
Get started!
Commençons!
e
Extreme Weather Sliding Glass Pet Door
™
f
Porte pour animaux pour climat extrême
de porte vitrée coulissante
2
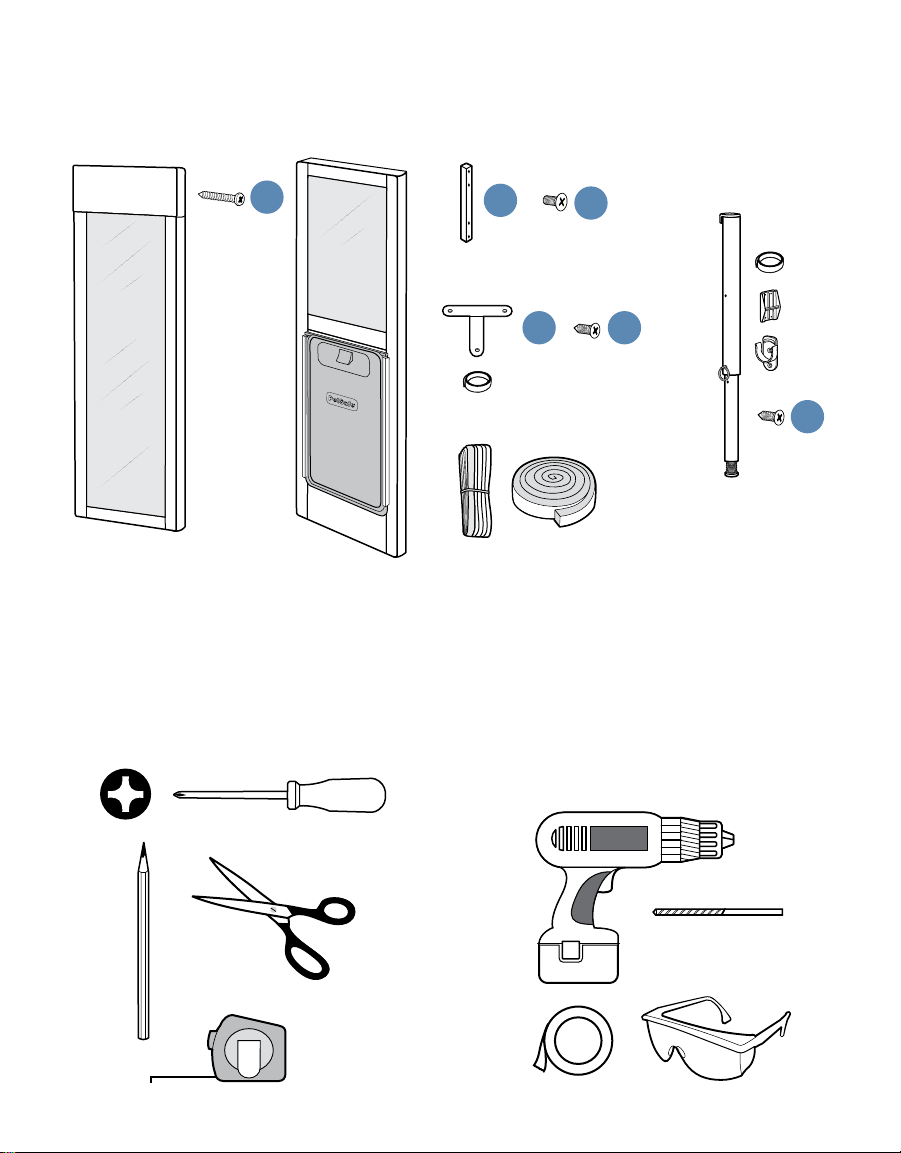
What you have
Ce que vous avez
What you need
Ce dont vous avez besoin
2
x
2
x
6
x
6
x
8
x
6
x
(2.5 mm)
7/64 in
Optional/Facultatif

3
Let’s give your best friend his day in the sun.
Offrez-lui de belles journées de jeu ensoleillées.
1
e Before beginning the pet door installation, open your sliding glass door and inspect the door frame.
• Remove any locks or other obstructions in the sliding glass door frame that will prevent the pet door
panel from fitting flush against the doorjamb.
• If you have a home security system, locate any sensors or other components that may need to be
moved or reconfigured after installing the pet door.
• Make sure the movable section of your sliding glass door is installed in the interior door track, as
shown above. If the movable section of your sliding glass door is installed in the exterior track, the
security bar provided will not work in your installation. Please contact Customer Care for assistance.
f Before beginning the pet door installation, open your sliding glass door and inspect the door frame.
• Remove any locks or other obstructions in the sliding glass door frame that will prevent the pet door
panel from fitting flush against the doorjamb.
• If you have a home security system, locate any sensors or other components that may need to be
moved or reconfigured after installing the pet door.
• Make sure the movable section of your sliding glass door is installed in the interior door track, as
shown above. If the movable section of your sliding glass door is installed in the exterior track, the
security bar provided will not work in your installation. Please contact Customer Care for assistance.
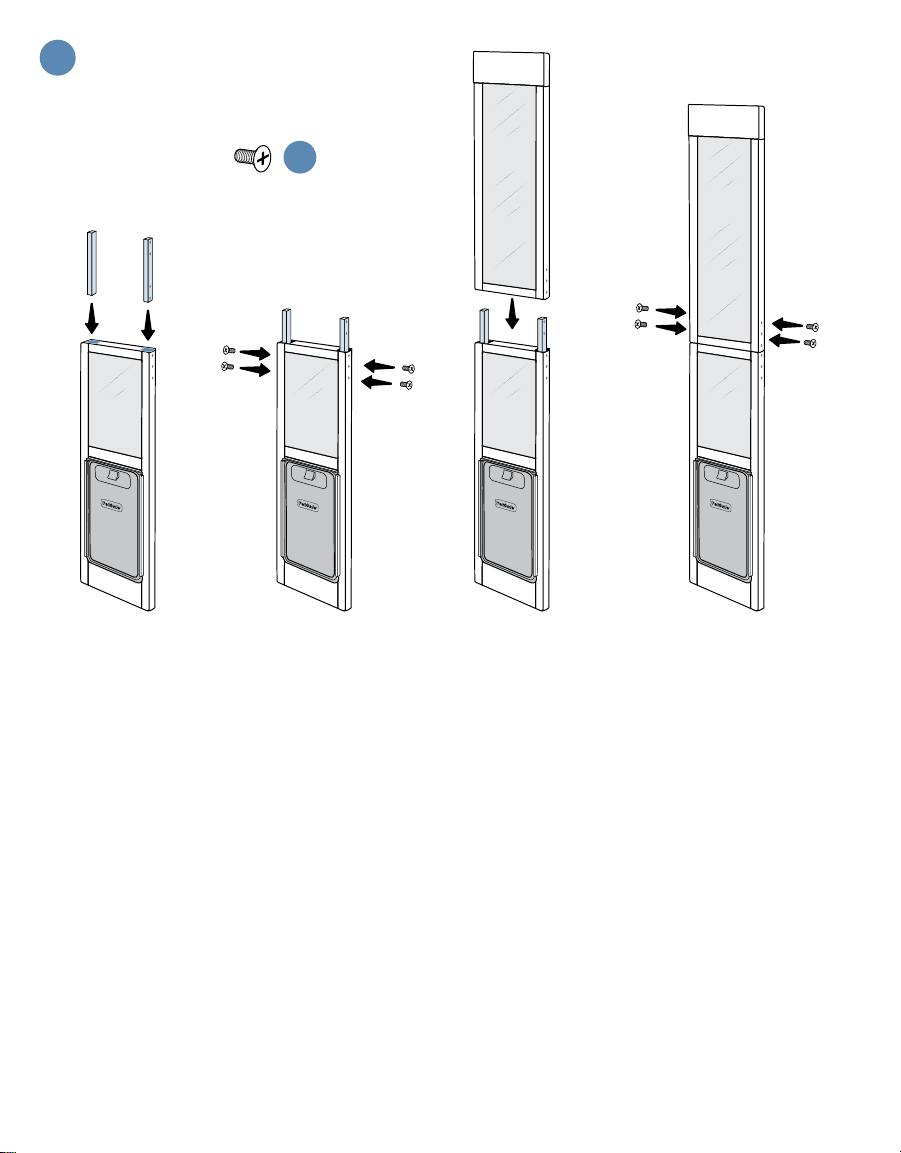
4
2
e To assemble the pet door, insert the two connecting bars into the channels at the sides of the bottom pet
door panel. Secure each connecting bar with two screws.
Slide the top pet door panel down onto the connecting bars. Secure each side of the top pet door
panel with two screws. Make sure the pet door panels are aligned correctly before fully tightening all
eight screws.
f Pour installer la porte pour animaux, insérez les deux barres de raccordement dans les canaux latéraux
du panneau inférieur de la porte. Sécurisez chacune des barres de raccordement avec deux vis.
Tirez le panneau supérieur de la porte vers le bas pour le fixer aux barres de raccordement. Sécurisez
chaque côté du panneau supérieur avec deux vis. Vérifiez que les panneaux de la porte sont bien
alignés avant de serrer complètement les huit vis.
8
x
Use/Utilisez
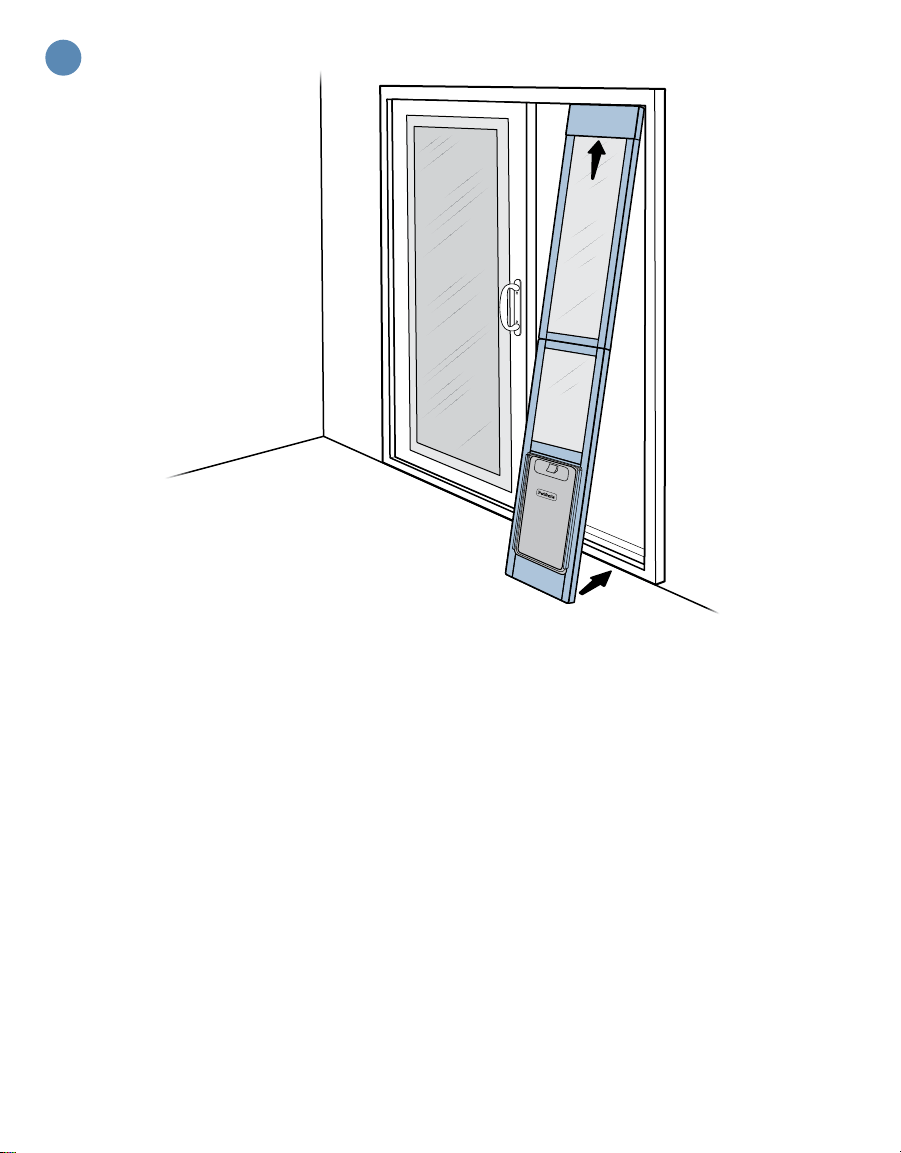
5
e Open the sliding glass door. Remove the cardboard inserts from under the height adjuster at the top of
the assembled pet door panel.
Standing inside your home and holding the pet door panel with the closing panel facing you, insert the
pet door panel into the opening. Press the spring-loaded height adjuster into the upper door track and
then lift the bottom of the pet door panel into the lower door track.
Push the pet door panel against the doorjamb and check the fit. It should fit flush into the doorjamb
without any gaps. The height adjuster should be fully extended and not tilted to either side.
f Ouvrez la porte vitrée coulissante. Retirez les inserts en carton sous le réglage de la hauteur au niveau
de la partie supérieure du panneau de porte.
Depuis l’intérieur de votre maison, tenez le panneau de porte de manière à ce que le panneau de
fermeture soit face à vous, puis insérez-le dans l’ouverture. Fixez le réglage de la hauteur monté sur
ressort dans le rail supérieur de la porte, puis levez le bas du panneau de porte pour le placer dans le
rail inférieur.
Encastrez le panneau de porte dans le montant de porte, et vérifiez qu’il est bien ajusté. Il doit bien
s’insérer dans le montant sans laisser aucun espace. Le réglage de la hauteur doit être entièrement tendu
et non incliné vers un côté.
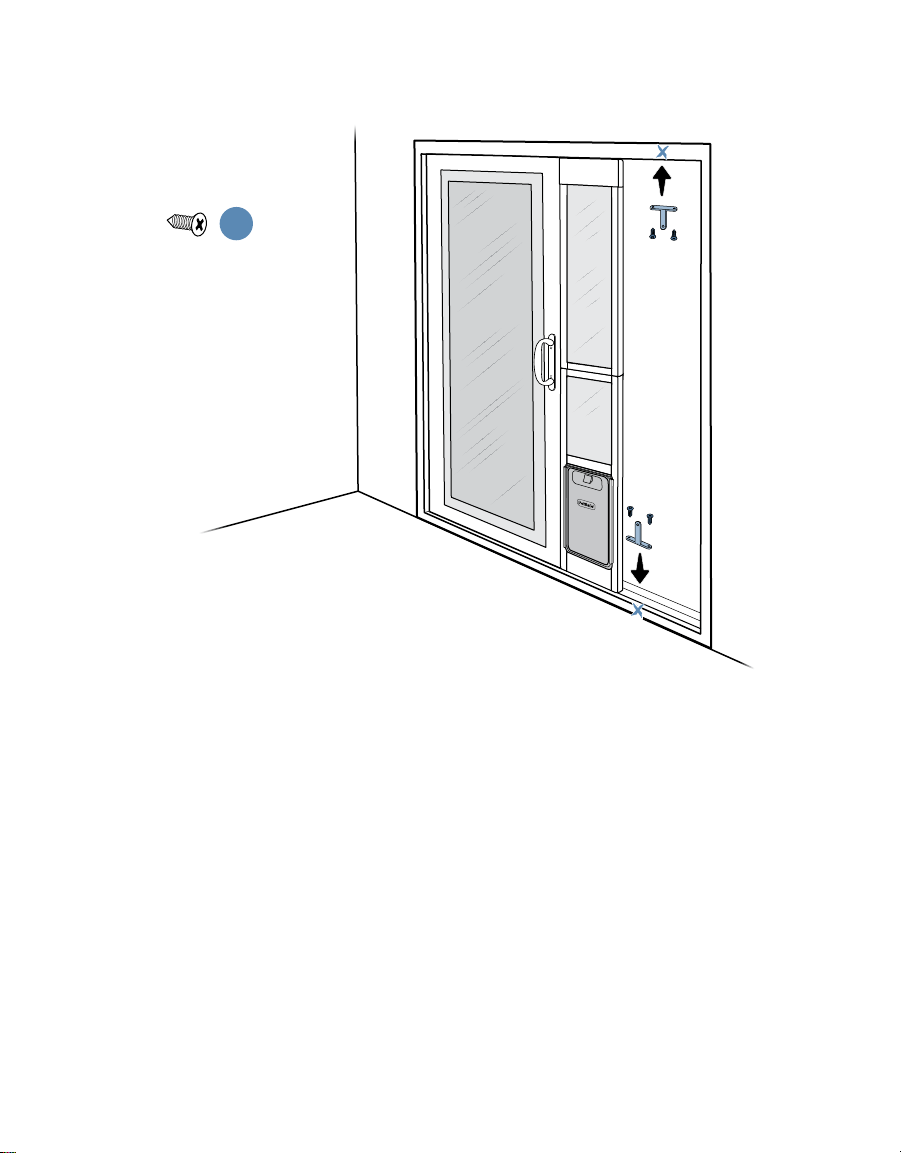
3

6
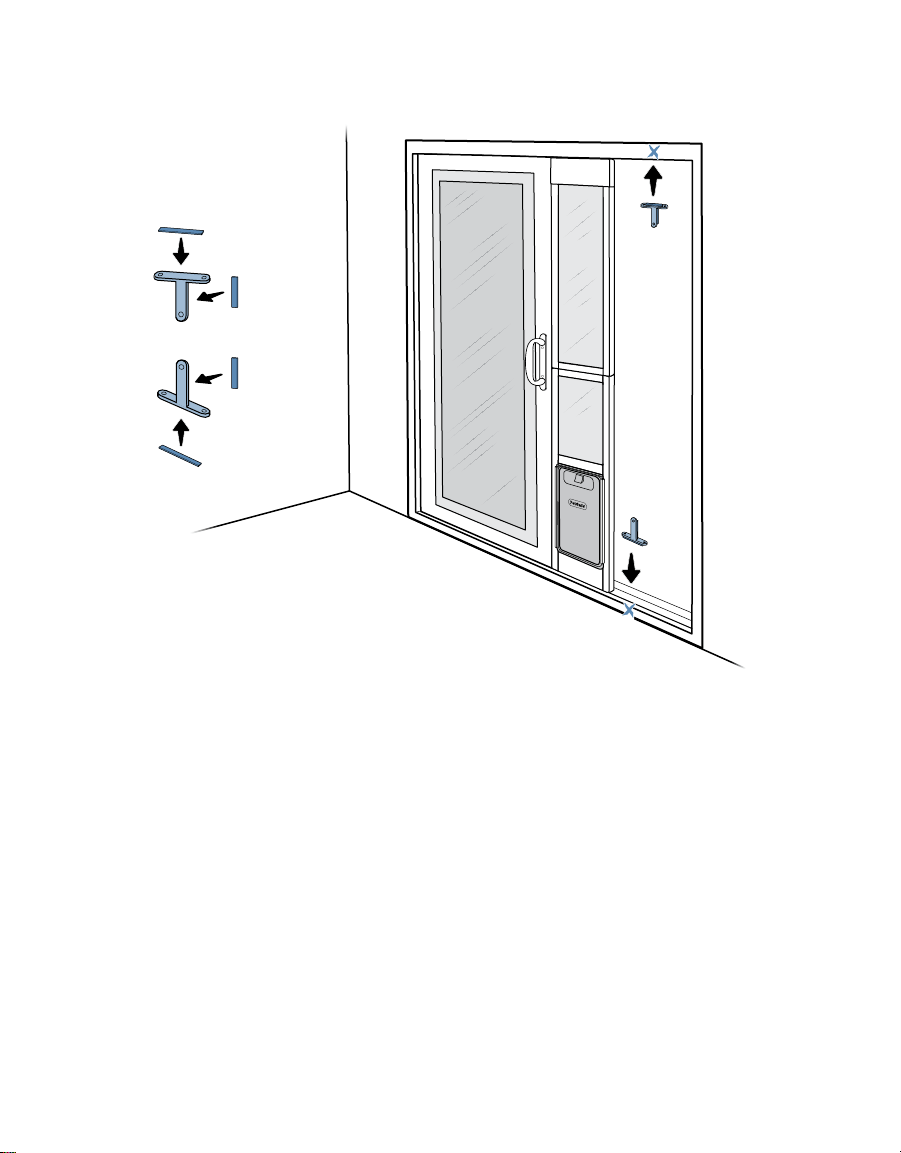
e Using a pencil, mark your sliding glass door frame in the following locations:
• At the top center/centre of the pet door panel
• At the bottom left or right edge of the pet door panel (away from the doorjamb)
Move your pet door panel aside to make room to insert the T-brackets into the top and bottom
sliding glass door tracks. You can install the T-brackets with either screws (see option A) or adhesive
(see option B).
For a more permanent installation, we have provided four additional screws that you can use to secure
the pet door panel directly to your sliding glass door frame. This installation method is more complex and
may require additional materials; please contact Customer Care for assistance.
f À l’aide d’un crayon, marquez les endroits suivants du cadre de votre porte vitrée coulissante :
• En haut du centre/au centre du panneau de porte
• Au niveau du coin inférieur gauche ou droite du panneau de porte (à l’écart du montant de la porte)
Mettez votre panneau de porte de côté pour pouvoir insérer les supports en T dans les rails inférieur
et supérieur de la porte vitrée coulissante. Pour fixer les supports en T, vous pouvez utiliser des vis
(voir option A) ou de l’adhésif (voir option B).
Pour une installation plus résistante, vous pouvez utiliser les quatre vis supplémentaires fournies afin de
fixer le panneau de porte directement dans le cadre de votre porte vitrée coulissante. Cette méthode
est plus difficile et vous aurez peut-être besoin d’autre matériel. Veuillez contacter le service client pour
obtenir de l’aide.
4
7
e Insert T-brackets into the top and bottom tracks of your sliding glass door, lining up the middle of the
bracket extensions with the marks you made on the door frame.
Secure each T-bracket to the sliding glass door frame with two screws. Depending on your frame
material, you may wish to drill 7/64-inch (2.5 mm) pilot holes first for ease of installation.
f Insérez les supports en T dans les rails inférieur et supérieur de votre porte vitrée coulissante, en alignant
le centre des extensions de support avec les marques que vous avez tracées sur le cadre de la porte.
Fixez chacun des supports en T au cadre de la porte vitrée coulissante avec deux vis. Selon le matériau
de votre cadre, vous pouvez percer préalablement des trous de guidage de 2,5 mm pour faciliter
l’installation.
4
x
Use/Utilisez
A Install T-brackets with screws
Fixer les supports en T avec des vis

8
e Move your pet door panel back into position behind the brackets. Attach the brackets to the pet door
panel with the remaining two screws.
Proceed to step 4 to secure the height adjuster.
f Remettez votre panneau de porte derrière les supports. Fixez les supports au panneau de porte avec les
deux vis restantes.
Passez à l’étape 4 pour sécuriser le réglage de la hauteur.
2
x
Use/Utilisez
9
e Using an alcohol wipe or solution, clean and dry the T-brackets, the sliding glass door track, and the pet
door panel where the adhesive will make contact.
Measure and cut adhesive the length of the T-brackets. Peel the backing from one side of the adhesive
and attach it to the T-brackets as shown above.
Peel the backing from the other side of the adhesive, then insert the T-brackets into the top and bottom
tracks of your sliding glass door, lining up the bracket extensions with the marks you made on the
door frame.
f Using an alcohol wipe or solution, nettoyez et séchez les supports en T, le rail de la porte vitrée
coulissante et le panneau de porte où l’adhésif sera appliqué.
Mesurez et découpez l’adhésif de la longueur des supports en T. Retirez la protection d’un côté de
l’adhésif et placez-la sur les supports en T, comme indiqué ci-dessus.
Retirez la protection de l’autre côté de l’adhésif, puis insérez les supports en T dans les rails inférieur et
supérieur de votre porte vitrée coulissante, en alignant les extensions de support avec les marques que
vous avez tracées sur le cadre de la porte.
B Install T-brackets with adhesive
Fixer les supports en T avec de l’adhésif

10
5
e Move your pet door panel back into position behind the brackets. Press on the T-brackets to secure the
adhesive to the front of the pet door panel.
f Remettez votre panneau de porte derrière les supports. Appuyez sur les supports en T pour fixer l’adhésif
sur l’avant du panneau de porte.

11
e If desired, secure the free edge of the height adjuster by installing a screw through the pre-drilled hole
and into the pet door panel. You may have some screws left over; one of these can be used to secure
the other edge of the height adjuster, if it is not covered by your sliding glass door frame.
f Si vous le souhaitez, sécurisez le bord libre du réglage de la hauteur en fixant, via le trou percé au
préalable, une vis dans le panneau de porte. Il est possible qu’il vous reste des vis. Vous pouvez en
utiliser une pour sécuriser l’autre bord du réglage de la hauteur, s’il n’est pas couvert par le cadre de
votre porte vitrée coulissante.
1
x
Use/Utilisez
6
12
7
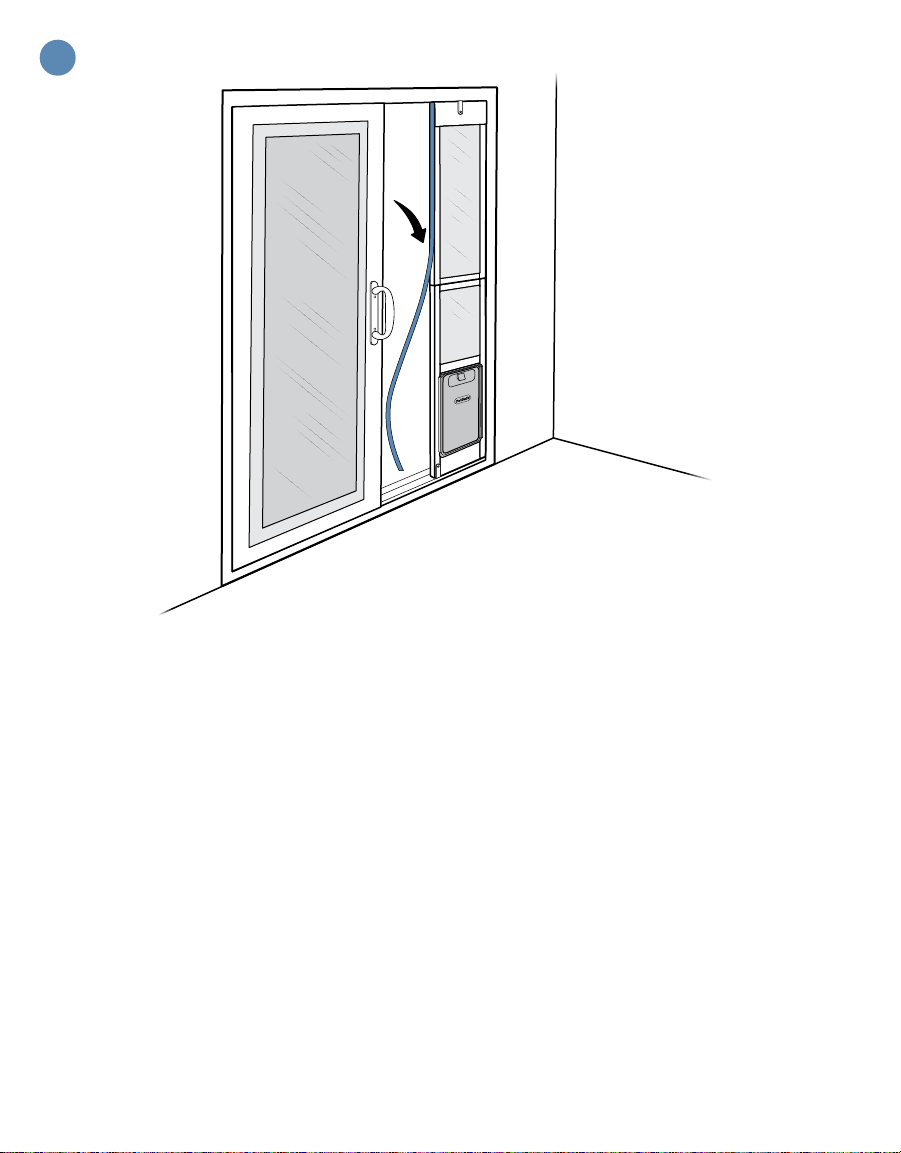
e Open the sliding glass door. Using an alcohol wipe or solution, clean and dry the edge of the pet
door panel.
Position the weather stripping at the top front edge, toward the interior side. Carefully peel away the
backing and press the weather stripping into place as you move down to the bottom of the door. Trim
away any excess with scissors.
f Ouvrez la porte vitrée coulissante. Using an alcohol wipe or solution, nettoyez et séchez le bord du
panneau de porte.
Placez le joint isolant au niveau du bord supérieur avant, vers le côté intérieur. Retirez délicatement la
protection et appuyez tout le long de la porte sur le joint isolant pour le fixer. Coupez tout surplus avec
des ciseaux.
13
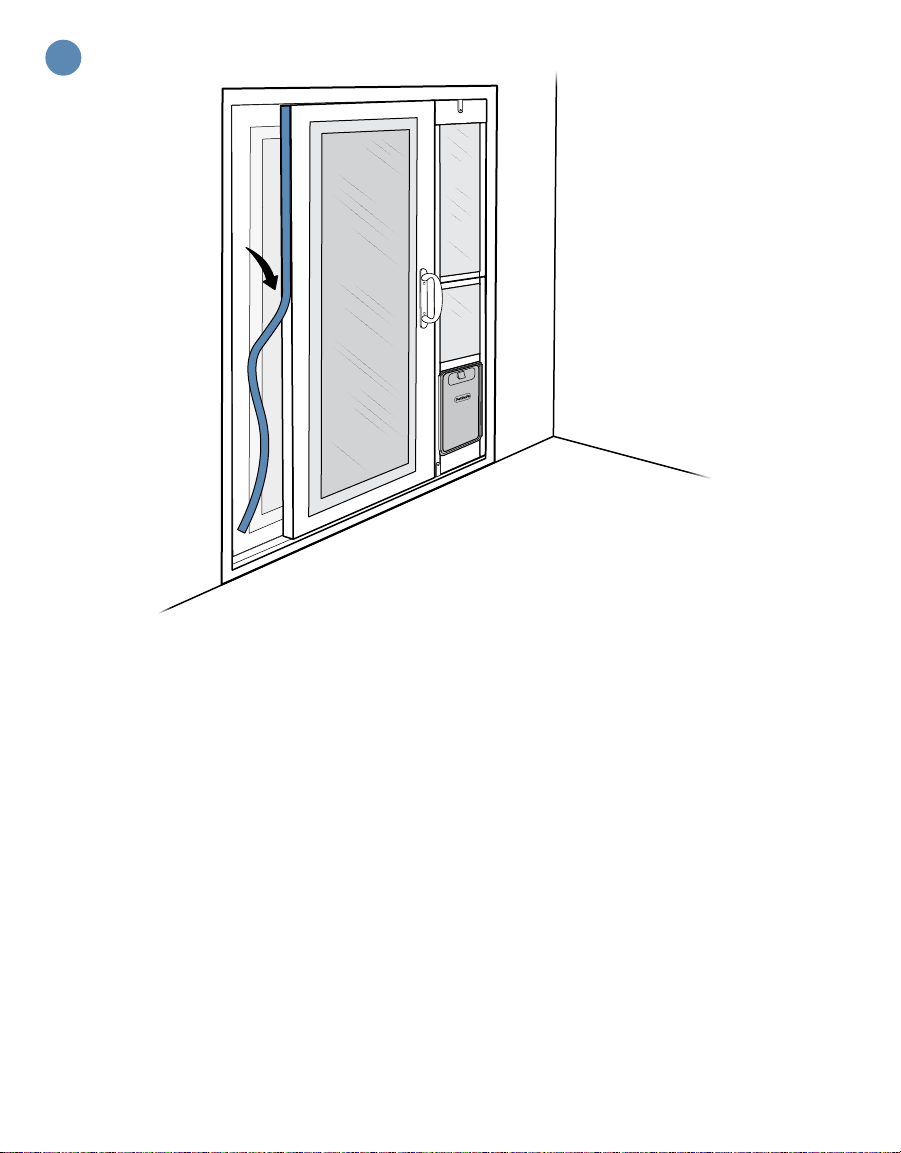
e Using an alcohol wipe or solution, clean and dry the back edge of your sliding glass door. Position the
glass sweep at the top glass edge, with the flexible part touching the stationary section of your sliding
glass door. Carefully peel away the backing and press the glass sweep into place as you move down
to the bottom of the glass. Trim away any excess with scissors.
The glass sweep forms a seal between the movable and stationary sections of your sliding glass door,
improving energy efficiency and weather resistance.
f Using an alcohol wipe or solution, nettoyez et séchez le bord arrière de votre porte vitrée coulissante.
Placez le panneau de verre au niveau du bord supérieur de la vitre, de sorte que la partie flexible
touche la partie fixe de votre porte vitrée coulissante. Retirez délicatement la protection et appuyez tout
le long de la vitre pour fixer le panneau de verre. Coupez tout surplus avec des ciseaux.
Le panneau de verre forme un joint hermétique entre les parties mobile et fixe de votre porte vitrée
coulissante, améliorant l’efficacité énergétique et la résistance aux intempéries.
8

14
9
e The last step in the installation is to mount the security bar between your sliding glass door frame and the
movable section of your sliding glass door. You can mount the security bar at any height you prefer. The
security bar comes with a bracket, a clip, and your choice of either adhesive or screws for mounting. Use
screws for the most secure installation.
First, attach the bracket and clip to the ends of the security bar.
f La dernière étape de l’installation consiste à fixer une barre de sécurité entre le cadre et la partie mobile
de votre porte vitrée coulissante. You can mount the security bar at any height you prefer. Pour fixer la
barre de sécurité, vous disposez d’un support, d’un clip, ainsi que de l’adhésif ou des vis. Use screws for
the most secure installation.
Commencez par fixer le support et le clip aux extrémités de la barre de sécurité.
15
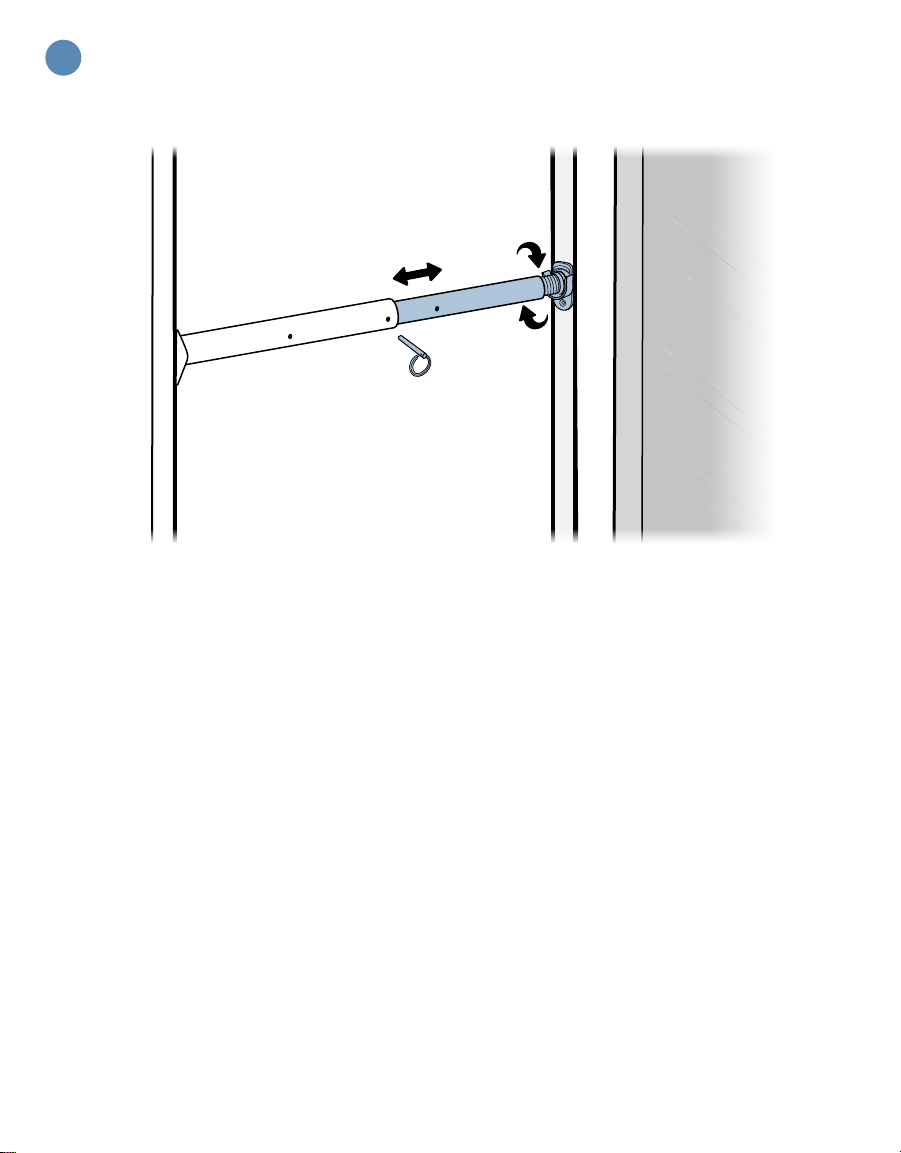
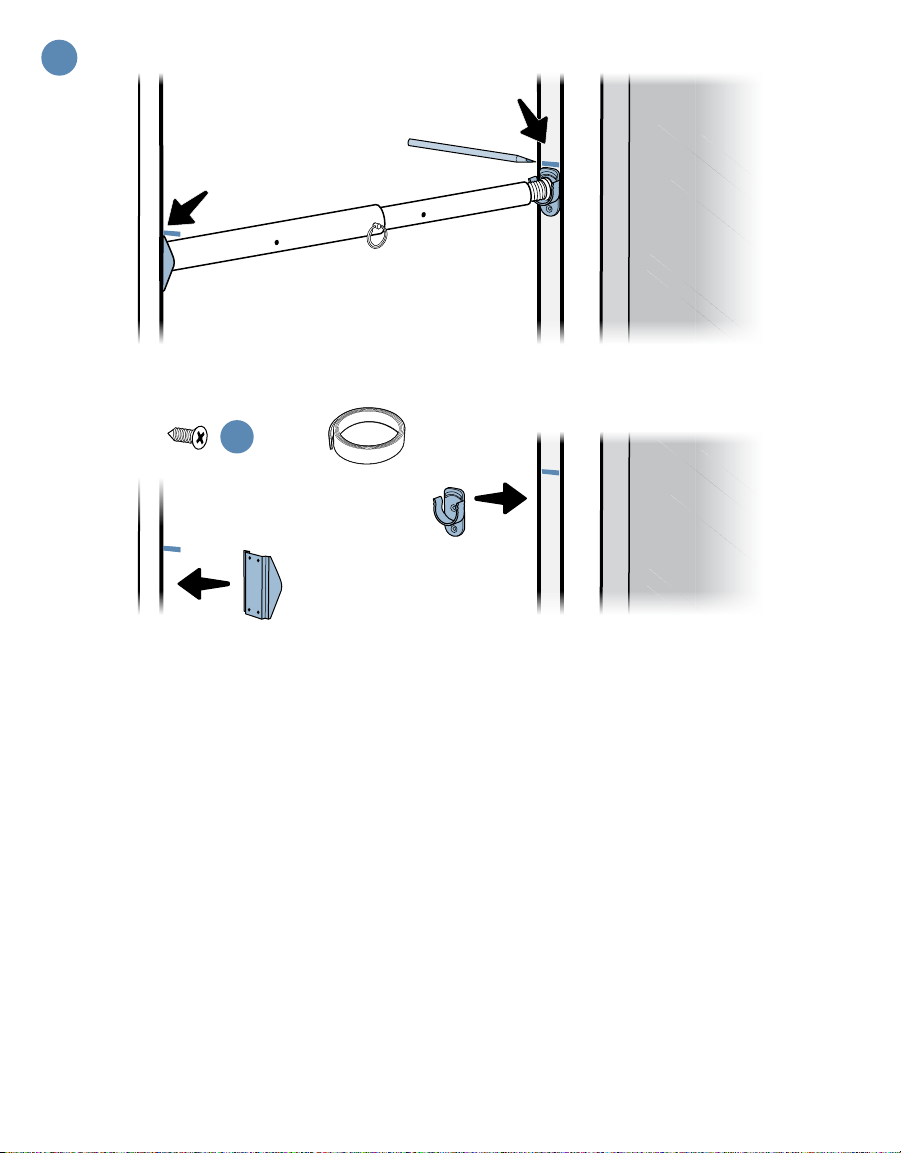
e Adjust the length of the security bar to fit the opening between your sliding glass door and frame.
Remove the pin and extend the inner rod of the security bar to the desired length, then line up the holes
in the outer and inner rods and reinsert the pin. There are two holes in the outer rod, and four holes in the
inner rod, allowing eight different length adjustments.
You can make further adjustments by rotating the threaded end of the security bar to extend or retract it.
f Réglez la longueur de la barre de sécurité pour qu’elle soit bien ajustée à l’ouverture entre le cadre et la
porte vitrée coulissante.
Retirez la goupille et déployez la tige intérieure de la barre de sécurité pour atteindre la longueur
souhaitée, puis alignez les trous situés sur les tiges intérieure et extérieure, et réinsérez la goupille. La
tige extérieure comporte deux trous, contre quatre trous pour la tige intérieure, ce qui offre huit réglages
différents de longueur.
Vous pouvez également procéder à des ajustements en tournant l’extrémité filetée de la barre de
sécurité pour la prolonger ou la diminuer.
10
16
e Make sure the security bar is level, then make marks on your sliding glass door and frame to indicate
where to mount the bracket and clip. Set the security bar aside.
Remove the bracket and clip from the security bar and mount them to your sliding glass door and frame
at the locations you marked. If using:
• Adhesive – Using an alcohol wipe or solution, clean and dry the bracket, the clip, and the surfaces
to which they will be attached. Peel the backing from one side of the adhesive and press it onto
the back of the bracket or clip. Peel the backing from the other side of the adhesive and press the
bracket or clip into place in the marked location.
• Screws – Attach the bracket and clip to the door frame using the screws provided.
f Vérifiez que la barre de sécurité est à niveau, puis marquez les endroits de fixation du support et du clip
sur le cadre et la porte vitrée coulissante. Mettez la barre de sécurité de côté.
Retirez le support et le clip de la barre de sécurité, puis fixez-les au niveau des emplacements que vous
avez indiqués sur le cadre et la porte vitrée coulissante. Si vous utilisez :
• De l’adhésif – Using an alcohol wipe or solution, nettoyez et séchez le support, le clip et les
surfaces où ils seront fixés. Retirez la protection d’un côté de l’adhésif et collez-la sur l’arrière du
support ou clip. Retirez la protection de l’autre côté de l’adhésif et placez le support ou le clip dans
l’emplacement indiqué.
• Des vis – fixez le support et le clip au cadre de la porte à l’aide des vis fournies.
6
x
Use/Utilisez
or/ou
11
17
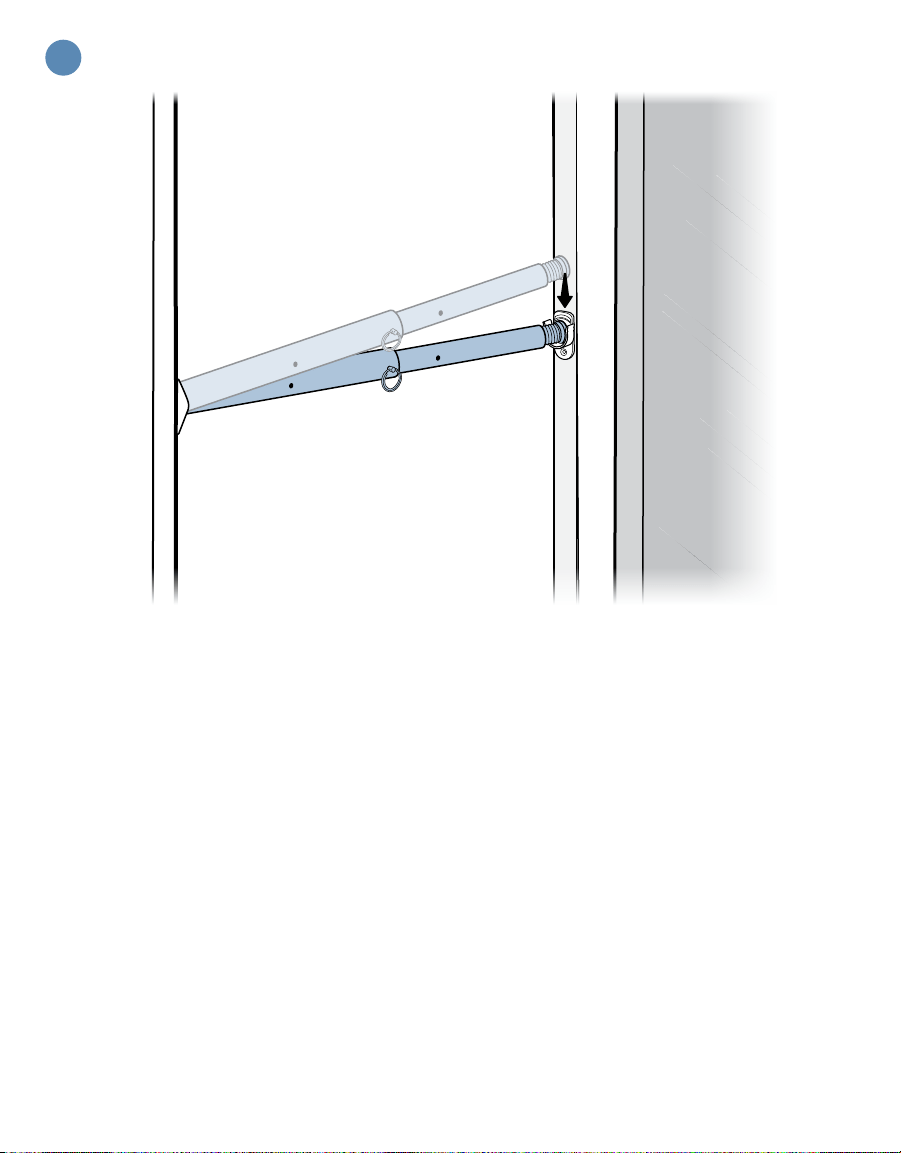
e To use the security bar, hook the security bar onto the bracket, then swivel it upward and snap it into
the clip.
The security bar can hang from the bracket at the side of the door frame when not in use.
f Pour utiliser la barre de sécurité, fixez-la sur le support, puis tournez-la vers le haut et insérez-la dans
le clip.
La barre de sécurité peut être accrochée au support, sur le côté du cadre de la porte, lorsqu’elle n’est
pas utilisée.
12

18
e The pet door panel comes with a closing panel to cover the pet door if the weather is bad, or to keep
your pet from using the pet door.
Pull up on the closing panel to remove it. To replace it, just slide it into the track on the interior side of the
pet door.
f Le panneau de porte pour animaux comprend un panneau de fermeture pour couvrir la porte en cas
d’intempéries, ou pour empêcher votre animal de l’utiliser.
Tirez le panneau de fermeture vers le haut pour l’enlever. Pour le remettre, vous n’avez qu’à le glisser
dans le rail intérieur de la porte pour animaux.
13
19
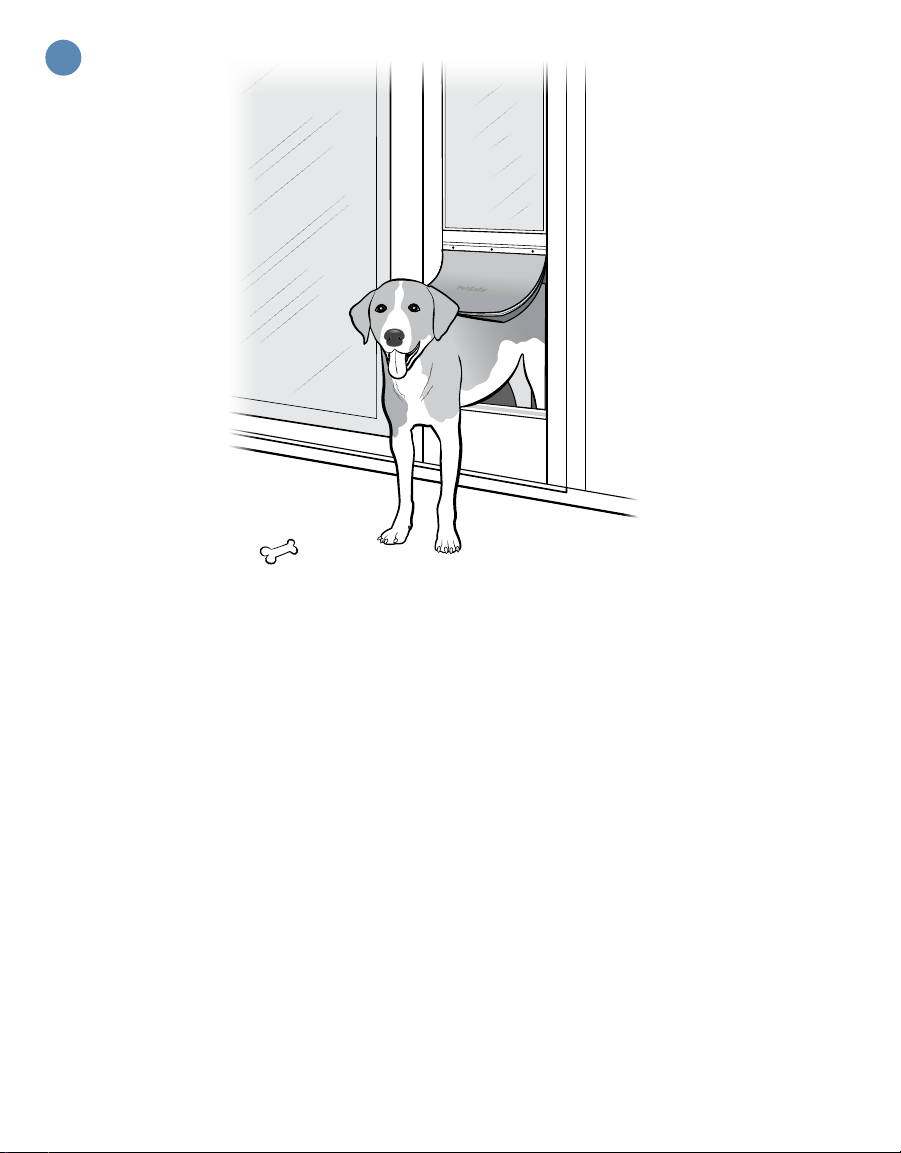
e Now that you have finished installing your new pet door, it’s time to train your pet to use it. Lift the flaps
and use praise and treats to encourage your pet to go through the pet door.
Don’t worry if your pet refuses to go through the door at first; just tape the flaps open and give him a little
time to explore. He’ll soon see what’s waiting for him outside and will want join in the fun!
After your pet has gone through the pet door a few times, allow the flaps to touch his back so he will
adapt to using the pet door on his own. We know both of you will enjoy the freedom your new pet door
will bring.
f Maintenant que vous avez fini d’installer votre nouvelle porte pour animaux, dressez votre animal
à l’utiliser. Soulevez les volets et encouragez votre animal de compagnie à passer à travers la
porte pour animaux en le félicitant et en lui offrant des friandises.
Ne vous inquiétez pas s’il refuse de passer à travers la porte au début. Fixez les volets à l’aide de ruban
adhésif et laissez-le explorer. Il découvrira vite ce qui l’attend dehors et voudra se joindre à l’aventure !
Une fois que votre animal de compagnie est passé à plusieurs reprises à travers la porte pour animaux,
laissez les volets lui toucher le dos. Il deviendra ainsi à l’aise pour utiliser la porte par lui-même. Nous
savons que vous allez tous les deux apprécier la liberté que vous offrira votre nouvelle porte pour animaux.
14
Because your pet is more than a fair weather friend.
Parce que les vrais amis méritent ce qu’il y a de mieux.

petsafe.com©2021 Radio Systems Corporation M400-2505-17/1
Radio Systems Corporation
10427 PetSafe Way
Knoxville, TN 37932 USA
+1 (865) 777-5404
Let us help!
1-Year Warranty
For important safety information,
pleaseseethecustomer care guide.
À votre écoute !
Garantie de 1 an
Pour obtenir les informations de sécurité importantes,
consultez le guide du service clientèle à l’intérieur.
United States
800-732-2677
Canada
8 0 0 - 4 57- 3911


