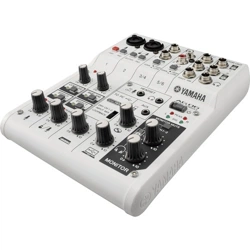
Welcome
Thank you for purchasing the Yamaha AG06 Mixing Console. Please read this manual
thoroughly to get the most out of the product and ensure long-term, trouble-free use. After
reading this manual, keep it readily available for future reference.
For the remainder of this manual, the word "mixer" is used instead of "Mixing Console."
MainFeatures
Multi-purpose6-channelmixerwithaudiointerface,idealforlivewebcasting
• Audio interface supports up to 24-bit/192 kHz recording.
• An intuitive Loopback function enables fast and easy live webcasting.
• Yamaha's premium “D-PRE” mic preamp provides high resolution sound.
IncludedAccessories
• USB cable (1.5 m)
• Technical Specifications (English only): Includes general specifications, input/output characteristics,
block diagram, dimensions, and jack and plug list.
• CUBASE AI DOWNLOAD INFORMATION: Contains the access code necessary for downloading the
Steinberg DAW software Cubase AI.
• Owner's Manual (this leaflet)
Quick Start Guide
Preparation: Download and install drivers.
The "Yamaha Steinberg USB Driver" might be required for computer input/output. Visit the
following Yamaha website for details on downloading and installing the driver, and making
the necessary settings. http://www.yamahaproaudio.com/ag/
STEP 1 Connectingspeakers,microphones,
instruments,etc.
1
Turnoffthepowerofallsp eaker s,inst ruments,andotherdevicestobe
connectedtothemixer.
2
Connectspeakers,microphonesandinstru mentsreferringtotheconnection
examplebelow.
ConnectionExample
Microphones Electric keyboard
Powered
monitor
speakers
Headphones
Portable
audio
player
Headset
Smartphone
Foot switch
(Yamaha FC5)
Computer
Rear panel
Electric guitar
NOTE
If you are using condenser microphones, turn on (
O
) the [+48V] phantom power switch.
STEP 2 Gettingsoundtothespeakersorheadphones.
1
Makesuretha tallswitch esincludingthe[ ](Standby/On)switcharenot
pressed(
N
).
2
UsetheincludedUSBcabletoconnectyourcomputertothemixer.
When using the [USB 2.0] terminal on the mixer's rear panel, refer to the notice
"Precautions when using the [USB 2.0] and [5V DC] terminals."
When connecting a tablet or other device that cannot provide power to the mixer,
connect a commercially available USB power adapter or USB mobile battery to the [5V
DC] terminal (micro B).
3
Turnthe[GAIN]knobs,Levelknobs,Speakers[ ]knob,andHeadphones[ ]
knobfullytotheleft(minimum).
Level knobs
[GAIN] knobs
Speakers [
] knob
Headphones [
]
knob
4
Makesurethatthevolumeofapoweredspeakersissettominimum.
5
Turnonthepowertoconnecteddevicesinthefollowingorder:Instruments,
audiodevices Mixer's[ ]switch Powere dmonitorspeakers.
NOTICE
Follow this order to avoid loud, unexpected noise from the speakers. Reverse the order when
turning the power off.
6
Forchannelstowhichamicr ophoneorinst rumentisconnected,setthe[GAI N]
knobtothe12o'clockposition.
7
SettheLevelknobstothe3o'clockposition.
8
SettheSpeakers[ ]knobandtheHeadphones[ ]knobtothe12o'clock
position.
9
Speakintoyourmicropho ne,playyourinstrument,orplayyouraudiodevice,
andadjustthevolumeonthepoweredmonitorspeaker s.
10
Ifnosoundisheard,orifyouwanttoadjustthevolu me,followtheinstructions
intheboxedsectionbelow.
If you still do not hear the sound after doing the following steps, please refer to the
checklist in the "Troubleshooting" section at the back of this booklet.
n
Thereisnosound,oryouneedtoincreas ethevolume
1
Speakintoyourmicropho neorplayyourinstrument,turningthe[GAIN]
knobtotherightsothatt hecorresponding[PEAK]LEDflashesbriefly.
NOTE
• For optimum volume when using a microphone, place the microphone as close to the sound source
as possible.
• If the [PEAK] LED does not light even if the [GAIN] knob has been turned fully to the right, raise the
volume of the sound source (instrument, etc.).
If no sound is heard or the volume does not increase after step 1:
2
Ifthe[PAD]switchor[GAIN]switchisturnedon(
O
),turntheLevelknob
fullytotheleftto"0"(minimum),andthenturnoff(
N
)theswi tches.
3
SlowlyturntheLevelknobtotherightu ntilth edesiredvolum eisreached.
n
Todecreasethevolume:
1
TurntheLevelknobfull ytotheleftto"0"(minimum),andthenturnon(
O
)
the[PAD]switchor[GAIN]switchonthechanne lforwhichyouwantto
decreasethevolume.
2
SlowlyturntheLevelknobtotherightu ntilth edesiredvolum eisreached.
If the volume does not decrease after the above steps:
3
Lowerthevolumeo ftheinstrumentoraudi odevice .
EN
ZN24020
MIXINGCONSOLE
Owner’sManual
Mixer Basics: Where Your Sound Goes
1
Inputthesoundfroma
microphoneorinstrument
2
Adjustthevolume,tone,
andeffectsofeachchannel
3
Thesoundfromall
channelsowsrightward
5
Outputthesound
fromspea kersor
headphones
4
Finaladjustmentof
thevolumeofthe
mixedsound
Channel number
Loading ...
Loading ...
Loading ...

