E L I T E
TM
30" Convection Self-Cleaning Single
Electric Built-In Wall Oven
Horno de Pared Empotrado
El_ctrico
a conveccibn de una unidad de 30"
con Autolimpieza
Models, Modelos 911.49022, 49023, 49024, 49029
229C4020P285 Sears, Roebuck and Co.,
(SR-10479) Hoffman Estates, IL 60179 U.S.A. www.sears.com
SELF-CLEANINGCONVECTIONOVEN
TABLEOFCONTENTS
Oven Safety .......................... 3-4
Features of Your Oven .............. 5
Removal of Packaging Tape .... 5
Oven Control, Clock,
Timer ..................................... 6-7
Control Display ......................... 8
Clock ........................................ 9
Kitchen Timer ........................... 9
Tones ...................................... 10
F Code .................................... 10
Oven Cooking Tips ........... 11 13
Baking With Margarine ........... 12
Baking .............................. 14-15
Convection Baking Tips ......... 16
Convection Roasting
Tips ................................... 17-18
Convection Baking and
Roasting ................................. 19
Favorite Recipe ................ 20-21
Multi-Stage Cooking ............... 22
Broiling ................................... 23
Setting Special
Features ............................ 24-28
;i;i.;i;,i i i .pi ii ii
Self-Cleaning Cycle .......... 29-30
Control Panel .......................... 31
Broiler Pan and Grid ............... 31
Self-Clean Oven Interior ......... 31
Oven Door Glass .................... 31
Door Vent Trim ........................ 31
Stainless Steel ........................ 31
Oven Light Bulbs .................... 32
Oven Racks ............................ 32
Oven Door .............................. 33
:ul. ii ill .
Before Calling for
Service .............................. 34-36
Temperature Ad)ustment ........ 37
Warranty ................................. 38
Consumer Service
Numbers ................................. 76
For your convenience and future reference, please write down your model
and serial numbers in the space provided. They are located on the front
frame behind the oven door.
MODEL NUMBER:
SERIAL NUMBER:
@Sears, Roebuck and Co.
2
IMPORTANTSAFETY
INSTRUCTIONS
SAVE THESE INSTRUCTIONS
Read all instructions before using this appliance. When using gas or
electrical appliances, basic safety precautions should be followed,
including the following:
IMPORTANT: To ensure safety for
yourself, family and home, please
read your Use and Care Guide
carefully. Keep it handy for reference.
Pay close attention to Safety Sections.
BE SURE your appliance is installed
and grounded by a qualified
technician.
• DO NOT leave children alone or
unattended near an appliance in
use.
• TEACH CHILDREN not to play
with controls or any part of the
appliance, and not to sit, climb, or
stand on the door, or any other part
of the appliance.
• CAUTION: NEVER STORE items
of interest to children in cabinets
above the appliance. Children
climbing on the appliance could
be seriously injured.
• KEEP THIS book for later use.
• NEVER USE your appliance for
warming or heating the room.
• NEVER TRY to repair or replace
any part of the appliance unless
instructions are given in this manual.
All other work should be done by a
qualified technician.
• ALWAYS KEEP combustible wall
coverings, curtains, dishcloths,
towels, potholders and other linens
a safe distance from the appliance.
NEVER HEAT unopened food
containers. Pressure buildup can
cause the container to burst and
cause injury.
NEVER LEAVE containers of fat or
drippings in your oven.
ALWAYS KEEP the oven area
free from things that will burn.
Food, wooden utensils and
grease buildup could catch fire.
Plastic utensils could melt and
canned foods could explode. Your
appliance should never be used as
a storage area.
ALWAYS KEEP your appliance
clear of things that will burn
(gasoline and other flammable
vapors or liquids).
NEVER TRY to clean a hot surface.
Some cleaners produce noxious
fumes, and wet cloths or sponges
could cause steam burns.
NEVER WEAR loose-fitting clothing
when using your appliance.
NEVER USE a towel or other bulky
cloth as a pothoider. Make sure the
potholder is dry. Moist potholders
and wet cloths or sponges could
cause steam burns. DO NOT let
potholders touch hot surfaces.
BE SURE the oven is securely
installed in a cabinet that is firmly
attached to the house structure.
LARGE SCRATCHES OR
IMPACTS to glass doors can lead
to broken or shattered glass.
3
IMPORTANTSAFETY
INSTRUCTIONS
• DO NOT touch hot heating elements,
surfaces near them or interior oven
surfaces. These may be hot enough to
cause burns even though they are dark
in color. During and after use, do not
touch or let clothing or flammable
material contact the elements or hot
surfaces until they have had time to
cool. Other surfaces near the oven vent
openings, oven door and window may
also be hot enough to cause burns.
• PLACE OVEN RACKS in the desired
position while the oven is cool. If racks
must be moved while oven is hot, do not
let potholder contact the hot oven
element.
• AFTER BROILING, always take the
broiler pan and grid out of the oven
and clean them. Leftover grease in the
broiler pan could catch fire the next
time you use your oven.
• ALWAYS USE care when opening
the oven door. Let hot air and steam
escape before moving foods.
• NEVER USE aluminum foil to line the
oven bottom. Improper use of foil could
start a fire, or electrical shock could
result.
• NEVER BLOCK the oven vent opening.
• CLEAN ONLY the parts listed
in this manual. Follow all cleaning
instructions. Be sure to remove broiler
pan and grid before the self-clean
cycle.
• NEVER RUB, move, clean or damage
the door gasket on self-cleaning
ovens. It is essential for a good seal.
• NEVER TRY to clean utensils,
cookware, removable parts or broiler
pan and grid in the self-clean cycle.
• DO NOT USE oven cleaners - No
commercial oven cleaner or protective
coating of any kind should be used in
or around any part of the oven.
• IF THE SELF-CLEANING mode
malfunctions, turn the oven off and
disconnect the power supply. Have it
serviced by a qualified technician.
IMPORTANT SAFETY NOTICE!
The California Safe Drinking Water
and Toxic Enforcement Act requires
the governor of California to
publish a list of substances known
to the state to cause birth defects
or other reproductive harm and
requires businesses to warn their
customers of potential exposure to
such substances. The fiberglass
insulation in a self-cleaning oven
will give off a very small amount
of carbon monoxide during the
cleaning cycle, Exposure can be
minimized by venting with an
open door or window or using a
ventilation fan or hood,
IMPORTANT: The health of
some birds is extremely sensitive
to the fumes given off during
the self-cleaning cycle of any
oven. Move birds to another
well-ventilated room,
READ AND UNDERSTAND
THIS INFORMATION NOW!
Be sure everyone in your home
knows what to do in case of fire.
Never use water on a grease fire;
it will only spread the flames.
OVEN FIRE:
Do not try to move the pan!
1. Close the oven door and turn
controls off.
2. If fire continues, carefully open
the door, throw baking soda on the
fire, or use a dry chemical, foam or
halon-type extinguisher.
4
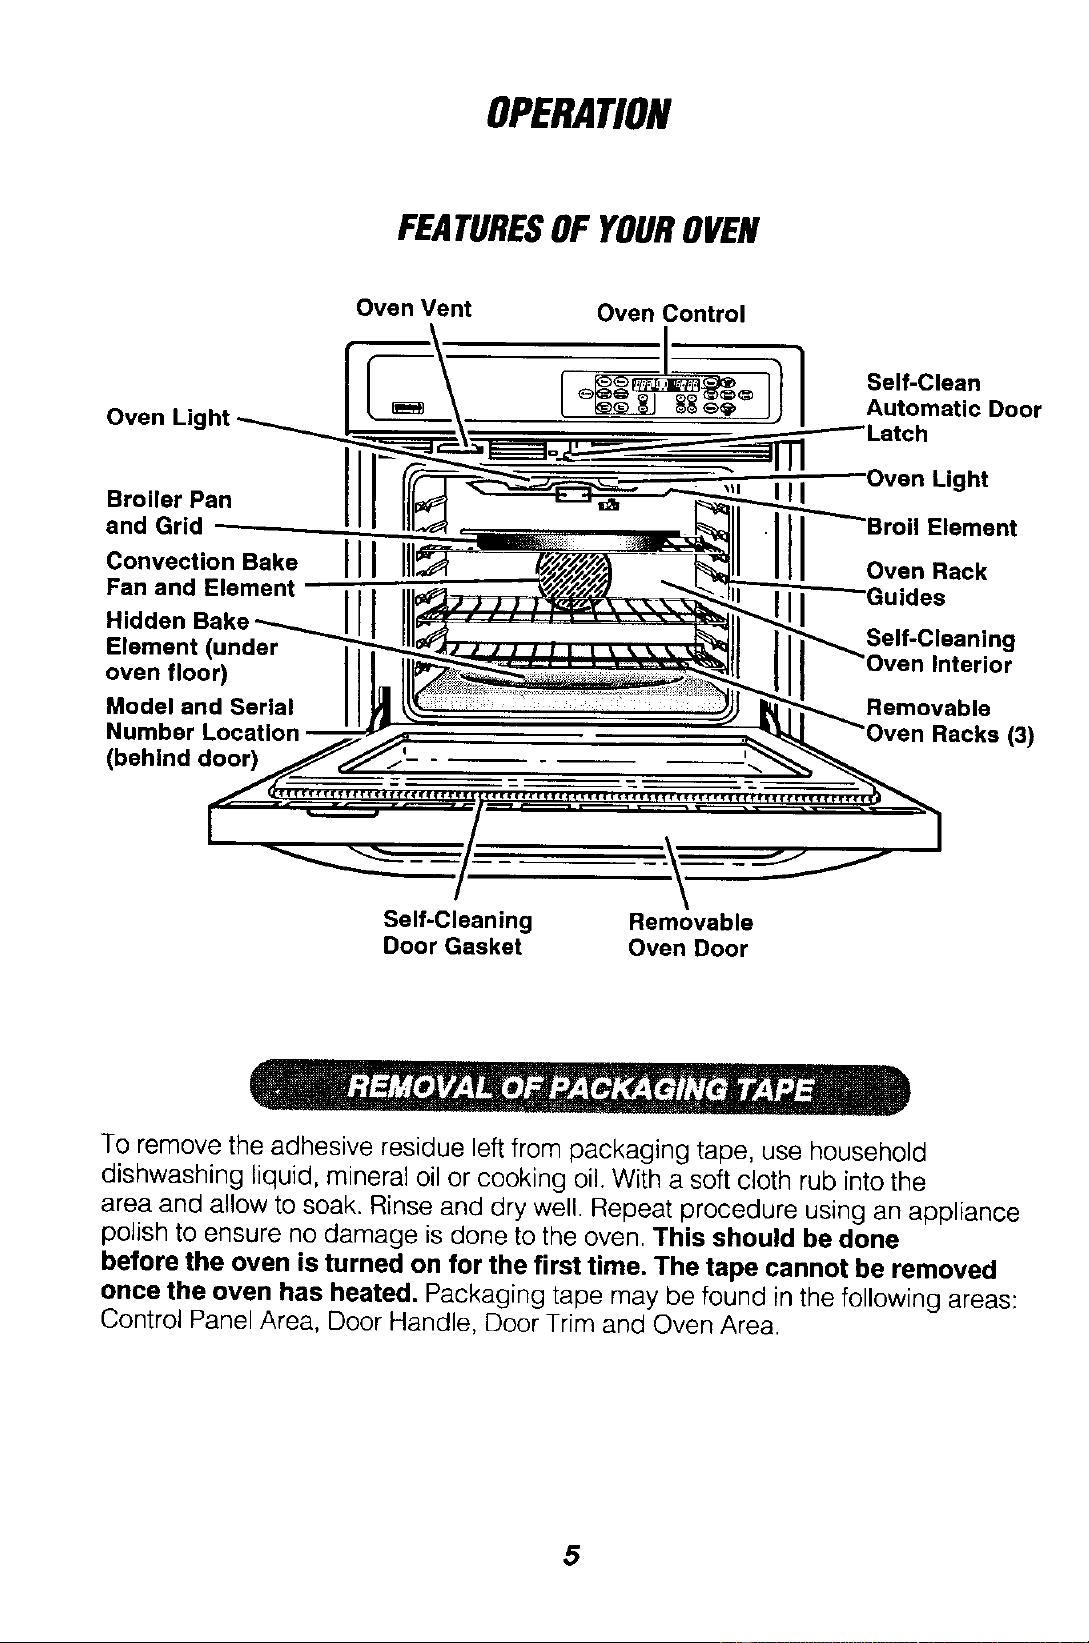
OPERATION
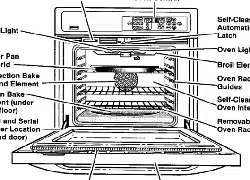
FEATURESOF YOUROVEN
Oven Vent
Oven Control
Oven
Broiler Pan
and Grid
Convection Bake
Fan and Element
Hidden
Element (under
oven floor)
Model and Serial
Number Locatlon
(behind door)
III
II
Self-Clean
Automatic Door
:h
Oven Light
Element
Oven Rack
ides
Self-Cleaning
n Interior
Removable
Racks (3)
Self-Cleaning
Door Gasket
Removable
Oven Door
To remove the adhesive residue left from packaging tape, use household
dishwashing liquid, mineral oil or cooking oil. With a soft cloth rub into the
area and allow to soak. Rinse and dry well. Repeat procedure using an appliance
polish to ensure no damage is done to the oven. This should be done
before the oven is turned on for the first time. The tape cannot be removed
once the oven has heated. Packaging tape may be found in the following areas:
Control Panel Area, Door Handle, Door Trim and Oven Area.
5
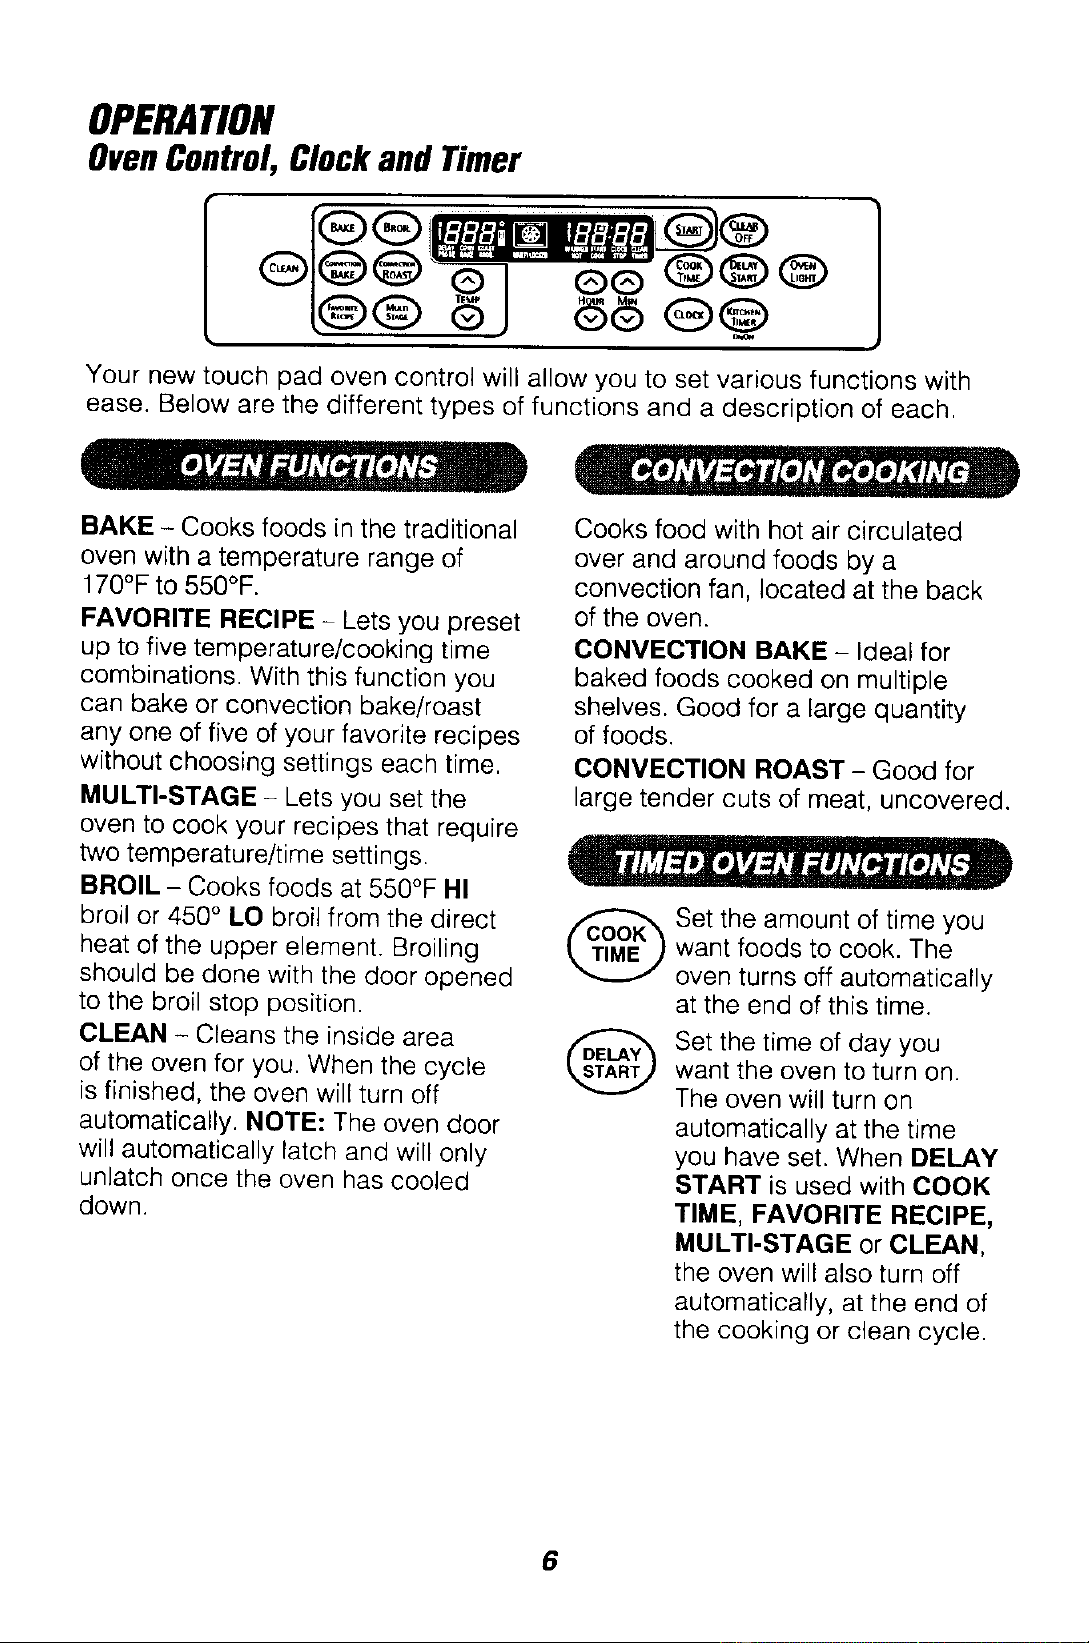
OPERATION
OvenControl,Clockand Timer
L@® ®® @@
Your new touch pad oven control will allow you to set various functions with
ease. Below are the different types of functions and a description of each.
BAKE - Cooks foods in the traditional
oven with a temperature range of
170°F to 550°F.
FAVORITE RECIPE - Lets you preset
up to five temperature/cooking time
combinations. With this function you
can bake or convection bake/roast
any one of five of your favorite recipes
without choosing settings each time.
MULTI-STAGE - Lets you set the
oven to cook your recipes that require
two temperature/time settings.
BROIL - Cooks foods at 550°F HI
broil or 450 ° LO broil from the direct
heat of the upper element. Broiling
should be done with the door opened
to the broil stop position.
CLEAN - Cleans the inside area
of the oven for you. When the cycle
is finished, the oven will turn off
automatically. NOTE: The oven door
will automatically latch and will only
unlatch once the oven has cooled
down.
Cooks food with hot air circulated
over and around foods by a
convection fan, located at the back
of the oven.
CONVECTION BAKE - Ideal for
baked foods cooked on multiple
shelves. Good for a large quantity
of foods.
CONVECTION ROAST - Good for
large tender cuts of meat, uncovered.
Set the amount of time you
want foods to cook. The
oven turns off automatically
at the end of this time.
Set the time of day you
want the oven to turn on.
The oven will turn on
automatically at the time
you have set. When BELAY
START is used with COOK
TIME, FAVORITE RECIPE,
MULTI-STAGE or CLEAN,
the oven will also turn off
automatically, at the end of
the cooking or clean cycle.
6
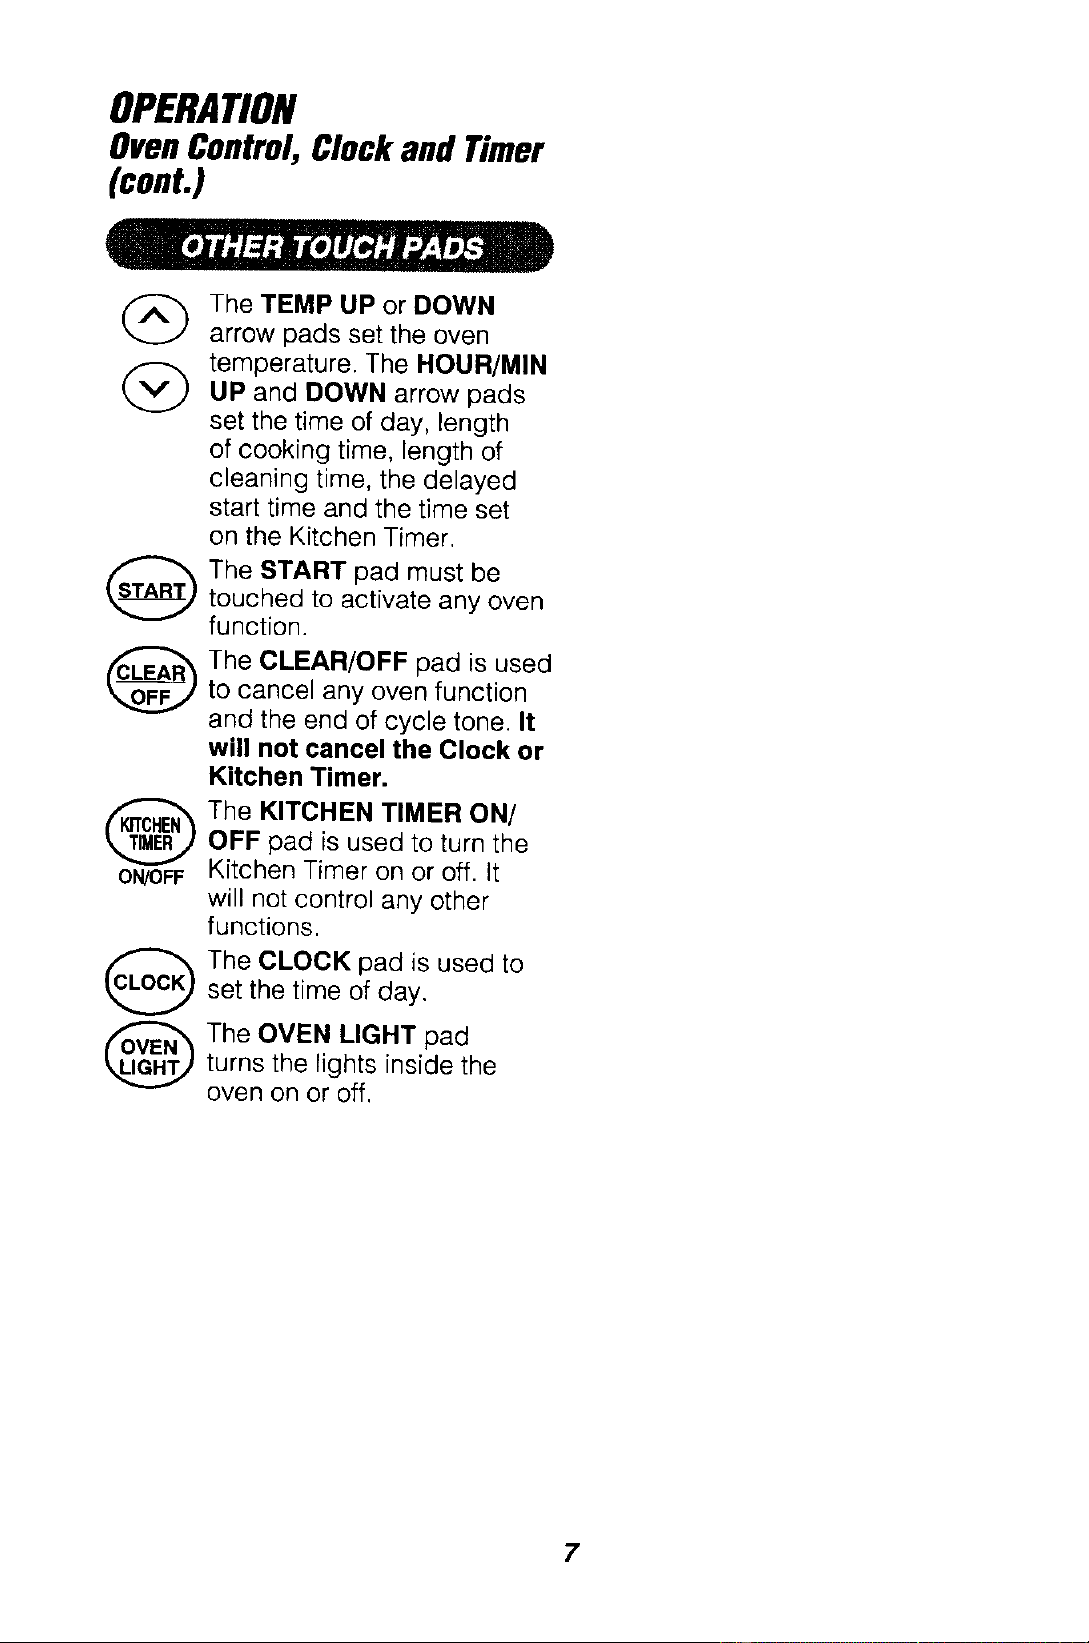
OPERATION
OvenControl,Clock and Timer
(cont.)
ON/OFF
The TEMP UP or DOWN
arrow pads set the oven
temperature. The HOUR/MIN
UP and DOWN arrow pads
set the time of day, length
of cooking time, length of
cleaning time, the delayed
start time and the time set
on the Kitchen Timer,
The START pad must be
touched to activate any oven
function.
The CLEAR/OFF pad is used
to cancel any oven function
and the end of cycle tone. It
will not cancel the Clock or
Kitchen Timer.
The KITCHEN TIMER ON/
OFF pad is used to turn the
Kitchen Timer on or off. It
will not control any other
functions.
The CLOCK pad is used to
set the time of day.
The OVEN LIGHT pad
turns the lights inside the
oven on or off.
7
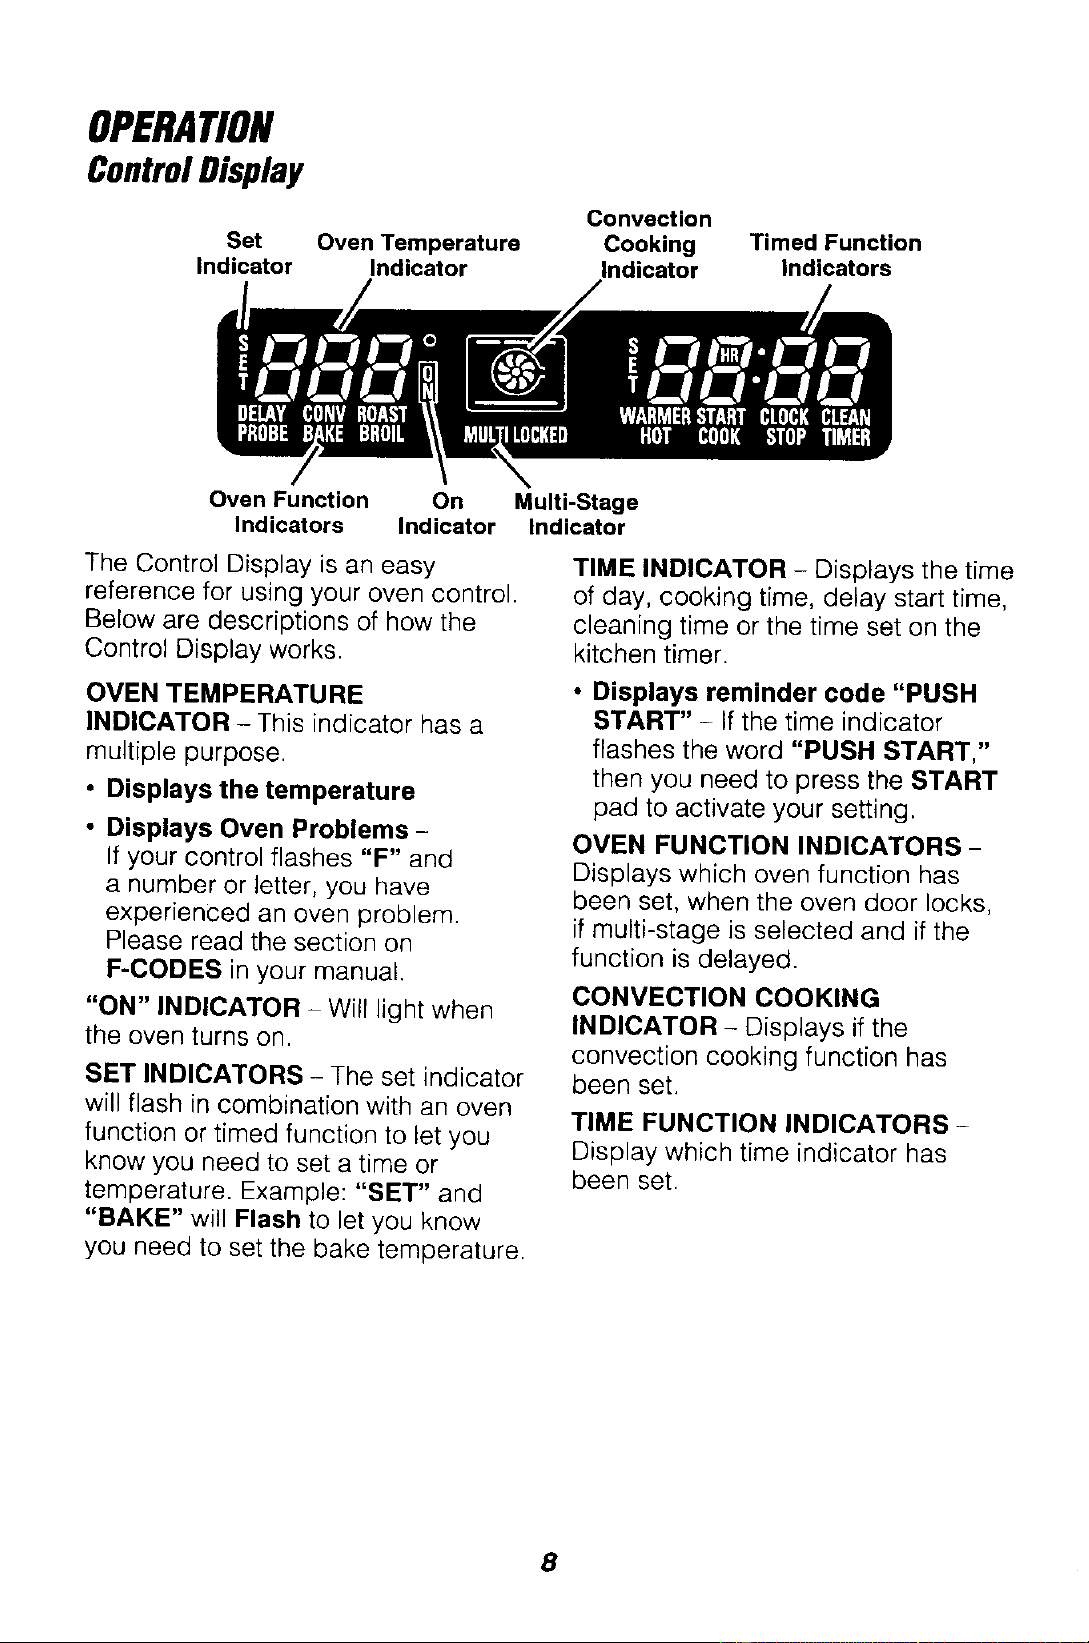
OPERATION
ControlDisplay
Convection
Set Oven Temperature Cooking Timed Function
indicator indicator Indicator Indicators
Oven Function On Multi-Stage
indicators indicator indicator
The Control Display is an easy
reference for using your oven control.
Below are descriptions of how the
Control Display works.
OVEN TEMPERATURE
INDICATOR - This indicator has a
multiple purpose.
° Displays the temperature
• Displays Oven Problems -
If your control flashes "F" and
a number or letter, you have
experienced an oven problem.
Please read the section on
F-CODES in your manual.
"ON" INDICATOR - Will light when
the oven turns on.
SET INDICATORS - The set indicator
will flash in combination with an oven
function or timed function to let you
know you need to set a time or
temperature. Example: "SET" and
"BAKE" will Flash to let you know
you need to set the bake temperature.
TIME INDICATOR - Displays the time
of day, cooking time, delay start time,
cleaning time or the time set on the
kitchen timer.
• Displays reminder code "PUSH
START" - If the time indicator
flashes the word "PUSH START,"
then you need to press the START
pad to activate your setting.
OVEN FUNCTION INDICATORS-
Displays which oven function has
been set, when the oven door locks,
if multi-stage is selected and if the
function is delayed.
CONVECTION COOKING
INDICATOR - Displays if the
convection cooking function has
been set.
TIME FUNCTION INDICATORS-
Display which time indicator has
been set.
8
OPERATION
Clockand Timer
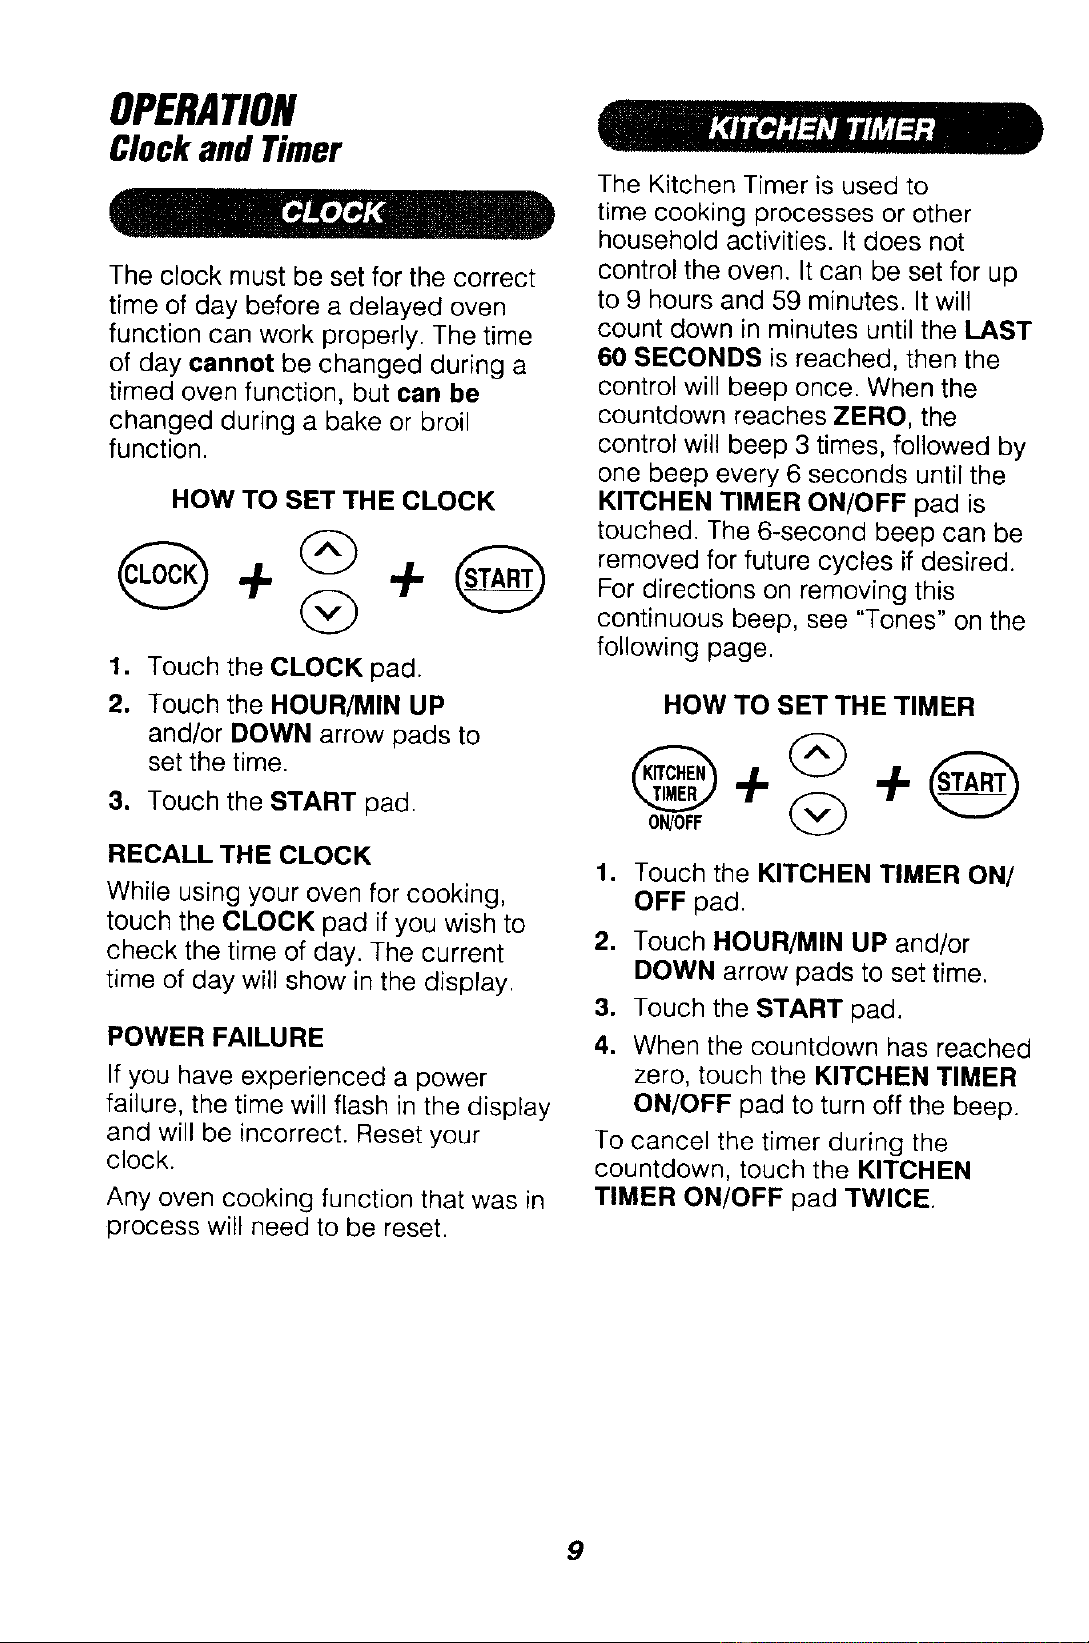
The clock must be set for the correct
time of day before a delayed oven
function can work properly. The time
of day cannot be changed during a
timed oven function, but can be
changed during a bake or broil
function.
HOW TO SET THE CLOCK
G
1. Touch the CLOCK pad.
2. Touch the HOUR/MIN UP
and/or DOWN arrow pads to
set the time.
3. Touch the START pad.
RECALL THE CLOCK
While using your oven for cooking,
touch the CLOCK pad if you wish to
check the time of day. The current
time of day will show in the display.
POWER FAILURE
If you have experienced a power
failure, the time will flash in the display
and will be incorrect. Reset your
clock.
Any oven cooking function that was in
process will need to be reset.
The Kitchen Timer is used to
time cooking processes or other
household activities. It does not
control the oven. It can be set for up
to 9 hours and 59 minutes. It will
count down in minutes until the LAST
60 SECONDS is reached, then the
control will beep once. When the
countdown reaches ZERO, the
control will beep 3 times, followed by
one beep every 6 seconds until the
KITCHEN TIMER ON/OFF pad is
touched. The 6-second beep can be
removed for future cycles if desired.
For directions on removing this
continuous beep, see "Tones" on the
following page.
HOW TO SET THE TIMER
01_0FF
1. Touch the KITCHEN TIMER ON/
OFF pad.
2. Touch HOUR/MIN UP and/or
DOWN arrow pads to set time.
3. Touch the START pad.
4. When the countdown has reached
zero, touch the KITCHEN TIMER
ON/OFF pad to turn off the beep.
To cancel the timer during the
countdown, touch the KITCHEN
TIMER ON/OFF pad TWICE.
9
OPERATION
OvenControl,ClockandTimer
Your new control has a series of
tones that will sound at different times.
These tones may sound while you set
the control for an oven function, or at
the end of the oven function. It will
also alert you that there may be a
problem with the functions. Below
are the types of tones and a brief
description of each.
TONES WHILE SE'rrlNG THE
CONTROL - When you touch a pad,
you will hear a beep. This beep will let
you know that the pad has been
activated. (The arrow pads do not
beep.)
END OF TIMED CYCLE TONE -At
the end of a timed cooking function,
you will hear 3 short beeps followed
by 1 beep every 6 seconds. This
beep will continue to sound every 6
seconds until the CLEAR/OFF pad is
touched or you may select the special
feature to cancel this 6-second beep
from sounding at the end of future
cycles.
TO CANCEL THE 6-SECOND BEEP
1. Touch and hold the BAKE and
BROIL pads, at the same time for
3 seconds, until the display shows
"SF."
2. Touch the KITCHEN TIMER ON/
OFF pad. The display will show
"CON BEEP" (continuous beep).
3. Touch the KITCHEN TIMER ON/
OFF pad again. The display will
show "BEEP" (beep canceled).
4. Touch the START pad to cancel
the 6-second beep and leave the
special feature mode.
if you would like to return the
6-second beep, repeat steps above
until the display shows your choice
and touch the START pad.
ATTENTION TONE - This tone will
sound if you make an error or an
oversight is made while setting an
oven function.
Examples would be:
a. Setting a clean cycle and the oven
door is not properly closed.
b. Setting function and not pressing
the START pad.
c. Touching an additional function
pad without first setting a
temperature or time.
Any of these can be quickly identified
by watching the display.
PREHEAT TONE - When you
set an oven temperature, the oven
automatically starts to heat. When the
temperature inside the oven reaches
the temperature you have set, a tone
will sound to let you know the oven is
ready for baking.
If you set an oven function and the
control beeps while the display is
flashing "F" and a number or letter
such as "F4" or "Fd," there may be a
problem with the control or oven.
Touch the CLEAR/OFF pad. If the
function code repeats, disconnect
all power to the oven for at least 30
seconds and then reconnect the
power. Try setting the function again.
If the code repeats again, write down
the flashing code and call for service.
Tell the technician what code was
flashing.
10
OPERATION
Oven Cooking Tips
It is normal to have some odor
when using your oven for the first
time. To help eliminate this odor,
ventilate the room by opening a
window or using a vent hood,
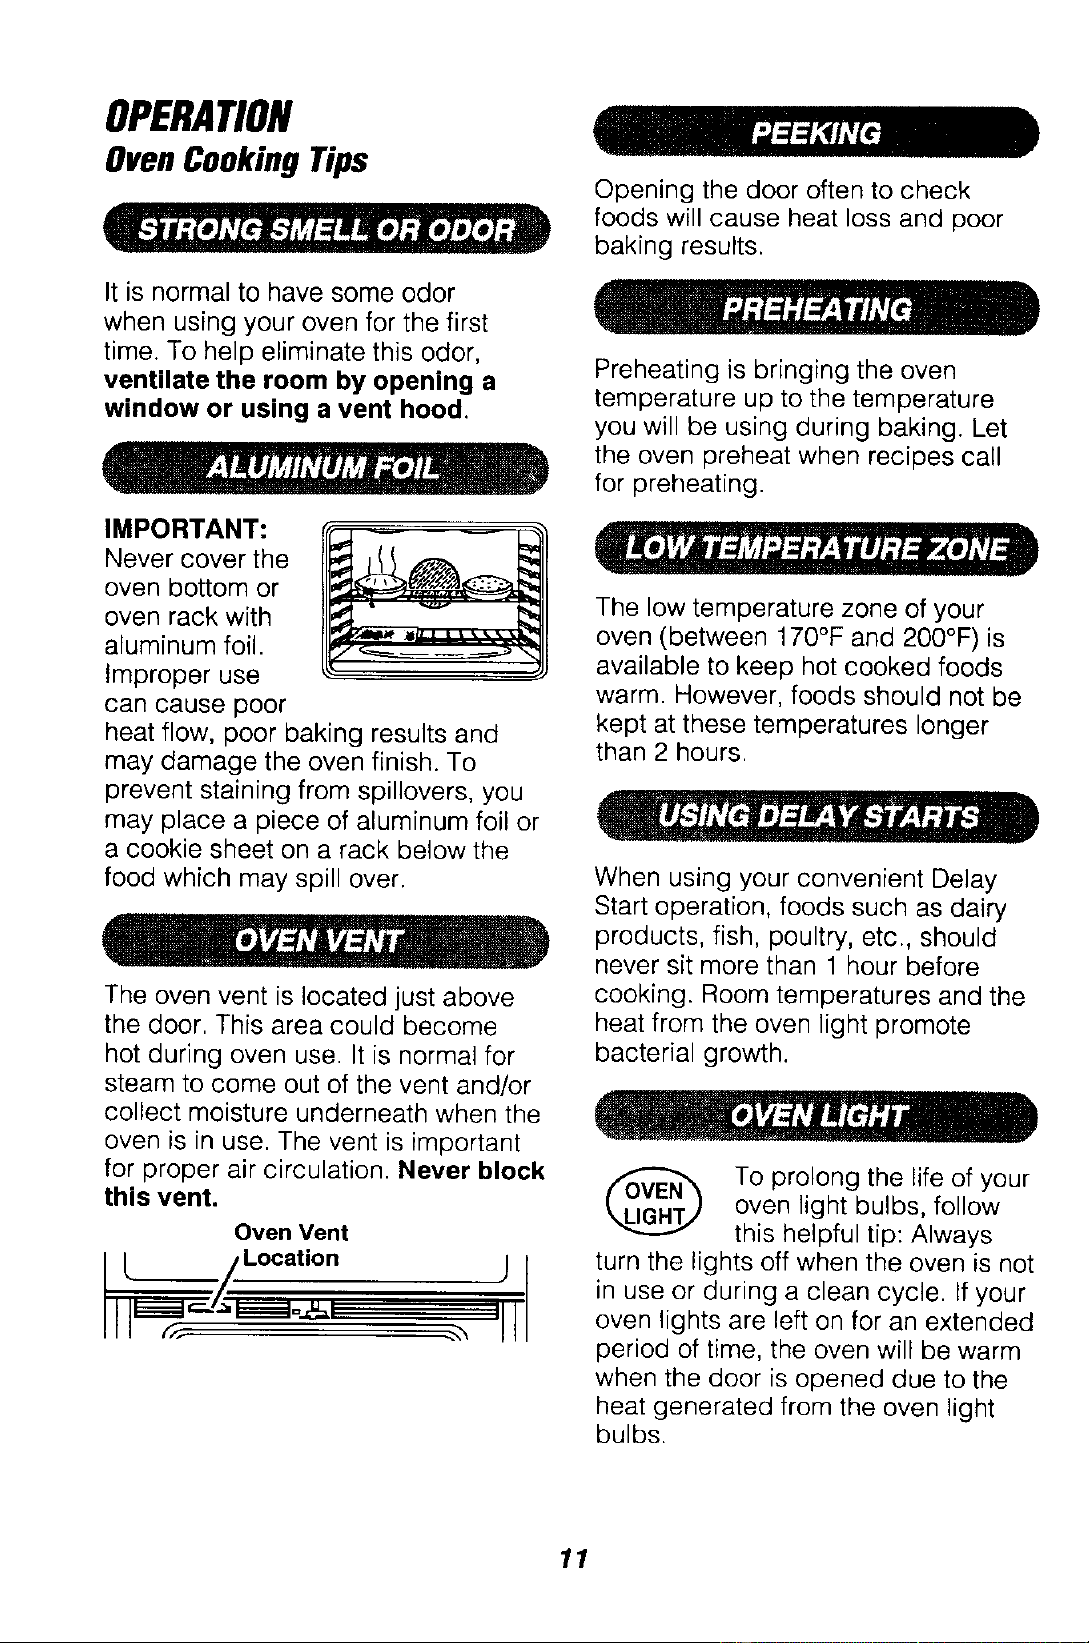
IMPORTANT:
Never cover the
oven bottom or
oven rack with
aluminum foil.
Improper use
can cause poor
heat flow, poor baking results and
may damage the oven finish. To
prevent staining from spillovers, you
may place a piece of aluminum foil or
a cookie sheet on a rack below the
food which may spill over.
The oven vent is located just above
the door. This area could become
hot during oven use. It is normal for
steam to come out of the vent and/or
collect moisture underneath when the
oven is in use. The vent is important
for proper air circulation. Never block
this vent.
Oven Vent
oca.on i
I
Opening the door often to check
foods will cause heat loss and poor
baking results.
Preheating is bringing the oven
temperature up to the temperature
you will be using during baking. Let
the oven preheat when recipes call
for preheating.
The low temperature zone of your
oven (between 170°F and 200°F) is
available to keep hot cooked foods
warm. However, foods should not be
kept at these temperatures longer
than 2 hours.
When using your convenient Delay
Start operation, foods such as dairy
products, fish, poultry, etc., should
never sit more than 1 hour before
cooking. Room temperatures and the
heat from the oven light promote
bacterial growth.
To prolong the life of your
oven light bulbs, follow
this helpful tip: Always
turn the lights off when the oven is not
in use or during a clean cycle. If your
oven lights are left on for an extended
period of time, the oven will be warm
when the door is opened due to the
heat generated from the oven light
bulbs.
11
OPERATION
OvenCookingTips(cont.)
Most recipes for baking have been
developed using high-fat products
such as butter or margarine (80% fat
by weight--the federal requirement
for products labeled "margarine").
You will get poor results if cakes, pies,
pastries, cookies or candies are made
with low-fat spreads. Low-fat spreads
contain less fat and more water. The
high moisture content of these
spreads affects the texture and flavor
of favorite baked recipes. The lower
the fat content of a spread product,
the more noticeable these differences
become. To ensure best results, use
margarine, butter or stick spreads
containing at least 70% vegetable oil.
The bake element is under the oven
floor. Do not place food on the oven
bottom for cooking.
The Oven Temperature Sensor at the
back of the oven continuously senses
and controls the temperature inside
the oven. To keep a constant set
temperature, the elements will cycle
(turn on and off during cooking).
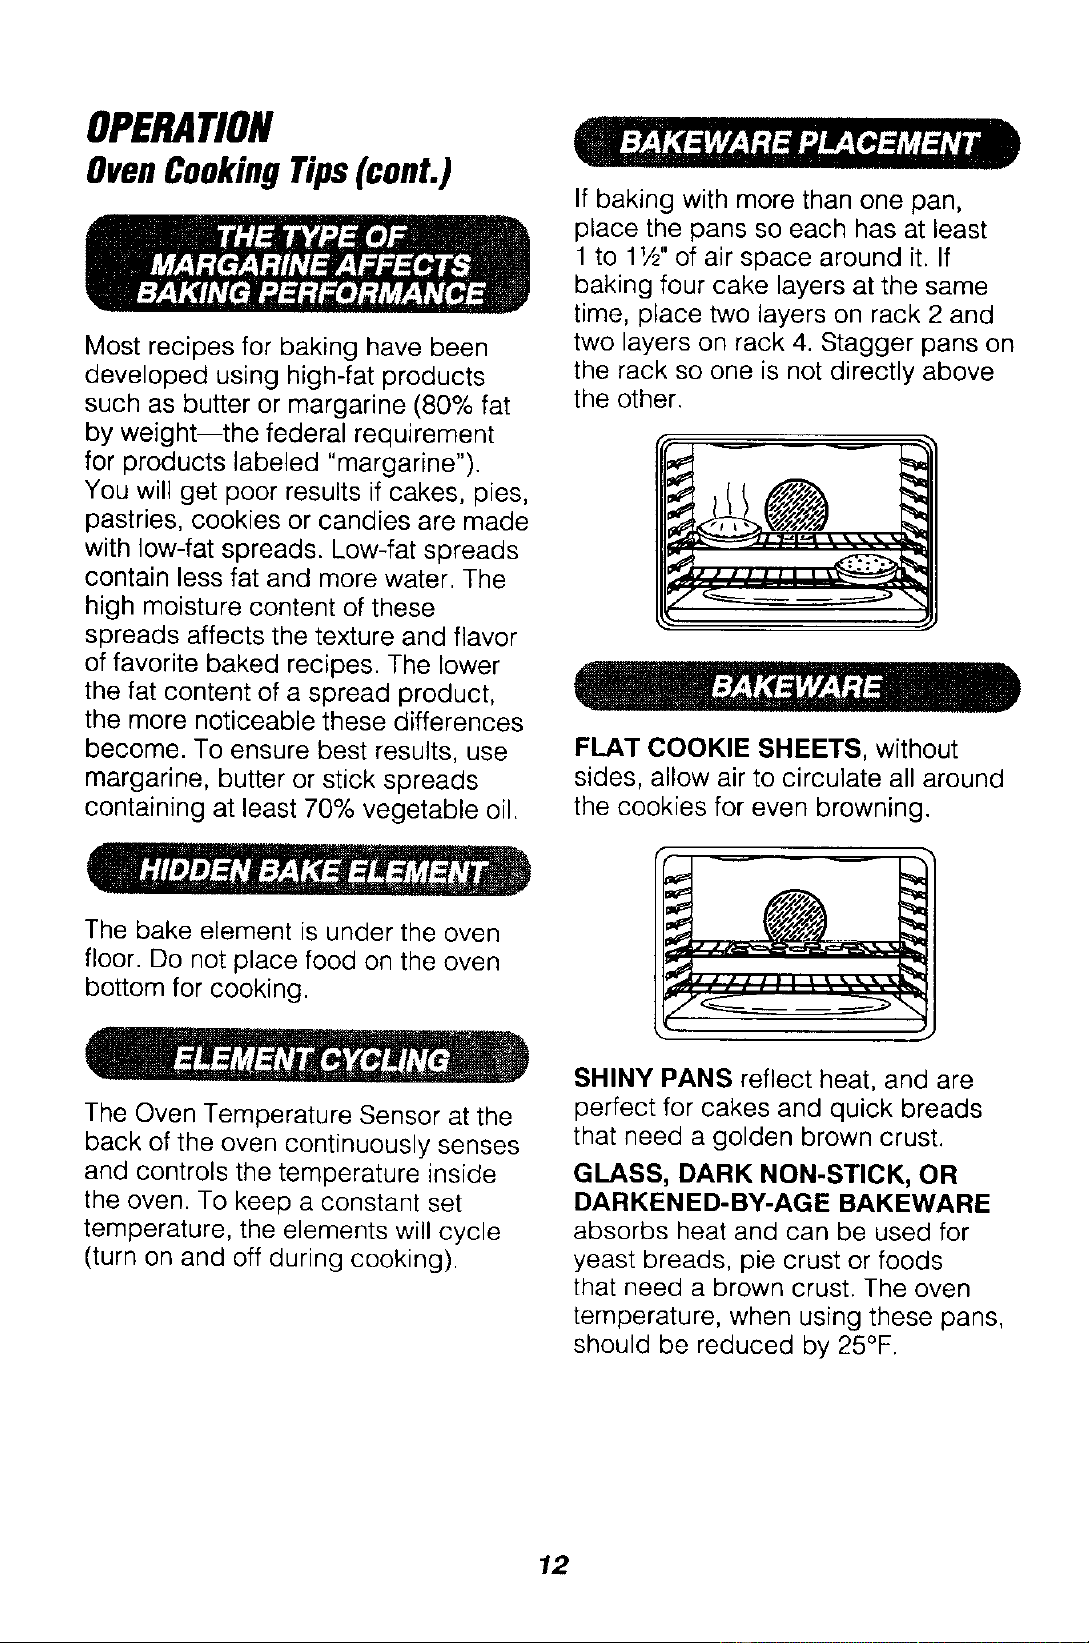
If baking with more than one pan,
place the pans so each has at least
1 to 1W' of air space around it. If
baking four cake layers at the same
time, place two layers on rack 2 and
two layers on rack 4. Stagger pans on
the rack so one is not directly above
the other.
._--,..,,,m :Y_'f.{..1 _V_'f;l_
FLAT COOKIE SHEETS, without
sides, allow air to circulate all around
the cookies for even browning.
SHINY PANS reflect heat, and are
perfect for cakes and quick breads
that need a golden brown crust.
GLASS, DARK NON-STICK, OR
DARKENED-BY-AGE BAKEWARE
absorbs heat and can be used for
yeast breads, pie crust or foods
that need a brown crust. The oven
temperature, when using these pans,
should be reduced by 25°F.
12
OPERATION
Oven Cooking Tips (cont.)
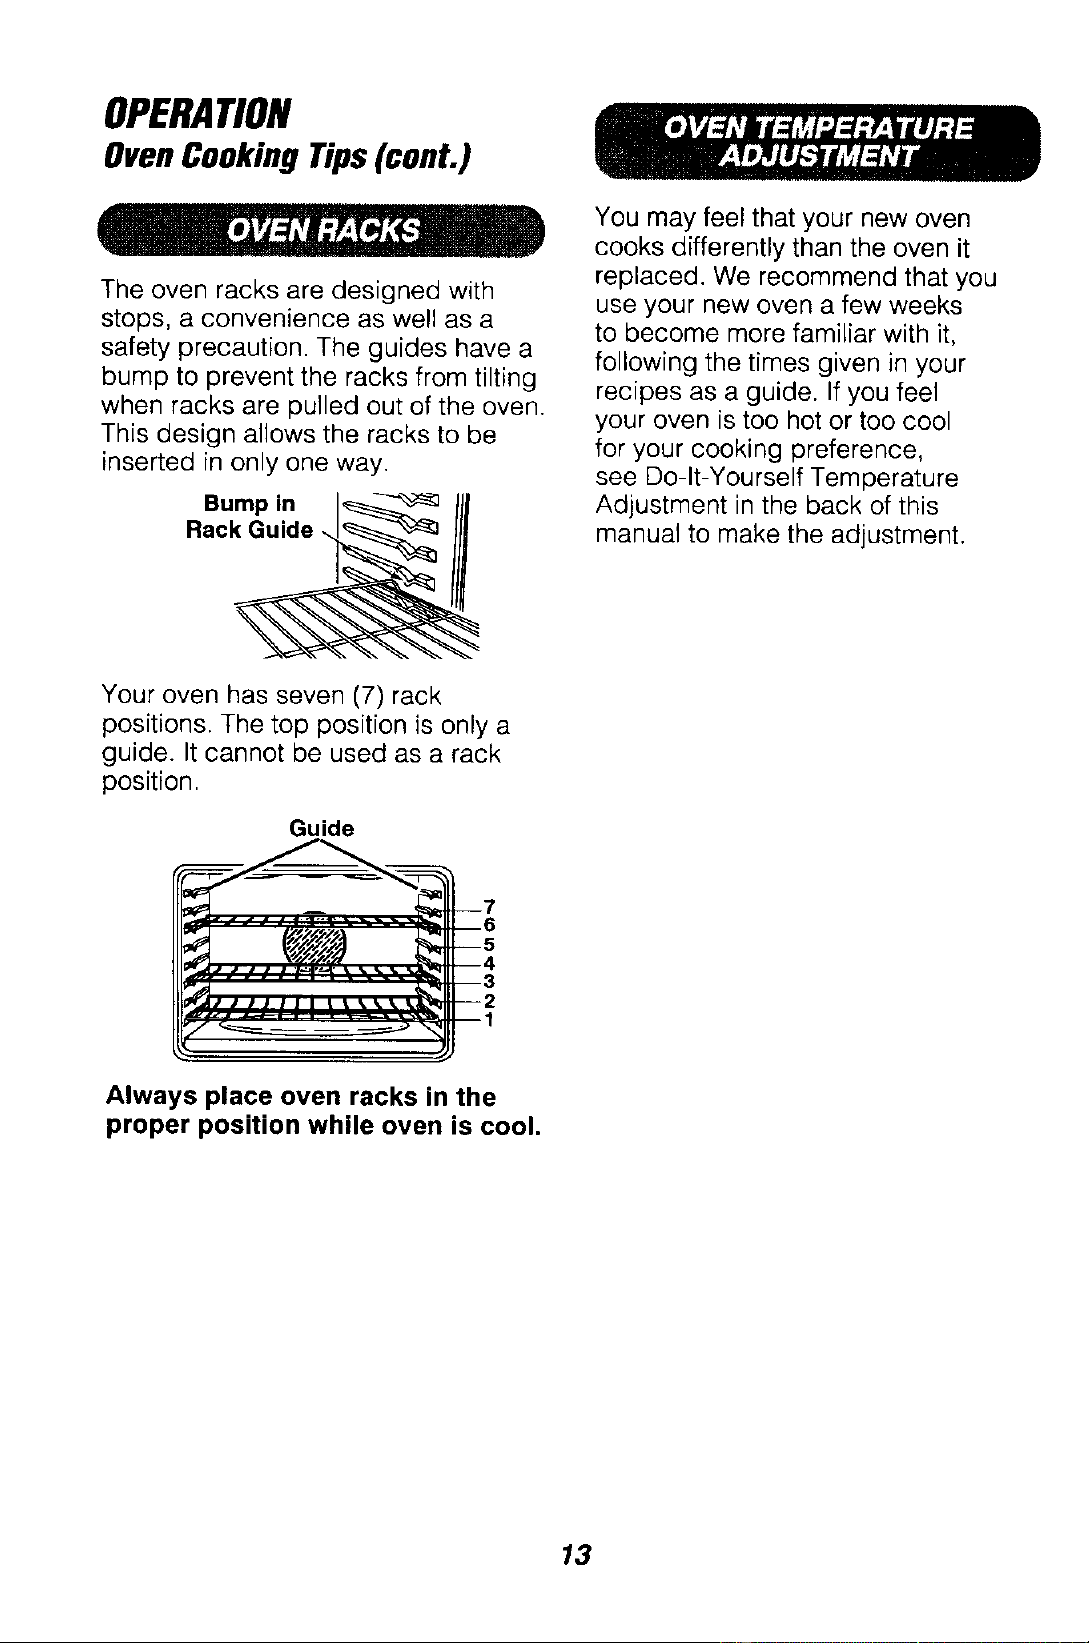
The oven racks are designed with
stops, a convenience as well as a
safety precaution. The guides have a
bump to prevent the racks from tilting
when racks are pulled out of the oven.
This design allows the racks to be
inserted in only one way.
Bump in
Rack Guide
You may feel that your new oven
cooks differently than the oven it
replaced. We recommend that you
use your new oven a few weeks
to become more familiar with it,
following the times given in your
recipes as a guide. If you feel
your oven is too hot or too cool
for your cooking preference,
see Do-It-Yourself Temperature
Adjustment in the back of this
manual to make the adjustment.
Your oven has seven (7) rack
positions. The top position is only a
guide. It cannot be used as a rack
position.
Guide
Always place oven racks in the
proper position while oven is cool.
13
OPERATION
Baking
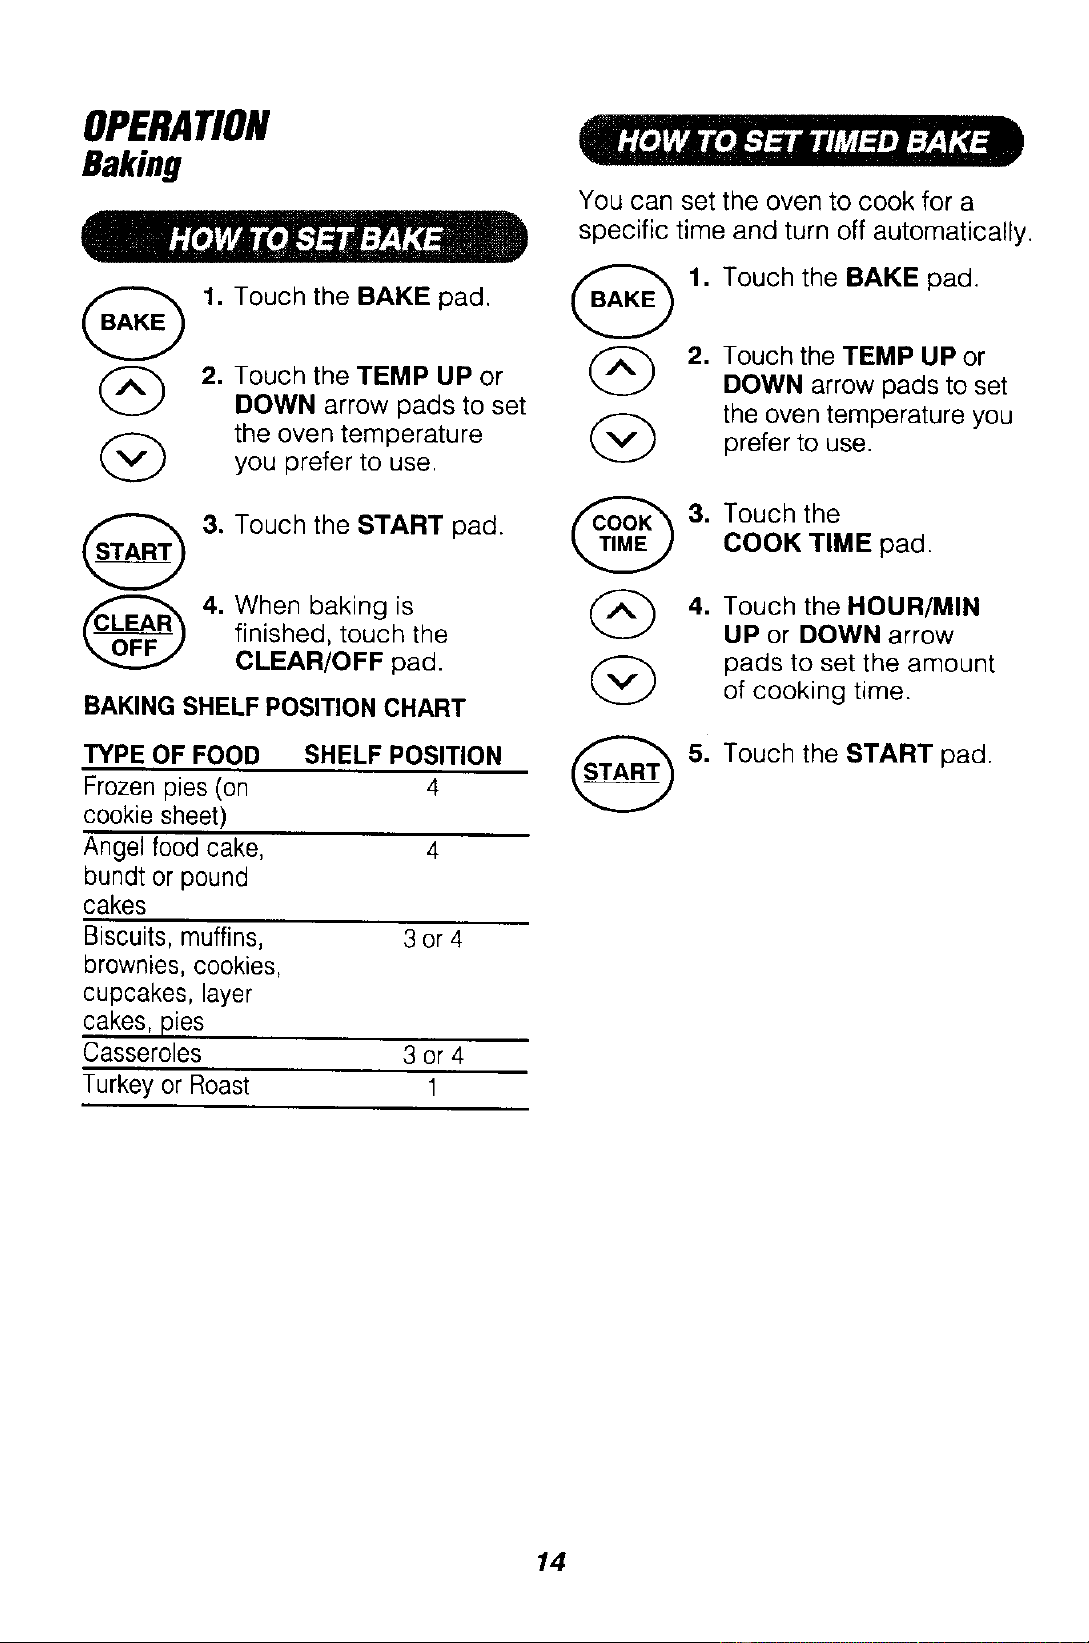
1. Touch the BAKE pad,
2. Touch the TEMP UP or
DOWN arrow pads to set
the oven temperature
you prefer to use.
3, Touch the START pad.
4. When baking is
finished, touch the
CLEAR/OFF pad.
BAKING SHELF POSITION CHART
TYPE OF FOOD SHELF POSITION
Frozen pies (on 4
cookie sheet)
Angel food cake, 4
bundt or pound
cakes
Biscuits, muffins, 3 or 4
brownies, cookies,
cupcakes, layer
cakes, pies
Casseroles 3 or 4
Turkey or Roast 1
You can set the oven to cook for a
specific time and turn off automatically.
1. Touch the BAKE pad.
. Touch the TEMP UP or
DOWN arrow pads to set
the oven temperature you
prefer to use.
@
G
3. Touch the
COOK TIME pad.
4. Touch the HOUR/MIN
UP or DOWN arrow
pads to set the amount
of cooking time.
5. Touch the START pad.
14
OPERATION
Baking(cont.)
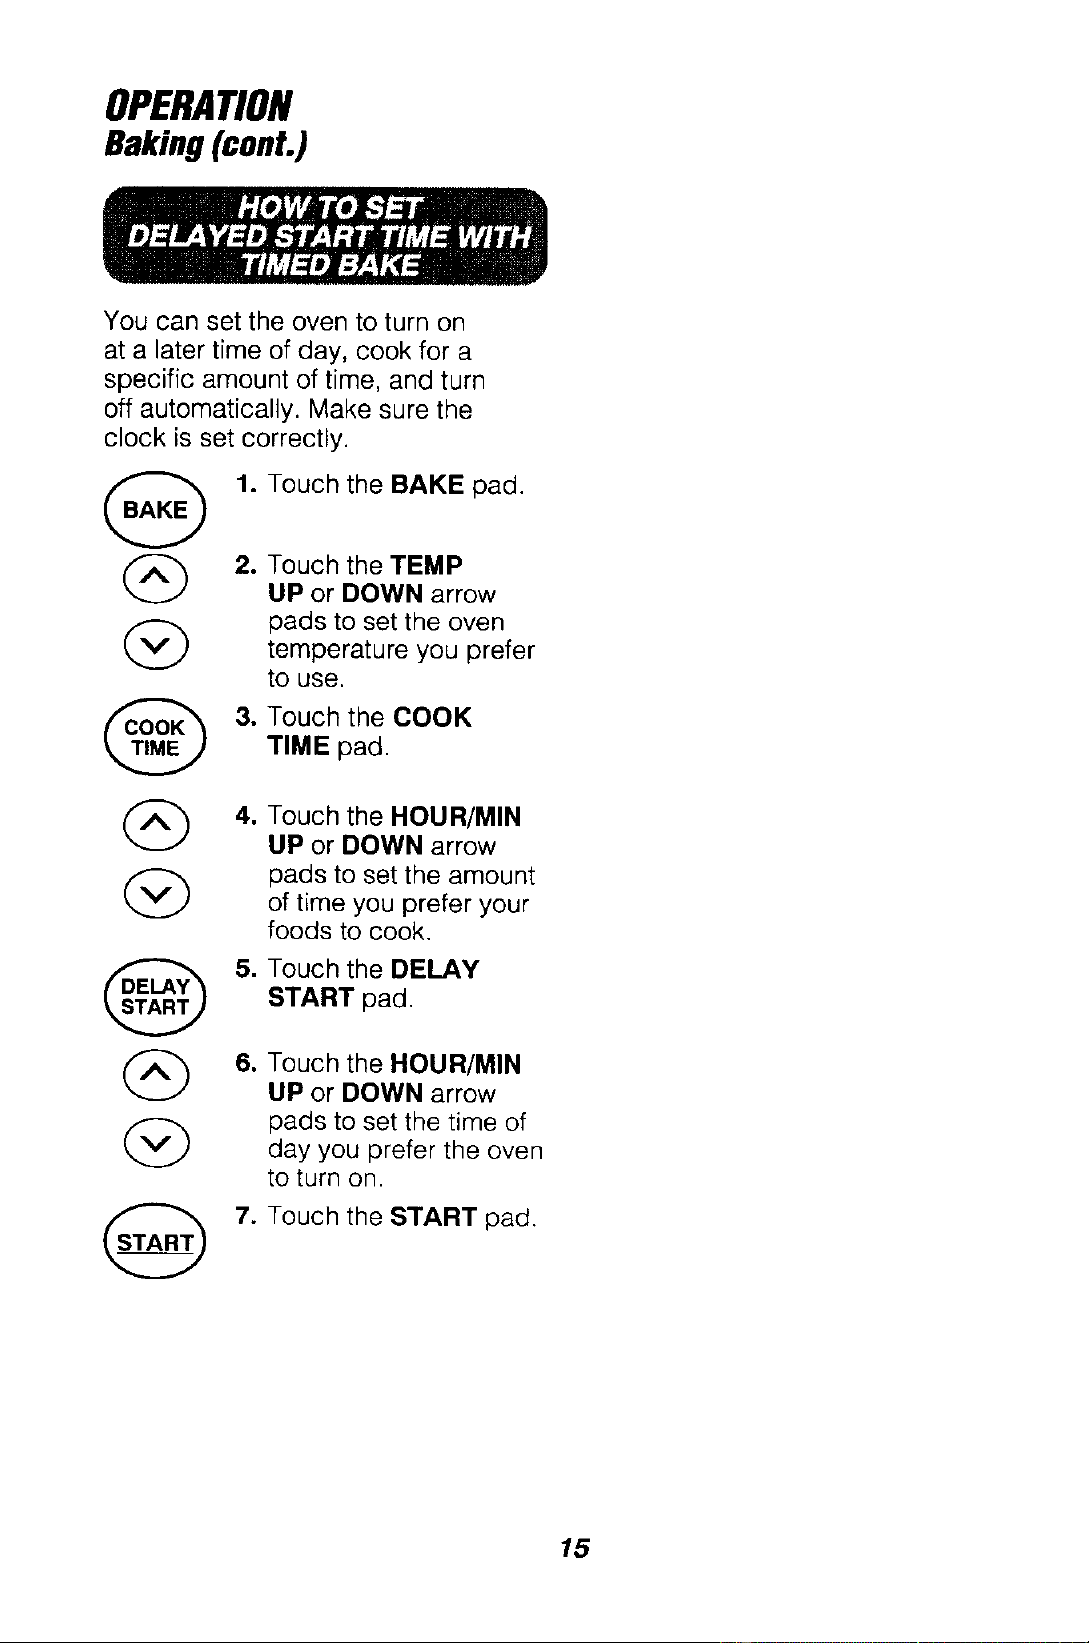
You can set the oven to turn on
at a later time of day, cook for a
specific amount of time, and turn
off automatically. Make sure the
clock is set correctly.
1. Touch the BAKE pad.
(_ 2. Touch the TEMP
UP or DOWN arrow
(_ pads to set the oven
temperature you prefer
to use.
3, Touch the COOK
TIME pad.
4, Touch the HOUR/MIN
UP or DOWN arrow
pads to set the amount
of time you prefer your
foods to cook.
5.
G
Touch the DELAY
START pad.
Touch the HOUR/MIN
UP or DOWN arrow
pads to set the time of
day you prefer the oven
to turn on.
Touch the START pad.
15
OPERATION
Convection Baking Tips
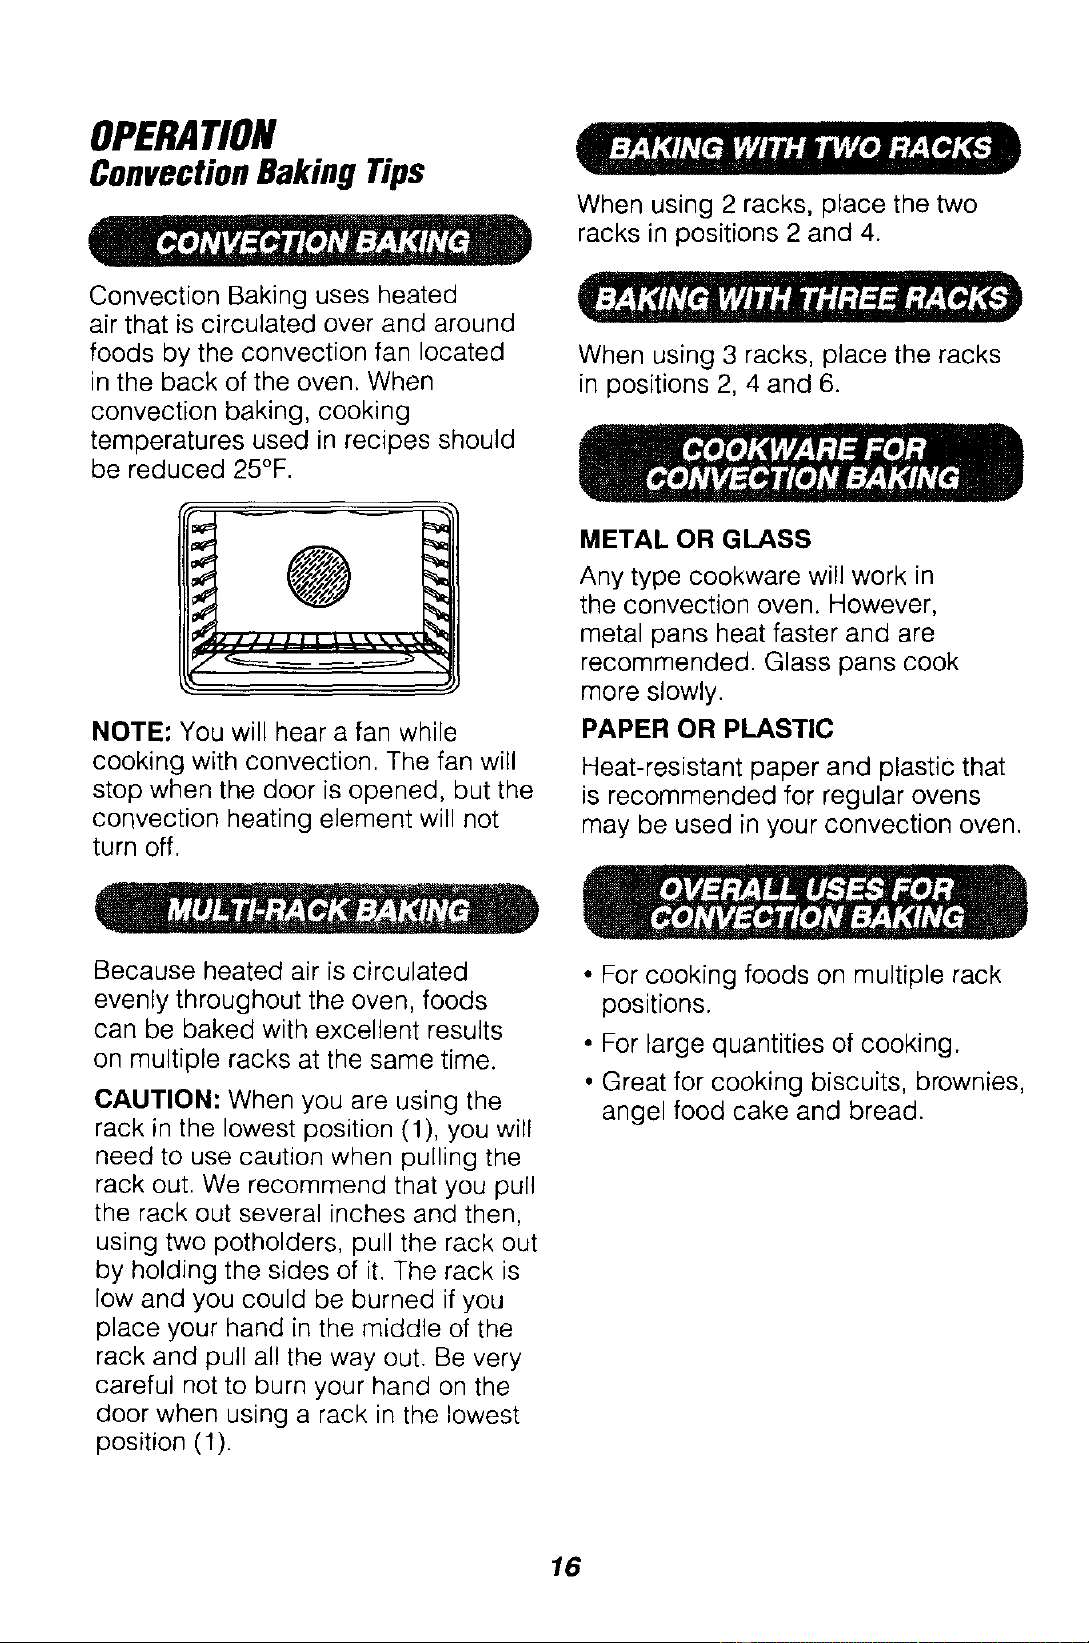
Convection Baking uses heated
air that is circulated over and around
foods by the convection fan located
in the back of the oven. When
convection baking, cooking
temperatures used in recipes should
be reduced 25°F.
NOTE: You will hear a fan while
cooking with convection. The fan will
stop when the door is opened, but the
convection heating element will not
turn off.
When using 2 racks, place the two
racks in positions 2 and 4.
When using 3 racks, place the racks
in positions 2, 4 and 6.
METAL OR GLASS
Any type cookware will work in
the convection oven. However,
metal pans heat faster and are
recommended. Glass pans cook
more slowly.
PAPER OR PLASTIC
Heat-resistant paper and plastic that
is recommended for regular ovens
may be used in your convection oven.
Because heated air is circulated
evenly throughout the oven, foods
can be baked with excellent results
on multiple racks at the same time.
CAUTION: When you are using the
rack in the lowest position (1), you will
need to use caution when pulling the
rack out. We recommend that you pull
the rack out several inches and then,
using two potholders, pull the rack out
by holding the sides of it. The rack is
low and you could be burned if you
place your hand in the middle of the
rack and pull all the way out. Be very
careful not to burn your hand on the
door when using a rack in the lowest
position (1).
• For cooking foods on multiple rack
positions.
• For large quantities of cooking.
• Great for cooking biscuits, brownies,
angel food cake and bread.
16
OPERATION
ConvectionRoastingTips
During Convection Roasting, heat
comes from the top element. The
convection fan circulates the heat
evenly around the food.
Meats cooked in a convection oven
are dark brown on the outside and
tender and juicy on the inside. In most
cases cooking time will be less when
using the Convection Roast feature.
Use the recommended roasting
temperature. Preheating is not
necessary. Check foods at the end of
suggested time. You may choose to
cook longer.
When you are Convection Roasting,
you should use the broiler pan and
grid that came with your new oven.
The pan is used to catch grease
spills and the grid is used to prevent
grease splatters.
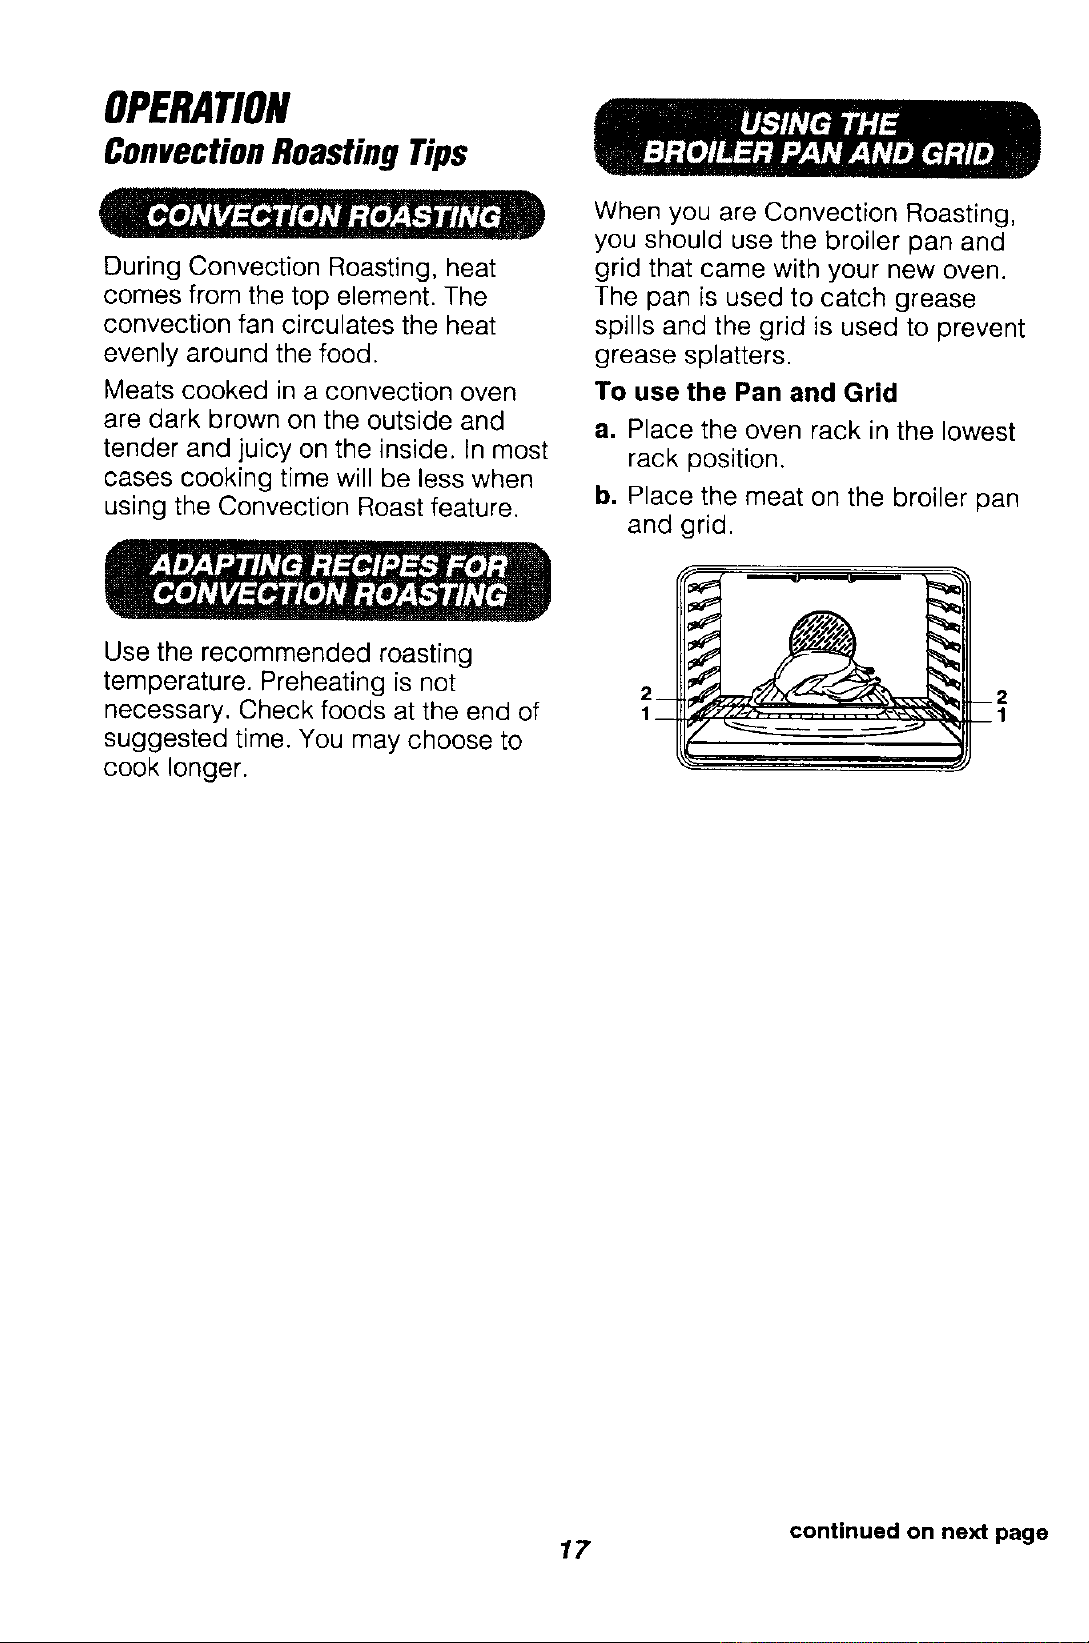
To use the Pan and Grid
a. Place the oven rack in the lowest
rack position.
b. Place the meat on the broiler pan
and grid.
L
continued on next page
17
OPERATION
ConvectionRoastingTips(cont.)
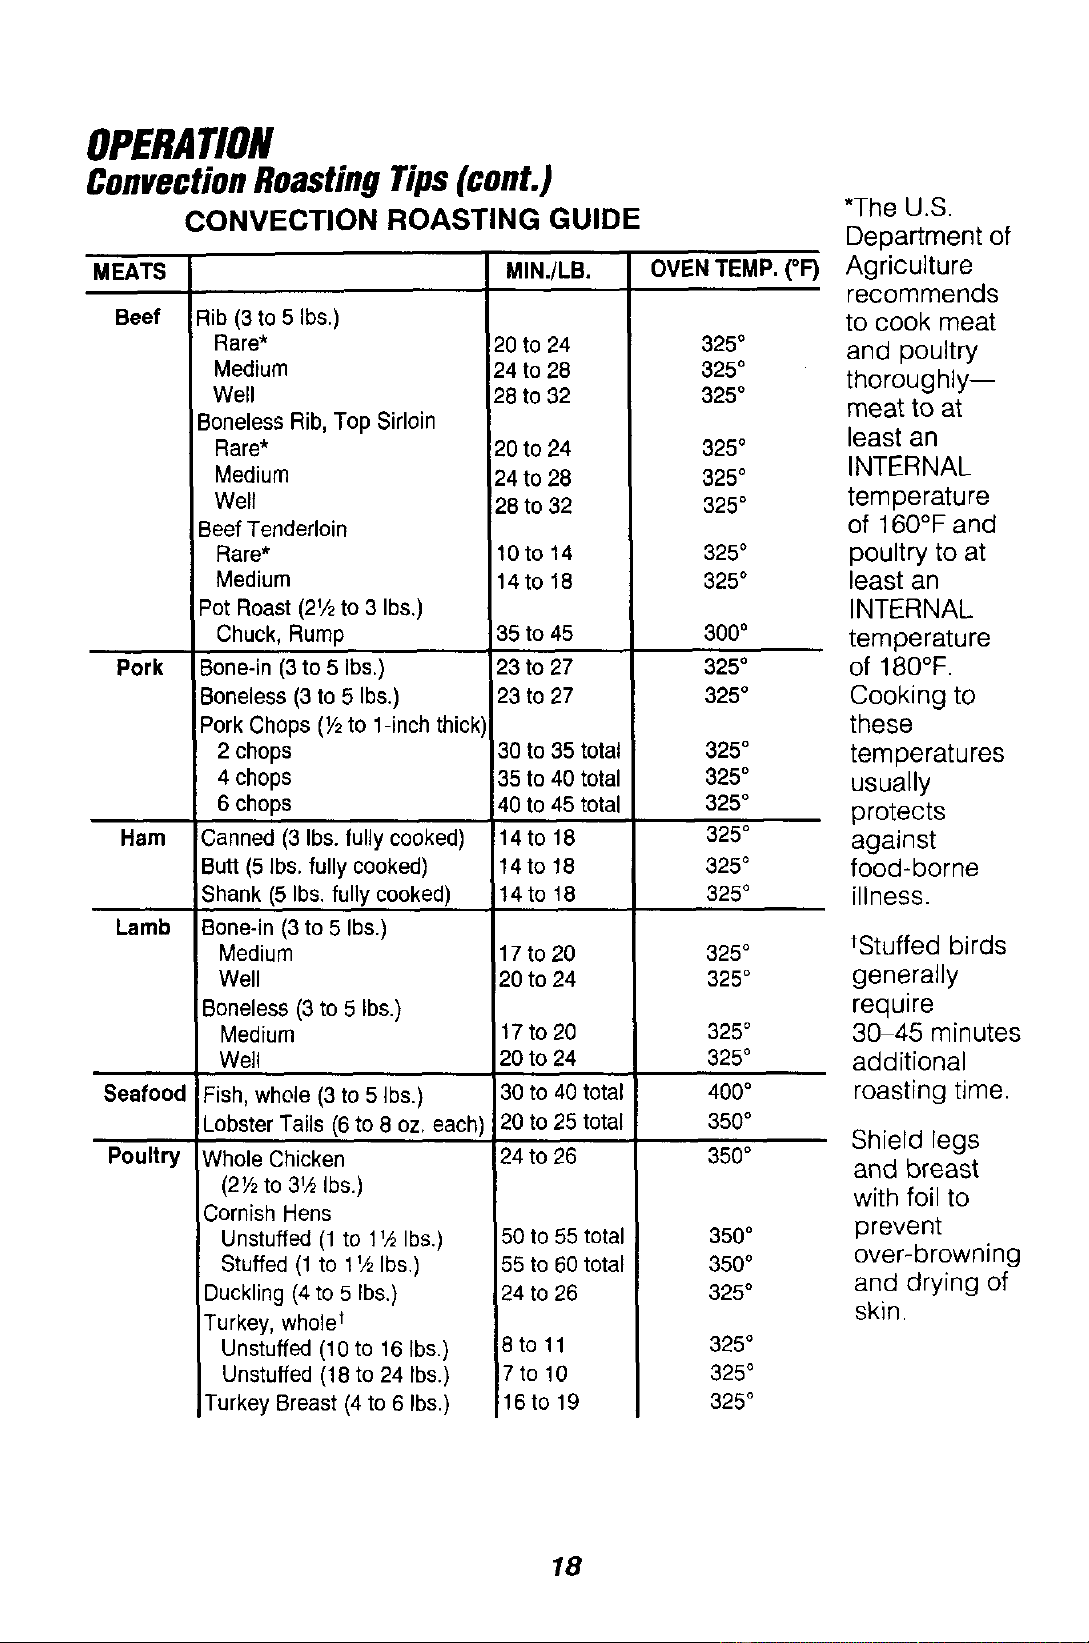
CONVECTION ROASTING GUIDE
MEATS
Beef
Pork
Ham
Lamb
Seafood
Poultry
Rib (3 to 5 Ibs.)
Rare*
Medium
Well
Boneless Rib, Top Sirloin
Rare*
Medium
Welt
Beef Tenderloin
Rare*
Medium
Pot Roast (2V2to 3 Ibs.)
Chuck, Rump
Bone-in (3 to 5 Ibs.)
Boneless (3 to 5 Ibs.)
Pork Chops (1/2to 1-inch thick)
2 chops
4 chops
6 chops
Canned (3 Ibs. fully cooked)
Butt (5 Ibs. fully cooked)
Shank (5 Ibs. fully cooked)
Bone-in (3 to 5 Ibs.)
Medium
Well
Boneless (3 to 5 Ibs.)
Medium
Well
Fish, whole (3 to 5 Ibs.)
Lobster Tails (6 to 8 oz, each)
Whole Chicken
(21/2to 3_,_Ibs.)
Cornish Hens
Unstuffed (1 to 1_/_Ibs.)
Stuffed (1 to 11_Ibs.)
Duckling (4 to 5 Ibs.)
Turkey, whole t
Unstuffed (10 to 16 Ibs.)
Unstuffed (18 to 24 Ibs.)
TurkeyBreast (4 to 6 Ibs.)
MIN./LB.
20 to 24
24 to 28
28 to 32
20 to 24
24 to 28
28 to 32
10 to 14
14 to 18
35 to 45
23 to 27
23 to 27
30 to 35 total
35 to 40 total
40 to 45 total
14 to 18
14to 18
14 to 18
17to20
20 to 24
17to 20
20 to 24
30 to 40 total
20 to 25 total
24 to 26
50 to 55 total
55 to 60 total
24 to 26
OVEN TEMP. (°F)
325°
325°
325°
325°
325°
325°
325°
325°
300°
325°
325°
325 °
325 °
325 °
325°
325 o
325°
325°
8toll
7to 10
16 to 19
325°
325 °
325°
400 °
350 °
350 °
350°
350°
325°
325°
325 °
325 °
*The U.S.
Department of
Agriculture
recommends
to cook meat
and poultry
thoroughly--
meat to at
least an
INTERNAL
temperature
of 160°F and
poultry to at
least an
INTERNAL
temperature
of 180°F.
Cooking to
these
temperatures
usually
protects
against
food-borne
illness.
tStuffed birds
generally
require
30 45 minutes
additional
roasting time.
Shield legs
and breast
with foil to
prevent
over-browning
and drying of
skin.
18
OPERATION
ConvectionBakingand
Roasting
@
G
0
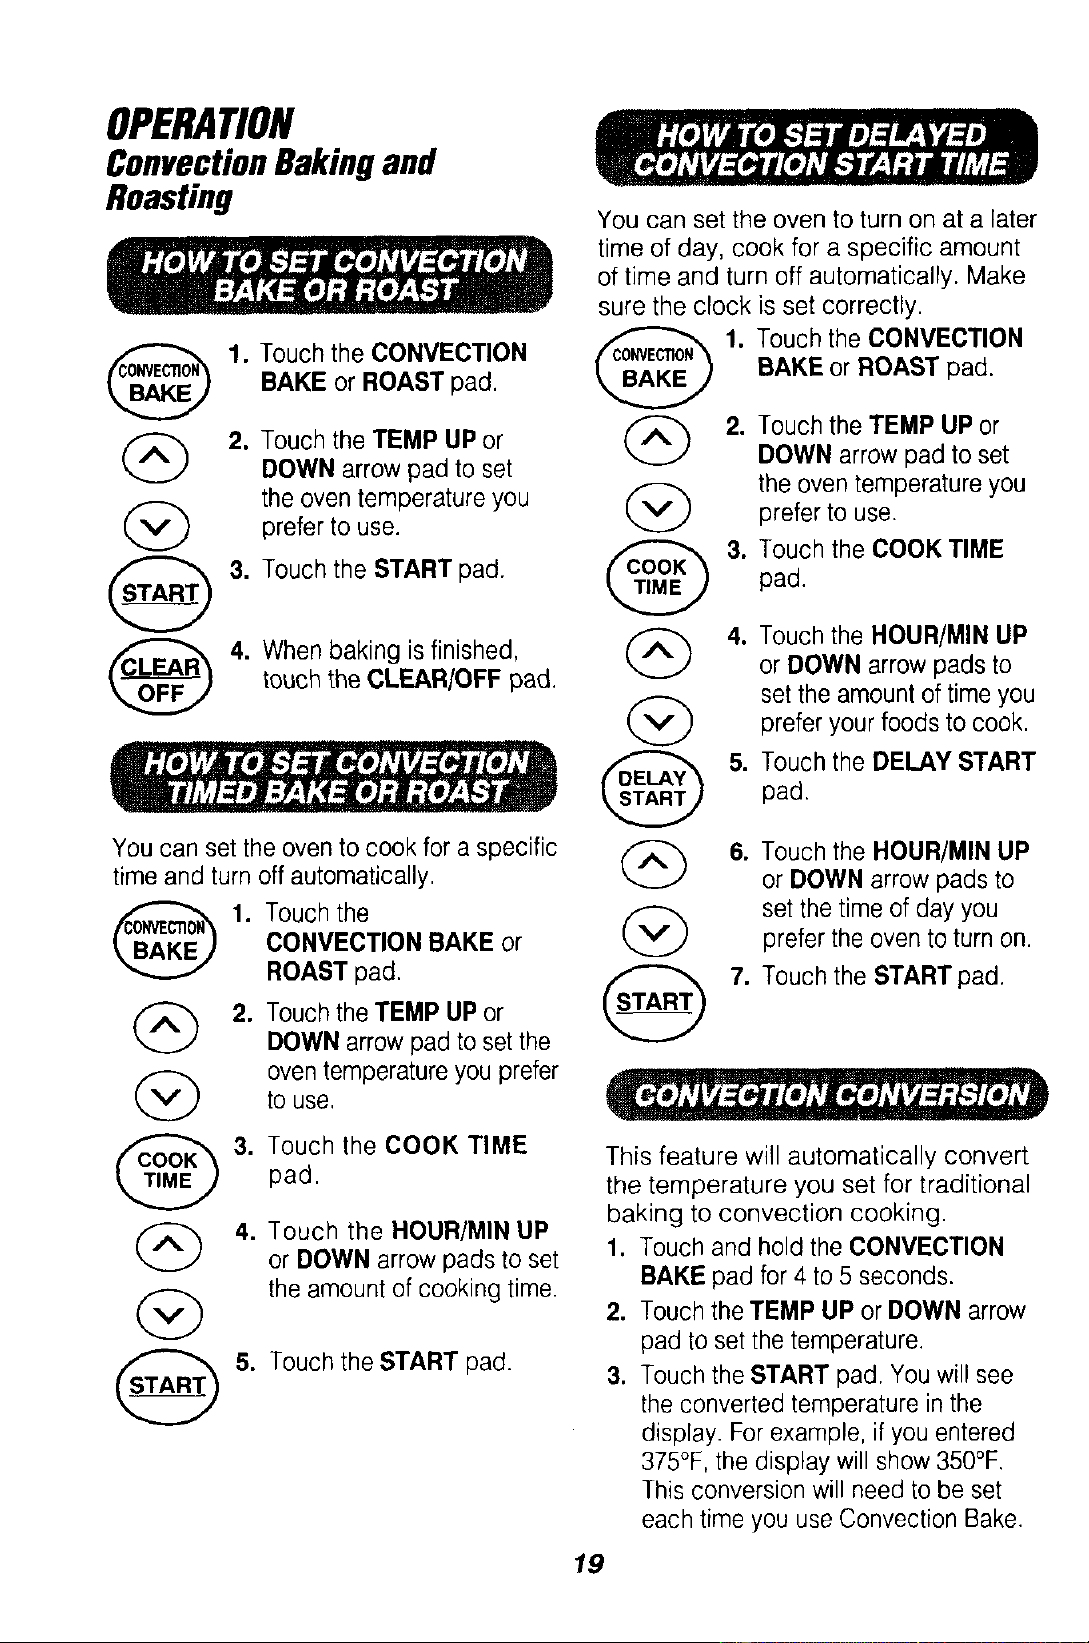
1. Touch the CONVECTION
BAKE or ROAST pad.
2. Touch the TEMP UP or
DOWN arrow pad to set
the oven temperature you
prefer to use.
3. Touch the START pad.
You can set the oven to turn on at a later
time of day, cook for a specific amount
of time and turn off automatically. Make
sure the clock is set correctly.
1. Touch the CONVECTION
BAKE or ROAST pad.
4. When baking is finished,
touch the CLEAR/OFF pad.
@
(_ 2. Touch the TEMP UP or
DOWN arrow pad to set
the oven temperature you
(_ prefer to use.
3. Touch the COOK TIME
pad.
(_) 4. Touch the HOUR/MIN UP
or DOWN arrow pads to
set the amount of time you
prefer your foods to cook.
You can set the oven to cook for a specific
time and turn off automatically.
1. Touch the
CONVECTION BAKE or
ROAST pad.
(_ 2. Touch the TEMP UP or
DOWN arrow pad to set the
O
5. Touch the DELAY START
pad.
6. Touch the HOUR/MIN UP
or DOWN arrow pads to
set the time of day you
prefer the oven to turn on.
7. Touch the START pad.
@
O
oven temperature you prefer
to use.
3. Touch the COOK TIME
pad.
4. Touch the HOUR/MIN UP
or DOWN arrow pads to set
the amount of cooking time,
5. Touch the START pad.
This feature will automatically convert
the temperature you set for traditional
baking to convection cooking.
1. Touch and hold the CONVECTION
BAKE pad for 4 to 5 seconds.
2. Touch the TEMP UP or DOWN arrow
pad to set the temperature.
3. Touch the START pad. You will see
the converted temperature in the
display. For example, if you entered
375°F, the display will show 350°F.
This conversion will need to be set
each time you use Convection Bake.
19
OPERATION
CookingTimeSavers
You can preset up to five temperature/
cooking time combinations with this
function. You can then bake or
convection bake/roast any one of five
of your favorite recipes without choosing
settings each time.
NOTES:
• You can not use Favorite Recipe with
Broil or the Self-Cleaning cycle.
• Your oven will remember Favorite
Recipe presettings even after a power
outage.
• Add your estimated preheat time to
your cooking time, At the preheat
tone, put your food in the oven.
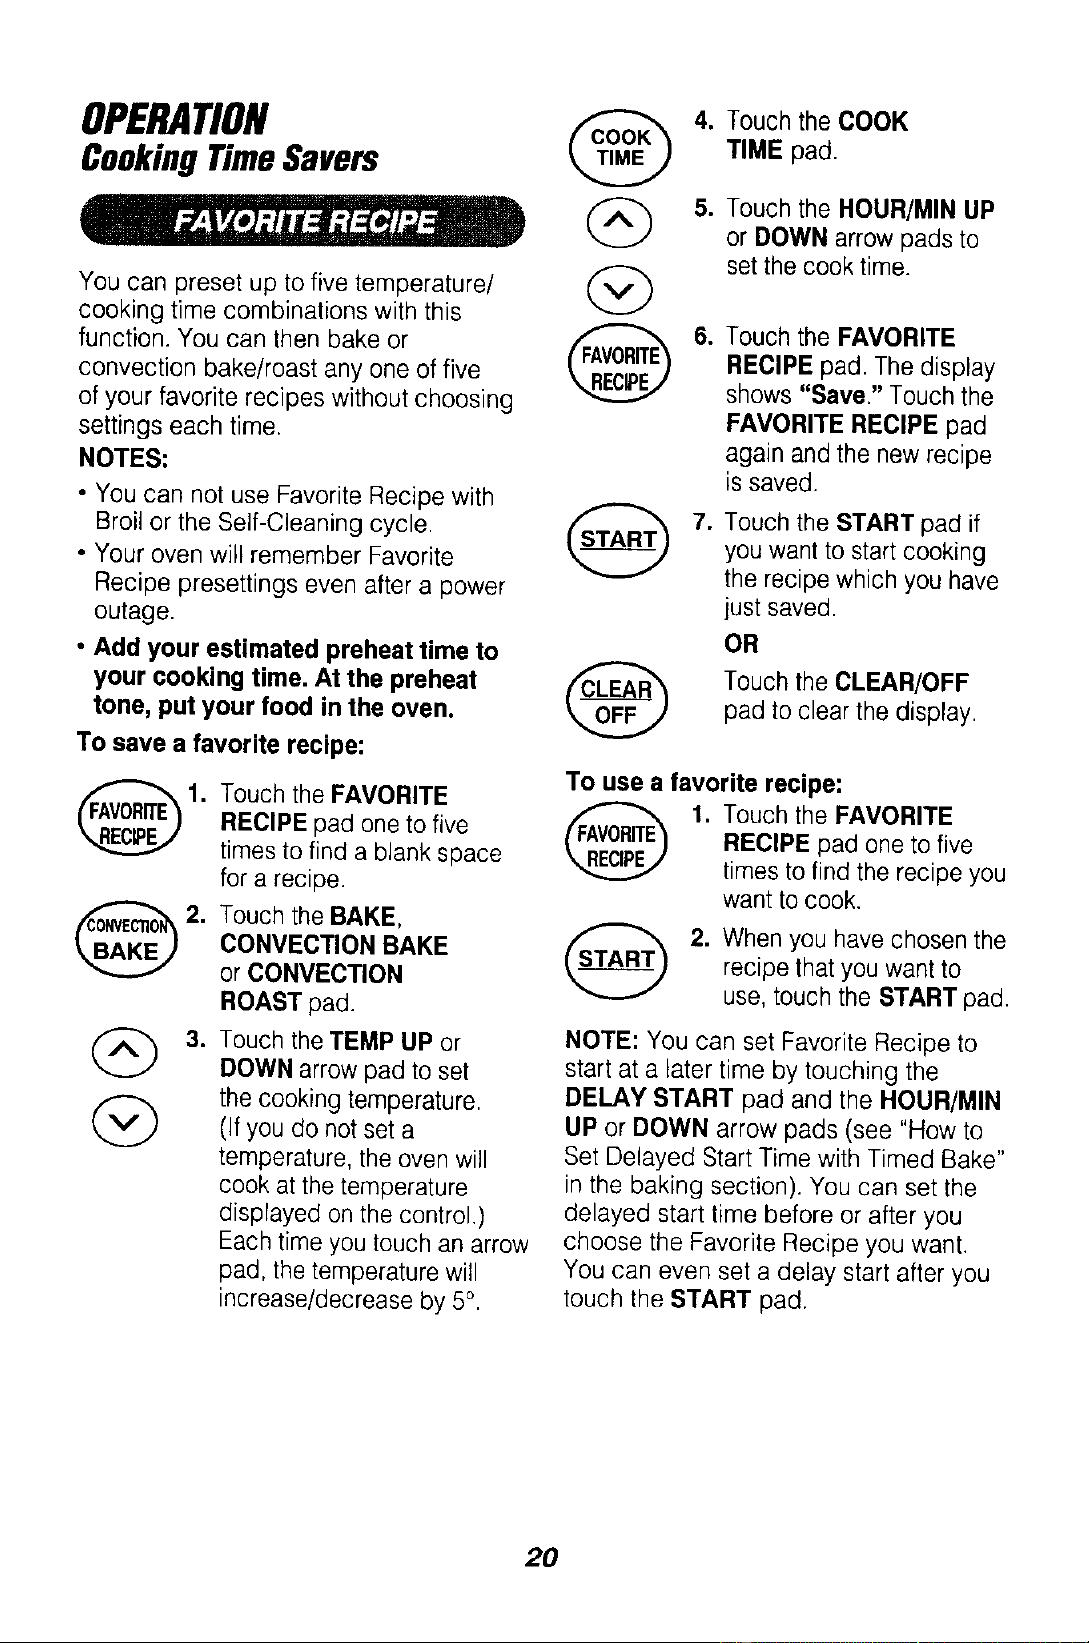
To save a favorite recipe:
Touch the FAVORITE
RECIPE pad one to five
times to find a blank space
for a recipe.
TouchtheBAKE,
CONVECTION BAKE
orCONVECTION
ROAST pad.
Touch the TEMP UP or
DOWN arrow pad to set
the cooking temperature.
(if you do not set a
temperature, the oven wi{I
cook at the temperature
displayed on the control,)
Each time you touch an arrow
pad, the temperature will
increase/decrease by 5 °.
G
@
4. Touch the COOK
TIME pad.
5. Touch the HOUR/MIN UP
or DOWN arrow pads to
set the cook time.
6. Touch the FAVORITE
RECIPE pad. The display
shows "Save." Touch the
FAVORITE RECIPE pad
again and the new recipe
is saved.
7. Touch the START pad if
you want to start cooking
the recipe which you have
just saved.
OR
Touch the CLEAR/OFF
pad to clear the display.
To use a favorite recipe:
1. Touch the FAVORITE
RECIPE pad one to five
times to find the recipe you
want to cook.
2. When you have chosen the
recipe that you want to
use, touch the START pad.
NOTE: You can set Favorite Recipe to
start at a later time by touching the
DELAY START pad and the HOUR/MIN
UP or DOWN arrow pads (see "How to
Set Delayed Start Time with Timed Bake"
in the baking section). You can set the
delayed start time before or after you
choose the Favorite Recipe you want.
You can even set a delay start after you
touch the START pad.
2O
OPERATION
CookingTimeSavers
(cont.)
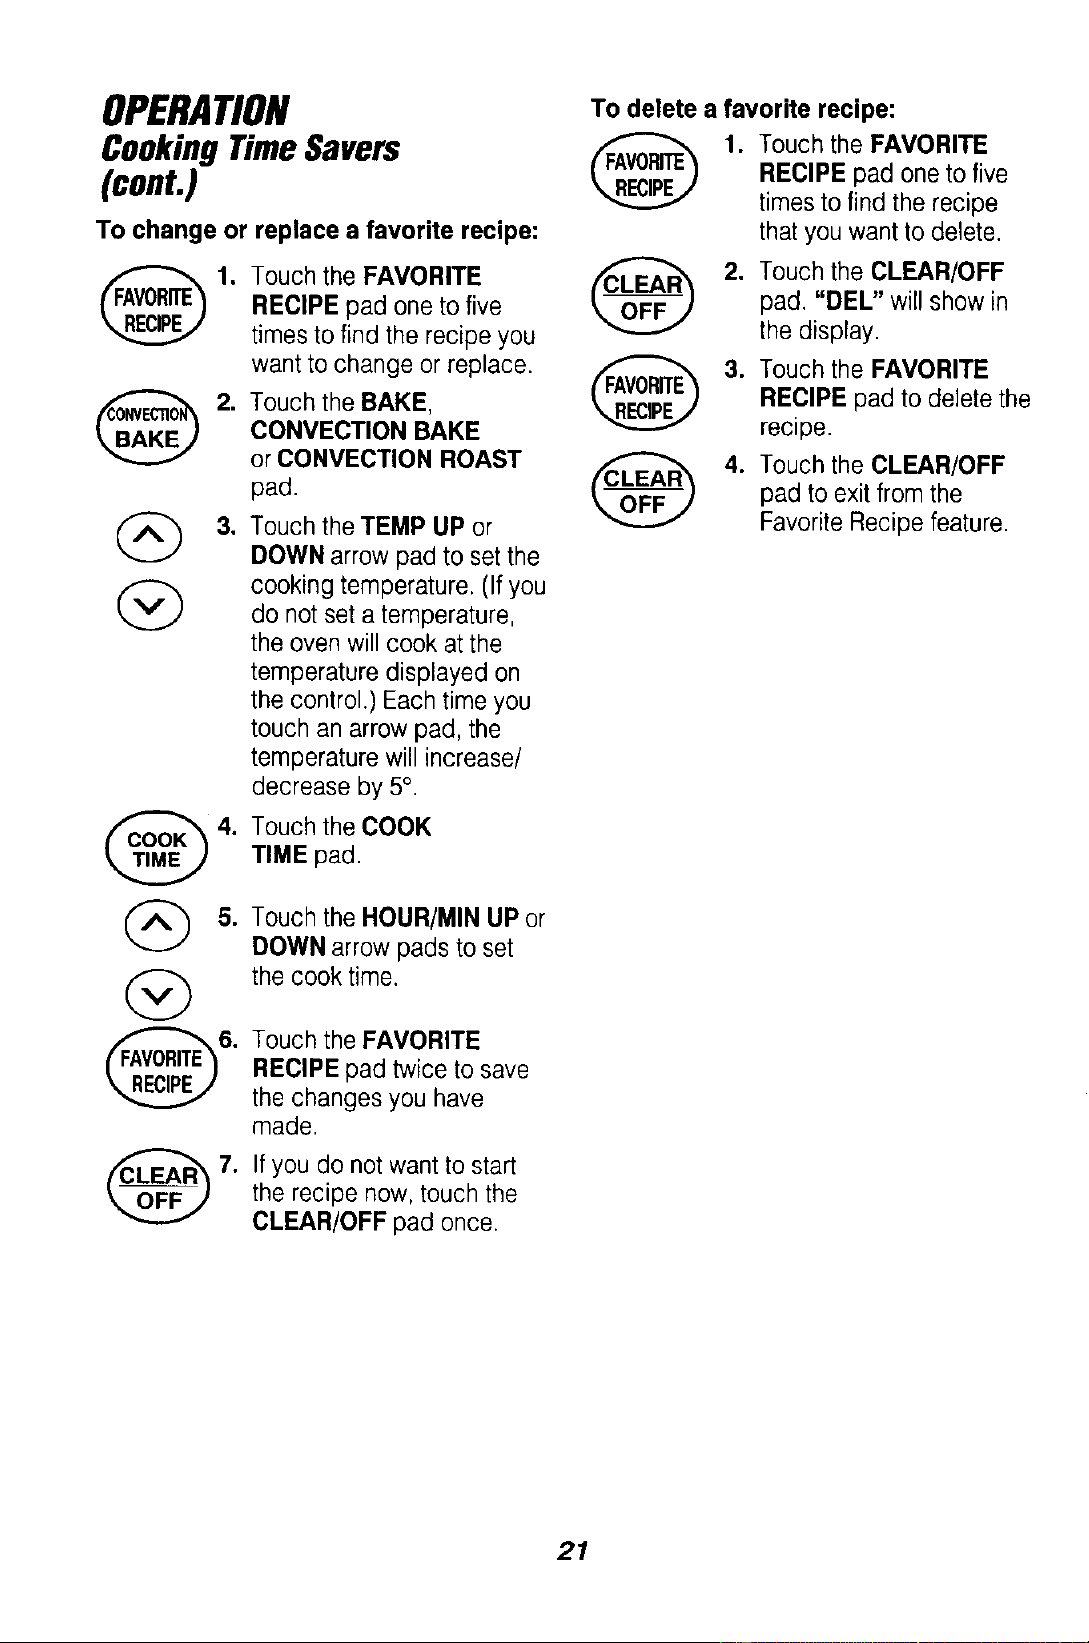
To change or replace a favorite recipe:
4.
5.
Touch the FAVORITE
RECIPE pad one to five
times to find the recipe you
want to change or replace.
Touch the BAKE,
CONVECTION BAKE
or CONVECTION ROAST
pad.
Touch the TEMP UP or
DOWN arrow pad to set the
cooking temperature. (If you
do not set a temperature,
the oven will cook at the
temperature displayed on
the control.) Each time you
touch an arrow pad, the
temperature will increase/
decrease by 5°.
Touch the COOK
TIME pad.
Touch the HOUR/MIN UP or
DOWN arrow pads to set
the cook time.
Touch the FAVORITE
RECIPE pad twice to save
the changes you have
made.
If you do not want to start
the recipe now, touch the
CLEAR/OFF pad once.
To delete a favorite recipe:
1. Touch the FAVORITE
RECIPE pad one to five
times to find the recipe
@
@
@
that you want to delete.
2. Touch the CLEAR/OFF
pad. "DEL" will show in
the display.
3. Touch the FAVORITE
RECIPE pad to delete the
recipe.
4. Touch the CLEAR/OFF
pad to exit from the
Favorite Recipe feature.
21
OPERATION
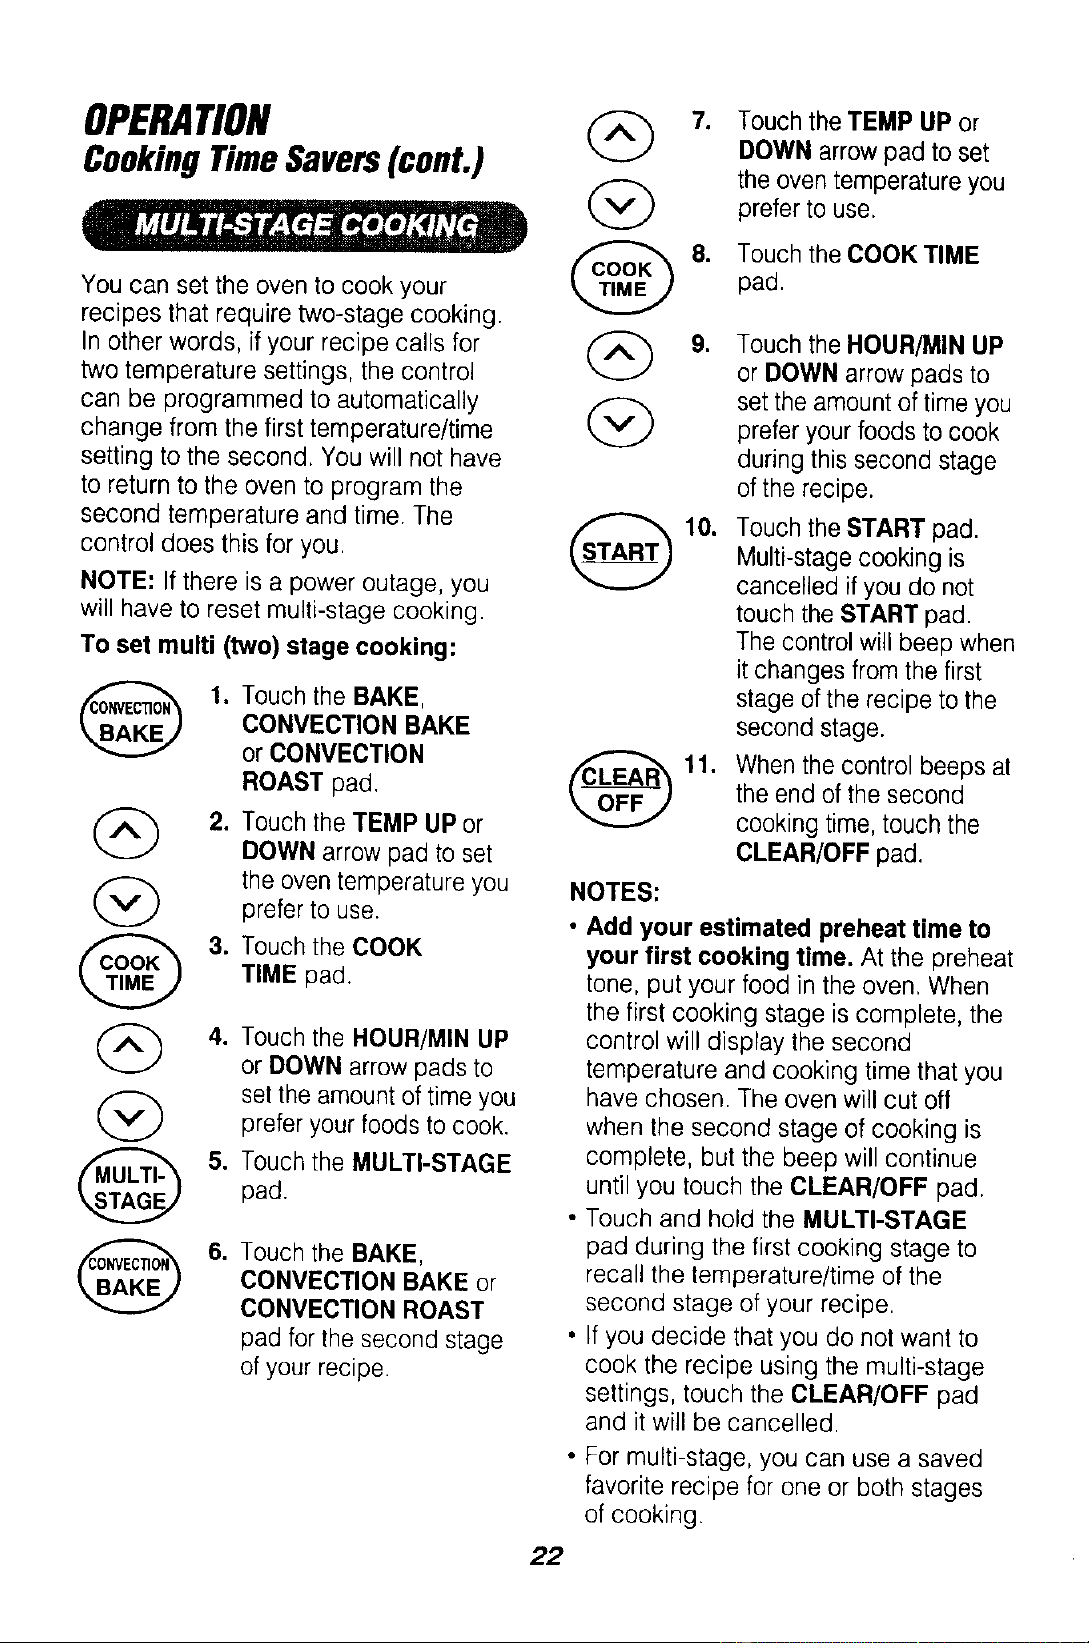
CookingTimeSavers(cont.)
You can set the oven to cook your
recipes that require two-stage cooking.
In other words, if your recipe calls for
two temperature settings, the control
can be programmed to automatically
change from the first temperature/time
setting to the second. You will not have
to return to the oven to program the
second temperature and time. The
control does this for you.
NOTE: If there is a power outage, you
will have to reset multi-stage cooking.
To set multi (two) stage cooking:
@
G
@
@
@
1. Touch the BAKE,
CONVECTION BAKE
or CONVECTION
ROAST pad,
2. Touch the TEMP UP or
DOWN arrow pad to set
the oven temperature you
prefer to use.
3. Touch the COOK
TIME pad.
4. Touch the HOUR/MIN UP
or DOWN arrow pads to
set the amount of time you
prefer your foods to cook.
5. Touch the MULTI-STAGE
pad.
6. Touch the BAKE,
CONVECTION BAKE or
CONVECTION ROAST
pad for the second stage
of your recipe.
(2>
@
.
,
Touch the TEMP LIP or
DOWN arrow pad to set
the oven temperature you
prefer to use.
Touch the COOK TIME
pad.
,
10.
11.
Touch the HOUR/MIN UP
or DOWN arrow pads to
set the amount of time you
prefer your foods to cook
during this second stage
of the recipe.
Touch the START pad.
Multi-stage cooking is
cancelled if you do not
touch the START pad.
The control will beep when
it changes from the first
stage of the recipe to the
second stage.
When the control beeps at
the end of the second
cooking time, touch the
CLEAR/OFF pad.
NOTES:
• Add your estimated preheat time to
your first cooking time. At the preheat
tone, put your food in the oven. When
the first cooking stage is complete, the
control will display the second
temperature and cooking time that you
have chosen. The oven will cut off
when the second stage of cooking is
complete, but the beep will continue
until you touch the CLEAR/OFF pad.
• Touch and hold the MULTI-STAGE
pad during the first cooking stage to
recall the temperature/time of the
second stage of your recipe.
• If you decide that you do not want to
cook the recipe using the multi-stage
settings, touch the CLEAR/OFF pad
and it will be cancelled.
• For multi-stage, you can use a saved
favorite recipe for one or both stages
of cooking.
22
OPERATION
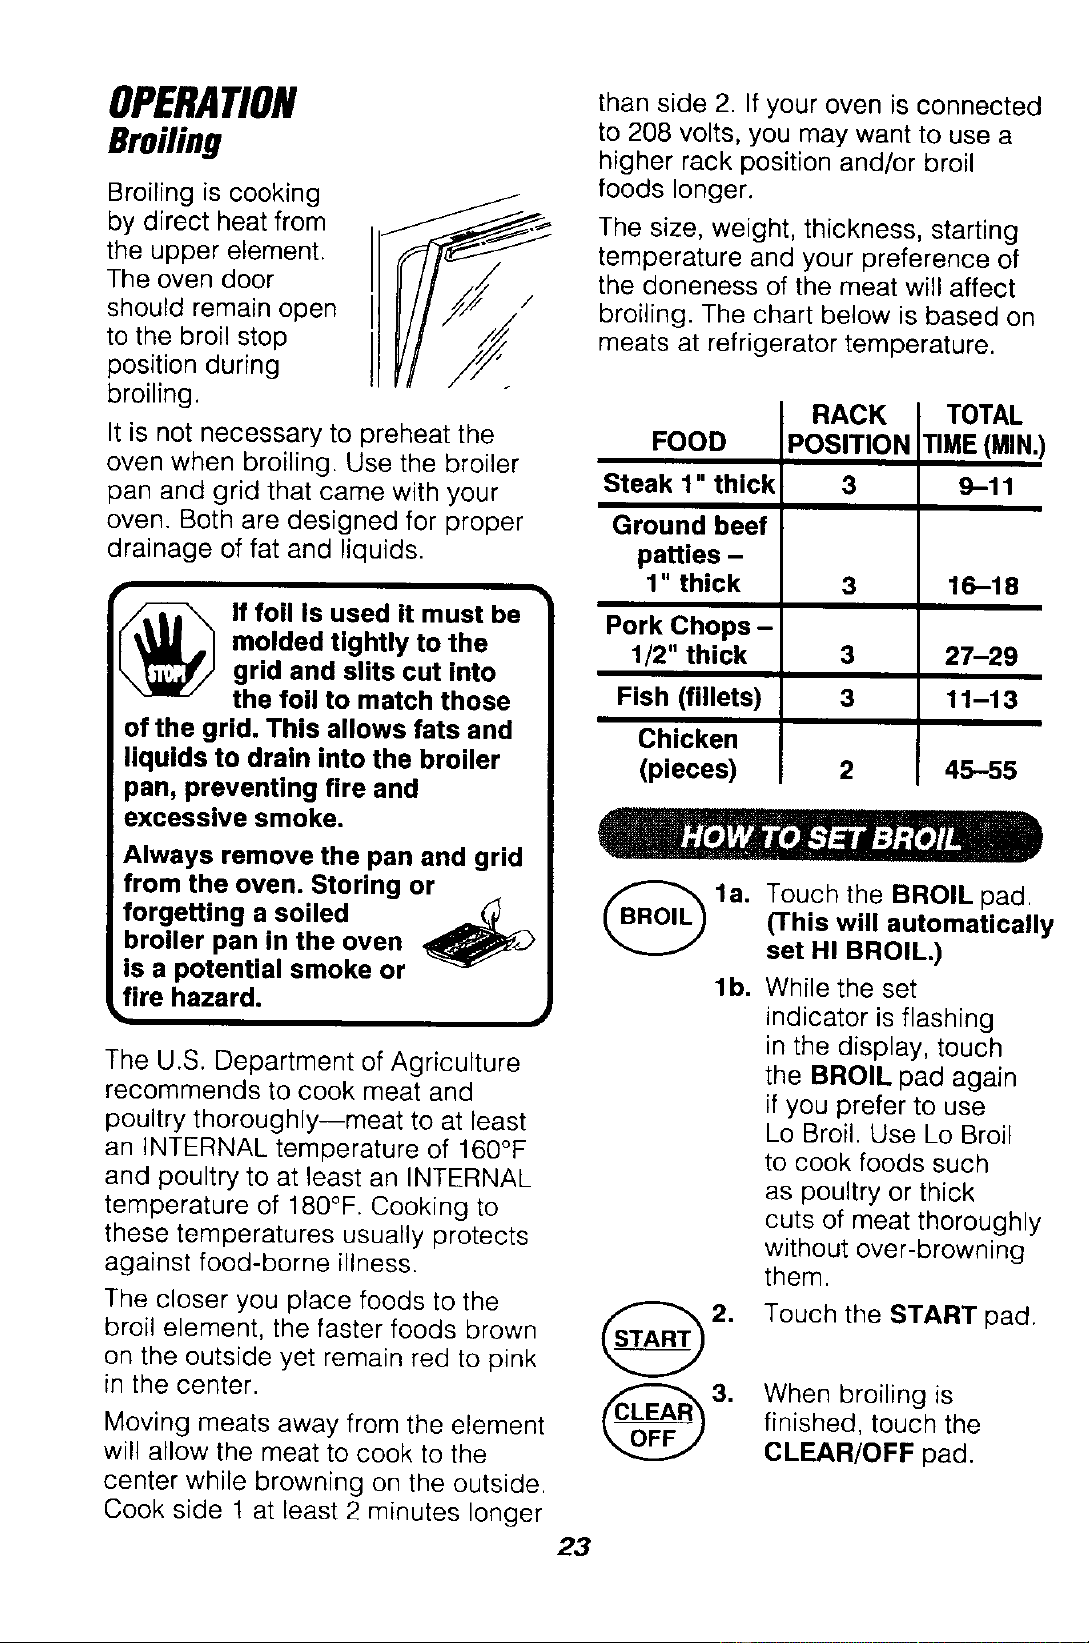
Broiling
Broiling is cooking
by direct heat from
the upper element.
The oven door
should remain open
to the broil stop
position during
broiling.
It is not necessary to preheat the
oven when broiling. Use the broiler
pan and grid that came with your
oven. Beth are designed for proper
drainage of fat and liquids.
_ f foil Is used it must be
molded tightly to the
grid and slits cut into
the foil to match those
of the grid. This allows fats and
liquids to drain Into the broiler
_an, preventing fire and
excessive smoke.
Always remove the pan and grid
from the oven. Storing or
forgetting a soiled _.__
broiler pan in the oven
is a potential smoke or
_fire hazard.
The U.S. Department of Agriculture
recommends to cook meat and
poultry thoroughly--meat to at least
an iNTERNAL temperature of 160°F
and poultry to at least an iNTERNAL
temperature of 180°F. Cooking to
these temperatures usually protects
against food-borne illness.
The closer you place foods to the
broil element, the faster foods brown
on the outside yet remain red to pink
in the center.
Moving meats away from the element
will allow the meat to cook to the
center while browning on the outside.
Cook side 1 at least 2 minutes longer
than side 2. If your oven is connected
to 208 volts, you may want to use a
higher rack position and/or broil
foods longer.
The size, weight, thickness, starting
temperature and your preference of
the doneness of the meat will affect
broiling. The chart below is based on
meats at refrigerator temperature.
FOOD
Steak 1" thick
Ground beef
patties -
1" thick
Pork Chops -
1/2" thick
Fish (fillets)
Chicken
(pieces)
RACK
POSITION
3
3
3
3
2
TOTAL
rIME (MIN.)
9-11
16-18
27-29
11-13
45-55
Touch the BROIL pad.
(This will automatically
set HI BROIL.)
While the set
indicator is flashing
in the display, touch
the BROIL pad again
if you prefer to use
Lo Broil. Use Lo Broil
to cook foods such
as poultry or thick
cuts of meat thoroughly
without over-browning
them.
Touch the START pad.
When broiling is
finished, touch the
CLEAR/OFF pad.
23
OPERATION
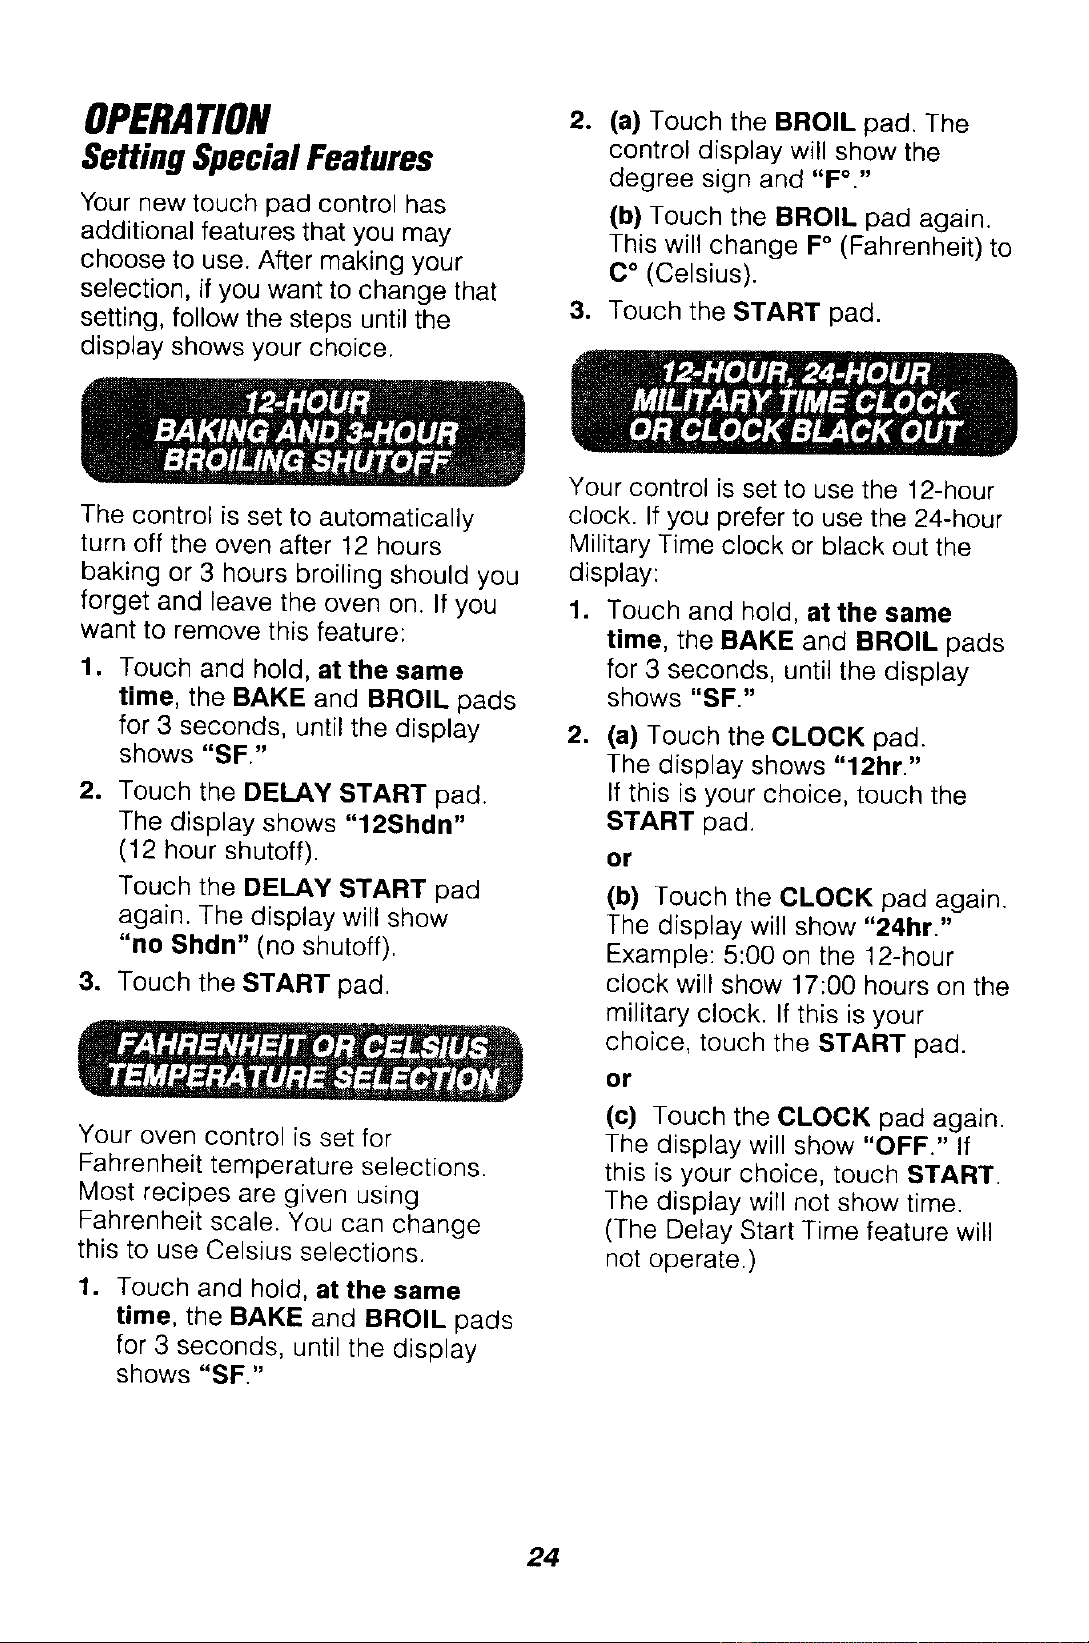
Setting SpecialFeatures
Your new touch pad control has
additional features that you may
choose to use. After making your
selection, if you want to change that
setting, follow the steps until the
display shows your choice.
_"F_:ft21]:
The control is set to automatically
turn off the oven after 12 hours
baking or 3 hours broiling should you
forget and leave the oven on. If you
want to remove this feature:
1. Touch and hold, at the same
time, the BAKE and BROIL pads
for 3 seconds, until the display
shows "SF."
2. Touch the DELAY START pad.
The display shows "12Shdn"
(12 hour shutoff).
Touch the DELAY START pad
again. The display will show
"no Shdn" (no shutoff).
3. Touch the START pad.
Your oven control is set for
Fahrenheit temperature selections.
Most recipes are given using
Fahrenheit scale. You can change
this to use Celsius selections.
1. Touch and hold, at the same
time, the BAKE and BROIL pads
for 3 seconds, until the display
shows "SF."
2. (a) Touch the BROIL pad. The
control display will show the
degree sign and "F°. ''
(b) Touch the BROIL pad again.
This will change F° (Fahrenheit) to
C ° (Celsius).
3. Touch the START pad.
Your control is set to use the 12-hour
clock. If you prefer to use the 24-hour
Military Time clock or black out the
display:
1. Touch and hold, at the same
time, the BAKE and BROIL pads
for 3 seconds, until the display
shows "SF."
.
(a) Touch the CLOCK pad.
The display shows "1211r."
If this is your choice, touch the
START pad.
or
(b) Touch the CLOCK pad again.
The display will show "24hr."
Example: 5:00 on the 12-hour
clock will show 17:00 hours on the
military clock. If this is your
choice, touch the START pad.
or
(c) Touch the CLOCK pad again.
The display will show "OFF." If
this is your choice, touch START.
The display will not show time.
(The Delay Start Time feature will
not operate.)
24
OPERATION
SettingSpecialFeatures(cent.)
Your new control has a cook and
hold feature for timed cooking only
that will keep hot cooked foods warm
up to 3 hours after the timed cooking
is finished. To activate this feature:
1. Touch and hold, at the same
time, the BAKE and BROIL pads
for 3 seconds, until the
display shows "SF."
2. (a) Touch the COOK TIME
pad. The display will show
"HLd OFF."
(b) Touch the COOK TIME pad
again to activate the feature. The
display will show "HLd ON."
3. Touch the START pad.
This special feature will allow you to
change the speed; #1 means speed
of change is slow, up to #5 which
means speed of change is fast. To
set the speed you prefer, follow
these steps:
1. Touch and hold, at the same
time, the BAKE and BROIL pads
for 3 seconds, until the
display shows "SF."
2. Touch the HOUR UP arrow pad.
The display will show the current
set speed.
=
=
Touch the HOUR UP arrow pad
to increase the speed up to the
number 5.
or
Touch the HOUR DOWN arrow
pad to decrease the speed down
to the number 1.
Touch the START pad.
The control will allow you to lock the
touch pads so they cannot be
activated when pressed. If you're
worried about leaving the oven
unsupervised, activate this feature.
1
Press and hold, at the same time,
the BAKE and BROIL pads for 3
seconds, until the display shows
"SF"
2. (a) Press the CLEAN pad.
The display shows "LOC OFF"
(lockout off).
(b) Press the CLEAN pad again.
The display will show "LOC ON"
(lockout on).
3. Press the START pad.
To unlock the control, repeat steps
1 and 2. Press START pad when the
displays shows "LOC OFF."
This feature can only be set when
the oven is not in use. When this
feature is on, the display will show
"LOC," if a touch pad is pressed.
(This feature will not affect the Clock,
Timer or Oven Light pads.)
25
OPERATION
SettingSpecial Features
(Designed for use on the Jewish
Sabbath and Holidays.)
(in some models)
The Sabbath feature can be used
for baking/roasting only. it cannot
be used for broiling, self-cleaning
or Delay Start cooking.
NOTE: The oven light comes on
automatically (on some models)
when the door is opened and goes
off when the door is closed. The bulb
may be removed. See the Oven Light
Replacement section. On models with
an OVEN LIGHT pad, the oven light
may be turned on and left on.
HOW TO SET FOR REGULAR
BAKING/ROASTING
NOTE: To understand how the oven
control works, practice using regular
baking (non-Sabbath) before entering
the Sabbath mode.
Make sure the clock shows the
correct time of day and the oven
is off.
1. Touch and hold both
the BAKE and BROIL
pads, at the same
time, until the display
shows "SF."
Tap the DELAY START
pad until "SAb bAtH"
appears in the display.
Touch the START pad
and _ will appear in the
display.
Touch the BAKE pad.
No signal will be given.
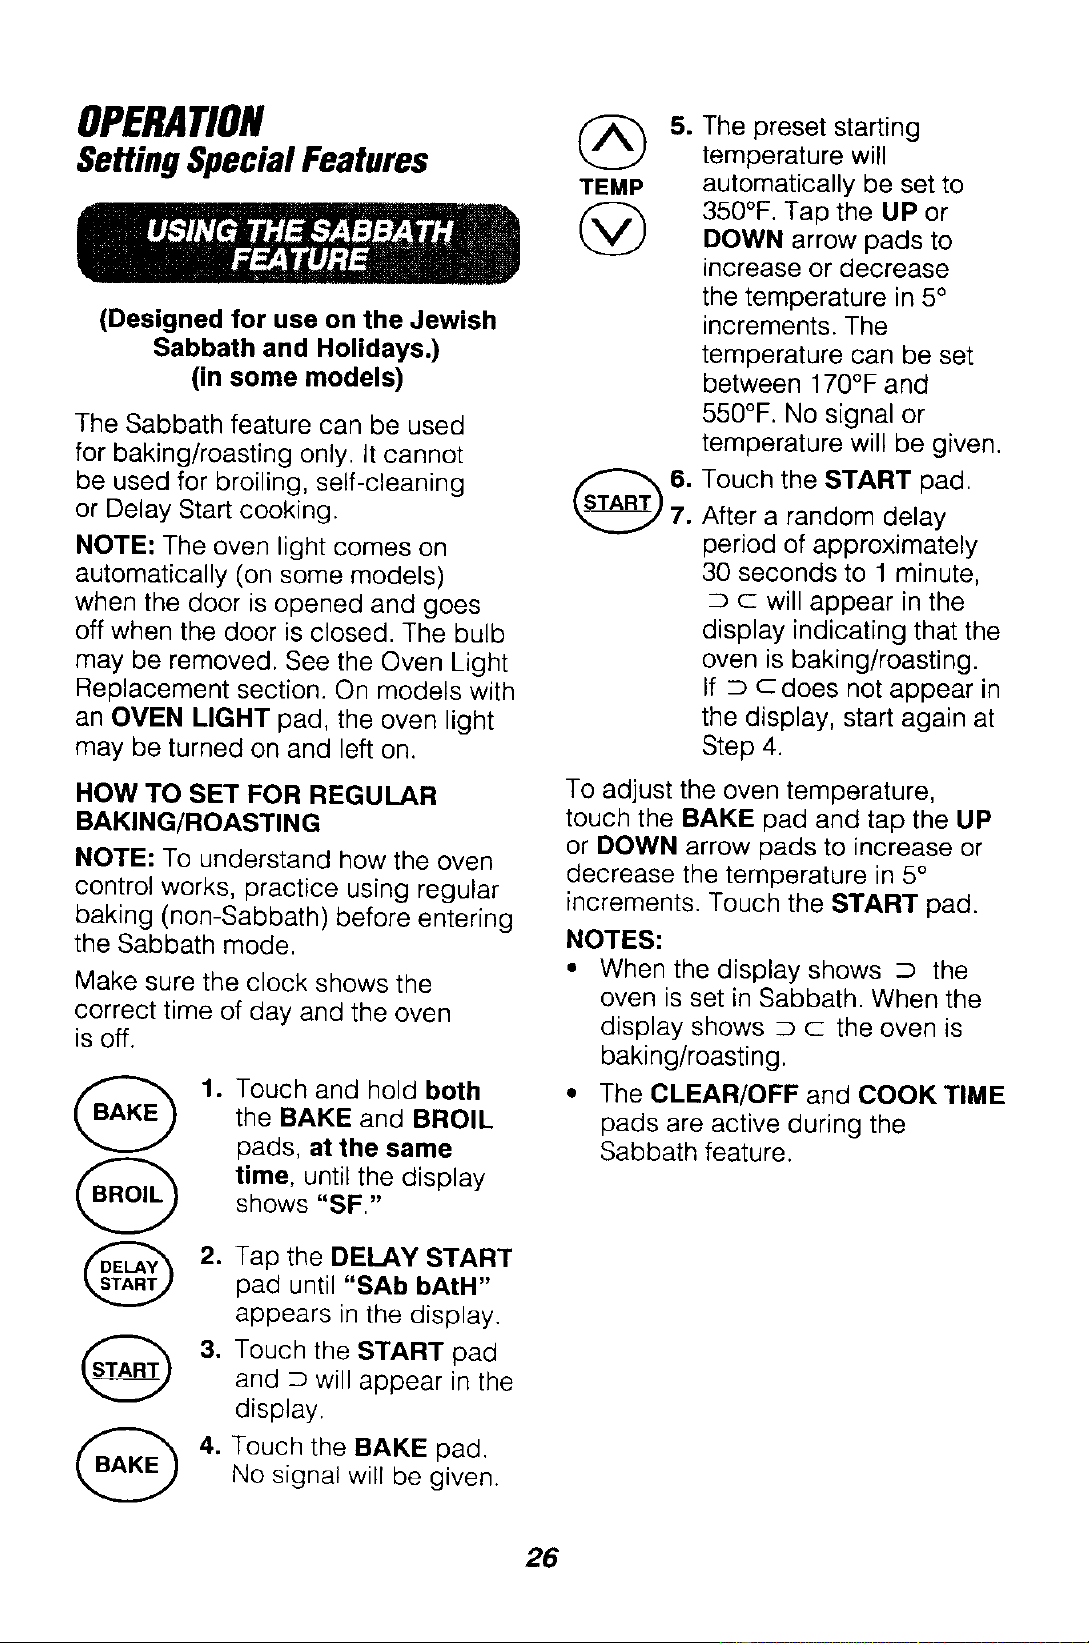
TEMP
.
The preset starting
temperature will
automatically be set to
350°F. Tap the UP or
DOWN arrow pads to
increase or decrease
the temperature in 5°
increments. The
temperature can be set
between 176°F and
550°F. No signal or
temperature will be given.
Touch the START pad.
After a random delay
period of approximately
30 seconds to 1 minute,
c will appear in the
display indicating that the
oven is baking/roasting.
If _ c does not appear in
the display, start again at
Step 4.
To adjust the oven temperature,
touch the BAKE pad and tap the UP
or DOWN arrow pads to increase or
decrease the temperature in 5°
increments. Touch the START pad.
NOTES:
• When the display shows D the
oven is set in Sabbath. When the
display shows D c the oven is
baking/roasting.
• The CLEAR/OFF and COOK TIME
pads are active during the
Sabbath feature.
26
OPERATION
Setting Special Features
HOW TO SET FOR TIMED BAKING/
ROASTING-IMMEDIATE START
AND AUTOMATIC STOP
NOTE: To understand how the oven
control works, practice using regular
(non-Sabbath) Immediate Start and
Automatic Stop before entering the
Sabbath mode.
Make sure the clock shows the
correct time of day and the oven
is off.
(_ 1,
HOUR MIN
@@
Touch and hold both
the BAKE and BROIL
pads, at the same
time, until the display
shows "SF."
Tap the DELAY START
pad until "SAb bAtH"
appears in the display.
Touch the START pad
and D will appear in the
display.
Touch the COOK TIME
pad. No signal will be
given.
Touch the UP or DOWN
arrow pads to set the
desired length of
cooking time between
1 minute and 9 hours
and 59 minutes. The
cooking time that
you entered will be
displayed.
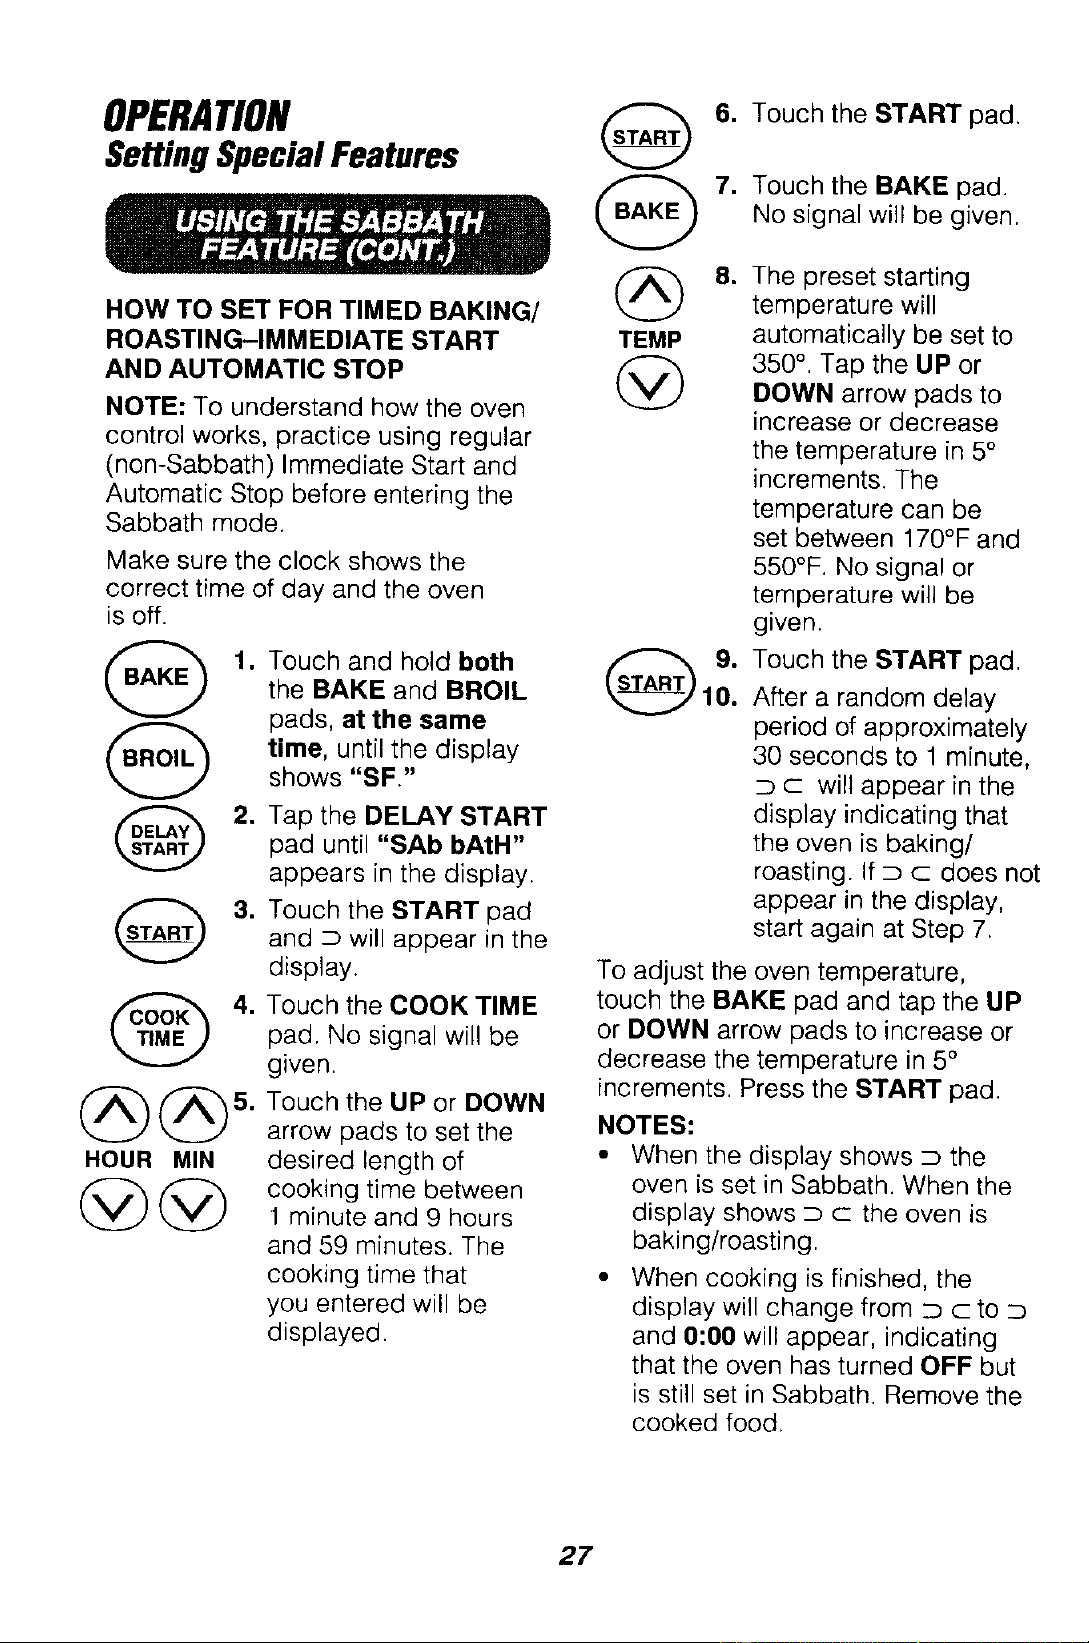
6. Touch the START pad.
7. Touch the BAKE pad.
No signal will be given.
@
TEMP
@
8. The preset starting
temperature will
automatically be set to
350 °. Tap the UP or
DOWN arrow pads to
increase or decrease
the temperature in 5°
increments. The
temperature can be
set between 170°F and
550°F. No signal or
temperature will be
given.
Touch the START pad.
After a random delay
period of approximately
30 seconds to 1 minute,
D c will appear in the
display indicating that
the oven is baking/
roasting. If D c does not
appear in the display,
start again at Step 7.
To adjust the oven temperature,
touch the BAKE pad and tap the UP
or DOWN arrow pads to increase or
decrease the temperature in 5°
increments. Press the START pad.
NOTES:
• When the display shows _ the
oven is set in Sabbath. When the
display shows D C the oven is
baking/roasting
When cooking is finished, the
display will change from D c to
and O:O0 will appear, indicating
that the oven has turned OFF but
is still set in Sabbath. Remove the
cooked food.
27
OPERATION
SettingSpecial Features
HOW TO EXIT THE SABBATH
FEATURE
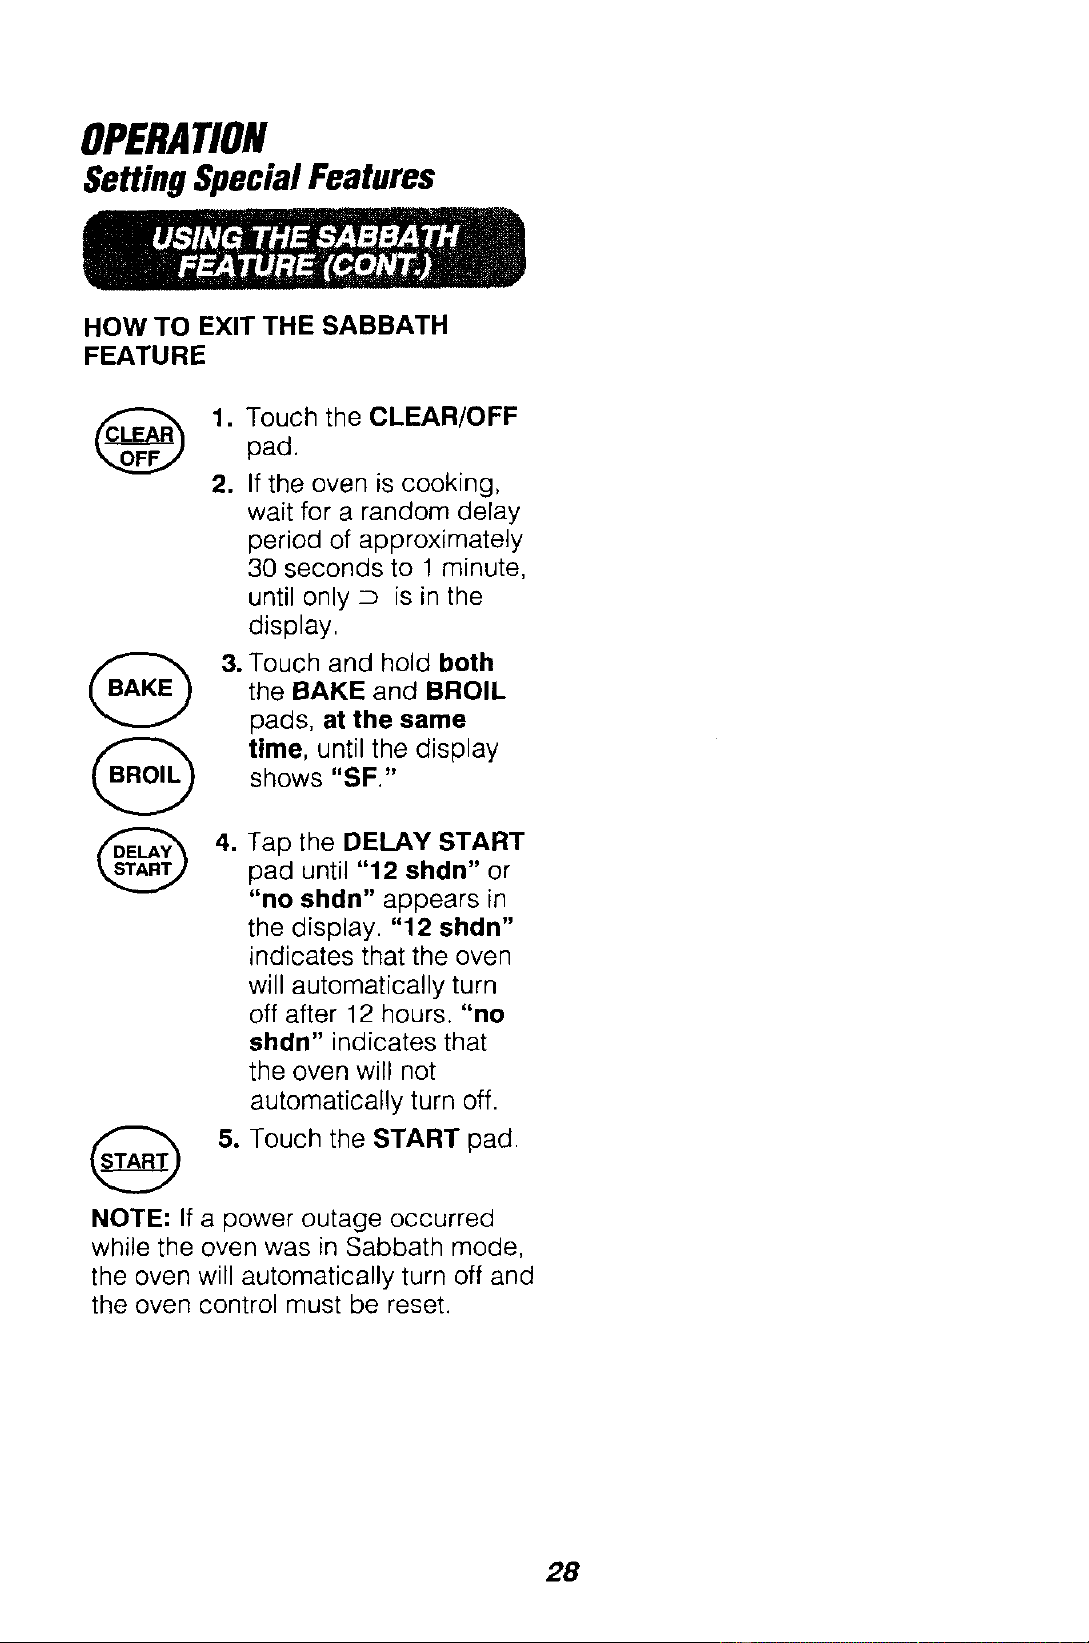
1. Touch the CLEAR/OFF
pad,
2. If the oven is cooking,
wait for a random delay
period of approximately
30 seconds to 1 minute,
until only _ is in the
display.
3. Touch and hold both
the BAKE and BROIL
pads, at the same
time, until the display
shows "SF."
4. Tap the DELAY START
pad until "12 shdn" or
"no shdn" appears in
the display. "12 shdn"
indicates that the oven
will automatically turn
off after 12 hours. "no
shdn" indicates that
the oven will not
automatically turn off.
5. Touch the START pad.
NOTE: If a power outage occurred
while the oven was in Sabbath mode,
the oven will automatically turn off and
the oven control must be reset.
28
CAREANDCLEANING
Self-CleaningCycle
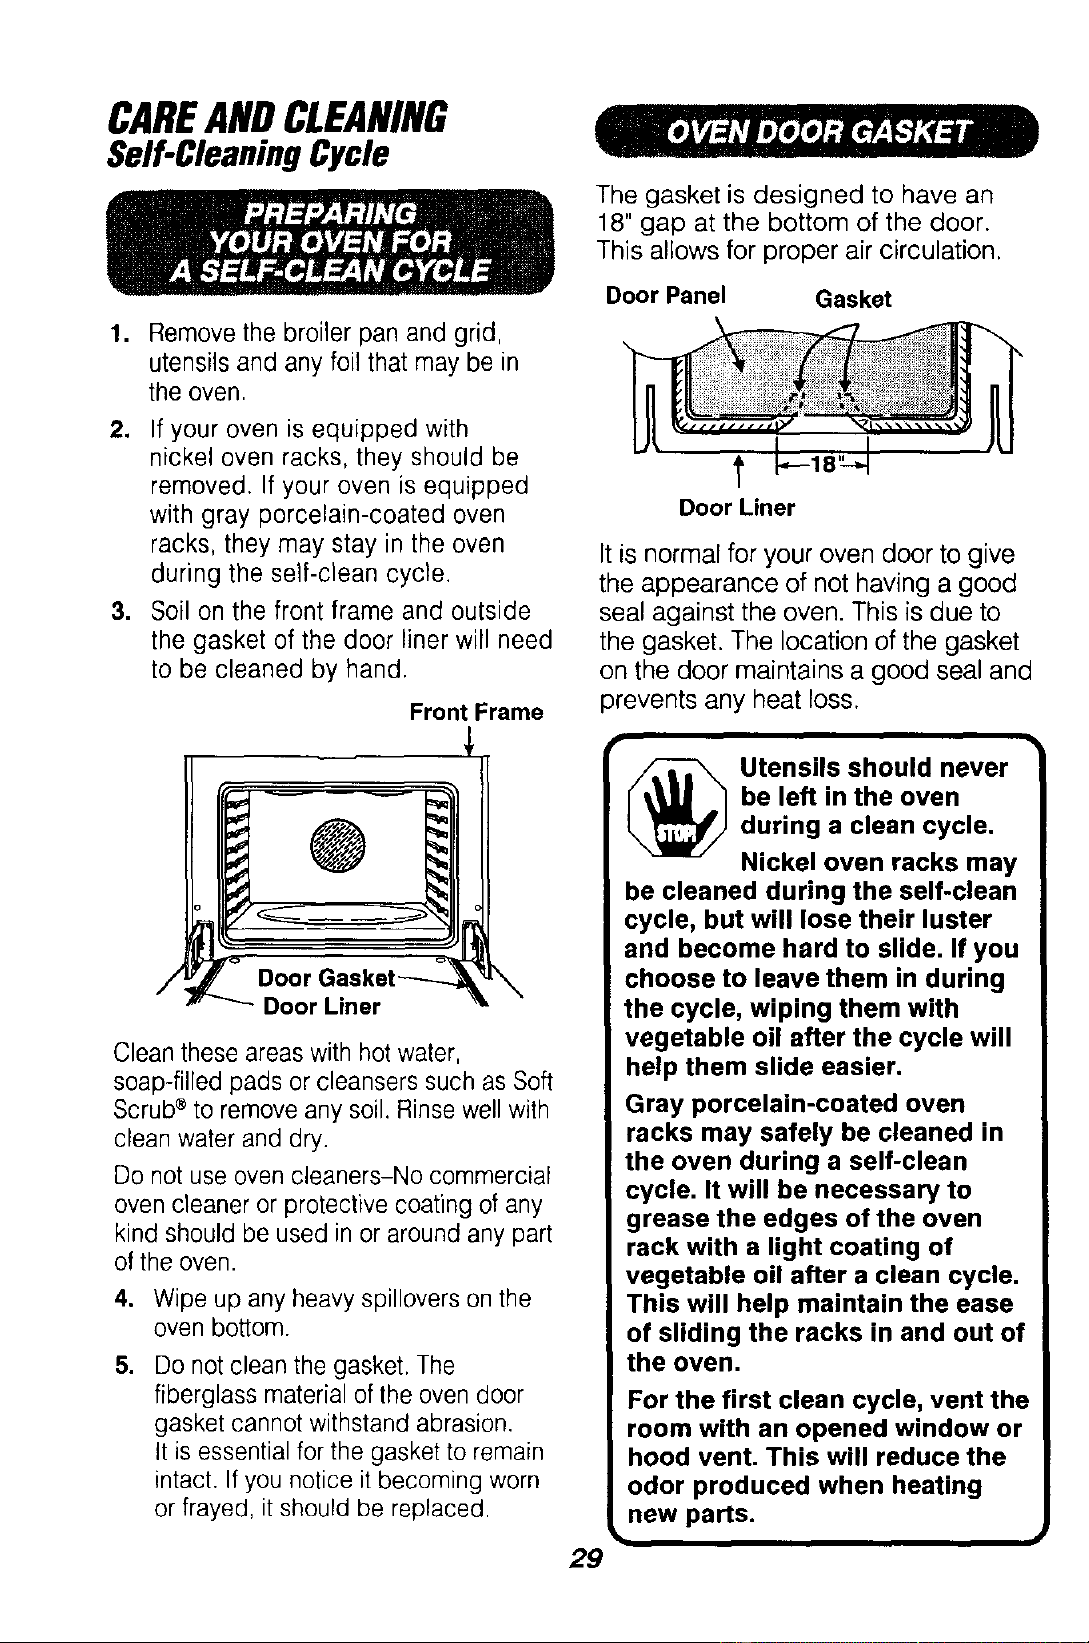
.
1
Remove the broiler pan and grid,
utensils and any foil that may be in
the oven.
If your oven is equipped with
nickel oven racks, they should be
removed. If your oven is equipped
with gray porcelain-coated oven
racks, they may stay in the oven
during the self-clean cycle.
3. Soil on the front frame and outside
the gasket of the door liner will need
to be cleaned by hand.
/
Fror
Door Liner
Frame
\
Clean these areas with hot water,
soap-filled pads or cleansers such as Soft
Scrub ®to remove any soil. Rinse well with
clean water and dry.
Do not use oven cleaners-No commercial
oven cleaner or protective coating of any
kind should be used in or around any part
of the oven.
4. Wipe up any heavy spillovers on the
oven bottom.
.
Do not clean the gasket, The
fiberglass material of the oven door
gasket cannot withstand abrasion.
It is essential for the gasket to remain
intact. If you notice it becoming worn
or frayed, it should be replaced.
The gasket is designed to have an
18" gap at the bottom of the door.
This allows for proper air circulation.
Door Panel Gasket
t I.-,,q
Door Liner
It is normal for your oven door to give
the appearance of not having a good
seal against the oven. This is due to
the gasket. The location of the gasket
on the door maintains a good seal and
prevents any heat loss.
29
_ tensils should never
be left in the oven
during a clean cycle.
Nickel oven racks may
be cleaned during the self-clean
cycle, but will lose their luster
and become hard to slide. If you
choose to leave them in during
the cycle, wiping them with
vegetable oil after the cycle will
help them slide easier.
Gray porcelain-coated oven
racks may safely be cleaned in
the oven during a self-clean
cycle. It will be necessary to
grease the edges of the oven
rack with a light coating of
vegetable oil after a clean cycle.
This will help maintain the ease
of sliding the racks in and out of
the oven.
For the first clean cycle, vent the
room with an opened window or
hood vent. This will reduce the
odor produced when heating
new parts.
CAREANDCLEANING
Self-CleaningCycle(cont.)
The Clean Cycle, including cootdown
time, is automatically set for 4 hours
20 minutes and automatically turns
off after the set time, but you may
change this from 3 hours if oven is
lightly soiled, up to 5 hours if oven is
heavily soiled.
O
69
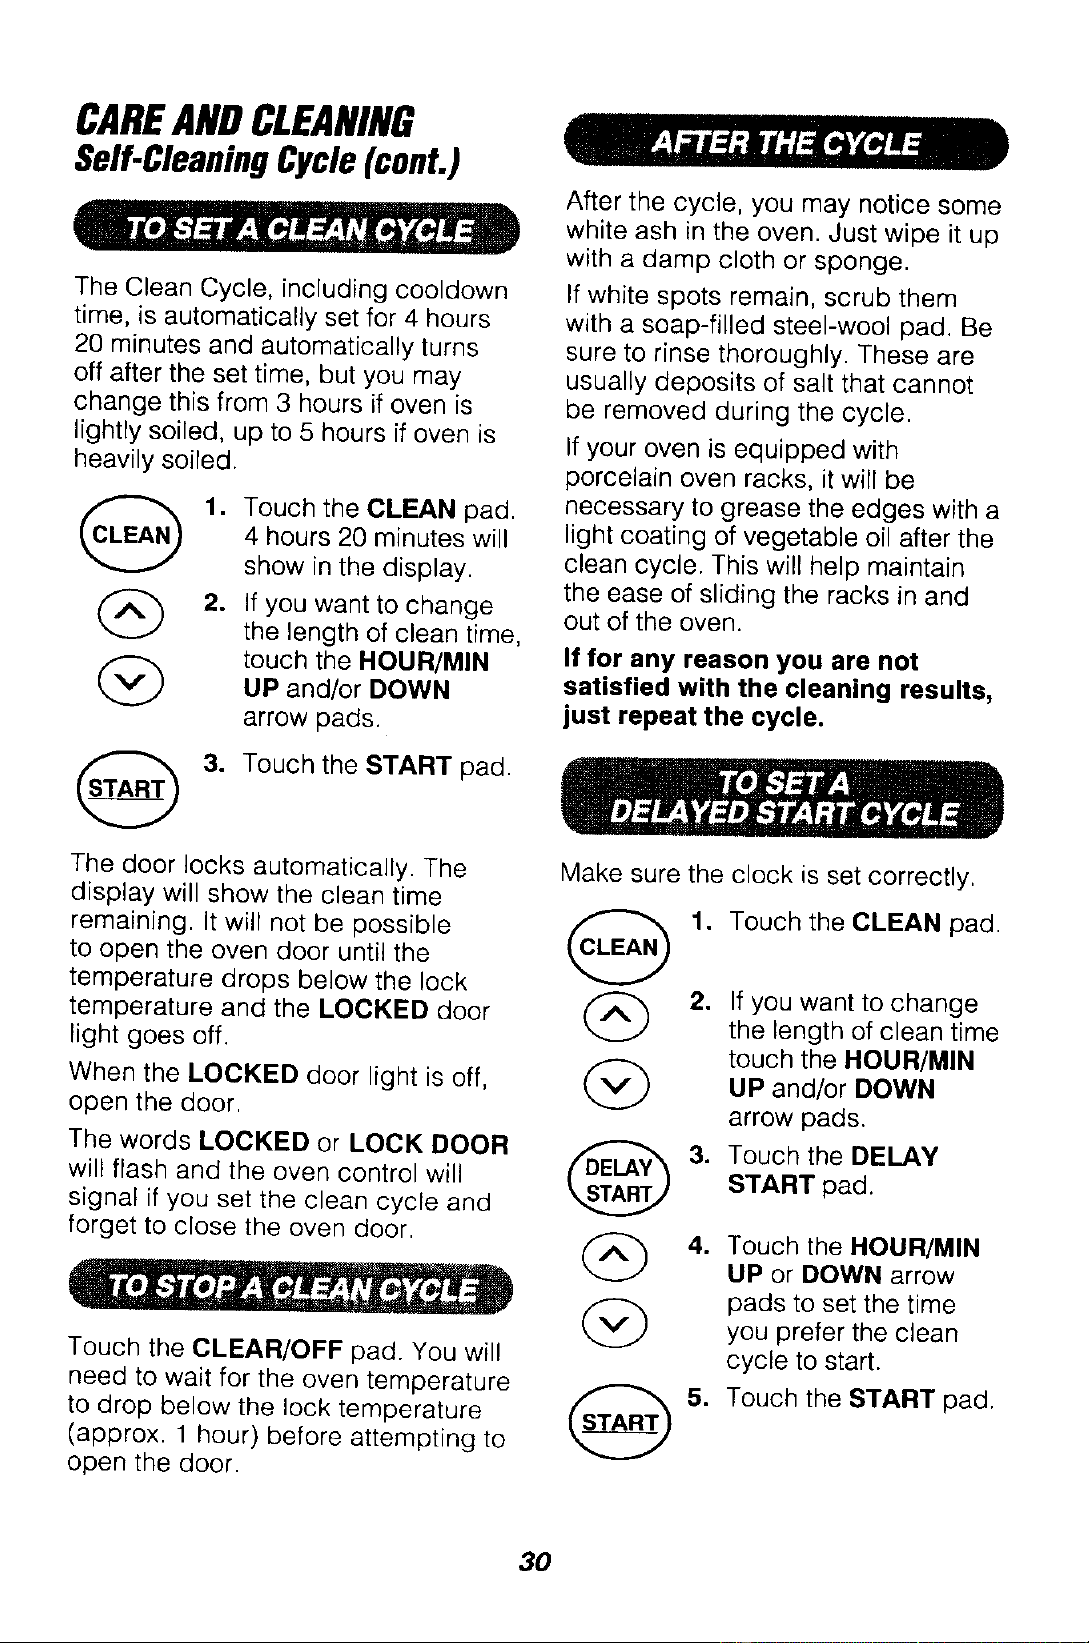
.
1
Touch the CLEAN pad.
4 hours 20 minutes will
show in the display.
If you want to change
the length of clean time,
touch the HOUR/MIN
UP and/or DOWN
arrow pads.
(_ 3. Touch the START pad.
The door locks automatically. The
display will show the clean time
remaining. It will not be possible
to open the oven door until the
temperature drops below the lock
temperature and the LOCKED door
light goes off.
When the LOCKED door light is off,
open the door,
The words LOCKED or LOCK DOOR
will flash and the oven control will
signal if you set the clean cycle and
forget to close the oven door.
Touch the CLEAR/OFF pad. You will
need to wait for the oven temperature
to drop below the lock temperature
(approx. 1 hour) before attempting to
open the door.
After the cycle, you may notice some
white ash in the oven. Just wipe it up
with a damp cloth or sponge.
If white spots remain, scrub them
with a soap-filled steel-wool pad. Be
sure to rinse thoroughly. These are
usually deposits of salt that cannot
be removed during the cycle.
If your oven is equipped with
porcelain oven racks, it will be
necessary to grease the edges with a
light coating of vegetable oil after the
clean cycle. This will help maintain
the ease of sliding the racks in and
out of the oven.
if for any reason you are not
satisfied with the cleaning results,
just repeat the cycle.
/mmmm
Make sure the
G
3.
db
clock is set correctly,
Touch the CLEAN pad.
If you want to change
the length of clean time
touch the HOUR/MIN
UP and/or DOWN
arrow pads.
Touch the DELAY
START pad.
Touch the HOUR/MIN
UP or DOWN arrow
pads to set the time
you prefer the clean
cycle to start.
Touch the START pad.
3O
CAREANDCLEANING
Cleaning
CLEANING MATERIALS
• Dishwashing detergent
• Warm water
• Soft cloth
Do not use abrasive cleaners,
industrial cleaners or bleach.
CLEANING MATERIALS
• Dishwashing detergent
• Warm water
• Soap-filled scouring pad
• Commercial oven cleaner
TO CLEAN
Allow the pan to soak. Sprinkle the
grid with dishwashing detergent and
cover with a damp cloth or paper
towel. Rinse and dry well. Scour as
needed. You may also place both the
pan and grid in the dishwasher.
Clean only as touch-up between
clean cycles. Use dishwashing
liquid, warm water, or a soap-filled
pad. Rinse well after cleaning
and dry.
NEVER USE OVEN CLEANERSIN
OR AROUND ANYPART OFTHE
OVEN.
When cleaning, be sure not to bend
or displace the temperature sensor
located on the back wall of the oven.
TO CLEAN
For everyday cleaning, use glass
cleaner and a paper towel. For
stubborn soil, use paste of baking
soda and water. Rinse thoroughly.
CLEANING MATERIALS
• Soft abrasive cleaner
• Sponge-scrubber
Do not use hard abrasive cleaners,
industrial cleaners or bleach.
Clean with warm sudsy water,
a stainless-steel cleaner or an
all-purpose liquid or spray cleaner.
Always scrub in the direction of the
grain. Rinse thoroughly with a
sponge or cloth and clean water.
Dry with a soft, clean cloth.
Do not use a soap-filled, steel-wool
pad; It will scratch the surface.
31
CAREANDCLEANING
Removable Parts
_ AUTION: You must
disconnect electrical
power to the oven at
the main circuit
breaker or fuse box before
attempting to replace oven light
bulbs. Do not touch the light
bulb with bare hands. The bulb
gets very hot very quickly. Wrap
foam rubber from bulb package
around bulb when installing.
When removing the bulb, wait
until the bulb has cooled and use
a dry cloth.
To give you the best lighting available,
your oven has two halogen bulbs.
Both lights are on the ceiling of the
oven cavity.
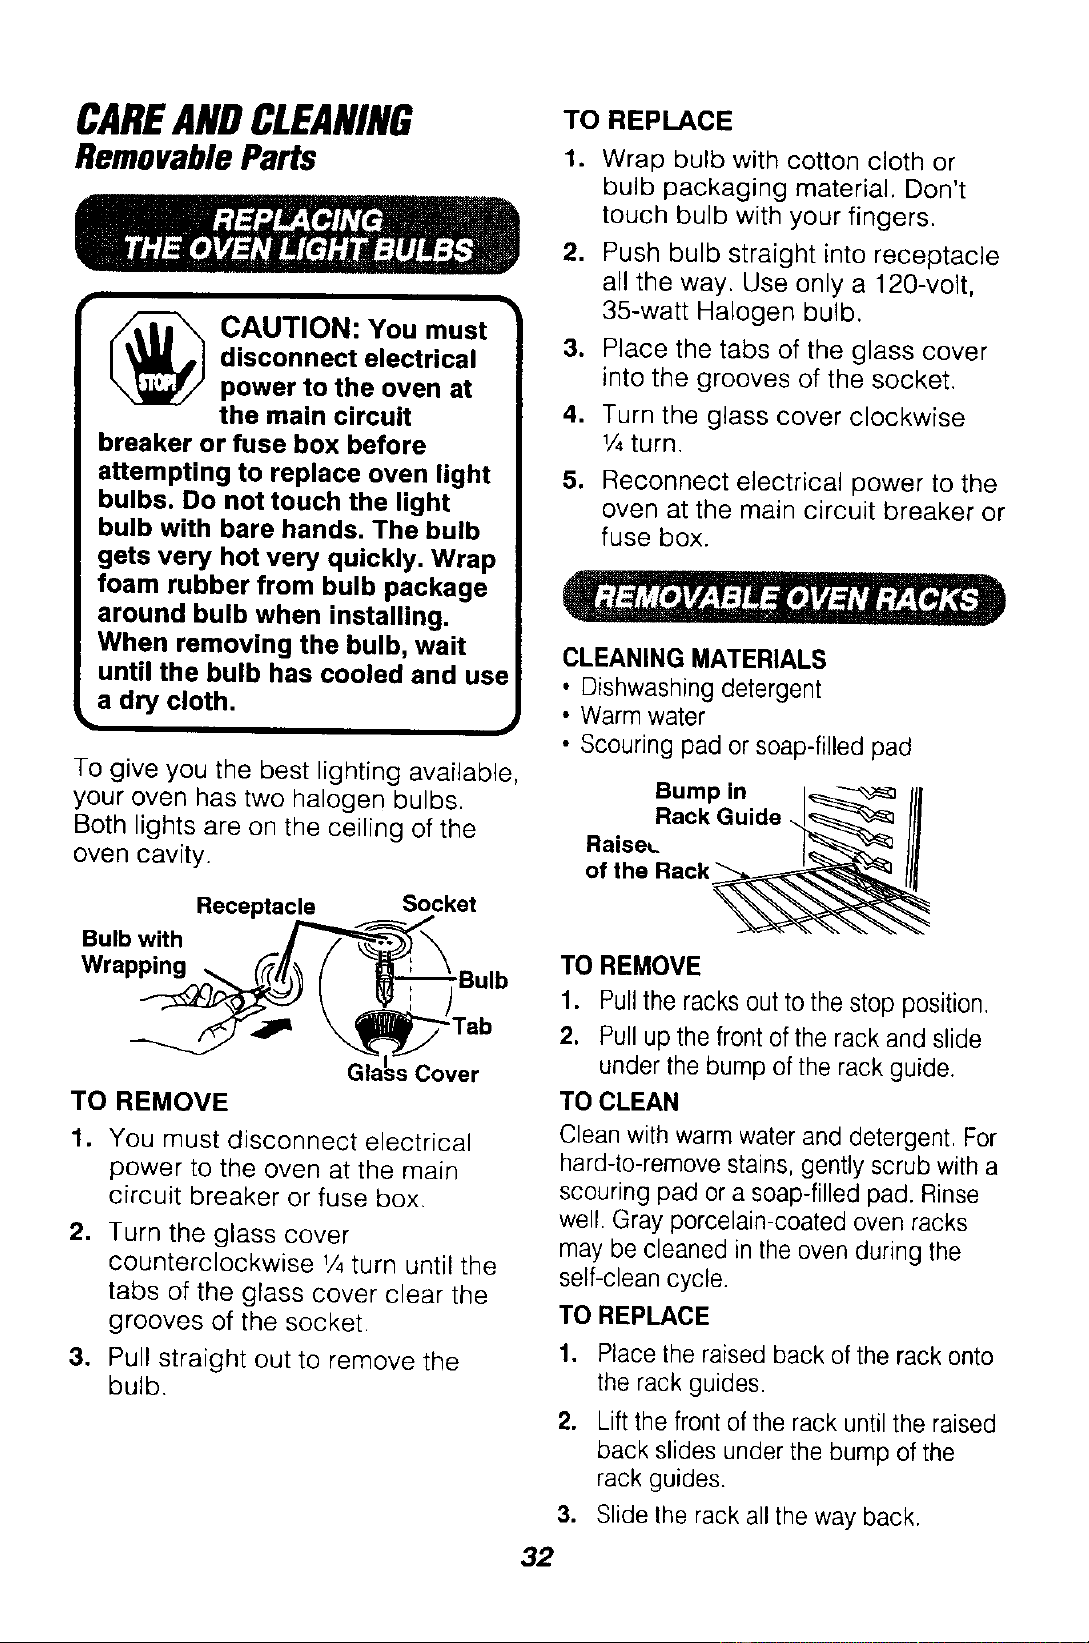
Receptacle
Bulb w)th
TO REMOVE
Socket
Bulb
_'_Tab
s Cover
1. You must disconnect electrical
power to the oven at the main
circuit breaker or fuse box.
2. Turn the glass cover
counterclockwise ¼ turn until the
tabs of the glass cover clear the
grooves of the socket.
3. Pull straight out to remove the
bulb.
TO REPLACE
t.
.
.
4,
5.
Wrap bulb with cotton cloth or
bulb packaging material. Don't
touch bulb with your fingers.
Push bulb straight into receptacle
all the way, Use only a 120-volt,
35-watt Halogen bulb.
Place the tabs of the glass cover
into the grooves of the socket.
Turn the glass cover clockwise
1/4turn.
Reconnect electrical power to the
oven at the main circuit breaker or
fuse box.
CLEANING MATERIALS
. Dishwashing detergent
• Warm water
• Scouring pad or soap-filled pad
Bump in I_. /11
Rack Guide _ !11
of the Rack_
TO REMOVE
1. Pull the racks out to the stop position,
2, Pull up the front of the rack and slide
under the bump of the rack guide.
TO CLEAN
Clean with warm water and detergent. For
hard-to-remove stains, gently scrub with a
scouring pad or a soap-filled pad. Rinse
well. Gray porcelain-coated oven racks
may be cleaned in the oven during the
self-clean cycle.
TO REPLACE
1. Place the raised back of the rack onto
the rack guides.
2. Lift the front of the rack until the raised
back slides under the bump of the
rack guides.
3. Slide the rack all the way back.
32
CAREANDCLEANING
Removable Parts (cont.)
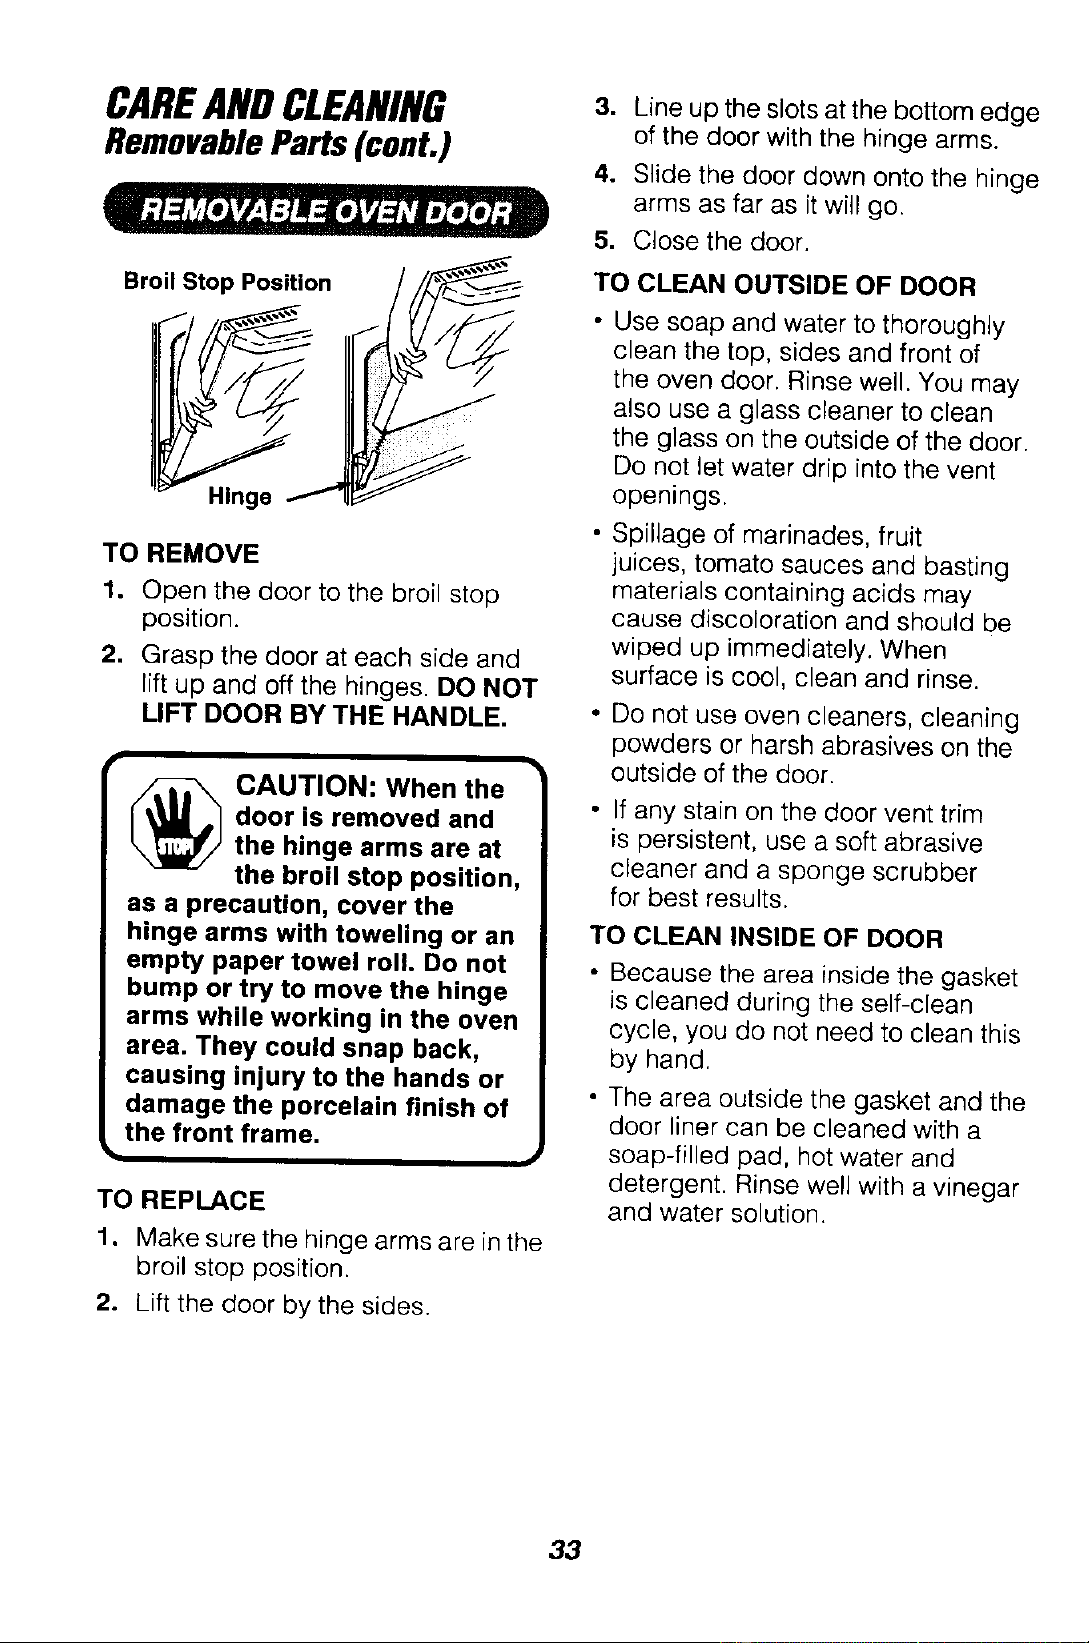
Broil Stop Position
TO REMOVE
1. Open the door to the broil stop
position.
2. Grasp the door at each side and
lift up and off the hinges. DO NOT
LIFT DOOR BY THE HANDLE.
_ AUTION: When the
door is removed and
the hinge arms are at
the broil stop position,
as a precaution, cover the
hinge arms with toweling or an
empty paper towel roll. Do not
bump or try to move the hinge
arms while working in the oven
area. They could snap back,
causing injury to the hands or
damage the porcelain finish of
the front frame.
TO REPLACE
1. Make sure the hinge arms are in the
broil stop position.
2. Lift the door by the sides.
.
4.
5,
Line up the slots atthe bottom edge
of the door with the hinge arms.
Slide the door down onto the hinge
arms as far as it will go.
Close the door.
TO CLEAN OUTSIDE OF DOOR
Use soap and water to thoroughly
clean the top, sides and front of
the oven door. Rinse well. You may
also use a glass cleaner to clean
the glass on the outside of the door.
Do not let water drip into the vent
openings.
Spillage of marinades, fruit
juices, tomato sauces and basting
materials containing acids may
cause discoloration and should be
wiped up immediately. When
surface is cool, clean and rinse.
• Do not use oven cleaners, cleaning
powders or harsh abrasives on the
outside of the door.
If any stain on the door vent trim
is persistent, use a soft abrasive
cleaner and a sponge scrubber
for best results.
TO CLEAN INSIDE OF DOOR
Because the area inside the gasket
is cleaned during the self-clean
cycle, you do not need to clean this
by hand.
The area outside the gasket and the
door liner can be cleaned with a
soap-filled pad, hot water and
detergent. Rinse well with a vinegar
and water solution.
33
BEFORECALLINGFORSERVICE
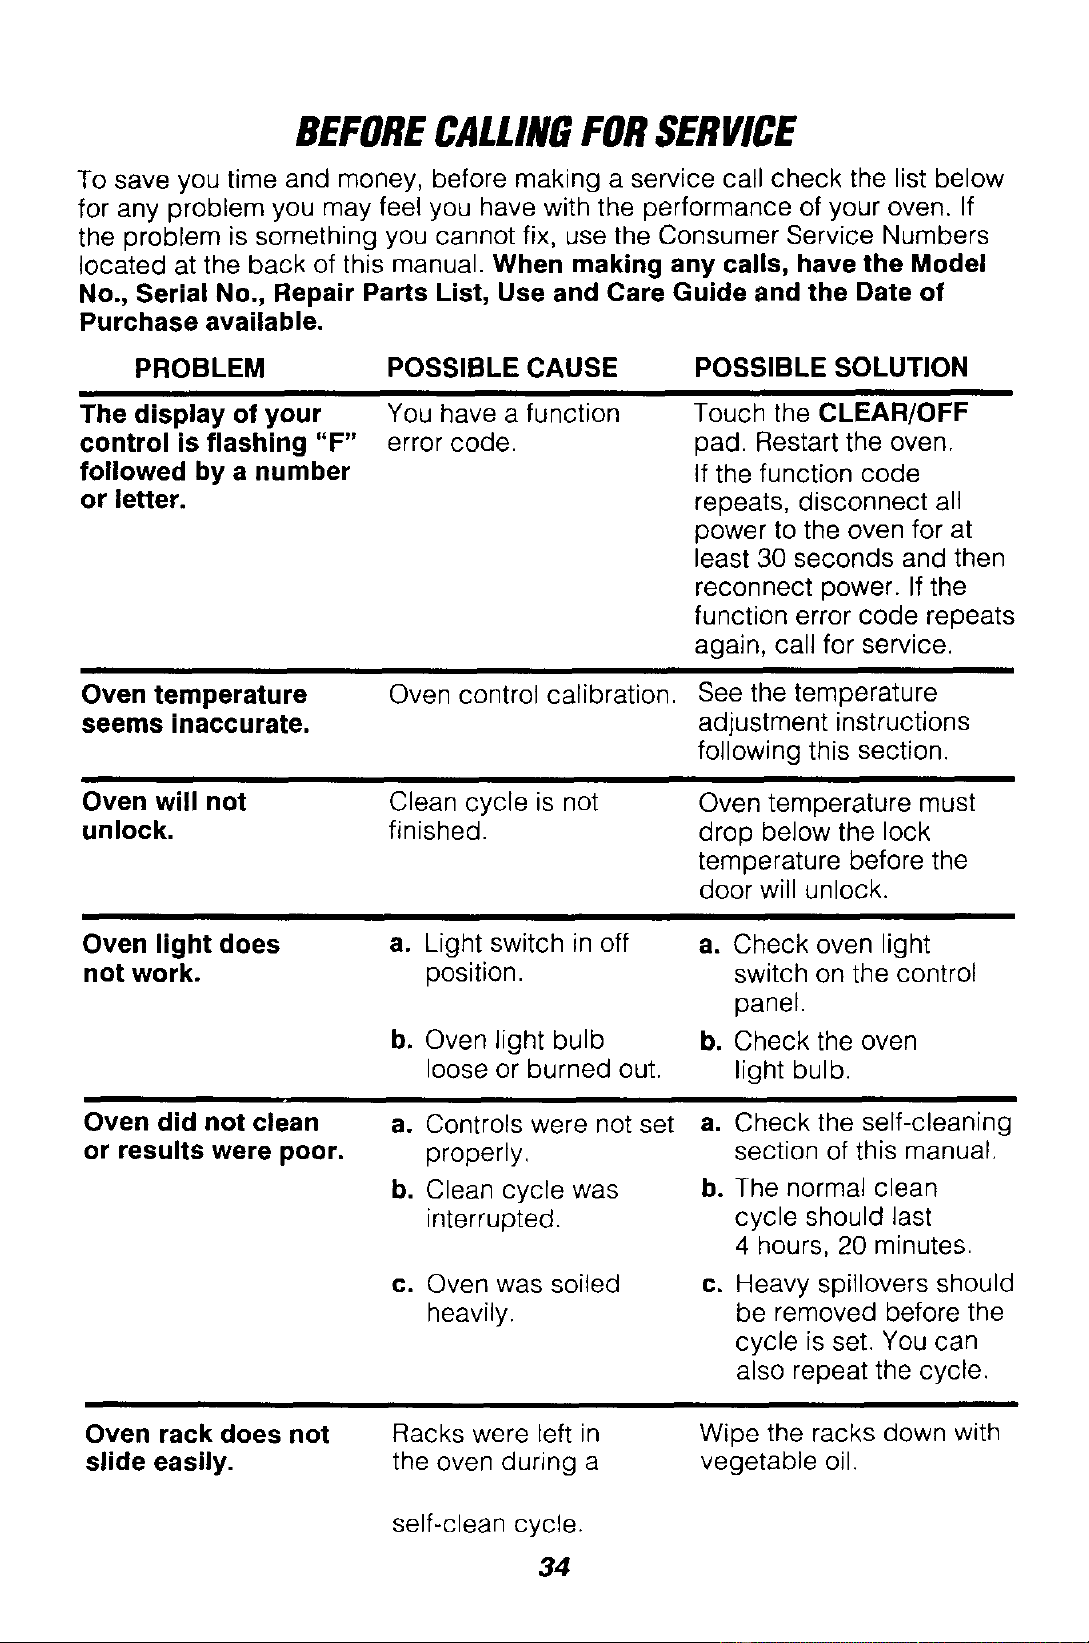
To save you time and money, before making a service call check the list below
for any problem you may feel you have with the performance of your oven. If
the problem is something you cannot fix, use the Consumer Service Numbers
located at the back of this manual. When making any calls, have the Model
No., Serial No., Repair Parts List, Use and Care Guide and the Date of
Purchase available.
PROBLEM POSSIBLE CAUSE POSSIBLE SOLUTION
The display of your
control is flashing "F"
followed by a number
or letter.
You have a function
error code.
Touch the CLEAR/OFF
pad. Restart the oven,
If the function code
repeats, disconnect all
power to the oven for at
least 30 seconds and then
reconnect power. If the
function error code repeats
again, call for service.
Oven temperature
seems inaccurate,
Oven control calibration. See the temperature
adjustment instructions
following this section.
Oven will not
unlock.
Clean cycle is not
finished.
Oven temperature must
drop below the lock
temperature before the
door will unlock.
Oven light does
not work.
a.
b,
Light switch in off
position.
Oven light bulb
loose or burned out.
a. Check oven light
switch on the control
panel.
b. Check the oven
light bulb.
Oven did not clean
or results were poor.
a. Controls were not set a.
properly,
b. Clean cycle was b.
interrupted.
c. Oven was soiled
heavily.
C.
Check the self-cleaning
section of this manual.
The normal clean
cycle should last
4 hours, 20 minutes.
Heavy spillovers should
be removed before the
cycle is set. You can
also repeat the cycle.
Oven rack does not
slide easily.
Racks were left in
the oven during a
Wipe the racks down with
vegetable oil.
self-clean cycle.
34
BEFORECALLINGFORSERVICE
PROBLEM
POSSIBLE CAUSE
POSSIBLE SOLUTION
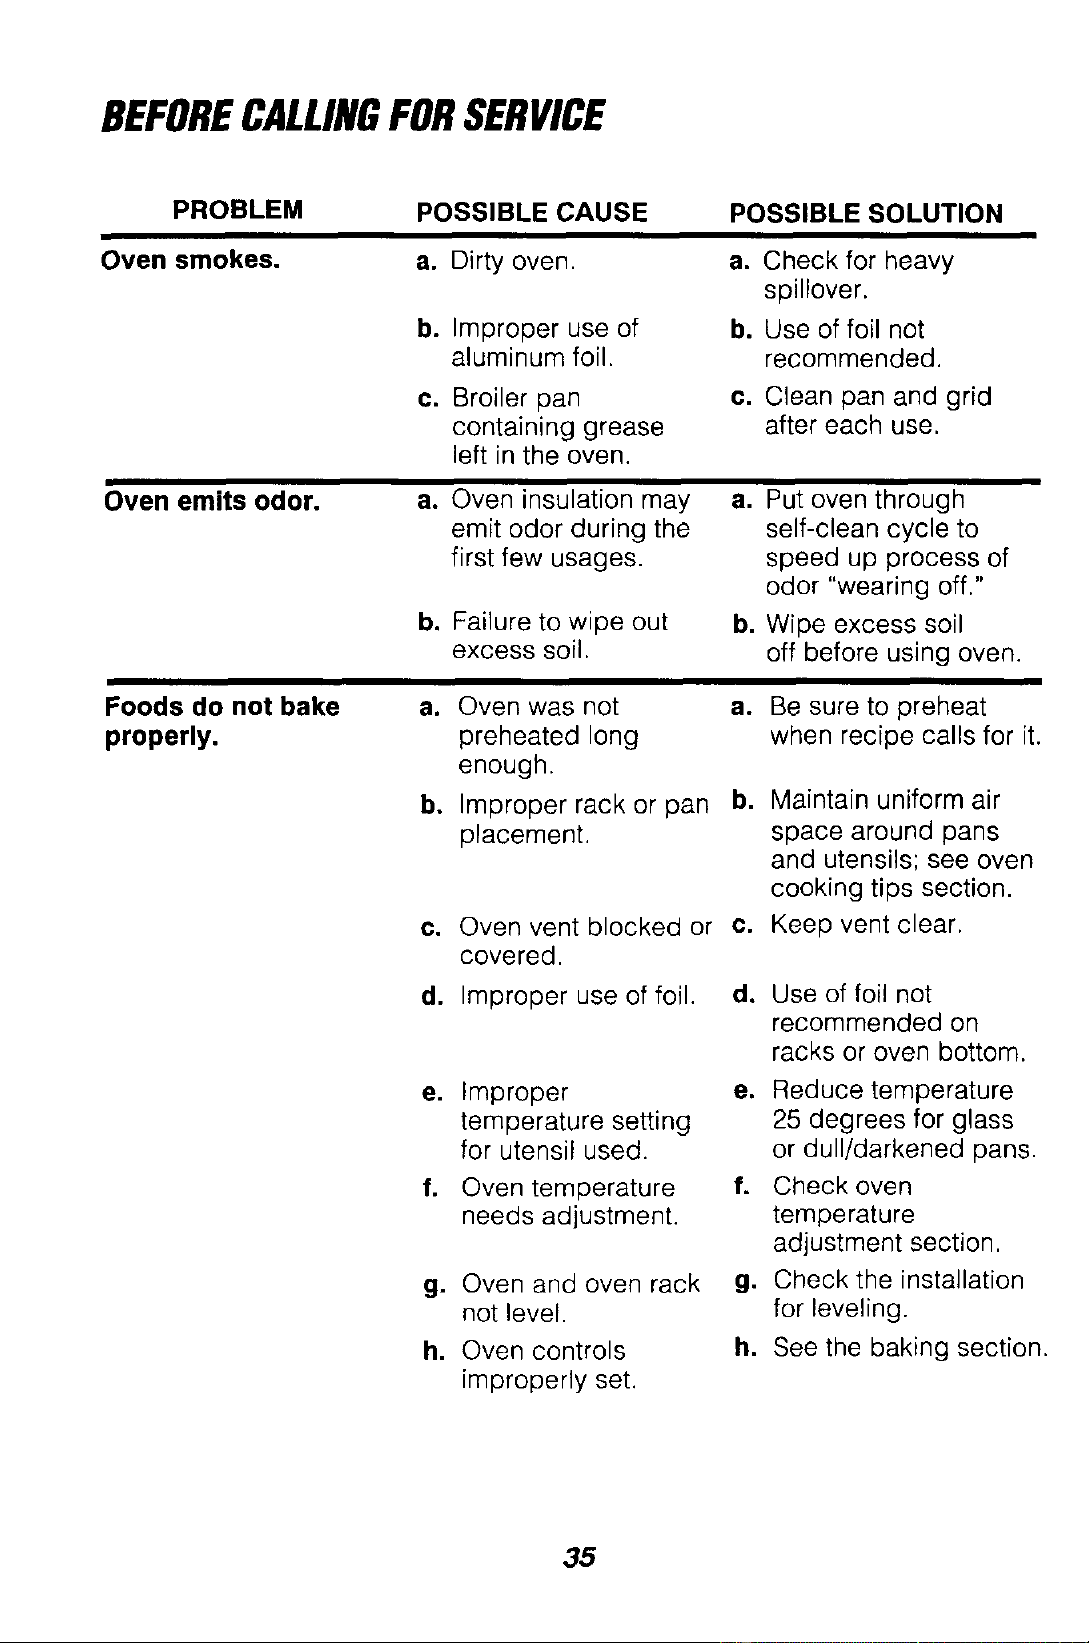
Oven smokes.
a. Dirty oven.
b. Improper use of
aluminum foil.
c. Broiler pan
containing grease
left in the oven.
a. Check for heavy
spillover.
b. Use of foil not
recommended.
e. Clean pan and grid
after each use.
Oven emits odor.
a. Oven insulation may
emit odor during the
first few usages.
b. Failure to wipe out
excess soil.
a. Put oven through
self-clean cycle to
speed up process of
odor "wearing off."
b. Wipe excess soil
off before using oven.
Foods do not bake
properly.
al
b.
Oven was not
preheated long
enough.
Improper rack or pan
placement,
c. Oven vent blocked or
covered.
d. Improper use of foil.
e=
f,
Improper
temperature setting
for utensil used.
Oven temperature
needs adjustment.
g. Oven and oven rack
not level.
h, Oven controls
improperly set.
a. Be sure to preheat
when recipe calls for it.
b. Maintain uniform air
space around pans
and utensils; see oven
cooking tips section.
e. Keep vent clear.
d. Use of foil not
recommended on
racks or oven bottom.
e. Reduce temperature
25 degrees for glass
or dull/darkened pans.
f. Check oven
temperature
adjustment section,
g, Check the installation
for leveling.
h, See the baking section.
35
BEFORECALLINGFORSERVICE
PROBLEM
POSSIBLE CAUSE POSSIBLE SOLUTION
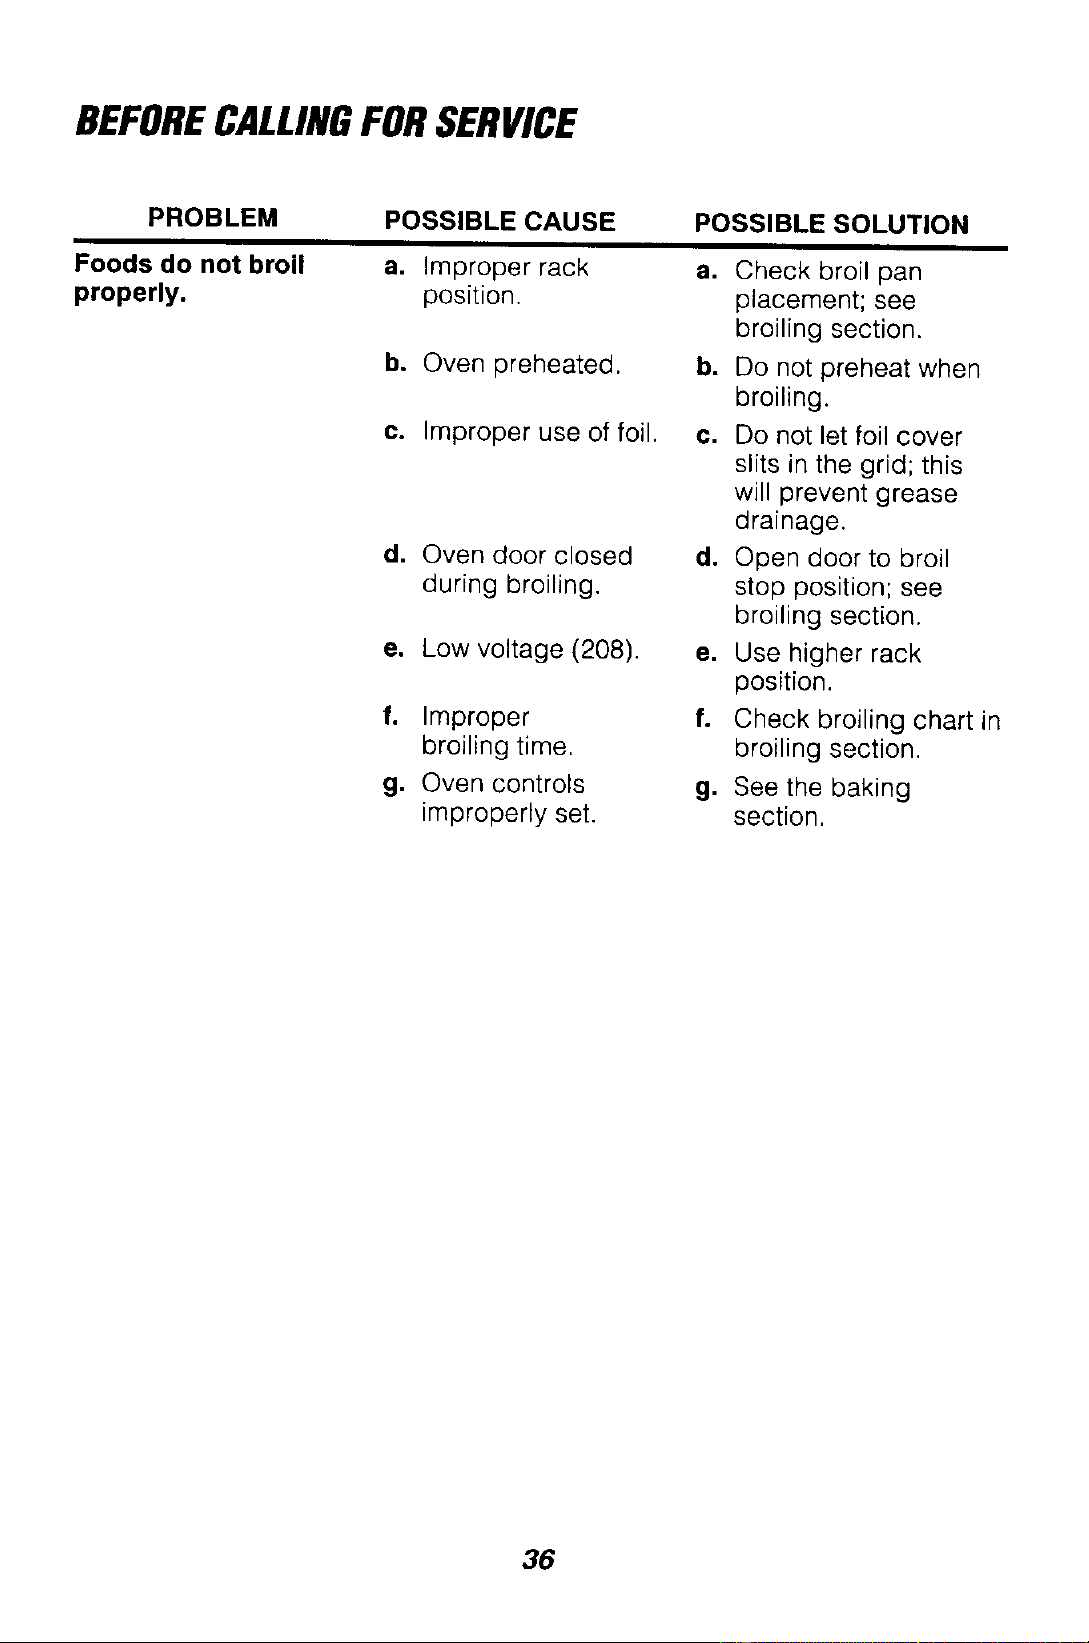
Foods do not broil
properly.
a. Improper rack a.
position.
b. Oven preheated, b.
c. Improper use of foil. ¢.
d. Oven door closed d.
during broiling.
e. Low voltage (208). e.
f, Improper f.
broiling time.
g. Oven controls g.
improperly set.
Check broil pan
placement; see
broiling section.
Do not preheat when
broiling.
Do not let foil cover
slits in the grid; this
will prevent grease
drainage.
Open door to broil
stop position; see
broiling section.
Use higher rack
position.
Check broiling chart in
broiling section.
See the baking
section,
36
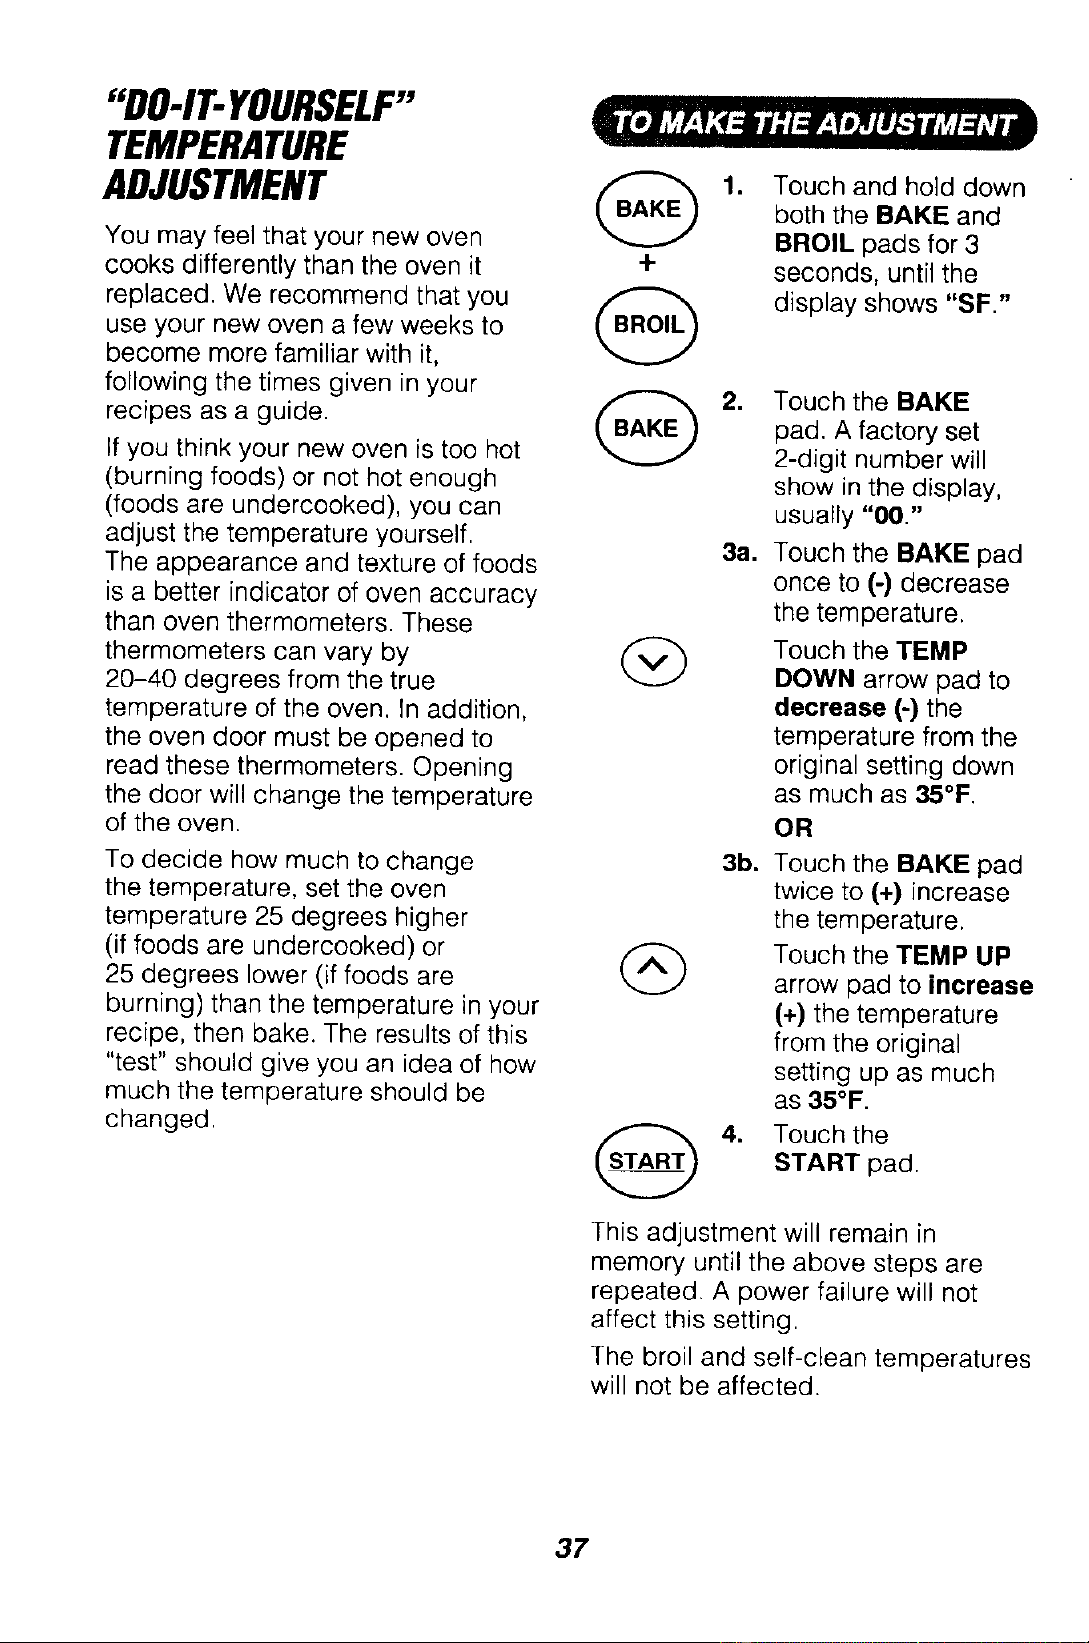
"DO-IT-YOURSELF"
TEMPERATURE
ADJUSTMENT
You may feel that your new oven
cooks differently than the oven it
replaced. We recommend that you
use your new oven a few weeks to
become more familiar with it,
following the times given in your
recipes as a guide.
If you think your new oven is too hot
(burning foods) or not hot enough
(foods are undercooked), you can
adjust the temperature yourself.
The appearance and texture of foods
is a better indicator of oven accuracy
than oven thermometers. These
thermometers can vary by
20-40 degrees from the true
temperature of the oven. In addition,
the oven door must be opened to
read these thermometers. Opening
the door will change the temperature
of the oven.
To decide how much to change
the temperature, set the oven
temperature 25 degrees higher
(if foods are undercooked) or
25 degrees lower (if foods are
burning) than the temperature in your
recipe, then bake. The results of this
"test" should give you an idea of how
much the temperature should be
changed.
t-
1. Touch and hold down
both the BAKE and
BROIL pads for 3
seconds, until the
display shows "SF."
2. Touch the BAKE
pad. A factory set
2-digit number will
show in the display,
usually "00."
3a. Touch the BAKE pad
once to (-) decrease
the temperature.
Touch the TEMP
DOWN arrow pad to
decrease (-) the
temperature from the
original setting down
as much as &=,°F.
OR
3b. Touch the BAKE pad
twice to (+) increase
the temperature.
Touch the TEMP UP
arrow pad to increase
(+) the temperature
from the original
setting up as much
as 35°F.
(_ 4. Touch the
START pad.
This adjustment will remain in
memory until the above steps are
repeated. A power failure will not
affect this setting.
The broil and self-clean temperatures
will not be affected.
37
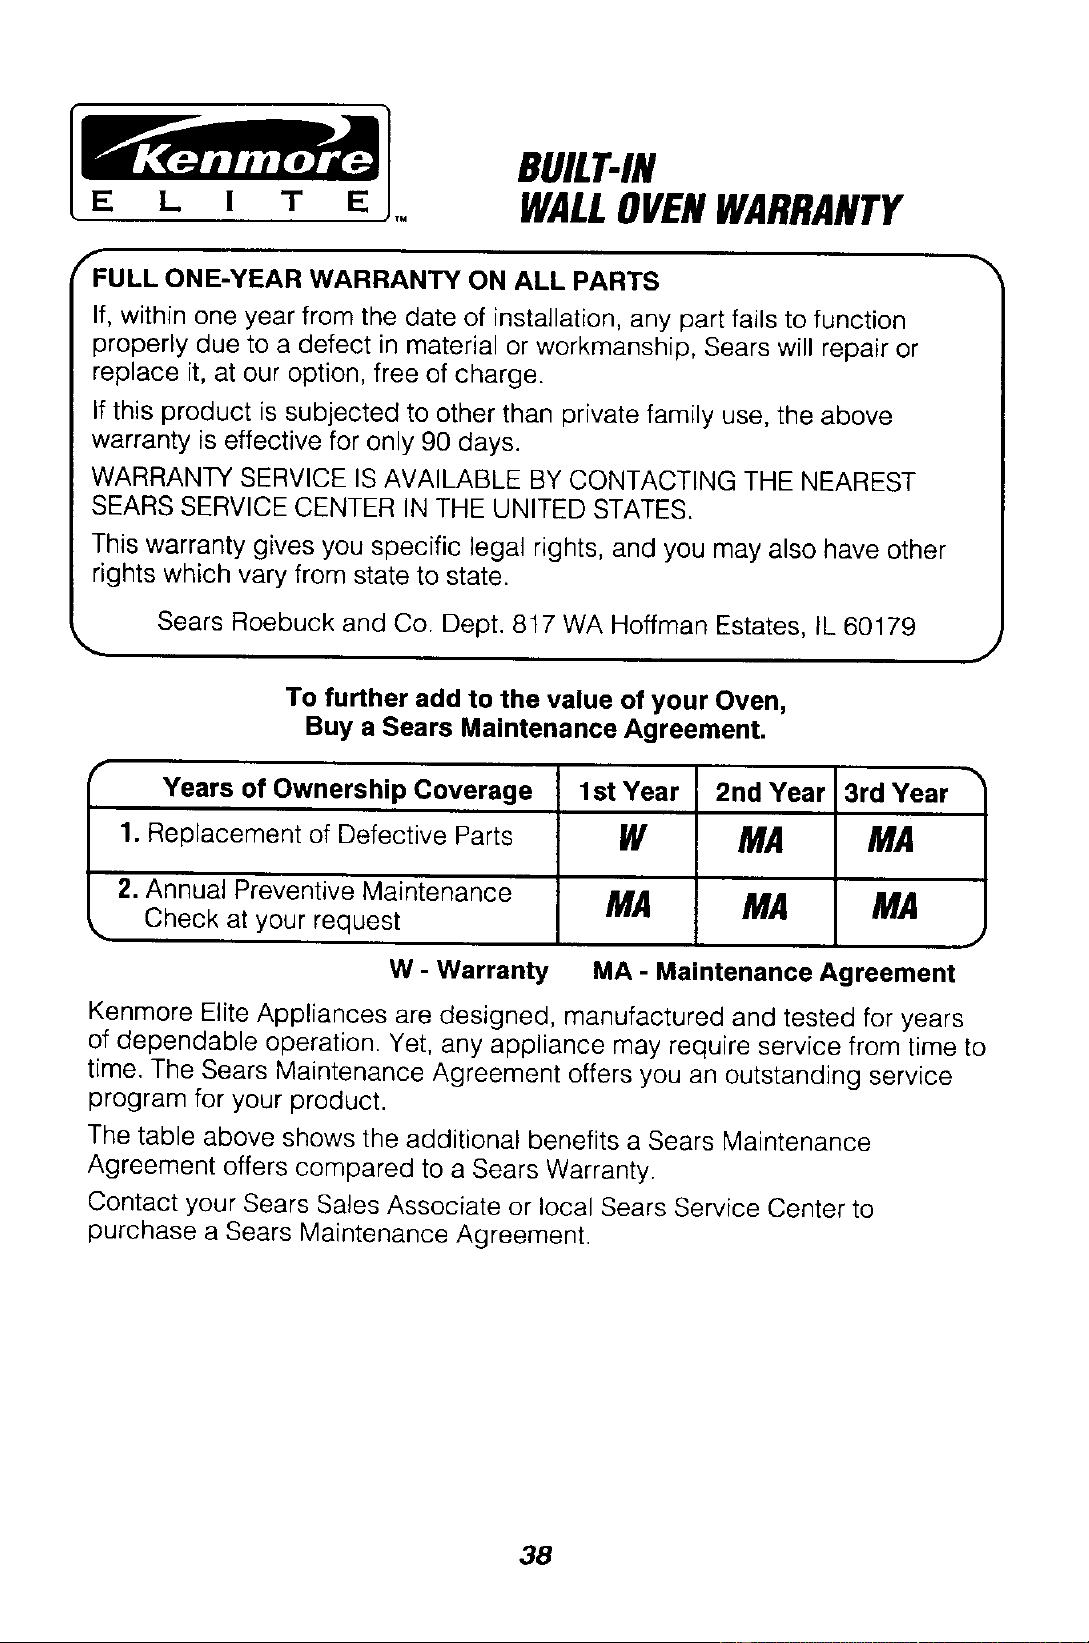
E L I T E
BUILT-IN
WALLOVENWARRANTY
f
FULL ONE-YEAR WARRANTY ON ALL PARTS
If, within one year from the date of installation, any part fails to function
properly due to a defect in material or workmanship, Sears will repair or
replace it, at our option, free of charge.
If this product is subjected to other than private family use, the above
warranty is effective for only 90 days.
WARRANTY SERVICE IS AVAILABLE BY CONTACTING THE NEAREST
SEARS SERVICE CENTER IN THE UNITED STATES.
This warranty gives you specific legal rights, and you may also have other
rights which vary from state to state.
Sears Roebuck and Co. Dept. 817 WA Hoffman Estates, IL 60179
To further add to the value of your Oven,
Buy a Sears Maintenance Agreement,
f
Years of Ownership Coverage 1st Year 2nd Year 3rd Year
1. Replacement of Defective Parts W MA MA
2. Annual Preventive Maintenance MA MA MA
k. Check at your request
W - Warranty MA - Maintenance Agreement
Kenmore Elite Appliances are designed, manufactured and tested for years
of dependable operation. Yet, any appliance may require service from time to
time. The Sears Maintenance Agreement offers you an outstanding service
program for your product.
The table above shows the additional benefits a Sears Maintenance
Agreement offers compared to a Sears Warranty.
Contact your Sears Sales Associate or local Sears Service Center to
purchase a Sears Maintenance Agreement.
38
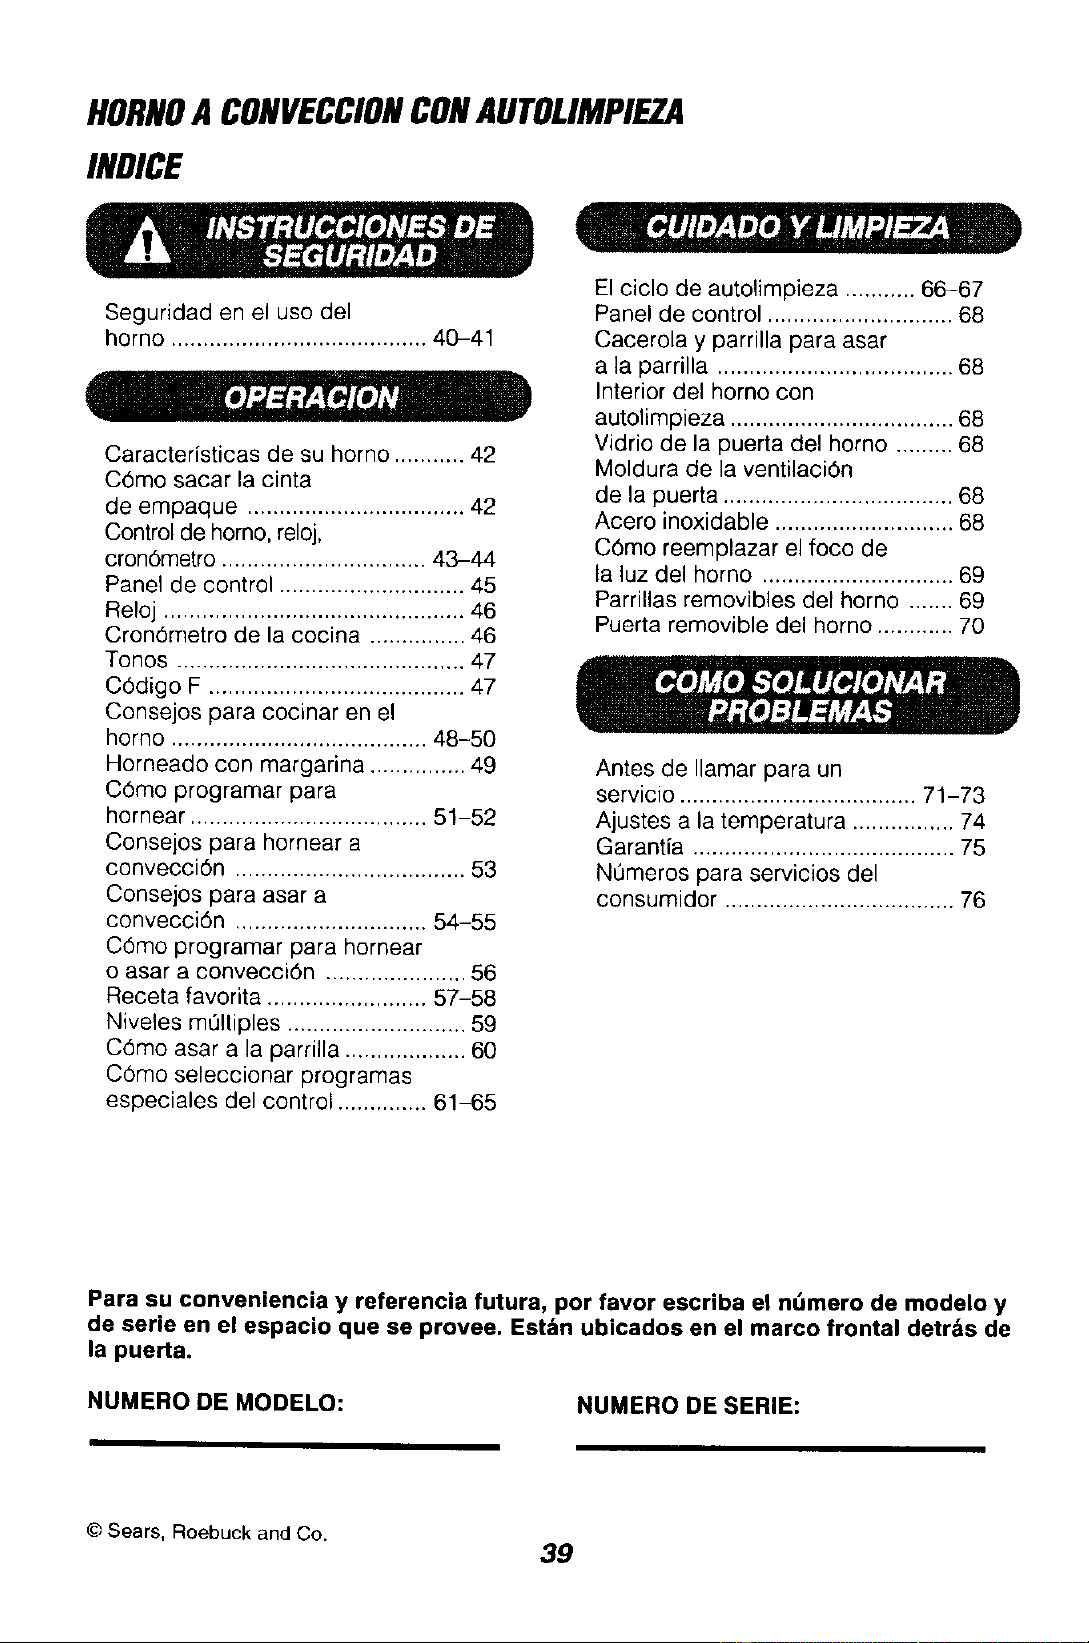
HORNOA CONVECCIONCONAUTOLIMPIEZA
INDICE
Seguridad en el uso del
horno ........................................ 40-41
Caracteristicas de su homo ........... 42
C6mo sacar la cinta
de empaque .................................. 42
Control de homo, reloj,
cron6metro ................................ 43-44
Panel de control ............................. 45
Reloj ............................................... 46
Cron6metro de la cocina ............... 46
Tonos ............................................. 47
C6digo F ........................................ 47
Consejos para cocinar en el
homo ........................................ 48-50
Horneado con margarina ............... 49
C6mo programar para
hornear ..................................... 51-52
Consejos para hornear a
convecci6n .................................... 53
Consejos para asar a
convecci6n .............................. 54-55
C6mo programar para hornear
o asar a convecci6n ...................... 56
Receta favorita ......................... 57-58
Niveles meltiples ............................ 59
COmo asar a la parrilla ................... 60
C6mo seleccionar programas
especiales del control .............. 61 65
El ciclo de autolimpieza ........... 66-67
Panel de control ............................. 68
Cacerola y parrilla para asar
a la parrilla ..................................... 68
Interior del homo con
autolimpieza ................................... 68
Vidrio de la puerta del homo ......... 68
Moldura de la ventilaci6n
de la puerta .................................... 68
Acero inoxidable ............................ 68
C6mo reemplazar el foco de
la luz del homo .............................. 69
Parrillas removibles del horno ....... 69
Puerta removible del homo ............ 70
Antes de Ilamar para un
servicio ..................................... 71-73
Ajustes a la temperatura ................ 74
Garantia ......................................... 75
N0meros para servicios del
consumidor .................................... 76
Para su conveniencia y referencia futura, por favor escriba el ndmero de modelo y
de serie en el espacio que se provee. Est_n ubicados en el marco frontal detrbs de
la puerta.
NUMERO DE MODELO:
NUMERO DE SERIE:
© Sears, Roebuck and Co.
39
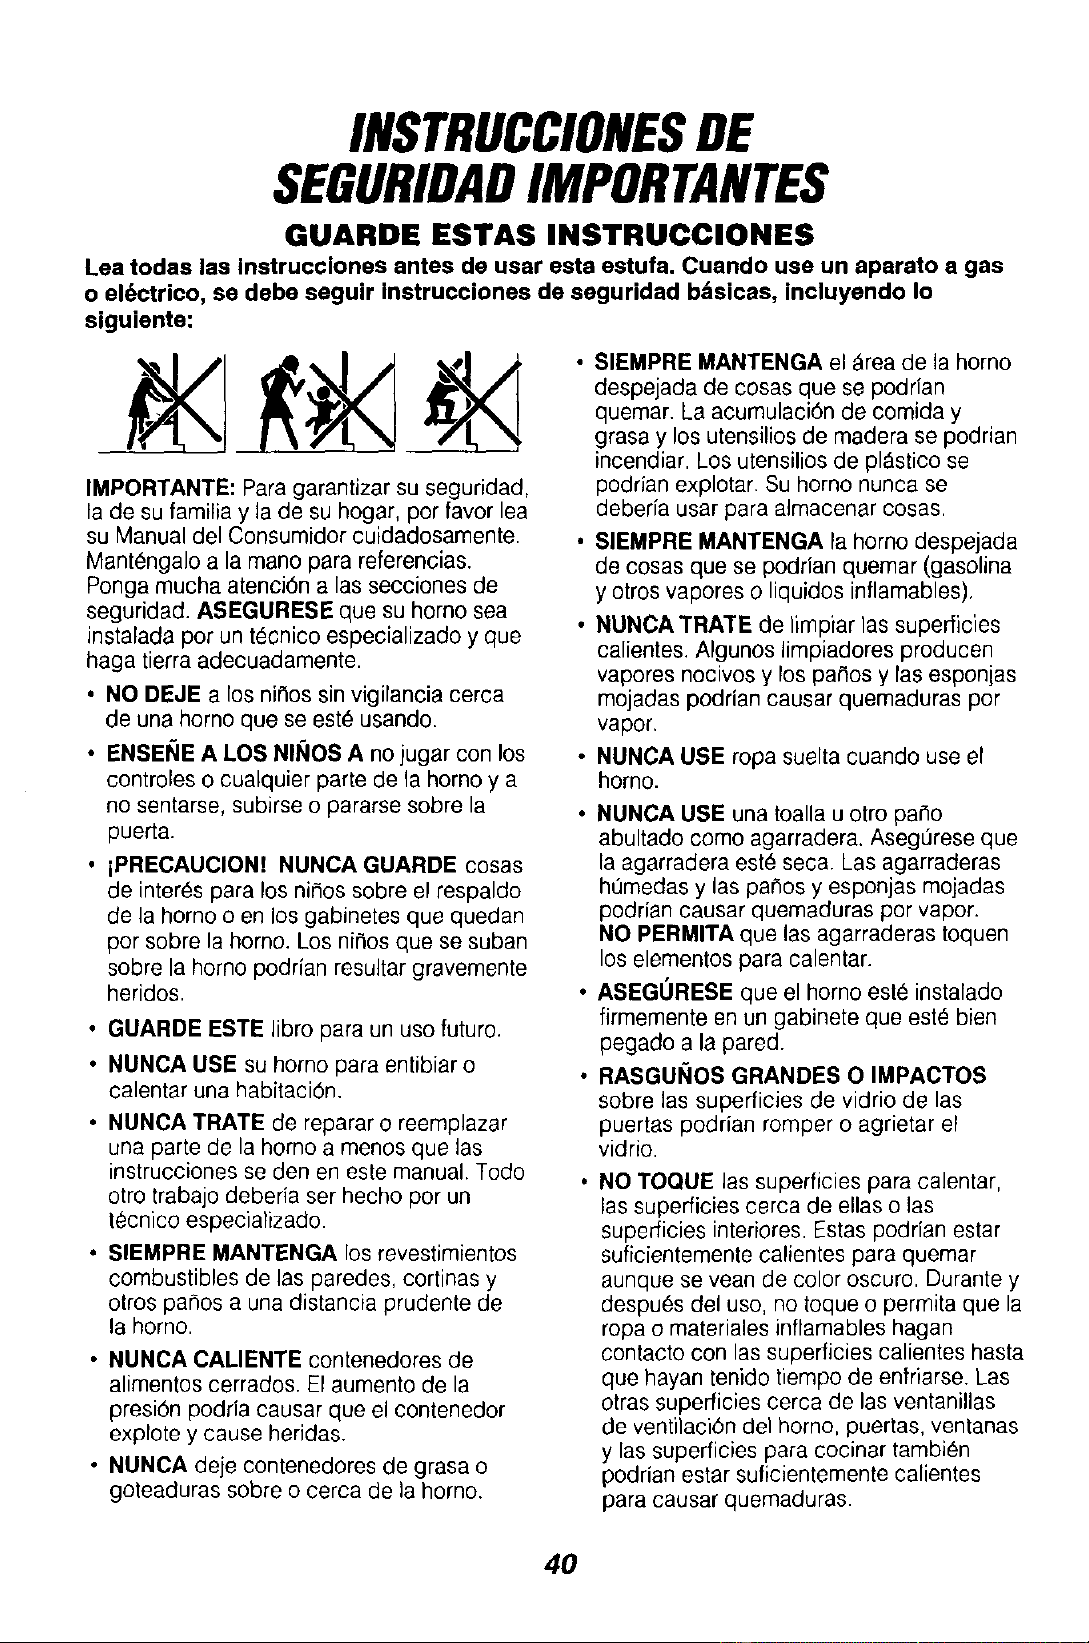
INSTRUCCIONESDE
SEGURIDADIMPORTANTES
GUARDE ESTAS INSTRUCCIONES
lea todas las Instrucciones antes de usar esta estufa. Cuando use un aparato a gas
o el_ctrico, se debe seguir instrucciones de seguridad b_sicas, incluyendo Io
siguiente:
IMPORTANTE: Para garantizar su seguridad,
la de su familia y la de su hogar, per favor lea
su Manual del Consumidor cuidadosamente
Mant6ngalo a la mane para referencias
Ponga mucha atenci6n alas secciones de
seguridad ASEGURESE que su homo sea
instalada per un t6cnico especializado y que
haga tierra adecuadamente
• NO DEJE a los niSos sin vigilancia cerca
de una homo qua se este usando
• ENSEI_E A LOS NINES A no jugar con los
eontroles o eualquier parte de la homo y a
no sentarse, subirse o pararse sobre la
puerta
• iPRECAUCION! NUNCA GUARDE cosas
de interns para los ni_os sobre el respaldo
de la homo o en los gabinetes qua quedan
per sobre la homo Los nir_os que se suban
sobre la homo podrian resultar gravemente
heridos
• GUARDE ESTE Jibro para un use future
• NUNCA USE su homo para entibiar o
calentar una habitaci6n
• NUNCA TRATE de reparar o reemplazar
una parte de la homo a menos qua las
instrucciones se den en este manual Todo
otro trabajo deberia set hecho per un
t_cnico especializade
• SIEMPRE MANTENGA los revestimientos
combustibles de las paredes cortinas y
otros parses a una distancia prudente de
la homo
• NUNCA CALIENTE contenedores de
alimentos cerrados El aumento de la
presi6n podria causar que el contenedor
expiate y cause heridas
• NUNCA deje contenedores de grasa o
goteaduras sobre o cerca de la homo
• SIEMPRE MANTENGA el _rea de la homo
despejada de cosas que se podfian
quemar La acumulaci6n de comida y
grasa y los utensilios de madera se podrian
incendiar Los utensilios de pl_stico se
podrfan explotar Su homo nunca se
deberia usar para almacenar cosas
• SIEMPRE MANTENGA la homo despejada
de cosas que se podfian quemar (gasolina
y otros vapores o liquidos inflamables)
• NUNCA TRATE de limpiar 1assuperficies
calientes AIgunos limpiadores producen
vapores nocivos y los pa,%s y las esponjas
mojadas podrian causar quemaduras per
vapor
NUNCA USE ropa suelta cuando use el
homo
NUNCA USE una toalla u otro paao
abultado come agarradera Aseg_rese que
la agarradera este seca Las agarraderas
hQmedas y las parses y esponjas mojadas
podrian causar quemaduras per vapor
NO PERMITA qua las agarraderas toquen
los elementos para calentar
ASEGURESE que el homo est_ instalado
firmemente en un gabinete qua est6 bien
pegado a la pared
RASGUNOS GRANDES O IMPACTOS
sobre las superficies de vidrio de las
puertas podrian romper o agrietar el
vidrio
NO TOQUE Jassuperficies para calentar
las superficies cerca de elias o las
superficies interiores Estas podrian estar
suficientemente calientes para quemar
aunque se vean de color oscuro Durante y
despu6s del use no toque o permita qua la
ropa o materiales inflamables hagan
contacto con las superficies calientes hasta
que hayan tenido tiempo de enfriarse Las
otras superficies cerca de las ventanillas
de ventilaci6n del homo, puertas, ventanas
y las superficies para cocinar tambi_n
podrian estar suficientemente calientes
para causar quemaduras
40
INSTRUCCIONESDE
SEGURIDAD
IMPORTANTES
• COLOQUE I.AS PARRILLAS DEL
HORNO en la posici6n deseada
rnientras el homo est_ frio. Si las parrillas
se deben mover rnientras el horno est_
caliente, no permits que la agarradera
haga contacto con el quemador caliente
del homo.
• DESPUES DE ASAR A LA PARRILLA,
siempre saque la cacerola y la parrilla
para asar del horno y Ifrnpielas. Los
sobraclos de grasa en la cacerola pars
asar podrran incendiarse la pr6xima vez
que usted use el horno.
• SlEMPRE TENGA cuidado cuando abra
la puerta del horno. Deje que el aire
caliente y el vapor escapen antes de
mover los alirnentos.
• NUNCA USE papel de aluminio para
cubrir el rondo del horno. El uso
incorrecto del papel de aluminio podrfa
ernpezar un incendio, o podria resultar
en un golpe de corriente.
• NUNCA OBSTRUYA la abertura de la
ventilaci6n del homo.
• LIMPIE SOLAMENTE las partes que se
listan en este manual. Siga todas las
instrucciones para la lirnpieza.
AsegQrese de sacar la caeerola y la
parrilla pars asar antes del ciclo de
autolimpieza.
• NUNCA FRIEGUE, mueva, limpie o
da¢_eel sello de la puerta en las estufas
con autolirnpieza. Es esencial para un
buen selfado.
• NUNCA TRATE de timpiar los utensilios,
ollas, partes rernovibles o la cacerola y
la parrilla para asar en el ciclo de
autolimpieza.
• NO USE limpiadores para hornos - No se
debeda usar ninguna clase de limpiador
pars hornos o cremas protectoras dentro o
alrededor de cualquier parte del horno.
• SI LA FUNCION DE AUTOLIMPIEZA
falla, apague el homo y desconecte la
electricidad. H&gale un servicio per un
t6cnico calificado.
;ADVERTENCIA DE
SEGURIDAD IMPORTANTE!
California Safe Drinking Water and
Toxic Enforcement Act requiere que el
gobernador de California publique una
lists de substanciss que el estado seps
que producen defectos de nacimiento u
otros daflos reproductivos y requiere
que los hombres de negocios adviertan
a sus clientes del contscto potencial a
tales substancias. El aislsnte de fibrs de
vidrio en el homo con autolimpieza
emitir -_,una muy pequefta cantidad de
mon6xido de carbono durante el ciclo
de autolimpieza. El contacto se puede
m nim izar ventilando con una puerta o
ventans sbierta o usando un ventilador
o una campana de ventilacibn.
IMPORTANTE: La salud de algunos
p_,jaros es extremadamente sensitiva a
los vspores producidos por el ciclo de
autolimpieza de cualquier homo. Ponga
los pdjaros en otra habitaci6n qua est_
bien ventilada.
;LEA Y COMPRENDA
ESTA INFORMACION AHORA!
Aseg,',rese que todos en su hogar sepan
qu_ hacer en caso de incendio. Nuncs
use agua sobre un incendio de grass,
esto solamente extenderd las llamas.
FUEGO EN EL HORNO:
iNo trate de mover la cacerola!
1. Cierre la puerta del homo y apague
los controles.
2.
Si el incendio continL_a,
cuidadosamente abra la puerta y
arroje soda pars cocinar sobre el
fuego, o use un extintor de quimico
seco, espurna o "halon".
41
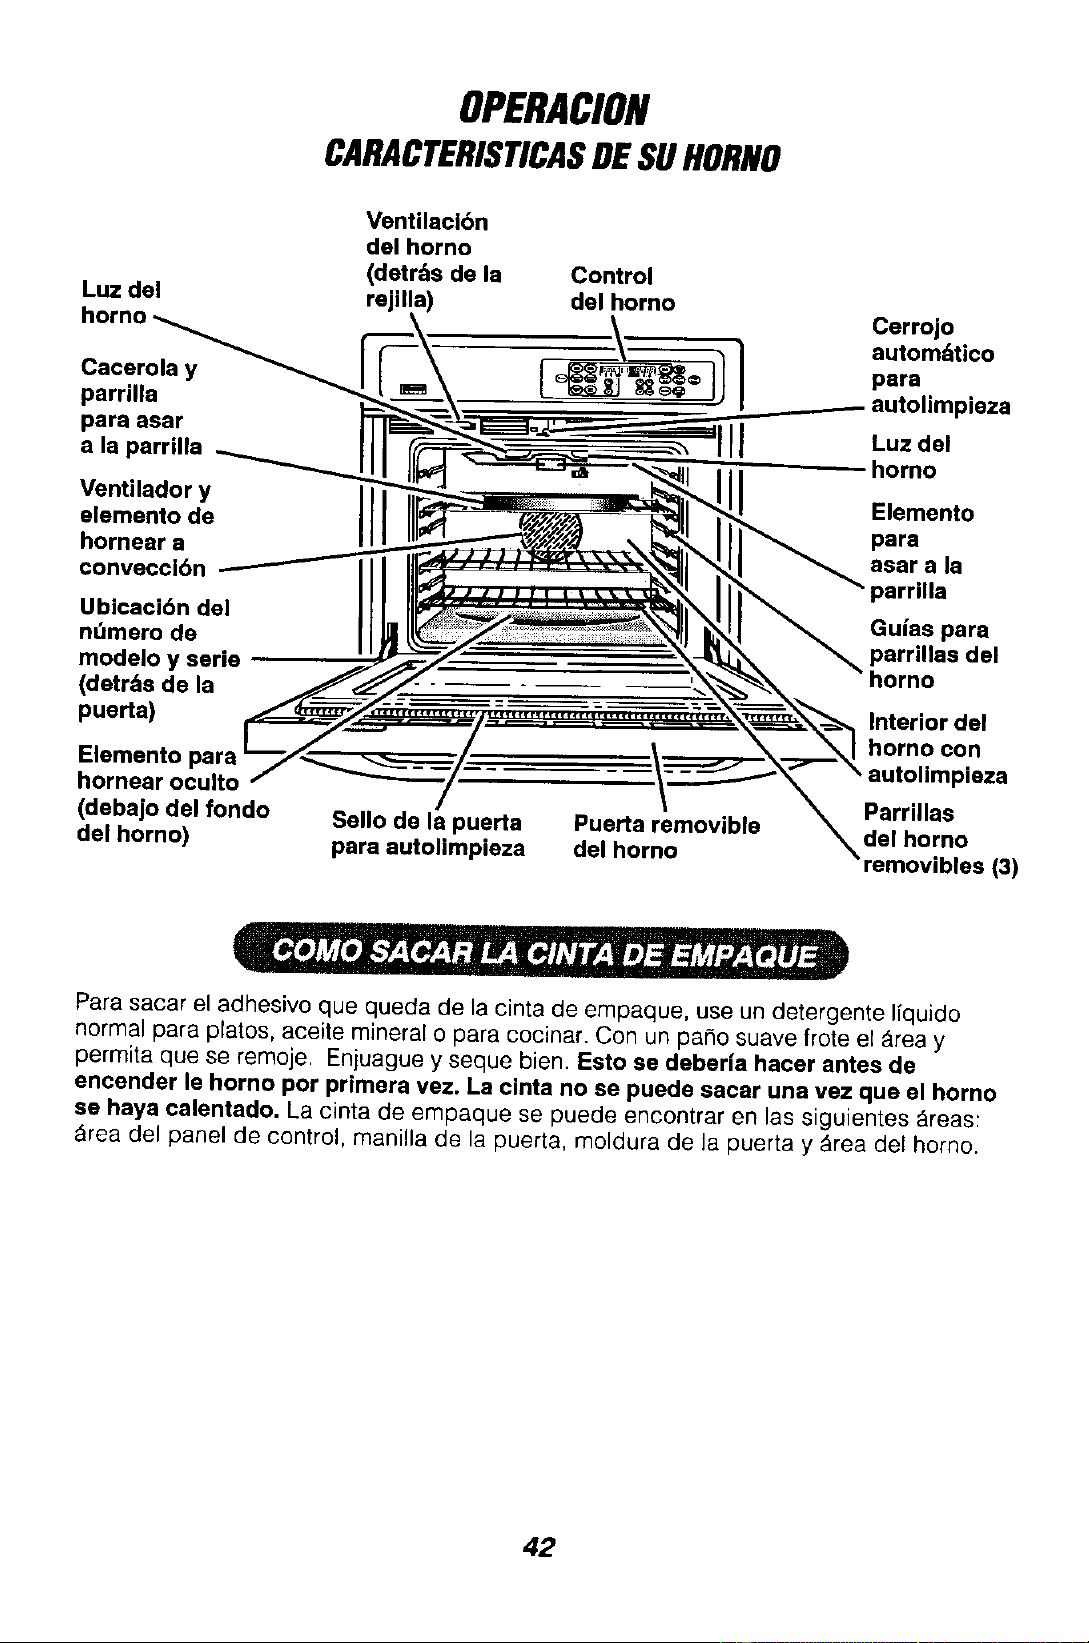
OPERAClON
CARACTERISTICASDESUHORNO
Luz del
Cacerola y
parrilla
pare asar
a la parrilla
Ventilador y
elemento de
hornear a
convecci6n
Ubicaci6n del
nt_mero de
modelo y serie
(detr&s de la
puerta)
Elemento
hornear oculto
(debajo de! rondo
del homo)
Ventilacibn
del horno
(detrds de le Control
rejil del homo
Sello de 18 puerta
para autolimpieza
Puerta removible
del homo
Cerrojo
autom=_tico
para
Luz del
homo
Elemento
pare
asar a la
parrilla
Guias para
parrillas del
horno
Interior del
horno con
pieza
Parrillas
del homo
removibles (3)
Para sacar el adhesivo que queda de la cinta de empaque, use un detergente Ifquido
normal para platos, aceite mineral o para cocinar. Con un parlo suave frote el _,rea y
permita que se remoje. Enjuague y seque bien. Esto se deberia hacer antes de
eneender le homo por primera vez. La einta no se puede sacar una vez que el horno
se haya calentado. La cinta de empaque se puede encontrar en las siguientes _reas:
&rea del panel de control, manilla de la puerta, moldura de la puerta y &rea del homo.
42
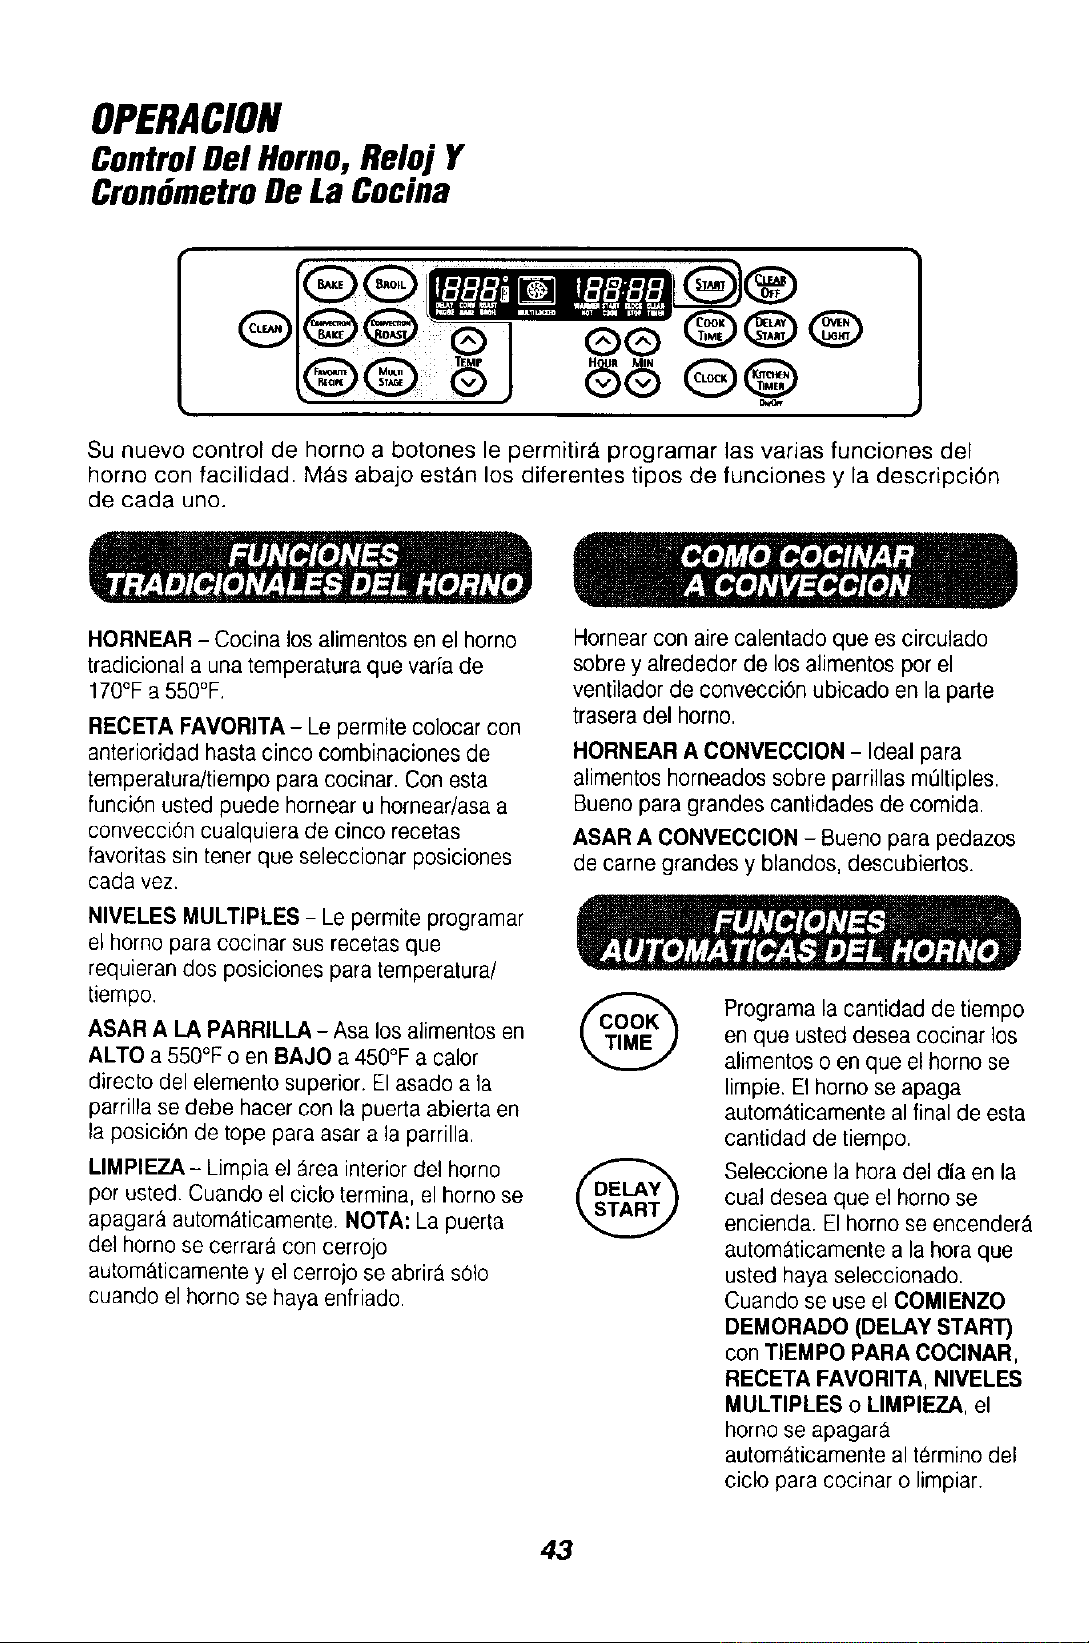
OPERACION
Control Del Homo, Reloj Y
CronGmetroDeLa Cocina
e@
Su nuevo control de horno a botones le permitir_ programar las varias funciones del
horno con facilidad. M_s abajo est_n los diferentes tipos de funciones y la descripcidn
de cada uno.
HORNEAR - Cocina los alimentos en el horno
tradicional a una temperatura que varia de
170°F a 550°F,
RECETA FAVORITA - Le permite colocar con
anterioridad hasta cinco combinaciones de
temperatura!tiempo para cocinar. Con esta
funciOn usted puede hornear u hornear/asa a
convecci6n cualquiera de cinco recetas
favoritas sin tener que seleccionar posiciones
cada vez.
NIVELES MULTIPLES - Le permite programar
el homo para cocinar sus recetas que
requieran dos posiciones para temperatura/
tiempo.
ASAR A LA PARRILLA - Asa los alimentos en
ALTO a 550°F o en BAJO a 450°F a calor
directo del elemento superior. El asado a la
parrilla se debe hacer con la puerta abierta en
la posici6n de tope para asar a la parrilla,
LIMPIEZA - Limpia el Area interior del homo
por usted Cuando el ciclo termina, el homo se
apagar_, automaticamente. NOTA: La puerta
del homo se cerrar_ con cerrojo
autom&ticamente y el cerrojo se abrir_ s61o
cuando el homo se haya enfriado.
Homear con aire calentado que es circulado
sobre y alrededor de los alimentos por el
ventilador de convecci6n ubicado en la parte
trasera del horno,
HORNEAR A CONVEOClON - Ideal para
alimentos horneados sobre parrillas m_ltiples.
Bueno para grandes cantidades de comida.
ASAR A CONVECClON - Bueno para pedazos
de came grandes y blandos, descubiertos.
Programa la cantidad de tiempo
en que usted desea cocinar los
alimentos o en que el homo se
limpie. El homo se apaga
autom&ticamente al final de esta
cantidad de tiempo.
Seleccione la hora del dia en la
cual desea que el homo se
encienda. El homo se encender_
autom&ticamente a la hora que
usted haya seleccionado.
Cuando se use el COMIENZO
DEMORADO (DELAY START)
con TIEMPO PARA COCINAR,
RECETA FAVORITA, NIVELES
MULTIPLES o LIMPIEZA, el
horno se apagar_
autom_ticamente al termino del
ciclo para cocinar o limpiar.
43
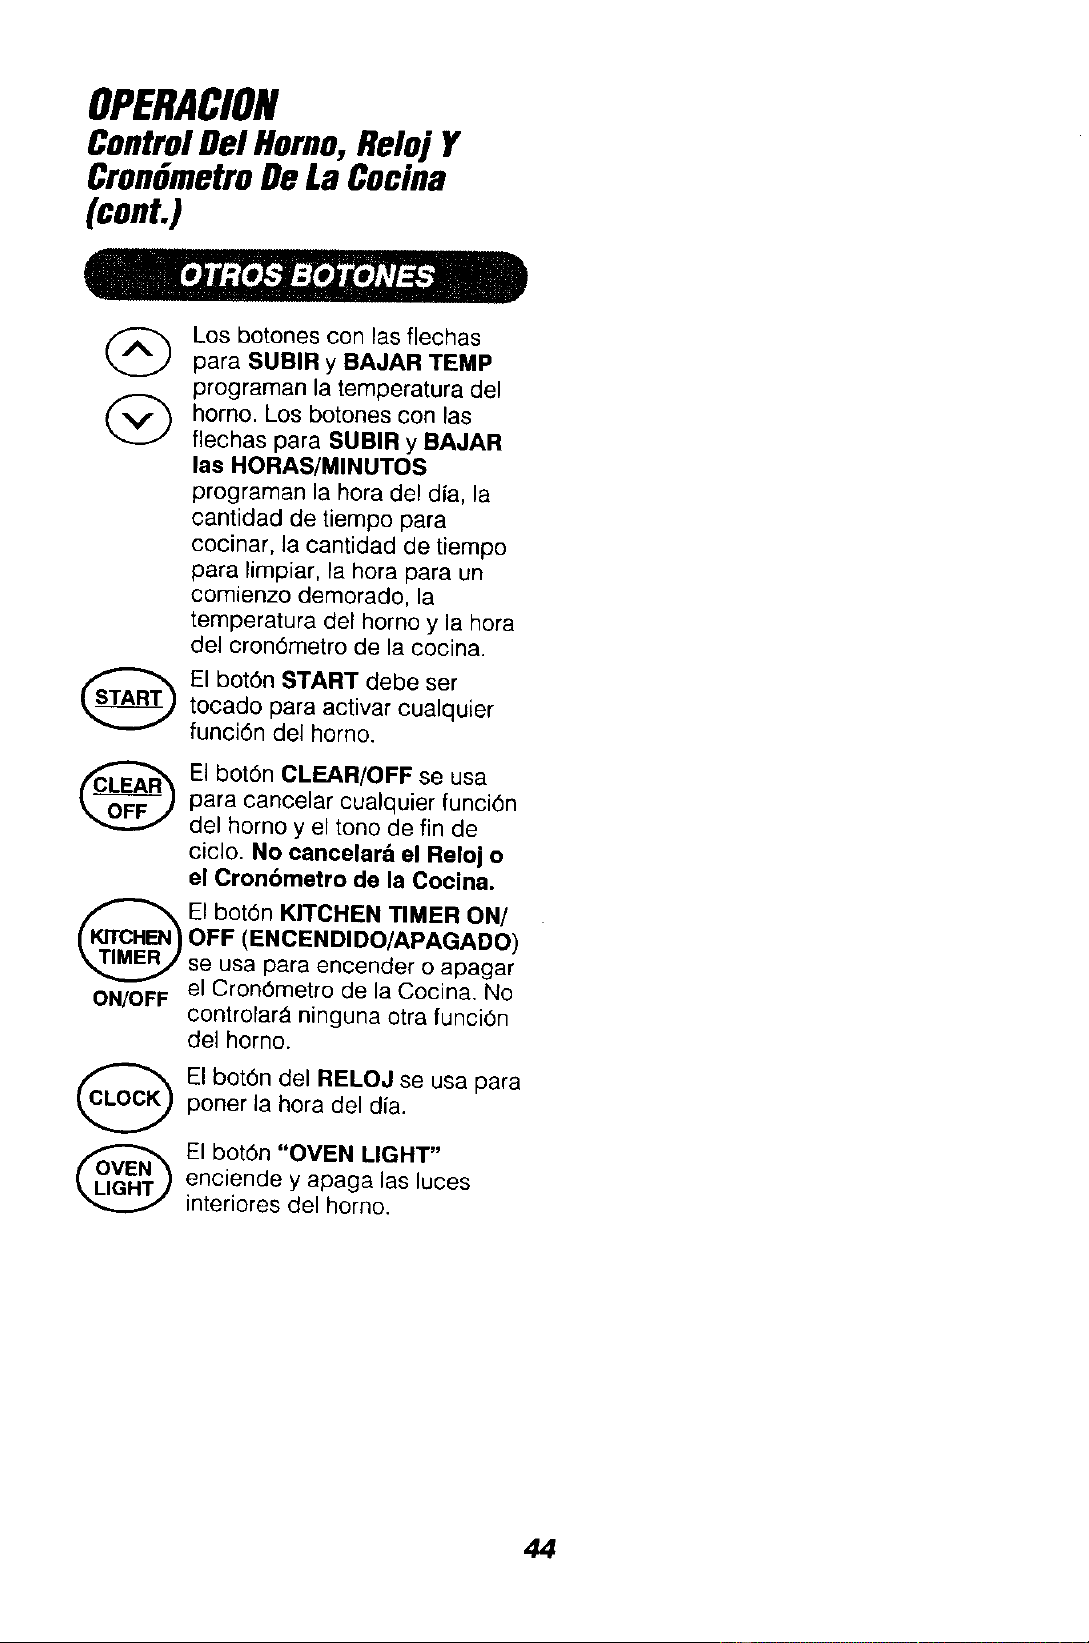
OPERACION
ControlDel Homo, Reloi Y
CrondmetroDeLa Cocina
(cont.)
Los botones con las flechas
para SUBIR y BAJAR TEMP
programan la ternperatura del
homo. Los botones con las
flechas para SUBIR y BAJAR
las HORAS/MINUTOS
programan la hora del dfa, la
cantidad de tiempo para
cocinar, la cantidad de tiempo
para limpiar, la hora para un
comienzo demorado, la
temperatura del homo y la hora
del cron6metro de la cocina.
El bot6n START debe ser
tocado para activar cualquier
funci6n del homo.
El bot6n CLEAR/OFF se usa
para cancelar cualquier funci6n
del homo y el tono de fin de
ciclo. No cancelar=t el Reloj o
el Cronbmetro de la Coclna.
El bot6n KITCHEN TIMER ON/
OFF (ENCENDIDO/APAGADO)
se usa para encender o apagar
...... el CronOmetro de la Cocina. No
UN/UI'I" . .
controlar_ nlnguna otra funcl6n
del homo.
El bot6n del RELOJ se usa para
poner la hora del dia.
El bot6n "OVEN LIGHT"
enciende y apaga las luces
interiores del homo,
44
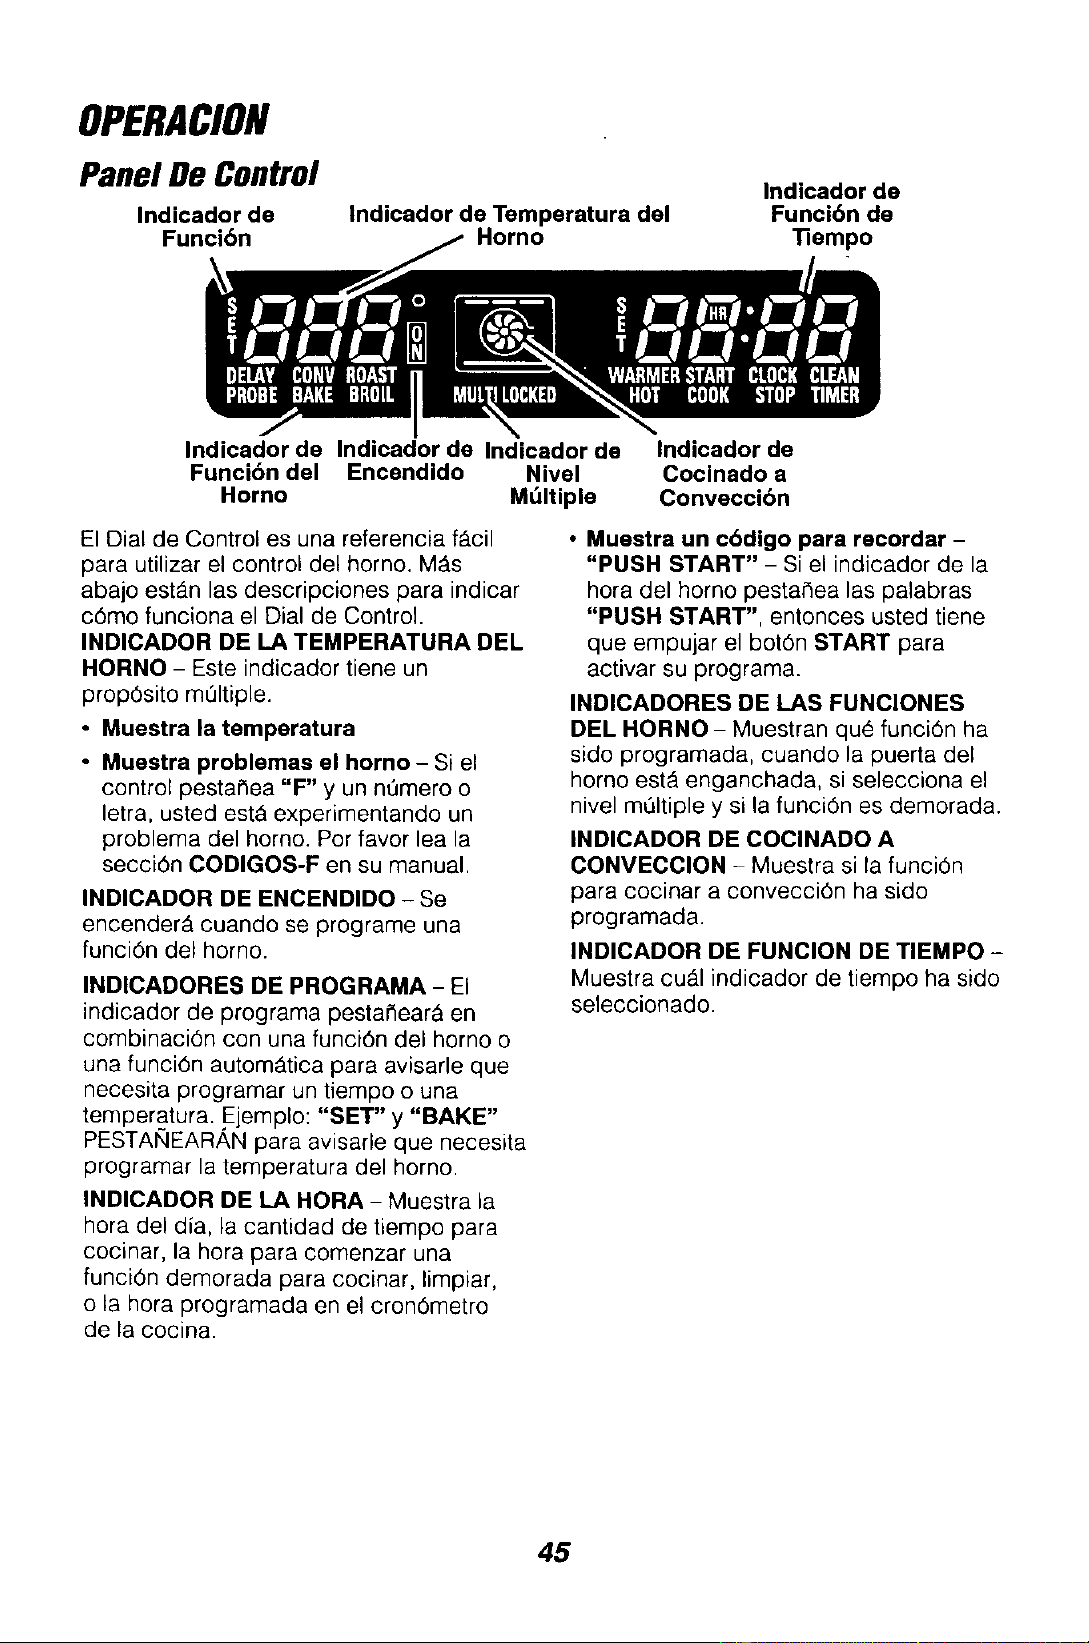
OPERACION
Panel De Control Indicadorde
Indicador de Indicador de Temperatura del Funcibn de
Funcibn Homo "Rempo
Indicador de Indicador de Indicador de Indicador de
Funcibn del Encendido Nivel Cocinado a
Homo MOltiple Conveccibn
El Dial de Control es una referencia f_.cil
para utilizar el control del horno. M_s
abajo est_n las descripciones para indicar
c6mo funciona el Dial de Control.
INDICADOR BE LA TEMPERATURA DEL
HORNO - Este indicador tiene un
prop6sito mL_ltiple.
• Muestra la temperatura
• Muestra problemas el horno - Si el
control pesta_ea "F" y un nQmero o
letra, usted est& experimentando un
problema del horno. Por favor lea la
secci6n CODIGOS-F en su manual.
INDICADOR DE ENCENDIDO - Se
encender_ cuando se programe una
funci6n del horno.
INDICADORES DE PROGRAMA - El
indicador de programa pestat_ear_ en
combinaci6n con una funci6n del homo o
una funciOn autom_.tica para avisarle que
necesita programar un tiempo o una
temperatura. Ejemplo: "SET" y "BAKE"
PESTANEARAN para avisarle que necesita
programar la temperatura del homo.
IHDICADOR DE LA HORA - Muestra la
hora del dia, la cantidad de tiempo para
cocinar, la hora para comenzar una
funci6n demorada para cocinar, limpiar,
o la hora programada en el cron6metro
de la cocina.
• Muestra un cbdigo para recordar -
"PUSH START" - Si el indicador de la
hora del horno pestar_ea las palabras
"PUSH START", entonces usted tiene
que empujar el bot6n START para
activar su programa.
INDICADORES DE I_AS FUNCIONES
DEL HORNO - Muestran qu_ funci6n ha
sido programada, cuando la puerta del
homo est_ enganchada, si selecciona el
nivel m_ltiple y si la funci6n es demorada.
INDICADOR DE COCINADO A
CONVECCION - Muestra si la funci6n
para cocinar a convecci6n ha sido
programada.
INDICADOR DE FUNCION DE TIEMPO -
Muestra cu_l indicador de tiempo ha sido
seleccionado.
45
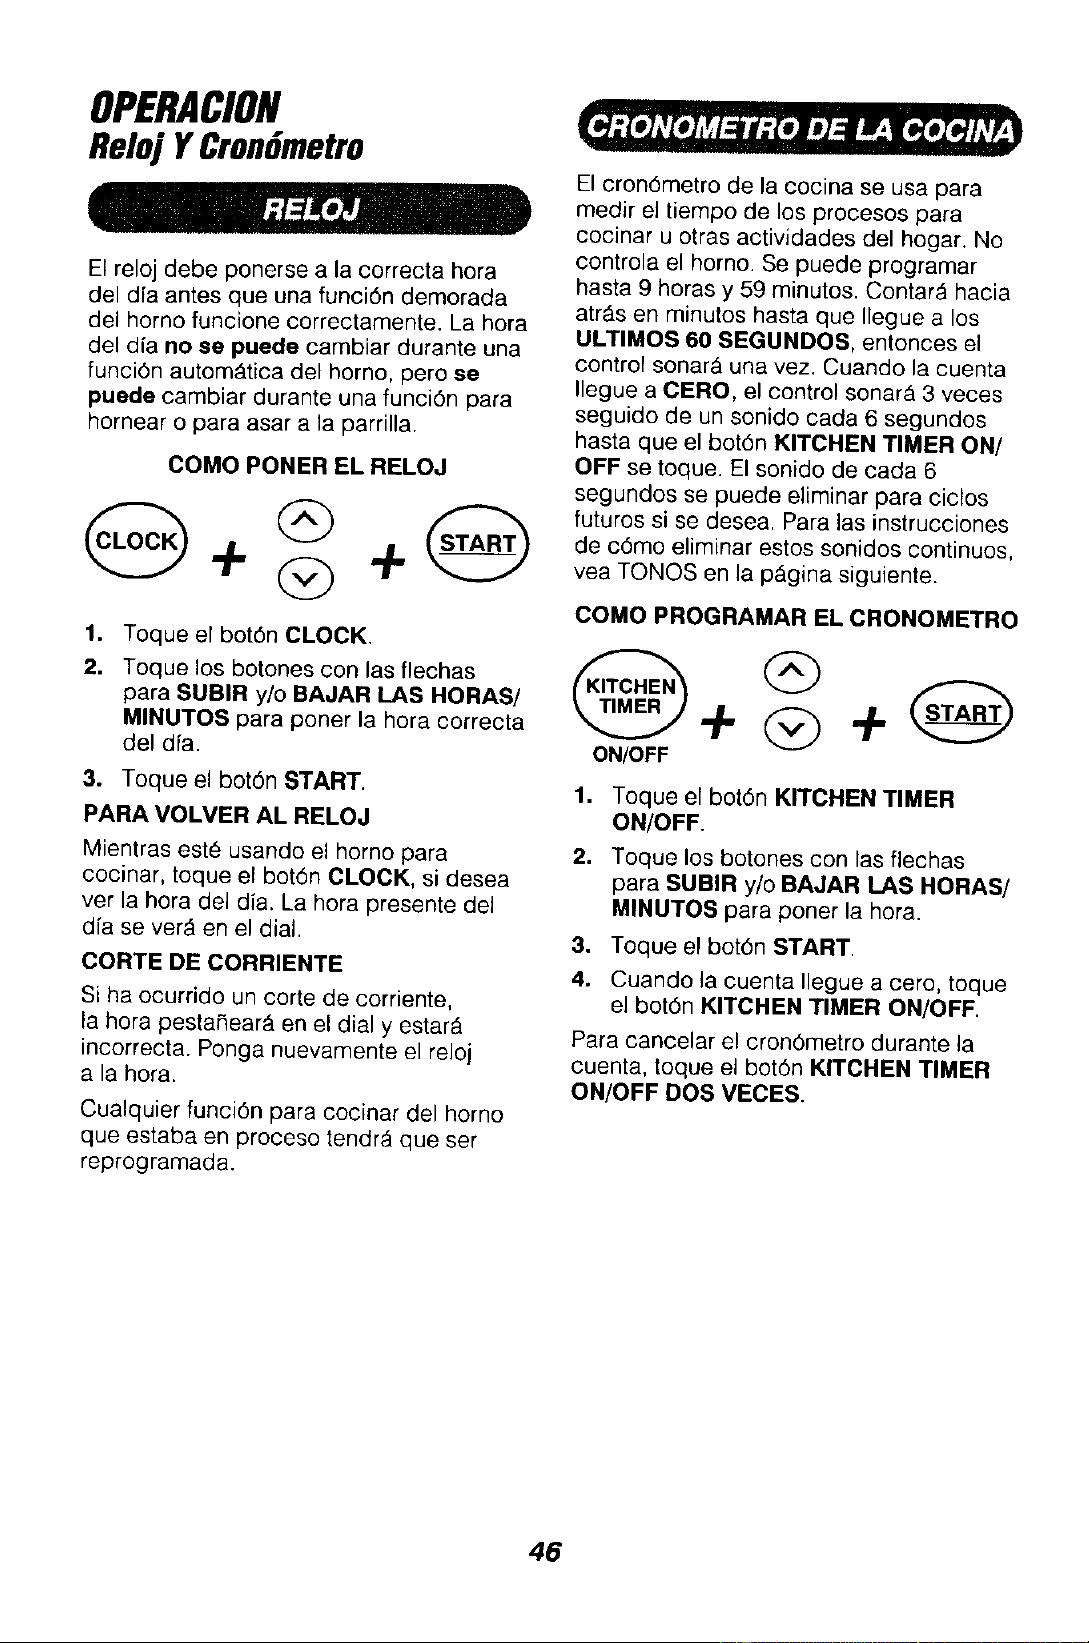
OPERACION
Reloj YCronGmetro
El relej debe ponerse a la correcta hera
del d[a antes que una funciCn demorada
del homo funcione correctamente. La hera
del alia no se puede cambiar durante una
funciCn autom_.tica del homo, pero se
puede cambiar durante una funciCn para
hornear o para asar a la parrilla.
COMe PONER EL RELOJ
O
1. Toque el botCn CLOCK,
2,
Toque los botones con las flechas
para SUBIR y/o BAJAR LAS HORAS/
MINUTES para poner la hera correcta
del d(a.
3. Toque el botCn START.
PARAVOLVER AL RELOJ
Mientras este usando el homo para
cocinar, toque el botCn CLOCK, si desea
ver la hera del dia. La hera presente del
dfa se verA en el dial.
CORTE DE CORRIENTE
Si ha ocurrido un corte de corriente,
la hera pestafiear& en el dial y estar&
incorrecta. Ponga nuevamente el reloj
a la hera.
Cualquier funciCn para cocinar del horno
que estaba en proceso tendr_ que ser
reprogramada.
El cronCmetro de la cocina se usa para
medir el tiempo de los procesos para
cocinar u otras actividades del hogar. No
controla el horno. Se puede programar
hasta 9 horas y 59 minutes. Centar_ hacia
arras en minutes hasta que Ilegue a los
ULTIMOS 60 SEGUNDOS, entonces el
control sonar_ una vez. Cuando la cuenta
Ilegue a CERO, el control sonar_ 3 veces
seguido de un senido cada 6 segundos
hasta que el botCn KITCHEN TIMER ON/
OFF se toque. El sonido de cada 6
segundos se puede eliminar para ciclos
futures si se desea. Para las instrucciones
de c6mo elimina[ estos sonidos continues,
vea TONES en la p_gina siguiente.
COMO PROGRAMAR EL CRONOMETRO
ON/OFF
1. Toque el botCn KITCHEN TIMER
ON/OFF
2, Toque los botones con las flechas
para SUBIR y/o BAJAR LAS HORAS/
MINUTES para poner la hera.
3. Toque el botCn START.
4. Cuando la cuenta Ilegue a cero, toque
el botCn KITCHEN TIMER ON/OFF.
Para cancelar el cron6metro durante la
cuenta, toque el bot6n KITCHEN TIMER
ON/OFF DOS VECES.
46
OPERACION
ControlDel Homo,
Reloj YCronGmetro
El nuevo control tiene una serie de tonos
que sonar_n a tiempos diferentes. Estos
tonos pueden sonar mientras usted
programa una funci6n del homo, o al final
de una funci6n del homo. Tambien le
avisar_ si existe un problema con una de
las funciones. M_s abajo est_.n los tipos
de tonos y una breve descripci6n de
cada uno.
SONIDOS MIENTRAS SELECCIONA EL
CONTROL - Cuando usted toque un
bot6n oyer_ un sonido. Este tono le har_.
saber que el bot6n ha sido activado. (Los
botches con las flechas no hacen un
sonido).
TONO AL FINAL DE UN CICLO
AUTOMATICO - Despues de una funci6n
para cocinar autom_tica, usted escuchar_
tres tonos cortos seguidos pot un tono
cada 6 segundos. El tono de cada 6
segundos seguir_ sonando hasta que
toque el bot6n CLEAR/OFF ousted
decida seleccienar el programa especial
para cancelar y evitar que el tono de 6
segundos suene al final de un ciclo futuro.
COMO CANCELAR EL TONO DE
6 SEGUNDOS
1,
Toque y sujete los botones
BAKE y BROIl., a la misma vez por 3
segundos, hasta que el dial muestre
"SF".
2. Toque el bot6n KITCHEN TIMER
ON/OFF. El dial mostrarA "CON
BEEP" (tono continuo).
3. Toque el bot6n KITCHEN TIMER
ON/OFF nuevamente. El dial mostrar_
"BEEP" (tono cancelado).
4. Toque el bot6n START, para cancelar
el tono y salir de este m6dulo especial.
Si desea regresar a los tonos de 6
segundos, repita los pasos de arriba hasta
que el dial muestre su selecci6n y empuje
el bot6n para el comienzo (START).
TONO DE ATENCION - Este tono sonar_
si hace un error u omite algo mientras
programa una funci6n del horno.
Unos ejemplos sedan:
a. Programar un ciclo de limpieza y la
puerta del homo no est,. bien cerrada.
b. Programar una funci6n y no empujar el
bot6n START.
c. Toque un bot0n para una funciOn
adicional sin programar primero la
temperatura o el tiempo.
Cualquiera de estos se puede identificar
r_pidamente con mirar el dial.
TONO DE PRECALENTAMIENTO -
Cuando programa una temperatura en el
homo, el homo empieza a calentarse
autom_ticamente. Cuando la temperatura
dentro del horno Ilega a la temperatura
que usted program6, sonar_ un tono para
avisarle que el homo est& listo para
hornear.
Si usted programa una funci6n del horno y
el control suena mientras el dial hace
pesta¢_ear una "F" y un nQmero o letra tal
como "F4" o "Fd," es posible que exista
un problema con el control o con el horno.
Simplemente empuje el botOn CLEAR/
OFF y espere una hora. Si se repite la
funci6n de los cOdigos, desconecte toda
la electricidad al aparato por Io menos 30
segundos y entonces reconecte la
corriente. Trate de programar esa funciOn
nuevamente. Si el cOdigo se repite
nuevamente, escriba el cOdigo que
pesta¢_ea y Ilame para un servicio. Dfgale
al t6cnico qu6 c0digo estaba
pesta¢_eando.
47

OPERACION
ConsejosPara Cocinar
En El Homo
Es normal sentir un poco de olor cuando
use su horno por primera vez. Para ayudar
a eliminar este olor, ventile la habitacibn
abriendo una ventana o usando una
campana de ventilacibn.
i I
_ :#:t;]_ mll] -lY,.tll m]klli_lCt.lEl_
Si abre la puerta frecuentemente para
mirar los alimentos, causarA una perdida
de calory malos resultados cuando
hornee.
I . . II!1 v !1!11"_
lr_,!,
El precalentamiento es subir la homo
temperatura a la temperatura que va a
usar cuando hornee. Permita que el horno
se precaliente cuando las recetas
requieren precalentamiento.
IMPORTANTE: Nunca cubra el rondo del
horno o la parrilla del horno con papel de
aluminio. El uso inadecuado puede
causar una mala circulaci6n del calor,
pobres resultados al hornear, y podria
da_ar el acabado del homo. Para
prevenir manchas a causa de derrames,
usted podria poner un peclazo de papel
de aluminio o una bandeja para galletas
debajo de la comida que se podria subir,
La ventilaci6n del homo est,. ubicada bajo
el elemento trasero derecho. Esta Area se
podria calentar mucho durante el uso del
homo. Es normal que salga vapor de la
ventilaci6n y/o que se produzca humedad
debajo cuando el homo no est# en uso. La
ventilaci6n es importante para la correcta
circulaci6n del aire. Nunca obatruya la
ventilacibn.
Ventilacibn
La zona de temperatura baja de su
homo (entre 170° y 200°F) est_ disponible
para mantener los alimentos tibios. Sin
embargo, los alimentos no se deberfan
mantener a estas bajas temperaturas por
m_.s de 2 horas.
Cuando use su conveniente operaci6n de
Comienzo Demorado, los alimentos tales
como productos I_cteos, pesoado, aves,
etc., nunca se deberfan dejar expuestos
por mb.s de una hora antes de ser
cocinados. La temperatura ambiente y el
calor de la luz del homo promueven el
crecimiento de bacterias.
Para prolongar la vida del
foco de las luces del homo,
siga estos consejos:
Siempre apague la luz
cuando el homo no este en uso O durante
un ciclo de limpieza. Si su homo no tiene
una ventana en la puerta, usted tendrA
que abrir la puerta para estar seguro que
las luces est_ apagada. Si la luz del homo
se deja encendida por un largo perfodo de
tiempo, el horno estar_ tibio cuando abra
la puerta debido al calor generado por el
foco de las luces del homo.
48
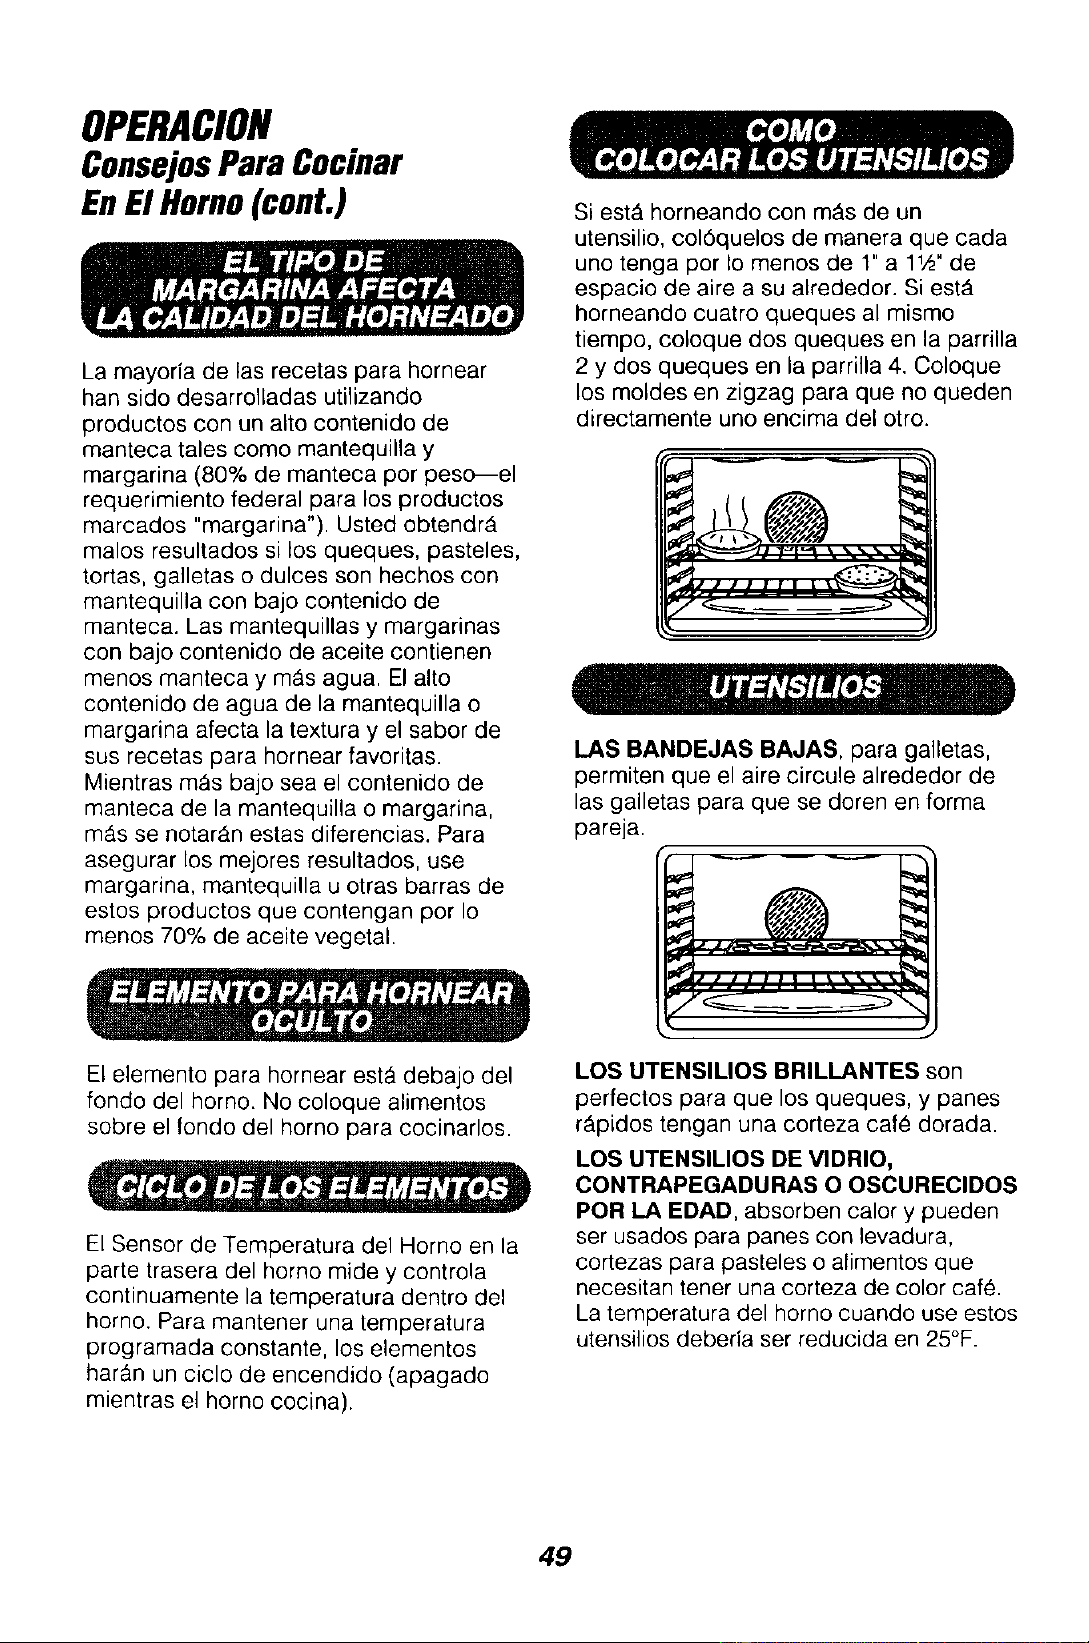
OPERACION
ConsejosParaCocinar
EnE1Homo(cont.)
La mayoria de las recetas para hornear
han sido desarrolladas utilizando
productos con un alto contenido de
manteca tales como mantequilla y
margarina (80% de manteca por peso--el
requerimiento federal para los productos
marcados "margarina"). Usted obtendr_.
malos resultados si los queques, pasteles,
tortas, ga]letas o dulces son hechos con
mantequilla con bajo contenido de
manteca. Las mantequillas y margarinas
con bajo contenido de aceite contienen
menos manteca y m_s agua. El alto
contenido de agua de la mantequilla o
rnargarina afecta la textura y el sabor de
sus recetas para hornear favoritas.
Mientras m&s bajo sea el contenido de
manteca de la mantequilla o margarina,
mAsse notarAn estas diferencias. Para
asegurar los mejores resultados, use
margarina, mantequilla u otras barras de
estos productos que contengan por Io
menos 70% de aceite vegetal.
El elemento para hornear est_ debajo del
fondo del horno. No coloque alimentos
sobre el rondo del homo para cocinarlos.
El Sensor de Temperatura del Homo en la
parte trasera del homo mide y controla
continuamente la temperatura dentro del
horno. Para mantener una temperatura
programada constante, los elementos
har&n un ciclo de encendido (apagado
mientras el homo cocina).
Si est_ horneando con m_s de un
utensilio, col6quelos de manera que cada
uno tenga por Io menos de 1" a 1W de
espacio de aire a su alrededor. Si est..
horneando cuatro queques al mismo
tiempo, coloque dos queques en la parrilla
2 y dos queques en la parrilla 4. Coloque
los moldes en zigzag para que no queden
directamente uno encima del otro.
L.AS BANBEJAS BAJAS, para galletas,
permiten que el aire circule alrededor de
las galletas para que se doren en forma
pareja.
LOS UTENSILIOS BRILLANTES son
perfectos para que los queques, y panes
rApidos tengan una corteza cafe dorada.
LOS UTENSILIOS DE VIDRIO,
CONTRAPEGADURAS O OSCURECIDOS
POR LA EDAD, absorben calory pueden
ser usados para panes con levadura,
cortezas para pasteles o alimentos que
necesitan tener una corteza de color caf_.
La temperatura del homo cuando use estos
utensilios deberia ser reducida en 25°F.
49
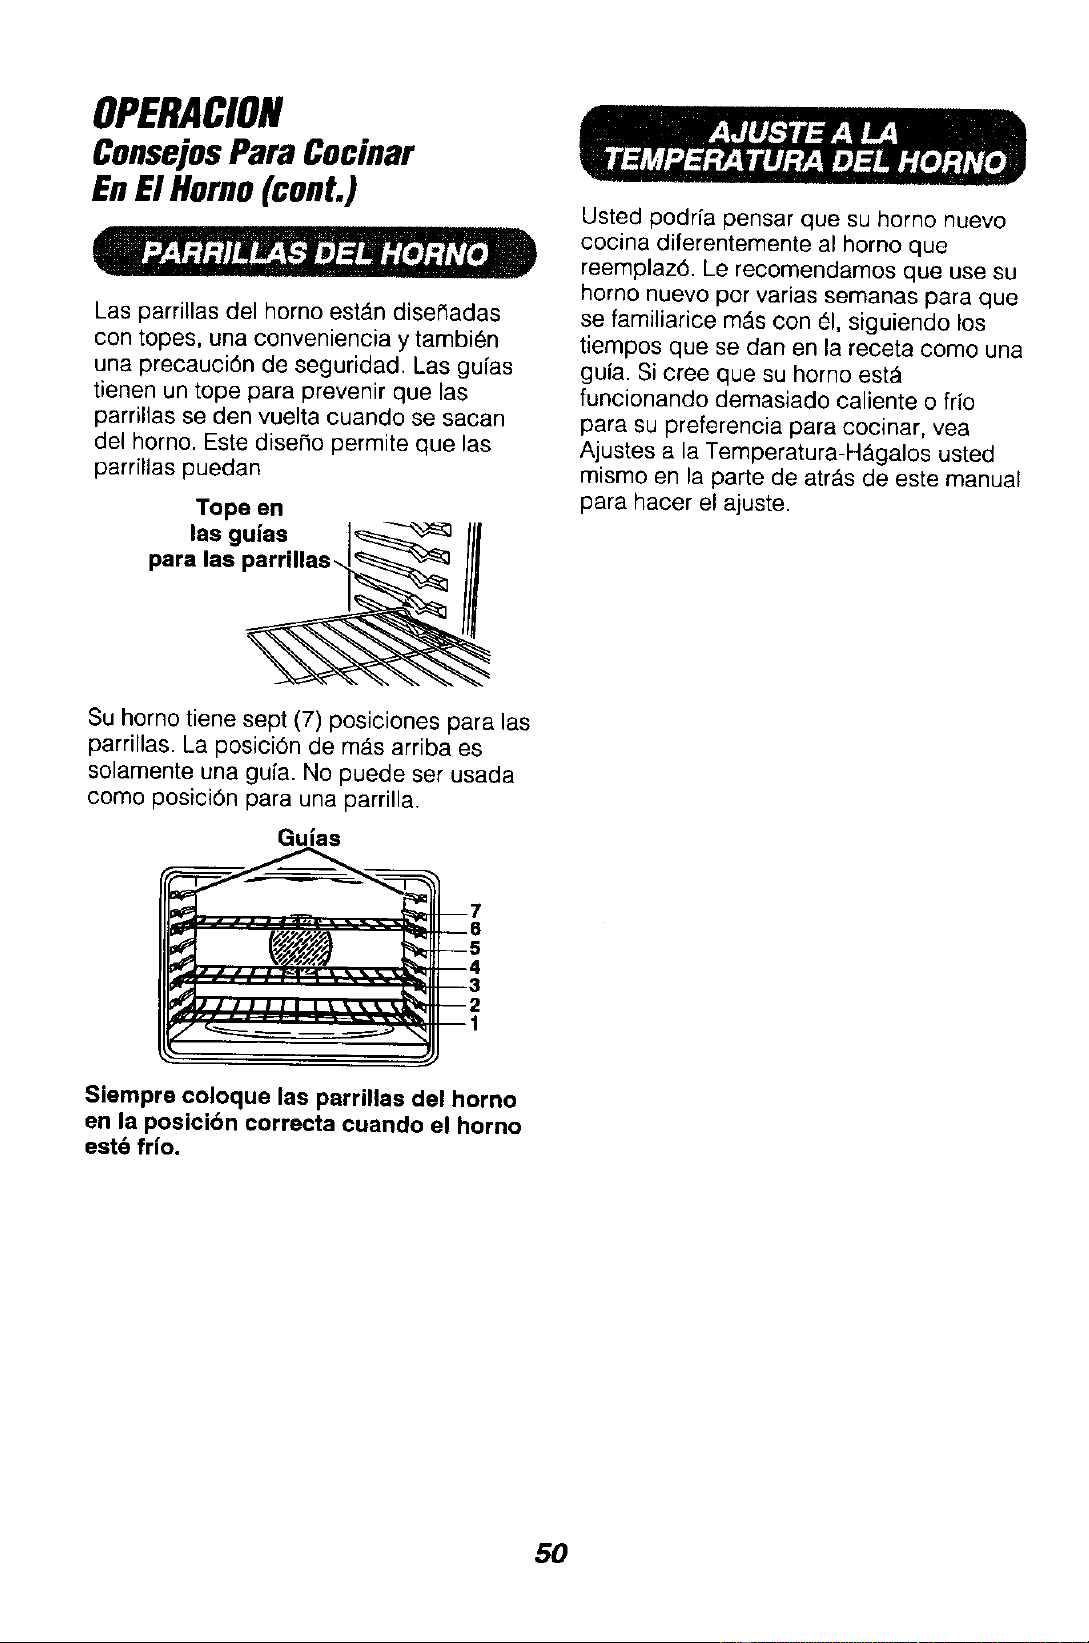
OPERACION
ConsejosPara Cocinar
EnElHomo(cont.)
Las parrillas del homo est_n diserladas
con topes, una conveniencia y tambi_n
una precauci6n de seguridad. Las gufas
tienen un tope para prevenir que las
parrillas se den vuelta cuando se sacan
del homo. Este dise_o permite que las
parrillas puedan
Tope en
paral_:__
Su homo tiene sept (7) posiciones para las
parrillas. La posici6n de m_s arriba es
solamente una gufa. No puede ser usada
come posici6n para una parrilla.
Gulas
Siempre coloque las perrlUas del homo
en la poslci6n correcta cuando el horno
est6 fr|o.
Usted podrfa pensar que su homo nueve
cocina diferentemente al homo que
reemplaz6. Le recomendames que use su
horno nuevo per varias semanas para que
se familiarice m&s con 61, siguiendo los
tiempos que se dan en la receta come una
gula. Si cree que su homo est_
funcienando demasiado ealiente e fifo
para su preferencia para cocinar, vea
Ajustes a la Temperatura-H_galos usted
misr'no en la parte de arras de este manual
para hacer el ajuste.
50
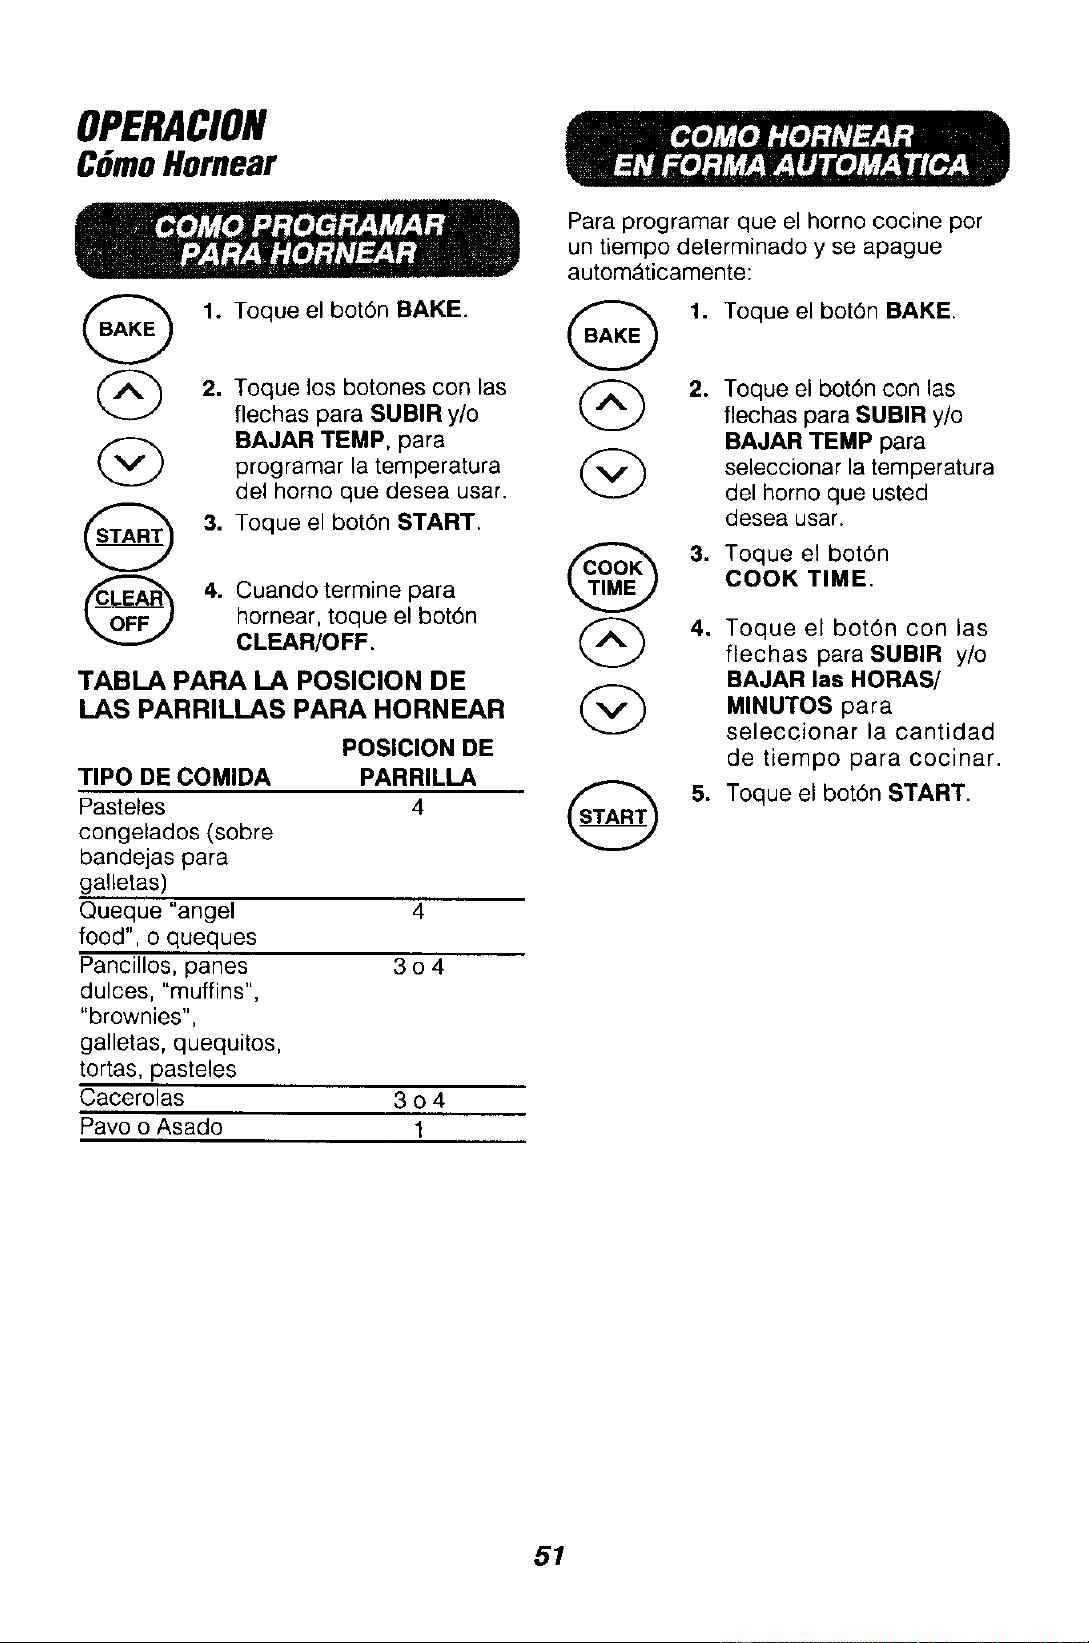
OPERACION
CGmoHornear
0
@
1. Toque el bot6n BAKE.
2. Toque los botones con las
flechas para SUBIR y/o
BAJAR TEMP, para
programar la temperatura
del homo que desea usar.
3. Toque el bot6n START.
4. Cuando termine para
hornear, toque el bot6n
CLEAR/OFF.
TABLA PARA LA POSICION DE
LAS PARRILLAS PARA HORNEAR
POSICION DE
TIPO DE COMIDA PARRILLA
Pasteles 4
congelados (sobre
bandejas para
galletas)
Queque "angel 4
food", o queques
Pancillos, panes 3 o 4
dulces, "muffins",
"brownies",
galletas, quequitos,
tortas, pasteles
Cacerolas 3 o 4
Pavo o Asado 1
Para programar que el horno cocine por
un tiempo determinado y se apague
autom4ticamente:
G
1. Toque el bot6n BAKE.
2. Toque el bot6n con las
flechas para SUBIR y/o
BAJAR TEMP para
seleccionar la temperatura
del homo que usted
desea usar.
3. Toque el bot6n
COOK TIME.
4. Toque el bot6n con las
flechas para SUBIR y/o
BAJAR las HORAS/
MINUTOS para
seleccionar la cantidad
de tiempo para cocinar.
5. Toque el bot6n START.
51
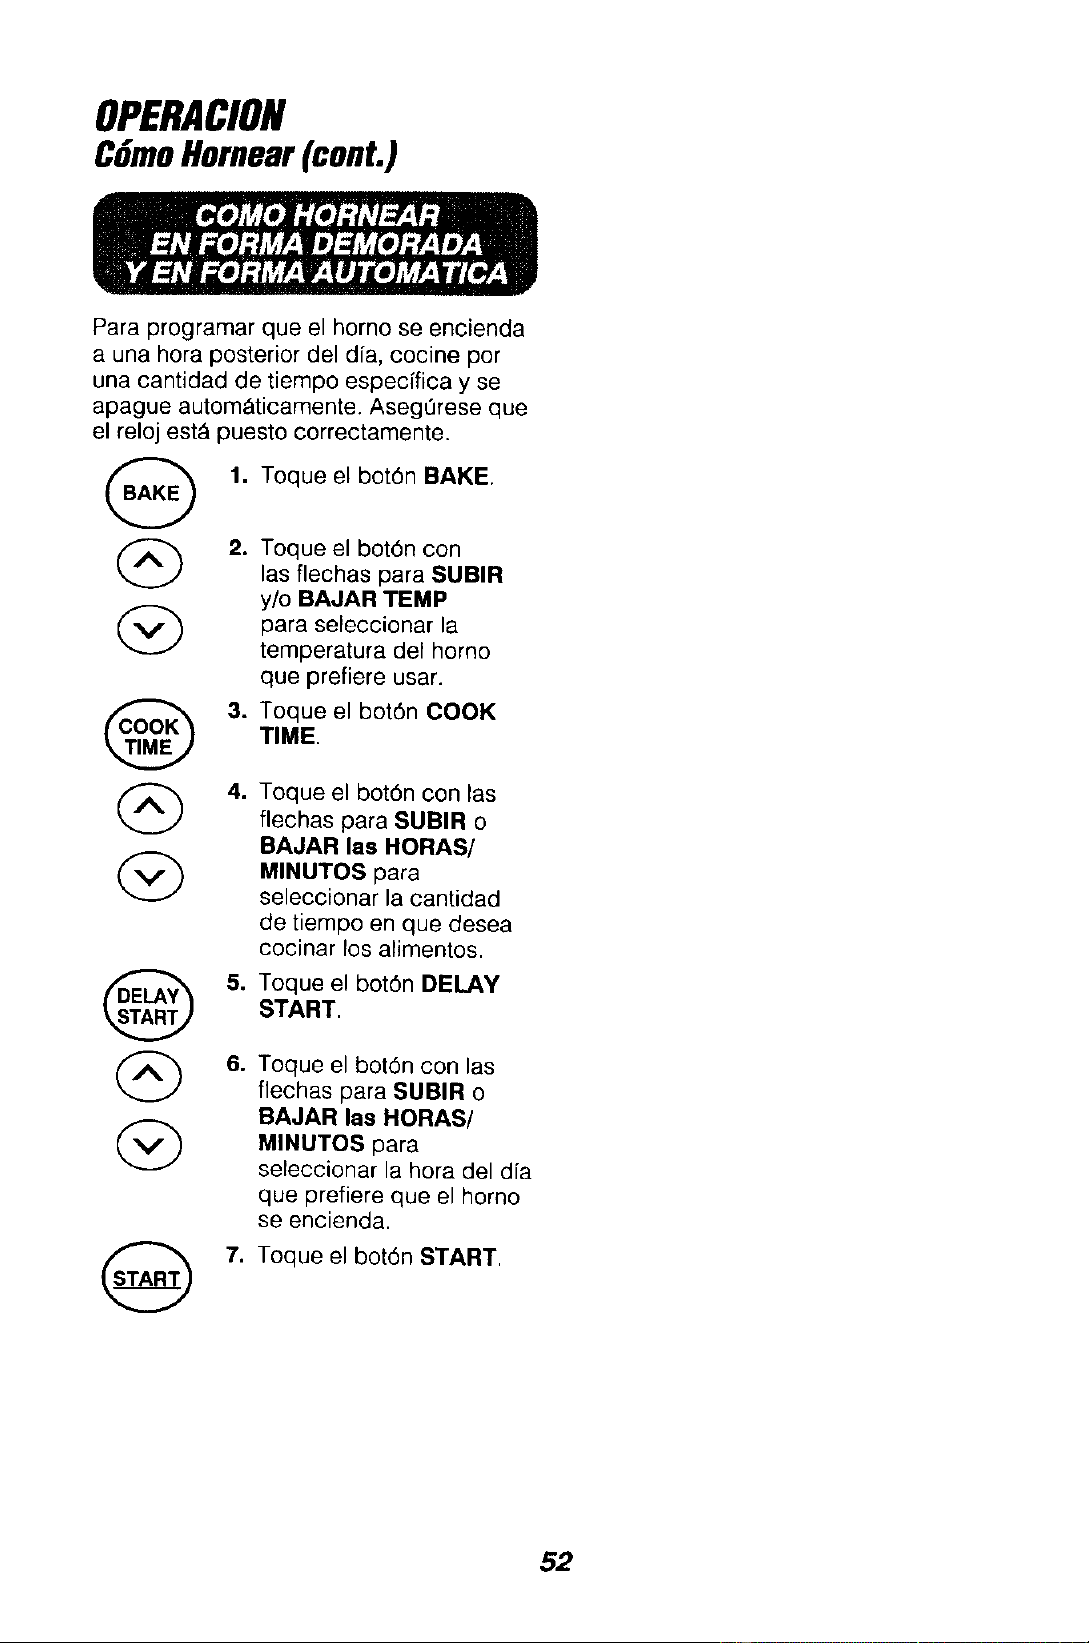
OPERACION
CGmoHornear(cont.)
Para programar que el horno se encienda
a una hora posterior del dfa, cocine por
una cantidad de tiempo especffica y se
apague autom&ticamente. Aseg0rese que
el reloj estA puesto correctamente.
G
@
1. Toque el bot6n BAKE.
2. Toque el bot6n con
las flechas para SUBIR
y/o BAJAR TEMP
para seleccionar la
temperatura clef homo
que prefiere usar.
3. Toque el bot6n COOK
TIME.
4. Toque el bot6n con ias
flechas para SUBIR o
BAJAR las HORAS/
MINUTOS para
seleccionar la cantidad
de tiempo en que desea
cocinar los alimentos.
5.
Toque el bot6n DELAY
START.
Toque el bot6n con las
flechas para SUBIR o
BAJAR las HORAS/
MINUTOS para
seleecionar la hora del d[a
que prefiere que el homo
se encienda.
7. Toque el bot6n START.
52
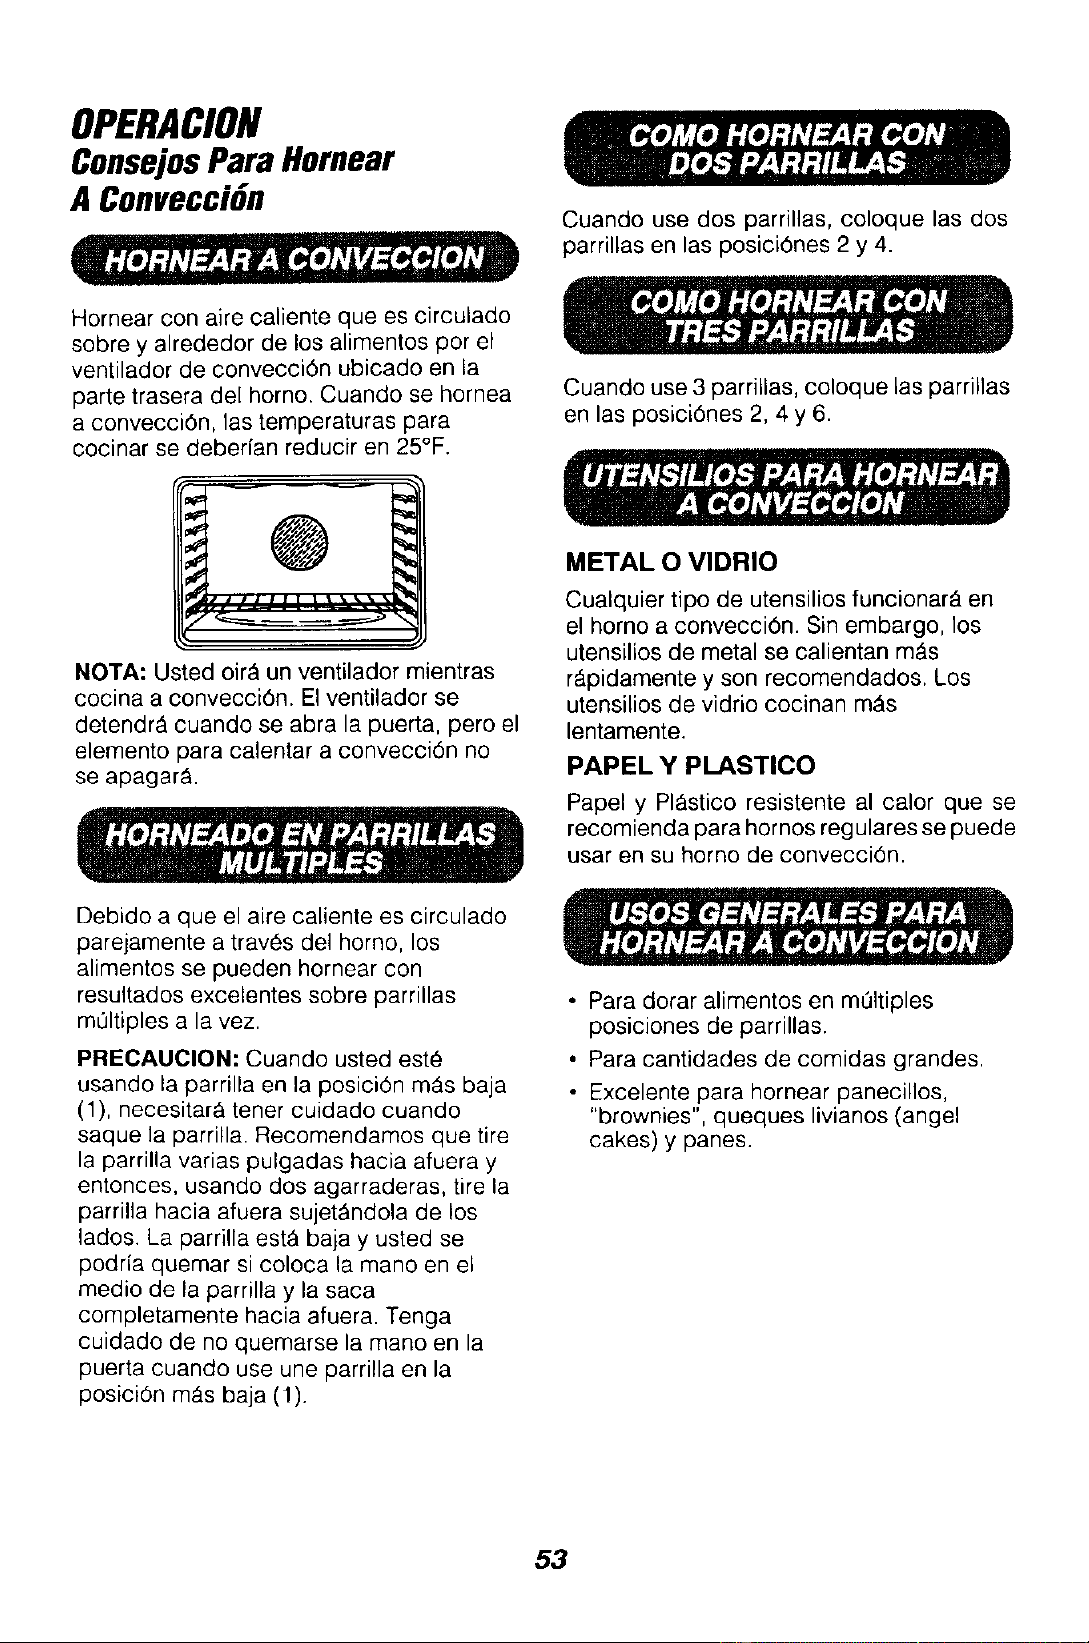
OPERACION
Consejos Para Hornear
A ConvecciGn
Cuando use dos parrillas, coloque las dos
parrillas en las posici6nes 2 y 4.
Hornear con aire caliente que es circulado
sobre y alrededor de los alimentos per el
ventilador de convecci6n ubicado en la
parte trasera del homo. Cuando se hornea
a convecci6n, las temperaturas para
cocinar se deberian reducir en 25°F.
NOTA: Usted oir_ un ventilador mientras
cocina a convecci6n. El ventilador se
detendr_ cuando se abra la puerta, pero el
elemento para calentar a convecci6n no
se apagar&.
Cuando use 3 parrillas, coloque las parrillas
en las posici6nes 2, 4 y 6.
METAL O VIDRIO
Cualquier tipo de utensilios funcionarA en
el homo a convecci6n. Sin embargo, los
utensilios de metal se calientan m&s
r_pidamente y son recomendados. Los
utensilios de vidrio cocinan m_s
lentamente.
PAPEL Y PLASTICO
Papel y Pl_stico resistente al calor que se
recomienda para hornos reg ulares se puede
usar en su horno de convecci6n.
Debido a que el aire caliente es circulado
parejamente a trav6s del homo, los
alimentos se pueden hornear con
resultados excelentes sobre parrillas
mOltiples a la vez.
PRECAUCION: Cuando usted este
usando la parrilla en la posici6n m&s baja
(1), necesitar& tener cuidado cuando
saque la parrilla. Recomendamos que tire
la parrilla varias pulgadas hacia afuera y
entonces, usando dos agarraderas, tire la
parrilla hacia afuera sujet_ndola de los
lades. La parrilla est_ baja y usted se
podria quemar si coloca la mano en el
medio de la parrilla y la saca
completamente hacia afuera. Tenga
cuidado de no quemarse la mano en la
puerta cuando use une parrilla en la
posiciOn m_s baja (1).
• Para dorar alimentos en m01tiples
posiciones de parrillas.
• Para cantidades de comidas grandes.
• Excelente para hornear panecillos,
"brownies", queques livianos (angel
cakes) y panes.
53
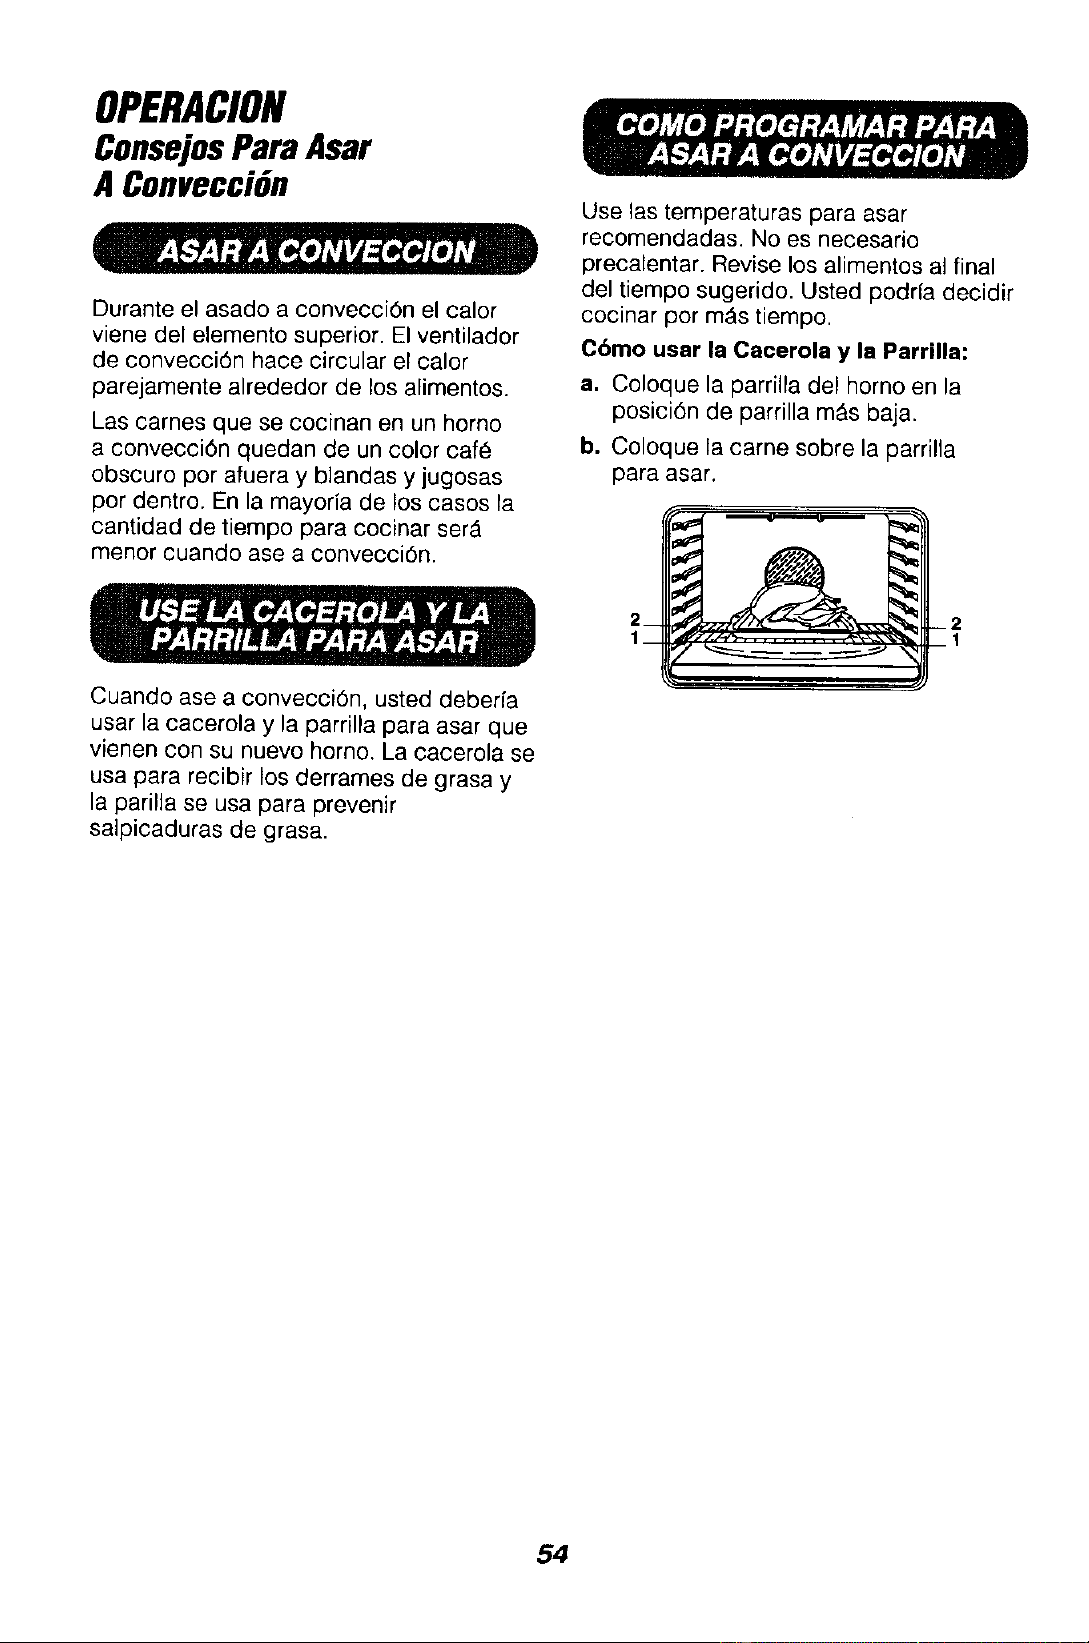
OPERACION
ConsejosPara Asar
A ConvecciGn
Durante el asado a convecci6n el calor
viene del elemento superior. El ventilador
de convecciOn hace circular el calor
parejamente alrededor de los alimentos.
Las carnes que se cocinan en un homo
a convecci6n quedan de un color cafe
obscure per afuera y blandas y jugosas
per dentro. En la mayoda de los cases la
cantidad de tiempo para cocinar ser_
menor cuando ase a convecci6n.
Use las temperaturas para asar
recomendadas. No es necesario
precalentar. Revise los alimentos al final
del tiempo sugerido. Usted podrfa decidir
cocinar per mAs tiernpo.
Cbmo usar la Cacerola y la Parrilla:
a. Coloque la parrilla del horno en la
posici6n de parrilla m&s baja.
b. Coloque la came sobre la parrilla
para asar.
Cuando ase a convecci6n, usted deberfa
usar la cacerola y la parrilla para asar que
vienen con su nuevo horno. La cacerola se
usa para recibir los derrames de grasa y
la parilJa se usa para prevenir
salpicaduras de grasa.
54
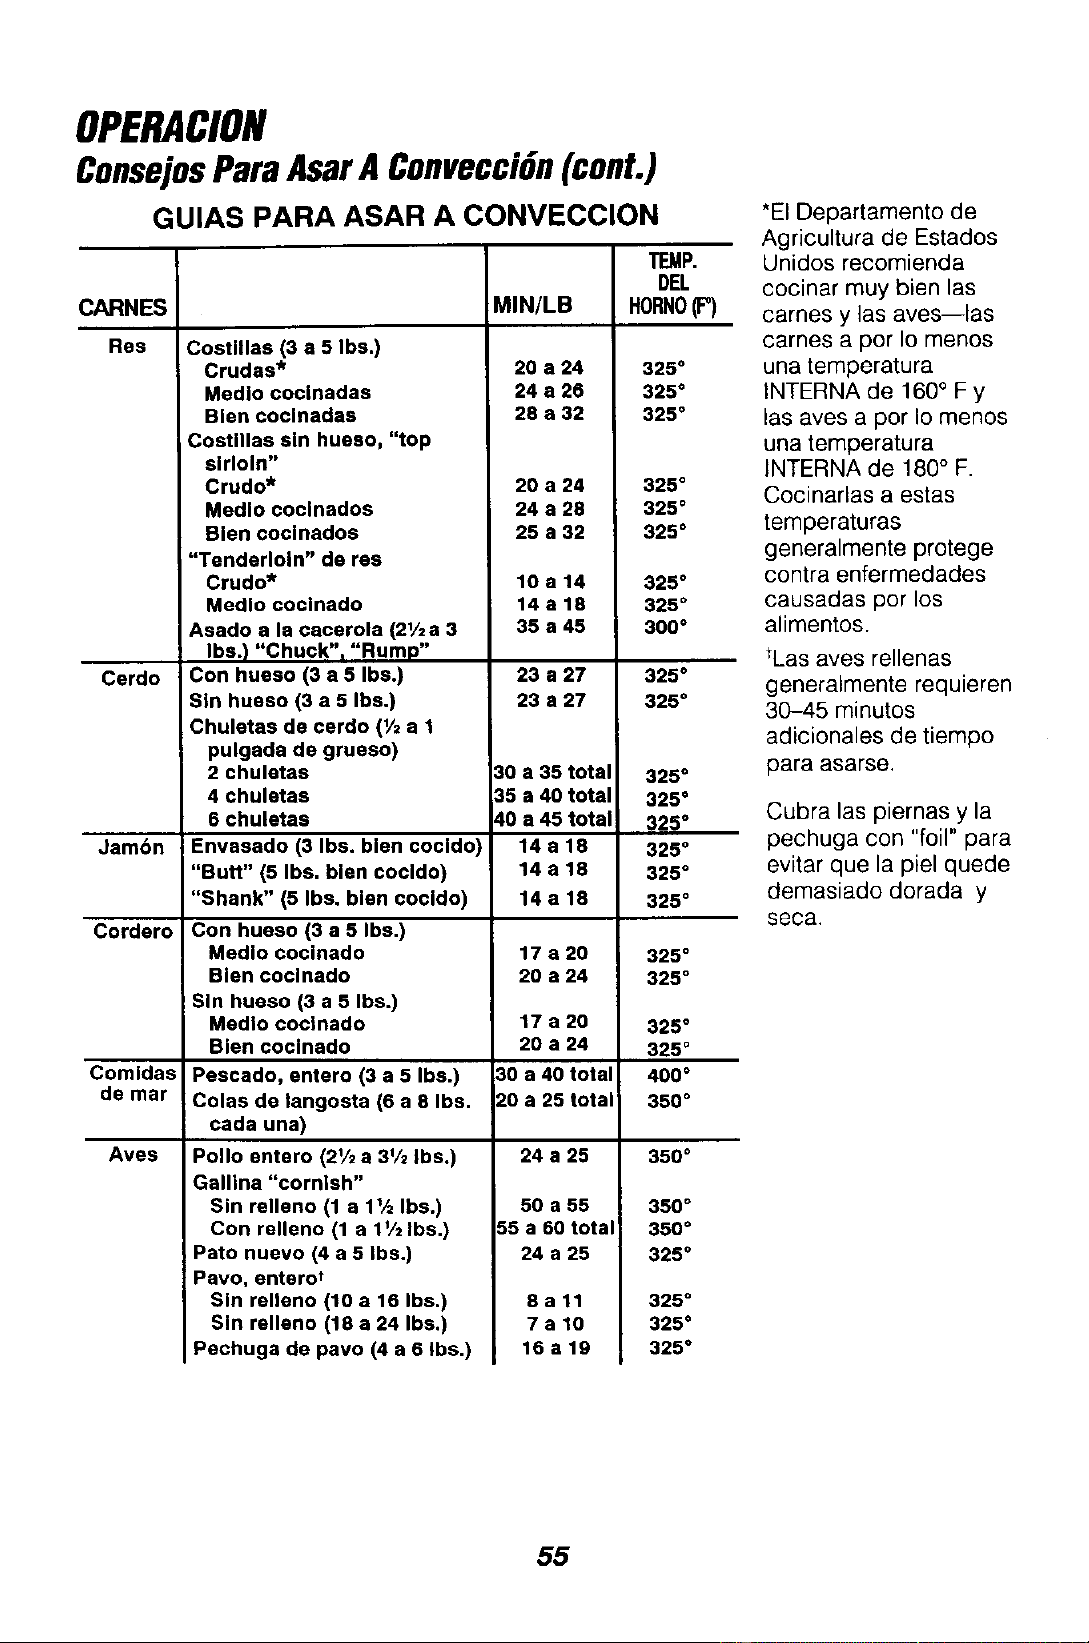
OPERACION
ConsejosParaAsarA ConvecciGn(cont.)
GUIAS PARA ASAR A CONVECCION
TEMP.
DEL
;ARNES MIN/LB HORNO(P)
Res
Cerdo
20 a 24
24 a 26
28 e 32
Costlllas (3 a 5 Ibs.)
Crudas*
Medio coclnadas
Blen coclnadas
Costnlas sin hueso, "top
sirloin"
Crudo*
Medlo cocinados
Blen coclnados
"Tenderloin" de res
Crudo*
Medlo coclnado
Asado a la cacerola (2V=a 3
Ibs.) "Chuck"= "Rump"
Con hueso (3 a 5 Ibs.)
Sin hueso (3 a 5 Ibs.)
Chuletas de oerdo (V= a 1
pulgada de grueso)
2 chuletas
4 chuletas
6 chuletas
Envasado (3 Ibs. blen cocldo
"Butt" (5 Ibs. blen cocldo)
"Shank" (5 Ibs. blen cocldo)
Con hueso (3 a 5 Ibs.)
Medlo cocinado
Blen coclnado
Sin hueso (3 a 5 Ibs.)
Medlo coclnado
Bien coclnado
Pescado, entero (3 a 5 Ibs.)
Colas de langosta (6 a 8 Ibs.
cada una)
Polio sntsro (2'/2 a 3'/= Ibs.)
Gallina "cornish"
Sin relleno (1 a 1% Ibs.)
Con relleno (1 a 1'/2 Ibs.)
Pato nuevo (4 a 5 Ibs.)
Pavo, entero t
Sin relleno (10 a 16 Ibs.)
Sin relleno (13 a 24 Ibs.)
Pechuga de pavo (4 a 5 Ibs.)
20 a 24
24 a 28
25 a 32
10a14
14a18
35 a 45
23 a 27
23 a 27
325 °
325 °
325 °
325 °
325 °
325 °
325 °
325 °
300 °
325 °
325 °
30 a 35 total 325 °
35 a 40 total 325 °
40 a45total 325 °
Jambn 14 a 18 325 °
14 a 18 325 °
14 a 18 325 °
Cordero
17 a 20 325 °
20 a 24 325 °
17 a 20 325 °
20 a 24 325 °
Comidas 30 a 40 total 400 °
de mar 20 a 25 total 350 °
Aves 24 a 25 350 °
50 a 55
35 a 60 total
24 a 25
8all
7a10
16a19
350 °
350 °
325 °
325 °
325 °
325 °
*El Departamento de
Agricultura de Estados
Unidos recomienda
cocinar muy bien las
carnes y las aves--las
carnes a per Io menos
una temperatura
INTERNA de 160° F y
las aves a por Io menos
una temperatura
INTERNA de 180° F.
Cocinarlas a estas
temperaturas
generalmente protege
contra enfermedades
causadas por los
alimentos.
tLas ayes rellenas
generalmente requieren
30_.5 minutos
adicionales de tiempo
para asarse,
Cubra las piernas y la
pechuga con "foil" para
evitar que la piel quede
demasiado dorada y
seca.
55
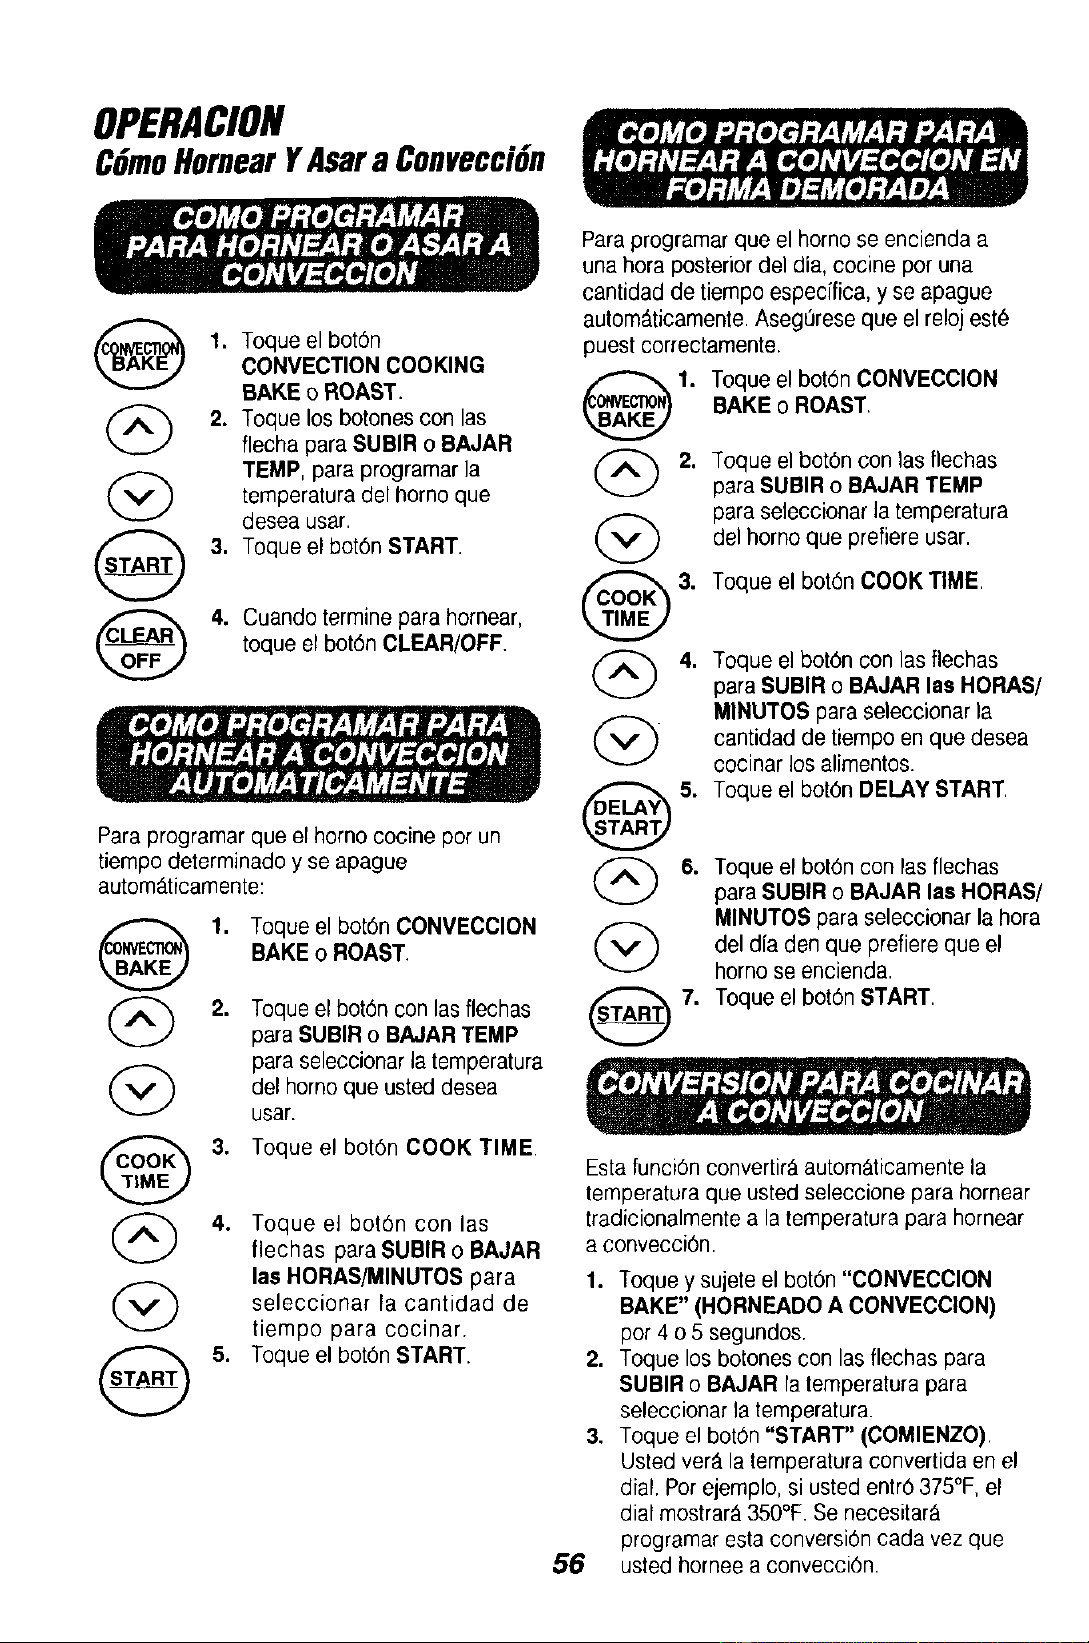
OPERACION
CGmoHornearYAsara ConvecciGn
@
G
0
@
1. Toque el bot6n
CONVECTION COOKING
BAKE o ROAST.
2. Toque los botenes con las
flecha para SUBIR o BAJAR
TEMP, para programarla
temperatura del borne que
desea usar.
3, Toque el bot6n START.
4. Cuando termine para hornear,
toque el bot6n CLEAR/OFF
Para programar que el homo cocine per un
tiempo determinado y se apague
autom_ticamente:
@
@
G
O
1. Toque el bot6n CONVECCION
BAKE o ROAST.
,
Toque el bot6n con las flechas
para SUBIR o BAJAR TEMP
para seleccionar la temperatura
del homo que usted desea
usar.
3. Toque el bot6n COOK TIME.
4. Toque el bot6n con las
flechas para SUBIR o BAJAR
las HORAS/MINUTOS para
seleccionar la cantidad de
tiempo para cocinar.
5. Toque el bot6n START.
G
@
G
@
Para programar que el homo se encienda a
una hera posterior del dia, cocine per una
cantidad de tiempo especffica, y se apague
autom_ticamente. Aseg0rese que el reloj est_
puest correctamente.
1. Toque el bot6n CONVECClON
BAKE o ROAST.
2. Toque el bot6n con las flechas
para SUBIR o BAJAR TEMP
para seleccionar la temperatura
del homo que prefiere usar.
3. Toque el bot6n COOK TIME.
4. Toque el bot6n con las flechas
para SUBIR o BAJAR las HORAS/
MINUTES para seleeeionar la
eantidad de tiempo en que desea
cocinar los alimentos.
5. Toque el bot6n DELAY START,
6. Toque el bot6n con las flechas
para SUBIR o BAJAR las HORAS/
MINUTES para seleccionar la hera
(_ del dfa den que prefiere que el
homo se encienda.
7. Toque el bet6n START.
56
Esta funci6n convertir_ autom_ticamente la
temperatura que usted seleccione para homear
tradicionalmente a la temperatura para hornear
a convecci6n.
1. Toque y sujete el bot6n "CONVECCION
BAKE" (HORNEADO A CONMECClON)
per 4 o 5 segundos.
2. Toque los botones con las flechas para
SUBIR o BAJAR la temperatura para
seleccionar la temperatura.
3. Toque el bot6n "START" (COMIENZO).
Usted ver_.la temperatura convertida en el
dial. Per ejemplo, si usted entr0 375°F, el
dial mostrar_ 350°F. Se necesitar_
programar esta conversi6n cada vez que
usted homee a convecci6n.

OPERACION
Ayudaspara tiempos
de cocinar
Usted puede preseleccionar hasta cinco
combinaciones de temperatura/cantidad
de tiempo para cocinar con esta funci6n.
Usted puede entonces hornear u hornear
o asar a convecci6n cualquiera de cinco
de sus recetas favoritas sin tener que
seleccionar posiciones cada vez.
NOTAS:
• Usted no puede usar el programa de
Receta Favorita con el ciclo para asar a
la parrilla o de limpieza automatic&
• Su horno recordarA las preselecciones
de Receta Favorita incluso hasta
despu_s de un corte de corriente.
• Agregue el tiempo de
precalentamiento esUmado a la
cantidad de tiempo para cocinar,
Cuando suene el tono de
precalentamiento, ponga la comida
en el homo.
Cbmo ahorrar un programa de Receta
Favorita:
@
@
G
1,
,
3,
Toque ei bot6n RECETA
FAVORITA (FAVORITE
RECIPE) de una a cinco
veces para encontrar un
espacio en blanco para una
receta.
Toqueeibot6nBAKE,
CONVECTION BAKE
oCONVECTION
ROAST.
Toque los bot6nes con las
fiechas para SUBIR o
BAJAR la TEMPERATURA
para programar la
temperatura. (Si no
programa una temperatura,
el homo cocinarA a la
temperatura que se muestra
en el control). Cada vez que
usted toque un bot6n con
una flecha, la temperatura
aumentar_/disminuir_ en 5°.
@
G
@
4. Toque el bot6n COOK
TIME.
,
,
7.
Toque los botones con las
flechas para SUBIR o BAJAR
las HORAS/MtNUTOS para
programar la cantidad de
tiempo para cocinar.
Toque el bot6n FAVORITE
RECIPE. El dial muestra
"SAVE." Toque el bot6n
FAVORITE RECIPE
nuevamente para ahorrar
la receta.
Toque el bot6n START si
desea empezar a cocinar
la receta que acaba de
ahorrar.
o
Toque el bot6n CLEAR/
OFF para poner el dial en
blanco. Usted acaba de
ahorrar esta receta.
Cbmo usar una receta favorita:
1. Toque el bot6n FAVORITE
RECIPE de una a cinco
veces para encontrar la
receta que desea cocinar.
2. Cuando haya elegido la
receta que desea usar,
toque el bot6n START.
NOTA: Usted puede programar una
Receta Favorita para que se empiece a
cocinar m_s tarde si toca el bot6n DELAY
START y los botones con las flechas para
SUBIR o BAJAR las HORAS/MINUTOS
(vea "C6mo programar un comienzo
demorado con un horneado autom_tico")
en la secci6n para hornear. Usted puede
programar un tiempo demorado antes o
despu_s de elegir la Receta Favorita que
desea. Usted incluso puede empezar un
comienzo demorado despues de tocar el
bot6n START.
57
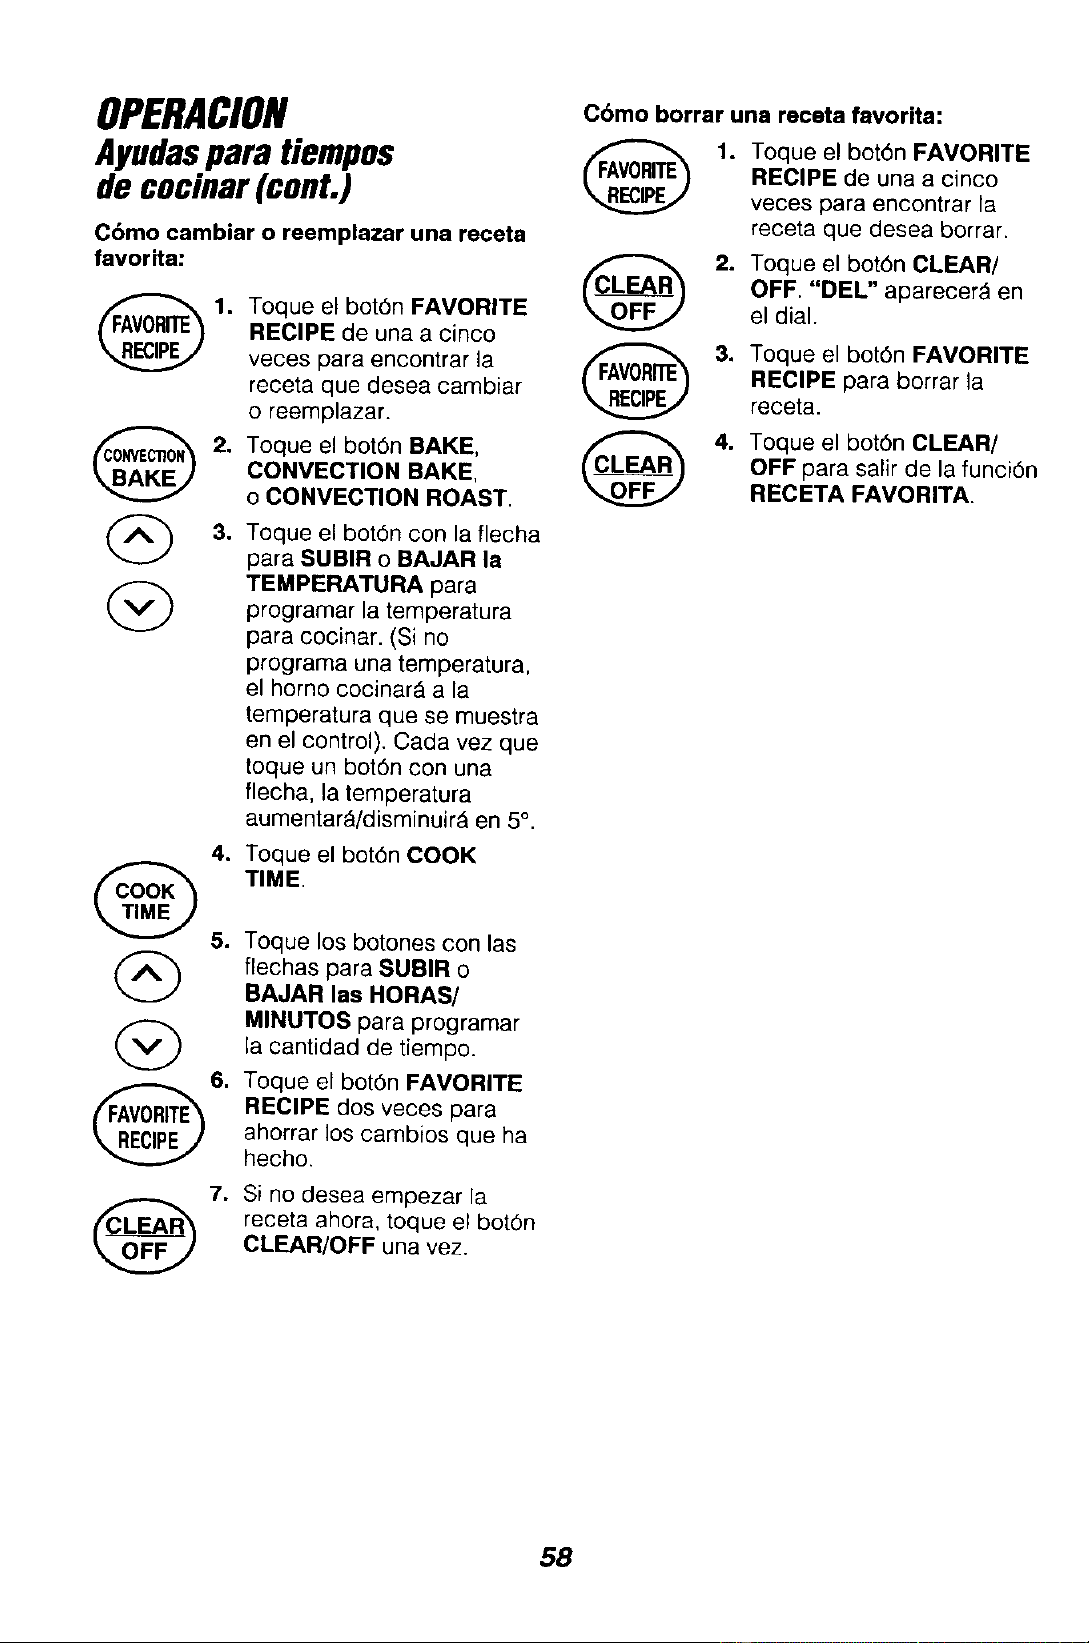
OPERACION
Ayudaspara tiempos
decocinar(cont.)
C6mo cambiar o reemplazar una receta
favorita:
@
1,
,
,
4,
G
6.
Toque el bot6n FAVORITE
RECIPE de una a cinco
veces para encontrar la
receta que desea cambiar
o reemplazar.
Toque el bot6n BAKE,
CONVECTION BAKE,
o CONVECTION ROAST.
Toque el bot6n con la flecha
para SgBIR o BAJAR la
TEMPERATURA para
programar la temperatura
para cocinar. (Si no
programa una temperatura,
el horno cocinar_ a la
temperatura que se muestra
en el control). Cada vez que
toque un bot6n con una
flecha, la temperatura
aumentar_/disminuirA en 5°.
Toque el bot6n COOK
TIME.
Toque los botones con las
flechas para SUBIR o
BAJAR las HORAS/
MINUTOS para programar
la cantidad de tiempo.
Toque el bot6n FAVORITE
RECIPE dos veces para
ahorrar los cambios que ha
hecho.
Si no desea empezar la
receta ahora, toque el bot6n
CLEAR/OFF una vez.
Cbmo borrar una receta favorita:
.
Toque el bot6n FAVORITE
RECIPE de una a cinco
veces para encontrar la
receta que desea borrar.
2.
Toque el bot6n CLEAR/
OFF. "DEL" aparecer_ en
el dial.
Toque el bot6n FAVORITE
RECIPE para borrar la
receta.
Toque el bot6n CLEAR/
OFF para salir de la funci6n
RECETA FAVORITA.
58
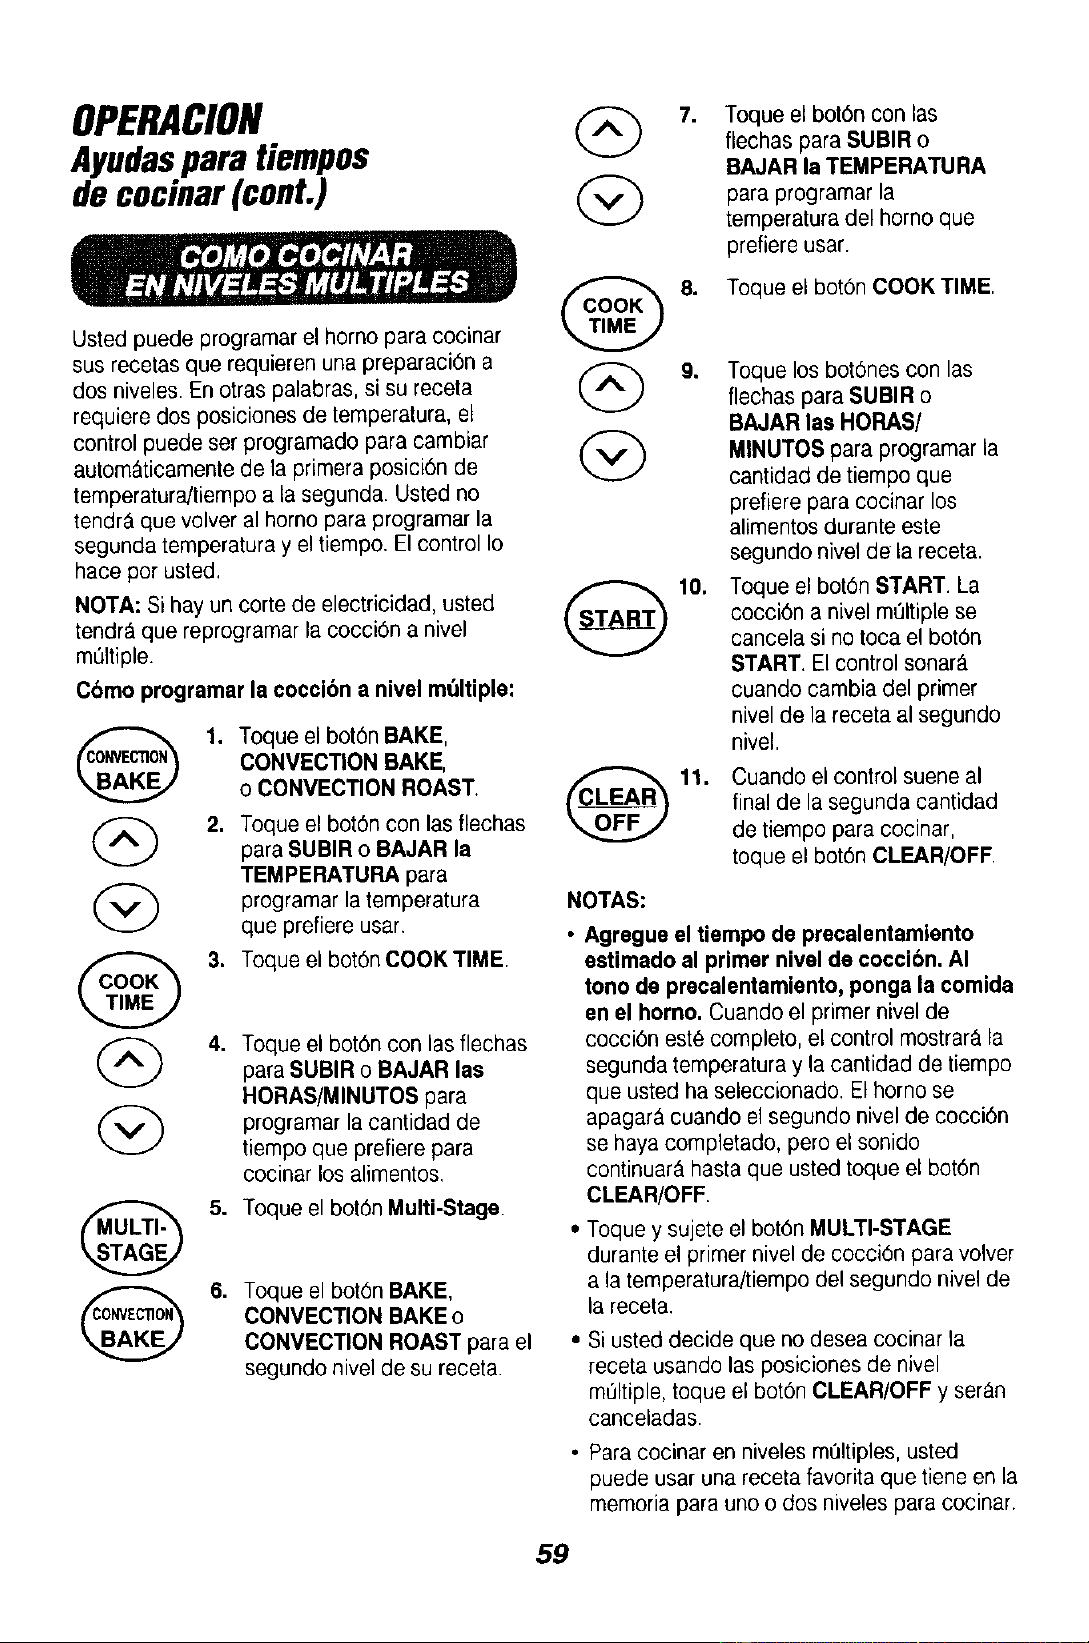
OPERACION T.
Ayudaspara tiempos
de cocinar(cont.)
Usted puede programar el homo para cocinar
sus recetas que requieren una preparaci6n a _ 9.
dos niveles. En otras palabras, si su receta
requiere dos posiciones de temperatura, el
control puede set programado para cambiar
autom&ticamente de la primera posici6n de
temperaturaJtiempo a la segunda. Usted no
tendr_, que volver al horno para programar la
segunda temperatura y el tiempo. El control Io
hace por usted,
NOTA: Si hay un corte de electricidad, usted _ 10.
tendr&que reprogramar la cocci6n a nivel
m_ltiple,
Cbmo programar la coccibn a nivel m_ltiple:
@
@
@
@
o
2,
Toque el bot6n BAKE,
CONVECTION BAKE,
o CONVECTION ROAST.
Toque el bot6n con las flechas
para SUBIR o BAJAR la
TEMPERATURA para
programar la temperatura
que prefiere usar.
3. Toque el bot6nCOOKTIME
4.
Toque el bot6n con las flechas
para SUBIR o BAJAR lee
HORAS/MINUTOS para
programar la cantidad de
tiempo que prefiere para
cocinar los alimentos.
5. Toque el bot6n Multi-Stage.
.
Toque el bot6n BAKE,
CONVECTION BAKE o
CONVECTION ROAST para el
segundo nivel de su receta.
Toque el bot6n con las
flechas para SUBIR o
BAJAR la TEMPERATURA
para programarla
temperatura del homo que
prefiere usar.
Toque el bot6n COOK TIME.
Toque los bot6nes con las
flechas para SUBIR o
BAJAR las HORAS/
MINUTOS para programar la
cantidad de tiempo que
prefiere para cocinar los
alimentos durante este
segundo nivet de la receta.
Toque el bot6n START. La
cocci6n a nivel m61tiple se
cancela si no toca el bot6n
START. El control sonarS.
cuando cambia del primer
nivel de la receta al segundo
nivel.
Cuando el control suene al
final de la segunda cantidad
de tiempo para cocinar,
toque el bot6n CLEAR/OFF
NOTAS:
Agregue el tiempo de precalentamiento
estimado al primer nivel de coccibn. AI
tono de precalentamiento, ponga la comida
en el homo. Cuando el primer nivel de
cocci6n este completo, el control mostrar& la
segunda temperatura y la cantidad de tiempo
que usted ha seleccionado. El homo se
apagar& cuando el segundo nivel de cocci6n
se haya completado, pero el sonido
continuar_ hasta que usted toque el bot6n
CLEAR/OFF
• Toque y sujete el bot6n MULTI-STAGE
durante el primer nivel de cocci6n para volver
a la temperaturaJtiempo del segundo nivel de
la receta.
• Si usted decide que no desea cocinar la
receta usando las posiciones de nivel
multiple, toque el bot6n CLEAR/OFF y ser_.n
canceladas.
• Para cocinar en niveles m01tiples,usted
puede usar una receta favorita que tiene en la
memoria para uno o dos niveles para cocinar.
59
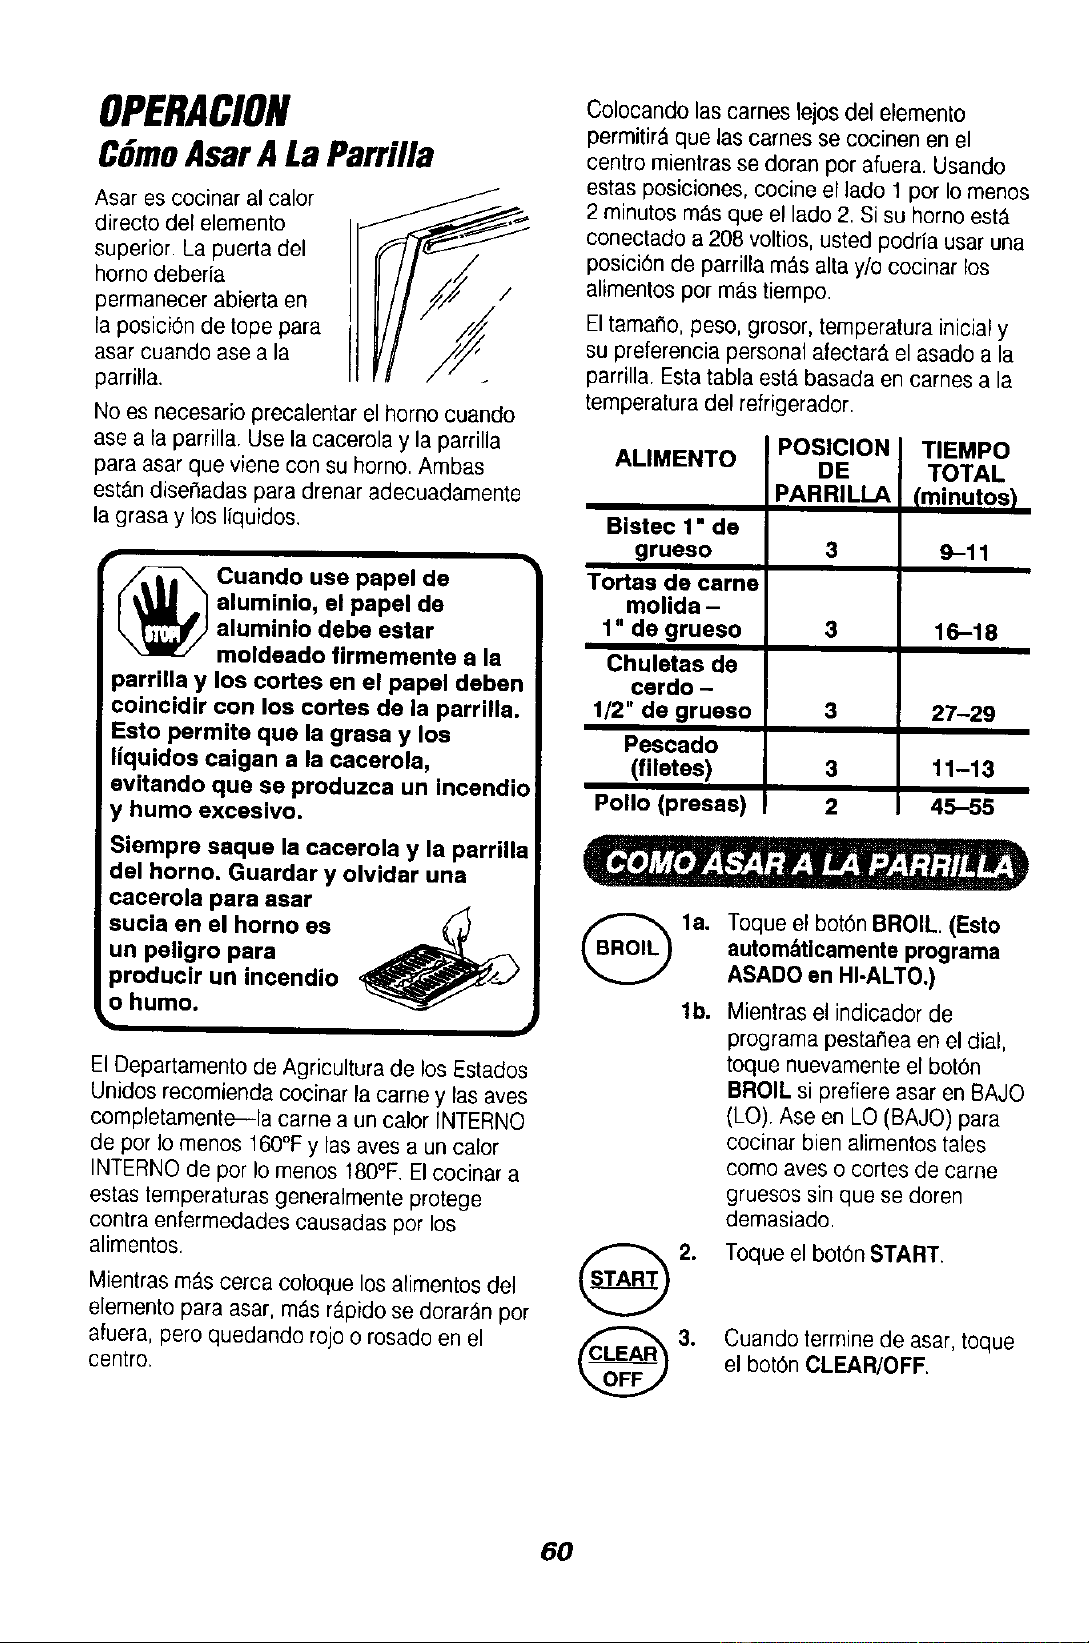
OPERACION
CGmoAsarALa Parrilla
Asar es cocinar 81calor
directo del elemento
superior. La puerta del
homo deberia
permanecer abierta en
la posici6n de tope para
asar cuando ase a la
parrilla.
/
No es necesario precalentar el homo cuando
ase a la parrilla. Use la cacerola y la parrilla
para asar qua viene con su homo. Ambas
est_.n disefiadas para drenar adecuadamente
la grasa y los Ifquidos.
r
_ uando use papel de
aluminlo, el papel de
aluminlo debe estar
moldeado firmemente a la
parrll|a y los cortes en el papal deben
coincidir con los cortes de la parrilla.
Esto permite qua la grasa y los
liquidos caigan a la cacerola,
evitando qua se produzca un Incendio
y humo excesivo.
Siempre saque la cacerola y la parrilla
del horno. Guardar y olvidar una
cacerola para asar
sucia en el homo as
un peligro para
_roducir un incendio
o humo.
El Departamento de Agricultura de los Estados
Unidos recomienda cocinar la came y las ayes
completamente--la came a un calor INTERNO
de por Io menos 160°F y las aves a un calor
INTERNO de por Io menos 180°F. El cocinar a
estas temperaturas generalmente protege
contra enfermedades causadas pot los
alimentos.
Mientras m_s cerca coloque los alimentos del
elemento para asar, m_s rApido se dorar_n por
afuera, pero quedando rojo o rosado en el
centre.
Colocando las carnes lejosdel elemento
permitir& que las tames se cocinen en el
centremientrasse doranporafuera.Usando
estasposiciones,cocineelladoI porIomenos
2 minutosm_Isque ellado2.Sisuhomo est_
conectadoa 208 voltios,ustedpodrfausaruna
posici6nde parriIIamt_saliay/ococinarlos
aIimentosporm_.stiempo.
El tama_o, peso, grosor, temperatura inicial y
su pre|erencia personal a|ectar& el asaclo a la
parrilla. Esta tabla est_ basada en carnes a la
temperatura del refrigerador.
ALIMENTO
Bistec 1• de
grueso
Tortas de came
molida -
1" de grueso
Chuletas de
cerdo -
1/2" de grueso
Pescado
(filetes)
Polio (presas)
POSICION
DE
PARRILLA
3
3
3
3
2
TIEMPO
TOTAL
(minutos}
9-11
16-18
27-29
11-13
45-55
la.
lb.
Toque el bot6n BROIL (Esto
autom_tlcamente programa
ASADO en HI-ALTO.)
Mientras el indicador de
programa pestafiea en el dial,
toque nuevamente el bot6n
BROIL si prefiere asar en BAJO
(LO). Ase en LO (BAJO) para
cocinar bien alimentos tales
como ayes o cortes de came
gruesos sin qua se doren
demasiado.
Toque el bot6n START.
Cuando termine de asar, toque
el bot6n CLEAR/OFF
60
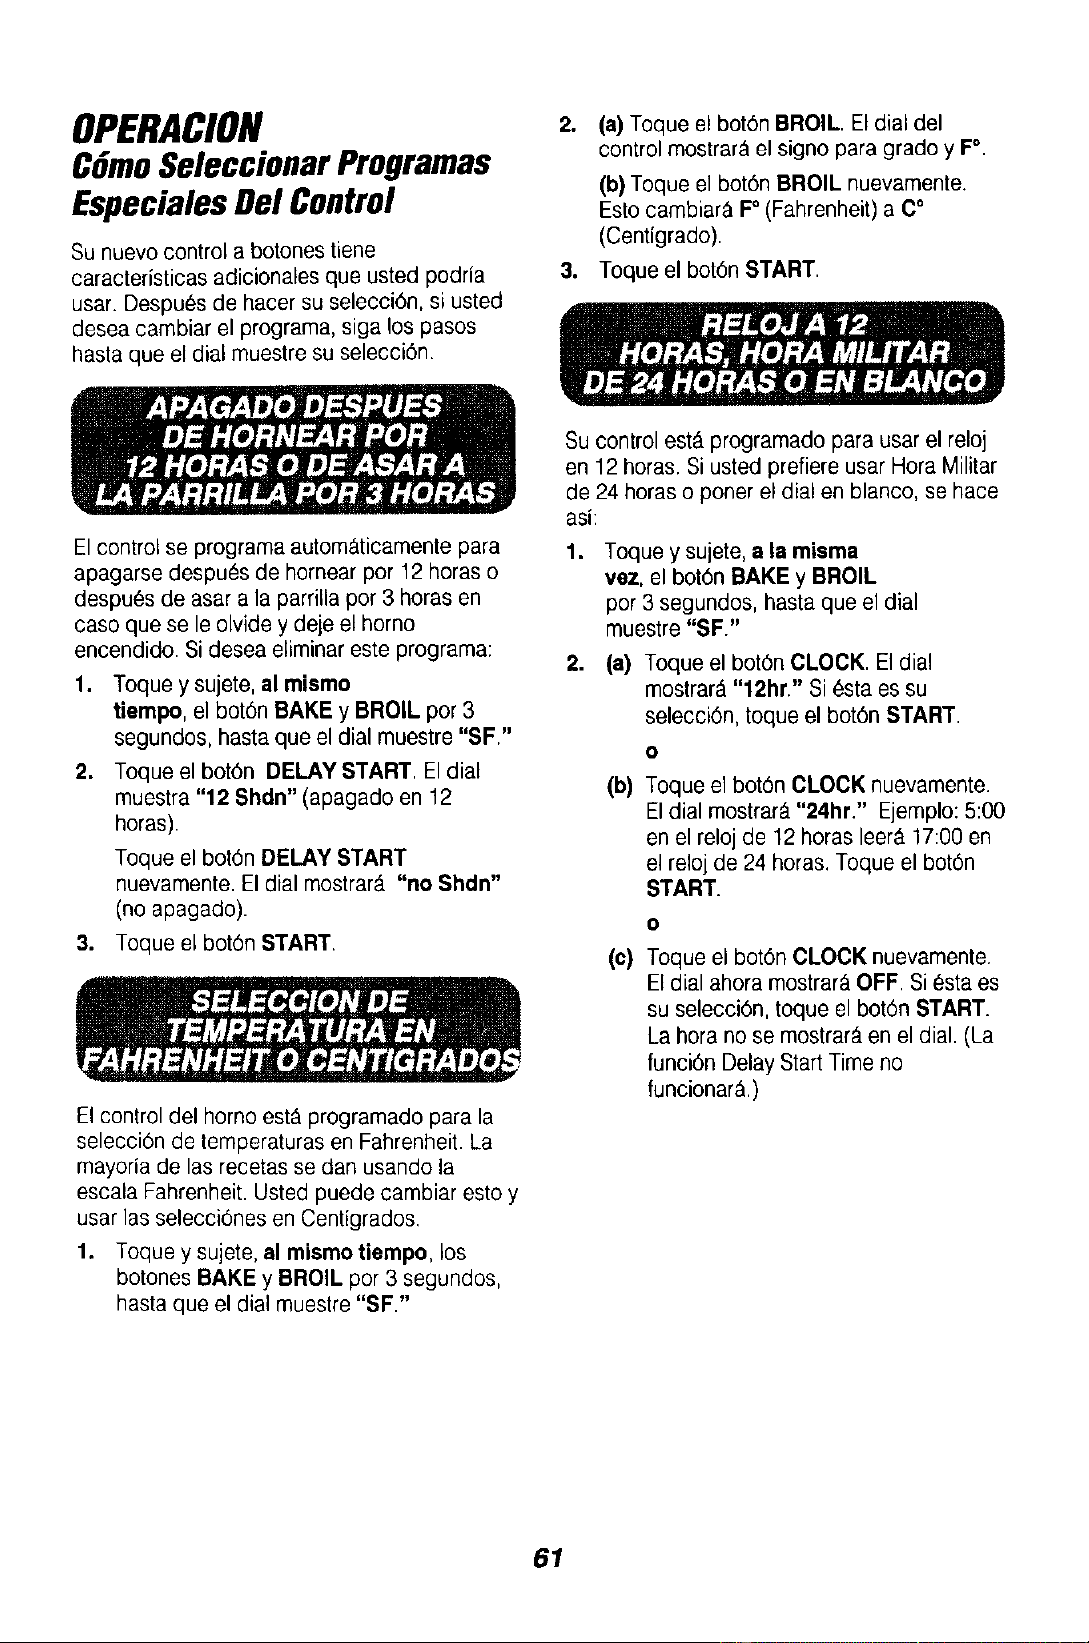
OPERACION
CGmoSeleccionar Programas
EspecialesDel Control
Su nuevo control a botones tiene
caracteristicas adicionales que usted podria
usar. Despues de hacer su selecci6n, si usted
desea cambiar el programa, siga los pasos
hasta que el dial muestre su selecci6n.
2,
(a) Toque el bot6n BROIL. El dial del
control mostrar& el signo para grado y F°.
(b) Toque el bot6n BROIL nuevamente.
Esto cambiar& F° (Fahrenheit) a C°
(Centigrado).
3. Toque el bot6n START.
El control se programa autom_ticamente para
apagarse despu_s de hornear por 12 horas o
despu6s de asar a la parrilla por 3 horas en
caso que se le olvide y deje el horno
encendido. Si desea eliminar este programa:
1. Toque y sujete, al mismo
tiempo, el bot6n BAKE y BROIL por 3
segundos, hasta que el dial muestre "SF,"
2. Toque el bot6n DELAY START. El dial
muestra "12 Shdn" (apagado en 12
horas).
Toque el bot6n DELAY START
nuevamente. El dial mostrar_. "no Shdn"
(no apagado).
3. Toque el bot6n START.
El control del homo est& programado para la
selecci6n de temperaturas en Fahrenheit. La
mayoria de las recetas se dan usando la
escala Fahrenheit. Usted puede cambiar esto y
usar las selecci6nes en Centigrados.
1. Toque y sujete, al mismo tiempo, los
botones BAKE y BROIL por 3 segundos,
hasta que el dial muestre "SF."
Su control est,. programado para usar el reloj
en 12 horas. Si usted prefiere usar Hora Militar
de 24 horas o porter el dial en blanco, se hace
asi:
1,
Toque y sujete, a la misma
vez, el bot6n BAKE y BROIL
por 3 segundos, hasta que el dial
muestre "SF."
2. (a) Toque el bot6n CLOCK. El dial
mostrar_ "12hr." Si 6sta es su
selecci6n, toque el bot6n START.
O
(b) Toque el bot6n CLOCK nuevamente.
El dial mostrar_."24hr." Ejemplo: 5:00
en el reloj de 12 horas leer;_ 17:00 en
el reloj de 24 horas. Toque el bot6n
START.
(c)
0
Toque el bot6n CLOCK nuevamente.
El dial ahora mostrar& OFF. Siesta es
su selecci6n, toque el bot6n START.
La hora no se mostrar_,en el dial. (La
funci6n Delay Start Time no
funcionar&.)
61

OPERACION
CGmoSeleccionarProgramas
Especiales(cont.)
Su nuevo control tiene una funci6n para
cocinar y mantener la temperatura para
cocinar autom_.ticamente solamente que
mantendrA los alimentos tibios hasta 3
horas despues que el cecinado
automAtico haya terminado. Para activar
esta funci6n:
1.
2.
.
Toque y sujete, a la misma
vez, los botones BAKE y BROIL
por 3 segundos, hasta que el dial
muestre "SF."
(a) Toque el bot6n COOK TIME. El
dial mostrar_ "HLd OFF."
(b) Toque el bot6n COOK TIME
nuevamente para activar este
programa. El dial mostrar_ "HLd ON."
Toque el bot6n START.
Este Programa Especial le permitir_
cambiar la velocidad, #1 significa que el
cambio de velocidad es lento hasta #5
que significa que el cambio de velocidad
es r_pido. Para seleccionar la velocidad
que prefiere, siga estos pasos:
1. Toque y sujete, a la misma
vez, los botches BAKE y BROIL
por 3 segundos, hasta que ei dial
muestre "SF."
2. Toque el bot6n con la flecha para
SUBIR la I-IORA. El dial le mostrar_
una posici6n de velocidad entre 1 y 5.
3. Toque la flecha para SUBIR la HORA
para aumentar la velocidad hasta el
nL_mero 5.
O
Toque el bot6n con la flecha para
BAJAR la NORA para disminuir la
velocidad hasta el ntJmero 1.
4. Toque el bot6n START.
El control le permitir_ cerrar los botches de
manera que no se puedan activar cuando
los empuje. Si se preocupa de dejar el
homo sin supervision, active este
programa.
1. Empuje y sujete, a la misma vez, por 3
segundes, los botches BAKE y BROIL
hasta que el dial muestre SF.
2. (a) Empuje el bot6n CLEAN. El dial
muestra LOC OFF (cierre inactivo).
(b) Empuje el bot6n CLEAN
nuevamente. El dial mestrar_. LOC ON
(cierre activado).
3. Empuje el bot6n START.
Para abrir el control, repita los pasos 1 y 2,
Presione el bot6n START cuando la pantalla
muestre "LOG OFF".
Este programa se puede seleccionar
solamente cuando el horno no est=t
_n USO.
Cuando este programa este activado, el
control sonar& y el dial mostrar_. LOC, si
se empuja un botOn.
62
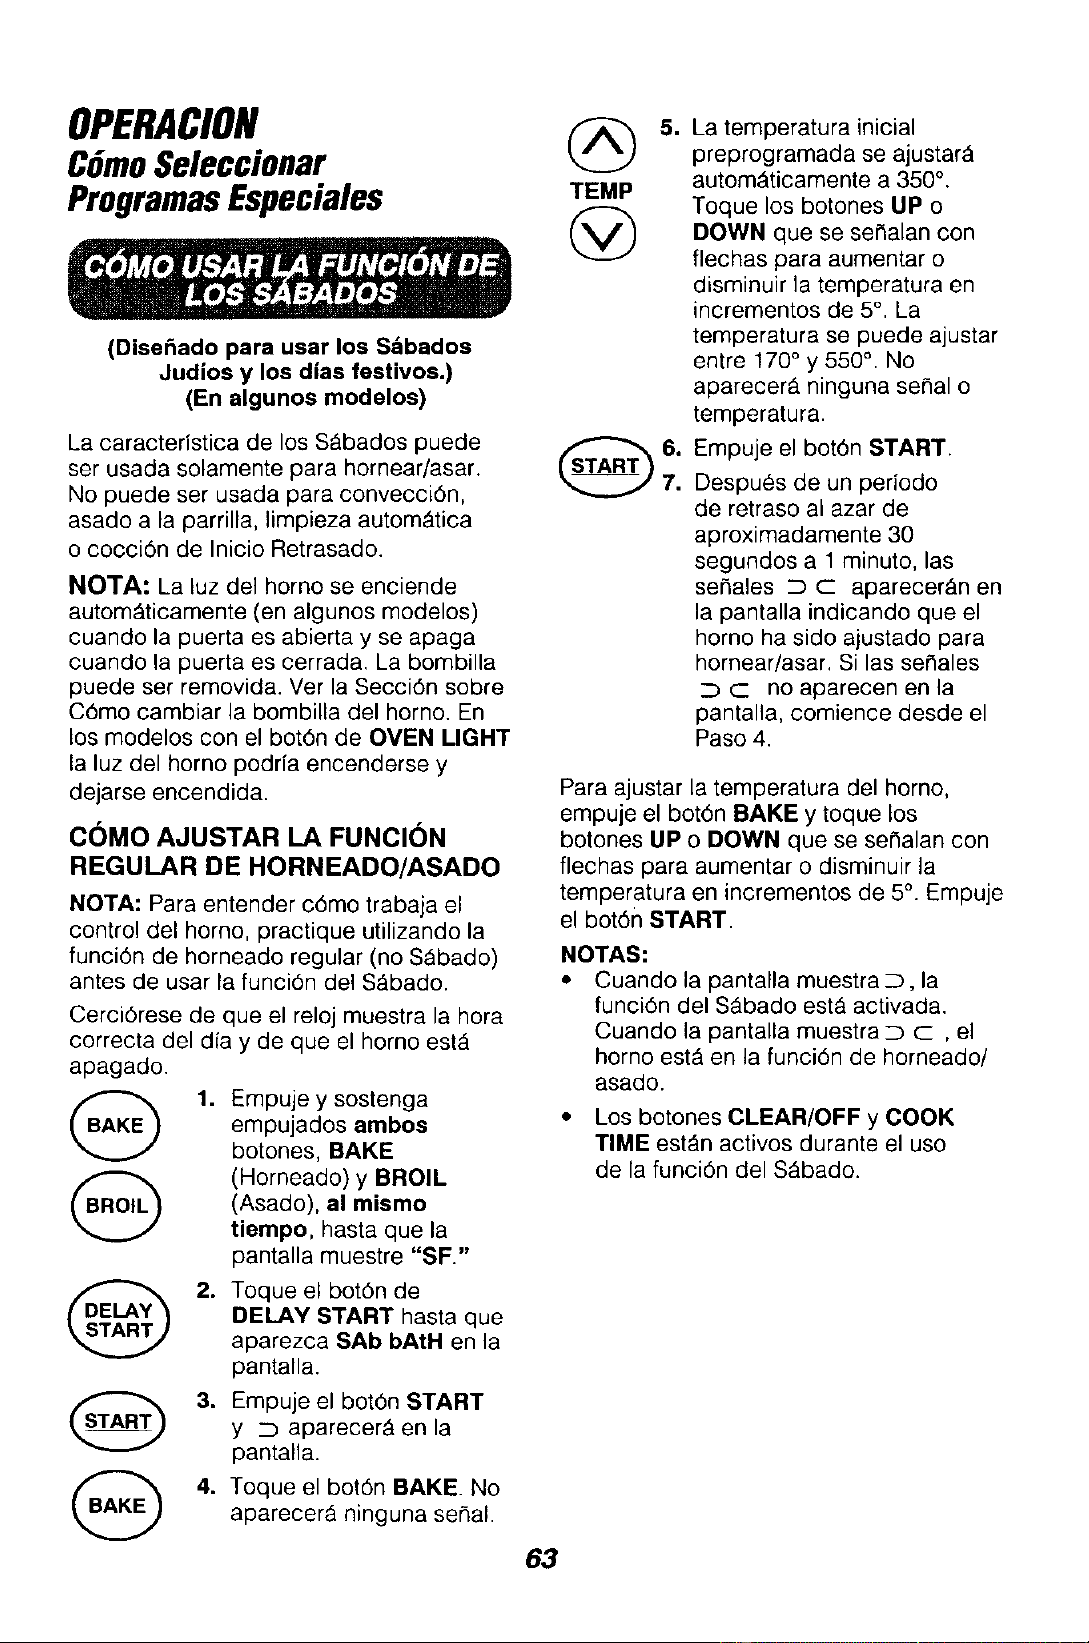
OPERACION
CGmoSeleccionar
ProgramasEspeciales
(Dise_ado para usar los Sdbados
Judios y los dias festivos.)
(En algunos modelos)
La oaracteristica de los S_bados puede
ser usada solamente para hornear/asar.
No puede ser usada para convecci6n,
asado a la parrilla, limpieza autom_tica
o cocciGn de Inicio Retrasado.
NOTA: La luz del horno se enciende
autom_ticamente (en algunos modelos)
cuando la puerta es abierta y se apaga
cuando la puerta es cerrada. La bombilla
puede set removida. Ver la SecciGn sobre
CGmo cambiar la bombilla del horno. En
los modelos con el bot6n de OVEN LIGHT
la luz del homo podr[a encenderse y
dejarse encendida.
COMO AJUSTAR LA FUNCION
REGULAR DE HORNEADO/ASADO
NOTA: Para entender c6mo trabaja el
control del homo, practique utilizando la
funci6n de horneado regular (no S&bado)
antes de usar la funci6n del S_bado.
CerciGrese de que el reloj muestra la hora
correcta del dfa y de que el horno estA
apagado.
G
1. Empuje y sostenga
empujados ambos
botones, BAKE
(Horneado) y BROIL
(Asado), al mismo
tiempo, hasta que la
pantalla muestre "SF."
Toque el bot6n de
DELAY START hasta que
aparezca SAb bAtH en la
pantalla.
Empuje el bot6n START
y _ aparecer_ en la
pantalla.
Toque el bot6n BAKE. No
aparecer_ ninguna sepal.
@
TEMP
@
.
1
7,
La temperatura inicial
preprogramada se ajustar_
automAticamente a 350 °.
Toque los botones LIP o
DOWN que se seClalan con
flechas para aumentar o
disminuir la temperatura en
incrementos de 5°. La
temperatura se puede ajustar
entre 170 ° y 550 °. No
aparecer_, ninguna sepal o
temperatura.
Empuje el botGn START.
Despues de un periodo
de retraso al azar de
aproximadamente 30
segundos a 1 minuto, las
se_ales _ c aparecer_n en
la pantalla indicando que el
homo ha sido ajustado para
hornear/asar. Si las setlales
C no aparecen en la
pantalla, comience desde el
Paso 4.
Para ajustar la temperatura del homo,
empuje el bot6n BAKE y toque los
botones LIP o DOWN que se set, alan con
flechas para aumentar o disminuir la
temperatura en incrementos de 5°. Empuje
el bot6n START.
NOTAS:
• Cuando la pantalla muestra _, la
funci6n del S&bado estA activada.
Cuando la pantalla muestra D c , el
homo est_ en la funci6n de homeado/
asado.
• Los botones CLEAR/OFF y COOK
TIME est_n activos durante el uso
de la funci6n del S_bado.
63
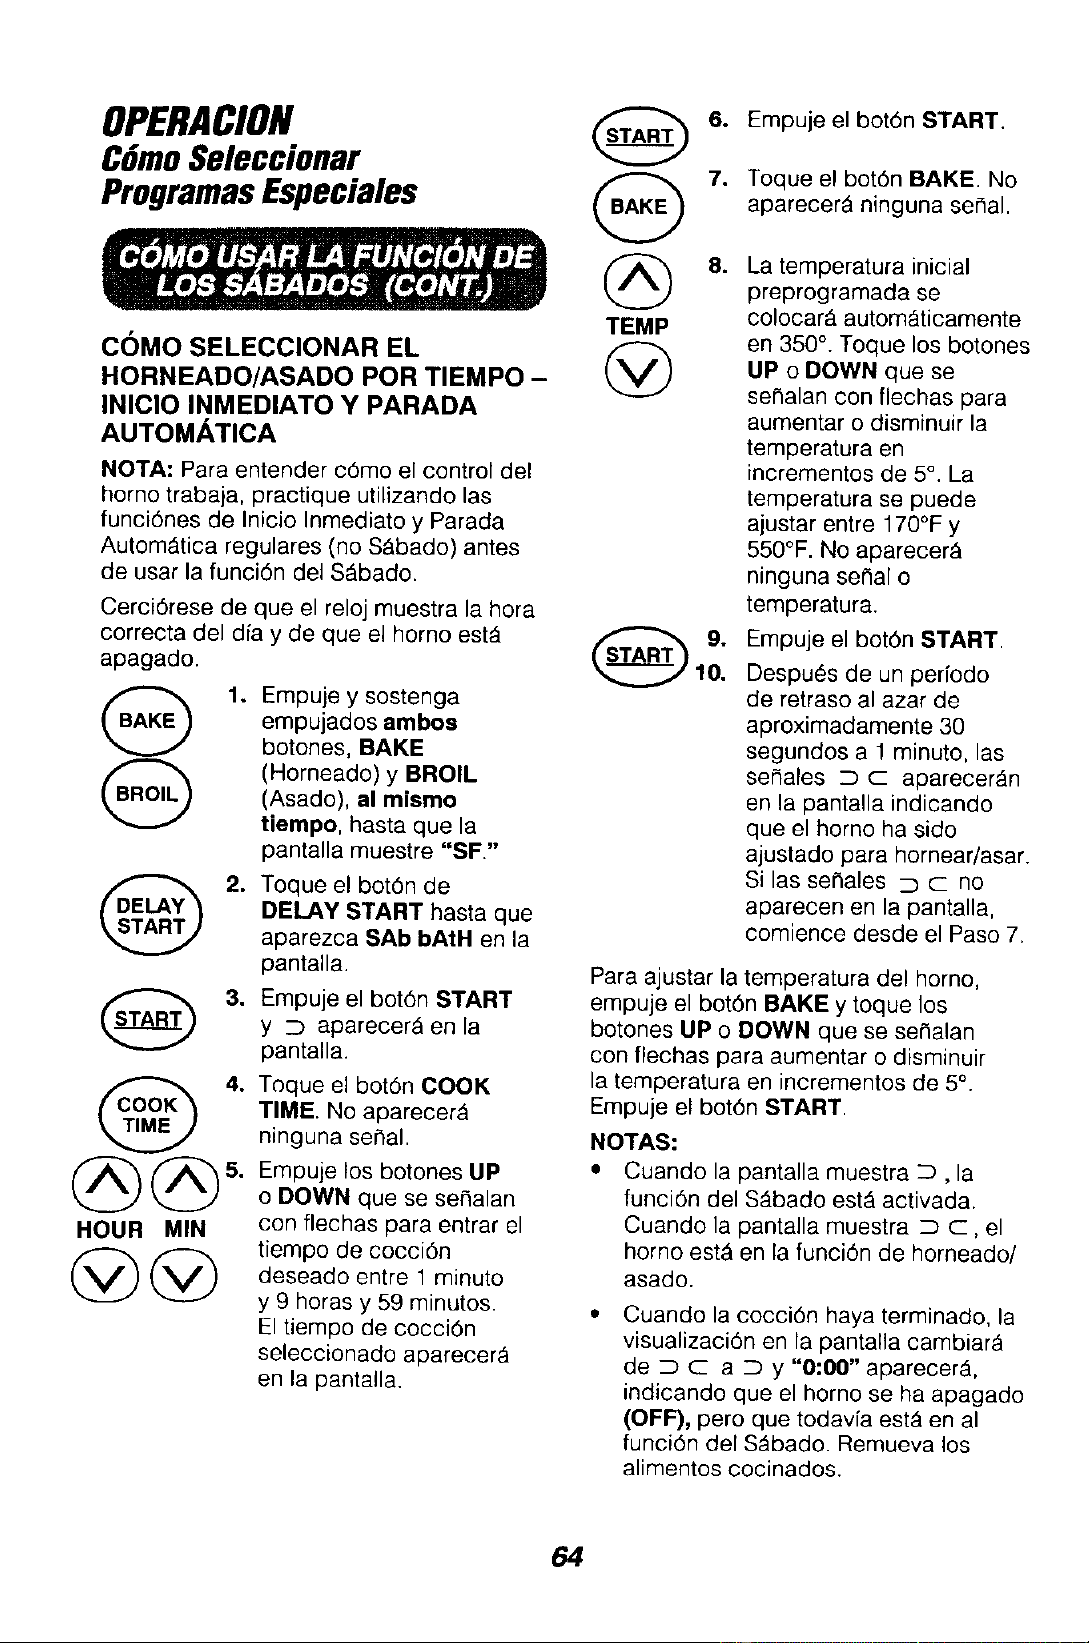
OPERACION
CGmoSeleccionar
ProgramasEspeciales
COMO SELECCIONAR EL
HORNEADO/ASADO POR TIEMPO -
INICIO INMEDIATO Y PARADA
AUTOMATICA
NOTA: Para entender c6mo el control del
horno trabaja, practique utilizando las
funci6nes de Inicio Inmediato y Parada
Autom_tica regulares (no S_bado) antes
de usar la funci6n del S_bado.
Cerci6rese de que el reloj muestra la hora
correcta del dfa y de que el horno est,.
apagado.
1. Empuje y sostenga
empujados ambo8
botones, BAKE
(Horneado) y BROIL
(Asado), al mismo
tiempo, hasta que la
pantalla muestre "SF."
2. Toque el bot6n de
DELAY START hasta que
aparezca SAb bAtH en la
pantalla.
3. Empuje el bot6n START
y z) aparecer_ en la
pantalla.
@
@@
HOUR MIN
4. Toque el bot6n COOK
TIME. No aparecerA
ninguna serial.
5. Empuje los botones UP
o DOWN que se se_alan
con flechas para entrar el
tiempo de cocci6n
deseado entre 1 minuto
y 9 horas y 59 minutos.
El tiempo de cocci6n
seleccionado aparecer_
en la pantalla.
@
TEMP
@
6. Empuje el bot6n START.
7. Toque el bot6n BAKE. No
aparecer_ ninguna serial.
,
La temperatura inicial
preprogramada se
colocar_, autom_ticamente
en 350 °. Toque los botones
UP o DOWN que se
senalan con flechas para
aumentar o disminuir la
temperatura en
incrementos de 5°. La
temperatura se puede
ajustar entre 170°F y
550°F. No aparecer_
ninguna sepal o
temperatura.
Empuje el bot6n START.
Despues de un perfodo
de retraso al azar de
aproximadamente 30
segundos a 1 minuto, las
se_ales _ c aparecer_n
en la pantalla indicando
que el homo ha sido
ajustado para hornear/asar.
Si las seSales _ C no
aparecen en la pantalla,
comience desde el Paso 7.
Para ajustar la temperatura del homo,
empuje el bot6n BAKE y toque los
botones UP o DOWN que se se¢_alan
con fiechas para aumentar o disminuir
la temperatura en incrementos de 5°.
Empuje el bot6n START.
NOTAS:
• Cuando la pantalla muestra _, la
funci6n del SAbado est_ activada.
Cuando la pantalla muestra _ c, el
homo est_ en la funci0n de horneado/
asado.
Cuando la cocci6n haya terminado, la
visualizaci6n en la pantalla cambiar_
de _ c: a _ y "0:00" aparecer&
indicando que el homo se ha apagaclo
(OFF), pero que todavfa estA en al
funci6n del S_bado. Remueva los
alimentos cocinados.
64
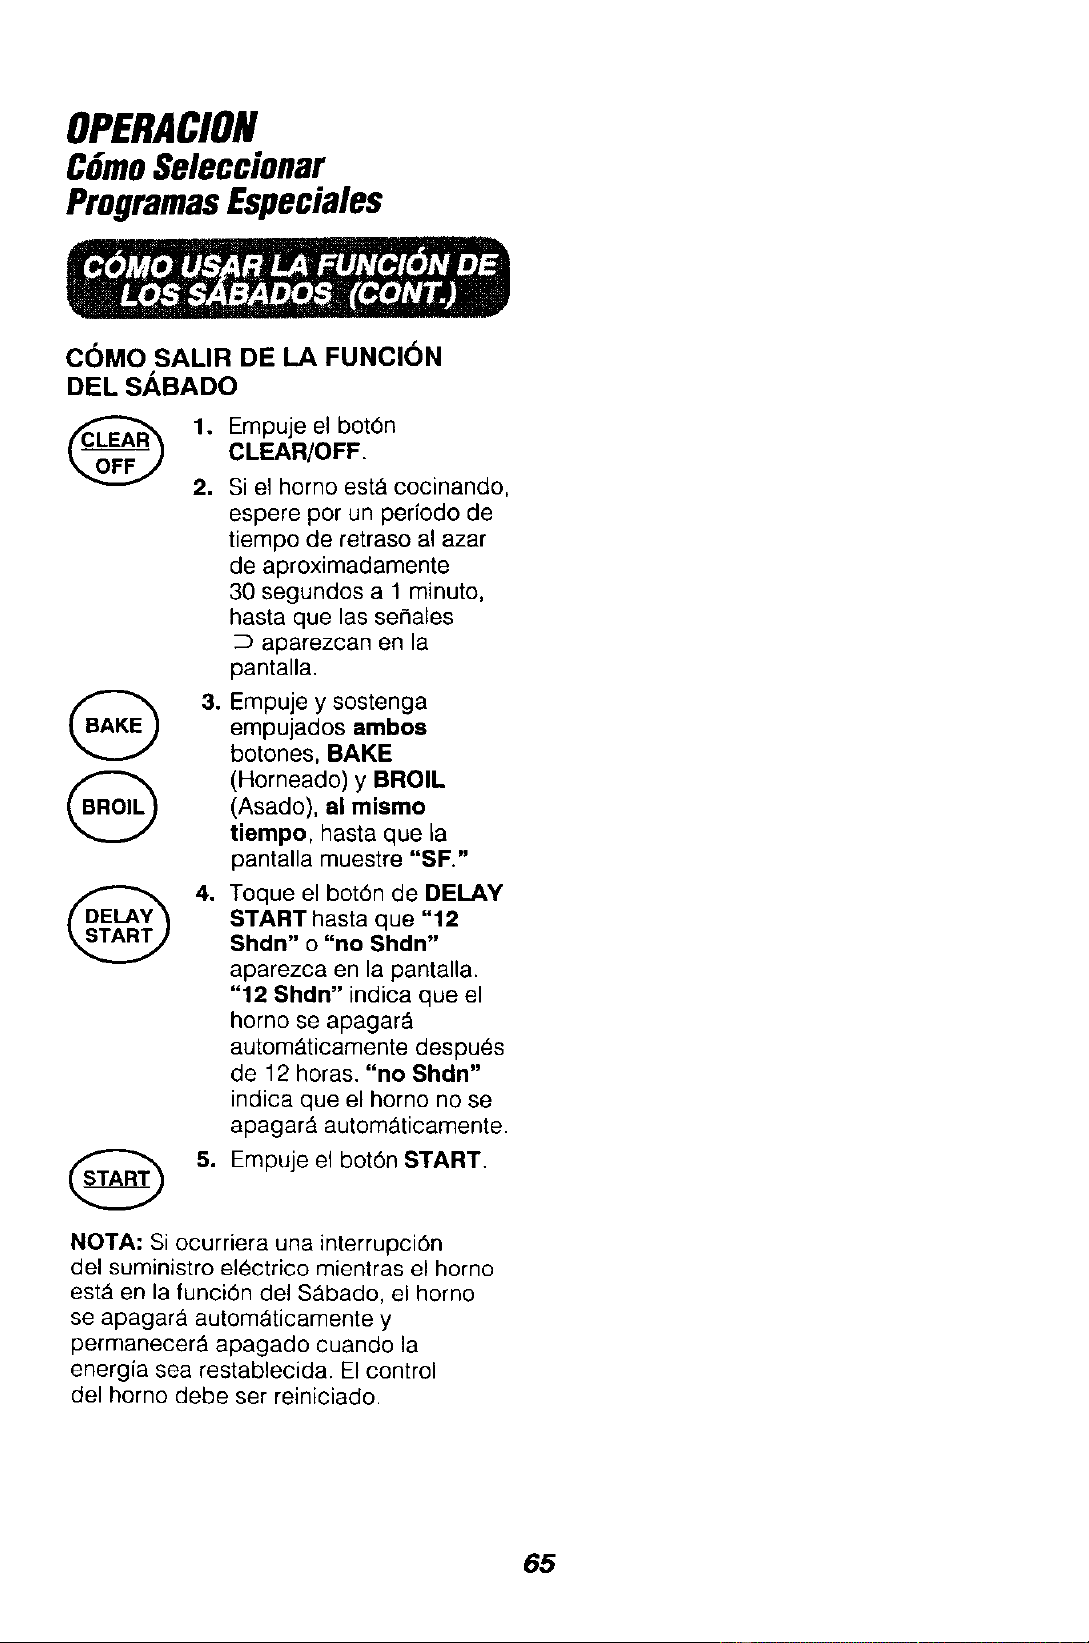
OPERACION
CGmoSeleccionar
ProgramasEspeciales
C_MO SALIR DE LA FUNCION
DEL SABADO
1. Empuje el bot6n
CLEAR/OFF.
2.
@
Si el homo est,. cocinando,
espere por un perfodo de
tiempo de retraso al azar
de aproximadamente
30 segundos a 1 minuto,
hasta que las serlales
aparezcan en la
pantalla.
3. Empuje y sostenga
empujados ambos
botones, BAKE
(Horneado) y BROIL
(Asado), al mismo
tiempo, hasta que la
pantalla muestre "SF"
4. Toque el bot6n de DELAY
START hasta que "12
Shdn" o "no Shdn"
aparezca en la pantalla.
"12 Shdn" indica que el
homo se apagar_
autom_ticamente despues
de 12 horas. "no Shdn"
indica que el homo no se
apagar_ autom_ticamente.
5. Empuje el bot6n START.
NOTA: Si ocurriera una interrupci6n
del suministro electrico mientras el horno
estA en la funci6n del SAbado, el homo
se apagar_ autom&ticamente y
permanecer_ apagado cuando la
energia sea restablecida. El control
del homo debe ser reiniciado.
65

CUIDADOYLIMPIEZA
E1Ciclo De Autolimpieza
.
.
,
Saque la cacerola y la parrilla para
asar, utensilios y cualquier papel
de aluminio que podria quedar en
el horno.
Si su homo est_ equipado con
parrillas de nfquel, las mismas
deben set removidas. Si su homo est_
equipado con parrillas cubiertas de
porcelana gris, las mismas deben ser
removidas durante el ciclo de limpieza
autom&tica.
La suciedad sobre el marco frontal
y afuera del sello del revestimiento de
la puerta necesitare ser limpiada a
mano.
Marco frontal
@
Revestimiento
de la puerta
Limpie estas _reas con agua caliente,
lanillas con jab6n o limpiadores como Soft
Scrub s para sacar cualquier suciedad.
Enjuague bien con agua limpia y seque.
No use limpiadores de hornos -
NingQn limpiador de hornos para usos
comerciales o revestimiento de protecci6n
debeser usado en el interior o alrededor
del horno.
4. Limpie cualquier derrame pesado del
fondo del horno.
5°
No limpie el sello. El material de fibra
de vidrio de la puerta del homo no
soporta la abrasi6n. Es esencial que el
sello permanezca intacto. Si usted
nora que se estA gastando o trizando,
deberia ser reemplazado.
El sello estA diserhado para que tenga un
espacio de 18" en el fondo de la puerta.
Esto permite la circulaci6n adecuada del
aire.
Panel de la puerta Sello
t
Revestimiento de la puerta
Es normal que su homo de la apariencia
de no tener un buen sello sobre el horno.
Esto se debe al sello. La ubicaci6n del
sello sobre la puerta del homo mantiene
la puerta sellada y previene cualquier
p_rdida de calor.
Los utensllios nunca se
deberian dejar dentro del
horno durante un ciclo de
Iimpieza.
Las parrillas de niquel del horno se
oodrian limpiar durante el ciclo de
autolimpieza, pero perderdn su
brillo y se pondr&n diffciles de
deslizar. Si decide deJarlas dentro
durante el clclo de limpieza, pdseles
aceite vegetal para qua se deslicen
m&s f&cilmente.
Las parrillas cubiertas de porcelana
gris pueden ser limpladas con
segurldad en el interior del horno
durante el ciclo de limpieza
automdtica. Ser_ necesario para
engrasar los extremos de la parrina
del horno con una capa ligera de
aceite vegetal despu6s de un ciclo de
limpieza. Esto ayudar,_ a que se haga
fdcil deslizar los estantes o rejillas en
el homo.
Durante el primer ciclo de limpieza,
ventile la habitacibn con una ventana
abierta o una campana de
ventilacibn.
66

CUIDADOYUMPIEZA
CicloDeAutolimpieza(cont.)
El Ciclo de Limpieza, incluyendo el tiempo
de la cuenta hacia atrA, se programa
automAticamente por 4 horas y 20 minutos
y se apaga autom_.ticamente despues del
tiempo programado, pero usted puede
cambiar esto de 3 horas si el homo est_
levemente sucio, hasta 5 horas si el homo
est& muy sucio.
@
G
1°
2,
Toque el bot6n CLEAN.
4 horas 20 minutos se
mostrar_n en el dial.
Si usted desea cambiar la
cantidad de tiempo para
limpiar, toque los botones
con las flechas para SUBIR
o BAJAR las HORAS/
MINUTOS.
3. Toque el botOn START.
La puerta se cierra con cerrojo
automAticamente. El dial mostrar_ el
tiempo de limpieza que queda. No ser_
posible abrir la puerta del homo hasta que
la temperatura caiga m_.s abajo de la
temperatura de cierre y la luz de LOCKED
door (puerta CON CERROJO) se apague.
Cuando la luz de LOCKED door se
apague, abra la puerta.
Las palabras LOCKED o LOCK DOOR
pestaClear_n y el control del horno dar_
una serlal si usted programa el ciclo de
limpieza y se olvida de cerrar la puerta
del homo.
Toque el bot0n CLEAR/OFF Usted
necesitar_ esperar a que la temperatura
del homo baje m4s que la temperatura de
enganche (aprox. 1 hora) antes de tratar
de abrir la puerta.
Despues del ciclo usted podria notar un
poco de cenizas blancas en el homo.
Simplemente limpielas con un pa¢lo o
esponja homed&
Si algunas manchas blancas persisten,
fri_guelas con una lanilla de acero con
jabOn. Aseg6rese de enjuagar bien. Estas
son generalmente depOsitos de sal que no
se pueden sacar durante el ciclo.
Si su homo est_ equipado con parrillas de
porcelana, serA necesario para engrasar
los extremos con una capa ligera de
aceite vegetal despues del ciclo de
limpieza. Esto ayudar_, a que se haga fAcil
deslizar los estantes o rejillas en el homo.
Si por alguna razbn usted no queda
satisfecho con los resultadoe de la
limpieza, simplemente repita el ciclo.
Asegt_rese que el reloj est_ puesto
correctamente.
@
G
@
G
1. Toque el botOn CLEAN.
2. Si usted desea cambiar la
cantidad de tiempo para
limpiar, toque los botones
con las flechas para
SUBIR o BAJAR las
HORAS/MINUTOS.
3. Toque el botOn DELAY
START.
4. Toque los botones con
las flechas para SUBIR
o BAJAR las HORAS/
MINUTOS para
seleceionar la hora del
dia en que prefiere que
el ciclo de limpieza
empiece.
5. Toque el botOn START.
67
CUIDADOYLIMPIEZA
CGmoLimpiar
MATERIALES DE LIMPIEZA
• Detergente liquido para platos.
• Agua tibia.
• Patio suave
No use limpiadores abrasivos,
limpiadores industriales o blanquedores
(cloro).
MATERIALES DE UMPIEZA
• Detergente liquido para plates.
• Agua tibia.
• Lanillas de acero con jab6n.
• Limpiador comereial para homos.
COMO LIMPIAR
Permita que la cacerola se remoje. Ponga
detergente para platos sobre la parrilla y
cubra con un patio o una toalla hOmeda
por un rato. Friegue a medida que sea
necesario. Lave, enjuague y seque bien.
Usted tambien podrfa poner la cacerola y
la parrilla en la lavadora de platos.
Limpie solamente para retocarlas entre
ciclos de limpieza. Use detergentes
Ifquidos para platos, agua tibia o lanillas
con jab6n. Enjuague bien despues de
limpiar y seque.
NUNCA USE LIMPIADORES PARA
HORNOS DENTRO O ALREDEDOR DE
CUALQUIER PARTE DEL HORNO,
Cuando limpie, asegOrese de no doblar o
mover el sensor de la temperatura ubicado
en la pared trasera del homo.
PARA LIMPIAR
Para limpieza diaria, use un limpiador
para vidrios y una toalla de papel. Para
suciedad pesada, use una pasta de soda
para hornear y agua. Enjuague bien.
MATERIALES DE LIMPIEZA
• Limpiador abrasivo suave
• Esponja-fregador
No use IImpiadores abrasivos fuertes,
limpiadores Industriales o cloro.
Limpie con agua tibia con jab6n, un
limpiador para acero inoxidable, o un
liquido o spray para limpiar para todo
prop6sito. Siempre friegue en direcei6n de
la veta. Enjuague bien con una esponja o
paRo y agua limpia. Seque con un patio
suave y limpio.
No use lanillas de acero Ilenas con
jab6n; rayar6 la superficie.
68
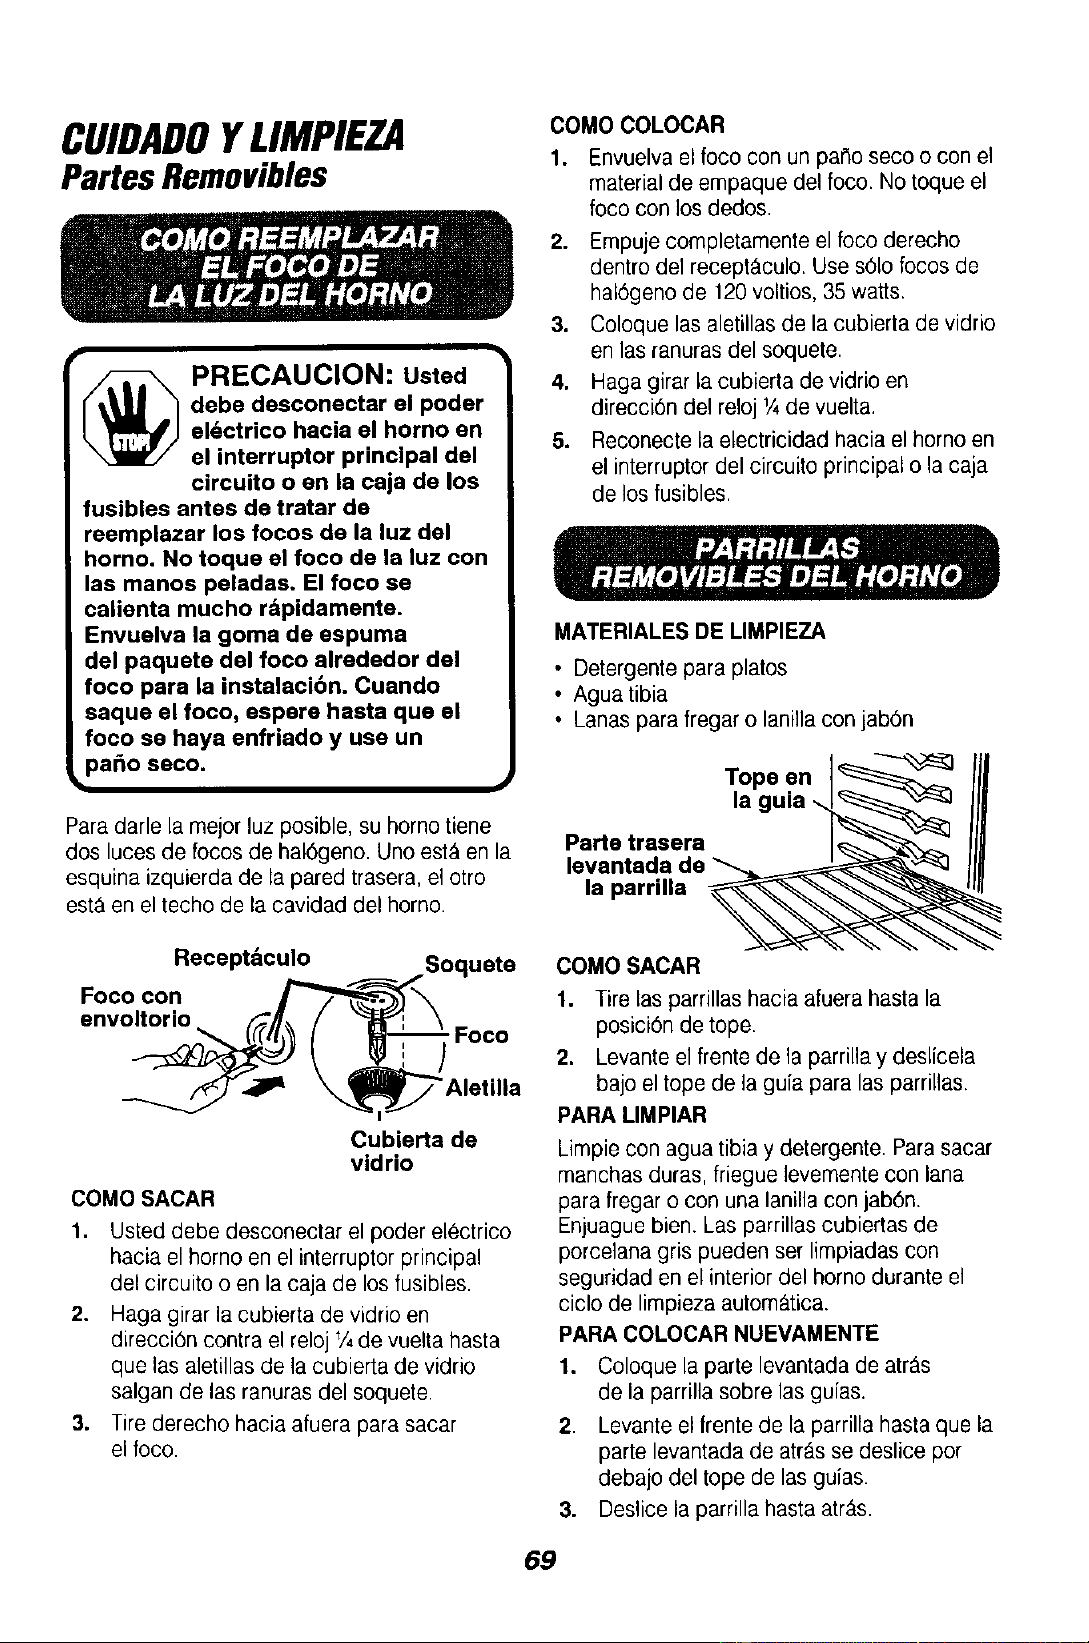
CUIDADOYLIMPIEZA
PartesRemovibles
2.
3.
PRECAUCION: Usted
debe desconectar el poder
el_ctrico hacia el homo an
el interruptor principal del
circuito o en la caja de los
fusibles antes de tratar de
reemplazar los focos de la luz dal
horno. No toque el foco de la luz con
las manos peladas. El foco se
caiienta mucho rapidamente.
Envuelva la goma de aspuma
del paqueta del foco alrededor dal
foco para la instalacibn. Cuando
saque el foco, aspara hasta que el
foco sa haya enfriado y usa un
paso seco.
COMO COLOCAR
Para darle la mejor luz posible, su horno tiene
dos luces de focos de hal6geno. Uno est& en la
esquina izquierda de la pared trasera, el otro
esta en el techo de la cavidad del homo.
Receptdculo Soquate
Foco con j_'_--_.'_
envoltorio (,_'/[_ // "_-_: \_
oco
_._-,_P _J-"j)Alet illa
Cubierta de
vidrio
COMO SACAR
1. Usted debe desconectar el poder electrico
hacia el homo en el interruptor principal
del circuito o en la caja de los fusibles.
2. Haga girar la cubierta de vidrio en
direcci6n contra el reloj 1/4de vuelta hasta
que las aletillas de la cubierta de vidrio
salgan de las ranuras del soquete.
3. Tire derecho hacia afuera para sacar
el foce.
1. Envuelva el foco con un patio seco o con el
material de empaque del foco. No toque el
foco con los dedes.
4,
5.
Empuje completamente el foco derecho
dentro de1recept_.culo. Use solo focos de
hal6geno de 120 voltios, 35 watts.
Coloque las aletillas de la cubierta de vidrio
en las ranuras del soquete.
Haga girar la cubierta de vidrio en
direcci6n del reloj 1Ade vuelta.
Reconecte la electricidad hacia el homo en
el interruptor del circuito principal o la caja
de los fusibles.
MATERIALES DE LIMPIEZA
• Detergente para platos
• Agua tibia
• Lanas para fregar o lanilla con jab6n
Tope en ]_=____
la guia %_
Parta trasera_
,a
COMO SACAR
1. Tire las parrillas hacia afuera hasta la
posici6n de tope.
2. Levante el frente de la parrilla y deslicela
bajo el tope de la guia para las parrillas.
PARA LIMPIAR
Limpie con agua tibia y detergente. Para sacar
manchas duras, friegue levemente con lana
para fregar o con una lanilla con jab6n.
Enjuague bien. Las parrillas cubiertas de
porcelana gris pueden set limpiadas con
seguridad en el interior del homo durante el
ciclo de limpieza autom&tica.
PARA COLOCAR NUEVAMENTE
1. Coloque la parte levantada de atr&s
de la parrilla sobre las guias.
2. Levante el frente de la parrilla hasta que la
parte levantada de atr_s se deslice por
debajo del tope de las guias.
3. Deslice la pamlla hasta atr&s.
69
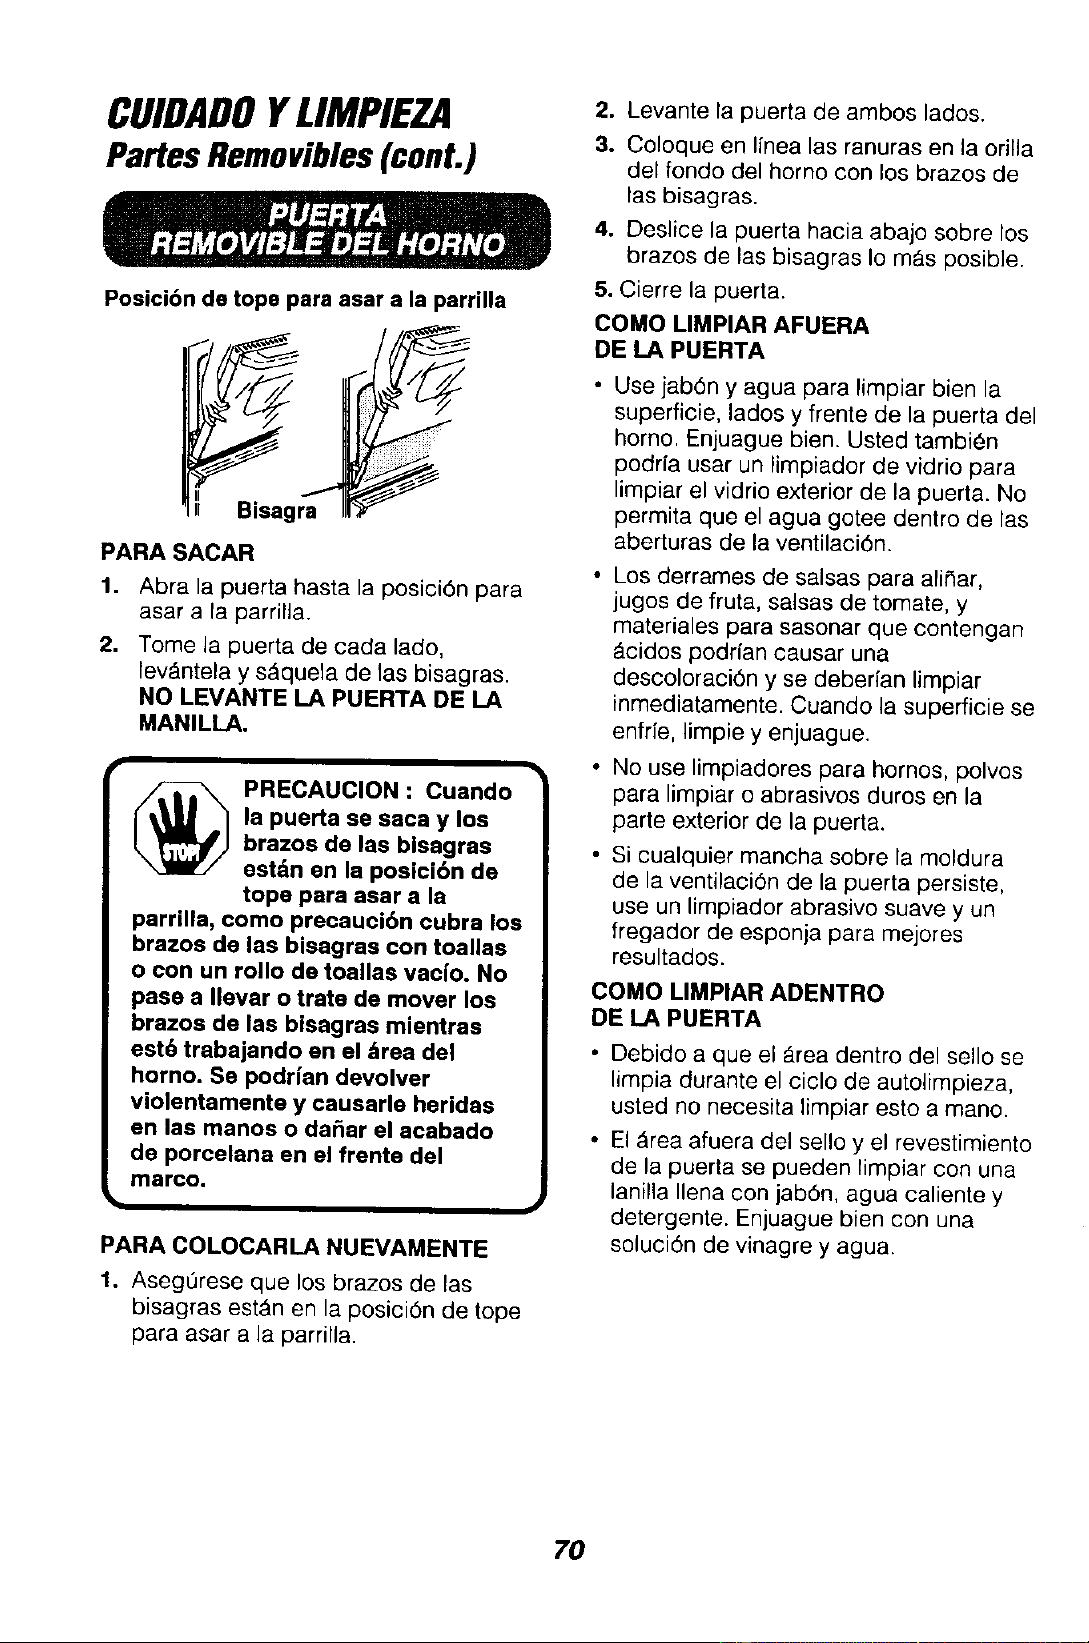
CUIDADOYLIMPIEZA
Parfes Removibles (cont.)
Posici6n de tope para asar a la parrilla
Bisagra
PARA SACAR
1. Abra la puerta hasta la posici6n para
asar a la parrilla.
2. Tome la puerta de cada lade,
lev_ntela y s&quela de las bisagras.
NO LEVANTE LA PUERTA DE LA
MANILLA.
PRECAUCION : Cuando
la puerta se saca y los
brazos de las blaagras
estdn an la posici6n de
tope para asar a la
parrilla, como precauci6n cubra los
brazos de las bisagraa con toallas
o con un folio de toaltas vaclo. No
pasa a Ilevar o trate de mover los
brazoa de las bisagras miantras
est6 trabajando en el _rea det
homo. Se podrfan devolver
violentamente y causarle heridas
en las manos o dafiar el acabado
de porcelana en el frenta del
marco.
I
PARA COLOCARLANUEVAMENTE
1. Aseg0rese que los brazes de las
bisagras est_n en la posici6n de tope
para asar a la parrilla.
2. Levante la puerta de ambos lades.
3. Coloque en Ifnea las ranuras en la orilla
del fondo del homo con los brazes de
las bisagras.
4. Deslice la puerta hacia abajo sobre los
brazes de las bisagras Io mAs posible.
5. Cierre la puerta.
COMO LIMPIAR AFUERA
DE LA PUERTA
• Use jab6n y agua para timpiar bien la
superfioie, lades y frente de la puerta del
homo. Enjuague bien. Usted tambien
podria usar un limpiador de vidrio para
limpiar el vidrio exterior de la puerta. No
permita que el agua getee dentro de las
aberturas de la ventilaci6n.
• Los derrames de salsas para alirhar,
jugos de fruta, salsas de tomate, y
materiales para sasonar que contengan
_cidos podrfan causar una
descoloraci6n y se deberian limpiar
inmediatamente. Cuando la superficie se
enfr[e, limpie y enjuague.
• No use limpiadores para homes, pelves
para limpiar o abrasives duros en la
parte exterior de la puerta.
• Si cualquier mancha sobre la moldura
de la ventilaci6n de la puerta persiste,
use un limpiador abrasive suave y un
fregador de esponja para mejores
resultados.
COMO LIMPIAR ADENTRO
DE LA PUERTA
• Debido a que el &tea dentro del sello se
limpia durante el ciclo de autolimpieza,
usted no necesita limpiar esto a mane.
• El _rea afuera del sello y el revestimiento
de la puerta se pueden limpiar con una
lanilla Ilena con jab6n, agua caliente y
detergente. Enjuague bien con una
soluci6n de vinagre y agua.
7O
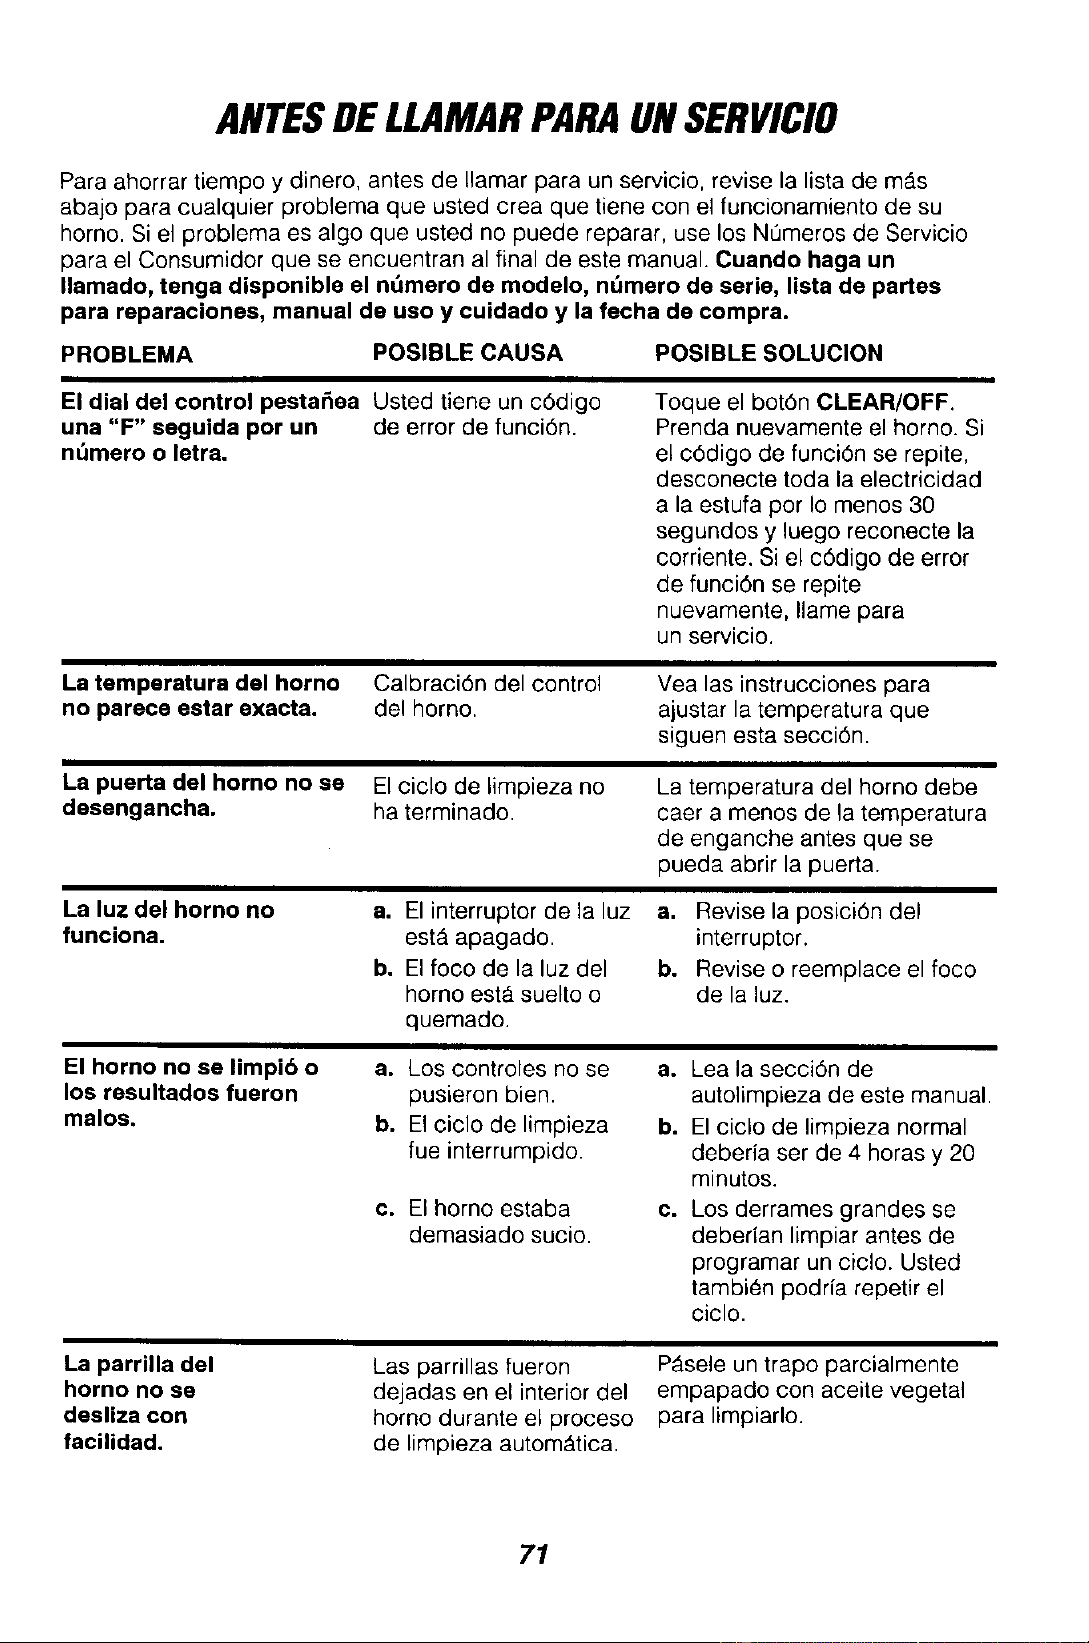
ANTESDELLAMARPARAUNSERVICIO
Para ahorrar tiempo y dinero, antes de Ilamar para un servicio, revise la lista de mAs
abajo para cualquier problema que usted crea que tiene con el funcionamiento de su
horno. Si el problema es algo que usted no puede reparar, use los NOmeros de Servicio
para el Consumidor que se encuentran al final de este manual. Cuando haga un
Ilamado, tenga disponible el n,'=mero de modelo, ndmero de serie, lista de partes
para reparaciones, manual de uso y cuidado y la fecha de compra.
PROBLEMA
POSIBLECAUSA
POSIBLE SOLUCION
El dial del control pesta_ea Usted tiene un cOdigo
una "F" seguida por un de error de funci6n.
n,',mero o letra.
Toque el bot6n CLEAR/OFF.
Prenda nuevamente el homo. Si
el c6digo de funciOn se repite,
desconecte toda la electricidad
a la estufa por Io menos 30
segundos y luego reconecte la
corriente. Si el c6digo de error
de funciOn se repite
nuevamente, Ilame para
un servicio,
La temperatura del homo Calbraci6n del control
no parece estar exacta, del horno,
Yea las instrucciones para
ajustar la temperatura que
siguen esta secci6n.
La puerta del horno no se
dasengancha.
El ciclo de limpieza no
ha terminado.
La temperatura del horno debe
caer a menos de la temperatura
de enganche antes que se
pueda abrir la puerta.
La luz del horno no
funciona.
a. El interruptor de la luz
est_ apagado.
b. El foco de la luz del
homo est& suelto o
quemado.
a. Revise la posiciOn del
interruptor.
b. Revise o reemplace el foco
de la luz.
El horno no se limpi6 o
los resultados fueron
malos.
a. Los controles no se
pusieron bien.
b. El ciclo de limpieza
rue interrumpido.
c. El homo estaba
demasiado sucio.
a. Lea la secci6n de
autolimpieza de este manual.
b. El ciclo de limpieza normal
deberia ser de 4 horas y 20
minutos.
C,
Los derrames grandes se
deberian limpiar antes de
programar un ciclo. Usted
tambi6n podria repetir el
ciclo.
La parrilla del
homo no ae
desliza con
facilidad.
Las parrillas fueron
dejadas en el interior del
homo durante el proceso
de limpieza autom_tica.
P_.sele un trapo parcialmente
empapado con aceite vegetal
para limpiarlo.
71
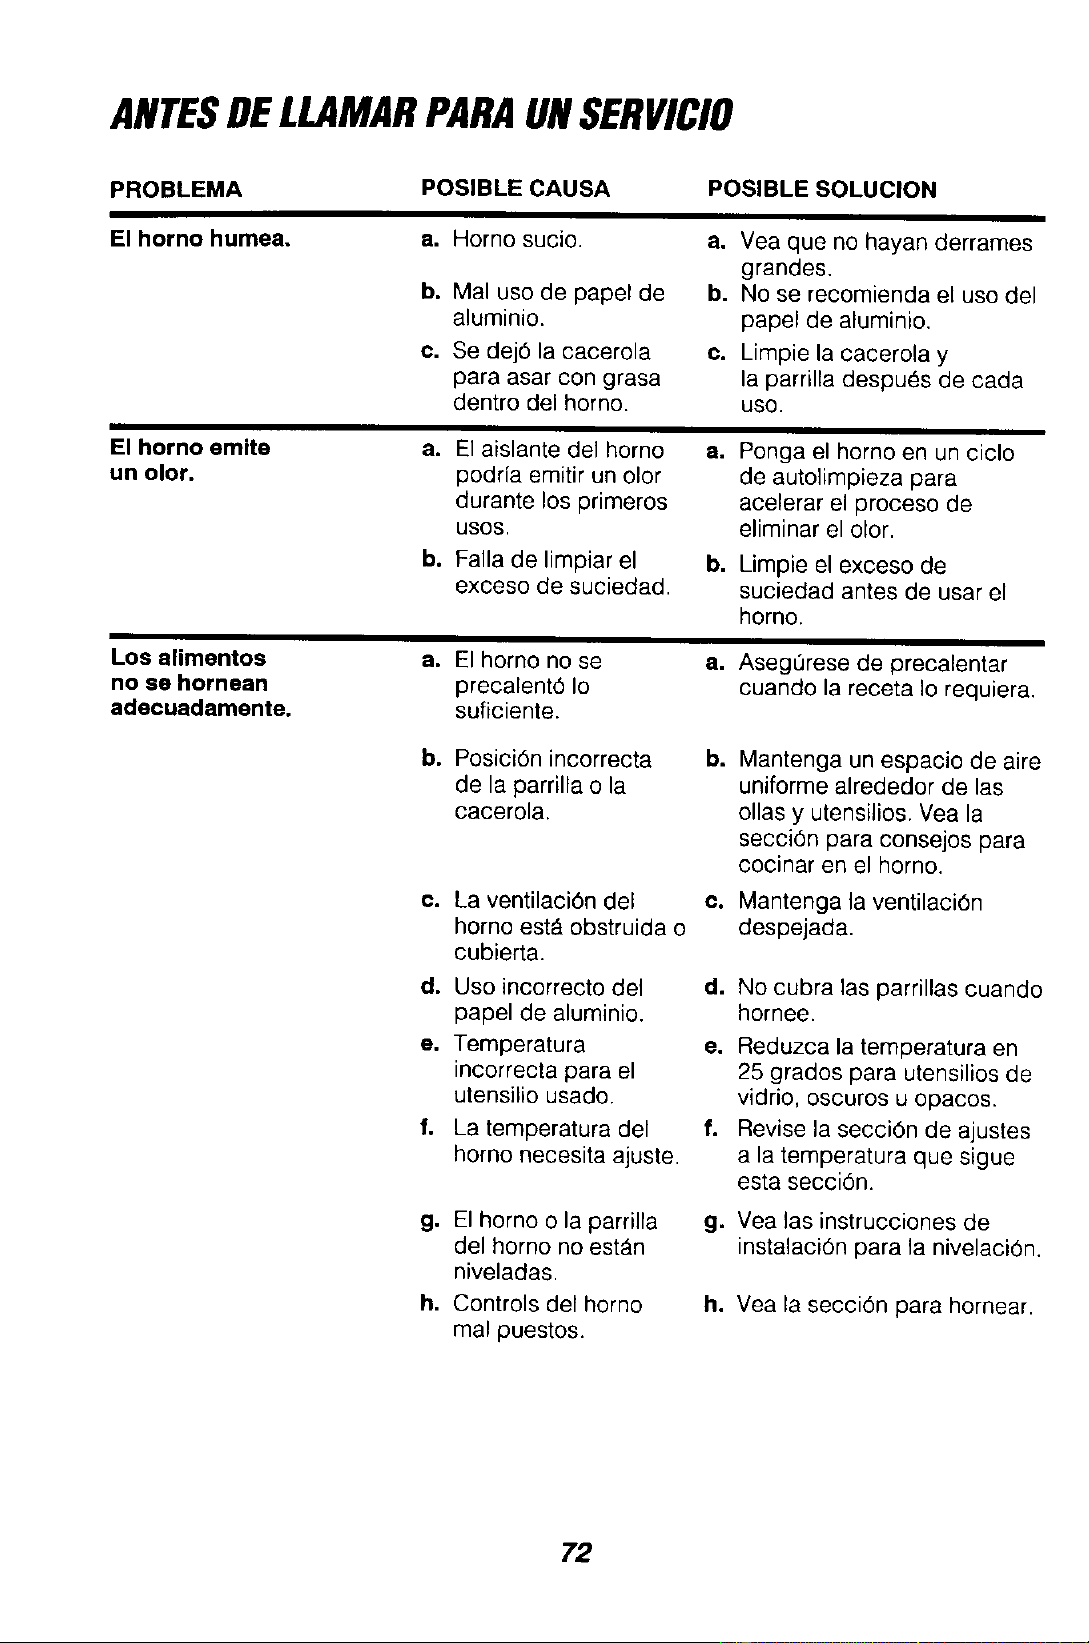
ANTESDELLAMARPARAUNSERVICIO
PROBLEMA
El horno humea.
El horno emite
un olor.
Los alimentos
no se hornean
adecuadamente.
POSIBLE CAUSA
POSIBLE SOLUCION
a,
b.
C.
Homo sucio.
Mal uso de papel de
aluminio.
Se dej6 la cacerola
para asar con grasa
dentro del homo.
a. Vea que no hayan derrames
grandes
b. No se recornienda el uso del
papel de aluminio.
c. Limpie la cacerola y
la parrilla despues de cada
uso.
a. El aislante del homo
podrfa emitir un olor
durante los primeros
USOS.
b. Falla de limpiar el
exceso de suciedad.
a. Ponga el homo en un ciclo
de autolimpieza para
acelerar el proceso de
eliminar el olor.
b, Limpie el exceso de
suciedad antes de usar el
homo.
a. El horno no se
precalent6 Io
suficiente.
a, AsegQrese de precalentar
cuando la receta Io requiera.
b. Posici6n incorrecta b.
de la parrilla o la
cacerola.
c. La ventilaci6n del ¢.
homo est_ obstruida o
cubierta.
d, Uso incorrecto del d.
papel de aluminio.
e, Temperatura e.
incorrecta para el
utensilio usado.
f, La temperatura del f.
homo necesita ajuste.
g. El homo o la parrilla g.
del homo no est&n
niveladas
h. Controls del homo h.
real puestos.
Mantenga un espacio de aire
uniforme alrededor de las
ollas y utensilios Vea la
secci6n para consejos para
cocinar en el horno.
Mantenga la ventilaci6n
despejada.
No cubra las parrillas cuando
hornee.
Reduzca la temperatura en
25 grados para utensilios de
viclrio, oscuros u opacos.
Revise la secci6n de ajustes
a la temperatura que sigue
esta secci6n
Vea las instrucciones de
instalaci6n para la nivelaci6n
Yea la secci6n para hornear.
72
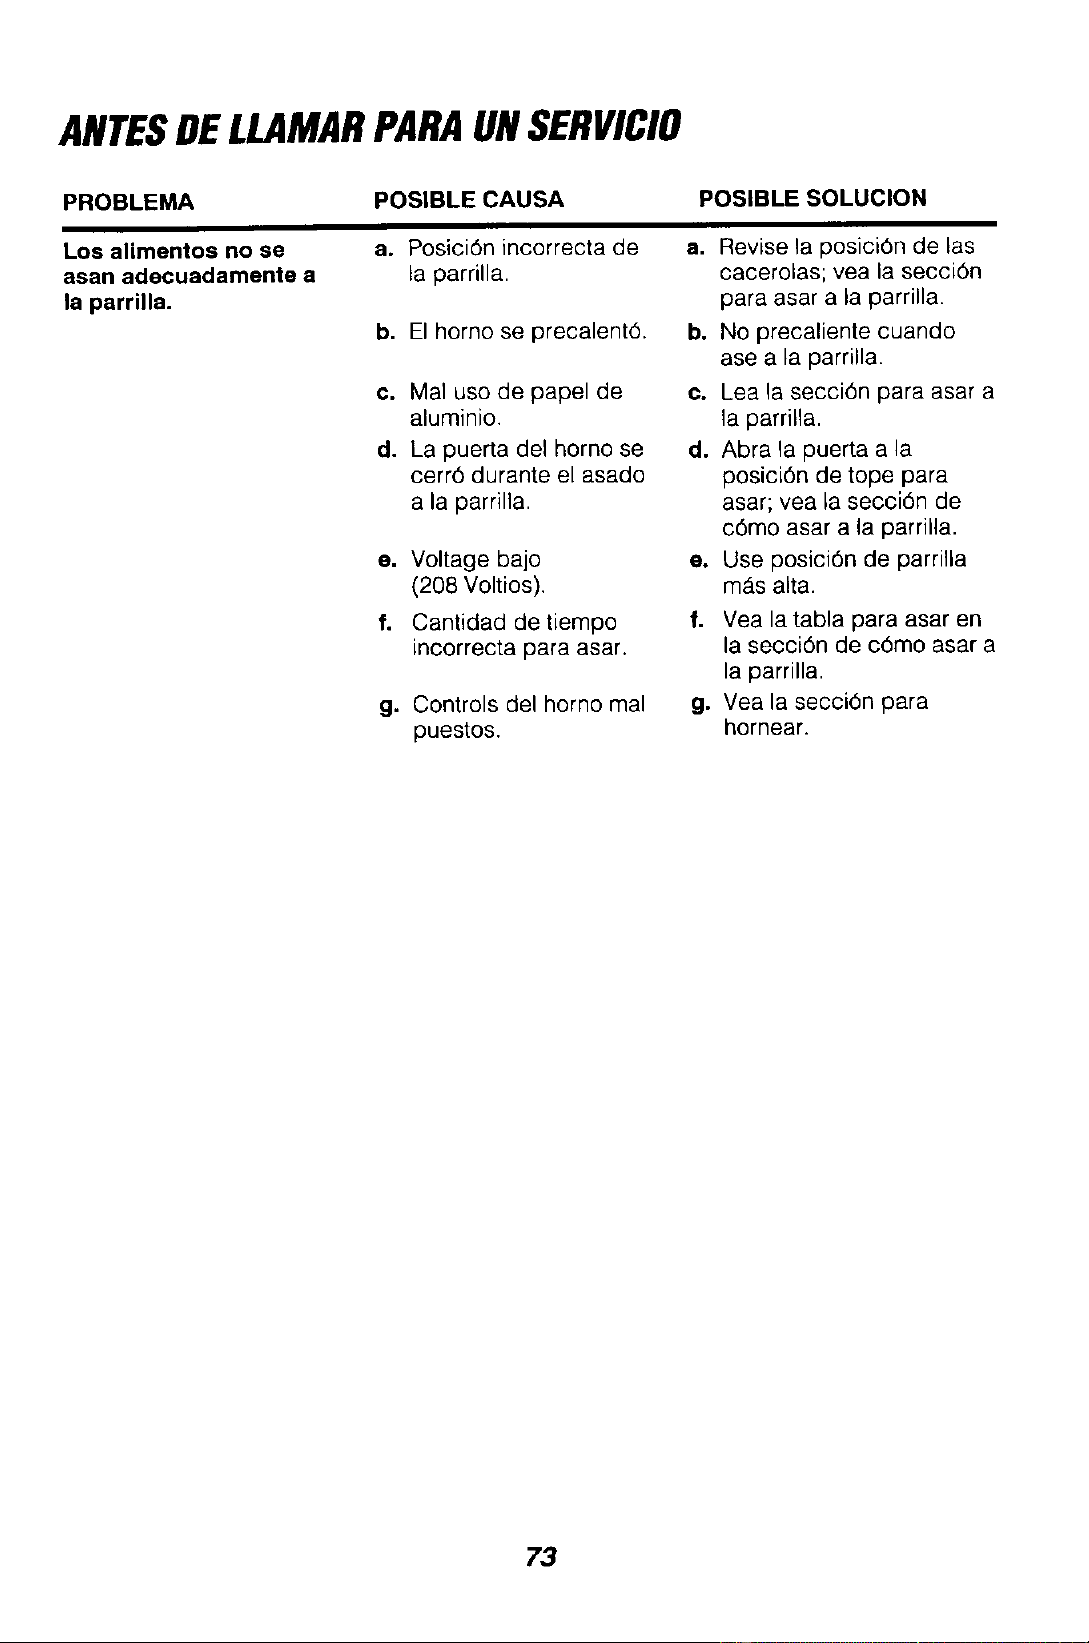
ANTESDELLAMARPARAUNSERVICIO
PROBLEMA
POS|BLECAUSA
POSIBLE SOLUCION
Los alimentos no se
asan adecuadamente a
la parrilla.
a. Posicidn incorrecta de
la parrilla.
b. El horno se precalent6.
c. Mal use de papel de
aluminio.
d. La puerta del home se
cerr6 durante el asado
a la parrilla.
e. Voltage bajo
(208 Voltios).
f. Cantidad de tiempo
incorrecta para asar.
g. Controls del homo mal
puestos.
a. Revise la posici6n de las
cacerolas; yea la secci6n
para asar a la parrilla.
b, No precaliente cuando
ase a la parrilla.
c. Lea la secci6n para asar a
la parrilla.
d. Abra la puerta a la
pesici6n de tope para
asar; vea la secci6n de
c6mo asar a la parrilla.
e, Use posici6n de parrilla
m_s alta.
f. Vea la tabla para asar en
la secci6n de c6mo asar a
la parrilla.
g. Vea la secci6n para
hornear.
73
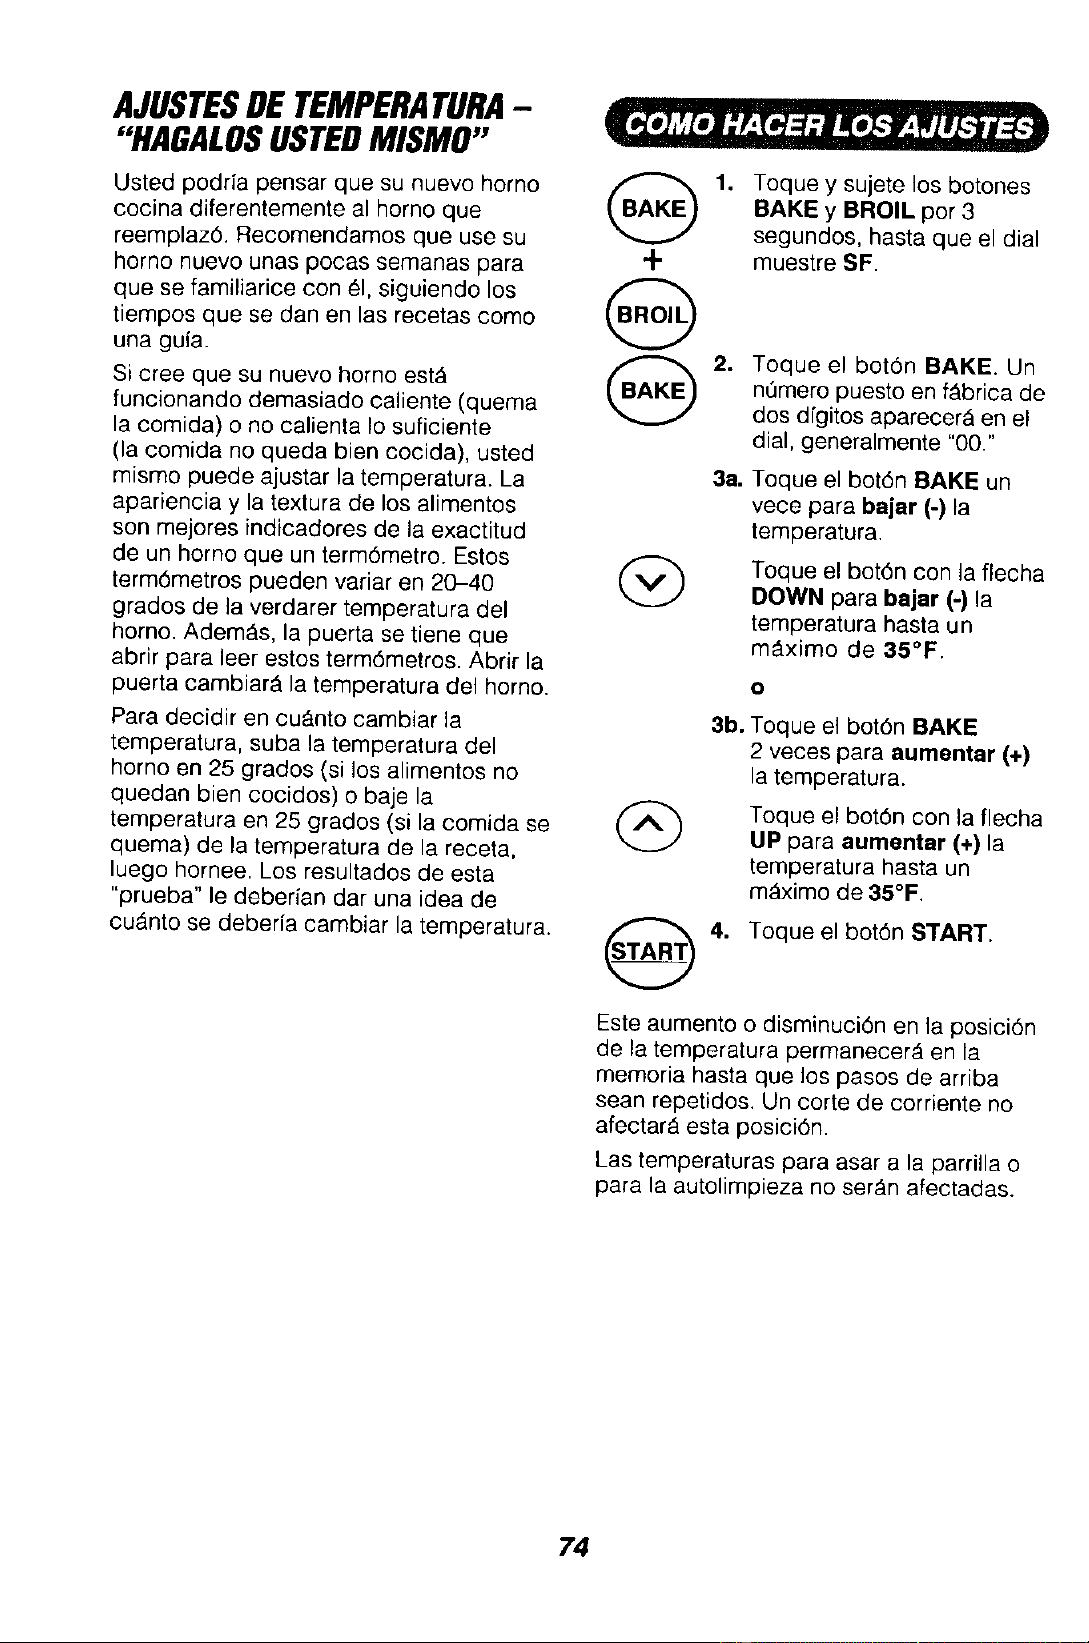
AJUSTESDE TEMPERATURA-
"HAGALOSUSTEDMISMO"
Usted podrfa pensar que su nuevo horno
cocina diferentemente al homo que
reemplaz6. Reoomendamos que use su
horno nuevo unas pocas semanas para
que se familiarice con el, siguiendo los
tiempos que se dan en las recetas como
una gufa.
si cree que su nuevo homo est_
funcionando demasiado caliente (quema
la comida) o no calienta Io suficiente
(la comida no queda bien cocida), usted
mismo puede ajustar la temperatura. La
apariencia y la textura de los alimentos
son mejores indicadores de la exactitud
de un homo que un term6metro. Estos
term6rnetros pueden variar en 20-40
grados de la verdarer temperatura del
horno. AdemAs, la puerta se tiene que
abrir para leer estos term6metros. Abrir la
puerta cambiar_ la temperatura del horno.
Para decidir en cu&nto cambiar la
temperatura, suba la temperatura del
homo en 25 grados (si los alimentos no
quedan bien cocidos) o baje la
temperatura en 25 grados (si la comida se
quema) de la temperatura de la receta,
luego hornee. Los resultados de esta
"prueba" le deberfan dar una idea de
cuAnto se deberia cambiar la temperatura.
+
1. Toque y sujete los botones
BAKE y BROIL por 3
segundos, hasta que el dial
muestre SF.
2=
3a,
Toque el bot6n BAKE. Un
nt_mero puesto en f_brica de
dos dfgitos aparecer_ en el
dial, generalmente "00."
Toque el bot6n BAKE un
vece para bajar (-) la
tomperatura.
Toque el bot6n con la flecha
DOWN para bajar (-) la
temperatura hasta un
m_ximo de 35°F.
3b. Toque el bot6n BAKE
2 veces para aumentar (+)
la temperatura.
Toque el bot6n con la flecha
UP para aumentar (+) la
temperatura hasta un
mAximo de 35°F
4. Toque el bot6n START.
Este aumento o disminuci6n en la posici6n
de la temperatura permanecer_ en la
memoria hasta que los pasos de arriba
sean repetidos. Un corte de corriente no
afectar_ esta posici6n.
Las temperaturas para asar a la parrilla o
para la autolimpieza no serAn afectadas.
74
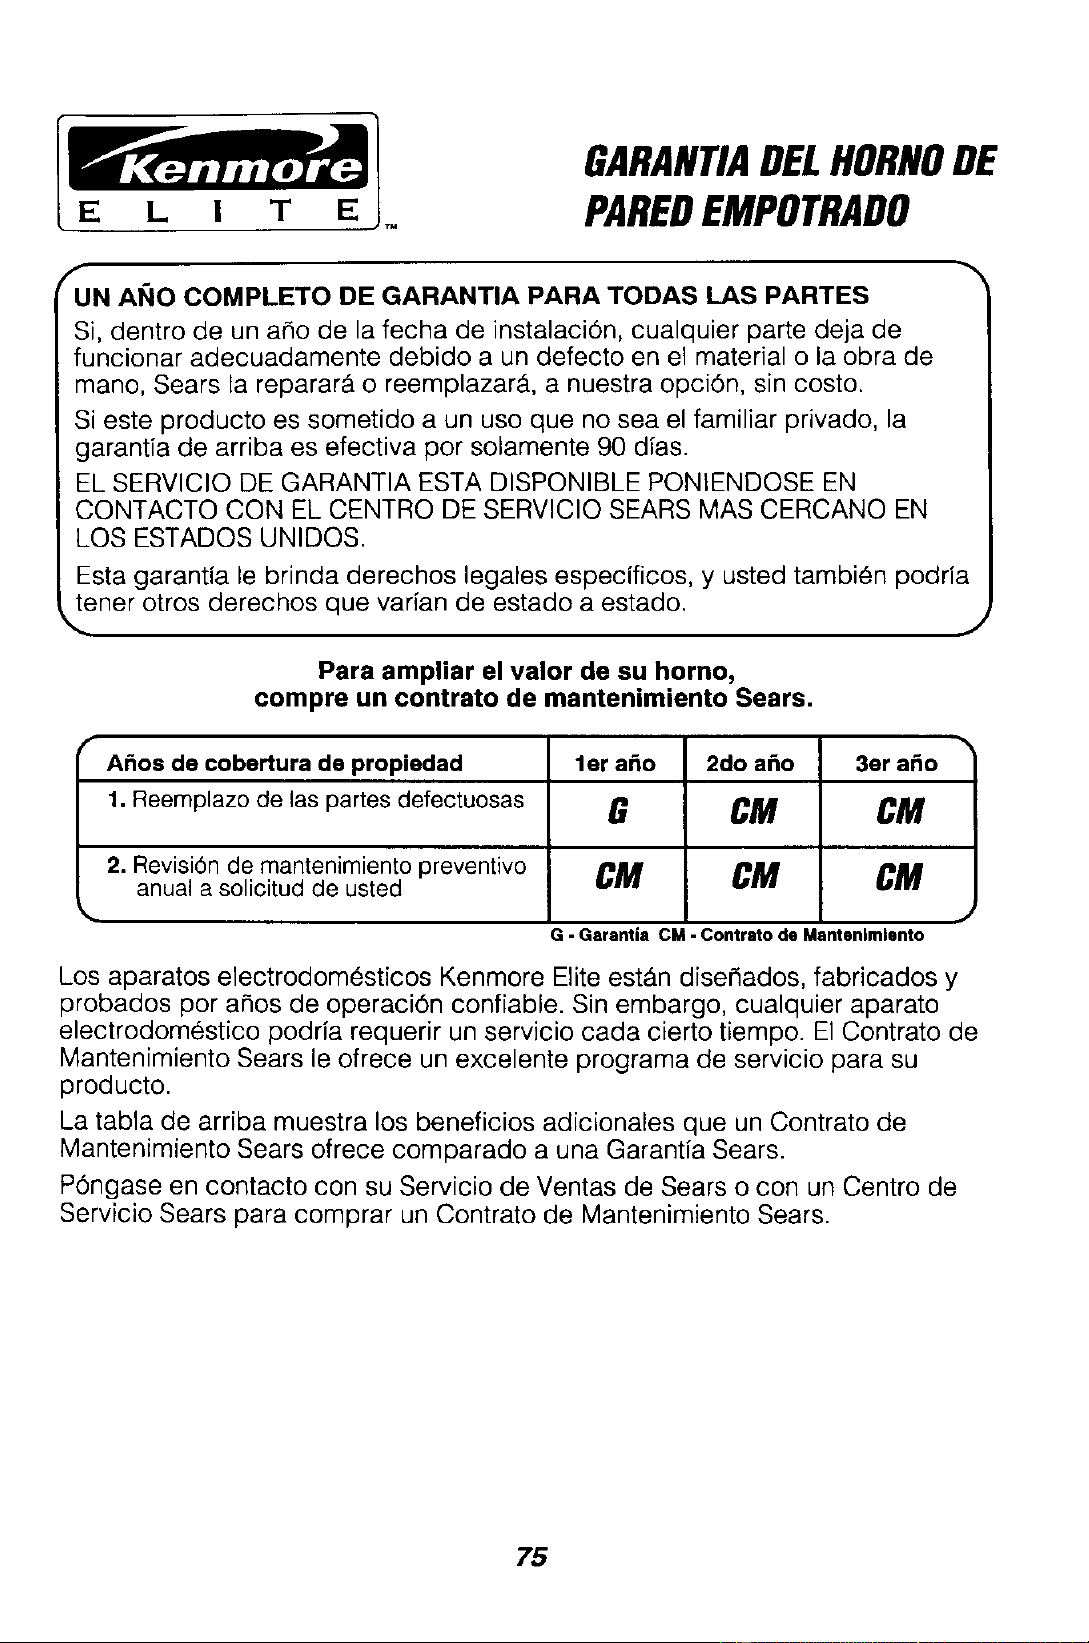
E L I T E
GARANTIADELHORNODE
PAREDEMPOTRADO
_N AI_IO COMPLETO DE GARANTIA PARA TODAS LAS PARTES
Si, dentro de un a_o de la fecha de instalaciOn, cualquier parte deja de
funcionar adecuadamente debido a un defecto en el material o la obra de
mane, Sears la reparara o reemplazar&, a nuestra opcidn, sin costo.
Si este producto es sometido a un uso que no sea el familiar privado, la
garantia de arriba es efectiva por solamente 90 dias.
EL SERVlClO DE GARANTIA ESTA DISPONIBLE PONIENDOSE EN
CONTACTO CON EL CENTRO DE SERVlClO SEARS MAS CERCANO EN
LOS ESTADOS UNIDOS.
Esta garantia le brinda derechos legales especificos, y usted tambien podria
tener otros derechos que varian de estado a estado.
Para ampliar el valor de su homo,
compre un contrato de mantenimiento Sears,
A_os de cobertura de propiedad ler a_o 2do a_o 3er a_o
1, Reemplazo de las partes defectuosas G CM CM
2. Revisi6n de mantenimiento preventivo CM CM CM
anual a solicitud de usted
G - Garantia CM - Contrato de Mantenlmlento
Los aparatos electrodom6sticos Kenmore Elite est&n diseSados, fabricados y
probados por ahos de operaciOn confiable. Sin embargo, cualquier aparato
electrodomestico podria requerir un servicio cada cierto tiempo. El Contrato de
Mantenimiento Sears le ofrece un excelente programa de servicio para su
producto.
La tabla de arriba muestra los beneficios adicionales que un Contrato de
Mantenimiento Sears ofrece comparado a una Garantia Sears.
P0ngase en contacto con su Servicio de Ventas de Sears o con un Centro de
Servicio Sears para comprar un Contrato de Mantenimiento Sears.
75

Get it fixed, at your home or ours!
For repairofmajor brandappliances in your own home...
no matter who made it,no matter who sold it!
1-800-4-MY-HOME @ Anybme,dayornKjht
(_4_oo-4694a_) (usA andCanada)
WWW.SeOI_,COWI WWW.seats,ca
For rep_r of carry-in products like vacuums, lawn equipment and
electronics,call for the nearestSears Parts and Repair Center.
1-800-488-1222 Anyene,dayorn_jht(U.SAone)
WWW.S&_rS,PJxn
For the replacement parts, accessories and owner's manuals
that you need to do-it-yourself, call Sears PartsDirectSU!
1-800-366-PART
(14900-366-7278)
6&m.-11 p.m, 7 daysaweek
www_sea_com/partsdirect
To purchase or inquireabout a Sears Service Agreement
or Sears Maintenance Agreement
1-800-827-6655 (u.s_.) 1-800-361-6665 (Canada)
7&m.-5pm,CST, Mort -Sat. 9a.m -8pro EST, M-F, 4pm. Sat
Parapedrsew_o dereparacK_na
dorn_illo, y para ordenarp_ezas
1-8_8-SU-HOGAR s_
(14_8-784-6427)
Au_ pour_ enfrar_as.
1-e00-LE-FOYER Mc
(14_oo-s33-_7)
_wvw see_s ca
© Sears,_ and Co
® Reg=stered Trademark / TMTrademark / SMServ=ce Mark of Sears, Roebuck and Co
® Marca Reg=strada / TMMarca de Fdbrlca / sM Mama de Serv_c=ode Sears, Roebuck and Co
uc Marque de commerce / MOMarque d_pos6e de Sears, Roebuck and Co
76