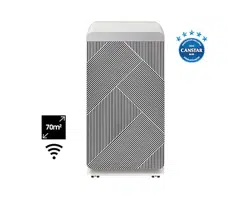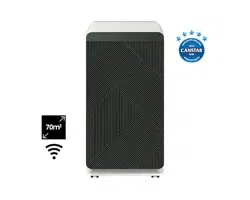
Air Purifier
User manual
AX70A9550GE / AX70B9550GG / AX70B9550GN
• Thank you for purchasing this Samsung Air Purifier.
• Before operating this unit, please read this manual carefully and retain it for future reference.
DB68-11329A-00_IB_ACR AX9500A_Medium PET_SA_EN_.indd 1DB68-11329A-00_IB_ACR AX9500A_Medium PET_SA_EN_.indd 1 2021-09-03 오후 2:08:342021-09-03 오후 2:08:34
2
English
Contents
Safety Information 3
Safety Information 3
Package Contents 7
Accessories 7
Air Purifier Overview 8
Front of main unit / Rear of main unit 8
Button unit / Display 9
Using the Air Purifier 17
Cleaning and Maintenance 21
Using the SmartThings App 24
Appendix 27
Correct Disposal of This Product
(Waste Electrical & Electronic Equipment)
(Applicable in countries with separate collection systems)
This marking on the product, accessories or literature indicates that the product and its electronic accessories
(e.g. charger, headset, USB cable) should not be disposed of with other household waste at the end of
their working life. To prevent possible harm to the environment or human health from uncontrolled waste
disposal, please separate these items from other types of waste and recycle them responsibly to promote the
sustainable reuse of material resources.
Household users should contact either the retailer where they purchased this product, or their local
Business users should contact their supplier and check the terms and conditions of the purchase contract. This
DB68-11329A-00_IB_ACR AX9500A_Medium PET_SA_EN_.indd 2DB68-11329A-00_IB_ACR AX9500A_Medium PET_SA_EN_.indd 2 2021-09-03 오후 2:08:342021-09-03 오후 2:08:34
3
English
Safety Information
These safety precautions are for owner's safety and preventions of property damage.
Therefore, please read this manual thoroughly before using your product.
Safety Information
WARNING
Hazards or unsafe practices that may result in severe personal injury or death.
CAUTION
Hazards or unsafe practices that may result in minor personal injury or property damage.
Follow directions.
Do NOT attempt.
Make sure the machine is grounded to prevent electric shock.
Disconnect from the power source.
Do NOT disassemble.
FOR INSTALLATION
WARNING
Only connect to a socket that can provide the rated power supply. Do not use the socket with other
products. Do not extend the power cord.
•
• Using a voltage converter may cause electric shock or fire.
•
Do not install the air purier near a heat source and ammable objects, or in areas that are highly
humid or dusty. Avoid exposure to oil, gas, direct sunlight and water.
• Follow instructions to avoid electric shock or fire.
CAUTION
When installing the product, make sure that the power plug can be easily removed when needed.
• Follow instructions to avoid electric shock or fire due to electrical leakage.
Install the product on a solid at ground.
•
Keep a safe distance from surrounding objects.
•
• The space is necessary to ensure efficient air intake and proper purification.
• Make sure that the inlet and outlet are not covered.
Make sure that the power cord is not pressed under the product.
• Follow instructions to avoid electric shock or fire.
DB68-11329A-00_IB_ACR AX9500A_Medium PET_SA_EN_.indd 3DB68-11329A-00_IB_ACR AX9500A_Medium PET_SA_EN_.indd 3 2021-09-03 오후 2:08:352021-09-03 오후 2:08:35
4
English
Safety Information
Safety Information
FOR POWER SUPPLY
WARNING
Use a dry cloth to wipe the power plug and the contact area to keep them free from dust, water and
other undesirable substances.
• Follow instructions to avoid electric shock or fire.
Check the position of the power plug when you connect it to a socket.
• Having the cord hanging from above the plug may damage the wires inside, which can lead to electric
shock or fire.
Please contact your local Samsung Service Centre if the power plug or cord is damaged.
If the supply cord is damaged, it must be replaced by the manufacturer, its service agent or similarly
qualied persons in order to avoid a hazard.
Make sure that the power plug is securely tted in the socket. Do not use it when the plug or cord is
damaged.
• Follow instructions to avoid electric shock or fire.
When you disconnect the power cord, pull it by the plug. Do not pull the cord itself.
• Follow instructions to avoid electric shock or fire.
Do not forcibly bend, pull, twist or tie the power cord into a knot. Do not hang it on a metallic object or
put a heavy object on it. Do not put the cord in a small gap between heavy objects, or forcibly push it
behind the air purier.
• Follow instructions to avoid electric shock or fire.
This appliance has a polarized plug (one blade is wider than the other). To reduce the risk of electric
shock, this plug is intended to t a polarized outlet only one way. If the plug does not t fully in outlet,
reverse the plug. If it still does not t, contact a qualied electrician.
• Do not attempt to defeat this safety feature.
CAUTION
Remove the power plug of your air purier when it is not used for a period of time and during a
thunderstorm.
• Follow instructions to avoid electric shock or fire.
Product installation must be handled by ofcial Samsung service personnel or a certied local
technician to avoid power cord or plug damage, which can be dangerous.
Disconnect the air purier from the power source before cleaning or repairing.
DB68-11329A-00_IB_ACR AX9500A_Medium PET_SA_EN_.indd 4DB68-11329A-00_IB_ACR AX9500A_Medium PET_SA_EN_.indd 4 2021-09-03 오후 2:08:352021-09-03 오후 2:08:35
5
English
Safety Information
FOR USING
WARNING
If the product is exposed to water, immediately disconnect it from the power source and contact your
local Samsung Service Centre.
• Follow instructions to avoid electric shock or fire.
If you notice a noise, burning smell or smoke from the product, immediately stop using it and contact
your local Samsung Service Centre.
• Follow instructions to avoid electric shock or fire.
If there is gas leakage (e.g., city gas or propane gas) in the location where the product is used, do NOT
touch the product or power cord. Immediately open the windows to ventilate the location, and then
contact the gas service provider's agent or a qualied technical expert for assistance.
• Do not turn the ventilation fan on.
•
Do not pull out the power plug while operating the air purier.
•
Please contact your local Samsung Service Centre when you require repair service.
• Follow instructions to avoid malfunction, water leakage, electric shock or fire.
Do not handle the power plug with wet hands.
• Follow instructions to avoid electric shock or fire.
Do not strike the product with excessive force or pull or press the front panel forcefully.
• Failure to do so may result in fire, a product malfunction, injury, noise or deformation.
Store the plastic package away from children or discard it according to the law.
• Follow instructions to protect children from a risk of suffocation.
Do not insert your nger or other objects into the air inlet or outlet.
• Take special care to protect children from injury.
• Take special care not to injure your fingers by putting them between the front panel and the product
when the front panel is closing.
Do not place an object near the air purier as children may use them to climb onto the product.
• Follow instructions to avoid injury from a tip-over or fall.
If the power plug area has contacted water, completely dry it before using the air purier again.
• Follow instructions to avoid electric shock or fire.
Do not insert a metal object and similar items inside the air purier.
• Follow instructions to avoid electric shock or injury.
Do not place a heavy object on the air purier.
• Follow instructions to avoid malfunction or noise.
To reduce the risk of re or electric shock, do not use this fan with any solid-state speed control device.
Not suitable for use with solid-state speed controls.
DB68-11329A-00_IB_ACR AX9500A_Medium PET_SA_EN_.indd 5DB68-11329A-00_IB_ACR AX9500A_Medium PET_SA_EN_.indd 5 2021-09-03 오후 2:08:352021-09-03 오후 2:08:35
6
English
Safety Information
Safety Information
If any of the electric components inside the air purier has contacted liquid or water, disconnect the
product from the power source and contact your local Samsung Service Centre.
• Follow instructions to avoid electric shock or fire.
Do NOT attempt to repair or modify the product.
• Use only the standard rated fuse.
• Follow instructions to avoid electric shock, fire, malfunction or injury.
CAUTION
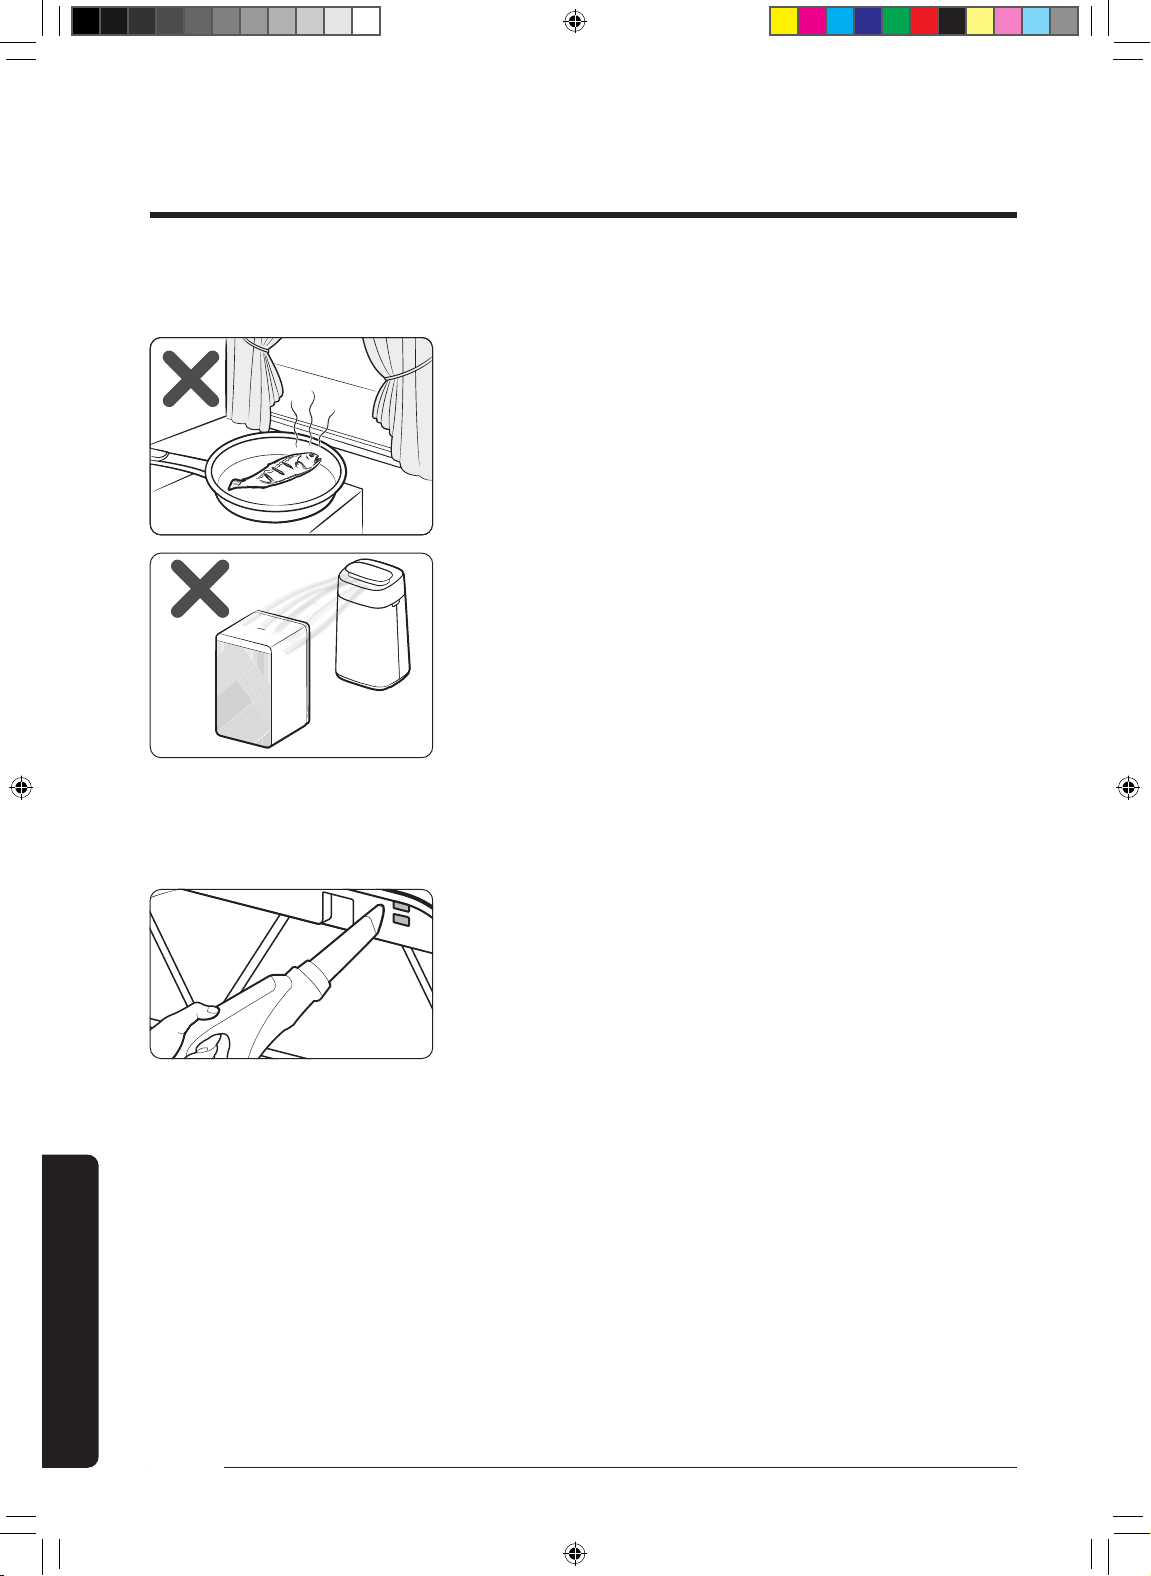
Keep your air purier at least 7 feet away from a TV or other audio/visual media.
• They can be affected by video or audio noise.
Operate the air purier with no obstacles in the vicinity.
•
39 inches from the product outlet
• The product is designed to intake, purify, and discharge polluted air. If there is any obstacle in the
vicinity, the purification capacity may decrease.
Do not step on the product or place other objects on it (laundry, candles, burning cigarettes, plates,
medicine, metal items, air fresheners, etc.).
• Follow instructions to avoid electric shock, fire, malfunction or injury.
Do not tilt or ip the air purier while the power plug is connected to the socket.
• Follow instructions to avoid malfunction or fire.
Do not use bug repellent or other spray products on the air purier.
• They can be harmful and may cause electric shock, fire or malfunction.
Do not submerge the air purier.
• Follow instructions to avoid malfunction.
Do not handle the product with wet hands.
• Follow instructions to avoid electric shock.
This appliance is not intended for use by persons (including children) with reduced physical, sensory or
mental capabilities, or lack of experience and knowledge, unless they have been given supervision or
instruction concerning use of the appliance by a person responsible for their safety. Children should be
supervised to ensure that they do not play with the appliance.
Cleaning and user maintenance shall not be made by children without supervision.
FOR CLEANING
WARNING
Do not apply water, benzene, thinner, alcohol, acetone or similar substances directly on the product.
• Follow instructions to avoid product discoloration or deformation, electric shock or fire.
Disconnect the product from the power source when cleaning. Wait for the fan to completely stop before cleaning.
• Follow instructions to avoid electric shock or fire.
CAUTION
Be sure to cut off all power sources before cleaning or any other maintenance work. Before connecting
power after maintenance, be sure to conrm that the product is assembled completely.
DB68-11329A-00_IB_ACR AX9500A_Medium PET_SA_EN_.indd 6DB68-11329A-00_IB_ACR AX9500A_Medium PET_SA_EN_.indd 6 2021-09-03 오후 2:08:352021-09-03 오후 2:08:35
7
English
Package Contents
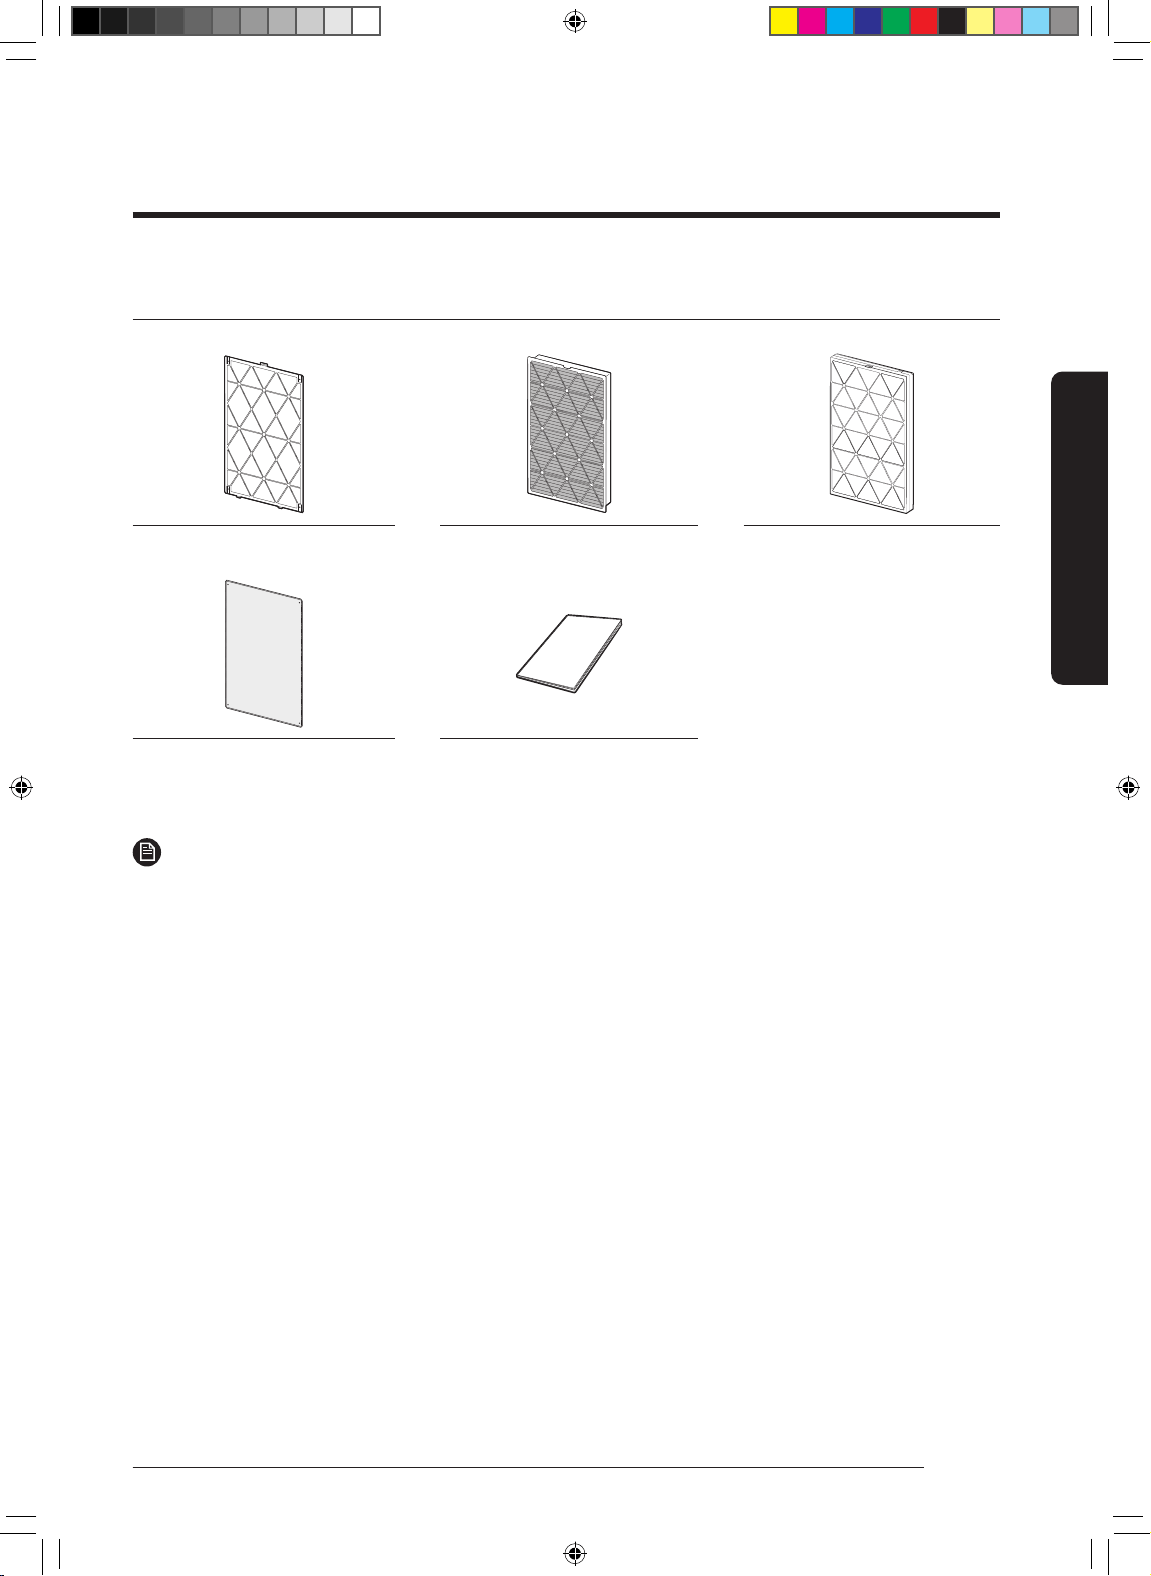
Package Contents
Accessories
User Manual
¹ The pet deodorization filter and
NOTE
•
–
originally supplied with the product.
DB68-11329A-00_IB_ACR AX9500A_Medium PET_SA_EN_.indd 7DB68-11329A-00_IB_ACR AX9500A_Medium PET_SA_EN_.indd 7 2021-09-03 오후 2:08:352021-09-03 오후 2:08:35
8
English
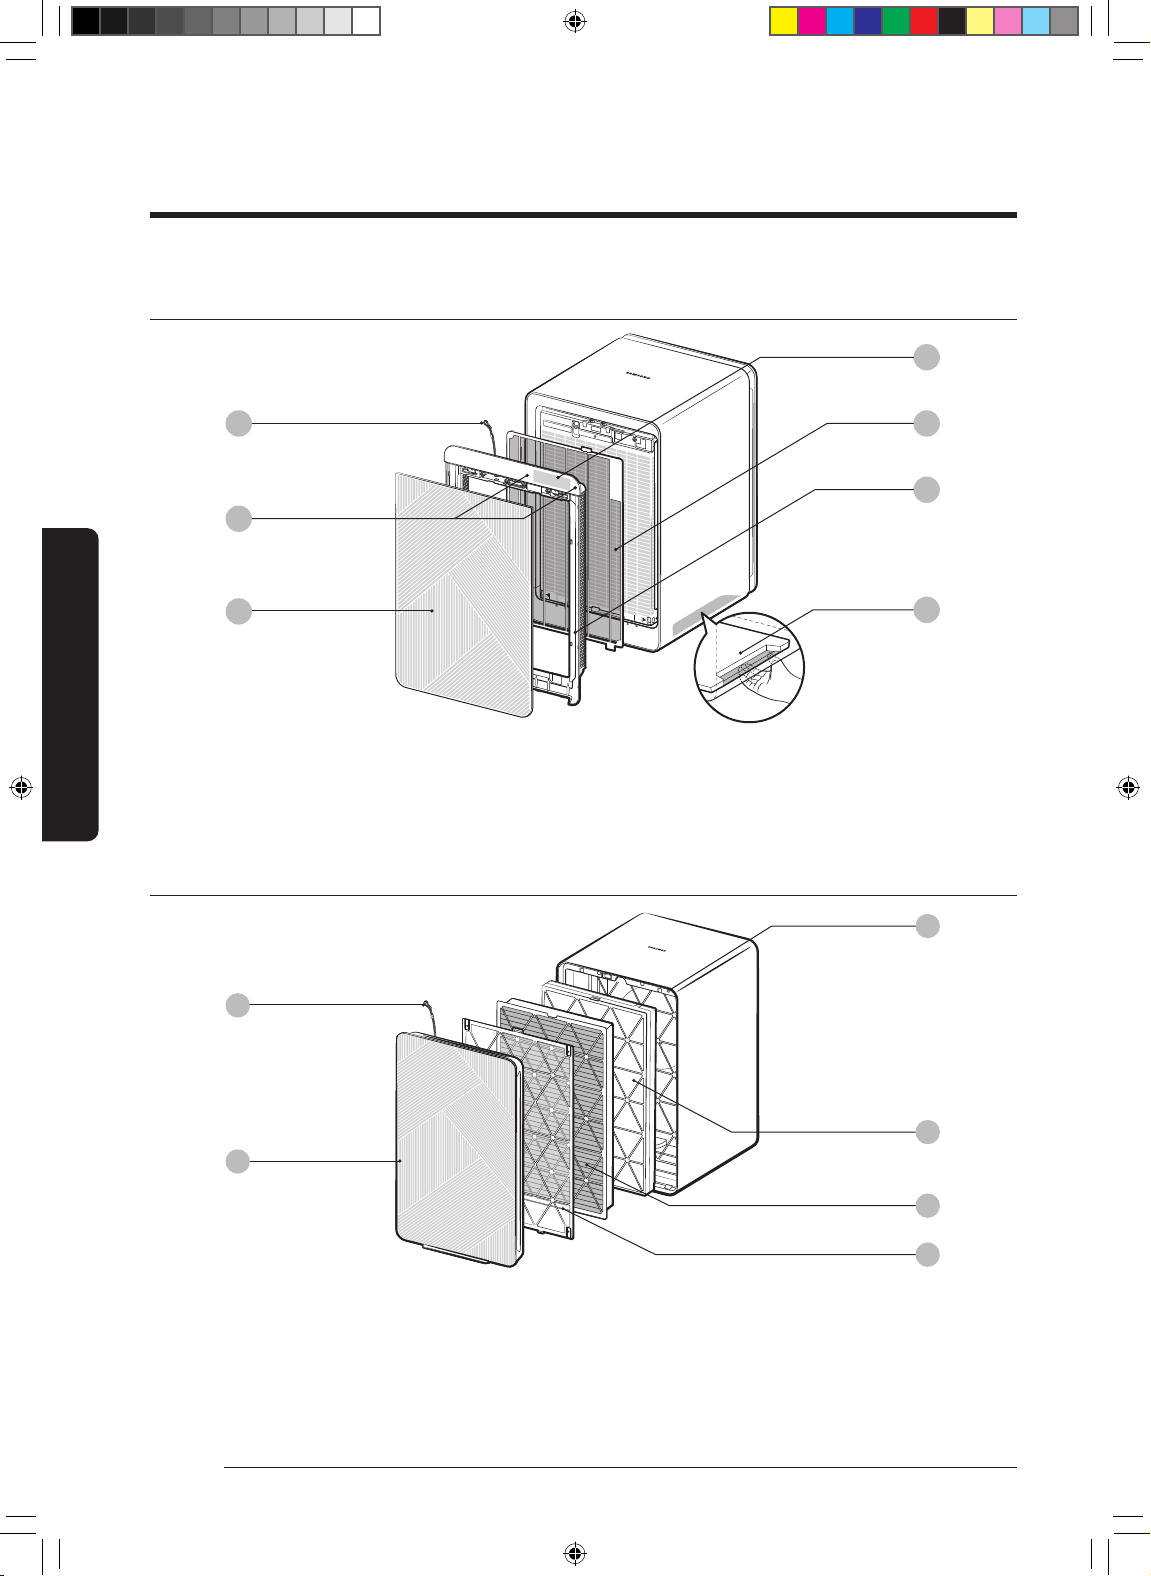
Air Purier Overview
01
02
Air inlet / Rear panel
03
Micro air sensor
04
05
Pet Deodorization Filter
06
Front of main unit
01
07
03
02
04
05
06
Air Purier Overview
01
02
Button unit
03
Air outlet / Bespoke panel
04
Display
05
Front mesh
06
Frame
07
Pull handle (both bottom sides)
Air Purier Overview
Rear of main unit
04
05
06
03
01
02
DB68-11329A-00_IB_ACR AX9500A_Medium PET_SA_EN_.indd 8DB68-11329A-00_IB_ACR AX9500A_Medium PET_SA_EN_.indd 8 2021-09-03 오후 2:08:362021-09-03 오후 2:08:36
9
English
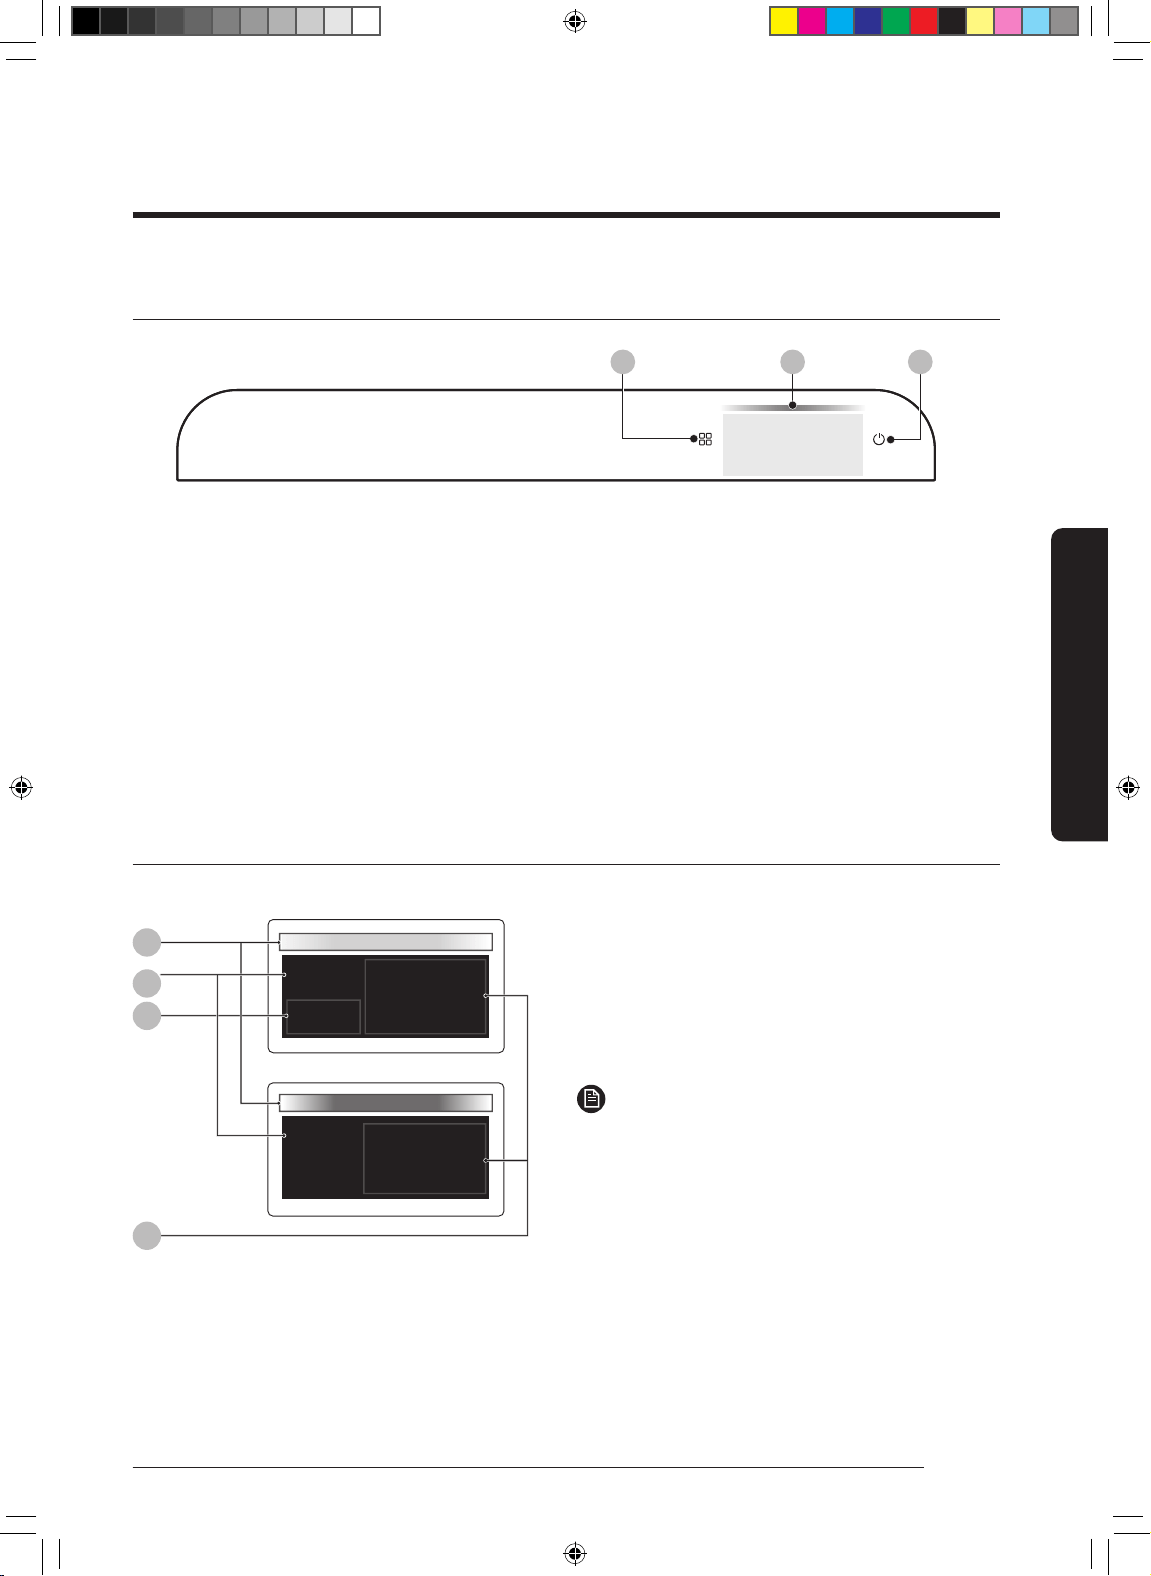
Air Purier Overview
01
Mode button
•
(Smart, High, Wind-Free, Sleep, Pet)
•
•
02
Power button
•
•
(When the device is locked/unlocked, the button
* Mode button + Power button
•
03
Display
Display
03
01
125
Smart
PM10
GAS
Smart
04
02
PM10, PM2.5 and PM1.0 indication
GAS indication
01
with colour indicators
02
Shows the operation mode
03
04
NOTE
•
㎛
or less
–
human hair
•
㎛
or less
–
human hair
•
㎛
or less
–
human hair
㎛
Button unit
01 02
Smart
PM10
5
03
DB68-11329A-00_IB_ACR AX9500A_Medium PET_SA_EN_.indd 9DB68-11329A-00_IB_ACR AX9500A_Medium PET_SA_EN_.indd 9 2021-09-03 오후 2:08:362021-09-03 오후 2:08:36

10
English
Air Purier Overview
Air Purier Overview
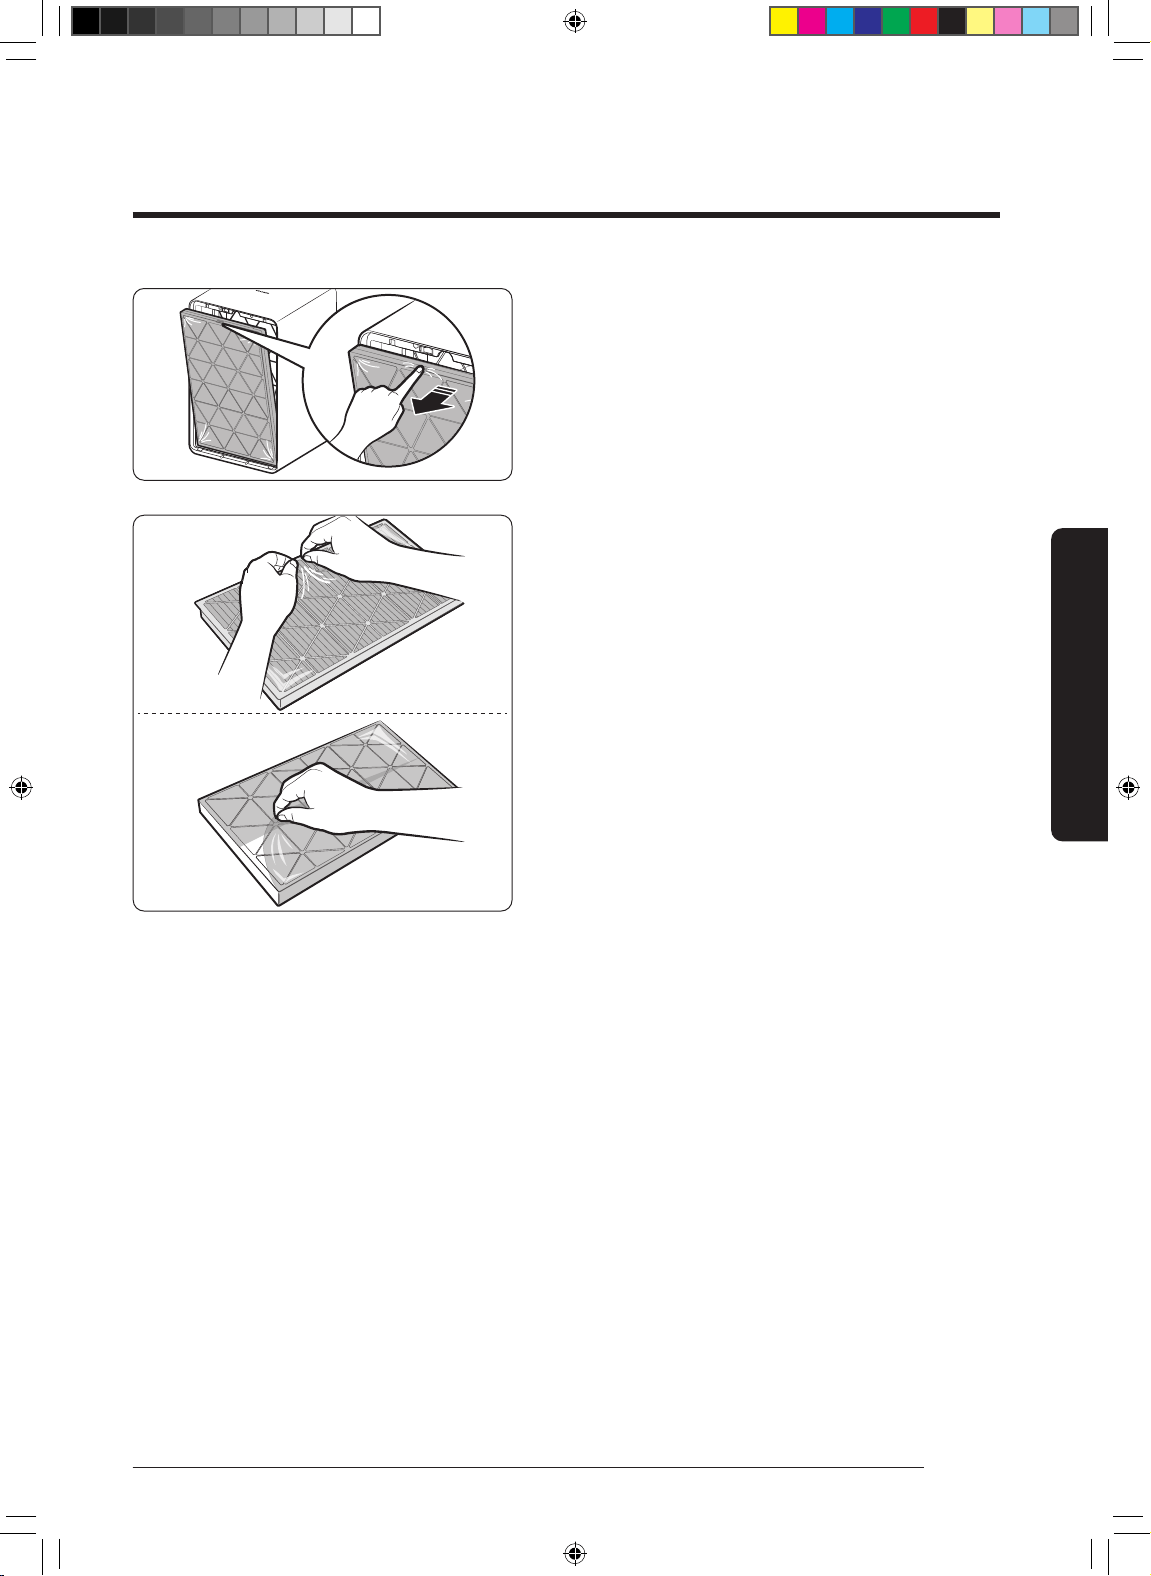
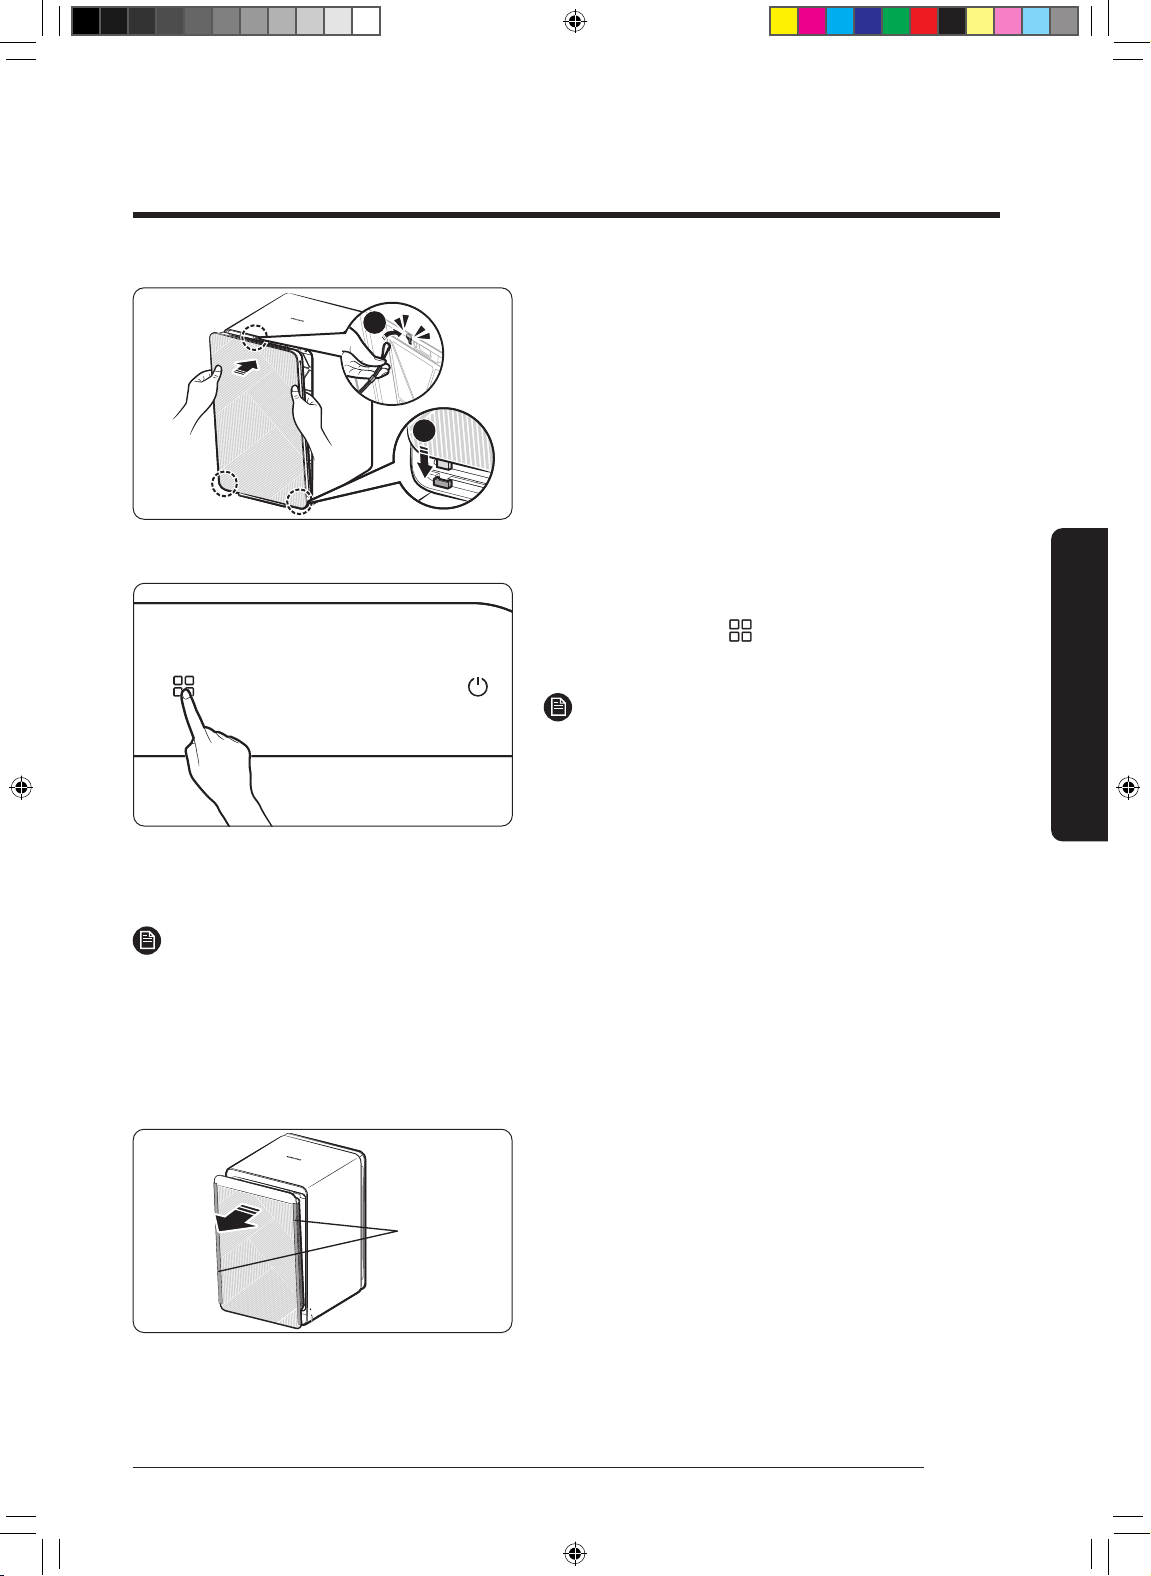
Removing the lters
STEP 1
Opening the rear panel
•
pull the panel towards yourself to remove it.
• Remove the clip wire from the rear of the main unit.
STEP 2
STEP 3
DB68-11329A-00_IB_ACR AX9500A_Medium PET_SA_EN_.indd 10DB68-11329A-00_IB_ACR AX9500A_Medium PET_SA_EN_.indd 10 2021-09-03 오후 2:08:372021-09-03 오후 2:08:37
11
English
Air Purier Overview
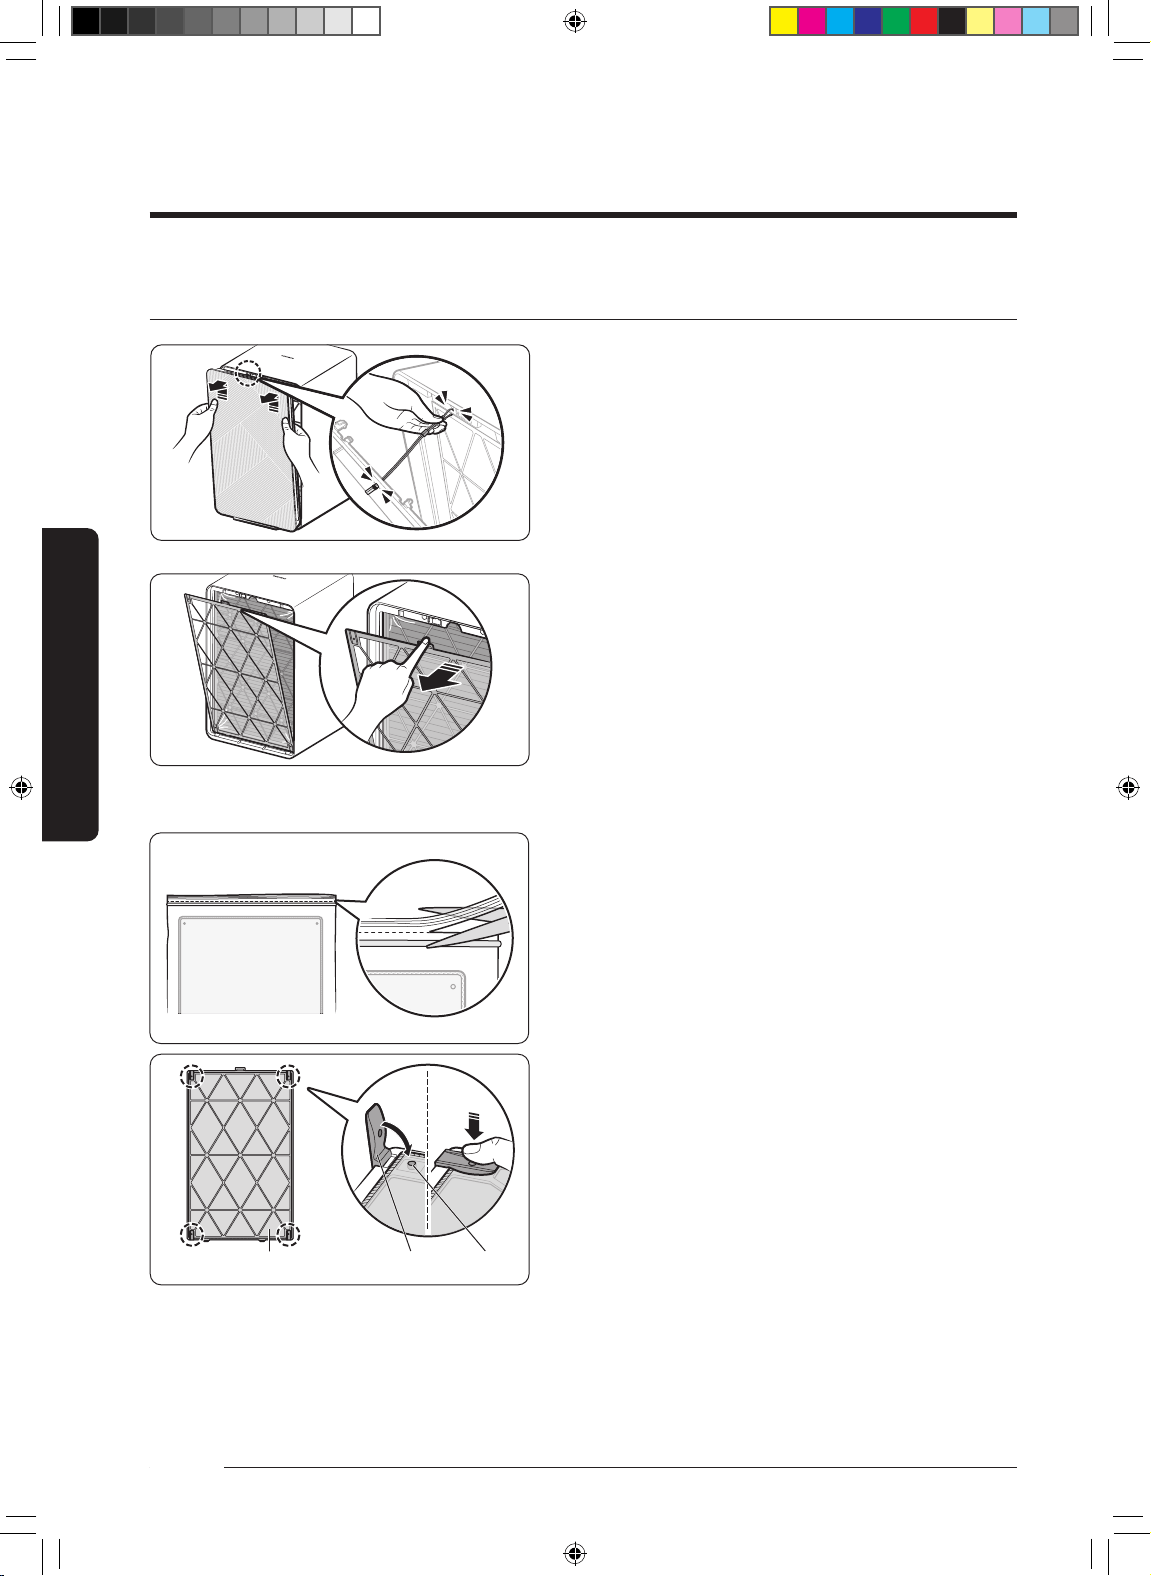
STEP 4
STEP 5
Remove the plastic packaging from the pet
Pet Deodorization Filter
Dust Collecting Filter
DB68-11329A-00_IB_ACR AX9500A_Medium PET_SA_EN_.indd 11DB68-11329A-00_IB_ACR AX9500A_Medium PET_SA_EN_.indd 11 2021-09-03 오후 2:08:372021-09-03 오후 2:08:37

12
English
Air Purier Overview
Air Purier Overview
Attaching the lters
STEP 1
• Put (
②
①
) at
•
before attaching it.
STEP 2
STEP 3
• Insert (
②
①
) at
the bottom of the main unit.
1
2
1
2
DB68-11329A-00_IB_ACR AX9500A_Medium PET_SA_EN_.indd 12DB68-11329A-00_IB_ACR AX9500A_Medium PET_SA_EN_.indd 12 2021-09-03 오후 2:08:372021-09-03 오후 2:08:37
13
English
Air Purier Overview
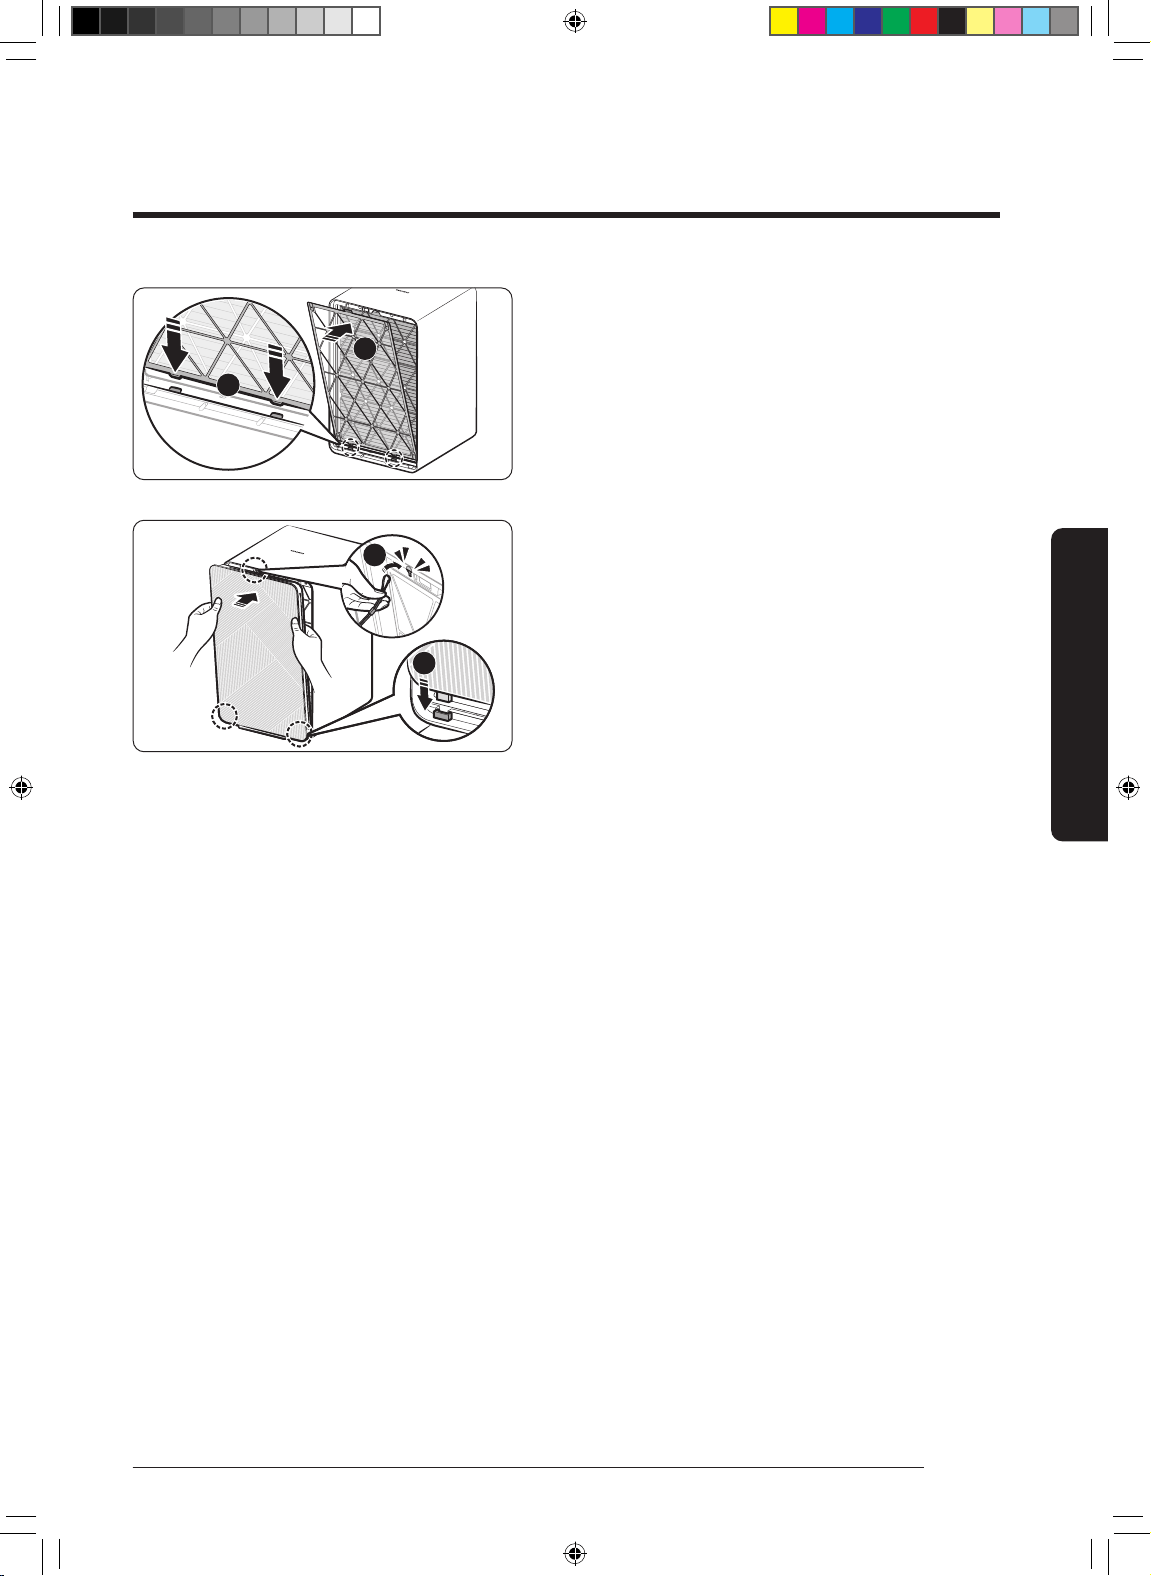
STEP 4
• Attach the clip wire (
①
) to the rear of the main unit.
• Insert the tabs on the panel into the slots (
②
) at the
of the panel to fasten it.
• Press and hold the [
] button for more than
3 seconds.
NOTE
•
needed” on the front display and plays an audible
•
NOTE
• Keep the doors and windows closed when the product is operating, if circumstances allow. Note that
reduced by ventilating the room.
•
Protective
plastic cover
1
2
DB68-11329A-00_IB_ACR AX9500A_Medium PET_SA_EN_.indd 13DB68-11329A-00_IB_ACR AX9500A_Medium PET_SA_EN_.indd 13 2021-09-03 오후 2:08:372021-09-03 오후 2:08:37
14
English
Air Purier Overview
Air Purier Overview
Attaching the pet mesh lter
STEP 1
Opening the rear panel
• Hold both upper sides of the rear panel, and pull the
panel towards yourself.
• Remove the clip wire from the rear of the main unit.
STEP 2
STEP 3
packaging
• Use scissors to cut off the top of the zipper bag.
STEP 4
•
the four fastening spots.
•
•
that it clicks into place.
Bump
DB68-11329A-00_IB_ACR AX9500A_Medium PET_SA_EN_.indd 14DB68-11329A-00_IB_ACR AX9500A_Medium PET_SA_EN_.indd 14 2021-09-03 오후 2:08:382021-09-03 오후 2:08:38
15
English
Air Purier Overview
STEP 5
• Insert (
②
①
) at
the bottom of the main unit.
STEP 6
• Attach the clip wire (
①
) to the rear of the main unit.
• Insert the tabs on the panel into the slots (
②
) at the
of the panel to fasten it.
1
2
1
2
DB68-11329A-00_IB_ACR AX9500A_Medium PET_SA_EN_.indd 15DB68-11329A-00_IB_ACR AX9500A_Medium PET_SA_EN_.indd 15 2021-09-03 오후 2:08:382021-09-03 오후 2:08:38
16
English
Air Purier Overview
Air Purier Overview
Using the lters
•
– This will disappear naturally after using the device for a day or two.
•
•
used.
•
environment in which the device is used, the amount of absorbed pollutants and how often the device is used.
•
• If the device has not been used for more than two weeks or some unpleasant smell comes from the device, operate the
•
–
regardless of the remaining warranty term.
• Filters for replacement can be purchased from the nearest Samsung Electronics website.
Pet deodorization lter
smells.
•
odours. This can keep the device performance high.
–
–
•
•
come in contact with water.
Dust collecting lter
•
come in contact with water.
DB68-11329A-00_IB_ACR AX9500A_Medium PET_SA_EN_.indd 16DB68-11329A-00_IB_ACR AX9500A_Medium PET_SA_EN_.indd 16 2021-09-03 오후 2:08:382021-09-03 오후 2:08:38

17
English
Using the Air Purier
If you hear a chime sound when you connect the power plug, it means that the power is connected properly.
Turning on/off the air purier
• The device turns on with a chime sound, and starts operation
in Smart mode.
– Immediately after the device starts operation, a welcome
message, app linkage reminder and 'sensor ready' indicator are
–
• During operation of the device, the front panel is kept open about
after the power plug is connected.
• The front display brightness changes depending on the ambient
light intensity.
Changing the operation mode
Change the device operation mode as necessary.
• Press the [ ] button to select the operation mode to use.
– Each time you press the button, the mode changes in the following
• If you switch the device to Sleep mode, the front panel closes, the
indicator only illuminates.
– If you change the operation mode after using Sleep mode for
ready' indicator appears.
• In Smart mode, the fan speed is automatically adjusted
odour conditions to keep the room air clean.
– If the room air becomes clean after device operation in Smart
mode for a certain period of time, the front panel closes and the
device automatically switches to 'power saving mode'.
decreases. The mode can manually be turned off by changing the
fan speed.
– While in Smart mode, use the SmartThings app to activate Sleep
mode. When it becomes very dark around the device, the front
panel will automatically close itself, the front display will turn off
and the device will operate at the lowest fan speed.
• The Pet mode effectively removes pet odours and fur in the air. In
Pet mode, the fan speed is automatically adjusted depending on the
surrounding dust and odour conditions to keep the room air clean.
Using the Air Purier
Using the Air Purier
DB68-11329A-00_IB_ACR AX9500A_Medium PET_SA_EN_.indd 17DB68-11329A-00_IB_ACR AX9500A_Medium PET_SA_EN_.indd 17 2021-09-03 오후 2:08:382021-09-03 오후 2:08:38

18
English
Using the Air Purier
Using the Air Purier
Lock function
Use this function to lock all buttons to prevent the buttons from
being pressed by mistake or by children during operation of the
device.
• To lock all buttons, press and hold the
[ ]
button for more
than 3 seconds. A chime sound is played, the 'lock' icon is
are locked.
• When the Lock function is on, all buttons are disabled and
cannot be selected.
Turning off the function
• Press and hold the
[ ]
button for more than 3 seconds.
A 'ding' sound is played, the 'unlock' icon is shown on the front
Filter replacement reminder
This function informs you when you need to replace the pet
deodorization lter and dust collecting lter.
• If an audible alarm is played and 'Filter Reset needed' appears on the
turn on the device and then press and hold the [ ] button for more
] button. If you do
not want to reset, press the [
] button. If you press the [ ] button,
'Filter is reset' appears on the display.
•
holding the [
have been replaced for any reason although the front display did not
display 'Filter Reset needed'.
CAUTION
•
reminder may not work properly.
NOTE
• When the filters need to be replaced, 'Filter Reset needed' is shown
3-second press
Child Lock on
Hold 3 sec to unlock
Lock
Unlock
3-second press
Filter Reset needed
Hold 3 sec to reset
Reset filter?
Reset
Cancel
DB68-11329A-00_IB_ACR AX9500A_Medium PET_SA_EN_.indd 18DB68-11329A-00_IB_ACR AX9500A_Medium PET_SA_EN_.indd 18 2021-09-03 오후 2:08:392021-09-03 오후 2:08:39

19
English
Using the Air Purier
Air outlet setting
While in Smart mode with high fan speed, change the number
of air outlets if necessary.
• Press and hold the [
] and [ ] buttons for more than
When you change the fan speed to High while in Smart mode,
•
the [
] and [
you change the fan speed to High while in Smart mode, the
• The changed setting is maintained even after the device is
turned off and on again.
NOTE
• When the fan speed is Medium or Low while in Smart mode,
the number of air outlets does not change automatically.
• In modes other than Smart mode, the setting is displayed
and can be changed, but the number of air outlets does not
change automatically.
Checking air quality
The concentrations of PM10, PM2.5 and PM1.0 are shown, and
the air quality and GAS level are shown with colour indicators,
depending on the PM10, PM2.5, PM1.0 and GAS levels.
•
–
•
Pollution level
PM10
concentration
(
㎍
/m³)
PM2.5
/
PM1.0
concentration
(
㎍
/m³)
Gas
pollution
level
Red
Poor 3
Moderate
Blue
•
Mode
Fan speed
Smart
High fan
speed
High
3 outlets
3 outlets
Medium -
Low -
3 outlets
125
Smart
PM10
GAS
Smart
Example of PM10 level indication
Example of GAS level indication
DB68-11329A-00_IB_ACR AX9500A_Medium PET_SA_EN_.indd 19DB68-11329A-00_IB_ACR AX9500A_Medium PET_SA_EN_.indd 19 2021-09-03 오후 2:08:392021-09-03 오후 2:08:39
20
English
Using the Air Purier
Using the Air Purier
NOTE
• PM concentrations can be affected by the environmental
conditions in which the device is used (e.g., there is a
construction site or road nearby, the device is used near a
fabric sofa, a vacuum cleaner is used or bedding/clothes are
arranged around the device).
•
– The device is used in a carpeted room, a veterinary clinic
or clothing store where there is a lot of fur, a highly humid
location or a location with lots of smoke or insects,
–
around the device, or
–
ventilation system or draughty window frames)
• The gas level can be affected by odorous household items
such as air fresheners, deodorants and detergents.
•
PM concentration readings may not match as air circulates.
The PM concentration readings may vary depending on the
product and PM meter.
• If the intensity of gas (odour) is constant with no change,
the gas level reading may not change even if the odour you
•
forecasts.
• In an environment that is affected by electromagnetic wave or
electrical noise, the PM concentration readings may increase
temporarily.
DB68-11329A-00_IB_ACR AX9500A_Medium PET_SA_EN_.indd 20DB68-11329A-00_IB_ACR AX9500A_Medium PET_SA_EN_.indd 20 2021-09-03 오후 2:08:392021-09-03 오후 2:08:39
21
English
Cleaning and Maintenance
Cleaning the air purier exterior
•
• Use cotton swabs to wipe the grooves on the rear panel.
• If it is hard to remove dust on the front or rear panel, remove the panel and wash it with water.
CAUTION
• Do NOT wipe the product with an alkaline detergent or disinfectant.
• Do NOT wipe the product surface with sulphuric acid, hydrochloric acid or organic solvent (e.g., thinner,
kerosene, acetone). Do NOT attach a sticker to the surface. The product surface may become damaged.
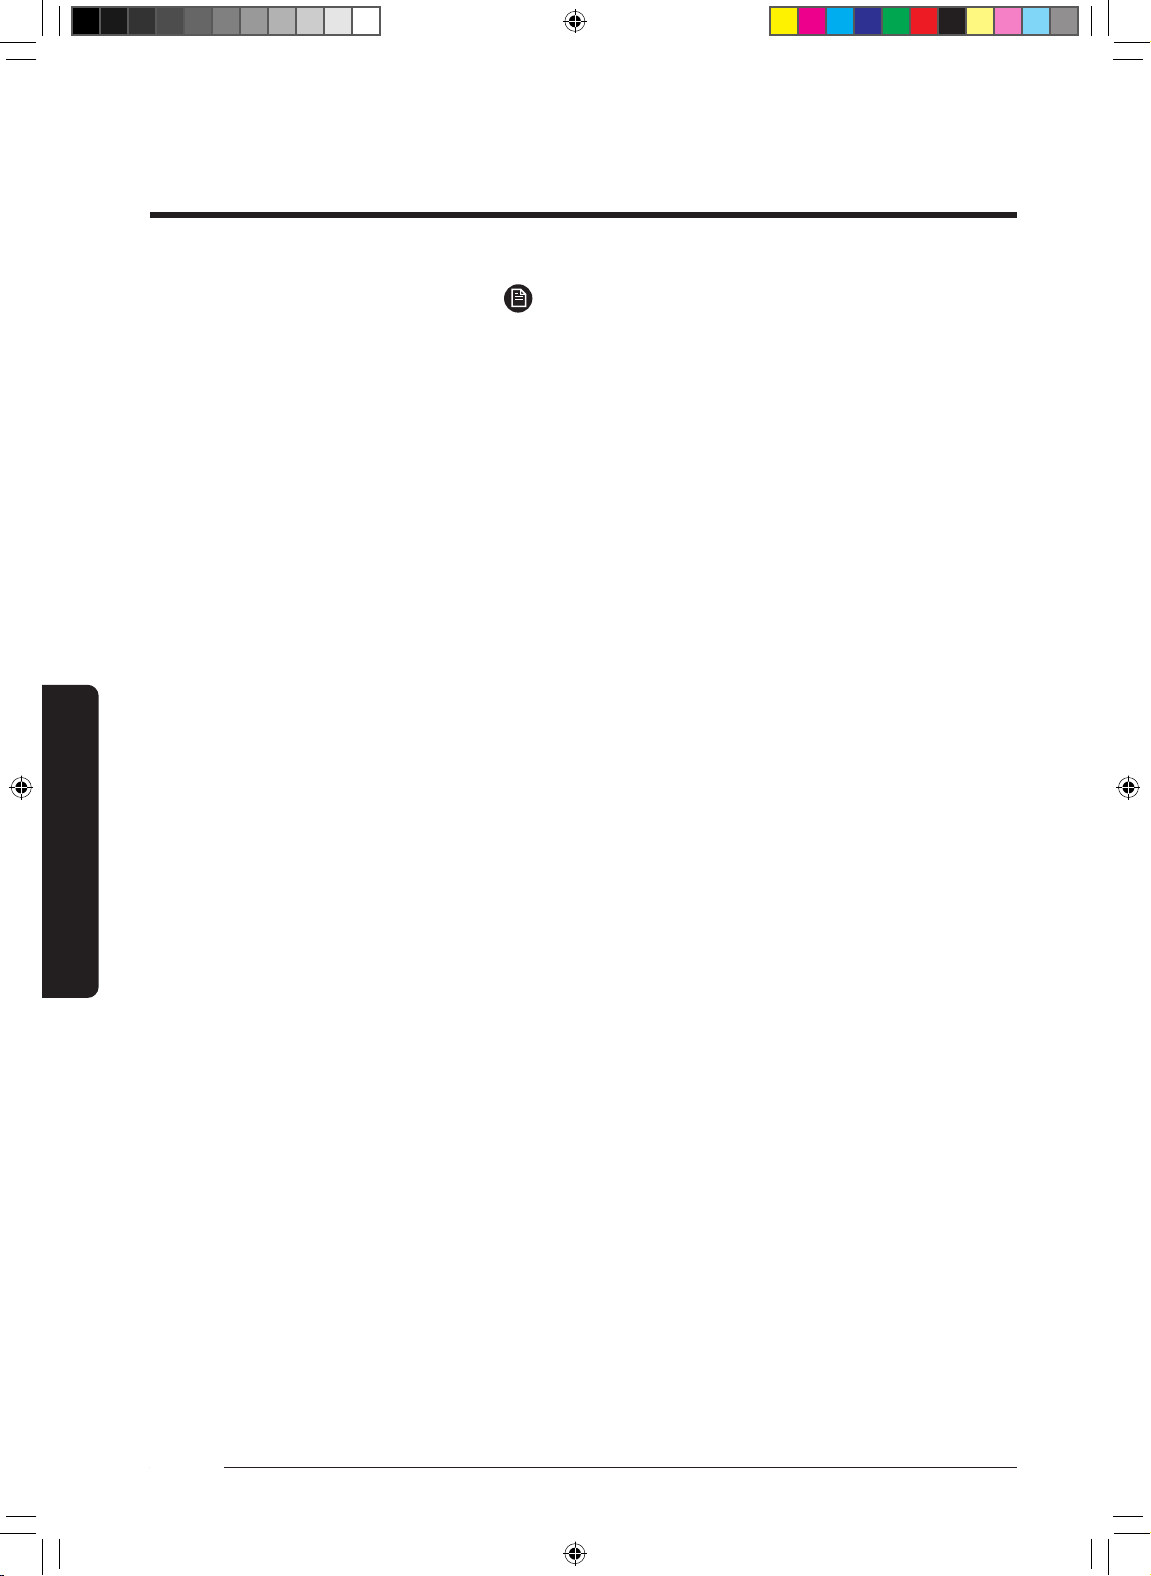
Cleaning the sensor unit
• Use a vacuum cleaner to clean the area around the
sensor. If the sensor is contaminated with dust or other
foreign material, a high PM concentration may be
detected.
CAUTION
• Do NOT put dust into the sensor inlet.
Cleaning and drying the front panel
STEP 1
Removing the front panel
• Hold both upper sides of the front panel and pull
towards yourself.
• Remove the clip wire from the front of the main unit.
STEP 2
Removing the front mesh
• Turn the front panel over.
• Hold the pulls in the upper portion and remove the
mesh.
PULL
PULL
Cleaning and Maintenance
Be sure to disconnect the power plug from the socket before cleaning the product.
DB68-11329A-00_IB_ACR AX9500A_Medium PET_SA_EN_.indd 21DB68-11329A-00_IB_ACR AX9500A_Medium PET_SA_EN_.indd 21 2021-09-03 오후 2:08:402021-09-03 오후 2:08:40
22
English
Cleaning and Maintenance
Cleaning and Maintenance
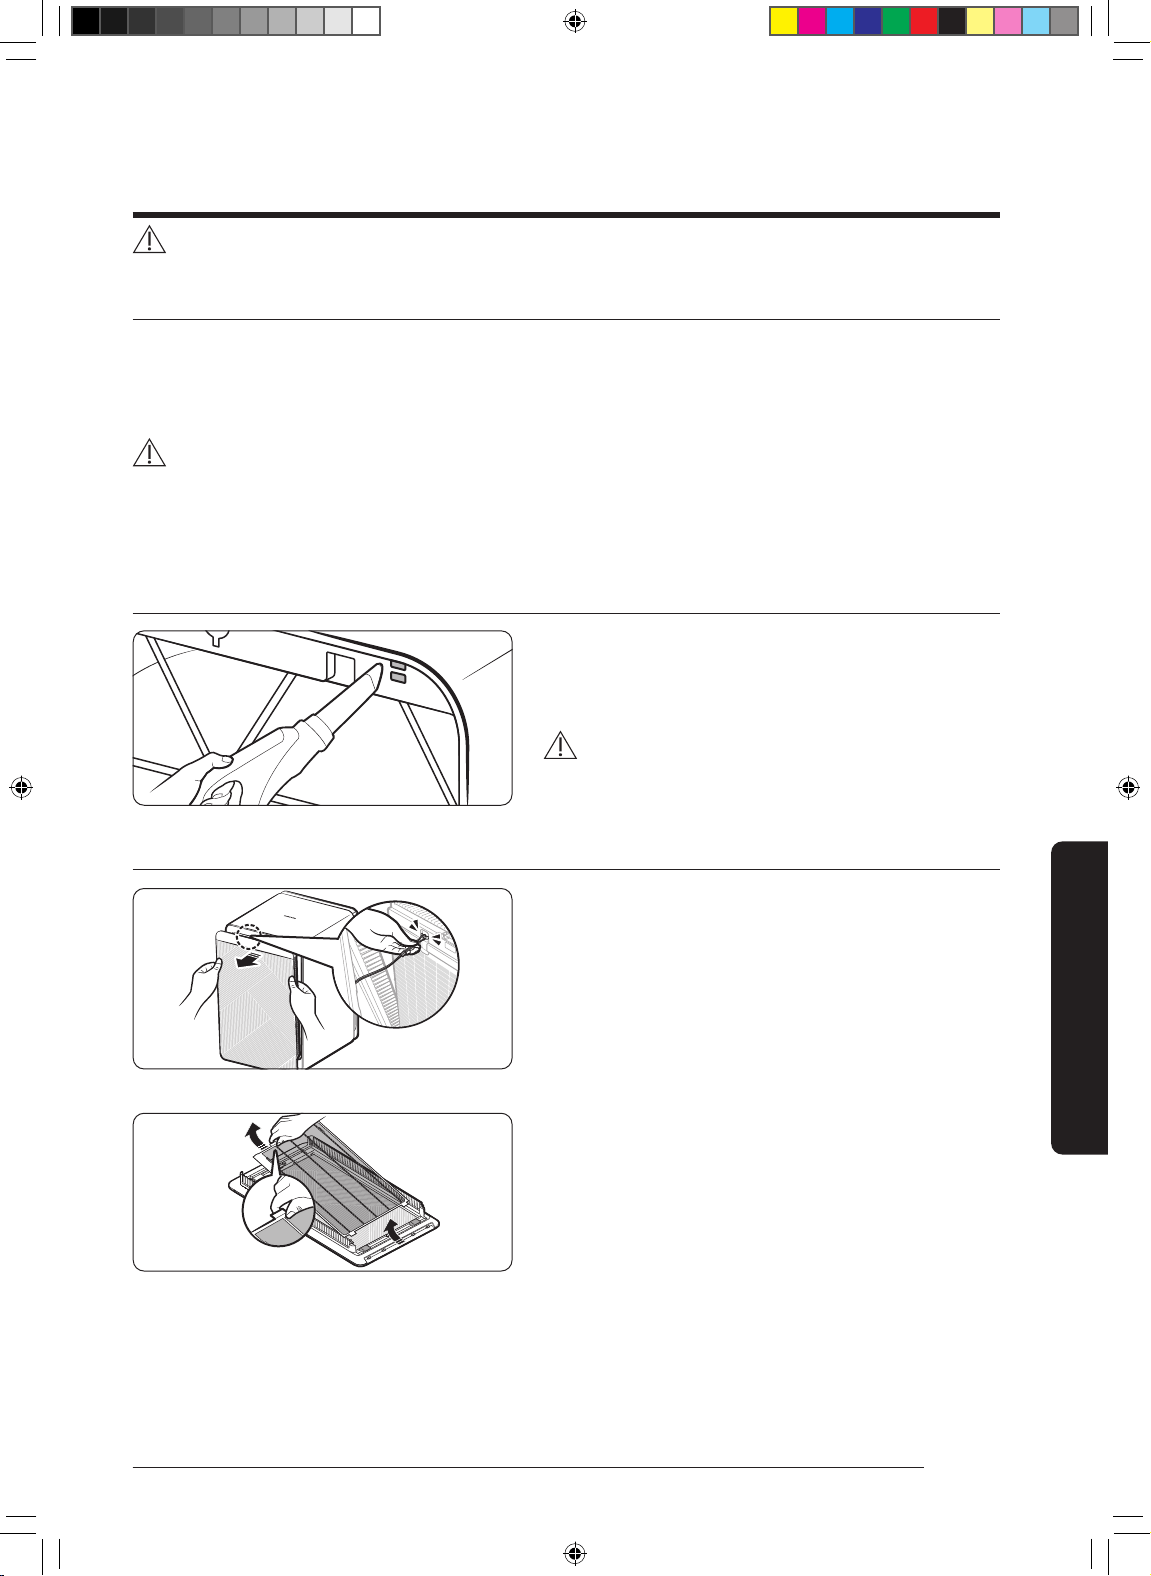
STEP 3
• Use water or a soft cloth to remove dust and other foreign
material on the front panel.
• If you cleaned the front mesh with water, dry it thoroughly
before attaching it to the product.
CAUTION
• The frame incorporates the display PBA.
Ensure that the frame does not come in contact with
STEP 4
Attaching the front mesh
•
– Insert the tabs on the front mesh into the slots (
①
)
at the bottom of the panel, and then push the areas
numbered
②
at the top of the mesh.
STEP 5
Attaching the front panel
• Attach the clip wire (
①
) to the front of the main unit.
• Insert the tabs on the panel into the slots (
②
) at
the bottom of the main unit, and then press the top
Front mesh
PULL
2
1
2
1
DB68-11329A-00_IB_ACR AX9500A_Medium PET_SA_EN_.indd 22DB68-11329A-00_IB_ACR AX9500A_Medium PET_SA_EN_.indd 22 2021-09-03 오후 2:08:402021-09-03 오후 2:08:40
23
English
Cleaning and Maintenance
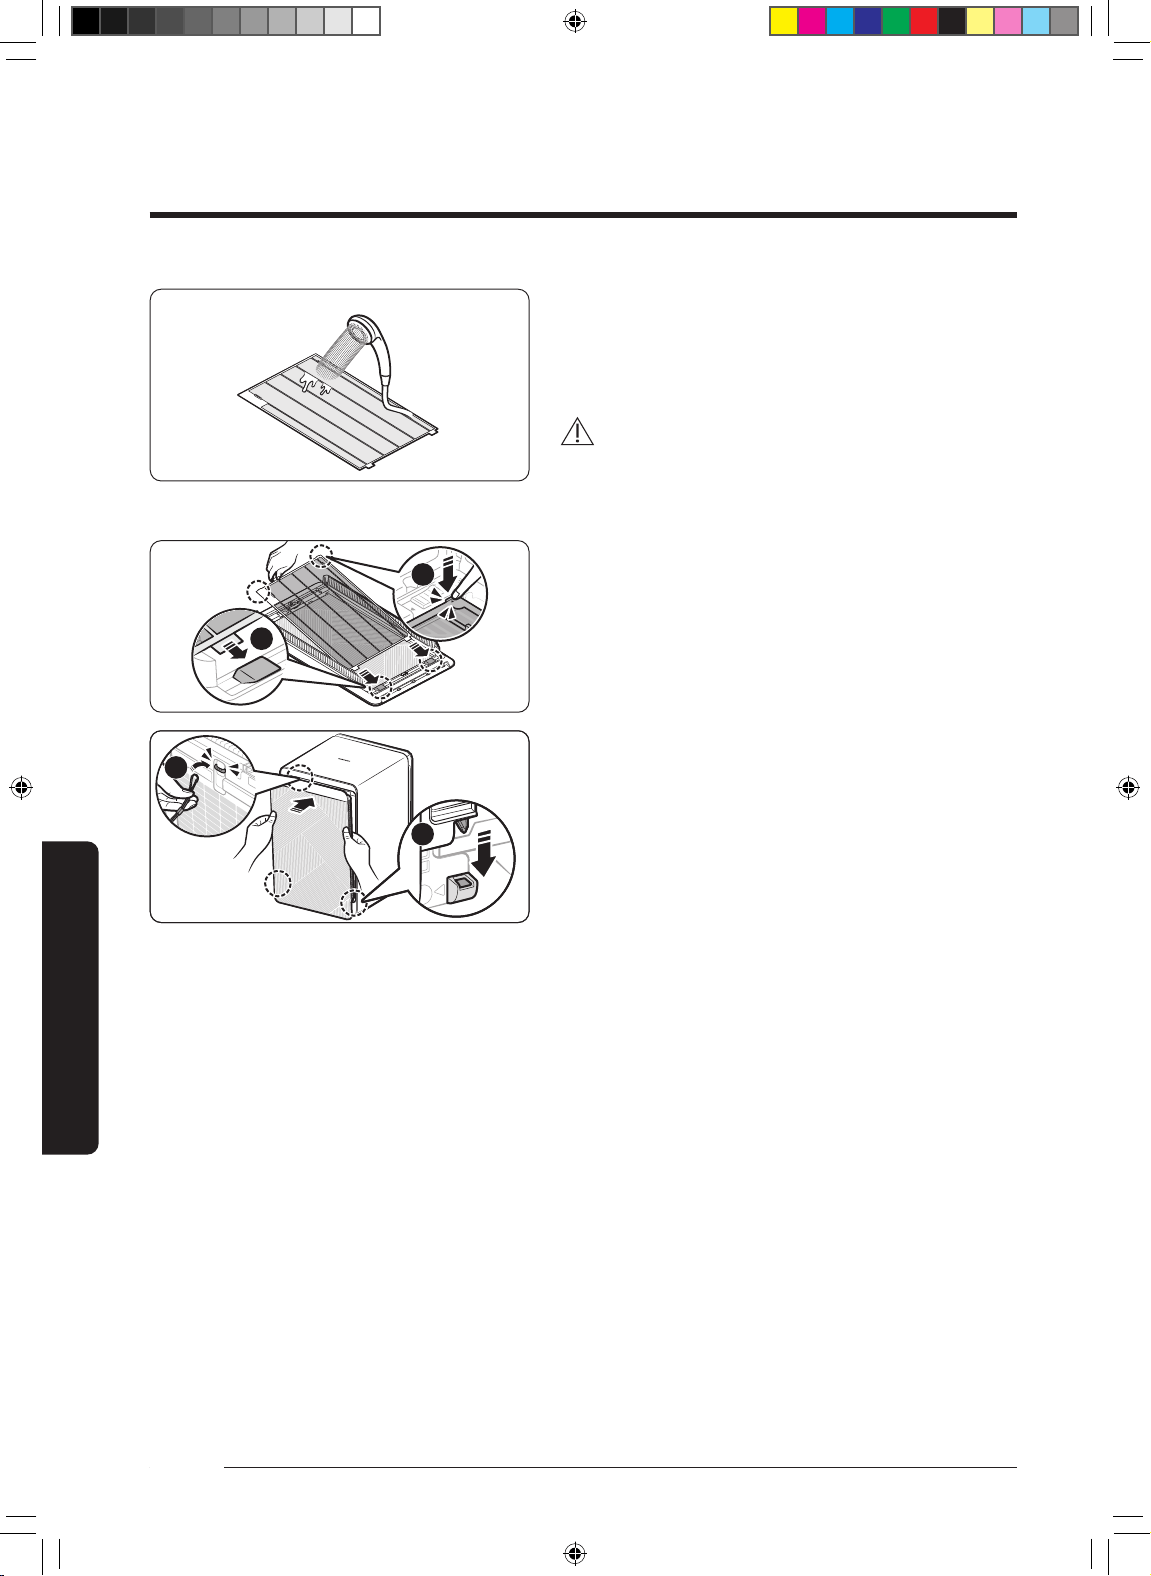
Cleaning and drying the lters
NOTE
•
Cleaning the pet mesh lter and pre-lter
•
vacuum cleaner to remove the larger dust and then
–
CAUTION
•
become damaged.
•
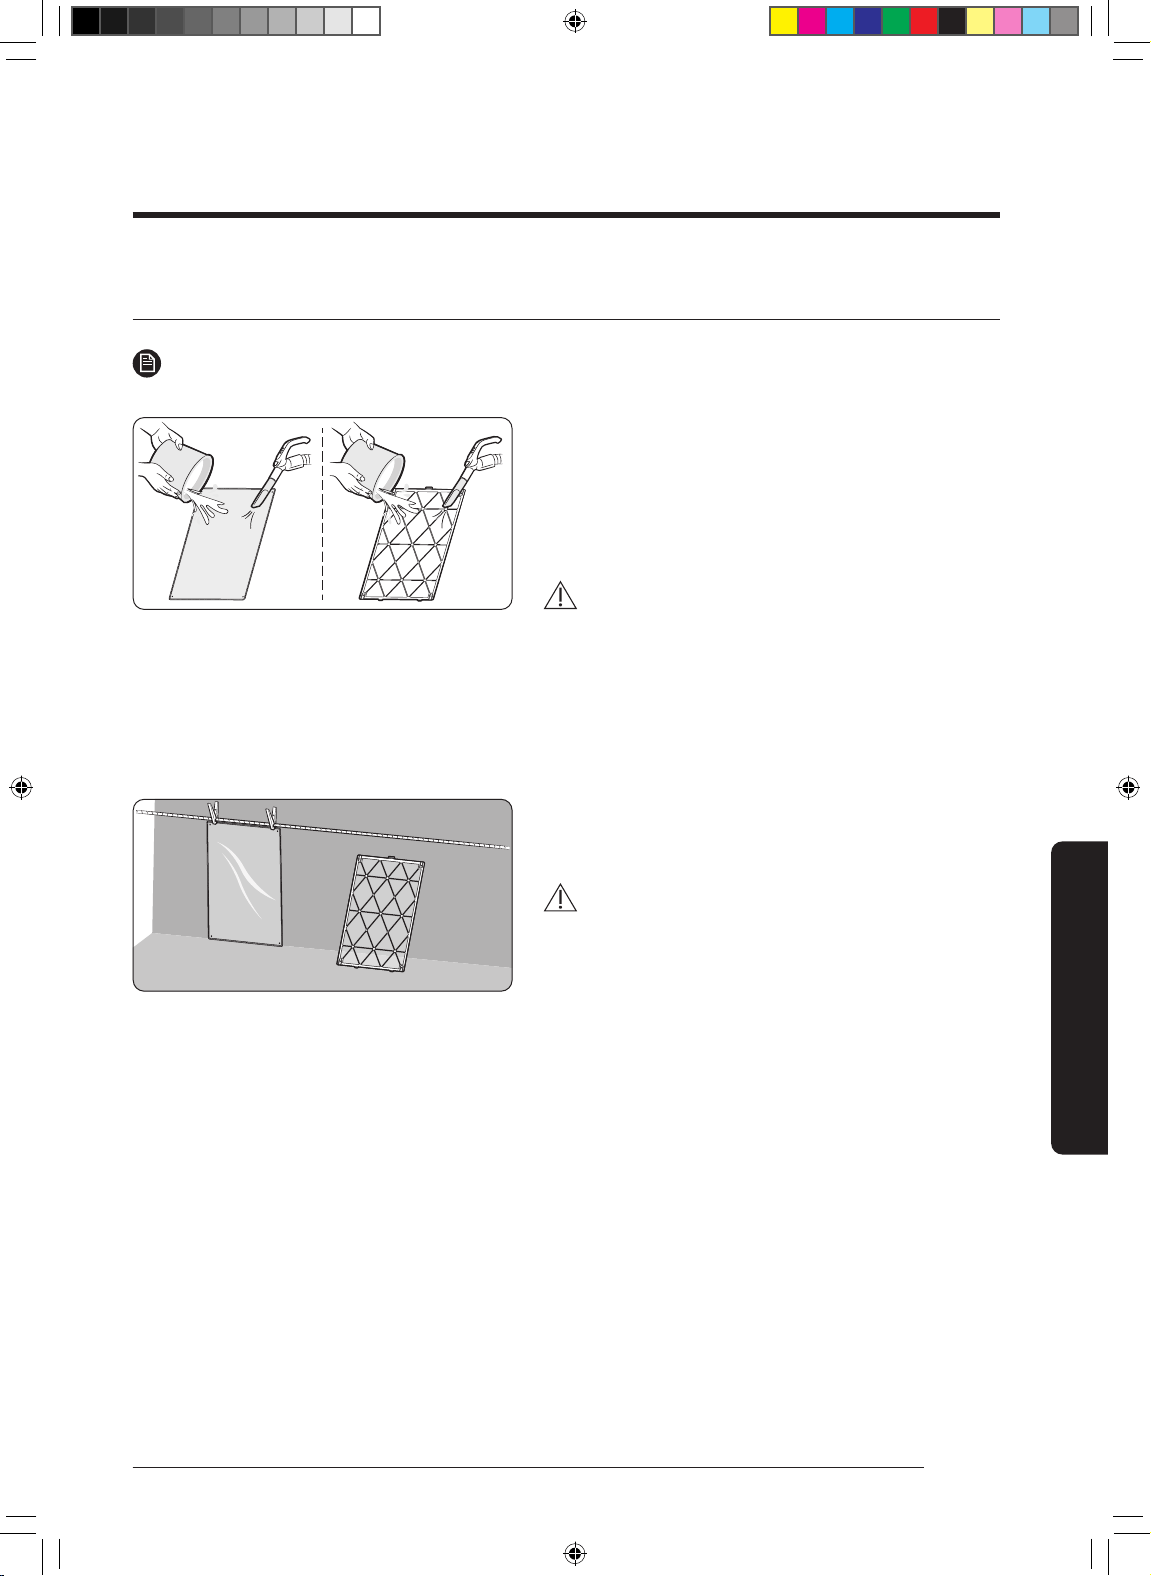
Drying the lters
•
CAUTION
•
deform or become damaged.
DB68-11329A-00_IB_ACR AX9500A_Medium PET_SA_EN_.indd 23DB68-11329A-00_IB_ACR AX9500A_Medium PET_SA_EN_.indd 23 2021-09-03 오후 2:08:402021-09-03 오후 2:08:40
24
English
Using the SmartThings App
The images shown may differ depending on your smartphone model, OS version and manufacturer.
If the WiFi disconnects, please follow the instructions on the Samsung SmartThings app via your mobile device or tablet.
SmartThings app
1
Checking the power connections
heck if the power is connected to the product and
the access point.
2
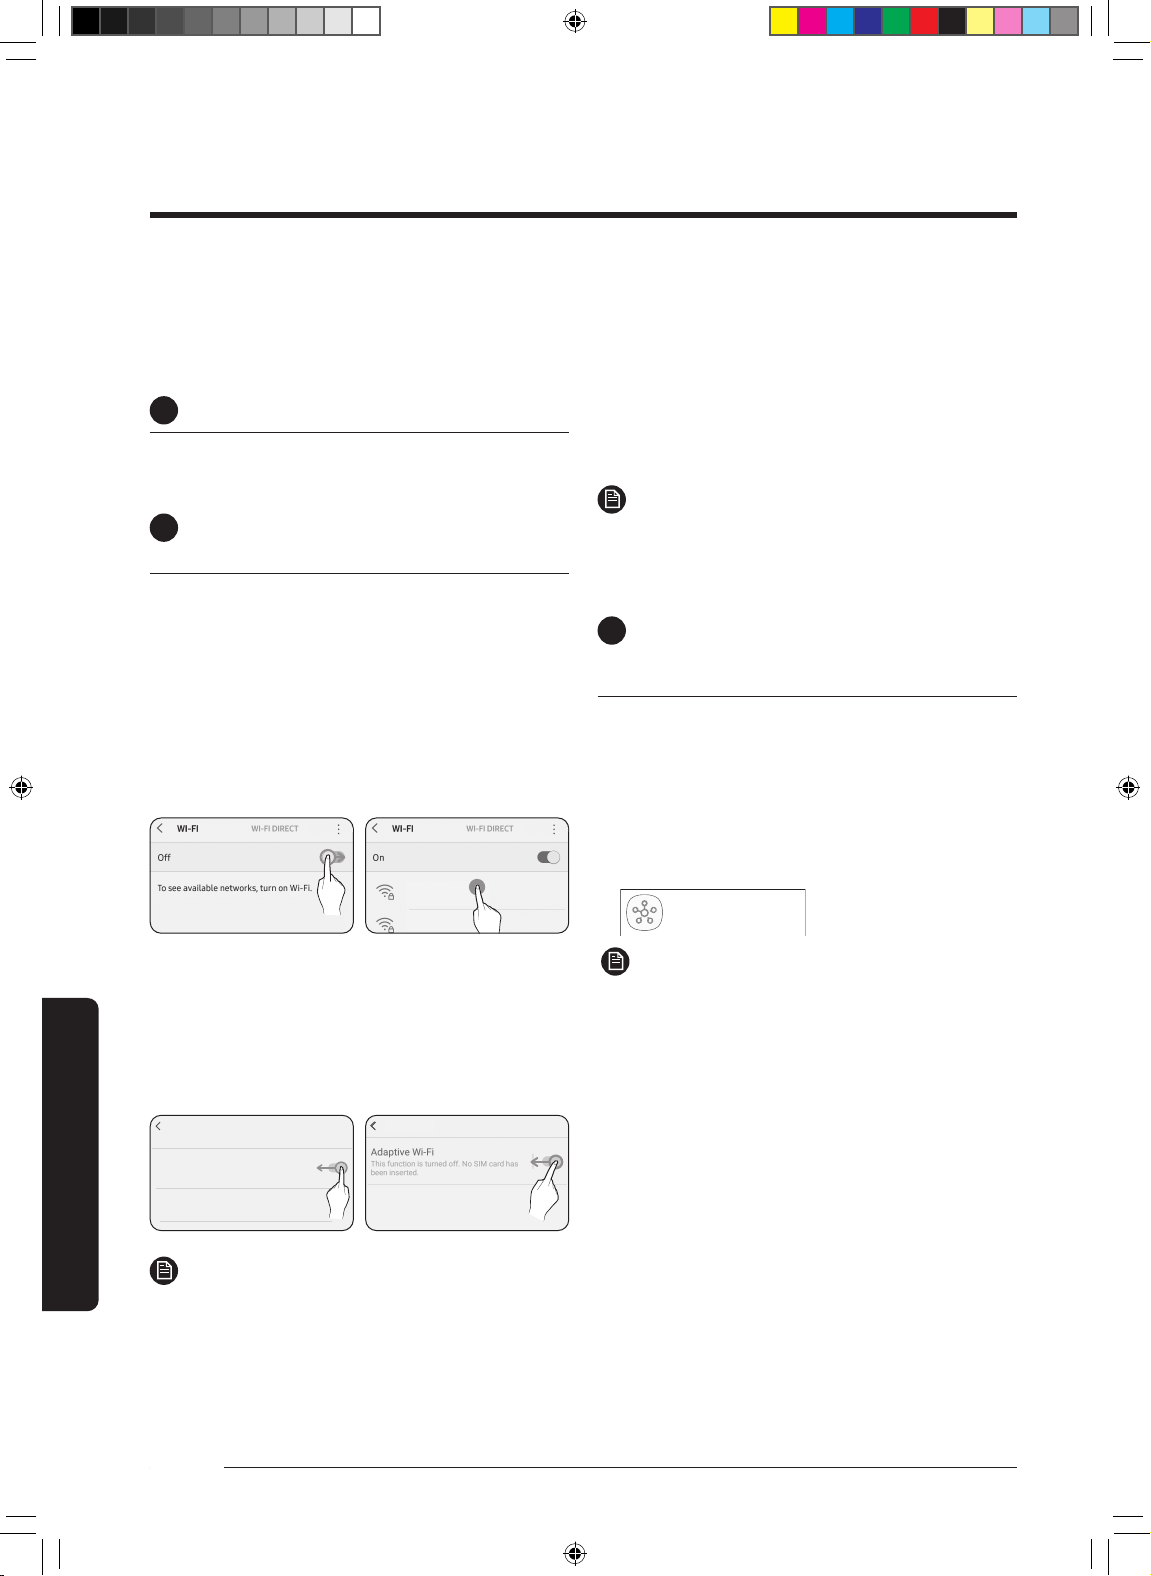
Setting up and connecting to a Wi-Fi
access point using your smartphone
1
To connect the product to a Wi-Fi network,
turn on Wi-Fi at "Settings > Wi-Fi", and then
select the access point to connect to
• Only alphanumeric characters are supported for
wireless access point names (SSIDs). If an SSID has
a special character, rename it before connecting to
it.
• This product supports only Wi-Fi 2.4 GHz.
SAMSUNG_2G
SAMSUNG_5G
On
Select
2
Turning off "Switch to mobile data" at
"Settings > Wi-Fi" on your Smartphone
• If "Switch to mobile data" or "Adaptive Wi-Fi" is
turned on, you cannot connect to the network. Be
sure to turn off these functions before connecting
to the network.
Advanced
Switch to mobile data
Insert SIM card to use mobile data.
Advanced
Off
Off
NOTE
• The setup may differ depending on your
smartphone model, OS version and manufacturer.
3
Checking the Internet connectivity
• After connecting to Wi-Fi, check that your
smartphone is connected to the Internet.
NOTE
•
service provider for troubleshooting.
3
Downloading the SmartThings
app and registering your Samsung
account
1
Downloading the SmartThings app
• Search for "SmartThings" on Play Store or App
Store, and download the SmartThings app to your
smartphone.
• If the SmartThings app is already installed on
your smartphone, update it to the latest version.
SmartThings (Samsung Connet)
Samsung Electronics Co., Ltd.
NOTE
•
The updates of the SmartThings app or the
functions supported by it may be discontinued for
the previously supported OS versions due to the
reasons such as usability and security.
• The SmartThings app may change without
prior notice to improve product usability and
performance.
DB68-11329A-00_IB_ACR AX9500A_Medium PET_SA_EN_.indd 24DB68-11329A-00_IB_ACR AX9500A_Medium PET_SA_EN_.indd 24 2021-09-03 오후 2:08:412021-09-03 오후 2:08:41

25
English
Using the SmartThings App
2
Registering your Samsung account
•
SmartThings app. To create your Samsung
account and log in to your account, follow the
instructions displayed on the SmartThings app.
NOTE
• If you already have a Samsung account, log in to
the account. If you have a smartphone that is a
Samsung device and you have a Samsung account,
your smartphone is automatically logged in to your
account.
• If you log in from a smartphone produced for
another country, you need to log in with its country
code when you create your Samsung account, and
the SmartThings app may not be used on some
smartphones.
4
Connecting the SmartThings app to
your product
1
Selecting the product to connect to
Start the SmartThings app about one minute after
turning on the product to connect to.
After the SmartThings app is started, select
'ADD NOW' when a pop-up window saying that a
product to connect to is found appears.
A new device has been found.
Add this device to SmartThings?
Don’t add Later
Add now
선택
Select
3) If the pop-up window does not appear, select "+",
and then "Add Device."
Home
Living room >
Add device
Home
Living room >
Select
Select
selecting it manually or by selecting "Scan".
•
•
Air purifier
By device type
By device type
Select
Select
2
Connecting the SmartThings app to your
product
• Follow the instructions displayed on the
SmartThings app to connect to your product.
• For information on how to use the SmartThings
app, select the How To menu on the app.
NOTE
• If any pop-up-window appears on the top of the
smartphone while connecting to your product, do
not select it.
• If a pop-up window saying that the device is
already registered appears during connecting
PERMISSION" from a user already connected to the
product.
• If a Samsung account-related country error
occurs during connecting to your product, log
out of your current Samsung account, log in
to your previous Samsung account, and then
delete all devices that have been connected
previously. Then, log in to your current Samsung
• If a failure message appears while adding a
device, see "Setting up and connecting to a Wi-
Fi access point using your smartphone" on page
to an installation location problem of the access
point or other problems.
• If the word "AP" does not disappear from the
display, unplug the power plug it in again.
DB68-11329A-00_IB_ACR AX9500A_Medium PET_SA_EN_.indd 25DB68-11329A-00_IB_ACR AX9500A_Medium PET_SA_EN_.indd 25 2021-09-03 오후 2:08:412021-09-03 오후 2:08:41
26
English
Using the SmartThings App
SmartThings
app
NOTE
• For the security protocols for wireless/wired
recommended. For the authentication methods,
AES is recommended. New Wi-Fi authentication
authentication methods are not supported.
•
• If your Internet service provider permanently
may not be able to connect your product to the
the Internet.
Open Source Announcement
The software included in this product contains open source
source code for a period of three years after the last
shipment of this product by contacting our support team
It is also possible to obtain the complete corresponding
source license information as related to this product. This
offer is valid to anyone in receipt of this information.
DB68-11329A-00_IB_ACR AX9500A_Medium PET_SA_EN_.indd 26DB68-11329A-00_IB_ACR AX9500A_Medium PET_SA_EN_.indd 26 2021-09-03 오후 2:08:412021-09-03 오후 2:08:41

27
English
Appendix
Operation issue
The device will not operate
•
•
If it still does not operate, try a different power outlet.
•
closed properly, the product will not operate.
•
display and the product will not operate.
Noise
I hear a strange noise from the device
• If you move the device when it is operating, noise may occur. Turn off
the device before moving it.
• When the front panel is moved, a crackling or rattle sound can be
heard depending on the environment in which the product is used.
– These sounds are normal motor noises that may occur during zero
point calibration when the front panel is moved.
• When the product is operating, a sensor operation sound, such as a
hissing sound, can be audible.
–
Sleep mode.
• When the product stops operation, a hissing sound can be audible as
the fan operation stops.
Odours
Strange smell comes from the device
• Using an air freshener, diffuser, scented candle or cleaning agent,
doing interior work or changing wall paper before operating the air
emit some unpleasant smell.
–
Crackling-
rattle
Before Requesting Service
DB68-11329A-00_IB_ACR AX9500A_Medium PET_SA_EN_.indd 27DB68-11329A-00_IB_ACR AX9500A_Medium PET_SA_EN_.indd 27 2021-09-03 오후 2:08:412021-09-03 오후 2:08:41
28
English
Appendix
Before Requesting Service
Odours
•
closed space for a prolonged period of time, odours generated in your
–
whether they are saturated with odours. If saturated, wash or
replace them.
remaining warranty term.
–
open.
–
ventilate the room to remove the odours before operating the air
•
in a highly humid environment or an environment in which moisture
–
the sun before use.
Air quality
The air quality indicator stays red.
(The air quality indicator does not seem to work properly.)
•
necessary.
• In winter season, during initial operation of the product shortly after
delivery, condensation occurs inside the sensors due to temperature
difference between the indoors and outdoors. As a result, the PM
㎍
indicator may illuminate red. This is a temporary issue
• If there is a change to the indoor odour due to cooking or temporary
indicator to illuminate red. If this occurs, ventilate the room for
•
operate the product. (The sensors are reset.)
•
time although you have used the suggested troubleshooting steps,
it can be a sensor malfunction. In this case, please contact your local
•
DB68-11329A-00_IB_ACR AX9500A_Medium PET_SA_EN_.indd 28DB68-11329A-00_IB_ACR AX9500A_Medium PET_SA_EN_.indd 28 2021-09-03 오후 2:08:422021-09-03 오후 2:08:42
29
English
Appendix
Air quality
The fan speed does not change when the air quality level
changes
• Switch the product to Smart mode.
While in High (fan speed), Sleep or Wind-Free mode, the fan speed
does not change automatically.
– The fan speed also does not change automatically when you
switch the product to Smart Sleep mode after turning on Sleep
mode using the SmartThings app while in Smart mode. Turn off
Sleep mode.
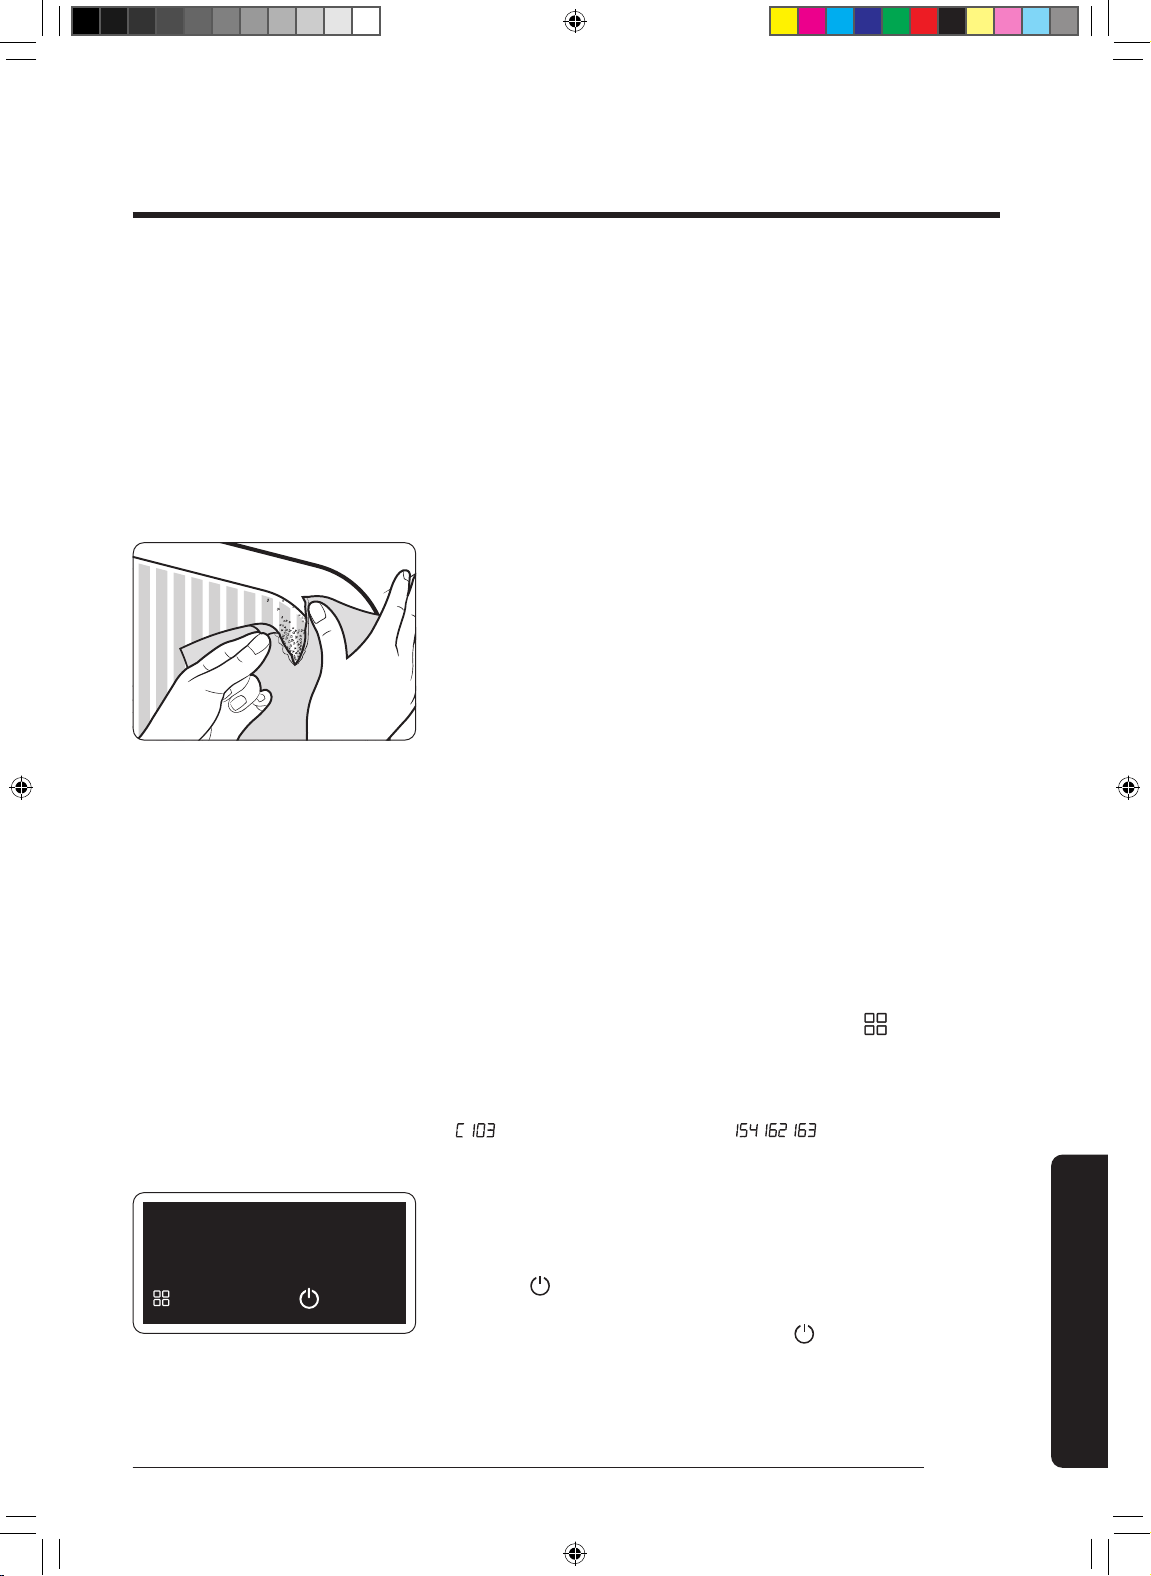
The PM10, PM2.5, PM1.0 levels do not change from Good (05).
• This may happen if the room is closed and the air is clean.
Tear paper near the micro-air sensor several times and/or rub the
torn paper pieces together to create dust. If the PM concentration
changes, the sensor is working properly.
– Dusting off a blanket or cleaning may not necessarily cause sensor
The PM10 and PM2.5 levels are different from the values
provided by the Ministry of Environment
• The values provided by the Ministry of Environment are an average of
Display
The lter replacement indicator is kept lit up
•
] button for
The display output is strange.
•
If an indication that looks like ,' , , ' appears, contact your
An 'Update Software?' message appears.
•
added or improvements made in the product.
Press the button in the controls area on the main unit of the air
minutes. If you press a button that is not the button, update will be
postponed and the 'Update Software?' message will appear again later.
• Do NOT remove the power plug while update is in progress.
•
Update software?
Later
Update
DB68-11329A-00_IB_ACR AX9500A_Medium PET_SA_EN_.indd 29DB68-11329A-00_IB_ACR AX9500A_Medium PET_SA_EN_.indd 29 2021-09-03 오후 2:08:422021-09-03 오후 2:08:42
30
English
Appendix
Memo
DB68-11329A-00_IB_ACR AX9500A_Medium PET_SA_EN_.indd 30DB68-11329A-00_IB_ACR AX9500A_Medium PET_SA_EN_.indd 30 2021-09-03 오후 2:08:422021-09-03 오후 2:08:42
31
English
Appendix
DB68-11329A-00_IB_ACR AX9500A_Medium PET_SA_EN_.indd 31DB68-11329A-00_IB_ACR AX9500A_Medium PET_SA_EN_.indd 31 2021-09-03 오후 2:08:422021-09-03 오후 2:08:42

COUNTRY CALL OR VISIT US ONLINE AT
AUSTRALIA
www.samsung.com/au/support
NEW ZEALAND
www.samsung.com/nz/support
DB68-11329A-00_IB_ACR AX9500A_Medium PET_SA_EN_.indd 32DB68-11329A-00_IB_ACR AX9500A_Medium PET_SA_EN_.indd 32 2021-09-03 오후 2:08:422021-09-03 오후 2:08:42