Loading ...
Loading ...
Loading ...
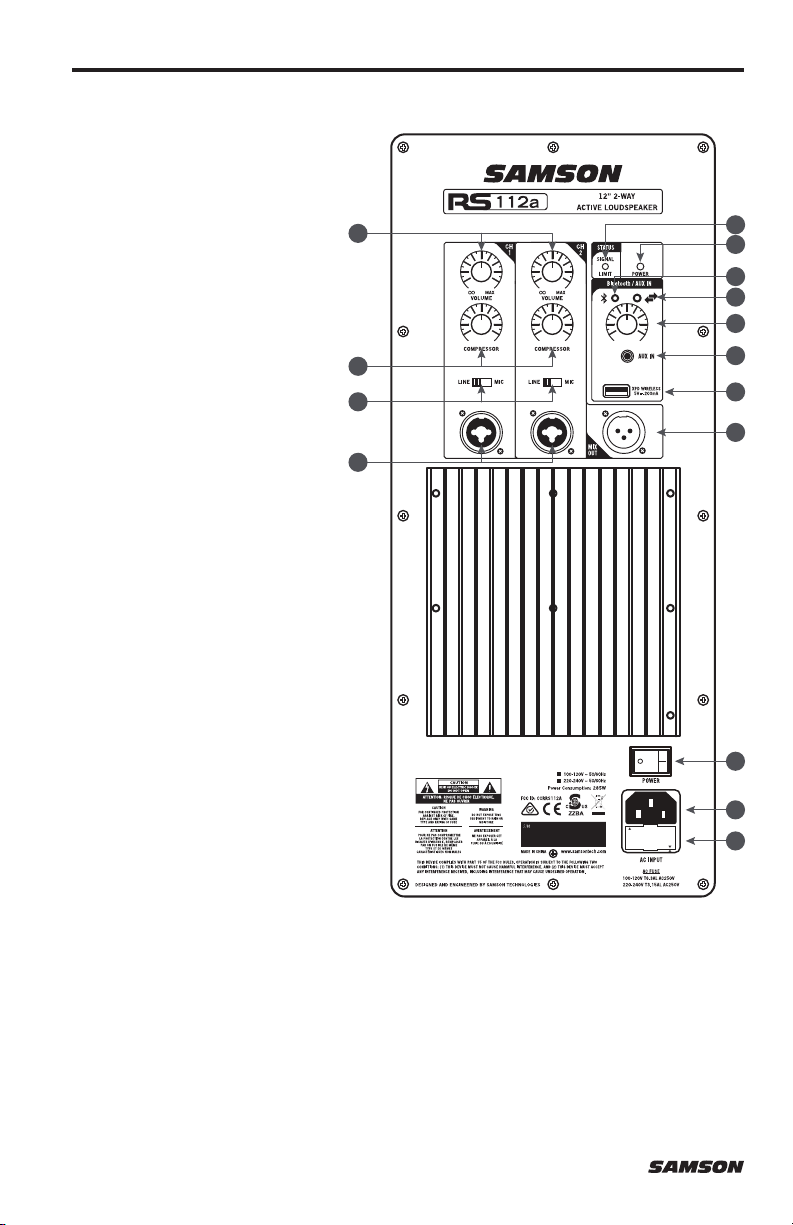
1. XLR & 1/4” Combo Input - Use
these XLR - 1⁄4” input for
balanced microphone or line level
devices.
2. SENSITIVITY Switch (Mic/Line) -
Matches the channel sensitivity to
the input audio source signals.
3. COMPRESSOR - These knobs
adjust the level of compression
applied to the channel. As the
knob is turned clockwise, the
compression ratio is raised
and the output gain is adjusted
accordingly. The dynamic range
of the channel is narrowed, where
softer signals will be magnified
and loud signals will be subdued
to sit better in the mix. Too
much compression can create
a pumping effect, eliminate
all dynamic range, and lead to
feedback.
4. Volume Control - This knob adjusts
the level of the Channel 1 and 2
input signals.
5. Pairing Indicator - Displays the
Bluetooth
®
status of the RS
loudspeaker.
6. Pairing Button - Press this button
to enable discoverable mode to
pair with a Bluetooth audio device.
7. Volume Control - This knob adjusts
the level of the Bluetooth and
Aux In.
8. 1/8” AUX IN - Connect a line level
device using a 3.5mm audio
cable.
9. XPD WIRELESS Input - Connect a
Samson XPD digital wireless USB receiver to this input.
10. MIX OUT - Male XLR connector used to link multiple RS Loudspeaker cabinets.
11. SIGNAL / LIMIT Indicator - This indicator lights green when signal is present. It will light red
when the amp is near the clipping point and the limiter is engaged.
12. POWER Indicator - This LED lights GREEN when amp is active.
13. POWER Switch - Switches on the RS Loudspeaker’s main power.
14. AC Power Inlet - Connect the supplied standard IEC AC power cable here.
15. Fuse Holder - The fuse holder comes from the factory with the appropriately rated fuse for
your model. If you need to change this fuse for any reason, replace it with one that has the
same exact rating.
Rear Panel Layout
USE ONLY WITH A 250V FUSE
EMPLOYER UNIQUEMENT
AVECUN FUSIBLE DE 205V
220–240
110–120
3
4
11
12
7
6
8
9
5
10
13
14
15
1
2
6
Loading ...
Loading ...
Loading ...