
Owner’s Manual
© 2020 Roland Corporation
Before using this unit, carefully read “USING THE UNIT SAFELY” and “IMPORTANT NOTES” (leaet “USING THE UNIT SAFELY” and Owner’s Manual
(p. 44)). After reading, keep the document(s) where it will be available for immediate reference.
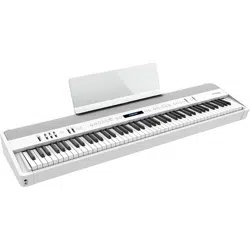
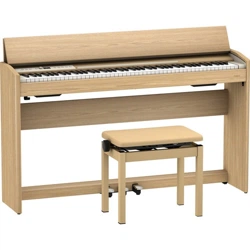
What You Can Do with the RP701/F701
Play the Piano
˙
Play the piano sounds of your dream
This piano contains a variety of piano tones ranging from concert grand piano to upright piano.
It also contains the sound of a harpsichord, which is the ancestor of the piano. You’ll be sure to nd piano sounds to your taste.
˙
Play string, organ, and percussion tones
You can also choose tones of instruments other than piano. Using tones other than the usual choices can provide a pleasant change, or
you can layer other tones with a piano tone to enjoy especially rich sonorities.
Practice songs
˙
Practice along with a metronome
You can practice while listening to a metronome. By changing the tempo or time signature as appropriate for the song you’re playing,
you can improve your ability to keep the rhythm.
˙
Practice along with the internal songs
Built into this piano are numerous well-known songs in a variety of genres such as classical, jazz, and practice pieces. You can listen to
these internal songs as models, or adjust the tempo and practice along with them.
˙
Practice one hand at a time
By playing back a song with the sound of the right-hand or left-hand part muted, you can hear the performance one hand at a time.
This also lets you practice along with the song one hand at a time.
˙
Record your performance
You can listen again to your own performance that you just recorded, and use it to improve your next performance. You can also save
your performance for your family member or piano teacher to hear.
Take advantage of Bluetooth
˙
Play back music through the piano’s speakers (Bluetooth audio function)
You can connect a smartphone or tablet, and listen to your favorite songs through the piano’s speakers. By performing along with a
song, you can enjoy being part of your favorite music.
˙
Use with piano with apps (Bluetooth MIDI function)
You can use an app to nd new musical scores, and use the practice support functions to experience new possibilities in piano
performance.
page
12
page
12
page
14
page
13
page
13
page
14
page
16
page
16
This app lets you download musical scores and practice songs. This app lets you customize the piano sound to your taste.
Download the apps
Download these smartphone/tablet apps and use them with your piano.
Piano Every Day
Piano Designer
Contents
Quick Operation ........................................ 3
Panel Descriptions (RP701) ............................. 4
Before You Play (RP701) ................................. 6
Panel Descriptions (F701) ............................... 8
Before You Play(F701) ................................... 10
Playing .................................................. 12
Listening to Songs ...................................... 13
Practicing/Recording ................................... 14
Connecting a Mobile Device via Bluetooth ............. 15
Connecting a Mobile Device via Bluetooth ............. 16
Reference ............................................... 17
Connecting the Equipment ............................. 18
Playing .................................................. 19
Playing Dierent Tones with the Left and Right Hand ...... 19
Playing Two Tones Layered on Each Key ................... 19
Changing the Settings for Dual Play ....................... 19
Adjusting the Sound’s Ambience and Brightness ........... 20
Changing the Keyboard Touch ............................ 20
Practicing with the Metronome ........................... 20
Changing the Settings for Metronome .................... 20
Listening to Songs ...................................... 21
Playing Back a Song ...................................... 21
Recording Your Performance ........................... 22
Recording Your Keyboard Performance .................... 22
Getting Ready to Record ................................. 22
Starting/Stopping Recording ............................. 22
Listening to the Recorded Performance ................... 22
Deleting a Saved Song .................................... 22
Managing Songs You Recorded. . . . . . . . . . . . . . . . . . . . . . . . . . . . 22
Copying a Recorded Song ................................. 23
Advanced Recording Methods ............................ 23
Recording Your Performance One Hand at a Time .......... 23
Overdubbing a Recorded Performance .................... 24
Recording Audio to USB Flash Drive ....................... 24
Creating Your Own Piano Tone (Piano Designer) ....... 25
Adjusting the Sound of the Overall Piano .................. 25
Editing the Grand Piano Tone ............................. 26
Connecting the Piano and a Mobile Device via
Bluetooth ............................................... 27
Listening to Music Through the Piano’s Speakers ........... 27
Using the Piano with an App .............................. 27
If Pairing Does Not Succeed in “Using the Piano with an
App” .................................................... 28
Convenient Functions ................................... 29
Loading/Saving Piano Setups ............................. 29
Saving Piano Settings (Piano Setup Export) ................ 29
Loading Piano Settings (Piano Setup Import) .............. 29
Initializing the Memory (Format Media) ................... 30
Restoring the Factory Settings (Factory Reset) ............. 30
Disabling the Buttons (Panel Lock) ........................ 30
Making Various Settings (Function Mode) .............. 31
Basic Settings in Function Mode ........................... 31
Turning the Bluetooth Function On/O (Bluetooth On/O) . 31
Adjusting the Volume of Bluetooth Audio (Input/Bluetooth
Vol.) ..................................................... 31
Playing Dierent Tones with the Left and Right Hand ...... 32
Playing Two Tones Layered on Each Key ................... 32
Dividing the Keyboard for Two People (Twin Piano) ........ 32
Transposing the Pitch of the Song Playback (Song
Transpose) .............................................. 32
Adjusting the Song (SMF) Volume (Song Volume SMF). . . . . . 32
Adjusting the Song (Audio) Volume (Song Volume Audio) .. 32
Adjusting the Volume of an Audio Playback Device (Input/
Bluetooth Vol.) ........................................... 33
Adjusting the Volume from the Computer (USB Audio Input
Volume) ................................................. 33
Setting the Song (SMF) Playback Mode (SMF Play Mode) ... 33
Changing How the Pedal Eects Are Applied (Damper Pedal
Part) .................................................... 33
Changing How the Pedals Work (Center Pedal) ............. 33
Changing the Eect of the Pedal (Left Pedal) ............... 34
Preventing Doubled Notes When Connected to a
Sequencer (Local Control) ................................ 34
MIDI Transmit Channel Settings (MIDI Transmit Ch.) ........ 34
Changing the Language Displayed in the Screen (Language) 34
Adjusting the Brightness of the Display (Display Contrast) .. 34
Specifying the Time Until the Operating Panel Dims (Screen
Saver) ................................................... 34
Specifying a Maximum Volume (Volume Limit) ............. 34
Outputting Sound Both from Headphones and Internal
Speakers (Speaker Auto Mute) ............................ 34
Making the Power Automatically Turn o After a Time (Auto
O) ..................................................... 35
Saving Settings Automatically (Auto Memory Backup) ...... 35
Settings Saved Even If the Power Is Turned O ............. 35
Troubleshooting ........................................ 36
Error Messages .......................................... 38
Tone List ................................................. 40
Internal Song List ....................................... 42
USING THE UNIT SAFELY ................................ 44
IMPORTANT NOTES ..................................... 45
Index .................................................... 46
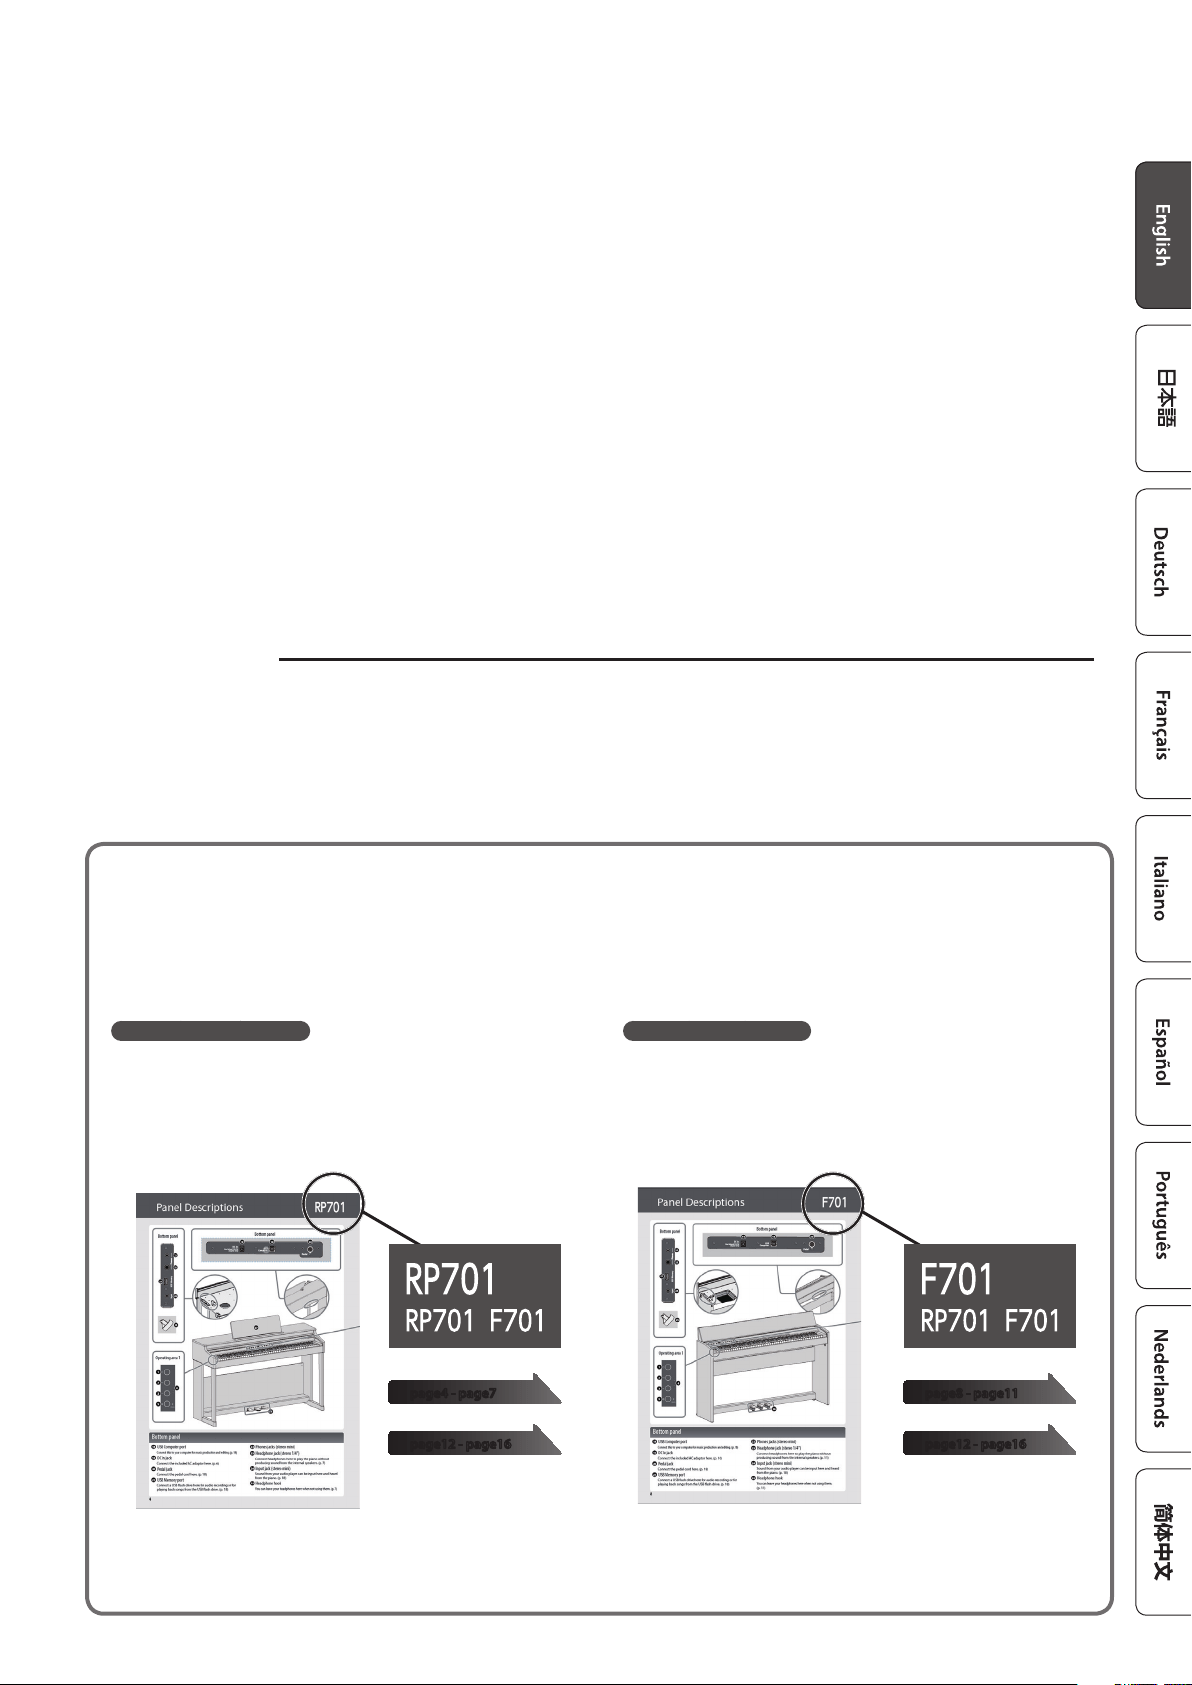
Quick Operation
How to read Quick Operation
Here we explain what you need to know before using this piano, and basic ways to use the piano.
This section is divided into pages with explanations that apply to models separately and pages that are common to all models. Read the
pages that apply to your model of piano.
For more details on how to use the piano, read “Reference.”
If you’re using the RP701
Read the pages that are marked “RP701” in their upper right and
pages that are marked “RP701 F701” in their upper right.
If you’re using the F701
Read the pages that are marked “F701” in their upper right and
pages that are marked “RP701 F701” in their upper right.
page8 - page11page4 - page7
page12 - page16page12 - page16
4
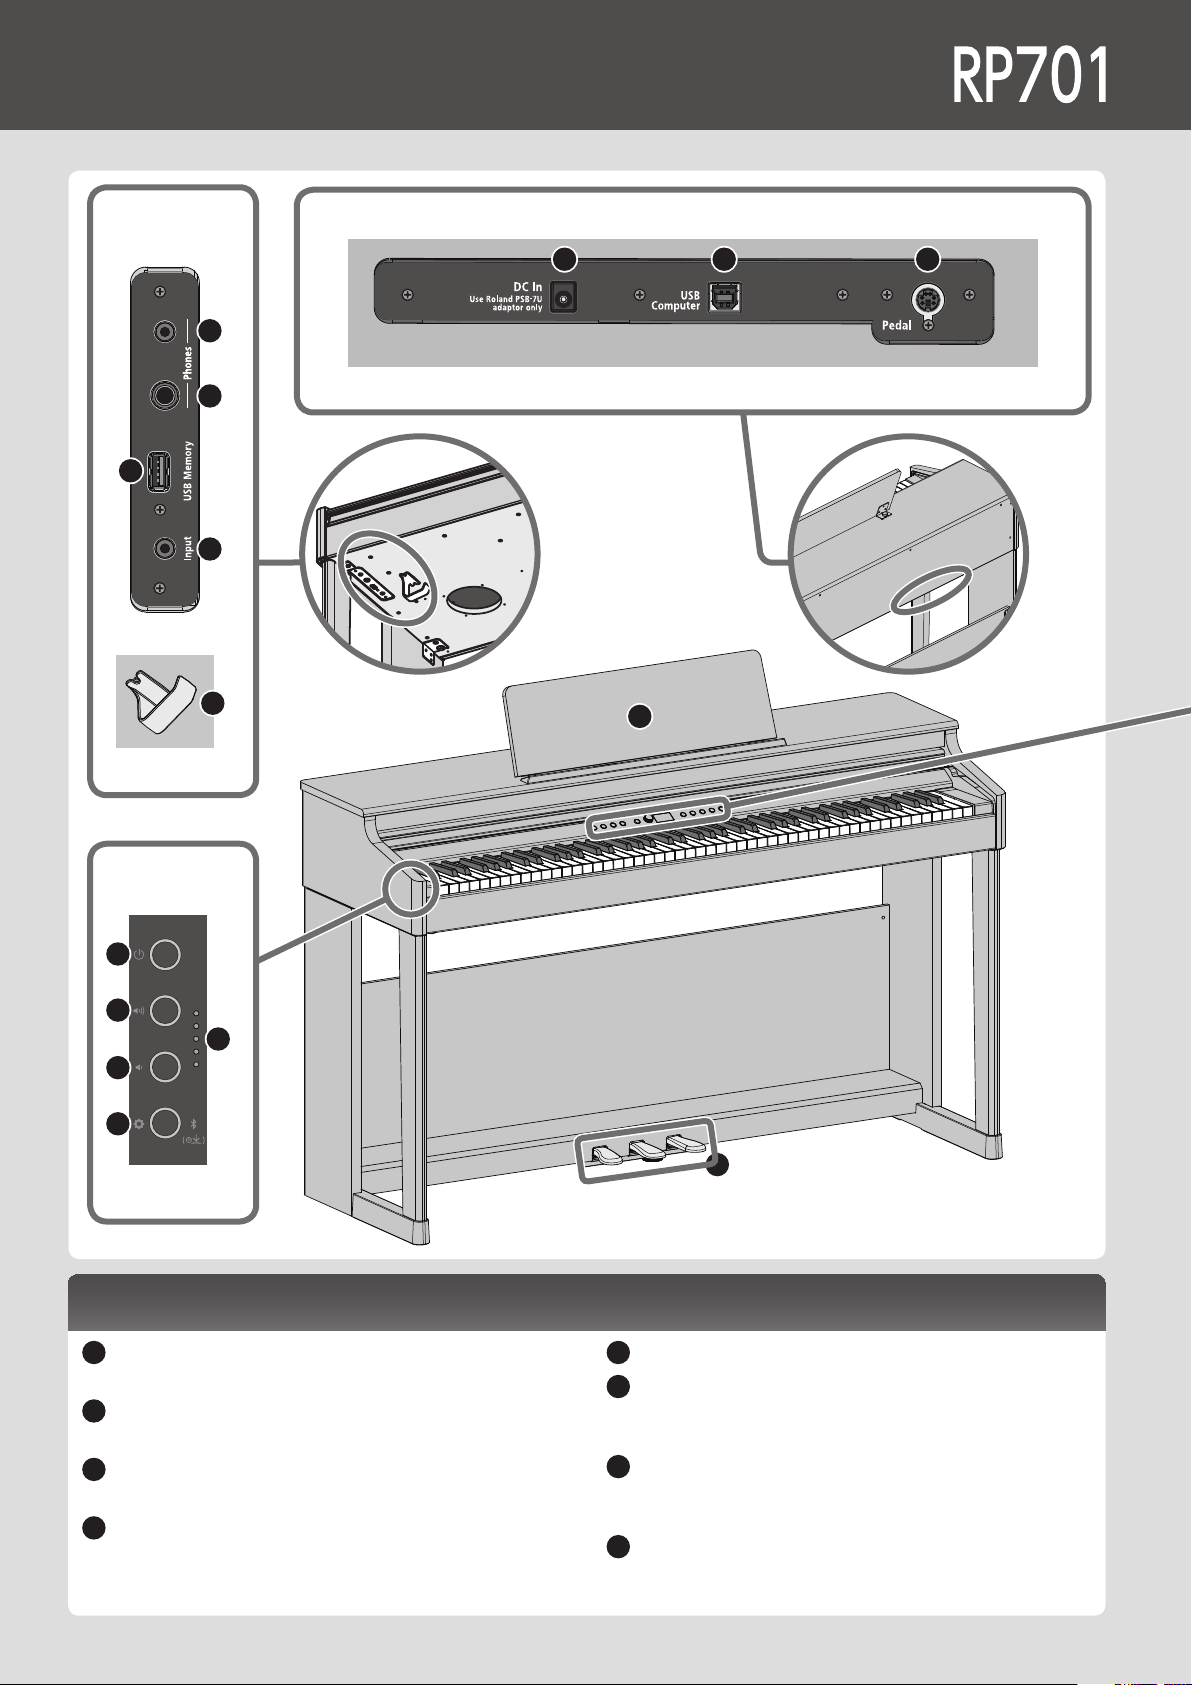
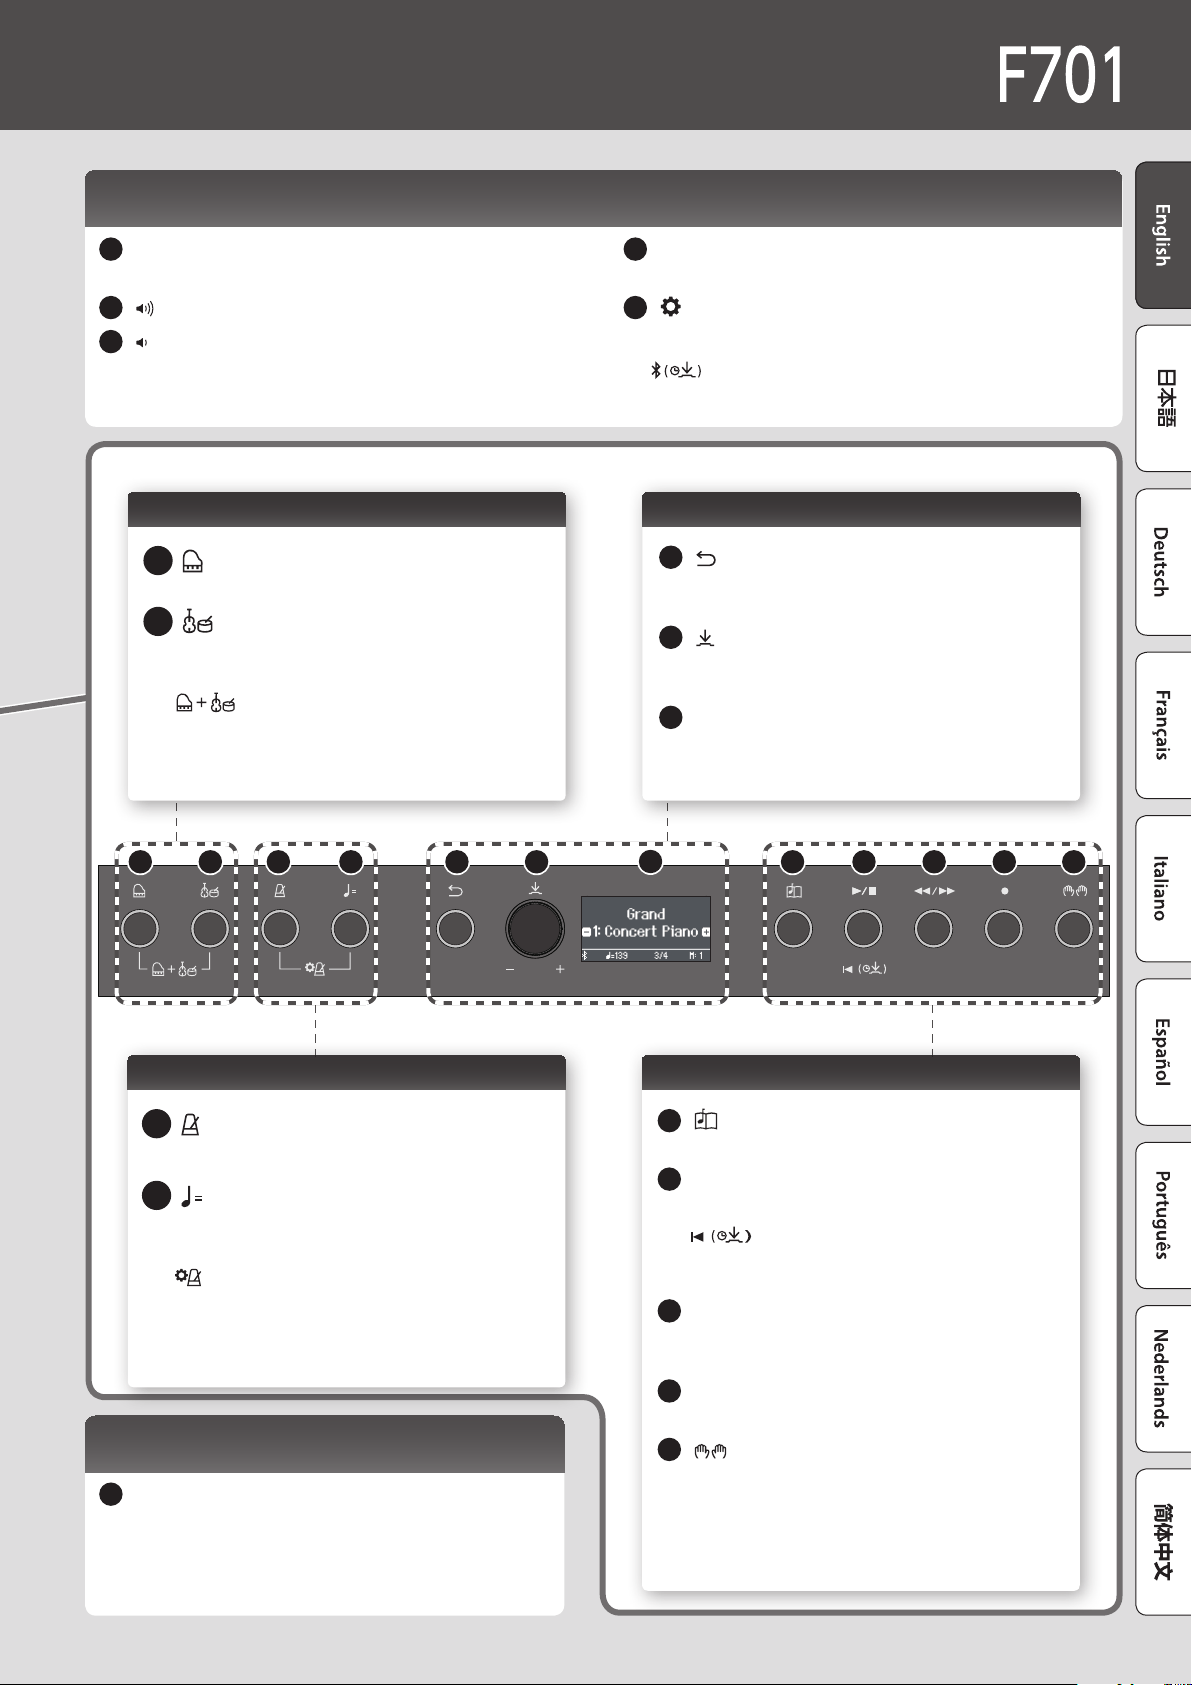
Panel Descriptions
Bottom panel
Operating area 1
1
2
3
4
5
26
27
19 2018
Bottom panel
18
USB Computer port
Connect this to your computer for music production and editing. (p. 18)
19
DC In jack
Connect the included AC adaptor here. (p. 6)
20
Pedal jack
Connect the pedal cord here. (p. 18)
21
USB Memory port
Connect a USB ash drive here for audio recording or for
playing back songs from the USB ash drive. (p. 18)
22
Phones jacks (stereo mini)
23
Headphone jack (stereo 1/4”)
Connect headphones here to play the piano without
producing sound from the internal speakers. (p. 7)
24
Input jack (stereo mini)
Sound from your audio player can be input here and heard
from the piano. (p. 18)
25
Headphone hook
You can leave your headphones here when not using them. (p. 7)
Bottom panel
24
25
23
22
21

5
Operating area 1
Other
1
[L] (Power) button
Turns the power on/o. (p. 6)
2
[ ] (Volume+) button
3
[ ] (Volume-) button
Adjust the overall volume of the piano when playing the
keyboard or when playing back songs. (p. 6)
4
Volume indicator
Lit according to the specied volume. (p. 6)
5
[ ] (settings) button
Lets you make various settings. (p. 31)
[ ] (Bluetooth)
Long-press this to connect with your mobile device. (p. 16)
26
Pedal
By pressing the pedals, you can apply eects to the
sound of the piano. (p. 7)
27
Music rest
Place printed music here. (p. 7)
8
[ ] (metronome) button
Lets you practice along with a metronome. (p. 14)
9
[ ] (Tempo) button
Changes the tempo of the metronome or song.
(p. 14) (p. 13)
[ ] (metronome settings)
By pressing the two buttons simultaneously, you
can make metronome settings. (p. 20)
13
[ ] (song) button
Selects songs. (p. 13)
14
[s] (play/stop) button
Plays back or stops the song. (p. 13)
[ ] (beginning of song)
Long-press this button to select the beginning of
the song. (p. 21)
15
[x/y](measure) button
Advances or returns the measure within the song
to the desired position. (p. 21)
16
[t] (recording) button
Records a song. (p. 14)
17
[ ] (part) button
5 Lets you select the performance part (right-
hand, left-hand, accompaniment) that will play
back. (p. 13)
5 This also lets you record parts separately.
(p. 23)
Practicing Playing back or recording a song
6 7 8 9 10 11
12
13 14 15 16 17
6
[ ] (Piano) button
Lets you select and play piano tones. (p. 12)
7
[ ](other) button
Lets you select and play a variety of tones other
than piano. (p. 12)
[ ] (Dual Play)
By pressing the two buttons simultaneously, you
can play two tones as a layer. (p. 19)
10
[ ] (back) button
Returns to the previous screen, or exits the current
screen. (p. 7)
11
[ ] (select/conrm) knob
Changes or conrms an item or value shown in the
screen. (p. 7)
12
Display
This shows information such as the tone name,
song name, tempo, and time signature.
Selecting and playing tones Basic operation
Operating area 2
6
Before You Play
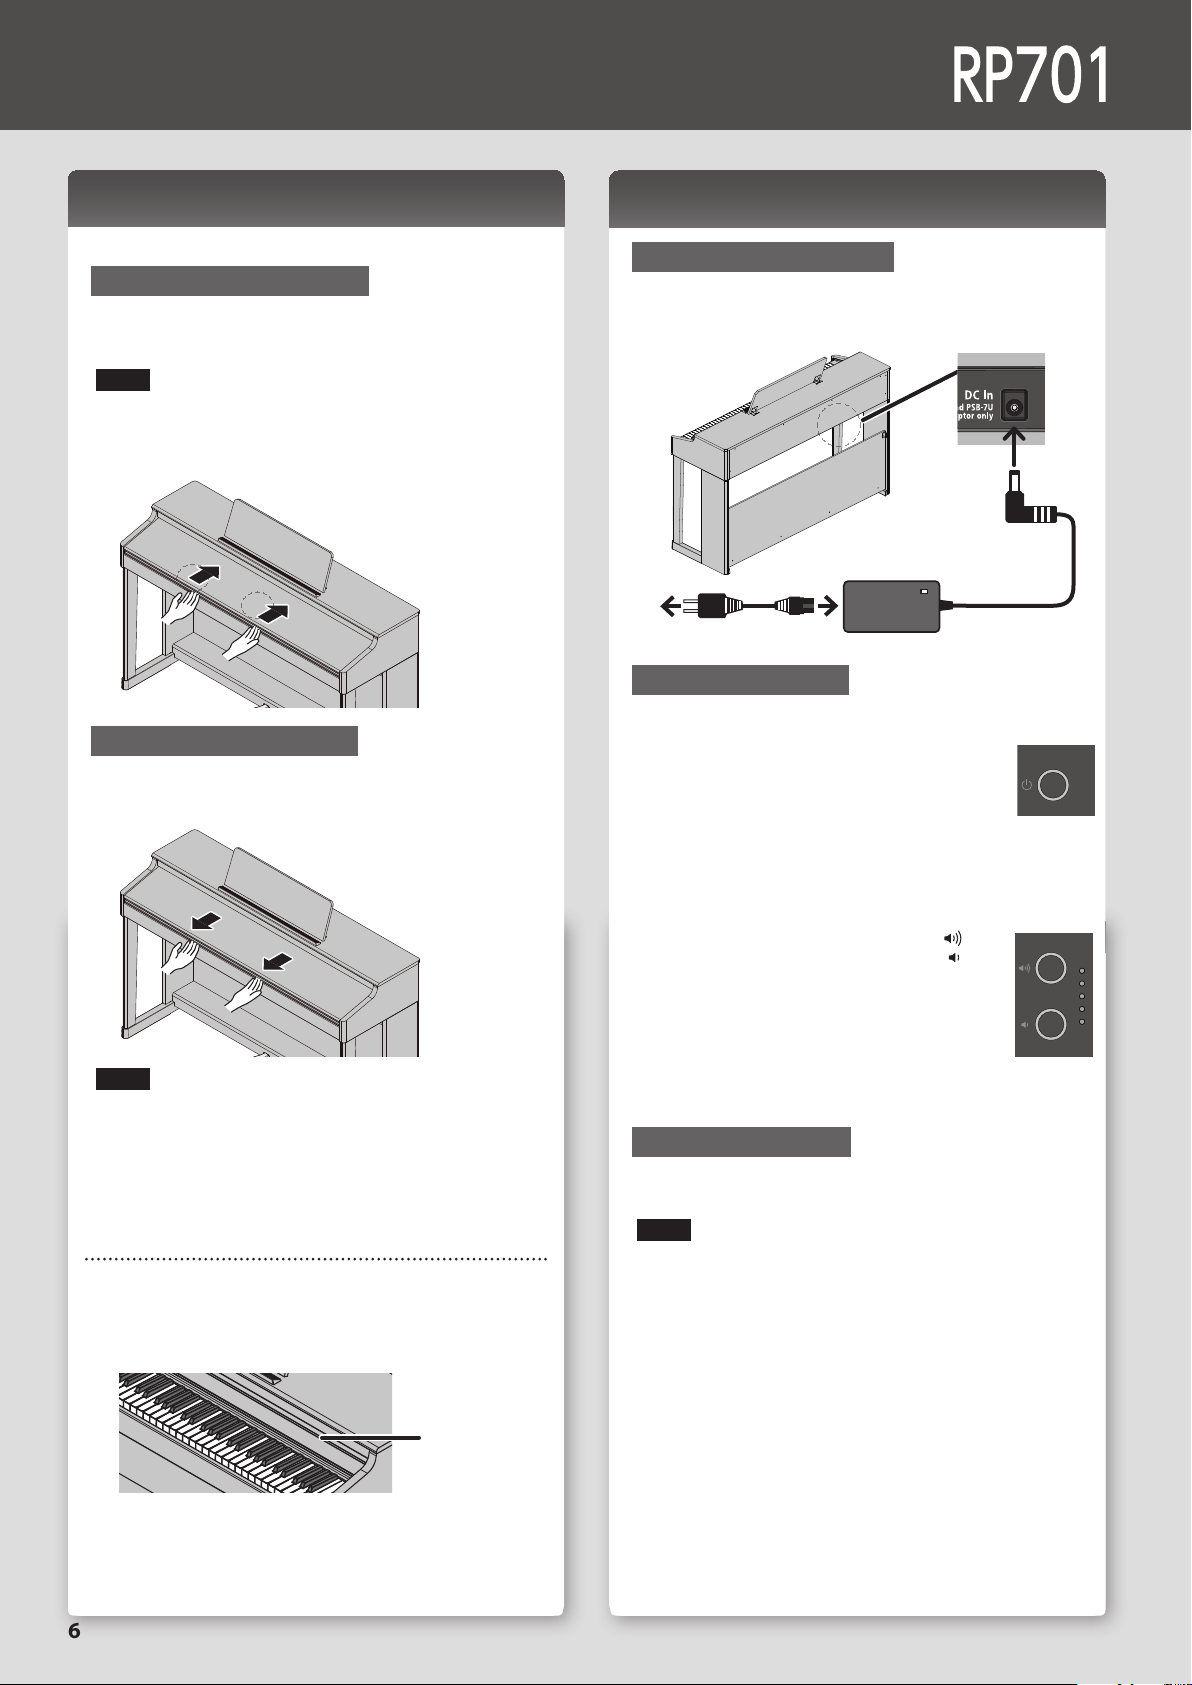
Turning the Power On/O
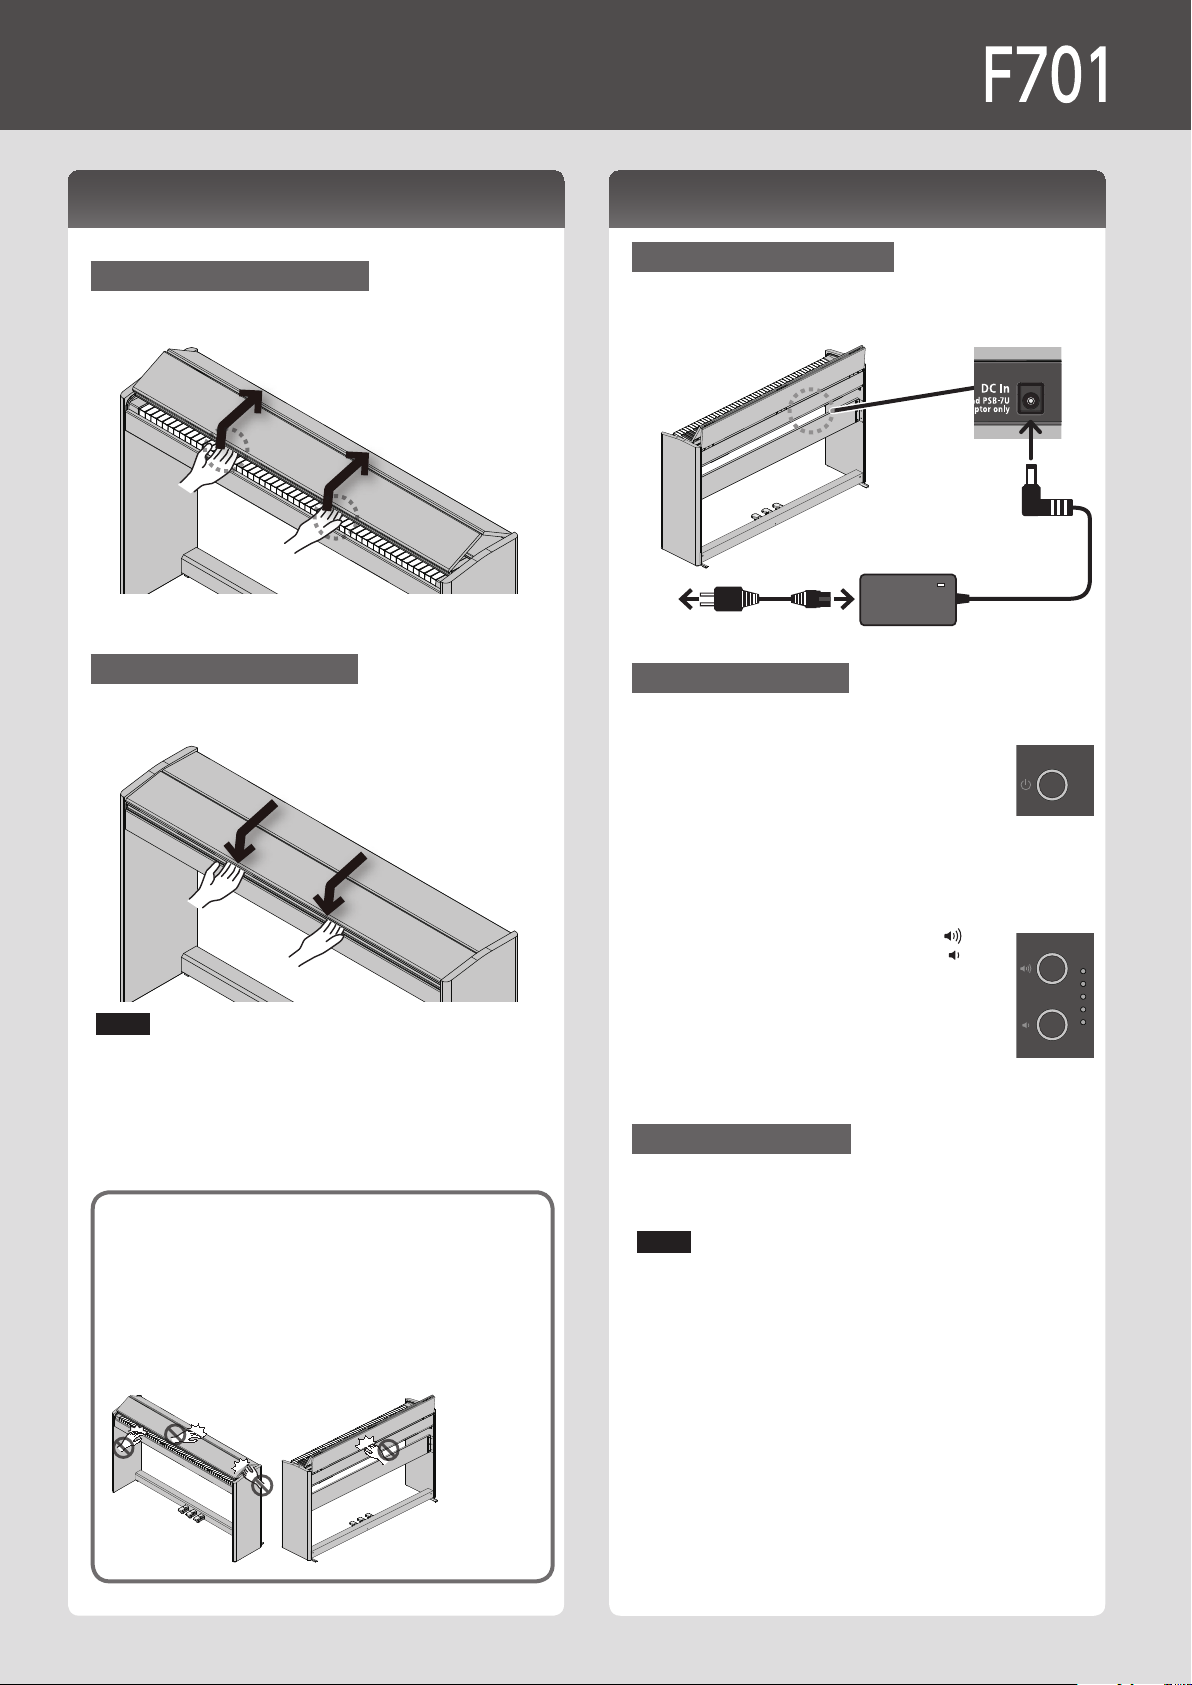
Connecting the AC adaptor
1. Connect the AC adaptor to the DC In jack located on
the bottom of the piano.
Bottom
panel
Power cord
To AC outlet
Turning the Power On
1. Turn the [L] button ON.
After a brief interval, you’ll be able to produce
sounds by playing the keyboard.
Before turning the unit on/o, always be sure to
turn the volume down. Even with the volume
turned down, you might hear some sound when switching the
unit on/o. However, this is normal and does not indicate a
malfunction
2. Use the Volume buttons to adjust the volume.
The volume increases when you press the [ ]
button, and decreases when you press the [ ]
button.
The volume indicator lights according to the
volume.
This will adjust the volume of the speakers if you’re
using the speakers of the unit, or the volume of the
headphones if headphones are connected. Each volume setting
is saved automatically.
Turning O the Power
1. Long-press the [L](power) button.
NOTE
With the factory settings, the unit’s power will automatically
be switched o 30 minutes after you stop playing or
operating the unit.
If you don’t want the power to turn o automatically, change
the “Auto O” setting to “OFF” as described on “Making the
Power Automatically Turn O After a Time (Auto O)” (p. 35).
When the power turns o, any unsaved data is lost. If there is
data that you want to keep, save it beforehand.
If the unit’s power has been turned o automatically, you can
use the [L] button to turn the unit back on again.
Opening/Closing the Keyboard Cover
You must use both hands to open or close the keyboard cover.
Opening the Keyboard Cover
1. Use both hands to lift the edge of the keyboard cover,
and push it away from yourself.
NOTE
If you have any objects (papers, metal objects, etc.) placed on
top of the keyboard cover, do not open the cover. Otherwise,
such objects may slip inside the instrument, and then become
irrecoverable.
Closing the Keyboard Cover
1. Grasp and gently lower the edge of the keyboard
cover with both hands.
NOTE
• When opening / closing the keyboard cover or you operate
the pedals, please be careful not to get your ngers pinched
between the movable part and the unit. In places where
small children are present, make sure that an adult provides
supervision and guidance.
• Do not apply undue force to the music rest while it is in use.
Using the keyboard cover to conceal the panel (Classic Position)
If you raise the keyboard cover slowly, it stops at a position that
hides the buttons and the display. If you use the cover to hide the
operation panel, you’ll be able to play as though you were playing
an acoustic piano. When you push the cover further inward and up,
it stops in a position where the operation panel is visible.
Keyboard cover
7
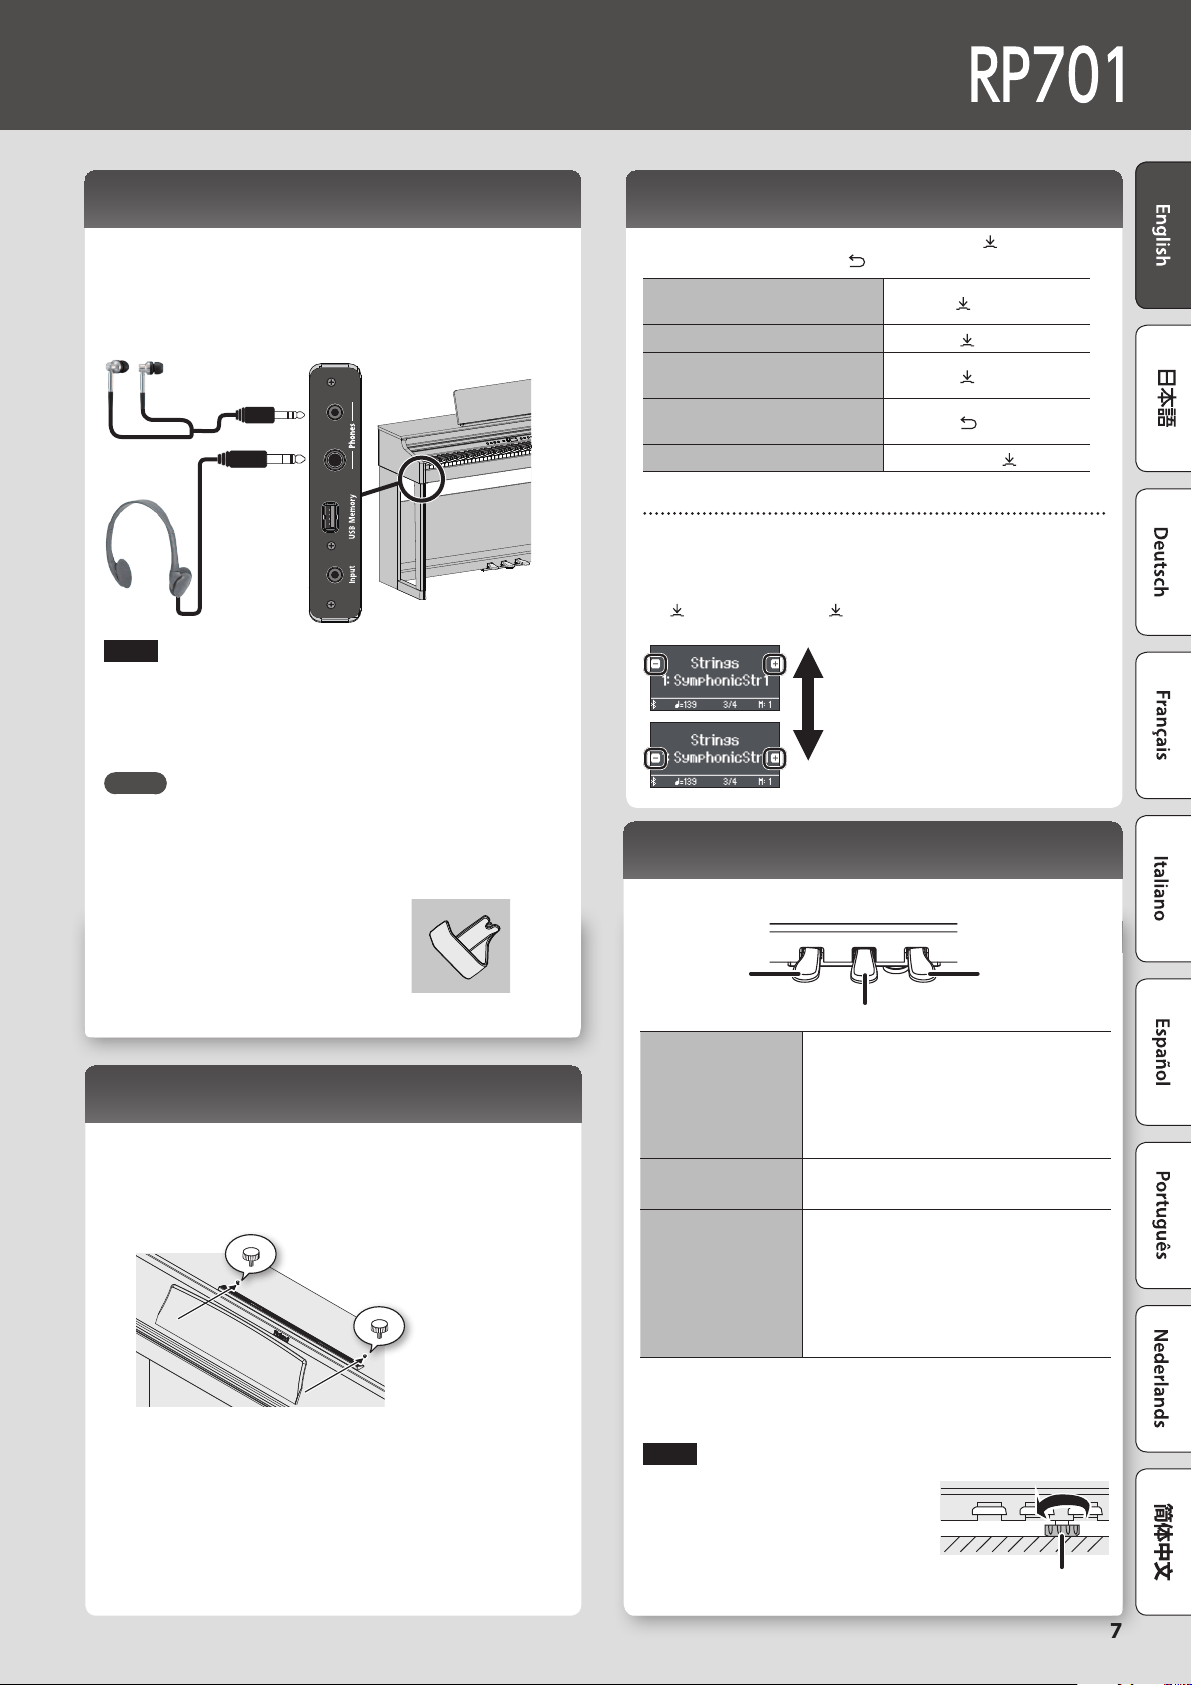
Using the Music rest
1. Loosen the music rest screws slightly (2–3 mm), insert the
music rest brackets between the screws and the body of the
piano, and turn the screws to secure the music rest while
using one hand to support the music rest.
When attaching the music rest, make sure that it is rmly
inserted all the way toward the back, and use your hand to
support the music rest so that it does not fall. Also take care not
to pinch your hand.
* Do not apply excessive force to the music rest.
* If you need to remove the music rest, loosen the screws while
using one hand to support the music rest. Detach the music rest,
and then rmly retighten the screws.
Using the Pedals
By pressing the pedals, you can apply eects to the sound of the piano.
Soft pedal
Sostenuto pedal
Damper pedal
Damper pedal
(right)
Use this pedal to sustain the sound. While
this pedal is held down, notes will be
sustained for an extended time even if you
release your ngers from the keyboard.
The resonance of the sound is aected by
how deeply you press the pedal.
Sostenuto pedal
(center)
The notes you are pressing when this
pedal is depressed will be sustained.
Soft pedal
(left)
This pedal is used to make the sound
softer. Playing with the soft pedal
depressed produces a sound that is not as
strong as when otherwise played with the
equivalent strength. The softness of the
tone can be varied subtly by the depth to
which you press the pedal.
* When opening / closing the keyboard cover or you operate the pedals, please
be careful not to get your ngers pinched between the movable part and
the unit. In places where small children are present, make sure that an adult
provides supervision and guidance.
NOTE
Under the pedals there is an adjuster for securing
the pedals. As you use the piano, the adjuster
might creep upward, allowing the pedals to
wobble when you step on them. If this occurs,
turn the adjuster to lower it into rm contact with
the oor. In particular if the piano is placed on
carpet, you should lower the adjuster so that it
rmly presses down on the oor.
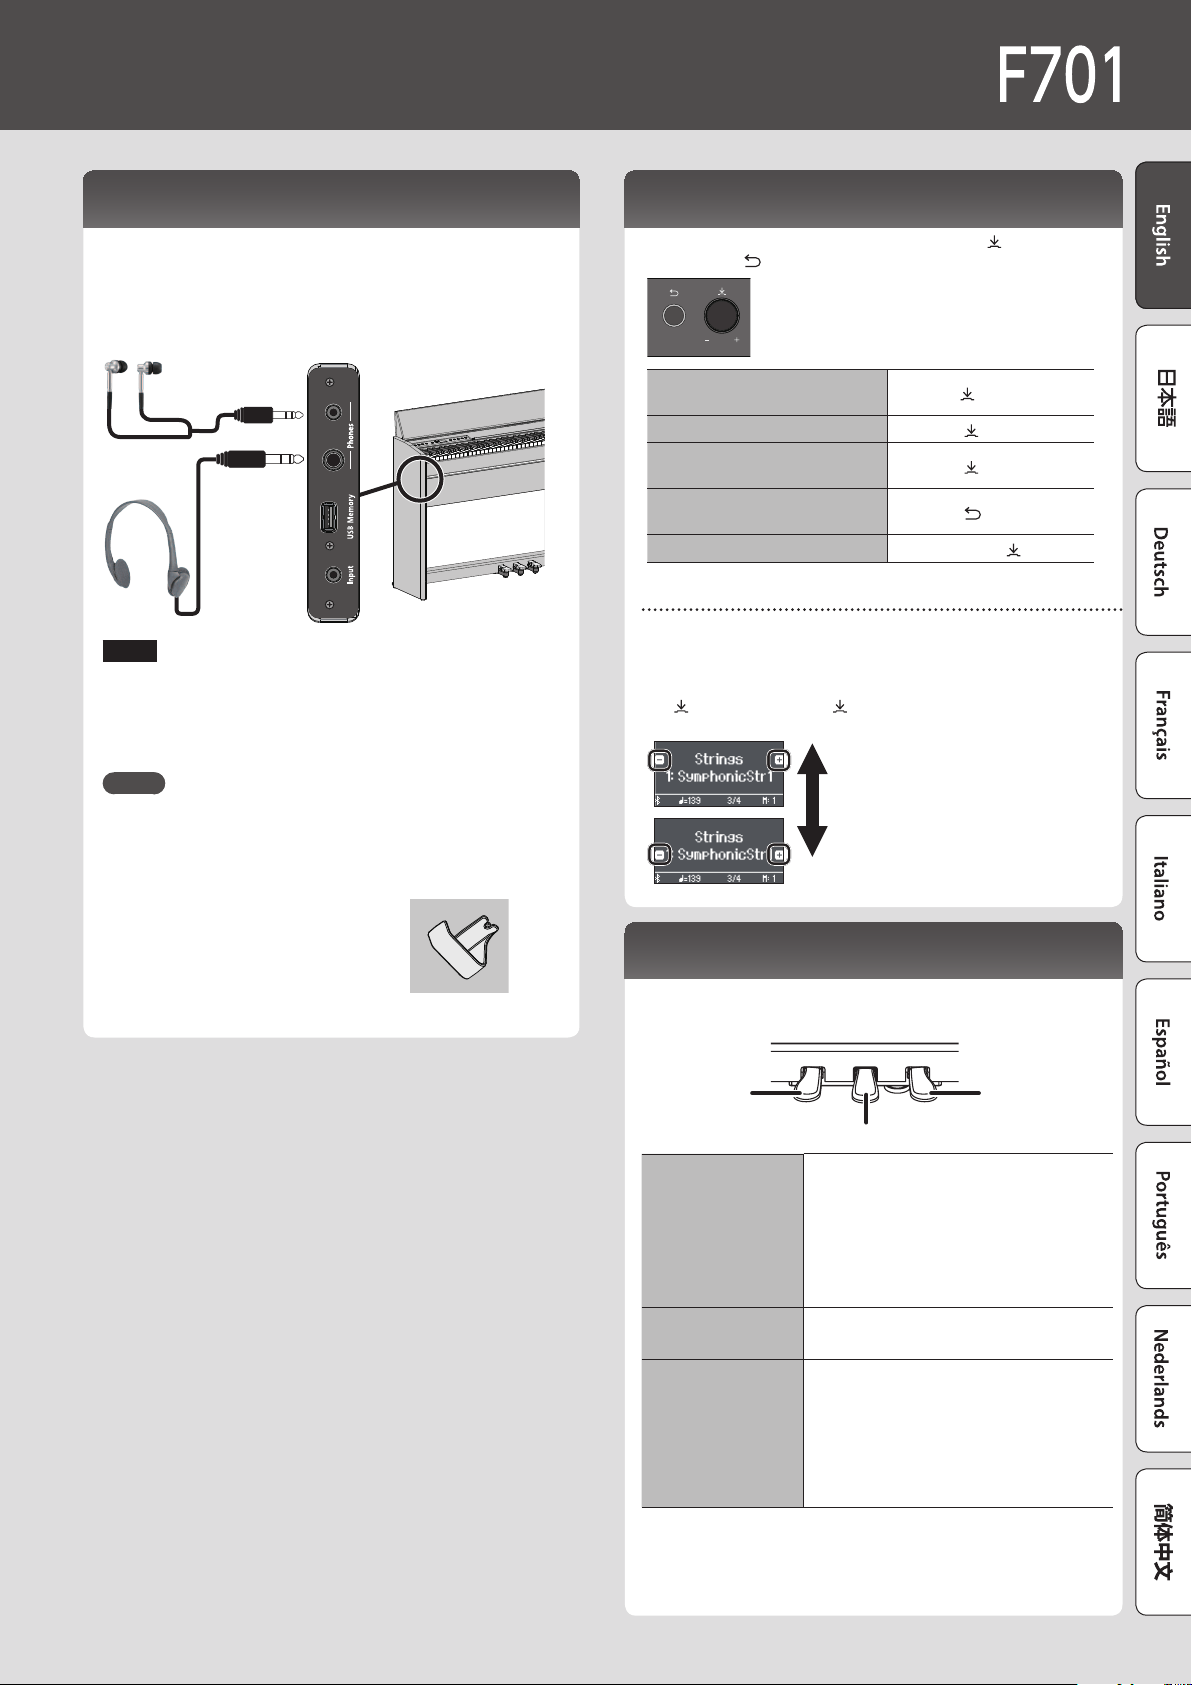
Using the Headphones
Use headphones if you want to perform without the sound being
heard nearby. This piano has two headphone jacks, two people can
also use headphones simultaneously.
1. Connect headphones to the headphone jacks located
on the bottom panel.
Stereo 1/4”
phone plug
Stereo-mini
plug
NOTE
When you connect headphones, sound is no longer heard from
the piano’s speakers.
2. Use the Volume buttons to adjust the volume of the
headphones.
MEMO
• A Headphones 3D Ambience eect will be applied, producing the
sensation that the sound is emanating from the piano itself even
when using headphones (p. 20).
• Whenever you are not using the headphones, you can hang them
on the headphone hook.
Basic Operations of Functions
To operate the functions of this piano, you use the [ ]
(select/conrm) knob and the [ ] (back) button.
Change an on-screen item or
value
Turn the [
] knob
Conrm
Press the [
] knob
Move the “-” “+” symbols in the
screen
Press the [
] knob
Return to the previous screen /
Exit the current screen
Press the [
] button
Return to the default value
Long-press the [
] knob
Moving the “-” “+” symbols
In some screens, the upper and lower lines of the screen let you change
dierent items or values. (Example: The upper line changes the category, and
the lower line changes the tone.) In such screens, the location of the “-” “+”
symbols alternates between the upper and lower lines each time you press
the [ ] knob, and turning the [ ] knob changes the item or value of the line
where the symbols are located.
When the “-” “+” symbols are in the
lower line, change the tone
When the “-” “+” symbols are in the
upper line, change the category
Adjuster
8
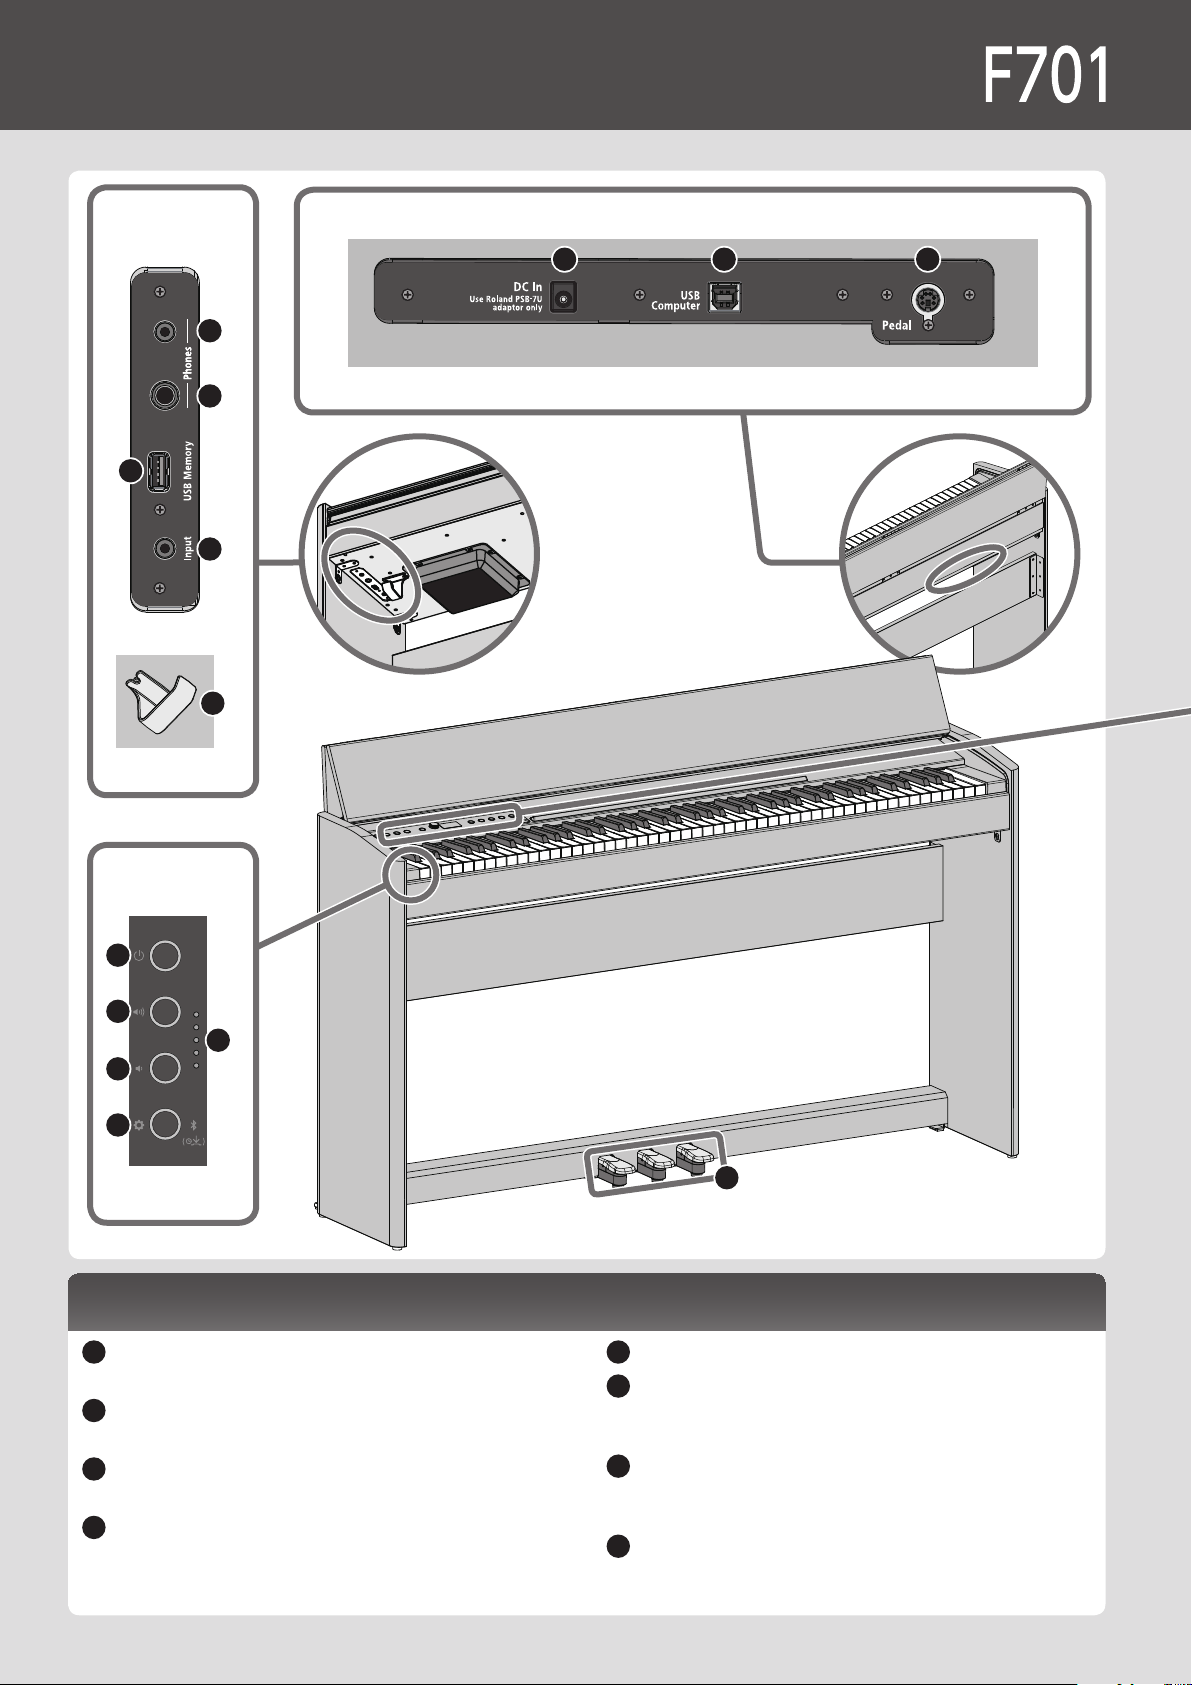
Panel Descriptions
Bottom panel
19 2018
Bottom panel
24
25
23
22
21
Bottom panel
18
USB Computer port
Connect this to your computer for music production and editing. (p. 18)
19
DC In jack
Connect the included AC adaptor here. (p. 10)
20
Pedal jack
Connect the pedal cord here. (p. 18)
21
USB Memory port
Connect a USB ash drive here for audio recording or for
playing back songs from the USB ash drive. (p. 18)
22
Phones jacks (stereo mini)
23
Headphone jack (stereo 1/4”)
Connect headphones here to play the piano without
producing sound from the internal speakers. (p. 11)
24
Input jack (stereo mini)
Sound from your audio player can be input here and heard
from the piano. (p. 18)
25
Headphone hook
You can leave your headphones here when not using them.
(p. 11)
Operating area 1
1
2
3
4
5
26
9
Operating area 1
Other
1
[L] (Power) button
Turns the power on/o. (p. 10)
2
[ ] (Volume+) button
3
[ ] (Volume-) button
Adjust the overall volume of the piano when playing the
keyboard or when playing back songs.
(p. 10)
4
Volume indicator
Lit according to the specied volume. (p. 10)
5
[ ] (settings) button
Lets you make various settings. (p. 31)
[ ] (Bluetooth)
Long-press this to connect with your mobile device. (p. 16)
26
Pedal
By pressing the pedals, you can apply eects to the
sound of the piano. (p. 11)
8
[ ] (metronome) button
Lets you practice along with a metronome.
(p. 14)
9
[ ] (Tempo) button
Changes the tempo of the metronome or song.
(p. 14) (p. 13)
[ ] (metronome settings)
By pressing the two buttons simultaneously, you
can make metronome settings. (p. 20)
13
[ ] (song) button
Selects songs. (p. 13)
14
[s] (play/stop) button
Plays back or stops the song. (p. 13)
[ ] (beginning of song)
Long-press this button to select the beginning of
the song. (p. 21)
15
[x/y](measure) button
Advances or returns the measure within the song
to the desired position. (p. 21)
16
[t] (recording) button
Records a song. (p. 14)
17
[ ] (part) button
5 Lets you select the performance part (right-
hand, left-hand, accompaniment) that will play
back. (p. 13)
5 This also lets you record parts separately.
(p. 23)
Practicing Playing back or recording a song
6 7 8 9 10 11
12
13 14 15 16 17
6
[ ] (Piano) button
Lets you select and play piano tones. (p. 12)
7
[ ](other) button
Lets you select and play a variety of tones other
than piano. (p. 12)
[ ] (Dual Play)
By pressing the two buttons simultaneously, you
can play two tones as a layer. (p. 19)
10
[ ] (back) button
Returns to the previous screen, or exits the current
screen. (p. 11)
11
[ ] (select/conrm) knob
Changes or conrms an item or value shown in the
screen. (p. 11)
12
Display
This shows information such as the tone name,
song name, tempo, and time signature.
Selecting and playing tones Basic operation
Operating area 2
10
Turning the Power On/O
Connecting the AC adaptor
1. Connect the AC adaptor to the DC In jack located on
the bottom of the piano.
Bottom
panel
Power cord
To AC outlet
Turning the Power On
1. Turn the [L] button ON.
After a brief interval, you’ll be able to produce
sounds by playing the keyboard.
* Before turning the unit on/o, always be sure to
turn the volume down. Even with the volume
turned down, you might hear some sound when switching the
unit on/o. However, this is normal and does not indicate a
malfunction
2. Use the Volume buttons to adjust the volume.
The volume increases when you press the [ ]
button, and decreases when you press the [ ]
button.
The volume indicator lights according to the
volume.
This will adjust the volume of the speakers if you’re
using the speakers of the unit, or the volume of the
headphones if headphones are connected. Each volume setting
is saved automatically.
Turning O the Power
1. Long-press the [L](power) button.
NOTE
With the factory settings, the unit’s power will automatically
be switched o 30 minutes after you stop playing or
operating the unit.
If you don’t want the power to turn o automatically, change
the “Auto O” setting to “OFF” as described on “Making the
Power Automatically Turn O After a Time (Auto O)” (p. 35).
• When the power turns o, any unsaved data is lost. If there is
data that you want to keep, save it beforehand.
• If the unit’s power has been turned o automatically, you can
use the
[L] button to turn the unit back on again.
Before You Play
Opening/Closing the Keyboard Cover
You must use both hands to open or close the keyboard cover.
Opening the Keyboard Cover
1. Use both hands to lift the edge of the keyboard cover,
and push it away from yourself.
2. Push the keyboard cover away from yourself until it
stops.
Closing the Keyboard Cover
1. Grasp and gently lower the edge of the keyboard
cover with both hands.
NOTE
• When opening / closing the keyboard cover or you operate
the pedals, please be careful not to get your ngers pinched
between the movable part and the unit. In places where
small children are present, make sure that an adult provides
supervision and guidance.
• If you need to move the piano, make sure the keyboard cover is
closed rst to prevent accidents.
When opening or closing the keyboard cover, take care
not to pinch your ngers between the folding sections.
It is dangerous to close the keyboard cover by pressing
it from above, since you risk pinching your ngers
between the sections of the keyboard cover.
Opening the keyboard cover by pushing it may cause this
unit to fall over. You must grasp the edge of the keyboard
cover when opening or closing it.
11
Using the Pedals
By pressing the pedals, you can apply eects to the sound of the
piano.
Soft pedal
Sostenuto pedal
Damper pedal
Damper pedal
(right)
Use this pedal to sustain the sound.
While this pedal is held down, notes
will be sustained for an extended time
even if you release your ngers from the
keyboard.
The resonance of the sound is aected by
how deeply you press the pedal.
Sostenuto pedal
(center)
The notes you are pressing when this
pedal is depressed will be sustained.
Soft pedal
(left)
This pedal is used to make the sound
softer. Playing with the soft pedal
depressed produces a sound that is not as
strong as when otherwise played with the
equivalent strength. The softness of the
tone can be varied subtly by the depth to
which you press the pedal.
* When opening / closing the keyboard cover or you operate the
pedals, please be careful not to get your ngers pinched between the
movable part and the unit. In places where small children are present,
make sure that an adult provides supervision and guidance.
Using the Headphones
Use headphones if you want to perform without the sound being
heard nearby. This piano has two headphone jacks, two people can
also use headphones simultaneously.
1. Connect headphones to the headphone jacks located
on the bottom panel.
Stereo 1/4”
phone plug
Stereo-mini
plug
NOTE
When you connect headphones, sound is no longer heard from
the piano’s speakers.
2. Use the Volume buttons to adjust the volume of the
headphones.
MEMO
• A Headphones 3D Ambience eect will be applied, producing the
sensation that the sound is emanating from the piano itself even
when using headphones (p. 20).
• Whenever you are not using the headphones, you can hang them
on the headphone hook.
Basic Operations of Functions
To operate the functions of this piano, you use the [ ] (select/conrm)
knob and the [ ] (back) button.
Change an on-screen item or
value
Turn the [
] knob
Conrm
Press the [
] knob
Move the “-” “+” symbols in the
screen
Press the [
] knob
Return to the previous screen /
Exit the current screen
Press the [
] button
Return to the default value
Long-press the [
] knob
Moving the “-” “+” symbols
In some screens, the upper and lower lines of the screen let you change
dierent items or values. (Example: The upper line changes the category, and
the lower line changes the tone.) In such screens, the location of the “-” “+”
symbols alternates between the upper and lower lines each time you press
the [
] knob, and turning the [ ] knob changes the item or value of the line
where the symbols are located.
When the “-” “+” symbols are in the
lower line, change the tone
When the “-” “+” symbols are in the
upper line, change the category
12
Playing
Selecting a Tone
Selecting other tones
Press the [ ] (Piano) button to select various types of piano tone.
1. Press the [ ] button.
Tone name
A piano tone is selected.
2. Turn the [ ] knob to select other piano tones.
Piano tones are organized into four categories.
By continuing to turn the [
] knob, you can successively select
piano tones of the next category.
Typical piano tones (grand tone category)
Display Explanation
Concert Piano
The sound of a splendid concert grand
piano. This piano sound has our highest
recommendation, and can be used for any
style of music.
Ballad Piano
A mellow grand piano sound,
recommended for quiet songs.
Mellow Piano
A grand piano sound that’s even more
mellow than Ballad Piano. It is ideal for
songs of a soft and relaxed atmosphere.
Bright Piano
A brilliant grand piano sound,
recommended when you want the piano
to stand out in an ensemble.
Selecting a category
1. Press the [ ] knob to move the “-” “+” symbols to the
upper line of the screen.
“-” “+” symbols
2. Turn the [ ] knob to select a category.
To select a tone, press the [ ] knob once again to move the “-” “+”
symbols to the lower line of the screen, and then select a tone.
Categories of the [ ] button
Display Explanation
Grand
Grand piano tones
Upright
Upright piano or ragtime piano tones
Classical
Fortepiano and harpsichord tones
E.Piano
Electric piano tones often used in pop
and rock
& For details on the piano tones of categories other than Grand,
refer to “Tone List” (p. 40).
Press the [
](other) button to select a variety of tones other than
piano.
1. Press the [ ] button.
Tone name
The tone is selected.
2. Turn the [ ] knob to select other tones.
Like the piano tones, the tones of the Other group are also
organized into several categories. The method of selecting a
category is the same as when selecting piano tones.
& For details on the tones that can be selected via the [other]
button, refer to “Tone List” (p. 40).
Categories of the [ ] button
Display Explanation
Strings
Tones of instruments used in an orchestra,
mainly string instruments such as violin
Organ
Tones such as pipe organ
* If you’ve selected a tone to which modulation is applied
(a rotary eect), you can change the speed of modulation by
pressing the [
] button.
Voice
Human vocal sounds of scat singing. The voice
will change in four stages according to the
strength at which you play the note.
Do Re Mi
Notes you play are sounded as “do-re-mi”
(solfege).
Drums
Lets you select sounds of percussion
instruments such as drums and percussion.
GM2 Lets you select GM2 sounds.
This piano lets you enjoy performing piano tones and a variety of tones other than piano.
The tones are organized into two groups, “piano” and “other”; press a tone button to select the corresponding group.
Selecting piano tones
13
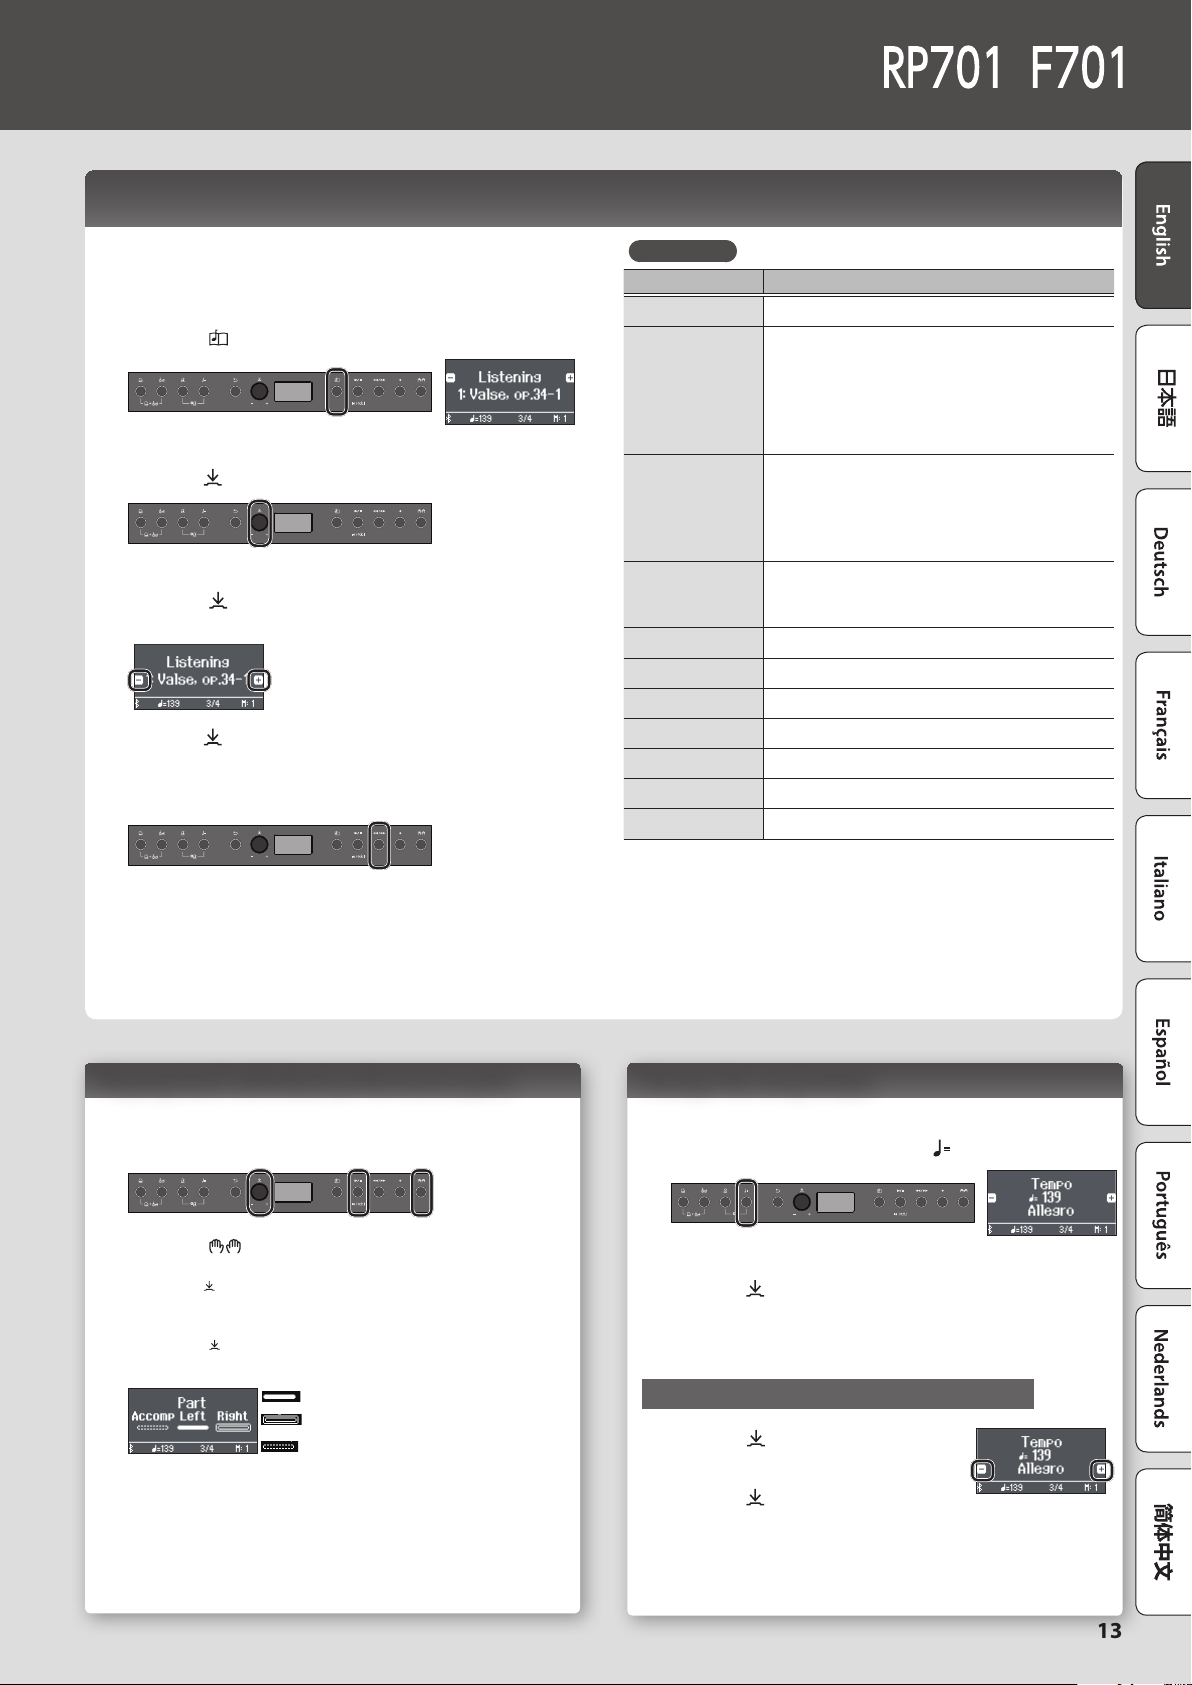
Listening to Songs
Playing Back a Song
Here’s how you can listen to the built-in songs. You can listen to these
internal songs as models for your own playing, or practice one hand at a
time along with them.
The internal songs are organized into several categories.
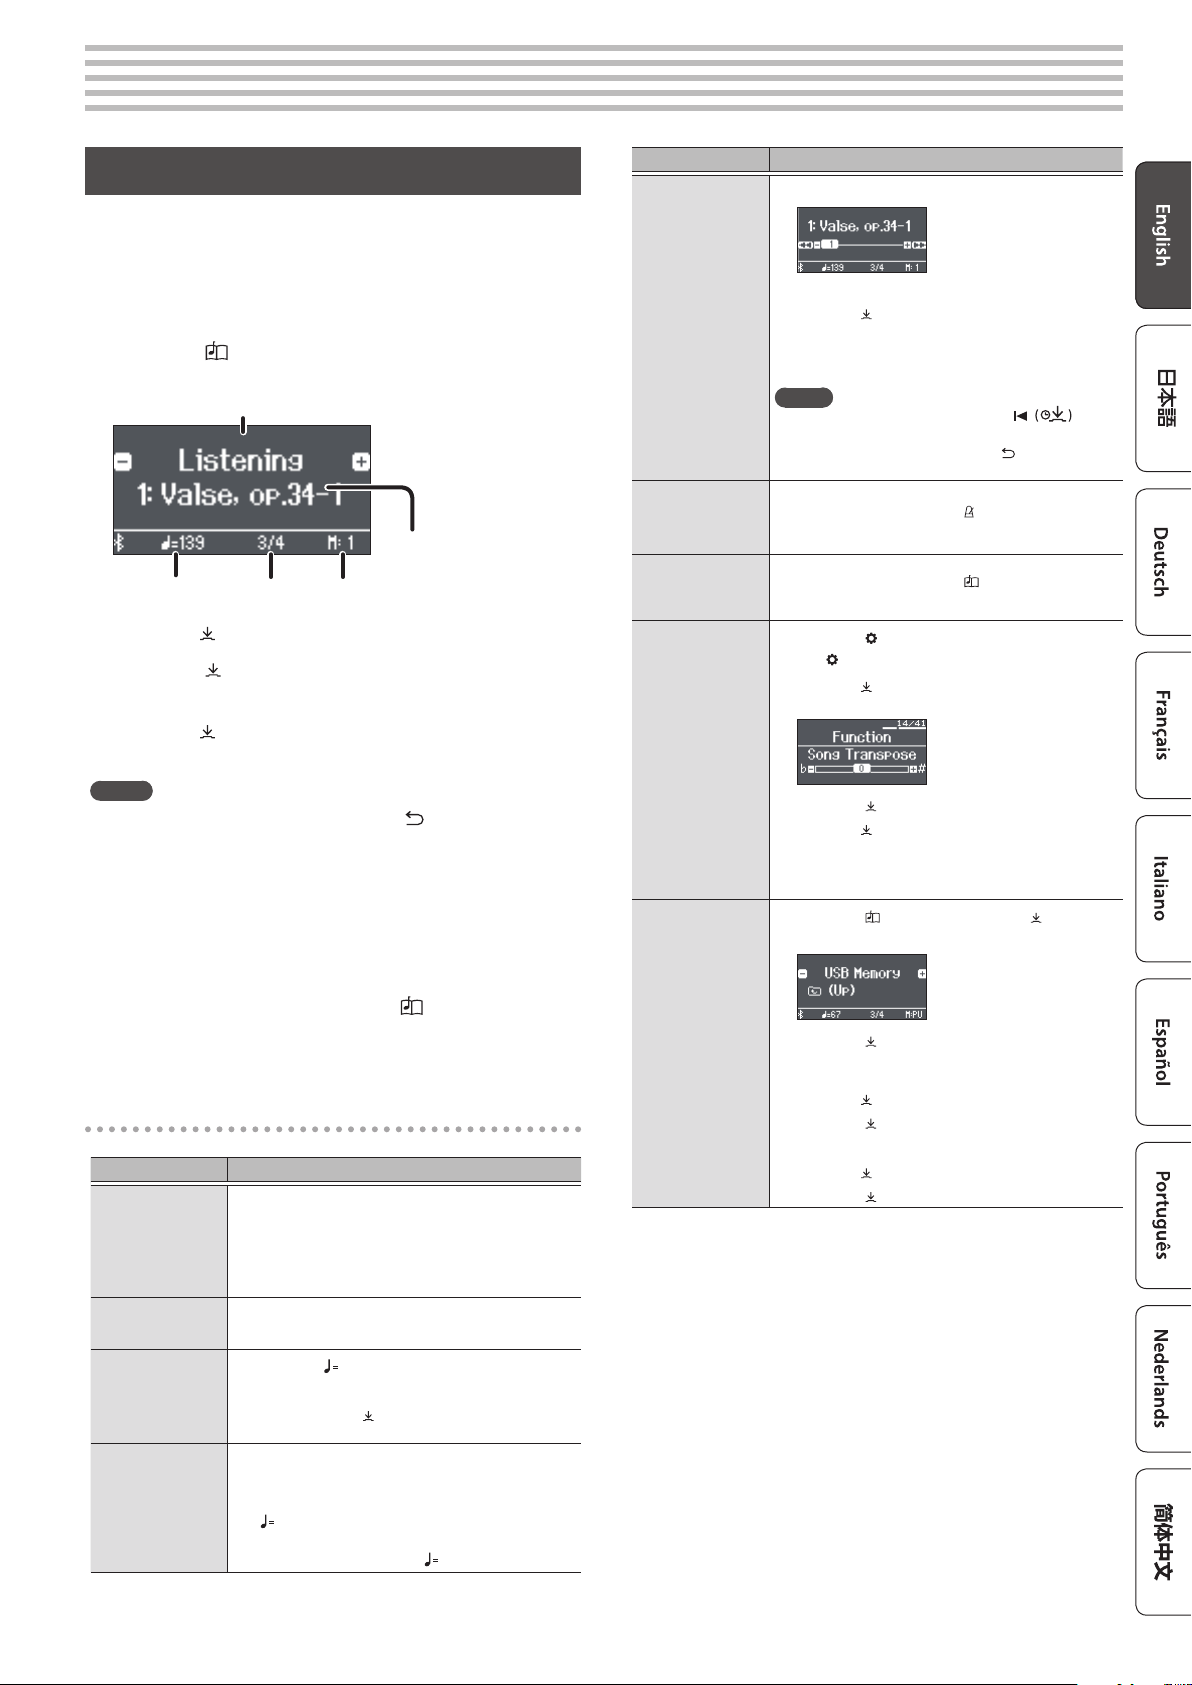
1. Press the [ ] button.
The Song screen appears.
2. Turn the [ ] knob to select the song category.
As an example, let’s select the “Listening” category.
3. Press the [ ] knob to move the “-” “+” symbols to the
lower line of the screen.
“-” “+” symbols
4. Turn the [ ] knob to select the song.
In this example, we’ll select “Valse, op.34-1.”
5. Press the [s] button.
The button is lit, and the song plays.
6. To stop the song, press the [s] button once again.
The button goes dark.
Category list
Category Explanation
Listening Piano songs recommended for listening
Ensemble
Famous songs, mainly classical pieces. These
include piano concertos, duets, and jazz
arrangements of classical pieces. Since this
collection contains songs that are challenging
to play, they are recommended for those at
intermediate level or above.
Entertainment
Arrangements of well-known songs from
around the world, including pop, jazz, and
children’s songs, in arrangements that can be
enjoyed by a wide range of people from the
beginner to the advanced player.
Do Re Mi Lesson
You can use these lessons to learn the basics of
music, by singing solfege along with the songs
or practicing score-reading.
Scales Scales in all keys (major scales, minor scales)
Hanon The Virtuoso Pianist No.1–20
Beyer Vorschule im Klavierspiel Op.101 No.1–106
Burgmüller 25 Études faciles et progressives Op.100
Czerny100 100 Übungsstücke Op.139
USB Memory Songs saved on a USB ash drive
Internal Memory Songs saved in internal memory
& For details on the internal songs, refer to “Internal Song List” (p.
42).
Playing back individual performance parts Change the song tempo
The built-in songs consist of three parts (right-hand, left-hand,
accompaniment), and you can play back just the part(s) that you want
to hear.
1. Press the [ ] button.
2. Turn the [
] knob to select the part that you want to
mute.
3. Press the [
] knob to conrm.
In this example, only the left-hand part plays back.
Sound is heard (play)
Sound is not heard (mute)
There is no data to play back
* Some songs don’t have a left-hand part or an accompaniment
part. In this case, you can’t select the corresponding part.
4. Press the [s] button.
Only the parts that you want to hear will play. You can also practice
by playing the muted part as you listen to the playback.
You can practice at a tempo that’s easy for you to play.
1. After selecting a song, press the [ ] button.
The display shows the tempo of the song.
2. Turn the [ ] knob to change the tempo numerically.
The song tempo changes.
3. Practice along with the song playback.
Changing the tempo as a tempo indication
1. Press the [ ] knob to move the “-” “+”
symbols to the lower line of the screen.
2. Turn the [ ] knob to select a tempo
indication.
The song tempo changes according to the tempo indication you
selected.

14
Practicing/Recording
Practicing with the Metronome
Recording Your Keyboard Performance
Here’s how to perform along with the metronome. You can also change
the metronome’s tempo and time signature.
1. Press the [ ] button.
The button blinks, and you hear the metronome.
2. Practice along with the metronome.
3. To stop the metronome, press the [
] button once again.
The button goes dark.
Changing the tempo
1. Press the [ ] button.
The display shows the current tempo.
2. Turn the [ ] knob to change the tempo.
Changing the time signature
1. Press the [ ] button and [ ] button simultaneously.
The Metronome setting screen appears.
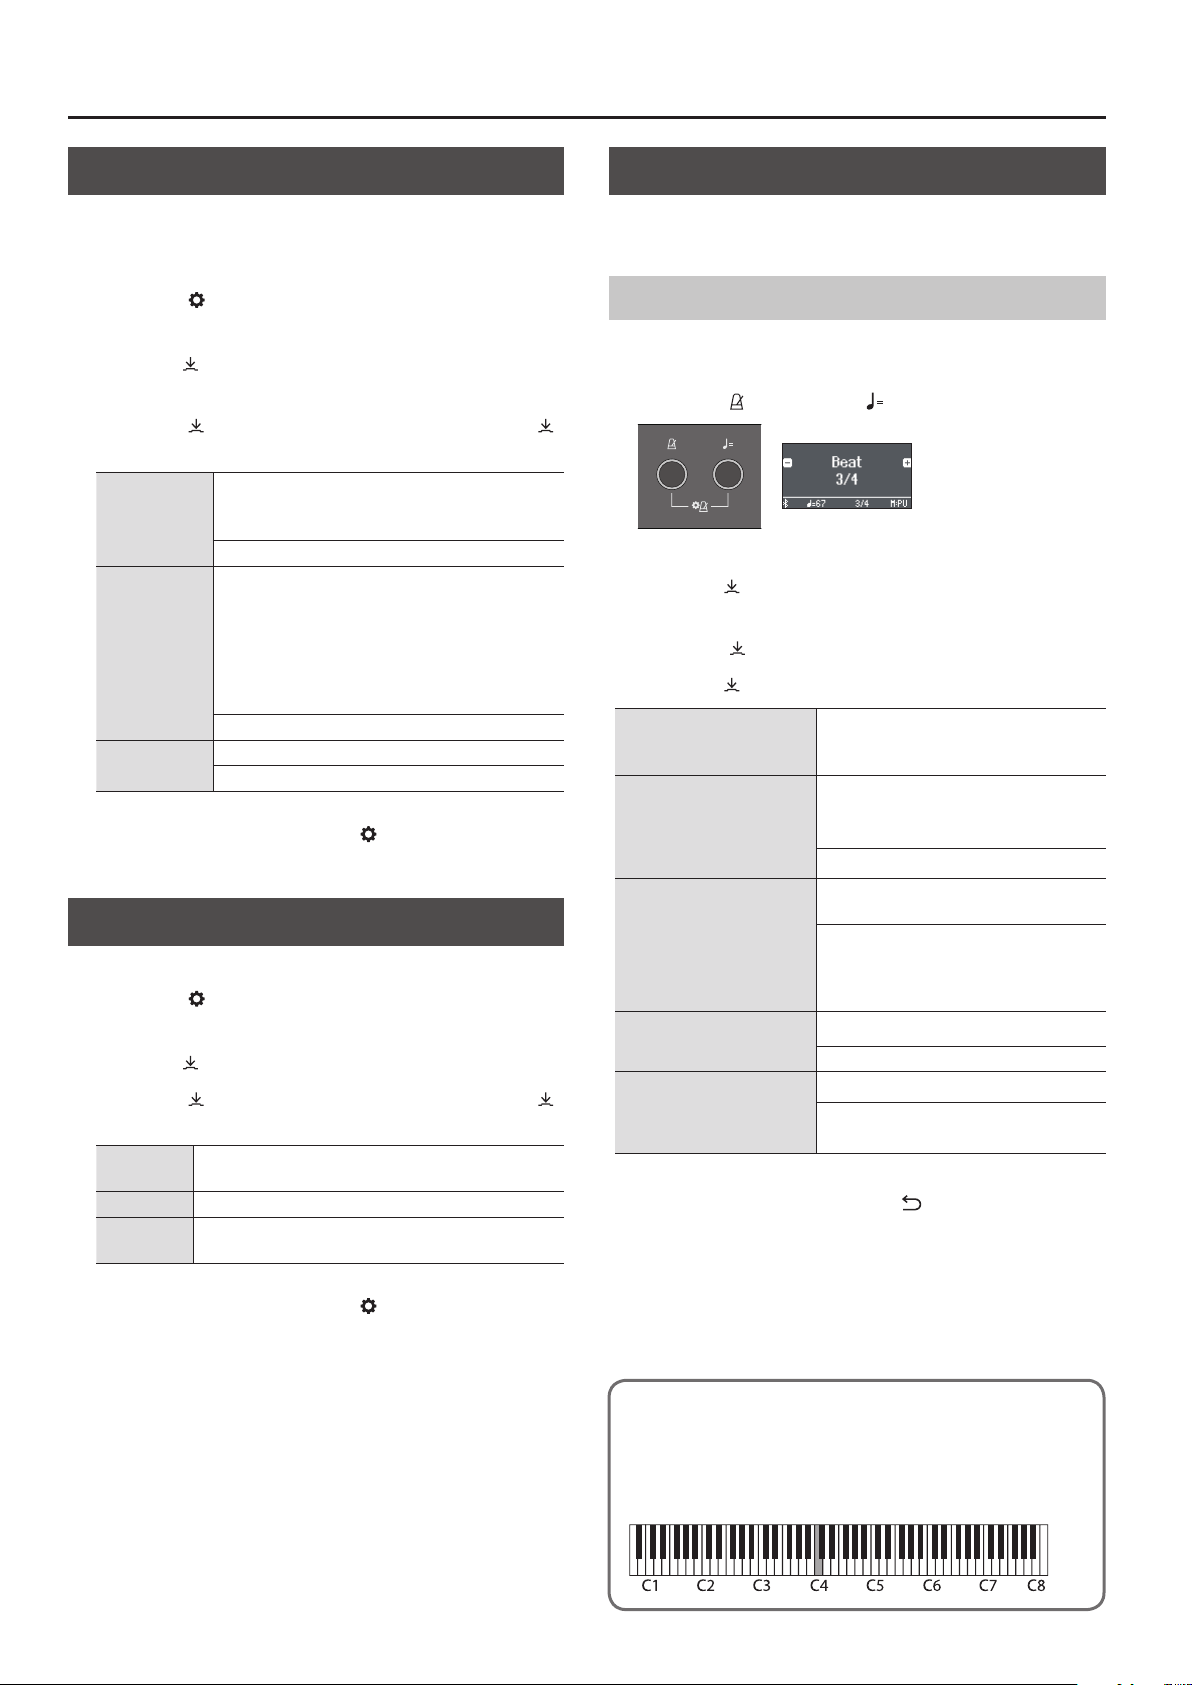
2. Turn the [ ] knob to access the “Beat” screen.
3. Press the [
] knob to move the “-” “+” symbols to the
lower line of the screen.
4. Turn the [ ] knob to select the time signature.
Available time
signatures
2/2, 3/2, 2/4, 3/4, 4/4, 5/4, 6/4, 7/4, 3/8, 6/8,
8/8, 9/8, 12/8 (default value: 4/4)
5. Press the [ ] button several times to return to the
previous screen.
You can record your own keyboard performance, and then play back to
check it.
Getting Ready to Record
1. Select the tone that you want to play.
2. You can sound the metronome if you like.
Press the [ ] button.
While listening to the metronome, specify the song’s tempo and time
signature.
Starting/Stopping Recording
3. Press the [7] button.
The [t] button lights, the [s] button blinks, and the piano enters
record-standby mode.
If you decide to cancel recording, press the [t] button once again.
4. Press the [s] button.
After a one-measure count, recording starts, and the [7] button and
[s] button are both lit.
MEMO
You can also start recording by playing the keyboard instead of
pressing the [s] button. In this case, a count is not sounded.
5. Play.
6. To stop recording, press the [s] button once again.
Recording stops.
The performance is saved automatically.
Listening to the Recorded Performance
7. Press the [s] button.
After you record, the newly recorded song is selected.
The recorded song starts playing back.
Deleting a Saved Song
1. While holding down the [7] button, press the [ ] button.
The “Delete Song - Media” screen appears.
2. Press the [ ] knob to conrm.
The “Delete Song - Song” screen appears.
3. Press the [ ] knob to conrm.
A conrmation message appears.
4. Turn the [ ] knob to select “Yes,” and press the [ ] knob
to conrm.
The deletion is executed.
15
Connecting a Mobile Device via Bluetooth
Here’s What You Can Do
Pairing
To wirelessly connect the piano with your mobile device, you
must rst perform “pairing” to create a one-to-one connection
between the piano and your mobile device.
“Pairing” is the procedure of registering (mutually
authenticating) your mobile device with the piano.
Pair your device as described in the procedure for each function.
Pairing
The pairing process
Separate pairing is required for “playing music through the
piano’s speakers” and for “using the piano with an app.” Note that
these processes are dierent.
& “Initial settings (pairing)” (p. 16)
& “Making settings (pairing)” (p. 16)
Playing music
through the piano’s
speakers
Using the piano
with an app
Settings on the piano
Settings on the
mobile device
Settings on the App
App
Settings on the
mobile device
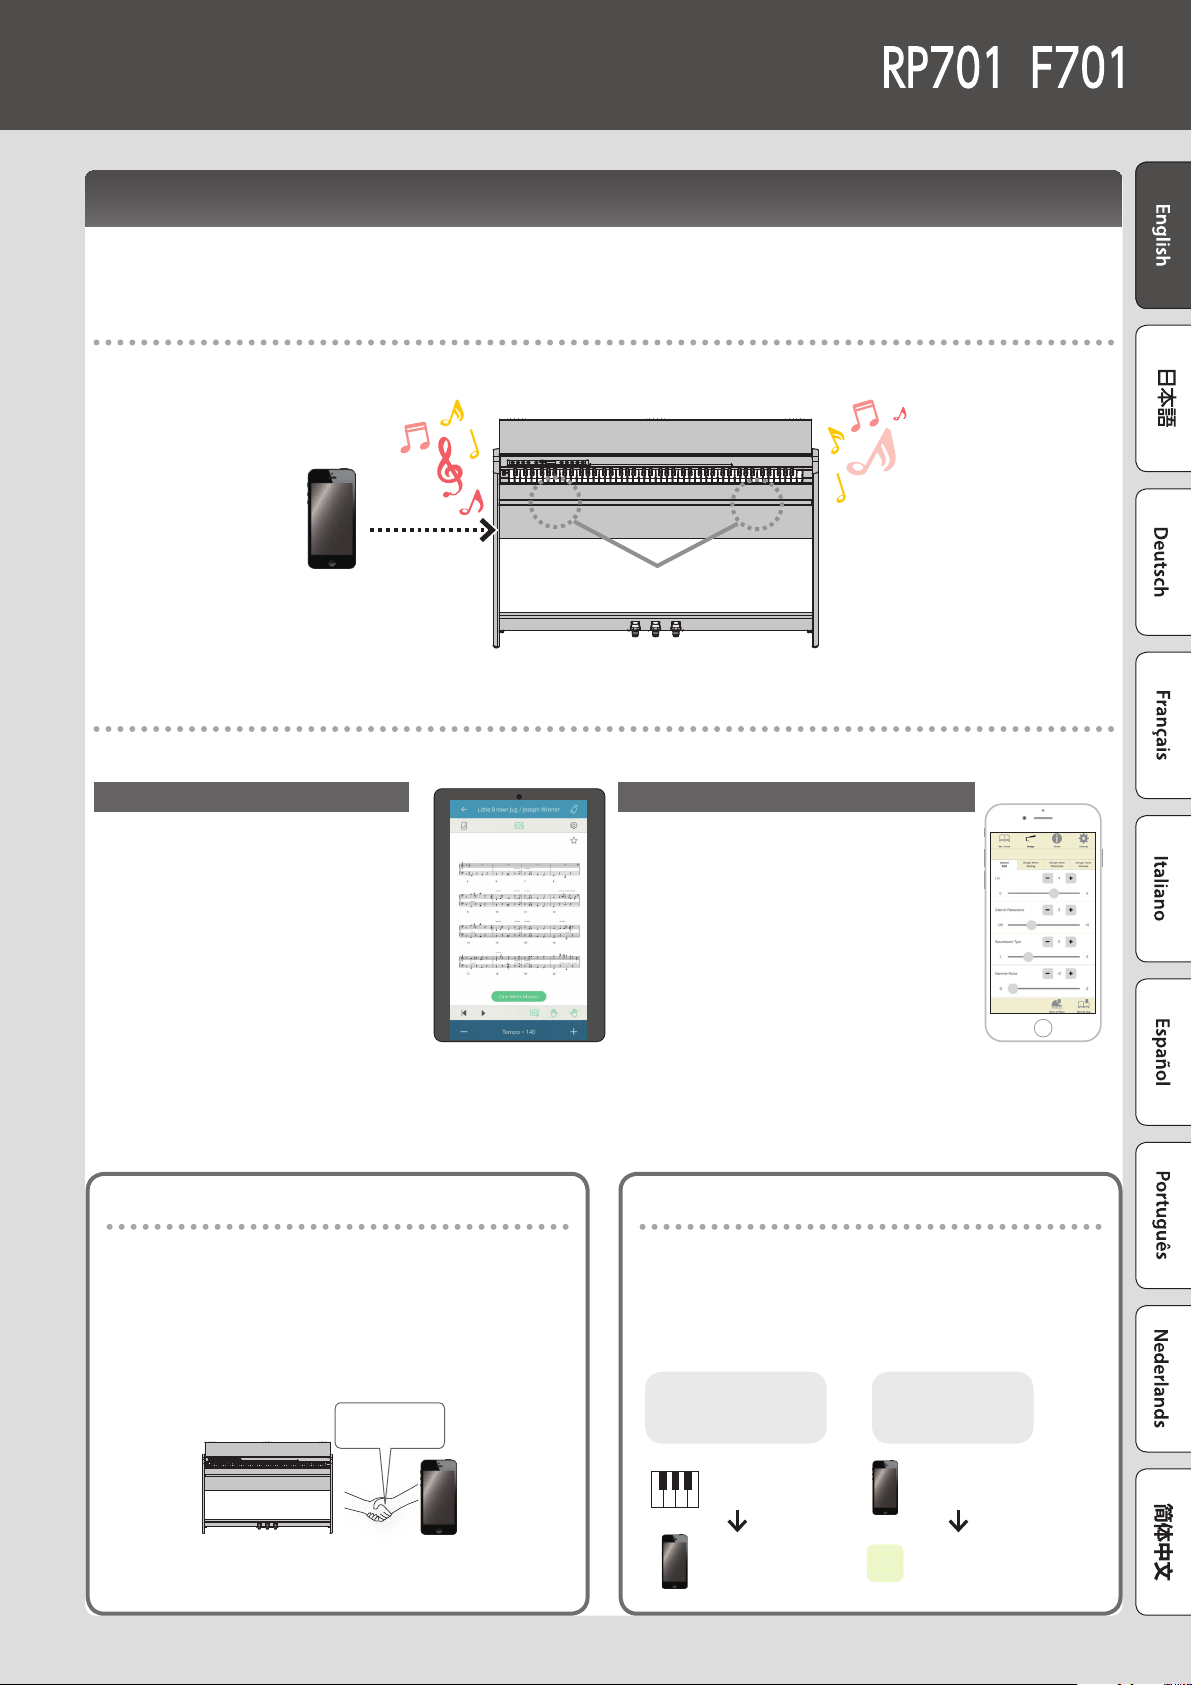
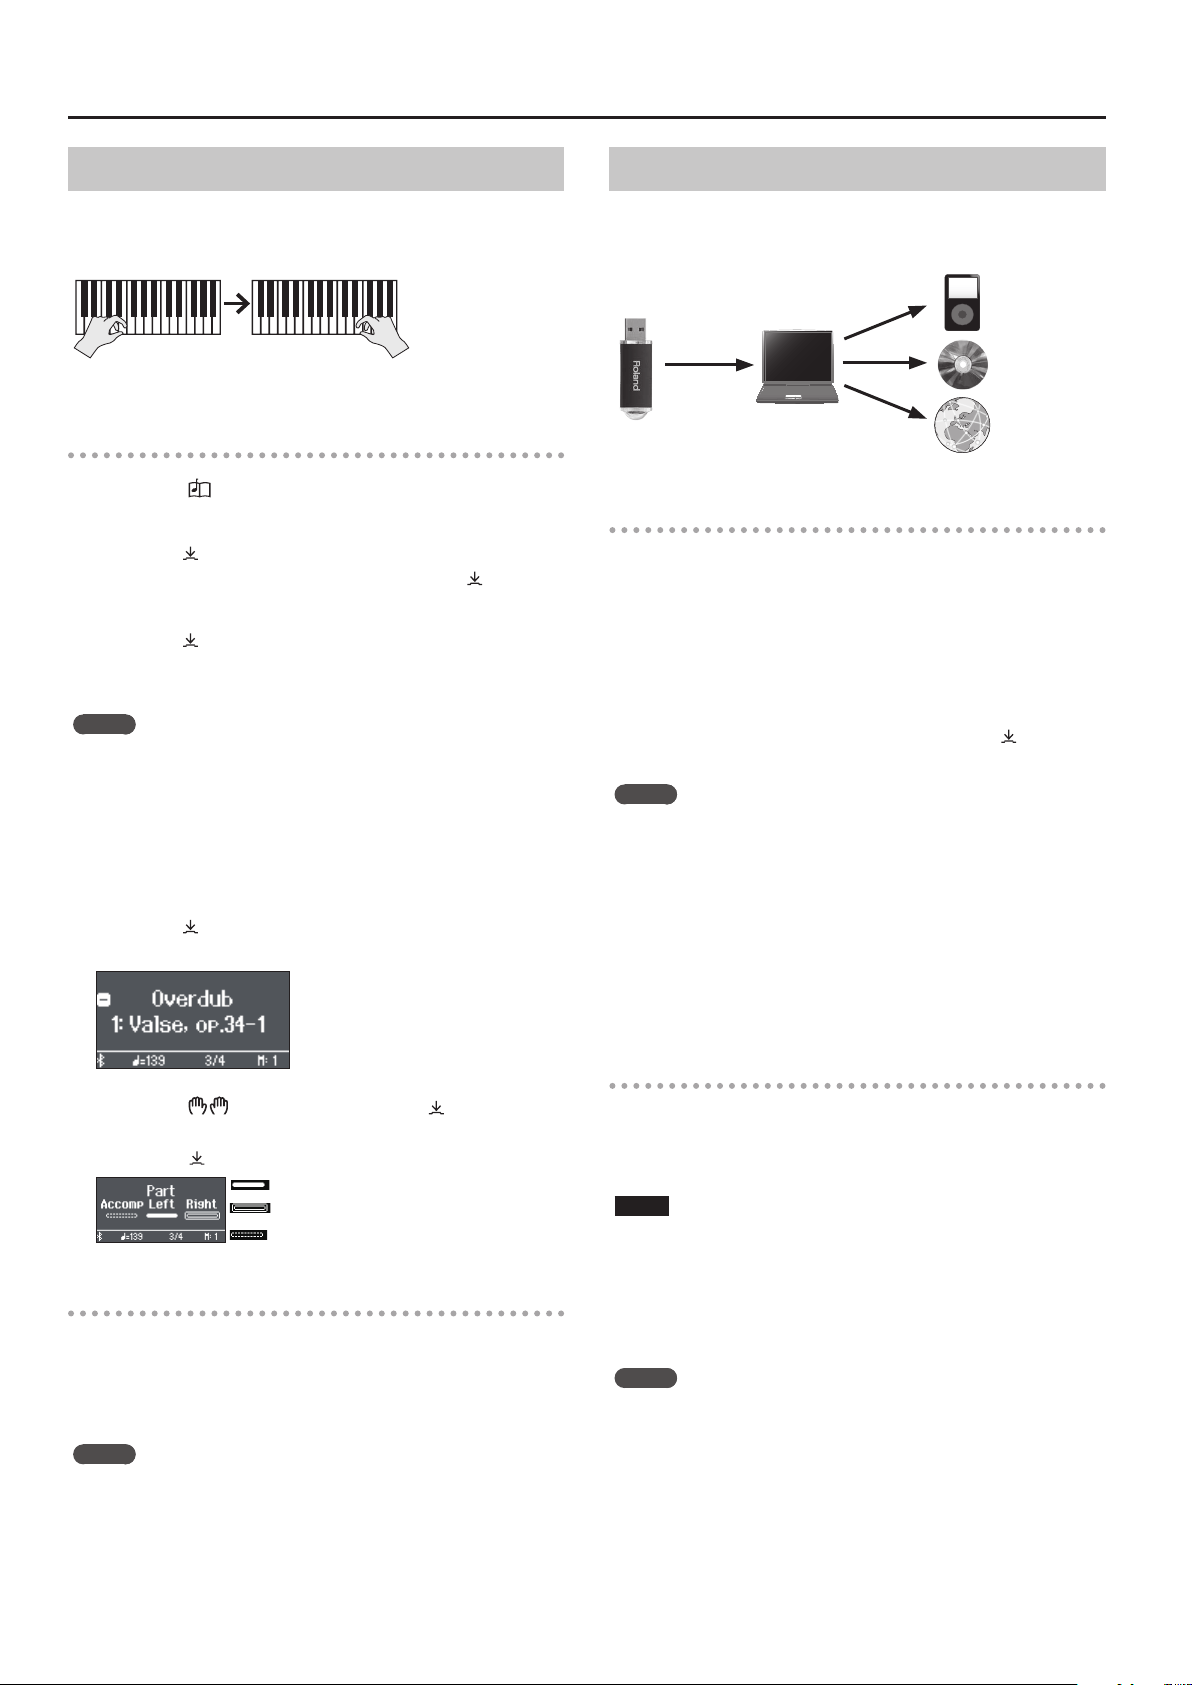
By using the Bluetooth function, you can wirelessly connect the piano with a mobile device such as your smartphone or tablet, allowing you to
do the following things.
Music played back by the mobile device can be heard through the piano’s speakers.
You can play back music data that’s saved on your iPhone or other mobile device, and wirelessly listen to it through the piano’s speakers.
Speakers
You can use apps to expand your piano enjoyment.
You can install apps (such as Roland’s “Piano Every Day” and “Piano Designer”) on your mobile device and use them together with the piano.
What you can do using Piano Every Day
• View the musical scores of internal songs and
practice them
• Go online, and nd and download the musical
scores of songs that you want to play
• Record your piano performance and play it
back on your smartphone
• Test your skills with lesson programs for the
internal songs
What you can do using Piano Designer
• Easily adjust settings for the piano’s condition,
such as its lid, strings, and hammers
• Play piano tones created by famous piano tuners
• Adjust the pitch, volume, and character of each
note while watching a graphic indication
16
Listening to Music Through the Piano’s Speakers
Here’s how to make settings so that music data saved on your
mobile device can be wirelessly played back through the piano’s
speakers.
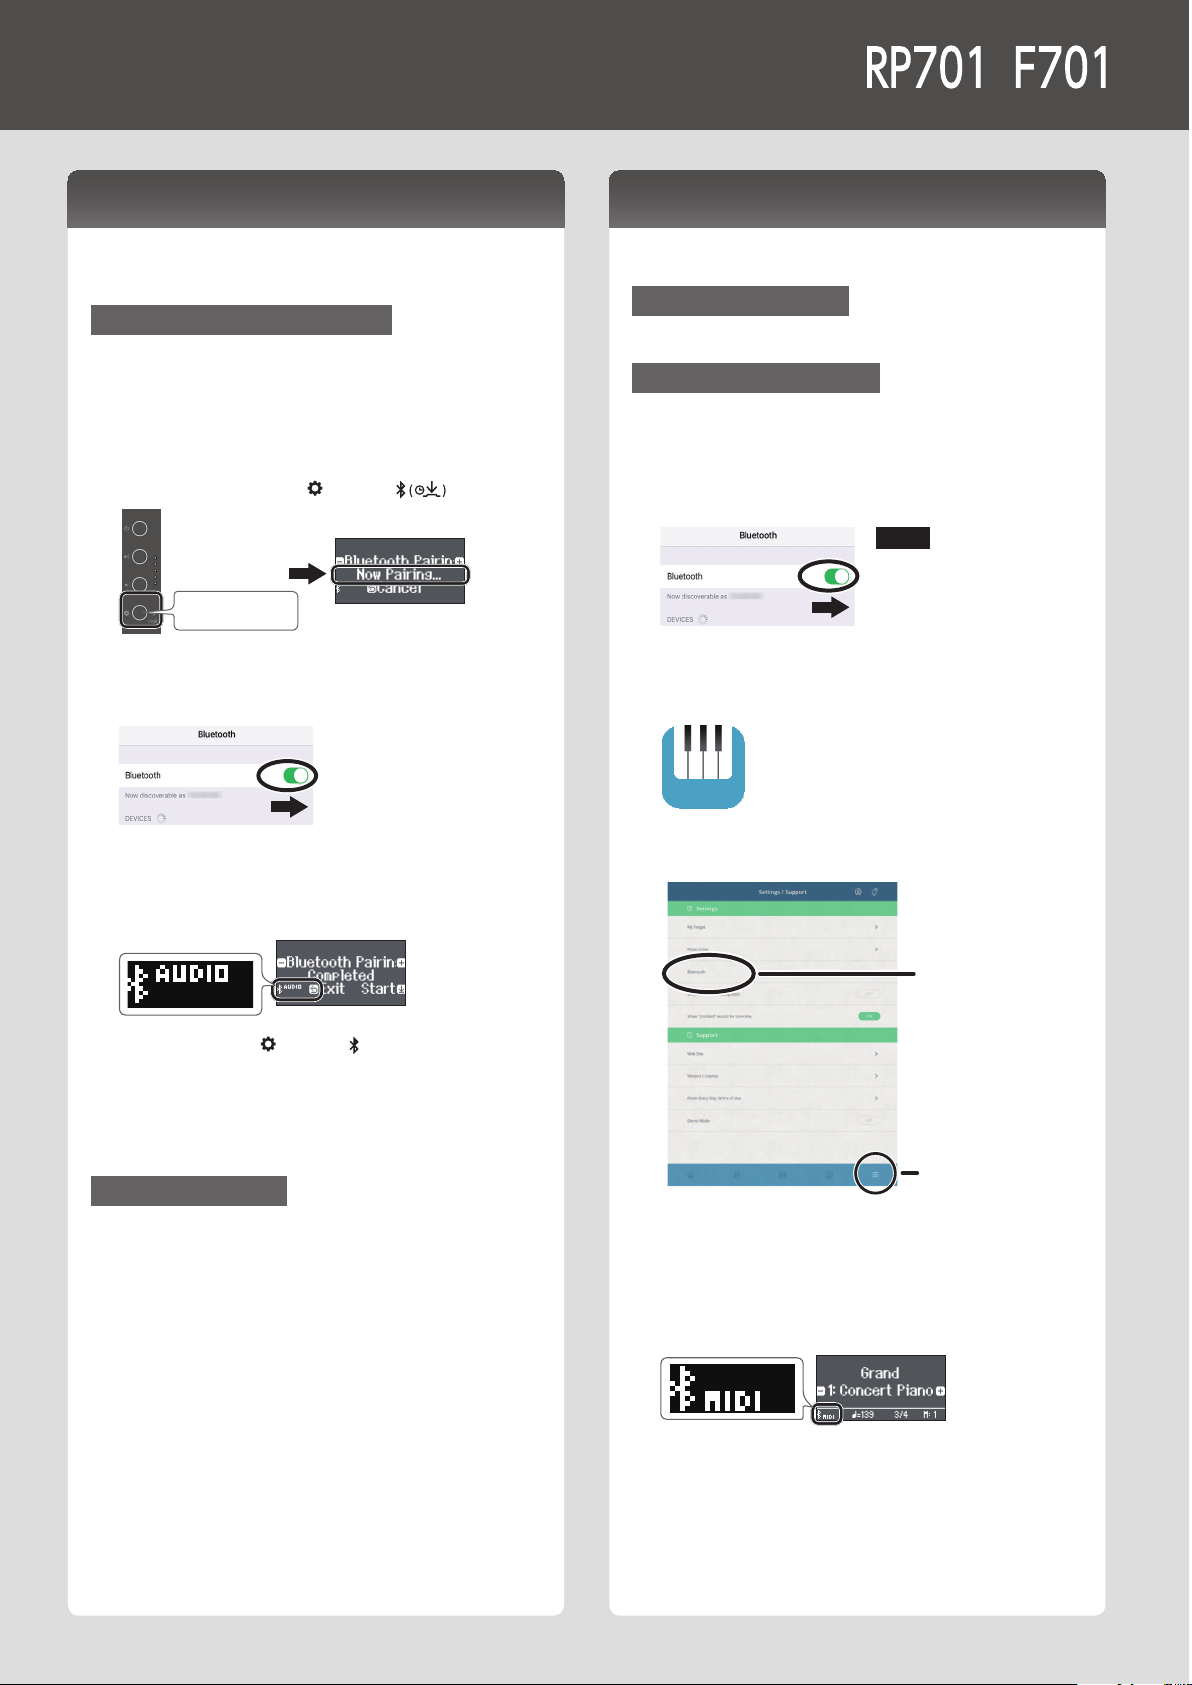
Making Initial Settings (Pairing)
As an example, we explain how to make settings for an iPad. If you’re
using an Android device, refer to the owner’s manual of the mobile
device you’re using.
1. Place the mobile device that you want to connect
near the piano.
2. Long-press the piano’s [
] button ( ).
long-pressing
When the piano’s display indicates “Now Pairing,” release your
nger.
3. Turn on the Bluetooth function of the mobile device.
4. Tap “RP701 Audio” or “F701 Audio” that is shown in
the Bluetooth device screen of your mobile device.
The piano and mobile device are paired. When pairing succeeds,
the word “AUDIO” appears in the piano’s display as shown below.
5. Press the piano’s [ ] button ( ) to return to the
previous screen.
* The mobile device that has been paired with the piano does
not need to be paired again the next time. Simply turn on the
Bluetooth function of the mobile device, and it will reconnect
with the piano.
Playing Back Audio
1. Play back music data on the mobile device.
You hear sound from the piano’s speakers.
2. Adjust the volume on your mobile device.
Using the Piano with an App
Here’s how to make settings so that you can use the piano with an
app that’s installed on your mobile device.
Downloading the app
In advance, download the app to your mobile device. (p. 1)
Making Settings (Pairing)
As an example, we show the procedure for using the “Piano Every
Day” app on an iOS device. If you’re using an Android device, refer
to the owner’s manual of your mobile device for details on how to
make Bluetooth function settings.
1. Turn on the Bluetooth function of the mobile device.
NOTE
Even if the “DEVICES” eld shows
the name of the device you’re
using (such as “RP701 MIDI”), do
not tap it.
2. Start the app that you installed on your mobile
device.
3. Tap the menu located in the lower right of the app
screen, and then in the menu screen tap “Bluetooth.”
Menu
Bluetooth
The screen of your mobile device shows “RP701 MIDI” or “F701
MIDI.”
4. Tap either “RP701 MIDI” or “F701 MIDI” depending on
the unit that you’re using.
The piano and mobile device are paired. When pairing succeeds,
the word “MIDI” appears in the piano’s display as shown below.
Now you can use the app.
& If pairing does not succeed (p. 28)
Connecting a Mobile Device via Bluetooth
Reference
How to read the Reference section
This section explains more advanced ways to use the piano and how to deal with problems. For basic use, refer to “Quick Operation.” Lists
of the tones and the internal songs are provided at the end of this section.
This content is common to both the RP701 model and the F701 model.

18
Bottom Panel
* To prevent malfunction and equipment failure, always turn down the volume, and turn o all the units before making any connections.
° Connecting the Equipment
USB Computer port
Connect a computer here. Use a
USB cable (commercially available)
to make this connection. This lets
the piano exchange performance
data with sequencer software
(commercially available) on your
computer, allowing you to produce
and edit music.
DC In jack
Connect the included AC
adaptor here.
Headphone Jacks
Here you can connect stereo
headphones.
Pedal jack
Connect the pedal cord.
USB Memory port
Here you can connect a USB ash drive. You can use it to record
your piano performance as audio, or use the piano to play back
music data (WAVE les, MIDI les, MP3 les) from the USB ash
drive. (p. 24, p. 21)
* Never turn o the power or disconnect a USB ash drive or the
power cord while the USB ash drive is blinking.
* Taking care that the USB ash drive is oriented correctly, rmly
insert it all the way into the port. Do not use excessive force.
Input jack
Connect an audio player or smartphone. Sound that’s
played back by the audio player can be heard from the
piano’s speakers. You can also play the piano along with the
song playback. Use a stereo mini-plug cable (commercially
available) to make this connection.
page
6
page
7
page
10
page
11
19
° Playing
Playing Dierent Tones with the Left and
Right
Hand
You can perform using dierent tones in the left and right regions of
the keyboard, divided at a specic note. This setting is called “Split
Play,” and the point at which the keyboard is divided is called the
“split point.”
1. Press the [ ] button.
The [ ] button is lit, and the piano is in function mode.
2. Turn the [ ] knob to access the “Keyboard Mode”
screen.
3. Press the [
] knob to conrm, and then turn the [ ]
knob to select “Split.”
4. Press the [
] button to exit function mode.
The split screen appears.
Right-hand tone
Left-hand tone
Item
When you turn the power on, “
Concert Piano
” is selected as the right-
hand tone and “A.Bass+Cymbl” is selected as the left-hand tone.
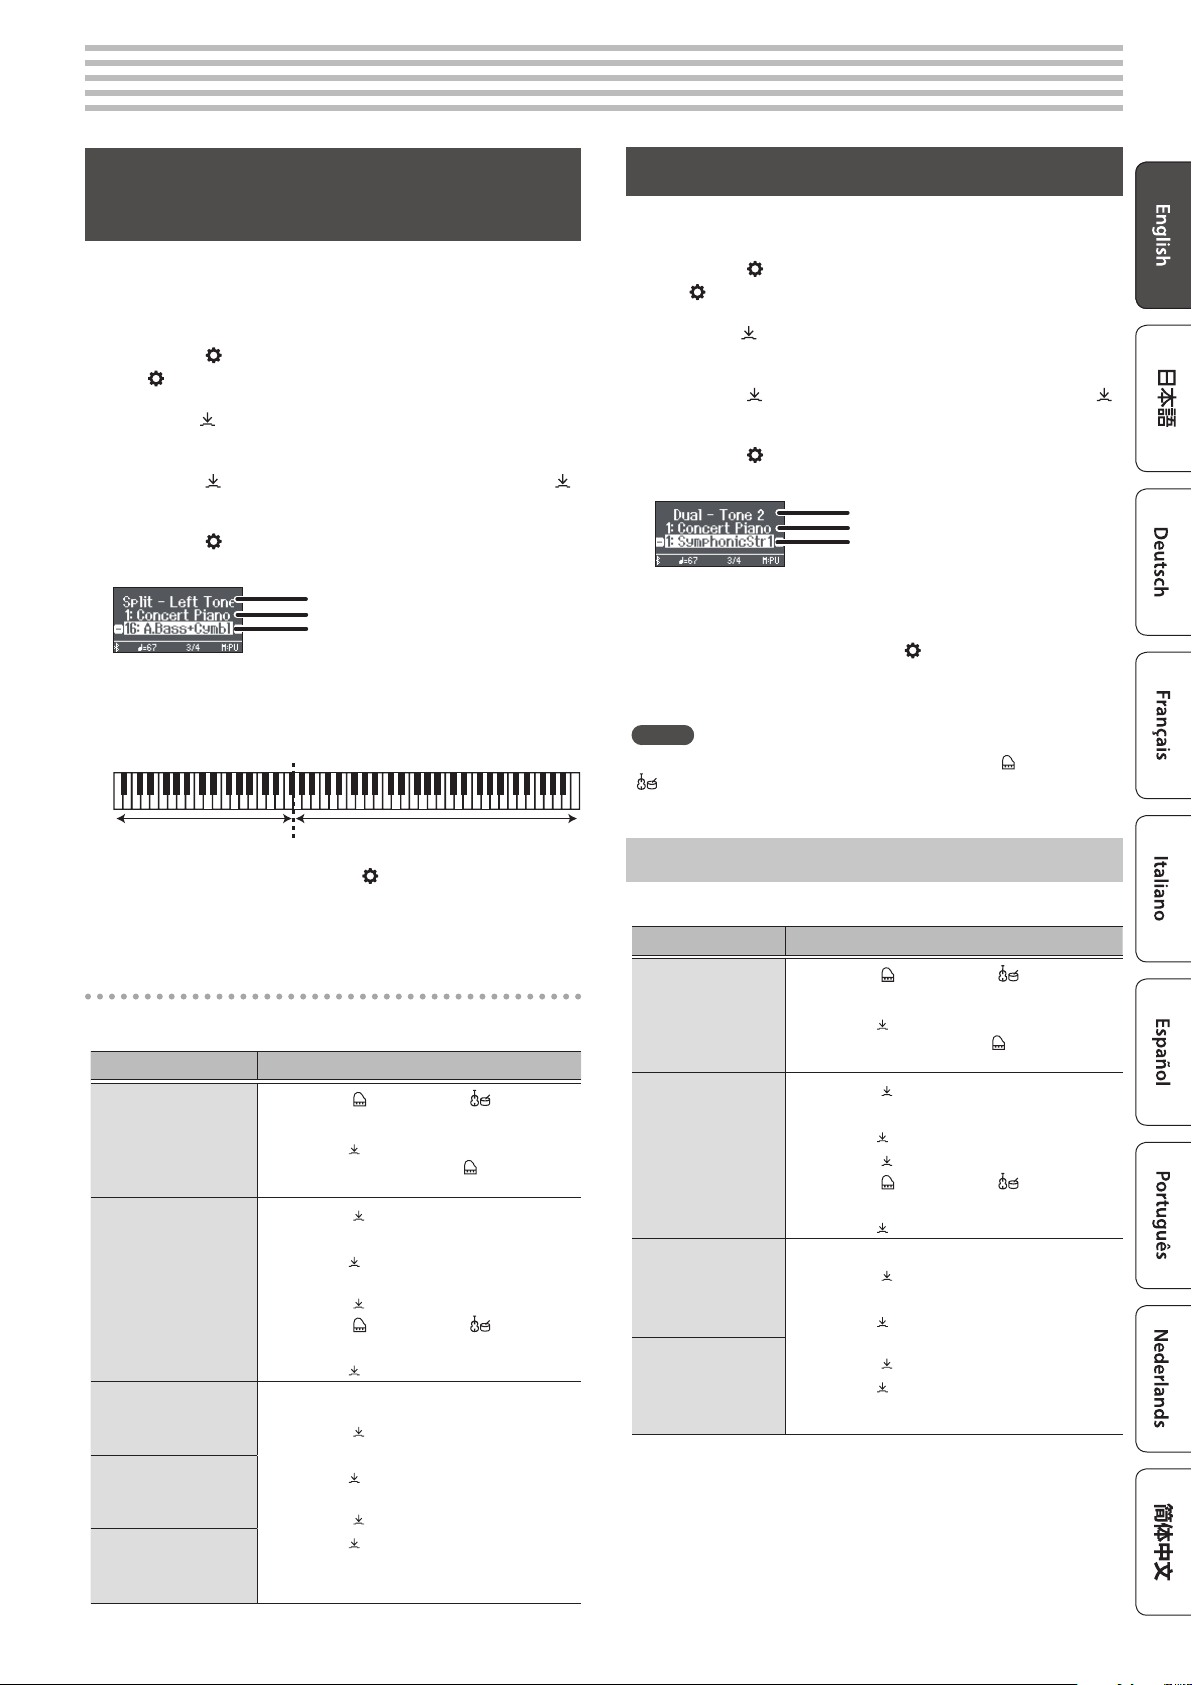
When split turns on, the keyboard settings are as follows.
Left-hand tone Right-hand tone
Split point (Power-up default): F#3
5. To exit Split Play, press the [ ] button to enter
function mode, and change “Keyboard Mode” to
“Whole.”
Changing the settings for Split Play
To edit the following settings, access the Split screen.
Operating the Unit
Changing the left-hand
tone (Split–Left Tone)
1. Press the [ ] button or the [ ] button.
The tone group is selected.
2. Turn the [ ] knob to select a tone.
* If you select a sound from the [ ] button as the
left-hand tone, it sounds dierent than usual.
Changing the right-hand
tone (Split–Right Tone)
1. Press the [ ] knob so that “-” “+” is shown in
the top line of the screen.
2. Turn the [
] knob to access “Right Tone”
screen.
3. Press the [
] knob to conrm.
4. Press the [
] button or the [ ] button.
The tone group is selected.
5. Turn the [ ] knob to select a tone.
Changing the point
at which tones are
separated (Split–Point)
1. Press the [ ] knob so that “-” “+” is shown in
the top line of the screen.
2. Turn the [
] knob to access the screen of
the item you want to set.
3. Press the [
] knob to conrm.
4. Turn the [
] knob to select the value that
you want to change.
Changing the volume
balance of the left-hand
tone and right-hand tone
(Split–Balance)
Changing the octave of
the left-hand tone and
right-hand tone (Split–
Left/Right Shift)
Playing Two Tones Layered on Each Key
You can play two tones simultaneously from a single key. This
function is called “Dual Play.”
1. Press the [ ] button.
The [ ] button is lit, and the piano is in function mode.
2. Turn the [ ] knob to access the “Keyboard Mode”
screen.
3. Press the [
] knob to conrm, and then turn the [ ]
knob to select “Dual.”
4. Press the [
] button to exit function mode.
The dual screen appears.
tone 1
tone 2
Item
When you turn the power on, “Concert Piano” is selected for tone
1 and “SymphonicStr1” is selected for tone 2.
5. To exit Dual Play, press the [ ] button to enter
function mode, and set “Keyboard Mode” to
“Whole.”
MEMO
You can also access the Dual screen by pressing the [
] button and
[
] button simultaneously. Press the buttons simultaneously once
again to exit Dual Play.
Changing the Settings for Dual Play
To edit the following settings, access the Dual screen.
Operating the Unit
Changing tone 2
(Dual–Tone 2)
1. Press the [ ] button or the [ ] button.
The tone group is selected.
2. Turn the [ ] knob to select a tone.
* If you select a sound from the [ ] button as tone 2,
it sounds dierent than usual.
Changing tone 1
(Dual–Tone 1)
1. Press the [ ] knob so that “-” “+” is shown in
the top line of the screen.
2. Turn the [
] knob to access “Tone 1” screen.
3. Press the [
] knob to conrm.
4. Press the [
] button or the [ ] button.
The tone group is selected.
5. Turn the [ ] knob to select a tone.
Changing the volume
balance of the two
tones (Dual–Balance)
1. Press the [ ] knob so that “-” “+” is shown in
the top line of the screen.
2. Turn the [
] knob to access the screen of the
item you want to set.
3. Press the [
] knob to conrm.
4. Turn the [
] knob to select the value that you
want to change.
Changing the octave of
the two tones
(Dual–Tone 1/Tone
2 Shift)
20
Playing
Adjusting the Sound’s Ambience and Brightness
You can add reverberant ambience to the sound as though you were
performing in a concert hall. You can also adjust the tonal brightness
of your keyboard performance or the song playback.
1. Press the [ ] button.
The button is lit, and the piano is in function mode.
2. Turn the [ ] knob to select the screen of the item
that you want to set.
3. Press the [
] knob to conrm, and then turn the [ ]
knob to choose the desired value.
Ambience
Higher values produce deeper ambience; lower
values produce shallower ambience.
• The reverberation eect is not applied to audio les.
0–10 (default value: 1)
Headphones
3D Ambience
You can apply a Headphones 3D Ambience
eect that creates the impression that the
sound is being heard from the piano itself even
when you’re using headphones.
• The Headphones 3D Ambience eect applies only to
piano sounds; it does not apply to other sounds.
• The reverberation eect is not applied to audio les.
O, On (default value: On)
Brilliance
Higher values produce brighter sounds.
-10–0–+10 (default value: 0)
4. To exit the setting, press the [ ] button to exit
function mode.
Changing the Keyboard Touch
You can change the playing feel (touch) of the keyboard.
1. Press the [ ] button.
The button is lit, and the piano is in function mode.
2. Turn the [ ] knob to access the “Key Touch” screen.
3. Press the [
] knob to conrm, and then turn the [ ]
knob to choose the desired value.
50 (default)
This touch setting is closest to that of an acoustic
piano.
1–100 Higher values make the keyboard feel heavier.
Fix
The sound is heard at a xed volume regardless of
how strongly you play the keyboard.
4. To exit the setting, press the [ ] button to exit
function mode.
Practicing with the Metronome
You can practice while hearing a metronome.
& “Practicing with the Metronome” (p. 14)
Changing the Settings for Metronome
You can change various other settings of the metronome in addition
to its tempo and time signature.
1. Press the [ ] button and [ ] button simultaneously.
The Metronome setting screen appears.
2. Turn the [ ] knob to access the screen of the item
that you want to set.
3. Press the [
] knob to conrm.
4. Turn the [
] knob to change the setting.
Beat
2/2, 3/2, 2/4, 3/4, 4/4, 5/4, 6/4, 7/4,
3/8, 6/8, 8/8, 9/8, 12/8 (default value:
4/4)
Metronome Downbeat
If this is on, the rst beat (downbeat)
of the metronome is played with a
stronger sound.
O, On (default value: On)
Metronome Pattern
Changes the pattern of the
metronome.
O, Eighth note, Eighth-note triplet,
Shue, Sixteenth note, Quarter-note
triplet, Quarter note, Dotted eighth
(default value: O)
Metronome Volume
Changes the metronome’s volume
O, 1–10 (default value: 5)
Metronome Tone
Changes the tone of the metronome.
Click, Electronic, Voice (Japanese),
Voice (English) (default value: Click)
5. To exit the setting, press the [ ] button.
Reading the note name (e.g., C4)
The alphabetical indication for settings such as “split point” shows
the name of the note.
For example, the indication “C4” means “the fourth ‘C’ from the
left edge of the keyboard.”
21
° Listening to Songs
Playing Back a Song
Here’s how you can listen to the built-in songs. You can listen to these
internal songs as models for your own playing, or practice one hand
at a time along with them.
& “Internal Song List” (p. 42)
& “Song Categories” (p. 13)
1. Press the [ ] button.
The Song screen appears.
Category
Tempo Time signature Measure
Song name
2. Turn the [ ] knob to select a song category.
3. Press the [
] knob to move the “-” “+” symbols to
the lower line of the screen.
4. Turn the [
] knob to select the song name.
You can choose song names within the category.
MEMO
To re-select the song category, press the [
] button.
5. Press the [s] button.
The button is lit, and the song plays.
6. To stop the song, press the [s] button once
again.
The button goes dark.
7. To exit song settings, press the [ ] button.
The button goes dark.
Changing how songs play back
Operating the Unit
Playing back
individual
performance
parts
The built-in songs consist of three parts (right-
hand, left-hand, accompaniment), and you can
play back just the part(s) that you want to hear.
& “Playing back individual performance
parts” (p. 13)
Change the song
tempo
& “Change the song tempo” (p. 13)
Return the song
tempo to its
initial value
1. Press the [ ] button.
The Tempo screen appears.
2. Long-press the [ ] knob.
The tempo returns to its initial value.
Play back
the song at a
constant tempo
(Tempo mute)
This is convenient when you want to practice
along with the song playback.
1. Hold down the [s] button and press the
[ ] button.
To defeat tempo mute, once again hold down the
[s] button and press the [ ] button.
Operating the Unit
Selecting the
measure to play
back
1. Press the [x/y] button.
The measure screen appears.
2. Turn the [ ] knob to select the measure that
you want to play.
3. Press the [s] button.
The song plays from the specied measure.
MEMO
5 If you long-press the [
s]
button ( ), the
beginning of the song is selected.
5 Press the
[x/y] button or the [
] button to return
to the previous screen.
Sounding a
count before the
song plays
1. While holding down the [ ] button, press the
[s] button.
Play all songs
in the selected
category
1. While holding down the [ ] button, press the
[s] button.
Playing back in a
dierent key
1. Press the [ ] button.
The [ ] button is lit, and the piano is in function mode.
2. Turn the [ ] knob to access the “Song
Transpose” screen.
3. Press the [ ] knob to conrm.
4. Turn the [
] knob to select the number of
semitones that you want to transpose.
5. Press the [s] button.
The song playback is transposed.
Playing songs
from a folder on
a USB ash drive
1. Press the [ ] button, and turn the [ ] knob to
select “USB Memory.”
2. Press the [ ] knob to conrm.
Enter the folder
3. Turn the [ ] knob to select the desired folder.
4. Press the [
] knob to conrm.
Exit the folder
5. Turn the [ ] knob toward the left to select “Up.”
6. Press the [
] knob to conrm.
22
° Recording Your Performance
Recording Your Keyboard Performance
You can record your own keyboard performance, and then play back
to check it.
Getting Ready to Record
1. Select the tone that you want to play.
2. You can sound the metronome if you like.
Set the metronome’s tempo and time signature. The metronome
setting is stored in the song, and you can use the same settings
during playback.
3. Press the [7] button.
The [t] button lights, the [s] button blinks, and the piano
enters record-standby mode.
If you decide to cancel recording, press the [t] button once again.
Starting/Stopping Recording
4. Press the [s] button.
After a one-measure count, recording starts, and the [7]
button and [s] button are both lit. The performance is saved
automatically.
MEMO
You can also start recording by playing the keyboard instead of
pressing the [s] button. In this case, a count is not sounded.
5. To stop recording, press the [s] button once
again.
Recording stops.
Listening to the Recorded Performance
6. Press the [s] button.
After you record, the newly recorded song is selected.
The recorded song starts playing back.
Deleting a Saved Song
You can delete a song that you saved.
MEMO
5 You can also delete a recorded song by holding down the [7]
button and pressing the [ ] button.
5 If you want to delete all songs that have been saved to internal
memory, initialize the memory (“Initializing the Memory (Format
Media)” (p. 30)).
1. Press the [ ] button.
The [ ] button is lit, and the piano is in function mode.
2. Turn the [ ] knob to access the “Delete Song”
screen.
3. Press the [
] knob to conrm.
The “Delete Song - Media” screen appears.
4. Turn the [ ] knob to select the media that contains
the song you want to delete, and press the [ ] knob
to conrm.
5. Turn the [
] knob to select the song that you want
to delete, and press the [ ] knob to conrm.
A conrmation message appears.
If you decide to cancel, press the [ ] button.
6. Turn the [ ] knob to select “Yes,” and press the [ ]
knob to conrm.
The deletion is executed.
7. Press the [ ] button.
You exit function mode.
Managing Songs You Recorded
You can rename a saved song.
1. Press the [ ] button.
The [ ] button is lit, and the piano is in function mode.
2. Turn the [ ] knob to access the “Rename Song”
screen.
3. Press the [
] knob to conrm.
The “Rename Song - Media” screen appears.
4. Turn the [ ] knob to select the media that contains
the song you want to rename, and press the [ ]
knob to conrm.
5. Turn the [
] knob to select the song that you want
to rename, and press the [ ] knob to conrm.
6. Rename the song.
Operating the Unit
Select the character which
you want to change
Turn the [
] knob
Change the character
Press the [
] knob (conrm)0
Turn the [ ]knob (change the
character)0
Press the [ ]knob (back)
Insert one character
Press the [s] button
Delete one character
Press the [7] button
7. Turn the [ ] knob to select the ( at the right edge of the
screen, and then press the [ ] knob to conrm.
A conrmation message appears.
8. Turn the [ ] knob to select “Yes,” and press the [ ]
knob to conrm.
The song is renamed.
* Never turn o the power or disconnect the USB ash drive while
the screen indicates “Executing...”
9. Press the [ ] button.
You exit function mode.
23
Recording Your Performance
Copying a Recorded Song
Songs that have been saved in internal memory can be copied to USB
ash drive. Alternatively, songs stored on a USB ash drive can be
copied to internal memory.
1. Press the [ ] button.
The [ ] button is lit, and the piano is in function mode.
2. Turn the [ ] knob to access the “Copy Song” screen,
and press the [ ] knob to conrm.
3. Press the [
] knob to conrm.
The “Copy Song - Media” screen appears.
4. Turn the [ ] knob to select the copy-source and
copy-destination media, and press the [ ] knob to
conrm.
5. Turn the [
] knob to select the song that you want
to copy.
If you decide to cancel, press the [ ] button.
6. Press the [ ] knob.
The copy is executed.
* Never turn o the power or disconnect the USB ash drive while
the screen indicates “Executing...”
7. Press the [ ] button.
You exit function mode.
Advanced Recording Methods
Recording Your Performance One Hand at a Time
By recording your left-hand performance to the Left part and your
right-hand performance to the Right part, you can record each hand
of your performance separately.
Left (or right) part
Getting ready to record
1. Select the tone that you want to play.
2. You can sound the metronome if you like.
Set the metronome’s tempo and time signature. The metronome
setting is stored in the song, and you can use the same settings
during playback.
3. Press the [7] button.
The [t] button lights, the [s] button blinks, and the piano
enters record-standby mode.
If you decide to cancel recording, press the [t] button once again.
4. Press the [ ] button and turn the [ ] knob to
select the part that you don’t want to record; then
press the [ ] knob to make it go dark.
Only the part that you’re recording will blink.
MEMO
If you don’t select a part at this time, your performance is recorded
to the following parts.
Performing with one tone “Right” part
Performing dierent tones
with the left and right
hands (Split Play)
The left-hand tone is the “Left”
part, and the right-hand tone is
the “Right” part
Performing with two tones
layered (Dual Play)
The tone 1 is the “Right” part, and
the tone 2 is the “Accomp” part
Starting/stopping recording
5. Press the [s] button.
After a one-measure count, recording starts, and the [7]
button and [s] button are both lit. The performance is saved
automatically.
MEMO
You can also start recording by playing the keyboard instead of
pressing the [s] button. In this case, a count is not sounded.
6. To stop recording, press the [s] button once
again.
Recording stops.
24
Recording Your Performance
Overdubbing a Recorded Performance
After recording one hand of your performance, you can overdub-
record the performance of the other hand.
You can also overdub-record onto a built-in song.
Left (or right) part
Right (or left) part
Getting ready to record
1. Press the [
] button.
The Song screen appears.
2. Turn the [ ] knob to select the category of the song
that you want to overdub, and press the [ ] knob to
conrm.
3. Turn the [
] knob to select the song that you want
to overdub.
You can select songs within the category.
MEMO
If you’re recording your performance along with a built-in song,
you can x the tempo of the built-in song (p. 21).
4. Press the [7] button.
The [t] button lights, the [s] button blinks, and the piano
enters record-standby mode.
If you decide to cancel recording, press the [t] button once again.
5. Turn the [ ] knob to access the “Overdub” screen.
The song of step 3 is selected.
6. Press the [ ] button and turn the [ ] knob to
select the part that you don’t want to record; then
press the [ ] knob to make it go dark.
Will play during recording (lit)
Will be recorded (blinking)
Neither recorded nor played (unlit)
Starting/stopping recording
7. Press the [s] button.
After a one-measure count, recording starts, and the [7]
button and [s] button are both lit. The performance is saved
automatically.
MEMO
You can also start recording by playing the keyboard instead of
pressing the [s] button. In this case, a count is not sounded.
8. To stop recording, press the [s] button once
again.
Recording stops.
Recording Audio to USB Flash Drive
If you audio-record your performance, you’ll be able to listen to it on
your computer or audio player, use it to create a music CD, or publish
it on the internet.
Getting ready to record
1. Connect your USB ash drive to the USB Memory
port.
* Audio data can’t be saved in the piano’s internal memory.
* Never turn o the power or disconnect a USB ash drive or the
power cord while the USB ash drive is blinking.
2. Select the tone that you want to play.
3. Hold down the [7] button and turn the [
] knob to
select “Audio.”
MEMO
You can also specify this via the Function mode “Recording Mode”
setting (p. 33).
4. Press the [7] button.
The [t] button lights, the [s] button blinks, and the piano
enters record-standby mode.
If you decide to cancel recording, press the [t] button once again.
5. You can sound the metronome if you like.
Starting/stopping recording
6. Press the [s] button.
Recording starts, and the [t] button and [s] button are lit. The
performance is saved automatically.
NOTE
Never turn o the power or disconnect the USB ash drive during
recording.
7. To stop recording, press the [s] button once
again.
Recording stops.
MEMO
5 You can delete a song (p. 22).
5 You can rename a song (p. 22).
25
This piano lets you adjust various elements of the sound, so you can personalize the piano tone to your taste.
This function is called “Piano Designer.”
MEMO
The process of creating your own piano tone can also be
done using touch operations on the dedicated app.
& “Using the Piano with an App” (p. 27)
Adjusting the Sound of the Overall Piano
App “Piano Designer”
Item Value Explanation
Master Tuning
415.3Hz–466.2Hz
(default value:
442.0Hz)
When playing in an ensemble with other instruments, you can adjust the reference pitch of this
piano so that you will harmonize correctly with the other instruments. The reference pitch is
usually expressed as the frequency that is heard when you play the middle A (A4) note. The action
of matching the reference pitch to other instruments is called “tuning.”
Temperament
You can play classical styles such as Baroque using historic temperaments (tuning methods).
Most modern songs are composed for and played in equal temperament, the most common tuning in use today. But at
one time, there were a wide variety of other tuning systems in existence. By playing in the temperament that was in use
when a composition was created, you can experience the sonorities of chords originally intended for that song.
Equal
(default value)
This temperament divides the octave into twelve equal steps. It is the temperament that is most
commonly used on today’s pianos. Every interval has the same slight amount of dissonance.
Just Major
In these temperaments, the primary triads are perfectly consonant. It is unsuited to playing
melodies and cannot be transposed, but is capable of beautiful sonorities. The Just tunings dier
from major and minor keys.
Just Minor
Pythagorean
This tuning, devised by the philosopher Pythagoras, eliminates dissonance in fourths and fths.
Although triadic chords are slightly dissonant, this tuning is suitable for songs that have a simple
melody.
Kirnberger I
As in the Just temperaments, the primary triads are consonant in this tuning. Beautiful sonorities
are obtained when playing songs that are written in keys appropriate for this tuning.
Kirnberger II This is a revision of Kirnberger I that reduces the limitations on the usable keys.
Kirnberger III
This is an improvement of the Meantone and Just tunings that provides a high degree of freedom
of modulation. Performances are possible in all keys. Since the resonance diers depending on
the key, chords played in this temperament resonate in diverse ways when compared to equal
temperament.
Meantone
This temperament slightly narrows the fth relative to Just temperaments. While the Just
temperaments contains two types of whole tone (major whole tone and minor whole tone),
meantone temperament uses only one type of whole tone (mean whole tone). Transposition
within a limited range of keys is possible.
Werckmeister
This temperament consists of eight perfect fths and four narrowed fths. Performance in all keys
is possible. Since dierent keys produce dierent sonorities, chords will resonate in diverse ways
when compared to equal temperament (Werckmeister I (III)).
Arabic This tuning is suitable for the music of Arabia.
Temperament Key
C–B
(default value: C)
When playing with tuning other than equal temperament, you need to specify the temperament
key for tuning the song to be performed (that is, the note that corresponds to C for a major
key or to A for a minor key). If you choose an equal temperament, there’s no need to select a
temperament key.
Hammer Response
O, 1–10
(default value: 1)
Adjusts the time from when you play the key until the piano sound is heard. Higher values
produce a greater delay.
° Creating Your Own Piano Tone (Piano Designer)
1. Press the [ ] button.
The button is lit, and the piano is in function mode.
2. Turn the [ ] knob to access the screen of the item that you want to adjust.
3. Press the [
] knob to conrm.
4. Turn the [
] knob to choose the value of the setting.
5. To exit the setting, press the [
] button to exit function mode.
26
Creating Your Own Piano Tone (Piano Designer)
Editing the Grand Piano Tone
You can adjust various aspects of the grand piano’s tone, including the string and pedal resonances, and the sound of the hammers striking the strings.
* These adjustments are possible only for the grand piano tone category of the [ ] button.
1. Press the [ ] button.
The button is lit, and the piano is in function mode.
2. Turn the [ ] knob to access the “piano designer”
screen.
3. Press the [
] knob to conrm.
4. Turn the [
] knob to access the screen of the item
that you want to edit.
5. Press the [
] knob to conrm, and turn the [ ] knob
to choose the value of the setting.
6. When you are nished editing the piano tone, press
[ ] button.
A conrmation message appears.
If you decide to cancel, press the [ ] button.
7. Turn the [ ] knob to select “Yes,” and press the [ ]
knob to conrm.
The Grand Piano tone settings are saved.
Piano tone settings
Item Value Explanation
Lid 0–6
Adjusts the extent to which the top lid of the grand piano is open.
The sound will become more mellow as you close the top lid of the piano in the screen. The sound will
become brighter as you open the top lid of the piano in the screen.
String Resonance O, 1–10
Adjusts the string resonance of the acoustic piano (the sound of the strings of already-pressed notes
vibrating in sympathy with the notes you play, and the sound of the strings of unplayed notes also
vibrating in sympathy if the damper pedal is pressed). Higher settings produce louder sympathetic
resonance.
Damper
Resonance
O, 1–10
Adjusts the overall resonance of the acoustic piano when its damper pedal is pressed (the sound of
other strings vibrating in sympathy when you press the damper pedal, and the resonance of the entire
instrument).
Higher settings produce louder sympathetic resonance.
Key O
Resonance
O, 1–10
Adjusts the resonance of the subtle sounds that occur when a key of an acoustic piano is released. A
higher value produces a larger tonal change during the decay.
Single Note
Tuning (*)
-50–0–+50
Adjusts the tuning of each individual key. For example, you can adjust the width of stretched tuning,
which tunes the higher register slightly higher and the lower register slightly lower.
Single Note
Volume (*)
-50–0 Adjusts the volume of each key. Lower settings decrease the volume.
Single Note
Character (*)
-5–0–+5
Adjusts the tonal character of each key. Higher settings produce a harder sound, and lower settings
produce a softer tone.
* The result of this eect will dier depending on the pitch range.
Reset Setting Resets the “Piano Tone Edit” settings of the selected tone to their factory settings.
(*) Single Note settings
1. Select the Single Note settings screen, and press the [
] knob to conrm.
2. Play the key for which you want to make adjustments, and turn the [
] knob to change the value.
3. Press the [
] button to exit the screen of that item.

27
° Connecting the Piano and a Mobile Device via Bluetooth
By using the Bluetooth function, you can wirelessly connect the
piano with a mobile device such as your smartphone or tablet,
allowing you to do the following things.
& Together with this section, you should also read the Quick
Operation section’s “Connecting a Mobile Device via Bluetooth”
(p. 15).
Listening to Music Through the Piano’s Speakers
Make settings so that music data saved on a smartphone or other mobile
device can be sent wirelessly to the piano’s speakers.
Pairing
As an example, we explain how to make settings from function mode
using an iOS device.
1. Place the mobile device that you want to connect
near the piano.
2. Press the piano’s [
] button.
The [ ] button is lit, and the piano is in function mode.
3. Turn the [ ] knob to access the “Bluetooth” screen,
and press the [ ] knob to conrm.
The following screen appears.
4. Press the [ ] knob to begin pairing.
If you decide to cancel pairing, press the [ ] button.
MEMO
You can also begin pairing directly by long-pressing the piano’s [
] button.
5. Turn on the Bluetooth function of the mobile
device.
6. Tap “RP701 Audio” or “F701 Audio,” that appears in
the mobile device’s Bluetooth “DEVICES” eld.
The piano and mobile device are paired. When pairing is
completed, a display like the following appears.
Mobile
device
“RP701 Audio” or “F701 Audio” are added in the
“My Devices” eld
Piano
The screen indicates “Completed,” and “AUDIO” is
shown beside the Bluetooth symbol
7. Press the piano’s [ ] button to exit function mode.
Pairing is complete.
Playing back audio
When you play back music data on the mobile device, the sound is
heard from the piano’s speakers.
MEMO
To adjust the volume of the audio, make adjustments on your mobile
device. If this does not produce the desired volume, you can adjust
the piano’s settings.
& “Input/Bluetooth Vol.” (p. 31)
Connecting an already-paired mobile device
If the mobile device has already been paired with the piano, there is
no need to perform pairing again the next time. Simply turn on the
Bluetooth function of the mobile device, and it will reconnect with the
piano.
* If the above step does not establish a connection, tap “RP701
Audio” or “F701 Audio” that are shown in the “DEVICES” eld of the
mobile device.
Using the Piano with an App
Apps that can be used with this piano
App name
Supported
OS
Explanation
Piano Every Day
iOS
Android
This app lets you download
electronic scores,
practice songs as if you
were playing a game,
or keep a record of
your practicing.
Piano Designer
iOS
Android
This app lets you customize the
piano sound to your
taste. It provides
touch-based editing
within the app for the
various elements of the
sound in “Creating Your Own Piano
Tone (Piano Designer)” (p. 25).
* Apps can be downloaded from the App Store or Google Play
(free of charge).
* In addition to the above, you can also use music apps (such as
Garage Band) that are compatible with Bluetooth MIDI.
* The information provided about apps made by Roland was
current when this manual was published. For the latest
information, refer to the Roland website.
Making Settings (Pairing)
You can make settings for using the piano together with an app that’s
installed on your mobile device. As an example, we’ll explain the
procedure for using an iPad with the “Piano Every Day” app.
* In the case of “using the piano with an app,” settings on the piano
are not necessary. Perform operations in the app to pair it with the
piano.
1. Turn on the Bluetooth function of the mobile
device.
NOTE
Even if the “DEVICES” eld shows the name of the device you’re
using (such as “RP701 MIDI”), do not tap it.
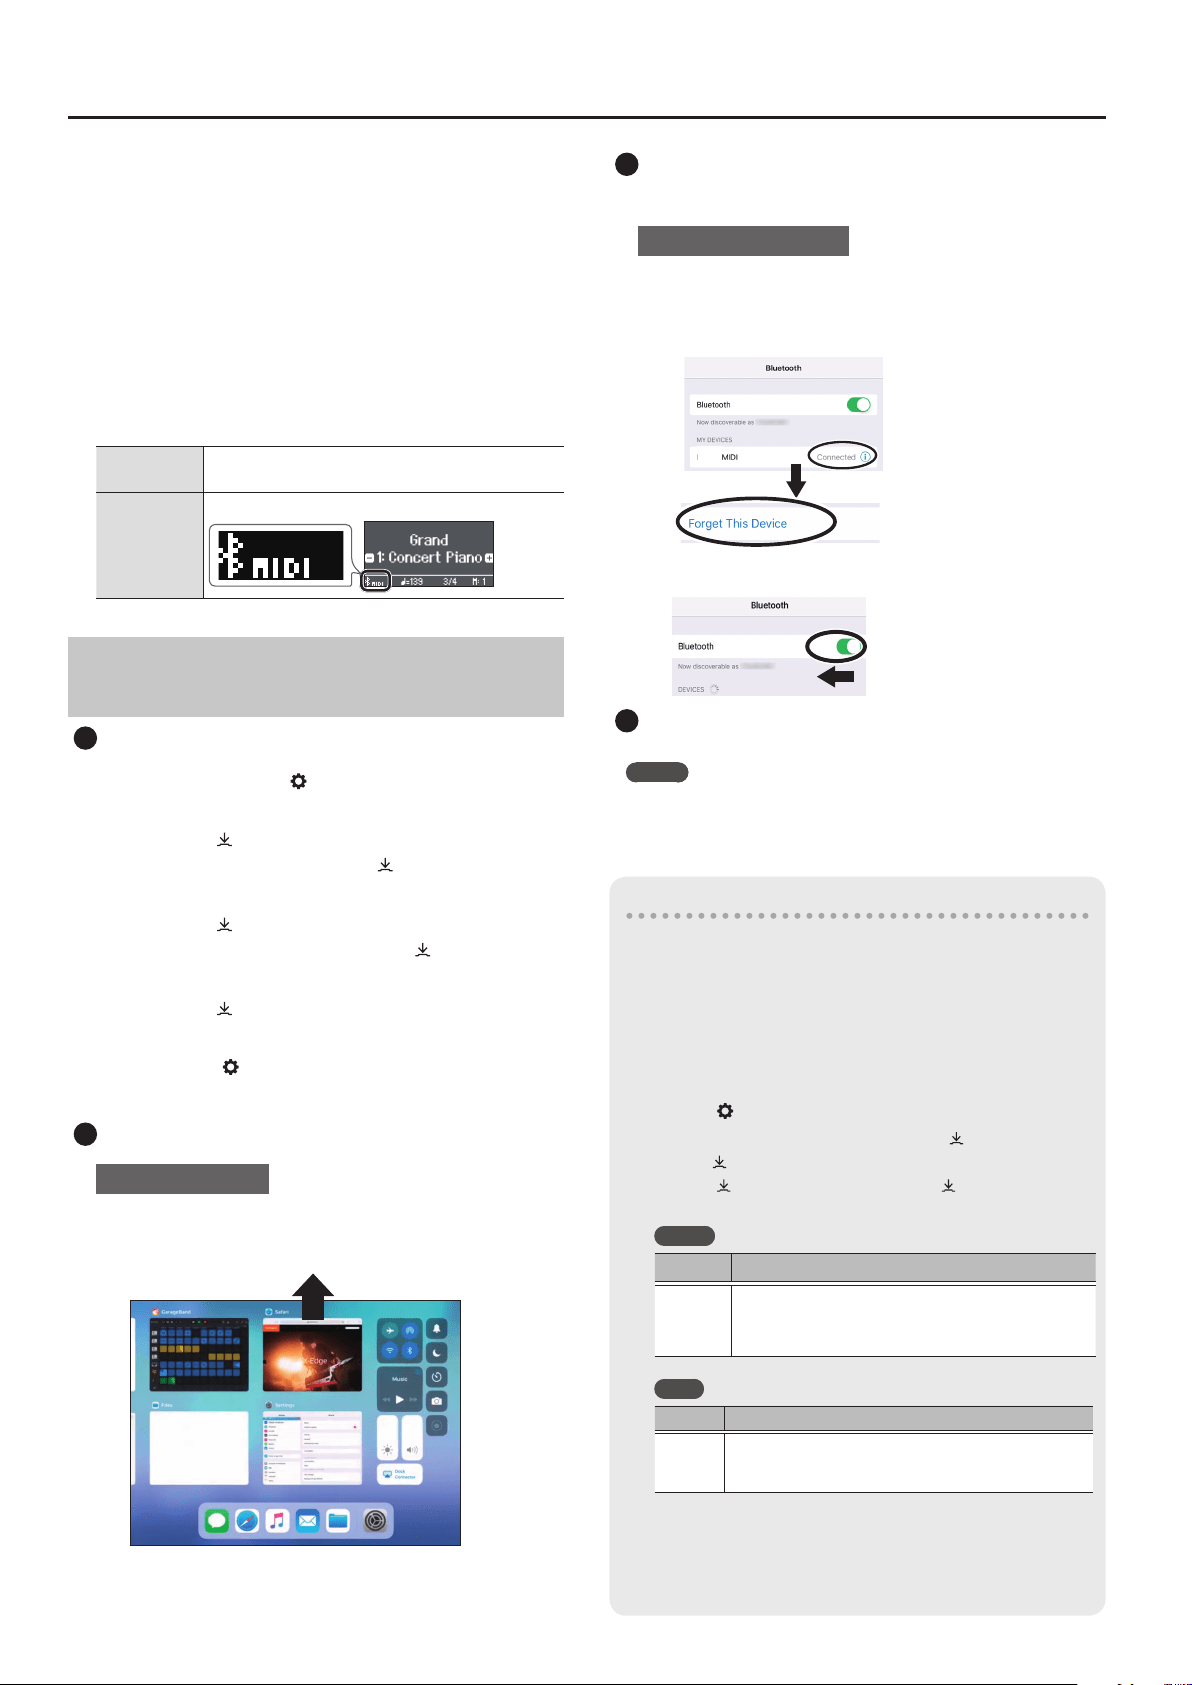
28
Connecting the Piano and a Mobile Device via Bluetooth
2. Start the app that you installed on your mobile
device.
3. Tap the menu located in the lower right of the
app screen, and then in the menu screen tap
“Bluetooth.”
The screen of your mobile device shows “RP701 MIDI” or “F701
MIDI.”
4. Tap either “RP701 MIDI” or “F701 MIDI” depending
on the unit that you’re using.
The piano and mobile device are paired. When pairing is
completed, a display like the following appears.
Mobile
device
“RP701 MIDI” or “F701 MIDI” are added in the “My
Devices” eld
Piano
The “MIDI” is shown beside the Bluetooth symbol
If Pairing Does Not Succeed in “Using the Piano
with an App”
1
Make sure that the piano’s Bluetooth function is “On.”
1. Press the piano’s [
] button.
The button is lit, and the piano is in function mode.
2. Turn the [ ] knob to access the “Bluetooth”
screen, and then press the [ ] knob to conrm.
The Bluetooth setting screen appears.
3. Turn the [ ] knob to access the “Bluetooth on/
o” screen, and then press the [ ] knob to
conrm.
4. Turn the [ ] knob to select “on.”
The piano’s Bluetooth function turns on.
5. Press the [ ] button.
The button goes dark, and you exit function mode.
2
Exit all apps on your mobile device.
Closing the app
1. Double-click the home button, and swipe up on
the app screen.
3
If already paired, cancel pairing, and turn o the
Bluetooth function.
Clearing the pairing
1. In the mobile device’s screen, tap the “i” located
beside “Connected,” and tap “Forget This
Device.”
RP701
2. Turn the Bluetooth switch o.
4
Perform the pairing procedure of p. 27 from step 1.
MEMO
If checking these points does not solve the problem, please refer to
the Roland support website.
https://www.roland.com/support/
If you have more than one piano
When pairing with a mobile device in a situation where there are
multiple pianos, such as in a music classroom, you can assign an
ID to each piano.
Assigning an ID
When you make this setting, an ID number is added to the end
of the device name that’s shown on the mobile device. (such as
“RP701 Audio1” “RP701 MIDI 1”)
1. Press the [ ] button.
2. Access the “Bluetooth” screen, and press the [
] knob to conrm.
3. Turn the [
] knob to select “Bluetooth ID.”
4. Press the [
] knob to conrm, and turn the [ ] knob to change
the number.
RP701
ID Explanation
0–99
Set to “0”: “RP701 Audio” “RP701 MIDI”
(default value)
Set to “1”: “RP701 Audio 1” “RP701 MIDI 1”
F701
Value Explanation
0–99
Set to “0”: “F701 Audio” “F701 MIDI” (default value)
Set to “1”: “F701 Audio 1” “F701 MIDI 1”
* If you are pairing in an environment where there are multiple
pianos, we recommend that you turn on the power of the
mobile device and only those pianos that you want to pair
(turn o the power of other devices).
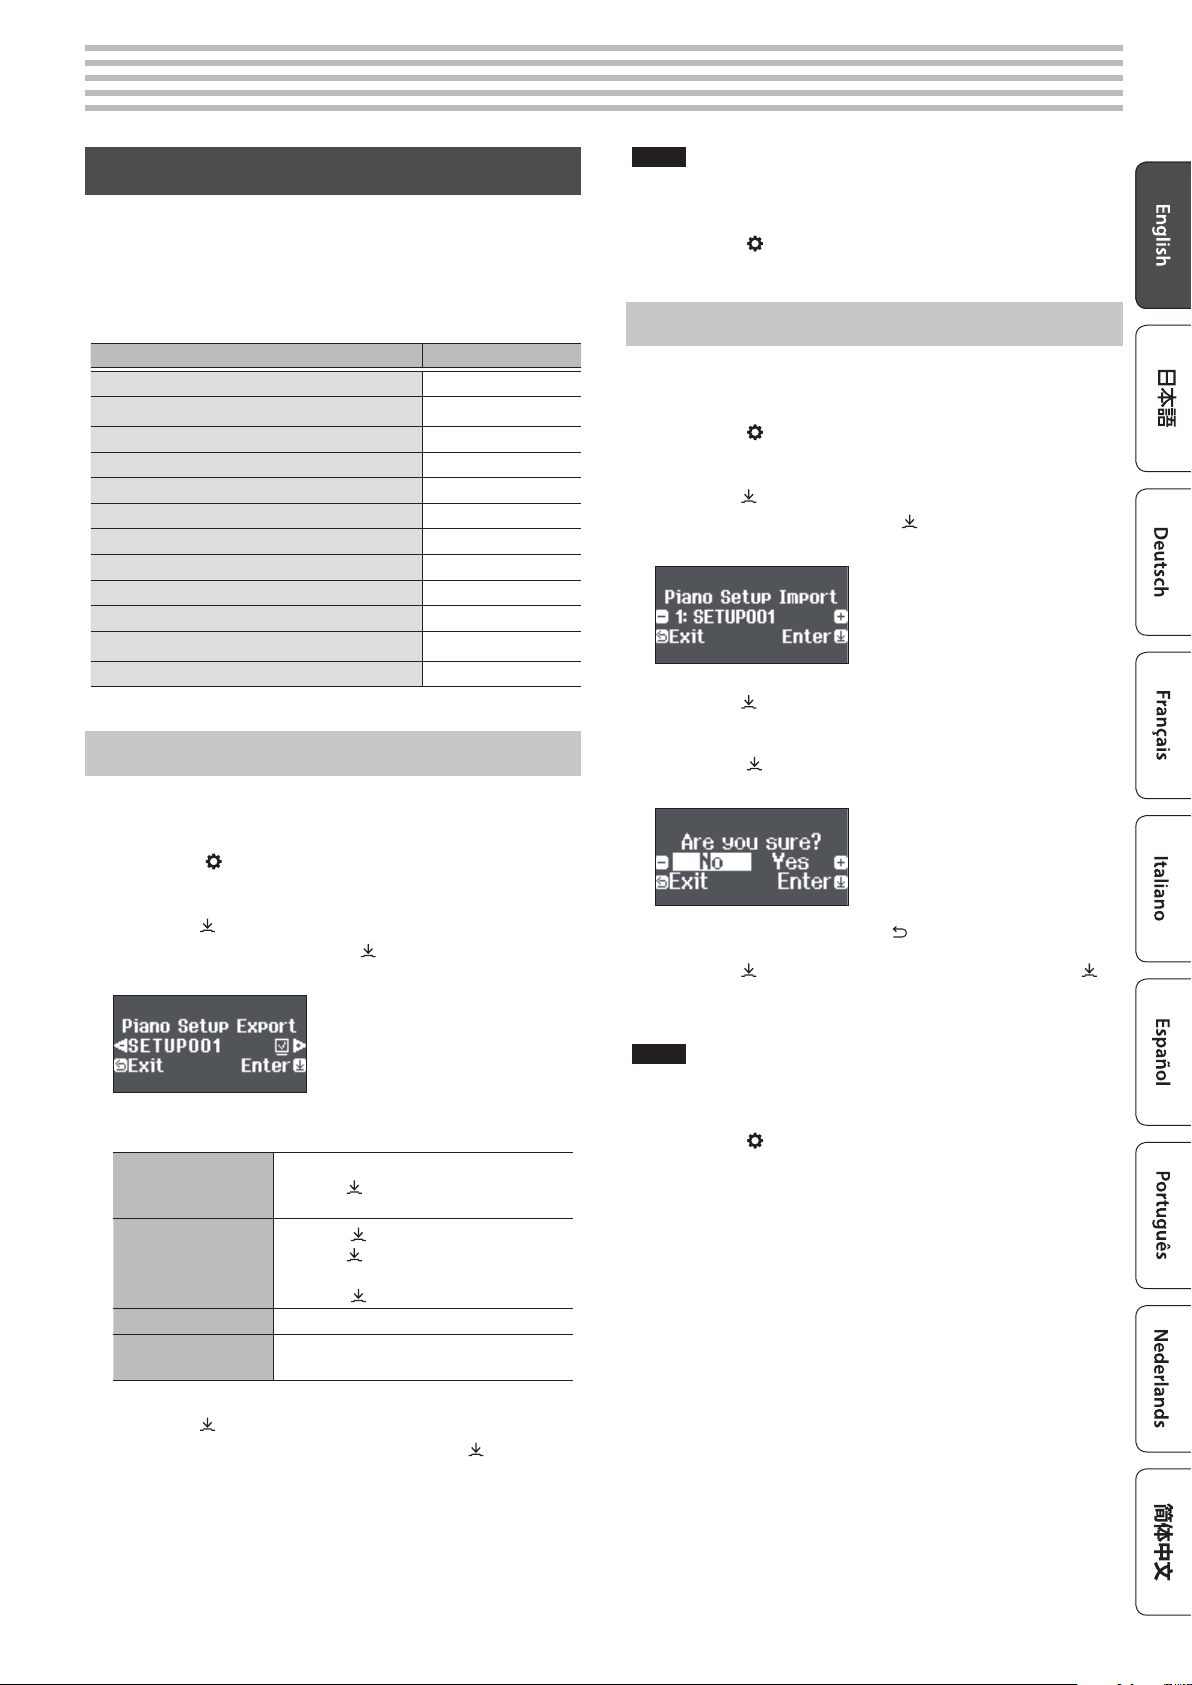
29
° Convenient Functions
Loading/Saving Piano Setups
You can save your own piano settings in a USB ash drive, or load
them into the other digital piano.
* Settings can be loaded only into another piano of the same
model.
Settings that are saved
Setting Page
Speaker volume p. 6, p. 10
Headphone volume p. 7, p. 11
Ambience p. 20
Brilliance p. 20
Headphones 3D Ambience p. 20
Key Touch p. 20
Master Tuning p. 25
Temperament p. 25
Temperament Key p. 25
Hammer Response p. 25
Piano Tone settings p. 26
Volume Limit p. 34
Saving Piano Settings (Piano Setup Export)
1. Connect your USB ash drive to the USB Memory
port.
2. Press the [
] button.
The button is lit, and the piano is in function mode.
3. Turn the [ ] knob to access “Piano Setup Export”
screen, and then press the [ ] knob.
The Piano Setup Export screen appears.
4. Rename the piano settings.
Select the character
which you want to
change
Turn the [
] knob
Change the
character
Press the [
] knob (conrm)0
Turn the [ ]knob (change the
character)0
Press the [ ]knob (back)
Insert one character
Press the [s] button
Delete one
character
Press the [7] button
5. Turn the [ ] knob to select the ( at the right
edge of the screen, and then press the [ ] knob to
conrm.
The settings are saved.
NOTE
Never turn o the power or remove the USB ash drive while the
screen indicates “Executing...”
6. Press the [ ] button to exit function mode.
The button goes dark.
Loading Piano Settings (Piano Setup Import)
1. Connect your USB ash drive to the USB Memory
port.
2. Press the [
] button.
The button is lit, and the piano is in function mode.
3. Turn the [ ] knob to access “Piano Setup Import”
screen, and then press the [ ] knob.
The Piano Setup Import screen appears.
4. Turn the [ ] knob to select the piano settings that
you want to load.
5. Press the [
] knob to conrm.
A conrmation message appears.
If you decide to cancel, press the [ ] button.
6. Turn the [ ] knob to select “Yes,” and press the [ ]
knob to conrm.
The settings are loaded.
NOTE
Never turn o the power or remove the USB ash drive while the
screen indicates “Executing...”
7. Press the [ ] button to exit function mode.
The button goes dark.
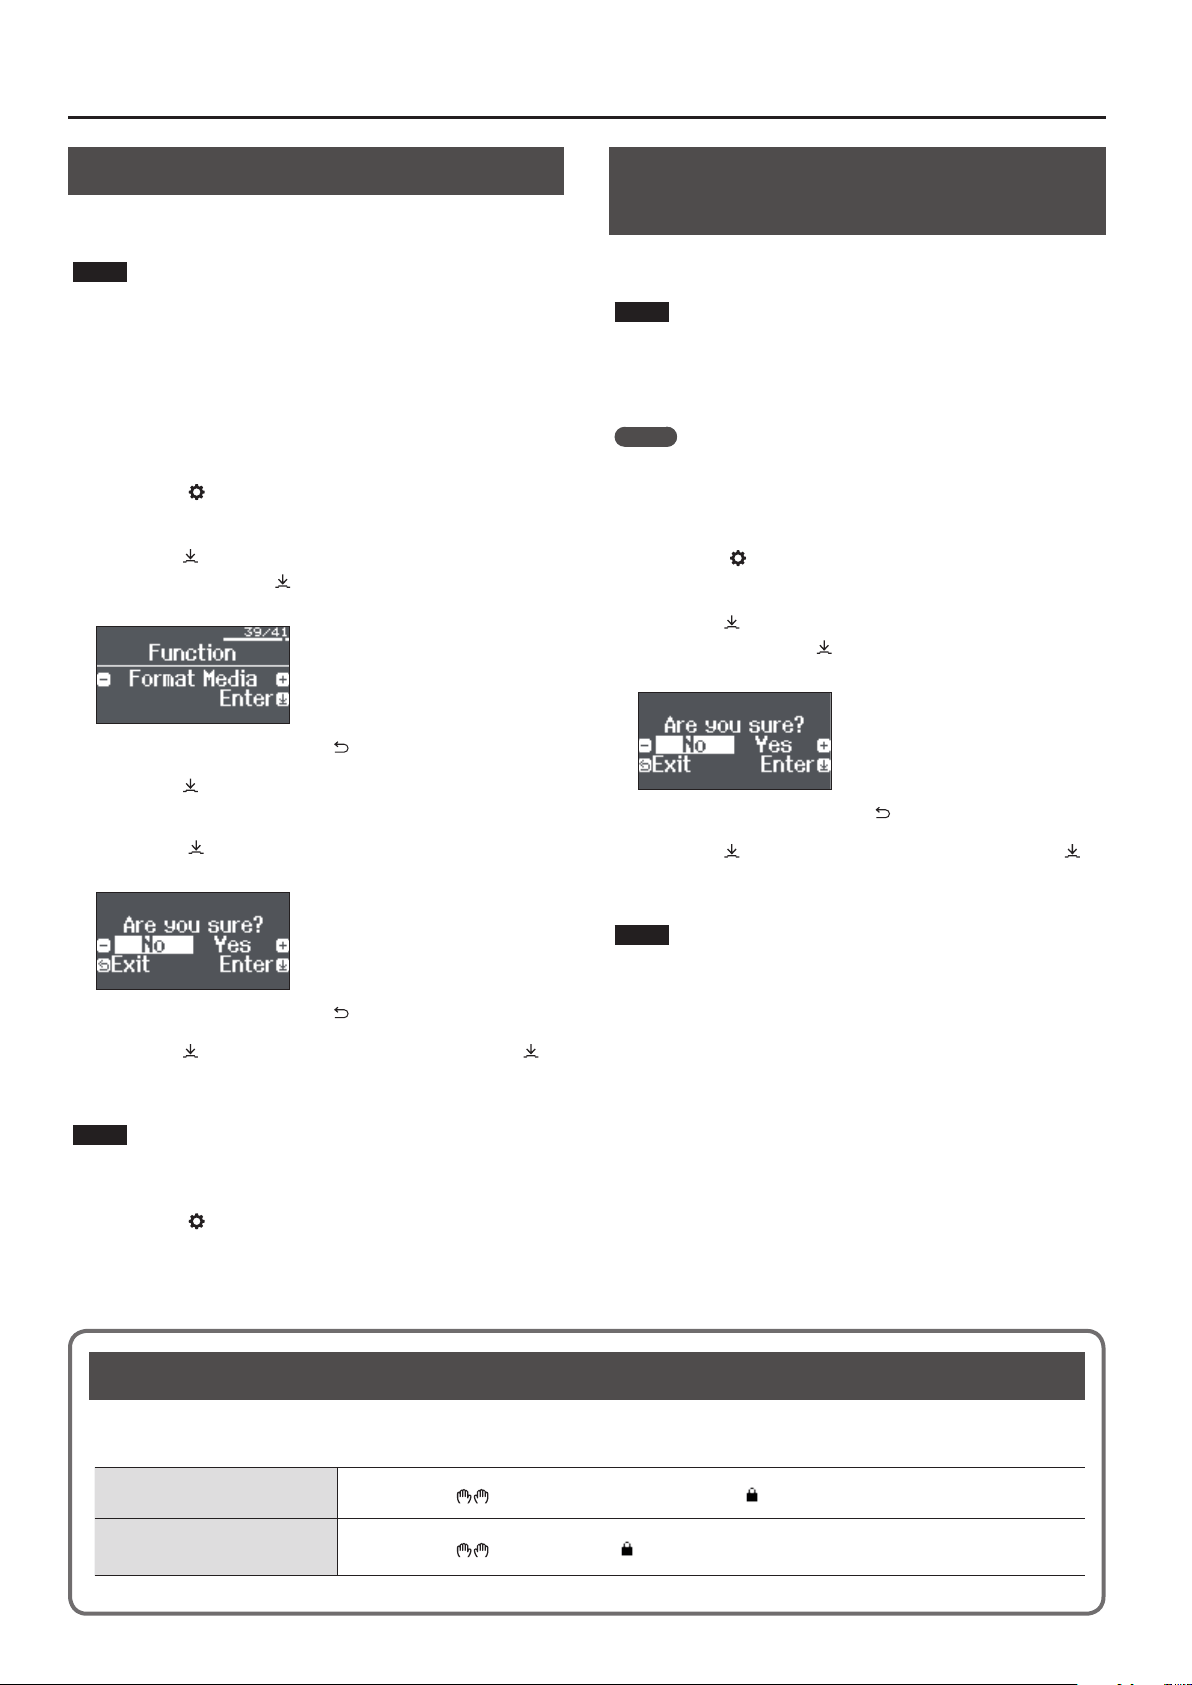
30
Convenient Functions
Initializing the Memory (Format Media)
Here’s how to erase all of the les that you saved in internal memory
or on a USB ash drive (commercially available).
NOTE
5 When you initialize, all registrations or les that you saved in
internal memory or on a USB ash drive are lost.
5 If you want settings other than the memory settings to be
returned to their factory-set state, execute a Factory Reset
(p. 30).
1. If you want to initialize a USB ash drive, connect
the USB ash drive to the USB Memory port.
2. Press the [
] button.
The button is lit, and the piano is in function mode.
3. Turn the [ ] knob to access “Format Media” screen,
and then press the [ ] knob.
The Format Media screen appears.
If you decide to cancel, press the [ ] button.
4. Turn the [ ] knob to select the media (Internal
Memory or USB Memory) that you want to format.
5. Press the [
] knob to conrm.
A conrmation message appears.
If you decide to cancel, press the [ ] button.
6. Turn the [ ] knob to select “Yes,” and press the [ ]
knob to conrm.
The memory is formatted.
NOTE
Never turn o the power or remove the USB ash drive while the
screen indicates “Executing...”
7. Press the [ ] button to exit function mode.
The button goes dark.
Restoring the Factory Settings
(Factory Reset)
Here’s how to restore all registrations and internally saved settings to
the factory-set condition. This function is called “Factory Reset.”
NOTE
Factory Reset erases all settings that you have stored, and returns
them to the factory-set condition. For details on the settings that
are reset, refer to “Settings Saved Even If the Power Is Turned O” (p.
35).
MEMO
Executing this function does not erase the les in internal memory
or on a USB ash drive (commercially available). If you want to erase
all les from internal memory or from a USB ash drive, refer to
(“Initializing the Memory (Format Media)” (p. 30)).
1. Press the [ ] button.
The button is lit, and the piano is in function mode.
2. Turn the [ ] knob to access “Factory Reset” screen,
and then press the [ ] knob.
A conrmation message appears.
If you decide to cancel, press the [ ] button.
3. Turn the [ ] knob to select “Yes,” and press the [ ]
knob to conrm.
The memory is reset to its factory values.
NOTE
Never turn o the power or remove the USB ash drive while the
screen indicates “Executing...”
4. Turn the power o, then on again.
Disabling the Buttons (Panel Lock)
To prevent settings from being accidentally changed while you perform, you can disable all buttons other than the [L] button and the
[Volume] buttons.
Lock the panel
Hold down the [
] button until the screen shows the “ ” symbol.
Unlock the panel
Hold down the [
] button until the “ ” symbol disappears.
31
° Making Various Settings (Function Mode)
Basic Settings in Function Mode
1. Press the [ ] button.
The button is lit, and the piano is in function mode.
2. Turn the [ ] knob to access the screen of the item you want to set.
3. Press the [
] knob to conrm.
* Depending on the item you select, there might be another screen for selecting additional items.
4. Turn the [ ] knob to change the value.
5. Press the [
] button to exit function mode.
The button goes dark.
Indication Value Explanation
Bluetooth-related settings
Bluetooth
Bluetooth
On/O
Turning the Bluetooth Function On/O (Bluetooth On/O)
If the Bluetooth function is on, you’ll be able to wirelessly connect the piano and your mobile device, so that
music played back from the mobile device can be heard through the piano’s speakers, or so that you can use the
piano with an app. (p. 27)
On, O
Bluetooth
Pairing
Perform the pairing to wirelessly connect the piano and mobile device for “Playing Music Through the Piano’s
Speakers.” (p. 27)
Input/
Bluetooth Vol.
Adjusting the Volume of Bluetooth Audio (Input/Bluetooth Vol.)
This is the volume setting for playing music from your mobile device through the piano’s speakers. (p. 16)
0–10
Bluetooth ID
If you are using the Bluetooth function in a location where there are multiple pianos, you can assign a separate ID
to each piano. (p. 28)
0–99
Settings related to the sound and keyboard
Key Touch & “Changing the keyboard touch sensitivity” (p. 20)
Ambience & “Adjusting the sound’s ambiance and brightness” (p. 20)
Headphones
3D Ambience
& “Adjusting the sound’s ambiance and brightness” (p. 20)
Brilliance & “Adjusting the sound’s ambiance and brightness” (p. 20)
Master
Tuning
& “Creating your own piano tone (Piano Designer)” (p. 25)
Temperament
Temperament
Key
Hammer
Response
Piano
Designer
32
Convenient Functions
Indication Value Explanation
Keyboard
Mode
Whole This is the same keyboard setting as a conventional acoustic piano.
Split
Playing Dierent Tones with the Left and Right Hand (p. 19)
Right Tone Selects the right-hand tone.
Left Tone Selects the left-hand tone.
Point Selects the location (key) at which the left and right tones are divided.
Balance Selects the volume balance between the left-hand tone and right-hand tone.
Left Shift Raises or lowers the pitch of the left-hand tone in one-octave steps.
Right Shift Raises or lowers the pitch of the right-hand tone in one-octave steps.
Dual
Playing Two Tones Layered on Each Key (p. 19)
Tone 1 Selects tone 1.
Tone 2 Selects tone 2.
Balance Selects the volume balance of the two tones.
Tone 1 Shift Raises or lowers the pitch of tone 1 in one-octave steps.
Tone 2 Shift Raises or lowers the pitch of tone 2 in one-octave steps.
Twin Piano
Dividing the Keyboard for Two People (Twin Piano)
You can divide the keyboard into left and right areas so that two people can play the same range of pitches. One person can
play a model performance, and the other person can practice along with that model performance. You can also change the way
(Mode) in which notes are sounded in Twin Piano.
O The same keyboard setting as a conventional acoustic piano.
On Mode
To select the mode for Twin Piano, select “On” in the Twin Piano screen of function mode,
and then perform the following procedure.
(1) Press the [
] button twice to access the “Twin Piano” screen
(2) Press the [ ] knob to make “-” “+” appear at the left and right of “Tone” in the screen
(3) Turn the [ ] knob toward the right to access the “Mode” screen
(4) Press the [ ] knob to conrm, and turn the [ ] knob to select either “Pair” or “Individual”
Pair
Notes played in the right area are louder in the right speaker; notes played
in the left area are louder in the left speaker.
Individual
Notes played in the right area are heard only from the right speaker; notes
played in the left area are heard only from the left speaker.
Kbd
Transpose
Raises or lowers the pitch range of the keyboard in semitone steps.
When you are accompanying a singer or performing as a vocalist-instrumentalist, this setting lets you match the vocal range of
the singer without having to change your keyboard ngering.
-6–0–+5
Settings related to song playback
Song
Transpose
Transposing the Pitch of the Song Playback (Song Transpose)
You can transpose the song playback in semitone steps. (p. 21)
-12–0–+12
Song Volume
SMF
Adjusting the Song (SMF) Volume (Song Volume SMF)
This setting adjusts the volume of your keyboard performance while a song plays back. This adjusts the volume of the song
(SMF data) that is played back.
0–10
Song Volume
Audio
Adjusting the Song (Audio) Volume (Song Volume Audio)
This setting adjusts the volume of your keyboard performance while a song plays back. This adjusts the volume of the song
(audio data) that is played back.
0–10
33
Convenient Functions
Indication Value Explanation
Input/
Bluetooth
Vol.
Adjusting the Volume of an Audio Playback Device (Input/Bluetooth Vol.)
This setting adjusts the volume of your keyboard performance while a song plays back. You can adjust the volume of an audio
playback device that’s connected to the Input jacks.
0–10
USB Audio
Input Vol.
Adjusting the Volume from the Computer (USB Audio Input Volume)
This setting adjusts the volume from the computer when you’re playing back audio from a computer connected to the USB Computer port.
0–10
SMF Play
Mode
Setting the Song (SMF) Playback Mode (SMF Play Mode)
This setting species the tone that you play on the keyboard while a song is playing back. Normally you will use the “Auto-Select”
setting. This determines whether the setting that is most suitable for the internal song or most suitable for external data is
selected when you play back a song whose le format is SMF.
Changing this setting does not aect the sound character of tone that you play from the keyboard.
* You can also switch the SMF Play Mode by holding down the [s] button and turning the [
] knob.
Auto-Select
Automatically switches the SMF Play Mode to either “Internal” or “External” depending on the song that is being played.
Internal
When you play back a song, the tone that you play from the keyboard changes to the tone that is saved in the
song. This is recommended when you play back an internal song or a song that you recorded on this piano.
External
The tone that you play from the keyboard does not change when you play back a song. This is recommended when you play
back external data such as commercially available music data.
* With this setting, some eects might not apply to the song playback sound.
For this reason, the character of the sound during playback might be dierent than the sound while you were
recording.
Recording-related settings
Recording
Mode
This piano lets you record in two dierent modes. You can choose whether to record as SMF or as audio.
* You can also switch recording modes by holding down the [t] button and turning the [
] knob.
SMF
Your performance is recorded to “Internal Memory” and played back on the piano. You can overdub your left-
hand performance onto your right-hand performance, and then listen to the playback of both hands together.
(p. 22)
Audio
Your performance is recorded to a USB ash drive as audio data. You can listen to your recorded piano
performance on a computer or audio player, use it to create a CD, or publish it on the internet. (p. 24)
Delete Song Deletes a song that was saved in the piano’s internal memory or on a USB ash drive. (p. 22)
Rename Song
Renames a saved song. (p. 22)
Copy Song
Songs that have been saved in internal memory can be copied to USB ash drive. Alternatively, songs stored on a USB ash drive
can be copied to internal memory. (p. 23)
Count-in
Measure
You can change the number of measures that are sounded as a count before song playback or recording begins.
1 Measure, 2 Measures
Pedal-related settings
Damper
Pedal Part
Changing How the Pedal Eects Are Applied (Damper Pedal Part)
When you press the right pedal while using Dual Play or Split Play (p. 7, p. 11) the pedal eect is applied to both tones, but
you can choose the tone to which the eect is applied.
Right & Left All enabled
Right Applied only to the Tone 1 (in dual mode)/Right-hand Tone (in split mode)
Left Applied only to the Tone 2 (in dual mode)/Left-hand Tone (in split mode)
Center Pedal
Changing How the Pedals Work (Center Pedal)
When you turn on the power, the center pedal functions as the sostenuto pedal (p. 7, p. 11). You can change the function of the pedal to a
variety of other operations. By assigning a function to the pedal, you can instantly change a setting by pressing the pedal while you perform.
Sostenuto The pedal functions as a sostenuto pedal.
Play/Stop
The pedal has the same function as the [s] button.
Layer
Pressing the pedal will layer on Tone 2, used for Dual Play.
* This is available only when using Dual Play.
34
Convenient Functions
Indication Value Explanation
Left Pedal
Changing the Eect of the Pedal (Left Pedal)
When you turn on the power, the left pedal functions as a soft pedal
(p. 7, p. 11)
. You can change the function of the pedal to
a variety of other operations. By assigning a function to the pedal, you can instantly change a setting by pressing the pedal while
you perform.
Sostenuto The pedal functions as a sostenuto pedal.
Play/Stop
The pedal has the same function as the [s] button.
Layer
Pressing the pedal will layer on Tone 2, used for Dual Play.
* This is available only when using Dual Play.
MIDI-related settings
Local Control
Preventing Doubled Notes When Connected to a Sequencer (Local Control)
When you have a MIDI sequencer connected via USB, set this parameter to Local O.
Since most sequencers have their Thru function turned on, notes you play on the keyboard may be sounded in duplicate, or
get dropped. To prevent this, you can enable the “Local O” setting so that the keyboard and internal sound generator will be
disconnected.
O
Local Control is o.
The keyboard is disconnected from the internal sound generator. Playing the keyboard will not produce sound.
On Local Control is on. The keyboard is connected to the internal sound generator.
MIDI
Transmit Ch.
MIDI Transmit Channel Settings (MIDI Transmit Ch.)
This setting species the MIDI channel on which the unit will transmit.
This unit will receive all sixteen channels (1–16).
O, 1–16
Overall operation settings
Language
Changing the Language Displayed in the Screen (Language)
You can change the language that is displayed in the screen.
English, Japanese, Chinese
Display
Contrast
Adjusting the Brightness of the Display (Display Contrast)
You can adjust the brightness of the display.
1–10
Screen Saver
Specifying the Time Until the Operating Panel Dims (Screen Saver)
When no operation has been performed for a specied length of time, the display will go blank and the operating panel button
LEDs will go dark. The display reappears when you perform an operation.
You can specify the time until the panel goes dark.
O, 30 sec., 1 min. (default value), 5 min., 10 min.
Volume Limit
Specifying a Maximum Volume (Volume Limit)
You can specify a maximum volume value. This lets you prevent loud sound from being produced unintentionally.
MEMO
You can also set the volume limit by turning the [ ] knob while holding down the [ ] button and the [ ] button.
20, 40, 60, 80, 100
Speaker Auto
Mute
Outputting Sound Both from Headphones and Internal Speakers (Speaker Auto Mute)
With the factory settings, sound is no longer output from the internal speaker when you connect headphones to the PHONES
jack. However, you can change this setting so that sound is output both from the headphones and from the internal speakers.
* If this is “O,” the sound that is output from the headphones will have a dierent character.
O Sound is heard both from headphones and the internal speakers.
On Sound is heard only from the headphones (default value).
35
Convenient Functions
Indication Value Explanation
Auto O
Making the Power Automatically Turn o After a Time (Auto O)
With the factory settings, the unit’s power will automatically be switched o 30 minutes after you stop playing or operating the
unit. If you don’t want the power to turn o automatically, change the “Auto O” setting to “O” as follows.
O, 10, 30, 240 (min)
Auto
Memory
Backup
Saving Settings Automatically (Auto Memory Backup)
You can make settings be saved automatically so that the settings will not change when you turn the power o and on again.
O Settings are not saved.
On
The settings are saved automatically. This is convenient, since you don’t need to make the settings each time you
turn on the power.
For details on the settings that are saved, refer to “Settings that are saved by “Auto Memory Backup”” (p. 35).
Piano Setup
Export
You can save your own piano settings in a USB ash drive, or load them into the other digital piano. (p. 29)
* Settings can be loaded only into another piano of the same model.
Piano Setup
Import
Format
Media
All les saved in the piano’s internal memory or on a USB ash drive (commercially available) can be deleted. (p. 30)
Factory Reset Settings saved in the piano can be returned to their factory-set state. (p. 30)
Version
Displays the version of the unit’s system program.
If a new system program becomes available, it can be used to update your piano. For details, refer to the following URL.
http://www.roland.com/support/ Enter the model name 0 refer to “Updater and Driver”
Settings Saved Even If the Power Is Turned O
This piano remembers the “settings that are saved automatically” even when the power is turned o and then on again. If you set the “Auto
Memory Backup” setting, the settings saved by “auto memory backup” are also saved. Other settings return to their default values when you
turn the power o and on again.
Settings that are saved automatically
This piano automatically saves the following settings. These
settings are remembered even if the power is turned o.
Setting Page
Speaker volume p. 6, p. 10
Headphone volume p. 7, p. 11
Bluetooth On/O p. 31
Bluetooth ID p. 31
Input/Bluetooth Vol. p. 31
Auto O p. 35
Settings that are saved by “Auto Memory Backup”
If the “Auto Memory Backup” function (p. 35) is on, the following
settings are saved.
Setting Page
Ambience p. 20
Brilliance p. 20
Headphones 3D Ambience p. 20
Setting Page
Key Touch p. 20
Master Tuning p. 25
Temperament p. 25
Temperament Key p. 25
Hammer Response p. 25
Balance (Split, Dual) p. 19
Metronome (volume, tone, downbeat) p. 20
Twin Piano Mode p. 32
USB Audio Input Vol. p. 33
SMF Play Mode p. 33
Count-in Measure p. 33
Damper Pedal Part p. 33
MIDI Transmit Ch. p. 34
Language p. 34
Display Contrast p. 34
Screen Saver p. 34
Volume Limit p. 34
Speaker Auto Mute p. 34
36
° Troubleshooting
Problem Items to check Cause/Action Page
Problems with the piano’s sound
No sound
Is the volume turned down? Raise the volume.
p. 6,
p. 10
Could headphones or an adaptor plug be
inserted in the Phones jack?
If headphones or an adaptor plug are inserted in the
headphones jack, sound is not output from the speakers.
–
If you want sound to be produced from headphones or external speakers, is the device connected correctly?
p. 7,
p. 11
Could the “Local Control” setting be turned
“O”?
In function mode, turn the “Local Control” setting “On.”
p. 34
Pitch of the keyboard or
song is incorrect
Could you have made transpose settings?
In function mode, use the “Keyboard Transpose” and “Song
Transpose” settings to defeat transposition.
p. 32
Is the Master Tune setting appropriate?
When shipped from the factory, the reference pitch is set to
“442.0 Hz.” Check the “Master Tuning” setting of the Piano
Designer function.
p. 25
Is the setting for the Temperament correct?
When shipped from the factory, the tuning is set to “Equal
temperament.” Check the “Temperament” setting of the Piano
Designer function.
p. 25
Is the Single Note Tuning setting
appropriate?
Check the Piano Designer function’s “Single Note settings.”
p. 26
Sounds are heard twice
(doubled) when the
keyboard is played
Could you have specied “Dual Play” which
layers two tones?
In function mode, select “Kbd Mode” and change “Dual” to
“Whole.”
p. 32
Could the piano be connected to an
external sequencer?
If you don’t want the piano to be played from another sound
module, set your music production software’s “soft thru” setting
t o “ O .”
–
If the function mode “Local Control” setting is “On,” turn the
“Local Control” setting “O.”
p. 34
Reverberation remains
even if you defeat the
Ambience eect
This is because an acoustic piano’s sense of depth and resonance is being faithfully simulated, and is not a
malfunction. Even if you turn o the acoustic ambience eects, the distinctive resonance of an acoustic piano
will remain.
–
The sound of the higher
notes suddenly changes
from a certain key
This simulates the characteristics of an acoustic piano, and is not a malfunction.
The sound will change where there is a change in the number of strings per key or a transition from wound
strings to unwound strings.
–
When you press a key,
the sound of a note
you didn’t press is also
faintly heard
In some cases, a note you play might
cause a dierent note (whose frequency
is an integer multiple of the rst note)
to resonate, producing the sensation
that the sound has changed; this is not a
malfunction.
Lower the Piano Designer’s “String Resonance” value, or turn it
o.
p. 26
High-pitched ringing is
heard
If you don’t hear it through headphones:
It may be that the piano has malfunctioned. Please contact your dealer or a Roland customer service center.
If you also hear it through headphones:
To decrease the metallic ringing, adjust the following settings.
•Ambience (p. 20)
•Piano Designer “String Resonance” (p. 26)
–
Low notes sound
wrong, or are buzzy
Could the volume be set to maximum?
If the volume is at the maximum, the sound might be distorted
depending on how you play the piano. If this occurs, lower the
volume.
p. 6,
p. 10
If you also hear it through headphones:
It may be that the piano has malfunctioned. Please contact your dealer or a Roland customer service center.
If you don’t hear it through headphones:
Objects near the piano are resonating because of the high volume of sound coming from the speakers. You
can take the following measures to minimize resonances.
5Keep the volume down.
5Locate the speakers 10–15 cm (4–6 inch) away from walls or other surfaces.
5Move away from the objects that are resonating.
–
The sound is heard
dierently depending
on the tone settings
When using “Dual play” which layers two tones, or “Split play” which produces dierent tones in the left-hand
and right-hand, the sound might be heard dierently depending on the specic combination. For some
combinations, the eect is not applied to the left-hand tone or to tone 2, but this is not a malfunction.
–
37
Troubleshooting
Problem Items to check Cause/Action Page
Problems with the pedals
Unusual sound is heard
when you press the
pedal
Could the adjuster located under the pedal
not be in contact with the oor?
(RP701)
The adjuster may have loosened as you used the pedal. Lower the
adjuster so that it contacts the oor. If you are using the piano on
carpet, lower the adjuster so that it presses strongly against the oor.
p. 7
Pedal does not work, or
is “stuck”
Is the pedal connected correctly? Check the pedal jack located on the bottom of the piano.
p. 18
Could you have disconnected or connected
the pedal cord while the power was on?
If you disconnect the pedal cord while the piano is powered-
on, the pedal eect might remain applied. Connect or
disconnect the pedal cord while the piano is powered o.
–
Could you have changed the way in which
the pedal eect is applied?
If the right pedal part is set to “Right,” it applies only to the right-hand
tone; if set to “Left,” it applies only to the left-hand tone.
p. 33
Could Twin Piano be turned on?
If Twin Piano is on, the right pedal will aect only the right-
hand keyboard zone and the left pedal will aect only the
left-hand keyboard zone.
–
Could you have changed the function of the
pedal?
If the function of the sostenuto pedal (center pedal) or the soft
pedal (left pedal) have been changed, they will not operate as
the sostenuto pedal or the soft pedal. Restore the settings of
the “Center Pedal Function” and “Left Pedal Function.”
p. 33,
p. 34
Problems with song playback
Only the sound of a
particular instrument in
a song does not play
When you press the [
] button, are there
parts (Right, Left, Accomp) that are unlit in
the screen?
Parts that are not shown in the screen do not sound. Select an
unlit part to highlight it so that it produces sound.
p. 13
Song volume is
inaudible or too low
Could the Song volume be set too low?
Depending on the data format of the song, raise the “Song
Volume SMF” or “Song Volume AUDIO” value.
p. 32
Changing the “Song
Volume” does not
change the volume
Could the SMF Play Mode be set to
“Internal”?
Set the SMF Play Mode to “External.”
p. 33
The selected sound
changes when you play
back a song
Could the SMF Play Mode be set to
“Internal”?
Set the SMF Play Mode to “External.”
p. 33
Can’t play back a song
saved in USB ash drive
Is the le extension “.WAV” or “.MP3” or
“.MID”?
This piano can play back three types of le: WAVE format or
MP3 format audio les, and MIDI les.
–
Names of songs saved
on the USB ash drive do
not appear in the screen
Does the le have a “.MID” extension? Could
the song name information in the le be
blank or consist only of spaces?
Song names can be shown in the screen only for les that have
a “.MID” extension. If the song name information in the le is
blank or consists only of spaces, the song name is not shown in
the piano screen.
–
Problems with recording
Can’t record
When you press the [Part] button, is the part
to be recorded blinking in the screen?
Select the part in the screen that you want to record, so that it
blinks.
p. 23
Can’t record audio
Is a USB ash drive connected to the USB
Memory port?
Audio recording cannot be performed unless a USB ash drive
is connected.
–
Volume diers between
recording and playback
Could the Song Volume be set too low?
Depending on the data format of the song, raise the “Song
Volume SMF” or “Song Volume AUDIO” value.
p. 32
The tonal character
of the piano changes
when you record
Could you be recording with a tone that you
created in Piano Designer?
Some of the Piano Designer settings might not be reproduced
when you play back a song.
–
Could you be playing back a song that you
audio-recorded to an USB ash drive?
If you want to record with the same tonal character as when
you play the keyboard, record your performance as SMF.
–
Other problems
Even though you’re using
headphones to mute the sound,
a thumping sound is heard
when you play the keyboard
The keyboard of this piano is designed to simulate the mechanism of an acoustic piano. Even on an acoustic
piano, a thumping sound is actually being produced when you press a key. Such sounds do not indicate a
malfunction.
–
Power turns o on its
own
Could you have made settings so that the
power automatically turns o when the
piano has not been used for a time?
If you don’t need the power to turn o automatically, turn the
Auto O setting “O.”
p. 35
Power does not turn on Is the AC adaptor connected correctly?
p. 6,
p. 10
The buttons of the
operating panel do not
work
Could you have enabled the “Panel Lock”
setting to prevent inadvertent operation?
Disengage the “Panel Lock” setting.
p. 30
The volume level of the
unit connected to Input
jack is too low
Could the volume of the connected device be turned down?
–
Could “Input/Bluetooth Vol.” be lowered?
p. 33
38
° Error Messages
Indication Meaning
Error 2
An error occurred during writing. The USB ash drive may be corrupted.
Insert other USB ash drive and try again. Alternatively, you can initialize the USB ash drive (p. 30).
The internal memory might be damaged. Format the internal memory (p. 30).
Error 3 The same le already exists.
Error 10
No USB ash drive is inserted. Insert the USB ash drive and try again.
The internal memory might be damaged. Format the internal memory (p. 30).
Error 11
There is not sucient free memory in the save destination.
Either insert other USB ash drive or delete unneeded les and try again.
Error 14
An error occurred during reading. The USB ash drive may be corrupted.
Insert other USB ash drive and try again. Alternatively, you can initialize the USB ash drive (p. 30).
The internal memory might be damaged. Format the internal memory (p. 30).
Error 15 The le is unreadable. The data format is not compatible with the unit.
Error 18
This audio format is not supported.
Use an WAV format (44.1 kHz, 16-bit linear) or MP3 format audio le.
Error 30 Internal memory capacity of the unit is full.
Error 40
The unit cannot deal with the excessive MIDI data sent from the external MIDI device.
Reduce the amount of MIDI data sent to the unit.
Error 43 A MIDI transmission error has occurred. Check the connected MIDI device.
Error 51
There may be a problem with the system. Repeat the procedure from the beginning. If it is not solved after you have tried several
times, contact the Roland service center.
Error 65
The USB Memory port was subjected to excessive current. Make sure that there is no problem with the USB ash drive, then turn
the power o, then on again.
39
Main Specications
RP701 F701
Sound
generator
Piano Sound: SuperNATURAL Piano
Keyboard PHA-4 Standard Keyboard: with Escapement and Ivory Feel (88 keys)
Bluetooth
Audio: Bluetooth Ver. 3.0 (Supports SCMS-T content protection)
MIDI: Bluetooth Ver. 4.0
Power Supply AC Adaptor
Power
consumption
20 W (When using the included AC adaptor) 20 W (When using the included AC adaptor)
Approximate power consumption when playing the piano at medium volume:
4 W (RP701), 4 W (F701)
Power consumption when sound has not been played after power-on:
3 W (RP701), 3 W (F701)
Dimensions
With music rest:
1,366 (W) x 463 (D) x 1,027 (H) mm
53-13/16 (W) x 18-1/4 (D) x 40-7/16 (H) inches
With lid closed:
1,360 (W) x 345 (D) x 781 (H) mm
53-9/16 (W) x 13-5/8 (D) x 30-3/4 (H) inches
With lid opened:
1,360 (W) x 345 (D) x 913 (H) mm
53-9/16 (W) x 13-5/8 (D) x 36 (H) inches
* Measurements include stabilizer components attached.
Weight 46.0 kg/101 lbs 7 oz 36.0 kg/79 lbs 6 oz
Accessories
Owner’s Manual, Leaet “USING THE UNIT SAFELY,” The collection of scores “Roland Piano Masterpieces” (CHINA only), AC adaptor,
Power cord, Headphone hook, Stabilizer (F701)
Option
(sold separately)
Headphones
* This document explains the specications of the product at the time that the document was issued. For the latest information, refer to the
Roland website.
40
° Tone List
Piano
No. Tone Name
Grand
1 Concert Piano
2 Ballad Piano
3 Mellow Piano
4 Bright Piano
Upright
5 Upright Piano
6 Mellow Upright
7 Bright Upright
8 Rock Piano
9 Ragtime Piano
Classical
10 Fortepiano
11 Mellow Forte
12 Bright Forte
13 Harpsichord
14 Harpsi 8’+4’
E.Piano
15 1976SuitCase
16 Tremolo EP
17 Pop EP
18 Vintage EP
19 FM E.Piano
20 EP Belle
21 60’s EP
22 Clav.
23 Stage Phaser
24 70’s EP
25 E.Grand
26 Magical Piano
Other
No. Tone Name
Strings
1 SymphonicStr1
2 Epic Strings
3 Rich Strings
4 Orchestra Str
5 Orchestra
6 Chamber Winds
7 Harp
8 Violin
9 Velo Strings
10 Cello
11 OrchestraBrs
12 Pizzicato Str
13 SymphonicStr2
14 Soft Pad
15 Flute
16 A.Bass+Cymbl
Organ
17 Pipe Organ
18 Nason Flt 8’
19 Combo Jz.Org
20 Ballad Organ
21 ChurchOrgan1
22 ChurchOrgan2
23 Gospel Spin
24 Full Stops
25 Mellow Bars
26 Light Organ
27 Lower Organ
28 60’s Organ
Voice
29 Jazz Scat
Do Re Mi
30 Do Re Mi 1#
31 Do Re Mi 1b
32 Do Re Mi 2#
33 Do Re Mi 2b
Drums
34 STANDARD Set
35 ROOM Set
36 POWER Set
37 ELEC.Set
38 ANALOG Set
39 JAZZ Set
40 BRUSH Set
41 ORCH.Set
42 SFX Set
GM2
43 Piano 1
44 Piano 1w
45 Piano 1d
46 Piano 2
47 Piano 2w
48 Piano 3
49 Piano 3w
No. Tone Name
50 Honky-tonk
51 Honky-tonk w
52 E.Piano 1
53 Detuned EP 1
54 Vintage EP
55 60’s E.Piano
56 E.Piano 2
57 Detuned EP 2
58 St.FM EP
59 EP Legend
60 EP Phaser
61 Harpsi.
62 Coupled Hps.
63 Harpsi.w
64 Harpsi.o
65 Clav.
66 Pulse Clav.
67 Celesta
68 Glockenspiel
69 Music Box
70 Vibraphone
71 Vibraphone w
72 Marimba
73 Marimba w
74 Xylophone
75 TubularBells
76 Church Bell
77 Carillon
78 Santur
79 Organ 1
80 TremoloOrgan
81 60’s Organ
82 Organ 2
83 Perc.Organ 1
84 Chorus Organ
85 Perc.Organ 2
86 Rock Organ
87 Church Org.1
88 Church Org.2
89 Church Org.3
90 Reed Organ
91 Pu Organ
92 Accordion 1
93 Accordion 2
94 Harmonica
95 Bandoneon
96 Nylon-str.Gt
97 Ukulele
98 Nylon Gt o
99 Nylon Gt 2
100 Steel-str.Gt
101 12-str.Gt
102 Mandolin
103 Steel+Body
104 Jazz Guitar
105 Hawaiian Gt
No. Tone Name
106 Clean Guitar
107 Chorus Gt 1
108 Mid Tone Gt
109 Muted Guitar
110 Funk Guitar1
111 Funk Guitar2
112 Chorus Gt 2
113 Overdrive Gt
114 Guitar Pinch
115 DistortionGt
116 Gt Feedback1
117 Dist.Rhy Gt
118 Gt Harmonics
119 Gt Feedback2
120 AcousticBass
121 FingeredBass
122 Finger Slap
123 Picked Bass
124 FretlessBass
125 Slap Bass 1
126 Slap Bass 2
127 Synth Bass 1
128 WarmSyn.Bass
129 Synth Bass 3
130 Clav.Bass
131 Hammer Bass
132 Synth Bass 2
133 Synth Bass 4
134 RubberSyn.Bs
135 Attack Pulse
136 Violin
137 Slow Violin
138 Viola
139 Cello
140 Contrabass
141 Tremolo Str.
142 PizzicatoStr
143 Harp
144 Yang Qin
145 Timpani
146 Strings
147 Orchestra
148 60’s Strings
149 Slow Strings
150 Syn.Strings1
151 Syn.Strings3
152 Syn.Strings2
153 Choir 1
154 Choir 2
155 Voice
156 Humming
157 Synth Voice
158 Analog Voice
159 OrchestraHit
160 Bass Hit
161 6th Hit
41
Tone List
No. Tone Name
162 Euro Hit
163 Trumpet
164 Dark Trumpet
165 Trombone 1
166 Trombone 2
167 Bright Tb
168 Tuba
169 MuteTrumpet1
170 MuteTrumpet2
171 French Horn1
172 French Horn2
173 Brass 1
174 Brass 2
175 Synth Brass1
176 Synth Brass3
177 AnalogBrass1
178 Jump Brass
179 Synth Brass2
180 Synth Brass4
181 AnalogBrass2
182 Soprano Sax
183 Alto Sax
184 Tenor Sax
185 Baritone Sax
186 Oboe
187 English Horn
188 Bassoon
189 Clarinet
190 Piccolo
191 Flute
192 Recorder
193 Pan Flute
194 Bottle Blow
195 Shakuhachi
196 Whistle
197 Ocarina
198 Square Lead1
199 Square Lead2
200 Sine Lead
201 Saw Lead 1
202 Saw Lead 2
203 Doctor Solo
204 Natural Lead
205 SequencedSaw
206 Syn.Calliope
207 Chier Lead
208 Charang
209 Wire Lead
210 Solo Vox
211 5th Saw Lead
212 Bass+Lead
213 Delayed Lead
214 Fantasia
215 Warm Pad
216 Sine Pad
217 Polysynth
No. Tone Name
218 Space Voice
219 Itopia
220 Bowed Glass
221 Metallic Pad
222 Halo Pad
223 Sweep Pad
224 Ice Rain
225 Soundtrack
226 Crystal
227 Synth Mallet
228 Atmosphere
229 Brightness
230 Goblins
231 Echo Drops
232 Echo Bell
233 Echo Pan
234 Star Theme
235 Sitar 1
236 Sitar 2
237 Banjo
238 Shamisen
239 Koto
240 Taisho Koto
241 Kalimba
242 Bagpipe
243 Fiddle
244 Shanai
245 Tinkle Bell
246 Agogo
247 Steel Drums
248 Woodblock
249 Castanets
250 Taiko
251 Concert BD
252 Melodic Tom1
253 Melodic Tom2
254 Synth Drum
255 TR-808 Tom
256 Elec.Perc.
257 Reverse Cym.
258 Gt FretNoise
259 Gt Cut Noise
260 BsStringSlap
261 Breath Noise
262 Fl.Key Click
263 Seashore
264 Rain
265 Thunder
266 Wind
267 Stream
268 Bubble
269 Bird 1
270 Dog
271 Horse Gallop
272 Bird 2
273 Telephone 1
No. Tone Name
274 Telephone 2
275 DoorCreaking
276 Door
277 Scratch
278 Wind Chimes
279 Helicopter
280 Car Engine
281 Car Stop
282 Car Pass
283 Car Crash
284 Siren
285 Train
286 Jetplane
287 Starship
288 Burst Noise
289 Applause
290 Laughing
291 Screaming
292 Punch
293 Heart Beat
294 Footsteps
295 Gun Shot
296 Machine Gun
297 Laser Gun
298 Explosion
42
° Internal Song List
No. Song Name Composer
Listening
1 Valse, op.34-1
Fryderyk Franciszek
Chopin
2 Polonaise op.53
Fryderyk Franciszek
Chopin
3 Nocturne No.20
Fryderyk Franciszek
Chopin
4 Die Forelle
Franz Peter Schubert,
Arranged by Franz Liszt
5 Reets dans l’Eau Claude Achille Debussy
6 La Fille aux Cheveux de Lin Claude Achille Debussy
7 La Campanella Franz Liszt
8 Scherzo No.2
Fryderyk Franciszek
Chopin
9 Barcarolle
Fryderyk Franciszek
Chopin
10 Zhavoronok
Mikhail Ivanovich
Glinka, Arranged by Mily
Alexeyevich Balakirev
Ensemble
1 Piano Concerto No.1 * Peter Ilyich Tchaikovsky
2 Piano Concerto No.2 * Sergei Rachmanino
3 Canon (Jazz Arrangement) * Johann Pachelbel
4 Sicilienne (Jazz Arrangement) * Gabriel Fauré
5 Berceuse from Dolly Suite Gabriel Fauré
6
Le jardin féerique from Ma mère
l’Oye
Maurice Ravel
7
Le Quattro Stagioni “La
Primavera” *
Antonio Vivaldi
8 Marche Militaire Nr.1 * Franz Peter Schubert
9
Waltz from the Sleeping Beauty *
Peter Ilyich Tchaikovsky
10 L’Apprenti sorcier * Paul Dukas
11 Salut d’Amour Edward Elgar
12
Pavane pour une infante
défunte
Maurice Ravel
13 Menuett G Dur BWV Anh.114 Johann Sebastian Bach
14 Präludium C Dur BWV846 Johann Sebastian Bach
15 Türkischer Marsch
Wolfgang Amadeus
Mozart
16 Für Elise Ludwig van Beethoven
17 Türkischer Marsch Ludwig van Beethoven
18 Auf Flügeln des Gesanges Felix Mendelssohn
19 Étude, op.10-3
Fryderyk Franciszek
Chopin
20 Valse, op.64-1
Fryderyk Franciszek
Chopin
21 Fantaisie-Impromptu
Fryderyk Franciszek
Chopin
22 Träumerei
Robert Alexander
Schumann
23 Dolly’s Dreaming Awakening Theodor Oesten
24 Brautchour Wilhelm Richard Wagner
25 Liebesträume Nr.3 Franz Liszt
26 Ungarische Tänze Nr.5 Johannes Brahms
27 Clair de Lune Claude Achille Debussy
28 1ère Arabesque Claude Achille Debussy
29 Golliwog’s Cakewalk Claude Achille Debussy
30 Je te veux Erik Satie
No. Song Name Composer
Entertainment
1 Polovtsian Dances Alexander Borodin
2 Ombra mai fù George Frideric Handel
3 Lascia ch’io pianga George Frideric Handel
4 Twinkle Twinkle Little Star French Folk Song
5 Mary Had a Little Lamb Traditional
6 Bear Song American Folk Song
7 Ich Bin Ein Musikante German Folk Song
8 Grand Father’s Clock Henry Work
9 Jingle Bells James Pierpont
10 We Wish You a Merry Christmas Carol
11 Silent Night Franz Gruber
12 Amazing Grace Hymn
13 Lavender’s Blue Traditional
14 Aura Lee George R. Poulton
15 Auld Lang Syne Traditional
16 Greensleeves Traditional
17 Maple Leaf Rag Scott Joplin
18 The Entertainer Scott Joplin
19
When The Saints Go Marching
In
Traditional
20 Little Brown Jug Joseph Winner
43
Internal Song List
No. Song Name Composer
DoReMi
1–15 Training No.1 - 15 Roland Corporation
16 Twinkle Twinkle Little Star French Folk Song
17 Summ,Summ,Summ Traditional
18 Frog Song German Folk Song
19 The Cuckoo Traditional
20 Oh! Susanna Stephen Foster
21 Let’s Clap Hands Traditional
22 Das klinget so herrlich
Wolfgang Amadeus
Mozart
23 Wiegenlied Johannes Brahms
24 Les Patineurs Émile Waldteufel
25 Minuet Johann Sebastian Bach
26 Old Folks At Home Stephen Foster
27 Deck the Halls Carol
28 Danny Boy Irish Song
29 Korobeiniki Russian Folk Song
30 Sakura Sakura Japanese Folk Song
Scales
1–36 Major Scales, Minor Scales –
Hanon
1–20 1–20 Charles-Louis Hanon
Beyer
1–106 1–106 Ferdinand Beyer
No. Song Name Composer
Burgmuller
1 Openness
Johann Friedrich Franz
Burgmüller
2 Arabesque
3 Pastoral
4 A Small Gathering
5 Innocence
6 Progress
7 The Clear Stream
8 Gracefulness
9 The Hunt
10 Tender Flower
11 The Young Shepherdess
12 Farewell
13 Consolation
14 Austrian Dance
15 Ballad
16 Sighing
17 The Chatterbox
18 Restlessness
19 Ave Maria
20 Tarantella
21 Angelic Harmony
22 Gondola Song
23 The Return
24 The Swallow
25 The Knight Errant
Czerny 100
1–100 1–100 Carl Czerny
• All rights reserved. Unauthorized use of this material for purposes other than
private, personal enjoyment is a violation of applicable laws.
• Songs marked by an asterisk (*) are arranged by Roland Corporation. The
copyrights to these songs are owned by the Roland Corporation.
• Songs in Listening category are piano solos. They have no accompaniment.
• Please purchase commercially available scores for Hanon–Czerny no. 100.
• The performance data for the tone demos and the internal songs is not
transmitted from the USB Computer port or via Bluetooth (MIDI).
• If the SMF Play Mode is set to “Internal, (p. 33)” there will be some parts whose
volume does not change when you adjust the Song Volume SMF value (p. 32).
If the SMF Play Mode is set to “External,” the volume of all parts will change.
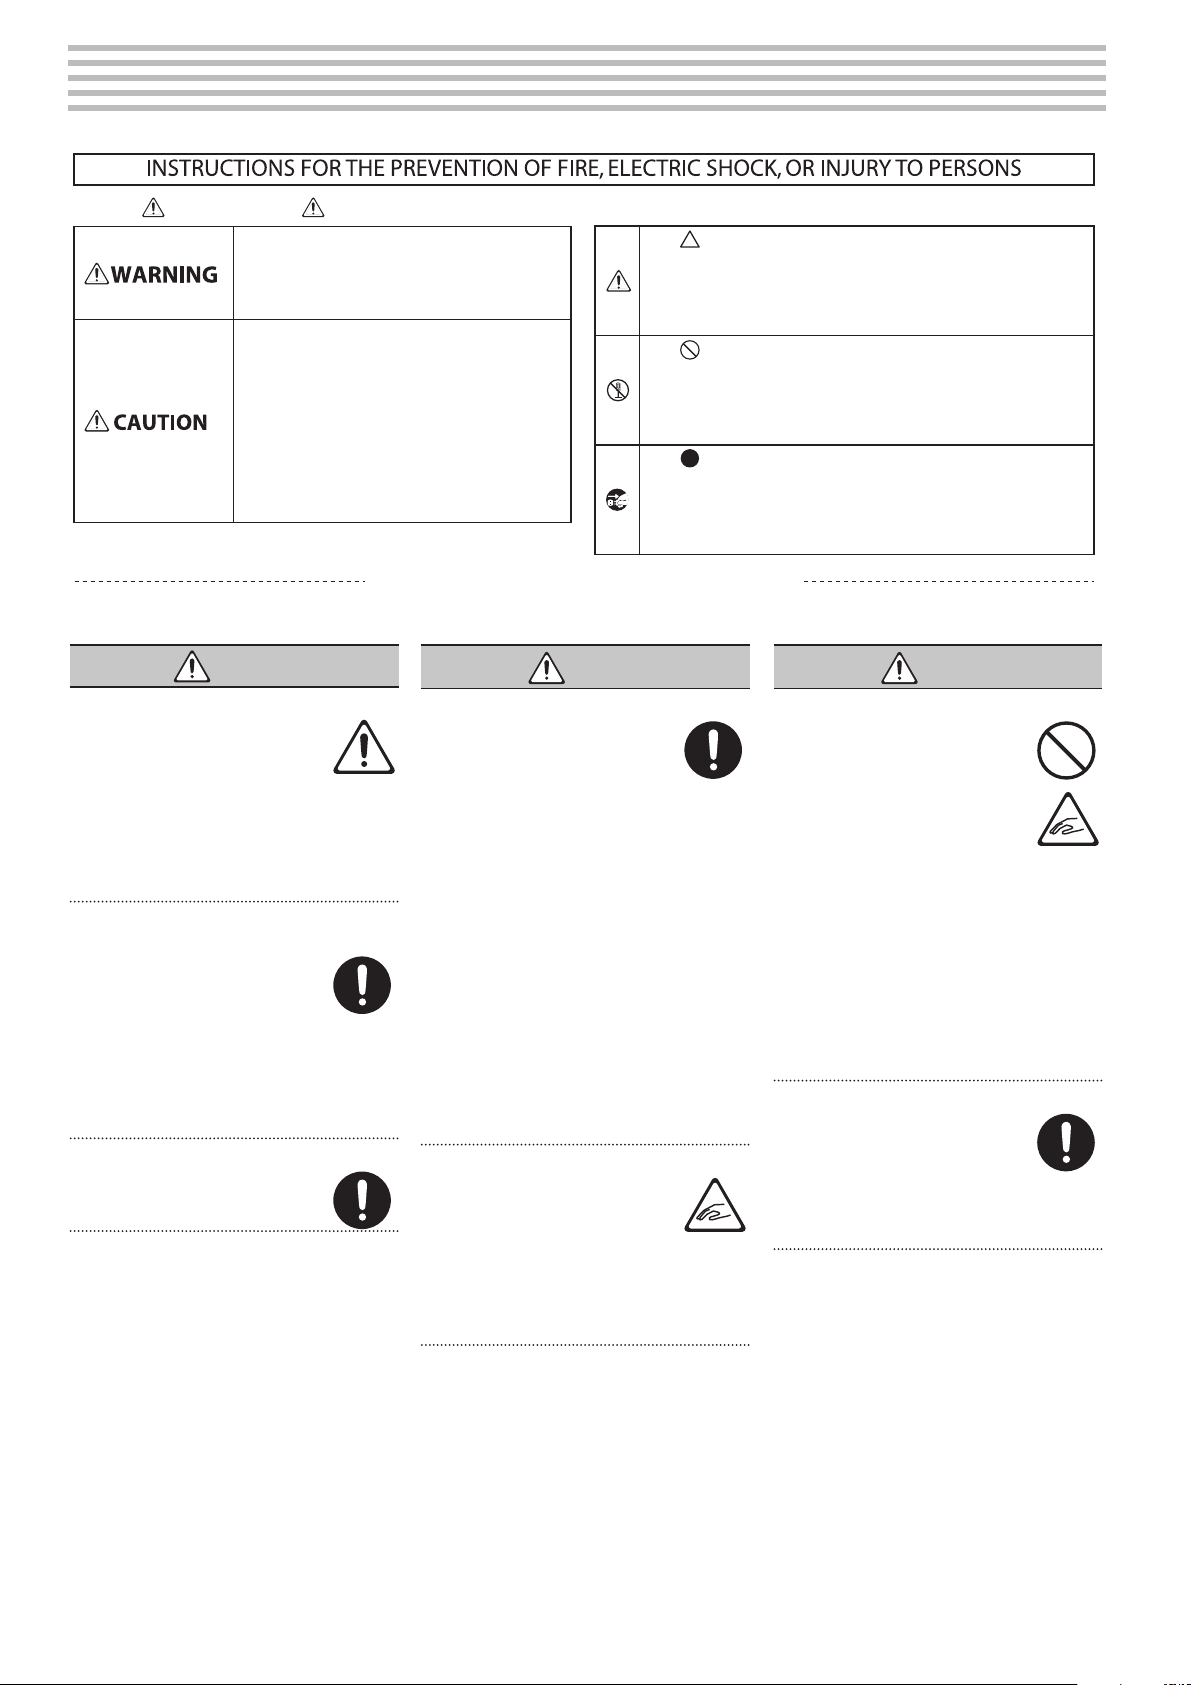
44
° USING THE UNIT SAFELY
WARNING
Concerning the Auto O function
The power to this unit will be
turned o automatically after a
predetermined amount of time
has passed since it was last used
for playing music, or its buttons or controls
were operated (Auto O function). If you
do not want the power to be turned o
automatically, disengage the Auto O
function (p. 35).
Use only the supplied AC adaptor and the correct
voltage
Be sure to use only the AC adaptor
supplied with the unit. Also,
make sure the line voltage at the
installation matches the input
voltage specied on the AC adaptor’s body.
Other AC adaptors may use a dierent
polarity, or be designed for a dierent
voltage, so their use could result in damage,
malfunction, or electric shock.
Use only the supplied power cord
Use only the attached power cord.
Also, the supplied power cord must
not be used with any other device.
CAUTION
Cautions when moving this unit
If you need to move the
instrument, take note of the
precautions listed below. At least
two persons are required to safely
lift and move the unit. It should be handled
carefully, all the while keeping it level.
Make sure to have a rm grip, to protect
yourself from injury and the instrument from
damage.
• Check to make sure the Screws securing
the unit to the stand have not become
loose. Fasten them again securely
whenever you notice any loosening.
• Disconnect the power cord.
• Disconnect all cords coming from external
devices.
• Raise the adjusters on the stand (RP701)
(p. 7).
• Close the keyboard cover.
• Remove the music stand (RP701).
Take care so as not to get ngers pinched
When handling the following
moving parts, take care so as not
to get ngers, toes, etc., pinched.
Whenever a child uses the unit,
an adult should be on hand to provide
supervision and guidance.
• Keyboard Cover (p. 6)(p. 10)
• Pedals (p. 7)(p. 11)
CAUTION
Precautions concerning use of bench
When using the bench, please
observe the following points:
• Do not use the bench as a toy, or
as a stepping stool.
• Do not allow two or more
persons to sit on the bench.
• Do not adjust the height while
sitting on the bench.
• Do not sit on the bench if the bolts
holding the bench legs are loose. (If the
bolts are loose, immediately re-tighten
them using the supplied tool.)
• Never insert your hand into the gap (the
metal height adjustment mechanism)
under the seat keyboard cover. Doing so
may cause your hand to be pinched or
injured.
Keep small items out of the reach of children
To prevent accidental ingestion
of the parts listed below, always
keep them out of the reach of small
children.
• Included Parts
Screws
Used for instructions intended to alert the
user to the risk of injury or material
damage should the unit be used
improperly.
* Material damage refers to damage or
other adverse effects caused with
respect to the home and all its
furnishings, as well to domestic animals
or pets.
Used for instructions intended to alert the
user to the risk of death or severe injury
should the unit be used improperly.
The symbol alerts the user to things that must be
carried out. The specific thing that must be done is
indicated by the design contained within the circle. In the
case of the symbol at left, it means that the power-cord
plug must be unplugged from the outlet.
The symbol alerts the user to important instructions or
warnings.The specific meaning of the symbol is
determined by the design contained within the triangle. In
the case of the symbol at left, it is used for general
cautions, warnings, or alerts to danger.
The symbol alerts the user to items that must never be
carried out (are forbidden). The specific thing that must
not be done is indicated by the design contained within
the circle. In the case of the symbol at left, it means that
the unit must never be disassembled.
About WARNING and CAUTION Notices
About the Symbols
ALWAYS OBSERVE THE FOLLOWING
45
° IMPORTANT NOTES
Power Supply
• Place the AC adaptor so the side with the
indicator faces upwards. The indicator will
light when you plug the AC adaptor into
an AC outlet.
Placement
• Do not allow lighting devices that
normally are used while their light
source is very close to the unit (such as
a piano light), or powerful spotlights to
shine upon the same area of the unit for
extended periods of time. Excessive heat
can deform or discolor the unit.
• Do not allow objects to remain on top
of the keyboard. This can be the cause
of malfunction, such as keys ceasing to
produce sound.
• Depending on the material and
temperature of the surface on which you
place the unit, its rubber feet may discolor
or mar the surface (F701).
Maintenance
• To clean the unit, use a dry, soft cloth; or
one that is slightly dampened. Try to wipe
the entire surface using an equal amount
of strength, moving the cloth along with
the grain of the wood. Rubbing too hard in
the same area can damage the nish.
• The Pedals of this unit are made of brass.
Brass eventually darkens as the result
of the natural oxidization process. If the
brass becomes tarnished, polish it using
commercially available metal polisher
(RP701).
Care of the Keyboard
• Do not write on the keyboard with any
pen or other implement, and do not stamp
or place any marking on the instrument.
Ink will seep into the surface lines and
become unremovable.
• Do not ax stickers on the keyboard. You
may be unable to remove stickers that use
strong adhesives, and the adhesive may
cause discoloration.
• To remove stubborn dirt, use a
commercially available keyboard cleaner
that does not contain abrasives. Start by
wiping lightly. If the dirt does not come
o, wipe using gradually increasing
amounts of pressure while taking care not
to scratch the keys.
Repairs and Data
• Before sending the unit away for repairs,
be sure to make a backup of the data
stored within it; or you may prefer to write
down the needed information. Although
we will do our utmost to preserve the data
stored in your unit when we carry out
repairs, in some cases, such as when the
memory section is physically damaged,
restoration of the stored content may be
impossible. Roland assumes no liability
concerning the restoration of any stored
content that has been lost.
Additional Precautions
• Any data stored within the unit can be
lost as the result of equipment failure,
incorrect operation, etc. To protect
yourself against the irretrievable loss
of data, try to make a habit of creating
regular backups of the data you’ve stored
in the unit.
• Roland assumes no liability concerning
the restoration of any stored content that
has been lost.
• Never strike or apply strong pressure to
the display.
• The sound of keys being struck and
vibrations produced by playing an
instrument can be transmitted through
a oor or wall to an unexpected extent.
Please take care not to cause annoyance
to others nearby.
• When disposing of the packing carton
or cushioning material in which this unit
was packed, you must observe the waste
disposal regulations that apply to your
locality.
• Do not apply undue force to the music
stand while it is in use (RP701).
• Do not use connection cables that contain
a built-in resistor.
Using External Memories
• Please observe the following precautions
when handling external memory devices.
Also, make sure to carefully observe all the
precautions that were supplied with the
external memory device.
• Do not remove the device while reading/writing
is in progress.
• To prevent damage from static electricity,
discharge all static electricity from your person
before handling the device.
Caution Regarding Radio Frequency Emissions
721
• The following actions may subject you to
penalty of law.
• Disassembling or modifying this device.
• Removing the certication label axed to the
back of this device.
• Using this device in a country other than where
it was purchased
Intellectual Property Right
• It is forbidden by law to make an audio
recording, video recording, copy or revision of
a third party’s copyrighted work (musical work,
video work, broadcast, live performance, or
other work), whether in whole or in part, and
distribute, sell, lease, perform or broadcast it
without the permission of the copyright owner.
• Do not use this product for purposes that could
infringe on a copyright held by a third party.
We assume no responsibility whatsoever with
regard to any infringements of third-party
copyrights arising through your use of this
product.
• The copyright of content in this product
(the sound waveform data, style data,
accompaniment patterns, phrase data, audio
loops and image data) is reserved by Roland
Corporation.
• Purchasers of this product are permitted to
utilize said content (except song data such
as Demo Songs) for the creating, performing,
recording and distributing original musical
works.
• Purchasers of this product are NOT permitted
to extract said content in original or modied
form, for the purpose of distributing recorded
medium of said content or making them
available on a computer network.
• This product contains eParts integrated software
platform of eSOL Co.,Ltd. eParts is a trademark
of eSOL Co., Ltd. in Japan.
• The Bluetooth® word mark and logos are
registered trademarks owned by Bluetooth
SIG, Inc. and any use of such marks by Roland is
under license.
• This Product uses the Source Code of μT-Kernel
under T-License 2.0 granted by the T-Engine
Forum (www.tron.org).
• This product includes third party open
source software.
Copyright © 2009-2018 Arm Limited. All rights
reserved.
Copyright © 2018 STMicroelectronics. All rights
reserved.
Licensed under the Apache License, Version 2.0
(the “License”);
You may obtain a copy of the License at
http://www.apache.org/licenses/LICENSE-2.0
Copyright © 2018 STMicroelectronics. All rights
reserved.
This software component is licensed by ST under
BSD 3-Clause license, the “License”;
You may obtain a copy of the License at
https://opensource.org/licenses/BSD-3-Clause
This product is using the Jansson (http://www.
digip.org/jansson/) source code.
Copyright © 2009-2016 Petri Lehtinen <petri@
digip.org> Released under the MIT license
http://opensource.org/licenses/mit-license.php
• The “Chinese language font MORISAWA SONG
GB2313BMP12” used by this product is provided
by Morisawa Corporation, and copyright to the
font data is the property of that corporation.
• Roland, SuperNATURAL, and Piano Every Day are
either registered trademarks or trademarks of
Roland Corporation in the United States and/or
other countries.
• Company names and product names appearing
in this document are registered trademarks or
trademarks of their respective owners.
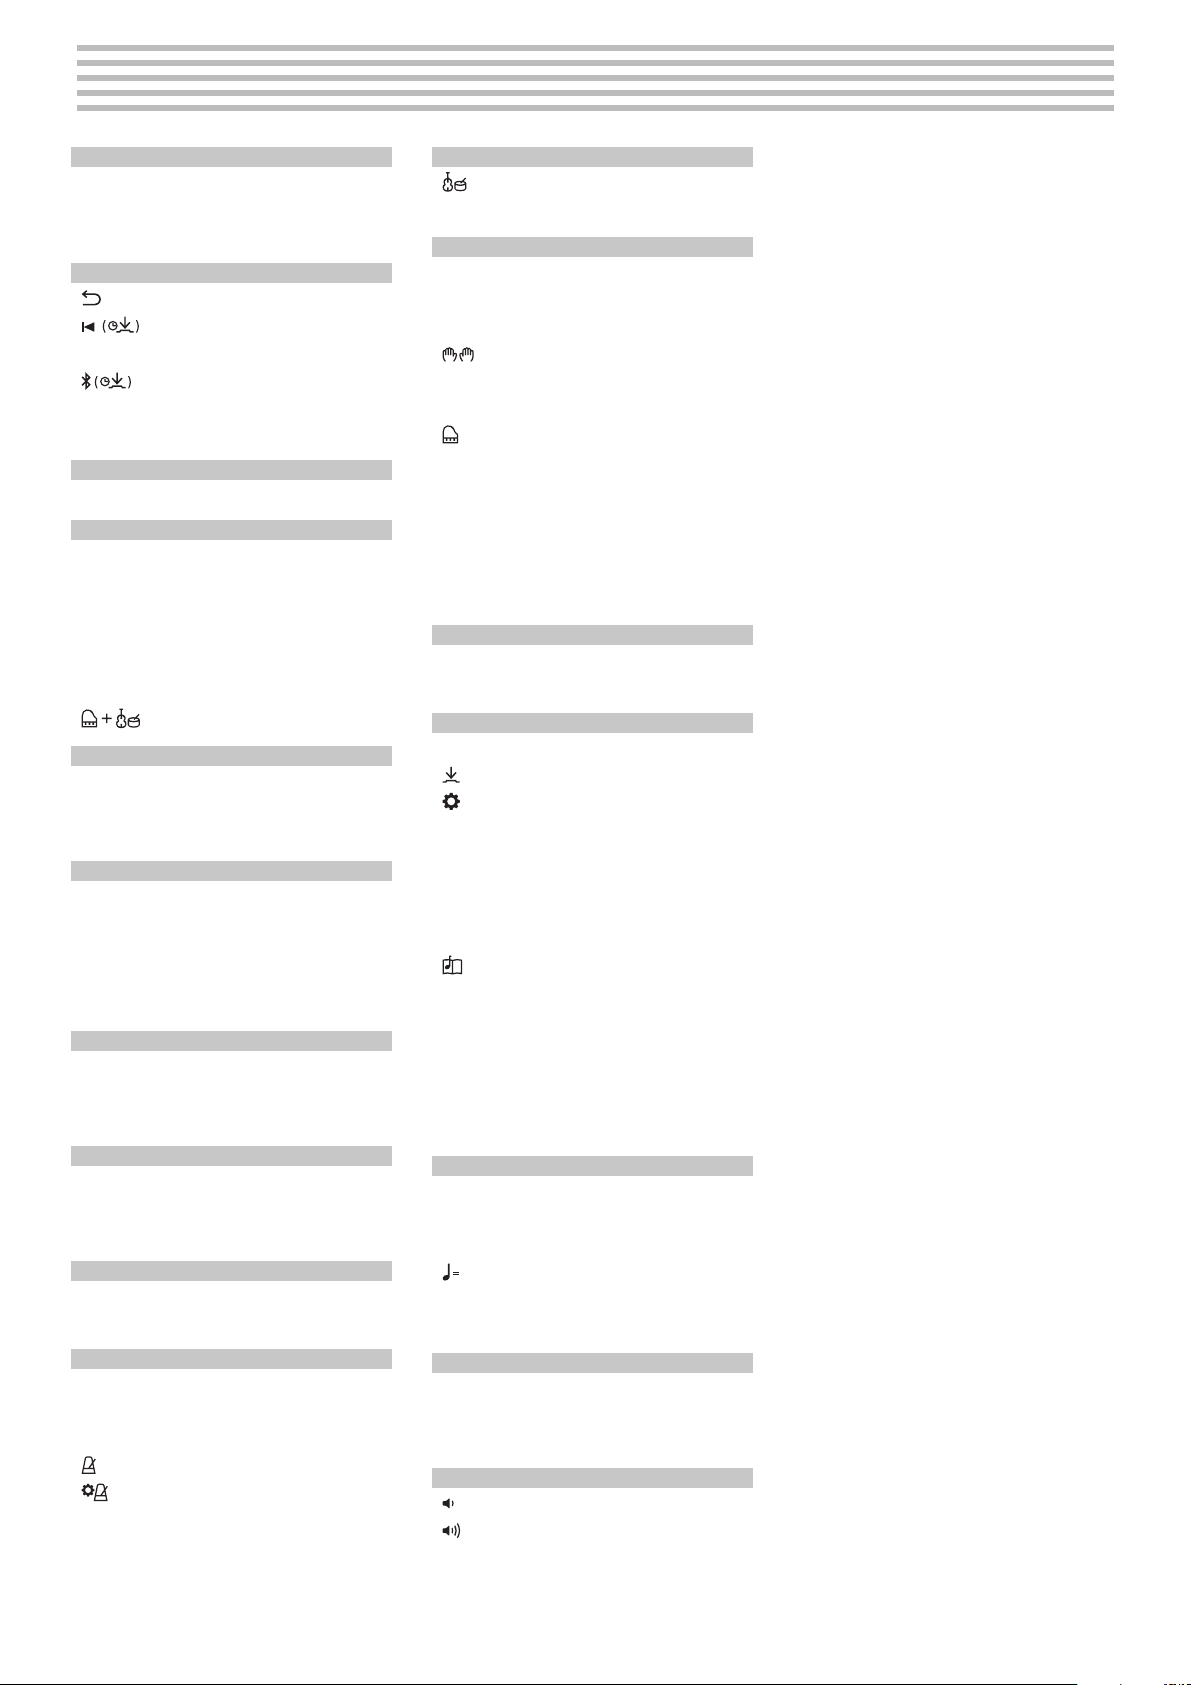
° Index
A
Ambience ............................20
Auto Memory Backup .................35
Auto O .........................6, 10, 35
B
[
] (back) button ...............5, 7, 9, 11
[
] (beginning of song) ........5, 9
Bluetooth ..........................15, 27
[
] (Bluetooth) ..................5, 9
Bluetooth On/O .....................31
Brilliance .............................20
C
Classic Position ........................6
D
Damper pedal ......................7, 11
Damper Resonance ...................26
DC In jack .........................4, 8, 18
Display ..............................5, 9
Display Contrast ......................34
Dual Play ..........................19, 32
[
] (Dual Play) .................5, 9
F
Factory Reset ......................30, 35
Format Media ......................30, 35
Function Mode .......................31
H
Hammer Response ....................25
Headphone hook ....................4, 8
Headphone jack ..................4, 8, 18
Headphones ........................7, 11
Headphones 3D Ambience .......7, 11, 20
I
Input/Bluetooth Vol. ..................33
Input jack .........................4, 8, 18
Internal Song ......................13, 42
K
Kbd Transpose ........................32
Key O Resonance ....................26
key touch .............................20
L
Lid ...................................26
Local Control .........................34
M
Master Tuning ........................25
[x/y](measure) button ...........5, 9
Metronome ........................14, 20
[ ] (metronome) button ..........5, 9, 14
[ ] (metronome settings) ........5, 9, 20
MIDI Transmit Ch. .....................34
Music rest. . . . . . . . . . . . . . . . . . . . . . . . . . . . 5, 7
O
[
](other) button ................5, 9, 12
overdub-record .......................24
P
Pairing .............................15, 27
Panel Lock ............................30
part ...............................13, 23
[
] (part) button ............ 5, 9, 13, 23
Pedal ...........................5, 7, 9, 11
Pedal jack .........................4, 8, 18
[
] (Piano) button ...................5, 9
Piano Designer. . . . . . . . . . . . . . . . . . . . . . . . 25
Piano Setup Export. . . . . . . . . . . . . . . . .29, 35
Piano Setup Import ................29, 35
Playing Back a Song ................13, 21
[s] (play/stop) button .............5, 9
[L] (Power) button ..............5, 6, 9, 10
R
Recording .........................14, 22
[t] (recording) button ................5, 9
S
Screen Saver ..........................34
[
] (select/conrm) knob ..........5, 7, 9
[
] (settings) button ..............5, 9, 31
Single Note Character .................26
Single Note Tuning ....................26
Single Note Volume ...................26
SMF Play Mode .......................33
Soft pedal ..........................7, 11
[
] (song) button ...................5, 9
Sostenuto pedal ....................7, 11
Speaker Auto Mute ...................34
Split Play ..........................19, 32
Split point ............................19
stop .................................5, 9
String Resonance .....................26
T
Temperament .........................25
Temperament Key ....................25
tempo .........................13, 14, 20
[
] (Tempo) button ...........5, 9, 13, 20
Tone ...............................12, 40
Twin Piano ............................32
U
USB Audio Input Volume ..............33
USB Computer port ...............4, 8, 18
USB Memory port .................4, 8, 18
V
[ ] (Volume-) button ................5, 9
[
] (Volume+) button ...............5, 9
Volume buttons .....................6, 10
Volume indicator .....................5, 9
Volume Limit .........................34