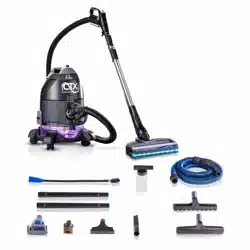
1

2
Congratulations on your purchase of your new Prolux CTX vacuum! At Prolux when we
designed it, we had you in mind! We wanted you to go to your closet and pull out your new
Prolux decades later and say, “Wow I am so glad I bought this”. When you empty out your
water bowl each time after you vacuum and say, “wow I can’t believe how much dirt this
picked up” or “have you noticed how the air feels cleaner in here?”. Welcome to the Prolux
family and don’t forget to register for your lifetime warranty at
www.proluxcleaners.com
.

4
Why do I have to register my warranty within 90 days to get my
Lifetime warranty?
Great question
Do you know what normally kills a vacuum cleaner?
1) Vacuum Bag is overfilled which causes the motor to overheat (good thing this is bagless).
2) Filters needing changed and are clogged which overheats the motor (good thing this does
not use filters).
3) Hair and carpet fibers wrapping around the brushroll overheating the motor.
LOL do you see a trend? In other words, proper maintenance will add years to your vacuum’s
life. By registering your warranty, we will email you maintenance tips, when it’s time to
maintain your vacuum, product info updates, and coupons if you ever want more carpet
shampoo or fragrances for your water. We do not ever require you to purchase anything OR to
prove that you are maintaining your vacuum to be covered by the lifetime warranty. All we
care about is that you are getting our reminders. Normally we send out maintenance email
reminders once every 6 months.
To register for your Lifetime Warranty go to
https://proluxcleaners.com/pages/warranty
or scan below with your phone

5
Frequently Asked Questions:
1. Is this “Made in the USA”.
No, it is not. “Made in the USA” has very specific legal definitions. Instead, it is “Built in America”. Most of
the parts are made in North America. However, we also looked worldwide for the best parts (remember we
want it to last a lifetime). For example, we found the best power nozzle from a company in Germany (their
factory is located in Poland) and the best motor (2 speed, dependable and very powerful) from Italy. Then we
assemble and test them here at the Prolux factory in Utah.
2. Does this vacuum come with a Lifetime Warranty?
It comes with a 90-day warranty BUT when you register at ProluxCleaners.com within 90 days of ordering it is
automatically upgraded to a lifetime warranty. See warranty details and the end of this manual.
3. How does the UV light work?
As you use your vacuum you will notice not much UV light is in the water bowl. This is because most of the
magic happens up inside the vacuum. The air passes through the water bowl, moves up inside the vacuum and
then exits the vacuum through the exhaust. This way it is exposed to the anti-bacterial Silver Nano and UV
light.
4. Is the vacuum heavy?
Its true water is a couple pounds heavier. However, you will really only notice the weight when you carry the
vacuum up the stairs. This is because we designed 4 high end caster wheels to easily roll on your floors. So,
while you are vacuuming it will feel like a very light vacuum. The water in the vacuum is what makes it
practically maintenance free, great filtration, and you never have to buy bags or filters. Plus using water to
filter with is what gives it all that extra deep cleaning power.
5. On air purifier mode mine is spraying out tiny amounts of water. Why?
This is because you over filled the water bowl. Follow the instructions in this manual for proper levels and it
will never spray or leak any water out.
6. Why does it not have a cord rewind feature?
Great question We debated this internally when we were designing the vacuum. Cord rewinders are a very
nice feature but they have one big problem. The problem is that they fail (normally within 3 years). We
designed the Prolux CTX to last a lifetime, so we did not include a cord rewind feature.
7. Why won’t my electric power nozzle turn on?
No worries its always something simple. 1) Make sure the cord from hose is plugged into the canister plug in.
2) Make sure the electric wand is fully snapped into the power head and the hose is fully snapped into the wand.
3) Make sure the vacuum is turned on to full power mode. 4) Make sure the hose power switch is flipped to
“on”. 5) Make sure you have pushed the power nozzle release button and released the head. If you have done
all of these things and it still does not work look for a reset button on the power nozzle, firmly push it and try
again. Also, see trouble shooting section in this manual for more details.
Table of Contents

6
Specifications …………………………………………....7
Safety & Precautions …………………………………... 8-10
Description of Parts ……………………………………. 12
How to operate & use …………………………………...13-18
Troubleshooting ………………………………………... 19
Warranty ………………………………………………... 20-22
SPECIFICATIONS
7
• Water UV Filtration – Not only does the CTX use water to filter with (like nature), it will also have a
Nano silver (anti-viral/anti-microbial) germ killing lining inside the water bowl and also an added germ
killing LED UV light which shines into the water bowl giving the CTX 3 stages of filtration.
• Powerful – 120V - 2 Speed Italian motor. Use the high speed for vacuum cleaning and the low speed
for air purification. Max CFM – 130
• Lightweight – Machine Weight (No Water): 14lbs, Machine Weight (w/Water): 17lbs
• Easy to Use – Aluminum power knob with multi speed motor adjustments and LED indicator lights
• NO BAGS!! – Bagless design allows you to never purchase another bag. Just fill the water bowl up and
dump out when you’re done
• Dependable – LIFETIME warranty when registered through Prolux (Registration is required within 90
days of purchase to be eligible for full LIFETIME warranty). Register at:
https://proluxcleaners.com/pages/warranty
Size
29"x16"x14.8"
Weight
17lbs
Power
130 CFM
Noise Level
Low – 68dB High – 80dB
Voltage
120V
Purification
Water, Nano Silver, UV
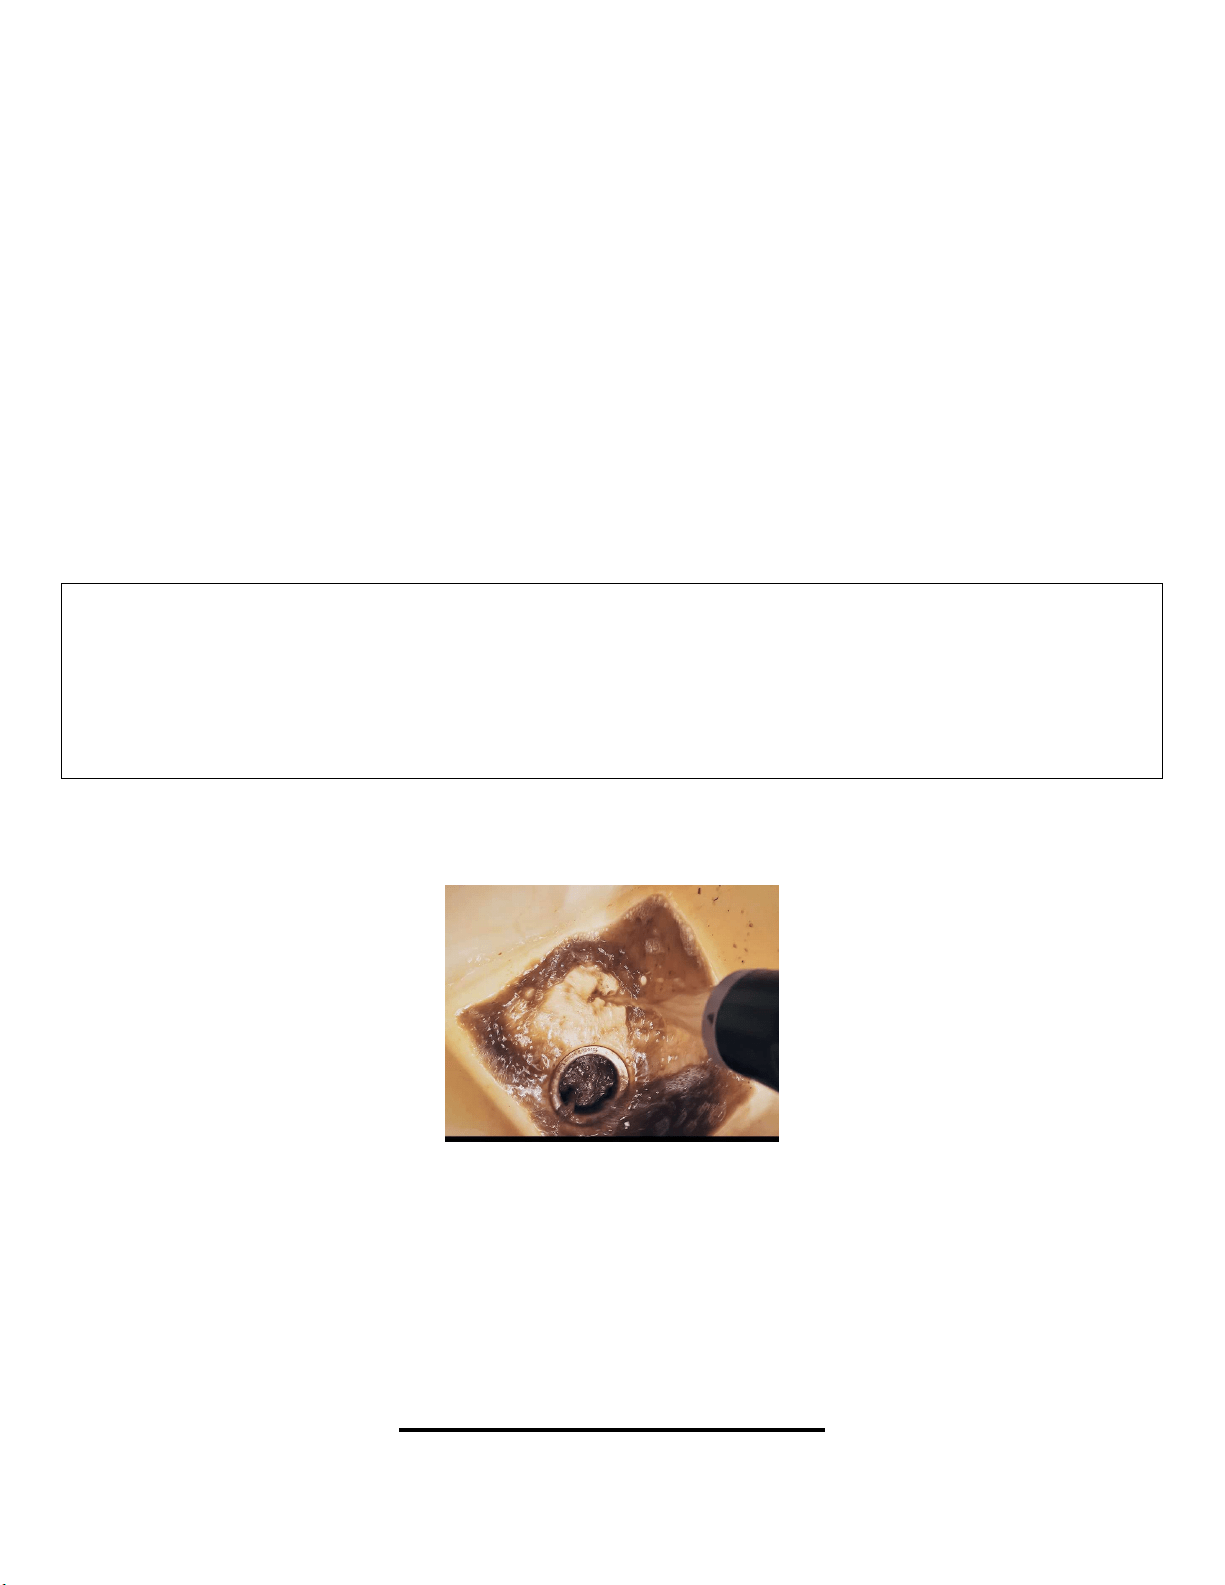
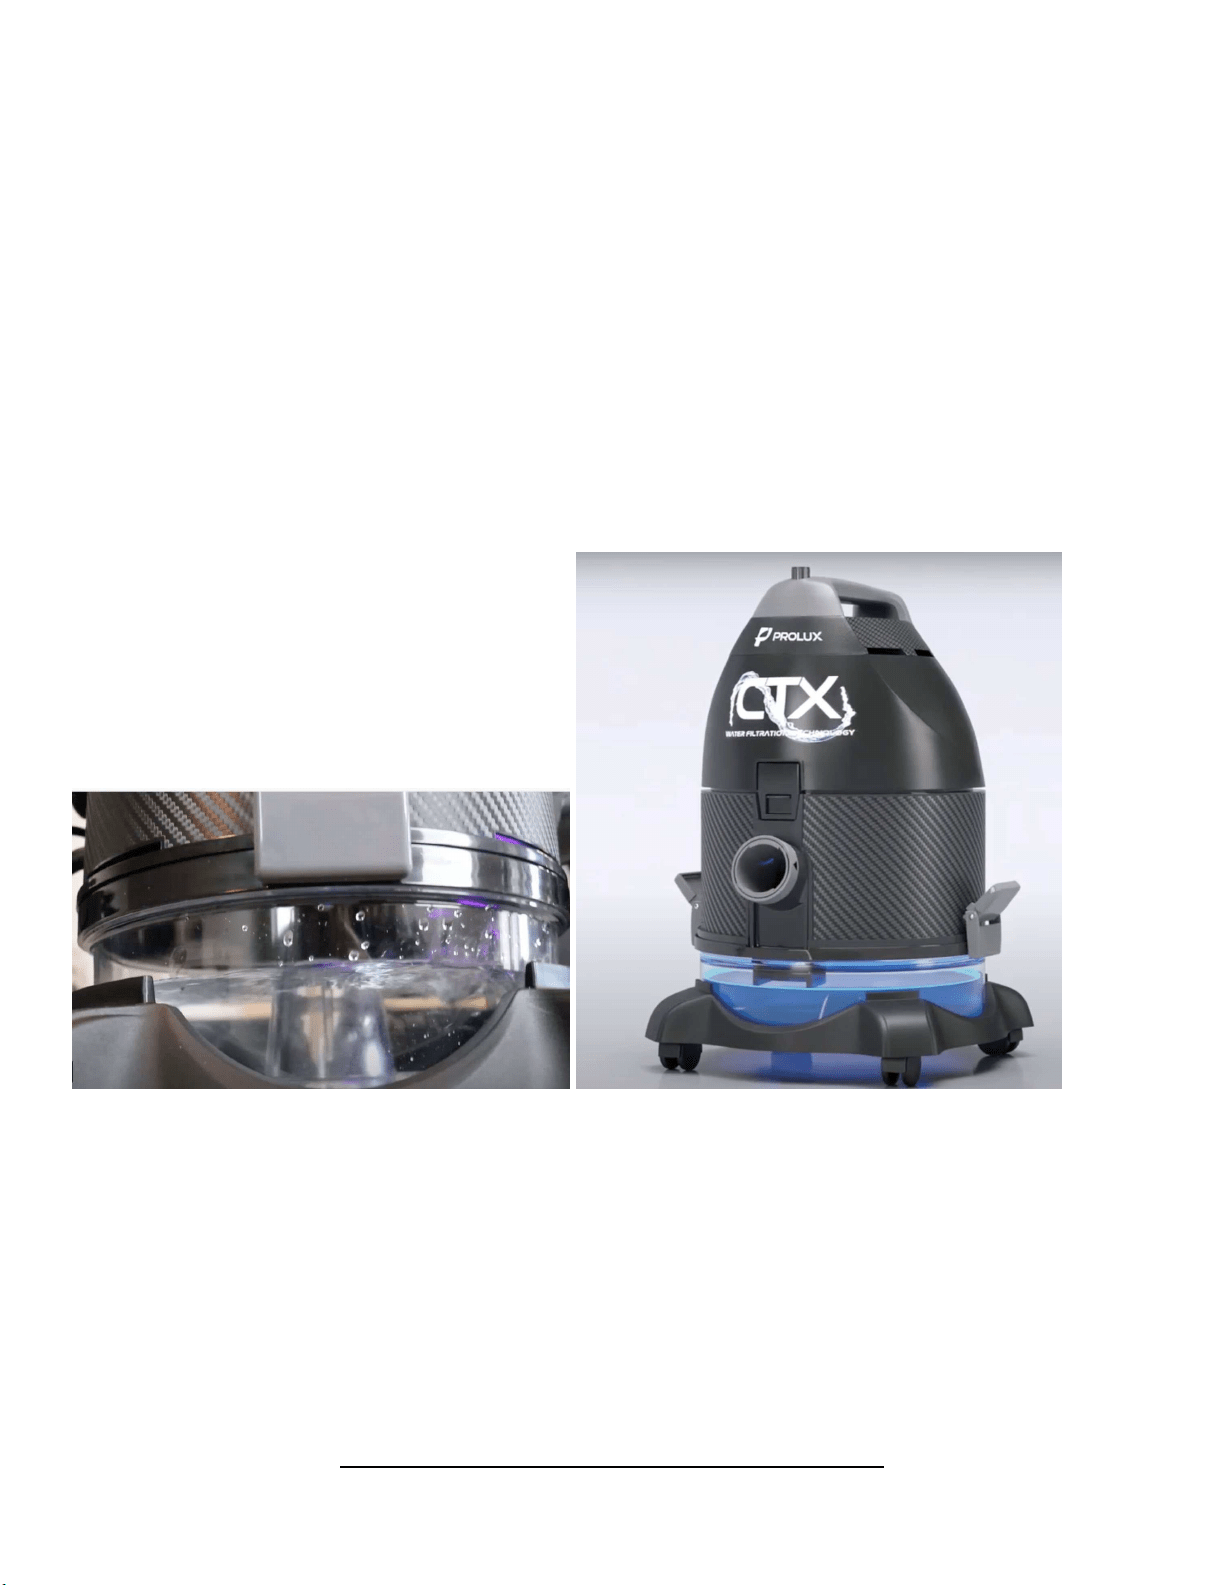
Why did my new CTX pick up so much more dirt than my old vacuum?
The above image is from an actual customer the first time they vacuumed with their new Prolux CTX. What
did yours look like? We love reviews with pictures like this!
The reason is most vacuum cleaners only have 70 CFM of suction power (stick vacuums and robot vacuums are
WAY less than that). However, the Prolux CTX has an amazing 130 CFM of deep cleaning power, so it picks
up what was left behind.
SAFETY INSTRUCTIONS

8
When using an electrical appliance, basic precautions should always be followed, including the
following: READ ALL INSTRUCTIONS BEFORE USING THIS APPLIANCE
WARNING: To reduce the risk of fire, electric shock, or injury:
• This appliance is for indoor use only. Do not use outside or store in wet places.
• This appliance is for household use only.
• DO NOT let children use without adult supervision. This appliance is not a toy.
• DO NOT leave appliance unattended when plugged in. Unplug from outlet when not in use and before
emptying the water container.
• USE ONLY as described in this manual. Use only manufacturer’s recommended attachments.
• DO NOT use with damaged cord or plug. If appliance is not working, as it should, has been dropped,
damaged, left outdoors, or dropped into water, contact customer service.
• DO NOT pull or carry by the cord, use cord as a handle, close a door on cord, or pull cord around sharp
edges or corners. Do not run appliance over cord. Keep cord away from heated surfaces.
• DO NOT unplug by pulling on cord. To unplug, grasp the plug, not the cord.
• DO NOT handle plug or appliance with wet hands.
• DO NOT put any objects into openings. Do not use with any opening blocked; keep free of dust, lint,
hair and anything that may reduce airflow.
• KEEP hair, loose clothing, fingers, and all parts of body away from openings and moving parts.
• USE EXTRA care when cleaning on stairs.
• NEVER use to pick up flammable or combustible liquids such as gasoline or use in areas where they
may be present. See section PRECAUTIONS WHEN VACUUMING LIQUIDS.
• ALWAYS turn off this appliance before connecting or disconnecting either hose or motorized nozzle
(optional).
• TURN OFF all controls before unplugging.
• This appliance is provided with DOUBLE INSULATION. Use only identical replacement parts. See
instructions for SERVICING OF DOUBLE INSULATED APPLIANCES.
• DO NOT suck up anything which is burning or smoking, such as cigarettes, matches or hot ashes.
• Before turning on this appliance, make sure the motor unit latches are tightly secured to the water bowl.
Failure to do this could cause a risk of injury and would defeat the utility of the appliance.
• Your CTX is provided with a safety interlock switch to prevent operating the appliance without
attaching the water container. Because the turbine operates at high speed, this is to protect you from
coming into contact with the moving Hydro Turbine.
GENERAL PRECAUTIONS & RECOMMENDATIONS

9
• DO NOT plug the CTX into the receptacle of an incandescent light bulb or use extensions cords with
less electrical capacity than needed.
• The CTX must not be used to clear sewers. An explosion may occur if the machine suctions sewer
gases.
• You must NEVER touch a metallic kitchen sink or washbasin or water pipelines with one hand while
holding the machine with the other hand. The danger is greater if the person’s skin is wet.
• Take special care when cleaning stairs.
• ATTENTION: It is not recommended to use the CTX for cleaning chimneys or open stoves, or other
devices that have oil or grease, for example, soot or ashes, clay dust, plaster or other similar materials
that are resistant to water action. It must also not be used for vacuuming toxic or volatile substances or
near any of these.
PRECAUTIONS WHEN VACUUMING LIQUIDS
Always consider the following precautions:
• DO NOT operate the machine with wet hands or feet or barefoot.
• NEVER use to clean up liquids outdoors, or on dirt.
• NEVER vacuum liquids when you are stepping on water or a wet floor. If it should be necessary to step
on a wet or damp floor to pick up water, do not touch the metallic parts of ANY electric device, lamp or
switch while performing this operation.
• DO NOT carry the machine with your hand while using the machine for cleaning operations.
• The water container must be empty BEFORE you begin picking up liquids.
•
DO NOT vacuum more than 2.8 liters (3 quarts); the water level must NEVER be above the center post
inside the bowl. Excess water in the bowl will cause shaking and vibration and will also cause the
vacuum to suck the water up into the motor. If this occurs, the vibrations are your warning the water
container is overfilled and to shut the motor off immediately.
•
NEVER vacuum water with the electrical hose. Instead use the non-electrical hose for vacuuming up
water.
SPECIAL CARE & SAFETY INSTRUCTIONS
WATER: Do not operate the CTX for too long without changing the water. When you notice that the water is
10
getting too full of dust and fuzz, dump it out and replace it with fresh water. The correct level of water is that of
the height of the central post of the water container.
WATER CONTAINER: ALWAYS empty the water container after each use, which the water bowl may need
to be emptied several times during use depending on the size of the area being cleaned. When you finish
cleaning your house and the water bowl has been cleaned always store the main motor housing OFF of the
water bowl to avoid rust and mold growth.
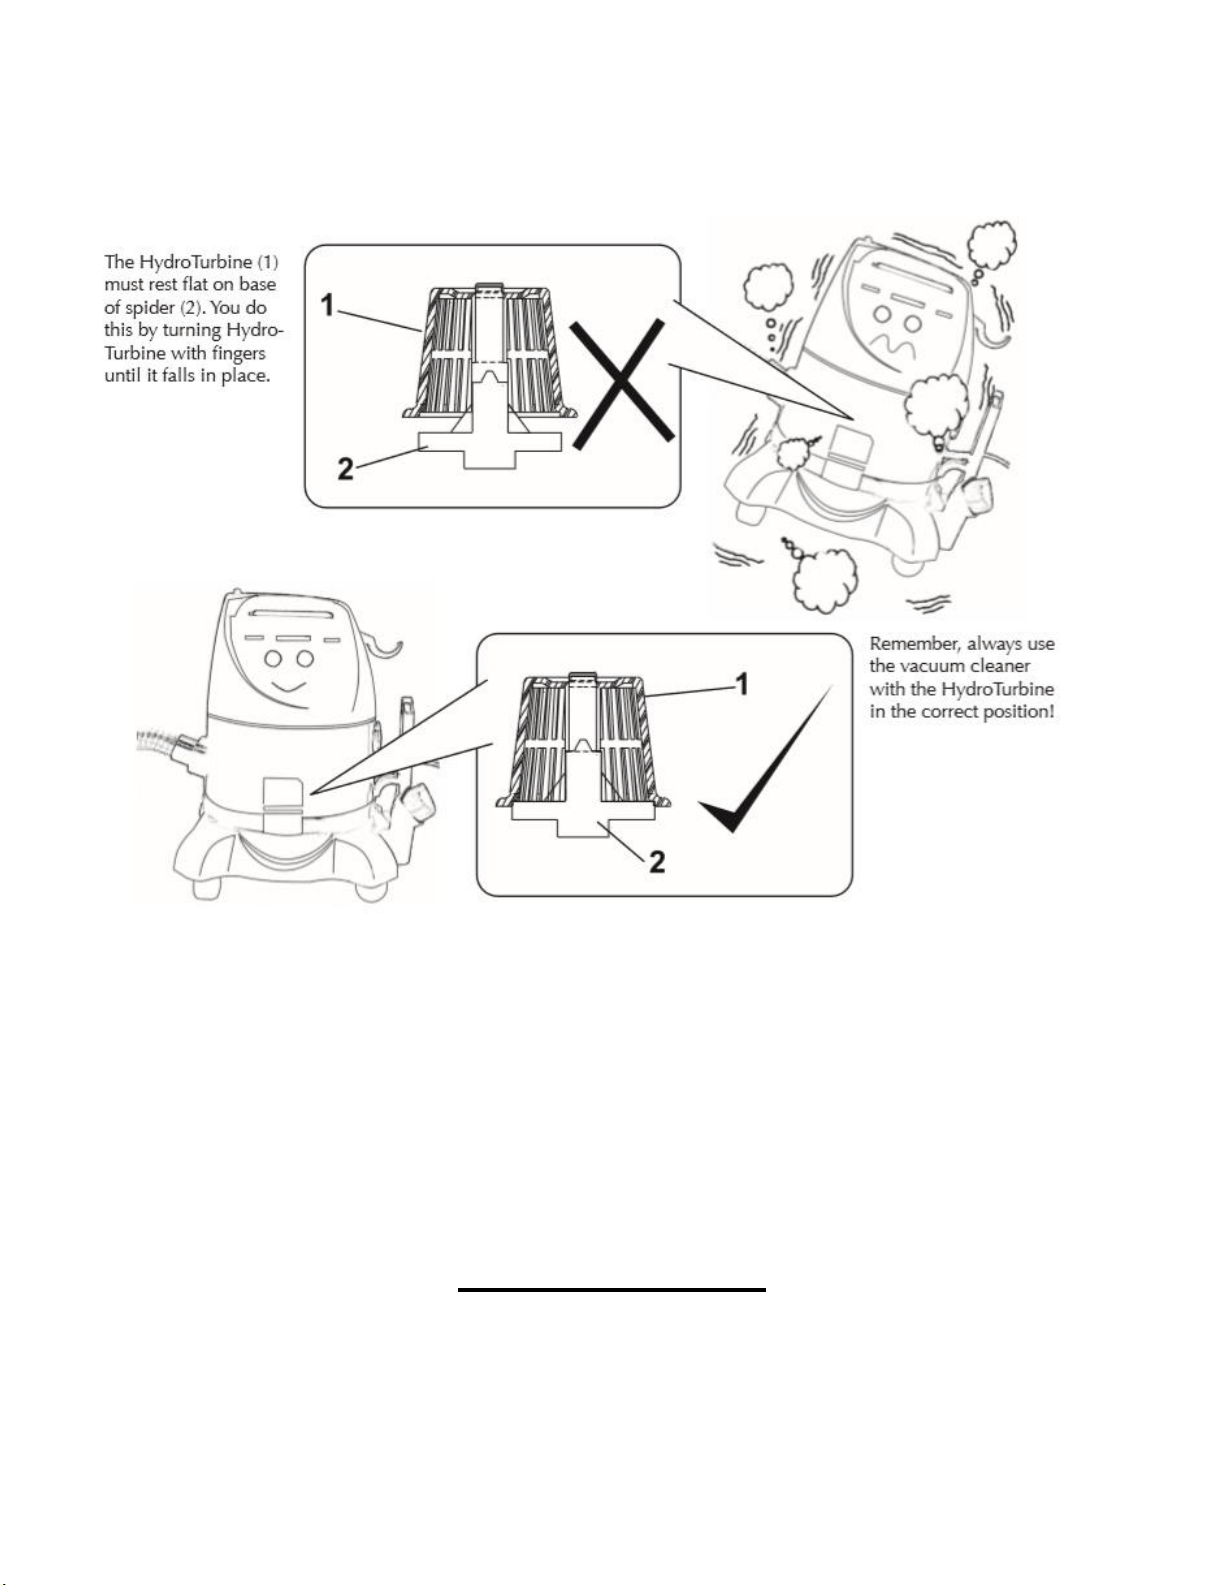
THE HYDROTURBINE IS THE HEART OF YOUR MACHINE: After vacuuming, unplug the CTX from
the power outlet. Remove and clean the Hydro Turbine monthly. Wash it inside and out with soapy water and a
stiff bristled toothbrush. Dry it completely and put in place again. Tighten the nut by hand until the flat surface
of the Hydro Turbine is properly adjusted. Do not over tighten, as the Hydro Turbine automatically tightens
upon starting the machine. The Hydro Turbine is the key for separating the dirty water from the airflow and
proper care is important for the performance of your appliance.
If the Hydro Turbine should become damaged (CHIPPED OR BROKEN), replace the Hydro Turbine with a
factory-made turbine from the manufacturer. WARNING: The CTX must NEVER be used without the Hydro
Turbine. Always place it back after cleaning it.
SERVICING OF DOUBLE INSULATED APPLIANCES: For your safety and protection, your CTX is a DOUBLE INSULATED
appliance. NEVER attempt to service the electrical parts of the appliance. There are special requirements for servicing DOUBLE
INSULATED appliances and failure to do so can cause safety hazards with your unit as well as voiding the warranty. All repairs
should be done by an authorized service center.
HYDRO TURBINE CARE
11
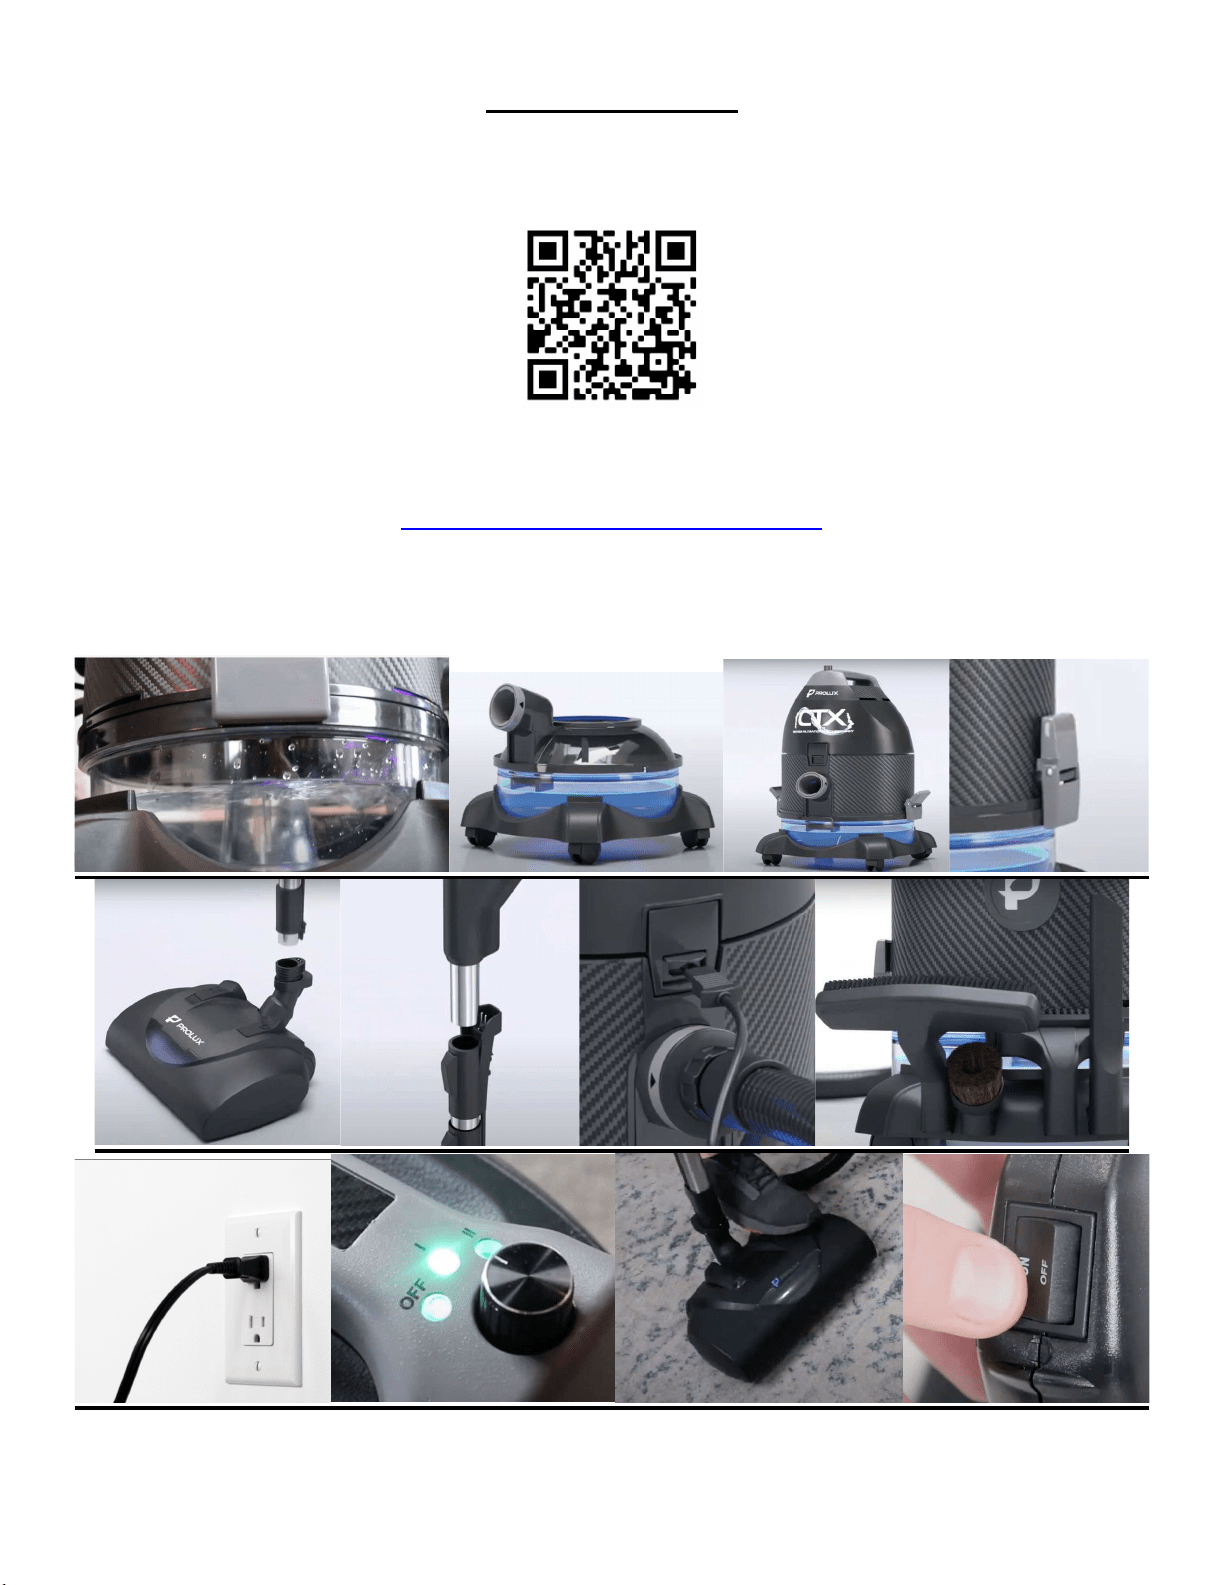
Description of Parts

12
OPERATION AND HANDLING
1. Power Switch
2. Power Hose Plug In
3. Suction Port
4. Hose/Cord Hanger
5. Water Bowl Latch
6. Water Bowl
7. Wheel Dolly
8. Electric Main Hose
19. Hard Floor Tool
20. Crevice Tool
21. Upholstery Tool
22. Duster Tool
23. Mini Turbo Head
24. Handheld Shampooer
25. Coil/Inflation Tool
26. Extension Wands
10. Hose Handle Release
11. Wand Extension Button
12. Main Wand
13. Wand Release Pedal
14. Height Adjuster
15. Pivot Release
16. Electric Powerhead
17. Tool Hose/Wet Pickup
13
General guidelines for using the CTX:
Fill up the water bowl with cold water until it almost covers the top of the central post inside the water bowl (fig
1) The motor unit is then placed on top of the water bowl (fig 2). The suction port of the bowl should be lined
up with the notch in the motor unit. The edge of the motor unit should firmly rest on the top of the water bowl
and be inside of the retaining ring for correct location, otherwise the machine will not work. This is because of
the safety switch located on the underside of the motor unit. Engage the two clamps, catch the lower latch piece
to the water bowl tabs and push the upper latch piece towards the motor unit locking the latches in place. Once
the water bowl has been latched to the motor unit place the machine on top of the wheeled base. Note: The
clamps will not operate properly if the motor unit is not in the proper position on the water container. If
the clamps do not operate easily, check the location of the motor unit.
Whichever hose you choose to use can now be connected to the water bowl port and locked into place. Just
insert the hose end into the port and twist to lock into place. You can now attach the wand(s) to the hose end
and then connect either the electric powerhead or any of the attachments to the wand end. Turn the vacuum on
with the power switch on top of the motor unit and you’re ready to clean.
WATER CONTAINER / HYDRO TURBINE
14
Using The Attachments
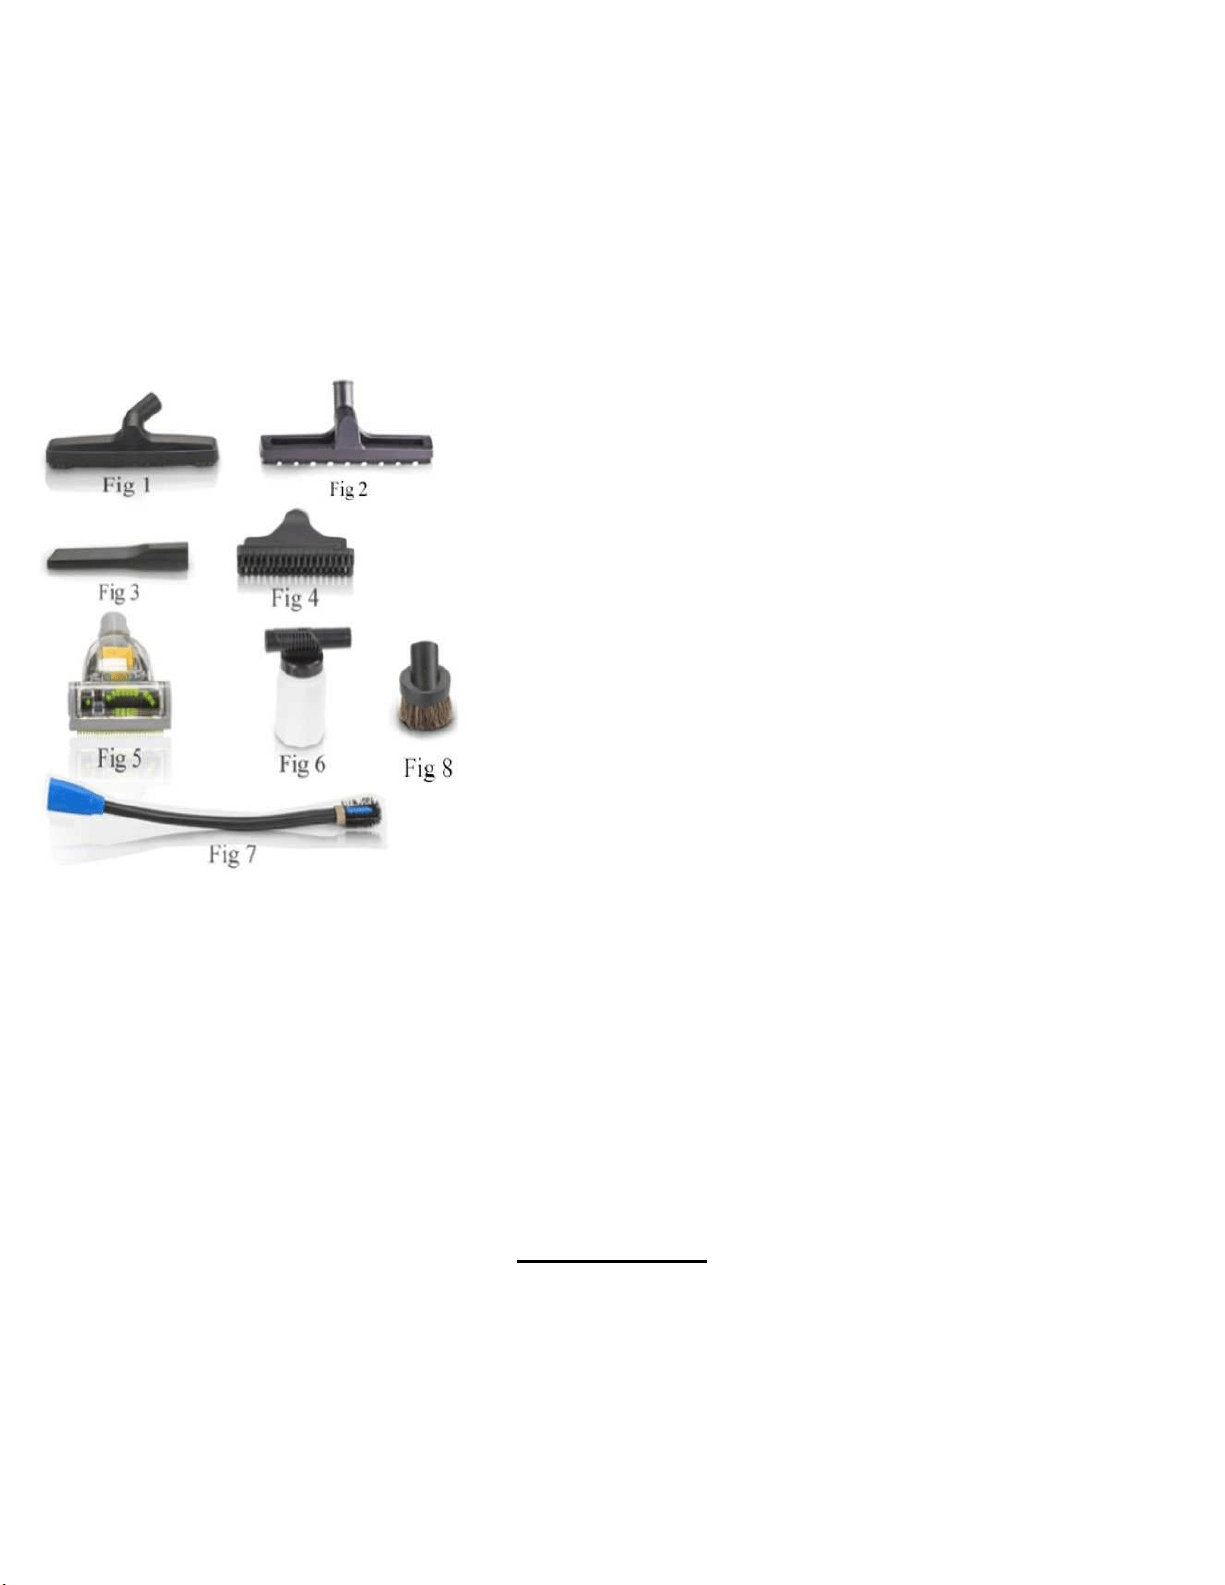
Floor Tool (Fig 1): Use the floor tool on hard floor surface when the powerhead is not needed. Can be attached to either the main
extendable wand or the included wand extensions.
Squeegee Floor Tool (Fig 2): Use for cleaning hard floors and for wet pick up. Works great for picking up wet spills or any liquid
To empty the water bowl:
1. Release both latches by pulling the upper part of the latch down and the
lower part up. You can then remove motor unit from the water bowl.
2. Carefully pick up the water bowl by the intake port end, remove it from
the wheel dolly and empty the dirty water into the sink or toilet.
3. If anything is left in the bowl after dumping place the heavier particles
in the bottom of the water bowl in the trashcan (such as wet fuzz)
4. Wash, rinse and dry the water container
5. Store the motor unit apart from the water container until next use so
both can fully dry out.
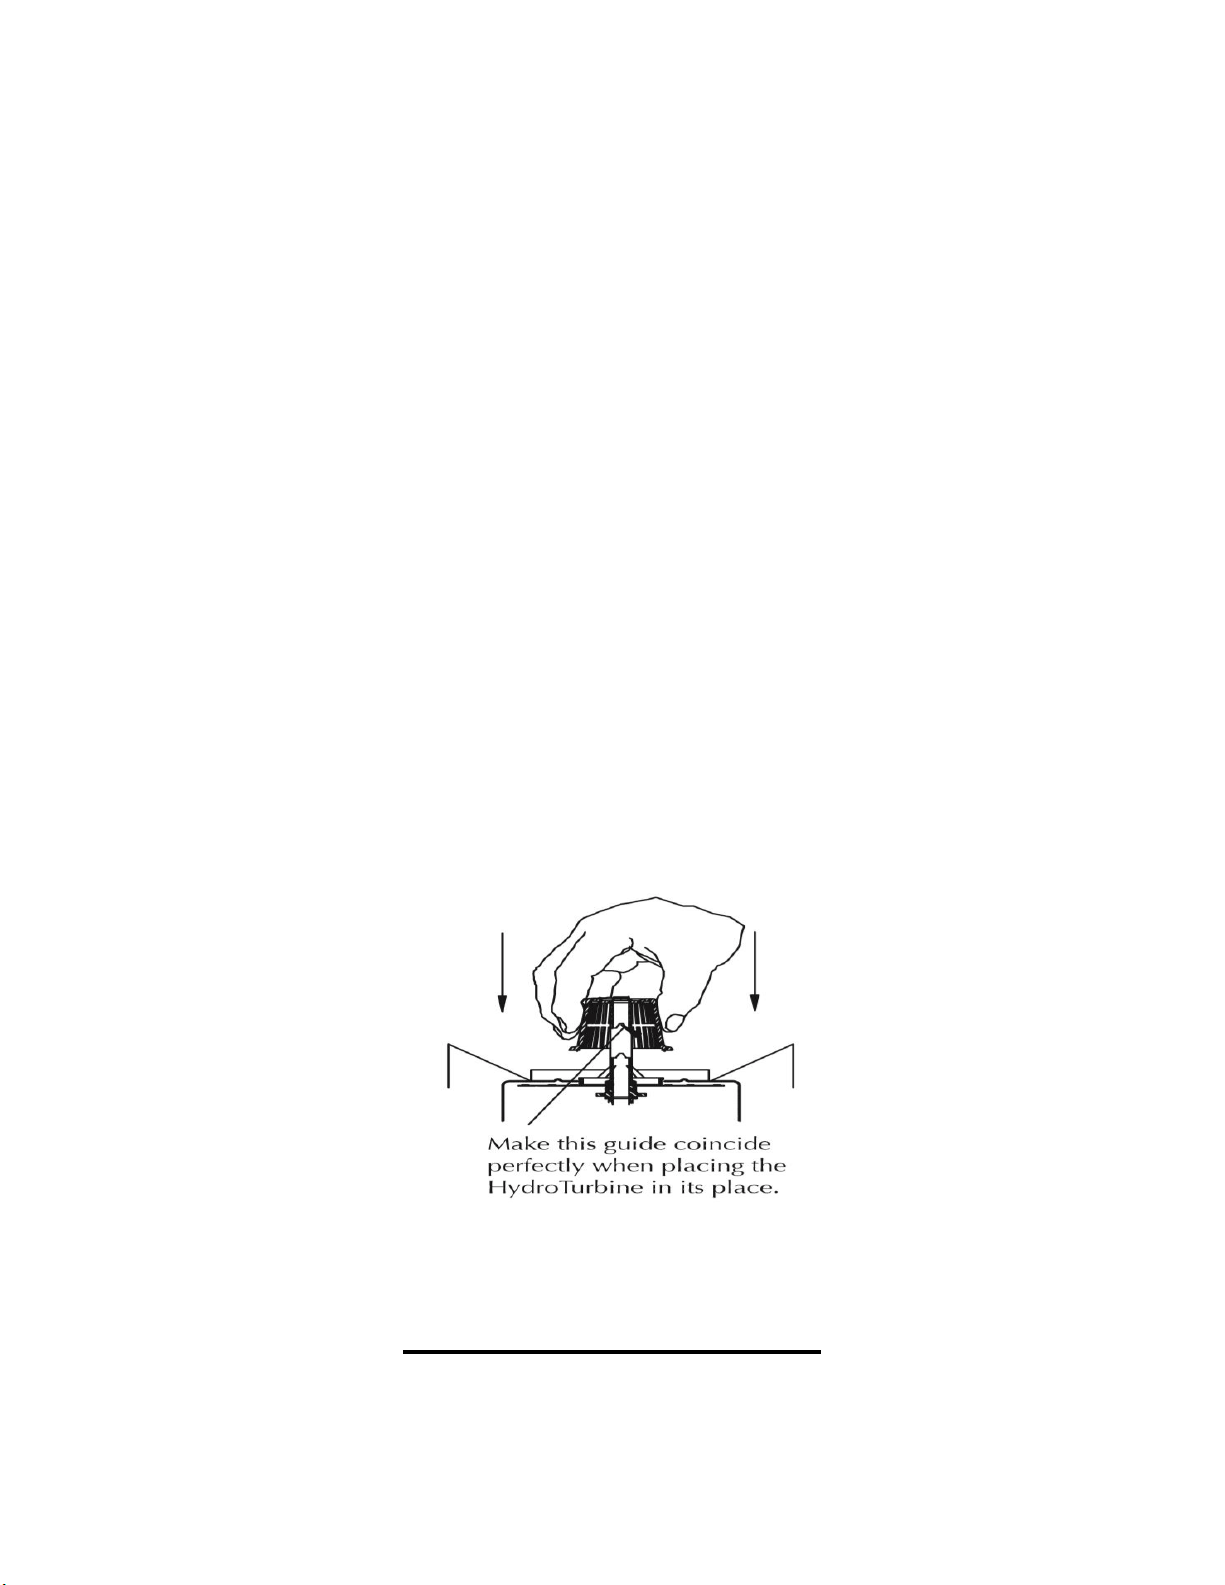
Care of Hydro Turbine:
Take out the turbine after each use and wash it inside and out with water
and soap, using a stiff bristled toothbrush to scrub the turbine clean. Dry it
and put it back in its place. Tighten the nut by hand until the turbine is
seated and the rim is flush with the rim of the metal casting of the motor.
Do not over tighten, as the Hydro Turbine automatically tightens up on
starting the machine.
WARNING: The Hydro Turbine must always be put back in its place
after cleaning. Do not operate the machine without the Hydro Turbine
installed.
15
on your hard floors.
Crevice Tool (Fig 3): Use for cleaning radiators, cracks & crevices along corners, and baseboards and in-between cushions.
Upholstery Tool (Fig 4): Use to clean upholstery, pillows, stairs or it can be used for dusting with the included slide on/off bristles.
Mini Turbo (Fig 5): This is the best pet hair tool in the business! Perfect for cleaning your upholstery, stairs and those hard-to-reach
places. This is the deluxe model with a geared belt, which reduces slippage and increases the life of your tool. Brush roll is designed to
sweep debris to the middle of the head for easy pick up. The swiveling bottom plate allows you to use this on
your floors as well. Fits
nearly any standard vacuum.
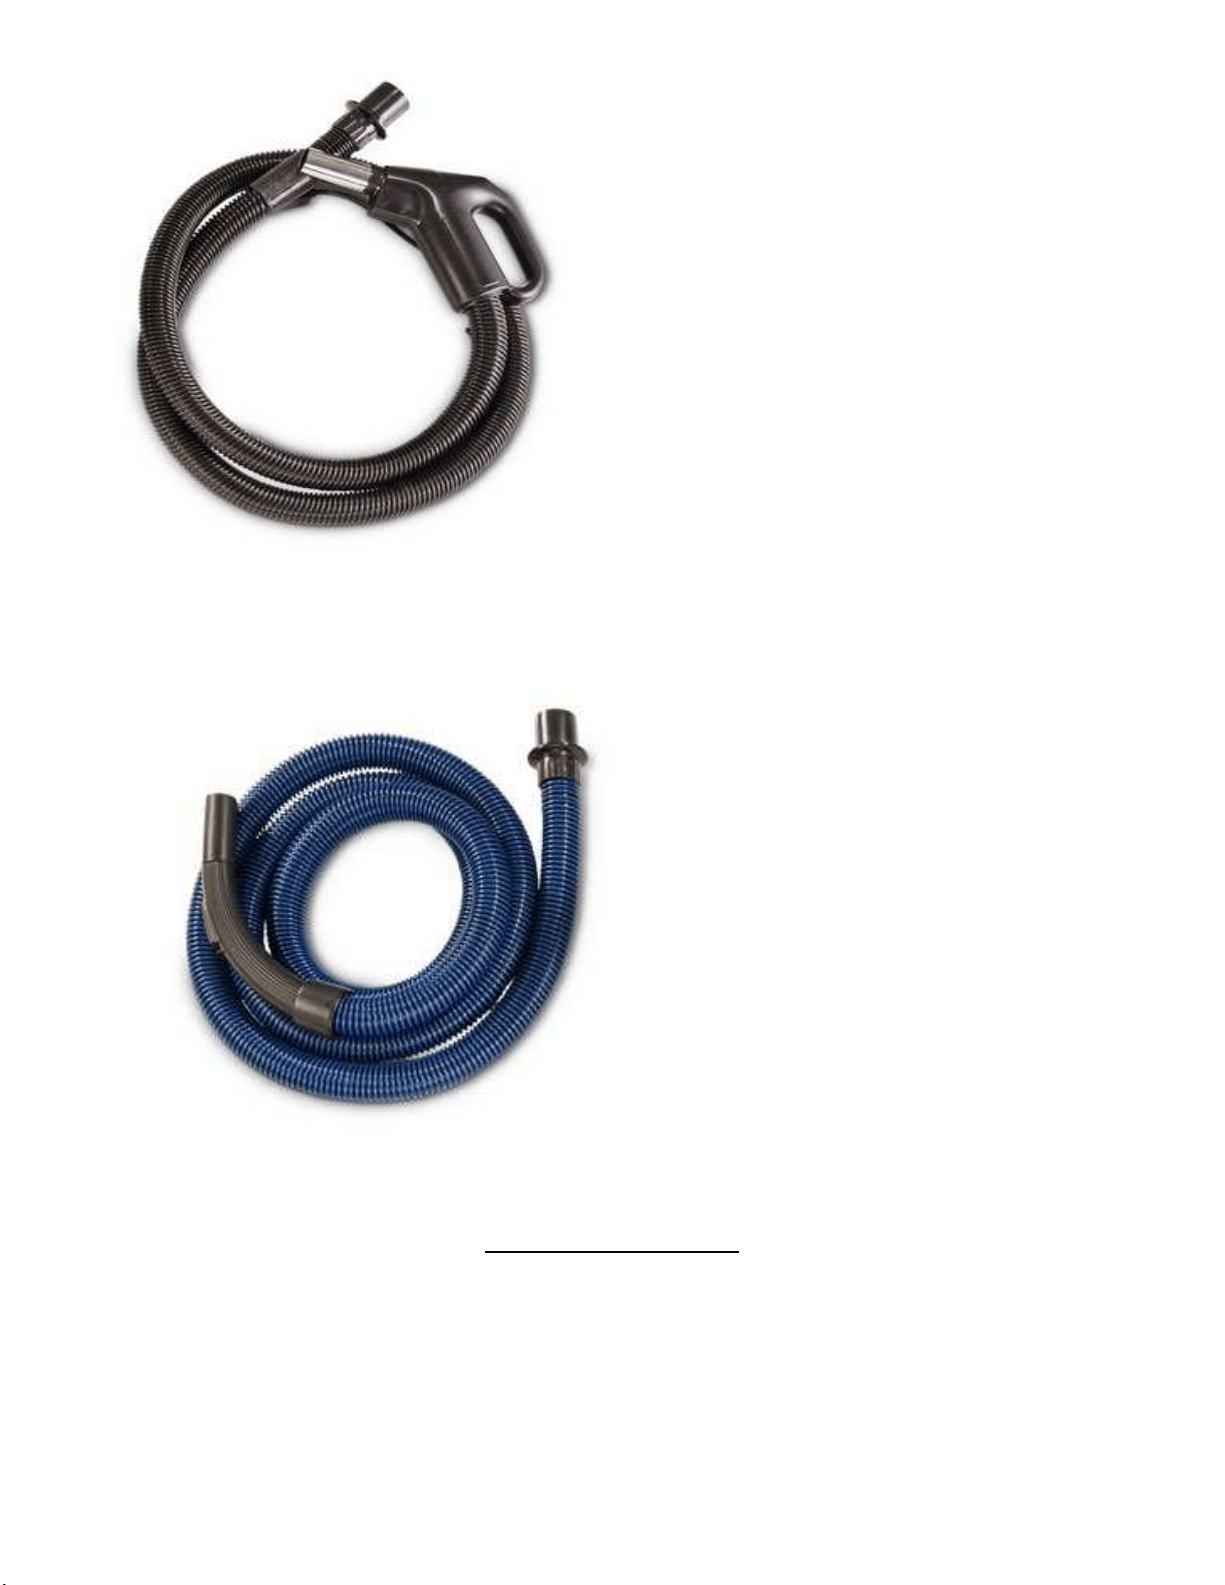
Using the Hoses
The CTX will come with 2 hoses, 1 electrical hose used with the powerhead for dry pickup and 1 non-electric
hose used with the attachments and for wet pick up. Both hoses can be used with the attachments, but generally
we recommend using the non-electric hose since it’s a lighter hose. NEVER use the electric hose for wet pick
up as this can put the user in danger of an electric shock since the hose is not insulated and made for wet pick
up.
Handheld Sprayer (Fig 6): This attachment works
great for those small areas that your regular sized
shampooer system is just too big for. Works great in the
car, on rugs, throw pillows, and furniture.
Blower/Coil Cleaner (Fig 7): This attachment great for
cleaning hard to reach areas. The bristled end makes it
especially easy to reach under your washer/dryer, behind
your fridge and even in your vents! This tool also works
great as an inflator and detailing.
Duster Brush (Fig 8): The duster brush can be used for
dusting any surface, but is best used for delicate or glass
surfaces
16
Using the Powerhead
MAIN ELECTRIC HOSE – Use with the
electric powerhead and other
attachments when needed. Just plug
the hose cord into the plug in on the
main motor unit and flip the switch
on the handle to the ON setting to
turn powerhead on
TOOL HOSE – Use this hose with
the attachments and extension
wands. This will also be the ONLY
hose you’ll use for wet pick up

17
USING
YOUR
VACU
Pivot Release – The pivot release pedal will
allow you to drop the head’s pivot. This
model of head has a safety feature where the
pivot has to be released in order for the
motor to turn on.
Height Adjuster – The height adjuster pedal
will allow you to adjust the height of the
head to accommodate any length of carpet.
With 5 height settings it’s easy to find the
right height for your carpet.
Head Pivot – Pivot and swivel neck,
fully articulating allows you to maneuver
the head with little effort. Will also allow
you to get under furniture to really clean
your carpet.
LED Headlight - Extremely durable, long
lasting LED Headlight will not fail like
conventional incandescent lamps. See
anything on your carpet other heads with
inadequate lighting wouldn’t allow you to
see

18
UM
REMEMBER THE FOLLOWING WHEN USING YOUR VACUUM CLEANER:
1. Before using the machine pick up by hand any hard or sharp objects such as pins, hairpins, thumbtacks, pieces of pencil, etc. that
could harm the spinning brush roll.
2. Do not lubricate the motor. The motor has permanent lubrication and is sealed.
3. Shut down the machine before connecting or disconnecting hose.
4. Do not use the machine to clean chimneys, open stoves, or other materials containing oils, grease, soot, ashes, clay dust, plaster or
other water-resistant materials.
5. Do not use the machine without water in the bowl unless you’re going to be using it for wet pick up. When being used for wet pick
up leave the water bowl empty since you’ll be filling it with the liquid being picked up.
Preparation:
1. Fill the water bowl with the required amount of water, which should be just below the stem in the bottom of the bowl.
NOTE: If you’re going to be using added fragrance oil add this to the bowl now
2. Ensure the Hydro Turbine is installed and in place correctly
3. Mount the motor unit onto the water bowl and lock it into place
Basic Functions:
1. Air Cleaning - Place the motor unit in a centralized area of the room and turn the power switch to the low setting. Let the
unit run for the desired time, which the size of the room will determine how long the unit needs to run for. Once the desired
time has been reached turn the unit off, empty the water bowl, clean and let it air dry. NOTE: Fragrance oils work great with
the vac when using it in purifier mode
2. Vacuuming – Attach desired hose, wand and powerhead or attachments. Turn the power switch on the main motor unit to
the high setting and begin to clean until finished or the water bowl needs to be changed and refilled. The water may need to
be changed several times depending on the size of the area, but you’ll always want to keep the water fresh so it’s able to filter
efficiently.
19
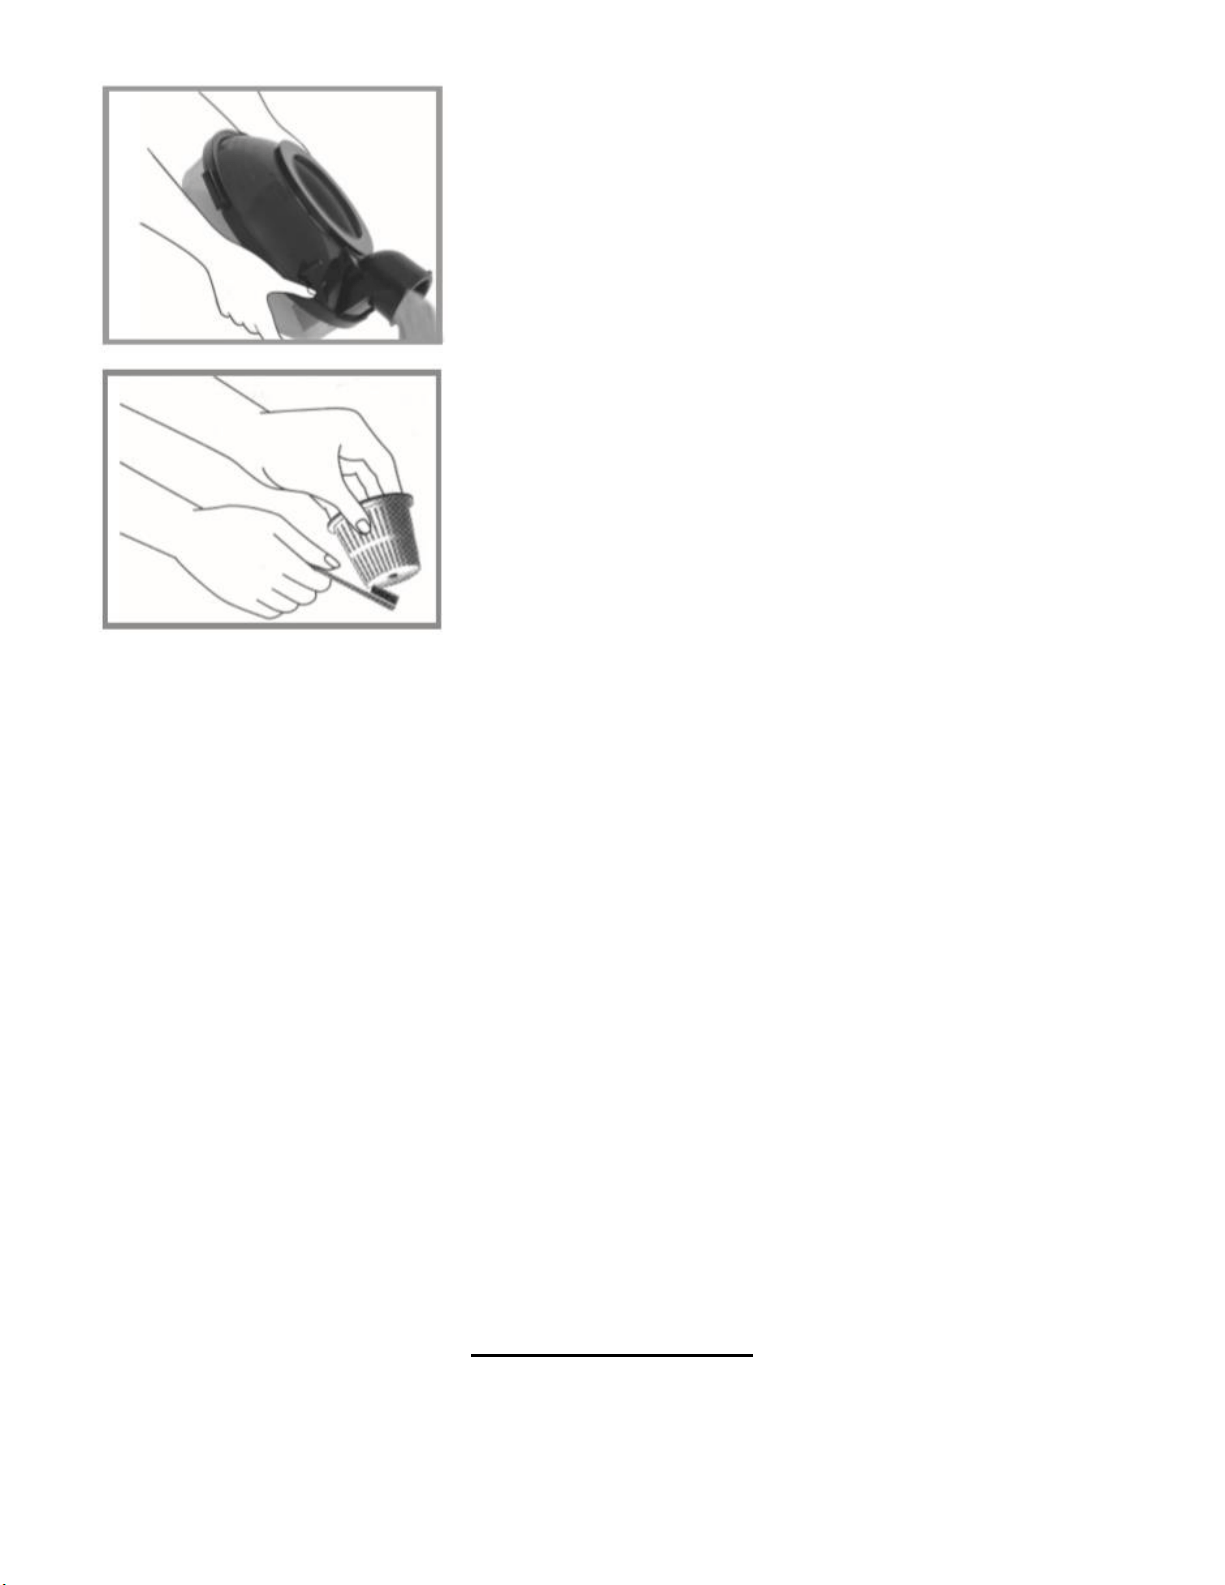
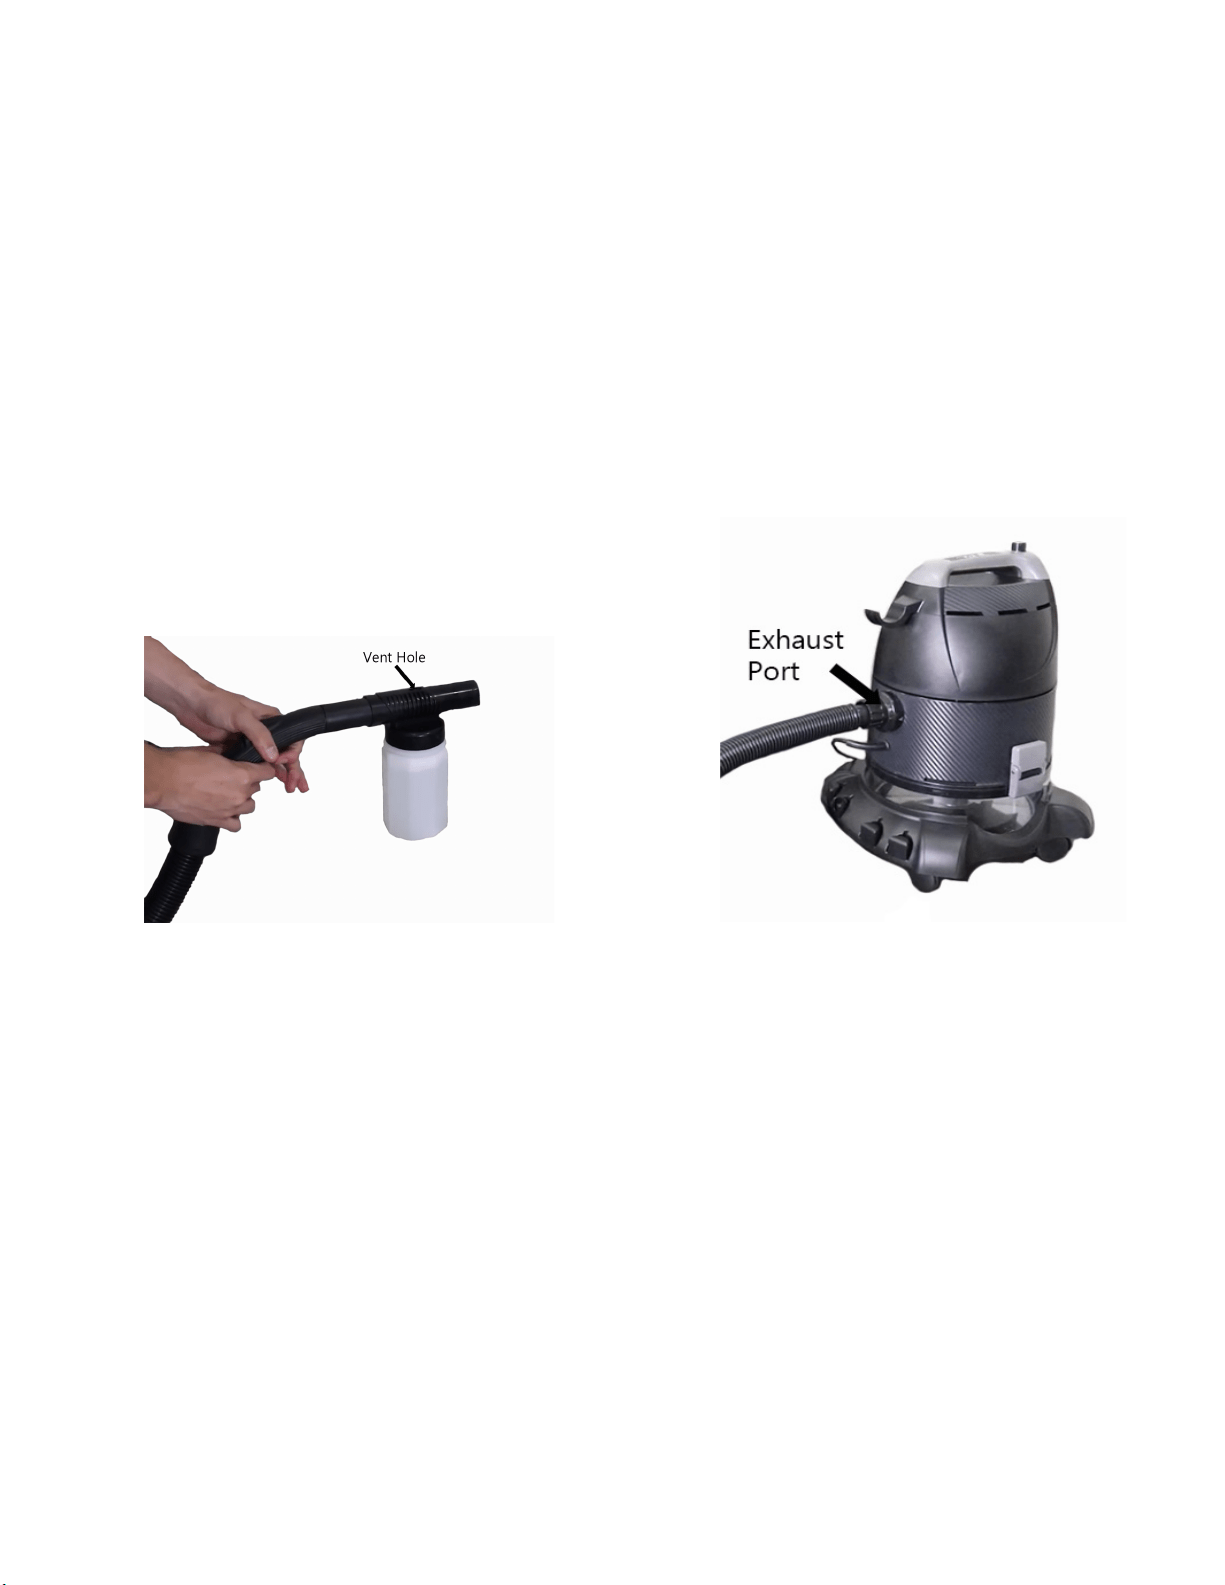
3. Handheld Shampooer – This attachment can be used to spray cleaning solution or shampoo onto your upholstery, carpets,
stairs, etc to then be hand cleaned. To use the sprayer simply fill it up with a mixture of water and cleaning solution or
shampoo, attach the sprayer to the end of the non-electric tool hose wand or the plastic wand extensions (Fig 1). NEVER use
this attachment with the electrical main hose as this will cause a risk of electrocution. ALWAYS use the non-electric tool
hose for any wet pick up or use with water attachments. At this time, you can then attach the canister end of the hose to the
exhaust port of the canister, so the vacuum now acts as a blower (Fig 2). Turn the vacuum on and cover the vent hole in the
top of the sprayer with your thumb (Fig 1). The air flow will now create pressure inside the sprayer bottle and will begin
spraying out the solution. Once the desired amount of cleaning solution/shampoo has been reached you can then let it sit for
a short time and can begin to clean the area with a clean rag.
Fig 1 Fig 2

20
Troubleshooting
WARNING: Never use a defective appliance. Always switch off the appliance and disconnect it from the outlet or remove the battery before you start to troubleshoot.
Problem Possible Cause Solution
Vacuum will not
turn on
Safety Switch is
Not Fully
Engaged
Check and make sure the water bowl is securely latched to the main
motor unit and the safety switch on the underside of the motor unit is
fully engaged. Manually engaging the switch is an easy way to test and
make sure the motor is still working properly.
Wall Outlet is
Not Supplying
Power
Test the vacuum on another wall outlet and check the fuse/breaker box
in your home.
Power Cord is
Damaged
Testing the cord with a voltage meter will let you know if current is still
flowing through the cord. If the cord needs to be replaced contact your
authorized service center for repair.
Suction power is
low
Water Bowl is
Full or Clogged
Check water bowl and empty/clean if needed
The Powerhead,
Wand or Hose is
Clogged
Remove the hose from the main motor unit and test the suction directly
from the motor unit. If the suction is strong reattach the hose only and
test suction at the end of the hose. If suction is weak, you’ve found the
clog and the hose can be attached to the exhaust of the motor unit to
blow the clog out. If suction is strong add on the wand and test again.
If the clog is found to be in the head you can try blowing out the head
using the motor unit exhaust air, or the head can be taken apart to gain
access to the internals and remove the clog. If you’re unable to find a
clog or regain suction contact your authorized service center for help.
Water Bowl is
Not Installed
Correctly
Remove main motor unit from the water bowl and reattach. Assure the
main motor unit and water bowl top are lined up and the motor unit
latches are aligned and latching down properly.
Vacuum makes
unusual noise or is
louder than usual
Possible Clog in
Water Bowl,
Hose, Wand or
Powerhead
See steps above for checking for a clog in parts mentioned

21
For more help or if you have any questions or concerns, please contact us directly at service@proluxcleaners.com
PROLUX LIFETIME LIMITED WARRANTY
The Prolux CTX vacuum is designed to last a lifetime. As such, Prolux warranties this product for its lifetime, for the original
owner, from premature wear or breakage due to manufacture defects in material and workmanship when utilized for normal
household use.
Subject to the following conditions, exclusions, and exceptions:
1. In order for the Lifetime warranty to apply, the original owner MUST register their warranty with a valid email address at
the link below within 90 days of original purchase.
https://proluxcleaners.com/pages/warranty
The reason Prolux does this is 1) To know who the original owner is and 2) The #1 killer of vacuums and cleaning appliances
is dirty filters, bags, water separator, or brush roll, which then in turn overheats the motor. By registering your warranty with
your email address, you will automatically get maintenance notifications when it’s time to maintain your vacuum. For
example, if it’s time to replace your filter or clean your brush roll, you will get an automatic email reminder (with a coupon).
The original owner never needs to buy anything to qualify for their lifetime warranty, but they do need to register for the
warranty to get maintenance reminders.
2. The Lifetime warranty of this product only applies to the original owner and is not transferable.
3. If the original owner does not register for the warranty, then the warranty period will automatically be set at 61 days from
purchase date.
4. Warranty Registration - If the original owner DOES NOT register for the warranty within 61 days of purchase, after 61 days
has passed and this product then needs warranty work, the original owner will be required to pay for all parts and shipping
costs of the claim. After a Prolux technician does the repair and inspects this product to be of appropriate quality, the original
owner will be given the chance after said repair(s) to then register for the warranty a 2
nd
time. At this time if the customer
chooses to register the Lifetime warranty will then apply going forward.
5. When used for commercial use, this vacuum will only come with a 1-year warranty and the Lifetime Warranty shall not
apply.
6. The Lifetime warranty shall not apply to defective parts failing because of misuse, neglect, accidents, abuse, or failure to
perform maintenance. The Lifetime warranty is designed to apply to normal use of this product. Below are 3 possible
examples of where the Lifetime warranty would not apply:
a. Example 1 – After filling up the water bowl with water, the user walks to the vacuum and accidentally drops the
water bowl on the floor and the water bowl cracks. This would not be covered by the warranty, as it is an “accident”.
However, in this case the user would contact
service@proluxcleaners.com
and they would sell them a new water
bowl (and provide a discount to the user).
b. Example 2 – 1 year after purchasing the vacuum, the user gets an email that its time to perform maintenance. As part
of that email, they are instructed to clean any hair and carpet fiber from around the brush roll. They ignore the email
and do not clean their brush roll. Over time, more buildup occurs around the brush roll and the power nozzle motor
overheats and burns up. The Lifetime warranty would not apply, as this would be “failure to perform maintenance”.
However, in this case the user would contact
and they would sell them a new power
nozzle motor (and provide a discount to the user).
c. Example 3 – The user vacuums up a toothbrush, which causes a restriction in the hose, and as a result a clog occurs.
The user notices the loss of suction and the vacuum seems to be running hot. Ignoring that, they continue to vacuum
anyway. A short time later the motor burns out. The Lifetime warranty would not apply, as this would be “misuse”.
However, in this case the user would contact
and they would sell them a new motor
(and provide a discount to the user).

22
7. When there is warranty work needing to be done, the original owner shall file a claim by sending an email to
. The customer will need to provide the original purchase date or order number, images of the
issue and a detailed description of the problem. For valid Lifetime warranty claims the Prolux Customer Service department
(or authorized service center) shall determine what parts to send and send those to the customer, along with a detailed video
of how to install the part. In the event sending a part cannot repair the issue, then the Prolux Customer Service department
may request the vacuum to be sent in for repair by an authorized Prolux technician. In either case, Prolux shall be responsible
for all costs including parts, labor and all shipping charges. There shall be no charge to the customer for valid Lifetime
warranty claims.
8. Product Discontinuation – No product stays in production forever. In the event that the original owner registers their warranty
and Prolux discontinues making this product, Prolux shall notify the original owner via email that the product will be
discontinued (giving the original owner time to stock up on any parts). IF the original owner needs warranty work AFTER
the product is not in production anymore AND Prolux cannot provide original or similar parts, then Prolux shall provide a
credit or refund (see table below). Prolux at their option may require the customer to ship back the vacuum for a credit or
refund (Prolux shall provide the prepaid shipping label) before credit or refund is issued.
Years since original purchase % of purchase price to be credited or refunded
0 to 1
90%
1 to 2
80%
2 to 3
70%
3 to 4
60%
4 to 5
50%
5 to 6
40%
6 to 7
30%
7 to 8
20%
8 to 9
10%
10 years and on
0%
9. Prolux Rebuild Program – As your vacuum gets older, nothing may be wrong with it and it still runs, but not as good as it
used to. This does not qualify the vacuum for any warranty issues, but it does qualify for our Prolux Rebuild Program. This
program is cheaper than buying new and allows you to ship your vacuum back to Prolux to be rebuilt to like new condition. If
you want to take advantage of this program, send an email to
service@proluxcleaners.com
requesting what exact parts you
would like rebuilt. Prolux will then give you a quote for the rebuild and provide shipping instructions.

23
Product Warranty Registration
Please use the link below to register your Prolux product:
https://proluxcleaners.com/pages/warranty
For more information on this product, including warranty info and to contact Prolux Customer Service, follow the link below:
https://www.proluxcleaners.com
Environmental tips
Once any electronic product is no longer functional, it should be disposed of in such a way as to cause minimum environmental
impact, in accordance with the regulations of your local authority. In most cases you can take such products to your local recycling
station.
