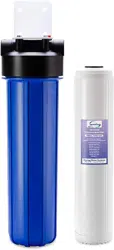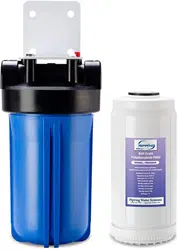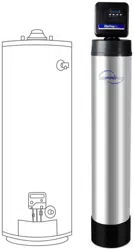

WF150K Whole House Central Water Filter
INSTALLATION INSTRUCTIONS
& OPERATING MANUAL Ver. 02/2020
Copyright ©2005-2019 ISPRING WATER SYSTEMS, LLC. All rights reserved.

Page 1
We stand behind our products
iSpring has been dedicated to providing high-quality drinking water to families across the United
States since 2005.
From various residential water filtration systems that purify your water in everyday life, to drinking
water faucets that deliver pure, healthy, and tasty water to you and your family, iSpring strives for
high standard products and aims to make excellent drinking water accessible for all households.
At iSpring, we strive for high standard products and aim to make excellent drinking water
accessible for all households.
With affordable pricing, reliable quality, prompt delivery, and top-notch customer service, we hope
to assist in bringing you great water for years to come.

www.123filter.com | (678) 261-7611 | support@123filter.com
Page 2
Prior to Installation
Read this instruction manual carefully prior to installation.
Keep this manual readily available for future reference.
Table of Contents
User Information ........................................................................................................ 3
Dimensions ................................................................................................................ 4
Product Operation & Specifications ........................................................................... 5
Before You Start ........................................................................................................ 6
Material Details ......................................................................................................... 7
Installation
Installation Requirements ........................................................................................ 10
Installation Instructions ............................................................................................ 12
Using the System
Programming the Central Water Filtration System................................................... 15
Operation of WF150K Central Whole House Filtration System ............................... 18
Care of Your Central Water Filtration System ......................................................... 21
Troubleshooting ....................................................................................................... 22
Warranty
Warranty and Registration ....................................................................................... 24

Page 3
User Information
The user must adhere to the installation specifications described in this Product Installation and
Operation Manual (hereinafter referred to as the “instruction manual”). iSpring is not responsible
for damage, loss, or injury resulting from neglect, improper maintenance, or unauthorized
modification of the unit.
● The unit should be placed only on flat surfaces. Do not mount on a wall.
● This product is designed for residential use only. Contact iSpring customer service to inquire about
using in non-residential settings.
● The operating temperature range is 33.8°F – 102.2°F. When the water temperature or ambient
temperature falls below 33.8°F, shut off the inline water supply, turn off the inline water adapter,
and drain the remaining water from the system. Failure of the water supply line or water purifier
may result in malfunction, damage, and possible injury to the enclosure or water supply line.
● In case of malfunction due to damage or failure of the power supply system, unplug the system
immediately and contact iSpring customer service.
● If leaking occurs, shut off the inline water supply by turning off the adapter, unplug the system, and
contact iSpring customer service.
● Use only authorized iSpring parts and filters. Using unauthorized or aftermarket components will
void the product warranty.
● This product is equipped with built-in systems to prevent internal leaks and minimize the risk of
water damage. However, it is recommended that users check external fittings and connections
regularly to ensure all components are secure.
● Unauthorized modification and disassembly are strictly prohibited and will void the warranty.
● Never touch the power cord connector when your hands are wet as this may result in electric shock.
www.123filter.com | (678) 261-7611 | support@123filter.com
Page 4
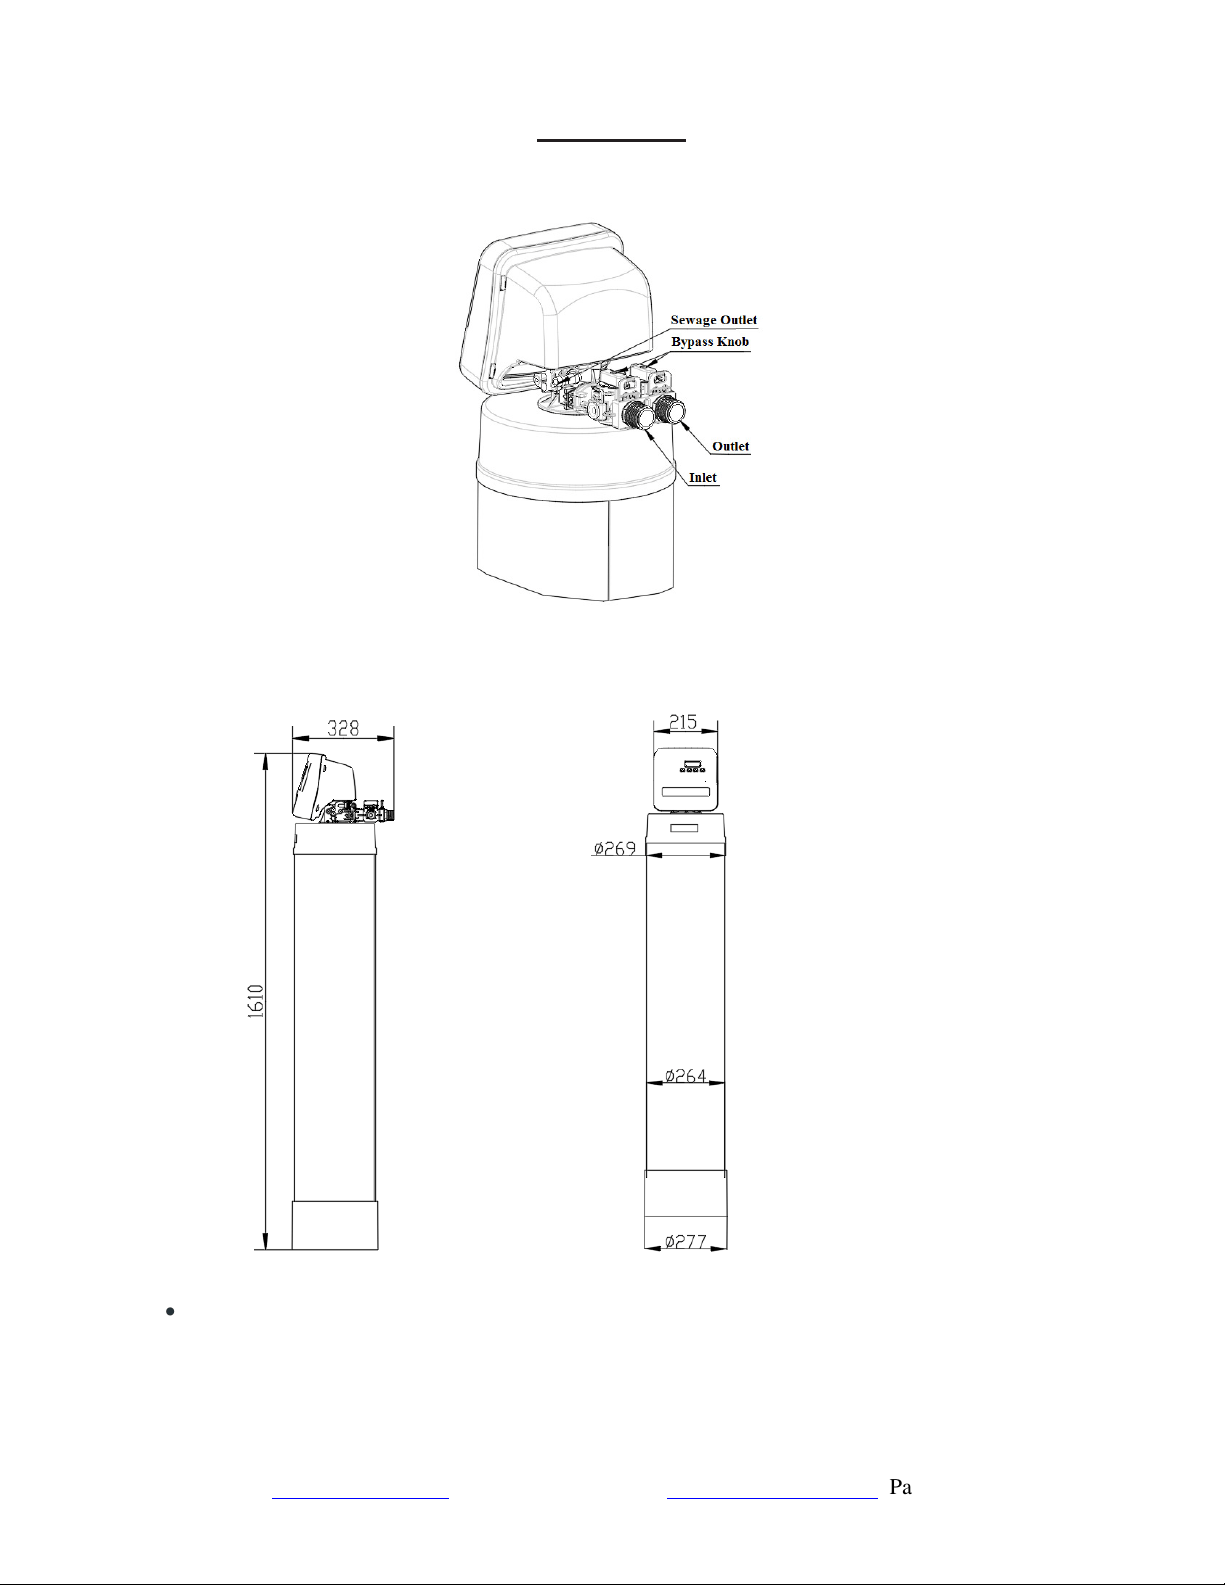
Dimensions
TOP VIEW
SIDE VIEW FRONT VIEW
• Note:all dimensions are in millimeters unless otherwise specified.
Page 5
Product Operation & Specifications
Though testing was performed under standard laboratory conditions, the actual performance of the
system may vary based on local water conditions and quality.
SPECIFICATIONS
Model WF150K
Hydrostatic Test Pressure 350 psi (24.15 bar)
Working Pressure Limits (minimum/maximum)
20 ~ 125 psi
(1.38 ~ 8.62 bar)
Water Temperature Limits (minimum/maximum)
33.8 ~ 102.2 °F
(1 ~ 39 °C)
Required Riser Pipe Diameter 1.050 inch (26.7 mm)
Electrical Adapter
Input: AC120V, 60Hz
Output: AC12V, 650mA
Pressure Tank Thread 2 1/2″ NPSM
Inlet/Outlet Connector 3/4″ NPT
*Independent 3
rd
party laboratory test data.
www.123filter.com | (678) 261-7611 | support@123filter.com
Page 6
Before You Start
Warning
This system can only be used with 120V/60Hz unidirectional AC power.
Do not place anything over the power cord and set the unit where the power cord will not be
stepped on or tripped over.
Electric shock hazard: Do not overload sockets or extension cords.
If there is smoke, abnormal odor, or abnormal noise in this machine, immediately unplug the power
of this system to avoid fire or electric shock.
Do not touch the plug with wet hands to prevent electric shock.
Note
Product installation and use must strictly comply with the requirements of this manual. Do not
perform any operation on the product without reading and understanding the contents of this
manual.
Do not use water that is microbiologically unsafe or of unknown quality without disinfection before
or after use with this system.
Activation of this product indicates that the owner has carefully read, understood and accepted the
contents of this manual, including the safety notices and instructions.
Failure to operate the product in accordance with this manual may result in product damage, water
leakage, water seepage, and other losses.
With proper use and maintenance, the lifespan of the wading products manufactured by the
company is ten years, and 5 years for electronic products, filter materials, wearing pieces (such as
the seal ring) is one-time use. At that time, the user should stop using the original product or
component and immediately replace it.
For questions or concerns, call 1-678-261-7611 or email Support@123filter.com, or visit
www.ispringfilter.com/support.
Page 7
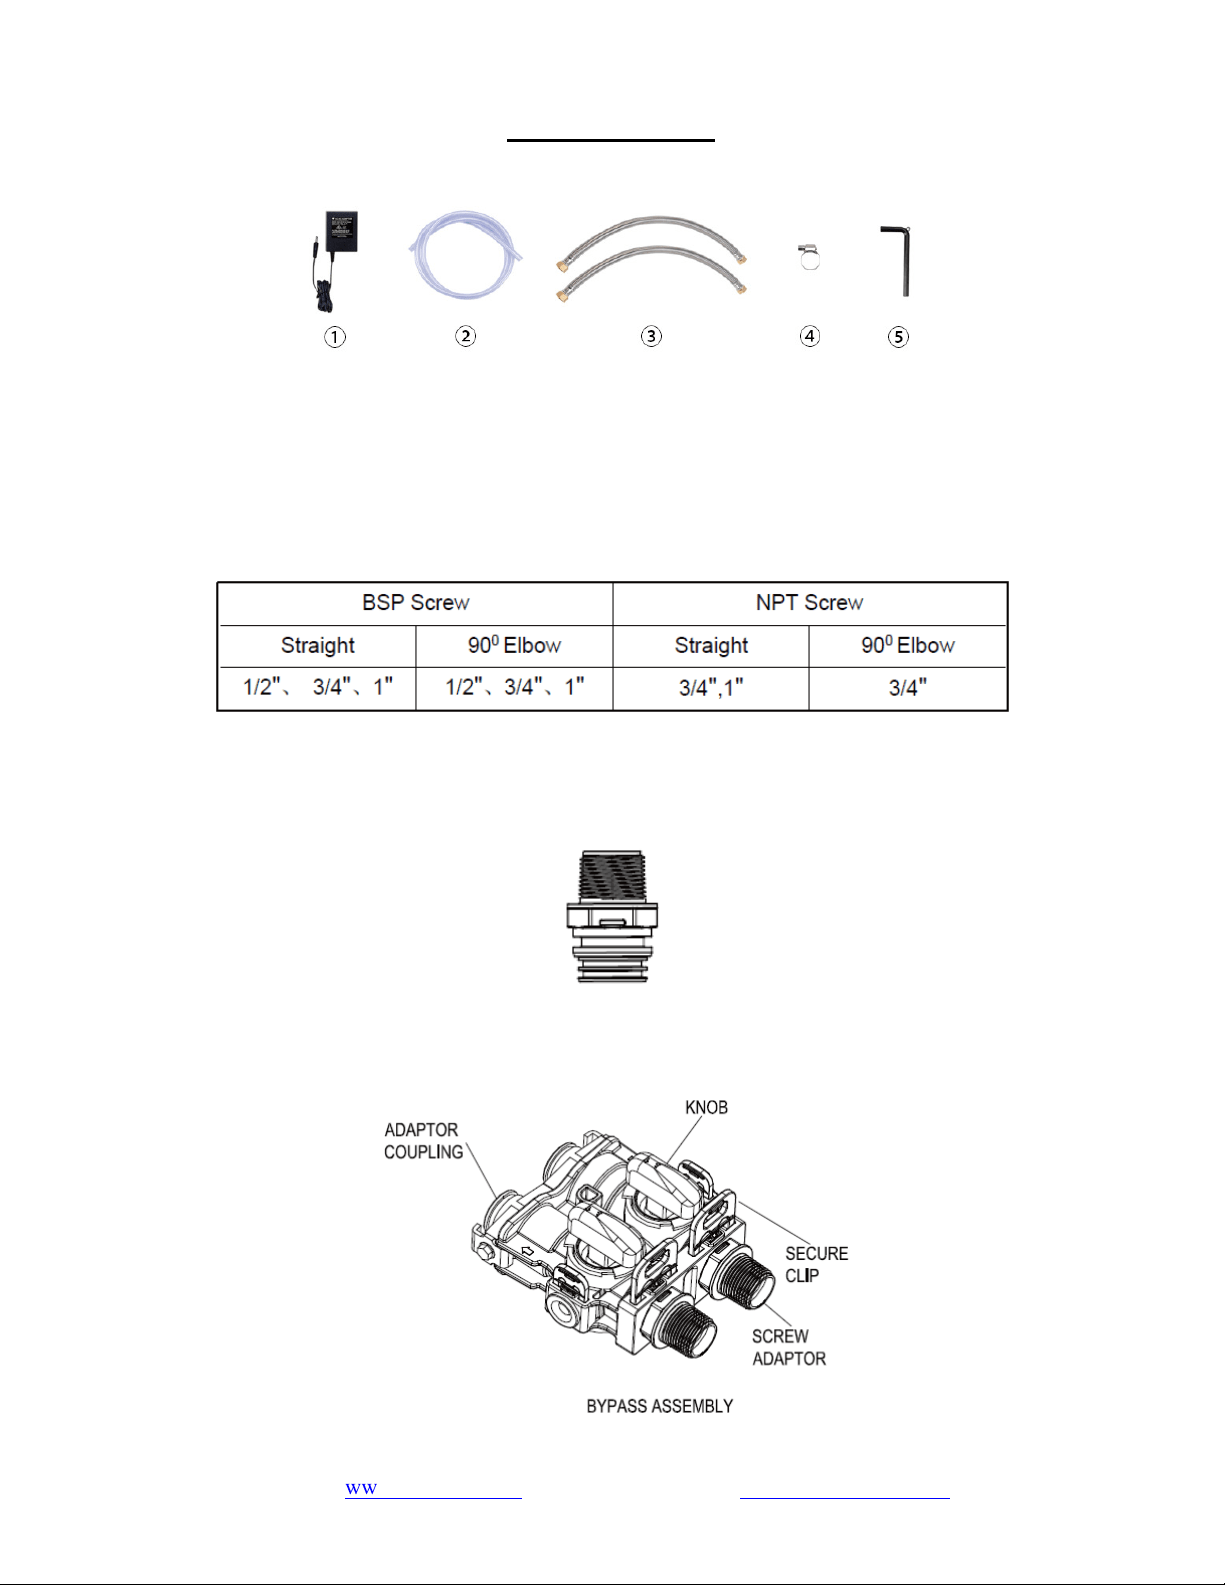
Material Details
1. Inspect Shipment:
One machine and its accessories are included: ① power adapter (white box, 1 pcs.) (adhered to the
base), ② sewage pipe (translucent pipe, 1 pcs.), ③ stainless steel braided hose (NPT6M connector,
2 pcs.), ④ stainless steel clamps (in the PE bag, 1 pcs.), ⑤ hex key (in the PE bag, 1 pcs.).
2. Inlet/Outlet Screw Standards:
3. Inlet/Outlet Screw Adaptor:
Connect Screw NPT6M
4. Inlet/Outlet Connections Types:
www.123filter.com | (678) 261-7611 | support@123filter.com
Page 8
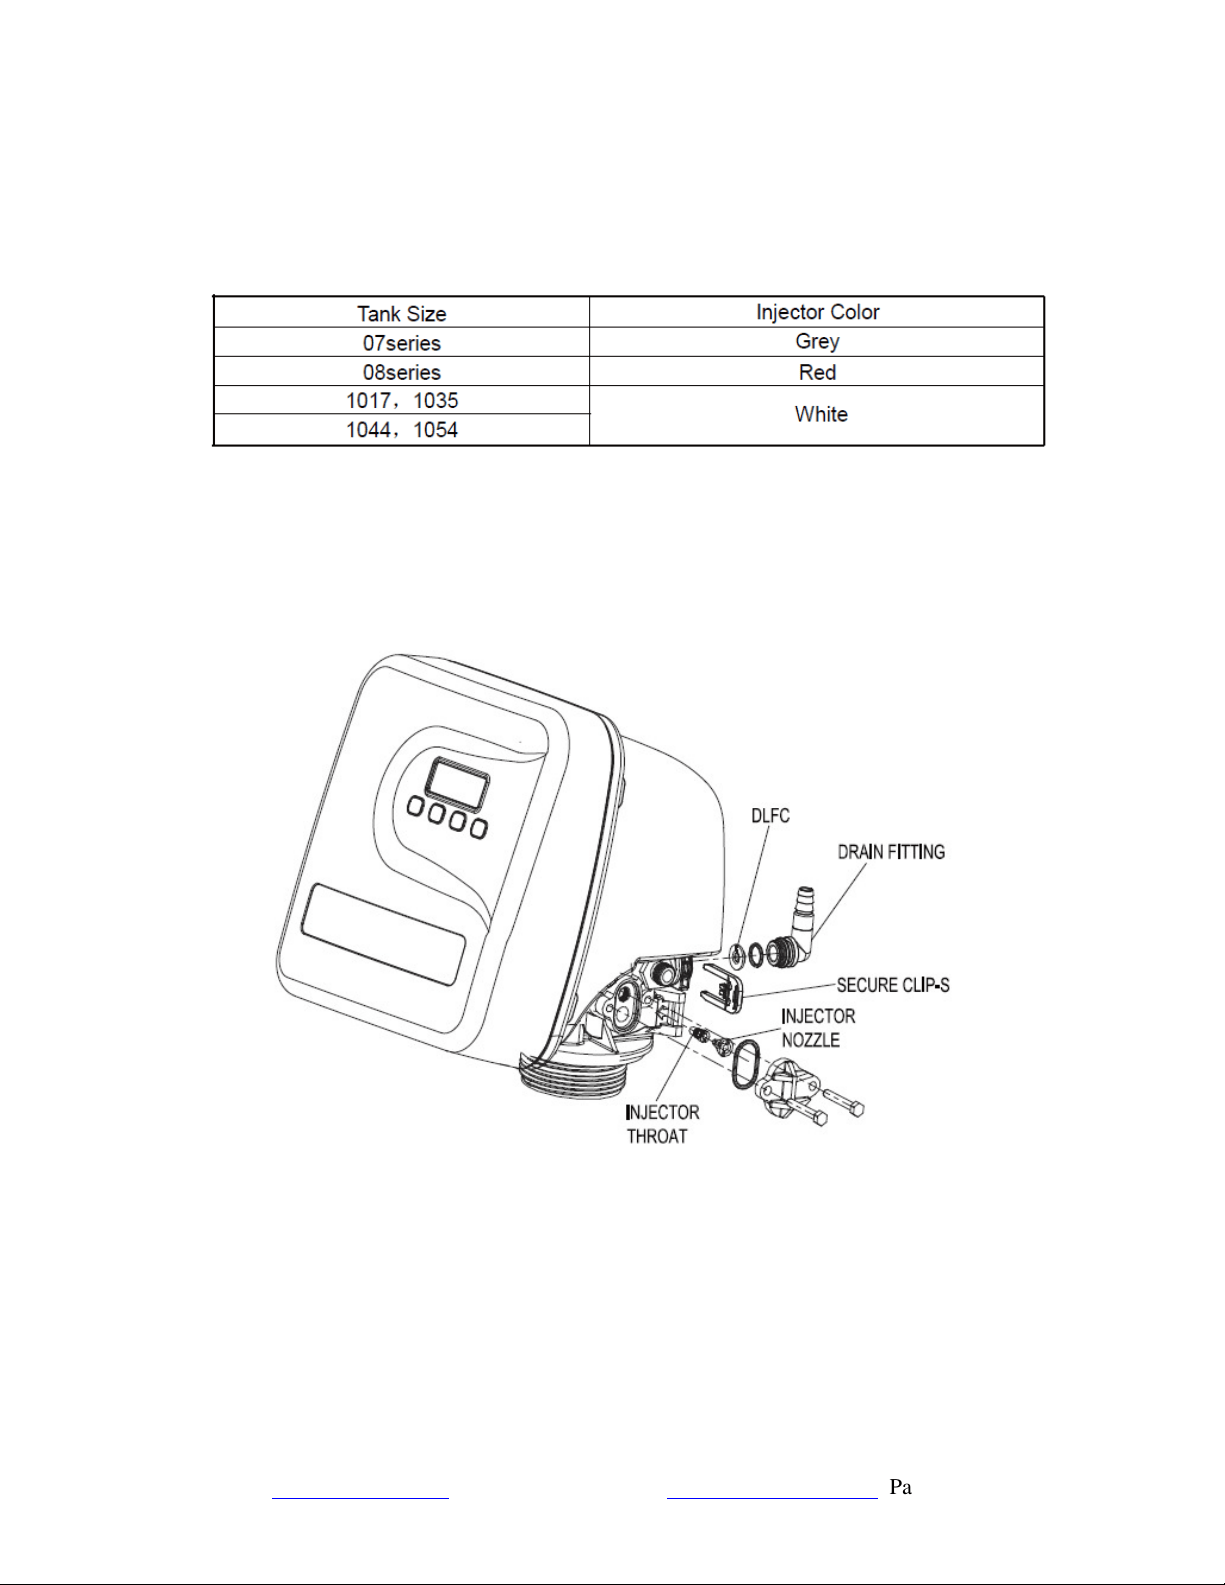
5.
Drain Line Flow Controls (DLFC) and Injector:
Different Size DLFCs are available for different tanks as follows:
Replace Injector and DLFC according to the following figure:

www.123filter.com | (678) 261-7611 | [email protected]om
Page 10
Installation Requirements
(1) Equipment Installation Conditions
The installation location should be well-ventilated and protected against wind and rain. Avoid
direct sunlight and radiation from any heat sources.
The relative humidity of the installation and use environment should not exceed 75% RH.
Equipment and pipes installed outdoors should be insulated and frost-proofed.
The inlet water must meet the water quality standard of municipal tap water. The water pressure is
to be 20 psi - 125 psi.
There should be a floor drain within 500mm of the installation position. Ensure the floor drain
remains unobstructed and is not tightly connected with the equipment’s sewage pipe.
There should be a sewage pipe with an outer diameter of DN50 PVC within 100 mm of the edge of
the material. This sewage pipe should remain open at all times.
If the equipment is installed indoors, the installation equipment must be equipped with water
leakage protection.
A 120V/60Hz five-eye power socket must be used. The product’s power supply and plug must be
installed in a wall position higher than 500 mm above the ground and equipped with proper
grounding, leakage protection, and waterproof devices.
The installation location should be level, and the ground bearing capacity should be greater than
300 kg/m
2
.
(2) Installation Precautions
During transportation, this product is strictly prohibited from being placed horizontally, and it
should not be inclined to less than 45°.
Ensure that there is proper space around the device and do not apply any external force to the
device or its connecting pipes.
Do not install this product near corrosive substances or gases, as this may cause the product to
corrode.
Do not place flammable items on or near the product.
All inlet and outlet pipes are recommended to use water pipes and fittings that meet the appropriate
standards of domestic drinking water. The connection of water pipes and circuits should comply with
national or industry standards, and the pipe connections should comply with relevant federal
installation regulations.
Be sure to pay attention to the height and placement angle of the pipeline when it is connected.
After the pipeline is properly connected, there should be no evidence of stress, so as to avoid damage
to the water pipe or the product due to the pressure of the pipeline after long-term use.
There must be sufficient space (about 10 cm) between the outlet of the sewage pipe and the sewage
to prevent sewage from flowing back to the product; the underground sewage pipe should be 30 cm
higher than the ground, and the sewage pipe should be fixed on the sewage pipe (do not insert the
sewage pipe directly into the sewage.

Page 11
www.123filter.com | (678) 261-7611 | support@123filter.com
If the water inlet pressure is higher than 125 psi, a pressure reducing valve must be installed at the
water inlet pipe of the water purifier. If the water inlet pressure is lower than 20 psi, a booster pump
must be installed at the water inlet pipe of the water purifier to ensure the working pressure meets
technical requirements. In addition, a pressure reducing valve or booster pump should be installed
between the water inlet pipe and the water supply pipe of this product.
During installation, pay attention to the direction of water flow, connect the inlet and outlet pipes
according to the inlet and outlet signs, and ensure there is no water leakage after installation.
Verify that the distance between the water outlet of the product and the water inlet of the water
heater is greater than 3 meters. If the connection distance of 3 meters cannot be guaranteed, it is
recommended to install a check valve between the water purifier and the hot water heater to prevent
hot water from causing severe damage to the purifier’s internal treatment system.
The installation and commissioning of all machines must be conducted only by a professional
technician.
www.123filter.com | (678) 261-7611 | [email protected]om
Page 12
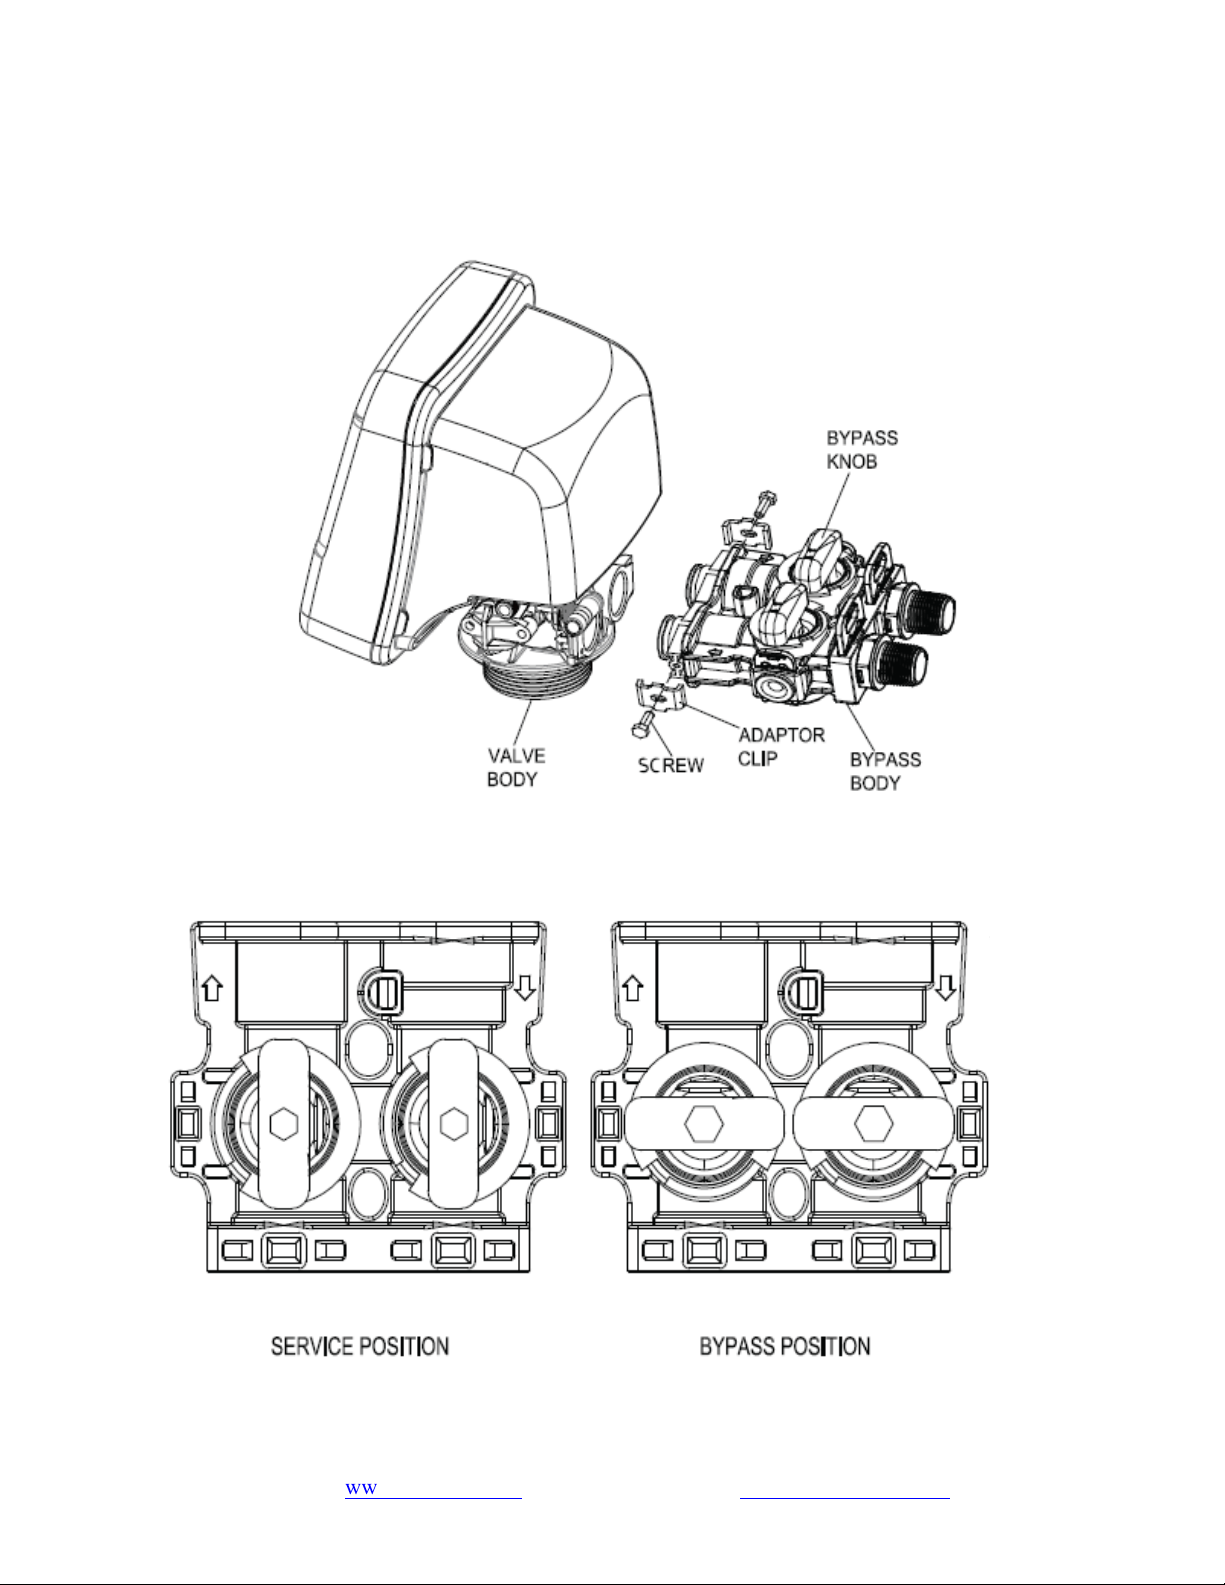
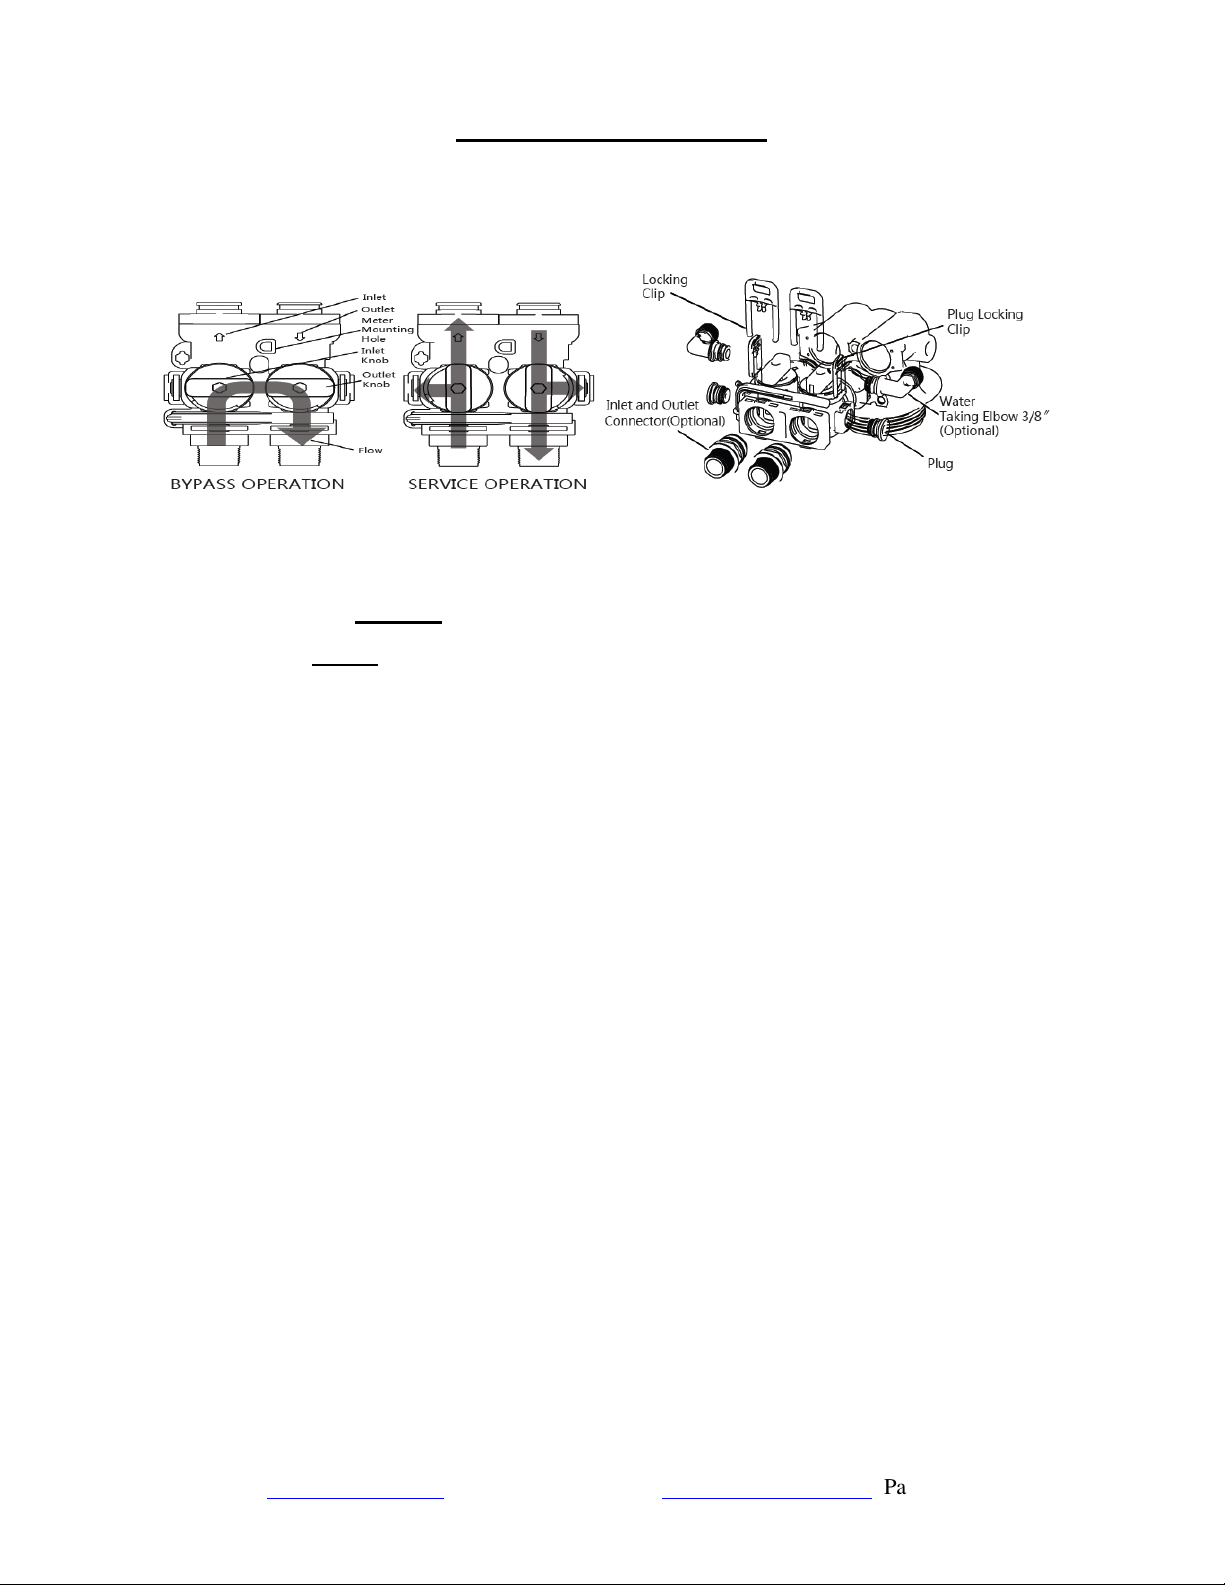
Installation Instructions
(1) General Bypass Installation
i. Hold the knob or use a bypass tool to rotate the knobs.
ii. Water supply will be bypassed when the knobs are horizontal.
iii. The bypass is in service status when knobs are oriented vertically.
iv. When the bypass is in service status, users can take raw water and filter water samples for testing at
the water taking port on either side of the bypass.
v. Mount the meter sensor into the meter sensor mounting hole. It can then achieve meter and control
functions after connecting the appropriate controller.
(2) Precautions Before Commissioning
Check whether the water inlet pipe and sewage pipe are connected as required. All piping
connections must comply with relevant national standards.
Fix the sewage hose onto the sewer pipe, but do not insert it directly into the sewer pipe. A gap of
100 mm shall be maintained with the bottom of the sewer pipe.
Check whether the pressure of the water source is within the range of 20 psi - 125 psi.
(3) Notes
i. The water pressure requirement is 20~125 psi. If the pressure is higher or lower than this, it is
recommended to install a pressure stabilizer.
ii. The operating ambient temperature requirement is 1℃~39℃. If the temperature is higher or lower
than this, heat preservation should be executed.
iii. Do not remove the clips when the system is in operation; relieve the pressure before removing the
clips.
This product should be installed out of reach of children.
Page 13
www.123filter.com | (678) 261-7611 | support@123filter.com
(4) Equipment Installation
Step 1. Confirm proper installation conditions, then unpack the equipment and verify that all
accessories are present. Prepare the installation tools and confirm that the water inlet and outlet
pipes, power supplies, sewage pipes, and floor drains at the installation site meet the appropriate
requirements.
Step 2. Close the indoor water inlet valve completely, then open any faucets in the room to remove
the remaining water in the indoor water pipe.
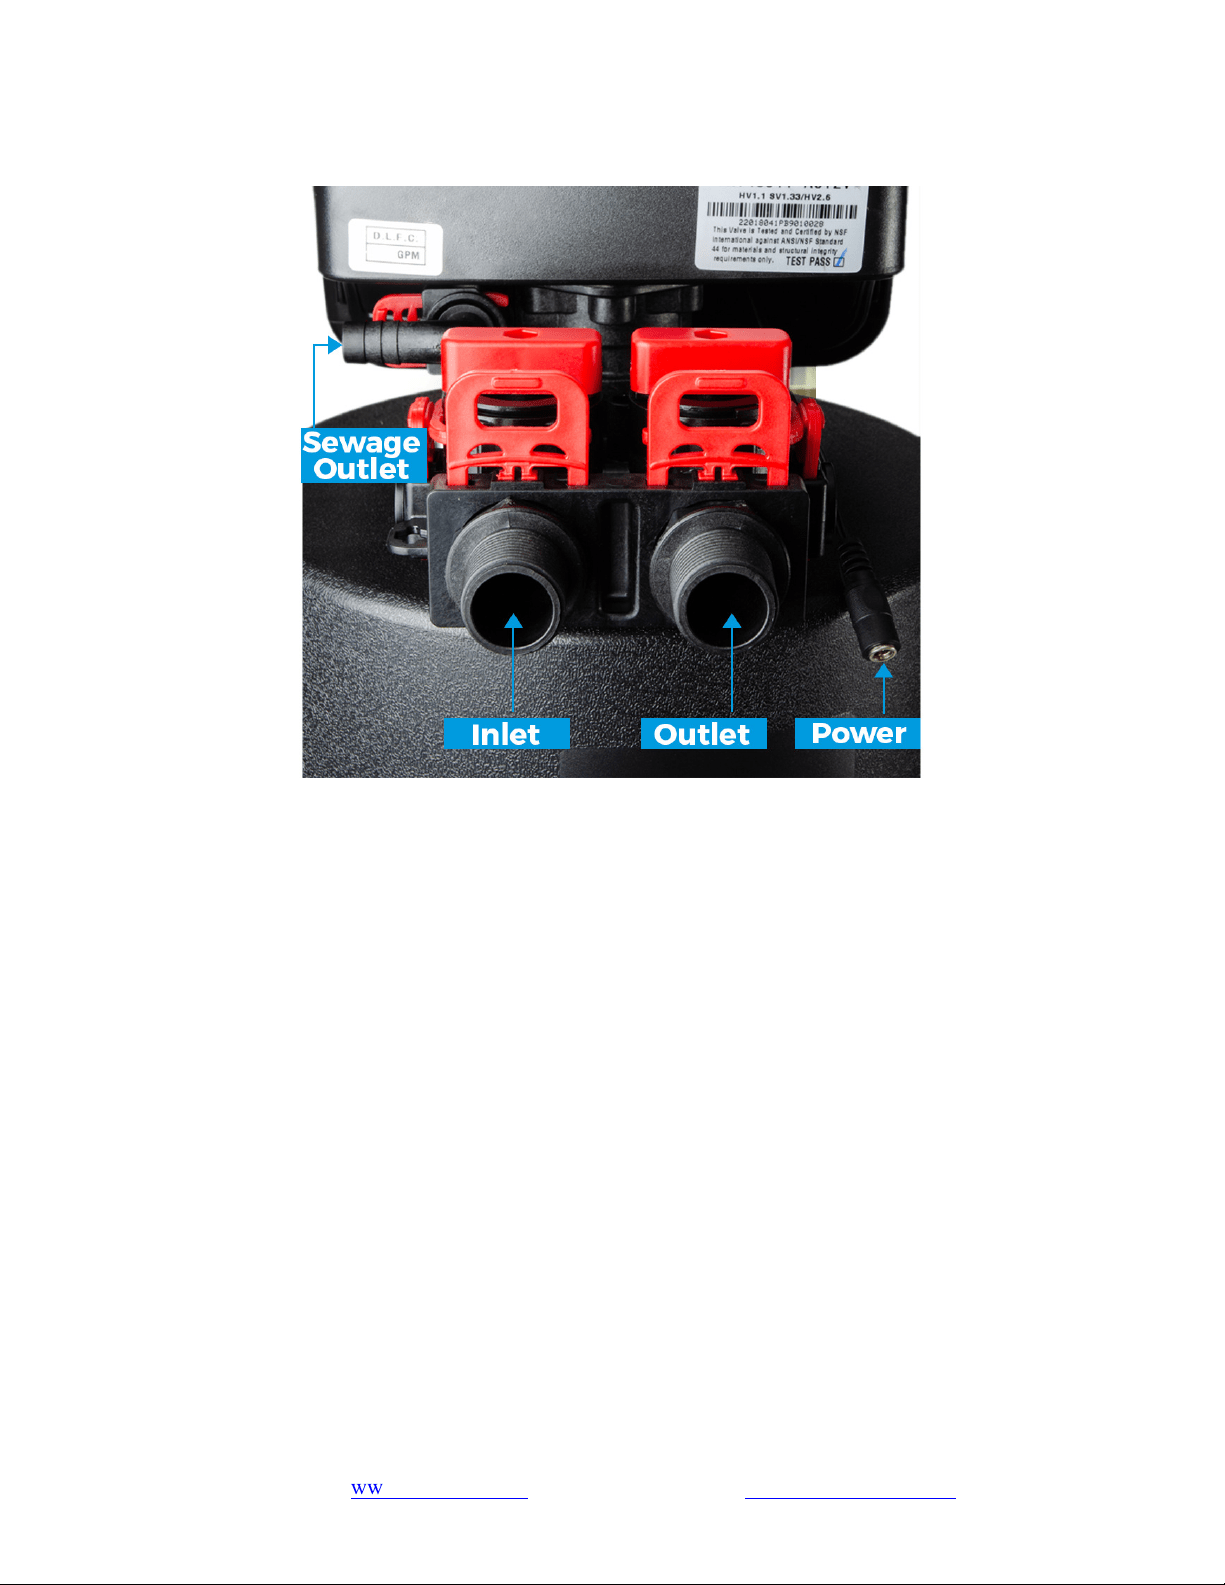
Step 3. Connect the water inlet and outlet pipes. Pay attention to the direction of the water inlet and
outlet and prevent the connection pipes from bearing stress. The water inlet is connected to the
stainless steel braided hose. The other end is connected to the water inlet channel. The water outlet
is connected to the stainless steel braided hose. The other end is connected to the water outlet.
Step 4. Connect the equipment drain hose and clamp to ensure a secure connection.
Step 5. The sewage outlet is inserted into the sewage pipe and the stainless steel clamp is locked and
clamped tightly outside to prevent high water pressure during sewage discharge, which will cause
the sewage hose to break loose and leak sewage.
Step 6. Plug in the power adapter and connect the other end of the socket to supply power.
Step 7. Place the bypass in the bypass position.
Step 8. Slowly turn on the main water supply.
Step 9. Open a cold water tap nearby and let the water run a few minutes till the water runs clean or
until the system is free of foreign material caused by plumbing work.
www.123filter.com | (678) 261-7611 | [email protected]om
Page 14
Step 10. Then, slowly open the water inlet valve (the valve should be opened at an angle of about
45°), fully open the water outlet valve. and let the water run until the air is purged from the unit.
Then close the tap. The air in the tank is then exhausted until it is full.
Step 11. Operate the bypass to the service position and observe whether there is water leakage or any
other leakage at each connection. After ensuring safety, close the water inlet valve and soak the
filter material for 10 minutes.
Step 12. Fully open the water inlet valve. Close the water outlet. Next, perform at least two filter
material washing processes.
All keys will lock after 3 minutes during the standby status. Press and hold the
“MENU” key for 3 seconds to unlock.
Step 12. a. To perform the filter material washing processes, press and hold the "
↑" / "↓"
keys
for 3 seconds in the unlocked state to enter the user menu settings.
Step 12. b. Press"SET/REGEN" button to confirm the parameter setting and enter the next
parameter setting option.
Step 12. c. Press "↑" / "↓" keys to adjust the value.
Step 12. d. Press "SET/REGEN" button again to confirm the parameter setting and until
"PROGRAMMING COMPLETE".
Step 12. e. Press and hold the "SET/REGEN" button for 3 seconds to enter the manual
regeneration mode, and choose immediate regeneration.
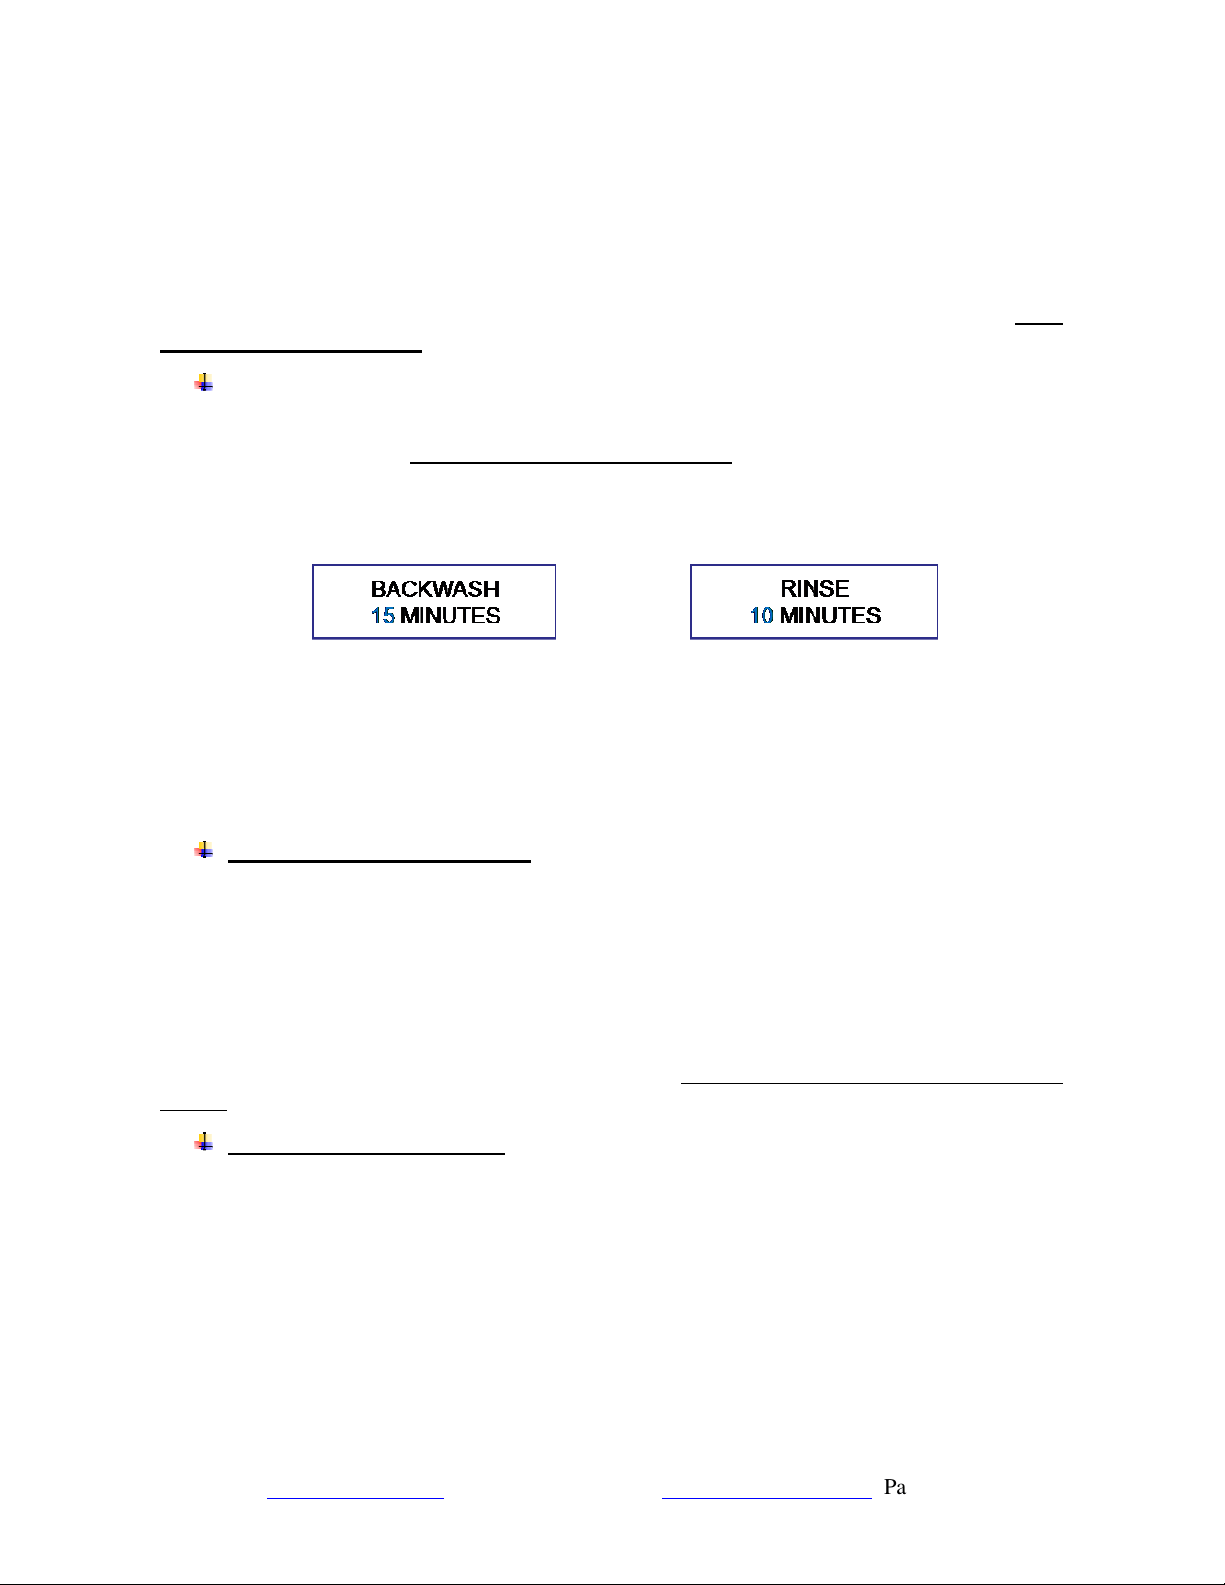
Filter material washing process: backwash (5-10 minutes) and rinse (5 minutes).
Step 13. Return the bypass to the service position.
Step 14. Open a cold water tap nearby and let the water run. Then close the tap. Verify the water is
completely clear before use.
Step 15. Check again for any water seepage in the laying pipeline and whether the fittings at the
connection parts with the original pipeline cause loosening or water seepage from construction.
Step 16. Set up the system parameters of the equipment (see Programming the Central Water Filtration
System for details, p.15 ~ p.17).
Default regeneration process: backwash (15 minutes) and rinse (10 minutes).
Step 17. Clean the installation site.
Page 15
www.123filter.com | (678) 261-7611 | support@123filter.com
Programming the Central Water Filtration System
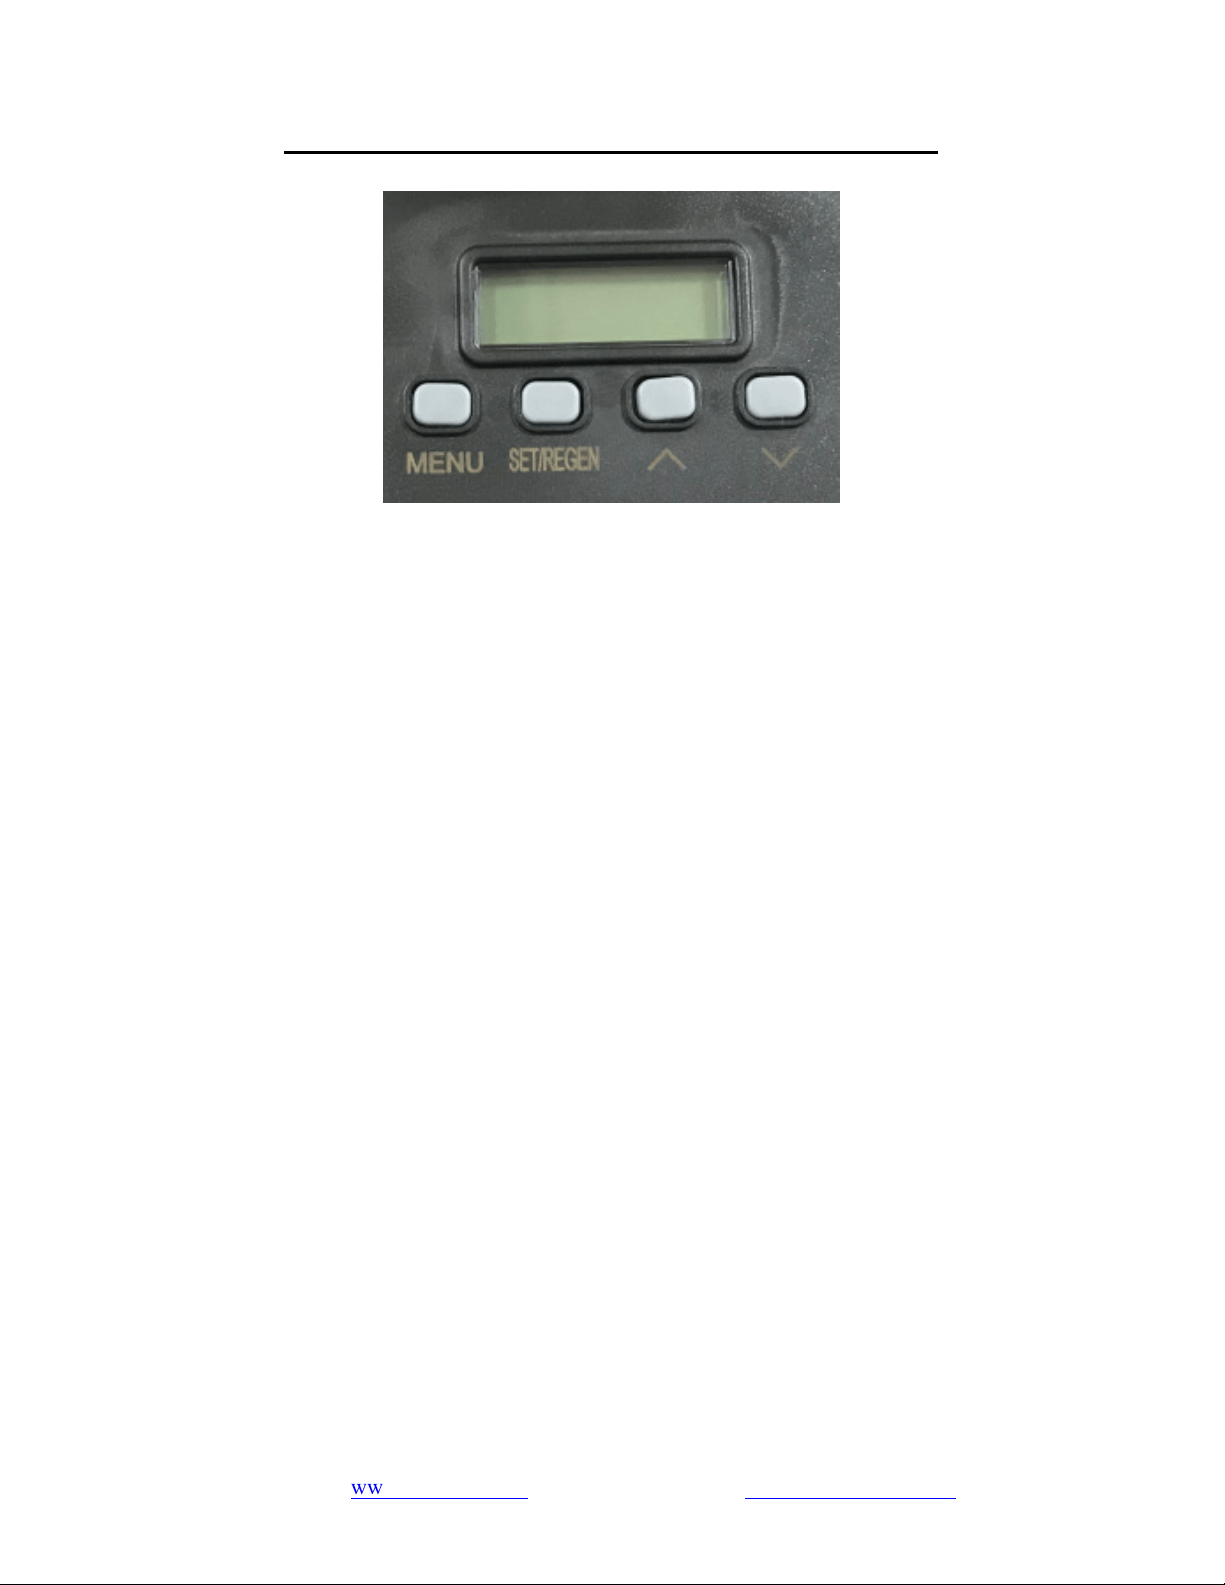
(1) Button Configuration
Key Pad Configuration
• MENU
This function is used to enter the basic setup information required at the time of installation.
• SET/REGEN
This function is used to initiate an immediate or delayed manual regeneration.
• DOWN/UP
These buttons are used to increase or decrease the value of the settings while in programming mode.
(2) Function Key Description
(a) "MENU"
Press and hold the key for 3 seconds to unlock the device while in standby mode.
Press and hold the key for 3 seconds in the unlocked state to enter the user menu settings, such as
regeneration mode, time, date, etc.
In the user menu display, press this button to immediately exit the menu display.
(b) "SET/REGEN"
While in the unlocked state, press and hold the button for 3 seconds to enter the manual
regeneration mode. You can choose either vacation mode or immediate regeneration. Choose
vacation mode and input estimated holiday days, the valve will regenerate in smart clean mode (see
p.17) when no water is used during the days; if there's water used during the days, the vacation
mode will be auto-off.
Delayed regeneration means that the system will start a regeneration at the next regeneration time
regardless of the remaining regeneration days or water consumption.
Press and release the button to
set a delayed regeneration that will occur at the regeneration time.
Immediate regeneration means that the system immediately starts a regeneration.
In the user menu display, press this button to once to delay regeneration.

www.123filter.com | (678) 261-7611 | [email protected]om
Page 16
In the user menu setting, press this to confirm the parameter setting and switch to the next option.
(c) "
↑" / "↓"
When the display is in a menu option, these keys can be used to adjust the value or option.
(2) Notes
(a) Combination key
Press and hold "
↑"
and "
↓"
at the same time for 3 seconds in the unlocked state to regeneration
cycle setting (backwash, rinse, lock/unlock value).
Press and hold "MENU" and "SET/REGEN" at the same time for 3 seconds in the unlocked state to
enter the user menu settings, such as language, units, smart clean, etc.
(b) During the menu setting process, if there is no activity within 1 minute, the system will
automatically return to the standby state.
(c) While in the standby state, if there is no activity within 3 minutes, the system will automatically
lock and the display can be processed after unlocking.
(d) For the calendar setting, current time and regeneration time, the "MENU" button is used to
switching options and "SET/REGEN" is used to enter setting. After adjustment, press "MENU" to
confirm and "SET/REGEN" to return to the standby state.
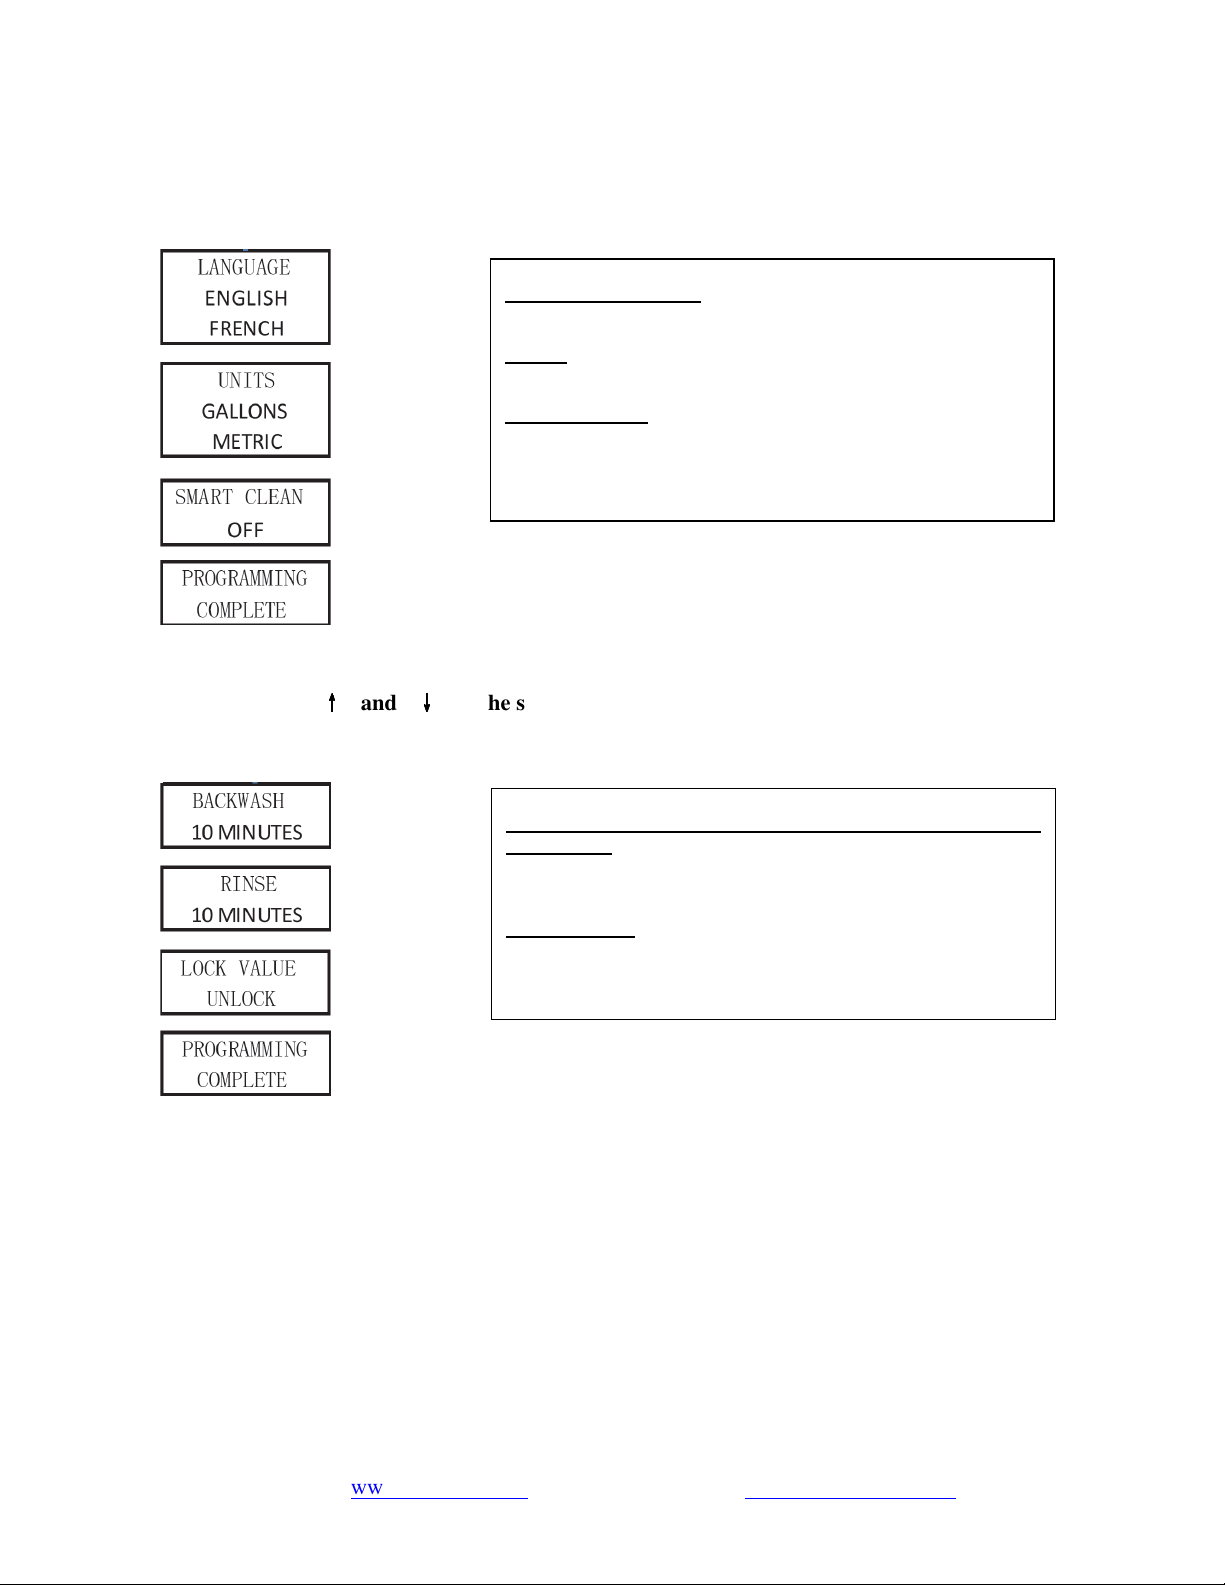
(3) Press and hold "MENU" for 3 seconds to enter the following user menu settings:
TIME OF DAY, YEAR, MONTH, DAY:
Time of day is for normal operation of system and the
scheduling of the regeneration time. The date is used in a
diagnostic function to track the last time the system
regenerated.
REGEN. DAYS:
The number of days between regenerations or back washes to
clean the filters. The user can set the number of days in the
regeneration cycle according to the water situation.
GALLONS:
Default value is "2100 GAL". Adjust the GALLONS to set the
capacity. This will cause the unit to regenerate either when the
gallons remaining goes to zero or the days between
regeneration is zero. Which ever occurs first.
REGEN. TIME:
Determines the time of day to perform a scheduled
regeneration. You can set the system's regeneration time
according to your routine. It is recommended to set it in a period
when water is not in use. The system defaults to 02:00 a.m.
LOAD DEFAULT:
If the selection is made, the processing time of each
regeneration cycle will be reset to the default value setting. The
capacity is three specifications of the tank, large, medium, and
small. The rinse time will return to the default value.
Page 17
www.123filter.com | (678) 261-7611 | support@123filter.com
(4) Press and hold "MENU" and "SET/REGEN" at the same time for 3 seconds to enter the
following user menu settings:
(5) Press and hold "
↑
↑↑
↑
" and "
↓
↓↓
↓
" at the same time for 3 seconds to enter the following user menu
settings:
SYSTEM LANGUAGE:
Choose the system language.
UNITS:
Choose the system unit of measurement: metric or US.
SMART CLEAN:
When set to ON, the system will perform a 10 (adjustable)
minute backwash and rinse if there is no water flow detected
after 7 (adjustable) days. The regeneration will occur at the
scheduled REGEN TIME.
BA. WA. DURATION (BACK WASH DURATION) / RINSE
DURATION:
Users can adjust these parameters at any time with the help of
an application engineer based on the water environment.
LOCK VALUE:
This setting locks the value set in this previous page, and the
end user will not be able to modify it before
this setting is changed to UNLOCK.

www.123filter.com | (678) 261-7611 | [email protected]om
Page 18
Operation of WF150K Central Whole House Filtration System
(1) Product Functions and Features
The central whole house water filtration system utilizes high-quality KDF85 and coconut shell
activated carbon to further purify municipal tap water, effectively reducing odor, residual chlorine,
and organic content.
The automatic back flush system is designed to flush and wash the filter media and move pollutants
to the drain. The whole house central water filtration series carries excellent effluent water quality
and abundant water purification flow, making the facility’s water safe for use. The resulting
purified water meets the drinking and bathing requirements of users, including families, enterprises,
and institutions. The product’s main functions are as follows:
(a) Fully Automatic Control
Built-in time controller, twenty-four-hour time control. Based on the set interval days or the amount
of treated water, the filter material is cleaned at the set regeneration time (usually in the early
morning).
The regeneration cycle can be set according to time or treated water volume.
Arbitrarily set the start time of the regeneration process.
Cycle function programming
Service: After the machine filters the municipal pipeline water, it can provide drinking water per
specifications.
Backwash: Backwash can remove the impurities remaining in the upper layer of the filter material
and the toxic and harmful substances adsorbed in the filter material, restore the performance of the
filter material, extend the life of the filter material, and prevent filter media from re-entering the
water and compromising the water quality.
Purge/Rinse: Rinse the filter material, drain the dirty water, and fill the machine with filtered,
purified water, compact the filter material, keep the filter material always operating in high quality
to best prepare for the next water purification cycle.
(b) Dechlorination and Antibacterial
Effectively remove residual chlorine
Inhibit bacteria and algae from breeding
Extend the life of activated carbon
(c) Efficient Filtering
Coconut shell granular activated carbon further removes residual chlorine and organic matter,
significantly improving water quality.

Page 19
www.123filter.com | (678) 261-7611 | support@123filter.com
(d) Water Purification Process:
Municipal Tap WaterActivated CarbonAlloy Filter MediaPurified Water
(2) Structure
Automatic multi-way electronic control valve
Made using high strength polyphenylene ether (PPE) with glass fiber, making the product hygienic,
reliable and durable
Corrosion resistance
Structural strength, well-designed
Filter
High-purity copper-zinc alloy filter
Polyethylene (PE) liner fiberglass tank
Made of synthetic materials, light yet strong
Corrosion resistance
One-piece, leak-proof
Granular activated carbon
High-quality coconut shell granular activated carbon
(3) Valve
This valve is controlled using a simple, user friendly electronic display on a large LCD screen. The
main page displays the current date and time while also showing key valve information such as the
current capacity setting, volume remaining (meter mode); regeneration days, regeneration days
remaining (timer mode).
Key Pad

www.123filter.com | (678) 261-7611 | [email protected]om
Page 20
Main Functions
Daily Reserve
Backwash Override/Rinse Override
Forced Regeneration
Smart Cleaning
Display Format:
Metric format and US format are available to meet the different customers' requirements.
Multi-Language Function:
English, Spanish, and other languages are available.
Continuous water monitoring/Continuous no water monitoring
Auto-locking:
All keys will lock after 3 minutes during the standby status. Press and hold the “MENU” key
for 3 seconds to unlock.
Please refer to the programming manual for additional details.

Page 21
www.123filter.com | (678) 261-7611 | support@123filter.com
Care of Your Central Water Filtration System
The product can be used frequently after installation and commissioning have been completed.
With an uninterrupted power supply, the user does not need to perform other operations on the
machine.
If the equipment fails or experiences other exceptional circumstances, the inlet and outlet valves
can be closed (bypass valve is open), and the municipal water supply can be used directly. After
removal, open the water inlet and outlet valves of the device.
The automatic regeneration start time default is to start late at night. During this time, the water is
not purified and should be used.
During the use of the water purifier, do not cut off the power to avoid errors in the clock on the
water purifier, which will affect the original regeneration start time and lead to the potential use of
unpurified water.
During the process of water purifier regeneration, if the system experiences a power loss, more than
one discharge may occur, resulting in the waste of water resources.
If there is no one in the home for more than three days, close the product’s main water purification
valve. Once the water purifier has been stopped for a while, a regeneration operation should be
added to ensure the quality of the purified water before reuse.
If water consumption increases significantly (relative to normal usage) or the quality of raw water
decreases, the number of regenerations should be increased accordingly.
Do not apply external force to the device and avoid direct sunlight and radiation from other heat
sources.
In case of power failure, readjust the current time and regeneration start time according to the
manual after the power supply is restored.
When the water supply in a residential area is shut down, the main water main valve should be
closed immediately. The municipal water supply may cause negative pressure to the household
pipeline and damage the equipment.
When the water supply is shut down, the bypass valve of the water purifier should be opened.
When the water supply is restored, the faucet in the home should be opened first. The contaminated
water should be released, and the bypass valve should be closed after running clear. When the
water supply is restored after the water is stopped, pollutants in the water pipe may enter the water
purifier and damage the machine, leading to filter failure.
Water purifiers installed outdoors without regular maintenance will fail sooner than those installed
indoors. It is recommended that you check the product and maintain it regularly. Call your local
dealer immediately if something goes wrong.

www.123filter.com | (678) 261-7611 | [email protected]om
Page 22
Troubleshooting
ISSUE POSSIBLE CAUSE POSSIBLE SOLUTION
Unit fails to initiate a
regeneration cycle
No power supply Check electrical service, fuse,
etc.
Power failure
Reset time.
Low water pressure
Iron or scale builds up in line
feeding unit
Clean pipes.
Iron build up inside
the
valve
or tank
Clean control and add resin
cleaner to clean bed. Increase
regeneration frequency.
Inlet of control plugged due to
foreign material
Remove the piston and clean the
control valve.
Control valve without
display
Power failure, the power adapter is
not plugged in
Check the power supply to
ensure regular or restored
power supply.
Power off while regeneration
Turn the bypass valve to the
bypass position or close the
control valve.
Control valve failure
Contact dealer.
Poor water quality
The
Control valve clock is
inaccurate due to a power failure,
causing the regeneration start time to
be changed
Adjust the control valve’s
current time. For operating
procedures, refer to the current
time in the control valve
manual.
Poor water quality
Add one regeneration process.
Refer to the setting of the
regeneration cycle in the
control valve manual for the
operating procedure.
Filter failure
Change the filter or contact
your dealer
.
Regenerate too often or too little
The regeneration cycle
setting
is not optimal. Adjust the
regeneration cycle of the
control valve and refer to the
setting of the regeneration cycle
in the control valve manual for
the operating procedure.
Incoming water quality does not
meet national municipal tap water
standards
Contact the relevant local water
supply department.

Page 23
www.123filter.com | (678) 261-7611 | support@123filter.com
Water system pressure is too low or
too high
Install pressure stabilization
equipment.
Control valve failure
Contact Dealer
.
Filter material
performance reduce
The back wash flow rate is too large
or too small
Verify the water pressure is 20
~ 125 psi.
Regeneration start time
is incorrect
The control valve is inaccurate due
to power failure
Adjust the current time of the
control valve.
The regeneration start time is set
incorrectly
Adjust regeneration start time.
For operating procedures, refer
to the current time in the
control valve manual.
Need help with troubleshooting? If you have any questions or find there are missing parts or
damage, please call 1-678-261-7611 or visit www.ispringfilter.com
When calling, please be prepared to provide the model of your product.

www.123filter.com | (678) 261-7611 | [email protected]om
Page 24
Warranty Registration
To register your product for the warranty, visit our website at 123filter.com and go to the
“Warranty” tab.
We provide a 30-day money back guarantee, a 1-year manufacturer warranty, and lifetime tech
support for all of our products. However, we do not have the order information from websites other
than 123Filter.com (Amazon, Home Depot, etc.), so please be sure to fill in that information upon
registration of your system. If you have any questions or concerns about your product, please do
not hesitate to call or email us, or put it in the notes/comments upon your warranty registration.
Your satisfaction is our business!
If you are happy with our products and service, please show your support by
writing a product review on Amazon, even just a single line. It takes you just a
minute but means a lot to us. Thank you!


3020 Trotters Parkway
Alpharetta, GA 30004, USA
iSpringFilter.com
For questions, comments, or technical support, please contact us at:
support@123Filter.com
(678) 261-7611
Monday-Friday 8:30 a.m. - 5:30 p.m. EST