Loading ...
Loading ...
Loading ...
COOKING WITH DUALZONE
TM
TECHNOLOGY
DualZone Technology utilizes two cooking
zones to increase versatility. The Smart Finish
feature ensures that, regardless of dierent cook
settings, both zones will finish ready to serve at
the same time.
SMART FINISH
To finish cooking at the same time when foods
have dierent cook times, temps,
or even functions:
1 Place ingredients in the baskets, then insert
baskets in unit.
2 Zone 1 will remain illuminated. Select the
desired cooking function. Use the TEMP
arrows to set the temperature, and use the
TIME arrows to set the time.
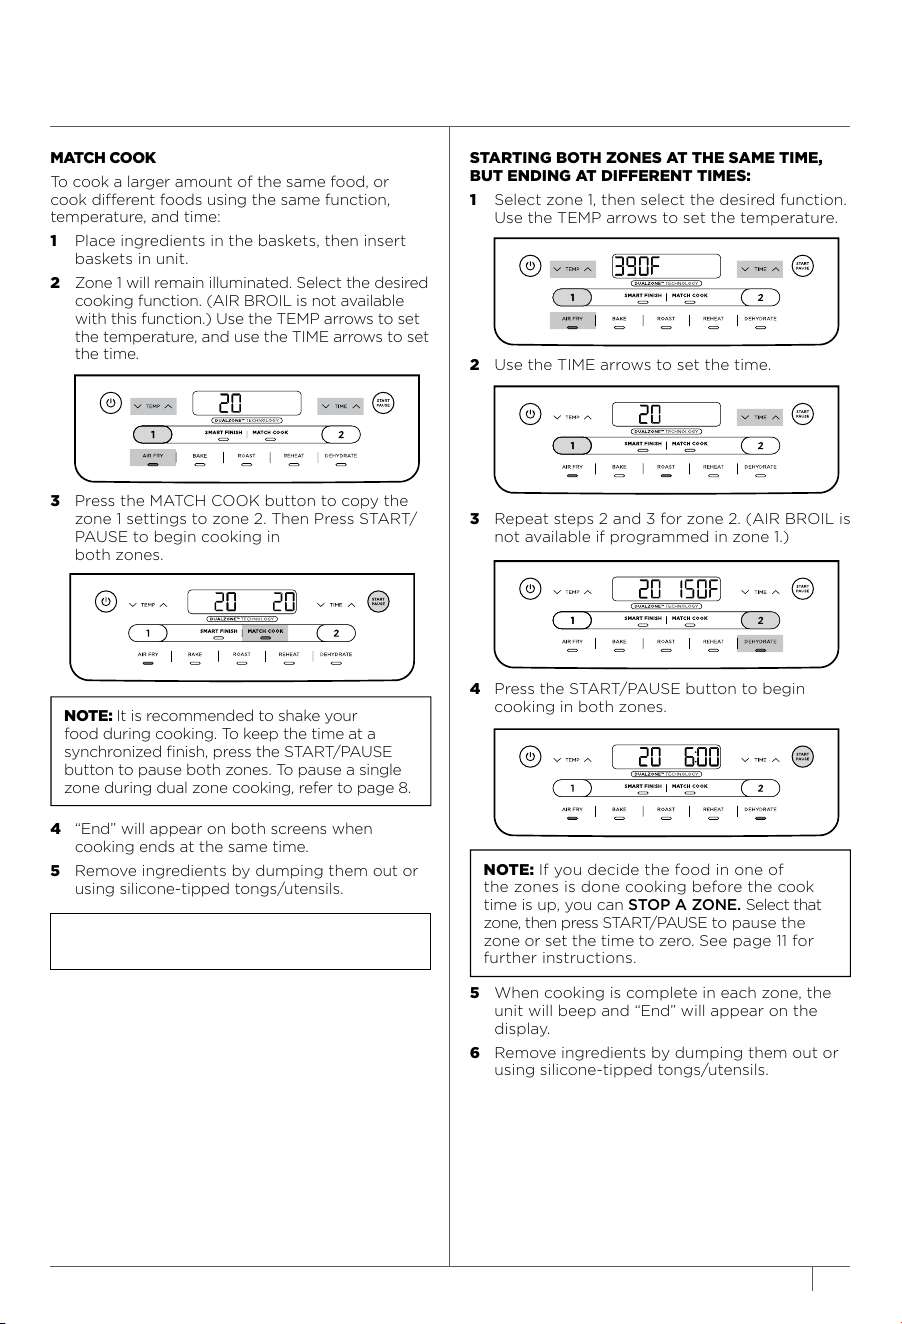
MATCH COOK
To cook a larger amount of the same food, or
cook dierent foods using the same function,
temperature, and time:
1 Place ingredients in the baskets, then insert
baskets in unit.
2 Zone 1 will remain illuminated. Select the desired
cooking function. (AIR BROIL is not available
with this function.) Use the TEMP arrows to set
the temperature, and use the TIME arrows to set
the time.
4 Press SMART FINISH, then press the START/
PAUSE button to begin cooking in the zone
with the longest time. The other zone will
display Hold. The unit will beep and activate
the second zone when both zones have the
same time remaining.
COOKING IN YOUR COMPACT 2-BASKET AIR FRYER
REFERENCE QUICK START GUIDE FOR RECIPES AND COOKING CHARTS
3 Select zone 2, then select the desired cooking
function. (AIR BROIL is not available if
selected in zone 1) Use the TEMP arrows to set
the temperature, and use the TIME arrows to
set the time.
5 When cooking is complete, the unit will beep
and “End” will appear on the display.
6 Remove ingredients by dumping them out or
using silicone-tipped tongs/utensils. DO NOT
place drawer on top of unit.
3 Press the MATCH COOK button to copy the
zone 1 settings to zone 2. Then Press START/
PAUSE to begin cooking in
both zones.
4 “End” will appear on both screens when
cooking ends at the same time.
5 Remove ingredients by dumping them out or
using silicone-tipped tongs/utensils.
STARTING BOTH ZONES AT THE SAME TIME,
BUT ENDING AT DIFFERENT TIMES:
1 Select zone 1, then select the desired function.
Use the TEMP arrows to set the temperature.
2 Use the TIME arrows to set the time.
3 Repeat steps 2 and 3 for zone 2. (AIR BROIL is
not available if programmed in zone 1.)
4 Press the START/PAUSE button to begin
cooking in both zones.
5 When cooking is complete in each zone, the
unit will beep and “End” will appear on the
display.
6 Remove ingredients by dumping them out or
using silicone-tipped tongs/utensils.
6 7ninjakitchen.com
ninjakitch en.com
NOTE: If you decide the food in one of
the zones is done cooking before the cook
time is up, you can STOP A ZONE. Select that
zone, then press START/PAUSE to pause the
zone or set the time to zero. See page 11 for
further instructions.
NOTE: It is recommended to shake your
food during cooking. To keep the time at a
synchronized finish, press the START/PAUSE
button to pause both zones. To pause a single
zone during dual zone cooking, refer to page 8.
NOTE: It is recommended to shake your
food during cooking. To keep the time at a
synchronized finish, press the START/PAUSE
button to pause both zones. To pause a single
zone during dual zone cooking, refer to page 8.
NOTE: You can select a dierent function for
zone 2.
NOTE: Air Broil can only be used in one zone.
NOTE: Air Broil cannot be used in
Match Cook mode.
NOTE: If you decide the food in one of
the zones is done cooking before the cook
time is up, you can STOP A ZONE. Select that
zone, then press START/PAUSE to pause the
zone or set the time to zero. See page 11 for
further instructions.
Loading ...
Loading ...
Loading ...