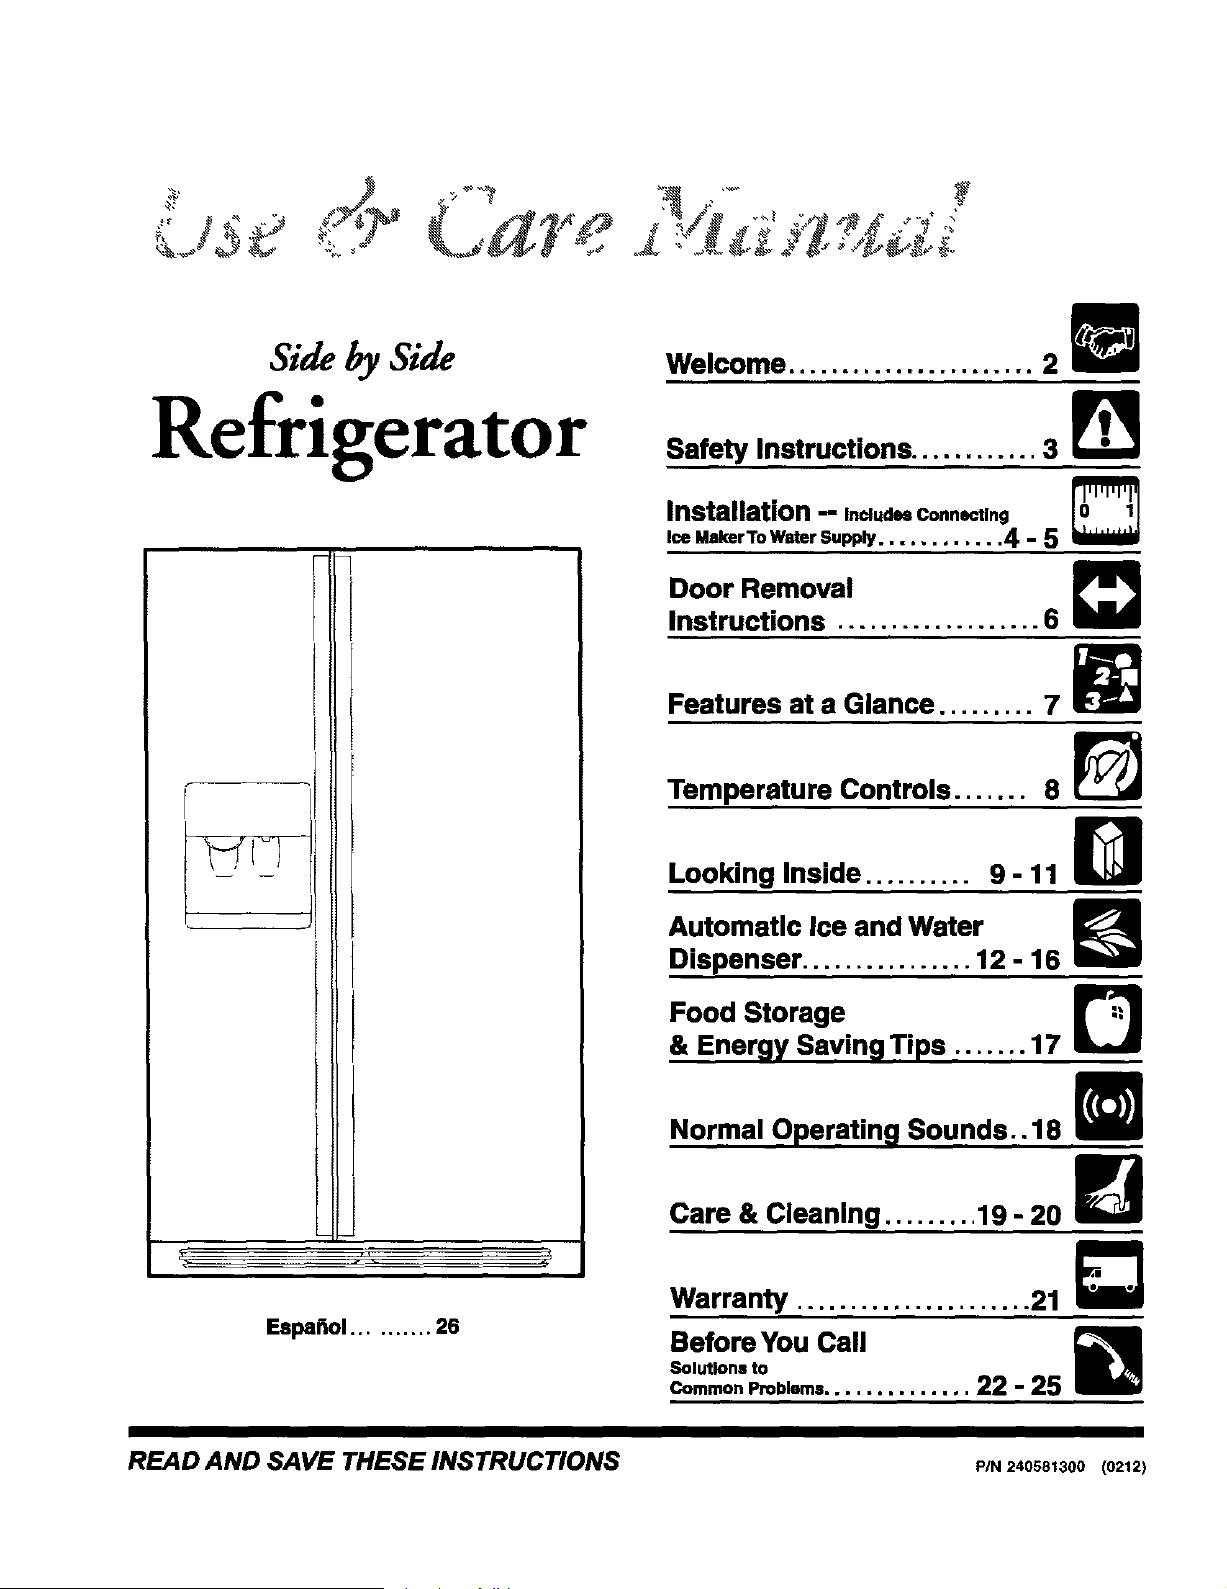
SiaebySiae
Refrigerator
I
Espafiol .......... 26
Welcome .................. ... .. 2
Safety Instructions ............ 3
Installation - In=_._Conneutlng
Ice Maker ToWater Supply ............ 4 - 5
Door Removal
Instructions ................... 6
Features at a Glance...
Temperature Controls .......
m
...... 7_
Looking Inside ..........
Automatic Ice and Water
Dispenser ................ 12 - 16
Food Storage D
& Energy Saving Tips ....... 17
Normal Operating Sounds.. 18
Care & Cleaning ......
Warranty ...................... 21
Before You Call
Solutions to
Commo,eroDlom,.............. 22 - 25
..,19 - 20
D
m
READ AND SAVE THESE INSTRUCTIONS p/. 24os.13oo(oa12)
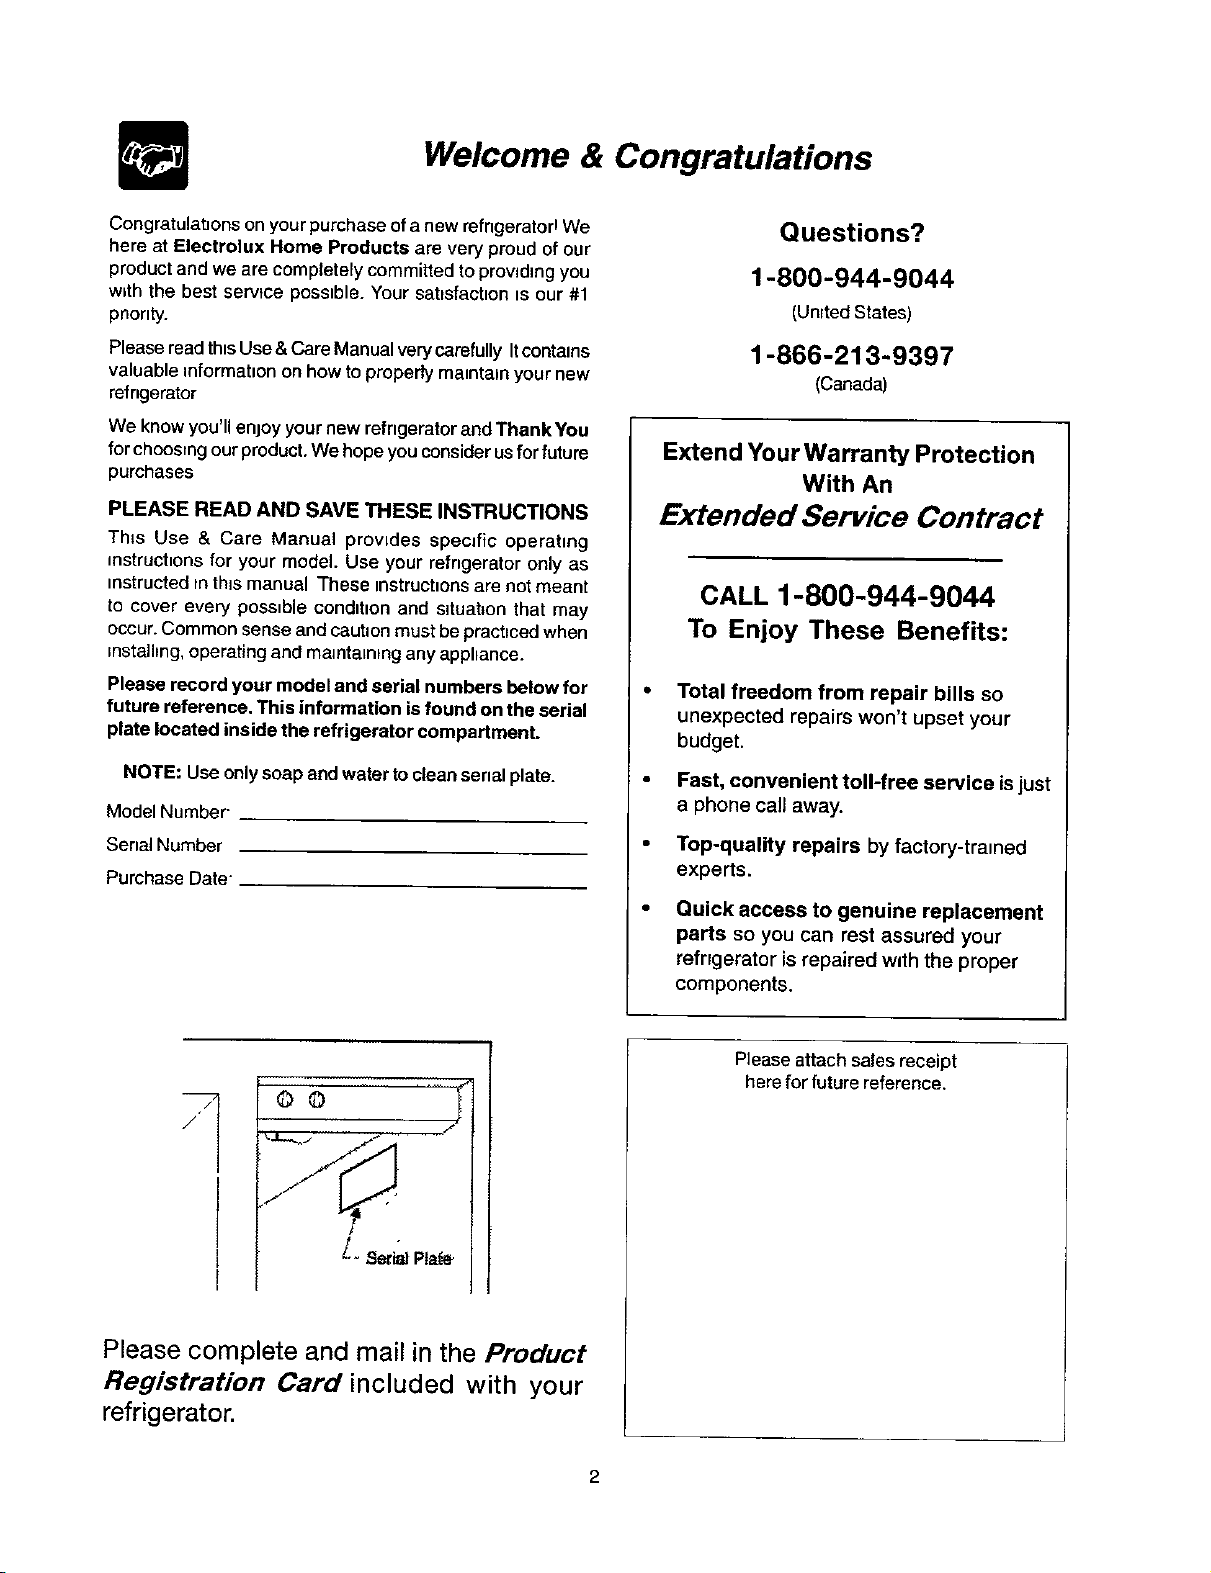
Welcome & Congratulations
Congratula'aons on your purchase of anew retngerator tWe
here at Electrolux Home Products are very proud of our
product and we are completely committed to providing you
with the best serv}ce possible. Your satisfaction is our #1
pnortty.
Pleaseread this Use& CareManualverycarefully Itcontams
valuable tntormatlon on how to propedy matnta_nyour new
refrigerator
We know you'll enjoy your new refngerator and Thank You
forchoosing our product, We hopeyou consider usfor future
purchases
PLEASE READ AND SAVE THESE INSTRUCTIONS
This Use & Care Manual provides specific operating
mstruchons for your model. Use your refrigerator only as
instructed in this manual These instructions are not meant
to cover every possible condition and situation that may
occur.Common sense and caution must be practiced when
installing, operating and maintaining any appliance.
Please record your model and serial numbers below for
future reference. This information is found on the serial
plate located inside the refrigerator compartment.
NOTE: Use only soap andwaterto cleanserialplate.
Model Number
Serial Number
Purchase Date"
Questions?
1-800-944-9044
(United States)
1-866-213-9397
(Canada)
Extend Your Warranty Protection
With An
Extended Service Contract
CALL 1-800-944-9044
To Enjoy These Benefits:
Total freedom from repair bills so
unexpected repairs won't upset your
budget.
Fast, convenient toll-free service is just
a phone call away.
Top-quality repairs by factory-trained
experts.
Quick access to genuine replacement
parts so you can rest assured your
refngerator is repaired with the proper
components.
Please complete and mail in the Product
Registration Card included with your
refrigerator.
Pleaseattachsalesreceipt
here for future reference.
2
Important Safety Instructions
Please Read All Instructions Before Using This Refrigerator.
FOR YOUR SAFETY
Do not store orusegasoline, or otherflammable I=qulds
m the vicinity of th_sor any other apphance Read
product labels forwarnings regarding flammabd_tyand
other hazards.
Do not operate the refrigerator in the presence of
explosive fumes.
Avmd contactwithany mowng parts of automatic ice
maker.
Remove all staples from the carton Staples can cause
severe cuts, and also destroy fimshes if theycome m
contact with other appliances or fumdure.
CHILD SAFETY
Destroy or recyclethecarton,plasticbags, and any exterior
wrapping matenal tmmedtately after the refngerator _s
unpacked Children shouldNEVER usethese_temstoplay
Cartons covered with rugs,bedspreads, plasticsheets or
stretch wrapmay becomeairtightchambers,and can quickly
cause suffocation.
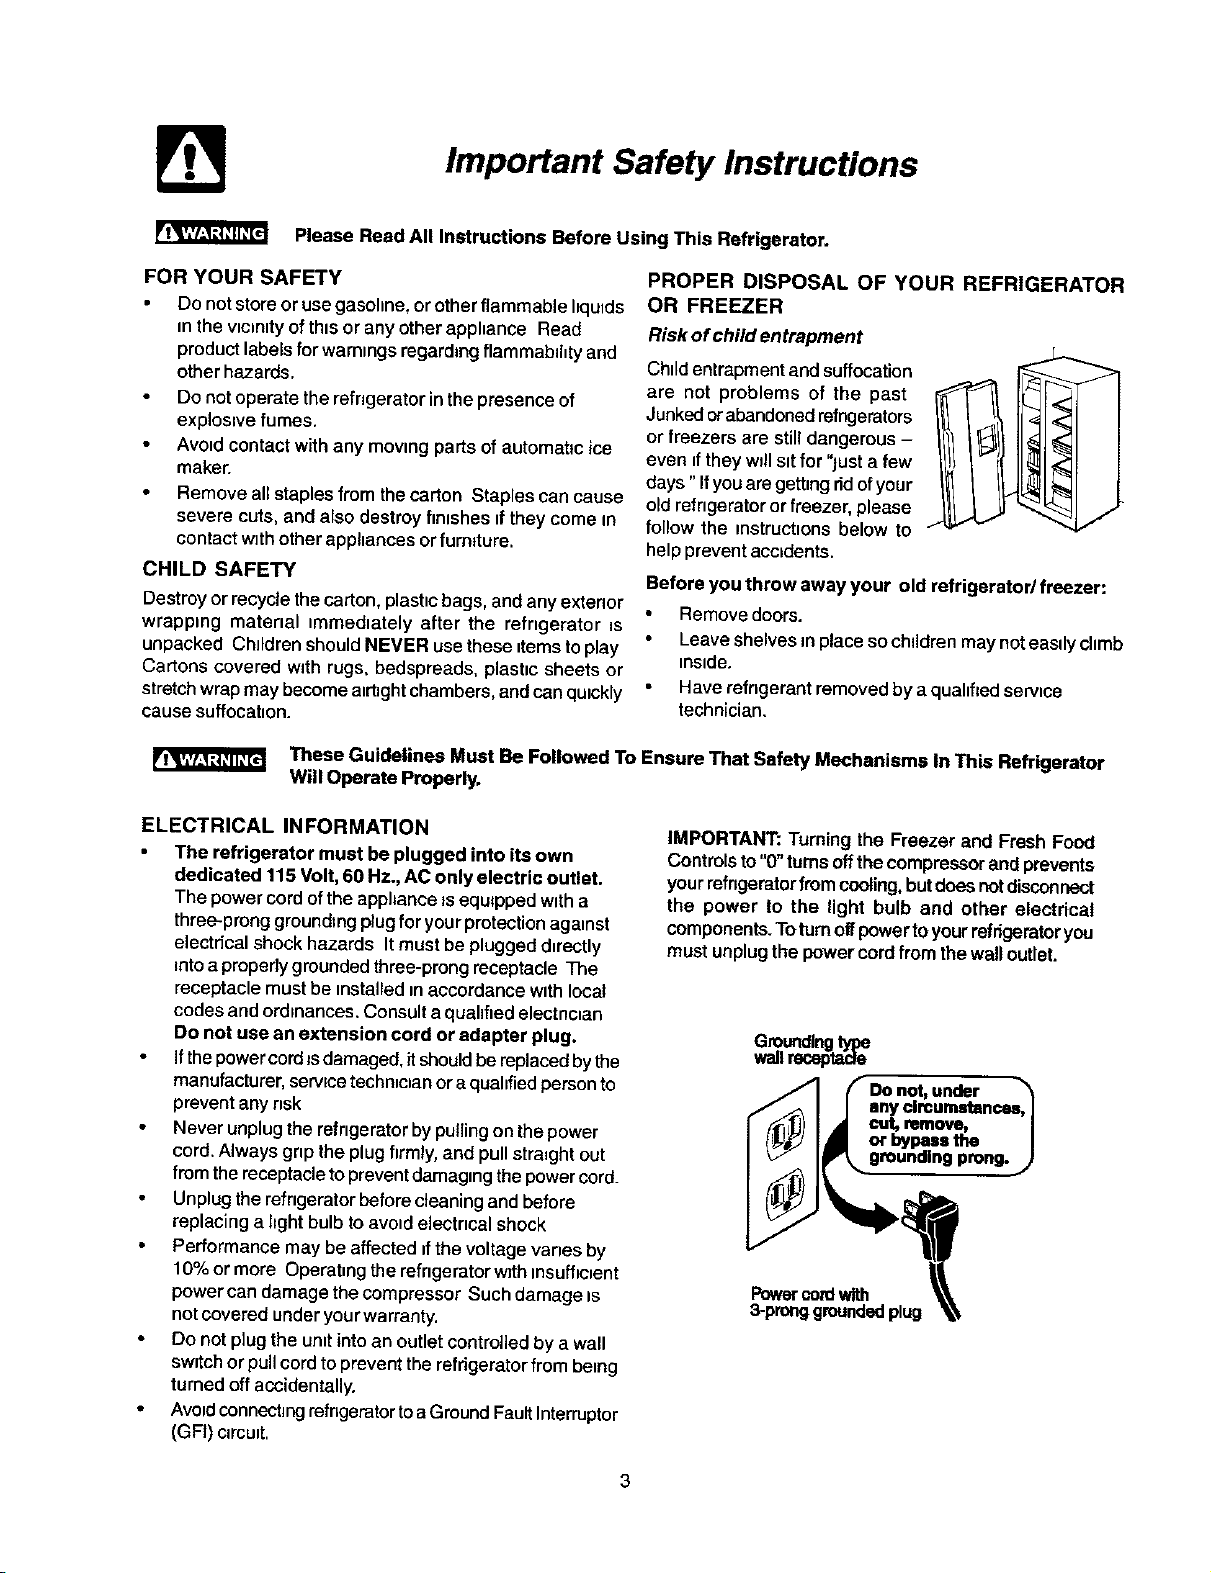
PROPER DISPOSAL OF YOUR REFRIGERATOR
OR FREEZER
Risk ofchild entrapment
Chtldentrapmentand suffecation
are not problems of the past
Junkedorabandoned refngerators
or freezers are still dangerous -
even if they will sit for "just a few
days" Ifyou are getting ridofyour
old refrigerator orfreezer, please
follow the instructions below to
help prevent accidents.
Before you throw away your old refrigerator/freezer:
Remove doors,
Leave shelves m placeso chddren may noteasdy chmb
inside.
Have refrigerant removed by a quahfled service
technician.
These Guidelines Must Be Followed To Ensure That Safety Mechanisms In This Refrigerator
Will Operate Properly.
ELECTRICAL INFORMATION
The refrigerator must be plugged into itsown
dedicated 115 Volt,60 Hz., AC only electric outlet.
The powercordofthe apphanceJsequippedwitha
three-pronggroundingplugforyourprotectionagainst
electricalshockhazards Itmust be pluggeddirectly
_ntoa properlygroundedthree-prongreceptacle The
receptaclemustbe metalled maccordancewithlocal
codes and ordinances. Consult a qualified electncian
Do not use an extension cord or adapter plug.
Ifthepowercord_sdamaged,itshouldbe replacedbythe
manufacturer,servicetechnicianora qualifiedpersonto
preventanynsk
Never unplug the refrigerator by pulling on thepower
cord. Always grip the plug hrmly,and pull straight out
from the receptacleto preventdamaging the powercord.
Unplugthe refngerator before cleaning and before
replacing a hght bulb to avoid electrical shock
Performance may be affected tfthe voltage vanes by
10% ormore Operating the refrigerator with insufftc_ent
power can damage the compressor Such damage is
not covered under your warranty.
Do not plug the unitinto an outlet controlled by a wall
switchor pull cord to prevent the refrigerator from being
turned off accidentally,
AvoidconnectingrefngeratortoaGround FaultInterruptor
(GFI) circuit,
IMPORTANT: Turningthe Freezer and Fresh Food
Controls to"0"turns offthecompressorand prevents
yourrefngeratorfrom cooling,butdoesnotdisconnect
the power to the light bulb and other electrical
components.Toturnoffpowertoyourrefrigeratoryou
mustunplugthe power cordfrom thewall outlet.
I anyclrcums_ances,I
• cut,remove, /
I orbypass the . /
W
3-pronggrm.lndedplug _
Installation
This Owner's Guide provides specific operating instrucbons
for your model Use the refrigerator only as instructed }nthis
Use& Care Manual Beforestarting therefrigerator,follow
these important first steps.
LOCATION
• Choose a placethatis neara grounded electricaloutlet
Do Not usean extension cordor an adapter plug.
Ifpossible,piece the refrigeratoroutof directsunlight
and away from the range, d_shwasheror other heat
sources.
• The refngeratormustbeinstalledona floor thattslevel
and strongenoughtosupport a fully loaded refrigerator.
Consrder watersupplyavadabilJtyfor modelsequipped
with an automatic ice maker
INSTALLATION
Do Not install the refrigerator where
the tamporatutewill drop below55°F (13°C)or rise
above tl 0°F (43°C). The compressor willnot beable
to maintain proper temperatures inside the
refrigerator.
Do Not block the toe gritle on the
lower frentofyourmffigerator.Sufficientaircirculation
is essential for the proper operation of your
refrigerator.
Installation Clearances
Allow the following clearancesfor ease ofinstallation,
proper air c=rculation,and plumbing end electncal
connections.
Sides & Top............... 3/8"
Back ........................ 1"
DOOR OPENING
NOTE: tf you refrigeratoris placedwith thedoor hinge
side agemsta wall, you may have to allow additional
space sothe door canbe opened wider.
Yourrethgerator sheuldbe pos'Ct_onedto alloweasyaccess to
a counter when remowng food. For best use of drawers and
freezer baskets,the refrigerator shouldbe ina position where
boththe rethgerator and freezerdoorscan be fullyopened.
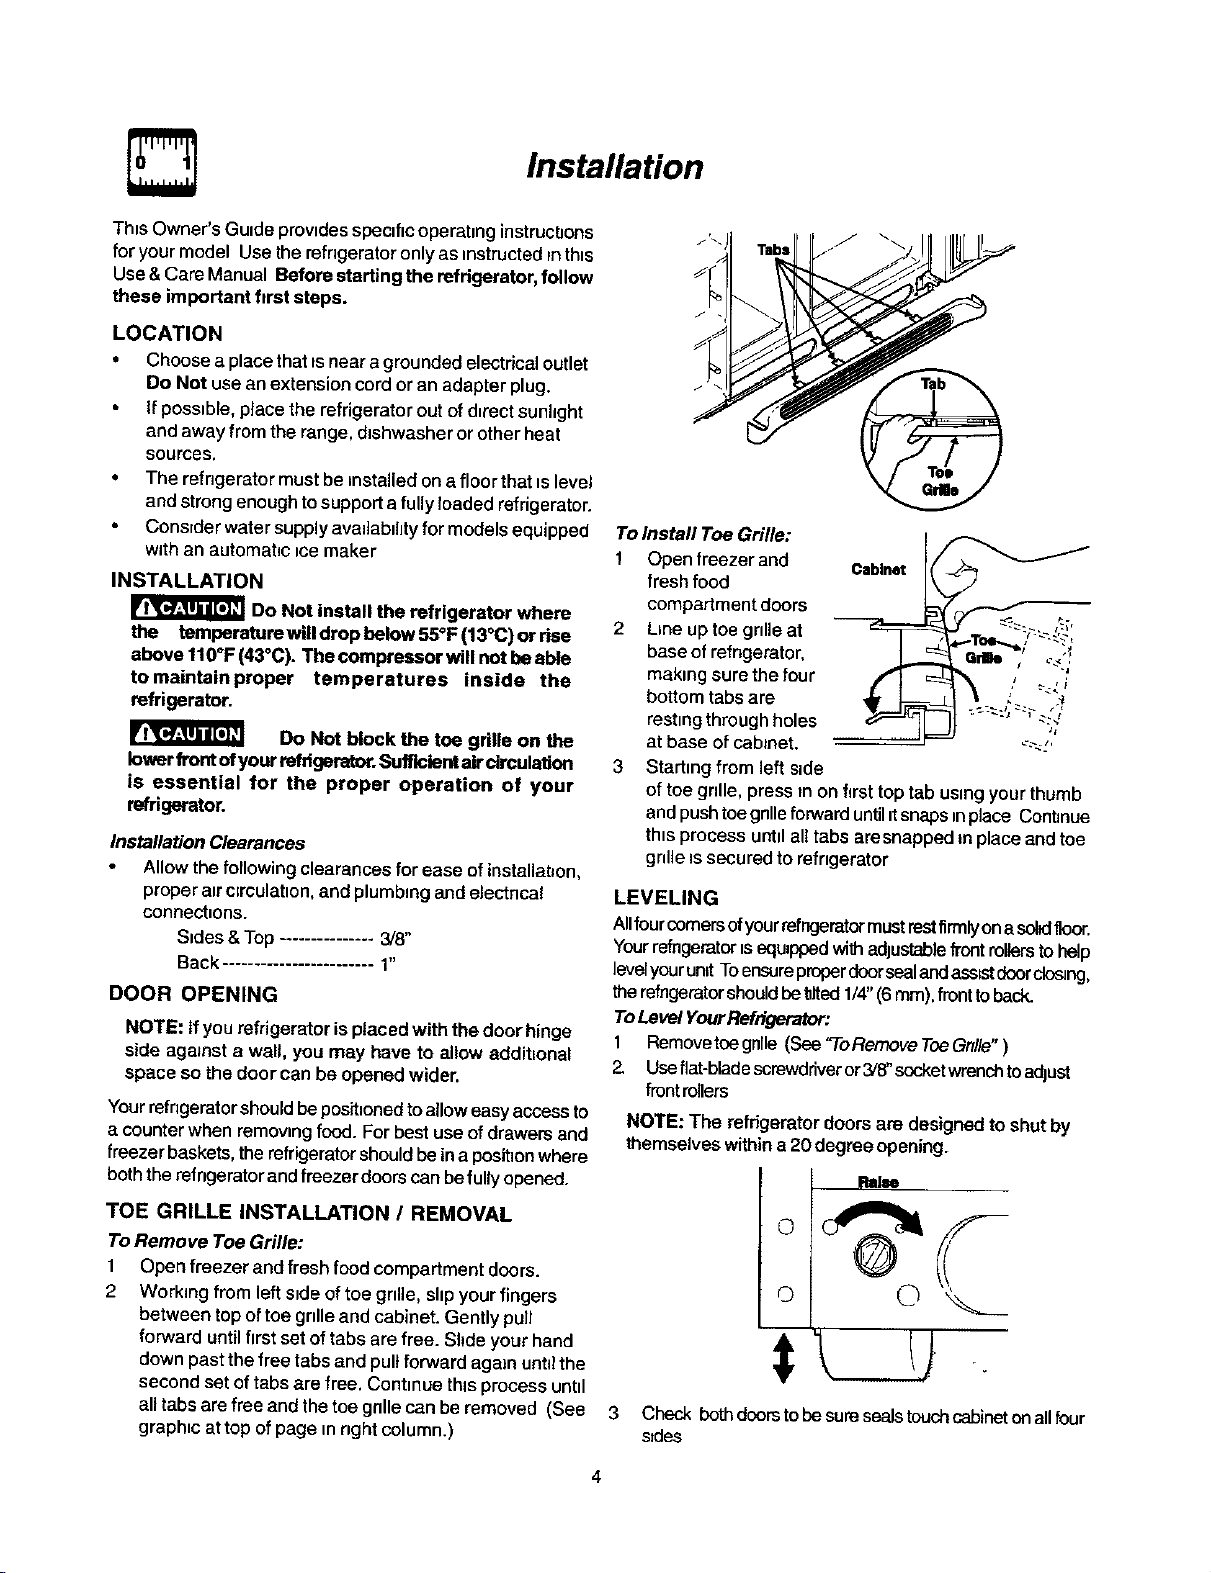
TOE GRILLE INSTALLATION / REMOVAL
To Remove Toe Grille:
1 Open freezer and fresh food compartment doors.
2 Working from left side of toe grd{e,shpyour fingers
between top oftoe gnlleand cabinet. Gently pu]l
forward until first set of tabs are free. Shde your hand
down past the tree tabs and pull forwardagain untt}the
second set of tabs are free. Continue this process until
all tabs are free and thetoo gnlle can be removed (See
graphic attop of page innght column.)
To Install Toe Grille:
1 Open freezerand
fresh food
compartment doors
2 Line uptoe gnlleat
baseof refngerator,
making sure the four
bottom tabs are
resting through holes
at base ofcabinet.
Cabinet
3
Starting from left side
of toe grille, press tnon first top tab using your thumb
and pushtoegnneforward untilitsnaps tnplace Continue
this process until all tabs aresnapped in place and toe
gnlle issecured to refngerator
LEVELING
Allfourcomersofyourrefngeratormustrestfirmlyona sohdfloor.
Yourrefngeratortsequippedwith adiustablefrontrollersto help
levelyourunitToenscreproperdoorsealandass=stdoorclo_ng,
therefngeratorshouldbetired1/4"(6ram),fronttobeck.
ToLevel YourRefrigerator:
1 Removetoegnlle (See"ToRernoveToeGnlle")
2. Useflat-bladescrewdriveror 3/8"socketwrenchtoadJuSt
frontrollers
NOTE: The refrigerator doors are designed to shutby
themselves within a 20 degreeopening.
©
Check bothdoorstobe suresealstouchcabinetonall four
sides

Installation. Connecting Ice Maker To Water Supply
Toavoideisctdc shock, whichcancausedeath orsevere personalinjury,disconnectthe refrigerator
from electrical power before connecting a water supply line to the refrigerator.
To Avoid Property Damage:
Copper tubing isrecommended for the water supply line, Water supply tubing made of1/_,,plastic Is not
recommended since it greatly increases the potential for water leaks. Manufacturer will not be responsible
for any damage if plastic tubing is used for supply line.
DO NOT install water supply tubing in areas where temperatures fall below freezing.
Chemicals from a malfunctioning softener can damage the icemaker. If the ice maker isconnected tosoft
water, ensure that the softener is maintained and working properly.
IMPORTANT: Ensure thatyour watersupplylineconnectionscomplywithall local plumbing codes.
Before Installing The Water Supply Line, You Will Need
Basic Tools: adjustable wrench,flat-blade screwdriver, and PhdhpsTM screwdriver
Access toa householdcoldwaterlinewithwater pressurebetween 20 and 100 psi
• Awater supplyhnemade of¼ inch (6.4 rnm)OD, coppertubing.Todetermine the lengthofcoppertubingneeded,
you willneed to measurethe distance from the ice makerinJetvalve at theback ofthe refrigeratorto yourcoldwater
pipe Thenadd approximately7 feet (2 1meters), so therefrigeratorcanbe movedoutforcleaning(as shown)
A shutoff valve toconnectthewatersupplylinetoyour householdwater system DO NOT usea self-piercing type
shutoff valve
A compression nutand ferrule (sleeve)for connestmgthe water supply hneto the ice maker inlet valve.
NOTE: Water hrtek;,tnumber 5303917950, available from your apphance dealerat additionalcost, contains 25 feet (7.6
meters) of ¼inch ODcoppertubtng, a saddle type shutoff valve (nonpiercing), (2) ¼ mchbrass compressionnuts, (2)
ferruleslsfeeves, andinstructionsfor installing a watersupply line
To Connect Water Supply Line ToIce Maker Inlet Valve
1. Disconnect refrigerator from elestrlc power source.
2. Place end of water supply line into sink orbueket. Turn ON water suppty
and flush supply line until water Is clear Turn OFF water supply at shut
off valve
3 Unscrew plastic cap from water valve inlet and discard cap
4. Shde brass compression nut, then ferrule (sleeve) onto water supply line,
as shown.
5. Push water supply line into water valve inlet as far as Jtwtll go (V4 inch).
SIrde ferrule (sleeve) into valve inlet and finger tighten compression nut
onto valve Tighten another haft turn with a wrench; DO NOT over t_ghten.
6 Wtth steel clamp and screw, secure water supply line to rear panel of
refngerator as shown.
7 Cod excess water supply line (about 2Y2turns) behind refrigerator as shown
and arrange coils so they do not vibrate or wear against any other surface
8. Turn ON water supply at shutoff valve and tighten any connecttons that
leak
9. Reconnect refrigerator to eisctncal power source
10. To turn pcemaker on, lower wire signal arm (see tce maker front cover for
ON/OFF posttlon of arm).
Rlll"ubo
VON_Inllt
C_I_
rno_ng mfnger_or outforcleaning)
IMPORTANT: it takesapproximately24 hoursfor the ice maker to beginproducing ice. Airin new plumbinglines may
cause_cemakertocycletwoorthreetimesbefore makingafulltrayofice Newplumbingmaycause tcetobediscolored
orhavepoorflavor.Discardicemadeduring thefirst24 hours.
,pH_J*
Door Removal Instructions
• _ WmtlCh ,
O_ ,_'\, '\
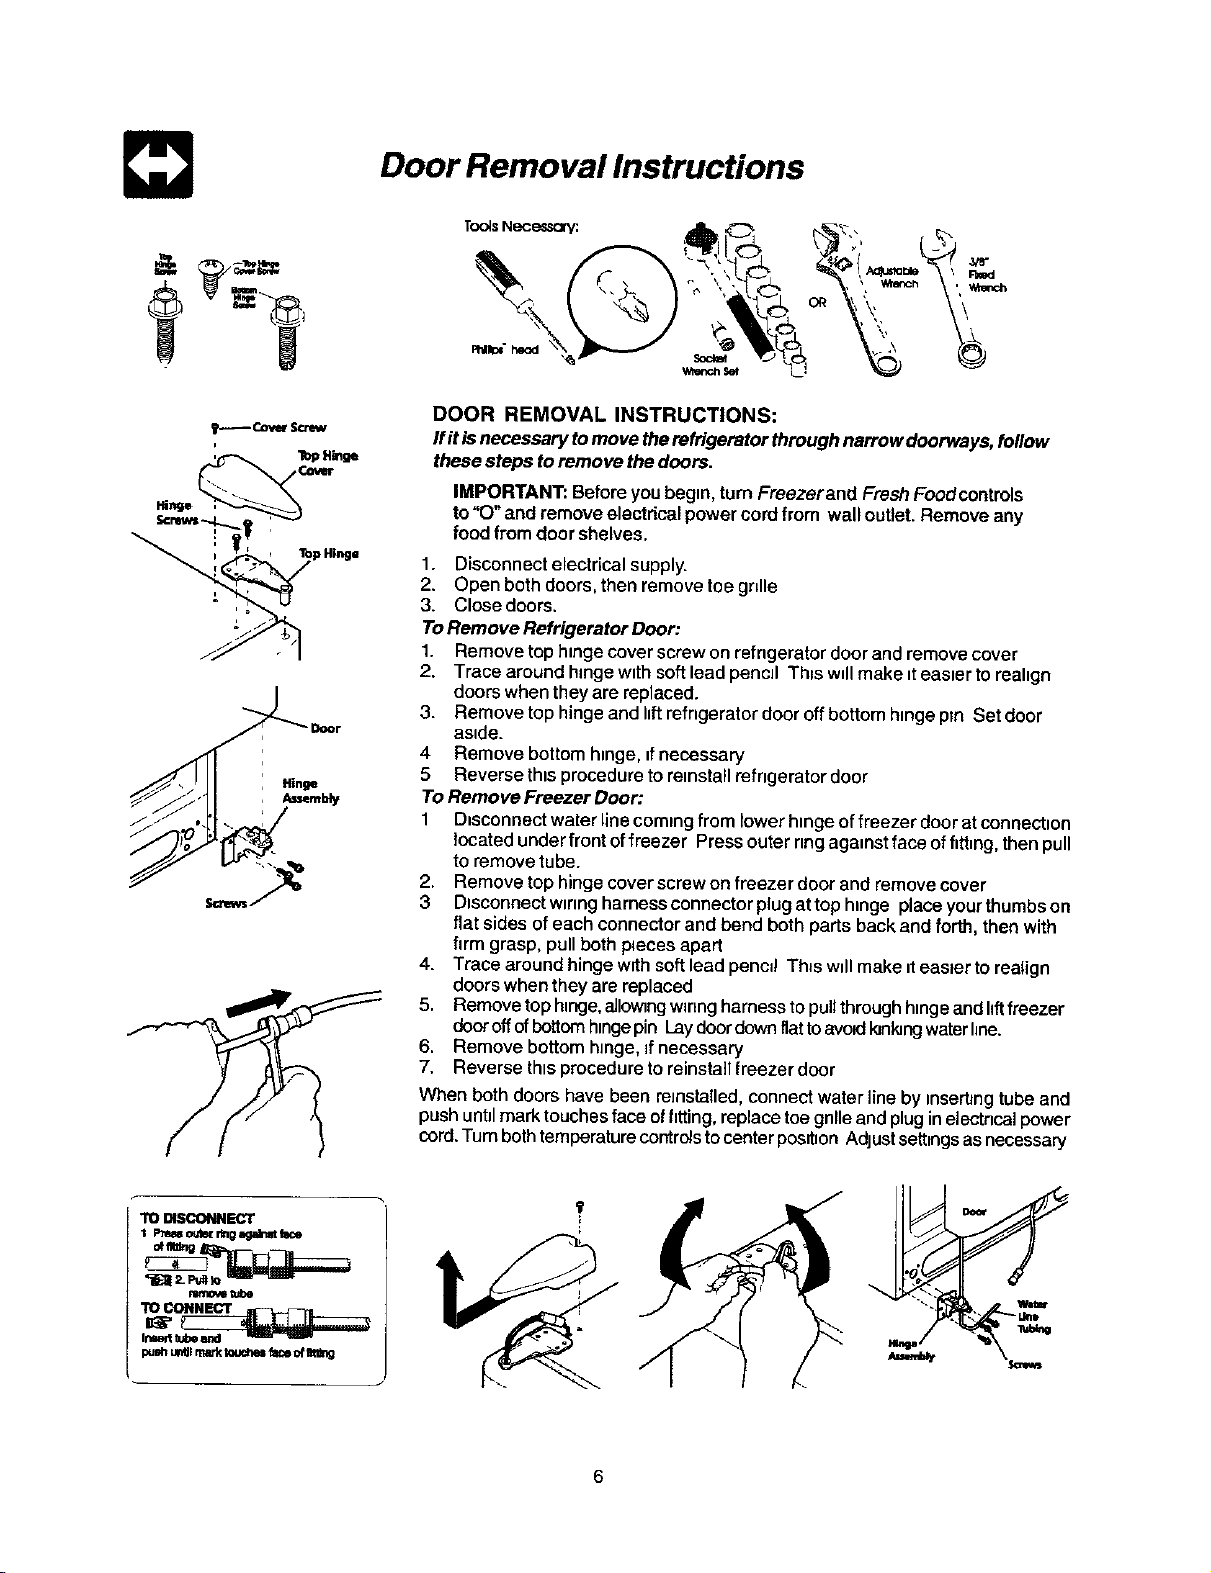
DOOR REMOVAL INSTRUCTIONS:
flit isnecessary tomove therefrigeratorthrough narrowdoorways,follow
these steps toremove thedoors.
IMPORTANT: Beforeyou begin, turnFreezerand Fresh Foodcentrols
to"O" and removeelectdcel powercordfrom wall outlet.Removeany
foodfromdoor shelves.
1. Disconnect electrical supply.
2. Open both doors, then remove toe grille
3. Close doors,
ToRemove Refrigerator Door:
1. Remove top hinge cover screw on refrigerator door and remove cover
2. Trace around hinge with soft lead pencil Th_swdlmake iteasier to realign
doors when they are replaced.
3. Remove top hinge and lift refrigerator door off bottom hinge pm Set door
aside.
4 Remove bottom hinge, ifnecessary
5 Reverse this procedure to reinstall refrigerator door
To Remove Freezer Door:
1 D_sconnectwaterline coming from lower hingeoffreezer door atconnection
located under front offreezer Press outer ringagainst face offitting, thenpull
to remove tube.
2, Remove top hinge cover screw on freezer door and remove cover
3 Dtsconnectwiringharnessconnectorplugattophlnge placeyourthumbson
flat sides of each connector and bend both parts back and fortt_,then with
firm grasp, pull both p_eoesapart
4. Trace around hinge with soft lead pencil Th_swdl make iteasier to realign
doors when they are replaced
5, Remove top hinge,aJlow]ngwrongharness to pullthrough hinge and hftfreezer
dooroff ofbottomhingepin Laydoordownfiattoavoidkinkingwaterhne.
6, Remove bottom hJnge,if necessary
7. Reverse thisprocedure to reinstall freezer door
When both doors have been reinstalled, connect water line by Inse_ng tube and
push untilmark touches face offitting, replace toegnlle andplug inelectncal power
cord.Turnbothtemperaturecontrolstocenter pos_lon Adjustsettrngsasnecessary
TO DISCONNECT
_ _-Pt_ _ _
?
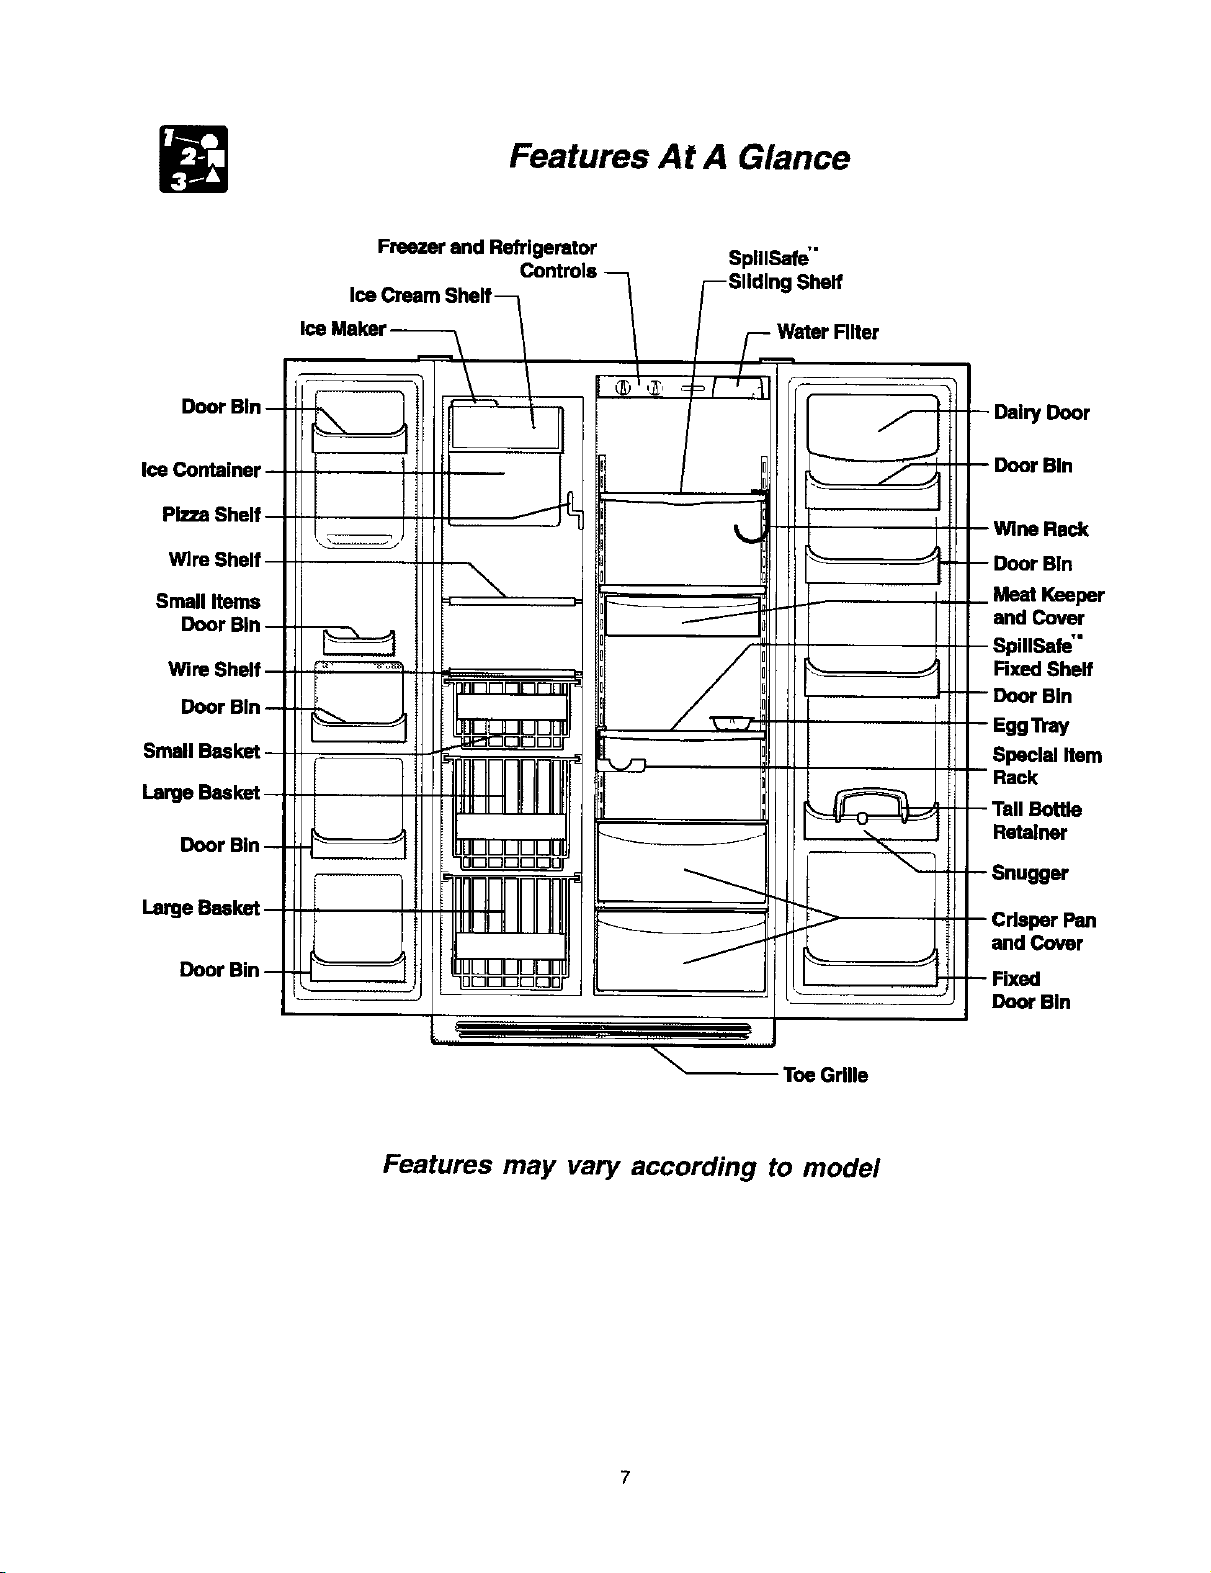
Features At A Glance
Door Bin --
Ice Container
Pizza Shelf
Small Items
Win
Door
Largq
Door
Freezer and Refflgemtor
SplllSafe'"
IShelf
:liter
Toe Grllle
r Door
Bin
Bin
Meat Keeper
and Cover
billSafe'"
Rxed Shelf
Speclal Ilem
Retainer
and Cover
Door Bin
Features may vary according to model
?
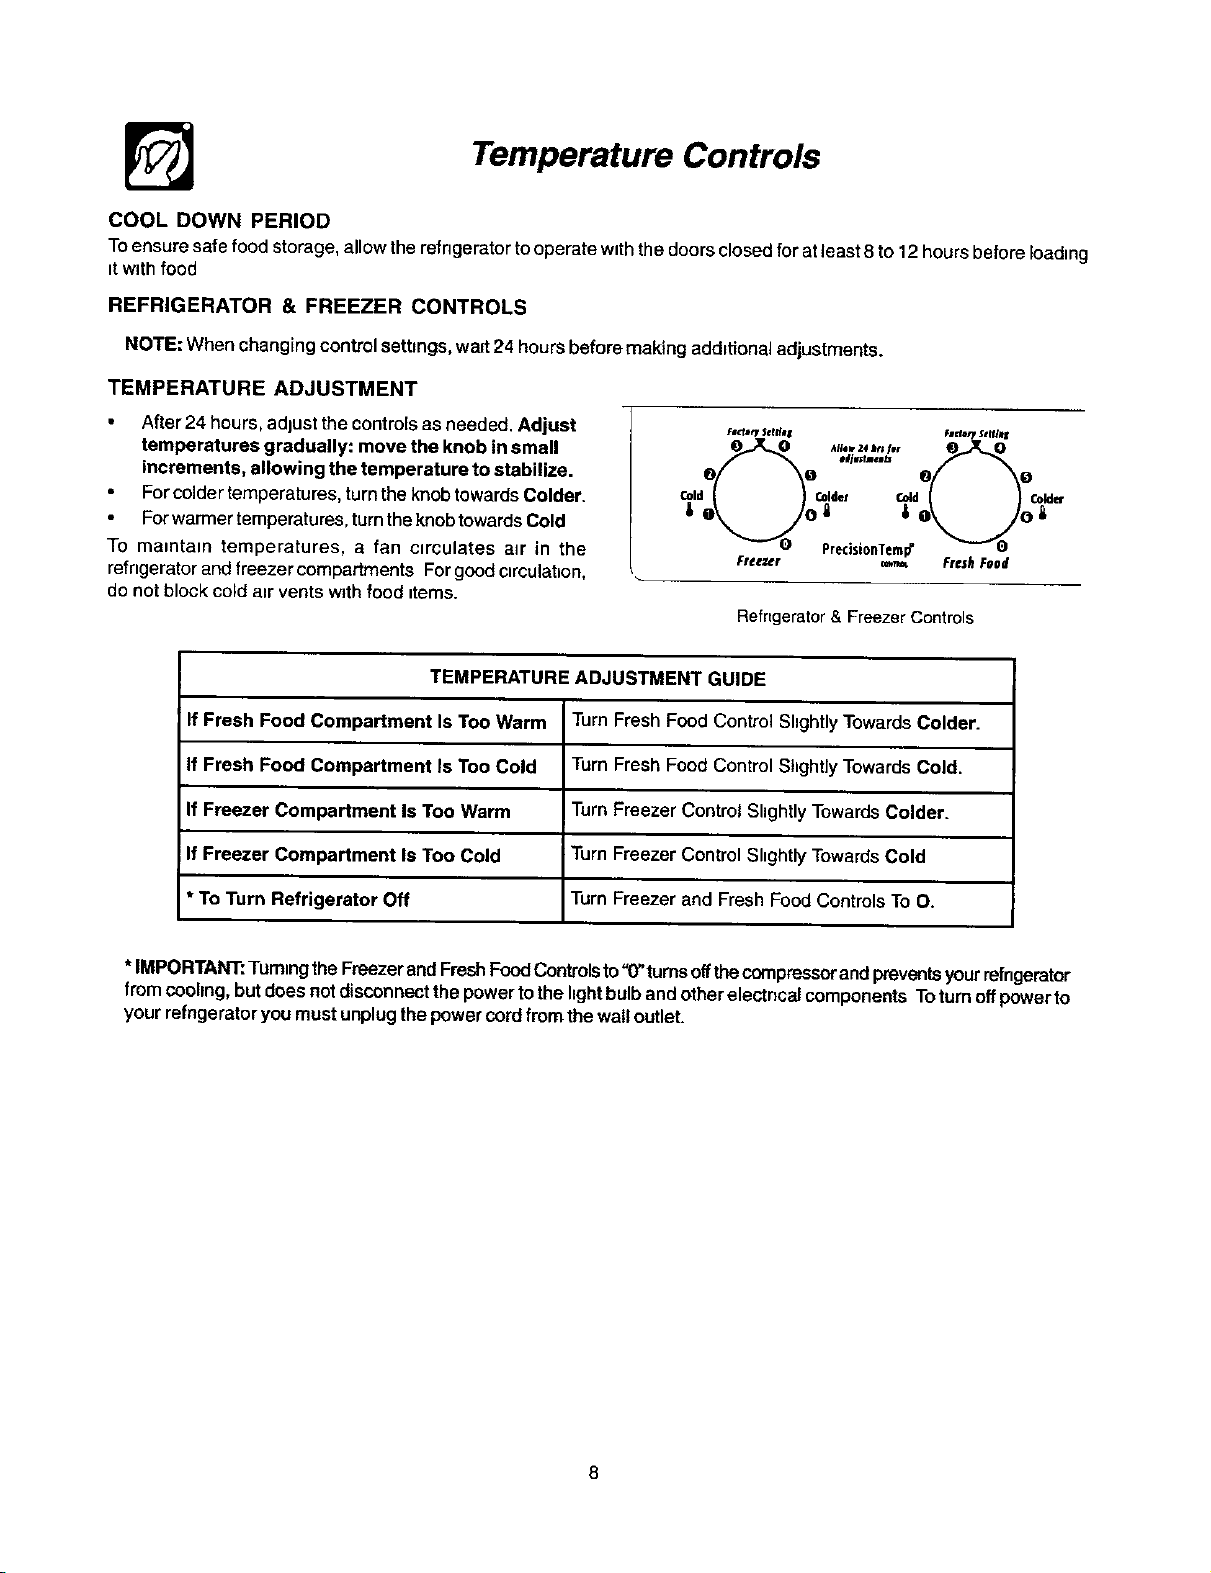
Temperature Controls
COOL DOWN PERIOD
Toensure sate foodstorage,allow therefrigerator to operate withthe doors closed forat_east8 to 12 hours before _oadmg
itwith food
REFRIGERATOR & FREEZER CONTROLS
NOTE: When changing control settings,wait24 hours before making additionaladjustments.
TEMPERATURE ADJUSTMENT
• After 24 hours, adjust the controls as needed. Adjust
temperatures gradually: move the knob in small
increments, allowing the temperature to stabilize.
• Forcc4dertemperatures, turnthe knob towards Colder.
• Forwarmer temperatures, turn theknobtowards Cold
To mamtam temperatures, a fan circulates air in the
refngerator and freezer compartments Forgood ctrculatbon,
do not block cold atr vents w_thfood ttems.
Ftcforf StfallI Fmd#rt$#Wq
oF of
recisionTe
Freezer c_ Fresh Food
Refrtgerator& Freezer Controls
TEMPERATURE ADJUSTMENT GUIDE
If Fresh Food Compartment Is Too Warm TurnFresh Food Control ShghtlyTowardsColder.
If Fresh Food Compartment Is Too Cold TurnFreshFood ControlShghtlyTowardsCold.
If Freezer Compartment Is Too Warm TurnFreezer ControlShghtlyTowardsColder.
If Freezer Compartment Is Too Cold TurnFreezer ControlShghtlyTowardsCold
* To Turn Refrigerator Off TurnFreezer and FreshFoodControlsTo O.
* IMPORTANT:Tummgthe F_ezer andFreshFoodControlsto"(Tturnsoffthecompressorand preventsyourrefngerator
from coohng,but doesnotdisconnectthepowertothehghtbulband otherelectnc_dcomponentsToturnoffpowerto
yourrefrigeratoryoumustunplugthepowercordfrom thewalloutlet.
Looking Inside
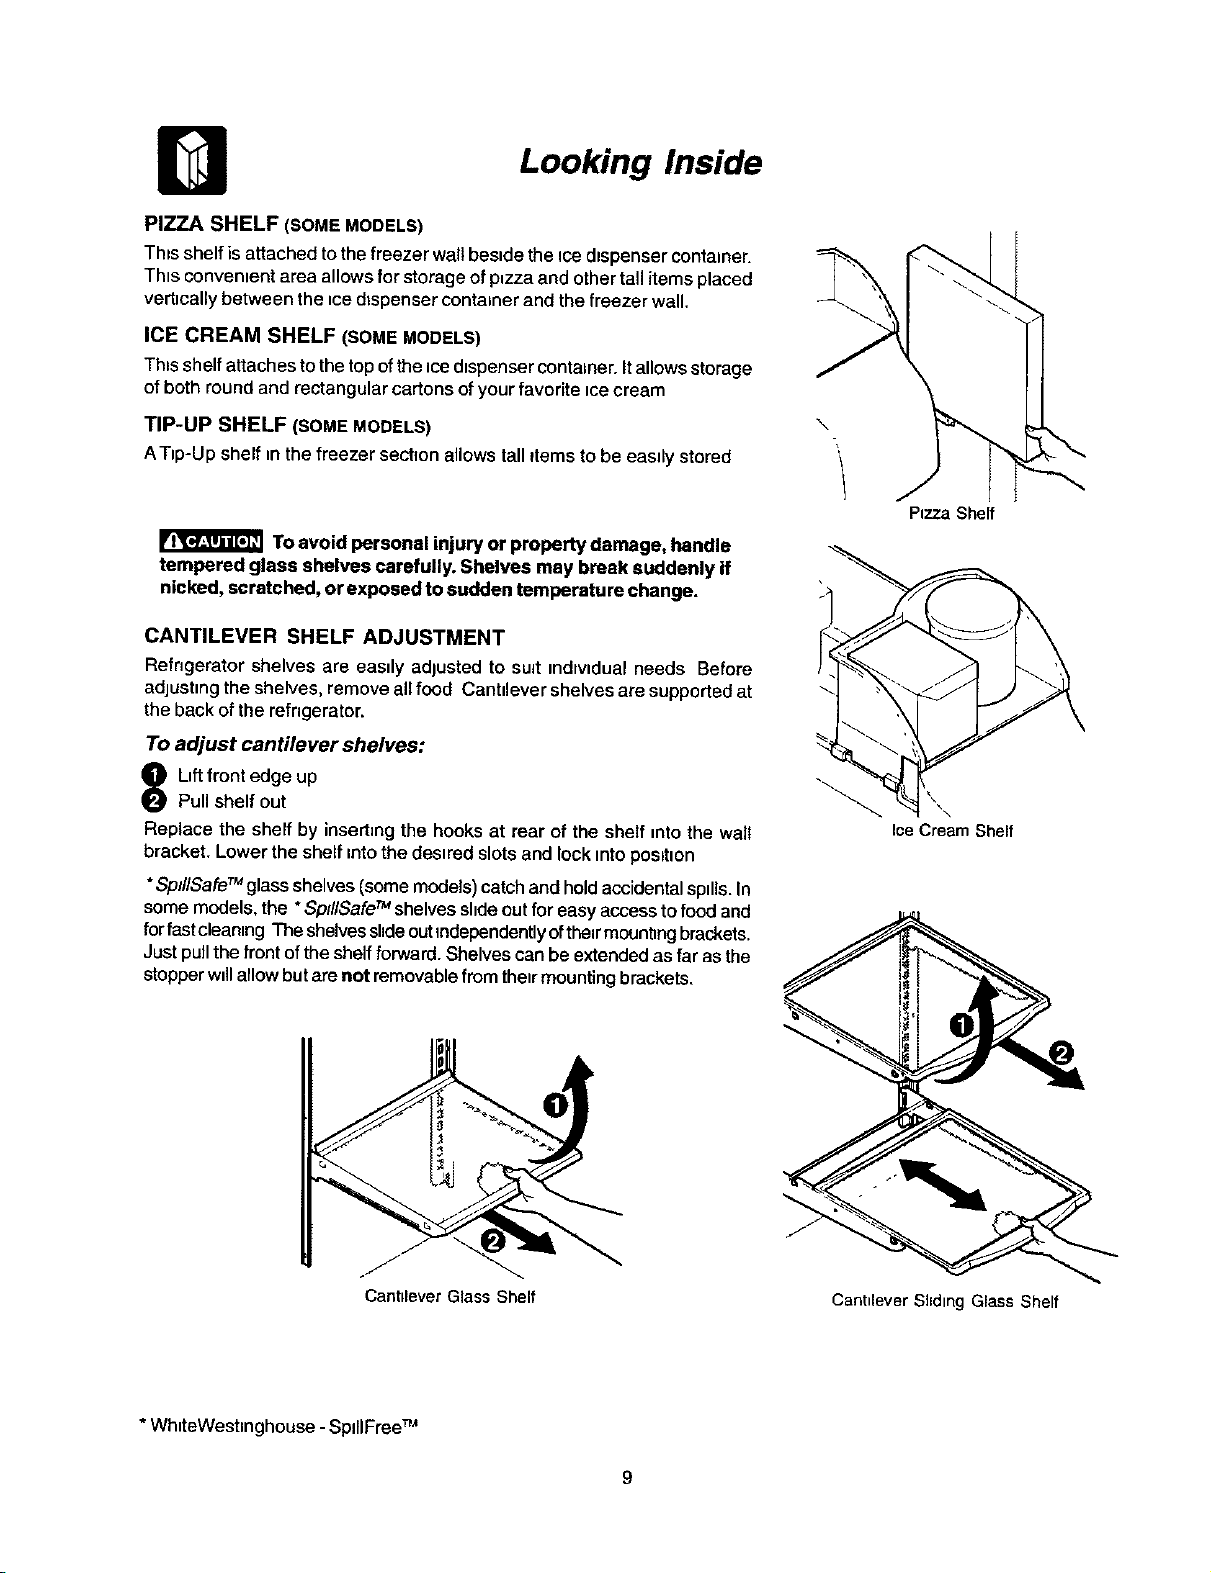
PIZZA SHELF (SOMEMODELS)
Thisshelf is attached to the freezer wail beside the ice dispenser container.
Thts convenient area allows for storage of p_zzaand other tall items placed
vertically between the _cedispenser container and the freezer wall.
ICE CREAM SHELF (SOMEMODELS)
This shelf attaches tothe top ofthe icedispenser container. Itallows storage
of both round and rectangular cartons of your favorite _cecream
TIP-UP SHELF (SOMEMODELS)
ATip-Up shelf mthe freezer sectlon allows tall items to be easily stored
\
To avoid personal injury or property damage, handle
tempered glass shelves carefully. Shelves may break suddenly if
nicked, scratched, or exposed to sudden temperature change.
CANTILEVER SHELF ADJUSTMENT
Refngerator shelves are eastly adjusted to suit indivtdual needs Before
adjusting the shelves, remove all food Cantilever shelves are supported at
the back of the refngerator.
To adjust cantilever shelves:
8 fftfront edge up
Pull shelf out
Replace the shelf by insertingthe hooks at rear of the shelf into the walt
bracket. Lower the shelf into the desired slots and lock intopos_hon
*SpJllSafaTM glass shelves (somemodels) catch and holdaccidental spills. In
some models, the *SplllSafeTM shelves shdecut for easy access to food and
forfastcleaning The shelvesshdeoutindependentlyoftheirmountingbrackets.
Just pull the front ofthe shelf forward. Shelves can be extended as far asthe
stopper wtllallow butare not removable from their mountingbrackets.
Pizza Shelf
\\
Ice Cream Shelf
Cantilever Glass Shelf
Cantilever Shding Glass Shelf
* WhlteWestlnghouse - SpillFreeTM
I1
Looking Inside (continued)
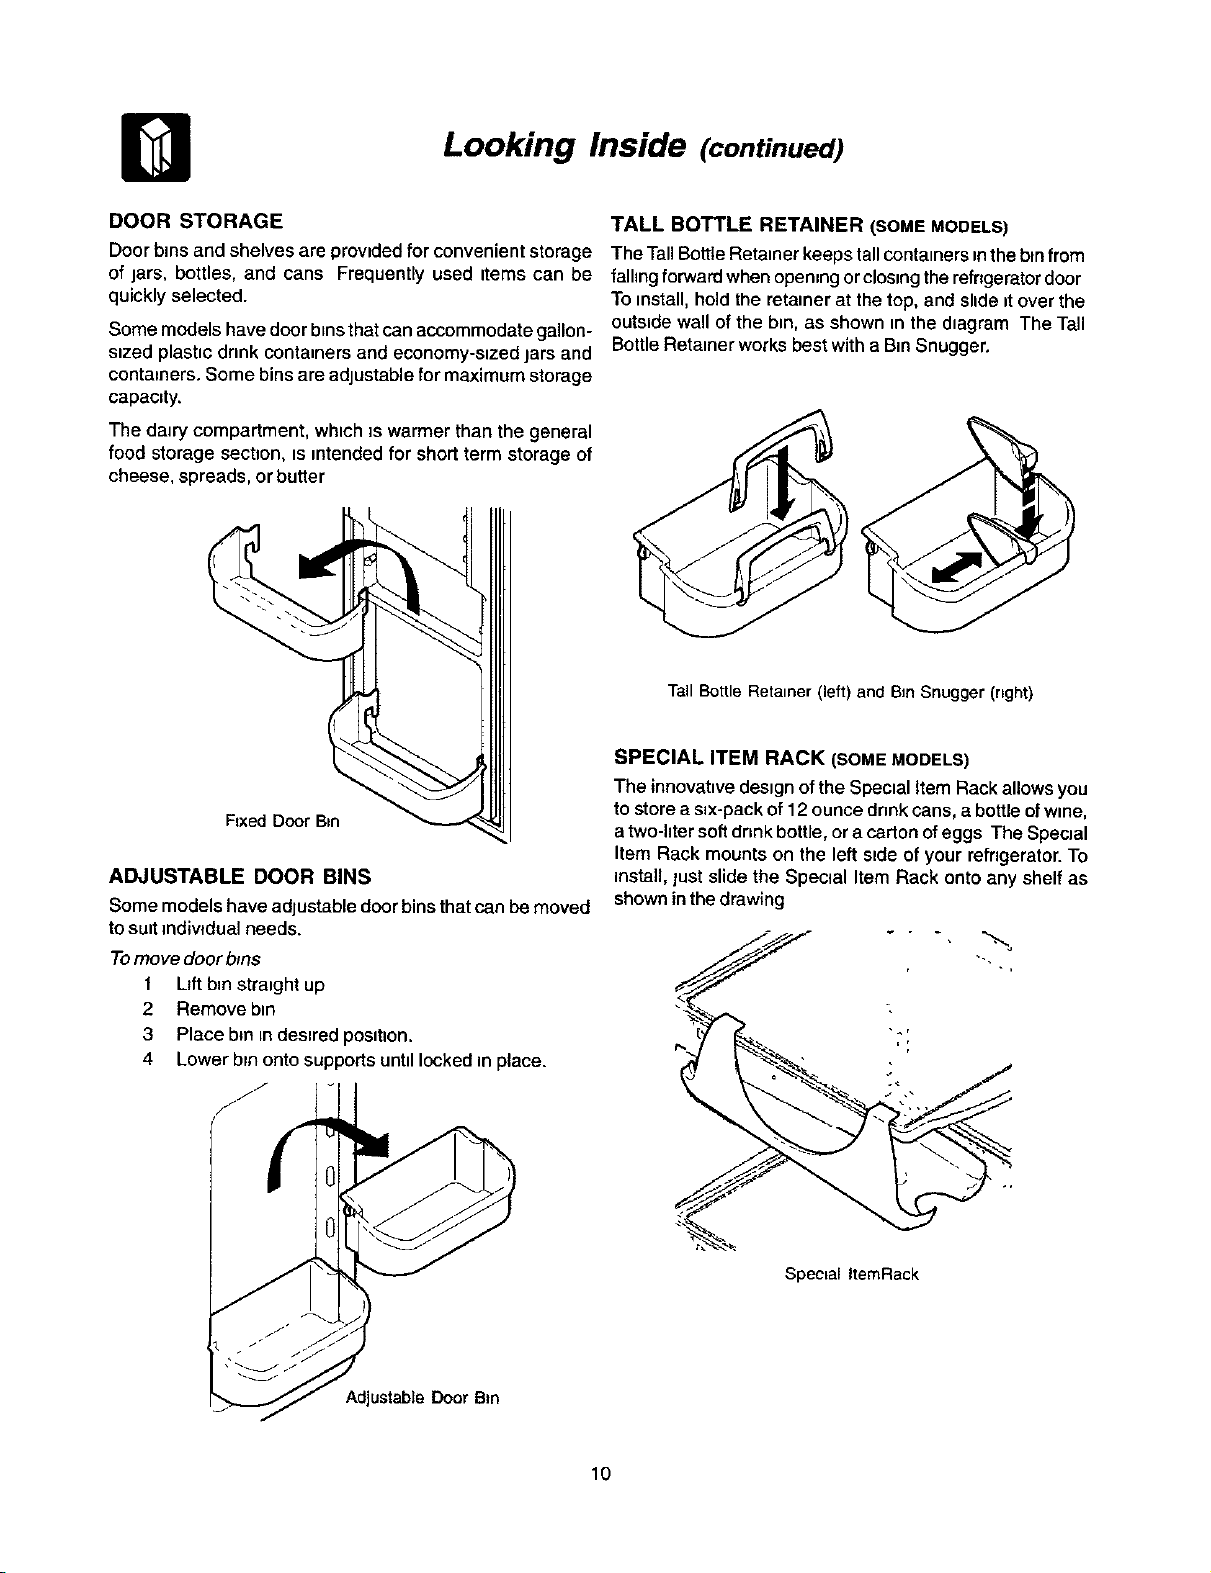
DOOR STORAGE
Door bins and shelves are provided for convenient storage
of jars, bottles, and cans Frequently used Items can be
quickly selected.
Some models have door b_nsthat can accommodate gallon-
sized plastic drink containers and economy-sized jars and
containers. Some bins are adjustable for maximum storage
capacity.
The dairy compartment, whichis warmer than the general
food storage section, isintended for short term storage of
cheese, spreads, or butter
TALL BOTTLE RETAINER (SOMEMODELS)
The TallBotl:leRetainer keeps tallCOntainersinthe bin from
fallingforward when openingorclosingtherefrigeratordoor
To install,hold the retainerat thetop,and slideit over the
outsidewall ofthe bin, as shown in thediagram The Tall
BottleRetatnerworksbestwitha BinSnugger.
Fixed Door Bm
ADJUSTABLE DOOR BINS
Some modelshaveadjustabledoorbinsthatcanbemoved
tosutt_ndivtdualneeds.
Tomove door bins
1 Lift bm straight up
2 Remove bm
3 Place bm indesired position.
4 Lower bin onto supports until locked in place.
jf
,f
Adjustable Door Bm
Tall Bottle Retatner (left) and 8in Snugger (right)
SPECIAL ITEM RACK (SOMEMODELS)
The innovatwe design ofthe Special Item Rackallowsyou
to storea s=x-packof12 ouncednnk cans, a bottle ofwme,
atwo-htersoftdnnkbottle,ora carton ofeggs The SpecBI
Item Rack mountson the leftside of yourrefngerator.To
install, just slide the Special Item Rack onto any shelfas
shownin thedrawing
\
Spectal ItemRack
10
Looking Inside - SpecialStorageAreas
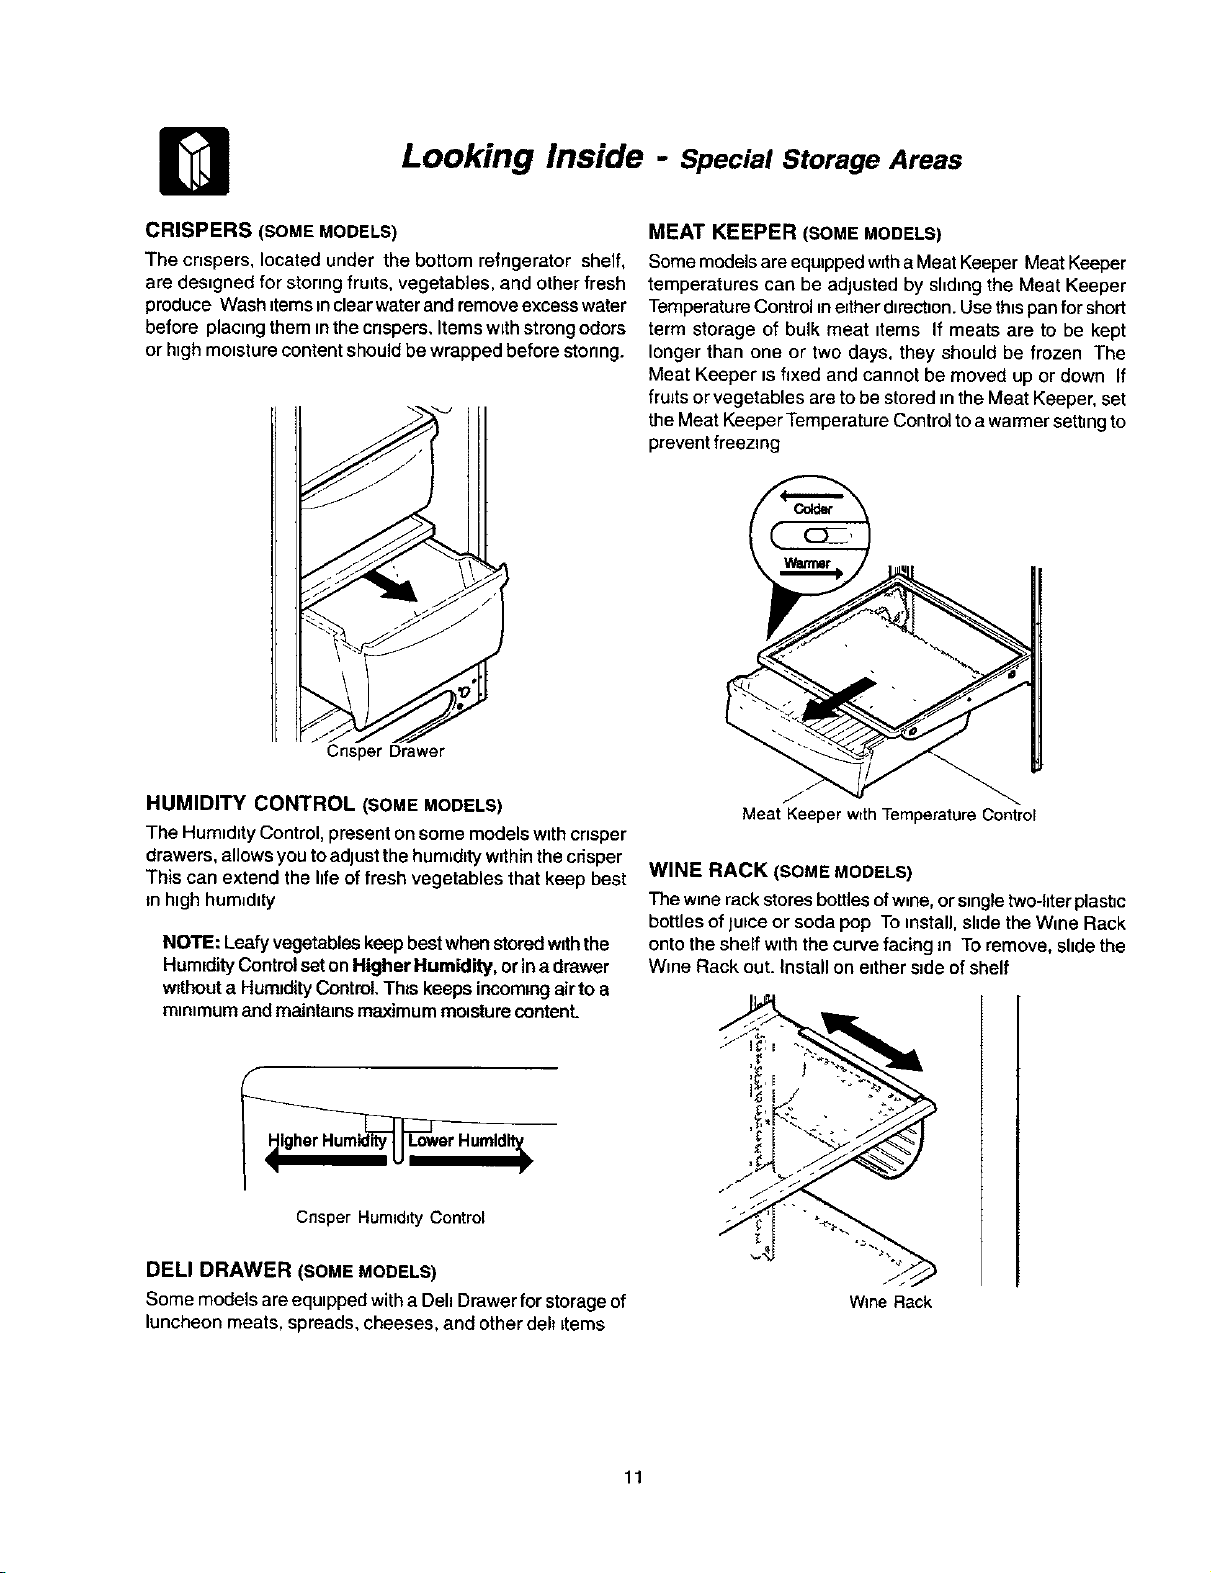
CRISPERS (SOMEMODELS)
The cnspers, locatedunder the bottom refrigerator shelf,
are destgned for storing fruits, vegetables, and other fresh
produceWash _temsinclearwater and removeexcess water
before placing them inthe cnspers. Items with strong odors
or high moisture content should bewrapped before storing.
MEAT KEEPER (SOMEMODELS)
Somemodels are equippedwith a MeatKeeper Meat Keeper
temperatures can be adjusted by shdlng the Meat Keeper
TemperatureControl tnertherdtrect_on.Use thtspan forshort
term storage of bulk meat items If meats are to be kept
longer than one or two days, they should be frozen The
Meat Keeper is fixed and cannot be moved up or down If
fruits or vegetables are to be stored inthe Meat Keeper, set
the Meat KeeperTemperature Control to awarmer settingto
prevent freezing
Cnsper Drawer
HUMIDITY CONTROL (SOMEMODELS)
The Humidity Control, present on some models withcrisper
drawers, allows you toadjust the humidity w_thinthe crisper
This can extend the life of fresh vegetables that keep best
tnhigh humidity
NOTE: Leafy vegetableskeepbest whenstored withthe
Humidity Control setonHigher Humidity, orina drawer
withouta Humidity Control.Thts keeps incoming airto a
minimum and maintains maximum moisture contenL
J
Meat Keeper w=thTemperature Control
WINE RACK (SOMEMODELS)
Thewme rack stores bottlesofw_ne,or single two-literplastic
bottles of jutceor soda pop To install,slide the Wine Rack
onto the shelf with the curve facing in Toremove, slide the
Wine Rackout. Installon e_thers_deof shelf
Cnsper HumidityControl
DELl DRAWER (SOMEMODELS)
Some models areequipped with aDehDrawer for storage of
luncheon meats, spreads, cheeses, and other del_=terns
WineRack
11
Automatic Ice and Water Dispenser
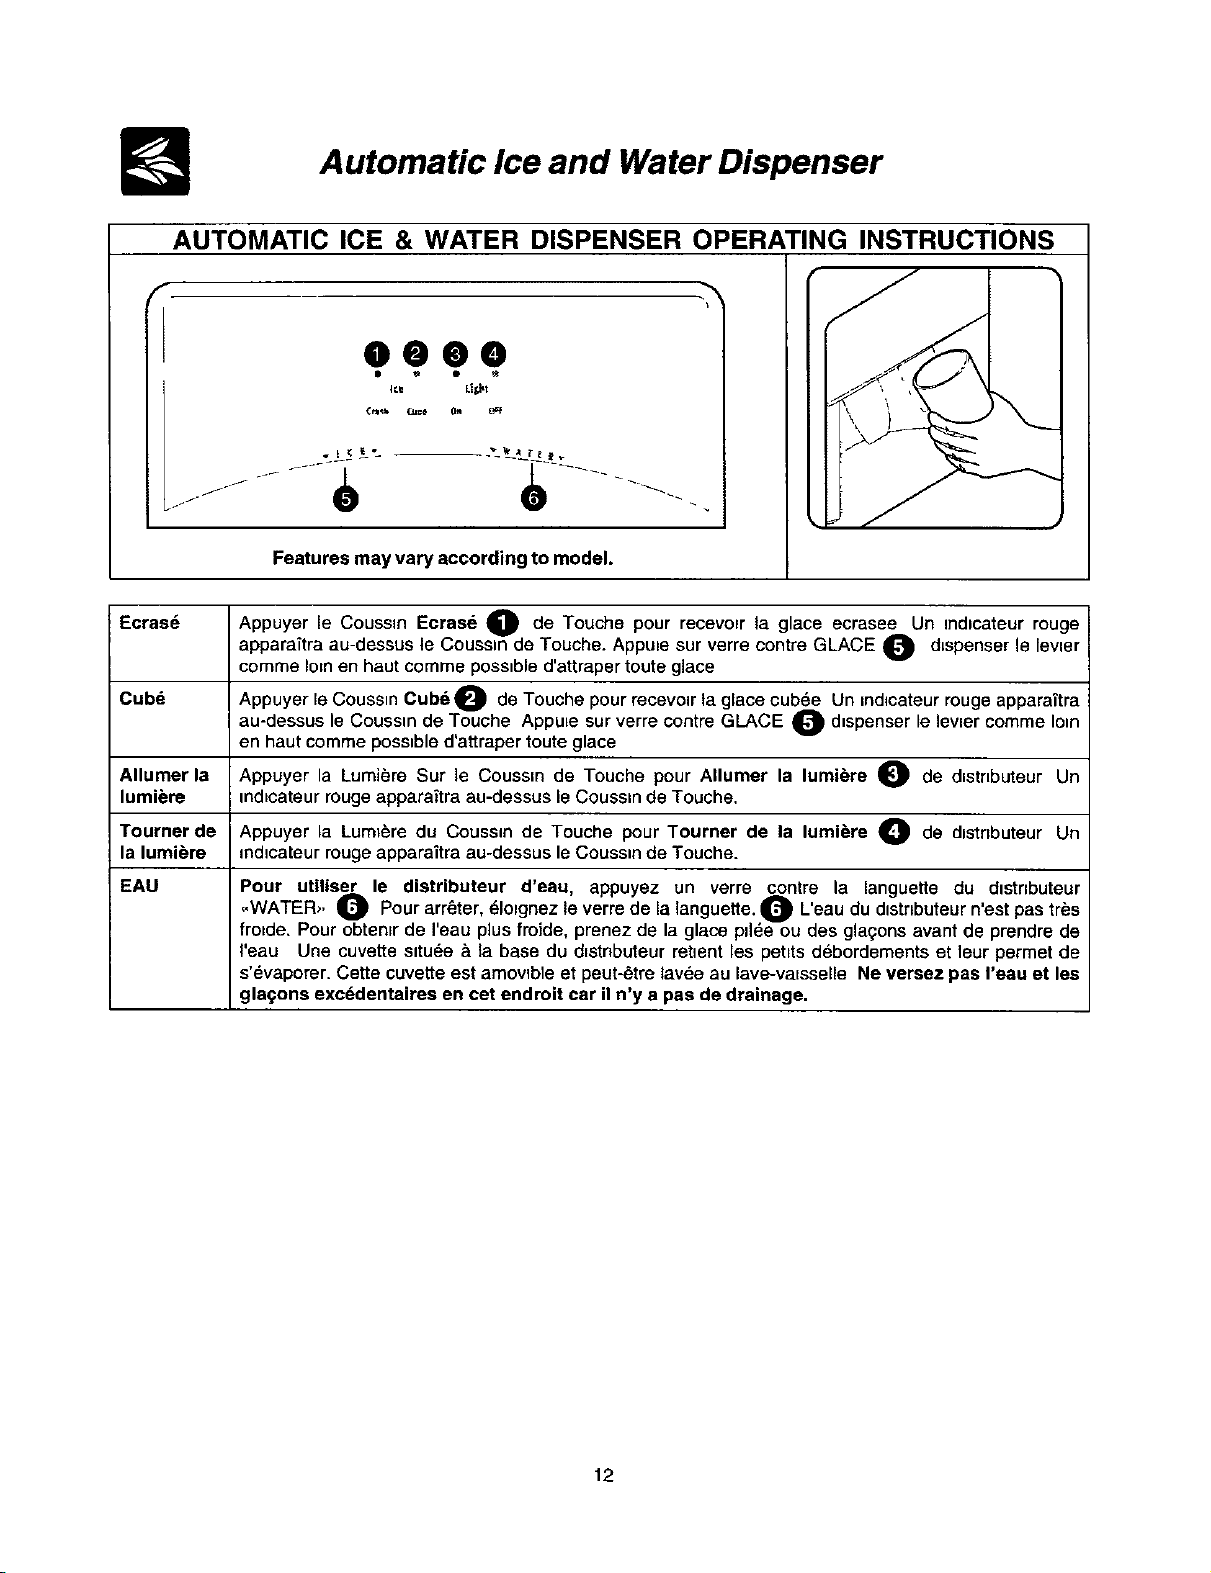
AUTOMATIC ICE & WATER DISPENSER OPERATING INSTRUCTIONS
f
00@0
Ice Li_t
Features may vary according to model.
Appuyer le Coussln Ecrase O de Touche pour recevo=r la glace ecrasee Un mdtcateur rouge
Ecrasd
apparaffra au-dessus le Coussm de Touche. Appu_e sur verre contre GLACE O d_spenser le levler
comTe Iota en haut comTe possible d'attraper toute glace
Cubd Appuyer le Cousstn Cubd_ de Touche pour recevoir ta glace cub_e Un indlcateur rouge apparaTtra
au-dessus le Coussln de Touche AppuLe sur verre contre GLACE _ d=spenser le lewer comTe Iota
en haut comTe possible d'attraper toute glace
Allumer la Appuyer la Lumibre Sur le Coussm de Touche pour Allumer la lumi_re O de d=str=buteur Un
lumi_re ind_cateur rouge apparai'tra au-dessus le Coussln de Touche.
Tourner de Appuyer la Luml_re du Coussln de Touche pour Tourner de la lumi_re O de dlstrlbuteur Un
la lumi_re mdtcateur rouge apparaitra au-dessus le Coussm de Touche.
EAU Pour utiliser le distributeur d'eau, appuyez un verre contre la languette du dtstnbuteur
Pour arr6ter, _lo=gnez le verre de la languette. _{_ L'eau du dlstr=buteurn'est pas trbs
_c WATER_
frotde. Pour obtenlr de I'eau plus fmide, prenez de la glace price ou des glagons avant de prendre de
I'eau Une cuvette sttude _ la base du d[stnbuteur retlent les pettts debordements et leur permet de
s'_vaporer. Cette cuvette est amowble et peut-_tre lav_e au lave-valsselle Ne versez pas I'eau et les
glacjons excddentaires en cet endroit car il n'y a pas de drainage.
12
Automatic Ice and Water Dispenser
ICE AND WATER DISPENSER FEATURES
The ice and water dispenser conventently dispenses chilled water, and tce cubes or crushed ice, depending on the model
To operate the icedispenser, selectthe iceoption desired usingthe touchpad Press aglass against thedispensing paddle
as far up as possible to catch all ice Tostop dispensing ice, pull glass away from dispensing paddle. Do not remove the
glass until the ice hascompletely dispensed. (Complete instructionsfor the dispenser operation are attached to the inside
of the freezer door )
How the Water Dispenser Works
The watertank, locatedbehind the drawers in therefngerator compartment, automatically fills aswater isdispensed. For
proper d_spenser operation, the recommended supply water pressure should fall between 20 psi and 100 psi.
Waterpressure mustnotexceed 100Ibs.Excessivepressurernsycausewaterfittartomalfunction.
After the refrigerator is connected to the water supply, fill the water tank by drawing one glass of water. It may take about
11/=minutes after act]rating the dispenser paddle before water begins to fill this first glass. Continue flushing the system
for 3 minutes to rid the tank and plumbing connections of any impurit]es The water dispenser has a built in shutoff device
that wdl stop the water flow after 3 m_nutes of continuous use. Simply release the dispenser paddle to reset the shutoff
mechanism
Chemicals from a maffunctioningsoftenercandamage the icemaker. Ifthe icemaker isconnected
to soft water, ensure that the softener is maintained and working properly.
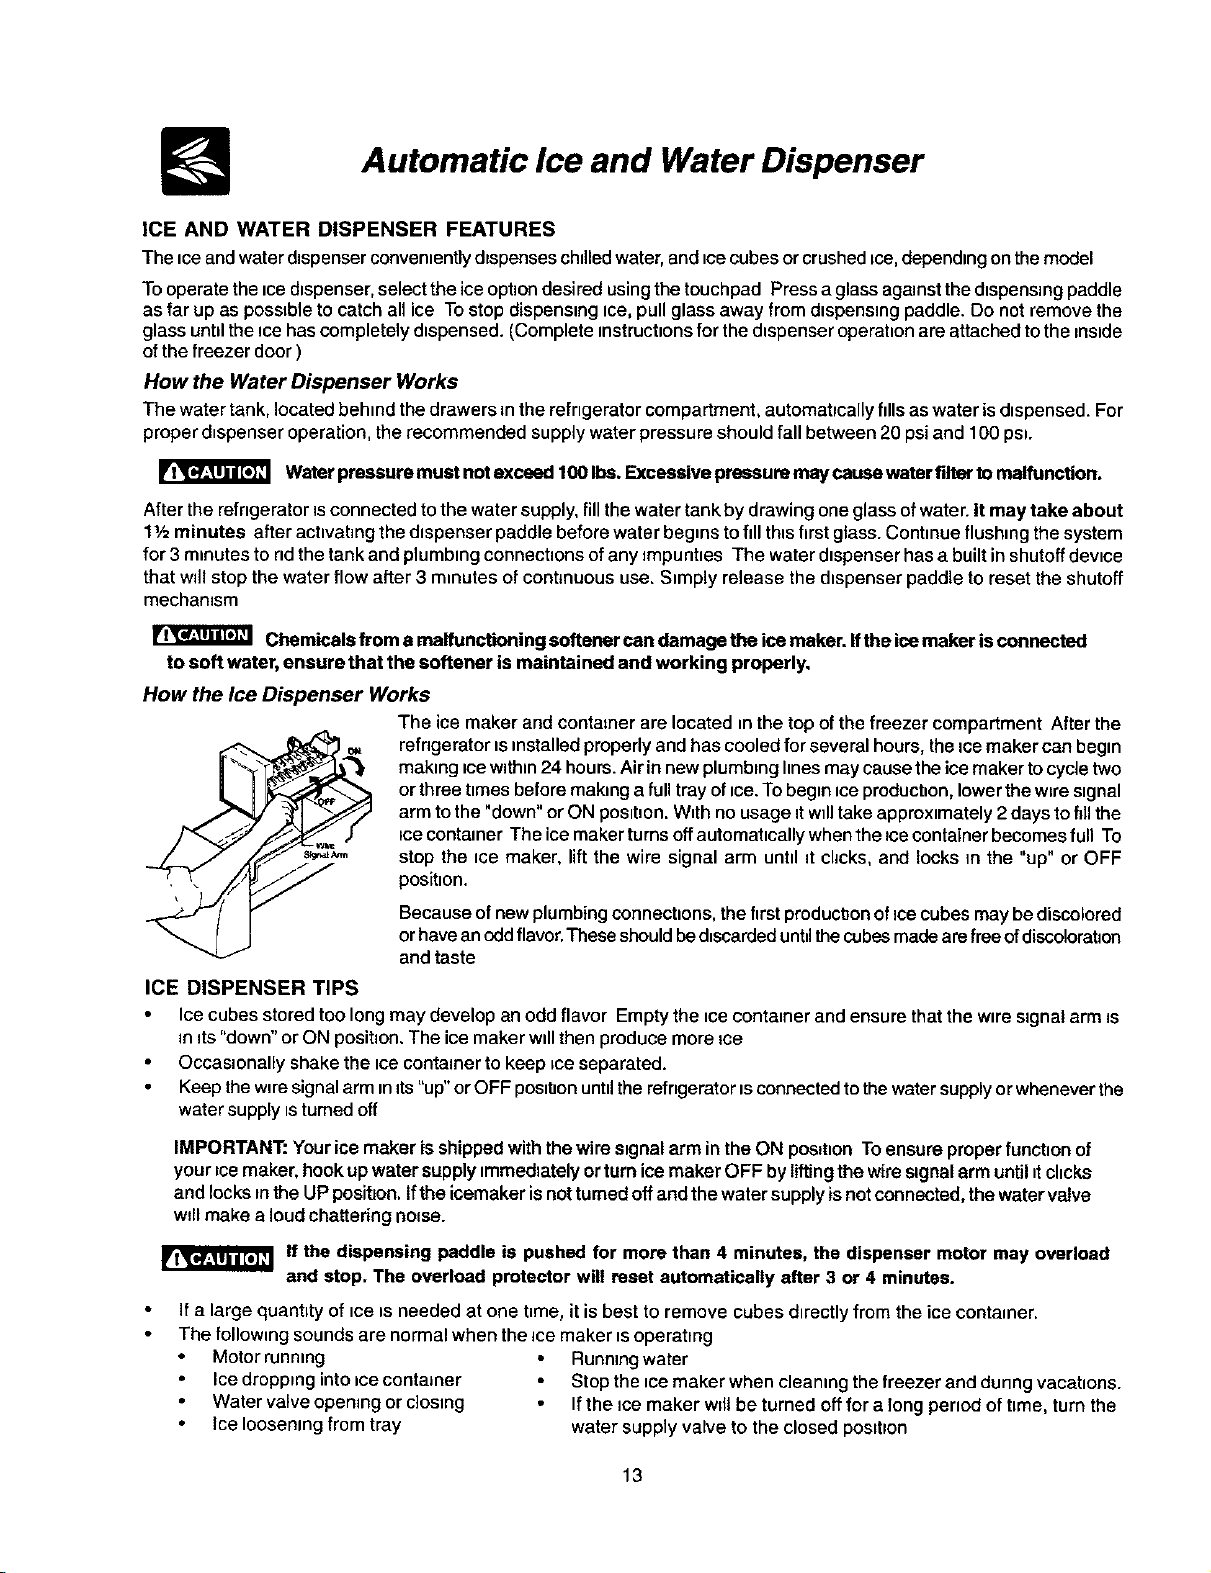
How the Ice Dispenser Works
The icemaker and containerare located in the top ofthefreezer compartment After the
refrigeratorisinstalled properlyand has cooledfor several hours,theicemakercanbegin
making icewdhin24 hours.Airinnewplumbtnglinesmay causetheice makertocycletwo
orthreettmesbefore making a fulltrayofice.To beginiceproduction,lowerthew_restgnal
armtothe"down" orON postt_on.Withno usageitw_lltake approximately2 daystofillthe
_cecontainerThe icemakerturnsoffautomaticallywhenthe tcecontainerbecomes full To
_._ stop the ice maker, lift the wire signal arm until _tchcks, and locks in the "up" or OFF
position.
Becauseof newplumbing connections, the5rstproduct]onof icecubes maybe discolored
or haveanodd flavor.These should bed_scardeduntdthecubesmadearefreeofdiscolorat=on
and taste
ICE DISPENSER TIPS
Ice cubes stored too long may develop an odd flavor Empty the _cecontainer and ensure that the wire signal arm is
in its "down" or ON position. The ice maker will then produce more ice
Occasionally shake the ice container to keep =ceseparated.
Keep the wire signal arm in its "up" or OFF position until the refngerator is connected to the water supply or whenever the
water supply tstumed off
IMPORTANT: Youricemaker isshipped withthe wire signalarm in theON position Toensureproperfunction of
yourice maker,hookupwatersupplyimmediately orturnicemakerOFF bylifting thewirestgnalarmuntilitclicks
and locksintheUP posibon.Ifthe icemakarisnotturnedoffand thewatersupplyisnotconnected,thewatervalve
wtllmake a loud chatteringno_se.
If the dispensing paddle is pushed for more than 4 minutes, the dispenser motor may overload
and stop. The overload protector will reset automatically after 3 or 4 minutes.
If a large quant=tyofice is needed at one t]me, it is best to remove cubes dtrectly from the ice container.
The following sounds are normal when the ice maker _soperating
Motor running Running water
Ice dropping into icecontainer Stop the =cemaker when cleaning the freezer and dunng vacations.
Water valveopen=ngor closing If the Ice maker w_ltbe turned off for a long penod of t]me, turn the
Ice loosening from tray water supply valve to the closed pos=t=on
13
Automatic Ice and Water Dispenser
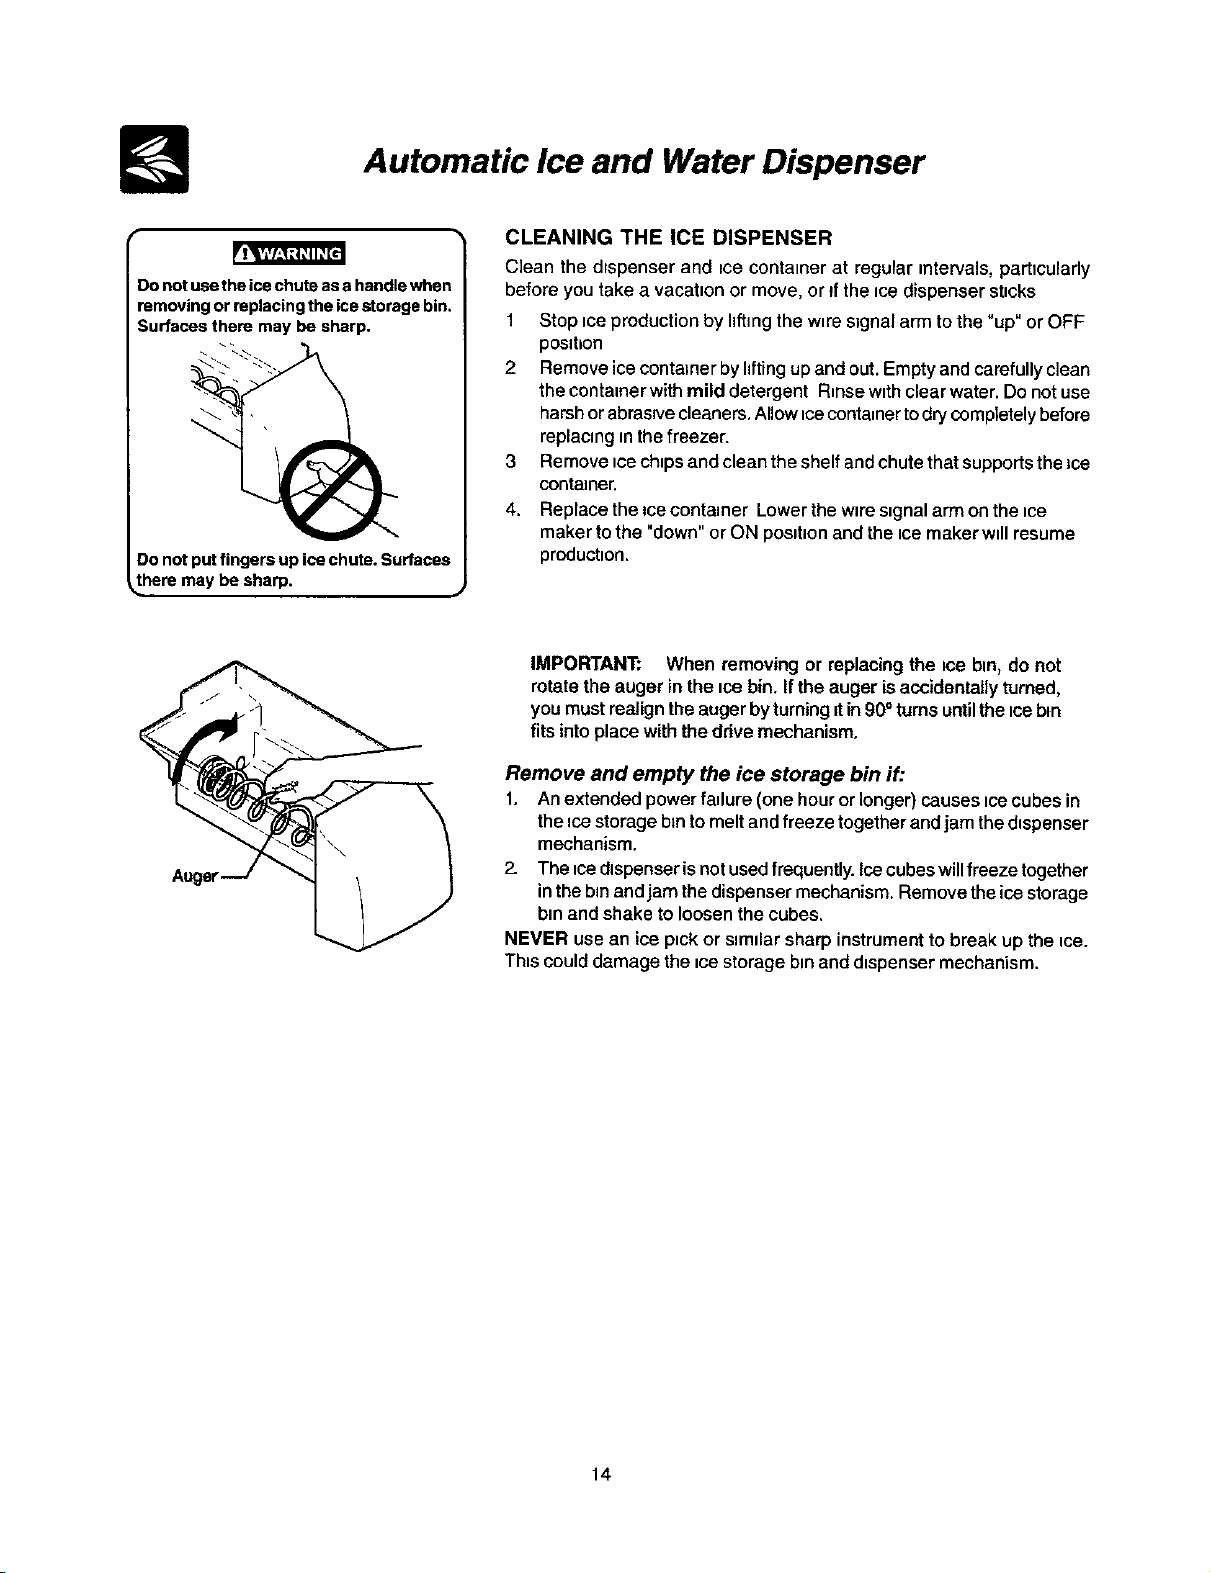
)o not use the ice chute as a handle when
removing or replacing the ice storage bin,
Surfaces there may be sharp.
Do not put fingers up ice chute. Surfaces
there may be sharp. •
CLEANING THE ICE DISPENSER
Clean the drepenser and _cecontainer at regular mtervals,parttcularly
before you take a vacatton or move, or If the _cedispenser sttcke
1 Stop iceproduction by hftmgthe w_res_gnalarm to the "up" or OFF
posltbon
2 Remove icecontainer bylifting up and out.Empty and carefully clean
the container with mild detergent Rinse wtthclear water. Do not use
harshor abrastvecleaners.Allowtcecontainertodry completelybefore
replacing in the freezer.
3 Remove tcech_psand clean the shelfand chute thatsupports the ice
container.
4. Replace the icecontainer Lower the wire s_gnalarm on the ice
maker to the "down" or ON postt_onand the Ice maker wtll resume
production.
IMPORTANT: When removingor replacing the tce bm, do not
rotatethe auger inthe tcebin. Ifthe auger isaccidentallyturned,
youmustrealigntheaugerbyturning_tin90°turnsuntil thetcebin
fitsintoplacewiththedrivemechanism.
Remove and empty the ice storage bin if:
1. Anextendedpowerfatlure(onehourorlonger)causesicecubesin
the _cestorage bmtomeltandfreeze together andjamthe dispenser
mechanism.
2_ The tcedispenser isnot usedfrequently. Icecubes will freezetogether
in the bmand jam the dispenser mechanism. Removethe ice storage
bm and shake to loosen the cubes.
NEVER use an ice p=ckor slmdar sharp instrument to break up the tce.
This could damage the _cestorage bin and d_spensermechanism.
14
Automatic Ice and Water Dispenser
PureSource TM*Ice and Water Filter (some models)
NOTE: Ifyou purchased a refrigeratorwith a PureSource n.. ice and Water filter, please read the followinguse and
careinformation. Thisiceand water bitersystem filters water to your ice maker and waterdispenser It islocated inthe
upper right back corner of the fresh food compartment
System Startup:
Water supply does not need to be turned off, however, do not use ice and water dtspenser while installing filter. The filter
cartndge has already been installed in the filter housing at the factory Refer to the How The Water Dispenser Works sect=on
to properly fill the system with water Changing the Filter:
Water cond=bons vary throughout the world, but changing the water filter every
6 - 9 months normally will ensure the h=ghest poss=b]e water quality The Filter
Status hghtwdl turn red after 400 gallons of water has flowed through the ice and
J water dispenser (some models) Also, _fthe filter has been in a refngerator that
has not been m use for awhile (during moving for example), change the filter
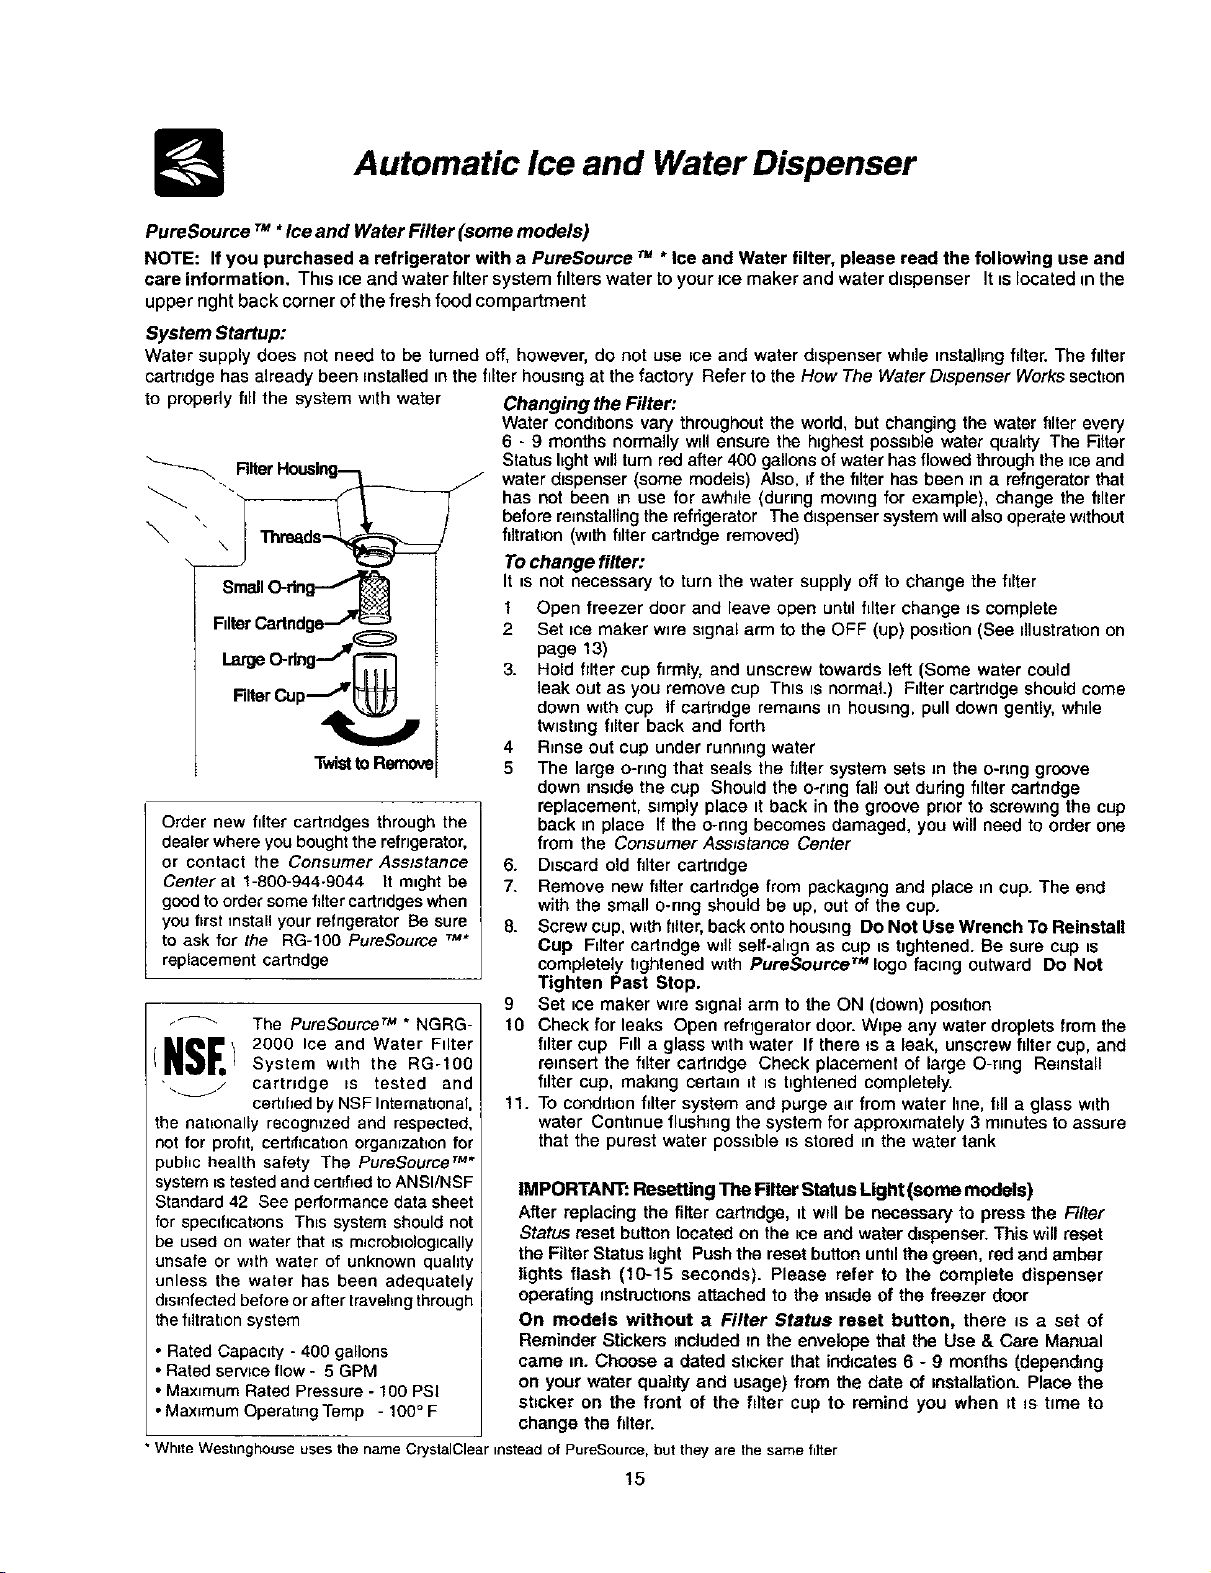
_. FilterHouslog_
SmallO-dng-J_
FtlterCadndgs-r_-J
LargeO-dng-J_--T_
FilterCupJ_
Twistto Remove
Order new filter cartndges through the
dealer where you bought the refrJgerator,
or contact the Consumer Assistance
Center at 1-800-944-9044 It m=ghtbe
good to order some tilter cadndges when
you first install your refngerator Be sure
to ask for the RG-100 PureSource _*
replacement cartndge
"_" The PureSource TM * NGRG-
NSE 2000 Ice and Water Filter
') System w=th the RG-t00
'_. / cartridge _s tested and
certihed by NSF International,
the nationally recogmzed and respected,
not for profit, certification organization for
_ubhc health safety The PureSouree rM*
system ts tested and certified to ANSI/NSF
Standard 42 See performance data sheet
for specrilcatJons Thts system should not
be used on water that is mlcroblologlcally
unsafe or w_th water of unknown quahty
unless the water has been adequately
disinfected before or after traveling through
the filtration system
before reinstalling the refrigerator The dtspenser system w_llalso operate without
filtration (with filter cartndge removed)
To change filter:
It =snot necessary to turn the water supply off to change the filter
1 Open freezer door and leave open until filter change is complete
2 Set tce maker wire signal arm to the OFF (up) position (See dlustrat_onon
page 13)
3. Hold filter cup firmly, and unscrew towards left (Some water could
leak out as you remove cup Thts ts normal.) Filter cartedge should come
down with cup If cartndge remains in housing, pull down gently, while
twisting filter back and forth
4 Rinse out cup under running water
5 The large o-nog that seals the filter system sets Jnthe o-nng groove
down reside the cup Should the o-nng fall out during filter cartndge
replacement, s_mply place tt back in the groove pcer to screwing the cup
back tn place If the o-nng becomes damaged, you will need to order one
from the Consumer Assistance Center
6. Discard old filter cartndge
7. Remove new filter cartndge from packaging and place in cup. The end
with the small o-nng should be up, out of the cup.
8. Screw cup, with hirer,back onto housing Do Not Use Wrench To Reinstall
Cup Filter cartndge wdl self-ahgn as cup is ttghtened. Be sure cup is
completely tightened w_th PureSource TM logo facmg outward Do Not
Tighten Past Stop.
g Set ice maker wire signal arm to the ON (down) position
t0 Check for leaks Open refrigerator door. Wtpe any water droplets from the
ftlter cup Fdl a glass with water If there _sa leak, unscrew filter cup, and
remsert the filter cartridge Check placement of large O-ring Reinstall
filter cup, makJng sertam _tts t_ghtened completely.
t 1. To conddlon filter system and purge air from water hoe, hll a glass with
water Continue flushing the system for apprexlmately 3 m_nutes to assure
that the purest water possible _sstored tn the water tank
Rated Capacity - 400 gallons
• Rated servtce flow - 5 GPM
• Maximum Rated Pressure - 100 PSI
• Maximum Operahng Temp - 100 ° F
IMPORTANT: Resetting The Filter Status Light (some models)
After replacing the filter cartndge, it wrll be necessary to press the Filter
Status reset button located on the tce and water d=spenser.This will reset
the Filter Status hght Push the reset button until the green, red and amber
lights flash (10-15 seconds). Please refer to the complete dispenser
operating instructions attached to the inside of the freezer door
On models without a Filter Status reset button, there is a set of
Reminder Stickers tncteded m the envelope that the Use & Care Manual
came m. Choose a dated sbcker that indicates 6 - 9 months (depending
on your water quahty and usage) from the date of installation. Place the
sbeker on the front of the filter cup to remind you when d _s time to
change the filter.
• Whtte Westinghouse uses the name CrystalClear instead of PureSource, but they are the same fdter
15
A utomatic Ice and Water Dispenser
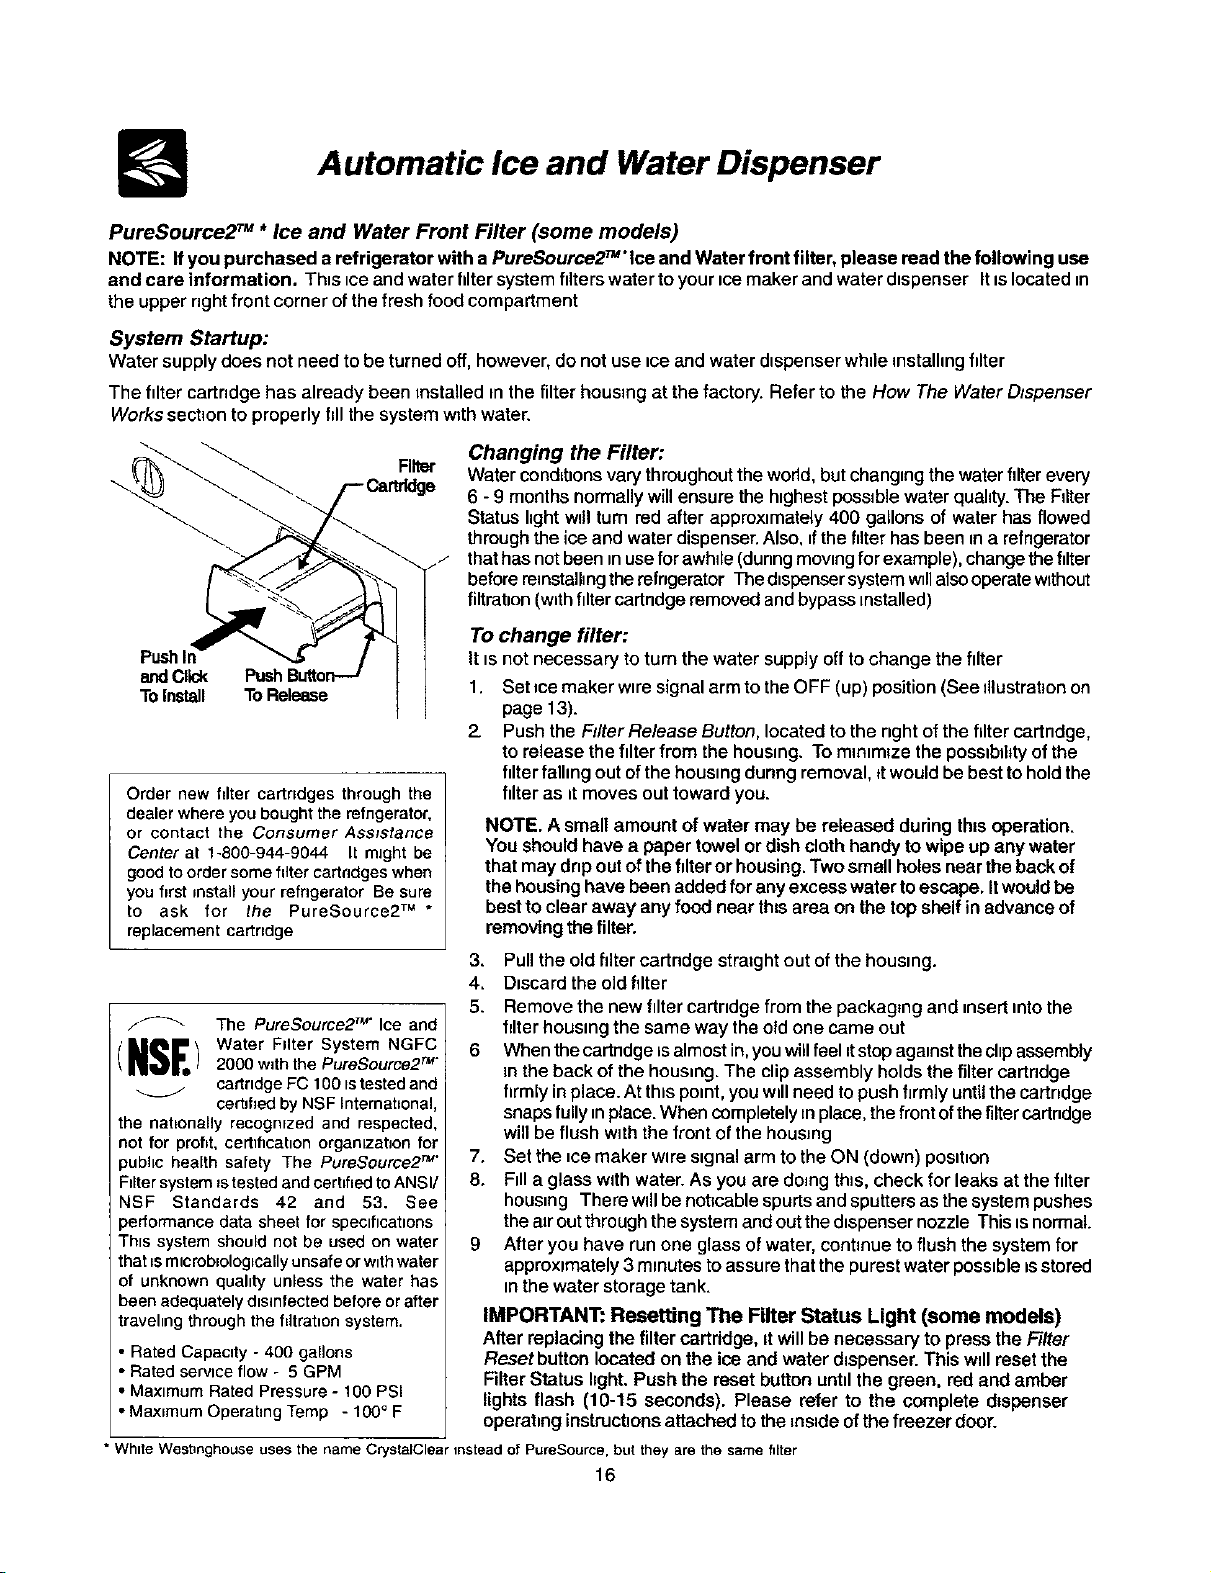
PureSource2 TM * Ice and Water Front Filter (some models)
NOTE: Ifyou purchased a refrigerator with a PureSource2T_°lce and Waterfront filter, please read the followinguse
and care information. Th_stceand water filter system filters watertoyour icemaker and water dtspenser Itislocatedm
theupperrightfront cornerofthefresh food compartment
System Startup:
Water supply does not needto be turnedoff, however, do notuseiceand water dispenser while instalhngfilter
The filter cartridge has already been tnstalledin the filter housingat the factory. Refer to the How The Water Dmpenser
Works section to properly fill the system with water.
Changing the Filter:
Filter Water cond=t]onsvary throughout the world,butchanging the waterfilter every
6 - 9 months normally will ensure the highest possible water quahty.The Filter
Status hghtwillturn red after approximately 400 gallons of water has flowed
through the ice and water dispenser.Also, _fthe filter has been in a refngerator
ti thathas notbeen inuseforawhile (dunng movingfor example),changethe fdter
beforere_nstalhngtherefngerator Thed_spensersystemwillalsooperatewtthout
filtretlon (with filtercartndge removed andbypass installed)
PushIn
andClick
TOInstall ToRelease
Order new fdter cartridges through the
dealer where you bought the refrigerator,
or contact the Consumer Asststance
Center at 1-800-944-9044 It might be
good to order some filter cartndges when
you first install your refrigerator Be sure
to ask for the PureSource2 TM *
replacement cartndge
F_ The PureSource2 r_"Ice and
(NSF. Water F,lter System NGFC2000 with the PureSource2 r_"
cartridge FC 100 tstestedand
certified by NSF International,
the nationally recognrzed and respected,
not for profit, certification orgamzatJon for
public health safety The PureSource2 n"
Fdtersystem _stested and certified to ANSI/
NSF Standards 42 and 53. See
performance data sheet forspectticattons
Thts system should not be used on water
that _smicroblolog_cally unsafe or with water
of unknown quahty unless the water has
been adequately disinfected before or after
travehng through the filtration system.
• Rated Capactty- 400 gallons
• Rated service flow - 5 GPM
•Maxtmum Rated Pressure - 100 PSi
• Maximum Operating Temp - 100 ° F
To change filter:
itis not necessary to turn the watersupply off tochange the filter
1. Set_cemaker wire signal armto the OFF (up)position (See illustration on
page 13).
2. Push the Fflter Release Button, located to the nght ofthe filter cartndge,
to release the filter from the housing. To mmtm_zethe possibll_tyofthe
fdterfalhng out of the housing dunng removal, _twould bebest to hold the
fdter as =tmoves outtoward you.
NOTE. A smallamount of water may be released during thisoperation.
You should have a paper towel or dish clothhandyto wipe up any water
that may drip out of the filter or housing. Two small holes near the back of
the hous}ng have been added for any excesswater to escape. Itwouldbe
best to clear away anyfood near this area on the top shelf in advanceof
removing thefilter.
3. Pull the oldfiltercartndge straight out of the housing.
4, Discard the old filter
5. Remove the new filter cartridge from the packaging and _nsertintothe
_ter housing the same way the otd one came out
6 Whenthe cartndge isalmost in,you willfeel =tstopagainst thecltpassembly
in the back of the housing. The clip assembly holds the filter cartridge
firmly in place.At this point, you will need topush firmly until the cartndge
snaps fully_nplace.When completely tnplace,the front ofthefiltercartndge
will be flush with the front of the housing
7. Set the _cemaker wire signal arm to the ON (down) posit_on
8. Fill a glass with water. As you are doing this, check for leaks at the filter
housing There willbe not_cablespurtsand sputters asthe system pushes
the air outthrough the systemand out thed_spensernozzle This isnormal.
9 After you have run one glass of water, continue to flush the system for
approximately 3 minutes toassure that the purestwater possible isstored
Inthe water storage tank.
IMPORTANT: Resetting The Filter Status Light (some models)
After replacing thefiltercartridge,it willbe necessary to press the Filter
Resetbutton located on the ice and water dispenser. This wtll reset the
Filter Status hght.Push the reset button until the green, red and amber
lights flash (10-15 seconds). Please refer to the complete dtspenser
operattng instructtons attached to thereside ofthe freezer door.
* White Westinghouse uses the name CnjstalClear instead of PureSource, but they are the same filter
16
[3
Food Storage & Energy Saving Ideas
FOOD STORAGE IDEAS
Fresh Food Storage
The fresh food compartment should be kept between 34° F and40° Fwithan optimum temperature of 37° F
Avoid overcrowding the refrigerator shelves This reduces the circulation of a_raround the food and results inuneven
cooling.
Fruits and Vegetables
Storage in the crisper drawers traps moisture to helppreserve the fruit and vegetablequality forlongertime periods.
Meat
Raw meat and poultry should be wrapped securely so leakage and contamination of other foods or surfaces does not
occur.
Frozen Food Storage
The freezer compartment should be kept at0° For lower
A freezer operates most efficiently when it is at least 2/3 full
Packaging Foods for Freezing
To minimize dehydration and quahtydeterioration, use aluminum foil, freezerwrap, freezer bags or airtightcontainers.
Force as much air out of the packages as possible and seal them tightly Trapped air can cause food todry out,
change color, and develop an off-flavor (freezer burn)
• Wrap fresh meats and poultry with suitable freezer wrap prior to freezing
• Do not refreeze meat that has completely thawed.
Loading the Freezer
Avotd addingtoo muchwarmfoodtothefreezer at onetime. Thisoverloadsthefreezer, slows the rate offreezmg,
and can raise thetemperature offrozen foods,
Leavea space between thepackages, socoldair can circulatefreely, allowingfood tofreeze as quickly as possible
Avoid storinghard-to-freezefoods suchas icecreamand orangejuiceonthefreezer door shelves These foodsare
best stored Inthefreezer intertorwhere thetemperature vanesless
ENERGY SAVING IDEAS
• Locate therefngerator inthe coolest partof the room,outof direct sunhght,
and away from heating ducts orregisters Do not placethe refrigerator
next to heat-producing apphances such as a range, oven,or dishwasher
Ifthis isnotpossible, a section of cabinetry or anadded layerof insulation
between the two appliances wdlhelp the refngerator operate more
efficiently.
• Level the refrigerator so that the doors closetightly
Refer tothis Use & Care Manual for the suggested temperature control
settings
Persodiccleaning of thecondenser wdlhelp the refrigerator run more
efficiently. See the Careand Cleaning Chart on page 19.
• Do notovercrowd the refngerator orblock cold air vents.Doing socauses
the refrigerator to run longer and use more energy
Cover foods and wipe containers dry before placing them inthe
refrigerator. This cuts down on motsture build-up insidethe unit.
• Organize the refngerator toreduce door openings. Remove as many
itemsas needed at one time and close the dooras soon as possible
17
Normal Operating Sounds & Sights
UNDERSTANDING THE SOUNDS YOU MAY HEAR
Your new hlgh-eftlclency refrigerator may make unfamlhar
sounds. These are all normal sounds and soon will become
famihartoyou They alsoindicateyour refngeratoris operating
as designed Hard surfaces, such as vtnyl or wood floors,
walls, and kitchen cabmets may make sounds more
noticeable. Listed below aredescnptlons ofsome ofthe most
common sounds you may hear, and what IScausing them
NOTE: Rigid foam insulation is very energy efficaent,
but is not a soundinsulator.
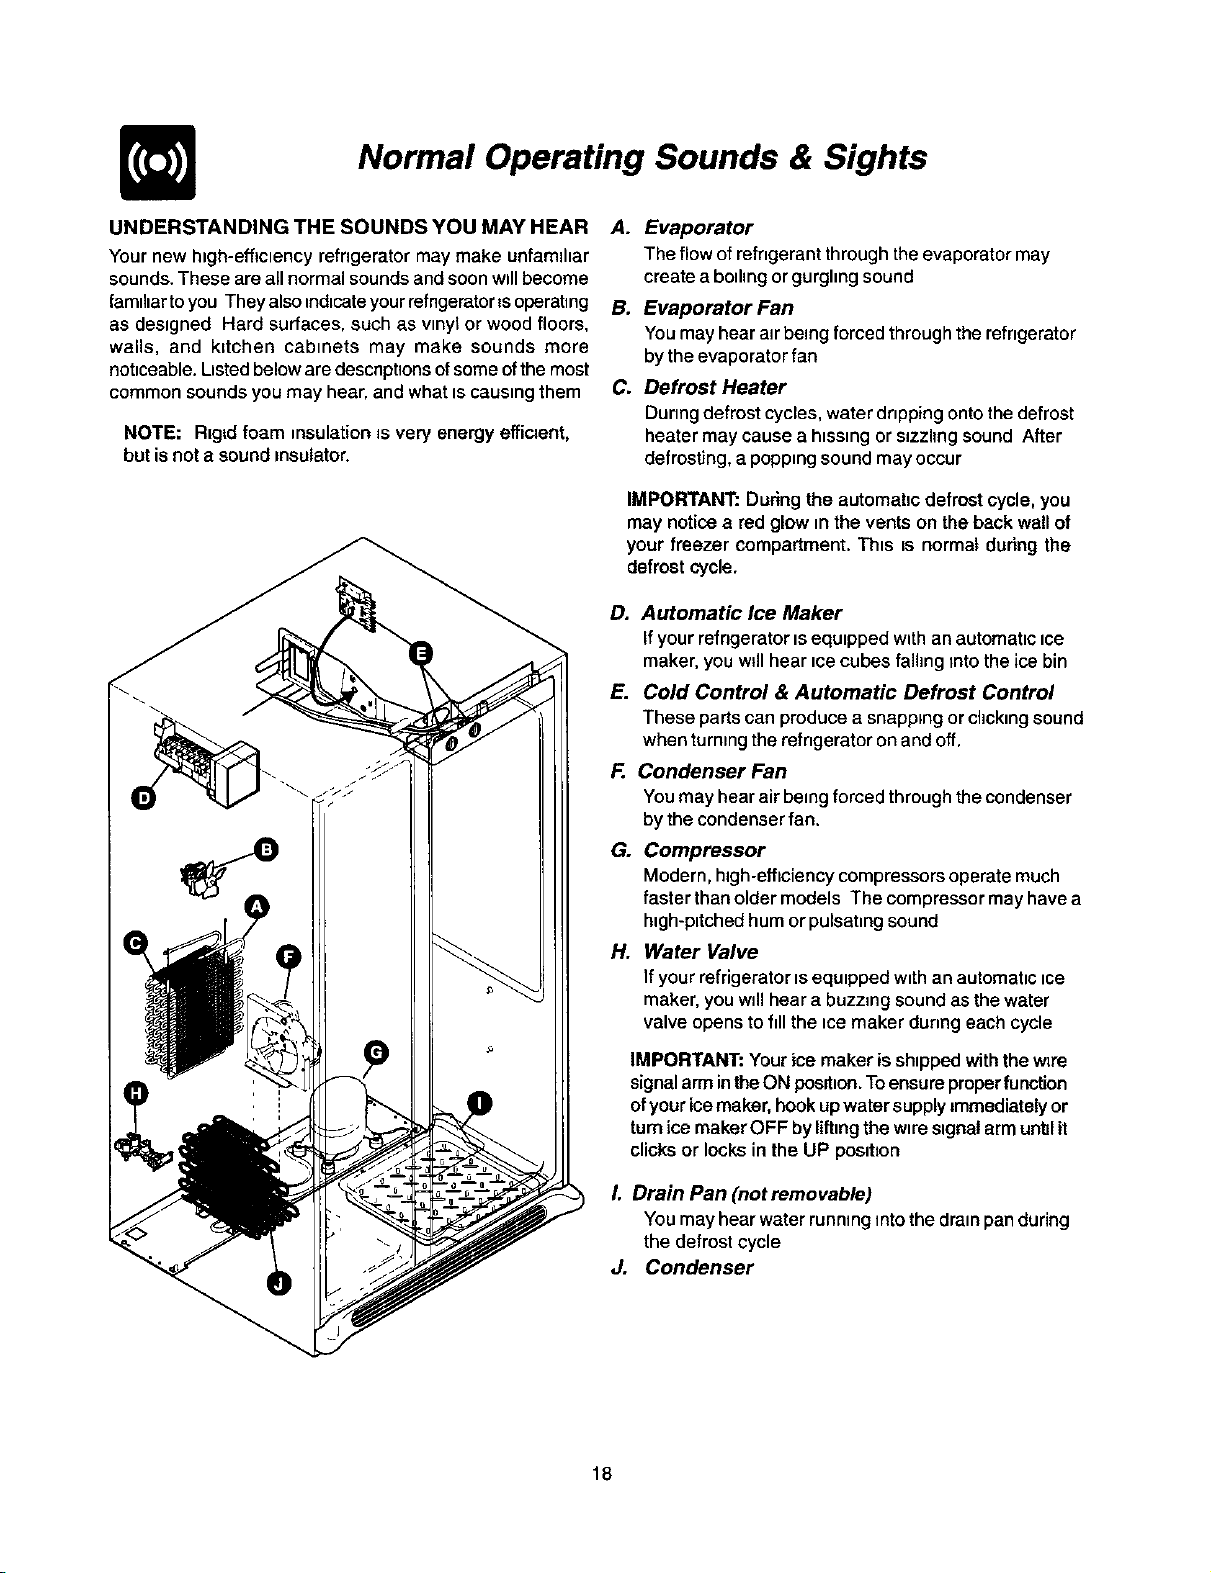
A. Evaporator
The flowof refrigerant through the evaporator may
create a boiling or gurghng sound
B. Evaporator Fan
Youmay hearair being forced through the refrigerator
bythe evaporator fan
C. Defrost Heater
During defrost cycles, water dnpping onto the defrost
heater may cause a h_asmgor sizzling sound After
defrosting, a popping sound mayoccur
IMPORTANT: During the automatic defrost cycle, you
may notice a red glow mthe vents on the back wall of
your freezer compartment. This is normal during the
defrost cycle.
D. Automatic Ice Maker
If yourrefngerator isequipped w_than automatic ice
maker, you will hear icecubes falling into the ice bin
E. Cold Control & Automatic Defrost Control
These parts can produce a snapping or chcklng sound
when turmng the refngeretor on and off.
F. Condenser Fan
You mayhear air beingforcedthroughthecondenser
bythe condenserfan,
G. Compressor
Modern,hlgh-ethciencycompressorsoperatemuch
fasterthanolder models The compressormay havea
high-pitchedhumor pulsating sound
H. Water Valve
If your refrigerator tsequtpped with an automatic tce
maker, you wdlhear a buzzing sound asthe water
valve opens to fill the icemaker dunng each cycle
IMPORTANT: Yourice maker is shipped withthe w_re
signalarmintheON position.Toensure properfunction
ofyouricemaker,hookupwater supply =mmediatelyor
turnicemaker OFF bylifting thewiresignalarmunblit
clicksor lockein the UP position
L Drain Pan (notremovable)
You may hear waterrunning into the drampan during
the defrost cycle
J. Condenser
18
Care & Cleaning
Keep your refrigerator and freezer clean to prevent odor build-up Wipe up anyspdls immediately and cleanboth sections at
least tw}ce a year Never use metalhc scouring pads, brushes, abrasive cleaners or strong alkahne solutions on any
surface Do not wash any removable parts in a d_shwasher Always unplug the electricsl power cord from the waft
outlet before cleaning.
• When moving the refrigerator, pull straight out. Do not shiftthe refrigerator from side to sideas this may
damage the floor. Becareful not to move the refrigerator beyond the plumbing connections.
• Damp objects stick tocold metal surfaces. Do not touch refrigerated surfaces with wet or damp hands.
To avoid damage and helpthe refrigerator runas efficiently as possible, clean the condenser periodically.
NOTES:
Turningthe freezer and freshfood controls to "O"turns off thecompressor, but does not disconnect electrical
power to the light bulb or other electrical components. Toturn off power to your refrigerator, you must unplugthe
power cord from thewall outlet
Do notuse razorbladesor other sharp instruments which can scratchthe appliance surfacewhen removing
adhestve labels. Any glueleft from tape orlabels can be removed with a m_xtureof warm water andmild
detergent, or,touch the glue residuewith thest_ckysideof tapeyou havealready removed. Do not remove the
serial plate.
Part
Interior/Door •
Liner •
Door Gaskets •
Drawers/Bins •
Glass o
Shelves °
Toe Grille *
Exterior and •
Handles
Exterior and •
Handles •
(Stainless •
Steel Models
Only)
Condenser •
Coils
Care & Cleaning Chart
Cleaning Agents Tips and Precautions
Soap and water Use 2 tablespoons of baking soda in 1 quart of warm water. Be
Baking soda and sure to wring excess water out of sponge or cloth before
water cleaning around controls, light bulb or any electrical part.
Soap and water W_pegasketswith a clean soft cloth
Soap and water Do notwash any removable items(bins, drawers, etc.) _n
dishwasher
Soap and water Allow glass towarm to room temperature before Jmmersmg _n
Glass cleaner warm water
Mdd hquldsprays
Soap and water Vacuum dust from front of toe gnlle Remove toe grdle (See
Mild hquldsprays dlustrationon page 4). Vacuum backside and wipe with sudsy
Vacuum attachment cloth or sponge. Rinse and dry.
Soap and water Do not use commercml household cleaners, ammonfa, or alcohol
to clean handles.
Soap and water
Ammoma
Statnless Steel
Cleaners
Clean stainless steel front and handles wJthnon-abraswe soapy
water and a dishcloth. Rinse with clean water and a soft cloth
W_pestubborn spots w=than ammoma-soaked paper towel, and
rinse Use a non-abrasive stainless steel cleaner These cleaners
can be purchased at most home =mprovement or malor
department stores. Always follow manufacturer's instruction
NOTE: Always, clean, wipe and dry with the grain to prevent
cress-grain scratching. Wash the rest of the cabinet w=thwarm
water and todd hqulddetergent Rinse well, and w_pedry w_tha
clean soft cloth
Vacuum attachment Use the dusting toolattachment on your vacuum to remove dust
budd-up on the condenser cuds (see item "J" m dlustrat_onon page
18 for location)
19
Care & Cleaning (continued)
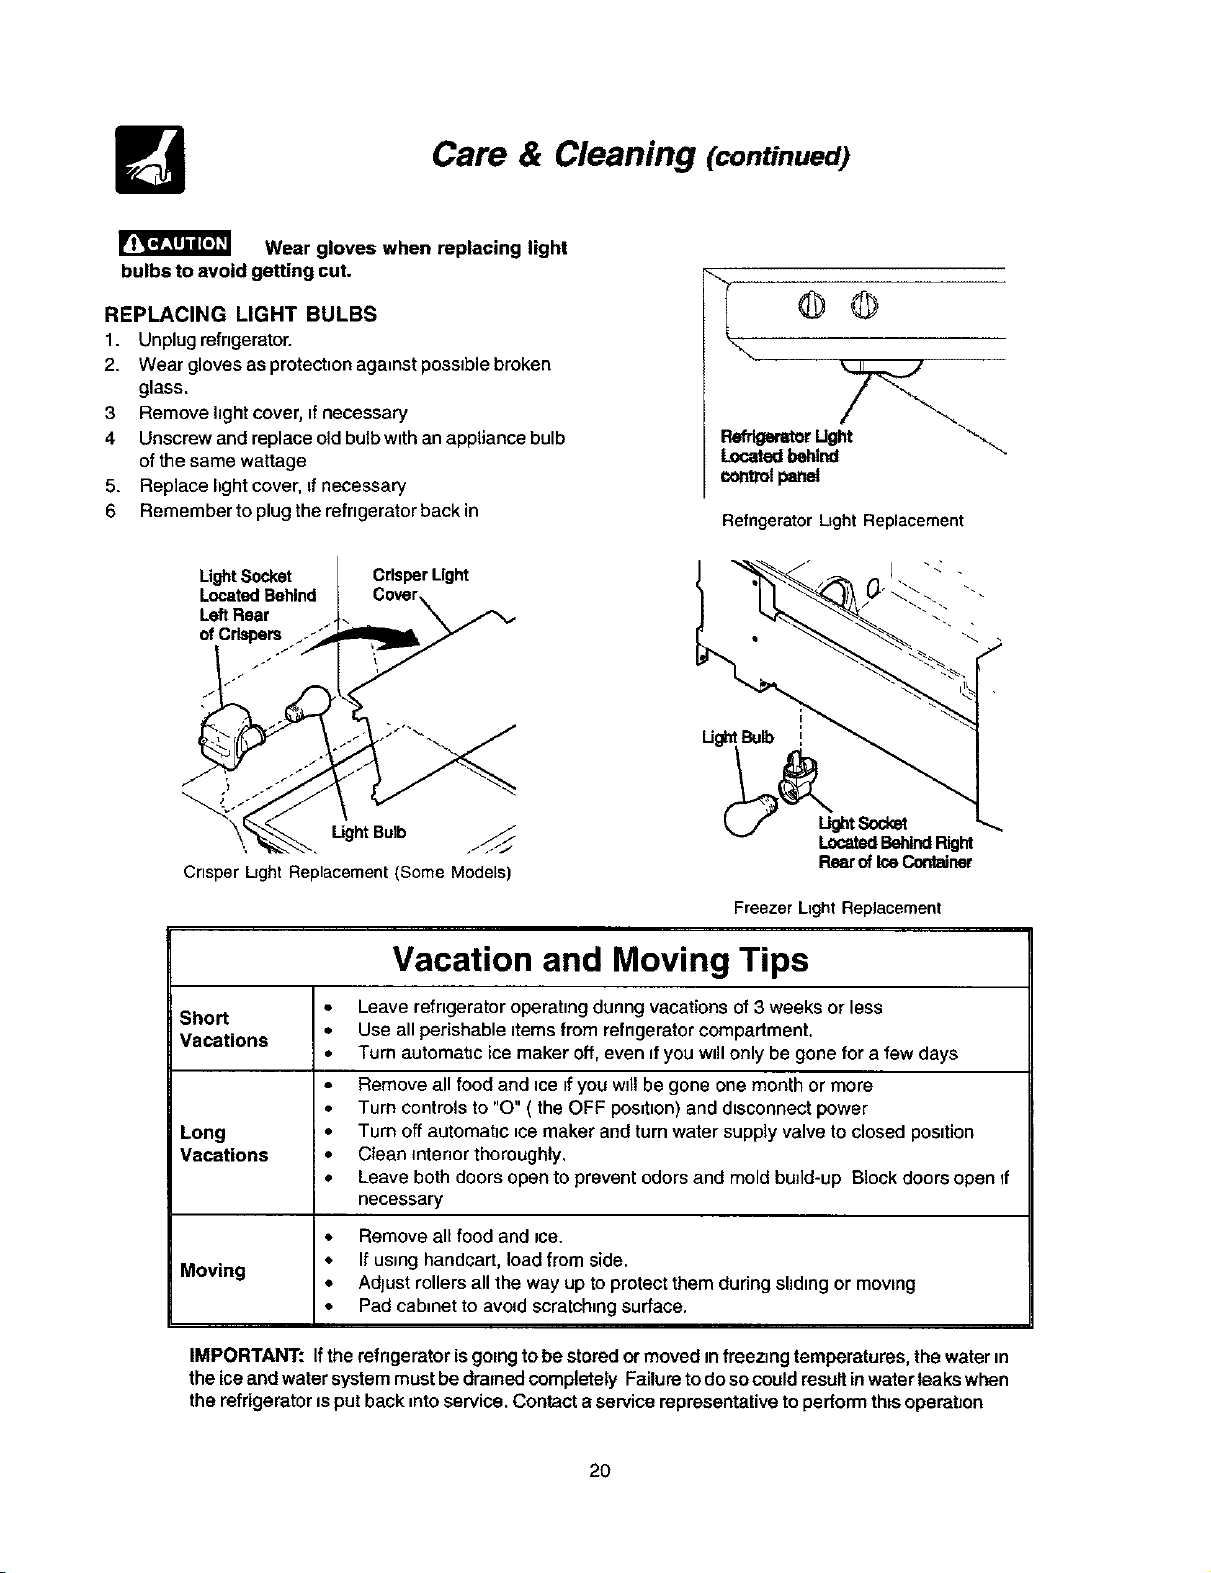
Wear gloves when replacing light
bulbs to avoid getting cut.
REPLACING LIGHT BULBS
1. Unplug refrigerator.
2. Wear gloves as protection against possible broken
glass.
3 Remove hghtcover, ifnecessary
4 Unscrew and replace old bulbwith an appliance bulb
of the same wattage
5. Replace light cover, tfnecessary
6 Remember to plug the refrigerator back in
®®
\
Y\
Locetedbemnd
€ontrolpat_
Refrigerator Ltght Replacement
LightSocket
LocatedBehind
Left Rear
ofcr s .
Crisper Light
Crisper IJght Replacement (Some Models)
E
ug_ Bulb(_
LocatedBehindI=Ught
Freezer L=ghtReplacement
Vacation and Moving Tips
Short
Vacations
Long
Vacations
Moving
• Leave refrtgerator operatingdunng vacations of 3 weeks orless
• Use all perishableitems from refngerator compartment.
• Turn automatic ice maker off, even if you will onlybe gone for a few days
• Remove all food and tce if you will be gone one month or more
• Turn controls to "O" ( the OFF position) and disconnect power
• Turn off automabc _cemaker and turn water supply valve to closed position
• Clean intenor thoroughly.
• Leave both doors open to prevent odors and mold build-up Block doors open If
necessary
• Remove all food and ice.
• If using handcart, load from side.
• Adjust rollers all the way up to protect them dudng sliding or moving
• Pad cab=netto avoid scratching surface.
IMPORTANT: Iftherefngeratorisgoing to be storedormoved infreezing temperatures,the waterin
theiceand watersystem mustbedrainedcompletelyFailuretodosocouldresultinwaterleakswhen
the refrigeratoris putbackinto service, Contact a servicerepresentativeto perform th_soperation
2O
Warranty Information
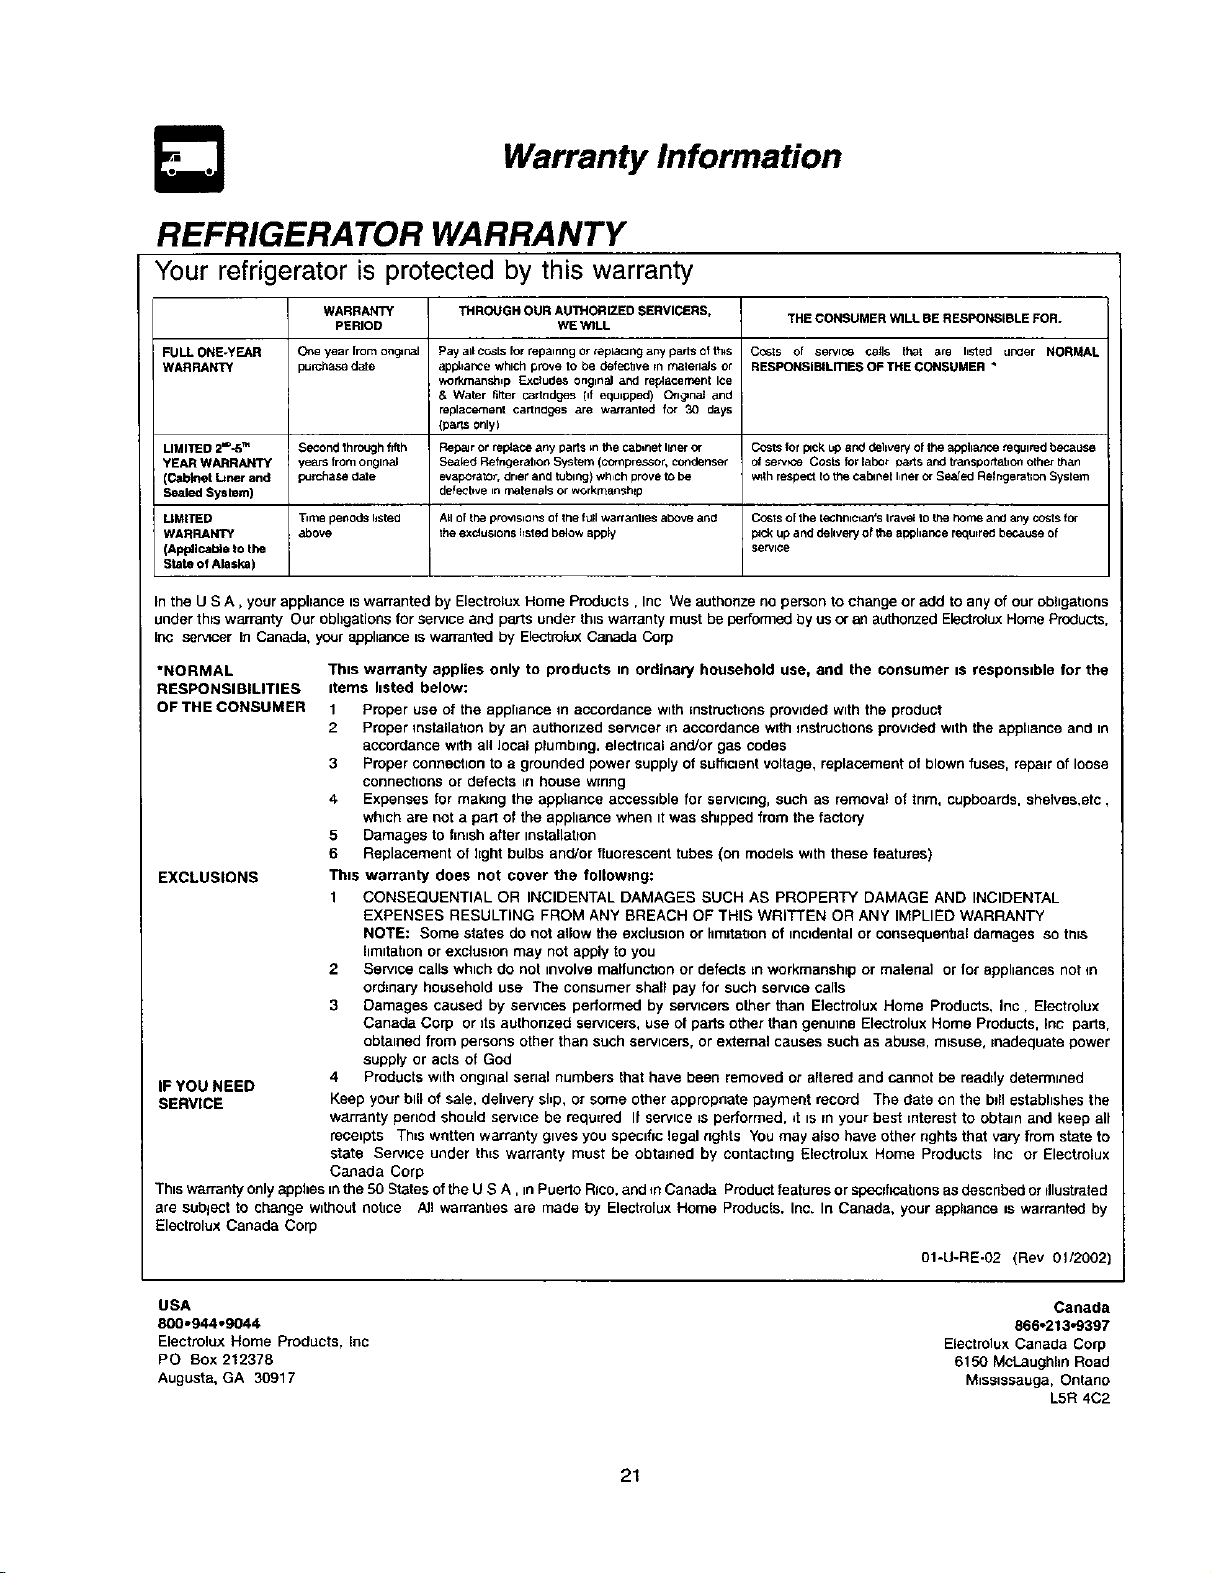
REFRIGERATOR WARRANTY
Your refrigerator is protected by this warranty
WARRANTY THROUGH OUR AU'PHORIZED SERVICERS, THE CONSUMER W1LL BE RESPONSIBLE FOR.
PERIOD WE W1LL
FULLONE-YEAR Oneyearfrornong4naJ Payadcostsforrepamngorrephac_nganyp_triscfth*s COSZS of se_'ice catls IbeE are hSted _lr_er NORMAL
WARRANTY _urcbese date apptlance which prove to be defecbve ;n rnaterlaJs or RESPONSIBILITIES OF THE CONSUMER *
'horkrnanshlp ExctudeS ong=naJ and re_acerr, ent Ice
& Water hrrer cartridges (if equipped) On_na] and
replacement cartndges are warranted for 30 days
(pa,%s 0nly)
LIMITED 2=_-5TM Second through f_h Repair or rel_aCe any parts m the Cab,net Ii_er Or Costs for pick L_ arid delivery of the appllaP_e requlP_=dbec_L_se
YEAR WARRANTY years from onglnal Seated Refngerat=on System (compressor, condenser of se_v_e Costs for labor _rts and transportation otber than
(Dabk_t Liner and pu_cbese date evaberato,, dr,er and tubing} wh,ch prove to be w_th respect to the cai_net I,ner o_ Sealed Rethgeratlon System
Sealed System) defecbve =n matenals or workmanshEp
UMITED Time penods ksted AUof U_ pro',qsqons Of the f_l wa_antles above ante Costs of the teChnlClan's Irav_ to _,e home and any costs _or
WARRANTY above the exclusions listed below apply p4ck up and delivery of the apphance redurred because of
(Ap_icatae to the service
StateofAlaska)
In the U SA, your apphance B warranted by Eleetrolux Home Products, Inc We authonze no person to change or add to any of our obl_gabons
under thts warranty Our obligations for service and parts under thiswarranty must be performed by us or an authonzed Electrclux Home Products.
[nc servtcerIn Canada, your apphance _swarranted by Electrolux Canada Corp
*NORMAL
RESPONSIBILITIES
OFTHECONSUMER
Thzs warranty applies only to products m ordinary household use, and the consumer zs responszble for the
Items hsted below:
1 Proper use of the apphance inaccordance w_thmstruchonsprovided w_ththe product
2 Proper _nstallation by an authorized servicer _naccordance w_thinstructionsprowded with the appliance and In
accordance with all local p_umbing, electrical ar_Jor gas codes
3 Proper connection to a grounded power supply of Sufficientvoltage, replacement of blown fuses, repair of loose
connections or defects In house wrong
4. Expenses for making the apphance accessible for servicing, such as removal of tnm, cupboards, shelves.etc
which are not a part of the apphance when _twas shipped from the factory
5 Damages to fimsh after installation
6 Replacement of light bulbs and/or lfuorescent tubes (on models with these features)
EXCLUSIONS Thzs warranty does not cover the following:
1 CONSEQUENTIAL OR INCIDENTAL DAMAGES SUCH AS PROPERTY DAMAGE AND INCIDENTAL
EXPENSES RESULTING FROM ANY BREACH OF THIS WRITTEN OR ANY IMPLIED WARRANTY
NOTE: Some states do not allow the exclusionor Ilmitaeonof incidental or consequenhal damages so trl_s
hm_tahonor excluszon may not apply to you
2 Service calls which do not involve malfunction or defects m workmanship or matena] or lot apphancesnot _n
ordinary household use The consumer shall pay for such service calls
3 Damages caused by sewzces pedormed by servicers other than Eiectrolux Home Products, Inc, Electrolux
Canada Corp or its authonzed servicers, use of parts other than genuine Electrolux Home Products, Inc parts,
obtained from persons other than such servicers, or external causes such as abuse, m_suse,inadequate power
supply or acts of God
4 Products w_thonglnal senal numbers that have been removed or altered and cannot be readdy determined
IF YOU NEED
SERVICE Keep your bdl of sale, dehvery sl.p, or some other appropnate payment record The date on the b_llestabhshes the
warranty penod should servme be required If service =sperformed. _tis m your best interest to obtain and keep all
receipts This written warranty gwes you specific legal nghts You may also have other rights that vary from state to
state Service under this warranty must be obtained by contacting Electrolux Home Products lne or Electrolux
Canada Corp
Th_swarranty only apphes mthe 50 States ofthe U S A, _nPuerto Rico. and _nCanada Productfeatures or specificationsas descnbed or dlustrated
are sublect to change w_thout notice All warrant_es are made by Electrelux Home Products. Inc. In Canada, your apphance =swarranted by
Electrolux Canada Corp
01-U-RE-02 (Rev 0_/2002
USA
800°944"9044
Electrolux Home Products, [no
PC Box 212378
Augusta, GA 30917
Canada
866o213"9397
Electrolux Canada Corp
6150 McLaughhn Road
M_sslssauga, Ontano
L5R 4C2
21
Before You Call
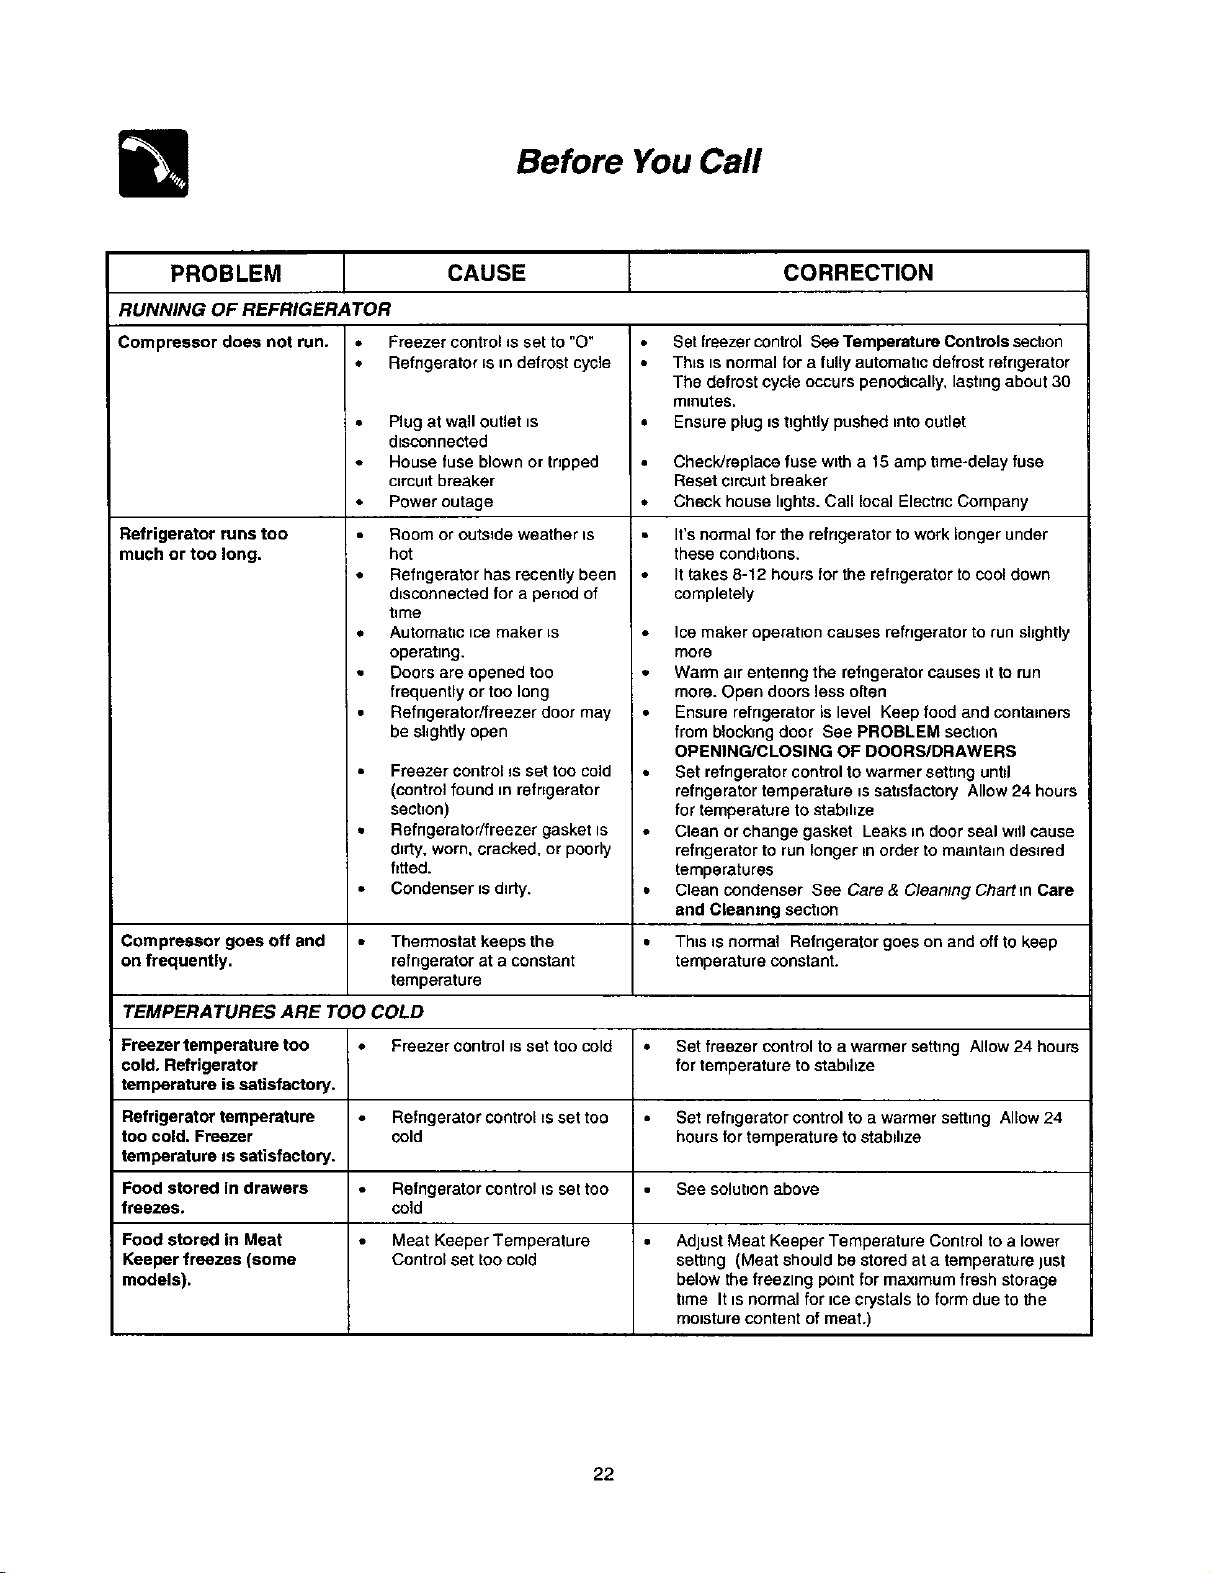
PROBLEM CAUSE CORRECTION
RUNNING OF REFRIGERATOR
Compressor does not run.
Refrigerator runs too
much or too long,
Compressor goes off and
on frequently.
• Freezer control _sset to "0"
• Refngerator _sm defrost cycle
Plug at wall outlet ts
disconnected
House fuse blown or tnpped
circuit breaker
Power outage
Room or outside weather is
hot
! • Refrigerator has recently been
disconnected for a period of
time
• Automatic ice maker is
operating.
• Doors are opened too
frequently or too long
Refngerator/freezer door may
be slightly open
Freezer control is set too cold
(control found in refrigerator
sectren)
• Refngerator/freezer gasket is
dirty, worn, cracked, or poorly
htted.
• Condenser is dirty.
Thermostatkeeps the
refrigerator at a constant
temperature
Set freezer control See Temperature Controls sechon
Th=s is normal for a fully automatic defrost refrigerator
The defrost cycle occurs penodtcally, lasting about 30
minutes,
Ensure plug =stightly pushed into outlet
• Check/raptace fuse w_tha 15 amp time-delay fuse
Reset clrcuttbreaker
• Check house lights. Call local Electric Company
It's normal for the refrigerator to work longer under
these cond_bone.
It takes 8-12 hours for the refrigerator to cool down
completely
Ice maker operation causes refngerator to run shghtiy
more
Warm air entenng the refngerator causes _tto run
more. Open doors less often
Ensure refngerator is level Keep food and containers
from blocking door See PROBLEM sect=on
OPENING/CLOSING OF DOORS/DRAWERS
Set refngerator control to warmer setting until
refrigerator temperature is satisfactory Allow 24 hours
for temperature to stabd=ze
Clean or change gasket Leaks m door seal wdl cause
refrigerator to run longer in order to maintain deslrad
temperatures
Clean condenser See Care & Cleaning Chartm Care
end Cleanmg section
This is normal Refrigeratorgoes on and off tokeep
temperature constant.
TEMPERATURES ARE TOO COLD
Freezer temperature too • Freezer control _sset too cold • Set freezer control to a warmersetttng Allow 24 hours
cold. Refrigerator for temperature tostabilize
temperature is satisfactory.
Refrigerator temperature Refngeratorcontrol ts set too Set refrigeratorcontrolto a warmersetting Allow 24
too cold. Freezer cold hoursfor temperature to etabdize
temperature is satisfactory.
Food stored in drawers Refngeratorcontrolis settoo See solutionabove
freezes, cold
Food stored in Meat Meat Keeper Temperature Adjust Meat Keeper Temperature Control to a lower
Keeper freezes (some Contral set too cold setting (Meat should be stored at a temperature lust
models), below the freezing point for maximum fresh storage
hme It is normal for ice crystals to form due to the
moisture content of meat.)
22
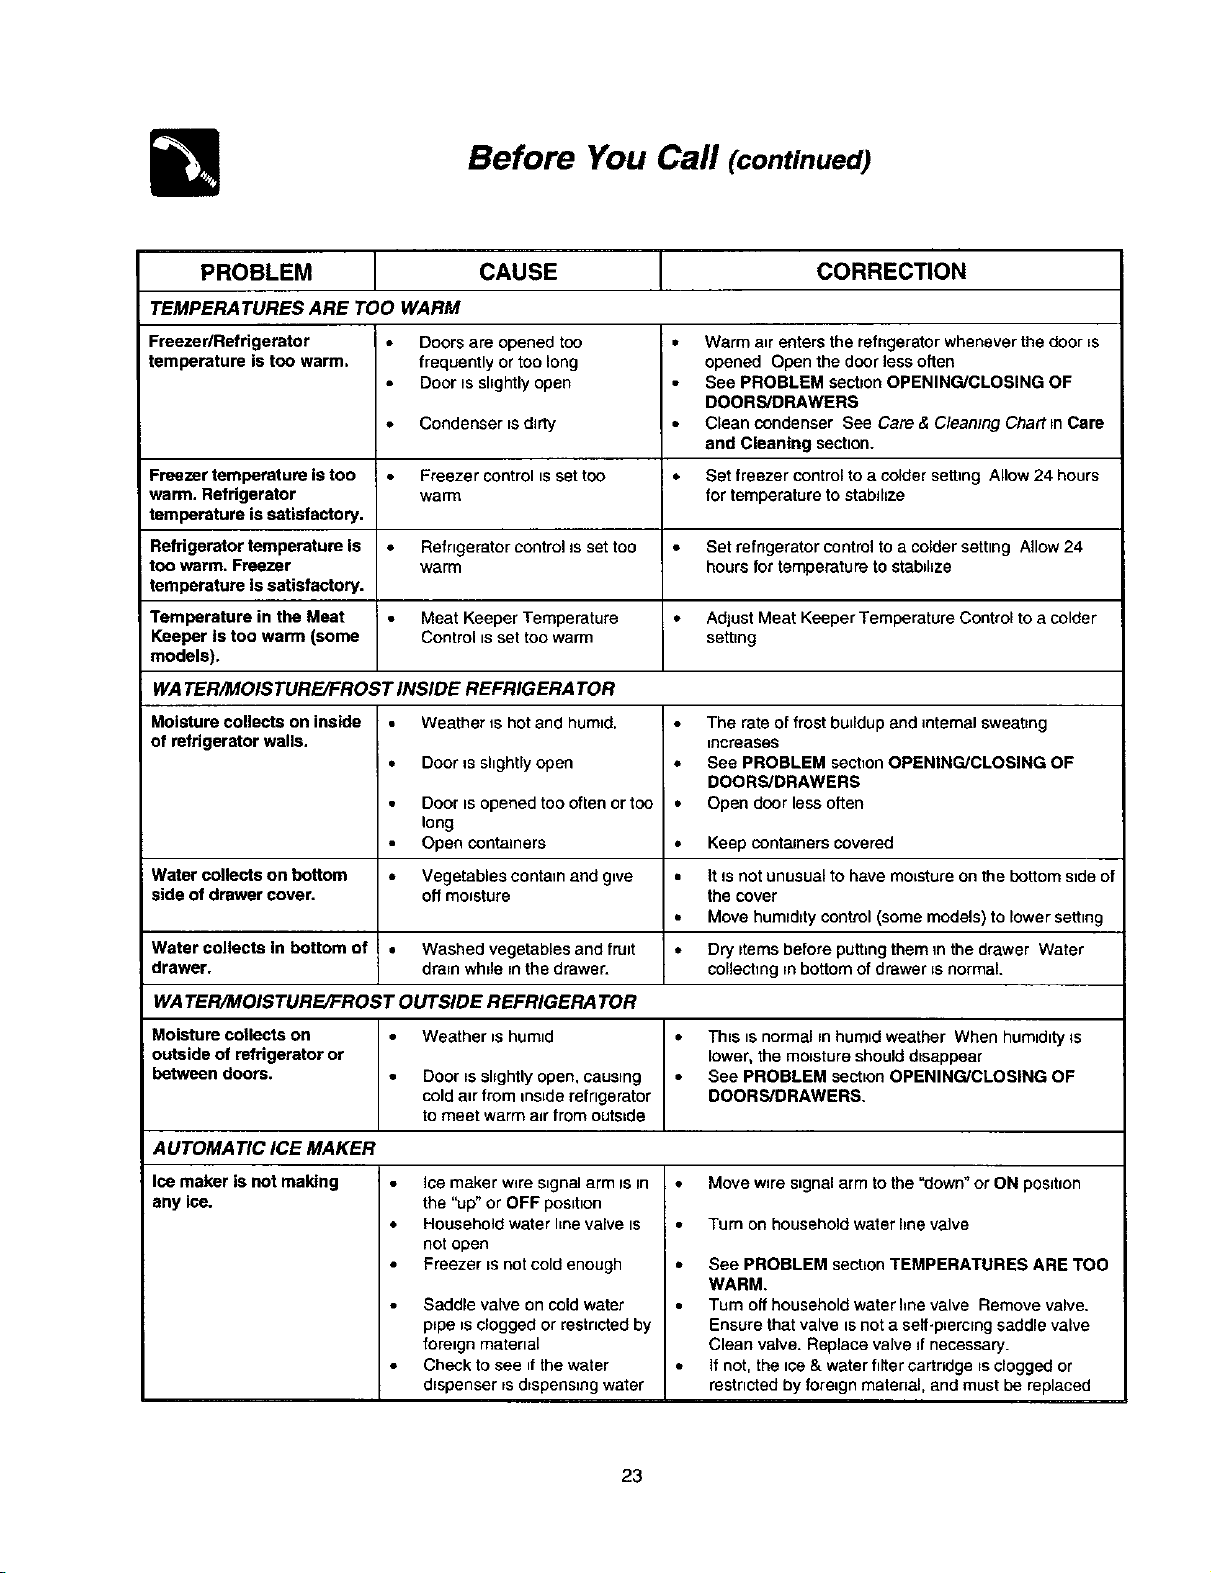
Before You Call (continued)
PROBLEM CAUSE
CORRECTION
TEMPERATURES ARE TOO WARM
Freezer/Refrigerator
temperature is too warm,
Freezer temperature is too
warm. Refrigerator
temperature is satisfactory.
Refrigerator temperature is •
too warm. Freezer
temperature is satisfactory.
Temperature in the Meat
Keeper Is too warm (some
models).
Doors are opened too
frequently or too long
Door ts shghtly open
Condenser ts dirty
Freezer control ts set too
warm
Refrigerator control Js set too
warm
Meat Keeper Temperature
Control =sset too warm
• Warm air enters the refngerator whenever the door is
opened Open the door lessoften
See PROBLEM secben OPENING/CLOSING OF
DOORS/DRAWERS
• Clean condenser See Care & Cleaning Chart m Care
and Cleaning section.
• Set freezer control to a coldersetting Allow24 hours
for temperature to stabdize
• Set refngerator controlto a colder setting Allow 24
hours for temperature to stabd=ze
• AdjustMeat Keeper TemperatureControl to acolder
setting
WA TER/MOISTURE/FROST INSIDE REFRIGERATOR
Moisture collects on inside
of refrigerator walls.
Water collects on bottom ,,
side of drawer cover.
Water collects in bottom of •
drawer,
Weather ts hot and humid.
• Door is shghtly open
Door is opened too often or too
long
Open containers
Vegetables contain and gwe
off moisture
Washed vegetables and fruit
drain wh_le in the drawer.
The rate of frost buildup and internal sweating
increases
See PROBLEM section OPENING/CLOSING OF
DOORS/DRAWERS
Open door less often
Keep containers covered
it is not unusual to have moisture onthe bottom side of
the cover
Move humrdtty control (some models) to lower setting
Dry _temsbefore putting them in the drawer Water
collechng tnbottom of drawer _snormal.
WA TER/MOISTURE/FROST OUTSIDE REFRIGERATOR
Moisture collects on Weather is humid ,* This tsnormal m humidweather When humidity _s
outside of refrigerator or lower, the moisture shouldd_sappear
between doors. • Door =sshghtly open, causing • See PROBLEM eecbon OPENING/CLOSING OF
coldair from inside refrigerator DOORS/DRAWERS.
tomeet warm air from outside
AUTOMA TIC ICE MAKER
Ice maker is not maldng • Move wire signal arm to the "down" or ON posdion
any ice.
Ice maker w_re s_gnal arm is in
the "up" or OFF position
• Household water hne valve IS
not open
Freezer is not cold enough
Saddle valve on cold water
pipe is clogged or restricted by
foreign matenal
Check to see if the water
dispenser =sdispensing water
Turn on household water hne valve
• See PROBLEM section TEMPERATURES ARE TOO
WARM.
• Tum offhouseholdwater hnevalve Remove valve.
Ensure thatvalve is not a self-plercrngsaddle valve
Clean valve. Replacevalve Jfnecessary.
• if not, the ice &water filter cartridgets cloggedor
restncted by foreign material, and mustbe replaced
23

Before You Call (continued)
PROBLEM CAUSE CORREC_ON
AUTOMATIC ICE MAKER (CONTINUED)
Ice maker is not making • Ice maker isproducing less tee
enough ice. than you expect.
Ice maker will not stop •
making ice.
; Ice maker is not separating
the ice cubes.
Ice has bad odor and taste. •
Freezer _snot cold enough
Household water hne valve is
not completely open
Check to see d water
d_spenseris d_spensmgslower
than normal.
Ice maker wire signal arm is
being held down by some item
In the freezer
Ice cubes are not being used
frequentlyenough
Ice cubes are hollow or smaller
than normal
Ice has picked up odor or
flavor from strong food stored
m refngerator or freezer
Water running toice maker
has poor taste or odor
Icenot used frequently enough
ICE DISPENSER
Ice maker should produce approximately 4 - 5 pounds
of _ce every 24 hours Extra Ice should produce up to 8
pounds of ice every 24 hours
See PROBLEM section TEMPERATURES ARE TOO
WARM.
Turn on household water hne valve.
If it is, replace the ice & water filter cartndge
Move _temand release wire signalarm Remove any
ice cubes that arefrozen together over the w_res_gnal
arm
• Remove and shake _ce container to separate cubes.
• The ice & water filter cartridge may be clogged
Replace filter cartridge
• Cover foods tightly Dpscardstale _ce Ice maker will
produce fresh supply.
' • Add filter to water supply{ine,Consult a water
purifying company.
D_soardstale _ce
Dispenser will not dispense
ice.
Ice dispenser is jammed.
• Ice storage container isempty.
Freezer temperature _sset too
warm
• Household water line valve Js
not open
Freezer door tsnot closed.
Ice dispensing arm has been
held infor more than 4-5
minutes.
Ice has melted and frozen
around auger due to infrequent
use, temperature fluctuations,
and/or power outages
Ice cubes are jammed
between _ce maker and back
of ice contamer
Ice cubes are frozen together
Ice cubes are hollow or smaller
than normal
When the first supply of Ice Is droppedInto the
centamer, the d_spensershouldoperate.
Turn freezer control to ahigher setting sothat ice
cubes will be made. When first supply of _ceis made,
dlspencer should operate
Open household water hnevalve Allow sufficient t_me
for the ice tobe made When ice ismade, the
dispenser should operate.
Ensure freezer door _sclosed
Motor isoverloaded. Motor ovedoad protector will
reset mapproximately 3minutes. Ice can then be
dispensed.
Remove _cecontainer, thaw, and empty the contents
Clean container, wipe dry, and replace in proper
position When new _ce_smade, dlspensor should
operate
Remove ice cubes that are Jamming the dispenser
Use the dispenser often so that cubes do not freeze
together
The _ce& water filter cartridgecouldbe clogged
Replace the filter cartridge Dispensing system
operates best at 20 - 100 psi water pressure Well
water pressures should fall within this range
24
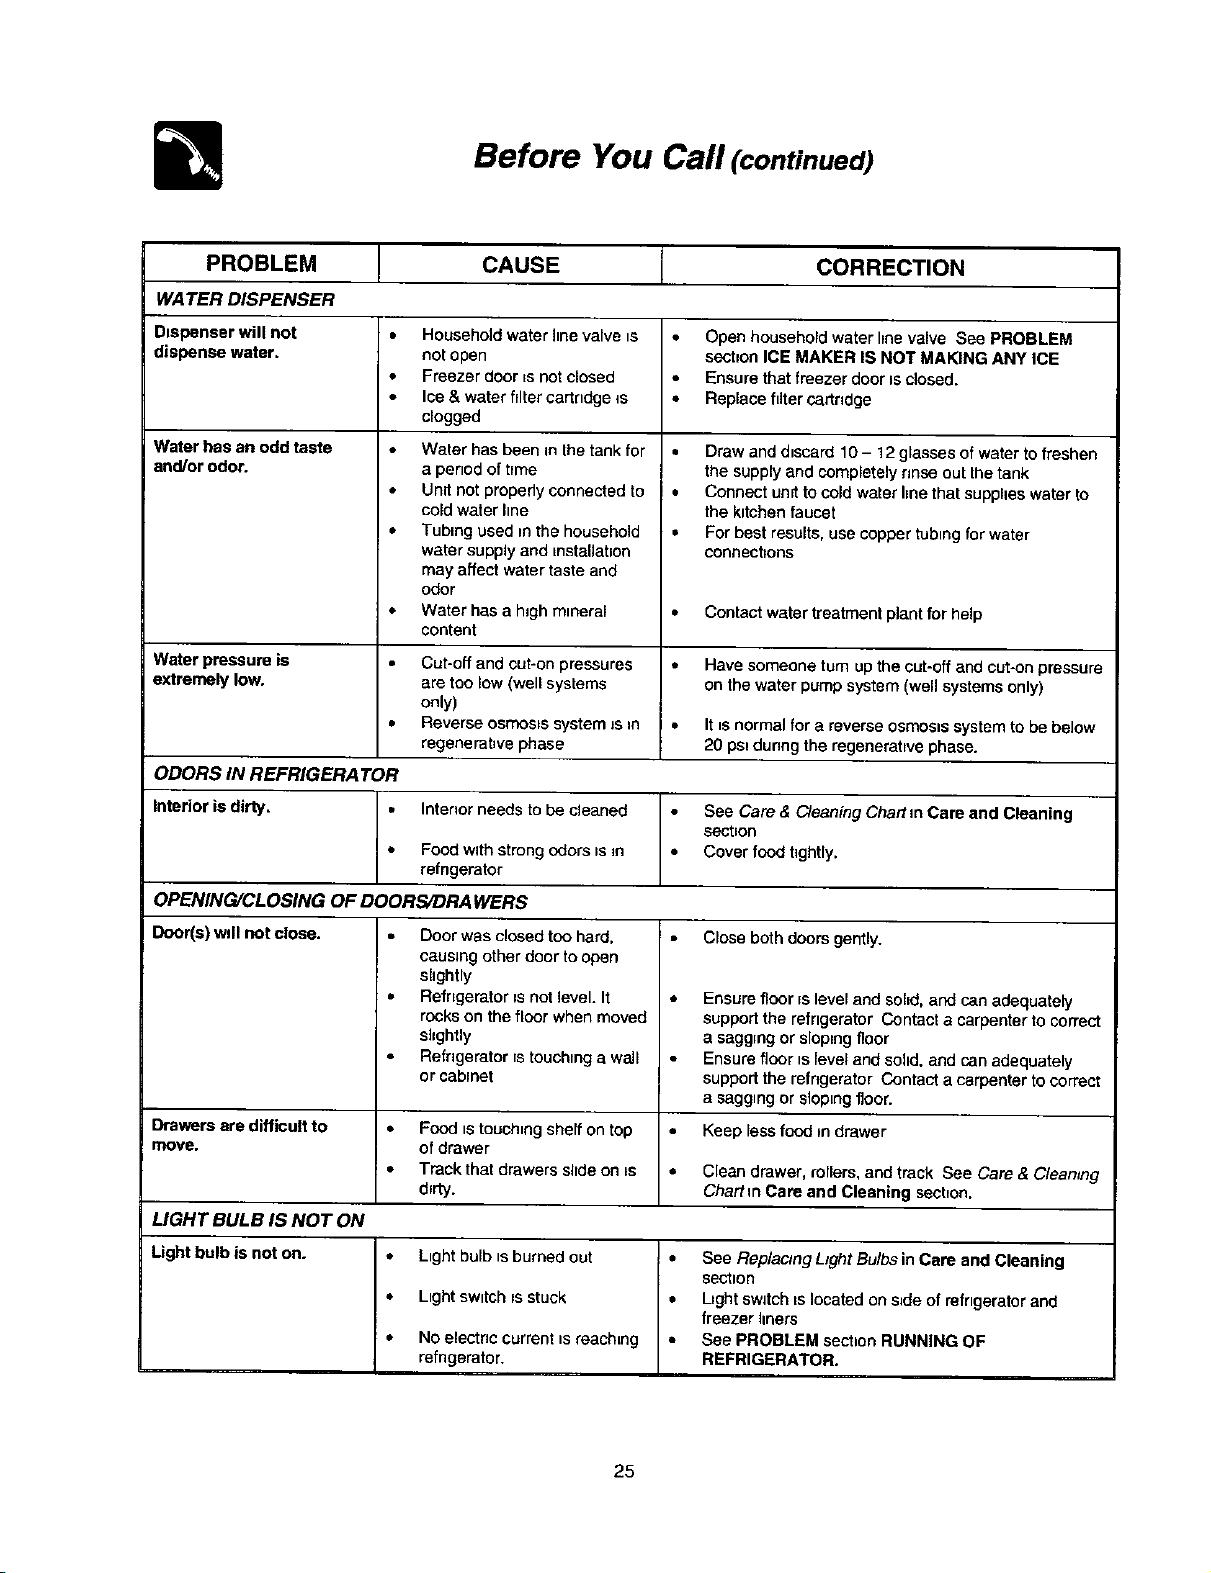
Before You Call (continued)
PROBLEM
WATEll DISPENSER
CAUSE
CORRECTION
Dispenser will not
dispense water.
Water has an odd taste
and/or odor.
Water pressure is
extremely low.
ODORS IN REFRIGERA TOll
• Householdwater linevalve is
not open
• Freezer door _snot closed
Ice & water filter cartndge _s
clogged
• Water has been in thetank for
a period oftime
• Umt not properly connected to
cold water hne
• Tubing used in the household
water supply and installation
may affect water taste and
odor
,* Water has a high mineral
content
Cut-off and cut-on pressures
are too low (well systems
only)
Reverse osmosis system _s=n
regenerabve phase
• Open household water I=nevalve See PROBLEM
section ICE MAKER IS NOT MAKING ANY ICE
• Ensure thatfreezer dooris closed.
• Replace fdter cartndge
• Draw and discard 10- 12 glassesof water tofreshen
the supply and completely rinse out the tank
• Connect unrt to cold water 5nethat supplies water to
the kitchen faucet
• For best results, use copper tubing for water
connectloos
• Contact water treatment plant for help
Have someone turn up the cet-off and cut-on pressure
on the water pump system (well systems only)
It isnormalfor a reverse osmosis system to be below
20 psi during the regenerative phase.
Interior is dirty, • Interior needs to be cleaned
• Food withstrong odors =sin
refngerator
OPENING/CLOSING OF DOORS/DRA WERS
Door(s)wgl not close. Door was closed too hard,
causing otherdoor to open
shghtly
Refrigerator Is not level. It
rocks on the floor whenmoved
shghtly
Refngerator is touching a wall
or cabinet
Food tstouch_ngshelf on top
of drawer
Track that drawers slide on =s
d_rty.
• See Care & Cleaning Chart m Care and Cleaning
sect=on
• Cover food tightly.
Close bothdoors gently.
Ensurefloor=sleveland sohd,and can adequately
support the refrigerator Contact a carpentertocorrect
a seggmg or sloptng floor
Ensure floor is level and solid, and can adequately
support the refrigerator Contact a carpenter to correct
a saggingor slop=rigfloor.
Drawers are difficult to • • Keep less food m drawer
move.
• ,, Clean drawer, rollers, and track See Care & Cleamng
Chart m Care and Cleaning sectfon.
LIGHT BULB IS NOT ON
Light bulb is noton. • Lght bulb is burned out • See Replacmg Light Bulbs in Care and Cleaning
section
• Lightswitch Jsstuck • Lightswitch=slocatedons=deof refrigerator and
freezer liners
• No electnc current is reaching • See PROBLEM sectionRUNNING OF
refngerator. REFRIGERATOR.
25