Loading ...
Loading ...
Loading ...
4
5. Den Geruchsfilter entnehmen.
→Abb.
9
en
General information
¡ Read this instruction manual carefully.
¡ Keep the instruction manual and the
product information safe for future refer-
ence or for the next owner.
¡ The appliance can only be used safely if it
is correctly installed according to the
safety instructions. The installer is re-
sponsible for ensuring that the appliance
works perfectly at its installation location.
¡ This instruction manual is intended for the
installer of the optional accessory.
¡ Only a licensed expert may connect the
appliance.
¡ Switch off the power supply before carry-
ing out any work.
Safe installation
Observe the safety instructions when installing the
optional accessory.
WARNING‒Risk of suffocation!
Children may put packaging material over their
heads or wrap themselves up in it and suffocate.
▶ Keep packaging material away from children.
▶ Do not let children play with packaging material.
WARNING‒Risk of injury!
Components inside the appliance may have sharp
edges.
▶ Wear protective gloves.
The odour filter remains hot for quite some time after
it has been regenerated.
▶ Do not touch the odour filter straight after it has
been regenerated – allow it to cool down.
WARNING‒Risk of fire!
A non-regenerable odour filter may catch fire in the
oven.
▶ Only regenerable odour filters that can be regen-
erated.
ATTENTION!
If a regenerable odour filter falls, it may become
damaged. The damage is not always visible from the
outside.
▶ Dispose of and replace any regenerable odour fil-
ters that have fallen.
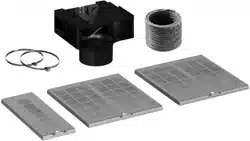
Included with the appliance
After unpacking all parts, check for any damage in
transit and completeness of the delivery.
→Fig.
1
Fitting the air recirculation deflector
1. Remove the flue duct.
You can find information on how to remove the
flue duct in the installation instructions for your ap-
pliance.
2. Fit the circulating-air guide into the angle brackets.
→Fig.
2
, →Fig.
3
3. Use the 2 hose clips to secure the hose to the cir-
culating-air guide and the air-pipe connector.
→Fig.
4
4. Tighten and, if required, shorten the hose.
5. Fit the flue duct.
The slots on the inner flue duct section point up-
wards.
You can find information about the installation of
the flue duct in the installation instructions for your
appliance.
Regenerable odour filter
Odour filters bind odorous substances in circulating-
air mode. Regularly replaced or regenerated odour
filters guarantee a high level of odour removal.
With normal use (daily for approx. onehour), replace
the odour filter at least every 10years.
The regenerable odour filter can be regenerated in a
standard oven.
With normal use (approx.1hour a day), the regener-
able odour filter must be replaced or regenerated
every 3-4 months. The regenerable odour filter can
be regenerated up to 30 times.
Cleaning the odour filter
ATTENTION!
Incorrect cleaning damages the regenerative odour
filter.
▶ Observe the regeneration instructions.
▶ Never clean a regenerative odour filter with clean-
ing products, water, in the dishwasher or with a
wet cloth.
▶ If the regenerative odour filters are visibly soiled,
remove the dirt with a damp cloth before starting
the regeneration process.
Ensure that the odour filter does not get wet.
Regenerating the odour filter
WARNING‒Risk of fire!
The oven cleaning function (pyrolytic self-clean) may
cause a regenerable odour filter to catch fire.
▶ Never regenerate a regenerable odour filter with
the oven cleaning function (pyrolytic self-clean).
WARNING‒Risk of injury!
The odour filter remains hot for quite some time after
it has been regenerated.
▶ Do not touch the odour filter straight after it has
been regenerated – allow it to cool down.
Note:During the regeneration process, parts of the
odour filter may become discoloured. This discolour-
ation has no effect on the performance of the odour
filter.
Requirement:The odour filter is removed.
1. Preheat the oven to a maximum of 200°C (air re-
circulation ).
2. To ensure that you do not scratch the baking tray,
place the odour filter on a wire rack.
3. During regeneration, an odour may develop. Open
a window to ensure that the room is well ventil-
ated.
4. Regenerate the regenerative odour filter with the
following settings.
Duration Temperature Type of heat-
ing
120mins Max. 200°C Air recircula-
tion
5. Leave the hot odour filter to cool down on a heat-
resistant surface.
Installing the odour filter
1. Open the glass plate.
2. Open the filter cover at the bottom of the appli-
ance.
Loading ...
Loading ...
Loading ...