
Loading ...
Loading ...
Loading ...
REMOVING & CLEANING THE DUST BAG
1. Remove dust bag assembly (3) by rotating the dust bag
assemblyapproximately15°counter-clockwiseand
pulling it out of the dust chute.
2. Remove the dust bag (3a) from the dust bag support
(3b) by opening the elasticized end of the dust bag (3c)
and sliding it off the dust bag support (Fig. B).
3.Carefullyshakethedustbagwiththeelasticized
opening pointing downward to remove the sanding dust.
NOTE: It is best to perform this function outdoors over a trash can to prevent sanding dust
fromescapingintotheworkarea.
4. Once the sanding dust is removed from the dust bag, reinstall the dust bag onto the dust
bag support.
5. Reinstall the dust bag assembly into the dust chute as noted above.
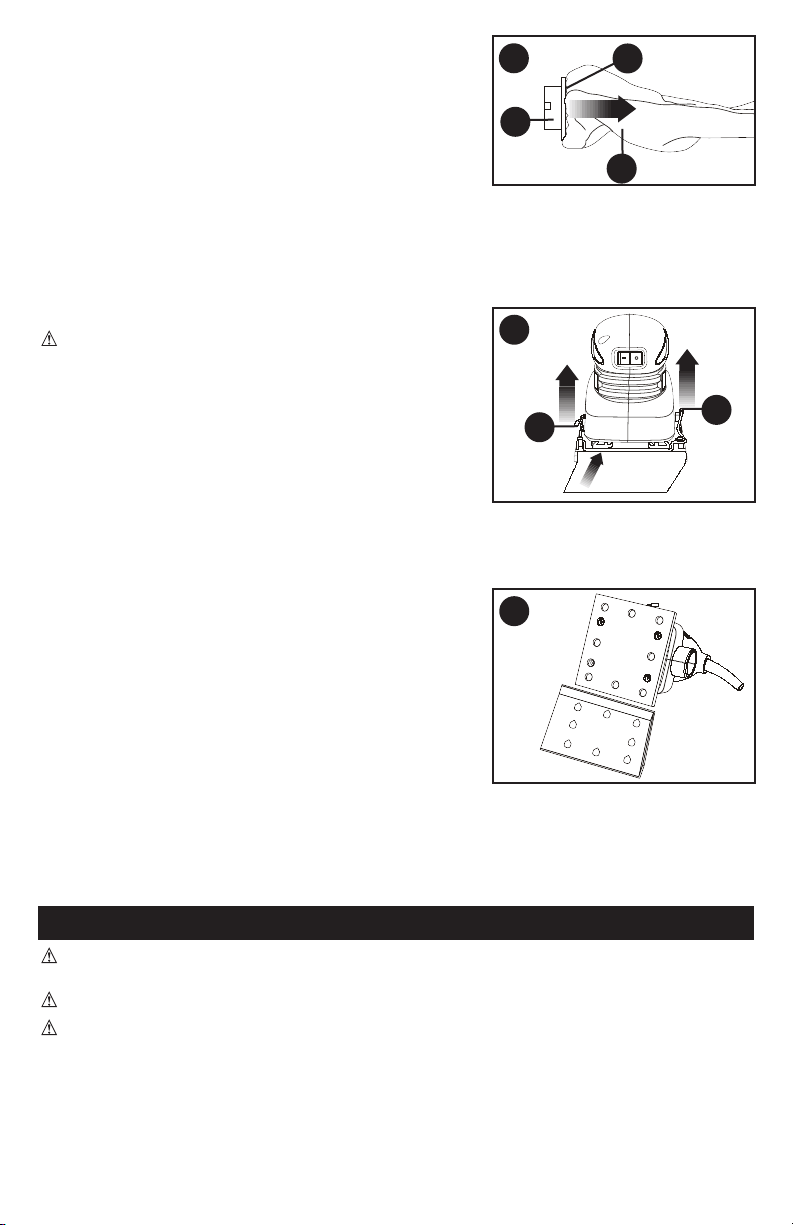
INSTALLING SANDPAPER
WARNING: Unplug the sander from the power
source before installing or changing the sandpaper.
1. Lift up and outward on the front and rear sandpaper
clamplevers(6)atthefrontandrearofthebacking
pad (7) (Fig. C).
2. Insert one end of the ¼ sheet sandpaper (10) with
grit side up into the open front sandpaper clamp (5),
makingsureitisalignedwiththebackingpad.Lift
thesandpaperclampleverupandinwardtolockthe
sandpaper into the clamp.
3.Wrapthesandpapersheetaroundthebackingpadandinsertitintotheopenrear
sandpaper clamp (Fig. 4).
NOTE:Makesurethesandpaperispulledtightoverthebackingpadforpropersandingoperation.
4.Liftthesandpaperclampleverupandinwardtolockthesandpaperintotheclamp.
PUNCHING HOLES IN SANDPAPER
The sandpaper must have 8 holes punched in it to allow
thesandingdusttoescapefromtheworkingsurface.The
pattern of these holes must match the hole pattern on
the sanding pad. If the sandpaper you are using does not
have the holes punched, use the hole punch supplied with
the tool to pierce the sandpaper in the correct locations.
1. Install the sandpaper as shown in Fig. C.
2. Place the hole punch (9) on a sturdy flat surface (Fig. D).
3. Align the corner of the sanding pad (10) with the corner
of the hole punch. This will ensure the holes are punched in the correct location.
4. When the sanding pad is correctly aligned on the hole punch, press the sanding pad firmly
onto the hole punch.
NOTE: The sharp pegs in the hole punch will pierce the sandpaper in the correct location.
OPERATING INSTRUCTIONS
WARNING: To reduce the risk of injury, let the tool work at its own pace. Do
not overload.
WARNING: Shock hazard. Under no circumstances should this product be used near water.
WARNING:
Always wear safety goggles or safety glasses with side shields when
operating your sander. Failure to do so could result in foreign objects being thrown into
your eyes resulting in possible serious eye damage.
Alwayswearanappropriatedustmaskandhearingprotectionwhenusingyoursander.
6
D
B
3b
3a
3c
C
6
6
Loading ...
Loading ...
Loading ...