
Mobile Portable Terminal
User’s Manual
V2
.0.0
I
Foreword
General
This manual introduces the installation and operations of the Mobile Portable Terminal (hereinafter
referred to as "the Terminal"). Read carefully before using the Terminal, and keep the manual safe for
future reference.
Safety Instructions
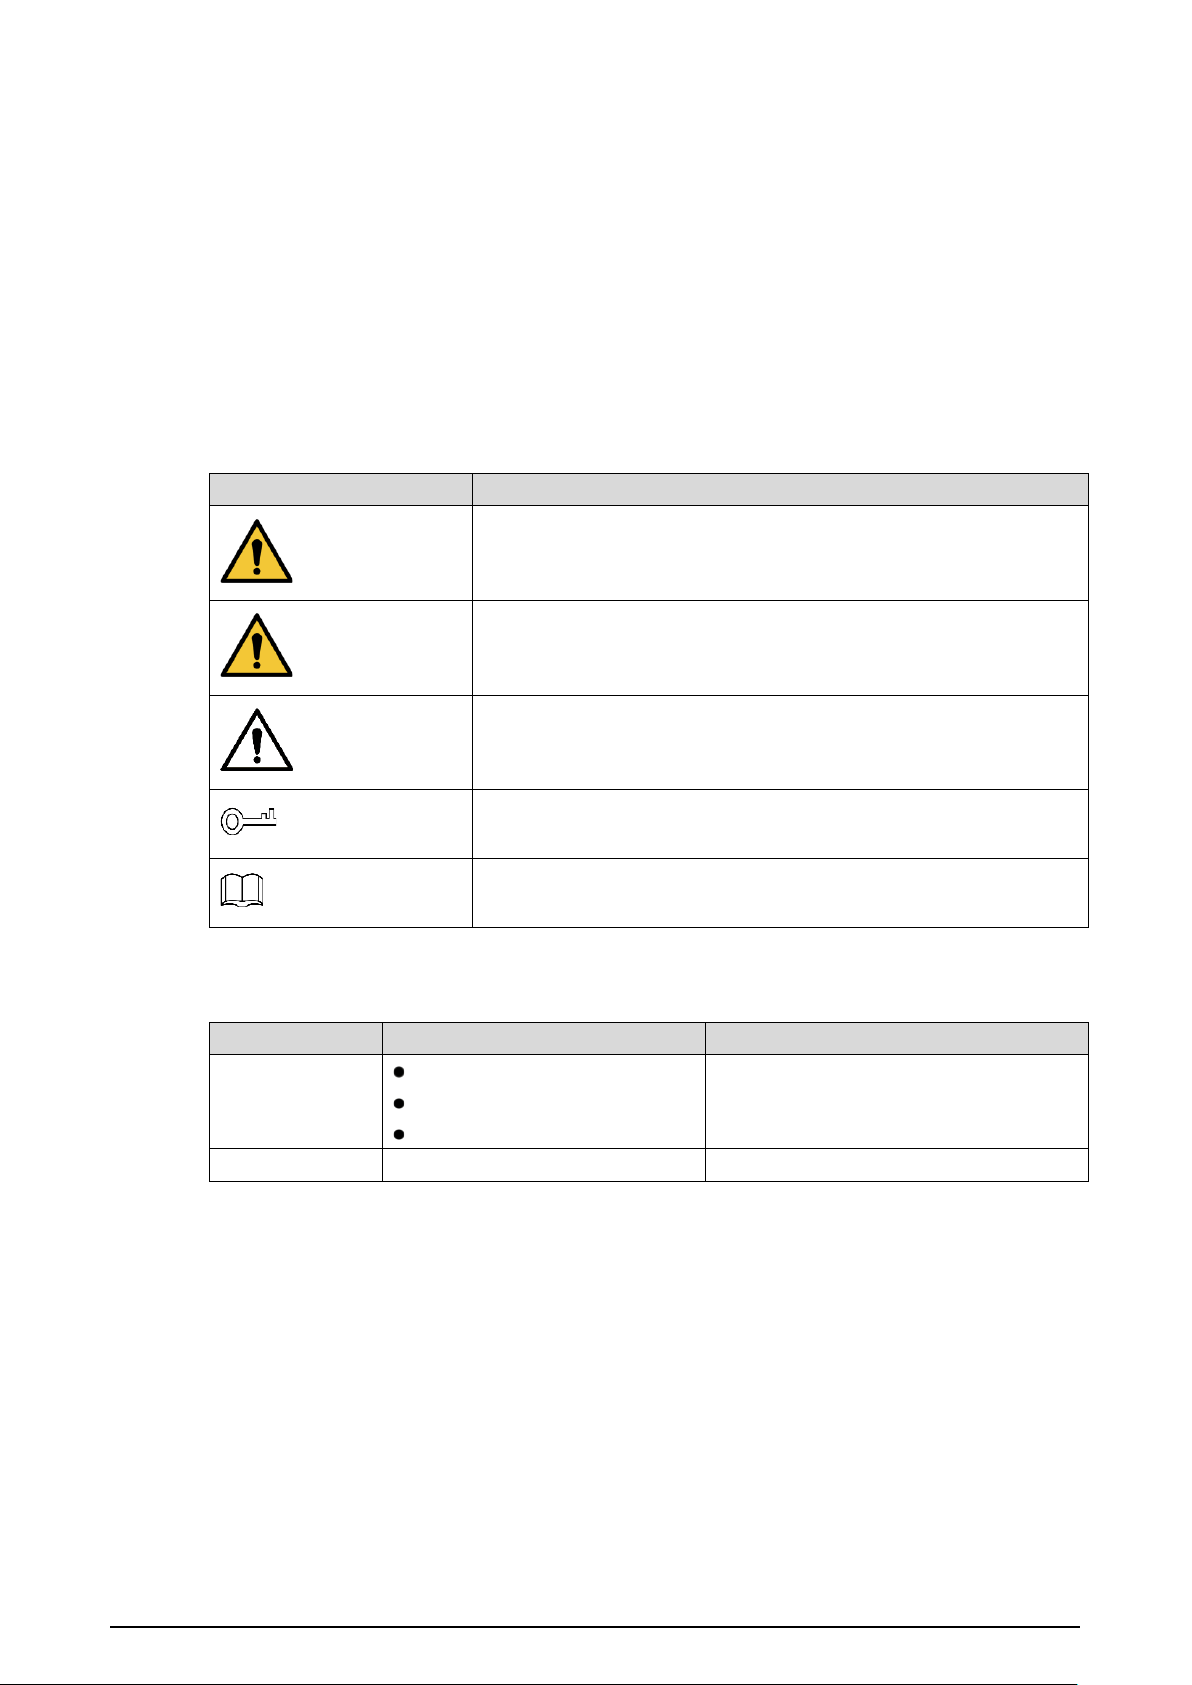
The following signal words might appear in the manual.
Signal Words
Meaning
DANGER
Indicates a high potential hazard which, if not avoided, will result in
death or serious injury.
WARNING
Indicates a medium or low potential hazard which, if not avoided,
could result in slight or moderate injury.
CAUTION
Indicates a potential risk which, if not avoided, could result in
property damage, data loss, reductions in performance, or
unpredictable results.
TIPS
Provides methods to help you solve a problem or save time.
NOTE
Provides additional information as a supplement to the text.
Revision History
Version
Revision Content
Release Time
V2.0.0
Added EIS.
Added app management.
Add platform configuration.
March 2022
V1.0.0 First release. May 2020
Privacy Protection Notice
As the device user or data controller, you might collect the personal data of others such as their face,
fingerprints, and license plate number. You need to be in compliance with your local privacy protection
laws and regulations to protect the legitimate rights and interests of other people by implementing
measures which include but are not limited: Providing clear and visible identification to inform people
of the existence of the surveillance area and provide required contact information.
About the Manual
The manual is for reference only. Slight differences might be found between the manual and the
product.

II
We are not liable for losses incurred due to operating the product in ways that are not in
compliance with the manual.
The manual will be updated according to the latest laws and regulations of related jurisdictions.
For detailed information, see the paper user’s manual, use our CD-ROM, scan the QR code or visit
our official website. The manual is for reference only. Slight differences might be found between
the electronic version and the paper version.
All designs and software are subject to change without prior written notice. Product updates
might result in some differences appearing between the actual product and the manual. Please
contact customer service for the latest program and supplementary documentation.
There might be errors in the print or deviations in the description of the functions, operations and
technical data. If there is any doubt or dispute, we reserve the right of final explanation.
Upgrade the reader software or try other mainstream reader software if the manual (in PDF
format) cannot be opened.
All trademarks, registered trademarks and company names in the manual are properties of their
respective owners.
Please visit our website, contact the supplier or customer service if any problems occur while
using the device.
If there is any uncertainty or controversy, we reserve the right of final explanation.
III
Important Safeguards and Warnings
The section introduces the proper way of using the Terminal, and danger and property damage
preventions. Read carefully before using the Terminal, and comply with the guidelines when using it.
Transportation Requirements
Transport the Terminal under allowed humidity and temperature conditions.
Storage Requirements
●
Store the Terminal under allowed humidity and temperature conditions.
●
To avoid short circuits caused by metal objects touching the battery anode and cathode, do not
store the battery with other metals.
●
If the Terminal will not be used for a week or longer, charge it to 60%, take the battery out of the
Terminal, and store it in a clean, dry and ventilated room with an ambient temperature of 20 ± 5 °C.
●
Charge the battery once every four months during storage.
Installation Requirements
Do not expose the battery to environments with extremely low air pressure, or extremely high or low
temperatures. Also, it is strictly prohibited to throw the battery into a fire or furnace, and to cut or put
mechanical pressure on the battery. This is to avoid the risk of fire and explosion.
Operation Requirements
Use the power adapter and cables provided with the Terminal. We assume no responsibility for injuries
or damage caused by using the incorrect power adapter and cables.
●
To prevent possible hearing damage, do not listen at high volume levels for long periods.
●
Use the Terminal under allowed humidity and temperature conditions.
●
Do not continuously charge the battery for 24 hours or longer. When it is finished charging or it no
longer needs charging, disconnect the adapter from the Terminal, and unplug it from the power
socket.
●
Please be advised that your configurations will be lost after performing a factory reset.

IV
Maintenance Requirements
Make sure to use the same model when replacing the battery to avoid fire or explosion. Dispose the
battery strictly according to the instructions on it.
The battery is a consumable accessory. We recommend replacing it after it has been used for a year.

V
Table of Contents
Foreword ............................................................................................................................................................................ I
Important Safeguards and Warnings ......................................................................................................................... III
1 Product Overview ........................................................................................................................................................ 1
Introduction ................................................................................................................................................................................. 1
Packing List ................................................................................................................................................................................... 1
Product Structure ....................................................................................................................................................................... 2
1.3.1 Structure ........................................................................................................................................................................... 2
1.3.2 Dimensions ..................................................................................................................................................................... 5
2 Installation .................................................................................................................................................................... 6
Installing the Terminal .............................................................................................................................................................. 6
Removing the Battery............................................................................................................................................................... 7
3 Basic Operations .......................................................................................................................................................... 9
Turning on or off the Terminal ............................................................................................................................................... 9
Login ............................................................................................................................................................................................... 9
3.2.1 Login with a Password ................................................................................................................................................ 9
3.2.2 Login with a Pattern ................................................................................................................................................... 10
3.2.3 Login with a Fingerprint ........................................................................................................................................... 12
Initialization ................................................................................................................................................................................ 14
Home Screen ............................................................................................................................................................................. 14
Shortcut Menu .......................................................................................................................................................................... 16
Camera ......................................................................................................................................................................................... 16
3.6.1 Taking Pictures ............................................................................................................................................................. 16
3.6.2 Recording Videos ........................................................................................................................................................ 17
3.6.3 Camera Settings .......................................................................................................................................................... 18
Settings ........................................................................................................................................................................................ 19
3.7.1 Network .......................................................................................................................................................................... 19
3.7.2 Device .............................................................................................................................................................................. 37
3.7.3 System ............................................................................................................................................................................. 48
Recording Audios ..................................................................................................................................................................... 61
ANPR ............................................................................................................................................................................................. 62
File Management ................................................................................................................................................................... 63
User Management ................................................................................................................................................................. 68
3.11.1 Adding Users .............................................................................................................................................................. 68
3.11.2 Changing Password ................................................................................................................................................. 69
3.11.3 Deleting Users ........................................................................................................................................................... 70
Log Management .................................................................................................................................................................. 70
System Maintenance ............................................................................................................................................................ 71
4 Platform Operations ..................................................................................................................................................73
Connecting to the Platform ................................................................................................................................................. 73
Adding the Device to the Platform .................................................................................................................................... 73
Cybersecurity Recommendations .......................................................................................................76

1
1 Product Overview
Introduction
The Terminal integrates high-performance mobile phone chip, ergonomic design, industry application,
and AI video technology. It is ideal for public security, energy, corporation, transportation, justice,
electricity, insurance and other industries. With functions such as video communication,
teleconference, audio and video acquisition, group talk, and voice call, the Terminal is suitable for the
following application scenarios: Law enforcement and evidence obtaining, security and patrol, and
process control. Therefore, it can meet the customers' needs for mobile business application.
Packing List
When you receive the product, check whether there is obvious damage to the packing box. Unpack
the box and check whether the components are complete against the packing list.
Table 1-1 Packing list
Name
Quantity
Main device 1
Power adapter 1
4600 mAh battery 1
Quick Start Guide 1
USB cable 1
2
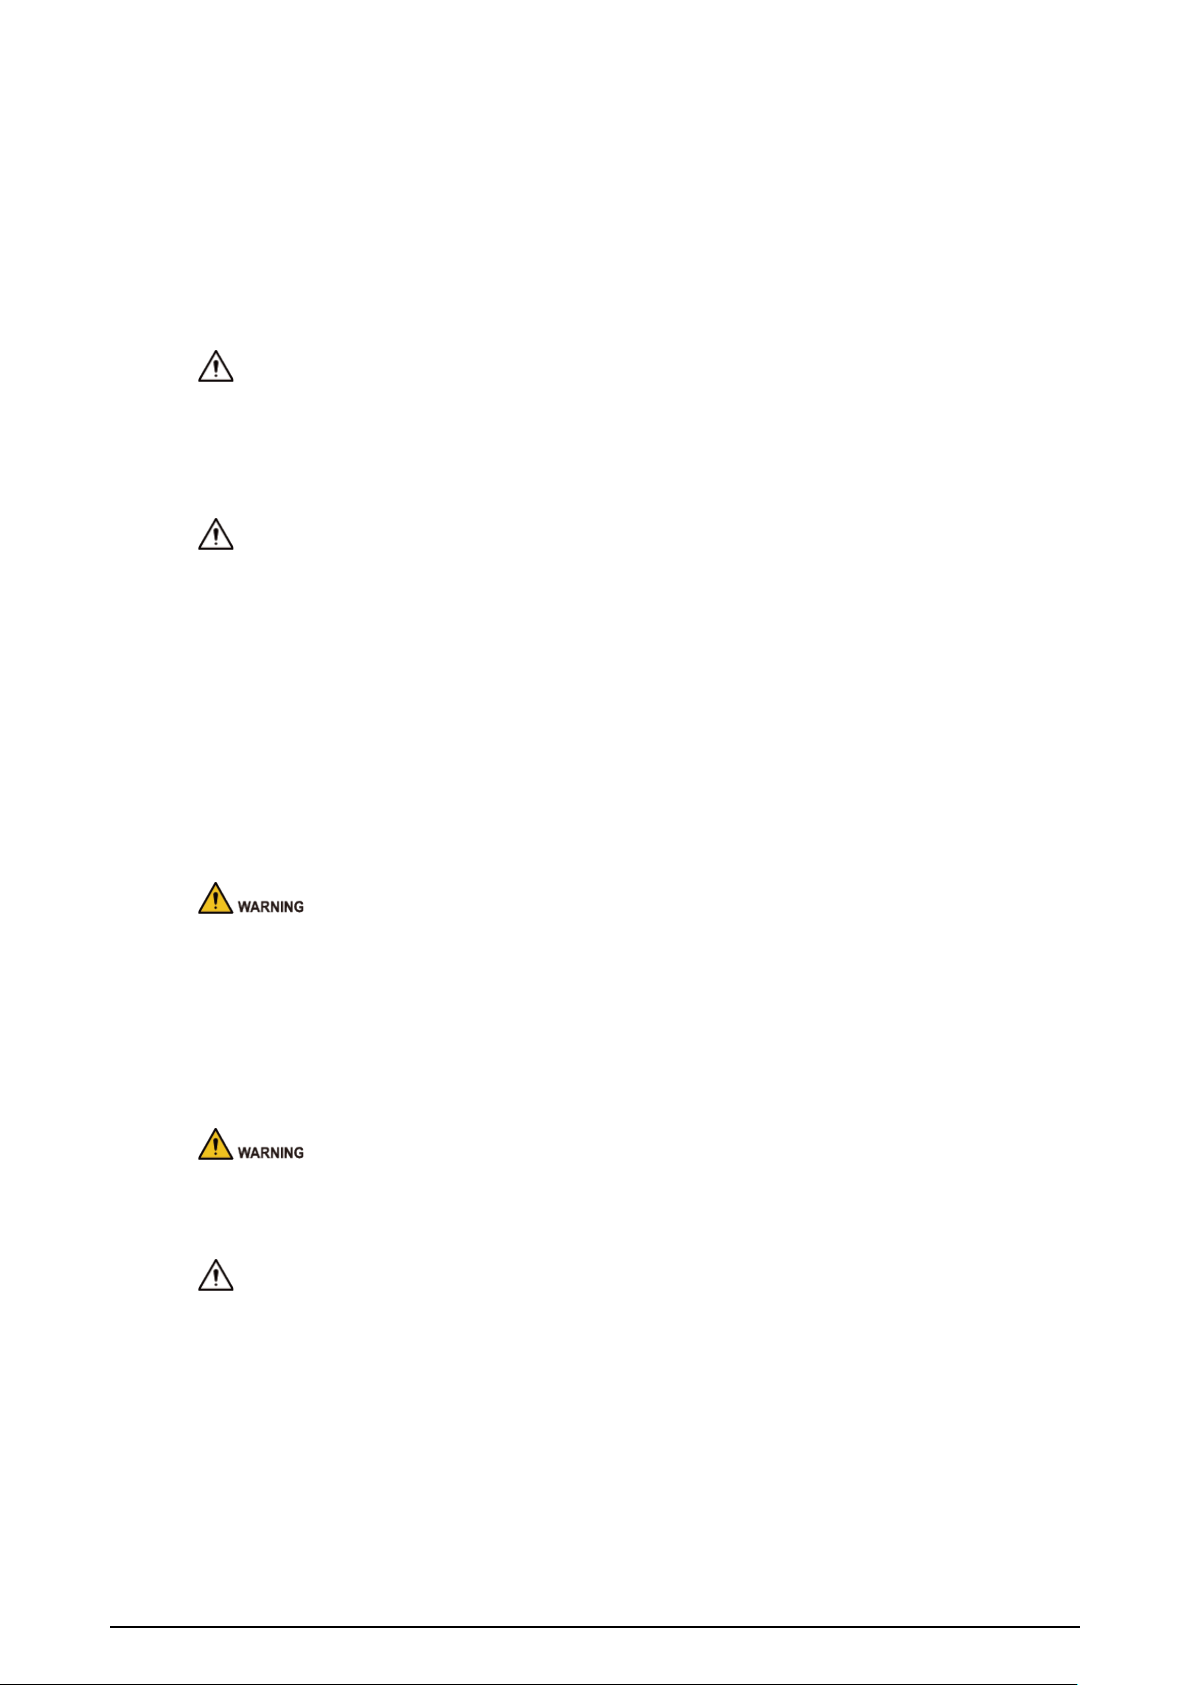
Product Structure
1.3.1 Structure
Structure (1)
Table 1-2 Structure description
No.
Description
No.
Description
1 Front camera. 2
Fn1 button.
It is a programmable button. You can
set the function of the button to
recording or capturing in >
Device
>
Customized Button
.
3
PTT (Push to Talk) button.
Press and hold the button to start talk if
the Terminal is in a POC group.
4
Menu button.
After unlocking the Terminal, whatever
screen you are on, tap the button to see
the tasks running in the background.

3
No.
Description
No.
Description
5
Fingerprint sensor.
●
After adding the fingerprint, you can
tap the button to unlock the Device
with your fingerprint.
●
When the Terminal is powered on,
the button serves as the Home
button.
6
Back button.
Tap the button to go back to the
previous screen.
7 Main microphone. 8 Photosensitive proximity sensor.
9 Sound pickup. 10
Indicator light.
●
Alarm: Flashes red quickly.
●
Low battery: Flashes red slowly.
●
Charging: Solid red when the
battery level is lower than 90%;
solid green when the battery level
is 90% or higher.
●
Acquiring stream: Flashes green
slowly.
●
Video
recording: Flashes blue
quickly.
●
Audio recording: Flashes blue
slowly.
11
Fn2 button.
It is a programmable button. You can set
the function of the button to recording
or capturing in >
Device
>
Customized Button
.
12
Power button.
●
Press and hold the button to turn
on or off the Terminal, restart the
Terminal, or take screenshots.
●
Short press the button to turn off
or wake up the screen.
13
Volume button.
Press the + or – button to adjust the
volume.
14 Rear button.
15
Battery cover lock.
Slide to the left or right side to lock or
unlock the battery cover.
16 Battery cover.
17
Pogpin port.
Connect to the base and back clip.
18 Speaker.
19 Lanyard hole. 20 Back microphone.
4
No.
Description
No.
Description
21 Flashing light. 22
SOS button.
Press the button to ask for help in
emergency.
Use this function with the
corresponding platform software.
23 Port for external camera. 24 Earphone jack.
25 USB charging port. —
Open the battery cover, and then you can see the internal structure of the Terminal.
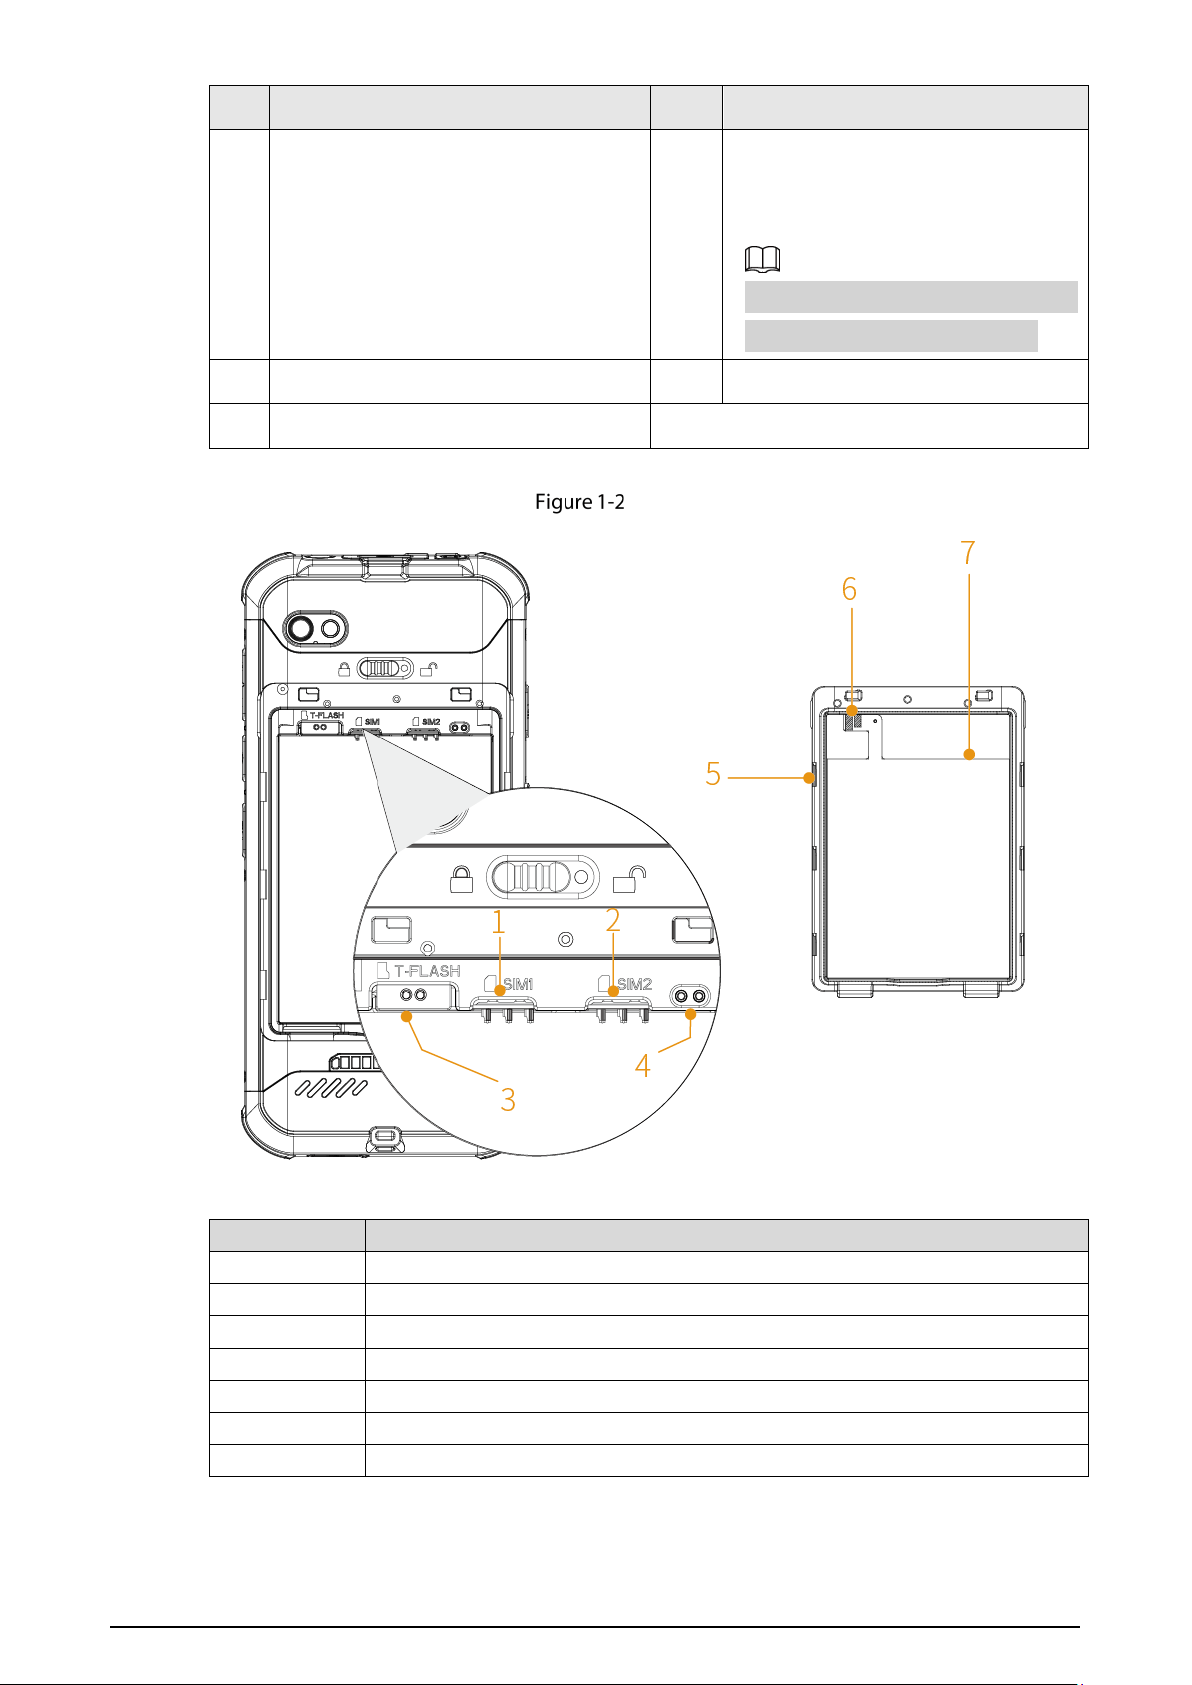
Structure (2)
Table 1-3 Structure description (2)
No.
Description
1 SIM card slot 1
2 SIM card slot 2
3 Micro SD card slot
4 NFC contact
5 Battery cover buckle
6 NFC antenna contact
7 NFC antenna
5
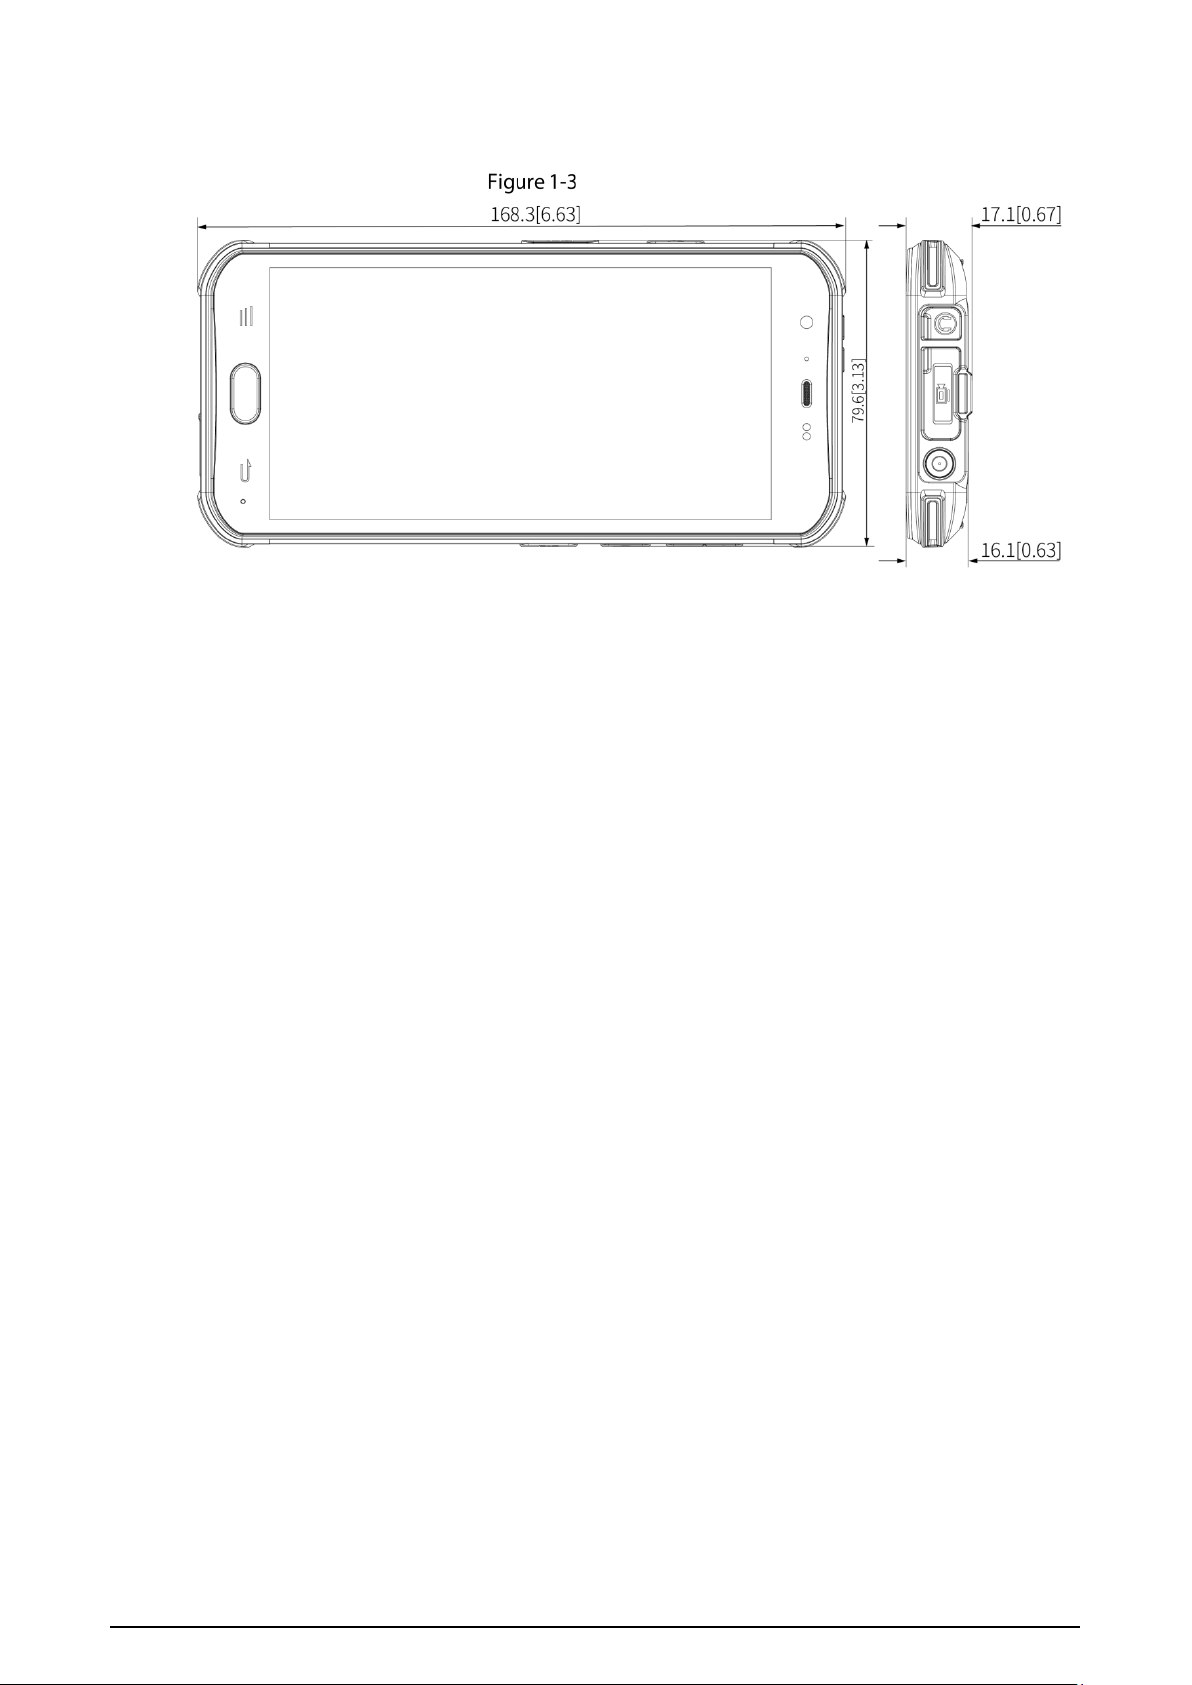
1.3.2 Dimensions
Dimensions (mm[inch])
6
2 Installation
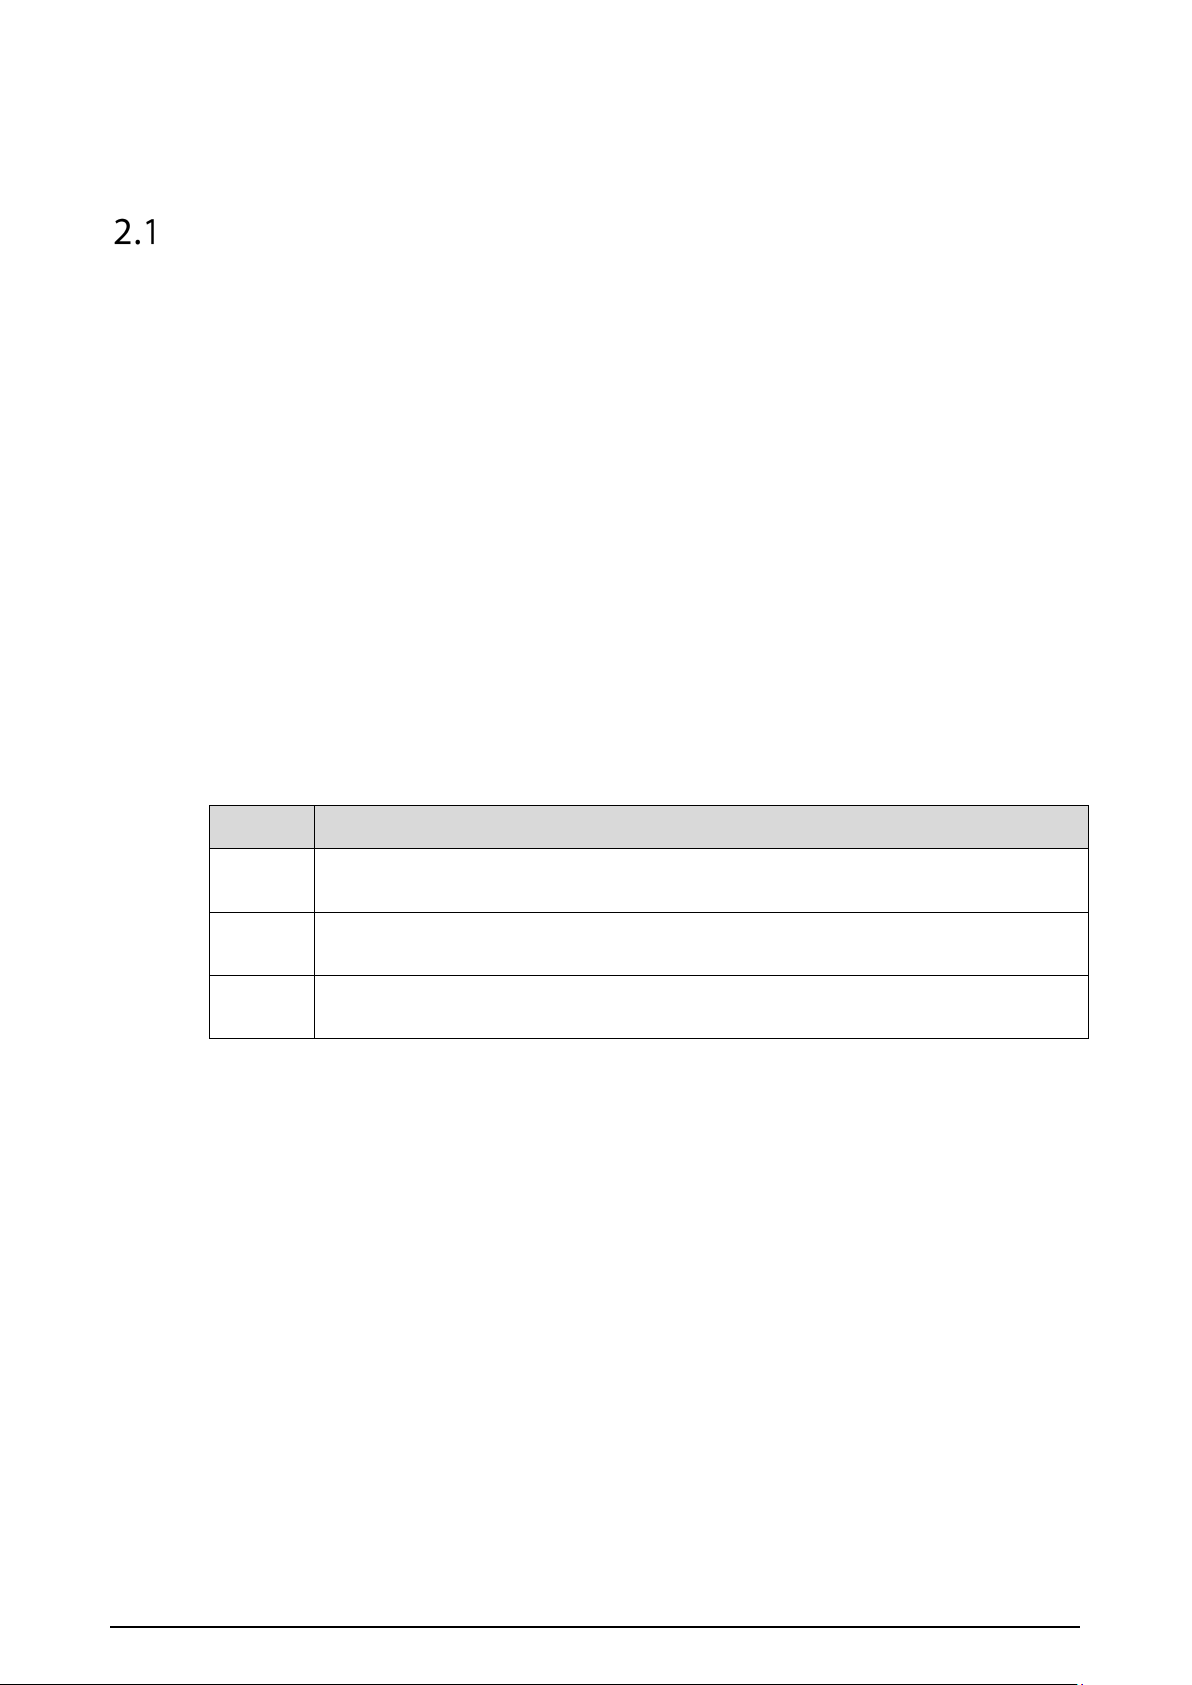
Installing the Terminal
After unpacking the box, first install the SIM card, micro SD card (optional) and battery. For details, see
Figure 2-1.
Follow the instructions below.
Before opening the battery cover, slide the battery cover lock to unlock the battery cover; before
closing the battery cover, insert the battery cover from the bottom (do not press the battery
handle), press 6 buckles on both sides to make the battery cover flat, and then slide the battery
cover lock to the left to lock the battery cover.
When installing the SIM card and micro SD card, insert them into the card slots with the metal
side facing downwards. After inserting the card, you will hear a "click" sound.
Use the standard nano-SIM card (small card). The Terminal might fail to recognize a non-standard
card. If the SIM card you use does not match the Terminal, contact the carrier.
To ensure good reading and writing speed, use a micro SD card that conforms to UHS-I U1
specification.
Both SIM card 1 and SIM card 2 support 2G/3G/4G, but you need to confirm whether the local
band is supported by the Terminal.
Table 2-1 Supported band
Network
Band
2G
GSM B2/B3/B5/B8
CDMA BC0
3G
WCDMA B1/B2/B4/B5/B8
TD-SCDMA B34/B39
4G
FDD-LTE B1/B2/B3/B4/B5/B7/B8/B12/B17/B19/B20/B28
TDD-LTE B34/B38/B39/B40/B41
7
Install SIM card, micro SD card, and battery
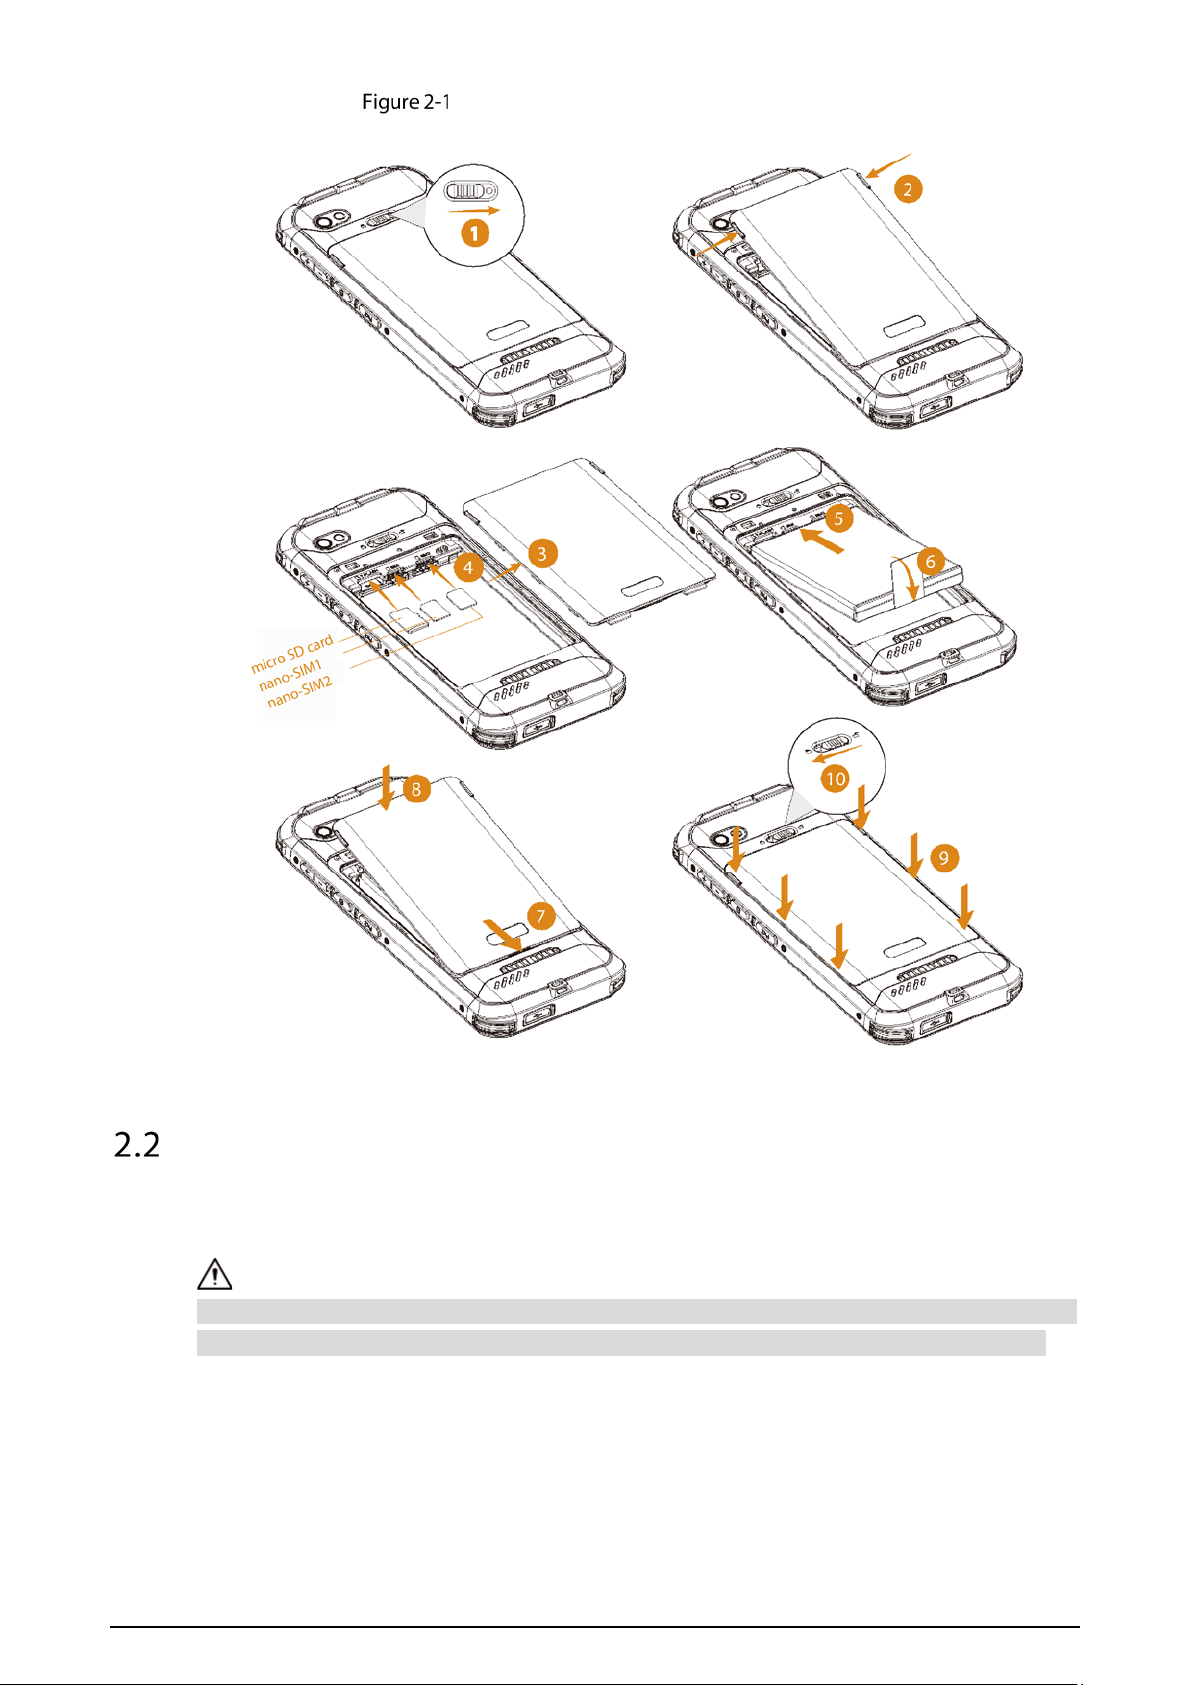
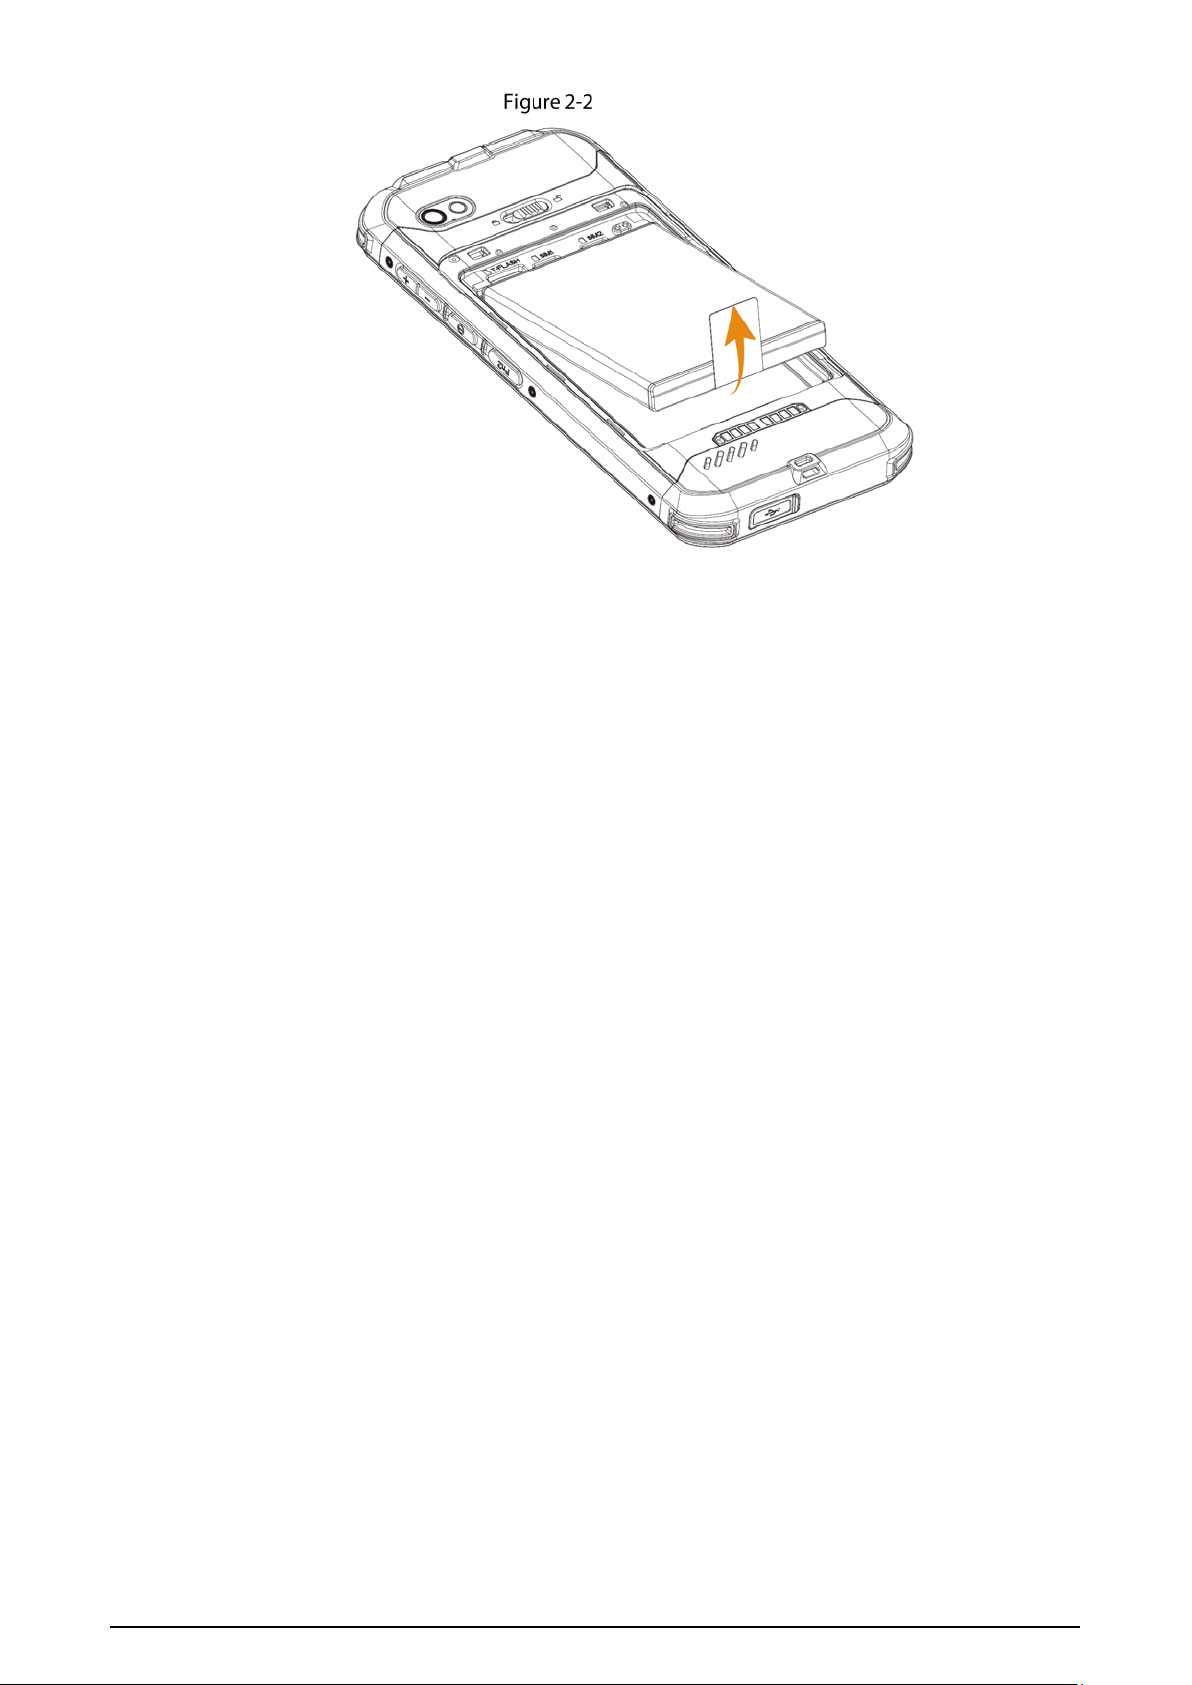
Removing the Battery
Before removing the battery, power off the Terminal, slide the battery cover lock to unlock the cover,
open the battery cover, and then take out of the battery.
Do not change the battery when the Terminal is powered on; otherwise the data (videos, audios and
snapshots) that needs to be written into ROM might be lost, and there might be other exceptions.
8
Remove the battery

9
3 Basic Operations
Turning on or off the Terminal
Press the power button on the right side of the Terminal to turn on, turn off, restart or hibernate the
Terminal.
●
When the Terminal has been turned off, press and hold the power button to start it.
●
When the Terminal has been turned on, press and hold the power button, tap .
Shutting down...
is displayed, and the Terminal will be turned off.
●
When the Terminal has been turned on, press and hold the Power button, tap .
Restarting... is
displayed, and the Terminal will be restarted.
●
When the Terminal has been turned on, press the power button once, and the Terminal will be
hibernated; press the Power button again to wake up the Terminal.
When the Terminal has been turned on, press and hold the power button, tap , and you can take a
screenshot of the current screen. You can also press and hold the power button and Volume – button
at the same time to take screenshots.
Login
You can log in to the system with a password, pattern, or fingerprint.
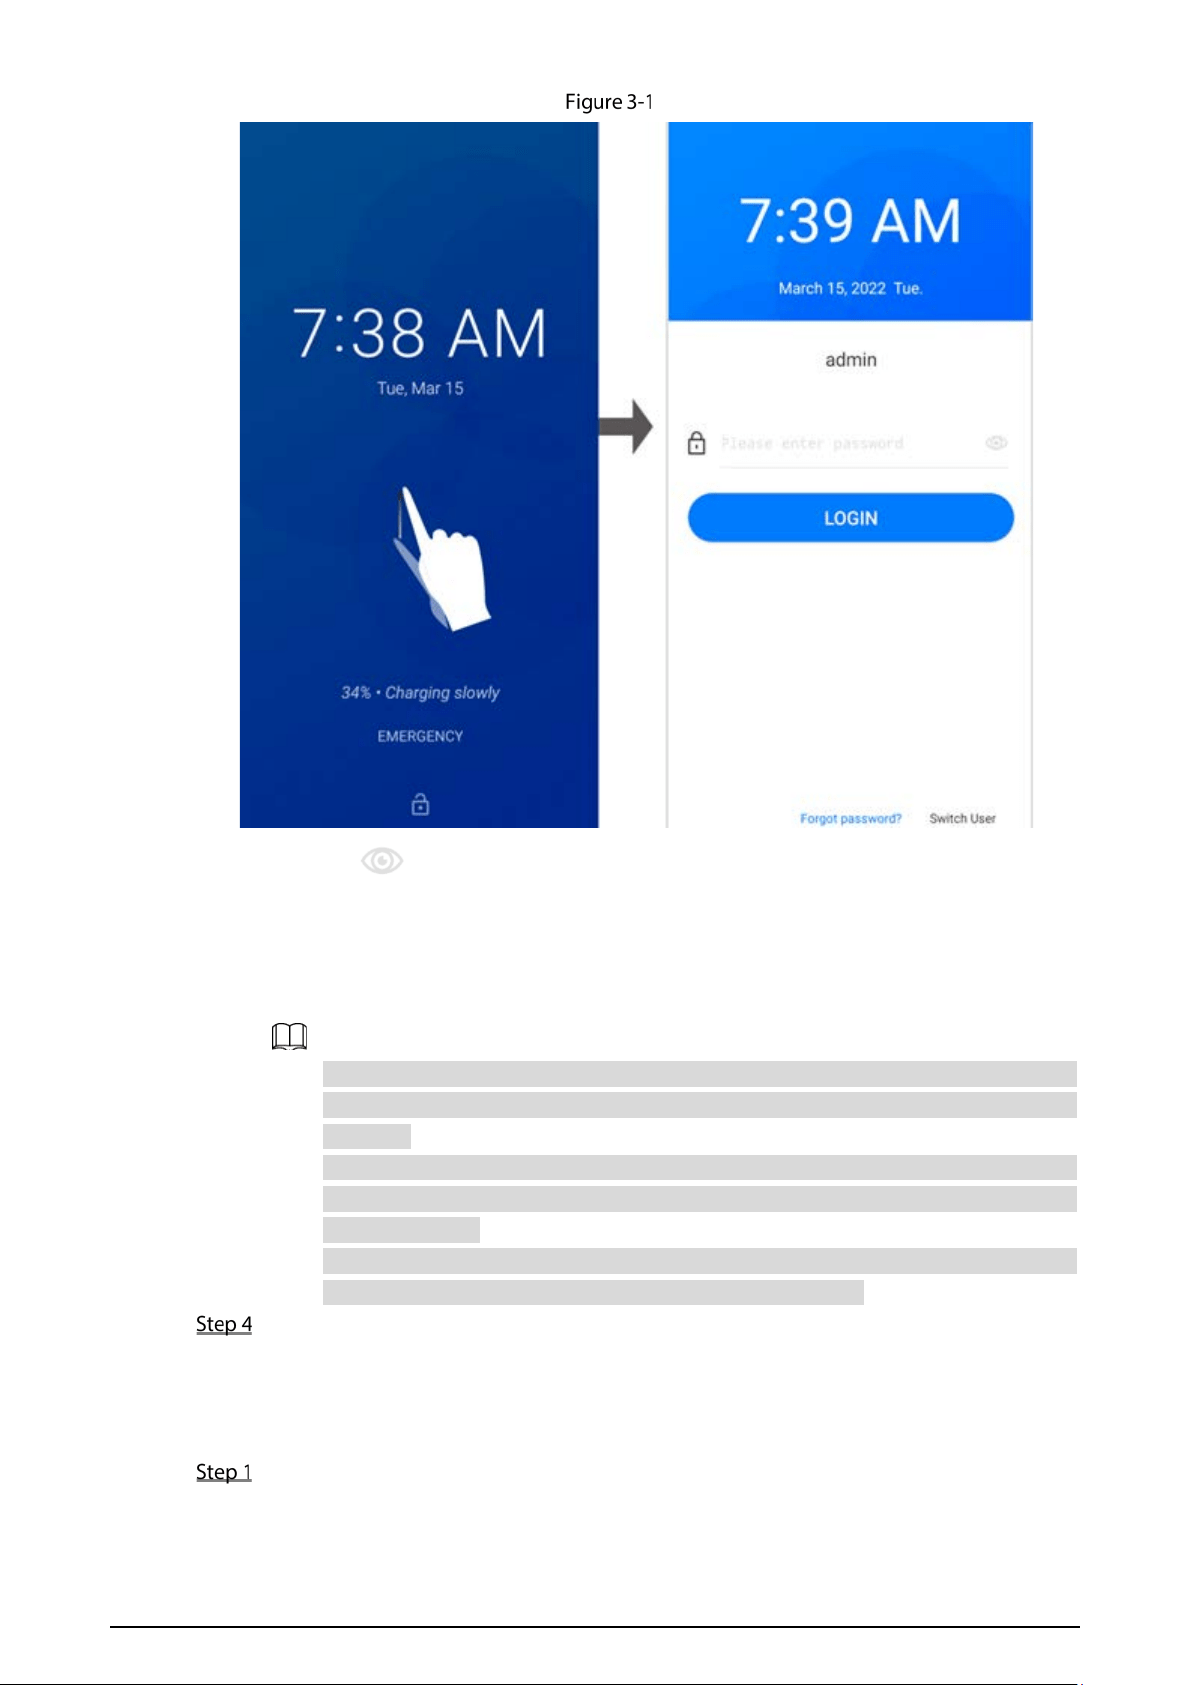
3.2.1 Login with a Password
Power on the Terminal.
Swipe up on the lock screen.
Enter the password.
10
Login
Tap to show the password.
The username is admin by default, and the password is the login password set at the first
startup of the Terminal. If you forget the login password, tap
Forgot password?, answer
the security questions correctly, and then reset the password.
Tap Switch User to log in with another account.
For first-time use, you need to set the login password. You can set three security
questions. If you forget the password, you can answer the questions to reset the
password.
The password must consist of 8–32 non-blank characters and contain at least two types
of the following characters: uppercase, lowercase, numbers, and special characters
(excluding ' " ; : &).
To ensure the security of the Terminal, change your password regularly. For details on
how to change the password, see "3.11.2 Changing Password".
Tap LOGIN.
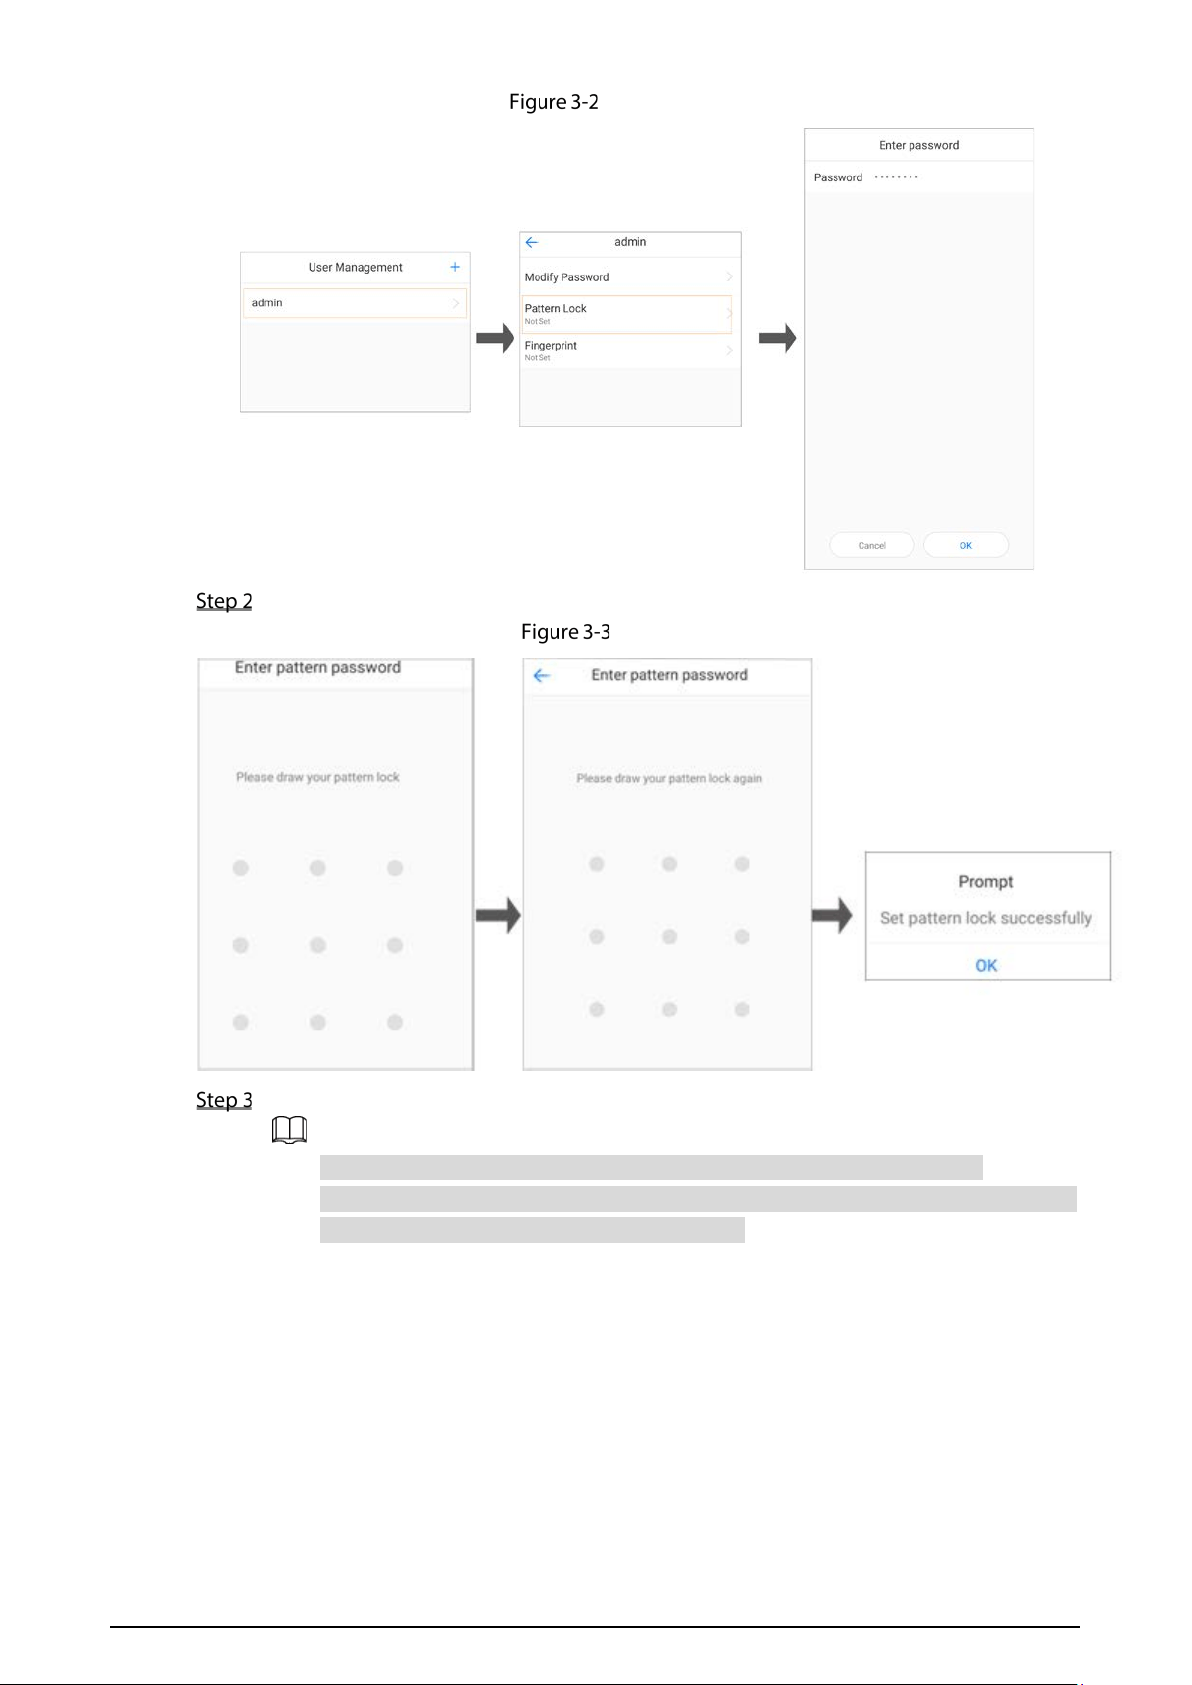
3.2.2 Login with a Pattern
After login, tap User Management on the home screen, select the user, and then tap Pattern
Lock.
11
Enter password (1)
Draw the pattern lock twice, and then tap OK.
Set pattern lock
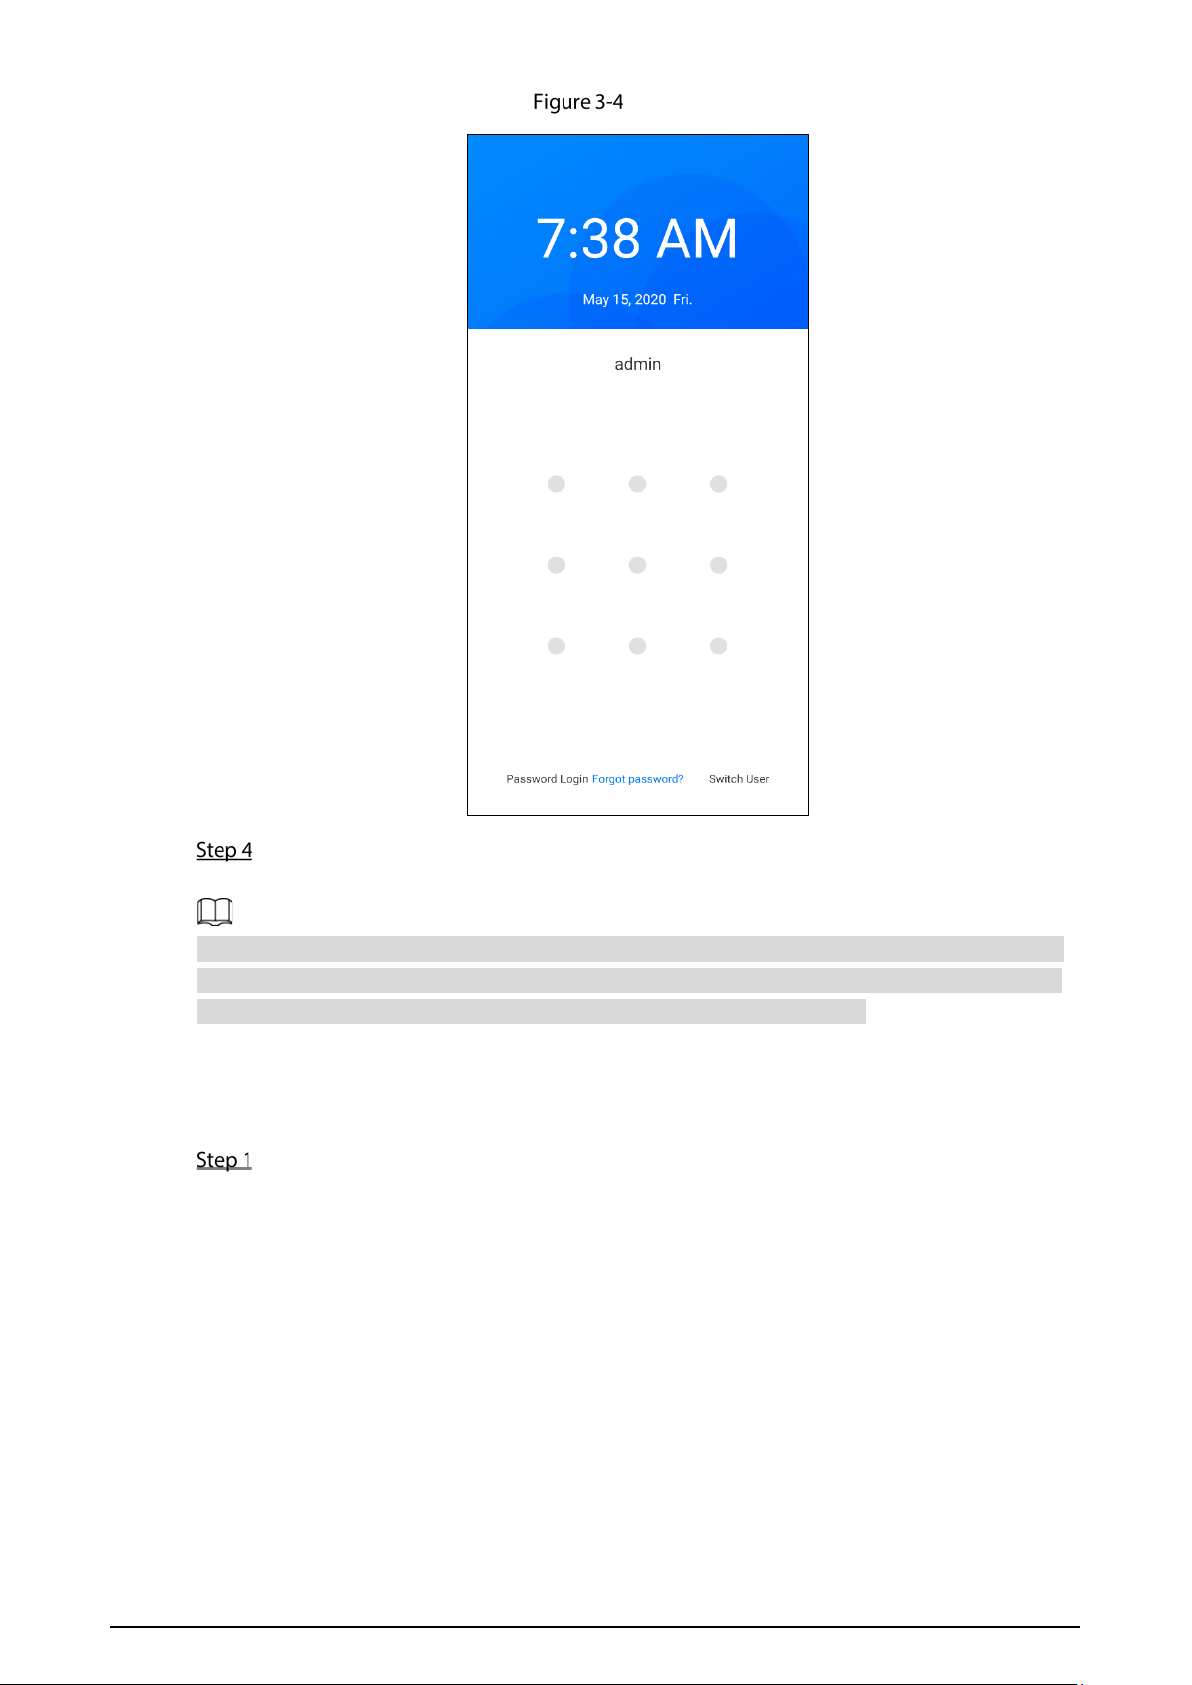
Swipe up on the lock screen.
If you forget the pattern lock, tap Password Login to log in with a password.
If you forget both the pattern and password, tap Forgot password? to reset the
password after answering the security questions.
12
Pattern login
Draw the pattern lock.
The home screen is displayed.
Tap User Management on the home screen, select the user, tap Pattern Lock, enter the password,
and then tap Disable Pattern Lock on the Enter pattern password interface. The Are you sure to
disable pattern lock prompt is displayed. Tap Delete to disable pattern lock.
3.2.3 Login with a Fingerprint
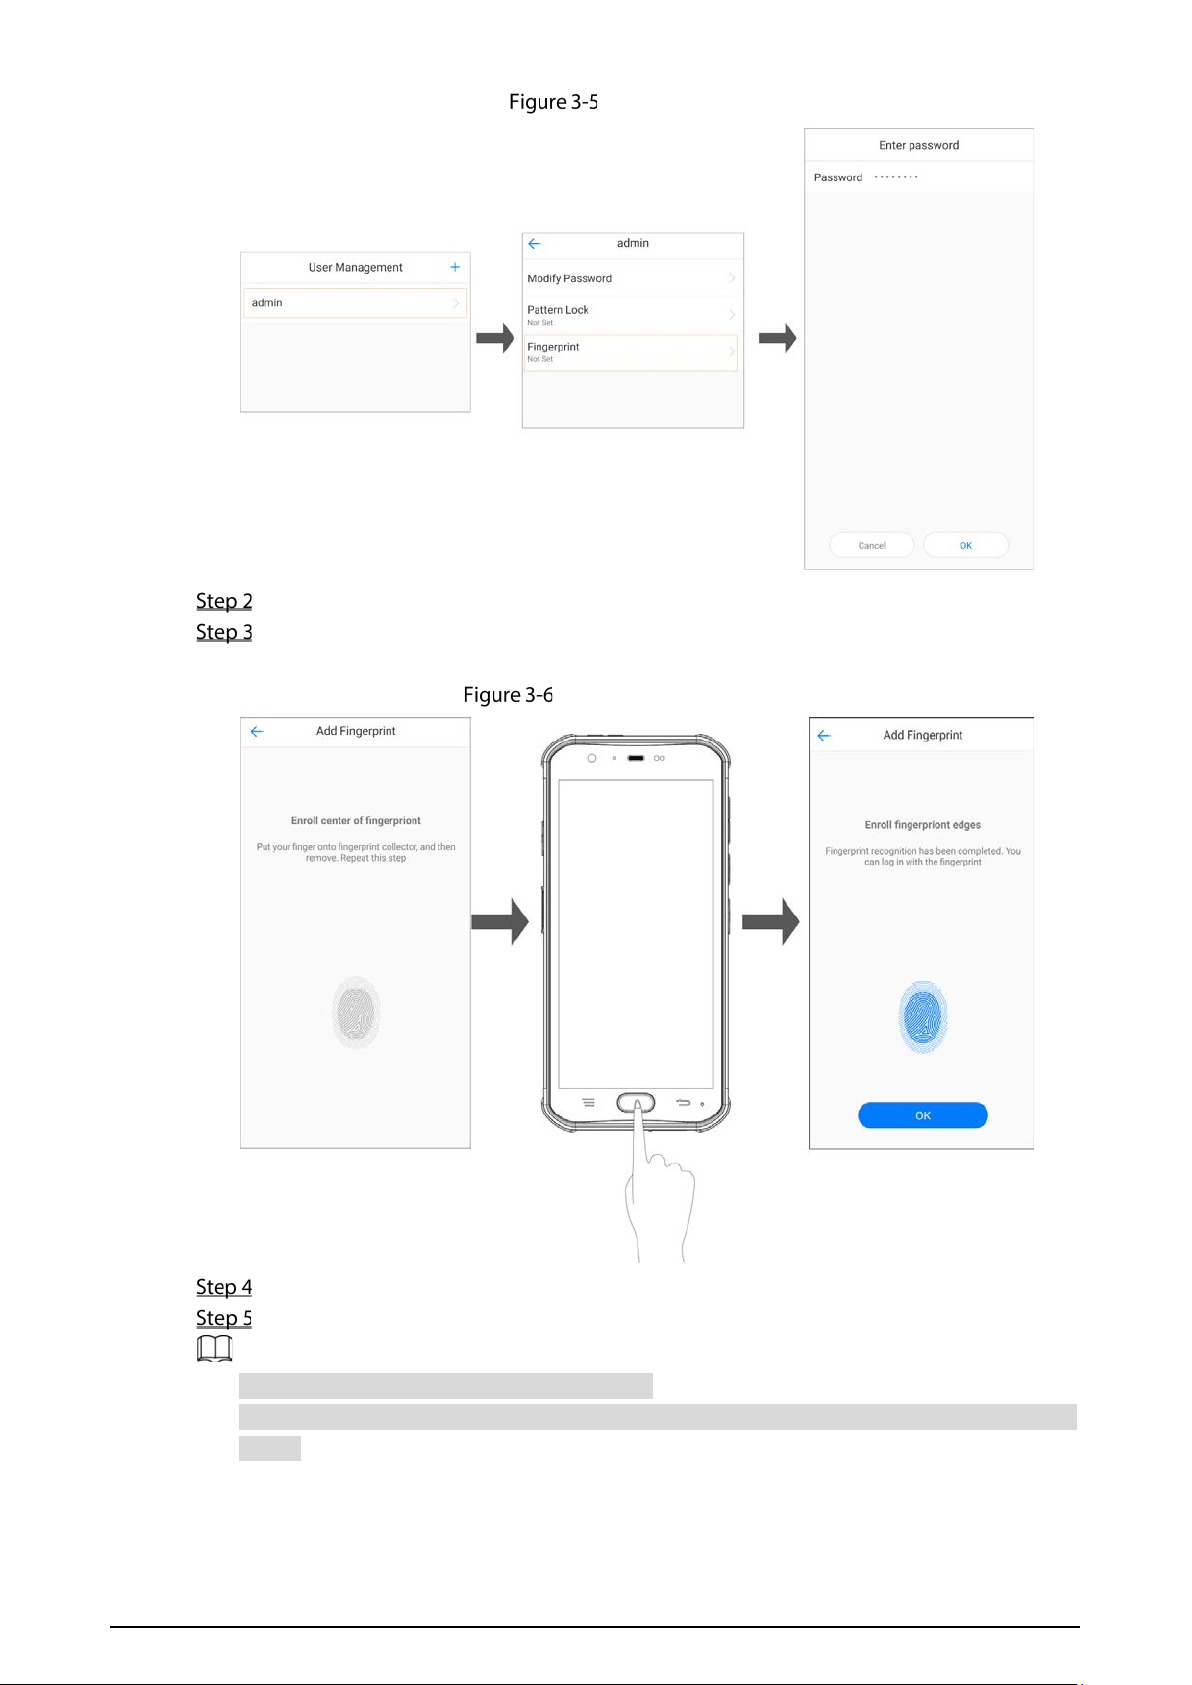
After login, tap User Management on the home screen, select the user, and then tap
Fingerprint.
13
Enter password (2)
Enter the password, tap OK, and then tap Add Fingerprint.
Put your finger onto the fingerprint sensor, and then remove the finger. Repeat this step until
the collection is complete, and then tap OK.
Add the fingerprint
Swipe up on the lock screen.
Put your finger onto the fingerprint sensor until the fingerprint is recognized.
Up to 2 fingerprints can be added for each user.
After adding the fingerprint, you can modify the fingerprint name or delete it on the Fingerprint
screen.
14
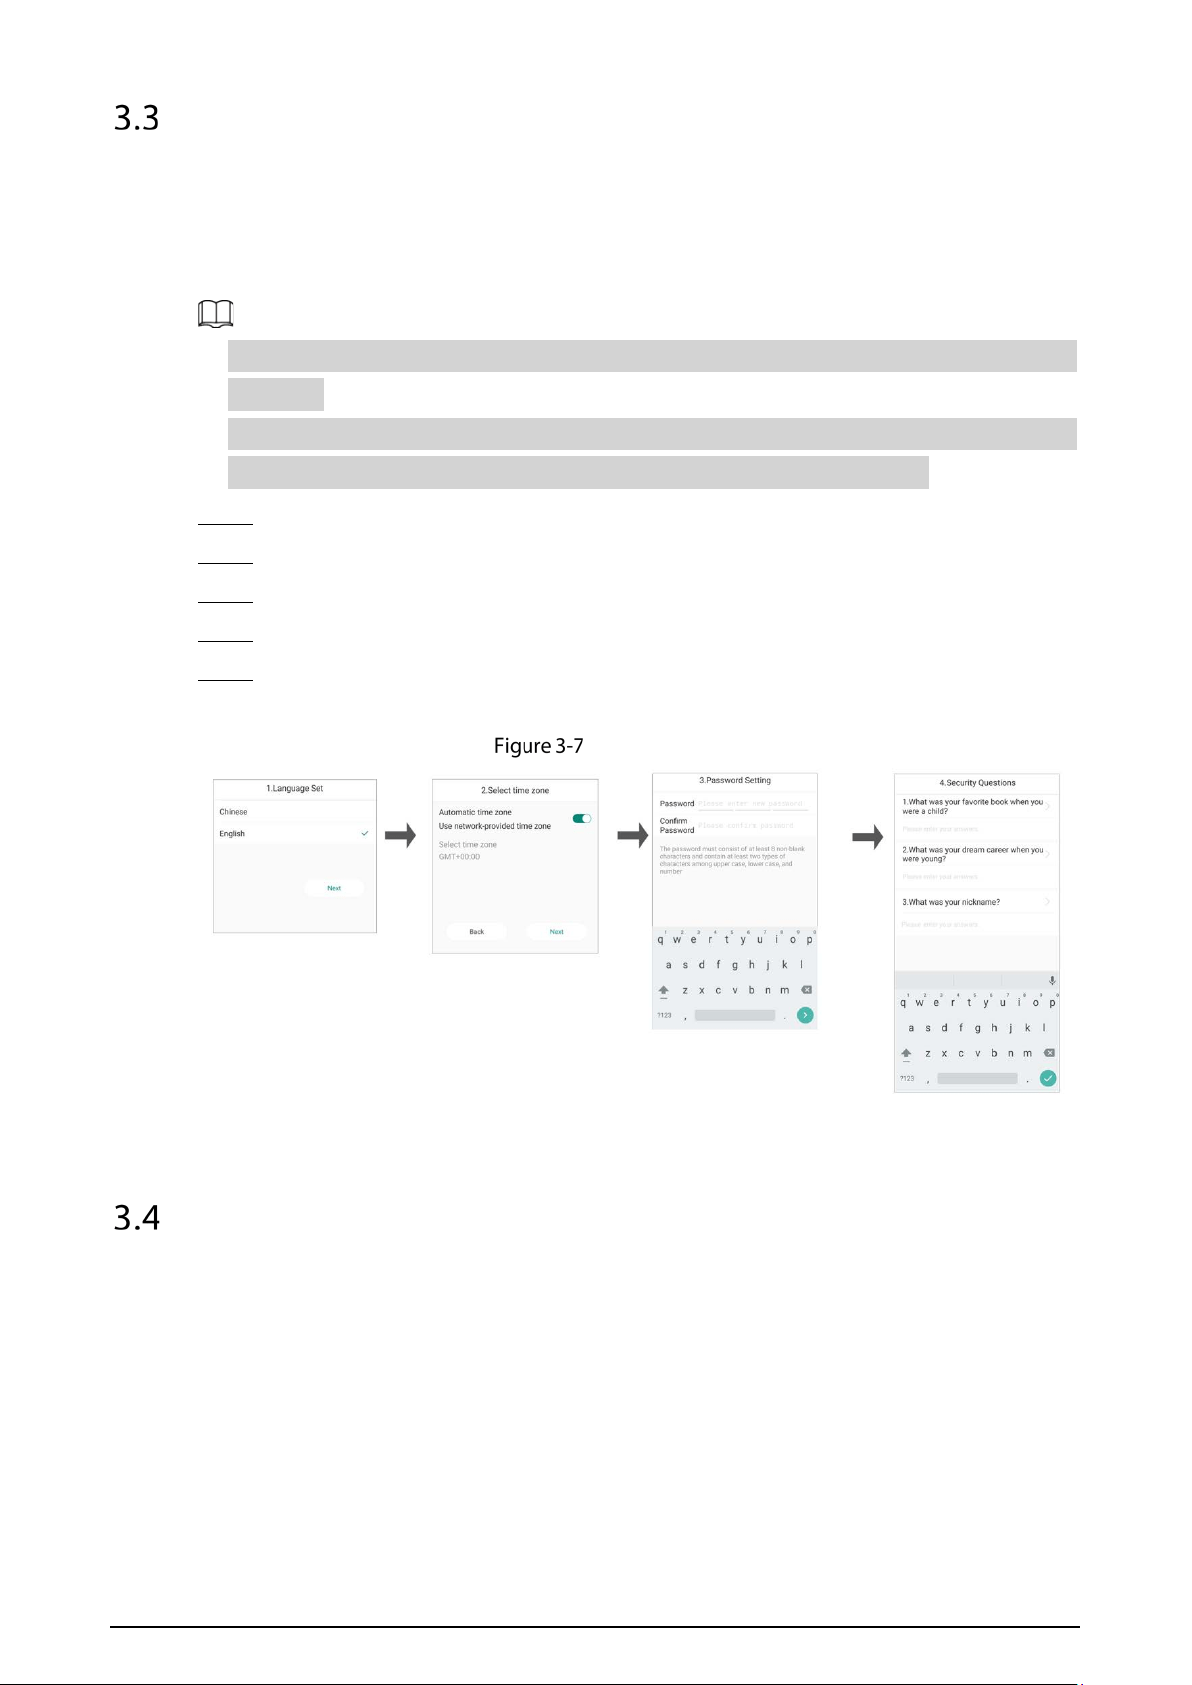
Initialization
For first-time use, you need to configure the login password and set at least 3 security questions. When
you forget the password, tap
Forgot password on the login screen and then answer the security
questions to reset the password.
●
Forgot password is available only for the admin account. Other users cannot reset the password
in this way.
●
After you tap
Forgot password and reset the password, the pattern and fingerprint of the admin
account will be deleted. You need to configure the pattern and fingerprint again.
Step 1 When the Terminal is turned off, press and hold the power button to turn on the Terminal.
Step 2 Select the language, and then tap Next.
Step 3 Select the time zone, and then tap Next.
Step 4 Enter the password and confirm it, and then tap Next.
Step 5 Set the security questions and answers, and then tap Finish.
The Terminal is initialized.
Initialization
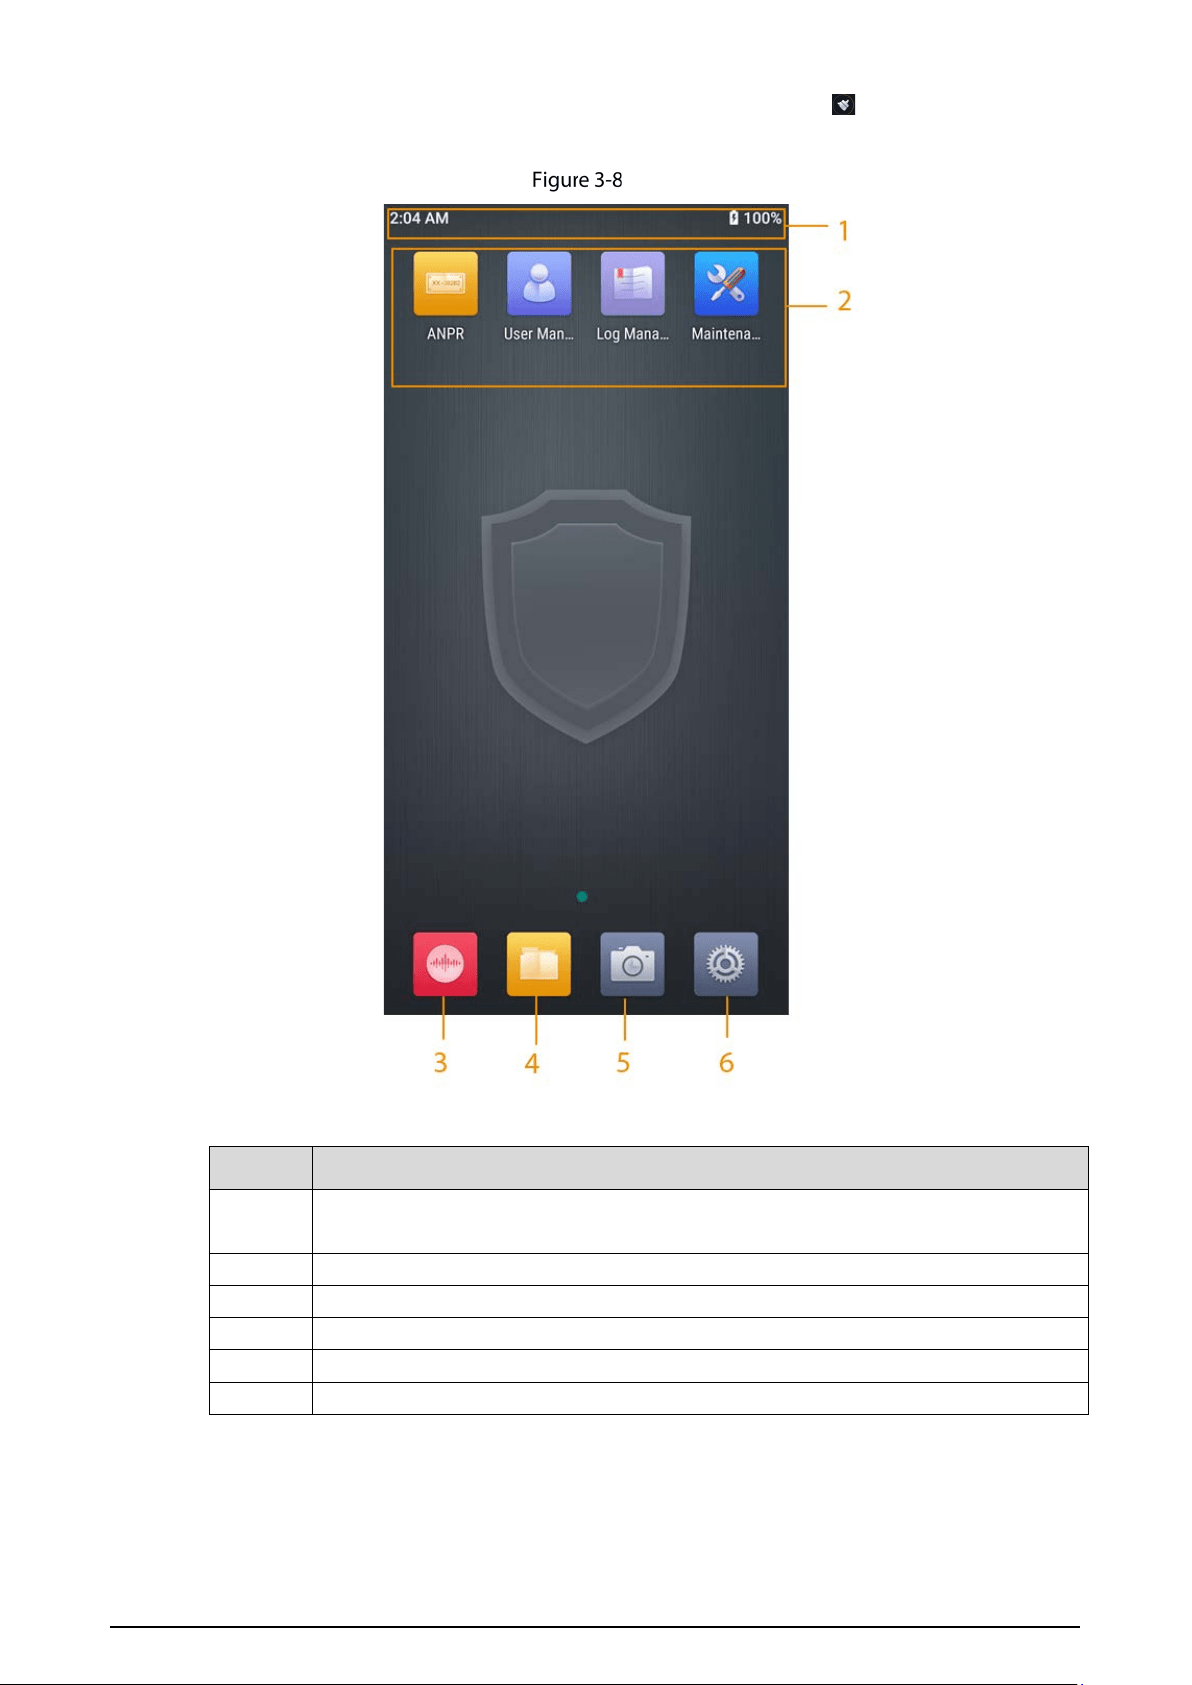
Home Screen
After login, the home screen is displayed.
●
Swipe down at the top of the screen to quickly enable Wi-Fi, Bluetooth, mobile data, and other
functions.
●
Swipe left or right to switch the screen.
●
Tap and hold an icon, and then drag it to the
Remove area to uninstall the application.
●
Tap and hold an icon and then drag it to move the application.
15
●
Tap the menu button to see the tasks running in the background. Tap to close all tasks running
in the background.
Home screen
Table 3-1 Home screen description
No.
Description
1
Notification section. The system information, messages, network connection, platform
connection, and other icons are displayed.
2 Menu section.
3 Audio recording.
4 File management.
5 Camera.
6 Settings.
16
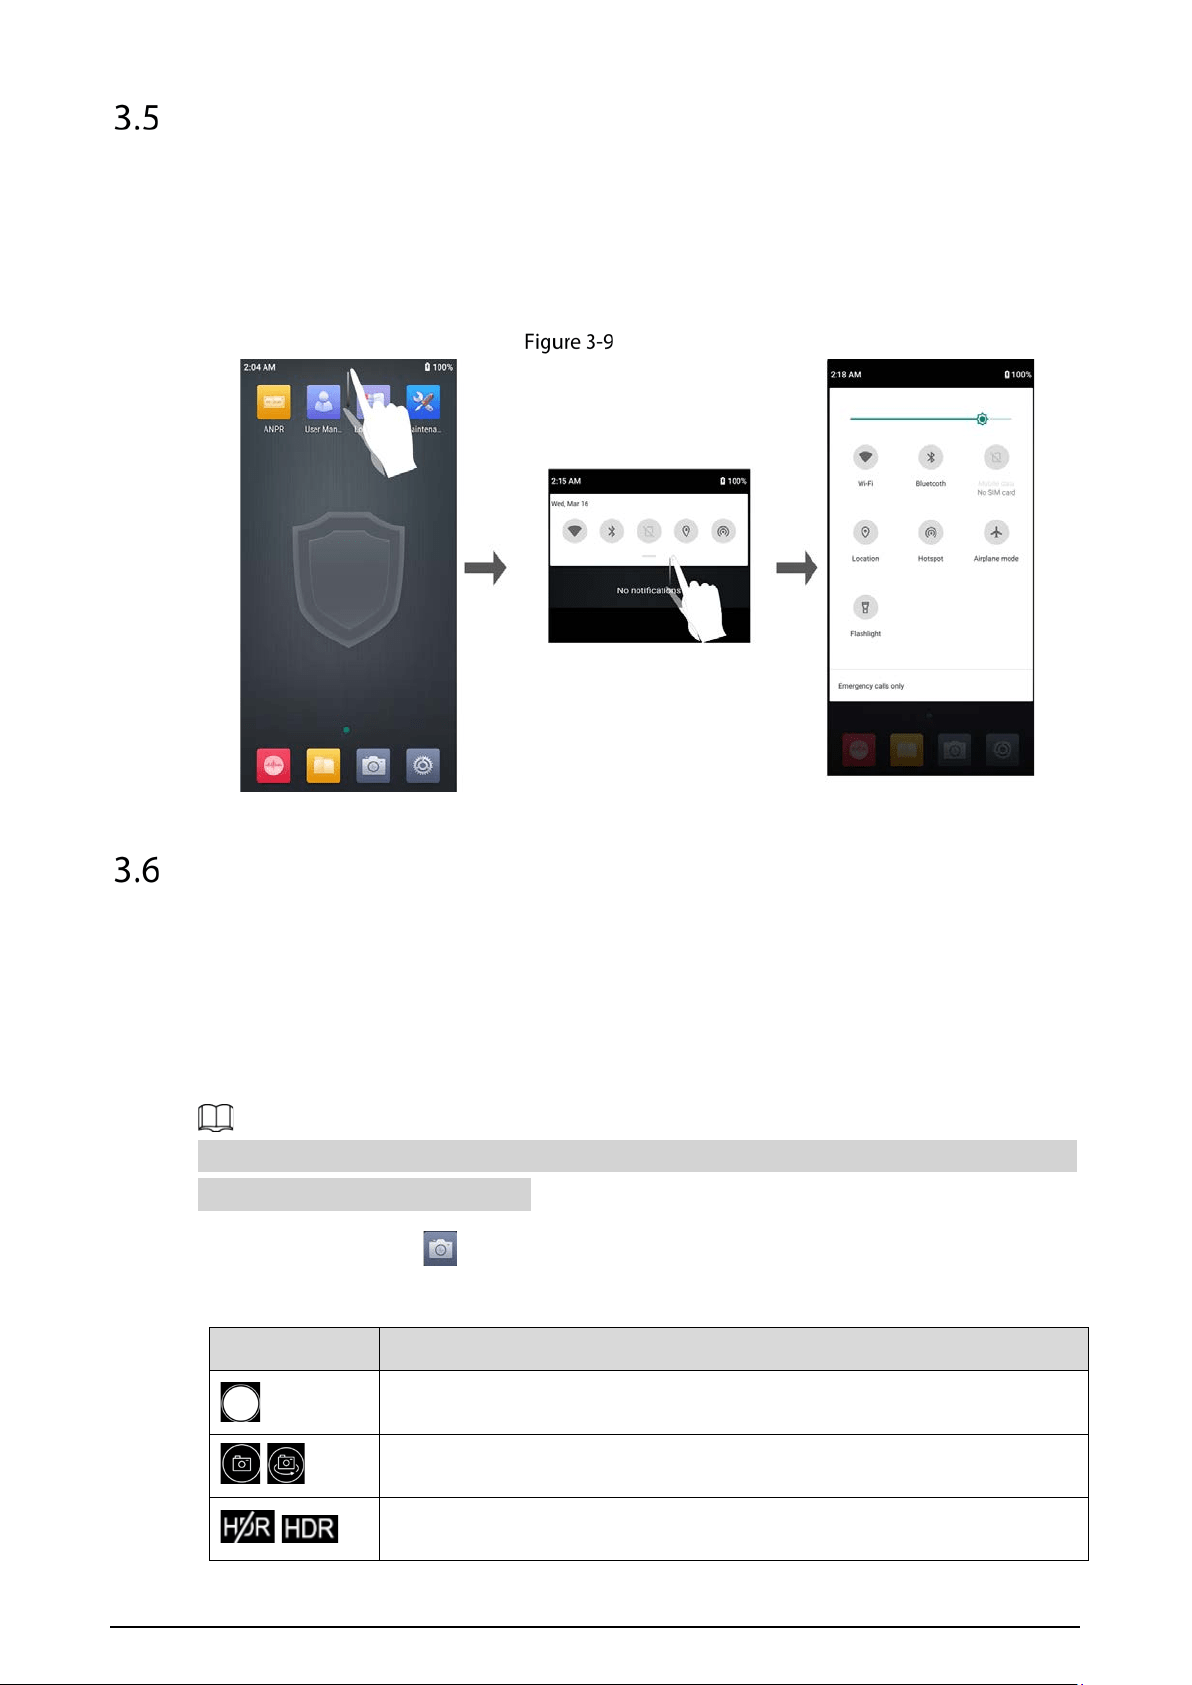
Shortcut Menu
On the shortcut menu, you can quickly enable Wi-Fi, Bluetooth, mobile data, location, hotspot,
airplane mode and flashlight. You can also adjust the screen brightness.
After login, swipe down at the top of the home screen. The shortcut menu bar is displayed. Swipe
down again to show the complete shortcut menu.
Shortcut menu
Camera
3.6.1 Taking Pictures
You can use the front or rear camera to take pictures. You can adjust capturing modes and parameters
to improve the picture quality.
The rear camera supports High-Dynamic Range (HDR), which helps to provide more dynamic range
and details in backlight environments.
On the home screen, tap .
Table 3-2 Picture taking icon description
Icon
Description
Take pictures.
/
Switch between the front camera and rear camera.
/
Enable or disable HDR.
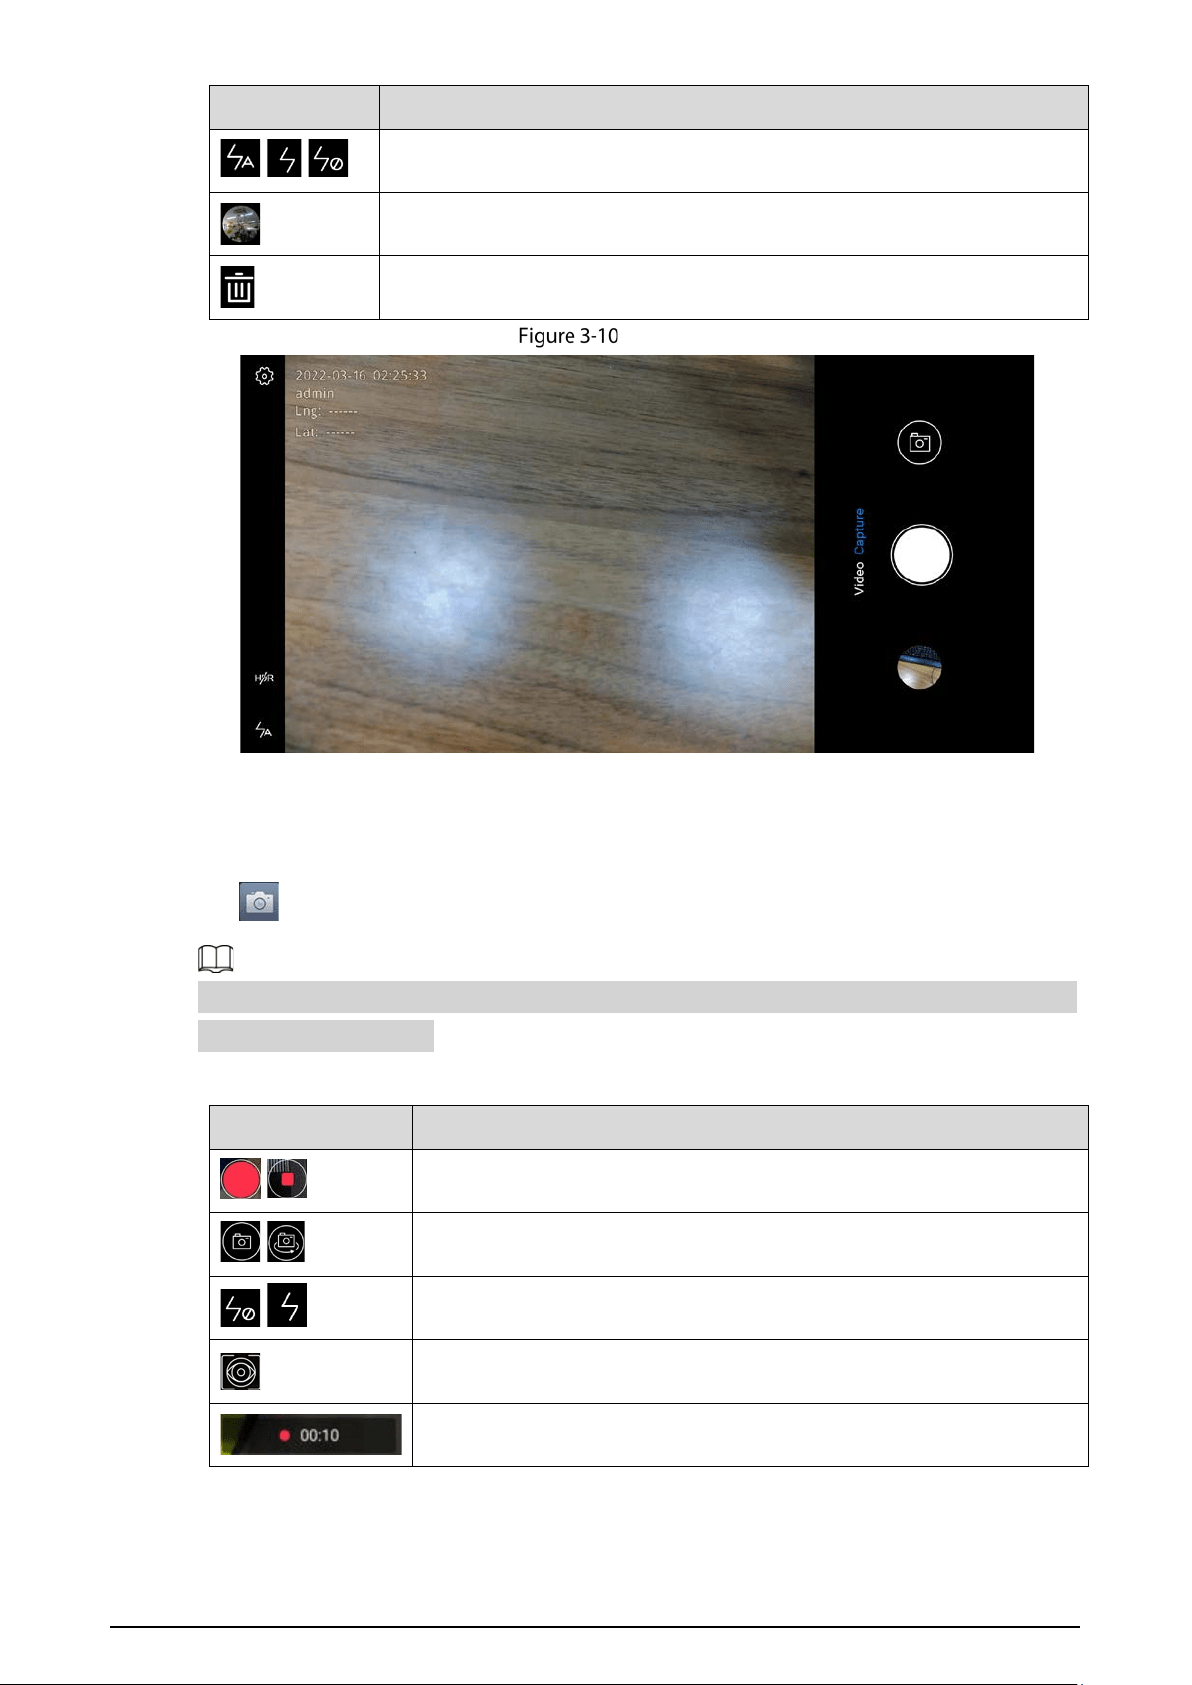
17
Icon
Description
/ /
Switch flashing light mode among
Automatic
,
Enable
, and
Disable
.
View the taken picture.
Delete the picture.
Taking pictures
3.6.2 Recording Videos
Tap on the home screen. Tap Video to switch to video recording mode.
Before connecting the Terminal to the data collection station, stop recording audio and video to avoid
incomplete file acquisition.
Table 3-3 Video recording icon description
Icon
Description
/
Start or stop video recording.
/
Switch between the front camera and rear camera.
/
Enable or disable flashing light.
Take a snapshot.
Displays the duration of the current video recording.
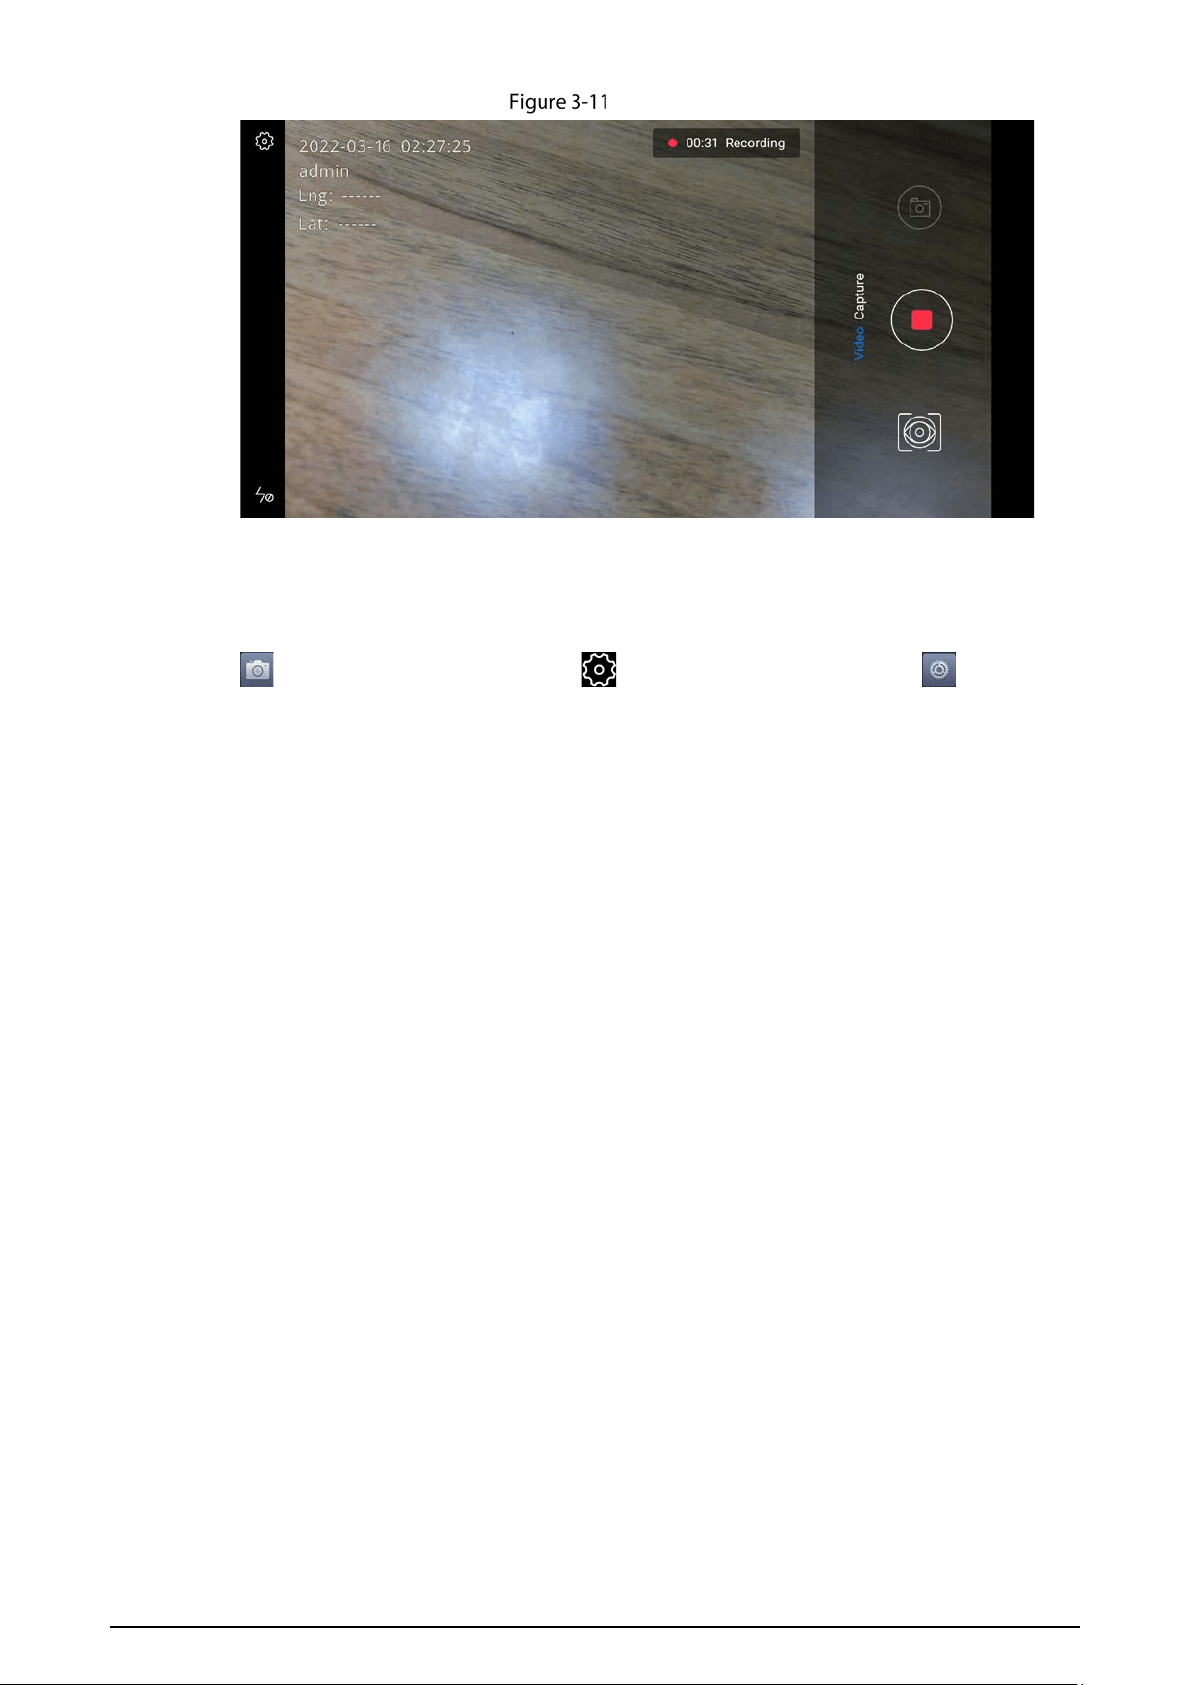
18
Recording videos
3.6.3 Camera Settings
Tap on the home screen and then tap on the upper-right corner , or tap on the home
screen and then select
Device > Camera Settings to configure the camera parameters. For details, see
"3.7.2.2 Camera Settings".
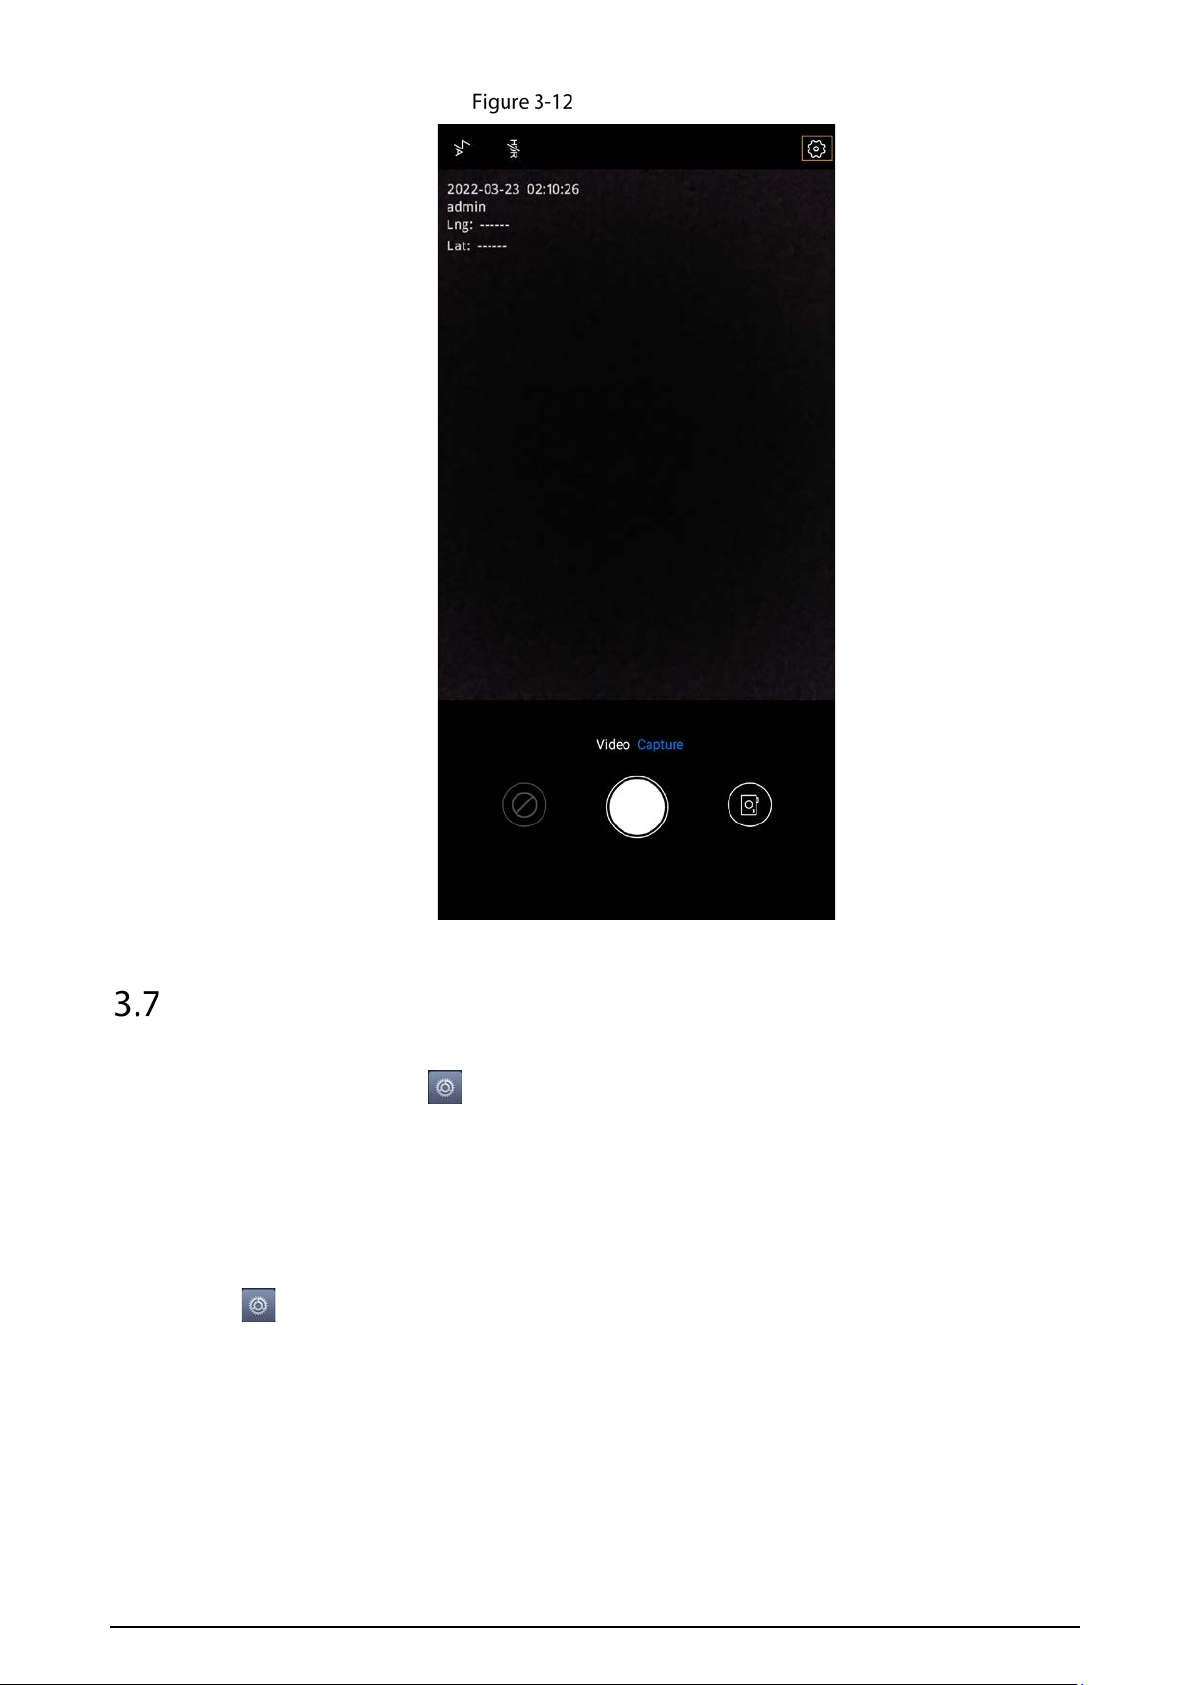
19
Camera settings
Settings
On the home screen, tap , and then you can set the network, audio recording, camera, volume,
and other parameters. You can also view system information.
3.7.1 Network
Tap on the home screen. On the Network tab, you can set WLAN, Bluetooth, mobile data,
location service, network allowlist, platform protocol, and more.
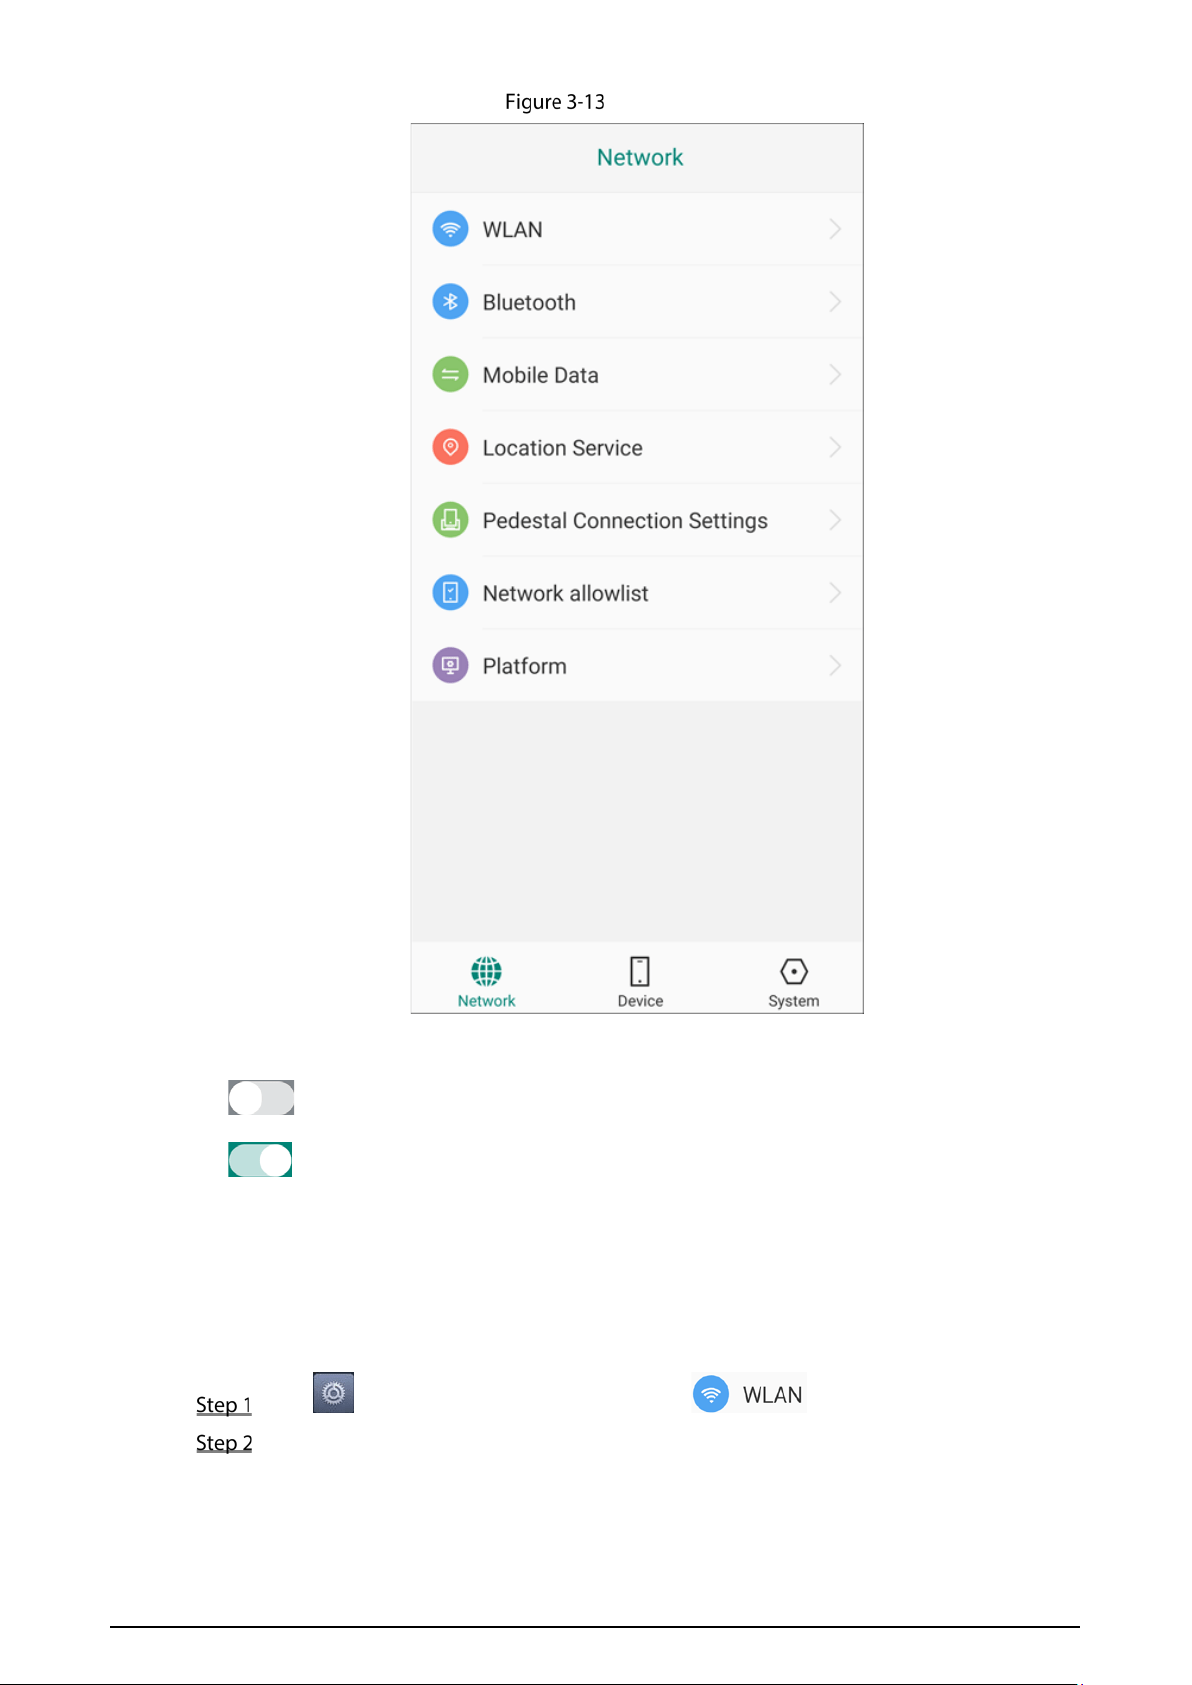
20
Network
Tap each icon to configure the corresponding network parameters.
●
indicates that the function is disabled.
●
indicates that the function is enabled.
3.7.1.2 WLAN
After enabling WLAN, you can search for and add wireless network, and view or modify network
information.
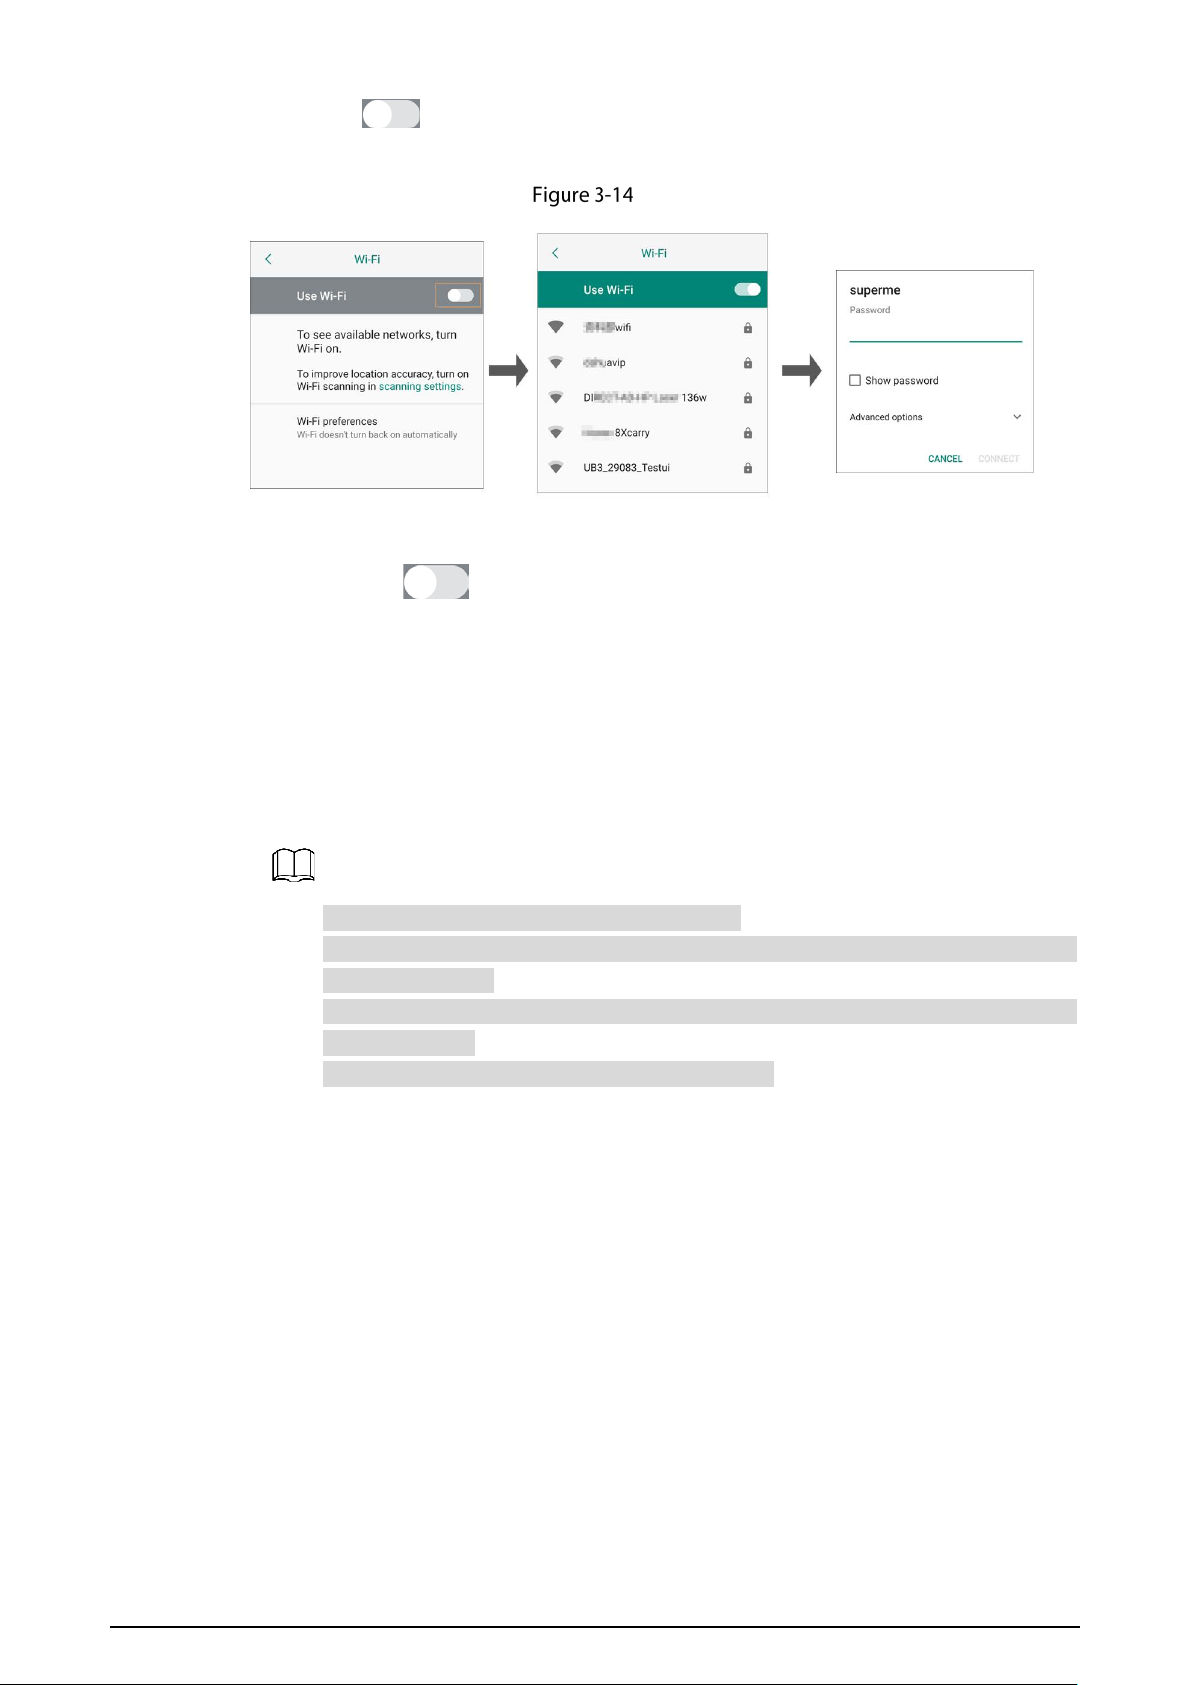
Tap on the home screen, and then select .
Connect WLAN network.
Auto search
21
Tap , and the system automatically searches for the nearby wireless network.
Select the network as needed, enter the password, and then tap
CONNECT.
Auto search
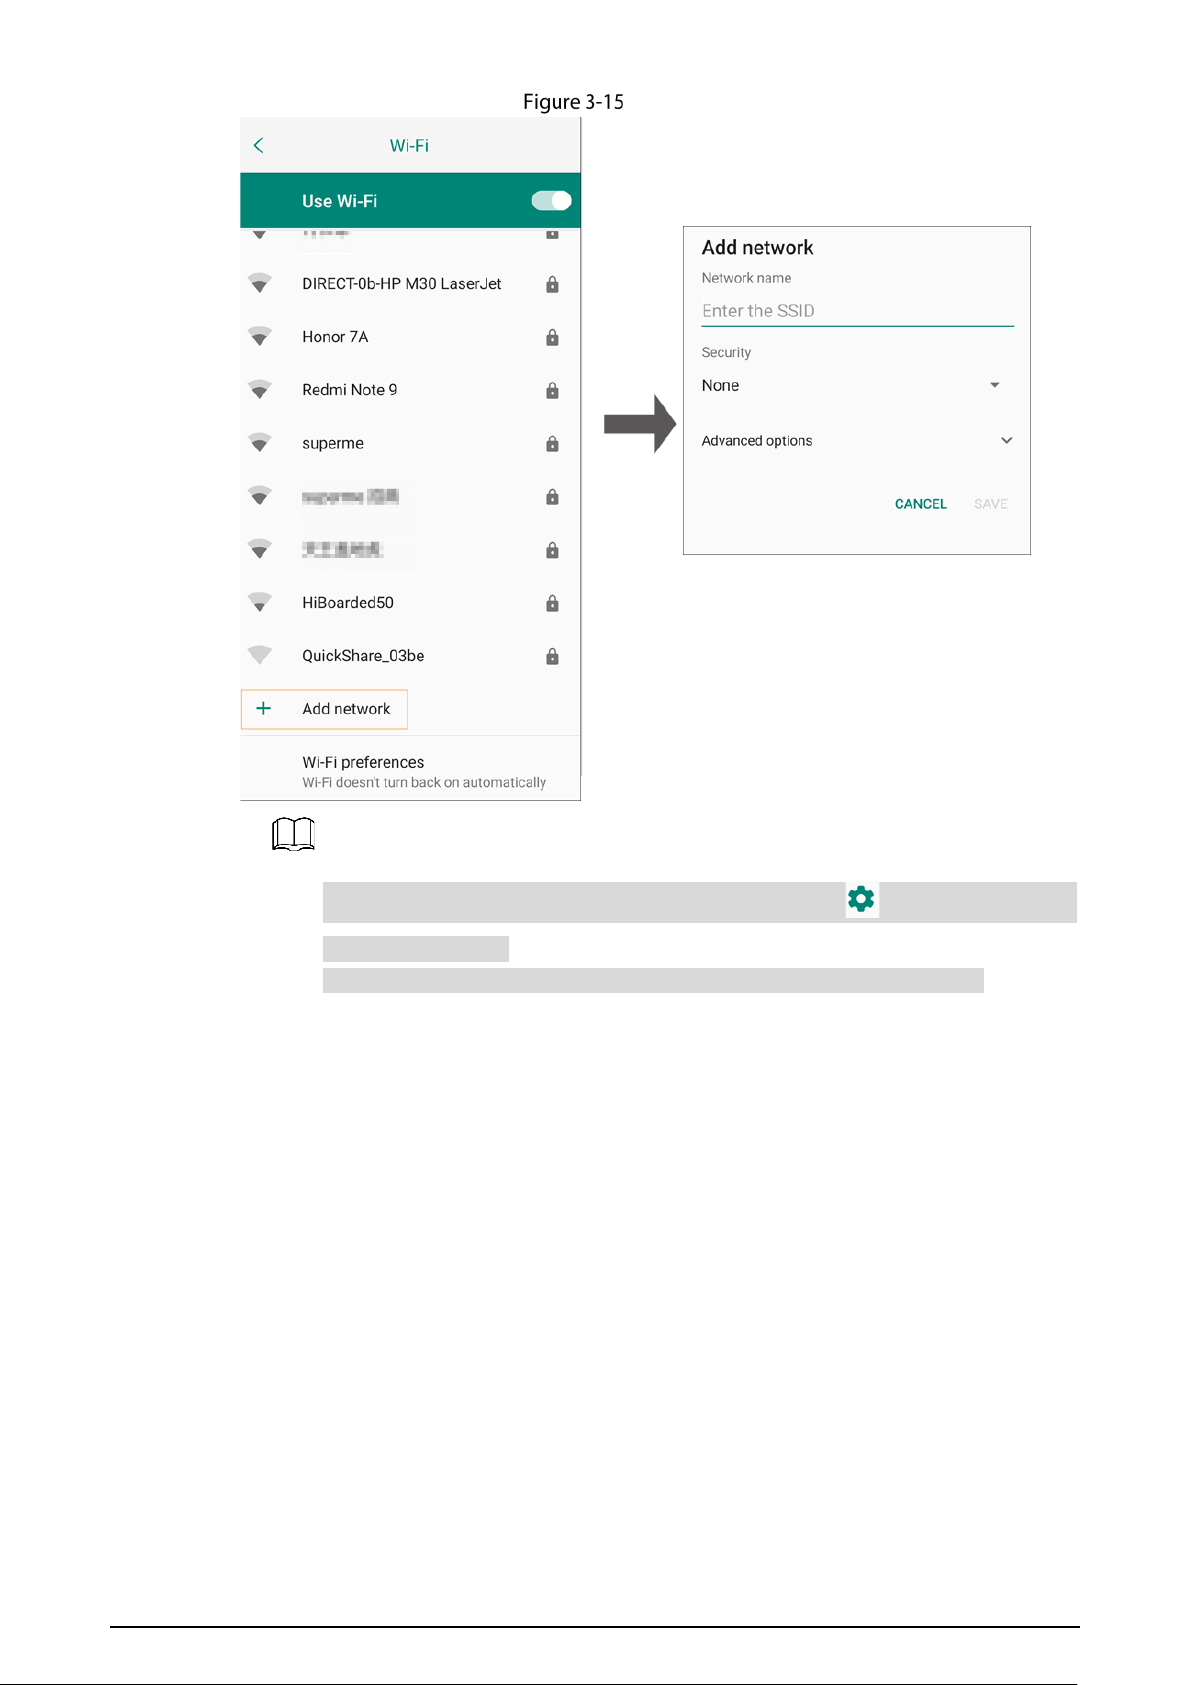
Add manually
1. Tap to enable the WLAN function.
2. Tap
Add network, and then enter the SSID (wireless network name).
3. Select the security of the connected network.
If selecting None, you do not need to enter a password when logging in to the
network.
If selecting other options, you need to enter a password or certificate.
4. (Optional) Enter the password.
5. Tap
SAVE.
Select Show password to display the password.
Tap Advanced options to set proxy, data metering method, IP address of the wireless
network, and more.
Tap Advanced options, and then select Yes for Hidden network to connect to hidden
wireless network.
Tap CANCEL if you do not want to add the network.
22
Add manually
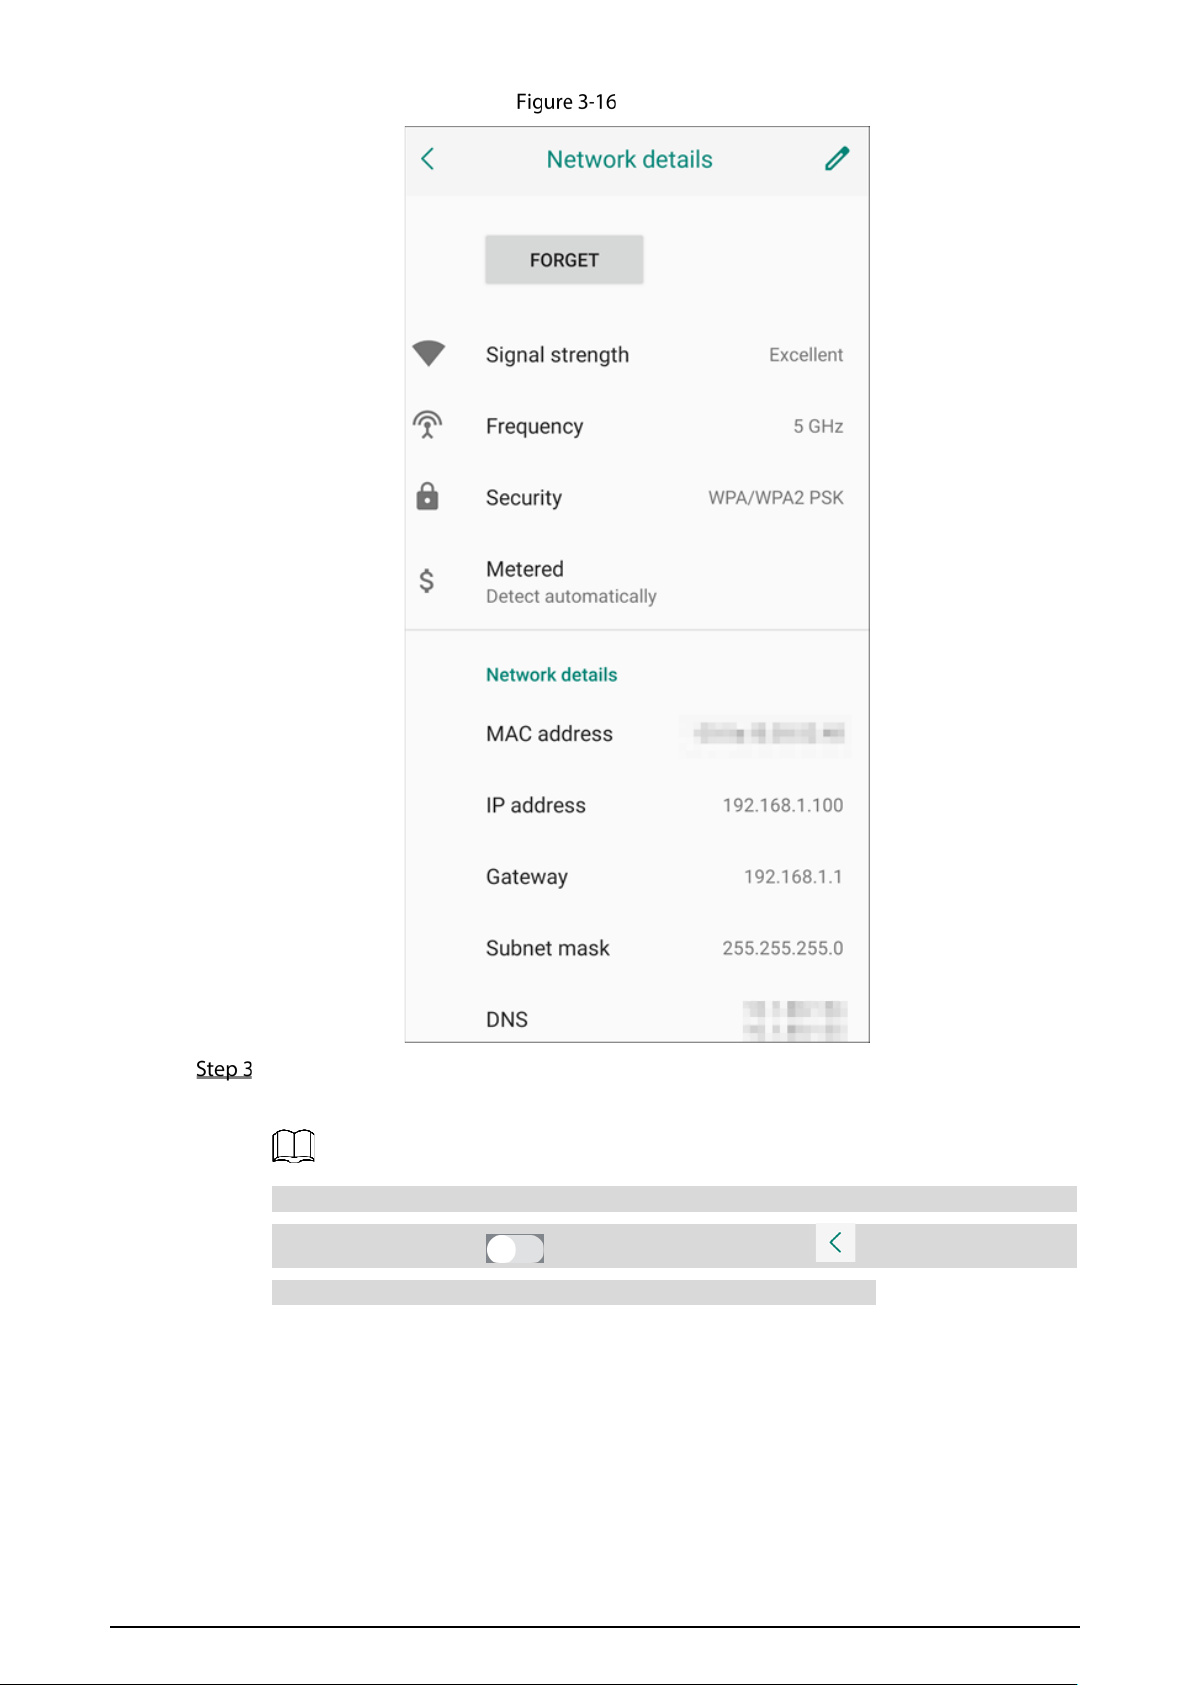
After connecting the wireless network successfully, tap to view and modify
network information.
Tap Saved networks to forget the network or add other networks manually.
23
Network details
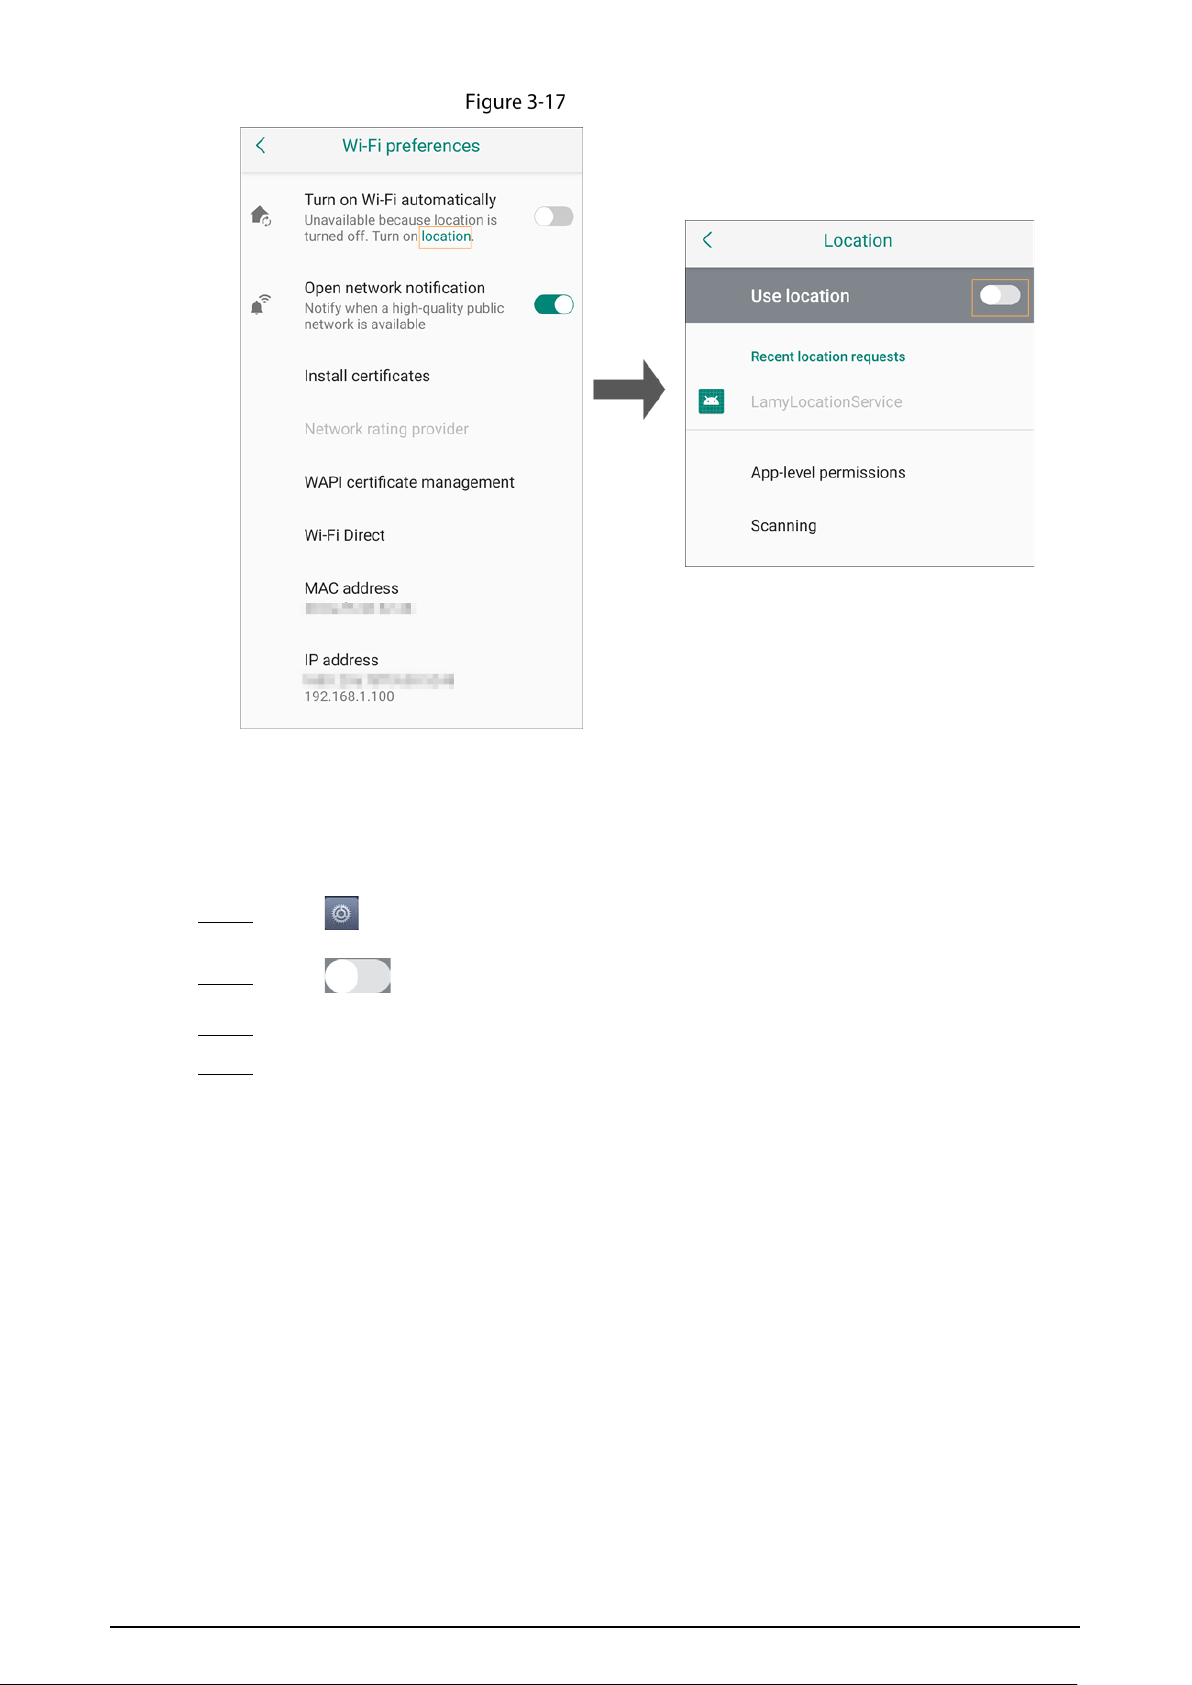
(Optional) Select Wi-Fi preferences to enable or disable Turn on Wi-Fi automatically and
Open network notification, and view the MAC address and IP address of the Terminal.
If you cannot enable Turn on Wi-Fi automatically, check whether location is turned on. Tap
location, and then tap to enable Use location. Tap to go back to the Wi-Fi
preferences interface, and then enable Turn on Wi-Fi automatically.
24
Turn on Wi-Fi automatically
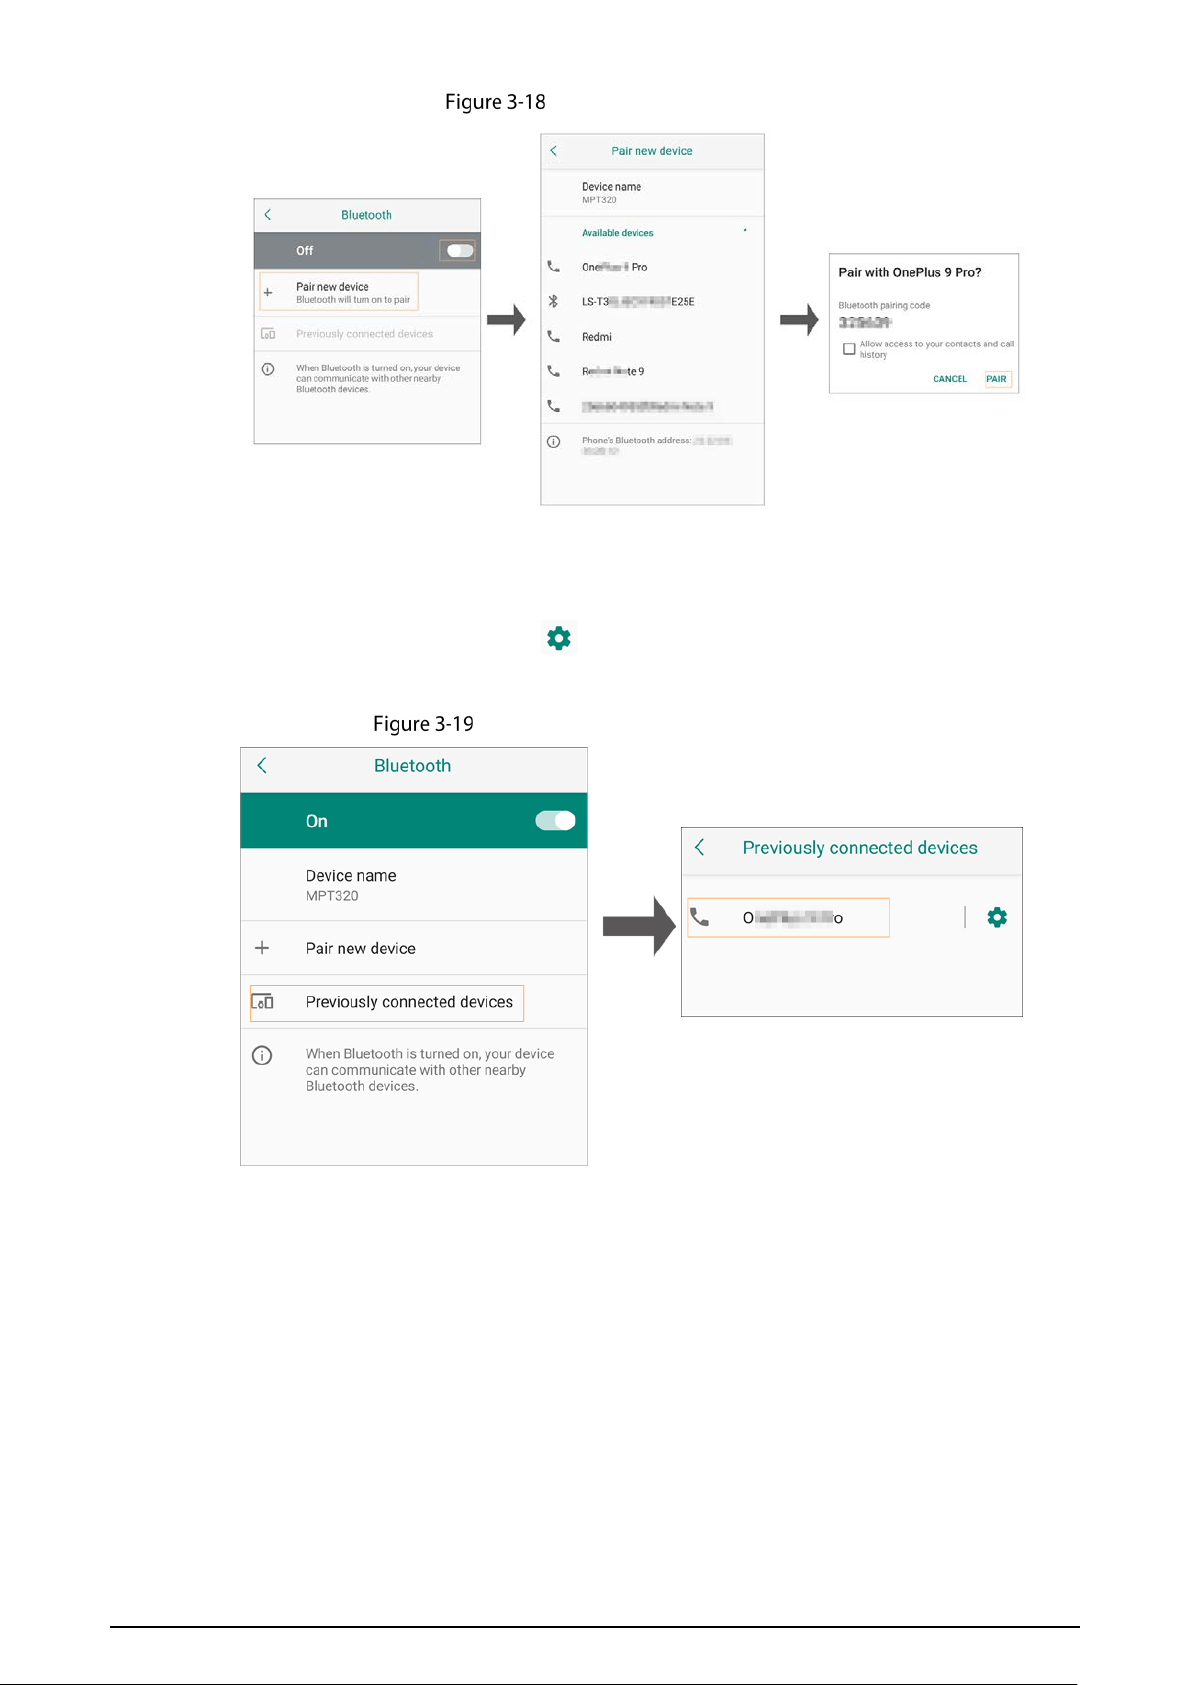
3.7.1.3 Bluetooth
The Terminal can receive files from other devices through Bluetooth.
Step 1 Tap on the home screen, and then select
Network > Bluetooth.
Step 2 Tap to enable the function.
Step 3 (Optional) Tap Device name to rename the Terminal.
Step 4 Pair with other devices through Bluetooth.
●
Pair with new devices.
Tap
Pair new device, and then the system automatically searches for nearby Bluetooth
devices. Select a device, and then tap
PAIR.
25
Pair with a new device
●
Pair with previously connected devices.
Tap
Previously connected devices, select a device, and then the system connects to the
device automatically. Tap to view device details, enable or disable
Contact sharing,
forget the device, and more
Pair with previously connected devices

26
Device details
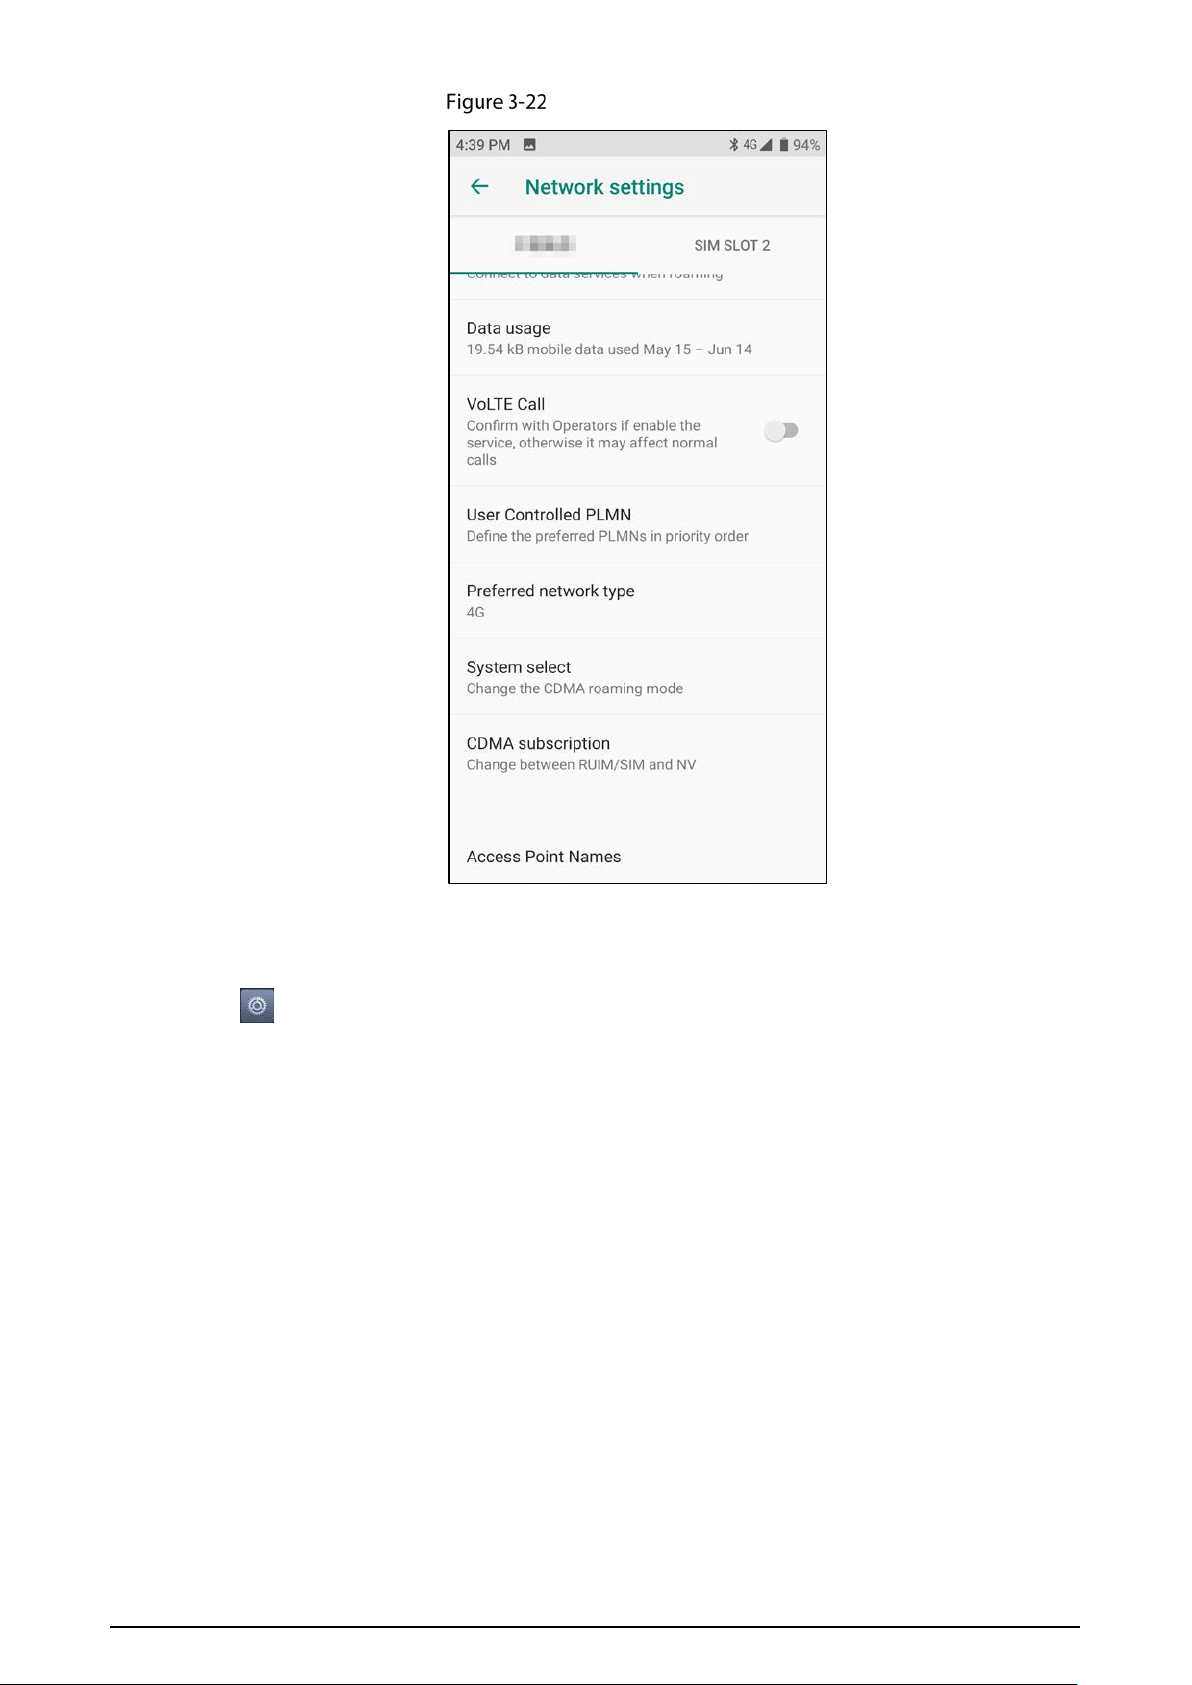
3.7.1.4 Mobile Data
3.7.1.4.1 Mobile Network
Tap on the home screen, select Network > Mobile Data > Mobile network, select a SIM card,
and then you can enable or disable mobile data and roaming. You can also see the data usage.
Tap Advanced on the Network settings screen, and then you can select preferred network type
and access point names.
The parameters might be different depending on the SIM card you insert.
Mobile network
27
Advanced parameters
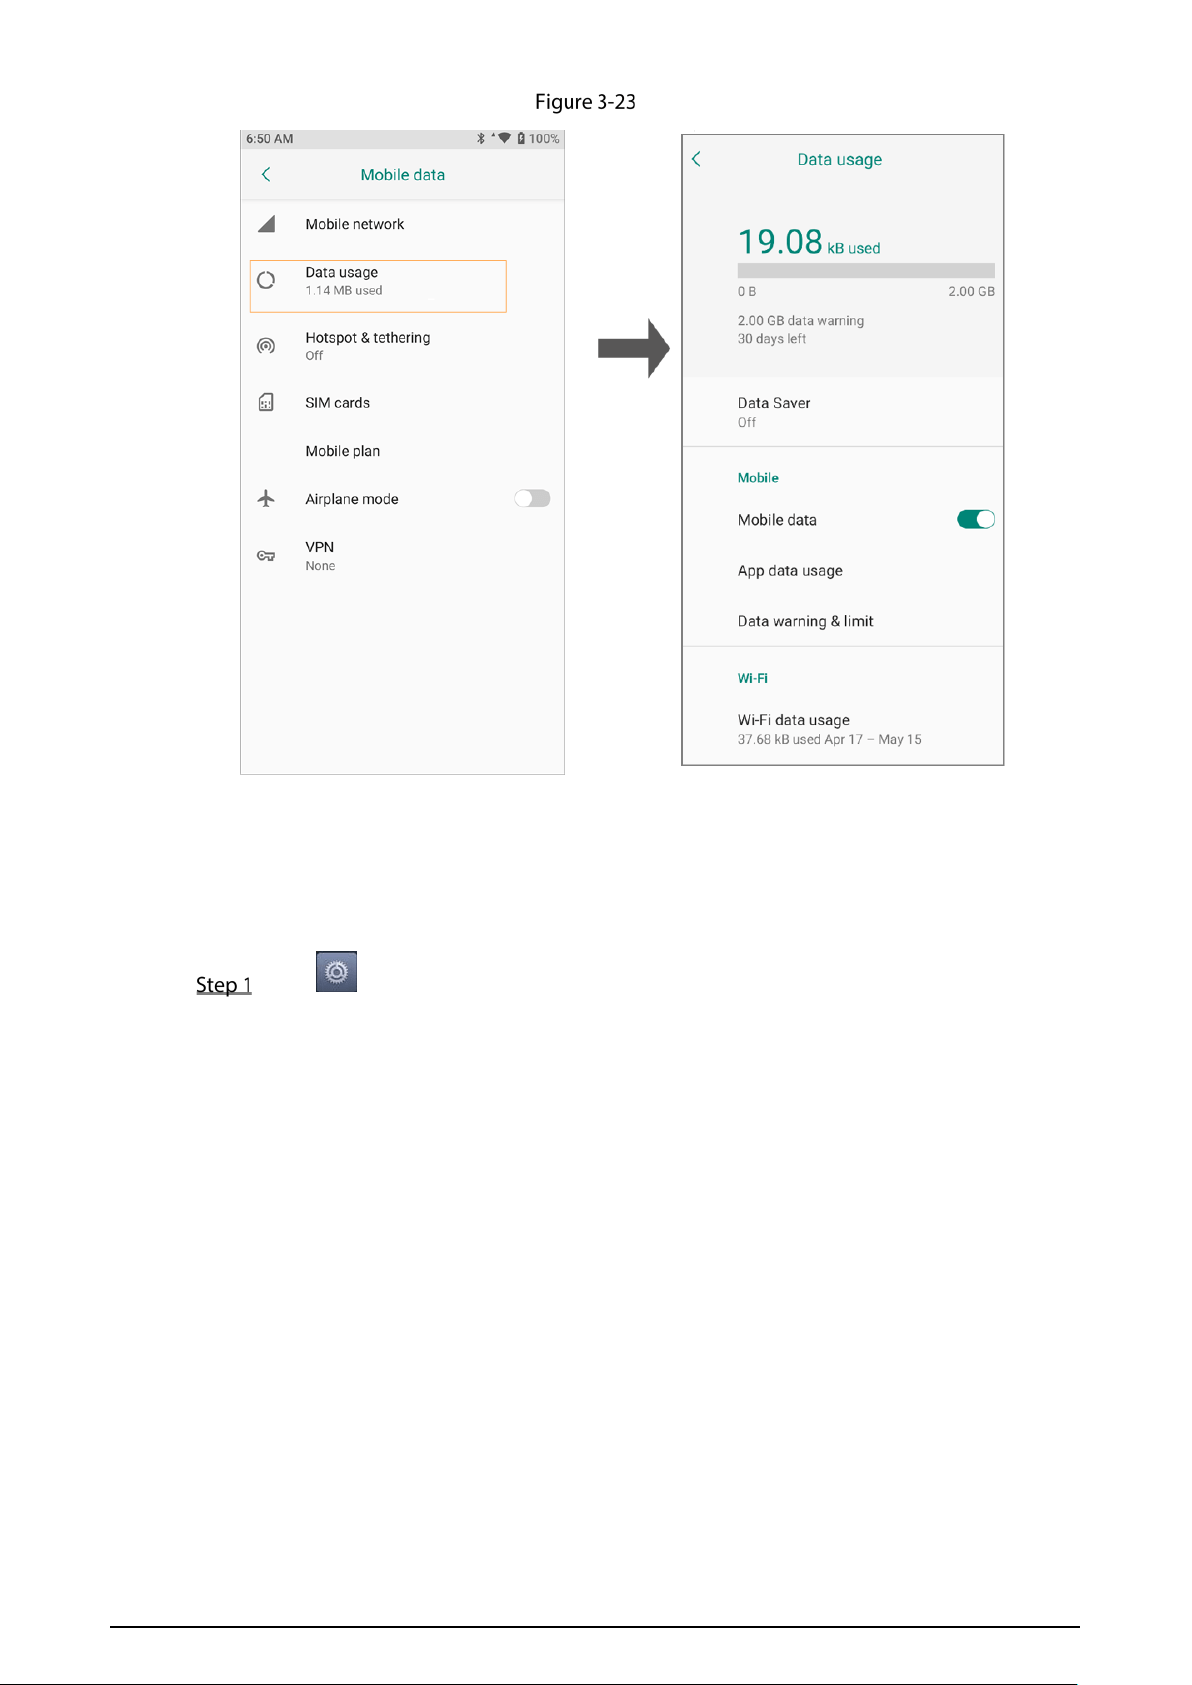
3.7.1.4.2 Data Usage
Tap on the home screen, select Network > Mobile Data > Data usage, and then you can see the
data usage, and set data warning and limit.
28
Data usage
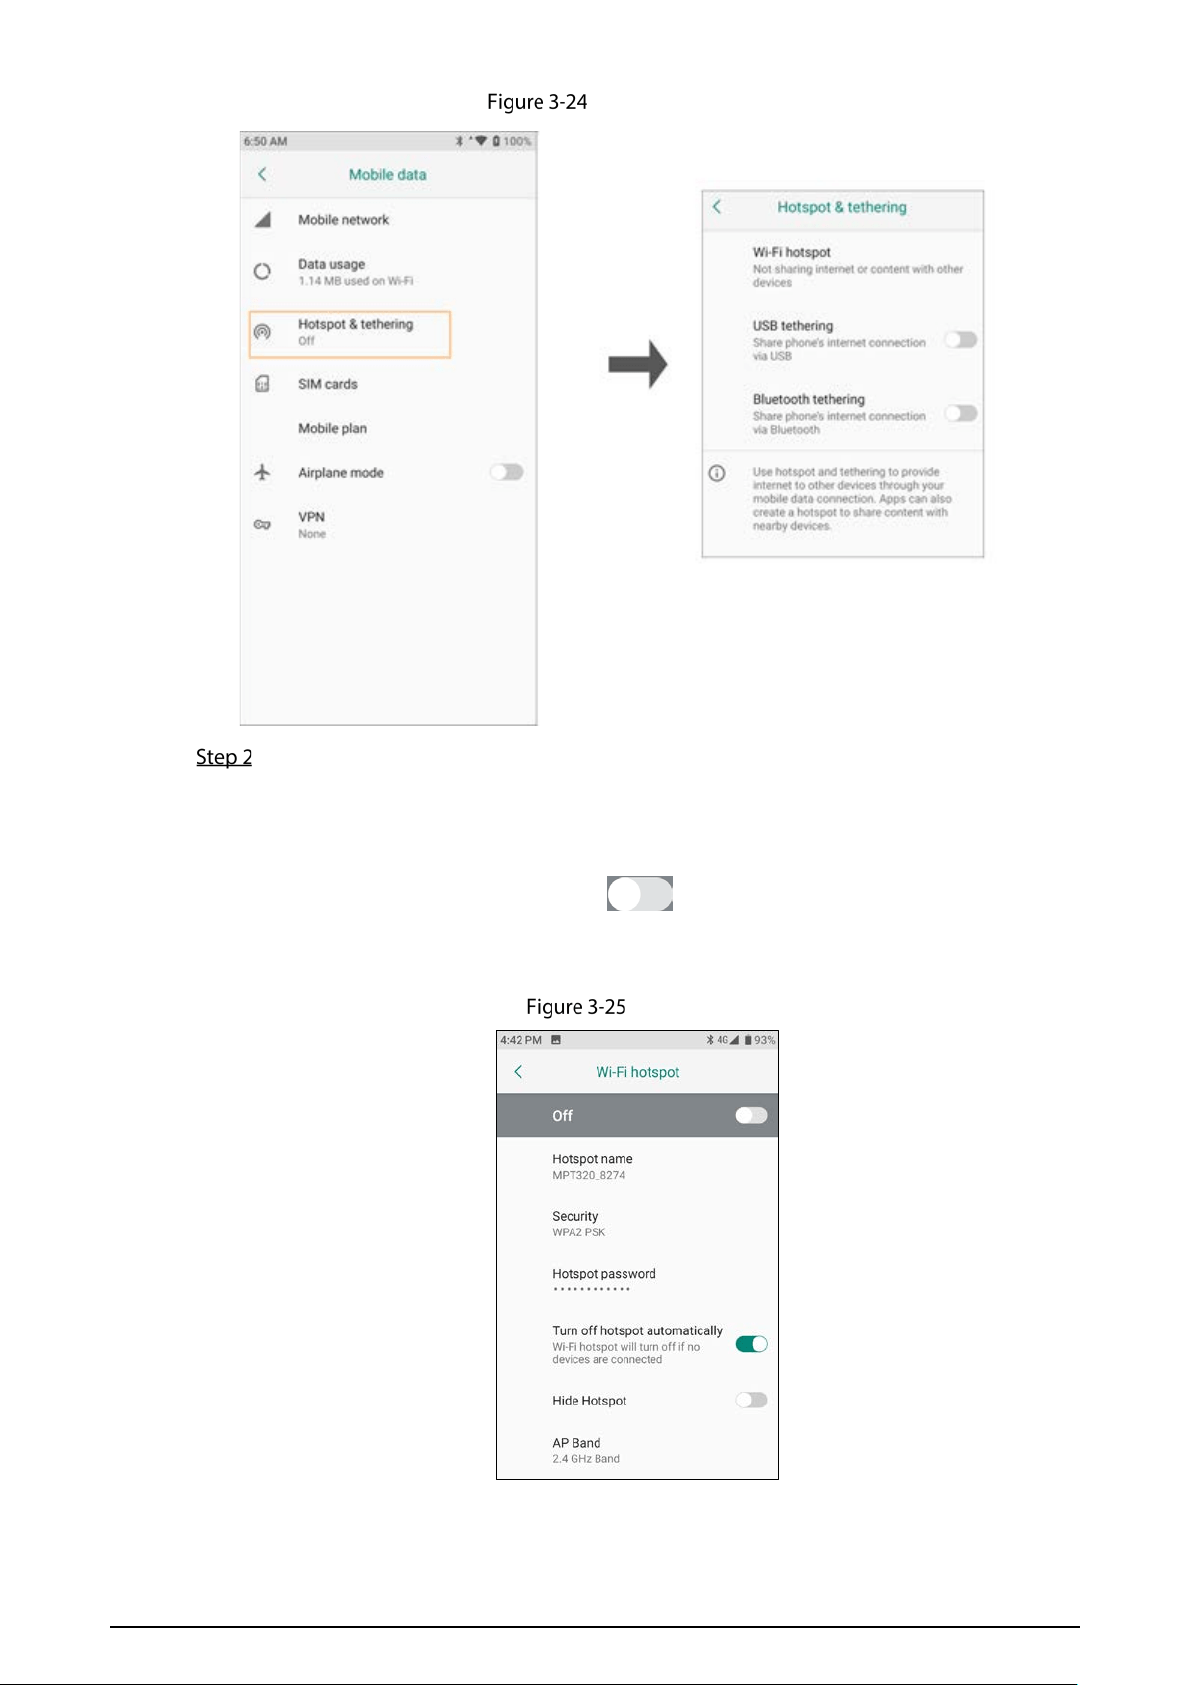
3.7.1.4.3 Hotspot and Tethering
You can connect the Terminal to nearby devices through Wi-Fi hotspot, USB tethering and Bluetooth
tethering, and share data with these devices.
Tap on the home screen, and then select Network > Mobile Data > Hotspot &
tethering
29
Hotspot and tethering
Set network sharing mode.
Wi-Fi hotspot
After Wi-Fi hotspot is enabled, the Terminal can be used as a wireless router. Nearby
devices that support WLAN can access the WLAN of the Terminal.
Tap
Wi-Fi hotspot and then tap to enable the function, set the Hotspot name,
Security and Hotspot password, enable or disable Turn off hotspot automatically and
Hide Hotspot. You can also select the AP Band.
Wi-Fi hotspot
USB tethering.
30
You can enable USB tethering after connecting a USB cable to the Terminal to share
network.
Bluetooth tethering
After
Bluetooth tethering is enabled, the Terminal can connect to nearby Bluetooth
devices to realize network connection and data sharing.
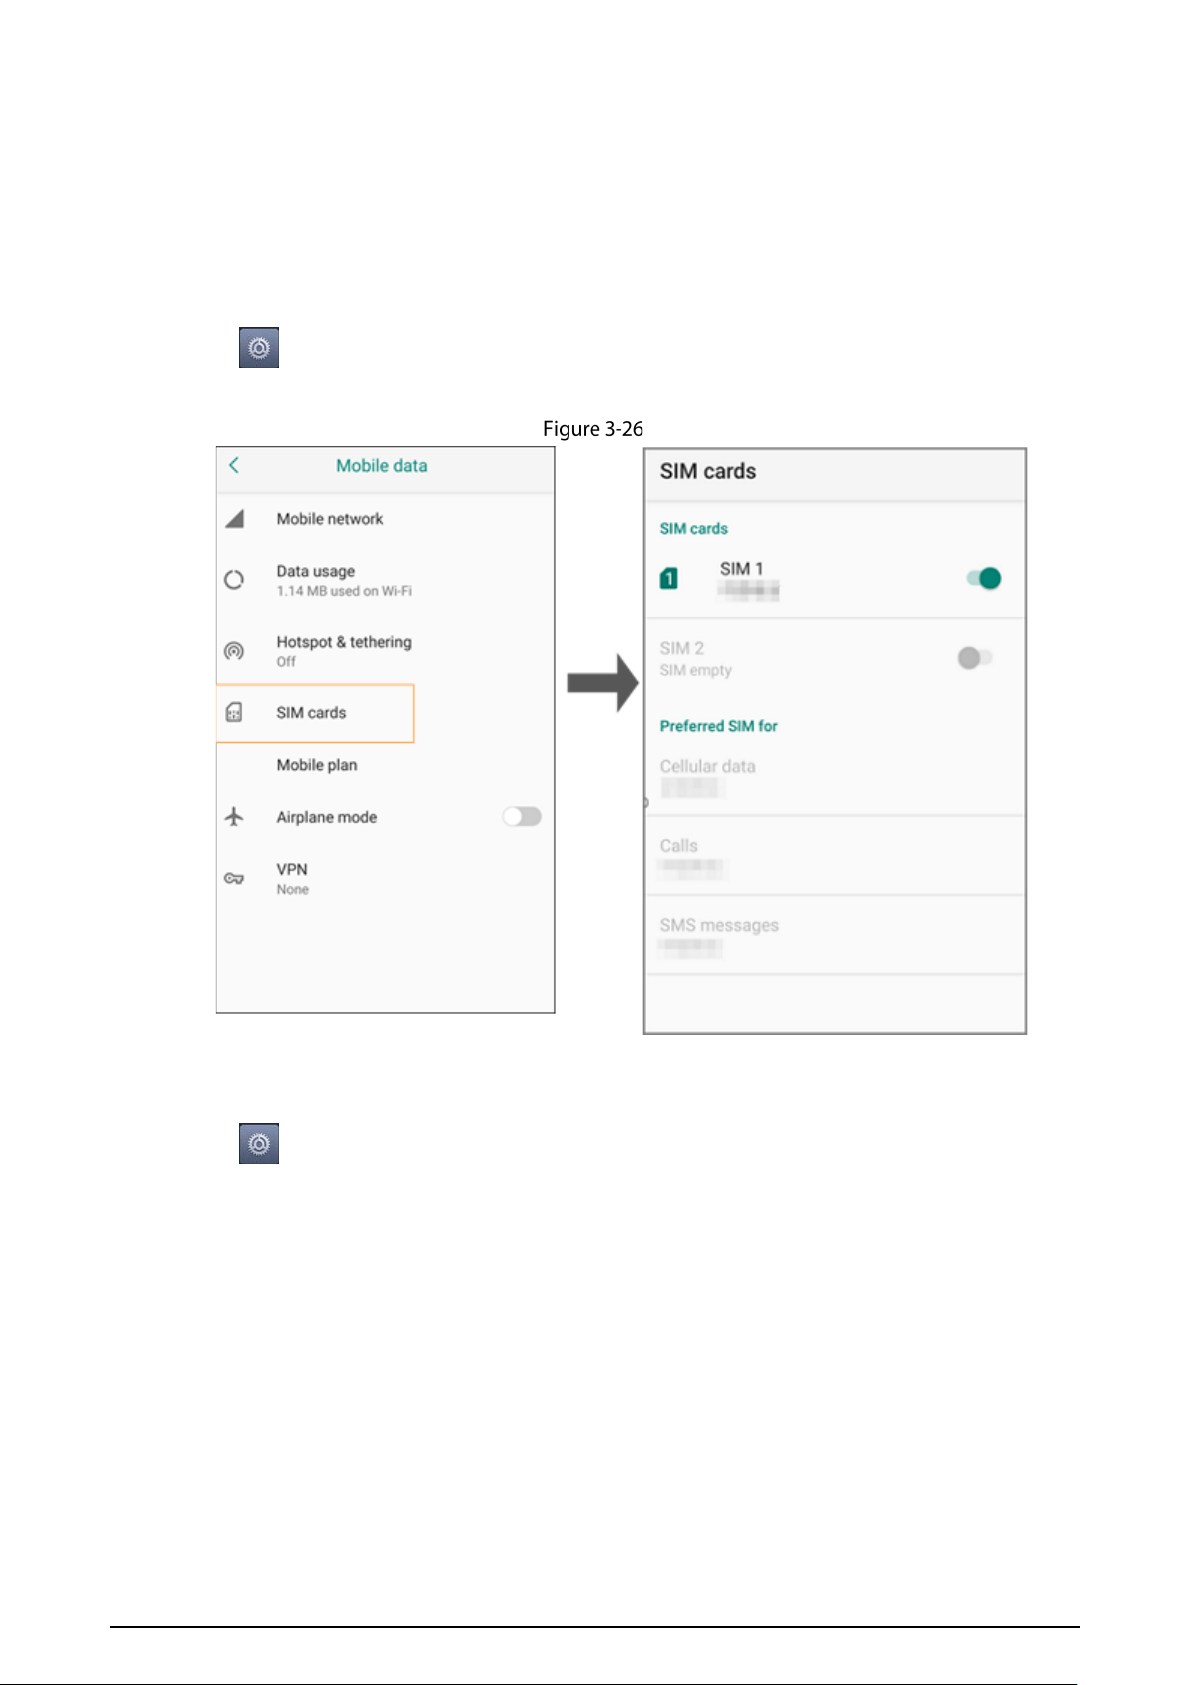
3.7.1.4.4 SIM Cards
Tap on the home screen, select Network > Mobile Data > SIM cards, enable the SIM card to be
used, and then set the preferred SIM card for mobile data.
SIM cards
3.7.1.4.5 Airplane Mode
Tap on the home screen, select Network > Mobile Data > Airplane mode to enable or disable
the airplane mode. You can also swipe down at the top of the screen, and then enable or disable the
mode on the shortcut menu.

31
Airplane mode
3.7.1.4.6 VPN
Tap on the home screen, select Network > Mobile Data > VPN, and then add VPN network, or
see the added network. Tap , and then set relevant information such as the VPN username,
password, and server address.
Add VPN
32
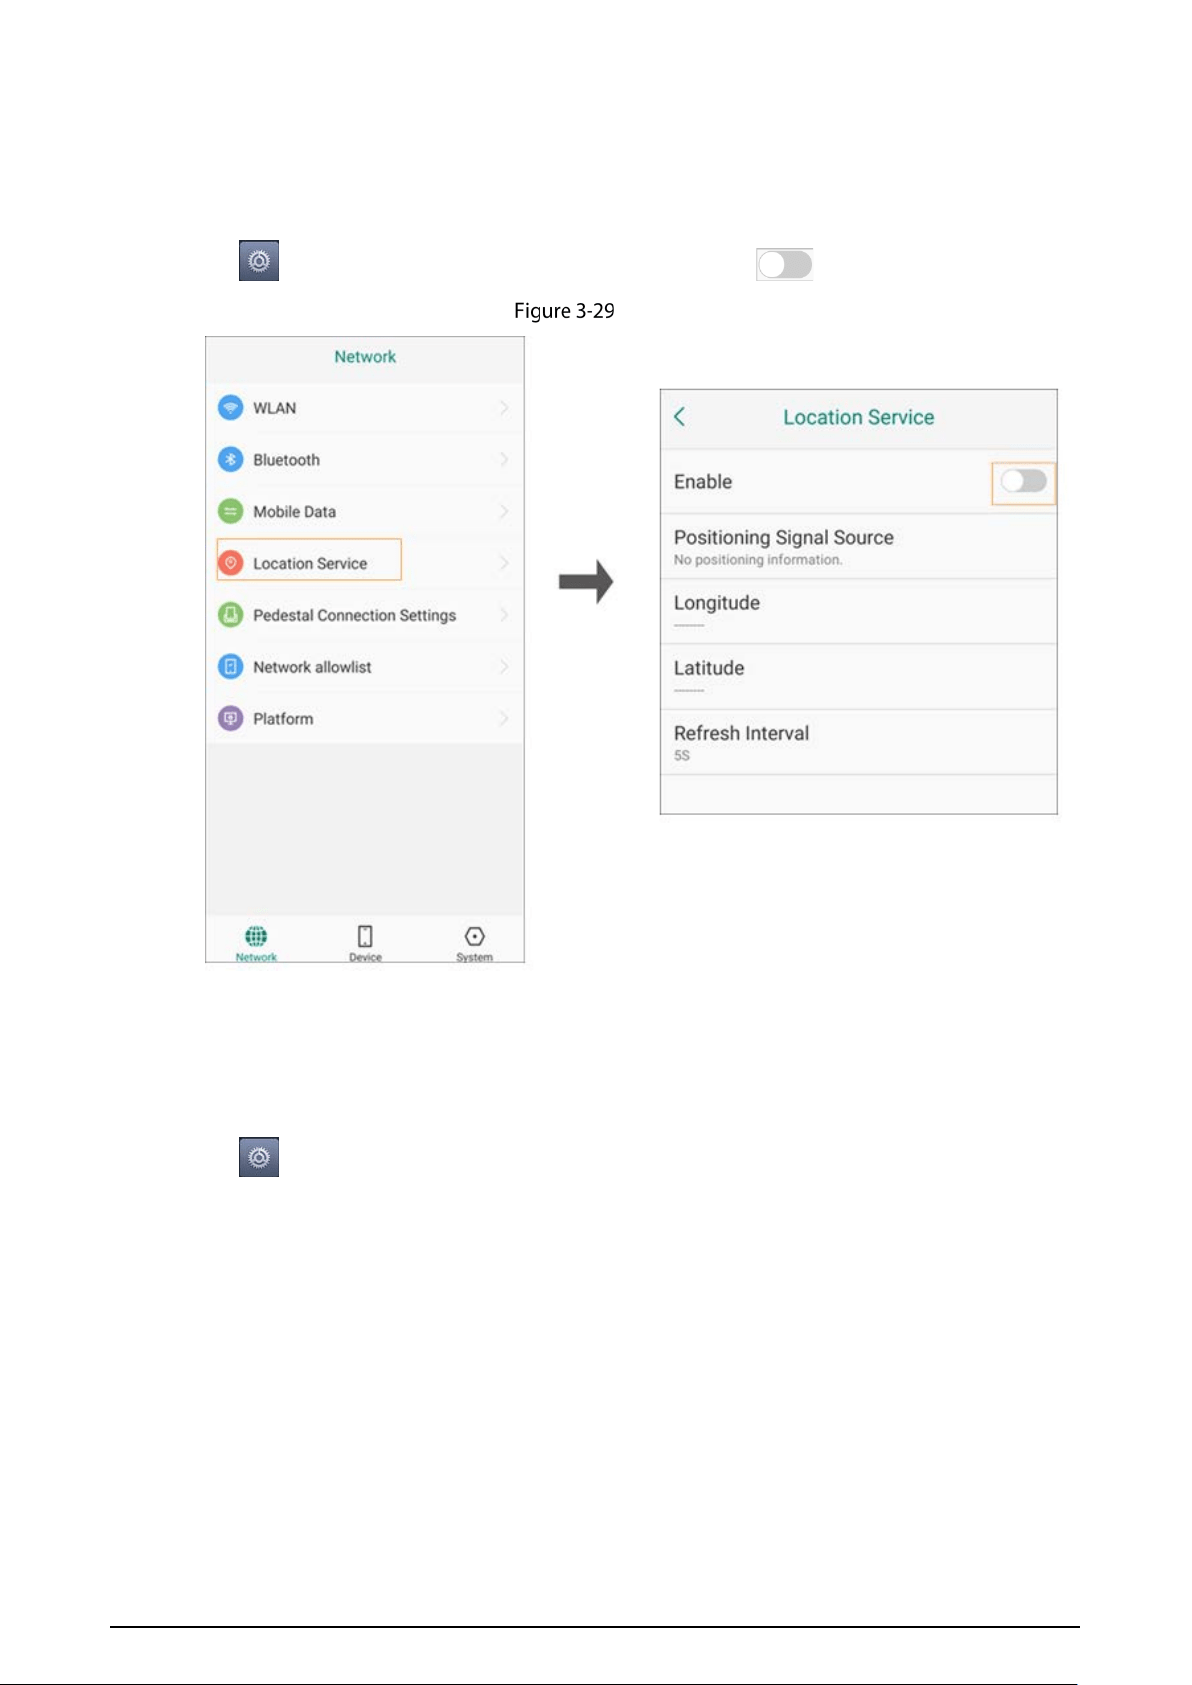
3.7.1.5 Location Service
After enabling the location service, you can locate the Terminal with GPS satellites. If the Terminal
connects to the platform, the location can be reported.
Tap on the home screen, select
Positioning, and then tap to enable the location service.
Location service
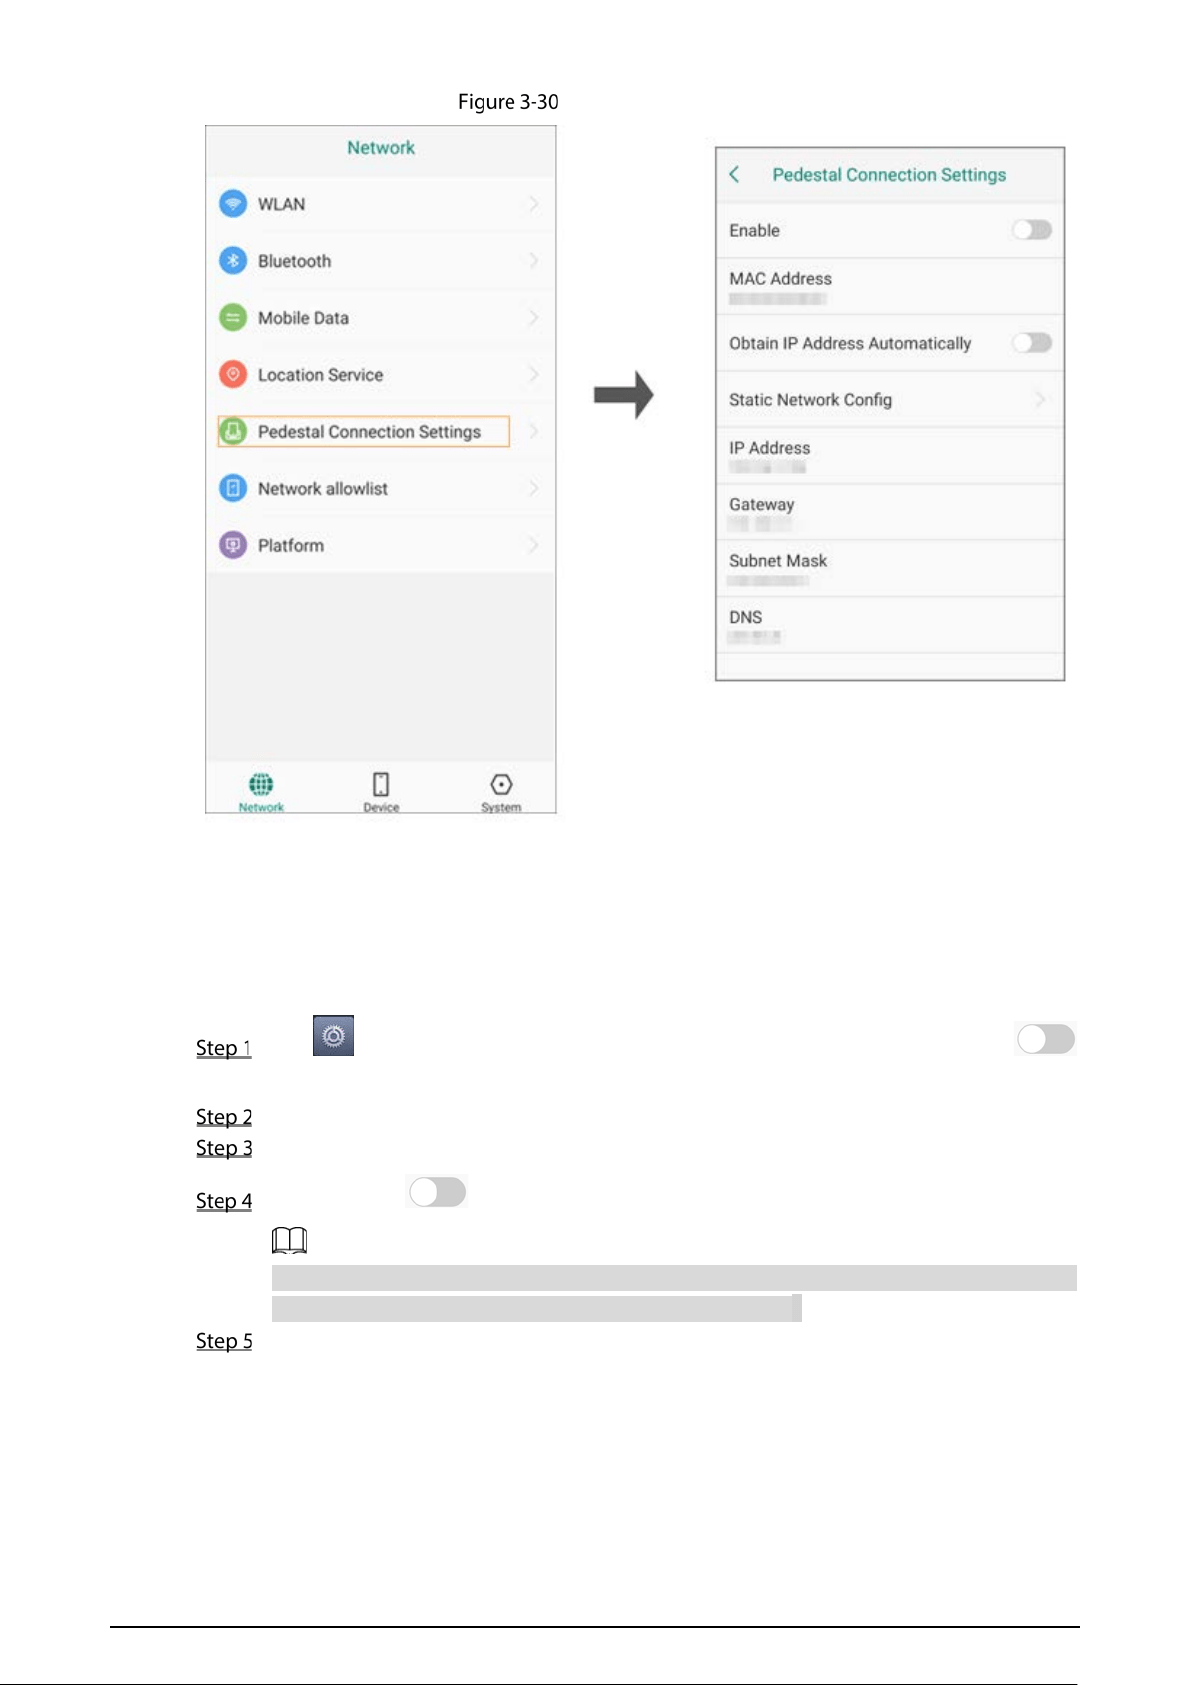
3.7.1.6 Pedestal Connection Settings
You can connect the Terminal to the charging and transmission base to transfer data and charge it.
Tap on the home screen, select
Network > Pedestal Connection Settings, tap Enable, and
then set the IP address which can be obtained automatically or entered manually.
33
Pedestal connection settings
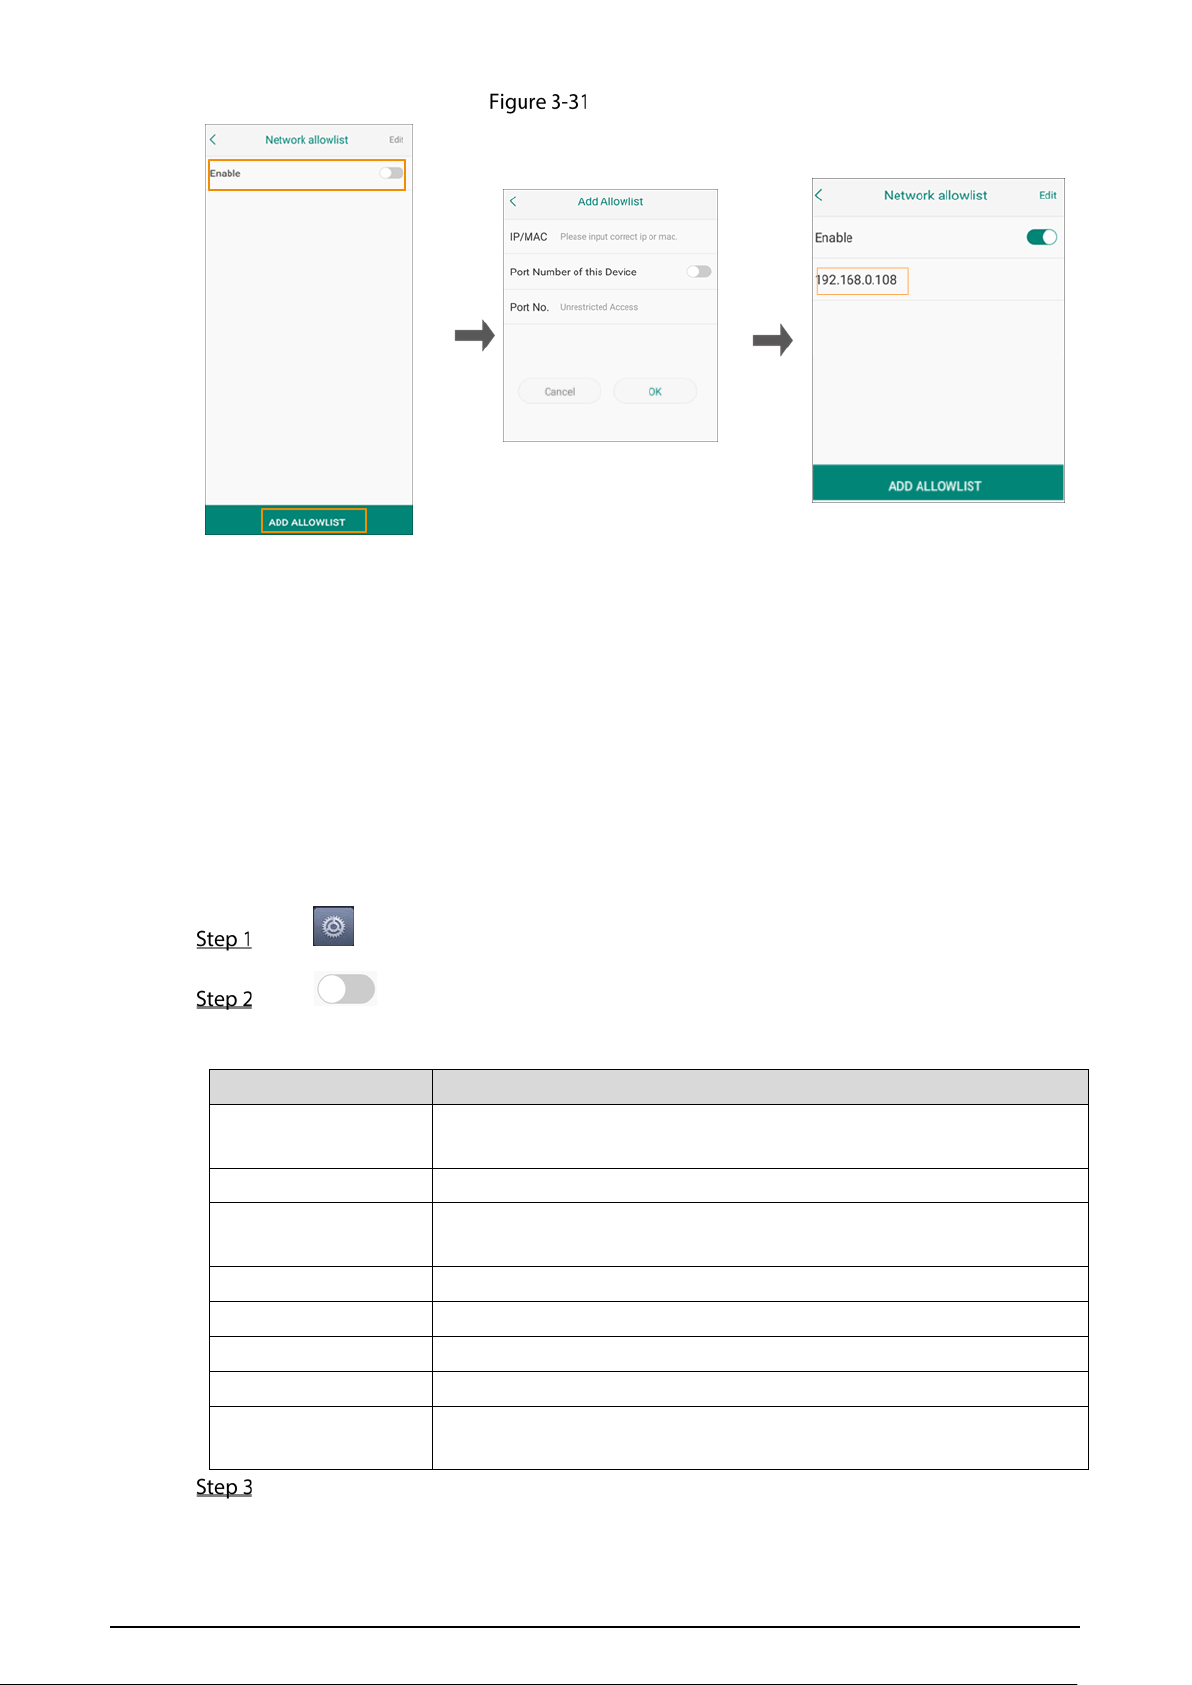
3.7.1.7 Network Allowlist
To ensure network security and protect the device data, you can set the IP/MAC address that can access
the Terminal by adding allowlist.
Tap on the home screen, select Network > Network allowlist, and then tap
to enable network allowlist.
Tap ADD ALLOWLIST.
Enter the IP or MAC address of the device that needs to access the Terminal.
(Optional) Tap next to Port Number of this Device, and then enter the port number.
Only devices whose IP or MAC addresses are on the allowlist can access the Terminal. If you
set the port number, only the defined port can be accessed.
Tap OK.
The system goes back to the Network Allowlist screen. The information of the device added
in the trusted list is displayed. You can tap
Edit to delete the device.
34
Add network allowlist
3.7.1.8 Platform Settings
You can connect the Terminal to the platform with the corresponding protocol, and control and
manage the Terminal through the platform. The supported platform protocols include
Private
Platform, ONVIF, RTSP, and GPS Config.
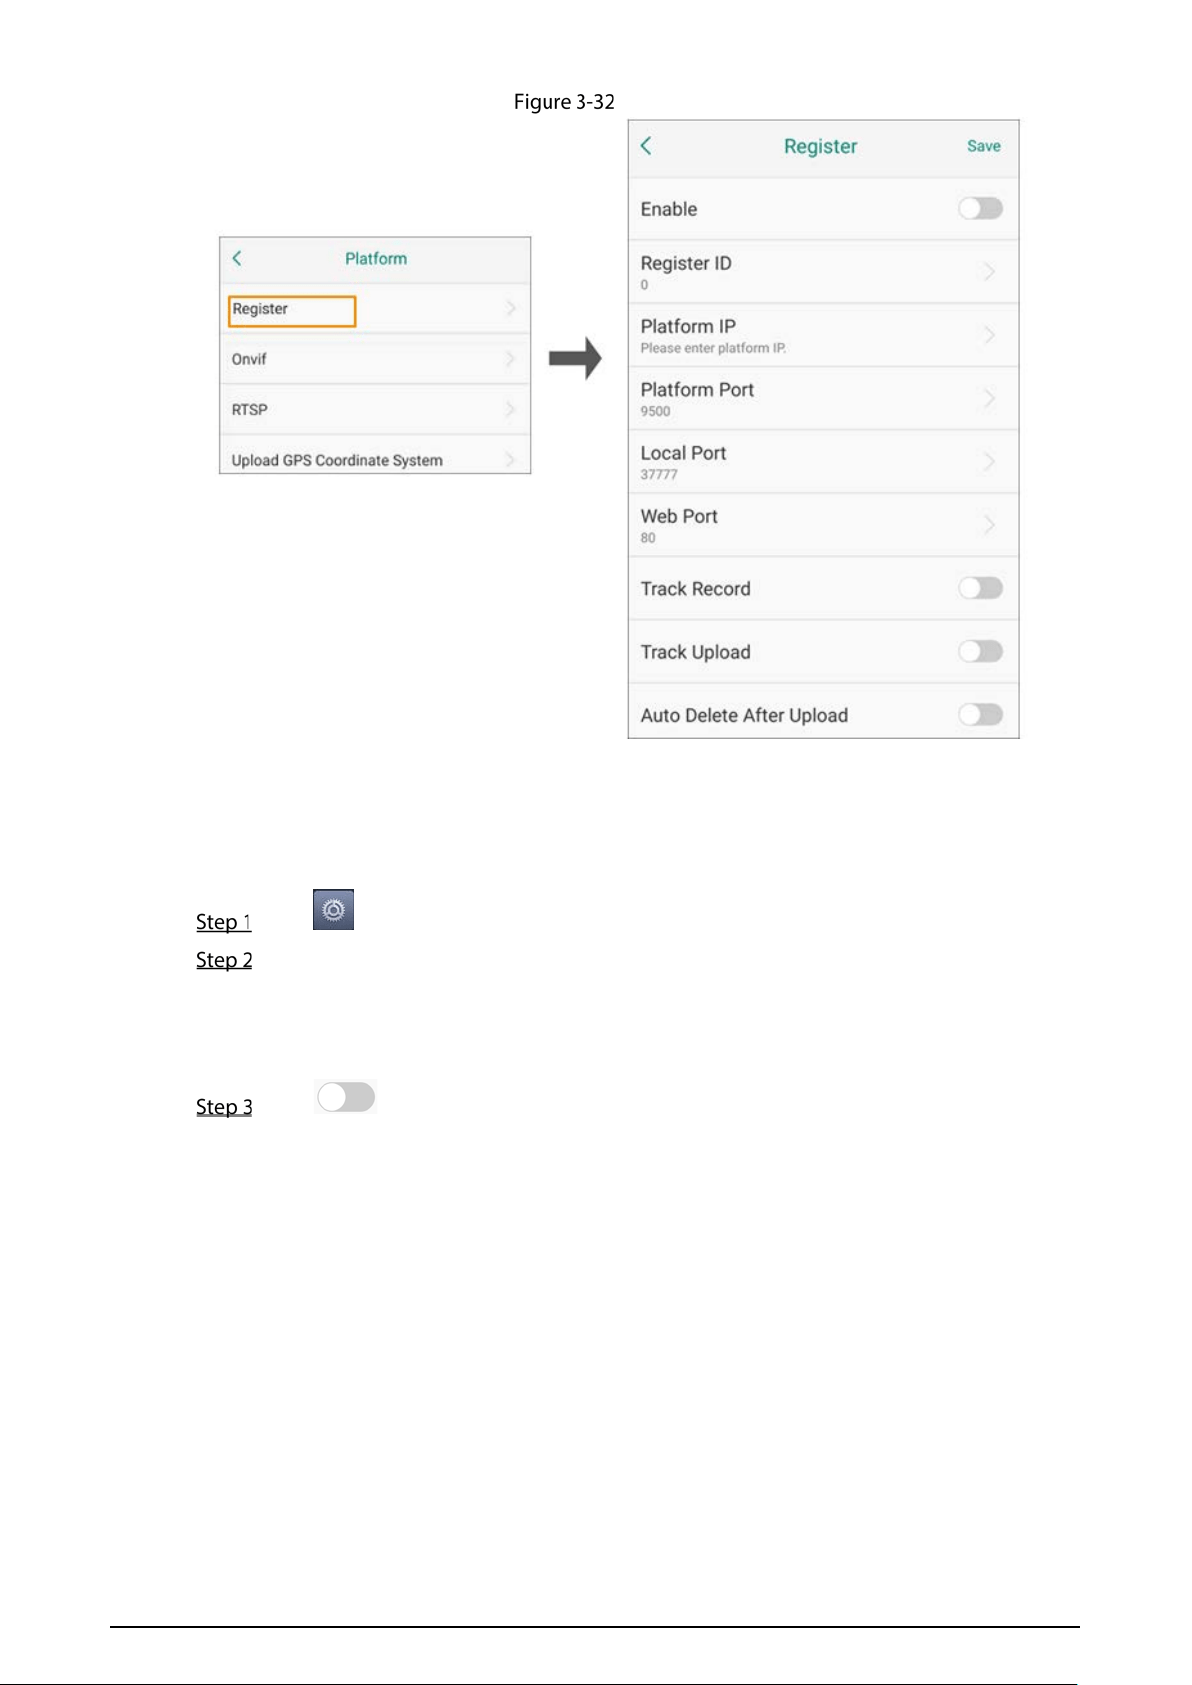
3.7.1.8.1 Register
Register the Terminal on the designated proxy server, and the client software visits the device through
the proxy server.
Tap on the home screen, and then select Network > Platform > Register.
Tap next to Enable and then configure the parameters.
Table 3-4 Register parameter description
Parameter
Description
Register ID
You can customize it. Make sure that the device ID on the Terminal is the
same as that on the platform.
Platform IP Enter the IP address of the platform server.
Platform Port
Enter the port number of the platform ARS (Active Register Server)
service.
Local Port Enter the registration port number of the Terminal. It is 37777 by default.
Web Port Enter the registration port of the platform server.
Track Record Enable the Terminal to keep track of its historical locations.
Track Upload Enable the Terminal to upload the track recorded during network failure.
Auto Delete After
Delete
Enable the Terminal to automatically delete the files that have been
uploaded to the platform.
Tap Save.
35
Private platform
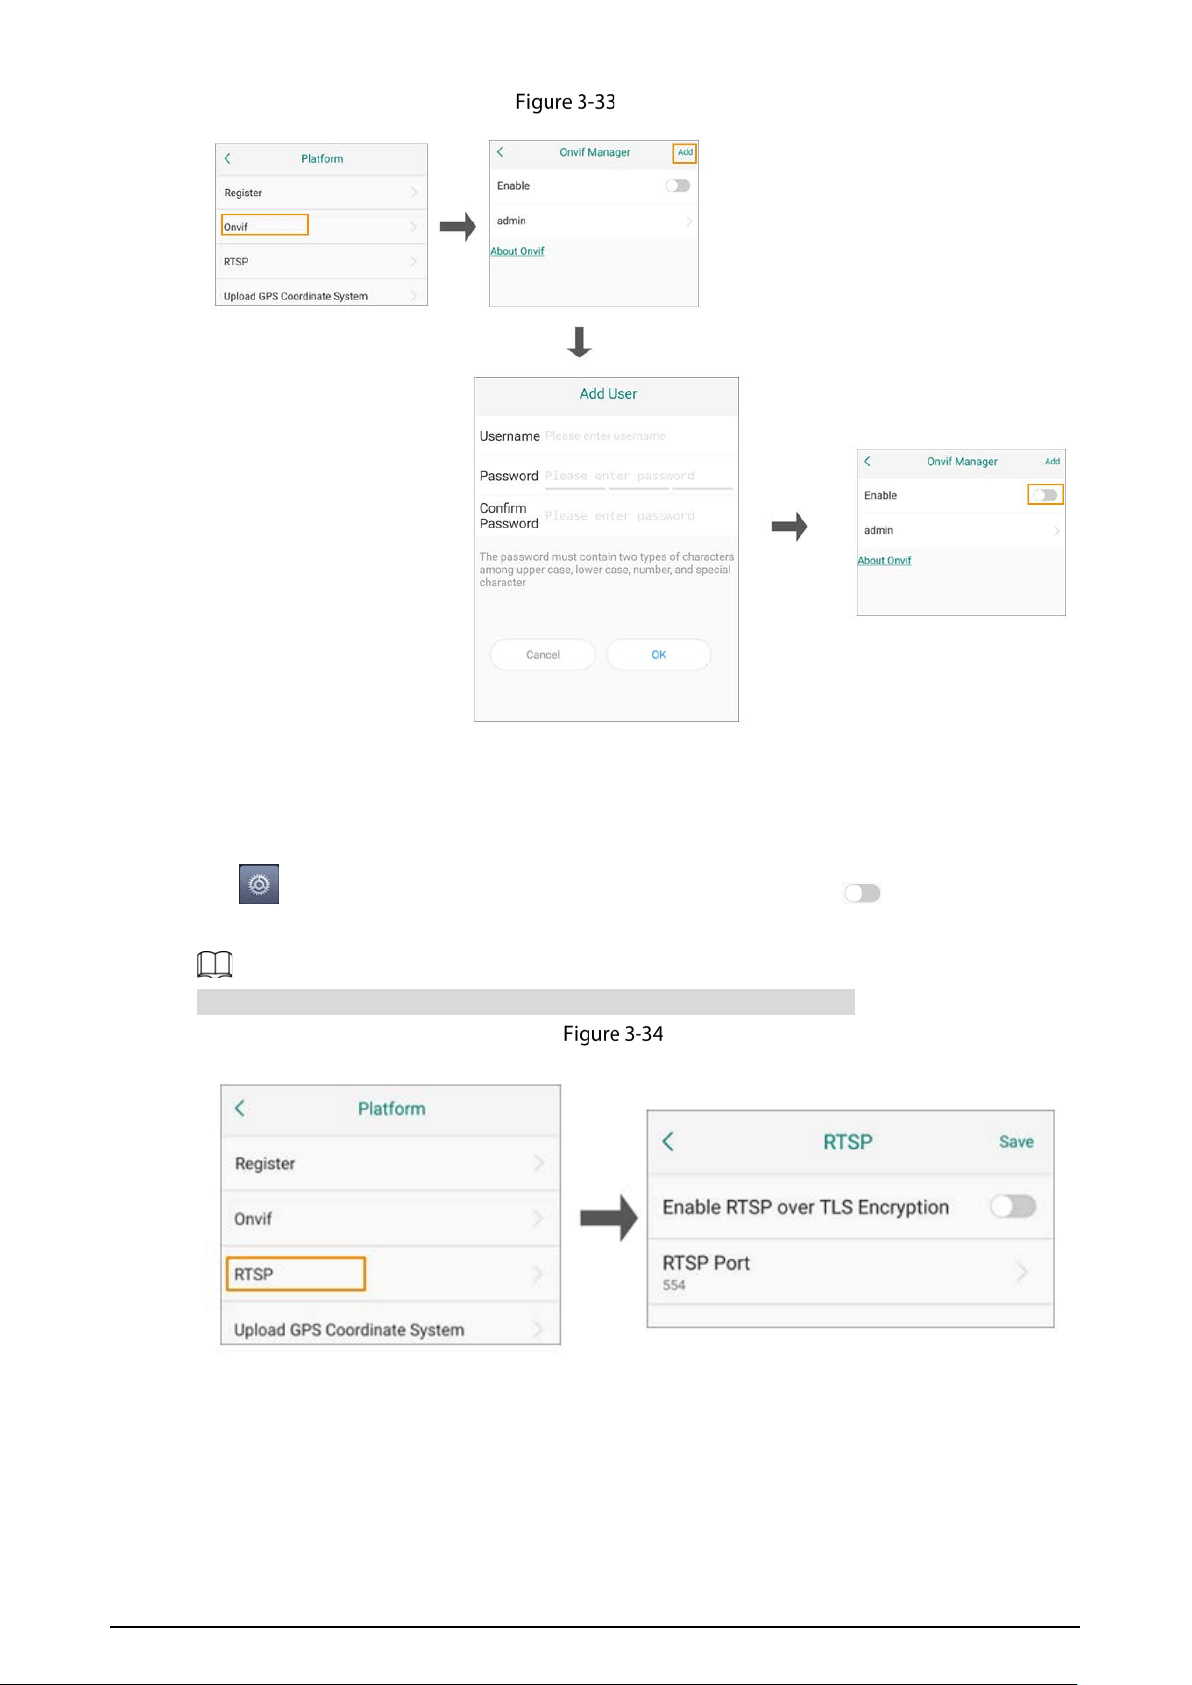
3.7.1.8.2 ONVIF
You can connect the Terminal to platforms through ONVIF (Open Network Video Interface Forum)
protocol.
Tap on the home screen, and then select Network > Platform > Onvif.
(Optional) Add an ONVIF account.
1) Tap Add.
2) Enter the username and password, and then confirm the password.
3) Tap
OK.
Tap .
36
Add ONVIF user
3.7.1.8.3 RTSP
You can connect the Terminal to platforms through RTSP (Real Time Streaming Protocol).
Tap on the home screen, select
Network > Platform > RTSP, tap next to Enable RTSP
over TLS Encryption, and then tap Save.
The RTSP port number is 554 by default. You can tap RTSP Port to modify it.
RTSP
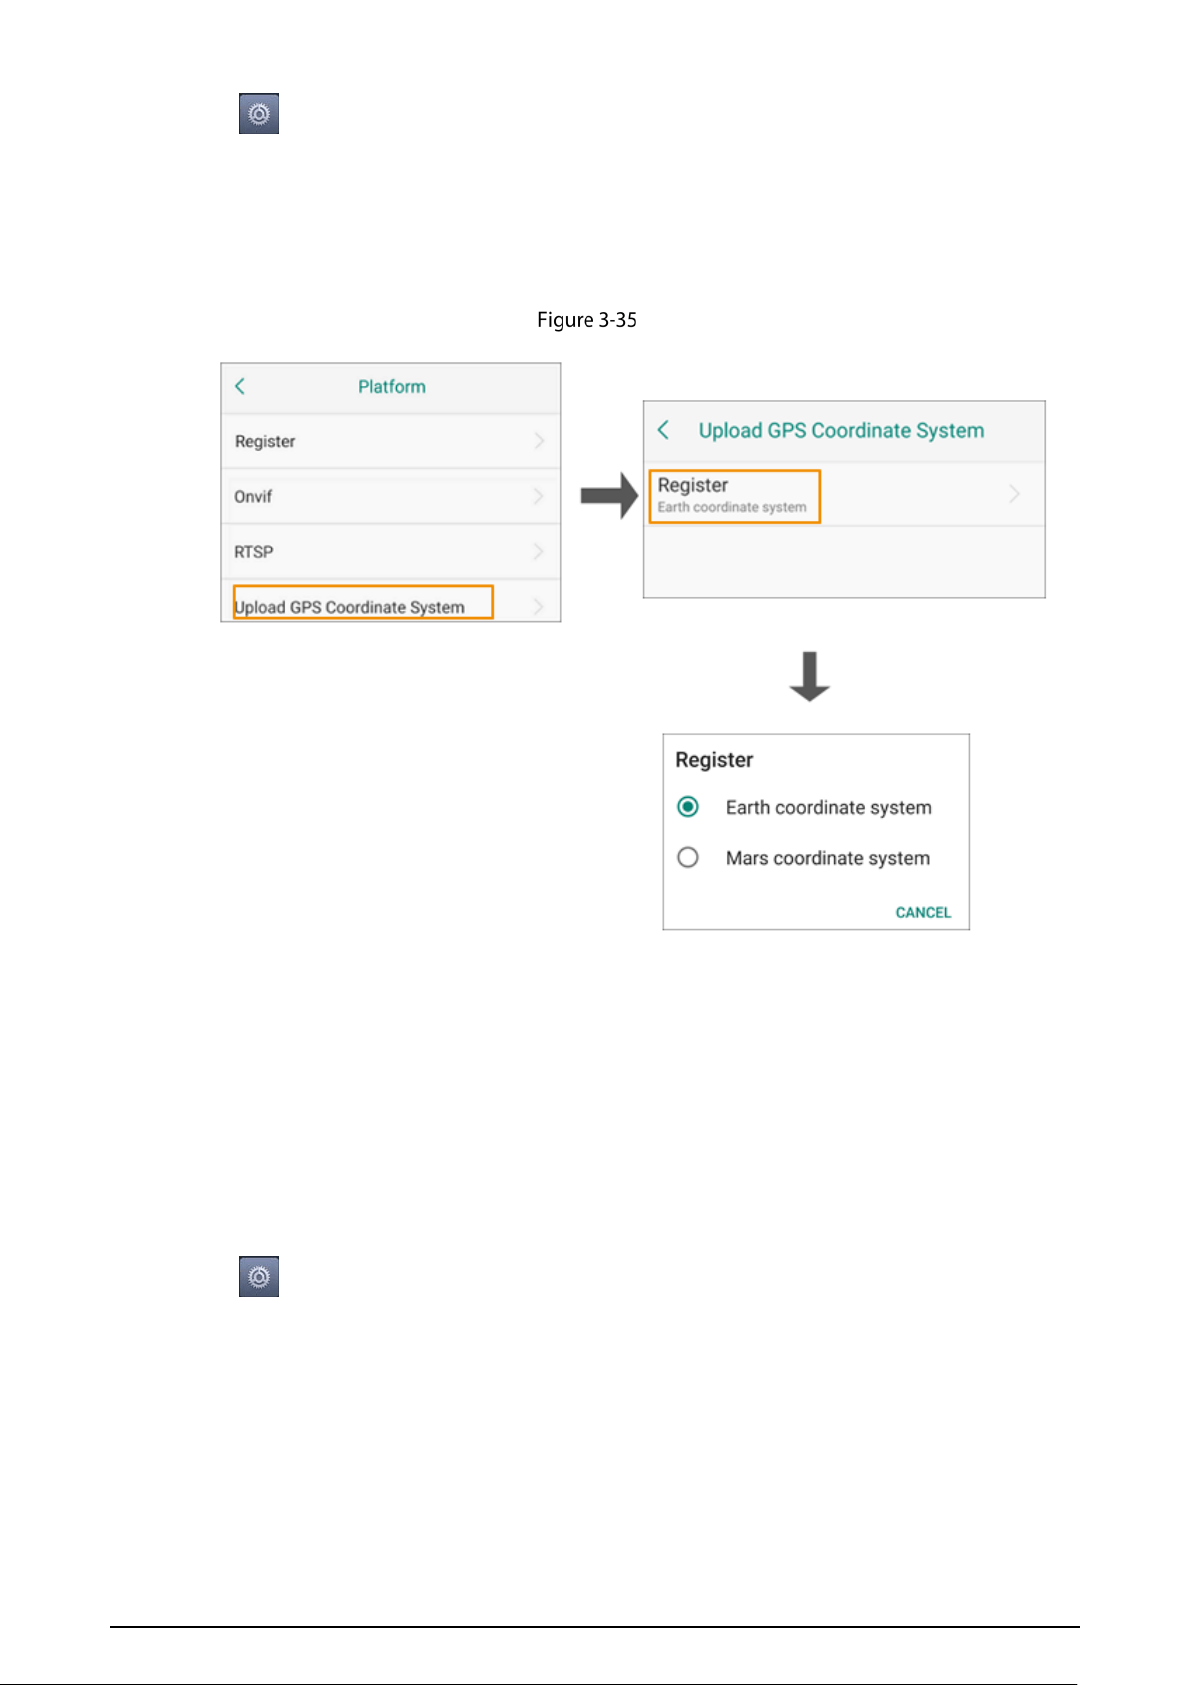
3.7.1.8.4 GPS Config
To ensure the accuracy of the GPS information uploaded to the platform, select the coordinate system
according to the GPS coordinate system of the platform.
37
Tap on the home screen, select Network > Platform > Upload GPS Coordinate System, tap
Register and then select the coordinate system.
Earth coordinate system: World Geodetic System or WGS84. It is the international coordinate
sy
stem.
Mars coordinate system: GCJ02 coordinate system formulated by the Chinese State Bureau of
Surveying and Mapping.
GPS config
3.7.2 Device
You can set audio recordings, camera parameters, volume, customized button, NFC, and data
overwriting.
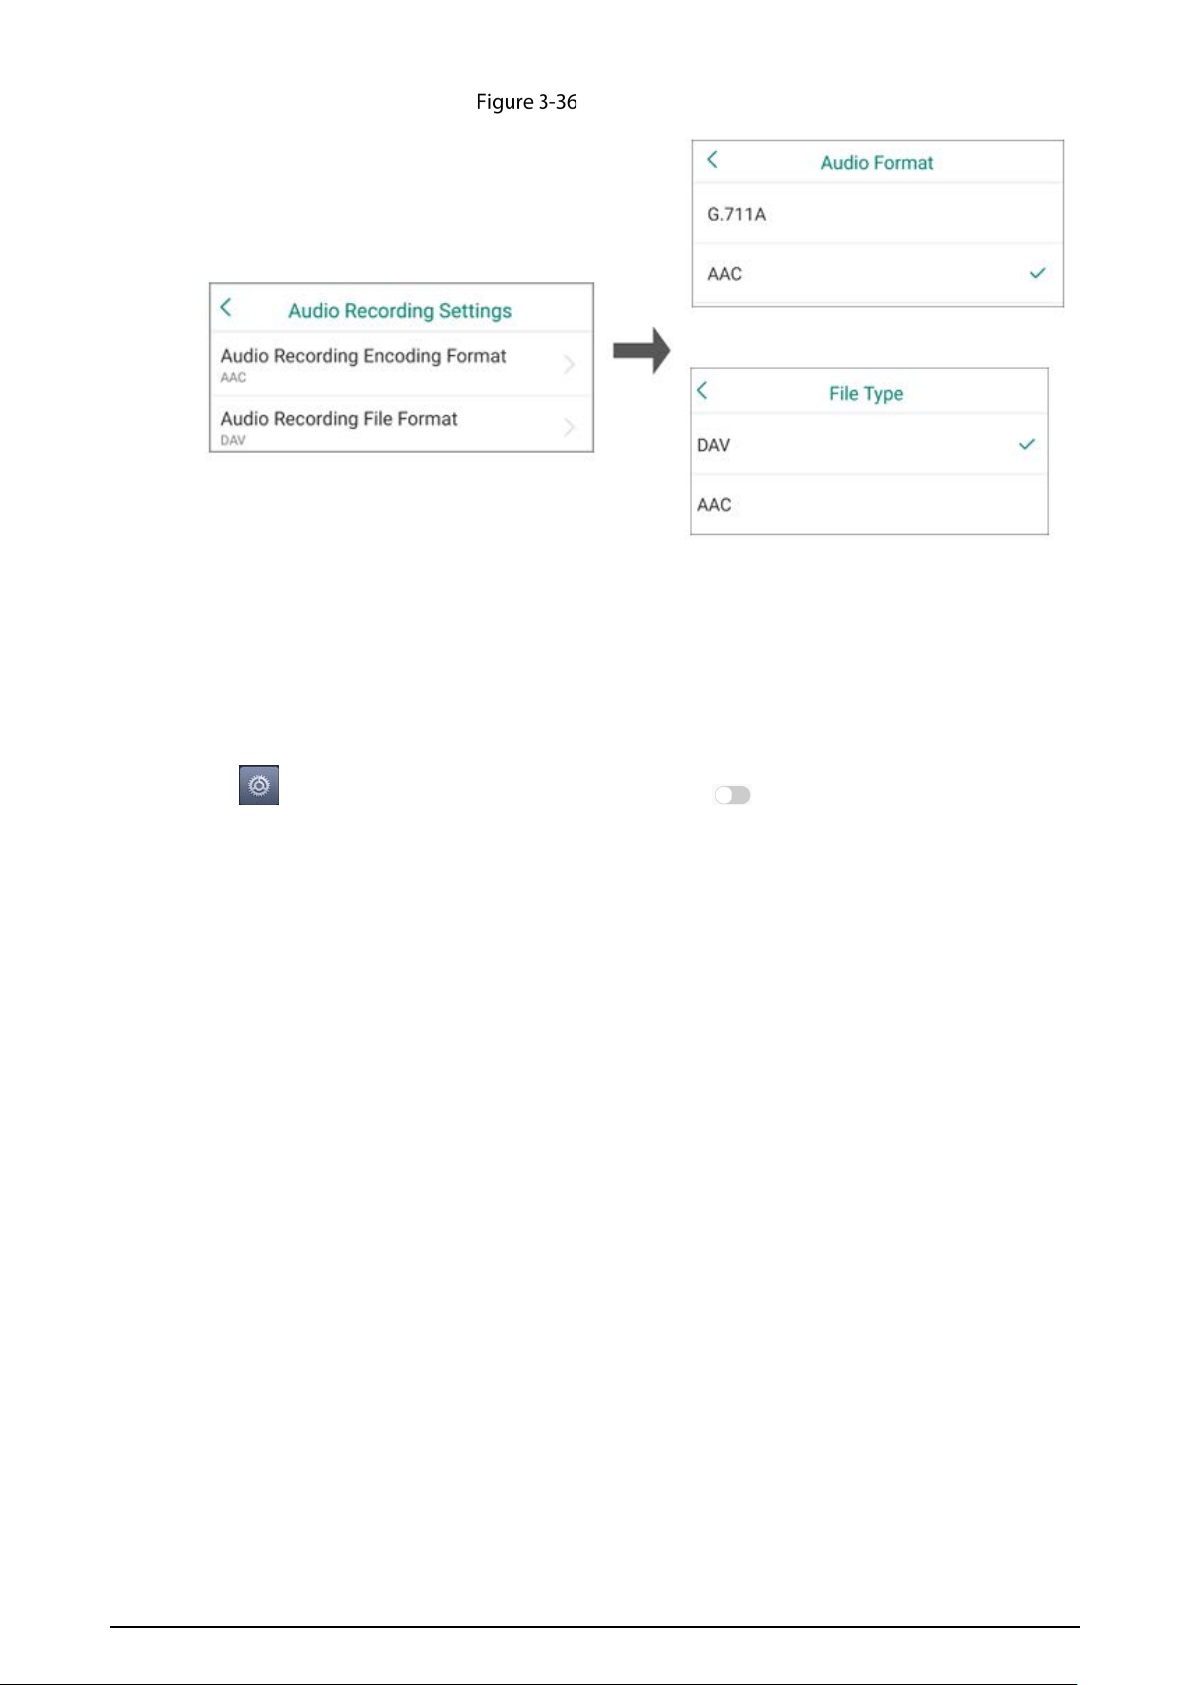
3.7.2.1 Audio Recording Settings
Tap , select Device > Audio Recording Settings to set the audio recording encoding format, and
audio recording file format.
38
Audio recording settings
3.7.2.2 Camera Settings
3.7.2.2.1 Snap Sound
Tap , select Device > Camera Settings, and then tap to enable snap sound.
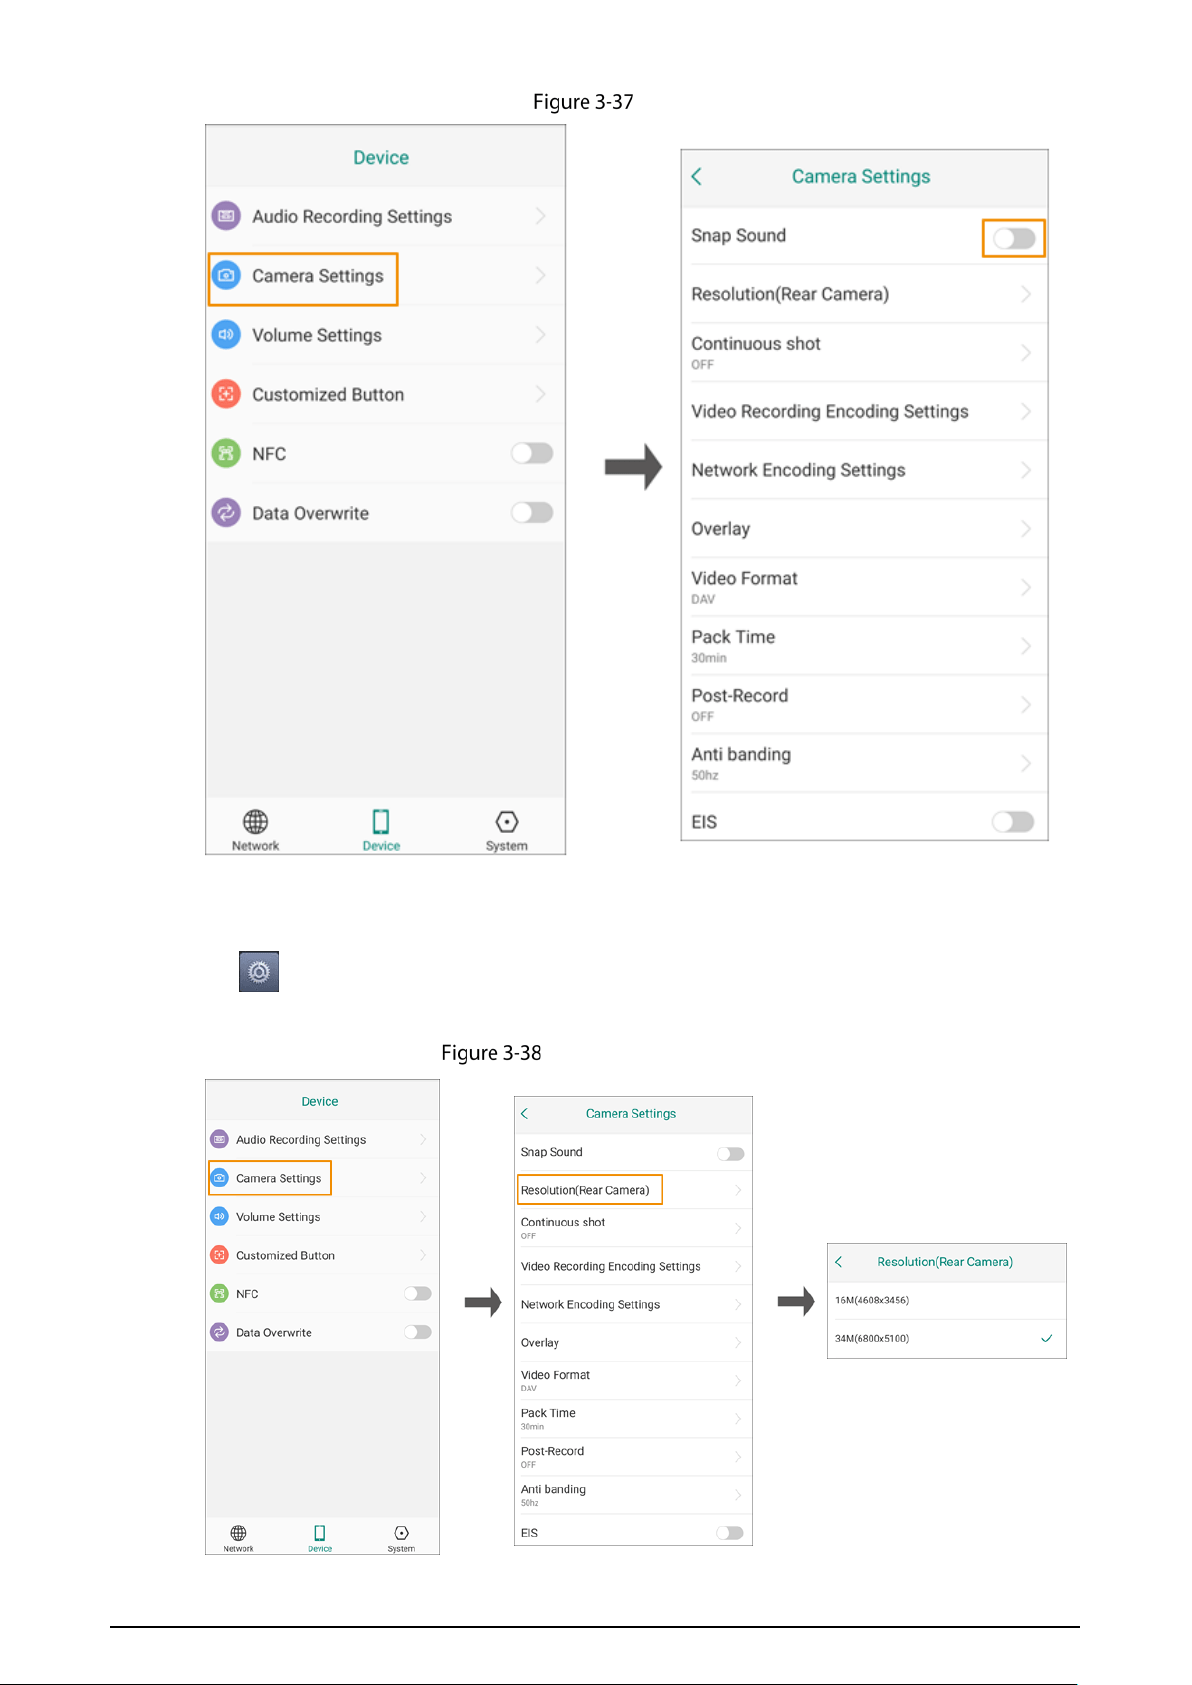
39
Snap sound
3.7.2.2.2 Rear Camera Photo Resolution
Tap , select Device > Camera Settings > Resolution(Rear Camera) and then select the photo
resolution of the rear camera.
Set rear camera photo resolution
40
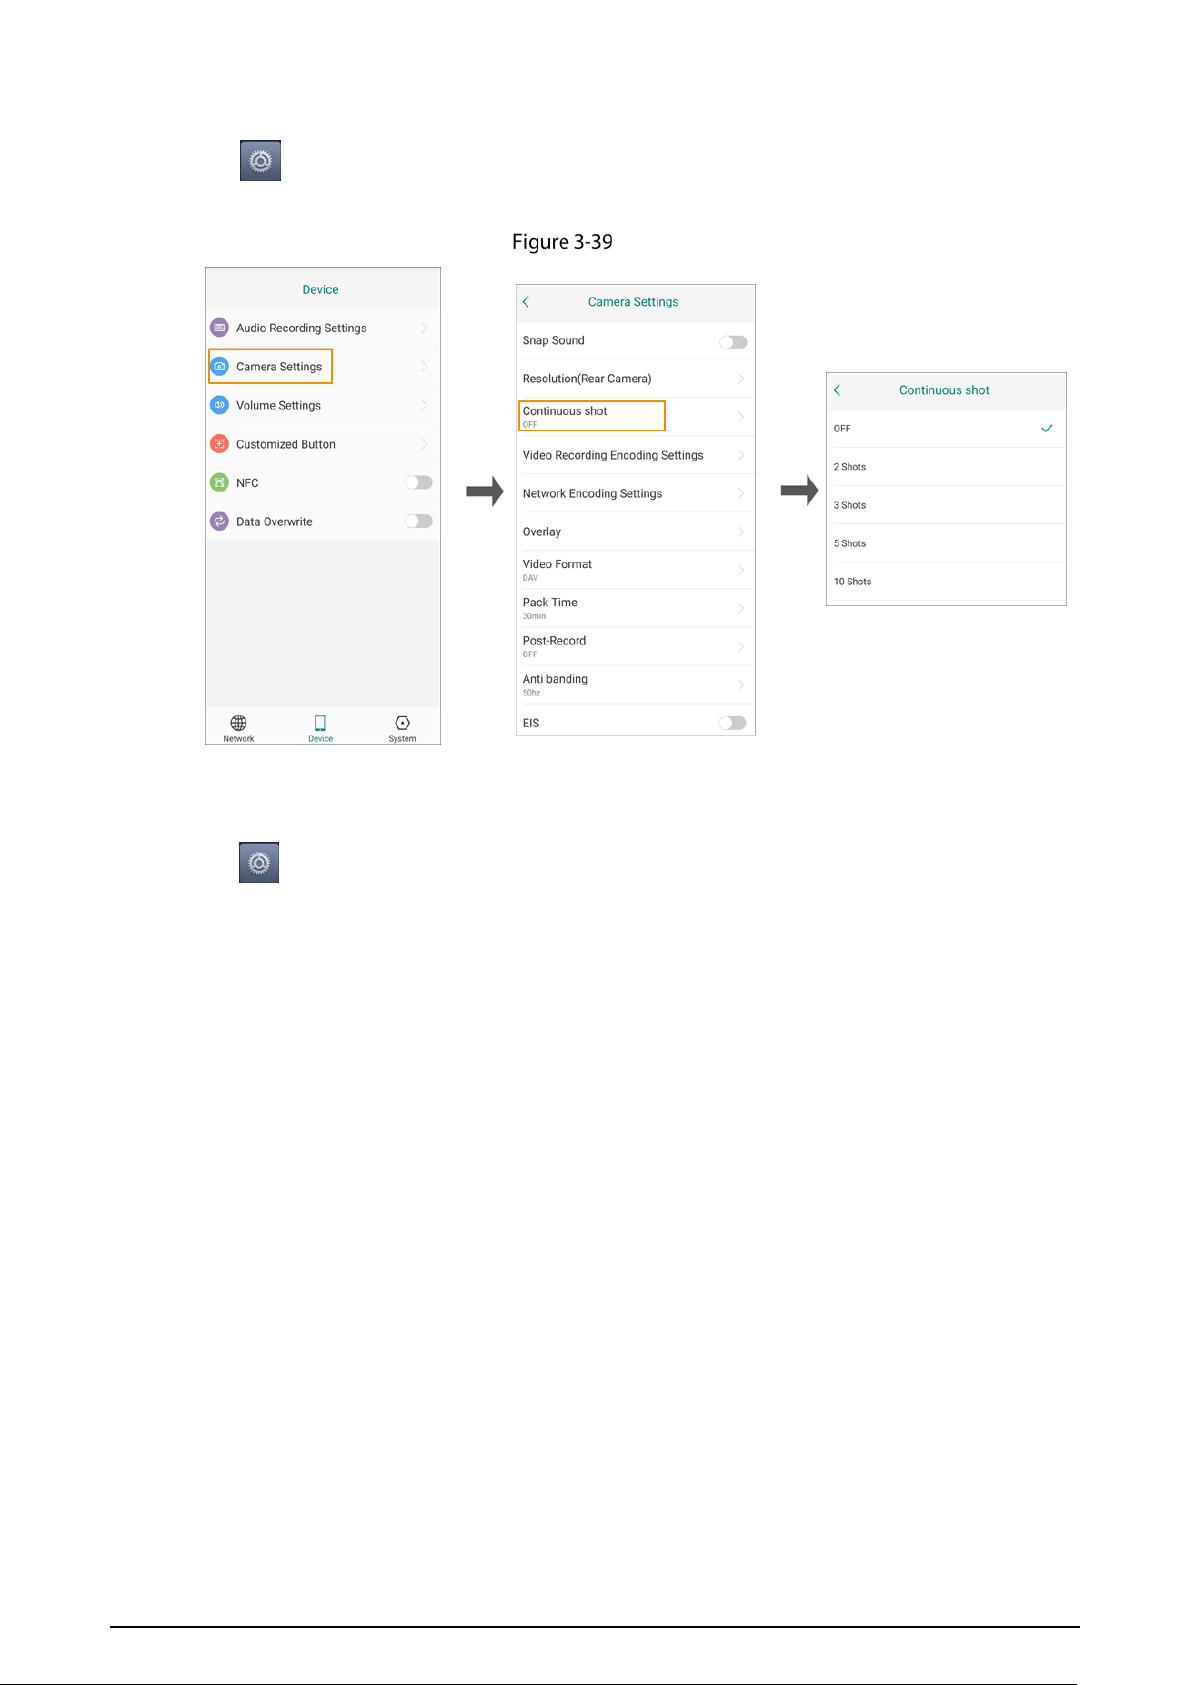
3.7.2.2.3 Continuous Shot
Tap , select Device > Camera Settings > Continuous shot and then select the number of
continuous shots.
Continuous shot
3.7.2.2.4 Video Recording Encoding Settings
Tap , select Device > Camera Settings > Video Recording Encoding Settings, and then set the
encoding parameters of front camera, rear camera, and external camera.
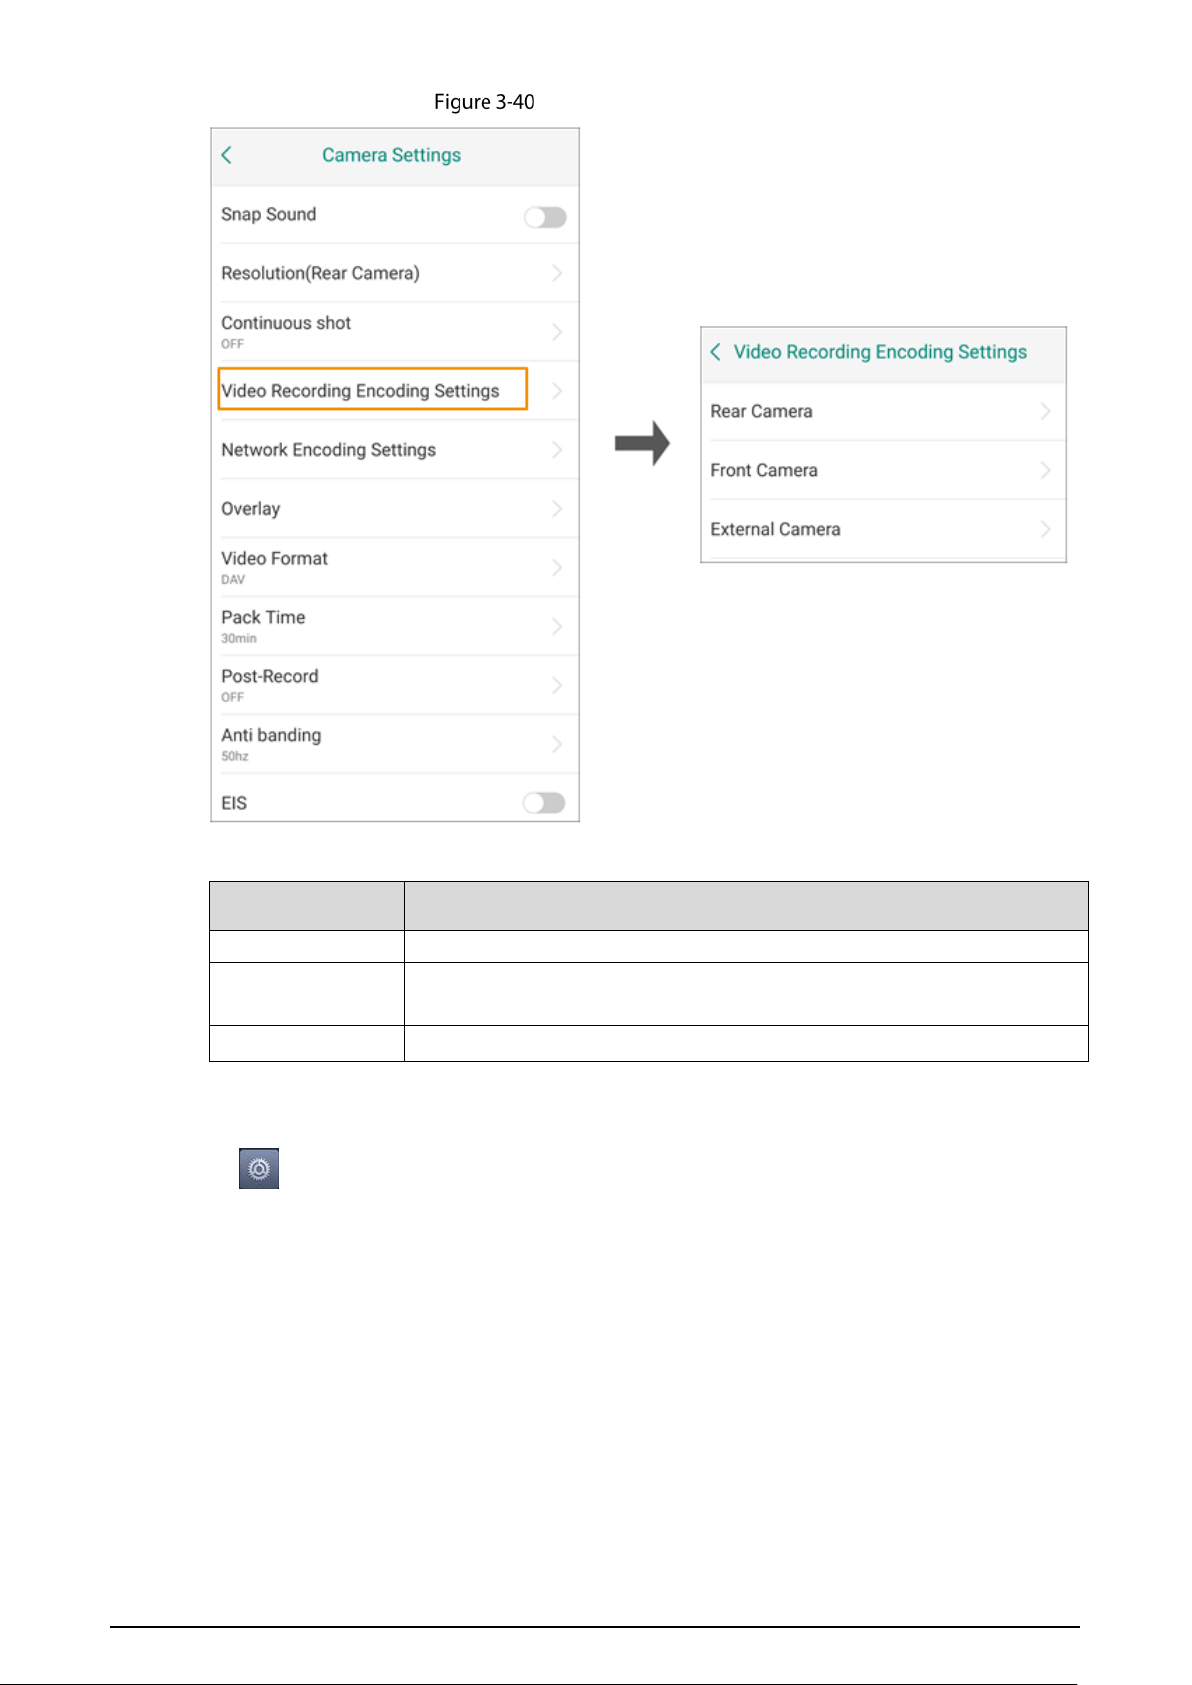
41
Video recording encoding settings
Table 3-5 Video recording encoding parameters
Parameter
Description
Video Encoding Video encoding type. Includes
H.265
and
H.264
.
Resolution
Select the resolution and frame rate of the video from
1080P@30
,
720P@60
, and
720P@30
.
Bitrate Select the video quality from
Best
,
Good
and
Ordinary
.
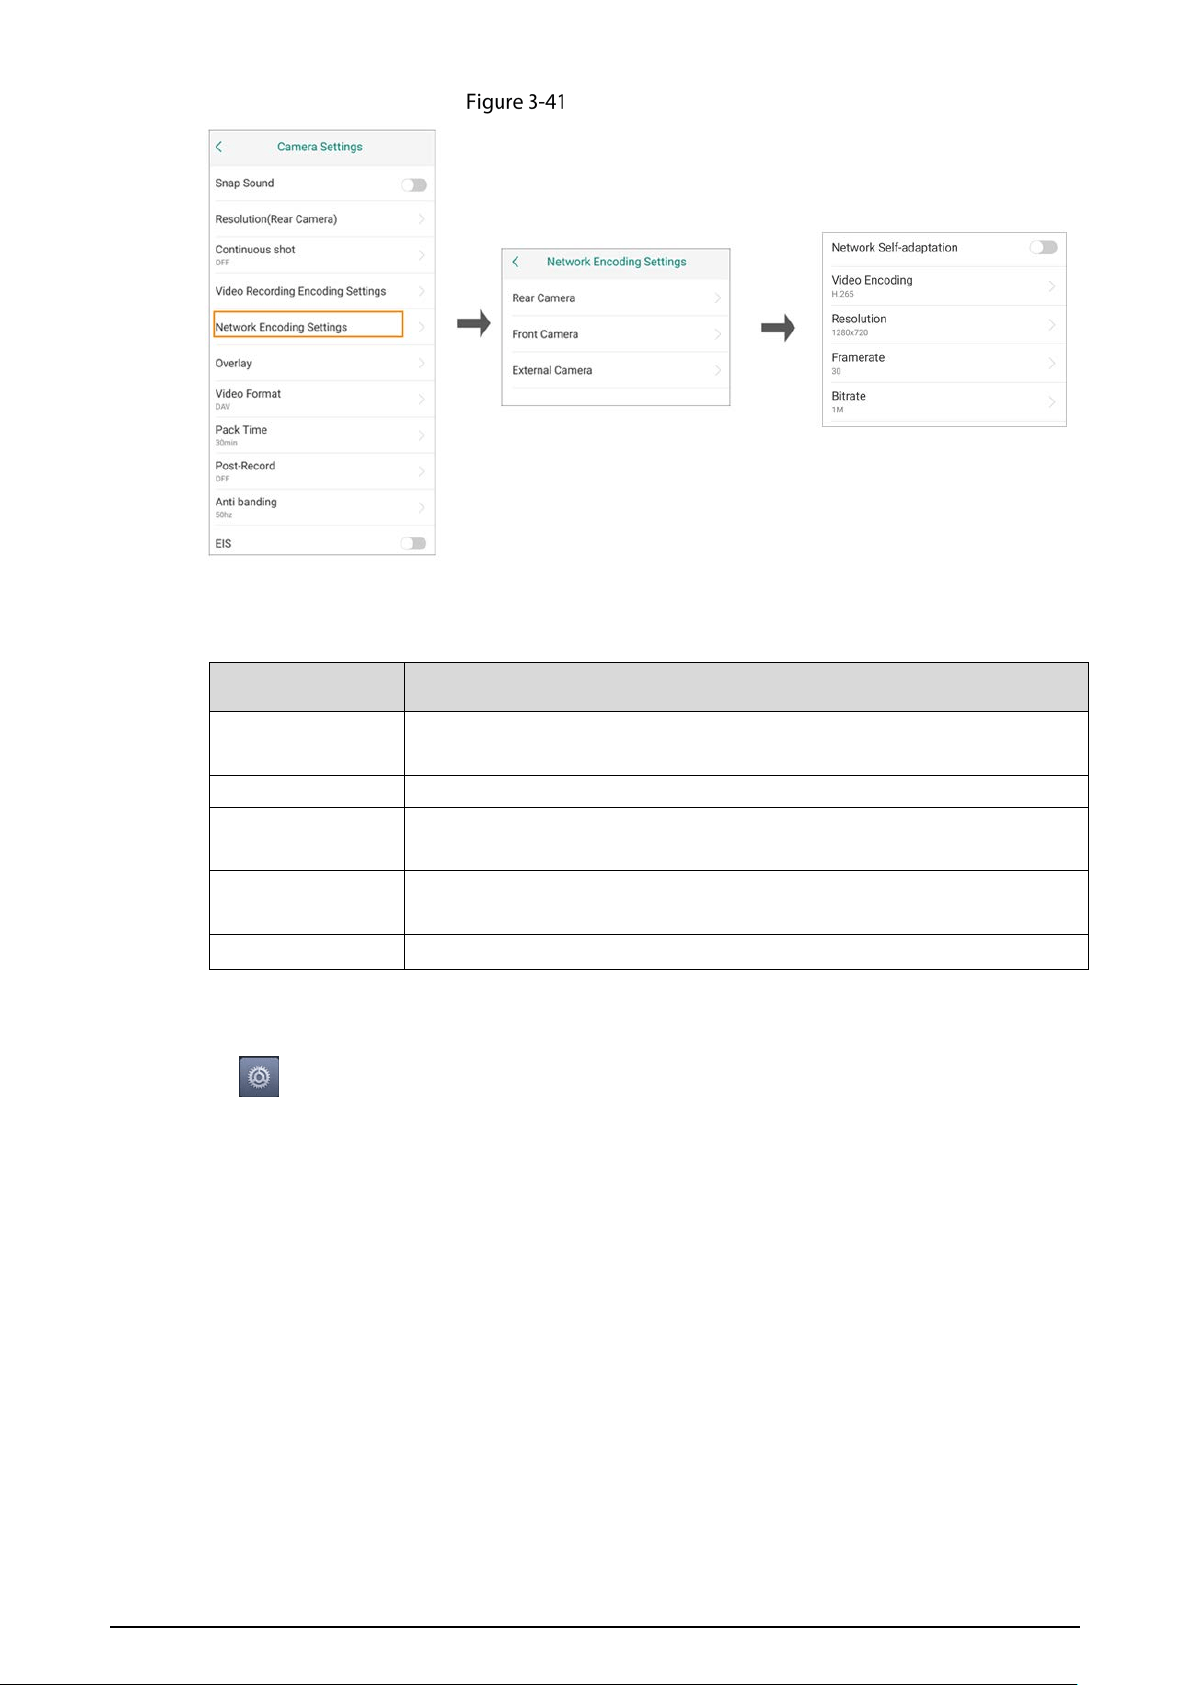
3.7.2.2.5 Network Encoding Settings
Tap on the home screen, select the Device tab, select Camera Settings > Network Encoding
Settings, and then set the encoding type, resolution, frame rate and bit rate. You can also enable
network self-adaptation to adjust the frame rate and bit rate according to the network condition.
42
Network encoding settings
Table 3-6 Network encoding parameters
Parameter
Description
Network Self-
adaptation
Enable the system to adjust the bit rate according to the network condition.
Video Encoding Video encoding type. Includes
H.265
and
H.264
.
Resolution
Select the video resolution. The higher the resolution, the better the iamge
quality.
Framerate
Select the frame rate. The higher the frame rate, the smoother the video,
but the more network bandwidth consumption.
Bitrate Select the bit rate.
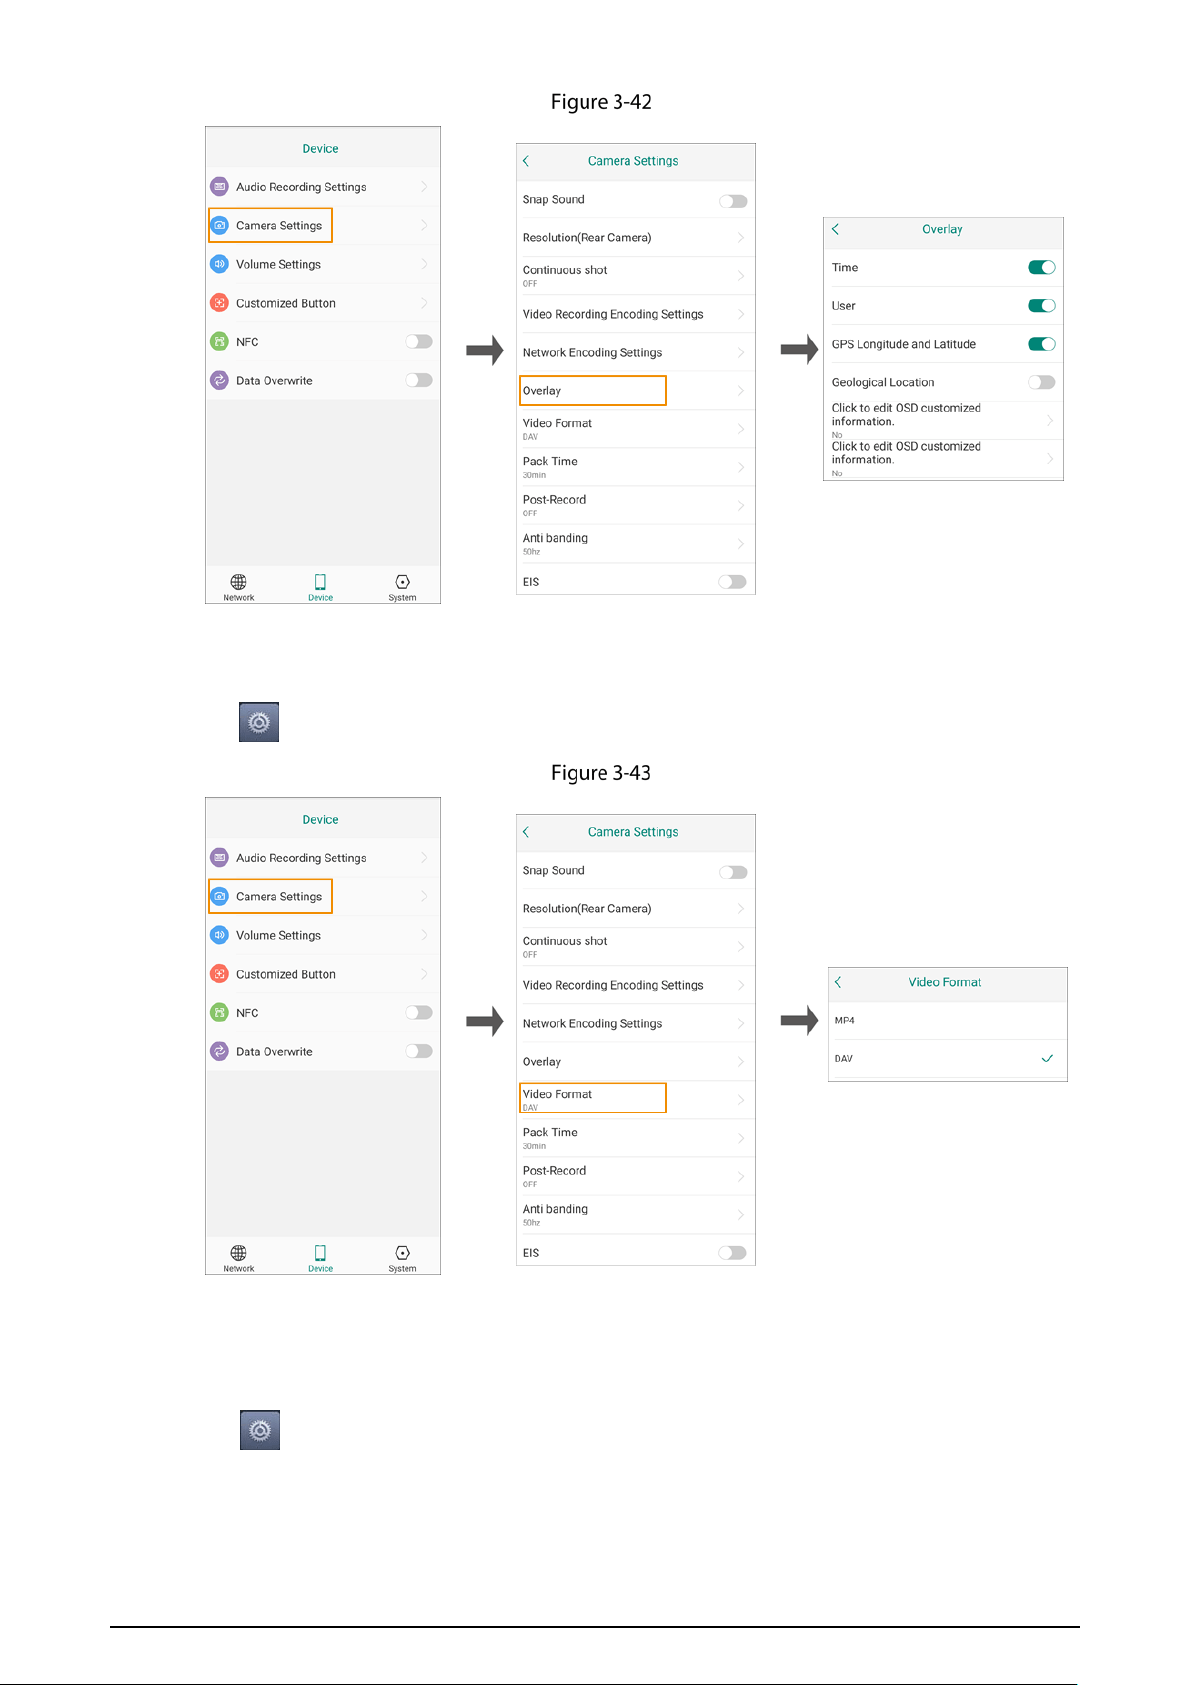
3.7.2.2.6 Overlay
Tap on the home screen, select the Device tab, and then select Camera Settings > Overlay.
After the corresponding OSD information is enabled, it will be displayed on the images and videos.
The OSD information includes time, user, GPS longitude and latitude, and geological location. You can
also add customized OSD information.
43
Overlay
3.7.2.2.7 Video Format
Tap , select Device > Camera Settings > Video Format, and then select a video format.
Overlay
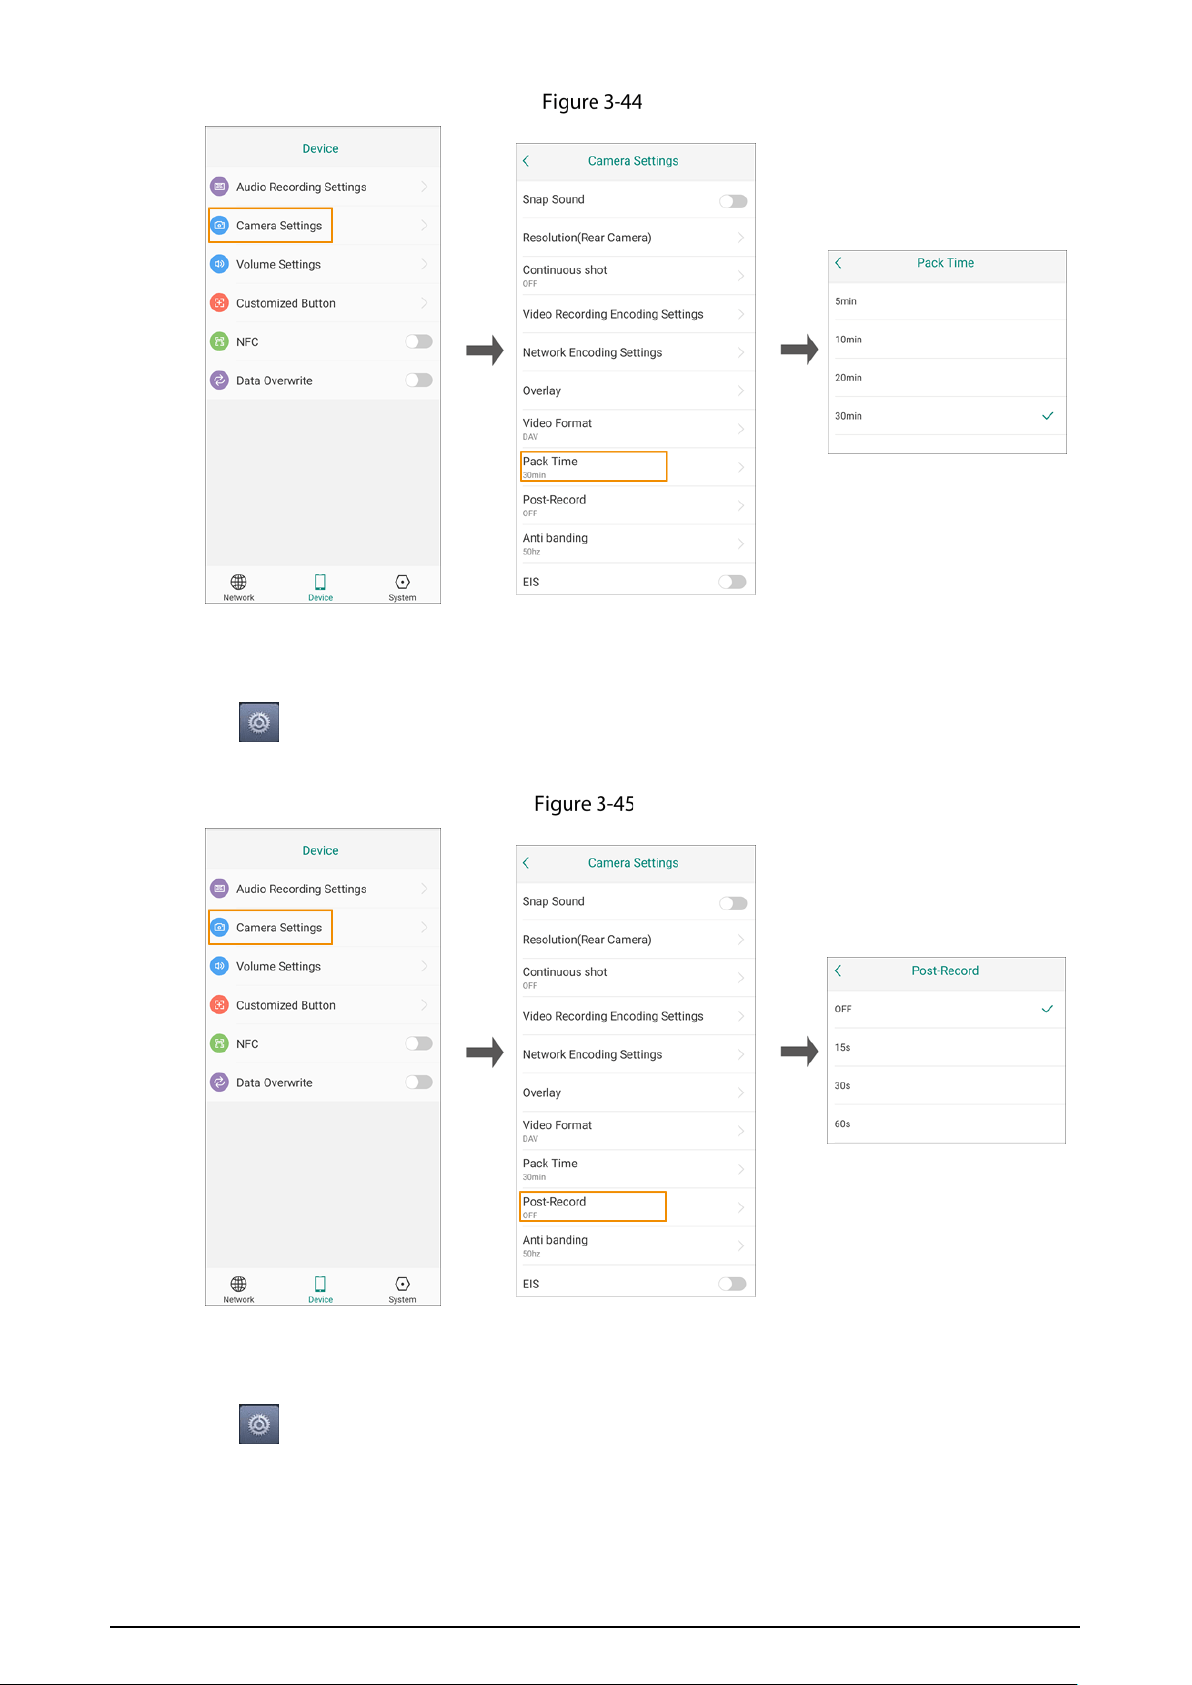
3.7.2.2.8 Pack Time
Tap , select Device > Camera Settings > Pack Time, and then set the interval at which the
recorded video is saved as a file.
44
Pack time
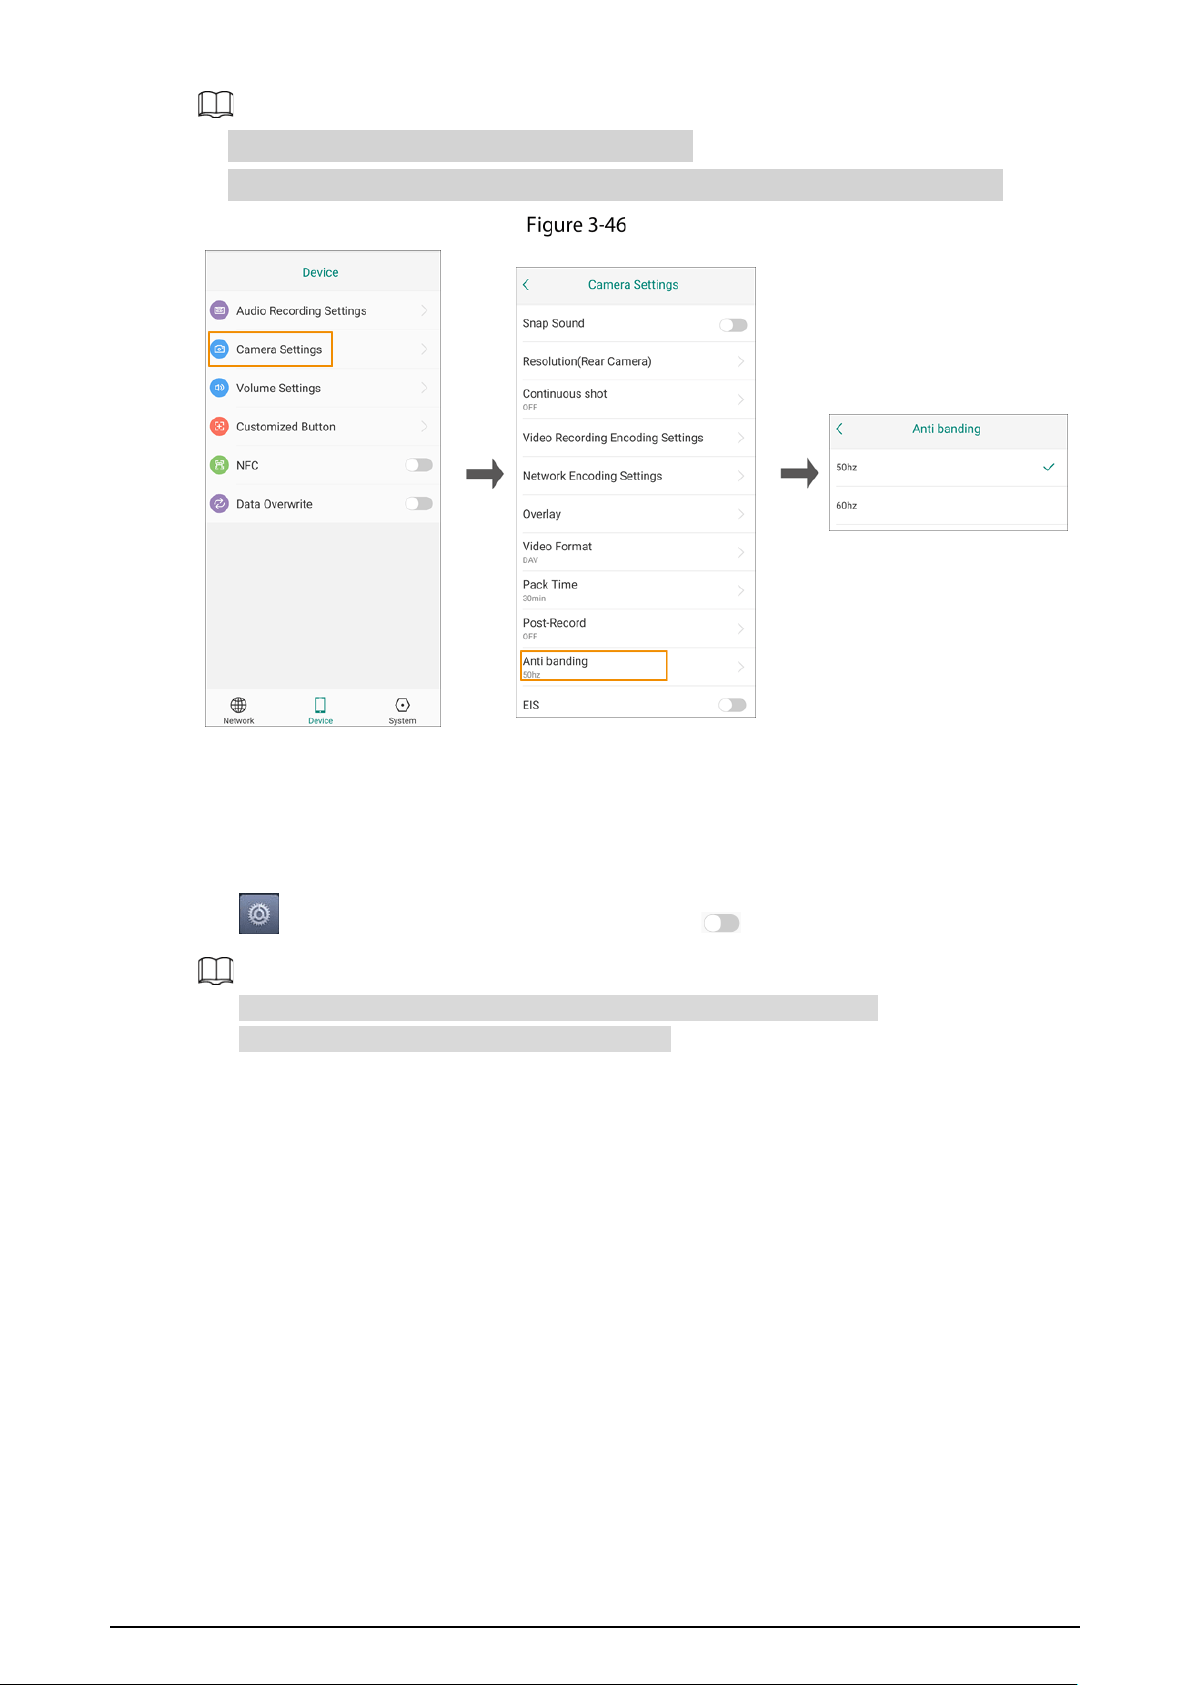
3.7.2.2.9 Post-record
Tap , select Device > Camera Settings > Post-Record, and then set the post-record time. For
example, if you select 15 s, 15 s video after the recording ends will be saved automatically.
Post-record
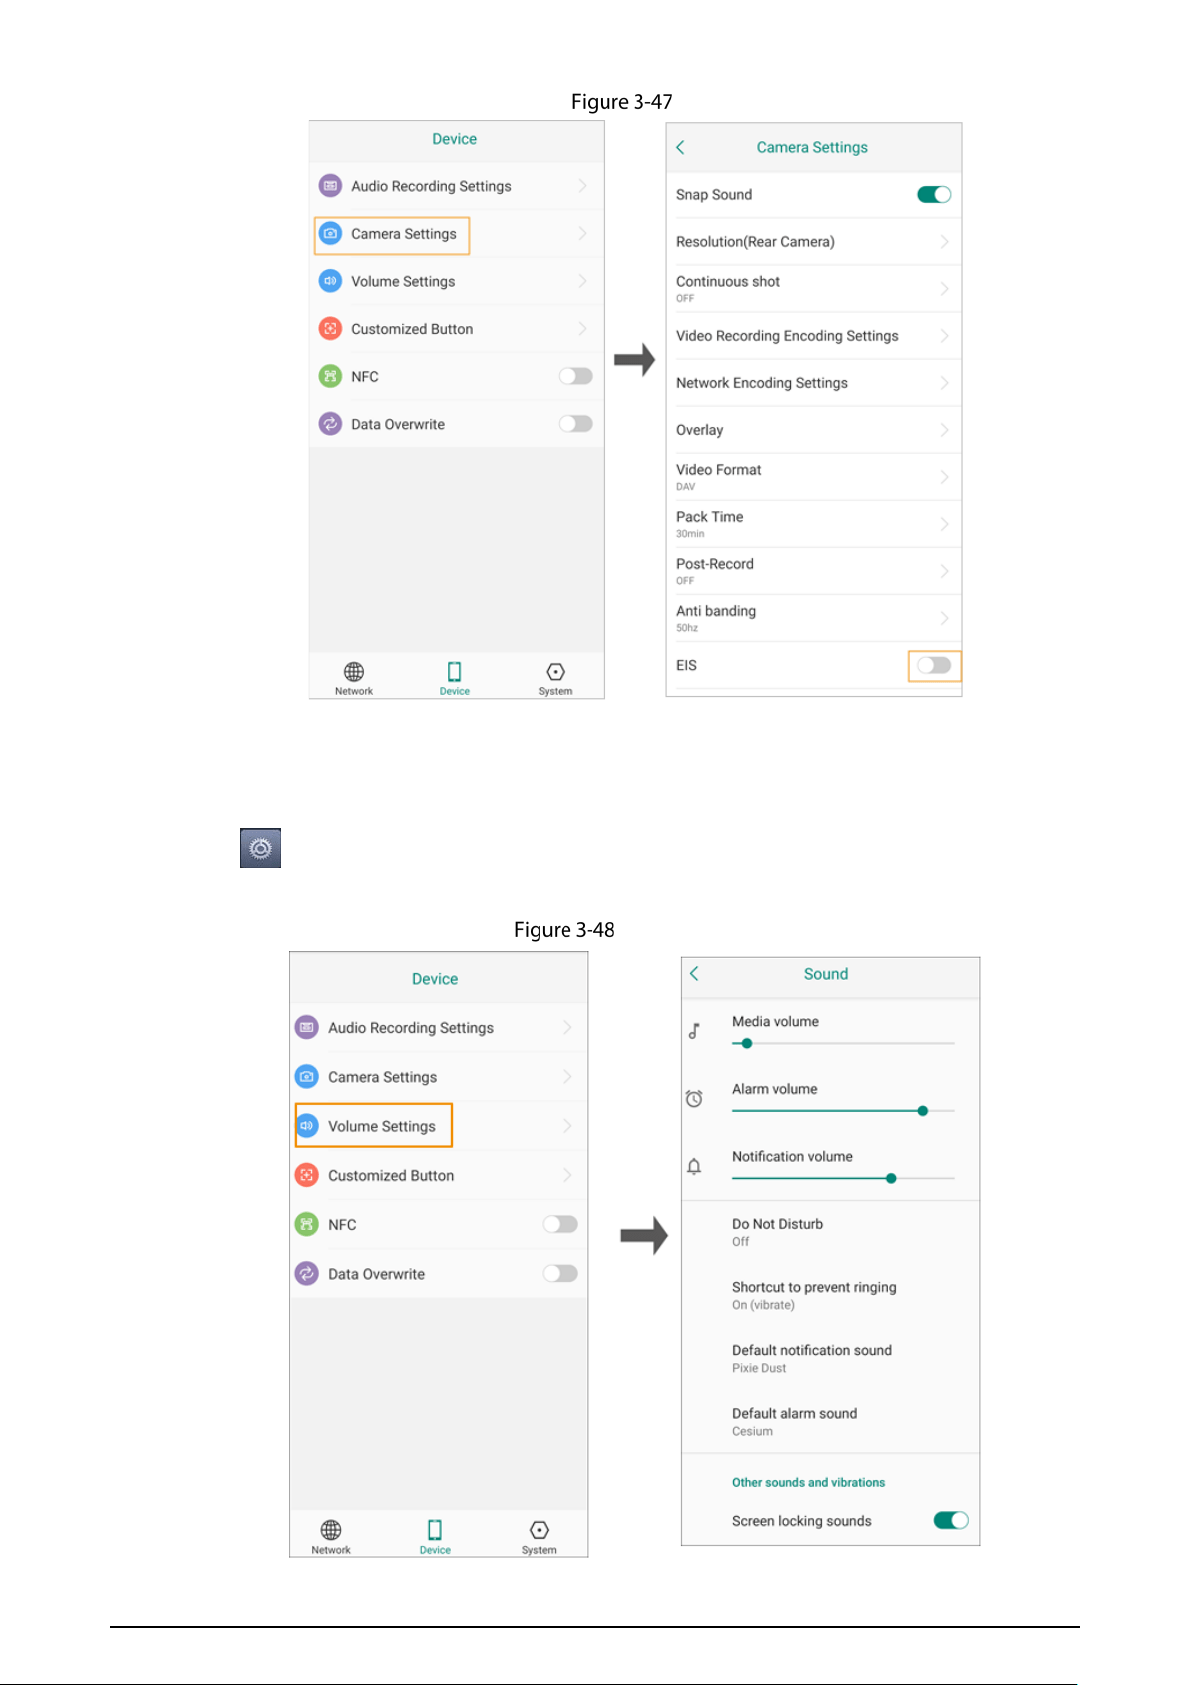
3.7.2.2.10 Anti-banding
Tap , select Device > Camera Settings > Anti banding, and then select an appropriate anti-
banding frequency to avoid flashing lines of the target during video recording.
45
●
50 Hz is the frequency of alternating current in China.
●
60 Hz is the frequency of the alternating current in Japan, US, and some other countries.
Anti-banding
3.7.2.2.11 EIS
Electronic Image Stabilization (EIS) corrects the device shaking with difference comparison algorithm
to make images clearer.
Tap , select
Device > Camera Setting, and then tap next to EIS to enable the function.
This function is only available for the video recording of the rear camera.
This function might affect the CPU performance.
46
EIS
3.7.2.3 Volume Settings
Tap on the home screen, select the Device tab, select Volume Settings, and then set the
volume (media, ring and alarm), vibrating, "do not disturb" mode, and more.
Volume settings
47
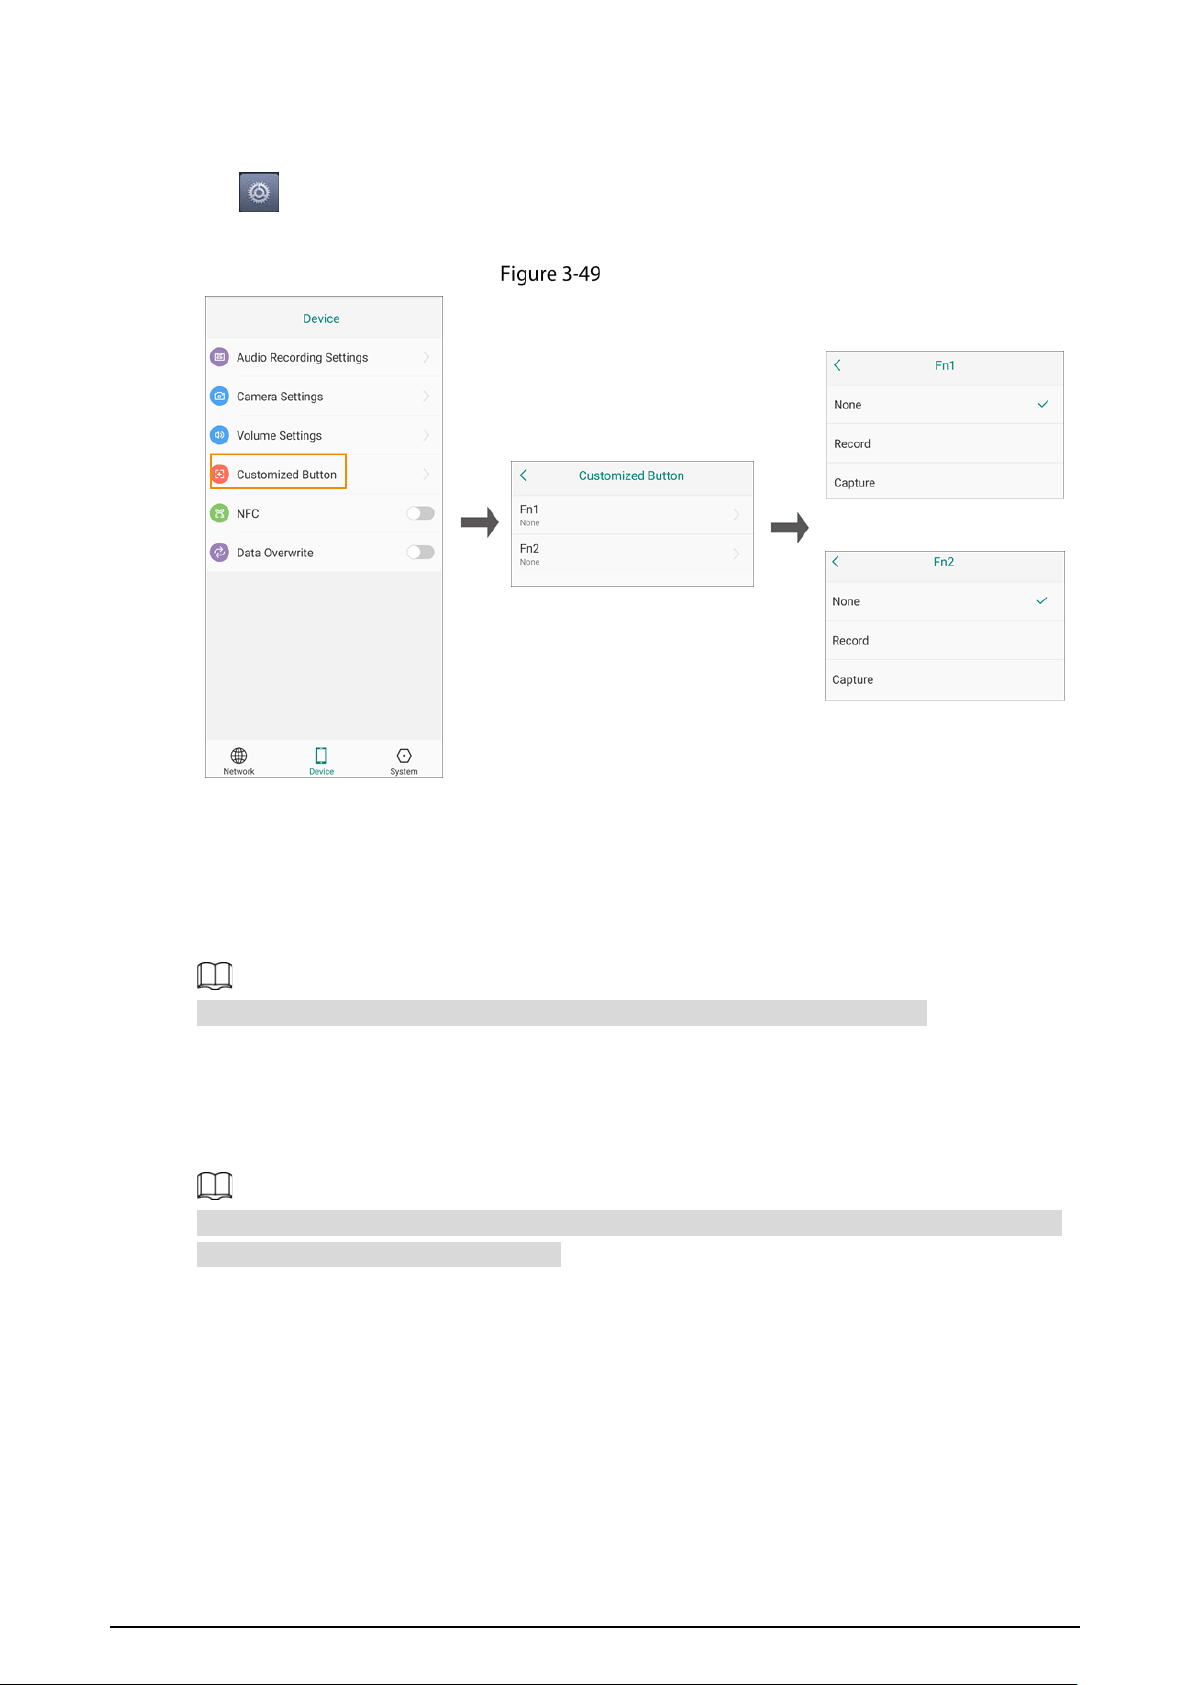
3.7.2.4 Customized Button
Tap on the home screen, select the Device tab, select Customized Button, and then set the Fn1
button and Fn2 button as recording button, capturing button, or none.
Customized button
3.7.2.5 NFC
After NFC (Near Field Communication) is enabled, the Terminal can exchange data with other devices
when touching them.
Before enabling NFC, you need to install the third-party software that supports NFC.
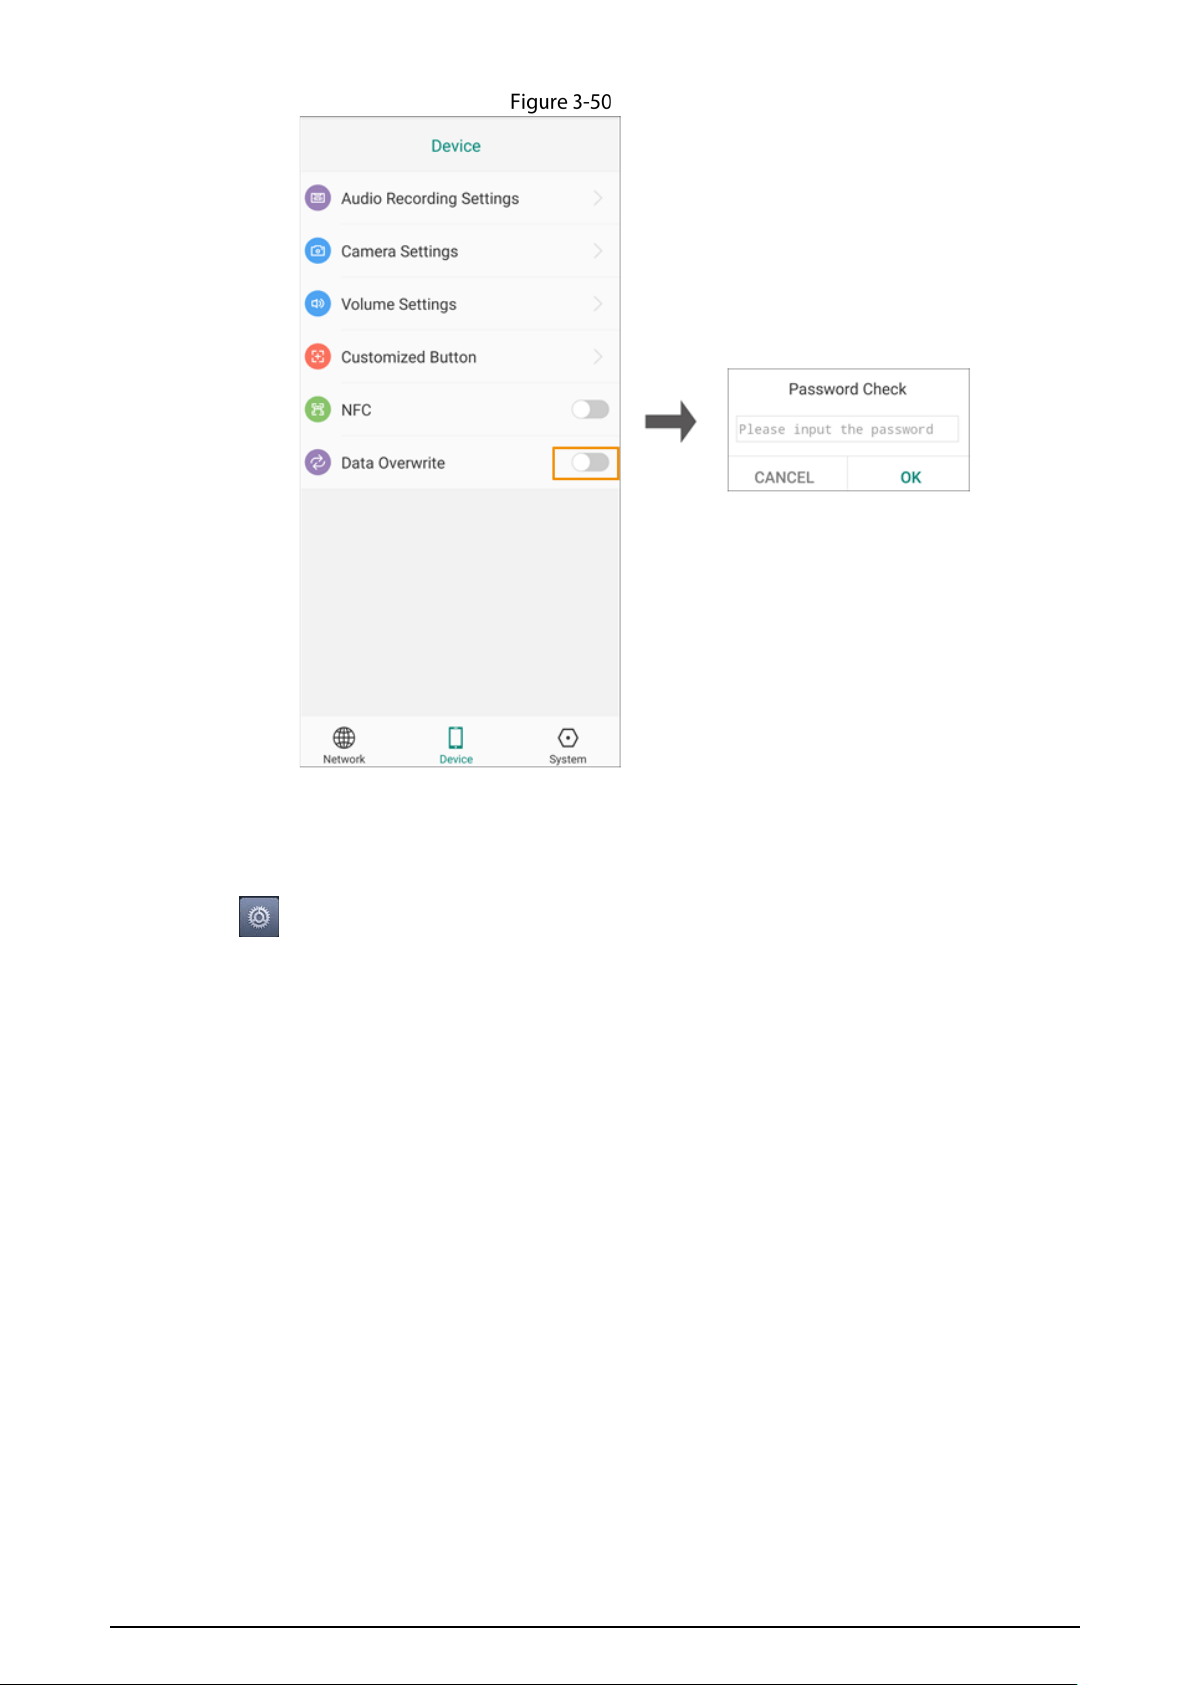
3.7.2.6 Data Overwriting
After Data Overwrite is enabled, the oldest files will be overwritten when the storage space is used up.
This function is available only for the admin account. You need to enter the password of the admin
account to enable or disable the function.
48
Date overwriting
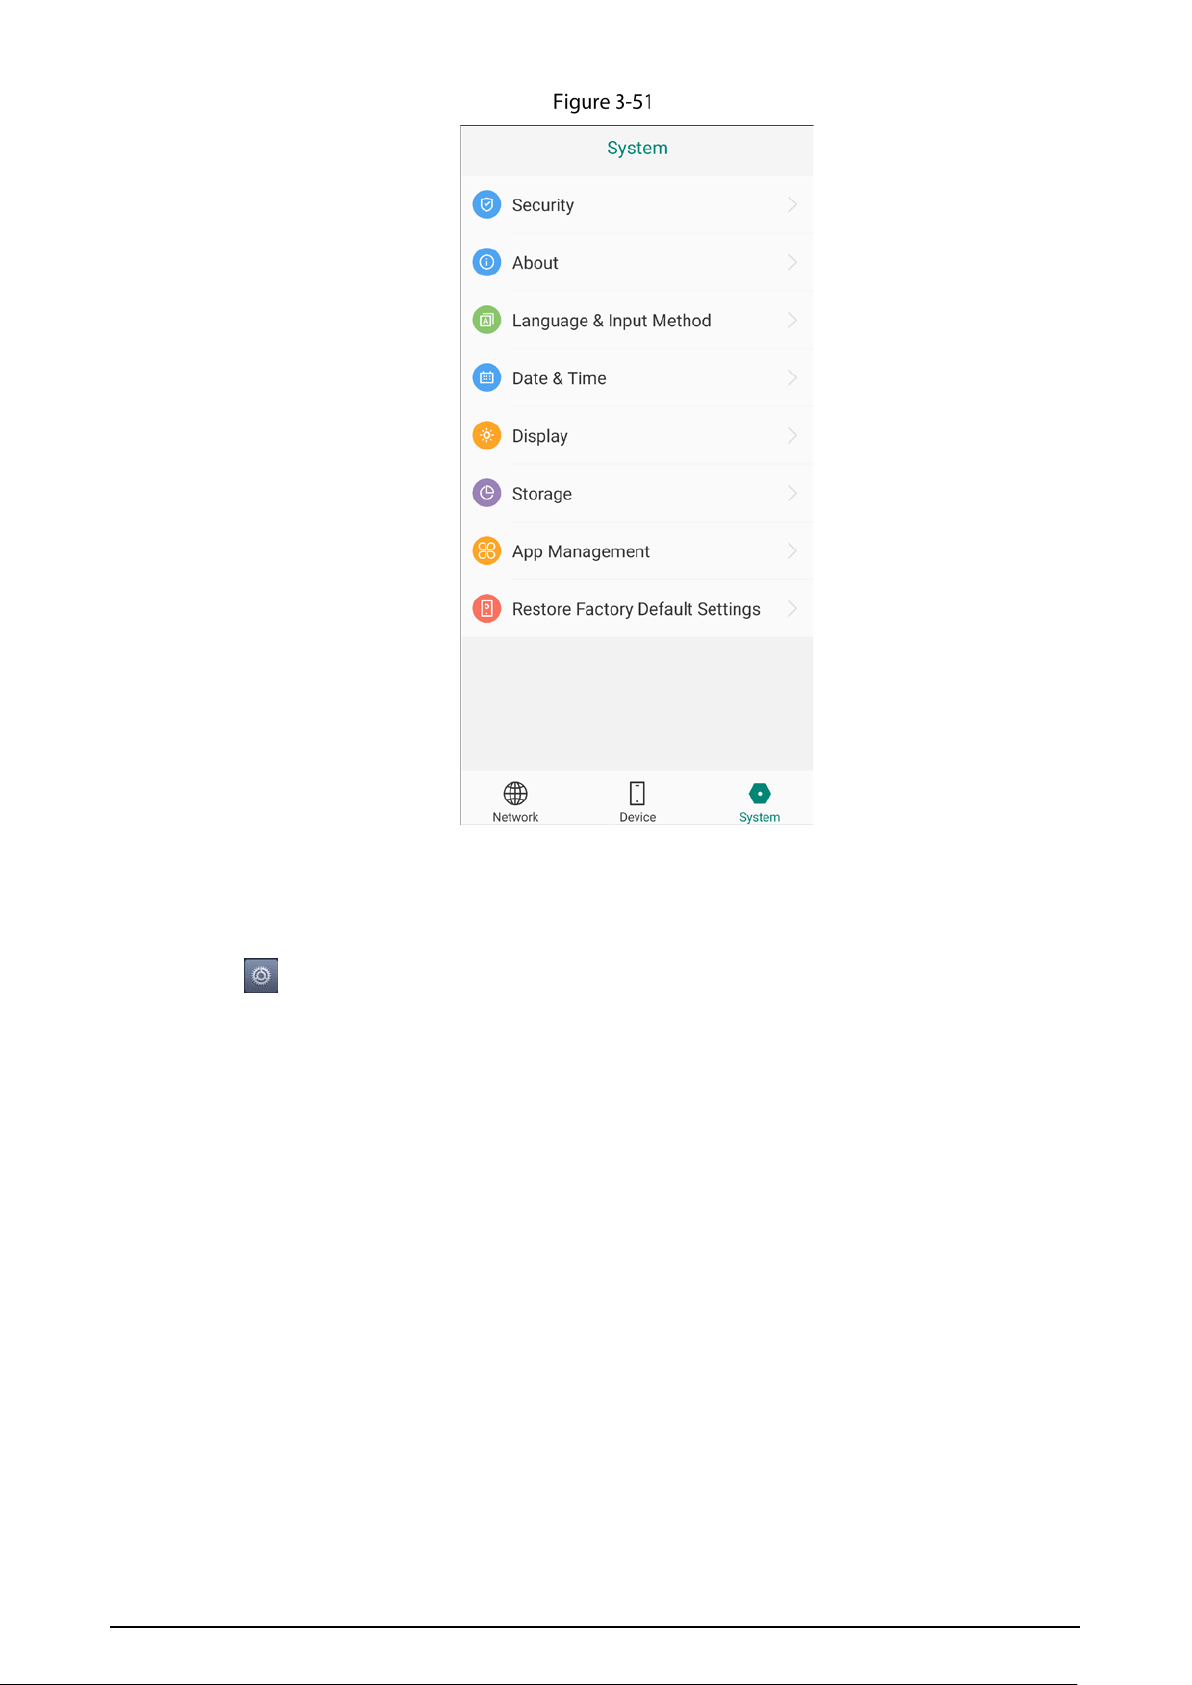
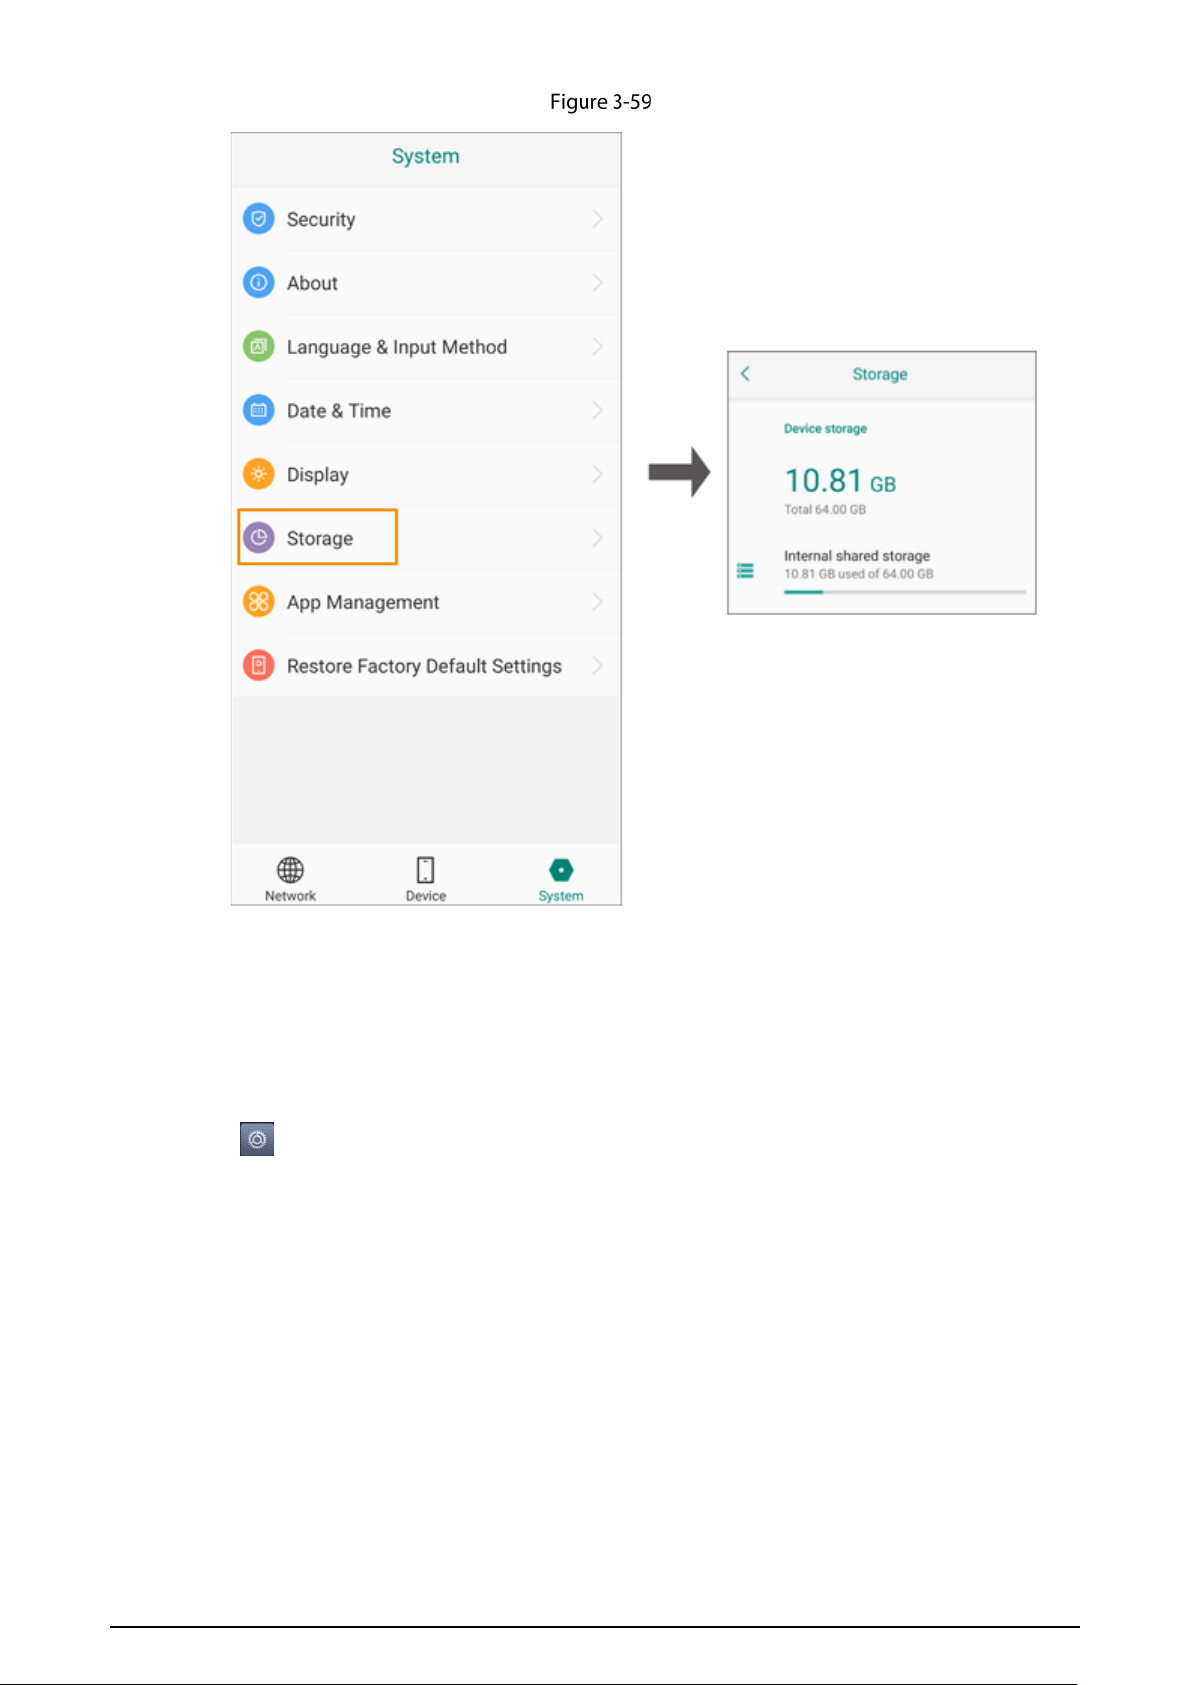
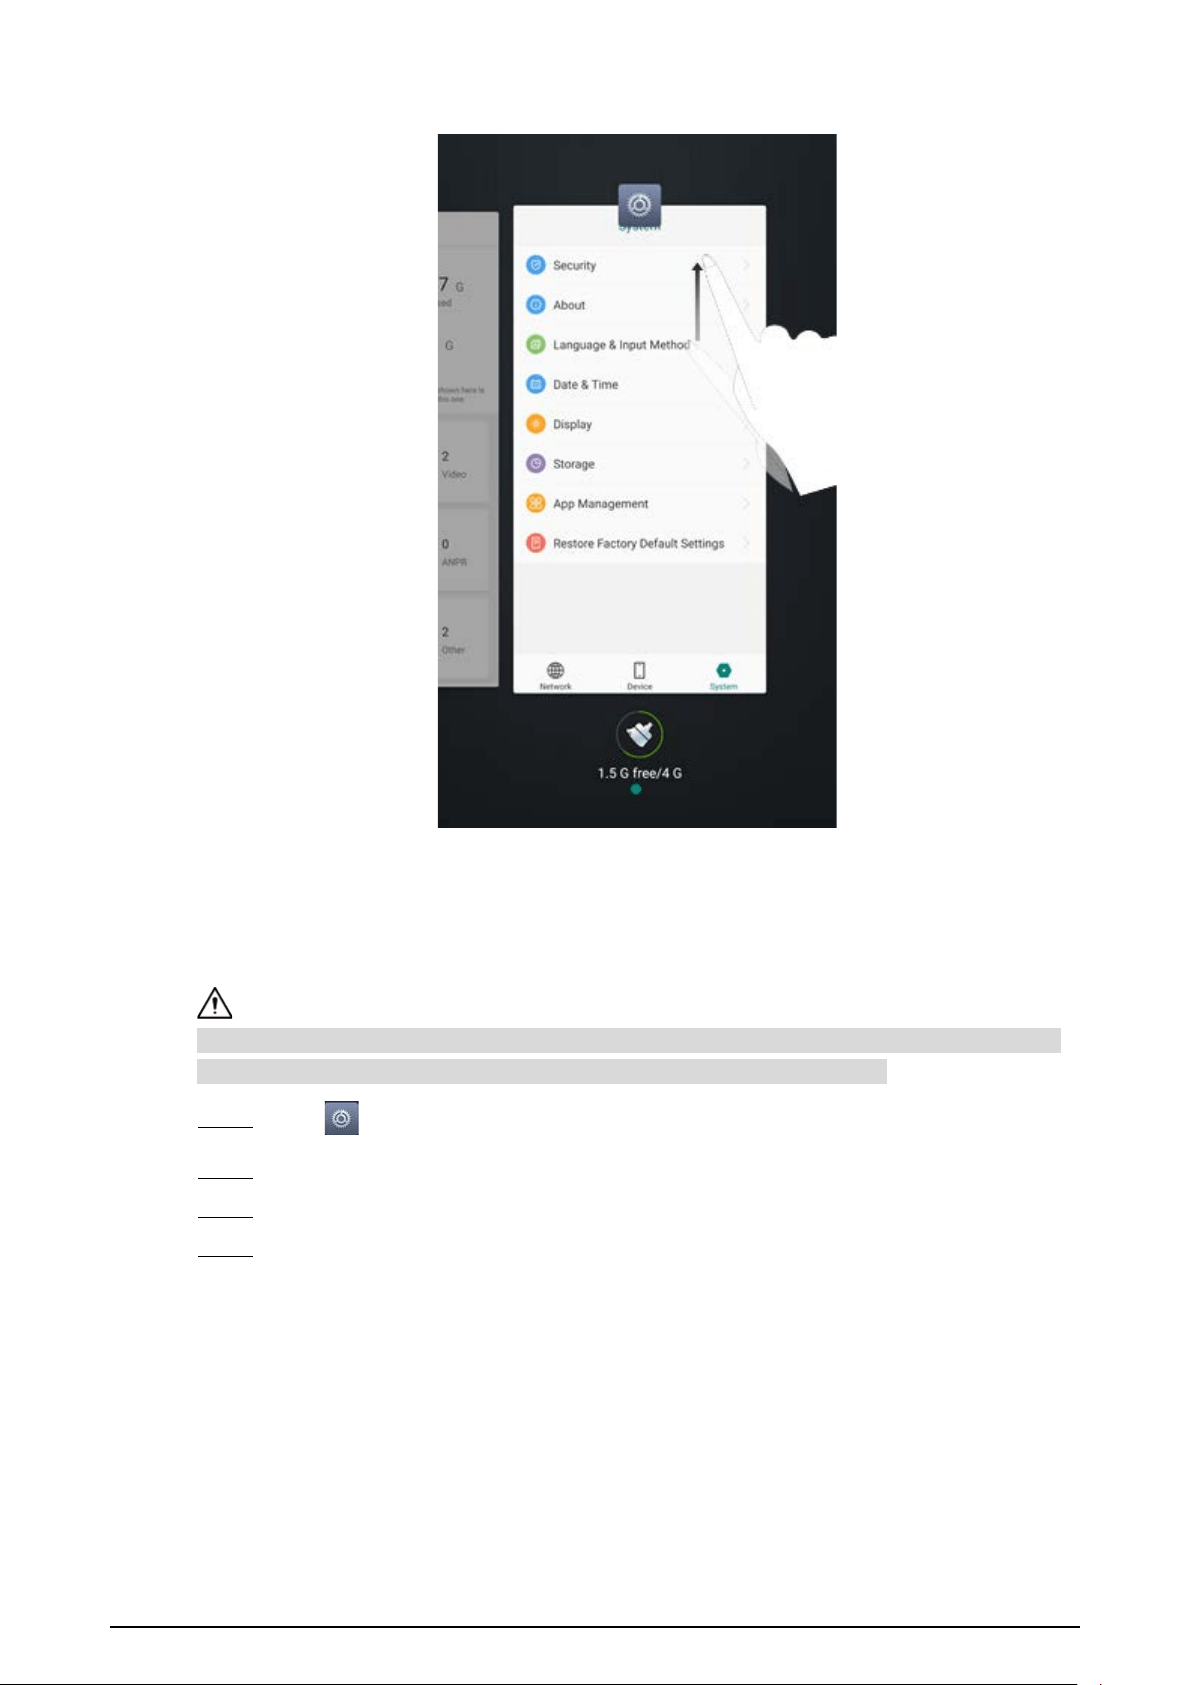
3.7.3 System
Tap on the home screen, select the System tab, and then you can view the device information,
and set the security protection, language, input method, date and time, display, and storage. You can
also restore the Terminal to factory settings.
49
System
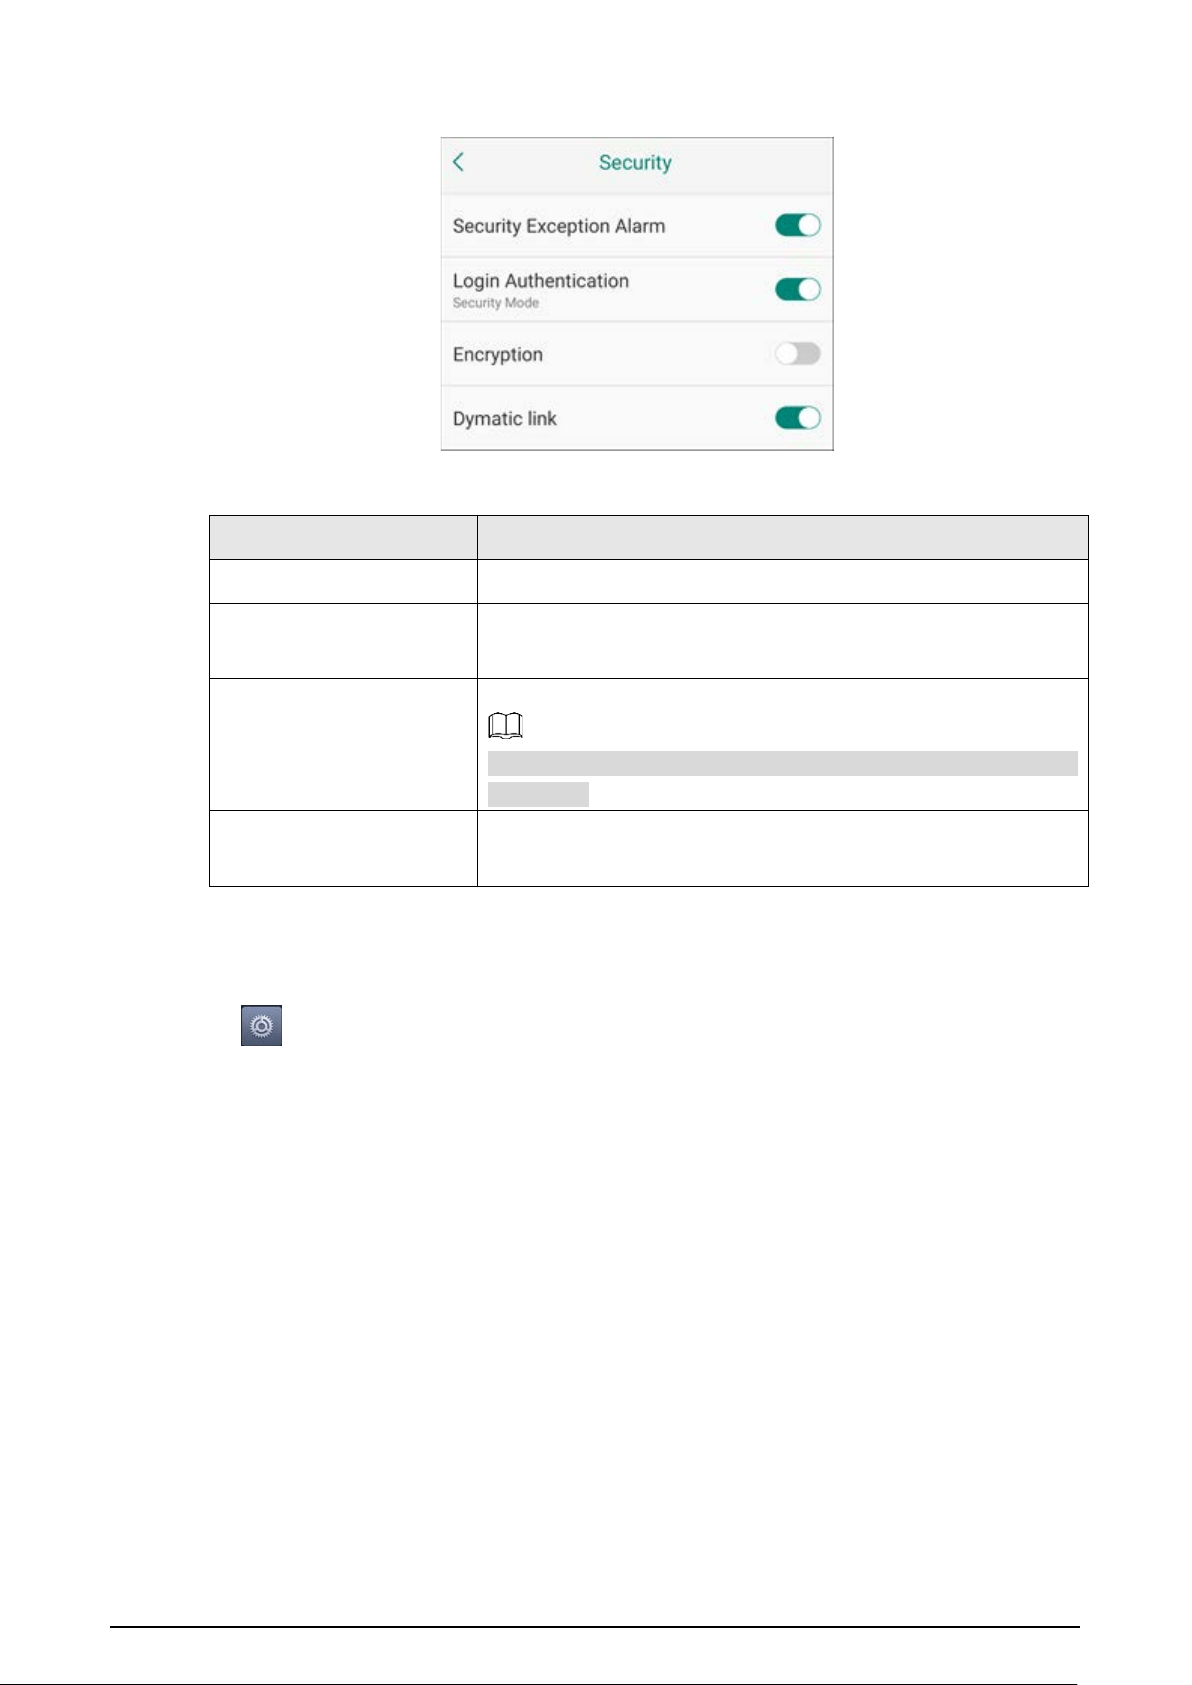
3.7.3.1 Security
Tap on the home screen, and then select System > Security, to configure the security
parameters.
50
Figure 3-54 Security
Table 3-6 Security parameters
Parameter
Description
Security Exception Alarm Display alarm information when an exception occurs.
Login Authentication
Configure login mode. We recommend you turn on security mode
to avoid security risks.
Encryption
Enable encryption for the pairing devices.
Make sure that the pairing devices
or software supports video
decryption.
Dynamic link
Enable it to set an independent link for each request. It is used
during live view video, voice talk and playback.
3.7.3.2 About
Tap on the home screen, select the System tab, and then tap About to view the device
information such as device name, CPU, RAM, storage, legal information and MAC address.

51
About
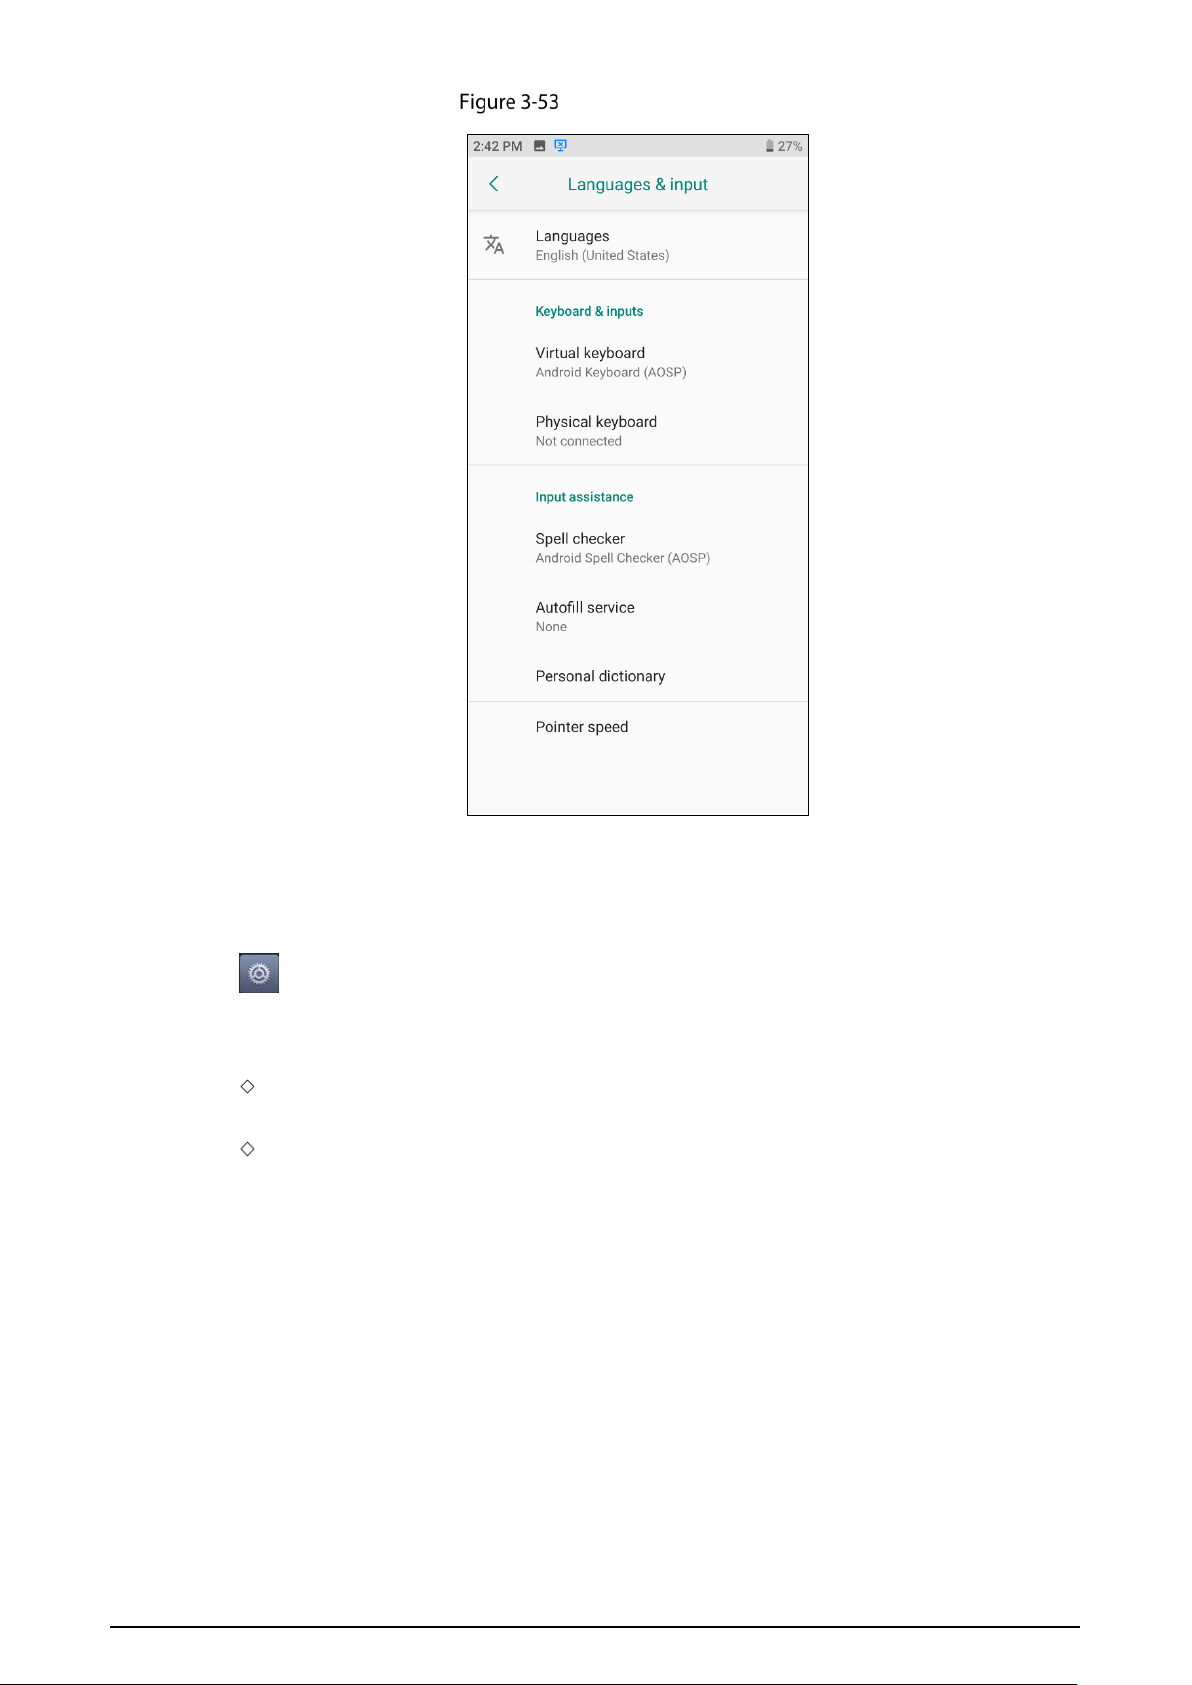
3.7.3.3 Language & Input Method
Tap on the home screen, select the System tab, and then tap Language & Input Method to
select the language and keyboard.
52
Language and input method
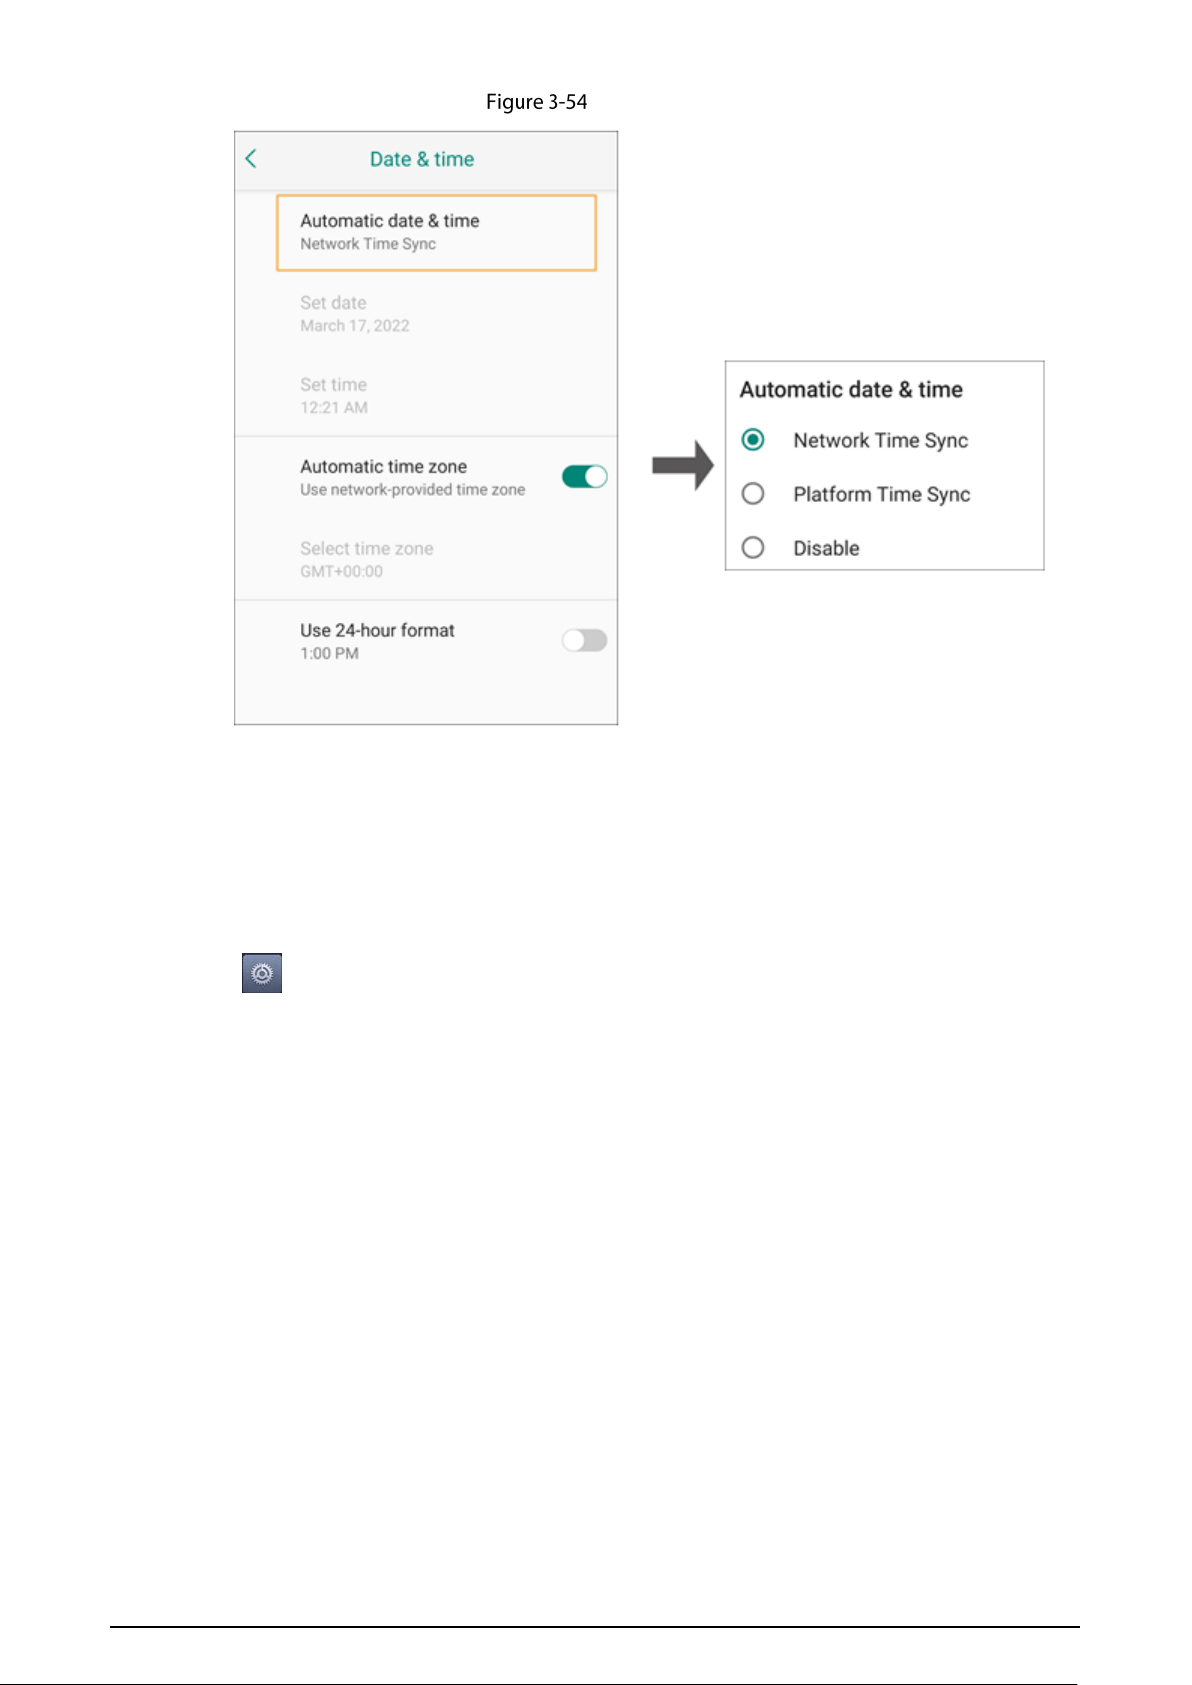
3.7.3.4 Date & Time
Tap on the home screen, select the System tab, and then tap Date & Time to select the time
synchronization mode. You can also set the date, time, and time zone manually.
Tap Automatic date & time.
If you need to synchronize time automatically, select Network Time Sync or Platform Time
Sync.
If you need to set time manually, select Disable, and then set date and time manually.
53
Automatic date & time
Tap Automatic time zone to enable or disable the function. After you disable automatic time
zone, set the time zone manually.
Tap Use 24-hour format to switch between 24-hour and 12-hour format.
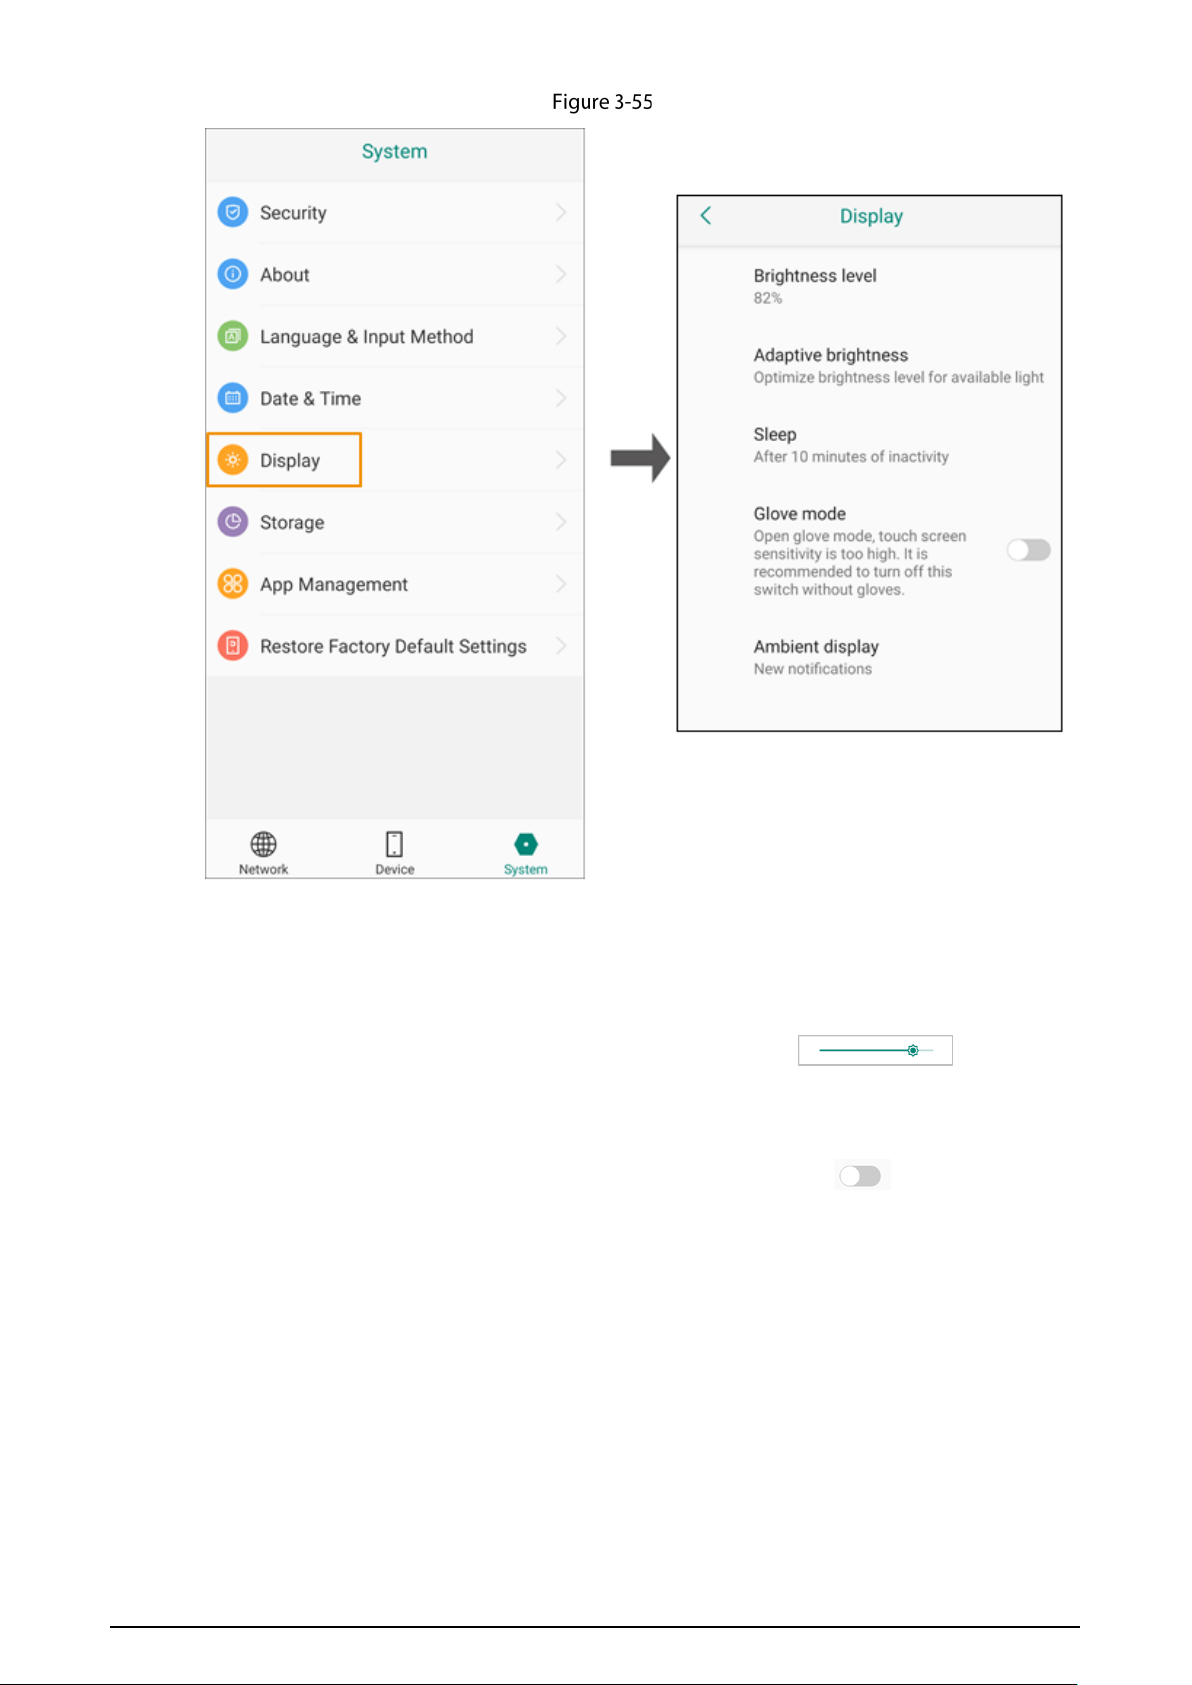
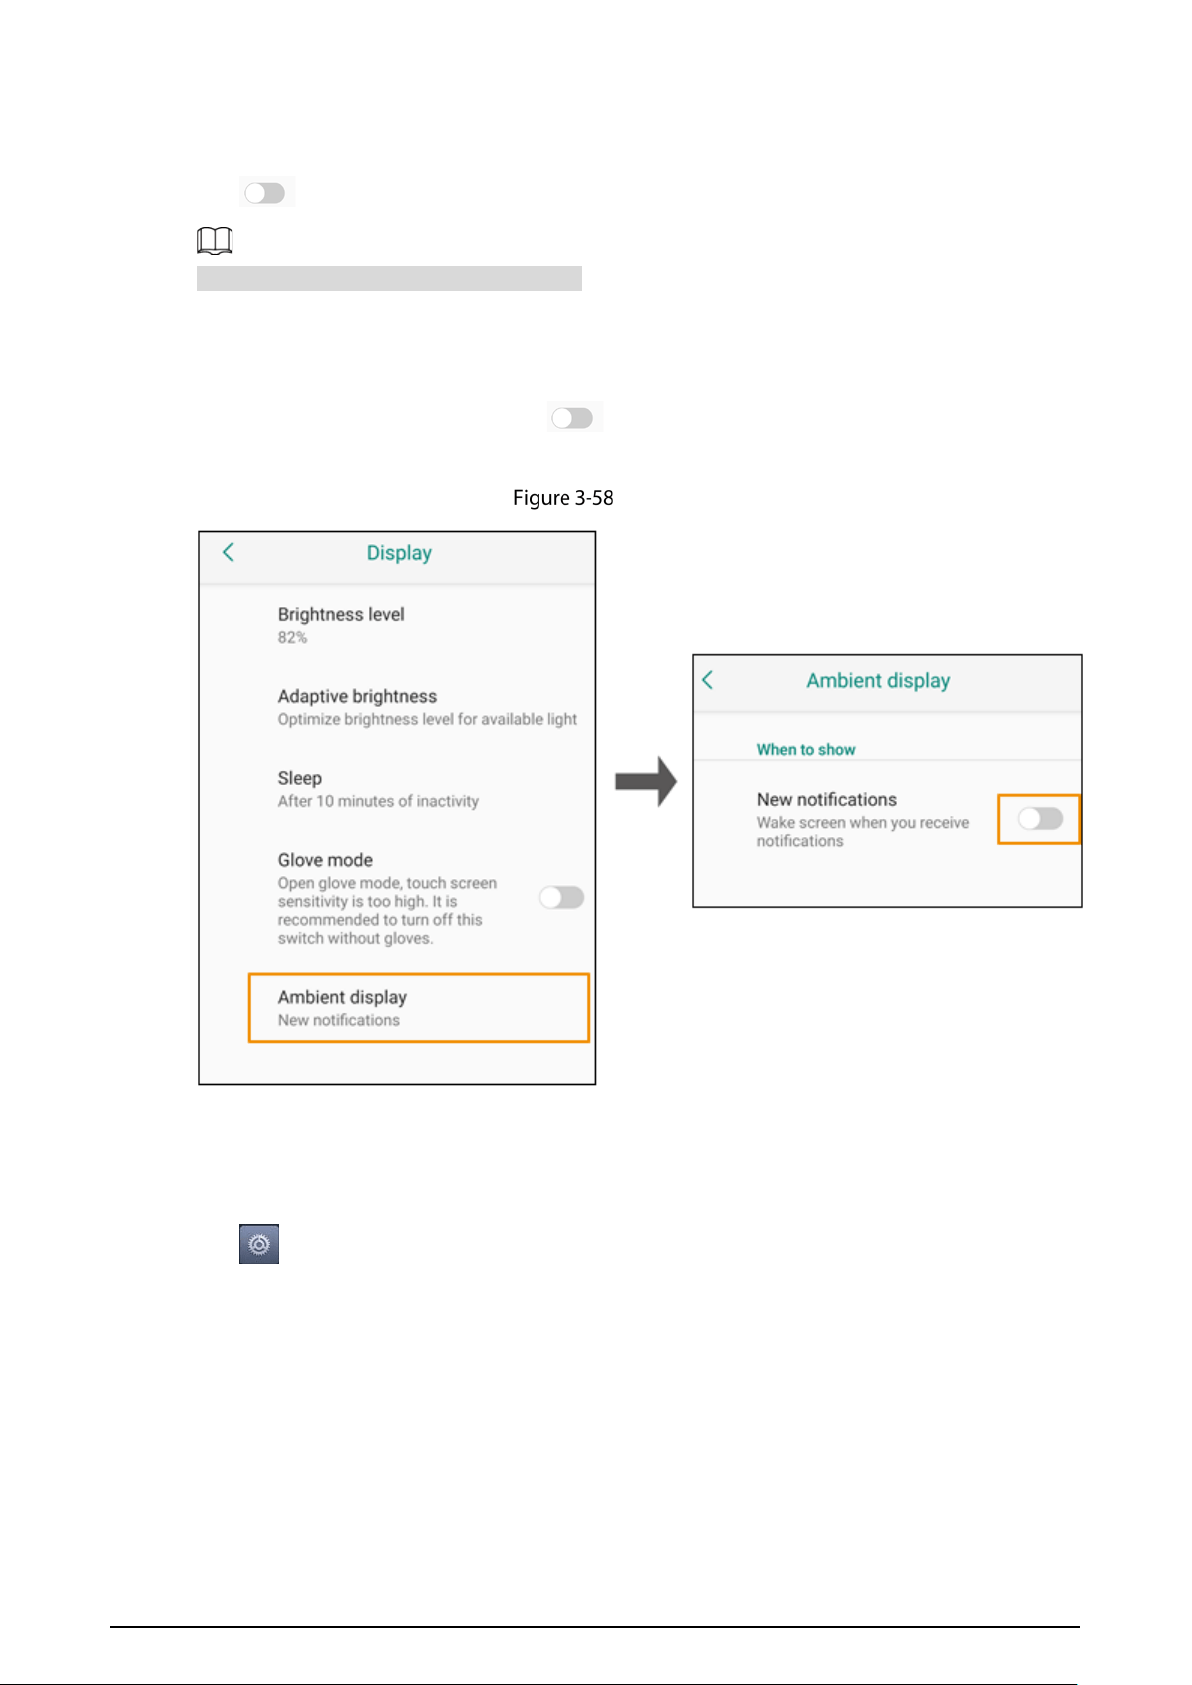
3.7.3.5 Display
Tap on the home screen, select the System tab, and then tap Display to adjust screen
brightness and sleep time, enable or disable glove mode, and set ambient display.
54
Display
Brightness Level
Adjust brightness manually.
Tap
Brightness level on the Display screen, and then drag on to adjust the
brightness.
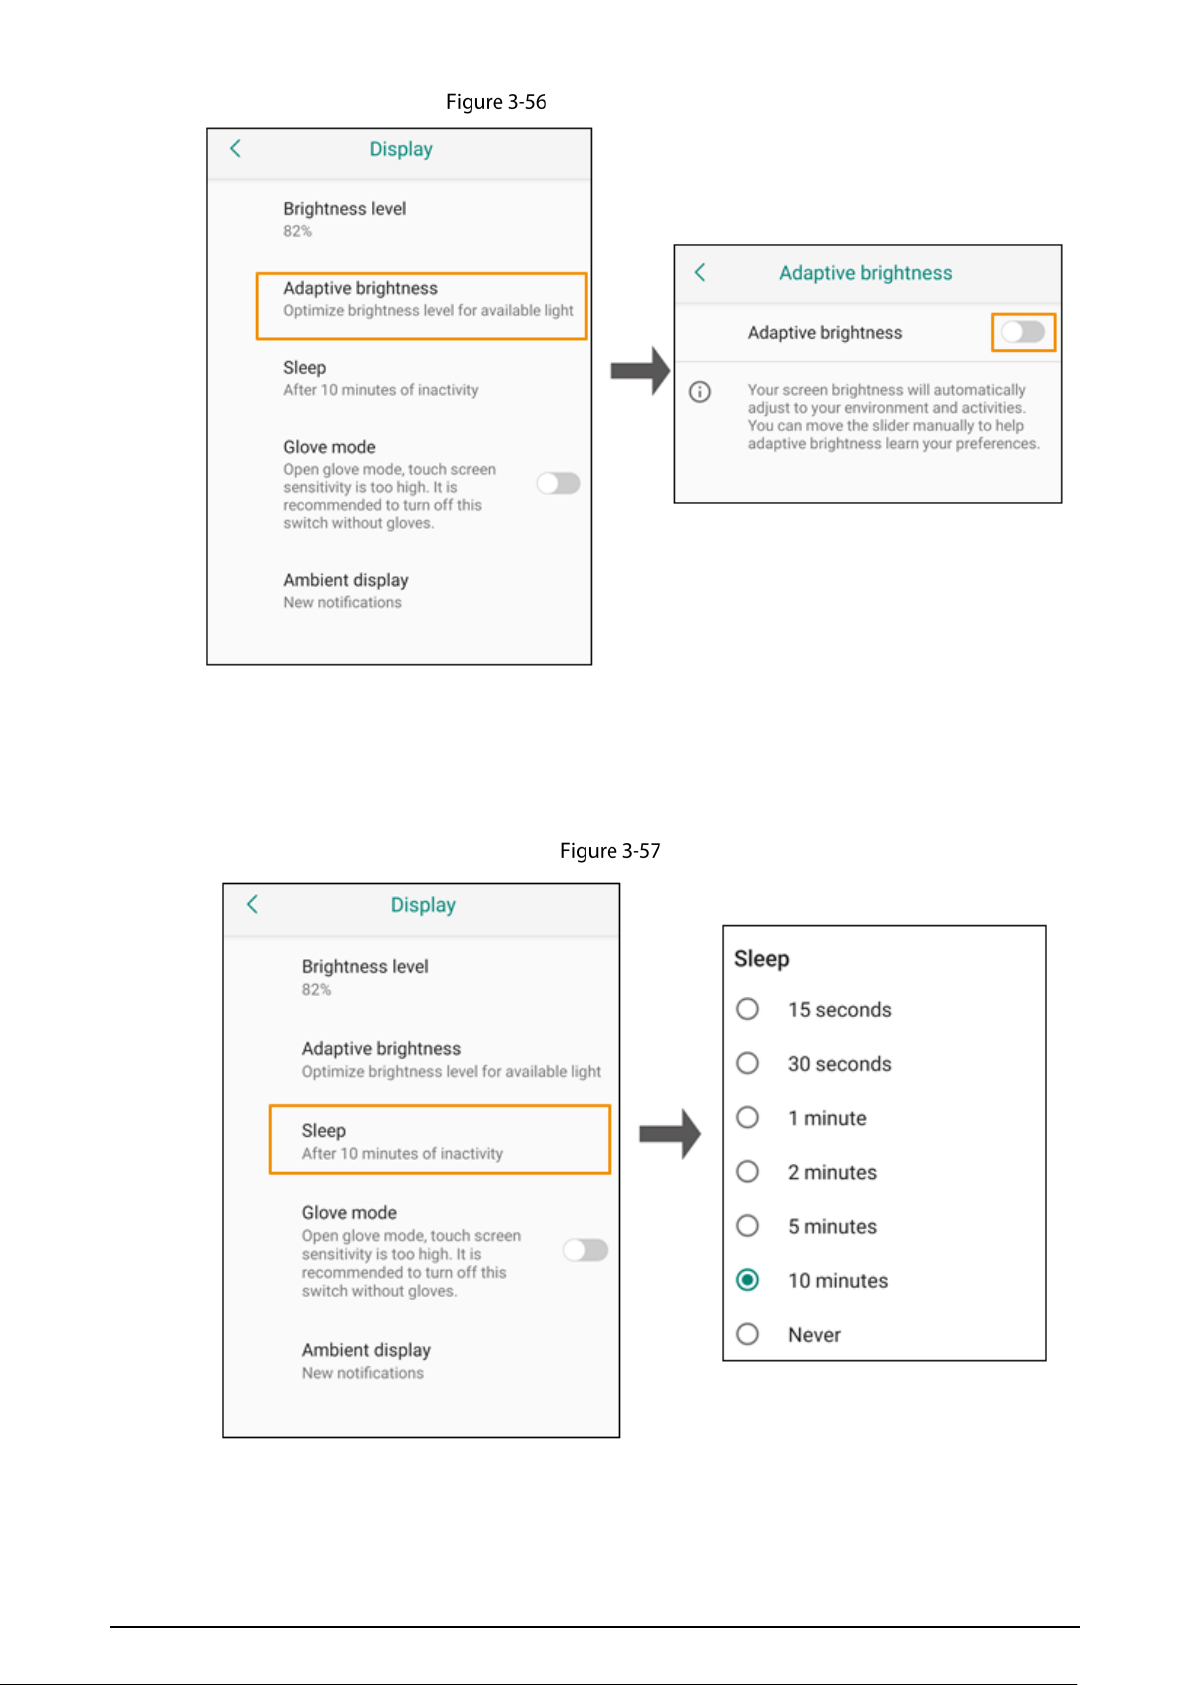
Adjust brightness automatically.
Tap
Adaptive brightness on the Display screen, and then tap to enable adaptive
brightness. The system will adjust screen brightness automatically according to ambient light.
55
Adjust brightness automatically
Sleep
You can set the sleep time for the Terminal to sleep automatically if no operation is performed within
the period.
Sleep
56
Glove Mode
Tap to enable the glove mode to increase the touch sensitivity.
If you do not wear gloves, disable the mode.
Ambient Display
Tap Ambient Display and then tap next to New notifications. The screen wakes up
automatically when you receive notifications.
Ambient display
3.7.3.6 Storage
Tap on the home screen, select the System tab, and then tap Storage to see the used space and
available space.
57
Storage
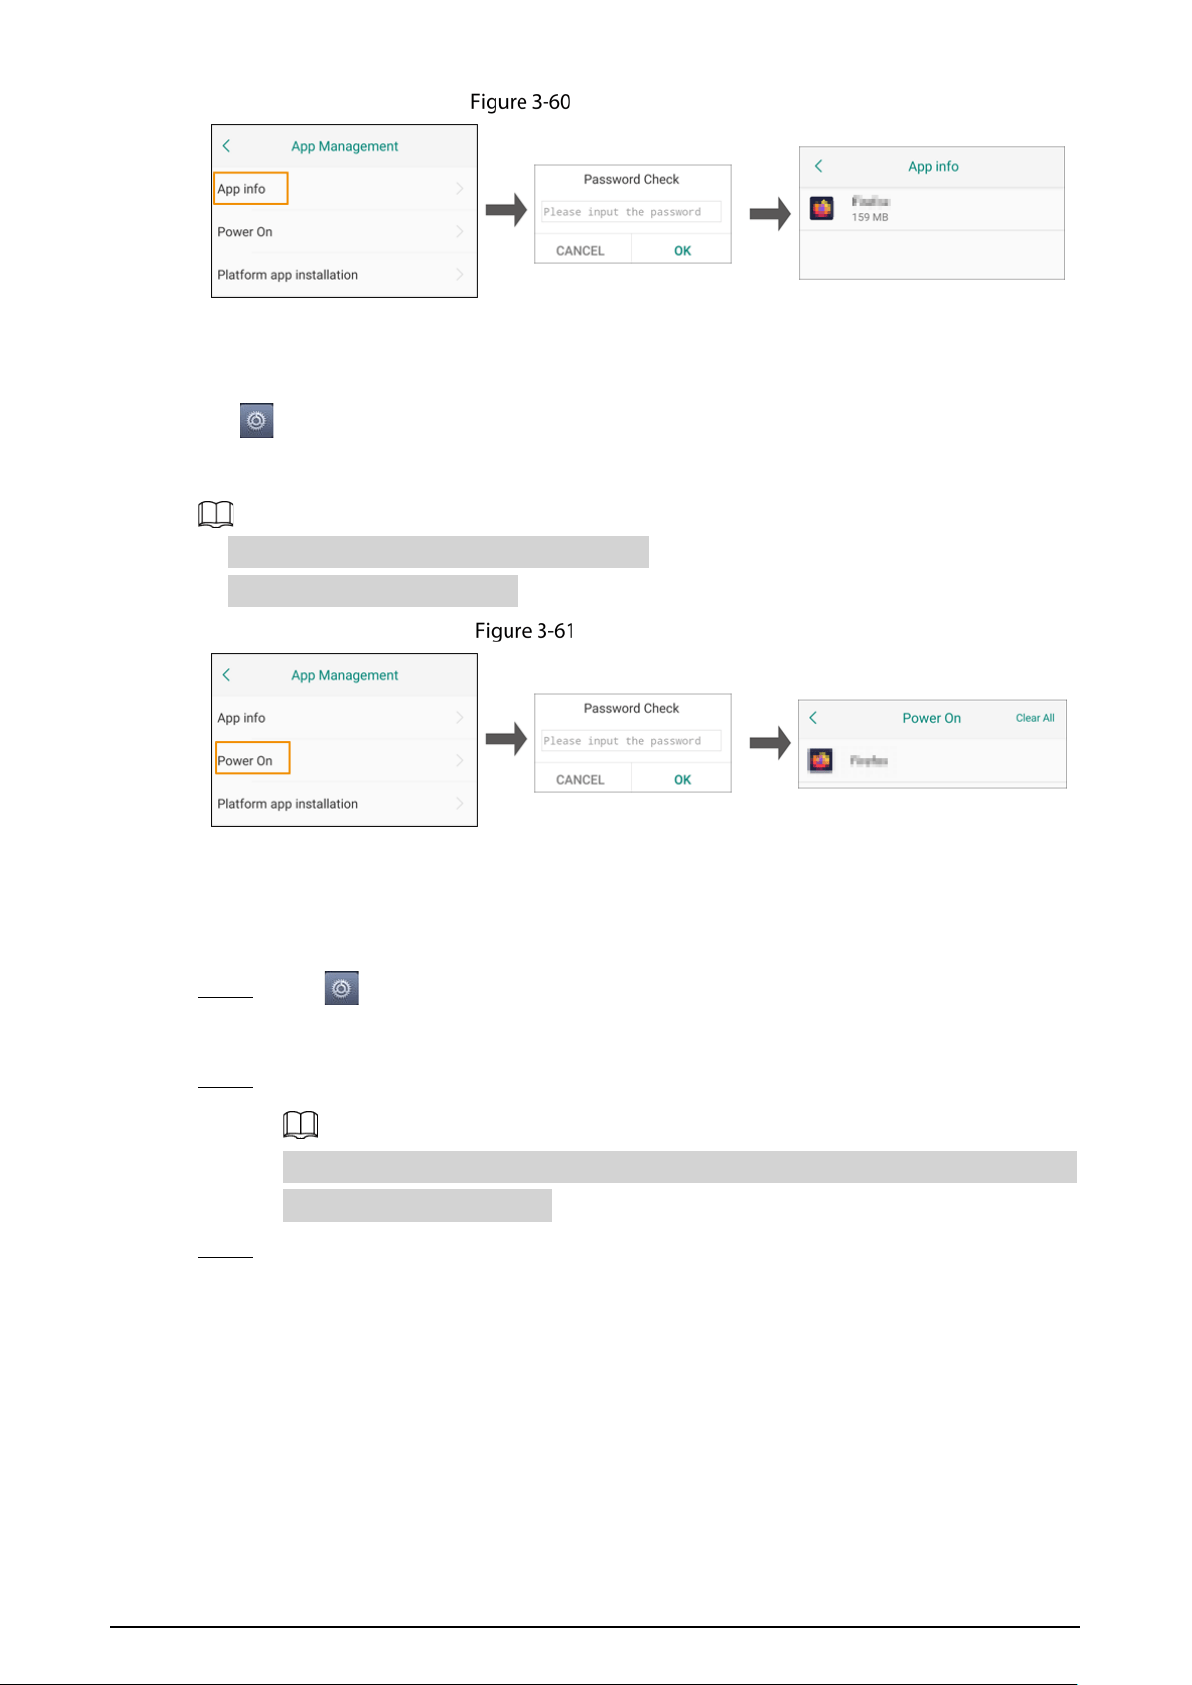
3.7.3.7 App Management
3.7.3.7.1 Viewing App Information
Tap on the home screen, select System > App Management > App info, enter the password,
and then you can view the information on the apps.
58
App information
3.7.3.7.2 Configuring Startup App
Tap on the home screen, select System > App Management > Power On, enter the password,
and then you can set the startup app that runs automatically after the system starts up.
●
Tap
Clear All to remove all the startup settings.
●
You can set only one startup app.
Set startup app
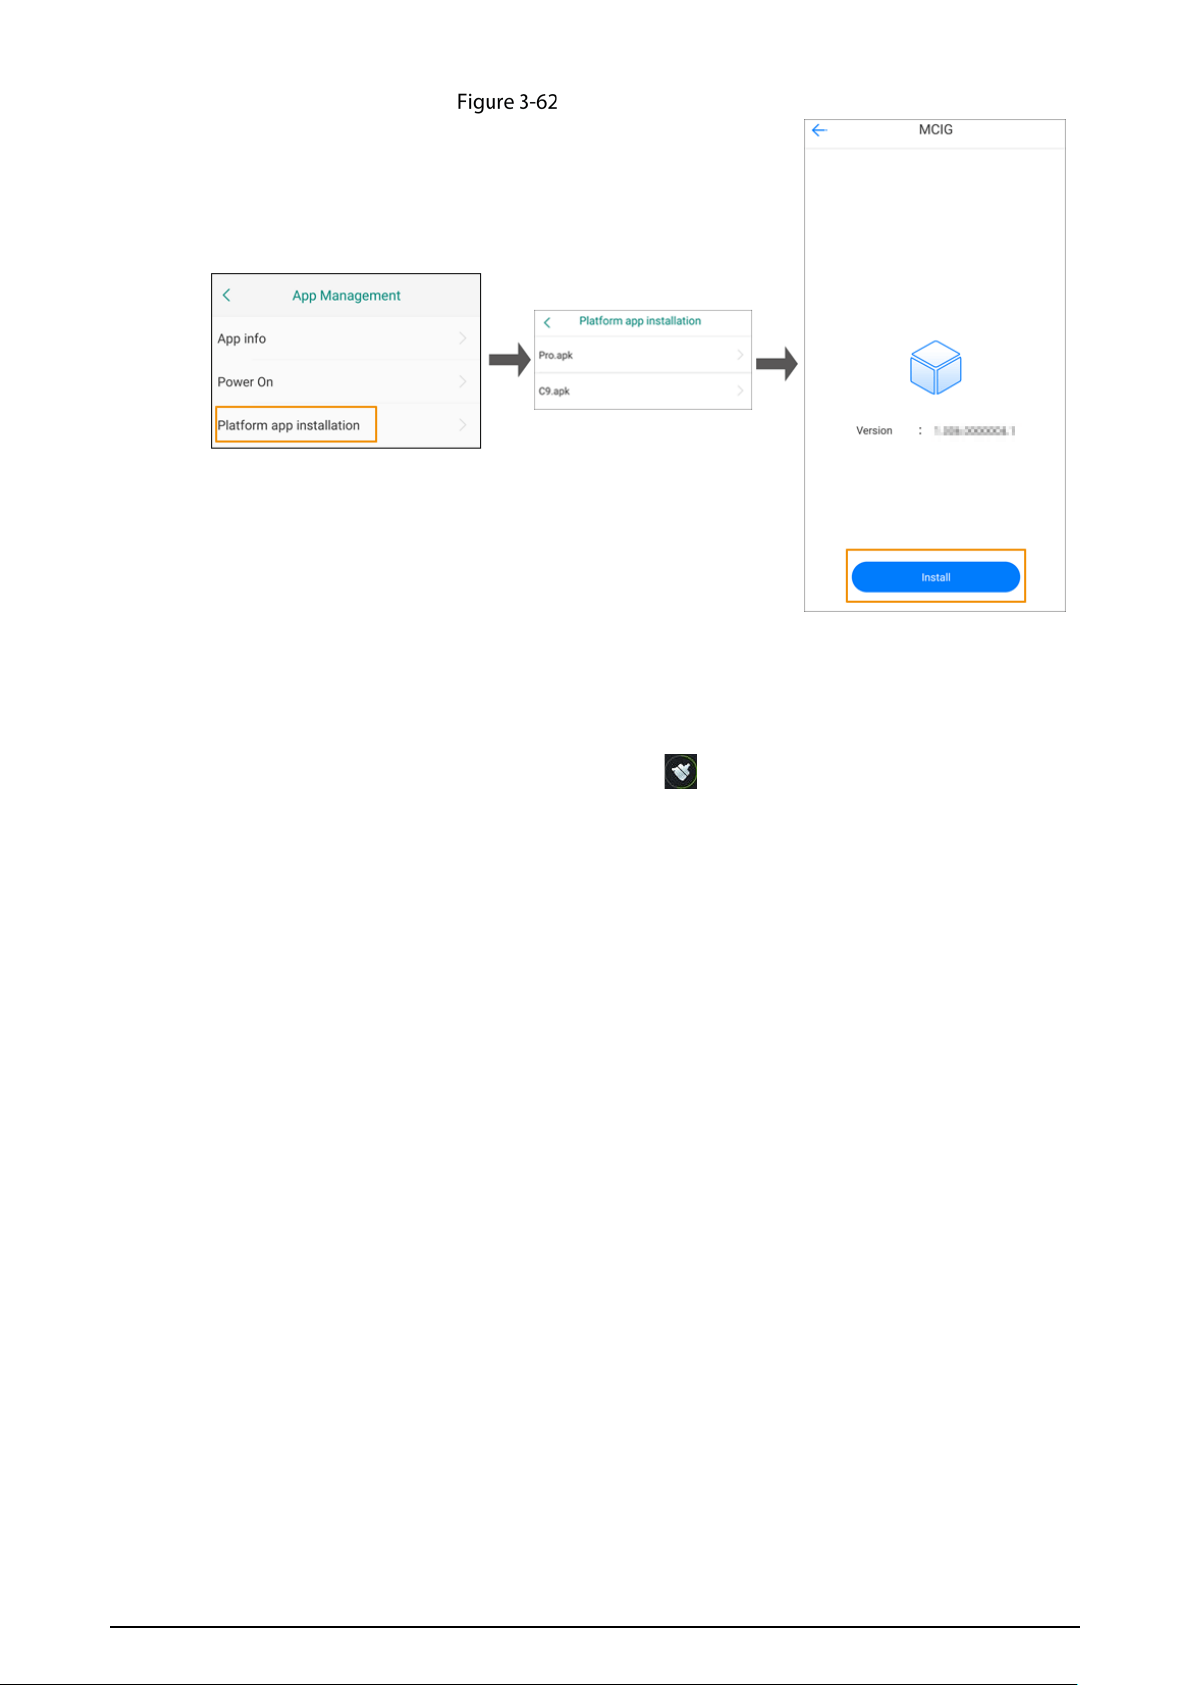
3.7.3.7.3 Installing Platform Apps
Install the platforms apps that have been configured in advance.
Step 1 Tap on the home screen, and then select
System > App Management > Platform app
installation.
Step 2 Select a pre-configured platform apk file.
The apk files are configured before the Terminal leaves the factory. Contact the technical
support to get other apk files.
Step 3 Follow the on-screen instructions to install the app. The installed app will appear on the
home screen.
59
Install platform app
3.7.3.7.4 Managing Background Apps
Tap the menu button on the home screen to view the apps running in the background. Tap an app
and then swipe up to close the background app. Tap to close all background apps.
60
Figure 3-65 Close background app
3.7.3.8 Restoring to Factory Default Settings
Please be advised that if you restore the Terminal to factory default settings, all data in the internal
storage and micro SD card will be erased, and the operation cannot be undone.
Step 1 Tap on the home screen, and then select
System > Restore Factory Default Settings.
Step 2 (Optional) Select Clear video, audio and image data.
Step 3 Tap RESTORE FACTORY DEFAULTS
.
Step 4 Tap ERASE EVERYTHING, enter the password of the admin account, and then tap OK.
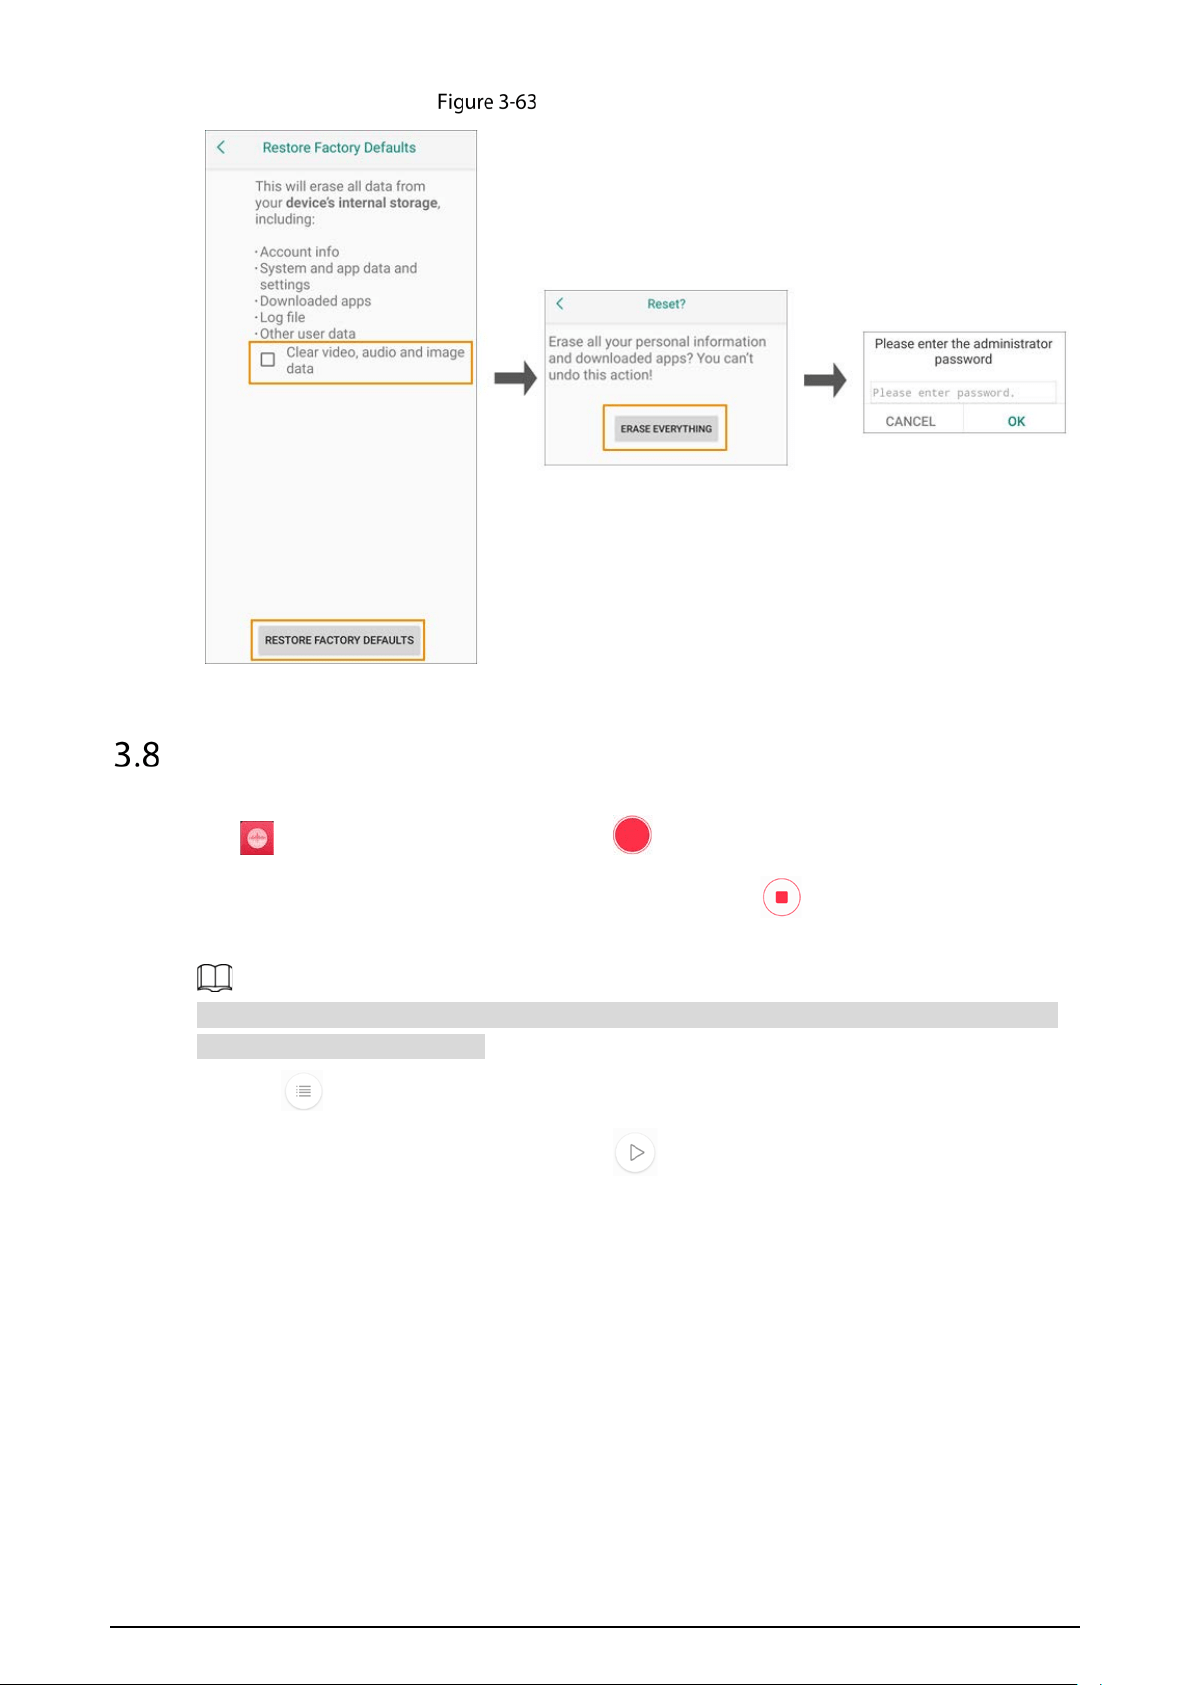
61
Restore to factory default settings
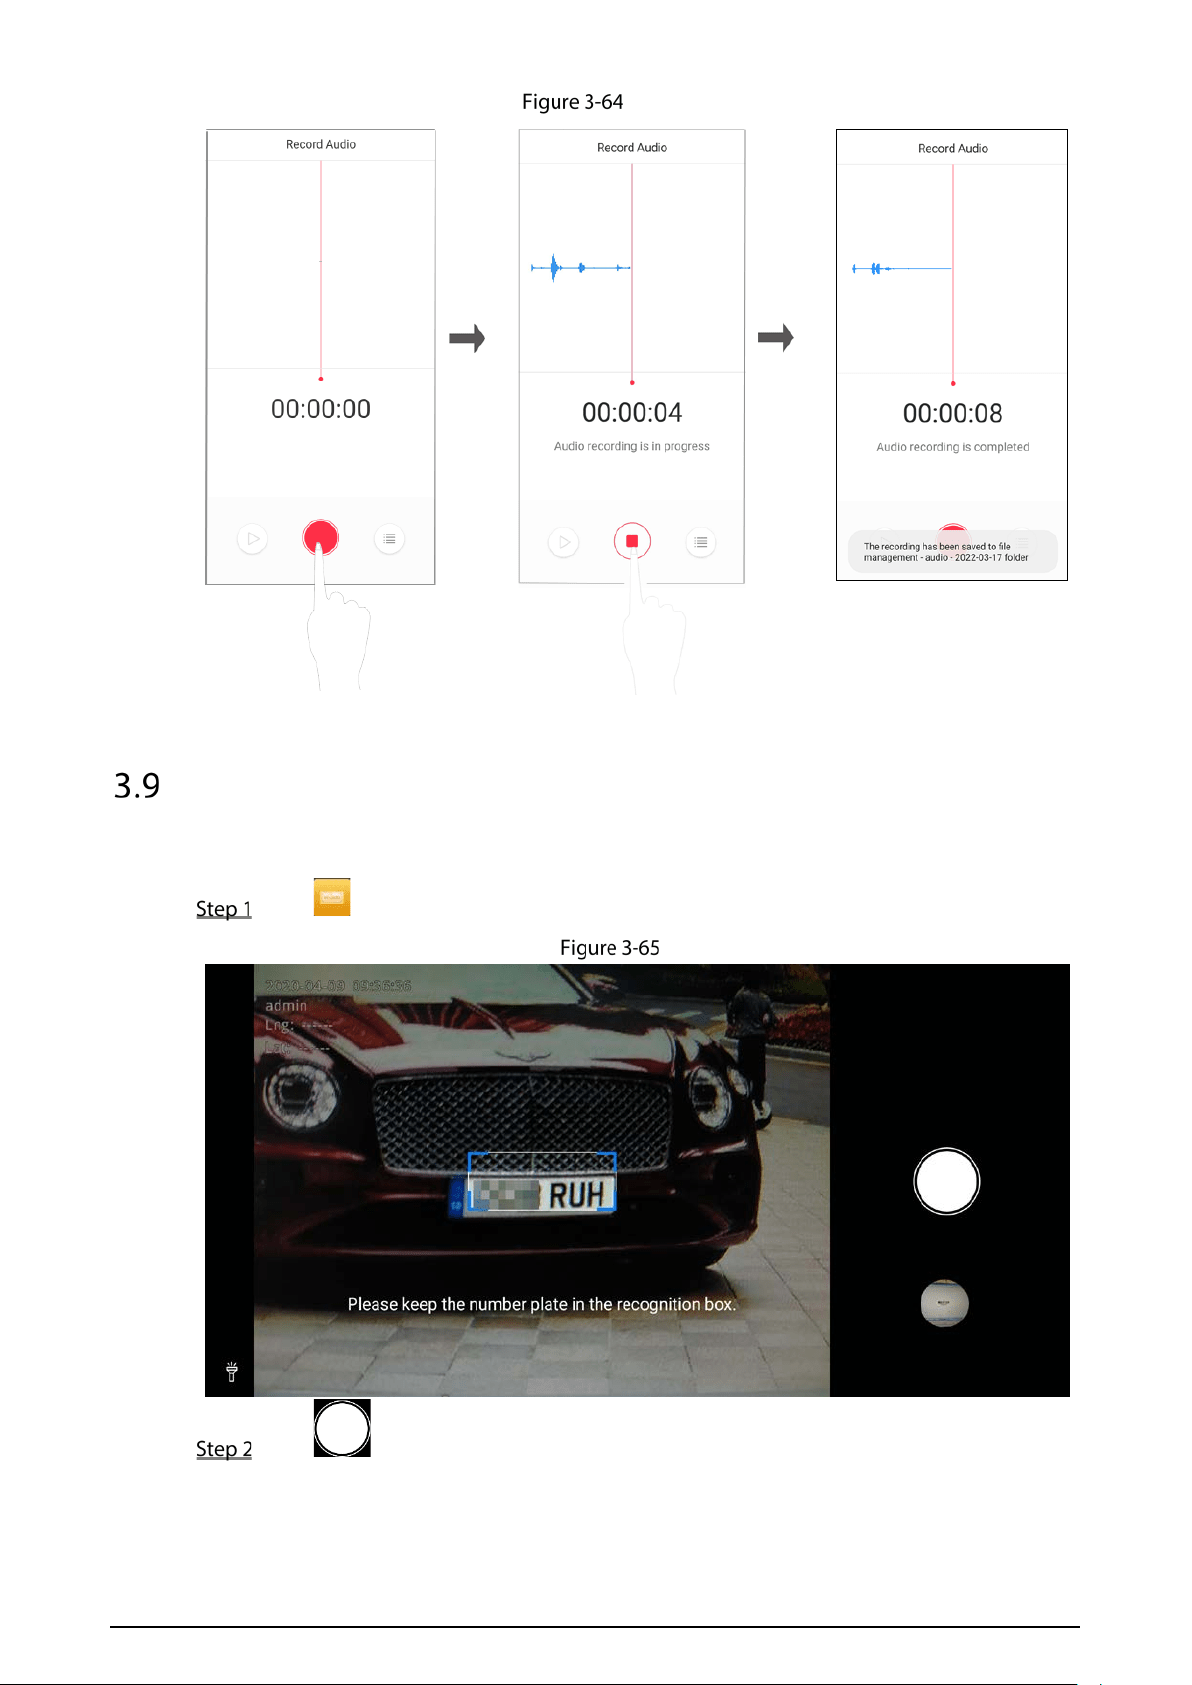
Recording Audios
Tap on the home screen, and then tap to start recording. The Audio recording is in
progress prompt and the audio duration are displayed. Tap , and the Audio recording is
completed prompt is displayed.
Before connecting the Terminal to the data collection station, stop recording audios and videos to
avoid incomplete file acquisition.
Tap to view audio files.
After the audio recording is complete, tap to play the audio.
62
Record audios
ANPR
The Terminal can recognize license plate information.
Tap on the home screen.
ANPR
Tap .
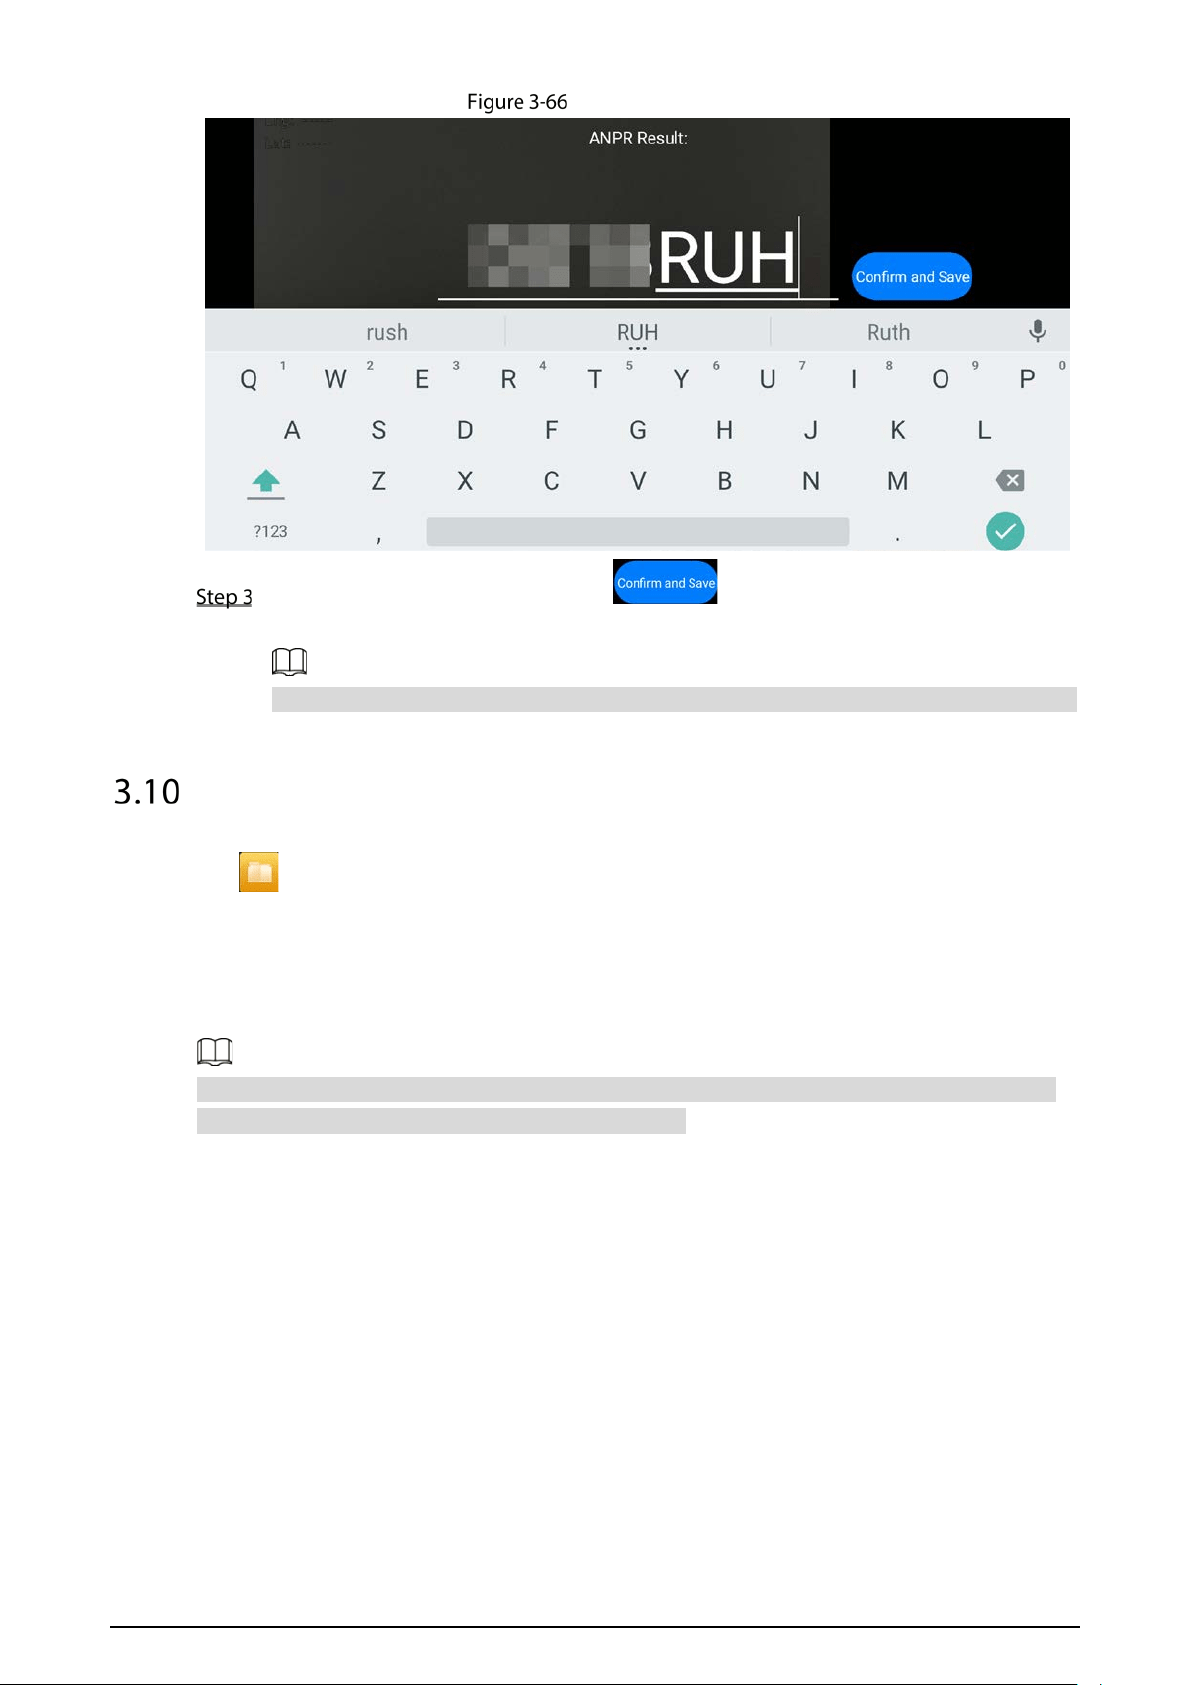
63
Plate number confirmation
Check the plate number, and then tap .
The picture is saved.
The pictures are saved in the folder with the capturing date under File Management > ANPR.
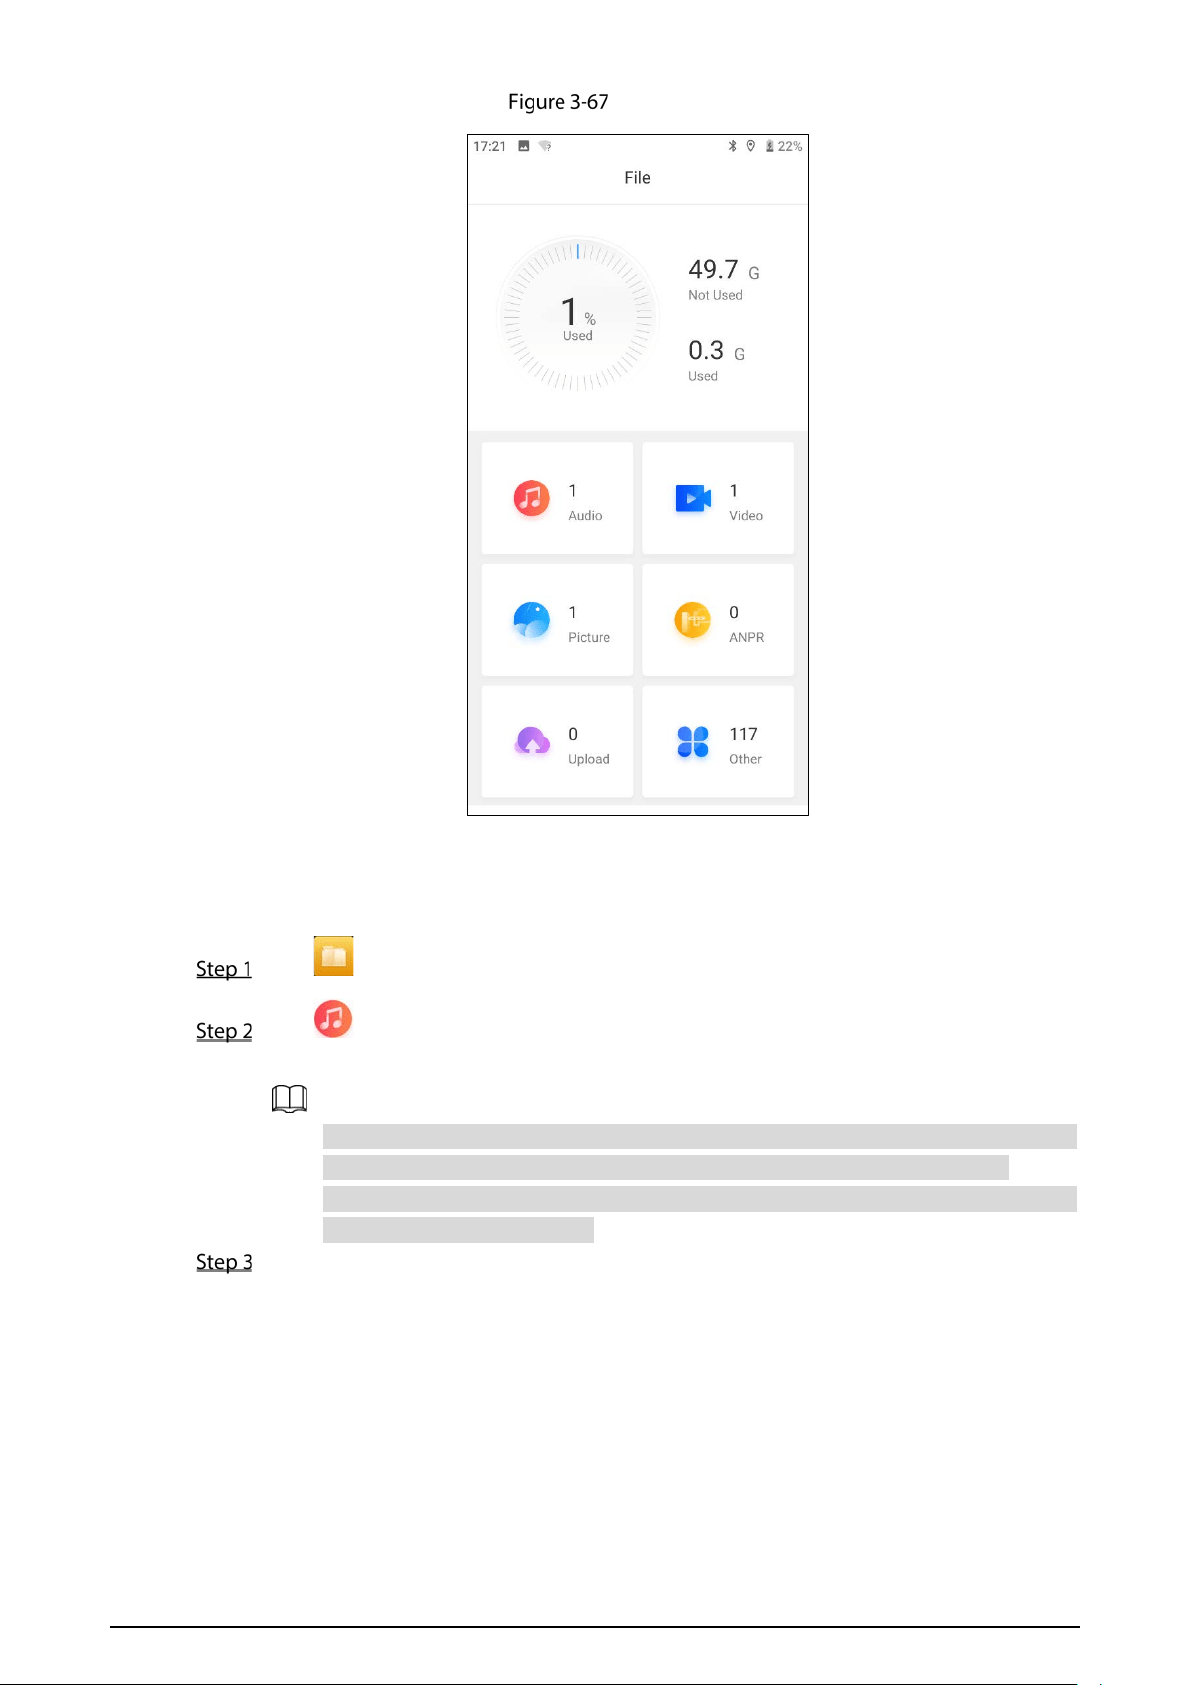
File Management
Tap on the home screen, and then you can view the available space, audio, video, picture, ANPR,
file uploading status, and other information. You can also delete and upload files.
The admin account has the permission to view, upload, and edit files of all users. Other accounts can
only view files of the corresponding user. This section uses the operation of the admin account as an
example.
If you tap Select All, only loaded files can be selected, which is to avoid accidental deletion. If you
want to delete all files, delete the corresponding folders.
64
File management
Audio
Tap on the home screen.
Tap and then select a folder.
The audio folder list is displayed.
The folder is named with the recording date and username. The earliest folder is listed
at the bottom, and the folders of admin are displayed above tho of other users.
The audio files are named with the recording time and displayed in chronological order,
with the earliest at the bottom.
Select an audio file to play it.
Tap Edit to upload or delete files.
Select a file and then swipe left to delete it.
65
Audio
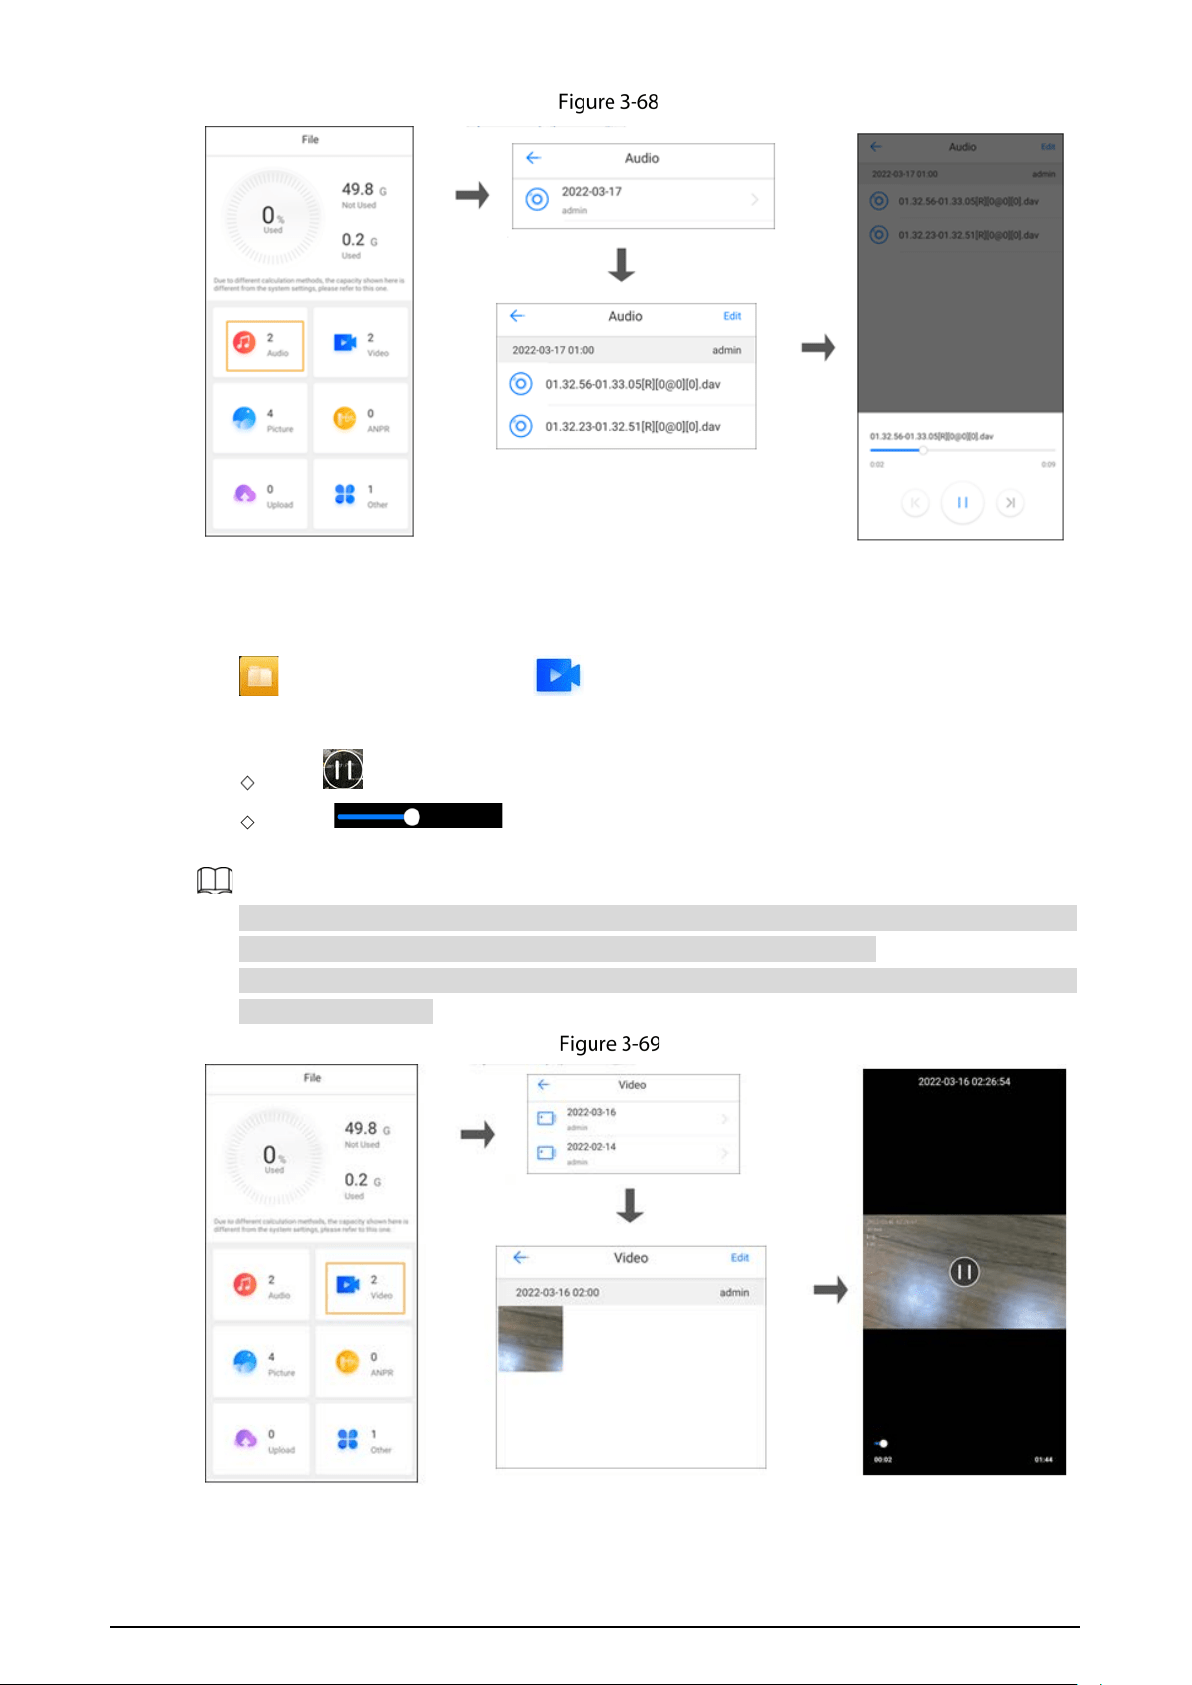
Video
Tap on the home screen, select , and then select a folder.
Tap a video file to play it.
Tap to pause the video play.
Drag to adjust the video play progress.
Tap Edit to upload or delete the files.
The folder is named with the recording date and username. The earliest folder is listed at the
bottom, and the folders of admin are displayed above that of other users.
The video files are named with the recording time and displayed in chronological order, with the
earliest at the bottom.
Video
66
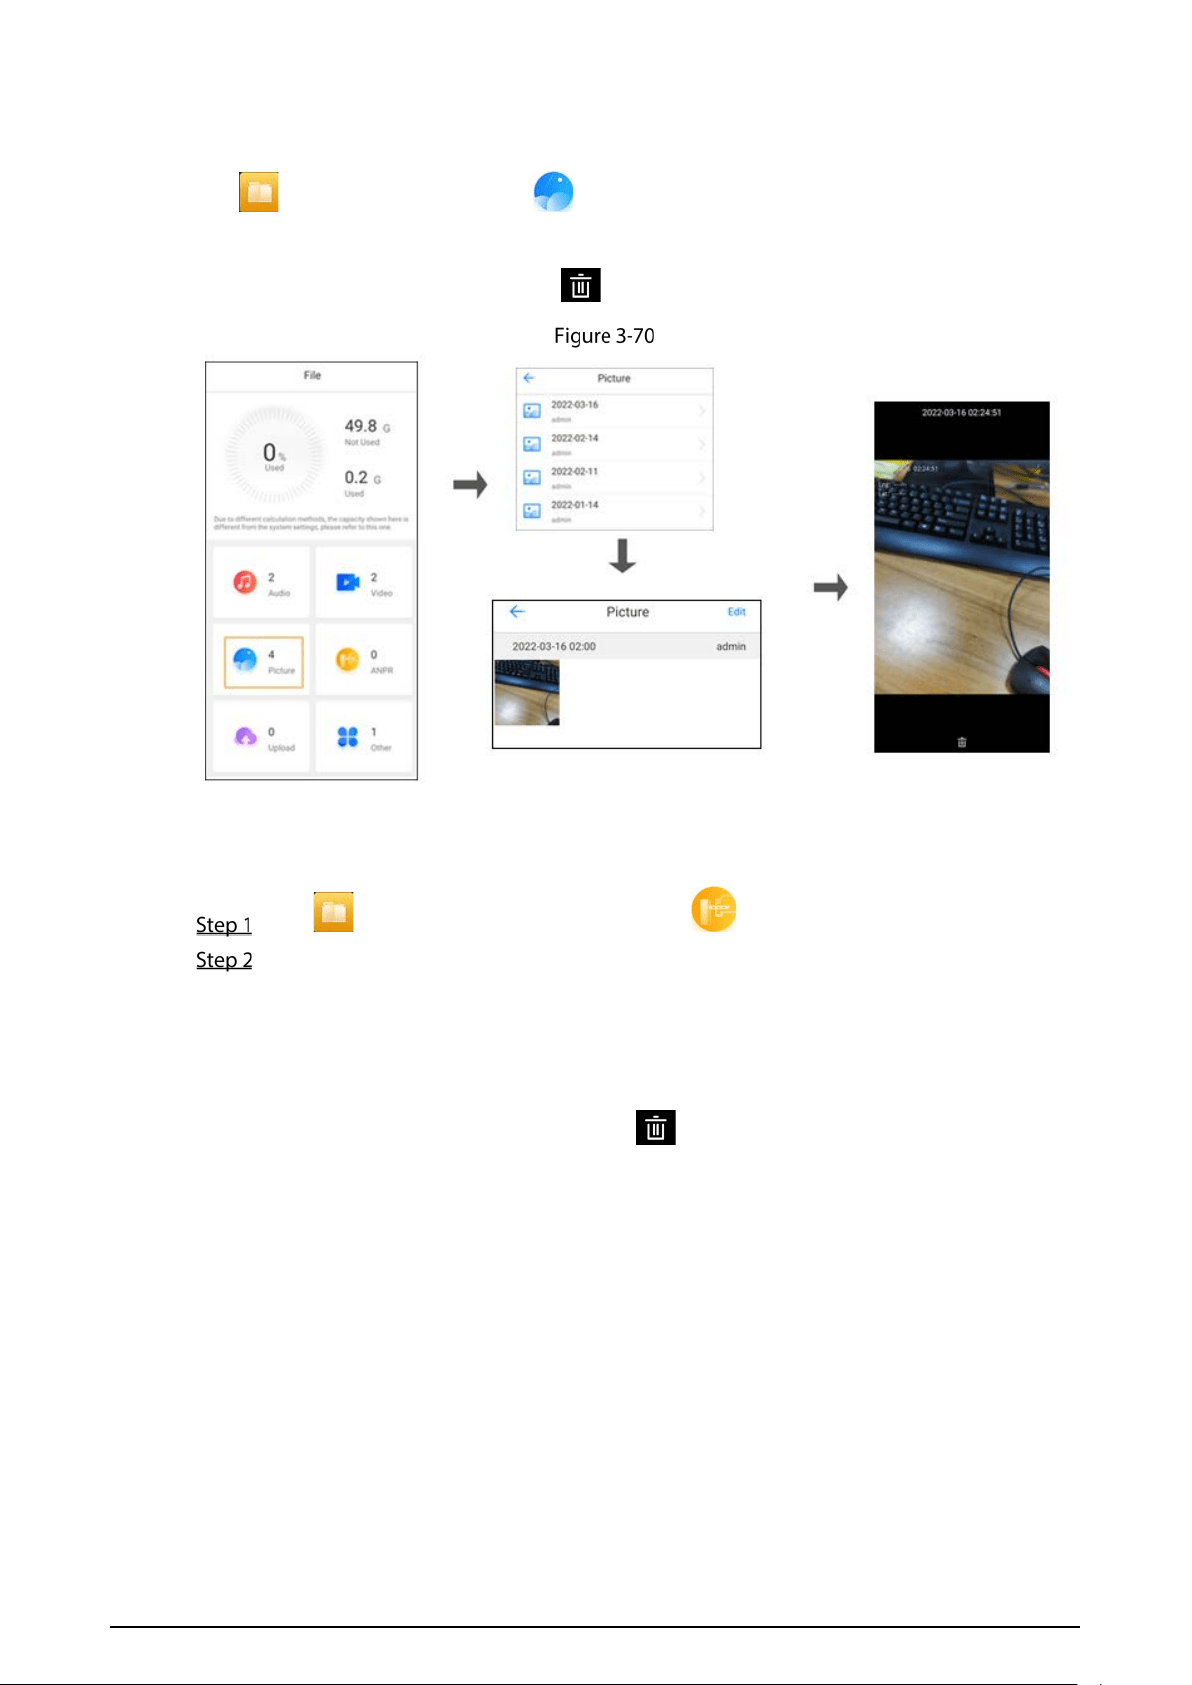
Picture
Tap on the home screen, select , select a folder and then then select a picture to view it.
Tap Edit to upload or delete the files.
While you are viewing a picture, tap to delete this picture.
Picture
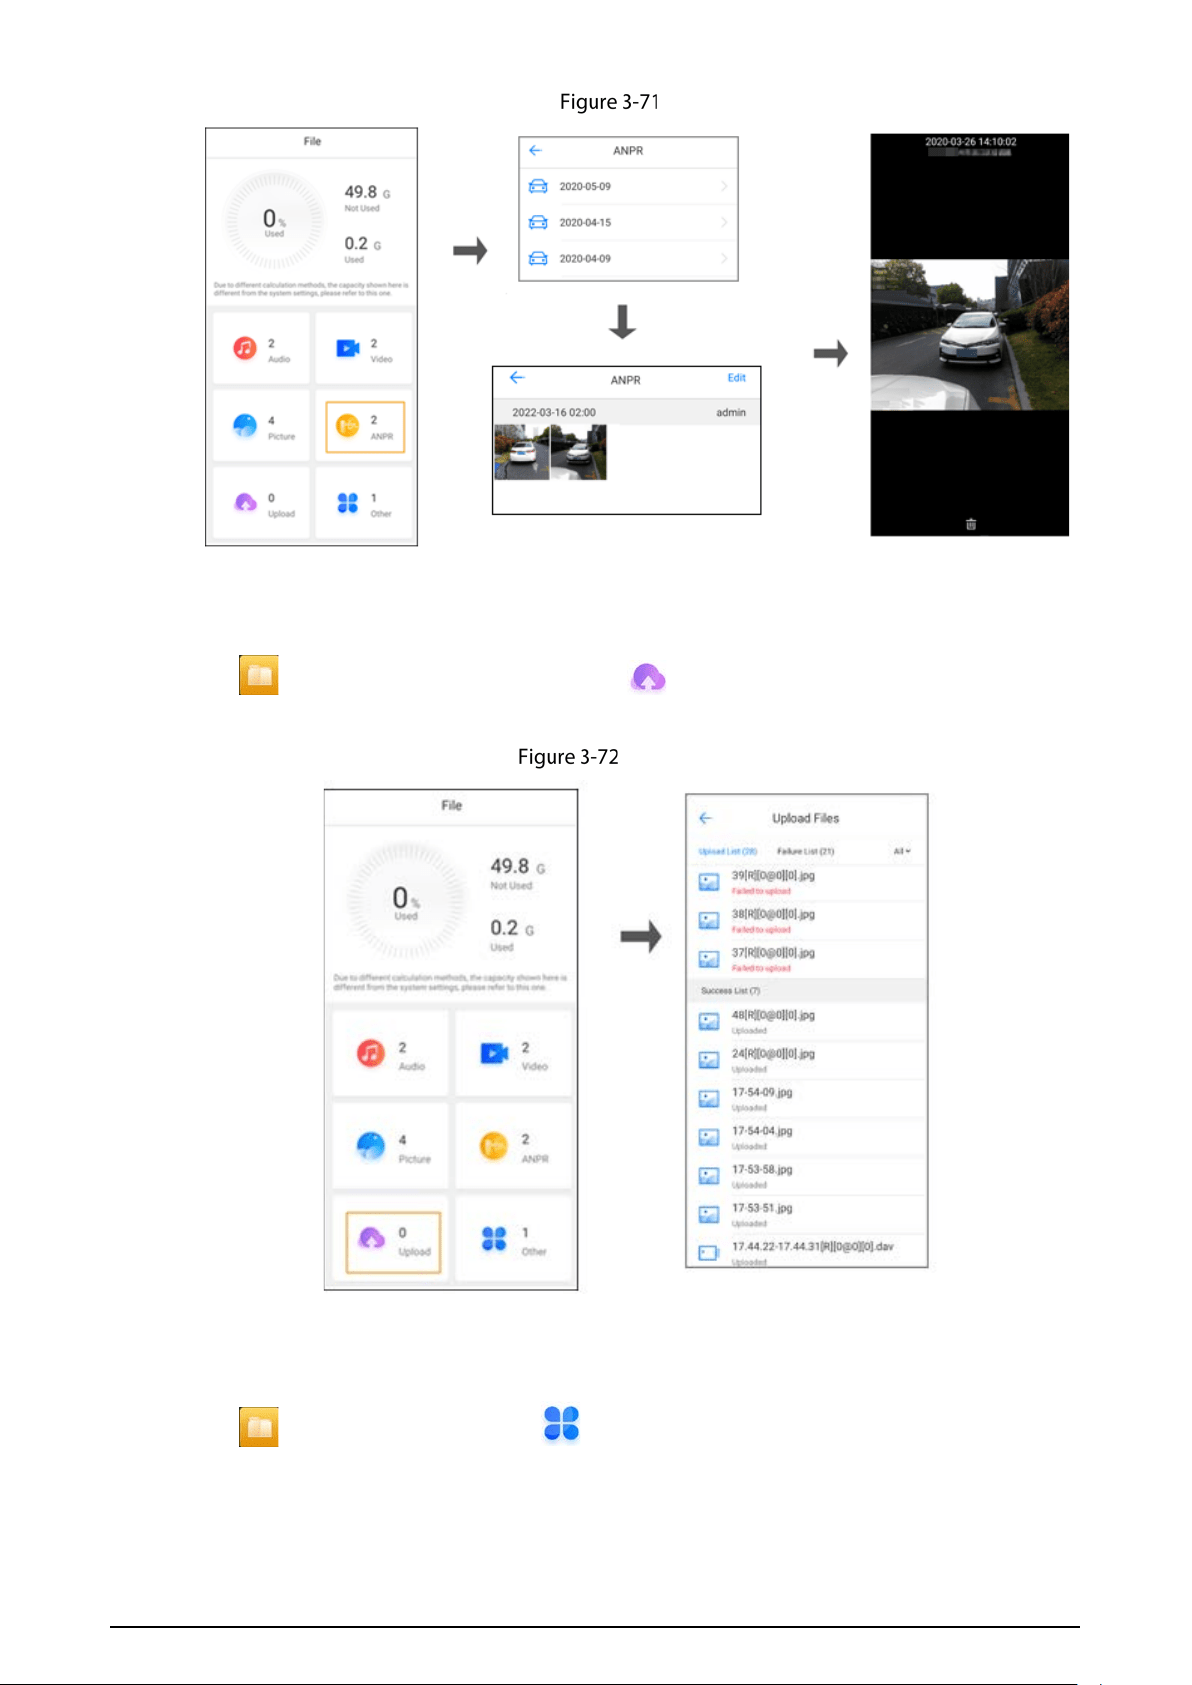
ANPR
Tap on the home screen, and then select .
Select the folder with the corresponding date, and then select the picture with the specific
time you need to view it.
Location, longitude and latitude, time, and license plate information are displayed on the
picture if you have enabled the corresponding OSD information.
Tap Edit to upload or delete the files.
While you are viewing a picture, tap to delete this picture.
67
ANPR
Uploading Files
Tap on the home screen, and then select to view the file uploading status, and upload
files again.
Uploading files
Others
Tap on the home screen, select , and then select Others to view the audios, videos and
pictures of third-party apps. The screenshots of the Terminal are also stored here.
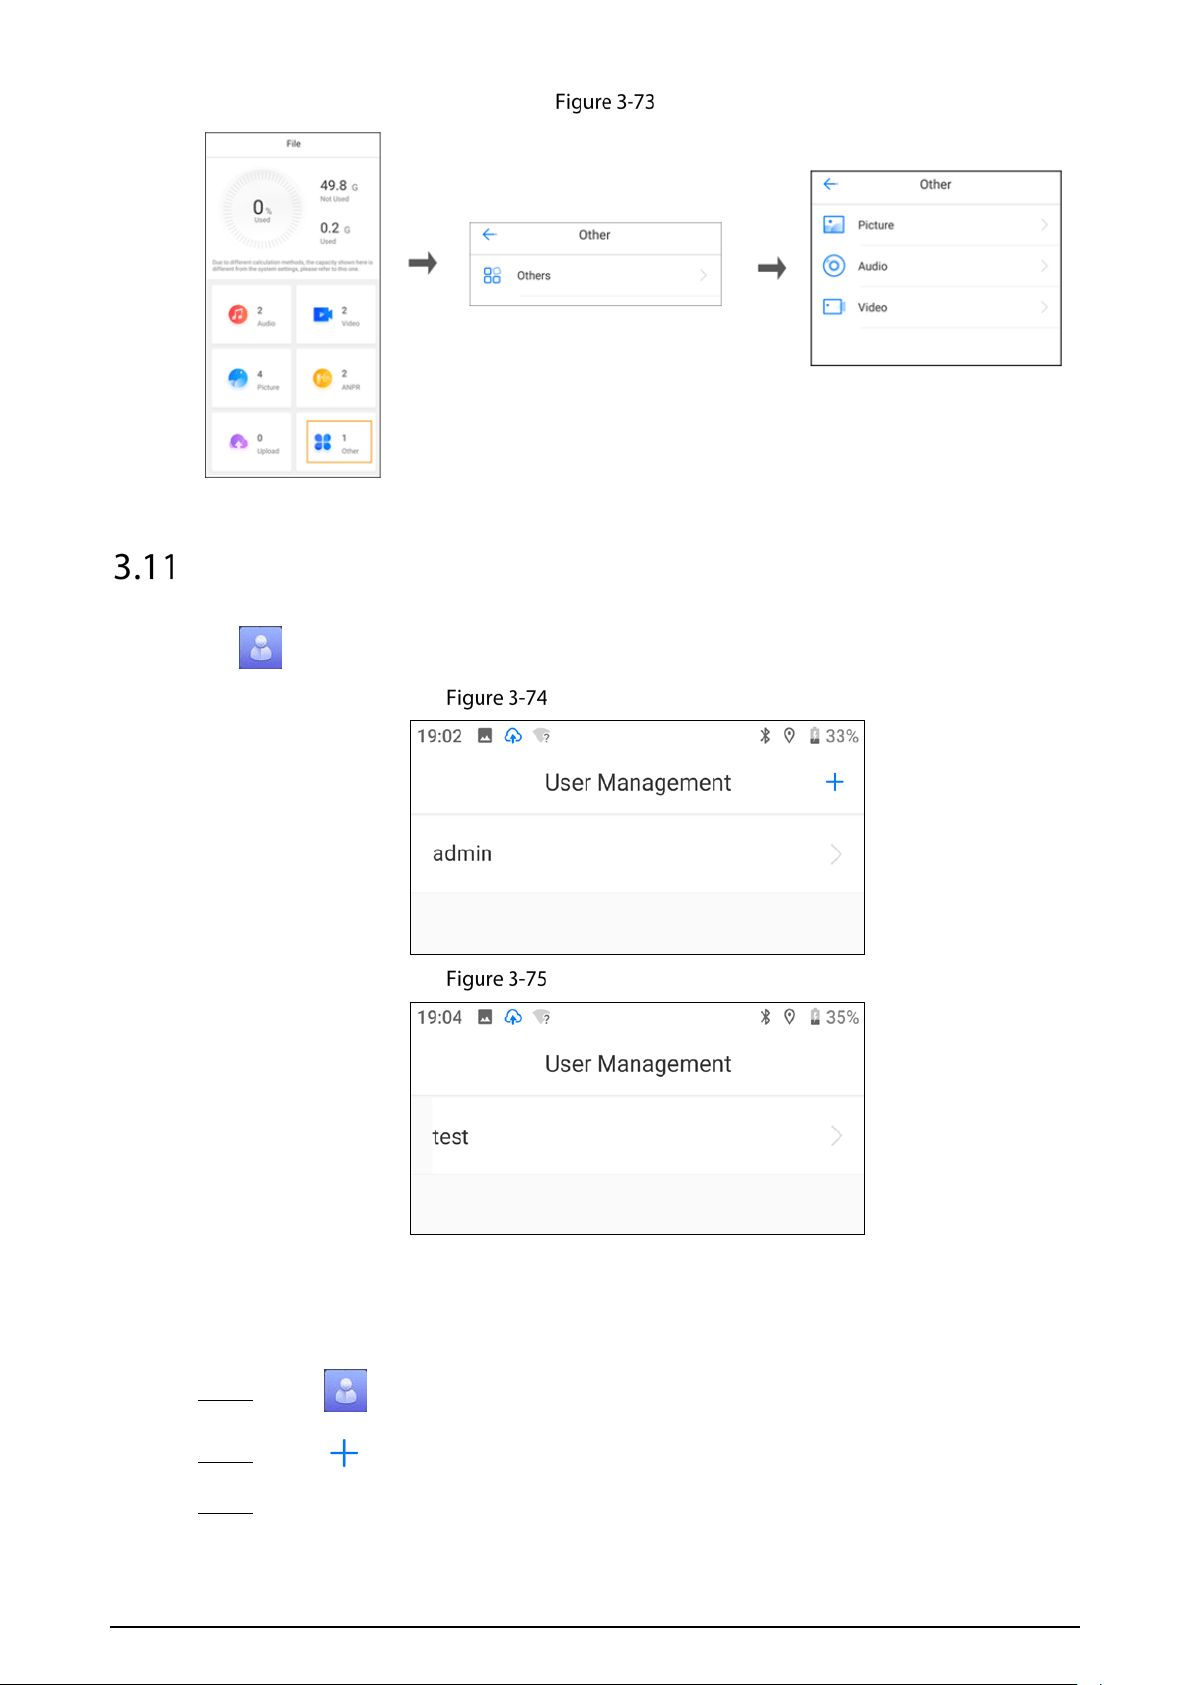
68
Others
User Management
Tap on the home screen.
User management (admin user)
User management (other users)
3.11.1 Adding Users
Step 1 Tap on the home screen .
Step 2 Tap at the upper-right corner.
Step 3 Enter the username and password, confirm the password, and set the password validity
period.
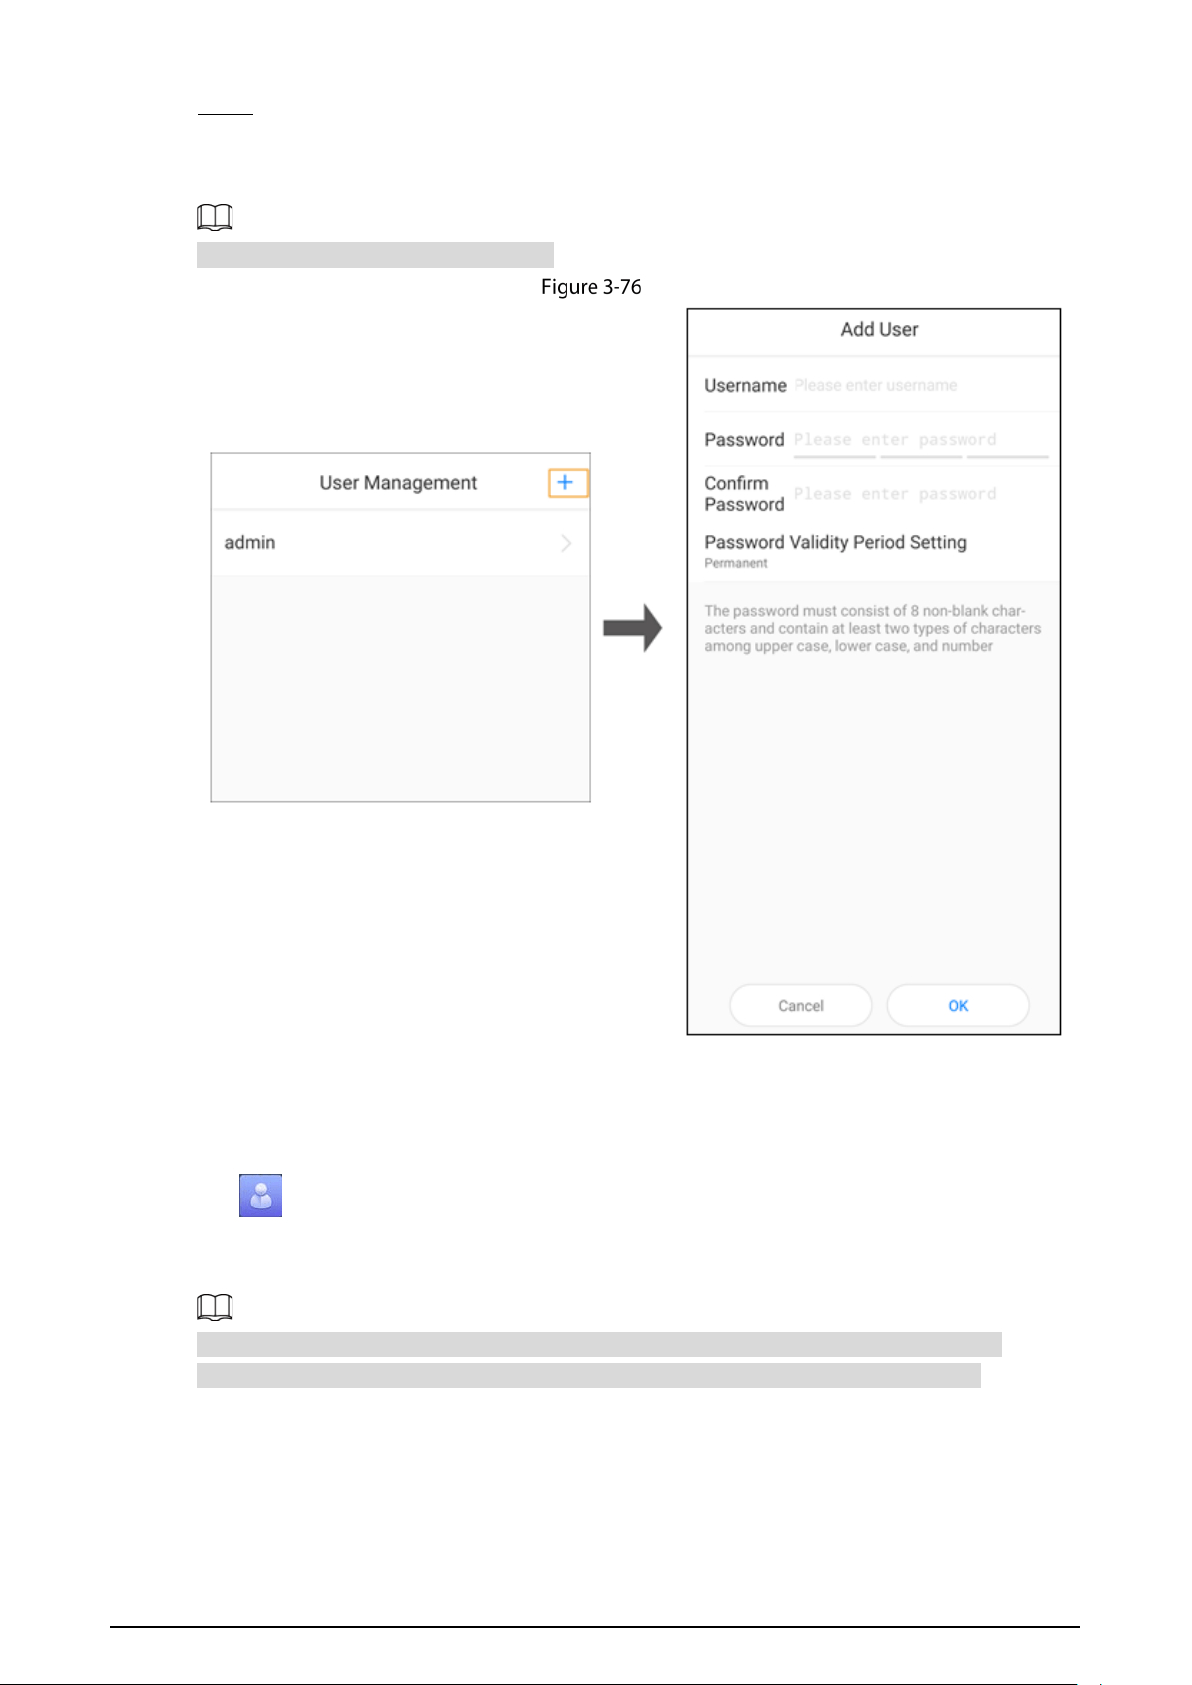
69
Step 4 Tap OK.
The Added the user successfully prompt is displayed, and the system goes back to the User
Management screen. The added user is displayed.
Only the admin user can add other users.
Add users
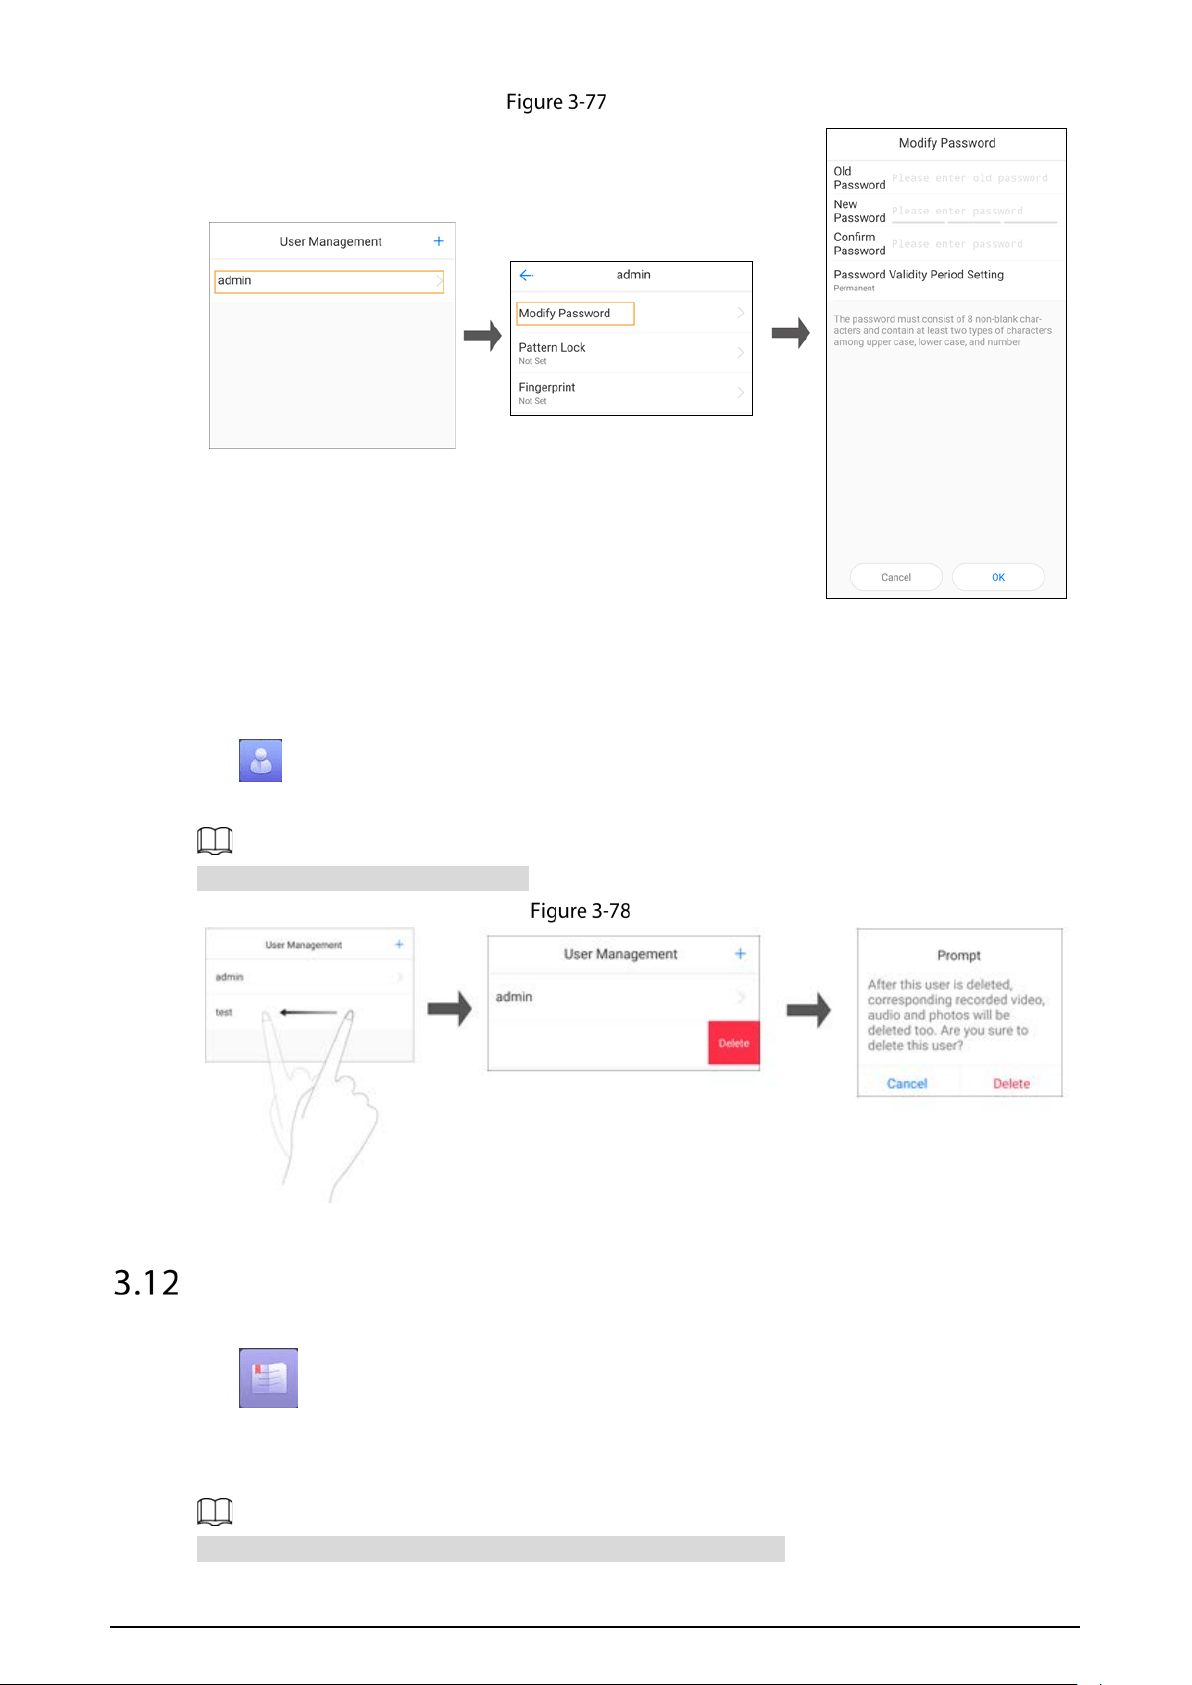
3.11.2 Changing Password
Tap on the home screen, and the User Management screen is displayed. Select a user, tap
Modify Password, enter the old password and new password, confirm the new password, and then
tap
OK. The Modified the password successfully prompt is displayed.
After selecting the user on the User Management screen, you can also set pattern lock and
fingerprint. For details, see "3.2.2 Login with a Pattern" and "3.2.3 Login with a Fingerprint".
70
Change password
3.11.3 Deleting Users
Tap on the home screen, swipe left on the user, tap Delete, and a prompt is displayed. Tap
Delete.
You cannot delete the admin account.
Delete users
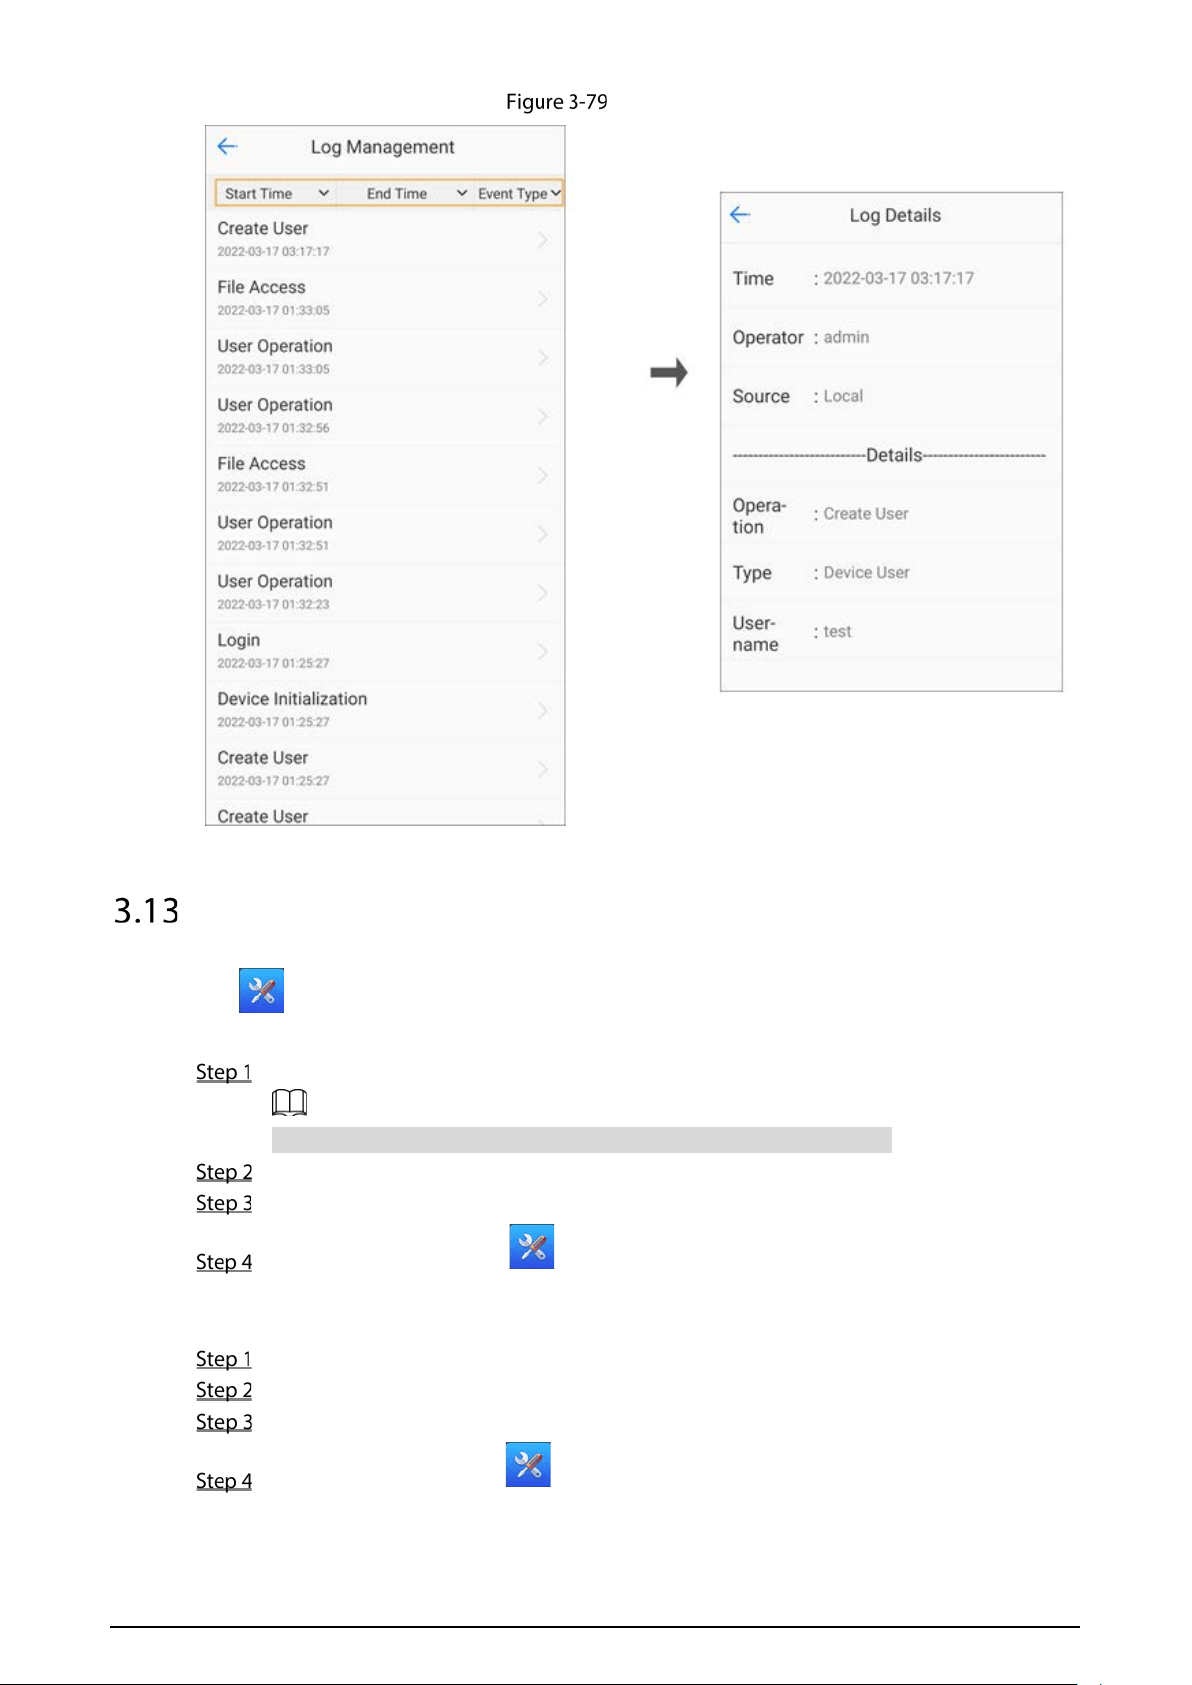
Log Management
Tap on the home screen, and the Log Management screen is displayed. Select the start time,
end time and event type as needed to search for logs.
Tap the log you want to view, and the
Log Details screen is displayed.
The event type includes All, System Log, User Log, and Alarm Log.
71
Log management
System Maintenance
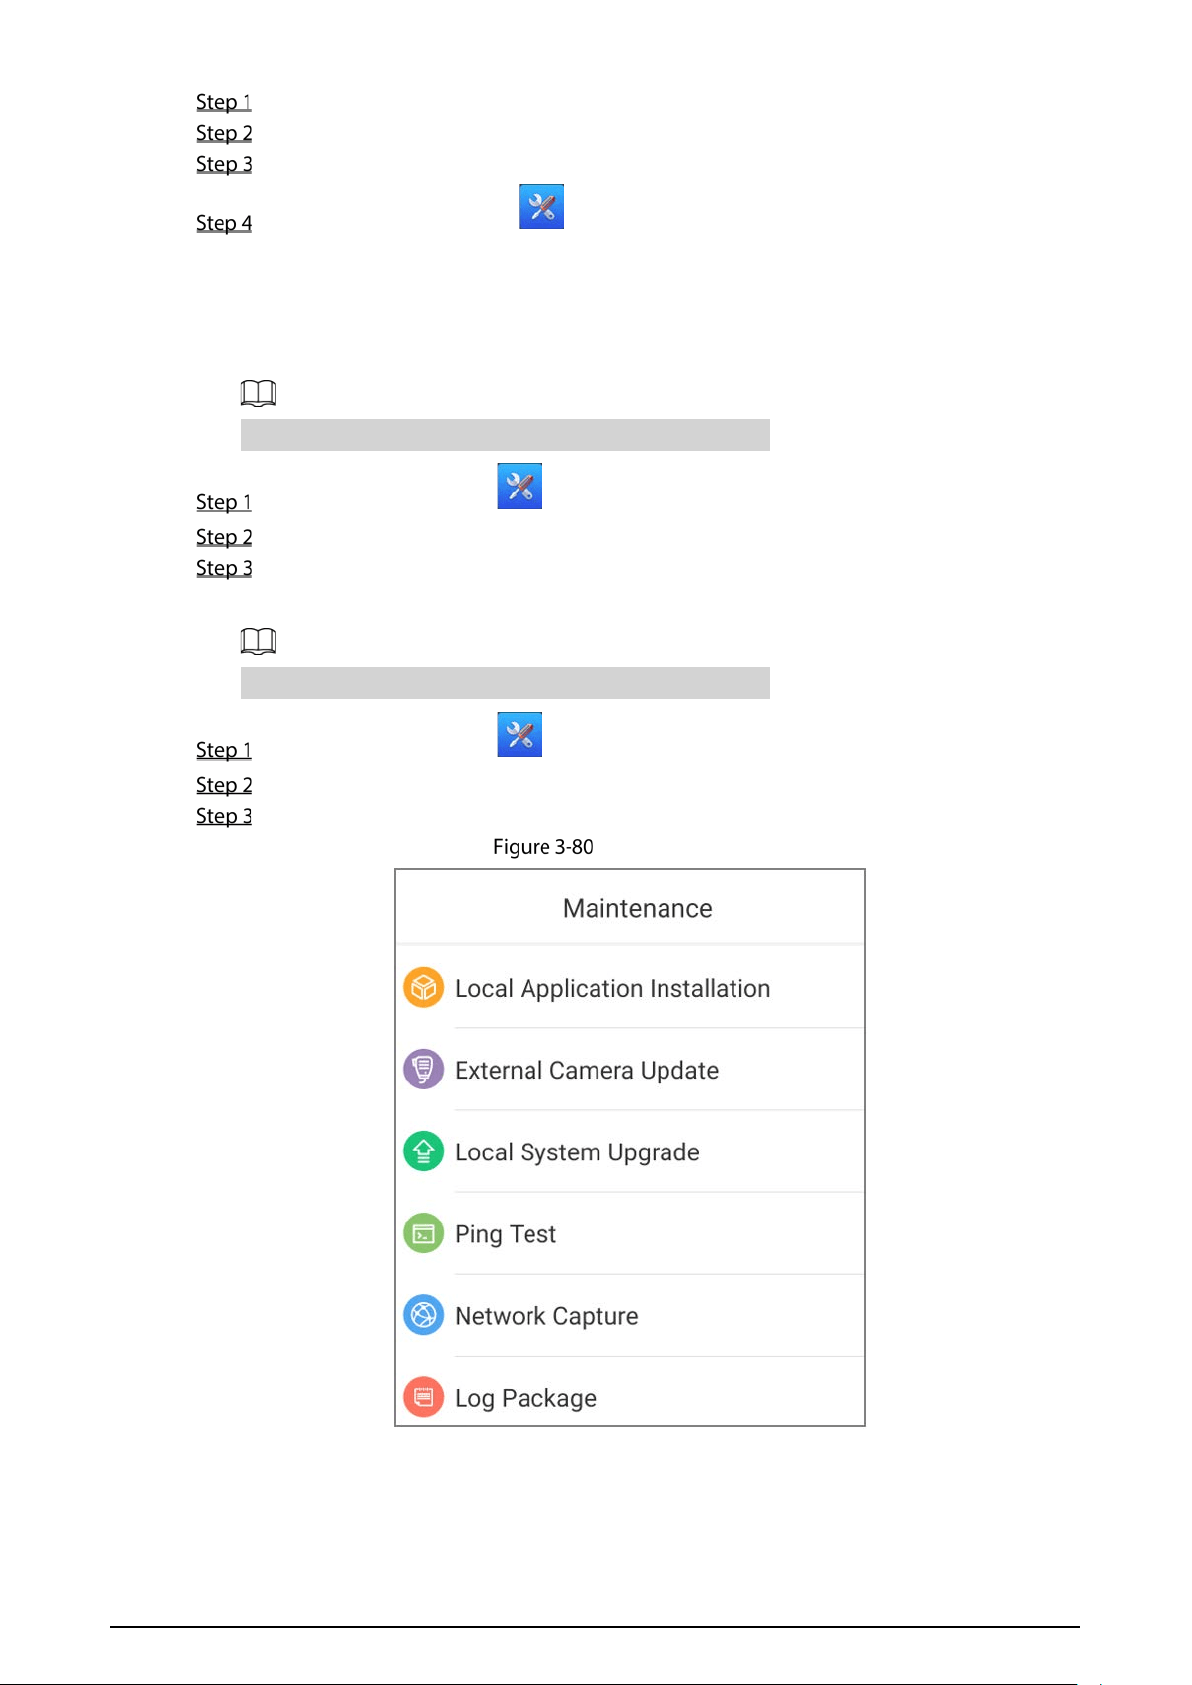
Tap on the home screen, and the Maintenance interface is displayed.
Local Application Installation
Format a micro SD card to the FAT32 format with DiskGenius on the PC.
DiskGenius can format micro SD cards with storage space up to 256 GB.
Copy the application with the suffi.apk to the root directory of the micro SD card.
Insert the micro SD card to the Terminal.
Log in to the Terminal, tap on the home screen, select Local Application Installation,
select an application, and then install the application according to the prompts.
External Camera Update
Format a micro SD card to the FAT32 format with DiskGenius on the PC.
Copy the update package of the external camera to the root directory of the micro SD card.
Insert the micro SD card to the Terminal.
Log in to the Terminal, tap on the home screen, select External Camera Update, select
the update file to update the external camera.
Local System Upgrade
72
Format a micro SD card with DiskGenius on the PC.
Copy the update package of the Terminal to the Micro SD card.
Insert the micro SD card to the Terminal.
Log in to the Terminal, tap on the home screen, select Local System Upgrade, and
then select the update file to update the system.
Ping Test
Select
Ping Test, enter an IP address, and then tap Start. The test result is displayed.
Network Capture
To share the capture packet, you need to turn on Bluetooth.
On the home screen, tap , and then select Network Capture.
Tap Capture to capture data packets. Tap StopCap to stop.
Tap Share to send the captured packet to a Bluetooth device.
Log Package
To share the capture packet, you need to turn on Bluetooth.
On the home screen, tap , and then select Log Package.
Tap Package to compress logs into one package.
Tap Share to send the log package to a Bluetooth device.
System maintenance
73
4 Platform Operations
After connecting the Device to the platform, users with corresponding permissions can access and
manage the Device on the platform.
Connecting to the Platform
Register the Device to the platform. For details, see "3.7.1.8.1 Register".
Adding the Device to the Platform
Add the Device to the platform for remote management.
For details on platform operations, see the corresponding user's manual.
Prerequisites
The Device and the platform are on the same network segment.
The Device is ready for registration. For details on registration settings, see "3.7.1.8.1 Register".
Procedure
Log in to the platform web manager.
On the home page, select Devices, or if you have opened a tab, click , and then select
Devices.
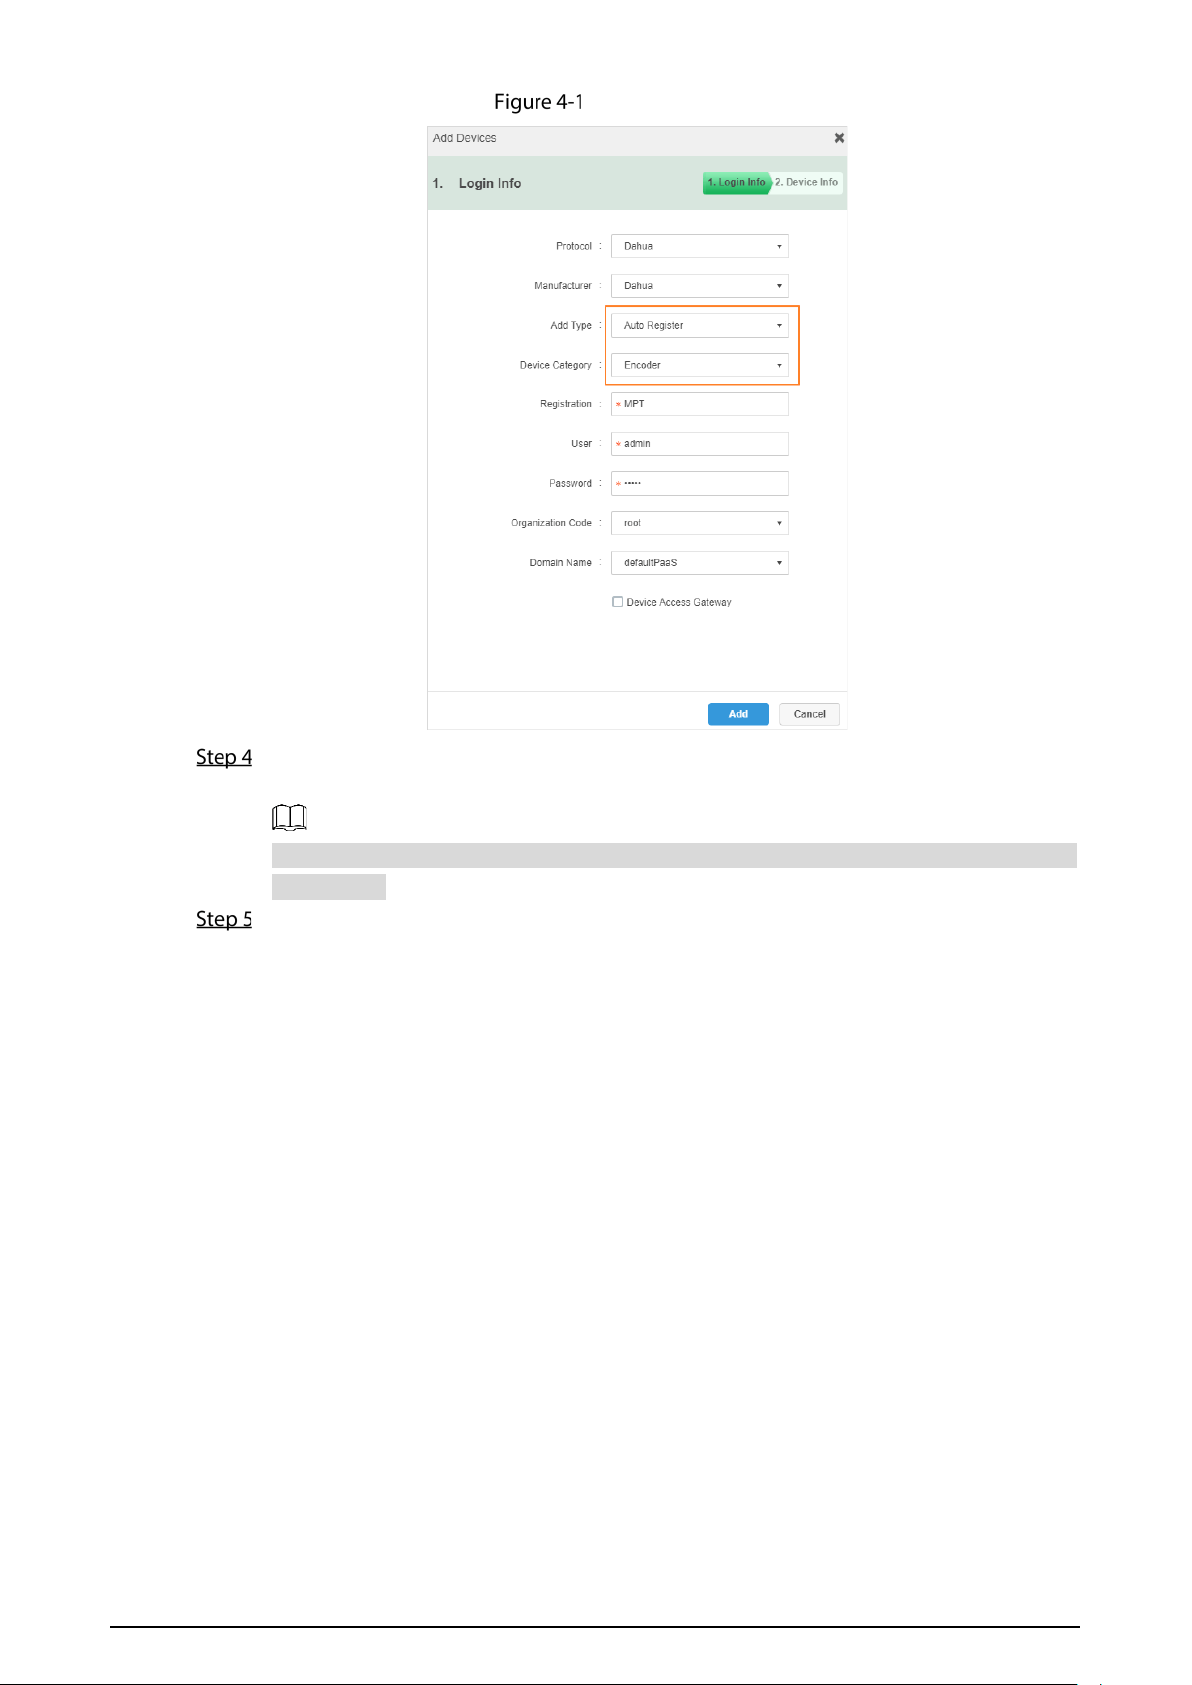
On the Devices page, click Add.
74
Add MPT (1)
Select Auto Register from Add Type, set Device Category to Encoder, enter device
registration ID in Registration, and set other device information.
The registration ID must be the same as the one entered on the MPT device when registering
the platform.
Click Add.
75
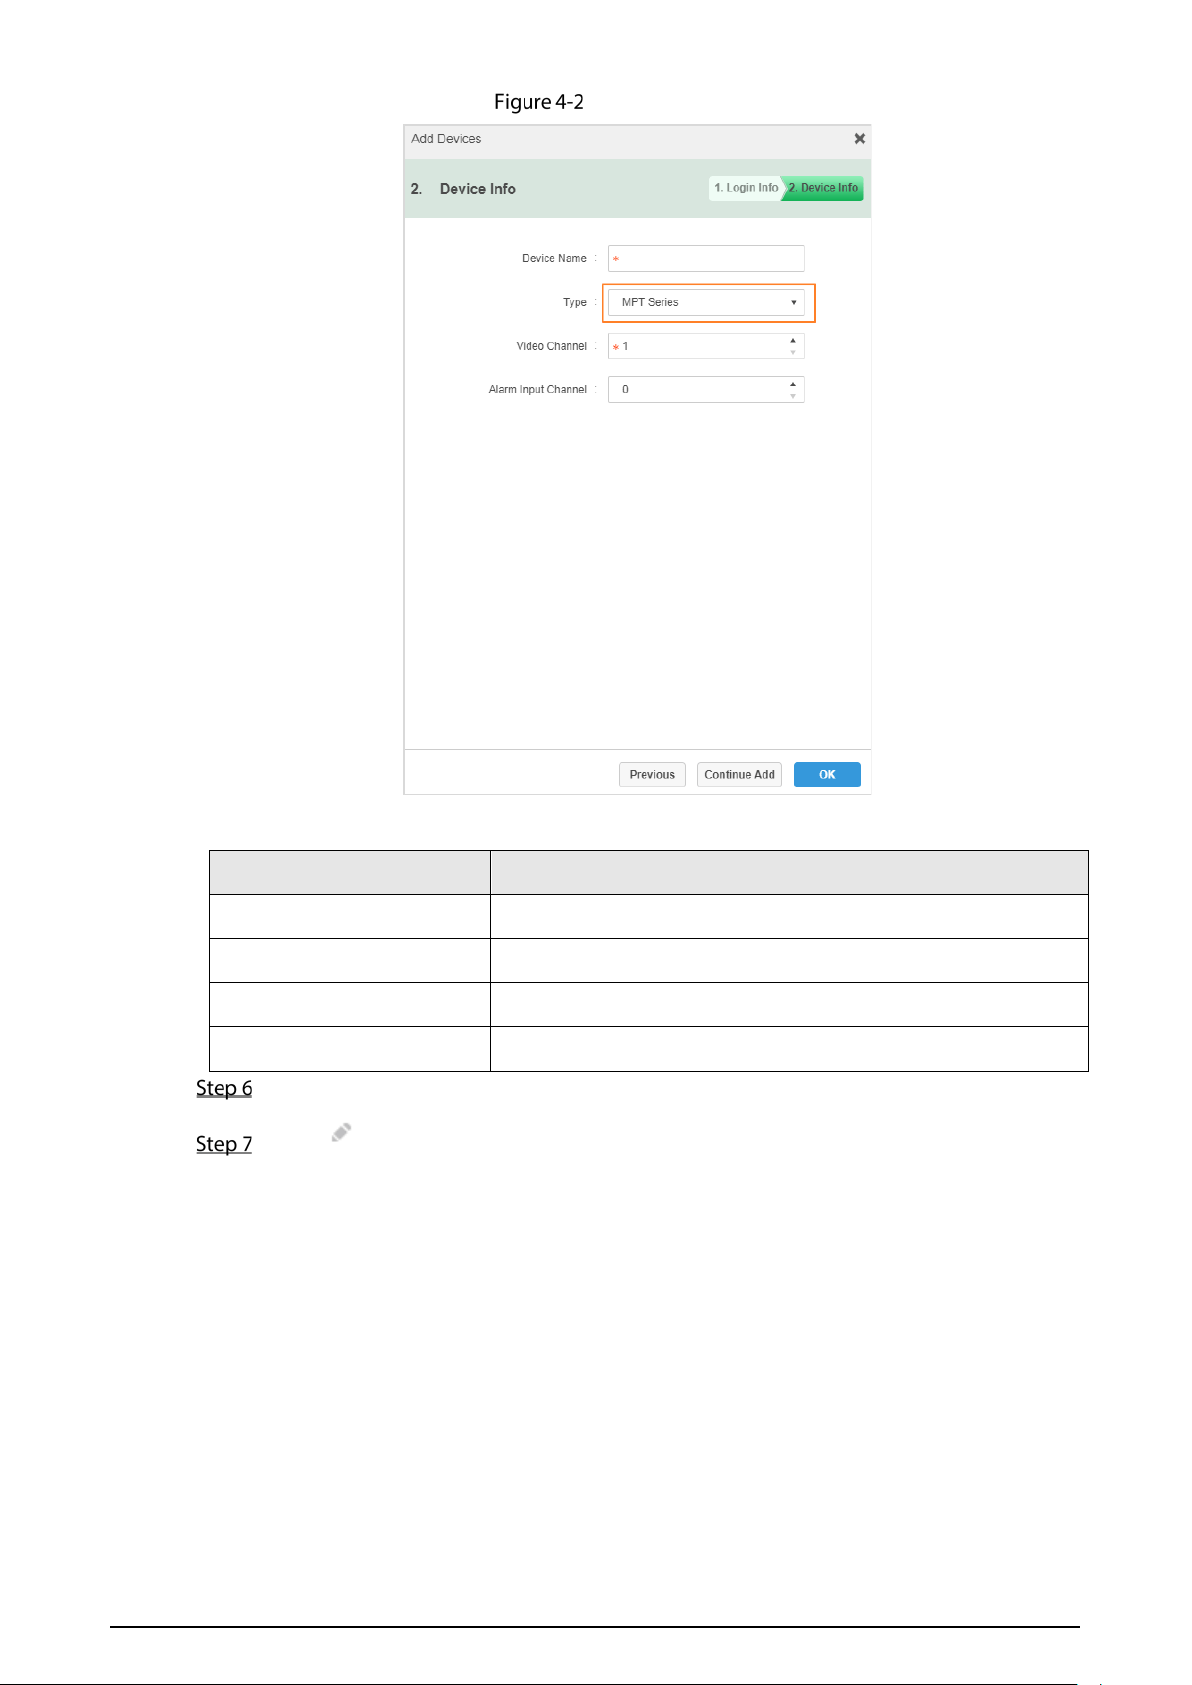
Add MPT (2)
Table 4-1 Device information parameters
Parameter
Description
Device Name Customize a device name.
Type Select
MPT Series.
Video Channel 3 is recommended.
Alarm Input Channel 1 is recommended
Click OK.
Click of the added device, select Basic Info, and then get device SN information.
Otherwise, you might fail to add the device.

76
Cybersecurity Recommendations
Mandatory actions to be taken for basic device network security:
1. Use Strong Passwords
Please refer to the following suggestions to set passwords:
The length should not be less than 8 characters.
Include at least two types of characters; character types include upper and lower case
letters, numbers and symbols.
Do not contain the account name or the account name in reverse order.
Do not use continuous characters, such as 123, abc, etc.
Do not use overlapped characters, such as 111, aaa, etc.
2. Update Firmware and Client Software in Time
According to the standard procedure in Tech-industry, we recommend to keep your device
(such as NVR, DVR, IP camera, etc.) firmware up-to-date to ensure the system is equipped
with the latest security patches and fixes. When the device is connected to the public
network, it is recommended to enable the "auto-check for updates" function to obtain
timely information of firmware updates released by the manufacturer.
We suggest that you download and use the latest version of client software.
"Nice to have" recommendations to improve your device network security:
1. Physical Protection
We suggest that you perform physical protection to device, especially storage devices. For
example, place the device in a special computer room and cabinet, and implement well-done
access control permission and key management to prevent unauthorized personnel from
carrying out physical contacts such as damaging hardware, unauthorized connection of
removable device (such as USB flash disk, serial port), etc.
2. Change Passwords Regularly
We suggest that you change passwords regularly to reduce the risk of being guessed or cracked.
3. Set and Update Passwords Reset Information Timely
The device supports password reset function. Please set up related information for password
reset in time, including the end user’s mailbox and password protection questions. If the
information changes, please modify it in time. When setting password protection questions, it is
suggested not to use those that can be easily guessed.
4. Enable Account Lock
The account lock feature is enabled by default, and we recommend you to keep it on to guarantee
the account security. If an attacker attempts to log in with the wrong password several times, the
corresponding account and the source IP address will be locked.
5. Change Default HTTP and Other Service Ports
We suggest you to change default HTTP and other service ports into any set of numbers between
1024–65535, reducing the risk of outsiders being able to guess which ports you are using.
6. Enable HTTPS
We suggest you to enable HTTPS, so that you visit Web service through a secure communication
channel.

77
7. MAC Address Binding
We recommend you to bind the IP and MAC address of the gateway to the device, thus reducing
the risk of ARP spoofing.
8. Assign Accounts and Privileges Reasonably
According to business and management requirements, reasonably add users and assign a
minimum set of permissions to them.
9. Disable Unnecessary Services and Choose Secure Modes
If not needed, it is recommended to turn off some services such as SNMP, SMTP, UPnP, etc., to
reduce risks.
If necessary, it is highly recommended that you use safe modes, including but not limited to the
following services:
SNMP: Choose SNMP v3, and set up strong encryption passwords and authentication
passwords.
SMTP: Choose TLS to access mailbox server.
FTP: Choose SFTP, and set up strong passwords.
AP hotspot: Choose WPA2-PSK encryption mode, and set up strong passwords.
10. Audio and Video Encrypted Transmission
If your audio and video data contents are very important or sensitive, we recommend that you
use encrypted transmission function, to reduce the risk of audio and video data being stolen
during transmission.
Reminder: encrypted transmission will cause some loss in transmission efficiency.
11. Secure Auditing
Check online users: we suggest that you check online users regularly to see if the device is
logged in without authorization.
Check device log: By viewing the logs, you can know the IP addresses that were used to log
in to your devices and their key operations.
12. Network Log
Due to the limited storage capacity of the device, the stored log is limited. If you need to save the
log for a long time, it is recommended that you enable the network log function to ensure that
the critical logs are synchronized to the network log server for tracing.
13. Construct a Safe Network Environment
In order to better ensure the safety of device and reduce potential cyber risks, we recommend:
Disable the port mapping function of the router to avoid direct access to the intranet devices
from external network.
The network should be partitioned and isolated according to the actual network needs. If
there are no communication requirements between two sub networks, it is suggested to use
VLAN, network GAP and other technologies to partition the network, so as to achieve the
network isolation effect.
Establish the 802.1x access authentication system to reduce the risk of unauthorized access
to private networks.
Enable IP/MAC address filtering function to limit the range of hosts allowed to access the
device.