TREAD
®
- SXS EDITION
Owner’s Manual

© 2021 Garmin Ltd. or its subsidiaries
All rights reserved. Under the copyright laws, this manual may not be copied, in whole or in part, without the written consent of Garmin. Garmin reserves the right to change
or improve its products and to make changes in the content of this manual without obligation to notify any person or organization of such changes or improvements. Go to
www.garmin.com for current updates and supplemental information concerning the use of this product.
Garmin
®
, the Garmin logo, inReach
®
, TracBack
®
, and Tread
®
are trademarks of Garmin Ltd. or its subsidiaries, registered in the USA and other countries. BaseCamp
™
, Garmin
Adventurous Routing
™
, Garmin Drive
™
, Garmin Explore
™
, Garmin Express
™
, Garmin PowerSwitch
™
, and myTrends
™
are trademarks of Garmin Ltd. or its subsidiaries. These
trademarks may not be used without the express permission of Garmin.
Android
™
is a trademark of Google Inc. Apple
®
and Mac
®
are trademarks of Apple Inc., registered in the U.S. and other countries. The BLUETOOTH
®
word mark and logos are owned
by the Bluetooth SIG, Inc., and any use of such name by Garmin is under license. iOverlander
™
is a trademark of iOverlander. microSD
®
and the microSD logo are trademarks of
SD-3C, LLC. Tripadvisor
®
is a registered trademark of Tripadvisor LLC. Windows
®
is a registered trademark of Microsoft Corporation in the United States and other countries. Wi‑Fi
®
is
a registered trademark of Wi-Fi Alliance. Other trademarks and trade names are those of their respective owners.

Table of Contents
Getting Started................................. 1
Device Overview...................................... 1
Turning the Device On or Off.................. 2
Acquiring GPS Signals............................ 2
Status Bar Icons...................................... 3
Using the Touchscreen........................... 3
Using the On-Screen Buttons................. 3
Adjusting the Screen Brightness............ 3
Vehicle Profiles....................................... 4
Adding a Vehicle Profile...................... 4
Choosing a Vehicle Profile.................. 4
Editing a Vehicle Profile...................... 5
Adding Propane Tanks........................ 5
Installation....................................... 5
Mounting Your Device in an ATV or Side-
by-Side..................................................... 5
Power Cable Overview........................ 5
Mounting Considerations................... 6
Mounting the Device on a Roll Bar..... 6
Mounting the Antenna.........................7
Installing the Antenna on the Group
Ride Mount........................................... 8
Installing the Fist Microphone and
Mount................................................... 8
Off-Road Navigation Features........ 10
Routes.................................................... 10
Adventure Roads and Trails................. 10
Straight Line Routes..............................11
Skipping the Next Stop on Your
Route.................................................. 11
Stopping the Route............................ 11
Tracks.................................................... 11
Recording Tracks.............................. 12
Recording Tracks with
inReach®........................................12
Navigating a Track............................ 12
Viewing Your Collections on the
Map.................................................... 12
Pitch and Roll........................................ 12
Calibrating Pitch and Roll................. 12
Adjusting Warning Angles................ 13
Enabling or Disabling Warning Angle
Alerts.................................................. 13
Viewing the Altimeter, Barometer, and
Compass................................................13
Calibrating the Compass.................. 13
Group Ride............................................. 13
Starting a Group Ride........................ 13
Joining a Group Ride......................... 14
Rejoining a Recent Group Ride......... 14
Adding Riders to a Group Ride......... 14
Broadcasting a Message.................. 14
Broadcasting a Location................... 14
Viewing a Group Ride Notification... 15
Exiting a Group Ride.......................... 15
Group Ride Settings.......................... 15
Radio...................................................... 15
Selecting a Preset............................. 15
Selecting a Radio Channel................ 15
Adjusting the Squelch....................... 15
Adding a Custom Radio Preset........ 16
Selecting a Roger Tone..................... 16
Turning the Radio Off........................ 16
Enabling Push-to-Talk with a
Headset.............................................. 16
Transmitting Your Voice................... 16
Adjusting the Radio Volume............. 16
Radio Settings................................... 16
inReach Features............................17
Messages.............................................. 17
Sending a Preset inReach
Message............................................ 17
Sending a Text Message.................. 17
Replying to a Message...................... 17
Checking for Messages.................... 17
Navigating to a Message Location.. 18
Deleting a Message...........................18
Tracking................................................. 18
Starting Tracking............................... 18
Stopping Tracking............................. 18
Sharing Your MapShare Web Page.. 18
inReach Tracking Settings................ 18
SOS.........................................................19
Initiating an SOS Rescue...................19
Canceling an SOS Rescue.................20
Syncing inReach Data........................... 20
Contacts................................................ 20
Adding a Contact............................... 20
Editing a Contact............................... 20
Table of Contents i

Deleting a Contact............................. 20
Data Use and History............................ 20
Viewing Plan and Usage Details.......20
Using the Map................................ 21
Map Tools.............................................. 21
Viewing a Map Tool...........................21
Up Ahead............................................... 22
Viewing Upcoming Locations........... 22
Customizing the Up Ahead
Categories..........................................22
Cities Ahead.......................................... 22
Viewing Upcoming Cities and Exit
Services..............................................22
Trip Information.................................... 22
Viewing Trip Data from the Map...... 22
Customizing the Trip Data
Fields.............................................. 23
Resetting Trip Information................23
Viewing Upcoming Elevation
Changes................................................. 23
Viewing Upcoming Traffic.................... 23
Viewing Traffic on the Map.............. 23
Searching for Traffic Incidents......... 23
Customizing the Map............................ 24
Customizing the Map Layers............ 24
Viewing the Public Lands Map
Key.................................................. 24
Enabling Adventure Roads and Trails
Map Layers........................................ 24
Changing the Map Data Field........... 24
Changing the Map Buttons............... 24
Changing the Map Perspective........ 24
Dog Tracking.................................. 24
Receiving Data From Your Handheld
Device.................................................... 25
Tracking Your Dogs.............................. 25
Dog Status Icons............................... 25
Viewing Your Dogs on the Map............ 25
Using the Apps............................... 26
Viewing the Owner's Manual on
YourDevice............................................26
Music Player.......................................... 26
Adding the Music Player Tool to the
Map.................................................... 26
BirdsEye Imagery.................................. 26
Downloading BirdsEye Imagery........27
Route Planner........................................ 27
Planning a Route............................... 27
Editing and Reordering Locations in a
Route.................................................. 27
Changing Routing Options for a
Route.................................................. 28
Navigating to a Saved Route............ 28
Editing and Saving Your Active
Route.................................................. 28
TracBack®............................................. 28
Following Your Recent Track............28
Saving Your Recent Track as a
Route.................................................. 28
Viewing the Weather Forecast............. 28
Viewing Weather Near a Different
City..................................................... 29
Viewing the Weather Radar.............. 29
Viewing Weather Alerts.....................29
Checking Road Conditions............... 29
Creating a Round-Trip Route................ 30
Garmin PowerSwitch™ App.................. 31
Activating a Power Switch................ 31
Turning Off All Switches................... 31
Customizing a Button....................... 32
Assigning a Switch to a Control
Input................................................... 32
Adding a Custom Layout.................. 32
Adding a Button to a Custom
Layout.............................................33
Arranging Buttons In a Custom
Layout.............................................33
Deleting a Custom Layout or
Button............................................. 33
Routines............................................. 33
Adding a Routine........................... 34
Editing a Routine............................34
Deleting a Routine......................... 34
Tread Audio App................................... 35
LED Controls...................................... 35
Enabling LED Groups..................... 36
Changing the Media Source..........36
LED Light Settings......................... 36
Audio Zone Settings.......................... 36
Live Services, Traffic, and
Smartphone Features..................... 37
ii Table of Contents

Bluetooth Feature Status Icons............37
Pairing with Your Smartphone............. 37
Tips After Pairing the Devices.......... 38
Pairing Additional Bluetooth
Devices...............................................38
Smart Notifications............................... 38
Receiving Notifications..................... 38
Receiving Notifications while
Viewing the Map............................ 39
Viewing the List of Notifications...... 39
Hands-Free Calling................................ 39
Placing a Call..................................... 39
Using In-Call Options......................... 40
Saving a Phone Number as a
Preset................................................. 40
Enabling or Disabling Bluetooth
Features................................................. 40
Showing or Hiding App Notifications
(Android™)..........................................40
Showing or Hiding Notification
Categories for Your Apple®
Device.................................................40
Enabling or Disabling Bluetooth Features
for Your Headset................................... 41
Disconnecting a Bluetooth Device....... 41
Deleting a Paired Phone....................... 41
Street Navigation............................41
Starting a Route.....................................41
Starting a Route by Using the Map...41
Your Route on the Map......................... 42
Active Lane Guidance....................... 43
Viewing Turns and Directions...........43
Viewing the Entire Route on the
Map.................................................... 43
Changing Your Active Route.................44
Adding a Location to Your Route..... 44
Shaping Your Route...........................44
Avoiding Delays, Tolls, and Areas........ 44
Avoiding Traffic Delays on Your
Route.................................................. 44
Avoiding Toll Roads.......................... 44
Avoiding Toll Stickers....................... 45
Avoiding Road Features.................... 45
Custom Avoidances.......................... 45
Avoiding a Road............................. 45
Avoiding an Area........................... 45
Disabling a Custom Avoidance.....45
Deleting Custom Avoidances....... 45
Arriving at Your Destination.............. 46
Changing the Route Calculation
Mode...................................................... 46
Taking a Route Using Garmin
Adventurous Routing™.......................... 46
Taking a Detour..................................... 46
Going Home...........................................46
Editing Your Home Location.............46
Parking Near Your Destination............. 47
Traffic.................................................... 47
Receiving Traffic Data Using Your
Smartphone....................................... 47
Viewing Traffic on the Map.............. 47
Searching for Traffic Incidents..... 47
Finding and Saving Locations......... 48
Finding a Location Using the Search
Bar.......................................................... 48
Location Search Results....................... 49
Changing the Search Area.................... 49
Finding a Location by Category............50
Navigating to Points of Interest Within
a Venue.............................................. 50
Points of Interest...................................50
Viewing Your Garmin Explore
Waypoints.......................................... 50
Synchronizing Garmin Explore
Account Data................................. 50
Finding National Parks...................... 51
Finding Campgrounds.......................51
Finding Ultimate Campgrounds Points
of Interest...........................................51
Finding RV Parks............................... 51
Finding RV Services...........................51
Finding iOverlander™ Points
of Interest...........................................52
Finding Powersport Points of
Interest............................................... 52
Finding Adventure Points..................52
Tripadvisor......................................... 52
Finding Tripadvisor Points of
Interest........................................... 52
Finding Parking Near Your Current
Location................................................. 53
Finding Parking Near a Specified
Location................................................. 53
Search Tools..........................................53
Table of Contents iii

Finding an Address........................... 53
Finding a Location Using
Coordinates....................................... 53
Finding Fuel Stations and Prices...... 53
Viewing Recently Found Locations...... 53
Clearing the List of Recently Found
Locations........................................... 54
Viewing Current Location
Information............................................ 54
Finding Emergency Services and
Fuel..................................................... 54
Getting Directions to Your Current
Location............................................. 54
Adding a Shortcut................................. 54
Removing a Shortcut......................... 54
Saving Locations................................... 54
Saving a Location.............................. 54
Saving Your Current Location........... 55
Saving a Waypoint on the Map......... 55
Editing a Saved Location.................. 55
Assigning Categories to a Saved
Location............................................. 55
Deleting a Saved Location................ 55
Driver Awareness Features and
Alerts............................................. 56
Enabling or Disabling Driver Alerts.......56
Settings..........................................57
Navigation Settings............................... 57
Map and Vehicle Settings..................... 57
Enabling Maps................................... 57
Connecting to a Wireless Network.......57
Enabling Bluetooth Wireless
Technology............................................ 57
Driver Assistance Settings................... 58
Traffic Settings...................................... 58
Display Settings.....................................58
Adjusting Sound and Notification
Volume................................................... 58
Setting the Text Language....................58
Date and Time Settings........................ 58
Device Settings......................................59
Enabling or Disabling Location
Services................................................. 59
Device Information......................... 59
Viewing E-label Regulatory and
Compliance Information....................... 59
Tread - SXS Edition Specifications.......59
Group Ride Specifications.................... 59
Charging the Device.............................. 60
Device Maintenance....................... 60
Garmin Support Center......................... 60
Map and Software Updates.................. 60
Updating Maps and Software Using a
Wi‑Fi Network.................................... 61
Product Updates................................61
Updating Maps and Software with
Garmin Express............................. 62
Device Care............................................63
Cleaning the Outer Casing................ 63
Cleaning the Touchscreen................ 63
Avoiding Theft................................... 63
Restarting the Device............................ 63
Removing the Device from the
Mount..................................................... 63
Troubleshooting............................. 63
My device is not acquiring satellite
signals....................................................63
My battery does not stay charged for
very long................................................ 64
My device does not connect to my
phone..................................................... 64
My device does not appear as a
removable drive on my computer........ 64
My device does not appear as either a
portable device or a removable drive or
volume on my computer....................... 64
Appendix........................................ 64
Garmin PowerSwitch............................ 64
Mounting Considerations................. 65
Mounting the Device......................... 65
Opening the Front Cover................... 66
Connecting Accessories................... 67
Connecting a Control Input............... 67
Connecting the Device to Vehicle
Power................................................. 68
Pairing with a Garmin Navigation
Device.................................................68
Garmin PowerSwitch
Specifications.................................... 69
iv Table of Contents

Troubleshooting................................ 69
My Garmin PowerSwitch will not
stay connected.............................. 69
My accessories are not receiving
power..............................................69
Tread Audio........................................... 69
Tools and Materials Needed............ 70
Tread Audio Box Mounting
Considerations.................................. 70
Mounting the Tread Audio Box Black
Box Device..................................... 70
Connections................................... 70
Port Identification...................... 71
Speaker and LED Wiring Harness
Wire and Connector
Identification.............................. 72
RCA Wiring Harness Wire and
Connector Identification............73
Connecting the Device to Vehicle
Power..........................................74
Using the Heat-Shrink Crimp
Connectors................................. 75
Complete System Wiring........... 75
Speaker Zones........................... 76
Single-Zone System Wiring
Example...................................... 76
Wireless Remote Mounting
Considerations.................................. 77
Mounting the Wireless Remote.... 77
Mounting the Speakers and
Brackets............................................. 78
Wiring............................................. 79
Wire Gauge Guide...................... 79
Additional Speakers...................79
Wireless Remote Overview............... 80
Connecting the Wireless Remote to
your Tread Audio Box.................... 80
Pairing with a Garmin Navigation
Device.................................................81
Tread Audio Box Specifications....... 81
Tread 6.5" XS-LED Tower Speakers
Specifications.................................... 82
Dimensions.................................... 82
Bracket Specifications...................... 83
Bracket Side Dimensions.............. 83
Bracket Top Dimensions............... 83
Data Management................................ 83
About Memory Cards........................ 84
Installing a Memory Card for Maps
and Data............................................. 84
Formatting the Memory Card........... 84
Connecting the Device to Your
Computer........................................... 84
Transferring GPX Files From Your
Computer........................................... 84
Transferring Data From Your
Computer........................................... 85
Disconnecting the USB Cable........... 85
Adding BaseCamp™ Data to
Garmin Explore.................................. 85
Exporting Data from BaseCamp with
a PC................................................ 85
Exporting Data from BaseCamp with
an Apple Computer........................85
Importing Data to Garmin
Explore........................................... 86
Purchasing Additional Maps................ 86
Table of Contents v

Getting Started
WARNING
See the Important Safety and Product Information guide in the product box for product warnings and other
important information.
1 Connect to a Wi‑Fi
®
network (Connecting to a Wireless Network, page57)(optional).
2 Pair your Bluetooth
®
phone and headset (Pairing with Your Smartphone, page37) (optional).
3 Update the maps and software on your device (Product Updates, page61).
4 Acquire GPS signals.
5 Mount the device and connect it to power (Installation, page5).
6 Adjust the screen brightness (Adjusting the Screen Brightness, page3).
7 Navigate to your destination (Starting a Route, page41).
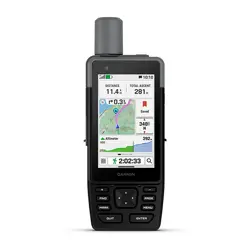
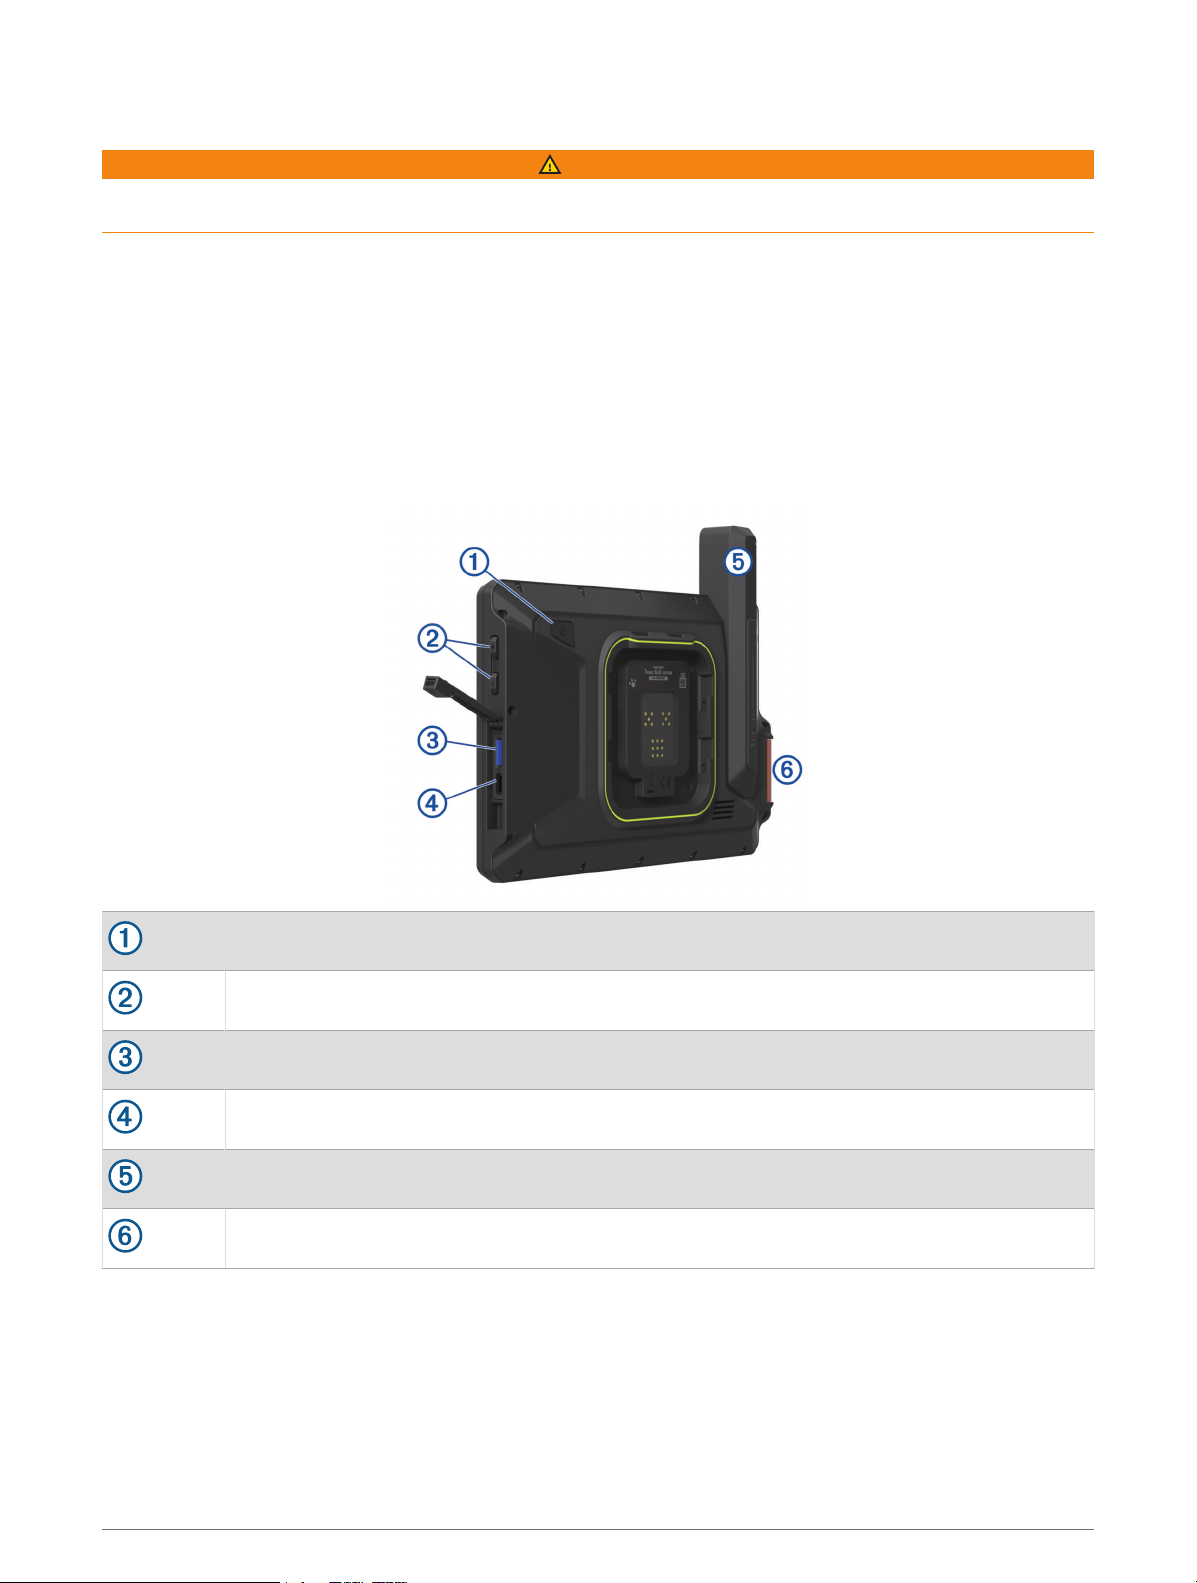
Device Overview
Power button
Volume control
microSD
®
memory card slot
USB power and data port
Iridium
®
antenna
SOS button (under protective cover)
Getting Started 1
Turning the Device On or Off
• To turn the device on, press the power key , or connect the device to power.
• To put the device in power saving mode, press the power key while the device is on.
While in power saving mode, the screen is off and the device uses very little power, but it can wake instantly
for use.
TIP: You can charge your device faster by putting it in power saving mode while charging the battery.
• To turn off the device completely, hold the power key until a prompt appears on the screen, and select Power
off.
Acquiring GPS Signals
When you turn on your navigation device, the GPS receiver must collect satellite data and establish the current
location. The time required to acquire satellite signals varies based on several factors, including how far you are
from the location where you last used your navigation device, whether you have a clear view of the sky, and how
long it has been since you last used your navigation device. The first time you turn on your navigation device, it
may take several minutes to acquire satellite signals.
1 Turn on the device.
2 Verify appears in the status bar, and enable location services if it does not (Enabling or Disabling Location
Services, page59).
3 If necessary, go to an open area with a clear view of the sky, away from tall buildings and trees.
appears at the top of the navigation map until the device determines your location.
2 Getting Started
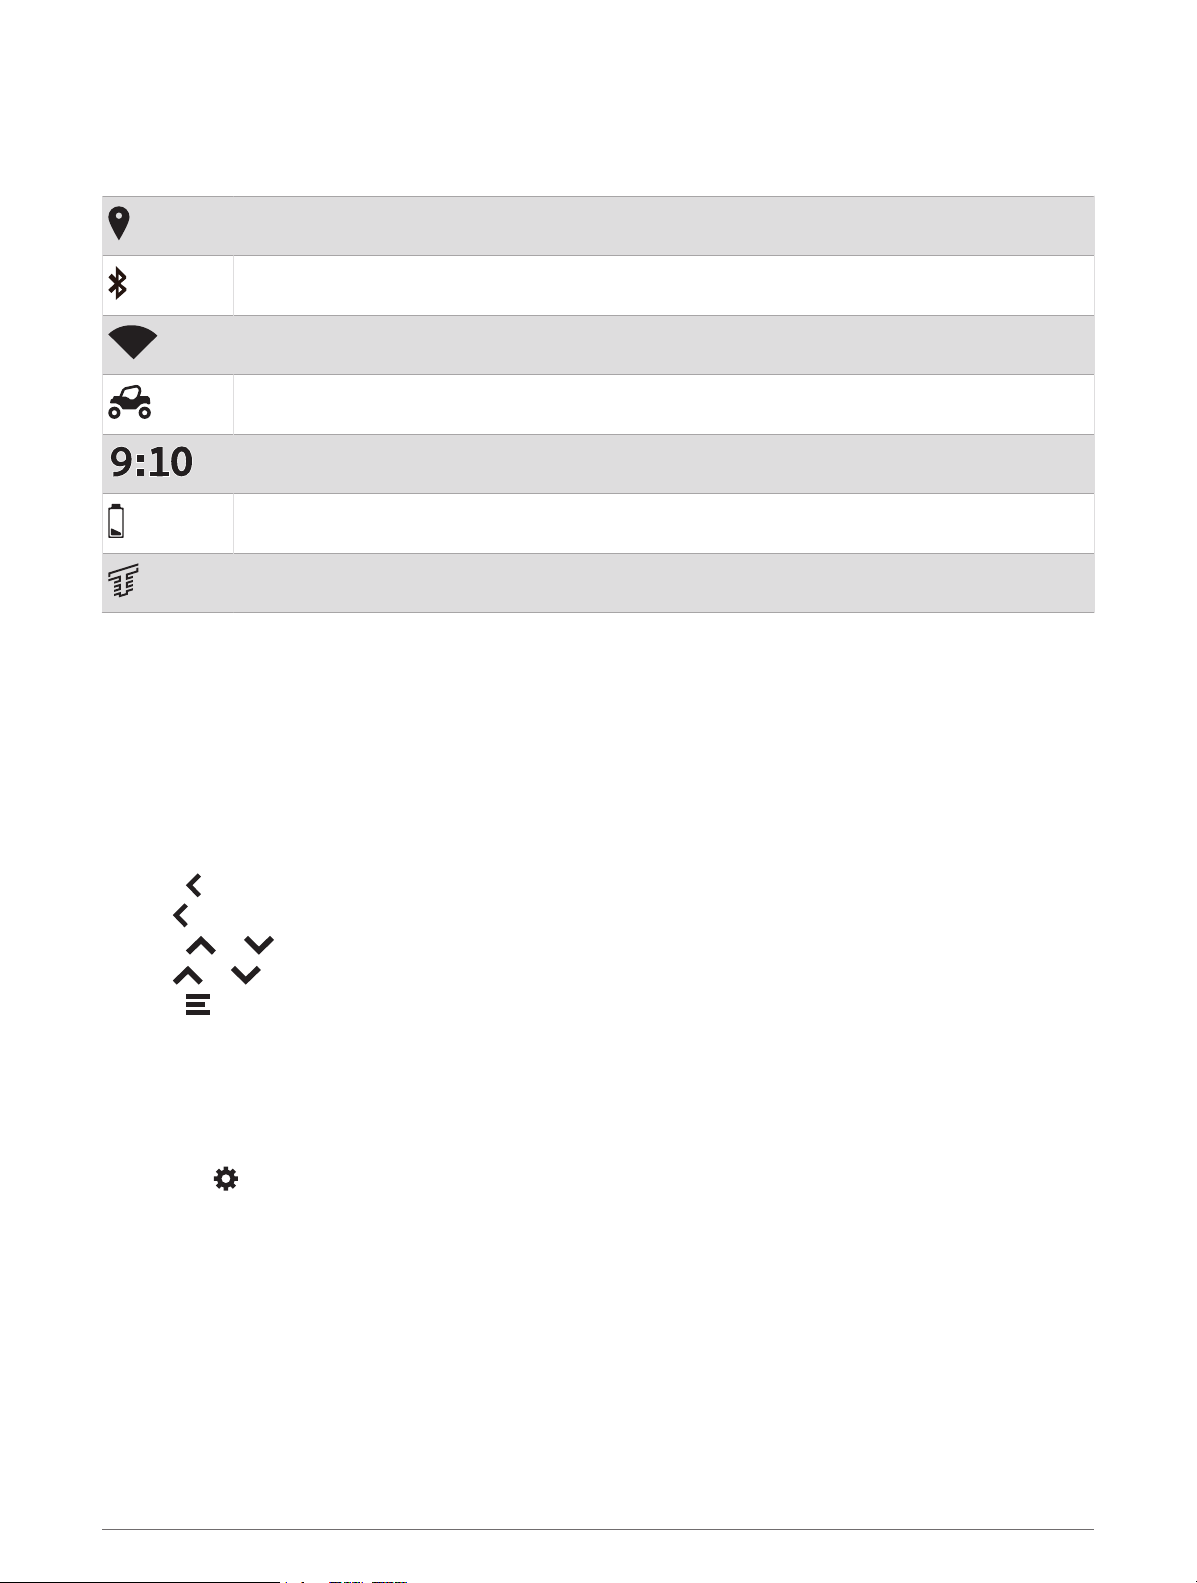
Status Bar Icons
The status bar is located at the top of the main menu. The status bar icons display information about features
on the device. You can select some icons to change settings or view additional information.
Location services status. Indicates your location has been established.
Bluetooth technology status.
Wi‑Fi signal strength.
Active vehicle profile.
Current time.
Battery charge level.
Tread app connection status (Pairing with Your Smartphone, page37).
Using the Touchscreen
• Tap the screen to select an item.
• Drag or swipe your finger across the screen to pan or scroll.
• Pinch two fingers together to zoom out.
• Spread two fingers apart to zoom in.
Using the On-Screen Buttons
On-screen buttons allow you to navigate the pages, menus, and menu options on your device.
• Select to return to the previous menu screen.
• Hold to quickly return to the main menu.
• Select or to scroll through lists or menus.
• Hold or to scroll faster.
• Select to see a context-based menu of options for the current screen.
Adjusting the Screen Brightness
You can adjust the brightness manually, using either the notification panel or the settings menu.
1 Select an option:
• Swipe down twice from the top of the screen to expand the quick settings in the notification panel.
• Select > Device > Display > Brightness level.
2 Use the slider bar to adjust the brightness.
Getting Started 3
Vehicle Profiles
WARNING
Entering your vehicle profile characteristics does not guarantee that your vehicle’s characteristics will be
accounted for in all route suggestions. Limitations may exist in map data for some route suggestions. Always
defer to all posted road signs and conditions during vehicle operation. Failure to do so could lead to an accident
involving personal injury or death.
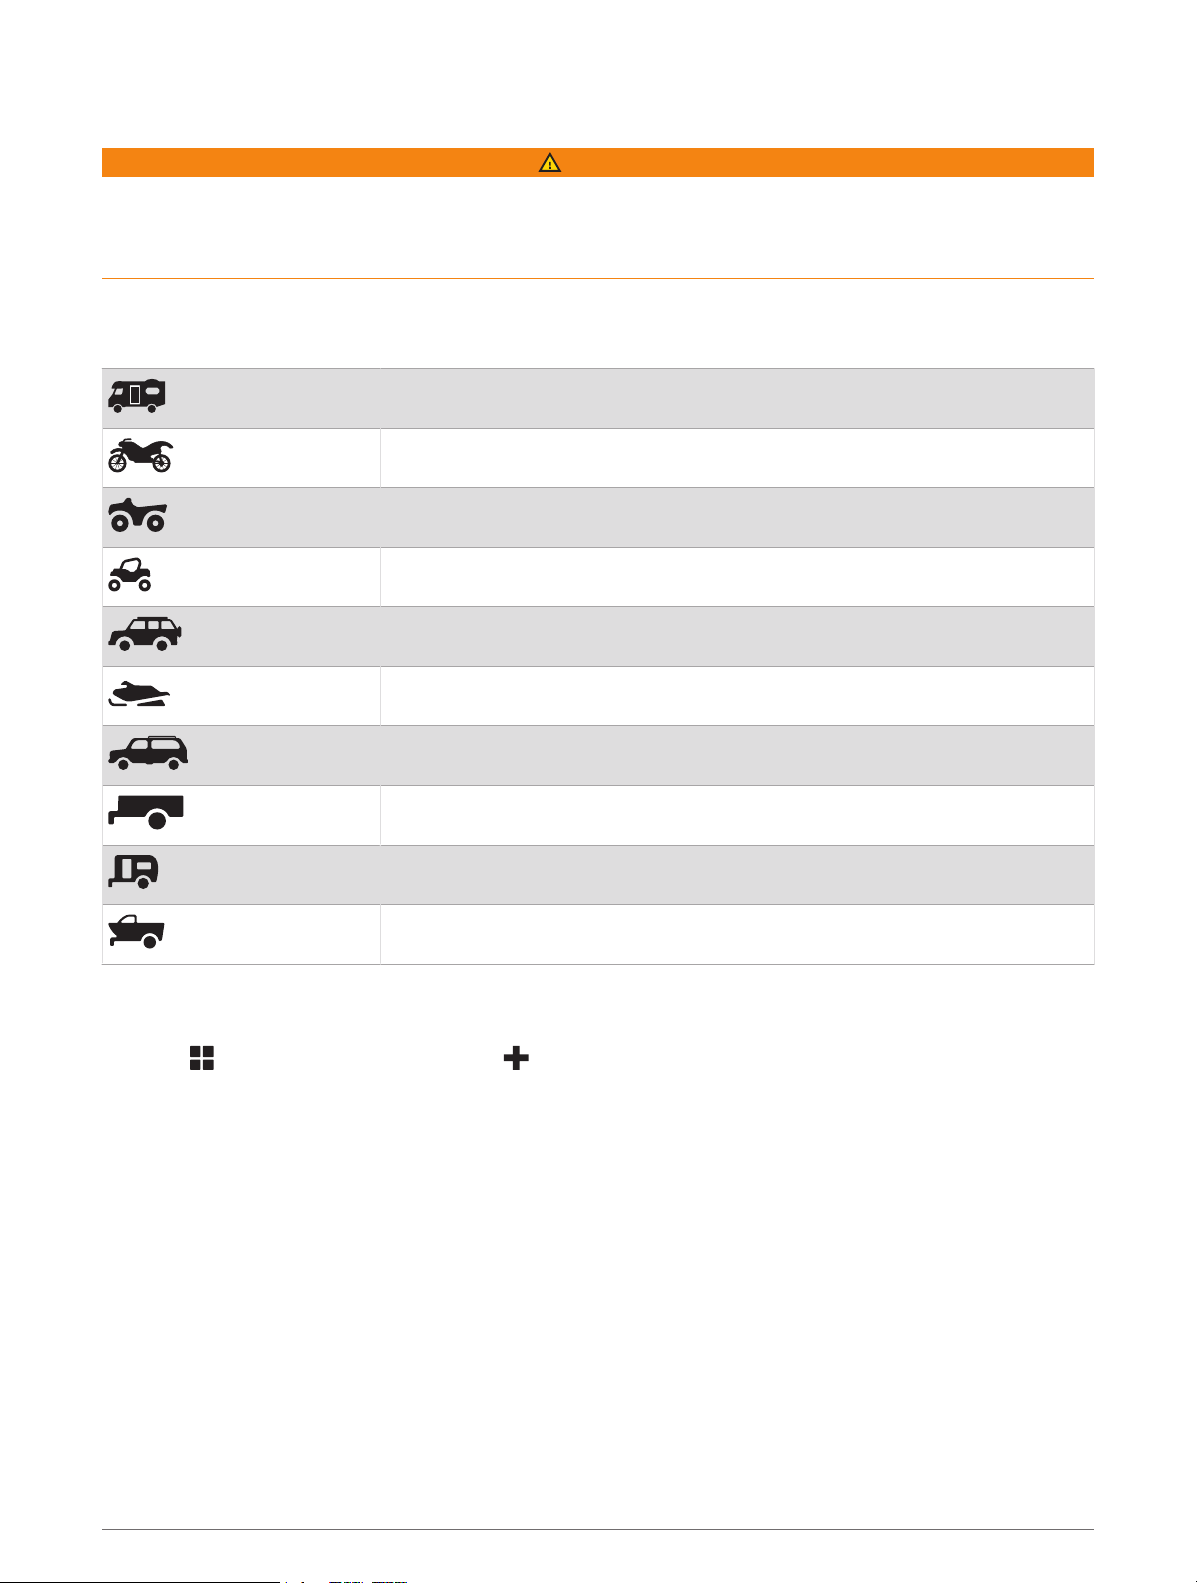
Vehicle profiles allow you to choose different settings based on each vehicle you use with the device. The
current vehicle profile is indicated by an icon in the status bar. If your vehicle profile includes a trailer, an icon of
the trailer appears with the vehicle icon.
RV or motor home profile
Motorcycle profile
ATV profile
Side-by-side profile
Full size profile
Snowmobile profile
Other profile
Profile with trailer
Profile with travel trailer
Profile with boat trailer
Adding a Vehicle Profile
You can add a vehicle profile for each vehicle to be used with your device.
1 Select > Navigation > Vehicle Profile > .
2 Select your current vehicle.
3 Follow the on-screen instructions to enter the vehicle characteristics.
Choosing a Vehicle Profile
1 Swipe down twice from the top of the screen.
2 Select the vehicle profile icon on the status bar.
4 Getting Started
Editing a Vehicle Profile
You can change basic vehicle profile information or add detailed information to a vehicle profile, such as
maximum speed.
1 Select > Navigation > Vehicle Profile.
2 Select the vehicle profile to edit.
3 Select an option:
• To edit the vehicle profile information, select , and select a field to edit.
• To rename the vehicle profile, select > > Rename Profile.
• To delete the vehicle profile, select > > Delete.
Adding Propane Tanks
NOTE: This feature is not available on all product models.
When you add your propane tanks to your vehicle profile, the device avoids routing through areas with propane
tank restrictions that may affect your route. The device also alerts you when you approach areas that require
you to shut off your propane tanks.
1 From the vehicle profile, select > Propane Tanks > Add Tank.
2 Enter the weight of the propane tank, and select Save.
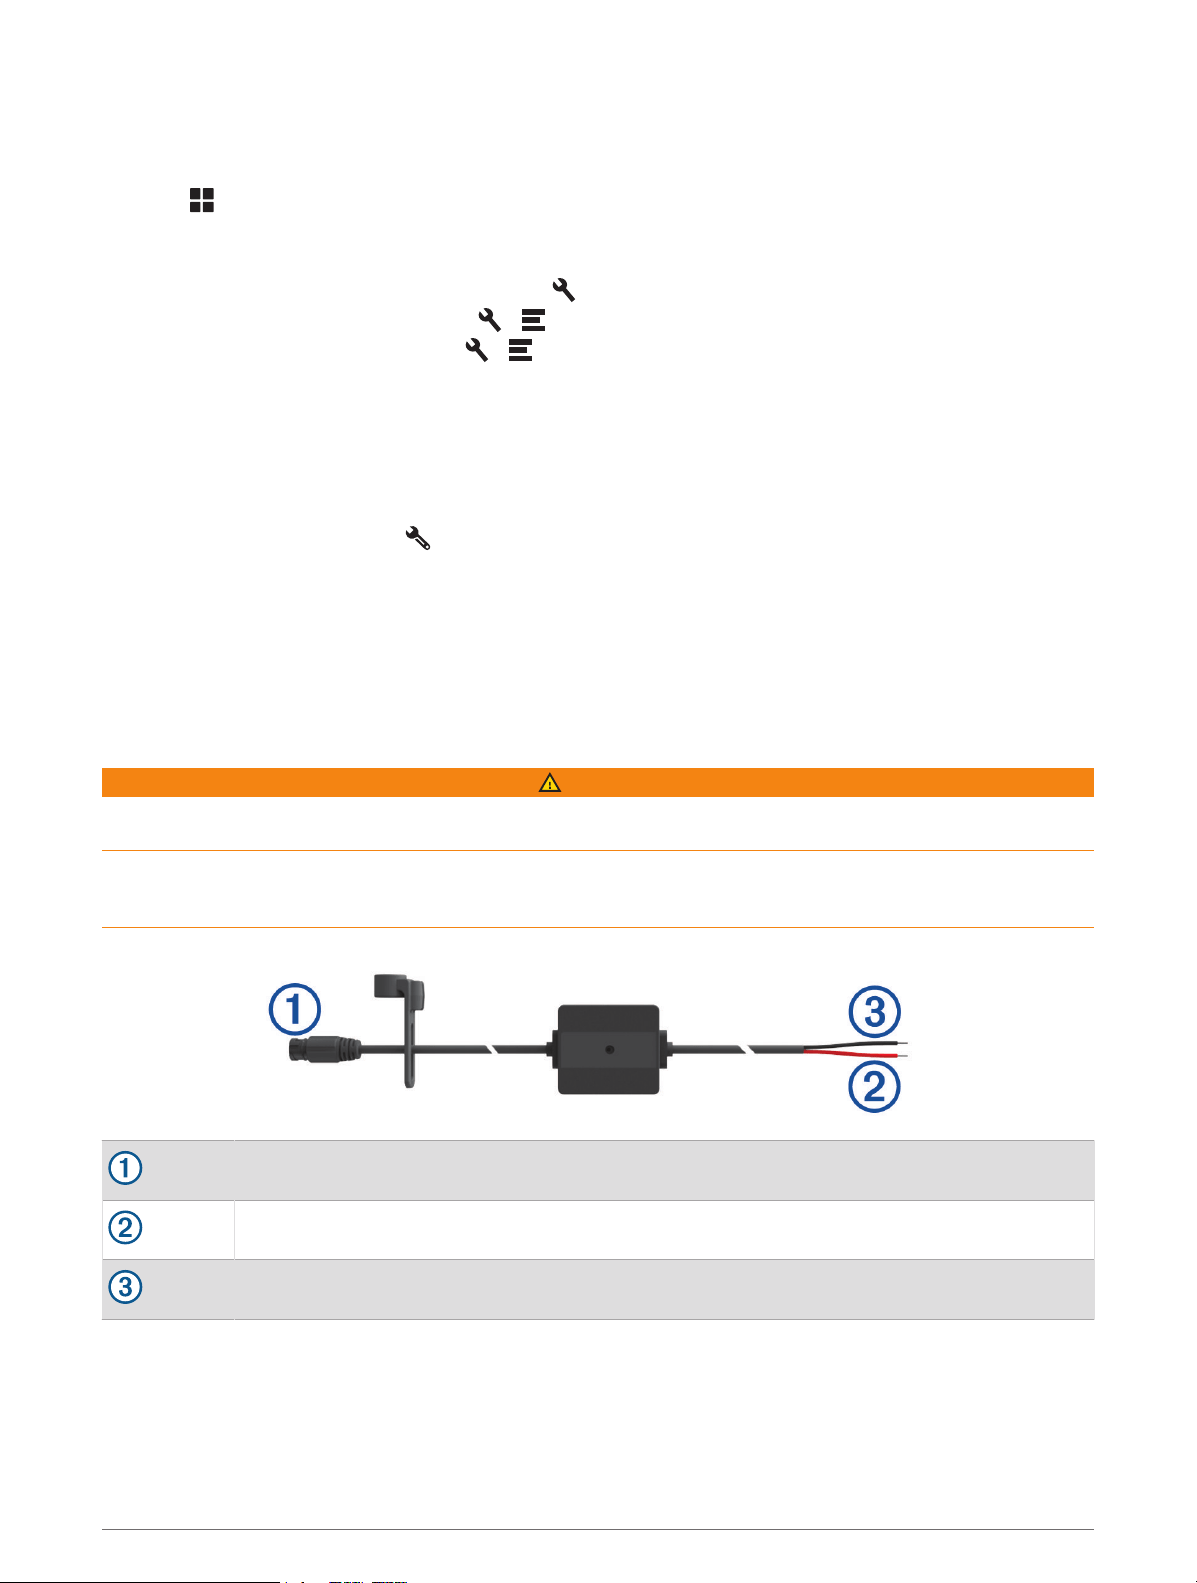
Installation
Mounting Your Device in an ATV or Side-by-Side
Power Cable Overview
WARNING
See the Important Safety and Product Information guide in the product box for product warnings and other
important information.
Garmin
®
strongly recommends having an experienced installer with the proper knowledge of electrical systems
install the device. Incorrectly wiring the power cable can result in damage to the vehicle or the battery and can
cause bodily injury.
Mount connector
12to24 Vdc system power (red)
System ground (black)
Installation 5
Mounting Considerations
• The device must be mounted close to the bus bar or battery and within the range of the supplied power cable.
• The mounting location must allow for the routing and connection of all cables.
• Excess wire should be bundled and secured using the included zip ties.
• The electrical contacts must be free from paint.
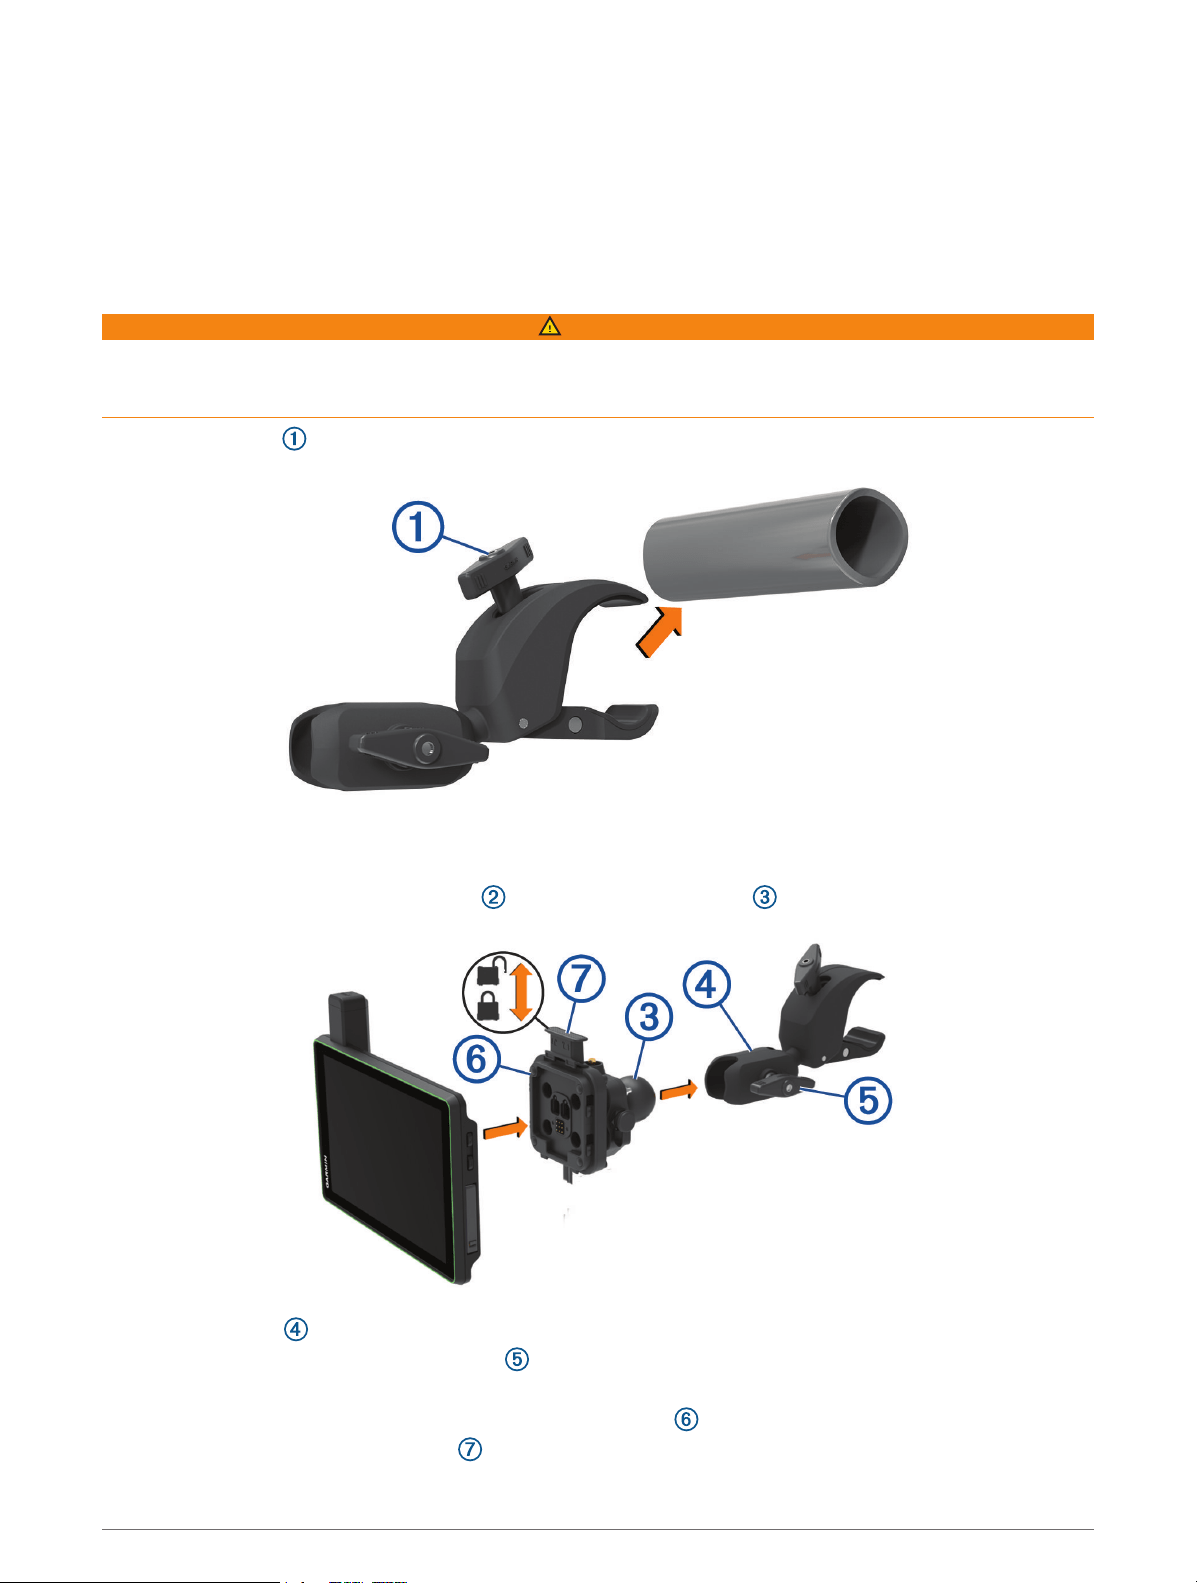
Mounting the Device on a Roll Bar
WARNING
Both the device and its mount contain magnets. Under certain circumstances, magnets may cause interference
with some internal medical devices and electronic devices, including pacemakers, insulin pumps, or hard drives
in laptop computers. Keep the device away from medical devices and electronic devices.
1 Loosen the knob on the roll bar mount.
2 Place the mount around the roll bar.
3 Tighten the knob on the mount until the clamp is secure.
4 Insert the ball on the Group Ride mount into the double-socket arm .
5 Tighten the knob slightly.
6 If necessary, adjust the Group Ride mount for better viewing and operation.
7 Tighten the knob to secure the mount.
8 Place the device onto the magnetic mount, and push the lock
down to secure the device to the mount.
9 Connect the Group Ride power cable to the connector on the vehicle wiring harness.
6 Installation
10 Tighten the collar around the connected power cables.
11 Route the power cable along a suitable path in your vehicle, and secure it using the included zip ties.
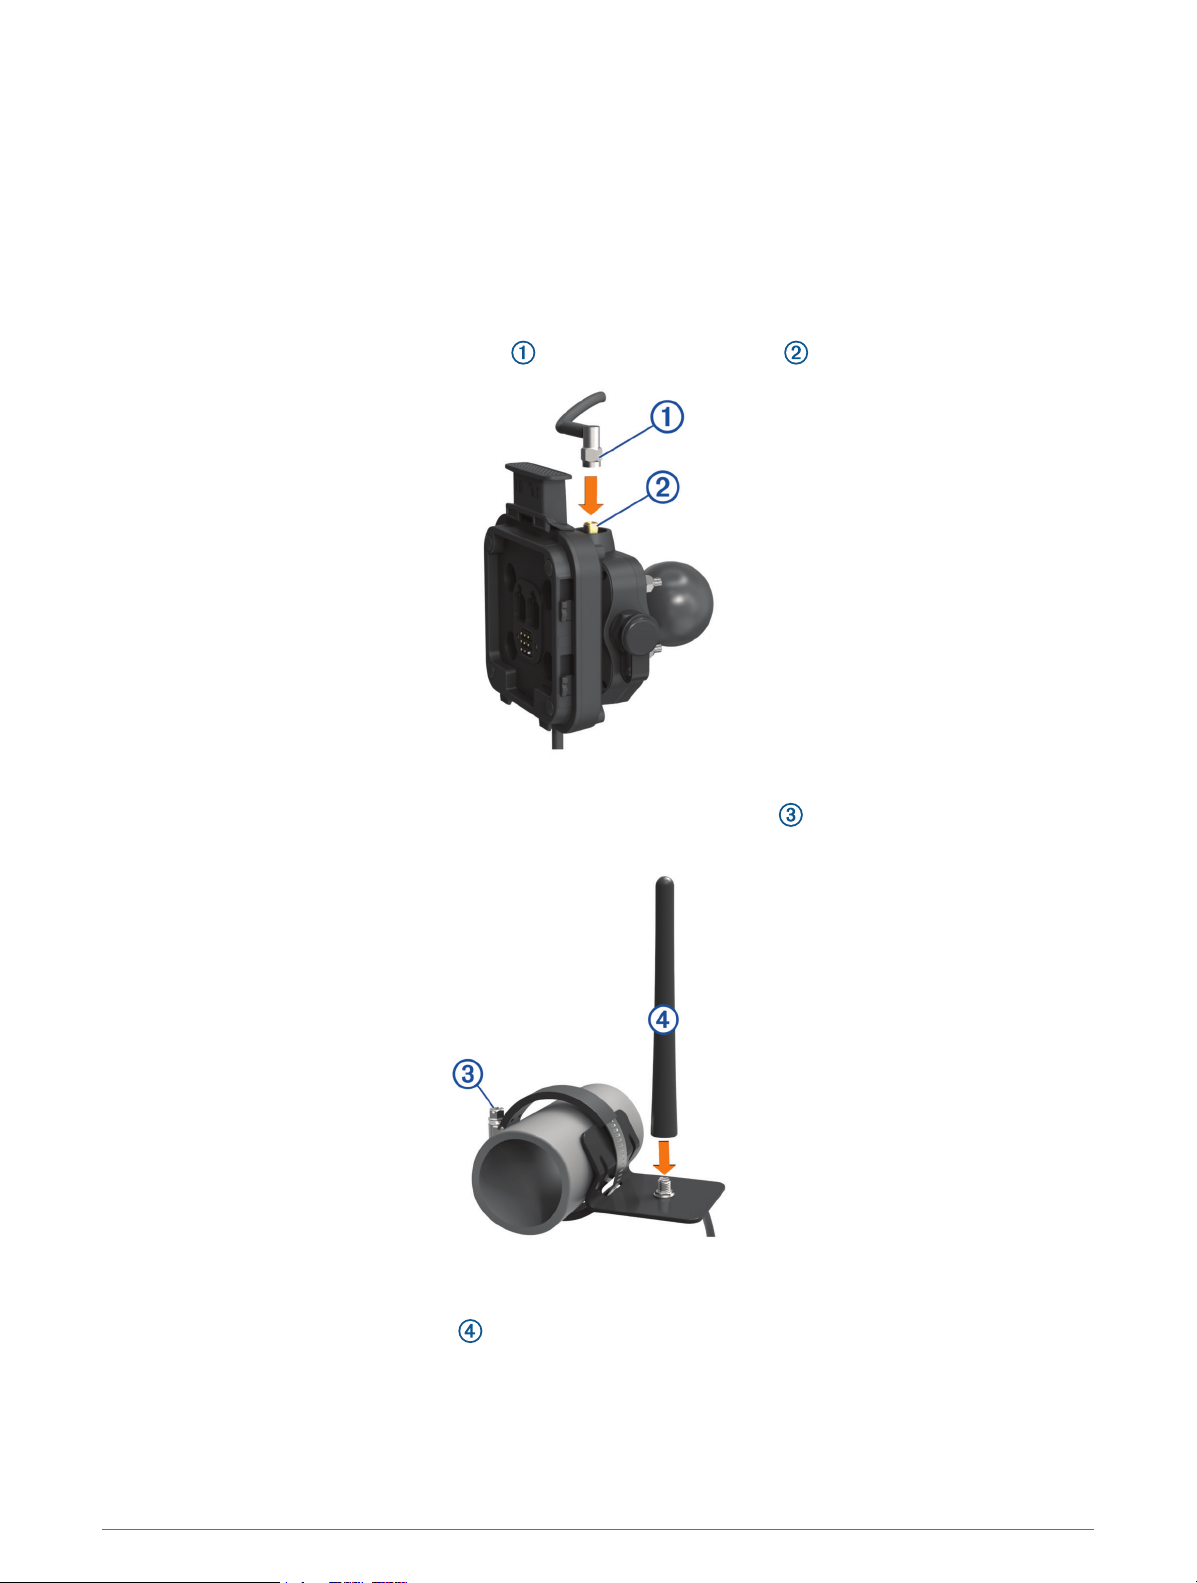
Mounting the Antenna
NOTE: The mounted antenna must be at least 4 cm (1.57 in.) away from the nearest roll bar or metal surface to
avoid radio interference.
You can use the external antenna mount to mount your antenna in a more suitable location for your vehicle,
such as a roll bar at the rear of your vehicle, to receive better radio reception. For the best results, use this
method for vehicles that have a roll cage.
1 Screw down and tighten the antenna cable onto the Group Ride mount .
2 Find a suitable location for the antenna.
3 Using a flat head screwdriver or
5
/
16
in. (8 mm) nut driver, loosen the bolt on the external antenna mount
until the ring separates.
4 Place the mount around the roll bar.
5 Tighten the bolt on the mount until the ring is secure.
6 Screw down and tighten the antenna onto the external antenna mount plate.
7 Route the antenna cable along a suitable path using the roll bars in your vehicle, and secure it using the
included zip ties.
8 Secure any loose cable to the roll bar using the included zip ties.
NOTE: You should avoid bundling loose cable behind body panels to reduce antenna interference.
Installation 7
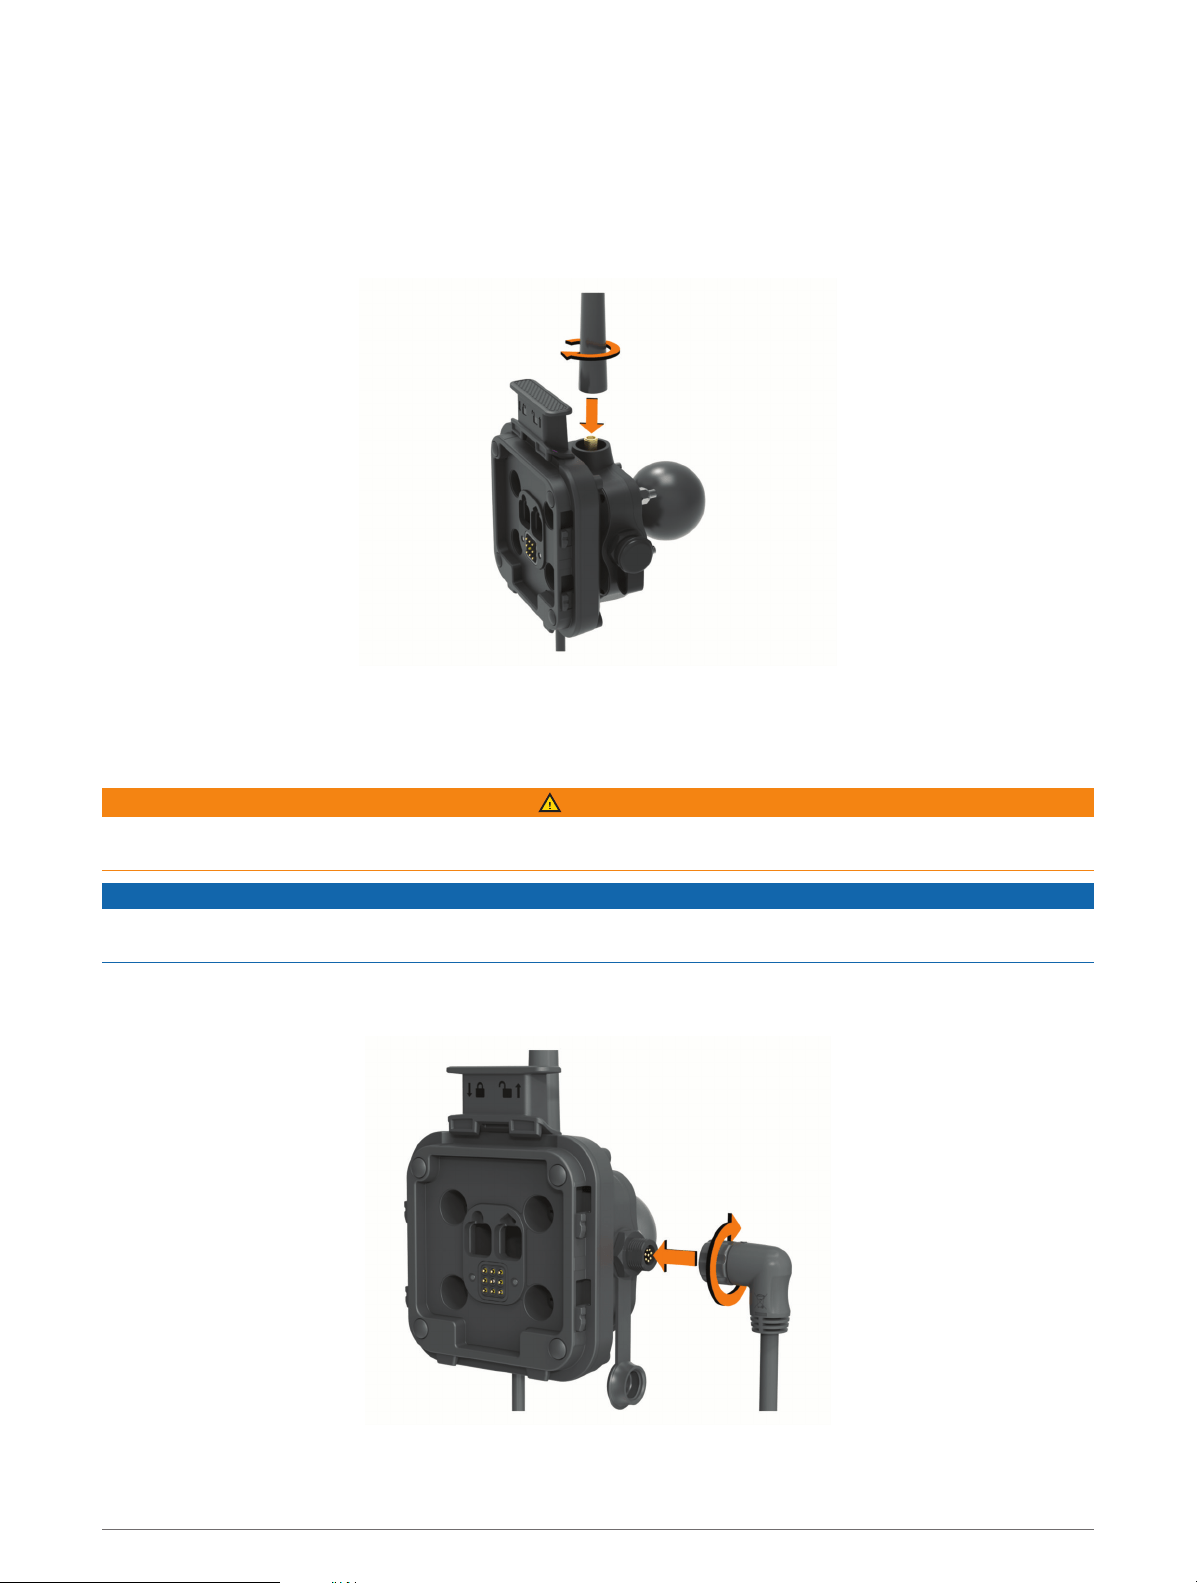
Installing the Antenna on the Group Ride Mount
NOTE: The mounted antenna must be at least 4 cm (1.57 in.) away from the nearest roll bar or metal surface to
avoid radio interference.
For the best range performance, use the external antenna mount. You can mount the antenna directly onto the
Group Ride mount when it is not possible to use the external antenna mount (Mounting the Antenna, page7).
Screw down and tighten the antenna onto the Group Ride mount.
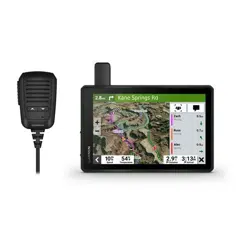
Installing the Fist Microphone and Mount
Before you can attach the fist microphone mount to your dashboard, you must select a suitable location on the
dashboard.
WARNING
It is your responsibility to ensure the mounting location complies with all applicable laws and ordinances, and
does not block your view of the road during the safe operation of your vehicle.
NOTICE
Avoid wires, gauges, air bags, air bag covers, HVAC, and other items when drilling pilot holes and attaching the
mount to the vehicle. Garmin is not responsible for any damages or consequences arising from the installation.
NOTE: This feature is not available on all product models.
1 Align and insert the connector on the fist microphone onto the Group Ride mount.
2 Tighten the collar around the connected cable.
8 Installation
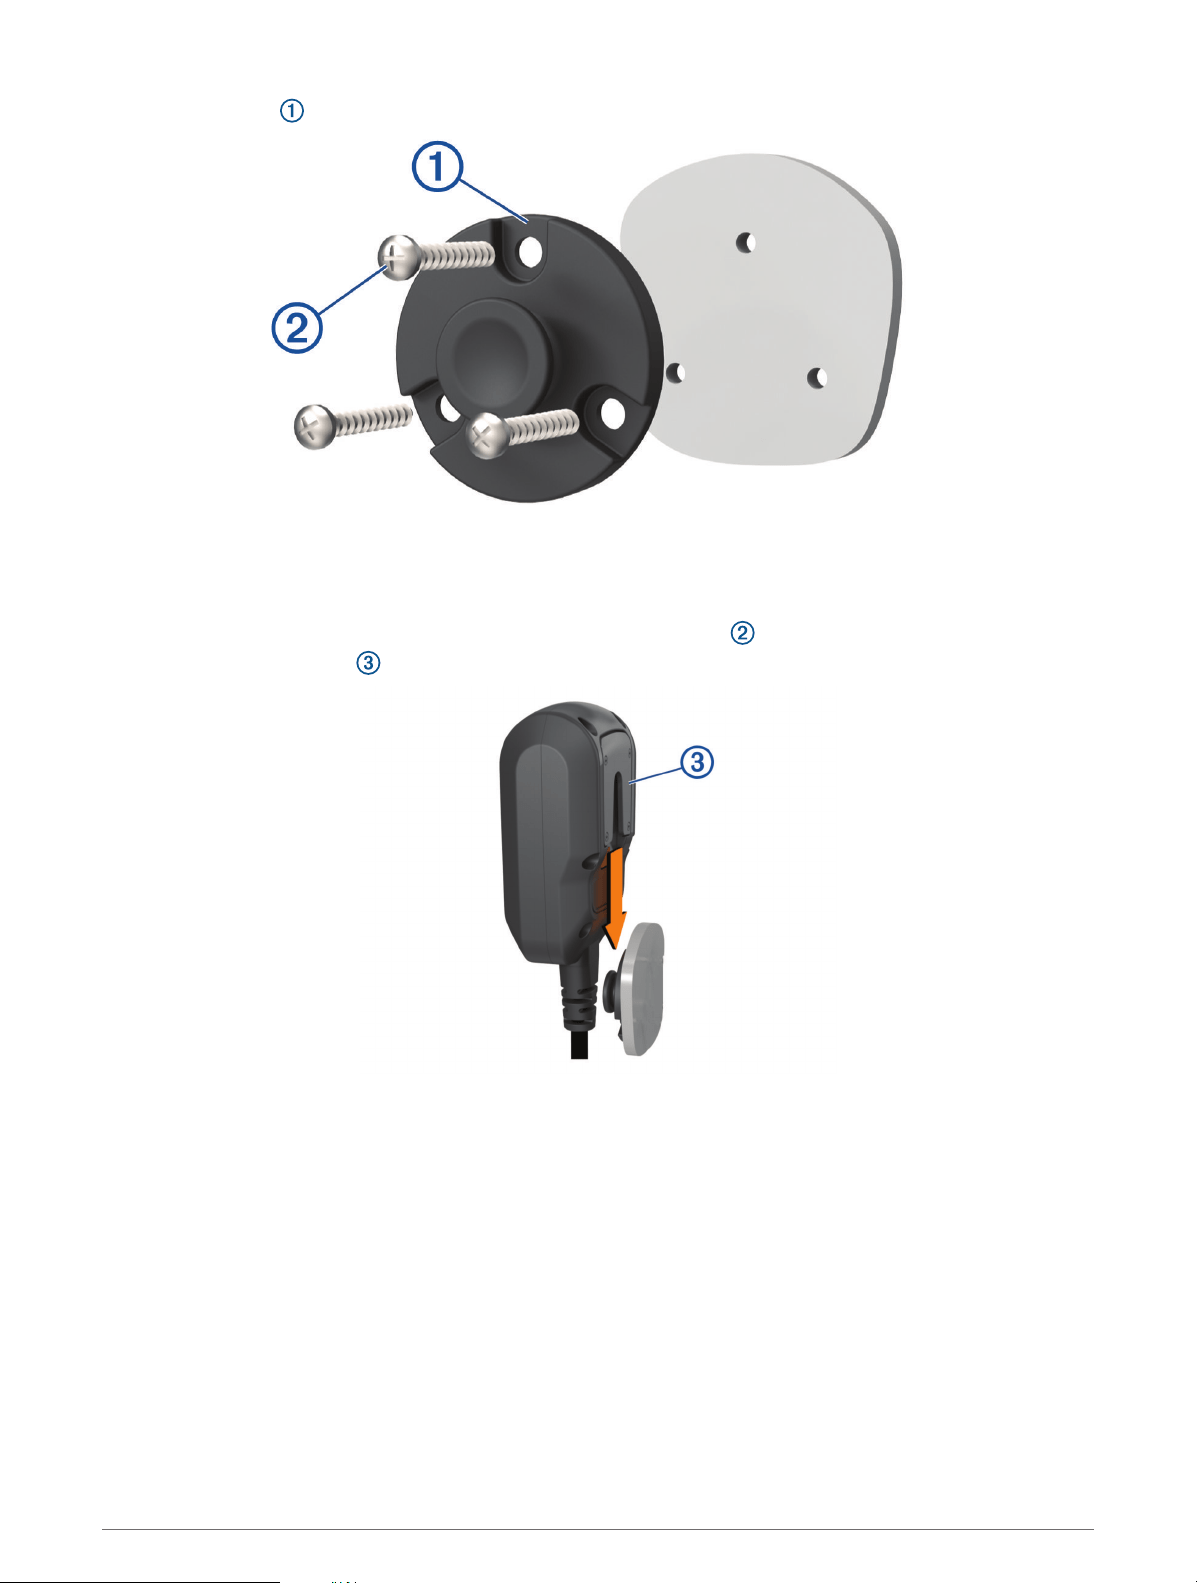
3 Place the mount on the selected location.
4 Using the mount as a template, mark the three screw locations.
5 Drill pilot holes (optional).
For some types of mounting material, drilling pilot holes is necessary.
6 Securely fasten the mount to the surface using the supplied screws .
7 Slide the fist microphone onto the mount.
Installation 9
Off-oad Navigation Features
Routes
A route is a path from your current location to one or more destinations.
• For off-road use, you can set the device to calculate point-to-point routes in a straight line (Straight Line
Routes, page11).
• The device calculates a recommended route to your destination based on the preferences you set, including
the route calculation mode (Changing the Route Calculation Mode, page46) and avoidances (Avoiding
Delays, Tolls, and Areas, page44).
• You can start navigating to your destination quickly using the recommended route, or you can select an
alternate route (Starting a Route, page41).
• If there are specific roads you need to use or avoid, you can customize the route (Adding a Location to Your
Route, page44).
• You can add multiple destinations to a route (Adding a Location to Your Route, page44).
Adventure Roads and Trails
WARNING
Entering your vehicle profile characteristics does not guarantee that your vehicle's characteristics will be
accounted for in all route suggestions. Limitations may exist in map data for some route suggestions. Always
defer to all posted road signs and conditions during vehicle operation. Failure to do so could lead to an accident
involving personal injury or death.
This device can navigate off-highway roads and trails based on your vehicle profile. Trails are color coded
based on accessibility. You can select to set which adventure roads and trails appear on the map.
10 Off-Road Navigation Features
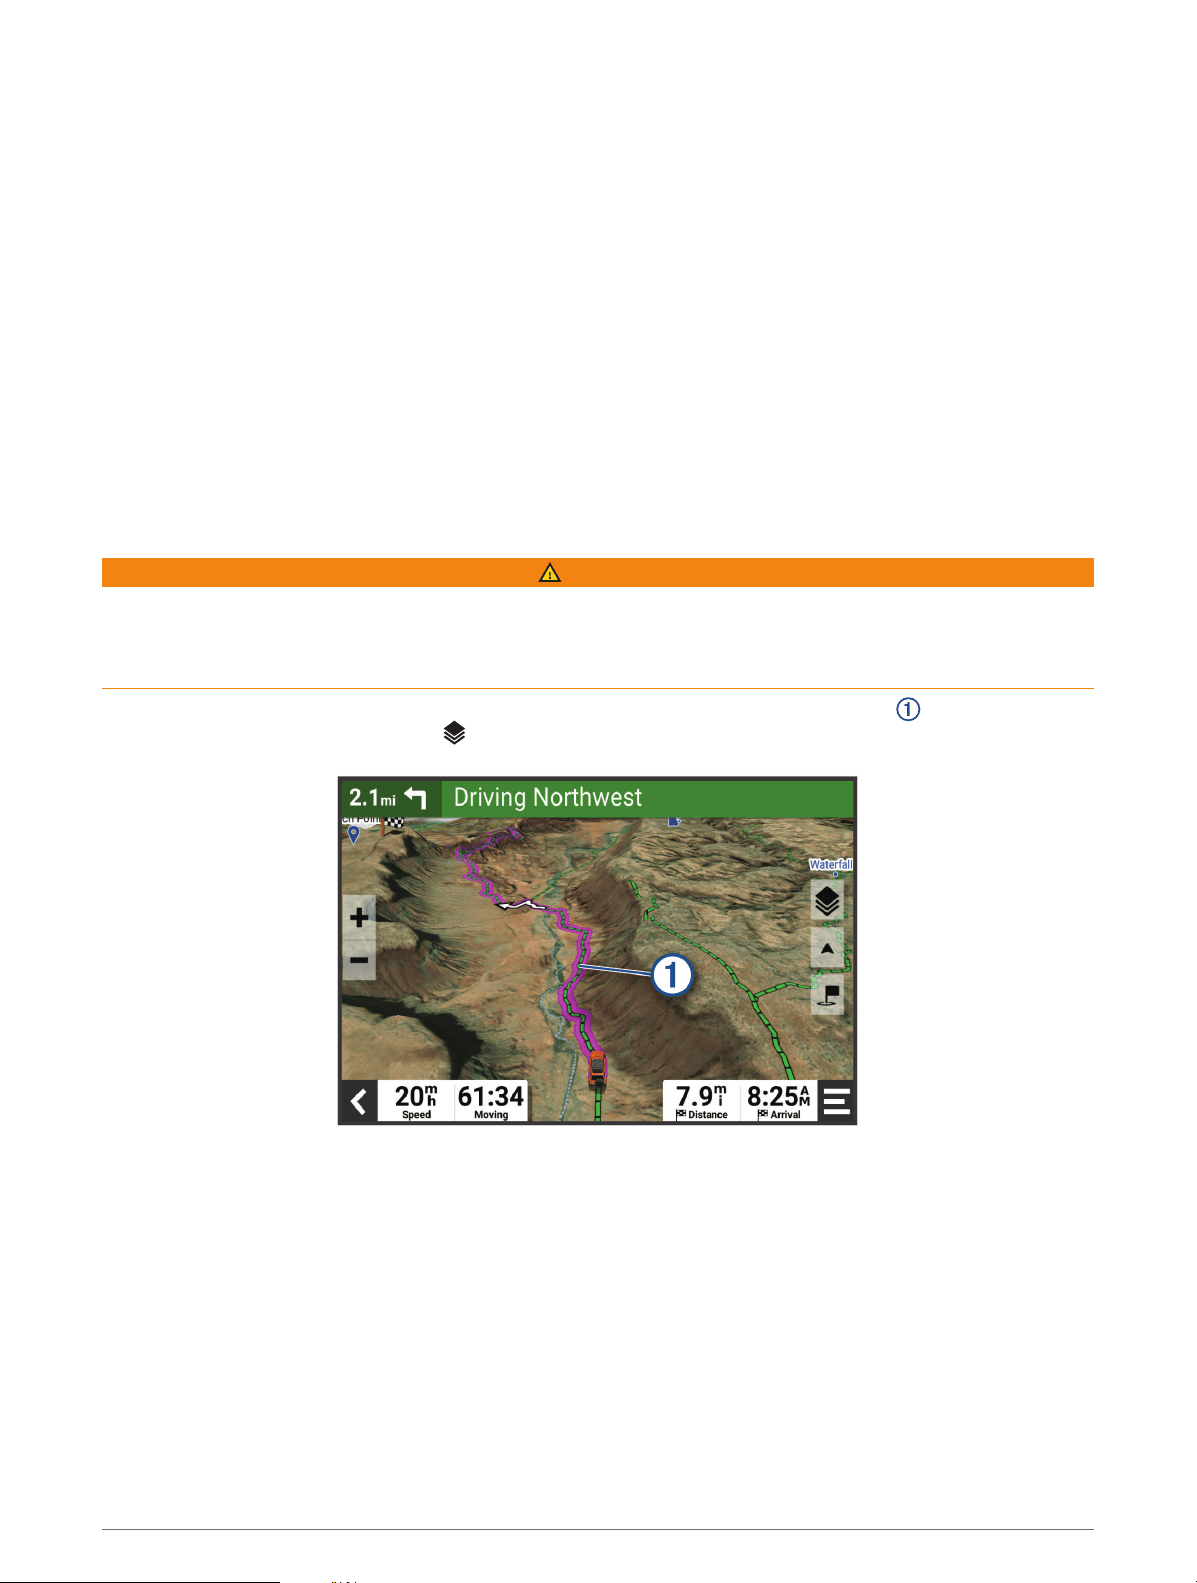
Straight Line Routes
For areas without defined roads or trails, the device guides you to your destination using a straight line route.
You can set multiple waypoints to navigate a route through areas without roads.
Distance to the destination.
Route highlighted on the map.
Vehicle speed.
Map tools. Provides tools to show you more information about your route and surroundings.
Map layers. Allows you to change the map orientation and add topographic and BirdsEye imagery to your
map view.
Skipping the Next Stop on Your Route
You can skip an upcoming location you previously added to your route.
From the map, select > Yes.
Stopping the Route
From the map, select > Stop.
Tracks
A track is a recording of your path. The track log contains information about the recorded path, including time,
location, and elevation information.
Off-Road Navigation Features 11

Recording Tracks
Tracking records your path. When you start tracking, your device logs your location and updates the track line. If
your device is paired with a Garmin Explore
™
account, your device periodically synchronizes recorded tracks with
the app.
1 From the main menu, swipe to the left and select Track Recorder.
2 Select Start.
Recording Tracks with inReach
®
You can record your path using the track recorder and inReach team tracking simultaneously.
From the main menu, swipe to the left, and select inReach > > Tracking Sync.
Navigating a Track
You can navigate a saved track using the Garmin Explore app on your device.
1 Select > Adventure > Explore > Tracks.
2 Select a track.
3 Select Go!.
Viewing Your Collections on the Map
You can view your Garmin Explore collections directly on the map. You must enable the collections map layer to
use this feature.
NOTE: If you do not assign a collection category to your Garmin Explore data, it appears as an unorganized
collection.
1 Select View Map > > Collections.
2 Select one or more collection categories from the list.
3 Select Save.
Your collections appear as icons on the map.
Pitch and Roll
WARNING
The Pitch and Roll application is intended to show vehicle angles based on calibrated measurements only. You
are responsible for calibrating the device. Changes to the position of the device after calibration may affect
the accuracy of its measurements. Measured values are suggestions only based on your input into the device.
Take readings often and carefully, and allow the readings to stabilize after significant changes in environmental
conditions. Always allow a margin of safety for changing conditions and reading errors. Failure to account for
your vehicle and your environment could cause an incident resulting in death or serious injury.
The device alerts you if your vehicle pitches or rolls at an angle that could affect the vehicle's stability.
Calibrating Pitch and Roll
You can set the angle of your vehicle to zero at any time.
1 Park your vehicle on a flat, level surface.
2 Adjust the position of your device in the mount so you can comfortably view the screen.
3 From the main menu, swipe to the left and select Pitch and Roll > Calibrate.
The values for pitch and roll reset to 0 degrees.
WARNING
To maintain the best accuracy, you must calibrate pitch and roll each time you reposition your device.
12 Off-Road Navigation Features

Adjusting Warning Angles
You can adjust the angles at which the device activates a pitch or roll alert. You are responsible for knowing and
setting the correct pitch and roll angle for your vehicle.
1 From the main menu, swipe to the left and select Pitch and Roll > > Warning Angles.
2 Swipe up or down to adjust the pitch or roll warning angles.
3 Select Accept.
Enabling or Disabling Warning Angle Alerts
1 From the main menu, swipe to the left and select Pitch and Roll > .
2 Select an option:
• To enable or disable pitch and roll notifications, select Pitch and Roll Notifications.
• To enable or disable audible alerts, select Audible Alerts.
Viewing the Altimeter, Barometer, and Compass
The device contains internal altimeter, barometer, and compass sensors with automatic calibration.
Select > Adventure > ABC.
TIP: You can also select the Altimeter or Barometer widget to open the ABC app.
Calibrating the Compass
NOTICE
Calibrate the electronic compass outdoors. To improve heading accuracy, do not stand near metal objects or
objects that influence magnetic fields, such as vehicles, electronic devices, buildings, or overhead power lines.
When your device is connected to the mount, it uses GPS data to determine your compass heading. When you
remove the device from the mount, it uses a built-in compass to show your heading.
Each time you disconnect your device from the mount, the device prompts you to calibrate the compass.
If you experience irregular compass behavior, for example, after moving long distances or after extreme
temperature changes, you can manually calibrate the compass to improve accuracy.
1 Disconnect the device from the mount and move away from objects that influence magnetic fields.
2 From the main menu, swipe to the left and select Altimeter > > Calibrate Compass.
3 Follow the on-screen instructions.
Group Ride
The Group Ride app allows you to coordinate rides and communicate with nearby riders using preset text
messages, live map locations, and voice communications.
Starting a Group Ride
You can create a group ride that allows you to choose the group radio channel, view and remove riders who join
your group ride, and set the group ride name.
1 From the main menu, select Group Ride > Start a Group Ride.
2 Enter your rider name, and select Done.
3 If necessary, select the radio channel, and select Next.
4 Enter the ride name, and select Done.
As riders join your group ride, their names appear on the list.
5 Select Start.
The group ride begins after all riders sync with the group ride.
Off-Road Navigation Features 13

Joining a Group Ride
You can join a nearby group ride that was created by another rider.
NOTE: For some product models, the Group Ride app is located in the apps menu.
1 From the main menu, select Group Ride > Nearby Group Rides.
2 Select a nearby group ride, and select Join.
Rejoining a Recent Group Ride
You can rejoin any of your ten most-recent group rides.
1 From the main menu, select Group Ride > Recent Group Rides.
2 Select a recent group ride, and select Join.
Adding Riders to a Group Ride
You can add riders to a group ride that is already in progress.
1 From the main menu, select Group Ride.
2 If necessary, select .
3 Select Add.
As new riders join the group ride, they appear on the list.
4 Select Continue.
Broadcasting a Message
WARNING
Do not read, send, or reply to any messages while driving. If you do so, you could become distracted by the
display, which could lead to an accident causing personal injury or death.
You can broadcast a preset message to the members in your active group ride that are in range of the VHF
radio.
1 From the main menu, select Group Ride.
2 If necessary, select .
3 Select Broadcast to Group.
4 Select a preset message, and select Send.
Broadcasting a Location
WARNING
While driving, do not interact with the display to broadcast your location. If you do so, you could become
distracted by the display, which could lead to an accident causing serious personal injury or death.
You can broadcast a location to the members in your active group ride that are in range of the VHF radio.
1 From the main menu, select Group Ride.
2 If necessary, select .
3 Select Broadcast to Group > Broadcast a Location, and select a location.
4 Select Share.
14 Off-Road Navigation Features

Viewing a Group Ride Notification
WARNING
Do not read or reply to any notifications while driving. If you do so, you could become distracted by the display,
which could lead to an accident causing serious personal injury or death.
From most pages, a notification appears when the device receives a broadcasted group ride location or
message. You can also view group ride notifications in the Group Ride app.
NOTE: When you are viewing the map, new notifications appear in a map tool at the edge of the screen..
1 From the main menu, select Group Ride > , and select a notification.
2 Select Go! to navigate to a shared location.
Exiting a Group Ride
1 From the main menu, select Group Ride.
2 If necessary, select .
3 Select Exit > Yes.
Group Ride Settings
From the main menu, select Group Ride > .
Edit Rider Name: Allows you to set your name that displays during a group ride. This setting is not available
during an active group ride.
Rider Map Labels: Sets the label to be displayed on each active rider on the map.
Show Tracks on Map: Shows the track that each group ride member takes on the map.
Auto Zoom to Group: Enables the map to automatically zoom to the active group ride.
Reset Default Settings: Allows you to reset all group ride settings to default values. This setting is not available
during an active group ride.
Radio
NOTE: This feature is not available on all product models.
You can use the Radio app to create radio presets, select a radio channel, and select squelch codes. To use this
feature, you must connect the device and the antenna to the Group Ride mount. The Tread - SXS Edition device
configures radio settings automatically when you join or create a group ride.
Selecting a Preset
NOTE: For some product models, the Radio app is located in the apps menu.
From the Radio widget on the main menu, select or .
Selecting a Radio Channel
1 From the main menu, select Radio.
2 Select an option:
• To move to a different channel, select or .
• To select a MURS channel from the menu, select Channel.
Adjusting the Squelch
You can adjust the squelch and change between CTCSS, DCS, and Open squelch modes to improve audio
quality and avoid radio interference in your area.
1 From the main menu, select Radio.
2 Select an option:
• To choose a squelch code within the current mode, select
or .
• To adjust the squelch mode, select Open.
Off-Road Navigation Features 15

Adding a Custom Radio Preset
1 Select Radio > Preset > .
2 Select or to select a channel and squelch code.
3 Select Save.
Selecting a Roger Tone
You can select the tone other devices play when you operate your radio.
1 Select Radio > > Roger Tone.
2 Select a roger tone.
The device plays the selected tone.
3 Select Save.
Turning the Radio Off
Select Radio > > Yes.
Enabling Push-to-Talk with a Headset
You can enable push-to-talk controls for use with a compatible Bluetooth headset. This allows you to transmit
your voice using the voice dial feature on your headset.
1 Select Radio > > Push to Talk with Headset.
2 If necessary, follow the on-screen instructions to pair your headset with the device.
3 Select Push to Talk with Headset.
4 Select .
Transmitting Your Voice
Before you can transmit your voice, you must pair your Tread - SXS Edition device with a compatible Bluetooth
headset or connect the fist microphone.
You can transmit your voice over the radio using the connected fist microphone or a compatible Bluetooth
headset.
NOTE: For some product models, the Radio app is located in the apps menu.
Select an option:
• Hold the push-to-talk button on the side of the connected fist microphone (Installing the Fist Microphone
and Mount, page8).
• From the main menu, select Radio > Push to Talk .
• Use the voice dial feature on your connected Bluetooth headset (Enabling Push-to-Talk with a Headset,
page16).
TIP: You can press the pause or stop button to manually close the radio.
NOTE: You must enable the Push to Talk with Headset setting to use this feature (Radio Settings,
page16).
Adjusting the Radio Volume
1 Select Radio > .
2 Use the slider bars to adjust the volume.
Radio Settings
From the main menu, select Radio > .
Push to Talk with Headset: Enables you to transmit your voice using the push-to-talk button on your compatible
headset.
Roger Tone: Sets the roger tone the device plays when you operate your radio.
Reset Default Settings: Resets all radio settings and presets to factory default values.
16 Off-Road Navigation Features

ineach Features
WARNING
Before you can use the inReach features of your Tread SXS Edition device, including messaging, SOS, tracking,
and inReach Weather, you must have an active satellite subscription. Always test your device before you use it
outdoors.
Ensure you have a clear view of the sky when using the messaging, tracking, and SOS functions, because these
features require satellite access to operate properly.
NOTICE
Some jurisdictions regulate or prohibit the use of satellite communications devices. It is the responsibility of the
user to know and follow all applicable laws in the jurisdictions where the device is intended to be used.
Messages
Your Tread SXS Edition device sends and receives text messages using the Iridium satellite network. You can
send messages to an SMS phone number, an email address, or another device that uses inReach technology.
Each message you send includes your location details where allowed.
Sending a Preset inReach Message
Preset messages have predefined text and predetermined recipients. You must set up preset messages using
the Garmin Explore website at explore.garmin.com.
1 Select inReach > Presets.
2 Select a preset message, and select Send.
Sending a Text Message
1 Select inReach > Compose.
2 Select To:, and add one or more contacts.
3 Select Message:, and enter a message.
4 Select Send.
Replying to a Message
1 Select inReach.
2 Select a conversation, and select Reply.
3 Select an option:
• To start with a pre-written message, select a quick text message from the top of the screen.
NOTE: You can add and edit quick text messages on the Garmin Explore website.
• To write a custom message, enter a message.
4 Select Done.
Checking for Messages
When you send a message, your device listens for replies for 10 minutes. The device also checks for new
messages every hour. When you are using the inReach tracking feature, your device automatically checks for
messages at your tracking interval.
NOTE: To receive messages, your device must have a clear view of the sky and be in view of a satellite when it
checks for the messages.
You can force a check for messages by manually checking for messages, sending a message, or sending a
track point. During a check, your device connects to satellites and receives messages waiting to be sent to your
device.
Select inReach > Check.
inReach Features 17

Navigating to a Message Location
When you send or receive a message from another device with inReach technology, the message may include
location information. For these messages, you can navigate to the location from which the message was sent.
1 Select inReach, and select a conversation.
2 Select a message with location information, and select Go!.
Deleting a Message
1 Select inReach.
2 Select a conversation.
3 Select Delete > Yes.
Tracking
You can use the tracking feature on your Tread SXS Edition device to record track points and transmit them over
the Iridium satellite network at the specified send interval. Track points appear on the Garmin Explore website
and the MapShare
™
tracking page.
Starting Tracking
Select inReach > .
Stopping Tracking
Select inReach > .
NOTE: Stopping tracking also pauses your activity recording.
Sharing Your MapShare Web Page
You can enable MapShare at explore.garmin.com.
You can share a link to your MapShare webpage with other people. The system automatically adds text,
including link information, to the end of your message.
1 Select inReach > > Send MapShare.
2 Select To:, and add one or more contacts.
3 Select Message:, and enter a message.
4 Select Send.
inReach Tracking Settings
Select inReach > .
Tracking Sync: Sets the device to use the track recorder and inReach tracking simultaneously.
Auto Track: Sets the device to start tracking when you turn on the device.
Send Interval: Sets the frequency at which the device records a track point and transmits it over the satellite
network when you are moving. If you are on a professional plan, you can specify the interval when you are
stationary.
18 inReach Features
SOS
WARNING
Before you can use the SOS function, you must have an active satellite subscription. Always test your device
before you use it outdoors.
Ensure you have a clear view of the sky when using the SOS function, because this feature requires satellite
access to operate properly.
NOTICE
Some jurisdictions regulate or prohibit the use of satellite communications devices. It is the responsibility of the
user to know and follow all applicable laws in the jurisdictions where the device is intended to be used.
During an emergency, you can use your Tread SXS Edition device to contact the Garmin Response
SM
center
to request help. Pressing the SOS button sends a message to the Garmin Response team, and they notify
the appropriate emergency responders of your situation. You can communicate with the Garmin Response
team during your emergency while you wait for help to arrive. You should only use the SOS function in a real
emergency situation.
Initiating an SOS Rescue
CAUTION
While the device is in SOS mode, do not turn off or attempt to turn off the device. Doing so could prevent this
feature from operating properly and could delay receipt of assistance in the event of an emergency.
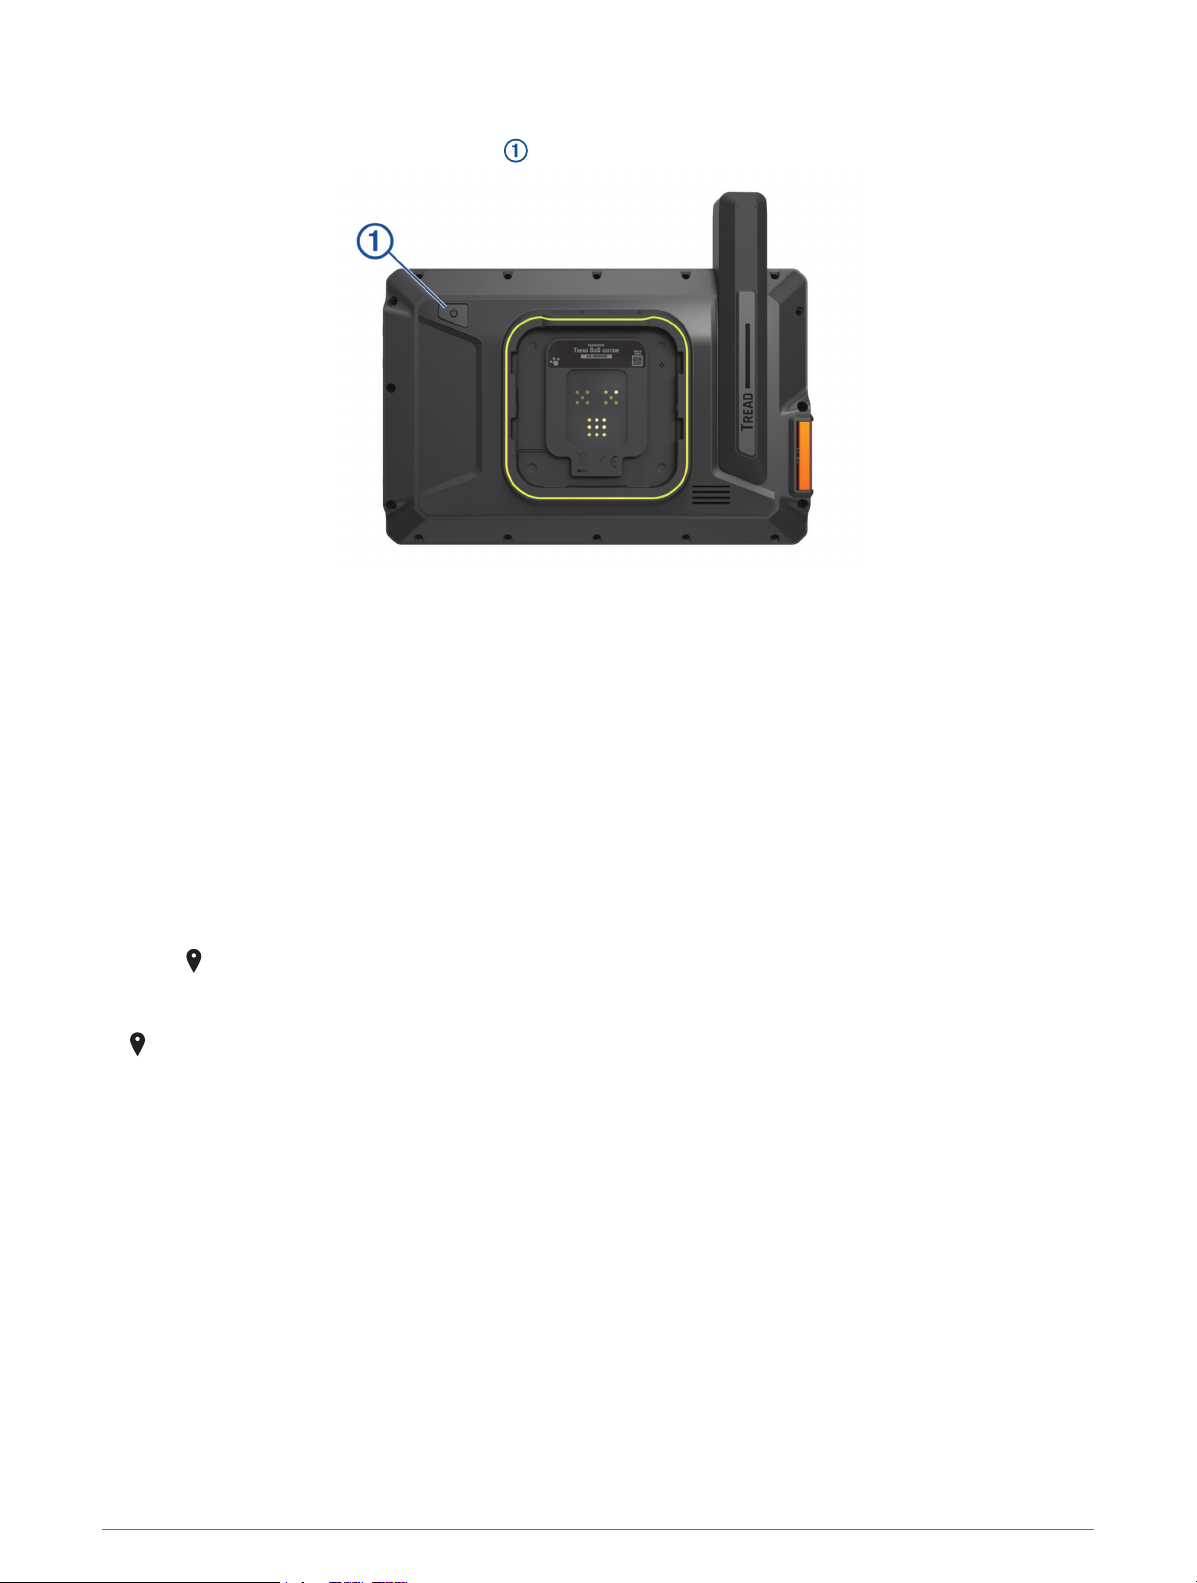
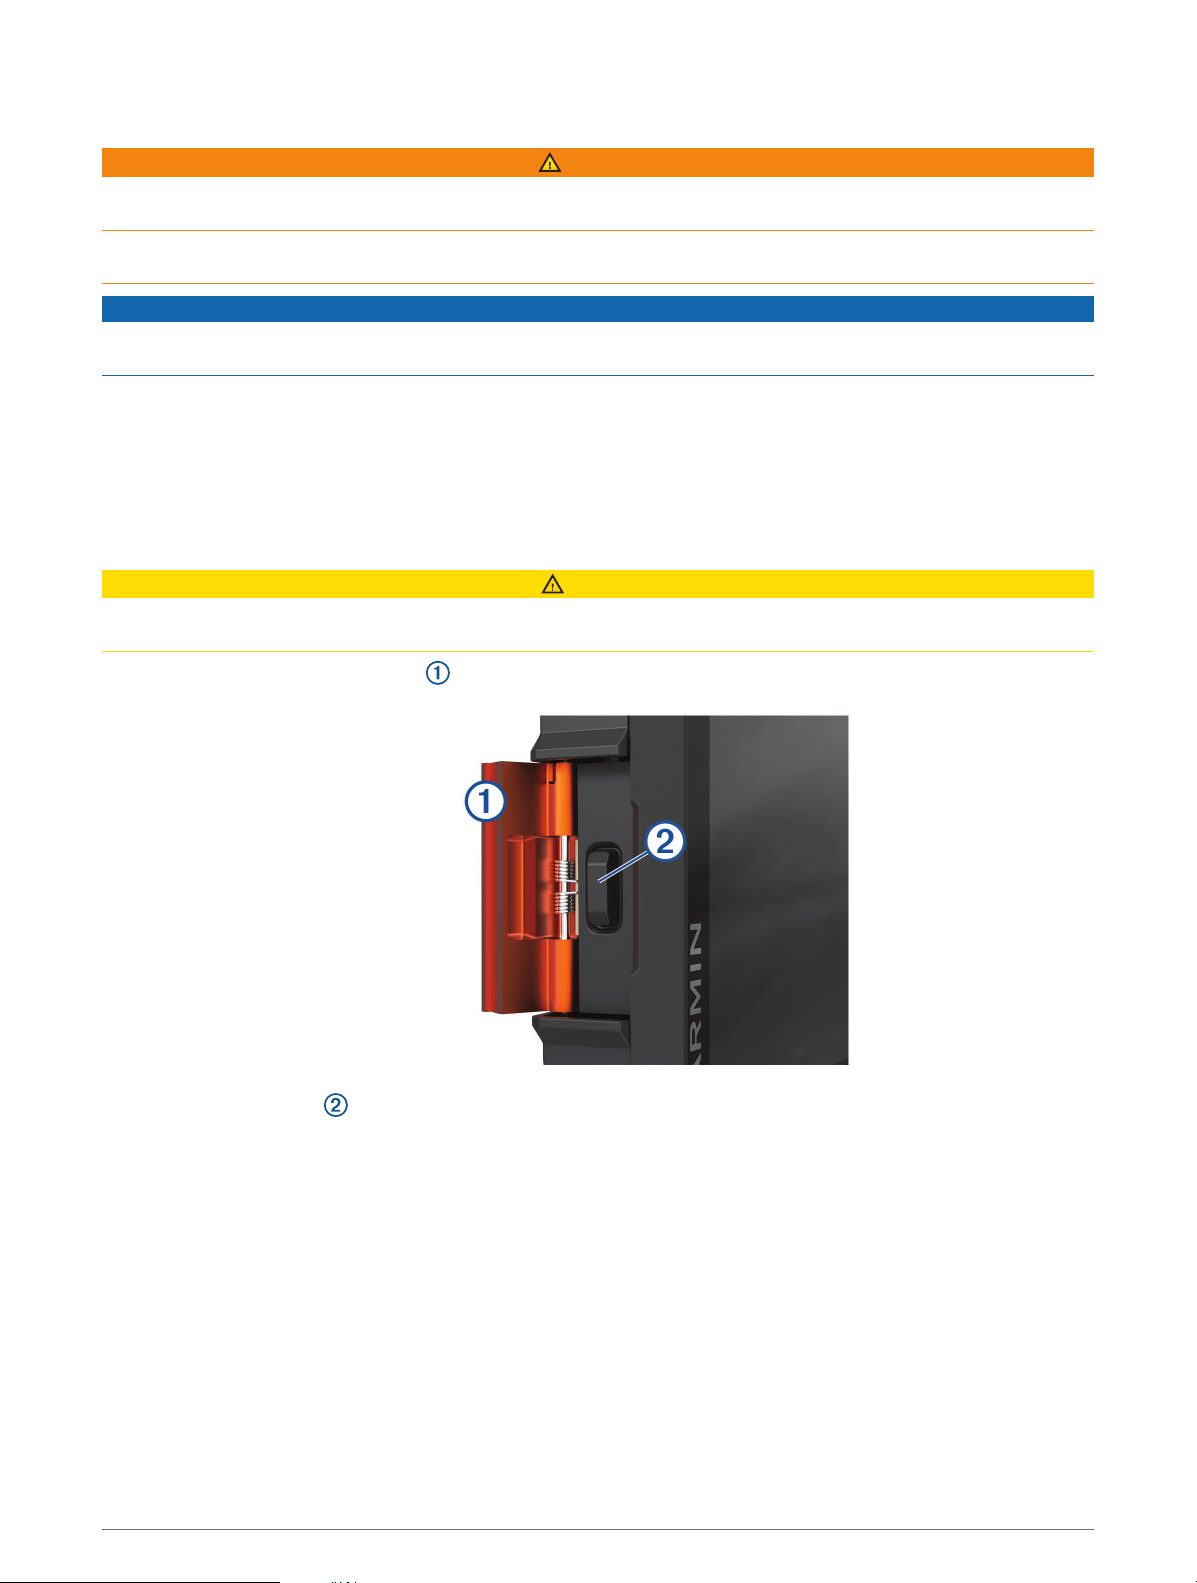
1 Open the SOS door on the device .
2 Press the SOS button .
3 Wait for the SOS countdown.
The device sends a default message to the emergency response service with details about your location.
4 Reply to the confirmation message from the emergency response service.
Your reply lets the emergency response service know that you are capable of interacting with them during
the rescue.
For the first 10 minutes of your rescue, an updated location is sent to the emergency response service every
minute. To conserve battery power after the first 10 minutes, an updated location is sent every 10 minutes
when moving, and every 30 minutes when stationary.
inReach Features 19

Canceling an SOS Rescue
If you no longer need assistance, you can cancel an SOS rescue after it is sent to the emergency response
service.
Select Cancel SOS.
Your device transmits the cancellation request. When you receive a confirmation message from the emergency
response service, the device returns to normal operation.
Syncing inReach Data
You can sync data from your explore.garmin.com account to your device using the Tread app. After you make
edits to your data, such as plan changes, contacts, preset messages, or quick text messages, you must sync
them to your device using the mobile app.
Open the Tread app.
Changes made to data such as collections, waypoints, routes, and tracks update automatically.
You can now sync your data to your Tread SXS Edition device.
Contacts
You can add, delete, and edit contacts on the Tread SXS Edition device.
Adding a Contact
1 Select inReach > > inReach Contacts > New Contact.
2 Enter the new information.
3 Select Save.
Editing a Contact
1 Select inReach > > inReach Contacts.
2 Select a contact.
3 Select an item to edit.
4 Enter the new information.
5 Select Save.
Deleting a Contact
1 Select inReach > > inReach Contacts.
2 Select a contact.
3 Select > Yes.
Data Use and History
You can view plan details and data use on the Tread SXS Edition device.
Viewing Plan and Usage Details
Select inReach > > About This Device.
20 inReach Features

Using the Map
You can use the map to navigate a route (Your Route on the Map, page42) or to view a map of your
surroundings when no route is active.
1 Select View Map.
2 Touch anywhere on the map.
3 Select an option:
• Drag the map to pan left, right, up, or down.
• To add or remove map layers such as topographic and BirdsEye imagery, select .
• To zoom in or out, select or .
• To switch between North Up, 2-D, and 3-D views, select .
• To open the route planner, select (Route Planner, page27).
• To start a route, select a location on the map, and select Go! (Starting a Route by Using the Map,
page41).
Map Tools
Map tools provide quick access to information and device functions while you view the map. When you activate
a map tool, it appears in a panel at the edge of the map.
Stop: Stops navigation of the active route.
Edit Route: Allows you to take a detour or skip locations in your route (Changing Your Active Route, page44).
Mute: Mutes the device audio.
Cities Ahead: Shows upcoming cities and services along your active route or along a highway (Cities Ahead,
page22).
Up Ahead: Shows upcoming locations along the route or the road on which you are traveling (Up Ahead,
page22).
Elevation: Displays elevation changes ahead.
Traffic: Displays traffic conditions along your route or in your area (Viewing Upcoming Traffic, page23). This
feature is not available in all areas or for all device models.
Trip Data: Displays customizable trip data, such as speed or mileage (Viewing Trip Data from the Map,
page22).
Track Recorder: Displays the track data for your active route.
Turns: Displays a list of upcoming turns in your route (Viewing Turns and Directions, page43).
Weather: Displays weather conditions for your area.
Music Player: Displays media controls and media information.
Smart Notifications: Displays recent smart notifications from your connected phone (Smart Notifications,
page38).
Pitch and Roll: Displays the current angle of your vehicle (Pitch and Roll, page12).
Group Ride: Displays the distance and direction of the members in your group ride (Group Ride, page13).
Radio: Allows you to use the push-to-talk feature with a compatible Bluetooth headset (Enabling Push-to-Talk
with a Headset, page16).
Environmental Zones: Shows upcoming environmental zones that apply to your vehicle.
inReach: Allows you to view and send inReach messages, and start inReach tracking (inReach Features,
page17).
Viewing a Map Tool
1 From the map, select .
2 Select a map tool.
The map tool appears in a panel at the edge of the map.
3 When you are done using the map tool, select
.
Using the Map 21

Up Ahead
The Up Ahead tool provides information about upcoming locations along your route or the road on which you
are traveling. You can view upcoming points of interest by category, such as restaurants, fuel stations, or rest
areas.
You can customize the categories that show in the Up Ahead tool.
Viewing Upcoming Locations
1 From the map, select > Up Ahead.
While you are traveling, the map tool shows the next location along your road or route.
2 Select an option:
• If the map tool shows categories, select a category to view a list of nearby locations in that category.
• If the map tool shows upcoming locations, select a location to view location details or start a route to the
location.
Customizing the Up Ahead Categories
You can change the location categories that appear in the Up Ahead tool.
1 From the map, select > Up Ahead.
2 Select a category.
3 Select .
4 Select an option:
• To move a category up or down in the list, select and drag the arrow next to the category name.
• To change a category, select the category.
• To create a custom category, select a category, select Custom Search, and enter the name of a business
or category.
5 Select Save.
Cities Ahead
While you are traveling on a highway or navigating a route that includes a highway, the Cities Ahead tool
provides information about upcoming cities along the highway. For each city, the map tool shows the distance
to the highway exit and the services available, similar to the information on highway road signs.
Viewing Upcoming Cities and Exit Services
1 From the map, select > Cities Ahead.
While you are traveling along a highway or an active route, the map tool shows information about upcoming
cities and exits.
2 Select a city.
The device shows a list of points of interest located at the selected city exit, such as fuel stations, lodging, or
restaurants.
3 Select a location, and select Go! to start navigating.
Trip Information
Viewing Trip Data from the Map
From the map, select > Trip Data.
22 Using the Map

Customizing the Trip Data Fields
1 From the map, select > Trip Data.
2 Select a trip data field.
3 Select an option.
The new trip data field appears in the trip data map tool.
Resetting Trip Information
1 From the map, select Speed.
2 Select a trip information data field.
3 Select > Reset Field(s).
4 Select an option:
• When not navigating a route, select Select All to reset every data field except the speedometer, on the first
page.
• Select Reset Overall Data to reset Trip A and total data.
• Select Reset Max. Speed to reset the maximum speed.
• Select Reset Trip B to reset the odometer.
Viewing Upcoming Elevation Changes
You can view upcoming elevation changes along your route. This can help you avoid or plan for steep uphill or
downhill grades.
1 From the map, select > Elevation.
2 Select the chart to expand it to the full screen.
The device displays your current elevation, and a chart of elevation over distance.
3 Select an option:
• Select or to change the distance range of the chart.
• Select the arrows to scroll the chart.
Viewing Upcoming Traffic
NOTICE
Garmin is not responsible for the accuracy or timeliness of the traffic information.
Before you can use this feature, your device must be receiving traffic data (Traffic, page47).
You can view traffic incidents coming up along your route or along the road on which you are traveling.
1 While navigating a route, select > Traffic.
The nearest upcoming traffic incident appears in a panel on the right side of the map.
2 Select the traffic incident to view additional details.
Viewing Traffic on the Map
The traffic map shows color-coded traffic flow and delays on nearby roads.
1 From the main menu, select > Navigation > Traffic.
2 If necessary, select > Legend to view the legend for the traffic map.
Searching for Traffic Incidents
1 From the main menu, select > Navigation > Traffic.
2 Select > Incidents.
3 Select an item in the list.
4 If there is more than one incident, use the arrows to view additional incidents.
Using the Map 23

Customizing the Map
Customizing the Map Layers
You can customize which data appear on the map, such as icons for points of interest and road conditions.
1 Select > Map Display > Map Layers.
2 Select the layers to include on the map, and select Save.
Viewing the Public Lands Map Key
Public lands are color-coded on the map to show who owns a specific plot of land. For example, you can see if
a plot of land is privately owned or if it is part of a national park. You must enable the public lands map layer to
use this feature (Customizing the Map Layers, page24).
You can view the legend for these colors on the device.
Select > Map Display > Map Layers > > Public Lands.
Enabling Adventure Roads and Trails Map Layers
You can enable or disable map layers that display accessible or inaccessible roads for different types of motor
vehicles.
1 Select > Map Display > Map Layers > > Adventure Roads & Trails.
2 Select a road or trail type.
Changing the Map Data Field
1 From the map, select a data field.
NOTE: You cannot customize Speed.
2 Select a type of data to display.
Changing the Map Buttons
1 From the map, hold a map button.
2 Select an option:
• To replace a map button, select a map button, and select a map button to display.
• To remove a map button, select .
3 Select Save.
Changing the Map Perspective
1 Select > Map Display > Driving Map View.
2 Select an option:
• Select Track Up to display the map in two dimensions (2-D), with your direction of travel at the top.
• Select North Up to display the map in 2-D with north at the top.
• Select 3-D to display the map in three dimensions.
• Select Auto Zoom to Group to automatically adjust the zoom level so all riders in a group ride are visible
on the map.
3 Select Save.
Dog Tracking
The dog tracking features allow you to see information transmitted from your handheld dog device on your
Tread - SXS Edition device. You can navigate to your dogs, view their current status and location, and observe
the distance they have traveled.
24 Dog Tracking
Receiving Data From Your Handheld Device
Before you can receive data, you must enable broadcasting on your handheld dog device. See the owner's
manual for your handheld dog device for more information.
Place your handheld dog device within 3m (10ft) of your Tread - SXS Edition device.
TIP: Your Tread - SXS Edition device receives data from one compatible handheld dog device at a time.
Stay more than 3m (10ft) away from other handheld dog devices or disable broadcasting on handheld dog
devices from which you do not want to receive data.
The devices connect and synchronize automatically.
Tracking Your Dogs
1 Select > Adventure > Dog Tracker.
The dogs connected to your handheld dog device appear on the screen.
2 Select a dog.
The dog's location and track log appear on the map.
3 Select Go! to navigate to your dog.
Dog Status Icons
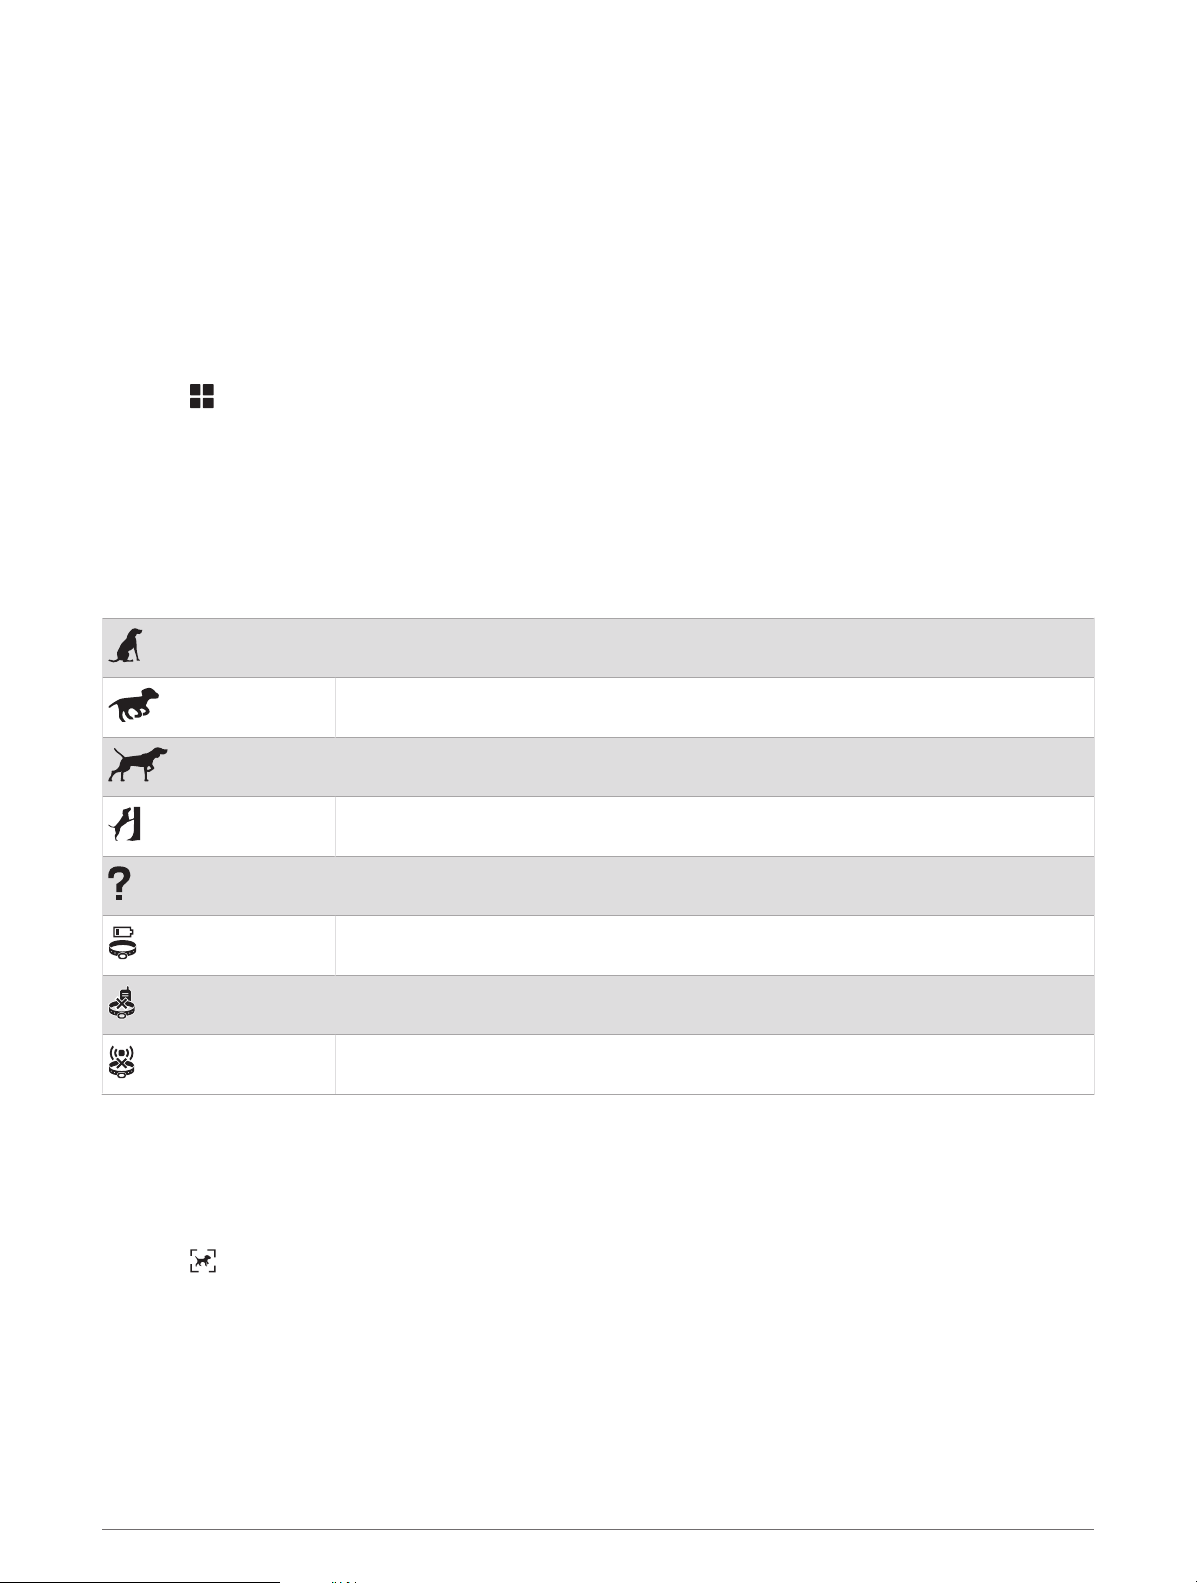
Icons indicate the status and location of your dogs.
Sitting
Running
On point
Treed
Unknown*
Collar battery low
Collar connection lost
Collar GPS reception lost
*The unknown status icon indicates the collar has not acquired a satellite signal and the handheld device
cannot determine the location of the dog.
Viewing Your Dogs on the Map
1 While viewing the map, select anywhere on the map.
2 Select .
The device zooms to show all of your dogs on the screen.
Dog Tracking 25
Using the Apps
Viewing the Owner's Manual on YourDevice
You can view the complete owner's manual on the device screen in many languages.
1 Select > Tools > Owner's Manual.
The owner's manual appears in the same language as the software text.
2 Select to search the owner's manual (optional).
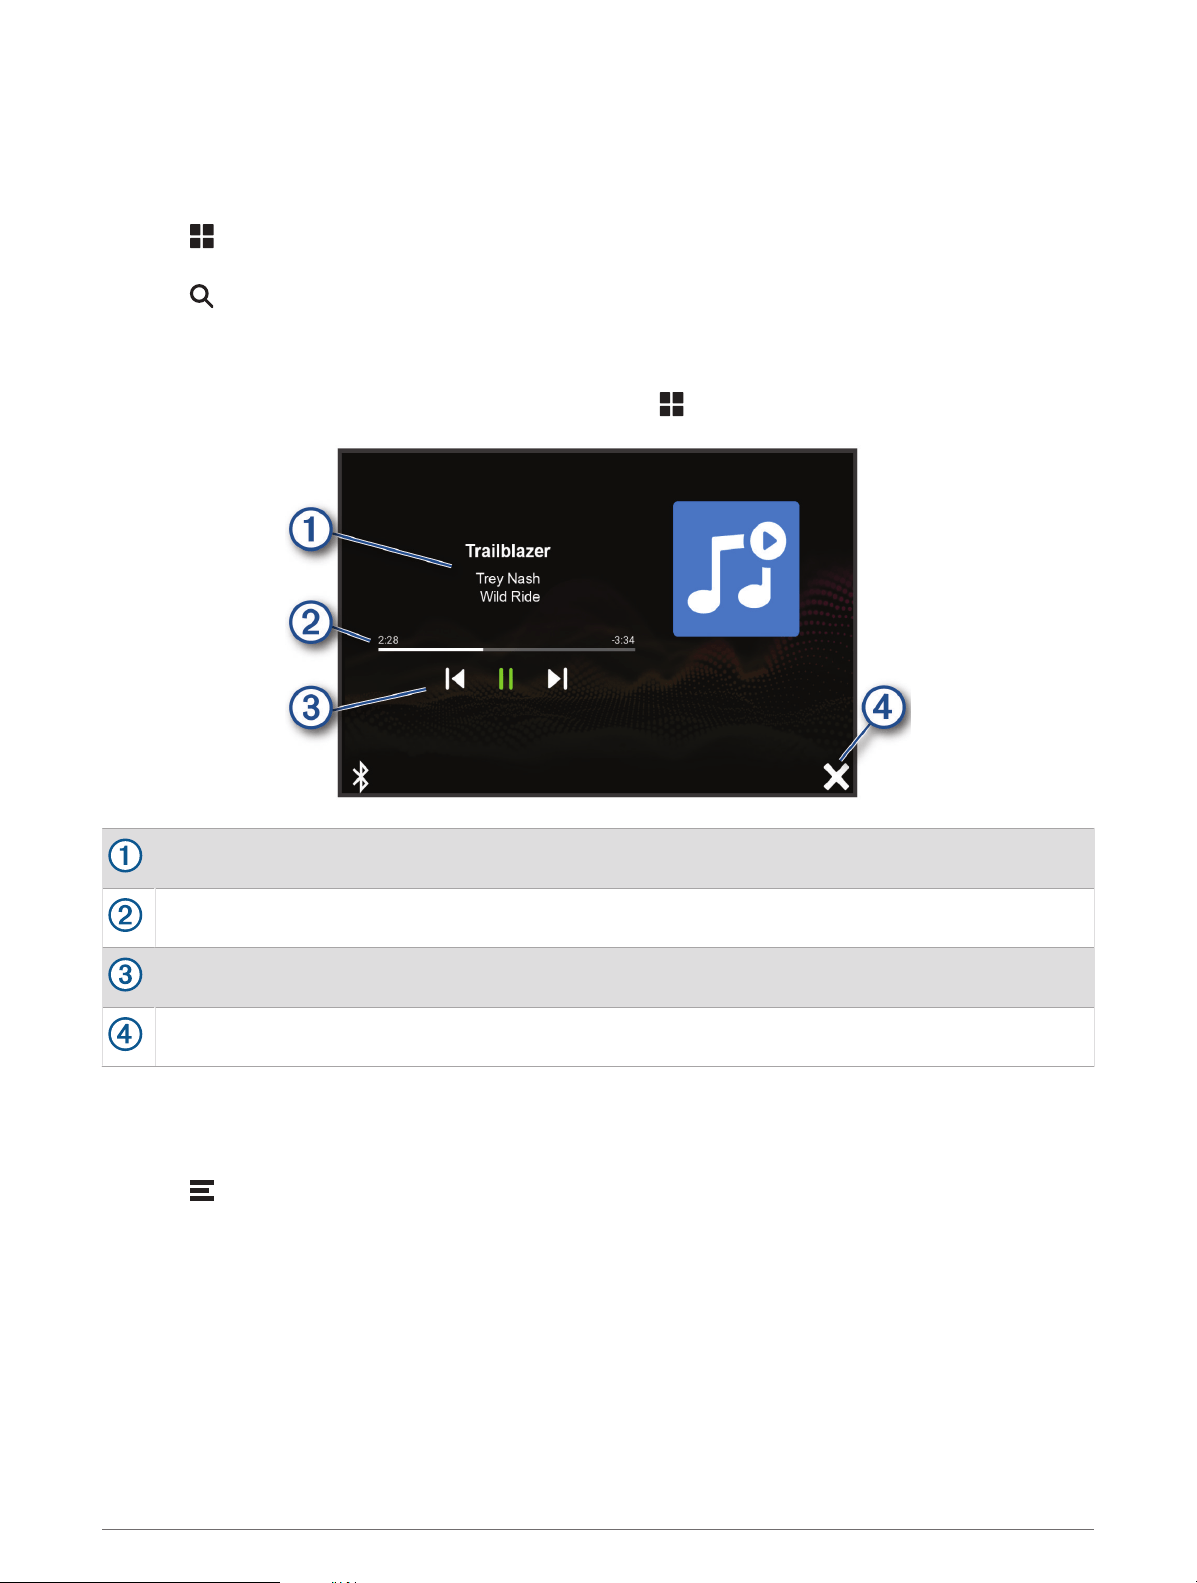
Music Player
The media player allows your device to control the media currently playing from a media app on your paired
phone. You can open the media player at any time by selecting > Tools > Music from the main menu.
Information about the currently playing media, such as title, artist, album, station, or channel.
Progress through the current media item.
Playback controls. The controls change based on the service providing the media.
Select to hide or shrink the media player.
Adding the Music Player Tool to the Map
The music player map tool enables you to control the music player from your map.
1 Open the map.
2 Select > Music Player.
The music player controls appear on the map.
BirdsEye Imagery
BirdsEye imagery provides downloadable, high-resolution map imagery, including detailed satellite imagery and
raster-based topographical maps. You can download BirdsEye Satellite Imagery directly to your device when it is
connected to a Wi‑Fi network.
26 Using the Apps

Downloading BirdsEye Imagery
Before you can download BirdsEye imagery directly to your device, you must connect to a wireless network
(Connecting to a Wireless Network, page57).
1 Select > Adventure > BirdsEye Direct.
2 Select .
3 Select an option:
• To download BirdsEye imagery files for a specific location or area, select Location, and select a category.
NOTE: The location defaults to your current location.
• To select an image quality option, select Detail.
• To define the size of the area to be shown in the downloaded imagery files, select Size, and enter a
distance from the selected location.
• To select where to save the downloaded imagery, select Save To.
4 Select Download.
5 Enter a name for the downloaded imagery and select Done.
Route Planner
You can use the route planner to create and save a route, which you can navigate later. This can be useful for
planning a delivery route, a vacation, or a road trip. You can edit a saved route to further customize it, including
reordering locations, adding suggested attractions, and adding shaping points.
You can also use the route planner to edit and save your active route.
Planning a Route
A route can include many locations, and it must include at least a starting location and one destination. The
starting location is the location from which you plan to start your route. If you start navigating the route from
a different location, the device gives you the option to route to your starting location first. For a round trip, the
starting location and final destination can be the same.
1 Select Route Planner > Create Route.
2 If necessary, select a calculation mode.
NOTE: The Turn-by-Turn mode is selected by default.
3 Select an option to choose a location for your starting point:
• Select a location on the map.
• Select , and search for a location (Finding a Location Using the Search Bar, page48).
4 Repeat step 3 to add more locations.
NOTE: The last location you add is the destination.
5 After you have added all the necessary locations, select .
Editing and Reordering Locations in a Route
1 Select Route Planner.
2 Select a saved route.
3 Select List.
4 Select a location.
5 Select an option:
• To change the location, select , and enter a new location.
• To move the location up or down, select , and drag the location to a new position in the route.
• To add a new location after the selected location, select .
• To remove the location, select
.
Using the Apps 27

Changing Routing Options for a Route
You can customize how the device calculates your route.
1 Select Route Planner.
2 Select a saved route.
3 Select .
4 Select an option:
• To add shaping points to your route, select Shaping, and select at least one location.
• To change the calculation mode for the route, touch a route segment, and select a calculation mode.
Navigating to a Saved Route
1 Select Route Planner.
2 Select a saved route.
3 Select Go!.
4 Select the first location to navigate to, and select OK.
The device calculates a route from your current location to the selected location, and then it guides you to
the remaining route destinations in order.
Editing and Saving Your Active Route
If a route is active, you can use the route planner to edit and save it.
1 Select Route Planner > My Active Route.
2 Edit your route using any of the route planner features.
The route recalculates each time you make a change.
3 Select Save to save your route, which you can navigate again later (optional).
TracBack
®
Following Your Recent Track
The TracBack feature records the most recent segment of your movement. You can retrace your recent track
back to a previous location.
1 Select > Adventure > TracBack.
Your recent track appears on the map.
2 Select Go!.
Saving Your Recent Track as a Route
You can save your recent track as a route, which you can navigate later using the route planner (Navigating to a
Saved Route, page28).
1 Select TracBack.
Your recent track appears on the map.
2 Select > Save as Route.
3 Enter a name, and select Done.
Viewing the Weather Forecast
Before you can use this feature, your device must be receiving weather data. You can connect your device to the
Tread app to receive weather data (Pairing with Your Smartphone, page37).
1 From the home screen, select the weather widget.
The device shows the current weather conditions and a forecast for the next several days.
2 Select a day.
The detailed forecast for that day appears.
28 Using the Apps

Viewing Weather Near a Different City
1 Select > Navigation > Weather > Current Location.
2 Select an option:
• To view weather for a favorite city, select a city in the list.
• To add a favorite city, select Add City, and enter a city name.
Viewing the Weather Radar
Before you can use this feature, your device must be connected to a supported phone running the Tread app
(Pairing with Your Smartphone, page37).
1 Select > Navigation > Weather Radar.
2 Select to animate the radar map.
Viewing Weather Alerts
Before you can use this feature, your device must be connected to a supported phone running the Tread app
(Pairing with Your Smartphone, page37).
NOTE: This feature is not available in all areas.
While you are traveling with your device, weather alerts may appear on the map. You can also view a map of
weather alerts near your current location or near a selected city.
1 Select > Navigation > Weather.
2 If necessary, select a city.
3 Select > Weather Alerts.
Checking Road Conditions
Before you can use this feature, your device must be connected to a supported phone running the Tread app
(Pairing with Your Smartphone, page37).
You can view weather-related road conditions for the roads in your area, on your route, or in another city.
1 Select > Navigation > Weather.
2 If necessary, select a city.
3 Select > Road Conditions.
Using the Apps 29

Creating a Round-Trip Route
The device can create a round-trip route using a specified starting location and a distance, duration, or
destination.
1 From the main menu, select > Navigation > Round Trip.
2 Select Start Location.
3 Select a location, and select Select.
4 Select Trip Attributes.
5 Select an option:
• Select Choose a Distance to plan your route by distance.
• Select Choose a Duration to plan your route based on time.
• Select Choose a Destination to plan your route based on a specified location.
6 Select Next.
7 Enter a distance, duration, or destination.
8 Select an option:
• If you entered a distance or duration, select Done.
• If you selected a destination, select Select.
9 Select Add a Direction.
10 Select a direction, and select Next.
11 Select Road Type.
12 Select a road type, and select Save.
13 Select Calculate.
14 Select one or more options:
• Select to view elevation statistics along your route.
• Select to shape your route.
• Use the slider to increase or decrease the level of adventure on your route.
15 Select a route, and select Go!.
30 Using the Apps
Garmin PowerSwitch
™
App
Opens the app settings menu
Enters editing mode to customize the app layout and functions
Turns off all outputs
Power buttons
Activates each connected output
Displays input voltage
Displays the total amperage of the selected Garmin PowerSwitch device
Displays the device name
Displays Garmin PowerSwitch device tabs and custom layout tabs
Activating a Power Switch
Before you can use the Garmin PowerSwitch app to activate a switch, you must install your Garmin
PowerSwitch device in your vehicle and pair it with the Garmin PowerSwitch app.
From the Garmin PowerSwitch app, select a power button to turn a switch on or off.
Turning Off All Switches
Select .
Using the Apps 31

Customizing a Button
1 From the Garmin PowerSwitch app screen, select .
The app enters editing mode.
2 Select on the button you want to customize.
3 Select an option:
• To change the name of the button, select the Button Label field, and enter a name.
• To add an icon to the button, select the Icon field, and select an icon.
• To change the button color, select a color.
• To change the button mode, select a button mode.
• To adjust the intensity of the switch, use the slider.
• To set the button to activate with a control input, select a control input.
4 Select .
5 Select Done.
Assigning a Switch to a Control Input
Before you can use control input functions, you must connect a control input to your Garmin PowerSwitch
device (Connecting a Control Input, page67).
You can assign one or more switches to turn on when the Garmin PowerSwitch device receives a signal from a
control input.
1 Select .
2 Select your Garmin PowerSwitch device.
3 Select a control input.
4 Select one or more switches.
Adding a Custom Layout
You can add a custom layout tab to the Garmin PowerSwitch app. Buttons added to a custom layout can control
multiple switches at the same time.
1 From the Garmin PowerSwitch app, select .
The device enters editing mode.
2 Select .
32 Using the Apps

Adding a Button to a Custom Layout
1 From the Garmin PowerSwitch app, select a custom layout tab.
2 Select .
The app enters editing mode.
3 Select Add Button.
4 On the new button, select .
5 Select an option:
• To change the name of the button, select the Button Label field, and enter a name.
• To add an icon to the button, select the Icon field, and select an icon.
• To change the button color, select a color.
6 Select Add Action.
7 If necessary, select a Garmin PowerSwitch device and a switch.
8 Select an action:
• To set the button to turn the switch on or off with each press, select Toggle.
• To set the button to turn on the switch, select Turn On.
• To set the button to turn off the switch, select Turn Off.
9 Select a button mode:
• To set the button to activate with one touch, select Normal.
• To set the button to activate only while touching the button, select Momentary.
• To set the button to turn on and off repeatedly, select Strobe, and select time intervals.
10 If applicable, use the slider to set the brightness of lights.
11 Select .
12 If necessary, select Add Action to add additional actions for the button.
You can add one action for every switch on the Garmin PowerSwitch device.
Arranging Buttons In a Custom Layout
1 From the Garmin PowerSwitch app, select a custom layout tab.
2 Select .
The app enters editing mode.
3 On the button you want to move, hold , and drag the button to a new location.
Deleting a Custom Layout or Button
1 From the Garmin PowerSwitch app, select a custom layout tab.
2 Select .
The app enters editing mode.
3 Select an option:
• To delete a button, select on the button you want to delete.
• To delete a layout tab, select on the layout tab.
Routines
Routines automate your Garmin PowerSwitch device. When you define a routine on your compatible Garmin
navigation device, it turns switches on or off automatically when the conditions of the routine are met. For
example, you can set a routine to turn on a switch at specific time each day or when your vehicle reaches a
specific speed. Routines are available only when using a compatible Garmin navigation device.
Using the Apps 33

Adding a Routine
1 From the Garmin PowerSwitch app, select > Routines.
2 If necessary, select Add Routine.
3 Select When.
4 Select a trigger:
• To set a switch to trigger when your vehicle reaches a specific speed, select Speed > Next, and follow the
on-screen instructions to enter speed thresholds.
• To set a switch to trigger at a specific time each day, select Time > Next, and enter a time.
• To set a switch to trigger at sunrise, select Sunrise.
• To set a switch to trigger at sunset, select Sunset.
5 Select Add Action.
6 Select a device, a switch, an action, and a button mode.
7 If necessary, use the slider to adjust the dimmer.
8 Select Save.
Editing a Routine
1 From the Garmin PowerSwitch app, select > Routines.
2 Select on the routine you want to edit.
3 Select an option:
• To change the trigger for the routine, select When, and select a trigger.
• To change an action, select on the action you want to change, and update the action.
• To add an action to the routine, select Add Action, and enter information about the action.
4 Select Save.
Deleting a Routine
1 From the Garmin PowerSwitch app, select > Routines.
2 Select on the routine you want to delete.
34 Using the Apps
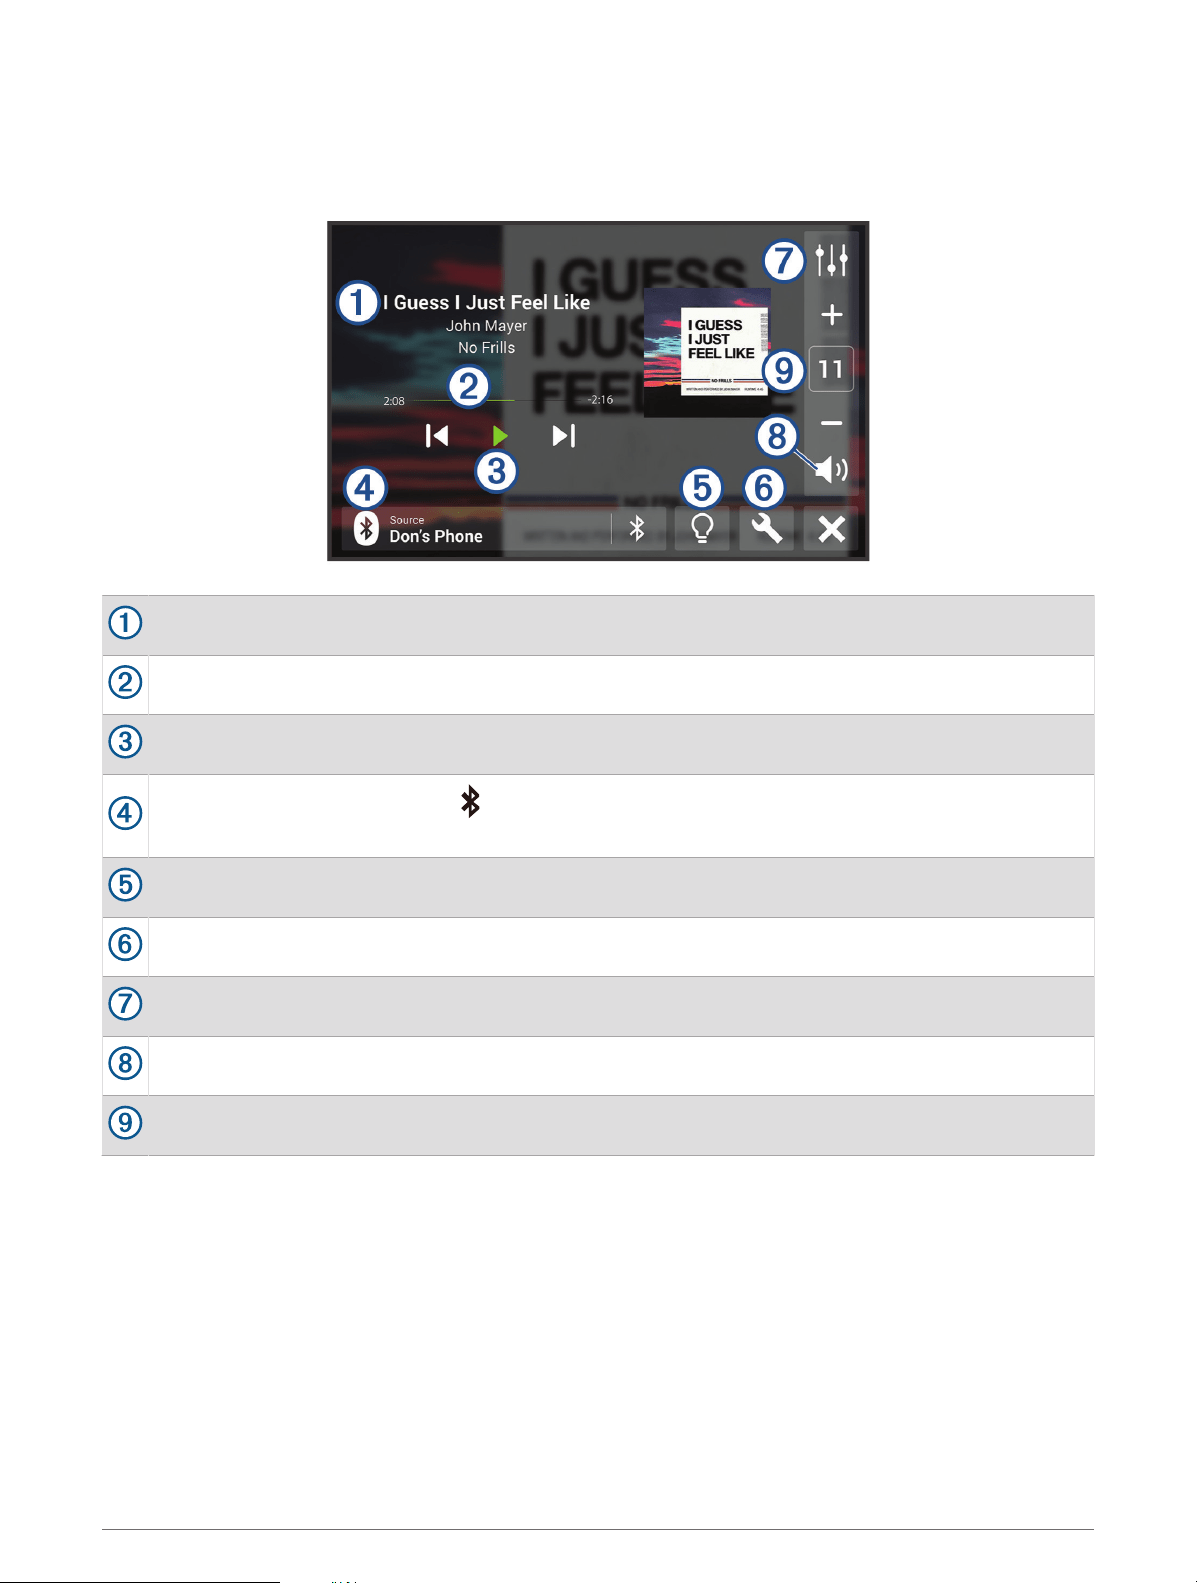
Tread Audio App
Before you can use the controls in the Tread Audio app, you must install your Tread Audio Box and Tread 6.5"
XS-LED Tower Speakers in your vehicle and pair the Tread Audio Box with the Tread Audio app.
Displays information about the currently playing media, such as title, artist, album, station, or channel.
Displays progress through the current media item.
Displays playback controls. The controls change based on the service providing the media.
Displays the current audio source. indicates the media is being played by another media app on your
phone and sent to the device using a Bluetooth media connection.
Opens the LED controls.
Opens the app settings menu.
Opens the volume zone controls.
Mutes the audio.
Increases or decreases the volume.
LED Controls
The LED controls allow you to control the LED lights on your connected Tread 6.5" XS-LED Tower Speakers and
optional, addressable LEDs. You can set the color of the LEDs, sync the LEDs to your music or the speed of your
vehicle, and display a call sign color during a group ride.
Using the Apps 35
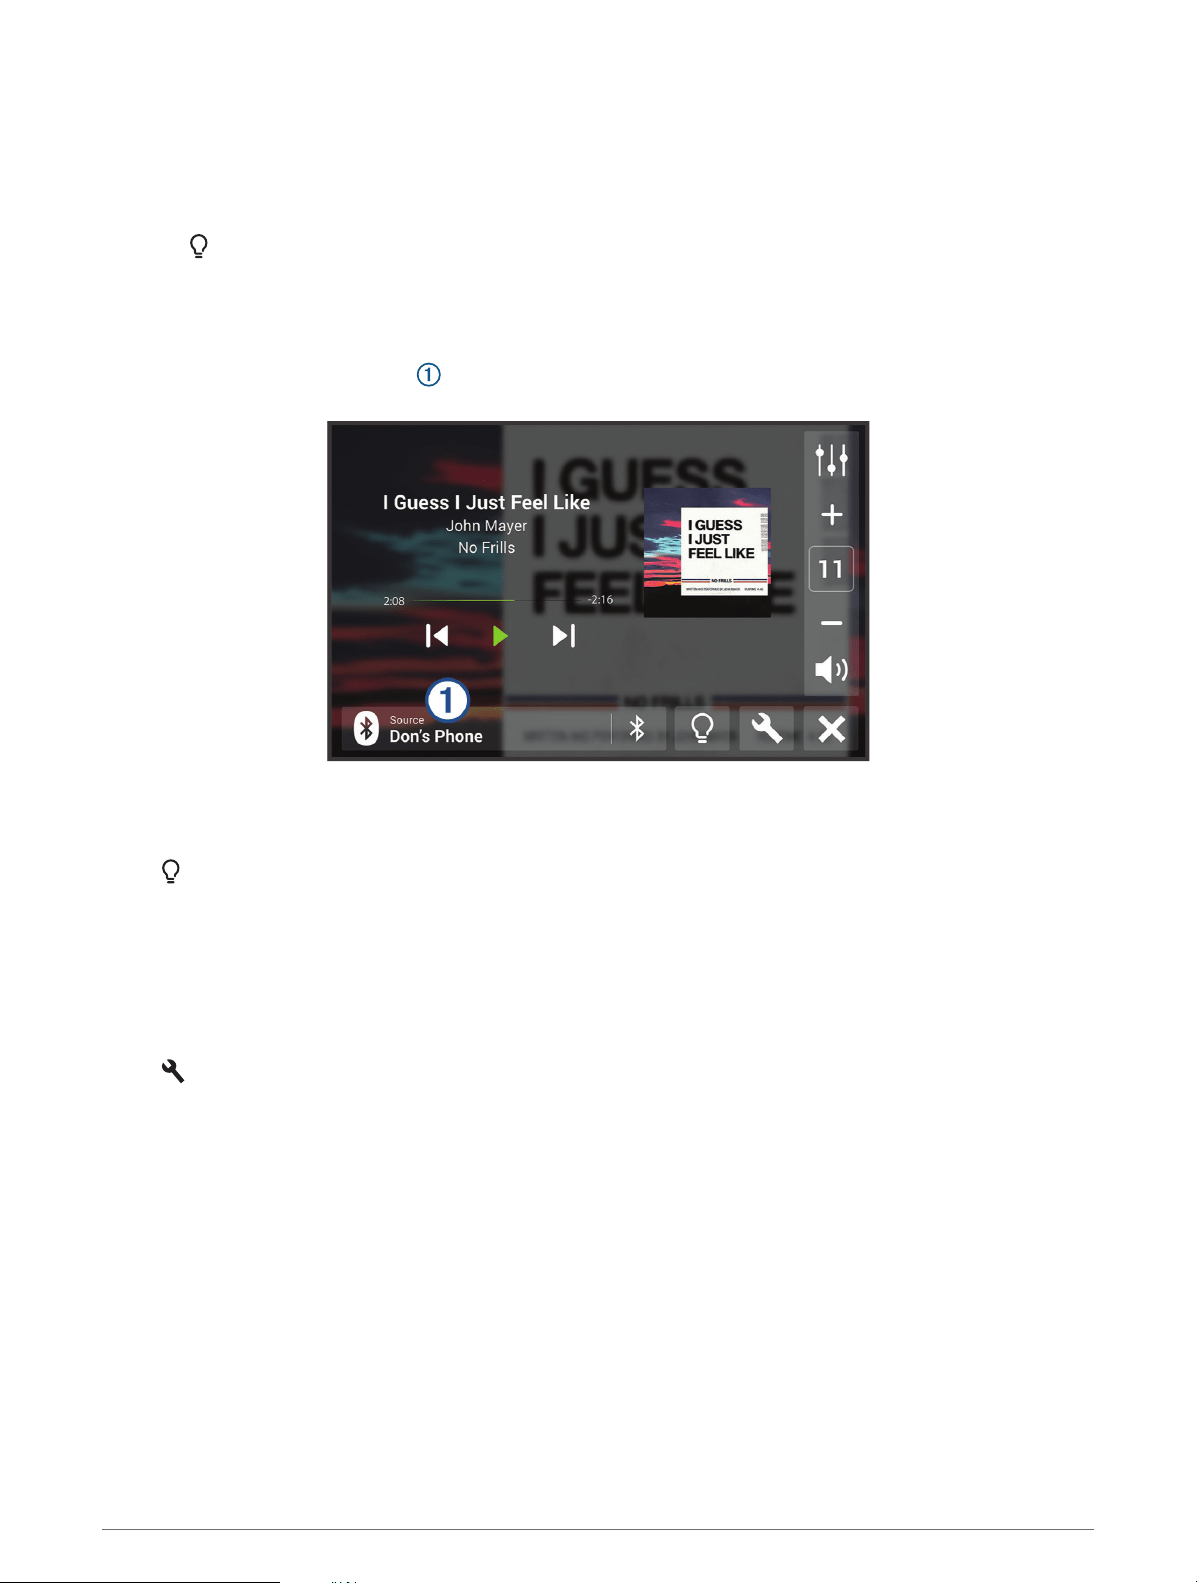
Enabling LED Groups
By default, the controls for LED groups RGB 1 and RGB 2 are enabled. Enabling an LED group allows you to
use the LED lighting controls for that group. You can enable the LED group for the Tread 6.5" XS-LED Tower
Speakers or any additional speakers or addressable LEDs after you set up and pair them with your Tread Audio
Box.
1 Select .
2 Select the LED group.
Changing the Media Source
You can change the source from which media is played on your device.
1 Select the current media source .
2 Select an available media source from the list.
LED Light Settings
Select .
Set Color: Sets the color of the LED lights.
Music Sync: Syncs the LED lights to music playback.
Speed Sync: Syncs the LED lights to the vehicle's speed.
Group Ride Sync: Sets the LED lights to display a call sign color during a group ride.
Audio Zone Settings
Select > Stereo Settings > Audio Zones, and if necessary, select a zone.
Zone Name: Sets the name of the zone.
Loud: Boosts the high and low frequencies.
Subwoofer Filter: Sets the low-pass frequency of the subwoofer.
Bass: Sets the relative volume of low-frequency audio.
Middle: Sets the relative volume of middle-frequency audio.
Treble: Sets the relative volume of high-frequency audio.
36 Using the Apps
Live Services, Traffic, and Smartphone Features
WARNING
Do not read or interact with notifications while driving, because doing so can cause distraction which could lead
to an accident resulting in serious personal injury or death.
NOTICE
Garmin is not responsible for the accuracy or timeliness of the traffic information.
The Tread app allows your device to receive smart notifications and live information, such as live traffic data
and weather information.
Live traffic data: Sends live traffic data to your device, such as traffic incidents and delays, construction zones,
and road closings (Traffic, page47).
Weather information: Sends real-time weather forecasts, road conditions, and weather radar to your device
(Viewing the Weather Forecast, page28).
Smart Notifications: Displays phone notifications and messages on your device. This feature is not available for
all languages.
Hands-Free calling: Allows you to place and receive phone calls through the device using your connected
Bluetooth headset.
Send locations to device: Allows you to send locations from your smartphone to your navigation device.
Bluetooth Feature Status Icons
Status icons appear in the Bluetooth settings next to each paired device.
Select > Bluetooth.
• A gray icon indicates the feature is disabled or disconnected for that device.
• A colored icon indicates the feature is connected and active for that device.
Hands-free calling
Smart notifications
Tread features and services
Pairing with Your Smartphone
You can pair your Tread - SXS Edition device with your smartphone and the Tread app to enable additional
features and access live information (Live Services, Traffic, and Smartphone Features, page37).
1 From the app store on your smartphone, install the Tread app.
2 Turn on your Tread - SXS Edition device, and place the device and your smartphone within 3m (10ft.) of
each other.
3 On your phone, open the Tread app.
4 Follow the on-screen instructions to sign in to a Garmin account and complete the pairing and setup
process.
The main app dashboard appears. After the devices are paired, they connect automatically when they are turned
on and within range.
Live Services, Traffic, and Smartphone Features 37

Tips Afer Pairing the Devices
• After the initial pairing, the two devices can connect automatically each time you turn them on.
• When you turn on the device, it tries to connect to the last phone to which it was connected.
• You might need to set your phone to connect to the device automatically when the device is turned on.
• You should verify the Bluetooth features you want to use are enabled (Enabling or Disabling Bluetooth
Features, page40).
Pairing Additional Bluetooth Devices
1 Place your headset or phone and your Bluetooth device within 33ft. (10m) of each other.
2 On your device, enable Bluetooth wireless technology.
3 On your headset or phone, enable Bluetooth wireless technology and ensure it is visible to other Bluetooth
devices.
4 On your device, select > Wireless Networks > Bluetooth > Pair new device.
A list of nearby Bluetooth devices appears.
5 Select your headset or phone from the list.
6 If necessary, select Pair.
Smart Notifications
While your device is connected to the Tread app, you can view notifications from your smartphone on your
Tread - SXS Edition device, such as text messages, incoming calls, and calendar appointments.
Receiving Notifications
WARNING
Do not read or interact with notifications while driving, because doing so can cause distraction that could lead
to an accident resulting in serious personal injury or death.
Before you can use this feature, your device must be connected to a supported phone running the Tread app
(Pairing with Your Smartphone, page37).
From most pages, a popup appears when the device receives a notification from your smartphone. If the device
is moving, you must verify you are a passenger and not the driver before you can view notifications.
NOTE: If you are viewing the map, notifications appear in a map tool.
• To ignore a notification, select OK.
The popup closes, but the notification remains active on your phone.
• To view a notification, select View.
• To listen to the notification, select View > Play.
The device reads the notification using text-to-speech technology. This feature is not available for all
languages.
• To perform additional actions, such as dismissing the notification from your phone, select View, and select
an option.
NOTE: Additional actions are available for only some notification types and must be supported by the app
generating the notification.
38 Live Services, Traffic, and Smartphone Features

Receiving Notifications while Viewing the Map
WARNING
Do not read or interact with notifications while driving, because doing so can cause distraction that could lead
to an accident resulting in serious personal injury or death.
Before you can use this feature, your device must be connected to a supported phone running the Tread app
(Pairing with Your Smartphone, page37).
When you are viewing the map, new notifications appear in a map tool at the edge of the screen. If the device is
moving, you must verify you are a passenger and not the driver before you can view notifications.
• To ignore a notification, select , or wait for popup to expire.
The popup closes, but the notification remains active on your phone.
• To view a notification, select the notification text.
• To listen to the notification, select Play Message.
The device reads the notification using text-to-speech technology. This feature is not available for all
languages.
Viewing the List of Notifications
You can view a list of all active notifications.
1 Select > Navigation > Smart Notifications.
The list of notifications appears. Unread notifications appear black, and previously read notifications appear
gray.
2 Select an option:
• To view a notification, select the notification description.
• To listen to a notification, select .
The device reads the notification using text-to-speech technology. This feature is not available for all
languages.
Hands-Free Calling
NOTE: While most phones and headsets are supported and can be used, a particular phone or headset cannot
be guaranteed to be compatible. All features may not be available for your phone.
Using Bluetooth wireless technology, your device can connect to your compatible mobile phone and wireless
headset or helmet to become a hands-free device. To check compatibility, go to www.garmin.com/bluetooth.
Placing a Call
1 Select > Tools > Phone.
2 Select an option:
• To dial a number, select , enter the phone number, and select .
• To view numbers of recent, missed, or recently dialed or received calls, select , select a log, and select a
number to dial it.
• To call a contact from your phone book, select , and select a contact.
Live Services, Traffic, and Smartphone Features 39

Using In-Call Options
In-call options appear when you answer a call. Some options may not be compatible with your phone.
TIP: If you close the in-call options page, you can open it again by selecting from any screen.
• To set up a conference call, select Add Call.
• To transfer audio to your phone, select Call in Progress on Navigator.
TIP: You can use this feature if you want to disconnect the Bluetooth connection and remain on the call, or if
you need privacy.
• To use the dial pad, select Keypad.
TIP: You can use this feature to use automated systems, such as voice mail.
• To mute the microphone, select Mute.
• To hang up, select End Call.
Saving a Phone Number as a Preset
You can save up to three contacts as presets on the dial pad. This allows you to quickly call your home phone
number, family members, or frequently called contacts.
1 Select > Tools > Phone.
2 If necessary, select .
3 Select a preset number, such as Preset 1.
4 Select OK, then select a contact.
Enabling or Disabling Bluetooth Features
You can enable or disable Bluetooth features such as phone calls, media audio, and live services for your paired
smartphone.
1 Select > Wireless Networks > Bluetooth.
2 Select your phone name.
3 Select a feature to enable or disable it.
Showing or Hiding App Notifications (Android
™
)
You can use the Tread app to customize which types of smartphone notifications appear on your Tread - SXS
Edition device.
1 On your phone, open the Tread app.
2 Select > Smart Notifications.
A list of smartphone app categories appears.
3 Select a category to enable or disable notifications for that type of app.
Showing or Hiding Notification Categories for Your Apple
®
Device
If you are connected to an Apple device, you can filter the notifications shown on your Tread - SXS Edition
device by showing or hiding categories.
1 Select > Tools > Smart Notifications > .
2 Select the check box next to each notification to show.
40 Live Services, Traffic, and Smartphone Features

Enabling or Disabling Bluetooth Features for Your Headset
By default, all compatible Bluetooth features are enabled when you pair your headset. You can enable or disable
certain features.
1 Select > Wireless Networks > Bluetooth.
2 Select the headset name, and select .
3 Select an option:
• To disconnect the headset, select Disconnect.
• To disable audio from phone calls, select Phone calls.
• To disable audio from streaming media, select Media Audio.
Disconnecting a Bluetooth Device
You can temporarily disconnect a Bluetooth device without deleting it from the paired devices list. The
Bluetooth device can connect to your Tread - SXS Edition device automatically in the future.
1 Select > Wireless Networks > Bluetooth.
2 Select the device to disconnect.
3 Select Disconnect.
Deleting a Paired Phone
You can delete a paired phone to prevent it from automatically connecting to your device in the future.
1 Select > Wireless Networks > Bluetooth.
2 Select the phone, and select Forget.
Street Navigation
Starting a Route
1 Select Where To, and search for a location (Finding and Saving Locations, page48).
2 Select a location.
3 Select an option:
• To start navigating using the recommended route, select Go!.
• To choose an alternate route, select , and select a route.
Alternate routes appear to the right of the map.
• To edit the course of the route, select > Edit Route, and add shaping points to the route (Adding a
Location to Your Route, page44).
The device calculates a route to the location and guides you using voice prompts and information on the map
(Your Route on the Map, page42). A preview of the major roads in your route appears at the edge of the map
for several seconds.
If you need to stop at additional destinations, you can add the locations to your route (Adding a Location to Your
Route, page44).
Starting a Route by Using the Map
You can start a route by selecting a location from the map.
1 Select View Map.
2 Drag and zoom the map to display the area to search.
3 Select a location on the map.
4 Select Go!.
Street Navigation 41

Your Route on the Map
As you travel, the device guides you to your destination using voice prompts and information on the map.
Instructions for your next turn or exit, or other actions appear across the top of the map.
Next action in the route. Indicates the next turn, exit, or other action and the lane in which you should
travel, if available.
Distance to the next action.
Name of the street or exit associated with the next action.
Route highlighted on the map.
Next action in the route. Arrows on the map indicate the location of upcoming actions.
Vehicle speed.
Name of the road on which you are traveling.
Estimated arrival time.
TIP: You can touch this field to change the information it shows.
Map tools. Provides tools to show you more information about your route and surroundings.
Map layers. Allows you to change the map orientation and add topographic and BirdsEye imagery to your
map view.
42 Street Navigation
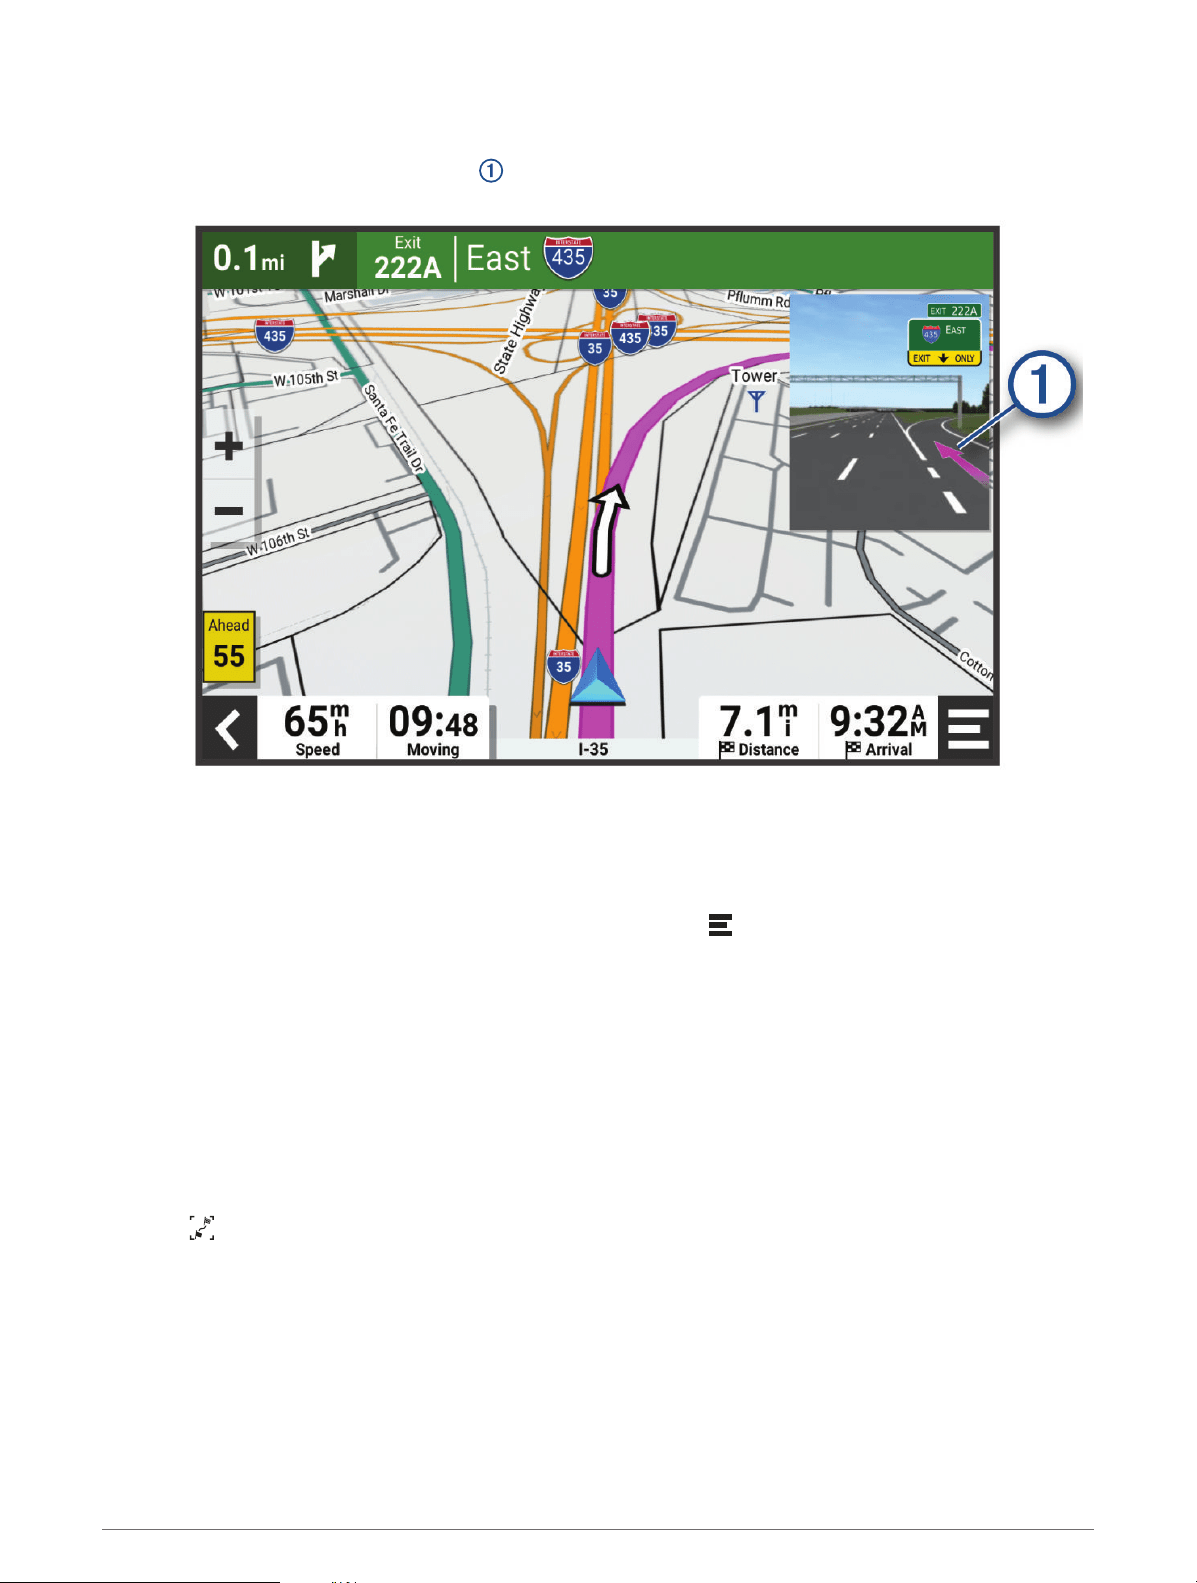
Active Lane Guidance
As you approach some turns, exits, or interchanges in your route, a detailed simulation of the road appears
beside the map, if available. A colored line indicates the proper lane for the turn.
Viewing Turns and Directions
While navigating a route, you can view upcoming turns, lane changes, or other directions for your route.
1 From the map, select an option:
• To view upcoming turns and directions as you navigate, select > Turns.
The map tool displays the next several turns or directions beside the map. The list updates automatically
as you navigate the route.
• To view the complete list of turns and directions for the entire route, select the text bar at the top of the
map.
2 Select a turn or direction (optional).
Detailed information appears. An image of the junction may appear for junctions on major roadways, if
available.
Viewing the Entire Route on the Map
1 While navigating a route, select anywhere on the map.
2 Select .
Street Navigation 43

Changing Your Active Route
Adding a Location to Your Route
Before you can add a location to your route, you must be navigating a route (Starting a Route, page41).
You can add locations to the middle or end of your route. For example, you can add a fuel station as the next
destination in your route.
1 From the map, select > Where To.
2 Search for a location (Finding and Saving Locations, page48).
3 Select a location.
4 Select Go!.
5 Select an option:
• To add the location as the next destination in your route, select Add as Next Stop.
• To add the location to the end of your route, select Add as Last Stop.
• To add the location and edit the order of destinations in your route, select Add to Active Route.
The device re-calculates the route to include the added location and guides you to the destinations in order.
Shaping Your Route
Before you can shape your route, you must start a route (Starting a Route, page41).
You can manually shape your route to change its course. This allows you to direct the route to use a certain
road or go through a certain area without adding a destination to the route.
1 Touch anywhere on the map.
2 Select Shape Route.
TIP: You can select to zoom in on the map and select a more precise location.
The device enters route shaping mode and recalculates the route to travel through the selected location.
3 Select Go!.
4 If necessary, select an option:
• To add more shaping points to the route, select additional locations on the map.
• To remove a shaping point, select the shaping point and select Remove.
Avoiding Delays, Tolls, and Areas
Avoiding Traffic Delays on Your Route
Before you can avoid traffic delays, you must be receiving traffic information.
By default, the device optimizes your route to avoid traffic delays automatically. If you have disabled this option
in the traffic settings (Traffic Settings, page58), you can view and avoid traffic delays manually.
1 While navigating a route, select > Traffic.
2 Select Alternate Route, if available.
3 Select Go!.
Avoiding Toll Roads
Your device can avoid routing you through areas that require tolls, such as toll roads, toll bridges, or congestion
areas. The device may still include a toll area in your route if no other reasonable routes are available.
1 Select > Navigation > Avoidances > Toll Roads.
2 Select Save.
44 Street Navigation

Avoiding Toll Stickers
If the map data on your device contains detailed toll sticker information, you can avoid or allow roads that
require toll stickers for each country.
NOTE: This feature is not available in all areas.
1 Select > Navigation > Tolls and Fees > Toll Stickers.
2 Select a country.
3 Select an option:
• To be asked each time before routing through an area that requires toll stickers, select Always Ask.
• To always avoid roads that require toll stickers, select Avoid.
• To always allow roads that require toll stickers, select Allow.
Avoiding Road Features
1 Select > Navigation > Avoidances.
2 Select the road features to avoid on your routes, and select OK.
Custom Avoidances
Custom avoidances allow you to select specific areas or sections of road to avoid. When the device calculates a
route, it avoids these areas and roads unless no other reasonable route is available.
Avoiding a Road
1 Select > Navigation > Custom Avoidances.
2 If necessary, select Add Avoidance.
3 Select Add Avoid Road.
4 Select the starting point of the section of road to avoid, and select Next.
5 Select the ending point of the road section, and select Next.
6 Select Done.
Avoiding an Area
1 Select > Navigation > Custom Avoidances.
2 If necessary, select Add Avoidance.
3 Select Add Avoid Area.
4 Select the upper-left corner of the area to avoid, and select Next.
5 Select the lower-right corner of the area to avoid, and select Next.
The selected area is shaded on the map.
6 Select Done.
Disabling a Custom Avoidance
You can disable a custom avoidance without deleting it.
1 Select > Navigation > Custom Avoidances.
2 Select an avoidance.
3 Select > Disable.
Deleting Custom Avoidances
1 Select > Navigation > Custom Avoidances > .
2 Select an option:
• To delete all custom avoidances, select Select All > Delete.
• To delete one custom avoidance, select the avoidance, and select Delete.
Street Navigation 45

Arriving at Your Destination
When you approach your destination, the device provides information to help you complete your route.
• indicates the location of your destination on the map, and a voice prompt announces you are approaching
your destination.
• When you approach some destinations, the device automatically suggests parking areas. You can select
More to view a full list of suggested parking areas (Parking Near Your Destination, page47).
• When you stop at your destination, the device automatically ends the route. If the device does not detect your
arrival automatically, you can select > Stop to end your route.
Changing the Route Calculation Mode
1 Select > Navigation > Calculation Mode.
2 Select an option:
• Select Turn-by-Turn to calculate routes on streets that are faster to drive but can be longer in distance.
• Select Straight Line to calculate off-road, point-to-point routes in a straight line.
Taking a Route Using Garmin Adventurous Routing
™
Your device can calculate adventurous routes that prefer curvy roads, hills, and fewer highways. This feature
can provide a more enjoyable ride, but it may increase the time or distance to your destination. The Garmin
Adventurous Routing feature is not compatible with off-road trails.
NOTE: This feature is not available on all device models or for all map regions.
1 Select Where To > Categories.
2 If necessary, select a subcategory.
3 Select a location.
4 Select .
5 Use the slider to increase or decrease the level of adventure of your route.
6 Select Go!
Taking a Detour
You can take a detour for a specified distance along your route or detour around specific roads. This is useful if
you encounter construction zones, closed roads, or poor road conditions.
1 From the map, select > Edit Route.
2 Select an option:
• To detour your route for a specific distance, select Detour by Distance.
• To detour around a specific road on the route, select Detour by Road.
Going Home
The first time you start a route home, the device prompts you to enter your home location.
1 Select Where To > Go Home.
2 If necessary, enter your home location.
Editing Your Home Location
1 Select Where To > > Set Home Location.
2 Enter your home location.
46 Street Navigation

Parking Near Your Destination
Your device can help you find a parking spot near your destination. When you approach some destinations, the
device automatically prompts you to search for parking.
1 Select an option:
• When the device prompts you, select Yes to search for nearby parking.
• If the device does not prompt you, select Where To > Categories > Parking, and select > My Destination.
2 Select a parking location, and select Go! > Add as Next Stop.
The device guides you to the parking area.
Traffic
NOTICE
Garmin is not responsible for the accuracy or timeliness of the traffic information.
Your device can provide information about traffic on the road ahead or on your route. You can set your device to
avoid traffic when calculating routes, and to find a new route to your destination if a large traffic delay occurs on
your active route (Traffic Settings, page58). The traffic map allows you to browse the map for traffic delays in
your area.
To provide traffic information, your device must be receiving traffic data.
• All product models can receive subscription-free traffic data using the Tread app.
Traffic data is not available in all areas. For information about traffic coverage areas, go to garmin.com/traffic.
Receiving Traffic Data Using Your Smartphone
Your device can receive subscription-free traffic data while connected to a smartphone running the Tread app.
1 Connect your device to the Tread app (Pairing with Your Smartphone, page37).
2 On your Tread - SXS Edition device, select > Traffic > Traffic, and verify the Garmin Live Traffic option is
selected.
Viewing Traffic on the Map
The traffic map shows color-coded traffic flow and delays on nearby roads.
1 From the main menu, select > Navigation > Traffic.
2 If necessary, select > Legend to view the legend for the traffic map.
Searching for Traffic Incidents
1 From the main menu, select > Navigation > Traffic.
2 Select > Incidents.
3 Select an item in the list.
4 If there is more than one incident, use the arrows to view additional incidents.
Street Navigation 47

Finding and Saving Locations
The maps loaded in your device contain locations, such as restaurants, hotels, auto services, and detailed
street information. The Where To menu helps you find your destination by providing several methods to browse,
search, and save this information.
From the main menu, select Where To.
• To quickly search all locations on your device, select Search (Finding a Location Using the Search Bar,
page48).
• To find an address, select Address.
• To browse or search pre-loaded points of interest by category, select Categories (Finding a Location by
Category, page50).
• To search near a different city or area, select next to the current search area (Changing the Search Area,
page49).
• To view and edit your saved locations, select Waypoints (Saving Locations, page54).
• To view locations you have recently selected from the search results, select Recent (Viewing Recently Found
Locations, page53).
• To search for RV parks and campgrounds, select Ultimate Public Campgrounds (Finding Ultimate
Campgrounds Points of Interest, page51).
• To browse and search Tripadvisor
®
traveler ratings, select Tripadvisor (Finding Tripadvisor Points of Interest,
page52).
• To find national parks and explore park maps, select National Parks (Finding National Parks, page51).
• To navigate to specific geographic coordinates, select Coordinates (Finding a Location Using Coordinates,
page53).
Finding a Location Using the Search Bar
You can use the search bar to search for locations by entering a category, brand name, address, or city name.
1 Select Where To.
2 Select Search in the search bar.
3 Enter all or part of the search term.
Suggested search terms appear below the search bar.
4 Select an option:
• To search for a type of business, enter a category name (for example, "movie theaters").
• To search for a business name, enter all or part of the name.
• To search for an address near you, enter the house number and street name.
• To search for an address in another city, enter the house number, street name, city, and state.
• To search for a city, enter the city and state.
• To search for coordinates, enter latitude and longitude coordinates.
5 Select an option:
• To search using a suggested search term, select the term.
• To search using the text you entered, select .
6 If necessary, select a location.
48 Finding and Saving Locations
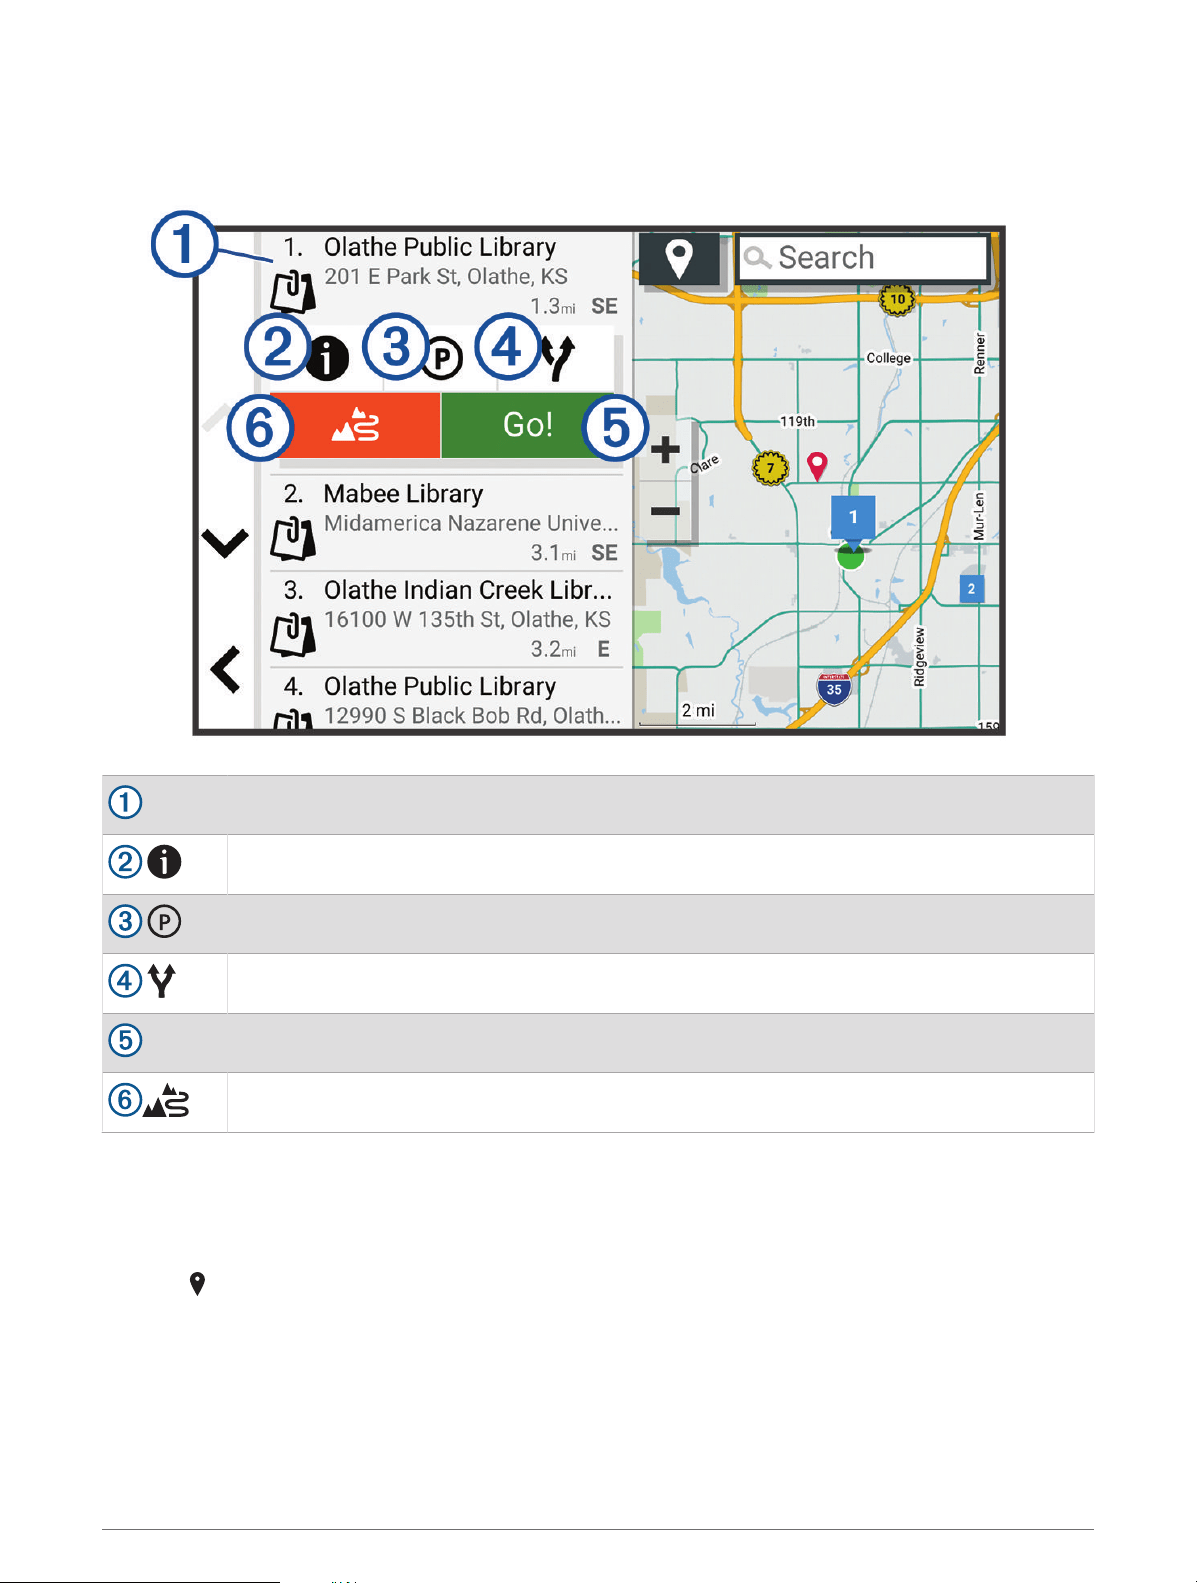
Location Search Results
The location search results appear in a list, with the nearest location at the top. Each numbered location also
appears on the map. You can scroll down to view more results.
Select a location to view the option menu.
Select to view detailed information about the location.
Select to find parking areas near the location.
Select to view alternate routes to the location.
Go!
Select to start navigating to the location using the recommended route.
Select to start navigating using Garmin Adventurous Routing.
Changing the Search Area
By default, the device searches near your current location. You can also search other areas, such as near your
destination, near another city, or along your active route.
1 Select Where To.
2 Select .
3 Select an option.
Finding and Saving Locations 49

Finding a Location by Category
1 Select Where To.
2 Select a category, or select Categories.
3 If necessary, select a subcategory.
4 Select a location.
Navigating to Points of Interest Within a Venue
NOTE: This feature may not be available in all areas or for all product models.
You can create a route to a point of interest (POI) within a larger venue, such as a store in a shopping mall or a
specific terminal in an airport.
1 Select Where To > Search.
2 Enter the name of the venue, and select .
3 Select the venue.
A list of categories for POIs within the venue appears.
4 Select a category, select a location, and select Go!.
The device creates a route to the parking area or venue entrance closest to the POI. When you arrive at the
destination, a checkered flag indicates the recommended parking area. A labeled point indicates the location of
the POI within the venue.
Points of Interest
NOTICE
You are responsible for understanding and complying with any applicable rules, laws, or regulations associated
with points of interest.
A point of interest is a place that you may find useful or interesting. Points of interest are organized by category
and can include popular travel destinations such as gas stations, restaurants, hotels, and entertainment venues.
Viewing Your Garmin Explore Waypoints
1 Select > Adventure > Explore.
2 Select a data type.
3 Select an item to view the details.
Synchronizing Garmin Explore Account Data
Before you can synchronize account data, you must connect to the Tread app and enable Garmin Explore.
You can synchronize data, such as tracks, with your Garmin Explore account. This can be helpful to keep
your data available on each of your compatible devices. Your device periodically synchronizes data with your
account automatically. You can also synchronize data manually at any time.
1 Select > Adventure > Explore.
2 Select .
50 Finding and Saving Locations

Finding National Parks
Device models that include maps for North America or the United States also include detailed information for
national parks in the United States. You can navigate to a national park or to a location within a national park.
NOTICE
You are responsible for understanding and complying with any applicable rules, laws, or regulations associated
with national parks.
1 Select Where To > National Parks.
A list of national parks appears, with the nearest park at the top.
2 Select Search, and enter all or part of the park name to narrow the results (optional).
3 Select a national park.
A list of categories for locations of features and amenities within the park appears below the park name.
4 Select an option:
• To start navigating to the park, select Go!.
• To view more park information or explore the park features and amenities, select .
• To quickly find a location within the park, select a category from the list below the park name, and select a
location.
Finding Campgrounds
NOTICE
You are responsible for understanding and complying with any applicable rules, laws, or regulations associated
with campgrounds.
Select Where To > Ultimate Public Campgrounds.
Finding Ultimate Campgrounds Points of Interest
NOTE: This feature is not available in all areas.
NOTICE
You are responsible for understanding and complying with any applicable rules, laws, or regulations associated
with campsites and points of interest.
Your device includes Ultimate Campgrounds points of interest, which allow you to find public campgrounds near
your location.
1 Select Where To > Ultimate Public Campgrounds.
2 If necessary, select Search Filters, select one or more search filters, and select Search.
3 Select a location.
Finding RV Parks
NOTE: This feature is not available in all areas.
Select Where To > PlanRV Parks.
Finding RV Services
NOTE: This feature is not available in all areas.
You can find nearby locations that offer repair, towing, and other services for RVs.
Select Where To > PlanRV Services.
Finding and Saving Locations 51

Finding iOverlander
™
Points of Interest
NOTICE
You are responsible for understanding and complying with any applicable rules, laws, or regulations associated
with campsites and points of interest.
Your device includes iOverlander points of interest, which allow you to find points of interest useful for
overlanding, such as camp sites, repair services, and lodging.
1 Select Where To > iOverlander.
2 Select a category.
3 Select a location.
Finding Powersport Points of Interest
NOTICE
You are responsible for understanding and complying with any applicable rules, laws, or regulations associated
with points of interest.
Your device includes powersport points of interest, which allow you to find points of interest useful for
powersports, such as vehicle dealers and shops.
1 Select Where To > Motorcycle Shop.
2 Select a location.
Finding Adventure Points
NOTICE
You are responsible for understanding and complying with any applicable rules, laws, or regulations associated
with campsites and points of interest.
Your device includes adventure points of interest, which allow you to find outdoor points of interest such as
campsites, hiking trails, OHV trails, fishing locations, and water activities.
1 Select Where To > Adventure Points.
2 If necessary, select Search Filters, select one or more search filters, and select Save.
3 Select a location.
Tripadvisor
NOTICE
Garmin is not responsible for the accuracy or timeliness of the Tripadvisor information.
You are responsible for understanding and complying with any applicable rules, laws, or regulations associated
with points of interest.
Your device includes Tripadvisor traveler ratings. Tripadvisor ratings appear automatically in the search results
list for restaurants, hotels, and attractions. You can also search for nearby Tripadvisor points of interest and
sort by distance or popularity.
Finding Tripadvisor Points of Interest
1 Select Where To > Tripadvisor.
2 Select a category.
A list of nearby Tripadvisor points of interest for the category appears.
3 Select Sort Results to sort the search results by distance or popularity (optional).
52 Finding and Saving Locations

Finding Parking Near Your Current Location
1 Select Where To > Categories > Parking.
2 Select a parking location.
3 Select Go!.
Finding Parking Near a Specified Location
1 Select Where To.
2 Search for a location.
3 From the location search results, select a location.
4 Select .
A list of parking areas near the selected location appears.
5 Select a parking location.
6 Select Go!.
Search Tools
Search tools allow you to search for specific types of locations by responding to on-screen prompts.
Finding an Address
NOTE: The order of the steps may change depending on the map data loaded on your device.
1 Select Where To.
2 If necessary, select to search near a different city or area.
3 Select Address.
4 Follow the on-screen instructions to enter address information.
5 Select the address.
Finding a Location Using Coordinates
You can find a location using latitude and longitude coordinates.
1 Select Where To > Coordinates.
2 If necessary, select , and change the coordinate format or datum.
3 Select Coordinates.
4 Enter the latitude and longitude coordinates, and select Done.
5 Select an option:
• To save the coordinates as a location, select Save.
• To start a route to the coordinates, select Go!.
Finding Fuel Stations and Prices
Before you can use this feature, your device must be connected to a supported phone running the Tread app
(Pairing with Your Smartphone, page37).
You can find nearby fuel stations and compare fuel prices.
1 Select Where To > Fuel Prices.
2 If necessary, select > Fuel Type, select a fuel type, and select Save.
3 Select a fuel station.
Viewing Recently Found Locations
Your device stores a history of the last 50 locations you have found.
Select Where To > Recent.
Finding and Saving Locations 53

Clearing the List of Recently Found Locations
Select Where To > Recent > > Clear > Yes.
Viewing Current Location Information
You can use the Where Am I? page to view information about your current location. This feature is helpful if you
need to tell emergency personnel your location.
From the map, select the vehicle.
Finding Emergency Services and Fuel
You can use the Where Am I? page to find the nearest hospitals, police stations, and fuel stations.
1 From the map, select the vehicle.
2 Select Hospitals, Police Stations, Fuel, or Roadside Assist..
NOTE: Some service categories are not available in all areas.
A list of locations for the selected service appears, with the nearest locations at the top.
3 Select a location.
4 Select an option:
• To navigate to the location, select Go!.
• To view the phone number and other location details, select .
Getting Directions to Your Current Location
If you need to tell another person how to get to your current location, your device can give you a list of
directions.
1 From the map, select the vehicle.
2 Select > Directions to Me.
3 Select a starting location.
4 Select Select.
Adding a Shortcut
You can add shortcuts to the Where To? menu. A shortcut can point to a location, a category, or a search tool.
The Where To? menu can contain up to 36 shortcut icons.
1 Select Where To > Add Shortcut.
2 Select an item.
Removing a Shortcut
1 Select Where To > > Remove Shortcut(s).
2 Select a shortcut to remove.
3 Select the shortcut again to confirm.
4 Select Done.
Saving Locations
Saving a Location
1 Search for a location (Finding a Location by Category, page50).
2 From the search results, select a location.
3 Select > Save.
4 If necessary, enter a name, and select Done.
5 Select Save.
54 Finding and Saving Locations

Saving Your Current Location
1 From the map, select the vehicle icon.
2 Select Save.
3 Enter a name, and select Done.
Saving a Waypoint on the Map
1 Select View Map.
2 Drag and zoom the map to display the area to search.
3 Select an option:
• Select a location marker.
• Select a point, such as a street, intersection, or address location.
4 Select .
5 Enter a name, and select Save.
Editing a Saved Location
1 Select Where To > Waypoints.
2 If necessary, select a category.
3 Select a location.
4 Select .
5 Select > Edit.
6 Select an option:
• Select Name.
• Select Phone Number.
• Select Categories to assign categories to the saved location.
• Select Map Symbol to change the symbol used to mark the saved location on a map.
7 Edit the information.
8 Select Done.
Assigning Categories to a Saved Location
You can add custom categories to organize your saved locations.
NOTE: Categories appear in the saved locations menu after you have saved at least 12 locations.
1 Select Where To > Waypoints.
2 Select a location.
3 Select .
4 Select > Edit > Categories.
5 Enter one or more category names, separated by commas.
6 If necessary, select a suggested category.
7 Select Done.
Deleting a Saved Location
NOTE: Deleted locations cannot be recovered.
1 Select Where To > Waypoints.
2 Select > Delete.
3 Select the box next to the saved locations to delete, and select Delete.
Finding and Saving Locations 55

Driver Awareness Features and Alerts
CAUTION
The driver alerts and speed limit features are for information only and do not replace your responsibility to abide
by all posted speed limit signs and to use safe driving judgment at all times. Garmin is not responsible for any
traffic fines or citations you receive for failing to follow all applicable traffic laws and signs.
Your device provides features that can help encourage safer driving and increase efficiency, even when you are
driving in a familiar area. The device plays an audible tone or message and displays information for each alert.
You can enable or disable the audible tone for some types of driver alerts. Not all alerts are available in all areas.
Schools: The device plays a tone and displays the speed limit (if available) for an upcoming school or school
zone.
Speed limit exceeded: The device plays a tone and displays a red border on the speed limit icon when you
exceed the posted speed limit for the current road.
Speed limit reduced: The device plays a tone and displays the upcoming speed limit so you can be prepared to
adjust your speed.
Railroad crossing: The device plays a tone to indicate an upcoming railroad crossing.
Animal crossing: The device plays a tone to indicate an upcoming animal crossing area.
Bends: The device plays a tone to indicate a bend in the road.
Slower traffic: The device plays a tone to indicate slower traffic when you approach slower traffic at a higher
speed. Your device must be receiving traffic information to use this feature (Traffic, page47).
Construction zone: The device plays a tone and displays a message when you approach a construction zone.
Lane closure: The device plays a tone and displays a message when you approach a lane closure.
Break planning: The device plays a tone and suggests upcoming rest stops after you have been driving for a
long time.
Risk of grounding: The device plays a tone and displays a message when you approach a road where your
vehicle could become grounded.
Lateral wind: The device plays a tone and displays a message when you approach a road where there is risk of
lateral wind.
Narrow road: The device plays a tone and displays a message when you approach a road that may be too
narrow for your vehicle.
Steep hill: The device plays a tone and displays a message when you approach a steep hill.
State and country borders: The device plays a tone and displays a message when you approach the border of a
state or country.
Shut off propane: The device plays a tone and displays a message when you approach an area where propane
should be turned off.
Enabling or Disabling Driver Alerts
You can enable or disable several types of driver alerts.
1 Select > Driver Assistance > Driver Alerts.
2 Select or clear the check box next to each alert.
56 Driver Awareness Features and Alerts

Settings
Navigation Settings
Select > Navigation.
Calculation Mode: Sets the route calculation method.
Off-Route Recalculation: Sets recalculation preferences when navigating away from an active route.
Avoidances: Sets road features to avoid on a route.
Custom Avoidances: Allows you to avoid specific roads or areas.
Environmental Zones: Sets the avoidance preferences for areas with environmental or emissions restrictions
that may apply to your vehicle.
Restricted Mode: Disables all functions that require significant operator attention.
Voice Language: Sets the language for navigation voice prompts.
Travel History: Allows the device to store a record of the places you go. This allows you to view the trip log, use
the Trip History feature, and use myTrends
™
suggested routes.
Clear Travel History: Allows you to clear all travel history from the device.
Map and Vehicle Settings
Select > Map Display.
Map Vehicle Icon: Sets the vehicle icon that represents your position on the map.
Driving Map View: Sets the perspective on the map.
Map Detail: Sets the level of detail on the map. More detail may cause the map to draw slower.
Map Theme: Changes the color of the map data.
Map Layers: Sets the data that appears on the map page (Customizing the Map Layers, page24).
Adventure Roads & Trails: Sets the trails visible on the map. Trails are organized by vehicle accessibility.
Auto Zoom: Automatically selects the zoom level for optimal use of your map. When disabled, you must zoom
in or out manually.
Skip Next Stop Confirmation: Sets a confirmation message to appear when skipping a location on your route.
Units: Sets the units of measure.
myMaps: Sets which installed maps the device uses.
Enabling Maps
You can enable map products installed on your device.
TIP: To purchase additional map products, go to garmin.com/maps.
1 Select > Map Display > myMaps.
2 Select a map.
Connecting to a Wireless Network
1 Select > Wireless Networks > Wi-Fi.
2 If necessary, select the toggle switch to turn on wireless network technology.
3 Select a wireless network.
4 If necessary, enter the encryption key.
The device connects to the wireless network. The device remembers the network information and connects
automatically when you return to this location in the future.
Enabling Bluetooth Wireless Technology
Select > Wireless Networks > Bluetooth.
Settings 57

Driver Assistance Settings
Select > Driver Assistance.
Driver Alerts: Enables an audible alert for each type of driver alert (Driver Awareness Features and Alerts,
page56).
Proximity Alerts: Alerts you when you approach speed cameras or red light cameras.
Route Preview: Shows a preview of the major roads in your route when you start navigation.
Break Planning: Reminds you to take a break and shows upcoming services after you drive for an extended
time. You can enable or disable break reminders and upcoming service suggestions.
Traffic Settings
From the main menu, select > Traffic.
Traffic: Enables the traffic feature.
Current Provider: Sets the traffic provider to use for traffic data. The Auto option selects the best available
traffic data automatically.
Subscriptions: Lists the current traffic subscriptions.
Optimize Route: Enables the device to use optimized alternate routes automatically or upon request (Avoiding
Traffic Delays on Your Route, page44).
Traffic Alerts: Sets the traffic delay severity for which the device displays a traffic alert.
Display Settings
Select > Device > Display.
Brightness level: Sets the display brightness level on your device.
Dark theme: Enables or disables the dark color theme.
Wallpaper: Sets the wallpaper background on your device.
Screen timeout: Allows you to set the amount of idle time before your device turns off the display while using
battery power.
Font size: Increases or decreases the font size on your device.
Adjusting Sound and Notification Volume
1 Select > Device > Sound & Notification.
2 Use the slider bars to adjust the sound and notification volume.
Setting the Text Language
You can select the language for text in the device software.
1 Select > Personal > Language & Input > Languages.
2 Select a language.
Date and Time Settings
Select > System > Date & Time.
Use network-provided time: Automatically sets the time zone based on information from the connected
network.
Use network-provided time zone: Sets the time zone on your device when Use network-provided time is
disabled.
Use 24-hour format: Enables or disables the 24-hour time format.
58 Settings

Device Settings
Select > About Device.
Legal Information: Allows you to view the end-user license agreement (EULA)and software license information.
Regulatory Information: Displays e-label regulatory and compliance information.
Garmin Device Information: Displays hardware and software version information.
Enabling or Disabling Location Services
The location services feature must be enabled for your device to find your location, calculate routes, and provide
navigational assistance. You can disable location services to plan a route when GPS signals are not available.
When location services are disabled, the device enables a GPS simulator to calculate and simulate routes.
TIP: Disabling location services can help save battery power.
1 Select > Personal > Location.
2 Select the toggle switch to enable or disable location services.
Device Information
Viewing E-label Regulatory and Compliance Information
1 From the settings menu, swipe to the bottom of the menu.
2 Select About Device > Regulatory Information.
Tread - SXS Edition Specifications
Water resistance IEC 60529 IP67
1
Operating temperature range From-20° to 55°C (from-4° to 131°F)
Charging temperature range From0° to 45°C (from32° to 113°F)
Power input (vehicle power cable, motorcycle, or external power) From 12 to 24Vdc
Battery type Lithium-ion battery
Battery voltage range From3.5to4.1V
Wireless frequencies
2.4 Ghz @ 9.9 dBm maximum
5.1 Ghz @ 12.8 dBm maximum
5.2 Ghz @ 15.1 dBm maximum
1.6 Ghz @ 31.7 dBm maximum
SAR 0.69 W/kg torso, 0.69 W/kg limb
Group Ride Specifications
Water resistance IEC 60529 IPX7
2
Operating temperature range From-20° to 55°C (from-4° to 131°F)
Wireless frequencies (United States) From 151.82 to 154.6 MHz @ 31.7 dBm
Wireless frequencies (EMEA) From 169.4125 to 169.4625 MHz @ 26.98 dBm
Wireless frequencies (New Zealand) From 160.175 to 160.5750 MHz @ 22 dBm
Wireless frequencies (Australia) From 151.15 to 152.15 MHz @ 17.3 dBm
1
The device is protected against the ingress of dust and withstands incidental exposure to water of up to 1 m for up to 30 min.
2
The device withstands incidental exposure to water of up to 1m for up to 30min. For more information, go to
www.garmin.com/waterrating.
Device Information 59

Charging the Device
NOTE: This Class III product shall be powered by an LPS power supply.
You can charge the battery in the device using any of these methods.
• Connect the device to an optional power adapter accessory, such as a wall power adapter.
You can purchase an approved Garmin AC-DC adapter suitable for home or office use from a Garmin dealer
or www.garmin.com. The device may charge slowly when connected to a third-party adapter.
Device Maintenance
Garmin Support Center
Go to support.garmin.com for help and information, such as product manuals, frequently asked questions,
videos, and customer support.
Map and Sofware Updates
For the best navigation experience, you should keep the maps and software on your device up to date.
Map updates provide the newest available changes to roads and locations in the maps used by your device.
Keeping maps up to date helps your device find recently added locations and calculate more accurate routes.
Map updates are large and may take several hours to complete.
Software updates provide changes and improvements to the device features and operation. Software updates
are small and take a few minutes to complete.
You can update your device using two methods.
• You can connect the device to a Wi‑Fi network to update directly on the device (recommended). This option
allows you to update your device conveniently without connecting it to a computer.
• You can connect the device to a computer and update it using the Garmin Express
™
application (garmin.com
/express).
60 Device Maintenance

Updating Maps and Sofware Using a Wi‑Fi Network
NOTICE
Map and software updates may require the device to download large files. Regular data limits or charges from
your internet service provider apply. Contact your internet service provider for more information about data
limits or charges.
You can update the maps and software by connecting your device to a Wi‑Fi network that provides access to the
internet. This allows you to keep your device up to date without connecting it to a computer.
1 Using the included USBcable, connect the device to external power.
NOTE: A USB power adapter is not included. Go to the product page on garmin.com to purchase a power
adapter accessory.
2 Connect the device to a Wi‑Fi network (Connecting to a Wireless Network, page57).
While connected to a Wi‑Fi network, the device checks for available updates automatically and displays a
notification when an update is available.
3 Select an option:
• When an update notification appears, swipe down from the top of the screen, and select An update is
available..
• To manually check for updates, select > Tools > System Updates.
The device displays available map and software updates. When an update is available, Update Available
appears below Map or Software.
4 Select an option:
• To install all available updates, select Download.
• To install only map updates, select Map.
• To install only software updates, select Software.
5 If necessary, read the license agreements, and select Accept All to accept the agreements.
NOTE: If you do not agree with the license terms, you can select Reject. This stops the update process. You
cannot install updates until you accept the license agreements.
6 Keep the device connected to external power and within range of the Wi‑Fi network until the update process
is complete.
TIP: If a map update is interrupted or canceled before it completes, your device may be missing map data. To
repair missing map data, you must update the maps again.
Product Updates
On your computer, install Garmin Express (www.garmin.com/express).
This provides easy access to these services for Garmin devices:
• Software updates
• Map updates
• Product registration
Device Maintenance 61

Updating Maps and Sofware with Garmin Express
You can use the Garmin Express application to download and install the latest map and software updates for
your device.
1 If you do not have the Garmin Express application installed on your computer, go to garmin.com/express and
follow the on-screen instructions to install it.
2 Open the Garmin Express application.
3 Connect your device to your computer using a mini-USBcable.
The small end of the cable connects to the mini-USB port on your Tread - SXS Edition device, and the
large end connects to an available USBport on your computer.
4 In the Garmin Express application, click Add a Device.
The Garmin Express application searches for your device and displays the device name and serial number.
5 Click Add Device, and follow the on-screen instructions to add your device to the Garmin Express application.
When setup is complete, the Garmin Express application displays the updates available for your device.
6 Select an option:
• To install all available updates, click Install All.
• To install a specific update, click View Details, and click Install next to the update you want.
The Garmin Express application downloads and installs the updates onto your device. Map updates are very
large, and this process may take a long time on slower internet connections.
NOTE: If a map update is too large for the internal storage of the device, the software may prompt you to
install a microSD card in your device to add storage space (Installing a Memory Card for Maps and Data,
page84).
7 Follow the on-screen instructions during the update process to finish installing updates.
For example, during the update process, the Garmin Express application may instruct you to disconnect and
reconnect your device.
62 Device Maintenance

Device Care
NOTICE
Avoid dropping your device.
Do not store the device where prolonged exposure to extreme temperatures can occur, because it can cause
permanent damage.
Never use a hard or sharp object to operate the touchscreen, or damage may result.
Cleaning the Outer Casing
NOTICE
Avoid chemical cleaners and solvents that can damage plastic components.
1 Clean the outer casing of the device (not the touchscreen) using a cloth dampened with a mild detergent
solution.
2 Wipe the device dry.
Cleaning the Touchscreen
1 Use a soft, clean, lint-free cloth.
2 If necessary, lightly dampen the cloth with water.
3 If using a dampened cloth, turn off the device and disconnect the device from power.
4 Gently wipe the screen with the cloth.
Avoiding Thef
• Remove the device and mount from sight when not in use.
• Remove the residue left on the windshield by the suction cup.
• Do not keep your unit in the glove compartment.
Restarting the Device
You can restart your device if it stops functioning.
Hold the power key for 12 seconds.
Removing the Device from the Mount
1 Pull up the release tab on the mount.
2 Grip the device by the top and bottom.
3 Pull the bottom edge of the device toward you until it releases from the magnet.
Pulling the device straight toward you may cause the mount to release from the suction cup.
Troubleshooting
My device is not acquiring satellite signals
• Take your device out of parking garages and away from tall buildings and trees.
• Remain stationary for several minutes.
Troubleshooting 63

My battery does not stay charged for very long
• Decrease the screen brightness (Display Settings, page58).
• Shorten the display timeout (Display Settings, page58).
• Decrease the volume (Adjusting Sound and Notification Volume, page58).
• Turn off the wi-fi radio when it is not in use.
• Put the device in power saving mode when not in use (Turning the Device On or Off, page2).
• Keep your device away from extreme temperatures.
• Do not leave your device in direct sunlight.
My device does not connect to my phone
• Select > Wireless Networks > Bluetooth.
The Bluetooth option must be enabled.
• Enable Bluetooth wireless technology on your phone and bring your phone within 10m (33ft.) of the device.
• Verify your phone is compatible.
Go to www.garmin.com/bluetooth for more information.
• Complete the pairing process again.
To repeat the pairing process, you must unpair your phone and device (Disconnecting a Bluetooth Device,
page41), and complete the pairing process (Pairing with Your Smartphone, page37).
My device does not appear as a removable drive on my computer
On most computers, the device connects using Media Transfer Protocol (MTP). In MTP mode, the device
appears as a portable device and not as a removable drive.
My device does not appear as either a portable device or a removable drive or
volume on my computer
1 Disconnect the USB cable from your computer.
2 Turn off the device.
3 Connect the USB cable to your device and to a USB port on your computer.
TIP: The USB cable must connect to a USB port on your computer, not to a USB hub.
The device turns on automatically and goes into MTP mode or USB mass storage mode. A picture of the device
connected to a computer appears on the device screen.
NOTE: If you have several network drives mapped on your computer, Windows
®
may have trouble assigning
drive letters to your Garmin drives. For information about assigning drive letters, see the help file for your
operating system.
Appendix
Garmin PowerSwitch
WARNING
Garmin strongly recommends having an experienced installer with the proper knowledge of electrical systems
install the device. Incorrectly wiring the power cable can result in damage to the vehicle or the battery and can
cause bodily injury.
You can use a connected Garmin PowerSwitch device to control lights, fans, and more from your Tread - SXS
Edition device.
64 Appendix
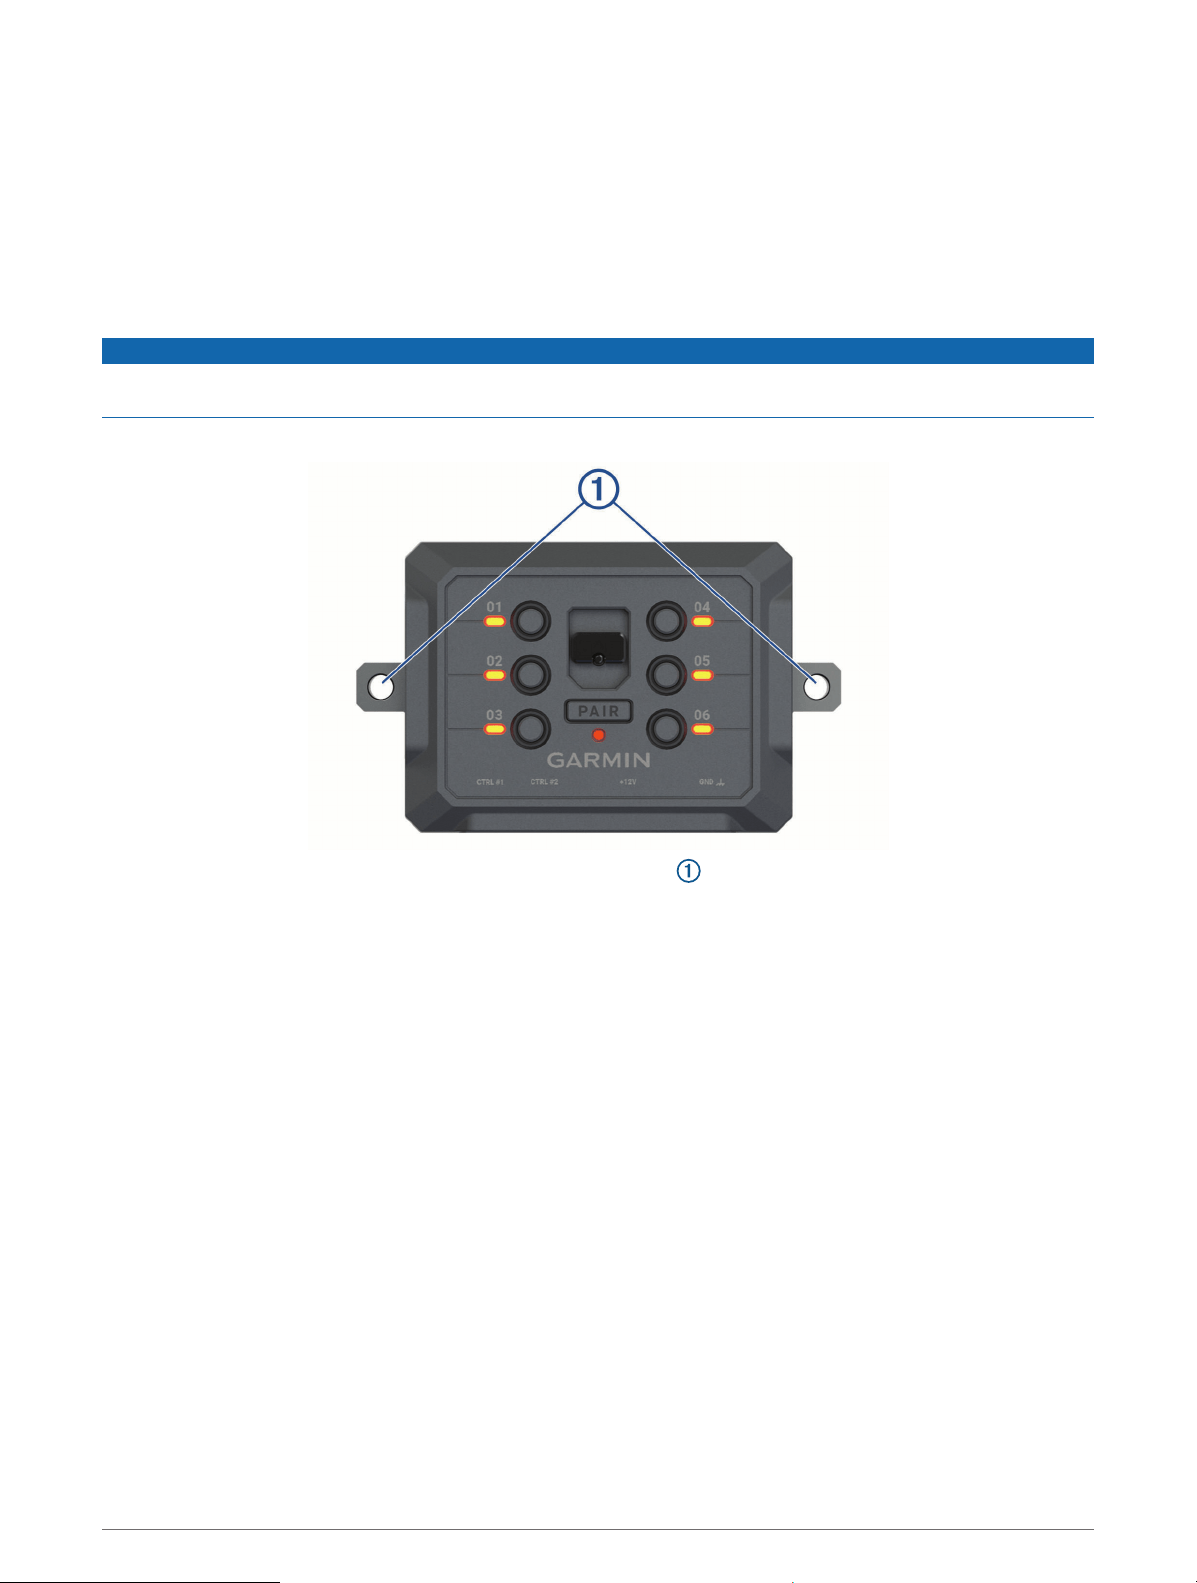
Mounting Considerations
• The device must be mounted close to the battery and within the range of the supplied power cable.
• The mounting surface must be strong enough to support the weight of the device.
• The location must allow room for the routing and connection of all cables.
Mounting the Device
Before you can mount the device, you must select a mounting location and purchase the appropriate hardware
for your mounting surface.
NOTICE
Avoid wires, gauges, air bags, air bag covers, HVAC, and other items when drilling pilot holes and attaching the
mount to the vehicle. Garmin is not responsible for any damages or consequences arising from the installation.
1 Place the mount on the selected location.
2 Using the mount as a template, mark the two screw locations .
3 Drill pilot holes (optional).
For some types of mounting material, drilling pilot holes is necessary. Do not drill through the mount.
4 Securely fasten the mount to the surface using the appropriate hardware for your mounting surface.
Appendix 65
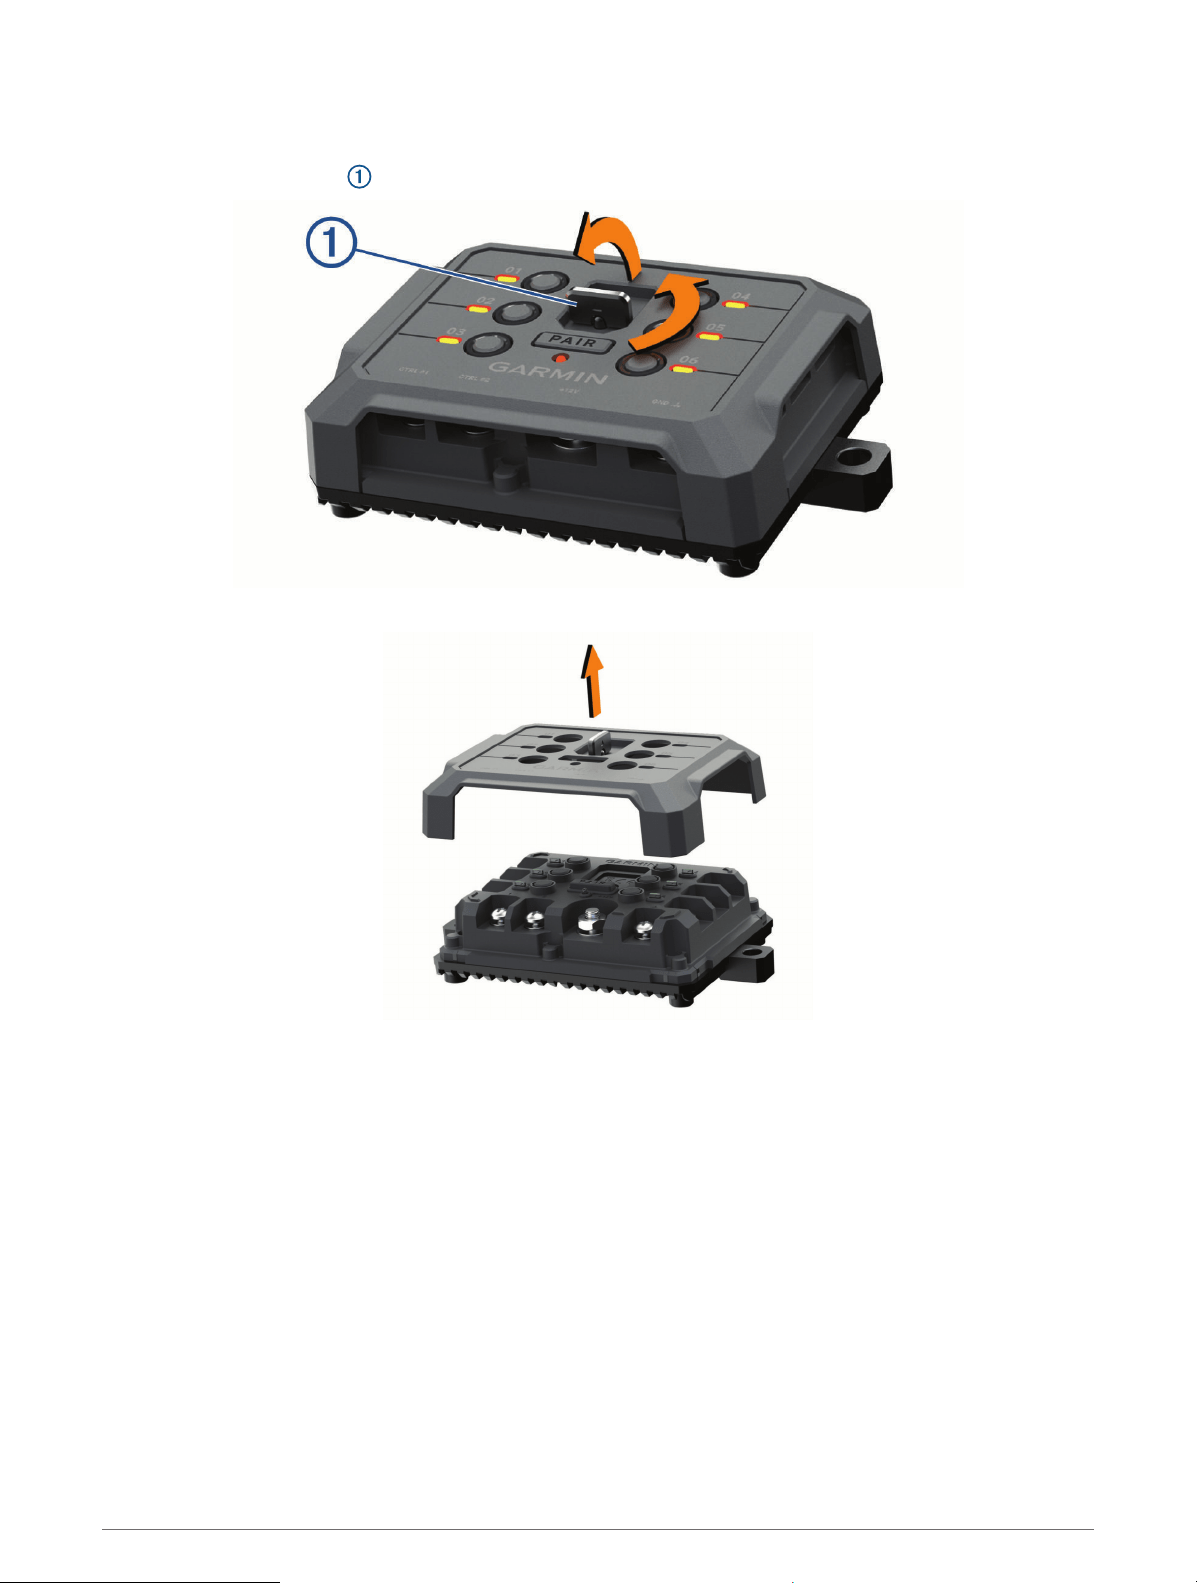
Opening the Front Cover
You must open the front cover to make electrical connections.
1 Lift the front cover latch and rotate it counter-clockwise.
2 Pull the front cover off of the device.
66 Appendix
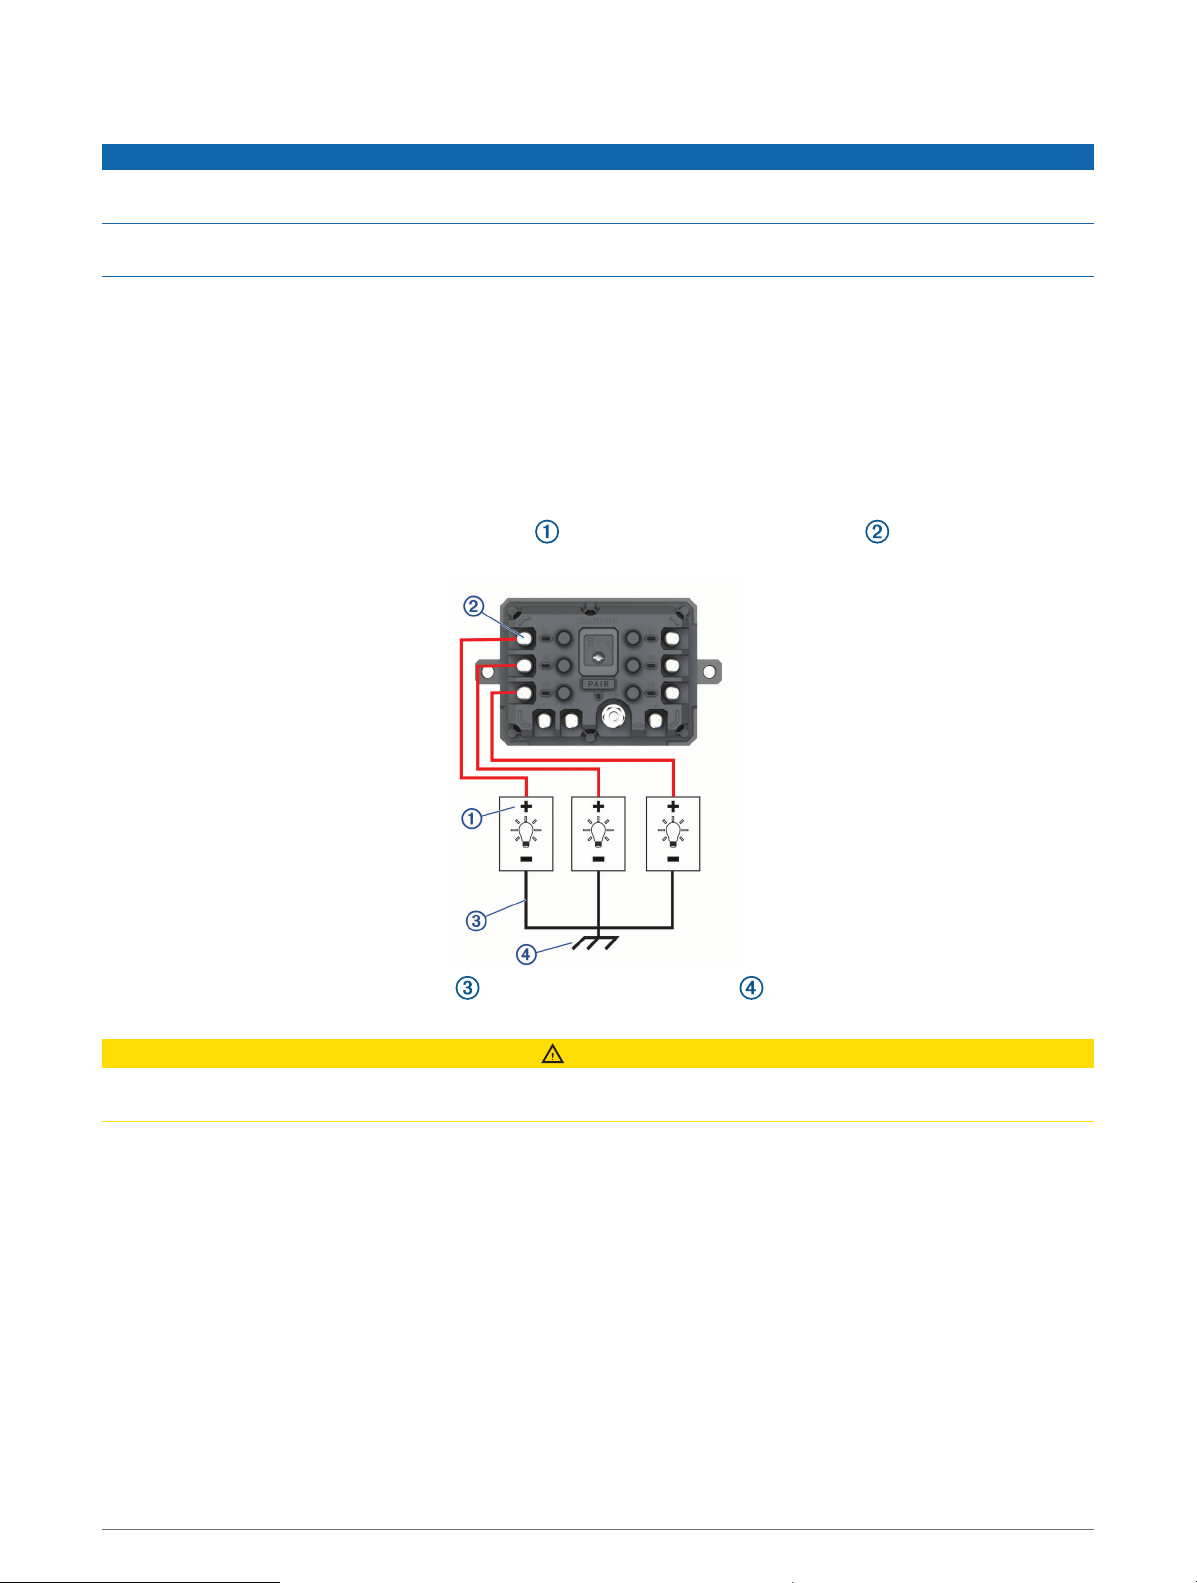
Connecting Accessories
NOTICE
Do not use the device to control or power a winch. Failure to follow this notice could cause damage to your
vehicle or your device.
Do not connect a power source to an accessory output terminal. Failure to follow this notice could cause
damage to your vehicle or your device.
Accessory requirements:
• Verify the amperage rating of each accessory before wiring it to the Garmin PowerSwitch device. The device
supports accessories up to 30A for each channel and a maximum of 100A for the entire system.
• Use 10AWG (6mm
2
) wires for accessories that use 20 to 30A.
• Use 12AWG (4mm
2
) wires for accessories that use 10 to 20A.
• Use 14AWG (2.5mm
2
) wires for accessories that use less than 10A.
• Use the appropriate size terminals for all accessory connections.
• Crimp all terminal connectors securely.
1 Connect the positive wire from the accessory to one of the accessory terminals on the Garmin
PowerSwitch device.
2 Connect the negative or ground wire to an unpainted ground stud on the vehicle frame, to a ground
distribution block, or directly to the negative terminal on the battery.
CAUTION
Do not connect the accessory ground wires to the ground terminal (GND) on the Garmin PowerSwitch device, as
doing so could result in personal injury or property damage, or could negatively impact device functionality.
3 Verify that all electrical connections are tight and will not come loose during use.
Connecting a Control Input
You can connect to the control terminals to enable the Garmin PowerSwitch device to turn on customizable
outputs. For example, you can connect your vehicle ignition switch to a control input terminal to turn on
accessories automatically each time you start your vehicle. The control terminals detect a signal from 3.3V to
18V. You can configure output functions with the Garmin PowerSwitch app.
Connect the control wire from the control source in your vehicle to one of the two control terminals on the
Garmin PowerSwitch device.
Appendix 67
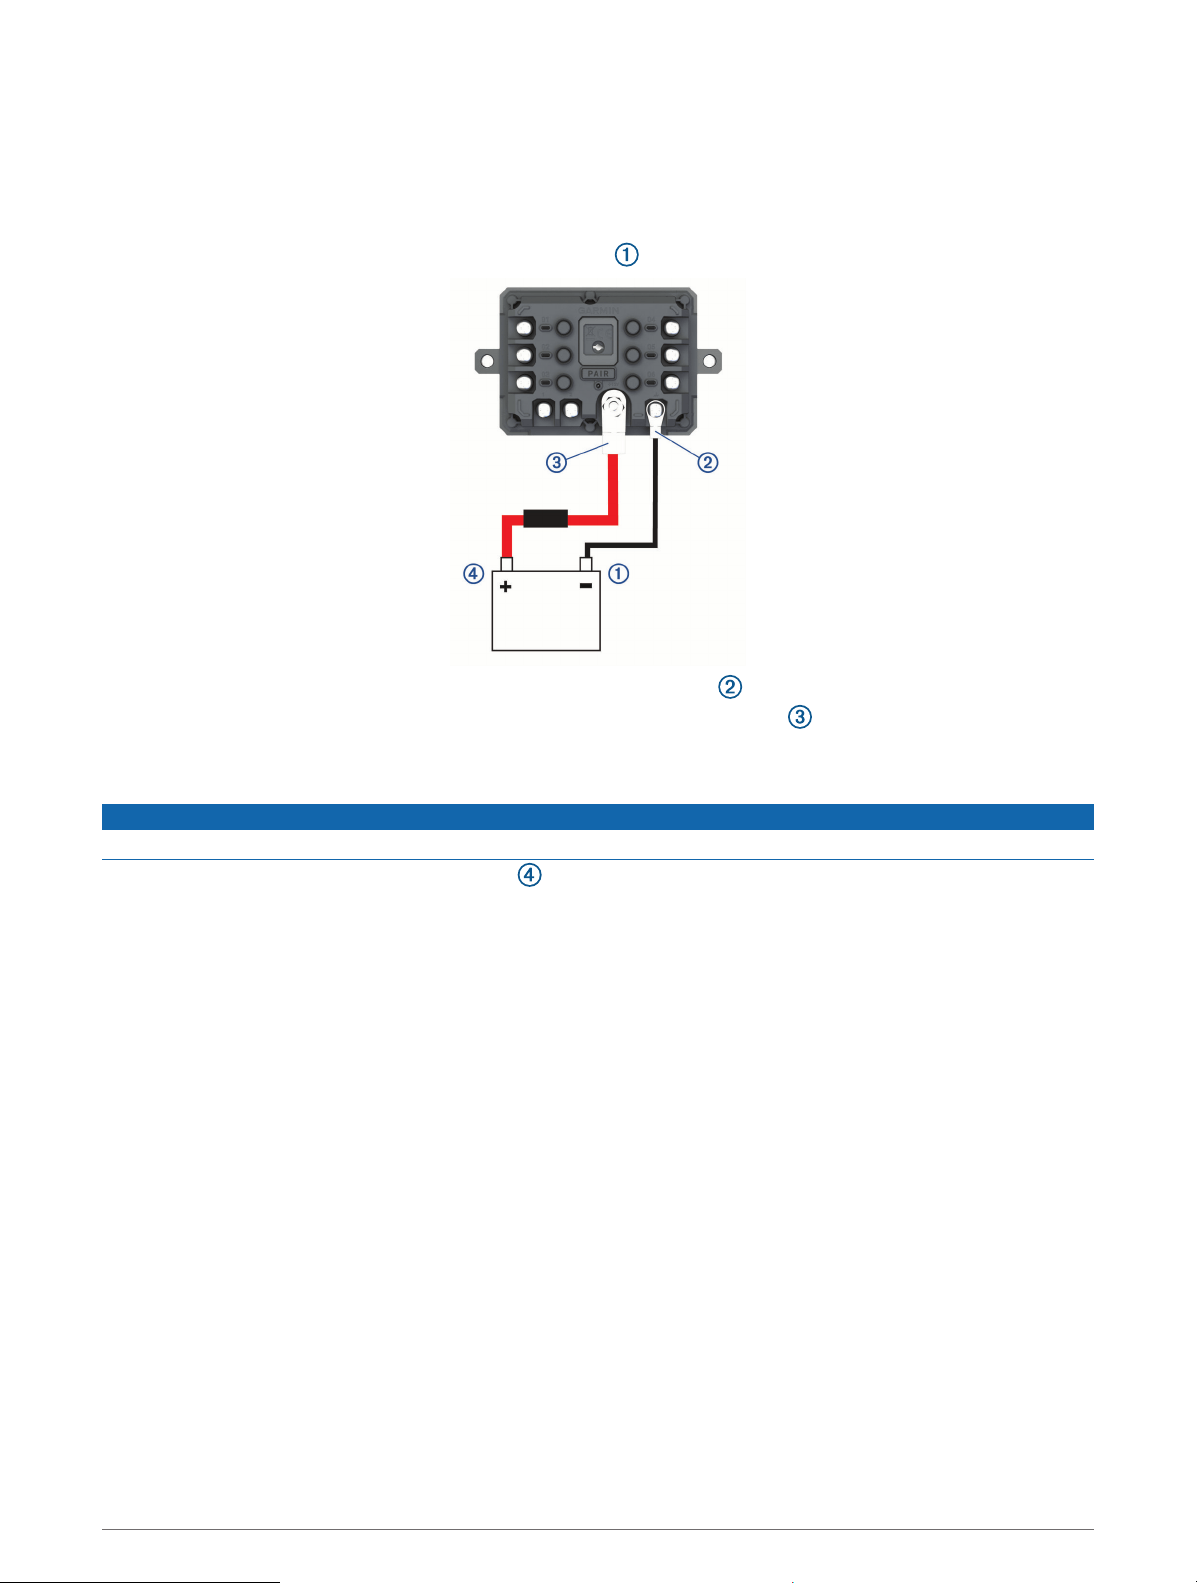
Connecting the Device to Vehicle Power
Before you can connect the device to vehicle power, you must remove the warning tag from the +12V terminal
on the device.
You should always confirm all electrical connections are secure and will not come loose while operating the
device.
1 Connect the large ring end of the included ground wire to the negative terminal on the vehicle battery.
2 Connect the small ring end of the ground wire to the GND terminal on the device.
3 Connect the small ring end of the included 12V cable to the +12V terminal on the device.
4 Tighten the
3
/
8
in. nut on the +12V terminal to a maximum torque specification of 4.52N-m (40lbf-in.).
You should confirm the nut cannot be loosened by hand.
NOTICE
Do not overtighten the +12V terminal to prevent damage to the terminal.
5 Connect the large ring end of the 12V cable to the positive terminal on the vehicle battery.
Pairing with a Garmin Navigation Device
You can pair your Garmin PowerSwitch device with a compatible Garmin navigation device.
1 Turn on power to your Garmin PowerSwitch device, and place your compatible Garmin navigation device
within 1m (3.3ft.) of it.
2 On your compatible navigation device, open the Garmin PowerSwitch app.
3 Follow the on-screen instructions to complete the pairing and setup process.
The main app dashboard appears. After the devices are paired, they connect automatically when they are turned
on and within range.
68 Appendix

Garmin PowerSwitch Specifications
Dimensions (DxWxH) 75 x 125 x 32mm (2.95 x 4.92 x 1.26in.)
Operating temperature range From -25° to 85°C (from -13° to 185°F)
Wireless frequency 2.4GHz @ 10 dBm
Power input From 12 to 16V using the included vehicle power cable.
Maximum accessory output 30A
Maximum system output 100A
Current draw with all outputs off 3mA
Water rating IEC 60529 IPX7
3
Troubleshooting
My Garmin PowerSwitch will not stay connected
• Verify the Garmin PowerSwitch device is receiving power.
• Verify that Bluetooth technology is enabled on your paired navigation device or smartphone.
• Move the navigation device or smartphone closer to your Garmin PowerSwitch device.
• Verify that your vehicle's battery is supplying at least 12V of power.
The Garmin PowerSwitch device turns off all outputs automatically to preserve your vehicle's battery if it is
receiving less than 11V of power (My accessories are not receiving power, page69).
My accessories are not receiving power
• Verify the Garmin PowerSwitch device is receiving power from the vehicle battery.
• Verify that your vehicle's battery is supplying at least 12V of power.
The Garmin PowerSwitch device turns off all outputs automatically to preserve your vehicle's battery if it is
receiving less than 11V of power. Outputs turn back on when the device detects more than 12V of power.
• Verify that all electrical connections are secure and will not come loose while operating the vehicle.
• Verify that each connected accessory draws less than 30A.
If an accessory draws more than 30A, the device turns off that output automatically.
• Verify that the total system load is less than 100A.
If the device detects a system load of more than 100A, it turns off all outputs automatically.
• Inspect all electrical connections for an electrical short circuit.
Tread Audio
WARNING
Garmin strongly recommends having an experienced installer with the proper knowledge of electrical systems
install the device. Incorrectly wiring the power cable can result in damage to the vehicle or the battery and can
cause bodily injury.
You can use a connected Tread Audio system to control audio and LED lights from your Tread - SXS Edition
device.
3
The device withstands incidental exposure to water of up to 1m for up to 30min. For more information, go to
www.garmin.com/waterrating.
Appendix 69

Tools and Materials Needed
• Phillips screwdriver
• Electric drill
• Drill bit (the size varies based on the surface material and screws used)
• Crimping pliers
• Wire strippers
• Heat gun
• 4 mm and 5 mm hex drivers or hex keys
NOTE: For customized installations, additional tools and materials may be needed.
Tread Audio Box Mounting Considerations
CAUTION
In high ambient temperatures and after extended use, the device enclosure may reach temperatures deemed
dangerous to touch. Therefore, you must install the device in a location where it is not touched during operation.
NOTICE
The storage and operating temperature ranges for this device are listed in the product specifications. Extended
exposure to temperatures exceeding the specified temperature range, in storage or operating conditions,
may cause device failure. Device damage and related consequences caused by extended exposure to these
conditions are not covered by the warranty.
• You must mount the device in a location with adequate ventilation where it is not exposed to extreme
temperatures.
• You should mount the device so that the cables can be connected easily.
• To achieve IP67 water ingress protection and optimal heat sink cooling, you must mount the device on a
vertical surface with the connectors pointing downward.
• You can mount the device on a horizontal surface, but such positioning might not achieve IPX67 water
ingress protection.
• To avoid interference with a magnetic compass, you should install the device at least 203 mm (8 in.) away
from a compass.
Mounting the Tread Audio Box Black Box Device
Before you mount the device, you must select a mounting location, and determine what screws and other
mounting hardware are needed for the surface.
1 Place the black box device in the mounting location, and mark the location of the pilot holes.
2 Drill a pilot hole for one corner of the device.
3 Loosely fasten the device to the mounting surface with one corner, and examine the other three pilot-hole
marks.
4 Mark new pilot-hole locations if necessary, and remove the device from the mounting surface.
5 Drill the remaining pilot holes.
6 Secure the device to the mounting location.
Connections
The stereo must be connected to power, to speakers, and to media input sources to function correctly. You
should carefully plan the layout of the stereo, speakers, and your input sources before making any connections.
70 Appendix
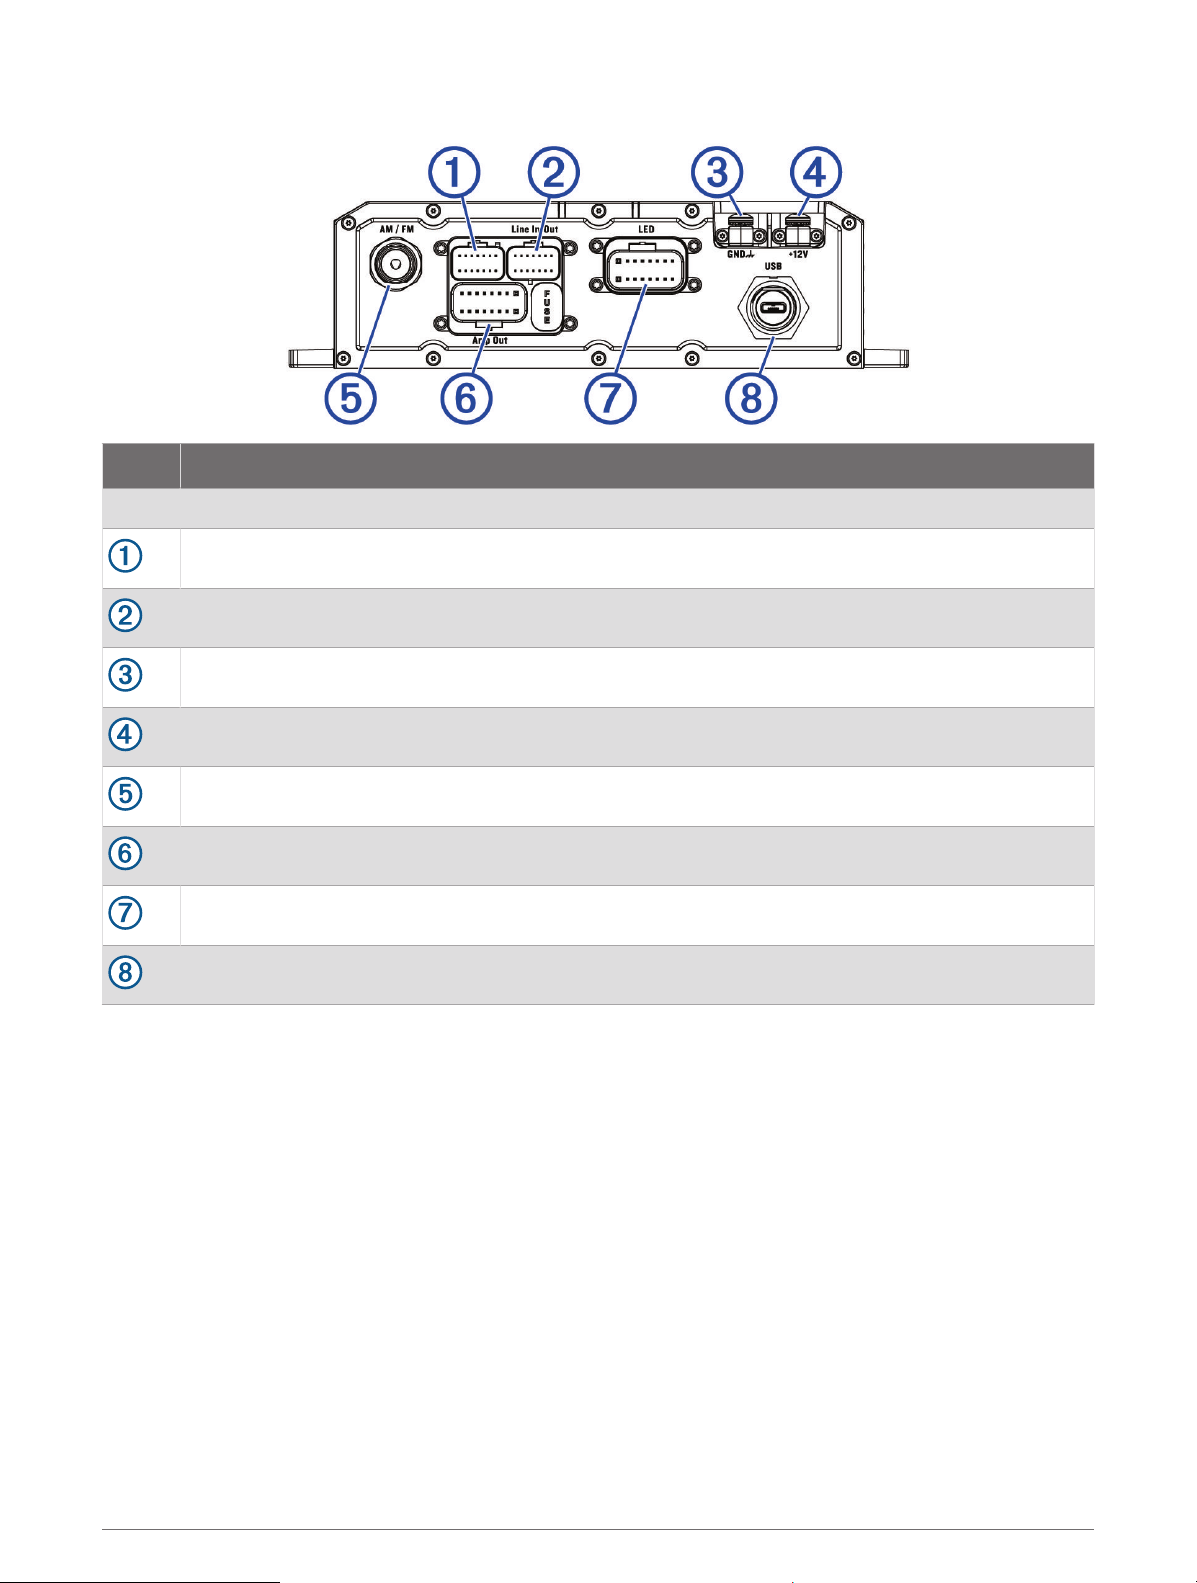
Port Identification
Item Description
FUSE Contains the 15 A fuse for the LED outputs.
Not used.
Connects the device to the auxiliary in and line/subwoofer out wiring harness.
Connects the device to the ground terminal wire (GND).
Connects the device to the +12V terminal wire.
Connects the device to the AM/FM antenna.
Connects the device to the speaker wiring harness.
Connects the device to the LED wiring harness.
Connects the device to an optional USB accessory.
Appendix 71

Speaker and LED Wiring Harness Wire and Connector Identification
Wire Group Wire Color and Description
Ignition
Red: Connects to the vehicle accessory line. If the ignition wire is unused, ground the
ignition wire or leave it disconnected.
Amplifier on
Blue: Connects to an optional external amplifier to turn it on when the stereo turns on.
Speaker zone 1
White: Left (+), Connects to the included speaker.
White with a black stripe: Left (-), Connects to the included speaker.
Gray: Right (+), Connects to the included speaker.
Gray with a black stripe: Right (-), Connects to the included speaker.
Speaker zone 2
Green: Left (+), Connects to an additional speaker.
Green with a black stripe: Left (-), Connects to an additional speaker.
Purple: Right (+), Connects to an additional speaker.
Purple with a black stripe: Right (-), Connects to an additional speaker.
LED RGB1
Black: Power
Red: Red LED
Green: Green LED
Blue: Blue LED
LED RGB2
Black: Power
Red: Red LED
Green: Green LED
Blue: Blue LED
72 Appendix
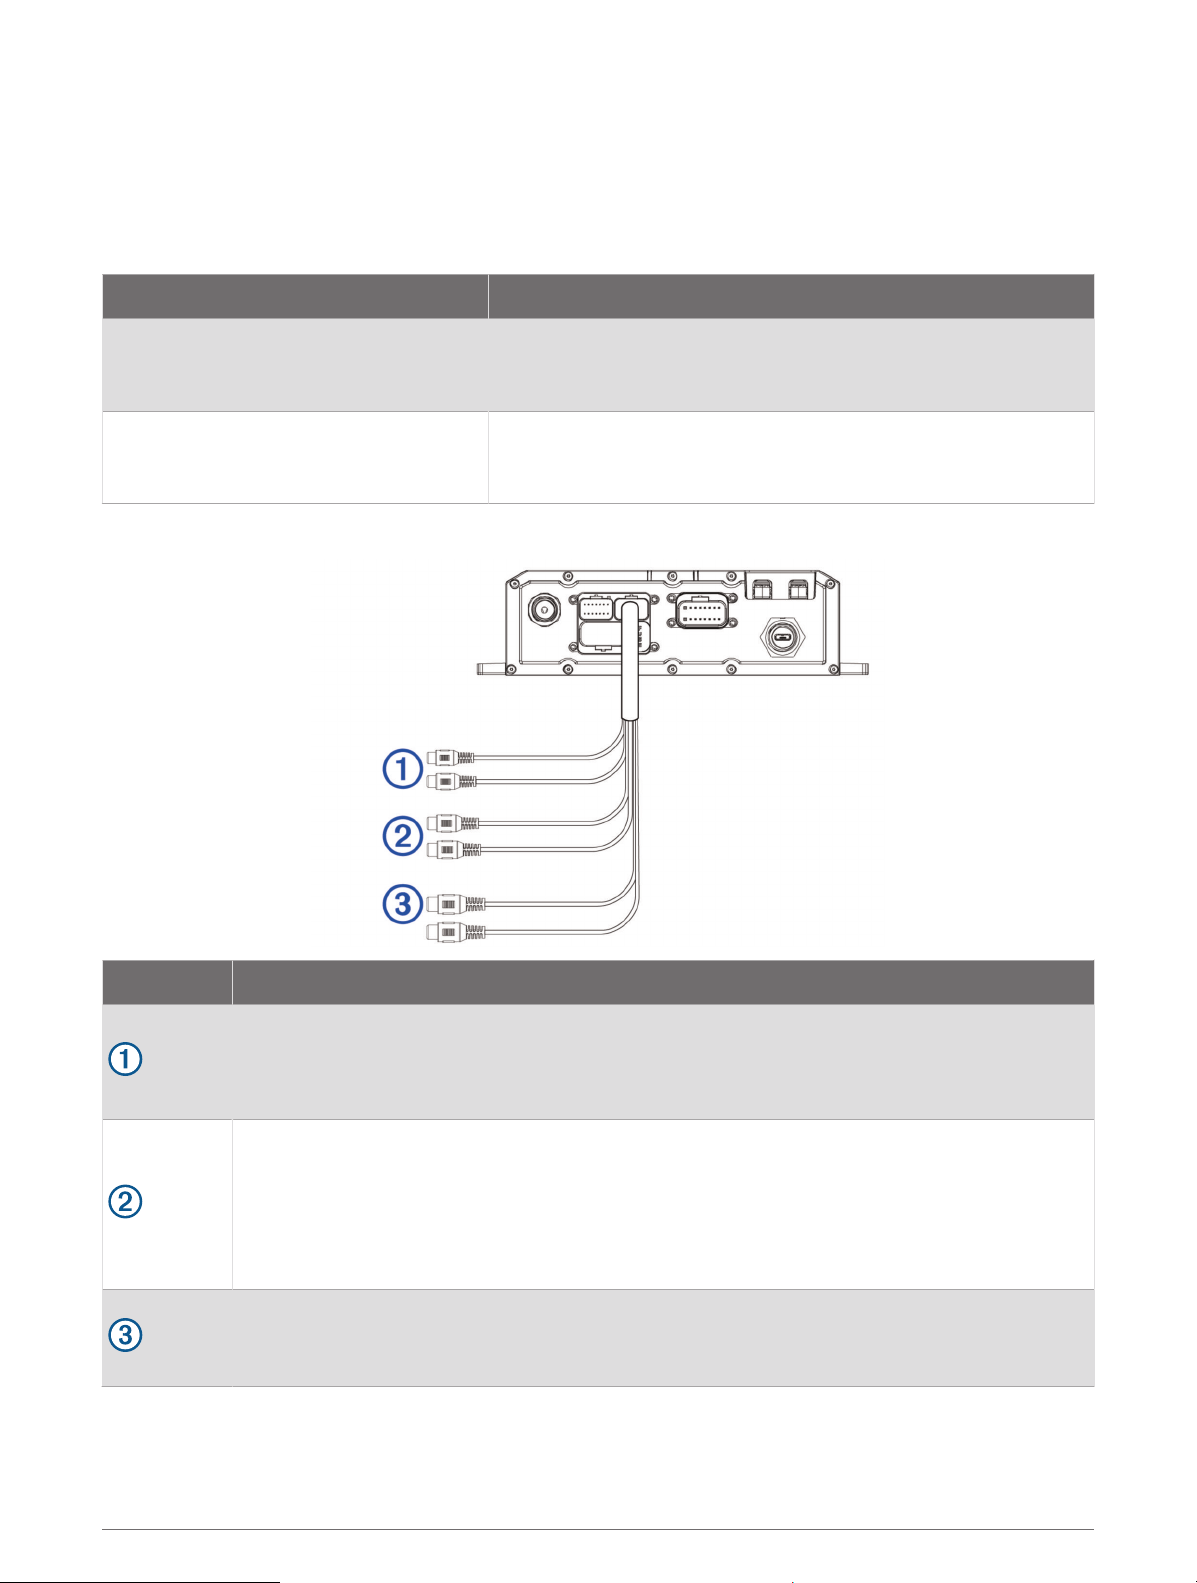
Addressable LED Wiring Considerations
You can wire addressable LED lights to your Tread Audio Box. For more information, see the manual for your
addressable LED lights.
Compatible addressable LED types:
• WS2812B
• WS2813
Addressable LED LED Wire Color and Function
Addressable LED 1
Red: +5V Power
White: Ground
Green with a black stripe: Data
Addressable LED 2
Red: +5V Power
White: Ground
Green with a black stripe: Data
RCA Wiring Harness Wire and Connector Identification
Wire Number Wire Function
Auxiliary in left: Provides a red and white RCA stereo line input for audio sources, such as a CD
or MP3 player.
Auxiliary in right: Provides a red and white RCA stereo line input for audio sources, such as a CD
or MP3 player.
Line out left: Provides a full-range output to an external amplifier, and is associated with the
volume control.
Line out right: Provides a full-range output to an external amplifier, and is associated with the
volume control.
NOTE: If you are connecting to an external amplifier, you should use a ground loop isolator to
ensure a clear signal.
Subwoofer out: Provides a single mono output to a powered subwoofer or subwoofer amplifier.
NOTE: If you are connecting to an external amplifier, you should use a ground loop isolator to
ensure a clear signal.
Appendix 73
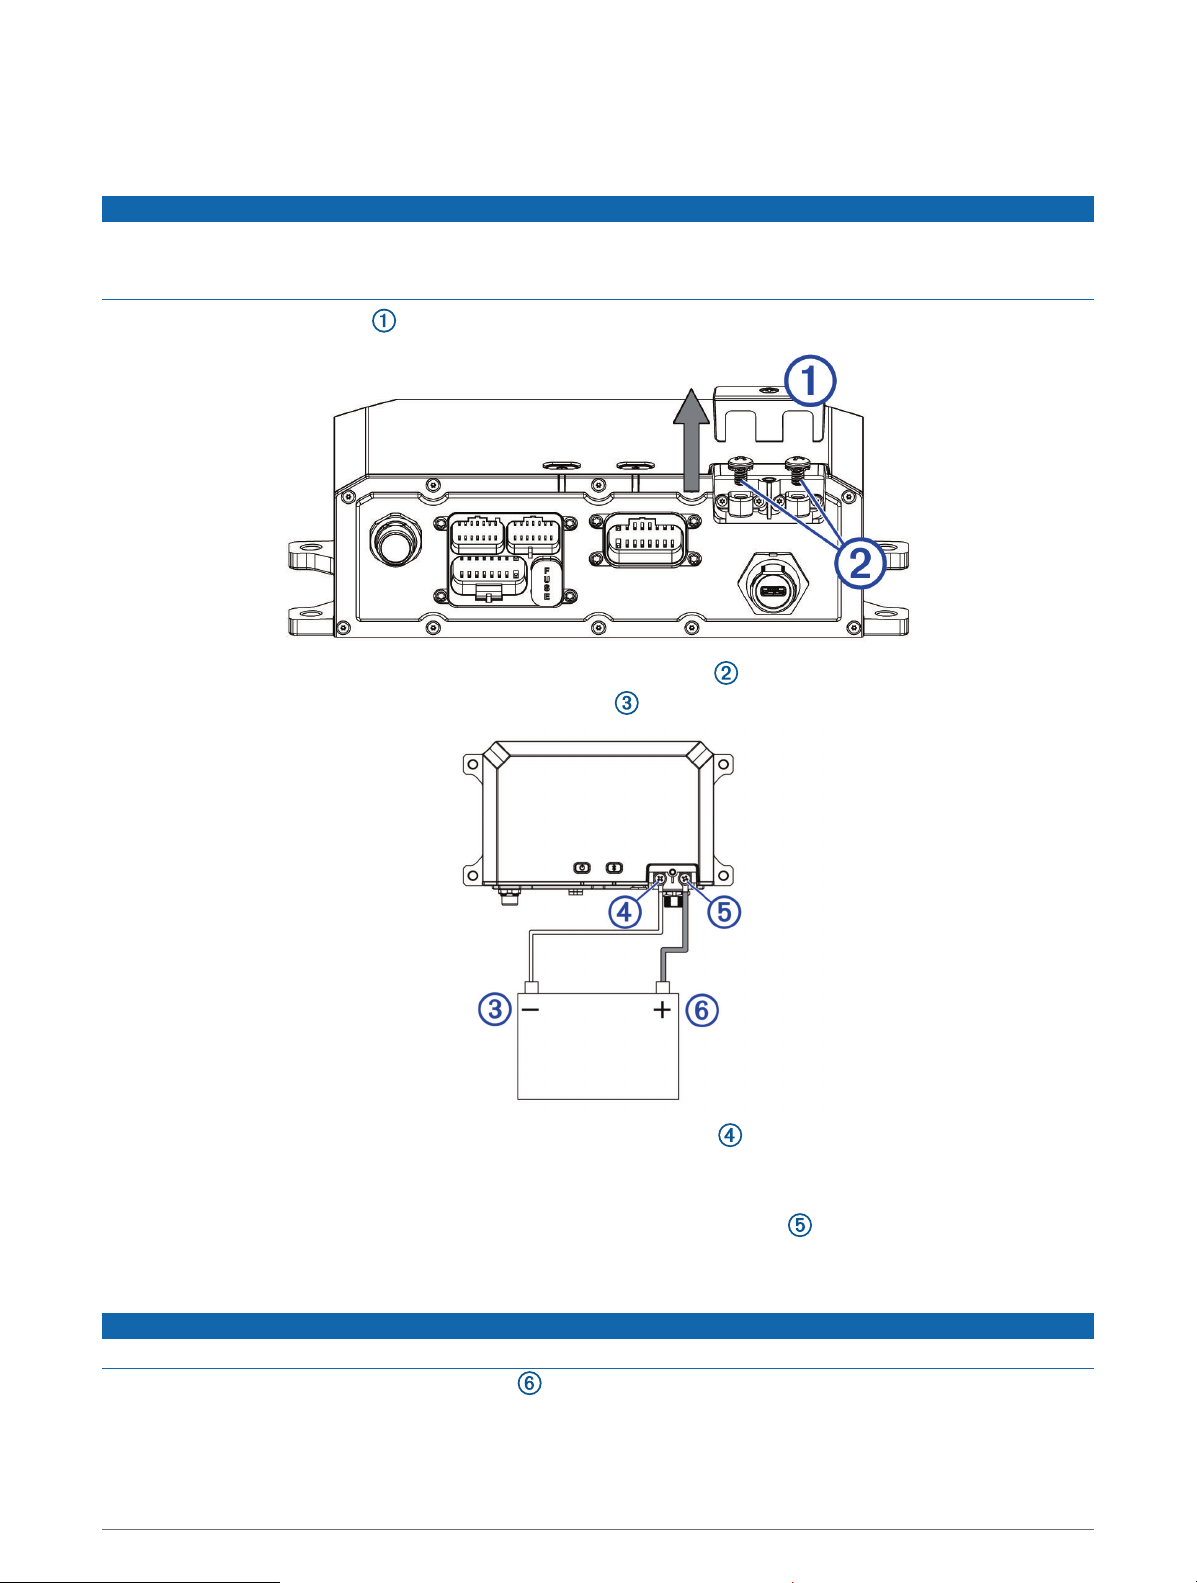
Connecting the Device to Vehicle Power
You should always confirm all electrical connections are secure and will not come loose while operating the
device.
NOTICE
If the ignition wire is not used, do not tie the ignition to the positive terminal on the vehicle battery. Ground the
ignition wire or leave it disconnected. Failure to ground or disconnect the ignition wire when the ignition is not
used could prevent the device from powering on.
1 Remove the terminal cover using a Phillips screwdriver.
2 Remove the screws from the GND terminal and the +12V terminal .
3 Connect the large ring end of the included ground wire to the negative terminal on the vehicle battery.
4 Connect the small ring end of the ground wire to the GND terminal on the device.
5 Tighten the screw on the GND terminal.
You should confirm the screws cannot be loosened by hand.
6 Connect the small ring end of the included 12V cable to the +12V terminal on the device.
7 Tighten the screw on the +12V terminal.
You should confirm the screws cannot be loosened by hand.
NOTICE
Do not overtighten the screw on the +12V terminal to prevent damage to the terminal.
8 Connect the large ring end of the 12V cable to the positive terminal on the vehicle battery.
9 Replace and tighten the terminal cover on the device.
74 Appendix
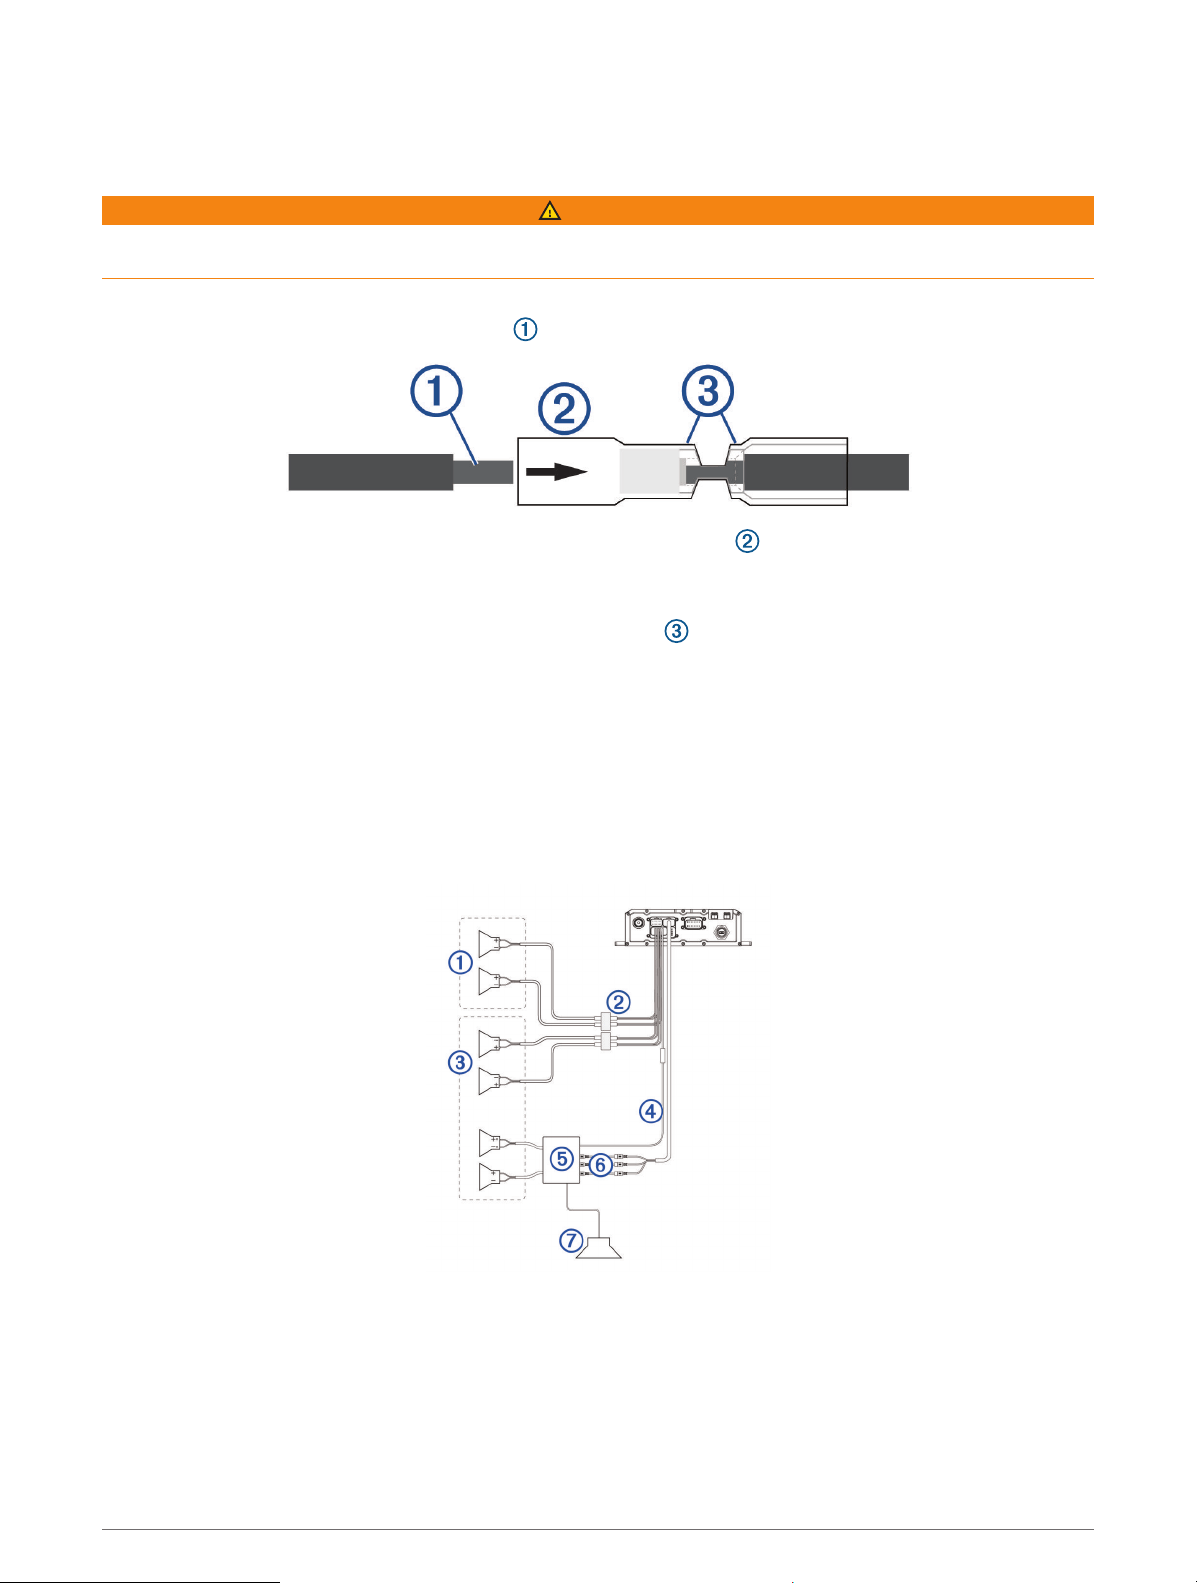
Using the Heat-Shrink Crimp Connectors
You should use the included heat-shrink crimp connectors to make a water-tight connection between the bare
wires.
WARNING
Only use the heat gun to apply heat to the heat-shrink crimp connectors in a well-ventilated area. Do not use the
heat gun near clothing or bare skin. Doing so can result in property damage or serious injury.
1 Using wire strippers, strip 6 mm (
1
/
4
in.) off the end of each bare wire.
2 If necessary, twist the strands of each wire clockwise to bundle them together.
3 Insert one bare wire into one end of the heat-shrink crimp connector .
The bare wires are not secure until they are crimped and sealed.
4 Insert the corresponding bare wire into the other end of the heat-shrink crimp connector.
5 Using pliers, crimp both sides of the center of the connector to secure the connection.
6 Using a heat gun, apply heat to the heat-shrink crimp connector until the connector is sealed to the wires.
Do not apply heat to the wires directly.
Complete System Wiring
This diagram illustrates a system installation with an external amplifier and subwoofer connected to the stereo
using a line out.
NOTE: You can also connect speakers to the speaker wires for the internal stereo amplifier while using an
external amplifier connected to the line out. Adjusting the volume affects speakers connected to the internal
amplifier and speakers connected to the line out. This may result in uneven volume levels.
Appendix 75
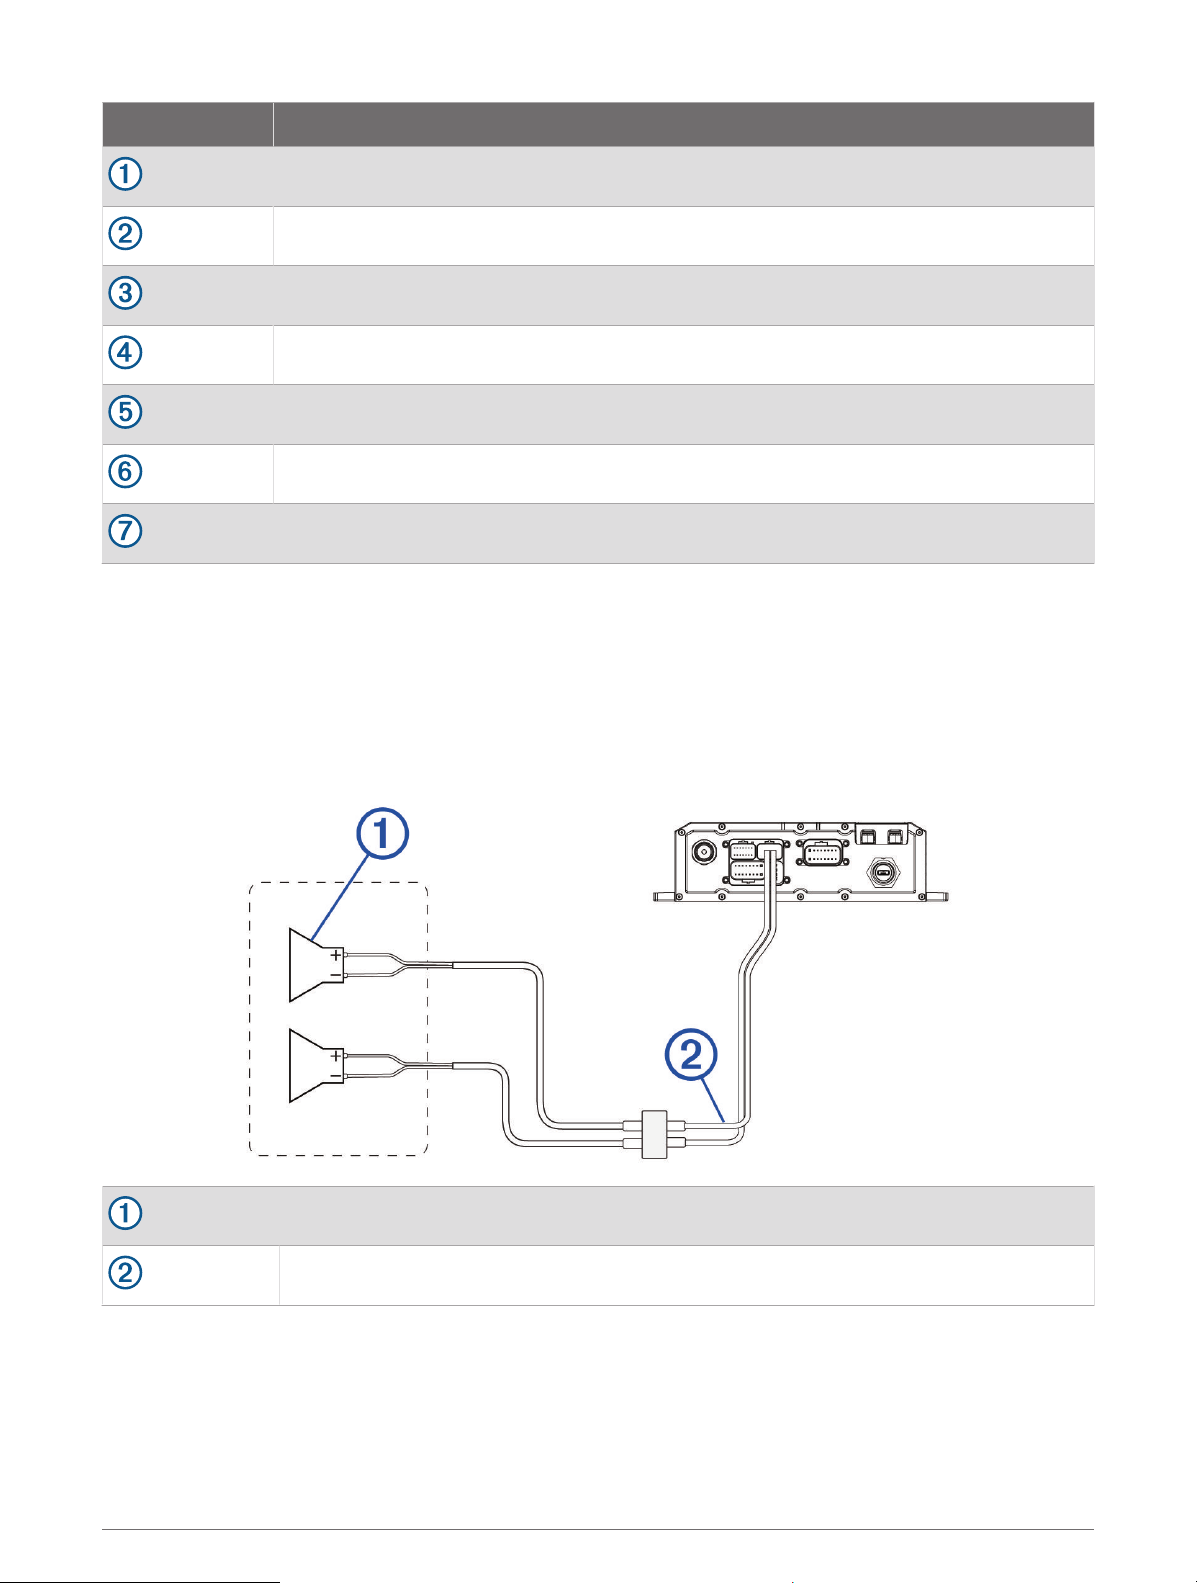
Item Description
Zone 2 speakers
Water-tight connection
Zone 1 speakers
Amplifier-on signal wire
Powered amplifier
Line out and subwoofer out
Subwoofer
Speaker Zones
You can group speakers in one area into speaker zones. This enables you to control the audio level of the each
zone individually.
Zones 1 and 2 are powered by the on-board amplifier. To use the RCA line output, you must connect an external
amplifier.
You can set the balance, tone, and name for each zone, and the fade between zones.
Single-Zone System Wiring Example
Speakers
Water-tight connection
76 Appendix

Wireless Remote Mounting Considerations
NOTICE
Selecting the correct mounting location is critical to optimize the performance of the wireless remote.
• You must mount the wireless remote in a location that is within 10m (33ft.) of the stereo.
• You must mount the wireless remote in a location where it is not submerged.
• You should select a flat mounting surface for the best results.
• The mounting surface must be free of dirt, debris, wax, or coatings.
• Move away from sources that can interfere with the wireless remote's operation. Sources of interference
may include strong electromagnetic fields, some 2.4GHz wireless sensors, high-voltage power lines, electric
motors, and wireless LAN access points.
• You should install the wireless remote in a location where you can allow the adhesive to dry at room
temperature for 72 hours.
Mounting the Wireless Remote
1 Select an appropriate location for the remote control (Wireless Remote Mounting Considerations, page77).
2 Test the range at the selected location by holding the wireless remote at the location, pressing a few buttons,
and confirming the correct operation.
3 Thoroughly clean and dry the mounting surface using a mixture of water and isopropyl alcohol.
The mounting surface must be free of dirt, debris, wax, or coatings.
4 Place the wireless remote on the mount, and rotate the remote until you hear a click.
5 Remove the backing from the adhesive.
6 Carefully orient the wireless remote in the mount with the Fusion
®
logo at the bottom.
NOTICE
It is extremely difficult to remove the adhesive. Some mounting surfaces might be damaged after removing the
adhesive.
7 Press the wireless remote in the mount firmly onto the mounting surface, maintaining pressure for at least
60 seconds.
Appendix 77
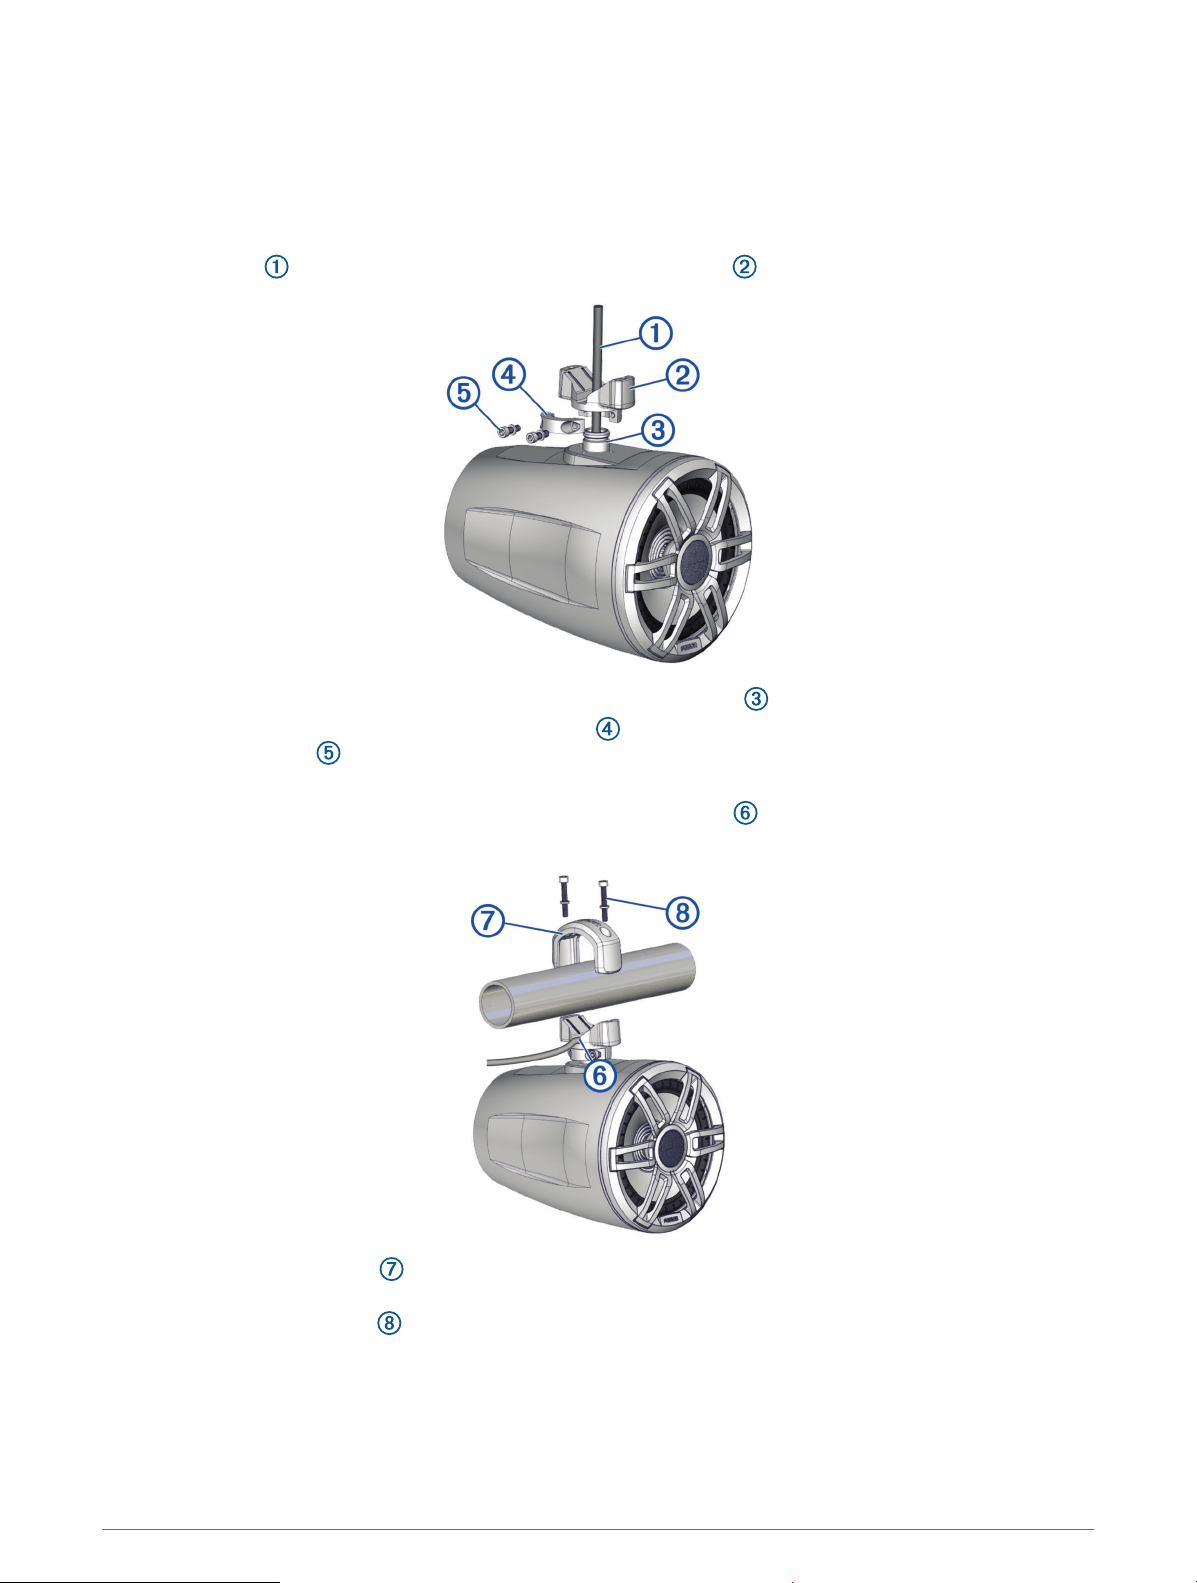
Mounting the Speakers and Brackets
You can mount the Tread 6.5" XS-LED Tower Speakers to a roll bar using the included brackets.
When installing the speaker and bracket, you can route the speaker and LED cable along the roll bar.
1 If necessary, mark the locations on the roll bar where you plan to mount the speakers.
2 Route the speaker and LED power wires along the roll bar to the mounting locations.
3 Feed the cable from the speaker through the base of the bracket .
4 Place the base of the bracket over the mounting knob on the speaker .
5 Using a 4mm hex driver or hex key, attach the collar to the base of the bracket using the two shorter
screws and washers , but do not fully tighten them.
6 Connect the speaker and LED wires (Wiring, page79).
7 Place the connected wires in the channel on the base of the bracket , and route the wires along the roll
bar.
8 Place the top of the bracket over the roll bar, and hold it against the base of the bracket.
9 Using a 5mm hex driver or hex key, attach the top of the bracket to the base of the bracket using the two
longer screws and washers , but do not fully tighten them.
78 Appendix

10 Adjust the angle of the speakers, and tighten all of the screws to secure the speaker to the roll bar, observing
these maximum torque measurements:
• For the longer screws that secure the bracket to the roll bar , do not tighten to more than 4N-m
(2.95lbf-ft.).
• For the shorter screws that secure the bracket to the speaker , do not tighten to more than 2.5N-m
(1.84lbf-ft.).
NOTICE
Tightening the screws more than the specified maximum torque measurement can damage the bracket.
11 Repeat these steps for additional brackets.
12 Route the speaker and LED wires along a suitable path in your vehicle, and secure them using the included
zip ties.
Wiring
When connecting the speakers and LED lights to your stereo or amplifier, observe these considerations.
• You should use the included wire to connect the speakers to the stereo or amplifier. If necessary, you can use
a larger gauge of wire (Wire Gauge Guide, page79).
• You should make all of the wiring connections using the included heat-shrink crimp connectors. You should
plan and select the best connection type for your installation needs.
• You can use this table to identify the polarity of the leads on the speaker.
Lead color Polarity Use
White Positive (+) Speaker
White with a black stripe Negative (-) Speaker
Red Red LED
Green Green LED
Blue Blue LED
Black +12V Power
Wire Gauge Guide
If necessary, you can use longer cables for your installation.
NOTE: If you are using aluminum or tinned wire, you should use a wire two gauges larger than the gauge listed
below to compensate for a potential voltage drop due to the wire material.
• Use 16 AWG (1.31mm
2
) for speaker wires.
• Use 20 AWG (0.52mm
2
) for LED wires.
Additional Speakers
You can wire additional Tread 6.5" XS-LED Tower Speakers together. Refer to the owner's manual for your
stereo system at garmin.com/express for more information.
Appendix 79
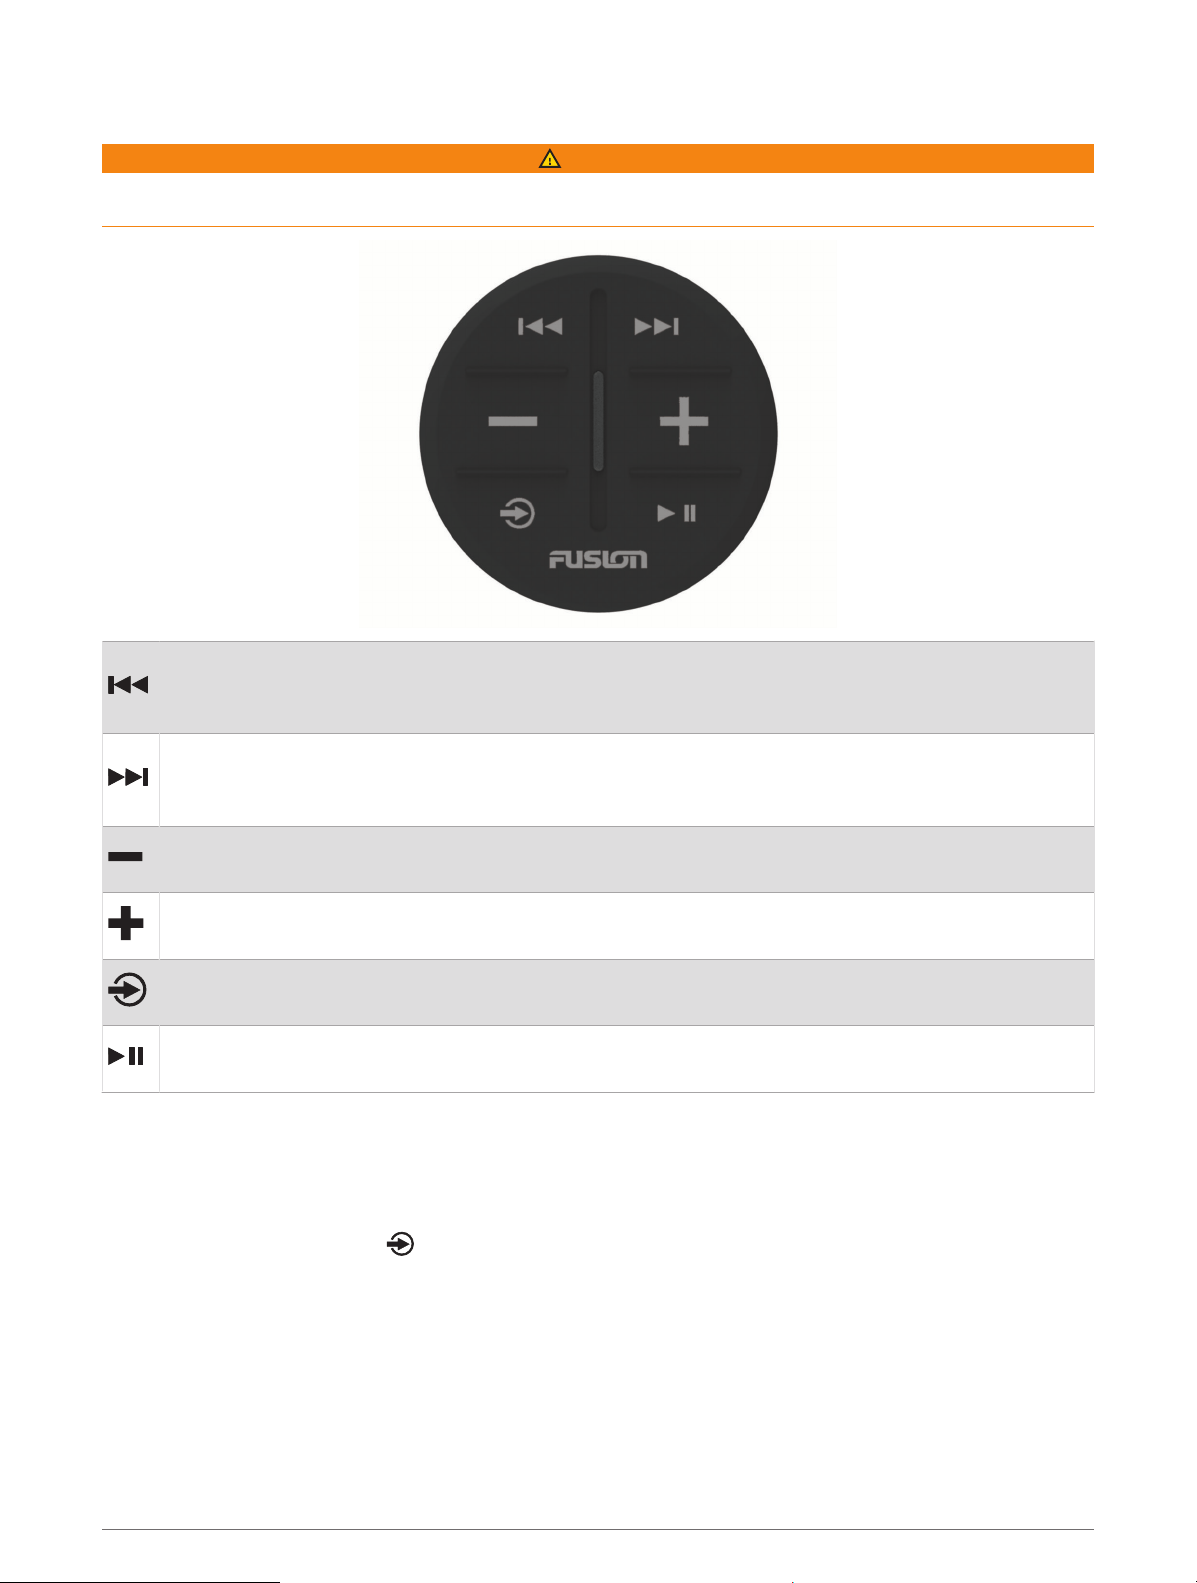
Wireless Remote Overview
WARNING
See the Important Safety and Product Information guide in the product box for product warnings and other
important information.
Radio sources: Press to tune to the previous station.
AUX sources: Press to decrease gain.
Other sources: Press to skip to the beginning of the track or to the previous track.
Radio sources: Press to tune to the next station.
AUX sources: Press to increase gain.
Other sources: Press to skip to the next track.
Press to decrease the volume.
Hold to quickly decrease the volume.
Press to increase the volume.
Hold to quickly increase the volume.
Press to cycle through the available sources.
Hold to pair with a stereo (Connecting the Wireless Remote to your Tread Audio Box, page80).
Radio and AUX sources: Press to mute or un-mute.
Other sources: Press to pause or resume.
Connecting the Wireless Remote to your Tread Audio Box
1 Bring the Tread Audio System remote within 10m (33ft.) of the compatible stereo.
NOTE: Stay 10m (33ft.) away from other ANT
®
devices while pairing.
2 On the Tread Audio Box, enable Bluetooth discoverable mode.
3 On the wireless remote, hold until the status LED flashes green and red.
The remote searches for the stereo. When the remote pairs successfully, the status LED flashes green briefly
and turns off.
If the remote cannot find the stereo, the status LED flashes red briefly and turns off.
80 Appendix

Pairing with a Garmin Navigation Device
You can pair your Tread Audio device with a compatible Garmin navigation device.
1 Turn on power to your Tread Audio device, and place your compatible Garmin navigation device within 1m
(3.3ft.) of it.
2 On your compatible navigation device, open the Tread Audio app.
3 On your Tread Audio device, press .
4 Follow the on-screen instructions to complete the pairing and setup process.
The main app dashboard appears. After the devices are paired, they connect automatically when they are turned
on and within range.
Tread Audio Box Specifications
General
Weight 997 g (2.2 lbs.)
Water resistance IEC 60529 IPX7 (water), IEC 60529 IP6X (dust)
4
Operating temperature range From -20 to 70°C (from -4 to 158°F)
Storage temperature range From -40 to 85°C (from -40 to 185°F)
Input voltage From 8 to 14.4 Vdc
Current (max.) 40A
Current (muted) less than 650mA
ANT wireless range Up to 3m (10ft.)
Compass-safe distance 203 mm (8 in.)
Fuse 15 A mini-blade type
Bluetooth wireless range Up to 10 m (30 ft.)
On-board, Class D Amplifier
Output power per channel 4 x 100 W RMS at 14.4 Vdc input, 4 ohm, 10% THD
5
Line output level (max.) 6.0 V (peak to peak)
Aux input level (typical) 1 V (RMS)
Tuner
FM radio frequency range 87.5 to 107.9 MHz
FM frequency step 200 kHz
AM radio frequency range 530 to 1710 kHz
AM frequency step 10 kHz
4
The device withstands incidental exposure to water of up to 1m for up to 30min, and is protected against powerful jets of water. For more information, go to
www.garmin.com/waterrating.
5
The stereo may limit the output power to prevent the amplifier from overheating, and to maintain the audio dynamics.
Appendix 81
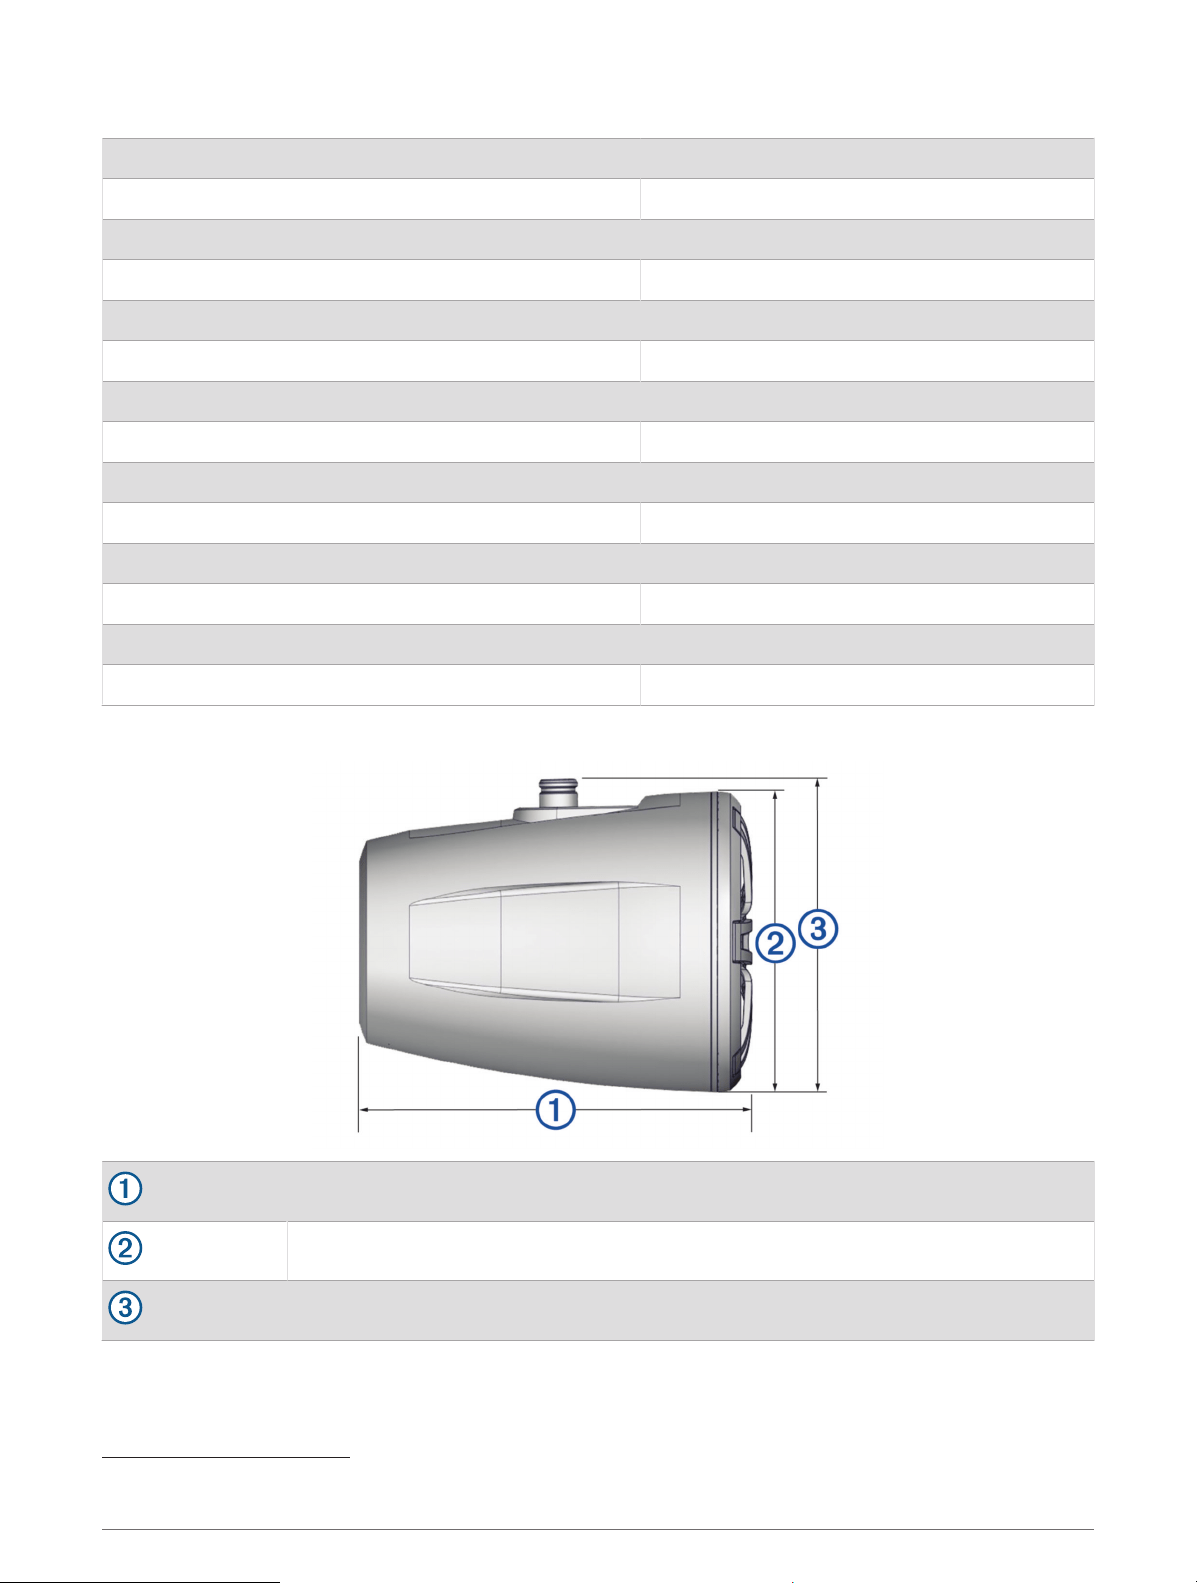
Tread 6.5" XS-LED Tower Speakers Specifications
Max. power 200W
RMS power 50W
Sensitivity (1W/1m) 91dB
Frequency response From 80Hz to 18kHz
Recommended amplifier power (RMS, playing music) From 20 to 150W
Nominal voice coil diameter 30mm
Impedance 4ohms
Operating temperature range From 0 to 50°C (from 32 to 122°F)
Storage temperature range From -20 to 70°C (from -4 to 158°F)
Cone material Polypropylene (PP) cone with cloth surround
Tweeter type Aluminum dome
Water and dust rating IEC60529 IP67
6
Compass-safe distance 310cm (122in.)
Weight 2.49 kg. (5.5 lb.)
Dimensions
223mm (8
13
/
16
in.)
Ø 176mm (6
15
/
16
in.)
180mm (7
1
/
8
in.)
6
Protected against dust and water ingress.
82 Appendix
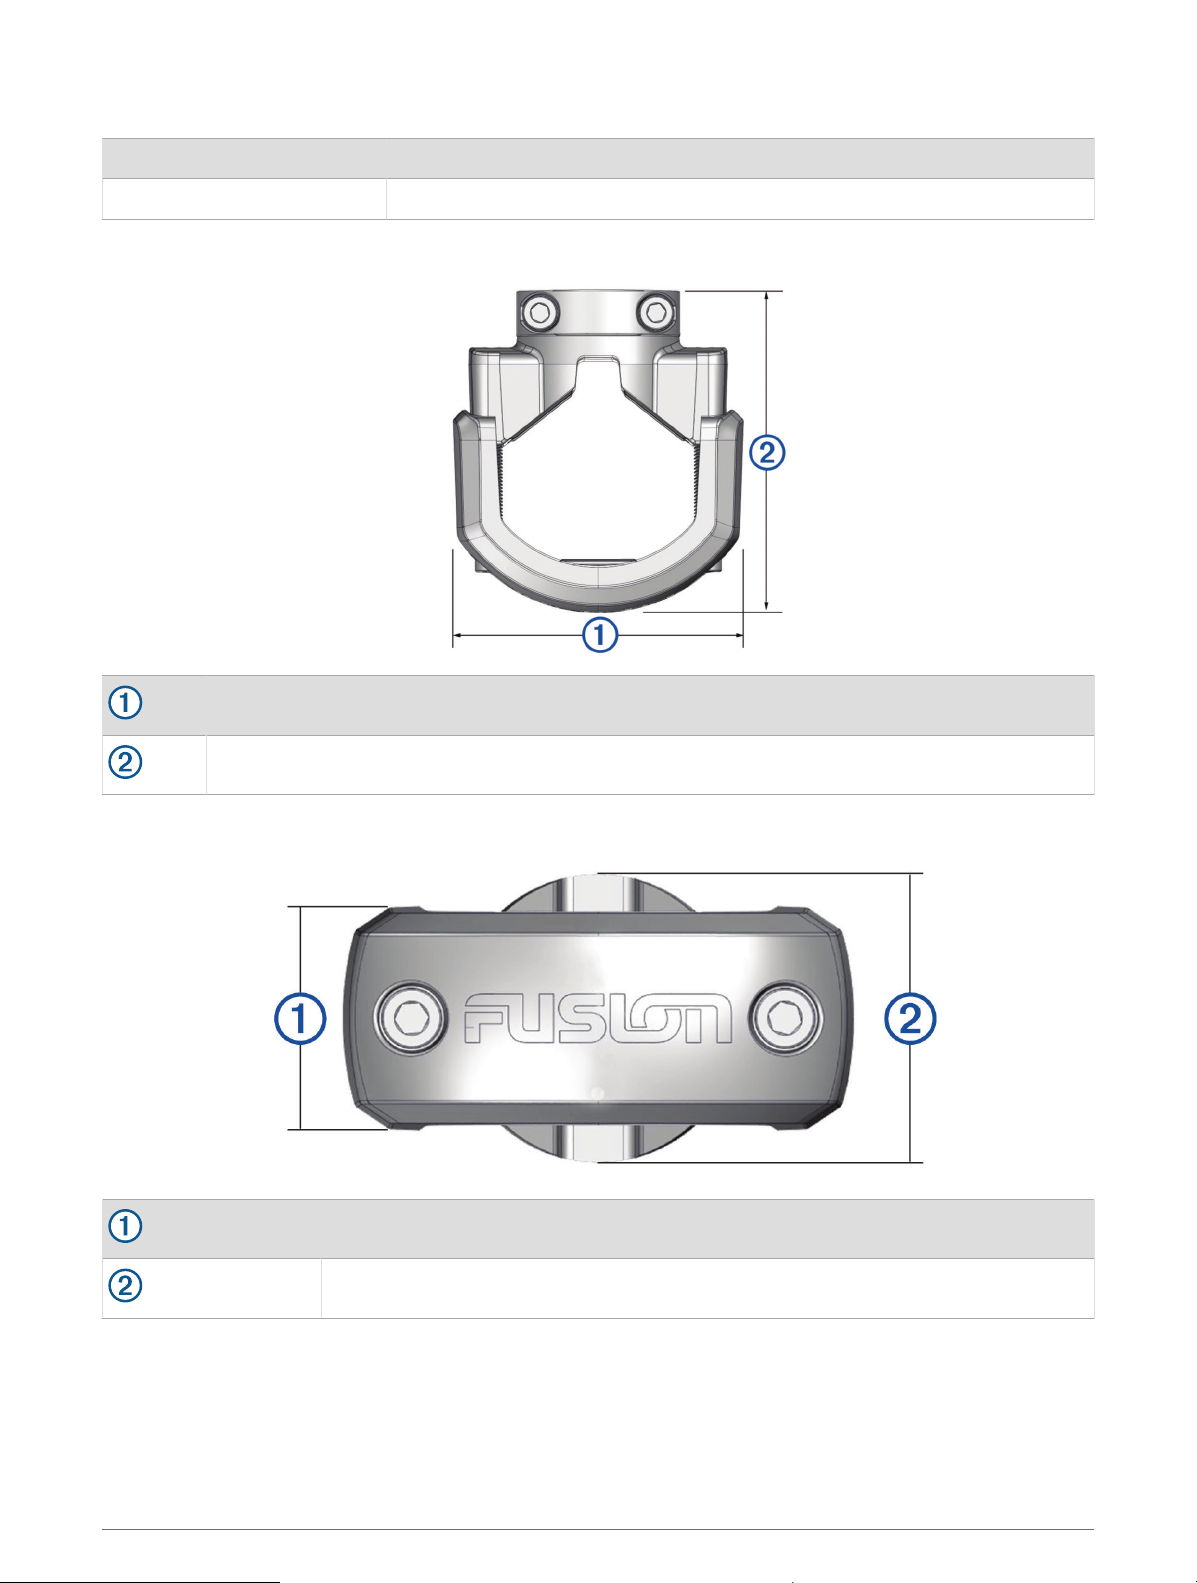
Bracket Specifications
Material Aluminum alloy with silicone pads
Supported roll bar sizes From 33.4mm (1.31in.) to 50.8mm (2.00in.) outer diameter
Bracket Side Dimensions
85mm (3
3
/
8
in.)
From 74mm (2
7
/
8
in.) to 94mm (3
11
/
16
in.)
Bracket Top Dimensions
37mm (1
7
/
16
in.)
48mm (2in.)
Data Management
The device has a memory card slot for additional data storage.
NOTE: The device is compatible with Windows 7 and newer, and Mac
®
OS 10.7 and newer. Apple computers
may require additional third-party software to read and write files.
Appendix 83

About Memory Cards
You can purchase memory cards from an electronics supplier, or purchase pre-loaded Garmin mapping
software (www.garmin.com). Memory cards can be used to store files such as maps and custom POIs.
Installing a Memory Card for Maps and Data
You can install a memory card to increase the storage space for maps and other data on your device. You can
purchase memory cards from an electronics supplier. The device supports microSD memory cards from 4 to
256GB. Memory cards must use the FAT32 file system format. Memory cards greater than 32GB must be
formatted using the device (Formatting the Memory Card, page84).
1 Locate the map and data memory card slot on your device (Device Overview, page1).
2 Insert a memory card into the slot.
3 Press it in until it clicks.
Formatting the Memory Card
The device requires a memory card formatted using the FAT32 file system. You can use the device to format
your card using this file system.
You must format a brand new memory card if it is not formatted using the FAT32 file system.
NOTE: Formatting the memory card deletes all data on the card.
1 Select > Device > Storage & USB.
2 Select your memory card.
3 Select > Storage settings > Format > FORMAT SD CARD.
4 Select Done.
Connecting the Device to Your Computer
You can connect the device to your computer using a USB cable.
1 Plug the small end of the USB cable into the port on the device.
2 Plug the larger end of the USB cable into a port on your computer.
Depending on your computer operating system, the device appears as either a portable device, a removable
drive, or a removable volume.
Transferring GPX Files From Your Computer
Apple computers may require additional third-party software, such as Android File Transfer, to read and write
files on this device.
If you have already created routes that you want to use on your device, you can transfer GPX files directly from
your computer.
1 Connect the device to your computer (Connecting the Device to Your Computer, page84).
The device appears as a portable device.
2 On your computer, open the file browser.
3 Select a GPXfile.
4 Select Edit > Copy.
5 Browse to the GPX folder on the device.
6 Select Edit > Paste.
84 Appendix

Transferring Data From Your Computer
1 Connect the device to your computer (Connecting the Device to Your Computer, page84).
Depending on your computer operating system, the device appears as either a portable device, a removable
drive, or a removable volume.
2 On your computer, open the file browser.
3 Select a file.
4 Select Edit > Copy.
5 Browse to a folder on the device.
NOTE: For a removable drive or volume, you should not place files in the Garmin folder.
6 Select Edit > Paste.
Disconnecting the USB Cable
If your device is connected to your computer as a removable drive or volume, you must safely disconnect your
device from your computer to avoid data loss. If your device is connected to your Windows computer as a
portable device, it is not necessary to safely disconnect the device.
1 Complete an action:
• For Windows computers, select the Safely Remove Hardware icon in the system tray, and select your
device.
• For Apple computers, select the device, and select File > Eject.
2 Disconnect the cable from your computer.
Adding BaseCamp
™
Data to Garmin Explore
You can export your BaseCamp data files and import them to Garmin Explore for use with your Tread - SXS
Edition device.
1 Export your data from BaseCamp:
• If you are using an Apple computer, see Exporting Data from BaseCamp with an Apple Computer, page85.
• If you are using a PC, see Exporting Data from BaseCamp with a PC, page85.
2 Import your BaseCamp data to the Garmin Explore website (Importing Data to Garmin Explore, page86).
3 Synchronize your Garmin Explore data with your Tread - SXS Edition device (Synchronizing Garmin Explore
Account Data, page50).
Exporting Data from BaseCamp with a PC
1 Select an option:
• To export all BaseCamp data stored on your computer, select My Collection, and select File > Export >
Export 'My Collection'.
• To export one or more items or a list, select one or more items or a list, and select File > Export > Export
Selection.
2 Enter a name, select a location for the exported file, select the file format, and select Save.
Exporting Data from BaseCamp with an Apple Computer
1 Select an option:
• To export all BaseCamp data stored on your computer, select My Collection, and select File > Export 'My
Collection'.
• To export one or more items or a list, select one or more items or a list, and select File > Export Selected
User Data.
2 Enter a name.
3 Select a location for the exported file.
4 Select the file format.
5 Select Export.
Appendix 85


support.garmin.com
GUID-F0AC3576-CD83-465E-983D-7AD585ADB59E v6June 2023