GPSMAP
®
H1/H1i Plus
Owner’s Manual

© 2025 Garmin Ltd. or its subsidiaries
All rights reserved. Under the copyright laws, this manual may not be copied, in whole or in part, without the written consent of Garmin. Garmin reserves the right to change
or improve its products and to make changes in the content of this manual without obligation to notify any person or organization of such changes or improvements. Go to
www.garmin.com for current updates and supplemental information concerning the use of this product.
Garmin
®
, the Garmin logo, GPSMAP
®
, Alpha
®
, ANT+
®
, Auto Lap
®
, City Navigator
®
, fēnix
®
, inReach
®
, and TracBack
®
are trademarks of Garmin Ltd. or its subsidiaries, registered in the
USA and other countries. Connect IQ
™
, Garmin Connect
™
, Garmin Connect+
™
, Garmin Explore
™
, Garmin Express
™
, Garmin HuntView
™
, Garmin Messenger
™
, Garmin Response
SM
,
SatIQ
™
, and tempe
™
are trademarks of Garmin Ltd. or its subsidiaries. These trademarks may not be used without the express permission of Garmin.
Android
™
is a trademark of Google Inc. Apple
®
, iPhone
®
, and Mac
®
are trademarks of Apple Inc., registered in the U.S. and other countries. Applied Ballistics Quantum
™
is a trademark,
and Applied Ballistics
®
is a registered trademark of Applied Ballistics, LLC. The Bluetooth
®
word mark and logos are owned by the Bluetooth SIG, Inc. and any use of such marks by
Garmin is under license. iOS
®
is a registered trademark of Cisco Systems, Inc. used under license by Apple Inc. Iridium
®
is a registered trademark of Iridium Satellite LLC. microSD
®
and the microSDHC logo are trademarks of SD-3C, LLC. NMEA
®
is a registered trademark of the National Marine Electronics Association. USB-C
®
is a registered trademark of USB
Implementers Forum. Vectronix
®
is a trademark registered in the U.S. and owned by Safran Vectronix AG Corporation. Wi‑Fi
®
is a registered mark of Wi-Fi Alliance Corporation.
Windows
®
is a registered trademark of Microsoft Corporation in the United States and other countries. Other trademarks and trade names are those of their respective owners.
M/N: A04828, AA4828

Table of Contents
Introduction......................................1
Getting Started with the GPSMAP H1i
Plus.......................................................... 1
Pairing Your Phone and Activating the
Device................................................... 1
Garmin Messenger App.................. 2
Iridium Satellite Network................. 2
Getting Started with the GPSMAP H1.... 2
Pairing Your Phone..............................3
Charging the GPSMAP Device................ 3
Saving Energy While Charging the
Device................................................... 3
Device Overviews.................................... 4
GPSMAP H1i Plus Device
Overview...............................................4
GPSMAP H1 Device Overview............ 5
Buttons................................................. 6
Home Page Overview.......................... 7
Customizing the Home Page and
Glances.............................................7
Customizing the Data Fields........... 8
Notification Center and Controls........8
Status LED......................................... 10
Starting an Activity................................ 10
Acquiring Satellite Signals................ 11
Customizing the Activities List......... 11
Customizing the Current Activity......11
Navigating Using TracBack®........... 11
Stopping the Current Activity............12
Apps...............................................12
Setting an Alarm....................................14
Altimeter................................................ 14
Altimeter Settings..............................15
Calibrating the Altimeter............... 15
Barometer.............................................. 15
Barometer Settings........................... 15
Applied Ballistics®................................ 16
Applied Ballistics Quantum App....... 16
Applied Ballistics Options................. 16
Quickly Editing Shooting
Conditions...................................... 16
Range Card.................................... 17
Customizing the Range Card
Fields.......................................... 17
Target Card.................................... 17
Adding a Target......................... 17
Editing the Target...................... 17
Changing the Target.................. 17
Deleting a Target....................... 17
Environment................................... 17
Editing the Environment............ 17
Enabling Auto Update................ 17
Profile............................................. 18
Adding a Profile......................... 18
Selecting a Different Profile...... 19
Applied Ballistics Glossary of
Terms................................................. 19
Applied Ballistics App Settings........ 22
Calculating the Size of an Area............ 23
Camera and Photos.............................. 23
Taking a Photo.................................. 23
Viewing Photos..................................23
Sorting Photos............................... 24
Viewing the Location of a Photo.. 24
Viewing Photo Information........... 24
Deleting a Photo............................ 24
Viewing a Slideshow..................... 24
Dog Tracking......................................... 25
Receiving Data From Your Dog
Device.................................................25
Tracking Your Dogs........................... 25
Dog Status Icons........................... 25
DogTrack Settings............................. 26
Using the Flashlight.............................. 26
Garmin Share......................................... 26
Sharing Data with Garmin Share...... 27
Receiving Data with Garmin Share... 27
Garmin Share Settings...................... 27
Geocaches............................................. 27
Registering Your Device at
Geocaching.com............................... 28
Downloading Geocaches Using a
Computer........................................... 28
Searching for a Geocache................ 28
Filtering the Geocache List............... 29
Saving a Custom Geocache
Filter................................................29
Editing a Custom Geocache
Filter................................................29
Viewing Geocache Details................ 29
Navigating to a Geocache................ 30
Table of Contents i

Logging the Attempt......................... 30
Removing Live Geocache Data from
the Device.......................................... 30
Removing Your Device Registration
From Geocaching.com..................... 30
Geocaching Settings......................... 31
Using the inReach Remote................... 31
Marking and Starting Navigation to a
Man Overboard Location...................... 31
Setting a Proximity Alarm..................... 32
Changing the Proximity Alarms Units
of Measure.........................................32
Deleting a Proximity Alarm............... 32
Setting the Proximity Alarm Tones.. 32
Disabling All Proximity Alarms......... 32
Satellite Page........................................ 32
Satellite Settings............................... 33
Saved Data.............................................33
Using the Saved App......................... 33
Using the Stopwatch............................. 34
Using Voice Commands....................... 34
Voice Commands.............................. 35
Voice Command Tips........................36
Recording a Voice Note........................ 36
Viewing a Weather Forecast................ 36
Viewing the Weather Map................. 36
Adding a Weather Location.............. 37
Switching the Weather Location...37
Deleting a Weather Location.........37
Requesting an inReach Weather
Forecast Over Satellite...................... 38
Updating an inReach Weather
Forecast Over Satellite.................. 38
Searching for Apps............................... 38
inReach Device Features for GPSMAP
H1i Plus..........................................39
Messages.............................................. 39
Sending a Test Message.................. 39
Sending a Check-In Message........... 39
Sending a New Message.................. 40
Sending a Post Message.................. 40
Replying to a Message...................... 41
Using Keyboard Shortcuts................ 41
Checking for Messages.................... 41
Viewing Message Details..................41
Deleting Messages............................42
Messages Setup................................ 42
Messenger App Settings...................42
inReach Tracking.................................. 42
Starting Tracking............................... 42
Stopping Tracking............................. 42
Sharing Your Tracking Page............. 42
inReach Tracking Setup.................... 43
SOS.........................................................43
Initiating an SOS Rescue...................44
Sending a Custom SOS Message.... 44
Canceling an SOS Request............... 44
Syncing inReach Data........................... 45
Viewing Plan Details and Usage.......... 45
Contacts................................................ 45
Adding a Contact............................... 45
Editing a Contact............................... 45
Deleting a Contact............................. 45
inReach Remote Settings..................... 46
Navigation...................................... 46
Navigating to a Destination.................. 46
Searching for a Destination.............. 47
Routing Settings................................ 47
Stopping Navigation..........................47
Compass................................................47
Navigating with the Compass.......... 47
Navigating with Sight 'N Go.............. 48
Projecting a Waypoint from Your
Current Location................................ 48
Using the Course Pointer.................. 49
Compass Settings............................. 50
Calibrating the Compass.............. 50
Setting the North Reference......... 50
Map........................................................ 51
Managing Maps.................................51
Downloading Maps........................51
Downloading TopoActive Maps... 52
Deleting a Map............................... 52
Navigating with the Map................... 52
Measuring Distance on the Map...... 52
Map Settings......................................53
Changing the Map Orientation......53
Showing and Hiding Map Data......... 53
Optional Maps................................... 53
Purchasing Additional Maps.........54
Waypoints.............................................. 54
ii Table of Contents

Saving Your Current Location as a
Waypoint............................................ 54
Saving a Location on the Map as a
Waypoint............................................ 54
Navigating to a Waypoint..................54
Finding a Saved Waypoint................ 55
Editing a Waypoint............................ 55
Increasing the Accuracy of a Waypoint
Location............................................. 55
Moving a Waypoint on the Map........55
Repositioning a Waypoint to Your
Current Location................................ 56
Deleting a Waypoint.......................... 56
Projecting a Waypoint from a Saved
Waypoint............................................ 56
Finding a Location Near a
Waypoint............................................ 56
Courses.................................................. 56
Creating a Course..............................57
Navigating a Saved Course...............57
Editing a Course................................ 58
Editing the Name of a Course.......... 58
Changing the Color of a Course on the
Map.................................................... 58
Viewing a Saved Course on the
Map.................................................... 58
Viewing the Elevation Plot of a
Course................................................ 59
Deleting a Course.............................. 59
Connected Features....................... 59
Garmin Explore...................................... 60
Connected Feature Requirements....... 60
Phone Notifications.............................. 60
Viewing Phone Notifications............ 60
Disabling Smart Notifications.......... 60
Managing Notifications.................... 61
Connect IQ Features............................. 61
Downloading Connect IQ Features.. 61
Downloading Connect IQ Features
Using Your Computer........................ 61
Settings Menu................................ 62
Sounds & Vibration Settings.................62
Connecting Bluetooth
Headphones...................................... 62
Display and Brightness Settings.......... 63
Connectivity Settings............................ 63
Wireless Sensors............................... 64
Pairing Your Wireless Sensors..... 64
Bluetooth Settings............................. 65
Wi‑Fi Settings..................................... 65
Connecting to a Wireless
Network.......................................... 65
Customizing the Action Button............ 65
Activity Settings.................................... 66
Marking Laps by Distance................ 66
Restoring Activity Settings................66
Data Recording Settings....................... 67
Auto Save Settings............................ 67
System Settings.................................... 68
Satellite Settings............................... 68
Setting Your Device Passcode......... 69
Changing Your Device
Passcode....................................... 69
Turning On Expedition Mode............ 69
Position Format Settings.................. 70
Changing the Units of Measure........ 70
Time Settings.................................... 70
Resetting Data and Settings............. 70
Restoring Default Page Settings.. 70
Marine Settings..................................... 71
Setting Up Marine Alarms................. 71
Searching for Settings.......................... 71
Device Information......................... 71
Product Updates................................... 71
Setting Up Garmin Express............... 71
Getting More Information..................... 71
Device Care............................................72
Cleaning the Device...........................72
Cleaning the USB Port....................... 72
Cleaning the Touchscreen................ 72
Data Management................................ 72
File Types........................................... 72
Installing a Memory Card..................73
Connecting the Device to Your
Computer........................................... 73
Transferring Files to Your Device
Using a Computer..............................73
Deleting Files..................................... 74
Specifications........................................74
Viewing E-label Regulatory and
Compliance Information....................... 74
Table of Contents iii

Appendix........................................ 75
Data Fields............................................. 75
Optional Accessories............................ 77
tempe................................................. 77
Tips for Pairing Wireless Sensors.... 78
Troubleshooting.................................... 78
Maximizing Battery Life.................... 78
Long-Term Storage........................... 78
Restarting the Device........................ 78
About Heart Rate Zones....................... 78
Fitness Goals..................................... 79
Heart Rate Zone Calculations...........79
iv Table of Contents
Introduction
WARNING
See the Important Safety and Product Information guide in the product box for product warnings and other
important information.
Getting Started with the GPSMAP H1i Plus
1 Charge the device (Charging the GPSMAP Device, page3).
2 Turn on the device and select your language, action button function, and current activity (GPSMAP H1i Plus
Device Overview, page4).
3 Pair your device and activate inReach
®
satellite communication features with the Garmin Messenger
™
app on
your phone (Pairing Your Phone and Activating the Device, page1).
4 If necessary, create a passocde to secure your device (Setting Your Device Passcode, page69).
5 Check for updates (Product Updates, page71).
For the best experience, you should keep the software on your device up to date. Software updates provide
changes and improvements to privacy, security, and features.
6 Sync your satellite communicator with the Garmin Messenger app (Syncing inReach Data, page45).
7 Test your satellite communicator before you begin your trip (Sending a Test Message, page39).
8 Go outdoors to an open area and wait while the device locates satellites.
9 Start an activity (Starting an Activity, page10).
Pairing Your Phone and Activating the Device
WARNING
Before you can use the inReach features of your satellite communicator, including messaging, SOS, tracking,
and inReach Weather, you must have an active satellite subscription. You must have a valid, unique phone
number that can receive a text message to complete activation and pairing with the Garmin Messenger app.
VOIP numbers are not supported. Always test your satellite communicator outdoors before using it on a trip.
The GPSMAP H1i Plus satellite communicator works best when it is paired with the Garmin Messenger app. The
app allows you to compose and send messages using your phone, and to sync inReach data with your satellite
communicator.
1 During the initial setup on your satellite communicator, scan the QR code with the camera on your phone to
download and install the Garmin Messenger app.
NOTE: If you previously skipped the pairing process, you can select > inReach Activation. Media and
group messaging will not be available if you activate the device through the Garmin Explore
™
web interface
instead of the Garmin Messenger app.
2 Follow the on-screen instructions to complete the pairing process and activate a subscription service plan.
3 To use additional connected features and complete the setup process, download and install the Garmin
Explore app using your phone.
After the satellite communicator and phone are paired, they connect automatically when they are turned on and
within range.
Introduction 1

Garmin Messenger App
WARNING
The inReach features of the Garmin Messenger app, including SOS, tracking, and inReach Weather, are not
available without a connected inReach satellite communicator and an active satellite subscription. Always test
the app outdoors before using it on a trip.
CAUTION
The non-satellite messaging features of the Garmin Messenger app alone should not be relied on as a primary
method to obtain emergency assistance.
NOTICE
The app works over both the internet (using a wireless connection or cellular data on your phone) and the
Iridium
®
satellite network. If you are using cellular data, your paired phone must be equipped with a data plan
and be in an area of network coverage where data is available. If you are in an area without network coverage,
you must have an active satellite subscription for your inReach satellite communicator to use the Iridium
satellite network.
You can use the app to message other Garmin Messenger app users, including friends and family without
Garmin
®
devices. Anyone can download the app and connect their phone, allowing them to communicate with
other app users over the internet (no login is required). App users can also create group messaging threads
with other SMS phone numbers. New members added to the group message can download the app to see what
others are saying.
Messages sent using a wireless connection or cellular data on your phone do not incur data charges or
additional charges on your satellite subscription. Messages received may incur charges if message delivery
is attempted over both the Iridium satellite network and the internet. Standard text messaging rates for your
cellular data plan apply.
You can download the Garmin Messenger app from the app store on your phone (garmin.com/messengerapp).
Iridium Satellite Network
Your device requires a clear view of the sky to transmit messages and track points over the Iridium satellite
network. Without a clear view of the sky, your device attempts to send the information until it acquires satellite
signals.
TIP: For the best connection with satellites, place the device with the antenna pointed toward the sky.
Getting Started with the GPSMAP H1
1 Charge the device (Charging the GPSMAP Device, page3).
2 Turn on the device and select your language, action button function, and current activity (GPSMAP H1 Device
Overview, page5).
3 Pair your device with the Garmin Explore app on your phone (Pairing Your Phone, page3).
The app allows you to receive notifications, view weather forecasts, search for live geocache data, and more.
4 If necessary, create a passocde to secure your device (Setting Your Device Passcode, page69).
5 Check for updates (Product Updates, page71).
For the best experience, you should keep the software on your device up to date. Software updates provide
changes and improvements to privacy, security, and features.
6 Go outdoors to an open area and wait while the device locates satellites.
7 Start an activity (Starting an Activity, page10).
2 Introduction
Pairing Your Phone
To use the connected features of your GPSMAP H1 navigator, you should pair it with the Garmin Explore app.
1 During the initial setup on your navigator, scan the QR code with the camera on your phone to download and
install the Garmin Explore app.
NOTE: If you previously skipped the pairing process, you can select > Settings > Connectivity > Pair
Phone.
2 Follow the on-screen instructions in the app to complete the pairing and setup process.
After the navigator and phone are paired, they connect automatically when they are turned on and within range.
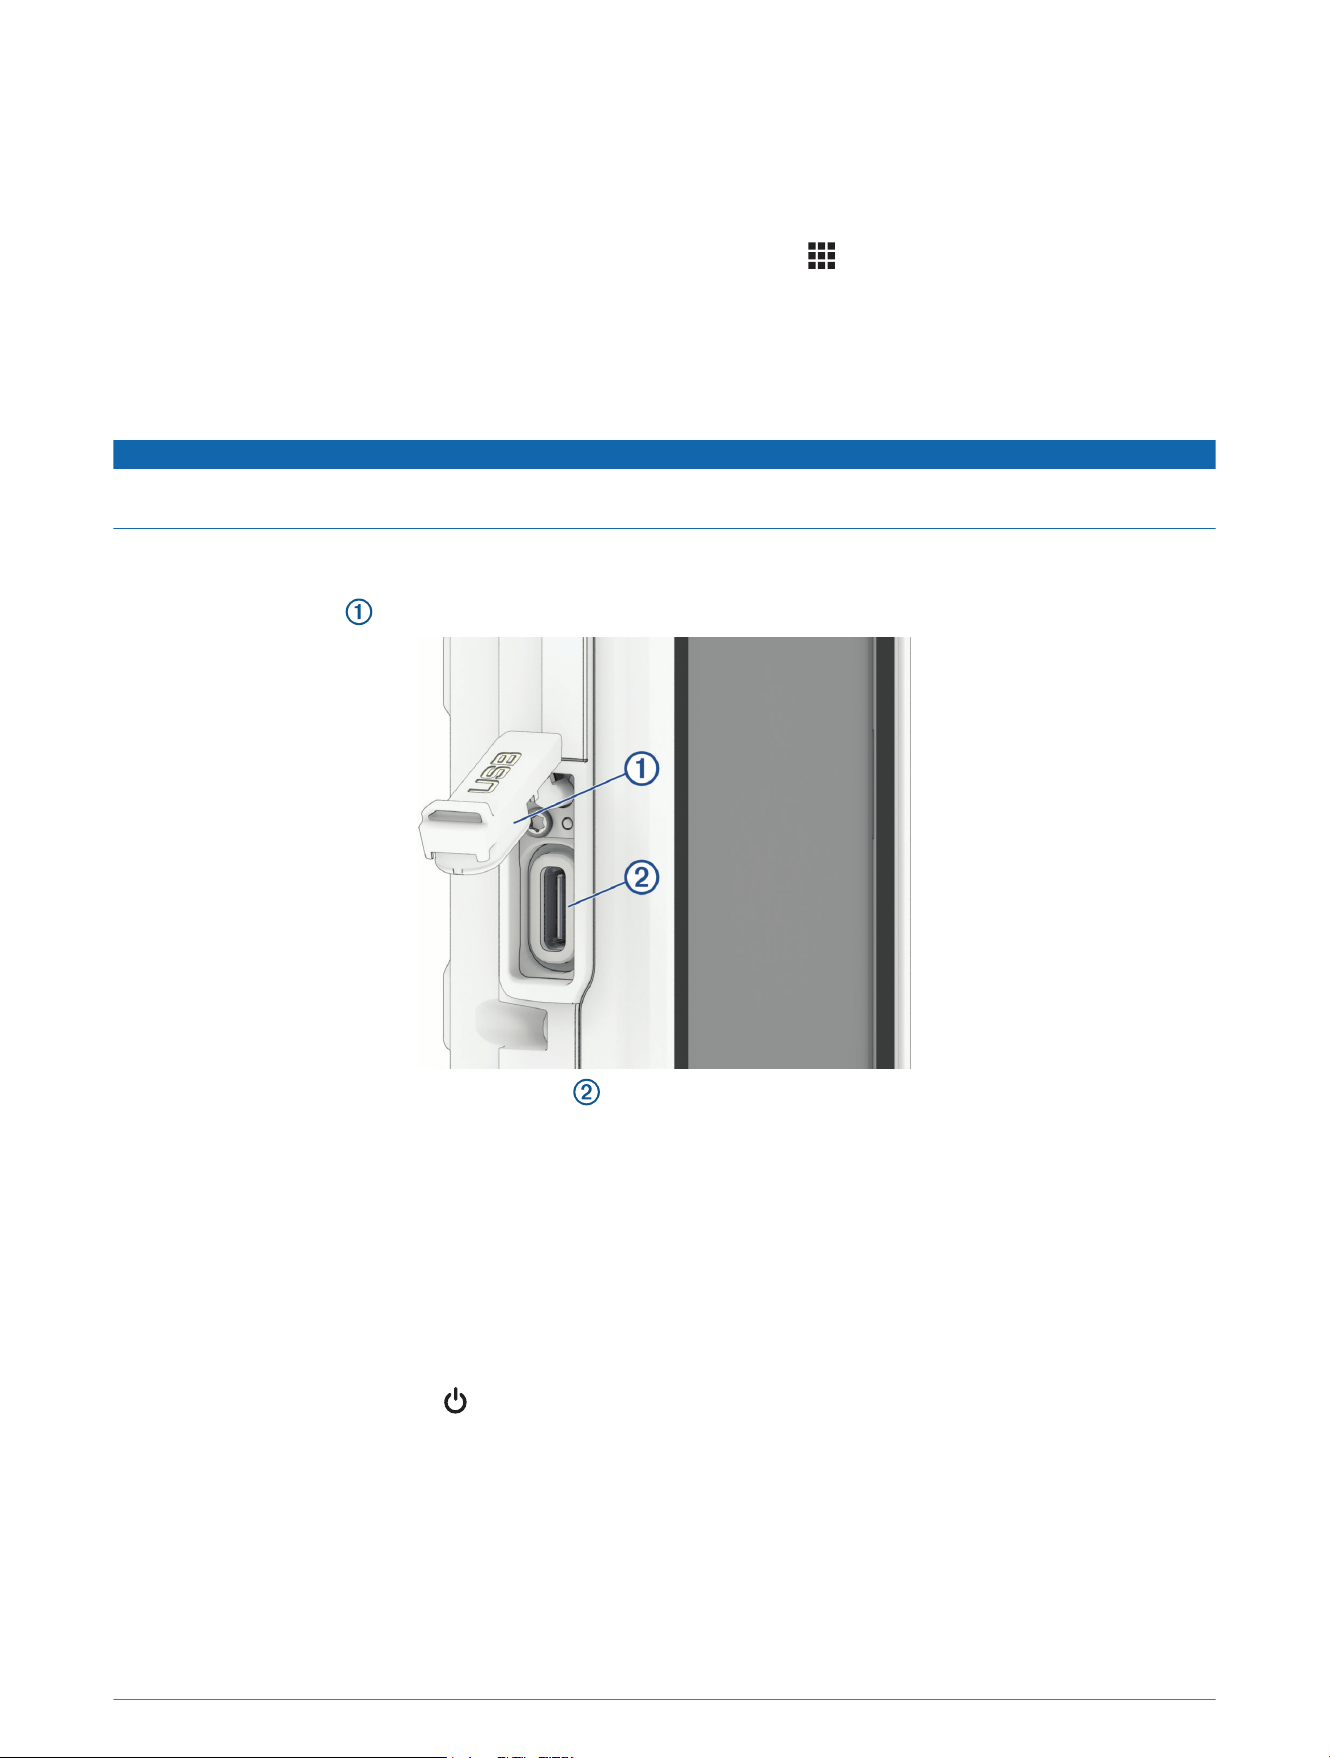
Charging the GPSMAP Device
NOTICE
To prevent corrosion, thoroughly dry the USB port, the weather cap, and the surrounding area before charging or
connecting to a computer.
NOTE: The device does not charge when it is outside the approved temperature range (Specifications,
page74).
1 Lift the weather cap .
2 Plug the power cable into the charging port on the device.
3 Plug the other end of the power cable into a USB-C
®
computer port or AC adapter (5 V minimum output
voltage).
The charging indicator appears in the status bar.
Saving Energy While Charging the Device
1 Connect your device to an external power source.
2 Hold the power button until the screen turns off.
The device goes into a low power, battery charging mode, and the battery gauge appears.
NOTE: If the charging source is not providing sufficient power, you can turn the device off while charging by
holding the power button until appears.
3 Charge the device completely.
Introduction 3
Device Overviews
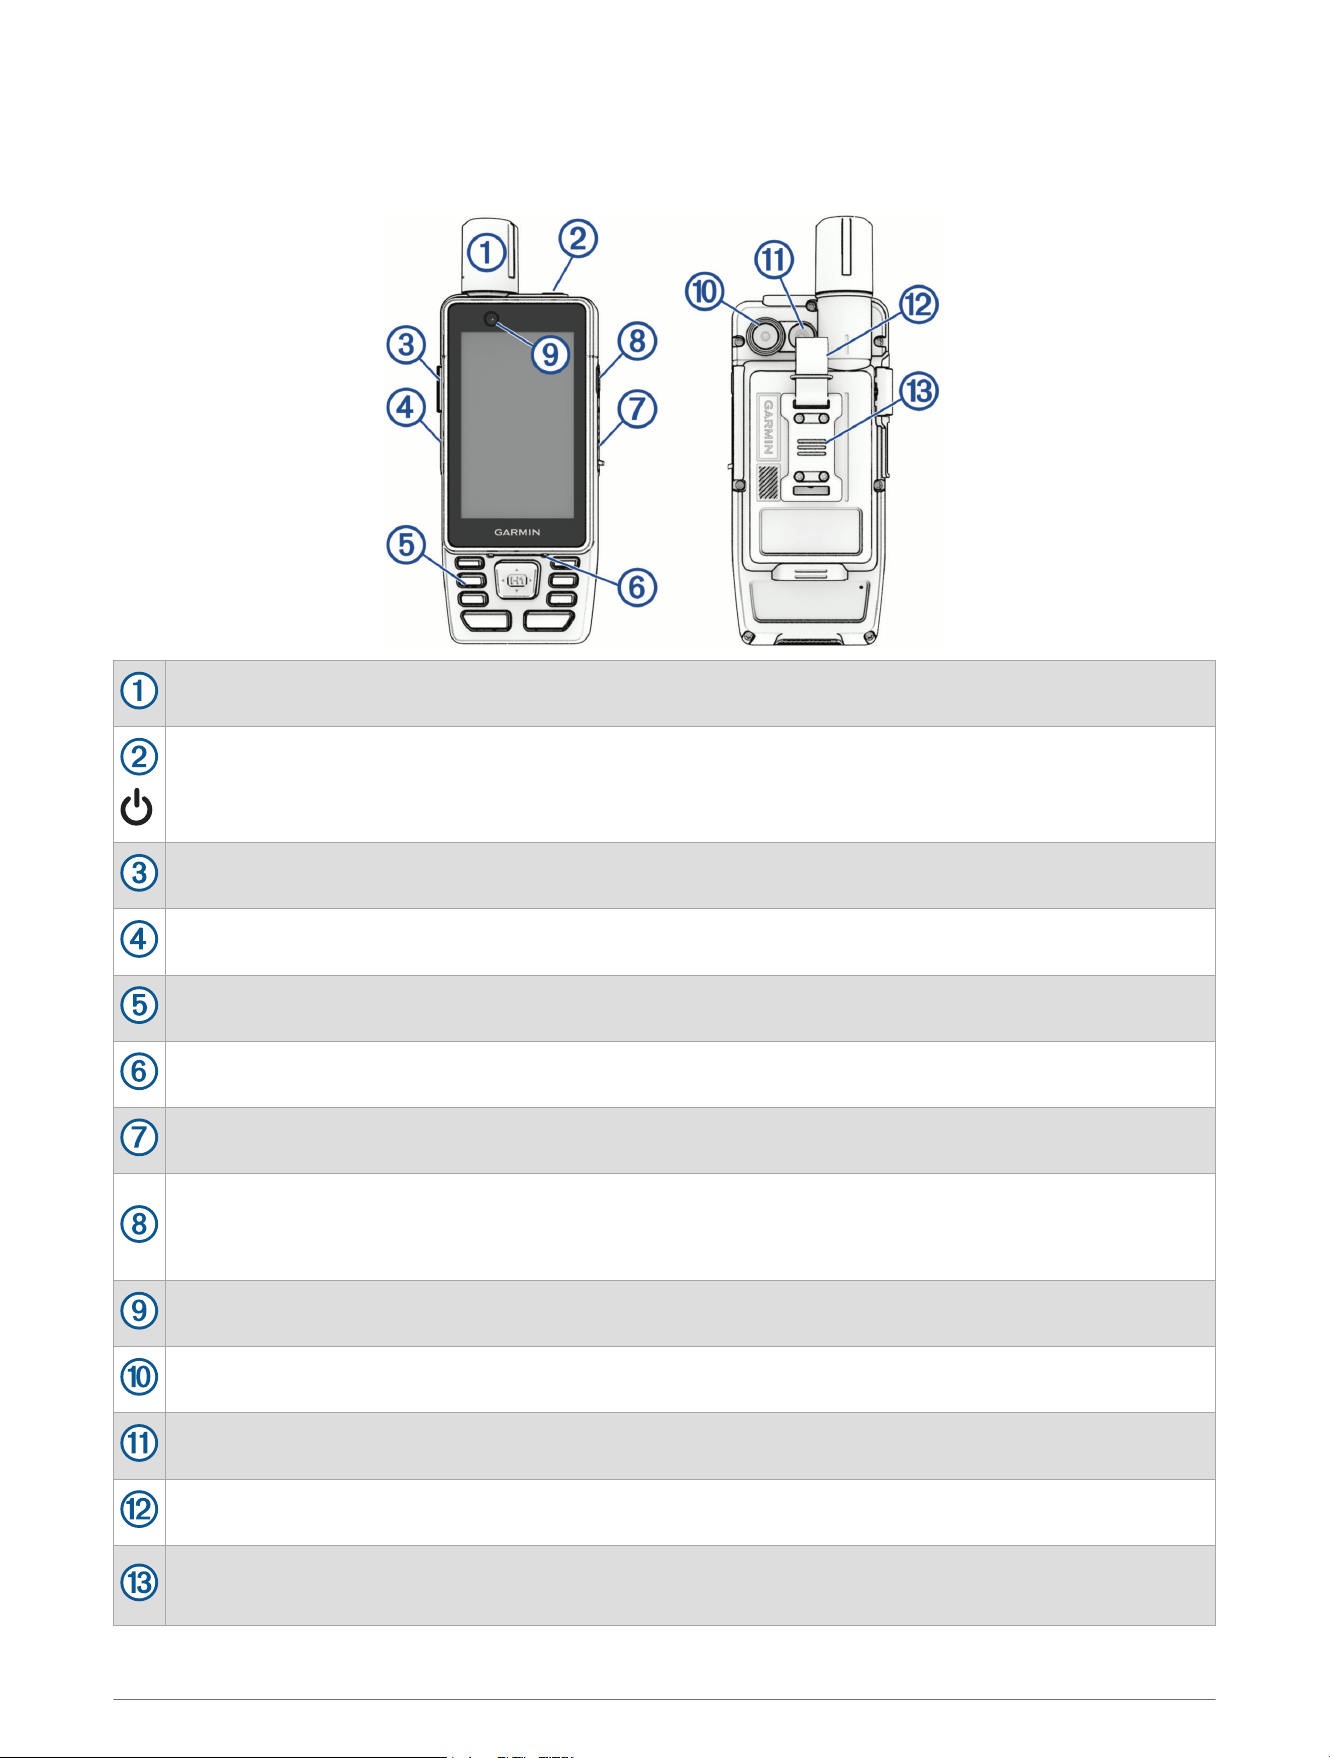
GPSMAP H1i Plus Device Overview
Internal Iridium and GNSS antenna
Press to enter sleep mode or wake the device.
Hold to view the notification center and controls, and turn the device on or off (Notification Center and
Controls, page8).
SOS button under protective cover (Initiating an SOS Rescue, page44).
USB port under weather cap (Charging the GPSMAP Device, page3).
Buttons (Buttons, page6).
Microphone (Recording a Voice Note, page36, Using Voice Commands, page34)
microSD
®
card slot under weather cap (Installing a Memory Card, page73).
Action button
NOTE: You can customize the shortcut function for this button during the initial setup, or from the device
settings menu (Customizing the Action Button, page65).
Front-facing camera (Camera and Photos, page23)
Rear-facing camera (Camera and Photos, page23)
Flashlight (Using the Flashlight, page26)
Carabiner loop
Spine mount
NOTE: Go to buy.garmin.com to purchase spine mount 2 optional accessories.
4 Introduction
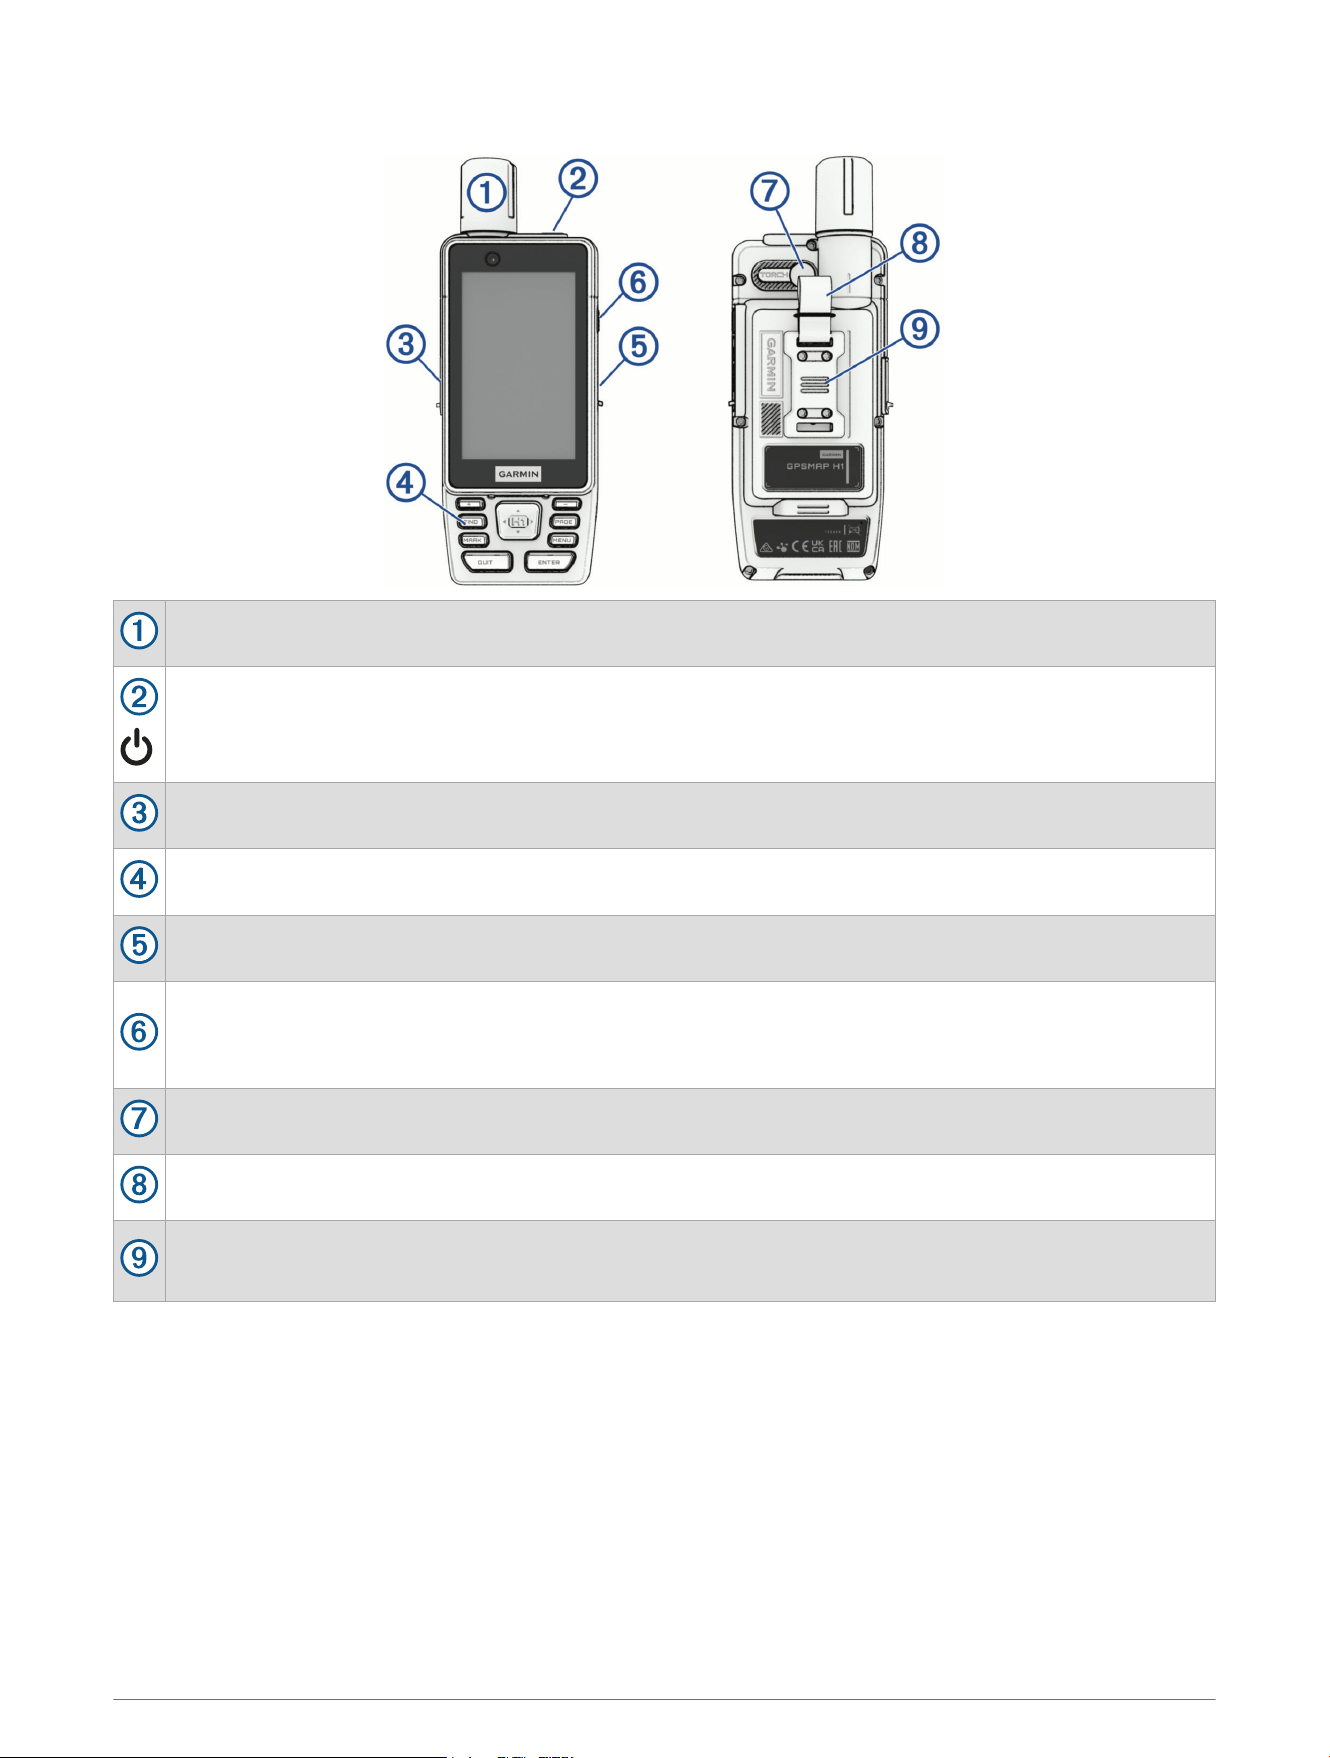
GPSMAP H1 Device Overview
GNSS antenna
Press to enter sleep mode or wake the device.
Hold to view the notification center and controls, and turn the device on or off (Notification Center and
Controls, page8).
USB port under weather cap (Charging the GPSMAP Device, page3).
Buttons (Buttons, page6).
microSD card slot under weather cap (Installing a Memory Card, page73).
Action button
NOTE: You can customize the shortcut function for this button during the initial setup, or from the device
settings menu (Customizing the Action Button, page65).
Flashlight
Carabiner loop
Spine mount
NOTE: Go to buy.garmin.com to purchase spine mount 2 optional accessories.
Introduction 5
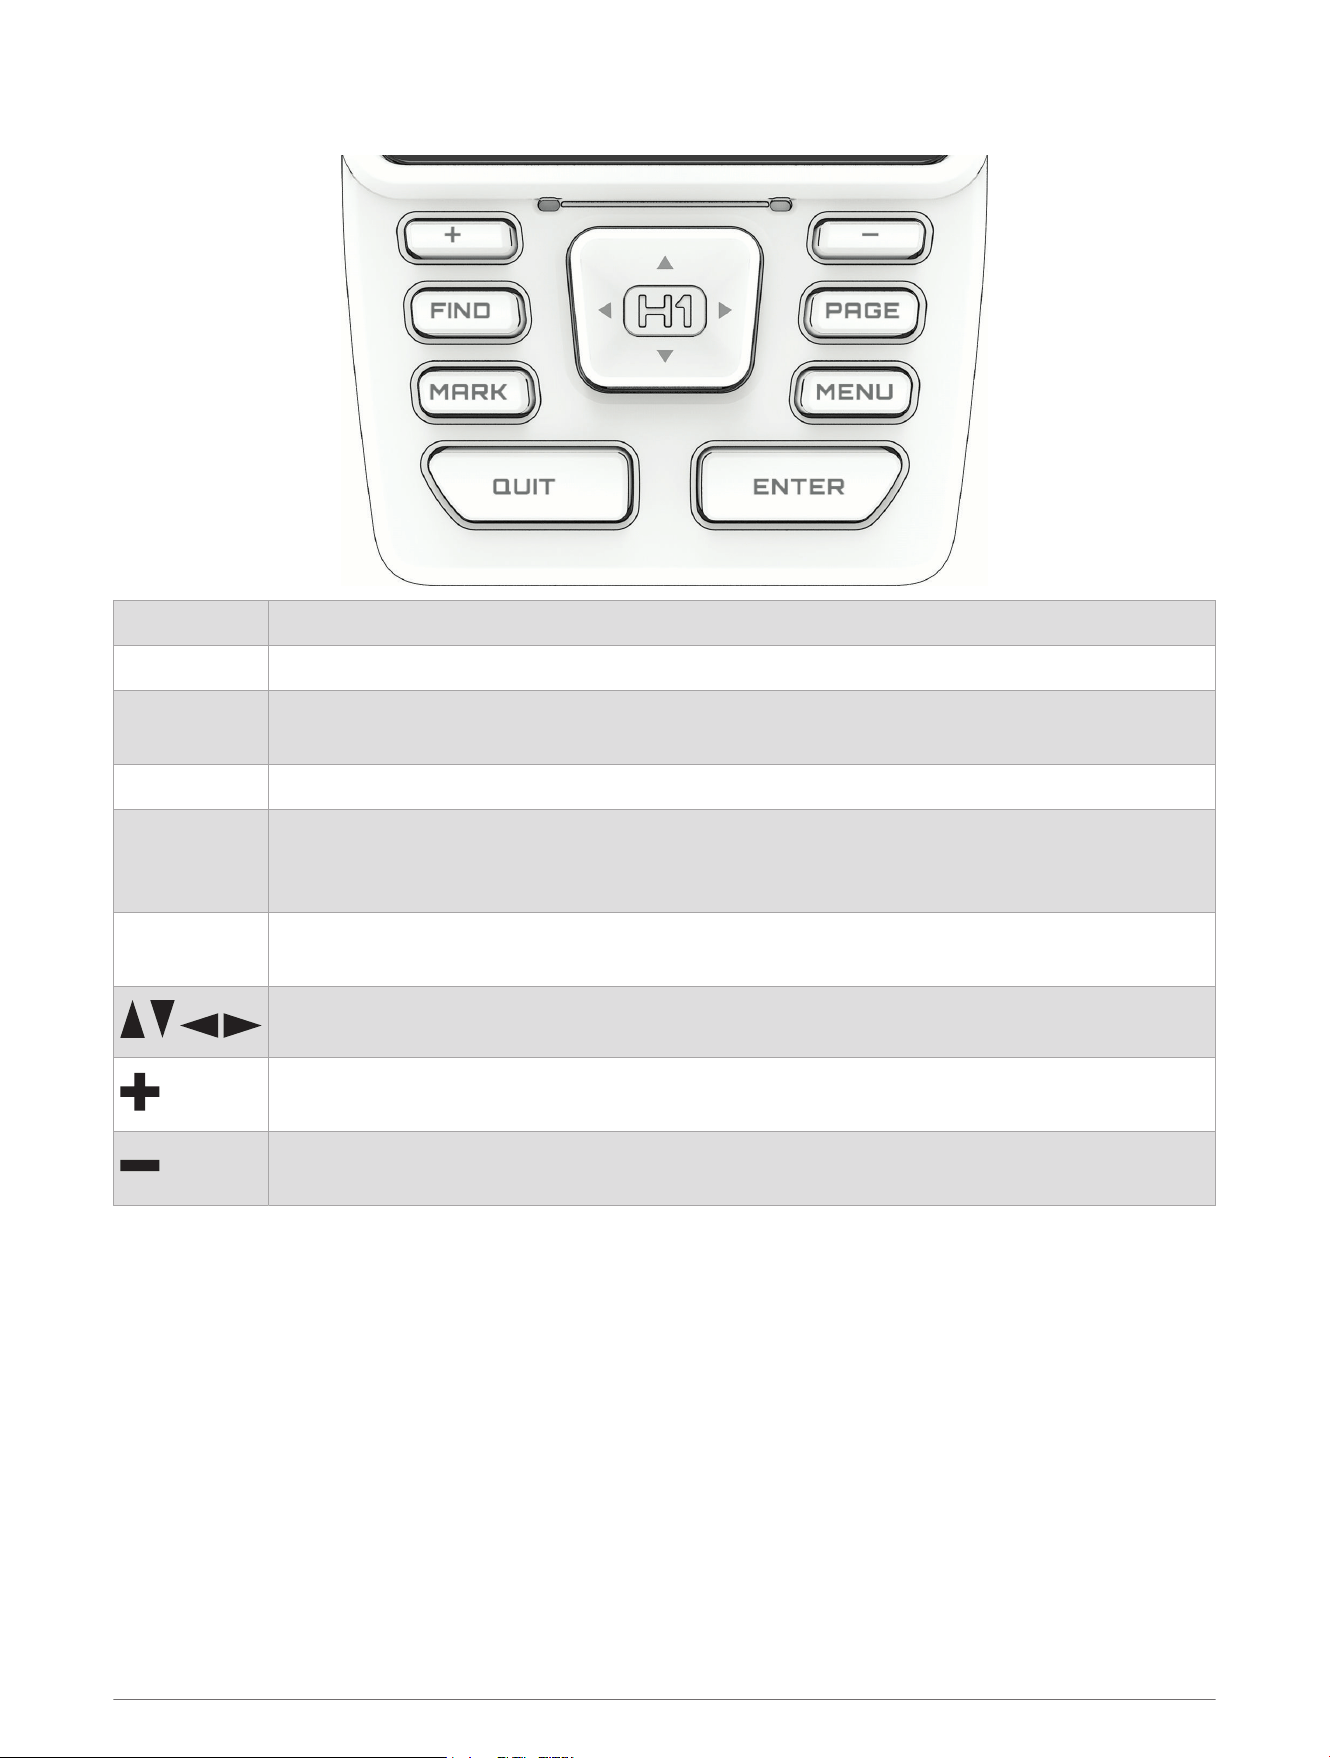
Buttons
FIND Press to open the search menu.
MARK Press to save your current location as a waypoint.
QUIT
Press to cancel.
Hold to return to the home page.
ENTER Press to choose options and acknowledge messages.
MENU
Press to open the options menu for the current page.
Press twice to return to the home page.
Hold to view the notification center and controls.
PAGE
Press to scroll through recently opened apps.
Hold to switch between open apps.
Press to scroll through menu options, move through dynamic areas of the screen, and move
the map cursor.
Press to zoom in on the map.
Press to scroll to the next page.
Press to zoom out on the map.
Press to scroll to the previous page.
6 Introduction

Home Page Overview
Status bar: Swipe down from the top of the page to view the notification center and controls (Notification
Center and Controls, page8).
Home Page: Displays an overview of your current activity, and includes dynamic areas such as a map and
data fields based on your current activity type. Select each dynamic area to view additional information.
Swipe left on the home page to view additional tools, glances, and data fields. You can customize the home
page and glances, as well as add and remove pages (Customizing the Home Page and Glances, page7).
NOTE: Some glances require a Bluetooth
®
connection to a compatible phone (Pairing Your Phone, page3).
Swipe right to return to the previous page.
: Select to open the apps list (Apps, page12).
: Select to start, stop, save, or discard, and view information about the current activity (Starting an Activity,
page10).
: Select to search for a location (Searching for a Destination, page47), apps (Searching for Apps,
page38), or settings (Searching for Settings, page71).
Saved: Select to open the Saved menu and navigate to saved waypoints, courses, or activities (Saved Data,
page33).
Customizing the Home Page and Glances
1 From the home page, press MENU, or tap and hold the screen.
2 Select Edit Home Screen.
3 Select an option:
• To change a glance, tap a glance and select another glance from the list.
TIP: From the home page, you can also use the arrows to select a glance, press MENU, and select Edit
Glance to change an individual glance.
• To change a data field, tap a data field glance, select a data field category, and select the first and second
data fields.
TIP: From the home page, you can press MENU, and select Lock Data Fields to prevent accidental
changes to data fields.
• To change the order of the pages, select or at the bottom of the screen.
• To make your favorite pages appear for all activity types, select Pin.
• To add a new page, select Add Page, and swipe left to view the available default layout options or create a
custom page.
• To duplicate a page, press MENU, and select Duplicate Page.
• To remove a page, press MENU, and select Remove Page.
• To reset all pages to the default, press MENU, and select Reset All Pages.
Introduction 7

Customizing the Data Fields
1 Open the data screen you want to update.
2 Tap a data field to select it.
3 Select a data field category.
4 Select the first and second data fields (if applicable).
Notification Center and Controls
The notification center displays the current activity recording and notifications from your paired phone. Controls
provide quick access to frequently used functions.
Hold or swipe down from the top of the home page to open the notification center and controls.
8 Introduction

Icon Name Description
Auto Brightness Select to automatically adjust the screen brightness based on the ambient light.
Bluetooth Select to disable Bluetooth technology and your connection to your paired phone.
Brightness Select the slider bar to adjust the screen brightness.
Camera
Select to open the camera app and take a photo with your GPSMAP H1i Plus satellite
communicator (Taking a Photo, page23).
Flashlight Select to turn on the LED flashlight.
Garmin Share Select to open the Garmin Share app (Garmin Share, page26).
Lock Device
Select to lock the buttons and the touchscreen to prevent inadvertent presses and
swipes.
You can press the power button to unlock the buttons and touchscreen.
Mark Waypoint Select to save your current location as a waypoint (Waypoints, page54).
Power Select to turn off the device.
Settings Select to open the settings menu (Settings Menu, page62).
Siren Select to open the siren app and sound an alarm.
Touch Select to disable touchscreen controls.
Tracking
Select to open the inReach Tracking page on your GPSMAP H1i Plus satellite
communicator (Starting Tracking, page42).
Voice Command
Select to open the voice command app and say a command on your GPSMAP H1i
Plus satellite communicator (Using Voice Commands, page34).
Voice Notes
Select to open the voice notes app and record a note on your GPSMAP H1i Plus
satellite communicator (Recording a Voice Note, page36).
Volume Select to mute all device sounds or adjust the speaker volume.
Wi-Fi Select to disable Wi‑Fi
®
communications.
Introduction 9

Status LED
The status LED indicates the device status.
LED Activity Status
Double flashing green
You have an unread inReach message on your GPSMAP H1i Plus satellite commu
nicator.
Flashing green
The device is in expedition mode.
The screen is turned off to maximize battery life.
Flashing red
An inReach message failed to send from your GPSMAP H1i Plus satellite communi
cator.
The device is below 10-percent battery power.
Alternating red and green
flashes
The GPSMAP H1i Plus satellite communicator is in SOS mode.
Starting an Activity
You can use the Start Activity feature to select your activity options and hit the trail quickly. Your device
remembers your selections and saves them for the next time you start an activity.
1 From the home screen, select Start Activity.
2 Select your activity options:
• Select the activity name to change the activity type. Activity types include walking, hiking, hunting, and
more.
• Select Navigation to begin navigating to a destination (Navigating to a Destination, page46).
• Select Tracking to start inReach tracking on your GPSMAP H1i Plus satellite communicator (Starting
Tracking, page42).
• Select Check-In to send a check-in message from your GPSMAP H1i Plus satellite communicator
(Sending a Check-In Message, page39).
3 Go outdoors to an open area and wait while the device locates satellites.
4 Select Start.
The device begins recording your path as part of the activity.
10 Introduction

Acquiring Satellite Signals
The device may need a clear view of the sky to acquire satellite signals. The time and date are set automatically
based on the GPS position.
TIP: For more information about GPS, go to garmin.com/aboutGPS.
1 Go outdoors to an open area.
2 If necessary, turn on the device.
3 Wait while the device searches for satellites.
It may take 30-60 seconds to locate satellite signals. in the status bar shows the satellite signal
strength.
Customizing the Activities List
1 Select to open the apps list.
2 Select Settings > Activities > Edit Activities.
3 Select an option:
• To add an activity, select Add Activity, and select one or more activities.
• To delete an activity, select .
• To change the location of an activity in the list, select an activity, press ENTER, press or to move the
activity, and press ENTER to select the new location.
Customizing the Current Activity
1 Select an option:
• Hold or swipe down from the top of the home page to open the notification center and controls. Select
Activity Recording.
• From the home page, select the activity recording at the bottom of the screen.
2 Press MENU to open the options menu.
3 Select an option:
• To change the activity type, select Change Activity, and select an activity.
• To change the recording settings, select Data Recording (Data Recording Settings, page67).
• To change the activity settings, select the activity settings (Activity Settings, page66).
Navigating Using TracBack
®
While recording an activity, you can navigate back to the beginning of your activity. This can be helpful when
finding your way back to camp or the trail head.
1 Hold or swipe down from the top of the home page to open the notification center and controls.
2 Select Activity Recording.
3 Select Stop > TracBack > Navigate.
4 Select your navigation options:
• To change the activity type, select the activity name. Activity types include walking, hiking, hunting, and
more.
• To adjust the course to follow map data and recalculate as needed, enable the Routing toggle switch.
• To set how the device routes from one point to the next, select Advanced Settings (Routing Settings,
page47).
5 Select Go > Resume.
The map displays your route with a magenta line, start point, and end point.
6 Navigate using the map (Navigating with the Map, page52) or compass (Navigating with the Compass,
page47).
Introduction 11

Stopping the Current Activity
1 Select an option:
• Hold or swipe down from the top of the home page to open the notification center and controls. Select
Activity Recording.
• From the home page, select the activity recording at the bottom of the screen.
2 Select an option:
• To pause the current activity recording, select Stop.
• To resume the current activity recording, select Resume.
• To save the current activity recording, select Stop > Save.
• To delete the current activity recording, select Stop > Discard.
Apps
Select to open the apps list. You can change the order of the apps by tapping and holding an app, and
dragging it to a new location, or by pressing MENU and selecting Change Item Order.
TIP: You can search for an app by name (Searching for Apps, page38).
12 Apps

Name More Information
Alarm Clock
Sets an audible alarm. If you are not currently using the device, you can set the device to
turn on at a specific time (Setting an Alarm, page14).
Altimeter Select to view the altimeter (Altimeter, page14).
Applied Ballistics Select to view aiming solutions for long-range rifle shooting (Applied Ballistics
®
, page16).
Area Calculation Select to calculate the size of an area (Calculating the Size of an Area, page23).
Barometer Select to view barometer information (Barometer, page15).
Calendar Select to view a calendar.
Camera
Select to take photos with the camera on your GPSMAP H1i Plus navigator (Taking a
Photo, page23).
Check-In
Select to send a check-in message with your GPSMAP H1i Plus satellite communicator
(Sending a Check-In Message, page39).
Compass Select to view the compass (Compass, page47).
Connect IQ Select to view a list of installed Connect IQ
™
apps (Connect IQ Features, page61).
Contacts
Select to manage contacts for inReach messages on your GPSMAP H1i Plus satellite
communicator (Contacts, page45).
Course Creator Select to create new courses (Creating a Course, page57).
DogTrack
Select to view information transmitted from a paired dog tracking device (Dog Tracking,
page25).
Flashlight Select to turn on the flashlight (Using the Flashlight, page26).
Garmin Share Select to send or receive data with other Garmin devices (Garmin Share, page26).
Geocaching Select to view a list of downloaded geocaches (Geocaches, page27).
Hunt & Fish
Select to view the predicted best dates and times for hunting and fishing at your current
location.
inReach Activation
Select to pair your phone and activate a service plan on your GPSMAP H1i Plus satellite
communicator with the Garmin Messenger app (Pairing Your Phone and Activating the
Device, page1).
inReach Remote
Select to send messages from your inReach satellite communicator paired with the
GPSMAP H1 navigator (Using the inReach Remote, page31).
Man Overboard
Select to save a man overboard (MOB) location and navigate back to it (Marking and
Starting Navigation to a Man Overboard Location, page31).
Map Select to view the map (Map, page51).
Map Manager
Select to view and manage downloaded maps. With an Outdoor Maps+ subscription,
allows you to download additional maps (Managing Maps, page51).
Mark Waypoint
Saves your current location as a waypoint (Saving Your Current Location as a Waypoint,
page54).
Messenger
Select to send messages over the Iridium satellite network with your GPSMAP H1i Plus
satellite communicator, and check for new messages (Messages, page39).
Photos Select to view saved photos (Viewing Photos, page23).
Apps 13
Name More Information
Proximity Alarms
Select to set alerts to sound within range of particular locations (Setting a Proximity Alarm,
page32).
Satellite Select to view your current GNSS satellite information (Satellite Page, page32).
Saved
Select to view your saved waypoints, courses, activities, and collections (Saved Data,
page33).
Service Plan
Select to view details about your inReach service plan on your GPSMAP H1i Plus satellite
communicator (Viewing Plan Details and Usage, page45).
Settings Select to open the settings menu (Settings Menu, page62).
Siren Select to sound an alarm.
SOS
Select to display a tip about how to initiate an SOS rescue with your GPSMAP H1i Plus
satellite communicator (SOS, page43).
If an SOS rescue is currently in progress, select to open the SOS message thread.
Stopwatch Select to use a timer, mark a lap, and time laps (Using the Stopwatch, page34).
Sun & Moon
Select to view sunrise, sunset, moonrise, and moonset times, along with the moon phase,
based on your GPS position.
Tracking
Select to record track points and transmit them over the Iridium satellite network with your
GPSMAP H1i Plus satellite communicator (Starting Tracking, page42).
Up Ahead
Select to view information about upcoming locations on your course. You can use the Up
Ahead app while navigating direct path courses to change the active point.
Voice Command
Select to speak a command for your GPSMAP H1i Plus navigator to perform (Using Voice
Commands, page34).
Voice Notes
Select to record a voice note with your GPSMAP H1i Plus navigator (Recording a Voice
Note, page36).
Weather
Select to view the current weather forecast and conditions (Viewing a Weather Forecast,
page36).
Setting an Alarm
1 Select to open the apps list.
2 Select Alarm Clock.
3 Select and to set the time.
4 Select Turn Alarm On > OK.
The alarm sounds at the selected time. If the device is off at the alarm time, the device turns on and sounds
the alarm.
Altimeter
By default, the altimeter displays the elevation over the distance traveled. You can customize altimeter settings
(Altimeter Settings, page15). You can select any point on the plot to view details about that point.
14 Apps

Altimeter Settings
Select to open the apps list. Select Altimeter. Press MENU to open the options menu.
Reset: Resets the altimeter data, including waypoint and trip data (Resetting Data and Settings, page70).
Altimeter Setup > Altimeter: Disables the altimeter, so the device only uses GPS data for elevation
measurements.
Altimeter Setup > Auto Calibration: Automatically calibrates the altimeter when you start an activity.
Altimeter Setup > Plot Type: Records elevation changes over a period of time or distance.
Altimeter Setup > Calibrate Altimeter: Manually calibrates the altimeter (Calibrating the Altimeter, page15).
Adjust Zoom Ranges: Adjusts the zoom ranges shown on the altimeter page.
Restore Defaults: Restores the altimeter to factory default settings.
Calibrating the Altimeter
1 Go to a location where the elevation, sea level pressure, or GPS altitude is known.
2 Select to open the apps list.
3 Select Altimeter.
4 Press MENU to open the options menu.
5 Select Altimeter Setup > Calibrate Altimeter.
6 Select Method to select the measurement to use in calibration.
7 Enter the measurement.
8 Select Calibrate.
Barometer
The barometer displays the environmental pressure data based on elevation. You can customize the barometer
settings (Barometer Settings, page15). You can select any point on the plot to view details about that point.
Barometer Settings
Select to open the apps list. Select Barometer. Press MENU to open the options menu.
Reset: Resets the barometer data, including waypoint and trip data (Resetting Data and Settings, page70).
Barometer Setup > Barometer Mode: Sets the barometer mode. The Variable Elevation option allows the
barometer to measure changes in elevation while you are moving. The Fixed Elevation option assumes the
device is stationary at a fixed elevation. The barometric pressure should change only due to weather.
Barometer Setup > Plot Type: Shows barometric pressure over a period of time, or ambient pressure changes
over a period of time.
Adjust Zoom Ranges: Adjusts the zoom ranges shown on the barometer page.
Restore Defaults: Restores the barometer settings to the factory default settings.
Apps 15

Applied Ballistics
®
WARNING
The Applied Ballistics feature is intended to provide accurate elevation and windage solutions based on gun and
bullet profiles and measurements of current conditions only. Depending on your environment, conditions may
change rapidly. Changes in environmental conditions, like wind gusts or downrange winds, may have an effect
on the accuracy of your shot. Elevation and windage solutions are suggestions only based upon your input into
the feature. Take readings often and carefully, and allow the readings to stabilize after significant changes in
environmental conditions. Always allow a margin of safety for changing conditions and reading errors.
Always understand your target and what lies beyond your target before taking a shot. Failure to account for your
shooting environment could cause property damage, injury, or death.
The Applied Ballistics feature offers customized aiming solutions for long-range shooting based on your
rifle characteristics, bullet characteristics, and various environmental conditions. You can enter parameters
including wind, temperature, humidity, range, and firing direction.
This feature provides the information you need to fire long-range projectiles, including elevation
holdover, windage, and time of flight. It also includes custom drag models for your bullet type. Go to
appliedballisticsllc.com for more details about this feature. See the Applied Ballistics Glossary of Terms,
page19 for descriptions of the terms and data fields.
NOTE: You may need to upgrade the ballistic solver in the Applied Ballistics Quantum
™
app to unlock all Applied
Ballistics features (Applied Ballistics Quantum App, page16).
Applied Ballistics Quantum App
The Applied Ballistics Quantum app allows you to manage ballistic profiles on your GPSMAP device, or upgrade
your ballistic solver, if necessary. You can download the Applied Ballistics Quantum app from the app store on
your phone.
Applied Ballistics Options
Select to open the apps list. Select Applied Ballistics. Press MENU to open the options menu.
Range Card: Displays data for various ranges based on user input parameters. You can change fields, edit the
range increment, and set the base range (Customizing the Range Card Fields, page17).
Target Card: Sets the long-range shooting conditions for your current target, including range, elevation, and
windage (Editing the Target, page17). You can change the selected target and customize conditions for up
to 26 targets (Changing the Target, page17).
Environment: Sets the atmospheric conditions for your current environment. You can enter custom values, use
the pressure and latitude values from the internal sensor in the device, or values from a connected wireless
sensor (Environment, page17).
Profile: Sets the bullet, gun, and scope properties for your current profile (Editing a Profile, page18). You can
change the selected profile (Selecting a Different Profile, page19) and add additional profiles (Adding a
Profile, page18).
Settings: Sets the units of measure, decimal place precision, target labels, and fire control options for windage
and elevation.
Quickly Editing Shooting Conditions
You can edit the range, direction of fire, and wind information.
1 From the Applied Ballistics app, use the arrow buttons to highlight each field, and press or to edit
each value.
2 Set the Range value to the target distance.
3 Set the Direction of Fire value to your actual direction of fire (either manually or by using the compass).
4 Set the Wind 1 value to the low wind speed.
5 Set the Wind 2 value to the high wind speed.
6 Set the Wind Direction value to the direction the wind is coming from.
16 Apps

Range Card
Customizing the Range Card Fields
1 From the Applied Ballistics app, press MENU.
2 Select Range Card.
3 Press or to select a field, and press ENTER.
4 Select an option:
• To edit the range increment, select RNG > Range Increment, and enter a value.
• To set the base range, RNG > Base Range, and enter a value.
• To customize other fields, select a field from the list.
Target Card
Adding a Target
You can add up to 26 targets.
1 From the Applied Ballistics app, press MENU.
2 Select Target Card > Add Target.
The new target appears at the bottom of the list.
Editing the Target
1 From the Applied Ballistics app, press MENU.
2 Select Target Card.
3 Select a target.
4 Select an option to edit.
Changing the Target
1 From the Applied Ballistics app, press MENU.
2 Select Target Card.
3 Select a target.
4 Select Set as current.
Deleting a Target
1 From the Applied Ballistics app, press MENU.
2 Select Target Card.
3 Select an option:
• To delete a single target, select a target, and select Delete.
• To delete all targets, press MENU, and select Delete All.
Environment
Editing the Environment
1 From the Applied Ballistics app, press MENU.
2 Select Environment.
3 Select an option to edit.
Enabling Auto Update
You can use the auto update feature to update the latitude and pressure values automatically. When connected
to a wireless sensor, such as a temperature sensor or weather meter, the other environment fields also update
(Pairing Your Wireless Sensors, page64). The values update every minute.
1 From the Applied Ballistics app, press MENU.
2 Select Environment > Auto Update > On.
Apps 17

Profile
Adding a Profile
You can add a .pro file that contains profile information by creating it using the Applied Ballistics Quantum app
and transferring the file to the AB folder on the device (Transferring Files to Your Device Using a Computer,
page73). You can also create a profile using your Garmin device.
1 From the Applied Ballistics app, press MENU.
2 Select Profile.
3 Select an option:
• To create a brand new profile, select + Profile
• To create a new profile based on an existing profile, select the profile, select Copy, and enter a name.
Editing a Profile
1 From the Applied Ballistics app, press MENU.
2 Select Profile.
3 Select a profile.
4 If necessary, select Rename, and enter a name.
5 Select Properties.
6 Select an option:
NOTE: Some options only appear when you enable the Advanced Settings option.
• To enter the bullet properties, select Bullet Data, and select an option.
TIP: You can select Bullet Library to automatically enter bullet properties from the Applied Ballistics
bullet database. If you manually enter the bullet properties, you can find the information on the bullet
manufacturer's website.
• To enter the gun properties, select Gun Data, and select an option.
• To enter the scope properties, select Scope, and select an option.
• To calibrate the muzzle velocity to provide a more accurate solution in the supersonic range for your
firearm, select Calibrate Muzzle Velocity, select an option, and select Use.
• To calibrate the custom drag factor, select Calibrate Custom Drag Factor, select an option, and select
Use.
• To edit the muzzle velocity temperature table, select MV Temp Table, press MENU, select Edit, and select
a value to edit.
NOTE: If necessary, you can select Clear MV-Temp to reset the muzzle velocity temperature table back to
the default values.
• To calibrate the drop scale factor to provide a more accurate solution at or beyond the transonic range for
your firearm, select Drop Scale Factor > Calibrate DSF, select an option, and select Use.
NOTE: Garmin recommends you calibrate the muzzle velocity prior to the drop scale factor. After you
calibrate the drop scale factor, you can select View DSF Table to view the drop scale factor table. If
necessary, you can select Clear DSF Table to reset the drop scale factor table to the default values.
Deleting a Profile
NOTE: You cannot delete your current profile.
1 From the Applied Ballistics app, press MENU.
2 Select Profile.
3 Select a profile.
4 Select Delete.
18 Apps

Selecting a Different Profile
1 From the Applied Ballistics app, press MENU.
2 Select Profile.
3 Select a profile.
4 Select Set as current.
Applied Ballistics Glossary of Terms
Quick Edit Fields
Direction of Fire: The direction of fire, with north at 0 degrees and east at 90 degrees. Input field.
Elevation: The vertical portion of the aiming solution, displayed in inches, milliradians (mrad/mil), or minute of
angle (MOA).
Range: The distance to the target, displayed in yards or meters. Input field.
Wind 1: The wind speed used in the shooting solution, displayed in miles per hour (mph), kilometers per hour
(km/h), or meters per second (m/s). Input field.
Wind 2: An optional, additional wind speed used in the shooting solution, displayed in miles per hour (mph),
kilometers per hour (km/h), or meters per second (m/s). Input field.
TIP: You can use two wind speeds to calculate a windage solution that contains a high and low value. The
actual windage to apply for the shot should fall in this range. Using both wind speed 1 and wind speed 2 is
not an effective way to account for different wind speeds at different distances between you and the target.
Windage 1: The horizontal portion of the aiming solution based on the wind speed 1 and wind direction,
displayed in inches, milliradians (mrad/mil), or minute of angle (MOA).
Windage 2: The horizontal portion of the aiming solution based on the wind speed 2 and wind direction,
displayed in inches, milliradians (mrad/mil), or minute of angle (MOA).
Wind Direction: The direction from which the wind is coming. For example, a 9:00 wind blows from your left to
your right. Input field.
Range Card Fields
Bullet Drop: The total drop the bullet experiences along its flight path, displayed in inches or centimeters.
Elevation: The vertical portion of the aiming solution, displayed in inches, milliradians (mrad/mil), or minute of
angle (MOA).
H. Cor. Effect: The horizontal Coriolis effect. The horizontal Coriolis effect is the amount of the windage
solution attributed to the Coriolis effect. This is always calculated by the device, although the impact may be
minimal if you are not shooting at extended range.
Lead: The horizontal correction needed to hit a target moving left or right at a given speed.
TIP: When you enter the speed of your target, the device factors the necessary windage required into the total
windage value.
Remaining Energy: The remaining energy of the bullet at target impact, displayed in foot-pounds of force (ft. lbf)
or joules (J).
Spin Drift: The amount of the windage solution attributed to the spin drift (gyroscopic drift). For example, in the
northern hemisphere, a bullet shot out of a right-hand twist barrel will always deflect slightly to the right as it
travels.
Time of Flight: The time of flight, which indicates the time required for a bullet to reach its target at a given
range.
V. Cor. Effect: The vertical Coriolis effect. The vertical Coriolis effect is the amount of the elevation solution
attributed to the Coriolis effect. This is always calculated by the device, although the impact may be minimal
if you are not shooting at extended range.
Velocity: The estimated velocity of the bullet when it impacts the target.
Velocity Mach: The estimated velocity of the bullet when it impacts the target, displayed as a factor of mach
speed.
Windage 1: The horizontal portion of the aiming solution based on the wind speed 1 and wind direction,
displayed in inches, milliradians (mrad/mil), or minute of angle (MOA).
Apps 19

Windage 2: The horizontal portion of the aiming solution based on the wind speed 2 and wind direction,
displayed in inches, milliradians (mrad/mil), or minute of angle (MOA).
Target Card Fields
Direction of Fire: The direction of fire, with north at 0 degrees and east at 90 degrees. Input field.
TIP: You can use the compass to set this value by pointing the top of the device toward the direction of fire.
The current compass value appears in the Direction of Fire field. You can press MENU to use this value.
Inclination: The angle of inclination of the shot. A negative value indicates a downhill shot. A positive values
indicates an uphill shot. The shooting solution multiplies the vertical portion of the solution by the cosine of
the inclination angle to calculate the adjusted solution for an uphill or downhill shot. Input field.
Range: The distance to the target, displayed in yards or meters. Input field.
Speed: The speed of a moving target, displayed in miles per hour (mph), kilometers per hour (km/h), or meters
per second (m/s). A negative value indicates a target moving left. A positive value indicates a target moving
right. Input field.
Environment Fields
Direction: The direction from which the wind is coming. For example, a 9:00 wind blows from your left to your
right. Input field.
Humidity: The percentage of moisture in the air. Input field.
Latitude: The horizontal location on the Earth's surface. Negative values are below the equator. Positive values
are above the equator. This value is used to calculate the vertical and horizontal Coriolis drift. Input field.
TIP: You can select the Use Current Position option to use the GPS coordinates from your device.
NOTE: The Latitude is used only for calculating the Coriolis effect. If you are shooting at a target less than
1,000 yards away, this input field is optional.
Pressure: The ambient (station) pressure. Ambient pressure is not adjusted to represent sea level (barometric)
pressure. Ambient pressure is required for the ballistics shooting solution. Input field.
TIP: You can manually enter this value, or you can select the Use Current Pressure option to use the pressure
value from the internal sensor in the device.
Temperature: The temperature at your current location, displayed in Fahrenheit (F) or Celsius (C). Input field.
TIP: You can manually enter the temperature reading from a connected tempe
™
sensor or other temperature
source. This field does not automatically update when connected to a tempe sensor.
Wind Direction Mode: Sets the wind direction setting (Direction) relative to your direction of fire (Relative to
DOF) or relative to true north (True Wind Dir).
NOTE: When you are engaging multiple targets at different DOFs, the True Wind Dir option is useful because
you only have to adjust your DOF, and your wind direction remains the same.
Wind Speed 1: The wind speed used in the shooting solution, displayed in miles per hour (mph), kilometers per
hour (km/h), or meters per second (m/s). Input field.
Wind Speed 2: An optional, additional wind speed used in the shooting solution, displayed in miles per hour
(mph), kilometers per hour (km/h), or meters per second (m/s). Input field.
TIP: You can use two wind speeds to calculate a windage solution that contains a high and low value. The
actual windage to apply for the shot should fall in this range.
Profile Fields - Bullet Data
Ballistic Coefficient: The manufacturer's ballistic coefficient for your bullet. Input field.
Diameter: The bullet diameter, displayed in inches or centimeters. Input field.
NOTE: The diameter of the bullet may vary from the common name of the round. For example, a 300 Win
Mag is actually .308 inches in diameter.
Length: The length of the bullet, displayed in inches or centimeters. Input field.
Model: The G1 or G7 standard projectile models for drag curve. Input field.
NOTE: Most long range rifle bullets are closer to the G7 standard.
Weight: The bullet weight, displayed in grains (gr) or grams (g). Input field.
Profile Fields - Gun Data
20 Apps

Muzzle Velocity: The speed of the bullet as it leaves the muzzle, displayed in feet per second (f/s) or meters per
second (m/s). Input field.
NOTE: This field is required for accurate calculations by the shooting solution. If you calibrate the muzzle
velocity, this field may be updated automatically for a more accurate firing solution.
Sight Height: The distance from the center axis of the rifle barrel to the center axis of the scope, displayed in
inches or centimeters. Input field.
TIP: You can easily determine this value by measuring from the top of the bolt to the center of the windage
turret, and adding half of the diameter of the bolt.
Twist Direction: The direction that the rifling of your barrel spirals. Most rifles have a right-handed twist. Input
field.
Twist Rate: The distance it takes for the rifling of your barrel to make one full rotation, displayed in inches or
centimeters. Rifle twist is often provided by the gun or barrel manufacturer. Input field.
Zero Range: The range at which the rifle was zeroed, displayed in yards or meters. Input field.
Profile Fields - Scope
Scope Units: The units of measure for your scope, displayed in inches, milliradians (mrad/mil), or minute of
angle (MOA). Input field.
Sight in Conditions: The environmental conditions while sighting in your gun. These are optional modifications
recommended when sighting in your gun 300 yards and beyond. Toggle field.
SSF Elevation: A linear multiplier that accounts for vertical scaling. Not all rifle scopes track perfectly, so the
ballistics solution requires a correction to scale according to a particular rifle scope. For example, if a turret is
moved 10 mil but the impact is 9 mil, the sight scale is 0.9. Input field.
SSF Windage: A linear multiplier that accounts for horizontal scaling. Not all rifle scopes track perfectly, so the
ballistics solution requires a correction to scale according to a particular rifle scope. For example, if a turret is
moved 10 mil but the impact is 9 mil, the sight scale is 0.9. Input field.
Zero Height: An optional modification to impact elevation at zero range. This is often used when adding a
suppressor or using a subsonic load. For example, if you add a suppressor and your bullet impacts the target
1 inch higher than expected, your Zero Height is 1 inch. You must set this to zero when you remove the
suppressor. Input field.
Zero Humidity: The humidity while sighting in your gun. This is an optional modification recommended when
sighting in your gun at 300 yards and beyond. Input field.
Zero Offset: An optional modification to impact windage at zero range. This is often used when adding a
suppressor or using a subsonic load. For example, if you add a suppressor and your bullet impacts the target
1 inch to the left of the expected impact, your Zero Offset is -1 inch. You must set this to zero when you
remove the suppressor. Input field.
Zero Pressure: The ambient pressure while sighting in your gun. This is an optional modification recommended
when sighting in your gun at 300 yards and beyond. Input field.
Zero Temperature: The temperature while sighting in your gun. This is an optional modification recommended
when sighting in your gun at 300 yards and beyond. Input field.
Profile Fields - Calibrate Muzzle Velocity
Range: The distance from the muzzle to the target, displayed in yards or meters. Input field.
TIP: You should enter a value as close as possible to the range suggested in the shooting solution. This is the
range where the bullet slows to Mach 1.2 and begins to enter the transonic range.
True Drop: The actual distance the bullet falls while in flight to the target, displayed in milliradians (mrad/mil) or
minute of angle (MOA). Input field.
Profile Fields - Calibrate Custom Drag Factor
Range: The range from which you are shooting. Input field.
TIP: In most cases, the calibrated custom drag factor should not exceed a 10% correction.
True Drop: The actual distance the bullet falls when fired at a specific range, displayed in milliradians (mrad/
mil) or minute of angle (MOA). Input field.
Profile Fields - Calibrate Drop Scale Factor
Apps 21

Range: The range from which you are shooting. Input field.
TIP: This range should be within 90% of the recommended range suggested in the shooting solution. Values
that are less than 80% of the recommended range will not provide a valid adjustment.
True Drop: The actual distance the bullet falls when fired at a specific range, displayed in milliradians (mrad/
mil) or minute of angle (MOA). Input field.
Profile Data Screen Fields
Aerodynamic Jump: The amount of the elevation solution attributed to aerodynamic jump. Aerodynamic jump
is the vertical deflection of the bullet due to a crosswind. Aerodynamic jump is calculated based on the wind
speed 1 value. If there is no crosswind component or wind value, this value is zero.
Bullet Drop: The total drop the bullet experiences along its flight path.
Cos. Incl. Ang.: The cosine of the inclination angle to the target.
Elevation: The vertical portion of the aiming solution, displayed in milliradians (mrad/mil) or minute of angle
(MOA).
H. Cor. Effect: The horizontal Coriolis effect. The horizontal Coriolis effect is the amount of the windage
solution attributed to the Coriolis effect. This is always calculated by the device, although the impact may be
minimal if you are not shooting at extended range.
Lead: The horizontal correction needed to hit a target moving left or right at a given speed.
TIP: When you enter the speed of your target, the device factors the necessary windage required into the total
windage value.
Max. Ord.: The maximum ordinance, displayed in inches or centimeters. The maximum ordinance is the
maximum height above the axis of the barrel that a bullet will reach along its flight path.
Max. Ord. Range: The range at which the bullet will reach its maximum ordinance, displayed in yards or meters.
Remaining Energy: The remaining energy of the bullet at target impact, displayed in foot-pounds of force (ft. lbf)
or joules (J).
Spin Drift: The amount of the windage solution attributed to the spin drift (gyroscopic drift). For example, in the
northern hemisphere, a bullet shot out of a right-hand twist barrel will always deflect slightly to the right as it
travels.
Time of Flight: The time of flight, which indicates the time required for a bullet to reach its target at a given
range.
V. Cor. Effect: The vertical Coriolis effect. The vertical Coriolis effect is the amount of the elevation solution
attributed to the Coriolis effect. This is always calculated by the device, although the impact may be minimal
if you are not shooting at extended range.
Velocity: The estimated velocity of the bullet when it impacts the target, displayed in feet per second (f/s) or
meters per second (m/s).
Velocity Mach: The estimated velocity of the bullet when it impacts the target, displayed as a factor of mach
speed.
Windage 1: The horizontal portion of the aiming solution based on the wind speed 1 and wind direction,
displayed in inches, milliradians (mrad/mil), or minute of angle (MOA).
Windage 2: The horizontal portion of the aiming solution based on the wind speed 2 and wind direction,
displayed in inches, milliradians (mrad/mil), or minute of angle (MOA).
Applied Ballistics App Settings
Select to open the apps list. Select Settings > Applied Ballistics.
Units: Sets the units of measure used in the Applied Ballistics app.
Hold Precision: Indicates whether the ballistic solver uses precise or rounded calculations.
Targets: Indicates whether targets are identified alphabetically or numerically.
Fire Control Settings: Enables or disables Spin Drift, Coriolis Effect, and Aerodynamic Jump in calculations.
22 Apps
Calculating the Size of an Area
1 Select to open the apps list.
2 Select Area Calculation.
3 Select an option:
• To mark points on the map to calculate an area, select Use GPS > Mark Points.
• To walk around the perimeter of the area to calculate, select Use GPS > Basic Area Calculation.
• To drive a farm vehicle to calculate the harvest price, select Use GPS > Harvest Calculation.
• To use a saved course to calculate an area, select Use Course.
4 If necessary, edit the width of the farm vehicle, measurement units, price per area, price per length, and
slope.
5 Follow the on-screen instructions, and select Start.
6 Select Stop and Calculate when finished.
Camera and Photos
NOTICE
Some jurisdictions regulate or prohibit the use of cameras or camera accessories. It is your responsibility to
know and comply with applicable laws and rights to privacy in jurisdictions where you plan to use this device.
You can take photos with your GPSMAP H1i Plus device. If enabled, the geographic location is automatically
saved in the photo information. You can navigate to the location.
Taking a Photo
1 Select to open the apps list.
2 Select Camera.
3 Turn the device horizontally or vertically to change the orientation of the photo.
4 Select to switch between the rear camera and front camera.
5 If necessary, select or press MENU to adjust the flash.
6 Select the shutter button or press ENTER to take a photo.
Viewing Photos
You can view photos you took with the camera on the GPSMAP H1i Plus navigator, or photos you transferred to
the device.
1 Select to open the apps list.
2 Select an option:
• Select Photos.
• Select Camera, and select the photo viewer.
3 Select a photo.
Apps 23

Sorting Photos
1 Select to open the apps list.
2 Select an option:
• Select Photos.
• Select Camera, and select the photo viewer.
3 Press MENU to open the options menu.
4 Select Sort Photos.
5 Select an option:
• Select Most Recently.
• Select Near A Location, and select a location.
• Select On A Specific Date, and enter a date.
Viewing the Location of a Photo
1 Select to open the apps list.
2 Select an option:
• Select Photos.
• Select Camera, and select the photo viewer.
3 Select a photo.
4 Press MENU to open the options menu.
5 Select View Map.
Viewing Photo Information
1 Select to open the apps list.
2 Select an option:
• Select Photos.
• Select Camera, and select the photo viewer.
3 Select a photo.
4 Press MENU to open the options menu.
5 Select View Information.
Deleting a Photo
1 Select to open the apps list.
2 Select an option:
• Select Photos.
• Select Camera, and select the photo viewer.
3 Select a photo.
4 Press MENU to open the options menu.
5 Select Delete Photo > Delete.
Viewing a Slideshow
1 Select to open the apps list.
2 Select an option:
• Select Photos.
• Select Camera, and select the photo viewer.
3 Select a photo.
4 Press MENU to open the options menu.
5 Select View Slideshow.
24 Apps
Dog Tracking
The dog tracking features allow you to see information transmitted from your compatible handheld dog tracking
device on your GPSMAP device. You can navigate to your dogs, view their current status and location, and view
their distance from the handheld device.
Receiving Data From Your Dog Device
Before you can receive data, you must enable broadcasting on your compatible Alpha
®
handheld dog tracking
device. See the owner's manual for your dog tracking device for more information.
1 Place your handheld dog tracking device within 3m (10ft.) of your GPSMAP navigator.
TIP: Your GPSMAP navigator receives data from one compatible device at a time. Stay more than 3m (10ft.)
away from other devices or disable broadcasting on devices from which you do not want to receive data.
2 On your GPSMAP navigator, select to open the apps list, and select DogTrack.
3 Press MENU to open the options menu.
4 Select Sensors > DogTrack > On.
A list of nearby devices appears.
5 Select your handheld dog tracking device from the list.
The devices connect and sync automatically.
Tracking Your Dogs
1 Select to open the apps list.
2 Select DogTrack.
The dogs connected to your navigator appear on the screen.
3 Select a dog.
The dog's location and track log appear on the map.
4 Select Go to navigate to your dog.
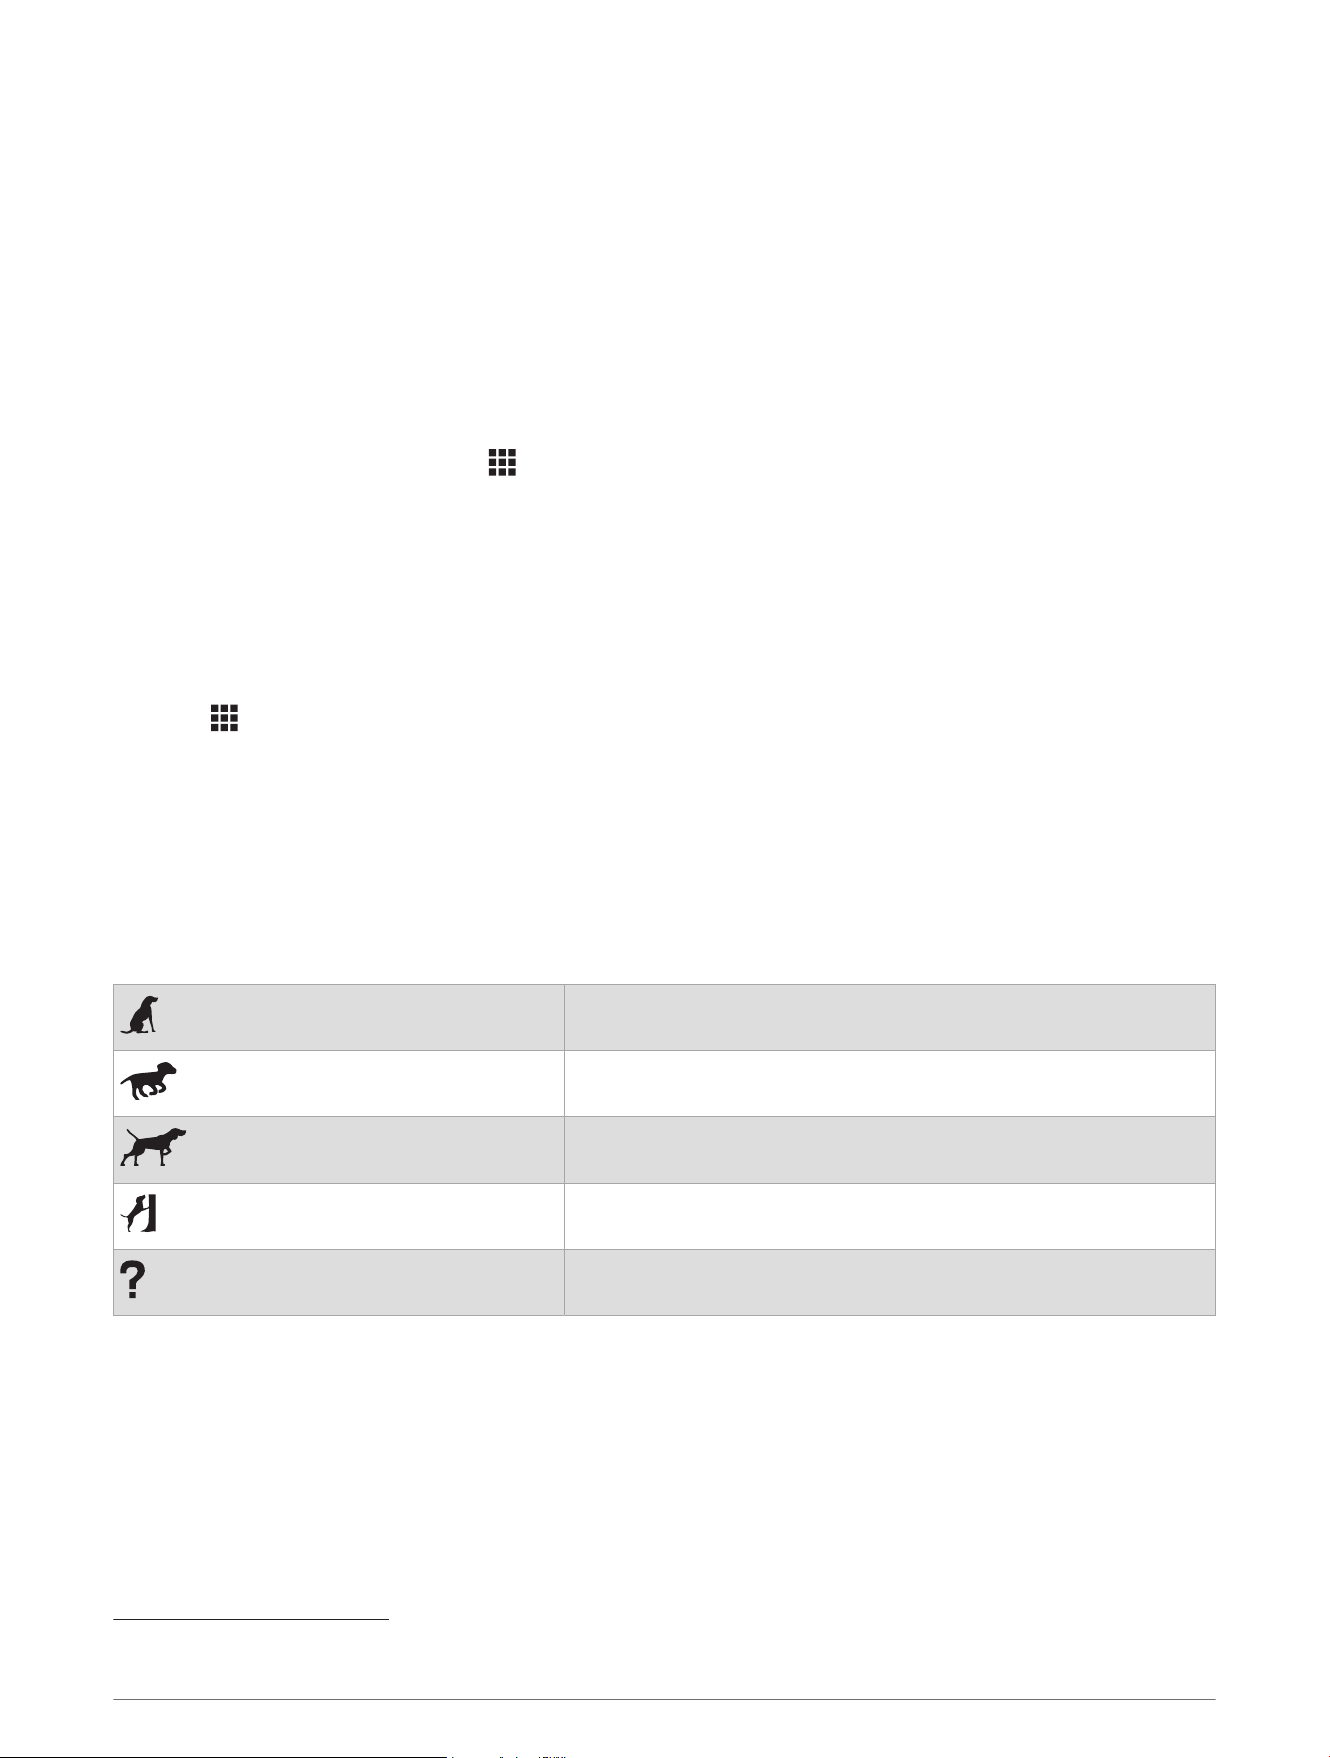
Dog Status Icons
Icons on the dog list page indicate the status and location of your dogs.
Sitting
Running
On point
Treed
Unknown
1
1
The unknown status icon indicates the collar has not acquired a satellite signal and the handheld device cannot determine the location of the dog.
Apps 25
DogTrack Settings
Select to open the apps list. Select DogTrack. Press MENU to open the options menu.
Clear Dog Tracks: Clears the dog track logs.
Forget Transmitter: Removes the connected dog tracking device from the list of paired devices.
Sensors: Pairs compatible dog tracking devices with your device (Receiving Data From Your Dog Device,
page25).
Settings > Dog Tracks on Map: Shows the dog track history on the map.
Settings > Auto Zoom: Automatically selects the appropriate zoom level for optimal use on your map. When Off
is selected, you must zoom in or out manually.
Using the Flashlight
WARNING
This device may have a flashlight that can be programmed to flash at various intervals. Consult your physician if
you have epilepsy or are sensitive to bright or flashing lights.
1 Select to open the apps list.
2 Select Flashlight.
3 Press ENTER or select to turn on the flashlight.
NOTE: Using the flashlight can reduce battery life. You can use the brightness slider to reduce the brightness
and extend the life of the battery.
4 Press MENU to open the options menu.
5 Select Strobe to program the flashlight to flash in a strobe pattern.
NOTE: Using the strobe can reduce battery life. You can swipe left or right to change the strobe pattern to
reduce the flash frequency and extend the life of the battery.
CAUTION
Programming the flashlight to flash in an SOS pattern will not contact emergency services on your behalf.
Garmin Share
NOTICE
It is your responsibility to use discretion when sharing information with others. Always ensure you are aware of
and comfortable with the individual with whom you share information.
The Garmin Share feature allows you to use Bluetooth technology to wirelessly share your data with other
compatible Garmin devices. With Garmin Share enabled and compatible Garmin devices in range of each
other, you can select saved locations and courses to transfer to another device through a direct, secured
device-to-device connection, without the need for a phone or Wi‑Fi connectivity.
26 Apps

Sharing Data with Garmin Share
Before you can use this feature, you must have Bluetooth technology enabled on both compatible devices, and
they must be within 3m (10 ft.) of each other. When prompted, you must also consent to share your data with
other Garmin devices using Garmin Share.
Your GPSMAP navigator can send and receive data when connected to another compatible Garmin device
(Receiving Data with Garmin Share, page27). You can also transfer your data between different devices. For
example, you can share a favorite course from your GPSMAP navigator to your compatible Garmin watch.
1 Select to open the apps list.
2 Select Garmin Share > Continue.
3 Select Share.
4 Select a category, and select one or more items.
5 Select Share.
6 Wait while the device locates compatible devices.
7 Select a device.
8 Confirm the six-digit PIN matches on both devices, and select Pair.
9 Wait while the devices transfer the data.
10 Select Share Again to share the same items with another user (optional).
11 Select Done.
Receiving Data with Garmin Share
Before you can use this feature, you must have Bluetooth technology enabled on both compatible devices, and
they must be within 3m (10 ft.) of each other. When prompted, you must also consent to share your data with
other Garmin devices using Garmin Share.
1 Select to open the apps list.
2 Select Garmin Share.
3 Wait while the device locates compatible devices in range.
4 Select Accept.
5 Confirm the six-digit PIN matches on both devices, and select Pair.
6 Wait while the devices transfer the data.
7 Select Done.
Garmin Share Settings
Select to open the apps list. Select Settings > Connectivity > Garmin Share.
Status: Enables the device to send and receive items through Garmin Share.
Forget Devices: Removes all of the devices with which items have been previously shared.
Geocaches
Geocaching is a treasure hunting activity in which players hide or search for hidden caches using clues and GPS
coordinates.
Apps 27

Registering Your Device at Geocaching.com
You can register your device at www.geocaching.com to search for a list of nearby geocaches, or to search live
information for millions of geocaches.
1 Connect to a wireless network (Connecting to a Wireless Network, page65) or to the Garmin Explore app
(Pairing Your Phone, page3).
2 Select to open the apps list.
3 Select Geocaching > Register Device.
An activation code and web address appear on your device screen if your device is connected to the internet.
4 On your computer, go to the web address listed and follow the on-screen instructions.
After you register, you can view geocaches from www.geocaching.com on your device while connected
wirelessly.
Downloading Geocaches Using a Computer
You can load geocaches manually onto your device using a computer (Transferring Files to Your Device Using
a Computer, page73). You can place the geocache files into a GPX file and import them into the GPX folder
on the device. With a premium membership to geocaching.com, you can use the "lists" feature to load a large
group of geocaches onto your device as a single GPX file.
1 Connect the device to your computer using a USB cable.
2 Go to www.geocaching.com.
3 If necessary, create an account.
4 Sign in.
5 Follow the instructions at geocaching.com to find and download geocaches to your device.
Searching for a Geocache
You can search the geocaches loaded on your navigator.
If you are connected to www.geocaching.com, you can search live geocache data and download geocaches.
NOTE: You can download detailed information for a limited number of geocaches per day. You can purchase a
premium subscription to download more. Go to www.geocaching.com for more information.
1 Select to open the apps list.
2 Select Geocaching.
When a geocache is not selected, the app automatically lists the geocaches nearest to your current location.
3 Press MENU to open the options menu.
4 Select an option:
• To search the geocaches loaded on your navigator near you or near another location, select Search, and
select a location.
• To search for live geocaches by code, select GC Live Download > GC Code, and enter the geocache code.
This feature allows you to download a specific geocache from www.geocaching.com when you know the
geocache code.
• To search for live geocaches near a location, select GC Live Download > Download Near, and select a
location.
5 Select a geocache.
The geocache details appear.
NOTE: If you selected a live geocache and you are connected, the navigator downloads the full geocache
details to the internal storage, if necessary.
28 Apps

Filtering the Geocache List
You can filter your geocache list based on certain factors, such as the level of difficulty.
1 Select to open the apps list.
2 Select Geocaching.
3 Press MENU to open the options menu.
4 Select Filter, and select one or more options:
• To filter using a saved filter, select Apply a Saved Filter, and select a filter from the list.
• To filter by a geocache category, such as puzzle or event, select Type.
• To filter by the physical size of the geocache container, select Cache Size.
• To filter by Unattempted, Did Not Find, or Found geocaches, select Status.
• To filter using live geocaches, select Geocache Files, and select the toggle switch.
• To filter by the difficulty level of finding the geocache, or the difficulty of the terrain, select a level from 1
to 5.
5 Select Done to view the filtered geocache list.
Saving a Custom Geocache Filter
You can create and save custom filters for geocaches based on specific factors.
1 Select to open the apps list.
2 Select Settings > Geocaching > Filter Setup > Create Filter.
3 Select items to filter.
4 Select Save.
By default, the new filter is saved automatically as Filter followed by a number. For example, Filter 2. You can
edit the geocache filter to change the name (Editing a Custom Geocache Filter, page29).
Editing a Custom Geocache Filter
1 Select to open the apps list.
2 Select Settings > Geocaching > Filter Setup.
3 Select a filter.
4 Select an item to edit.
Viewing Geocache Details
1 Select to open the apps list.
2 Select Geocaching.
3 Select a geocache.
The geocache description appears.
You can press MENU to view logs or hints.
Apps 29

Navigating to a Geocache
1 Select to open the apps list.
2 Select Geocaching.
3 Select a geocache.
4 Select Navigate.
5 Select your navigation options:
• Select the activity name to change the activity type. Activity types include walking, hiking, hunting, and
more.
• To adjust the course to follow map data and recalculate as needed, enable the Routing toggle switch.
• To set how the device routes from one point to the next, select Advanced Settings (Routing Settings,
page47).
6 Select Go.
The device calculates your route and displays it on the map. You can navigate using the navigation tools
(Map, page51, Compass, page47).
Logging the Attempt
After you have attempted to find a geocache, you can log your results. You can verify some geocaches at
www.geocaching.com.
1 Select to open the apps list.
2 When navigating to a geocache, select Geocaching > Log.
3 Select Found, Did Not Find, Needs Repair, or Unattempted.
4 Select an option:
• To stop logging, select Done.
• To begin navigation to the geocache nearest you, select Find Next Closest.
• To enter a comment about looking for the cache or about the cache itself, select Edit Comment.
If you are signed in to www.geocaching.com, the log uploads to your www.geocaching.com account
automatically.
Removing Live Geocache Data from the Device
You can remove live geocache data to show only geocaches manually loaded on the device using a computer.
1 Select to open the apps list.
2 Select Settings > Geocaching > Geocaching Live > Remove Live Data.
Live geocaching data is removed from the device and no longer appears in the geocache list.
Removing Your Device Registration From Geocaching.com
If you transfer ownership of your device, you can remove your device registration from the geocaching website.
1 Select to open the apps list.
2 Select Settings > Geocaching > Geocaching Live > Unregister Device.
30 Apps

Geocaching Settings
Select to open the apps list. Select Settings > Geocaching.
Geocaching Live: Allows you to remove live geocache data from your device and remove your device
registration from geocaching.com (Removing Live Geocache Data from the Device, page30, Removing Your
Device Registration From Geocaching.com, page30).
Geocache Style: Sets the device to display the geocache list using names or codes.
Filter Setup: Allows you to create and save custom filters for geocaches (Saving a Custom Geocache Filter,
page29).
Found Geocaches: Allows you to edit the number of geocaches found. This number automatically increases
when you log a find (Logging the Attempt, page30).
Geocache Proximity Alarm: Allows you to set an alert to sound when you are within a specified range of a
geocache.
Using the inReach Remote
The inReach remote function allows you to control a compatible inReach satellite communicator using your
GPSMAP H1 navigator.
NOTE: You may need to enable the inReach remote feature on your satellite communicator. See the owner's
manual for your satellite communicator for more information.
1 Bring your inReach satellite communicator within 3m (10ft.) of your GPSMAP H1 device.
TIP: Your GPSMAP H1 device receives data from one compatible device at a time. Stay more than 3m
(10ft.) away from other devices or disable broadcasting on devices from which you do not want to receive
data.
2 Turn on the satellite communicator.
3 On your GPSMAP H1 navigator, select to open the apps list, and select inReach Remote.
4 Select Pair inReach Device > inReach Remote > On.
A list of nearby devices appears.
5 Select your satellite communicator from the list.
6 Wait while the GPSMAP H1 navigator connects to your satellite communicator.
7 Confirm the six-digit PIN matches on both devices, and select OK.
8 Select an option:
• To send a check-in message, select Messages, and select .
• To send a text message, select Messages > New Message, select the message contacts, and enter the
message text or select a quick text option.
• To start inReach tracking, select Tracking > Start Tracking.
• To share a link to a tracking webpage, select Tracking > Share Tracking Link.
• To view a weather forecast, select Weather.
• To initiate an SOS rescue, select Initiate SOS.
NOTE: You should only use the SOS function in a real emergency situation.
Marking and Starting Navigation to a Man Overboard Location
1 Select to open the apps list.
2 Select Man Overboard > Start.
The map opens, showing the route to the MOB location. By default, the route appears as a magenta line.
3 Navigate using the map (Navigating with the Map, page52) or compass (Navigating with the Compass,
page47).
Apps 31

Setting a Proximity Alarm
Proximity alarms alert you when you are within a specified range of a particular location.
1 Select to open the apps list.
2 Select Proximity Alarms > New Alarm.
3 Select a category.
4 Select a location.
5 Select Select Location.
6 Enter a radius.
When you enter an area with a proximity alarm, the device sounds a tone.
Changing the Proximity Alarms Units of Measure
1 Select to open the apps list.
2 Select Proximity Alarms.
3 Press MENU to open the options menu.
4 Select Change Units.
5 Select a unit of measure.
Deleting a Proximity Alarm
1 Select to open the apps list.
2 Select Proximity Alarms.
3 Select an alarm.
4 Press MENU to open the options menu.
5 Select Delete.
Setting the Proximity Alarm Tones
You can customize tones for proximity alarms.
1 Select to open the apps list.
2 Select Proximity Alarms.
3 Press MENU to open the options menu.
4 Select Proximity Alarm Settings.
5 If necessary, select the Proximity Tones toggle switch to turn on alert tones.
6 Select a tone for each audible alarm type.
Disabling All Proximity Alarms
1 Select to open the apps list.
2 Select Proximity Alarms.
3 Press MENU to open the options menu.
4 Select Proximity Alarm Settings.
5 Select the Proximity Alarms toggle switch to turn off proximity alarms.
Satellite Page
The satellite page shows your current location, satellite locations, and signal strength. Select to open the
apps list. Select Satellite. You can swipe left or right to view additional satellite constellations (if available).
32 Apps

Satellite Settings
Select to open the apps list. Select Satellite. Press MENU to open the options menu.
Use With GPS On: Turns on GPS.
NOTE: This option appears when the device is in demo mode (Satellite Settings, page68).
Track Up: Indicates whether satellites are shown with their rings oriented with your current track toward the top
of the screen.
North Up: Indicates whether satellites are shown with their rings oriented with north toward the top of the
screen.
Single Color: Displays the satellite page in single color format.
Multicolor: Displays the satellite page in multicolor format.
Satellite Setup: Sets the satellite system options (Satellite Settings, page68).
Saved Data
From the home page, select Saved.
Waypoints: Waypoints are locations you record and store in the device. Waypoints can mark where you are,
where you are going, or where you have been (Waypoints, page54).
Courses: A course is a sequence of waypoints or locations that leads you to your final destination (Courses,
page56).
Activities: You can use your device to record your path as an activity (Starting an Activity, page10).
Collections: You can use the Garmin Explore app to group related waypoints, courses, or activities into
collections. You can show or hide the data in each collection on the device (Garmin Explore, page60).
Using the Saved App
1 From the home page, select Saved.
2 Select Collections.
Garmin Explore
TIP: You can use the menu options to enable or disable collections on your device. If your saved data is
organized into collections, this helps filter the content in the saved app. The app will display the waypoints
and courses in your enabled collections.
3 Select a saved item.
TIP: You can filter the list of saved items by selecting the icons at the top of the list. For example, select to
filter for waypoints.
4 Select an option:
• To navigate to a saved item, select Navigate.
• To view the elevation plot for a course or activity, select .
• To show the course or activity on the map, even when you are not navigating, press MENU, and select
Show on Map.
• To change the color of a course or activity on the map, even when you are not navigating, press MENU,
and select Set Color.
• To delete a saved item, press MENU, and select Delete.
Apps 33

Using the Stopwatch
1 Select to open the apps list.
2 Select Stopwatch.
3 Press MENU, and select Enable Activ. Sync to start and stop an activity when you start and stop the timer
(optional).
4 Select Start to start the timer.
5 Select Lap to restart the lap timer.
The total stopwatch time continues running.
6 Select Stop to stop both timers.
7 Select Reset to reset both timers.
Using Voice Commands
You can use the integrated microphone in your GPSMAP H1i Plus navigator to say a command for the device to
perform.
NOTE: Voice command is not available for all languages and regions.
1 Select an option:
• Swipe down from the top of the home page to view the notification center and controls, and select .
• Press the action button.
NOTE: You can customize the action button function (Customizing the Action Button, page65).
• Select to open the apps list, and select Voice Command.
2 Say a voice command (Voice Commands, page35).
34 Apps
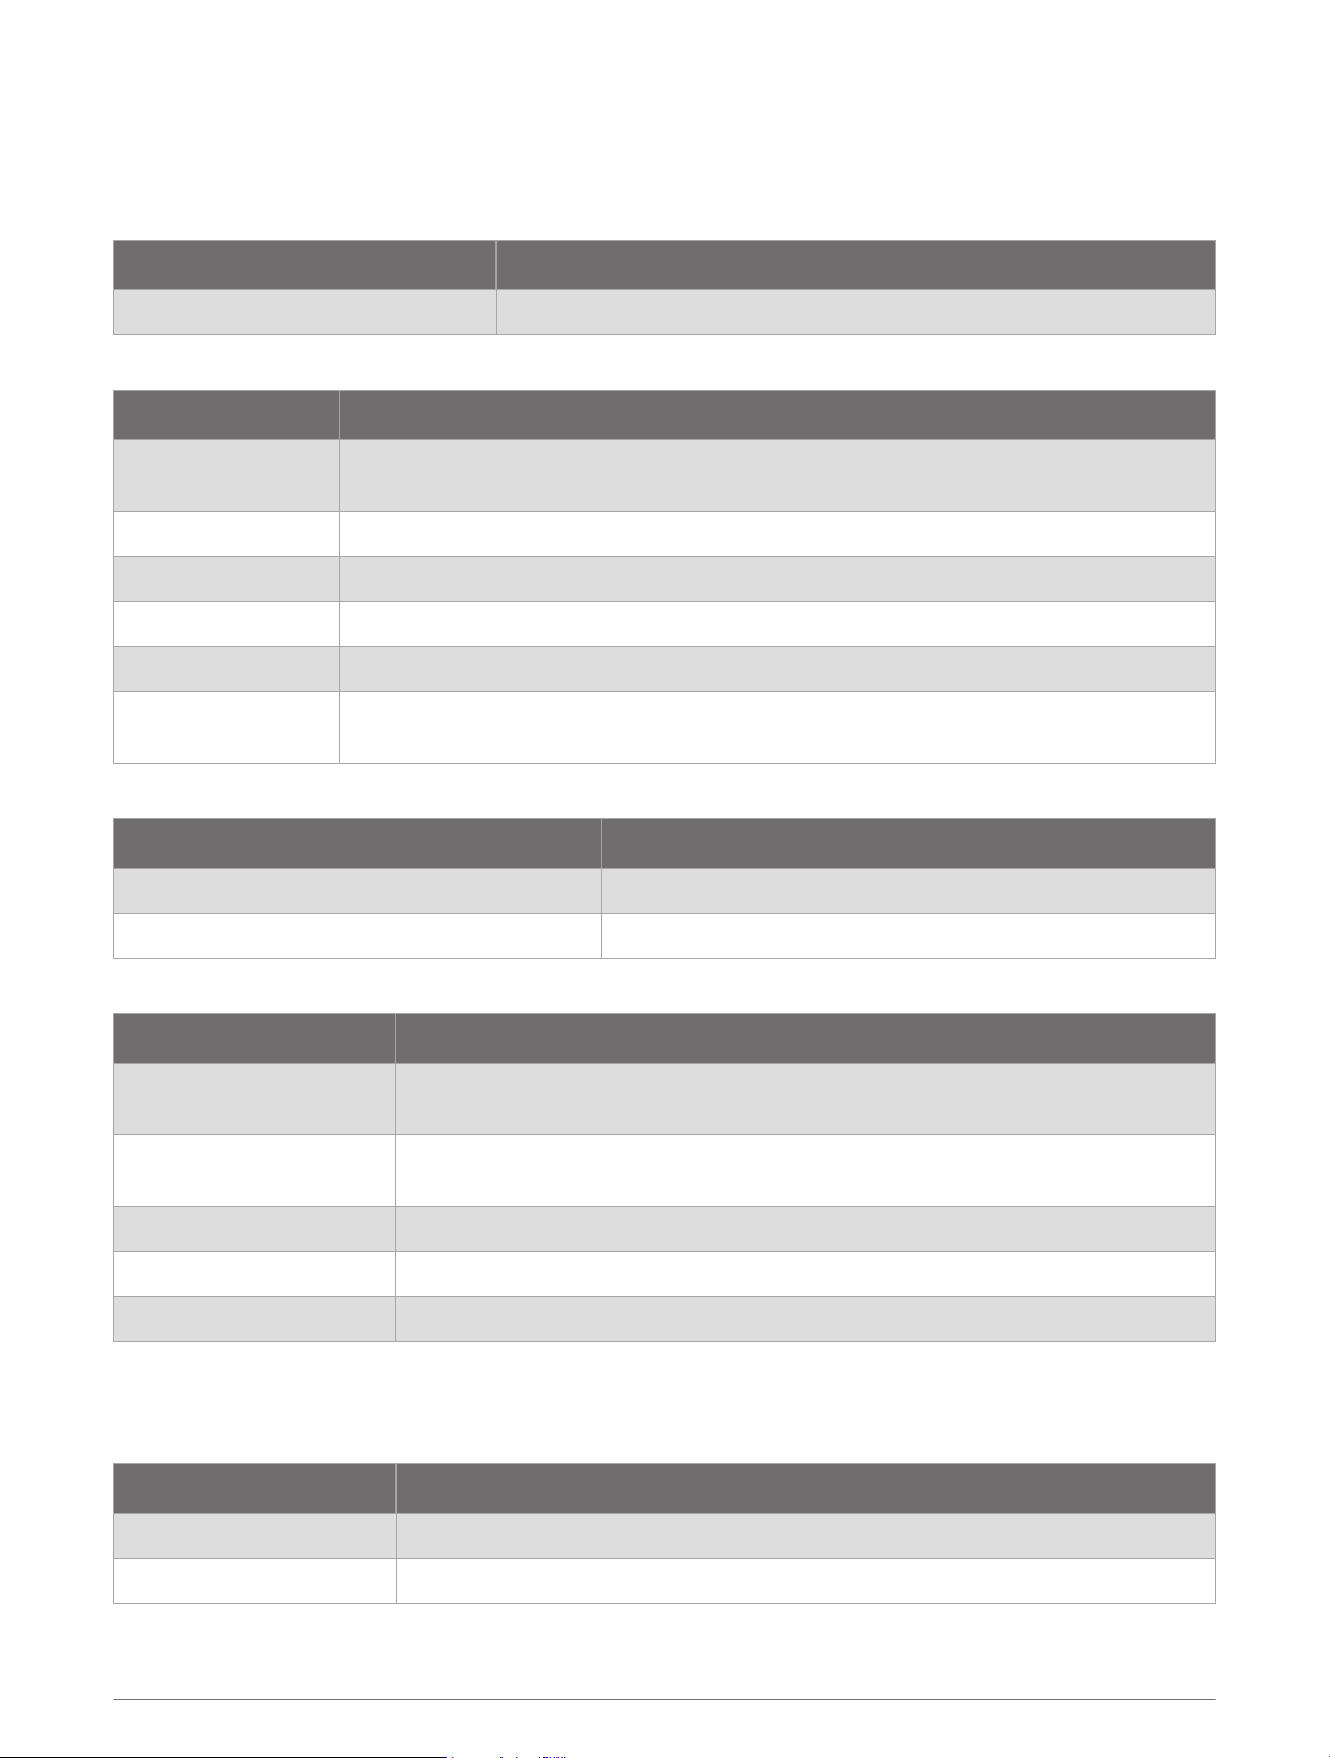
Voice Commands
The voice command system is designed to detect natural speech. This is a list of commonly used voice
commands, but the GPSMAP H1i Plus navigator does not require these exact phrases. You can try saying
variations of these commands in a way that is natural to you.
Voice Help Command Function
What can I say? Shows a list of common voice commands.
Device and Screen Functions
Voice Command Function
Turn off flashlight
Example of a command to disable a device feature. For example, this one turns off the
flashlight.
Increase brightness Raises the screen brightness level.
Automatic brightness Automatically adjusts the screen brightness based on the ambient light.
Set brightness to 80 Sets the screen brightness level to a specified percent. Available numbers are 0-100%.
Home screen Open the home page.
Nevermind
Dismisses the current voice command. For example, you may use this command if you
misspoke or were interrupted.
Clock Functions
Voice Command Function
Start stopwatch Starts the stopwatch.
Stop stopwatch Stops the stopwatch.
App and Activity Functions
Voice Command Function
Show me the weather
Example of a command to open an app on the device. For example, this one
opens the weather app.
Switch to the compass app
Example of a command to open an app on the device. For example, this one
opens the compass.
Start activity Starts recording an activity with the current activity type.
Switch to hike Changes the current activity type.
Start tracking Starts inReach tracking.
NOTE: The apps and activities listed are examples, but you can control all of the default apps and activities with
voice commands (Apps, page12).
Navigation Functions
Voice Command Function
Begin navigation Opens the search menu to search for a destination.
Save location Saves your current location.
Apps 35
Media Functions
Voice Command Function
Change volume to 8 Adjusts the volume to the specified level. Available numbers are 0-10.
Decrease volume Lowers the audio volume.
Mute Silences all audio.
Read my messages Begins reading unread inReach messages on the device, starting with the oldest.
Voice Command Tips
• Speak in a normal voice directed at the microphone (GPSMAP H1i Plus Device Overview, page4).
• Use phrases that the device can recognize (Voice Commands, page35).
• Reduce background noise, such as voices or wind, to increase the accuracy of the voice recognition.
• Hold the device close to your mouth with your back to strong winds for best performance.
Recording a Voice Note
You can record and listen to voice notes using the built-in speaker and microphone in your GPSMAP H1i Plus
device.
1 Select to open the apps list.
2 Select Voice Notes > New Voice Note.
3 Press ENTER or select to being recording.
4 Say your voice note.
5 Press ENTER or select to stop recording.
6 Select an option:
• Select to play the voice note.
• Select to rename the voice note.
• Select to adjust the playback volume
• Press MENU and select Delete to delete the voice note.
Viewing a Weather Forecast
While your GPSMAP navigator is connected to your phone or to a Wi‑Fi network and has an active internet
connection, it can receive detailed weather information from the internet.
1 Select to open the apps list.
2 Select Weather.
The navigator automatically downloads a weather forecast for your current location.
3 Select a time interval, the weather map, or a day to view detailed weather information.
Viewing the Weather Map
While your navigator is connected to a phone or Wi‑Fi network with internet access, you can view a live weather
map showing precipitation, cloud coverage, temperature, or wind conditions.
1 Select to open the apps list.
2 Select Weather.
3 Select the weather map.
4 Select Precipitation, Cloud Coverage, Temperature, or Wind.
NOTE: Some options may not be available in all areas.
The selected data appears on the map. The navigator may take a few moments to load the weather map
data.
36 Apps

Adding a Weather Location
You can add a weather location to view weather forecasts for waypoints, GPScoordinates, or other locations.
1 Select to open the apps list.
2 Select Weather.
3 Press MENU to open the options menu.
4 Select Weather Locations > New Location.
5 Select a location.
6 Select Select Location.
7 Edit the location name if necessary, and select .
The navigator downloads a forecast for the selected location.
Switching the Weather Location
You can quickly switch between forecasts for weather locations you have previously added.
1 Select to open the apps list.
2 Select Weather.
3 Press MENU to open the options menu.
4 Select Weather Locations.
5 Select a location from the list.
TIP: The My Location option always downloads a forecast for your current location.
The navigator downloads the most recent forecast for the selected location.
Deleting a Weather Location
1 Select to open the apps list.
2 Select Weather.
3 Press MENU to open the options menu.
4 Select Weather Locations.
5 Select .
6 Select .
NOTE: You cannot delete the My Location forecast.
Apps 37

Requesting an inReach Weather Forecast Over Satellite
This feature is available only on the GPSMAP H1i Plus satellite communicator with an active satellite
subscription.
If you are in a location without active internet access, your GPSMAP H1i Plus satellite communicator can send
a message to request a weather forecast using your inReach service plan. You can receive weather forecasts
for your current location, a waypoint, GPS coordinates, or a location you choose on the map. Weather forecasts
incur data charges or additional charges on your inReach service plan. For the best results, you should ensure
your satellite communicator has a clear view of the sky when you request a weather forecast over satellite.
1 Select to open the apps list.
2 Select Weather.
3 If necessary, select Change Location to request a weather forecast for an alternate location.
By default, the satellite communicator requests weather for your current location.
4 Select Get Forecast.
The satellite communicator sends a request for the forecast. It may take several minutes to receive the weather
forecast data.
NOTE: A marine forecast will be included for locations on an ocean or other large body of water, if available. If
you are unable to get a marine forecast, select a location further from the shore.
After the satellite communicator finishes downloading the data, you can view the forecast at any time until all
the information in the forecast has expired. You can also update the forecast at any time (Updating an inReach
Weather Forecast Over Satellite, page38).
Updating an inReach Weather Forecast Over Satellite
If you are in a location without active internet access, your GPSMAP H1i Plus satellite communicator can update
an inReach weather forecast that has expired or contains outdated information. Updating a forecast incurs the
same data charges or additional charges as requesting a forecast.
1 Select to open the apps list.
2 Select Weather.
3 Press MENU to open the options menu.
4 Select Update Forecast > Update Forecast.
The satellite communicator requests an updated forecast. If you update the My Location forecast, the satellite
communicator requests an updated forecast for your current location. It may take several minutes to receive the
updated weather forecast data.
Searching for Apps
1 Select an option:
• From the home page, select .
• Press FIND.
2 Select the Apps filter at the top of the screen.
3 Select Search Apps.
4 Enter all or part of the app name.
38 Apps
inReach Device Features for GPSMAP H1i Plus
WARNING
Before you can use the inReach features of your GPSMAP H1i Plus satellite communicator, including
messaging, SOS, tracking, and inReach Weather, you must have an active satellite subscription. Always test
your satellite communicator outdoors before using it on a trip.
Ensure you have a clear view of the sky when using the messaging, tracking, and SOS functions, because these
features require satellite access to operate properly.
NOTICE
Some jurisdictions regulate or prohibit the use of satellite communications devices. It is the responsibility of the
user to know and follow all applicable laws in the jurisdictions where the device is intended to be used.
Messages
Your GPSMAP H1i Plus satellite communicator sends and receives messages using the Iridium satellite
network. You can send messages to an SMS phone number, an email address, or another device that uses
inReach technology. Each message you send includes your location details where allowed.
Sending a Test Message
WARNING
You should send a test message outdoors before using the satellite communicator on a trip to ensure your
satellite subscription is active.
1 Select to open the apps list.
2 Select Messenger > New Message.
3 Send a message to [email protected].
NOTE: Your device should automatically receive a message from this address after activating your
subscription.
Wait while the device sends a test message. When you receive a confirmation message, your device is ready
to use.
Sending a Check-In Message
Check-in messages are messages with predefined text and recipients.
TIP: You can customize check-in message recipients in the Garmin Messenger app. From the Device tab in the
app, select Check-In > Edit Check-in Contacts.
1 Select to open the apps list.
2 Select Messenger > .
3 Select a check-in message.
inReach Device Features for GPSMAP H1i Plus 39
Sending a New Message
You can send a message to multiple recipients at once, creating a group conversation where all participants can
see each other's responses.
1 Select to open the apps list.
2 Select Messenger > New Message.
3 Select Contacts to choose recipients from your contacts list, or enter each recipient's contact information
using the keyboard.
TIP: You can select to close the keyboard.
4 Select Start a message, and select an option:
• To start with a pre-written message, select Quick Text.
NOTE: You can add and edit quick text messages on the Garmin Explore website.
• To write a custom message, begin typing using the keyboard.
5 Select an option:
NOTE: Only one attachment is allowed per message.
• To send a link to a tracking webpage with your message, select > Tracking Link.
• To send a voice note with your message, select > Voice, and begin recording (Recording a Voice Note,
page36).
• To send a saved photo with your message, select > Photos, and select a photo.
• To take a new photo and send it with your message, select > Camera, and take photo (Taking a Photo,
page23).
• To exclude location coordinates from your message, select .
NOTE: By default, location coordinates are included with your message.
6 After you have finished your message, select Send.
Sending a Post Message
You can send a post message to multiple recipients at once, where each recipient receives the message
individually without seeing replies from others.
1 Select to open the apps list.
2 Select Messenger > New Message.
3 Select Contacts to choose recipients from your contacts list, or enter each recipient's contact information
using the keyboard.
TIP: You can select to close the keyboard.
4 Select Start a message, and select an option:
• To start with a pre-written message, select Quick Text.
NOTE: You can add and edit quick text messages on the Garmin Explore website.
• To write a custom message, begin typing using the keyboard.
5 Select an option:
NOTE: Only one attachment is allowed per message.
• To send a link to a tracking webpage with your message, select > Tracking Link.
• To send a voice note with your message, select > Voice, and begin recording (Recording a Voice Note,
page36).
• To send a saved photo with your message, select > Photos, and select a photo.
• To take a new photo and send it with your message, select > Camera, and take photo (Taking a Photo,
page23).
• To exclude location coordinates from your message, select .
NOTE: By default, location coordinates are included with your message.
6 After you have finished your message, press MENU, and select Send as Post Message.
40 inReach Device Features for GPSMAP H1i Plus
Replying to a Message
1 Select to open the apps list.
2 Select Messenger.
3 Select a conversation.
4 Select Reply.
5 Select an option:
• To start with a pre-written message, select Quick Text.
• To write a custom message, begin typing using the keyboard.
TIP: You can select to close the keyboard.
6 Select an option:
NOTE: Only one attachment is allowed per message.
• To send a link to a tracking webpage with your message, select > Tracking Link.
• To send a voice note with your message, select > Voice, and begin recording (Recording a Voice Note,
page36).
• To send a saved photo with your message, select > Photos, and select a photo.
• To take a new photo and send it with your message, select > Camera, and take photo (Taking a Photo,
page23).
• To exclude location coordinates from your message, select .
NOTE: By default, location coordinates are included with your message.
7 When you have finished your message, select Send.
Using Keyboard Shortcuts
• To select the first autocomplete option, select FIND.
• To cycle through keyboards, select MARK.
• To change character case, select PAGE once, and to turn on caps lock, select PAGE twice.
• To insert a backspace, select .
• To insert a space, select .
Checking for Messages
Your device continuously listens for new messages in Performance messaging mode. In Low Power messaging
mode, when you send a message, your device listens for replies for 10 minutes (Messenger App Settings,
page42). The device also checks for new messages every hour. When you are using the inReach tracking
feature, your device automatically checks for messages at your tracking interval.
NOTE: To receive messages, your device must have a clear view of the sky and be in view of a satellite when it
checks for messages.
You can force a check for messages by manually checking for messages, sending a message, or sending a
track point. During a check, your device connects to satellites and receives messages waiting to be sent to your
device.
1 Select to open the apps list.
2 Select Messenger.
3 Press MENU to open the options menu.
4 Select Mail Check.
Viewing Message Details
1 Select to open the apps list.
2 Select Messenger.
3 Select a conversation.
4 Select a message.
inReach Device Features for GPSMAP H1i Plus 41

Deleting Messages
1 Select to open the apps list.
2 Select Messenger.
3 Select a conversation.
4 Press MENU to open the options menu.
5 Select Delete Thread.
Messages Setup
Select to open the apps list. Select Messenger. Press MENU to open the options menu. Select Messages
Setup.
Ring Until Read: Sets the satellite communicator to ring until you read a new message. This feature is helpful if
you are in a noisy environment.
Notifications: Alerts you to incoming inReach messages.
Show on Map: Displays inReach messages on the map.
Messenger App Settings
Select to open the apps list. Select Settings > Messenger.
Notifications: Alerts you to incoming inReach messages.
Sounds & Vibration: Sets the device tones and vibration patterns for new messages and sent messages.
Auto Download Media: Automatically downloads photo and voice messages over satellite.
Messaging Mode: Performance mode listens continuously for incoming messages, which reduces battery life.
Low Power mode extends battery life by checking for incoming messages less frequently.
inReach Tracking
You can use the tracking feature on your GPSMAP H1i Plus satellite communicator to record track points and
transmit them over the Iridium satellite network at the specified send interval.
Starting Tracking
1 Select to open the apps list.
2 Select Tracking > Start Tracking.
NOTE: Starting the Tracking feature also starts recording your path as an activity.
Stopping Tracking
1 Select to open the apps list.
2 Select Tracking > Stop Tracking.
NOTE: Stopping tracking also stops your activity recording.
Sharing Your Tracking Page
You can share a link to a tracking webpage with other people. The system automatically adds text, including link
information, to your message.
1 Select to open the apps list.
2 Select Tracking > Share Tracking Link.
3 Select Contacts to choose recipients from your contacts list, or enter each recipient's contact information.
TIP: You can select to close the keyboard.
4 If necessary, select the pre-written message text to customize your message.
5 Select Send.
42 inReach Device Features for GPSMAP H1i Plus
inReach Tracking Setup
Select to open the apps list. Select Tracking. Press MENU to open the options menu. Select Tracking Setup.
Tracking: Starts the inReach tracking feature.
If both this option and the Auto Start option in the Data Recording settings are enabled, the device will
automatically start recording and inReach tracking when the device acquires satellites (Data Recording
Settings, page67).
Send Interval: Sets the frequency at which the device records a track point and transmits it over the satellite
network.
NOTE: The Send Interval frequency affects battery life (Specifications, page74).
SOS
WARNING
Before you can use the SOS function, you must have an active satellite subscription. Always test your device
outdoors before using it on a trip.
Ensure you have a clear view of the sky when using the SOS function, because this feature requires satellite
access to operate properly.
NOTICE
Some jurisdictions regulate or prohibit the use of satellite communications devices. It is the responsibility of the
user to know and follow all applicable laws in the jurisdictions where the device is intended to be used.
During an emergency, you can use your GPSMAP H1i Plus device to contact the Garmin Response
SM
center
to request help. Pressing the SOS button sends a message to the Garmin Response team, and they notify
the appropriate emergency responders of your situation. You can communicate with the Garmin Response
team during your emergency while you wait for help to arrive. You should only use the SOS function in a real
emergency situation.
inReach Device Features for GPSMAP H1i Plus 43
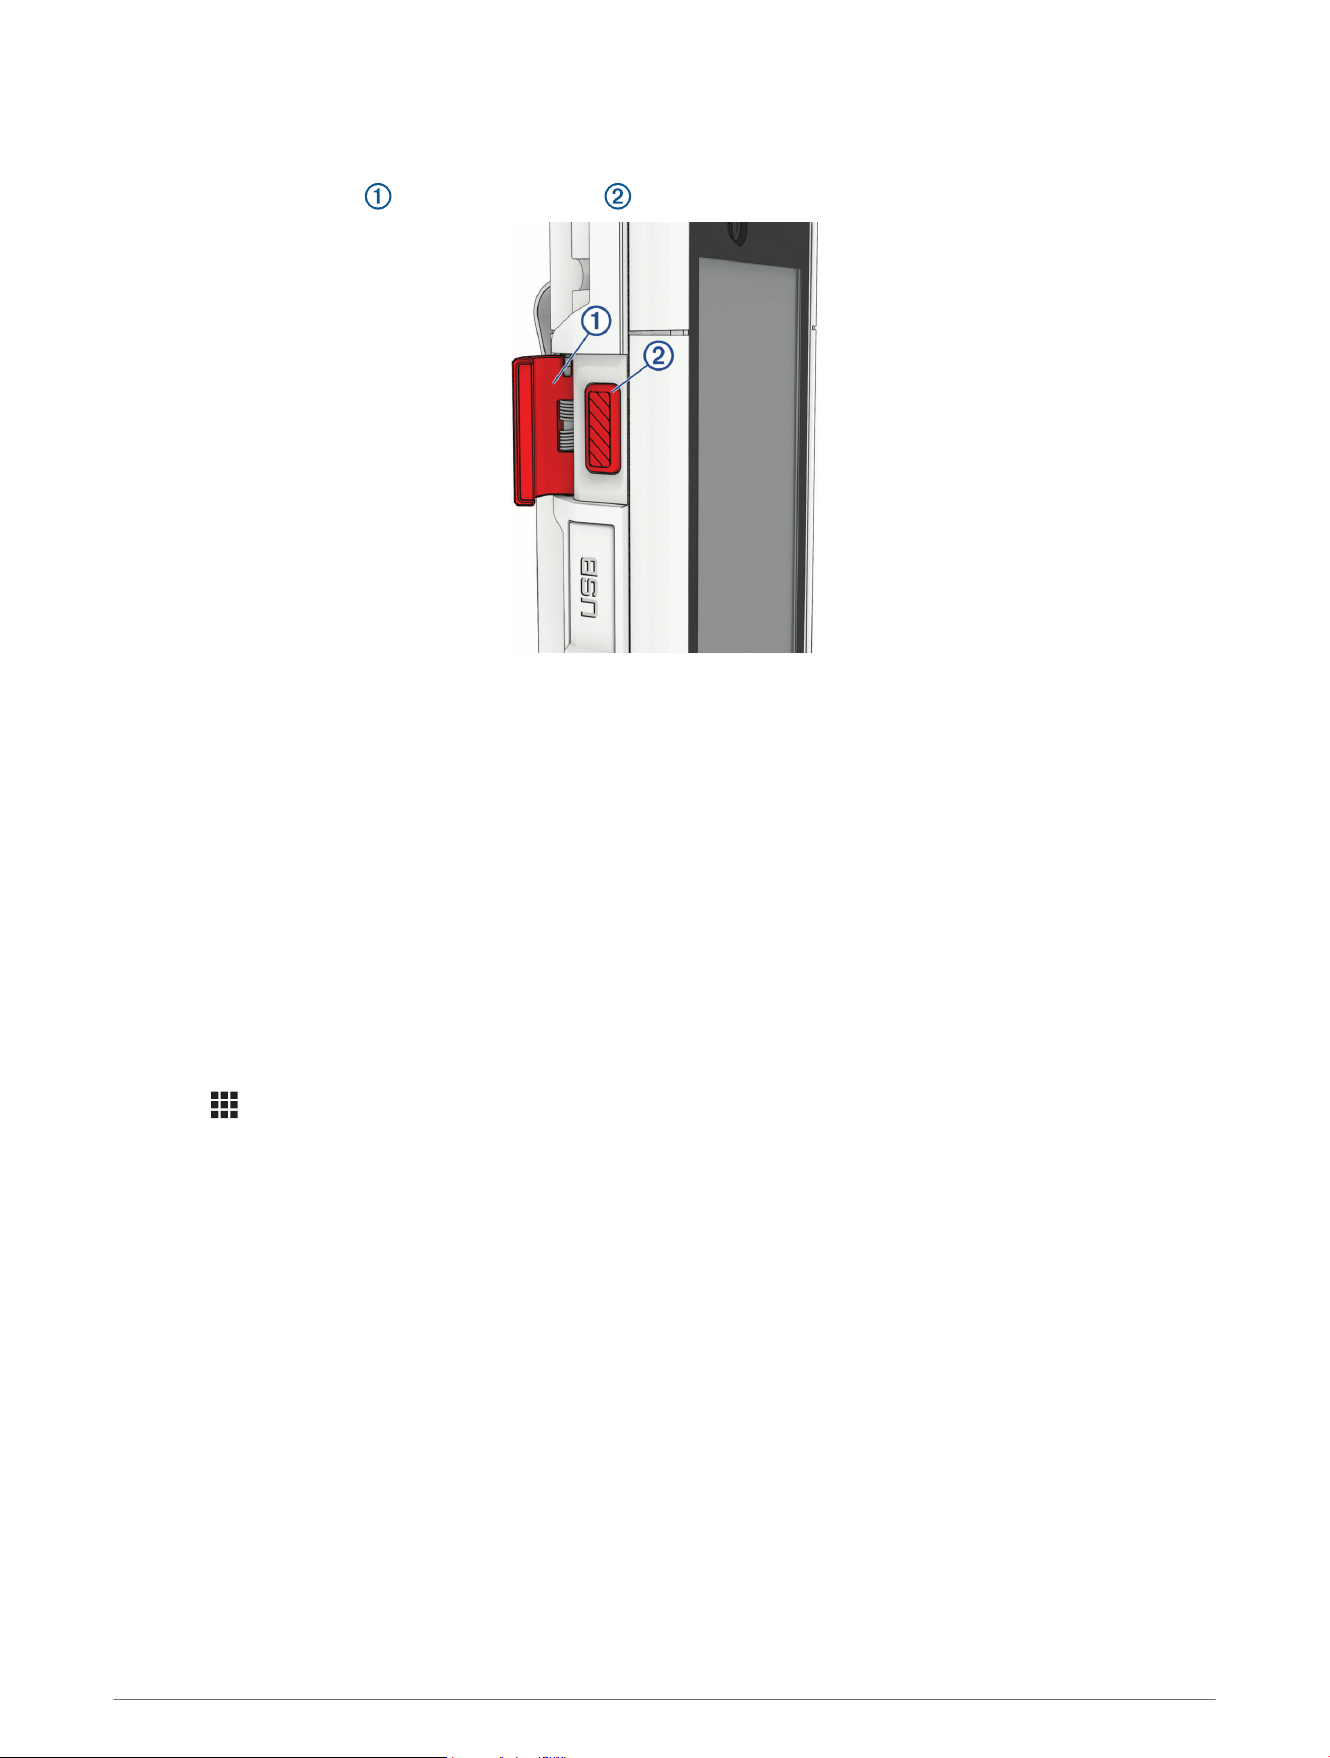
Initiating an SOS Rescue
You can initiate an SOS rescue with the device turned on or off if the device has battery power.
1 Lift the protective cap from the SOS button .
2 Press and hold the SOS button.
3 Wait for the SOS countdown.
The device sends a default message to the emergency response service with details about your location.
4 Reply to the confirmation message from the emergency response service.
Your reply lets the emergency response service know that you are capable of interacting with them during
the rescue. If you do not reply, the emergency response service will still initiate a rescue.
For the first 10 minutes of your rescue, an updated location is sent to the emergency response service every
minute. To conserve battery power after the first 10 minutes, an updated location is sent every 10 minutes.
TIP: You can also initiate an SOS rescue and interact with the Garmin Response team using the Garmin
Messenger app. You must have an active satellite subscription to use the SOS feature in the app.
Sending a Custom SOS Message
After pressing the SOS button to initiate an SOS rescue, you can reply with a custom message using the SOS
page.
1 Select to open the apps list.
2 Select SOS > Reply.
3 Use the on-screen keyboard to write a custom SOS message.
4 Select Send.
Your reply lets the emergency response service know that you are capable of interacting with them during the
rescue.
Canceling an SOS Request
If you no longer need assistance, you can cancel an SOS request after it is sent to the emergency response
service.
1 Lift the protective cap, and hold the SOS button.
2 Select Cancel SOS.
3 When prompted to confirm your cancellation request, select Cancel SOS.
Your device transmits the cancellation request. When you receive a confirmation message from the
emergency response service, the device returns to normal operation.
44 inReach Device Features for GPSMAP H1i Plus

Syncing inReach Data
After you make edits to your data, such as plan changes, contacts, or check-in message recipients, you must
sync your device using the Garmin Messenger app.
1 Turn on the inReach satellite communicator.
2 Bring your compatible phone within 10m (33ft.) of your satellite communicator.
3 Open the Garmin Messenger app.
4 Wait while your data syncs automatically.
TIP: You can check the connection status of the inReach satellite communicator and see the last time
messages were checked on the Device tab in the app.
Viewing Plan Details and Usage
You can view plan details and data use on the GPSMAP H1i Plus satellite communicator. Data use includes the
number of messages, track points, and check-in messages sent during the billing cycle. The data use counters
reset automatically at the beginning of each billing cycle.
1 Select to open the apps list.
2 Select Service Plan.
3 If you have made changes to your data plan in the Garmin Messenger app, select Update.
Contacts
You can add, delete, and edit contacts for inReach messages on the GPSMAP H1i Plus satellite communicator.
Adding a Contact
1 Select to open the apps list.
2 Select Contacts > New Contact.
3 Select an item to edit.
4 Enter the new information.
Editing a Contact
1 Select to open the apps list.
2 Select Contacts.
3 Select a contact.
4 Select an item to edit.
5 Enter the new information.
Deleting a Contact
1 Select to open the apps list.
2 Select Contacts.
3 Select a contact.
4 Press MENU to open the options menu.
5 Select Delete Contact.
inReach Device Features for GPSMAP H1i Plus 45

inReach Remote Settings
You can access some inReach features from your GPSMAP H1i Plus satellite communicator using another
compatible device with ANT+
®
wireless technology, such as the fēnix
®
watch. You can use the inReach Remote
feature on another compatible device to view incoming messages, send check-in messages, start and stop
tracking, and initiate or cancel an SOS.
Select to open the apps list. Select Settings > Connectivity > Sensors & Accessories > inReach Remote.
Enabled: Turns on or off the inReach Remote feature and allows you to access some inReach features using
another compatible device.
Device Number: Displays the device number for the ANT+ channel.
Verified Devices: Displays a list of verified devices that this device can wirelessly connect to.
Navigation
Navigating to a Destination
1 Press FIND.
2 Select a category.
3 Select a destination.
TIP: You can search for a destination, such as recent finds or saved locations (Searching for a Destination,
page47).
4 Select Navigate.
5 Select your navigation options:
• Select the activity name to change the activity type. Activity types include walking, hiking, hunting, and
more.
• To adjust the course to follow map data and recalculate as needed, enable the Routing toggle switch.
• To set how the device routes from one point to the next, select Advanced Settings (Routing Settings,
page47).
6 Select Go.
The device calculates your route and displays it on the map. You can navigate using the navigation tools
(Map, page51, Compass, page47).
46 Navigation

Searching for a Destination
1 Select an option:
• From the home page, select .
• Press FIND.
2 Select the Map filter at the top of the screen.
3 Select an option:
• To search for a destination on the preloaded map, select Search Map.
• To search for a recently found location, select Recent Finds.
• To use the map to select a destination, select Use Map.
• To search for a saved waypoint, course, or activity, select Saved.
• To search for a point of interest, such as cities, food, or lodging, select Points of Interest.
• To search for a downloaded geocache, select Geocaches.
• To create a course and navigate it, select Create a Course.
• To point the device at an object in the distance and navigate using the object as a reference point, select
Sight 'N Go.
• To navigate back to the beginning of your activity, select TracBack.
• To select a destination using known coordinates, select Coordinates.
4 If necessary, enter all or part of the name.
5 If necessary, select Current Location to change the search area from near your current location to near
another location.
6 Select a destination.
Routing Settings
Begin navigating to a destination (Navigating to a Destination, page46). Select Advanced Settings.
NOTE: The available routing settings vary based on the destination or course selected.
Calculation Method: Sets the method used to calculate your route.
Off Course Recalculation: Sets recalculation preferences when navigating away from an active route.
Avoidance Setup: Sets the types of roads, terrain, and transportation methods to avoid while navigating.
Course Transitions: Sets how the device routes from one point on the course to the next. This setting is
available only for courses. The Distance option routes you to the next point on the route when you are
within a specified distance of your current point. You can use the Up Ahead app while navigating direct path
courses to change the active point.
Stopping Navigation
1 Press FIND.
2 Select Stop Navigation.
Compass
When navigating, points to your destination, regardless of the direction you are moving. When points
toward the top of the electronic compass, you are traveling directly toward your destination. If points any
other direction, turn until it points toward the top of the compass.
Navigating with the Compass
When navigating to a destination, points to your destination, regardless of the direction you are moving.
1 Begin navigating to a destination (Navigating to a Destination, page46).
2 Select > Compass to open the compass.
3 Turn until points toward the top of the compass, and continue moving in that direction to the destination.
Navigation 47

Navigating with Sight 'N Go
You can point the device at an object in the distance with the compass direction locked in, project the object as
a waypoint, and navigate using the object as a reference point.
1 Select > Compass to open the compass.
2 Press MENU to open the options menu.
3 Select Sight 'N Go.
4 Point the device at an object.
5 Select Lock Direction > Set Course.
6 Navigate using the compass.
Projecting a Waypoint from Your Current Location
You can save a new waypoint by projecting the distance from your current location.
For example, if you would like to navigate to a location you observe on the other side of a river or stream,
you can project a waypoint from your current location to the observed location, and then navigate to the new
location after you cross the river or stream.
1 Select > Compass to open the compass.
2 Press MENU to open the options menu.
3 Select Sight 'N Go.
4 Point the device at the new location.
5 Select Lock Direction > Project Waypoint.
6 Select a unit of measure.
7 Enter the distance, and select Done.
8 Select Save.
48 Navigation
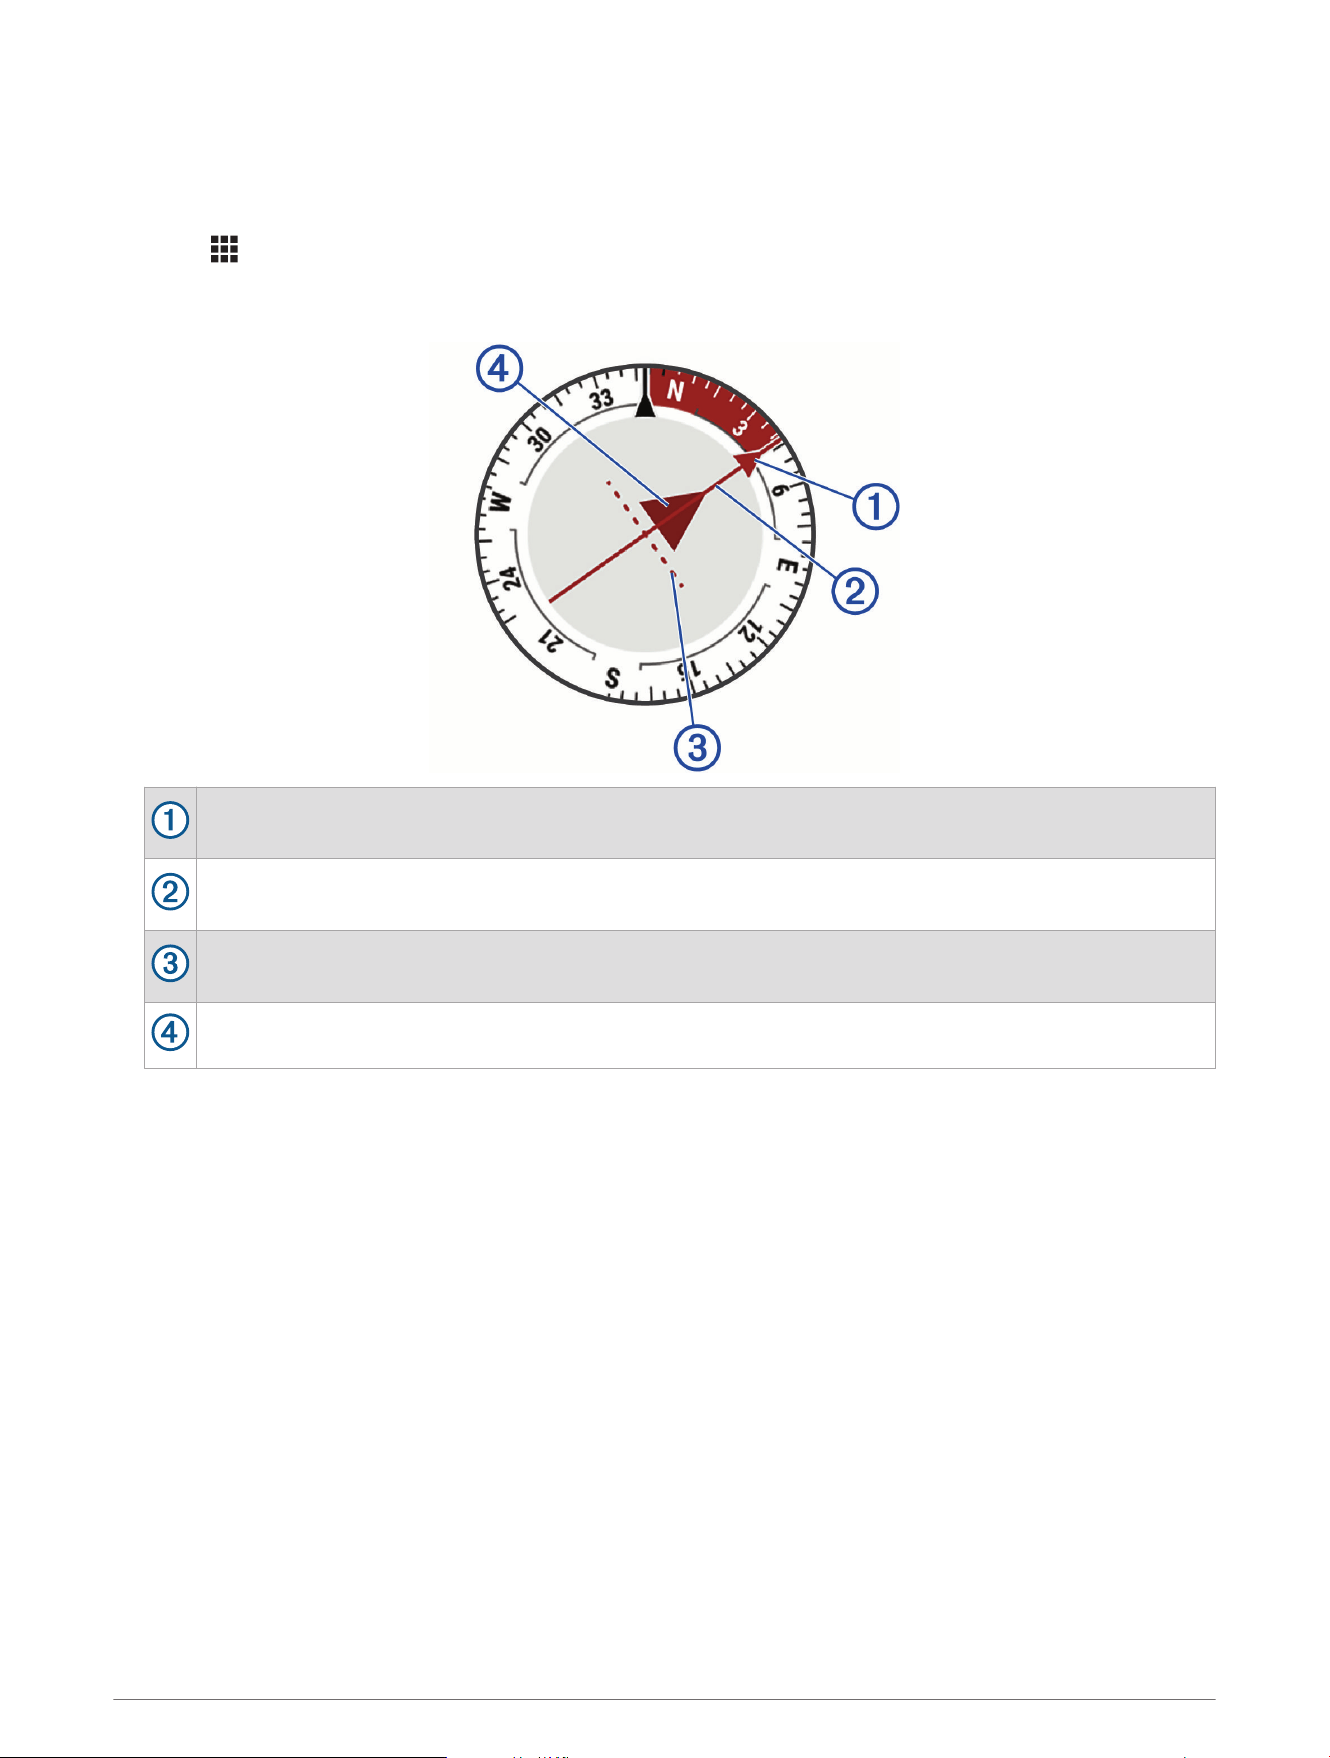
Using the Course Pointer
The course pointer is most useful when you are navigating to your destination in a straight line, such as when
you are navigating on water. It can help you navigate back to the course line when you go off-course to avoid
obstacles or hazards.
1 Select > Compass to open the compass.
2 Press MENU to open the options menu.
3 Select Compass Settings > Compass Style > Course (CDI) to enable the course pointer.
Course line pointer. Indicates the direction of the desired course line from your starting point to your
next waypoint.
Course deviation indicator (CDI). Indicates the location of the desired course line in relation to your
location. If the CDI is aligned with the course line pointer, you are on course.
Course deviation distance. The dots indicate your distance off course. The distance represented by
each dot is indicated by the scale in the upper-right corner.
To-and-from indicator. Indicates whether you are past the next waypoint.
Navigation 49

Compass Settings
Select > Compass to open the compass, and press MENU.
Sight 'N Go: Allows you to point the device at an object in the distance, and navigate using the object as a
reference point (Navigating with Sight 'N Go, page48).
Stop Navigation: Stops navigation of the current route.
Resume Navigation: Resumes navigation of the current route.
Change Dashboard: Changes the theme and information displayed on the dashboard.
NOTE: Your compass dashboard is activity-specific. Your settings are saved to the current activity type
(Activity Settings, page66).
Calibrate Compass: Calibrates the compass if you experience irregular compass behavior. For example, after
moving long distances or after extreme temperature changes (Calibrating the Compass, page50).
Compass Settings > Activity Settings: Customizes the compass settings for the current activity type (Activity
Settings, page66).
Compass Settings > Display: Sets the directional heading on the compass to letters, degrees, or milliradians.
Compass Settings > North Reference: Sets the north reference used on the compass (Setting the North
Reference, page50).
Compass Settings > Compass Style: Sets the behavior of the pointer that appears on the map when navigating.
Bearing points in the direction of your destination. Course (CDI) shows your relationship to the course line
leading to the destination.
Compass Settings > Set Scale: Sets the scale for the distance between the dots on the course deviation
indicator when navigating with Sight 'N Go.
Compass Settings > Compass: Automatically switches from an electronic compass to a GPS compass when
you are traveling at a higher rate of speed for a period of time.
Lock Data Fields: Locks the data fields. You can unlock the data fields to customize them.
Change Data Fields: Customizes the compass data fields.
Restore Defaults: Restores the compass to factory default settings.
Calibrating the Compass
Before you can calibrate the electronic compass, you must be outdoors, away from objects that influence
magnetic fields, such as cars, buildings, or overhead power lines.
The GPSMAP device has a 3-axis electronic compass. You should calibrate the compass after moving long
distances or experiencing temperature changes.
1 Select > Compass to open the compass.
2 Press MENU to open the options menu.
3 Select Calibrate Compass > Start.
4 Follow the on-screen instructions.
Setting the North Reference
You can set the directional reference used in calculating heading information.
1 Select > Compass to open the compass.
2 Press MENU to open the options menu.
3 Select Compass Settings > North Reference.
4 Select an option:
• To set geographic north as the heading reference, select True.
• To set the magnetic declination for your location automatically, select Magnetic.
• To set grid north (000 degrees) as the heading reference, select Grid.
• To set the magnetic variation value manually, select User.
50 Navigation

Map
represents your location on the map. As you travel, moves and displays your path. Depending on your zoom
level, waypoint names and symbols may appear on the map. You can zoom in on the map to see more detail.
When you are navigating to a destination, your route is marked with a colored line on the map.
Managing Maps
1 Select to open the apps list.
2 Select Map Manager.
3 Select an option:
• To download premium maps and activate your Outdoor Maps+ subscription for this device, select
Outdoor Maps+ (Downloading Maps, page51).
• To download TopoActive maps, select TopoActive Maps (Downloading TopoActive Maps, page52).
• To check for updates to downloaded maps, select Check for Updates.
Downloading Maps
Before you can download maps to your device, you must pair your device with the Garmin Explore app (Pairing
Your Phone, page3), and connect to a wireless network (Connecting to a Wireless Network, page65).
1 Select to open the apps list.
2 Select Map Manager > Outdoor Maps+.
3 Select an option:
• To download free satellite map data without a subscription, select Add Satellite Imagery.
• To download premium maps and activate your Outdoor Maps+ subscription for this device, select Get
Outdoor Maps+.
NOTE: Go to garmin.com/outdoormaps for information about purchasing a subscription.
4 Press MENU, and select Layer Information to view details about the map layers (optional).
5 Select New Map.
6 Select an option:
• Select Use Map to download an area directly from the map.
• Select a location from the available categories.
A preview of the map region appears.
7 From the map, complete one or more actions:
• Drag the map to view different areas.
• Pinch or spread two fingers on the touchscreen to zoom in and out of the map.
• Select and to zoom in and out of the map.
• Double-tap the map to quickly zoom in.
8 Select Next.
9 Complete one or more actions:
• To edit the map name, select Name.
• To change the map storage location from internal storage to a memory card, select Storage Location.
• To change the map layers to download, select the checkboxes next to each layer's name.
NOTE: You can press MENU and select Layer Information to view details about the map layers.
An estimated download size appears for the map. You should verify your device has enough available
storage space for the map.
10 Select Download.
Navigation 51

Downloading TopoActive Maps
Before you can download maps to your device, you must pair your device with the Garmin Explore app (Pairing
Your Phone, page3), and connect to a wireless network (Connecting to a Wireless Network, page65).
1 Select to open the apps list.
2 Select Map Manager > TopoActive Maps > Add.
3 Select a map.
4 Select Download.
Deleting a Map
You can remove maps to increase the available device storage.
NOTE: Some preloaded maps cannot be deleted.
1 Select to open the apps list.
2 Select Map Manager.
3 Select an option:
• Select TopoActive Maps, select a map, press MENU, and select Remove.
• Select Outdoor Maps+, select a map, press MENU, and select Delete.
Navigating with the Map
1 Begin navigating to a destination (Navigating to a Destination, page46).
2 Select > Map to open the map.
A blue triangle represents your location on the map. As you travel, the blue triangle moves and displays your
path.
3 Complete one or more actions:
• Drag the map, or press , , , or to view different areas.
• Pinch or spread two fingers on the touchscreen, or press and to zoom in and out on the map.
TIP: You can double-tap the map to quickly zoom in.
• To view more information about a waypoint on the map (represented by an icon) or other location, move
the map cursor to the location, and select the information bar at the top of the map.
Measuring Distance on the Map
You can measure the distance between multiple locations.
1 Select > Map to open the map.
2 Press MENU to open the options menu.
3 Select Measure Distance > Start.
4 Drag the map and tap a location, or press , , , and to move the map cursor to a location.
5 Select Use.
The measured distance appears.
6 Move the map cursor and select Use to add additional locations on the map.
52 Navigation

Map Settings
Select > Map to open the map, and press MENU.
Show Dashboard: Shows or hides the dashboard after setting one to display on the map in the settings for the
current activity type (Activity Settings, page66).
Stop Navigation: Stops navigating the current route.
Map Setup > Activity Settings: Customizes the map settings for the current activity type (Activity Settings,
page66).
NOTE: The map dashboard, dark mode, and other settings are activity-specific.
Map Setup > Map Manager: Select to view and manage downloaded maps. With an Outdoor Maps+
subscription, allows you to download additional maps (Managing Maps, page51).
Map Setup > Orientation: Adjusts how the map is shown on the page (Changing the Map Orientation, page53).
Map Setup > Guidance Text: Sets when the guidance text is shown on the map.
Map Setup > Auto Zoom: Automatically selects the appropriate zoom level for optimal use on your map. When
Off is selected, you must zoom in or out manually.
Map Setup > Detail: Sets the amount of detail shown on the map. Showing more detail may cause the map to
redraw more slowly.
Map Setup > Shaded Relief: Shows detail relief on the map, if available, or turns off shading.
Map Setup > Vehicle: Sets the position icon, which represents your position on the map. The default icon is a
small blue triangle.
Map Setup > Text Size: Sets the text size for map items.
Map Setup > Map Speed: Adjusts the speed at which the map is drawn. A faster map drawing speed decreases
the battery life.
Measure Distance: Measures the distance between multiple locations (Measuring Distance on the Map,
page52).
Restore Defaults: Restores the map to factory default settings.
Map Layers: Shows different layers in the map and allows you to select which layers to view.
Download Maps Here: With an Outdoor Maps+ subscription, allows you to download maps for the current
location (Managing Maps, page51).
Create Course: Select to create a new course using the map (Creating a Course, page57).
Changing the Map Orientation
1 Select > Map to open the map.
2 Press MENU to open the options menu.
3 Select Map Setup > Orientation.
4 Select an option:
• Select North Up to show north at the top of the page.
• Select Track Up to show your current direction of travel at the top of the page.
• Select Automotive Mode to show an automotive perspective with the direction of travel at the top of the
page.
Showing and Hiding Map Data
If you have multiple maps installed on your device, you can choose the map data to show on the map.
1 From the map, select .
2 Select the map layer to show or hide the map data.
Optional Maps
You can use additional maps with the device, such as Outdoor Maps+, City Navigator
®
, and Garmin HuntView
™
Plus detailed maps. Detailed maps may contain additional points of interest, such as restaurants or marine
services. For more information, go to buy.garmin.com or contact your Garmin dealer.
Navigation 53

Purchasing Additional Maps
1 Go to your device product page at garmin.com.
2 Click the Maps tab.
3 If necessary, select a continent and a map type.
4 Select a map.
5 Follow the on-screen instructions.
Waypoints
Waypoints are locations you record and store in the device. Waypoints can mark where you are, where you are
going, or where you have been. You can add details about the location, such as name, elevation, and depth.
You can add a .gpx file that contains waypoints by transferring the file to the GPX folder (Transferring Files to
Your Device Using a Computer, page73).
Saving Your Current Location as a Waypoint
1 Press MARK.
2 If necessary, select a field to edit information about the waypoint, such as the name or location.
3 Select Done.
Saving a Location on the Map as a Waypoint
You can save a location on the map as a waypoint.
1 Select > Map to open the map.
2 Tap the screen, or press , , , or to move the cursor to a location.
3 Select the information bar at the top of the screen.
4 Press MENU to open the options menu.
5 Select Save as Waypoint.
Navigating to a Waypoint
1 From the home page, select Saved.
2 Select a waypoint.
TIP: You can select to filter your saved data for waypoints.
3 Select Navigate.
4 Select your navigation options:
• Select the activity name to change the activity type. Activity types include walking, hiking, hunting, and
more.
• To adjust the course to follow map data and recalculate as needed, enable the Routing toggle switch.
• To set how the device routes from one point to the next, select Advanced Settings (Routing Settings,
page47).
5 Select Go.
The device calculates your route and displays it on the map. You can navigate using the navigation tools
(Map, page51, Compass, page47).
54 Navigation

Finding a Saved Waypoint
1 Press FIND.
2 Select Saved > Waypoints.
3 If necessary, select an option:
• Select Search Waypoints to search using the name of the waypoint.
• Select Searching Near to search near a recently found location, another waypoint, your current location, or
a point on the map.
4 Select a waypoint from the list.
Editing a Waypoint
1 From the home page, select Saved.
2 Select a saved waypoint.
3 Press MENU to open the options menu.
4 Select Edit Waypoint.
5 Select an item to edit, such as the name or location.
6 Enter the new information, and select Done.
Increasing the Accuracy of a Waypoint Location
You can refine the accuracy of a waypoint location by averaging the location data. When averaging, the
navigator takes several GPS readings at the same location and uses the average value to provide more
accuracy.
1 From the home page, select Saved.
2 Select a waypoint.
3 Press MENU to open the options menu.
4 Select Edit Waypoint.
5 Press MENU to open the options menu.
6 Select Average Location.
7 Move to the waypoint location.
8 Select Start.
9 Follow the on-screen instructions.
10 When the confidence status bar reaches 100%, select Save.
For best results, collect four to eight samples for the waypoint, waiting at least 90 minutes between samples.
Moving a Waypoint on the Map
1 From the home page, select Saved.
2 Select a waypoint.
3 Press MENU to open the options menu.
4 Select Edit Waypoint.
5 Press MENU to open the options menu.
6 Select Move Waypoint.
7 Press , , , or , or tap the screen to move the cursor to a new location on the map.
8 Select Move.
Navigation 55

Repositioning a Waypoint to Your Current Location
You can change the position of a waypoint. For example, if you move your vehicle, you can change the location
to your current position.
1 From the home page, select Saved.
2 Select a waypoint.
3 Press MENU to open the options menu.
4 Select Edit Waypoint.
5 Press MENU to open the options menu.
6 Select Reposition Here.
The waypoint location changes to your current location.
Deleting a Waypoint
1 From the home page, select Saved.
2 Select a saved waypoint.
3 Press MENU to open the options menu.
4 Select Delete.
Projecting a Waypoint from a Saved Waypoint
You can save a new waypoint by projecting the distance and bearing from a saved waypoint to a new location.
1 From the home page, select Saved.
2 Select a waypoint.
3 Press MENU to open the options menu.
4 Select Project Waypoint.
5 Enter the bearing, and select Done.
6 Select a unit of measure.
7 Enter the distance, and select Done.
8 Select Save.
Finding a Location Near a Waypoint
1 From the home page, select Saved.
2 Select a waypoint.
3 Press MENU to open the options menu.
4 Select Find Near Here.
5 Select a category.
The list displays locations near the selected waypoint.
Courses
A course can have multiple destinations, and can be navigated point to point or on routable roads. Courses are
saved as FIT files on the device.
56 Navigation

Creating a Course
1 Select to open the apps list.
2 Select Course Creator.
3 Select a category.
4 If necessary, select a location.
5 Press ENTER, or select Add Point to add the first point in the course.
6 Tap the screen, or press , , , or , and select Add Point to add additional points to the course.
7 If necessary, select Edit Point, and select an option:
• To edit information about the point, select Edit Point.
• To delete the point from the course, select Delete Point.
8 Press MENU to open the options menu.
9 Select an option:
• To cancel the last action, select Undo.
• To view a list of points in the course, select Course Points.
• To change the order of points in the course, select Course Points, select a point, and select Move Up or
Move Down.
• To edit information about a point, select Course Points, select a point, and select Edit Point.
• To delete a point from the course, select Course Points, select a point, and select Delete Point.
• To view an elevation plot of the course, select Elevation Chart.
• To calculate the most direct route possible to the destination, select Routing Options > Direct Routing.
• To set the method used to calculate your route, select Routing Options > Calculation Method.
• To set the types of roads, terrain, and transportation methods to avoid while navigating, select Routing
Options, and select the applicable toggle switches.
• To show different layers in the map and select which layers to view, select Map Layers.
10 Select > Save.
11 If necessary, select a field to edit the course name or color.
12 Select Done.
Navigating a Saved Course
1 From the home page, select Saved.
2 Select a course.
TIP: You can select to filter your saved data for courses.
3 Select Navigate.
4 Select your navigation options:
• To change the activity type, select the activity name. Activity types include walking, hiking, hunting, and
more.
• To adjust the course to follow map data and recalculate as needed, enable the Routing toggle switch.
• To set how the device routes from one point to the next, select Advanced Settings (Routing Settings,
page47).
5 Select Go.
The device calculates your route and displays it on the map. You can navigate using the navigation tools
(Map, page51, Compass, page47).
Navigation 57

Editing a Course
1 From the home page, select Saved.
2 Select a course.
3 Press MENU to open the options menu.
4 Select Edit Course.
5 Select Edit Point, and select an option:
• To edit information about the point, select Edit Point.
• To delete the point from the course, select Delete Point.
• To add a point to the course, select Add Point.
6 Press MENU to open the options menu.
7 Select an option:
• To cancel the last action, select Undo.
• To view a list of points in the course, select Course Points.
• To change the order of points in the course, select Course Points, select a point, and select Move Up or
Move Down.
• To edit information about a point, select Course Points, select a point, and select Edit Point.
• To delete a point from the course, select Course Points, select a point, and select Delete Point.
• To view an elevation plot of the course, select Elevation Chart.
• To calculate the most direct route possible to the destination, select Routing Options > Direct Routing.
• To set the method used to calculate your route, select Routing Options > Calculation Method.
• To set the types of roads, terrain, and transportation methods to avoid while navigating, select Routing
Options, and select the applicable toggle switches.
• To show different layers in the map and select which layers to view, select Map Layers.
8 Select > Save.
9 If necessary, select a field to edit the course name or color.
10 Select Done.
Editing the Name of a Course
1 From the home page, select Saved.
2 Select a course.
3 Press MENU to open the options menu.
4 Select Change Name.
5 Enter the new name.
Changing the Color of a Course on the Map
You can customize the track color of a course on the map to make it distinct.
1 From the home page, select Saved.
2 Select a course.
3 Press MENU to open the options menu.
4 Select Set Color.
5 Select a color.
Viewing a Saved Course on the Map
1 From the home page, select Saved.
2 Select a course.
3 Press MENU to open the options menu.
4 Select Show on Map.
58 Navigation

Viewing the Elevation Plot of a Course
The elevation plot displays the elevation data for a course based on your routing settings when navigating. If
routing is disabled, the elevation plot displays the straight-line elevation data between course points. If routing
is enabled, the device adjusts the course to follow map data and recalculate as needed, and the elevation plot
displays the elevation data along the roads included in your course.
1 From the home page, select Saved.
2 Select a course.
3 Select .
Deleting a Course
1 From the home page, select Saved.
2 Select a course.
3 Press MENU to open the options menu.
4 Select Delete.
Connected Features
Connected features are available for your GPSMAP navigator when you connect the device to a wireless
network or a compatible phone using Bluetooth technology. Some features require you to install the Garmin
Messenger app on your phone. Some features require you to install the Garmin Explore app on your phone. Go
to garmin.com/apps for more information.
Garmin Messenger: The Garmin Messenger app allows you to compose and send messages using your phone,
and to sync contacts and check-in message recipients with your GPSMAP H1i Plus satellite communicator.
Garmin Explore: The Garmin Explore app syncs and shares waypoints, courses, and collections with your
device. You can also download maps to your phone for offline access.
Connect IQ: Allows you to extend your device features with widgets, data fields, and apps using the Connect IQ
app.
EPO Downloads: Allows you to download an extended prediction orbit file to quickly locate GPS satellites and
reduce the time it takes to get an initial GPS fix using the Garmin Explore app or when connected to a Wi‑Fi
network.
Outdoor Maps+: Allows you to download satellite imagery or premium map data using an Outdoor Maps+
subscription when connected to a Wi‑Fi network.
Live Geocache Data: Provides paid or subscription-free services to view live geocache data from
www.geocaching.com using the Garmin Explore app or when connected to a Wi‑Fi network.
Tracking: Allows you to record track points with your GPSMAP H1i Plus satellite communicator and transmit
them over the Iridium satellite network. You can invite contacts to follow along by sending them an inReach
message from the field. This feature allows your contacts to view your live data on a tracking webpage.
Phone notifications: Displays phone notifications and messages from your paired phone on your GPSMAP
navigator.
Software Updates: Allows you to receive updates for your device software using the Garmin Explore app or
when connected to a Wi‑Fi network.
Weather: Allows you to view current weather conditions and weather forecasts using the Garmin Explore app or
when connected to a Wi‑Fi network.
inReach Weather: Allows you to request a weather forecast over satellite on your GPSMAP H1i Plus device,
using your inReach service plan.
Follow Garmin Trails: With a Garmin Connect+
™
subscription, access outdoor trails and courses recommended
by Garmin databases and other Garmin users, with pictures, ratings, trip reports, and more. To sign up, you
can download the Garmin Connect app from the app store on your phone, or go to connect.garmin.com.
Connected Features 59
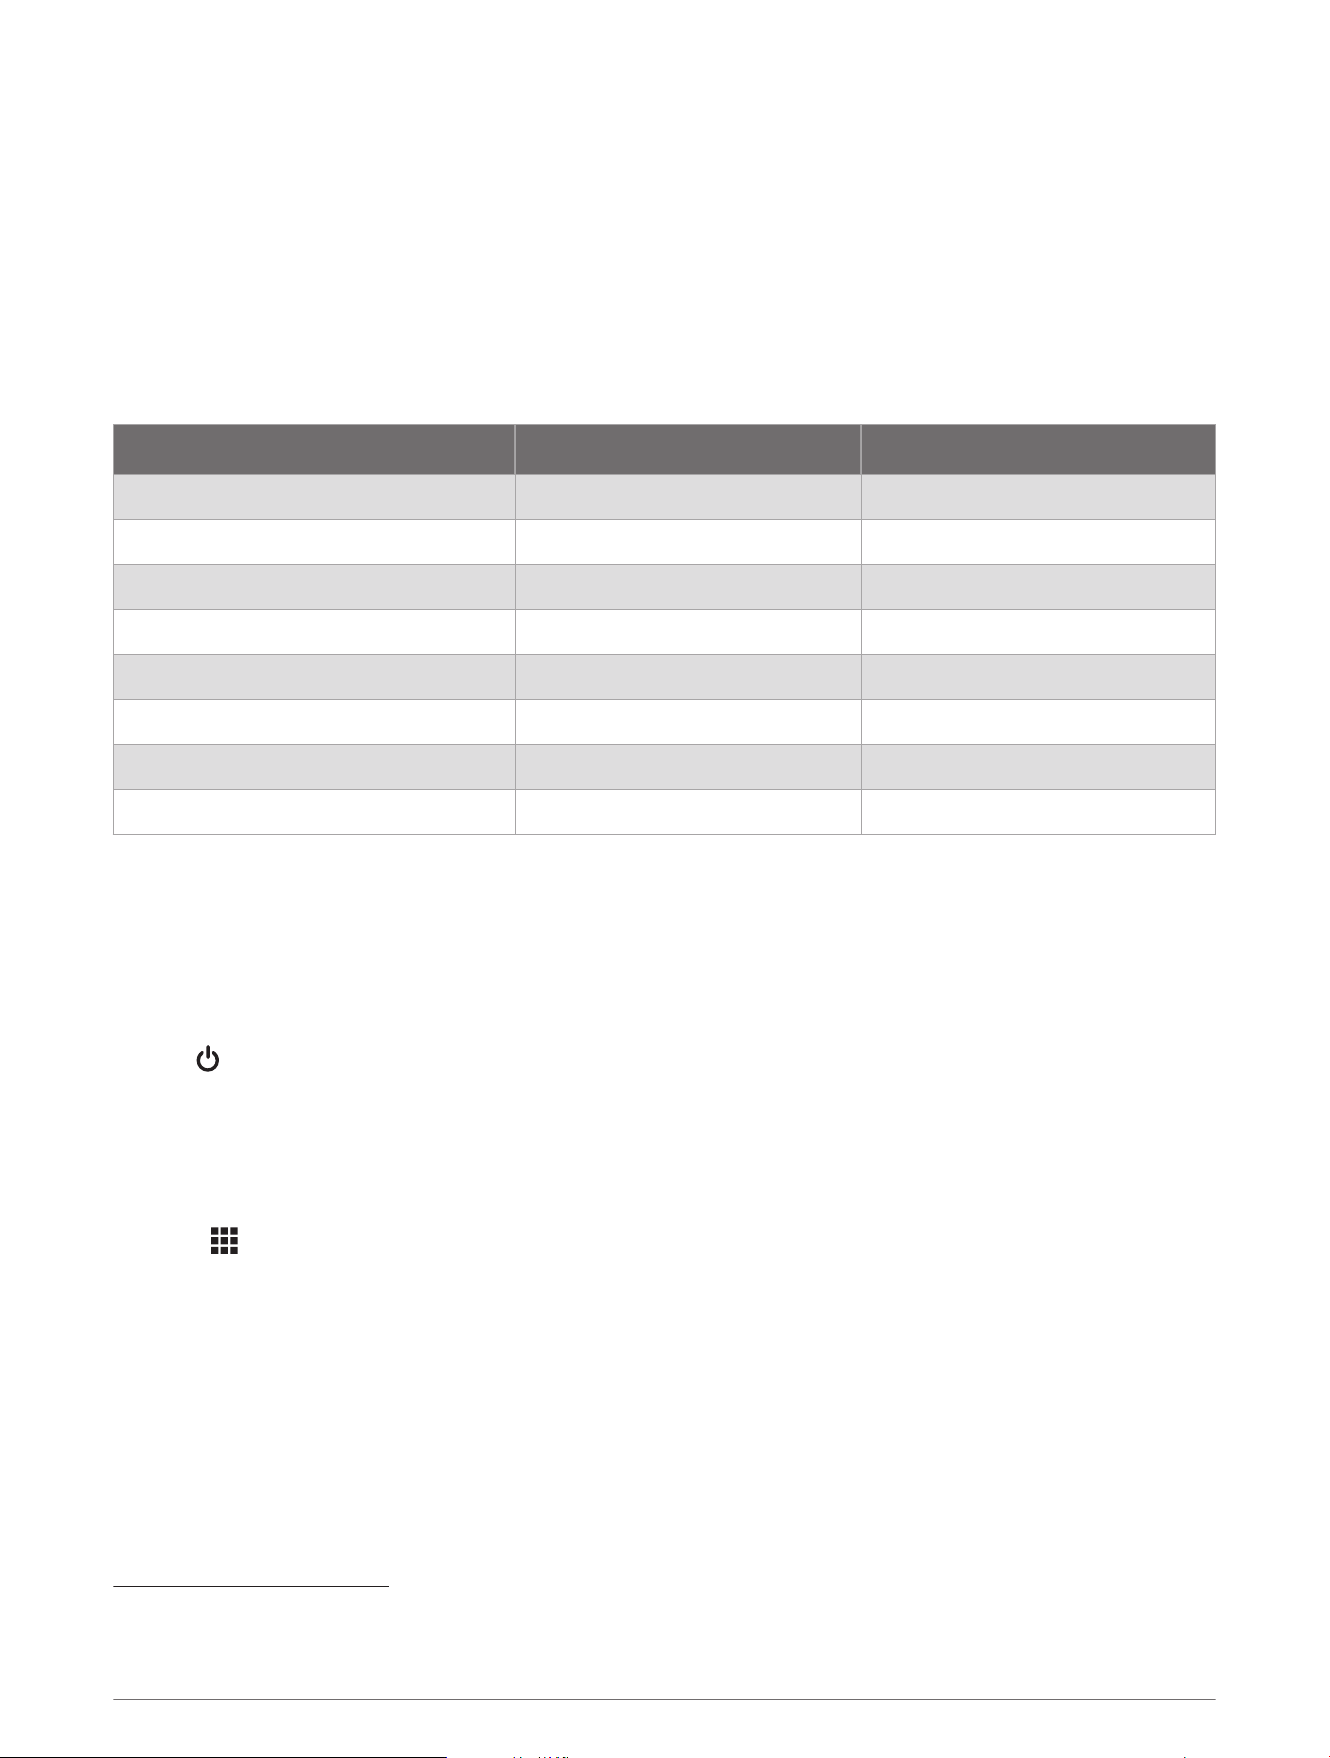
Garmin Explore
The Garmin Explore website and app allow you to create courses, waypoints, and collections, plan trips, sync
tracks, upload activities, and use cloud storage. They offer advanced planning both online and offline, allowing
you to share and sync data with your compatible Garmin device. You can use the app to download maps for
offline access, and then navigate anywhere without using your cellular service.
You can download the Garmin Explore app from the app store on your phone (garmin.com/exploreapp), or you
can go to explore.garmin.com.
Connected Feature Requirements
Some features require a phone and a Garmin app on your phone.
Feature Connected to a Paired Phone Connected to a Wi‑Fi Network
Activity uploads to Garmin Explore Yes No
Software updates Yes Yes
EPO downloads Yes Yes
Live geocache data Yes Yes
Weather Yes Yes
Phone notifications Yes
2
No
Connect IQ Yes No
Outdoor Maps+ Yes
3
Yes
4
Phone Notifications
Phone notifications require a compatible smartphone to be paired with the GPSMAP H1/H1i Plus device. When
your phone receives messages, it sends notifications to your device.
Viewing Phone Notifications
Before you can view notifications, you must pair your device with your compatible phone.
1 Hold or swipe down from the top of the home page to open the notification center and controls.
2 Select a notification.
Disabling Smart Notifications
By default, smart notifications appear on the screen when they are received on your paired phone. You can
disable smart notifications to prevent them from appearing.
1 Select to open the apps list.
2 Select Settings > Connectivity > Bluetooth > Smart Notifications.
3 Select the toggle switch to disable smart notifications.
2
The device receives phone notifications from a paired iOS
®
phone directly, and through the Garmin Explore app on an Android
™
phone.
3
Required to activate your subscription.
4
Required to download maps.
60 Connected Features

Managing Notifications
You can use your compatible phone to manage notifications that appear on your GPSMAP H1/H1i Plus device.
Select an option:
• If you are using an iPhone
®
, go to the iOS notifications settings, and select the notifications to show on
your phone and device.
NOTE: All notifications that you enable on your iPhone also appear on your device.
• If you are using an Android phone, from the Garmin Explore app, select your profile picture, and select App
Settings > Notifications, and select the notifications that you want to appear on your device.
Connect IQ Features
You can add Connect IQ features to your device from Garmin and other providers using the Connect IQ app.
Data Fields: Download new data fields that present sensor, activity, and history data in new ways. You can add
Connect IQ data fields to built-in features and pages.
Apps: Add interactive features to your device, such as new outdoor and fitness activity types.
Downloading Connect IQ Features
Before you can download features from the Connect IQ app, you must pair your GPSMAP H1/H1i Plus device
with your smartphone (Pairing Your Phone, page3).
1 From the app store on your smartphone, install and open the Connect IQ app.
2 If necessary, select your device.
3 Select a Connect IQ feature.
4 Follow the on-screen instructions.
Downloading Connect IQ Features Using Your Computer
1 Connect the device to your computer using a USB cable.
2 Go to apps.garmin.com, and sign in.
3 Select a Connect IQ feature, and download it.
4 Follow the on-screen instructions.
Connected Features 61

Settings Menu
Select to open the apps list. Select Settings.
TIP: You can search for a setting by name (Searching for Settings, page71).
Sounds & Vibration: Sets the device sounds and vibration, such as button feedback and alerts (Sounds &
Vibration Settings, page62).
Display & Brightness: Adjusts the backlight and display settings (Display and Brightness Settings, page63).
Connectivity: Pairs your device to a phone and wireless sensors, allows you to connect to wireless networks,
and provides access to other connectivity features and settings (Connectivity Settings, page63).
Action Button: Customizes the action button function (Customizing the Action Button, page65).
Activities: Customizes the activities list (Customizing the Activities List, page11), and customizes each activity's
map, compass, and recording settings (Activity Settings, page66).
Data Recording: Customizes activity recording settings and the recording method used on the device (Data
Recording Settings, page67).
System: Customizes system settings (System Settings, page68).
Messenger: Customizes the settings for the Messenger app on the GPSMAP H1i Plus satellite communicator
(Messenger App Settings, page42).
Map: Sets the map appearance and customizes map settings (Map Settings, page53).
Camera: For the GPSMAP H1i Plus navigator, saves photos to internal storage or a memory card (if available),
and sets the camera flash mode to Auto, On, or Off.
Geocaching: Customizes your geocache settings (Geocaching Settings, page31).
Marine: Sets the appearance of marine data on the map (Marine Settings, page71).
Applied Ballistics: Customizes the settings for the Applied Ballistics app (Applied Ballistics App Settings,
page22).
Sounds & Vibration Settings
Select to open the apps list. Select Settings > Sounds & Vibration.
Volume: Mutes all sounds or adjusts the speaker volume.
Bluetooth Audio: Connects Bluetooth headphones to your device (Connecting Bluetooth Headphones, page62).
Vibrations: Turns vibrations on or off.
Messenger: Sets device tones and vibration patterns for new messages and sent messages on the GPSMAP
H1i Plus satellite communicator.
Smart Notifications: Enables notifications from your paired phone, and sets device tones and vibration patterns
for calls, texts, and phone apps.
Nav. Prompts: Enables turn-by-turn navigation prompts while following a course.
System Alerts: Enables system alerts, and sets device tones and vibration patterns.
Button Feedback: Plays a tone or vibrates when you press a button.
Keyboard Feedback: Plays a tone or vibrates when you use the onscreen keyboard.
Start/Stop Activity: Plays a tone or vibrates when you start and stop an activity.
Lap: Plays a tone or vibrates when you start and stop a lap.
Touch Interactions: Plays a tone or vibrates when you interact with the touchscreen.
Connecting Bluetooth Headphones
1 Bring the headphones within 2m (6.6ft.) of your device.
2 Enable pairing mode on the headphones.
3 Select to open the apps list.
4 Select Settings > Sounds & Vibration > Bluetooth Audio > Add Device.
5 Select your headphones to complete the pairing process.
62 Settings Menu

Display and Brightness Settings
Select to open the apps list. Select Settings > Display & Brightness.
Brightness: Adjusts the screen brightness.
Auto Brightness: Automatically adjusts the screen brightness based on ambient light.
Night Vision: Enables night vision mode for compatibility with night vision goggles when the Auto Brightness
option is turned off.
Display Timeout: Adjusts the length of time before the screen turns off.
NOTE: This option impacts battery life.
Backlight Timeout: Adjusts the length of time before the backlight turns off when the Display Timeout option is
set to Never.
NOTE: The device uses more battery when the screen is always on.
Touch: Enables the touchscreen.
Tap to Wake: Turns on the screen when tapped.
Auto Lock: Locks the device after the screen turns off. You can press the power button to unlock the device.
Dark Mode: Displays day or night colors automatically based on the time of day, or always uses a light or dark
background.
Connectivity Settings
Select to open the apps list. Select Connectivity.
Sensors & Accessories: Pairs wireless sensors and accessories with your device (Pairing Your Wireless Sensors,
page64).
Bluetooth: Pairs your device to a phone and customizes the Bluetooth settings (Bluetooth Settings, page65).
Wi-Fi: Connects to wireless networks and customizes the Wi-Fi settings (Wi‑Fi Settings, page65).
Bluetooth Audio: Connects Bluetooth headphones to your device (Connecting Bluetooth Headphones, page62).
Garmin Share: Enables the Garmin Share feature to send or receive data with other Garmin devices (Garmin
Share, page26), and removes previously paired devices.
Settings Menu 63
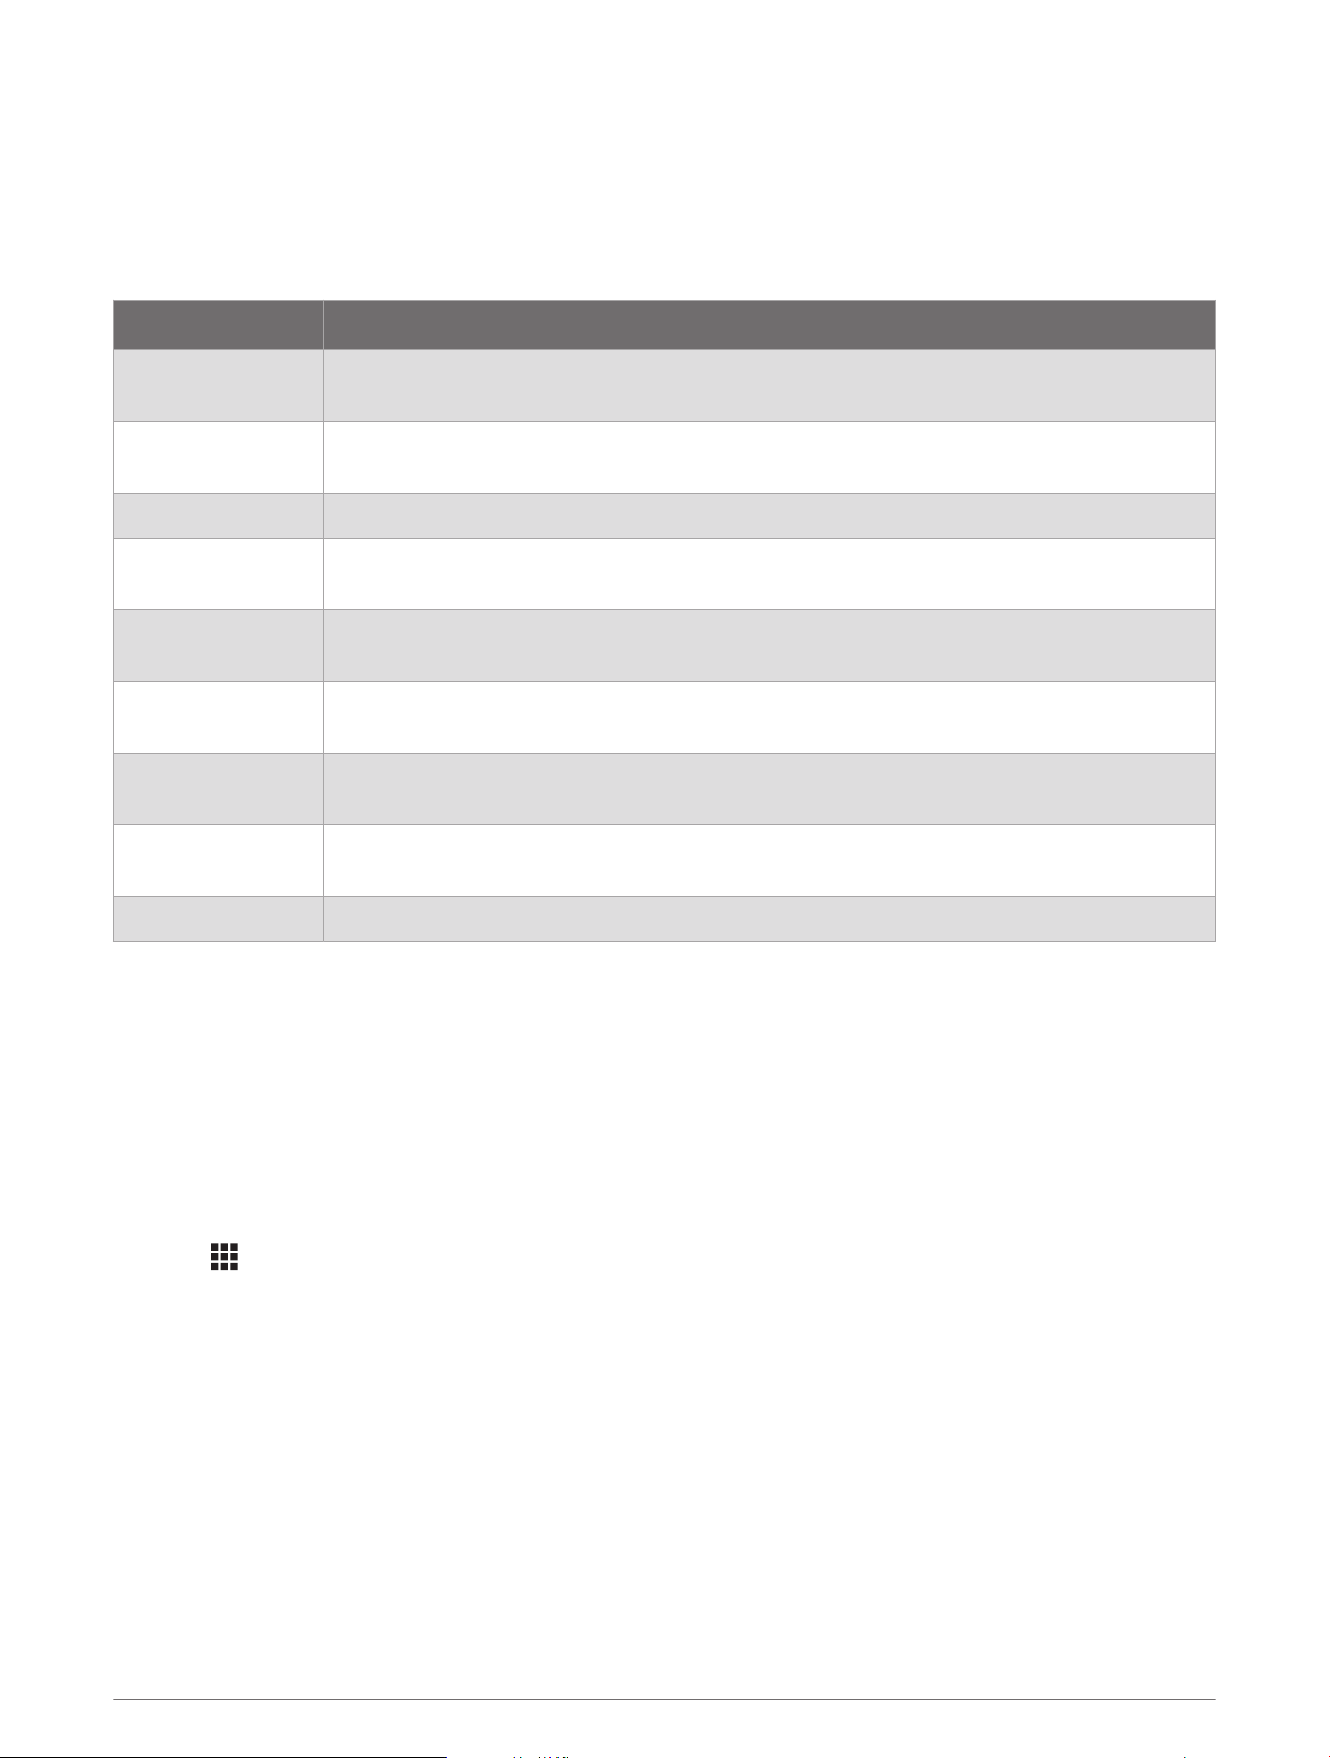
Wireless Sensors
You can pair your navigator with wireless sensors using ANT+ or Bluetooth technology (Pairing Your Wireless
Sensors, page64). After the devices are paired, you can customize the optional data fields (Customizing the
Data Fields, page8).
For information about specific Garmin sensor compatibility, purchasing, or to view the owner's manual, go to
buy.garmin.com for that sensor.
Sensor Type Description
Applied Ballistics
You can use Applied Ballistics devices, such as rangefinders or wind sensors, and view
additional ballistics information on your navigator.
Bike Spd/Cad
Sensor
You can attach speed or cadence sensors to your bike and view the data during your ride.
DogTrack You can view data from a compatible dog tracking device.
Heart Rate Monitor
You can use an external sensor, such as a chest heart rate monitor, to view heart rate
data during your activities.
inReach Remote
The inReach remote function allows you to control your inReach satellite communicator
using your GPSMAP H1 navigator.
Tempe Sensor
You can attach the tempe temperature sensor to a secure strap or loop where it is
exposed to ambient air, so it provides a consistent source of accurate temperature data.
Vectronix
You can use Vectronix
®
rangefinders, and view additional ballistics information on your
navigator.
Other
You can search for other sensors, such as weather meter devices, to use with the Applied
Ballistics app.
CIQ Sensor You can use sensors for downloaded Connect IQ apps.
Pairing Your Wireless Sensors
Your navigator can be paired with wireless sensors using ANT+ or Bluetooth technology. For example, you can
connect a heart rate monitor with your navigator. For more information about compatibility and purchasing
optional sensors, go to buy.garmin.com. For more information about connection types, go to garmin.com/hrm
_connection_types.
1 Put on the heart rate monitor, install the sensor, or press the button to wake up the sensor.
NOTE: See your wireless sensor owner's manual for pairing information.
2 Bring the navigator within 3m (10ft.) of the sensor.
NOTE: Stay 10m (33ft.) away from other sensors while pairing.
3 Select to open the apps list.
4 Select Settings > Connectivity > Sensors & Accessories.
5 Select your sensor type.
6 Select On.
When the sensor is paired with your navigator, the sensor status changes from Searching to Connected.
64 Settings Menu

Bluetooth Settings
Select to open the apps list. Select Settings > Connectivity > Bluetooth.
Status: Enables Bluetooth wireless technology, and shows current connection status.
Smart Notifications: Enables notifications from your paired phone, and sets device tones and vibration patterns
for calls, texts, and phone apps.
Forget Phone: Removes the connected phone from the list of paired phones. This option is available only after a
phone is paired.
Wi‑Fi Settings
Select to open the apps list. Select Settings > Connectivity > Wi-Fi.
Wi-Fi: Enables Wi‑Fi wireless technology.
NOTE: Other Wi‑Fi settings appear only when Wi‑Fi is enabled.
Auto Upload: Upload activities automatically over a known wireless network.
Wi-Fi Sync: Select to manually sync data over a Wi‑Fi connection.
My Networks: Connects your device to a wireless network (Connecting to a Wireless Network, page65).
Connecting to a Wireless Network
1 Select to open the apps list.
2 Select Settings > Connectivity > Wi-Fi.
3 Select the toggle switch to enable Wi‑Fi technology, if necessary.
4 Select My Networks > Add Network.
5 Select a wireless network from the list and enter the password, if necessary.
The navigator stores the network information and connects automatically when you return to this location.
Customizing the Action Button
1 Select to open the apps list.
2 Select Settings > Action Button.
3 Select an option:
• To customize the shortcut function when you press the action button, select Tap Action Button.
• To customize the shortcut function when you hold the action button, select Hold Action Button.
• To customize the shortcut function when you quickly press the action button twice, select Double Tap
Action Button.
Settings Menu 65

Activity Settings
These settings allow you to customize each preloaded activity based on your needs. For example, you can
customize the map appearance, compass dashboard, and activity recording settings for each activity.
Select to open the apps list. Select Settings > Activities, and select an activity.
Lock On Road: Locks the position icon, which represents your position on the map, onto the nearest road. This
is most useful when driving or navigating on roads.
Map Dashboard: Sets a dashboard to display on the map. Each dashboard shows different information about
your activity or your location.
Track Color: Changes the track log color.
Marine Chart Mode: Sets the type of chart the device uses when displaying marine data. Nautical displays
various map features in different colors so the marine POIs are more readable and so the map reflects the
drawing scheme of paper charts. Fishing (requires marine maps) displays a detailed view of bottom contours
and depth soundings and simplifies map presentation for optimal use while fishing.
Compass Dashboard: Customizes the dashboard that displays on the compass. Each dashboard shows
different information about your activity or your location.
Auto Pause: Sets the device to stop recording your activity when you drop below a specific speed.
Auto Lap: Sets the device to automatically mark a lap a specific distance.
Marking Laps by Distance
You can use the Auto Lap
®
feature to automatically mark the lap at a specific distance. This feature is helpful for
comparing your performance over different parts of an activity.
1 Select to open the apps list.
2 Select Settings > Activities.
3 Select an activity.
4 Select the Auto Lap toggle switch to turn it on.
5 Select Auto Lap Distance.
6 Enter a value, and select Done.
Restoring Activity Settings
You can restore all activity settings to the factory default settings.
1 Select to open the apps list.
2 Select Settings > Activities.
3 Press MENU to open the options menu.
4 Select Restore Defaults.
66 Settings Menu

Data Recording Settings
Select to open the apps list. Select Settings > Data Recording.
Activity Settings: Customizes the recording settings for the current activity type (Activity Settings, page66).
NOTE: Auto pause and auto lap settings are activity-specific.
Record Method: Sets how the device records activity data. The Smart option (default) records points at a
variable rate to create an optimum representation of your path and allows for longer activity recordings. The
Every Second option records points every second and provides more detailed activity recordings, but may not
record entire activities that last for longer periods of time.
Auto Start: Sets the device to start a new recording automatically when the device acquires satellites.
Auto Save: Sets an automated schedule to save your recordings. This helps organize your trips and save
memory space (Auto Save Settings, page67).
Output Format: Sets the device to save the recording as a FIT or a GPX and FIT file (File Types, page72). The
FIT option records your activity with fitness information that is tailored for the Garmin Connect application
and can be used for navigation. The FIT and GPX option records your activity as both a traditional track that
can be viewed on the map and used for navigation, and as an activity with fitness information.
Trip Recording: Sets a trip recording option.
Auto Save Settings
Select to open the apps list. Select Settings > Data Recording > Auto Save.
Auto: Automatically saves the current recording when no point has been recorded for four days.
Daily: Automatically saves the previous day's recording and starts a new one when you turn on the device on a
new day.
Weekly: Automatically saves the previous week's recording and starts a new one when you turn on the device
on a new week.
Never: Never saves the current recording automatically.
Settings Menu 67

System Settings
Select to open the apps list. Select Settings > System.
Satellite: Sets the satellite system options (Satellite Settings, page68).
Compass: Customizes the compass settings (Compass Settings, page50).
Altimeter: Customizes the altimeter settings (Altimeter Settings, page15).
Barometer: Customizes the barometer settings (Barometer Settings, page15)
Language: Sets the text language on the device.
NOTE: Changing the text language does not change the language of user-entered data or map data, such as
street names.
Voice: Sets the device voice dialect and your dialect for voice controls.
Keyboard: Enables keyboard languages.
Passcode: Sets a four-digit passcode to secure your device (Setting Your Device Passcode, page69).
Expedition Mode: Customizes settings for turning on expedition mode (Turning On Expedition Mode, page69).
Messaging Mode: Performance mode listens continuously for incoming inReach messages on your GPSMAP
H1i Plus satellite communicator, which reduces battery life. Low Power mode extends battery life by
checking for incoming inReach messages less frequently.
Position Format: Sets the geographical position format and datum options (Position Format Settings, page70).
Units: Sets the units of measure used on the device (Changing the Units of Measure, page70).
Time: Adjusts the time settings (Time Settings, page70).
Waypoints: Sets the automatic name type for waypoints, and allows you to enter a custom prefix for
automatically named waypoints.
Accessibility: Sets the touchscreen sensitivity and adjusts the size of the text.
RINEX Logging: Enables the device to write Receiver Independent Exchange Format (RINEX) data to a system
file. RINEX is a data interchange format for raw satellite navigation system data.
Advanced Settings > External Power Off: Sets the power mode when disconnected from external power.
Advanced Settings > External Power On: Sets the power mode when connected to external power.
Advanced Settings > USB Mode: Sets the device to use MTP (media transfer protocol) or Garmin mode when
connected to a computer.
Advanced Settings > HR Zones: Sets the five heart rate zones and your maximum heart rate for fitness
activities.
Reset: Resets user data and settings (Resetting Data and Settings, page70).
About: Displays device information, such as the unit ID, software version, regulatory information, and license
agreement (Viewing E-label Regulatory and Compliance Information, page74).
Satellite Settings
Select to open the apps list. Select Settings > System > Satellite.
Auto Select: Enables the device to use SatIQ
™
technology to dynamically select the best multi-band system
based on your environment. The Auto Select setting offers the best positioning accuracy while still
prioritizing battery life.
All Systems + Multi-Band: Enables multiple satellite systems on multiple frequency bands. Multi-band systems
use multiple frequency bands and allow for more consistent track logs, improved positioning, improved
multi-path errors, and fewer atmospheric errors when using the device in challenging environments. However,
using multiple systems can reduce battery life more quickly than using GPS only.
GPS only: Enables the GPS satellite system.
Demo Mode: Disables satellite systems.
68 Settings Menu
Setting Your Device Passcode
NOTICE
If you enter your passcode incorrectly three times, the device locks temporarily. After five incorrect attempts,
the device locks until you reset your passcode in the Garmin Explore app. If you have not paired your device with
your phone, the device deletes your data and resets to the factory default settings after five incorrect attempts.
You can set up a device passcode to prevent unauthorized users from using your device.
1 Select an option:
• During the initial setup, select Create Passcode when prompted.
• Select to open the apps list, and select Settings > System > Passcode > Set Passcode.
2 Enter a four-digit passcode.
3 Re-enter the passcode.
By default, you must enter the passcode immediately after you turn on the device or when the screen turns back
on. You can set a time interval before a passcode is required using the Require Passcode setting.
Changing Your Device Passcode
NOTICE
You must know your existing device passcode to change it. If you enter your passcode incorrectly three times,
the device locks temporarily. After five incorrect attempts, the device locks until you reset your passcode in the
Garmin Explore app. If you have not paired your device with your phone, the device deletes your data and resets
to the factory default settings after five incorrect attempts.
1 Select to open the apps list.
2 Select Settings > System > Passcode > Change Passcode.
3 Enter your existing four-digit passcode.
4 Enter a new four-digit passcode.
5 Re-enter the passcode.
Turning On Expedition Mode
You can use expedition mode to prolong the battery life. In expedition mode, the screen shuts off, the device
enters low power mode, and the device collects fewer GPS track points. You can change how often GPS track
points are recorded.
1 Select to open the apps list.
2 Select Settings > System > Expedition Mode.
3 Select an option:
• To enable the device to prompt you to turn on expedition mode when you turn off the device, select
Expedition Mode > Prompted.
• To automatically turn on expedition mode after two minutes of inactivity, select Expedition Mode > Auto.
• To never turn on expedition mode, select Expedition Mode > Never.
4 Select Recording Interval.
In expedition mode, the device collects GPS track points at the frequency indicated.
NOTE: Recording track points less frequently maximizes battery life.
In expedition mode, the green LED flashes occasionally.
Settings Menu 69

Position Format Settings
NOTE: You should not change the position format or the map datum coordinate system unless you are using a
map or chart that specifies a different position format.
Select to open the apps list. Select Settings > System > Position Format.
Position Format: Sets the position format in which a location reading appears.
Map Datum: Sets the coordinate system on which the map is structured.
Map Spheroid: Shows the coordinate system the device is using. The default coordinate system is WGS 84.
Changing the Units of Measure
1 Select to open the apps list.
2 Select Settings > System > Units.
3 Select an option:
• To change the unit of measure for speed and distance, select Speed/Distance.
• To change the unit of measure for vertical speed, select Vertical Speed.
• To change the unit of measure for elevation, select Elevation > Elevation.
• To change the unit of measure for depth to feet, fathoms, or meters, select Elevation > Depth.
• To change the unit of measure for temperature, select Temperature.
• To change the unit of measure for pressure, select Pressure.
4 Select a unit of measure.
Time Settings
Select to open the apps list. Select Settings > System > Time.
Time Format: Sets the device to show time in a 12-hour or 24-hour format.
Time Zone: Sets the time zone for the device. The Automatic option sets the time zone automatically based on
your GPS position.
Daylight Saving Time: Sets the device to use daylight saving time.
Resetting Data and Settings
1 Select to open the apps list.
2 Select Settings > System > Reset.
3 Select an option:
• To reset data specific to a trip, such as distance and averages, select Reset Trip Data.
• To delete all saved waypoints, select Delete All Waypoints.
• To clear the data recorded since you started your current activity, select Clear Current Activity.
NOTE: The device continues to record new data for the current activity.
• To reset all device settings to the factory default values, select Reset All Settings.
NOTE: Resetting all settings clears all geocaching activity from your device. It does not remove your saved
user data, such as courses and waypoints.
• To remove all saved user data and reset all settings on the device to the factory default values, select
Delete All.
NOTE: Deleting all settings removes your activity data, personal GPS data, history, and saved user data,
including courses and waypoints.
Restoring Default Page Settings
1 Open the page for which you will restore the settings.
2 Press MENU to open the options menu.
3 Select Restore Defaults.
70 Settings Menu

Marine Settings
Select to open the apps list. Select Settings > Marine.
Appearance: Sets the appearance of marine navigation aids on the map.
Marine Alarm Setup: Sets alarms for when you exceed a specified drift distance while anchored, when you are
off course by a specified distance, and when you enter water of a specific depth (Setting Up Marine Alarms,
page71).
Marine Speed Filter: Averages the speed of your vessel over a short period of time for smoother speed values.
Setting Up Marine Alarms
1 Select to open the apps list.
2 Select Settings > Marine > Marine Alarm Setup.
3 Select an alarm type.
4 Enter a distance, and select Done.
Searching for Settings
1 Select an option:
• From the home page, select .
• Press FIND.
2 Select the Settings filter at the top of the screen.
3 Select Search Settings.
4 Enter all or part of the setting name.
Device Information
Product Updates
On your computer, install Garmin Express
™
(www.garmin.com/express). On your phone, install the Garmin
Explore app.
This provides easy access to these services for Garmin devices:
• Software updates
• Map updates
• Data uploads to Garmin Explore
• Product registration
Setting Up Garmin Express
1 Connect the device to your computer using a USBcable.
2 Go to garmin.com/express.
3 Follow the on-screen instructions.
Getting More Information
You can find more information about this product on the Garmin website.
• Go to support.garmin.com for additional manuals, articles, and software updates.
• Go to buy.garmin.com, or contact your Garmin dealer for information about optional accessories and
replacement parts.
Device Information 71

Device Care
NOTICE
Do not store the device where prolonged exposure to extreme temperatures can occur, because it can cause
permanent damage.
Never use a hard or sharp object to operate the touchscreen, or damage may result.
Avoid chemical cleaners, solvents, sunscreen, and insect repellents that can damage plastic components and
finishes.
Secure the weather cap tightly to prevent damage to the USB port.
Avoid extreme shock and harsh treatment, because it can degrade the life of the product.
Cleaning the Device
1 Wipe the device using a cloth dampened with a mild detergent solution.
2 Wipe it dry.
Cleaning the USB Port
1 Turn off the device and disconnect the device from power.
2 Clean the USB port using a soft, clean, lint-free cloth or cotton swab.
NOTE: If necessary, you can lightly dampen the cloth or cotton swab with isopropyl alcohol.
3 Allow the device to dry completely before you connect it to power.
Cleaning the Touchscreen
1 Use a soft, clean, lint-free cloth.
2 If necessary, lightly dampen the cloth with water.
3 If using a dampened cloth, turn off the device and disconnect the device from power.
4 Gently wipe the screen with the cloth.
Data Management
File Types
NOTE: Most file types are stored in the GARMIN\NewFiles folder. The GARMIN\GPX folder is used for
geocaches. The GARMIN\GPXActivities folder is used for GPX activities if the device is set to save recordings
as GPX files (Data Recording Settings, page67).
The handheld device supports these file types:
• Files from Garmin Explore.
• GPX route, track, and waypoint files.
• GPX geocache files (Downloading Geocaches Using a Computer, page28).
• FIT courses, activities, and locations (waypoints).
72 Device Information
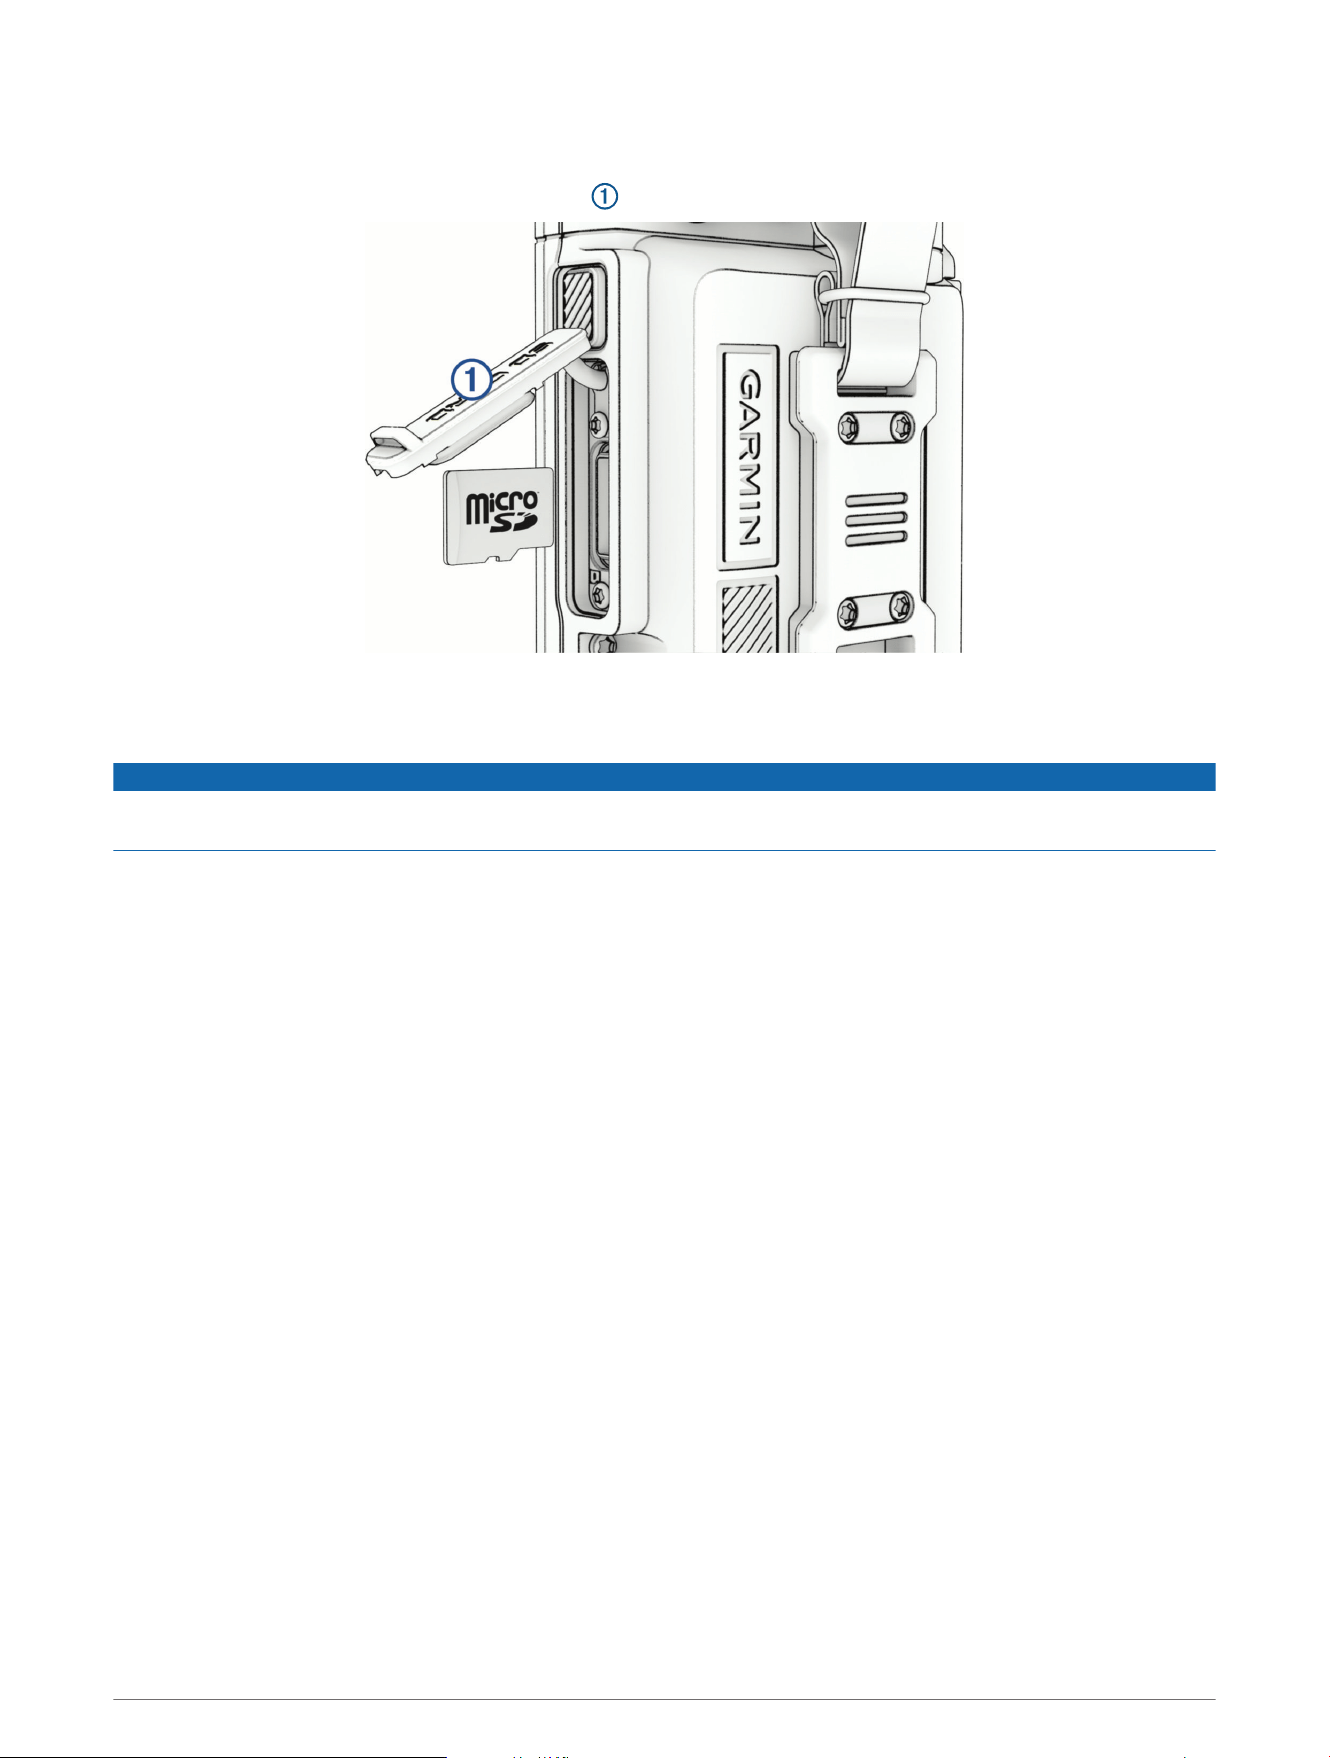
Installing a Memory Card
You can install a microSD memory card, up to 1 TB, for additional storage or pre-loaded maps.
1 Lift the weather cap on the side of the device .
2 Insert the memory card with the gold contacts facing the front of the device.
Connecting the Device to Your Computer
NOTICE
To prevent corrosion, thoroughly dry the USB port, the weather cap, and the surrounding area before charging or
connecting to a computer.
1 Pull up the weather cap from the USB port.
2 Plug one end of the cable into the USB port on the device.
3 Plug the other end of the cable into a computer USB port.
Depending on your computer operating system, the device and memory card (optional) appear as either
portable devices, removable drives, or removable volumes.
NOTE: Mac
®
operating systems do not detect the device by default. You must use Garmin Express software
to interact with files on your device.
Transferring Files to Your Device Using a Computer
1 Connect the device to your computer.
Depending on your computer operating system, the device and memory card (optional) appear as either
portable devices, removable drives, or removable volumes.
NOTE: Mac operating systems do not detect the device by default. Garmin Express software can be used
to perform device updates, but you should use a Windows
®
operating system to interact with files on your
device.
2 On your computer, open the file browser.
3 Select a file.
4 Select Edit > Copy.
5 Open the portable device, drive, or volume for the device or memory card.
6 Browse to a folder.
NOTE: Most file types have a named folder within the Garmin folder.
7 Select Edit > Paste.
The file appears in the list of files in the device memory or on the memory card.
Device Information 73
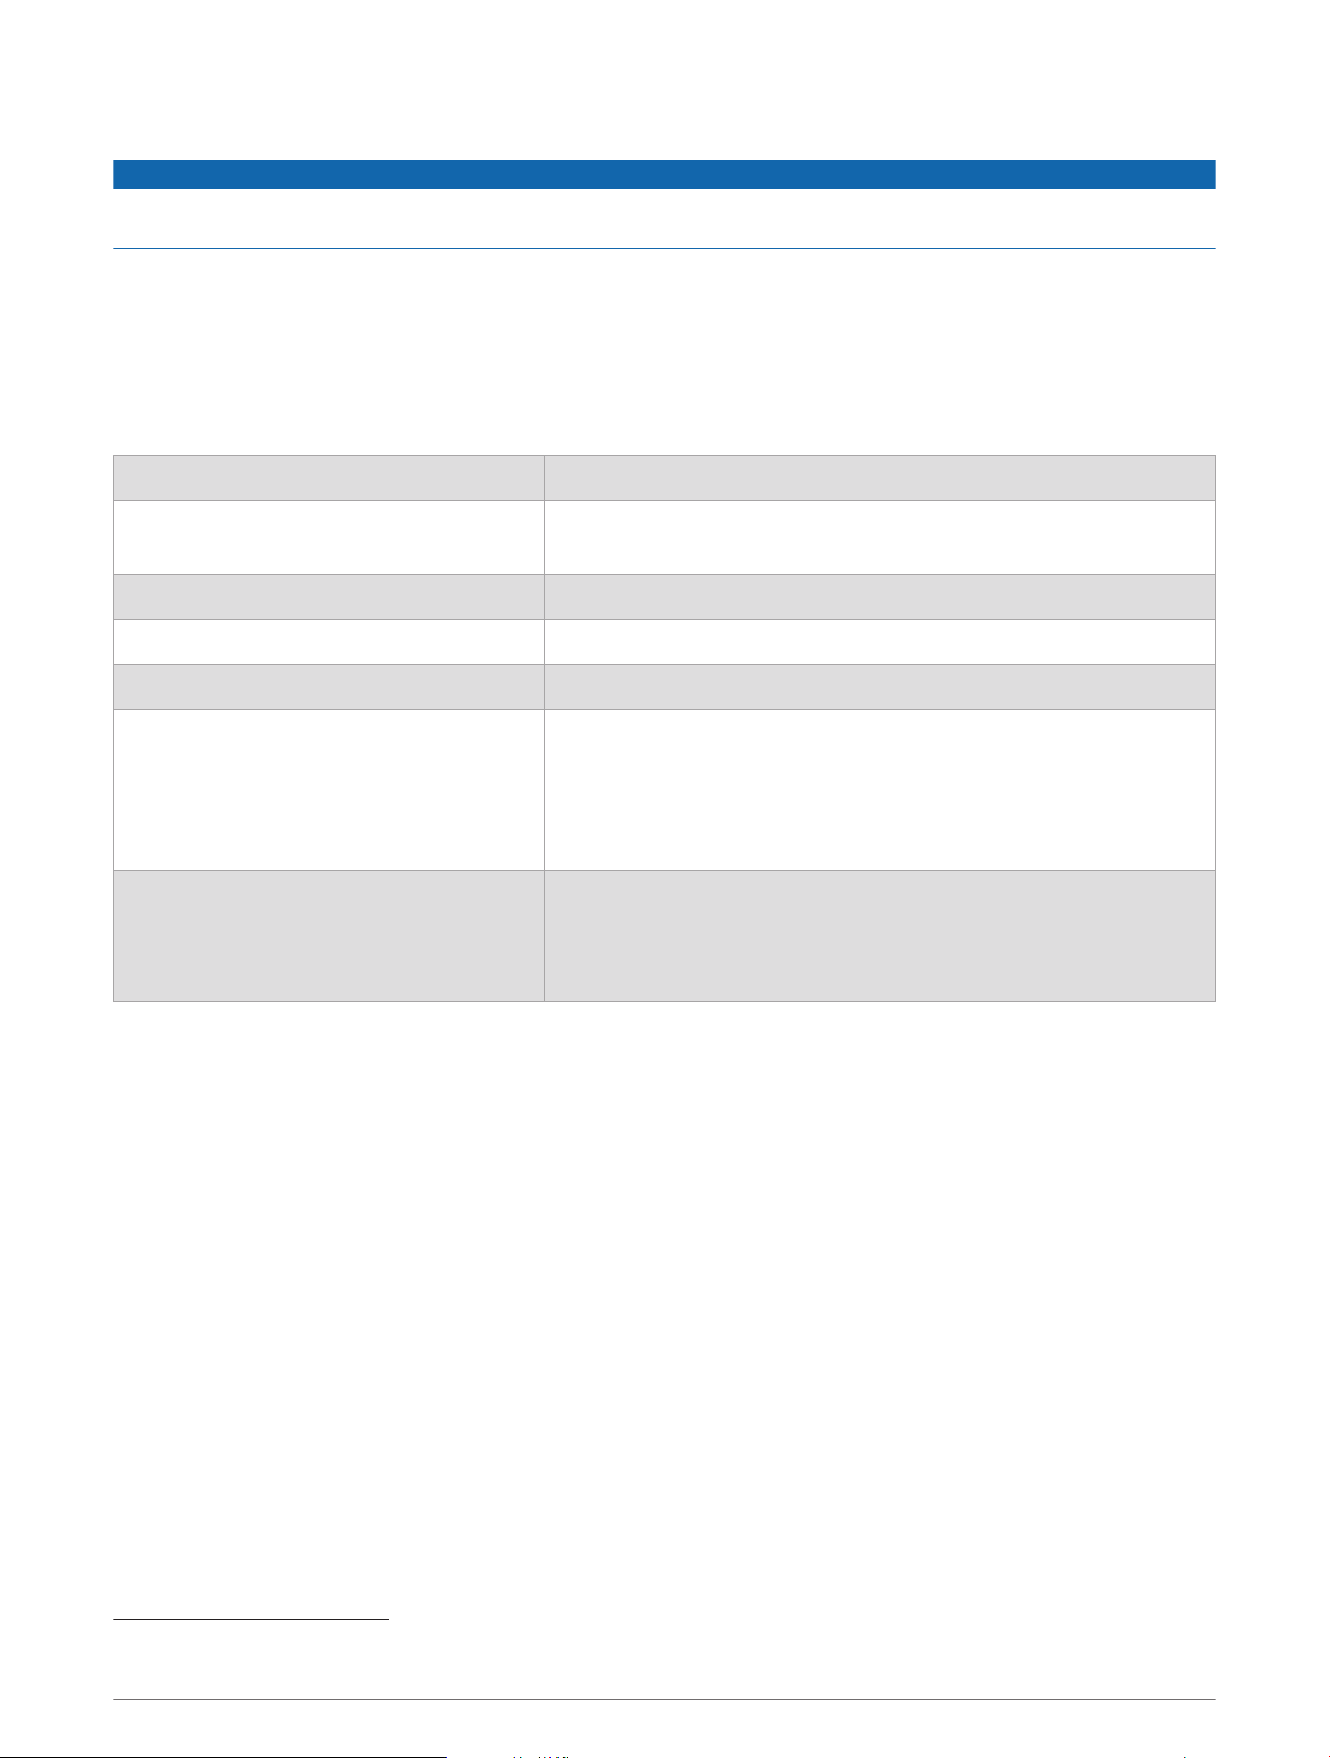
Deleting Files
NOTICE
If you do not know the purpose of a file, do not delete it. Your device memory contains important system files
that should not be deleted.
1 Open the Garmin drive or volume.
2 If necessary, open a folder or volume.
3 Select a file.
4 Press the Delete key on your keyboard.
Specifications
Battery type Rechargeable, built-in lithium-ion battery
Battery life
For GPSMAP H1, go to garmin.com/GPSMAPH1Specs
For GPSMAP H1i Plus, go to garmin.com/GPSMAPH1iPlusSpecs
Water rating IEC 60529 IP67
5
Operating temperature range From -20° to 60°C (from -4° to 140°F)
Charging temperature range From -15° to 60°C (from 5° to 140°F)
Wireless frequencies and transmit power
GPSMAP H1i Plus:
2 400 - 2 483,5 MHz: < 20dBm
1 610 - 1 626,5 MHz (Iridium): < -3dBW/4 kHz
GPSMAP H1:
2 400 - 2 483,5 MHz: < 20dBm
EU SAR
GPSMAP H1i Plus:
1,17 W/kg limb, 1,17 W/kg trunk
GPSMAP H1:
0,12 W/kg limb, 0,12 W/kg trunk
Viewing E-label Regulatory and Compliance Information
The label for this device is provided electronically. The e-label may provide regulatory information, such as
identification numbers provided by the FCC or regional compliance markings, the IMEI number, as well as
applicable product and licensing information.
1 Select Settings.
2 Select System.
3 Select About.
5
The device is protected against the ingress of dust and withstands incidental exposure to water of up to 1 m for up to 30 min.
74 Device Information

Appendix
Data Fields
Some data fields require you to be navigating or require wireless accessories to display data.
24 hr Max. Temp.: The maximum temperature recorded in the last 24hours from a compatible temperature
sensor.
24 hr Min. Temp.: The minimum temperature recorded in the last 24hours from a compatible temperature
sensor.
Accuracy of GPS: The margin of error for your exact location. For example, your GPS location is accurate to
within +/-3.65m (12ft.).
Activity Distance: The distance traveled for the current track or activity.
Activity Time: The current time of the activity timer.
Ambient Pressure: The uncalibrated ambient pressure.
Ascent - Average: The average vertical distance of ascent since the last reset.
Ascent - Maximum: The maximum rate of ascent in feet per minute or meters per minute since the last reset.
Ascent - Total: The total elevation distance ascended during the activity or since the last reset.
Automotive Turn: The direction of the next turn in the route. You must be navigating for this data to appear.
Average Cadence: Cycling. The average cadence for the current activity.
Average HR %Max.: The average percentage of maximum heart rate for the current activity.
Average Lap: The average lap time for the current activity.
Avg. HR: The average heart rate for the current activity.
Barometer: The calibrated current pressure.
Battery Level: The remaining battery power.
Bearing: The angular direction. You must be navigating for this data to appear.
Bearing to Destination: The direction from your current location to a destination. You must be navigating for this
data to appear.
Cadence: Cycling. The number of revolutions of the crank arm. Your device must be connected to a cadence
accessory for this data to appear.
Calories: The amount of total calories burned.
Compass Heading: The direction you are moving based on the compass.
Course: The direction from your starting location to a destination. Course can be viewed as a planned or set
route. You must be navigating for this data to appear.
Current Lap: The stopwatch time for the current lap.
Date: The current day, month, and year.
Descent - Average: The average vertical distance of descent since the last reset.
Descent - Maximum: The maximum rate of descent in meters per minute or feet per minute since the last reset.
Descent - Total: The total elevation distance descended during the activity or since the last reset.
Distance to Dest.: The remaining distance to the final destination. You must be navigating for this data to
appear.
Distance to Next: The remaining distance to the next waypoint on the route. You must be navigating for this
data to appear.
Elapsed Activity Time: The total time recorded. For example, if you start the timer and run for 10 minutes, then
stop the timer for 5 minutes, then start the timer and run for 20 minutes, your elapsed time is 35 minutes.
Elevation: The altitude of your current location above or below sea level.
Elevation Above Ground: The altitude of your current location above ground level.
Elevation - Maximum: The highest elevation reached since the last reset.
Elevation - Minimum: The lowest elevation reached since the last reset.
Appendix 75

ETAatDestination: The estimated time of day when you will reach the final destination (adjusted to the local
time of the destination). You must be navigating for this data to appear.
ETAat Next: The estimated time of day when you will reach the next waypoint on the route (adjusted to the local
time of the waypoint). You must be navigating for this data to appear.
Glide Ratio: The ratio of horizontal distance traveled to the change in vertical distance.
Glide Ratio to Dest.: The glide ratio required to descend from your current position to the destination elevation.
You must be navigating for this data to appear.
GPS Elevation: The altitude of your current location using GPS.
GPS Heading: The direction you are moving based on GPS.
GPSSignal Strength: The strength of the GPS satellite signal.
Grade: The calculation of rise (elevation) over run (distance). For example, if you climb 3m (10ft.) for every
60m (200ft.) you travel, the grade is 5%.
Heading: The direction you are moving.
Heart Rate: Your heart rate in beats per minute (bpm). Your device must be connected to a compatible heart
rate monitor.
Heart Rate - %Max.: The percentage of maximum heart rate.
Heart Rate Zone: The performance zone of your current heart rate (1 to 5). The default zones are based on your
user profile and maximum heart rate (220 minus your age).
Lap Ascent: The vertical distance of ascent for the current lap.
Lap Cadence: Cycling. The average cadence for the current lap.
Lap Descent: The vertical distance of descent for the current lap.
Lap Distance: The distance traveled for the current lap.
Lap Heart Rate Percent: The average percentage of maximum heart rate for the current lap.
Lap HR: The average heart rate for the current lap.
Laps: The number of laps completed for the current activity.
Lap Speed: The average speed for the current lap.
Last Lap Ascent: The vertical distance of ascent for the last completed lap.
Last Lap Cadence: Cycling. The average cadence for the last completed lap.
Last Lap Descent: The vertical distance of descent for the last completed lap.
Last Lap Distance: The distance traveled for the last completed lap.
Last Lap HR: The average heart rate for the last completed lap.
Last Lap Speed: The average speed for the last completed lap.
Last Lap Time: The stopwatch time for the last completed lap.
Location (lat/lon): The current position in latitude and longitude, regardless of the selected position format
setting.
Location (selected): The current position using the selected position format setting.
Location of Dest.: The position of your final destination. You must be navigating for this data to appear.
None: This is a blank data field.
Odometer: A running tally of the distance traveled for all trips. This total does not clear when resetting the trip
data.
Off Course: The distance to the left or right by which you have strayed from the original path of travel. You must
be navigating for this data to appear.
Pace: The current pace.
Pointer: An arrow points in the direction of the next waypoint or turn. You must be navigating for this data to
appear.
Speed: The current rate of travel.
Speed Limit: The reported speed limit for the road. Not available in all maps and in all areas. Always rely on
posted road signs for actual speed limits.
76 Appendix

Speed - Maximum: The highest speed reached since the last reset.
Speed - Moving Avg.: The average speed while moving since the last reset.
Speed - Overall Avg.: The average speed while moving and stopped since the last reset.
Stopwatch Timer: The stopwatch time for the current activity.
Sunrise: The time of sunrise based on your GPS position.
Sunrise/Sunset: The time of the next sunrise or sunset based on your GPS position.
Sunset: The time of sunset based on your GPS position.
Temperature: The temperature of the air. Your body temperature affects the temperature sensor. Your device
must be connected to a tempe sensor for this data to appear.
Temperature - Water: The temperature of the water. Your device must be connected to a NMEA
®
0183 device
capable of acquiring the water temperature.
Time of Day: The time of day based on your current location and time settings (format, time zone, daylight
saving time).
Time to Destination: The estimated time remaining before you reach the destination. You must be navigating
for this data to appear.
Time to Next: The estimated time remaining before you reach the next waypoint in the route. You must be
navigating for this data to appear.
To Course: The direction in which you must move to get back on the route. You must be navigating for this data
to appear.
Total Lap: The stopwatch time for all the completed laps.
Trip Odometer: A running tally of the distance traveled since the last reset.
Trip Time: A running tally of the total time spent moving and not moving since the last reset.
Trip Time - Moving: A running tally of the time spent moving since the last reset.
Trip Time - Stopped: A running tally of the time spent not moving since the last reset.
Turn: The angle of difference (in degrees) between the bearing to your destination and your current course. L
means turn left. R means turn right. You must be navigating for this data to appear.
Velocity Made Good: The speed at which you are closing on a destination along a route. You must be navigating
for this data to appear.
Vertical Dist. to Dest.: The elevation distance between your current position and the final destination. You must
be navigating for this data to appear.
Vertical Dist. to Next: The elevation distance between your current position and the next waypoint in the route.
You must be navigating for this data to appear.
Vertical Speed: The rate of ascent or descent over time.
Vertical Speed to Dest.: The rate of ascent or descent to a predetermined altitude. You must be navigating for
this data to appear.
Waypoint at Dest.: The last point on the route to the destination. You must be navigating for this data to appear.
Waypoint at Next: The next point on the route. You must be navigating for this data to appear.
Optional Accessories
Optional accessories, such as mounts, maps, fitness accessories, and replacement parts, are available at
http://buy.garmin.com or from your Garmin dealer.
tempe
Your device is compatible with the tempe temperature sensor. You can attach the sensor to a secure strap or
loop where it is exposed to ambient air, so it provides a consistent source of accurate temperature data. You
must pair the tempe sensor with your device to display temperature data. See the instructions for your tempe
sensor for more information.
Appendix 77

Tips for Pairing Wireless Sensors
• Verify that the sensor is compatible with your Garmin device.
• Before you pair the sensor with your Garmin device, move 10 m (33 ft.) away from other sensors with ANT+
technology.
• Bring the Garmin device within range 3 m (10 ft.) of the sensor.
• After you pair the first time, your Garmin device automatically recognizes the sensor each time it is activated.
This process occurs automatically when you turn on the Garmin device and only takes a few seconds when
the sensors are activated and functioning correctly.
• When paired, your Garmin device receives data from only your sensor, and you can go near other sensors.
Troubleshooting
Maximizing Battery Life
You can do several things to extend the battery life.
• Reduce the screen brightness (Display and Brightness Settings, page63).
• Reduce the length of time before the backlight turns off (Display and Brightness Settings, page63).
• Turn off the screen automatically when the backlight times out (Display and Brightness Settings, page63).
• Reduce the flashlight brightness (Using the Flashlight, page26).
• Reduce the flash frequency of the flashlight strobe (Using the Flashlight, page26).
• Use expedition mode (Turning On Expedition Mode, page69).
• Turn off wireless connectivity (Wi‑Fi Settings, page65).
• Turn off Bluetooth technology (Bluetooth Settings, page65).
• Turn off additional satellite systems (Satellite Settings, page68).
• Use Low Power messaging mode on your GPSMAP H1i Plus satellite communicator (Messenger App
Settings, page42).
• Reduce the frequency of the Send Interval tracking setting on your GPSMAP H1i Plus satellite communicator
(inReach Tracking Setup, page43).
Long-Term Storage
When you do not plan to use the device for several months, you should charge the battery to at least 50% before
you store the device. You should store the device in a cool, dry place with temperatures around the typical
household level. After storage, you should fully recharge the device before using it.
Restarting the Device
If the device stops responding, you may need to restart it. This does not erase any of your data or settings.
Hold the power button for approximately 15 seconds.
About Heart Rate Zones
Many athletes use heart rate zones to measure and increase their cardiovascular strength and improve their
level of fitness. A heart rate zone is a set range of heartbeats per minute. The five commonly accepted
heart rate zones are numbered from 1 to 5 according to increasing intensity. Generally, heart rate zones are
calculated based on percentages of your maximum heart rate.
78 Appendix

Fitness Goals
Knowing your heart rate zones can help you measure and improve your fitness by understanding and applying
these principles.
• Your heart rate is a good measure of exercise intensity.
• Training in certain heart rate zones can help you improve cardiovascular capacity and strength.
If you know your maximum heart rate, you can use the table (Heart Rate Zone Calculations, page79) to
determine the best heart rate zone for your fitness objectives.
If you do not know your maximum heart rate, use one of the calculators available on the Internet. Some gyms
and health centers can provide a test that measures maximum heart rate. The default maximum heart rate is
220 minus your age.
Heart Rate Zone Calculations
Zone
% of Maximum Heart
Rate
Perceived Exertion Benefits
1 50–60% Relaxed, easy pace, rhythmic breathing
Beginning-level aerobic training,
reduces stress
2 60–70%
Comfortable pace, slightly deeper
breathing, conversation possible
Basic cardiovascular training, good
recovery pace
3 70–80%
Moderate pace, more difficult to hold
conversation
Improved aerobic capacity, optimal
cardiovascular training
4 80–90%
Fast pace and a bit uncomfortable,
breathing forceful
Improved anaerobic capacity and
threshold, improved speed
5 90–100%
Sprinting pace, unsustainable for long
period of time, labored breathing
Anaerobic and muscular endurance,
increased power
Appendix 79

support.garmin.com
GUID-A494ACED-FFD6-481B-9DAF-D521E717FE5F v3November 2025
