LS832WU
Projector
User Guide
Model No. VS19516
P/N: LS832WU
IMPORTANT: Please read this User Guide to obtain important information on installing and using your product in
a safe manner, as well as registering your product for future service. Warranty information contained in this User
Guide will describe your limited coverage from ViewSonic® Corporation, which is also found on our web site at
http://www.viewsonic.com in English, or in specific languages using the Regional selection box on our website.

2
Thank you for choosing ViewSonic®
As a world-leading provider of visual solutions, ViewSonic® is dedicated to
exceeding the world’s expectations for technological evolution, innovation, and
simplicity. At ViewSonic®, we believe that our products have the potential to make
a positive impact in the world, and we are confident that the ViewSonic® product
you have chosen will serve you well.
Once again, thank you for choosing ViewSonic®!

3
Safety Precauons
Please read the following Safety Precauons before you start using the projector.
• Keep this user guide in a safe place for later reference.
•
• Allow at least 20“ (50 cm) clearance around the projector to ensure proper
•
•
•
beam may damage your eyes.
•
on.
•
•
cool for approximately 45 minutes prior to removing the lamp assembly for
replacement.
•
rated life could cause them to break on rare occasions.
• Never replace the lamp assembly or any electronic component unless the
projector is unplugged.
•
inside which may cause death if you should come into contact with live parts.
• When moving the projector, be careful not to drop or bump the projector on
anything.
•
•
• Avoid exposing the projector to direct sunlight or other sources of sustained
of the projector to dangerous levels.

4
•
may cause it to fail. If the projector does become wet, disconnect it from the
power supply and call your local service center to have the projector serviced.
•
•
other. A grounding-type plug has two blades and a third grounding prong. The
outlet.
•
•
plug, and at the point where it emerges from the projector.
• In some countries, the voltage is NOT stable. This projector is designed to
operate safely within a voltage between 100 to 240 volts AC, but could fail if
or cut out, it is recommended that you connect your projector through a power
• If smoke, an abnormal noise, or a strange odor is present, immediately switch
using the projector.
•
•
•
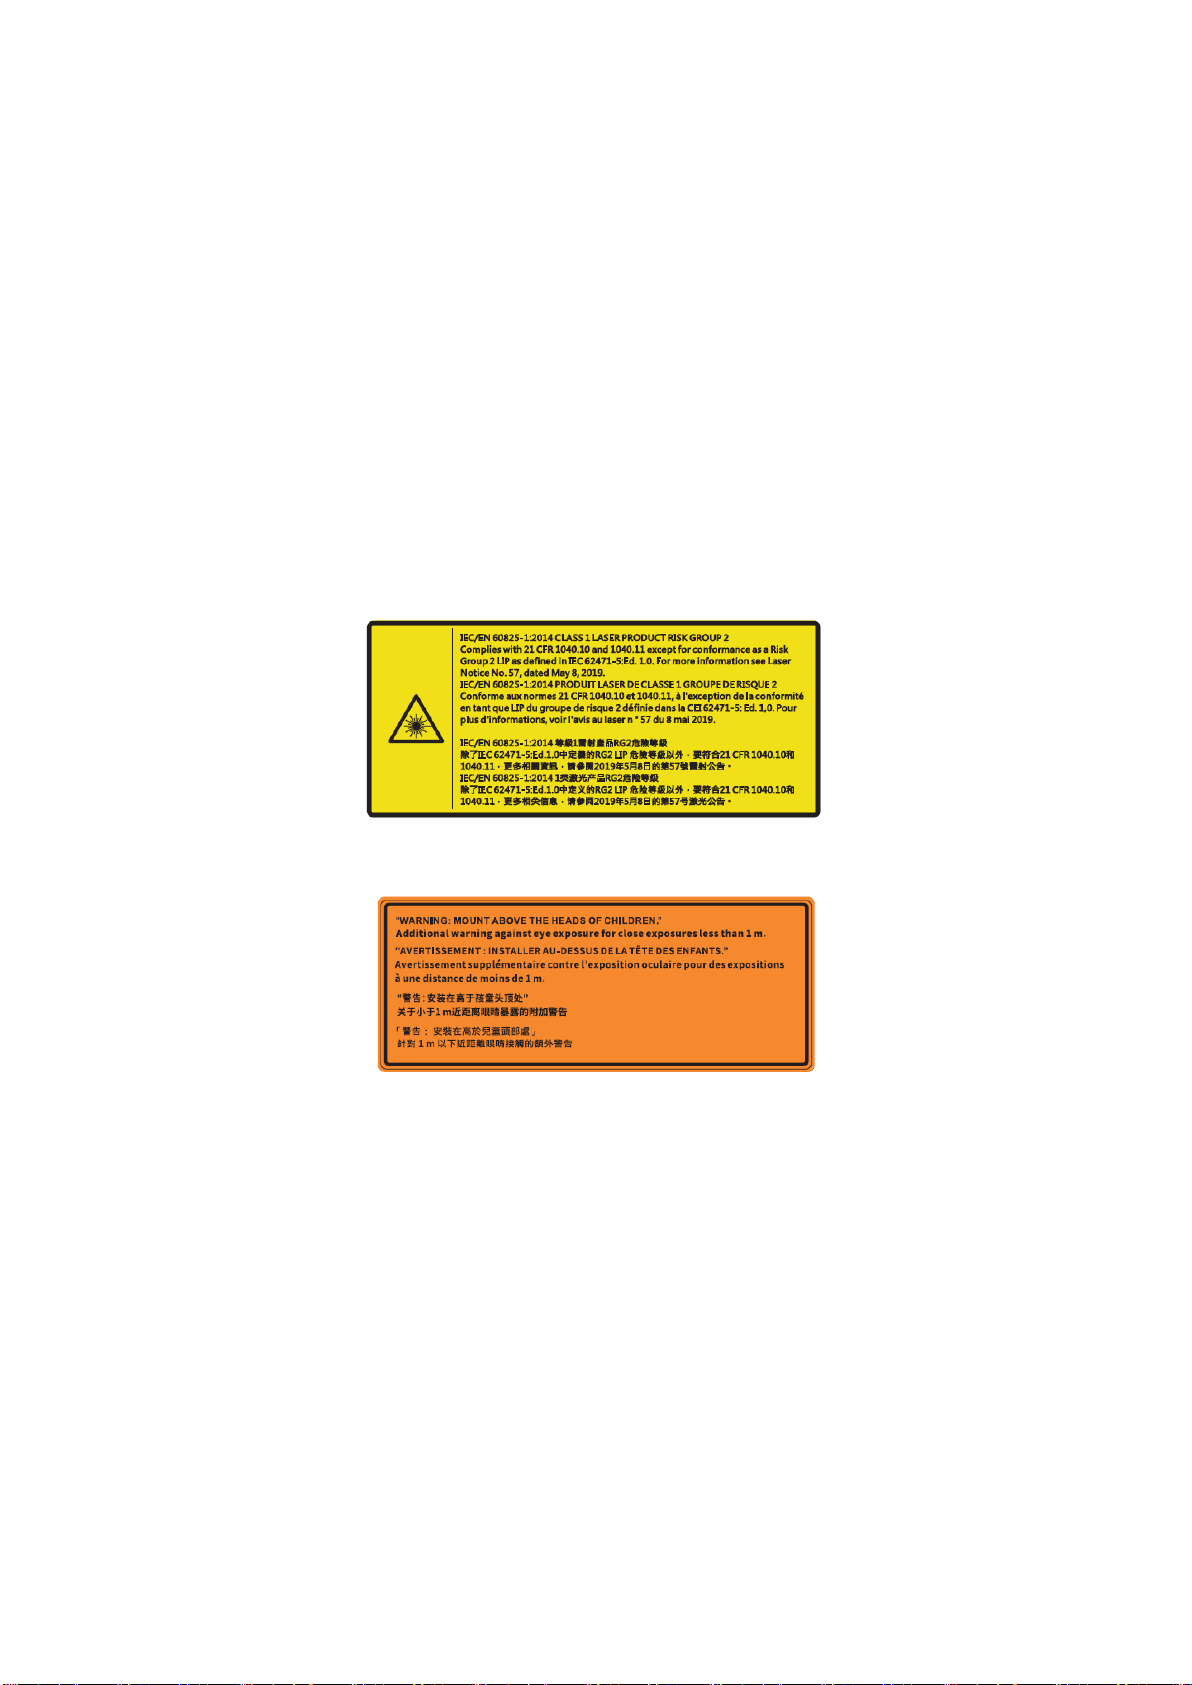
CAUTION:
with any bright light source, do not stare into the beam, RG2 IEC 62471-
5:2015.
5
Safety Precautions - Ceiling Mounting
Please read the following Safety Precautions before you start using the projector.
If you intend to mount the projector on the ceiling, it is strongly recommended
that you use a proper fitting projector ceiling mount kit and that you ensure it is
securely and safely installed.
If you use an inappropriate projector ceiling mount kit, there is a safety risk that the
projector may fall from the ceiling due to an improper attachment through the use
of the wrong gauge or length screws.
Laser Caution
This product belongs to CLASS I laser product and complies with IEC 60825-1:2014.
•
projector beam at any distance from the projector.
•
•
telescopes inside the beam.

6
Contents
Safety Precautions ....................................................... 3
Introduction ................................................................ 8
Package Contents ...................................................................................................8
Product Overview ...................................................................................................9
Projector .................................................................................................................. 9
Keypad ................................................................................................................... 10
Indicator Lights ...................................................................................................... 10
I/O Ports ................................................................................................................ 11
Remote Control ..................................................................................................... 12
Initial Setup ............................................................... 16
Choosing a Location - Projection Orientation .......................................................16
.................................................................... ......................17
Mounting the Projector ........................................................................................18
Making Connections .................................................. 19
Connecting to Power ............................................................................................19
............................................................................20
VGA Connection .................................................................................................... 20
VGA Out Connection ............................................................................................. 21
.................................................................................................. 22
Audio and Microphone Connection ...................................................................... 23
USB Connection ..................................................................................................... 24
Network Connection ............................................................................................. 25
RS-232 Connection ................................................................................................ 26
Using the Projector .................................................... 27
Starting Up the Projector .................................................................... ..................27
Selecting an Input Source .....................................................................................28
Adjusting the Projected Image .............................................................................29
Adjusting the Projector’s Height and Projection Angle ......................................... 29
Adjusting the Focus and Keystone ........................................................................ 30
................................................................................31

7
Operating the Projector ............................................. 32
............................................................................32
Menu Navigation ..................................................................................................33
.................................................................... 34
Menu Operation ...................................................................................................43
......................................................................................................... 43
Audio Menu ........................................................................................................... 50
Setup Menu ........................................................................................................... 51
Network Menu ...................................................................................................... 56
Information Menu ................................................................................................. 58
Appendix ................................................................... 59
Specifications .................................................................... .................................... 59
...........................................................................................60
Timing Chart .........................................................................................................61
.................................................................................................... 63
................................................................................................. 65
Troubleshooting ...................................................................................................66
........................................................................................................ 68
Maintenance.................................................................... .....................................69
General Precautions .............................................................................................. 69
Cleaning the Lens .................................................................................................. 69
Cleaning the Case .................................................................................................. 69
Storing the Projector ............................................................................................. 69
Regulatory and Service Information .......................... 70
Compliance Information ....................................................................................... 70
FCC Compliance Statement ................................................................................... 70
Industry Canada Statement ................................................................................... 70
CE Conformity for European Countries ................................................................. 71
......................................................................... 72
......................................................... 73
................................................................ 73
Copyright Information ..........................................................................................74
Customer Service .................................................................................................. 75
Limited Warranty .................................................................................................. 76
Mexico Limited Warranty ...................................................................................... 79

8
Introduction
Package Contents
1 2 3
4
5
Number Descripon
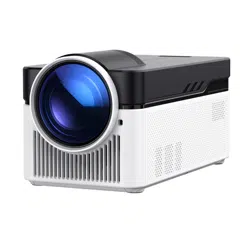
1
Projector
2
Remote Control
3
4
5
NOTE:
9
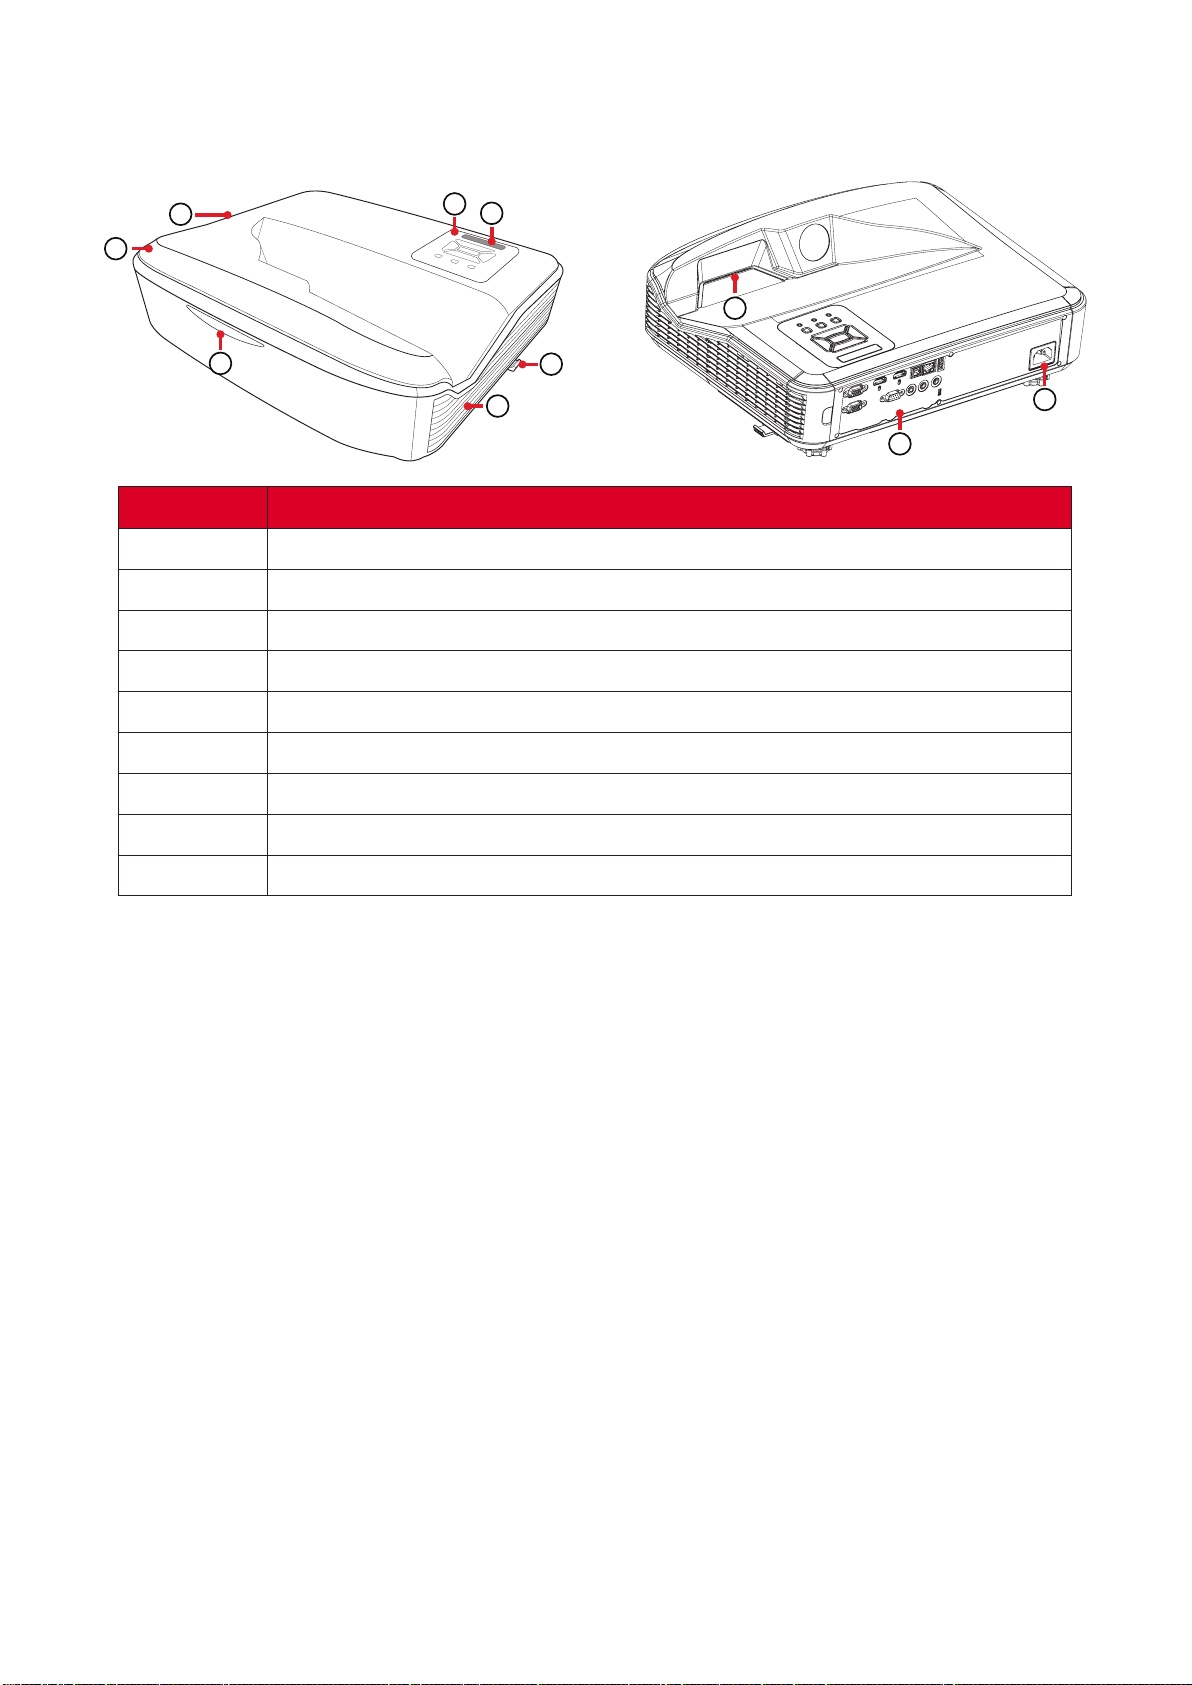
Product Overview
Projector
1
9
8
5
2
3
4
6
7
4
Number Descripon
1
2
3
4
5
6
7
8
9
NOTE:
•
•
10
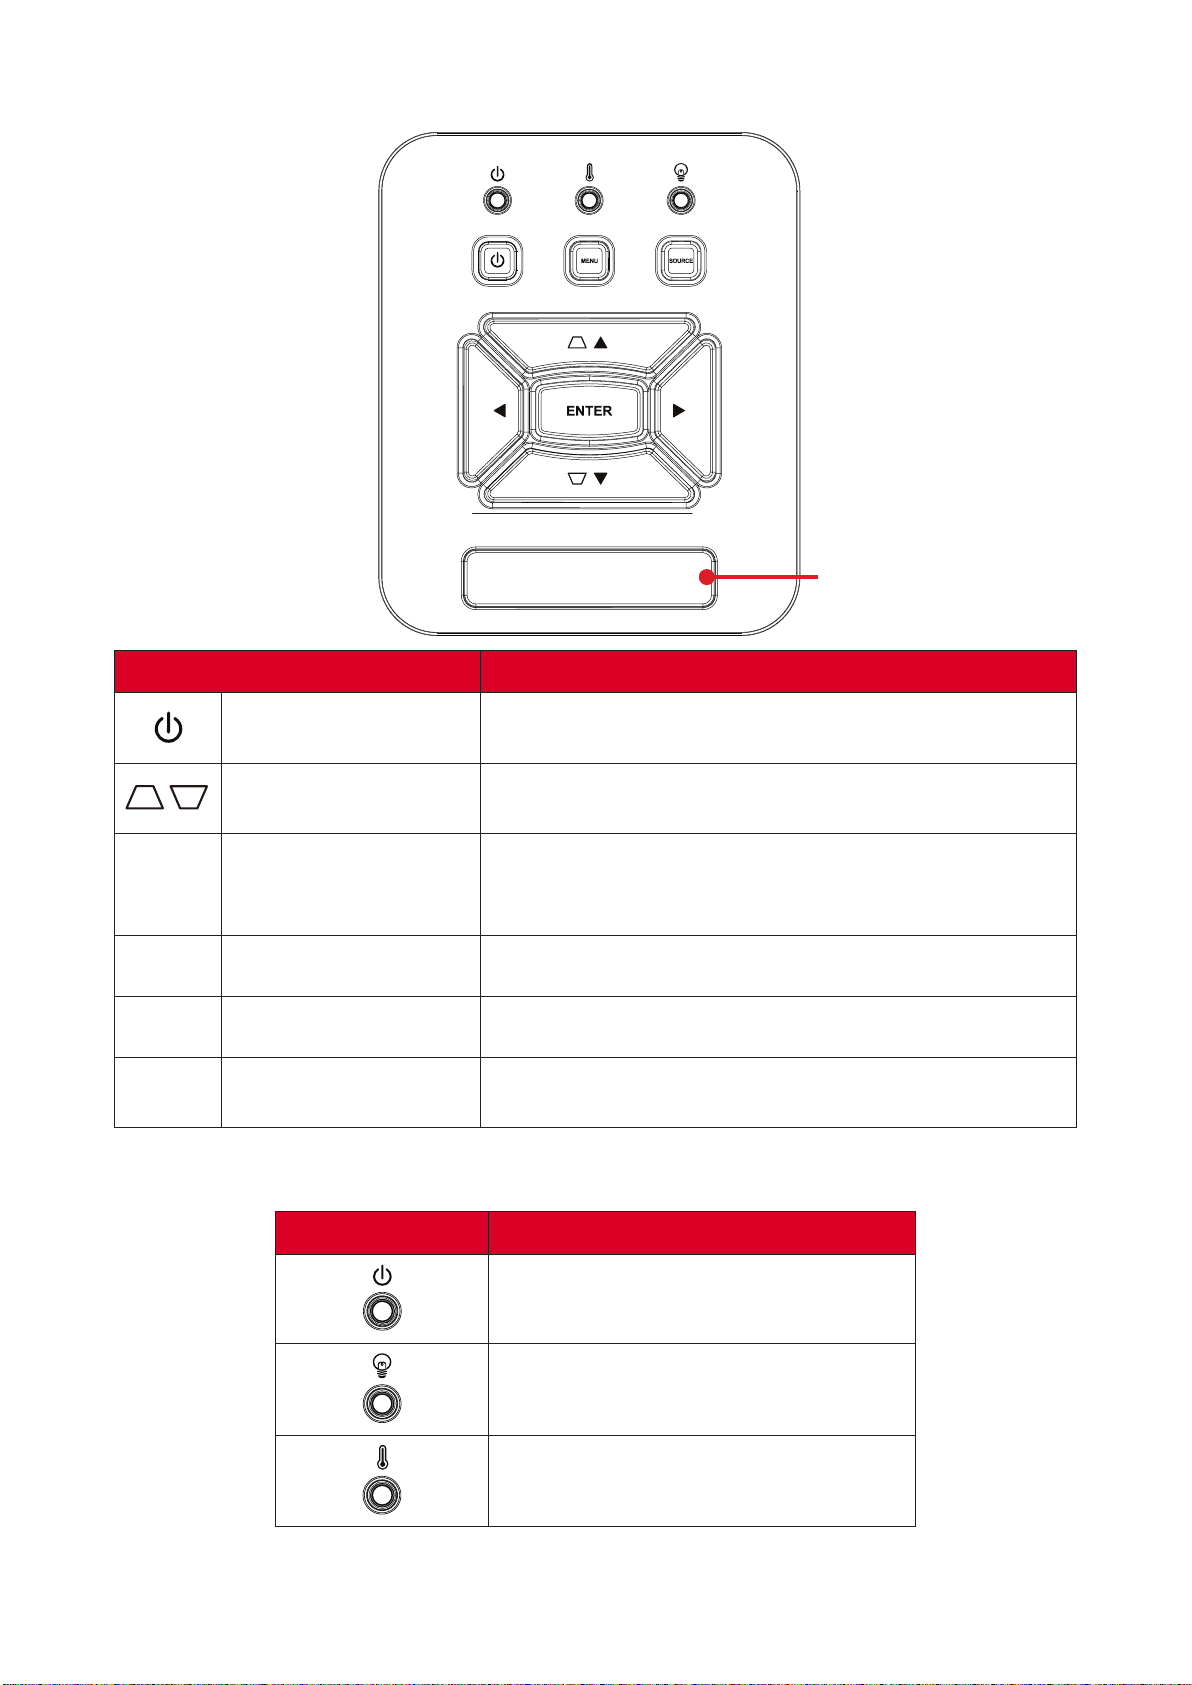
Keypad
Key Descripon
Power
Keystone
tupq
Navigaon
MENU
Menu/Exit
SOURCE
Source
ENTER
Enter
Indicator Lights
Indicator Light Descripon
11
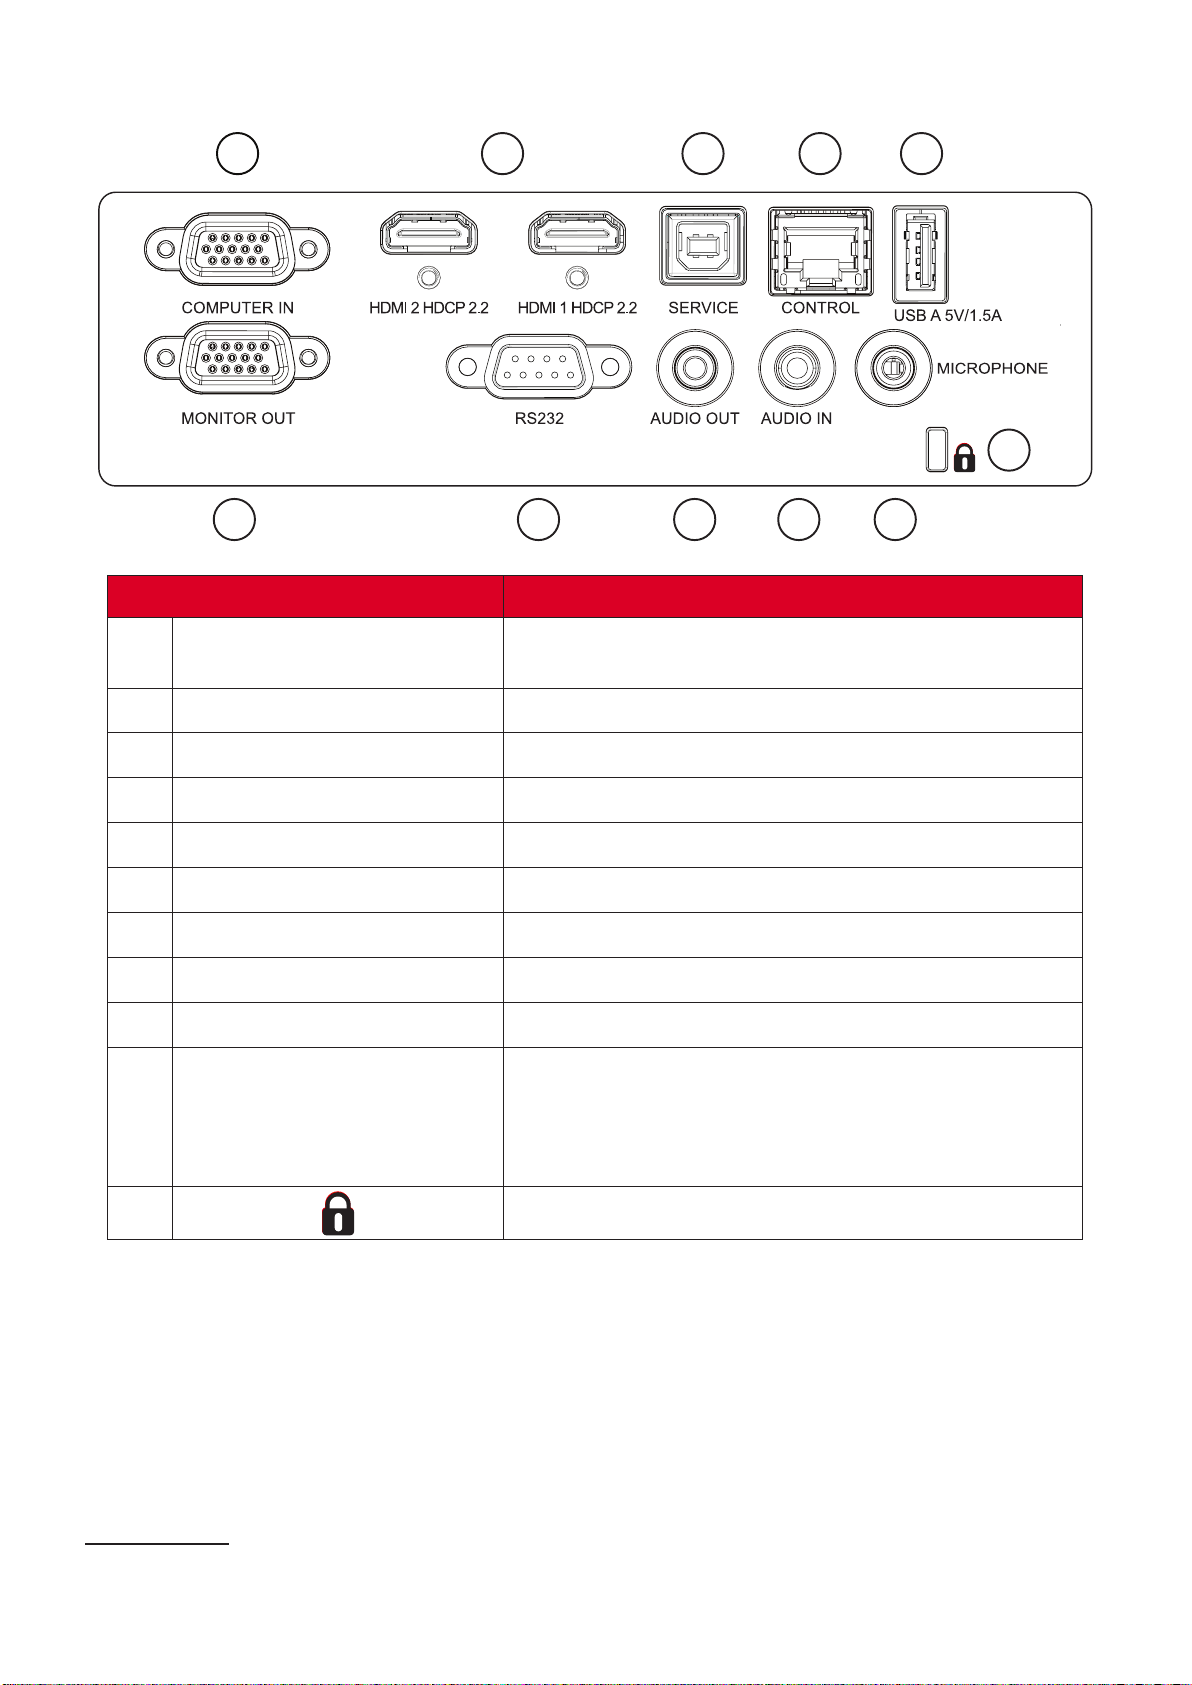
I/O Ports
1 2
3
4
5
6 7 8 9
10
11
Port Descripon
1 COMPUTER IN
2 HDMI
1
3 SERVICE
4 RJ-45
5 USB (5V/1.5A Out)
6 MONITOR OUT
7 RS232
8 AUDIO OUT
9 AUDIO IN
10 Microphone
NOTE:
11
¹
12
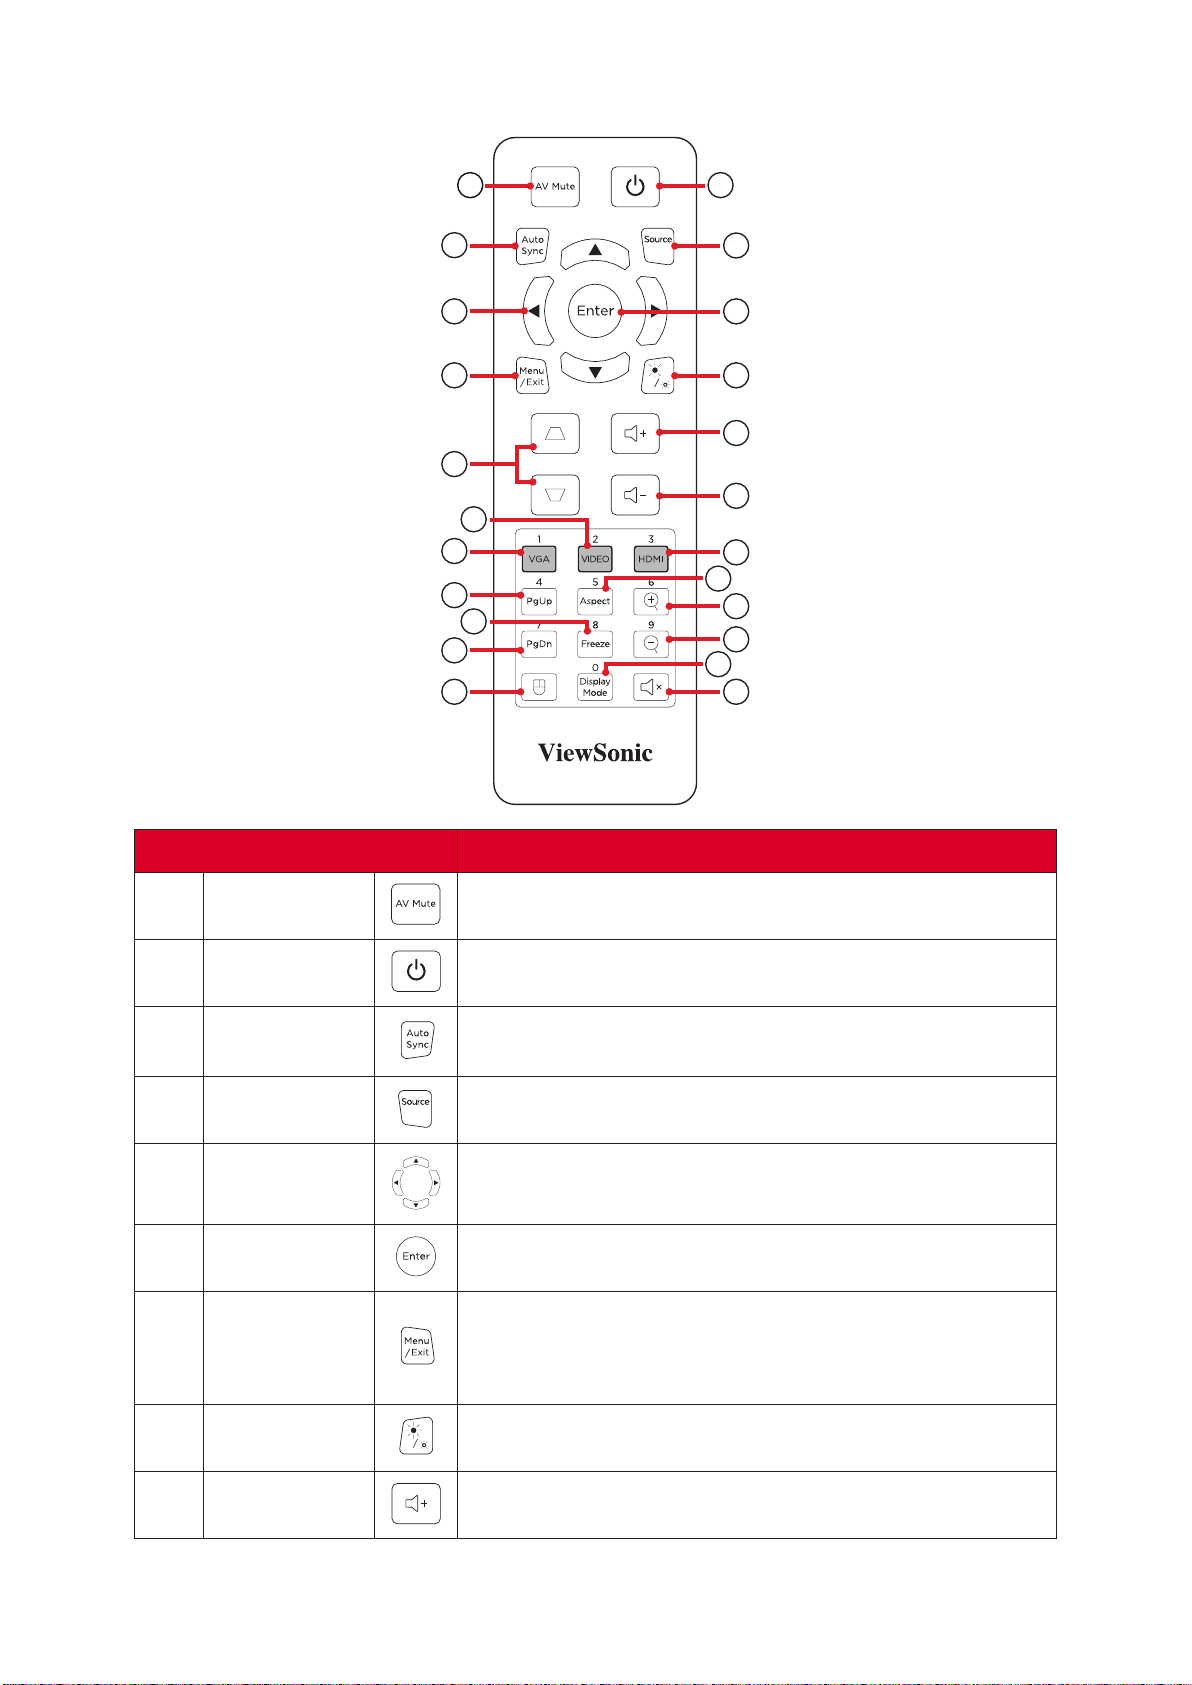
Remote Control
1 2
3
4
7
10
13
16
20
22
12
18
11
14
17
19
23
15
21
5
8
9
6
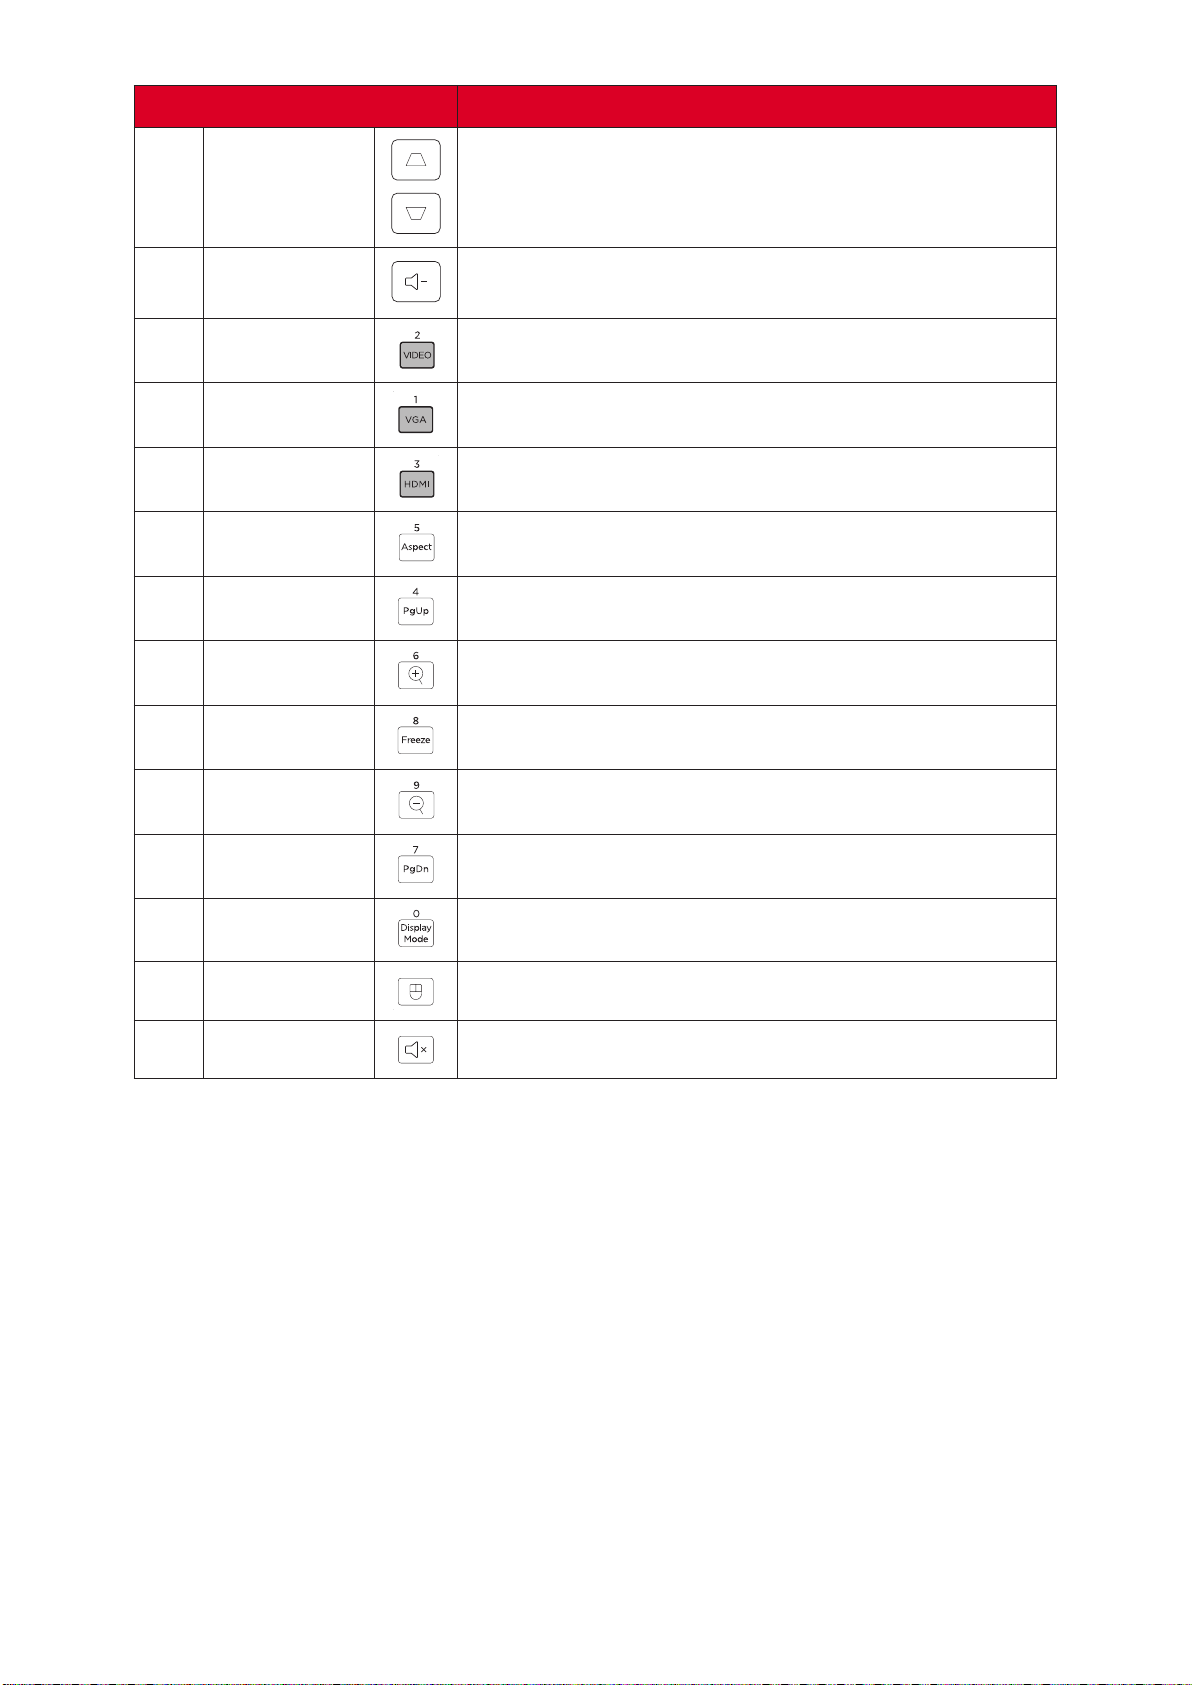
Buon Descripon
1
AV Mute
2
Power
3
Auto Sync
4
Source
5
Navigaon
Buons
6
Enter
7
Menu/Exit
•
•
•
8
Brightness
9
Volume Up
13
Buon Descripon
10
Keystone
11
Volume
Down
12
Video
Unsupported Buon
13
VGA COMPUTER IN
14
HDMI HDMI 1 or HDMI 2
15
Aspect
16
Page Up Unsupported Buon
17
Zoom In
18
Freeze
19
Zoom Out
20
Page Down
Unsupported Buon
21
Display Mode
22
Mouse Mode
Unsupported Buon
23
Mute
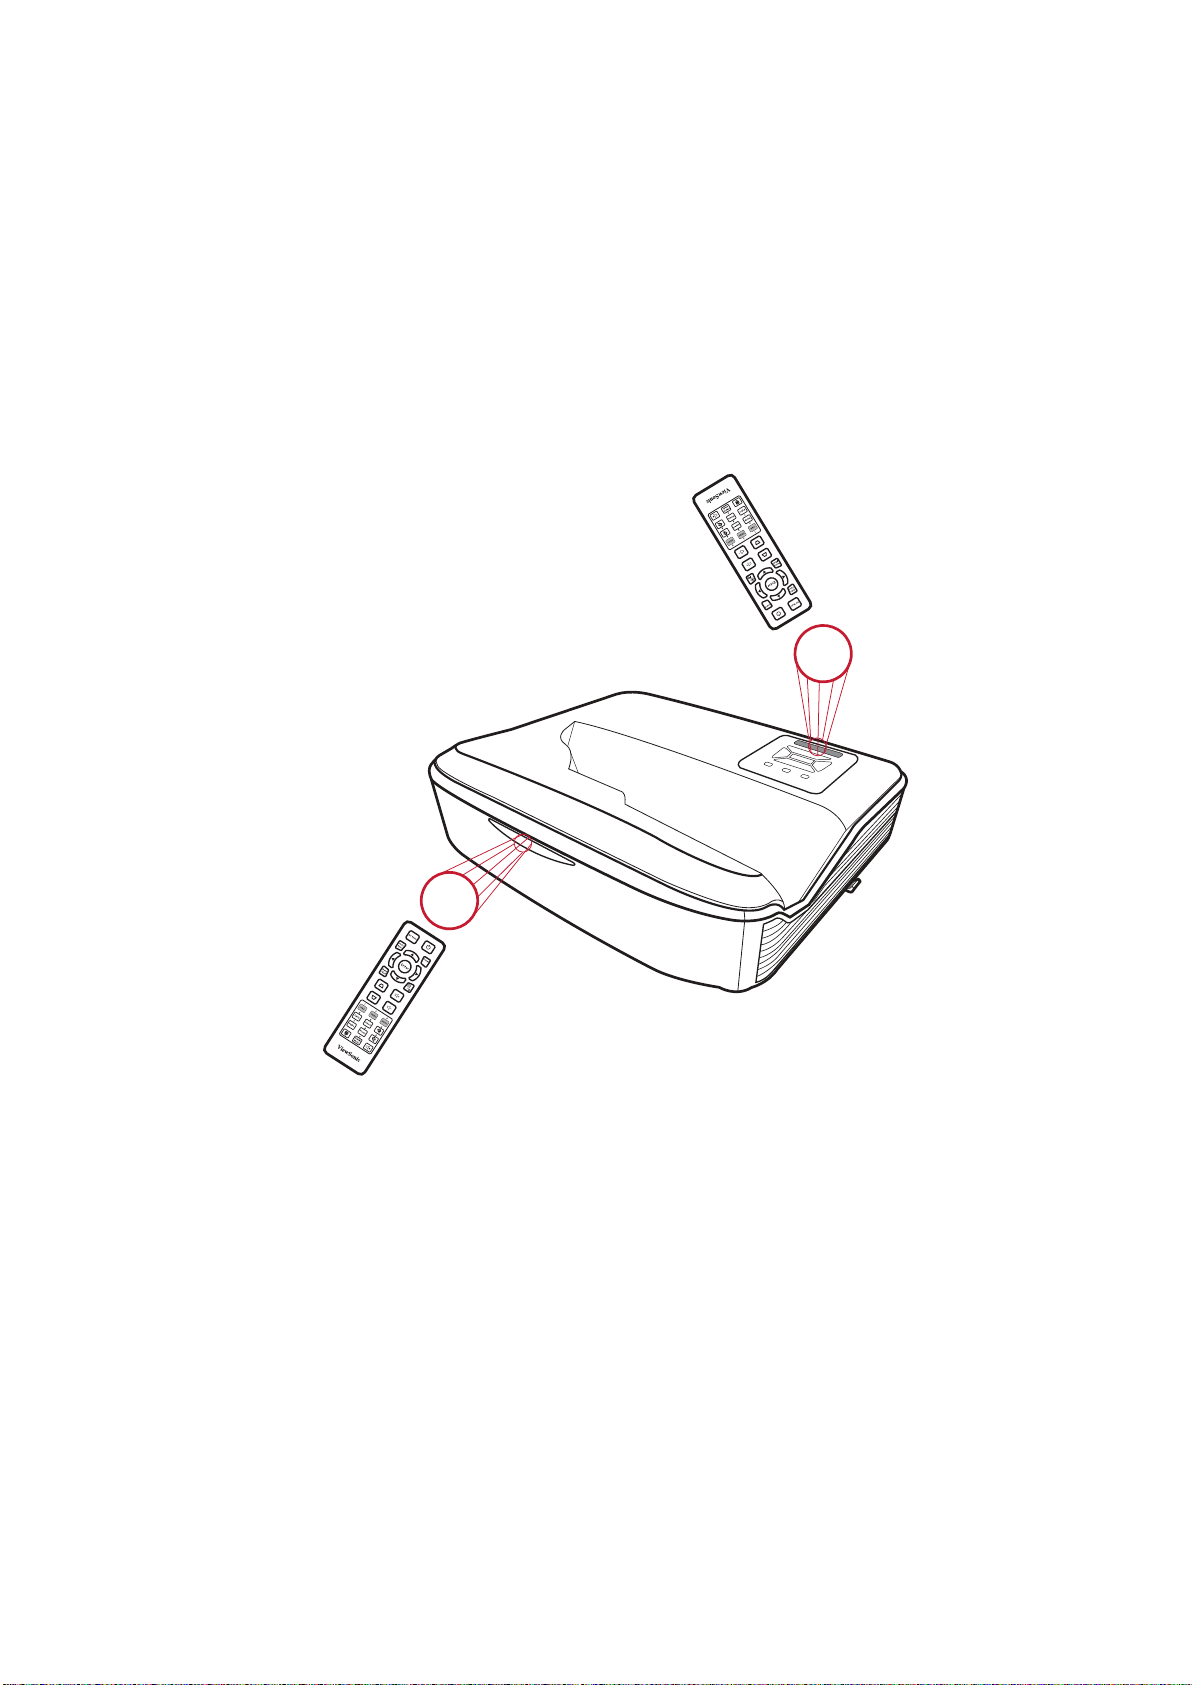
14
Remote Control - Receiver Range
1.
2.
NOTE:
Approx. 30°
Appro
x. 30°
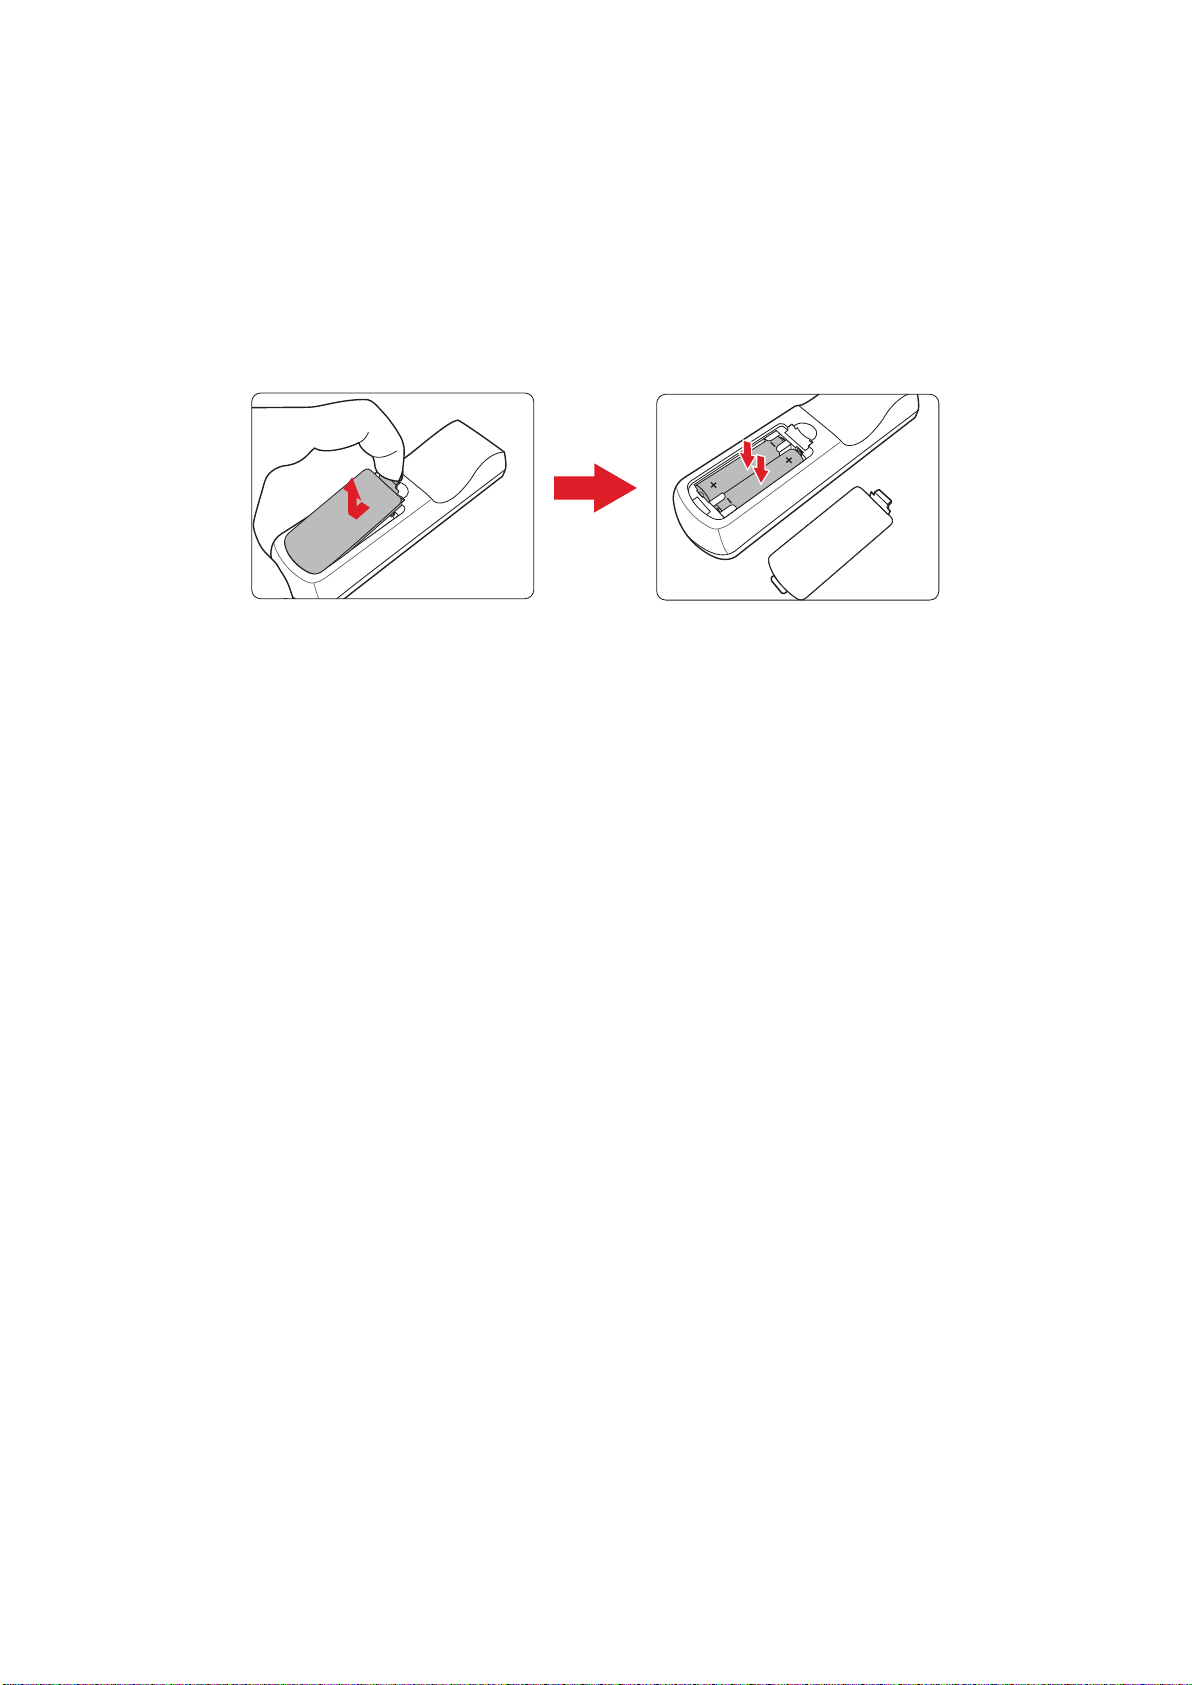
15
Remote Control - Replacing the Baeries
1.
2.
NOTE:
3.
NOTE:
•
•
•
•
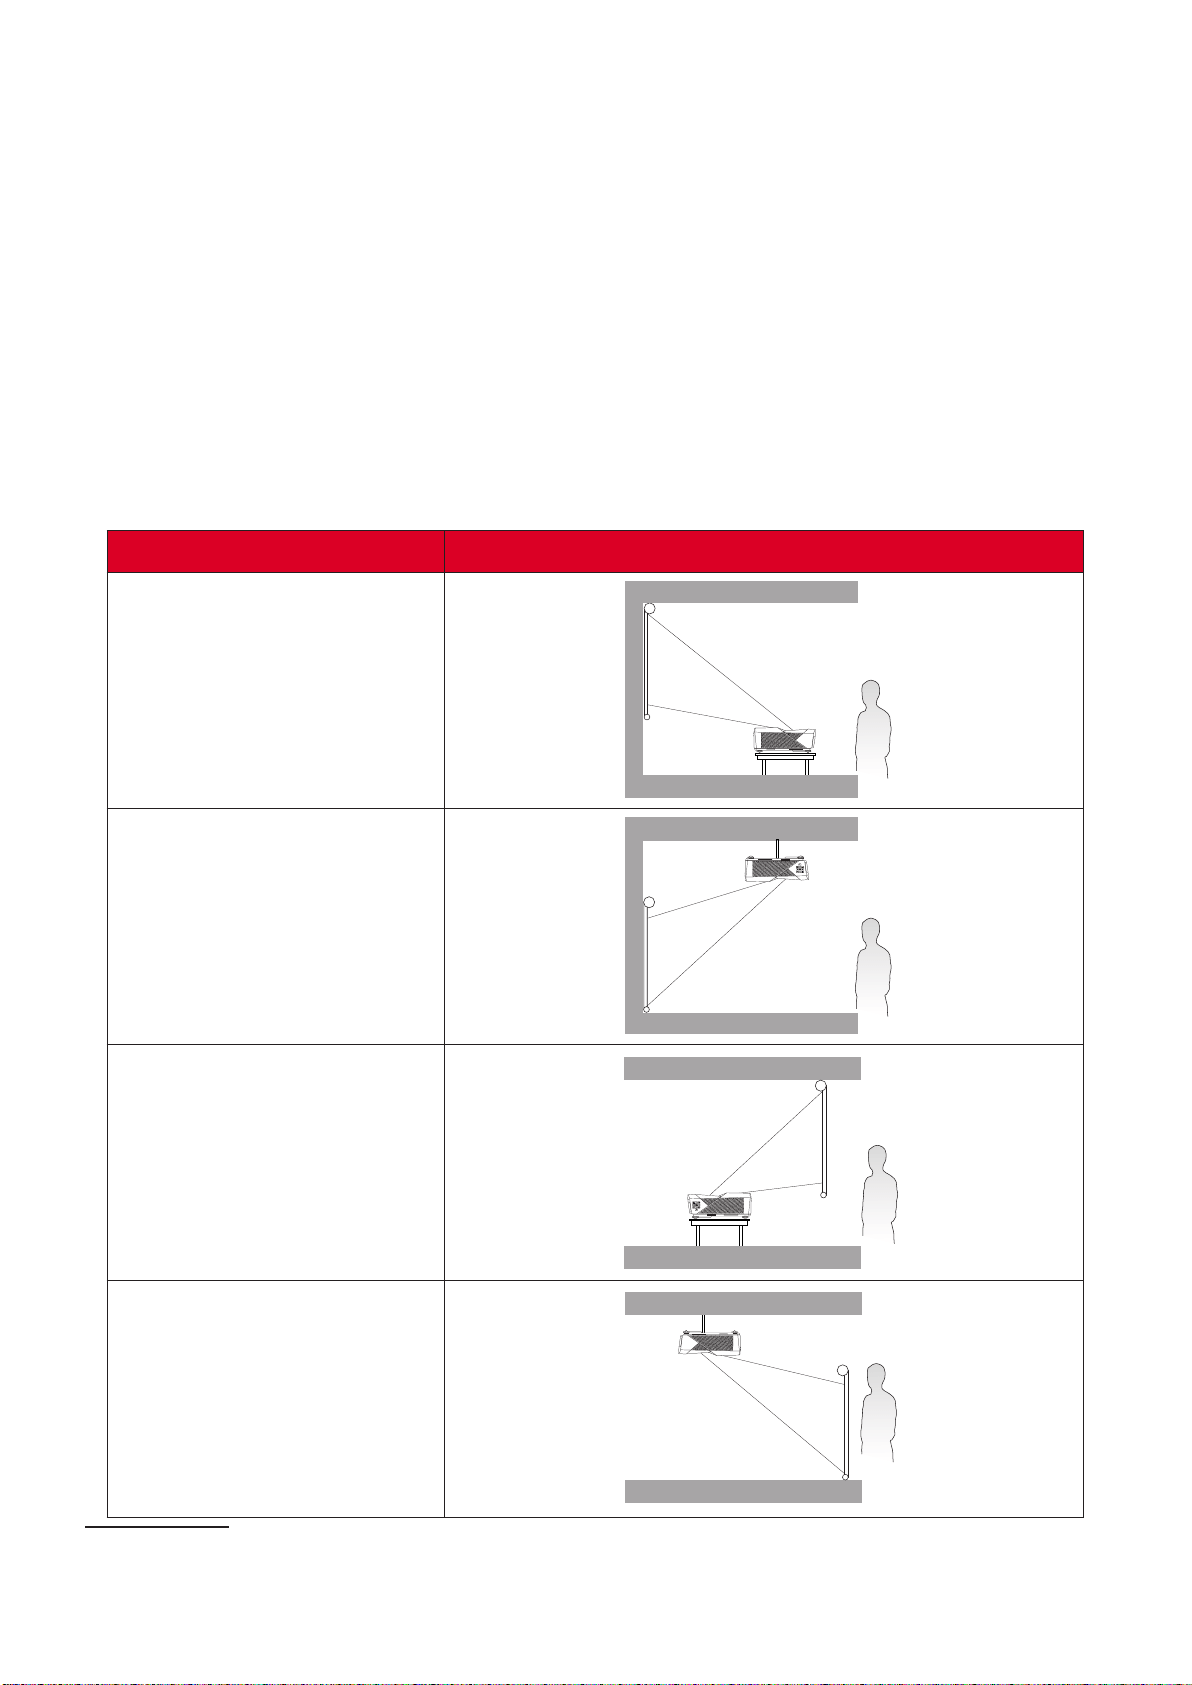
16
Inial Setup
Choosing a Locaon - Projecon Orientaon
•
•
•
Locaon
Front Table
Front Ceiling
Rear Table¹
Rear Ceiling¹
¹
17
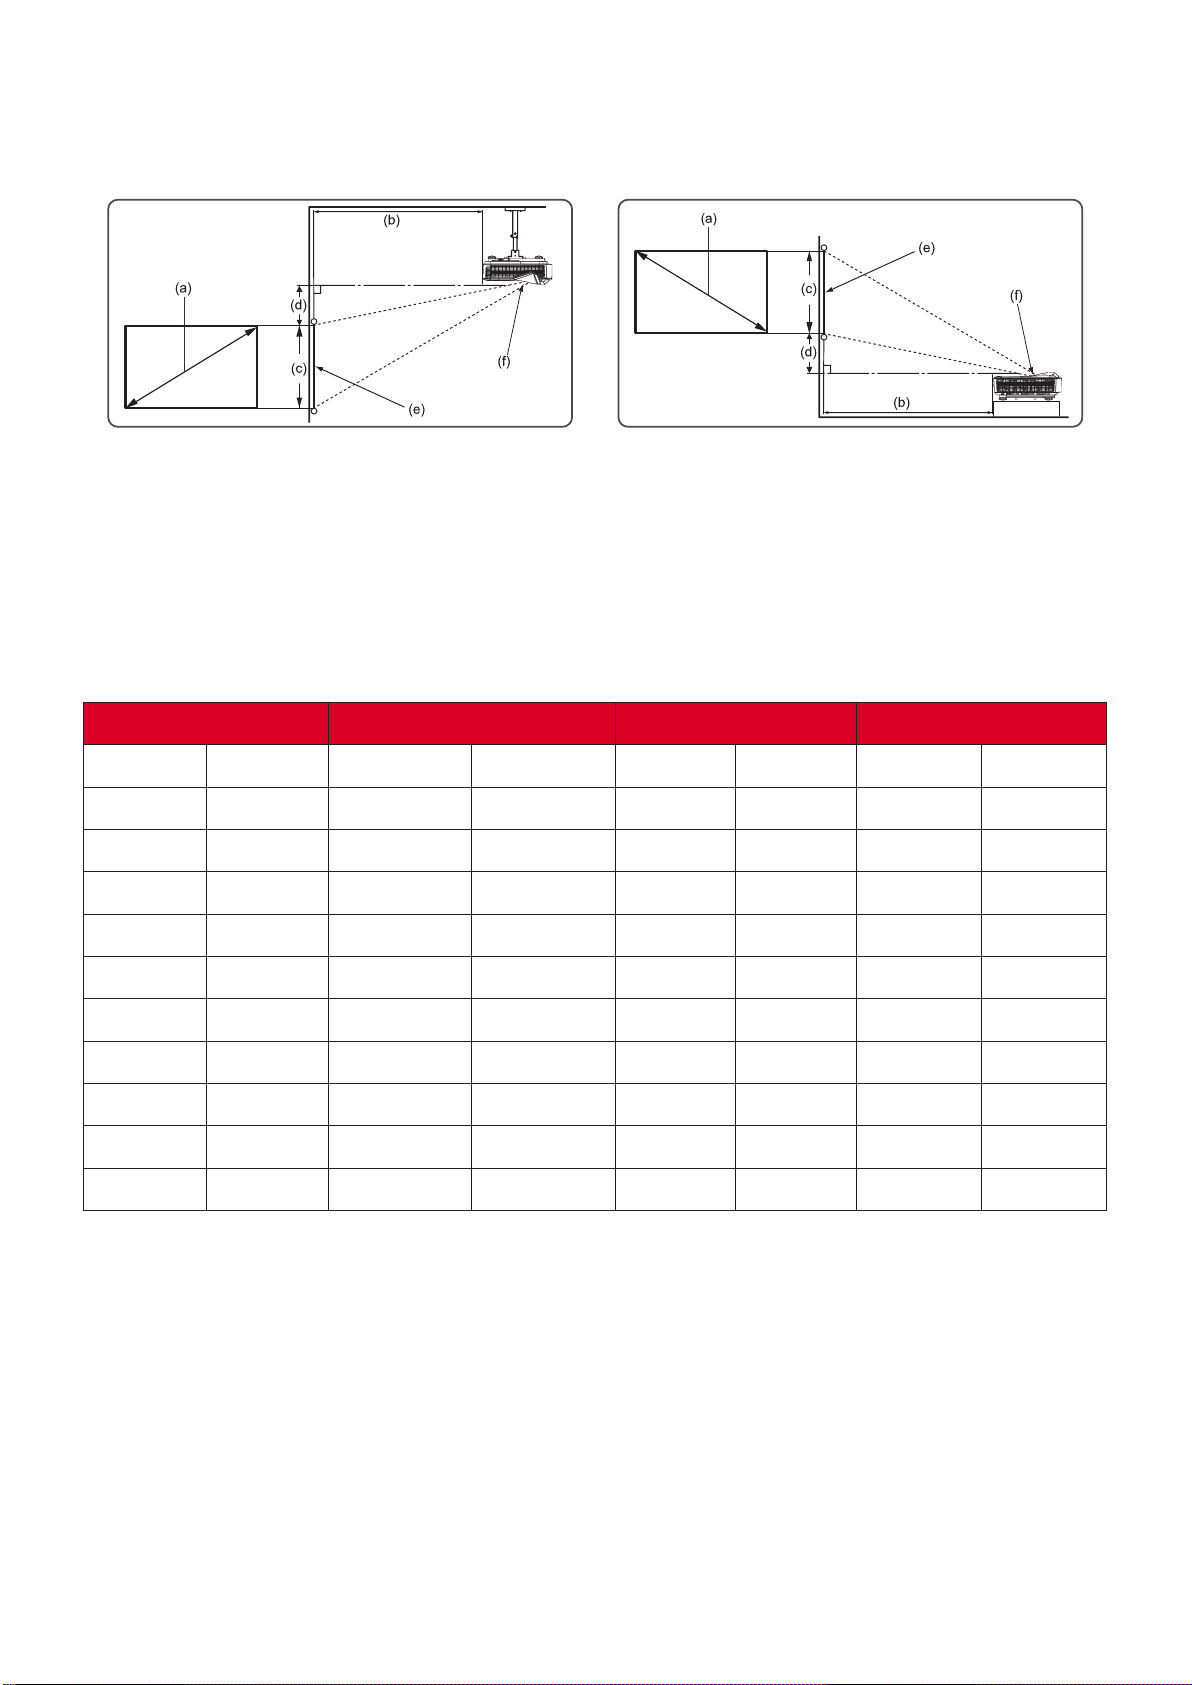
Projecon Dimensions
•
NOTE:
•
16:10 Image on a 16:10 Screen
(a) Screen Size (b) Projecon Distance (c) Image Height (d) Vercal Oset
in.
mm
in.
mm
in.
mm
in.
mm
174 249
2286 228 1212 272
2794 1481
446
664 2289
NOTE:
•
•
18
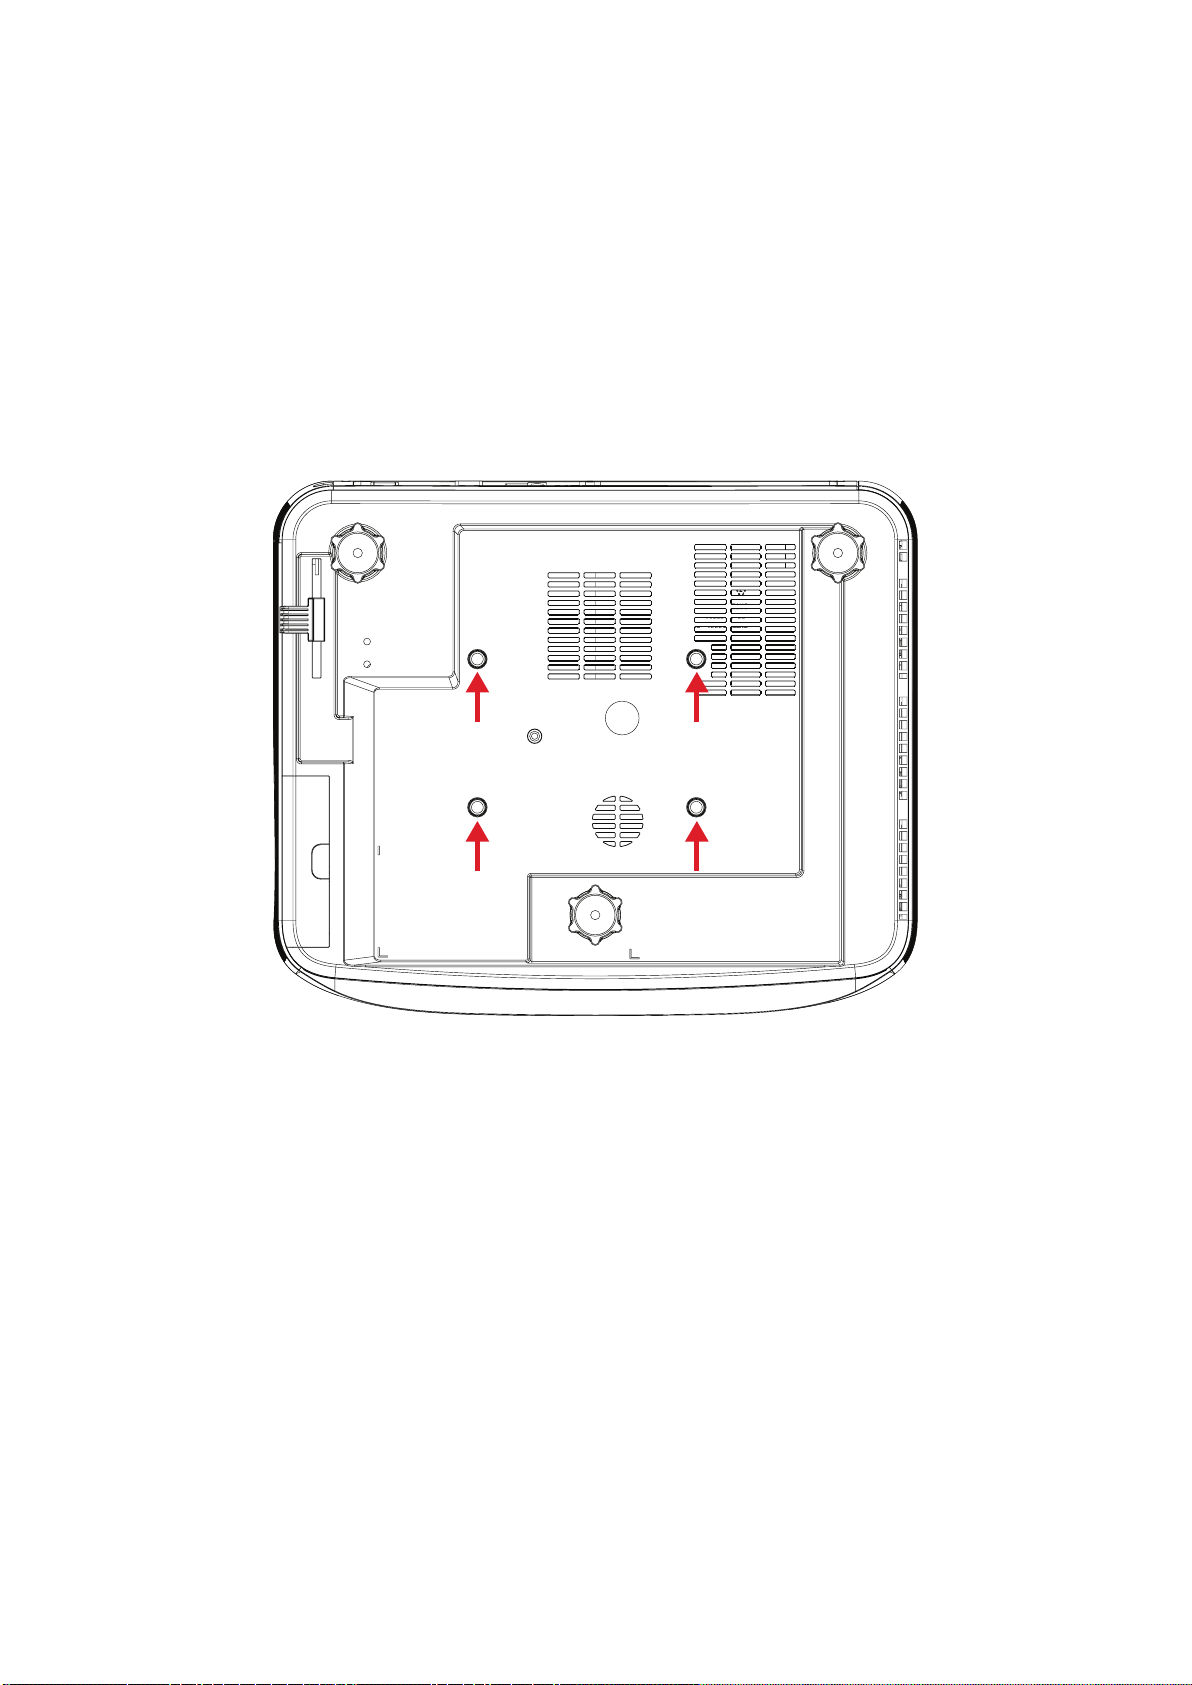
Mounng the Projector
NOTE:
1.
2.
•
•
CAUTION:
•
•
19
Making Connecons
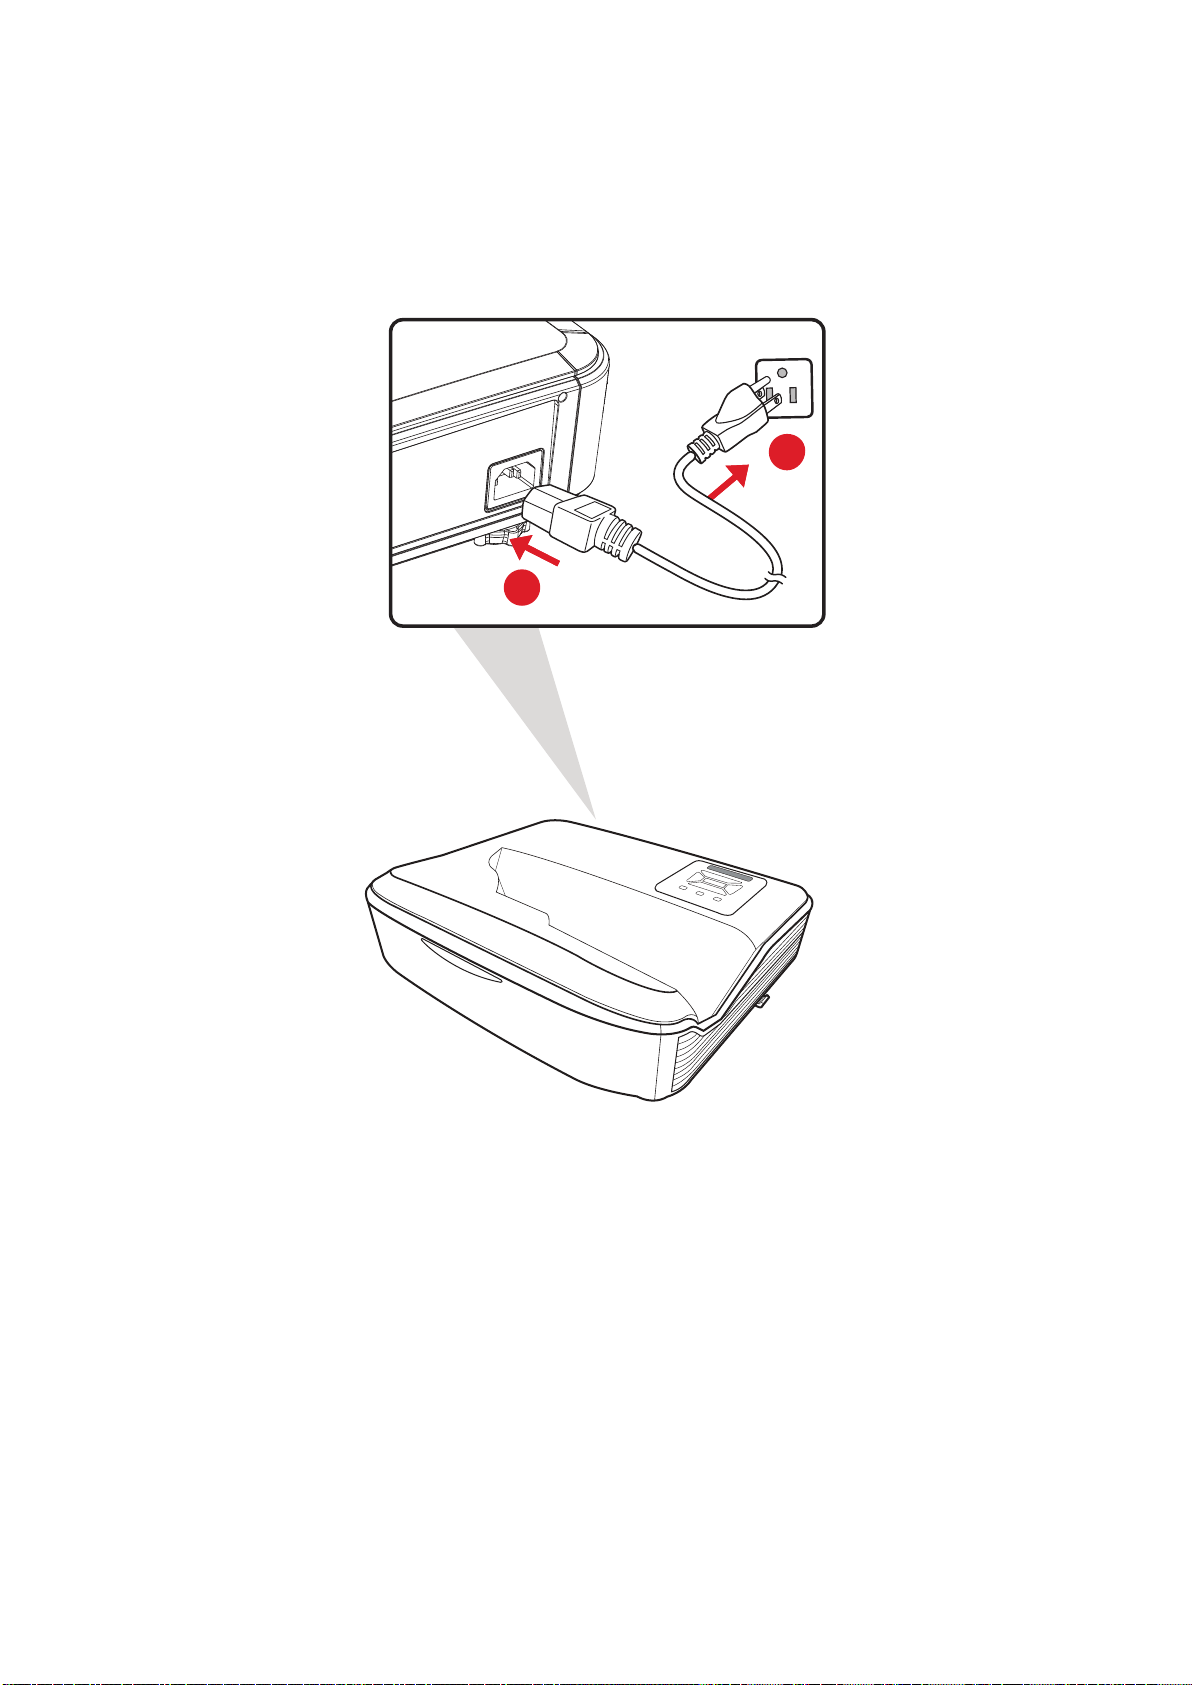
Connecng to Power
1. Connect the power cord to the AC IN jack at the rear of the projector.
2. Plug the power cord into a power outlet.
1
2
NOTE: When installing the projector, incorporate a readily accessible disconnect
or disconnect the power plug.
20
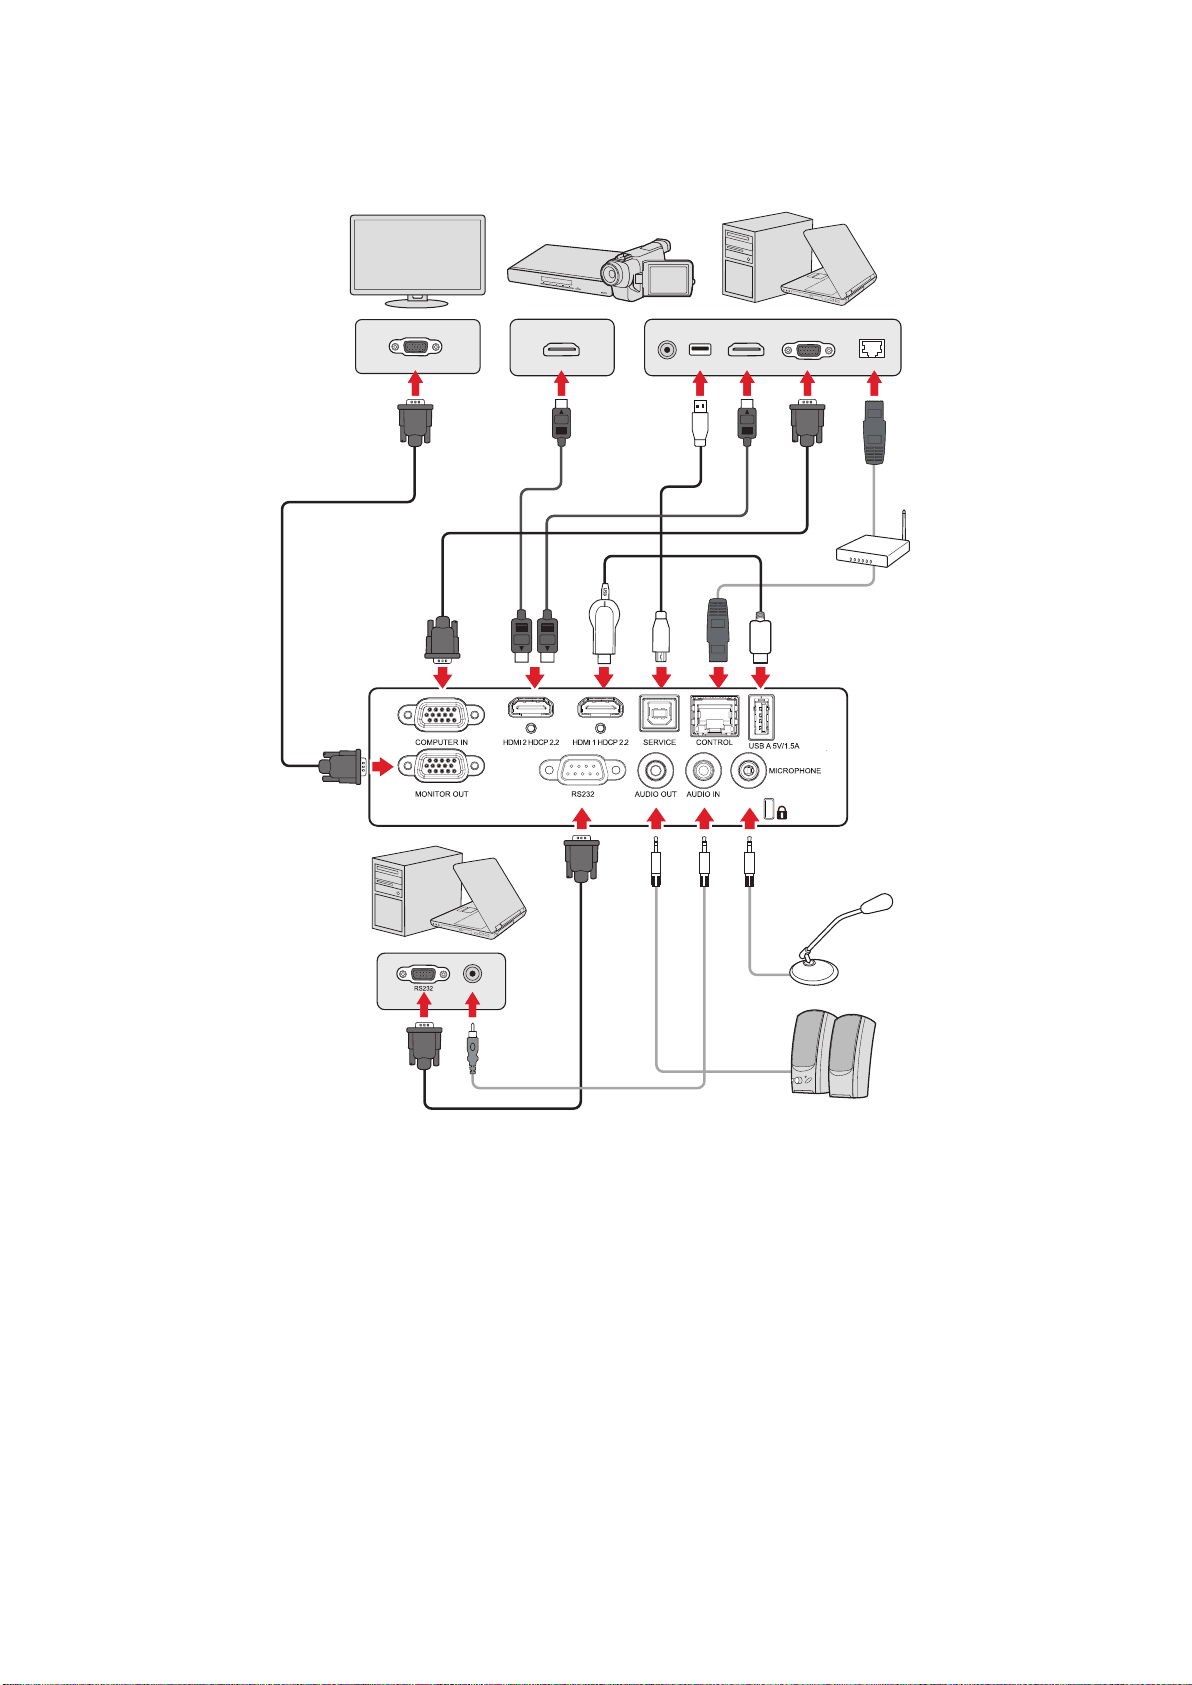
Connecng to External Devices
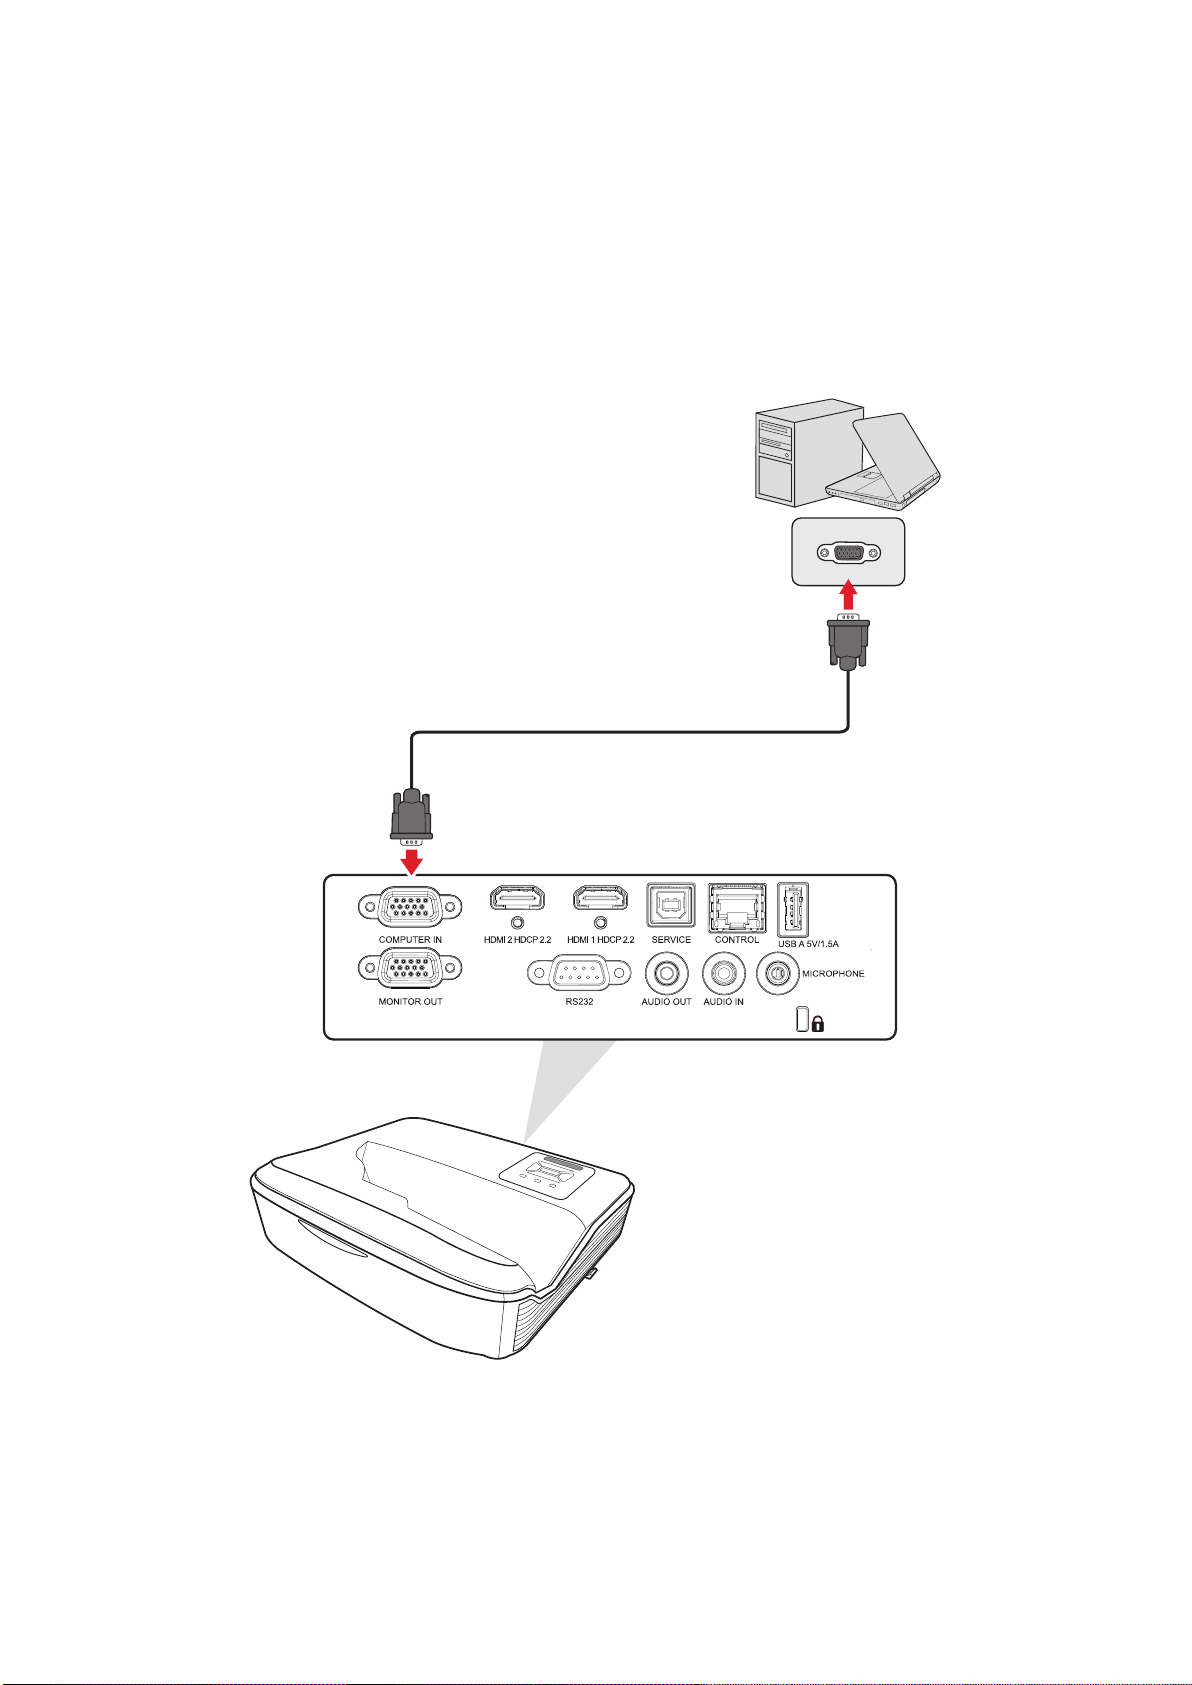
VGA Connecon
Connect one end of a VGA cable to the VGA port of the computer. Then connect the
other end of the cable to the COMPUTER IN port of the projector.
NOTE:
when connected to a projector. You may have to adjust your computer’s
21
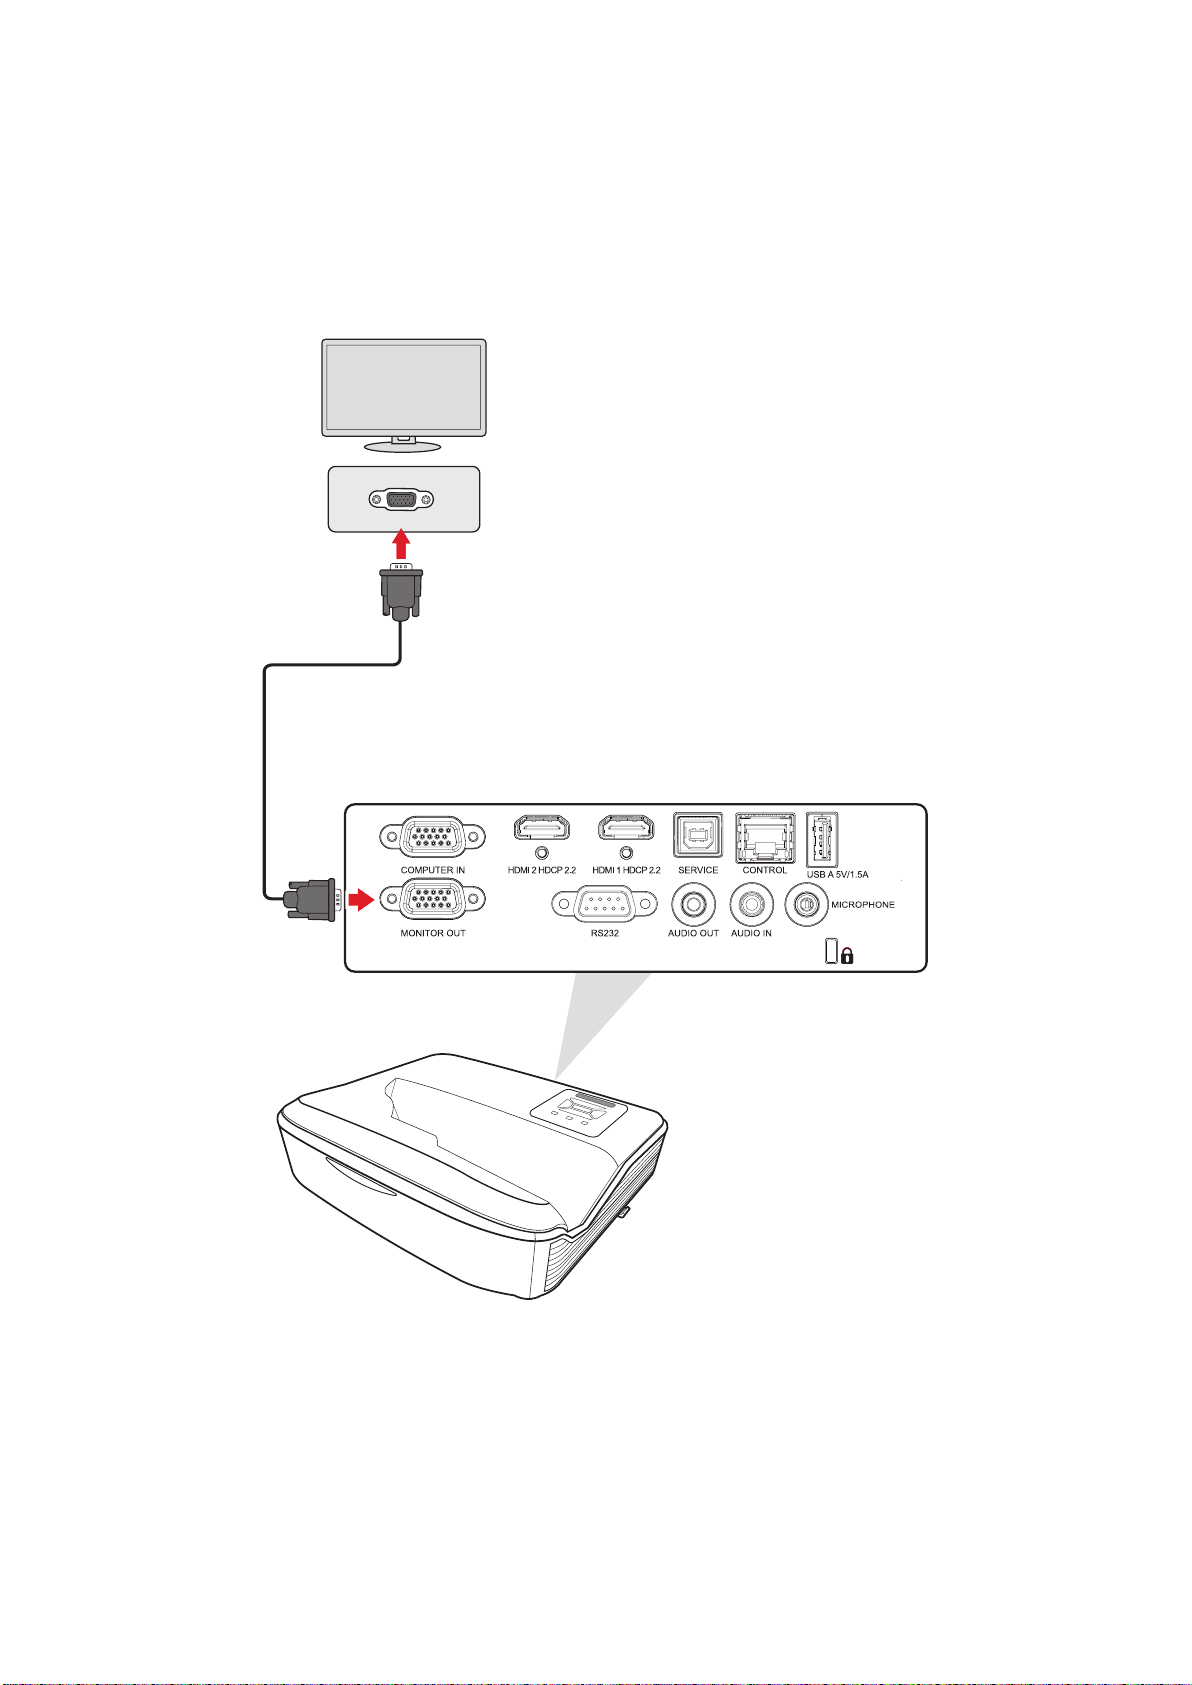
VGA Out Connecon
To view the projected content up close on a monitor as well as project it, a monitor
can be connected to the MONITOR OUT port of the projector.
port of your monitor. Then connect the other end of the cable to the MONITOR
OUT port of your projector.
22
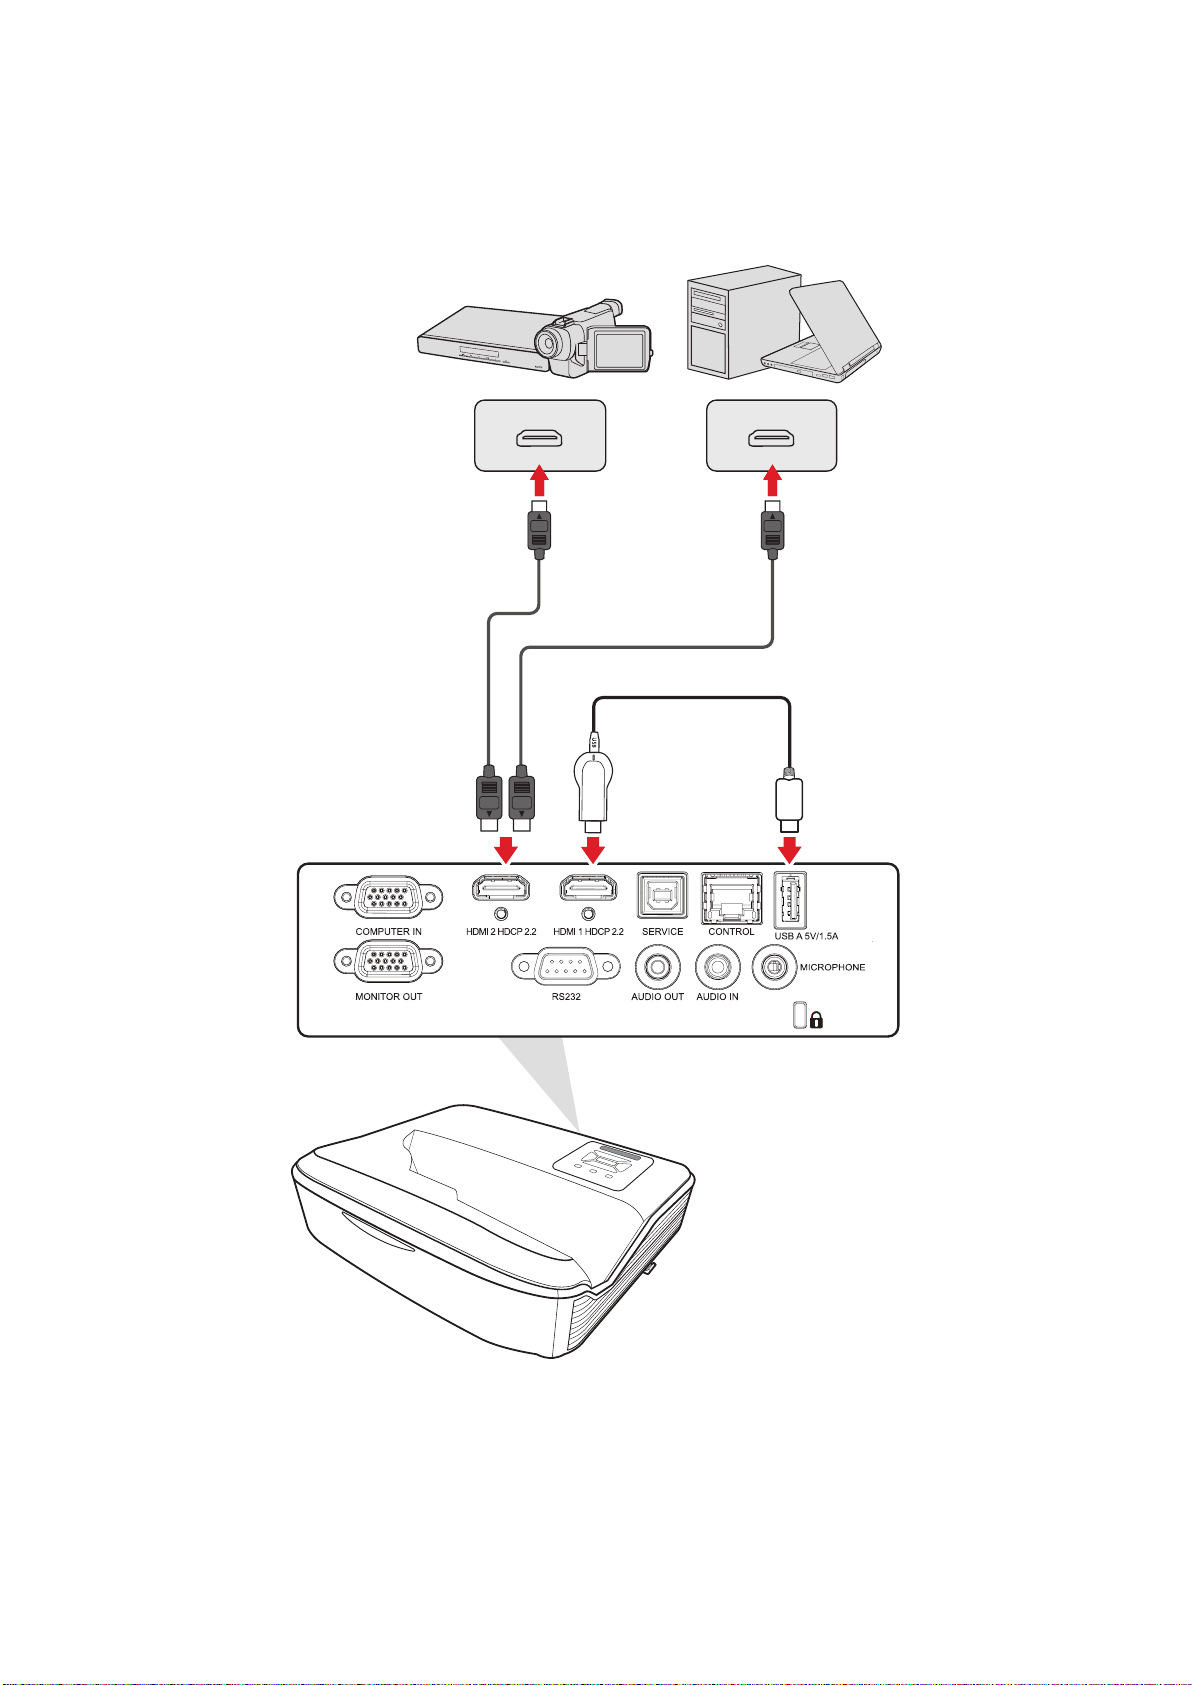
HDMI Connecon
Connect one end of an HDMI cable to the HDMI port of your video device. Then
connect the other end of the cable to the HDMI 1/2 port of your projector.
NOTE: The
HDMI 1 and 2 ports support HDCP 2.2.
23
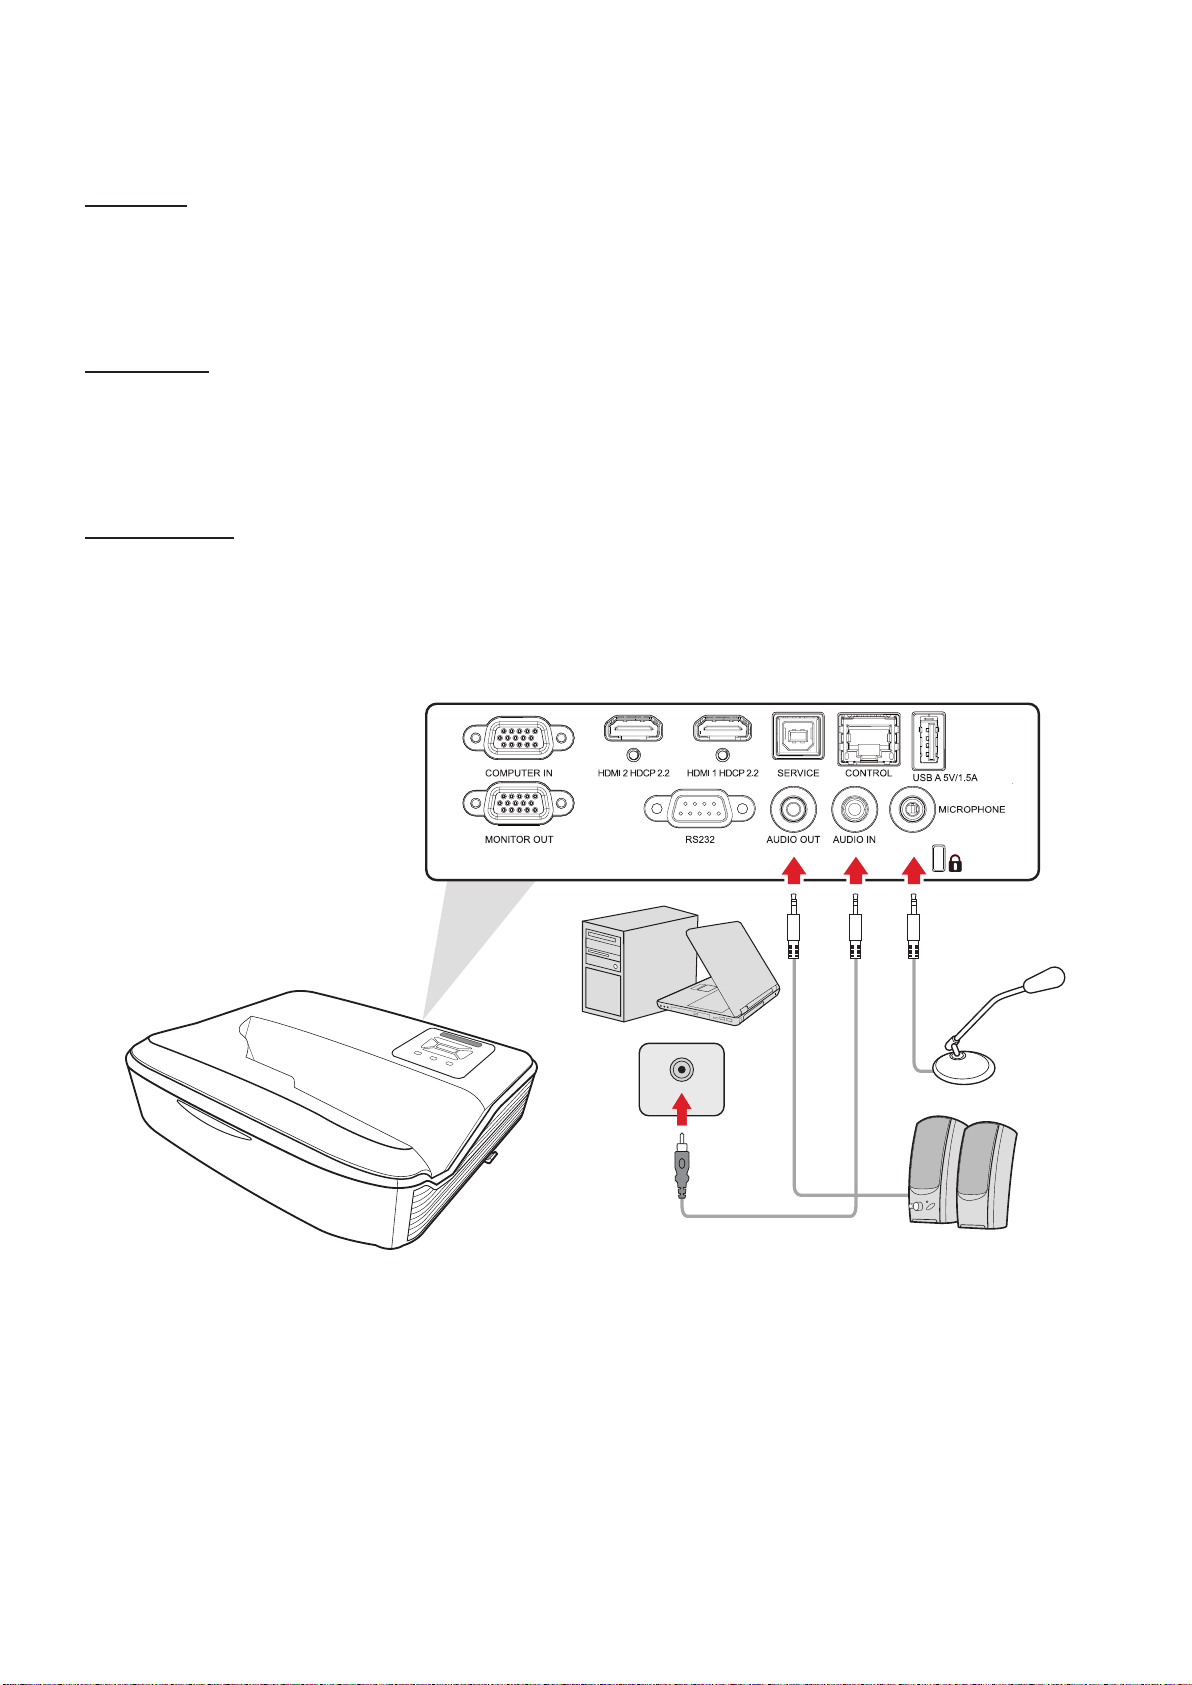
Audio and Microphone Connecon
The projector supports both Audio In and Audio Out as well as Microphone input.
Audio In
projector’s Audio In port.
Audio Out
Audio
Out port.
Microphone
Connect a microphone directly to the Microphone port.
NOTE: Only supports microphone input; does not support audio in. Plugging in
the wrong cable may damage the projector.
24
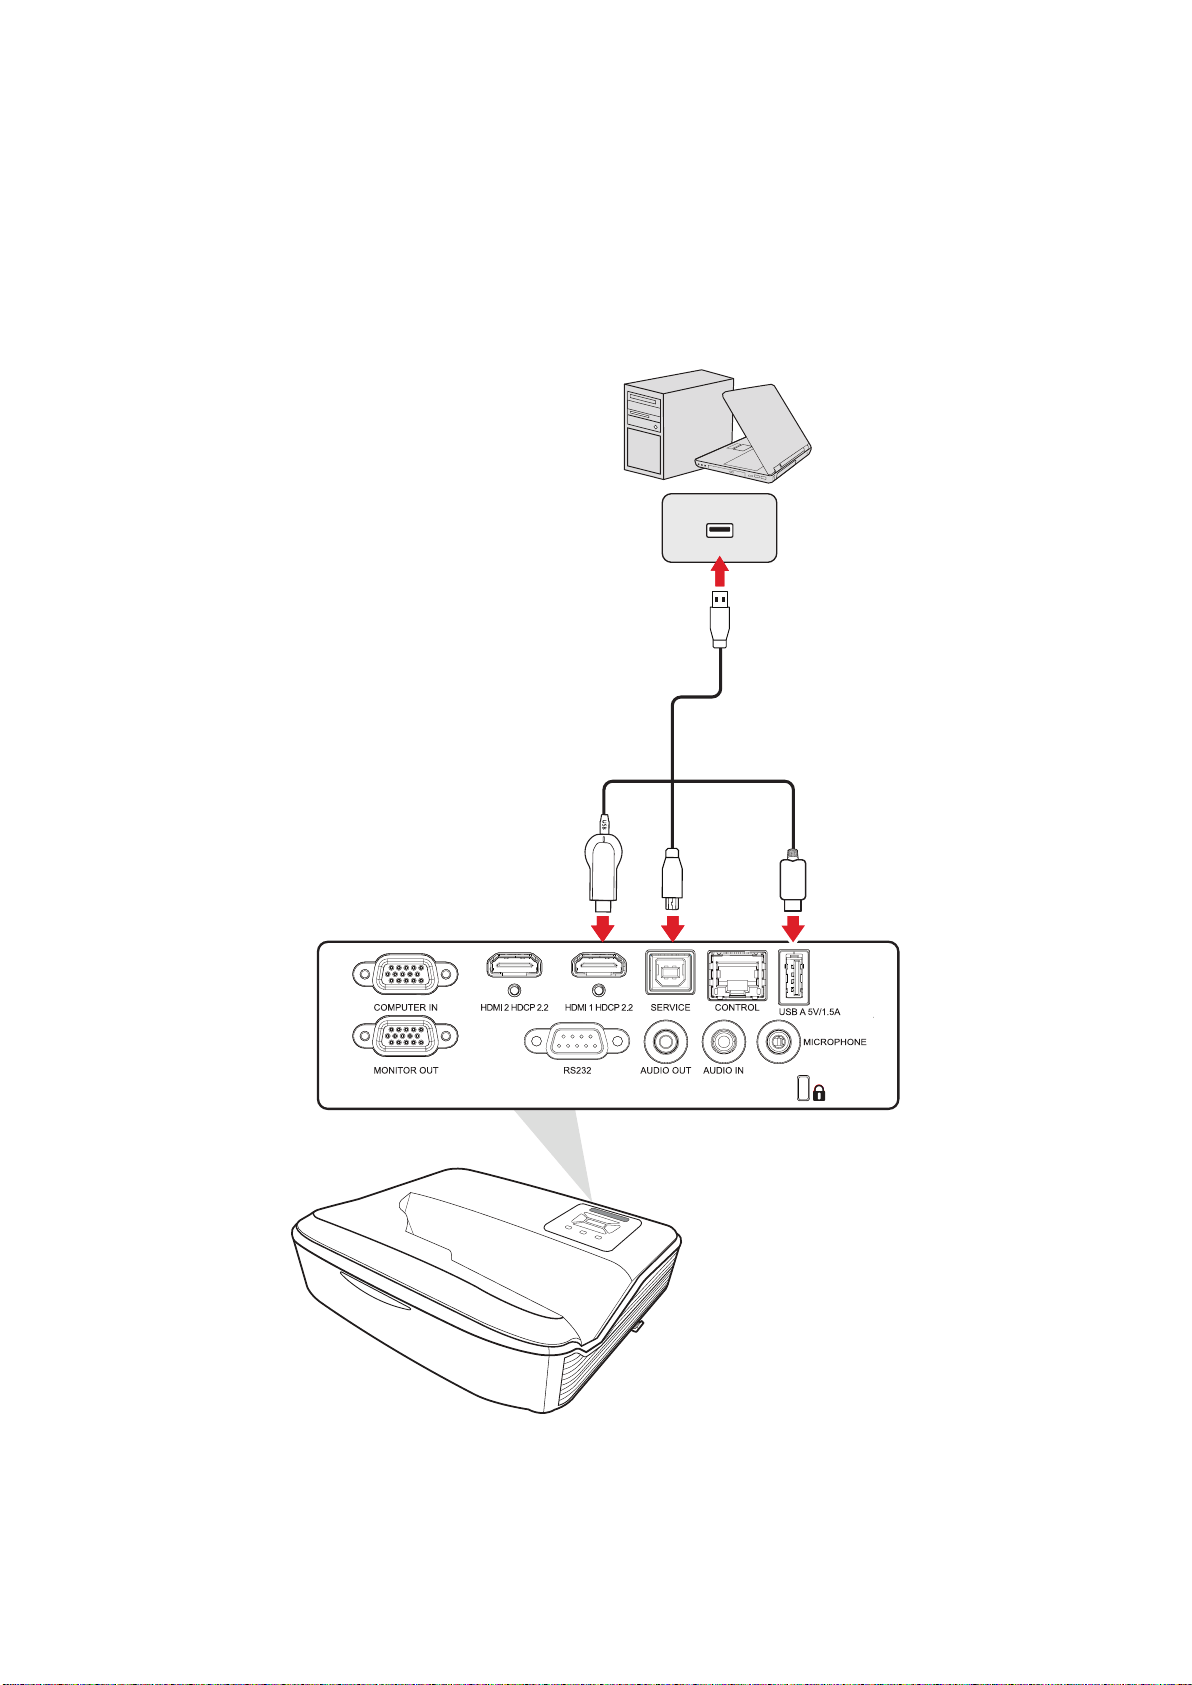
USB Connecon
USB Type A Connecon
The USB Type A port is for supplying power (e.g., dongles).
USB Type B Connecon
The USB Type B port is for servicing the projector.
25
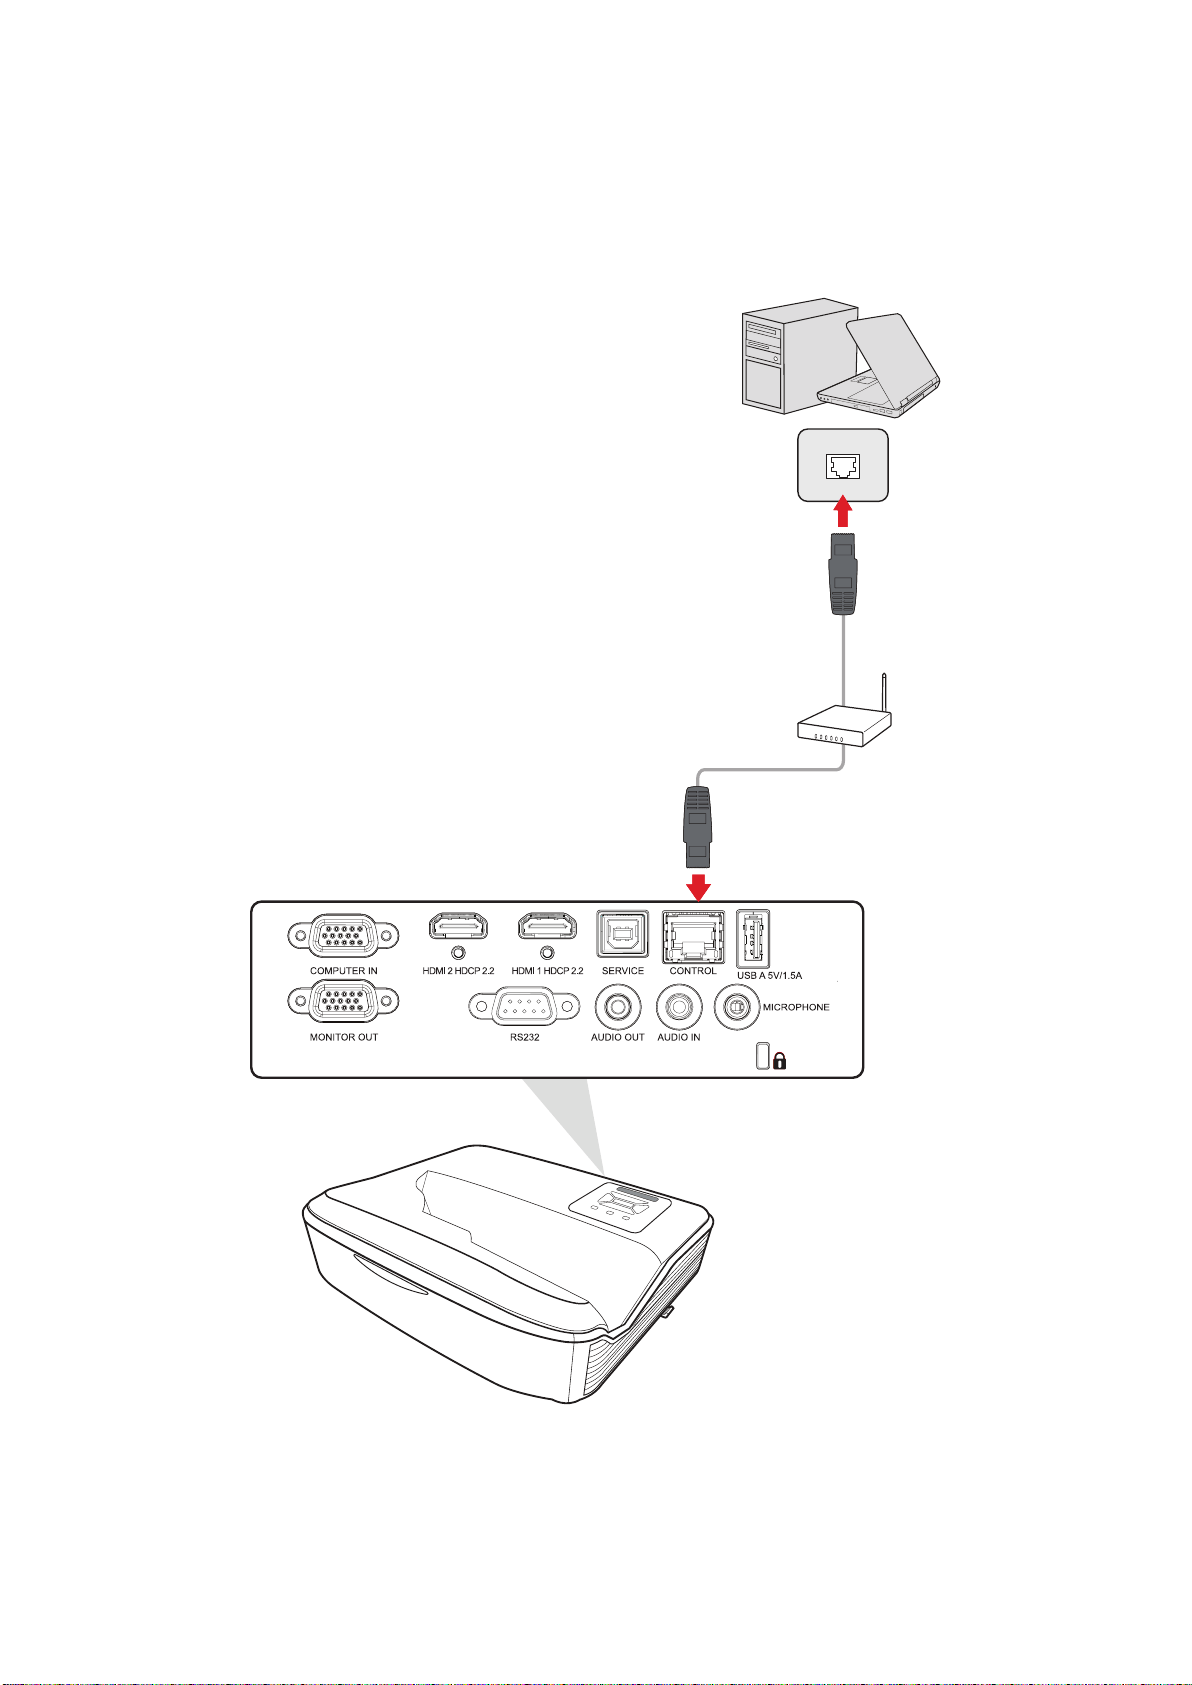
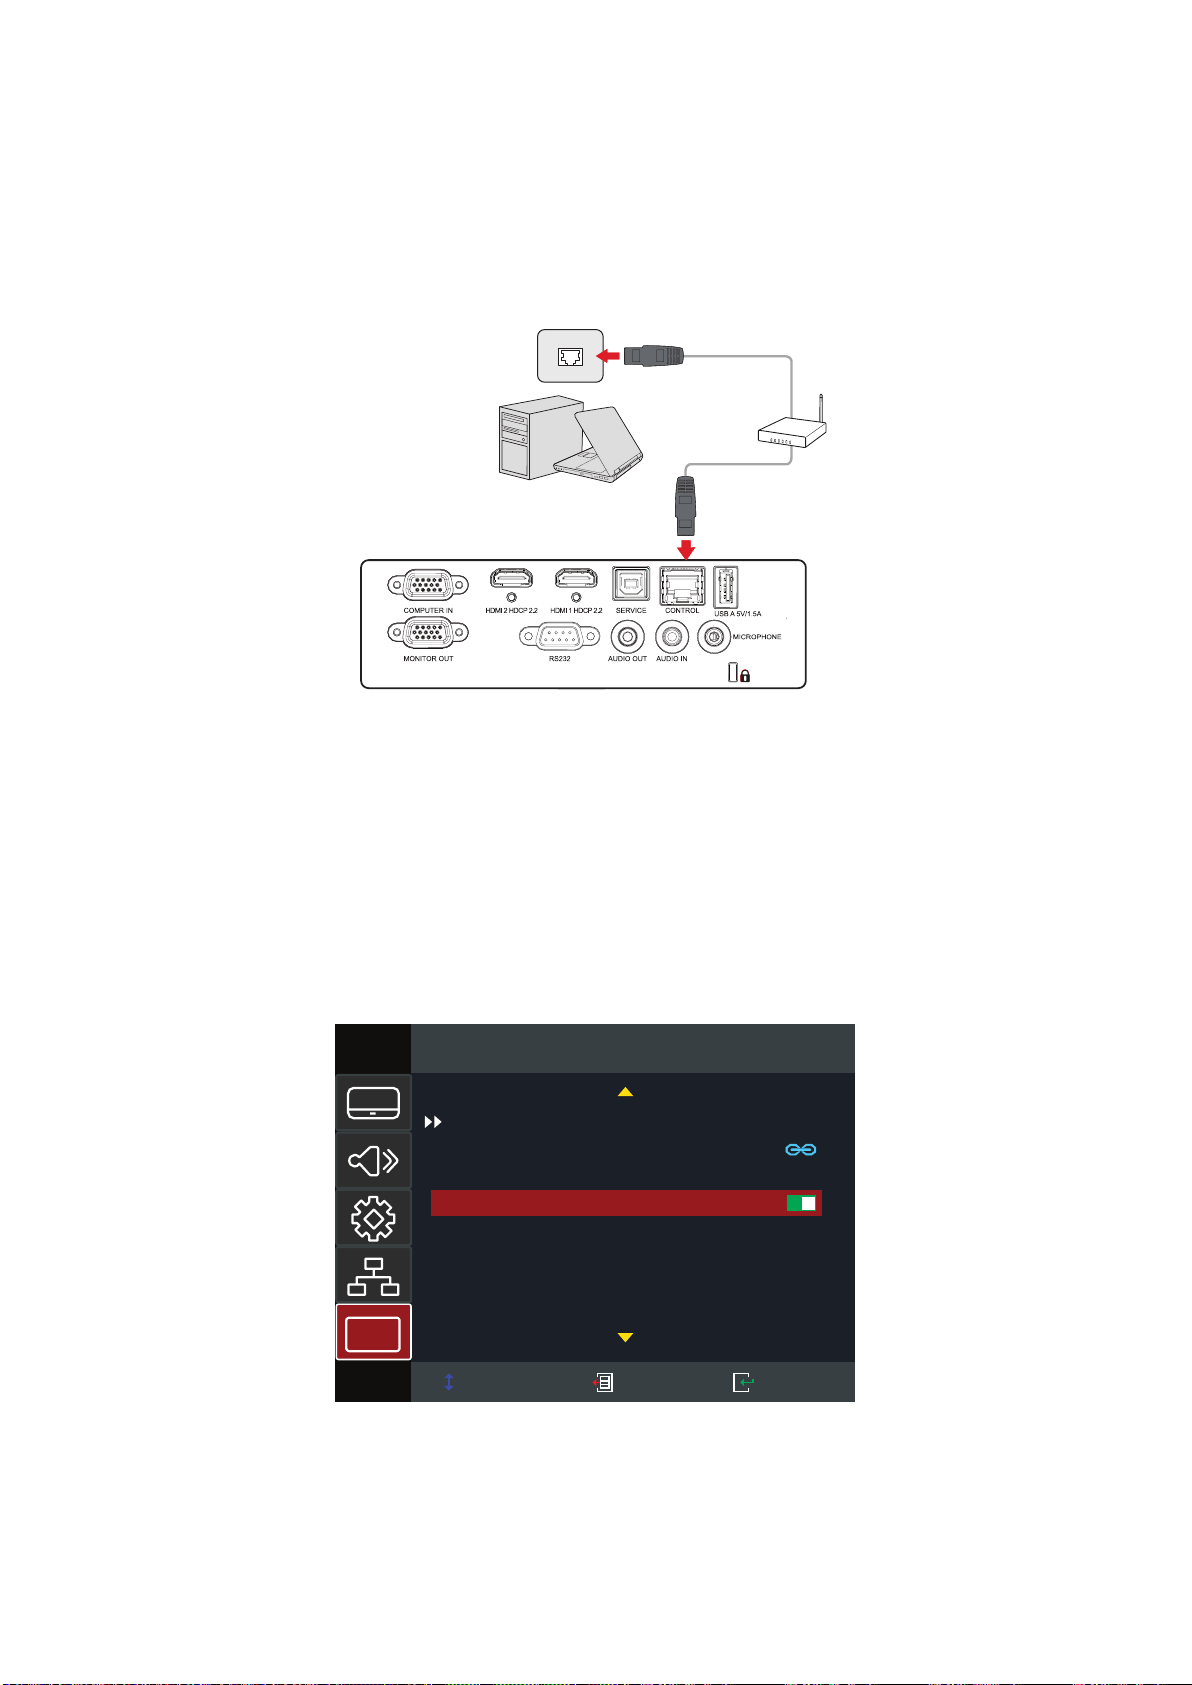
Network Connecon
Plug the network cable into the LAN
The projector provides several networking and remote management features. The
remotely.
26
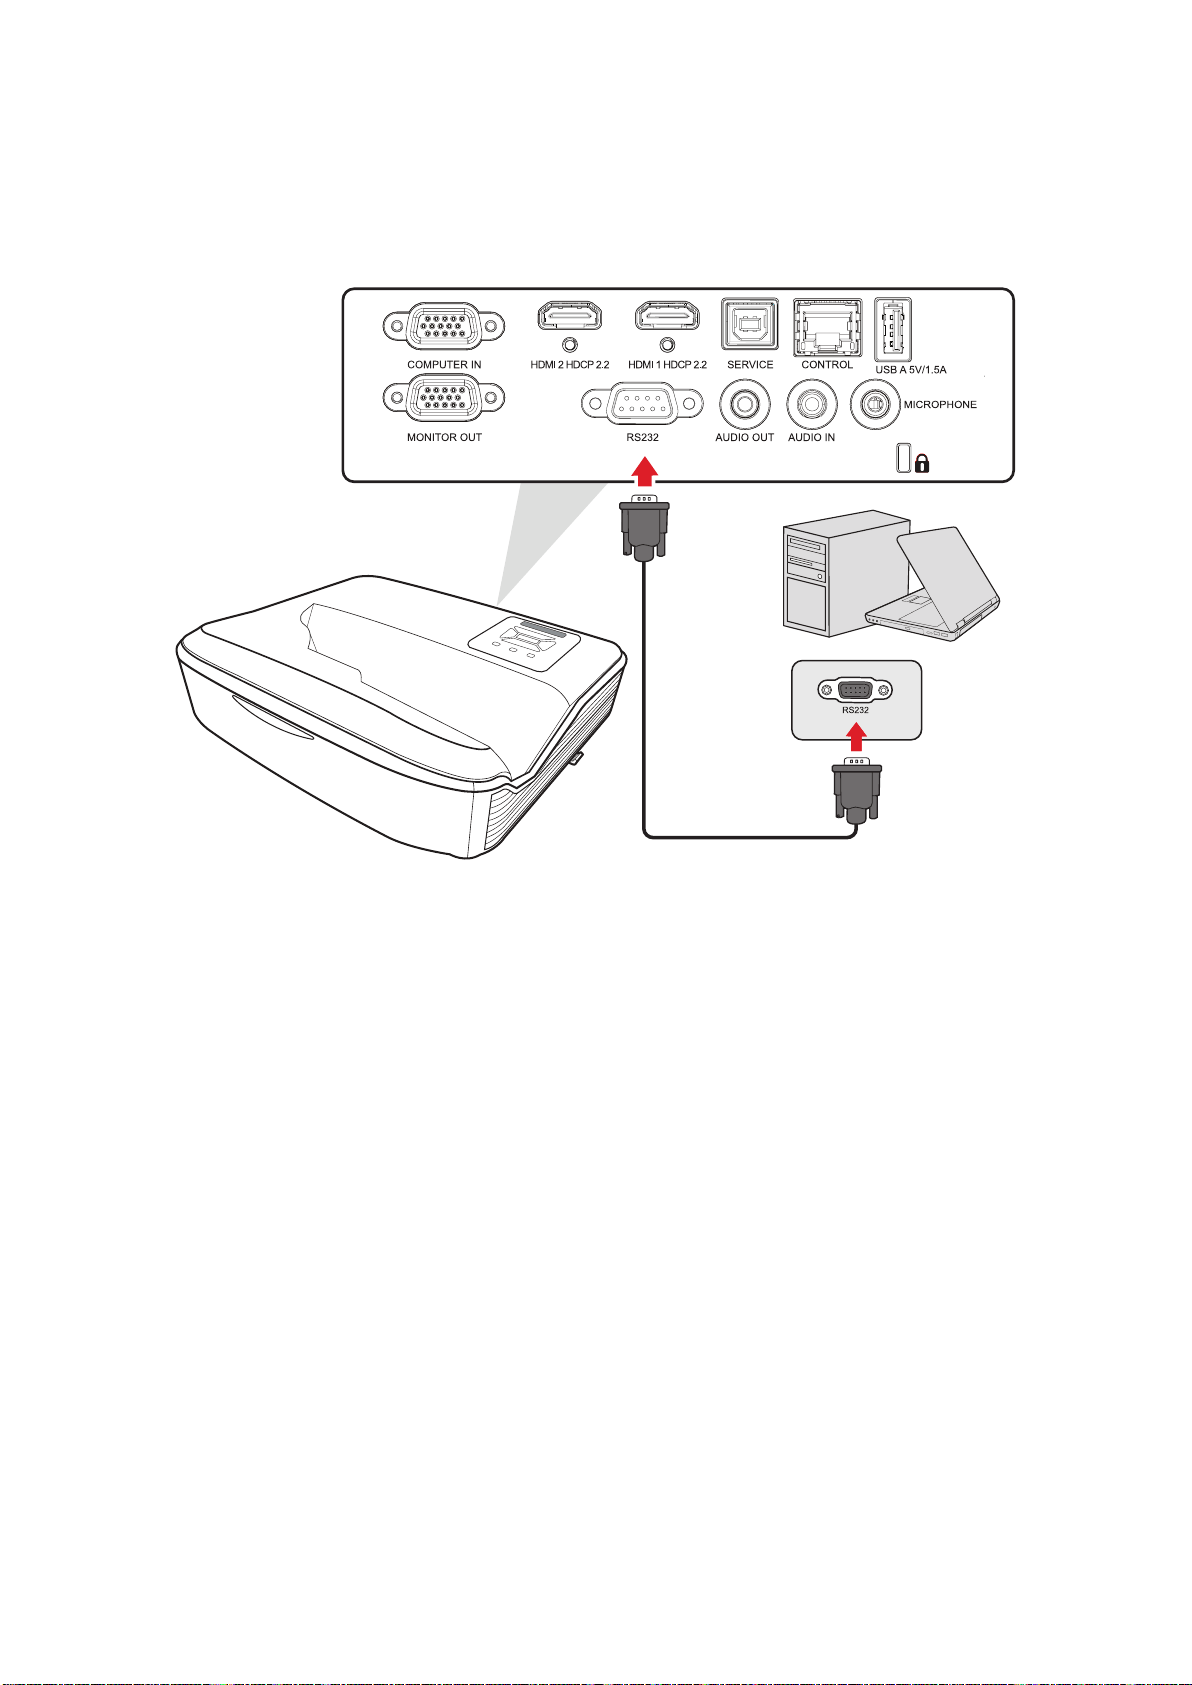
RS-232 Connecon

27
Using the Projector
Starng Up the Projector
1. Ensure the projector’s power cord is properly connected to a power outlet.
2. Press the Power
projector.
NOTE:
•
•
28
Selecng an Input Source
Source
control to select the desired input.
NOTE: Ensure the connected sources are also turned on.
29
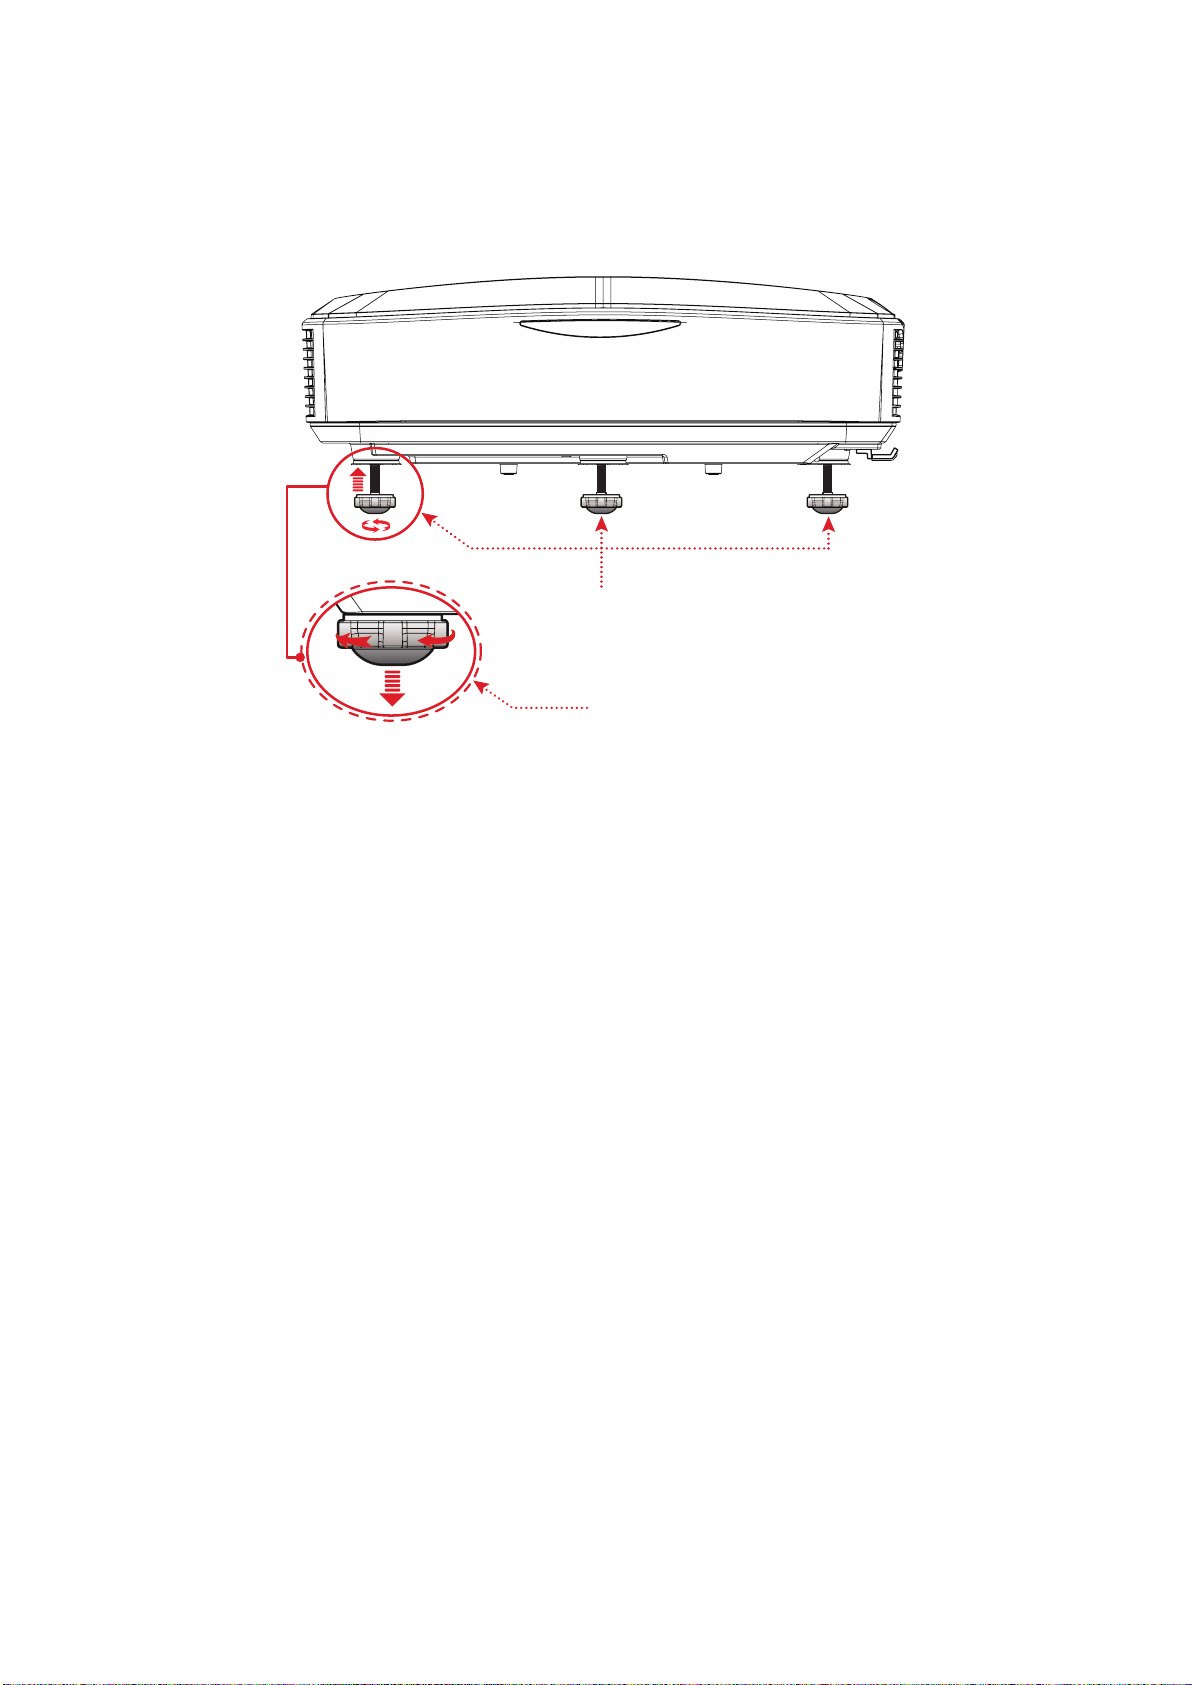
Adjusng the Projected Image
Adjusng the Projector’s Height and Projecon Angle
Adjustment Feet
Adjustment Ring
30
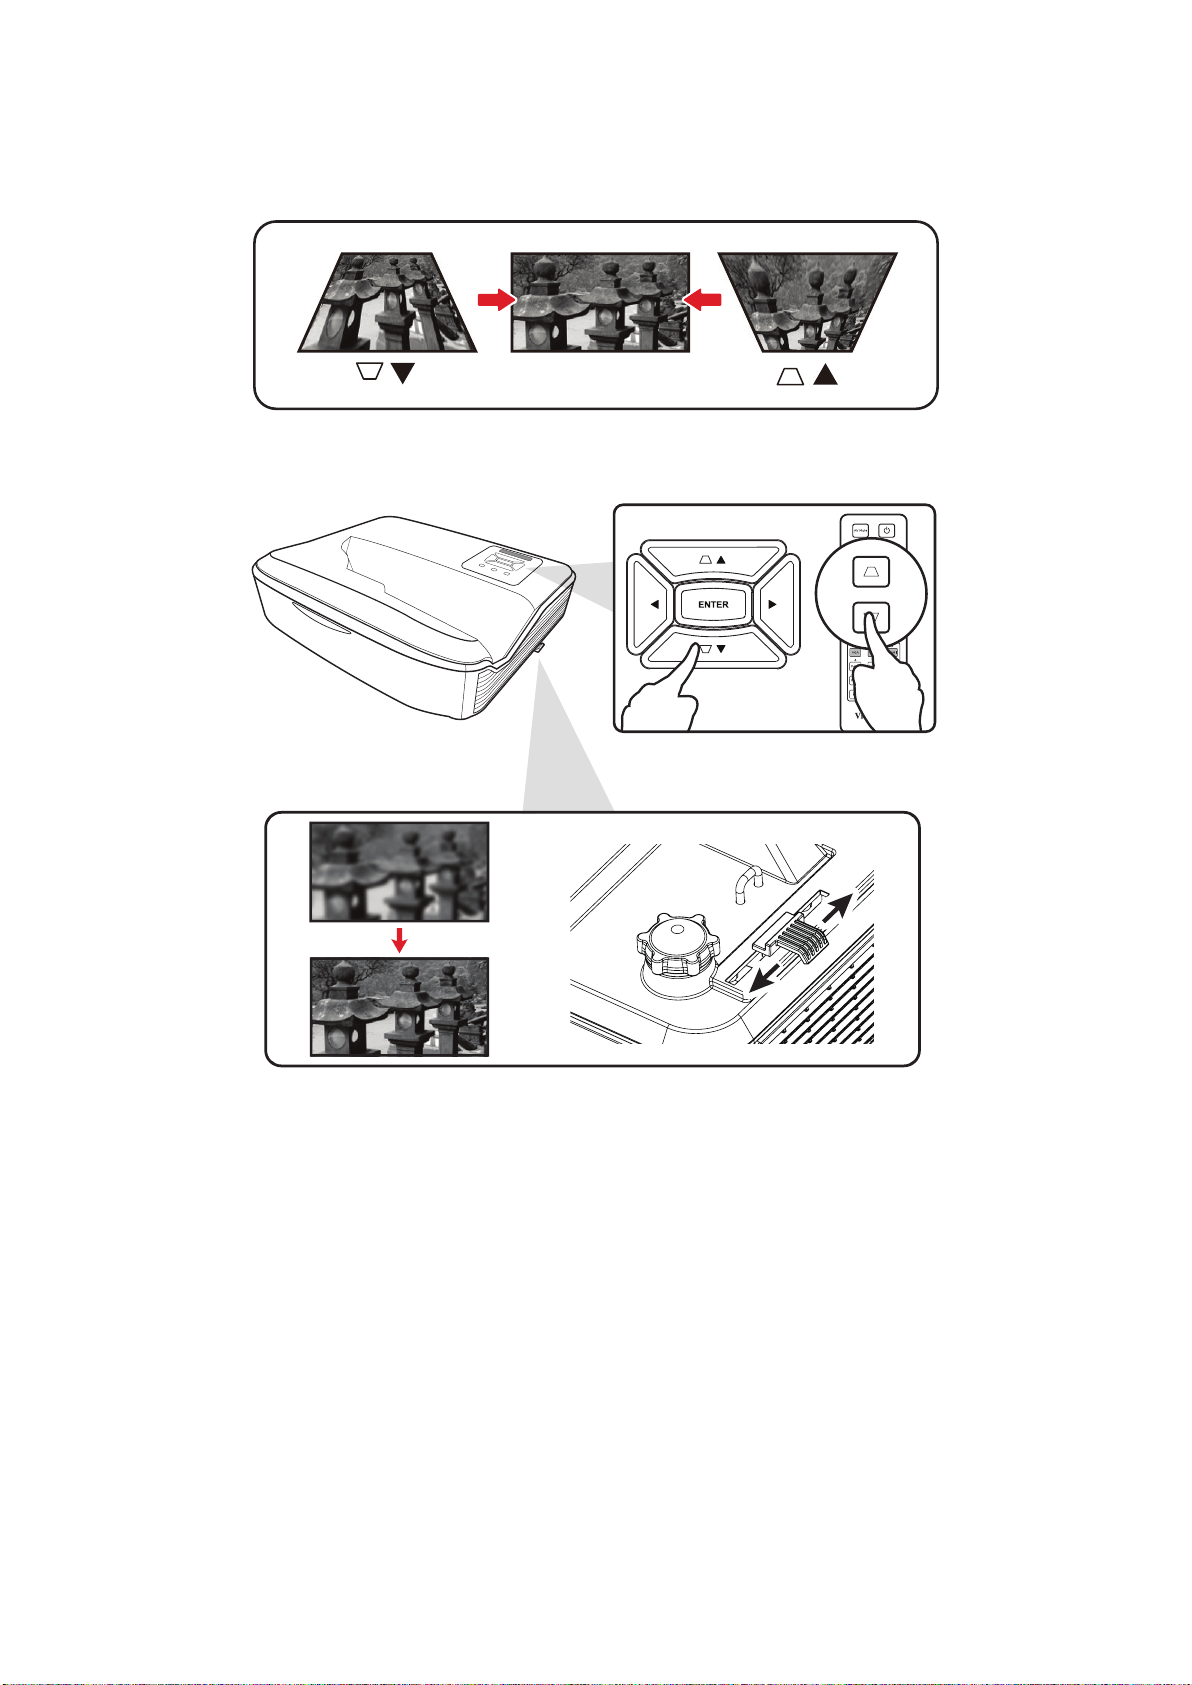
Adjusng the Focus and Keystone
Focus Switch or Keystone Keys.

31
Shung Down the Projector
1. Press the Power
2. Press the Power
3.
32
Operang the Projector
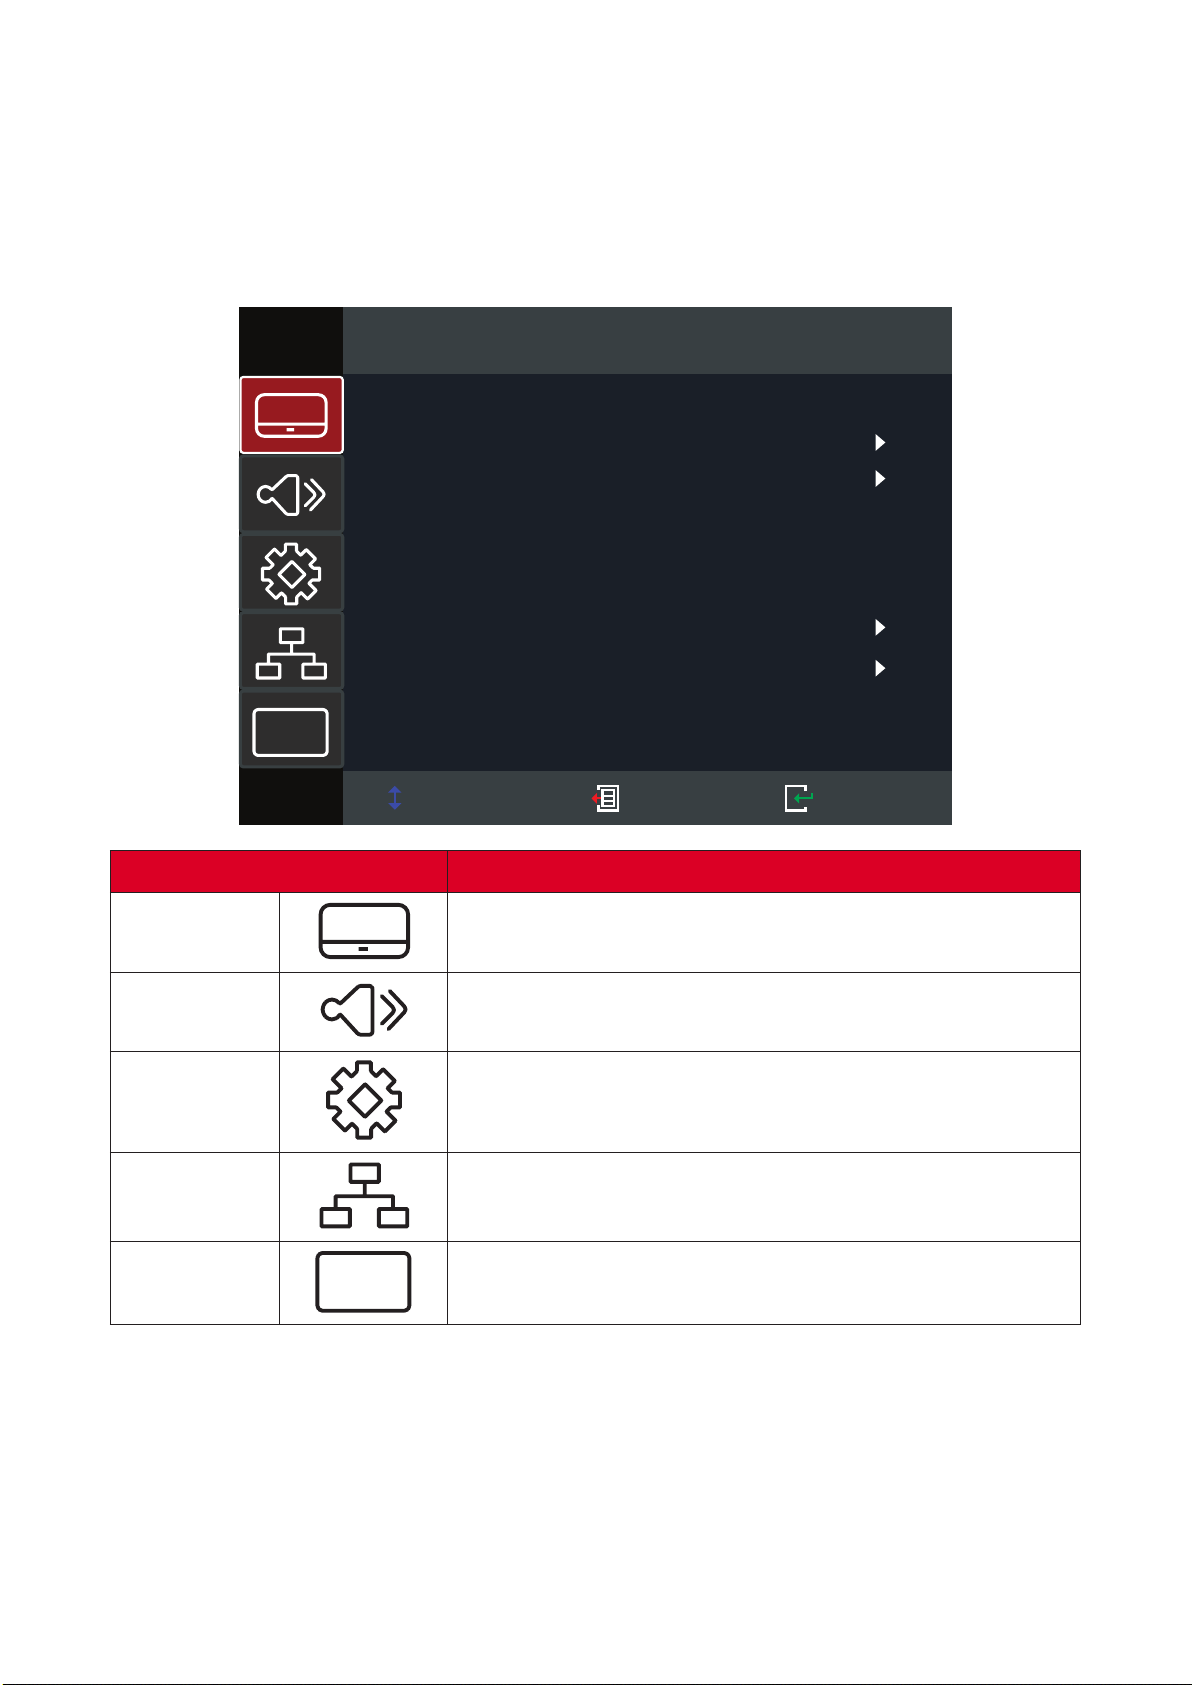
On-Screen Display (OSD) Menu
Select Exit Enter
Display
Image Settings
3D
Aspect Ratio
Edge Mask
Zoom
Image Shift
Keystone
i
4:3
0
0
Menu Descripon
Display
Audio
Setup
Network
Informaon
i

33
Menu Navigaon
1. Menu/Exit
2. Navigaonpq
Enter
3. Use the Navigaontu
Enter
Navigaontu
4.
5. Enter
6. Menu/Exit
34
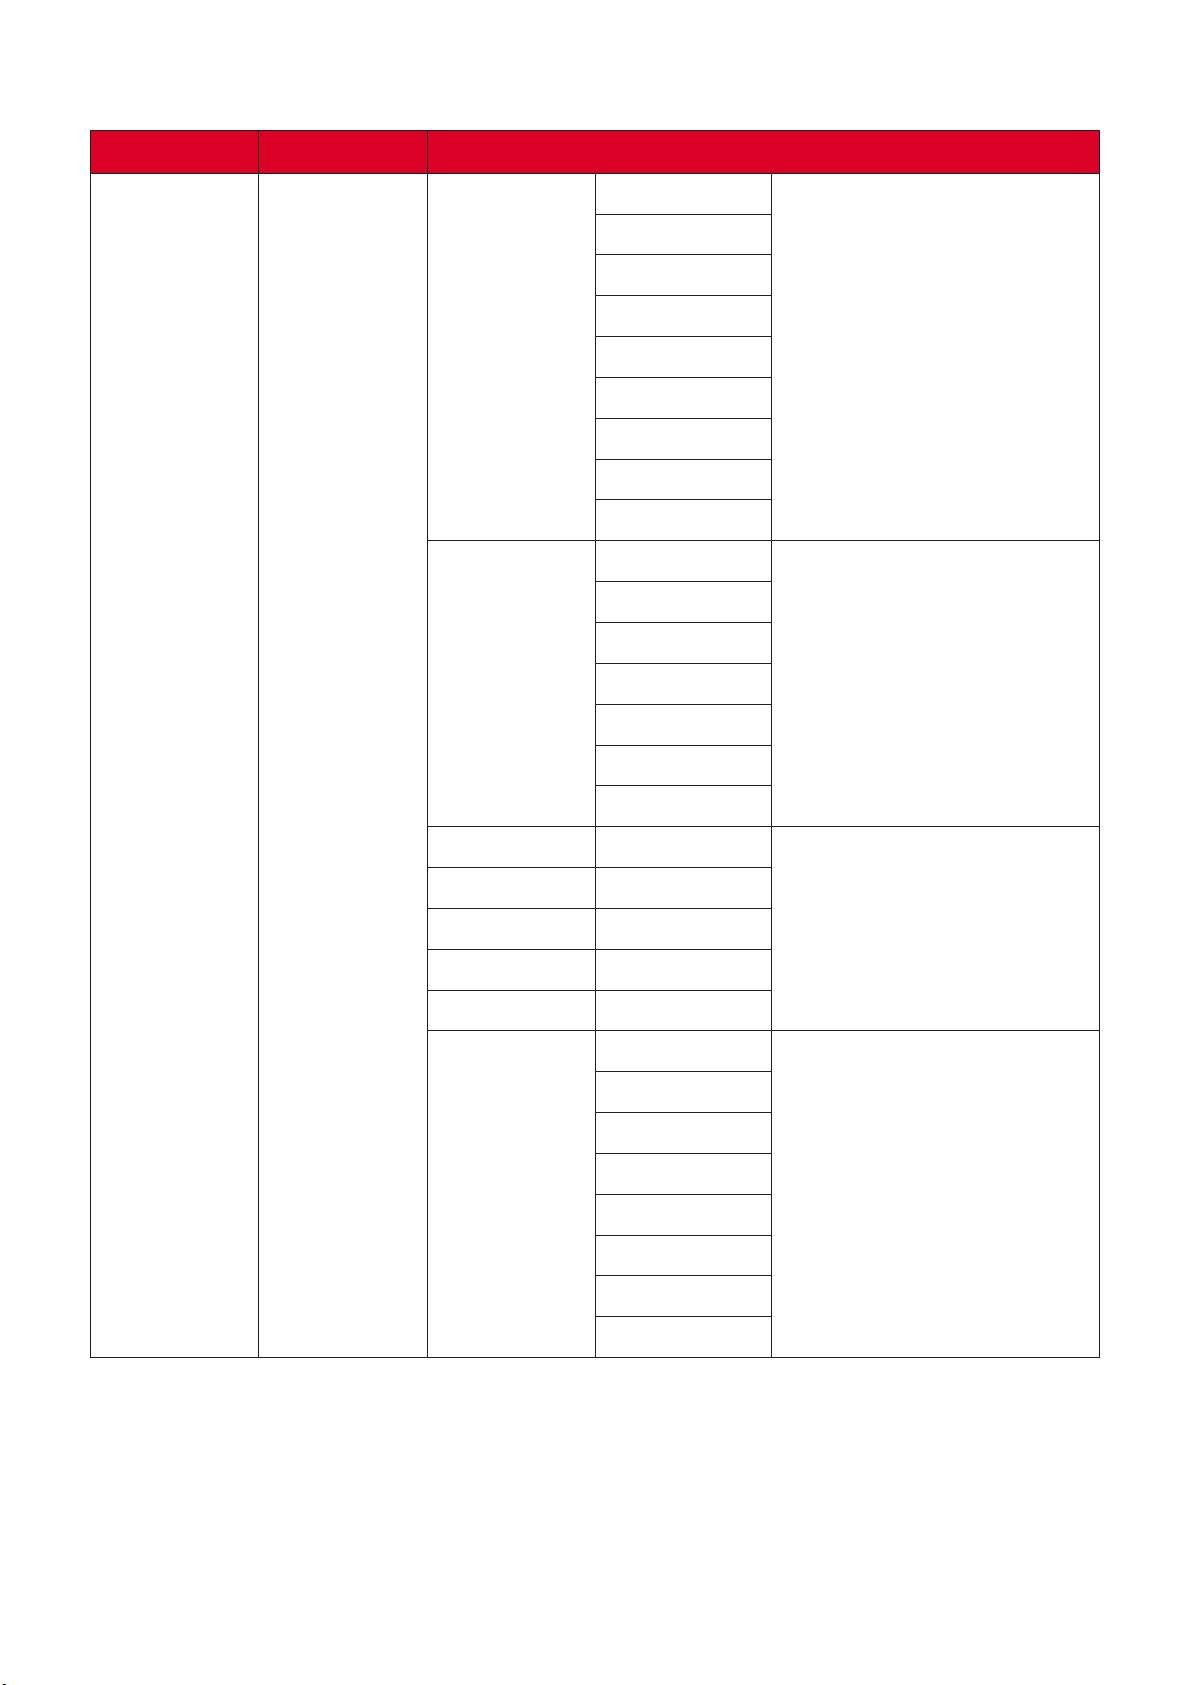
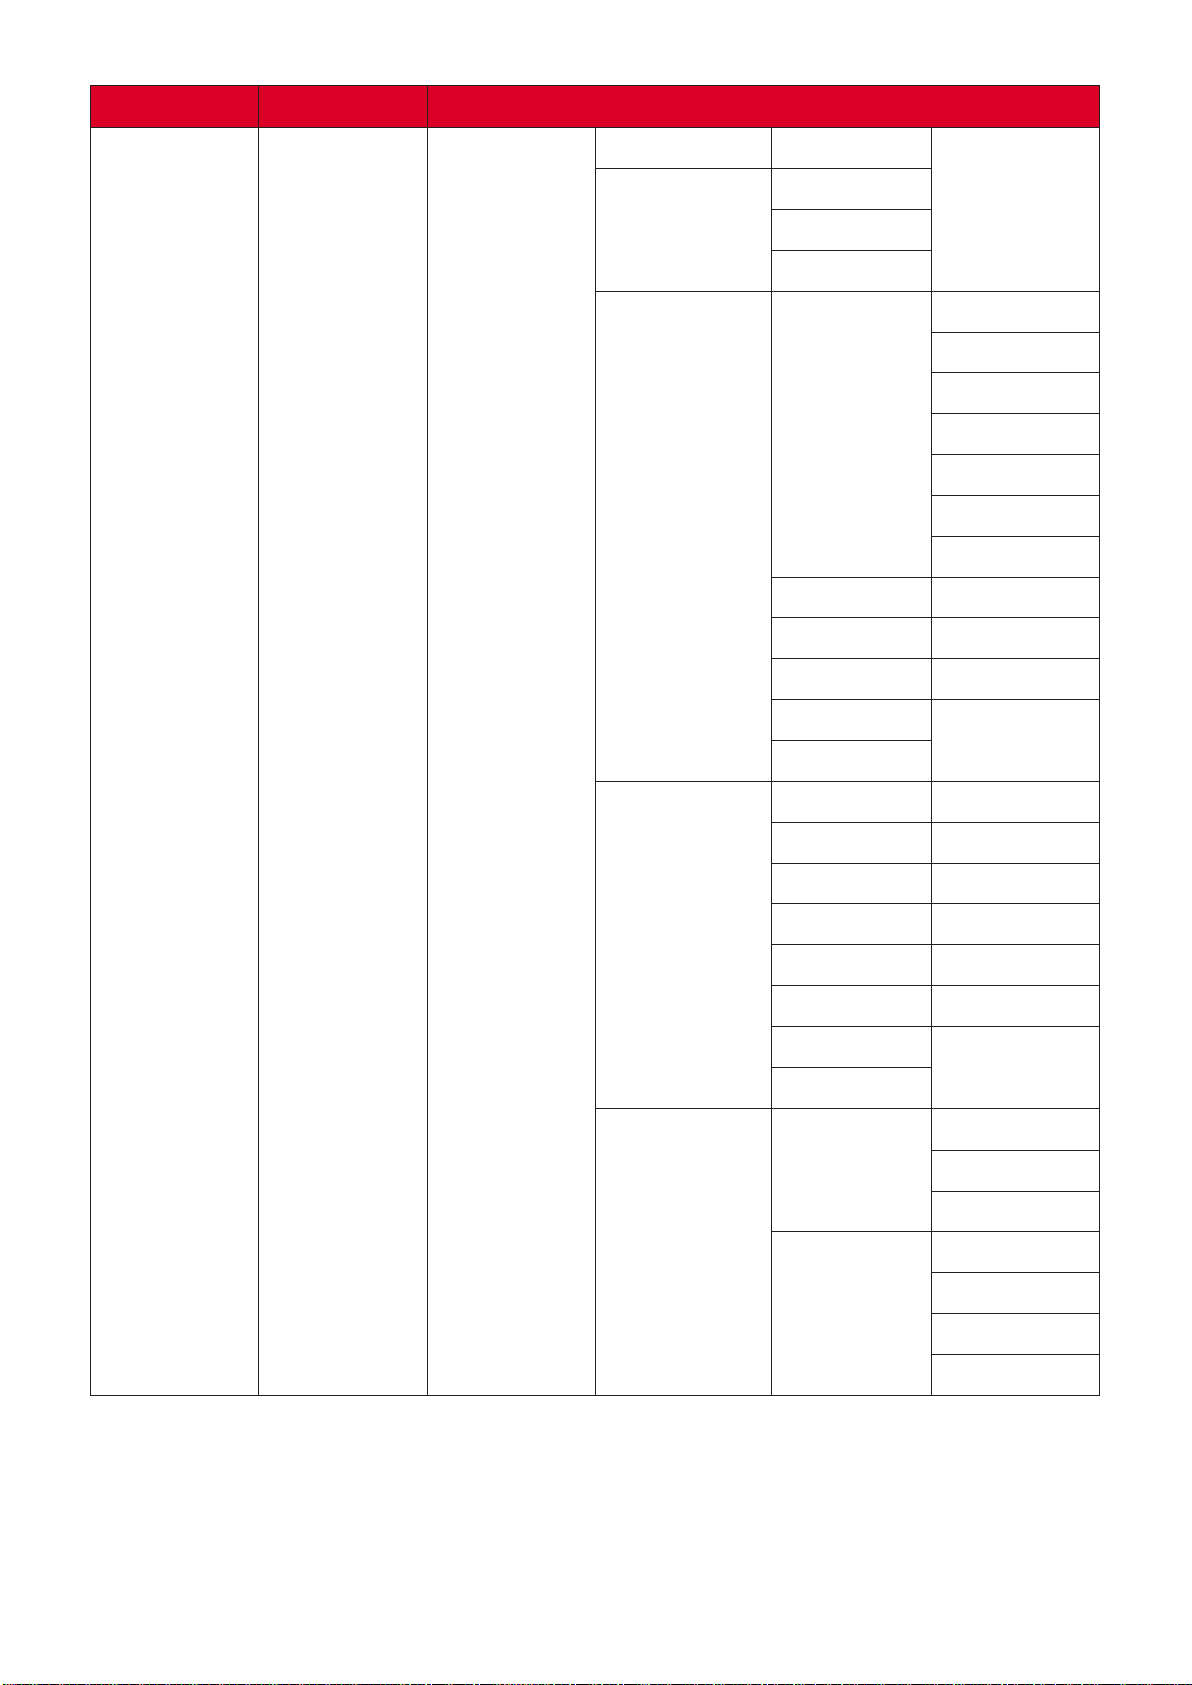
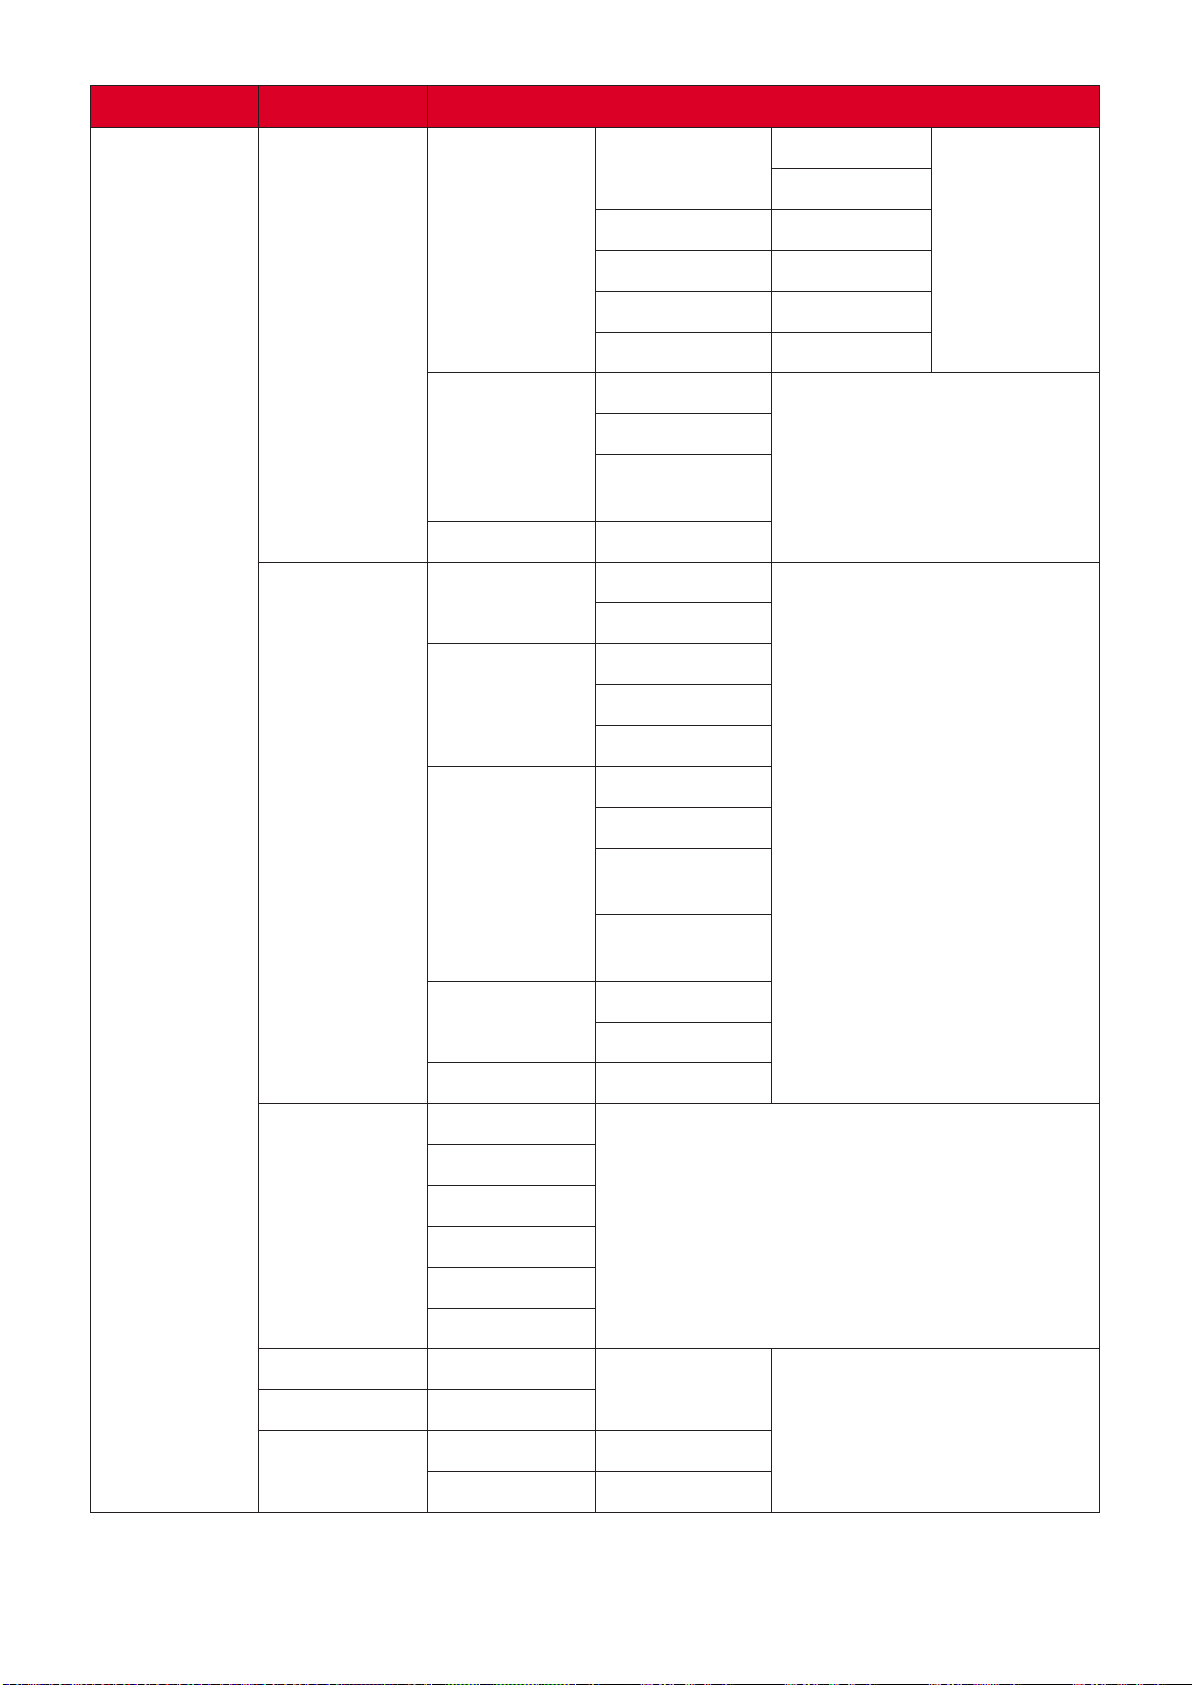
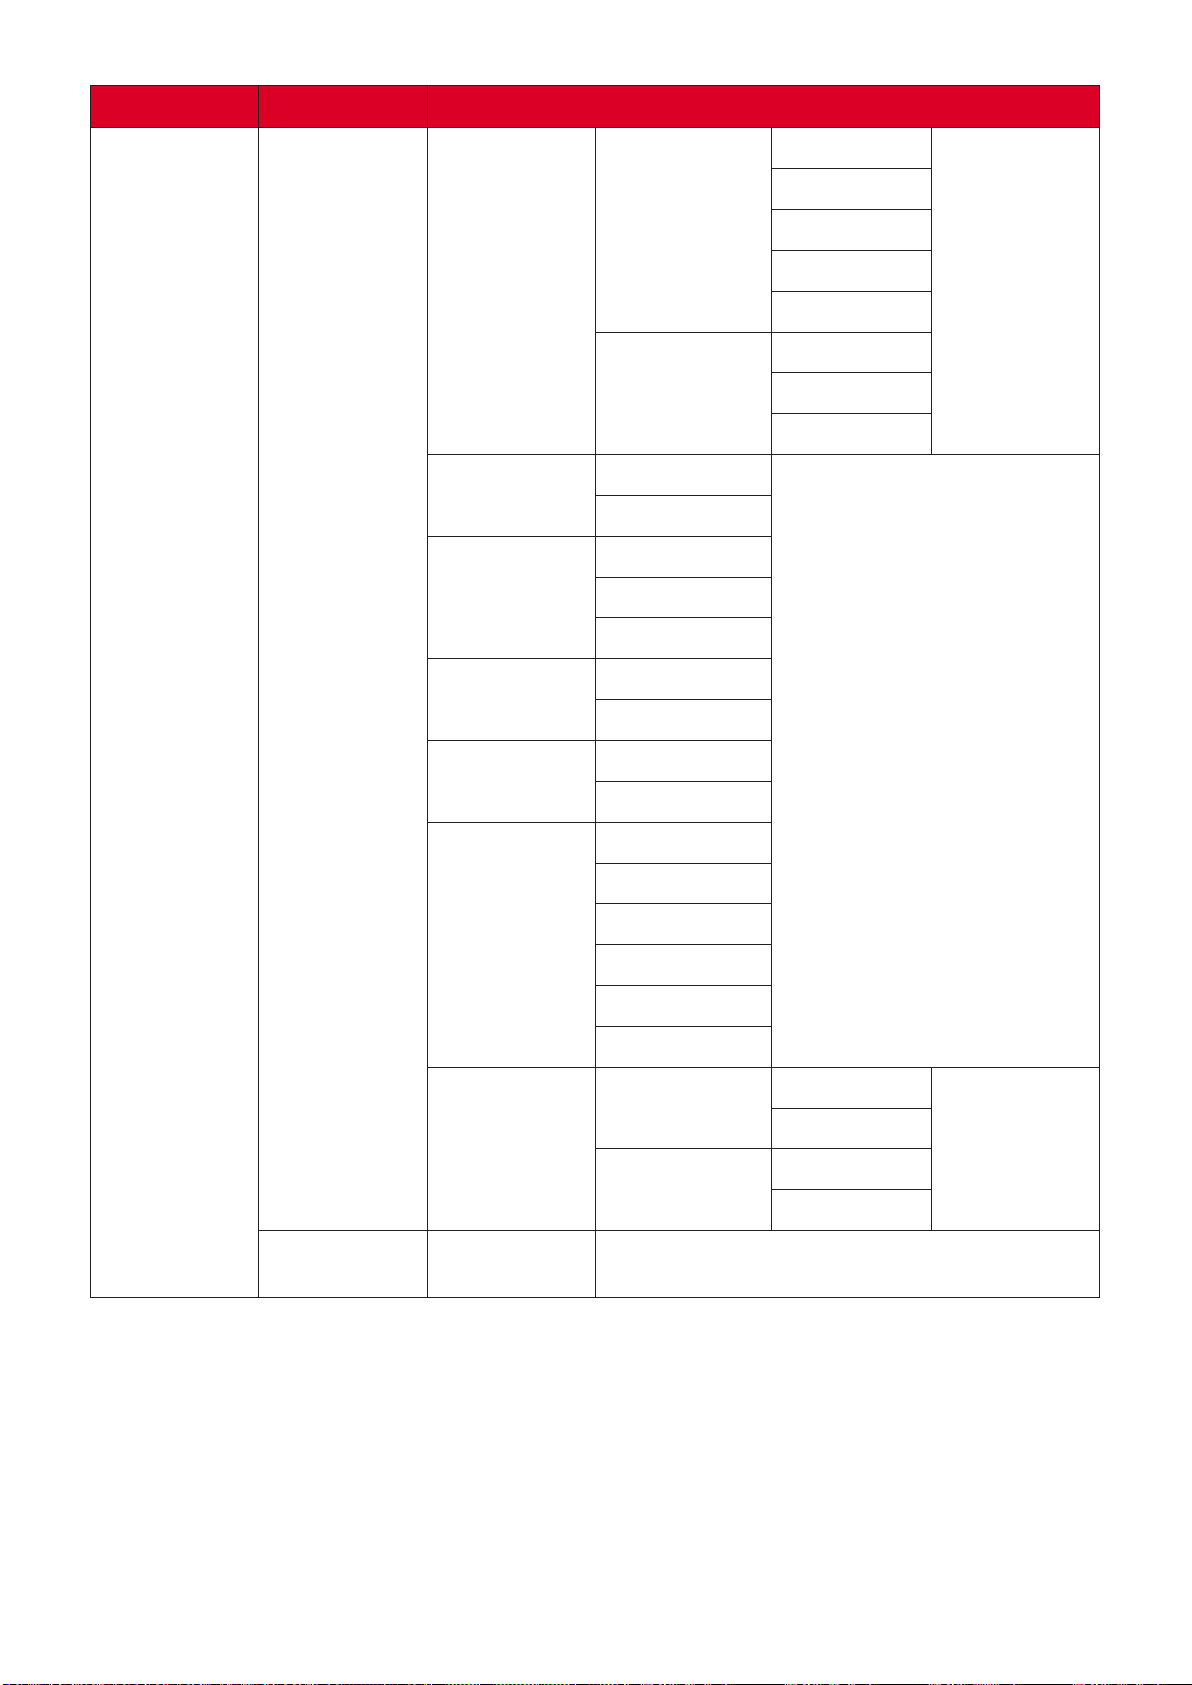
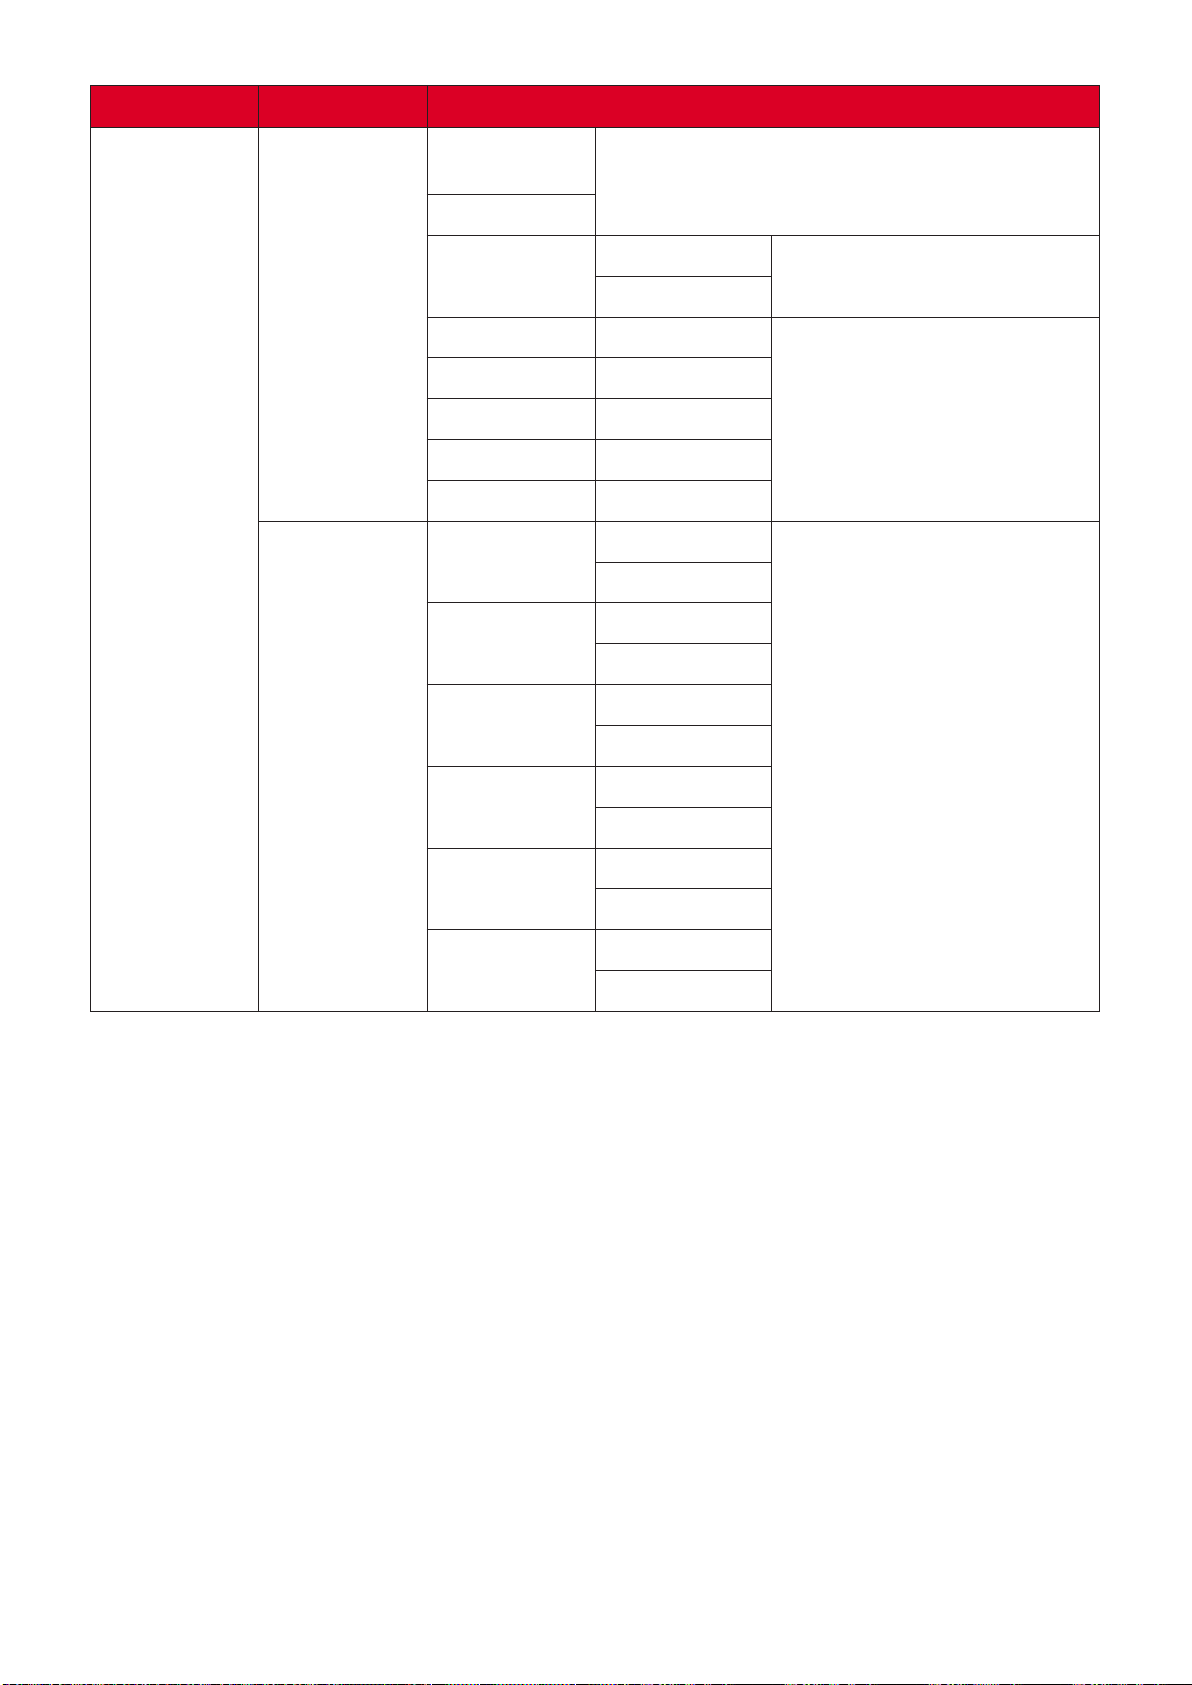
On-Screen Display (OSD) Menu Tree
Main Menu Sub-menu Menu Opon
Display
User
Wall Color
Color
35
Main Menu Sub-menu Menu Opon
Display
Color
Temperature
Warm
Cool
Color
Blue
Auto
Auto
36
Main Menu Sub-menu Menu Opon
Display
Auto
Frame
Auto
37
Main Menu Sub-menu Menu Opon
Display
Audio
Auto
Volume
Setup
Hours
38
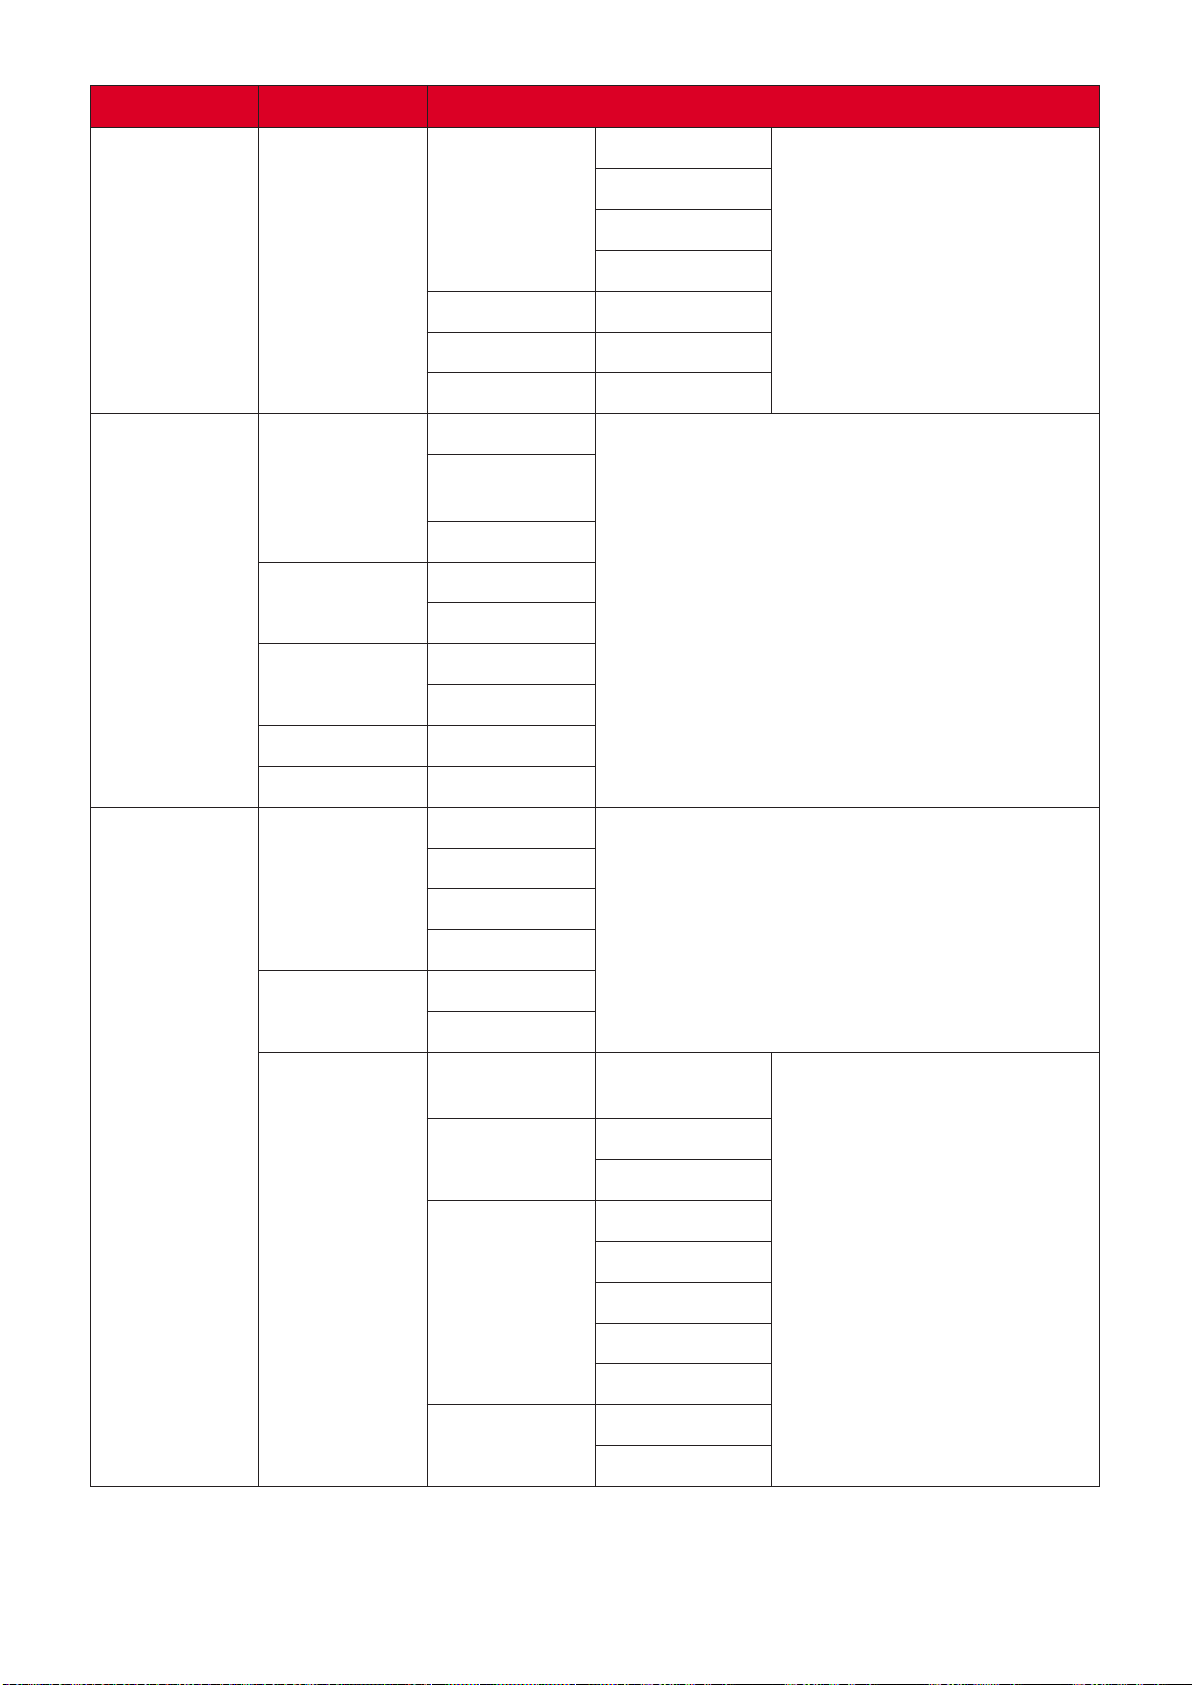
Main Menu Sub-menu Menu Opon
Setup
Hour
39
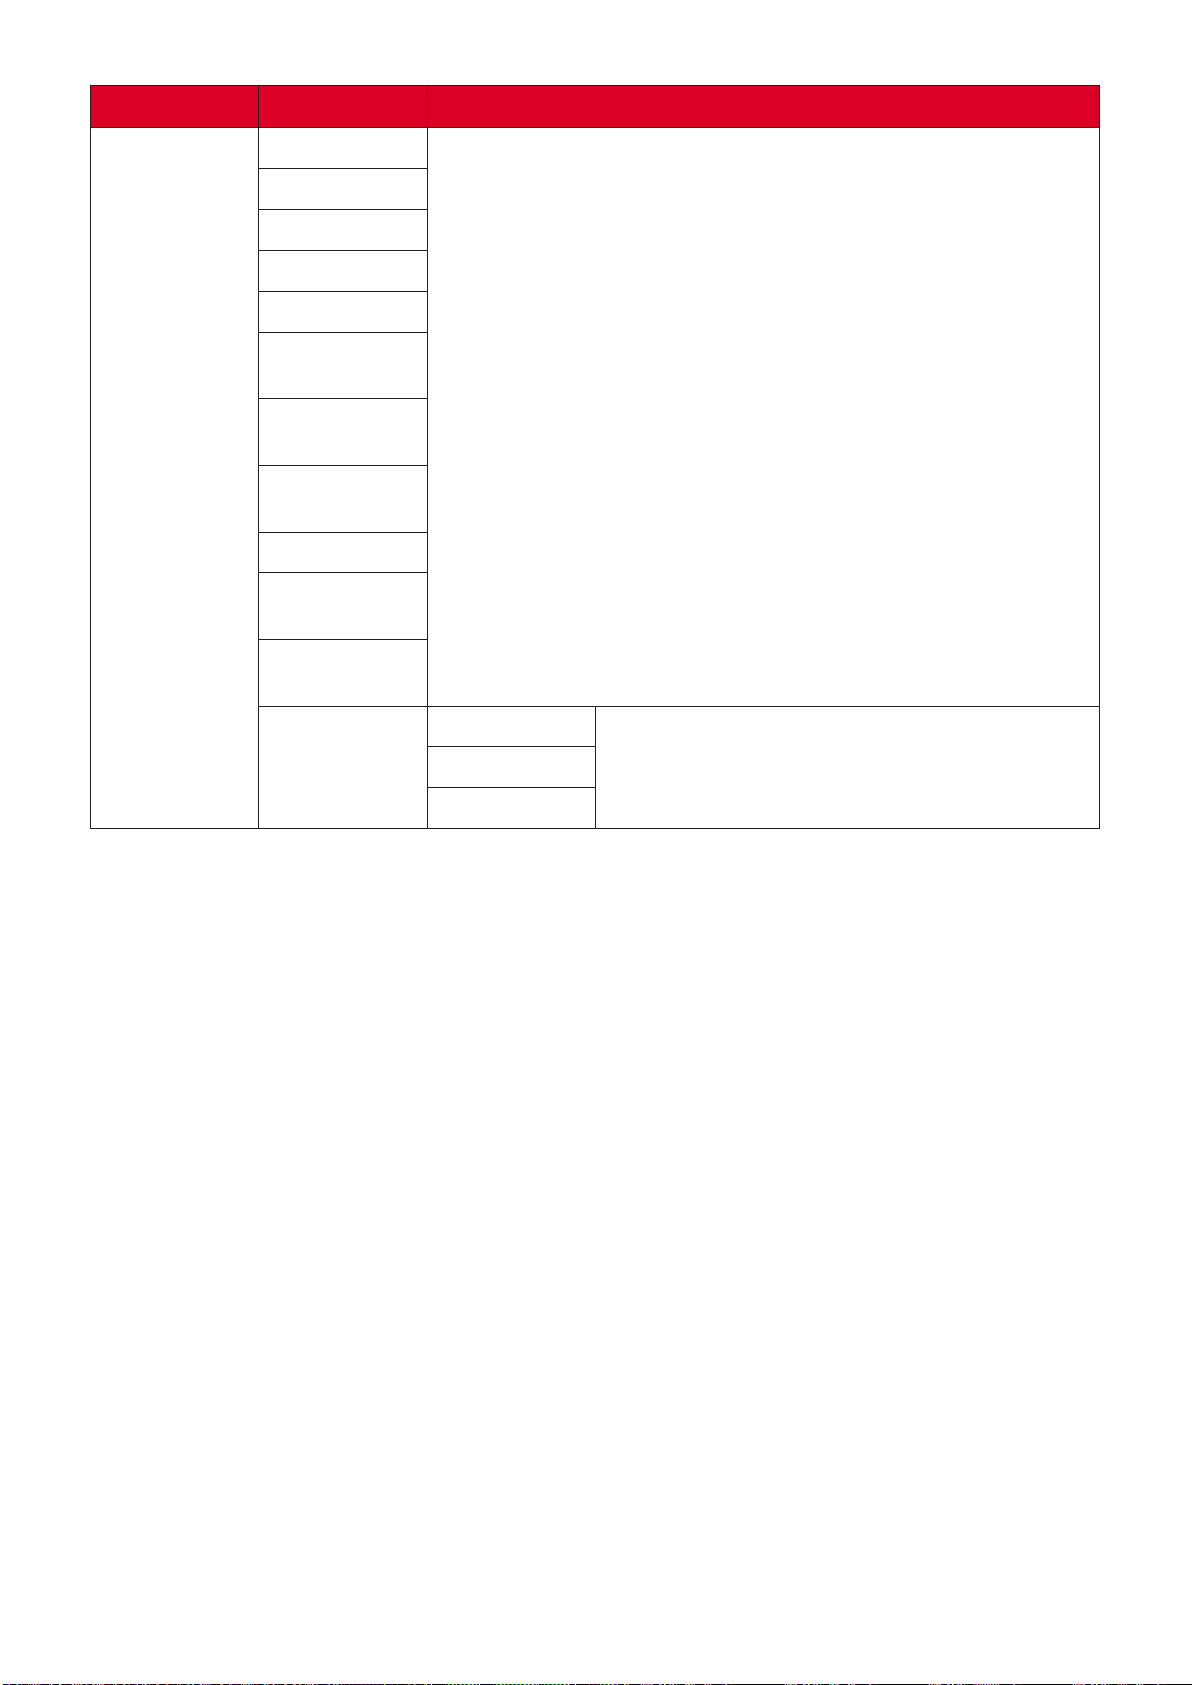
Main Menu Sub-menu Menu Opon
Setup
繁體中文
簡体中文
日本語
한국어
ไทย
Bahasa
40
Main Menu Sub-menu Menu Opon
Setup
Color
Blue
41
Main Menu Sub-menu Menu Opon
Network
42
Main Menu Sub-menu Menu Opon
Informaon
Hours
Hours
43
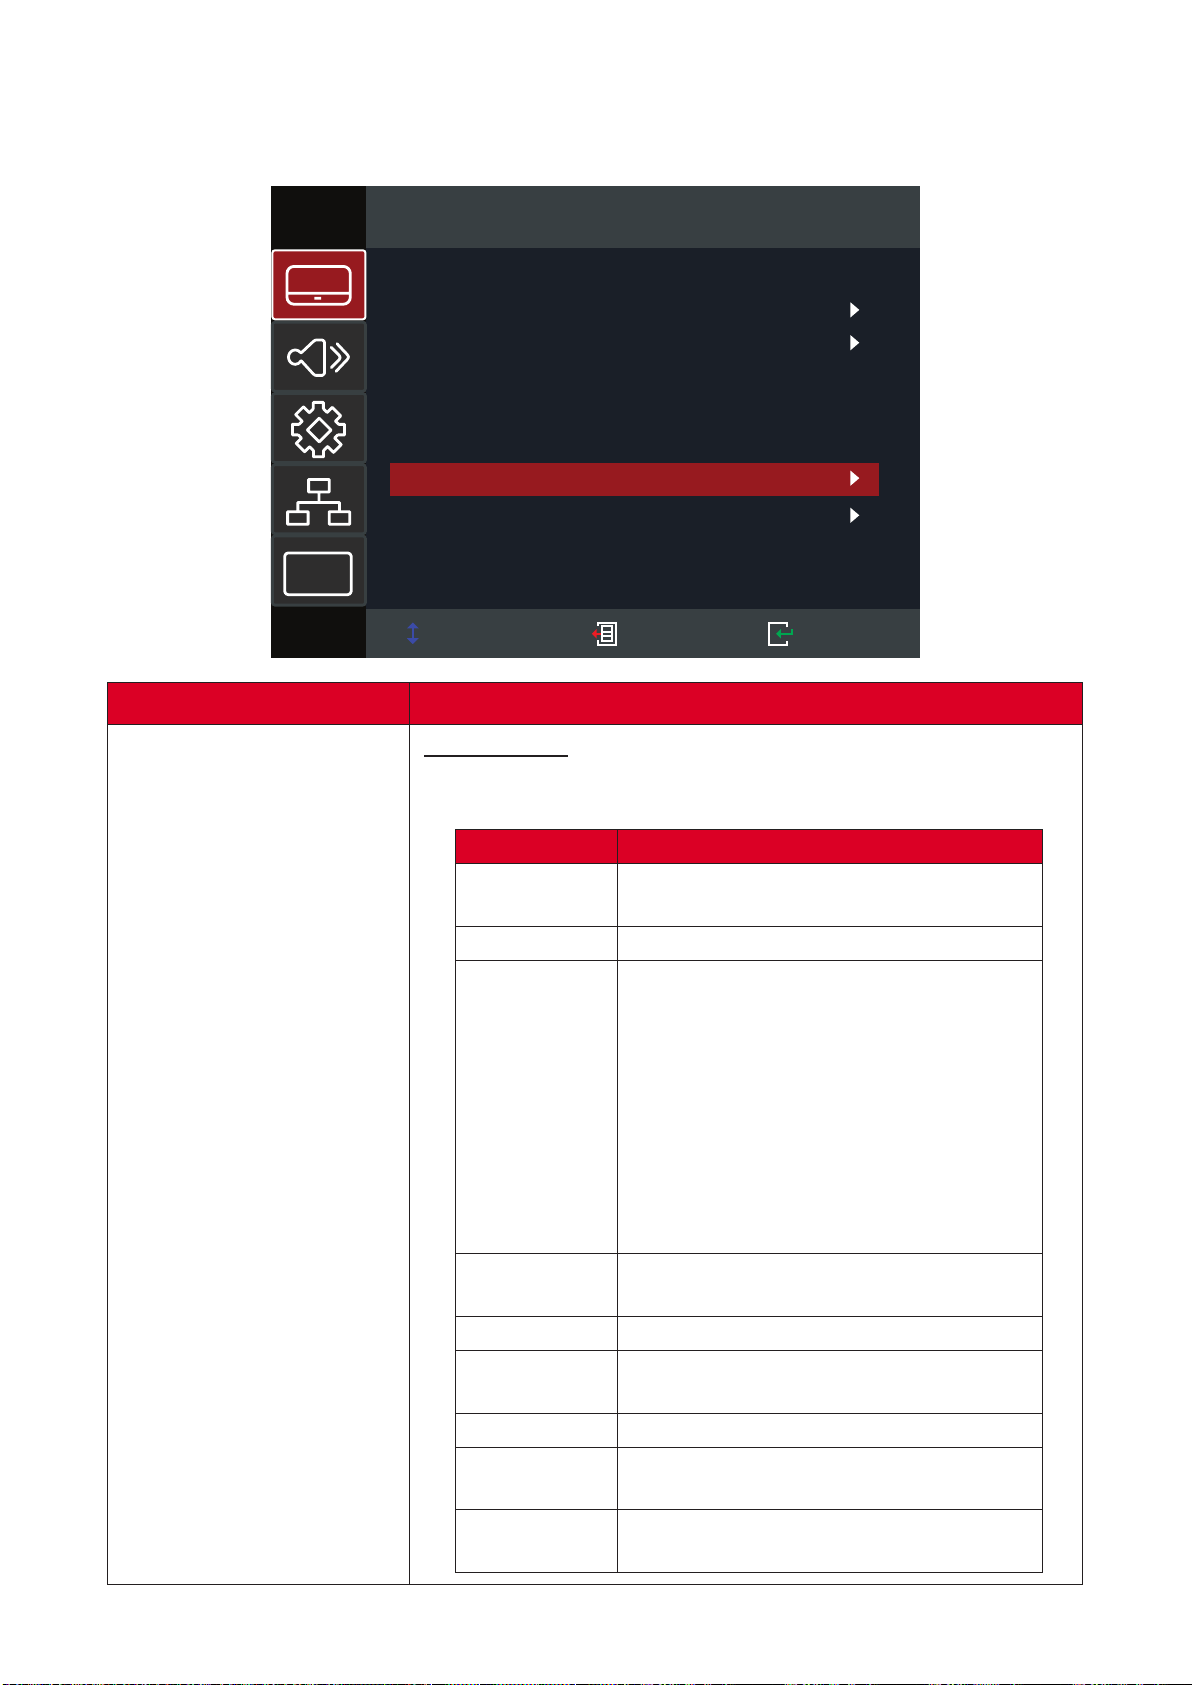
Menu Operaon
Display Menu
Select Exit Enter
Display
Image Settings
3D
Aspect Ratio
Edge Mask
Zoom
Image Shift
Keystone
i
4:3
0
0
Menu Descripon
Image Sengs
Mode Descripon
Presentaon
Bright
HDR SIM.
NOTE:HDMI EDID 2.0
HDMI 12
Cinema
sRGB
DICOM SIM.
User
Blending
3D
NOTE:
44
Menu Descripon
Image Sengs
Wall Color
NOTE:
Brightness
Color

45
Menu Descripon
Image Sengs
Seng Descripon
Brilliant Color™
Color Temperature
Color Matching
RGB Gain/Bias
Color Space
46
Menu Descripon
Image Sengs
Seng Descripon
Automac
Frequency
Phase
H. Posion
V. Posion
NOTE:
Mode Descripon
Dynamic Black
Eco
Constant Power
47
Menu Descripon
3D
Opon Descripon
O
DLP-Link
Opon Descripon
3D
L (Le)
R (Right)
NOTE:
Opon Descripon
Auto
SBS
Top and Boom
Frame Sequenal
NOTE:
•
HDMI 1HDMI 2/VGA
48
Menu Descripon
Aspect Rao
Aspect Rao Descripon
4:3
16:9
16:10
LBX
Nave
Auto
NOTE:
Edge Mask
Zoom
Image Shi

49
Menu Descripon
Keystone
Opon Descripon
Four Corners
NOTE:
H. Keystone
V. Keystone
Reset
50
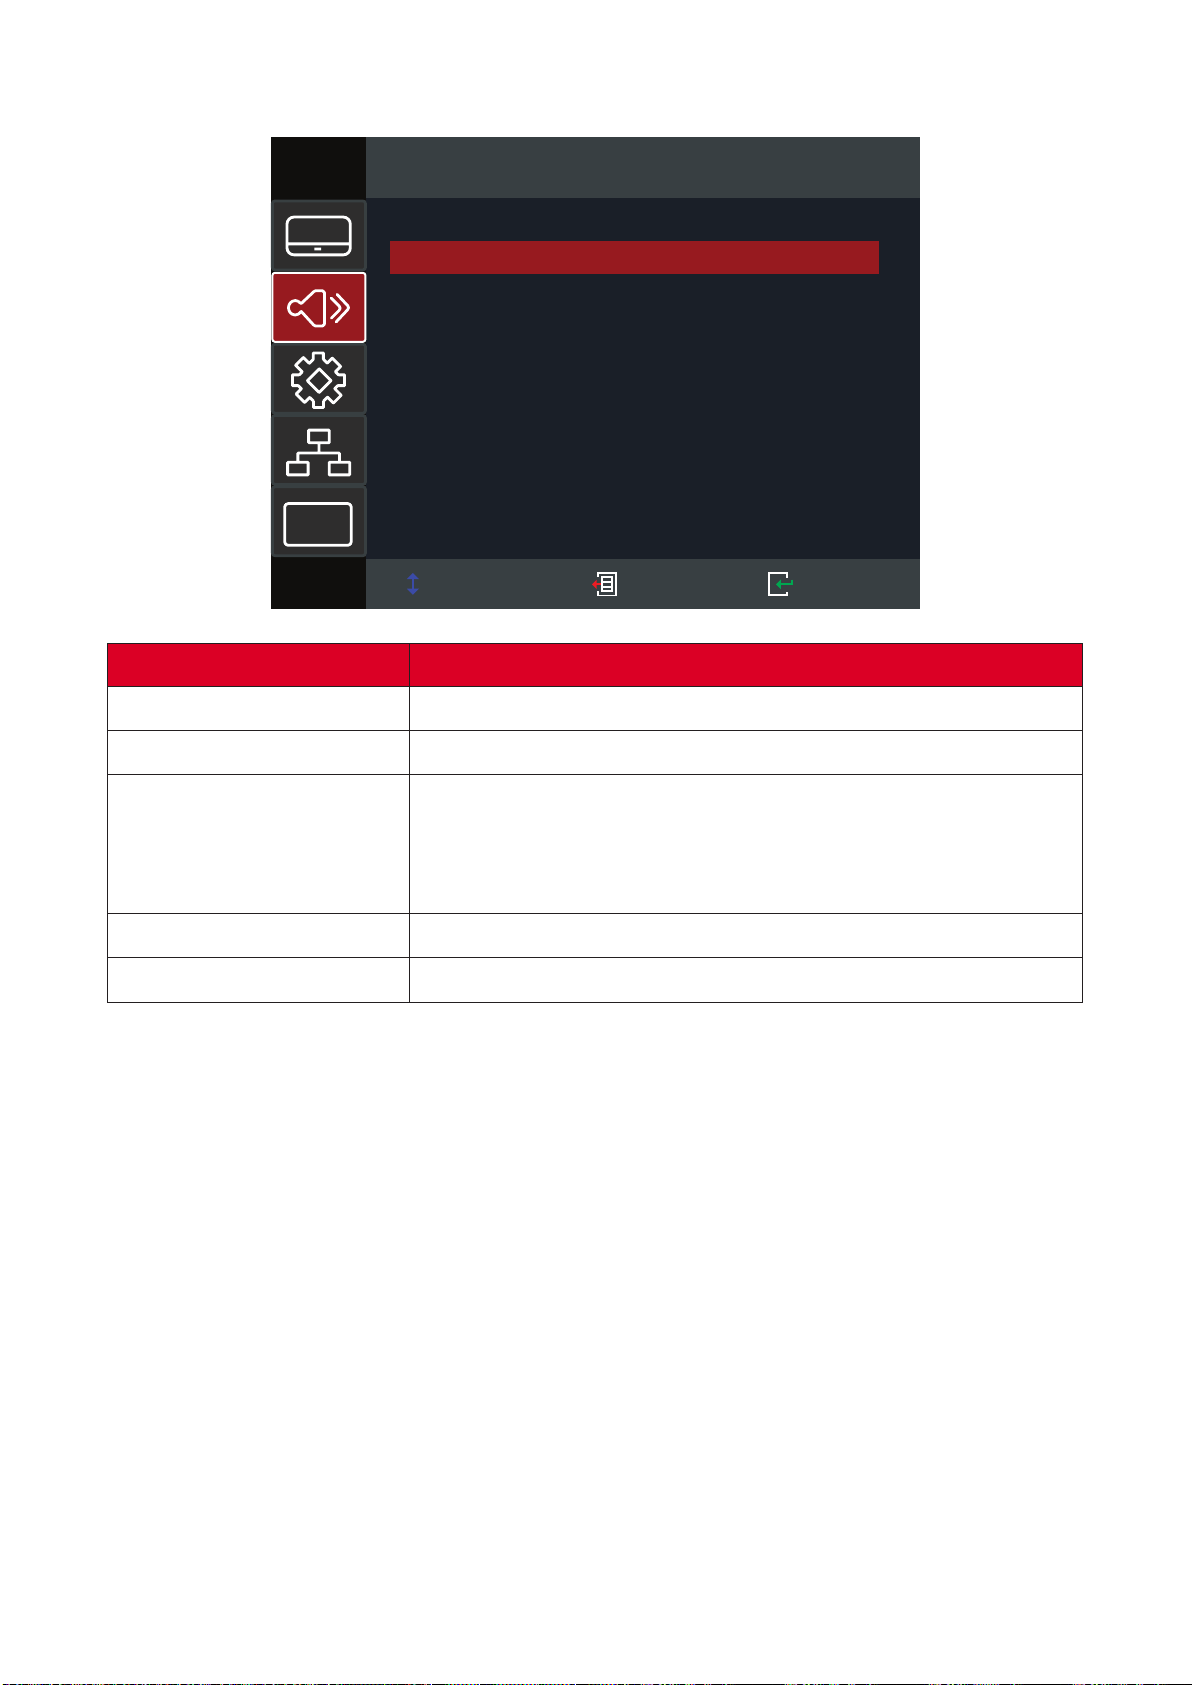
Audio Menu
Select Exit Enter
Audio
Audio Settings
Mute
Mic
Volume
Mic Volume
i
Auto
Off
On
5
5
Menu Descripon
Audio Sengs
Mute
Mic
NOTE:
Volume
Mic Volume
51
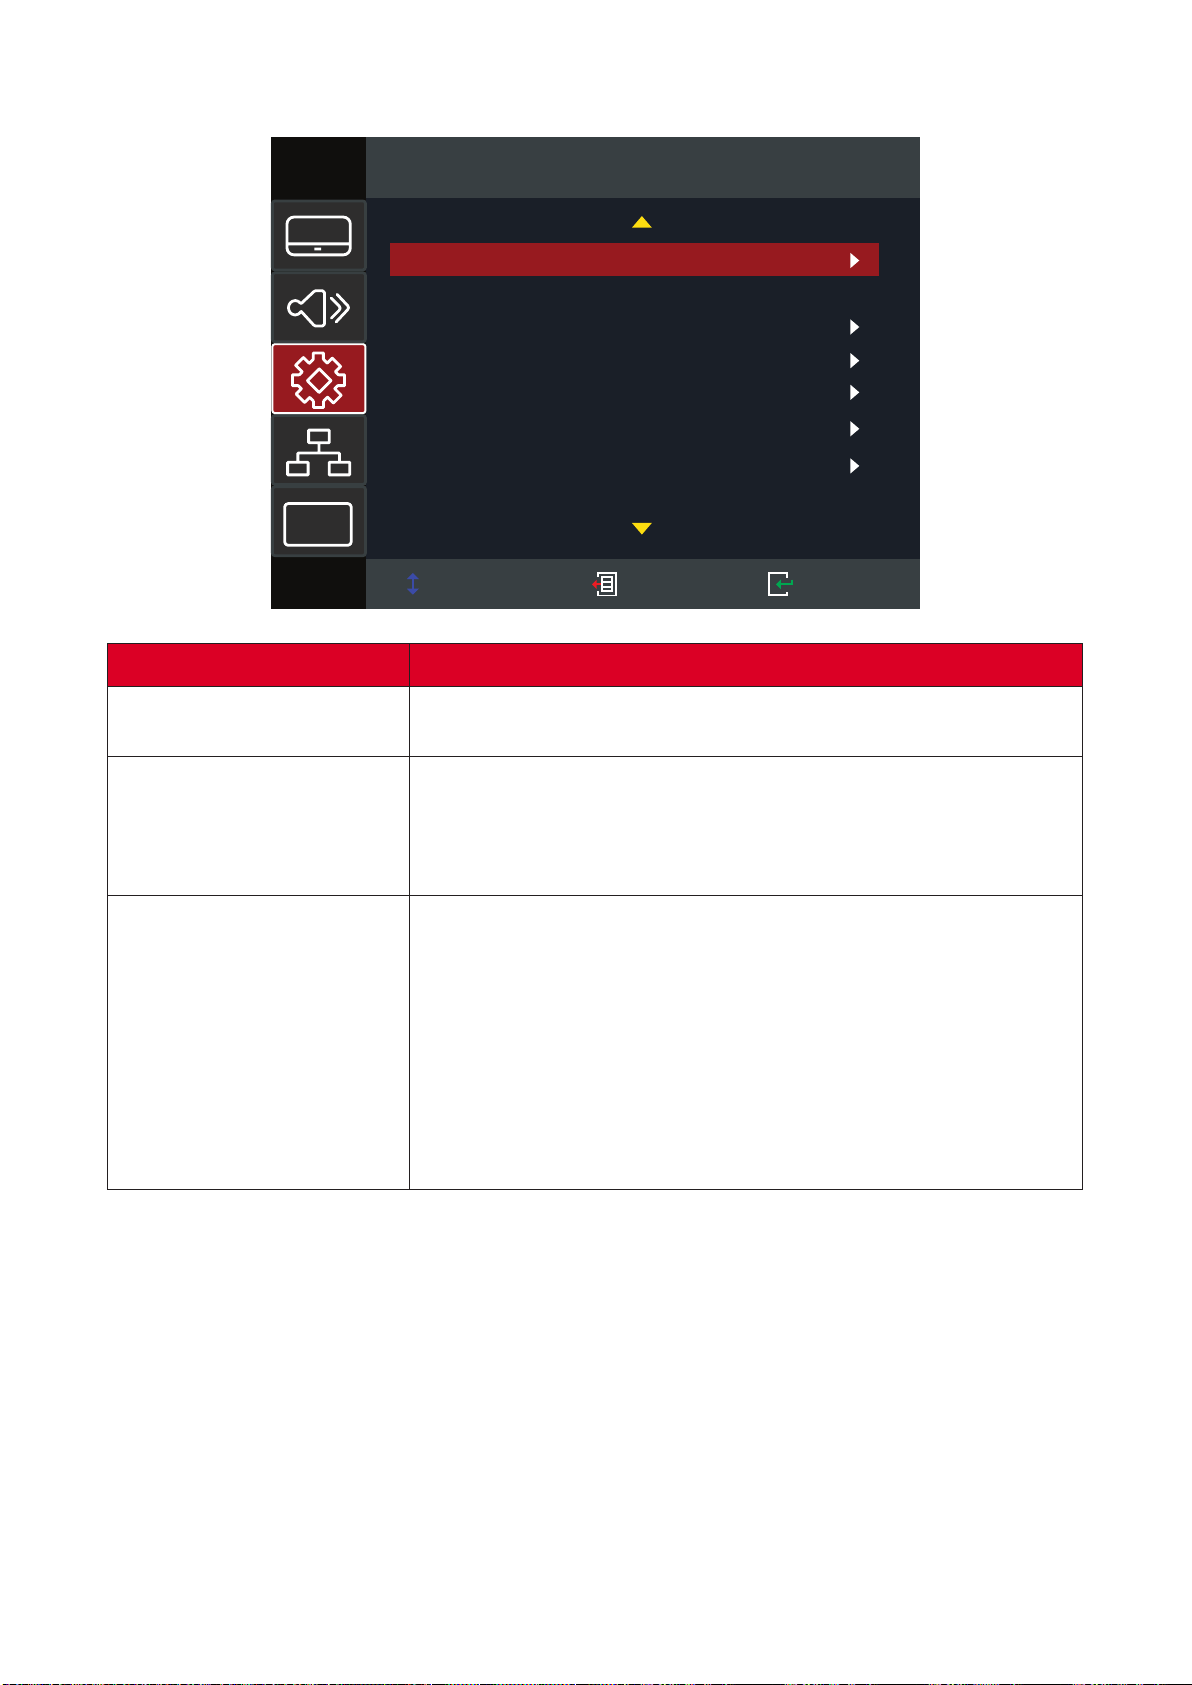
Setup Menu
Select Exit Enter
Setup
Projection
Screen Type
Filter Settings
Power Settings
Security
HDMI CEC
Test Pattern
Options
i
16:10
Menu Descripon
Projecon
Screen Type
NOTE:
Filter Sengs
NOTE:
•
•
Oponal Filter Installed > YESFilter
Reminder
52
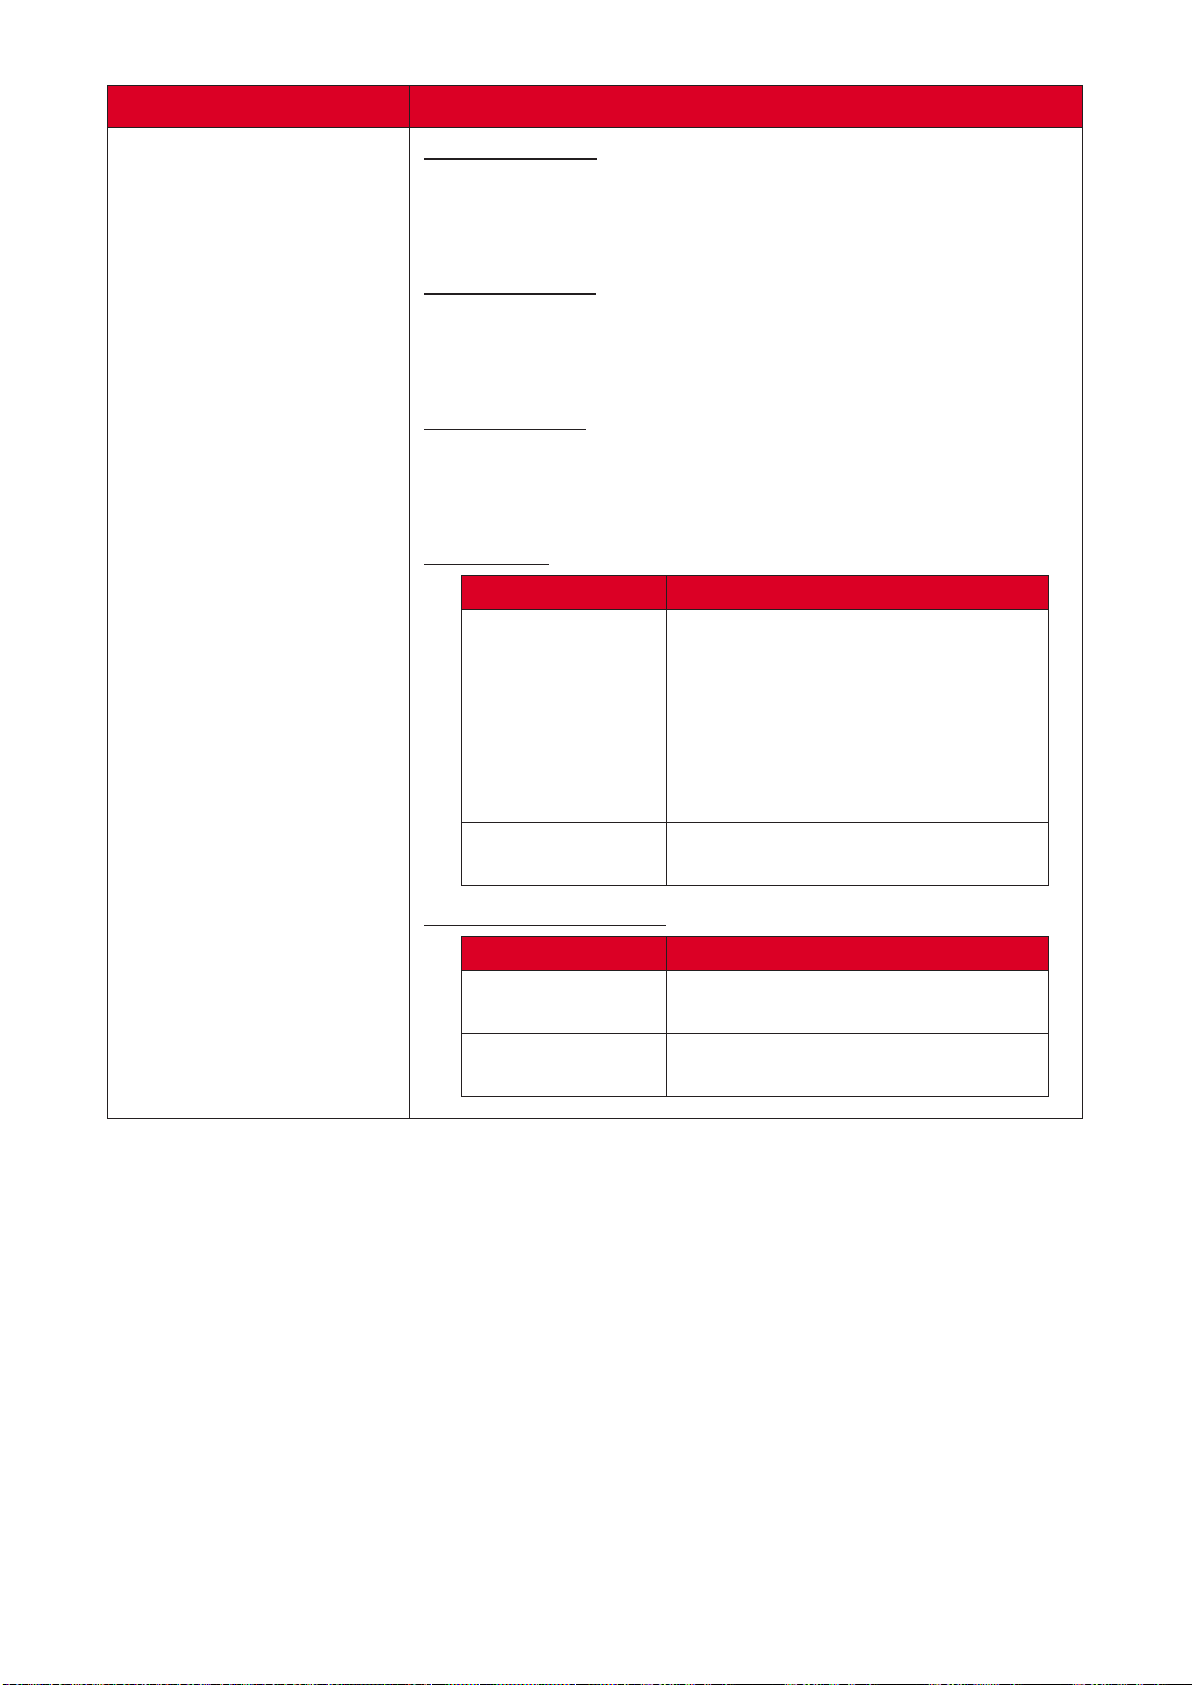
Menu Descripon
Power Sengs
Power
Power
Opon Descripon
Sleep Timer
NOTE:
Always On
Mode Descripon
Acve
Eco
53
Menu Descripon
Security
NOTE:1234
NOTE:
HDMI CEC
NOTE:
•
HDMI
•
Test Paern
54
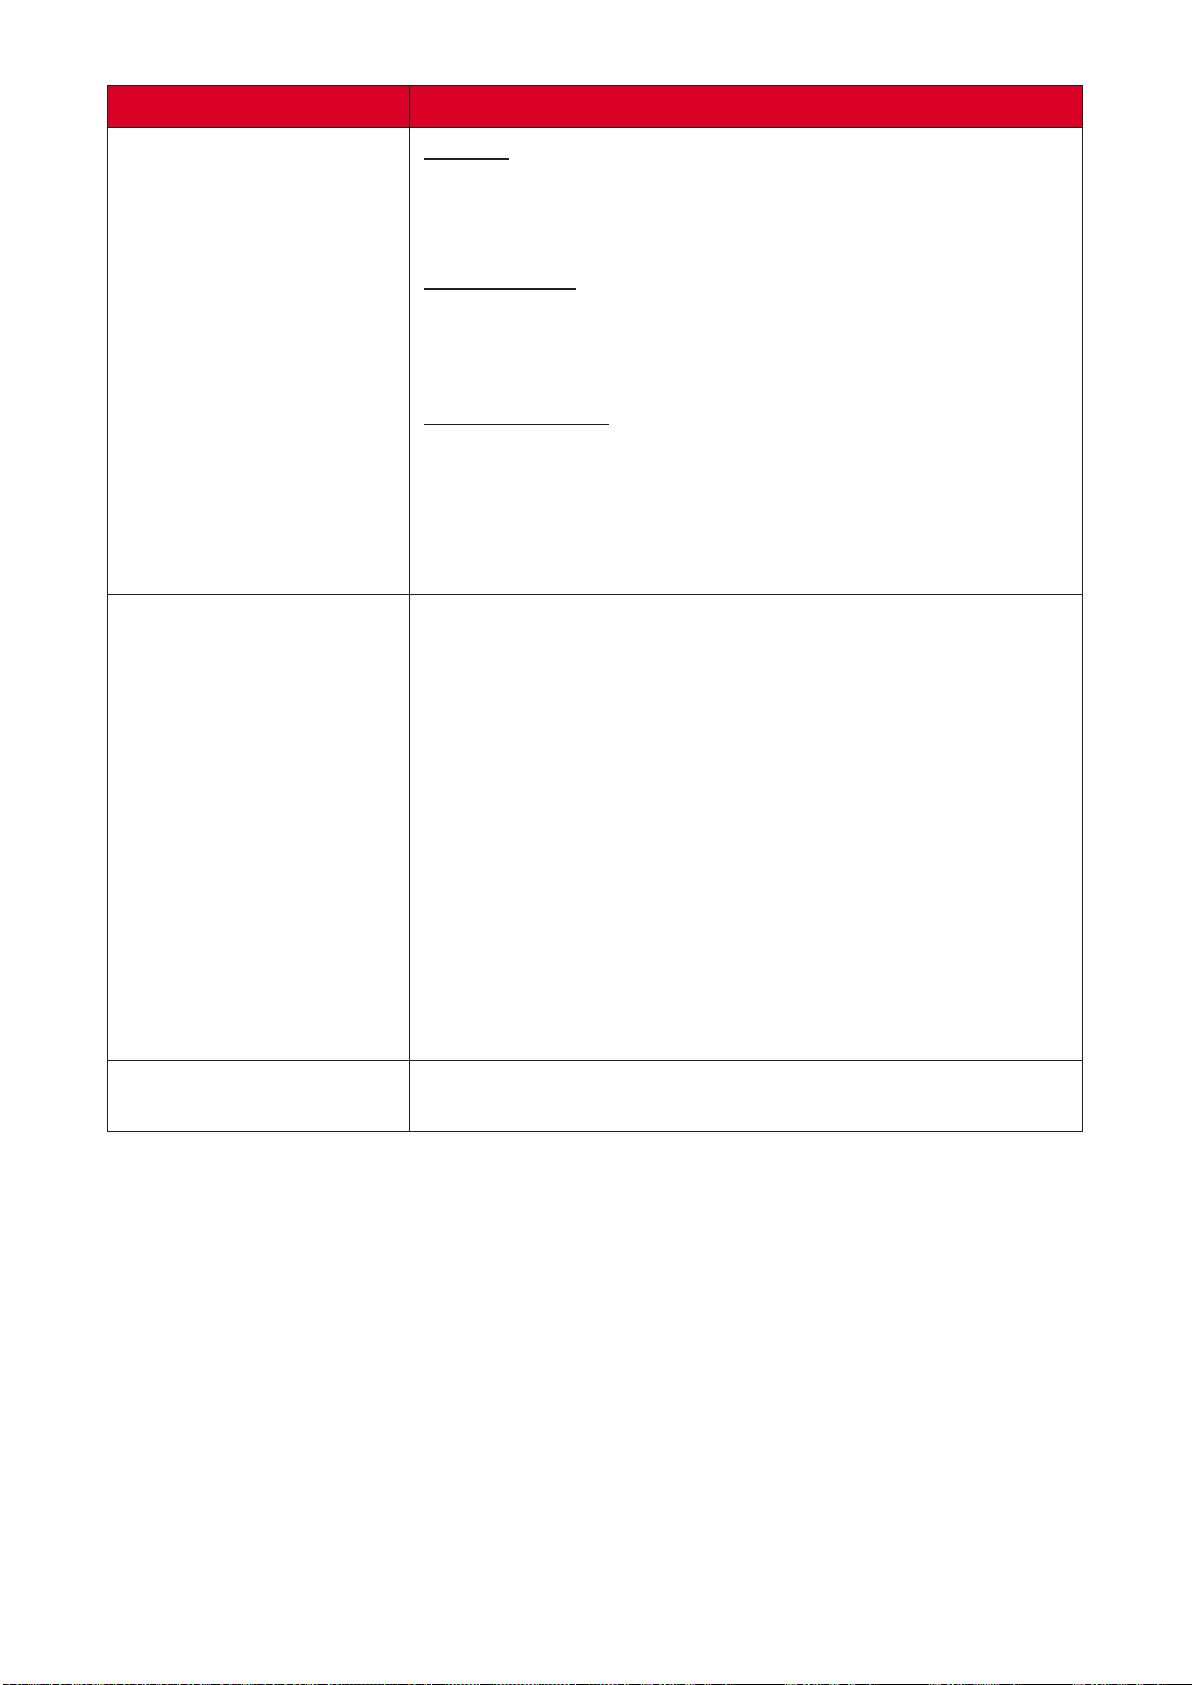
Menu Descripon
Opons
Opon Descripon
O
Source
On
NOTE:HDMI
1HDMI 2VGA
HDMI 1HDMI 2 VGA
NOTE:

55
Menu Descripon
Opons
Opon Descripon
EDID 1.4
EDID 2.0
NOTE:
Reset
NOTE:
56
Network Menu
Select Exit Enter
Network
LAN
Control
i
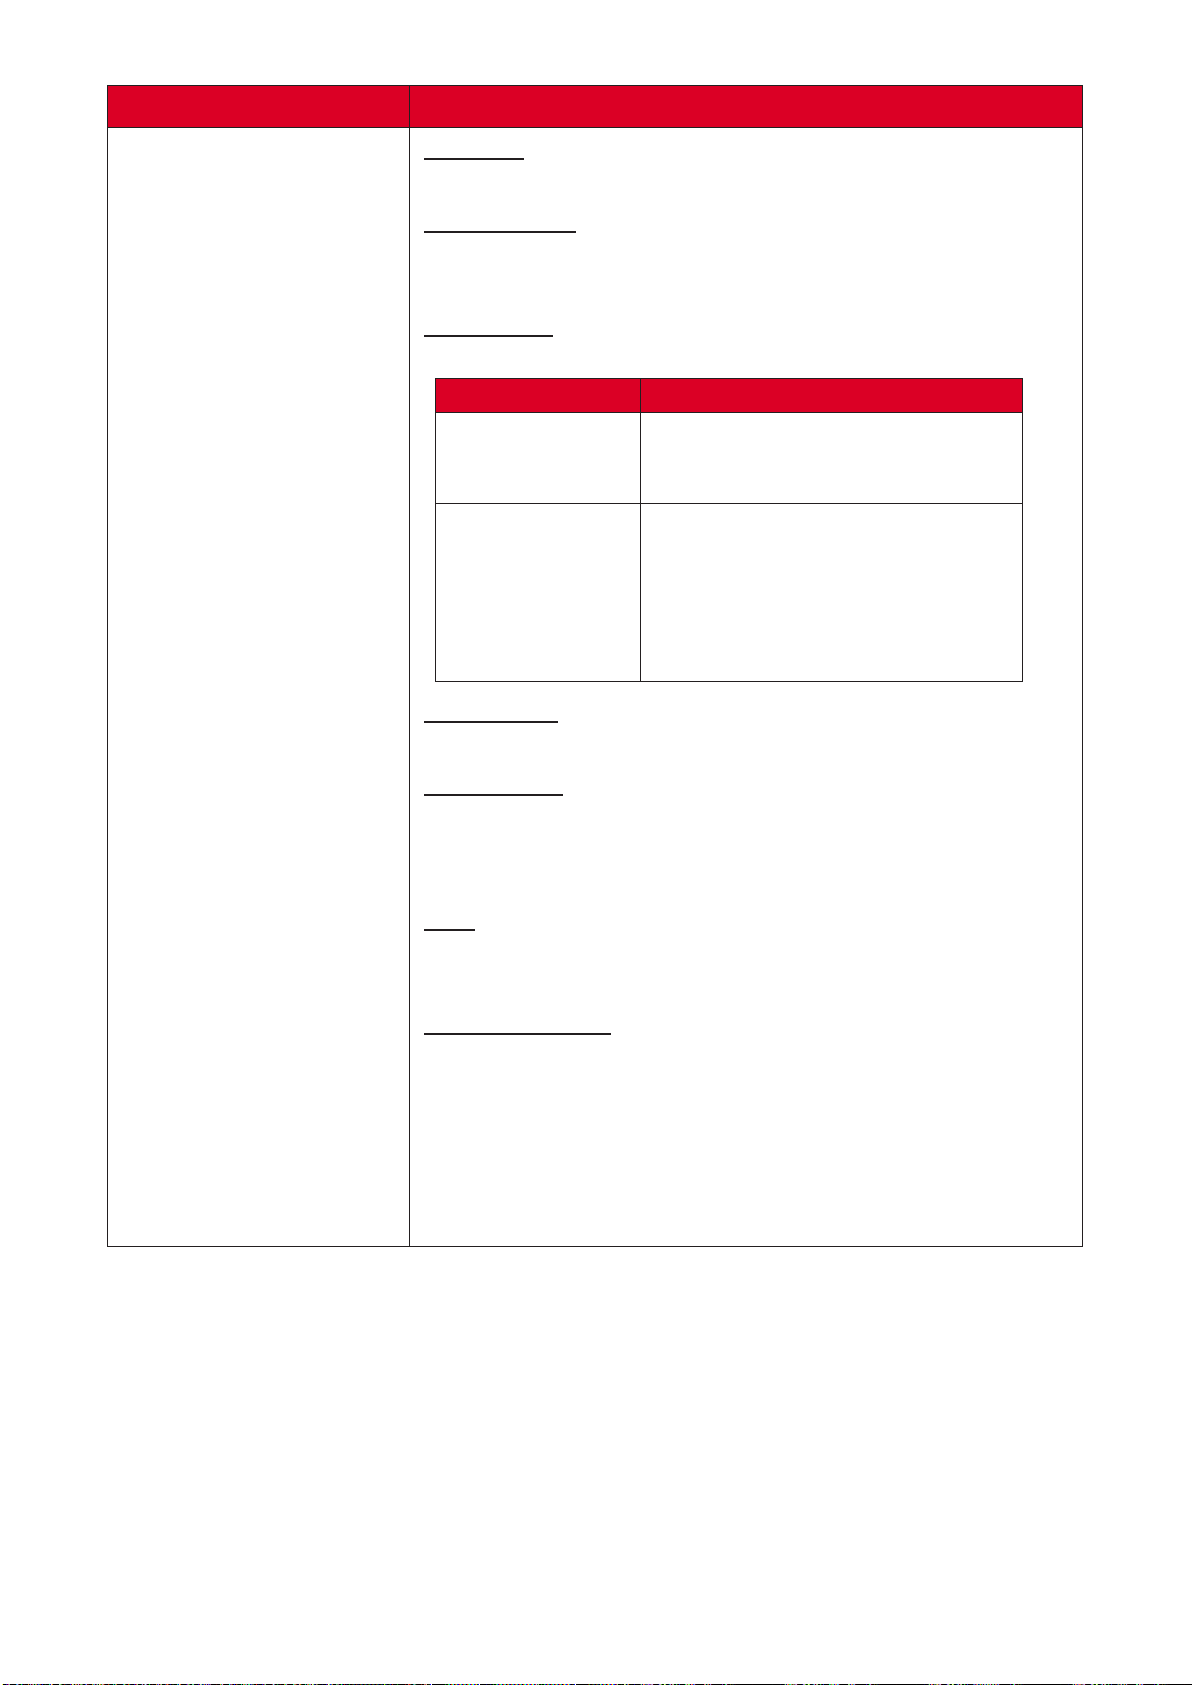
Menu Descripon
LAN
Control
NOTE:
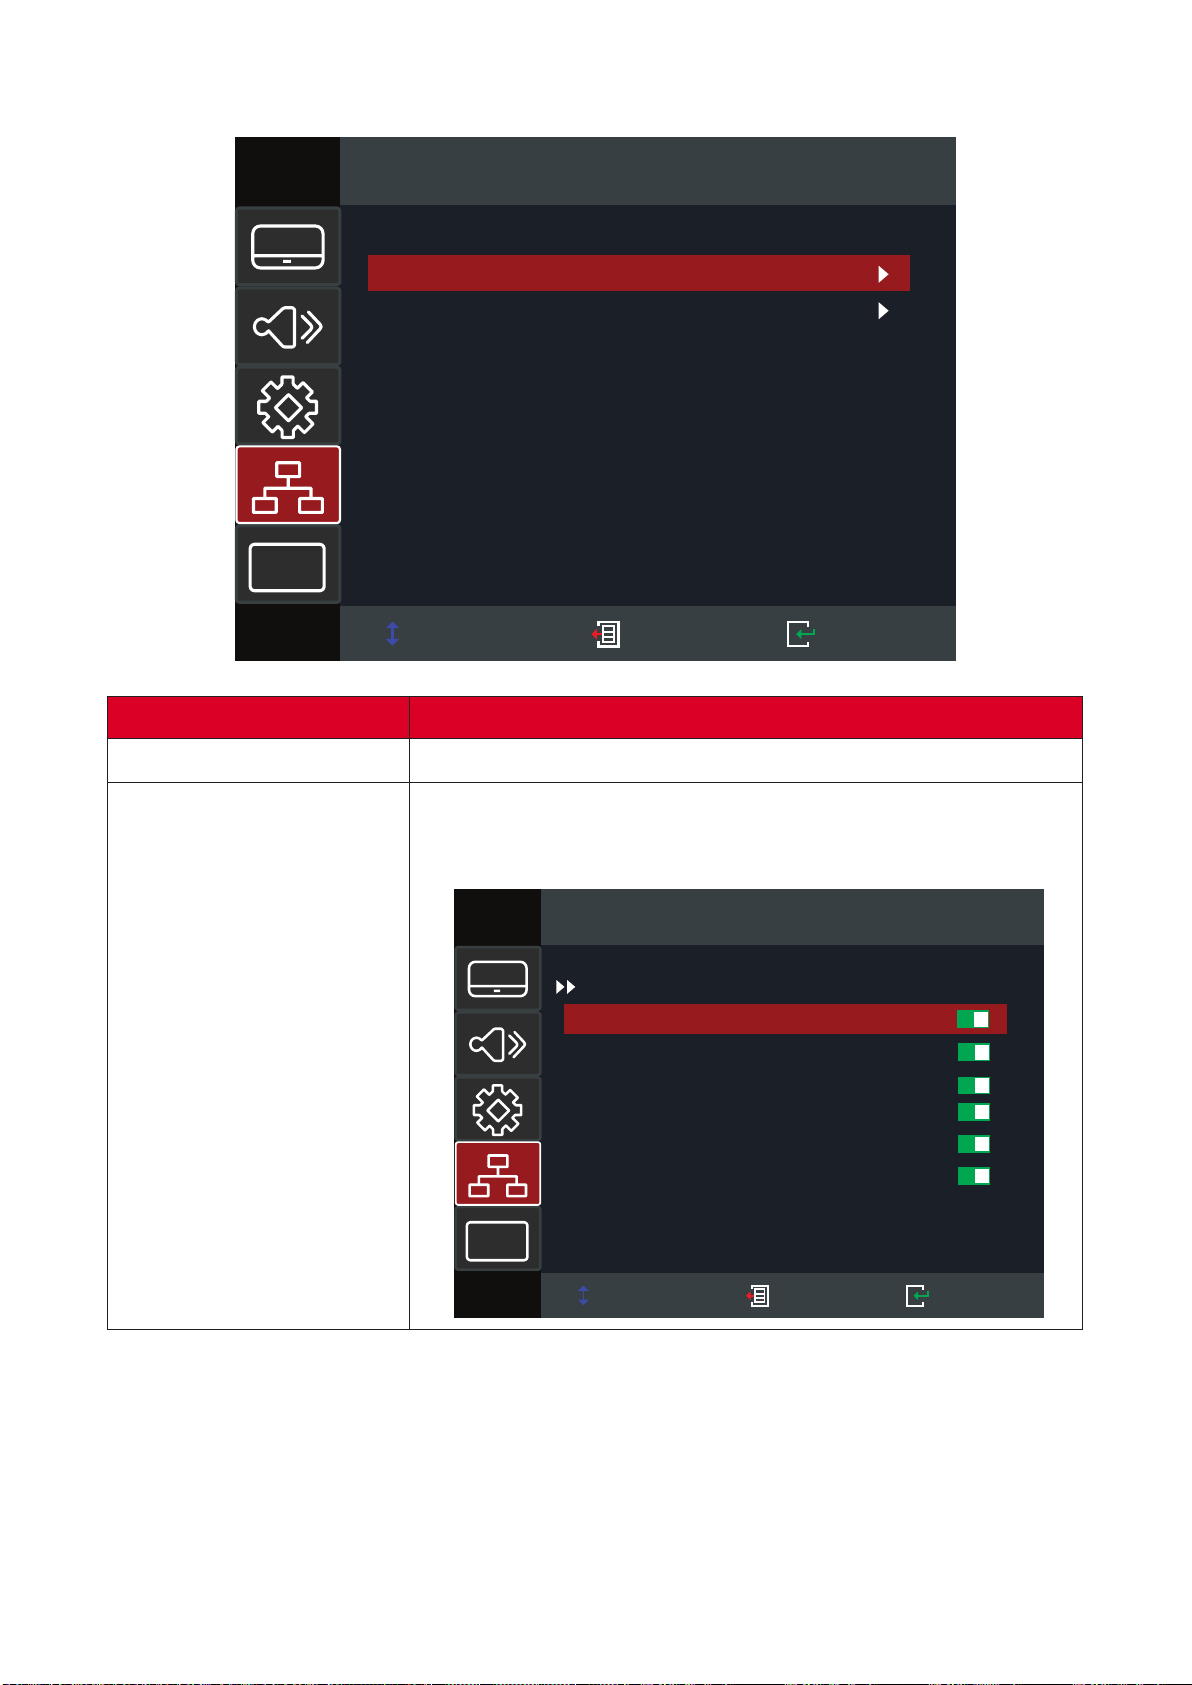
Select Exit Enter
Network
Control
Crestron
Extron
PJ Link
AMX Device Discovery
Telnet
HTTP
i
57
Controlling the Projector through a Network
NOTE: Network > Control > HTTP
1.
2. NetworkLAN
3. DHCPOnO to
MENU
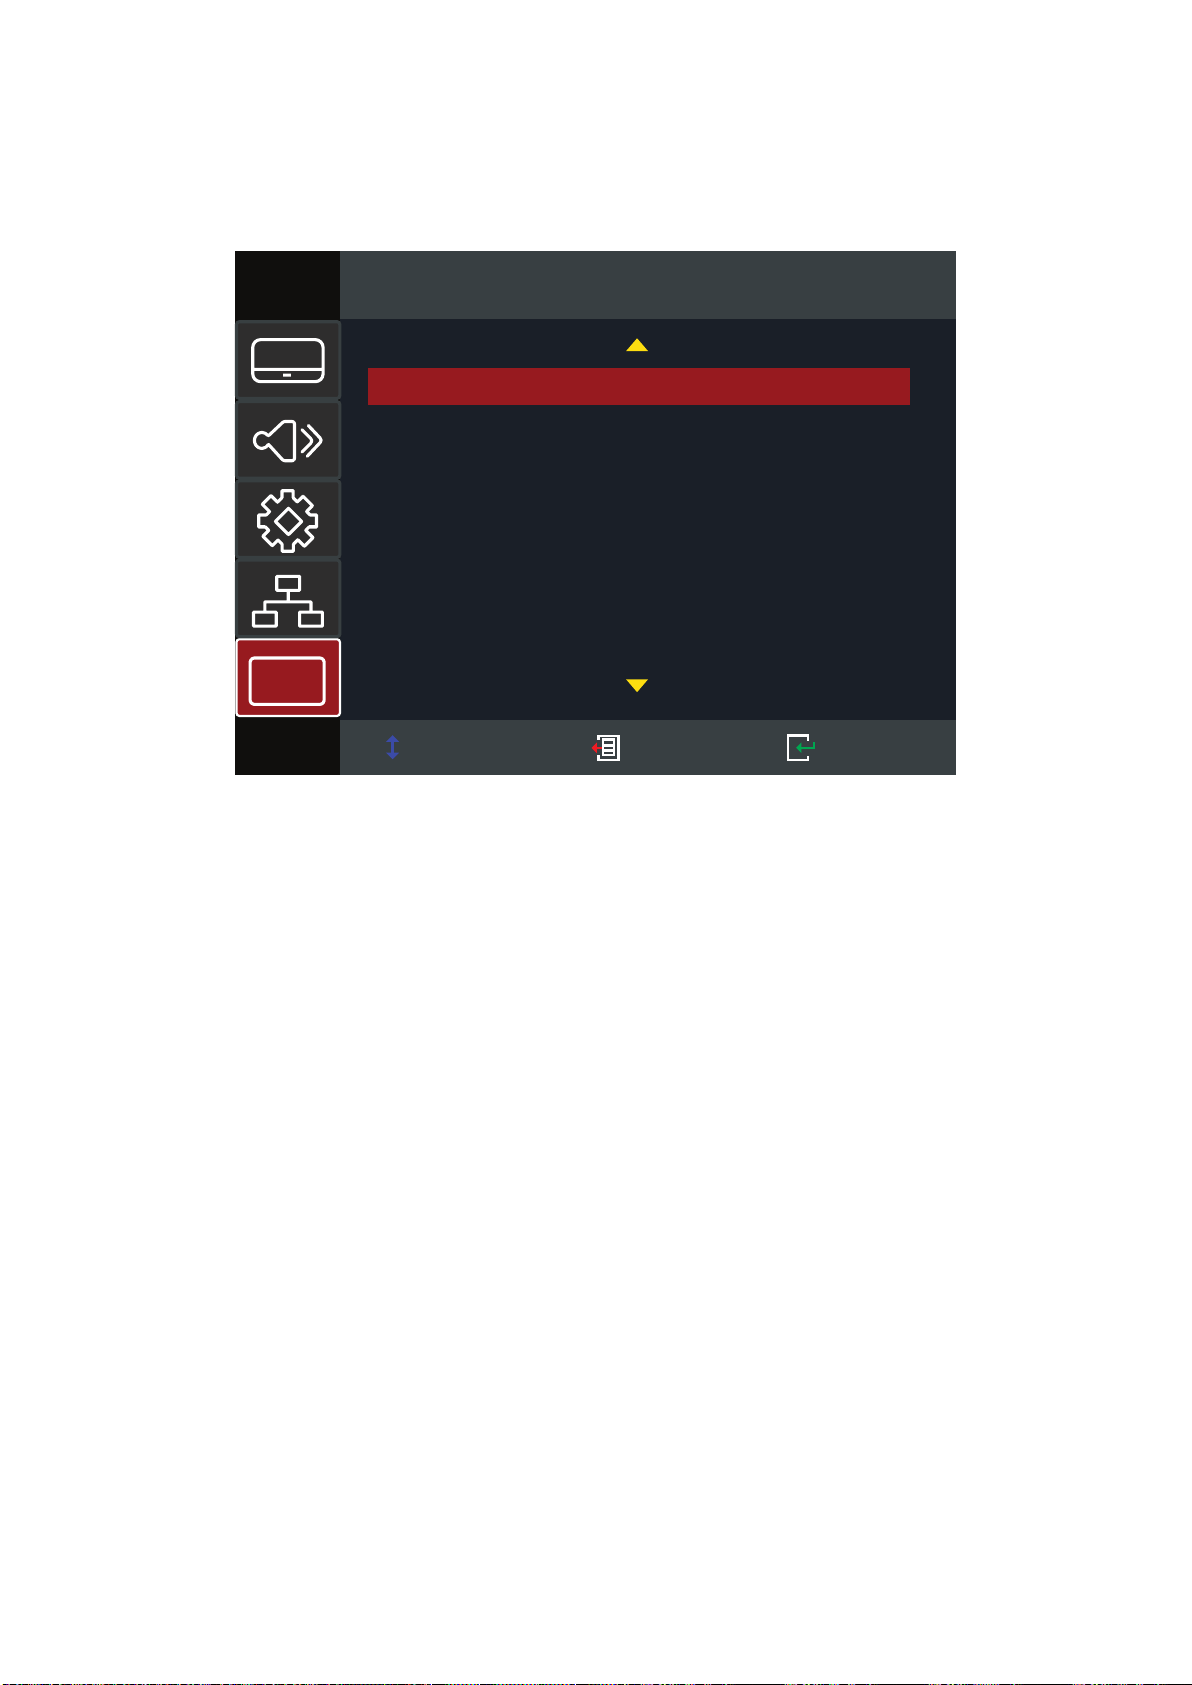
NOTE: LAN
Select Exit Enter
Network
LAN
Network Status
MAC Address
DHCP
IP Address
Subnet Mask
Gateway
DNS
i
C0:0A:A0:00:FB:00
190.000.0.100
250.000.000.0
190.000.0.200
190.000.0.20
4.
5. Log in
NOTE: admin
58
Informaon Menu
Select Exit Enter
Information
Serial Number
Source
Resolution
Refresh Rate
Display Mode
Power Mode (Standby)
Light Source Hours
Network Status
i
X92130500001
HDMI 1
1920 x 1080
60Hz
Presentation
Eco.
1hr. 20min.
Disconnected
59
Appendix
Specicaons
Item Category Specicaons
Projector
Type Laser
Display Size 80”~170”
0.253 (100” @ 0.28 m)
Lens F=2.44; f=3.70 mm
Display System 1-CHIP DMD
Input Signal
HDMI 1.4 f
h
: 15~98 kHz, f
v
: 23~120 Hz, Pixel rate: 170 MHz
HDMI 2.0 f
h
: 15~135 kHz, f
v
: 23~120 Hz, Pixel rate: 600 MHz
VGA f
h
: 15~98 kHz, f
v
: 23~120 Hz, Pixel rate: 170 MHz
1920 x 1200
Power
Input Voltage AC 100~240V, 50/60 Hz (auto switch)
Temperature 5°C to 40°C (41°F to 104°F)
Humidity 10% to 85% (non-condensing)
Storage
Temperature -20°C to 60°C (-4°F to 140°F)
Humidity 5% to 95% (non-condensing)
Dimensions
Physical
(W x H x D)
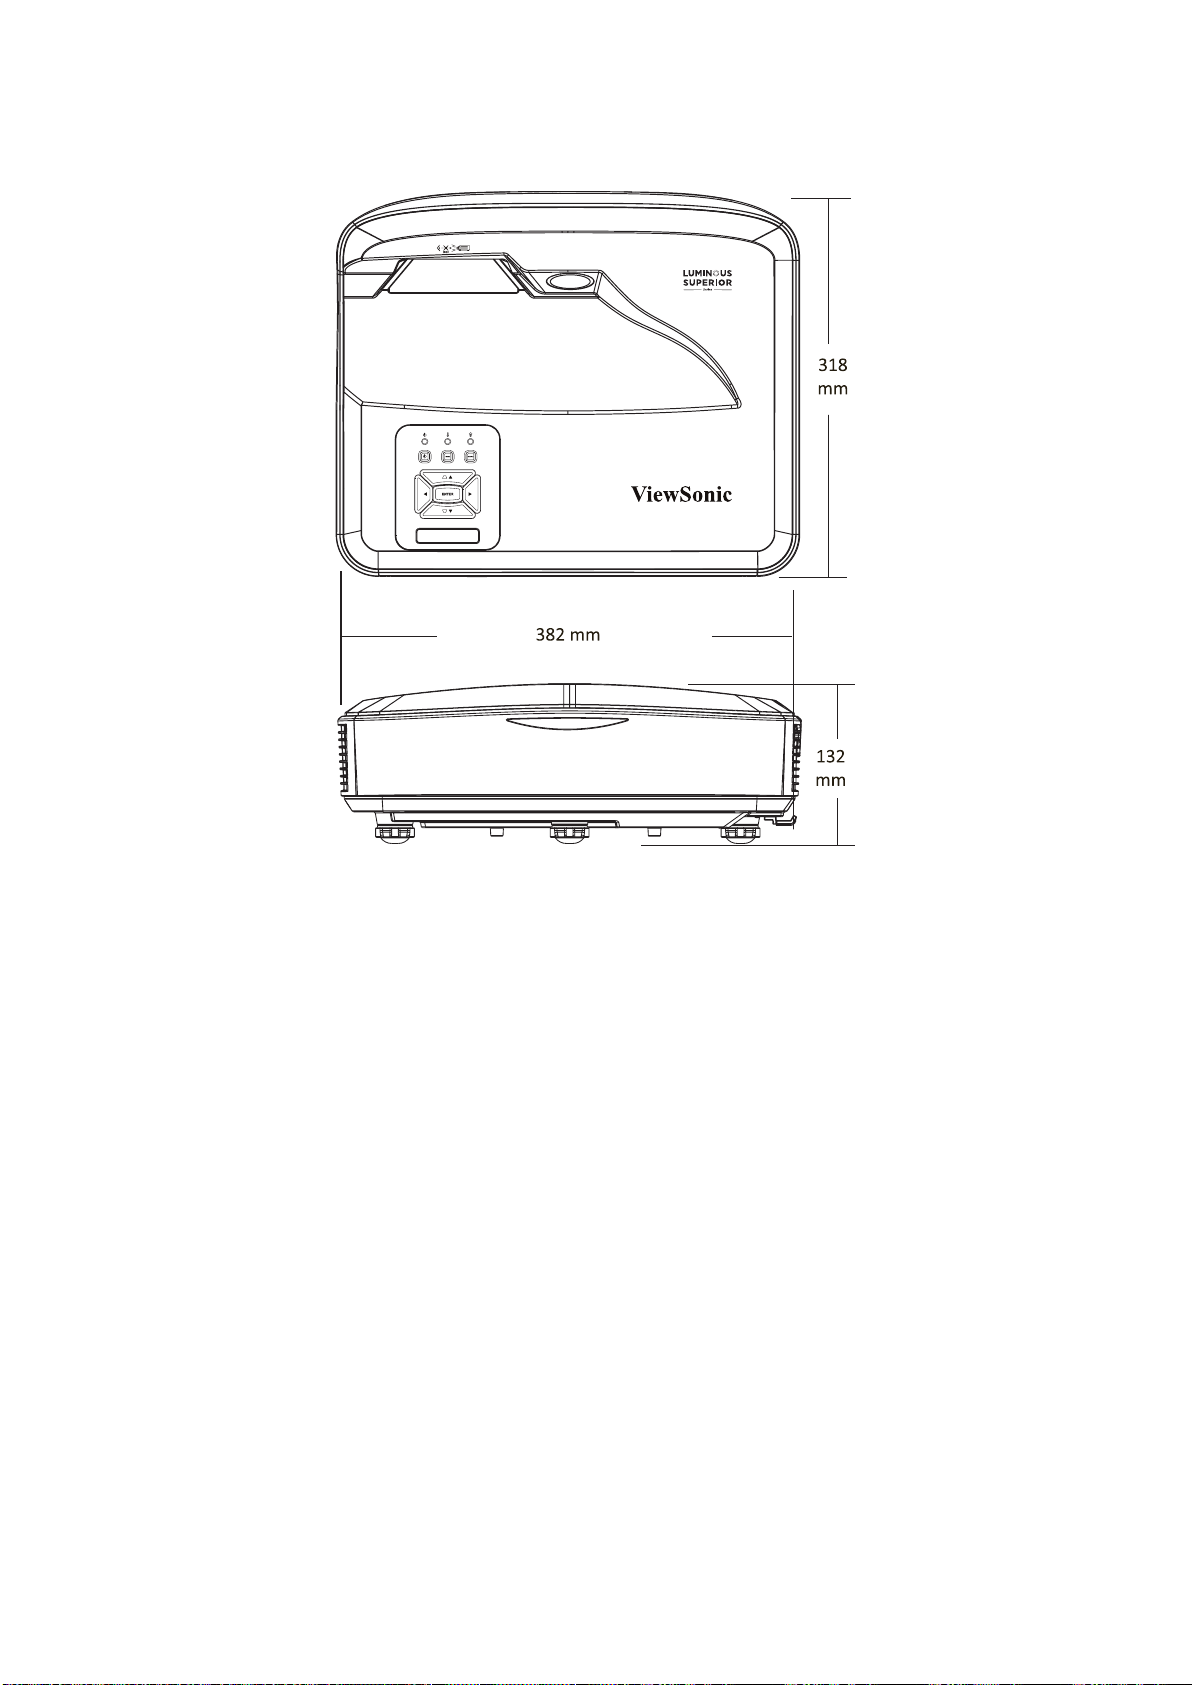
382 x 132 x 318 mm
(15.04” x 5.20” x 12.52”)
Weight
Physical 5.80 kg (12.79 lbs)
Power
On¹ 328W (Typical)
< 0.5W (Standby)
¹
60
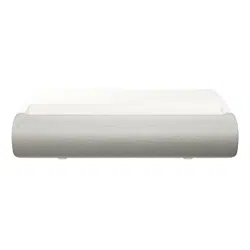
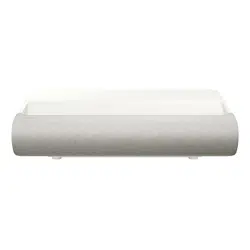
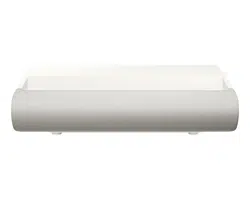
Projector Dimensions
382 mm (W) x 132 mm (H) x 318 mm (D)
61
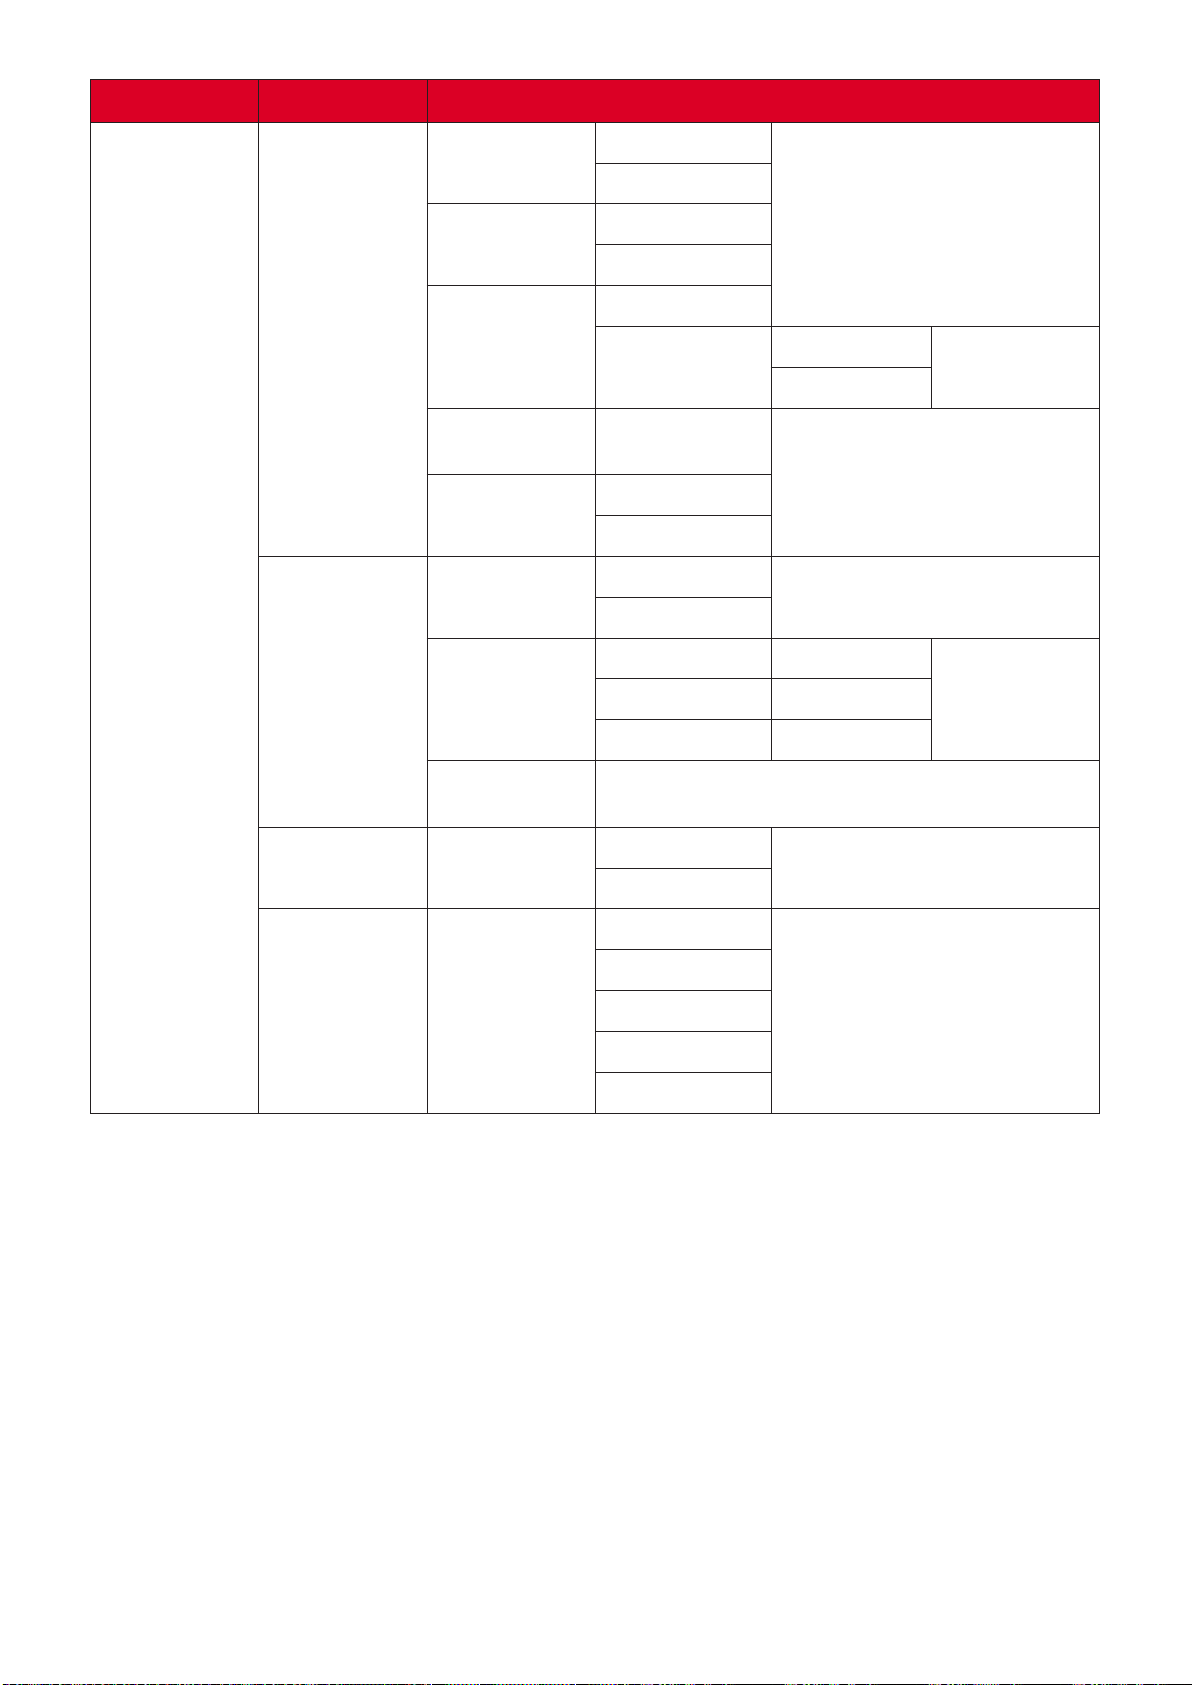
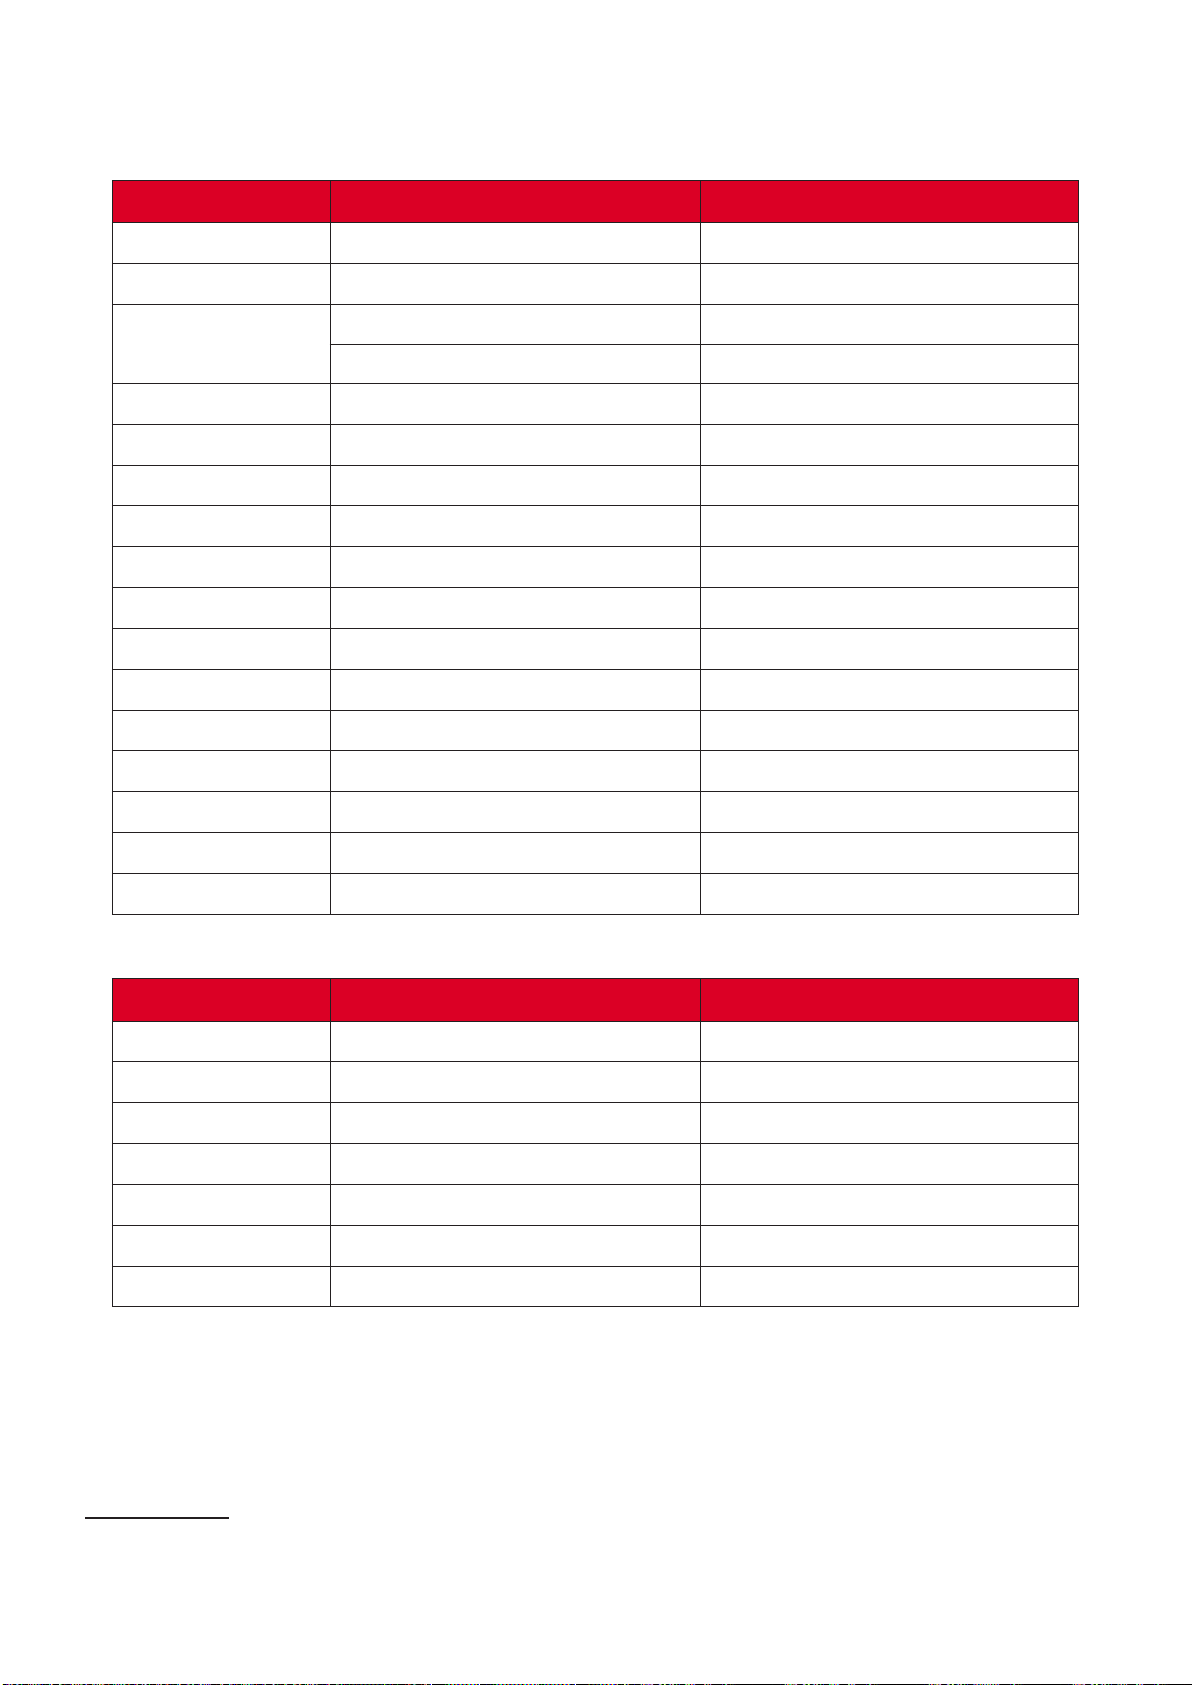
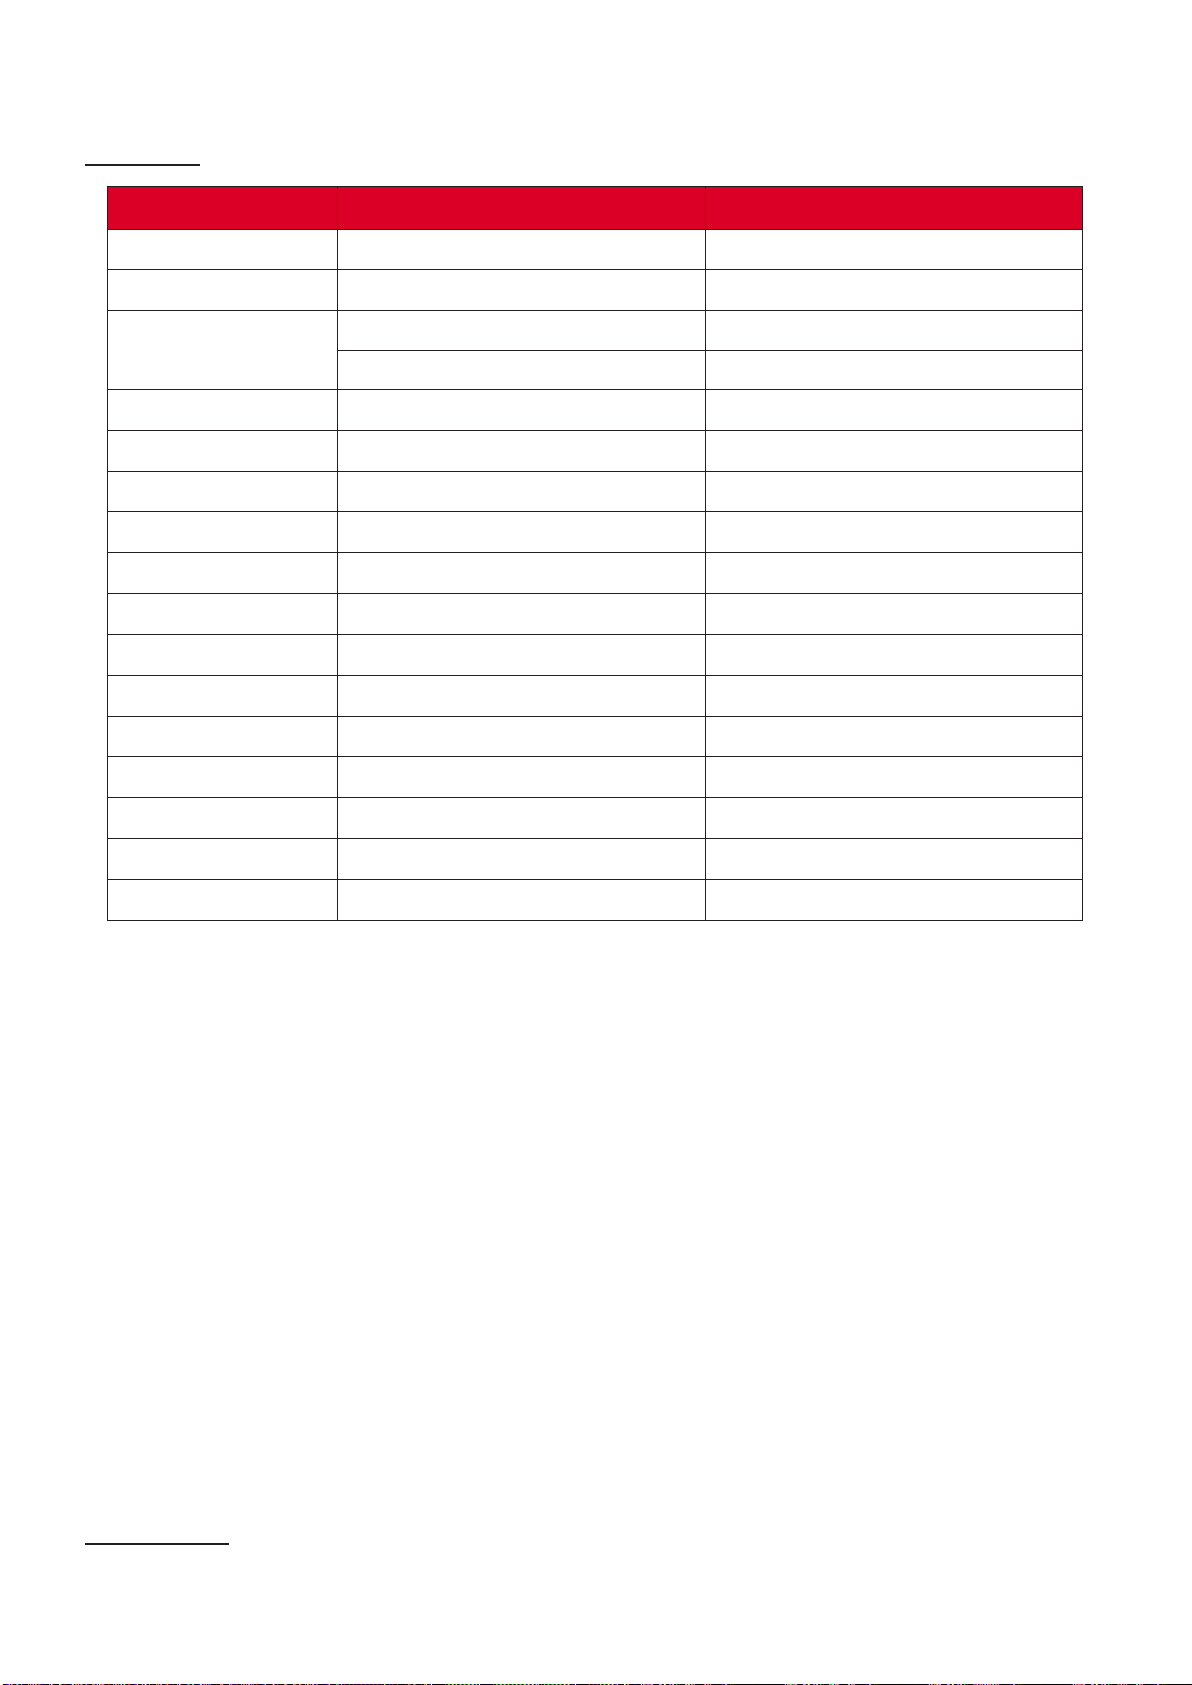
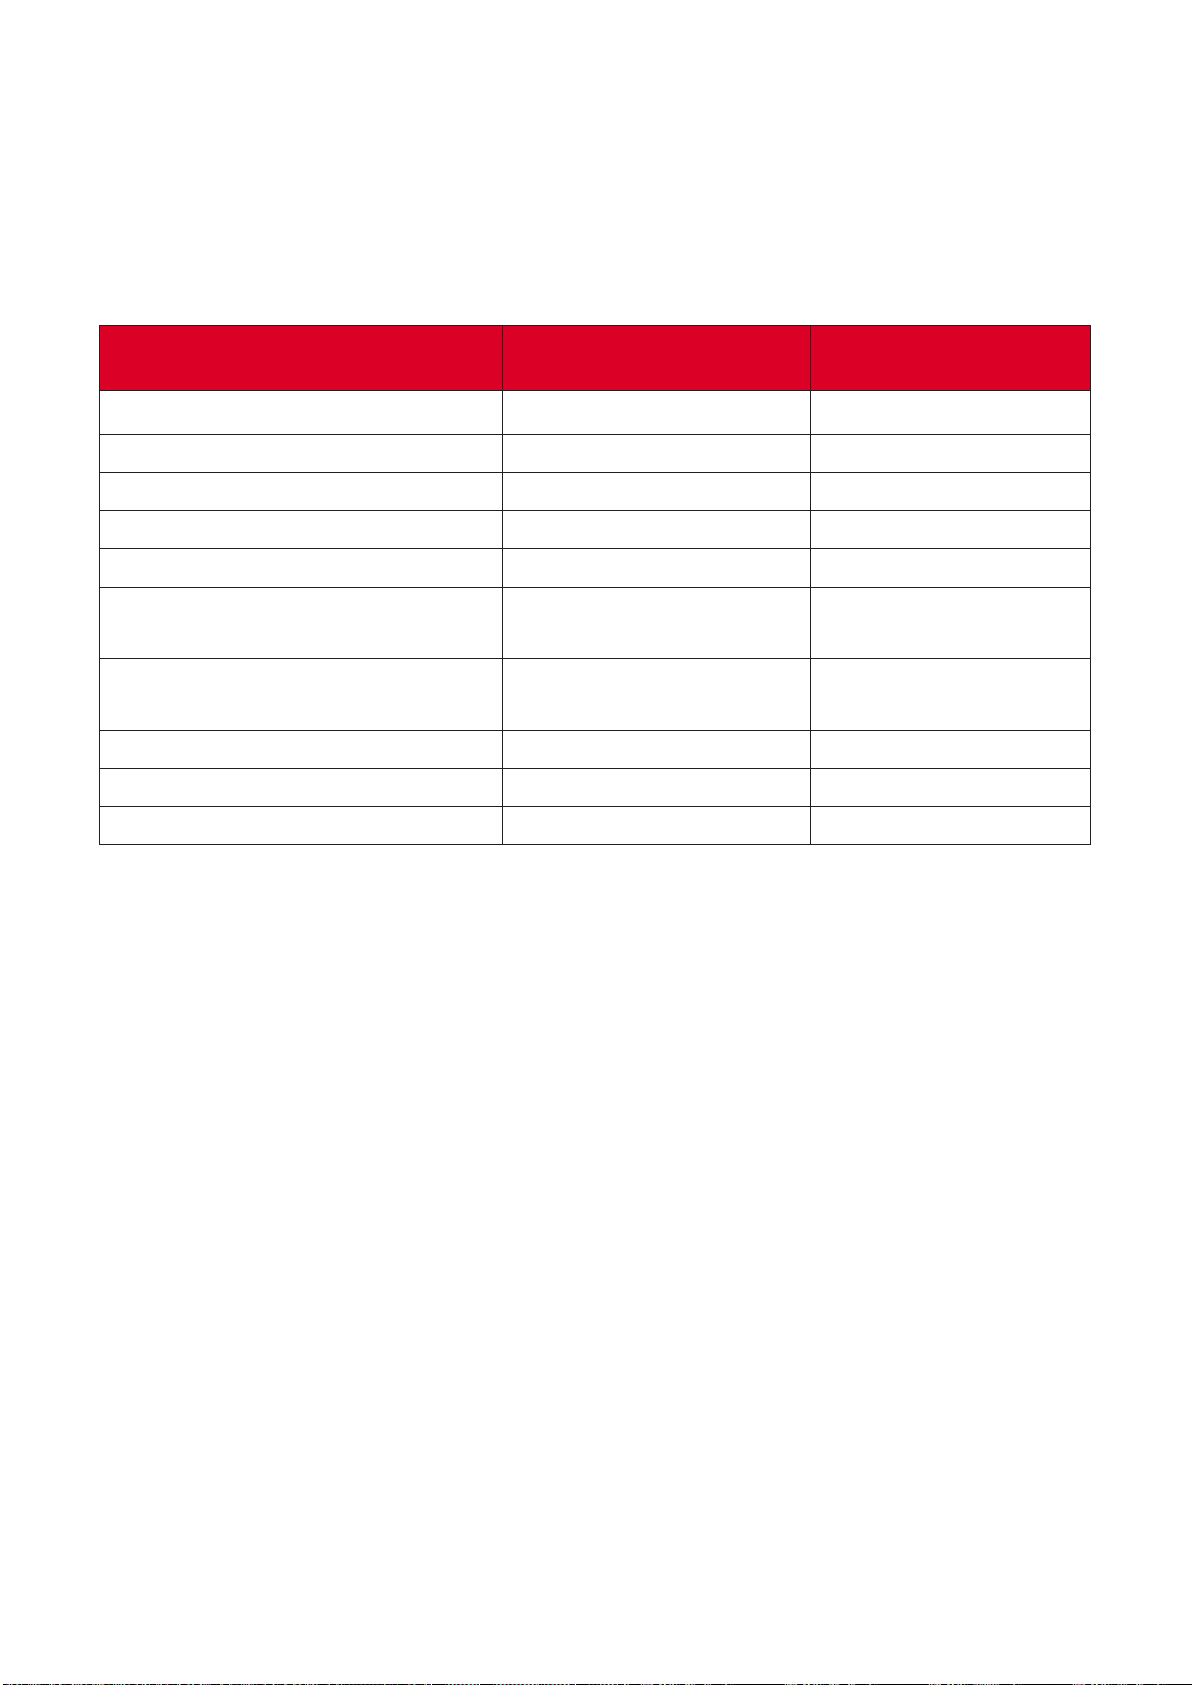
Timing Chart
Analog RGB Timing
Timing Resoluon Refresh Rate (Hz)
VGA
640 x 480 60/67/72/75/85/120
SVGA
800 x 600 56/60/72/75/85/120
XGA
1024 x 768 60/70/75/85/120
1152 x 864 70/75/85
WXGA
1280 x 768 60/75/85
Quad-VGA
1280 x 960 60/75
SXGA
1280 x 1024 60/72/75/85
WXGA
1366 x 768 60
WXGA+
1440 x 900 60
UXGA
1600 x 1200 60
WSXGA+
1680 x1050 60
WUXGA
1920 x 1200-RB² 59.94
HD
1280 x 720 50/60/120
MAC 13"
640 x 480 67
MAC 19"
1024 x 768 75
MAC 21"
1152 x 870 75
FHD
1920 x 1080 50/60
Analog Video Timing
Timing Resoluon Refresh Rate (Hz)
HDTV(1080i)
3
1920 x 1080 50/60
HDTV(1080p)
3
1920 x 1080 50/60
HDTV (720p)
1280 x 720 50/60
SDTV(480p)
720 X 480 60
SDTV(576p)
720 x 576 50
SDTV(480i)
720 X 480 60
SDTV(576i)
720 x 576 50
² 1920 x 1080 @ 60Hz only supports RB (Reduced Blanking)
³ Mac 60
62
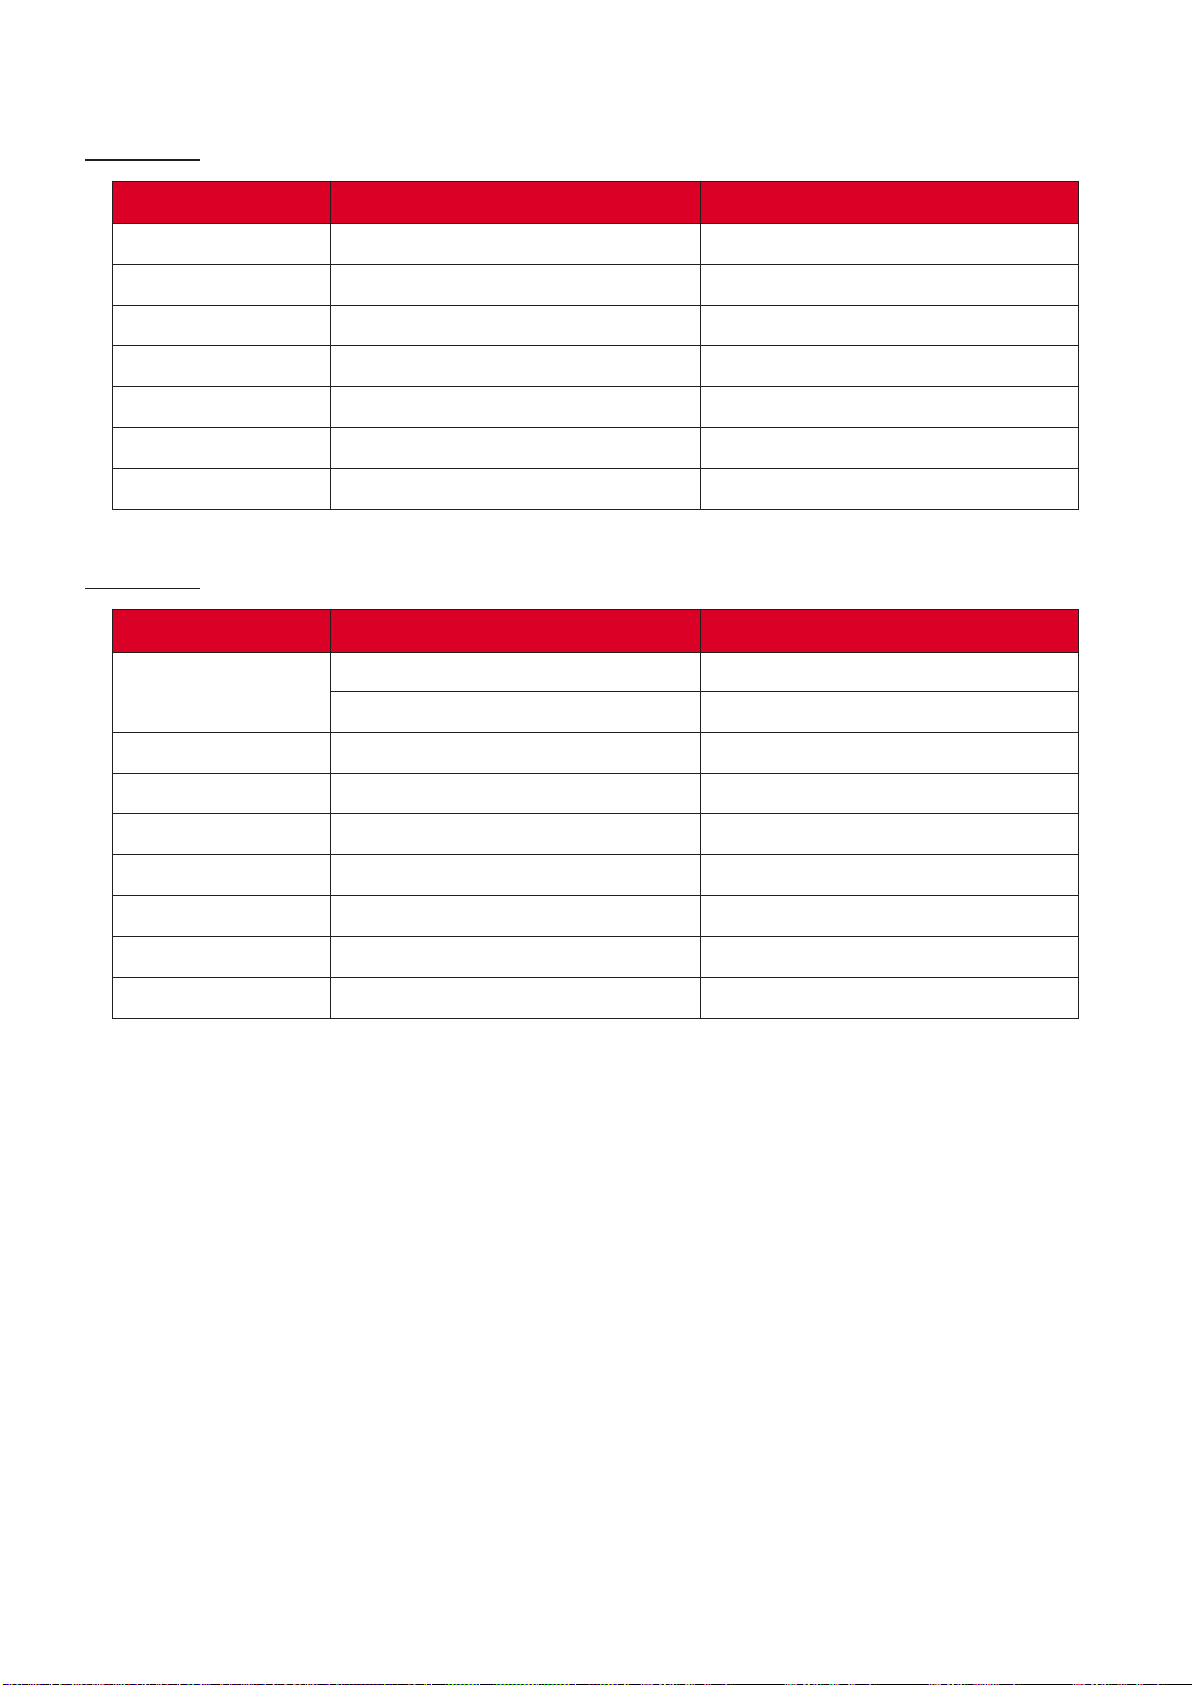
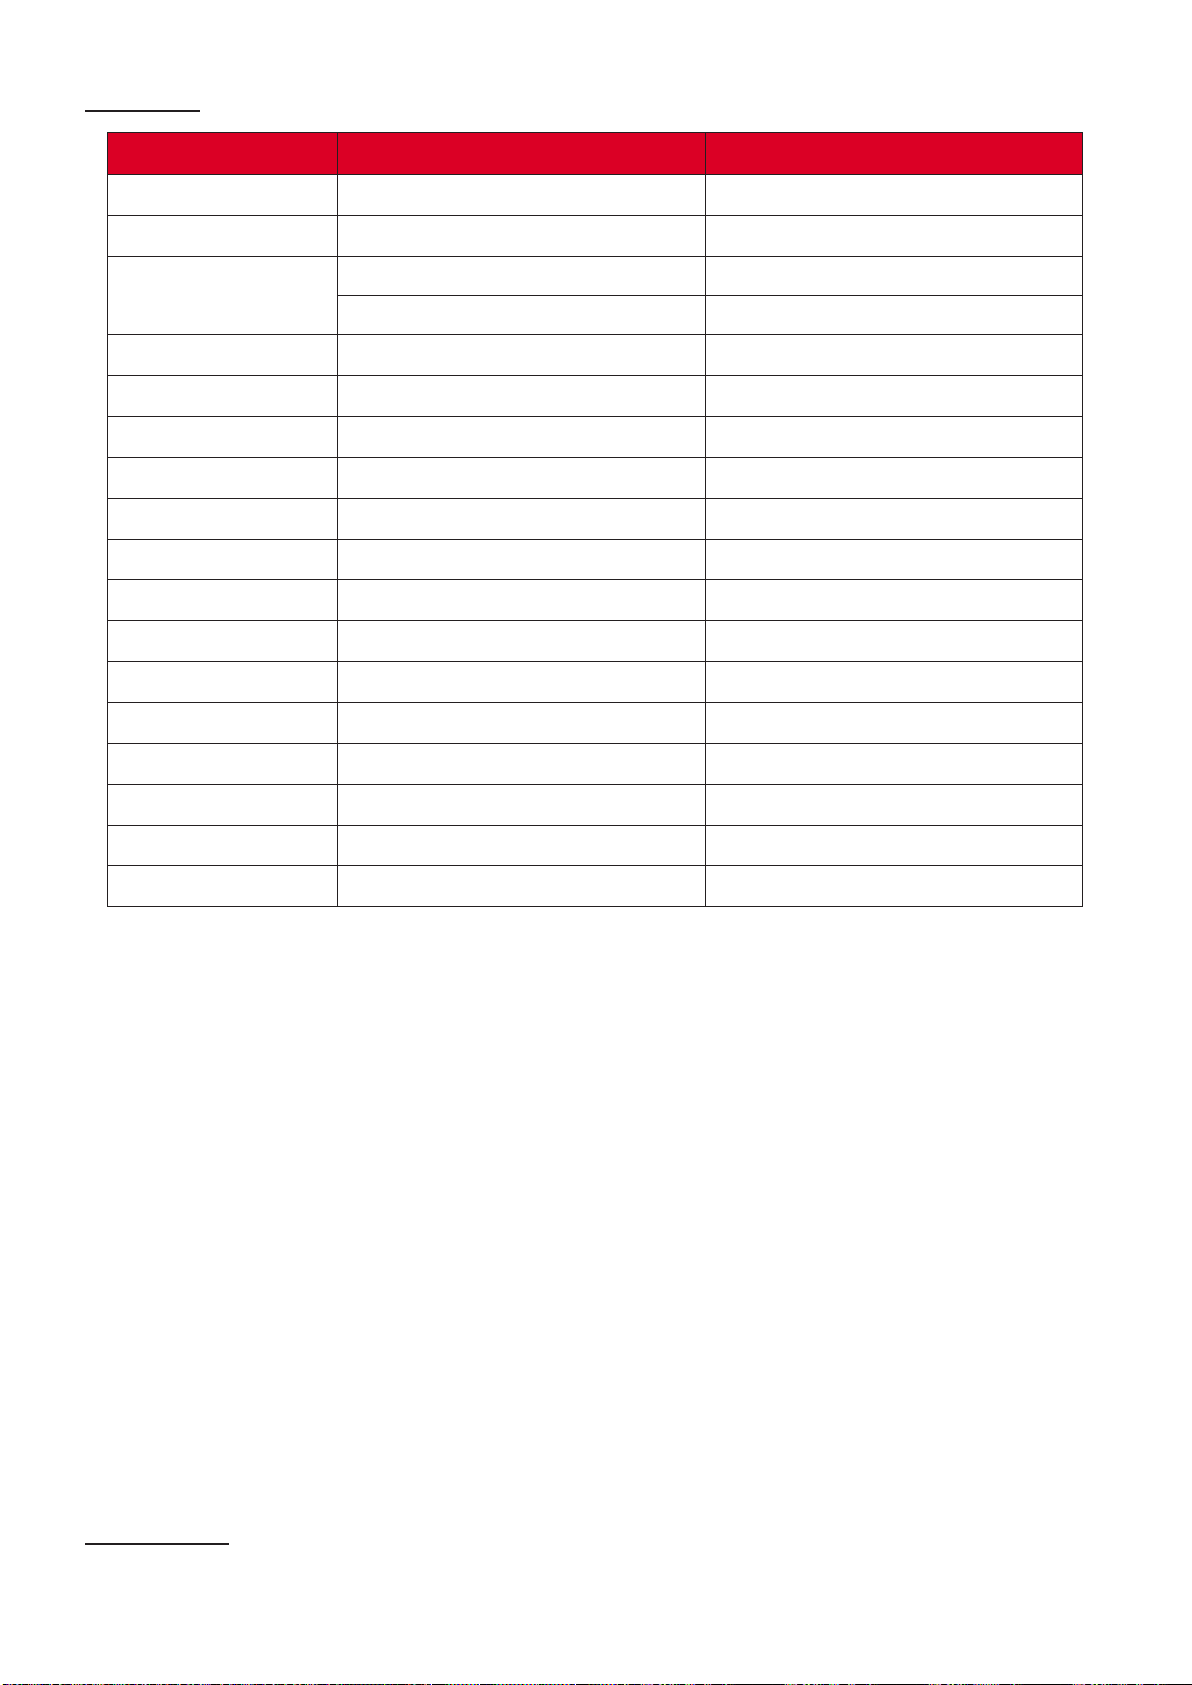
HDMI Video Timing
HDMI 1.4
Timing Resoluon Refresh Rate (Hz)
HDTV(1080p)
1920 x 1080 50/60
HDTV(1080i)
1920 x 1080 50/60
HDTV(720p)
1280 x 720 50/60
SDTV(480p)
720 x 480 60
SDTV(576p)
720 x 576 50
SDTV(480i)
720 x 480 60
SDTV(576i)
720 x 576 50
HDMI 2.0
Timing Resoluon Refresh Rate (Hz)
UHDTV(2160p)
3840 x 2160 24/25/30/50/60
4096 x 2160 24/25/30/50/60
HDTV(1080p)
1920 x 1080 50/60
HDTV(1080i)
1920 x 1080 50/60
HDTV(720p)
1280 x 720 50/60
SDTV(480p)
720 x 480 60
SDTV(576p)
720 x 576 50
SDTV(480i)
720 x 480 60
SDTV(576i)
720 x 576 50
63
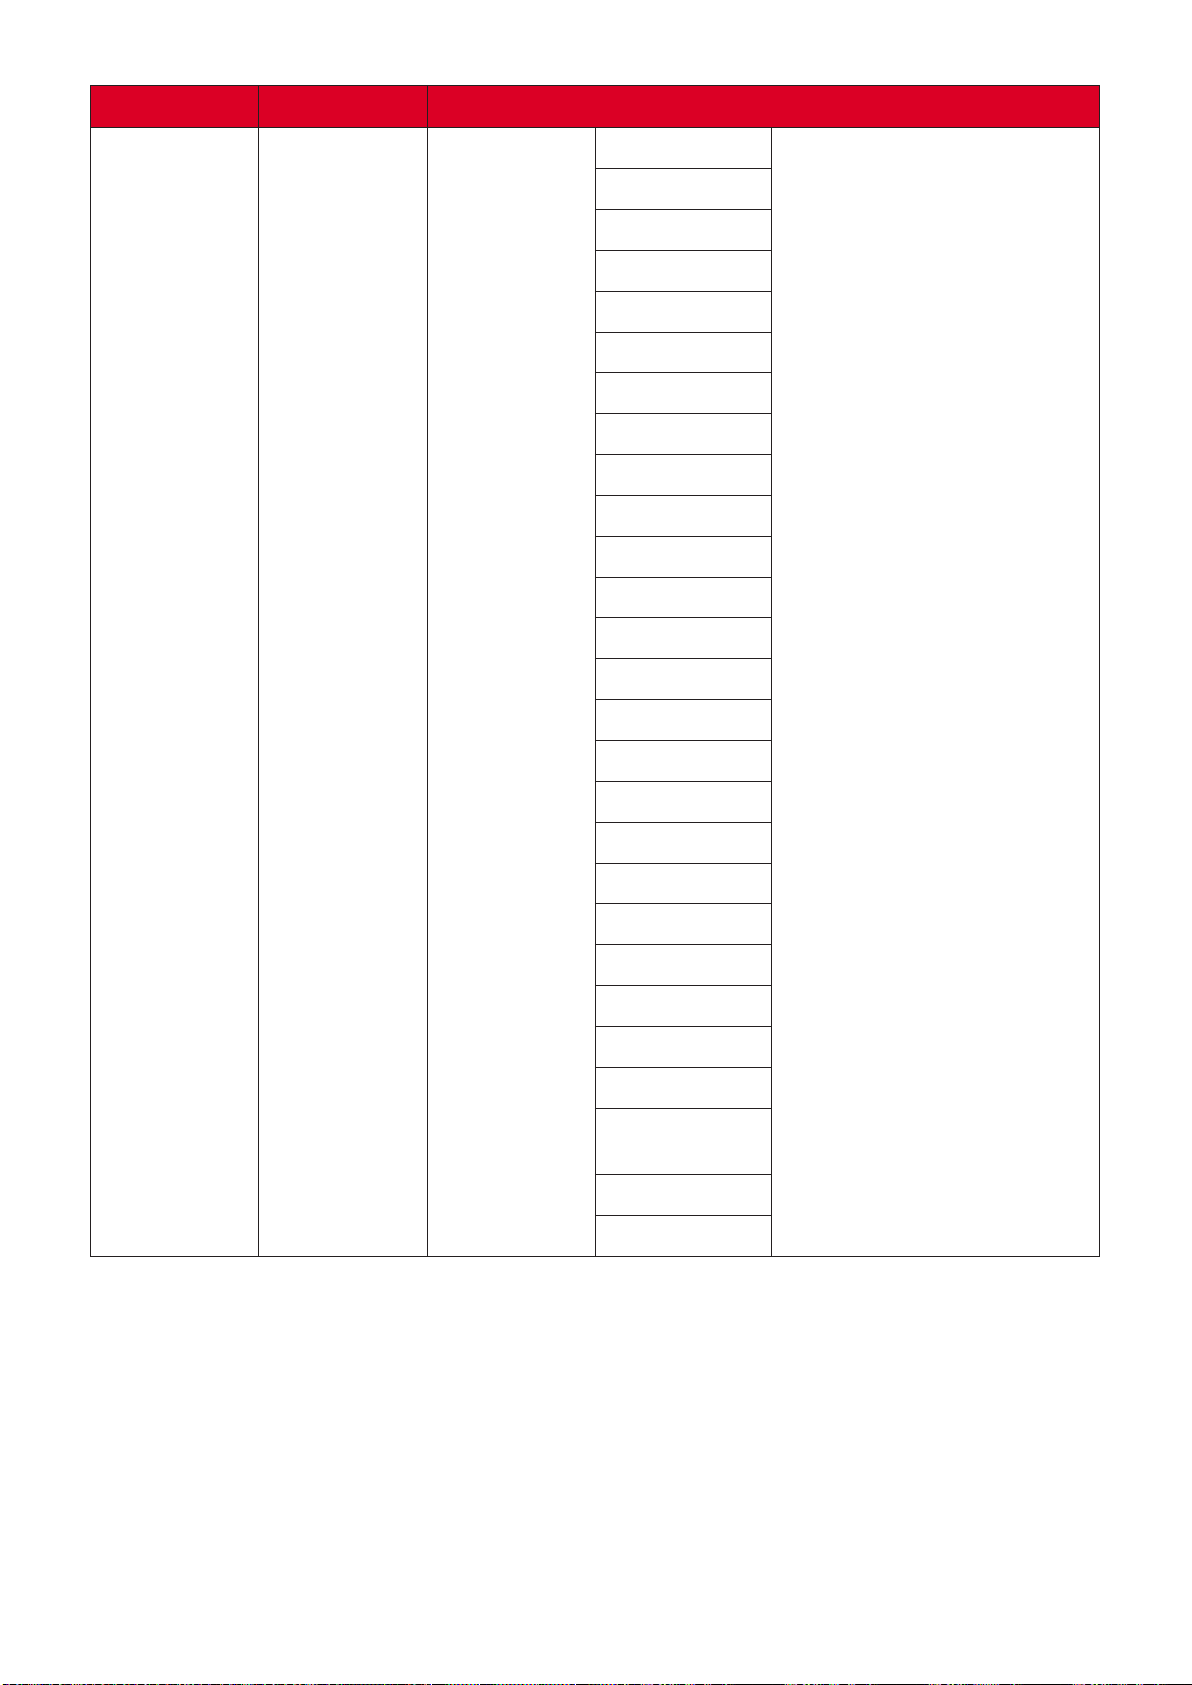
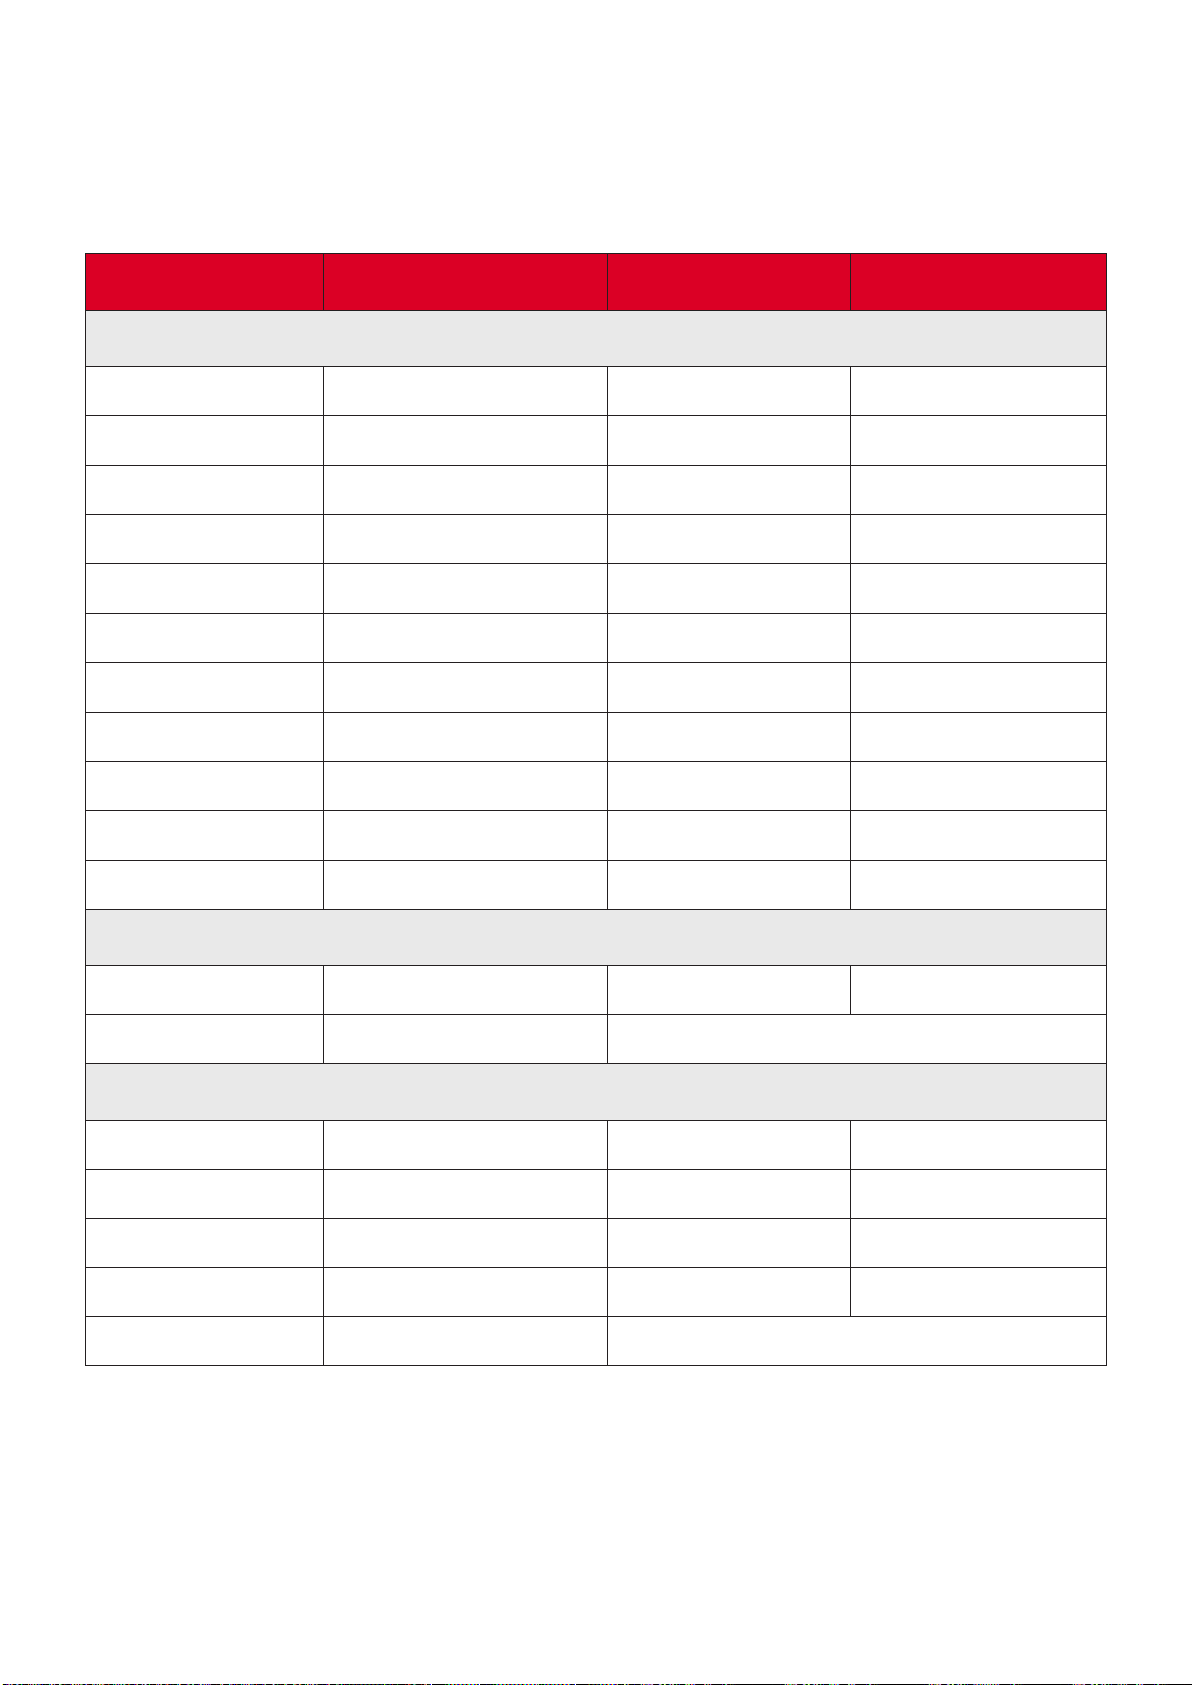
HDMI PC Timing
HDMI 1.4
Signal Resoluon Refresh Rate (Hz)
VGA
640 x 480 60/67/72/75/85/120
SVGA
800 x 600 56/60/72/75/85/120
XGA
1024 x 768 60/70/75/85/120
1152 x 864 70/75/85
WXGA
1280 x 768 60/75/85
Quad-VGA
1280 x 960 60/75
SXGA
1280 x 1024 60/72/75/85
WXGA
1366 x 768 60
WXGA+
1440 x 900 60
UXGA
1600 x 1200 60
WSXGA+
1680 x 1050 60
WUXGA
1920 x 1200-RB 59.94
HD
1280 x 720 50/60/120
MAC 13"
640 x 480 67
MAC 19"
1024 x 768 75
MAC 21"
1152 x 870 75
FHD
1920 x 1080 50/60
64
HDMI 2.0
Signal Resoluon Refresh Rate (Hz)
VGA
640 x 480 60/67/72/75/85/120
SVGA
800 x 600 56/60/72/75/85/120
XGA
1024 x 768 60/70/75/85/120
1152 x 864 70/75/85
WXGA
1280 x 768 60/75/85
Quad-VGA
1280 x 960 60/75
SXGA
1280 x 1024 60/72/75/85
WXGA
1366 x 768 60
WXGA+
1440 x 900 60
UXGA
1600 x 1200 60
WSXGA+
1680 x1050 60
WUXGA
1920 x 1200-RB 59.94
HD
1280 x 720 50/60/120
MAC 13"
640 x 480 67
MAC 19"
1024 x 768 75
MAC 21"
1152 x 870 75
4K
3840 x 2160 50/60
FHD
1920 x 1080 50/60
65
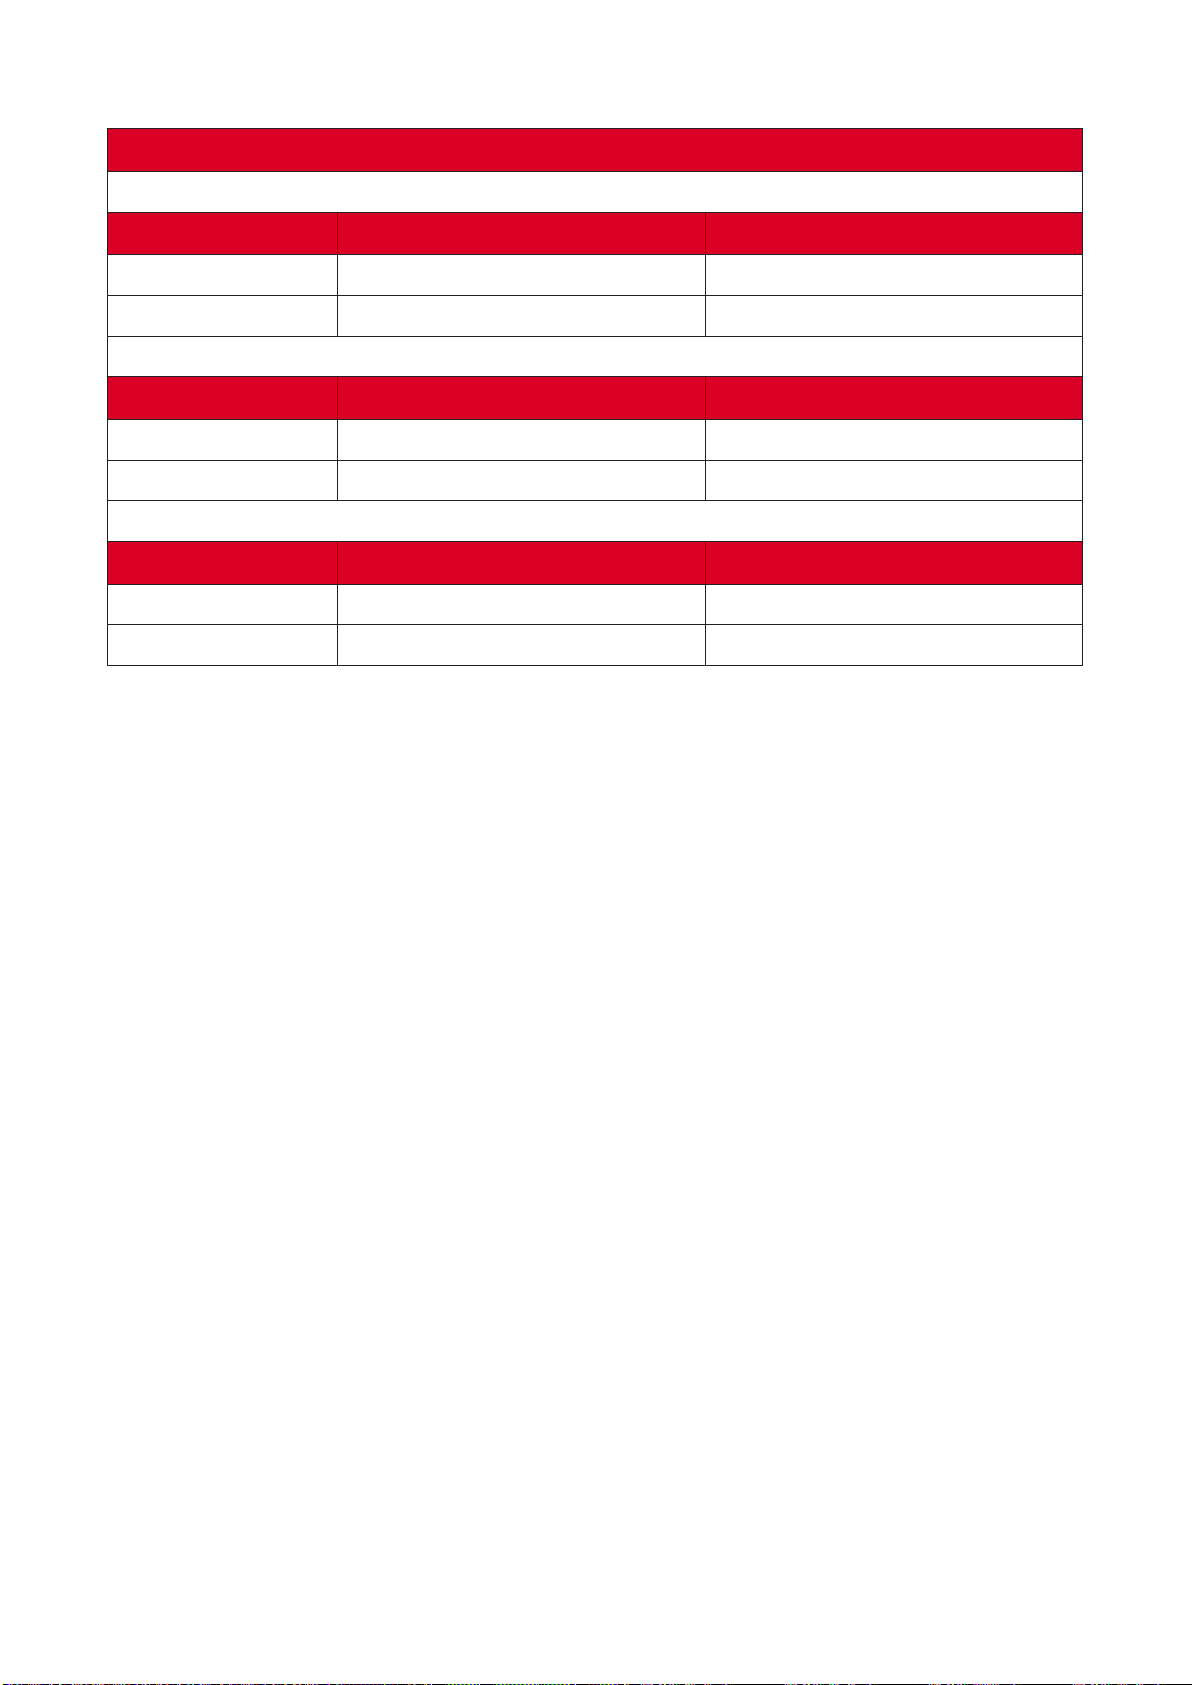
3D Support Timing
HDMI 3D
Frame Packing Format
Signal Resoluon Refresh Rate (Hz)
1080p
1920 x 1080 24
720p
1280 x 720 50/60
Side by Side Format
Signal Resoluon Refresh Rate (Hz)
1080i
1920 x 1080 50/60
1080p
1920 x 1080 50/60
Top and Boom Format
Signal Resoluon Refresh Rate (Hz)
1080p
1920 x 1080 24/50/60
720p
1280 x 720 50/60
NOTE:
•
120 Hz.
• 1080P@24hz will run 144Hz (XGA, WXGA, 1080p)/96Hz (WUXGA).
• If the input frame rate is 48 Hz or greater, the output frame rate is set to
twice the input frame rate (FRC = 2X mode).
• If the 3D input frame rate is 25Hz or greater, the output frame rate is set to
• If the 3D input frame rate is 24Hz (includes 23.9Hz), the output frame rate

66
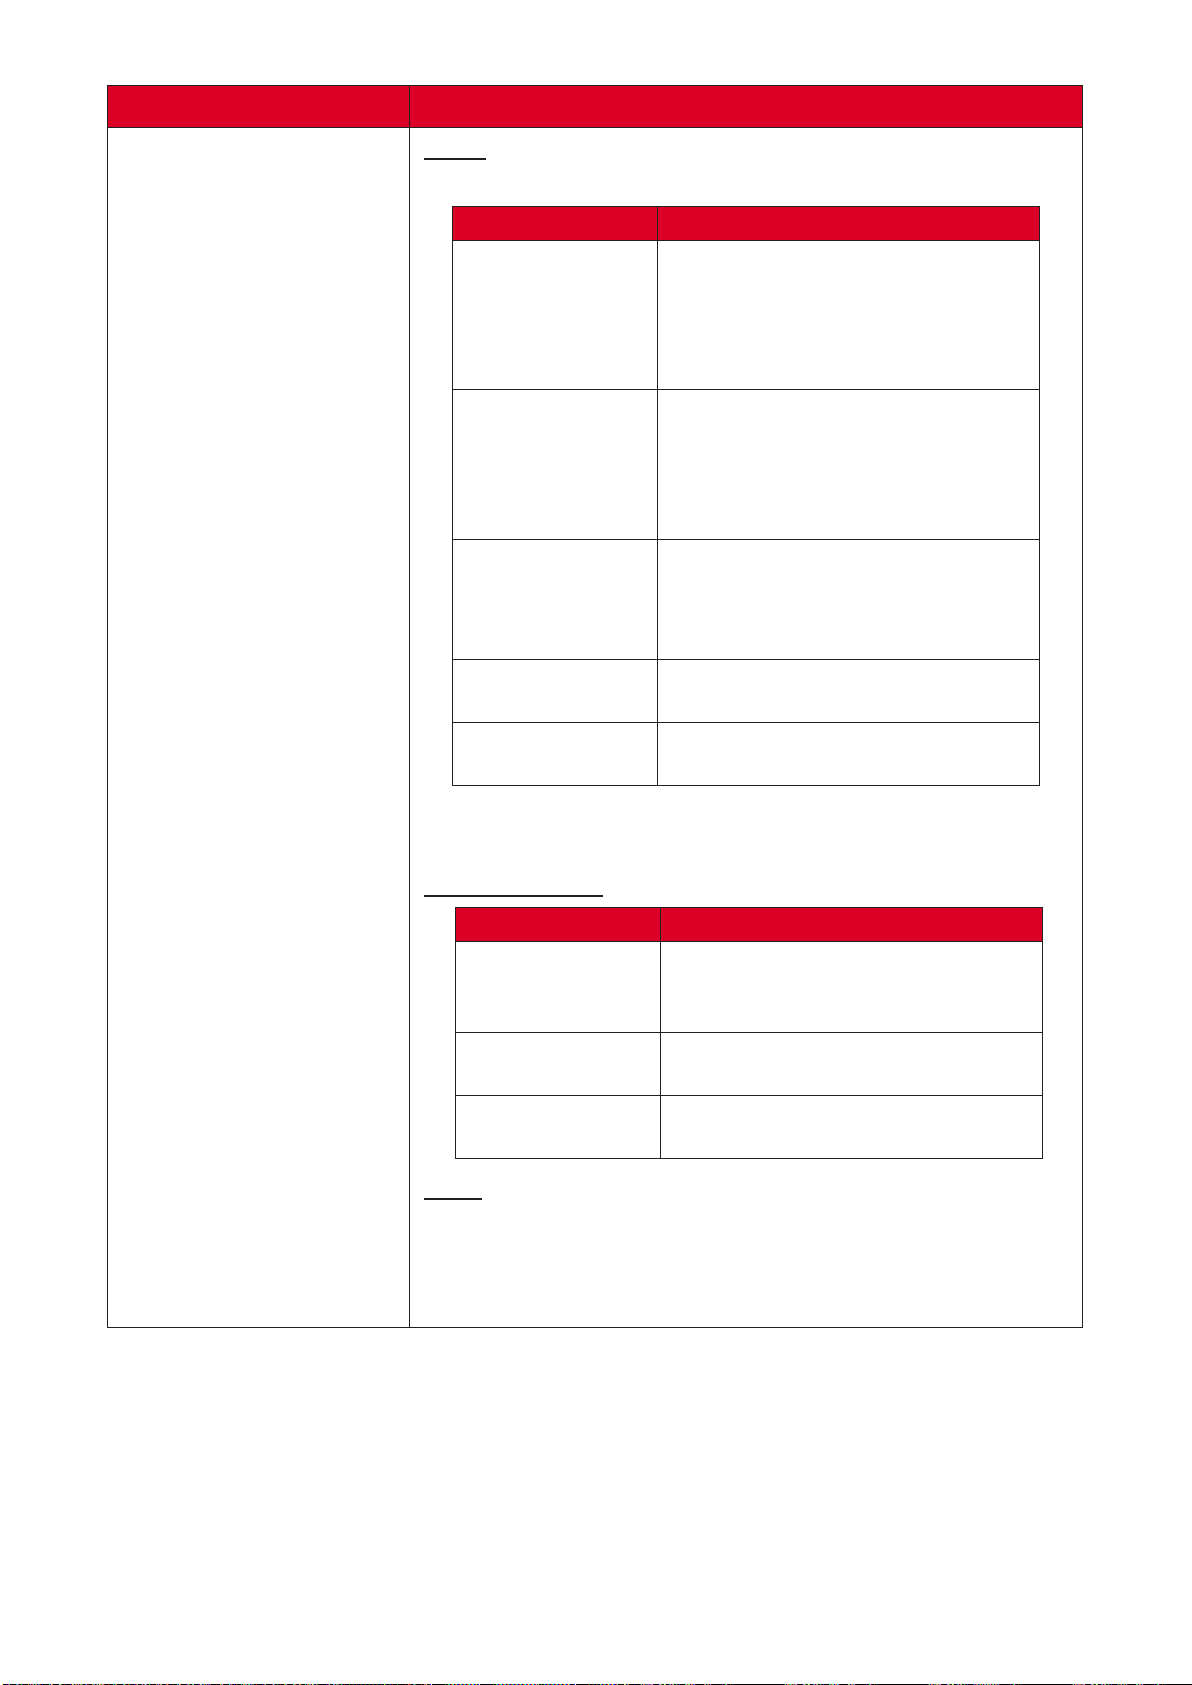
Troubleshoong
using the projector.
Problem or Issue Possible Soluons
The projector does not
turn on
•
projector and to the power outlet.
• If the cooling process has not completed, please
projector again.
• If the above does not work, try another power
outlet or another electrical device with the same
power outlet.
There is no picture
•
properly, and that the video source is turned on.
•
select the correct source with the “Source Input”
on either the projector or the remote control.
The image is blurred
• Focus Switch will help
•
properly. If necessary, adjust the height of the
The image is reversed
• Open the OSD Menu and go to: Setup > Projecon
The image is stretched
DVD
• When you play an anamorphic DVD or 16:9 DVD,
the projector will show the best image in 16:9.
•
the format as 4:3 in projector OSD Menu.
• Please setup the display format as 16:9 (wide)

67
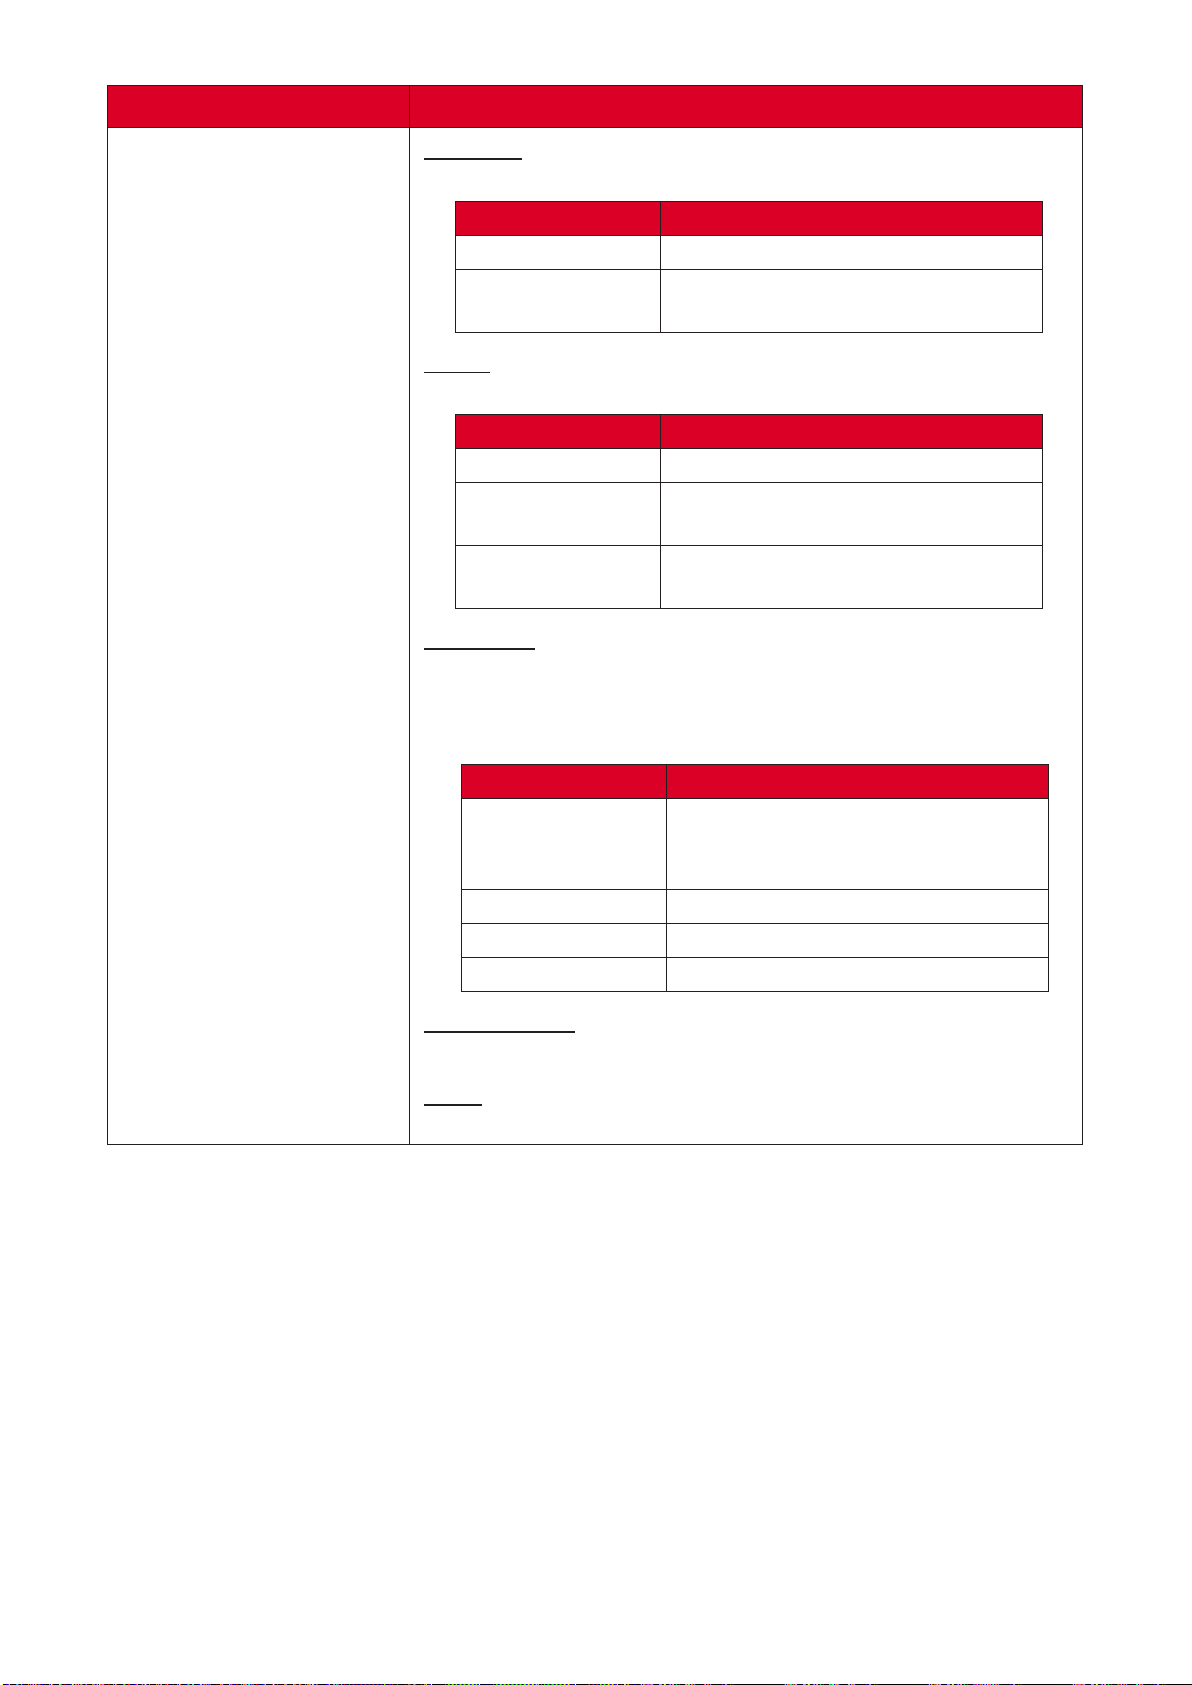
Problem or Issue Possible Soluons
The remote control
does not work
•
control and projector; and that they are within
•
and replace if necessary.
The projector stops
responding to all
controls
•
Wait at least 20 seconds then reconnect and try
again.
68
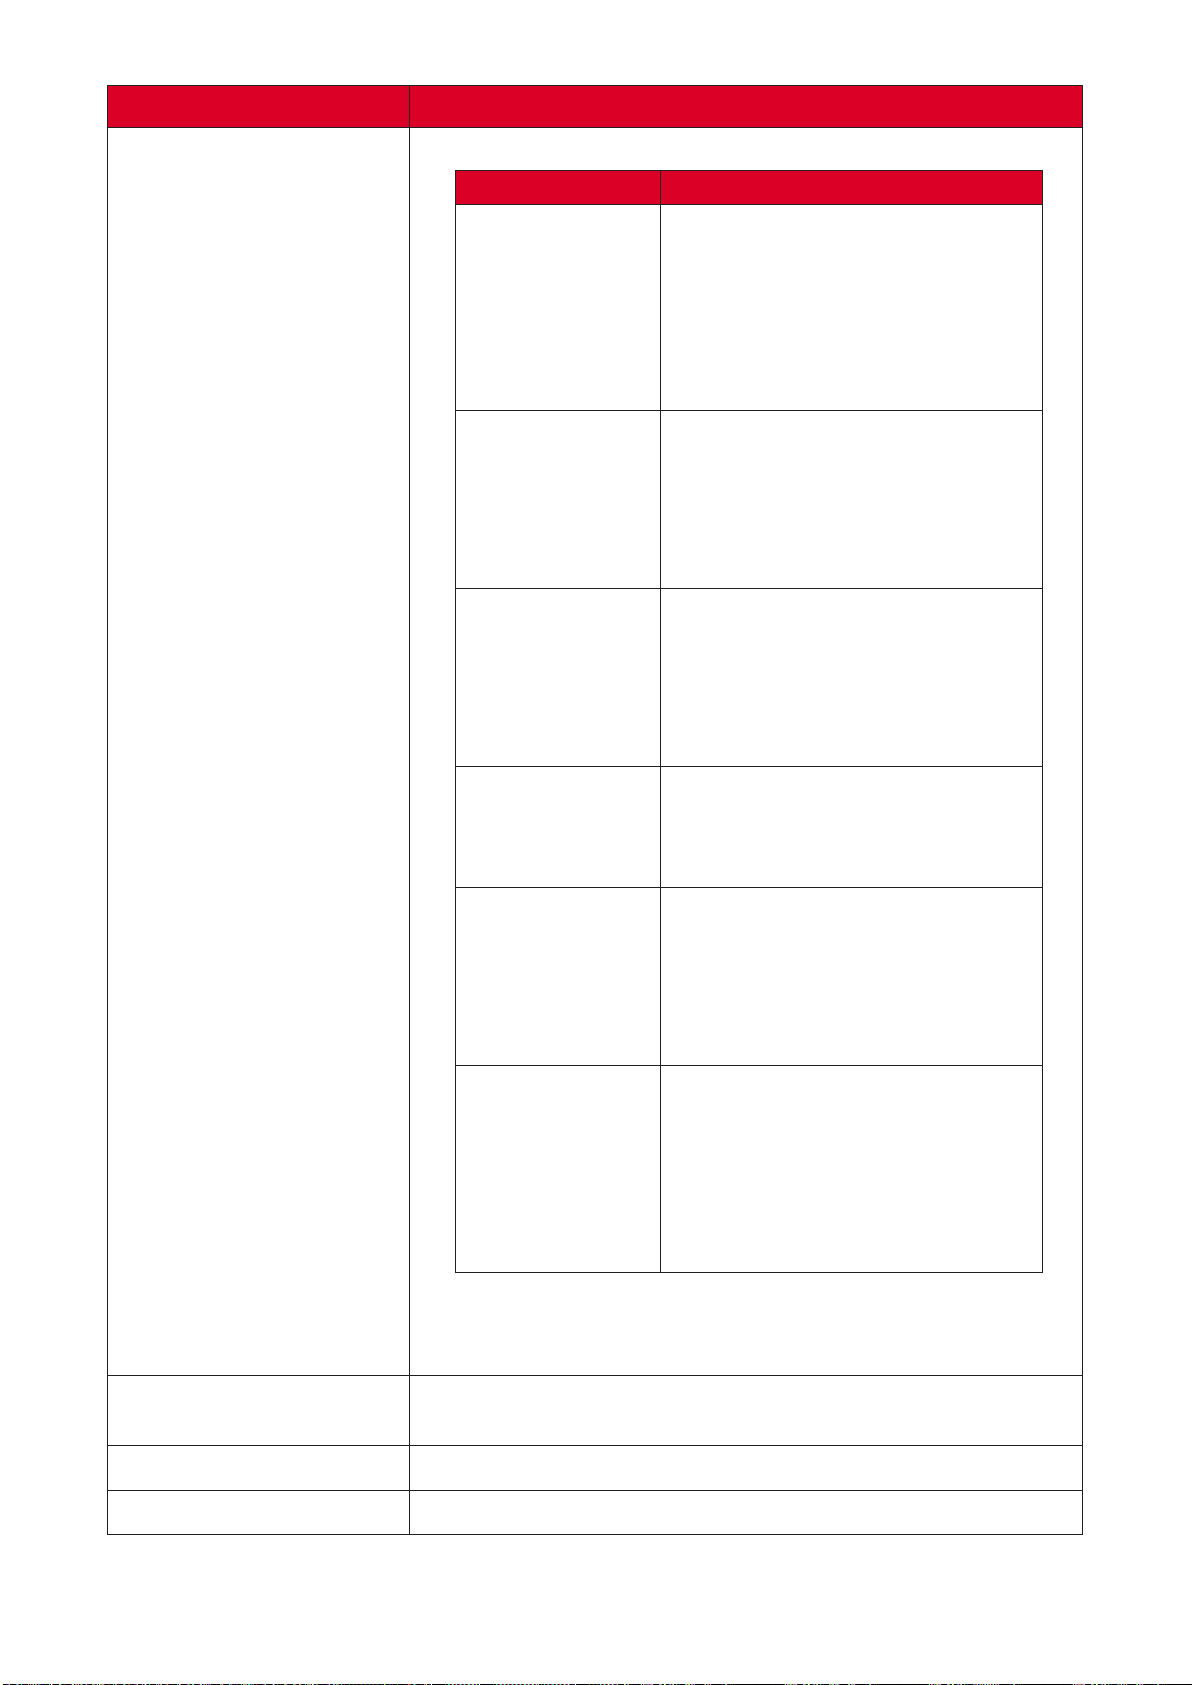
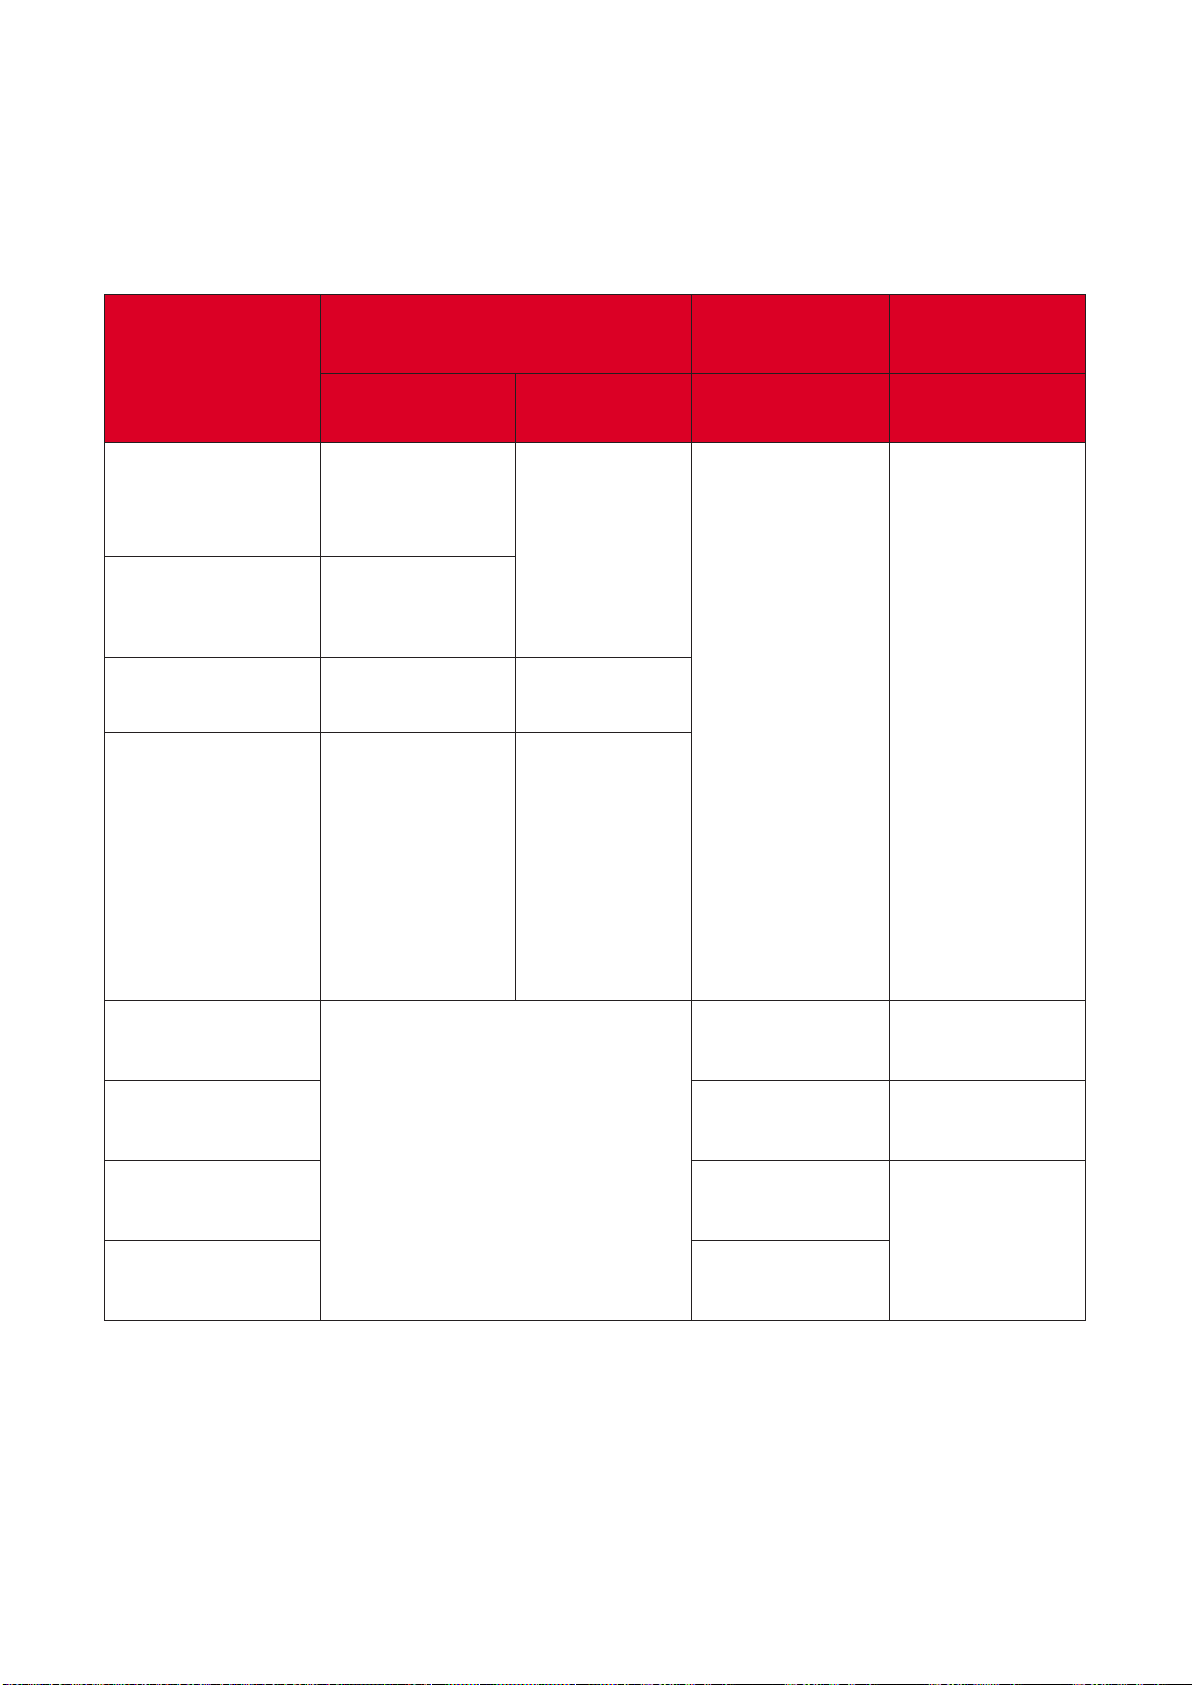
LED Indicators
your nearest service center for assistance.
Status and
Descripon
Power Indicator Light
Temperature
Indicator Light
Light Source
Indicator Light
Red Blue Red Red
Standby State
(Power cord
input)
Steady Light
Power On
(Warming)
Flashing
on)
Power On and
Lamp Lighng
Steady Light
Power O
(Cooling)
Flashing
sec on)
Back to red
steady light
when the
cooling fan
Error
(Lamp overheat)
Steady Light
Error
(Lamp failure)
Steady Light
Error
(Fan failure)
Flashing
Error
(Overheat)
Steady Light

69
Maintenance
General Precauons
•
power outlet.
• Never remove any parts from the projector. Contact ViewSonic® or a reseller
when any part of the projector needs replacing.
• Never spray or pour any liquid directly onto the case.
•
show marks more clearly than a lighter-colored projector.
Cleaning the Lens
• Use a canister of compressed air to remove dust.
•
lens cleaner and gently wipe the surface.
CAUTION: Never rub the lens with abrasive materials.
Cleaning the Case
•
•
the surface.
CAUTION: Never use wax, alcohol, benzene, thinner, or other chemical
detergents.
Storing the Projector
•
recommend range.
• Retract the adjuster foot completely.
•
• Pack the projector in its original packaging or equivalent.
Disclaimer
• ViewSonic® does not recommend the use of any ammonia or alcohol-based
cleaners on the lens or case. Some chemical cleaners have been reported to
damage the lens and/or case of the projector.
•
alcohol-based cleaners.

70
Regulatory and Service Informaon
Compliance Informaon
FCC Compliance Statement
•
•
•
•
Warning:
Industry Canada Statement

71
CE Conformity for European Countries
The following informaon is only for EU-member states:
72
Declaraon of RoHS2 Compliance
Substance
Proposed Maximum
Concentraon
Actual Concentraon
Certain components of products as stated above are exempted under the Annex
III of the RoHS2 Direcves as noted below. Examples of exempted components
are:
•
•
•
•
•
•
•

73
Indian Restricon of Hazardous Substances
Product Disposal at End of Product Life
USA & Canada:
Europe:
Taiwan:

74
Copyright Informaon
Disclaimer:
75
Customer Service
NOTE:
Country/ Region Website Country/ Region Website
Asia Pacic & Africa
中国
香港 (繁體中文)
日本
臺灣
ประเทศไทย
Việt Nam
Americas
Europe
Ққ

76
Limited Warranty
What the warranty covers:
Limited Three (3) year General Warranty:
Limited One (1) year Heavy Usage Warranty:
Who the warranty protects:

77
What the warranty does not cover:
1.
2.
3.
How to get service:
1.
2.
3.
4.
Limitaon of implied warranes:

78
Exclusion of damages:
1.
2.
3.
Eect of state law:
Sales outside the U.S.A. and Canada:

79
Mexico Limited Warranty
What the warranty covers:
How long the warranty is eecve:
Who the warranty protects:
What the warranty excludes and does not cover:
1.
2.
3.
4.

80
How to get service:
1.
2.
3.
Limitaon of implied warranes:
Exclusion of damages:
1.
2.
3.
4.

81
Name, address, of manufacturer and importers:
Hermosillo:
Villahermosa:
Puebla, Pue. (Matriz):
Veracruz, Ver.:
Chihuahua:
Cuernavaca:
Distrito Federal:
Guadalajara, Jal.:
Guerrero Acapulco:
Monterrey:
MERIDA:
Oaxaca, Oax.:
Tijuana:
FOR USA SUPPORT:
®
82