Loading ...
Loading ...
Loading ...

11
2. Rotate tracking knob left or right as you turn
tracking wheel with your other hand. Do this in
small increments and allow time for belt to
respond to changes. Clockwise knob rotation
moves belt toward left, counterclockwise toward
right.
3. If belt refuses to track properly, increase belt
tension and repeat above steps.
7.5 V-belt tension
1. Disconnect machine from power source.
2. Remove four button head screws and open
motor shroud.
3. Remove two screws from pulley cover (access
through housing) and remove pulley cover.
4. Loosen screws on motor mount and slide motor
backward to tension belt.
5. Tighten motor mount screws, reinstall pulley
cover and shroud.
8.0 Operation
8.1 Operating controls
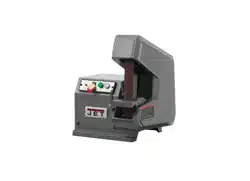
Refer to Figure 7-1.
Power indicator light – Illuminates when machine
is connected to power.
Running indicator light – Illuminates when motor
is operating.
MODELS BGB-142/248/260-1 only:
On/off switch with safety key – Pull up to start
motor, push down to stop.
IMPORTANT: To prevent accidental or
unauthorized starting of grinder, shut off machine
and pull out key (yellow portion) of switch and store
in safe place. This key must be reinserted to start
machine.
Overload reset – If motor overheats, allow machine
a few minutes to cool down, then push button to
reset.
MODELS BGB-260-3 only:
On button – Push to start motor.
Emergency stop – Push to stop motor. To restart,
rotate button clockwise until it disengages.
Overload reset – (Inside magnetic starter box.) If
motor overheats, allow machine a few minutes to
cool down, then the overload relay will automatically
reset.
8.2 General operating tips
1. Always use platen when grinding workpiece.
2. Adjust gap between work rest and belt to 1/16-
inch or less.
3. Handles must be tight and covers closed
before operating.
4. Some metals may create a fire hazard during
grinding; consult workpiece supplier for
instructions on proper use and cautions.
5. Allow machine to come up to speed before
applying workpiece.
6. Place workpiece upon work rest, and apply
only moderate pressure into abrasive belt; do
not apply excessive pressure.
9.0 User-maintenance
Always disconnect power to
machine before performing maintenance.
Failure to do this may result in serious personal
injury.
9.1 General cleaning
Keep exterior of machine clean and free of chips.
Periodically clean out interior of housing with
vacuum or brush – do not use bare hands.
Periodically empty grinding dust and particles from
the dust collection system (not provided).
9.2 Lubrication
Lubrication of the grinder is not required. Bearings
are pre-lubricated and sealed.
9.3 Abrasive belt replacement
1. Disconnect machine from power source.
2. Open side cover, and open dust cover by
unscrewing dust cover screw.
3. De-tension and slip belt off wheels.
4. Install new belt around wheels, tension, and
test tracking. Make further adjustments as
needed.
5. Close all covers before operating.
9.4 Contact wheel replacement
1. Disconnect machine from power source.
2. Open side cover and dust cover, and remove
abrasive belt.
3. Loosen and remove hex nut and flange
washer, and slide contact wheel off spindle.
4. Install new wheel. Reinstall flange washer and
hex nut and tighten.
5. Install abrasive belt, tension, and check
tracking.
6. Close all covers before operating.
Loading ...
Loading ...
Loading ...