
INSTRUCTION MANUAL
DEWALT Industrial Tool Co., 701 East Joppa Road, Towson, MD 21286
(JULY14) Part No. 79002845 Copyright © 2014 D
EWALT
DW0851
Self-Leveling 5 Beam Laser Pointer
IF YOU HAVE ANY QUESTIONS OR COMMENTS ABOUT THIS OR ANY DEWALT TOOL, CALL
US TOLL FREE AT: 1-800-4-D
EWALT (1-800-433-9258).
Safety
WARNING: To reduce the risk of injury, read the safety manual provided with your product
or access it online at www.DeWALT.com.
Use of controls or adjustments or performance of procedures other than those specifi ed
herein may result in hazardous radiation exposure.
WARNING LABELS
For your convenience and safety, the following label is on your laser.
CAUTION: LASER RADIATION - DO NOT STARE INTO BEAM. CLASS 2 LASER
PRODUCT.
Laser Information
The DW0851 laser level is a class 2 laser product and complies with 21 CFR 1040.10 and 1040.11
except for deviations pursuant to laser notice No. 50, dated June 24, 2007.
PRODUCT OVERVIEW
The DW0851 laser level is a self-leveling laser tool that can be used for horizontal (level) and vertical
(plumb) alignment and square alignment. This tool comes fully assembled and has been designed
with features that allow for quick and easy set-up. Please read and understand all instructions within
this instruction manual in addition the Safety Manual prior to use.
Specifications
SPECIFICATIONS
Light Source Semiconductor laser diode
Laser Wavelength 630–680 nm visible
Laser Power <1.0 mW (each beam) CLASS 2 LASER PRODUCT
Working Range (Line)
Working Range (Dot)
±30' (10 m)
±100' (30 m)
±165'(50m) with detector
Accuracy* (Horizontal dots) ± 3/16" @ 50' (± 4.5 mm @ 15 m)
Accuracy* (Vertical up dot) ± 3/16" @ 50' (± 4.5 mm @ 15 m)
Accuracy* (Horizontal line) ± 1/8" @ 50' (± 3.0mm @ 15 m)
Indicators Flashing Indicator: battery low
Flashing Laser: tilt range exceeded
Power Source 3 AA size batteries (4.5V DC)
Operating Temperature 20 °F to 120 °F (-10 °C to 50 °C)
Storage Temperature -5 °F to 140 °F (-20 °C to 60 °C)
Environmental Water resistant
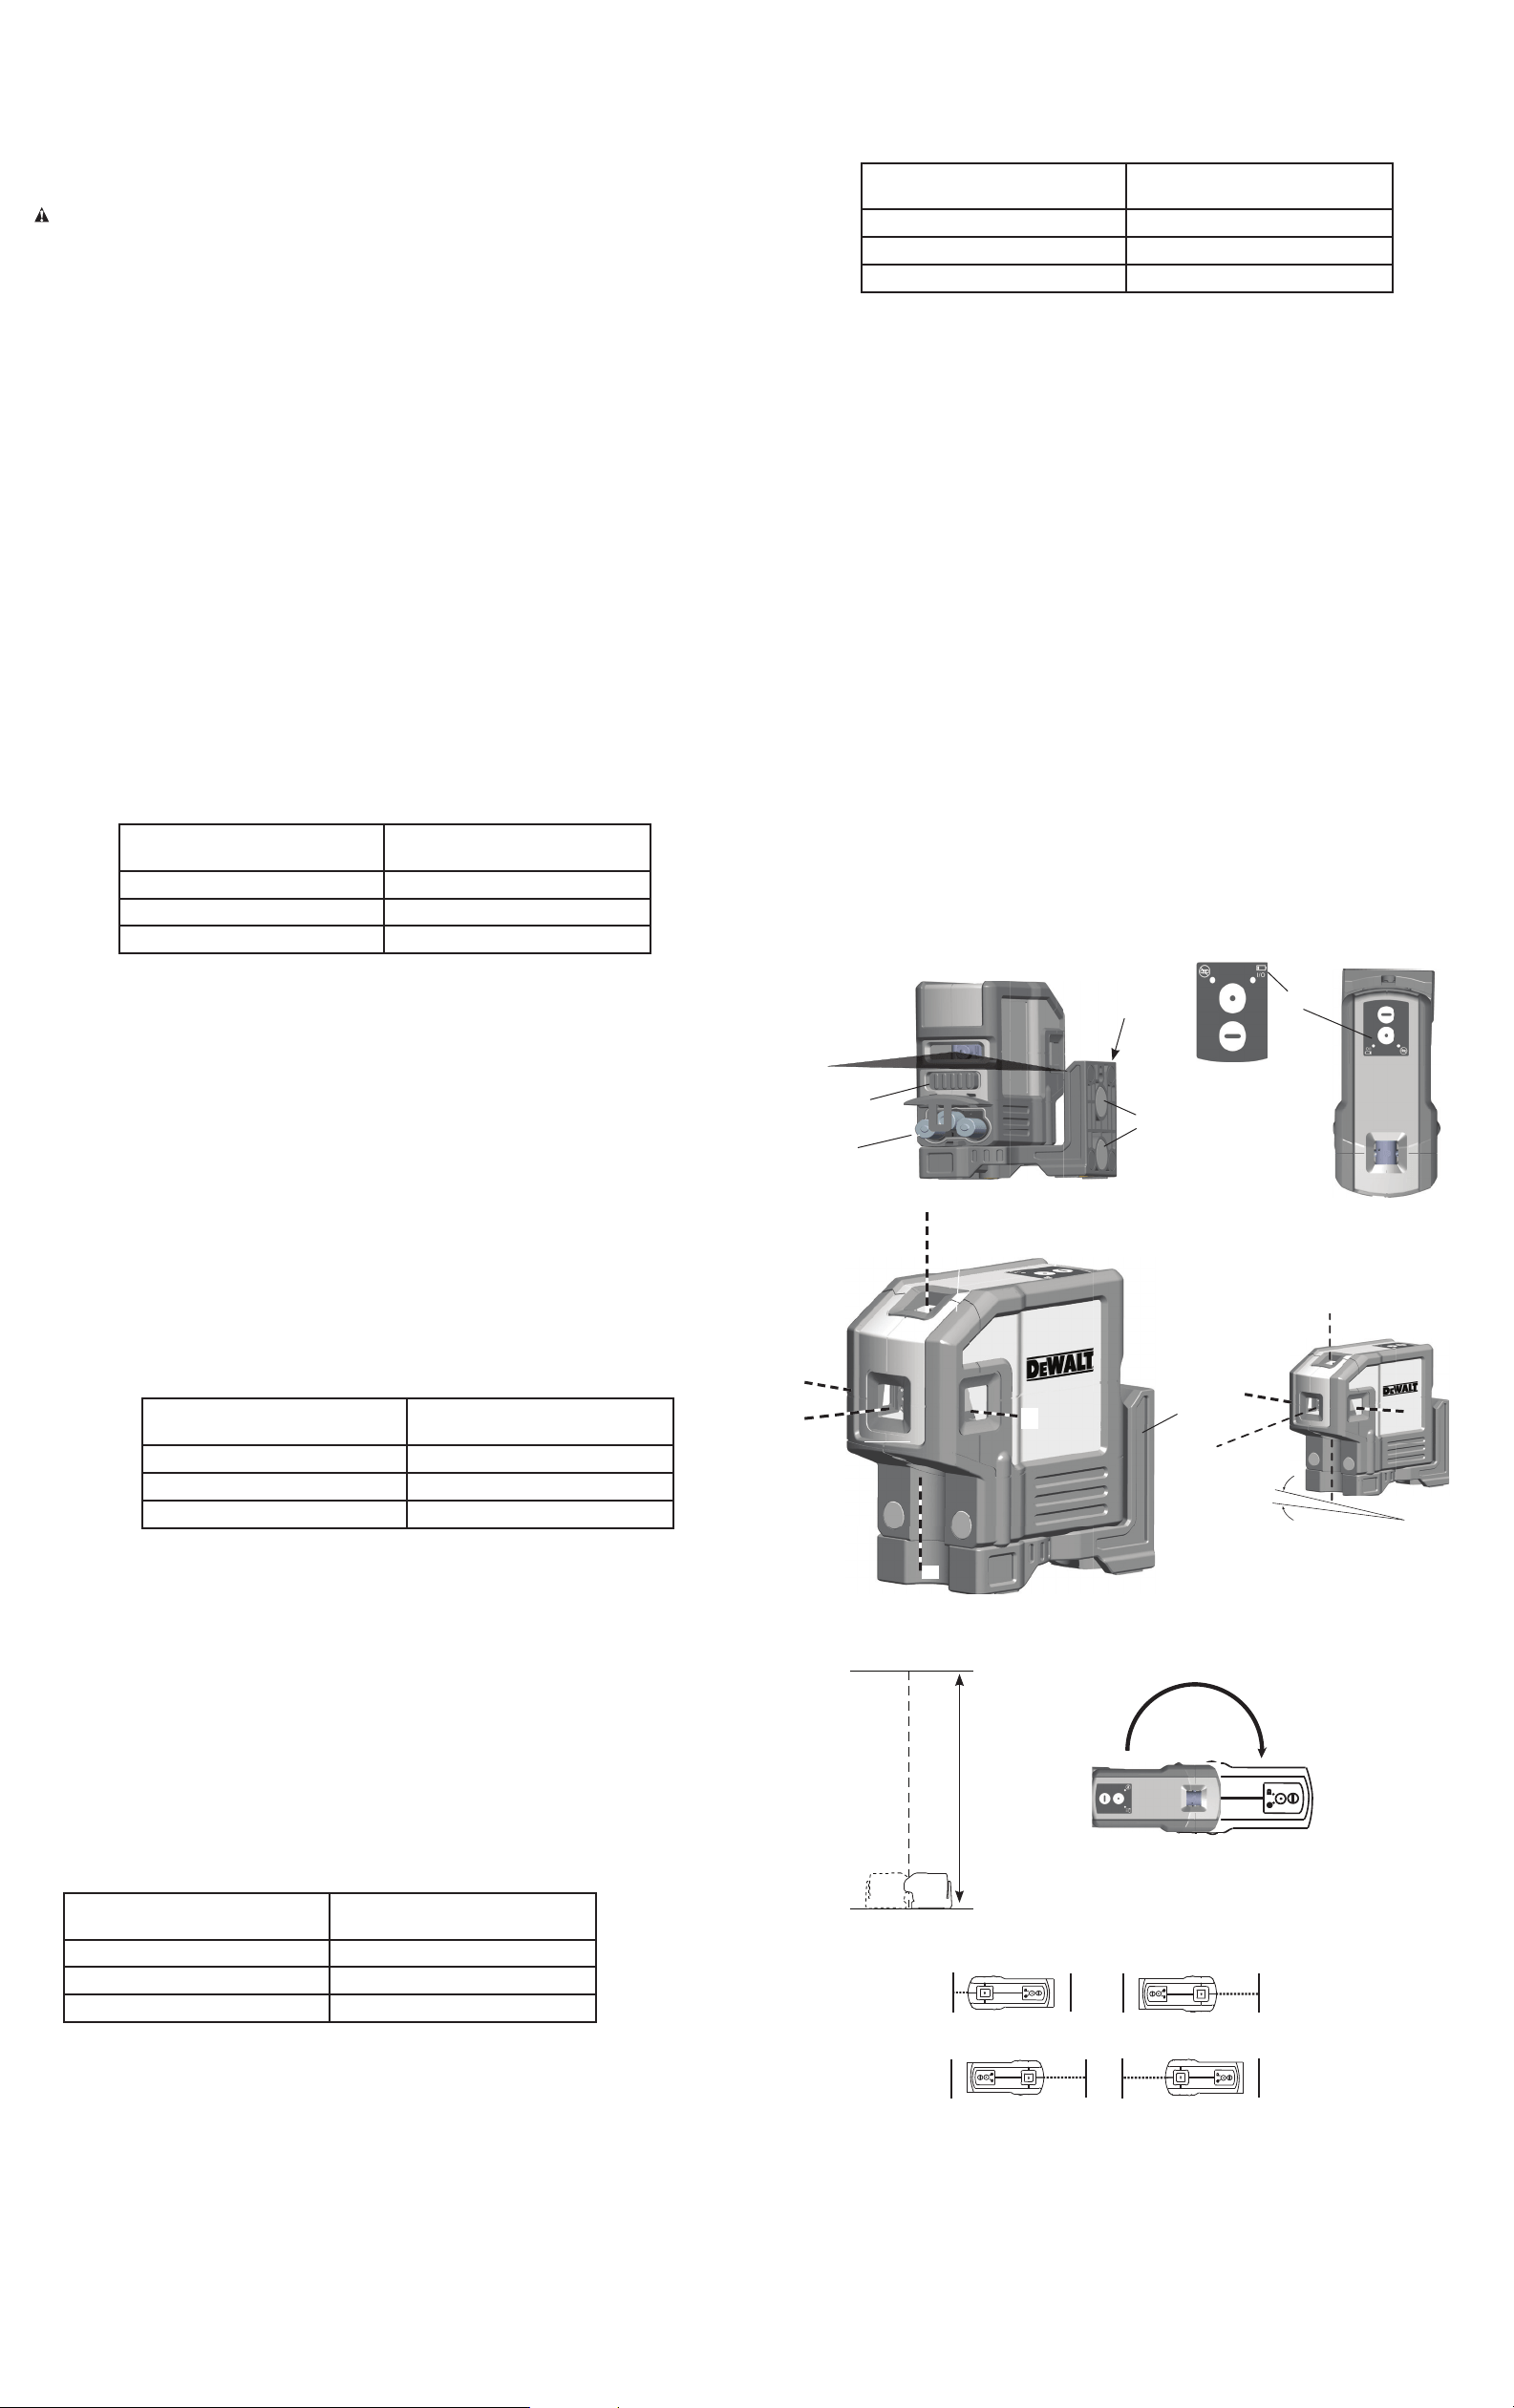
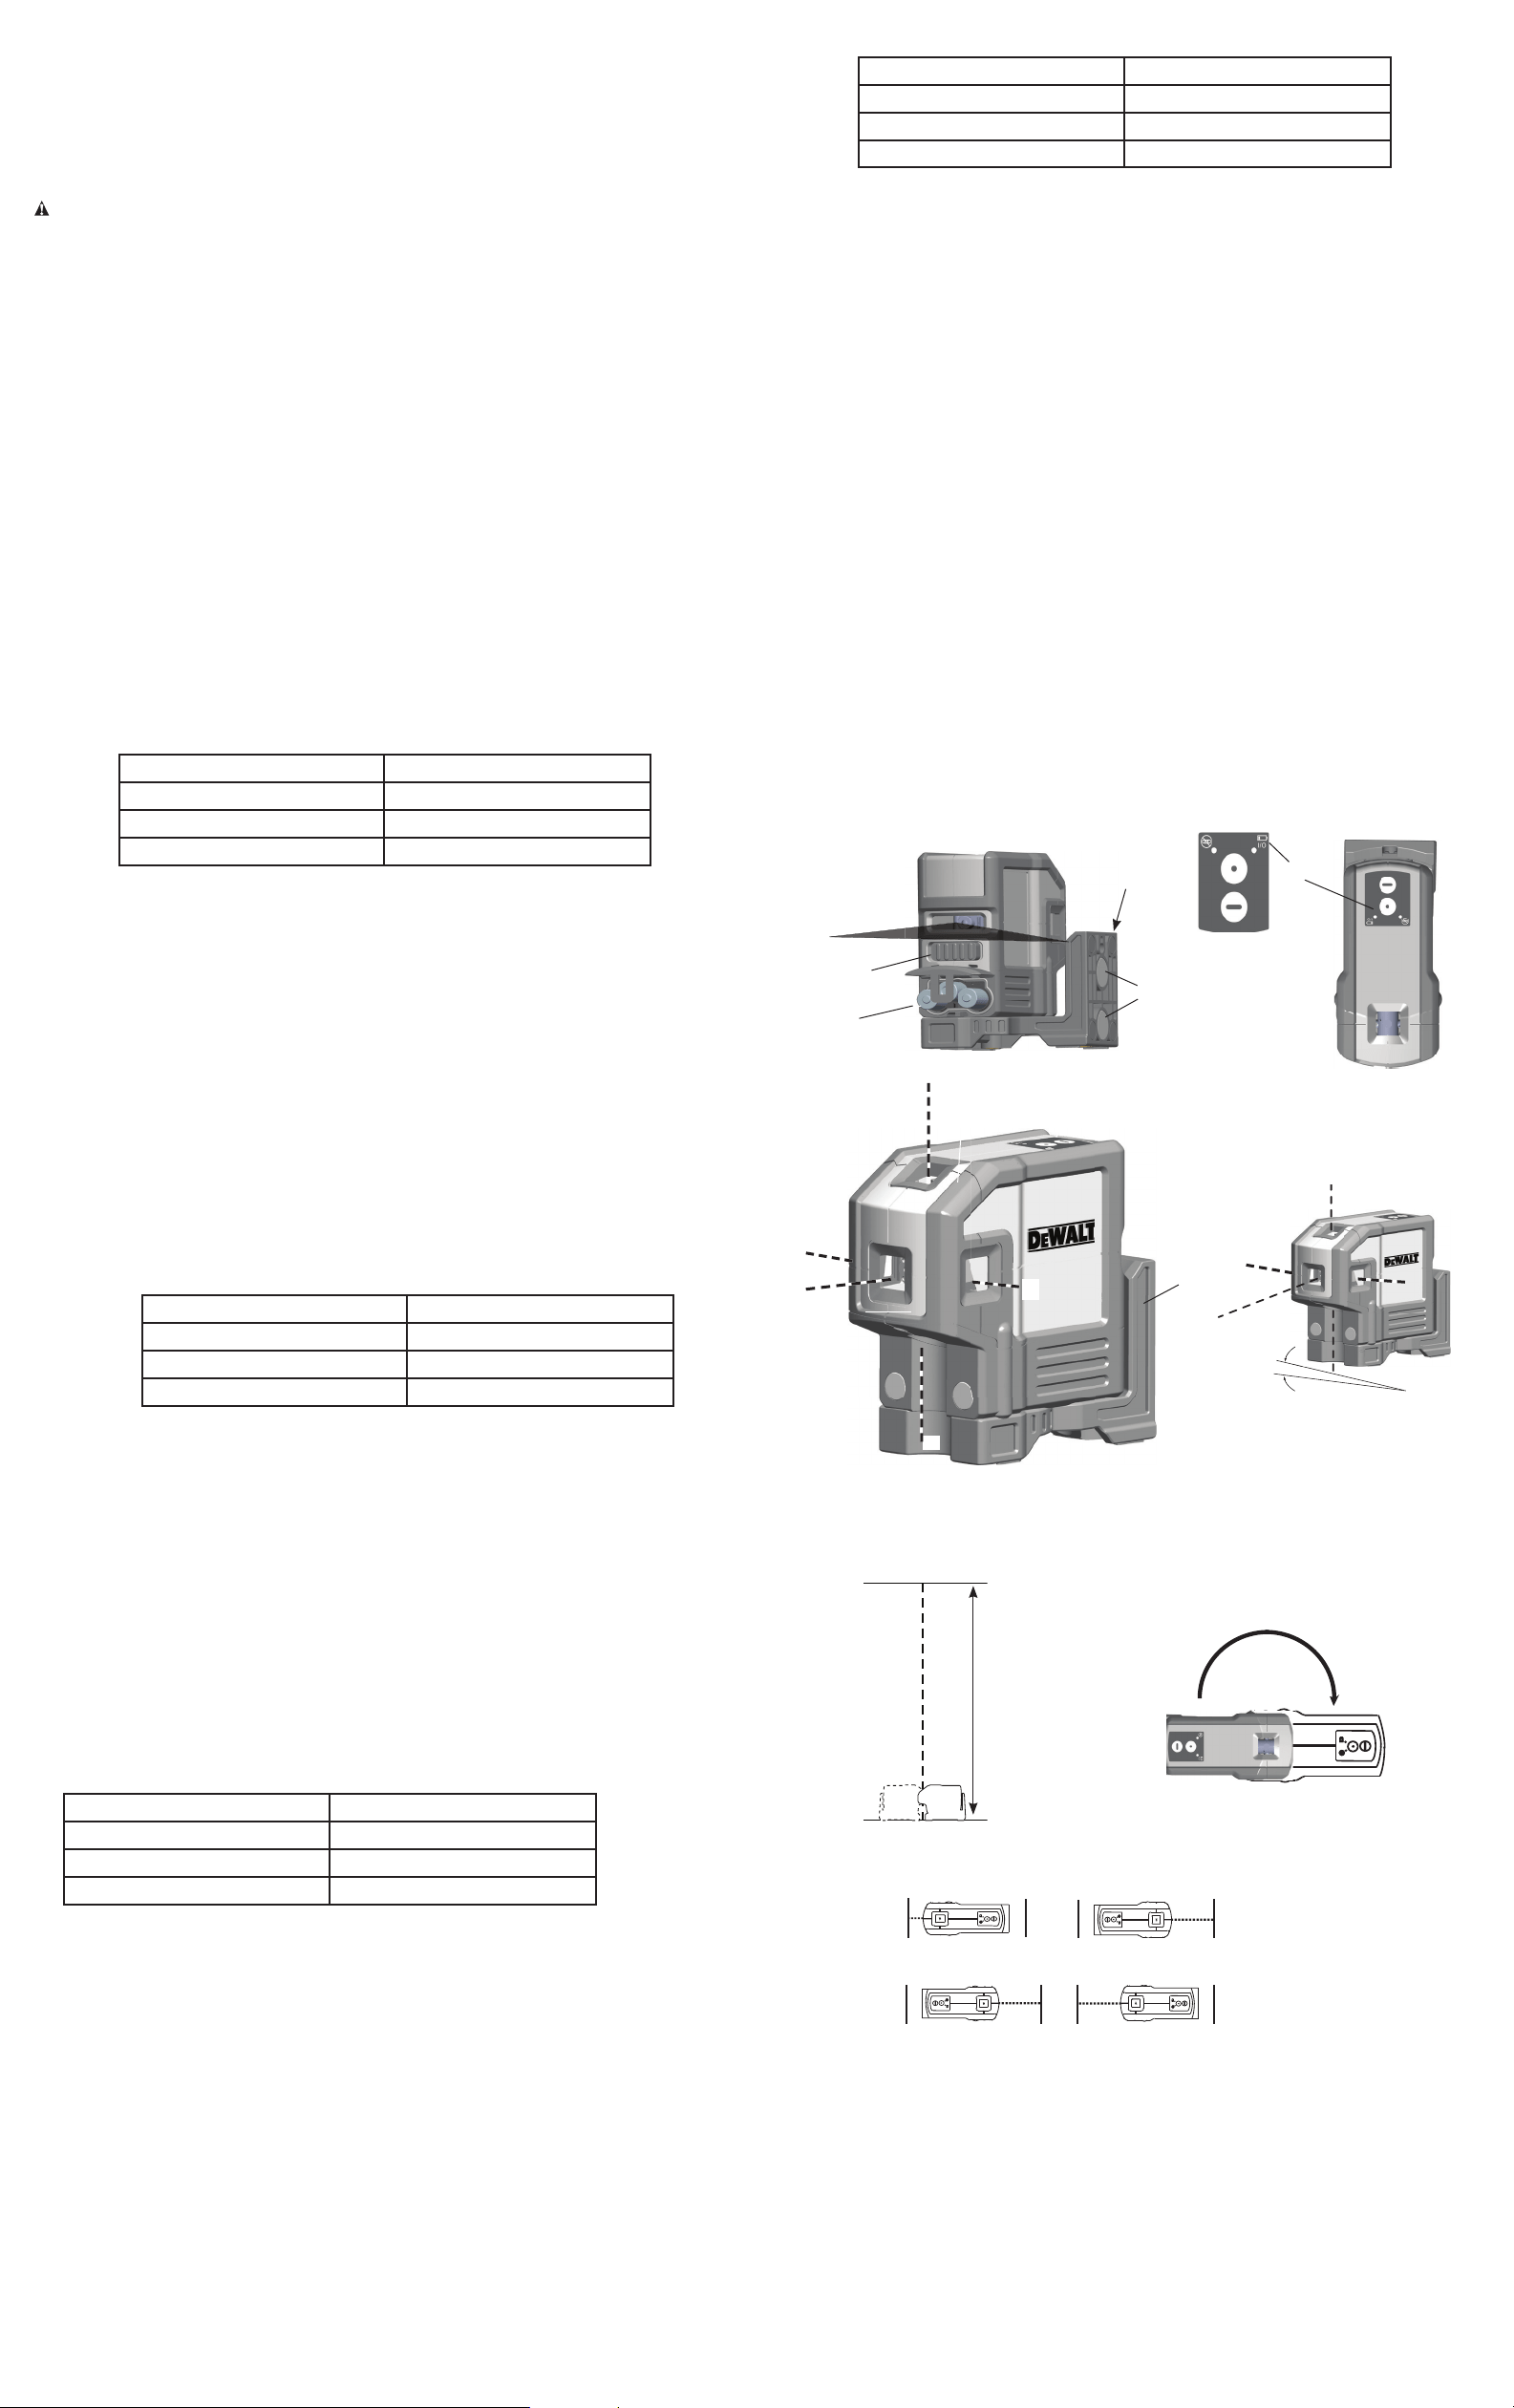
Keypad, Modes and LED.
Power switch.
The Power ON/OFF switch is located on the rear of the tool as shown in figure 1 (A). When the
switch (A) is in the OFF/LOCKED position, the unit will remain off and the pendulum will be locked
When the on/off switch (A) is in the ON/UNLOCKED position, the unit will be powered ON, the
pendulum will be released from the locked position and self level.
Keypad.
The keypad located on the top of the tool as shown in figure 2 provides activation keys for
selection of laser dots and / or line function.
Low Battery Indicator.
The DW0851 is equipped with a low battery indicator on the keypad as shown in Figure 2. The
indicator light is located on the keypad. When the light flashes, the batteries are low and need to be
replaced. The laser may continue to operate for a short time while the batteries continue to drain.
After fresh batteries are installed and the laser is turned on again, the indicator light will remain
green.
Out of Level Indicator
The DW0851 is equipped with an out of level indicator on the keypad as shown in Figure 2. When
the tilt range (> 4° tilt) has been exceeded the LED will will turn on and falsh and the laser beam
will flash.
The flashing beam indicates the tilt range has been exceeded and the tool IS NOT LEVEL (OR
PLUMB) AND SHOULD NOT BE USED FOR DETERMINING OR MARKING LEVEL (OR PLUMB).
Try repositioning the laser on a more level surface.
Batteries & Power
Your laser tool requires 3 x AA batteries. (B)
Use only new, high-quality batteries for best results.
• Ensure batteries are in good working condition. If the low battery indicator light is flashing, the
batteries need replacement.
• To extend battery life, turn laser off when not working with or marking the beam.
Set Up
LEVELING THE LASER
This tool is self-leveling. It is calibrated at the factory to find plumb as long as it is positioned on flat
surface within 4° of level. As long as the tool is properly calibrated, no manual adjustments must
be made.
To ensure the accuracy of your work, check to make sure your laser is calibrated often. See Field
Calibration Check.
• Before attempting to use the laser, make sure it is positioned securely, on a smooth, flat
surface.
• Always mark the center of the dot or pattern created by the laser.
• Extreme temperature changes may cause movement of internal parts that can affect accuracy.
Check your accuracy often while working. See Field Calibration Check.
• If the laser has been dropped, check to make sure your laser is calibrated. See Field Calibration
Check.
OPERATION
Turning the Laser On and Off (Fig. 3)
• With the laser off, place it on a stable, flat surface. Turn the laser on by sliding on/off switch
(A) to the ON/UNLOCKED position.
• Activate or deactivate the desired function using the keypad (C) located on top of the tool.
It will then project five beams; one up (D), one down (E), one horizontal to the left, (F), one
horizontal to the right (G), and one straight ahead (H) when the "DOT" key is pressed.
• It will project a horizontal line from the rear window when the "LINE" key is pressed.
• To turn the laser off, slide the the on/off switch (A) to the locked position.
The DW0851 is equipped with a locking pendulum mechanism. This feature is only activated when
the laser is switched off.
Using the Laser
The beams are level or plumb as long as the calibration has been checked (see Field Calibration
Check) and the laser beam is not flashing (see Out of level Range Indicator).
The tool can be used to transfer points using any combination of the five beams and/or horizontal
line.
OPERATING TIPS
To ensure the accuracy of your work, check to make sure your laser is calibrated often. See Field
Calibration Check.
• Before attempting to use the laser, make sure it is positioned securely, on a smooth, flat
surface.
• Always mark the center of the dot or pattern created by the laser.
• Extreme temperature changes may cause movement of internal parts that can affect accuracy.
Check your accuracy often while working. See Field Calibration Check.
• If the laser has been dropped, check to make sure your laser is calibrated. See Field Calibration
Check.
INTEGRATED MAGNETIC PIVOTING BRACKET (FIG. 1 & 3)
The DW0851 has a magnetic pivoting bracket (I) permanently attached to the unit. This bracket
allows the unit to be mounted to any upright surface made of steel or iron using the magnets (J)
located on the back of the pivoting bracket. Common examples of suitable surfaces include steel
framing studs, steel door frames and structural steel beams. Position the laser on a stable surface.
CAUTION: Do not stand underneath the laser when it is mounted with the magnetic
pivoting bracket. Serious personal injury or damage to the laser may result if the laser falls.
If you have questions or comments, contact us.
1-800-4-DEWALT • www.dewalt.com
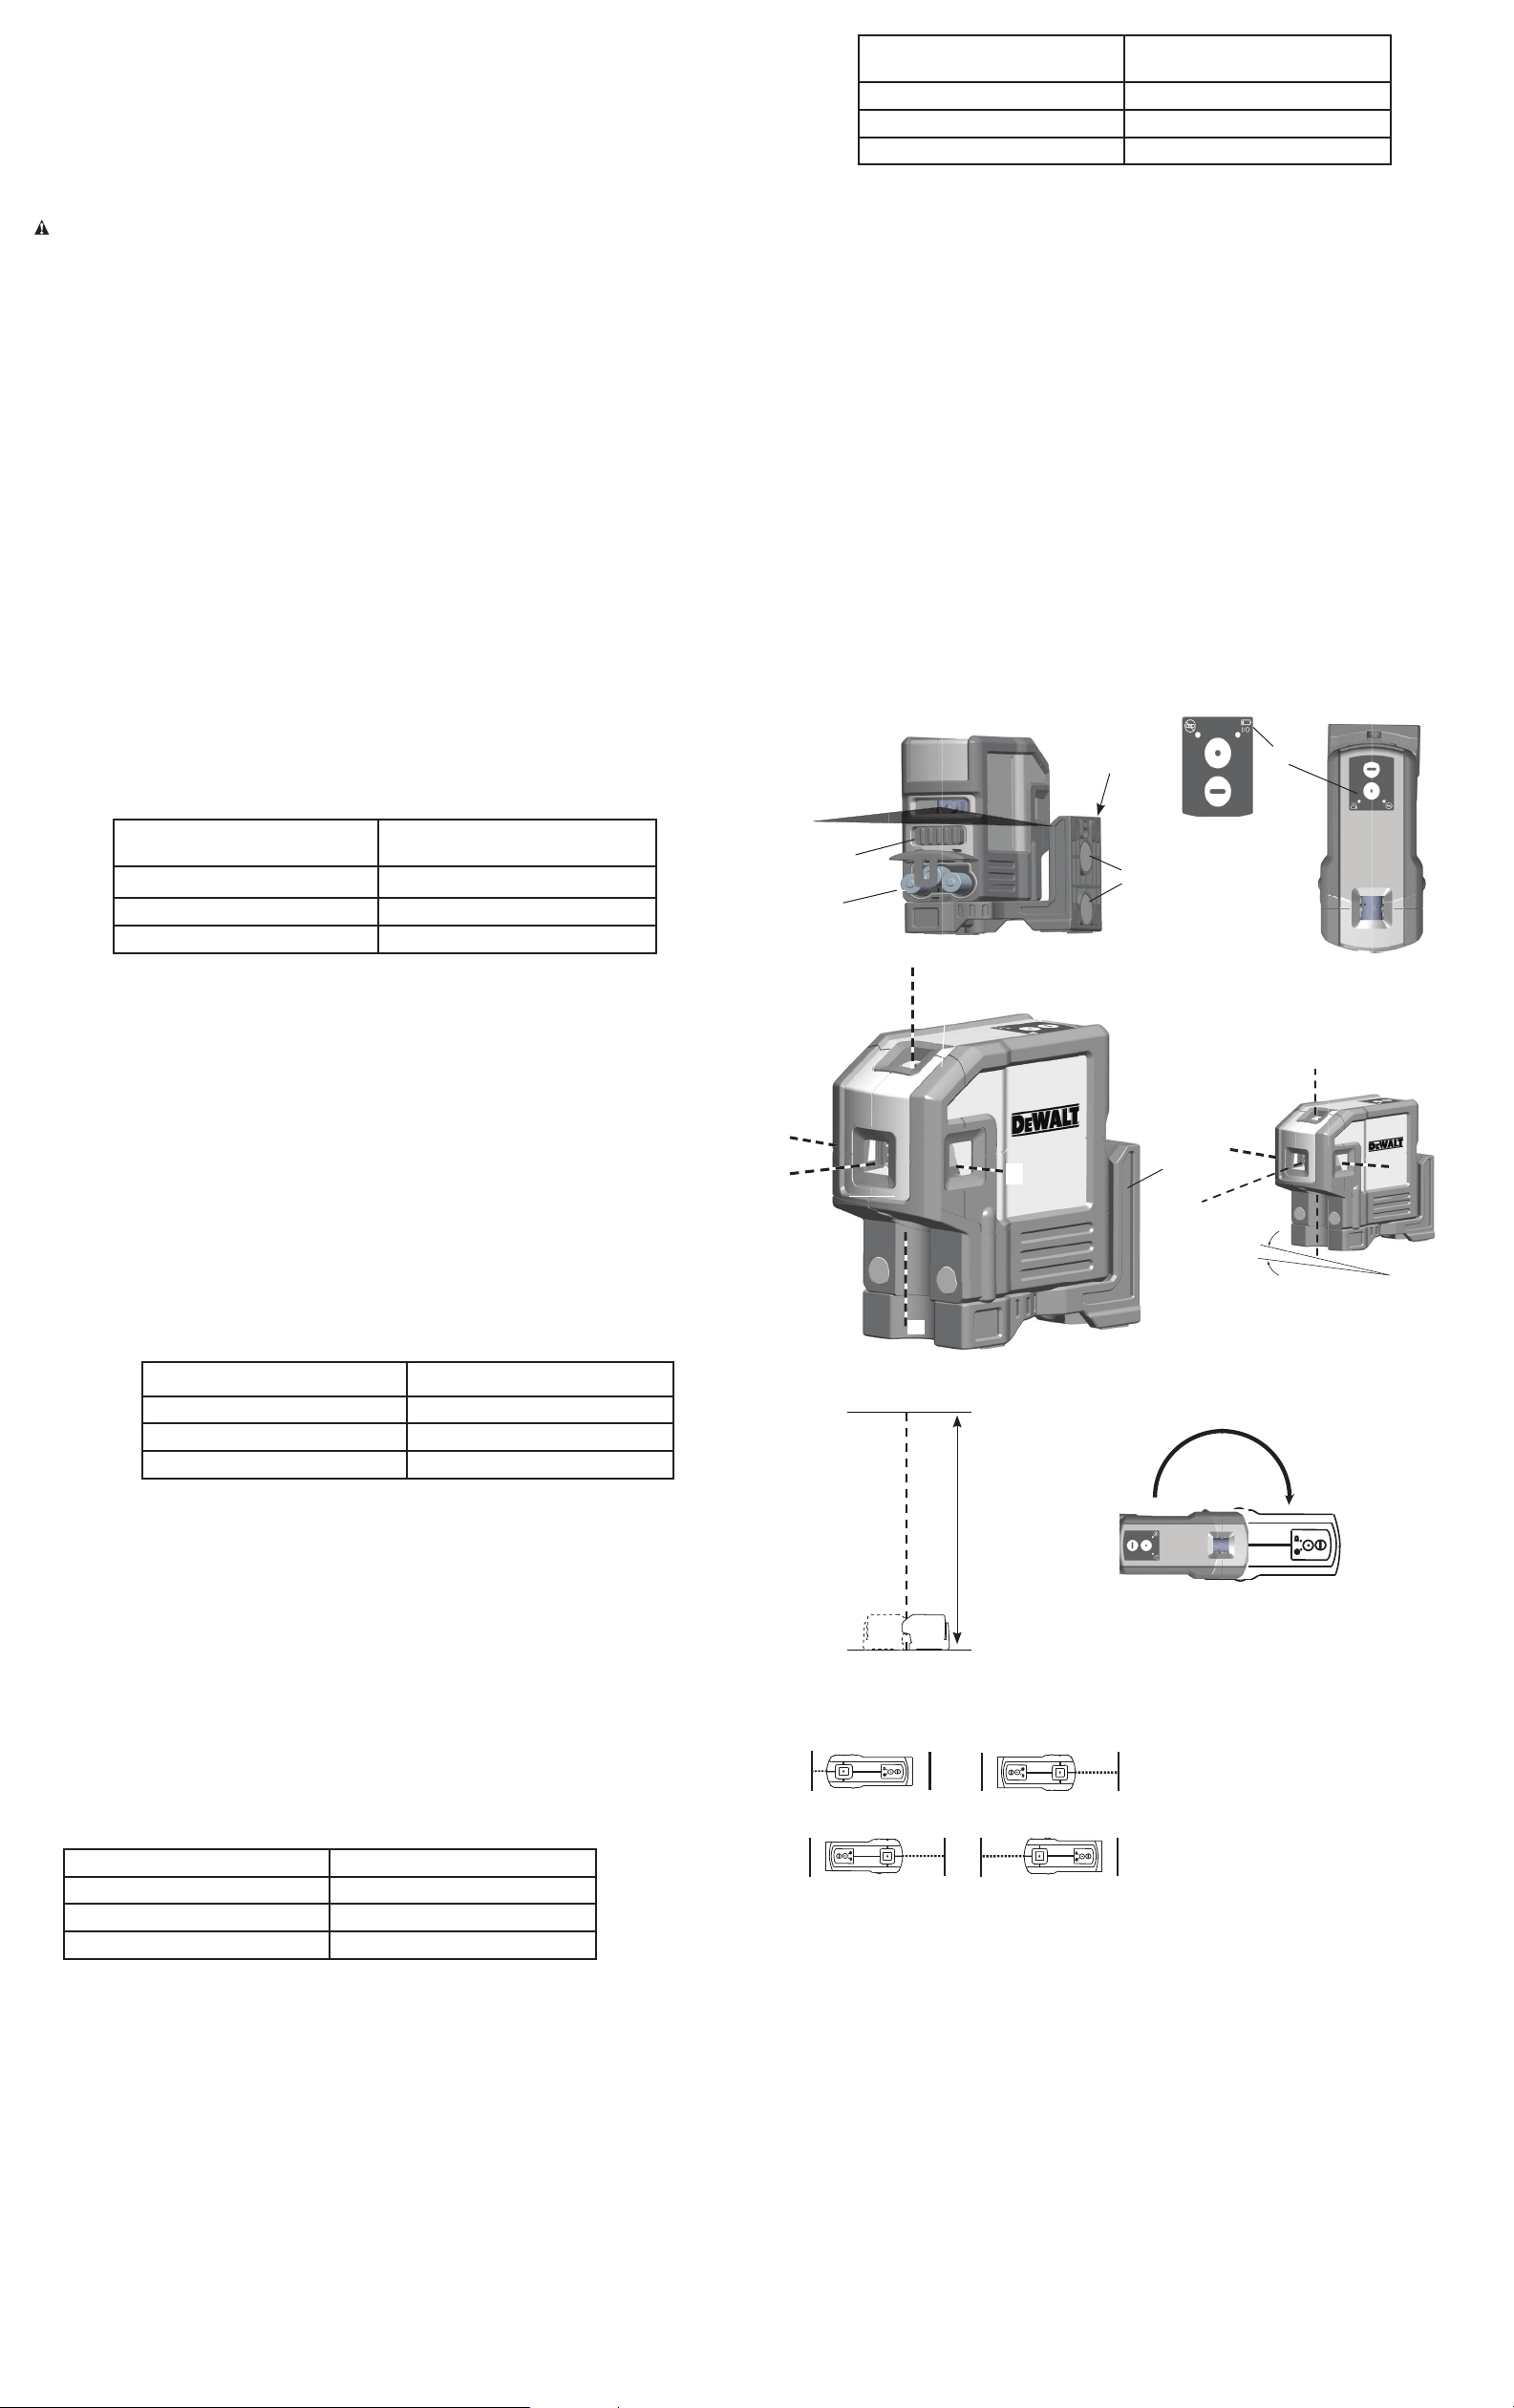
The pivoting bracket also provides floor clearance of approximately 1-3/4" (44.5 mm) which aids
in the installation of steel framing track.
USING THE LASER WITH ACCESSORIES
The laser is equipped with both 1/4" x 20 and 5/8" x11 female threads on the bottom of the unit.
These threads may be used to accommodate current or future DEWALT accessories. Only use
D
EWALT accessories specified for use with this product. Follow the directions included with the
accessory.
WARNING: Since accessories, other than those offered by DEWALT, have not been tested
with this product, use of such accessories with this tool could be hazardous. To reduce the risk of
injury, only D
EWALT recommended accessories should be used with this product.
Recommended accessories for use with your tool are available at extra cost from your local dealer
or authorized service center. If you need assistance in locating any accessory, please contact
D
EWALT Industrial Tool Co., 701 East Joppa Road, Towson, MD 21286, call 1-800-4-DEWALT
(1-800-433-9258) or visit our website: www.DeWALT.com.
Field Calibration Check
CHECKING ACCURACY – PLUMB (FIG. 5–6)
Checking the plumb calibration of the laser can be most accurately done when there is a
substantial amount of vertical height available, ideally 25' (7.5 m), with one person on the floor
positioning the laser and another person near a ceiling to mark the dot created by the beam
on the ceiling (Fig. 5). It is important to conduct a calibration check using a distance no shorter
than the distance of the applications for which the tool will be used.
1. Start by marking a point on the floor.
2. Place the laser so that the down dot beam is centered on the point marked on the floor.
3. Allow time for the laser to settle to plumb and mark the center of the dot created by the up
beam.
4. Turn the laser 180° as shown (Fig. 6), making sure that the down dot beam is still centered
on the point previously marked on the floor.
5. Allow time for the laser to settle to plumb and mark the center of the dot created by the up
beam.
If the measurement between the two marks is greater than shown below, the laser is no longer
in calibration.
Distance Between Floor/
Ceiling
Measurement Between Marks
15' (4.5 m) 1/8" (3.0mm)
30' (9 m) 1/4" (5.5 mm)
50' (15 m) 3/8" (9.0 mm)
CHECKING ACCURACY - LEVEL (FIG. 7–10)
Checking the level calibration of the laser unit requires two parallel walls at least 20' (6 m) apart.
It is important to conduct a calibration check using a distance no shorter than the distance of the
applications for which the tool will be used.
1. Place unit 2"–3" (5–8 cm) from first wall, facing the wall (Fig. 7).
2. Mark the beam position on the first wall.
3. Turn the unit 180˚, and mark the beam position on the second wall (Fig. 8).
4. Place the unit 2"–3" (5-8 cm) from the second wall, facing the wall (Fig. 9).
5. Adjust the height of the unit until the beam hits the mark from step 3.
6. Turn the unit 180˚, and aim the beam near the mark on the first wall from step 2 (Fig. 10).
7. Measure the vertical distance between the beam and the mark.
8. If the measurement is greater than the values shown below, the laser must be serviced at
an authorized service center.
Repeat steps 1 through 8 to check the front beam, left beam, and right beam and rear beam
Distance Between Walls Measurement Between Marks
15' (4.5 m) 1/8" (3.0mm)
30' (9 m) 1/4" (5.5 mm)
50' (15 m) 3/8" (9.0 mm)
CHECKING ACCURACY – HORIZONTAL BEAM, SCAN DIRECTION (FIG. 6)
Checking the horizontal scan calibration of the laser requires two walls 30’ (9 m) apart. It is
important to conduct a calibration check using a distance no shorter than the distance of the
applications for which the tool will be used.
1. Attach the laser to a wall using its pivot bracket. Make sure the laser is facing straight ahead.
2. Turn on the laser’s horizontal beam and pivot the laser approximately 45˚ so that the right-
most end of the laser line is striking the opposing wall at a distance of at least 30’ (9m).
Mark the center of the beam (a).
3. Pivot the laser approximately 90˚ to bring the left-most end of the laser line around to the mark
made in Step 2. Mark the center of the beam (b).
4. Measure the vertical distance between the marks.
5. If the measurement is greater than the values shown below, the laser must be serviced at an
authorized service center.
Distance Between Walls Measurement Between Marks
15' (4.5 m) 5/64" (2.0 mm)
30' (9 m) 7/64" (4.0 mm)
50' (15 m) 1/4" (6.0 mm)
CHECKING ACCURACY – HORIZONTAL BEAM, PITCH DIRECTION (FIG. 7)
Checking the horizontal pitch calibration of the laser requires a single wall at least 30’ (9 m)
long. It is important to conduct a calibration check using a distance no shorter than the
distance of the applications for which the tool will be used.
1. Attach the laser to one end of a wall using its pivot bracket.
2. Turn on the laser’s horizontal beam and pivot the laser toward the opposite end of the wall
and approximately parallel to the adjacent wall.
3. Mark the center of the beam at two locations (c, d) at least 30’ (9 m) apart.
4. Reposition the laser to the opposite end of the wall.
5. Turn on the laser’s horizontal beam and pivot the laser back toward the first end of the wall
and approximately parallel to the adjacent wall.
6. Adjust the height of the laser so that the center of the beam is aligned with the nearest
mark(d).
7. Mark the center of the beam (e) directly above or below the farthest mark (c).
8. Measure the distance between these two marks (c, e).
9. If the measurement is greater than the values shown below, the laser must be serviced at an
authorized service center.
Distance Between Walls Measurement Between Marks
15' (4.5 m) 5/64" (2.0 mm)
30' (9 m) 7/64" (4.0 mm)
50' (15 m) 1/4" (6.0 mm)
Troubleshooting
THE LASER DOES NOT TURN ON
• Make sure batteries are installed according to (+), (-) markings on battery door.
• Make sure the batteries are in proper working condition. If in doubt, try installing new batteries.
• Make sure that the battery contacts are clean and free of rust or corrosion. Be sure to keep the
laser level dry and use only new, high-quality batteries to reduce the chance of battery leakage.
• If the laser has been stored in extremely hot temperatures, allow it to cool.
THE LASER BEAMS FLASH (FIG. 4)
The DW0851 laser level has been designed to self-level up to 4° in all directions when positioned
as shown in Figure 4. If the laser is tilted so much that internal mechanism cannot plumb itself,
it will flash the laser—the tilt range has been exceeded. THE FLASHING BEAMS CREATED BY
THE LASER ARE NOT LEVEL OR PLUMB AND SHOULD NOT BE USED FOR DETERMINING OR
MARKING LEVEL OR PLUMB. Try repositioning the laser on a more level surface.
THE LASER BEAMS WILL NOT STOP MOVING
The DW0851 is a precision instrument. Therefore, if it is not positioned on a stable (and motionless)
surface, the tool will continue to try to find plumb. If the beam will not stop moving, try placing the
tool on a more stable surface. Also, try to make sure that the surface is relatively flat, so that the
laser is stable.
.
*Accuracy spec assumes laser is positioned on a surface within 4° of level.
FIG. 6
FIG. 1
A
FIG. 5
25'
(7.5 m)
FIG. 7
B
FIG. 2
>4°
FLASHING
CLIGNOTANT
DESTELLA
FIG. 4
FIG. 8
FIG. 9
FIG. 10
FIG. 3
D
E
C
I
J
H F
G
I

MANUAL DE INSTRUCCIONES
DEWALT Industrial Tool Co., 701 East Joppa Road, Towson, MD 21286
(JULIO 14) Parte N.° 79002845 Copyright © 2014 D
EWALT
DW0851
Puntero láser con rayo de auto nivelación 5
SI TIENE CONSULTAS O COMENTARIOS ACERCA DE ESTA HERRAMIENTA DEWALT O DE
CUALQUIER OTRA, LLÁMENOS SIN CARGO AL NÚMERO: 1-800-4-D
EWALT (1-800-433-9258).
Seguridad
ADVERTENCIA: Para reducir el riesgo de lesiones, lea el manual de seguridad provisto
con su producto o acceda al mismo en línea en www.DeWALT.com.
El uso de controles o ajustes o la realización de procedimientos diferentes a los
especifi cados en el presente pueden resultar en exposición peligrosa a la radiación.
ETIQUETAS DE ADVERTENCIA
Para su comodidad y seguridad, se incluye la etiqueta siguiente en su láser.
PRECAUCIÓN: RADIACIÓN LÁSER - NO MIRE FIJO EL RAYO. PRODUCTO LÁSER
DECLASE 2.
Información sobre el láser
El nivel láser DW0851 es un producto láser de clase 2 y cumple con 21 CFR 1040.10 y 1040.11
excepto por las desviaciones en virtud de la notificación para láser N.° 50, de fecha 24 de junio
de 2007.
DESCRIPCIÓN DEL PRODUCTO
El nivel láser DW0851 es una herramienta láser de autonivelación que puede usarse para alineación
horizontal (nivel) y vertical (plomada) y alineación cuadrada. Esta herramienta viene totalmente
ensamblada y ha sido diseñada con características que permiten una instalación rápida y sencilla.
Lea y comprenda todas las instrucciones en este manual de instrucciones además del Manual de
seguridad antes del uso.
Especificaciones
ESPECIFICACIONES
Fuente de luz Diodo de láser semiconductor
Longitud de onda del láser 630–680 nm visible
Potencia del láser <1,0 mW (cada rayo) PRODUCTO LÁSER CLASE 2
Rango de trabajo (línea)
Rango de trabajo (punto)
10 m (±30')
30 m (±100')
±165'(50m) con detector
Precisión* (horizontal -punto) ± 4.5 mm a 15 m (± 3/16" a 50')
Precisión* (vertical -punto) ± 4.5 mm a 15 m (± 3/16" a 50')
Precisión* (horizontal -línea) ± 3.0 mm @ 15 m (± 1/8" @ 50')
indicadores Indicador destellando: batería baja
Láser destellando: rango de inclinación excedido
Fuente de alimentación 3 baterías tamaño AA (4,5 VCC)
Temperatura de
funcionamiento
-10 °C a 50 °C (20 °F a 120 °F)
Temperatura de
almacenamiento
-20 °C a 60 °C (-5 °F a 140 °F)
Ambiental Resistente al agua
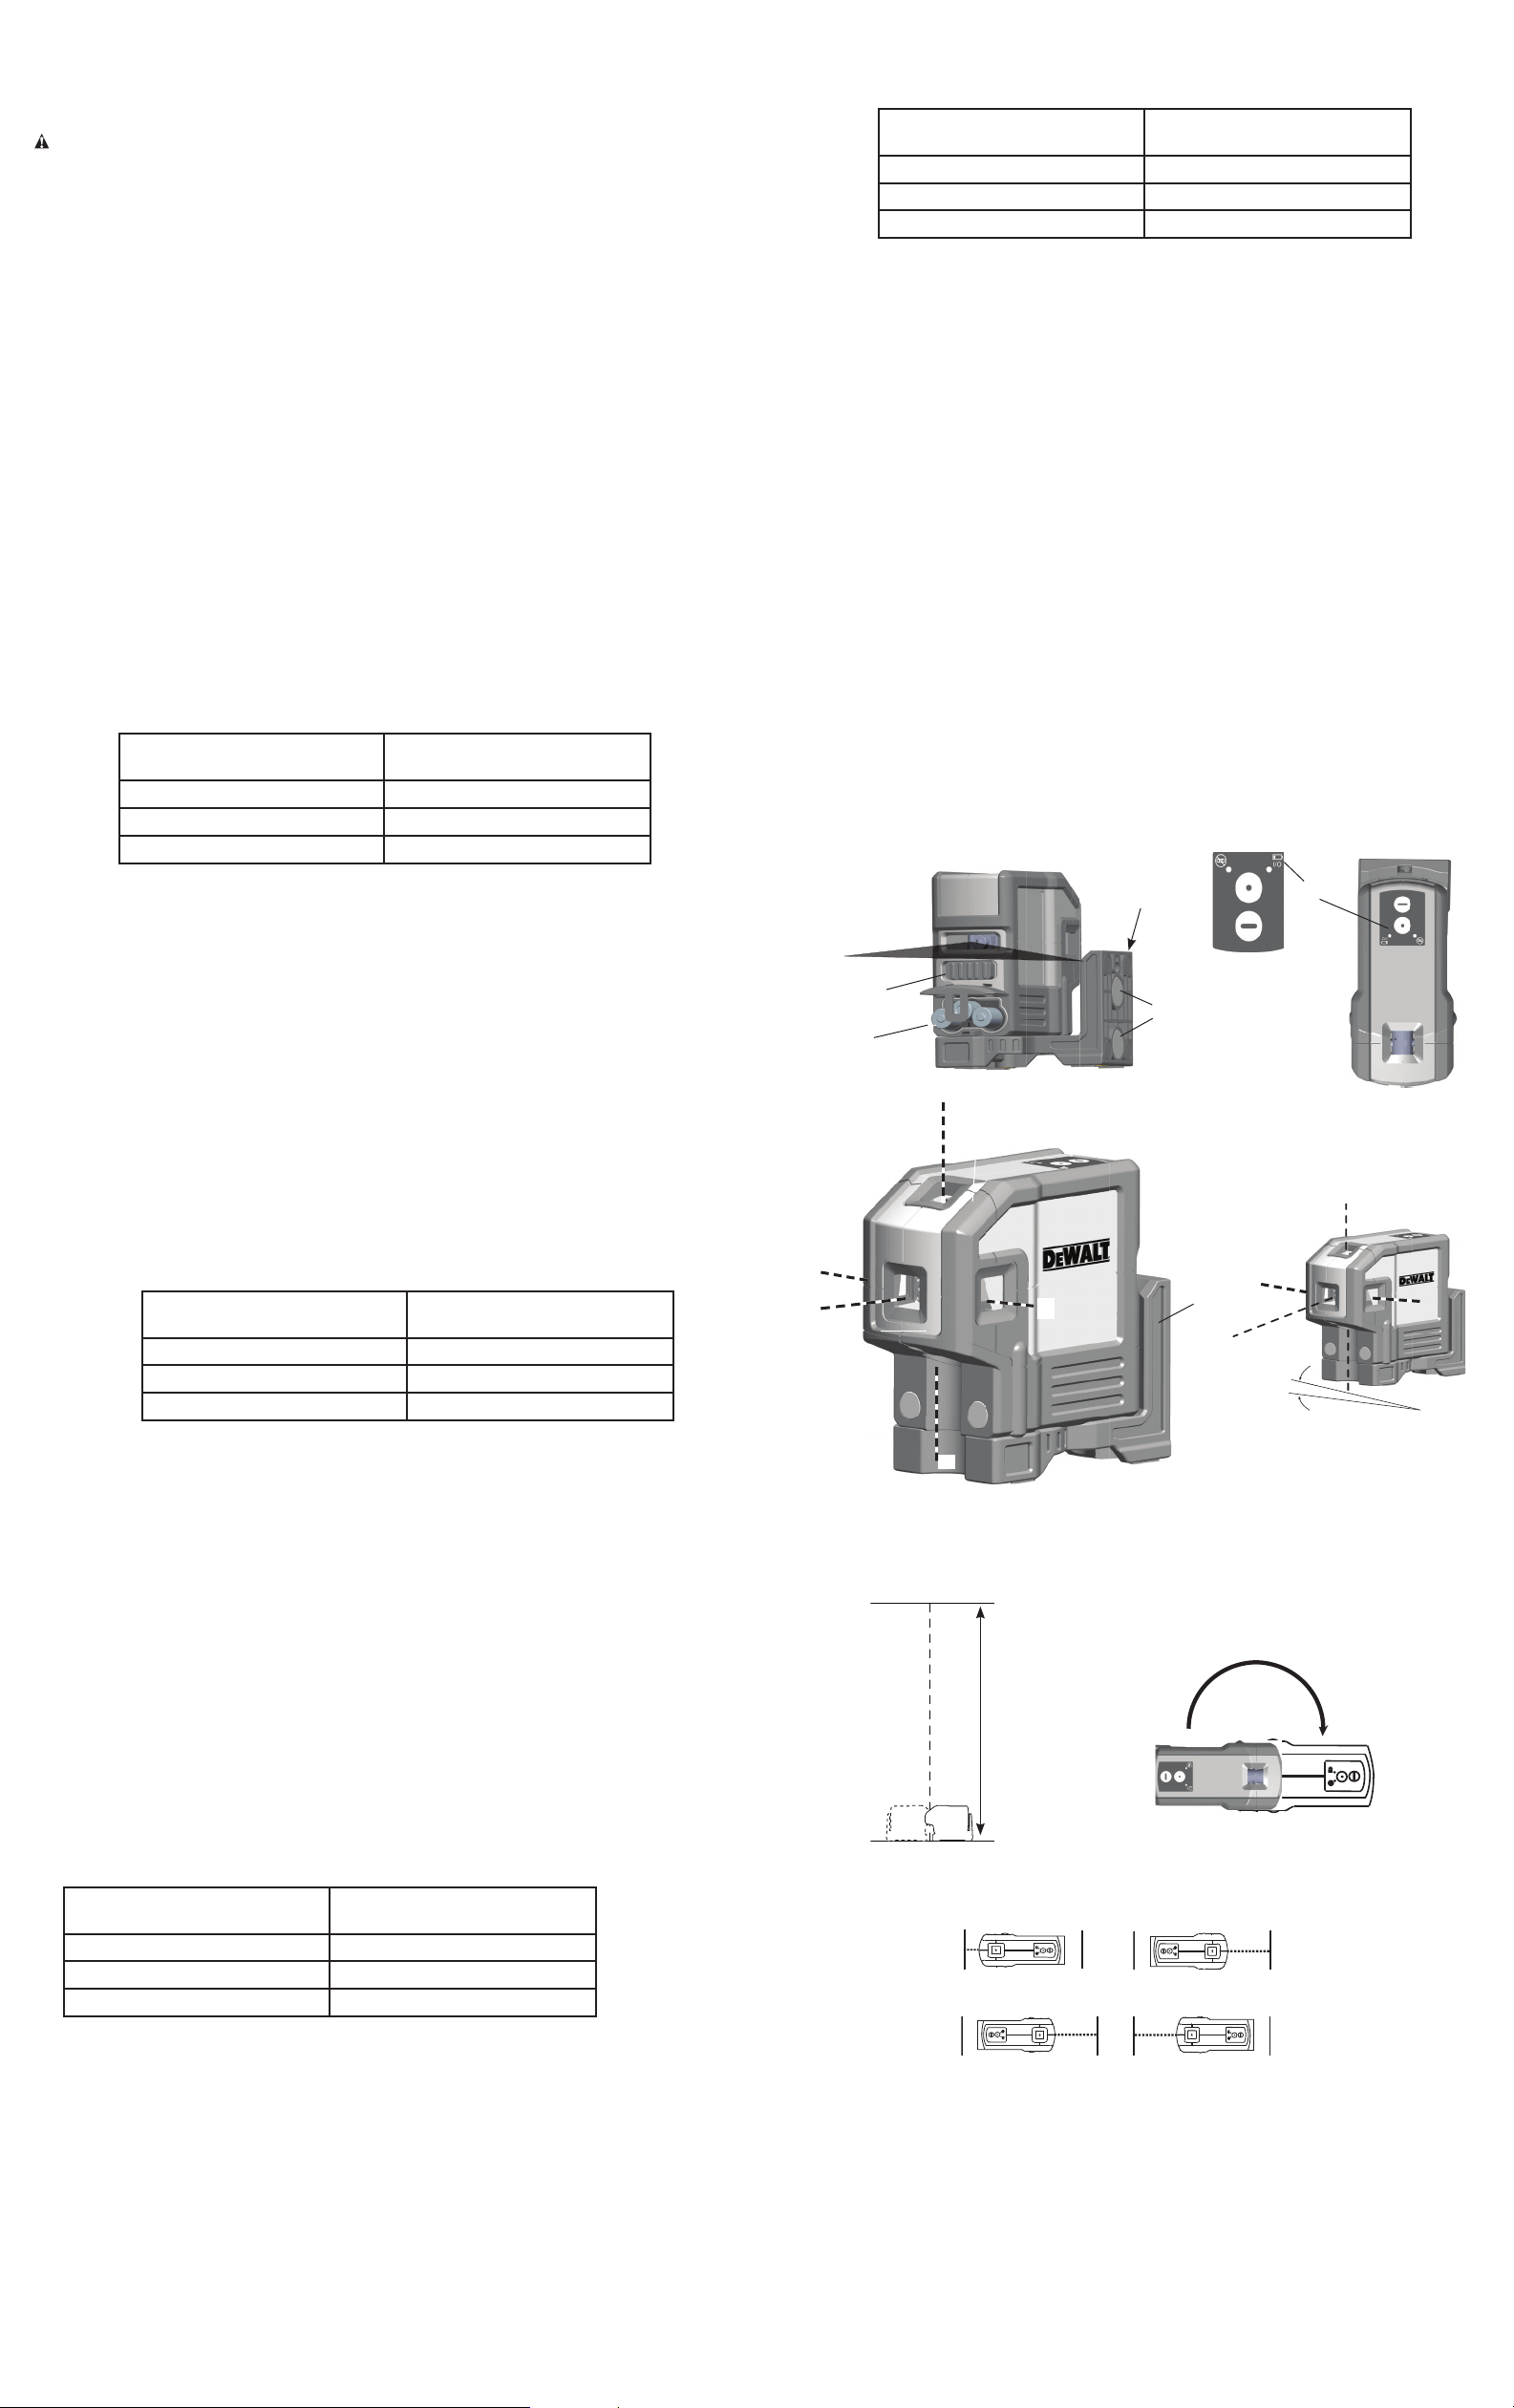
Teclado, Modos y LED.
Interruptor de energía.
El interruptor de ENCENDIDO/APAGADO se ubica en la parte posterior de la herramienta
como se muestra en la figura 1(A). Cuando el interruptor (A) está en la posición APAGADO/
BLOQUEADO, la unidad se mantendrá apagada y el péndulo se bloqueará
Cuando el interruptor de encendido/apagado (A) está en la posición ENCENDIDO/DESBLOQUEADO,
la unidad se ENCENDERÁ, el péndulo se liberará de la posición de bloqueo y se autonivelará.
Teclado.
El teclado ubicado en la parte superior de la herramienta como se muestra en la figura 2 contiene
las teclas de activación para la selección de los puntos láser y/o la función de línea.
Indicador de batería baja.
El DW0851 está equipado con un indicador de batería baja en el teclado como se muestra en la
Figura 2. La luz del indicador se ubica en el teclado. Cuando la luz parpadea, las baterías están
bajas y deben reemplazarse. El láser puede continuar operando por un tiempo breve hasta que las
baterías se agoten por completo. Una vez que se instalen baterías nuevas y el láser se encienda
nuevamente, la luz del indicador se mantendrá verde.
Indicador fuera de nivel
El DW0851 está equipado con un indicador fuera de nivel en el teclado como se muestra en la
Figura 2. Cuando el rango de inclinación (inclinación > 4°) se ha excedido, el LED se encenderá y
el rayo láser parpadeará.
El rayo parpadeante indica que se ha excedido el rango de inclinación y que la herramienta NO
ESTÁ A NIVEL (O PLOMADA) Y NO DEBE USARSE PARA DETERMINAR O MARCAR EL NIVEL
(OPLOMADA). Intente cambiar la posición del láser en una superficie más nivelada.
Baterías y alimentación
Su herramienta láser requiere 3 baterías AA. (B)
Use solo baterías nuevas de alta calidad para obtener mejores resultados.
• Verifique que las baterías estén en buenas condiciones. Si la luz del indicador de batería baja
parpadea, debe reemplazar las baterías.
• Para extender la duración de las baterías, apague el láser cuando no trabaja o marca el rayo.
Instalación
NIVELACIÓN DEL LÁSER
Esta herramienta posee autonivelación. Está calibrada en fábrica para encontrar plomada
cuando se coloca en una superficie plana dentro de 4° del nivel. Si la herramienta está calibrada
correctamente, no deben realizarse ajustes manuales.
Para asegurar la precisión de su trabajo, con frecuencia compruebe que su láser esté calibrado.
Vea Comprobación de calibración en campo.
• Antes de intentar usar el láser, asegúrese de que esté colocado firmemente en una superficie
suave y plana.
• Siempre marque el centro del punto o patrón creado por el láser.
• Los cambios extremos de temperatura pueden causar el movimiento de partes internas
que pueden afectar la precisión. Compruebe la precisión con frecuencia al trabajar. Vea
Comprobación de calibración en campo.
• Si el láser se ha caído, compruebe que esté calibrado. Vea Comprobación de calibración
encampo.
FUNCIONAMIENTO
Encendido y apagado del láser (Fig. 3)
• Con el láser apagado, colóquelo en una superficie estable y plana. Encienda el láser deslizando
el interruptor de encendido/apagado (A) a la posición ENCENDIDO/DESBLOQUEADO.
• Active o desactive la función deseada usando el teclado (C) ubicado en la parte superior de
la herramienta. Luego proyectará cinco rayos; uno hacia arriba (D), uno hacia abajo (E), uno
horizontal a la izquierda, (F), uno horizontal a la derecha (G) y uno hacia adelante (H) cuando
se presiona la tecla "PUNTO".
• Proyectará una línea horizontal desde la ventana posterior cuando se presiona la tecla
"LÍNEA".
• Apague el láser deslizando el interruptor de encendido/apagado (A) a la posición de bloqueo.
El DW0851 está equipado con un mecanismo de péndulo de bloqueo. Esta función solo se activa
cuando el láser se apaga.
Uso del láser
Los rayos están a nivel o en plomada si se ha comprobado la calibración (vea Comprobación de
calibración en campo) y el rayo láser no parpadee (vea Indicador de fuera de rango de nivel).
La herramienta puede usarse para transferir puntos usando cualquier combinación de los cinco
rayos y/o líneas horizontales.
SUGERENCIAS PARA LA OPERACIÓN
Para asegurar la precisión de su trabajo, con frecuencia compruebe que su láser esté calibrado.
Vea Comprobación de calibración en campo.
• Antes de intentar usar el láser, asegúrese de que esté colocado firmemente en una superficie
suave y plana.
• Siempre marque el centro del punto o patrón creado por el láser.
• Los cambios extremos de temperatura pueden causar el movimiento de partes internas
que pueden afectar la precisión. Compruebe la precisión con frecuencia al trabajar. Vea
Comprobación de calibración en campo.
• Si el láser se ha caído, compruebe que esté calibrado. Vea Comprobación de calibración en
campo.
SOPORTE DE PIVOTE MAGNÉTICO INTEGRADO (FIG. 1 Y 3)
El DW0851 posee un soporte de pivote magnético (I) conectado de forma permanente a la unidad.
Este soporte permite que la unidad se monte en una superficie vertical de acero o hierro usando los
imanes (J) ubicados en la parte posterior del soporte de pivote. Ejemplos comunes de superficies
adecuadas incluyen pernos para marcos de acero, marcos de puerta de acero y vigas estructurales
de acero. Coloque el láser en una superficie estable.
PRECAUCIÓN: No se pare debajo del láser cuando está montado con el soporte de
pivote magnético. Pueden producirse lesiones personales graves o daños al láser si el láser cae.
Si tiene preguntas o comentarios, puede contactarnos.
1-800-4-DEWALT • www.dewalt.com
El soporte de pivote también cuenta con un despeje del suelo de aproximadamente 44,5mm
(1-3/4"), lo que ayuda a la instalación de la pista del marco de acero.
USO DEL LÁSER CON ACCESORIOS
El láser está equipado con roscas hembra de 1/4" x 20 y 5/8" x 11 en la parte inferior de la unidad.
Estas roscas pueden usarse para alojar accesorios actuales o futuros de D
EWALT. Use solo
accesorios D
EWALT especificados para usar con este producto. Siga las instrucciones incluidas
con el accesorio.
ADVERTENCIA: Como los accesorios, fuera de los ofrecidos por DEWALT, no han sido
probados con este producto, el uso de tales accesorios con esta herramienta podría ser
peligroso. Para reducir el riesgo de lesiones, solo debe usar accesorios recomendados por
D
EWALT con este producto.
Los accesorios recomendados para usar con su herramienta están disponibles a un costo
adicional con su distribuidor local o centro de servicio autorizado. Si necesita asistencia para ubicar
un accesorio, contacte a D
EWALT Industrial Tool Co., 701 East Joppa Road, Towson, MD 21286,
llame al 1-800-4-D
EWALT (1-800-433-9258) o visite nuestro sitio web: www.DeWALT.com.
Comprobación de calibración en campo
COMPROBACIÓN DE LA PRECISIÓN - PLOMADA (FIG. 5-6)
La comprobación de la calibración de plomada del láser puede realizarse con mayor precisión
cuando hay una cantidad sustancial de altura vertical disponible, idealmente 7,5 m (25'), con
una persona en el piso colocando el láser y otra persona cerca del cielo raso para marcar el
punto creado por el rayo en el cielo raso (Fig. 5). Es importante realizar una comprobación de
calibración usando una distancia no menor a la distancia de las aplicaciones para las que se
usará la herramienta.
1. Comience marcando un punto en el piso.
2. Coloque el láser de forma tal que el rayo puntual hacia abajo esté centrado en el punto
marcado en el piso.
3. Permita un tiempo para que el láser asiente la plomada y marque el centro del punto creado
por el rayo hacia arriba.
4. Gire el láser 180° como se muestra (Fig. 6), asegurándose de que el rayo puntual hacia
abajo aún esté centrado en el punto anteriormente marcado en el piso.
5. Permita un tiempo para que el láser asiente la plomada y marque el centro del punto creado
por el rayo hacia arriba.
Si la medición entre las dos marcas es mayor que la indicada a continuación, el láser ya no está
calibrado.
Distancia entre el suelo/techo Medición entre marcas
15' (4.5 m) 1/8" (3.0mm)
30' (9 m) 1/4" (5.5 mm)
50' (15 m) 3/8" (9.0 mm)
COMPROBACIÓN DE LA PRECISIÓN - NIVEL (FIG. 7–10)
La comprobación de la calibración del nivel de la unidad láser requiere dos paredes paralelas
con una distancia de al menos 6 m (20'). Es importante realizar una comprobación de calibración
usando una distancia no menor a la distancia de las aplicaciones para las que se usará la
herramienta.
1. Coloque la unidad 5–8 cm (2"–3") de la primera pared, apuntando hacia la pared (Fig. 7).
2. Marque la posición del rayo en la primera pared.
3. Gire la unidad 180˚ y marque la posición del rayo en la segunda pared (Fig. 8).
4. Coloque la unidad 5-8 cm (2"–3") de la segunda pared, apuntando hacia la pared (Fig. 9).
5. Ajuste la altura de la unidad hasta que la viga llegue a la marca del paso 3.
6. Gire la unidad 180˚ y apunte el rayo cerca de la marca en la primera pared del paso 2
(Fig. 10).
7. Mida la distancia vertical entre el rayo y la marca.
8. Si la medición es mayor a los valores que se indican a continuación, el láser debe ser
reparado en un centro de servicio autorizado.
Repita los pasos 1 a 8 para comprobar el rayo delantero, el rayo izquierdo, el rayo derecho y el
rayo posterior
Distancia entre las paredes Medición entre marcas
15' (4.5 m) 1/8" (3.0mm)
30' (9 m) 1/4" (5.5 mm)
50' (15 m) 3/8" (9.0 mm)
COMPROBACIÓN DE LA PRECISIÓN - RAYO HORIZONTAL, DIRECCIÓN DE
EXPLORACIÓN (FIG. 6)
La comprobación de la calibración de exploración horizontal del láser requiere dos paredes con
una separación de 9 m (30'). Es importante realizar una comprobación de calibración usando una
distancia no menor a la distancia de las aplicaciones para las que se usará la herramienta.
1. Coloque el láser en una pared usando su soporte de pivote. Asegúrese de que el láser apunte
hacia adelante.d
2. Encienda el rayo horizontal del láser y gire el láser aproximadamente 45˚ de tal forma que
el extremo de la derecha de la línea del láser golpee la pared opuesta a una distancia de
al menos 9 m (30'). Marque el centro del rayo (a).
3. Gire el láser aproximadamente 90˚ para llevar la línea izquierda del láser cerca de la marca
realizada en el Paso 2. Marque el centro del rayo (b).
4. Mida la distancia vertical entre las marcas.
5. Si la medición es mayor a los valores que se indican a continuación, el láser debe ser reparado
en un centro de servicio autorizado.
Distancia entre las paredes Medición entre marcas
15' (4.5 m) 1/8" (3.0mm)
30' (9 m) 1/4" (5.5 mm)
50' (15 m) 3/8" (9.0 mm)
COMPROBACIÓN DE LA PRECISIÓN - RAYO HORIZONTAL, INCLINACIÓN DE
EXPLORACIÓN (FIG. 7)
La comprobación de la calibración de inclinación horizontal del láser requiere una pared única de
al menos 9 m (30') de largo. Es importante realizar un comprobación de calibración usando una
distancia no menor a la distancia de las aplicaciones para las que se usará la herramienta.
1. Coloque el láser en un extremo de una pared usando su soporte de pivote.
2. Encienda el rayo horizontal del láser y gire el láser hacia el extremo opuesto de la pared y
aproximadamente paralelo a la pared adyacente.
3. Marque el centro del rayo en dos ubicaciones (c, d) al menos a 9 m (30') de distancia.
4. Vuelva a colocar el láser en el extremo opuesto de la pared.
5. Encienda el rayo horizontal del láser y gire el láser hacia el primer extremo de la pared y
aproximadamente paralelo a la pared adyacente.
6. Ajuste la altura del láser de forma tal que el centro del rayo esté alineado con la marca más
cercana (d).
7. Marque el centro del rayo (e) directamente arriba o debajo de la marca más lejana (c).
8. Mida la distancia entre estas dos marcas (c, e).
9. Si la medición es mayor a los valores que se indican a continuación, el láser debe ser reparado
en un centro de servicio autorizado.
Distancia entre las paredes Medición entre marcas
15' (4.5 m) 1/8" (3.0mm)
30' (9 m) 1/4" (5.5 mm)
50' (15 m) 3/8" (9.0 mm)
Resolución de problemas
EL LÁSER NO SE ENCIENDE
• Asegúrese de que las baterías estén colocadas de acuerdo con las marcas (+) y (-) en la puerta
de la batería.
• Asegúrese de que las baterías estén en apropiadas condiciones de funcionamiento. En caso de
duda, pruebe instalar nuevas baterías.
• Asegúrese de que los contactos de la batería estén limpios y libres de óxido o corrosión.
Asegúrese de mantener el nivel láser seco y use solo baterías nuevas de alta calidad para
reducir la probabilidad de fugas de la batería.
• Si el láser se ha almacenado en temperaturas extremadamente calurosas, deje enfriar.
EL RAYO LÁSER PARPADEA (FIG. 4)
El nivel láser DW0851 ha sido diseñado para autonivelarse hasta 4° en todas las direcciones
cuando se coloca tal como se muestra en la Figura 4. Si el láser está inclinado tanto que el
mecanismo interno no puede establecer una plomada, el láser parpadeará: se ha excedido el
rango de inclinación. EL RAYO PARPADEANTE CREADO POR EL LÁSER NO ESTÁ A NIVEL O
NO PUEDE ESTABLECER LA PLOMADA Y NO DEBE USARSE PARA DETERMINAR O MARCAR
EL NIVEL O PLOMADA. Intente cambiar la posición del láser en una superficie más nivelada.
EL RAYO LÁSER NO DEJA DE MOVERSE
El DW0851 es un instrumento de precisión. En consecuencia, si no se coloca en una superficie
estable (y estática), la herramienta continuará intentando establecer una plomada. Si el rayo no
deja de moverse, intente colocar la herramienta en una superficie más estable. Asimismo, intente
asegurarse de que la superficie esté relativamente plana, para que el láser esté estable.
*Las especificaciones de precisión asumen que el láser está colocado en una superficie dentro
de 4° del nivel.
FIG. 6
FIG. 1
A
FIG. 5
7,5 M (25')
FIG. 7
B
FIG. 2
>4°
DESTELLADOR
INTERMITENTE
PARPADEANTE
FIG. 4
FIG. 8
FIG. 9
FIG. 10
FIG. 3
D
E
C
I
J
H F
G
I
MANUEL D'INSTRUCTIONS
DEWALT Industrial Tool Co., 701 East Joppa Road, Towson, MD 21286
(JULY14) Nº de pièce79002845 Copyright © 2014 D
EWALT
DW0851
Pointeur laser autonivelant à 5 faisceaux
POUR TOUTE QUESTION OU TOUT COMMENTAIRE AU SUJET DE CET OUTIL OU DE TOUT
AUTRE OUTIL D
EWALT, APPELER SANS FRAIS AU NUMÉRO: 1 800 4-DEWALT (1 800 433-9258).
Sécurité
AVERTISSEMENT: Pour réduire les risques de blessures, lire le guide de sécurité fourni
avec votre produit ou le consulter en ligne à www.DeWALT.com.
L'utilisation de commandes ou de réglages ou encore l'exécution de procédures autres
que celles indiquées ici peuvent entraîner une exposition dangereuse aux rayonnements.
ÉTIQUETTES D'AVERTISSEMENT
Pour des raisons pratiques et de sécurité, l'étiquette suivante a été apposée sur le laser.
ATTENTION: RAYONNEMENT LASER - NE JAMAIS FIXER LE FAISCEAUÉQUIPEMENT
LASER DE CATÉGORIE 2
Renseignements sur le laser
Le niveau au laser DW0851 est un laser de catégorie2 conforme aux normes 21 CFR 1040.10 et
1040.11 à l'exception des dérogations prévues par l'avis nº50 en date du 24juin2007.
APERÇU DU PRODUIT
Le niveau au laser DW0851 est un outil laser autonivelant pouvant être utilisé pour un alignement
horizontal (niveau), vertical (aplomb) et d'angle droit. Complètement assemblé, il comporte des
fonctions permettant un réglage rapide et facile. Avant de l'utiliser, veuillez lire et comprendre toutes
les consignes de ce manuel d'instructions ainsi que le guide de sécurité.
Fiche technique
FICHE TECHNIQUE
Source lumineuse Diode laser à semi-conducteur
Longueur d'onde du laser 630 à 680nm visible
Puissance laser <1,0mW (par faisceau) ÉQUIPEMENT LASER DE
CATÉGORIE 2
Portée (ligne)
Portée (point)
±10m (30pi)
±30m (100pi)
±165'(50m) avec detecteur
Précision* (point-à l'horizontale) ± 4.5 mm à 15m (± 3/16 po à 50pi)
Précision* (point-à la verticale) ± 4.5 mm à 15m (± 3/16po à 50pi)
Précision* (ligne-à l'horizontale) ± 3 mm à 15m (± 1/8po à 50pi)
Voyants Voyant clignotant: pile faible
Laser clignotant: dépassement de la plage d'inclinaison
Source d'alimentation 3piles AA (4,5Vc.c.)
Température d'utilisation De -10 °C à 50 °C (20 °F à 120 °F)
Température d'entreposage De -20°C à 60°C (-5°F à 140°F)
Environnement Résistant à l'eau
Clavier, modes et voyant à DEL
Interrupteur d'alimentation
L'interrupteur Marche/Arrêt se trouve au dos de l'outil, comme illustré à la figure 1 (A). Lorsque
l'interrupteur (A) est en position ARRÊT/BLOQUÉ, l'appareil est éteint et le pendule est bloqué.
Lorsqu'il est en position MARCHE/DÉBLOQUÉ (A), l'appareil est allumé, le pendule et débloqué et
la fonction d'autonivelage est active.
Clavier
Le clavier situé au-dessus de l'outil (voir figure 2) comporte des touches d'activation permettant
de choisir entre les fonctions de points ou de ligne laser.
Voyant de pile faible
L'appareilDW0851 est doté d'un voyant de pile faible, comme illustré à la figure 2. Ce voyant
est situé sur le clavier. Lorsqu'il clignote, les piles sont faibles et doivent être remplacées. Le laser
continuera à fonctionner quelque temps pendant que les piles se déchargent. Une fois les piles
neuves installées et le laser rallumé, le voyant reste vert.
Voyant d'erreur de niveau
L'appareilDW0851 est doté d'un voyant d'erreur de niveau situé sur le clavier, comme illustré à la
figure 2. Lorsque la plage d'inclinaison (inclinaison > 4°) est dépassée, le voyant s'allume et clignote
et le faisceau laser se met à clignoter.
Le clignotement du faisceau laser indique que la plage d'inclinaison a été dépassée et que l'outil
n'est pas DE NIVEAU (OU D'APLOMB) ET NE DOIT PAS SERVIR À DÉTERMINER OU À MARQUER
LE NIVEAU (OU L'APLOMB). Essayer de repositionner le laser sur une surface plus à niveau.
Piles et alimentation
Votre outil laser a besoin de 3pilesAA. (B)
Pour obtenir de meilleurs résultats, n'utiliser que des piles neuves de qualité supérieure.
• Vérifier qu'elles sont en bon état. Lorsque le voyant de pile faible clignote, il faut remplacer
lespiles.
• Pour prolonger les piles, éteindre le laser lorsque vous ne l'utilisez pas ou que vous marquez
le faisceau.
Réglage
MISE À NIVEAU DU LASER
Cet outil est autonivelant. Il est étalonné en usine pour trouver l'aplomb à condition d'être posé
sur une surface plane d'une inclinaison maximale de 4°. Tant qu'il est bien étalonné, il n'est pas
nécessaire de le régler manuellement.
Pour un travail précis, veiller à étalonner votre laser fréquemment. Voir Vérification de l'étalonnage
sur place.
• Avant d'utiliser le laser, vérifier qu'il est solidement positionné sur une surface plane et lisse.
• Toujours marquer le centre de la forme ou du point projeté par le laser.
• Les changements extrêmes de température peuvent provoquer le déplacement de composants
internes et compromettre la précision. Au cours du travail, vérifier fréquemment la précision. Voir
Vérification de l'étalonnage sur place.
• Si le laser est tombé, vérifier qu'il est toujours étalonné. Voir Vérification de l'étalonnage
surplace.
FONCTIONNEMENT
Marche et arrêt du laser (fi g.3)
• Placer le laser éteint sur une surface plane et stable. L'allumer en glissant l'interrupteur
Marche/Arrêt (A) en position MARCHE/DÉBLOQUÉ.
• Activer ou désactiver la fonction souhaitée à l'aide du clavier (C) situé au-dessus de l'outil.
Sivous appuyez sur le bouton DOT (Point), l'appareil projette cinq faisceaux: un vers le haut
(D), un vers le bas (E), un horizontal vers la gauche (F), un horizontal vers la droite (G) et un
vers l'avant (H).
• Si vous appuyez sur le bouton LINE (Ligne), il projette une ligne horizontale depuis la
fenêtrearrière.
• Pour éteindre le laser, glisser l'interrupteur Marche/Arrêt (A) en position de blocage.
Le modèleDW0851 est équipé d'un mécanisme de blocage à mouvements de pendule. Cette
fonction ne s'active que lorsque l'on éteint le laser.
Utilisation du laser
Les faisceaux seront de niveau ou d'aplomb si l'étalonnage a été vérifié (voir Vérification de
l'étalonnage sur place) et si le faisceau laser ne clignote pas (voir Voyant d'erreur de niveau).
Il est possible d'utiliser l'outil pour reporter des points à l'aide d'une combinaison des cinq faisceaux
et de la ligne horizontale.
TRUCS
Pour un travail précis, veiller à étalonner votre laser fréquemment. Voir Vérification de l'étalonnage
sur place.
• Avant d'utiliser le laser, vérifier qu'il est solidement positionné sur une surface plane et lisse.
• Toujours marquer le centre de la forme ou du point projeté par le laser.
• Les changements extrêmes de température peuvent provoquer le déplacement de composants
internes et compromettre la précision. Au cours du travail, vérifier fréquemment la précision. Voir
Vérification de l'étalonnage sur place.
• Si le laser est tombé, vérifier qu'il est toujours étalonné. Voir Vérification de l'étalonnage
surplace.
SUPPORT MAGNÉTIQUE PIVOTANT INTÉGRÉ (FIG.1 ET 3)
Le modèle DW0851 est équipé d'un support magnétique pivotant (I) intégré à l'appareil. Ce support
permet de monter l'appareil sur une surface droite en acier ou en fer, grâce aux aimants (J) se
trouvant sur son dos. Les surfaces utilisables sont, par exemple, des montants en acier, des cadres
de porte en acier ou des poutres en acier profilé. Positionner le laser sur une surface stable.
ATTENTION: Ne pas se tenir sous le laser lorsqu'il est fixé par le support magnétique
pivotant. S'il tombait, vous pourriez vous blesser gravement ou endommager l'appareil.
Le support pivotant laisse également un dégagement au sol d'environ 44,5mm (1-3/4po), ce qui
permet d'installer un rail de construction métallique.
Pour toute question ou tout commentaire, communiquer avec nous.
1 800 4-DEWALT • www.dewalt.com
UTILISATION DU LASER AVEC ACCESSOIRES
Des filets de vis femelles de 1/4 x 20 et 5/8 x11 se trouvent sous l'appareil. Ils servent à fixer des
accessoires D
EWALT existants ou futurs. N'utiliser que les accessoires DEWALT conçus pour ce
produit. Respecter les consignes fournies avec l'accessoire.
AVERTISSEMENT: Étant donné qu'aucun test n'a été fait avec des accessoires non vendus
par D
EWALT, leur utilisation avec cet outil pourrait s'avérer dangereuse. Pour réduire les risques
de blessure, n'utiliser que les accessoires recommandés par D
EWALT.
Les accessoires recommandés pour l'utilisation avec cet outil sont en vente chez un détaillant
local ou un centre de service autorisé. Si vous avez besoin d'aide pour trouver un accessoire,
communiquer avec D
EWALT Industrial Tool Co., 701 East Joppa Road, Towson, MD 21286,
composer le 1 800 4-D
EWALT (1 800 433-9258) ou consulter notre site Web: www.DEWALT.com.
Vérifi cation de l'étalonnage sur place
VÉRIFICATION DE L'ÉTALONNAGE DE L'APLOMB (FIG.5 ET 6)
La vérification de l'étalonnage de l'aplomb du laser sera plus efficace si vous procédez sur
une grande hauteur, idéalement de 7,5m (25pi), et qu'une personne au sol positionne le laser
tandis qu'une autre marque le point du faisceau au plafond (fig.5). Il est important de vérifier
l'étalonnage sur une distance au moins équivalente à celle de l'installation pour laquelle le laser
sera utilisé.
1. Commencer par marquer un point sur le sol.
2. Placer le laser de manière à ce que le point du faisceau du bas soit centré sur le point au sol.
3. Laisser au laser le temps de trouver l'aplomb et marquer le centre du point créé par le
faisceau du haut.
4. Faire pivoter le laser à 180° comme illustré (fig.6), en faisant en sorte que le faisceau vers
le bas soit toujours centré sur le point marqué au sol.
5. Laisser au laser le temps de trouver l'aplomb et marquer le centre du point créé par le
faisceau du haut.
Si la mesure entre les deux marques est inférieure à celles du tableau ci-dessous, l'étalonnage du
laser n'est plus valable.
Distance entre au sol/plafond Mesure entre les marques
15' (4.5 m) 1/8" (3.0mm)
30' (9 m) 1/4" (5.5 mm)
50' (15 m) 3/8" (9.0 mm)
VÉRIFICATION DE LA PRÉCISION DU NIVEAU (FIG.7 À 10)
Pour vérifier l'étalonnage du niveau de l'appareil laser, il faut deux murs parallèles distants d'au
moins 6m (20pi). Il est important de vérifier l'étalonnage sur une distance au moins équivalente
à celle de l'installation pour laquelle le laser sera utilisé.
1. Placer l'appareil de 5 à 8cm (2 po à 3po) du premier mur, lui faisant face (fig. 7).
2. Marquer la position du faisceau sur le premier mur.
3. Faire pivoter l'appareil à 180˚ et marquer la position du faisceau sur le deuxième mur (fig.8).
4. Placer l'appareil de 5 à 8cm (2 po à 3po) du deuxième mur, lui faisant face (fig. 9).
5. Régler la hauteur de l'appareil jusqu'à ce que le faisceau atteigne la marque de l'étape3.
6. Faire pivoter l'appareil à 180˚ et diriger le faisceau près de la marque du premier mur faite à
l'étape 2 (fig.10).
7. Mesurer la distance verticale entre le faisceau et la marque.
8. Si la mesure est supérieure aux valeurs indiquées ci-dessous, le laser doit être réparé dans
un centre de service autorisé.
Répéter les étapes1 à 8 pour vérifier le faisceau frontal, de gauche, de droite et de l'arrière.
Distance entre les murs Mesure entre les marques
15' (4.5 m) 1/8" (3.0mm)
30' (9 m) 1/4" (5.5 mm)
50' (15 m) 3/8" (9.0 mm)
VÉRIFICATION DE LA PRÉCISION DU FAISCEAU D'ANGLE À 90° DU NIVEAU
(VÉRIFICATION DE LA PRÉCISION DE LA DIRECTION DE BALAYAGE DU FAISCEAU
HORIZONTAL (FIG.6)
Pour vérifier l'étalonnage du balayage horizontal du laser, il faut deux murs séparés par une
distance d'au moins 9m (30pi). Il est important de vérifier l'étalonnage sur une distance au moins
équivalente à celle de l'installation pour laquelle le laser sera utilisé.
1. Fixer le laser à un mur à l'aide de son support pivotant. Vérifier qu'il est bien dirigé vers
l'avantd.
2. Allumer le faisceau horizontal du laser et faire pivoter l'appareil d'environ 45˚, de manière à
ce que l'extrémité droite de la ligne laser touche le mur opposé à une distance d'au moins
9m (30pi). Marquer le centre du faisceau(a).
3. Faire pivoter le laser d'environ 90˚ pour amener l'extrémité gauche de la ligne laser aux
environs de la marque faite à l'étape2. Marquer le centre du faisceau(b).
4. Mesurer la distance verticale entre les marques.
5. Si la mesure est supérieure aux valeurs indiquées ci-dessous, le laser doit être réparé dans un
centre de service autorisé.
Distance entre les murs Mesure entre les marques
15' (4.5 m) 1/8" (3.0mm)
30' (9 m) 1/4" (5.5 mm)
50' (15 m) 3/8" (9.0 mm)
VÉRIFICATION DE LA PRÉCISION DE LA DIRECTION DE L'INCLINAISON DU
FAISCEAU HORIZONTAL (FIG.7)
Pour vérifier l'étalonnage de l'inclinaison horizontale du laser, il faut deux murs séparés par une
distance d'au moins 9 m (30 pi). Il est important de vérifier l'étalonnage sur une distance au
moins équivalente à celle de l'installation pour laquelle le laser sera utilisé.
1. Fixer le laser à une extrémité à l'aide de son support pivotant.
2. Allumer le faisceau horizontal et faire pivoter le laser vers l'autre extrémité du mur, à peu près
parallèlement au mur proche.
3. Marquer le centre du faisceau à deux endroits (c, d) distants d'au moins 9m (30pi).
4. Repositionner le laser à l'autre extrémité du mur.
5. Allumer le faisceau horizontal et faire pivoter le laser vers la première extrémité du mur, à peu
près parallèlement au mur proche.
6. Régler la hauteur du laser de manière à ce que le faisceau soit aligné sur la marque la plus
proche (d).
7. Marquer le centre du faisceau (e) directement sur ou sous la marque la plus éloignée (c).
8. Mesurer la distance entre ces deux marques (c, e).
9. Si la mesure est supérieure aux valeurs indiquées ci-dessous, le laser doit être réparé dans un
centre de service autorisé.
Distance entre les murs Mesure entre les marques
15' (4.5 m) 1/8" (3.0mm)
30' (9 m) 1/4" (5.5 mm)
50' (15 m) 3/8" (9.0 mm)
Dépannage
LE LASER NE S'ALLUME PAS
• Vérifier que les piles sont installées dans le sens des signes (+) et (-) de la porte du compartiment.
• Vérifier que les piles sont en bon état de marche. Dans le doute, installer de nouvelles piles.
• Vérifier que les contacts des piles sont propres et exempts de rouille ou de corrosion. Veiller à ce
que le niveau au laser reste au sec et n'utiliser que des piles neuves de qualité supérieure pour
réduire les risques de fuite.
• Si le laser a été entreposé à la forte chaleur, le laisser refroidir.
LES FAISCEAUX LASER CLIGNOTENT (FIG. 4)
Le niveau au laser DW0851 a été conçu pour s'autoniveler jusqu'à 4° dans tous les sens lorsqu'il
est positionné comme sur la figure 4. Si son inclinaison est telle que le mécanisme interne ne
peut se remettre d'aplomb par lui-même, le laser clignote, ce qui indique un dépassement de la
plage d'inclinaison. LE CLIGNOTEMENT DES FAISCEAUX LASER INDIQUE QUE L'OUTIL N'EST
PAS DE NIVEAU OU D'APLOMB ET NE DOIT PAS SERVIR À DÉTERMINER NI À MARQUER LE
NIVEAU OU L'APLOMB. Essayer de repositionner le laser sur une surface plus à niveau.
LES FAISCEAUX LASER BOUGENT SANS CESSE
L'appareil DW0851 est un instrument de précision. Toutefois, s'il n'est pas placé sur une surface
stable (et immobile), il continuera à chercher l'aplomb. Si le faisceau n'arrête pas de bouger,
essayer de placer l'outil sur une surface plus stable. Essayer également de faire en sorte que la
surface soit relativement plane, afin que le laser soit stable.
*Les caractéristiques concernant la précision partent du principe que le laser est positionné sur
une surface d'une inclinaison maximale de 4°.
FIG. 1
A
FIG. 5
7,5M
(25pi)
FIG. 7
B
FIG. 2
>4°
FLASHING
CLIGNOTANT
DESTELLA
FIG. 4
FIG. 8
FIG. 9
FIG. 10
FIG. 3
D
E
C
I
J
H F
G
I
FIG. 6
MANUAL DE INSTRUÇÕES
DEWALT Industrial Tool Co., 701 East Joppa Road, Towson, MD 21286
(JULHO13) nº da peça 79002845 Copyright © 2013 D
EWALT
DW0851
Apontador-Laser 5 Autonivelante
SE VOCÊ TEM QUAISQUER PERGUNTAS OU COMENTÁRIOS SOBRE ISSO OU
QUALQUER FERRAMENTA D
EWALT, LIGUE PARA NÓS GRATUITAMENTE PELO TELEFONE:
1-800-4-D
EWALT (1-800-433-9258).
Segurança
ADVERTÊNCIA: Para reduzir o risco de ferimentos, leia este manual de segurança
fornecido com o seu produto ou acesse online em www.DeWALT.com.
O uso de controles, ajustes ou execução de procedimentos diferentes daqueles aqui
especifi cados pode resultar em exposição a radiação perigosa.
ETIQUETAS DE ADVERTÊNCIA
Para sua conveniência e segurança, as seguintes etiquetas estão no seu laser.
CUIDADO: RADIAÇÃO LASER - NÃO OLHE DIRETAMENTE PARA O FEIXE. PRODUTO
LASER CLASSE 2 .
Informação sobre o Laser
O nivelador laser DW0851 é um produto laser Classe 2 e está em conformidade com 21 CFR
1040.10 e 1040.11 exceto para divergências relativas ao Laser Notice Nº 50, com data de 24
de junho de 2007.
VISÃO GERAL DO PRODUTO
O nivelador laser DW0851 é uma ferramenta laser autonivelante que pode ser usada para
alinhamento horizontal (nível) e vertical (prumo). Esta ferramenta vem completamente montada e
foi projetada com recursos que permitem uma configuração rápida e fácil. Por favor, leia o entenda
todas as instruções deste manual de instrução, além do Manual de Segurança, antes de usar.
Especificações
ESPECIFICAÇÕES
Fonte de Luz Diodo semicondutor laser
Comprimento de Onda do Laser 630–680 nm visível
Alimentação do Laser <1,0 mW (cada feixe) PRODUTO LASER CLASSE 2
Alcance de Trabalho (Linha):
Alcance de Trabalho (Ponto):
±30' (10 m)
±100' (30 m)
±165'(50m) com detector
Precisão* (Ponto-Horizontal) ± 3/16 pol. @ 50’ (±4.5mm @ 15 m)
Precisão* (Ponto-Vertical) ± 3/16 pol. @ 50’ (±4.5 mm @ 15 m)
Precisão* (linha-Horizontal) ± 1/8pol @ 50' (± 3 mm à 15m)
Indicadores Indicador Piscando: bateria descarregada
Laser Piscando: ângulo de inclinação excedido
Fonte de Alimentação 3 baterias tamanho AA (4,5V CC)
Temperatura de Operação de 20 °F a 120 °F (de -10 °C a 50 °C)
Temperatura de Armazenamento de -5 °F a 140 °F (de -20 °C a 60 °C)
Ambiental Resistente a água
Teclado, Modos, e LED.
Chave de Energia.
O interruptor ON/OFF está localizado na parte traseira da ferramenta conforme mostrado na
figura 1 (A). Quando o interruptor (A) está na posição OFF/LOCKED, a unidade permanece
desligada e o pêndulo travado
Quando o interruptor on/off (A) estiver na posição ON/UNLOCKED, a unidade será LIGADA,
opêndulo será liberado da posição travado e ela se autonivelará.
Teclado.
O teclado localizado no topo da ferramenta como mostrado na figura 2 oferece botões de
ativação para a seleção de função ponto e / ou linha laser.
Indicador de Bateria Descarregada.
O DW0851 é equipado com uma indicador de bateria descarregada no teclado, como mostrado
na Figura 2. A luz indicadora vermelha está localizada no teclado. A luz pisca, indica que as
baterias estão descarregadas e precisam ser substituídas. O laser pode continuar a operar por um
tempo curto enquanto as baterias continuam a descarregar. Depois que as novas baterias forem
instaladas e o laser religado, a luz indicadora ficará verde.
Indicador de Fora de Nível
O DW0851 é equipado com um indicador de fora de nível no teclado, como mostrado na Figura2.
Quando a faixa de inclinação (> 4° de inclinação) for excedida, o LED vai acender e piscar e o feixe
laser vai ficar piscando.
O feixe piscando indica que a faixa de inclinação foi excedida e a ferramenta NÃO ESTÁ NIVELADA
(OU NO PRUMO) E NÃO DEVE SER USADA PARA DETERMINAR OU MARCAR O NÍVEL (OU
PRUMO). Tente reposicionar o laser em uma superfície mais nivelada.
Baterias e Alimentação
Sua ferramenta laser necessita de 3 baterias AA. (B)
Use apenas baterias novas e de alta qualidade para melhores resultados.
• Assegure-se de que as baterias estejam em boas condições de trabalho. Se o indicador de
bateria descarregada estiver piscando, é necessário substituir as baterias.
• Para estender a vida da bateria, desligue o laser quando não estiver usando ou marcando o feixe.
Configuração
NIVELAMENTO DO LASER
Esta ferramenta é autonivelante. É calibrada na fábrica para encontrar o prumo enquanto estiver
posicionado em uma superfície plana dentro de 4° do nível. Enquanto a ferramenta estiver
corretamente calibrada, não são necessários ajustes manuais.
Para manter a precisão do seu trabalho, verifique com frequência se o seu laser está calibrado. Ver
Verificação de Calibração de Campo.
• Antes de tentar usar o laser, assegure-se de que esteja firmemente posicionado, em uma
superfície lisa e plana.
• Sempre marque o centro do ponto ou padrão criado pelo laser.
• Mudanças extremas de temperaturas podem causar o movimento de peças internas que
podem afetar a precisão. Verifique sua precisão frequentemente enquanto trabalha. Ver
Verificação de Calibração de Campo.
• Se o laser cair, verifique se o seu laser está calibrado. Ver Verificação de Calibração de Campo.
OPERAÇÃO
Para Ligar e Desligar o Laser (Fig. 3)
• Com o laser desligado, coloque-o em uma superfície plana e estável. Ligue o laser
deslizando o interruptor on/off (A) para a posição ON/UNLOCKED.
• Ative ou desative a função desejada usando o teclado (C) localizado no topo da ferramenta.
Ele irá então projetar cinco feixes; um para cima (D), um para baixo (E), um horizontal para
a esquerda(F) um horizontal para a direita (G), e um para a frente (H) quando o botão "DOT"
for pressionado.
• Vai ser projetada uma linha horizontal pela janela traseira quando o botão "LINE" for pressionado.
• Para desligar o laser, passe a chave on/off switch (A) para a posição travada.
O DW0851 é equipado com um mecanismo de trava do pêndulo. Este recurso só é ativado
quando a unidade é desligada.
Uso do Laser
Os lasers são nivelados ou no prumo se a calibração tiver sido verificada (Ver Verificação de
Calibração de Campo) e o feixe laser não estiver piscando (Ver Indicador de Inclinação Fora
de Faixa).
A ferramenta pode ser usada para transferir pontos usando qualquer combinação dos cinco
feixes e/ou linha horizontal.
DICAS DE OPERAÇÃO
Para manter a precisão do seu trabalho, verifique com frequência se o seu laser está calibrado. Ver
Verificação de Calibração de Campo.
• Antes de tentar usar o laser, assegure-se de que esteja firmemente posicionado, em uma
superfície lisa e plana.
• Sempre marque o centro do ponto ou padrão criado pelo laser.
• Mudanças extremas de temperaturas podem causar o movimento de peças internas que
podem afetar a precisão. Verifique sua precisão frequentemente enquanto trabalha. Ver
Verificação de Calibração de Campo.
• Se o laser cair, verifique se o seu laser está calibrado. Ver Verificação de Calibração de Campo.
SUPORTE MAGNÉTICO PIVOTADO INTEGRADO (FIG. 1 E 3)
O DW0851 possui um suporte magnético pivotado (I) permanentemente fixado à unidade. Este
suporte permite que a unidade seja montada em qualquer superfície vertical feita de aço ou ferro
usando os ímãs (J) localizados atrás do suporte pivotante. Exemplos comuns de superfícies
adequadas incluem estruturas de aço, aduelas de porta feitas de aço e vigas de aço estrutural.
Coloque o laser em uma superfície estável.
Se você tiver perguntas ou comentários, entre em contato conosco.
1-800-4-DEWALT • www.dewalt.com
O suporte pivotante também oferece uma distância de solo de aproximadamente 1-3/4"
(44.5mm) que ajuda na instalação de trilho para estrutura de aço.
USO DO LASER COM ACESSÓRIOS
O laser vem equipado com uma rosca 1/4" x 20 e uma 5/8" x11, fêmeas. no fundo da unidade.
Estas roscas servem para acomodar acessórios atuais ou futuros da DEWALT. Use apenas
acessórios D
EWALT específicos para este produto. Siga as instruções incluídas com o acessório.
ADVERTÊNCIA: Como os acessórios, que não sejam aqueles oferecidos pela DEWALT, não
foram testados com este produto, e o uso destes acessórios com esta ferramenta pode ser
perigoso. para reduzir o risco de ferimentos, apenas os acessórios recomendados pela D
EWALT
devem ser usados com este produto.
Os acessórios recomendados para uso com a sua ferramenta estão disponíveis a um custo extra
em seu distribuidor local ou centro de serviço autorizado. Se precisar de assistência para localizar
um acessório, entre em contato com a D
EWALT Industrial Tool Co., 701 East Joppa Road, Towson,
MD 21286, ligue para 1-800-4-D
EWALT (1-800-433-9258) ou visite nosso site: www.DeWALT.com.
Verifi cação de Calibração de Campo.
VERIFICAÇÃO DA PRECISÃO – PRUMO (FIG. 5–6)
A verificação da calibração do prumo do laser pode ser feita com mais precisão quando houver
uma quantidade substancial de altura vertical disponível, idealmente 25' (7,5 m), com uma
pessoa no chão posicionando o laser e outra pessoa perto do teto para marcar o ponto criado
pelo feixe no teto (Fig. 5). É importante fazer a verificação da calibração usando uma distância
que não seja menor do que a distância das aplicações nas quais a ferramenta será usada.
1. Comece marcando um ponto no piso.
2. Coloque o laser de modo que o ponto para baixo esteja centrado no ponto marcado no chão.
3. Permita que o laser atinja o prumo e marque o centro do ponto criado pelo feixe para cima.
4. Gire o laser 180° como mostrado na (Fig. 6), verificando que o ponto para baixo ainda
esteja centrado no ponto previamente marcado no chão.
5. Permita que o laser atinja o prumo e marque o centro do ponto criado pelo feixe para cima.
Se as medições entre as duas marcas forem maiores do que mostrado abaixo, o laser não está
mais calibrado.
Distância Entre chão/tecto Medição Entre Marcas
15' (4.5 m) 1/8" (3.0mm)
30' (9 m) 1/4" (5.5 mm)
50' (15 m) 3/8" (9.0 mm)
VERIFICAÇÃO DA PRECISÃO – NÍVEL (FIG. 7–10)
A verificação da calibração do passo horizontal exige duas paredes paralelas com pelo menos 20'
(6 m) entre si. É importante fazer a verificação da calibração usando uma distância que não seja
menor do que a distância das aplicações nas quais a ferramenta será usada.
1. Coloque a unidade a 2 pol. – 3 pol. (5 cm – 8 cm) da primeira parede, de frente para a
parede (Fig. 7).
2. Marque a posição do feixe na primeira parede.
3. Gire a unidade 180˚, e marque a posição do feixe na segunda parede (Fig. 8).
4. Coloque a unidade a 2 pol. – 3 pol. (5 cm – 8 cm) da segunda parede, de frente para a
parede (Fig. 9).
5. Ajuste a altura da unidade até que o feixe encontre a marca do passo 3.
6. Gire a unidade 180˚, e a ponte o feixe para perto da marca na primeira parede, feita no
passo 2 (Fig. 10).
7. Meça a distância vertical entre o feixe e a marca.
8. Se as medidas forem maiores do que os valores mostrados abaixo, o laser precisa ser
enviado para um centro de serviço autorizado.
Repita os passos 1 até 8 para verificar os feixes frontal, o esquerdo, o direito e o traseiro
Distância Entre as Paredes Medição Entre Marcas
15' (4.5 m) 1/8" (3.0mm)
30' (9 m) 1/4" (5.5 mm)
50' (15 m) 3/8" (9.0 mm)
VERIFICAÇÃO DA PRECISÃO – FEIXE HORIZONTAL, DIREÇÃO DA VARREDURA (FIG. 6)
A verificação da calibração da varredura horizontal exige duas paredes a 30' (9 m) de distância.
É importante fazer a verificação da calibração usando uma distância que não seja menor do que
a distância das aplicações nas quais a ferramenta será usada.
1. Fixe o laser a uma parede usando seu suporte pivotante. Assegure-se de que o laser esteja
apontando diretamente para a frente.
2. Ligue o feixe horizontal do laser e gire o laser aproximadamente 45˚ para que a ponta mais à
direita da linha laser esteja tocando a parede oposta a uma distância de no mínimo 30’ (9 m).
Marque o centro do feixe (a).
3. Gire o laser aproximadamente 90˚ para trazer a extremidade mais à esquerda da linha do laser
para a marca feita no Passo 2. Marque o centro do feixe (b).
4. Meça a distância vertical entre as marcas.
5. Se as medidas forem maiores do que os valores mostrados abaixo, o laser precisa ser
enviado para um centro de serviço autorizado.
Distância Entre as Paredes Medição Entre Marcas
15' (4.5 m) 1/8" (3.0mm)
30' (9 m) 1/4" (5.5 mm)
50' (15 m) 3/8" (9.0 mm)
VERIFICAÇÃO DA PRECISÃO – FEIXE HORIZONTAL, DIREÇÃO DO PASSO (FIG. 7)
A verificação da calibração do passo horizontal exige uma parede com pelo menos 30' (9 m) de
comprimento. É importante fazer a verificação da calibração usando uma distância que não seja
menor do que a distância das aplicações nas quais a ferramenta será usada.
1. Fixe o laser a uma extremidade da parede usando seu suporte pivotante.
2. Ligue o feixe horizontal do laser e gire o laser em direção à extremidade oposta da parede e
aproximadamente paralelo à parede adjacente.
3. Sempre marque o centro do feixe nas duas localizações (c, d) a pelo menos 30' (9 m) entre
si.
4. Reposicione o laser na extremidade oposta da parede.
5. Ligue o feixe horizontal do laser e gire o laser novamente em direção à extremidade inicial da
parede e aproximadamente paralelo à parede adjacente.
6. Ajuste a altura do laser para que o centro do feixe esteja alinhado com a marca mais próxima
(d).
7. Marque o centro do feixe (e) diretamente acima ou abaixo da marca mais distante (c).
8. Meça a distância entre estas duas marcas (c, e).
9. Se as medidas forem maiores do que os valores mostrados abaixo, o laser precisa ser
enviado para um centro de serviço autorizado.
Distância Entre as Paredes Medição Entre Marcas
15' (4.5 m) 1/8" (3.0mm)
30' (9 m) 1/4" (5.5 mm)
50' (15 m) 3/8" (9.0 mm)
Solução de problemas
O LASER NÃO LIGA
• Verifique se as baterias estão instaladas de acordo com as marcas (+) e (–) no interior da tampa
das baterias.
• Assegure-se de que as baterias estejam em boas condições de trabalho. Se estiver em dúvida,
coloque baterias novas.
• Verifique se os contatos da bateria estão limpos e livres de ferrugem ou corrosão. Assegure-se
de manter o nivelador laser seco e use apenas baterias novas e de alta qualidade, para reduzir
a possibilidade de vazamento das baterias.
• Se a unidade laser tiver sido armazenada em temperaturas extremamente altas, permita que esfrie.
OS FEIXES DE LASER ESTÃO PISCANDO (FIG. 4)
O nivelador laser DW0851 foi projetado para se autoalinhar até 4° em qualquer direção quando
posicionado como mostrado na Figura 4. Se o laser tiver sido tão inclinado que o mecanismo
interno não possa se colocar no prumo, os feixes de laser irão piscar – a faixa de inclinação foi
excedida OS FEIXES PISCANDO CRIADOS PELO LASER NÃO ESTÃO NIVELADOS OU NO
PRUMO E NÃO DEVEM SER USADOS PARA DETERMINAR OU MARCAR O NÍVEL OU PRUMO.
Tente reposicionar o laser em uma superfície mais nivelada.
OS FEIXES DE LASER NÃO PARAM DE SE MOVER
O DW0851 é um instrumento de precisão. Desta maneira, se não estiver posicionado em uma
superfície estável (e imóvel), a ferramenta vai continuar a tentar buscar o prumo. Se o feixe não
parar de se mover, tente colocar a ferramenta em uma superfície mais estável. Além disso, tente
se certificar de que a superfície seja relativamente plana, para que o laser fique estável.
*As especificações de precisão presumem que o laser esteja posicionado em uma superfície
dentro de 4° do nível.
FIG. 1
A
FIG. 5
25'
(7,5 m)
FIG. 7
B
FIG. 2
>4°
PISCANDO
CLIGNOTANT
DESTELLA
FIG. 4
FIG. 8
FIG. 9
FIG. 10
FIG. 3
D
E
C
I
J
H F
G
I
FIG. 6