ICE MAKER
Model: ER-IM05
User Manual
Made In China Rev_1.1_EN
suppo@thereyehome.com
Manufacturer: Shenzhen Guiyang Network Technology Co., Ltd
4008051
Address: 1404K3, East Block, Shengtang Commercial Building, Futian District,
Shenzhen, China
Questions or Concerns?

IMPORTANT SAFETY INSTRUCTIONS
EXPLORING YOUR ICE MAKER
USING YOUR ICE MAKER
CARE AND CLEANING
TROUBLESHOOTING GUIDE
WARRANTY AND SERVICE
01-02
03-05
06-08
09-11
12-13
14-15
CONTENT

IMPORTANT SAFETY
INSTRUCTIONS
When using an electrical appliance, especially when children are present, basic
safety precautions should always be followed, including the following:
Always plug the appliance directly into a wall outlet / receptacle. Never use with
an extension cord or relocatable power tap (outlet / power strip).
DO NOT let cord hang over edge of table or counter, or touch hot suaces.
DO NOT immerse any pa in water or any other liquid.
DO NOT attempt to disassemble, repair, modify or replace any pa of the
appliance. No user seiceable pas inside. All seicing should be peormed by
qualied personnel only.
Always place and use the appliance on a d, stable and level suace with
sucient ventilation, away from heat sources. Leave at least 6 inches of clear-
ance on the sides and back.
Always turn the appliance OFF and unplug it before cleaning, or whenever not in
use.
Always turn the appliance OFF and unplug it before making any repairs or
seicing to avoid electric shock or UV radiation.
DO NOT sit on or place any object on top of the appliance.
DO NOT use with water that is micro-biologically unsafe or of unknown quality.
DO NOT use mechanical devices to defrost. Car out self-cleaning cycle to
remove any frozen pas.
If the appliance is stored in a cold environment, wait at least 3 hours for the
appliance to warm to room temperature before plugging it in.
Regarding the use of ammable blowing agent and refrigerant, dispose of the
ice maker in accordance with local regulations.
Use caution and handle with care when moving, handling and using the ice
maker to avoid damaging to the refrigerant tubing or increasing the risk of
leakage.
Damaged pas (e.g., compressor, condenser, motor and copper pipe etc.,) shall
be replaced with the same one by authorized personnel to minimize the risk of
possible ignition resulting from incorrect pas or improper seicing.
This ice maker complies with the applicable terms in Code of Federal Regula-
tions, including 21 CFR, Chapter 1.
DO NOT attempt to replace UV lamp by yourself. Have the lamp replaced by
authorized personnel only.
This appliance is not intended for use by persons (including children) with
reduced physical, senso or mental capabilities, or lack of experience and
knowledge, unless they have been given supeision or instruction concerning
the use of the appliance by person responsible for their safety.
Close supeision is necessa when any appliance is used by or near children.
Children should be supeised to ensure that they do not play with the appli-
ance. Cleaning and user maintenance shall not be done by children unless they
are older than 8 and supeised. Keep the appliance and its cord out of reach of
children.
Use the appliance only for intended household purposes as described in this
User Manual.
This appliance must be provided with correct voltage via a professionally
installed power socket. Make sure the voltage indicated on the label of the
appliance is the same as your local supply.
DO NOT operate the appliance with a damaged cord or plug or if the product
malfunctions, is dropped or damaged in any manner.
FOR HOUSEHOLD USE ONLY
SAVE THESE INSTRUCTIONS
READ ALL
INSTRUCTIONS
BEFORE USE
AND SAVE FOR
FUTURE
REFERENCE
DO NOT touch or
hold the mains plug
with wet hands.
DO NOT tilt the ice
maker. If tipped
over, set it upright
on a at, level
suace for at least
2 hours before use.
Fill the water tank
with fresh potable
water or connect
with water ltration
system to prolong
the seice life.
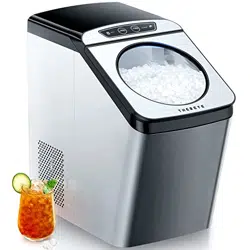
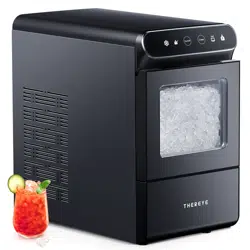
Specications
Input
Rated Power
Ice Bin
Water Tank
120V~ 60Hz
170W
3.3lbs./1.5kg
0.70Gal./2.65L
0201
IMPORTANT SAFETY
INSTRUCTIONS
When using an electrical appliance, especially when children are present, basic
safety precautions should always be followed, including the following:
Always plug the appliance directly into a wall outlet / receptacle. Never use with
an extension cord or relocatable power tap (outlet / power strip).
DO NOT let cord hang over edge of table or counter, or touch hot suaces.
DO NOT immerse any pa in water or any other liquid.
DO NOT attempt to disassemble, repair, modify or replace any pa of the
appliance. No user seiceable pas inside. All seicing should be peormed by
qualied personnel only.
Always place and use the appliance on a d, stable and level suace with
sucient ventilation, away from heat sources. Leave at least 6 inches of clear-
ance on the sides and back.
Always turn the appliance OFF and unplug it before cleaning, or whenever not in
use.
Always turn the appliance OFF and unplug it before making any repairs or
seicing to avoid electric shock or UV radiation.
DO NOT sit on or place any object on top of the appliance.
DO NOT use with water that is micro-biologically unsafe or of unknown quality.
DO NOT use mechanical devices to defrost. Car out self-cleaning cycle to
remove any frozen pas.
If the appliance is stored in a cold environment, wait at least 3 hours for the
appliance to warm to room temperature before plugging it in.
Regarding the use of ammable blowing agent and refrigerant, dispose of the
ice maker in accordance with local regulations.
Use caution and handle with care when moving, handling and using the ice
maker to avoid damaging to the refrigerant tubing or increasing the risk of
leakage.
Damaged pas (e.g., compressor, condenser, motor and copper pipe etc.,) shall
be replaced with the same one by authorized personnel to minimize the risk of
possible ignition resulting from incorrect pas or improper seicing.
This ice maker complies with the applicable terms in Code of Federal Regula-
tions, including 21 CFR, Chapter 1.
DO NOT attempt to replace UV lamp by yourself. Have the lamp replaced by
authorized personnel only.
This appliance is not intended for use by persons (including children) with
reduced physical, senso or mental capabilities, or lack of experience and
knowledge, unless they have been given supeision or instruction concerning
the use of the appliance by person responsible for their safety.
Close supeision is necessa when any appliance is used by or near children.
Children should be supeised to ensure that they do not play with the appli-
ance. Cleaning and user maintenance shall not be done by children unless they
are older than 8 and supeised. Keep the appliance and its cord out of reach of
children.
Use the appliance only for intended household purposes as described in this
User Manual.
This appliance must be provided with correct voltage via a professionally
installed power socket. Make sure the voltage indicated on the label of the
appliance is the same as your local supply.
DO NOT operate the appliance with a damaged cord or plug or if the product
malfunctions, is dropped or damaged in any manner.
FOR HOUSEHOLD USE ONLY
SAVE THESE INSTRUCTIONS
READ ALL
INSTRUCTIONS
BEFORE USE
AND SAVE FOR
FUTURE
REFERENCE
DO NOT touch or
hold the mains plug
with wet hands.
DO NOT tilt the ice
maker. If tipped
over, set it upright
on a at, level
suace for at least
2 hours before use.
Fill the water tank
with fresh potable
water or connect
with water ltration
system to prolong
the seice life.
Specications
Input
Rated Power
Ice Bin
Water Tank
120V~ 60Hz
170W
3.3lbs./1.5kg
0.70Gal./2.65L
0201

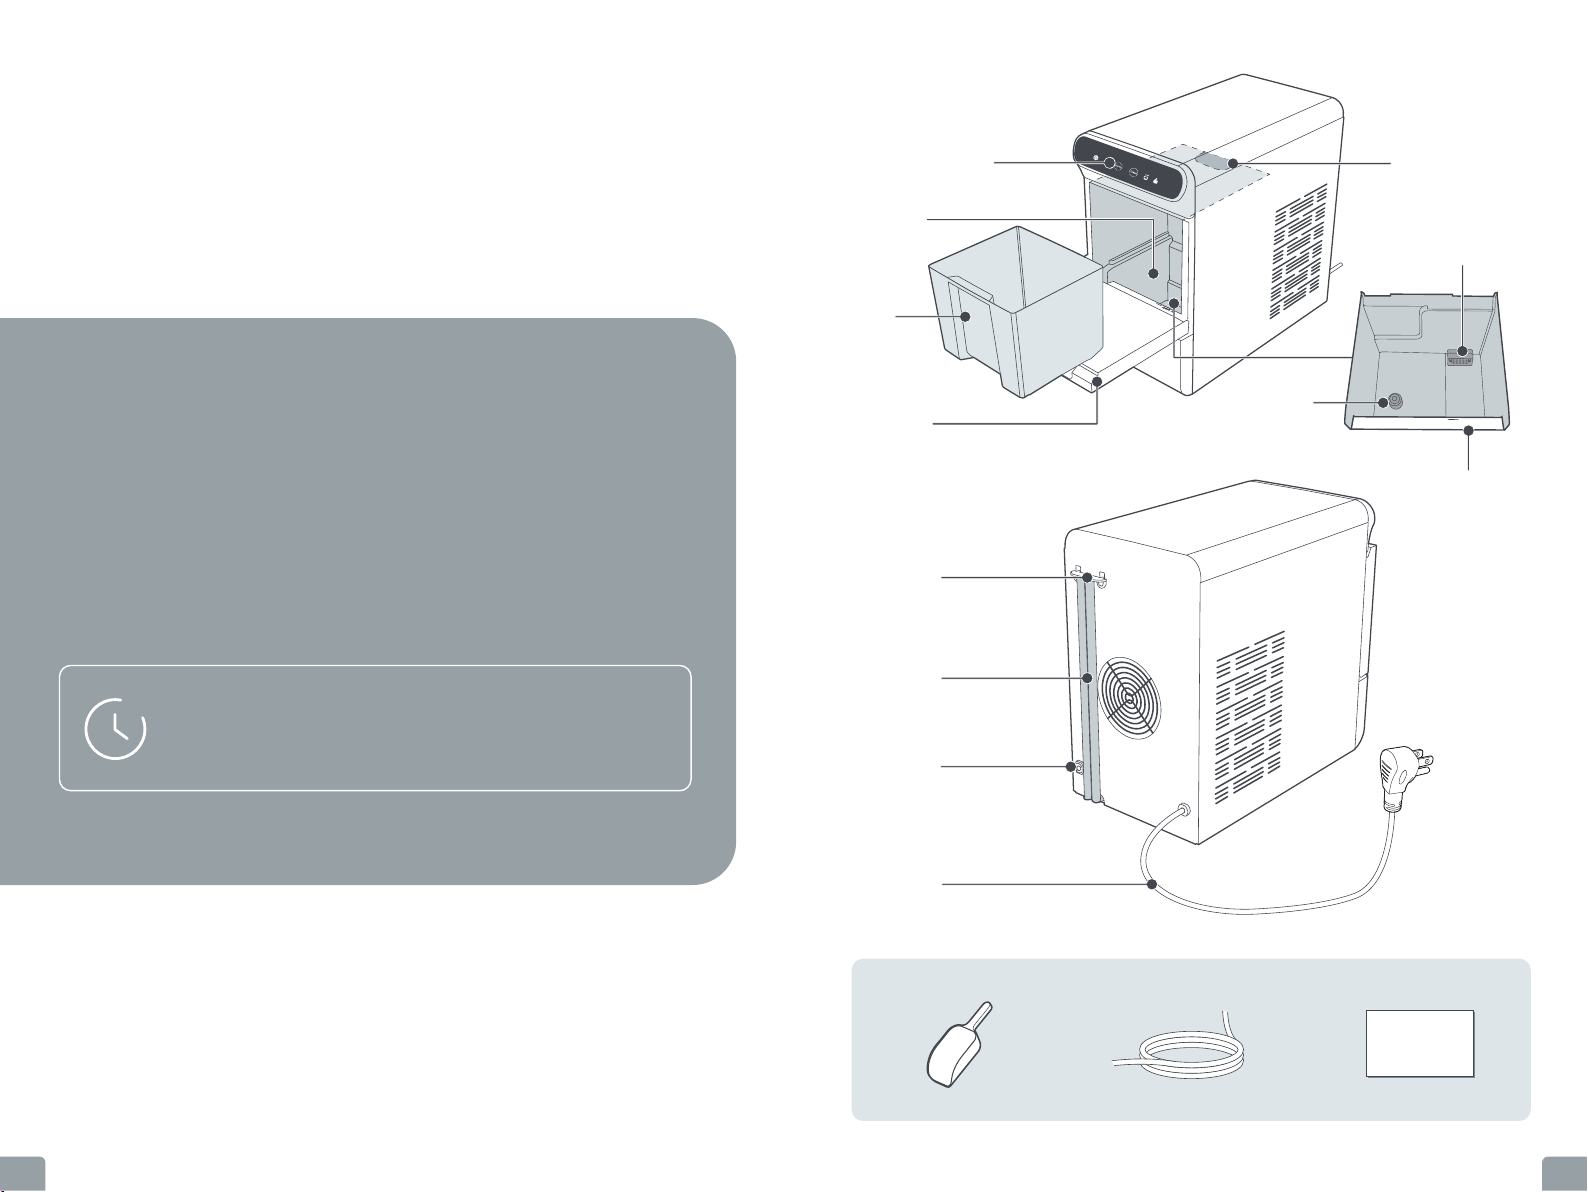
01
EXPLORING YOUR
ICE MAKER
This ice maker may have been tilted or placed upside down
during transpoation. Please set it upright for at least 2
hours before initial use to allow the refrigerant uid to settle.
2H
Ice Bin
Drain Plug
Drainpipe
Ice Scoop Inlet Pipe User Manual
Power Cord
& Plug
Water Inlet
for Automatic Rell
Front Door
Water Level
Detector
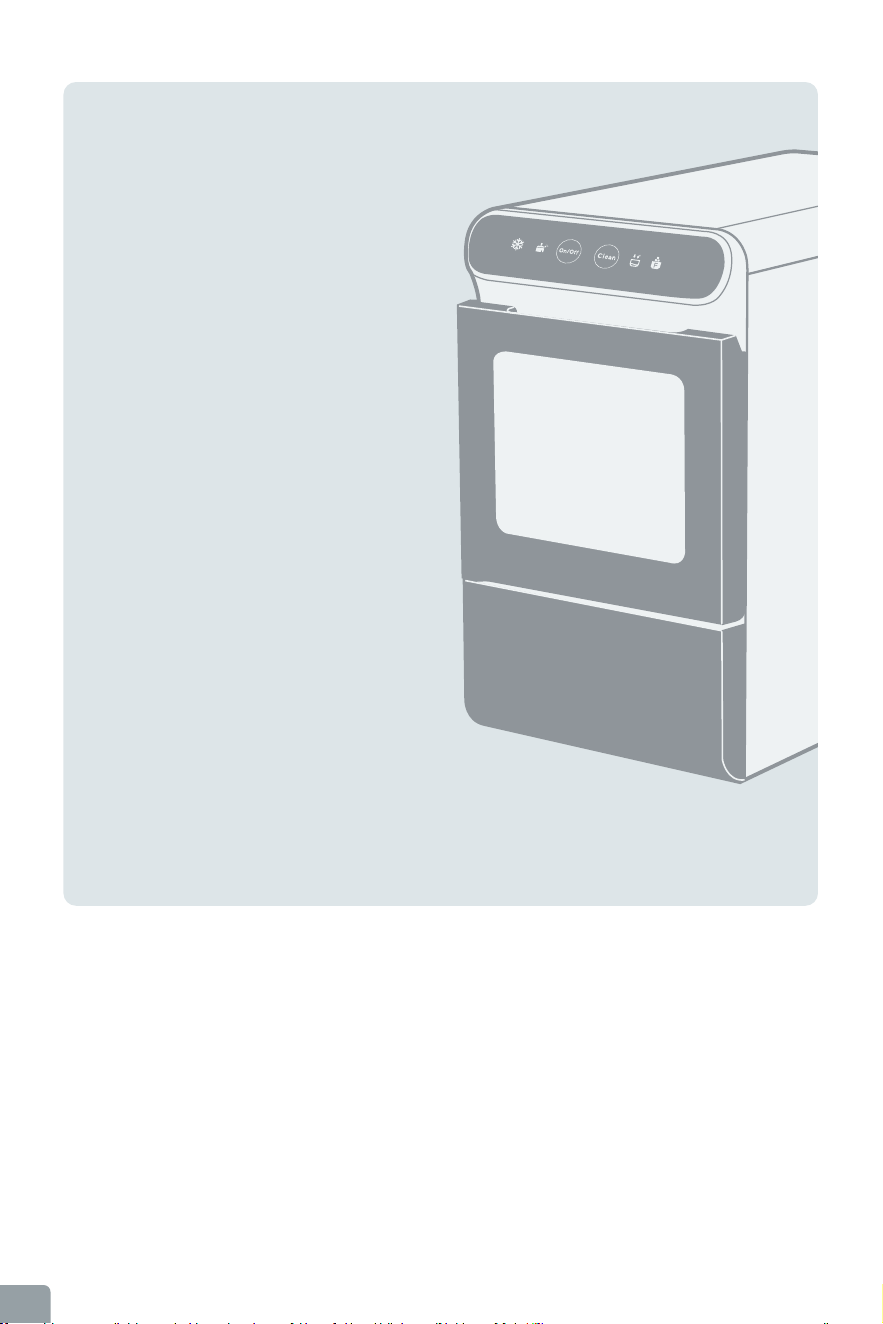
Control Panel & Display
Ice Full Sensor
Water Tank
MAX Fill Line
Water Filter
User Manual
Other Accessories
0403
MAX

01
EXPLORING YOUR
ICE MAKER
This ice maker may have been tilted or placed upside down
during transpoation. Please set it upright for at least 2
hours before initial use to allow the refrigerant uid to settle.
2H
Ice Bin
Drain Plug
Drainpipe
Ice Scoop Inlet Pipe User Manual
Power Cord
& Plug
Water Inlet
for Automatic Rell
Front Door
Water Level
Detector
Control Panel & Display
Ice Full Sensor
Water Tank
MAX Fill Line
Water Filter
User Manual
Other Accessories
0403
MAX
02
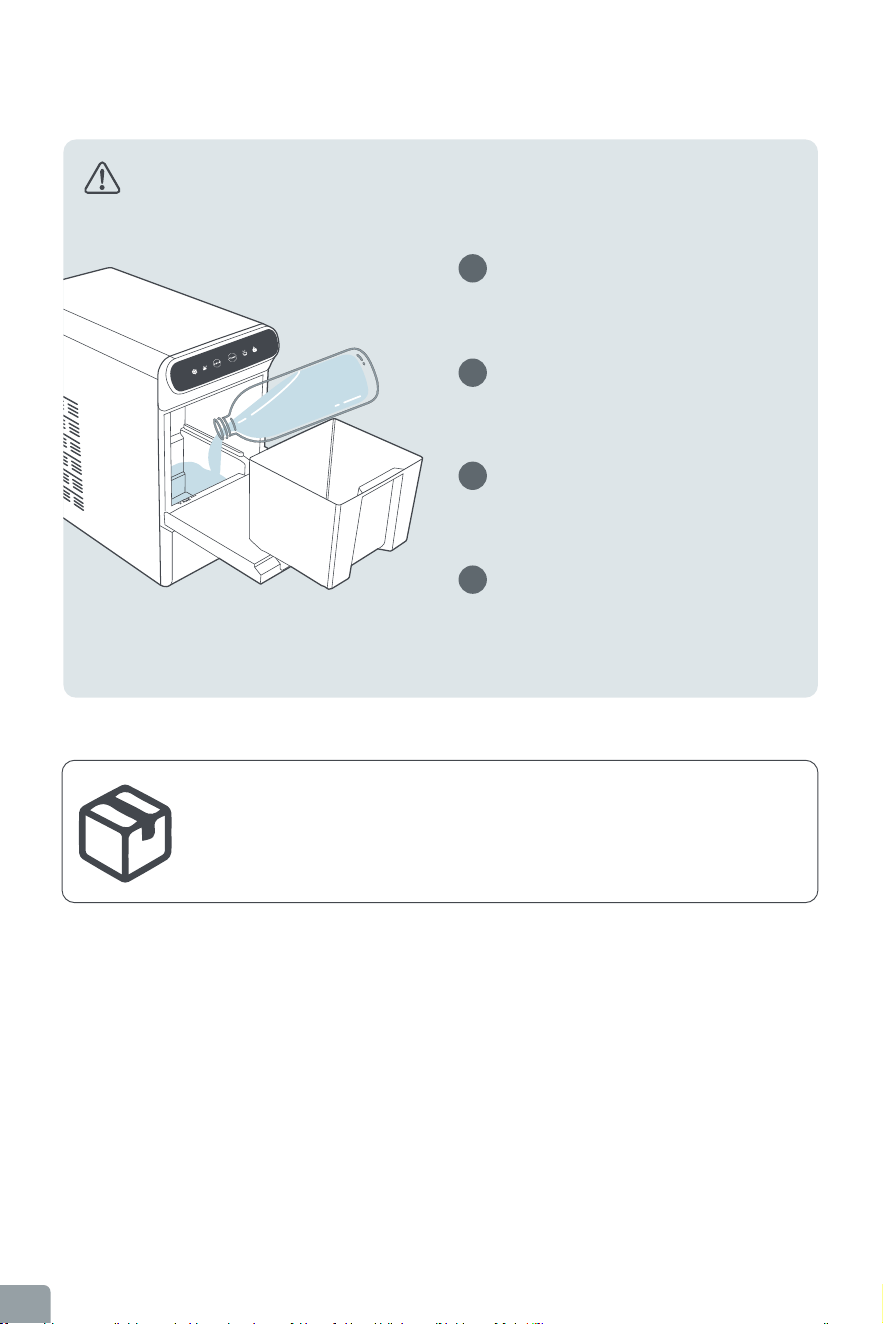
USING YOUR ICE
MAKER
•Make sure the drain plug is rmly inseed before use.
•The ice maker will stop making ice when the ice bin is full
and resume in 4 hours automatically. Remove the ice
cubes timely, the unit will resta making ice immediately if
there is plenty of water.
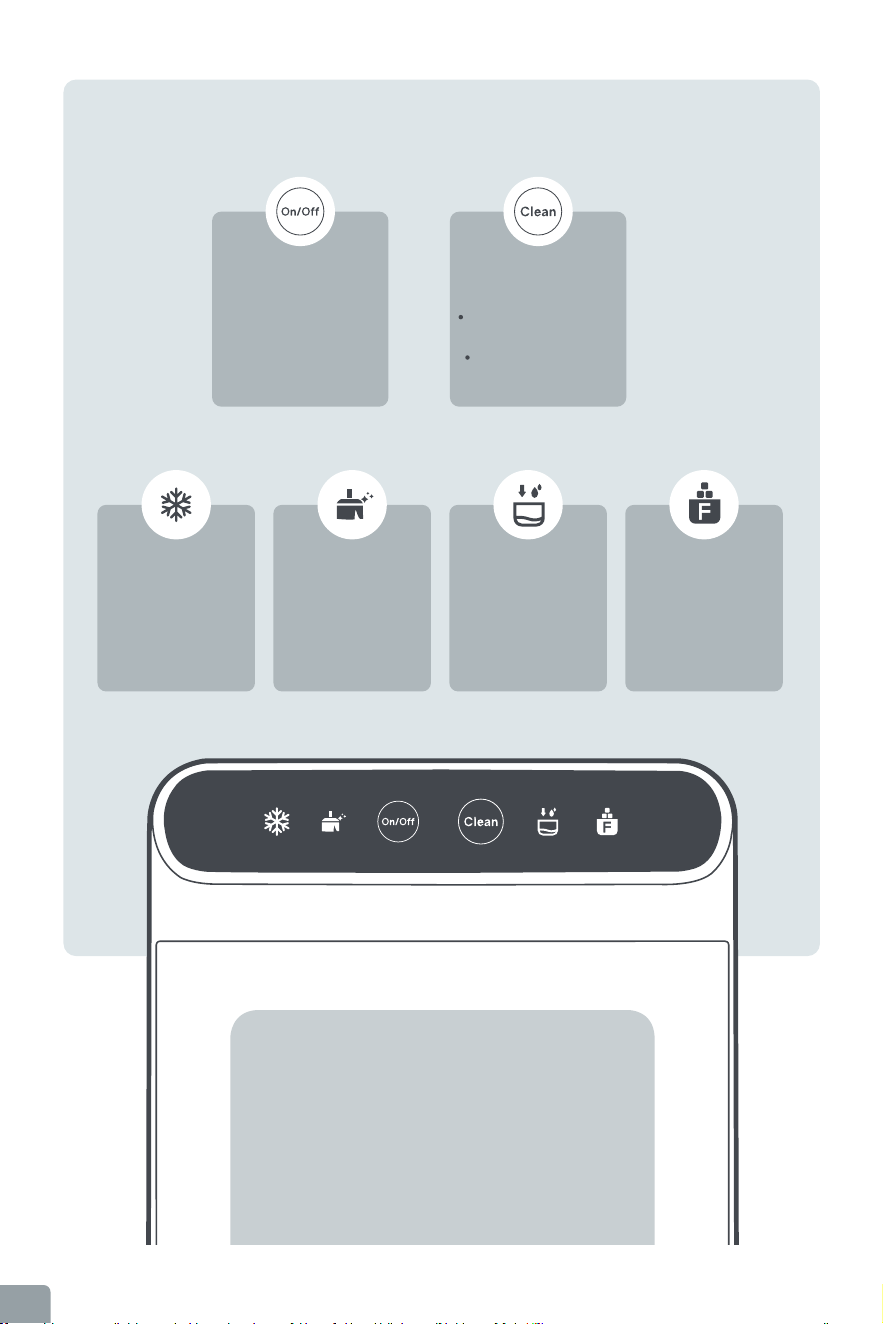
Control Panel & Display
Sta/Stop
Press to sta or stop
making ice.
Self-cleaning
Hold for 3s to sta or
stop cleaning cycle.
Press once to mute
beeps.
Ice Making
Indicator stays solid
on during ice making
cycle.
Cleaning
Indicator stays solid
on during cleaning
cycle.
Add Water
Indicator ashes when
lack of water. Add
water in time.
Ice Bin Full
Indicator stays solid
on when ice full.
Remove ice in time.
0605

02
USING YOUR ICE
MAKER
•Make sure the drain plug is rmly inseed before use.
•The ice maker will stop making ice when the ice bin is full
and resume in 4 hours automatically. Remove the ice
cubes timely, the unit will resta making ice immediately if
there is plenty of water.
Control Panel & Display
Sta/Stop
Press to sta or stop
making ice.
Self-cleaning
Hold for 3s to sta or
stop cleaning cycle.
Press once to mute
beeps.
Ice Making
Indicator stays solid
on during ice making
cycle.
Cleaning
Indicator stays solid
on during cleaning
cycle.
Add Water
Indicator ashes when
lack of water. Add
water in time.
Ice Bin Full
Indicator stays solid
on when ice full.
Remove ice in time.
0605
Getting Staed Automatic Relling
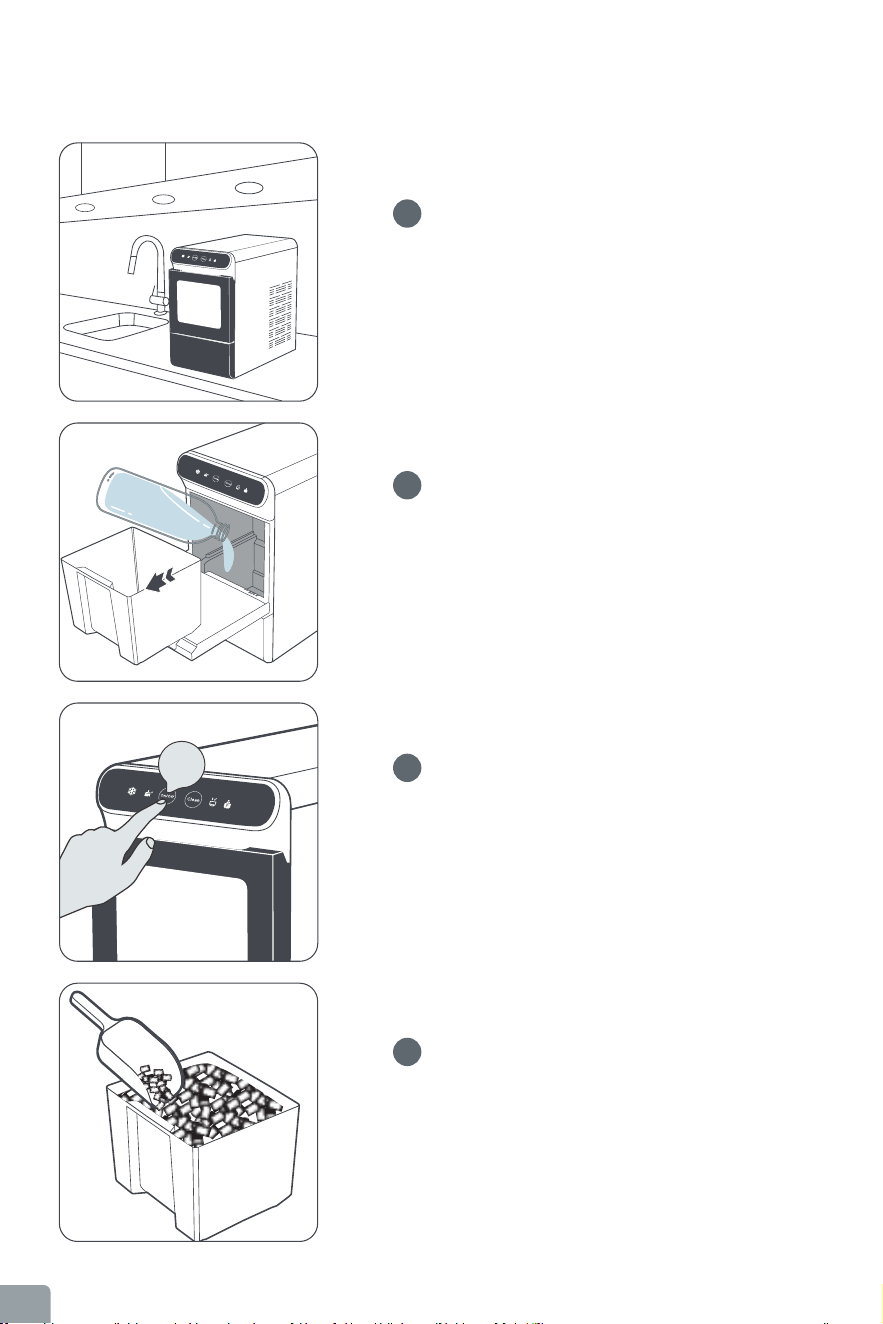
1
Locate and Clean
Locate upright on a at, level suace with at least 6 inches of
clearance on the sides and back. Clean the tank, ice bin and ice
scoop, then settle for at least 2 hours before rst use.
1
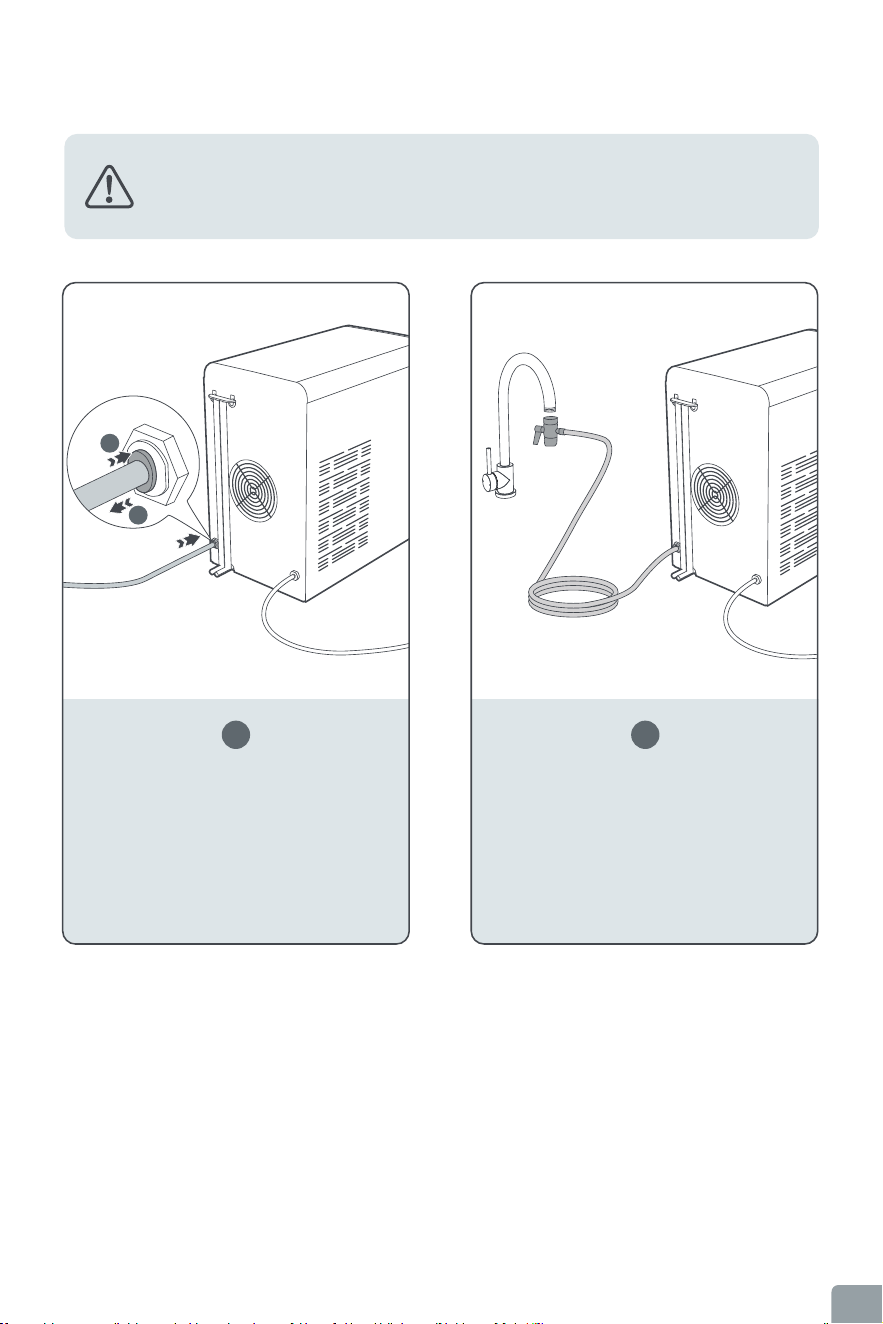
Inse the Hose
Fully inse the included hose into the
water inlet till the end is reached.
To remove, hold against the gray ring and
pull out.
2
•To add water automatically, connect the included hose to the water supply system as instructed.
An adapter (not included) may be required as per the type of water supply system in your home.
•To avoid ovelow of water, do not add water manually when the ice maker is already
connected to the water supply system.
2
Add Water Manually
Open the front door and pull the ice bin out. Fill the water tank
with potable water below MAX line. Place the ice bin back and
close the door.
*Recommended water type: distilled or demineralized water at 40~ 82°F.
*It is recommended to connect with water ltration
system to avoid blockage by scale or mineral
build-up.
3
Sta Making Ice
Plug into a properly installed grounded outlet, then press
On/O button to sta ice making cycle. It will keep making ice
until the ice bin is full.
4
Scoop Ice Out
The ice maker will sta to produce ice in about 15 minutes.
Scoop the ice cubes out once made. Put in use or store in
freezer to avoid melting.
Inse
Remove
1
2
Connect with Water Supply System
Connect the other end with water supply
system. A 1/4'' faucet adapter may be
required.
1/4'' Adapter
(Not Included)
Water
On/O
0807
Getting Staed Automatic Relling
1
Locate and Clean
Locate upright on a at, level suace with at least 6 inches of
clearance on the sides and back. Clean the tank, ice bin and ice
scoop, then settle for at least 2 hours before rst use.
1
Inse the Hose
Fully inse the included hose into the
water inlet till the end is reached.
To remove, hold against the gray ring and
pull out.
2
•To add water automatically, connect the included hose to the water supply system as instructed.
An adapter (not included) may be required as per the type of water supply system in your home.
•To avoid ovelow of water, do not add water manually when the ice maker is already
connected to the water supply system.
2
Add Water Manually
Open the front door and pull the ice bin out. Fill the water tank
with potable water below MAX line. Place the ice bin back and
close the door.
*Recommended water type: distilled or demineralized water at 40~ 82°F.
*It is recommended to connect with water ltration
system to avoid blockage by scale or mineral
build-up.
3
Sta Making Ice
Plug into a properly installed grounded outlet, then press
On/O button to sta ice making cycle. It will keep making ice
until the ice bin is full.
4
Scoop Ice Out
The ice maker will sta to produce ice in about 15 minutes.
Scoop the ice cubes out once made. Put in use or store in
freezer to avoid melting.
Inse
Remove
1
2
Connect with Water Supply System
Connect the other end with water supply
system. A 1/4'' faucet adapter may be
required.
1/4'' Adapter
(Not Included)
Water
On/O
0807

03
CARE AND
CLEANING
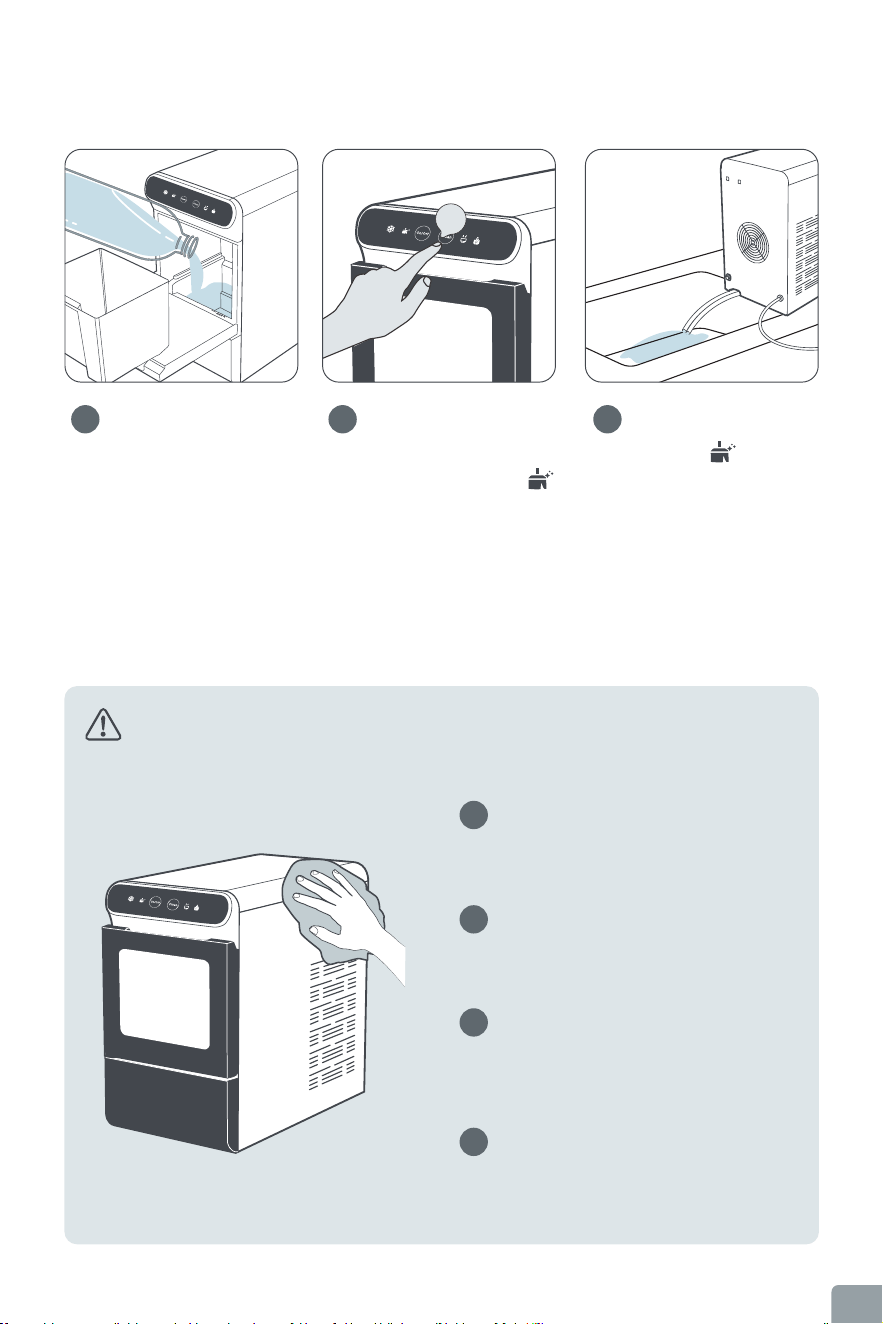
Self-Cleaning
Regular Cleaning
The ice maker will car out a self-cleaning cycle automatically
after keep running for 4.5 hours (if ice bin is not full).
1
Unplug and take out the ice bin. Remove the water
lter on the right corner of the tank.
2
Rinse clean the ice bin and water lter with diluted
detergent and warm water.
3
Clean the water tank with diluted detergent, warm
water and a soft cloth. Add water to rinse and drain
out the water.
4
Gently wipe the exterior with a soft, damp cloth.
To remove the fallen di or bers, we recommend cleaning the ice bin and water tank once eve 1
to 2 weeks. Unplug before cleaning.
1
Fill the tank with water below
MAX line or connect with water
supply system.
2
Hold Clean for 3s to sta an
8-minute self-cleaning cycle (
stays solid on).
3
Once completed, will turn o.
Unhook the drainpipe and lay
down to a sink.
* To resume ice making, press On/O
again.
3S
1009
03
CARE AND
CLEANING
Self-Cleaning
Regular Cleaning
The ice maker will car out a self-cleaning cycle automatically
after keep running for 4.5 hours (if ice bin is not full).
1
Unplug and take out the ice bin. Remove the water
lter on the right corner of the tank.
2
Rinse clean the ice bin and water lter with diluted
detergent and warm water.
3
Clean the water tank with diluted detergent, warm
water and a soft cloth. Add water to rinse and drain
out the water.
4
Gently wipe the exterior with a soft, damp cloth.
To remove the fallen di or bers, we recommend cleaning the ice bin and water tank once eve 1
to 2 weeks. Unplug before cleaning.
1
Fill the tank with water below
MAX line or connect with water
supply system.
2
Hold Clean for 3s to sta an
8-minute self-cleaning cycle (
stays solid on).
3
Once completed, will turn o.
Unhook the drainpipe and lay
down to a sink.
* To resume ice making, press On/O
again.
3S
1009
04
TROUBLESHOOTING
GUIDE
The troubleshooting guide addresses the most common
problems. If problems persist, feel free to contact the
Customer Suppo at
Storage
When not in use for an extended period of time, clean, drain water completely and d the
interior. Cover and store in a cool, d location away from direct sunlight.
Removal of Scale/Mineral Build-up
1
Fill the water tank with warm water (around 90°F)
below MAX line.
2
Add in distilled white vinegar or ice maker cleaner.
Set aside for at least 2 hours.
3
Hold Clean for 3s to sta self-cleaning cycle. Repeat
up to 3 cleaning cycles.
4
Drain the mixture and continue running 3 cleaning
cycles with fresh water for each rinse.
For scale or mineral build-up, follow the directions below to descale once a month or when needed.
Do not clean with solvents or chemicals.
suppo@thereyehome.com
1211

05
WARRANTY AND
SERVICE
Thank you for choosing Thereye Ice Maker. This product
is covered with Thereye product and labor warranty for
12 months from the date of its original purchase.
Q
A
ashing
solid on
solid on,
ashing
ashing,
The ice maker does not
work or no ice / crushed
ice is being formed.
Noise during ice making.
Water leaks.
ashing
•Lack of water. Fill water up to the MAX level and press On/O to
resta.
•Disassemble the water lter. Check and clean when necessa.
•Check if the water level detector is blocked. Clear and resta.
•Scale blocked in internal pipes. Descale as instructed.
•Ice bin full. Remove ice and press
On/O to resta.
•Ice full sensor damaged. Contact Customer Suppo for help.
•Di on ice full sensor. Wipe clean with a soft, damp cloth.
•Ice-making assembly is defrosting. Wait 30 to 45 minutes for the
ice maker to return to normal automatically.
•Or you can hold
Clean for 3s to car out a self-cleaning cycle,
then press
On/O to resta after cleaning is done.
•Ice-making assembly is frozen. Wait 20 minutes for the ice maker
to defrost automatically. Unplug the ice maker then resta.
•Check if lights up. stays solid on during ice making cycle.
•Check if the water tank is lack of water. Fill with water and press
On/O to resta.
•The ice maker will stop making ice when the ice bin is full and
resume in 4 hours automatically. Remove the ice cubes timely, the
unit will resta immediately.
•Hold
Clean for 3s to car out a self-cleaning cycle.
•Disassemble the water lter. Check and clean when necessa.
•Suggested ambient temperature: 50~ 90°F. Suggested water
temperature: 40~ 82°F.
•Make sure the ice maker is placed upright on a at, level suace
with at least 6 inches of clearance on the sides and back.
•Check if the fan at the back is blocked by any foreign objects.
•Car out a self-cleaning cycle to remove any frozen pas.
•During a freezing cycle, it is normal to hear the ice scrapping, the
fan moving air and the water pump circulating water.
•Check if the hose is fully inseed into the water inlet till the end is
reached.
•Unplug the hose and check if the inseed end is intact and at.
Cut for a new at end when necessa.
•Wrap the connection pa with PTFE thread seal tape for a tight
connection.
1
YEAR
1413
- Accident, misuse, or repairs peormed by
unauthorized personnel.
- Any unit that has been tampered with or
used for commercial purpose.
- Normal wear and tear of wearable pas.
- Use of force, damage caused by external
inuences.
- Damage caused by non-obseance of the
User Manual, e.g. connection to an
unsuitable mains supply or non-compli-
ance with the instructions.
- Paially or completely dismantled
appliances.
- Defects caused by or resulting from
damages from shipping or from repairs,
seice, or alteration to the product or any
of its pas that have been peormed by a
repair person not authorized.
We can only provide after sales seice for
products that are sold by Thereye or Thereye
authorized retailers and distributors. If you
have purchased your unit from a dierent
place, please contact your seller for return
and warranty issues.
The warranty will not apply in cases of:
* Please have your order ID ready before contacting Customer Suppo.
15

ICE MAKER
Model: ER-IM05
User Manual
Made In China Rev_1.1_EN
suppo@thereyehome.com
Manufacturer: Shenzhen Guiyang Network Technology Co., Ltd
4008051
Address: 1404K3, East Block, Shengtang Commercial Building, Futian District,
Shenzhen, China
Questions or Concerns?