
Instructions for use


IMPORTANT SAFETY INSTRUCTIONS 4
Safeguarding the environment 8
Installation 8
Fitting the appliance 8
Prior to connecting 9
After connecting 9
Before rst use 9
Accessories 10
Probe placing 11
Appliance features 12
Control panel 12
Key lock 13
Messages 13
Shortcuts 14
ON/OFF/Pause 15
Kitchen timer 15
Changing settings 16
Specials 20
Sous vide 26
Steam defrost 28
Reheat 29
Steam 30
Assisted mode 32
Maintenance & cleaning 33
Data for testing heating performance 35
Technical specication 35
Introduction to “Chef touch” 36
How to apply the “Chef touch” method 37
The cooking bags 38
Preparing bags 38
Machine operation indications 39
How to cook in a steam oven 40
How to use the blast chiller 41
Indications concerning storing the packs
in a refrigerator/freezer 41
How to use the steam oven for heating 42
Cooking table 43
Cooking and preparation tips 46
Troubleshooting guide 48
After-Sales Service 48

4
These instructions are also available on our website: docs.kitchenaid.eu
IMPORTANT SAFETY INSTRUCTIONS
SAFETY IS OUR PRIORITY
This manual and the appliance itself display important safety warnings, to be
read and observed at all times.
This is the danger symbol relating to safety, which alerts users to
potential risks to themselves and others. All safety warnings are
preceded by the danger symbol and the text shown here:
DANGER
Indicates a hazardous situation which, if
not avoided, will cause serious injury.
WARNING
Indicates a hazardous situation which, if
not avoided, could cause serious injury.
All safety warnings give specic details of the potential
risk present, and indicate how to reduce the risk of
injury, damage and electric shock resulting from
improper use of the appliance. Carefully observe the
following instructions:
• Keep these instructions close at hand for future
reference
• Use protective gloves to perform all unpacking and
installation operations.
• The appliance must be handled and installed by two or
more persons.
• The appliance must remain disconnected from the
power supply before any installation work is carried
out.
• Installation and maintenance must be carried out by a
qualied technician, in compliance with the
manufacturer’s instructions and local safety
regulations. Do not repair or replace any part of the

5
appliance unless specically stated in the user manual.
• Replacement of power cables must be carried out by a
qualied electrician. Contact an authorised After-Sales
Service.
• Regulations require that the appliance be earthed.
• Once the appliance is tted in its housing, the power
cable must be long enough to connect the appliance
to the main power supply.
• For installation to comply with current safety
regulations, an omnipolar disconnect switch with
minimum contact gap of 3 mm must be used.
• Do not use multiple plug adaptors if the oven is tted
with a plug.
• Do not use extension leads, multiple socket adapters.
• Do not connect the appliance to a socket which can be
operated by remote control or timer.
• The electrical components must not be accessible to
the user after installation.
• Do not touch the appliance with any wet part of the
body and do not operate it when barefoot.
• This appliance is designed solely for use as a domestic
appliance, for cooking food. No other use is permitted
(e.g. heating rooms).
The manufacturer declines any liability for injury to
persons or animals or damage to property if this advice
and these precautions are not respected.
• The appliance and its accessible parts become hot
during use.
• Care should be taken to avoid touching heating
elements.
• Very young (0-3 years) and young children (3-8 years)

6
must be kept away unless continuously supervised.
• Children aged 8 years and above, and persons with
reduced physical, sensory or mental capabilities or lack
of experience and knowledge can only use this
appliance if they are supervised or have been given
instructions on safe appliance use, and if they
understand the hazards involved. Children must not
play with the appliance. Cleaning and user
maintenance must not be carried out by children
without supervision.
• During and after use, do not touch the heating
elements or interior surfaces of the appliance – risk of
burns. Do not allow the appliance to come into contact
with cloths or other ammable materials until all the
components have cooled down completely.
• At the end of cooking, exercise caution when opening
the appliance door, letting the hot air or steam exit
gradually before accessing the oven. When the
appliance door is shut, hot air is vented from the
aperture above the control panel. Do not obstruct the
vent apertures.
• Use oven gloves to remove pans and accessories,
taking care not to touch the heating elements.
• Do not place ammable materials in or near the
appliance: a re may break out if the appliance is
inadvertently switched on.
• Do not heat or cook sealed jars or containers in the
appliance.
• The pressure that builds up inside might cause the jar
to explode, damaging the appliance.
• Do not use containers made of synthetic materials.

7
• Overheated oils and fats catch re easily. Always
remain vigilant when cooking foods rich in fat and oil.
• Never leave the appliance unattended during food
drying.
• If alcoholic beverages are used when cooking foods
(e.g. rum, cognac, wine), remember that alcohol
evaporates at high temperatures. As a result, there is a
risk that vapours released by the alcohol may catch re
upon coming into contact with the electrical heating
element.
• Overheated oils and fats catch re easily. Always
remain vigilant when cooking foods rich in fat, oil or
alcohol (e.g. rum, cognac, wine).
• Never use steam cleaning equipment.
• Use only the temperature probe recommended for this
oven.
• Do not use harsh, abrasive cleaners or sharp metal
scrapers to clean the oven door glass as they can
scratch the surface, which may result in the glass
shattering.
• Ensure that the appliance is switched o before
replacing the lamp to avoid the possibility of electric
shock.
SCRAPPING OF HOUSEHOLD APPLIANCES
• This appliance is manufactured with recyclable or reusable materials. Scrap
the appliance in accordance with local regulations on waste disposal. Before
scrapping, cut o the power cords so that the appliances cannot be
connected to the mains.
• For further information on the treatment, recovery and recycling of
household appliances, contact the competent local authority, the domestic
waste collection service or the shop where you purchased the product.

8
Disposal of packing materials
• The packaging material is 100 % recyclable and
is marked with the recycle symbol (
)
• The various parts of the packing must therefore
be disposed of responsibly and in full
compliance with local authority regulations
governing waste disposal.
Energy saving tips
• Only pre-heat the microwave oven if specied in
the cooking table or recipe.
• Use dark lacquered or enamelled baking moulds
as they absorb heat far better.
Scrapping the product
• This appliance is marked in conformity with
European Directive 2012/19/EU, Waste Electrical
and Electronic Equipment (WEEE).
• By ensuring that this product is disposed of
correctly, you will help prevent potential
negative consequences for the environment and
human health, which could otherwise arise
through inappropriate waste handling of this
product.
• The symbol
on the product or on the
accompanying documentation indicates that it
should not be treated as domestic waste but
must be taken to an appropriate collection
centre for the recycling of electrical and
electronic equipment.
Safeguarding the environment
After unpacking the appliance, ensure that it has
not been damaged during transport and that the
appliance door closes properly.
In the event of problems, contact the dealer or
your nearest After-Sales Service.
To prevent any damage, do not remove the
appliance from its polystyrene foam base until the
time of installation.
Children should not perform installation
operations. Keep children away during installation
of the appliance. Keep the packaging materials
(plastic bags, polystyrene parts, etc.) out of reach of
children, during and after the installation of the
appliance.
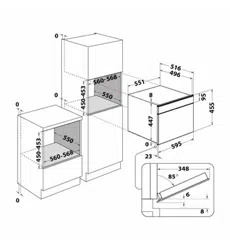
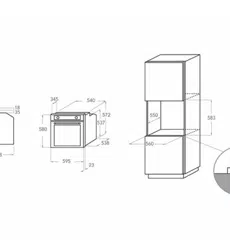
Installation
Follow the separate tting instructions supplied
when installing the appliance.
Fitting the appliance

9
Check that the voltage on the rating plate
corresponds to the voltage in the home.
Ensure that the appliance oven cavity is empty
before tting.
Ensure that the appliance is not damaged. Check
that the microwave oven door closes rmly against
the door support and that the internal door seal is
not damaged. Empty the appliance oven and clean
the interior with a soft, damp cloth.
Do not operate this appliance if it has a damaged
mains cord, if it is not working properly, or if it has
been damaged or dropped. Do not immerse the
mains cord in water. Keep the cord away from hot
surfaces.
If the power cable is too short or damaged, it must
be replaced. The power cable must only be
replaced by a qualied technician in compliance
with the manufacturer’s instructions and current
safety regulations. Contact an authorised
After-Sales Service.
For installation to comply with current safety
regulations, an omnipolar disconnect switch with
minimum contact gap of 3 mm must be used.
Prior to connecting
The appliance can be operated only if the
appliance oven door is rmly closed.
The earthing of this appliance is compulsory. The
manufacturer will accept no responsibility for
injury to persons, animals or damage to objects
arising from the non-observance of this
requirement.
The manufacturers are not liable for any problems
caused by the user’s failure to observe these
instructions.
After connecting
. OPEN THE DOOR, remove the accessories and
ensure that the oven is empty.
RINSE THE WATER
CONTAINER with tap water (no detergents) and
then ll it to the “MAX” mark.
SLIDE THE WATER CONTAINER into its socket until it
engages in the contact point and sits rmly in
place.
.
RUN THE CALIBRATION FUNCTION and follow on screen
instructions.
NOTE
THE WATERPUMP responsible for lling and draining
the steam boiler is now activated. It will initially
sound louder during pumping of air, and lower
when water is lling the pump again.
THIS IS NORMAL, and no reason for alarm.
AFTER CALIBRATION, let the oven cool to room
temperature and then wipe dry any damp areas
if present.
EMPTY THE WATER CONTAINER and dry it o before
further use.
Before first use
10
GENERAL
THERE ARE a number of accessories available on the
market. Before you buy, ensure that they are
suitable for cooking with steam and hot air in
combination.
PLACE A CONTAINER on the wire shelf. It can hold
greater weights than the baking tray or steam tray
can.
ENSURE THAT THERE IS a space of at least 30mm
between the upper rim of the container and the
cavity ceiling to allow sucient steam to enter the
container.
CHOOSING COOKING CONTAINER
USE PERFORATED COOKING containers whenever
possible, e.g. for cooking vegetables. The steam
has free access to the food from all sides and the
food is cooked evenly.
STEAM EASILY REACHES into the space between big
pieces of food such as large potatoes. This ensures
even and eective cooking. It enables a large
quantity to nish in the same amount of time as a
smaller quantity. Placing (spacing) food to allow
the steam even and easy access to individual
pieces of food enables it to be cooked in the same
amount of time as smaller quantities.
MORE COMPACT DISHES such as casseroles or bakes, or
food such as peas or asparagus spears, which have
very little or no space between them will take
longer to cook because the steam has less space in
which to work.
SPONGE
THE SUPPLIED SPONGE is used for wiping o residual
condensation that may be present in the cooled
oven after cooking. It is important that you allow
the oven to cool o to avoid scalding.
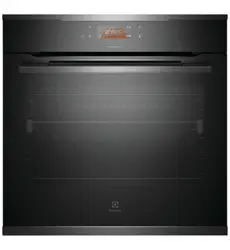
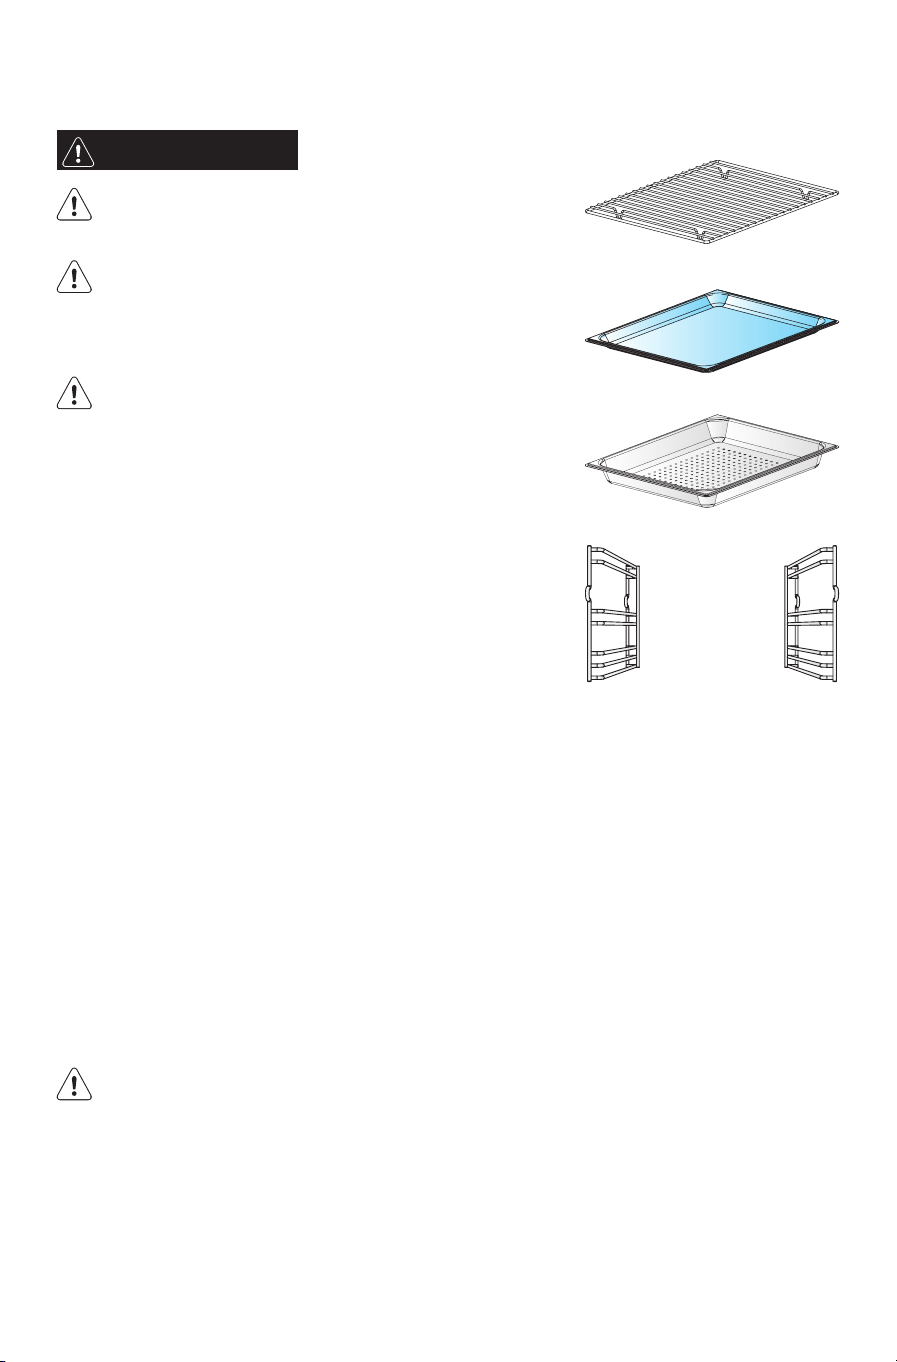
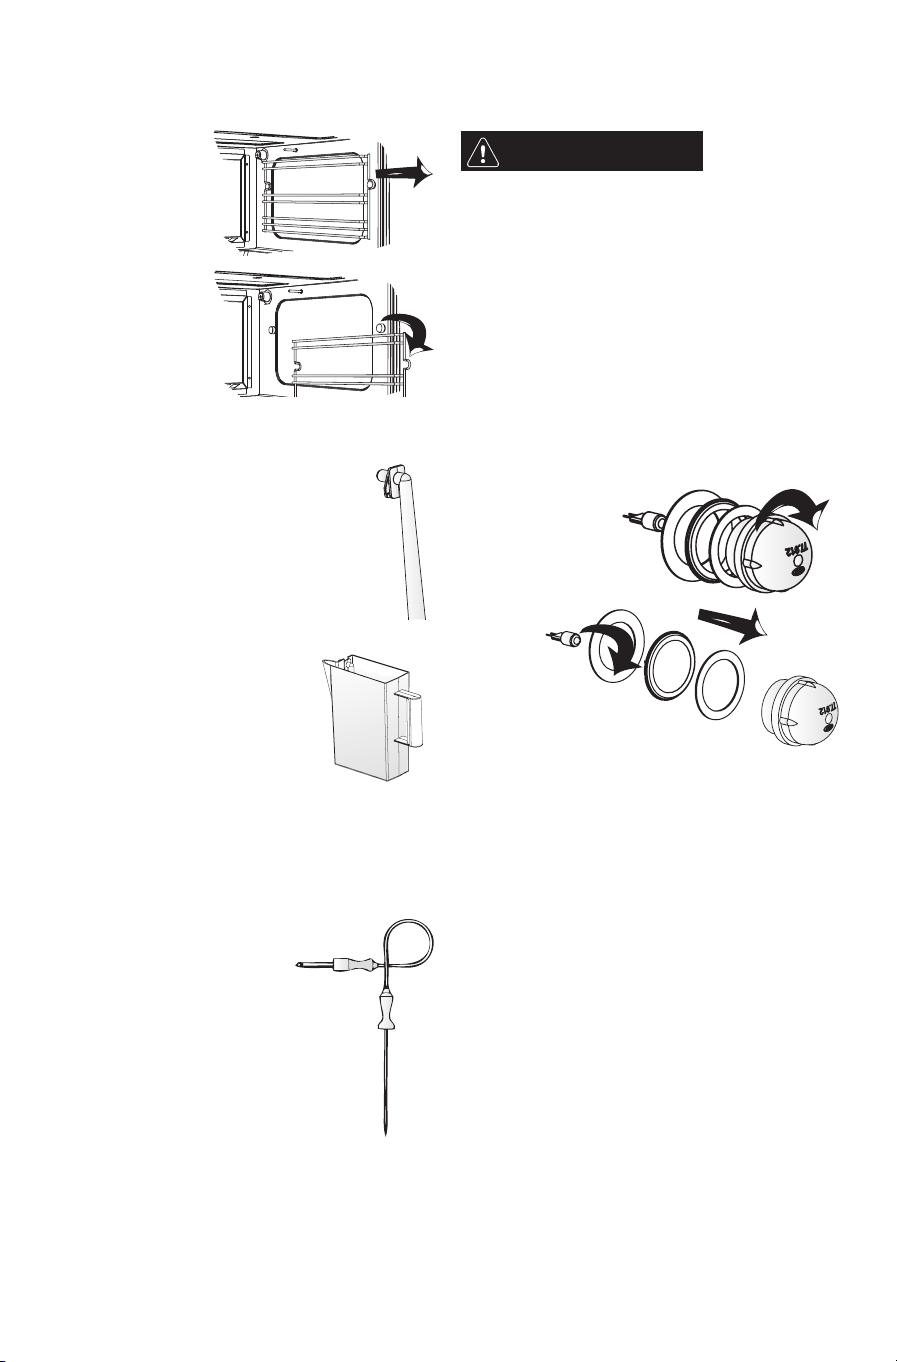
WIRE SHELF
THE WIRE SHELF allows hot air circulation around the
food. Put food directly on
it or use it as support for
pots, cake tins and other
cooking containers.
When you put food directly on the wire shelf, place
the baking & drip tray under it.
BAKING & DRIP TRAY
USE THE BAKING & DRIP TRAY beneath the wire shelf and
steam tray. It may also be used as a cooking utensil
or as a baking tray.
THE BAKING & DRIP TRAY is
used to collect the
dripping juices and
food particles that
otherwise would stain
and soil the interior of
the oven. Avoid placing vessels directly on the
oven oor.
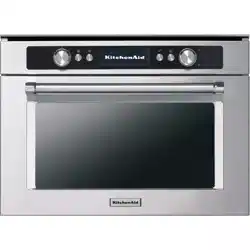
Steam tray
USE THE STEAM TRAY for foods such as sh,vegetables
and potatoes.
USE THE OVEN WITHOUT THE
STEAM TRAY for foods such
as rice and grains.
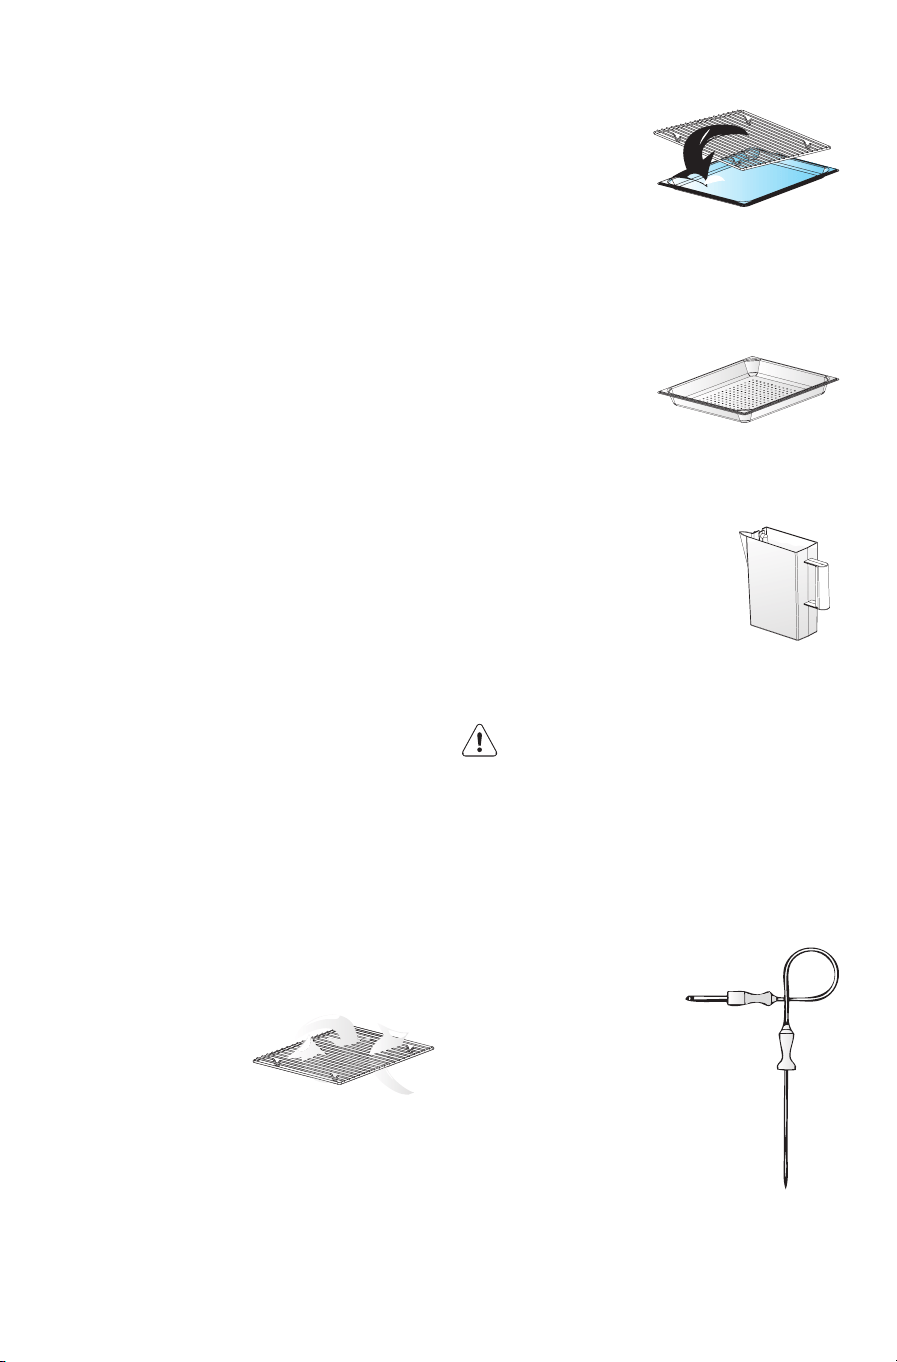
WATER CONTAINER
THE WATER CONTAINER IS LOCATED behind the door and is
accessible as soon as the door is opened.
ALL COOKING FUNCTIONS, except Forced
air, require the water container to be
full.
FILL WATER CONTAINER to the”MAX” mark
with tap water.
USE ONLY fresh tap water or still
bottled water. Never use distilled or ltered water
nor any other liquids in the water container.
IT IS IMPORTANT TO EMPTY THE WATER CONTAINER AFTER
EACH USE. This is for hygienic reasons. It also prevents
condensate from building up inside the appliance.
CAREFULLY (i.e. slowly, so as not to spill) pull the
water container out of its compartment. Keep it
horizontal to allow remaining water to drain out of
the valve seat.
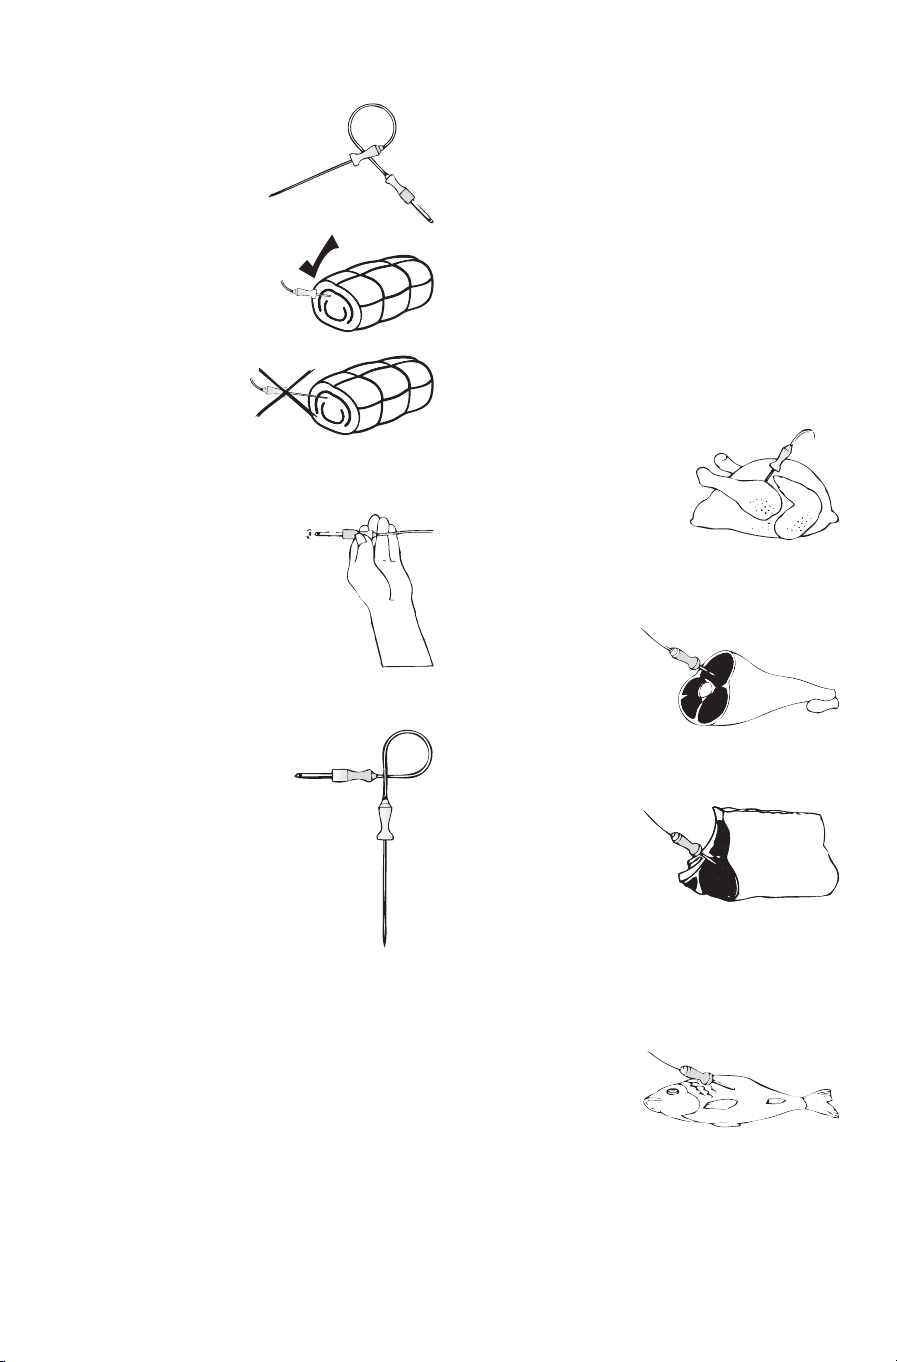
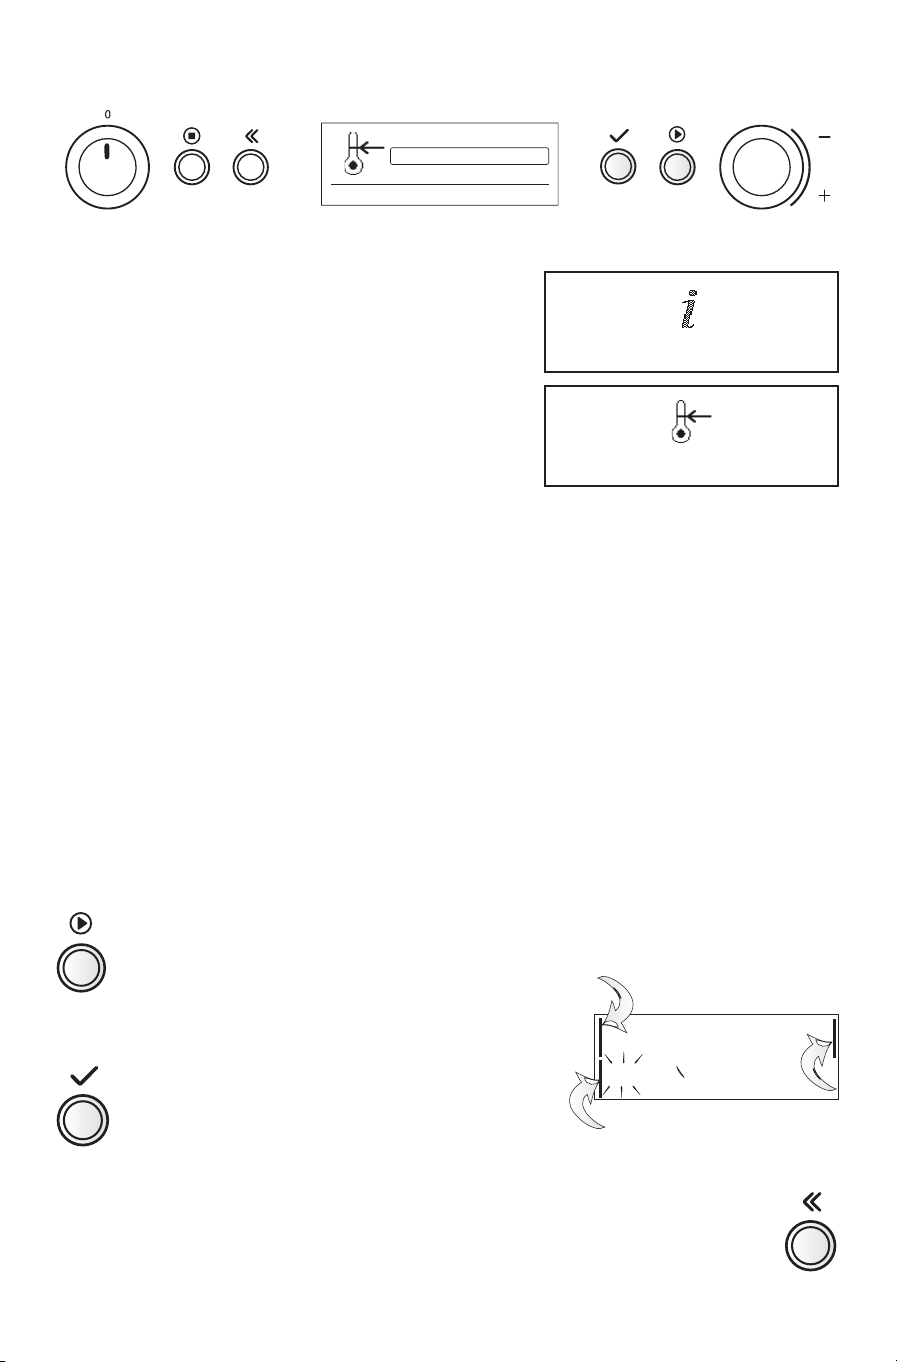
PROBE
Use only the temperature
probe recommended for
this oven.
THE PROBE IS DESIGNED to
measure the internal
temperature of your food
between the range of 30°C
and 100°C. As soon as the set
temperature is reached, the
appliance switches o and
displays ”Temperature
reached” in the display.
NEVER IMMERSE the probe in water when cleaning.
Simply wipe clean with a damp cloth or kitchen roll
after use.
Accessories
11
.
PLACE THE TEMPERATURE
PROBE in the food while it
is still on the
kitchencounter.
ENSURE that as much as
possible of the probe
length is inserted in
the food. This will
ensure a more
accurate temperature
reading.
.
PLACE the prepared
food in the oven.
.
FLIP THE PROBE LID BACK AND
connect the temperature
probe to the oven wall socket
and ensure that the cord is
free, including after the oven
door is closed. Both the socket
and probe plug are without
current.
TEMPERATURE COOKING
THE TEMPERATURE PROBE should
normally be inserted so that
the tip of the probe is
positioned in the thickest part
of the food, as this is the part
that takes the longest time to
heat.
THE TIP OF THE PROBE must not
touch any bones which the
food may contain.
Also, avoid inserting the probe
in fatty areas of the food as these areas heat up
more quickly, giving misleading end temperatures.
The probe should, if possible, be positioned so that
the tip does not touch the walls or the bottom of
the cooking vessel.
THE TEMPERATURE which is set must be higher than
the current temperature of the food.
IT IS NOT POSSIBLE to use the probe when making
sweets, jam or marmalade, or dishes which need to
be cooked or simmered for a long period. This is
because the highest temperature which can be set
is 100°C.
NEVER IMMERSE the probe in water when cleaning.
Simply wipe clean with a clean, damp cloth or
kitchen roll after use.
THE OVEN MUST NOT BE OPERATED with the temperature
probe in the cavity if it is not plugged into the
oven.
If you do operate the oven without complying with
the above, you will damage the probe.
ONLY USE THE FOOD PROBE SUPPLIED or recommended by
the After-Sales Service. Other brands on the
market will not give proper results and may
damage your oven.
CHICKEN
WHEN THE PROBE is used to roast
chicken, the tip should be
positioned in the thickest part
of the chicken, i.e. on the
inside of the thigh just behind
the leg. It must not touch any
bones.
LAMB
WHEN COOKING A LAMB
JOINT / LEG OF LAMB,insert
the tip of the probe into
the thickest part so that
it does not touch the
bone.
PORK
WHEN COOKING PORK, e.g.
pork shoulder,
gammon, silverside,
etc, the probe should
be inserted into the
‘end’ of the joint rather
than through the layer of fat on the surface. Avoid
placing the tip of the probe in fatty areas of the
pork.
FISH
THE PROBE CAN BE USED
WHEN COOKING WHOLE,
LARGE FISH, such as pike
or salmon. Insert the tip
of the probe in the
thickest part, not too close to the backbone.
Probe placing

12
Appliance features
q
e
r
w
Steam inlet
Temperature sensor
Door seal
Water container
Valve seat
Lift & pull
Push
Probe lid / oven wall socket
Shelf levels
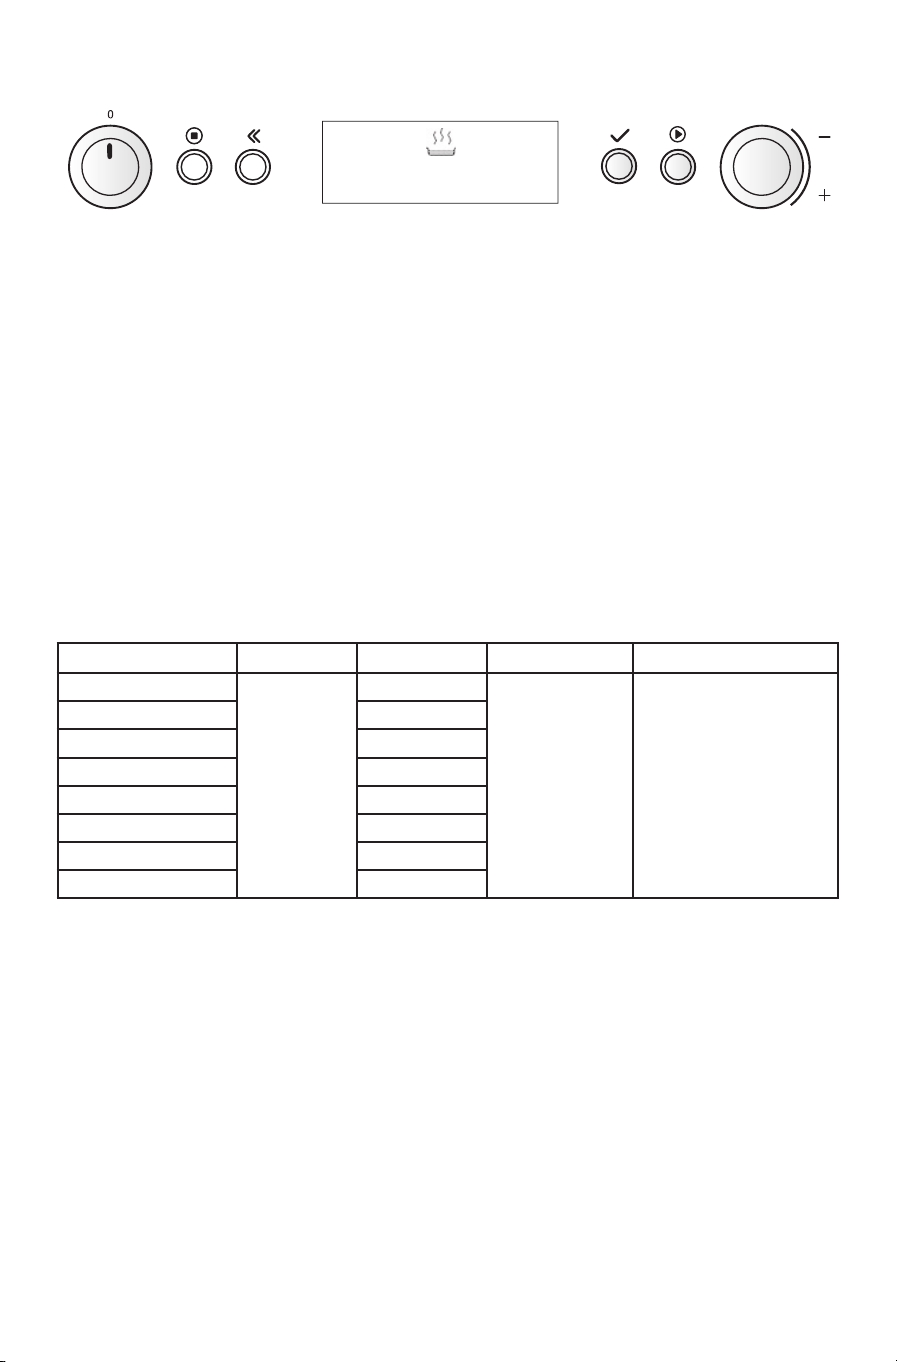
Control panel
Multifunction knob
ON/OFF/pause button
Digital display
Back button
Adjust knob
OK button
Start button
Calibrate
Language
Time
Appliance and display setting
13
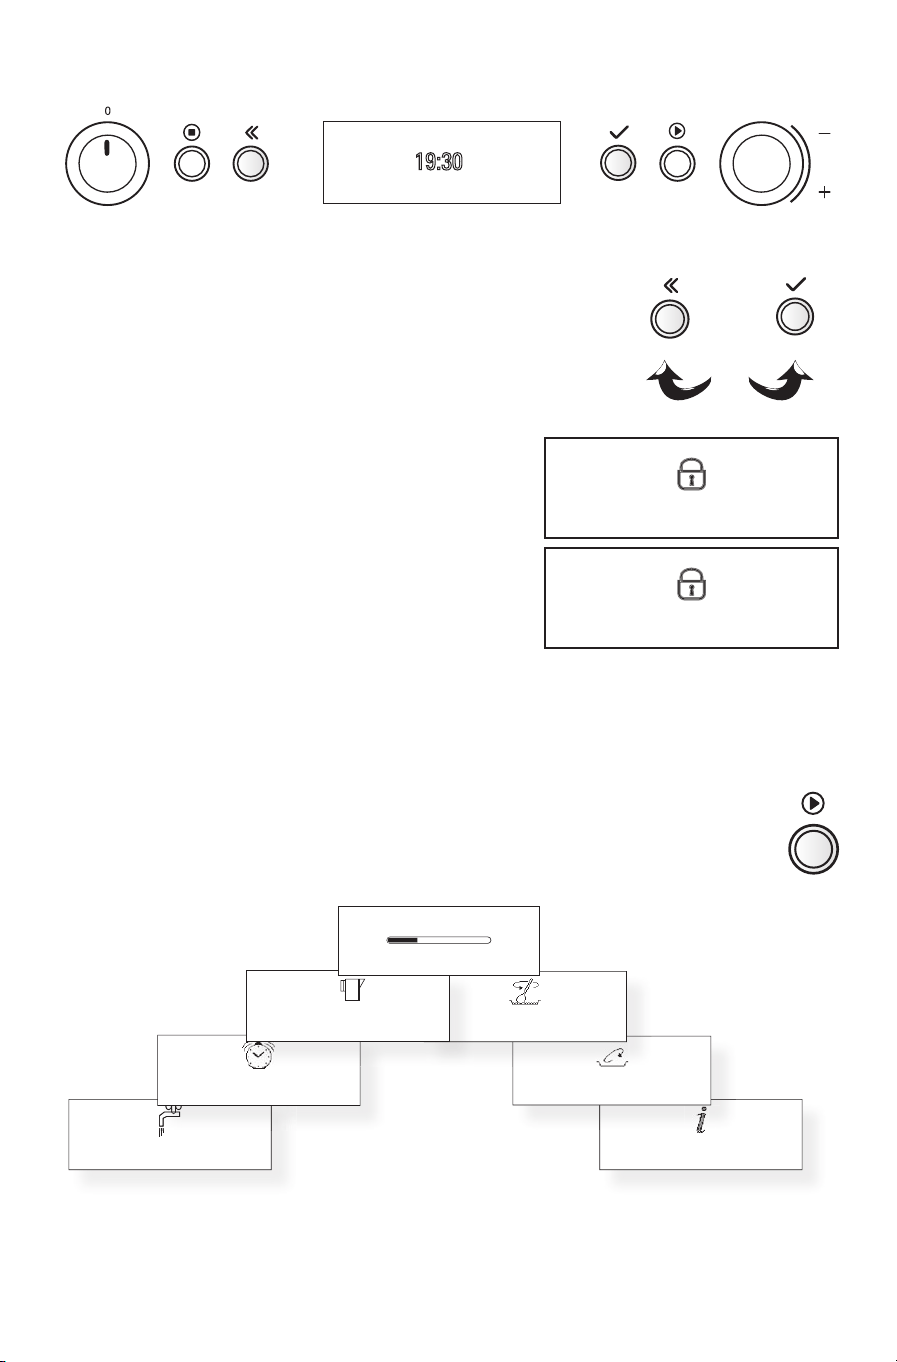
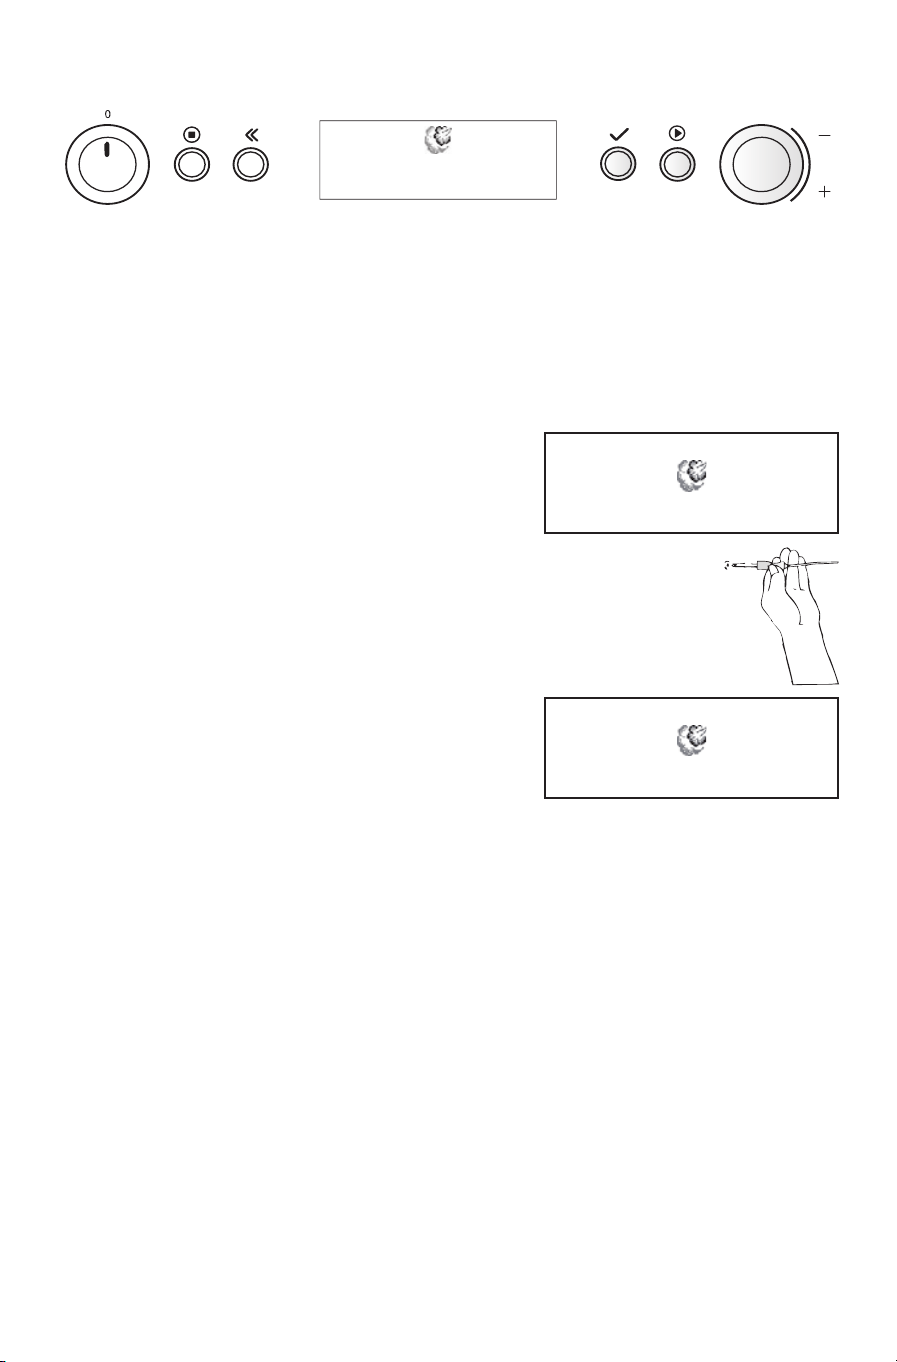
Key lock
19:30
q
q
. PRESS THE BACK AND OK BUTTONS SIMULTANEOUSLY AND KEEP PRESSED UNTIL TWO BEEPS ARE
HEARD ( SECONDS).
USE THIS FUNCTION to prevent children from using the oven unattended.
WHEN THE LOCK IS ACTIVE, none of the buttons are responsive.
PLEASE NOTE: These buttons only work in conjunction when the
oven is switched OFF.
A CONFIRMATION MESSAGE is displayed for 3 seconds before returning
to the previous view.
THE KEY LOCK IS DEACTIVATED in the same way it was activated.
q
Key lock
has been activated
Key lock
has been deactivated
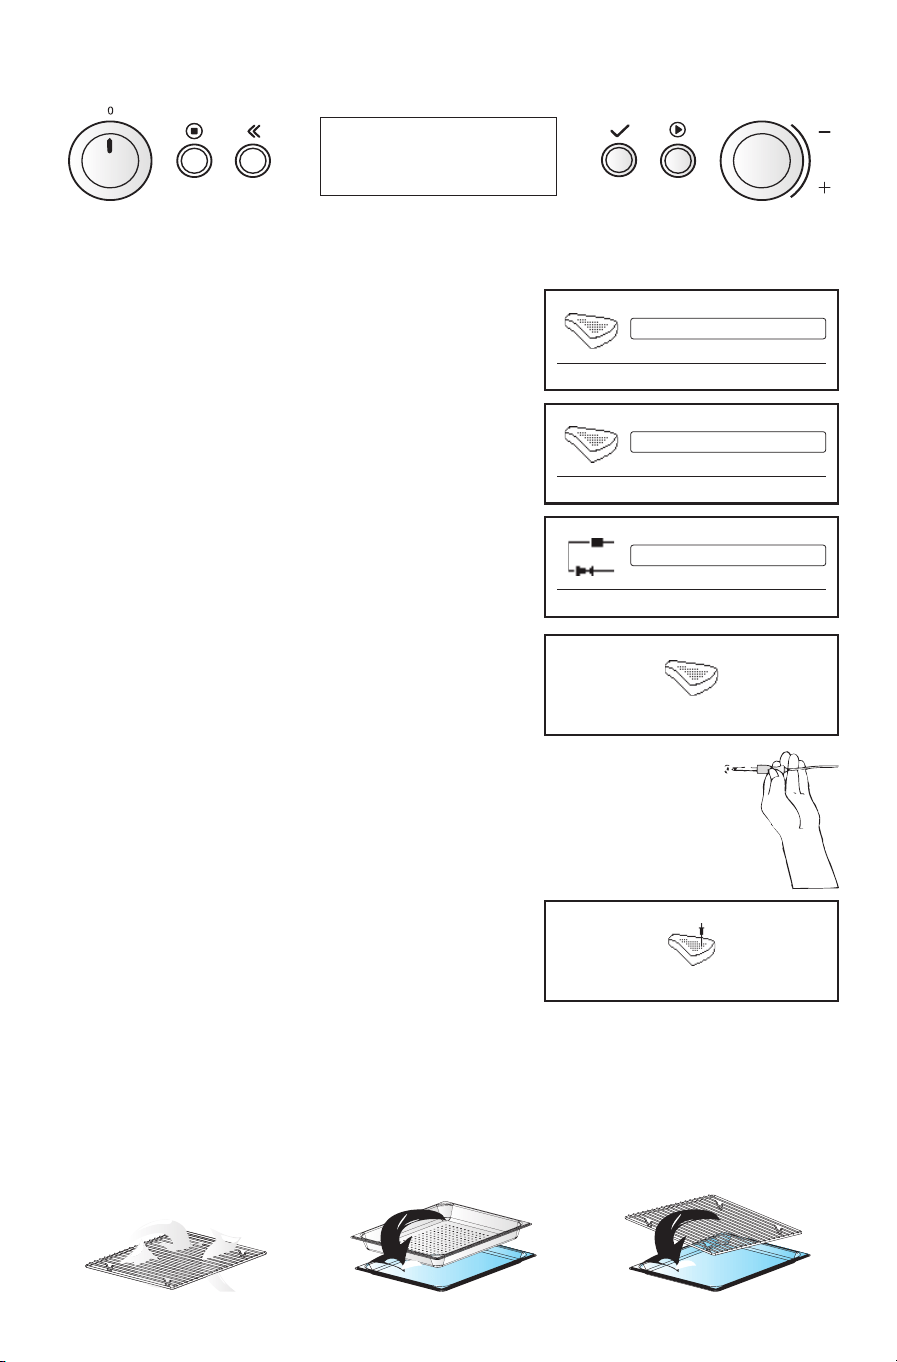
Messages
WHEN USING SOME OF THE FUNCTIONS, the oven may stop and prompt you to perform an action or simply advise
you on which accessory to use.
IF A MESSAGE APPEARS:
- Open the door (if needed).
- Perform the action (if needed).
- Close the door and restart by pressing the “Start” button.
25%
Remove and empty container
Press OK when done
Draining boiler
Cooking nearly nished
Please check on food.
Empty and rell container
Please stir food
Please turn food
Do not open oven door
during calibration

14
Shortcuts
q
w
et
r
Shortcuts
. TURN THE MULTIFUNCTION KNOB until “Shortcuts” is displayed.
.
TURN THE ADJUST KNOB to choose your favourite shortcuts. The
most frequently used function is pre-selected.
.
PRESS THE OK BUTTON to conrm your selection.
.
TURN THE ADJUST KNOB / OK BUTTON to make the required
adjustments.
.
PRESS THE START BUTTON.
IN ORDER TO ENABLE EASIER USE, the oven automatically compiles a list
of your favourite shortcuts for you to use.
WHEN YOU BEGIN using your oven, the list consists of 10 empty
positions marked “shortcuts”. As you use the oven over time, it will
automatically ll in the list with shortcuts for your most frequently
used functions.
WHEN YOU ENTER THE SHORTCUTS MENU, the function that you have used most often will be pre-selected and
listed as shortcuts #1.
NOTE: the order of functions listed in the Shortcuts menu will automatically change according to your
cooking habits.
Shortcuts
Shortcuts
Shortcuts
Your most used cooking functions
Bread
Shortcuts
Your most used cooking functions
French fries
Bread
Shortcuts
Your most used cooking functions
15
ON/OFF/Pause
THE APPLIANCE IS TURNED ON/OFF OR PAUSED using the ON/OFF button.
WHEN THE APPLIANCE IS TURNED ON, all buttons function normally and the 24 hour clock is not displayed.
WHEN THE APPLIANCE IS TURNED OFF, only one button is responsive. Only the OK button (see Kitchen timer) will
work. The 24 hour clock is displayed.
NOTE: The oven’s behaviour may dier from that described above, depending on whether the ECO function
is switched ON or OFF (see ECO for more information).
THE DESCRIPTIONS IN THIS IFU are provided on the assumption that the oven is ON.
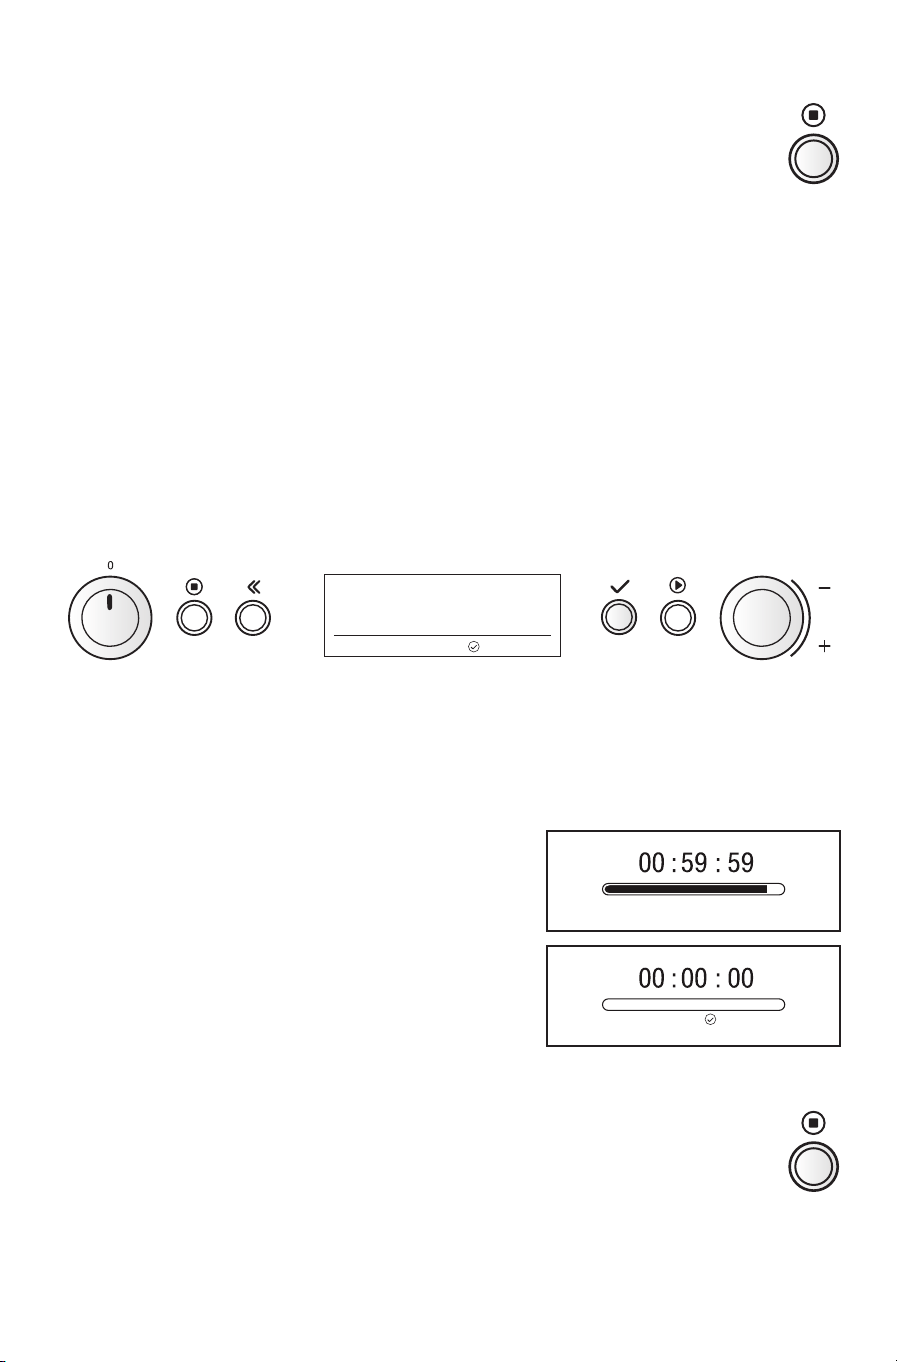
Kitchen timer
00 : 00 : 00
(HH) (MM) (SS)
w
e
rq
Turn +/- to set timer, to start
. TURN THE OVEN OFF by turning the Multifunction knob to the zero position or pressing the ON/OFF button.
.
PRESS THE OK BUTTON.
.
TURN THE ADJUST KNOB to set the desired length of the timer.
.
PRESS THE OK BUTTON to start the timer countdown.
USE THIS FUNCTION when you need a kitchen timer to measure exact
time for various purposes such as standing times for roasts and
cooking on the hob.
THIS FUNCTION IS ONLY AVAILABLE when the oven is switched o or in
standby mode.
AN ACOUSTIC SIGNAL will be heard when the timer has nished counting down.
PRESSING THE STOP BUTTON before the timer has nished will switch the timer o.
Timer
Turn + to prolong , to switch o

16
Changing settings
w
e
q
Settings
. TURN THE MULTIFUNCTION KNOB until “Settings” is shown.
.
TURN THE ADJUST KNOB to choose one of the settings to adjust.
WHEN THE APPLIANCE IS FIRST PLUGGED IN, it will ask you to set the language and 24 hour clock.
AFTER A POWER FAILURE, the clock will ash and needs to be reset.
YOUR OVEN HAS a number of functions which can be adjusted to your personal taste.
Language
. PRESS THE OK BUTTON
. TURN THE ADJUST KNOB to choose one of the available languages.
.
PRESS THE OK BUTTON again to conrm the change.
q
w
e
Calibrate
Language
Time
Appliance and display settings
Türkçe
English
Français
Please select language
Language
has been set
17
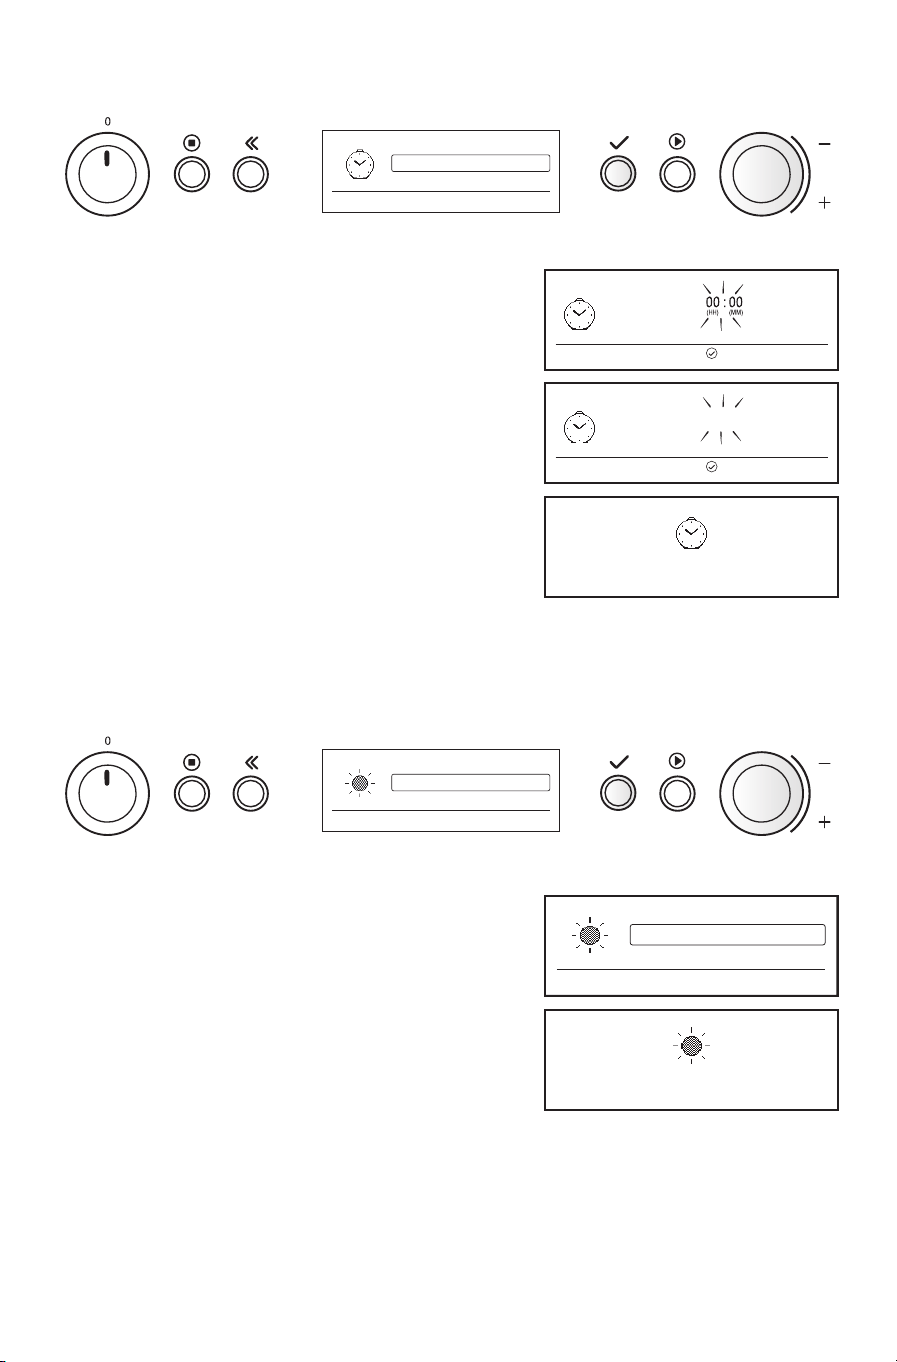
Clock setting
q
w
r
e
Brightness
Time
Volume
Appliance and display settings
. TURN THE ADJUST KNOB until “Time” is displayed.
.
PRESS THE OK BUTTON. (The digits icker).
.
TURN THE ADJUST KNOB to set the hour clock.
.
PRESS THE OK BUTTON again to conrm the change.
THE CLOCK IS SET AND IN OPERATION.
Turn +/- to set time, when done.
12 : 30
(HH) (MM)
Turn +/- to set time, when done.
Time
has been set
Brightness
q
w
r
e
Time
Brightness
Volume
Appliance and display settings
. TURN THE ADJUST KNOB until “Brightness” is displayed.
.
PRESS THE OK BUTTON.
.
TURN THE ADJUST KNOB to set the level of brightness suited to your
preference.
.
PRESS THE OK BUTTON again to conrm your selection.
Time
has been set
High
Medium
Low
For normal living conditions
18
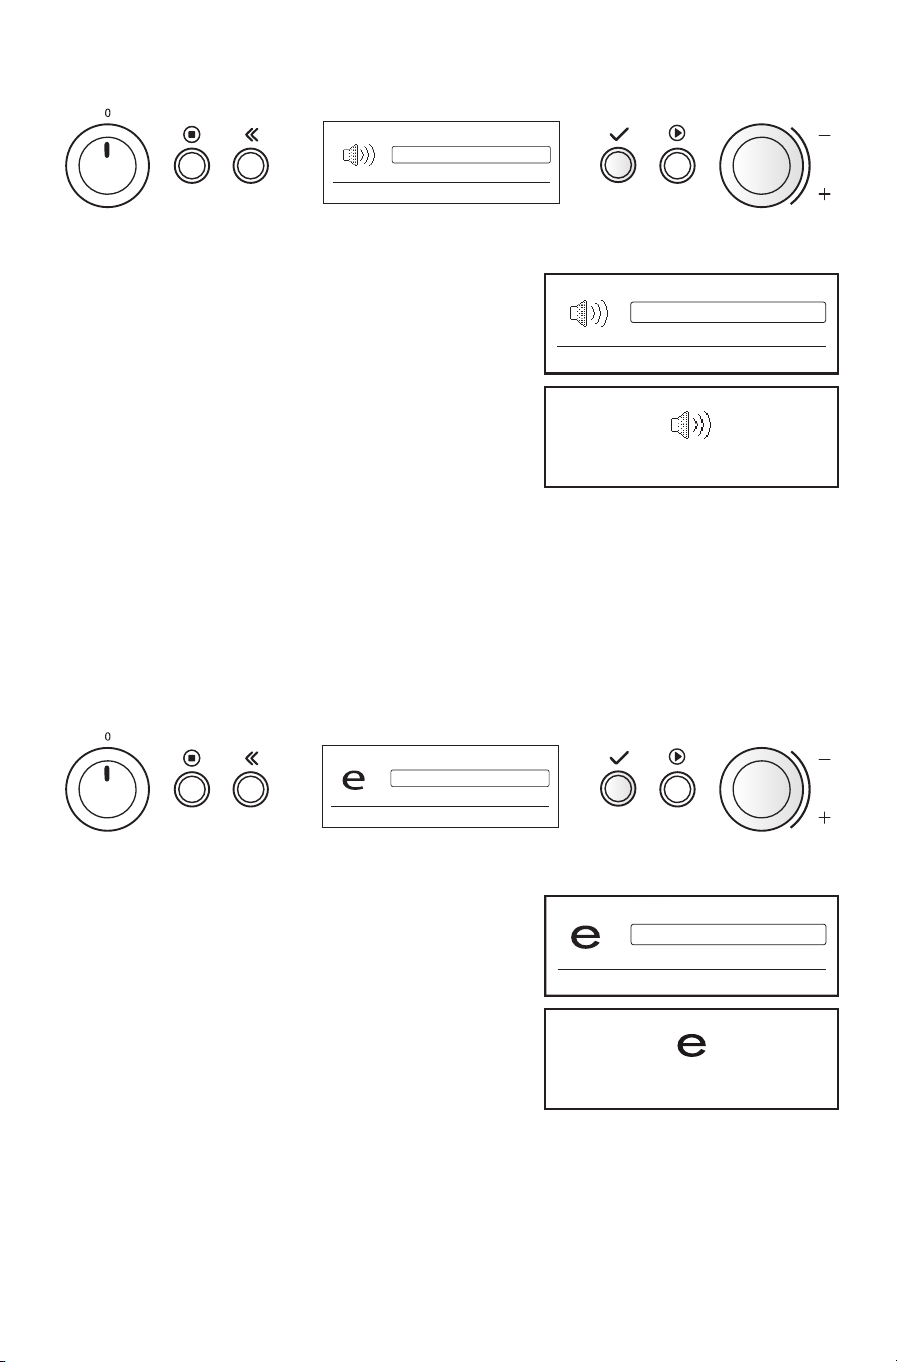
Volume
q
w
r
e
Brightness
Volume
Eco mode
Appliance and display settings
. TURN THE ADJUST KNOB until “Volume” is displayed.
.
PRESS THE OK BUTTON.
.
TURN THE ADJUST KNOB to set the volume high, medium, low or
mute.
.
PRESS THE OK BUTTON again to conrm the change.
Volume
has been set
High
Medium
Low
For normal living conditions
Eco
q
w
r
e
Volume
Eco mode
Calibrate
Appliance and display settings
. TURN THE ADJUST KNOB until “Eco Mode” is displayed.
.
PRESS THE OK BUTTON.
.
TURN THE ADJUST KNOB to turn the ECO setting ON or OFF.
.
PRESS THE OK BUTTON again to conrm the change.
WHEN ECO IS ON, the display will automatically dim down after a
while to save energy. It will automatically light up again when a
button is pressed or the door is opened.
WHEN OFF IS SET, the display will not turn o and the 24 hour clock
will always be visible.
Eco mode
has been set
q
w
OFF
ON
Minimal power consumption
19
Calibrate
q
w
e
Eco mode
Calibrate
Language
Calibration of water boiling point
. PRESS THE OK BUTTON. It is important that you do not open the
door until the entire process is complete.
.
PRESS THE OK BUTTON.
.
PRESS THE START BUTTON.
BEFORE USING THIS FUNCTION,
ENSURE that the water container is lled with fresh tap water.
CALIBRATION
THE BOILING TEMPERATURE OF WATER depends on air pressure. It boils more easily at high altitudes than at sea
level.
DURING CALIBRATION, the appliance is automatically congured to the current pressure ratios at the present
location. This may cause more steam than usual – this is normal.
AFTER CALIBRATION
LET THE OVEN COOL and wipe dry the damp parts.
RECALIBRATION
USUALLY the calibration is carried out once and should be enough if the oven is permanently installed in a
house.
HOWEVER, if you have installed your appliance in a mobile home or similar, moved to another town or in any
other way altered the altitude where it is installed, it must be recalibrated before use.
Do not open oven door
during calibration
Do not open oven door
during calibration
00:10
COOK TIME
14:22
END TIME
During cooking
ONCE THE COOKING PROCESS HAS BEEN STARTED:
The time can easily be increased in 1 minute steps by pressing the Start button. Each press
increases the time.
BY TURNING THE ADJUST KNOB, you may toggle between the
parameters to select the one that you wish to alter.
PRESSING THE OK BUTTON selects it and enables it to be changed
(it ashes). Use the up / down buttons to alter your setting.
PRESS THE OK BUTTON AGAIN to conrm your selection. The oven
continues automatically with the new setting.
BY PRESSING THE BACK BUTTON you may return directly to the last parameter you changed.
200 g
00:70
High
POWER
WEIGHT
COOK TIME

20
Specials
q
w
Specials
. TURN THE MULTIFUNCTION KNOB until “Specials” is shown.
.
TURN THE ADJUST KNOB to choose one of the special functions. Follow instructions in the separate function
chapter (example; Dough proving).
SPECIAL FUNCTIONS
FUNCTION SUGGESTED USE
DOUGH PROVING USE TO PROVE the dough inside the oven at a constant temperature of 40°C
STEAM CLEANING USE TO RINSE the oven.
DESCALE USE TO DESCALE the boiler.
DRAIN MANUAL DRAINING of the boiler
DISINFECTION FOR DISINFECTION of baby bottles or jars
YOGHURT FOR MAKING YOGHURT
PRESERVATION FOR PRESERVATION of food such as fruit and vegetables
Dough proving
q
w
e
Descale
Proving
Preservation
For dough proving
. PRESS THE OK BUTTON.
.
TURN THE ADJUST KNOB to set the time.
.
PRESS THE START BUTTON.
THE PROVING FUNCTION is used to let dough prove. Much faster than
at room temperature.
PROVING
PLACE BOWL with dough on drip tray at shelf level 1 or 2. Cover with baking cloth.
SHORTEN THE PROVING TIME by 1/3 compared with a traditional recipe.
SHORTENING THE PROVING TIMES is recommended because the ambient temperature is more optimal inside
than outside the oven I.E. room temperature. Therefore it is necessary to stop the proving prematurely.
Otherwise it will continue and prove too much.
Proving
00:20
COOK TIME
13:35
END TIME
40°C
TEMPERATURE

21
Steam cleaning
q
w
e
Descale
Steam cleaning
Proving
For cleaning with steam
. PRESS THE OK/SELECT BUTTON.
. FOLLOW the on-screen instructions.
.
PRESS THE START BUTTON.
T
HE STEAM CLEANING FUNCTION is used to soften hard soiled particles and facilitate easier cleaning.
USE IT REGULARLY to avoid build up of salt deposits and other acid foods that can aect steel. Rust may
develop if not kept clean.
WIPE OVEN DRY after cleaning.
Steam cleaning
13:35
END TIME
22
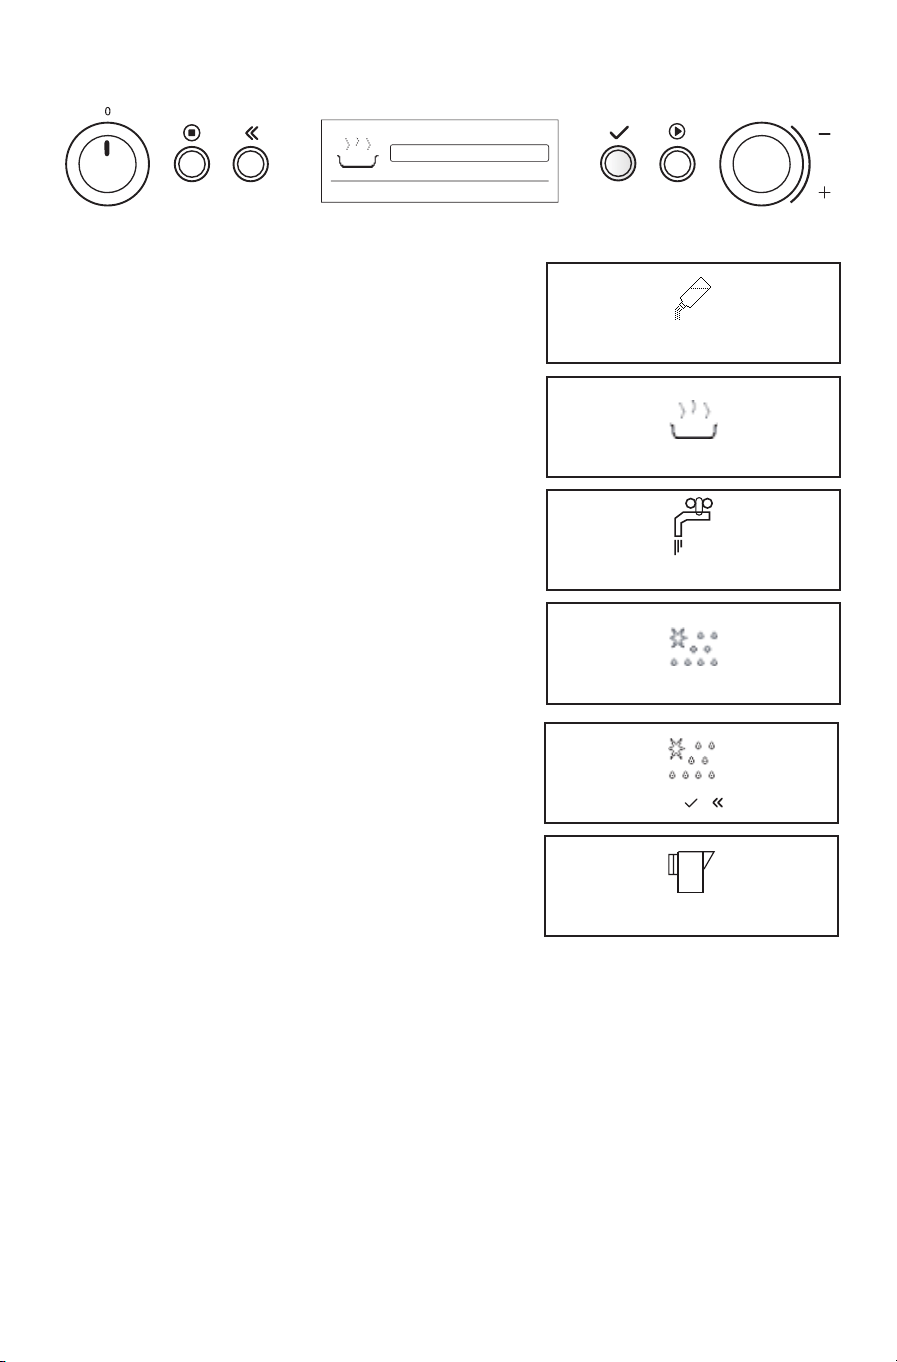
Descaling
q
w
Drain
Descaling
Proving
For descaling the boiler
. PRESS THE OK BUTTON. (Oven now prepares for descaling)
.
PRESS THE OK BUTTON after placing the water container with
descaler in its place. Follow on-screen guidance. Do not
interrupt the process until it has nished.
THE APPLIANCE HAS A SYSTEM that indicates when oven descaling is
necessary. Carry out descaling when the message “Descale
needed” appears on the display. Before carrying out descaling,
ensure that you have enough descaling liquid available. We
recommend that you use “Wpro active’clean” descaler suitable
for coee / espresso machines and kettles.
DESCALING LASTS about ½ hour, during which no cooking function
can be activated. A message (“Please remove...”) indicates the
end of the operation.
AFTER EMPTYING the water container, no residue should be present in the system, the appliance is properly
descaled and safe to use.
NOTE: ONCE STARTED, the descaling procedure must always be completed.
DESCALER AMOUNT
MIX 1 litre of water with all of the content in one full bottle (250 ml) of “Wpro active’clean” descaler. If “Wpro
active’clean” descaler is unavailable, use only white vinegar.
Empty and rell
container with descaler
Descaling
00:32
PHASE TIME
11:10
END TIME
1/3
PHASE
Rinsing
00:06
PHASE TIME
11:10
END TIME
2/3
PHASE
Empty and rell
container with water
Descale is needed
Press or
Please remove and empty the container.
Press OK when done
23
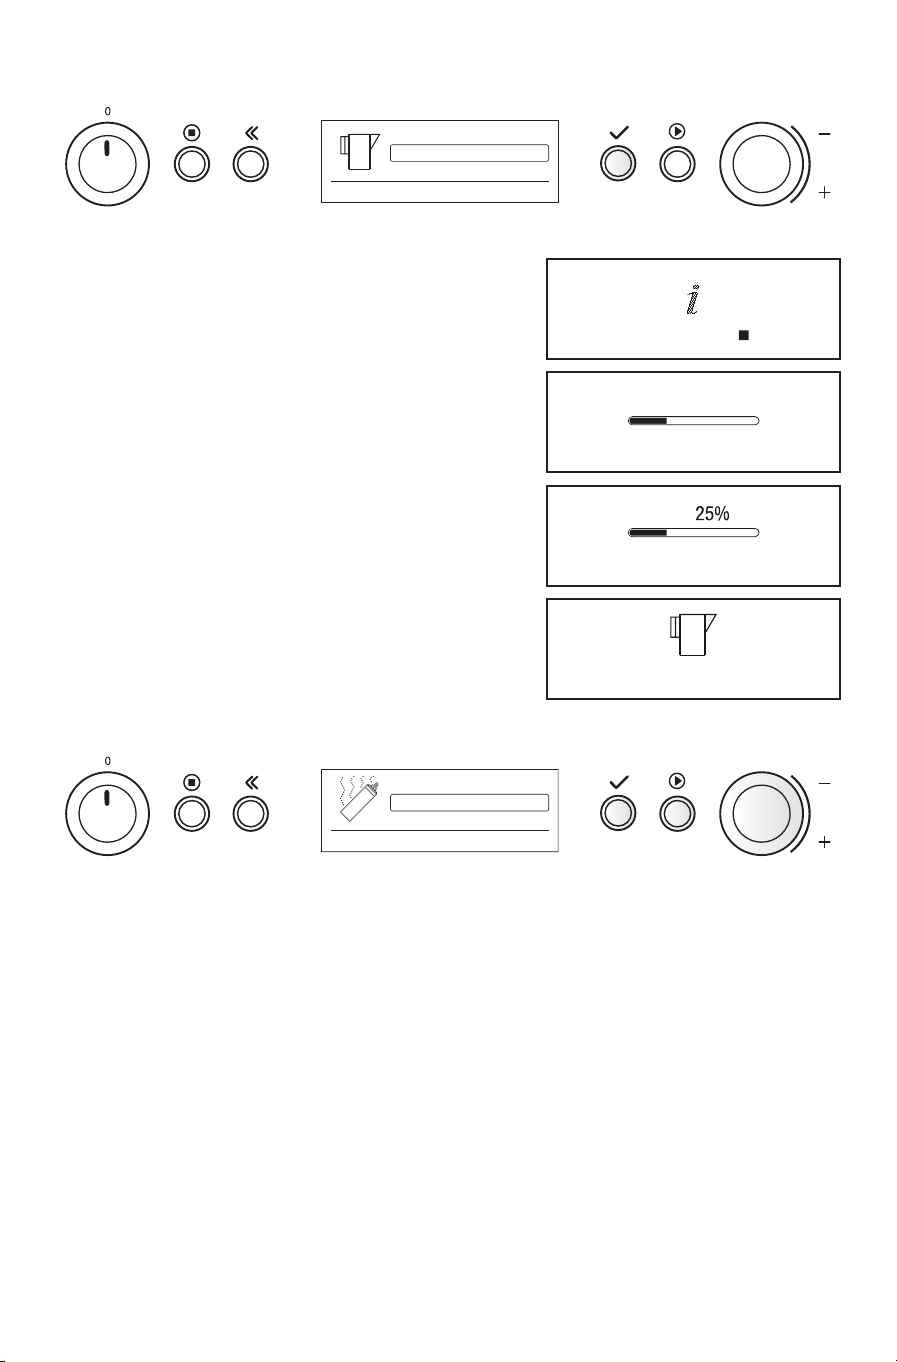
Drain
q
Disinfection
Drain
Descale
Descale
. PRESS THE OK BUTTON.
MANUAL DRAINING of the boiler can be performed to ensure that no
residual water is left behind during a certain period.
IF THE TEMPERATURE in the boiler is too high, the oven will not start
the draining procedure until the temperature has chilled to under
60°C. Once it has chilled enough it will start automatically.
Preparing to empty boiler, Press to cancell
21 °C
Please wait
Remove and empty container
Press OK when done
Draining boiler
Disinfection
q
w
e
Yoghurt
Disinfection
Drain
For disinfection of baby bottles
. PRESS THE OK BUTTON.
.
TURN THE ADJUST KNOB to set the time.
.
PRESS THE START BUTTON.
FOR DISINFECTION of baby bottles and other items such as jars for preservation.
ENSURE that the items which you intend to disinfect are heat-resistant and able to withstand 100°C .
INSERT THE BAKING AND DRIP TRAY OR WIRE SHELF AT LEVEL 1. Place the items on it, well spaced from each other to
allow steam to reach all parts.
ALL ITEMS shall be dismantled to their smallest individual parts to allow the steam to reach all sides.
DRY ALL PARTS THOROUGHLY before reassembling them.
NOTE:
A
MINIMUM TIME OF 20 MINUTES is needed for proper results and equals default factory setting. It is not possible
to set less time.
MAX. TIME is 1½ hour.

24
Yoghurt
q
w
e
Preservation
Yoghurt
Disinfection
For making of yoghurt
. PRESS THE OK BUTTON.
.
TURN THE ADJUST KNOB to set the time.
.
PRESS THE START BUTTON.
FOR MAKING YOGHURT. If you use unpasteurised milk, you will have to heat it up to 90°C and leave it to cool to
below 49°C (don’t allow it to go below 32°C. 43°C is optimal). Otherwise the yoghurt will not set.
ADD ABOUT 100G of room temperature yoghurt with live culture, to 1 litre of full cream milk. (Milk and
yoghurt should have the same percentage fat content).
PUT THE MIX in (6-7) portion sized glass dishes. Cover each one tightly with a lid or heat resistant cling lm.
Special yoghurt jars may also be used.
PLACE THE DISHES on the wire shelf in the oven.
SET THE TIME to 5 hours. (Temperature is factory set at 40°C).
ALLOW THE YOGHURT TO COOL and then place in the refrigerator for several hours before serving. It will keep for
1-2 weeks. You can use some of it (about 100 g) to start you o if you are going to make another batch
within 5-7 days.
NOTE: In order not to introduce unwanted bacteria cultures by mistake, it is very important that all utensils
and jars are very clean when making yoghurt. We recommend that you use the “DISINFECTION” function
to sterilise the containers, etc. before use.
Yoghurt
03:00
COOK TIME
10:20
END TIME
40°C
TEMPERATURE

25
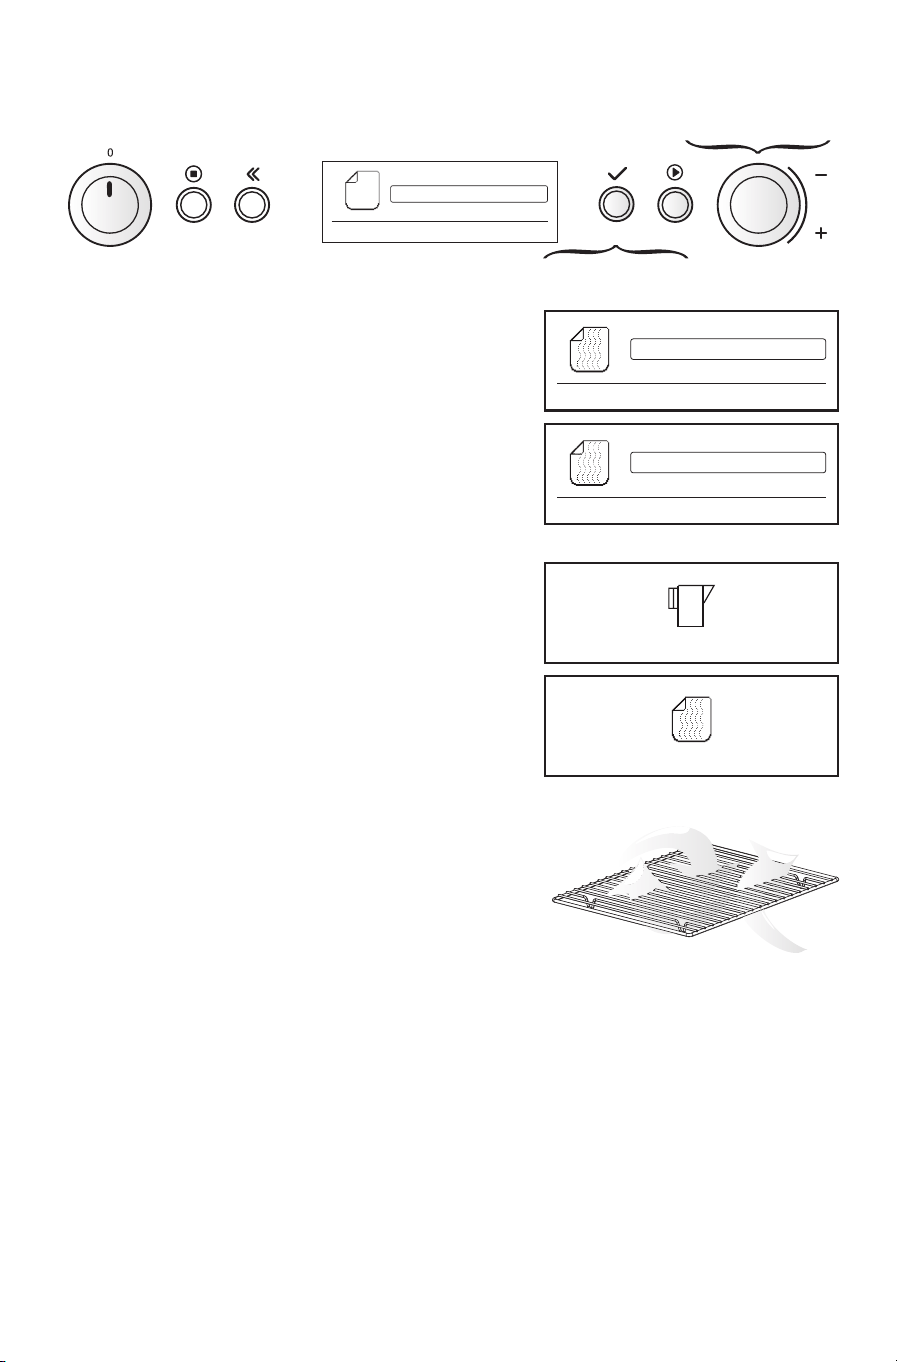
Preservation
w
r
q
e
t
y
Proving
Preservation
Yoghurt
For preservation of food
. PRESS THE OK BUTTON.
.
TURN THE ADJUST KNOB to select which setting to edit.
.
PRESS THE OK BUTTON to conrm.
.
TURN THE ADJUST KNOB to change the setting.
.
PRESS THE OK BUTTON to conrm. (Repeat steps & if needed).
.
PRESS THE START BUTTON.
FOR PRESERVATION of fruits and vegetables.
INSERT THE WIRE SHELF AT LEVEL 2 and the drip tray beneath it. Put the prepared jars on the wire shelf. If the jars
are too high, place them directly on the bottom of the drip tray on level 1.
USE ONLY FRUIT and vegetables of good quality. Jars can be cleaned with the disinfection function. Open the
door after the preserving time has ended but let the jars remain in the oven until they have reached room
temperature
PRESERVATION
FOOD AMOUNT TIME HINTS
VEGETABLES
1-litre jar 40 – 120 mins
PRE-COOK VEGETABLES and ll the jars as
described for the fruit. Pour over brine.
½-litre jar 25 – 105 mins
FRUIT
1-litre jar 30 – 50 mins
RIPE FRUIT does not need to be pre-cooked.
Hard fruit needs some pre-cooking.
FILL THE JARS but leave about 2 cm unlled at
the top. Pour syrup over the fruit.
½-litre jar 15 – 35 mins
Preservation
00:30
COOK TIME
10:48
END TIME
100°C
TEMPERATURE
26
Sous vide
q
wryos
etuad
f
Reheat
Sous vide
Specials
For sous vide reheating
. TURN THE MULTIFUNCTION KNOB.
.
TURN THE ADJUST KNOB until “Sous vide” is shown.
.
TURN THE ADJUST KNOB to choose one of the sous vide
functions.
.
PRESS THE OK BUTTON to conrm.
.
TURN THE ADJUST KNOB to select food.
.
PRESS THE OK BUTTON to conrm.
.
FOLLOW the on-screen instructions concerning the water
container and other accessories.
.
TURN THE ADJUST KNOB to select which setting to edit.
.
PRESS THE OK BUTTON to conrm.
.
TURN THE ADJUST KNOB to change the setting.
.
PRESS THE OK BUTTON to conrm. (Repeat step & if
needed).
.
PRESS THE START BUTTON.
ALWAYS USE THE WIRE SHELF to put food on, to allow the air to
circulate properly around the food.
Reheat
Cook
See instructions for use for more information
Salty cream
Whole meat
Chopped meat
See instructions for use for more information.
Whole meat
01:20
COOK TIME
11:55
END TIME
Please remember to ll container with tap water

27
Reheat
USE THIS FUNCTION TO cook items listed in the table below.
FOOD COOK TIME ACCESSORIES
FROZEN 01 min – 4 hours
WIRE SHELF on level 3
CHILLED 01 min – 4 hours
Cook
USE THIS FUNCTION TO cook items listed in the table below.
FOOD COOK TIME ACCESSORIES
WHOLE MEAT 1 h 20 mins – 4 hours
WIRE SHELF on level 3
CHOPPED MEAT 45 mins – 4 hours
POULTRY 45 mins – 4 hours
FISH 40 mins – 4 hours
MOLLUSC 30 mins – 4 hours
SHELLFISH 28 mins – 4 hours
VEGETABLES 35 mins – 4 hours
FRUIT 25 mins – 4 hours
SWEET CREAM 35 mins – 4 hours
SALTY CREAM 30 mins – 4 hours

28
Steam defrost
q
w
e
r
t
y
Steam defrost
. TURN THE MULTIFUNCTION KNOB until Steam defrost is displayed.
.
TURN THE ADJUST KNOB TO select which setting to edit.
.
PRESS THE OK BUTTON to conrm.
.
TURN THE ADJUST KNOB to change the setting.
.
PRESS THE OK BUTTON TO CONFIRM. (Repeat steps and if needed).
.
PRESS THE START BUTTON.
USE THIS FUNCTION for defrosting meat, poultry, sh, vegetables, bread and fruit.
WHEN DEFROSTING, it is better to under-thaw the food slightly and allow the process to nish during standing
time.
STANDING TIME AFTER DEFROSTING ALWAYS IMPROVES the result since the temperature will then be evenly
distributed throughout the food.
PLACE BREAD with wrapping on to avoid it becoming soggy.
PLACE THE FOODS SUCH AS MEAT AND FISH without package / wrappings, into the steam tray on level 3. Place the
drip tray beneath on level 1 to collect the thawing water.
PLEASE TURN THE FOOD HALFWAY THROUGH DEFROSTING, REARRANGE AND SEPARATE ALREADY THAWED PIECES.
FOOD WEIGHT DEFROST TIME STANDING TIME TEMPERATURE
MEAT
MINCED
500 g 25 – 30 mins
30 – 35 mins
60 °C
SLICED 20 – 25 mins
BRATWURST 450 g 10 – 15 mins 10 – 15 mins
POULTRY
WHOLE 1000 g 60 – 70 mins 40 – 50 mins
FILLETS
500 g
25 – 30 mins 20 – 25 mins
LEGS 30 – 35 mins 25 – 30 mins
FISH
WHOLE 600 g 30 – 40 mins 25 – 30 mins
FILLETS 300 g 10 – 15 mins 10 – 15 mins
BLOCK 400 g 20 – 25 mins 20 – 25 mins
VEGETABLES
BLOCK 300 g 25 – 30 mins 20 – 25 mins
PIECES 400 g 10 – 15 mins 5 – 10 mins
BREAD
LOAF 500 g 15 – 20 mins 25 – 30 mins
SLICES
250 g
8 – 12 mins 5 – 10 mins
ROLLS & BUNS 10 – 12 mins 5 – 10 mins
CAKE 400 g 8 – 10 mins 15 – 20 mins
FRUIT
MIXED 400 g 10 – 15 mins 5 – 10 mins
BERRIES 250 g 5 – 8 mins 3 – 5 mins
Steam defrost
00:05
COOK TIME
14:31
END TIME
60 °C
TEMPERATURE
29
Reheat
q
w
e
r
t
y
Reheat
. TURN THE MULTIFUNCTION KNOB until “Reheat” is displayed.
.
TURN THE ADJUST KNOB to select which setting to edit.
.
PRESS THE OK BUTTON to conrm.
.
TURN THE ADJUST KNOB to change the setting.
.
PRESS THE OK BUTTON to conrm. (Repeat steps and if needed).
.
PRESS THE START BUTTON.
USE THIS FUNCTION when reheating 1 – 2 portions of chilled or room temperature food.
WHEN YOU ARE SAVING a meal in the refrigerator or “plating” a meal for reheating, arrange the thicker, denser
food to the outside of the tray and the thinner or less dense food in the middle.
SOME MINUTES STANDING TIME ALWAYS IMPROVES the result.
ALWAYS COVER FOOD when using this function.
CHILLED FOOD SERVINGS REHEAT TIME TEMPERATURE HINTS
DINNER PLATE
1-2
18 – 25 mins
100 °C
PLACE THE FOOD COVERED with
lid or heat-resistant cling
lm into the steam tray at
level 3.
PLACE THE DRIP TRAY beneath to
collect the water.
SOUP 20 25 MINS
VEGETABLES 20 – 25 mins
RICE & PASTA 15 – 20 mins
POTATOES IN PIECES 20 – 25 mins
MEAT IN SLICES 15 – 20 mins
MEAT IN SAUCE 25 – 30 mins
FISH FILLETS 10 – 15 mins
30
Steam
u
t
y
i
o
q
w
e
00:20
COOK TIME
100 °C
TEMPERATURE
15:53
END TIME
Steam
. TURN THE MULTIFUNCTION KNOB until “Steam” is displayed.
.
TURN THE ADJUST KNOB to select one of the functions.
.
PRESS THE OK / SELECT BUTTON to conrm.
.
DECIDE whether you are going to cook with or without the food probe and follow the proper procedure
below.
IF NO PROBE IS USED:
O
PEN THE DOOR, insert food.
.
TURN THE ADJUST KNOB to choose the setting you want to change.
.
PRESS THE OK / SELECT BUTTON to conrm.
.
TURN THE ADJUST KNOB to change the setting.
.
PRESS THE OK / SELECT BUTTON to conrm.
(Repeat steps – if needed).
.
PRESS THE START BUTTON.
IF PROBE IS USED:
OPEN THE DOOR, insert food (probe correctly placed in food) and
connect the Probe plug to the oven wall socket.
.
TURN THE ADJUST KNOB to choose the setting you want to change.
.
PRESS THE OK / SELECT BUTTON to conrm.
.
TURN THE ADJUST KNOB to change the setting.
.
PRESS THE OK / SELECT BUTTON to conrm.
(Repeat steps – if needed).
.
PRESS THE START BUTTON.
USE THIS FUNCTION FOR food such as vegetables, sh, for juicing fruit and blanching.
ENSURE that the oven has cooled to below 100 °C before using this function. Open the door and allow to
cool.
Steam
00:20
COOK TIME
15:53
END TIME
100°C
TEMPERATURE
Steam
30 °C
FOOD PROBE
15:53
END TIME
100°C
TEMPERATURE

31
Steam
FOOD TEMP °C TIME ACCESSORIES HINTS
RED BEETS
Small
100 °C
50 – 60 mins
STEAM TRAY at level 3
Drip tray on level 1
RED CABBAGE
Sliced
30 – 35 mins
WHITE
CABBAGE
25 – 30 mins
WHITE BEANS
Soaked 75 – 90 mins DRIP TRAY on level 3
ADD DOUBLE amount of
water
FISH TERRINE
75 – 80 °C
60 – 90 mins
STEAM TRAY at level 3
COVER WITH LID or
heat-resistant cling lm
72 °C
BAKED EGGS
90 °C 20 – 25 mins DRIP TRAY on level 3
GNOCCHI
90 – 100 °C 10 – 15 mins
STEAM TRAY at level 3
Drip tray on level 1
ALWAYS PLACE the food without packaging /
wrapping in oven unless stated otherwise.
COOKING TIMES are based on an oven at room temperature.
32
Assisted mode
q
w
r
e
s
u
t
i
y
o
a
AUTO
Assisted mode
. TURN THE MULTIFUNCTION KNOB until “Assisted Mode” is shown.
.
TURN THE ADJUST KNOB to select the food class.
.
PRESS THE OK / SELECT BUTTON to conrm.
.
TURN THE ADJUST KNOB to select the food.
.
PRESS THE OK / SELECT BUTTON to conrm.
.
TURN THE ADJUST KNOB to select “Food probe” or “No food probe”
cooking.
IF NO PROBE IS USED:
OPEN THE DOOR, insert food
.
TURN THE ADJUST KNOB to choose the setting you want to change.
.
PRESS THE OK / SELECT BUTTON to conrm.
.
TURN THE ADJUST KNOB to change the setting.
.
PRESS THE OK / SELECT BUTTON to conrm.
(Repeat steps – if needed).
.
PRESS THE START BUTTON.
IF PROBE IS USED:
O
PEN THE DOOR, insert food (probe correctly inserted in food) and
connect the probe plug to the oven wall socket.
.
TURN THE ADJUST KNOB to choose the setting you want to change
.
PRESS THE OK / SELECT BUTTON to conrm.
.
TURN THE ADJUST KNOB to change the setting.
.
PRESS THE OK /SELECT BUTTON to conrm.
(Repeat steps – if needed).
.
PRESS THE START BUTTON.
ALWAYS USE THE WIRE SHELF to put food on, to allow the air to circulate properly around the food.
PLACE THE DRIP TRAY beneath the wire shelf or steam tray to collect any dripping water, fat and juices.
NO FOOD PROBE
FOOD PROBE
For probe-assisted cooking
Roast beef
Roast pork
See instructions for use for more information.
Hotdog
Meat
Poultry
Bread/cakes
Roast beef
40:00
COOK TIME
16:11
END TIME
200°C
TEMPERATURE
Roast beef
55 °C
FOOD PROBE
200°C
TEMPERATURE
33
GENERAL
WARNING
CLEANING IS THE ONLY MAINTENANCE normally
required.
FAILURE TO MAINTAIN THE OVEN in a clean condition
could lead to deterioration of the surface that
could adversely aect the life of the appliance and
possibly result in a hazardous situation.
DO NOT USE METAL SCOURING PADS, ABRASIVE
CLEANERS, steel-wool pads, gritty washcloths, etc.,
which can damage the control panel, and the
interior and exterior oven surfaces. Use a sponge
with a mild detergent or a paper towel with spray
glass cleaner. Apply spray glass cleaner to a paper
towel.
DO NOT SPRAY directly onto the oven.
AT REGULAR INTERVALS, particularly if spills have
occurred, remove the shelves and shelf support,
and wipe the interior of the oven clean. Do not
forget the cavity ceiling (which is easily
overlooked).
REMOVE, EMPTY AND DRY the water container after
each use.
SALTS ARE ABRASIVE and if deposited in the cooking
compartment, rust could develop in places. Acid
sauces like ketchup, mustard or salted foods e.g.
cured roasts, contain chloride and acids. These
aect steel surfaces. It is a good idea to clean the
cooled oven cavity after each use.
RUN THE STEAM CLEANING FUNCTION regularly to aid and
ease cleaning.
USE MILD DETERGENT, water and a soft cloth to clean
the interior surfaces, front and rear of the door and
the door opening.
DO NOT ALLOW GREASE or food particles to build
up around the door and door seal. Failure to keep
the seal clean may result in damage to the fronts or
adjacent units, due to the door not closing
properly during operation.
DISHWASHER SAVE
WIRE SHELF
BAKING & DRIP TRAY
STEAM TRAY
SHELF SUPPORTS
Maintenance & cleaning
34
REMOVING THE SHELF SUPPORTS
PULL / SLIDE THE SHELF
SUPPORT forward to
unhook. Clean the
shelf supports and
cavity walls.
REFIT THEM by sliding
them back onto the
cavity wall hooks.
DISHWASHER UNSAVE
WATER PIPE
REMOVE THE WATER PIPE from the water
container for easy cleaning. Please note
that the pipe is not dishwasher safe.
WATER CONTAINER
THE WATER CONTAINER is not
dishwasher safe. Use a sponge
with a mild detergent.
SEALS & RINGS
THESE ITEMS belonging to the light bulb assembly
are not dishwasher safe.
FOOD PROBE
THE FOOD PROBE is not
dishwasher safe.
The probe should be cleaned in
mild, soapy water.
NEVER IMMERSE the probe in
water when cleaning. Simply
wipe clean with a clean, damp
cloth or kitchen roll after use.
DO NOT USE STEEL-WOOL PADS. This
will scratch the surface.
REPLACING THE OVEN LIGHT BULB
WARNING
DANGER OF ELECTRICAL SHOCK
BEFORE REPLACING THE BULB, ENSURE:
- That the appliance is switched o.
- That the appliance mains cord is disconnected.
- That the fuses are removed from the fuse box or
are switched o.
- Place a cloth on the cavity bottom to protect
the light bulb & glass cover.
.
TURN THE GLASS CAP anticlockwise to unscrew.
. REMOVE the seals and metal ring and clean the
glass cap.
.
REPLACE the old bulb with a W, V, G,
heat-resistant (oven) halogen bulb.
.
REFIT THE RING and seals to the glass cap.
.
REFIT THE ASSEMBLY by screwing it on clockwise.
Maintenance & cleaning

35
Data for testing heating performance
IN ACCORDANCE WITH IEC 60350.
T
HE INTERNATIONAL ELECTROTECHNICAL COMMISSION has developed a standard for comparative testing of heating
performance of dierent ovens. We recommend the following for this oven:
Test Approx. time Temperature Preheated oven Accessories
8.4.1 30 35 MINS 150 °C NO
BAKING & DRIP TRAY
8.4.2 18 20 MINS 170 °C YES BAKING & DRIP TRAY
8.5.1 33 35 MINS 160 °C NO WIRE SHELF
8.5.2 65 70 MINS 160170 °C YES WIRE SHELF
Technical specification
SUPPLY VOLTAGE 230 V/50 Hz
RATED POWER INPUT 1450 W
FUSE 10 A
OUTER DIMENSIONS (H X W X D) 455 x 595 x 517
INNER DIMENSIONS (H X W X D) 236 x 372 x 360

36
THE METHOD
“Chef touch” represents a cooking system for foods
that undergo preliminary vacuum packing.
To achieve such packing, specic bags are used
made of plastic material resistant to certain heat
treatments.
Once cooked, the food can be immediately
consumed and can undergo a rapid temperature
drop before being stored at refrigeration or
freezing temperature.
The food is served after removing it from the
wrapping used during cooking and in the event of
its undergoing storage treatment (refrigeration or
freezing) it can be subsequently heated to service
temperature.
The products cooked using Chef touch have better
organoleptic and nutritional qualities than those
cooked using traditional methods.
Thanks to this method in fact, the loss of nutritional
elements, juices and volatile aromas is greatly
reduced.
Vacuum packing allows the food to cook without
direct contact with the air or the surrounding
steam, thus reducing or eliminating completely:
• The evaporation of volatile aromatic substances,
• The loss of humidity during cooking, which
causes a loss of nutritional elements
• The formation of oxidised components
Chef touch is suitable for various types of food
preparation, particularly for enhancing a number
of meat, sh and also vegetable dishes.
MICRO-ORGANISMS AND FOOD
Food normally contains various kinds of micro-
organisms.
Some of them can be considered “useful”,
contribute to the preparation of the foods
themselves and do not represent any risk for
consumers or for product storage.
For example, charcuterie, cheeses and wine owe
their identity above all to the action of bacteria
which have improved and transformed the
“structure” in the successive “ageing” stages.
In nature, there are other species of
micro-organisms called “pathogens” which are
detrimental to human health.
Such micro-organisms can also be present in the
food we consume and can come into contact with
food from the surrounding environment, from
contamination by human beings or from the raw
materials themselves.
Vacuum product packaging, a key factor of Chef
touch, reduces the level of oxygen in contact with
food and thus inhibits the growth of dierent
microbial forms; at the same time, it creates the
ideal environment for the growth of other
micro-organisms, called “anaerobic”, able to live
and proliferate in the absence of oxygen.
Such species can also be pathogens and therefore
harmful to human health. Among the best known
anaerobic pathogens is Clostridium Botulinum,
able to live without oxygen and produce a highly
toxic toxin if the product is not stored properly
(storage times and temperatures dierent to those
suggested).
Vacuum packaging does not eliminate micro-
organisms entirely and cannot therefore be used in
itself as a room temperature storage method.
In order to cook using Chef touch, it will be
necessary to respect standard hygienic procedures
and follow the instructions shown in the operator’s
manual relating to the following aspects:
• Use of fresh raw materials and ingredients;
• Use of the “KitchenAid vacuum machine
appliance” and specic cooking packs;
• Compliance with minimum cooking times
indicated by “KitchenAid steam oven” and IFU
tables;
• Immediate consumption of food or rapid
temperature reduction by means of “KitchenAid
blast chiller”
• Compliance with storage times and
temperatures indicated in operating
instructions.
Introduction to “Chef touch”

37
How to apply the “Chef touch” method
The diagram below summarises the 3 dierent Chef touch operating modes applicable :
• KitchenAid vacuum chamber,
• KitchenAid blast chiller,
• KitchenAid steam oven.
The “Chef touch” has dierent types of use, in line with the normal habits of food consumers
A) Immediate consumption
Suggested for any “Chef touch” food preparation and representing the very best way to exploit this
cooking method. It involves preparing the bag, cooking and consuming, without any further food storage.
Ideal when using the “Chef touch” to prepare a lunch or dinner during the course of the same day.
FOOD
PREPARATION VACUUM COOKING CONSUMPTION
B) Short-period storage (max. 48 hours)
Suggested for those foods to be consumed after cooling them or for heating dishes prepared the day
before. The blast chiller quickly reduces the temperature of the food.
It involves preparing the bag, cooking, blast chilling to refrigeration temperature and storage in a
refrigerator (+4 °C) for a maximum of 48 hours before eating.
FOOD PREPARATION VACUUM COOKING CHILLING FRIDGE STORING RE-HEATING CONSUMPTION
C) Prolonged storage
Suggested for those who like preparing dishes beforehand and eating them heated up some time after.
This method can be used with all the types of foods suggested for “Chef touch”. This involves preparing the
bag, cooking, blast chilling to freezing temperature and storage in the freezer (-18°C).
FOOD
PREPARATION VACUUM COOKING SHOCK FREEZER FRIDGE STORING RE-HEATING CONSUMPTION
Raw materials and ingredients
In order to ensure that a top-quality product is obtained, always follow the instructions below:
• Only select top-quality products
• Always select fresh produce, not previously frozen or deep-frozen products, as the end quality of the
product would suer considerably
PRODUCT PREPARATION:
During the preparation of dishes, always comply with basic food hygiene rules:
• Always wash your hands before handling food and repeat the operation during preparation.
• Ensure that all kitchen surfaces, implements and containers have been carefully cleaned and sanitised.
• Keep insects and pets away from food and the kitchen.
• Always wash all vegetables before cooking.
• We recommend to always use clean surfaces and/or equipment to prepare products of dierent kinds
and wash and sanitise them after each use (e.g. do not use the same chopping board to cut meat and
vegetables).
• We recommend to always work food quickly and not remain it at room temperature for too long during
preparation.
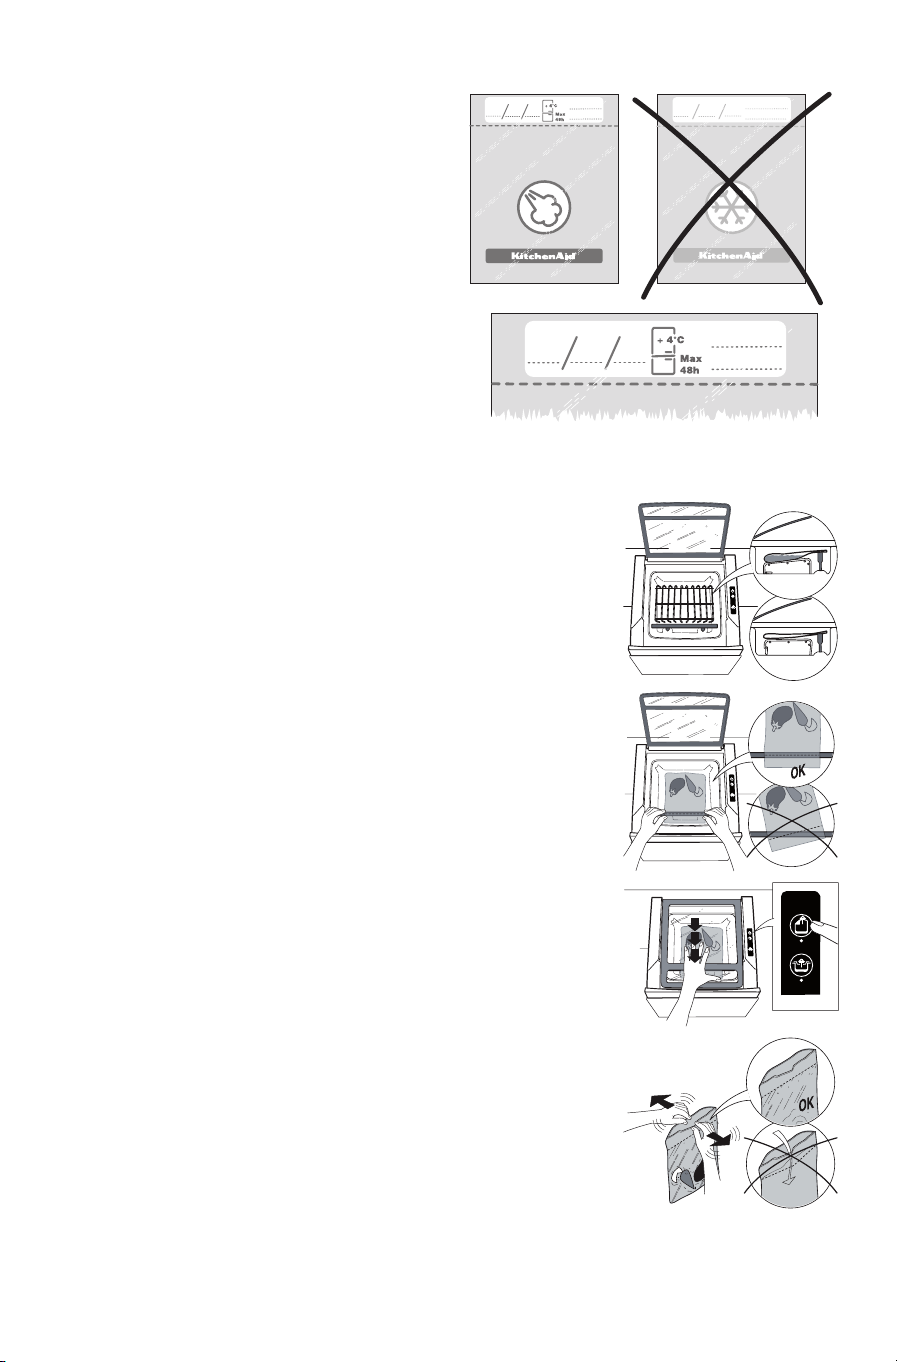
38
The cooking bags
To use the “Chef touch”, the KitchenAid red coloured
bags must be used.
Before starting the bag lling operation, it is best to
indicate in the spaces provided on the bag the date of
preparation and type of product in indelible ink.
Preparing bags
USING KITCHENAID VACUUM BAGS
. Open the drawer fully (until it clicks).
. Switch the machine on using the blue switch on the front right hand side.
. Select the size of KitchenAid bag best suited to the dimensions of the
food (x or x).
. Open the lid, making sure the vacuum chamber is dry. When placing food
in the bag, take care that the bag does not become dirty or wet next to
the opening, as this could result in an ineective seal.
. Position the support grid in the machine compartment as shown, with
the bag in the centre of the grid, again as shown in the gure; if necessary,
angle the grid so that it slopes slightly, as this will prevent any food
spillage during the vacuum cycle. For large items of food, it may be
necessary to remove the grid in order to gain additional space inside the
vacuum chamber.
. Line up the dotted line on the bag with the sealing bar. Make sure the
edges are positioned on the bar without any wrinkles or folds.
. Close the lid and hold it down while at the same time selecting the
desired bag cycle. Keep the lid pressed down for a few moments. In this
way the lid will remain shut and tight to the seal for the duration of the
cycle.
A perfect seal is essential in order to maintain the vacuum conditions in the
bag. This can be identied by a clearly visible seal with no sign of any burns.
Always check that the seal is on top of or parallel to the dotted line on the
KitchenAid bag.
Moreover, check the eectiveness of the seal: after sealing, it must not be
possible to pull the edges of the bag apart. If this is not the case, transfer the
food into another bag and repeat the vacuum packing procedure.
IMPORTANT For optimum management of bags and food contained in
them, write the packing date and contents on the space provided above the
seal.
IMPORTANT If upon repeating the vacuum packing procedure the
problem persists, contact the After-Sales Service.

39
Machine operation indications
SWITCHING ON (pulling the drawer out to working position)
Always pull the drawer out to its full extension so that the glass lid can open
fully.
Switch the machine on using the blue On switch on the front right hand side.
The control panel LEDs light up and a brief acoustic signal indicates that the
machine has been switched on. At this point, the machine runs a set-up cycle
lasting approximately 2 seconds; do not press any buttons until set-up has been
completed.
VACUUM CYCLE FOR BAGS
At the start of each cycle, a brief acoustic signal is heard.
The cycle automatically proceeds as follows:
• The air extraction phase is indicated by the ashing of the function button. This phase lasts
approximately 2 minutes and 30 seconds.
• The heat sealing phase is indicated by the function button LED remaining lit. This phase lasts 9 seconds.
This is followed by a cooling phase lasting approx. 5 seconds.
• During the subsequent exhaust phase, all the LED indicators return to their initial state. The exhaust
valve remains open for 20 seconds. During this time, no function can be selected.
• Once the vacuum chamber is decompressed, the lid can be opened and the sealed bag removed.
• At the end of the cycle, a brief acoustic signal is heard, indicating that the machine is ready to perform
another cycle.
• The total duration of the cycle is 3 minutes (to reopening of the glass lid)
IMPORTANT The cycle can be stopped in advance by pressing the button
. In this case, the machine
will not proceed with sealing and the chamber will be decompressed. Wait for approximately 20 seconds
and the acoustic signal before starting another cycle.
VACUUM CYCLE FOR KITCHENAID CONTAINERS
At the start of each cycle, a brief acoustic signal is heard.
The cycle automatically proceeds as follows:
• The vacuum phase is indicated by the function button LED ashing. This phase lasts approximately 45
seconds.
• During the subsequent exhaust phase, all the LED indicators return to their initial state. The exhaust
valve remains open for 20 seconds. During this time, no function can be selected.
• Once the vacuum chamber is decompressed, the lid can be opened and the vacuum container
removed.
• At the end of the cycle, a brief acoustic signal is heard, indicating that the machine is ready to perform
another cycle. The chamber is decompressed, enabling the container to be removed.
• The total duration of the cycle is 1 minute (to reopening of the glass lid)
IMPORTANT The cycle can be stopped in advance by pressing the button
. The chamber is
decompressed and the glass lid will lift. Wait for approximately 20 seconds and the acoustic signal before
starting another cycle.
To ensure the best organoleptic quality of the product and prevent any cooking liquids from escaping, we
always recommend not performing the “sous-vide” cooking process on packs which have not successfully
completed the vacuum operation.
To prevent any growth of dangerous micro-organisms, the vacuum product must promptly undergo
cooking (utilisation procedure A) or be blast chilled and stored (utilisation procedures B and C).
Do not store vacuum-packed products at room temperature.
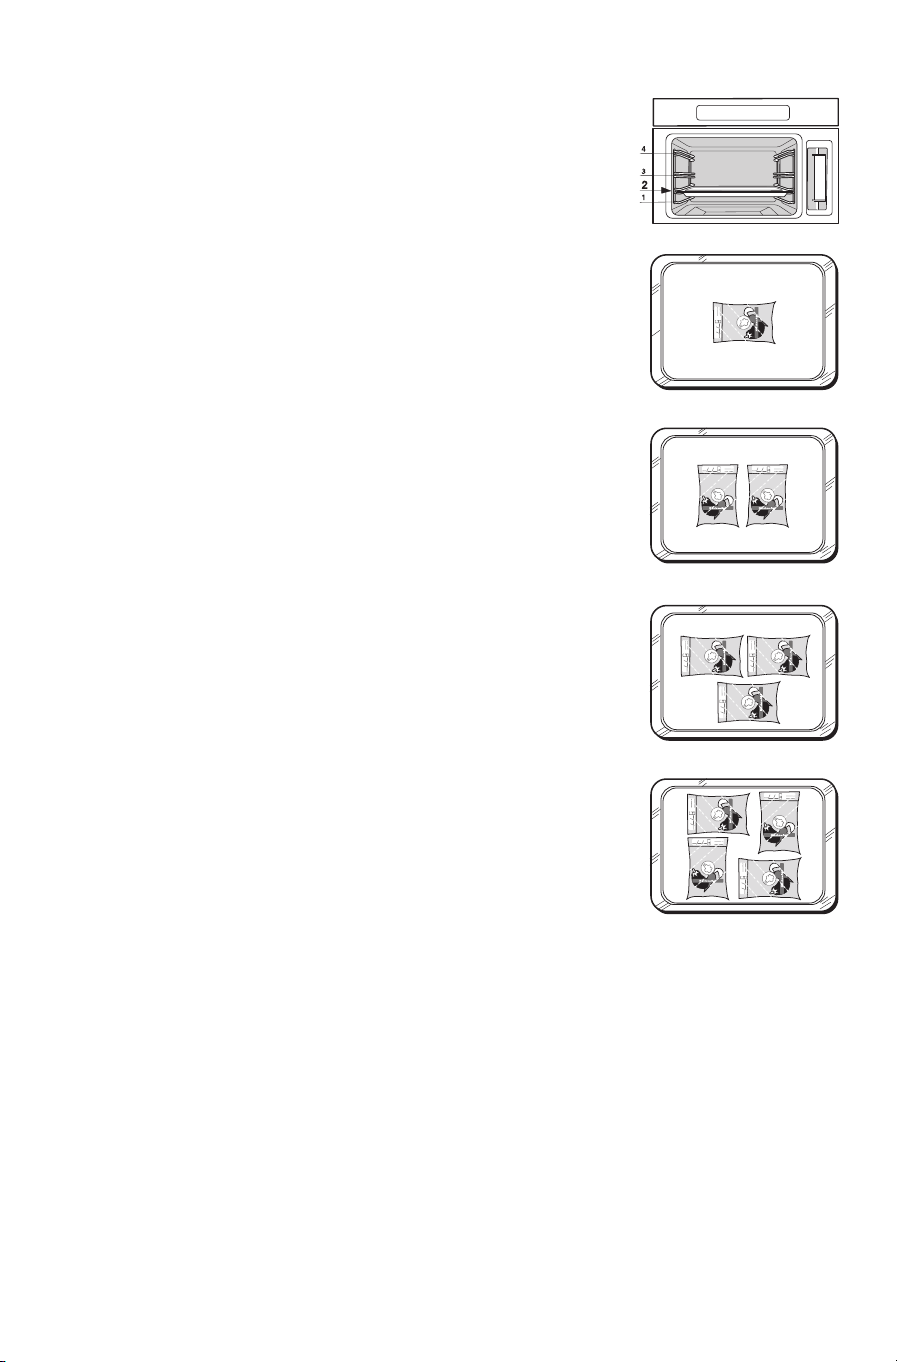
40
How to cook in a steam oven
To cook using the “Chef touch”, follow the indications shown on the drawing.
• Open the door and position the grid at the 2nd level
• Position the packs as in gure (1, 2, 3, 4)
• Close the door
• Select the sous-vide menu
• Set the cooking program (see display illustrations)
• Select the reference category
• Set the cooking time according to the indications on the attached tables
• Start cooking
• After cooking (signalled by an acoustic indicator) take the product out of
the oven
An acoustic indicator will indicate any opening of the door before the set
minimum cooking time is reached and the following message will be
displayed on the screen: “Cooking is not complete, close the door
immediately”
The message will remain on the screen every time the minimum cooking
cycle has not been completed.
We suggest not eating any food that has not completed minimum cooking
treatment as all bacteria may not have been adequately eliminated.
We always recommend that you check doneness of food before consuming it.
The end of cooking is indicated by an acoustic signal
The screen will show the message “Cooking completed, consume or blast chill
and store”.
The display page on the screen can be switched o by pressing the “OK” key.
Once cooked, the product must be eaten or blast chilled.
At the end of cooking, be careful when removing the pack from the oven as
this could be very hot. We recommend always using appropriate gloves / pot
holders for removing pouch
PACK BREAKAGE
If, at the end of cooking, the bag is open, proceed as follows:
• Take the bag out of the oven
• The bag could be hot and liquid could be leaking from it
• Remove the food from the bag
If the cooking cycle has terminated, the food can be eaten but its organoleptic quality is not guaranteed.
In case the cooking cycle is not terminated, but is above the set minimum time, we suggest proceeding to
take the food out of the bag and nishing cooking in the traditional way (see above).
BLACK OUT
If, during “sous-vide” cooking, the display screen shows a ashing clock, this means that during the
process, there has been a power break.
In the event of such a condition occurring, we suggest taking the food out of the bag and nishing
cooking in the traditional way (see above)
+ 4°C
Max
48h
+ 4°C
Max
48h
+ 4°C
Max
48h
+ 4°C
Max
48h
+ 4°C
Max
48h
+ 4°C
Max
48h
+ 4°C
Max
48h
+ 4°C
Max
48h
+ 4°C
Max
48h
+ 4°C
Max
48h
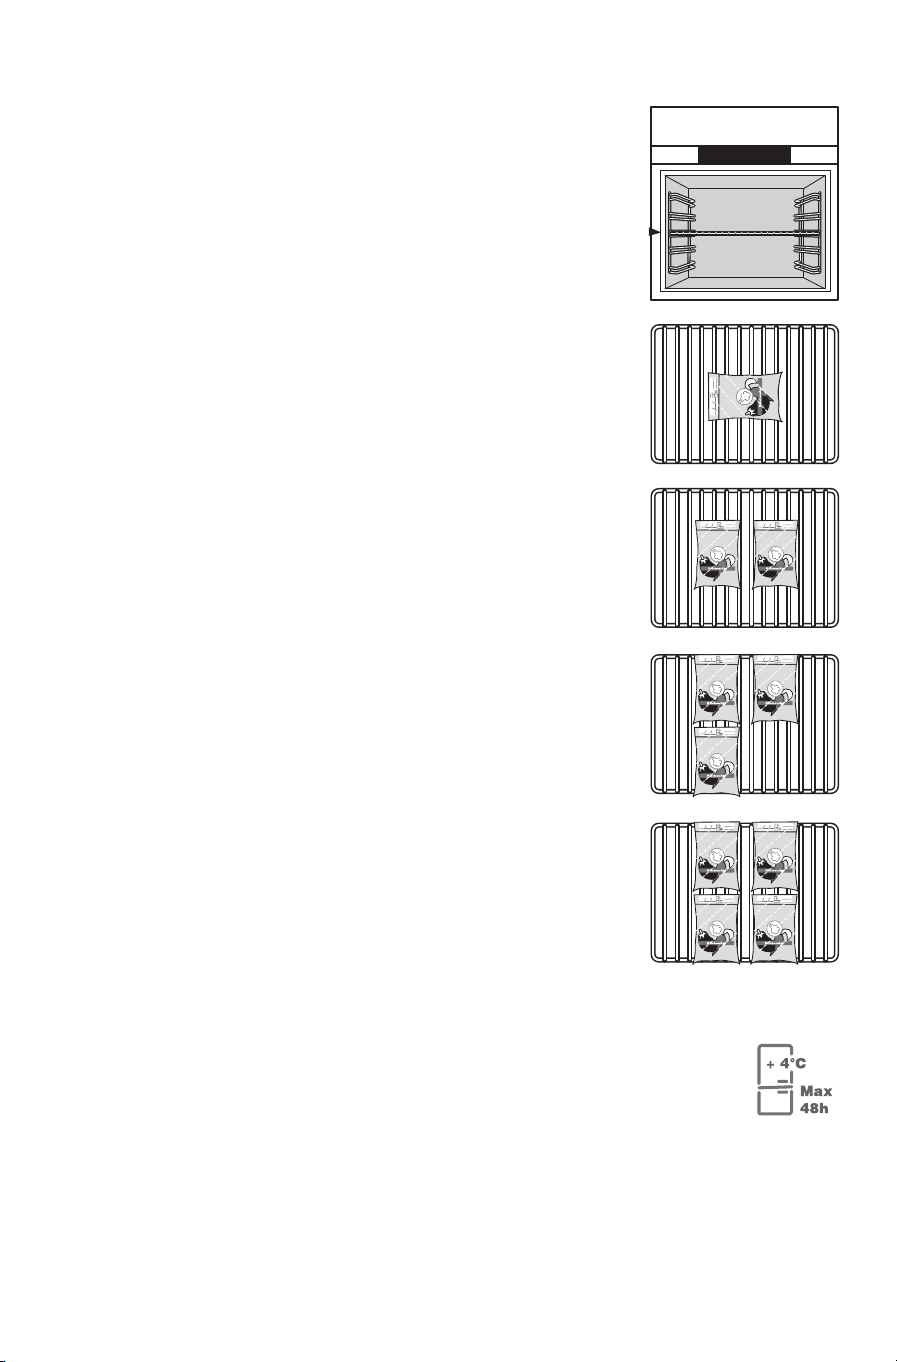
41
How to use the blast chiller
Remember to only use the KitchenAid brand product.
We suggest drying the surface of the food with paper or a kitchen
cloth before placing it in the chiller.
This solution is advisable to limit the formation of condensation during
the chilling cycle and to prevent ice forming on the walls and
negatively aecting chiller performance.
To blast chill packs, follow the instructions shown on the drawing:
Open the door and position the grid on mid level
Position the packs as in gure (1, 2, 3, 4)
Select from the following cycles:
Rapid chilling, time setting procedure
Fast freezing, time setting procedure
Select a time of 2 hours for the rapid chilling cycle and 4 hours for the fast
freezing cycle
Ensure that the door of the appliance is well closed; press the START/STOP key
to start the required cycle.
The end of cycle is indicated by an acoustic signal and ashing symbols on the
screen.
Take the treated foods out of the chamber and proceed with storage
Close the appliance door again and press the START/STOP key. The control
panel will switch o automatically within 3 minutes and the front door will
close automatically. At the end of the chilling cycle, if the pack is hot or warm, it
can be presumed that an incorrect operating cycle has been set. In this case
follow these instructions:
Even though cooked, eliminate the product without eating it because the
microbiological characteristics of the food inside the pack may not be
adequate.
In case of a fault that cannot be put down to a cycle setting error, contact the
After-Sales Service.
BLACK OUT
In the case of a power outage, the product does not show any message on the
display.
If there is any evidence that a black out has occurred, we suggest throwing
away food.
Mid level
Indications concerning storing the packs
in a refrigerator/freezer
Always put away the bags containing food with the utmost care so as not to damage their
surface during storage.
The packs must be stored at a temperature of 4°C in a refrigerator and -18°C in a freezer. It is
best to refer to the appliance operating instructions to identify the best storage area and to
adopt any other necessary measures.
The packs can be kept at a chilled temperature for 48 hours at most, after which, if they are not
eaten, they must be disposed of.
Chilled products cannot be subsequently frozen.
BLACK OUT
If a power break occurs during “Chef touch” product storage, the product must be eliminated.

42
How to use the steam oven for heating
To heat, follow the instructions provided in “How to cook in a steam oven”.
The end of cooking is indicated by an acoustic signal
At the end of cooking, be careful when removing the pack from the oven as this could be very hot. We
recommend always using appropriate gloves / pot holders for removing the pouch.
PACK BREAKAGE
If, at the end of cooking, the pack is open, proceed as follows:
• Take the pack out of the oven
• The pack is very hot and liquid could leak from the hole
• Take the food out of the bag
If the cooking cycle has been terminated, the food can be eaten, but its organoleptic quality cannot be
guaranteed. If necessary, terminate heating using traditional procedures
BLACK OUT
If, during heating, a ashing clock appears on the screen, this means that a power break has occurred.
In the event of such a condition occurring, we suggest taking the food out of the bag and nishing
cooking in the traditional way.
POUCH OPENING AFTER COOKING OR HEATING
Always mind the bag’s outside temperature, this could be very hot. We recommend always using
appropriate gloves / pot holders for touching the pouch
The pouch is best removed from the oven by gripping the upper aps
Rest the pouch on a at surface
Alternatively, to help keep the pouch straight, this is best rested on a hollow container, leaving the ap to
be cut turned upwards.
Cut just under the dotted/continuous pack sealing line
Remove any excess liquid and pour the remaining pouch content into a container or plate ready for eating.
The product is best not kept at room temperature for a long time before eating, so its organoleptic
qualities do not deteriorate.
Once taken out of the pouch, the product cannot be vacuum packed again.

43
Cooking table
Cooking time interval values in the table are not valid for food. We always recommend that fresh food is
cooked from a chilled temperature.
Sous Vide pouches have to be cooked and reheated only with Sous Vide dedicated cycles as indicated in
the table below, paying attention to select the proper cooking cycle.
CATEGORY
CUT/PORTION/
DESCRIPTION
COOKING
CYCLE
COOKING TIME
(mins)
HEATING TIME
(from chilled)
(mins)
HEATING TIME
(from frozen)
(mins)
Fish
Smoothhound / swordsh
Fish
(llets or steaks)
45-55 10-20 20-30
Sole / turbot (llets)
Fish
(llets or steaks)
45-50 10-20 25-35
Salmon (steak)
Fish
(llets or steaks)
40-45 25-35 35-45
Saddled bream / seabream
Fish
(llets or steaks)
40-45 10-20 50-60
Gilt-head/bass/gurnard (whole)
Fish
(llets or steaks)
45-50 10-20 50-60
Gilt-head/bass/gurnard (llet)
Fish
(llets or steaks)
40-45 10-20 20-30
Grouper/amberjack/John Dory/red
mullet (llet or steak)
Fish
(llets or steaks)
40-45 10-20 50-60
Angler sh
Fish
(llets or steaks)
40-45 10-20 50-60
Scorpionsh / cod (steak or llet)
Fish
(llets or steaks)
45-50 10-20 50-60
Clams
Cuttlesh (whole or in pieces) Clams 55-60 5-15 15-25
Squid (whole or in pieces) Clams 60-70 5-15 15-25
Shortn squid (whole or in pieces) Clams 60-70 5-15 15-25
Curled octopus (whole or in pieces) Clams 70-80 10-20 20-30
Octopus (whole or in pieces) Clams 100-120 10-20 20-30
Shellsh
Shrimp/prawn (without shell) Shellsh 28-30 10-20 20-30
Tiger prawn (without shell) Shellsh 28-30 10-20 20-30
Shrimp tails (without shell) Shellsh 28-30 10-20 20-30
Savoury
creams
Cheese fondues Savoury creams 40-50 10-20 15-25
"Cream" base Savoury creams 35-40 10-20 15-25
"Fresh tomato" base Savoury creams 35-40 10-20 15-25
Lamb
Loin stew
Meat (steaks or
cubes)
45-50 45-50 40-50
Loin Meat (whole joint) 80-85 80-85 30-40

44
Cooking table
CATEGORY
CUT/PORTION/
DESCRIPTION
COOKING
CYCLE
COOKING TIME
(mins)
HEATING TIME
(from chilled)
(mins)
HEATING TIME
(from frozen)
(mins)
Pork
Shin (whole or boneless)
Meat (steaks or
cubes)
220-240 25-35 40-50
Slices of bacon
Meat (steaks or
cubes)
70-80 10-20 15-20
Bacon (whole) Meat (whole joint) 100-120 60-70 85-90
Fillet (whole) Meat (whole joint) 80-85 45-55 80-90
Leg (whole or boneless joint) Meat (whole joint) 90-100 45-55 85-90
Shoulder (whole) Meat (whole joint) 95-105 50-60 100-110
Boneless loin (whole) Meat (whole joint) 80-85 55-65 80-90
Beef
Osso buco
Meat (steaks or
cubes)
220-240 15-25 25-35
Beef stew
Meat (steaks or
cubes)
220-240 15-25 80-90
Roast beef (whole) Meat (whole joint) 80-85 35-45 75-85
Fillet (whole) Meat (whole joint) 80-85 50-60 85-95
Best end (whole) Meat (whole joint) 80-90 45-55 75-85
Veal
Shin (boneless)
Meat (steaks or
cubes)
220-240 25-35 40-50
Osso buco
Meat (steaks or
cubes)
220-240 15-25 25-35
Boneless loin steaks
Meat (steaks or
cubes)
45-50 15-25 25-35
Boneless loin (whole) Meat (whole joint) 80-85 55-65 85-95
Veal stew
Meat (steaks or
cubes)
220-240 20-30 40-50
Fillet (whole) Meat (whole joint) 80-85 45-55 75-85
Best end (whole) Meat (whole joint) 80-85 70-80 85-95
Chicken
Leg (whole) Poultry 55-65 15-25 40-50
Breast (whole or half) Poultry 50-60 15-25 70-80
Turkey
Leg (whole or boneless) Poultry 80-90 30-40 75-85
Breast (piece) Poultry 60-70 40-50 75-85

45
CATEGORY
CUT/PORTION/
DESCRIPTION
COOKING
CYCLE
COOKING TIME
(mins)
HEATING TIME
(from chilled)
(mins)
HEATING TIME
(from frozen)
(mins)
Vegetables
Cauliower (pieces or slices) /
broccoli (whole)
Vegetables 35-45 20-30 40-50
Courgette (whole) Vegetables 35-38 15-25 40-50
Potato (pieces) Vegetables 40-50 20-30 40-50
Pepper (half or in pieces) Vegetables 35-40 10-20 35-45
Onion (whole or quarters) Vegetables 35-40 10-20 20-30
Carrot (whole) Vegetables 35-38 7-20 20-30
Leek (in pieces) Vegetables 35-38 10-20 20-30
Radicchio / endive Vegetables 35-38 10-20 15-25
Beet (whole or in pieces) Vegetables 35-38 15-25 20-30
Artichoke (half, thornless) Vegetables 35-40 7-20 15-25
Fennel (whole or quarters) Vegetables 35-40 15-25 40-50
Asparagus (whole) Vegetables 35-38 5-15 15-25
Mushrooms
Champignons / cep mushrooms
(whole or in pieces)
Vegetables 35-40 10-20 25-35
Honey/chanterelle mushrooms
(whole)
Vegetables 35-38 10-20 25-35
Fruit
Apples/pears (whole) Fruit 30-35 15-25 30-40
Apples/pears (pieces) Fruit 25-30 10-20 20-30
Blackberries/raspberries (whole,
fresh)
Fruit 25-28 10-20 20-30
Pineapple (slices) Fruit 30-35 10-20 20-30
Plums (whole) Fruit 25-30 10-20 20-30
Sweet creams
Chocolate base Sweet creams 35-45 5-15 10-20
Chocolate and mascarpone base Sweet creams 35-45 5-15 10-20
Chocolate and cream base Sweet creams 35-40 5-15 10-20
Cooking table

46
PREPARING AND COOKING MEAT
MEAT (WHOLE JOINT):
• It is advisable to dimension the cut of meat
before cooking.
• Meat can be cooked in the bag without adding
any other ingredients or after traditional salting
and seasoning.
• After vacuum cooking and after removing the
bag, the piece of meat can be browned in a pan
for a few minutes in the traditional way.
• Some meat cuts such as “Roast beef” are suitable
for consumption at refrigeration temperatures.
Cut the meat when it is cold using a slicing
machine and garnish as desired (oil and pepper
or accompanying sauces).
• Some meat cuts, such as “lamb/veal loin” can
also be cooked with the bone. Pay the utmost
attention during preparation so as not to pierce
the bag with the bone.
STEWS:
• For best quality results, always use meat cuts
that are suitable for stewing.
• Use pieces of meat of at least 3cm each.
Basic recipe:
The following is provided as a simple guideline and
is a basic recipe for all kinds of stews:
250g meat
30g carrots (sliced)
50g potatoes (diced)
80g tomato
Salt and herbs to taste
MEAT (STEAKS):
• Steaks (loin, osso buco) can be prepared and
cooked using dry or wet (adding 80 – 100g
tomato per bag) cooking methods as desired. If
you are preparing lean meats, we suggest you
add cooking liquid in the bag.
• Steak thickness is important for the nal cooking
results. If you are cooking fatty meat such as
bacon, the slices may be as much as 2 cm thick.
SHINS:
• It is preferable to cook boneless shins to avoid
breaking the bag.
• If you are cooking a large shin (veal), once you
have removed the bone and cut the meat into
pieces, it will probably be necessary to divide it
into several bags.
POULTRY:
• Chicken breasts can be cooked whole, in pieces
or slices. Whichever cut you choose, you can use
dry or wet cooking methods as desired. You can
also stu the breast by making a pocket and
stung it as you please (ham, cheese and a leaf
vegetable).
• Legs may be cooked with the bone or boneless.
Make sure the bones do not have any sharp
edges to avoid breaking the bag.
• After vacuum cooking and after removing the
bag, the piece of meat can be browned or grilled
in a pan for a few minutes in the traditional way.
PREPARING AND COOKING FISH
FILLETS OR SLICES:
• It is preferable to cook sh llets or slices using
dry cooking methods or with little seasoning.
• When vacuum cooking llets, choose cuts of the
right consistency (300/400g or more) for best
results.
• After vacuum cooking and after removing the
bag, the sh can be browned or grilled in a pan
for a few minutes in the traditional way.
FISH (WHOLE):
• Carefully clean (scale and gut) the whole sh
before cooking it.
• Remove the head and tail of the sh if the bag is
not large enough to contain the whole sh.
• Cook the sh using dry cooking methods or
adding cooking liquid (e.g. oil, cream, sauce)
according to personal taste.
• After vacuum cooking and after removing the
bag, the sh can be browned or grilled in a pan
for a few minutes in the traditional way.
CLAMS:
• Carefully clean the whole clams by removing
skirt, gut and cartilage before cooking them.
• It is advisable to cut large clams, such as octopus,
into pieces. They can be cooked using dry or wet
(tomato, seasoning, sauces) cooking methods
according to personal taste.
• After vacuum cooking and after removing the
bag, the clams can be browned or grilled in a
pan for a few minutes in the traditional way.
• Some segmented forms, such as “sliced octopus
or shortn squid rings” are suitable for
consumption at refrigeration temperature,
accompanied by potatoes, salad or other
vegetables as desired.
SHELLFISH:
• Carefully clean the whole shellsh (remove gut)
before cooking them.
• It is preferable to cook shellsh without shells to
avoid breaking the bag.
• Shellsh can be prepared and cooked using dry
Cooking and preparation tips

47
Cooking and preparation tips
or wet (70 – 90g water per bag) cooking
methods as desired.
• For best cooking results, choose shrimps, prawns
(or tiger prawns) from 8 to 13 cm long.
• After vacuum cooking and after removing the
bag, the shellsh can be browned or grilled in a
pan for a few minutes in the traditional way.
PREPARING AND COOKING ACCOMPANYING SAUCES:
S
AVOURY CREAMS:
• Savoury creams are served as accompaniment to
main dishes or as a dish to be eaten with a
spoon.
Basic recipe:
The following is provided as a simple guideline and
is a basic recipe for many savoury creams:
Cheese fondues:
70g pecorino
70g gorgonzola
70g taleggio
70g cream
In addition to the kinds of cheese mentioned
above, you can use, for example,blue-veined, fresh
or ripened cheese, according to personal taste.
“Cream base” with vegetables:
100g cream
70g other cheese
50 – 100g cubed vegetables (courgettes) or
julienne radicchio
“Cream base” with sh:
70g cream
110g smoked salmon
“Fresh tomato base” with vegetables
170g fresh tomatoes
15g onion
60g aubergine
70g courgettes
40g peppers
15g oil
“Fresh tomato base” with sh
300g fresh tomatoes
80g tuna in oil
20g onion
30g oil
PREPARING AND COOKING VEGETABLES AND MUSHROOMS:
V
EGETABLES or WHOLE MUSHROOMS:
• Some vegetables are best cooked whole :
courgettes, carrots, beets, asparagus. For best
cooking results, choose carrots and courgettes
with a diameter of at least 3cm.
VEGETABLES OR MUSHROOMS IN PIECES:
• It is possible to cook all kinds of vegetables in
pieces. Dimension the pieces of vegetables
according to the size of the vegetable or
mushroom and according to their arrangement
in the bag.
• 50 – 100g of water can be added in the bag as
desired. At the end of the cooking cycle, the
content of the bag can be blended and served as
a “cream of vegetable soup”.
PREPARING AND COOKING FRUIT:
F
RUIT (WHOLE and in PIECES):
• It is possible to cook all kinds of fruit in pieces.
Dimension the pieces of fruit according to the
size of the fruit itself and according to their
arrangement in the bag.
• Some kinds of fruit can also be cooked whole
(apples, pears).
• At the end of the cooking cycle, the content of the
bag can be blended and served as a “fruit purée”.
PREPARING AND COOKING SWEET CREAMS:
S
WEET CREAMS:
• Sweet creams can be used to garnish desserts or
can be served as spoon desserts.
Basic recipe:
The following is provided as a simple guideline and
is a basic recipe for many sweet creams:
Chocolate /chocolate and cream base:
150g chocolate in pieces (200g if used without
cream)
90g cream
Chocolate and mascarpone base:
100g chocolate in pieces
250g mascarpone
At the end of the cooking process, knead the bag
to mix the ingredients
Crumbled biscuits, hazelnuts (whole or crushed)
and fruit can be added at the end of the cooking
cycle.

48
The appliance does not work
• The door is properly closed.
• Check the fuses and ensure that there is power
available.
• Check that the appliance has ample ventilation.
• Wait for 10 minutes, then try to operate the
appliance once more.
• Open and then close the door before you try
again.
• Disconnect the appliance from the power
supply. Wait for 10 minutes before reconnecting
and trying again.
The electronic programmer does not work
If the display shows the letter “F” followed by a
number, contact the nearest After-Sales Service.
In this case, quote the number that follows the
letter “F”.
Troubleshooting guide
Before calling the After-Sales Service
. See whether you can solve the problem with the
help of the suggestions given in the
“Troubleshooting guide”.
. Switch the appliance o and back on again to
see if the fault persists.
If the above checks have been carried out and
the fault still occurs, get in touch with the
nearest After-Sales Service.
Always specify:
• a brief description of the fault;
• the type and exact model of the appliance;
• the service number (number after the word
“Service” on the rating plate), located on the
right-hand edge of the appliance cavity (visible
when the appliance door is open).
The service number is also indicated in the
guarantee booklet.
• your full address;
• your telephone number.
NOTE: if any repairs are required, please contact an
authorised After-Sales Service (to guarantee that
original spare parts will be used and repairs carried
out correctly).
After-Sales Service

49

50

51

Printed in Italy
10/15
400010839667
GB
Whirlpool Europe S.r.l. Socio Unico
Viale G. Borghi, 27
21025 Comerio (Varese) Italy
Tel. +39 0332 759111 – Fax +39 0332 759268
www.whirlpool.eu