Loading ...
Loading ...
Loading ...
16 17
Before any cleaning or maintenance, turn off the appliance and unplug it from the wall socket.
• Wipe the cabinet of the unit with a slightly damp cloth and then dry it naturally or wipe it dry.
• Never wash the unit with water, it could be dangerous.
• Never use petrol, alcohol or solvents to clean the unit.
• Never spray insecticide liquids or similar to the unit.
• Clean the Bucket with water every two weeks.
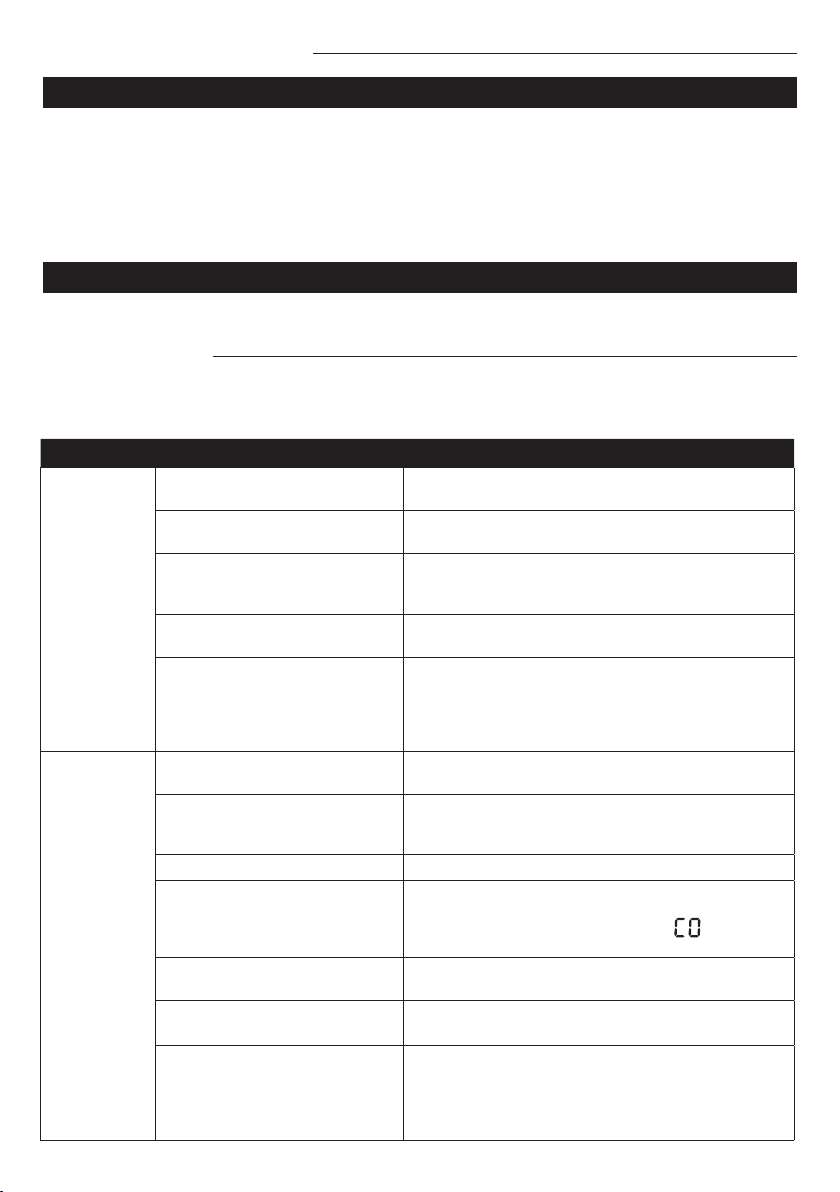
Problem Possible Causes Solutions
Dehumidifier
does not
start.
The Dehumidifier is
unplugged.
Make sure the Dehumidifier’s plug is pushed
completely into the outlet.
The fuse is blown/circuit
breaker is tripped.
Check the house fuse/circuit breaker box and
replace the fuse or reset the circuit breaker.
Dehumidifier has reached
its present level or the Bucket
is full.
Change to a lower setting; Empty the water
Bucket and replace it properly.
Bucket is not in the proper
position.
The Bucket must be in place and securely
seated for the Dehumidifier to operate.
Power failure. There is a protective time delay (up to 3 min.)
to prevent the compressor from overloading.
For this reason, the unit may not start work
immediately, but delay 3 min when power
is resumed.
Dehumidifier
does not dry
the air as it
should.
Not enough time allowed
for unit to remove moisture.
When first installed, allow at least 24 hours
to maintain the desired dryness.
Airflow is restricted. Make sure there are no curtains, blinds
or furniture block the front or back of the
Dehumidifier.
Dirty filter. Clean the filter.
The Humidity Control may not
be set low enough.
For drier air, press the “Decrease” button
to lower the percent humidity desired in the
room, or set the Dehumidifier to “ ”
for maximum dehumidifying.
Doors and windows may
not be closed tightly.
Check that all doors, windows, and other
openings are securely closed.
Clothes dryer may be blowing
moist air into the room.
Install the Dehumidifier away from the dryer.
The dryer should be vented outside.
Room temperature
is too low.
Moisture removal is best at higher room
temperatures. Lower room temperatures will
reduce the moisture removal rate. This model
is designed to operate at temperatures
above 41°F (5°C).
Cleaning and Maintenance
Troubleshooting
CLEANING THE FILTER
END OF SEASON OPERATIONS
START OF SEASON CHECKS
• To keep your appliance working efficiently, clean the
filter every week of operation.
• When the filter needs to be cleaned, the Clean
indicator will light up (after 250 hours of use).
Remove the filter from the back of the unit.
• Remove the filter refer to below picture.
• Use a vacuum cleaner to remove dust from the filter.
If the filter is very dirty, immerse it in warm water and
rinse it a number of times. The water temperature
should not be higher than 104°F (40°C). After washing,
leave the filter to dry.
• Once the filter drys completely, place the filter back
in the unit and press the “Filter” button to reset the
Clean indicator.
Occasionally, you may encounter some problems that are of a minor nature and a service
call may not be necessary. Use this troubleshooting guide to identify possible problems
you may be experiencing.
• Unplug the unit from the outlet, empty the Bucket and remove the drain cap.
• Run off all water left inside the appliance. When all the water has been drained,
put the cap back in place.
• Clean the filter and dry it thoroughly before putting back.
• Cover the appliance to avoid dust accumulation.
• Store the appliance upright in a dry location.
When frost builds up on the evaporator coils, the compressor will cycle off and the fan will
continue to run until the frost disappears. When the coils are completely defrosted, the
compressor or fan (depending on the model) will automatically restart. The unit start
to dehumidify the room.
AUTOMATIC DEFROST
NOTE:
• After the Pump is activated, water will not run out of the Drain Hose right away as there
is a small, internal tank which must be filled first.
• Make sure there are no kinks or knots in the Drain Hose.
Pump Adaptor
Sealring
Pump Hose about 16.4 ft (5 m)
CAUTION:
• Do not operate the appliance without the filter in place.
• When removing or re-installing the filter, be careful to avoid possible cuts,
and do not contact the metal parts of the appliance, which will result in personal injury.
Operating Instructions
Make sure the power cable and plug are undamaged and the earth system is efficient.
Follow the installation instructions precisely.
Cleaning and Maintenance
Loading ...
Loading ...
Loading ...