
COOK
LIKE
A
GOD
TMD240 1
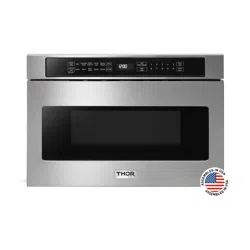
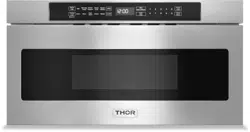
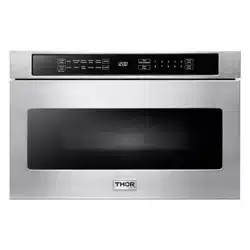
24 INCH MICROWAVE DRAWER

24 INCH MICROWAVE
DRAWER
USE AND CARE MANUAL
TMD2401
2

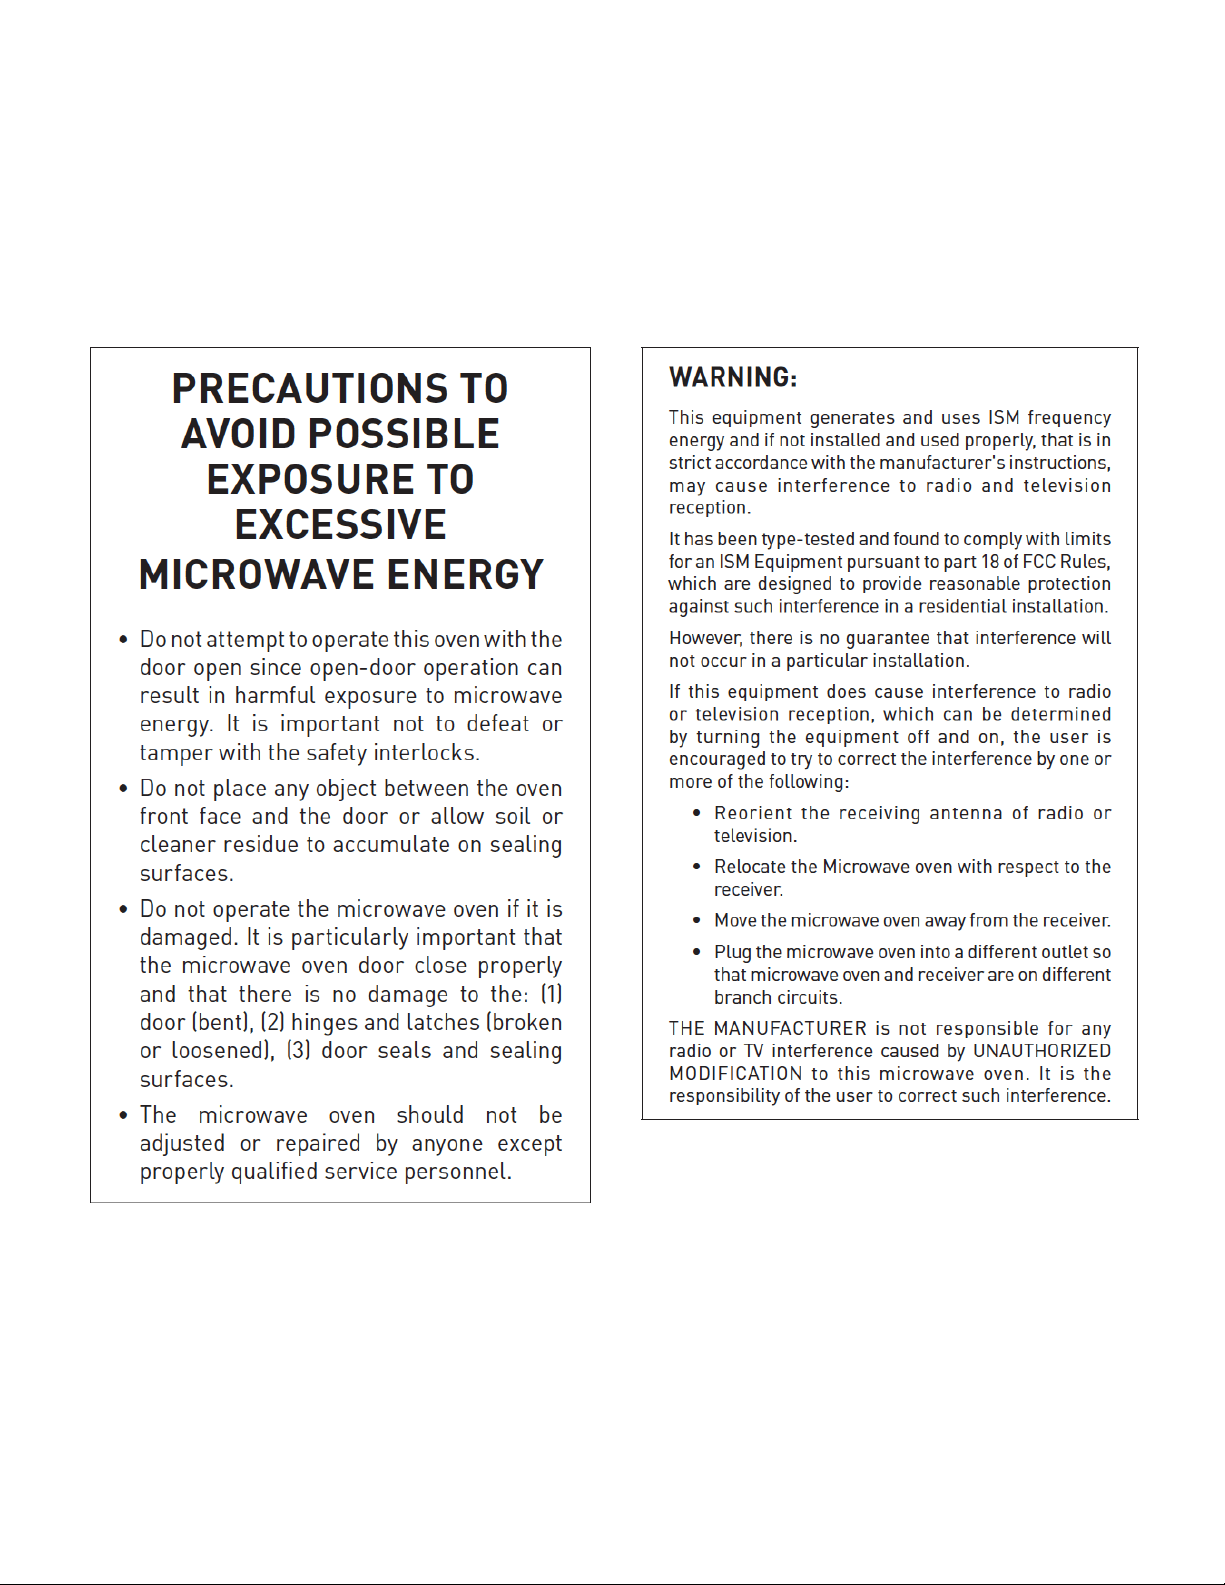
PRECAUTIONS TO AVOID POSSIBLE EXPOSURE TO
EXCESSIVE MICROWAVE ENERGY.................................................................................... 2
IMPORTANT SAFETY INSTRUCTIONS.............................................................................. 4
IMPORTANT INFORMATION YOU NEED TO KNOW........................................................... 5
ABOUT UNPACKING AND EXAMINING YOUR DRAWER MICROWAVE.............................. 5
ELECTRICAL GROUNDING INSTRUCTIONS...................................................................... 5
RADIO OR TV INTERFERENCE.......................................................................................... 5
ABOUT YOUR DRAWER MICROWAVE................................................................................ 5
COOKWARE SAFETY......................................................................................................... 5
ACCESSORIES................................................................................................................... 6
CHILD SAFETY.................................................................................................................. 6
FOOD SAFETY................................................................................................................... 6
COOKING SAFETY............................................................................................................. 7
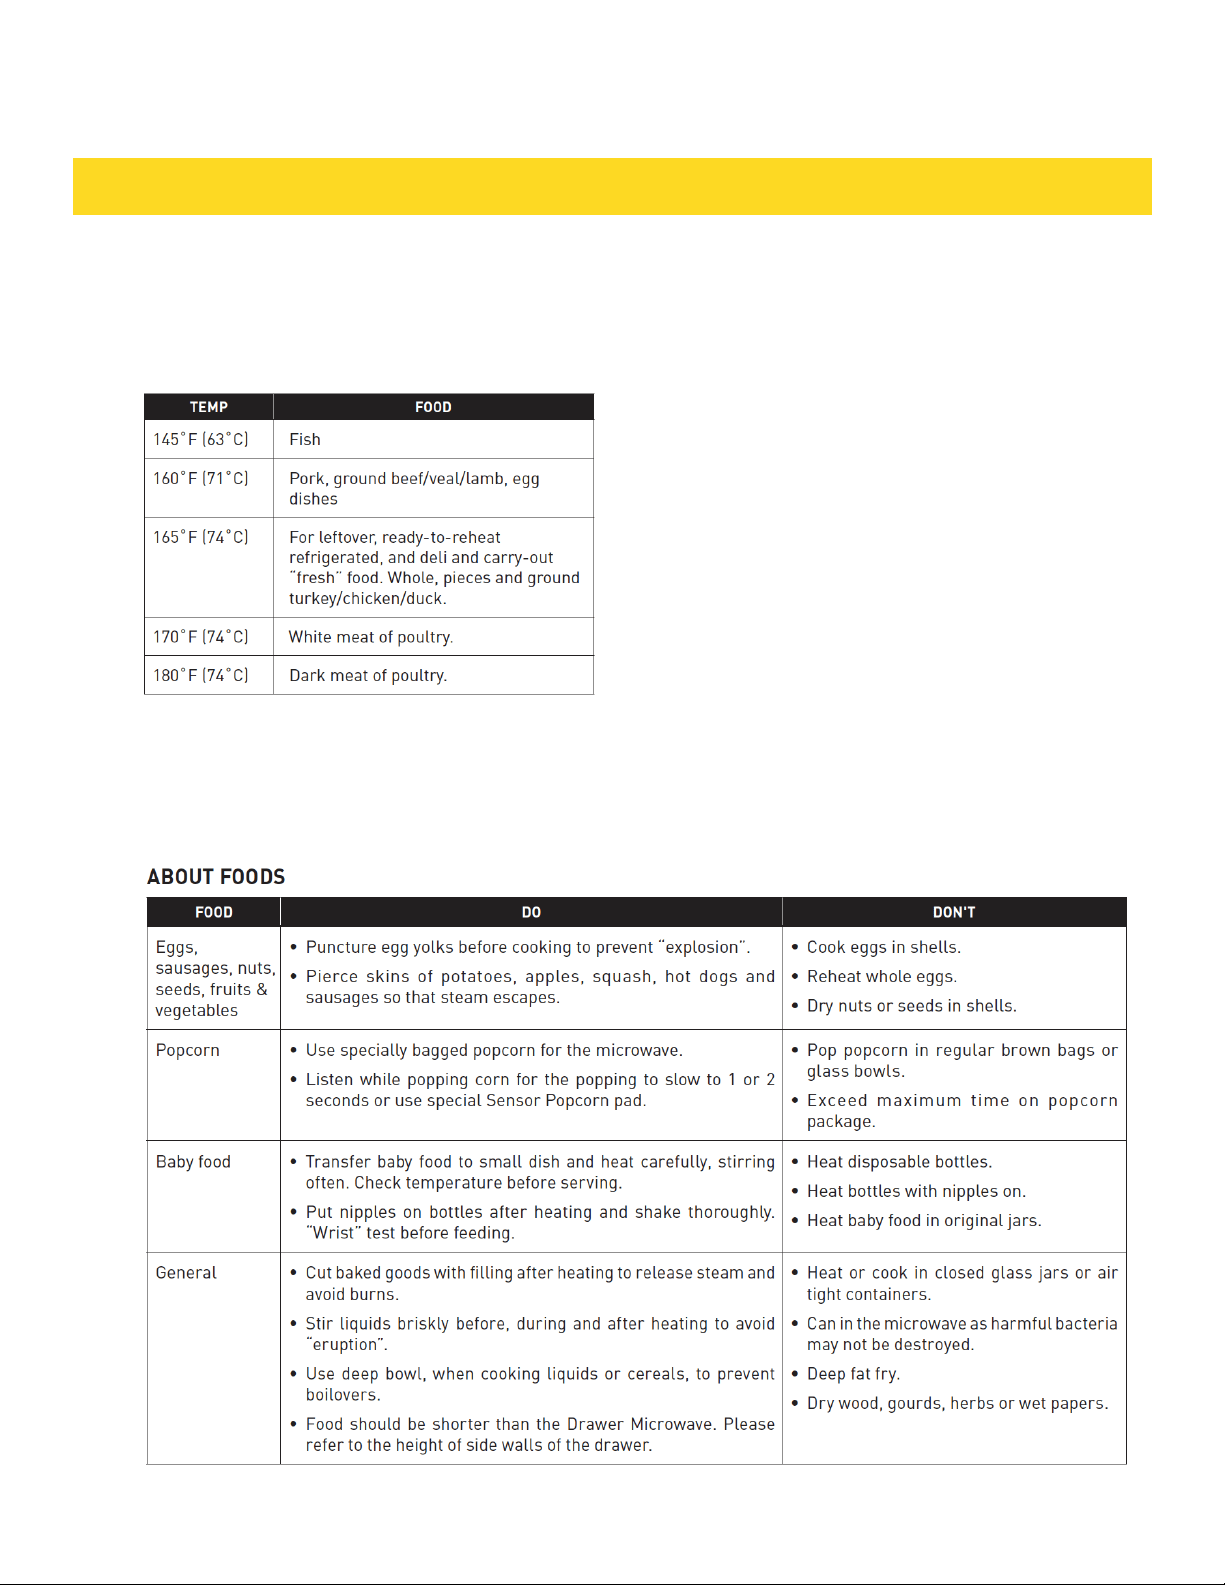
ABOUT FOODS.................................................................................................................. 7
BEFORE OPERATING........................................................................................................ 8
TO SET THE CLOCK........................................................................................................... 8
STOP/CLEAR..................................................................................................................... 8
OPEN OR CLOSE DRAWER MICROWAVE ......................................................................... 8
FEATURES AND CONTROL PANEL................................................................................... 9
SETTINGS....................................................................................................................... 10
TIME COOKING................................................................................................................ 10
TO SET POWER LEVEL.................................................................................................... 10
SENSOR SETTINGS......................................................................................................... 10
COVERING FOODS........................................................................................................... 10
SENSOR POPCORN / SENSOR REHEAT.......................................................................... 11
SENSOR COOK................................................................................................................ 12
DEFROST........................................................................................................................ 13
TABLE OF CONTENTS

MANUAL DEFROST..........................................................................................................13
REHEAT............................................................................................................................14
BEVERAGE CENTER........................................................................................................ 14
MELT / SOFTEN / WARM................................................................................................. 15
KEEP WARM.................................................................................................................... 16
MULTIPLE SEQUENCE COOKING.................................................................................... 16
ADD-A-MINUTE............................................................................................................... 16
MORE OR LESS TIME ADJUSTMENT............................................................................... 16
HELP (IN THE DISPLAY).................................................................................................. 16
CONTROL LOCK.............................................................................................................. 16
SETUP / HELP.................................................................................................................. 16
AUDIBLE SIGNAL ELIMINATION..................................................................................... 17
END OF COOKING REMINDER........................................................................................ 17
AUTO START.................................................................................................................... 17
SETUP / HELP.................................................................................................................. 17
DEMONSTRATION MODE................................................................................................ 17
STANDBY MODE.............................................................................................................. 17
CLEANING AND MAINTENANCE.................................................................................... 18
EXTERIOR........................................................................................................................ 18
STAINLESS STEEL SURFACE.......................................................................................... 18
FRONT SIDE OF THE DRAWER....................................................................................... 18
TOUCH CONTROL PANEL............................................................................................... 18
DRAWER GUIDES............................................................................................................ 18
INTERIOR........................................................................................................................ 18
WAVEGUIDE COVER........................................................................................................ 18
ODOR REMOVAL.............................................................................................................. 18
BEFORE YOU CALL FOR SERVICE................................................................................... 19
INSTALLATIONS ........................................................................................................ 20-29
WARRANTY ..................................................................................................................... 30
TABLE OF CONTENTS
3

When using electrical appliances, basic safety
precautions should be followed, including the
following:
WARNING - To reduce the risk of burns, electric
shock, fire, injury to persons or exposure to
excessive microwave energy:
1. Read all instructions before using the appliance.
2. Read and follow the specific “PRECAUTIONS
TO AVOID POSSIBLE EXPOSURE TO EXCESSIVE
MICROWAVE ENERGY” on page 2
3. This appliance must be properly grounded. Connect
only to properly grounded outlet. See ELECTRICAL
GROUNDING INSTRUCTIONS on page 5
4. Install or locate this appliance only in accordance
with the provided Installation Guide.
5. Some products such as whole eggs and sealed
containers— for example, closed glass jars—are able
to explode and should not be heated in the appliance.
6. Use this appliance only for its intended use as
described in this manual. Do not use corrosive
chemicals or vapors in this appliance. This appliance
is specifically designed to heat, cook or dry food. It is
not designed for industrial or laboratory use.
7. As with any appliance, close supervision is
necessary when used by children.
8. Do not operate this appliance if it has a damaged
cord or plug, if it is not working properly or if it has
been damaged or dropped.
9. This appliance should be serviced only by qualified
service personnel. Contact nearest Authorized
Servicer for examination, repair or adjustment.
10. Do not cover or block any openings on the
appliance.
11. Do not store or use this appliance outdoors. Do
not use this product near water—for example, near
a kitchen sink, in a wet basement, near a swimming
pool or similar locations.
12. Do not immerse cord or plug in water.
13. Keep cord away from heated surfaces.
14. Do not climb or sit on the appliance.
15. Be sure that fingers or other objects or materials
are not around the appliance opening when the
appliance is closed.
16. Do not put fingers or clothes around the drawer
guides when the appliance is opened or closed. They
could be caught in the guides when the appliance is
closed.
17. Be sure that the food and container are shorter than
the drawer before closing it. You can refer to the height of
the side walls of the drawer.
18. When cleaning appliance sealing surfaces that come
together on closing the drawer, use only mild, nonabrasive
soaps or detergents applied with a sponge or soft cloth.
See cleaning instructions on page 18
19. To reduce the risk of fire in the appliance cavity:
a. Do not overcook food. Carefully attend appliance when
paper, plastic or other combustible materials are placed
inside the appliance to facilitate cooking.
b. Remove wire twist-ties from paper or plastic bags before
placing bag in appliance.
c. If materials inside the appliance ignite, keep appliance
door closed, turn microwave off and shut off power at the
fuse or circuit breaker panel.
d. Do not use the appliance for storage purposes. Do not
leave paper products, cooking utensils, or food in the
appliance when not in use.
20. Liquids, such as water, coffee or tea are able to be
overheated beyond the boiling point without appearing
to be boiling due to surface tension of the liquid. Visible
bubbling or boiling when the container is removed from
the appliance is not always present. THIS COULD RESULT
IN VERY HOT LIQUIDS SUDDENLY BOILING OVER WHEN
A SPOON OR OTHER UTENSIL IS INSERTED INTO THE
LIQUID.
To reduce the risk of injury to persons:
a. Do not overheat the liquid.
b. Stir liquid both before and halfway through heating it.
c. Do not use straight-sided containers with narrow necks.
Use a wide-mouthed container.
d. After heating, allow the container to stand in the
appliance at least for 20 seconds before removing the
container.
e. Use extreme care when inserting a spoon or other
utensil into the container.
21. If the appliance light fails, consult a AUTHORIZED
SERVICER.
IMPORTANT SAFETY INSTRUCTIONS
SAVE THESE INSTRUCTIONS
4

IMPORTANT INFO YOU NEED TO KNOW
ABOUT UNPACKING AND EXAMINING YOUR
DRAWER MICROWAVE
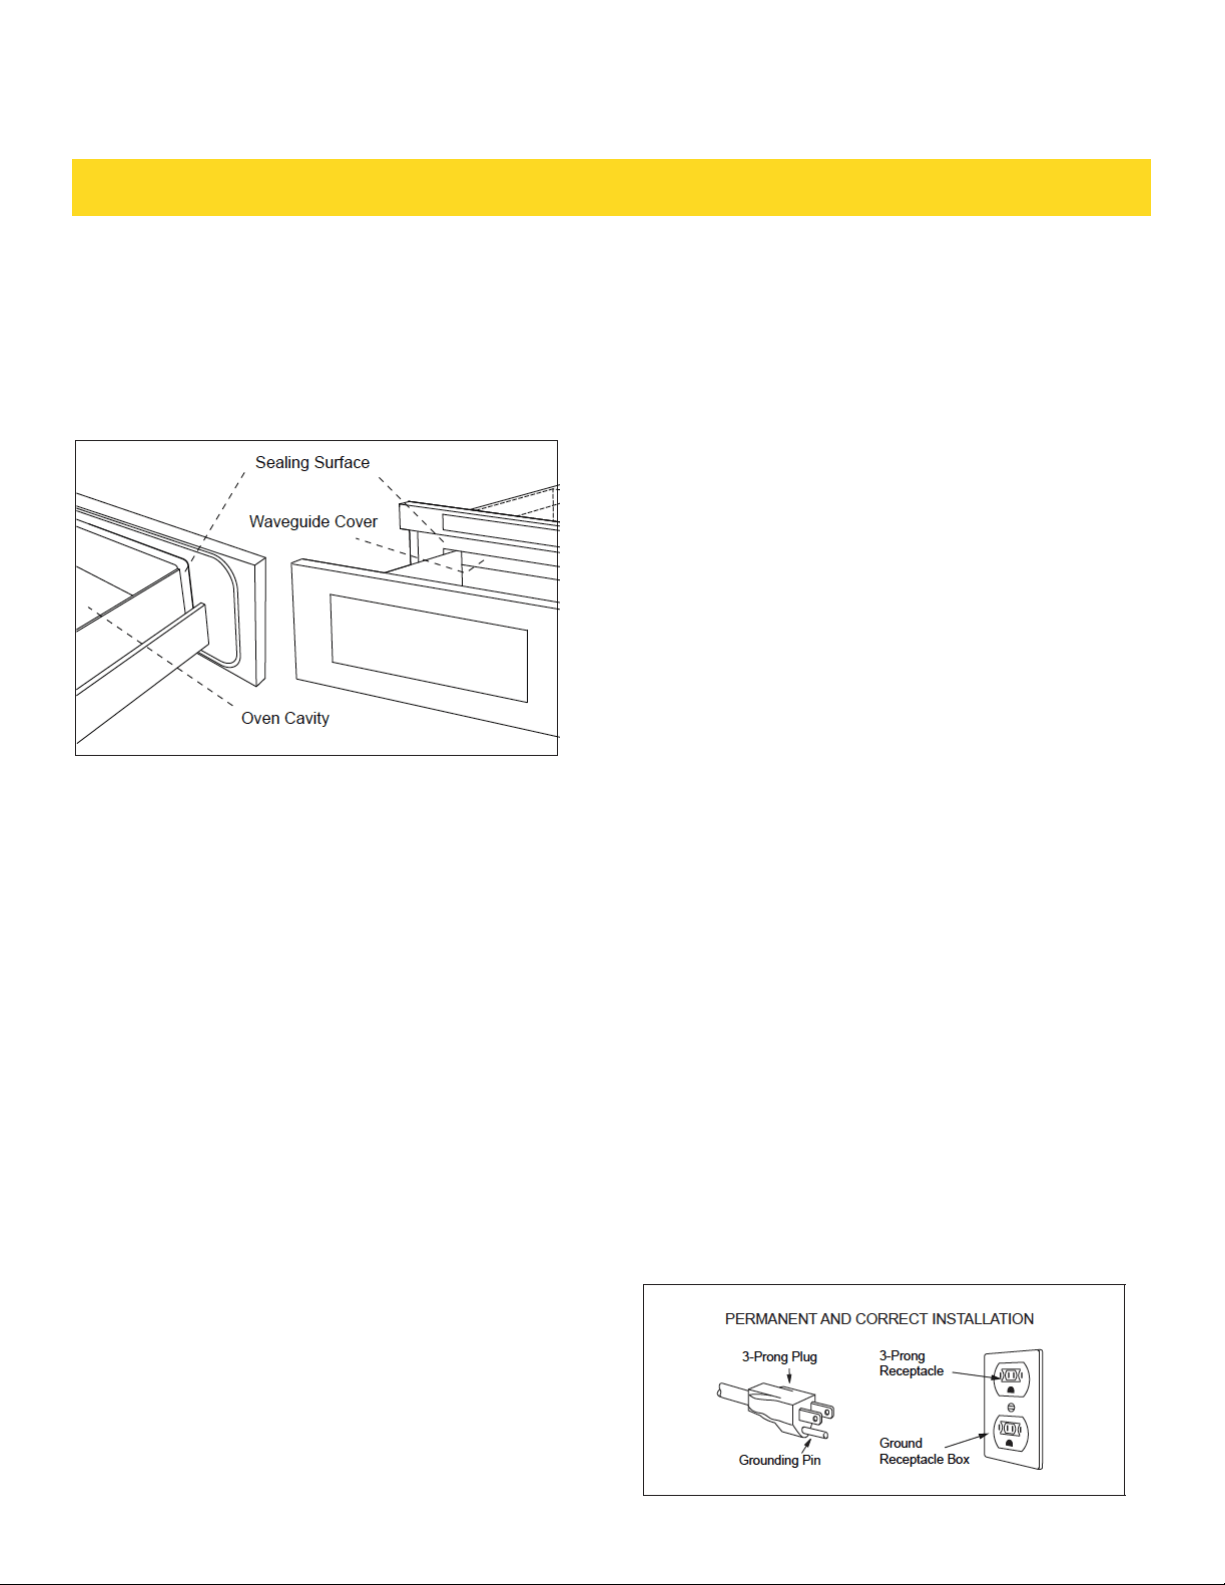
1. Remove all packing materials from inside the Drawer
Microwave. DO NOT REMOVE THE WAVEGUIDE COVER,
which is located on the top of the Drawer Microwave.
2. Remove the feature sticker, if there is one. Check the
drawer for any damage, such as misaligned or bent
drawer, damaged drawer seals and sealing surfaces,
broken or loose drawer guides and dents inside the cavity
or on the front side of the drawer. If there is any damage,
do not operate the Drawer Microwave and contact your
AUTHORIZED SERVICER.
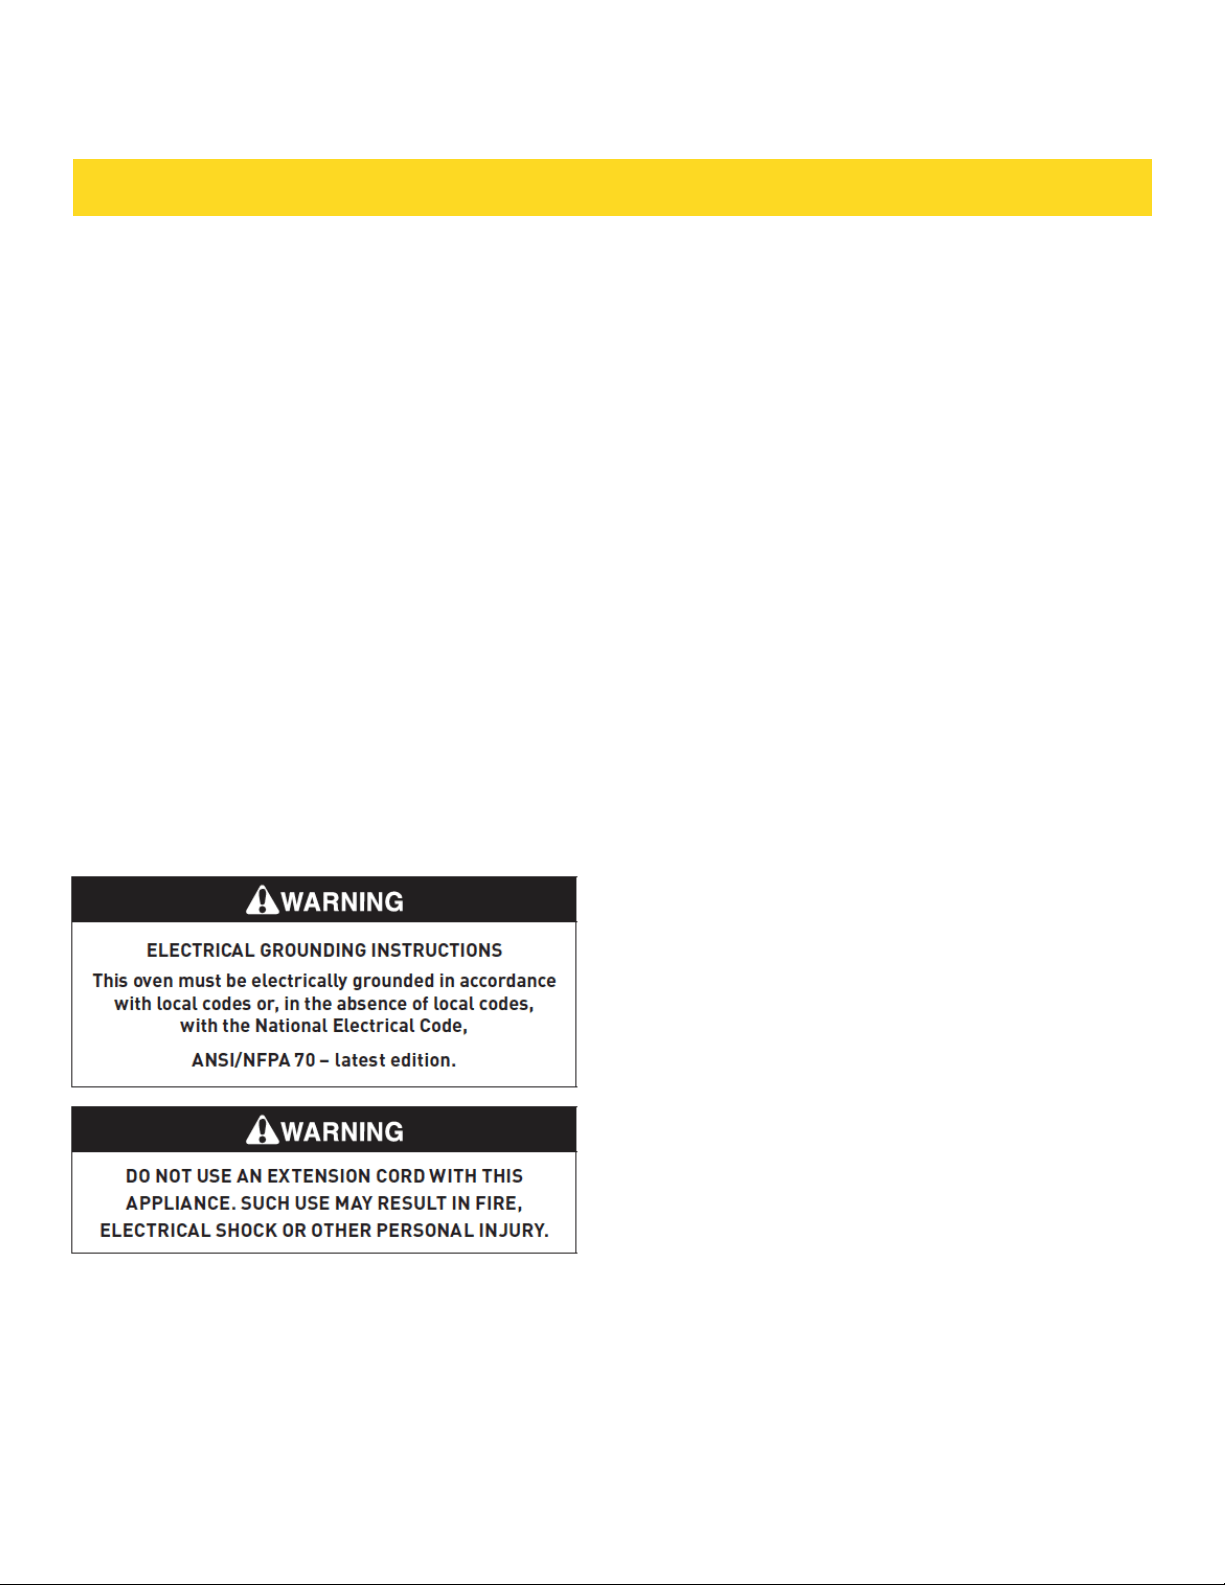
ELECTRICAL GROUNDING INSTRUCTIONS
This appliance must be grounded. The oven is equipped
with a cord having a grounding wire with a grounding plug.
It must be plugged into a wall receptacle that is properly
installed and grounded in accordance with the National
Electrical Code and local codes and ordinances. In the
event of an electrical short circuit, grounding reduces
risk of electric shock by providing an escape wire for the
electric current.
Do not use an extension cord. If the power supply cord is
too short, have a qualified electrician or serviceman install
an outlet near the appliance. If you have any questions
about the grounding or electrical instructions, consult a
qualified electrician or serviceperson.
• If you have any questions about the grounding or
electrical instructions, consult a qualified electrician or
serviceperson.
• Neither THOR nor the dealer can accept any liability for
damage to the oven or personal injury resulting from failure
to observe the correct electrical connection procedures.
RADIO OR TV INTERFERENCE
Should there be any interference caused by the Drawer
Microwave to your radio or TV, check that the Drawer
Microwave is on a different electrical circuit, relocate the
radio or TV as far away from the oven as feasible or check
position and signal of receiving antenna.
ABOUT YOUR DRAWER MICROWAVE
ALWAYS have food in the Drawer Microwave when it is on to
absorb the microwave energy. The vent under the Drawer
Microwave must not be blocked.
During microwaving, steam may come from the right side
of the vent. When using the Drawer Microwave at power
levels below 100%, you may hear the magnetron cycling
on and off. It is normal for the exterior of the Drawer
Microwave to be warm to the touch when cooking or
reheating. Condensation is a normal part of microwave
cooking. Room humidity and the moisture in food will
influence the amount of moisture that condenses in the
Drawer Microwave. Generally, covered foods will not cause
as much condensation as uncovered ones. The Drawer
Microwave is for food preparation only. It should not be
used to dry clothes or newspapers. Your Drawer Microwave
is rated 950 watts by using the IEC Test Procedure. In using
recipes or package directions, check food a minute or two
before the minimum time and add time accordingly. When
opening or closing the Drawer Microwave quickly, food in
the Drawer Microwave may be spilled. To clean, please
refer to the Cleaning and Maintenance section on page 18.
COOKWARE SAFETY
• Use dry, sturdy pot-holders. Damp pot-holders may
cause burns from steam. Dishtowels or other substitutes
should NEVER be used as potholders because they can
trail across hot surface elements and ignite or get caught
on appliance parts.
• DO NOT heat unopened food containers; buildup of
pressure may cause the container to explode and result in
injury.
• Use care when opening the drawer microwave. Let hot air
or steam escape before removing or replacing food.
• PREPARED FOOD WARNING: Follow food manufacturer's
instructions. If a plastic frozen food container and/or its
cover distorts, warps, or is otherwise damaged during
cooking, immediately discard the food and its container.
The food could be contaminated. It is not necessary to buy
all new cookware. Many pieces already in your kitchen can
be used successfully in your new Drawer Microwave. Make
sure the utensil does not touch the interior walls during
cooking.
5

IMPORTANT INFO YOU NEED TO KNOW
Use these utensils for safe microwave cooking and
reheating:
• glass ceramic (Pyroceram®), such as Corningware®.
• heat-resistant glass (Pyrex®)
• microwave-safe plastics
• microwave-safe paper plates
• microwave-safe pottery, stoneware and porcelain
• browning dish (Do not exceed recommended preheating
time. Follow manufacturer’s directions.)
These items can be used for short time reheating of foods
that have little fat or sugar in them:
• wood, straw, wicker
DO NOT USE:
• metal pans and bakeware (cookie sheets / brownie
pans)
• dishes with metallic trim
• non-heat-resistant glass
• non-microwave-safe plastics (margarine tubs)
• recycled paper products
• brown paper bags
• food storage bags
• metal twist-ties
Should you wish to check if a dish is safe for microwaving,
place the empty dish in the oven and microwave on HIGH
for 30 seconds. A dish which becomes very hot should not
be used.
The following coverings are ideal:
• Paper towels are good for covering foods for reheating
and absorbing fat while cooking bacon.
• Wax paper can be used for cooking and reheating.
• Plastic wrap that is specially marked for microwave use
can
be used for cooking and reheating. DO NOT allow plastic
wrap to touch food. Vent so steam can escape.
• Lids that are microwave-safe are a good choice because
heat is kept near the food to hasten cooking.
• Oven cooking bags are good for large meats or foods
that need tenderizing. DO NOT use metal twist-ties.
Remember to slit bag so steam can escape.
How to use aluminum foil in your Drawer Microwave:
• Small flat pieces of aluminum foil placed smoothly
on the food can be used to shield areas that are either
defrosting or cooking too quickly.
• Foil should not come closer than one inch to any surface
of the Drawer Microwave. Should you have questions
about utensils or coverings, check a good microwave
cookbook or follow recipe suggestions.
Accessories
There are many microwave accessories available for
purchase. Evaluate carefully before you purchase so that
they meet your needs. A microwave-safe thermometer
will assist you in determining correct doneness
and assure you that foods have been cooked to safe
temperatures. THOR is not responsible for any damage to
the Drawer Microwave when accessories are used.
CHILD SAFETY
• Children below the age of 7 should use the Drawer
Microwave with a supervising person very near to them.
Between the ages of 7 and 12, the supervising person
should be in the same room. The child must be able to
reach the Drawer Microwave comfortably.
• At no time should anyone be allowed to lean or swing on
the Drawer Microwave.
• Children should be taught all safety precautions: use
potholders, remove coverings carefully, pay special
attention to packages that crisp food because they may be
extra hot.
• Don't assume that because a child has mastered one
cooking skill he/she can cook everything.
• Children need to learn that the Drawer Microwave is not a
toy. See page 16 for Control Lock feature.
FOOD SAFETY
• Arrange food carefully. Place thickest areas towards
outside of dish.
• Watch cooking time. Cook for the shortest amount of
time indicated and add more as needed. Food severely
overcooked can smoke or ignite.
• Cover foods while cooking. Check recipe or cookbook for
suggestions: paper towels, wax paper, microwave plastic
wrap or a lid. Covers prevent spattering and help foods to
cook evenly.
• Shield with small flat pieces of aluminum foil any thin areas
of meat or poultry to prevent overcooking before dense,
thick areas are cooked thoroughly.
• Stir foods from outside to center of dish once or twice
during cooking, if possible.
• Turn foods over once during microwaving to speed cooking
of such foods as chicken and hamburgers. Large items like
roasts must be turned over at least once.
• Rearrange foods such as meatballs halfway through
cooking both from top to bottom and from right to left.
• Add standing time. Remove food from Drawer Microwave
and stir, if possible. Cover for standing time which allows
the food to finish cooking without overcooking.
• Check for doneness. Look for signs indicating that cooking
temperatures have been reached.
Doneness signs include:
• Food steams throughout, not just at edge.
• Center bottom of dish is very hot to the touch.
• Poultry thigh joints move easily.
• Meat and poultry show no pinkness.
• Fish is opaque and flakes easily with a fork.
6
IMPORTANT INFO YOU NEED TO KNOW
COOKING SAFETY
Check foods to see that they are cooked
to the United States Department of
Agriculture's recommended temperatures.
To test for doneness, insert a meat
thermometer in a thick or dense area away
from fat or bone. NEVER leave the
thermometer in the food during cooking,
unless it is approved for microwave use.
• ALWAYS use potholders to prevent burns
when handling utensils that are in contact
with hot food. Enough heat from the food
can transfer through utensils to cause
skin burns.
• Avoid steam burns by directing steam
away from the face and hands. Slowly lift
the farthest edge of a dish’s covering and
carefully open popcorn and oven cooking
bags away from the face.
• Stay near the Drawer Microwave while
it is in use and check cooking progress
frequently so that there is no chance of
overcooking food.
• NEVER use the oven for storing
cookbooks or other items.
• Select, store and handle food carefully to
preserve its high quality and minimize the
spread of foodborne bacteria.
• Keep waveguide cover clean. Food
residue can cause arcing and/or fires.
7

Before operating your new Drawer Microwave make sure you read and understand this Use and
Care Guide completely. The following steps MUST be taken before any functions can be used.
Before you use the Drawer Microwave:
1. Plug in the Drawer Microwave. ENJOY YOUR MICROWAVE TOUCH CLEAR AND TOUCH
CLOCK will appear.
2. Touch the Stop/Clear pad. : will appear.
3. Set clock.
TO SET THE CLOCK
1. Touch Timer/Clock pad and number 2.
2. Enter the correct time of day by touching the numbers in sequence. Touch Timer/Clock pad.
This is a 12 hour clock. If you attempt to enter an incorrect clock time, ERROR will appear in
the display. Touch the Stop/Clear pad and re-enter the time.
• If the electrical power supply to your Drawer Microwave should be interrupted, the display
will intermittently show ENJOY YOUR MICROWAVE TOUCH CLEAR AND TOUCH CLOCK after
the power is reinstated. If this occurs during cooking, the program will be erased. The time of
day will also be erased. Simply touch Stop/Clear pad and reset the clock for the correct time of
day.
STOP/CLEAR
Touch the Stop/Clear pad to:
1. Erase if you make a mistake during programming.
2. Cancel timer.
3. Stop the oven temporarily during timed cooking.
4. Return the time of day to the display.
5. Cancel a program during cooking, touch twice.
OPEN OR CLOSE DRAWER MICROWAVE
Always Touch the OPEN or CLOSE pad on the control panel to open or close the Drawer
Microwave. Do not push or pull the drawer by hand, except in case of emergency, such as a
power failure. If necessary, push or pull slowly.
BEFORE OPERATING
8
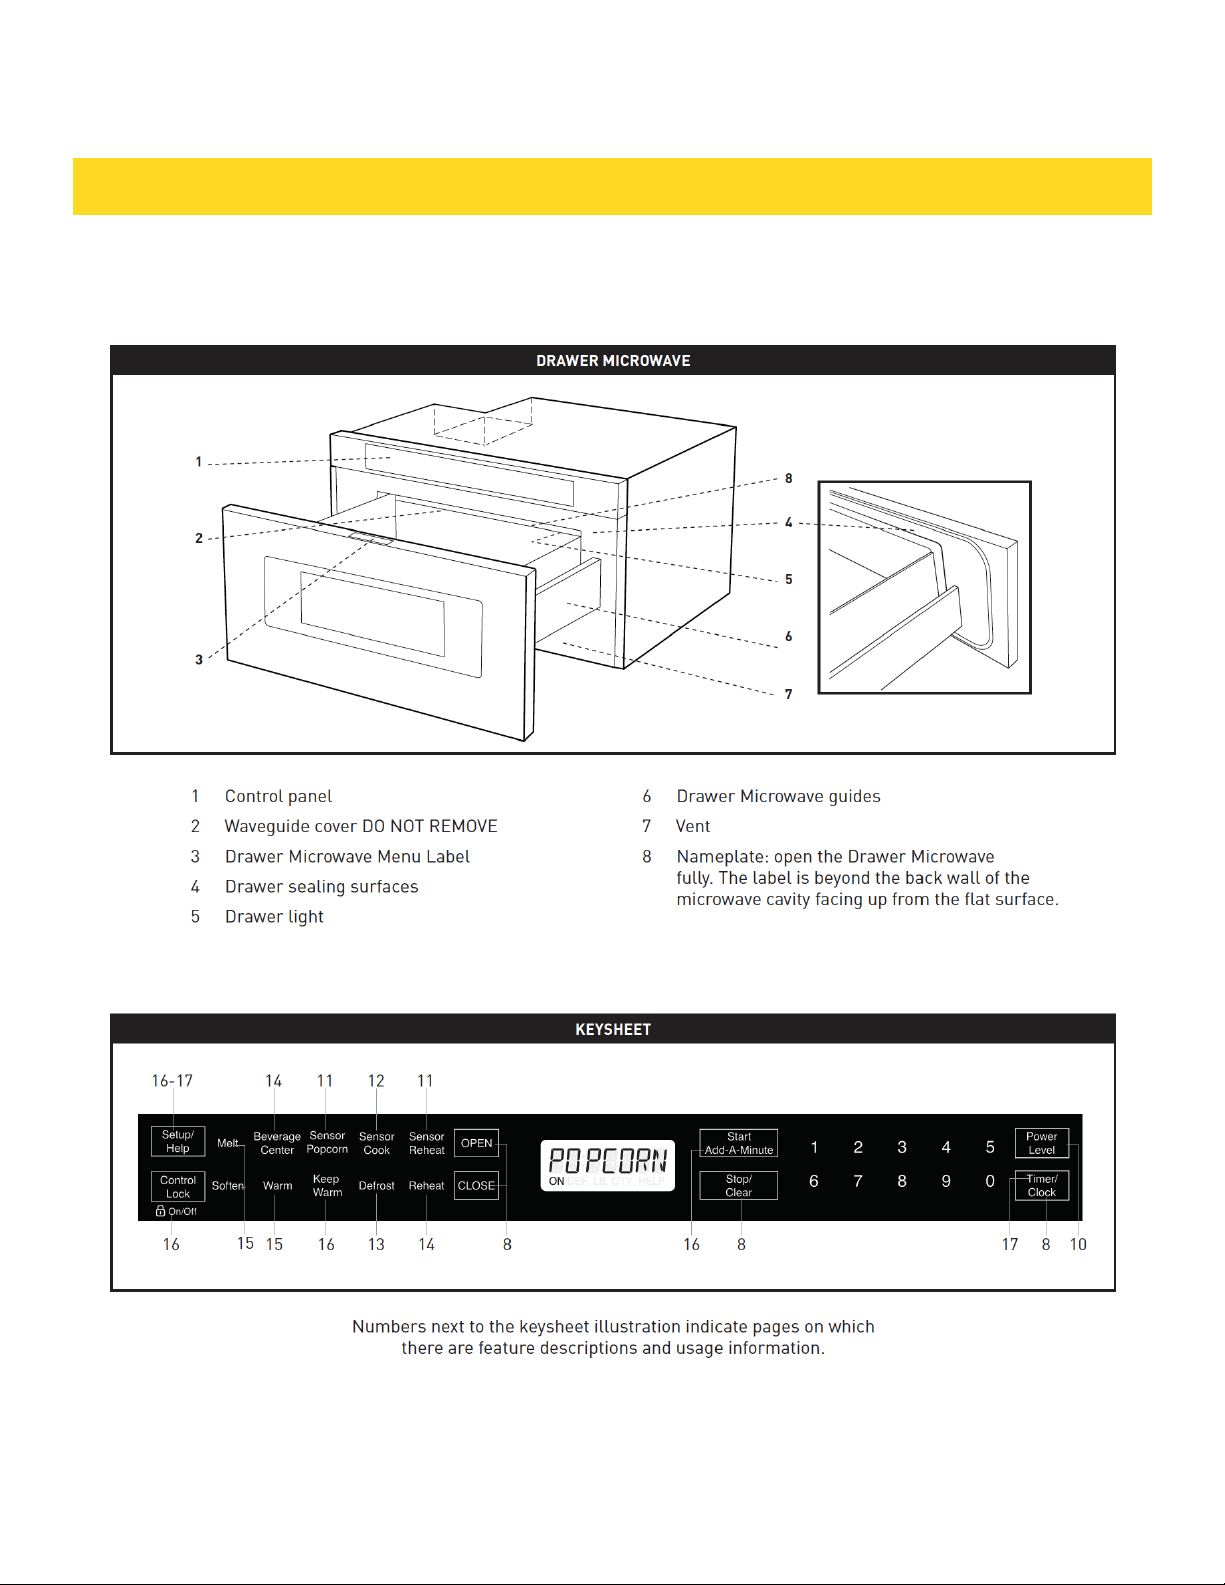
FEATURES AND CONTROL PANEL
9
TIME COOKING
Your Drawer Microwave can be programmed for 99 minutes 99 seconds (99.99).
Always enter the seconds after the minutes, even if they are both zeros.
• Cook for 5 minutes at 100%
1. Enter cooking time 5 0 0.
2. Touch Start /Add-A-Minute pad.
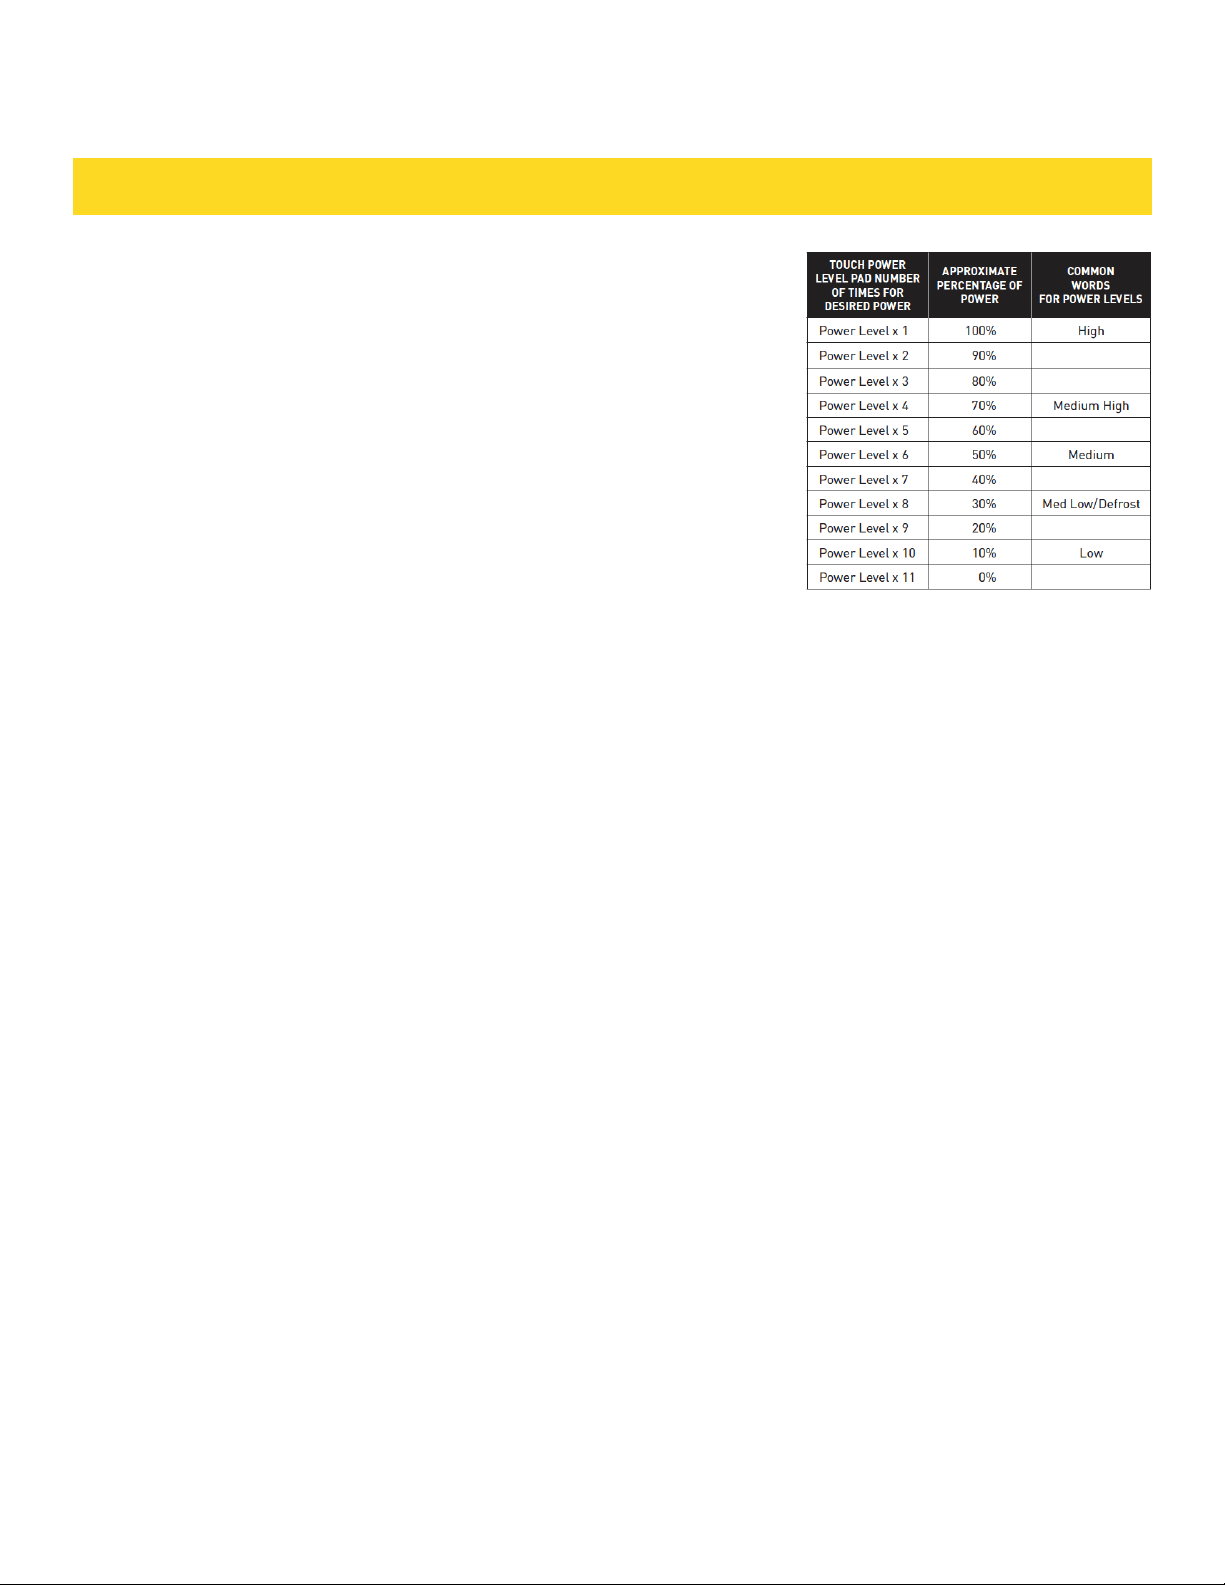
TO SET POWER LEVEL
There are eleven preset power levels. Using lower power levels increases the
cooking time, which is recommended for foods such as cheese, milk and long
slow cooking of meats. Consult a microwave cookbook or recipes for specific
recommendations.
• Defrost for 5 minutes at 30%
1. Enter defrost time 5 0 0.
2. Touch Power Level 8 times.
3. Touch Start /Add-A-Minute.
SETTINGS
SENSOR SETTINGS
Sensor is a semi-conductor device that detects the vapor (moisture and humidity) emitted from the food as it heats. The
sensor adjusts the cooking times and power levels for various foods and quantities.
• After the oven is plugged in, wait 2 minutes before using any sensor setting.
• Be sure the exterior of the cooking container and the interior of the oven are dry. Wipe off any moisture with a dry cloth
or paper towel.
• The sensor works with foods at normal storage temperature. For example, popcorn would be at room temperature.
• Any sensor selection can be programmed with More or Less Time Adjustment. See page 16.
• More or less food than the quantity listed in the charts should be cooked following the guidelines in any microwave
cookbook.
• During the first part of sensor use, the food name will appear on the display. Do not open the oven or touch Stop/Clear
during this part of the cycle. The measurement of vapor will be interrupted. If this occurs, an error message will
appear. To continue cooking, touch the Stop/Clear pad and cook manually.
• When the sensor detects the vapor emitted from the food, the remainder of cooking/reheating time will appear. The
oven may be opened when the remaining time appears on the display. At this time, you may stir or season food, as
desired.
• Except for Popcorn, if the sensor does not detect vapor properly when cooking other foods, ERROR will be displayed,
and the microwave will turn off.
• Check food temperature after cooking. If additional time is needed, continue to cook manually.
• Each food has a cooking hint. Touch the Set Up/Help pad when the HELP indicator is lighted in the display.
COVERING FOODS
Some foods work best when covered. Use the cover recommended in the charts for these foods. You may refer to the
hints by touching the Set Up/Help pad. See page 16.
• Casserole lid
• Plastic wrap: Use plastic wrap recommended for microwave cooking. Cover dish loosely; allow approximately 1/2 inch
to remain uncovered to allow steam to escape. Plastic wrap should not touch food.
• Wax paper: Cover dish completely. Fold excess wrap under dish to secure. If dish is wider than paper, overlap two
pieces at least one inch to cover. Be careful when removing any covering to allow steam to escape away from you.
10
SETTINGS
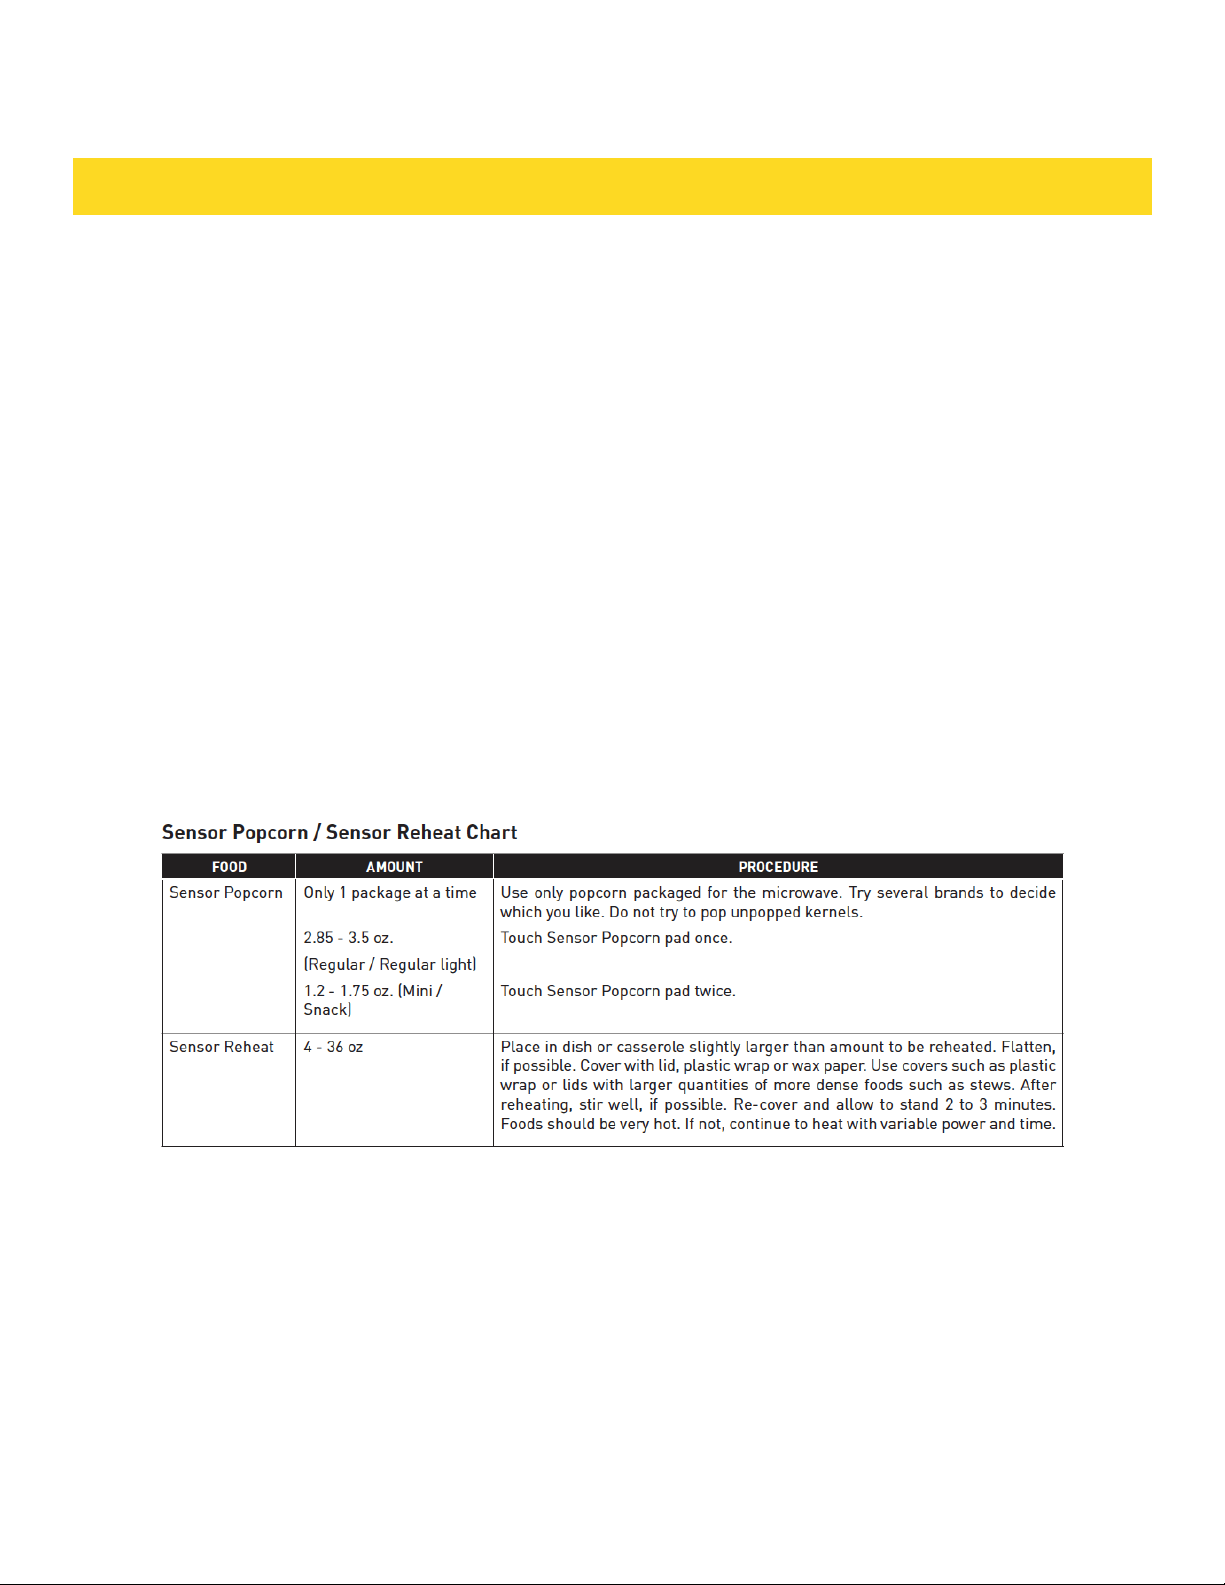
SENSOR POPCORN / SENSOR REHEAT
You can pop popcorn and reheat many foods and don’t need to calculate cooking time
or power level. Touch Sensor Reheat or Sensor Popcorn and Start /Add-AMinute
pad.
When the sensor detects the vapor emitted from the food, the remainder of cooking/
reheating time will appear.
NOTE:
• The Sensor Popcorn setting has 2 choices. Follow directions
in the display to choose desired option.
11
SETTINGS
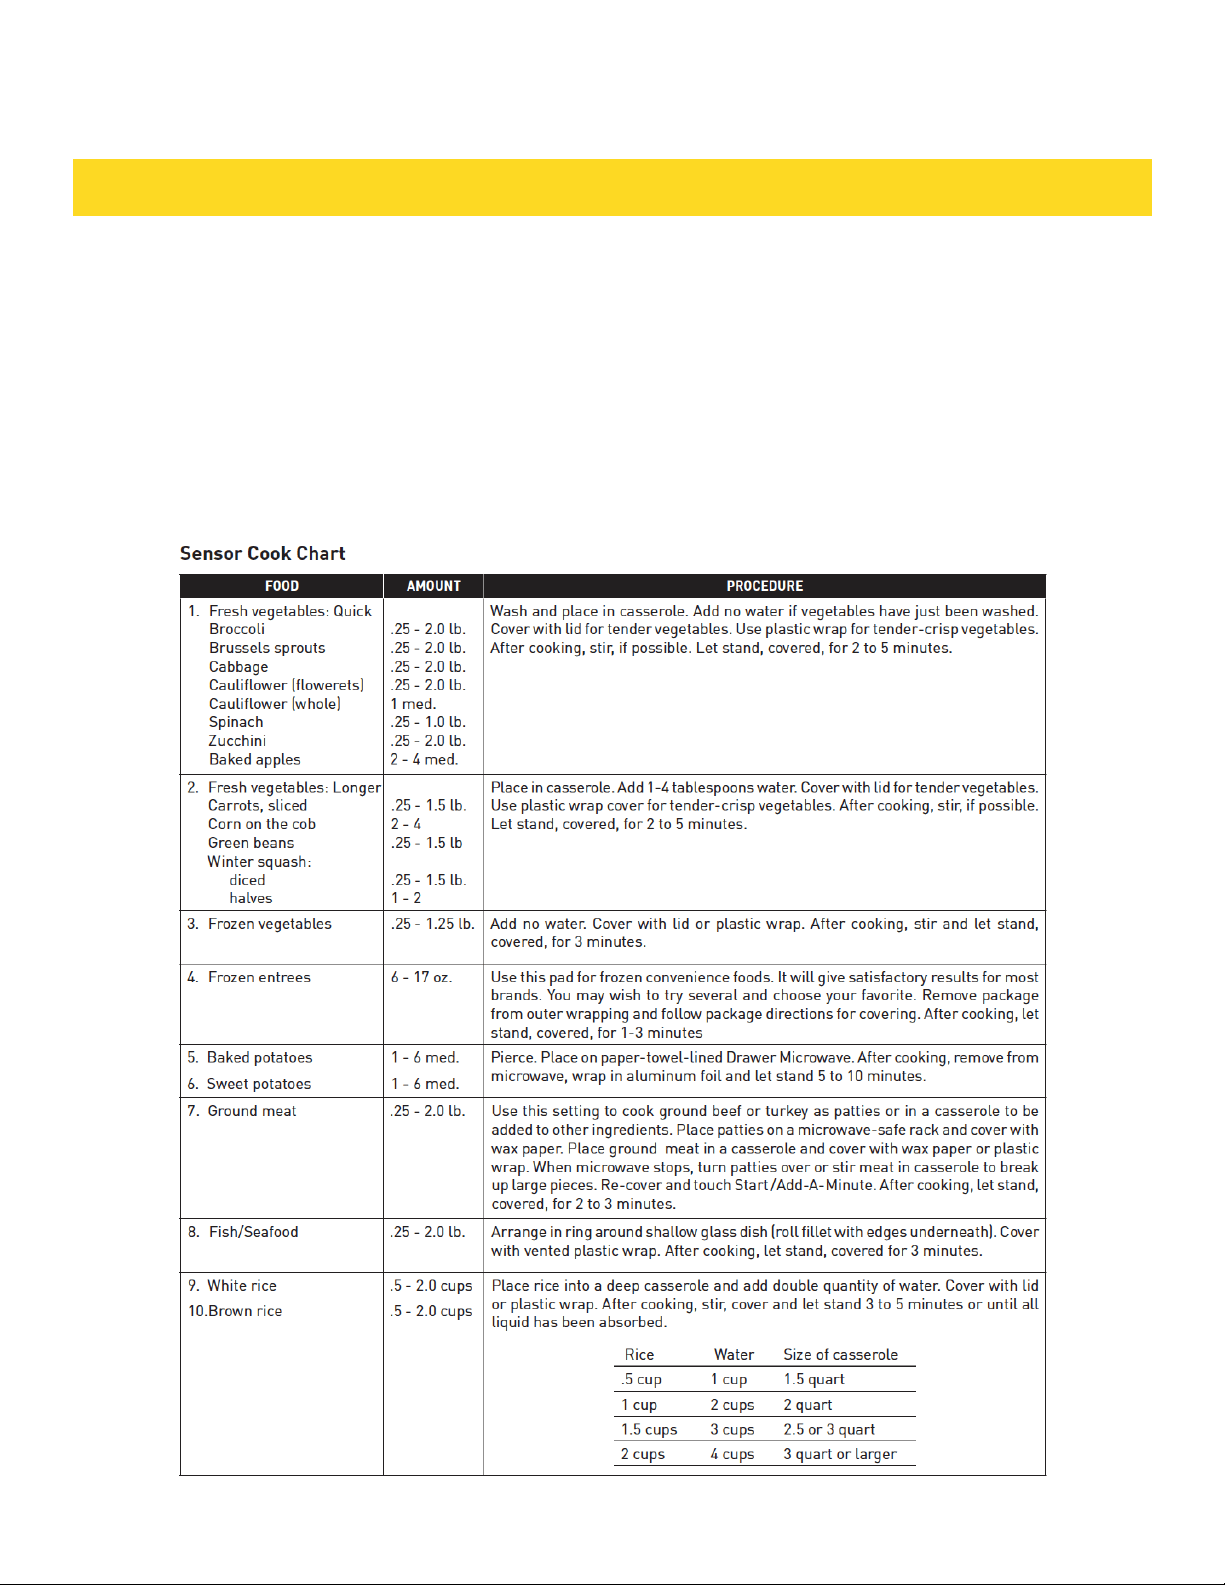
SENSOR COOK
1. Touch Sensor Cook pad once.
2. See Menu Label. Select desired food by
touching number pad. Ex: Touch 5 for baked
potatoes.
3. Touch Start /Add-A-Minute pad.
NOTE:
• To heat or cook other foods or foods above or
below the quantity allowed on the Sensor Cook
Chart, cook manually.
12
SETTINGS
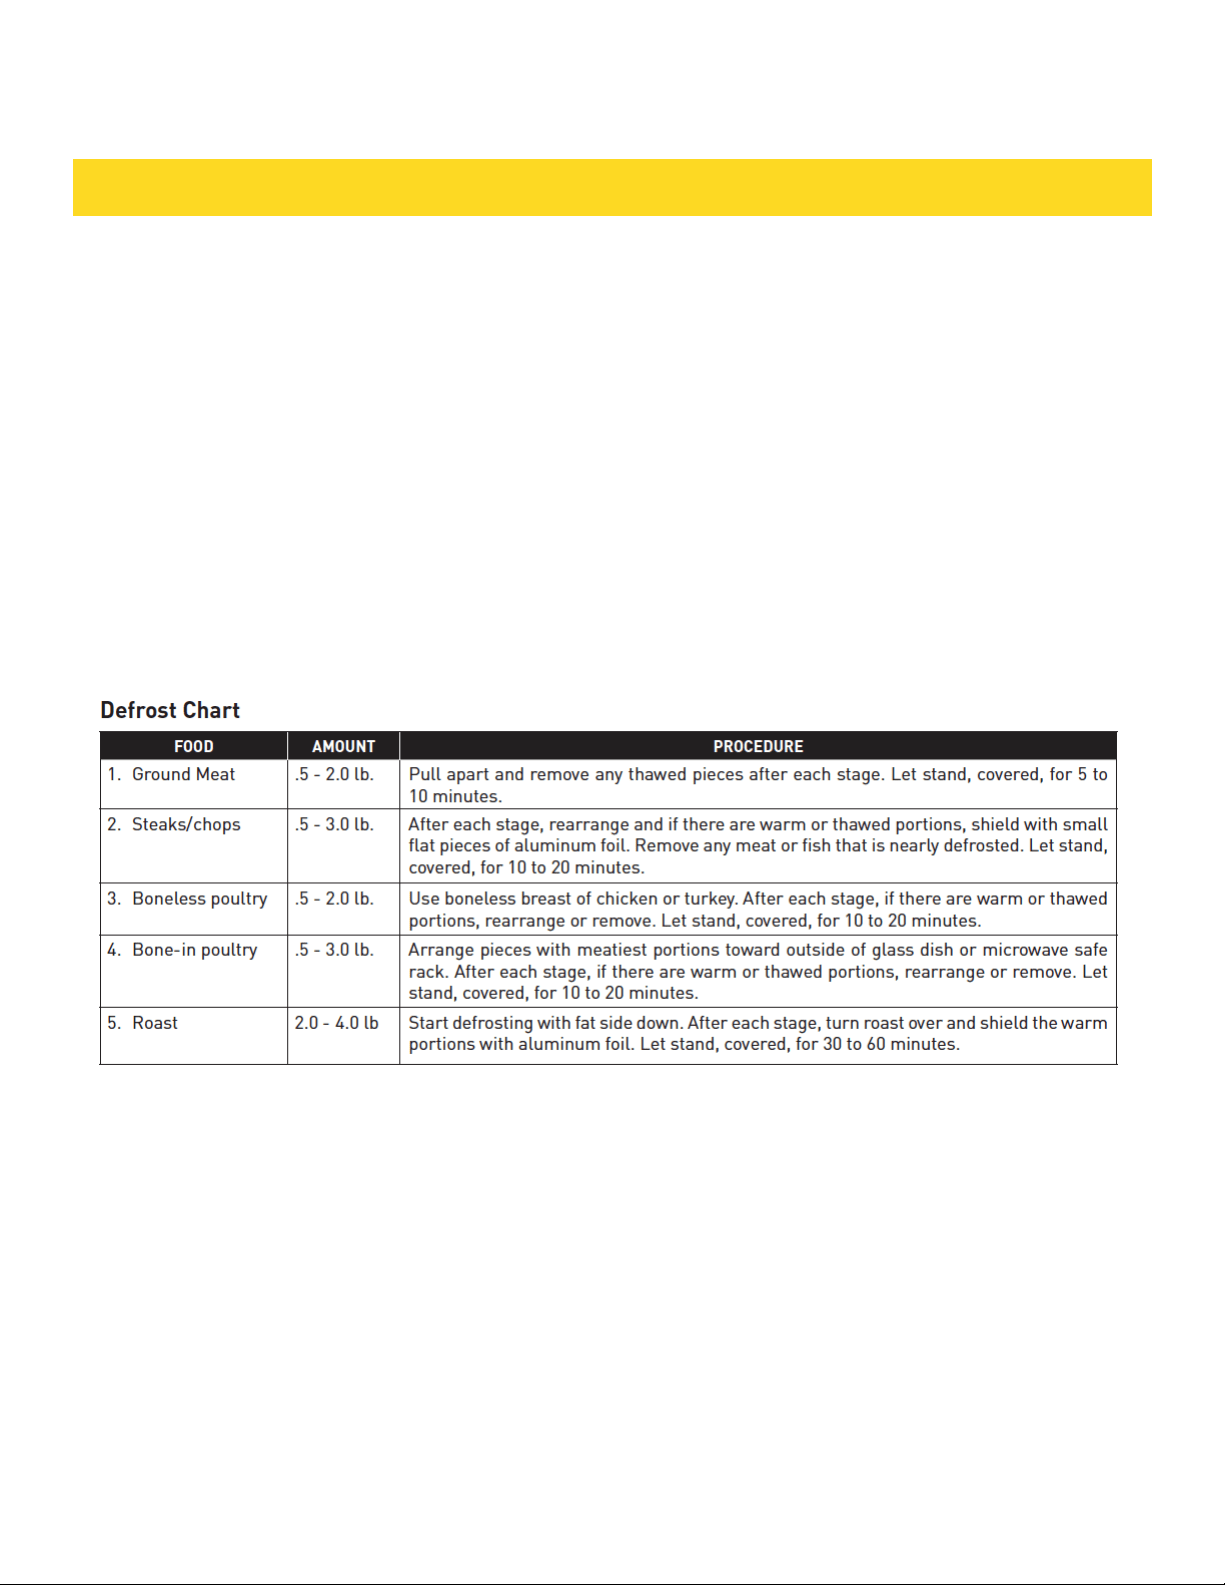
DEFROST
Use this feature to defrost the foods shown in the Defrost
Chart below.
1. Touch Defrost pad.
2. See Menu Label. Select desired food by touching the
number pad. Ex: Touch 2 for steaks/chops.
3. Enter weight by touching number keys.
4. Touch Start /Add-A-Minute pad. The oven will stop so
that the food can be checked.
5. After the first stage, open the Drawer Microwave. Turn
steak over and shield any warm portions. Close the Draw-
er Microwave. Touch Start /Add-A-Minute pad.
6. After the second stage, open the Drawer Microwave.
Shield any warm portions. Close the Drawer Microwave.
Touch Start /Add-A-Minute pad.
7. After defrost cycle ends, cover and let stand as indicat-
ed in the chart below.
NOTE:
• Defrost can be programmed with More or Less Time
Adjustment. See page 16.
• To defrost other foods or foods above or below the
weights
allowed on the Defrost Chart, see Manual Defrost below.
• Check foods when oven signals. After final stage, small
sections may still be icy. Let stand to continue thawing.
Do
not cook until all ice crystals are thawed.
• Shielding prevents cooking from occurring before the
center of the food is defrosted. Use small smooth strips
of aluminum foil to cover edges and thinner sections of
the food.
MANUAL DEFROST
If the food that you wish to defrost is not listed on the De-
frost Chart or is above or below the limits in the amount
column on the Defrost Chart, you need to defrost manual-
ly. You can defrost any frozen food, either raw or previous-
ly cooked, by using Power Level at 30%. Follow the exact
3-step procedure found under To Set Power Level on page
10. Estimate defrosting time and Touch Power Level pad
eight times for 30% power. For either raw or previously
cooked frozen food the rule of thumb is approximately 4
minutes per pound. For example, defrost 4 minutes for 1
pound of frozen spaghetti sauce.
Always stop the oven periodically to remove or separate
the portions that are defrosted. If food is not defrosted
at the end of the estimated defrosting time, program the
oven in 1 minute increments on Power Level 30% until
totally defrosted. When using plastic containers from
the freezer, defrost only long enough to remove from the
plastic in order to place in a microwave-safe dish.
13
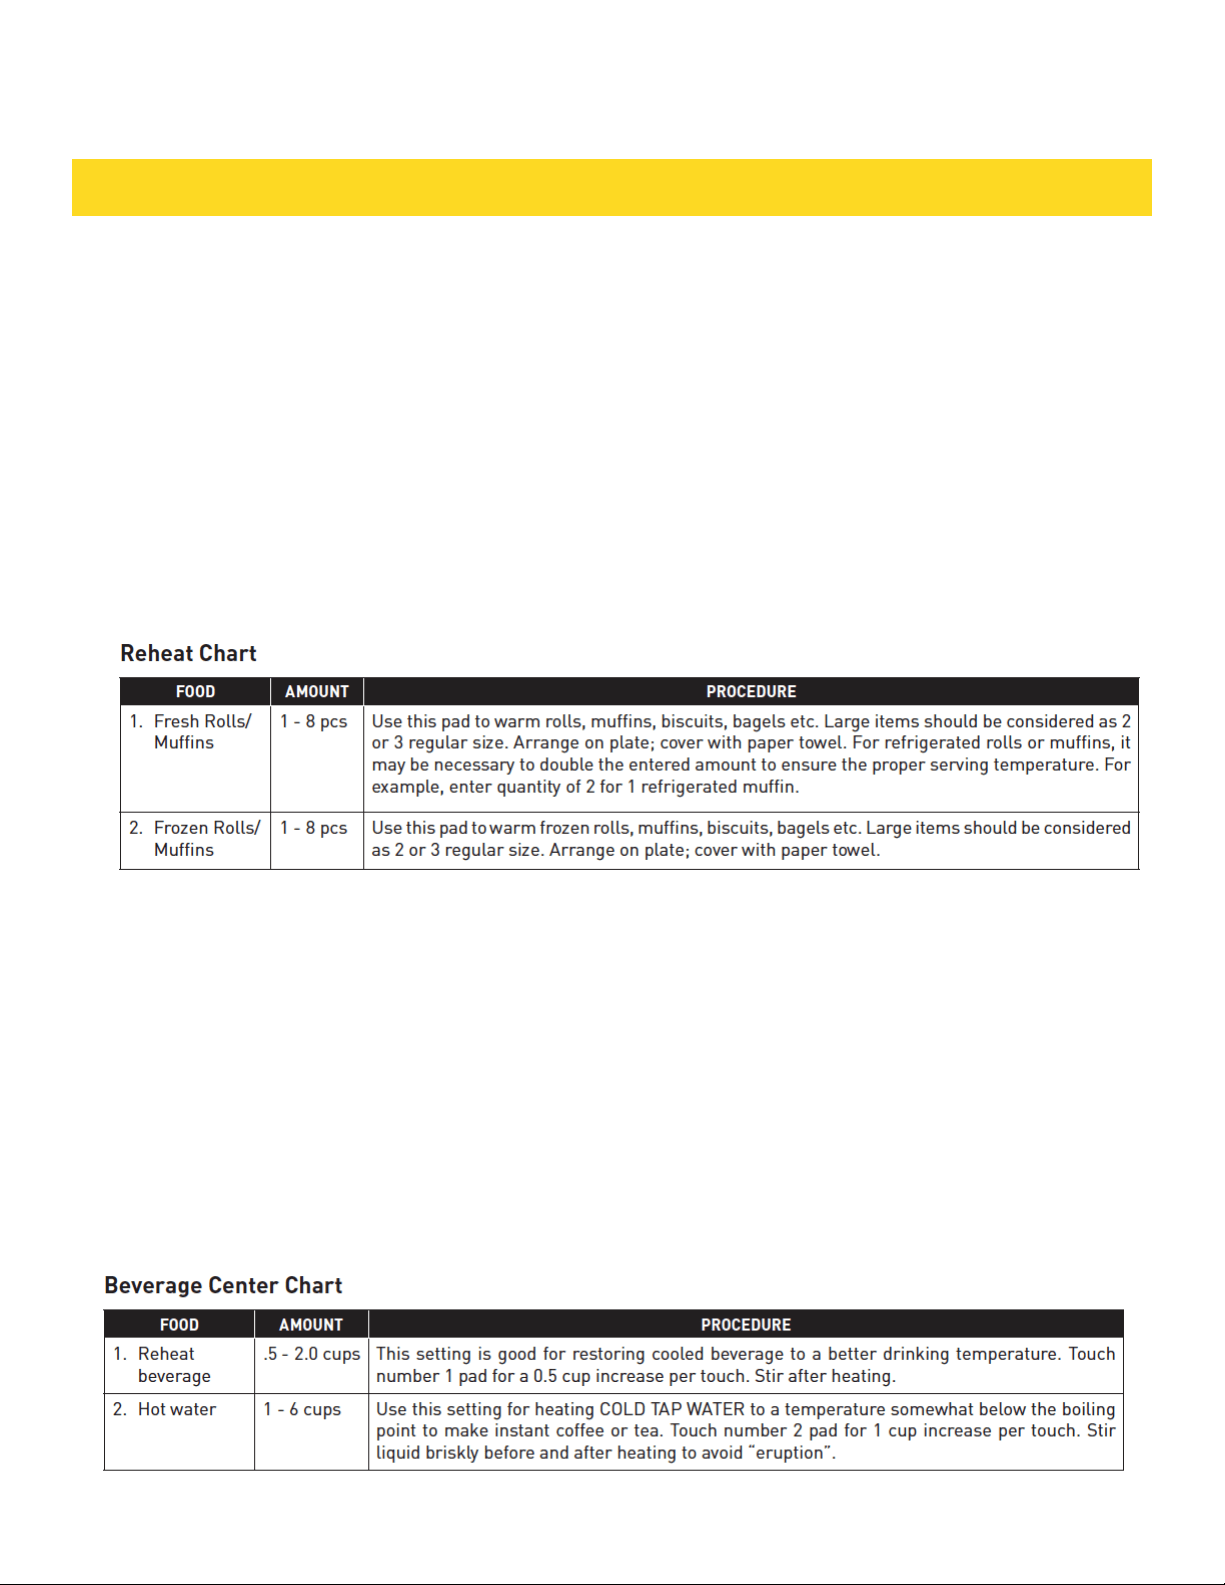
REHEAT
Reheat automatically computes the correct warming time
and microwave power level for foods shown in the chart
below.
1. Touch Reheat pad once.
2. See Menu Label. Select desired food by touching
number pad. Ex: Touch 2 for frozen rolls or muffins.
3. Touch the number pad to select quantity. Ex: Touch 2
for 2 rolls or muffins.
4. Touch Start /Add-A-Minute pad.
NOTE:
• Reheat can be programmed with More or Less Time
Adjustment. See page16.
• To reheat other foods or foods above or below the
quantity allowed on the Reheat Chart, heat manually.
BEVERAGE CENTER
Beverage Center enables you to reheat coffee or tea to
restore to a more suitable drinking temperature or to
make instant coffee or tea.
1. Touch Beverage Center pad once.
2. See Menu Label. Select desired selection by touching
number pad. Ex: Touch 2 to make coffee.
3. Repeating touching same number pad to select
quantity. Ex: Touch 2 two more times for 2 cups of coffee.
4. Touch Start /Add-A-Minute pad.
NOTE:
• Beverage Center can be programmed with More or Less
Time Adjustment. See page 16.
• Should you attempt to enter more or less than the
allowed amount, an error message will appear in the
display.
SETTINGS
14
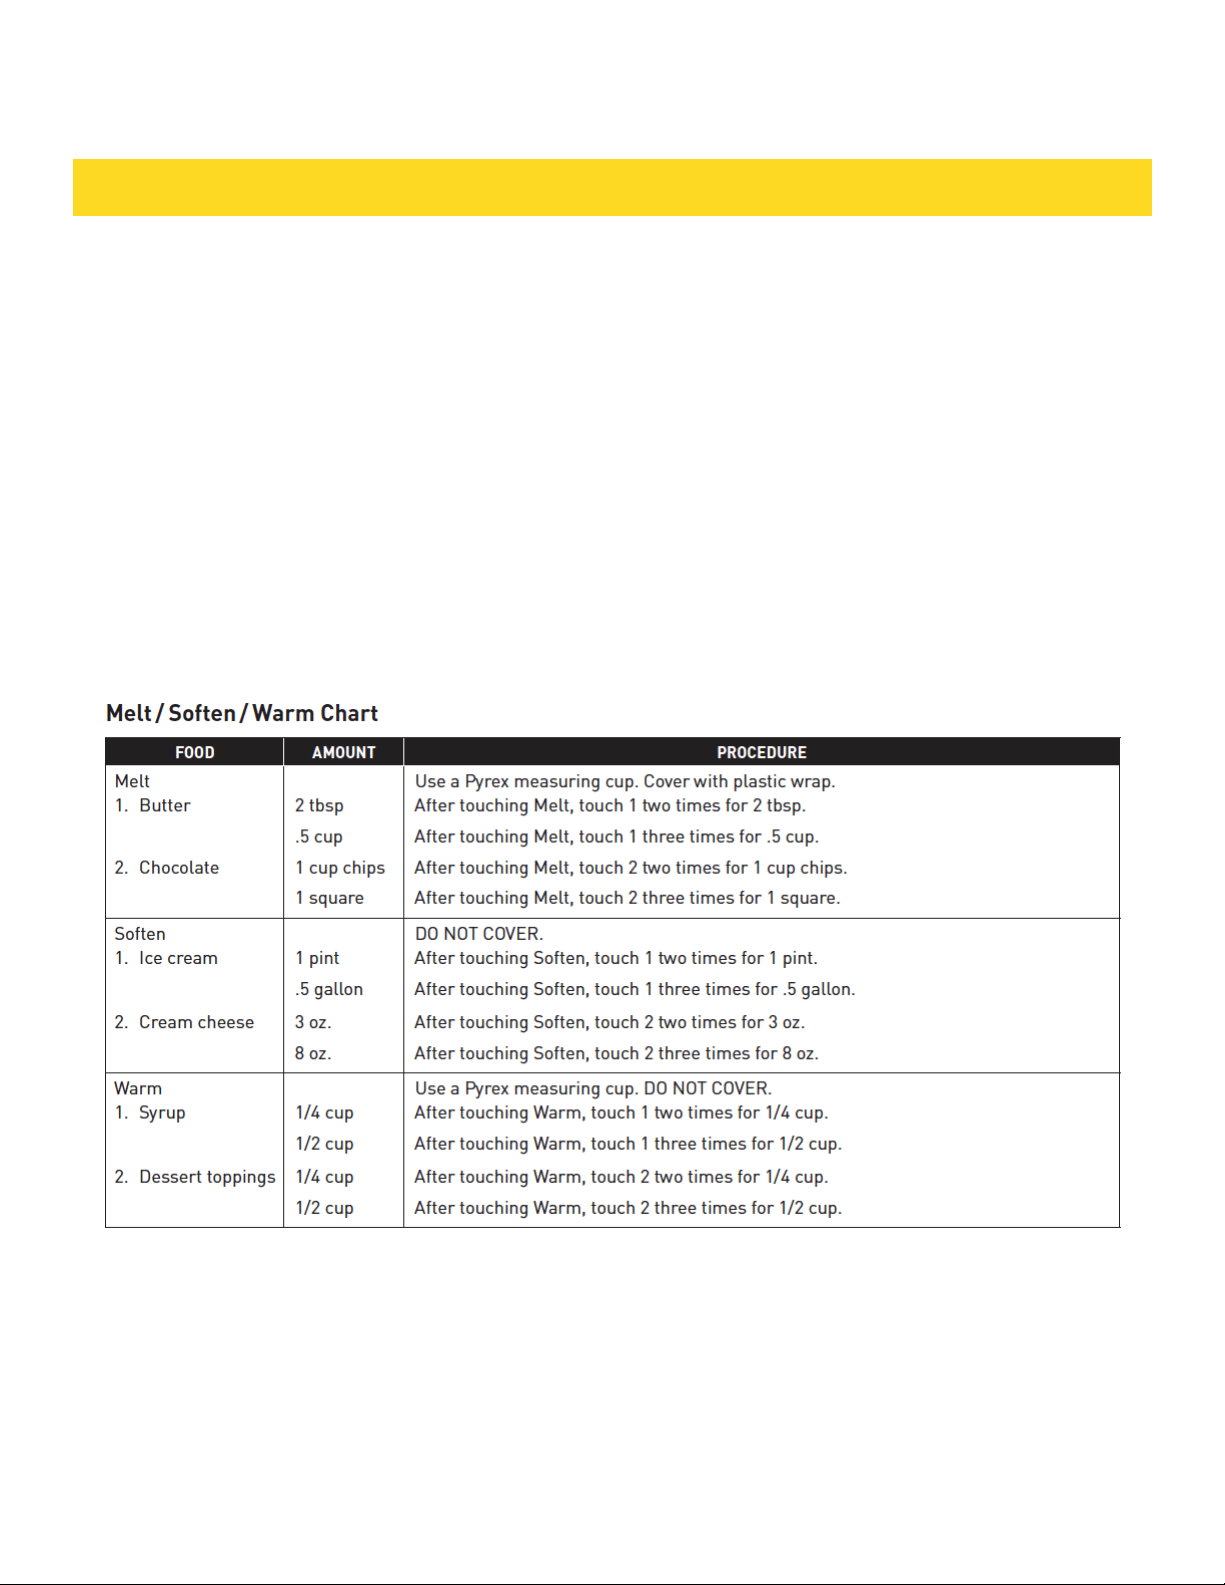
MELT / SOFTEN / WARM
Melt, Soften and Warm automatically compute the correct
heating time and microwave power level for melting,
softening and warming foods shown in the chart below.
1. Touch Melt pad once.
2. See Menu Label. Select desired food by touching
number pad. Ex: Touch 2 for chocolate.
3. Repeat touching same number pad to select quantity.
Ex: Touch 2 two more times for 1 square.
4. Touch Start /Add-A-Minute pad.
NOTE:
• Melt, Soften and Warm can be programmed with More
or Less Time Adjustment. See page 16.
• To melt, soften or warm other food or foods above or
below the quantity allowed on the Melt/Soften/Warm
Chart, use manual operation.
SETTINGS
15

KEEP WARM
Keep Warm allows you to keep food warm up to 30
minutes.
Direct use
1. Touch Keep Warm pad.
2. Enter desired time by touching the number keys. To
enter 30 minutes, touch 3 0 0 0.
3. Touch Start /Add-A-Minute pad. The oven will start.
The display will show 30.00 and count
down. KEEP WARM will be displayed intermittently during
the countdown.
With Manual Cooking
1. Enter desired cooking time and power level.
2. Touch Keep Warm pad.
3. Enter desired warming time up to 30 minutes.
4. Touch Start /Add-A-Minute pad.
The operation will start. When the cooking time is
complete, a long tone will sound and Keep Warm will
start. The display will count down. KEEP WARM will be
displayed intermittently during the countdown.
NOTE:
• If you attempt to enter more than 30 minutes for Keep
Warm, an error message will appear in the display.
• Keep Warm cannot be programmed with Sensor
Popcorn, Sensor Reheat, Sensor Cook, Defrost or Reheat.
MULTIPLE SEQUENCE COOKING
Your Drawer Microwave can be programmed for up to 4
automatic cooking sequences, switching from one power
level setting to another automatically.
Sometimes cooking directions tell you to start on one
power level and then change to a different power level.
Your Drawer Microwave can do this automatically.
1. First enter cooking time. Then touch Power Level pad
once for 100% cooking or repeat touching Power Level
pad for a lower power level.
2. Enter second cooking time. Repeat touching Power
Level pad for desired level. You can follow this procedure
up to 4 times.
3. Touch Start /Add-A-Minute pad.
NOTE:
• If Power Level pad is touched once, HIGH will be
displayed.
• If 100% is selected as the final sequence, it is not
necessary to touch the Power Level pad.
• If you wish to know power level during cooking, simply
touch the Power Level pad. As long as your finger is
touching the Power Level pad, the power level will be
displayed.
• Keep Warm can be programmed even if 4 cooking
sequences have been set.
ADD-A-MINUTE
Add-A-Minute allows you to cook for a minute at 100% by
simply touching the Add-A-Minute pad. You can also
extend cooking time in multiples of 1 minute by
repeatedly touching the Add-A-Minute pad during manual
cooking.
NOTE:
• To use Add-A-Minute, touch pad within 3 minutes after
cooking, closing the drawer or touching the Stop/Clear
pad.
• Add-A-Minute cannot be used with Sensor settings,
Reheat or Defrost.
MORE OR LESS TIME ADJUSTMENT
Should you discover that you like any of the Sensor,
Reheat or Defrost settings slightly more done, touch the
Power Level pad once after touching your selection. The
display will show MORE.
For slightly less done, touch the Power Level pad twice
after touching your selection. The display will show LESS.
HELP (IN THE DISPLAY)
Each setting of Sensor Reheat, Sensor Cook, Sensor
Popcorn, Keep Warm, Reheat and Defrost has a cooking
hint. If you wish to check, touch Set Up/Help whenever
HELP is lighted in the
Interactive Display for these and other manual operation
hints.
CONTROL LOCK
The Control Lock prevents unwanted drawer operation
such as by small children. The Drawer Microwave can
be set so that the control panel and the automatic door
mechanism are deactivated or locked.
To Lock
Touch Control Lock pad and hold for 3 seconds. The
display shows LOCK ON.
To Unlock
Touch Control Lock pad and hold for 3 seconds. The
display shows LOCK OFF.
The Control Lock is canceled when the electrical power
supply to your oven is interrupted. Set the Control Lock
again when power to the oven is restored.
SETUP / HELP
If the electrical power supply to your Drawer Microwave
should be interrupted, the display will intermittently show
ENJOY YOUR MICROWAVE TOUCH CLEAR AND TOUCH
CLOCK after the power is reinstated. If this occurs, the
Setup/Help option you input will be erased. Simply touch
Stop/Clear pad and reset.
SETTINGS
16

AUDIBLE SIGNAL ELIMINATION
At the end of timed cook, beeps will sound. The audible
signal can be turned off if you prefer quiet operation.
To Turn Sound Off
1. Touch Setup/Help pad.
2. Touch Setup/Help pad again.
3. Touch Start /Add-A-Minute pad. The display shows
SOUND OFF.
To Restore Sound
1. Touch Setup/Help pad.
2. Touch Setup/Help pad again.
3. Touch Start /Add-A-Minute pad. The display shows
SOUND ON.
END OF COOKING REMINDER
At end of timed cooking, the microwave will signal every
10 seconds for the first minute; then every 3 minutes until
Stop/Clear pad is touched, up to one hour.
To Turn Reminder Off
1. Touch Setup/Help pad three times. The display shows
REMIND SIGNAL OFF? TOUCH START.
2. Touch Start /Add-A-Minute pad. The display shows
REMIND SIGNAL OFF.
To Turn Reminder Signal Back On
1. Touch Setup/Help pad three times. The display shows
REMIND SIGNAL ON? TOUCH START.
2. Touch Start /Add-A-Minute pad. The display shows
REMIND SIGNAL ON.
AUTO START
If you wish to program the Drawer Microwave to begin
cooking automatically at a designated time of day, follow
this procedure.
1. Touch Setup/Help pad 4 times. The display shows AUTO
START TOUCH START.
2. Touch Start /Add-A-Minute pad.
3. Enter start time.
4. Touch Timer/Clock pad.
5. Touch the number keys to enter cooking time.
Touch Power Level pad repeatedly until the desired power
level is reached.
6. Touch Start /Add-A-Minute pad.
DEMONSTRATION MODE
To Select Demo Mode
1. Touch Setup/Help pad five times. The display shows
DEMO ON? HOLD START 3 SEC.
2. Hold Start /Add-A-Minute pad for 3 seconds. The dis-
play shows DEMO ON.
To Cancel Demo Mode
1. Touch Setup/Help pad five times. The display shows
DEMO OFF? TOUCH START.
2. Touch Start /Add-A-Minute pad. The display shows
DEMO OFF.
NOTE:
• Drawer Microwave doesn’t heat in Demo Mode.
• Display counts down quickly.
TIMER
1. Touch Timer/Clock pad and number 1.
2. Enter time.
3. Touch Timer/Clock pad again.
To cancel timer, touch Stop/Clear.
STANDBY MODE
This microwave will go into standby mode after a period of
inactivity. The backlight of the display will automatically
dim after 3 minutes if the unit has not been in operation.
If the display is in standby mode, simply touch the control
panel or open/close the door to return the backlight to
maximum brightness.
SETTINGS
17

Any piece of equipment works better and lasts longer
when maintained properly and kept clean. Cooking
equipment is no exception. Your Drawer Microwave must
be kept clean and maintained properly.
Disconnect the power cord before cleaning or leave the
door open to inactivate the oven during cleaning.
EXTERIOR
The outside surface is precoated metal and plastic. Clean
the outside with mild soap and water; rinse and dry with
a soft cloth. Do not use any type of household or abrasive
cleaner.
STAINLESS STEEL SURFACE
The exterior should be wiped often with a soft damp cloth
and polished with a soft dry cloth to maintain its beauty.
There are also a variety of products designed especially
for cleaning and shining the stainless exterior of the oven.
We recommend thatcthe cleaner be applied to a soft cloth
and then carefully used on the stainless exterior rather
than sprayed directly on to it. Follow package directions
carefully.
FRONT SIDE OF THE DRAWER
Wipe the window on both sides with a soft damp cloth to
remove any spills or spatters. Metal parts will be easier to
maintain if wiped frequently with a soft damp cloth. Avoid
the use of spray and other harsh cleaners as they may
stain, streak or dull the drawer surface.
TOUCH CONTROL PANEL
If desired, the touch keys may be deactivated before
cleaning. See the Control Lock information on page 16
of this manual. Wipe the panel with a cloth dampened
slightly with water only. Dry with a soft cloth. Do not scrub
or use any sort of chemical cleaners. Close drawer and
follow directions on page 16 for turning Control Lock off.
Touch Stop/Clear.
DRAWER GUIDES
Remove the food crumbs from the drawer guides. Wipe
with a soft dry cloth in order to keep the Drawer Micro-
wave opening and closing smoothly.
INTERIOR
Before cleaning the the Drawer Microwave, touch and
hold the Control Lock button for 3 seconds to lock the
control pad and the automatic door mechanism. The
drawer can be locked in either the open or closed posi-
tion. The display will show LOCK ON. This will prevent
the drawer from accidentally opening or closing during
cleaning. After cleaning, touch and hold the Control Lock
button for 3 seconds to turn the lock off. The display will
show LOCK OFF.
Cleaning is easy because no heat is generated to the in-
terior surfaces; therefore, there is no baking and setting
of spills or spattering. To clean the interior surfaces,
including drawer sealing surfaces, wipe with a soft damp
cloth. DO NOT USE ABRASIVE OR HARSH CLEANERS OR
SCOURING PADS. For heavier soil, use mild soap; wipe
clean with a soft damp cloth. Do not use any chemical
oven cleaners.
WAVEGUIDE COVER
ATTENTION The waveguide cover, located on the inside
top of the Drawer Microwave area, is made from mica,
so it requires special care. Keep the waveguide cover
clean to assure good microwave performance. Carefully
wipe with a soft damp cloth any food spatters from the
surface of the cover immediately after they occur. Built-
up splashes may overheat and cause smoke or possibly
catch fire. Do not remove the waveguide cover.
ODOR REMOVAL
Occasionally, a cooking odor may remain in the Drawer
Microwave. To remove odor, combine 1 cup water, grated
peel and juice of one lemon and several whole cloves in
a 2-cup glass microwave-safe measuring cup. Boil for
several minutes using 100% power. Leave in the Drawer
Microwave until water cools. Wipe interior with a soft
cloth.
CLEANING AND MAINTENANCE
18
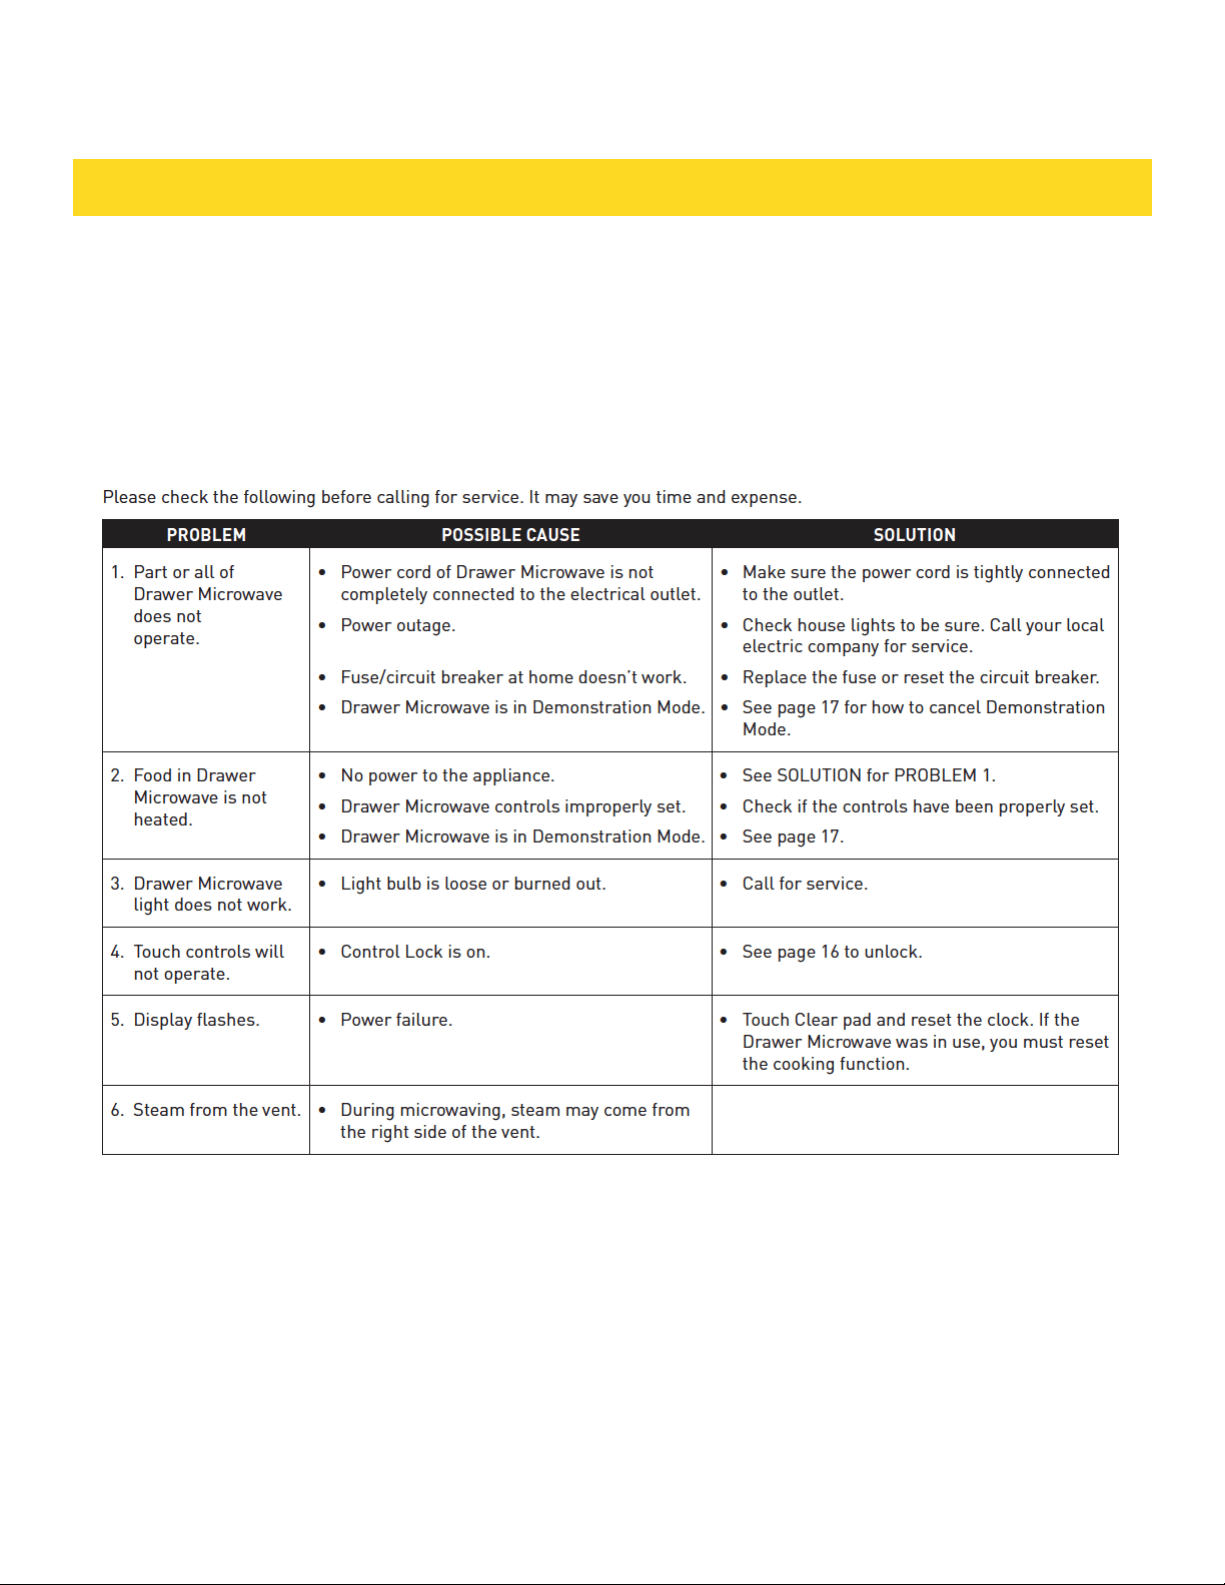
BEFORE YOU CALL FOR SERVICE
19
IMPORTANT–PLEASE READ AND FOLLOW
• Before beginning, read these instructions
thoroughly and carefully.
• Because the kit includes metal parts, caution
should be used in handling and installation to
avoid the possibility of injury.
• Do not remove permanently affixed labels,
warnings or plates from the product as this may
void the warranty.
• Observe all local and national codes, require-
ments and ordinances.
• Installers should leave these instructions with
the consumer who should retain them for the
local inspector’s use and for future reference.
• For SAFETY CONSIDERATIONS do not install
drawer in any combustible cabinetry, which is
not in accord with the stated clearances and
dimensions on page 4, See figure 1.
IMPORTANT SAFETY INSTRUCTIONS
• WARNING: If the information in this manual
is not followed exactly, a fire or electrical shock
may result that could cause property damage,
personal injury or death.
• WARNING: To reduce the risk of tipping,
the Drawer Microwave must be secured by a
properly installed Anti-Tip block.
• This appliance must be electrically grounded
in accordance with local codes.
• Make sure the wall coverings and the cabinets
around the Drawer Microwave can withstand
the heat generated by the appliance.
• WARNING: Never leave children alone or
unattended in the area where a appliance is
in use. Never leave the drawer open when the
microwave is unattended.
• WARNING: Stepping, leaning or sitting on the
drawer may result in serious injuries and can
also cause damage to the appliance.
• Do not use the Drawer Microwave as a storage
space. This creates a potentially hazardous
situation.
• Check that the time-of-day is in the display.
If not, touch Stop/Clear to prevent unintended
use.
INSTALLATION GUIDE
20
INSTALLATION GUIDE
UNPACKING YOUR DRAWER MICROWAVE
• Remove all packing materials from inside the
Drawer Microwave. DO NOT REMOVE THE WAVE-
GUIDE COVER, which is located on the top of the
appliance.
• Remove the feature sticker, if there is one. Check the
drawer for any damage, such as misaligned or bent
drawer, damaged drawer seals and sealing surfaces,
broken or loose
drawer guides and dents inside the cavity or on the front
side of the drawer. If there is any damage, do not operate
the appliance and contact your AUTHORIZED SERVICER.
IMPORTANT NOTES TO THE INSTALLER
• Read all of the Installation Manual before installing the
Drawer Microwave.
• Remove all packing material before connecting the
electrical supply.
• Observe all governing codes and ordinances.
• Be sure to leave these instructions with the consumer.
IMPORTANT NOTES TO THE CONSUMER
Keep this manual with your Use and Care Manual for
future reference.
• As when using any microwave oven generating heat,
there are certain safety precautions you should follow.
These are listed in the Use and Care Manual. Read all and
follow carefully.
• Be sure your Drawer Microwave Oven is installed and
grounded properly by a qualified installer or service
technician.
CLEARANCES AND DIMENSIONS
• Dimensions that are shown in figure 1 must be used.
Given dimensions provide minimum clearance. Locate
electrical outlet in the shaded area in the upper left-hand
corner of the cutout. See figure 4.
• Contact surface must be solid and level. Pay special
attention to the floor on which the appliance will sit. The
floor of the opening should be constructed of plywood
strong enough to support the weight of the oven (about
100 pounds).
• Check location where the Drawer Microwave will be
installed for proper electrical supply.
• Your appliance can be built into a cabinet or wall by
itself or under a gas or electric wall oven.
• Be sure that the clearance of the floor between the wall
oven and the Drawer Microwave is a minimum of 2".
• The microwave interior will easily accommodate a 9" x
13" oblong dish or a bag of microwave popcorn.
GROUNDING INSTRUCTIONS
This appliance must be grounded. In the event
of an electrical short circuit, grounding reduces
the risk of electric shock by providing an escape
wire for the electric current. The Drawer
Microwave is equipped with a cord having a
grounding wire with a grounding plug. The plug
must be plugged into an outlet that is properly
installed and grounded in accordance with the
National Electrical Code and local codes and
ordinances.
WARNING: Improper use of the grounding plug
can result in a risk of electric shock. Do not
use an extension cord. If the power supply
cord is too short, have a qualified electrician
or serviceman install an outlet near the
appliance.
21
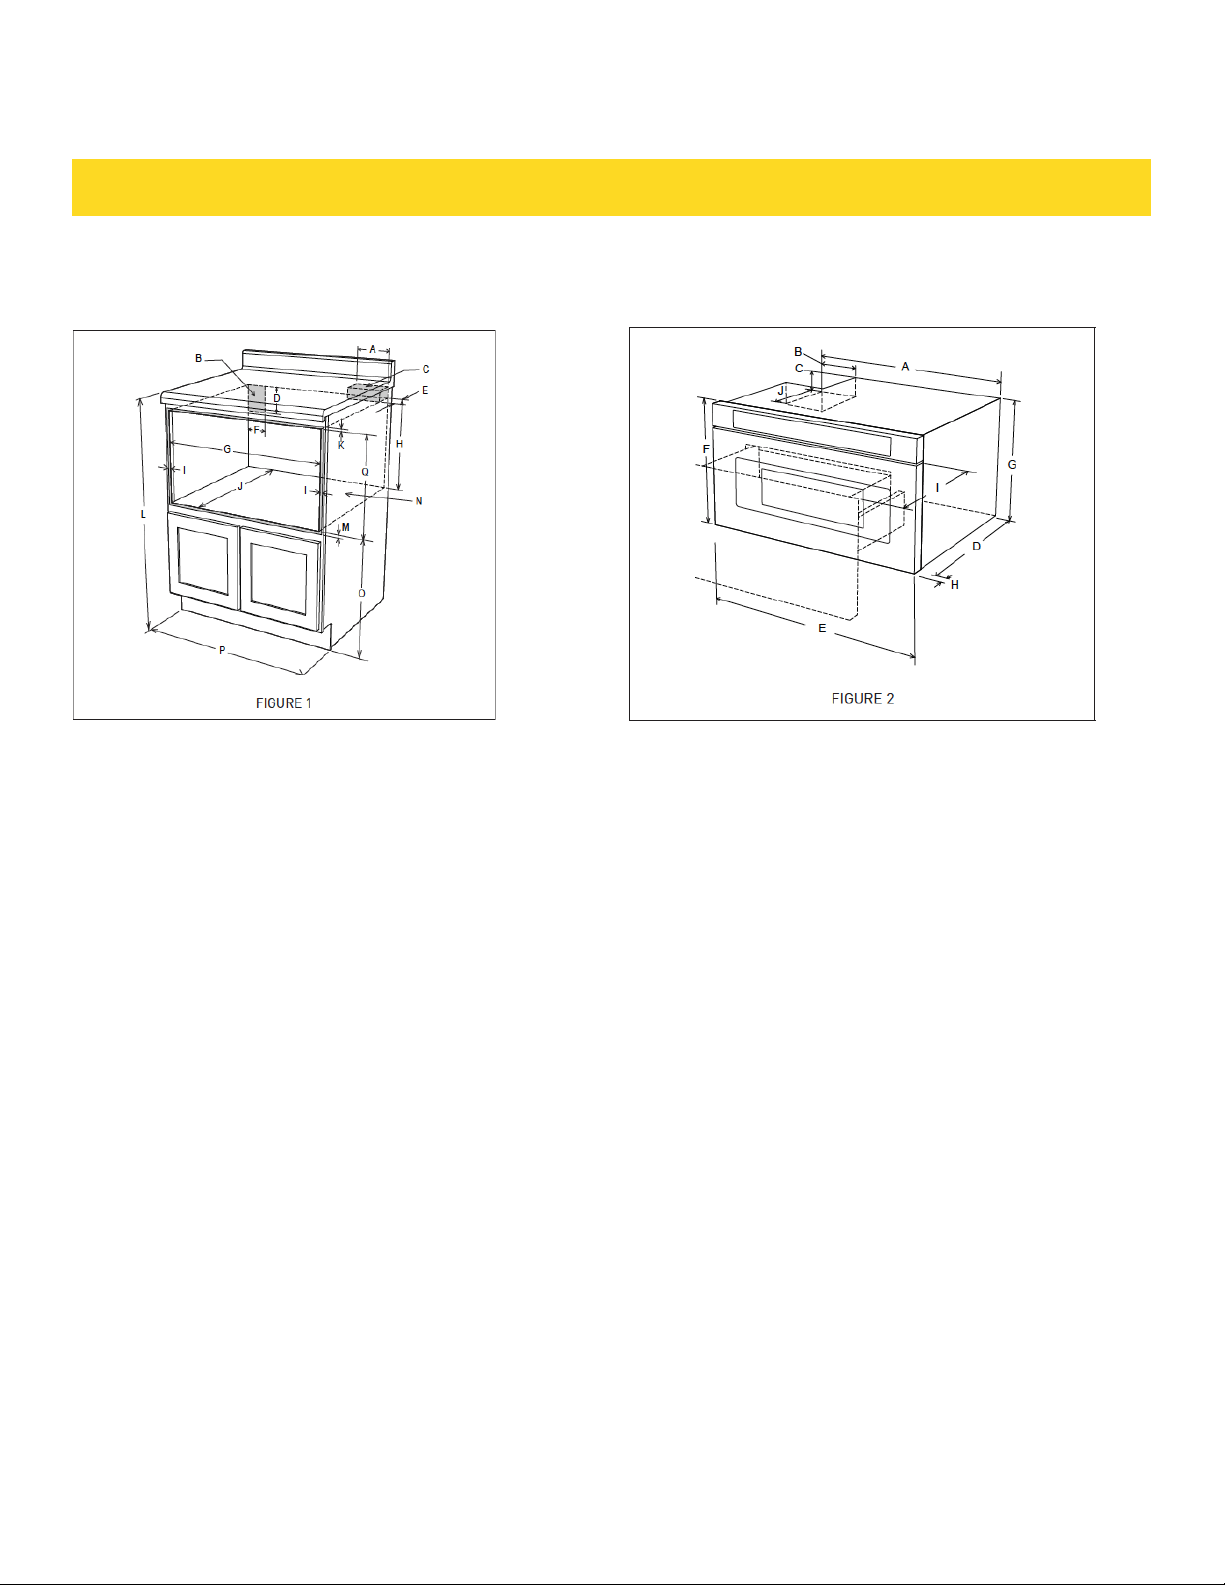
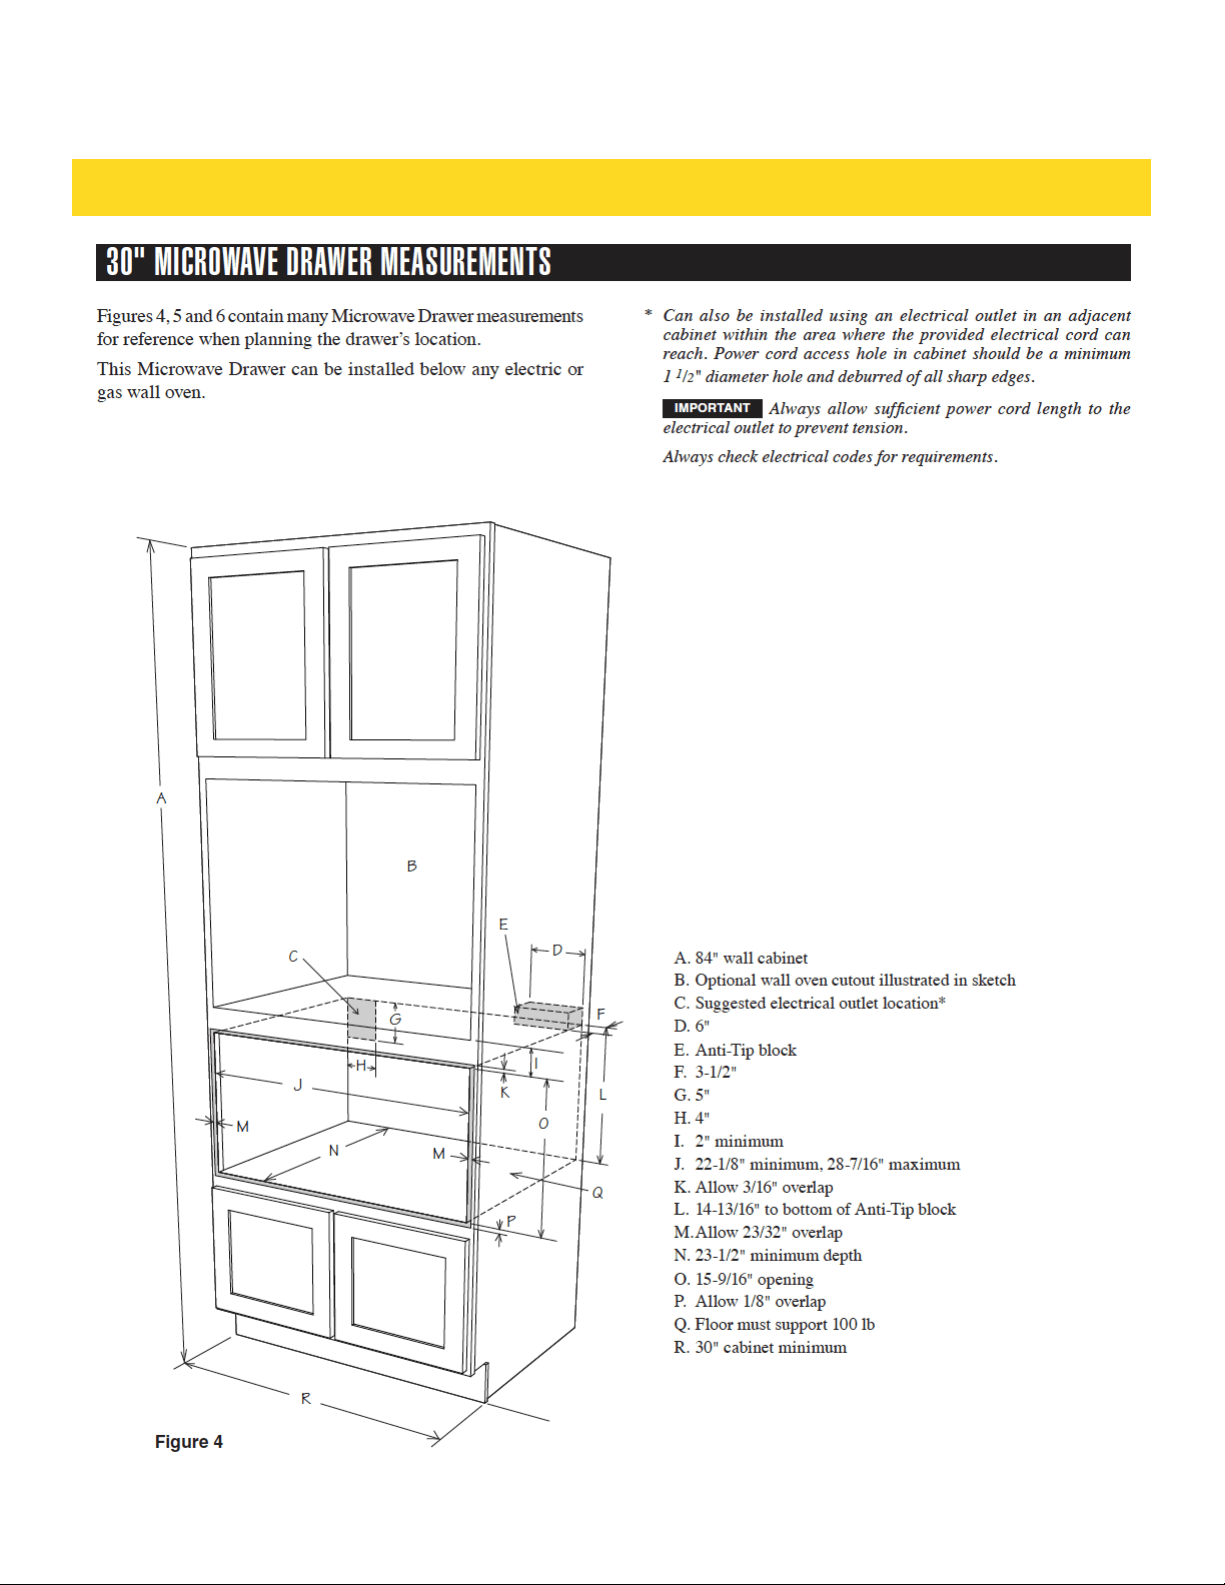
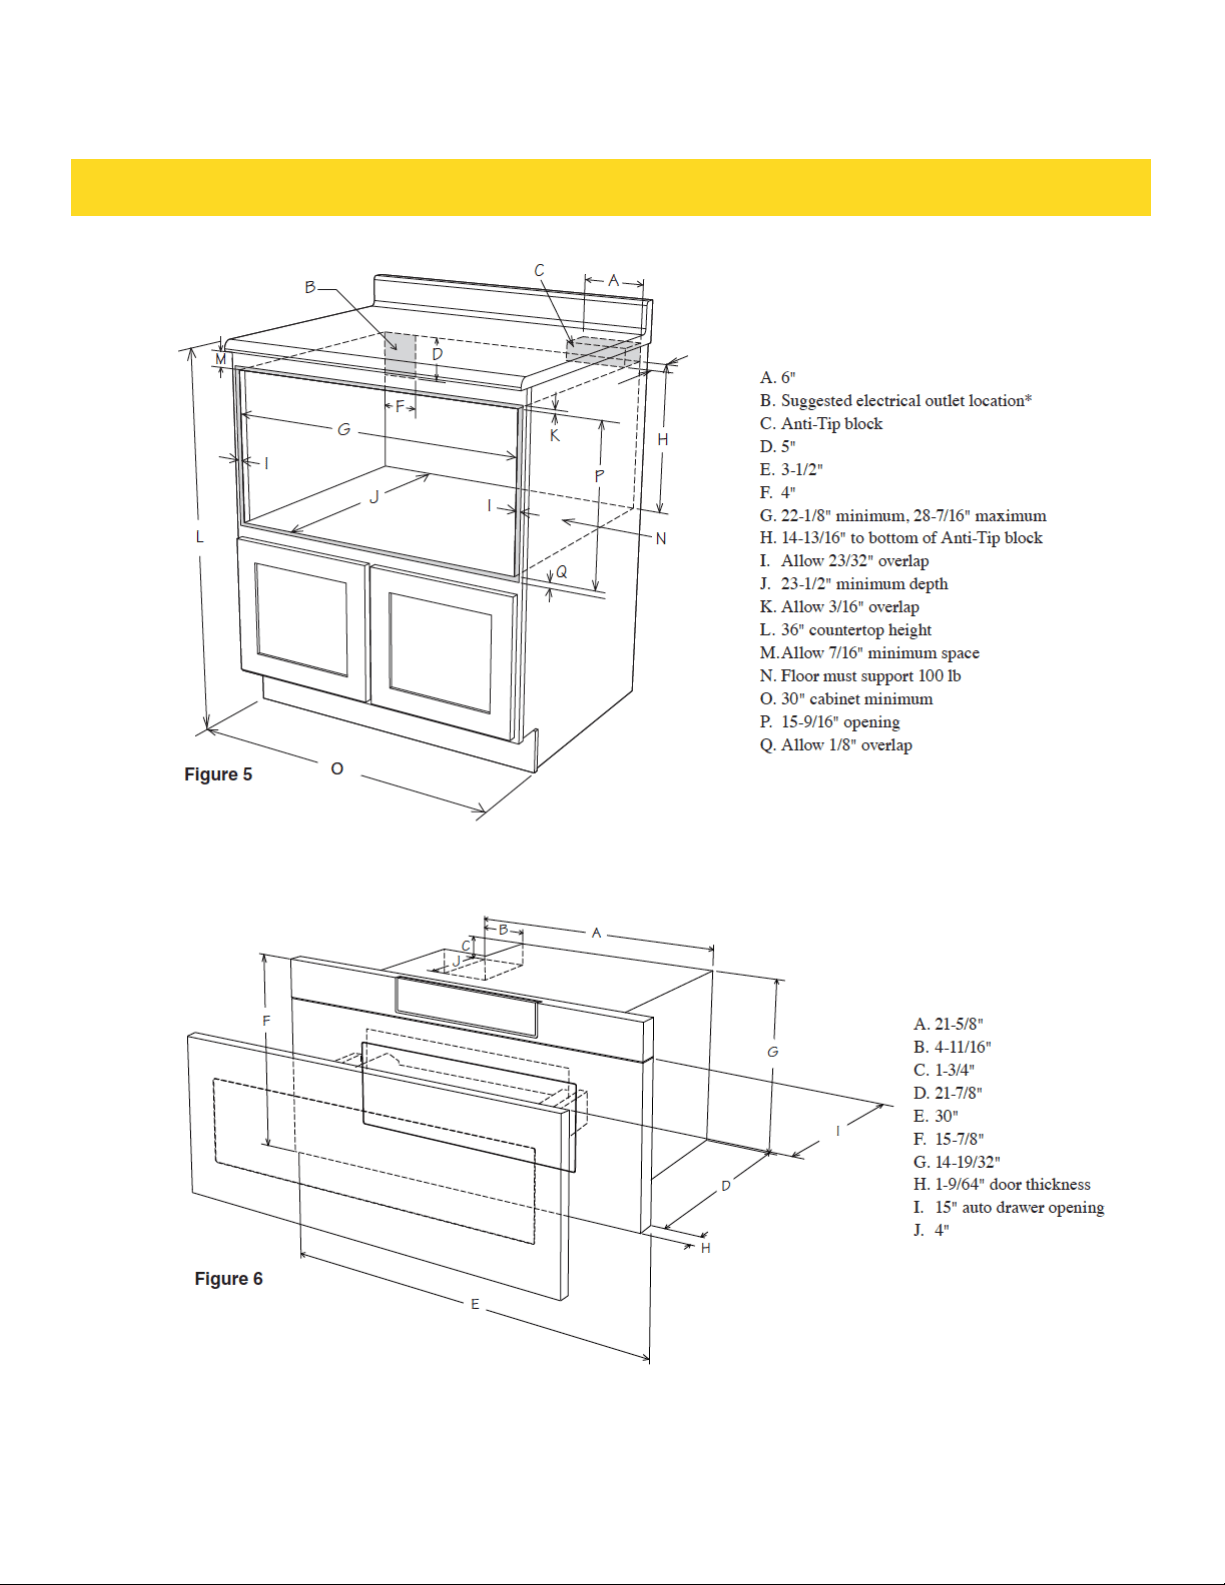
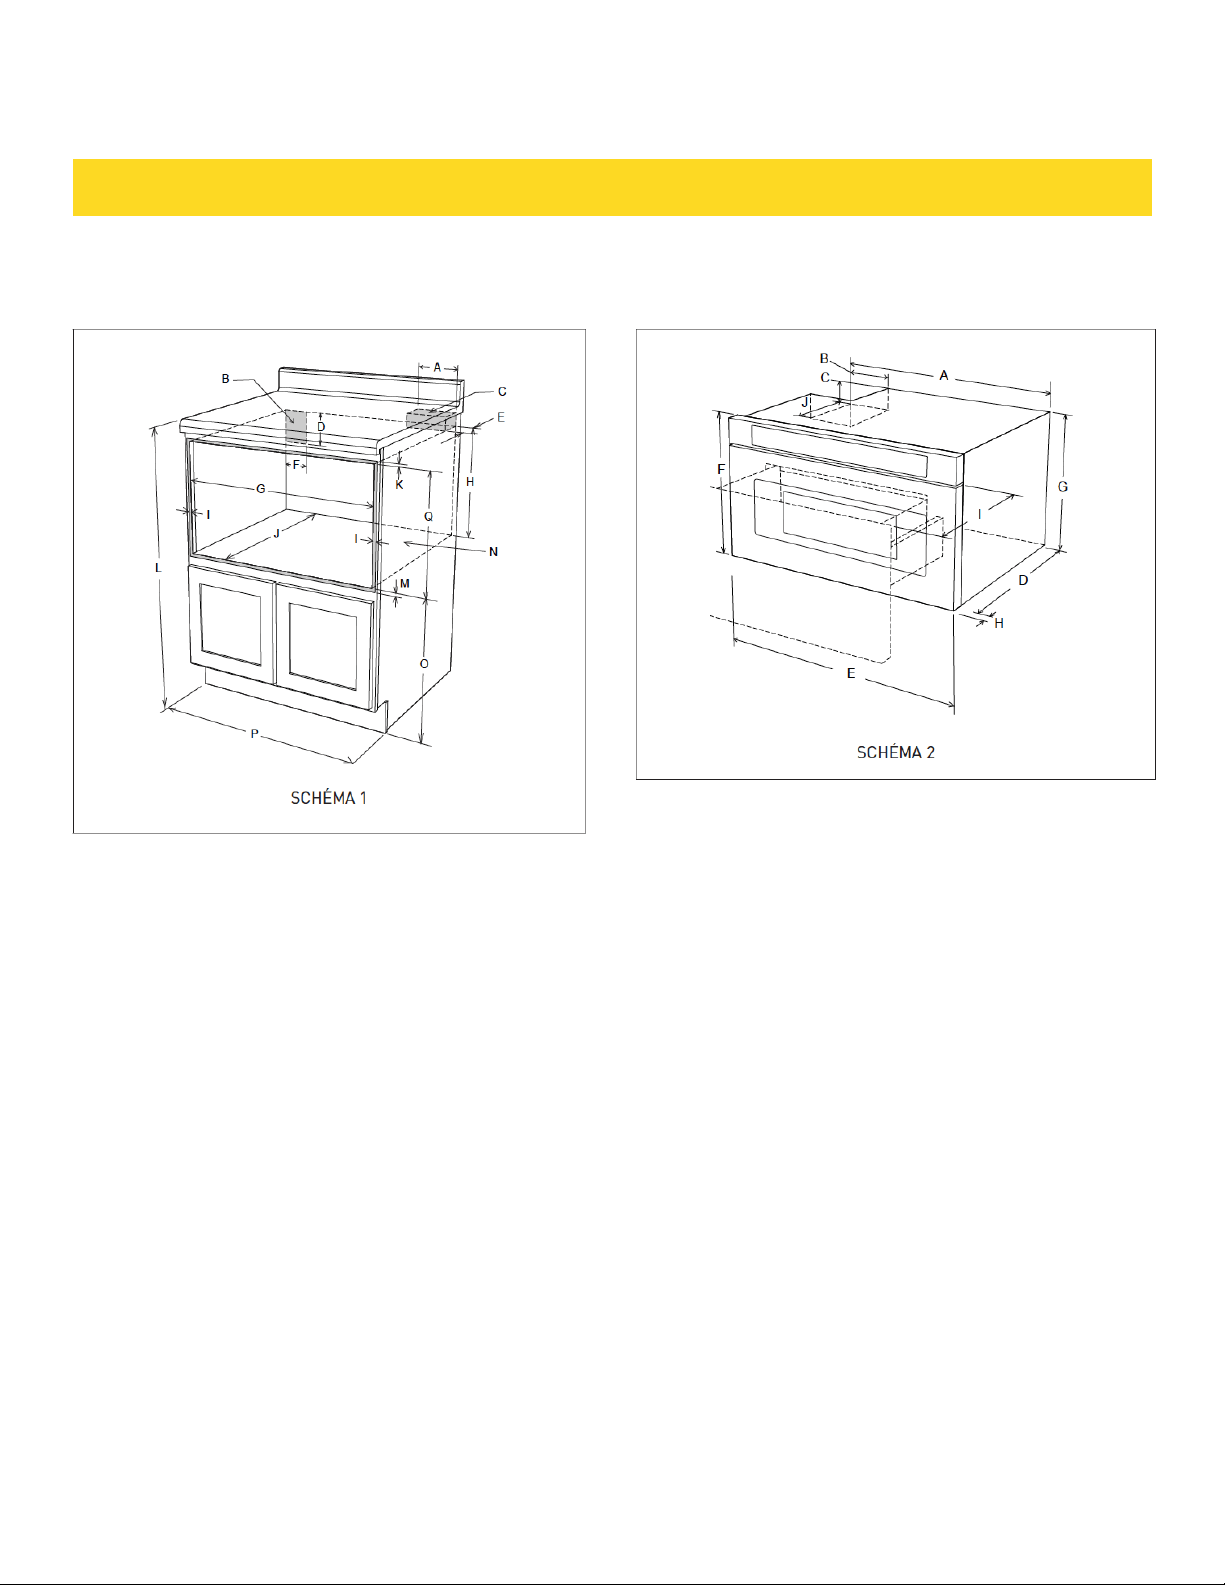
DRAWER MICROWAVE MEASUREMENTS
A. 6" (152.40 mm)
B. Suggested electrical outlet location*
C. Anti-Tip block
D. 5" (127 mm)
E. 3-1/2" (88.90 mm)
F. 4" (101.60 mm)
G. 22-1/8" (561.98 mm) opening
H. 14-13/16" (376.24 mm) to bottom of Anti-Tip block
I. Allow 7/8" (22.23 mm) overlap
J. 23-1/2" (596.90 mm) minimum depth
K. Allow 3/16" (4.76 mm) overlap
L. 36" (914.4 mm) countertop height
M. Allow 1/8" (3.17 mm) overlap
N. Floor must support 100 lb (45.4 kg)
O. 19" (482.60 mm) to top of floor
P. 24" (609.6 mm) cabinet minimum
Q. 15-9/16" (395.27 mm) opening
A. 21-5/8" (549.28 mm)
B. 4-11/16" (119.06 mm)
C. 1-3/4" (44.45 mm)
D. 21-7/8" (555.60 mm)
E. 23-7/8" (606.43 mm)
F. 15-7/8" (403.22 mm)
G. 14-19/32" (370.69 mm)
H. 1-9/64" (29 mm) door thickness
I. 15" (381 mm) auto drawer opening
J. 4" (101.6 mm)
Figures 1 and 2 contain many Drawer Microwave measure-
ments for reference when planning the drawer’s location.
This Drawer Microwave can be installed below any electric
or gas wall oven.
* Can also be installed using an electrical outlet in an
adjacent cabinet within the area where the provided elec-
trical cord can reach. Power cord access hole in cabinet
should be a minimum 1-1/2" diameter hole and deburred
of all sharp edges.
IMPORTANT - Always allow sufficient power cord length
to the electrical outlet to prevent tension. Always check
electrical codes for requirements.
INSTALLATION GUIDE
22
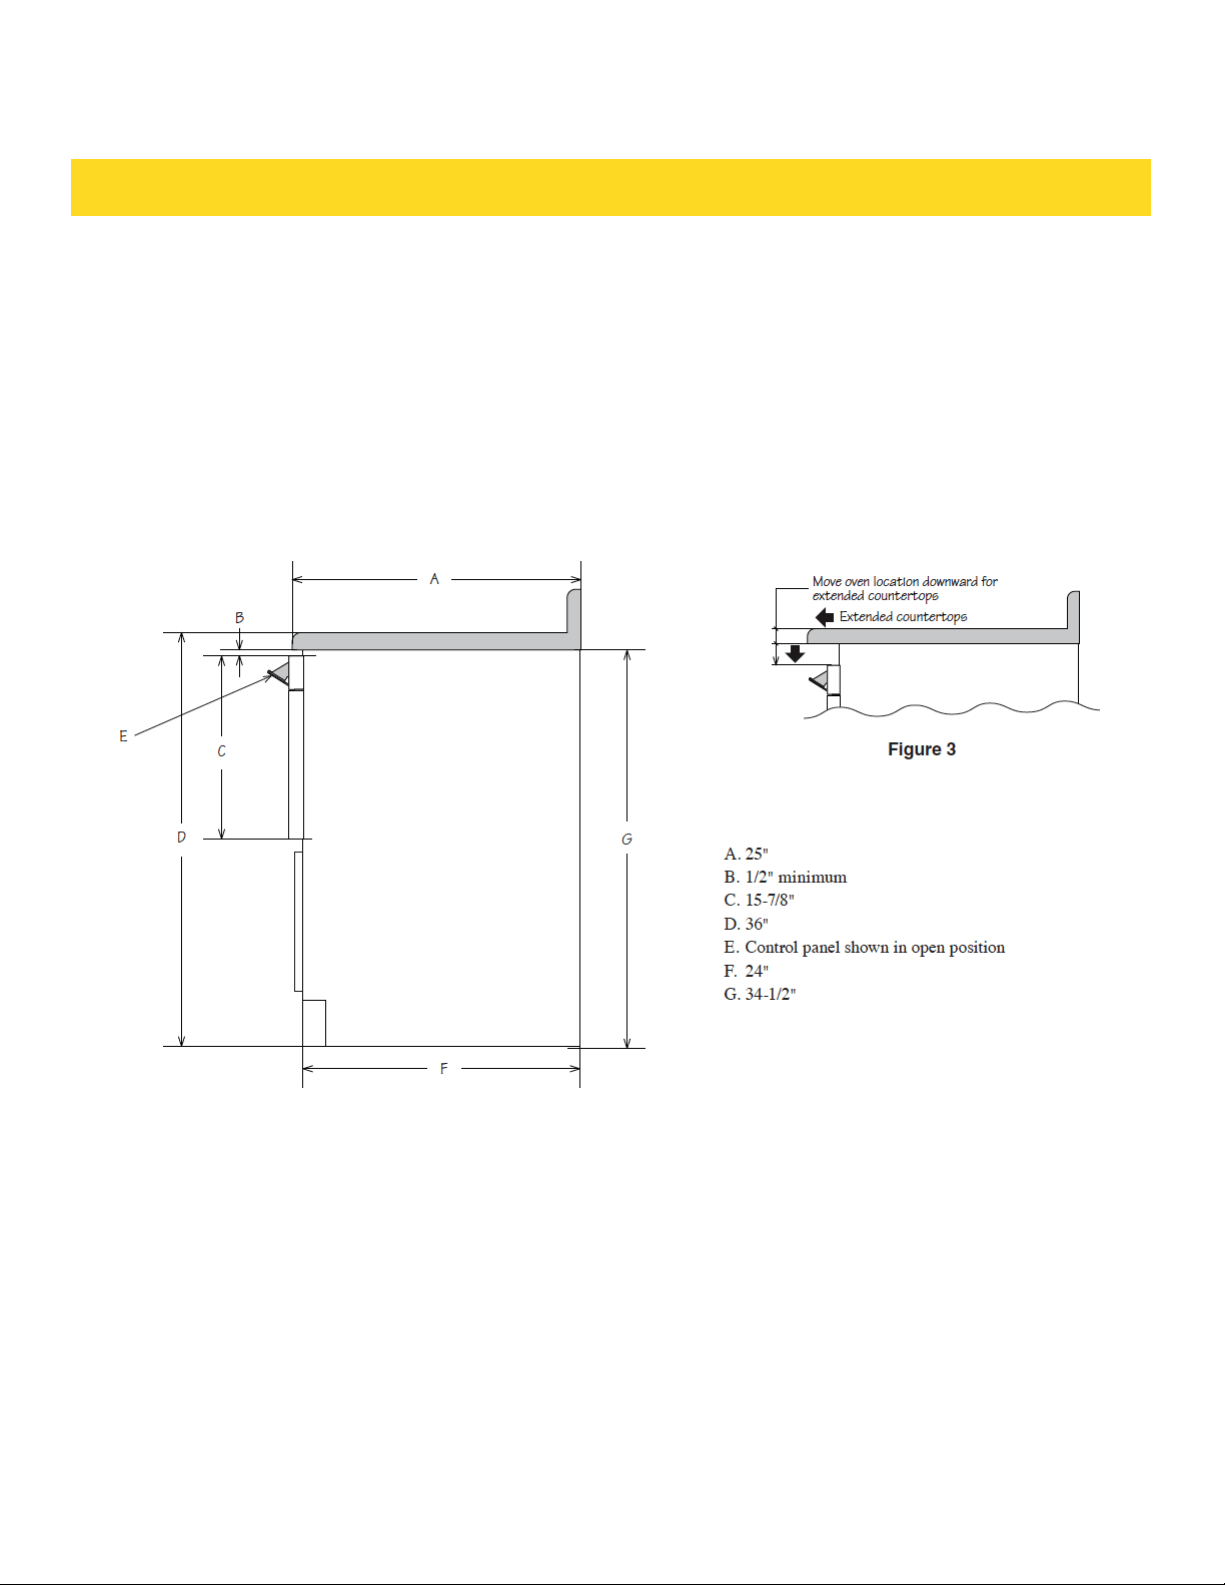
This drawing represents a typical standard cabinet. If installed in custom cabinets with
extended counter tops, take into account visibility and access to controls. See Figure 3.
INSTALLATION GUIDE
23
INSTALLATION GUIDE
24
INSTALLATION GUIDE
25
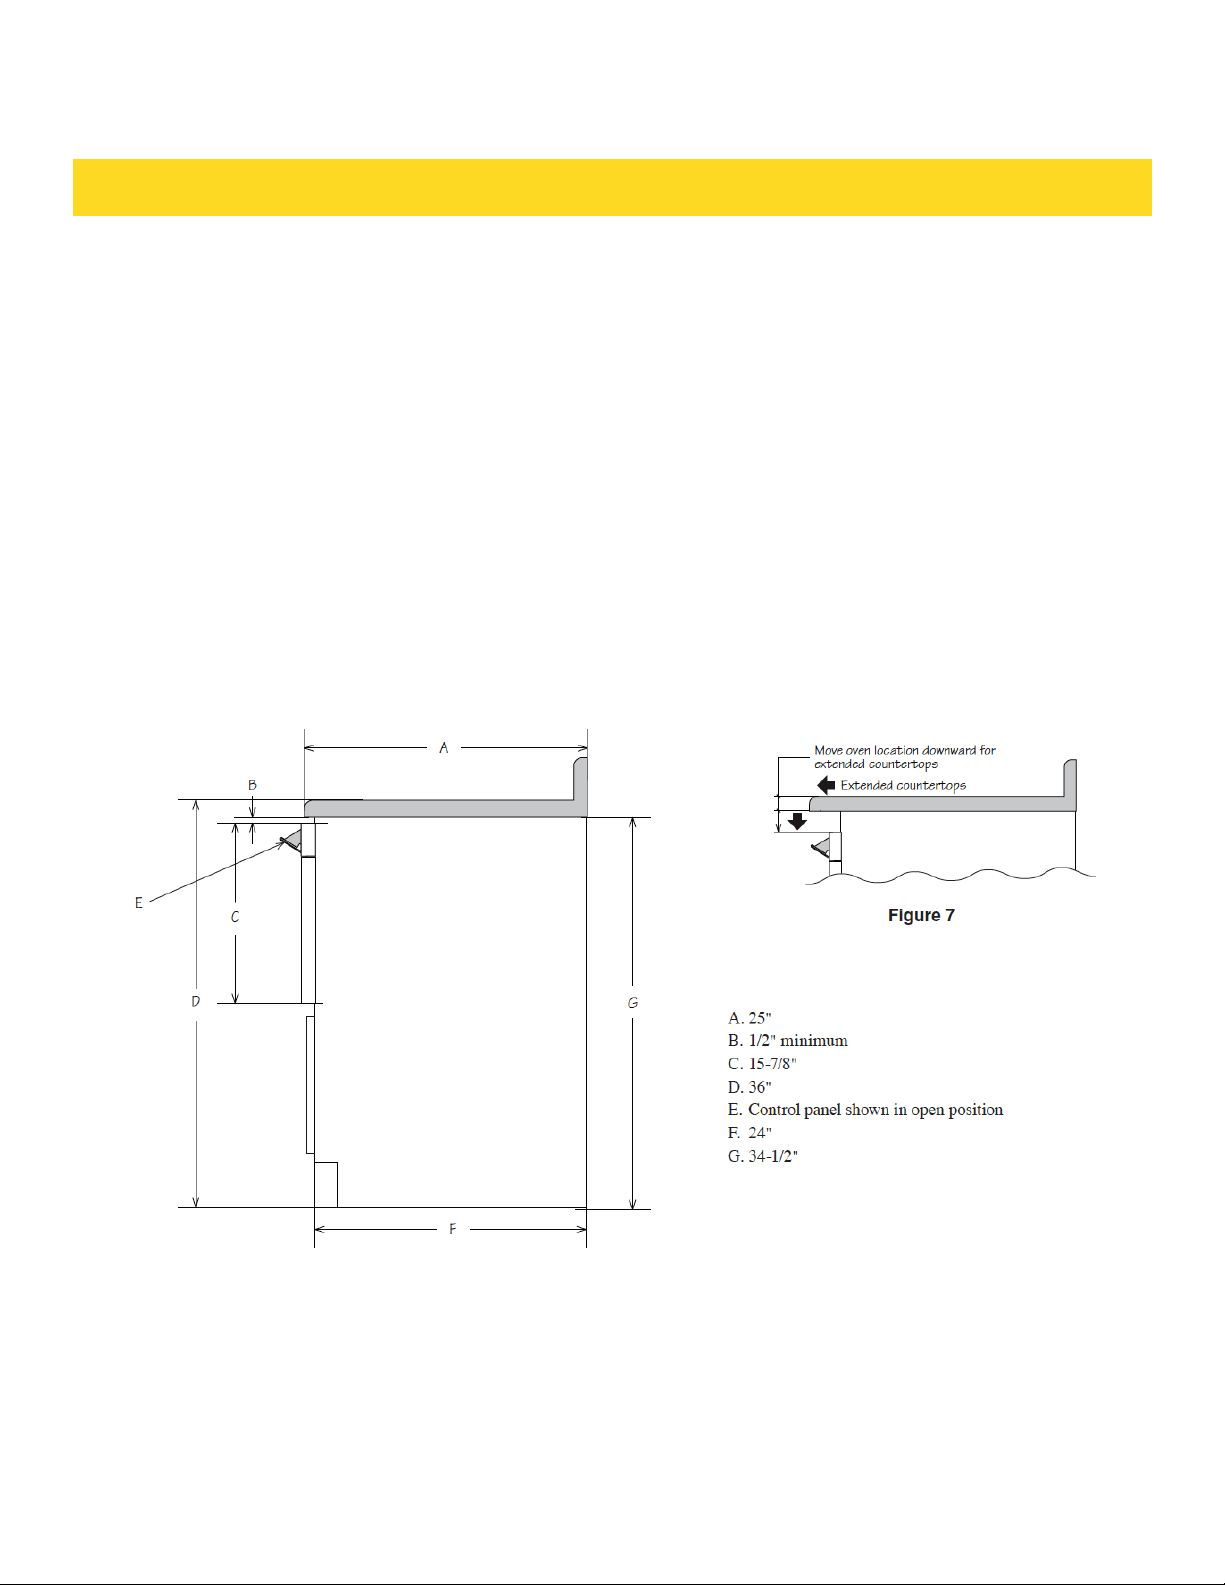
This drawing represents a typical standard cabinet. If installed in custom cabinets with
extended counter tops, take into account visibility and access to controls. See Figure 7.
INSTALLATION GUIDE
26
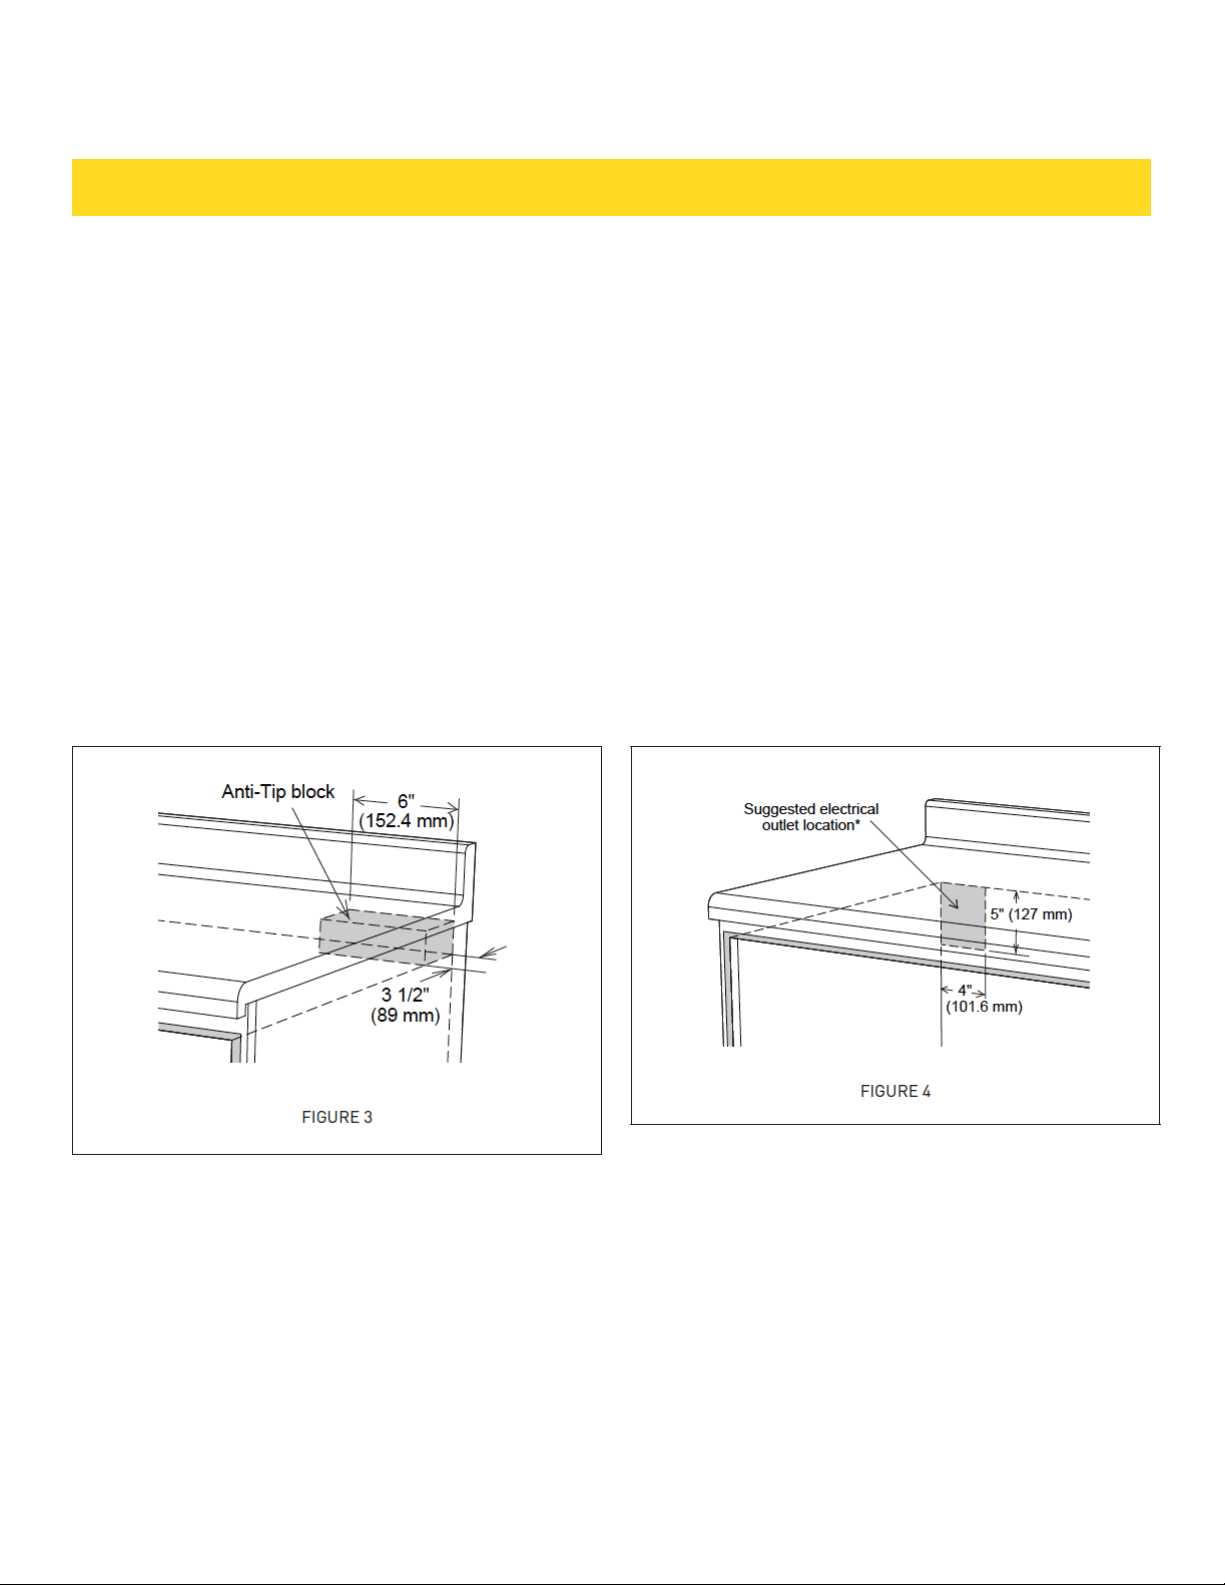
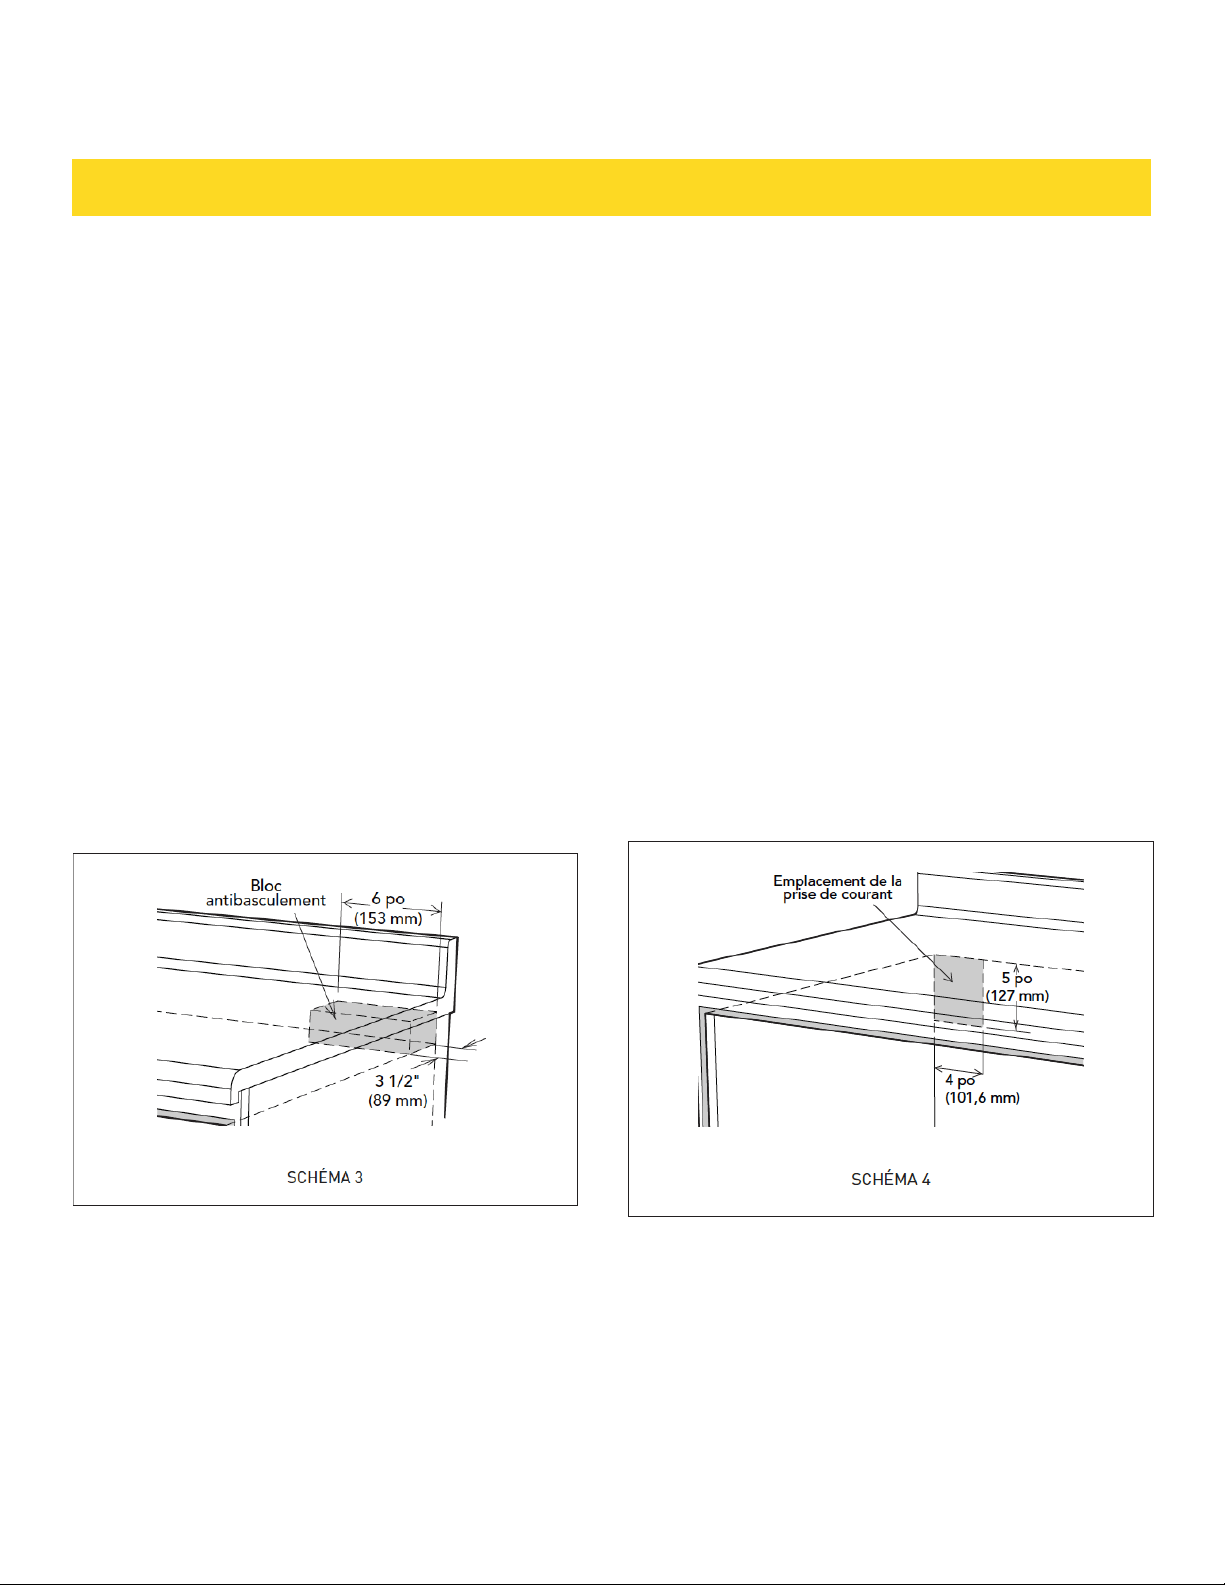
ANTI-TIP BLOCK
NORMAL INSTALLATION STEPS ANTI-TIP BLOCK
INSTALLATION INSTRUCTIONS
• To reduce the risk of tipping of the drawer, the Anti-Tip
block must be properly installed located 14-13/16" above
the floor on which the appliance will sit. The 6" Anti-Tip
block must be provided by the installer. See figure 1 and 3.
The Anti-Tip block prevents serious injury that might
result from spilled hot liquids.
• If the Drawer Microwave is ever moved to a different
location, the Anti-Tip block must also be moved and
installed. When installed to the wall, make sure that the
screws completely penetrate the dry wall and are secured
in wood or metal so that the block is totally stable. When
fastening, be sure that the screws do not penetrate
electrical wiring or plumbing.
ELECTRICAL OUTLET
The electrical requirements are a 120 volt 60 Hz, AC
only, 15 amp. or more protected electrical supply. It is
recommended that a separate circuit serving only this
appliance be provided. The Drawer Microwave is equipped
with a 3-prong grounding plug. It must be plugged into a
wall receptacle that is properly installed and grounded.
Should you only have a 2-prong outlet, have a qualified
electrician install a correct wall receptacle.
Note: If you have any questions about the grounding or
electrical instructions, consult a qualified electrician or
service person.
* Can also be installed using an electrical outlet in an
adjacent cabinet within the area where the provided
electrical cord can reach. Always check electrical codes
for requirements.
INSTALLATION GUIDE
27
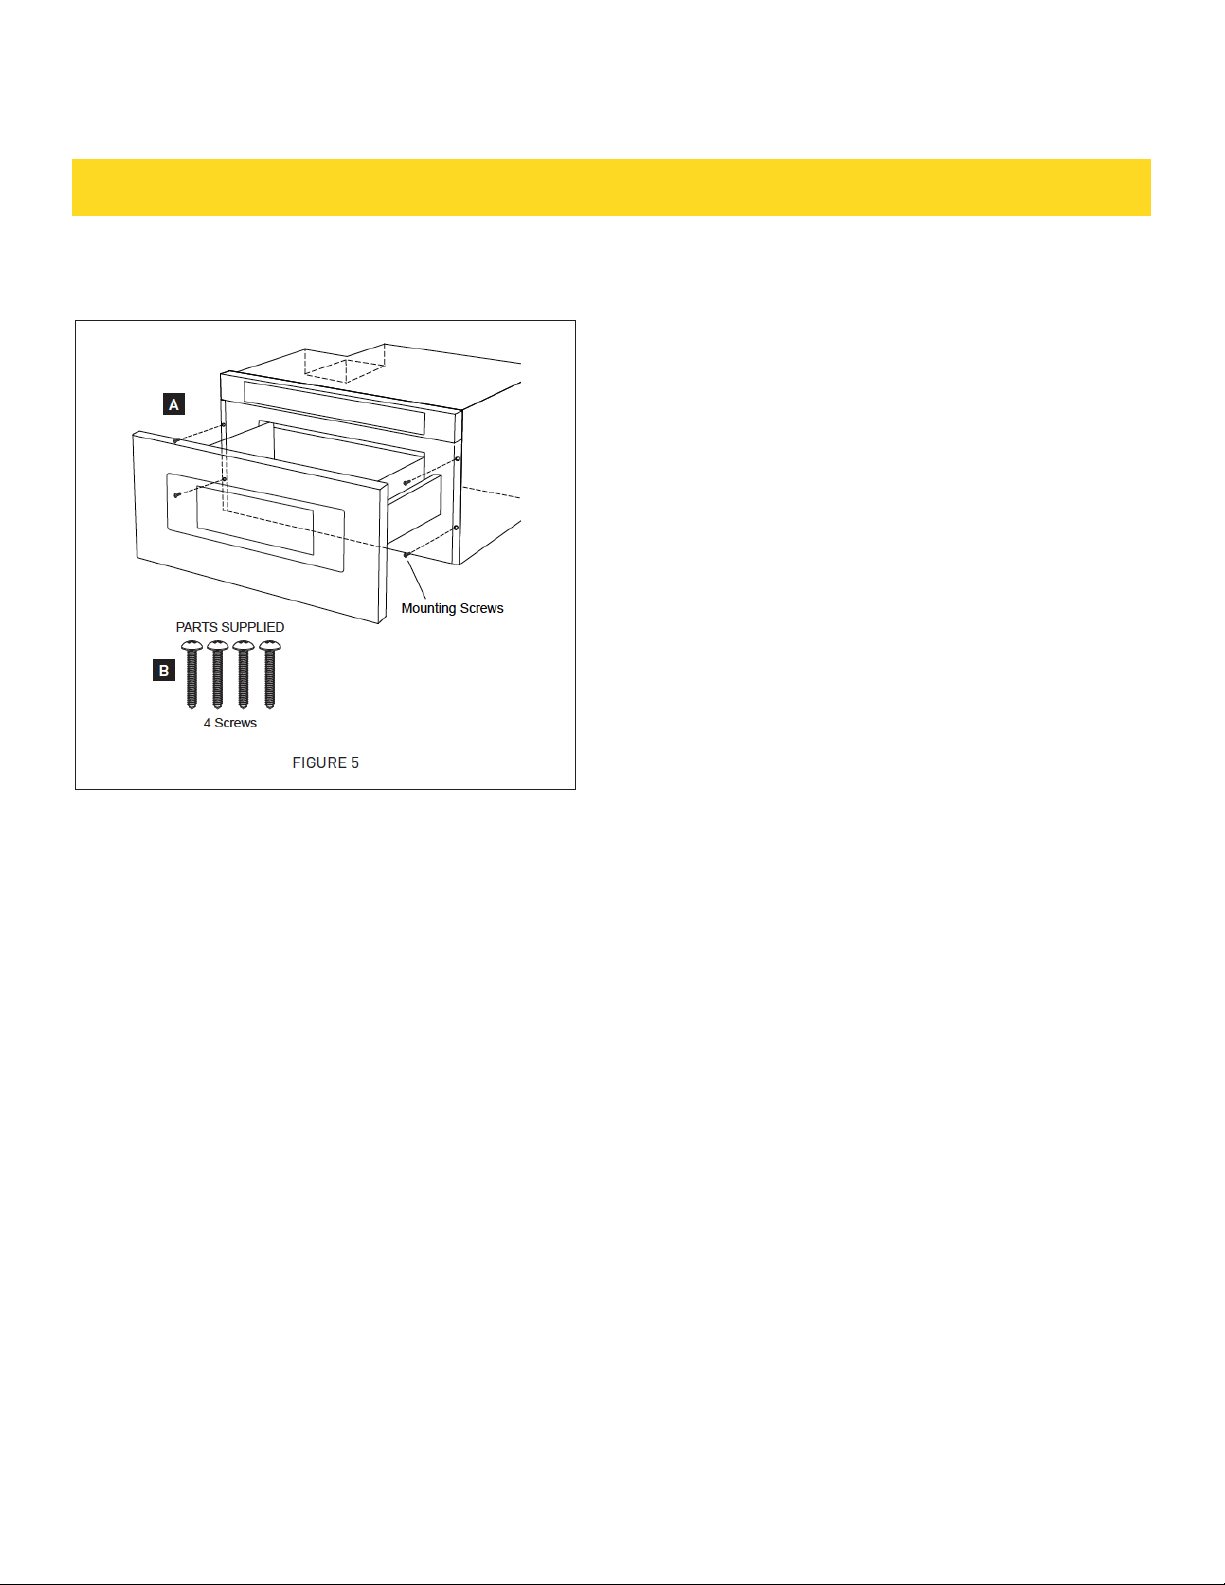
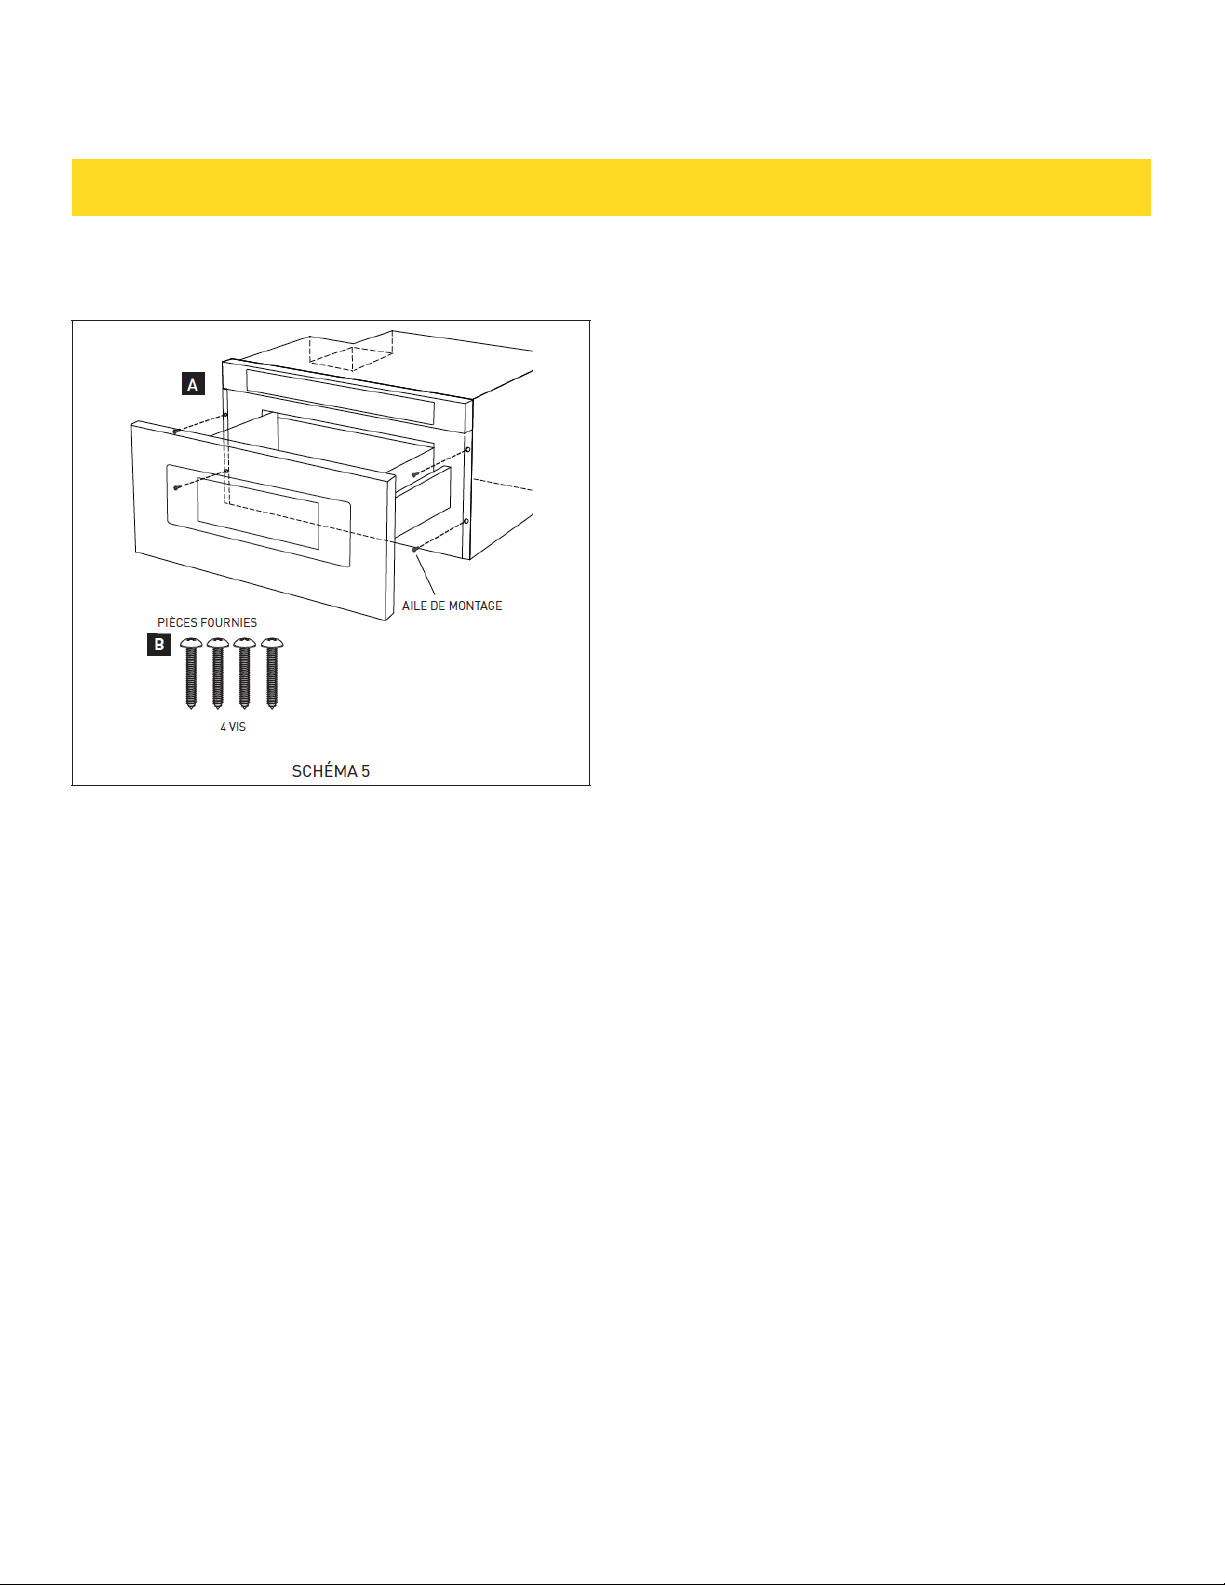
DRAWER INSTALLATION
1. Place the drawer adjacent to the wall or cabinet
opening. Plug the power supply cord into the electrical
outlet.
2. Carefully guide the drawer into the prepared opening.
Avoid pinching the cord between the oven and the wall.
3. Slide the drawer all the way until the mounting flange
is flush with the face of the cabinet. See figure 5A.
4. Open the drawer. Using the 4 holes on the drawer as
a template, pre drill the cabinet using a 1/16" bit. See
figure 5A.
5. Secure the drawer with the 4 screws supplied. See
figure 5B.
MODEL AND SERIAL NUMBER LOCATION
The nameplate includes model number and serial number.
Open the Drawer Microwave fully. The label is slightly be-
yond the back wall of the microwave cavity facing up from
the flat surface.
CARE, CLEANING AND MAINTENANCE
Refer to the User Manual for cleaning instructions.
BEFORE YOU CALL FOR SERVICE
Read the BEFORE YOU CALL FOR SERVICE and operating
instruction sections in your User Manual. It may save you
time and expense. The list includes common occurrences
that are not the result of defective workmanship or mate-
rials in this Drawer Microwave.
INSTALLATION GUIDE
28
01
02
03
04
05
06
07
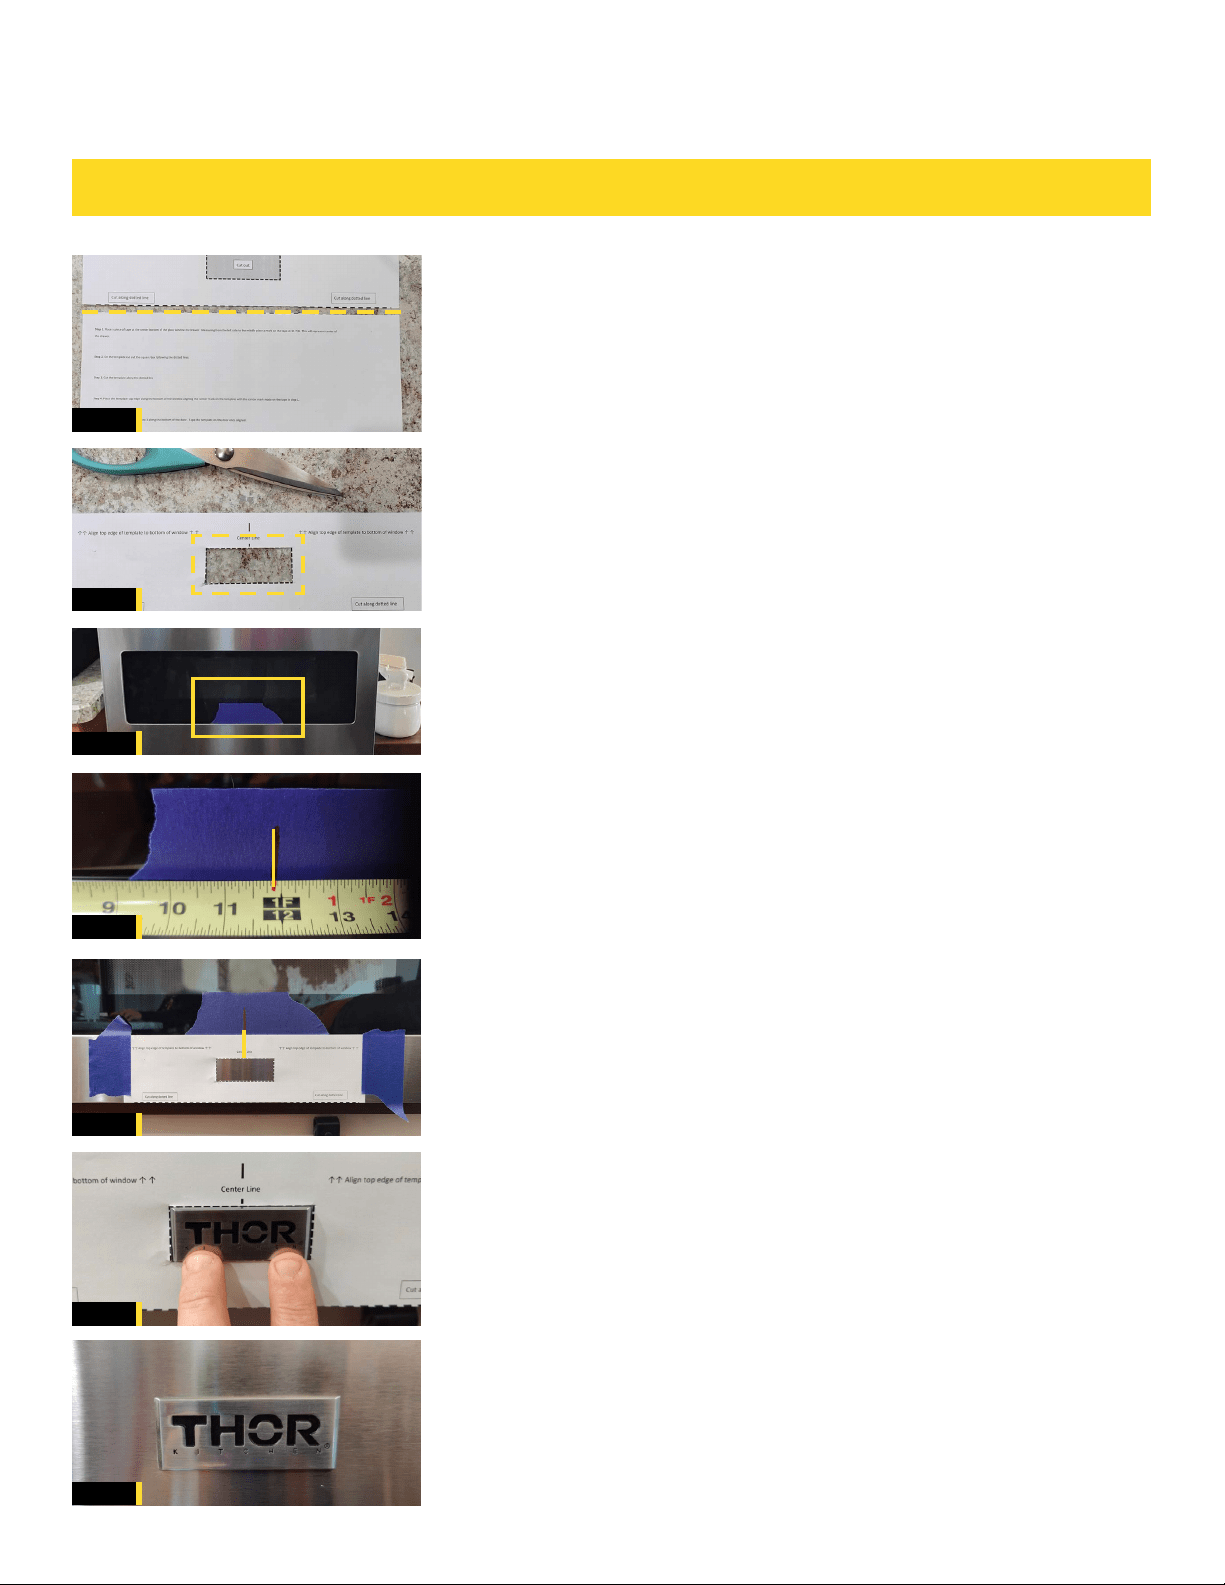
STEP 1
Cut along dotted line separating template from
instruction sheet. See Fig. 1
STEP 2
On the template, cut out the square box following the
dotted line. Remove the cutout portion. See Fig. 2
STEP 3
Place a strip of painter’s or masking tape at the bottom
center of the microwave window. See Fig. 3
STEP 4
Using a ruler or tape measure, measure from the left side of the
door to the middle and place a mark on the tape at 11 7/8”. This
will represent the center of the drawer. See Fig. 4
STEP 5
Place the template on to the microwave and align the top edge
of the template to the bottom of the window. Align the center
mark made on the tape to the centerline mark on the template.
Once template is aligned with all marks tape it to the drawer.
See Fig. 5
STEP 6
Remove backing tape off of THOR Kitchen logo and align
it into the square opening on the template. Press logo
firmly in to place once it is centered. See Fig. 6
STEP 7
Remove template and tape.
24 INCH MICROWAVE DRAWER - TMD2401
LOGO / BADGE INSTALLATION
FINAL
FIG. 6
FIG. 5
FIG. 4
FIG. 3
FIG. 2
FIG. 1
Lookin’ good!
BADGE INSTALLATION GUIDE
29
IMPORTANT - S’IL VOUS PLAÎT LIRE ET SUIVRE
• Prière de lire attentivement toutes ces directives avant
de commencer.
• Le kit comprend des parties métalliques, il faut faire
attention lors de la manipulation et de l’installation pour
éviter éventuelles blessures.
• Ne pas retirer de façon permanente les étiquettes, les
mises en garde ou les plaques fixées au produit.
• Veuillez observer tous les codes et règlements locaux et
national.
• L’installateur devra laisser ces directives au client qui
devra les conserver pour l’usage d’un inspecteur local et
pour référence ultérieure.
• Pour des RAISONS DE SÉCURITÉ, n’installez ce tiroir
dans aucun genre de placard combustible, ni aucun plac-
ard qui ne se conforme pas aux dimensions et espaces
indiqués aux page 4, Consultez les schéma 1.
INSTRUCTIONS DE SÛRETÉ IMPORTANTES
• ADVERTISSEMENT : Si l’on ne suit pas de près les
indications dans ce manuel, il y a un risque d’incendie
ou de décharge électrique qui pourrait provoquer des
dommages des biens, des blessures personnelles, voire
la mort.
• ADVERTISSEMENT : Pour réduire le risque de
basculement, il faut fixer le Four Drawer Microwave avec
un bloc antibasculement correctement installé.
• Ce Four Drawer Microwave doit être mis à la terre
conformément aux codes locaux.
• Assurez-vous que les revêtements muraux et les
placards autour du Four Drawer Microwave sont faits
pour supporter la chaleur produite par le électroménager.
• ADVERTISSEMENT : Ne laissez jamais les enfants
seuls ou sans supervision aux alentours du Four Drawer
Microwave lorsque ce dernier fonctionne. Ne laissez
jamais ouvert le tiroir sans supervision.
• ADVERTISSEMENT : Le fait de marcher, de s’appuyer
ou de s’asseoir sur le tiroir peut provoquer des blessures
sérieuses et pourrait causer des dommages au Four
Drawer Microwave.
• N’utilisez pas le Four Drawer Microwave comme espace
de rangement. Cela pourrait provoquer des risques de
blessure ou de dommages.
• Vérifiez que l’heure s’affiche. Sinon, appuyez sur Stop/
Clear pour prévenir un emploi non autorisé.
GUIDE D’INSTALLATION
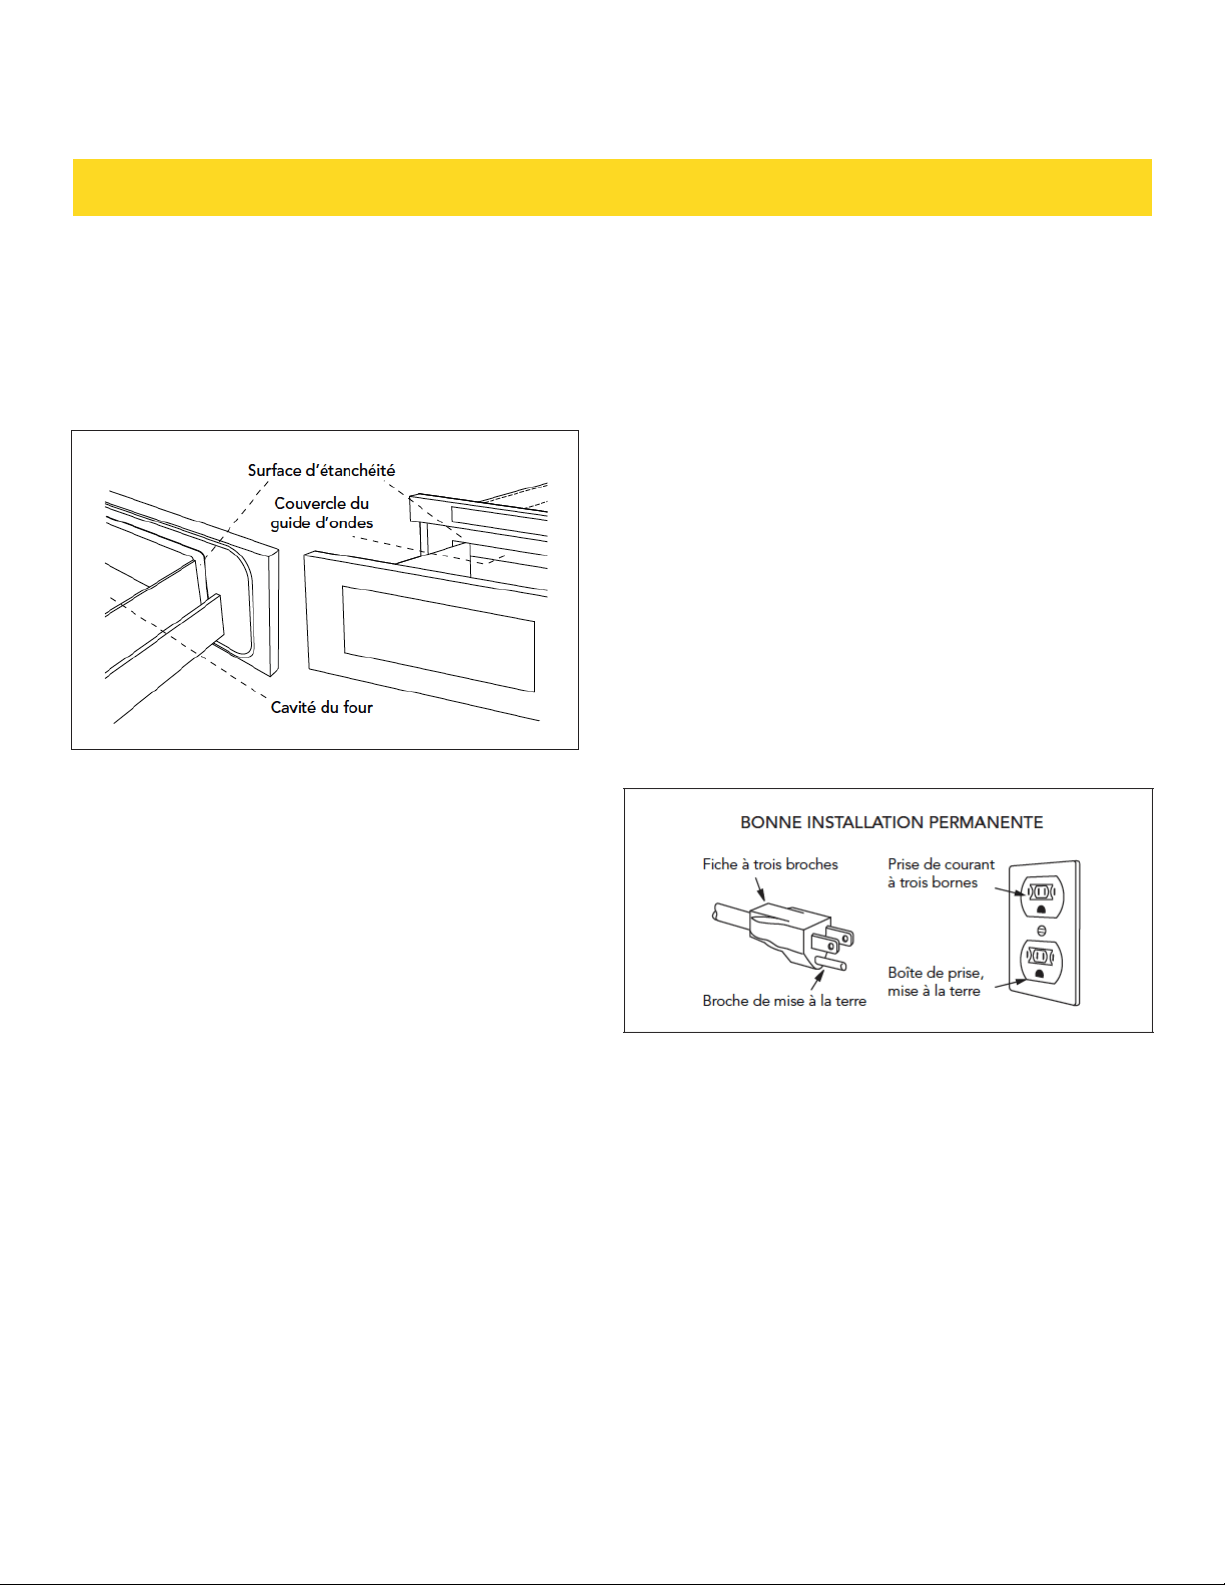
DÉBALLAGE DU FOUR DRAWER MICROWAVE
• Retirez tout le matériau d’emballage du Drawer
Microwave. N’ENLEVEZ PAS LE COUVERCLE DU GUIDE
D’ONDES, qui se trouve sur le dessus du Four Drawer
Microwave.
• Enlevez l’autocollant descriptif, s’il y en a un. Inspectez
le tiroir pour toute sorte de dommage, dont un tiroir
décalé ou tordu, des sceaux d’étanchéité endommagés
sur le tiroir ou sur le plafond du tiroir, des glissières
cassées ou lâches ou des enfoncements dans la cavité
ou sur la face du tiroir. Si vous trouvez des dommages,
n’utilisez pas le Four Drawer Microwave : contactez votre
AGENT DE SERVICE AGRÉÉ.
REMARQUES IMPORTANTES POUR L’INSTALLATEUR
• Lisez tout le manuel d’installation avant d’installer le
Four Drawer Microwave.
• Enlevez tout le matériau d’emballage avant de
connecter le secteur d’alimentation électrique.
• Observez tous les codes et règlements principaux.
• Assurez-vous de laisser ces instructions avec le
consommateur.
REMARQUES IMPORTANTES POUR LE
CONSOMMATEUR
Conservez ce manuel avec votre manuel d’utilisateur
pour référence ultérieure.
• Comme c’est le cas pour tout four à micro-ondes qui
produit de la chaleur, il faut suivre certaines consignes
de sécurité. Ces consignes sont signalées dans le
manuel d’utilisateur. Veuillez les lire le les suivre de
près.
• Assurez-vous que le Four Drawer Microwave est
installé et mis à la terre par un installateur ou un
technicien qualifié. service technician.
DÉGAGEMENTS ET DIMENSIONS
• Les dimensions indiquées au Schéma 1 doivent être
observées.
Ces dimensions offrent un dégagement minimal.
Repérer la prise électrique dans l’aire ombrée dans le coin
gauche supérieur de la découpe. Voir Schéma 4.
• La surface de contact doit être solide et de niveau. Prêter
une attention particulière au plancher qui supportera le
tiroir. Le plancher de l’ouverture doit être en contreplaqué
assez fort pour supporter le poids du four et sa propre
charge (environ 45,5 kg [100 lb]).
• Vérifier que l’emplacement où le tiroir sera installé aura
une alimentation électrique appropriée.
• Votre four peut être installé dans une armoire, sur un
mur, ou sous un four mural au gaz ou électrique.
• Vérifier que le dégagement du plancher entre le four
mural et le tiroir est au minimum de 2 po (50,8 mm).
• L’intérieur du micro-ondes acceptera facilement un plat
rectangulaire de 9 po x 13 po ou un sac de maïs soufflé
allant au micro-ondes.
INSTRUCTIONS POUR LA MISE À LA TERRE
Il faut que cet appareil soit mis à la terre. En cas de court-
circuit, la mise à la terre réduit le risque de décharge
électrique en fournissant une voie d’échappement pour le
courant électrique. Le Four Drawer Microwave est équipé
d’un cordon avec un conducteur de terre et une fiche de
mise à la terre. Il faut brancher cette dernière sur une
prise murale dûment installée et mise à la terre selon le
Code National d’électricité et selon les codes et règle-
ments locaux.
ADVERTISSEMENT : Un mauvais usage de la fiche de mise
à la terre peut entraîner un risque de décharge électrique.
N’utilisez pas de rallonge. Si le cordon d’alimentation est
trop court, demander à un électricien ou un réparateur
qualifié de poser une prise près de l’appareil.
GUIDE D’INSTALLATION
MESURES POUR LE FOUR DRAWER MICROWAVE
A. 6 po (152,40 mm)
B. Emplacement de la prise électrique*
C. Bloc antibasculement
D. 5 po (127 mm)
E. 3-1/2 po (88,90 mm)
F. 4 po (101,60 mm)
G. Ouverture 22-1/8 po (561,98 mm)
H. 14-13/16 po (376,24 mm) à la base du bloc
antibasculement
I. Laisser un chevauchement de 7/8 po (22,23 mm)
J. Profondeur min. 23-1/2 po (596,90 mm)
K. Laisser un chevauchement de 3/16 po (4,76 mm)
L. Hauteur de comptoir 36 po (914,4 mm)
M. Laisser un chevauchement de 1/8 po
(3,17 mm) min.
N. Le plancher doit support 45.4 kg (100 lb)
O. 19 po (482,60 mm) au dessus du plancher
(recommandé)
P. Armoire min. 24 po (609,6 mm)
Q Ouverture 15-9/16 po (395,27 mm)
A. 21-5/8 po (549,28 mm)
B. 4-11/16 po (119,06 mm)
C. 1-3/4 po (44,45 mm)
D. 21-7/8 po (555,60 mm)
E. 23-7/8 po (606,43 mm)
F. 15-7/8 po (403,22 mm)
G. 14-19/32 po (370,69 mm)
H. Épaisseur de la porte 1-9/64 po (29 mm)
I. Ouverture tiroir 15 po (381 mm)
J. 4 po (101,6 mm)
Les nombreuses dimensions des Schémas 1 et 2 sont
des références pour la préparation de la pose du tiroir.
Ce Drawer Microwave peut s’installer en dessous de tout
four mural électrique ou à gazé.
* Peut être installé aussi en utilisant une prise secteur
dans une armoire voisine dans les limites imposées
par la longueur du cordon d’alimentation fourni avec
l’appareil. Le trou de cordon d’alimentation dans une
armoire doit mesurer au moins 1-1/2 po en diamètre et
doit être dépourvu de bords rugueux.
IMPORTANT - Prévoyez toujours une longueur suffisante
de cordon d’alimentation pour que celui-ci ne soit
aucunement tendu.
Vérifiez toujours les normes et le code électriques de
votre
région.
GUIDE D’INSTALLATION
BLOC ANTI-BASCULEMENT
ÉTAPES D’INSTA LLATION NORMALE
DIRECTIVES D’INSTALL ATION DU BLOC
ANTI-BASCULEMENT
• Pur réduire le risque de basculement du tiroir, le
bloc antibasculement doit être correctement installé
14-13/16 po au-dessus du plancher sur lequel le four
Microwave Drawer sera posé. Le bloc anti-basculement
de 6 po sera fourni par l’installateur. Voir Schémas 1
et 3. Le bloc anti-basculement empêche de sérieuses
blessures qui pourraient survenir du déversement de
liquides chauds.
• Si jamais l’on choisit de changer l’emplacement du
Four Drawer Microwave, le bloc antibasculement doit
l’être aussi et réinstallé. Lorsqu’il est installé au mur,
vérifier que les vis complètement à sec pénètrent le
mur et sont correctement sécurisés et dans le matériau
de base underneathl le bloc soit parfaitement stable. En
fixant, Faire attention que les vis ne pénètrent pas dans
le câblage électrique ou la plomberie.
PRISE DE COURANT
Le courant alimentation est 120 volts, 60 Hz, CA
seulement, 15 A ou plus et doit être protégé. Il est recom-
mandé d’alimenter cet appareil par un circuit séparé.
Le four est équipé d’une fiche trois broches, mise à la
terre. Il faut la brancher dans une prise murale correcte-
ment installée et mise à la terre. Si vous ne possédez que
des prises à deux broches, demandez à un électricien de
métier d’installer une prise murale qui convienne.
Remarque: Pour toute question à propos de l’installation
électrique ou de la mise à la terre, consulter un électric-
ien de métier ou un réparateur qualifié.
* Peut être installé aussi en utilisant une prise secteur
dans une armoire voisine dans les limites imposées par la
longueur du cordon d’alimentation fourni avec l’appareil.
Vérifiez toujours les normes et le code électriques de
votre région.
GUIDE D’INSTALLATION
1. Placer le four près de l’ouverture du mur ou de
l’armoire. Brancher le cordon ans la prise électrique.
2. Guider avec précaution le four assemblé dans
l’ouverture préparée. Éviter de pincer le cordon entre le
four et le mur.
3. Faire complètement glisser le tiroir jusqu’à ce que
la bride de montage affleure à la face de l’armoire. Voir
Schéma 5A.
4. Ouvrir le tiroir. À l’aide des 4 trous du tiroir comme
gabarit, percer des avant-trous dans l’armoire avec un
foret de 1/16 po. Voir Schéma 5A.
5. Fixer le tiroir avec les 4 vis fournies. Voir Schéma 5B.
INSTALLATION DU TIROIR
EMPLACEMENT DES NUMÉROS DE MODÈLE ET
DE SÉRIE
La plaque d’identification comprend les
numéros de série et de modèle. Ouvrir
complètement le four Drawer Microwave.
L’étiquette se trouve légèrement au-delà de la
paroi arrière de la cavité du four à micro-ondes
sur la surface plate.
ENTRETIEN, NETTOYAGE ET SERVICE
Consulter le mode d’emploi et d’entretien pour
les instructions de nettoyage.
AVANT D’APPELER UN TECHNICIEN
Lisez les sections AVANT D’APPELER UN
TECHNICIEN et Instructions d’opération dans
le manuel d’utilisateur. Ça pourrait éviter des
pertes de temps et des dépenses futiles. La
liste inclut des événements communs qui ne
résultent pas de défectuosités de l’appareil.
GUIDE D’INSTALLATION
30
WARRANTY REGISTRATION
Scan theQR code or visit
thorkitchen.com/warranty
Input your product info
and select register
You’re done.
Let’s get cookin’.
You chose THOR Kitchen to enhance your culinary journey and
we’re stoked to have you in the club. Think of it as a secret
society of really savvy people, such as yourself, choosing
professional power and performance at an affordable price.
Register your product by following the steps below.
WELCOME
TO THE CLUB
WARRANTY NEED PARTS?