Before using your new product, please read these instructions to prevent any damage.
ASSEMBLY GUIDE
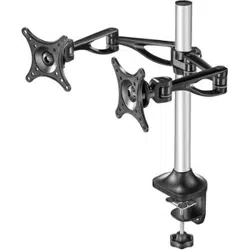
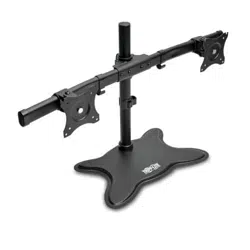
Dual Screen
Desktop Mount
NS-PMMD22

www.insigniaproducts.com
2
Contents
Introduction . . . . . . . . . . . . . . . . . . . . . . . . . . . . . . . . . . . . . . . . . . . . . . . . . . . . . . . . . . . . . . . . . . . . . . . . . . . . . . . . . . . . . . . . . . 3
IMPORTANT SAFETY INSTRUCTIONS . . . . . . . . . . . . . . . . . . . . . . . . . . . . . . . . . . . . . . . . . . . . . . . . . . . . . . . . . . . . . . . . . . . 3
Features . . . . . . . . . . . . . . . . . . . . . . . . . . . . . . . . . . . . . . . . . . . . . . . . . . . . . . . . . . . . . . . . . . . . . . . . . . . . . . . . . . . . . . . . . . . . . . 3
Dimensions. . . . . . . . . . . . . . . . . . . . . . . . . . . . . . . . . . . . . . . . . . . . . . . . . . . . . . . . . . . . . . . . . . . . . . . . . . . . . . . . . . . . . . . . . . . . . . . . . . . . . . . 3
Package contents . . . . . . . . . . . . . . . . . . . . . . . . . . . . . . . . . . . . . . . . . . . . . . . . . . . . . . . . . . . . . . . . . . . . . . . . . . . . . . . . . . . . . . . . . . . . . . . . . 4
VESA mount patterns . . . . . . . . . . . . . . . . . . . . . . . . . . . . . . . . . . . . . . . . . . . . . . . . . . . . . . . . . . . . . . . . . . . . . . . . . . . . . . . . . . . . . . . . . . . . . 4
Installation instructions . . . . . . . . . . . . . . . . . . . . . . . . . . . . . . . . . . . . . . . . . . . . . . . . . . . . . . . . . . . . . . . . . . . . . . . . . . . . . . . 5
STEP 1: Preparing your monitors . . . . . . . . . . . . . . . . . . . . . . . . . . . . . . . . . . . . . . . . . . . . . . . . . . . . . . . . . . . . . . . . . . . . . . . . . . . . . . . . . . 5
STEP 2: Attaching your monitor mount to a desktop edge . . . . . . . . . . . . . . . . . . . . . . . . . . . . . . . . . . . . . . . . . . . . . . . . . . . . . . . . . . 5
STEP 3: Attaching the monitor support arm . . . . . . . . . . . . . . . . . . . . . . . . . . . . . . . . . . . . . . . . . . . . . . . . . . . . . . . . . . . . . . . . . . . . . . . . 7
STEP 4: Attaching the monitors. . . . . . . . . . . . . . . . . . . . . . . . . . . . . . . . . . . . . . . . . . . . . . . . . . . . . . . . . . . . . . . . . . . . . . . . . . . . . . . . . . . . 8
STEP 5: Adjusting the monitors and managing the cables . . . . . . . . . . . . . . . . . . . . . . . . . . . . . . . . . . . . . . . . . . . . . . . . . . . . . . . . . . 9
Specifications. . . . . . . . . . . . . . . . . . . . . . . . . . . . . . . . . . . . . . . . . . . . . . . . . . . . . . . . . . . . . . . . . . . . . . . . . . . . . . . . . . . . . . . . . 9
ONE-YEAR LIMITED WARRANTY . . . . . . . . . . . . . . . . . . . . . . . . . . . . . . . . . . . . . . . . . . . . . . . . . . . . . . . . . . . . . . . . . . . . . . 10
www.insigniaproducts.com
3
NS-PMMD22
Introduction
Congratulations on your purchase of a high-quality Insignia product. Your NS-PMMD22 represents the state of the art in
monitor mount design and is designed for reliable and trouble-free performance.
IMPORTANT SAFETY INSTRUCTIONS
1 Make sure these instructions are read and completely understood before attempting installation. If you are unsure of
any part of this installation, please contact a professional installer for assistance.
2 The desk or mounting surface must be capable of supporting the combined weight of the mount and the display,
otherwise the structure must be reinforced.
3 Please check joint parts every two months, making sure the screws are tight.
4 This product was designed to be installed on a desk. Before installing, make sure the mount will support the combined
load of the equipment and hardware. Never exceed the maximum load capacity 44 lb. (20 kg), or else it may result in
product failure or personal injury.
5 Note: This product is intended for indoor use only. Use of this product outdoors could lead to product failure or
personal injury.
6 WARNING: This product contains small items that could be a choking hazard if swallowed. Keep these items away from
young children.
SAVE THESE INSTRUCTIONS
Features
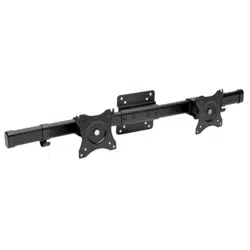
• Holds two monitors side-by-side, extending your display
• Supports up to two 22-pound, 30-inch 16:9 landscape monitors at the same time
• Max height of 15.7 in (40 cm) lets you raise or lower both monitors at the same time
• Tilt either monitor from -85° to 15°, giving you versatile viewing options
• Integrated cord management clip keeps your cables organized
• Heavy-duty steel construction securely holds your monitors in place
• Requires monitors with 75 × 75mm or 100 × 100mm VESA mounts
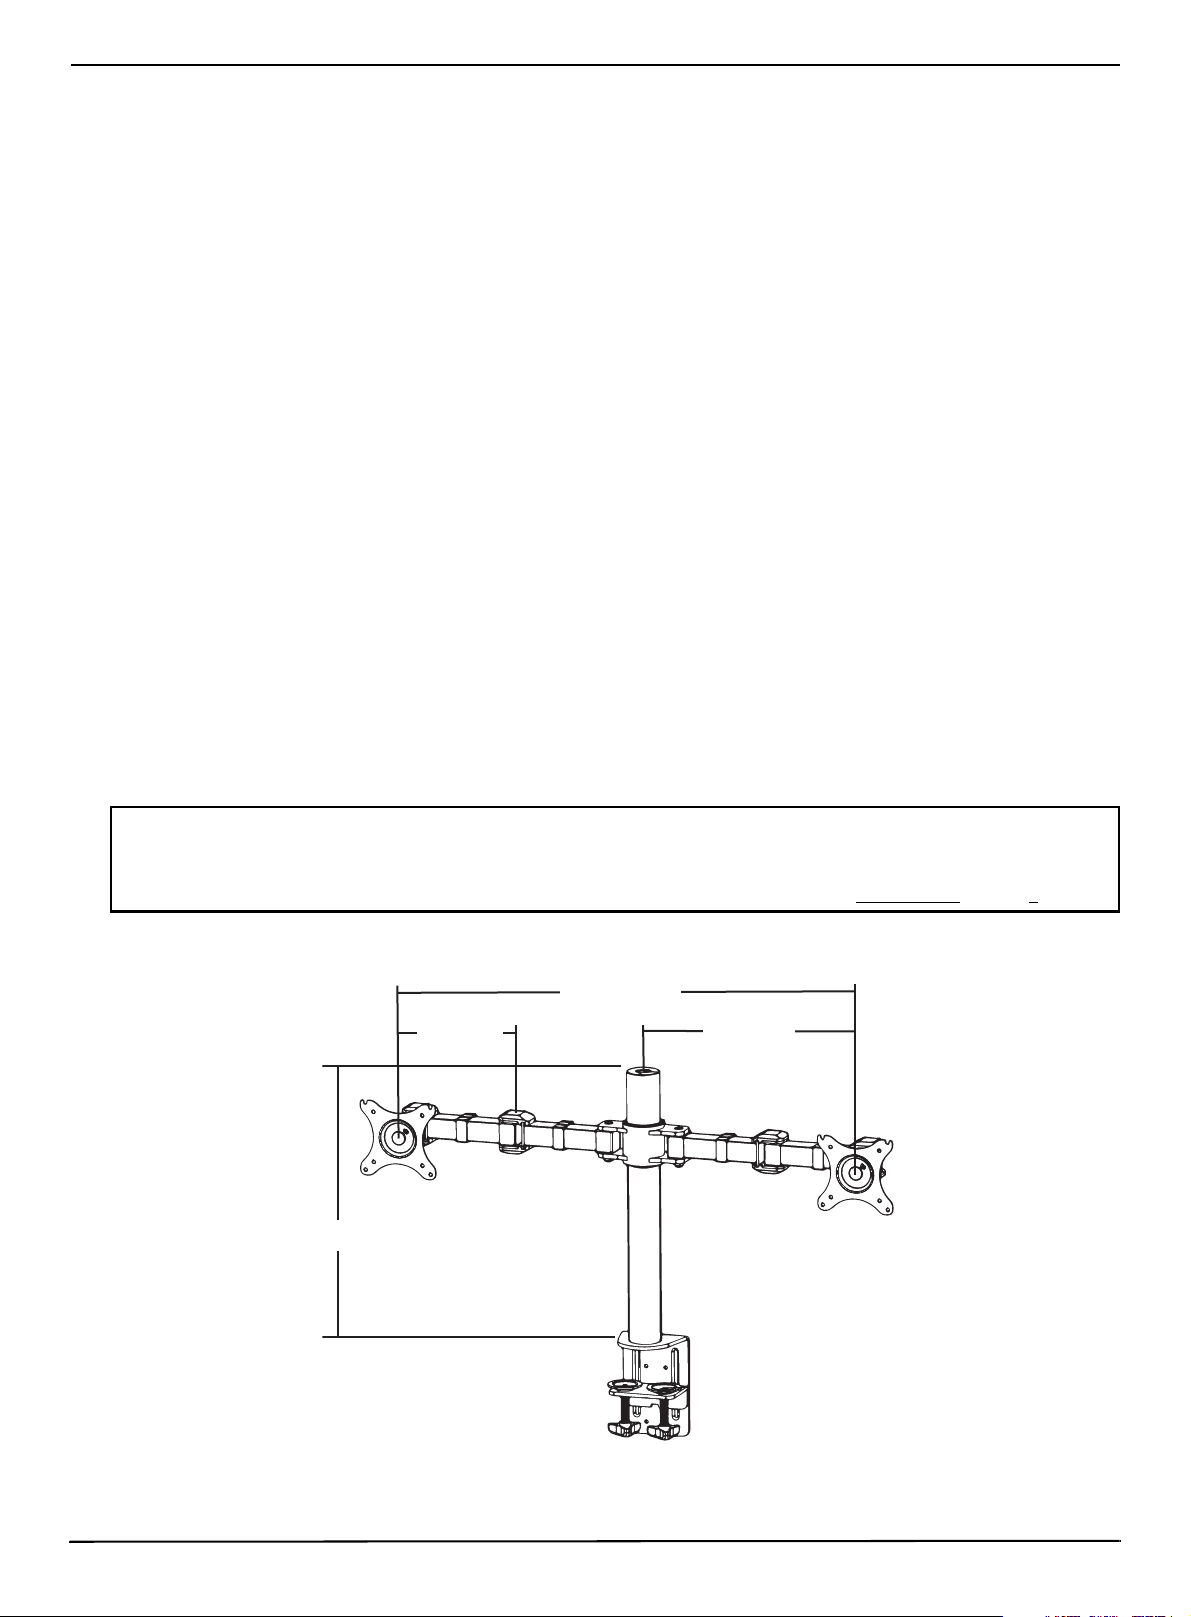
Dimensions
WARNINGS:
• Do not attach your monitor mount to a glass-top table or desk. The weight of your mount and monitors may break the tabletop.
• Attach your monitor mount to a square or rectangular table or desk. Your monitor mount may not fit securely to an oval or
irregularly shaped table.
• Do not attach a monitor to your monitor mount that exceeds the size and weight limitations. See Specifications
on page 9.
17.7" (45 cm)
Max. 28.3" (72 cm)
14.2" (36 cm)
6.3'' (16 cm)
www.insigniaproducts.com
4
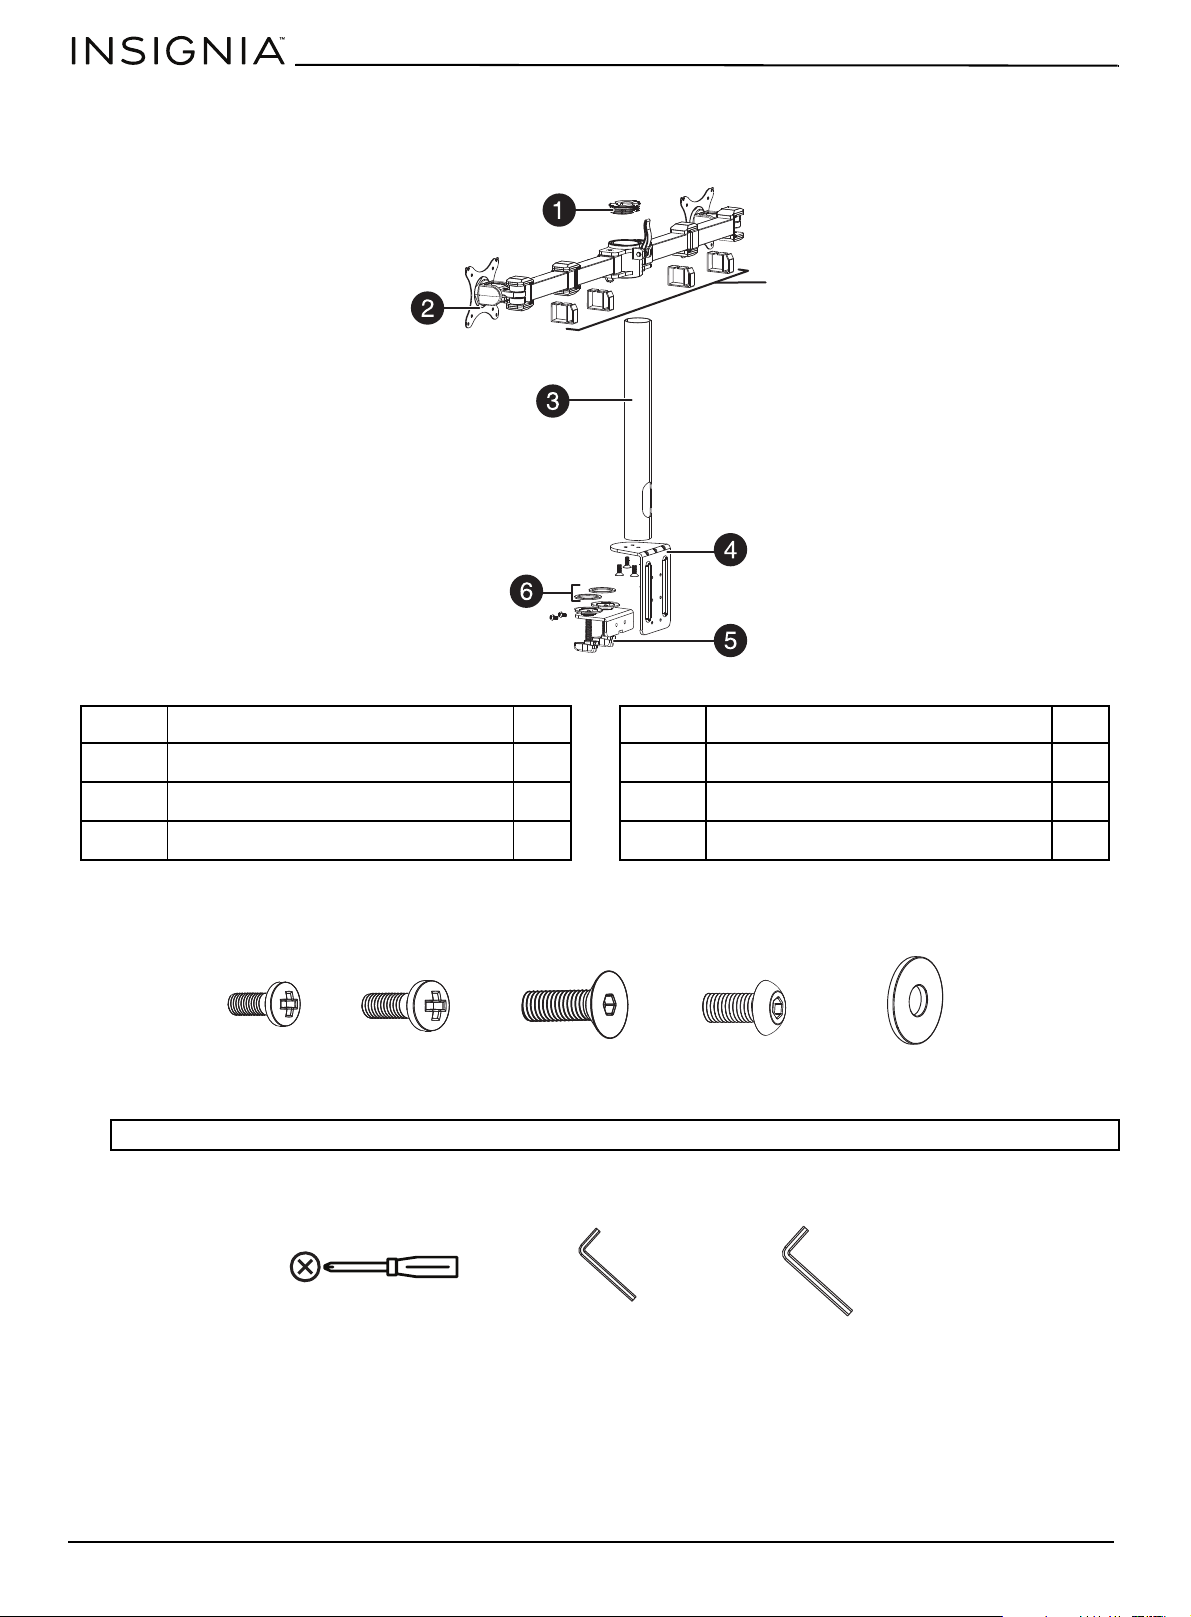
Package contents
Parts
Make sure that you have all the parts necessary to assemble your new monitor mount:
Hardware
Make sure that you have all the hardware necessary to assemble your new monitor mount:
Tools required
Make sure that you have the tools necessary to assemble and install your new monitor mount:
VESA mount patterns
Your monitor mount works with the following VESA screw hole patterns:
• 75 × 75 mm (3 × 3")
• 100 × 100 mm (3.9 × 3.9")
#PARTQTY.#PARTQTY.
1 Tube cover 2 4 Support base 1
2 Monitor support arm 1 5 Base clamp 1
3 Monitor support tube 1 6 Anti-slip rubber pads 2
Note: You may not use all the included hardware.
Cable support brackets
(pre-installed)
A M4 x 12 mm (8) B M5 x 12 mm (8) C M6 x 20 mm (3) D M6 x 10 mm (2) E 6.5 x 13x2 (16)
Phillips screwdriver
(not provided)
F 4 x 4 mm Allen wrench
(provided)
G 5 x 5 mm Allen wrench
(provided)
www.insigniaproducts.com
5
NS-PMMD22
Installation instructions
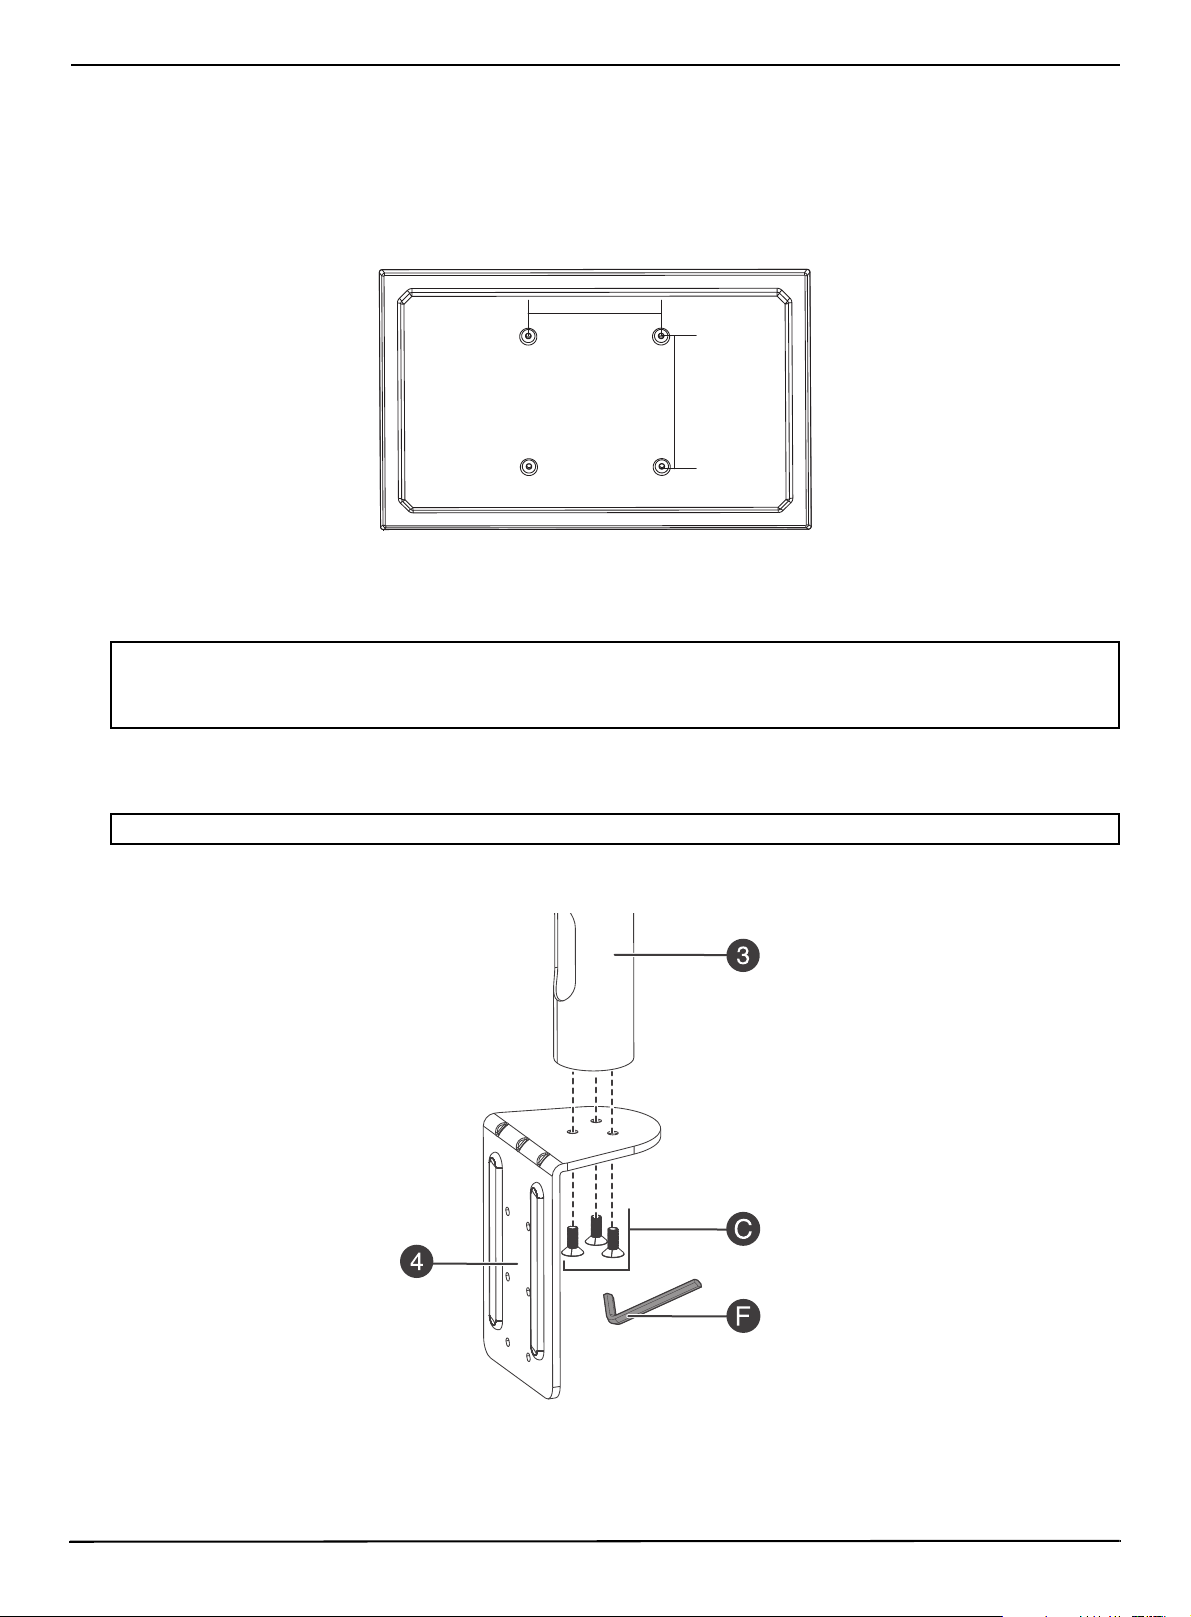
STEP 1: Preparing your monitors
1 Make sure that your monitors have screw holes on the backs for VESA mounting. You can use monitors with VESA
mounting patterns of 75 × 75 mm (3 × 3") or 100 × 100 mm (3.9 × 3.9").
2 Remove the bases or stands from your monitors.
STEP 2: Attaching your monitor mount to a desktop edge
Select the position on the desk where you want your monitor mount installed. Make sure that there is enough room for
your monitors. The desk should be between .8 in. (2 cm) and 3.9 in. (10 cm) thick and strong enough to bear the weight of
your monitors.
1 Align the support tube (3) bottom with the three holes in the support base (4), then secure the tube using three
M6 × 20 mm screws (C). Tighten the screws using the 4 x 4 Allen wrench (F).
Notes:
• Make sure that the tabletop or desktop is square or rectangular. Your mount may not fit securely to an oval or irregularly shaped
surface.
• Make sure that the tabletop or desktop thickness is between .8 and 3.9 inches (2 and 10 cm).
Note: You need a Phillips screwdriver for this step.
75 × 75 mm (3 × 3") or
100 × 100 mm (3.9 × 3.9")
75 × 75 mm (3 × 3") or
100 × 100 mm (3.9 × 3.9")
www.insigniaproducts.com
6
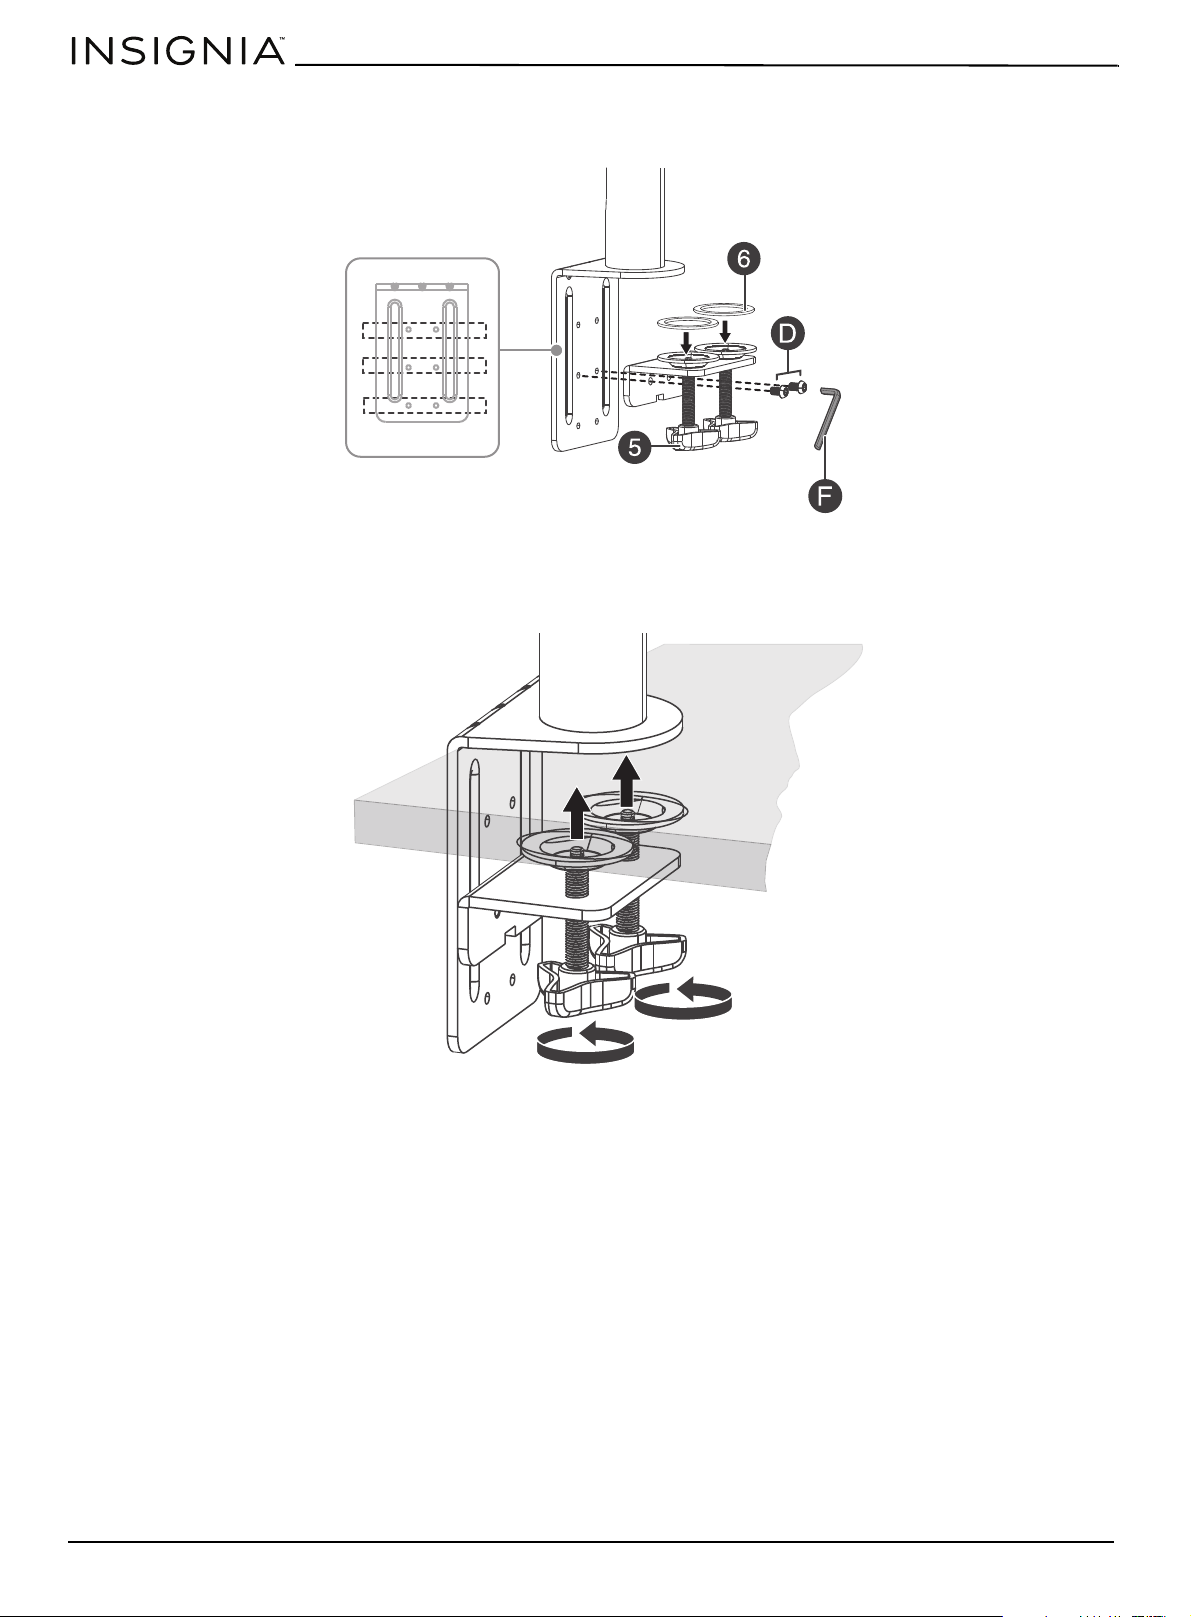
2 Determine which mounting holes to use, based on the thickness of your desk. Insert two M6 x 10 mm screws (D)
through the base clamp (5), then tighten the screws using the 4 × 4 Allen wrench (F). Place the anti-slip rubber pads (6)
on the tops of the clamp screws.
3 Slide the support base/base clamp assembly over the edge of the desk where you want your monitor mount installed,
then tighten both base clamp screws by turning them counterclockwise. Make sure that the clamp assembly is flush
with the desk to prevent wobbling.
Desktop
www.insigniaproducts.com
7
NS-PMMD22
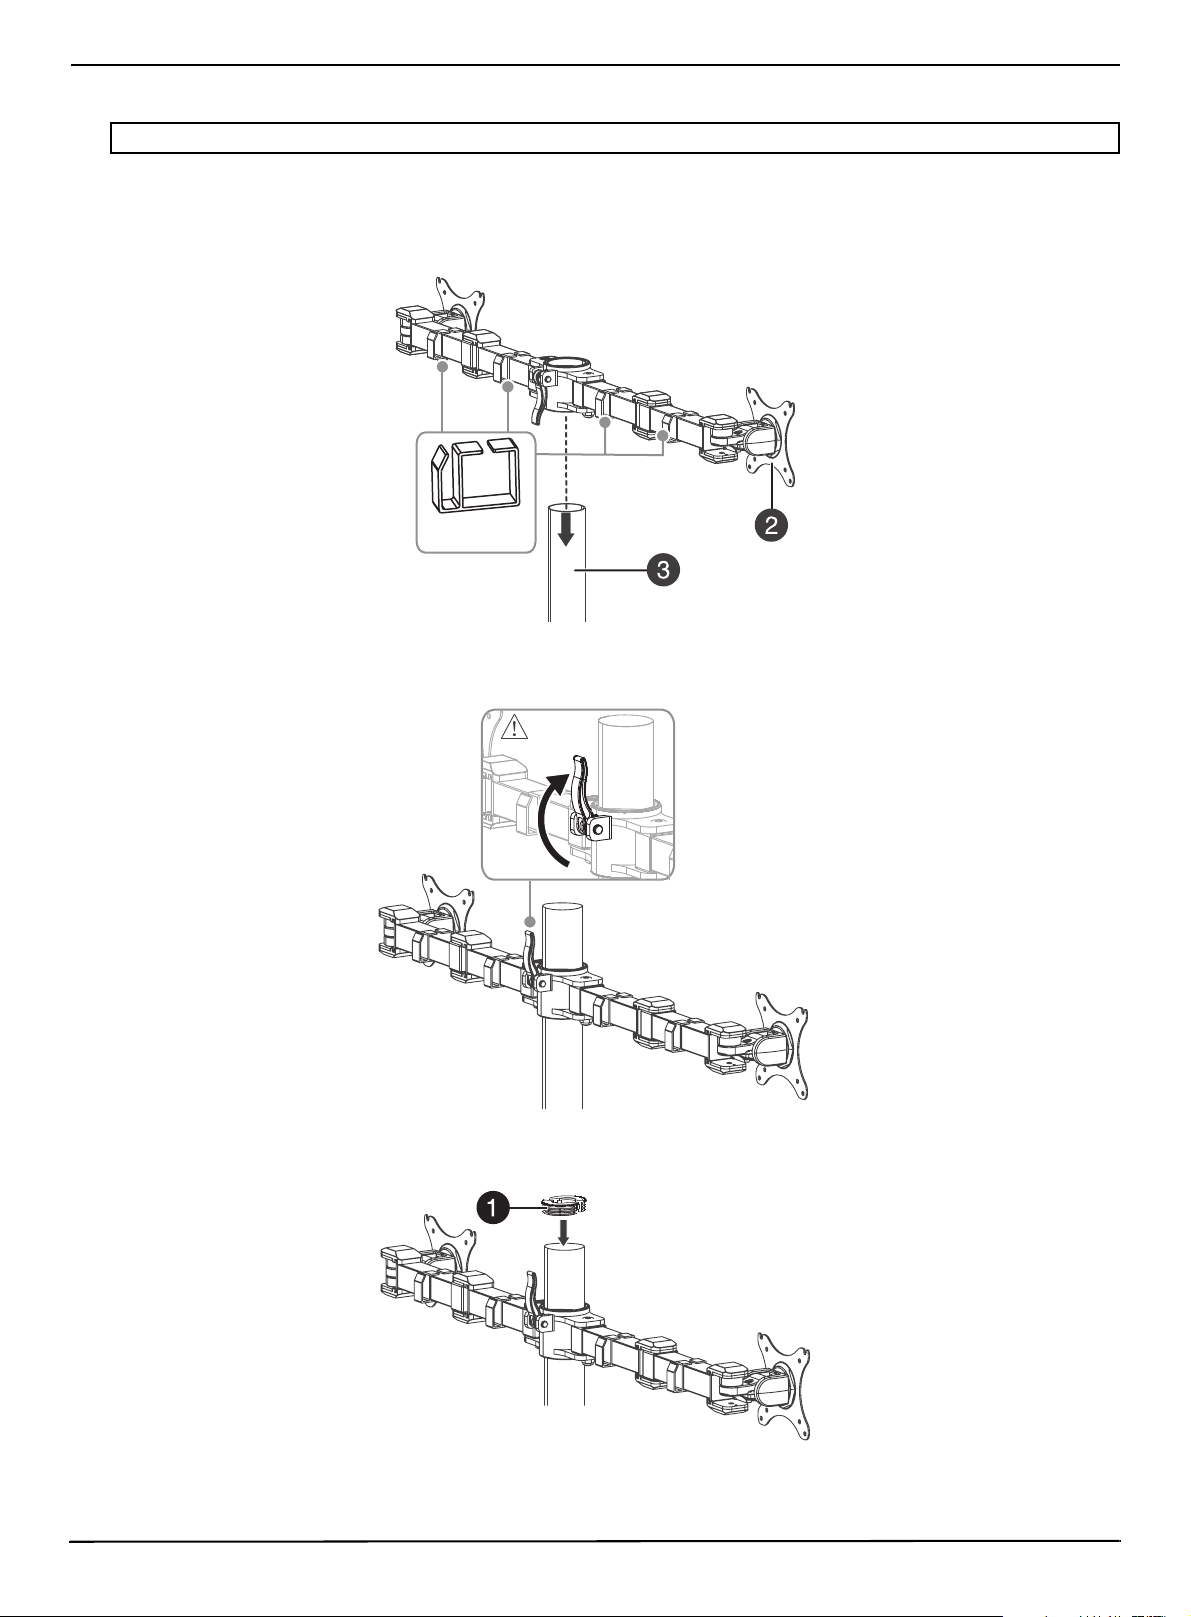
STEP 3: Attaching the monitor support arm
As you decide where to position the monitor support arm, remember the tops of the monitors should be level with your
eyes.
1 Slide the monitor support arm (2) over the top of the support tube (3). Make sure that the cable support brackets are
installed and evenly spaced along the monitor support arm.
2 Tighten the monitor support lock when the monitor support arm is at the desired height.
3 Slide the tube covers (1) into the top of the support tube.
Note: The monitor support arm is one piece, so both monitors will be at the same height.
Cable support
bracket
www.insigniaproducts.com
8
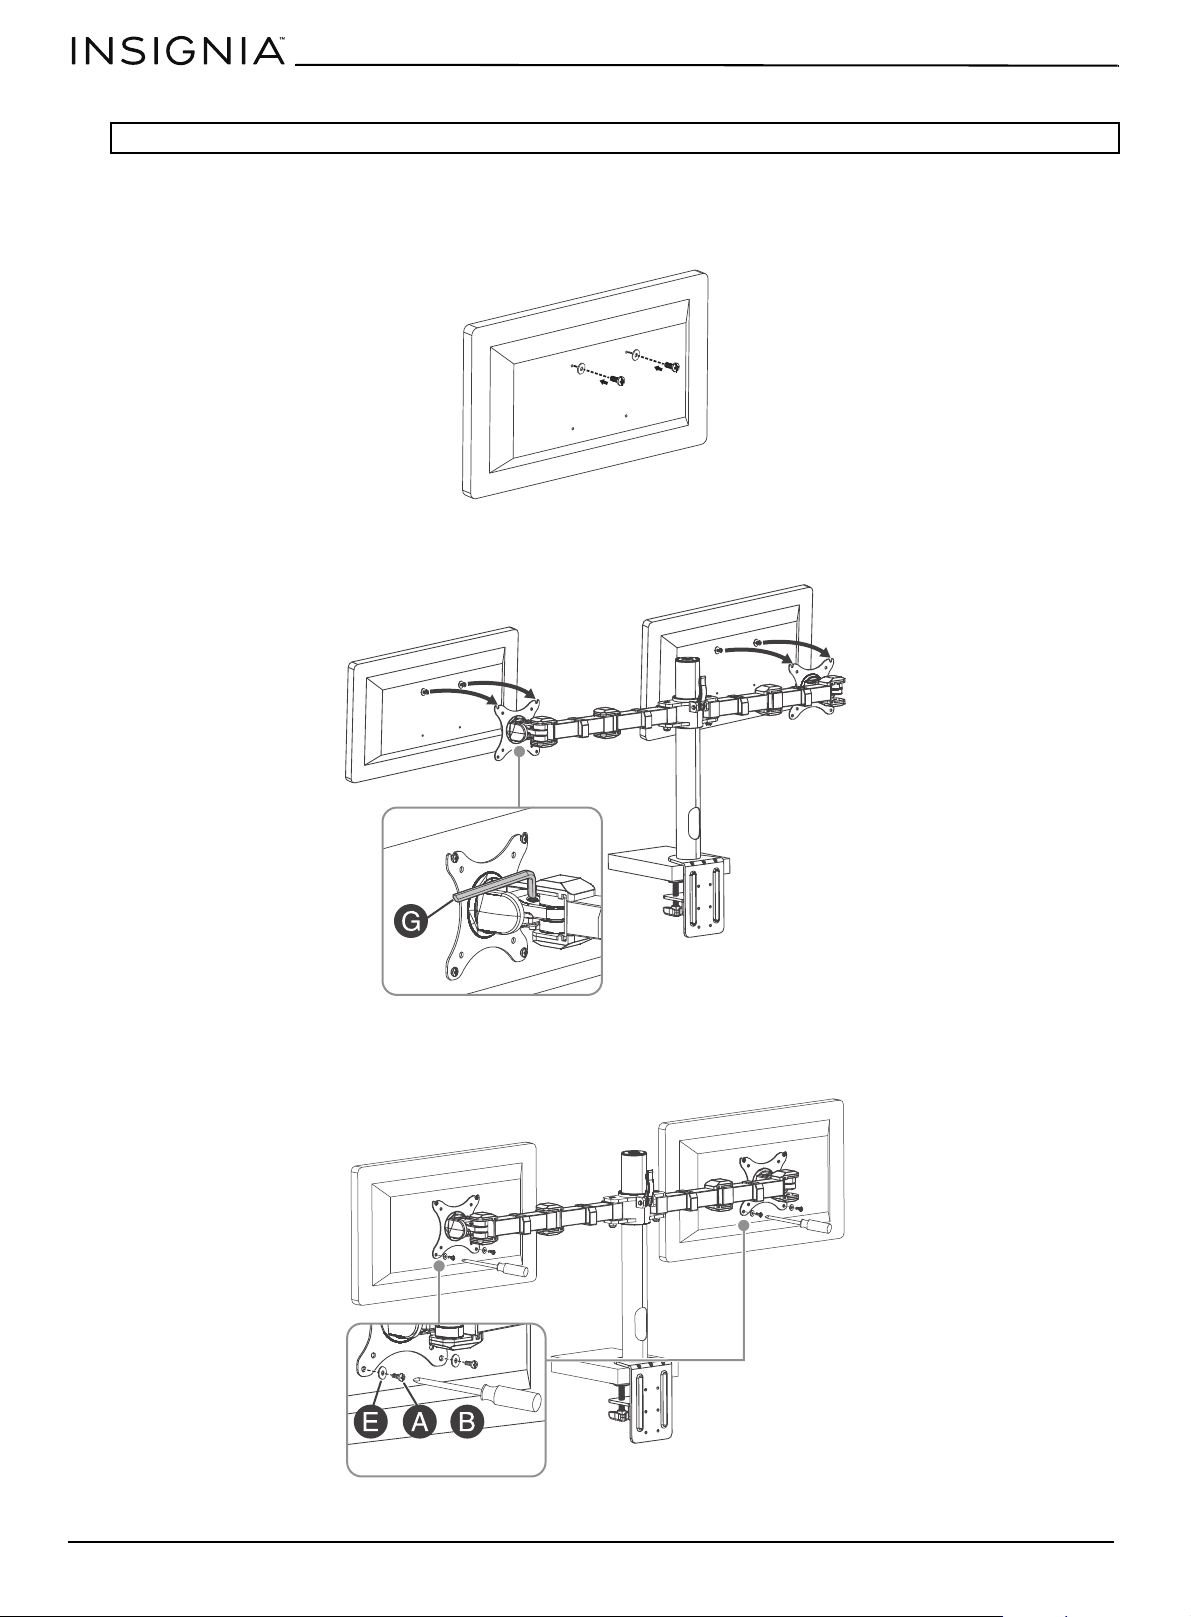
STEP 4: Attaching the monitors
Depending on the VESA screw holes on the back of your monitors, you need to use the M4 × 12 mm mounting screws (A)
or the M5 × 12 mm mounting screws (B).
1 Determine which mounting screws you need (A or B) by hand-threading a screw into a VESA screw hole. Do not force
the screw to fit.
2 Lock the monitor plates into position with the 5 x 5 Allen wrench (G), then center the back of the first monitor on the
monitor plate at the end of the monitor support bar.
3 Align the mounting holes on the monitor with the holes on the monitor plate, then attach the monitor to the monitor
plate using four screws (A or B) with washers (E). Tighten the screws firmly with a Phillips screwdriver, but do not
overtighten. Repeat for the second monitor.
Note: Monitors can be oriented either horizontally or vertically.
/
www.insigniaproducts.com
9
NS-PMMD22
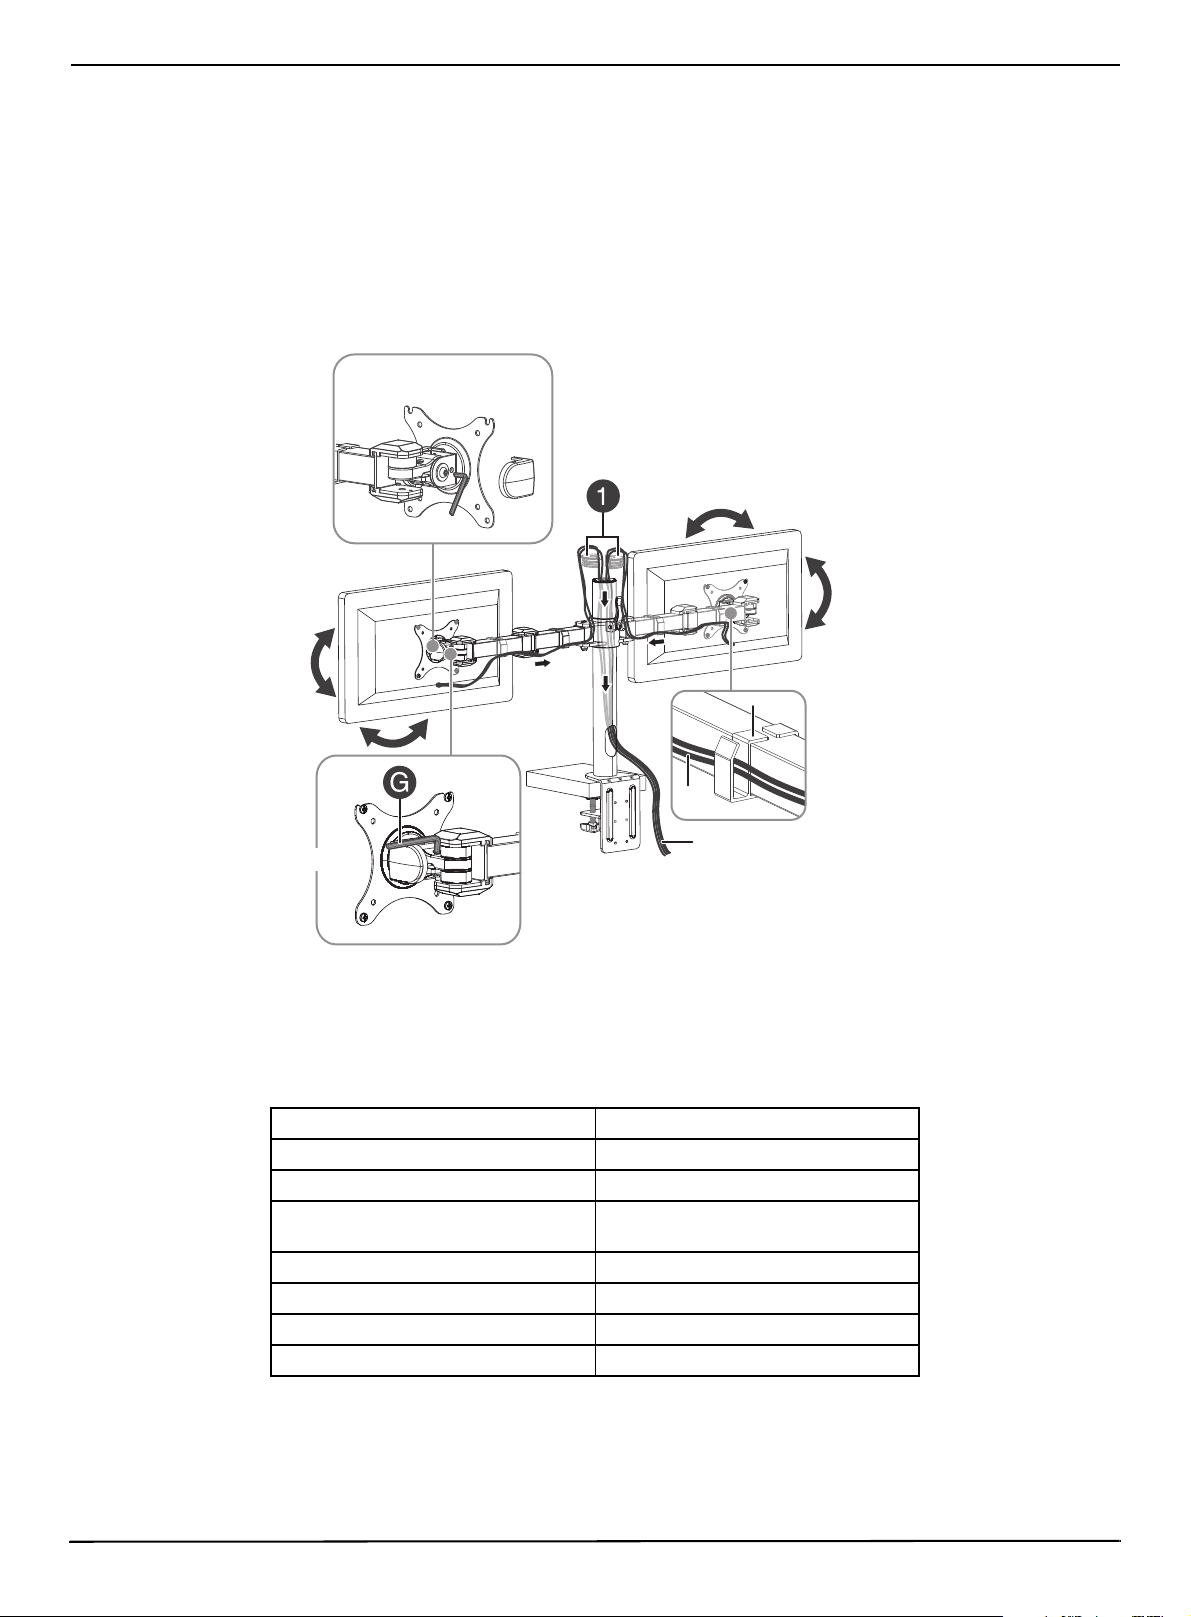
STEP 5: Adjusting the monitors and managing the cables
To avoid eye strain:
• Position your monitors about an arm’s length from your eyes.
• Position your monitors so there is no glare on the screens from windows or light sources.
• Tilt the screens up slightly.
• If you cannot read the on-screen text when your monitor is positioned correctly, you should increase the text size
instead of moving your monitors closer or moving closer to your monitors.
1 Remove the plastic monitor support bar end cover and tighten the side bolt with the 4 x 4 Allen wrench (F) to prevent
the monitors from sagging.
2 Use the 5 × 5 Allen wrench (G) to adjust the viewing angle of the monitors.
3 Run monitor video and power cables up through the support tube and out the top through the tube cover (1).
4 Align the cables on the back side of the monitor arm, then secure them in place with the cable support brackets.
Specifications
Dimensions HxWxD 17.7 x 28.3 x 3.5 in. (45 x 72 x 9 cm)
Weight 9.5 lbs. (4.3 kg)
Monitor size 10 to 30 inch monitors
Max load capacity 22 lbs. (10 kg) for each monitor plate,
44 lbs. (20 kg) total
Monitor support arm height range 7.9~15.7 in. (20~40 cm)
Monitor orientation Horizontal or vertical
Tilt angle -85° ~ 15°
Integrated cable management Yes
±180°
±180°
-85°~15°
-85°~15°
Monitor cables
Use 4 x 4 Allen wrench (F)
Use 5 x 5 Allen wrench (G)

www.insigniaproducts.com
10
ONE-YEAR LIMITED WARRANTY
Definitions:
The Distributor* of Insignia branded products warrants to you, the original purchaser of this new Insignia-branded product (“Product”), that the
Product shall be free of defects in the original manufacturer of the material or workmanship for a period of one (1) year from the date of your purchase
of the Product (“Warranty Period”).
For this warranty to apply, your Product must be purchased in the United States or Canada from a Best Buy branded retail store or online at
www.bestbuy.com
or www.bestbuy.ca and is packaged with this warranty statement.
How long does the coverage last?
The Warranty Period lasts for 1 year (365 days) from the date you purchased the Product. Your purchase date is printed on the receipt you received
with the Product.
What does this warranty cover?
During the Warranty Period, if the original manufacture of the material or workmanship of the Product is determined to be defective by an authorized
Insignia repair center or store personnel, Insignia will (at its sole option): (1) repair the Product with new or rebuilt parts; or (2) replace the Product at
no charge with new or rebuilt comparable products or parts. Products and parts replaced under this warranty become the property of Insignia and are
not returned to you. If service of Products or parts are required after the Warranty Period expires, you must pay all labor and parts charges. This
warranty lasts as long as you own your Insignia Product during the Warranty Period. Warranty coverage terminates if you sell or otherwise transfer the
Product.
How to obtain warranty service?
If you purchased the Product at a Best Buy retail store location or from a Best Buy online website (www.bestbuy.com or www.bestbuy.ca), please take
your original receipt and the Product to any Best Buy store. Make sure that you place the Product in its original packaging or packaging that provides
the same amount of protection as the original packaging.
To obtain warranty service, in the United States and Canada call 1-877-467-4289. Call agents may diagnose and correct the issue over the phone.
Where is the warranty valid?
This warranty is valid only in the United States and Canada at Best Buy branded retail stores or websites to the original purchaser of the product in the
country where the original purchase was made.
What does the warranty not cover?
This warranty does not cover:
• Food, beverage, and or medicine loss/spoilage.
• Customer instruction/education
•Installation
•Set up adjustments
• Cosmetic damage
• Damage due to weather, lightning, and other acts of God, such as power surges
• Accidental damage
•Misuse
•Abuse
•Negligence
• Commercial purposes/use, including but not limited to use in a place of business or in communal areas of a multiple dwelling condominium or
apartment complex, or otherwise used in a place of other than a private home.
• Modification of any part of the Product, including the antenna
• Display panel damaged by static (non-moving) images applied for lengthy periods (burn-in).
• Damage due to incorrect operation or maintenance
• Connection to an incorrect voltage or power supply
• Attempted repair by any person not authorized by Insignia to service the Product
• Products sold “as is” or “with all faults”
• Consumables, including but not limited to batteries (i.e. AA, AAA, C etc.)
• Products where the factory applied serial number has been altered or removed
• Loss or Theft of this product or any part of the product
• Display panels containing up to three (3) pixel failures (dots that are dark or incorrectly illuminated) grouped in an area smaller than one tenth
(1/10) of the display size or up to five (5) pixel failures throughout the display. (Pixel based displays may contain a limited number of pixels that
may not function normally.)
• Failures or Damage caused by any contact including but not limited to liquids, gels or pastes.
REPAIR REPLACEMENT AS PROVIDED UNDER THIS WARRANTY IS YOUR EXCLUSIVE REMEDY FOR BREACH OF WARRANTY. INSIGNIA SHALL NOT BE
LIABLE FOR ANY INCIDENTAL OR CONSEQUENTIAL DAMAGES FOR THE BREACH OF ANY EXPRESS OR IMPLIED WARRANTY ON THIS PRODUCT,
INCLUDING, BUT NOT LIMITED TO, LOST DATA, LOSS OF USE OF YOUR PRODUCT, LOST BUSINESS OR LOST PROFITS. INSIGNIA PRODUCTS MAKES NO
OTHER EXPRESS WARRANTIES WITH RESPECT TO THE PRODUCT, ALL EXPRESS AND IMPLIED WARRANTIES FOR THE PRODUCT, INCLUDING BUT NOT
LIMITED TO ANY IMPLIED WARRANTIES OF AND CONDITIONS OF MERCHANTABILITY AND FITNESS FOR A PARTICULAR PURPOSE, ARE LIMITED IN
DURATION TO THE WARRANTY PERIOD SET FORTH ABOVE AND NO WARRANTIES, WHETHER EXPRESS OR IMPLIED, WILL APPLY AFTER THE WARRANTY
PERIOD. SOME STATES, PROVINCES AND JURISDICTIONS DO NOT ALLOW LIMITATIONS ON HOW LONG AN IMPLIED WARRANTY LASTS, SO THE ABOVE
LIMITATION MAY NOT APPLY TO YOU. THIS WARRANTY GIVES YOU SPECIFIC LEGAL RIGHTS, AND YOU MAY ALSO HAVE OTHER RIGHTS, WHICH VARY
FROM STATE TO STATE OR PROVINCE TO PROVINCE.
Contact Insignia:
1-877-467-4289
www.insigniaproducts.com
INSIGNIA is a trademark of Best Buy and its affiliated companies.
*Distributed by Best Buy Purchasing, LLC
7601 Penn Ave South, Richfield, MN 55423 U.S.A
©2022 Best Buy. All rights reserved.

For product inquiries, please contact us with the information below:
1-877-467-4289
www.insigniaproducts.com
INSIGNIA is a trademark of Best Buy and its affiliated companies.
Distributed by Best Buy Purchasing, LLC
7601 Penn Ave South, Richfield, MN 55423 U.S.A.
©2022 Best Buy. All rights reserved.
V1 ENGLISH
22-0240