User Manual
5” Flush Mount Dual Input Monitor
PMON-50-FM

3
email - [email protected] (US)
tel - 1-800-477-2267 (East Coast) - 1-888-883-2790 (West Coast)
email - [email protected] (Europe)
Installation Guide
2
Installation Guide
email - [email protected] (US)
tel - 1-800-477-2267 (East Coast) - 1-888-883-2790 (West Coast)
email - [email protected] (Europe)
Fitting Instructions
PMON-50-FM
5” Flush Mount Dual Input Monitor
Choose a mounting location that will not obscure the driver’s view.
Also please ensure that the unit is not mounted in a location that will obstruct
the operation of any airbags.
Ensure that the mounting area is clean and free from silicone based cleaners.
Mount the bracket using the self-adhesive pad and leave to cure for 1 minute
before mounting the screen. You can also secure the bracket further with the
supplied screws.
Alternatively, you can mount the screen using the supplied mounting box and
secure using the supplied screws or nuts and bolts.
Once the unit is in place, run the connections cable to behind the dash where
the connections are to be made as shown in the wiring diagram.
Introduction
Box Contents
Key Features
u 5” high resolution display
u Dual Video input
u Dual triggers for channel switching
u Auto shut off if no signal
u Sunshade included
u User Guide
u Monitor
u Mounting Bracket
u Bracket Mounting screws
u Sunshade
u Main Harness
u GX16 - RCA Adapters x 2
u Harness Tape
u Mounting Plate
u Mounting Plate Screws
u Nuts and Bolts
u Harness Extension
Thank you for purchasing your EchoMaster Pro automotive monitor.
Your monitor displays a clear, high resolution image of the area
surrounding your vehicle, meaning your maneuvering and vehicle
awareness will be greatly improved.
Please ensure you read and understand all aspects of this manual before
tting or using your EchoMaster monitor.
PMON-50-FM
5” Flush Mount Dual Input Monitor
Operating Instructions
To turn on the unit the vehicle ignition should be active.
The monitor will only turn on when there is a video signal present.
Press the POWER button to turn the screen on.
To switch between the 2 video inputs use the CAM Select button.
Pressing the MENU button will allow you to adjust the various menu settings
available.
When a 12V input is detected on the green wire, the unit will automatically
switch to Video1. If the unit is currently turned off when this trigger is
detected it will automatically turn on and switch to Video 1.
5
email - [email protected] (US)
tel - 1-800-477-2267 (East Coast) - 1-888-883-2790 (West Coast)
email - [email protected] (Europe)
Installation Guide
4
Installation Guide
email - [email protected] (US)
tel - 1-800-477-2267 (East Coast) - 1-888-883-2790 (West Coast)
email - [email protected] (Europe)
The white wire will perform the same function, but for Video 2.
Menu
The Menu functions can be adjusted using the + and – buttons on the
monitor.
Brightness: Adjust the brightness level of the screen between 0 and 60.
Contrast: Adjust the contrast of the screen between 0 and 60.
Color: Adjust the color of the screen between 0 and 60.
Volume: Adjust the volume level of the built-in speaker between
0 and 10.
Hue: Adjust the hue of the screen between 0 and 128.
Sharp: Adjust the sharpness level of the image between 0 and 128.
Camera 1: This allows you to reverse the image on Video 1.
Camera 2: This allows you to reverse the image on Video 2.
Version: This will show you the version of software that is currently
installed in the PMON-50-FM.
EXIT: This will exit the menu.
Operating Instructions (continued)
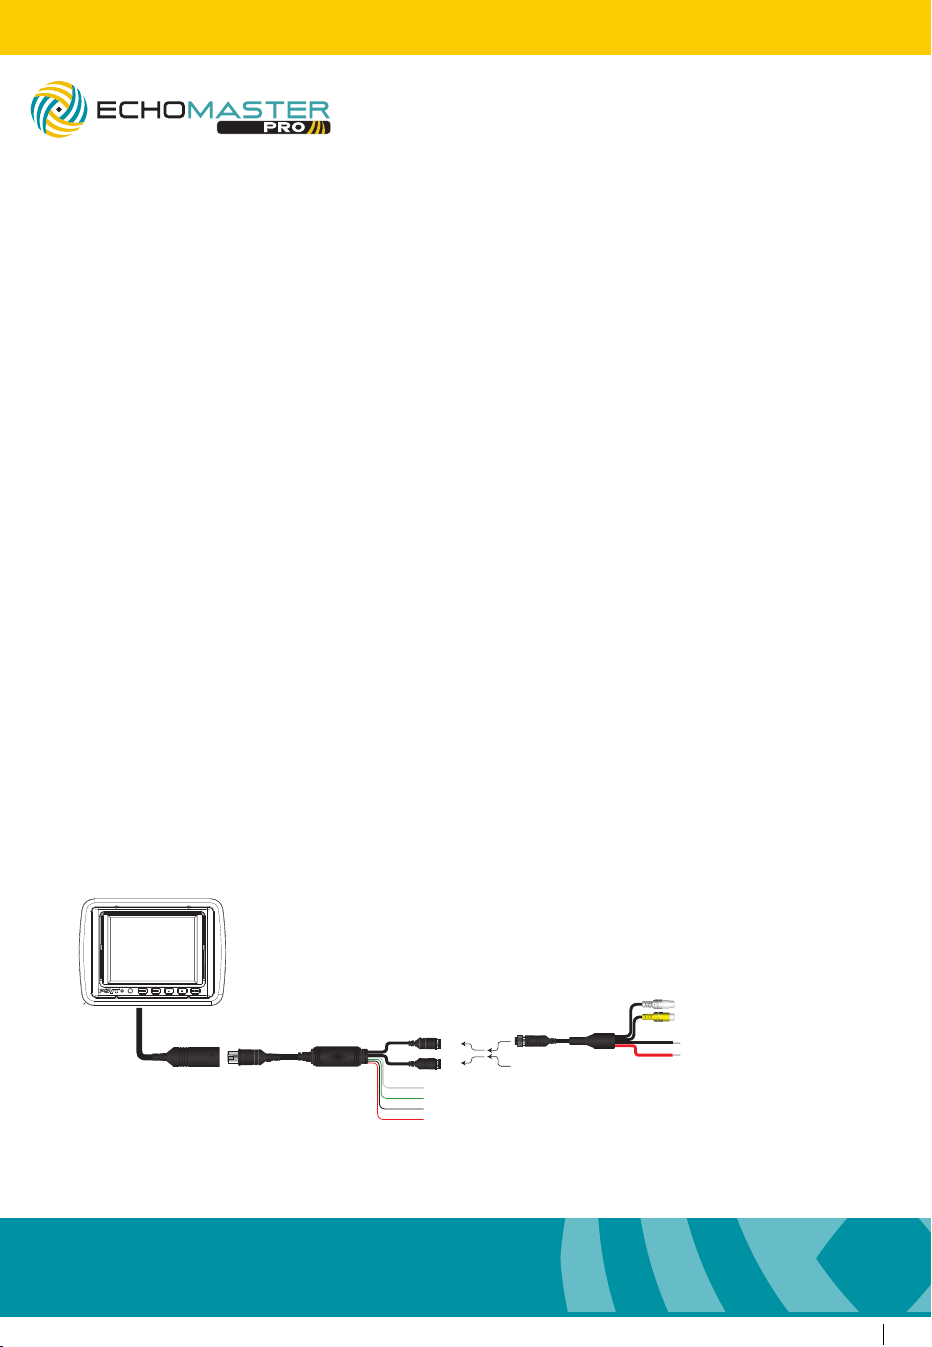
Wiring Diagram
Dimensions (mm)
PMON-50-FM
5” Flush Mount Dual Input Monitor
Reverse (AV1) Trigger +12V (Green)
AV2 Trigger +12V (White)
(Black)GND
(Red)
Ignition +12V
AV1
AV2
VIDEO
AUDIO
Adapter Harness
Main Harness
GND Out
+12V Out
(Black)
(Red)
PMON-50-FM
5” Flush Mount Dual Input Monitor
1
23
4
5
VIDEON/C
GND
N/C POWER +12V
Pin Out

5
email - [email protected] (US)
tel - 1-800-477-2267 (East Coast) - 1-888-883-2790 (West Coast)
email - [email protected] (Europe)
Installation Guide
4
Installation Guide
email - [email protected] (US)
tel - 1-800-477-2267 (East Coast) - 1-888-883-2790 (West Coast)
email - [email protected] (Europe)
The white wire will perform the same function, but for Video 2.
Menu
The Menu functions can be adjusted using the + and – buttons on the
monitor.
Brightness: Adjust the brightness level of the screen between 0 and 60.
Contrast: Adjust the contrast of the screen between 0 and 60.
Color: Adjust the color of the screen between 0 and 60.
Volume: Adjust the volume level of the built-in speaker between
0 and 10.
Hue: Adjust the hue of the screen between 0 and 128.
Sharp: Adjust the sharpness level of the image between 0 and 128.
Camera 1: This allows you to reverse the image on Video 1.
Camera 2: This allows you to reverse the image on Video 2.
Version: This will show you the version of software that is currently
installed in the PMON-50-FM.
EXIT: This will exit the menu.
Operating Instructions (continued)
Wiring Diagram
Dimensions (mm)
PMON-50-FM
5” Flush Mount Dual Input Monitor
Reverse (AV1) Trigger +12V (Green)
AV2 Trigger +12V (White)
(Black)GND
(Red)
Ignition +12V
AV1
AV2
VIDEO
AUDIO
Adapter Harness
Main Harness
GND Out
+12V Out
(Black)
(Red)
PMON-50-FM
5” Flush Mount Dual Input Monitor
1
23
4
5
VIDEON/C
GND
N/C POWER +12V
Pin Out
7
email - [email protected] (US)
tel - 1-800-477-2267 (East Coast) - 1-888-883-2790 (West Coast)
email - [email protected] (Europe)
Installation Guide
6
Installation Guide
email - [email protected] (US)
tel - 1-800-477-2267 (East Coast) - 1-888-883-2790 (West Coast)
email - [email protected] (Europe)
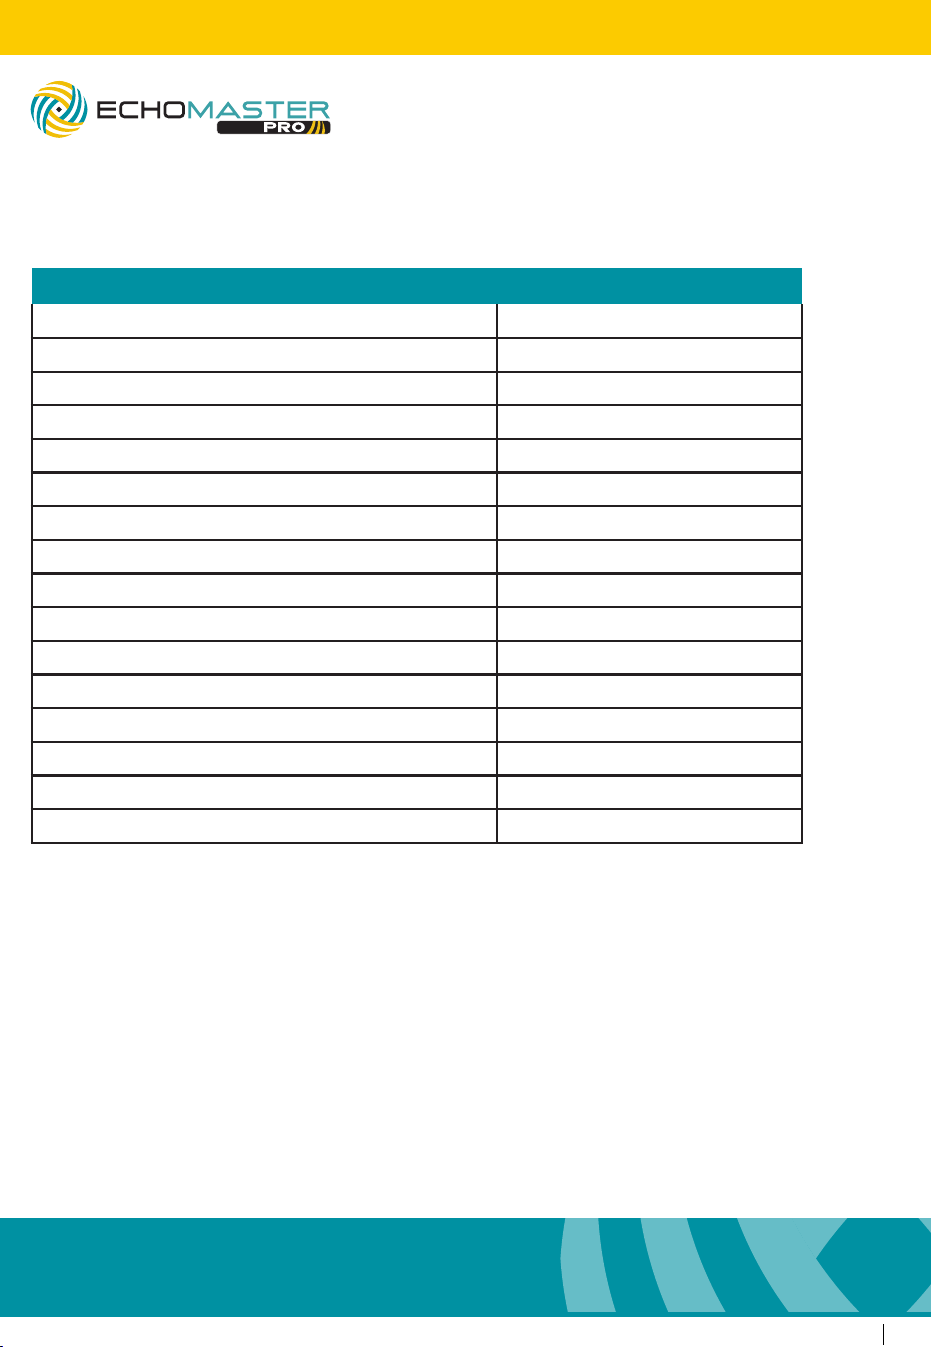
Specications
PMON-50-FM
Screen Size 5.0”
Aspect Ratio 4:3
Power Supply 12-24V DC
Resolution 640x480
Luminance 350
Contrast 500:1
TV Format AUTO
OSD Languages Multi
Video Inputs 2
Audio Inputs 2
Triggers 2
Current Draw 520mA
Operating Temperature -20C - +70C
IP Rating 30
Parking Guidelines NO
Dimensions (mm) 178.5 x 130 x 30.5
PMON-50-FM
5” Flush Mount Dual Input Monitor
PMON-50-FM
5” Flush Mount Dual Input Monitor

7
email - [email protected] (US)
tel - 1-800-477-2267 (East Coast) - 1-888-883-2790 (West Coast)
email - [email protected] (Europe)
Installation Guide
6
Installation Guide
email - [email protected] (US)
tel - 1-800-477-2267 (East Coast) - 1-888-883-2790 (West Coast)
email - [email protected] (Europe)
Specications
PMON-50-FM
Screen Size 5.0”
Aspect Ratio 4:3
Power Supply 12-24V DC
Resolution 640x480
Luminance 350
Contrast 500:1
TV Format AUTO
OSD Languages Multi
Video Inputs 2
Audio Inputs 2
Triggers 2
Current Draw 520mA
Operating Temperature -20C - +70C
IP Rating 30
Parking Guidelines NO
Dimensions (mm) 178.5 x 130 x 30.5
PMON-50-FM
5” Flush Mount Dual Input Monitor
PMON-50-FM
5” Flush Mount Dual Input Monitor

email - [email protected] (US)
tel - 1-800-477-2267 (East Coast) - 1-888-883-2760 (West Coast)
email - [email protected] (Europe)
tel - +44(0)1420 487110 (Sales) - +44(0)1420 470618 (Technical)
15500 Lightwave Drive, Suite 202, Clearwater, Florida 33760
Woolmer Way, Bordon, Hampshire, United Kingdom
EchoMaster is a Power Brand of AAMP Global.
EchoMaster.com