
20
This product is under warranty to the original retail consumer against
defects in material and workmanship for a period of 1 (one) year and is a
complete “bumper to bumper” warranty including the spray gun, the high
pressure hose and all accessories from the date of purchase. The warranty
is not transferable or assignable. This warranty covers replacement parts.
This limited one year warranty applies only to products used in consumer
applications and is void in rental or any commercial application. Reason-
able care must be used in conformity with operation and maintenance
instructions in the owner’s manual. Failure to follow these instructions will
void this warranty. This warranty gives you speci c legal rights and you
may also have other rights which vary from state to state.
Keep your original receipt of purchase in case of warranty claim. Any pow-
er washer or parts returned for a warranty claim must have a “RETURNED
MERCHANDISE AUTHORIZATION (RMA) NUMBER.” You must obtain an RMA
NUMBER by calling A.R. North America, Inc. at 1-866-235-5112 Monday
through Friday, 8 a.m. to 5 p.m. (CST) or e-mail info@arblueclean.com. Any
return without an RMA NUMBER will be considered unauthorized and will
be shipped back at the expense of the sender. Freight costs to the compa-
ny for warranty work must be paid by the purchaser.
A.R. North America, Inc.
Attn: Power Washer Warranty Department
140 – 81st Avenue NE, Fridley, MN 55432
Phone: 1-866-235-5112
Fax: 1-866-331-2762
Email: info@arblueclean.com
Website: www.arblueclean.com
P
RESSURE
W
ASHER
L
IMITED
W
ARRANTY
W
ARRANTY
R
ETURNS
1
Questions, problems, missing parts?
Before returning to your retailer, call our
customer service department at 1-866-235-5112,
8 a.m. - 5:00 p.m., CST, Monday - Friday.
www.arblueclean.com
AR620 & AR630
Electric Pressure Washer
ASSEMBLY, CARE AND USE
INSTRUCTIONS
READ CAREFULLY
IMPORTANT:
RETAIN THESE
INSTRUCTIONS AND ATTACH RECEIPT
TO MANUAL FOR FUTURE REFERENCE.
Important Notice
Winter storage or long time storage. Drain all water out of
the pump. Flush the pressure washer with a 50% antifreeze
solution, and relieve the pressure. Flush the pressure washer
before you use it again to remove the antifreeze.
AR620/630_FN

2
Read and understand these instructions as they pertain with
safety. Pay special attention to the safety symbol throughout this
manual. Failure to comply with these instructions may result in
personal injury or property damage. DO NOT allow children to
operate or play on or around this equipment.
1. Plug the unit into a 3-prong outlet that is properly grounded.
Improper grounding can result in electrical shock.
2. Do not operate the machine in or around an explosive envi-
ronment.
3. Never spray ammable liquids.
4. Always wear safety glasses or goggles and appropriate cloth-
ing when operating the unit.
5. Understand all safety precautions and rst aid for chemicals
being used.
6. Follow the chemical manufacturer’s recommendations when
using chemicals in the soap injector.
7. Do not alter the machine from the manufacturer’s design.
8. Keep all safety devices active on the machine.
9. Locate the machine so it is protected from eternal damage.
10. Always place the machine on a level surface.
11. Never spray any part of this pressure washer or any other
electrical machine.
12. Never use an undersized discharge nozzle.
13. Do not adjust the unloader relief valve.
14. Never operate the unit with broken or missing parts.
15. Always check and maintain proper oil levels described in the
Maintenance section of this manual.
S
AFETY
I
NSTRUCTIONS
B
EFORE
O
PERATING
19
NOTES

18
NOTES
3
W
HILE
O
PERATING
16. Always use water that is clear and free from particles
17. Always point the wand nozzle away from people and animals,
the high pressure the unit generates is very dangerous.
18. Keep the pressure hose connected to the machine and wand
while unit is pressurized.
19. Never leave the wand unattended while the machine is running.
20. Always seek emergency medical immediately if any uid pene-
trates the skin. The cut may be deeper and more serious than it
appears.
21. Never run preheated water into the machine.
22. Do not secure the wand in the squeezed, “ON” position.
23. No smoking when operating the machine.
24. Never use the unit when under the in uence of drugs, alcohol, or
medication.
25. Do not adjust the unloader.
26. Do not move the unit by pulling on the hose or electrical cord.
27. Only operate the machine with su cient water supply to the
pump.
28. Do not let the machine run with the wand in the not-squeezed,
“OFF” position for more than 2 minutes (30 seconds with the wa-
ter temperature above 80° F). This causes bypass water tempera-
ture to increase which damages the pump.
29. Protect your machine from freezing during storage. Follow the
instructions to protect your pressure washer from freezing stor-
age temperatures.
30. Always follow all other guidelines and safety instructions de-
scribed in this manual.

4
1. The pressure washer should be as close as possible to the water
supply.
2. Locate the pressure washer on a solid, level surface with a gentle
slope to prevent water from building up in the work area. Excess
water can make surfaces slippery.
3. Position the unit so the operator has easy access to the pressure
washer and its controls.
4. To prevent damage and excessive hose wear, locate the pressure
washer so the hose does NOT extend across tra c areas. Make sure
there are no kinks or twists in the hose.
5. Use extension cords of at least 12-3 gauge for lengths up to 50 feet
or 10-3 gauge for lengths up to 100 feet. Check the extension cord
to make sure it is not damaged or frayed. The outlet should have an
amperage rating of 20 amps or greater and should have a Ground
Fault Circuit Interrupter (GFCI).
6. Do not use the pressure washer outdoors if it is raining, and do not
spray the motor or any of its connections.
7. Do not use chemicals or agents which are not compatible with the
Buna-N and PVC (polyvinyl) or neoprene covering of the hose.
8. Do not run acids or hard caustics through the pump.
9. Check to determine if the water supply can exceed the output of the
pump. The output of this unit is 2.1 gpm (gallons per minute), so the
water supply must deliver at least 2.5 gpm.
Calculate gpm ow rate by running the water supply into a
pail for one minute. Measure the gallons in the pail. If it is at
least 2.5 gallons in the minute, your supply is adequate. Your
water supply must be clean and free of debris. Use water
with a temperature of less than 140° F.
A
SSEMBLY
I
NSTRUCTION
P
RE
-A
SSEMBLY
C
HECKLIST
17
1 42654 TSS kit 1
2 392840 Screw 1
3 1980300 Nut 1
4 2500540 Insert 1
5 1980220 Wobble plate 2
6 1271070 Spring 1
7 1080041 Piston 1
8 1080070 Pin 1
9 1080401 Ring 1
10 1080250 O-ring 1
11 2500550 Split pin 1
12 1980210 Piston guide 1
13 740290 O-ring 1
14 800560 O-ring 1
15 880830 O-ring 1
16 1271170 Ring 1
17 1080192 O-ring 3
18 1271160 Piston 1
19 2460420 Seat 1
20 1080250 O-ring 1
21 1540272 Screw 1
22 390080 O-ring 2
23 1540660 Valve body 1
24 1140450 O-ring 1
25 1460430 O-ring 1
26 1540170 Shutter 1
27 1080091 Spring 1
28 394280 O-ring 1
29 1560660 Ring 1
30 1560680 Knob 1
31 480560 O-ring 1
32 800560 O-ring 1
33 1120681 O-ring 1
34 1560650 Hose tail 1
35 480480 O-ring 1
36 1250280 Ball 1
37 1560520 Spring 1
38 1540570 Fitting 1
39 1540300 Nut 1
40 1569206 IDR assembly 1
41 1540280 Suction tting 1
42 1540630 O-ring 1
43 1122260 Fitting 1
44 880270 O-ring 1
45 2260420 Screw 1
46 480440 O-ring 1
47 1560900 Fitting 1
48 1461470 Fitting 1
49 25263 Complete valve 1
50 1340260 Filter 1
51 1540870 Plug 1
52 1981190 Screw 1
53 1260820 O-ring 1
54 1540881 Piston 1
55 1981320 Spring 1
56 2022201 Fork 1
57 2029787 TSS box assembly 1
58 660190 O-ring 1
59 880840 O-ring 1
60 40126 Fitting
1
Legend
Pos Code Description Qty Pos Code Description Qty
Kits
F 42451 Gasket kit 1
Pos Code Description Qty
For
For
AR630TSS AR630TSS-Hot

16
49
1
2
3
4
5
6
5
8
11
7
9
10
12
24
41
46
47
34
35
36
37
23
22
52
13
14
15
16
17
18
19
20
21
25
26
27
28
39
38
22
45
50
44
43
32
29
31
30
40
57
53
51
59
17
54
58
55
17
56
33
48
60
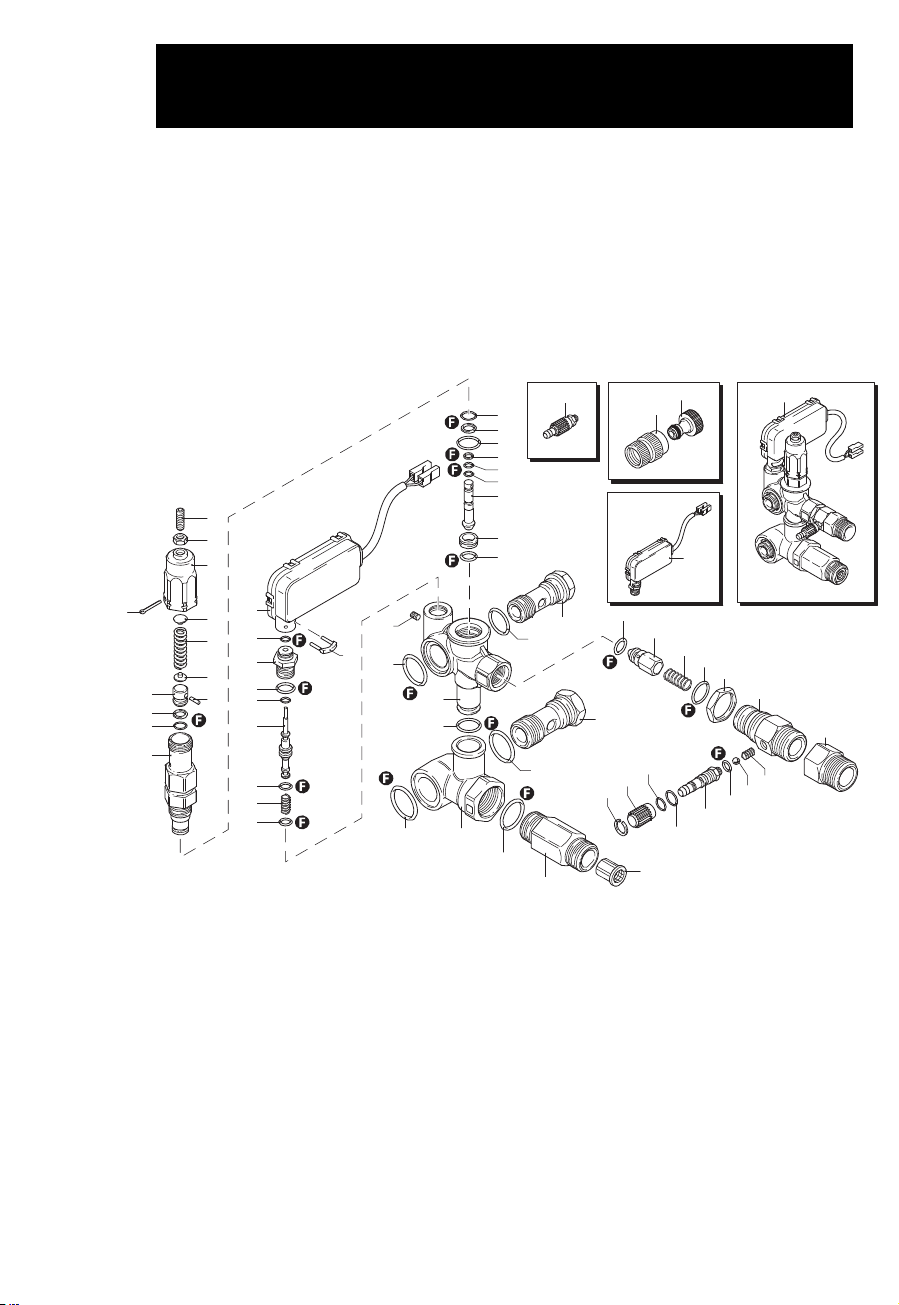
AR630TSS / AR630TSS-H
OT
U
NLOADER
5
1. Connect the high pressure hose to the pressure washer with the twist
fast coupler and tighten securely. Fasten wand and gun together and
connect gun/wand to high pressure hose.
Tighten all connections and replace worn parts before
starting the machine. Sudden release of high pressure
streams may result if connections detach during use. This
can cause serious injury. Never disconnect any part of
the unit while the machine is running or before relieving
system pressure, it is dangerous. Seek medical attention
if an injury ever occurs.
2. Remove the red plug from the pump crankcase and install the black
dipstick. Always check that the oil level is full before operating.
3. Oil level can be checked in two places.
4. First, on back side of pump sight glass, level should be half way.
5. Second, on dip stick, oil should read between the indentation on the
dip stick.
A
SSEMBLY
I
NSTRUCTION
(
CONT
)
A
SSEMBLING
O
PERATING
I
NSTRUCTIONS
B
EFORE
S
TARTING
THE
P
RESSURE
W
ASHER
1. Read all safety instructions throughout the manual.
2. Place unit on dry, rm, level ground for optimum lubrication of pump.
3. Check oil levels prior to each use.
4. Tighten all hoses and connections. Check parts and replace if need-
ed.
5. When the unit is attached to a pressure main and the nozzle is in the
low pressure setting, purge air from system by squeezing gun trigger
before starting machine. Let water run until there is a steady stream
of water coming out of the nozzle.

6
O
PERATING
I
NSTRUCTIONS
(
CONT
)
S
TARTING
THE
P
RESSURE
W
ASHER
1. Turn on the water supply to the proper gpm ow rate.
2. Plug power cord into properly grounded outlet.
3. Turn nozzle to low pressure and squeeze trigger.
4. Turn “ON/OFF” switch to the “ON” position and wait until a constant
stream of water comes out. Adjust nozzle sleeves to achieve proper
pressure and coverage area.
1. Observe all safety instructions through this manual.
2. Do Not allow the machine to run with the wand not squeezed, “OFF”,
for more than 2 minutes (30 seconds with the water temperature
above 80° F).
When the wand trigger is released the pump does not
stop pumping. Water is routed through a bypass circuit
which builds up heat. If the water temperature becomes
too high, damage to the seals, packings and other parts
may result.
3. Check pump, connections and hose for water and oil leaks. Replace
worn parts.
1. Rinse and close the downstream chemical injector.
2. Turn the motor power switch to the “OFF” position.
3. Turn o water supply.
4. Squeeze the trigger on the wand to relieve the system water pressure
and drain as much water as possible.
D
URING
O
PERATION
S
TOPPING
THE
P
RESSURE
W
ASHER
15
1 1981780 Knob 1
2 1980470 Screw 1
3 1980300 Nut 1
4 1980390 Insert 2
5 1980220 Wobble plate 1
6 1271070 Spring 1
7 1080041 Piston 1
8 1080401 Ring 1
9 1080250 O-ring 1
10 1080070 Pin 2
11 1980210 Piston guide 1
12 880830 O-ring 1
13 740290 O-ring 1
14 800560 O-ring 1
15 1080190 O-ring 3
16 1271160 Piston 1
17 1080121 Seat 1
18 1260570 Washer 1
19 3990080 O-ring 1
20 1540272 Screw 1
21 1270790 Plate 1
22 395370 Washer 2
23 395270 Screw 2
24 1260530 Cover 1
25 1260520 Indicator arm 1
26 1270080 Valve body 1
27 770140 O-ring 2
28 1180140 O-ring 1
29 1260540 Suction tting
1
30 1260560 Washer 1
31 880270 O-ring 1
2260420 Screw
1
32
1540360 Screw
1
33 40126 Fitting 1
34 1260660 lter 1
35 1270940 Fitting 1
36 1271170 Ring 1
2980 Complete valve
1
37
2892 Complete valve
1
38 480480 O-ring 3
39 1260670 Fitting 1
40 720030 O-ring 1
41 1262940 Bushing 1
42 1250270 Spring 1
43 1250280 Ball 1
44 880840 O-ring 1
45 1264090 Spring 1
46 1269041 Injector 1
47 1264080 Plug 1
48 1269010 Knob 1
49 1981770 Plug 1
1279211 Combiset assembly
1
50
1279238 Combiset assembly
1
51 1460430 O-ring 1
52 1540170 Shutter 1
53 1080091 Spring 1
54 394280 O-ring 1
55 1200690 O-ring 1
56 1270091 Injector 1
57 1260820 O-ring 1
58 1264070 Ring 1
59 1264060 Piston 1
Legend
Pos Code Description Qty Pos Code Description Qty
For
For
For
AR620 AR630 AR630-Hot
Kits
F 2715 Gasket kit 1
Pos Code Description Qty

14
37
50
46
49
1
2
3
4
5
6
5
7
10
8
9
11
12
13
14
15
27
16
17
44
26
36
10
23
24
21
22
30 29 34
57
58
59
3132
28
18
19
20
25
48
15
38
43
42
41
39
40
38
45
56
47
51
52
53
54
55
35
33
AR620 / AR630 / AR630-H
OT
U
NLOADER
7
S
TARTING
THE
M
ACHINE
A
FTER
A
P
ERIOD
OF
N
ON
-U
SE
M
AINTENANCE
R
OUTINE
C
HECKS
- D
O
THESE
BEFORE
EVERY
USE
5. Spray the backside of the nozzle with a lubricant and work the nozzle
back and forth from high pressure to low pressure. This will help keep
the nozzle from sticking.
6. Follow this procedure each time the machine is stopped. Having the
nozzle set at low pressure and squeezing the trigger on the gun when
you start the unit will reduce the startup load of the unit.
Long periods of non-use can cause calcium and iron deposits inside the
pump. Starting the machine could cause damage to the pump. Insert the
allen key provided with the unit through the hole in the motor end hous-
ing and rotate the motor one revolution clockwise and counter-clockwise.
Remove the key and start the motor. It should start up easily.
Change oil after the rst 50 hours of use. Use a SAE20 or 30 non-deter-
gent oil. After that, change oil every 200 hours, once a year or when it
looks milky, more frequently if used in demanding environments. Chang-
ing oil is one of the most important and lease expensive maintenance
items, it will prolong the life of your pressure washer.
1. Check water inlet screens for signs of debris.
2. Check nozzle for debris and signs of extensive wear. Worn nozzle will
result in poor performance. Only check nozzle with the motor turned
“OFF” and the pressure relieved from the system!
3. Check all ttings and connections for leaks and worn areas.
O
PERATING
I
NSTRUCTIONS
(
CONT
)

8
M
AINTENANCE
(
CONT
)
C
LEANING
T
IPS
The gun nozzle supplied with the pressure washer provides optimum
cleaning for universal cleaning applications if used properly.
Cleaning agents are most e ective when the surface is rinsed rst to loos-
en dirt. After pre-rinsing to loosen dirt, then clean with detergent.
Detergent should be applied from the bottom to the top of the washing
area. Apply detergent and allow the detergent to react with the dirt, then
rinse from the top to the bottom. This detergent applying and rinsing
technique will help to avoid streaks and skips in the washing area.
Never use more detergent than is necessary to clean the surface.
Always follow directions supplied by the detergent manufacturer on the
container.
For best spraying results, hold the gun 6 – 12” away from the washing
surface and use long, slow deliberate side to side strokes, similar to using
a paint sprayer. This technique will provide the most e ective cleaning
impact and minimize streaks and skips in the cleaning process. Waving
the spray gun aimlessly across the surface wastes water and expensive
detergent and prolongs the cleaning process.
If the pressure washer is used to apply wax, the gun should be held further
from the surface to optimize the “misting” e ect when applying the wax.
For best results, follow the directions supplied by the wax manufacturer.
Hold the gun/wand in the normal operating position. Turn the nozzle
sleeve clockwise for a fan spray and counterclockwise for a stream. (Pull
the nozzle sleeve forward for high pressure while pushing the sleeve away
from the gun for low pressure). After shutting down the unit and draining
the hose, spray a lubricant, such as WD40, on the backside of the nozzle
and work the nozzle back and forth from high to low pressure. This will
help prevent the nozzle from sticking. Examine nozzle tip for blockage
only with pressure washer “OFF” and pressure relieved from systems.
G
UN
, W
AND
AND
N
OZZLE
13
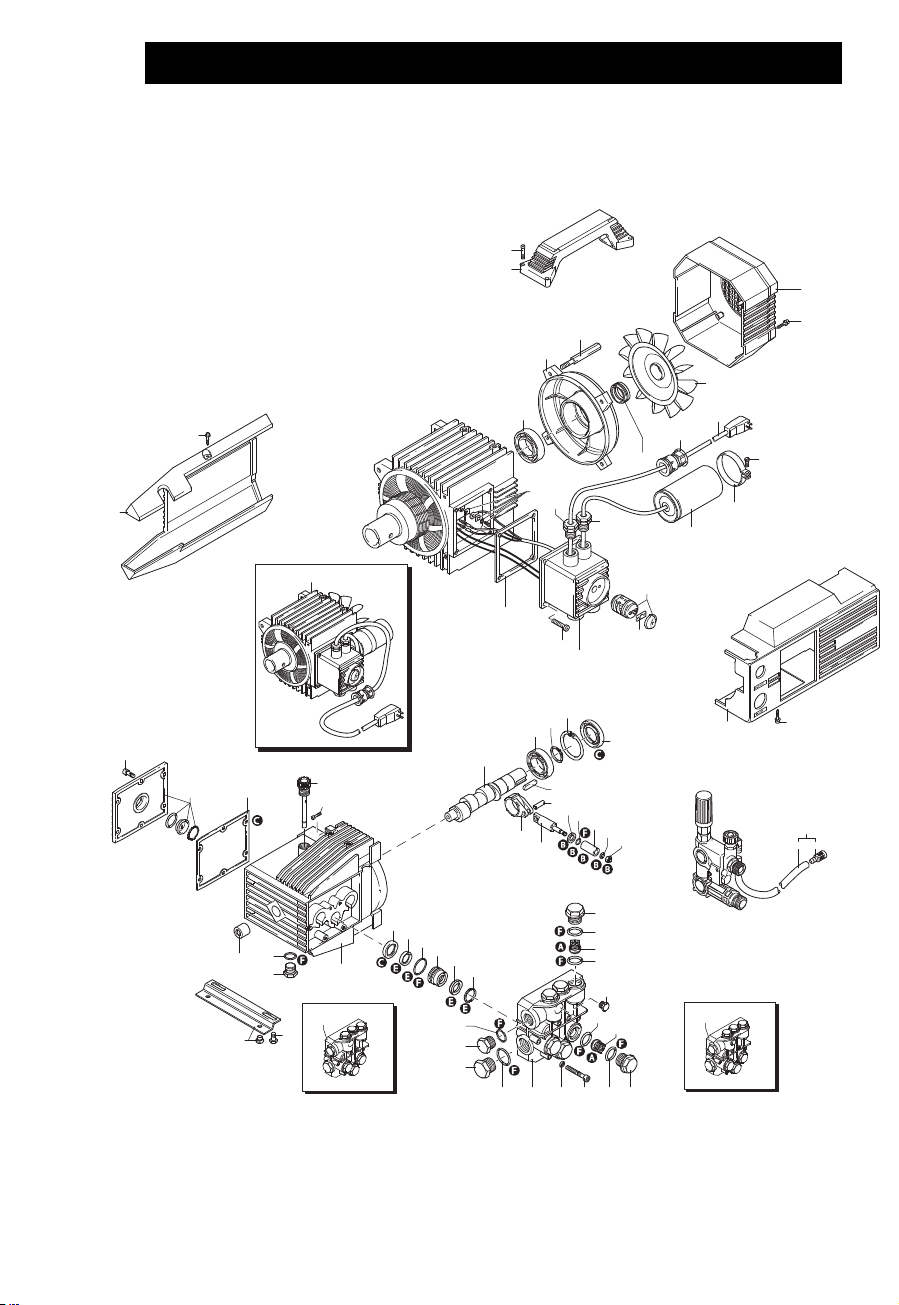
1 1260279 Casing 1
2 1261551 Screw 8
3 180030 Screw 4
4 1260710 Handle 1
5 1261760 Fan cowling 1
6 1341030 Filter 1
1264629 Casing
1
7
1272810 Blue Casing
1
8 1260470 Screw 4
9 1260830 Foot 2
10 1269115 Hose & Filter Assembly 1
11 1260780 Screw 4
12 1262790 Detergent hose 1
13 1260760 Screw 6
14 1269101 Cover 1
15 1260040 Oil seal 1
16 1260480 Plug 1
17 1260050 Bushing 1
1269216 Head assembly
1
1269251 Head assembly
1
1269221 Head assembly
1
18
1269306 Head assembly
1
19 1260010 Pump body 1
20 1260190 Shaft 1
21 1320370 Bearing 1
22 1260770 Ring 1
23 1260790 Ring 1
24 1260750 Ring 1
25 1380520 Key 1
26 1260080 Pin 3
27 1260070 Piston 3
28 1260091 Plate 3
29 480480 O-ring 3
30 1260120 Piston 3
31 1260100 Washer 3
32 1260110 Nut 3
33 1260060 Connecting-rod 3
34 1260162 Plug 6
960160 O-ring
6
35
960191 O-ring
6
36 1269050 Complete valve 6
880830 O-ring
6
37
880831 O-ring
6
1260020 Head
1
1320023 Head
1
38
1320022 Head
1
39 1260460 Oil seal 3
1260440 Water seal
3
40
1260441 Water seal
3
1260420 O-ring
3
41
1260421 O-ring
3
42 1381550 Washer 6
43 680570 Screw 6
180101 O-ring
1
44
180102 O-ring
1
45 820361 Plug 1
46 1980740 Plug 2
740290 O-ring
2
47
740291 O-ring
2
1260140 Ring
3
48
1520120 Ring
1
1271650 Water seal
3
49
1260131 Water seal
3
50 1260151 Piston guide 3
51 620301 Plug
1
1260301 Fan
1
52
1260300 Fan
1
53 1260970 Seal 1
54 1260360 Stud bolt 4
55 1260960 Shield 1
56 1260950 Bearing 1
57 1269100 Clamp 1
58 1260400 Gasket 1
59 1261560 Screw 4
1261410 Box
1
60
1260341 Box
1
4747 Motor
1
61
44545 Motor
1
1261240 Switch
1
62
1272030 Switch
1
63 1271950 Cable retainer 1
64 1269090 Cable retainer 1
65 1263550 Capacitor 1
66 1267280 Clamp 1
67 1271880 Screw 1
68 1262370 Ori ce 1
69 1261820 Cable 1
70 1265180 Gasket
1
Legend
Pos Code Description Qty Pos Code Description Qty
For
For
For
AR620 AR630 AR630-Hot
For
For
AR630TSS AR630TSS-Hot
Kits
A 1864 Valve kit 1
B 2628 Piston kit 1
C 1865 Oil seal kit 1
E 1866 Water seal kit 1
F 2040 Gasket kit 1
Pos Code Description Qty
12
3
4
2
5
2
1
2
7
61
70
62
55
53
56
54
60
63
64
67
66
52
68
59
69
65
57
8
9
11
18
44
37
36
45
46
47
19
4717
46
41
50
40
39
49
48
27
26
24
25
29
28
30
31
32
33
20
21
22
23
16
13
15
14
37
36
35
34
10
6 12
51
18
Hot Units
7
58
38 42 43 35 34
AR620 / AR630 / AR630-H
OT
/ AR630TSS / AR630TSS-H
OT
9
S
ETTING
N
OZZLE
P
RESSURE
/ C
HEMICAL
I
NJECTOR
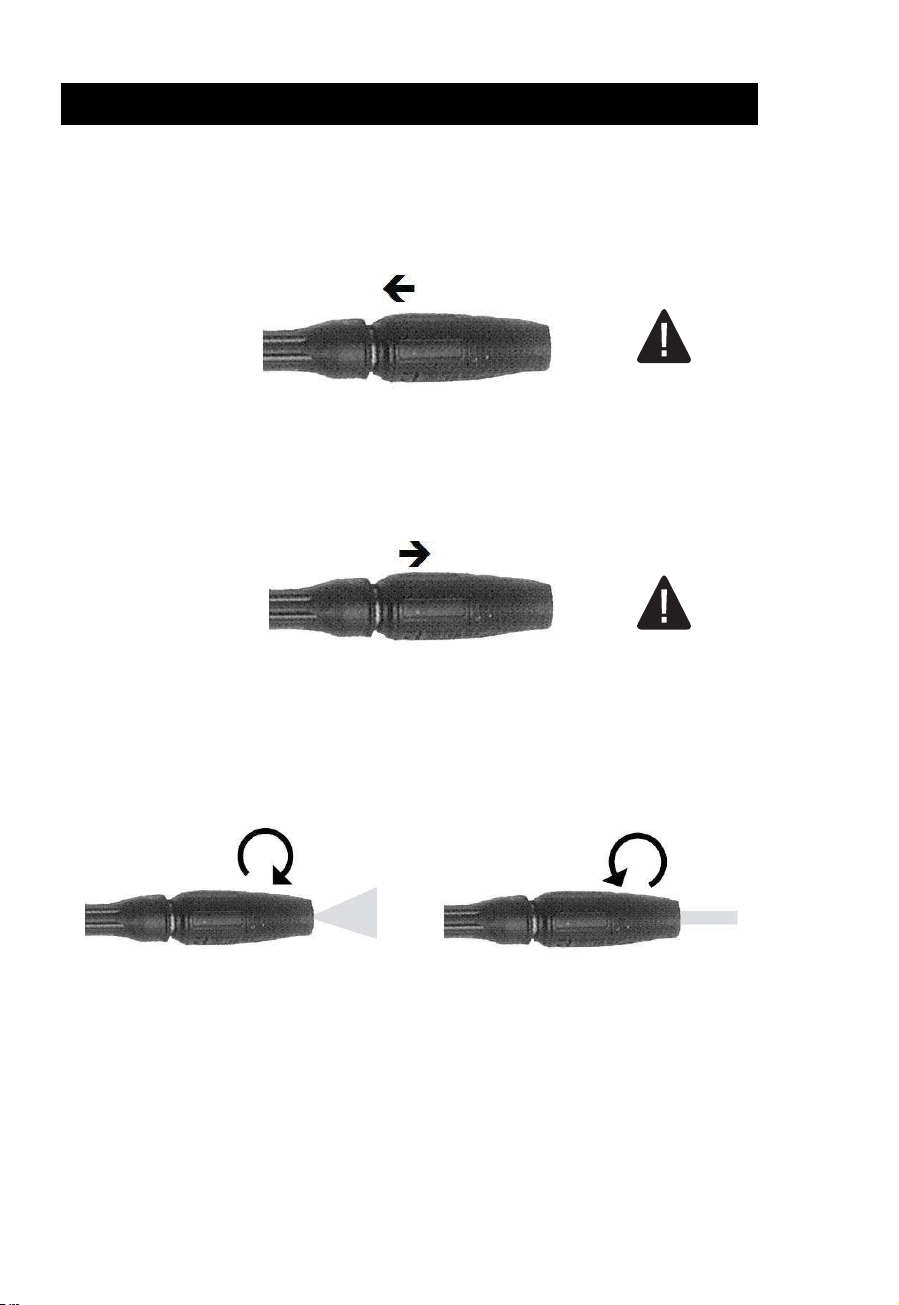
High Pressure
1. For high pressure pull back on nozzle. Make sure to keep all parts of hand
away from out coming water.
Diagram A
Low Pressure
2. For low pressure and chemical suction push the nozzle forward. Keep all
parts of hand away from out coming water.
Diagram B
Fan Spray
3. For adjusting the water spray pattern turn nozzle clockwise for wide spray
fan pattern and counter clockwise for narrow stream spray pattern.
Diagram C

10
Your pressure washer is supplied with a downstream low pressure soap/
chemical injector. Soap is added after the water ows through the pump.
The injector is used add liquids to the water. The injector works only on
low pressure.
The draw soap/chemical into the pressure washer, insert the lter end of
the pick-up hose into the soap/chemical. Adjust the nozzle to the low
pressure position. Do Not use powders, granular, high viscosity detergents
or acidic based detergents/chemicals in the injector.
To shutdown the injector, remove pick-up hose and lter from detergent/
chemical tank and place it in a container of clear water. Run water through
the entire system to wash out the chemical you were using.
Severe damage could occur by water freezing inside the components. To
prevent costly repairs, follow these steps:
1. Make sure the unit is “OFF”, water supply is disconnected and system
pressure has been relieved.
2. Install a suction hose from the pump inlet (garden hose tting) into a
gallon of NON-TOXIC RV anti-freeze. Following operating instructions
start the machine and squeeze trigger on the spray gun allowing
the pump to draw anti-freeze though the entire system. Once the
anti-freeze appears at the end of the wand, turn the machine “OFF”.
3. Squeeze gun trigger to relieve pressure from system. Disconnect the
high pressure hose from the high pressure outlet and put the hose,
gun/wand and owners manual in a secure place to prevent unautho-
rized people from using the machine.
4. When preparing the high pressure hose assembly and water supply
to the unit, turn the water on and squeeze the trigger on the spray
gun to send water through the system. Dispose of the anti-freeze/
water solution safely where it will not be harmful to the environment,
people or animals.
U
SING
THE
S
OAP
I
NJECTOR
S
TORING
THE
P
RESSURE
W
ASHER
11
T
ROUBLESHOOTING
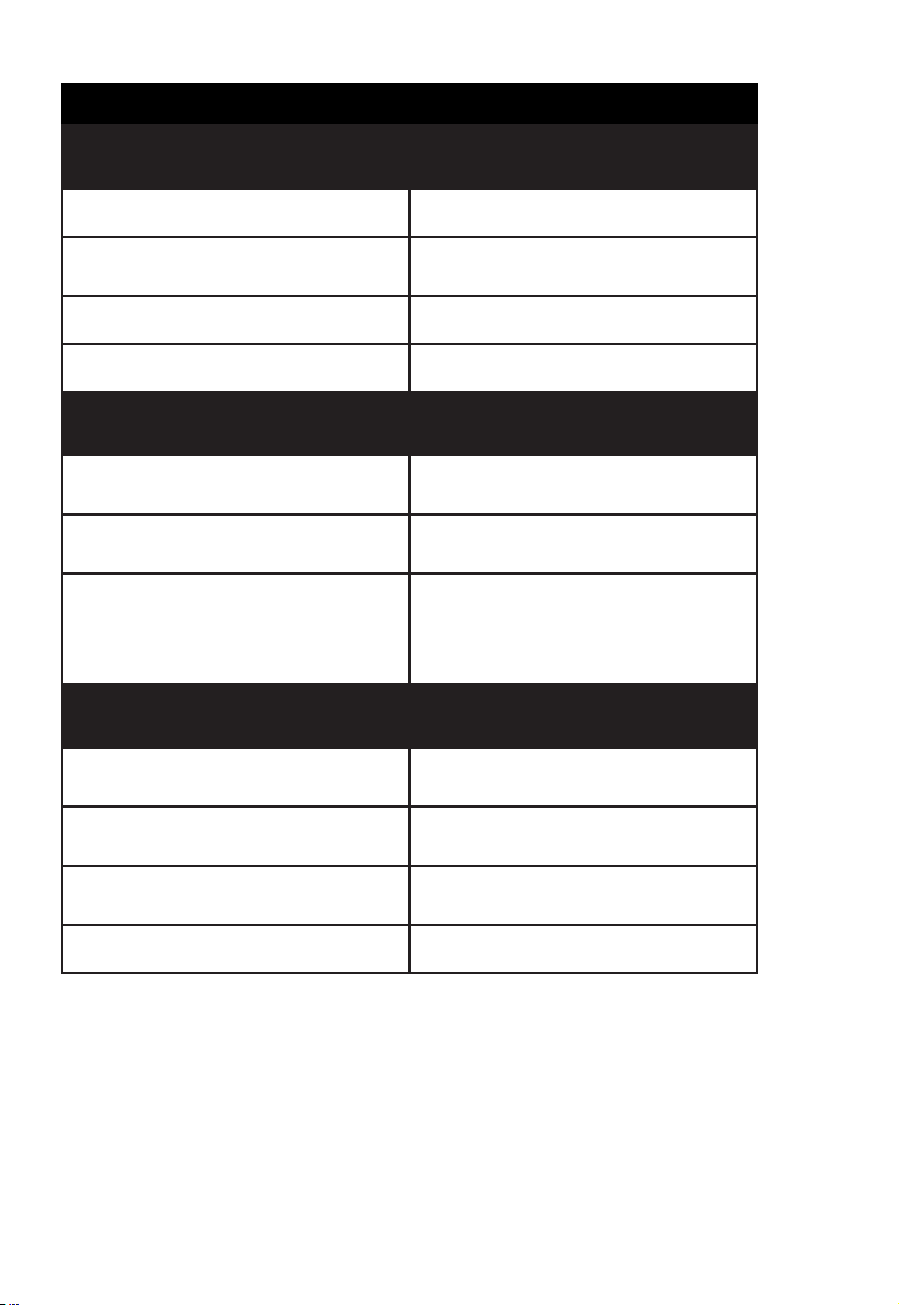
Low Pressure
Causes Solutions
Plugged nozzle. Clean and check for blockage.
Insu cient ow of water to the
pump.
Increase water ow to the pump.
Plugged inlet screen. Pull out and clean screen carefully.
Using restrictive supply hose. Use larger diameter supply hose.
Surging Pressure
Causes Solutions
Restricted supply by under-sized
ttings or inlet.
Use larger ttings and clean the inlet
screen.
Insu cient ow of water to the
pump.
Increase water ow to the pump.
Air trapped in the pump head. Set nozzle on low pressure setting,
squeeze gun trigger before starting
machine. Start engine and run water
until air is purged out of the system.
Soap injector not working
Causes Solutions
Adjustable nozzle set on high pres-
sure mode.
Set nozzle to low pressure. Injector
only works on low pressure setting.
Back pressure from the addition of
extra hose.
Do not use additional high pressure
hose.
Detergent adjustment knob turned
o .
Turn detergent adjustment knob
counter-clockwise to open.
Plugged injector valve. Check and clean the injector.
10
Your pressure washer is supplied with a downstream low pressure soap/
chemical injector. Soap is added after the water ows through the pump.
The injector is used add liquids to the water. The injector works only on
low pressure.
The draw soap/chemical into the pressure washer, insert the lter end of
the pick-up hose into the soap/chemical. Adjust the nozzle to the low
pressure position. Do Not use powders, granular, high viscosity detergents
or acidic based detergents/chemicals in the injector.
To shutdown the injector, remove pick-up hose and lter from detergent/
chemical tank and place it in a container of clear water. Run water through
the entire system to wash out the chemical you were using.
Severe damage could occur by water freezing inside the components. To
prevent costly repairs, follow these steps:
1. Make sure the unit is “OFF”, water supply is disconnected and system
pressure has been relieved.
2. Install a suction hose from the pump inlet (garden hose tting) into a
gallon of NON-TOXIC RV anti-freeze. Following operating instructions
start the machine and squeeze trigger on the spray gun allowing
the pump to draw anti-freeze though the entire system. Once the
anti-freeze appears at the end of the wand, turn the machine “OFF”.
3. Squeeze gun trigger to relieve pressure from system. Disconnect the
high pressure hose from the high pressure outlet and put the hose,
gun/wand and owners manual in a secure place to prevent unautho-
rized people from using the machine.
4. When preparing the high pressure hose assembly and water supply
to the unit, turn the water on and squeeze the trigger on the spray
gun to send water through the system. Dispose of the anti-freeze/
water solution safely where it will not be harmful to the environment,
people or animals.
U
SING
THE
S
OAP
I
NJECTOR
S
TORING
THE
P
RESSURE
W
ASHER
11
T
ROUBLESHOOTING
Low Pressure
Causes Solutions
Plugged nozzle. Clean and check for blockage.
Insu cient ow of water to the
pump.
Increase water ow to the pump.
Plugged inlet screen. Pull out and clean screen carefully.
Using restrictive supply hose. Use larger diameter supply hose.
Surging Pressure
Causes Solutions
Restricted supply by under-sized
ttings or inlet.
Use larger ttings and clean the inlet
screen.
Insu cient ow of water to the
pump.
Increase water ow to the pump.
Air trapped in the pump head. Set nozzle on low pressure setting,
squeeze gun trigger before starting
machine. Start engine and run water
until air is purged out of the system.
Soap injector not working
Causes Solutions
Adjustable nozzle set on high pres-
sure mode.
Set nozzle to low pressure. Injector
only works on low pressure setting.
Back pressure from the addition of
extra hose.
Do not use additional high pressure
hose.
Detergent adjustment knob turned
o .
Turn detergent adjustment knob
counter-clockwise to open.
Plugged injector valve. Check and clean the injector.
12
3
4
2
5
2
1
2
7
61
70
62
55
53
56
54
60
63
64
67
66
52
68
59
69
65
57
8
9
11
18
44
37
36
45
46
47
19
4717
46
41
50
40
39
49
48
27
26
24
25
29
28
30
31
32
33
20
21
22
23
16
13
15
14
37
36
35
34
10
6 12
51
18
Hot Units
7
58
38 42 43 35 34
AR620 / AR630 / AR630-H
OT
/ AR630TSS / AR630TSS-H
OT
9
S
ETTING
N
OZZLE
P
RESSURE
/ C
HEMICAL
I
NJECTOR
High Pressure
1. For high pressure pull back on nozzle. Make sure to keep all parts of hand
away from out coming water.
Diagram A
Low Pressure
2. For low pressure and chemical suction push the nozzle forward. Keep all
parts of hand away from out coming water.
Diagram B
Fan Spray
3. For adjusting the water spray pattern turn nozzle clockwise for wide spray
fan pattern and counter clockwise for narrow stream spray pattern.
Diagram C

8
M
AINTENANCE
(
CONT
)
C
LEANING
T
IPS
The gun nozzle supplied with the pressure washer provides optimum
cleaning for universal cleaning applications if used properly.
Cleaning agents are most e ective when the surface is rinsed rst to loos-
en dirt. After pre-rinsing to loosen dirt, then clean with detergent.
Detergent should be applied from the bottom to the top of the washing
area. Apply detergent and allow the detergent to react with the dirt, then
rinse from the top to the bottom. This detergent applying and rinsing
technique will help to avoid streaks and skips in the washing area.
Never use more detergent than is necessary to clean the surface.
Always follow directions supplied by the detergent manufacturer on the
container.
For best spraying results, hold the gun 6 – 12” away from the washing
surface and use long, slow deliberate side to side strokes, similar to using
a paint sprayer. This technique will provide the most e ective cleaning
impact and minimize streaks and skips in the cleaning process. Waving
the spray gun aimlessly across the surface wastes water and expensive
detergent and prolongs the cleaning process.
If the pressure washer is used to apply wax, the gun should be held further
from the surface to optimize the “misting” e ect when applying the wax.
For best results, follow the directions supplied by the wax manufacturer.
Hold the gun/wand in the normal operating position. Turn the nozzle
sleeve clockwise for a fan spray and counterclockwise for a stream. (Pull
the nozzle sleeve forward for high pressure while pushing the sleeve away
from the gun for low pressure). After shutting down the unit and draining
the hose, spray a lubricant, such as WD40, on the backside of the nozzle
and work the nozzle back and forth from high to low pressure. This will
help prevent the nozzle from sticking. Examine nozzle tip for blockage
only with pressure washer “OFF” and pressure relieved from systems.
G
UN
, W
AND
AND
N
OZZLE
13
1 1260279 Casing 1
2 1261551 Screw 8
3 180030 Screw 4
4 1260710 Handle 1
5 1261760 Fan cowling 1
6 1341030 Filter 1
1264629 Casing
1
7
1272810 Blue Casing
1
8 1260470 Screw 4
9 1260830 Foot 2
10 1269115 Hose & Filter Assembly 1
11 1260780 Screw 4
12 1262790 Detergent hose 1
13 1260760 Screw 6
14 1269101 Cover 1
15 1260040 Oil seal 1
16 1260480 Plug 1
17 1260050 Bushing 1
1269216 Head assembly
1
1269251 Head assembly
1
1269221 Head assembly
1
18
1269306 Head assembly
1
19 1260010 Pump body 1
20 1260190 Shaft 1
21 1320370 Bearing 1
22 1260770 Ring 1
23 1260790 Ring 1
24 1260750 Ring 1
25 1380520 Key 1
26 1260080 Pin 3
27 1260070 Piston 3
28 1260091 Plate 3
29 480480 O-ring 3
30 1260120 Piston 3
31 1260100 Washer 3
32 1260110 Nut 3
33 1260060 Connecting-rod 3
34 1260162 Plug 6
960160 O-ring
6
35
960191 O-ring
6
36 1269050 Complete valve 6
880830 O-ring
6
37
880831 O-ring
6
1260020 Head
1
1320023 Head
1
38
1320022 Head
1
39 1260460 Oil seal 3
1260440 Water seal
3
40
1260441 Water seal
3
1260420 O-ring
3
41
1260421 O-ring
3
42 1381550 Washer 6
43 680570 Screw 6
180101 O-ring
1
44
180102 O-ring
1
45 820361 Plug 1
46 1980740 Plug 2
740290 O-ring
2
47
740291 O-ring
2
1260140 Ring
3
48
1520120 Ring
1
1271650 Water seal
3
49
1260131 Water seal
3
50 1260151 Piston guide 3
51 620301 Plug
1
1260301 Fan
1
52
1260300 Fan
1
53 1260970 Seal 1
54 1260360 Stud bolt 4
55 1260960 Shield 1
56 1260950 Bearing 1
57 1269100 Clamp 1
58 1260400 Gasket 1
59 1261560 Screw 4
1261410 Box
1
60
1260341 Box
1
4747 Motor
1
61
44545 Motor
1
1261240 Switch
1
62
1272030 Switch
1
63 1271950 Cable retainer 1
64 1269090 Cable retainer 1
65 1263550 Capacitor 1
66 1267280 Clamp 1
67 1271880 Screw 1
68 1262370 Ori ce 1
69 1261820 Cable 1
70 1265180 Gasket
1
Legend
Pos Code Description Qty Pos Code Description Qty
For
For
For
AR620 AR630 AR630-Hot
For
For
AR630TSS AR630TSS-Hot
Kits
A 1864 Valve kit 1
B 2628 Piston kit 1
C 1865 Oil seal kit 1
E 1866 Water seal kit 1
F 2040 Gasket kit 1
Pos Code Description Qty
14
37
50
46
49
1
2
3
4
5
6
5
7
10
8
9
11
12
13
14
15
27
16
17
44
26
36
10
23
24
21
22
30 29 34
57
58
59
3132
28
18
19
20
25
48
15
38
43
42
41
39
40
38
45
56
47
51
52
53
54
55
35
33
AR620 / AR630 / AR630-H
OT
U
NLOADER
7
S
TARTING
THE
M
ACHINE
A
FTER
A
P
ERIOD
OF
N
ON
-U
SE
M
AINTENANCE
R
OUTINE
C
HECKS
- D
O
THESE
BEFORE
EVERY
USE
5. Spray the backside of the nozzle with a lubricant and work the nozzle
back and forth from high pressure to low pressure. This will help keep
the nozzle from sticking.
6. Follow this procedure each time the machine is stopped. Having the
nozzle set at low pressure and squeezing the trigger on the gun when
you start the unit will reduce the startup load of the unit.
Long periods of non-use can cause calcium and iron deposits inside the
pump. Starting the machine could cause damage to the pump. Insert the
allen key provided with the unit through the hole in the motor end hous-
ing and rotate the motor one revolution clockwise and counter-clockwise.
Remove the key and start the motor. It should start up easily.
Change oil after the rst 50 hours of use. Use a SAE20 or 30 non-deter-
gent oil. After that, change oil every 200 hours, once a year or when it
looks milky, more frequently if used in demanding environments. Chang-
ing oil is one of the most important and lease expensive maintenance
items, it will prolong the life of your pressure washer.
1. Check water inlet screens for signs of debris.
2. Check nozzle for debris and signs of extensive wear. Worn nozzle will
result in poor performance. Only check nozzle with the motor turned
“OFF” and the pressure relieved from the system!
3. Check all ttings and connections for leaks and worn areas.
O
PERATING
I
NSTRUCTIONS
(
CONT
)

6
O
PERATING
I
NSTRUCTIONS
(
CONT
)
S
TARTING
THE
P
RESSURE
W
ASHER
1. Turn on the water supply to the proper gpm ow rate.
2. Plug power cord into properly grounded outlet.
3. Turn nozzle to low pressure and squeeze trigger.
4. Turn “ON/OFF” switch to the “ON” position and wait until a constant
stream of water comes out. Adjust nozzle sleeves to achieve proper
pressure and coverage area.
1. Observe all safety instructions through this manual.
2. Do Not allow the machine to run with the wand not squeezed, “OFF”,
for more than 2 minutes (30 seconds with the water temperature
above 80° F).
When the wand trigger is released the pump does not
stop pumping. Water is routed through a bypass circuit
which builds up heat. If the water temperature becomes
too high, damage to the seals, packings and other parts
may result.
3. Check pump, connections and hose for water and oil leaks. Replace
worn parts.
1. Rinse and close the downstream chemical injector.
2. Turn the motor power switch to the “OFF” position.
3. Turn o water supply.
4. Squeeze the trigger on the wand to relieve the system water pressure
and drain as much water as possible.
D
URING
O
PERATION
S
TOPPING
THE
P
RESSURE
W
ASHER
15
1 1981780 Knob 1
2 1980470 Screw 1
3 1980300 Nut 1
4 1980390 Insert 2
5 1980220 Wobble plate 1
6 1271070 Spring 1
7 1080041 Piston 1
8 1080401 Ring 1
9 1080250 O-ring 1
10 1080070 Pin 2
11 1980210 Piston guide 1
12 880830 O-ring 1
13 740290 O-ring 1
14 800560 O-ring 1
15 1080190 O-ring 3
16 1271160 Piston 1
17 1080121 Seat 1
18 1260570 Washer 1
19 3990080 O-ring 1
20 1540272 Screw 1
21 1270790 Plate 1
22 395370 Washer 2
23 395270 Screw 2
24 1260530 Cover 1
25 1260520 Indicator arm 1
26 1270080 Valve body 1
27 770140 O-ring 2
28 1180140 O-ring 1
29 1260540 Suction tting
1
30 1260560 Washer 1
31 880270 O-ring 1
2260420 Screw
1
32
1540360 Screw
1
33 40126 Fitting 1
34 1260660 lter 1
35 1270940 Fitting 1
36 1271170 Ring 1
2980 Complete valve
1
37
2892 Complete valve
1
38 480480 O-ring 3
39 1260670 Fitting 1
40 720030 O-ring 1
41 1262940 Bushing 1
42 1250270 Spring 1
43 1250280 Ball 1
44 880840 O-ring 1
45 1264090 Spring 1
46 1269041 Injector 1
47 1264080 Plug 1
48 1269010 Knob 1
49 1981770 Plug 1
1279211 Combiset assembly
1
50
1279238 Combiset assembly
1
51 1460430 O-ring 1
52 1540170 Shutter 1
53 1080091 Spring 1
54 394280 O-ring 1
55 1200690 O-ring 1
56 1270091 Injector 1
57 1260820 O-ring 1
58 1264070 Ring 1
59 1264060 Piston 1
Legend
Pos Code Description Qty Pos Code Description Qty
For
For
For
AR620 AR630 AR630-Hot
Kits
F 2715 Gasket kit 1
Pos Code Description Qty
16
49
1
2
3
4
5
6
5
8
11
7
9
10
12
24
41
46
47
34
35
36
37
23
22
52
13
14
15
16
17
18
19
20
21
25
26
27
28
39
38
22
45
50
44
43
32
29
31
30
40
57
53
51
59
17
54
58
55
17
56
33
48
60
AR630TSS / AR630TSS-H
OT
U
NLOADER
5
1. Connect the high pressure hose to the pressure washer with the twist
fast coupler and tighten securely. Fasten wand and gun together and
connect gun/wand to high pressure hose.
Tighten all connections and replace worn parts before
starting the machine. Sudden release of high pressure
streams may result if connections detach during use. This
can cause serious injury. Never disconnect any part of
the unit while the machine is running or before relieving
system pressure, it is dangerous. Seek medical attention
if an injury ever occurs.
2. Remove the red plug from the pump crankcase and install the black
dipstick. Always check that the oil level is full before operating.
3. Oil level can be checked in two places.
4. First, on back side of pump sight glass, level should be half way.
5. Second, on dip stick, oil should read between the indentation on the
dip stick.
A
SSEMBLY
I
NSTRUCTION
(
CONT
)
A
SSEMBLING
O
PERATING
I
NSTRUCTIONS
B
EFORE
S
TARTING
THE
P
RESSURE
W
ASHER
1. Read all safety instructions throughout the manual.
2. Place unit on dry, rm, level ground for optimum lubrication of pump.
3. Check oil levels prior to each use.
4. Tighten all hoses and connections. Check parts and replace if need-
ed.
5. When the unit is attached to a pressure main and the nozzle is in the
low pressure setting, purge air from system by squeezing gun trigger
before starting machine. Let water run until there is a steady stream
of water coming out of the nozzle.

4
1. The pressure washer should be as close as possible to the water
supply.
2. Locate the pressure washer on a solid, level surface with a gentle
slope to prevent water from building up in the work area. Excess
water can make surfaces slippery.
3. Position the unit so the operator has easy access to the pressure
washer and its controls.
4. To prevent damage and excessive hose wear, locate the pressure
washer so the hose does NOT extend across tra c areas. Make sure
there are no kinks or twists in the hose.
5. Use extension cords of at least 12-3 gauge for lengths up to 50 feet
or 10-3 gauge for lengths up to 100 feet. Check the extension cord
to make sure it is not damaged or frayed. The outlet should have an
amperage rating of 20 amps or greater and should have a Ground
Fault Circuit Interrupter (GFCI).
6. Do not use the pressure washer outdoors if it is raining, and do not
spray the motor or any of its connections.
7. Do not use chemicals or agents which are not compatible with the
Buna-N and PVC (polyvinyl) or neoprene covering of the hose.
8. Do not run acids or hard caustics through the pump.
9. Check to determine if the water supply can exceed the output of the
pump. The output of this unit is 2.1 gpm (gallons per minute), so the
water supply must deliver at least 2.5 gpm.
Calculate gpm ow rate by running the water supply into a
pail for one minute. Measure the gallons in the pail. If it is at
least 2.5 gallons in the minute, your supply is adequate. Your
water supply must be clean and free of debris. Use water
with a temperature of less than 140° F.
A
SSEMBLY
I
NSTRUCTION
P
RE
-A
SSEMBLY
C
HECKLIST
17
1 42654 TSS kit 1
2 392840 Screw 1
3 1980300 Nut 1
4 2500540 Insert 1
5 1980220 Wobble plate 2
6 1271070 Spring 1
7 1080041 Piston 1
8 1080070 Pin 1
9 1080401 Ring 1
10 1080250 O-ring 1
11 2500550 Split pin 1
12 1980210 Piston guide 1
13 740290 O-ring 1
14 800560 O-ring 1
15 880830 O-ring 1
16 1271170 Ring 1
17 1080192 O-ring 3
18 1271160 Piston 1
19 2460420 Seat 1
20 1080250 O-ring 1
21 1540272 Screw 1
22 390080 O-ring 2
23 1540660 Valve body 1
24 1140450 O-ring 1
25 1460430 O-ring 1
26 1540170 Shutter 1
27 1080091 Spring 1
28 394280 O-ring 1
29 1560660 Ring 1
30 1560680 Knob 1
31 480560 O-ring 1
32 800560 O-ring 1
33 1120681 O-ring 1
34 1560650 Hose tail 1
35 480480 O-ring 1
36 1250280 Ball 1
37 1560520 Spring 1
38 1540570 Fitting 1
39 1540300 Nut 1
40 1569206 IDR assembly 1
41 1540280 Suction tting 1
42 1540630 O-ring 1
43 1122260 Fitting 1
44 880270 O-ring 1
45 2260420 Screw 1
46 480440 O-ring 1
47 1560900 Fitting 1
48 1461470 Fitting 1
49 25263 Complete valve 1
50 1340260 Filter 1
51 1540870 Plug 1
52 1981190 Screw 1
53 1260820 O-ring 1
54 1540881 Piston 1
55 1981320 Spring 1
56 2022201 Fork 1
57 2029787 TSS box assembly 1
58 660190 O-ring 1
59 880840 O-ring 1
60 40126 Fitting
1
Legend
Pos Code Description Qty Pos Code Description Qty
Kits
F 42451 Gasket kit 1
Pos Code Description Qty
For
For
AR630TSS AR630TSS-Hot

18
NOTES
3
W
HILE
O
PERATING
16. Always use water that is clear and free from particles
17. Always point the wand nozzle away from people and animals,
the high pressure the unit generates is very dangerous.
18. Keep the pressure hose connected to the machine and wand
while unit is pressurized.
19. Never leave the wand unattended while the machine is running.
20. Always seek emergency medical immediately if any uid pene-
trates the skin. The cut may be deeper and more serious than it
appears.
21. Never run preheated water into the machine.
22. Do not secure the wand in the squeezed, “ON” position.
23. No smoking when operating the machine.
24. Never use the unit when under the in uence of drugs, alcohol, or
medication.
25. Do not adjust the unloader.
26. Do not move the unit by pulling on the hose or electrical cord.
27. Only operate the machine with su cient water supply to the
pump.
28. Do not let the machine run with the wand in the not-squeezed,
“OFF” position for more than 2 minutes (30 seconds with the wa-
ter temperature above 80° F). This causes bypass water tempera-
ture to increase which damages the pump.
29. Protect your machine from freezing during storage. Follow the
instructions to protect your pressure washer from freezing stor-
age temperatures.
30. Always follow all other guidelines and safety instructions de-
scribed in this manual.

2
Read and understand these instructions as they pertain with
safety. Pay special attention to the safety symbol throughout this
manual. Failure to comply with these instructions may result in
personal injury or property damage. DO NOT allow children to
operate or play on or around this equipment.
1. Plug the unit into a 3-prong outlet that is properly grounded.
Improper grounding can result in electrical shock.
2. Do not operate the machine in or around an explosive envi-
ronment.
3. Never spray ammable liquids.
4. Always wear safety glasses or goggles and appropriate cloth-
ing when operating the unit.
5. Understand all safety precautions and rst aid for chemicals
being used.
6. Follow the chemical manufacturer’s recommendations when
using chemicals in the soap injector.
7. Do not alter the machine from the manufacturer’s design.
8. Keep all safety devices active on the machine.
9. Locate the machine so it is protected from eternal damage.
10. Always place the machine on a level surface.
11. Never spray any part of this pressure washer or any other
electrical machine.
12. Never use an undersized discharge nozzle.
13. Do not adjust the unloader relief valve.
14. Never operate the unit with broken or missing parts.
15. Always check and maintain proper oil levels described in the
Maintenance section of this manual.
S
AFETY
I
NSTRUCTIONS
B
EFORE
O
PERATING
19
NOTES

20
This product is under warranty to the original retail consumer against
defects in material and workmanship for a period of 1 (one) year and is a
complete “bumper to bumper” warranty including the spray gun, the high
pressure hose and all accessories from the date of purchase. The warranty
is not transferable or assignable. This warranty covers replacement parts.
This limited one year warranty applies only to products used in consumer
applications and is void in rental or any commercial application. Reason-
able care must be used in conformity with operation and maintenance
instructions in the owner’s manual. Failure to follow these instructions will
void this warranty. This warranty gives you speci c legal rights and you
may also have other rights which vary from state to state.
Keep your original receipt of purchase in case of warranty claim. Any pow-
er washer or parts returned for a warranty claim must have a “RETURNED
MERCHANDISE AUTHORIZATION (RMA) NUMBER.” You must obtain an RMA
NUMBER by calling A.R. North America, Inc. at 1-866-235-5112 Monday
through Friday, 8 a.m. to 5 p.m. (CST) or e-mail [email protected]. Any
return without an RMA NUMBER will be considered unauthorized and will
be shipped back at the expense of the sender. Freight costs to the compa-
ny for warranty work must be paid by the purchaser.
A.R. North America, Inc.
Attn: Power Washer Warranty Department
140 – 81st Avenue NE, Fridley, MN 55432
Phone: 1-866-235-5112
Fax: 1-866-331-2762
Email: inf[email protected]
Website: www.arblueclean.com
P
RESSURE
W
ASHER
L
IMITED
W
ARRANTY
W
ARRANTY
R
ETURNS
1
Questions, problems, missing parts?
Before returning to your retailer, call our
customer service department at 1-866-235-5112,
8 a.m. - 5:00 p.m., CST, Monday - Friday.
www.arblueclean.com
AR620 & AR630
Electric Pressure Washer
ASSEMBLY, CARE AND USE
INSTRUCTIONS
READ CAREFULLY
IMPORTANT:
RETAIN THESE
INSTRUCTIONS AND ATTACH RECEIPT
TO MANUAL FOR FUTURE REFERENCE.
Important Notice
Winter storage or long time storage. Drain all water out of
the pump. Flush the pressure washer with a 50% antifreeze
solution, and relieve the pressure. Flush the pressure washer
before you use it again to remove the antifreeze.
AR620/630_FN