1
FFJ00
FVC13
fisher-price.com
• Read all instructions before assembly and use
of the product.
• Keep instructions for future use.
• Adult assembly is required. No tools needed
for assembly.
• Requires three AA (LR6) alkaline batteries
(not included) for electronic toy. Tool needed
to install batteries: Phillips screwdriver.
• Product features and decorations may vary
from photos.
• Lee estas instrucciones antes de ensamblar
y usar este producto.
• Guarda estas instrucciones para
futura referencia.
• Requiere montaje por un adulto. No es
necesario usar herramientas para el montaje.
• El juguete electrónico funciona con 3 pilas
alcalinas AA (LR6) x 1,5V (no incluidas).
Herramienta necesaria para instalar las pilas:
desatornillador de cruz.
• Las características y decoración pueden
variar de las mostradas.
2
WARNING
ADVERTENCIA
To prevent serious injury or death:
• Use only for a child who is able to hold head upright unassisted and who is not
able to walk or climb out of product.
• Never leave child unattended. Always keep child in view while in product.
• Never use near steps, pools, hot surfaces or areas that may be hazardous to
a child. Product may move during use.
• To avoid tip-over, place product on a flat, level surface.
• Strings can cause strangulation! DO NOT place items with a string around child’s
neck, such as hood strings or pacifier cords. DO NOT suspend strings over
product or attach strings to toys.
Para evitar lesiones graves o la muerte:
• Usar solo con niños que puedan mantener la cabeza derecha sin ayuda
y que no puedan caminar ni salirse del producto.
• No dejar al niño fuera de su alcance. Siempre mantener al niño a la vista mientras esté
en el producto.
• No usar cerca de escalones, piscinas, superficies calientes u otras áreas
peligrosas para niños. El producto se puede mover durante el uso.
• Para evitar que el producto se voltee, ponerlo sobre una superficie plana, nivelada.
• ¡Los cordones pueden causar estrangulación! NO poner artículos con cordones,
tales como capuchas o chupones, alrededor del cuello del niño. NO suspender
cordones sobre el producto ni amarrar cordones a los juguetes.
IMPORTANT! Before assembly and each use,
inspect this product for damaged hardware,
loose joints, missing parts or sharp edges. Do
not use the product if any parts are missing,
damaged or broken. Do not use accessories or
replacement parts other than those approved
by the manufacturer.
• This product may come with replacement
warning labels which you can apply over the
factory applied warning label if English is not
your primary language. Select the warning
label with the appropriate language for you.
¡IMPORTANTE! Antes del montaje y de cada
uso, revisar que el producto no tenga piezas
dañadas, conexiones sueltas, piezas faltantes
o bordes filosos. NO usar el producto si falta
o está rota alguna pieza. No usar accesorios ni
piezas de repuesto, salvo aquellos aprobados
por el fabricante.
• Este producto viene con etiquetas de
advertencia en español que puedes pegar
sobre las etiquetas de fábrica, en caso de
que el inglés no sea tu idioma primario.
Selecciona las etiquetas de advertencia en el
idioma de tu elección.
3
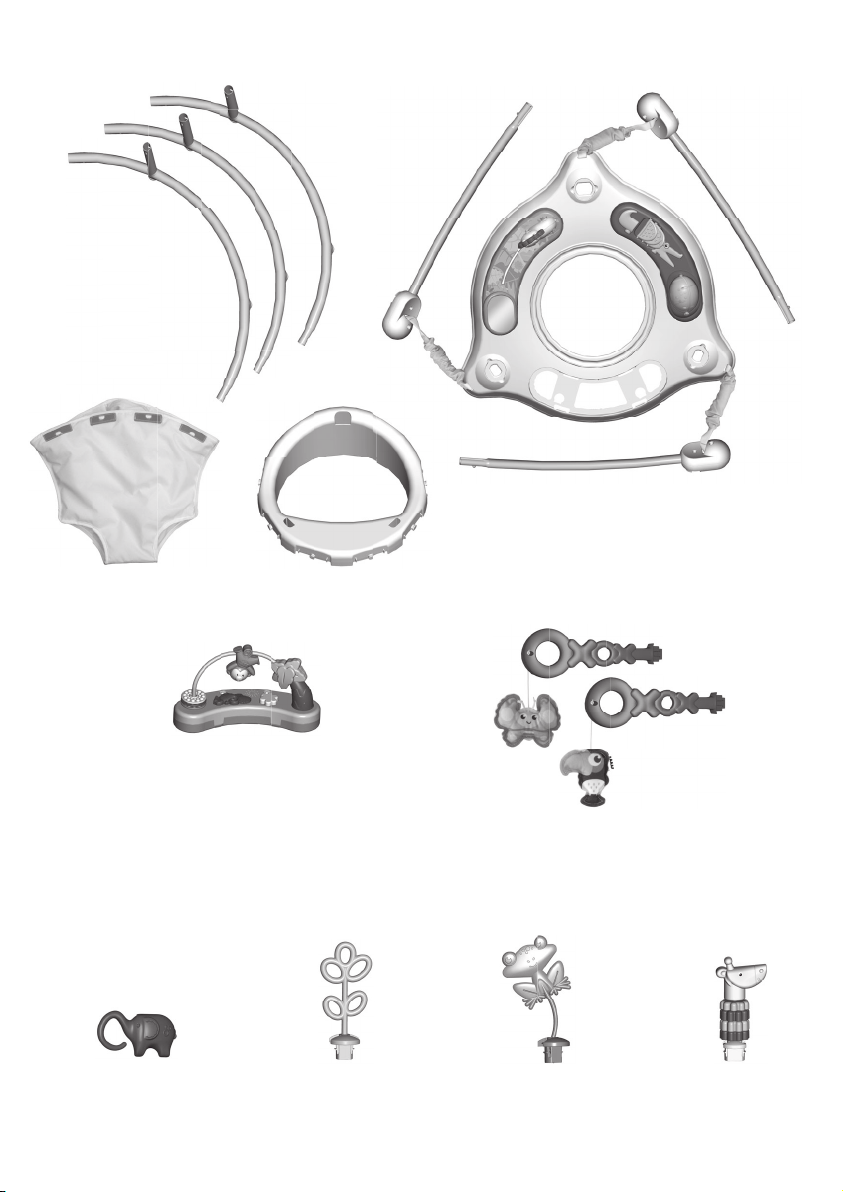
Frame
Armazón
Parts Piezas
2 Hanging Toys
2 juguetes colgantes
Seat Ring
Aro del asiento
Seat Pad
Almohadilla
Electronic Toy
Juguete electrónico
Frog Teether Toy
Rana mordedera
Linkable Elephant Toy
Elefante que se conecta
Giraffe Toy
Jirafa
Link Tree
Árbol que se conecta
3 Base Tubes
3 tubos de base
Before beginning assembly, you may want to install
batteries into the electronic toy. Refer to the Battery
Installation section in these instructions.
Instala las pilas en el juguete electrónico antes de
empezar con el montaje. Consulta la sección de
colocación de las pilas de este instructivo.
4
©2017 Mattel. All Rights Reserved. FFJ00-2C71
PRINTED IN MEXICO 1101127435-2LC
MÉXICO
Importado y distribuido por Mattel de México,
S.A. de C.V., Miguel de Cervantes Saavedra
No. 193, Pisos 10 y 11, Col. Granada,
Delegación Miguel Hidalgo, C.P. 11520,
México, D.F. R.F.C. MME-920701-NB3.
CHILE
Mattel Chile, S.A., Avenida Américo
Vespucio 501-B, Quilicura, Santiago.
Tel.: 1230-020-6213.
VENEZUELA
Servicio al consumidor Venezuela:
Tel.: 0-800-100-9123.
ARGENTINA
Mattel Argentina, S.A., Curupaytí 1186,
(1607) – Villa Adelina, Buenos Aires.
Tel.: 0800-666-3373.
CONSUMER ASSISTANCE
ATENCIÓN AL CLIENTE
CO SU SS S
1-800-432-5437 (US)
Fisher-Price, Inc., 636 Girard Avenue, East Aurora, NY 14052.
Hearing-impaired consumers/Clientes con problemas auditivos
1-800-382-7470.
Centro de Servicio en México:
59-05-51-00 Ext. 5206 ó 01-800-463-59-89
COLOMBIA
Mattel Colombia, S.A., Calle 123#7-07 P.5,
Bogotá. Tel.: 01800-710-2069.
PERÚ
Mattel Perú, S.A., Av. Juan de Arona # 151,
Centro Empresarial Juan de Arona, Torre
C, Piso 7, Oficina 704, San Isidro, Lima 27,
Perú. RUC: 20425853865. Reg. Importador:
02350-12-JUE-DIGESA. Tel.: 0800-54744.
E-mail Latinoamérica:
SOUTH AFRICA
Mattel South Africa (PTY) LTD, Office 102 I3,
30 Melrose Boulevard, Johannesburg 2196.
5
1,5V x 3
AA (LR6)
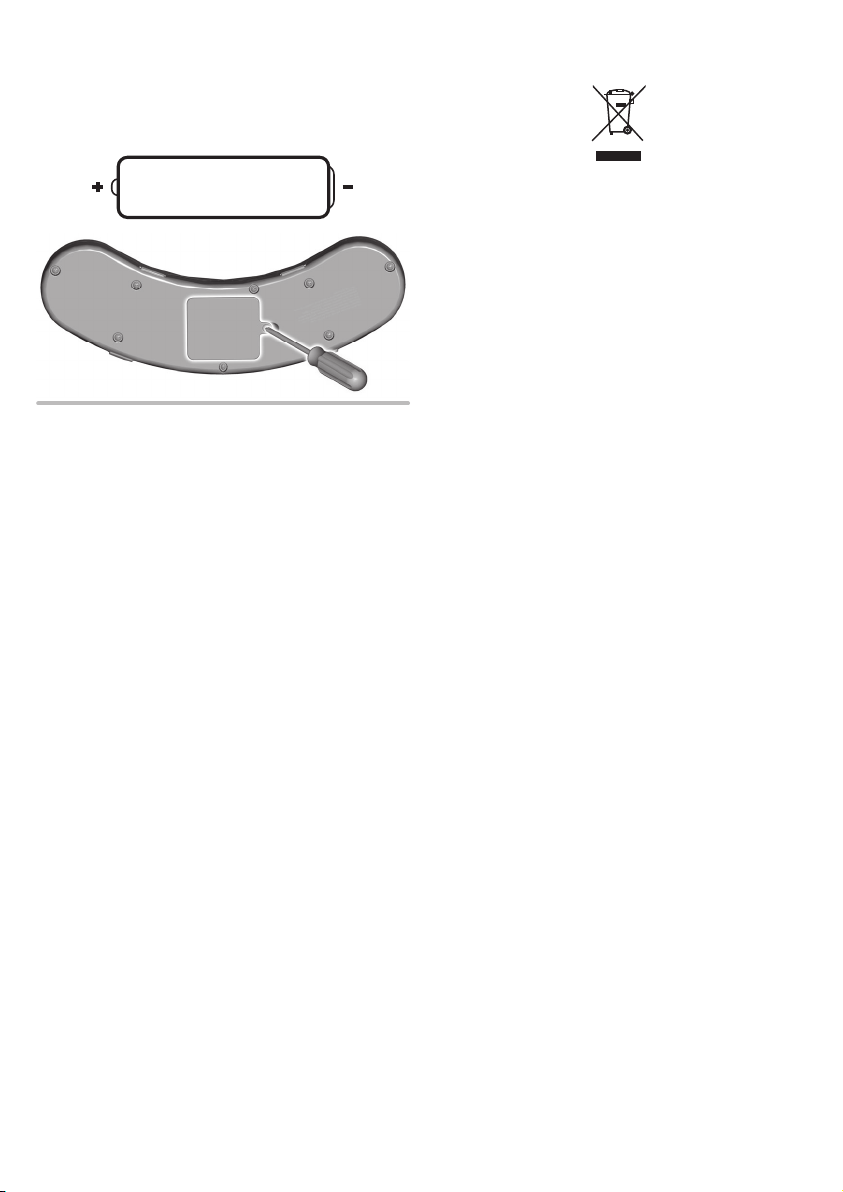
Battery Installation Colocación de las pilas
• Loosen the screw in the battery compartment
door with a Phillips screwdriver and remove
the battery compartment door.
• Insert three AA (LR6) alkaline batteries into
the battery compartment.
• Replace the battery compartment door and
tighten the screw.
• If the electronic toy product begins to
operate erratically, you may need to reset the
electronics. Slide the power/volume switch
off and then back on.
• When sounds or lights become faint or stop,
it’s time for an adult to replace batteries.
• Aflojar el tornillo de la tapa del compartimento
de pilas con un desatornillador de cruz
y retirar la tapa.
• Insertar 3 pilas alcalinas AA (LR6) x 1,5V en
el compartimento.
• Cerrar la tapa del compartimento de pilas
y apretar el tornillo.
• Si el juguete electrónico no funciona
correctamente, restablece el circuito electrónico.
Pon el interruptor de encendido/volumen en
apagado y nuevamente en encendido.
• Sustituye las pilas cuando los sonidos o luces
pierdan intensidad o dejen de funcionar.
For longer life, use alkaline batteries.
Para una mayor duración, usar solo pilas alcalinas.
Protect the environment by not disposing of
this product or any batteries with household
waste. This symbol indicates that this product
shall not be treated as household waste.
Check your local authority for recycling
advice and facilities.
Proteger el medio ambiente no desechando
este producto o baterías de cualquier tipo
en la basura del hogar. Este símbolo indica
que se debe desechar apropiadamente de
este producto. Consultar con la agencia local
pertinente en cuanto a información y centros
de reciclaje.
6
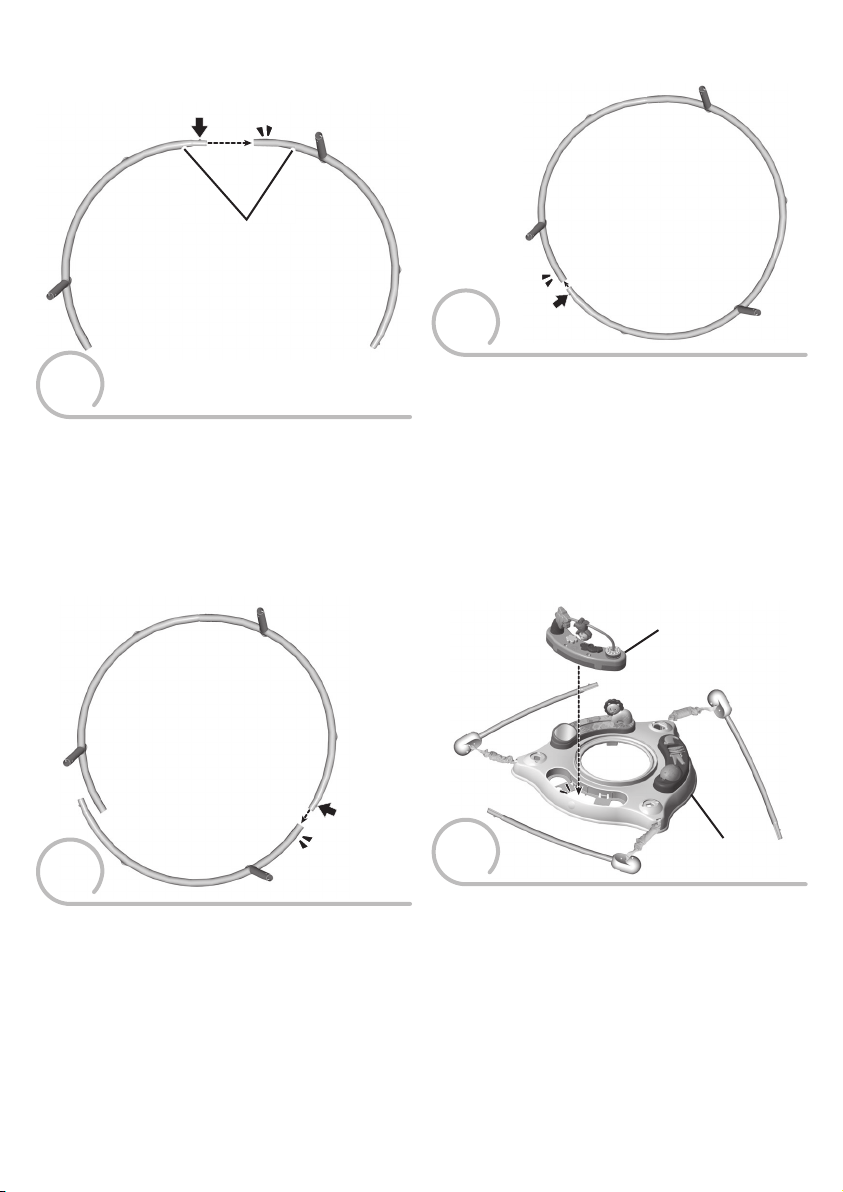
2
• While pressing the button on the base tube
assembly, insert it the remaining base tube.
Continue to slide it until you hear a “click”.
• Mientras presionas el botón de la unidad de
los tubos de la base, insértalo en el tubo de
base restante. Sigue insertando el tubo hasta
que se oiga un clic.
PRESS
PRESIONAR
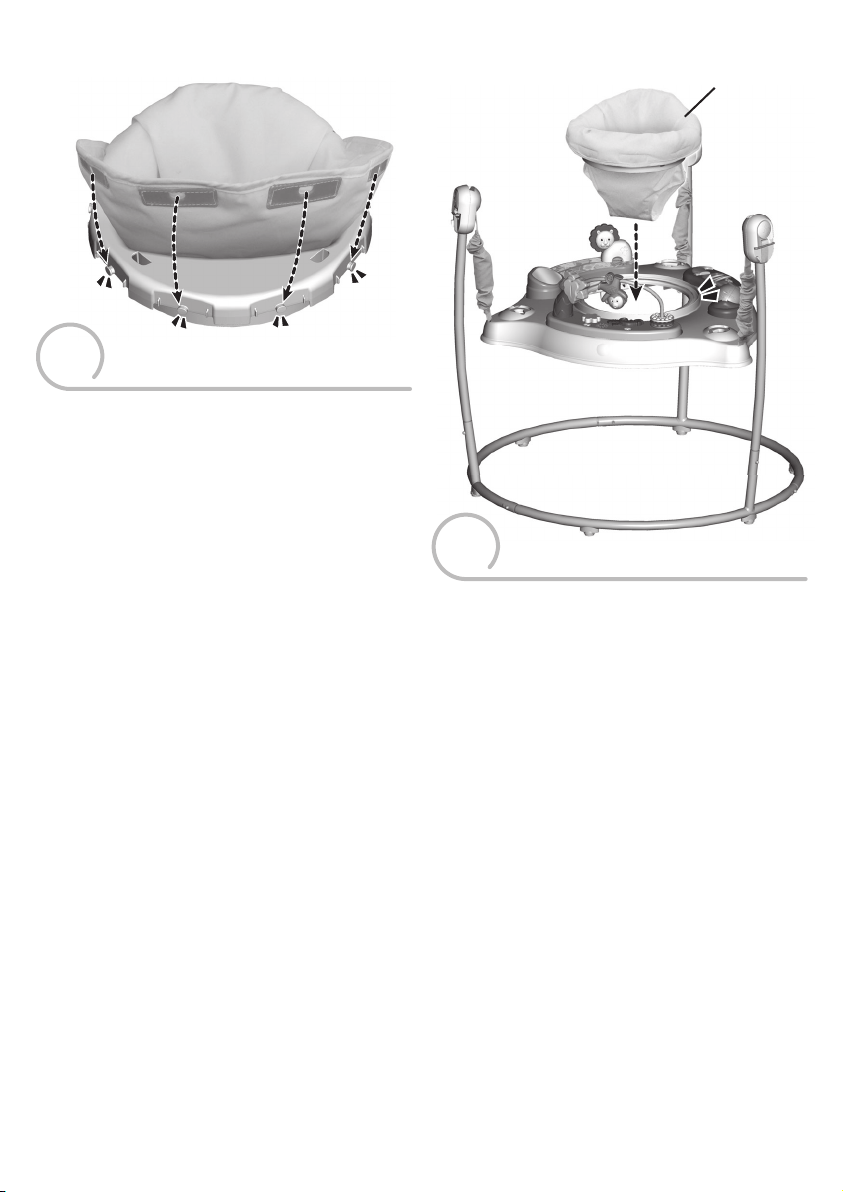
Electronic Toy
Juguete electrónico
Frame
Armazón
4
Hint: You may want to install batteries inside
the electronic toy before completing this
assembly step. Please refer to the Battery
Installation section.
• Insert and “snap” the electronic toy into
the frame.
Atención: Instala las pilas del juguete electrónico
antes de completar este paso de montaje.
Consulta la sección de Colocación de las pilas.
• Inserta y ajusta el juguete electrónico en
el armazón.
Assembly Montaje
Base Tubes
Tubos de base
1
• While pressing the button on a base tube,
insert it into another base tube. Continue to
slide it until you hear a “click”.
• Mientras presionas el botón de un tubo de
base, insértalo en otro tubo de la base. Sigue
insertando el tubo hasta que se oiga un clic.
PRESS
PRESIONAR
• While pressing the button on the free end
of the base tube assembly, insert it into the
remaining free end of the assembly. Continue
to slide the base tube until you hear a “click”.
• Mientras presionas el botón del extremo libre
de la unidad de los tubos de la base, insértalo
en el extremo libre restante de la unidad.
Sigue insertando el tubo base hasta que se
oiga un clic.
3
PRESS
PRESIONAR
7
5
Assembly Montaje
PRESS
PRESS
PRESIONAR
PRESIONAR
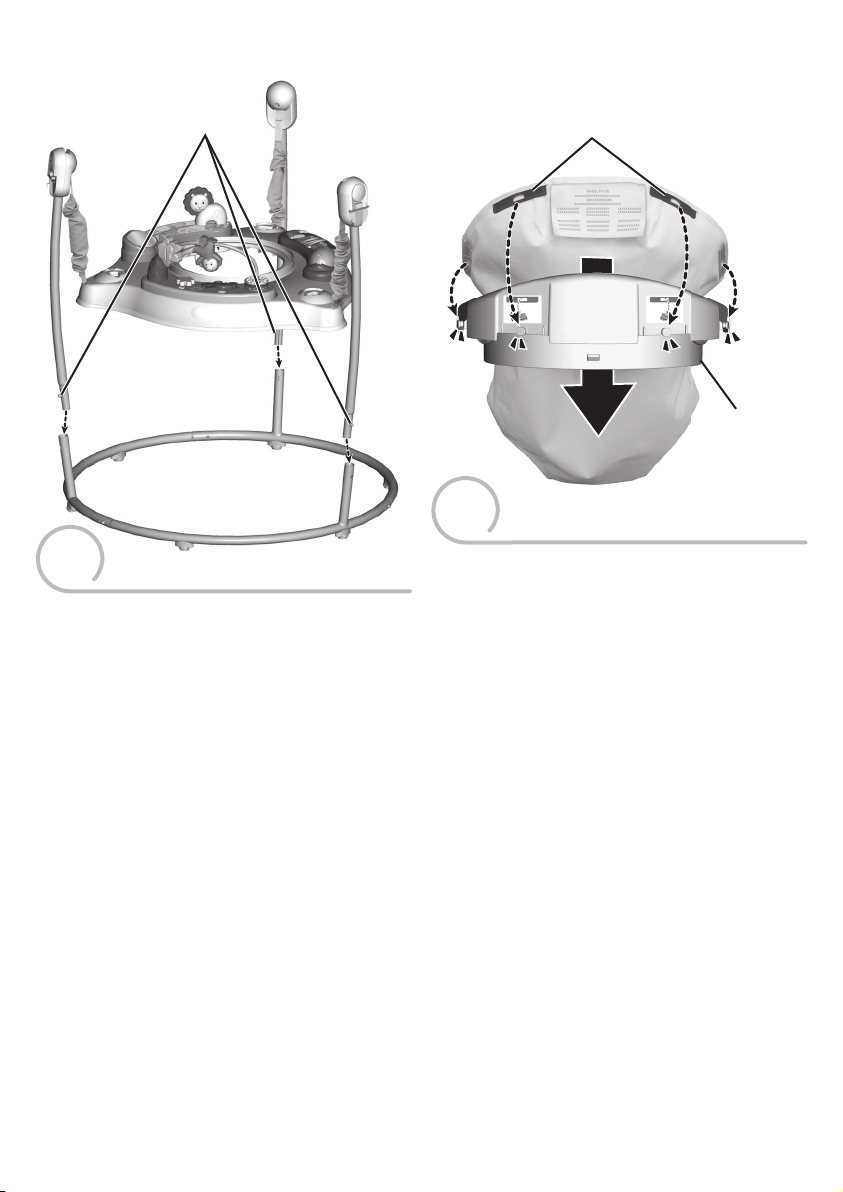
Hint: You may need the help of another adult
with this assembly step.
• While pressing a button on a frame tube,
insert into an upright base tube. Continue to
slide the frame tube into the base tube until
you hear a “click”. Pull up on the frame tube
to be sure it is secure.
• Repeat this procedure to assemble the two
remaining frame tubes to the base tubes.
Atención: Pide la ayuda de otra persona para
completar este paso de montaje.
• Mientras presionas un botón de un tubo
del armazón, insértalo en un tubo de base
vertical. Sigue insertando el tubo del armazón
en el tubo de la base hasta que se oiga un
clic. Jala hacia arriba el tubo del armazón
para asegurarte de que está seguro.
• Repetir este procedimiento para ensamblar
los dos tubos de armazón restantes en los
tubos de base.
6
Seat Pad Red Tabs
Lengüetas rojas de
la almohadilla
• Position the seat pad with the red tabs toward
you and the seat ring with the instructional
labels toward you.
Hint: The seat pad can only be assembled to
the seat ring one way. First, assemble the red
tabs on the seat pad to the peg below each
instructional label.
• Align the red tabs on the seat pad to the pegs
below each instructional label on the seat
ring. "Snap" the tabs to the pegs.
• "Snap" tabs on the side of the pad to the
matching pegs.
• Coloca la almohadilla con las lengüetas rojas
hacia ti y el aro del asiento con las etiquetas
de instrucciones hacia ti.
Atención: La almohadilla está diseñada para
ajustarse en el aro del asiento de una sola
manera. Primero, conecta las lengüetas rojas
de la almohadilla en la clavija abajo de cada
etiqueta de instrucciones.
• Alinea las lengüetas rojas de la almohadilla
en las clavijas abajo de cada etiqueta de
instrucciones del aro del asiento. Conecta las
lengüetas en las clavijas.
• Conecta las lengüetas del lado de la
almohadilla en las clavijas correspondientes.
Seat Ring
Aro del asiento
BACK VIEW
VISTA DE ATRÁS
8
• Turn the seat ring around so that the front
faces you.
• "Snap" the remaining four tabs on the seat
pad to the pegs on the seat ring.
• Voltea el aro del asiento que el frente apunte
hacia ti.
• Conecta las cuatro lengüetas restantes de la
almohadilla en las clavijas del aro del asiento.
7
Assembly Montaje
FRONT VIEW
VISTA DEL FRENTE
8
Seat
Silla
• Insert and “snap” the seat into the frame.
• First, turn the seat to see if it moves freely.
Then, pull up on the seat to be sure it's
attached to the frame. If the seat does not
move freely or you can remove it, you have
not assembled it correctly. Remove the seat
from the frame completely and try again.
• Inserta y ajusta la silla en el armazón.
• Primero, voltea la silla para ver si se mueve
libremente. Luego, jala hacia arriba la silla
para asegurarte de que está segura en el
armazón. Si la silla no se mueve libremente
o se desprende, significa que no está bien
montada. Quita la silla del armazón y vuelve
a intentar.
9
9
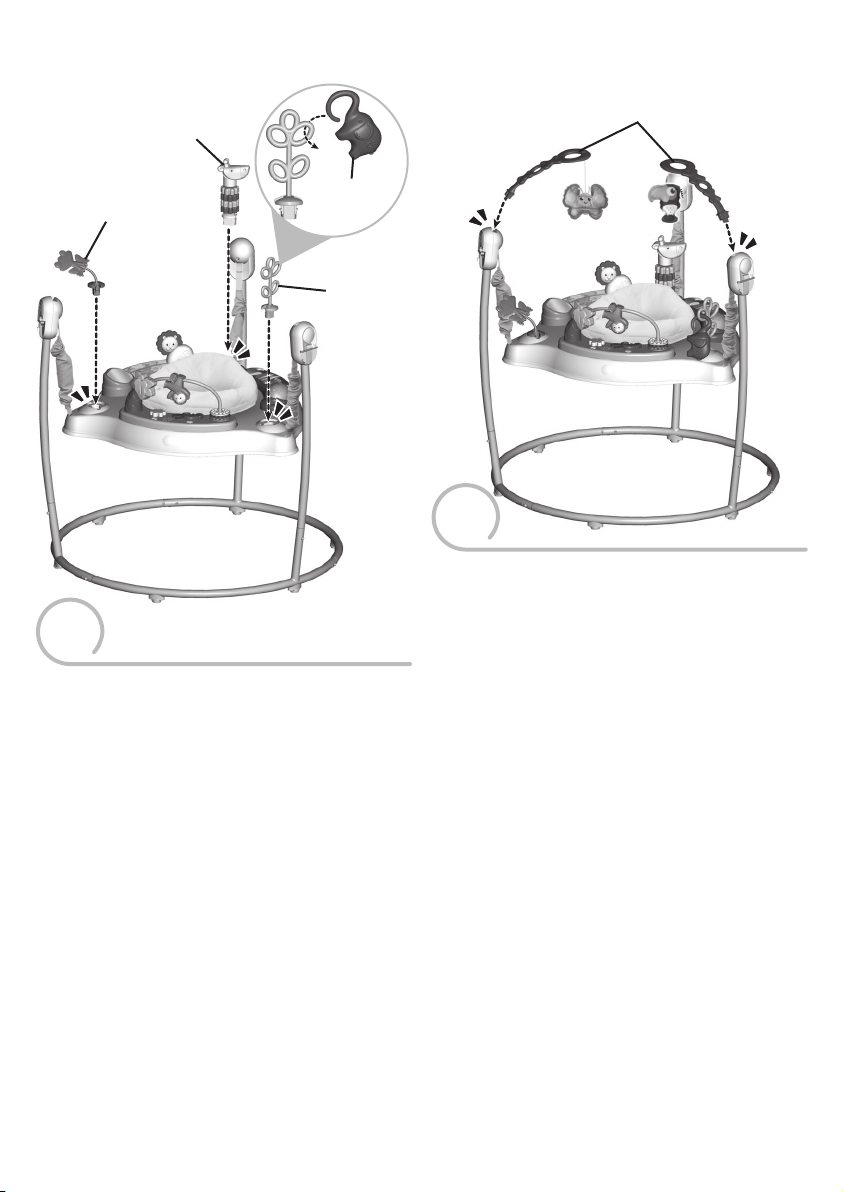
• Insert and "snap" the frog teether, giraffe toy
and link tree. The giraffe toy has a larger base
and fits only into one of the sockets.
Hint: These toys are removable. Squeeze the
tabs on the base of the toy and lift.
• Hook the elephant toy's trunk to the link tree.
• Inserta y ajusta la rana mordedera, jirafa
y árbol. La base de la jirafa es más grande
y sólo se ajusta en una de las conexiones.
Atención: Estos juguetes son removibles.
Aprieta las lengüetas en la base del juguete
y levántalo.
• Engancha la trompa del elefante en el árbol.
Assembly Montaje
Giraffe Toy
Jirafa
Link Tree
Árbol que
se conecta
Frog Teether Toy
Rana mordedera
Hanging Toys
Juguetes colgantes
• Insert and "snap" the hanging toys into the
slots in the hubs.
• Inserta y ajusta los juguetes colgantes en las
ranuras de las conexiones.
10
Elephant Toy
Elefante
10
Setup and Use Preparación y uso
WARNING
ADVERTENCIA
To prevent serious injury or death:
• Use only for a child who is able to hold head upright unassisted and who is not
able to walk or climb out of product.
• Never leave child unattended. Always keep child in view while in product.
• Never use near steps, pools, hot surfaces or areas that may be hazardous to
a child. Product may move during use.
• To avoid tip-over, place product on a flat, level surface.
• Strings can cause strangulation! DO NOT place items with a string around child’s
neck, such as hood strings or pacifier cords. DO NOT suspend strings over
product or attach strings to toys.
Para evitar lesiones graves o la muerte:
• Usar solo con niños que puedan mantener la cabeza derecha sin ayuda
y que no puedan caminar ni salirse del producto.
• No dejar al niño fuera de su alcance. Siempre mantener al niño a la vista mientras esté
en el producto.
• No usar cerca de escalones, piscinas, superficies calientes u otras áreas
peligrosas para niños. El producto se puede mover durante el uso.
• Para evitar que el producto se voltee, ponerlo sobre una superficie plana, nivelada.
• ¡Los cordones pueden causar estrangulación! NO poner artículos con cordones,
tales como capuchas o chupones, alrededor del cuello del niño. NO suspender
cordones sobre el producto ni amarrar cordones a los juguetes.
11
IMPORTANT! This product is shipped with the
straps in the middle height position . Please
be sure you adjust the height of the frame for
your child.
¡IMPORTANTE! Este producto viene de fábrica
con los cinturones en la posición del medio .
Ajusta la altura del armazón según la estatura
del niño.
Seat Height Adjustment
Ajuste de altura de la silla
• Place your child in the seat. Check the
distance between your baby’s feet and the
floor. Your child’s toes should touch the floor
(without bouncing). If your child’s entire
foot is touching the floor or the toes are not
touching the floor at all, adjust the height to
any of three positions (one for the smallest
child and three for the tallest child).
• Sienta al niño en la silla. Revisa la distancia
entre los pies del bebé y el piso. Los dedos
de los pies del bebé deben tocar el piso (sin
rebotar). Si todo el pie del bebé toca el piso o si
no llega a tocarlo, ajusta la altura en una de tres
posiciones (la primera para niños pequeños
y la tercera para niños más grandes).
12
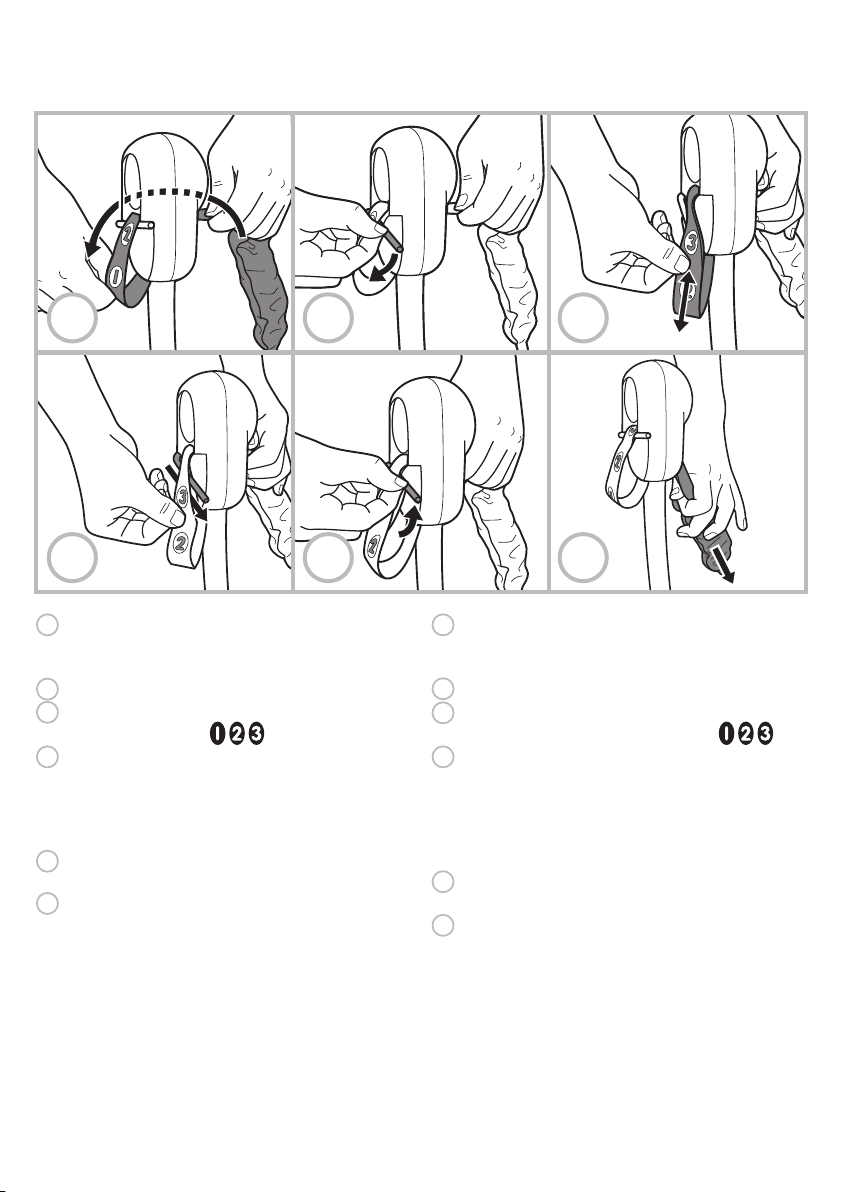
1
While feeding the strap into the slot on
the inside of the hub, pull the strap on the
outside of the hub.
2
Lower the strap bar.
3
Pull the strap out or feed it into the hub to
the desired height .
4
Fit the strap bar into the desired slot in
the strap.
Hint: You may need to feed the strap, from the
inside of the hub, to be able to insert the strap
bar into the slot in the strap.
5
Lift the strap bar to secure the strap
in place.
6
Pull the strap on the inside of the hub.
IMPORTANT! Repeat this process to adjust the
height for the other two straps. Make sure all
three straps are adjusted to the same height.
Seat Height Adjustment
Ajuste de altura de la silla
1
Mientras introduces el cinturón en la ranura
del interior de la conexión, jala el cinturón en
el exterior de la conexión.
2
Baja la barra del cinturón.
3
Jala hacia afuera el cinturón o mételo en la
conexión en la posición deseada .
4
Introducir la barra de cinta en la ranura
deseada en la cinta.
Atención: Quizá sea necesario meter el
cinturón del interior de la conexión para poder
meter la barra del cinturón en la ranura
del cinturón.
5
Sube la barra del cinturón para asegurar el
cinturón en su lugar.
6
Jala el cinturón en el interior de la conexión.
¡IMPORTANTE! Repite este procedimiento para
ajustar la altura de los otros dos cinturones.
Asegurarse de que las tres cintas estén
ajustadas a la misma altura.
1
4
2
5
3
6
13
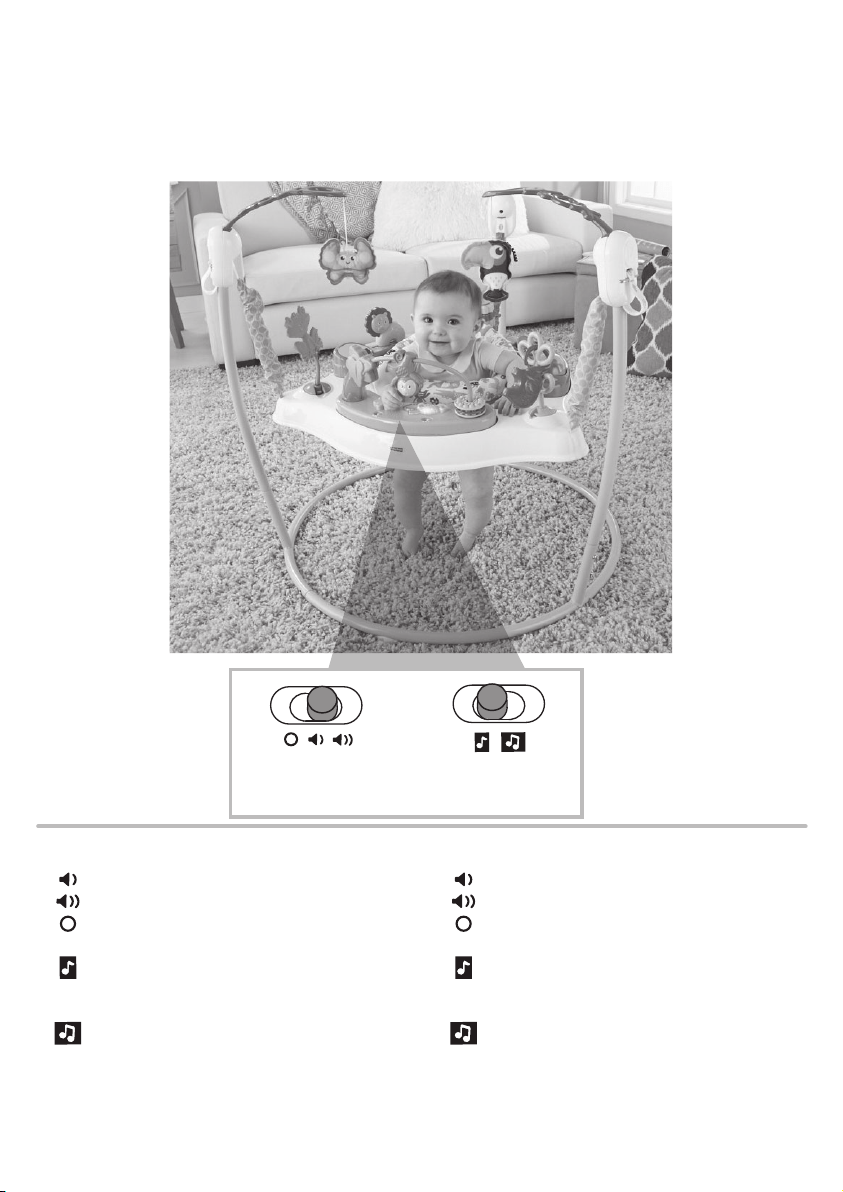
• Slide the power/volume switch to:
ON with low volume
ON with high volume
OFF
• Slide the mode switch to:
Baby's jumping activates lights, sounds
and music! Press the flower button to
hear tunes.
Baby's jumping activates approximately
20 minutes of lights, sounds and music.
Press the flower button to hear
sound effects!
Mode Switch
Interruptor de
modalidad
Power/Volume Switch
Interruptor de
encendido/volumen
Jump on in & explore around
with music, lights & sounds!
¡Siéntate y explora a tus alrededores
con música, luces y sonidos!
• Poner el interruptor de encendido/volumen en:
ENCENDIDO con volumen bajo
ENCENDIDO con volumen alto
APAGADO
• Poner el interruptor de modalidad en:
¡Los saltitos de tu bebé activan luces,
sonidos y música! Presiona el botón de la
flor para escuchar melodías.
Los saltitos de tu bebé activan
aproximadamente 20 minutos de luces,
música y sonidos. ¡Presiona el botón de
la flor para escuchar efectos de sonido!
14
• The seat pad is machine washable. Wash it
separately in cold water on the gentle cycle.
Do not use bleach. Tumble dry separately on
low heat and remove promptly.
• The frame, seat ring and toys may be wiped
clean using a mild cleaning solution and
damp cloth. Do not use bleach. Do not use
harsh or abrasive cleaners. Rinse clean
with water to remove soap residue. Do not
immerse the electronic toy.
• La almohadilla se puede lavar a máquina.
Lavarla por separado en agua fría, en ciclo
para ropa delicada. No usar blanqueador.
Meterla a la secadora por separado
a temperatura baja y sacarla inmediatamente
después de finalizado el ciclo.
• Pásales un paño humedecido en una solución
limpiadora neutra al armazón, aro del asiento
y juguetes. No uses blanqueador. No uses
limpiadores fuertes o abrasivos. Enjuágalos
con agua para eliminar el residuo de jabón.
No sumerjas el juguete electrónico.
Care Mantenimiento
Remove the Seat and Pad
• Lift the frame. While pressing a tab on the
seat, pull the seat from the frame.
• Turn the seat over. Pull to remove the seat
tabs from the pegs on the seat. Remove
the pad.
Replace the Seat and Pad
• Please follow the Assembly instructions.
Desprender el asiento y la almohadilla
• Levanta el armazón. Mientras presionas una
lengüeta de la silla, jala la silla del armazón.
• Voltea la silla. Desconecta las lengüetas de
la silla de las clavijas de la silla, jalándolas.
Quita la almohadilla.
Volver a montar el asiento y la almohadilla
• Seguir las instrucciones de ensamblaje.
BOTTOM VIEW
VISTA DE ABAJO
PRESS
PRESS
PRESIONAR
PRESIONAR
PRESS
PRESS
PRESIONAR
PRESIONAR
PRESS
PRESS
PRESIONAR
PRESIONAR

15
In exceptional circumstances, batteries may
leak fluids that can cause a chemical burn
injury or ruin your product. To avoid
battery leakage:
• Do not mix old and new batteries or batteries
of different types: alkaline, standard (carbon-
zinc) or rechargeable.
• Insert batteries as indicated inside the battery
compartment.
• Remove batteries during long periods of non-
use. Always remove exhausted batteries from
the product. Dispose of batteries safely. Do
not dispose of product in a fire. The batteries
inside may explode or leak.
• Never short-circuit the battery terminals.
• Use only batteries of the same or equivalent
type as recommended.
• Do not charge non-rechargeable batteries.
• Remove rechargeable batteries from the
product before charging.
• If removeable, rechargeable batteries are
used, they are only to be charged under
adult supervision.
En circunstancias excepcionales, las pilas
pueden derramar líquido que puede causar
quemaduras o dañar el producto. Para
evitar derrames:
• No mezclar pilas nuevas con gastadas ni
mezclar pilas alcalinas, estándar (carbono-
cinc) o recargables.
• Cerciorarse de que la polaridad de las pilas
sea la correcta.
• Sacar las pilas gastadas del producto
y desecharlas apropiadamente. Sacar las pilas
si el producto no va a ser usado durante un
periodo prolongado. No quemar las pilas ya
que podrían explotar o derramar el líquido
incorporado en ellas.
• No provocar un cortocircuito con las terminales.
• Usar sólo el tipo de pilas recomendadas
(o su equivalente).
• No cargar pilas no recargables.
• Sacar las pilas recargables antes de cargarlas.
• La carga de las pilas recargables sólo debe
realizarse con la supervisión de un adulto.
Battery Safety Information
Información de seguridad acerca de las pilas

16
FCC STATEMENT (UNITED STATES ONLY)
This equipment has been tested and found
to comply with the limits for a Class B digital
device, pursuant to Part 15 of the FCC
rules. These limits are designed to provide
reasonable protection against harmful
interference in a residential installation.This
equipment generates uses and can radiate
radio frequency energy and, if not installed
and used in accordance with the instructions,
may cause harmful interference to radio
communications.However, there is no
guarantee that interference will not occur
in a particular installation.If this equipment
does cause harmful interference to radio or
television reception, which can be determined
by turning the equipment off and on, the user
is encouraged to try to correct the interference
by one or more of the following measures:
• Reorient or relocate the receiving antenna.
• Increase the separation between the
equipment and receiver.
• Consult the dealer or an experienced radio/TV
technician for help.
NOTE: Changes or modifications not expressly
approved by the manufacturer responsible for
compliance could void the user’s authority to
operate the equipment.
This device complies with Part 15 of the FCC
Rules. Operation is subject to the following
two conditions: (1) This device may not cause
harmful interference, and (2) this device must
accept any interference received, including
interference that may cause undesired operation.
NOTA FCC (VÁLIDO SÓLO EN LOS
ESTADOS UNIDOS)
Este equipo fue probado y cumple con los
límites de un dispositivo digital de Clase B,
según está establecido en la Parte 15 del
reglamento FCC. Estos límites están diseñados
para proporcionar una protección razonable
contra interferencia dañina en una instalación
residencial. Este equipo genera, utiliza y puede
radiar energía de radiofrecuencia y,
si no se instala y utiliza según lo estipulado en
las instrucciones, puede causar interferencia
dañina a radiocomunicaciones. Sin embargo,
no hay ninguna garantía de que no haya
interferencia en una instalación particular.
Si este equipo llega a causar interferencia dañina
a la recepción de radio o televisión, lo cual
puede ser verificado encendiendo y apagando
el equipo, se recomienda tomar una de las
siguientes medidas para corregir el problema:
• Cambiar la orientación o localización de la
antena receptora.
• Aumentar la distancia entre el equipo
y el receptor.
• Ponerse en contacto con el distribuidor o con
un técnico de radio/TV.
Nota: los cambios o modificaciones no
expresamente autorizados por el fabricante
responsable del cumplimiento de las normas
puede cancelar la autoridad del usuario de usar
el equipo.
Este dispositivo cumple con la Parte 15 del
reglamento FCC. El uso está sujeto a las dos
condiciones siguientes: (1) este dispositivo
no debe causar interferencia dañina y (2) este
dispositivo debe aceptar cualquier interferencia
recibida, incluyendo interferencia que
pueda causar que el dispositivo no funcione
correctamente.
CAN ICES-3 (B)/NMB-3 (B)
Operation is subject to the following two
conditions: (1) this device may not cause
interference, and (2) this device must accept
any interference, including interference that
may cause undesired operation of the device.
L’utilisation de ce dispositif est autorisée
seulement aux conditions suivantes : (1) il ne
doit pas produire de brouillage et (2) il doit
pouvoir tolérer tout brouillage radioélectrique
reçu, même si ce brouillage est susceptible de
compromettre son fonctionnement.
Consumer Information
Información al consumidor