
Model / Modelo: 1340
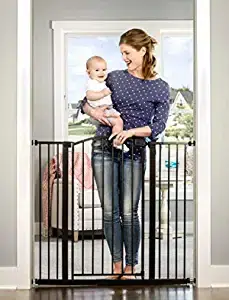
2 in 1 Super Wide Safety Gate and Play Yard
2 en 1 Puerta de Seguridad Super Wide y Patio Infantil
www.regalo-baby.com
Regalo International, LLC.
3200 Corporate Center Drive, Suite 100 / Burnsville, MN 55306, USA / EE. UU.
866.272.5274 (U.S. only / solo en EE. UU.) or / o 952.435.1080
Made in China / Hecha en China
• LEA TODAS LAS INSTRUCCIONES ANTES DE MONTAR Y USAR LAREJA.
GUÁRDELAS PARA UTILIZARLAS COMO REFERENCIA.
• READ ALL INSTRUCTIONS BEFORE ASSEMBLY AND USE OF GATE.
KEEP INSTRUCTIONS FOR FUTURE USE.
™
™

English
• Mounting hardware must be mounted into the wall.
• Base locks are to be used at all times, on both sides
of the gate.
• For children ages 6 months to 24 months
When mounting:
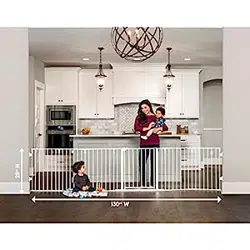
• The minimum opening allowed is 56"
• The maximum opening allowed is 130".
• Please note if your opening is larger than 130" you can purchase
the optional 2 Panel Extension Kit, model number 0040 W.
Periodically check the gate for signs of damage, wear, or missing
components. Do not use if any part is missing, worn or damaged.
Check the gate regularly to ensure all the hardware and mountings
are tightened. Do not use abrasive cleaners or bleach. Clean by
sponging with warm water and a mild detergent.
MANUFACTURER RECOMMENDATIONS:
IMPORTANT
CARE AND MAINTENANCE
BEFORE USING PRODUCT
Read and follow all instructions carefully to ensure
that your gate and extensions are properly installed.
Improper installation could result in the gate
becoming unstable or dislodged from the doorway.
Always make sure the extension is securely attached
to the gate before using. The safety of your child is
your responsibility. Please keep these instructions for
your reference.
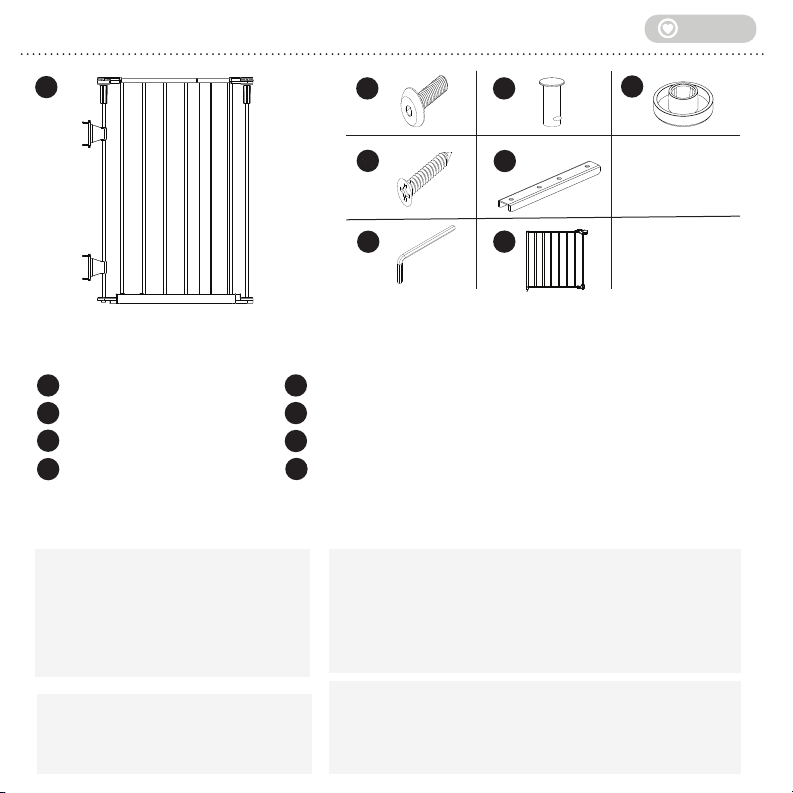
A
B
C
F
G
Main Gate Assembly (2)
Pan Head Screw (4)
Wood screw (8)
Allen Wrench (1)
PLEASE CHECK TO MAKE SURE YOU HAVE THE FOLLOWING PARTS:
Upper Door Hinge Pin (1)
Door Frame U-bracket (1)
Door Frame Assembly (1)
Cap Hinge Cover (1)
Before Assembly
D
E
H
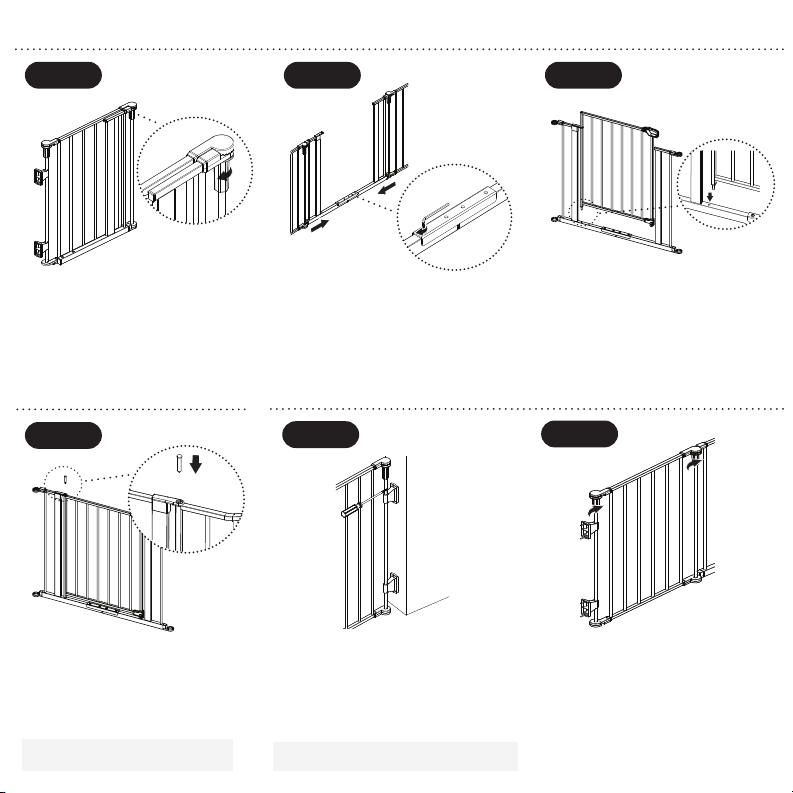
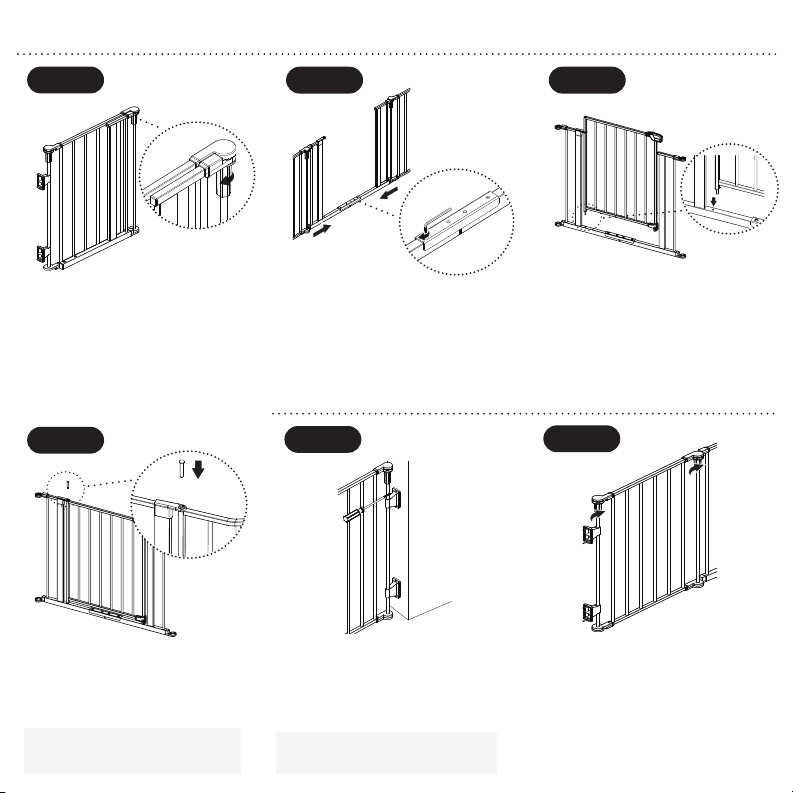
Gate Assembly
STEP 1
Start with the main gate assemblies (A). Loosen
the hinge knob in the clockwise direction. Doing
this will let main gate assemblies unfold.
STEP 2
Slide the two gate assemblies together. Place
the door frame u-bracket (F) over the lower
frame lining over the four (4) holes. Using the
allen wrench (D) tighten down the four (4) pan
head screws (B). Rotate the allen wrench in the
clockwise direction to tighten the screws.
STEP 3
Set the door frame assembly (G) into the gate.
Set the pin of the door into the receiver hole on
the bottom main frame assembly.
STEP 4
Place the upper door hinge pin (E) through the
hole in the main frame assembly and into the
door frame assembly.
STEP 1
Determine what side you wish to have the hinge
of the door on. Place the wall mounts on that end
of the gate against the wall. Using the wood
screws (C), screw into the wall. Turning the a
screwdriver in the clockwise direction will tighten
the screws. Repeat on both ends of the gate.
STEP 2
Tighten all the gate hinges by twising the hinge
knob counter clockwise direction.
NOTE: Once the upper door hinge pin is
installed it will not be removed easily.
Mounting of the Gate
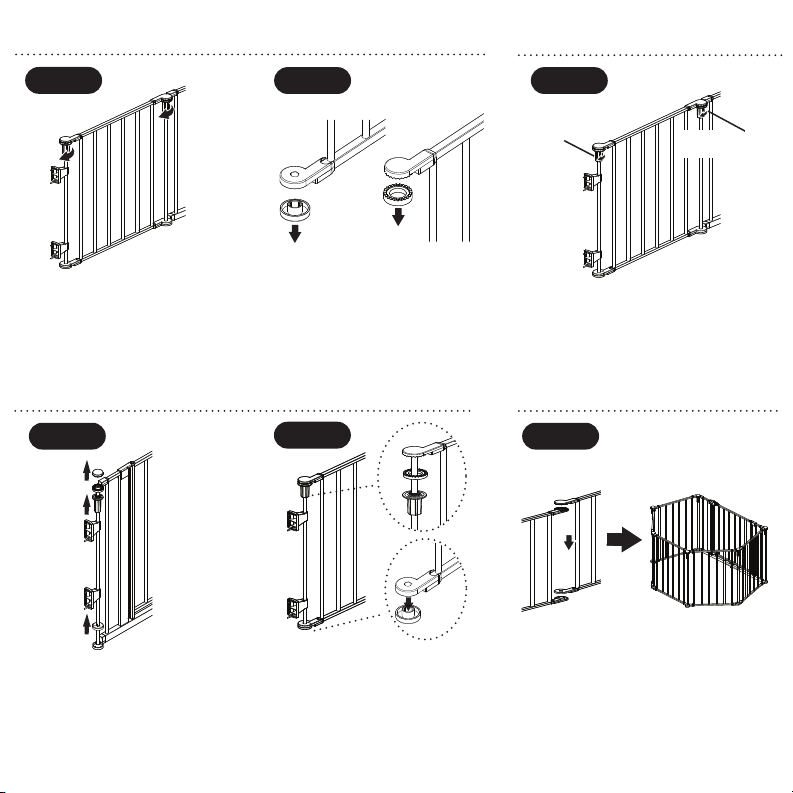
NOTE: If your application does not require both
extension gates, refer to removing extension gate.
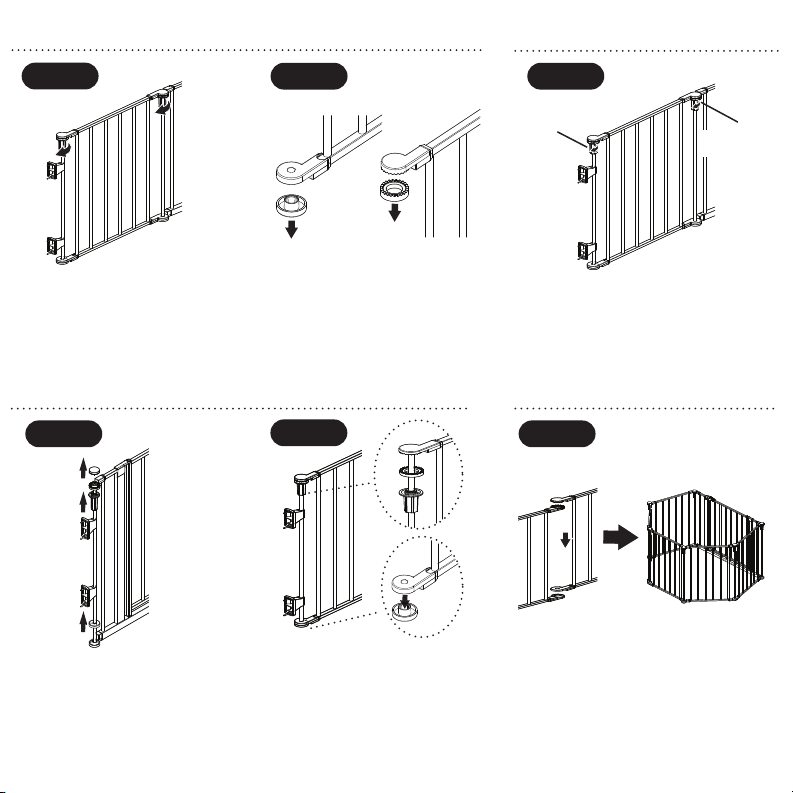
Completely remove
hinge knob
Loosen all other
hinge knob(s)
Removing Extension Gate
STEP 1
If the standard gate is too long for your
opening you must remove either the right or
left extension gate. Loosen the hinge knob in
the clockwise direction. Slide the hinge knob
down and pull out the tube hinge. Do the
same with the tube hinge on the end with the
wall mounts.
STEP 2
Remove the hinge cover cap. Hinge cover
cap (H) is on the bottom of the hinge with
the wall mounts. Remove the toothed hinge
cap from the top.
STEP 1
Twist the hinge knobs in clockwise direction to
loosen.
STEP 2
STEP 3
Connecting The Panels
To Convert Into Play Yard
If the standard gate is too long for your opening you
must remove either the right or left extension gate.
Loosen the hinge knob in the clockwise direction.
Slide the hinge knob down and pull out the tube
hinge. Do the same with the tube hinge on the end
with the wall mounts.
Removing the Wall Mount: Panel 1
If the standard gate is too long for your
opening you must remove either the right or
left extension gate. Loosen the hinge knob in
the clockwise direction. Slide the hinge knob
down and pull out the tube hinge. Do the
same with the tube hinge on the end with the
wall mounts.
Removing the Wall Mount: Panel 2
Loosen the hinge knob in the clockwise
direction to disengage the locking teeth.
Slide the hinge knob and the toothed hinge
cap downward. Pull the tube along with the
hinge knob, toothed hinge cap, and wall
mounts away from the gate to release all
the parts. Remove the hinge cover cap from
the bottom of the 2 in 1 Super Wide™
Safety Gate.
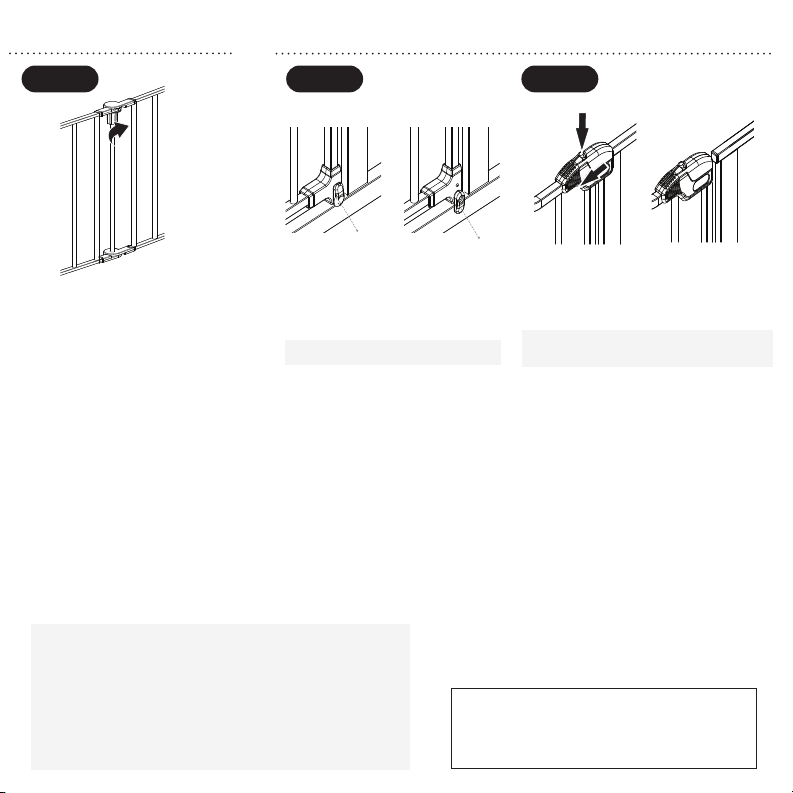
STEP 4
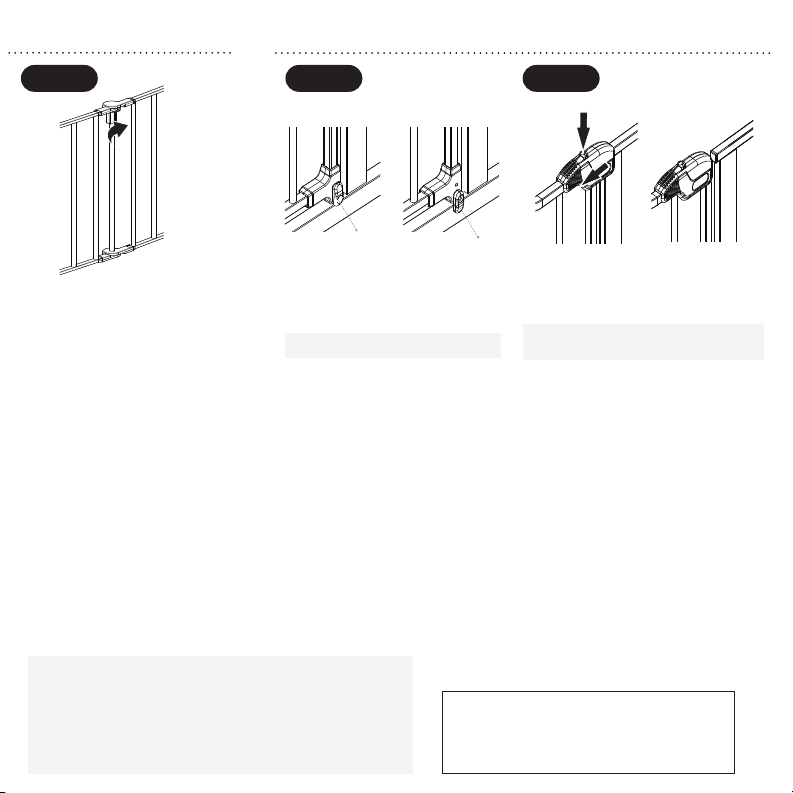
LOCKED
UNLOCKED
STEP 1
To open the gate, start with rotating the base
lock in the upward direction. Do this on both
sides of the door.
STEP 2
Press the release button down on the handle.
Slide the handle back towards the hinge.
Gate Operation
NOTE: Handle is spring loaded and will return to
its "locked" position on its own. When closing the
gate you must do the same operation.
NOTE: You can rotate the base lock in
either direction.
STEP 5
Place the tube with the hinge knob on it into
the hole in the bottom of the extension gate.
Slide the tube into place and screw the hinge
knob in the counter clockwise direction to
tighten. Assembly is now complete.
90 DAYS LIMITED WARRANTY
If, during the first 90 days after consumer purchase of the item,
under reasonable and non-commercial use and conditions of
maintenance, it fails while owned by the original purchaser because
of the quality of materials or workmanship of finish and assembly,
Regalo International, LLC, will replace or repair it at Regalo’s option.
PROOF OF PURCHASE REQUIRED.
Need More Width?
Please note if your opening is larger than 130" you
can purchase the optional 2 Panel Extension Kit,
model number 0040 W.
I
A
B
C
D
E
F
Spanish
G
H
• El herraje de ensamble debe instalarse en la
pared.
• En todo momento se deben usar bloqueos
para la base, en ambos lados de la puerta.
• Para niños de 6 a 24 meses de edad
Al instalar:
• La abertura mínima permitida es de 56" (142).
• La abertura máxima permitida es de 130" (330 cm).
• Tenga en cuenta que si la abertura es mayor a 74.5" puede comprar
el juego opcional para extensión de paneles Home Accents™ 2 con
número de modelo 0040 W.
Vérifiez régulièrement la barrière (dommage, usure, pièce manquante).
Cessez l’utilisation si une pièce est manquante, usée ou endommagée.
Vérifiez régulièrement le serrage des pièces de montage et de fixation. Pour
nettoyer la barrière, n’utilisez pas d’abrasifs ni d’eau de Javel. Nettoyez avec
une éponge légèrement imbibée d’eau chaude et un détergent doux.
RECOMENDACIONES DEL FABRICANTE:
IMPORTANTE
SOIN ET ENTRETIEN
ANTES DE USAR EL PRODUCT
Lea y siga las instrucciones cuidadosamente
para asegurarse de que haya instalado
adecuadamente la puerta. La instalación
inadecuada podría provocar que la puerta sea
inestable o se desprenda del umbral. La
seguridad de su hijo es su responsabilidad.
Conserve estas instrucciones como referencia.
A
B
C
F
G
Ensamble principal de la puerta (2)
Tornillos de cabeza plana (4)
Tornillos para madera (8)
Llave Allen (1)
ASEGÚRESE DE CONTAR CON LAS SIGUIENTES PARTES:
Clavija de la bisagra superior de la puerta (1)
Abrazadera en U del marco de la puerta (1)
Ensamble del marco de la puerta (1)
Cubierta de la bisagra de coronamiento (1)
Antes de ensamblar
D
E
H
Ensamble de la puerta
PASO 1
Comience con los conjuntos principales de la
puerta (A). Afloje la perilla de la bisagra en el
sentido de las agujas del reloj. Esto permite
que se desplieguen los conjuntos principales
de la puerta.
PASO 2
Una los dos conjuntos principales de la puerta.
Coloque la abrazadera en U del marco de la
puerta (F) sobre el marco inferior alineando los
cuatro agujeros. Con una llave Allen (D) apriete
los cuatro tornillos de cabeza plana (B). Gire la
llave Allen en el sentido de las agujas del reloj
para apretar los tornillos.
PASO 3
Coloque en la puerta el ensamble del marco de la
puerta (G). Coloque la clavija del ensamble del
marco de la puerta en el agujero receptor del
ensamble del marco principal.
PASO 4
Meta la clavija de la bisagra superior de la
puerta (E) en el agujero del ensamble del
marco principal y en el ensamble del marco
de la puerta.
PASO 1
Decida en qué lado quiere dejar la bisagra de la
puerta. Coloque contra la pared los montajes para
pared en ese extremo de la puerta. Sujételo a la
pared usando tornillos para madera (C). Cuando
se gira el destornillador en el sentido de las
agujas del reloj se aprietan los tornillos. Repita el
proceso en ambos extremos de la puerta.
PASO 2
Apriete todas las bisagras de la puerta girando la
perilla de la bisagra en sentido contrario al de las
agujas del reloj.
NOTA: Media vez se haya metido la clavija
de la bisagra superior de la puerta no se le
puede sacar fácilmente.
NOTA: Si su situación no requiere el uso de
ambas puertas de extensión, vea la sección
titulada Cómo retirar la puerta de extensión.
Cómo montar la puerta
Cómo remover la puerta de extensión
PASO 1
Si la puerta estándar es demasiado larga para
la apertura, deberá quitar una o más puertas
de extensión. Afloje la perilla de la bisagra en
el sentido de la agujas del reloj. Meta hacia
abajo la perilla de la bisagra y saque la bisagra
de tubo. Haga lo mismo con la bisagra de
tubo que está en el extremo con los montajes
para pared.
PASO 2
Quite la cubierta de la bisagra de
coronamiento (H). La cubierta de la bisagra
de coronamiento se encuentra en la parte
inferior de los montes para pared. Quite de la
parte superior la corona dentada de la
bisagra.
PASO 1
Quite de la parte superior la corona dentada de la
bisagra.
PASO 2
PASO 3
Conectando los paneles
Para convertirlo en patio
infantil
Ajuste los paneles de la puerta en un “círculo” para
alinear el centro de las bisagras.
Retirer la fixation murale : Panneau 1
Afloje la cubierta de la bisagra de
coronamiento en el sentido de las agujas del
reloj para liberar los dientes de bloqueo.
Deslice la perilla de la bisagra y la tapa de la
bisagra dentada hacia abajo. Jale el tubo junto
con la perilla de la bisagra, tapa de la bisagra
dentada y montajes para pared en dirección
opuesta de la puerta para liberar todas las
piezas. Quite la cubierta de la bisagra de
coronamiento inferior de la parte inferior de la
puerta de seguridad Super Wide™ 2 en 1.
Retirer la fixation murale : Panneau 2
Afloje la perilla de la bisagra en el sentido
de las agujas del reloj para liberar los
dientes de bloqueo. Deslice la perilla de la
bisagra y la tapa de la bisagra dentada hacia
abajo. Jale el tubo junto con la perilla de la
bisagra, tapa de la bisagra dentada y
montajes para pared en dirección opuesta
de la puerta para liberar todas las piezas.
Quite la tapa de la cubierta de la bisagra de
la parte inferior de la puerta de seguridad
Super Wide™ 2 en 1.
PASO 4
Retire completamente la
perilla de la bisagra
Afloje todas las otras
perillas de la bisagra
BLOQUEADA
DESBLOQUEADO
PASO 1
Para abrir la puerta, comience por girar hacia
arriba el bloqueo de la base. Haga esto a
ambos lados de la puerta. Nota: Se puede
girar el bloqueo de la base a cualquier
dirección.
PASO 2
Presione hacia abajo el botón de liberación que
está en la manija. Mueva la manija hacia la
bisagra.
NOTA: La manija es accionada por resorte y vuelve
por sí misma a la posición "bloqueada". Deberá
hacer la misma operación al cerrar la puerta.
PASO 5
Coloque el tubo con la perilla de la bisagra en
el agujero en la parte inferior de la puerta de
extensión. Deslice el tubo en su lugar y
atornille la perilla de la bisagra en el sentido
contrario a las agujas del reloj. El ensamblaje
ahora está completo.
¿Necesita más ancho?
Tenga en cuenta que si la abertura es mayor a 130"
puede comprar el juego opcional para Juego de
extensión de 2 paneles con número de modelo 0040 W.
GARANTÍA LIMITADA DE 90 DÍAS
Si durante los primeros 90 días después de la compra del artículo
por el consumidor, bajo cualquier uso razonable y no comercial, así
como condiciones de mantenimiento razonables, este falla aún bajo
posesión del comprador original debido a la calidad de los
materiales o mano de obra del acabado o ensamble, Regalo
International, LLC lo reemplazará o reparará, a criterio de Regalo. SE
REQUIERE COMPROBANTE DE COMPRA.
NOTA: Se puede girar el bloqueo de la base
a cualquier dirección.
WARNING
ADVERTENCIA
SPANISH • Ejecute la instalación de acuerdo con las instrucciones del fabricante. • Los niños murieron
o resultaron gravemente heridos cuando las puertas no se instalaron de forma segura. SIEMPRE
instale y use según las instrucciones usando todas las partes requeridas. • Nunca apile las puertas de
seguridad una encima de la otra para formar una barrera más alta. Esto podría causar lesiones graves
o la muerte. • DEJE de usarla cuando el niño pueda escalar sobre la puerta, o cuando pueda
desprenderla. • Solo utilice cuando el mecanismo de cierre/traba esté bien activado. • NUNCA utilice
para mantener a los niños alejados de una piscina. Diseñado para utilizar con niños de 6 a 24 meses
de edad. • Este producto no necesariamente evitará todos los accidentes. Nunca deje a los niños sin
supervisión. • Siempre asegúrese de que la puerta descanse directamente sobre el piso antes de
comenzar la instalación. • Revise la puerta con frecuencia y asegúrese que los soportes y herrajes
estén bien ajustados. • No utilice si faltan componentes, o si estos están dañados. • Requiere de
supervisión por parte de adultos en todo momento. • Se requiere instalación por adultos. • Para evitar
caídas, nunca la utilice en la parte superior de las escaleras.
ENGLISH • Install according to manufacturer's instructions. • Children have died or been seriously
injured when gates are not securely installed. ALWAYS install and use gate as directed using all required
parts. • Never stack gates on top of each other to form a taller barrier. This could result in serious injury
or death. • STOP using when a child can climb over or dislodge the gate. • Use only with the locking/
latching mechanism securely engaged. • NEVER use to keep child away from pool. • Intended for use
with children from 6 months through 24 months. • This product will not necessarily prevent all
accidents. Never leave child unattended. • Always ensure the gate is resting against the floor before
beginning installation. • Check the gate regularly to see if all the hardware and mountings are tightened.
• Do not use if any components are missing or damaged. • Adult supervision is required at all times.
• Adult assembly required. • To prevent falls, never use at top of stairs.
20181228ET