
Foreword
The commercial ice cream machine produced by our company adopts an
all-digital computer control system, famous brand high-quality electrical
components, and advanced production technology, and has a variety of
colors to choose from, which is easy to operate, safe and reliable. The ice
cream machine has a high puffing rate and a high output, and the made
ice cream tastes smooth and delicate. Our ice cream machines are widely
used in catering service industries such as cold drink shops, fast-food
chain stores, western restaurants, groceries stores, and other food service
industries.

CONTENTS
I.Safety Precautions ---------------------------------------------------------1
II.Product Structure -----------------------------------------------------------2
III.Introduction of Operation Panel and Function -------------------------3
IV.Sanitary and Parts Cleaning of Ice Cream Machine-------------------5
V.Assembly Method of Parts -----------------------------------------------5
VI.Ice Cream Manufacturing Method --------------------------------------6
VII.Ice Cream Machine Cleaning and Maintenance Methods------------7
VIII.Annex----------------------------------------------------------------------8
IX.Fault Analysis and Solutions---------------------------------------------8

1
Safety Precautions
I. The Unpacking and Inspection of New Machines
1
)
Cut and unpack the straps and planks that secure the carton; Remove the carton and
foam board ,and remove the bag to see if the machine is damaged; (Note: The
machine must not be tilted more than 45° during handling)
2
)
Open the cylinder head and check if the accessories are complete against the
packing list.
II. Using Environment
1
)
Minimum ambient temperature: 5 ° C, maximum ambient temperature: 35 ° C. Do
not use it in places where is wet and it will be wet by rain. Do not use it in a place
with a lot of sulfuric acid such as hot springs or in a place with a lot of salt such as the
bay.
2)The material temperature is at least 5 degrees and the highest is 40 degrees.
Low-temperature storage is recommended to improve the efficiency of ice cream
production.
3)Choose a well-ventilated location, on a level and solid surface.
4
)
There should be at least 80 cm of space behind the ice cream machine, and there
should be no less than 30 cm of space left and right on each side to allow cold air to
enter the machine and allow hot air to escape, to ensure the condensation cycle of the
machine. Clean the dust on the condenser regularly.
Note: The machine will inevitably be shaken during transportation. It is best to use it 4
hours after smoothing.
III. Electrical Connection
1
)
According to the required power, determine the wire size used in the connection
circuit. All internal lines in the ice cream machines have been connected before
leaving the factory. Simply connect the wires to the power cord from the lower rear of
the machine and connect the ground wire.
Note: All external wiring, plugs, and sockets should meet the requirements of national
standards.
2
)
The rated voltage deviation of the incoming power supply should not be too high or
too low. If it is too high or too low, the indicator light (red) will flash and alarm (beep),
and the machine cooling function will not start.
+6%
Note
:
Voltage
:
220V -10%
(
198V-245V
)
2
+6%
380V -10%
(
342V-403V
)
3
)
Look at the nameplate attached to the rear panel of the machine, to check if the
voltage specified on the machine matches the local power supply voltage.
4
)
Be sure to entrust the electrical construction agency to connect the ground wire.
Otherwise, an electric shock may occur in the event of a malfunction or leakage. (The
grounding yellow-green line is at the bottom of some models.)
5
)
Do not damage the power cord or cause it to be damaged or processed.
Gather the wires into bundles, stretched, barely bent, twisted.
6
)
When the machine is malfunctioning, turn off the power. If a trip occurs, contact
the store or service personnel.
IV
、
Refrigeration Condition
a
、
Refrigeration is not allowed when the empty cylinder has a stirring shaft.
b
、
No cooling when there is water in the tank.
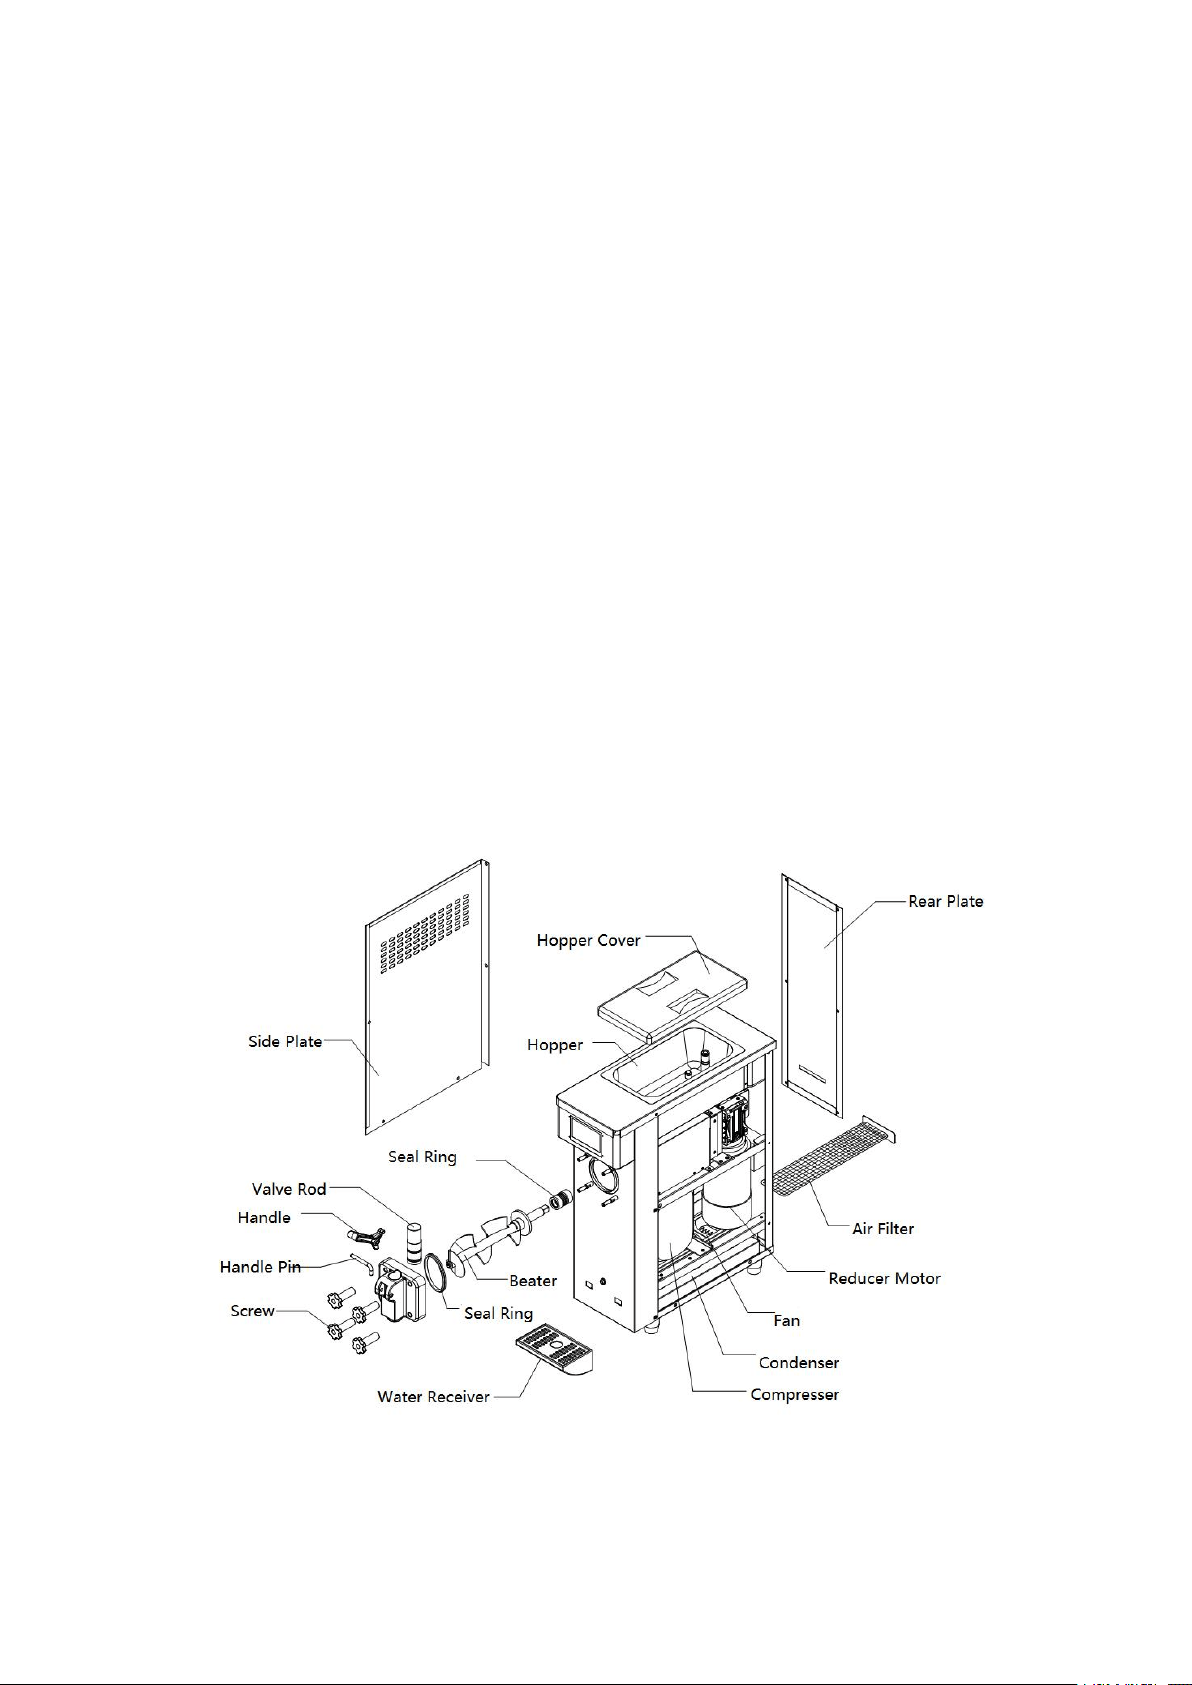
Product Structure
:

3
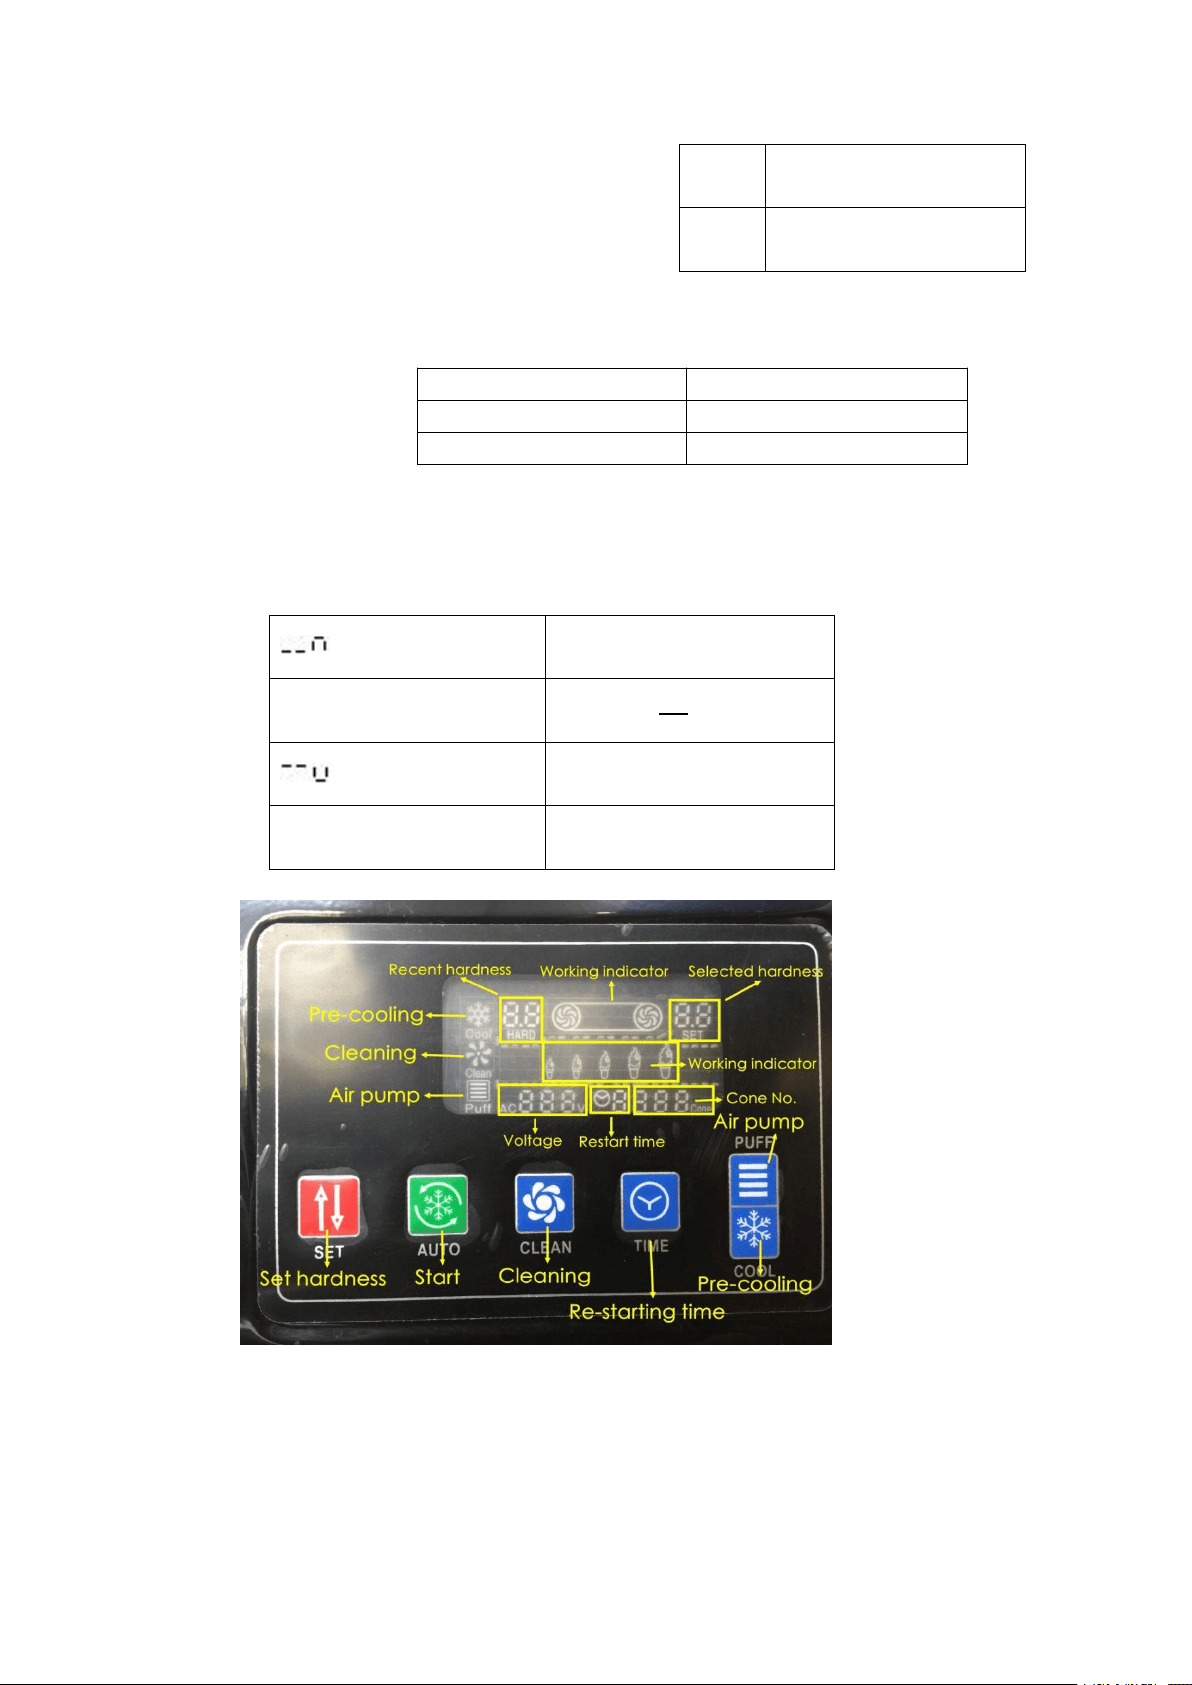
Operation Panel and Function Introduction
The operation panel is divided into an LCD screen and a touch screen (select the
corresponding operation by physical comparison)
LCD screen operation and function introduction
1
)
Cleaning/Defrosting Button
:
In the standby state, the button is clicked to enter the cleaning state, the cleaning
indicator lights, the buzzer sounds short, the stirring motor runs, and the liquid crystal
display shows the current value of the current stirring motor. Press this button again to
enter the standby state.
Press and hold the button for 5 seconds, the defrosting function is turned on, the
cleaning icon flashes, and then the button is pressed, and the defrosting function is
turned off. (Only for models with this feature.)
2
)
Cooling Button
:
In the standby state, the button is clicked to enter the cooling state, the cooling
indicator light is on, the buzzer sounds short, the stirring motor, the compressor, and
the fan motor start, and the liquid crystal display displays the current value of the
current stirring motor. Press this button again to enter the standby state.
3
)
Puffing Button
:
In the standby state, press the “Puffing” button, the air pump indicator light is on,
and the air pump is not working; in the cleaning or cooling state, press the puffing
button, the air pump indicator light flashes, and the air pump starts. (Only for models
with this feature.)
4
)
Hardness Adjustment Setting Button
:
Press and hold “
△
” “
▽
” or for 1 second to enter the hardness parameter
setting state, then click this button to change the hardness value. The higher the
hardness value, the harder the ice cream; the lower the hardness value, the softer the
ice cream.
5
)
Fresh/Pre-cool Button
:
In the standby state, press the “preservation” button, the freshness indicator light
is on, the buzzer will beep once, the stirring motor, compressor, and fan motor will
start at a delay, and the liquid crystal display will display the current value of the
current stirring motor. Press this button again to enter the standby state. In the cooling
state, press this button to automatically enter the trough pre-cooling function after
cooling is completed (only for models with this function)
6)Timing / Clear Button
In the standby state, jog the button to enter the restart time setting state, and then click
the button to change the restart time setting value. Press and hold the button for 10
seconds to clear the number of cups.
7)The number of ice cream cups shows that each time ice cream is squeezed, the
number is automatically recorded.
CL1
Lack of material in the
left hopper
4
8)Material Shortage Display (only for models
with this function):
When the material is missing, the missing code is
displayed in the cup number display area and the
buzzer is intermittently alarmed.
9
)
Alarm Display
10)Temperature Display
Due to the content limitation on the screen, the chute temperature and the freezing cylinder
temperature display can only be displayed in the same area. The display rules are as follows:
CL2
Lack of material in the
right hopper
CL3
Lack of material in both
hoppers
UH
Over Voltage Alarm
UL
Low Voltage Alarm
JJ
Motor Overload Alarm
Tank Temperature Display
Prompt
XX ℃
Tank Temperature Display
Value
Freezer Temperature Display
Prompt
XX ℃
Freezer Temperature Display
Value
5
Sanitary and Parts Cleaning of Ice Cream Machine
1
)
Use hygienic raw materials, otherwise, it may endanger health.
2
)
Do not return the ice cream that has been taken out to the tank, it may be harmful
to your health.
3
)
For the operator of the ice cream machine, you must wash your hands first and
wear them neatly, otherwise, it may endanger your health.
4
)
The seal O-ring for 3 months.
5
)
6-month replacement period for the auger.
6
)
When using it for the first time or not using it for a long time, please clean the parts
before using it.
Please use the food detergent and cleaning brush to clean the parts that have been
dismantled (refer to the product structure drawing), especially thoroughly clean the
groove of the O-ring.
Note: Please do not damage or lose parts during operation; do not use hot water
or dish-washing detergent to clean the resin parts, otherwise it may cause
deformation; please do not soak the parts in the detergent for more than 30
minutes, otherwise it may cause deterioration. For those parts that are prone to
dirt, please wash them carefully. The blade is very sharp, please be careful not to
scratch your hand.
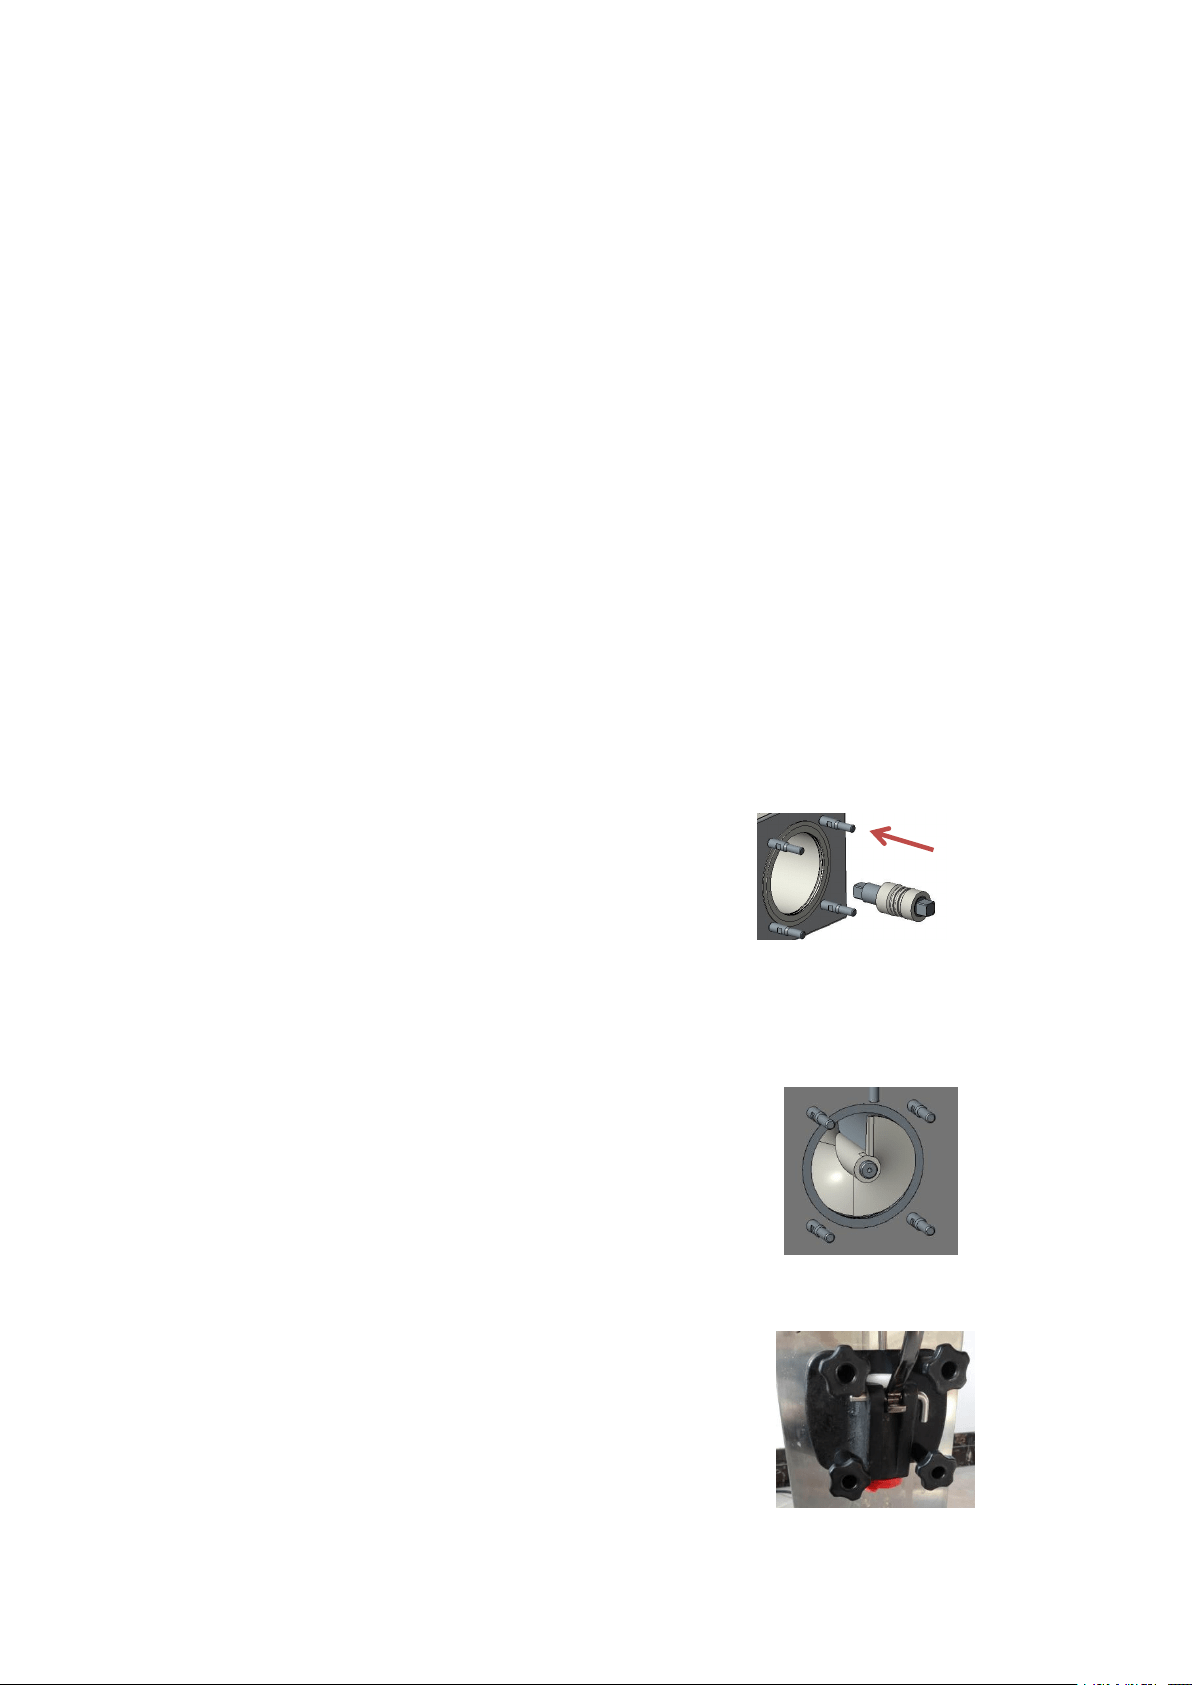
Assembly Method of Parts
1
)
Assembly of the square shaft and bellows of the
agitator, refer to Figure C to fit the bellows into the
square shaft.
Rotate the square shaft after inserting the freezing
cylinder to make it align with the inner square hole.
Figure C
2)Install the stirrer on the machine, refer to Figure D.
After inserting the freezing cylinder, rotate the stirrer to make it
align the square shaft and press the stirrer resilience, it has
been determined whether it is installed in place.
Figure D
3)Assembly of the discharge valve, refer to Figure E
Note: Don't forget to install the seal ring.
Figure E
4
)
Install the water tank as shown (Figure F).

6
Note : Make sure the control power switch is off when you are
assembling the machine.
Figure F
Ice Cream Manufacturing Method
1) Place the prepared ice cream slurry for 15 minutes and pour it into the two tanks at
the top of the ice cream machine;
Note:Requires slurry not to agglomerate.
2) Turn on the power, the ice cream machine enters the standby state, and press the
“clean button” to let the machine run for 3-5 minutes. At this time, press the handle to
let the slurry release 2-3 cups and then pour into the upper tank to prevent the water
from freezing at the discharge opening;
Note: Please prepare the slurry according to the proportion of the ice cream powder.
3) Press the “Set” button, (the button version “
△
” “
▽
” or the button) for 1 second,
you can adjust the stall position (softness) of the ice cream as needed.
Note: Please refer to the machine "warm tips" to set the adjustment hardness value.
4) Press the "cooling" button, and the machine enters the cooling state. Before
pressing the cooling button, you can press the “Puffing” button to increase the puffing
effect; press the “Pre-cool” button to cool the slurry in the feed chute.
5) When the hardness of the current ice cream reaches the set hardness, the machine
will automatically stop and rest; when the machine stops taking a rest, the automatic
work time adjustment range is within 3-9 minutes. At this time, press the time
adjustment button to set the machine to enter the next refrigeration. The time required
for the cycle is increased by one minute per press time, and after 9-minute, it is
returned to the 3-minute state.
Note: When the weather is hot, it is best to set a shorter time; when the weather is cold, it is
best to set a longer time.
6
)
Take an egg cone or cup and place it at the exit of the outlet valve. Press the
discharge handle to squeeze out the ice cream and push the handle back off.
7
)
If there is residual slurry or ice cream left in the machine for a long time, press the
"pre-cooling" button to keep the slurry at a low temperature. In order to ensure food
hygiene and safety, and to reduce energy consumption, it is recommended to clean the
machine every day, leaving no residual ice cream in the machine.

7
8) After the cooling is completed, the hardness of the ice cream is too hard to make
the display alarm or the freezing cylinder does not stir, no discharge phenomenon. If
so, first cut off the power switch, press the switch again after 30 seconds, and press
the “Thaw” button to freeze Thaw in the tank. After the thawing is completed, press
the “Cleaning” button, whether the material is discharged, the material can be
discharged normally. Press the “Start” button again. (Only for models with this
function.)
Ice Cream Machine Cleaning and Maintenance Methods
I. Cleaning of the Freezing Cylinder and Tank
To ensure the health of ice cream consumers and improve the service life of machine
parts, the freezing cylinder must be cleaned and disinfected as long as the ice cream
machine is stopped after every use.
1)Press the cleaning button to discharge all the slurry in the tank, press again,
and the machine stops.
2)Please use hot water and an appropriate amount of disinfectant, pour it into the
tank, and pour it into a volume of about 70% of the tank.
3
)
Press the cleaning button again and stir for about 5 minutes before draining the
cleaning solution.
4
)
Please wash with hot water 2-3 times and stop.
5
)
Use a cleaning brush to clean the chute discharge port. Carefully clean the
liquid level sensor with a clean cloth and a cleaning brush. If the cleaning is not
complete, sometimes the material shortage alarm will not work. Please remove the
mixing blade and clean the rotating shaft and the head with a clean cloth. Use a
cleaning brush to thoroughly clean the groove inside the rotating shaft. Wipe the
tank with a clean cloth.
II.Washing and Unloading Parts
Cut off the power supply, screw out the four nuts of the discharge valve, and
remove the discharge valve;
Pulling out the handle fixing pin, handle, valve rod, and sealing ring in the
discharge valve in sequence; The agitator is withdrawn from the freezing cylinder; the
parts are disassembled to the minimum unit and cleaned.
Reinstall the cleaned parts following the opposite steps to remove.
III. Body Cleaning and Maintenance
The control switch power must be turned off before cleaning the body.
Wipe with a dry, soft cloth. If the soil is dirty, use a warm towel sprayed with
food detergent to remove the stain and wipe off the remaining detergent.
The lower part of the machine and the base are also susceptible to contamination.
Please clean it.
Regarding the drain pipe, the drain pipe is connected from the inside of the water

8
tank of the machine. If the drain pipe has liquid such as raw materials, it may be
caused by a defective motor shaft in the deep part of the freezing cylinder, so
please contact the store or maintenance personnel.
Note: Please do not use polishing powder, gasoline, hot water, etc., otherwise
it will damage the outer surface of the machine.
Please do not use water directly to avoid leakage or accidents.
If the power cord is damaged, do not use it. Please check it once or twice a
month. Check if there is any damage.
IV. Cleaning and Maintenance of the Condenser
During the working period, the condenser will be covered with dust, which will affect
the heat dissipation. The cooling effect is poor. It must be cleaned every two months.
It is best to clean it with professional personnel. Always cut off the power before
cleaning, and do not damage the condenser fins.
Annex
1. Consumable Parts:
Seal O Ring 1 set; Scraper 2 Pieces; Cleaning Brushes 1 Set
2. Hex Wrench 1 Piece;
3. Manual;
4. Warranty Card;
Fault Analysis and Solutions
No.
Fault
Phenomenon
Cause
Method
1
The machine does
not start.
1.The power cord is not
connected.
1.Check the power cord and
connect it.
2.Zero line is not connected.
2.Check the neutral line and
connect it.
3.The control power switch is
not turned on.
3.Turn on the control power
switch.
4.The control power switch
connection problem.
4.Reconnect the control power
switch.
5.There is a problem with the
PCB.
5.Replace the PCB board.
2
Cleaning function
does not work.
1.Loose connection.
1.Reconnect.
2.Motor or capacitor is bad.
2.Repair or replace the motor or
capacitor.
3.The contactor is bad.
3.Replace the contactor.
The compressor
1.Low voltage.
1.Check the supply voltage.
9
3
does not run.
2.The function switch wiring
is loose.
2.The function switch cable
should be reconnected.
3.The contactor is bad.
3.Replace the contactor.
4.There is a problem with the
PCB.
4.Replace the PCB board.
5.Capacitor Failure (220V
series)
5.Replace the capacitor.
6.The compressor is bad.
6.Replace the compressor.
4
Not Cooling
1.Refrigerant Leak
1.Repair the leak position and
vacuum the refrigerant.
2.Condenser is blocked.
2.Clean the condenser.
3.The fan does not work.
3.Repair or replace the fan.
5
Can't make ice
cream
1.No material in the cylinder.
1.Add slurry to the cylinder.
2.Unloading puffing tube is
blocked.
2.Pull out the puffing tube and
clean it up.
3.The slurry ratio is wrong, too
thick.
3.Reconstitute the qualified
slurry.
4.The panel travel switch is
damaged or disconnected
4.Reconnect the line or replace
the travel switch.
5.There is a problem with the
reducer.
5.Repair or replace the gear unit.
6
Poor Expansion
1.Expanded tube is not
inserted.
1.Reinsert the expansion tube.
2.No open puffing switch.
2.Turn on the puffing switch.
7
Ice cream is too soft
1.Slurry ratio is wrong.
1.Reconstitute qualified slurry.
2.Improper hardness setting.
2.Reset hardness.
3.Motor current is large, there
is a short circuit.
3.Repair or replace the motor.
8
Ice cream is too
hard
1.Too much water in the
ingredients
1.Reconstitute qualified slurry.
2.Improper hardness setting.
2.Reset hardness.
10
Material Leakage
1.Discharge Valve Leakage
1.Replace the discharge valve
seal.
2.Leakage at the rod.
2.Replace the stem seal.
3.Leakage at the leak.
3.Replace the outlet valve seal.
4.Stirring shaft seal rupture.
4.Replace the seal.
11
The compressor
stops after the ice
cream is formed,
and the motor does
1.Travel switch contacts are
attached.
1.Repair or replace the travel
switch.

10
Technical Parameters:
Specific technical parameters and refrigerant performance are subject to
the nameplate.
not stop.
12
When the ice
cream is made, the
motor does not
work, and the ice
cream does not
come out.
1.Travel switch is damaged.
1.Repair or replace the travel
switch.
13
Beater Split
Under normal circumstances,
it will not happen. The
abnormal situation is as
follows.
Replace the beater.
14
LCD does not
display.
1.Slurry water, freezing tank.
1. Replace the PCB board.
2.Mis-press the cooling button
during cleaning; with water
cooling.
3.Refrigeration when one
cylinder has material and the
other cylinder has no material.
4.Empty cylinder refrigeration.
5.Excessive use of a cylinder
when playing ice cream.
6.Hot slurry is poured into the
cylinder for rapid cooling.
7.When the motor direction is
reversed, the material is
cooled.
8.There is a problem with the
PCB.
15
LCD does noe
display.
1.The plug is loose.
2.Check the wiring plug.
2.LCD monitor is damaged.
2.Replace the LCD.
16
Alarm Display
UH--Over Voltage Alarm
UL--Low Voltage Alarm
JJ -- Motor Overload Alarm

11
The pictures in the manual are for illustrative purposes only, please refer
to the actual product!