


en
7DEOHRIFRQWHQWV
HQ
,QVWUXFWLRQPDQXDO
8 ,QWHQGHGXVH
( ,PSRUWDQWVDIHW\LQIRUPDWLRQ
*HQHUDOLQIRUPDWLRQ
6WHDP
] &DXVHVRIGDPDJH
*HQHUDOLQIRUPDWLRQ
6WHDP
7 (QYLURQPHQWDOSURWHFWLRQ
6DYLQJHQHUJ\
* *HWWLQJWRNQRZ\RXUDSSOLDQFH
&RQWUROSDQHO
7RXFKEXWWRQVDQGGLVSOD\
'LVSOD\
2SHUDWLQJPRGHV
+HDWLQJPRGHV
6WHDP
:DWHUWDQN
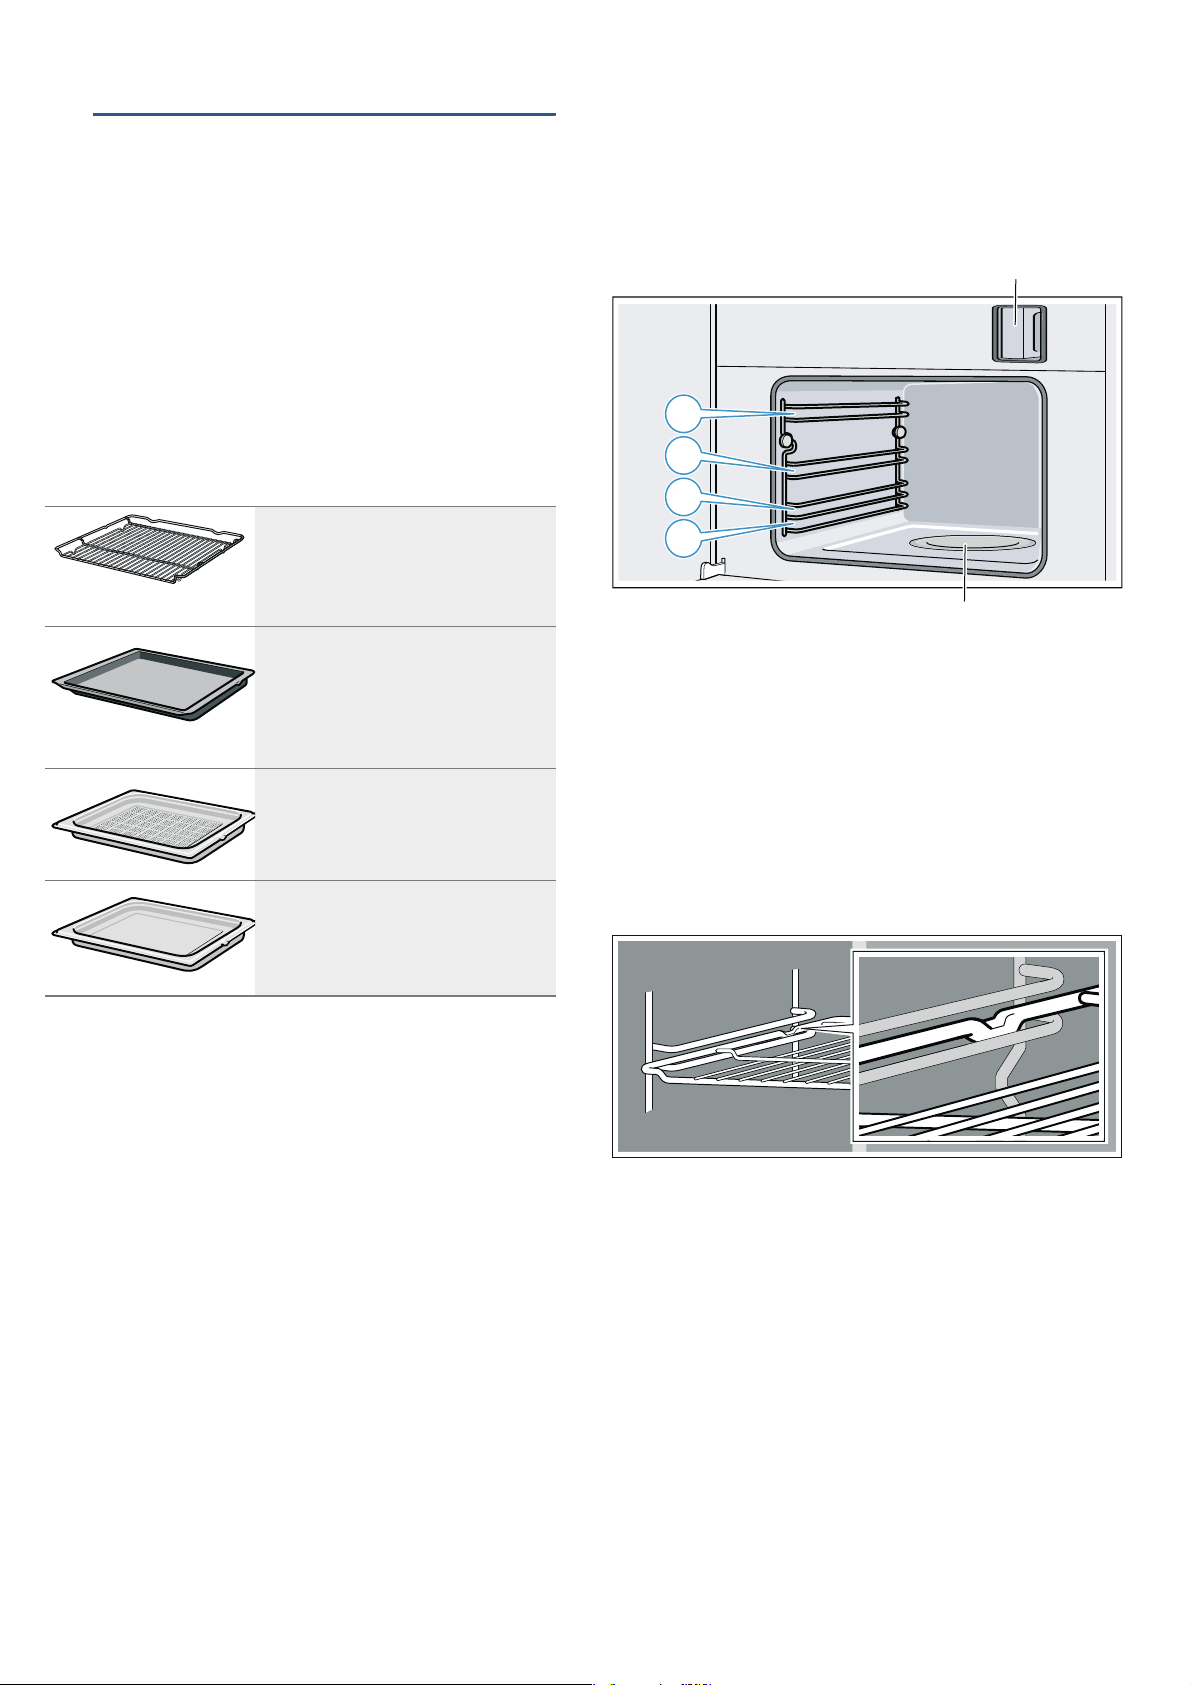
_ $FFHVVRULHV
$FFHVVRULHVLQFOXGHG
,QVHUWLQJDFFHVVRULHV
K %HIRUHXVLQJIRUWKHILUVWWLPH
6HWWLQJWKHFXUUHQWWLPH
&OHDQLQJWKHDFFHVVRULHV
1 2SHUDWLQJWKHDSSOLDQFH
6ZLWFKWKHDSSOLDQFHRQDQGRII
6WDUWLQJRUSDXVLQJWKHDSSOLDQFH
)LOOLQJWKHZDWHUWDQN
6HWWKHKHDWLQJPRGHDQGWHPSHUDWXUH
$IWHUHDFKXVH
O 7LPHVHWWLQJRSWLRQV
7LPHU
&RRNLQJWLPH
(QGWLPH
6HWWLQJWKHFORFN
P $XWRPDWLFSURJUDPPHV
6HWDXWRPDWLFSURJUDP
$FFHVVRULHV
3UHSDULQJIRRG
$PRXQW:HLJKW
3URJUDPPHWDEOH
D &OHDQLQJ
&OHDQLQJDJHQWV
'HVFDOLQJ
)DVWFOHDQLQJIXQFWLRQ
&OHDQLQJWKHUDLOV
3 7URXEOHVKRRWLQJ
)DXOWWDEOH
/('OLJKWV
&KDQJLQJWKHGRRUVHDO
4 &XVWRPHUVHUYLFH
(QXPEHUDQG)'QXPEHU
7HFKQLFDOGDWD
J 7HVWHGIRU\RXLQRXUFRRNLQJVWXGLR
&DNHVDQGSDVWULHV
3RXOWU\PHDWDQGILVK
9HJHWDEOHVDQGVLGHGLVKHV
'HVVHUW
2YHUKHDWVWHDPLQJ
3URYLQJGRXJK
'HIURVW
5HKHDWLQJ
7HVWGLVKHV
3URGXNWLQIR
$GGLWLRQDOLQIRUPDWLRQRQSURGXFWVDFFHVVRULHV
UHSODFHPHQWSDUWVDQGVHUYLFHVFDQEHIRXQGDW
ZZZERVFKKRPHFRPDQGLQWKHRQOLQHVKRS
ZZZERVFKHVKRSFRP

en ,QWHQGHGXVH
8,QWHQGHGXVH
,QWHQGHG X VH
5HDG WKHVH LQVWUXFWLRQV FDUHIXOO\ 2QO\ WKHQ ZLOO
\RXEHDEOHWRRSHUDWH\RXUDSSOLDQFHVDIHO\
DQG FRUUHFWO\ 5HWDLQ WKH LQVWUXFWLRQ PDQXDO DQG
LQVWDOODWLRQLQVWUXFWLRQVIRUIXWXUHXVHRUIRU
VXEVHTXHQWRZQHUV
7KLVDSSOLDQFHLVRQO\LQWHQGHGWREHIXOO\ILWWHG
LQDNLWFKHQ2EVHUYHWKHVSHFLDOLQVWDOODWLRQ
LQVWUXFWLRQV
&KHFNWKHDSSOLDQFHIRUGDPDJHDIWHU
XQSDFNLQJLW'RQRWFRQQHFWWKHDSSOLDQFHLILW
KDVEHHQGDPDJHGLQWUDQVSRUW
2QO\DOLFHQVHGSURIHVVLRQDOPD\FRQQHFW
DSSOLDQFHVZLWKRXWSOXJV'DPDJHFDXVHGE\
LQFRUUHFWFRQQHFWLRQLVQRWFRYHUHGXQGHU
ZDUUDQW\
7KLVDSSOLDQFHLVLQWHQGHGIRUGRPHVWLFXVH
RQO\7KHDSSOLDQFHPXVWRQO\EHXVHGIRUWKH
SUHSDUDWLRQRIIRRGDQGGULQN7KHDSSOLDQFH
PXVWEHVXSHUYLVHGGXULQJRSHUDWLRQ2QO\XVH
WKLVDSSOLDQFHLQGRRUV
7KLVDSSOLDQFHLVLQWHQGHGIRUXVHXSWRD
PD[LPXPKHLJKWRI PHWUHVDERYHVHD
OHYHO
7KLV DSSOLDQFH PD\ EH XVHG E\ FKLOGUHQ RYHU WKH
DJH RI \HDUV ROG DQG E\ SHUVRQV ZLWK UHGXFHG
SK\VLFDOVHQVRU\RUPHQWDOFDSDELOLWLHVRUE\
SHUVRQV ZLWK D ODFN RI H[SHULHQFH RU NQRZOHGJH
LIWKH\DUHVXSHUYLVHGRUDUHLQVWUXFWHGE\D
SHUVRQUHVSRQVLEOHIRUWKHLUVDIHW\KRZWRXVH
WKHDSSOLDQFHVDIHO\DQGKDYHXQGHUVWRRGWKH
DVVRFLDWHGKD]DUGV
&KLOGUHQPXVWQRWSOD\ZLWKRQRUDURXQGWKH
DSSOLDQFH&KLOGUHQPXVWQRWFOHDQWKH
DSSOLDQFHRUFDUU\RXWJHQHUDOPDLQWHQDQFH
XQOHVVWKH\DUHDWOHDVW \HDUVROGDQGDUH
EHLQJVXSHUYLVHG
.HHSFKLOGUHQEHORZWKHDJHRI \HDUVROGDWD
VDIHGLVWDQFHIURPWKHDSSOLDQFHDQGSRZHU
FDEOH
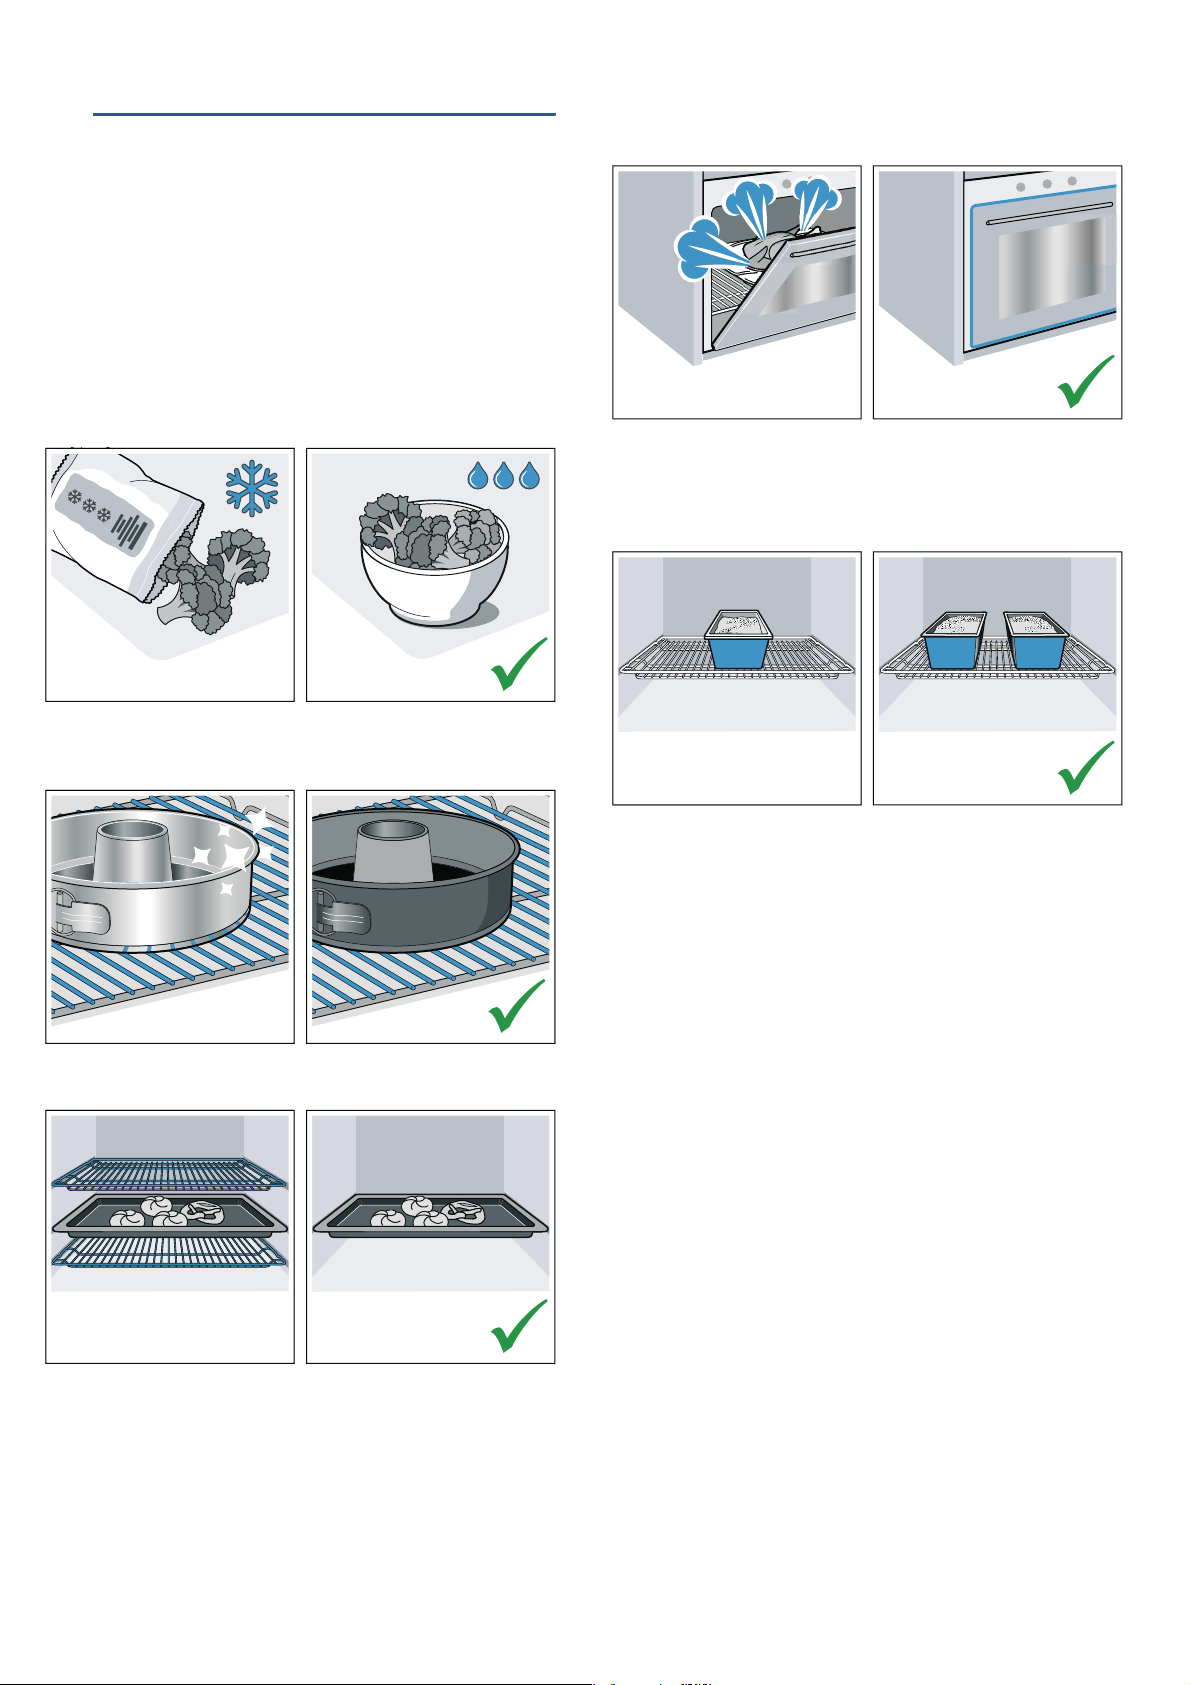
$OZD\VVOLGHDFFHVVRULHVLQWRWKHFRRNLQJ
FRPSDUWPHQWWKHULJKWZD\URXQG
~ $FFHVVRULHVRQ SDJH
(,PSRUWDQWVDIHW\
LQIRUPDWLRQ
,PSRUWDQW VDIHW\ LQIRUPDWLRQ
*HQHUDOLQIRUPDWLRQ
::DUQLQJ² 5LVNRIILUH
■ &RPEXVWLEOHLWHPVVWRUHGLQWKHFRRNLQJ
FRPSDUWPHQWPD\FDWFKILUH1HYHUVWRUH
FRPEXVWLEOHLWHPVLQWKHFRRNLQJ
FRPSDUWPHQW 1HYHU RSHQ WKH DSSOLDQFH GRRU
LIWKHUHLVVPRNHLQVLGH6ZLWFKRIIWKH
DSSOLDQFHDQGXQSOXJLWIURPWKHPDLQVRU
VZLWFKRIIWKHFLUFXLWEUHDNHULQWKHIXVHER[
5LVNRIILUH
■ /RRVHIRRGUHPQDQWVIDWDQGPHDWMXLFHV
PD\FDWFKILUH%HIRUHXVLQJWKHDSSOLDQFH
UHPRYHWKHZRUVWRIWKHIRRGUHPQDQWVIURP
WKHFRRNLQJFRPSDUWPHQWKHDWLQJHOHPHQWV
DQGDFFHVVRULHV
5LVNRIILUH
■ $ GUDXJKW LV FUHDWHG ZKHQ WKH DSSOLDQFH GRRU
LV RSHQHG *UHDVHSURRI SDSHU PD\ FRPH LQWR
FRQWDFWZLWKWKHKHDWLQJHOHPHQWDQGFDWFK
ILUH'RQRWSODFHJUHDVHSURRISDSHUORRVHO\
RYHUDFFHVVRULHVGXULQJSUHKHDWLQJ$OZD\V
ZHLJKWGRZQWKHJUHDVHSURRISDSHUZLWKD
GLVKRUDEDNLQJWLQ2QO\FRYHUWKHVXUIDFH
UHTXLUHGZLWKJUHDVHSURRISDSHU
*UHDVHSURRISDSHUPXVWQRWSURWUXGHRYHU
WKHDFFHVVRULHV
5LVFRIILUH
■ 3DFNDJLQJWKDWZDVQRWUHPRYHGIURP
DFFHVVRULHVFDQFDWFKILUH5HPRYHDOO
SDFNDJLQJIURPWKHDFFHVVRULHV5HPRYHDOO
SODVWLFFRUQHUSURWHFWRUV
::DUQLQJ² 5LVNRIEXUQV
■ 7KHDSSOLDQFHEHFRPHVYHU\KRW1HYHU
WRXFKWKHLQWHULRUVXUIDFHVRIWKHFRRNLQJ
FRPSDUWPHQWRUWKHKHDWLQJHOHPHQWV
$OZD\VDOORZWKHDSSOLDQFHWRFRROGRZQ
.HHSFKLOGUHQDWDVDIHGLVWDQFH
5LVNRIVHULRXVEXUQV
■ $FFHVVRULHV DQG RYHQZDUH EHFRPH YHU\ KRW
$OZD\VXVHRYHQJORYHVWRUHPRYH
DFFHVVRULHVRURYHQZDUHIURPWKHFRRNLQJ
FRPSDUWPHQW
5LVNRIEXUQV
■ $OFRKROLFYDSRXUVPD\FDWFKILUHLQWKHKRW
FRRNLQJFRPSDUWPHQW1HYHUSUHSDUHIRRG
FRQWDLQLQJODUJHTXDQWLWLHVRIGULQNVZLWKD
KLJKDOFRKROFRQWHQW2QO\XVHVPDOO
TXDQWLWLHVRIGULQNVZLWKDKLJKDOFRKRO
FRQWHQW2SHQWKHDSSOLDQFHGRRUZLWKFDUH

,PSRUWDQWVDIHW\LQIRUPDWLRQ HQ
::DUQLQJ² 5LVNRIVFDOGLQJ
■ 7KHDFFHVVLEOHSDUWVEHFRPHKRWGXULQJ
RSHUDWLRQ1HYHUWRXFKWKHKRWSDUWV.HHS
FKLOGUHQDWDVDIHGLVWDQFH
5LVNRIVFDOGLQJ
■ :KHQ\RXRSHQWKHDSSOLDQFHGRRUKRW
VWHDP FDQ HVFDSH 6WHDP PD\ QRW EH YLVLEOH
GHSHQGLQJRQLWVWHPSHUDWXUH:KHQ
RSHQLQJGRQRWVWDQGWRRFORVHWRWKH
DSSOLDQFH 2SHQ WKH DSSOLDQFH GRRU FDUHIXOO\
.HHSFKLOGUHQDZD\
5LVNRIVFDOGLQJ
■ :DWHULQDKRWFRRNLQJFRPSDUWPHQWPD\
FUHDWHKRWVWHDP1HYHUSRXUZDWHULQWRWKH
FRRNLQJFRPSDUWPHQWZKHQWKHFRRNLQJ
FRPSDUWPHQWLVKRW
::DUQLQJ² 5LVNRILQMXU\
■ 6FUDWFKHGJODVVLQWKHDSSOLDQFHGRRUPD\
GHYHORSLQWRDFUDFN'RQRWXVHDJODVV
VFUDSHUVKDUSRUDEUDVLYHFOHDQLQJDLGVRU
GHWHUJHQWV
5LVNRILQMXU\
■ 7KH KLQJHV RQ WKH DSSOLDQFH GRRU PRYH ZKHQ
RSHQLQJDQGFORVLQJWKHGRRUDQG\RXPD\
EHWUDSSHG.HHS\RXUKDQGVDZD\IURPWKH
KLQJHV
5LVNRILQMXU\
■ &RPSRQHQWVLQVLGHWKHDSSOLDQFHGRRUPD\
KDYHVKDUSHGJHV:HDUSURWHFWLYHJORYHV
::DUQLQJ² 5LVNRIHOHFWULFVKRFN
■ ,IWKHVXSSO\FRUGLVGDPDJHGLWPXVWEH
UHSODFHGE\WKHPDQXIDFWXUHULWVVHUYLFH
DJHQW RU VLPLODUO\ TXDOLILHG SHUVRQV LQ RUGHU WR
DYRLGDKD]DUG
5LVNRIHOHFWULFVKRFN
■ ,QFRUUHFW UHSDLUV DUH GDQJHURXV 5HSDLUV PD\
RQO\EHFDUULHGRXWDQGGDPDJHGSRZHU
FDEOHVUHSODFHGE\RQHRIRXUWUDLQHGDIWHU
VDOHVWHFKQLFLDQV,IWKHDSSOLDQFHLV
GHIHFWLYHXQSOXJWKHDSSOLDQFHIURPWKH
PDLQVRUVZLWFKRIIWKHFLUFXLWEUHDNHULQWKH
IXVHER[&RQWDFWWKHDIWHUVDOHVVHUYLFH
5LVNRIHOHFWULFVKRFNDQGVHULRXVLQMXU\
■ 7KHFDEOHLQVXODWLRQRQHOHFWULFDODSSOLDQFHV
PD\PHOWZKHQWRXFKLQJKRWSDUWVRIWKH
DSSOLDQFH1HYHUEULQJHOHFWULFDODSSOLDQFH
FDEOHVLQWRFRQWDFWZLWKKRWSDUWVRIWKH
DSSOLDQFH
5LVNRIHOHFWULFVKRFN
■ 'RQRWXVHDQ\KLJKSUHVVXUHFOHDQHUVRU
VWHDPFOHDQHUVZKLFKFDQUHVXOWLQDQ
HOHFWULFVKRFN
5LVNRIHOHFWULFVKRFN
■ $GHIHFWLYHDSSOLDQFHPD\FDXVHHOHFWULF
VKRFN 1HYHU VZLWFK RQ D GHIHFWLYH DSSOLDQFH
8QSOXJWKHDSSOLDQFHIURPWKHPDLQVRU
VZLWFKRIIWKHFLUFXLWEUHDNHULQWKHIXVHER[
&RQWDFWWKHDIWHUVDOHVVHUYLFH
::DUQLQJ² +D]DUGGXHWRPDJQHWLVP
3HUPDQHQWPDJQHWVDUHXVHGLQWKHFRQWURO
SDQHORULQWKHFRQWUROHOHPHQWV7KH\PD\
DIIHFWHOHFWURQLFLPSODQWVHJKHDUW
SDFHPDNHUVRULQVXOLQSXPSV:HDUHUVRI
HOHFWURQLFLPSODQWVPXVWVWD\DWOHDVWFP
DZD\IURPWKHFRQWUROSDQHO
6WHDP
::DUQLQJ² 5LVNRIVFDOGLQJ
■ 7KH ZDWHU LQ WKH ZDWHU WDQN PD\ EHFRPH YHU\
KRWLI\RXFRQWLQXHWRRSHUDWHWKHDSSOLDQFH
(PSW\WKHZDWHUWDQNDIWHUHYHU\RSHUDWLRQ
ZLWKVWHDP
5LVNRIVFDOGLQJ
■ +RWVWHDPLVJHQHUDWHGLQWKHFRRNLQJ
FRPSDUWPHQW'RQRWUHDFKLQWRWKHFRRNLQJ
FRPSDUWPHQWGXULQJDQ\RSHUDWLRQZLWK
VWHDP
5LVNRIVFDOGLQJ
■ +RWOLTXLGPD\VSLOORYHUWKHVLGHVRIWKH
DFFHVVRU\ZKHQLWLVUHPRYHGIURPWKH
FRRNLQJFRPSDUWPHQW5HPRYHKRW
DFFHVVRULHVZLWKFDUHDQGDOZD\VZHDURYHQ
JORYHV
::DUQLQJ² 5LVNRILQMXU\DQGULVNRIILUH
)ODPPDEOHOLTXLGVFDQFDWFKILUHLQWKHFRRNLQJ
FRPSDUWPHQWZKHQLWLVKRWH[SORVLRQ'RQRW
ILOO WKH ZDWHU WDQN ZLWK DQ\ IODPPDEOH IOXLGV HJ
DOFRKROLFGULQNV2QO\ILOOWKHZDWHUWDQNZLWK
ZDWHURUZLWKWKHGHVFDOLQJVROXWLRQWKDWLV
UHFRPPHQGHGE\XV

en &DXVHVRIGDPDJH
]&DXVHVRIGDPDJH
&DXVHV RI GD PDJH
*HQHUDOLQIRUPDWLRQ
&DXWLRQ
■ $FFHVVRULHVIRLOJUHDVHSURRISDSHURURYHQZDUHRQ
WKHFRRNLQJFRPSDUWPHQWIORRUGRQRWSODFH
DFFHVVRULHV RQ WKH FRRNLQJ FRPSDUWPHQW IORRU 'R QRW
FRYHUWKHFRRNLQJFRPSDUWPHQWIORRUZLWKDQ\VRUWRI
IRLORUJUHDVHSURRISDSHU'RQRWSODFHRYHQZDUHRQ
WKH FRRNLQJ FRPSDUWPHQW IORRU LI D WHPSHUDWXUH RI RYHU
&KDVEHHQVHW7KLVZLOOFDXVHKHDWWR
DFFXPXODWH
■ $OXPLQLXPIRLO$OXPLQLXPIRLOLQWKHFRRNLQJ
FRPSDUWPHQW PXVW QRW FRPH LQWR FRQWDFW ZLWK WKH GRRU
JODVV7KLVFRXOGFDXVHSHUPDQHQWGLVFRORXUDWLRQRI
WKHGRRUJODVV
■ 6LOLFRQHEDNHZDUH'RQRWXVHVLOLFRQHPRXOGVRU
UHXVDEOH EDNLQJ WUD\ OLQHUV FRYHUV RU DFFHVVRULHV WKDW
FRQWDLQVLOLFRQH2WKHUZLVHWKHEDNLQJVHQVRUPD\EH
GDPDJHG
*UHDVHSURRISDSHUZLWKDVLOLFRQHFRDWLQJFDQEH
XVHG
■ :DWHULQDKRWFRRNLQJFRPSDUWPHQWGRQRWSRXU
ZDWHULQWRWKHFRRNLQJFRPSDUWPHQWZKHQLWLVKRW
7KLVZLOOFDXVHVWHDP
■ 0RLVWXUHLQWKHFRRNLQJFRPSDUWPHQW2YHUDQ
H[WHQGHGSHULRGRIWLPHPRLVWXUHLQWKHFRRNLQJ
FRPSDUWPHQW PD\ OHDG WR FRUURVLRQ $OORZ WKH FRRNLQJ
FRPSDUWPHQWWRGU\DIWHUXVH'RQRWNHHSPRLVWIRRG
LQWKHFORVHGFRRNLQJFRPSDUWPHQWIRUH[WHQGHG
SHULRGVRIWLPH'RQRWVWRUHIRRGLQWKHFRRNLQJ
FRPSDUWPHQW
■ &RROLQJZLWKWKHDSSOLDQFHGRRURSHQ)ROORZLQJ
RSHUDWLRQ DW KLJK WHPSHUDWXUHV RQO\ DOORZ WKH FRRNLQJ
FRPSDUWPHQWWRFRROGRZQZLWKWKHGRRUFORVHG'R
QRWWUDSDQ\WKLQJLQWKHDSSOLDQFHGRRU(YHQLIWKH
GRRULVRQO\OHIWRSHQDFUDFNWKHIURQWRIQHDUE\
IXUQLWXUHPD\EHFRPHGDPDJHGRYHUWLPH
2QO\OHDYHWKHFRRNLQJFRPSDUWPHQWWRGU\ZLWKWKH
GRRURSHQLIDORWRIPRLVWXUHZDVSURGXFHGZKLOVWWKH
RYHQZDVRSHUDWLQJ
■ )UXLWMXLFHZKHQEDNLQJSDUWLFXODUO\MXLF\IUXLWSLHVGR
QRWSDFNWKHEDNLQJWUD\WRRJHQHURXVO\)UXLWMXLFH
GULSSLQJ IURP WKH EDNLQJ WUD\ OHDYHV VWDLQV WKDW FDQQRW
EHUHPRYHG,ISRVVLEOHXVHWKHGHHSHUXQLYHUVDOSDQ
■ 2YHQFOHDQHU1HYHUXVHRYHQFOHDQHULQWKHFRRNLQJ
FRPSDUWPHQWZKHQLWLVVWLOOZDUP7KLVPD\GDPDJH
WKHHQDPHO5HPRYHDOOIRRGUHPQDQWVIURPWKH
FRRNLQJFRPSDUWPHQWDQGWKHDSSOLDQFHGRRUEHIRUH
\RXQH[WKHDWXSWKHDSSOLDQFH
■ ([WUHPHO\GLUW\VHDO,IWKHVHDOLVYHU\GLUW\WKH
DSSOLDQFHGRRUZLOOQRORQJHUFORVHSURSHUO\GXULQJ
RSHUDWLRQ7KHIURQWVRIDGMDFHQWXQLWVFRXOGEH
GDPDJHG$OZD\VNHHSWKHVHDOFOHDQ1HYHURSHUDWH
WKHDSSOLDQFHLIWKHVHDOLVGDPDJHGRUPLVVLQJ
~ &OHDQLQJRQ SDJH
■ $SSOLDQFHGRRUDVDVHDWVKHOIRUZRUNWRS'RQRWVLW
RQ WKH DSSOLDQFH GRRU RU SODFH RU KDQJ DQ\WKLQJ RQ LW
'RQRWSODFHDQ\FRRNZDUHRUDFFHVVRULHVRQWKH
DSSOLDQFHGRRU
■ ,QVHUWLQJDFFHVVRULHVGHSHQGLQJRQWKHDSSOLDQFH
PRGHODFFHVVRULHVFDQVFUDWFKWKHGRRUSDQHOZKHQ
FORVLQJWKHDSSOLDQFHGRRU$OZD\VLQVHUWWKH
DFFHVVRULHVLQWRWKHFRRNLQJFRPSDUWPHQWDVIDUDV
WKH\ZLOOJR
■ &DUU\LQJWKHDSSOLDQFHGRQRWFDUU\RUKROGWKH
DSSOLDQFH E\ WKH GRRU KDQGOH 7KH GRRU KDQGOH FDQQRW
VXSSRUWWKHZHLJKWRIWKHDSSOLDQFHDQGFRXOGEUHDN
6WHDP
&DXWLRQ
■ %DNLQJWLQV2YHQZDUHPXVWEHKHDWDQGVWHDP
UHVLVWDQW6LOLFRQHEDNLQJWLQVDUHQRWVXLWDEOHIRU
FRPELQHGRSHUDWLRQZLWKVWHDP
■ 2YHQZDUH ZLWK DUHDV RI UXVW 'R QRW XVH DQ\ RYHQZDUH
ZKLFKGLVSOD\VDUHDVRIUXVW(YHQWKHVPDOOHVWVSRWV
RIUXVWFDQOHDGWRFRUURVLRQLQWKHFRRNLQJ
FRPSDUWPHQW
■ 'ULSSLQJOLTXLGV:KHQVWHDPLQJZLWKDSHUIRUDWHG
FRRNLQJFRQWDLQHUDOZD\VLQVHUWWKHVROLGFRRNLQJ
FRQWDLQHUXQGHUQHDWK'ULSSLQJOLTXLGLVFDXJKW
■ +RWZDWHULQWKHZDWHUWDQN+RWZDWHUPD\GDPDJH
WKHVWHDPV\VWHP2QO\ILOOWKHZDWHUWDQNZLWKFROG
ZDWHU
■ 'HVFDOLQJ VROXWLRQ 'R QRW DOORZ DQ\ GHVFDOLQJ VROXWLRQ
WRFRPHLQWRFRQWDFWZLWKWKHFRQWUROSDQHORURWKHU
VXUIDFHV RQ WKH DSSOLDQFH 7KLV GDPDJHV WKH VXUIDFHV
,IWKLVGRHVKDSSHQUHPRYHWKHGHVFDOLQJVROXWLRQ
LPPHGLDWHO\ZLWKZDWHU
■ &OHDQLQJ WKH ZDWHU WDQN 'R QRW FOHDQ WKH ZDWHU WDQN LQ
WKHGLVKZDVKHU2WKHUZLVHWKHZDWHUWDQNZLOOEH
GDPDJHG&OHDQWKHZDWHUWDQNZLWKDVRIWFORWKDQG
VWDQGDUGZDVKLQJXSOLTXLG
(QYLURQPHQWDOSURWHFWLRQ HQ
7(QYLURQPHQWDOSURWHFWLRQ
(QYLURQPHQWDO SURWHFWLRQ
<RXUQHZDSSOLDQFHLVSDUWLFXODUO\HQHUJ\HIILFLHQW+HUH
\RX FDQ ILQG WLSV RQ KRZ WR VDYH HYHQ PRUH HQHUJ\ ZKHQ
XVLQJ WKH DSSOLDQFH DQG KRZ WR GLVSRVH RI \RXU DSSOLDQFH
SURSHUO\
6DYLQJHQHUJ\
■ 2QO\SUHKHDWWKHDSSOLDQFHLIWKLVLVVSHFLILHGLQWKH
UHFLSHRULQWKHWDEOHVLQWKHRSHUDWLQJLQVWUXFWLRQV
■ /HDYHIUR]HQIRRGWRGHIURVWEHIRUHSODFLQJLWLQWKH
FRRNLQJFRPSDUWPHQW
■ 8VHEDNLQJWLQVWKDWDUHGDUNFRORXUHGSDLQWHGEODFN
RUKDYHDQHQDPHOFRDWLQJ7KHVHDEVRUEWKHKHDW
SDUWLFXODUO\ZHOO
■ 5HPRYHDQ\XQQHFHVVDU\DFFHVVRULHVIURPWKH
FRRNLQJFRPSDUWPHQW
■ 2SHQWKHDSSOLDQFHGRRUDVLQIUHTXHQWO\DVSRVVLEOH
ZKHQWKHDSSOLDQFHLVLQXVH
■ ,W LV EHVW WR EDNH VHYHUDO FDNHV RQH DIWHU WKH RWKHU 7KH
FRRNLQJFRPSDUWPHQWVWD\VZDUP7KLVUHGXFHVWKH
EDNLQJWLPHIRUWKHVHFRQGFDNH<RXFDQSODFHWZR
FDNHWLQVQH[WWRHDFKRWKHULQWKHFRRNLQJ
FRPSDUWPHQW
■ )RU ORQJHU FRRNLQJ WLPHV \RX FDQ VZLWFK WKH DSSOLDQFH
RII PLQXWHVEHIRUHWKHHQGRIWKHFRRNLQJWLPHDQG
XVHWKHUHVLGXDOKHDWWRILQLVKFRRNLQJ
en *HWWLQJWRNQRZ\RXUDSSOLDQFH
**HWWLQJWRNQRZ\RXU
DSSOLDQFH
*HWWLQJ WR NQRZ \RXU DSSOLDQFH
,Q WKLV VHFWLRQ ZH ZLOO H[SODLQ WKH LQGLFDWRUV DQG FRQWUROV
<RXZLOODOVRILQGRXWDERXWWKHYDULRXVIXQFWLRQVRI\RXU
DSSOLDQFH
1RWH 'HSHQGLQJRQWKHDSSOLDQFHPRGHOLQGLYLGXDO
GHWDLOVDQGFRORXUVPD\GLIIHU
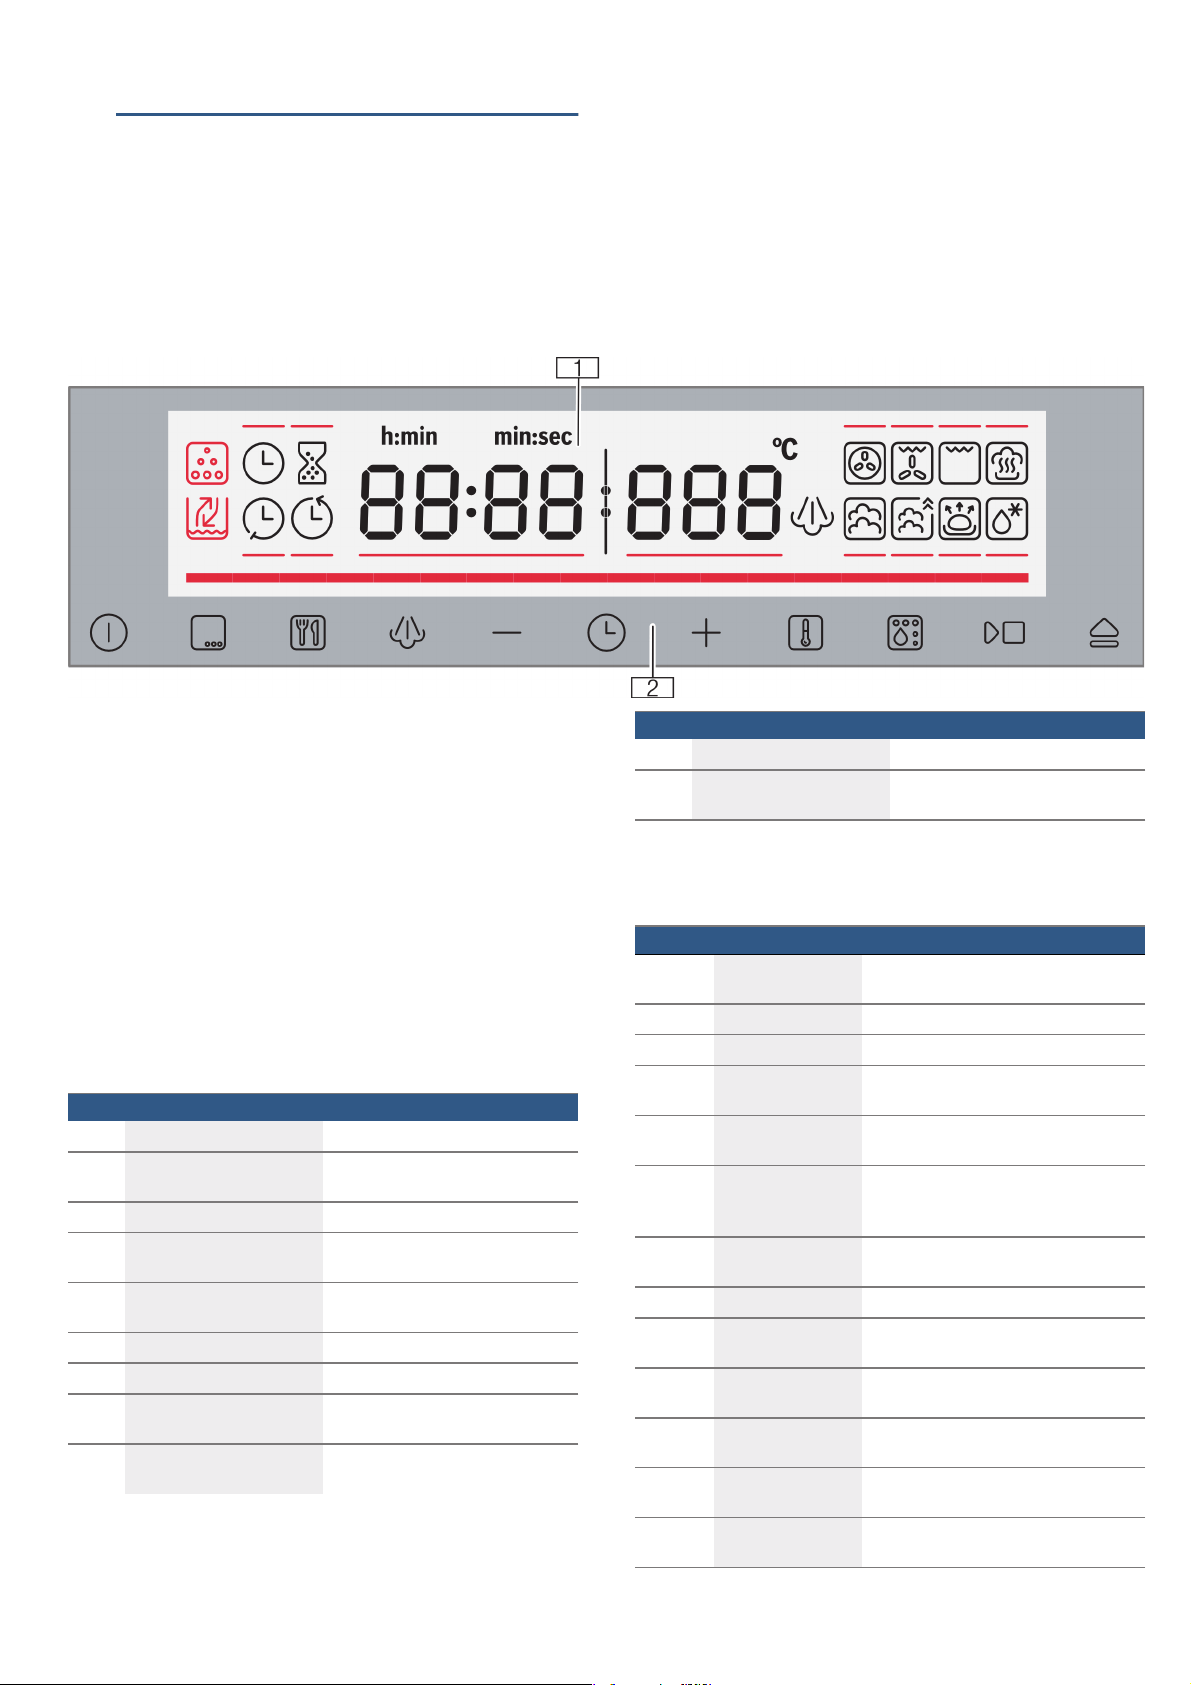
&RQWUROSDQHO
<RXFDQVHW\RXUDSSOLDQFHVYDULRXVIXQFWLRQVRQWKH
FRQWUROSDQHO7KHFXUUHQWVHWWLQJVDUHVKRZQRQWKH
GLVSOD\
7KH RYHUYLHZ VKRZV WKH FRQWURO SDQHO ZLWK DOO WKH SRVVLEOH
V\PEROVDQGLQGLFDWRUOLJKWV
7RXFKEXWWRQVDQGGLVSOD\
<RX FDQ XVH WKH WRXFK EXWWRQV WR VHW WKH YDULRXV IXQFWLRQV
RI\RXUDSSOLDQFH<RXZLOOEHDEOHWRVHHWKHYDOXHVIRU
WKHVHRQWKHGLVSOD\
7RXFKILHOGV
+HUH\RXFDQILQGDVKRUWH[SODQDWLRQRIWKHYDULRXV
EXWWRQVDQGWRXFKILHOGV
'LVSOD\HOHPHQWV
+HUH\RXFDQILQGDVKRUWH[SODQDWLRQRIWKHYDULRXV
GLVSOD\HOHPHQWV
( 'LVSOD\
7KH GLVSOD\ VKRZV V\PEROV IRU DFWLYH IXQFWLRQV DQG
WKHWLPHVHWWLQJRSWLRQV
0 7RXFKILHOGV
7KHUHDUHVHQVRUVEHKLQGWKHWRXFKILHOGV6LPSO\
WRXFKDV\PEROWRVHOHFWWKHIXQFWLRQ
6\PERO 0HDQLQJ
# 2QRII 6ZLWFKWKHDSSOLDQFHRQDQGRII
!
2SHUDWLQJPRGHV 2SHQWKHRSHUDWLQJPRGHV
PHQX
}
7HPSHUDWXUHVHOHFWLRQ 6HOHFWDWHPSHUDWXUH
)
$GGHGVWHDP $GGVWHDPWRRSHUDWLQJPRGHV
KRWDLURUKRWDLUJULOO
M
0LQXVEDFN 'HFUHDVH YDOXH SUHYLRXV PHQX
LWHP
0 7LPHIXQFWLRQV 2SHQWKHWLPHIXQFWLRQVPHQX
N
3OXVIRUZDUG ,QFUHDVH YDOXH 1H[W PHQX LWHP
%
$XWRPDWLFSURJUDP 2SHQWKHDXWRPDWLFSUR
JUDPPVPHQX
O
&OHDQLQJIXQFWLRQV 2SHQWKHFOHDQLQJIXQFWLRQV
PHQX
o 6WDUW6WRS 6WDUWRUVWRSWKHRSHUDWLRQ
v (MHFWZDWHUWDQN (MHFWWKHZDWHUWDQNIURPWKH
DSSOLDQFH
6\PERO 0HDQLQJ
N
'HVFDOLQJ
UHTXLUHG
,IWKLVV\PEROOLJKWVXSWKHDSSOL
DQFHPXVWEHGHVFDOHG
$
)LOOZDWHUWDQN )LOOWKHZDWHUWDQNZLWKIUHVKZDWHU
#
(PSW\ZDWHUWDQN (PSW\WKHZDWHUWDQN
0 &ORFN 7KH FXUUHQW WLPH DSSHDUV LQ WKH GLV
SOD\
t
7LPHU <RXFDQXVHWKHWLPHUDVDQHJJ
WLPHURUDNLWFKHQWLPHU
y
&RRNLQJWLPH ,IWKHV\PEROLVKLJKOLJKWHGWKH
FRRNLQJ WLPH ZLOO DSSHDU RQ WKH GLV
SOD\
{
(QGWLPH ,IWKLVV\PEROLVKLJKOLJKWHGWKH
HQGWLPHLVDFWLYDWHG
)
$GGHGVWHDP 7KH DGGHG VWHDP IXQFWLRQ LV DFWLYH
<
+RWDLU 7KHKHDWLQJPRGHKRWDLULV
VHOHFWHG
7
+RWDLUJULOO 7KHKHDWLQJPRGHKRWDLUJULOOLV
VHOHFWHG
(
/DUJHDUHDJULOO 7KH KHDWLQJ PRGH ODUJH DUHD JULOO LV
VHOHFWHG
U
5HJHQHUDWLRQ 7KHKHDWLQJPRGHUHJHQHUDWLRQLV
VHOHFWHG
S
)XOOVWHDP 7KHKHDWLQJPRGH)XOOVWHDPLV
VHOHFWHG
6\PERO 0HDQLQJ

*HWWLQJWRNQRZ\RXUDSSOLDQFH HQ
'LVSOD\
7KHGLVSOD\LVVWUXFWXUHGVRWKDWWKHLQIRUPDWLRQFDQEH
UHDGDWDJODQFH
7KHYDOXHWKDW\RXFDQFXUUHQWO\VHWLVLQIRFXV,WLV
GLVSOD\HGLQZKLWHOHWWHULQJZLWKDGDUNEDFNJURXQG
7HPSHUDWXUHLQGLFDWRU
7KHWHPSHUDWXUHLQGLFDWRUEDUVVKRZWKHKHDWLQJSKDVHV
LQWKHFRRNLQJFRPSDUWPHQW
2SHQLQJWKHDSSOLDQFHGRRU
,I\RXRSHQWKHDSSOLDQFHGRRUGXULQJDQRSHUDWLRQWKH
RSHUDWLRQ LV SDXVHG 2SHUDWLRQ FRQWLQXHV WR UXQ ZKHQ \RX
FORVHWKHGRRU
,QWHULRUOLJKWLQJ
:KHQ\RXRSHQWKHDSSOLDQFHGRRUWKHLQWHULRUOLJKWLQJ
VZLWFKHVRQ,IWKHGRRUUHPDLQVRSHQIRUORQJHUWKDQ
PLQXWHVWKHOLJKWLQJVZLWFKHVRIIDJDLQ
&RROLQJIDQ
7KHFRROLQJIDQVZLWFKHVRQDQGRIIDVUHTXLUHGE\WKH
FDYLW\WHPSHUDWXUH7KHKRWDLUHVFDSHVDERYHWKHGRRU
&DXWLRQ
'R QRW FRYHU WKH YHQWLODWLRQ VORWV 2WKHUZLVH WKH DSSOLDQFH
ZLOORYHUKHDW
6RWKDWWKHFRRNLQJFRPSDUWPHQWFRROVGRZQPRUH
TXLFNO\ DIWHU RSHUDWLRQ WKH FRROLQJ IDQ FRQWLQXHV WR UXQ IRU
DFHUWDLQSHULRGDIWHUZDUGV
2SHUDWLQJPRGHV
<RXU DSSOLDQFH KDV YDULRXV RSHUDWLQJ PRGHV ZKLFK PDNH
\RXUDSSOLDQFHHDVLHUWRXVH
<RXFDQILQGPRUHSUHFLVHGHVFULSWLRQVRIWKHVHLQWKH
FRUUHVSRQGLQJVHFWLRQV
+HDWLQJPRGHV
7RPDNHVXUHWKDW\RXDOZD\VXVHWKHULJKWW\SHRI
KHDWLQJWRFRRN\RXUIRRGZHKDYHH[SODLQHGWKH
GLIIHUHQFHVDQGDSSOLFDWLRQVEHORZ
7KH RSHUDWLRQ LQ KHDWLQJ PRGHV KRW DLU DQG KRW DLU JULOO ZLOO
DXWRPDWLFDOO\VWRSDIWHUKRXUVLIDWHPSHUDWXUHRI
&ZLWKRXWFRRNLQJWLPHLVVHW
7KHRSHUDWLRQLQIXOOVXUIDFHJULOOZLOODXWRPDWLFDOO\VWRS
DIWHUWKUHHKRXUVLIQRFRRNLQJWLPHLVVHW
'HIDXOWYDOXHV
)RU HDFK W\SH RI KHDWLQJ WKH DSSOLDQFH VSHFLILHV D GHIDXOW
WHPSHUDWXUH RU OHYHO <RX FDQ DFFHSW WKLV YDOXH RU FKDQJH
LWLQWKHDSSURSULDWHDUHD
@
2YHUVWHDP 7KHKHDWLQJPRGHRYHUVWHDPLV
VHOHFWHG
C
)HUPHQWDWLRQ 7KHKHDWLQJPRGHIHUPHQWDWLRQLV
VHOHFWHG
B
'HIURVW 7KHKHDWLQJPRGHGHIURVWLV
VHOHFWHG
+HDWLQJLQGLFD
WRU
7KHKHDWLQJLQGLFDWRUGLVSOD\VWKHULVLQJWHP
SHUDWXUH LQ WKH FRRNLQJ FRPSDUWPHQW :KHQ DOO
EDUV DUH ILOOHG WKH DYHUDJH WHPSHUDWXUH LQ WKH
FRRNLQJFRPSDUWPHQWKDVUHDFKHGWKHVHWWLQJ
WHPSHUDWXUH
7KHEDUVGRQRWDSSHDUZKHQVHWWLQJVDUH
DSSOLHGIRUFOHDQLQJ
2SHUDWLQJPRGH 8VH
7\SHVRIKHDWLQJ 7KHUHDUHVHYHUDOILQHO\WXQHG
W\SHVRIKHDWLQJIRU\RXWRSUH
SDUH\RXUGLVKHV
6WHDPLQJ 7KHUHDUHILQHO\WXQHGVWHDP
W\SHVRIKHDWLQJIRU\RXWRSUH
SDUH\RXUGLVKHV
$XWRPDWLFSURJUDPPHV +HUH\RXFDQILQGSUHSUR
JUDPPHGVHWWLQJYDOXHVZKLFK
DUHVXLWDEOHIRUPDQ\GLVKHV
'HVFDOH
<RXFDQXVHWKLVWRUHPRYH
OLPHVFDOHIURPWKHHYDSRUDWRU
)DVWFOHDQLQJIXQFWLRQ 7KHIDVWFOHDQLQJIXQFWLRQ
FOHDQVWKHUHVLGXDOZDWHUIURP
WKHSLSHV\VWHPDOPRVWDXWR
PDWLFDOO\
2SHUDWLQJPRGH 7HPSHUDWXUH 8VH
<
+RWDLU &
&
)RUEDNLQJDQGURDVWLQJRQRQHRUPRUHOHYHOV
7KHIDQGLVWULEXWHVWKHKHDWIURPWKHULQJVKDSHGKHDWLQJHOHPHQWLQWKHEDFN
ZDOOHYHQO\DURXQGWKHFRRNLQJFRPSDUWPHQW
7
+RWDLUJULOO & )RUEDNLQJRUURDVWLQJPHDWSRXOWU\DQGZKROHILVK7KHIDQFLUFXODWHVWKHKRW
DLUDURXQGWKHIRRG
(
)XOOVXUIDFHJULOO QRWDGMXVWDEOH )RUJULOOLQJIODWLWHPVVXFKDVVWHDNVRUVDXVDJHVIRUPDNLQJWRDVWDQGIRU
EURZQLQJIRRG
7KHZKROHDUHDRIWKHJULOOKHDWLQJHOHPHQWEHFRPHVKRW
6WHDPDVVLVWDQFHSRVVLEOHZLWKWKLVW\SHRIKHDWLQJZDWHUUHVHUYRLU0867EHIXOOEHIRUHDSSOLDQFHLVRSHUDWHG
en *HWWLQJWRNQRZ\RXUDSSOLDQFH
6WHDP
7R HQDEOH \RX WR ILQG WKH FRUUHFW VWHDP W\SH RI KHDWLQJ IRU
\RXUGLVKZHKDYHH[SODLQHGWKHGLIIHUHQFHVDQGVFRSHV
RIDSSOLFDWLRQKHUH
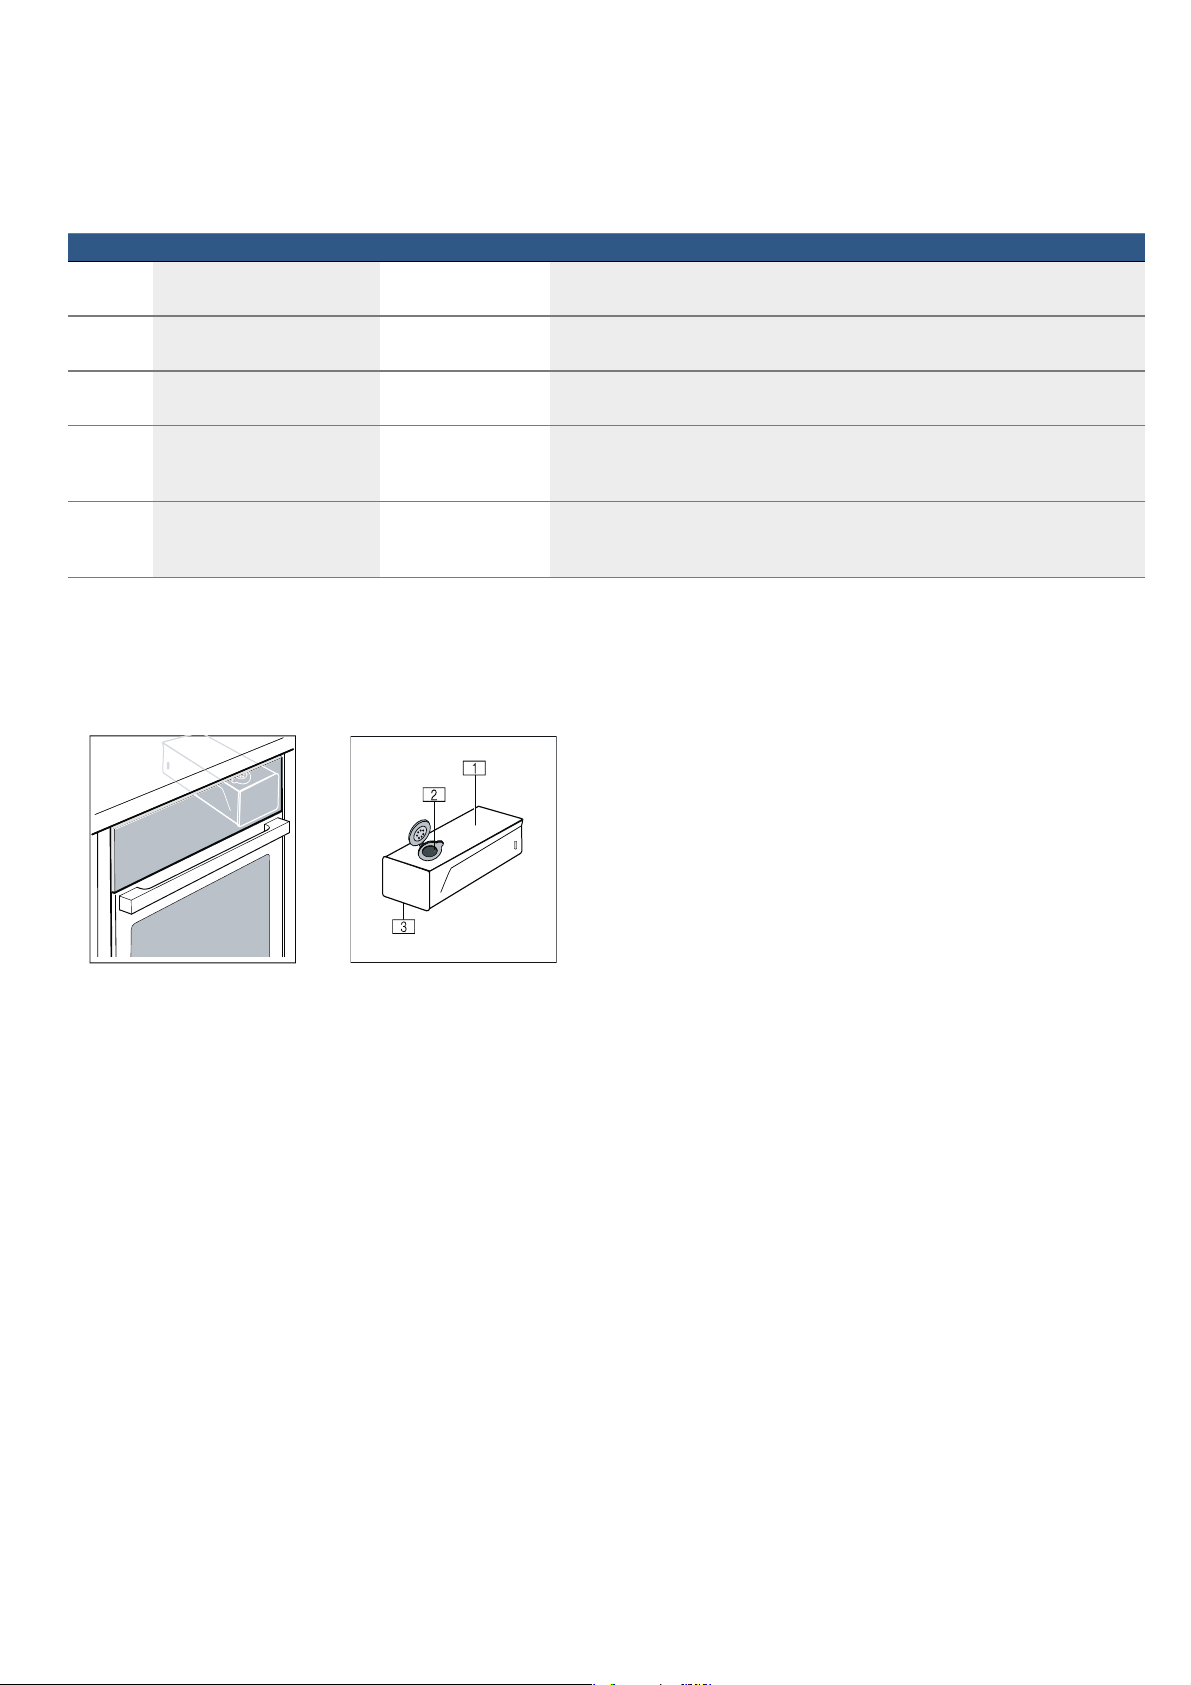
:DWHUWDQN
7KH DSSOLDQFH LV ILWWHG ZLWK D ZDWHU WDQN 7KH ZDWHU WDQN LV
ORFDWHGRQWKHULJKWVLGHRIWKHSDQHO)RURSHUDWLRQVZLWK
VWHDPILOOWKHZDWHUWDQNZLWKZDWHU
1RWH 7KHOLGRIWKHZDWHUWDQNFDQEHFDUHIXOO\UHPRYHG
IRUFOHDQLQJ
2SHUDWLQJPRGH 7HPSHUDWXUH 8VH
S
6WHDP & )RUYHJHWDEOHVILVKVLGHGLVKHVIRUH[WUDFWLQJMXLFHIURPIUXLWDQGIRU
EODQFKLQJ
@
2YHUVWHDP & )RUIRRGVZLWKGHQVHILEURXVWLVVXHRUODUJHSLHFHVRIIRRGWKDWDUHGLIILFXOW
WRFRRNWKURXJKFRPSOHWHO\
U
5HJHQHUDWLRQ & )RUJHQWO\KHDWLQJIRRG
7KHVWHDPHQVXUHVWKDWWKHIRRGGRHVQRWGU\RXW
C
)HUPHQWDWLRQ & )RUOHDYLQJ\HDVWGRXJKDQGVRXUGRXJKWRSURYHDQGIRUFXOWXULQJ\RJXUW
'RXJKSURYHVPRUHTXLFNO\WKDQDWURRPWHPSHUDWXUH7KHVXUIDFHRIWKH
GRXJKZLOOQRWGU\RXW
B
'HIURVW & )RUYHJHWDEOHVPHDWILVKDQGIUXLW
7KHPRLVWXUHJHQWO\WUDQVIHUVWKHKHDWWRWKHIRRGZLWKRXWDIIHFWLQJLWVTXDO
LW\7KHIRRGZLOOQRWGU\RXWRUORVHLWVVKDSH
( 7DQNFRYHU
0 )LOOLQJRSHQLQJ
8 +DQGOHIRUUHPRYLQJDQGLQVHUWLQJWKHZDWHUWDQN
2
$FFHVVRULHV HQ
_$FFHVVRULHV
$FFHVV RULHV
<RXUDSSOLDQFHLVDFFRPSDQLHGE\DUDQJHRI
DFFHVVRULHV+HUH\RXFDQILQGDQRYHUYLHZRIWKH
DFFHVVRULHV LQFOXGHG DQG LQIRUPDWLRQ RQ KRZ WR XVH WKHP
FRUUHFWO\
::DUQLQJ² 5LVNRIILUH
3DFNDJLQJWKDWZDVQRWUHPRYHGIURPDFFHVVRULHVFDQ
FDWFKILUH5HPRYHDOOSDFNDJLQJIURPWKHDFFHVVRULHV
5HPRYHDOOSODVWLFFRUQHUSURWHFWRUV
$FFHVVRULHVLQFOXGHG
<RXUDSSOLDQFHLVHTXLSSHGZLWKWKHIROORZLQJ
DFFHVVRULHV
2QO\XVHJHQXLQHDFFHVVRULHV7KH\DUHVSHFLDOO\
DGDSWHGIRU\RXUDSSOLDQFH
<RXFDQEX\DFFHVVRULHVIURPWKHDIWHUVDOHVVHUYLFH
IURPVSHFLDOLVWUHWDLOHUVRURQOLQH
1RWH 7KH DFFHVVRULHV PD\ EHFRPH GHIRUPHG ZKHQ WKH\
EHFRPH KRW 7KLV GRHV QRW DIIHFW WKHLU IXQFWLRQ 2QFH WKH\
FRROGRZQDJDLQWKH\UHJDLQWKHLURULJLQDOVKDSH
1RWH <RXFDQXVHWKHVWHDPFRQWDLQHUZLWKDOOKHDWLQJ
PRGHVLQYROYLQJVWHDPZLWKRXWDQ\UHVWULFWLRQV,I\RXVHW
RWKHU KHDWLQJ PRGHV DW KLJK WHPSHUDWXUHV WDNH WKH VWHDP
FRQWDLQHURXWRIWKHFRRNLQJFRPSDUWPHQW+LJK
WHPSHUDWXUHVFDQFDXVHSHUPDQHQWGHIRUPDWLRQVDQG
GLVFRORXUDWLRQRIWKHVWHDPFRQWDLQHU
,QVHUWLQJDFFHVVRULHV
7KHFRRNLQJFRPSDUWPHQWKDVIRXUVKHOISRVLWLRQV7KH
VKHOISRVLWLRQVDUHQXPEHUHGIURPERWWRPWRWRS
,QVRPHDSSOLDQFHVWKHKLJKHVWVKHOISRVLWLRQLVPDUNHG
RQWKHFRRNLQJFRPSDUWPHQWZLWKWKHJULOOV\PERO
&DXWLRQ
■ 'RQRWSODFHDQ\WKLQJRQWKHFRRNLQJFRPSDUWPHQW
IORRU'RQRWFRYHULWZLWKDOXPLQLXPIRLO$EXLOGXSRI
KHDWFRXOGGDPDJHWKHDSSOLDQFH
7KHFRRNLQJFRPSDUWPHQWIORRUDQGWKHHYDSRUDWRU
GLVKPXVWDOZD\VEHNHSWFOHDU$OZD\VSODFH
RYHQZDUHLQDSHUIRUDWHGFRRNLQJFRQWDLQHURURQD
ZLUHUDFN
■ 'RQRWVOLGHDQ\DFFHVVRULHVEHWZHHQWKHVKHOI
SRVLWLRQVRUWKH\PD\WLS
1RWHV
■ +ROGWKHEDNLQJWUD\VHFXUHO\DWWKHVLGHVZLWKERWK
KDQGVDQGVOLGHLWLQWRWKHVKHOIVXSSRUWVNHHSLQJLW
SDUDOOHO 'R QRW PRYH WKH EDNLQJ WUD\ IURP VLGH WR VLGH
DV\RXVOLGHLWLQRWKHUZLVHLWZLOOQRWJRLQHDVLO\DQG
WKHHQDPHOOHGVXUIDFHVPD\EHGDPDJHG
■ 0DNHVXUHWKDW\RXDOZD\VLQVHUWWKHDFFHVVRULHVLQWR
WKHFRRNLQJFRPSDUWPHQWWKHULJKWZD\URXQG
■ $OZD\VLQVHUWWKHDFFHVVRULHVIXOO\LQWRWKHFRRNLQJ
FRPSDUWPHQWVRWKDWWKH\GRQRWWRXFKWKHDSSOLDQFH
GRRU
■ 7DNHDQ\DFFHVVRULHVWKDW\RXZLOOQRWEHXVLQJRXWRI
WKHFRRNLQJFRPSDUWPHQW
:LUHUDFN
)RURYHQZDUHFDNHWLQVDQGRYHQ
SURRIGLVKHV
)RUURDVWVJULOOHGLWHPVDQGIUR]HQ
PHDOV
8QLYHUVDOSDQ
)RUPRLVWFDNHVRWKHUEDNHGLWHPV
IUR]HQPHDOVDQGODUJHURDVWV
,WFDQEHXVHGWRFDWFKGULSSLQJIDW
ZKHQ\RXDUHJULOOLQJGLUHFWO\RQWKH
ZLUHUDFN
6WHDP FRQWDLQHU SHUIRUDWHG VL]H /
)RUWKHVWHDPLQJRIZKROHILVKRU
ODUJHTXDQWLWLHVRIYHJHWDEOHVIRU
MXLFLQJEHUULHVHWF
6WHDPFRQWDLQHUXQSHUIRUDWHG
VL]H/
)RUFDWFKLQJGULSSLQJOLTXLGZKHQ
VWHDPLQJ DQG IRU FRRNLQJ ULFH SXOVHV
DQGFHUHDOV
( (YDSRUDWRUGLVK
0 :DWHUWDQN

en %HIRUHXVLQJIRUWKHILUVWWLPH
K%HIRUHXVLQJIRUWKHILUVW
WLPH
%HIRUHXVLQJIRUWKHILUVWWLPH
%HIRUH\RXFDQXVH\RXUQHZDSSOLDQFH\RXPXVWPDNH
VRPHVHWWLQJV<RXPXVWDOVRFOHDQWKHFRRNLQJ
FRPSDUWPHQWDQGDFFHVVRULHV
&DXWLRQ
7KHDSSOLDQFHPD\EHFRPHGDPDJHGGXHWRWKHXVHRI
XQVXLWDEOHOLTXLGV
'RQRWXVHKLJKO\FKORULQDWHGWDSZDWHU!PJORU
RWKHUOLTXLGV
2QO\XVHFROGIUHVKWDSZDWHUVRIWHQHGZDWHURU
XQFDUERQDWHGPLQHUDOZDWHU
6HWWLQJWKHFXUUHQWWLPH
7RXFKWKH 0 EXWWRQ
8VHWKH MN EXWWRQVWRVHWWKHKRXUV
7RXFKWKH 0 EXWWRQ
8VHWKH MN EXWWRQVWRVHWWKHPLQXWHV
7RXFKWKH 0 EXWWRQ
7KHFXUUHQWWLPHLVVHW
&OHDQLQJWKHDFFHVVRULHV
&OHDQWKHDFFHVVRULHVWKRURXJKO\XVLQJVRDS\ZDWHUDQG
DGLVKFORWKRUVRIWEUXVK
12SHUDWLQJWKHDSSOLDQFH
2SHUDWLQJ WKH DSSOLDQFH
<RX KDYH DOUHDG\ OHDUQW DERXW WKH FRQWUROV DQG KRZ WKH\
ZRUN 1RZ ZH ZLOO H[SODLQ KRZ WR VHW \RXU DSSOLDQFH <RX
ZLOOOHDUQDERXWZKDWKDSSHQVZKHQ\RXVZLWFKWKH
DSSOLDQFHRQDQGRIIDQGKRZWRVHOHFWWKHRSHUDWLQJ
PRGH
::DUQLQJ² 5LVNRIVFDOGLQJ
:KHQ\RXRSHQWKHDSSOLDQFHGRRUKRWVWHDPFDQ
HVFDSH6WHDPPD\QRWEHYLVLEOHGHSHQGLQJRQLWV
WHPSHUDWXUH :KHQ RSHQLQJ GR QRW VWDQG WRR FORVH WR WKH
DSSOLDQFH2SHQWKHDSSOLDQFHGRRUFDUHIXOO\.HHS
FKLOGUHQDZD\
::DUQLQJ² 5LVNRIVFDOGLQJ
7KHZDWHULQWKHHYDSRUDWRUGLVKLVVWLOOKRWHYHQDIWHUWKH
DSSOLDQFHKDVEHHQVZLWFKHGRII'RQRWHPSW\WKH
HYDSRUDWRUGLVKLPPHGLDWHO\DIWHUVZLWFKLQJRIIWKH
DSSOLDQFH$OORZWKHDSSOLDQFHWRFRROGRZQEHIRUH
FOHDQLQJLW
6ZLWFKWKHDSSOLDQFHRQDQGRII
%HIRUH \RX DUH DEOH WR VHW WKH DSSOLDQFH \RX PXVW VZLWFK
LWRQ
([FHSWLRQ7KHFXUUHQWWLPHFDQRQO\EHVHWLIWKH
DSSOLDQFHLVLQVWDQGE\PRGH7KHWLPHUFDQEHVHW
UHJDUGOHVVRIZKHWKHUWKHDSSOLDQFHLVRQRURII
6ZLWFK RII \RXU DSSOLDQFH ZKHQ \RX GR QRW QHHG WR XVH LW
,IQRVHWWLQJVDUHDSSOLHGIRUDORQJWLPHWKHDSSOLDQFH
VZLWFKHVLWVHOIRIIDXWRPDWLFDOO\
6ZLWFKRQWKHDSSOLDQFH
7RXFKWKH # EXWWRQWRVZLWFKRQWKHDSSOLDQFH
2QWKHGLVSOD\\RXZLOOVHHDFRRNLQJWLPHDQGD
WHPSHUDWXUH
6ZLWFKLQJRIIWKHDSSOLDQFH
7RXFKWKH # EXWWRQWRVZLWFKRIIWKHDSSOLDQFH
$Q\IXQFWLRQWKDWLVFXUUHQWO\VHWZLOOEHFDQFHOOHG
7KHWLPHZLOODSSHDURQWKHGLVSOD\
6WDUWLQJRUSDXVLQJWKHDSSOLDQFH
7RVWDUWWKHDSSOLDQFHRUWRLQWHUUXSWLWZKLOHLWLVLQ
RSHUDWLRQWRXFKWKH o EXWWRQ7KHIDQPD\FRQWLQXHWR
UXQDIWHUWKHDSSOLDQFHLVSDXVHG
7RXFKWKH # EXWWRQWRGHOHWHDOOVHWWLQJV
,I\RXRSHQWKHFRRNLQJFRPSDUWPHQWGRRUZKLOHWKH
DSSOLDQFH LV LQ RSHUDWLRQ WKLV SDXVHV WKH DSSOLDQFH &ORVH
WKHFRRNLQJFRPSDUWPHQWGRRUWRUHVXPHFRRNLQJ
2SHUDWLQJWKHDSSOLDQFH HQ
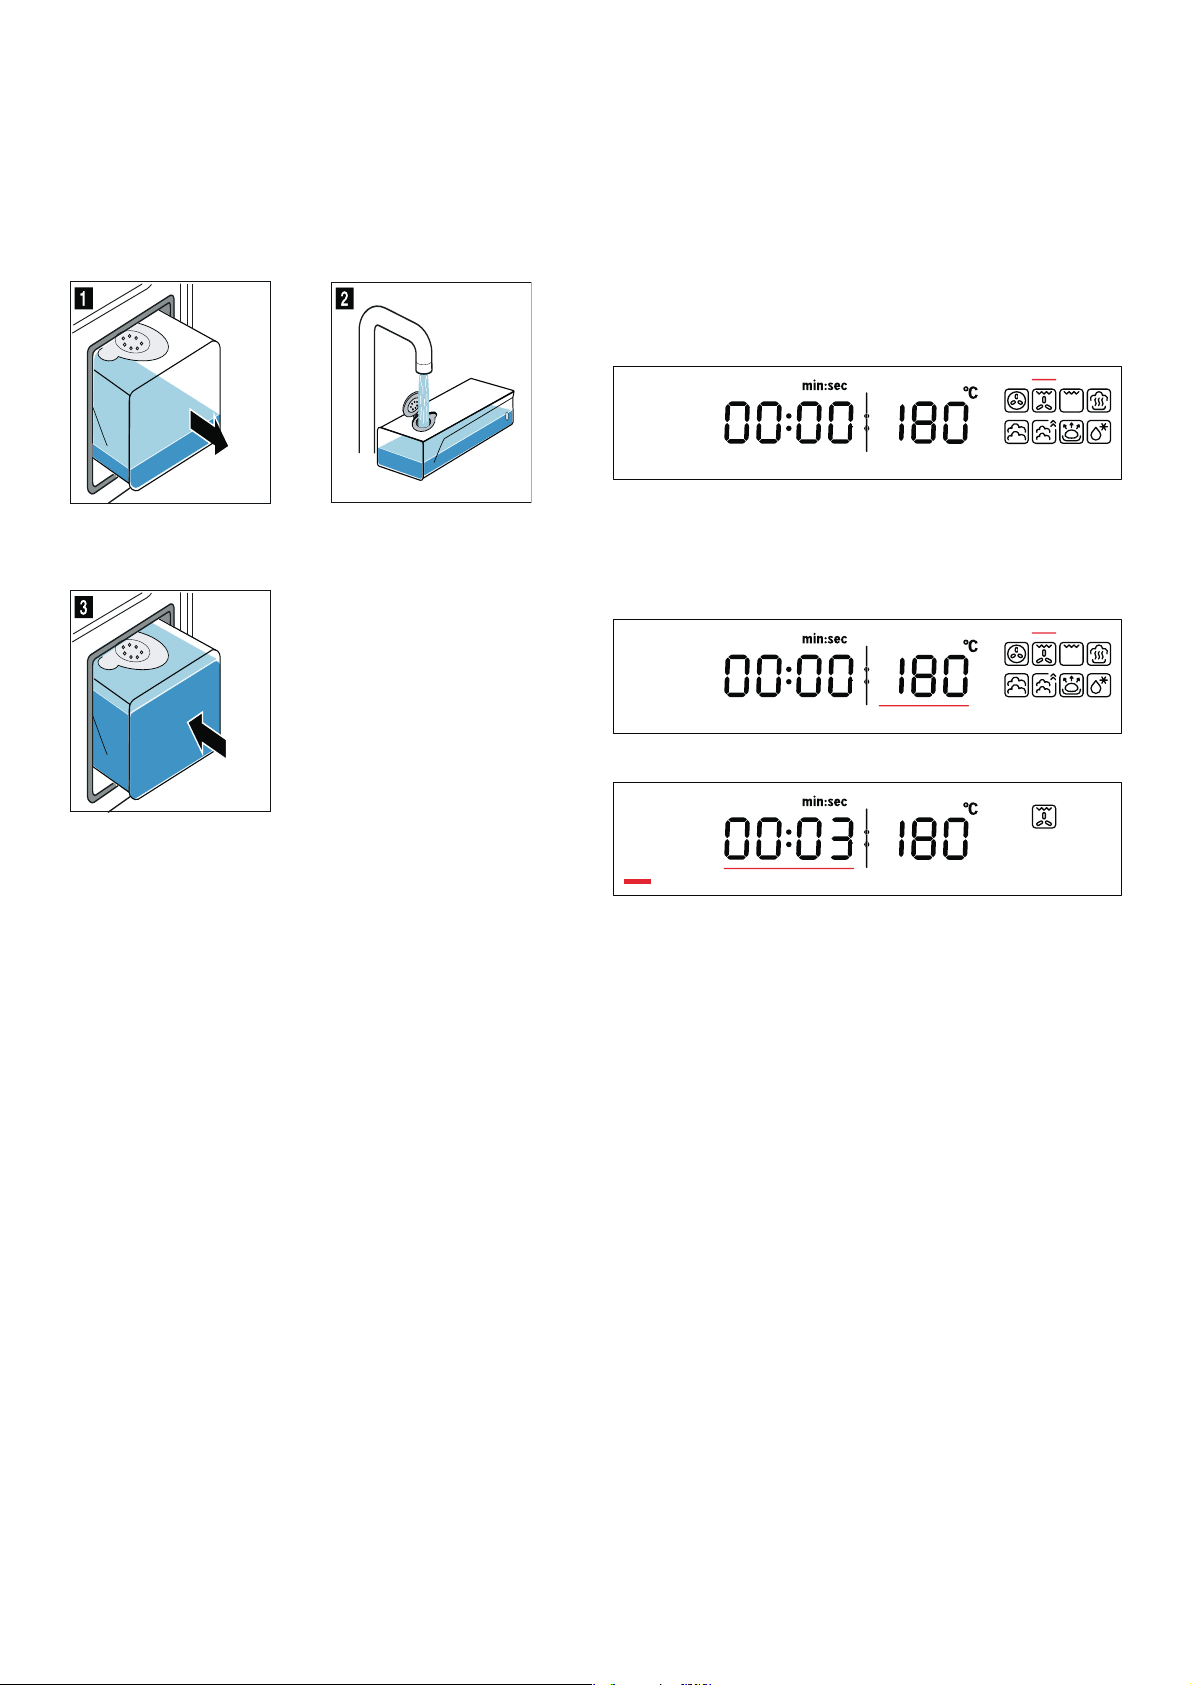
)LOOLQJWKHZDWHUWDQN
)LOOWKHZDWHUWDQNEHIRUHHDFKXVH
7RXFKWKH v EXWWRQWRHMHFWWKHZDWHUWDQN
5HPRYHWKHZDWHUWDQNIURPWKHWDQNUHFHVV%LOG !
2SHQ WKH WDQN OLG DQG ILOO WKH ZDWHU WDQN ZLWK FROG ZDWHU
%LOG "
&ORVHWKHWDQNOLG
5HLQVHUWWKHILOOHGZDWHUWDQNLQWRWKHWDQN
UHFHVV%LOG #
7KHZDWHUWDQNKDVEHHQILOOHG<RXFDQVWDUWRSHUDWLRQ
&DXWLRQ
7KHDSSOLDQFHPD\EHFRPHGDPDJHGGXHWRWKHXVHRI
XQVXLWDEOHOLTXLGV
'RQRWXVHKLJKO\FKORULQDWHGWDSZDWHU!PJORU
RWKHUOLTXLGV
2QO\XVHFROGIUHVKWDSZDWHUVRIWHQHGZDWHURU
XQFDUERQDWHGPLQHUDOZDWHU
5HILOOLQJWKHZDWHUWDQN
,IWKHUHLVRQO\OLWWOHZDWHUUHPDLQLQJLQWKHZDWHUWDQNWKH
V\PERO $ ILOOZDWHUWDQNZLOOIODVKRQWKHGLVSOD\
$IWHU WZR PLQXWHV WKH V\PERO $ ILOO ZDWHU WDQN ZLOO OLJKW XS
SHUPDQHQWO\DQGDQDXGLEOHVLJQDOZLOOVRXQG7KH
RSHUDWLRQVWRSV
7RXFKWKH v EXWWRQWRHMHFWWKHZDWHUWDQN
5HPRYHWKHZDWHUWDQNIURPWKHWDQNUHFHVVDQGILOO
WKHZDWHUWDQNZLWKFROGZDWHU
5HLQVHUWWKHZDWHUWDQNLQWRWKHWDQNUHFHVV
HLQVFKLHEHQ
7RXFKWKH o EXWWRQWRVWDUWWKHRSHUDWLRQ
2SHUDWLRQZLOOFRQWLQXH
6HWWKHKHDWLQJPRGHDQGWHPSHUDWXUH
$IWHU WKH DSSOLDQFH LV VZLWFKHG RQ WKH VHW VXJJHVWHG W\SH
RIKHDWLQJDSSHDUVZLWKWKHWHPSHUDWXUH<RXFDQVWDUW
XVLQJWKHDSSOLDQFHDWWKLVVHWWLQJLPPHGLDWHO\E\
SUHVVLQJWKH o EXWWRQ)RURWKHUVHWWLQJV\RXFDQ
FKDQJHWKHYDOXHVDVIROORZV
([DPSOHLQGLDJUDP+RWDLUJULOODW &
7RXFK WKH ! EXWWRQ PXOWLSOH WLPHV XQWLO WKH V\PERO 7
DSSHDUVRQWKHGLVSOD\
7KHKHDWLQJPRGHKRWDLUJULOOLVVHOHFWHG$SUHVHW
WHPSHUDWXUHDSSHDUVRQWKHGLVSOD\
7RXFKWKH } EXWWRQ
8VHWKH MN EXWWRQVWRVHWWKHWHPSHUDWXUHWR
&
7RXFKWKH o EXWWRQ
7KHDSSOLDQFHZLOOVWDUWKHDWLQJXVLQJWKHVHWYDOXHVDQG
WKH FRRNLQJ WLPH ZLOO VWDUW FRXQWLQJ XS RQ WKH GLVSOD\ 7KH
OHQJWKRIWKHEDURQWKHWHPSHUDWXUHLQGLFDWRUJUDGXDOO\
LQFUHDVHV
$IWHUHDFKXVH
::DUQLQJ² 5LVNRIVFDOGLQJ
:KHQ\RXRSHQWKHDSSOLDQFHGRRUKRWVWHDPFDQ
HVFDSH6WHDPPD\QRWEHYLVLEOHGHSHQGLQJRQLWV
WHPSHUDWXUH :KHQ RSHQLQJ GR QRW VWDQG WRR FORVH WR WKH
DSSOLDQFH2SHQWKHDSSOLDQFHGRRUFDUHIXOO\.HHS
FKLOGUHQDZD\
0RLVWXUH DQG GLUW UHPDLQ LQ WKH FRRNLQJ FRPSDUWPHQW DIWHU
HDFKRSHUDWLRQ7KHUHIRUHGU\DQGFOHDQWKHFRRNLQJ
FRPSDUWPHQW DQG WKH HYDSRUDWRU GLVK DIWHU HDFK XVH $OVR
HPSW\WKHZDWHUWDQNDIWHUHDFKXVH

en 7LPHVHWWLQJRSWLRQV
'U\LQJWKHFRRNLQJFRPSDUWPHQW
::DUQLQJ² 5LVNRIVFDOGLQJ
7KHZDWHULQWKHHYDSRUDWRUGLVKPD\VWLOOEHKRW$OORZLW
WRFRROEHIRUHZLSLQJ
/HDYHWKHDSSOLDQFHGRRUDMDUXQWLOWKHDSSOLDQFHKDV
FRROHGGRZQ
5HPRYHDQ\GLUWIURPWKHFRRNLQJFRPSDUWPHQW
LPPHGLDWHO\
:LSHRXWWKHFRROHGFRRNLQJFRPSDUWPHQWDQG
HYDSRUDWRU GLVK ZLWK WKH FOHDQLQJ VSRQJH DQG GU\ ZLWK
DVRIWFORWK
:LSHWKHIURQWRIWKHXQLWVGU\LIFRQGHQVDWLRQKDV
IRUPHG
(PSW\LQJWKHZDWHUWDQN
7KHZDWHUWDQNPXVWEHHPSWLHGDQGGULHGDIWHUHDFK
VWHDPRSHUDWLRQ
&DXWLRQ
■ 'RQRWGU\WKHZDWHUWDQNLQWKHKRWFRRNLQJ
FRPSDUWPHQW7KLVZLOOGDPDJHWKHZDWHUWDQN
■ 'R QRW FOHDQ WKH ZDWHU WDQN LQ WKH GLVKZDVKHU7KLV ZLOO
GDPDJHWKHZDWHUWDQN
7RXFKWKH v EXWWRQ
5HPRYHWKHZDWHUWDQNDQGHPSW\WKHUHVLGXDOZDWHU
7KRURXJKO\GU\WKHVHDOLQWKHWDQNFRYHUDQGWKH
ZDWHUWDQNUHFHVVLQWKHDSSOLDQFH
,QVHUWWKHZDWHUWDQNLQWRWKHZDWHUWDQNUHFHVV
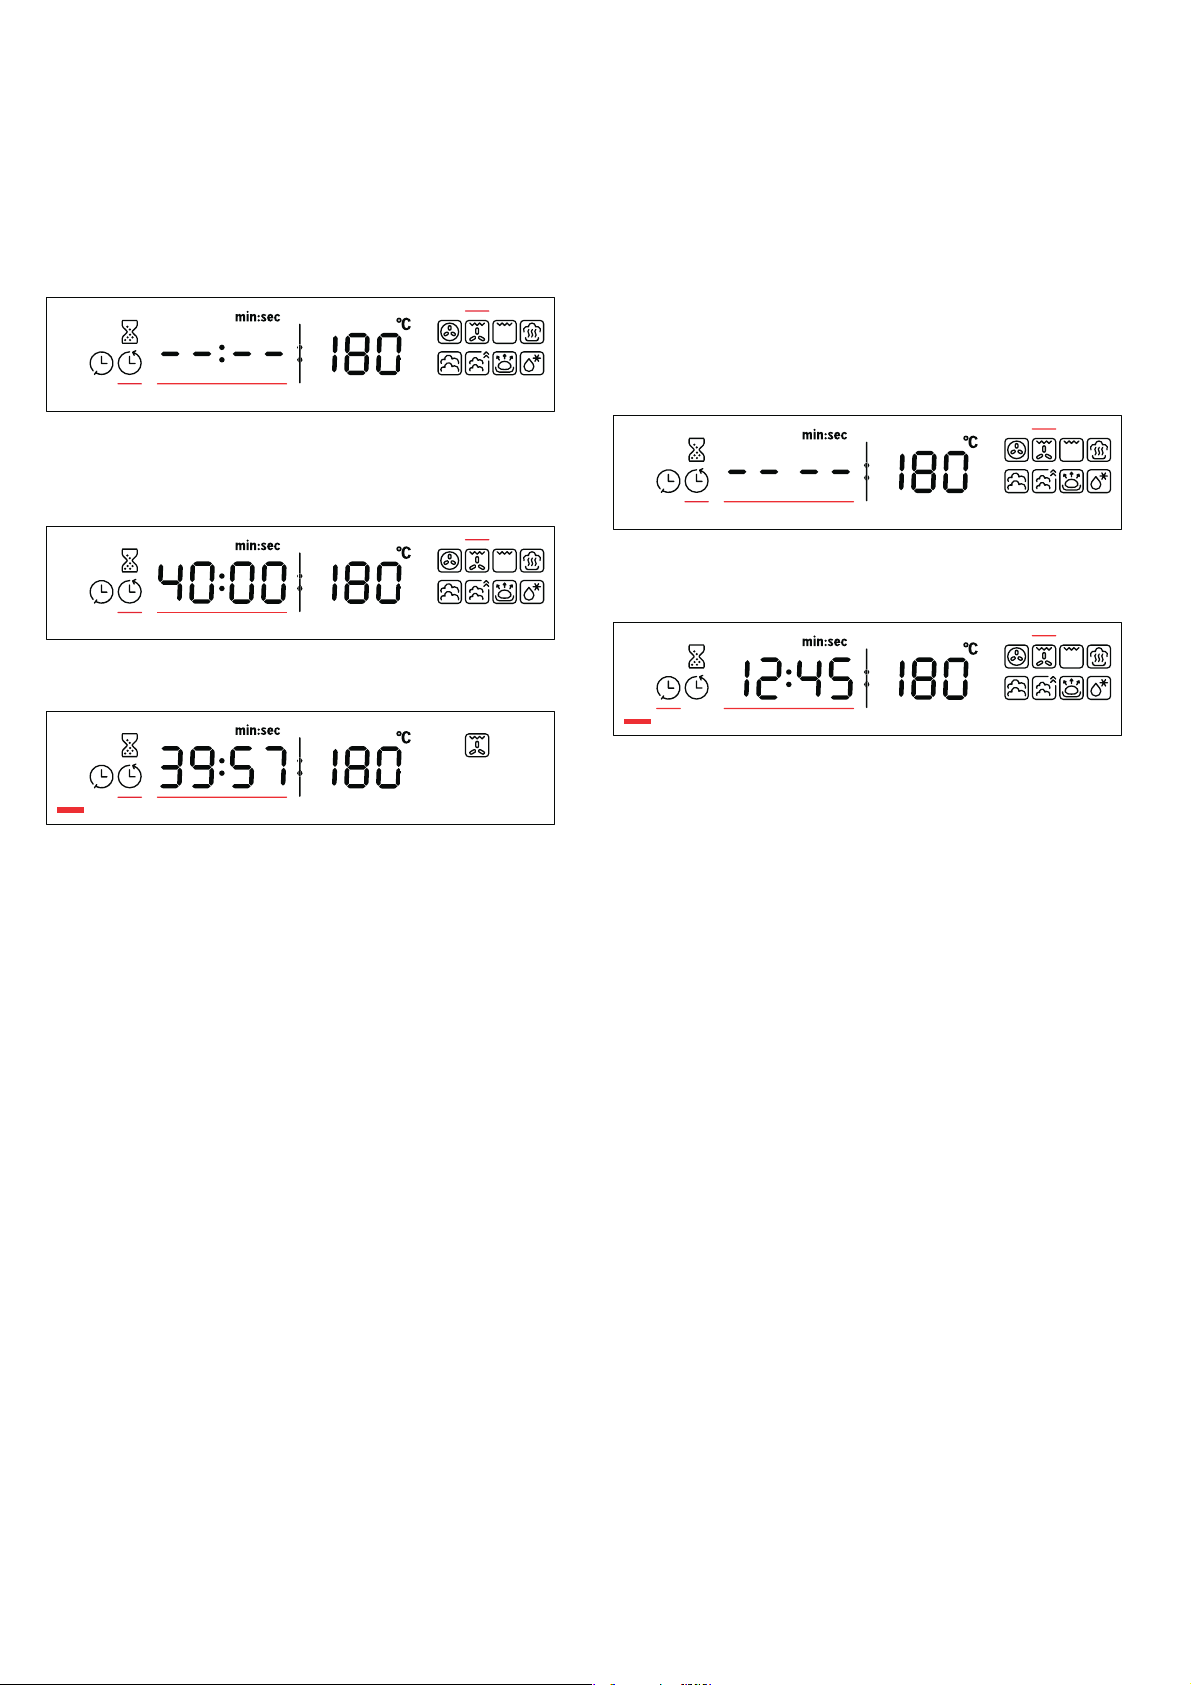
O7LPHVHWWLQJRSWLRQV
7LPHVHWWLQJ RSWLRQV
<RXUDSSOLDQFHKDVGLIIHUHQWWLPHVHWWLQJRSWLRQV
7LPHU
<RX FDQ VHW WKH WLPHU DW DQ\ WLPH HYHQ LI WKH DSSOLDQFH LV
VZLWFKHG RII ,W UXQV SDUDOOHO WR WKH RWKHU WLPH VHWWLQJV DQG
KDVDVHSDUDWHDXGLEOHVLJQDO,QWKLVZD\\RXFDQWHOO
ZKHWKHULWLVWKHWLPHURUDFRRNLQJWLPHZKLFKKDV
HODSVHG
7KHPD[LPXPVHWWLQJ\RXFDQDSSO\LVKRXUV
3UHVVWKH 0EXWWRQ
7KHILHOGIRUWKHWLPHURSHQV
3UHVVWKH MN EXWWRQVWRVHWWKHWLPHUGXUDWLRQ
7KHWLPHUVWDUWVDIWHUDIHZVHFRQGV
1RWH 7KHWLPHVHWWLQJFKDQJHVLQVHFRQGVWHSVLIWKH
WLPHU LV VHW WR OHVV WKDQ KRXU DQG LQ PLQXWH VWHSV LI WKH
WLPHU LV VHW WR PRUH WKDQ KRXU $ ORQJ SUHVV DFFHOHUDWHV
WKHVHWWLQJYDOXH
7KH t V\PEROIRUWKHWLPHUDQGWKHWLPHFRXQWLQJGRZQ
DUHVKRZQLQWKHGLVSOD\
:KHQWKHWLPHKDVHODSVHG
$Q DXGLEOH VLJQDO VRXQGV 8VH WKH 0 EXWWRQ WR FDQFHO WKH
DXGLEOHVLJQDOHDUO\
&DQFHOOLQJWKHWLPHUGXUDWLRQ
3UHVV WKH 0 EXWWRQ WR RSHQ WKH WLPHVHWWLQJ RSWLRQV PHQX
DQGWXUQWKHWLPHEDFNWR]HUR3UHVVWKH 0 EXWWRQWR
FORVHWKHPHQX
&KDQJLQJWKHWLPHUGXUDWLRQ
8VHWKH 0 EXWWRQWRRSHQWKHWLPHVHWWLQJRSWLRQVPHQX
DQGFKDQJHWKHWLPHUWLPHLQWKHQH[WIHZVHFRQGVXVLQJ
WKH MN EXWWRQV6WDUWWKHWLPHUZLWKWKH 0 EXWWRQ
7LPHVHWWLQJRSWLRQ 8VH
t
7LPHU 7KHWLPHUIXQFWLRQVOLNHDQHJJWLPHU
$Q DXGLEOH VLJQDO VRXQGV RQFH WKH WLPH
KDVHODSVHG
y
&RRNLQJWLPH $QDXGLEOHVLJQDOZLOOVRXQGRQFHWKH
VHWFRRNLQJWLPHKDVHODSVHG7KH
DSSOLDQFHVWRSVKHDWLQJDXWRPDWLFDOO\
{
(QGWLPH 6HWDODWHUHQGWLPH7KHDSSOLDQFH
VZLWFKHVRIIDXWRPDWLFDOO\VRWKDWWKH
RSHUDWLRQHQGVDWWKHGHVLUHGWLPH
0 7LPH 6HWWKHFXUUHQWWLPH7KHDSSOLDQFH
PXVWEHVZLWFKHGRIIZKHQ\RXGRWKLV
7LPHVHWWLQJRSWLRQV HQ
&RRNLQJWLPH
:KHQ \RX VHW D FRRNLQJ WLPH IRU \RXU IRRG WKH DSSOLDQFH
ZLOO VWRS KHDWLQJ DXWRPDWLFDOO\ RQFH WKLV WLPH KDV HODSVHG
)RUH[DPSOH6HWWLQJIRUKRWDLUJULOO & PLQXWHV
7RXFK WKH 0 EXWWRQ PXOWLSOH WLPHV XQWLO WKH V\PERO y
DSSHDUVRQWKHGLVSOD\
LVKLJKOLJKWHGLQWKHGLVSOD\
8VH WKH MN EXWWRQV WR VHW WKH FRRNLQJ WLPH )RU HDFK
EXWWRQSUHVVWKHWLPHZLOOFKDQJHLQPLQXWH
LQFUHPHQWV $ ORQJ SUHVV DFFHOHUDWHV WKH VHWWLQJ YDOXH
7KHVHWFRRNLQJWLPHZLOOEHVKRZQRQWKHGLVSOD\
3UHVVWKH o EXWWRQWRVWDUWWKHDSSOLDQFH
2SHUDWLRQVWDUWVDQGWKHGXUDWLRQFRXQWVGRZQ
1RWH ,QRSHUDWLQJPRGHVVWHDP SDQGRYHUVWHDP @
WKHFRRNLQJWLPHGRHVQRWVWDUWFRXQWLQJGRZQXQWLOWKH
DSSOLDQFHKDVUHDFKHGWKHVHWWHPSHUDWXUH
7KHFRRNLQJWLPHKDVHODSVHG
$VLJQDOVRXQGV7KHDSSOLDQFHVWRSVKHDWLQJ<RXFDQ
FDQFHOWKHDXGLEOHVLJQDOHDUO\XVLQJWKH 0EXWWRQ
&DQFHOOLQJWKHFRRNLQJWLPH
3UHVV WKH 0 EXWWRQ WR RSHQ WKH WLPHVHWWLQJ RSWLRQV PHQX
DQGGLDOWKHFRRNLQJWLPHEDFNWR]HUR7KHRSHUDWLRQ
HQGV3UHVVWKH 0EXWWRQWRFORVHWKHPHQX
&KDQJLQJWKHFRRNLQJWLPH
3UHVVWKH 0EXWWRQWRRSHQWKHWLPHVHWWLQJRSWLRQV
PHQX &KDQJH WKH FRRNLQJ WLPH XVLQJ WKH MN EXWWRQV WR
WKHOHIWRIWKHGLVSOD\
(QGWLPH
,I\RXFKDQJHWKHHQGWLPHWRDODWHUWLPHEHDULQPLQG
WKDW HDVLO\ VSRLOHG IRRGV PXVW QRW EH DOORZHG WR UHPDLQ LQ
WKHFRRNLQJFRPSDUWPHQWIRUWRRORQJ
5HTXLUHPHQW$FRRNLQJWLPHPXVWEHVHW
([DPSOHLQWKHSLFWXUH<RXSXWWKHIRRGLQWKHFRRNLQJ
FRPSDUWPHQW DW ,W WDNHV PLQXWHV WR FRRN DQG ZLOO
EHUHDG\DWEXW\RXZRXOGOLNHLWWREHUHDG\DW
LQVWHDG
7RXFK WKH 0 EXWWRQ PXOWLSOH WLPHV XQWLO WKH { V\PERO
DSSHDUVRQWKHGLVSOD\
8VHWKH MN EXWWRQVWRVHWWKHHQGWLPH)RUHDFK
EXWWRQSUHVVWKHWLPHZLOOFKDQJHLQPLQXWH
LQFUHPHQWV$ORQJSUHVVZLOODFFHOHUDWHWKLVVHWWLQJ
7RXFKWKH o EXWWRQWRFRQILUP
7KH DSSOLDQFH LV LQ VWDQGE\ PRGH 7KH { V\PERO DQG
WKHWLPHDWZKLFKFRRNLQJZLOOILQLVKZLOODSSHDURQWKH
GLVSOD\7KHDSSOLDQFHZLOOVWDUWFRRNLQJ\RXUIRRGDW
WKHDSSURSULDWHWLPH7KHFRRNLQJWLPHFRXQWVGRZQ
RQWKHGLVSOD\
1RWH ,QRSHUDWLQJPRGHVVWHDP SDQGRYHUVWHDP @
WKHFRRNLQJWLPHGRHVQRWVWDUWFRXQWLQJGRZQXQWLOWKH
DSSOLDQFHKDVUHDFKHGWKHVHWWHPSHUDWXUH
7KHFRRNLQJWLPHKDVHODSVHG
$VLJQDOVRXQGV7KHDSSOLDQFHVWRSVKHDWLQJ<RXFDQ
FDQFHOWKHDXGLEOHVLJQDOHDUO\XVLQJWKH 0EXWWRQ
&RUUHFWLQJRUFDQFHOOLQJWKHHQGWLPH
'XULQJRSHUDWLRQ\RXFDQDGMXVWWKHHQGWLPHYLDWKH M
N EXWWRQV3UHVVWKH # EXWWRQWRGHOHWHDOOVHWWLQJV
6HWWLQJWKHFORFN
7KH WLPH LV VKRZQ RQ WKH GLVSOD\ ZKHQ WKH DSSOLDQFH LV LQ
VWDQGE\<RXFDQVHWWKHWLPHDVIROORZV
3UHUHTXLVLWH7KHDSSOLDQFHLVLQVWDQGE\
7RXFKWKH 0 EXWWRQ
7RXFK WKH MN EXWWRQV WR VHW WKH KRXUV DQG WRXFK WKH
0 EXWWRQWRFRQILUP$ORQJSUHVVZLOODFFHOHUDWHWKH
VHWWLQJ
7RXFKWKH MN EXWWRQVWRVHWWKHPLQXWHVDQGWRXFK
WKH 0 EXWWRQWRFRQILUP$ORQJSUHVVZLOODFFHOHUDWH
WKHVHWWLQJ
7KHFXUUHQWWLPHLVVHW
en $XWRPDWLFSURJUDPPHV
P$XWRPDWLFSURJUDPPHV
$XWRP DWLF S URJ UDPP HV
<RXFDQSUHSDUHIRRGYHU\HDVLO\E\XVLQJYDULRXV
SURJUDPPHV6LPSO\VHOHFWDSURJUDPPHDQGWKH
DSSOLDQFHZLOODSSO\WKHRSWLPDOVHWWLQJVIRU\RX
7RDFKLHYHJRRGUHVXOWVWKHFRRNLQJFRPSDUWPHQWPXVW
QRWEHWRRKRWEHIRUHVWDUWLQJWKHSURJUDPPH$OZD\V
GLVWULEXWHWKHIRRGHYHQO\LQWKHFRRNZDUHDQGGRQRW
VWDFNWKHP$OOSURJUDPPHVDUHGHVLJQHGIRUFRRNLQJRQ
RQHOHYHO7KHFRRNLQJUHVXOWPD\YDU\DFFRUGLQJWRWKH
VL]HDQGTXDOLW\RIWKHIRRG
<RX FDQ VFDQ WKH 45 FRGH WR JHW FRUUHVSRQGLQJ UHFLSH IRU
WKHSURJUDPPHDQG\RXFDQDOVRFRRNWKHIRRGLQ\RXU
RZQVHDVRQZD\
)RU VRPH GLVKHV LW LV SRVVLEOH WR VHW D ODWHU HQG WLPH <RX
FDQILQGRXWKRZWRVHWDODWHUHQGWLPHE\ORRNLQJLQWKH
WLPHVHWWLQJ RSWLRQV 3OHDVH UHPHPEHU WKDW HDVLO\ VSRLOHG
IRRGVPXVWQRWEHDOORZHGWRUHPDLQLQWKHFRRNLQJ
FRPSDUWPHQWIRUWRRORQJ
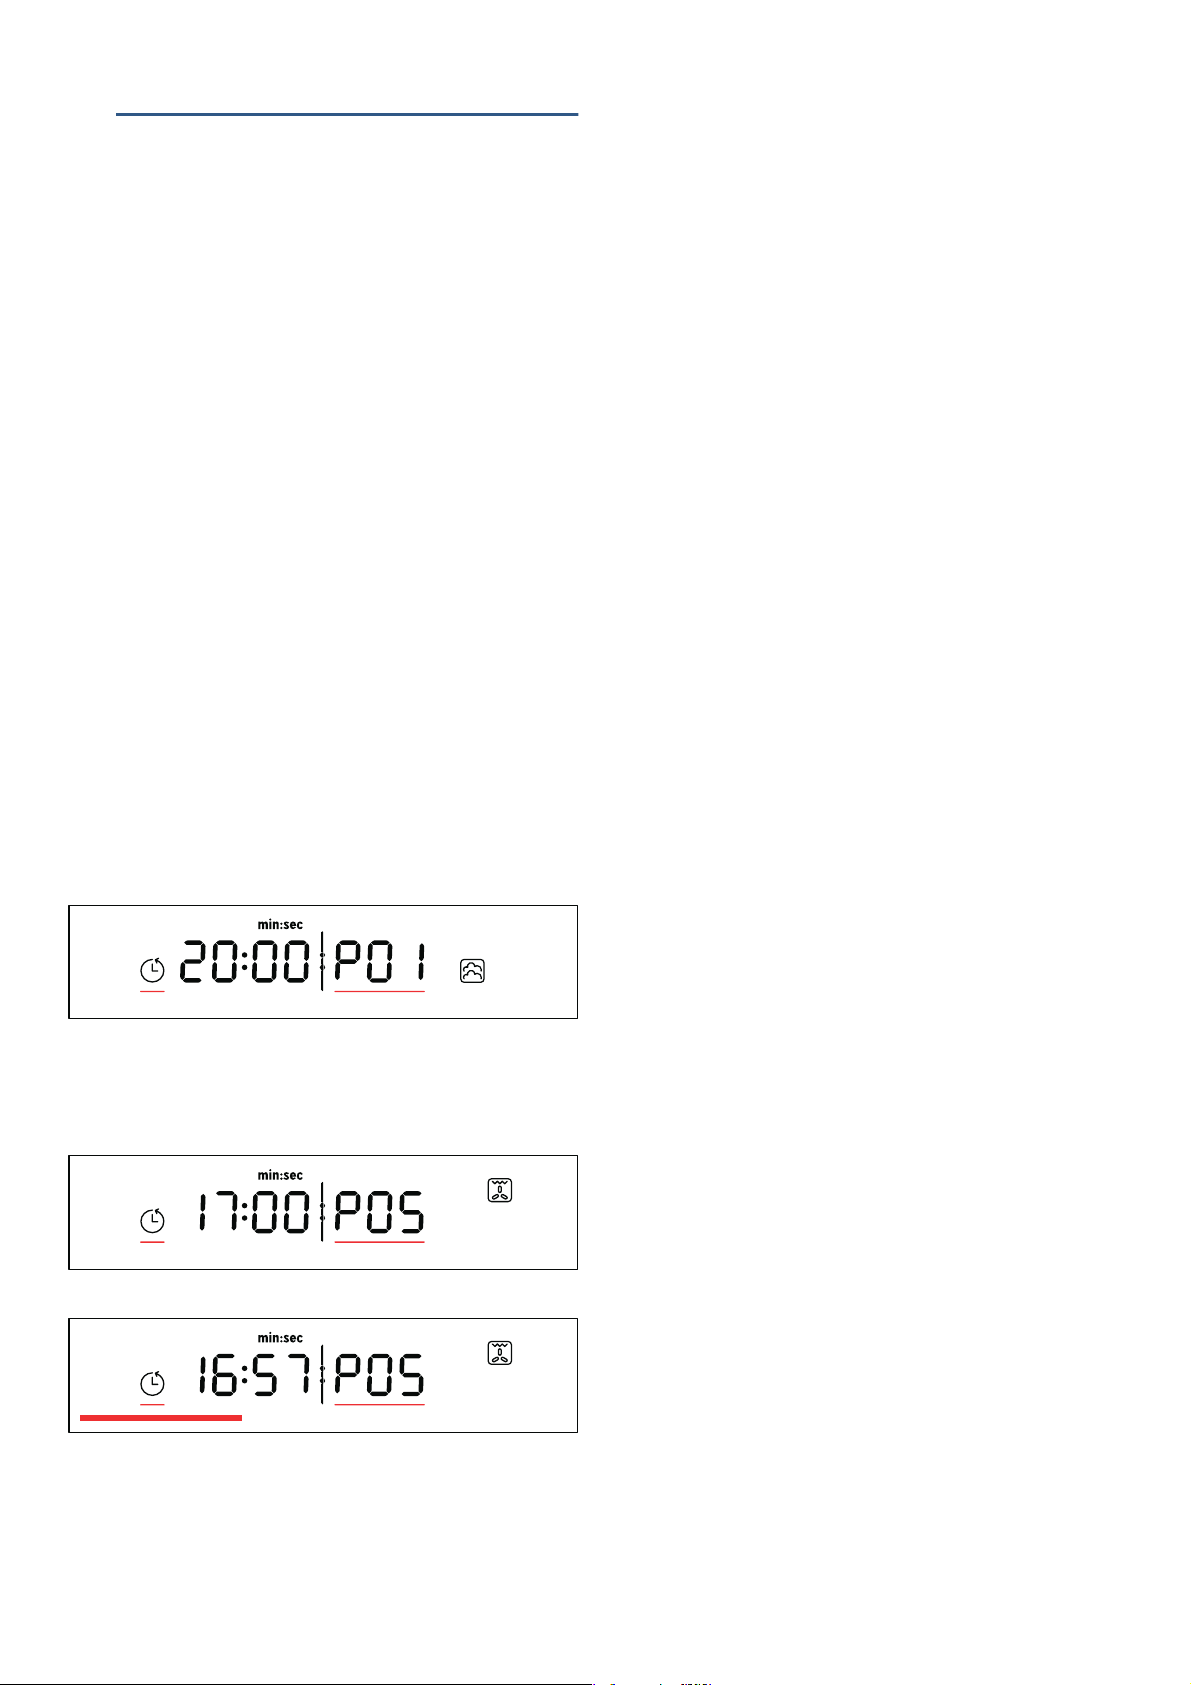
6HWDXWRPDWLFSURJUDP
2QFH\RXKDYHVHOHFWHGWKHDXWRPDWLFSURJUDPPRGH
GHIDXOW YDOXHV IRU WKH DXWRPDWLF SURJUDP DQG FRRNLQJ WLPH
ZLOODSSHDURQWKHGLVSOD\<RXFDQVWDUWXVLQJWKH
DSSOLDQFHDWWKLVVHWWLQJLPPHGLDWHO\E\SUHVVLQJWKH
o EXWWRQ
)RU RWKHU VHWWLQJV \RX FDQ FKDQJH WKH YDOXHV DV VKRZQ LQ
WKHSLFWXUHV
)RUH[DPSOH3URJUDP ˜‹†
7RXFKWKH % EXWWRQ
7KHDXWRPDWLFSURJUDPPRGHLVQRZVHOHFWHG$
SURJUDPQXPEHUDKHDWLQJPRGHDQGDFRRNLQJWLPH
DSSHDURQWKHGLVSOD\
8VHWKH MN EXWWRQVWRWKHOHIWRIWKHGLVSOD\WR
FKDQJHWKHDXWRPDWLFSURJUDP
7RXFKWKH o EXWWRQ
2QFHWKHDSSOLDQFHLVLQRSHUDWLRQWKHFRRNLQJWLPHZLOO
FRXQW GRZQ RQ WKH GLVSOD\ 7KH SURJUDP QXPEHU LV YLVLEOH
RQWKHGLVSOD\
1RWHV
■ 'XULQJRSHUDWLRQWKHDXWRPDWLFSURJUDPFDQQRWEH
FKDQJHG
■ 7RXFKWKH o EXWWRQWRVWRSWKHSURJUDPWKDWLV
FXUUHQWO\LQSURJUHVV
$FFHVVRULHV
(QVXUH WKDW \RX DOZD\V XVH VXLWDEOH DFFHVVRULHV DQG WKDW
WKH\ DUH SODFHG LQ WKH FRRNLQJ FRPSDUWPHQW WKH ULJKW VKHOI
SRVLWLRQ
3HUIRUDWHGVWHDPFRQWDLQHU
:KHQFRRNLQJZLWKDSHUIRUDWHGVWHDPFRQWDLQHULQVHUW
WKHXQSHUIRUDWHGVWHDPFRQWDLQHUEHORZWRFDWFKWKH
GULSSLQJOLTXLG
:LUHUDFN
:KHQFRRNLQJRQWKHZLUHUDFNVOLGHWKHEDNLQJWUD\LQWR
WKHERWWRPWRFDWFKGULSSLQJV
&RRNZDUH
8VH WKH VXLWDEOH FRRNZDUH $OZD\V SODFH FRRNZDUH RQ WKH
LQGLFDWHGDFFHVVRULHV:KHQVWHDPLQJIRRGFRRNZDUH
PXVWEHKHDWDQGVWHDPUHVLVWDQWJODVVDQGFHUDPLF
FRQWDLQHUVDUHVXLWDEOHIRUFRRNLQJZKLFKLVDQLGHDO
FRRNLQJFRQWDLQHU
3UHSDULQJIRRG
8VHIUHVKIRRGIRUFRRNLQJ,WLVUHFRPPHQGHGWRFRRN
PHDWDWIULGJHWHPSHUDWXUH
$PRXQW:HLJKW
3DUWRIWKHSURJUDPVUHTXLUHRSHUDWLQJDFFRUGLQJWRWKH
ZHLJKWLQVWUXFWLRQVLQWKHWDEOH
5RDVWILVK3
:KHQSUHSDULQJWKHZKROHILVKIRUURDVWLQJFXWRIIWKH
VSLQHIURPWKHILVKEHOO\WKHQOD\LWIODWRQWKHZLUHUDFN
5RDVWPHDWDQGSRXOWU\33
:KHQ URDVWLQJ FKLFNHQ ZLQJV LW LV QHFHVVDU\ WR GLVWULEXWH
WKHPHYHQO\RQWKHZLUHUDFN7KHDPRXQWRIFRQGLPHQWV
VXFK DV VXJDU RU KRQH\ VKRXOG EH UHGXFHG EHFDXVH LW FDQ
HDVLO\FDXVHWKHVNLQWREHTXLFNO\FRORUHG
:KHQ URDVWLQJ ZKROH FKLFNHQ FXW RSHQ WKH EHOO\ DQG OD\ LW
IODWRQWKHJULOOEDFNXS
%HIRUH URDVWLQJ EHHI WHQGHUORLQ EUXVK RLO RQ LWV VXUIDFH WR
JHWDEHWWHUUHVXOW
:KHQURDVWLQJODPEOHJFKRRVHWKHULJKWVL]HODPEKLQG
OHJVWRRWKLFNOHJZLOOOHDGWRWKHFHQWHURIWKHPHDWQRW
FRRNHGZHOO
6WHDPHGULFH3
:HLJKWKHIRRGDQGDGGWKHFRUUHFWUDWLRRIZDWHU
5LFHZDWHU

$XWRPDWLFSURJUDPPHV HQ
6WHDPHGHJJFXVWDUG3
(DFKHJJZHLJKVDERXWJ(JJZDWHU LWPHDQVWR
DQHJJRIJDGGJRIZDWHUSOHDVHDGGWKHFRUUHFW
UDWLR RI ZDWHU 8VH D LQFK ERZO IRU HJJ XVH DQ LQFK
GHHSSODWHIRUHJJV7KHVL]HDQGWKLFNQHVVRI
FRQWDLQHUZDWHUTXDOLW\DQGVDOWDPRXQWZLOODIIHFWWKH
FRRNLQJHIIHFW
7RDFKLHYHJRRGUHVXOWVWKHFRRNLQJFRPSDUWPHQWPXVW
FROG GRZQ HQRXJK 'R QRW RSHQ WKH DSSOLDQFH GRRU GXULQJ
DXWRPDWLFFRRNLQJSURFHVV
3URJUDPPHWDEOH
)ROORZWKHLQVWUXFWLRQVIRUWKHGLVKHV
3URJUDP 'LVK :HLJKW &RRNZDUH$FFHVVRULHV 6KHOISRVLWLRQ 1RWHV
6HDIRRG
3 6WHDPHGEDVVILVK $ERXWJ &RRNZDUHSHUIRUDWHG
VWHDPFRQWDLQHU
³
3 6WHDPHGFRGILVK $ERXWJ &RRNZDUHSHUIRUDWHG
VWHDPFRQWDLQHU
&XWLQWRSLHFHVZLWKDPD[L
PXPWKLFNQHVVRIFP
3 6WHDPHGVKULPS &RRNZDUHSHUIRUDWHG
VWHDPFRQWDLQHU
³
3 6WHDPHGFUDE 0D[LPXPRIJ
SHUFUDE
3HUIRUDWHGVWHDPFRQWDLQHU ³
3 5RDVWILVKZKROH $ERXWJ :LUHUDFN &XWDQGWLOH
0HDWDQGSRXOWU\
3 6WHDPHGFKLFNHQIHHW &RRNZDUHSHUIRUDWHG
VWHDPFRQWDLQHU
³
3 6WHDPHGSRUNULEV &RRNZDUHSHUIRUDWHG
VWHDPFRQWDLQHU
&XWLQWRSLHFHV
3 6WHDPHGVDXVDJH &RRNZDUHSHUIRUDWHG
VWHDPFRQWDLQHU
&XWRUVOLFHG
3 6WHDPHGSRUNZLWKULFH
IORXU
&RRNZDUHSHUIRUDWHG
VWHDPFRQWDLQHU
&XWLQWRVOLFHVZLWKDWKLFN
QHVVDERXWPP
3 5RDVWFKLFNHQSLHFHV $ERXWJ :LUHUDFN ³
3 5RDVWFKLFNHQZKROH $ERXWJ :LUHUDFN &XWDQGWLOH넬ZLWKEDFNXS
3 7HQGHUORLQPHGLXP $ERXWJ :LUHUDFN :KROHPHDW
3 7HQGHUORLQZHOOGRQH $ERXWJ :LUHUDFN :KROHPHDW
3 /HJ RI ODPE RQ WKH ERQH
ZHOOGRQH
$ERXWJ :LUHUDFN /DPEKLQGOHJV
3 5RDVWSRUNEHOO\ :LUHUDFN &XWLQWRVOLFHVZLWKDWKLFN
QHVVDERXWPP
3 5RDVWSRUNULEV $ERXWJ :LUHUDFN 6WULSV
9HJHWDEOHV
3 6WHDPHGEURFFROLIOR
UHWV
&RRNZDUHSHUIRUDWHG
VWHDPFRQWDLQHU
)ORUHWV
3 6WHDPHGSRWDWRVZHHW
SRWDWR
&RRNZDUHSHUIRUDWHG
VWHDPFRQWDLQHU
&XWLQWRSLHFHV
3 6WHDPHGSXPSNLQ &RRNZDUHSHUIRUDWHG
VWHDPFRQWDLQHU
&XWLQWRSLHFHV
3 6WHDPHGHJJSODQW &RRNZDUHSHUIRUDWHG
VWHDPFRQWDLQHU
&URVVHTXDOSDUWV
3 6WHDPHGEDE\FDEEDJH &RRNZDUHSHUIRUDWHG
VWHDPFRQWDLQHU
&URVVRUHTXDOSDUWV
6WDSOH
3 6WHDPHGEXQ 0D[LPXPRIJ
SHUEXQ
3HUIRUDWHGVWHDPFRQWDLQHU ³
3 6WHDPHGULFH $ERXWJ &RRNZDUHSHUIRUDWHG
VWHDPFRQWDLQHU
:HLJK WKH ULFH DQG DGG WR WKH
ZDWHULQDUDWLRRI
(JJ
3 (JJFXVWDUG HJJV &RRNZDUHSHUIRUDWHG
VWHDPFRQWDLQHU
:HLJKWKHHJJVDQGDGGWR
WKHZDWHULQDUDWLRRI
3 :KROHERLOHGHJJ 3HUIRUDWHGVWHDPFRQWDLQHU ³
<RXFDQGHOD\WKHHQGWLPHRIWKHSURJUDP

en &OHDQLQJ
D&OHDQLQJ
&OHDQLQJ
:LWK JRRG FDUH DQG FOHDQLQJ \RXU DSSOLDQFH ZLOO UHWDLQ LWV
DSSHDUDQFH DQG UHPDLQ IXOO\ IXQFWLRQLQJ IRU D ORQJ WLPH WR
FRPH :H ZLOO H[SODLQ KHUH KRZ \RX VKRXOG FRUUHFWO\ FDUH
IRUDQGFOHDQ\RXUDSSOLDQFH
::DUQLQJ² 5LVNRIVKRUWFLUFXLW
'RQRWXVHKLJKSUHVVXUHFOHDQHUVRUVWHDPMHWFOHDQHUV
WRFOHDQ\RXUDSSOLDQFH
&DXWLRQ
5LVNRIVXUIDFHGDPDJH
'RQRWXVH
■ KDUVKRUDEUDVLYHFOHDQLQJDJHQWV
■ RYHQFOHDQHUV
■ FRUURVLYHRUDJJUHVVLYHFOHDQHUVRUWKRVHFRQWDLQLQJ
FKORULQH
■ FOHDQLQJDJHQWVZLWKDKLJKDOFRKROFRQWHQW
,IVXFKDQDJHQWFRPHVLQWRFRQWDFWZLWKWKHIURQWRIWKH
DSSOLDQFHZDVKLWRIILPPHGLDWHO\ZLWKZDWHU
&DXWLRQ
5LVNRIVXUIDFHGDPDJH
,IGHVFDOHUFRPHVLQWRFRQWDFWZLWKWKHIURQWRIWKH
DSSOLDQFHRUDQ\RWKHUVHQVLWLYHVXUIDFHVZDVKLWRII
LPPHGLDWHO\ZLWKZDWHU
5HPRYHIRRGUHVLGXHVIURPWKHFRRNLQJFRPSDUWPHQWDV
VRRQDVWKHDSSOLDQFHKDVFRROHG
6DOWVDUHYHU\FRUURVLYHDQGFDQFDXVHUXVW5HPRYH
UHPDLQVRIDFLGLFVDXFHVNHWFKXSPXVWDUGRUVDOWHG
IRRGIURPWKHFRRNLQJFRPSDUWPHQWLPPHGLDWHO\DIWHU
FRROLQJ
'RQRWXVHKDUGVFRXULQJSDGVRUFOHDQLQJVSRQJHV
&OHDQLQJDJHQWV
'HVFDOLQJ
7RHQVXUHWKDW\RXUDSSOLDQFHFRQWLQXHVWRRSHUDWH
FRUUHFWO\LWPXVWEHGHVFDOHGUHJXODUO\
'HVFDOLQJ FRPSULVHV D QXPEHU RI GLIIHUHQW VWHSV $OO VWHSV
PXVW EH FRPSOHWHG LQ IXOO 2QO\ DIWHU WKLV ZLOO WKH DSSOLDQFH
EHUHDG\IRUXVHDJDLQ
1RWH 2QFHWKHDSSOLDQFHKDVEHHQVZLWFKHGEDFNRQ
DJDLQLWPXVWILUVWEHULQVHGWZLFHLQRUGHUWRUHPRYHDQ\
UHPDLQLQJGHVFDOLQJVROXWLRQIURPWKHDSSOLDQFH7KH
DSSOLDQFHFDQQRWEHXVHGIRURWKHUDSSOLFDWLRQVXQWLOWKH
VHFRQGULQVHF\FOHLVFRPSOHWH
■ 'HVFDOLQJ PLQXWHV VHFRQGVRQFHWKLVLV
FRPSOHWHHPSW\WKHHYDSRUDWRUGLVKDQGUHILOOWKH
ZDWHUWDQN
■ )LUVWULQVHF\FOH VHFRQGVRQFHWKLVLVFRPSOHWH
HPSW\WKHHYDSRUDWRUGLVK
■ 6HFRQGULQVHF\FOH VHFRQGVRQFHWKLVLV
FRPSOHWHGUDLQWKHUHPDLQLQJZDWHU
6WDUWLQJ
&DXWLRQ
■ 5LVNRIGDPDJHWRWKHDSSOLDQFH2QO\XVHWKH
GHVFDOHUUHFRPPHQGHGE\XVIRUWKHGHVFDOLQJ
SURJUDP7KHOHQJWKRIWLPHIRUZKLFKWKHGHVFDOHULV
OHIWWRZRUNLVEDVHGRQWKLVSURGXFW8VLQJRWKHU
GHVFDOHUVPD\GDPDJHWKHDSSOLDQFH
'HVFDOHURUGHUQR
■ 'HVFDOLQJ VROXWLRQ 'R QRW DOORZ DQ\ GHVFDOLQJ VROXWLRQ
RU GHVFDOHU WR FRPH LQWR FRQWDFW ZLWK WKH FRQWURO SDQHO
RURWKHUVXUIDFHVRQWKHDSSOLDQFH7KLVPD\GDPDJH
WKHVXUIDFHV,IWKLVGRHVKDSSHQUHPRYHWKH
GHVFDOLQJVROXWLRQLPPHGLDWHO\ZLWKZDWHU
$SSOLDQFHH[WHULRUZLWKDOXPLQLXPIURQW 8VHVRDS\ZDWHUDQGGU\ZLWKDVRIWFORWK
0LOG ZLQGRZ FOHDQLQJ DJHQW ZLSH RYHU WKH DOXPLQLXP IURQW KRUL]RQWDOO\ DQG ZLWKRXW DSSO\LQJ
SUHVVXUHXVLQJDVRIWZLQGRZFORWKRUDOLQWIUHHPLFURILEUHFORWK
$SSOLDQFHH[WHULRUZLWKVWDLQOHVVVWHHOIURQW 8VHVRDS\ZDWHUDQGGU\ZLWKDVRIWFORWK
$OZD\V UHPRYH IOHFNV RI OLPHVFDOH JUHDVH VWDUFK DQG DOEXPLQ HJ HJJ ZKLWH LPPHGLDWHO\
6SHFLDOVWDLQOHVVVWHHOFOHDQLQJDJHQWVFDQEHREWDLQHGIURPWKHDIWHUVDOHVVHUYLFHRUIURP
VSHFLDOLVWUHWDLOHUV
&RRNLQJFRPSDUWPHQWLQWHULRUZLWKHYDSRUD
WRUGLVK
+RW VRDS\ ZDWHU RU D YLQHJDU VROXWLRQ ă XVH WKH HQFORVHG FOHDQLQJ VSRQJH RU D VRIW ZDVKLQJ
XSEUXVK
&DXWLRQ
'R QRW XVH VWHHO SDGV RU VFRXUHUV LQ RUGHU WR SUHYHQW GDPDJH WR WKH FRRNLQJ FRPSDUWPHQWV
LQWHULRUVXUIDFHV
:DWHUWDQN 6RDS\ZDWHUGRQRWFOHDQLQWKHGLVKZDVKHU
7DQNUHFHVV 5XEGU\DIWHUHYHU\XVH
6HDOLQWKHZDWHUWDQNOLG 7KRURXJKO\GU\DIWHUHYHU\XVH
5DLOV 6HHVHFWLRQ&OHDQLQJWKHUDLOV
'RRUVHDO +RWVRDS\ZDWHU
$FFHVVRULHV 6RDNLQKRWVRDS\ZDWHU&OHDQZLWKDEUXVKRUZDVKLQJXSVSRQJHRULQWKHGLVKZDVKHU,I
WKHUDLOVDUHGLVFRORXUHGE\VWDUFK\IRRGVHJULFHFOHDQWKHPZLWKDYLQHJDUVROXWLRQ
&OHDQLQJ HQ
0L[ PO ZDWHU ZLWK RQH GHVFDOLQJ WDEOHW JSF WR
PDNHDGHVFDOLQJVROXWLRQ
7RXFKWKH v EXWWRQUHPRYHWKHZDWHUWDQNDQGSRXU
WKHGHVFDOLQJVROXWLRQLQWRLW
5HLQVHUW WKH ZDWHU WDQN ZLWK WKH GHVFDOLQJ VROXWLRQ LQWR
WKHWDQNUHFHVV
7RXFKWKH O EXWWRQWZLFHXQWLO ’‹ƒDSSHDUVRQWKH
GLVSOD\
7KHGHVFDOLQJIXQWLRQLVVHOHFWHG
7RXFKWKH o EXWWRQWRVWDUWGHVFDOLQJ
<RXFDQVHHWKHUHPDLQLQJWLPHFRXQWLQJGRZQLQWKH
VWDWXVEDU$QDXGLEOHVLJQDOZLOOVRXQGRQFHWKH
UHPDLQLQJWLPHKDVIXOO\HODSVHG
)LUVWULQVLQJF\FOH
5HPRYHWKHGHVFDOLQJVROXWLRQIURPWKHHYDSRUDWRU
GLVKXVLQJDFOHDQLQJVSRQJHSURYLGHG
5HPRYH WKH ZDWHU WDQN ULQVH WKRURXJKO\ ILOO ZLWK ZDWHU
DQGUHLQVHUW
3UHVVWKH o EXWWRQ
7KHDSSOLDQFHLVULQVLQJ7KHILUVWULQVLQJF\FOHHQGV
DIWHUDURXQG VHFRQGV
7KRURXJKO\ULQVHRXWWKHFOHDQLQJVSRQJHZLWKZDWHU
5HPRYHWKHUHPDLQLQJZDWHULQWKHHYDSRUDWRUGLVK
XVLQJWKHFOHDQLQJVSRQJH
3URFHHGZLWKWKHVHFRQGULQVLQJF\FOH
6HFRQGULQVHF\FOH
5HPRYHWKHZDWHUWDQNULQVHWKRURXJKO\DQGILOOZLWK
IUHVKZDWHU
5HLQVHUWWKHZDWHUWDQNLQWRWKHWDQNUHFHVV
7RXFKWKH o EXWWRQWRVWDUWRSHUDWLRQ
7KHDSSOLDQFHLVULQVLQJ$IWHUVHFRQGVWKHULQVH
F\FOHLVILQLVKHG
5HPRYHWKHUHPDLQLQJZDWHULQWKHHYDSRUDWRUGLVK
XVLQJDFOHDQLQJVSRQJH
:LSHRXWWKHFRRNLQJFRPSDUWPHQWXVLQJWKHFOHDQLQJ
VSRQJHDQGWKHQGU\ZLWKDVRIWFORWK
6ZLWFKRIIWKHDSSOLDQFH
'HVFDOLQJLVFRPSOHWHDQGWKHDSSOLDQFHLVUHDG\IRU
XVHDJDLQ
'HVFDOLQJWKHHYDSRUDWRUGLVKRQO\
<RXFDQDOVRXVH'HVFDOHLI\RXGRQRWZLVKWRGHVFDOH
WKHZKROHDSSOLDQFHEXWRQO\WKHHYDSRUDWRUGLVKLQWKH
FRRNLQJFRPSDUWPHQW
7KHRQO\GLIIHUHQFHLVDVIROORZV
0L[ PO ZDWHU ZLWK RQH GHVFDOLQJ WDEOHW JSF WR
PDNHDGHVFDOLQJVROXWLRQ
&RPSOHWHO\ILOOWKHHYDSRUDWRUGLVKZLWKGHVFDOLQJ
VROXWLRQ
)LOOWKHZDWHUWDQNZLWKZDWHURQO\
6WDUW'HVFDOHDVGHVFULEHG
<RXFDQDOVRGHVFDOHWKHHYDSRUDWRUGLVKPDQXDOO\
)DVWFOHDQLQJIXQFWLRQ
7R HQVXUH WKDW \RXU DSSOLDQFH VWD\V FOHDQ \RX FDQ SXPS
ZDWHUWKURXJKWKHSLSHV\VWHP
6WDUWLQJ
7RXFKWKH v EXWWRQUHPRYHWKHZDWHUWDQNDQGILOO
ZLWKZDWHU
5HLQVHUWWKHZDWHUWDQNLQWRWKHWDQNUHFHVV
7RXFKWKH O EXWWRQRQHWLPHXQWLOWKHYDOXH ’‹‚LV
VHOHFWHG
7RXFKWKH o EXWWRQ
7KHIDVWFOHDQLQJIXQFWLRQLVVWDUWLQJ7KHUHPDLQLQJ
WLPHLVFRXQWLQJGRZQRQWKHGLVSOD\
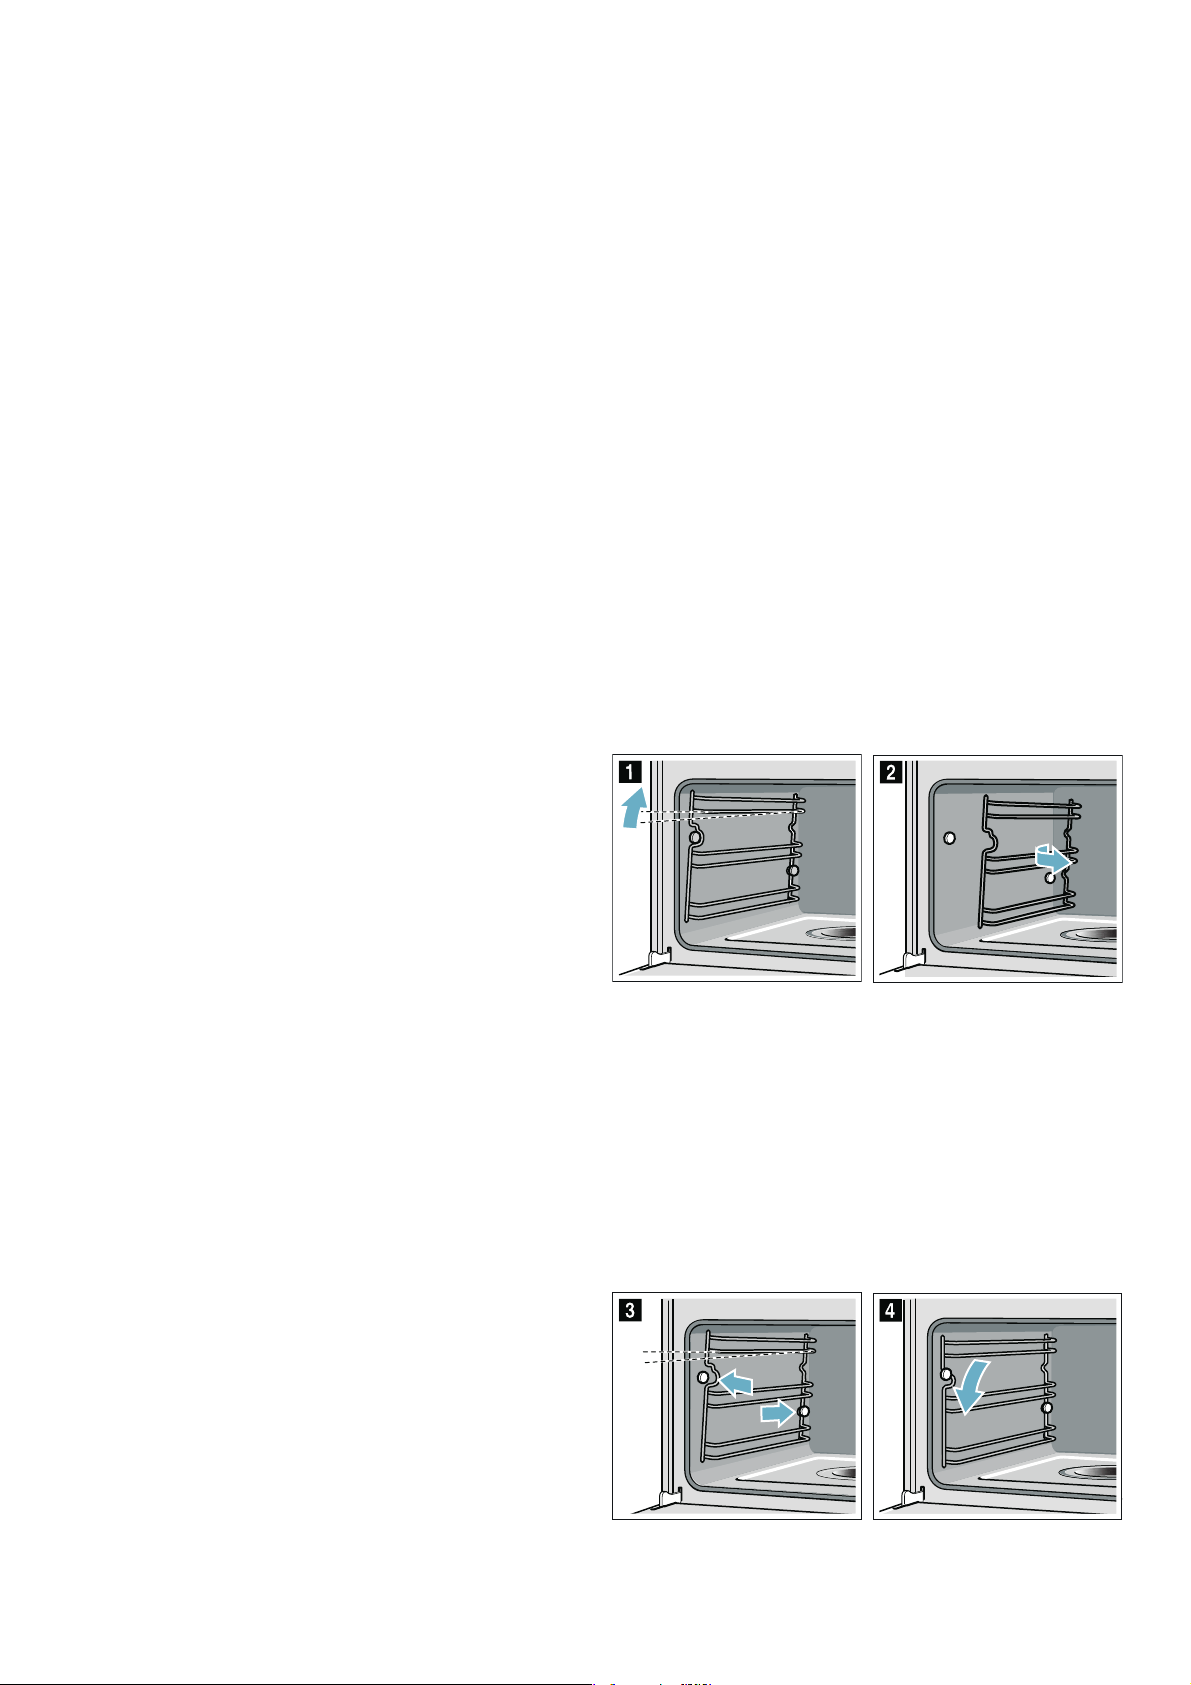
&OHDQLQJWKHUDLOV
7KHUDLOVFDQEHUHPRYHGIRUFOHDQLQJ
::DUQLQJ² 5LVN RI EXUQLQJ GXH WR KRW FRPSRQHQWV
LQWKHFRRNLQJFRPSDUWPHQW
:DLWXQWLOWKHFRRNLQJFRPSDUWPHQWKDVFRROHGGRZQ
'HWDFKLQJWKHUDLOV
1RWH 6ZLQJWKHIURQWRIWKHUDLODVIDUDVSRVVLEOHXQWLO
\RXIHHOUHVLVWDQFHRWKHUZLVHWKHDSSOLDQFHVLGHSDQHO
PD\EHFRPHEHQW
&DUHIXOO\SUHVVWKHIURQWRIWKHUDLOXSZDUGVXQWLOLW
EHFRPHVGHWDFKHGDQGUHOHDVHLWIURPWKHKROGHUDW
WKHVLGHILJ !
'HWDFKWKHUDLOIURPWKHKROGHUDQGUHPRYHLWILJ "
&OHDQWKHUDLOVZLWKZDVKLQJXSOLTXLGDQGDVSRQJH
EUXVK
RU
&OHDQWKHUDLOVLQWKHGLVKZDVKHU
$WWDFKLQJWKHUDLOV
3RVLWLRQWKHUDLOVRWKDWWKHLQGHQWDWLRQVDUHIDFLQJ
XSZDUGV
+RRNWKHUDLOLQDWWKHEDFNDQGSXVKLWWRZDUGVWKH
UHDUXQWLOLWHQJDJHVILJ #
+RRNWKHIURQWRIWKHUDLORQWRWKHKROGHUDQGSUHVV
GRZQXQWLOLWHQJDJHVDQGLVIL[HGOHYHOLQSODFHLQWKH
DSSOLDQFHRQFHPRUHILJ $
(DFKVHWRIUDLOVRQO\ILWVRQRQHVLGH

en 7URXEOHVKRRWLQJ
37URXEOHVKRRWLQJ
7URXEOH VKRRWLQJ
,IDIDXOWRFFXUVWKHUHLVRIWHQDVLPSOHH[SODQDWLRQ
%HIRUHFDOOLQJWKHDIWHUVDOHVVHUYLFHSOHDVHUHIHUWRWKH
IDXOWWDEOHDQGDWWHPSWWRFRUUHFWWKHIDXOW\RXUVHOI
7LS ,IDPHDOGRHVQRWWXUQRXWH[DFWO\DV\RXZDQWHG
UHIHUWRWKH7HVWHGIRU\RXLQRXUFRRNLQJVWXGLR
VHFWLRQ+HUH\RXZLOOILQGSOHQW\RIFRRNLQJWLSVDQG
QRWHV
::DUQLQJ² 5LVNRIHOHFWULFVKRFN
,QFRUUHFWUHSDLUVDUHGDQJHURXV5HSDLUVPD\RQO\EH
FDUULHGRXWDQGGDPDJHGSRZHUFDEOHVUHSODFHGE\RQH
RIRXUWUDLQHGDIWHUVDOHVWHFKQLFLDQV,IWKHDSSOLDQFHLV
GHIHFWLYHXQSOXJWKHDSSOLDQFHIURPWKHPDLQVRUVZLWFK
RIIWKHFLUFXLWEUHDNHULQWKHIXVHER[&RQWDFWWKHDIWHU
VDOHVVHUYLFH
)DXOWWDEOH
,IDQHUURUPHVVDJHEHJLQQLQJZLWK(LVVKRZQHJ
(VZLWFKWKHDSSOLDQFHRIIDQGWKHQRQDJDLQ,IWKLV
PHVVDJHDSSHDUVDJDLQFRQWDFWWKHDIWHUVDOHVVHUYLFH
/('OLJKWV
'HIHFWLYH/('OLJKWVPD\EHUHSODFHGE\WKH
PDQXIDFWXUHUWKHLUDIWHUVDOHVVHUYLFHRUDTXDOLILHG
WHFKQLFLDQHOHFWULFLDQRQO\
&KDQJLQJWKHGRRUVHDO
,I WKH VHDO DURXQG WKH RXWVLGH RI WKH FRRNLQJ FRPSDUWPHQW
LV IDXOW\ LW PXVW EH UHSODFHG 7KH VHDO PD\ EH UHSODFHG E\
DVHUYLFHWHFKQLFLDQRQO\%RRNRQOLQHWRDUUDQJHD
VHUYLFHWHFKQLFLDQYLVLW3OHDVHVXSSO\\RXUDSSOLDQFHV(
QXPEHUDQG)'QXPEHU
)DXOW 3RVVLEOHFDXVH 'HVFULSWLRQUHPHG\
7KHGLVSOD\GRHVQRWOLJKWXS 7KHSOXJLVQRWSOXJJHGLQWRWKHPDLQV &RQQHFWWKHDSSOLDQFHWRWKHPDLQV
3RZHUFXW &KHFNZKHWKHURWKHUNLWFKHQDSSOLDQFHVDUH
ZRUNLQJRUQRW
7KHDSSOLDQFHFDQQRWEHVWDUWHG 7KHDSSOLDQFHGRRULVQRWIXOO\FORVHG &ORVHWKHDSSOLDQFHGRRU
7KHDSSOLDQFHGRHVQRWVWDUW7KHFRRNLQJ
WLPHUOLJKWVXS
7KH6WDUW EXWWRQZDVQRWSUHVVHGDIWHUWKH
VHWWLQJZDVPDGH
3UHVVWKH o EXWWRQWRVWDUWWKHDSSOLDQFH
7KH ILOO ZDWHU WDQN LQGLFDWRU DSSHDUV HYHQ
WKRXJKWKHZDWHUWDQNLVIXOO
7KHZDWHUWDQNKDVQRWEHHQLQVHUWHGFRU
UHFWO\
6OLGHLQWKHZDWHUWDQNXQWLOLWHQJDJHV
7KHIDXOWGHWHFWLRQV\VWHPLVQRWZRUNLQJ &DOOWKHDIWHUVDOHVVHUYLFH
7KHUHLVDZDWHURYHUIORZIURPWKHHYDSRUD
WRUGLVK
7KHHYDSRUDWRUGLVKZDVQRWHPSWLHGDIWHU
WKHODVWFRRNLQJRSHUDWLRQ
$IWHUHDFKFRRNLQJRSHUDWLRQXVHDFOHDQLQJ
VSRQJHWRHPSW\WKHHYDSRUDWRUGLVK
7KHUHLVDQH[WUHPHO\ORXGSXPSLQJVRXQG
GXULQJFRRNLQJ
7KHZDWHUWDQNLVHPSW\EXWZDWHULVVWLOO
HYDSRUDWLQJLQWKHHYDSRUDWRUGLVK
)LOOWKHZDWHUWDQN
7KHZDWHUWDQNKDVQRWEHHQLQVHUWHGFRU
UHFWO\
6OLGHLQWKHZDWHUWDQNXQWLOLWHQJDJHV
7KHUHLVDSXPSLQJVRXQGGXULQJFRRNLQJ 7KLVLVQRUPDO
7KHUHLVDSRSSLQJQRLVHGXULQJFRRNLQJ &ROGZDUPHIIHFWZLWKIUR]HQIRRGFDXVHG
E\WKHVWHDP
7KLVLVQRUPDO
6WHDPHVFDSHVIURPWKHYHQWLODWLRQVORWV
GXULQJFRRNLQJ
7KLVLVQRUPDO
7KHDSSOLDQFHLVQRWSURGXFLQJVWHDPSURS
HUO\
/LPHVFDOHKDVIRUPHGLQWKHDSSOLDQFH 7KHGHVFDOLQJSURJUDPPHQHHGVWREHVWDUWHG
7KHFRRNLQJFRPSDUWPHQWOLJKWGRHVQRW
ZRUN
7KH/('OLJKWLVIDXOW\ &DOOWKHDIWHUVDOHVVHUYLFH7KHJODVVOLJKW
FRYHUFDQQRWEHUHPRYHG
$QHUURULVGLVSOD\HGGXULQJXVH
7KHFRQWUROSDQHOGLVSOD\V´(((
((((µ
7HFKQLFDOIDXOW &DOOWKHDIWHUVDOHVVHUYLFH
&XVWRPHUVHUYLFH HQ
4&XVWRPHUVHUYLFH
&XVWRPHU VHUYLFH
2XUDIWHUVDOHVVHUYLFHLVWKHUHIRU\RXLI\RXUDSSOLDQFH
QHHGVWREHUHSDLUHG:HZLOODOZD\VILQGDQDSSURSULDWH
VROXWLRQDOVRLQRUGHUWRDYRLGDIWHUVDOHVSHUVRQQHO
KDYLQJWRPDNHXQQHFHVVDU\YLVLWV
(QXPEHUDQG)'QXPEHU
:KHQFDOOLQJXVSOHDVHTXRWHWKHIXOOSURGXFWQXPEHU(
QRDQGWKHSURGXFWLRQQXPEHU)'QRVRWKDWZHFDQ
SURYLGH\RXZLWKWKHFRUUHFWDGYLFH7KHUDWLQJSODWH
EHDULQJWKHVHQXPEHUVFDQEHIRXQGZKHQ\RXRSHQWKH
DSSOLDQFHGRRU
2QVRPHDSSOLDQFHVZLWKDVWHDPDVVLVWHGFRRNLQJ
IXQFWLRQ\RXZLOOILQGWKHUDWLQJSODWHEHKLQGWKHFRQWURO
SDQHO
7RVDYHWLPH\RXFDQPDNHDQRWHRIWKHQXPEHUVIRU
\RXUDSSOLDQFHDQGWKHWHOHSKRQHQXPEHURIWKHDIWHU
VDOHVVHUYLFHLQWKHVSDFHEHORZLQFDVH\RXQHHGWKHP
3OHDVHQRWHWKDWDYLVLWIURPDQDIWHUVDOHVVHUYLFH
HQJLQHHULVQRWIUHHRIFKDUJHLQWKHHYHQWWKDWWKH
DSSOLDQFHKDVEHHQPLVXVHGHYHQGXULQJWKHZDUUDQW\
SHULRG
3OHDVHILQGWKHFRQWDFWGDWDRIDOOFRXQWULHVLQWKH
HQFORVHGFXVWRPHUVHUYLFHOLVW
7RERRNDQHQJLQHHUYLVLWDQGSURGXFWDGYLFH
5HO\ RQ WKH SURIHVVLRQDOLVP RI WKH PDQXIDFWXUHU <RX FDQ
WKHUHIRUHEHVXUHWKDWWKHUHSDLULVFDUULHGRXWE\WUDLQHG
VHUYLFH WHFKQLFLDQV ZKR FDUU\ RULJLQDO VSDUH SDUWV IRU \RXU
DSSOLDQFHV
7HFKQLFDOGDWD
0DQXIDFWXUHULQIRUPDWLRQ
0DQXIDFWXUHU%6++RPH$SSOLDQFHV&KLQD&R/WG
$GGUHVV))&1,QWHUQDWLRQDO0DQVLRQ1R
=KRQJVKDQ5RDG1DQMLQJ
6WDQGDUGVFRQIRUPWR
*%
6DIHW\RIKRXVHKROGDQGVLPLODUHOHFWULFDODSSOLDQFHV
*HQHUDOUHTXLUHPHQWV
*%
6DIHW\RIKRXVHKROGDQGVLPLODUHOHFWULFDODSSOLDQFHV
3DUWLFXODUUHTXLUHPHQWVIRUVWDWLRQHGVWRYHVVWRYHV
RYHQVDQGVLPLODUDSSOLDQFHV
(QR )'QR
$IWHUVDOHVVHUYLFH O
&1
&DOOUDWHVGHSHQGRQWKHQHWZRUNXVHG
=1U)'(1U
7\SH
1RPLQDOYROWDJH 9a
5DWHGIUHTXHQF\ +]
3RZHUUDWLQJ :
$SSOLDQFHGLPHQVLRQV:[+[' [[PP
&RRNLQJFRPSDUWPHQWVL]H
:[+['
[[PP

en 7HVWHGIRU\RXLQRXUFRRNLQJVWXGLR
J7HVWHGIRU\RXLQRXU
FRRNLQJVWXGLR
7HVWHG IRU \RX LQ RXU FRRNLQJ VWXGLR
+HUH\RXFDQILQGDVHOHFWLRQRIGLVKHVDQGWKHLGHDO
VHWWLQJV IRU WKHP :H ZLOO VKRZ \RX ZKLFK W\SH RI KHDWLQJ
DQG WHPSHUDWXUH DUH EHVW VXLWHG WR \RXU GLVK <RX ZLOO JHW
LQIRUPDWLRQRQVXLWDEOHFRRNLQJDFFHVVRULHVDQGWKH
KHLJKWDWZKLFKWKH\VKRXOGEHSODFHGLQWKHFRRNLQJ
FRPSDUWPHQW<RXZLOODOVRJHWWLSVDERXWFRRNZDUHDQG
SUHSDUDWLRQPHWKRGV
1RWH <RXU DSSOLDQFH LV YHU\ HQHUJ\HIILFLHQW DQG UDGLDWHV
YHU\ OLWWOH KHDW WR LWV VXUURXQGLQJV GXULQJ RSHUDWLRQ $ ORW RI
VWHDPFDQEXLOGXSLQWKHFRRNLQJFRPSDUWPHQWZKHQ
FRRNLQJIRRG'XHWRWKHKLJKGLIIHUHQFHLQWHPSHUDWXUH
EHWZHHQWKHDSSOLDQFHLQWHULRUDQGWKHH[WHUQDOSDUWVRI
WKHDSSOLDQFHFRQGHQVDWLRQPD\EXLOGXSRQWKHGRRU
FRQWURO SDQHO RU DGMDFHQW NLWFKHQ FDELQHW SDQHOV 7KLV LV D
QRUPDOSK\VLFDOSKHQRPHQRQ&RQGHQVDWLRQFDQEH
UHGXFHGE\SUHKHDWLQJWKHRYHQRURSHQLQJWKHGRRU
FDUHIXOO\
&DNHVDQGSDVWULHV
<RXU DSSOLDQFH RIIHUV \RX D UDQJH RI KHDWLQJ W\SHV IRU WKH
SUHSDUDWLRQ RI FDNHV DQG VPDOO EDNHG LWHPV <RX FDQ ILQG
WKHLGHDOVHWWLQJVIRUPDQ\GLVKHVLQWKHVHWWLQJVWDEOHV
$OVR UHIHU WR WKH QRWHV LQ WKH VHFWLRQ RQ DOORZLQJ GRXJK WR
ULVH
6WHDPDVVLVWHGEDNLQJ
&HUWDLQ W\SHV RI EDNHG LWHP HJ \HDVWULVHQ SDVWULHV JHW
DPRUHFULVS\FUXVWDQGDPRUHJORVV\VXUIDFHLIEDNHG
ZLWK WKH VWHDP DVVLVW PRGH 7KH EDNHG LWHP GRVH QRW GU\
RXWDVPXFK
$FFHVVRULHV
(QVXUH WKDW \RX DOZD\V XVH VXLWDEOH DFFHVVRULHV DQG WKDW
WKH\DUHSODFHGLQWKHULJKWVKHOISRVLWLRQ
:LUHUDFN
$OZD\VSODFHRYHQZDUHWLQVDQGGLVKHVRQWKHZLUHUDFN
%DNLQJWUD\
6OLGHWKHEDNLQJWUD\LQWRWKHLQGLFDWHGOHYHO
%DNLQJWLQV
)RURSWLPDOFRRNLQJUHVXOWVZHUHFRPPHQGXVLQJGDUN
FRORXUHGPHWDOEDNLQJWLQV&DUERQVWHHOEDNLQJWLQV
FHUDPLFGLVKHVDQGJODVVGLVKHVH[WHQGEDNLQJWLPH
,I \RX DUH XVLQJ VLOLFRQH PRXOGV IROORZ WKH PDQXIDFWXUHUV
LQVWUXFWLRQVDQGUHFLSHV6LOLFRQHPRXOGVDUHRIWHQ
VPDOOHUWKDQQRUPDOEDNLQJWLQV4XDQWLW\DQGUHFLSH
VSHFLILFDWLRQVPD\YDU\
7KHEDNLQJWLQVPXVWEHUHVLVWDQWWRKHDWDQGVWHDPIRU
XVHLQVWHDPDVVLVWHGEDNLQJ
&RRNZDUH
2QO\XVHFRRNZDUHZKLFKLVVXLWDEOHIRUXVHLQDQRYHQ
&RRNZDUHPXVWEHKHDWUHVLVWDQWIRUEDNHVDQGJUDWLQV
)RURSWLPDOFRRNLQJUHVXOWVZHUHFRPPHQGXVLQJZLGH
VKDOORZFRRNZDUH
*UHDVHSURRISDSHU
2QO\XVHJUHDVHSURRISDSHUWKDWLVVXLWDEOHIRUWKH
VHOHFWHGWHPSHUDWXUH$OZD\VFXWJUHDVHSURRISDSHUWR
VL]H
5HFRPPHQGHGVHWWLQJYDOXHV
7KH WDEOH OLVWV WKH RSWLPDO KHDWLQJ W\SH IRU YDULRXV W\SHV RI
IRRG7KHWHPSHUDWXUHDQGFRRNLQJWLPHDUHGHSHQGHQW
RQ WKH TXDQWLW\ RI IRRG DQG WKH UHFLSH 6HWWLQJV UDQJHV DUH
LQGLFDWHGIRUWKLVUHDVRQ7U\XVLQJWKHORZHUYDOXHVWR
VWDUWZLWK$ORZHUWHPSHUDWXUHZLOOUHVXOWLQPRUHHYHQ
EURZQLQJ<RXFDQXVHDKLJKHUVHWWLQJQH[WWLPHLI
QHFHVVDU\
1RWH &RRNLQJWLPHVFDQQRWEHUHGXFHGE\XVLQJKLJKHU
WHPSHUDWXUHV7KHIRRGZRXOGRQO\EHFRRNHGRQWKH
RXWVLGHEXWZRXOGQRWEHIXOO\EDNHGLQWKHPLGGOH
3UHKHDWLQJLVUHFRPPHQGHGIRUEDNLQJIRRGVDQGWKLVLV
LQGLFDWHGLQWKHWDEOH'RQRWSODFH\RXUIRRGRU
DFFHVVRULHVLQWRWKHFRRNLQJFRPSDUWPHQWXQWLOLWKDV
ILQLVKHGSUHKHDWLQJ
,I \RX ZLVK WR IROORZ RQH RI \RXU RZQ UHFLSHV ZKHQ EDNLQJ
\RX VKRXOG XVH WKH VHWWLQJ YDOXHV OLVWHG IRU VLPLODU IRRG LQ
WKH WDEOH DV UHIHUHQFH 5HPRYH XQXVHG DFFHVVRULHV IURP
WKHFRRNLQJFRPSDUWPHQW7KLVZLOOHQVXUHWKDW\RX
DFKLHYHWKHEHVWSRVVLEOHFRRNLQJUHVXOWVDQGHQHUJ\
VDYLQJV
'LVK 6L]H $FFHVVRULHVFRRN
ZDUH
6KHOISRVLWLRQ 7\SHRIKHDWLQJ 7HPSHUDWXUH
LQ &
&RRNLQJWLPH
LQ PLQV
3RXQGFDNH 5LQJWLQ/RDIWLQ
<
6SRQJHFDNH 5LQJFDNHWLQ
<
&KLIIRQFDNH 5LQJFDNHWLQ
<
6ZLVVUROO %DNLQJWUD\
<
&RRNLHV %DNLQJWUD\
<
&UDQEHUU\FRRNLHV %DNLQJWUD\
<
0DUJDULWD %DNLQJWUD\
<
:KROHZKHDWEUHDG %DNLQJWUD\
<
7RDVW J /RDIWLQ
<
%UHDGUROO %DNLQJWUD\
<
%DJXHWWH %DNLQJWUD\
<
)

7HVWHGIRU\RXLQRXUFRRNLQJVWXGLR HQ
3RXOWU\PHDWDQGILVK
<RXUDSSOLDQFHRIIHUV\RXDUDQJHRIKHDWLQJW\SHVIRU
SUHSDULQJSRXOWU\PHDWDQGILVK<RXFDQILQGWKHLGHDO
VHWWLQJVIRUFHUWDLQGLVKHVLQWKHVHWWLQJVWDEOHV
6WHDPDVVLVWHGURDVWLQJ
&HUWDLQIRRGVZLOOEHFRPHFULVSLHUGXULQJVWHDPLQJ
DVVLVWHGFRRNLQJ7KHLUVXUIDFHEHFRPHVJORVVLHUDQG
WKH\GU\RXWOHVV8VHXQFRYHUHGFRRNZDUH&RRNZDUH
PXVWEHKHDWDQGVWHDPUHVLVWDQW
6WHDPLQJ
3RXOWU\PHDWDQGILVKDUHFRRNHGPRUHJHQWO\XVLQJWKH
VWHDPLQJIXQFWLRQWKDQZLWKVWHDPDVVLVWDQFH/DUJHU
SLHFHVUHTXLUHDORQJHUKHDWLQJXSWLPHDQGDORQJHU
FRRNLQJWLPH,I\RXDUHXVLQJVHYHUDOSLHFHVZKLFKDUH
WKHVDPHZHLJKWWKHKHDWLQJXSWLPHLVLQFUHDVHGDQG
QRWWKHFRRNLQJWLPH
*ULOOLQJ
.HHSWKHDSSOLDQFHGRRUFORVHGZKHQXVLQJJULOO3ODFH
WKH IRRG WR EH JULOOHG RQ WKH ZLUH UDFN ,Q DGGLWLRQ VOLGH WKH
EDNLQJ WUD\ LQ XQGHUQHDWK $Q\ GULSSLQJ IDW ZLOO EH FDXJKW
:KHQ JULOOLQJ WU\ ZKHUHYHU SRVVLEOH WR XVH SLHFHV RI IRRG
ZKLFK DUH RI D VLPLODU WKLFNQHVV DQG ZHLJKW 7KLV ZLOO DOORZ
WKHPWREURZQHYHQO\DQGUHPDLQVXFFXOHQWDQGMXLF\
8VH WRQJV WR WXUQ WKH SLHFHV RI IRRG \RX DUH JULOOLQJ ,I \RX
SLHUFHWKHPHDWZLWKDIRUNWKHMXLFHVZLOOUXQRXWDQGLW
ZLOOEHFRPHGU\
1RWH 6PRNHPD\EHSURGXFHGZKHQJULOOLQJ
$FFHVVRULHV(QVXUHWKDW\RXDOZD\VXVHVXLWDEOH
DFFHVVRULHV DQG WKDW WKH\ DUH SODFHG LQ WKH RYHQ WKH ULJKW
VKHOISRVLWLRQ
3HUIRUDWHGVWHDPFRQWDLQHU:KHQVWHDPLQJLQWKH
SHUIRUDWHGVWHDPFRQWDLQHUDOZD\VLQVHUWWKH
XQSHUIRUDWHG VWHDP FRQWDLQHU XQGHUQHDWK 'ULSSLQJ OLTXLG
LVFDXJKW
5RDVWLQJRQWKHZLUHUDFN
5RDVWLQJRQWKHZLUHUDFNLVSDUWLFXODUO\ZHOOVXLWHGIRU
ODUJHUSRXOWU\PHDWRUIRUPXOWLSOHSLHFHVDWWKHVDPH
WLPH
6OLGHWKHEDNLQJWUD\LQWRWKHRYHQEHORZZLUHUDFN
5RDVWLQJLQFRRNZDUH
2QO\XVHFRRNZDUHZKLFKLVVXLWDEOHIRUXVHLQDQRYHQ
*ODVV FRRNZDUH LV EHVW &KHFN ZKHWKHU WKH FRRNZDUH ILWV
LQWKHFRRNLQJFRPSDUWPHQW
6KLQ\URDVWLQJGLVKHVPDGHIURPVWDLQOHVVVWHHORU
DOXPLQLXPUHIOHFWKHDWOLNHDPLUURUDQGDUHWKHUHIRUHQRW
SDUWLFXODUO\VXLWDEOH7KHSRXOWU\PHDWDQGILVKFRRNV
VORZHUDQGGRHVQRWEURZQVRZHOO8VHDKLJKHU
WHPSHUDWXUHDQGRUDORQJHUFRRNLQJWLPH
2EVHUYHWKHPDQXIDFWXUHUVLQVWUXFWLRQVIRU\RXUURDVWLQJ
FRRNZDUH
&RRNZDUH
&RRNZDUHPXVWEHKHDWDQGVWHDPUHVLVWDQW&RRNLQJ
WLPHVDUHLQFUHDVHGLIWKLFNVLGHGRYHQZDUHLVXVHG
$OZD\VSODFHFRRNZDUHRQWKHLQGLFDWHGDFFHVVRULHV
5HFRPPHQGHVHWWLQJYDOXHV
7KHVHWWLQJYDOXHVDUHEDVHGRQWKHDVVXPSWLRQWKDW
XQVWXIIHGFKLOOHGUHDG\WRURDVWSRXOWU\PHDWRUILVKLV
SODFHGLQWRDFROGFRRNLQJFRPSDUWPHQW
,QWKHWDEOH\RXFDQILQGWKHLGHDOKHDWLQJW\SHIRUWKH
NLQGRISRXOWU\\RXDUHFRRNLQJ7KHWHPSHUDWXUHDQG
FRRNLQJWLPHGHSHQGRQWKHDPRXQWFRPSRVLWLRQDQG
WHPSHUDWXUHRIWKHIRRG6HWWLQJUDQJHVDUHLQGLFDWHGIRU
WKLVUHDVRQ7U\XVLQJWKHORZHUYDOXHVDWILUVW<RXFDQ
LQFUHDVHWKHWHPSHUDWXUHQH[WWLPHLIQHFHVVDU\
,QWKHWDEOH\RXFDQILQGVSHFLILFDWLRQVIRUSRXOWU\PHDW
DQGILVKZLWKGHIDXOWYDOXHVIRUWKHZHLJKW,I\RXZLVKWR
FRRNKHDYLHURQHXVHWKHORZHUWHPSHUDWXUHLQHYHU\
FDVH,IFRRNLQJPXOWLSOHSLHFHVXVHWKHZHLJKWRIWKH
KHDYLHVW SLHFH DV D UHIHUHQFH IRU GHWHUPLQLQJ WKH FRRNLQJ
WLPH 7KH LQGLYLGXDO SLHFHV VKRXOG EH DSSUR[LPDWHO\ HTXDO
LQVL]H
$JHQHUDOUXOHWKHODUJHUWKHUHDG\WRURDVWSRXOWU\PHDW
RUILVKLVWKHORZHUWKHFRRNLQJWHPSHUDWXUHDQGWKH
ORQJHUWKHFRRNLQJWLPH7XUQWKHSRXOWU\RUPHDWDIWHU
DSSUR[WRRIWKHLQGLFDWHGWLPH
%URZQLQJWRDVWVOLFHV :LUHUDFN
(
0XIILQ %DNLQJWUD\
<
3RUWXJXHVHHJJWDUW %DNLQJWUD\
<
%DNHGSRWDWRZLWK
FKHHVH
2YHQSURRIGLVK
7
3L]]DIUHVK 0D[LPXPWKLFN
QHVVRIPP
%DNLQJWUD\
<
3L]]DIUR]HQ %DNLQJWUD\
<
3UHKHDW
'LVK 6L]H $FFHVVRULHVFRRN
ZDUH
6KHOISRVLWLRQ 7\SHRIKHDWLQJ 7HPSHUDWXUH
LQ &
&RRNLQJWLPH
LQ PLQV

en 7HVWHGIRU\RXLQRXUFRRNLQJVWXGLR
3RXOWU\
0HDW
:KHQFRRNLQJPHDWWU\LQJWRVHOHFWSLHFHVRIWKHVDPH
WKLFNQHVV
)LVKVHDIRRG
7KHZKROHILVKGRHVQRWKDYHWREHWXUQHG3ODFHWKH
ZKROHILVKLQWRWKHFRRNLQJFRPSDUWPHQWLQVZLPPLQJ
SRVLWLRQZLWKWKHGRUVDOILQIDFLQJXSZDUGV
'LVK 6L]H $FFHVVRULHVFRRN
ZDUH
6KHOISRVLWLRQ 7\SHRIKHDWLQJ 7HPSHUDWXUH
LQ &
&RRNLQJWLPH
LQ PLQV
5RDVWFKLFNHQZKROH NJ :LUHUDFN
7
5RDVWFKLFNHQZKROH NJ :LUHUDFN
7
)
6WHDPHGFKLFNHQZKROH NJ 8QSHUIRUDWHGVWHDP
FRQWDLQHU
S
6WHDPHGFKLFNHQEUHDVW 3HUIRUDWHGVWHDP
FRQWDLQHU
S
5RDVWFKLFNHQSLHFHV :LUHUDFN
<
'LVK 6L]H $FFHVVRULHVFRRN
ZDUH
6KHOISRVLWLRQ 7\SHRIKHDWLQJ 7HPSHUDWXUH
LQ &
&RRNLQJWLPH
LQ PLQV
5RDVWSRUNEHOO\ PPWKLFN :LUHUDFN
7
5RDVWSRUNULEV &XWLQWRVHFWLRQV :LUHUDFN
<
6WHDPHGSRUNULEV &XWLQWRVHFWLRQV 8QSHUIRUDWHGVWHDP
FRQWDLQHU
S
)ORXUHGVWHDPHGSRUN PPWKLFN &RRNLQJ FRQWDLQHU
SHUIRUDWHGVWHDP
FRQWDLQHU
S
)ORXUHGVWHDPHGEHHI PPWKLFN &RRNLQJ FRQWDLQHU
SHUIRUDWHGVWHDP
FRQWDLQHU
S
5RDVWODPSOHJZHOO
GRZQ
NJ :LUHUDFN
<
5RDVWODPSFKRSV :LUHUDFN
<
5RDVWODPEVNHZHUV J SHU SLHFH RI
PHDW
:LUHUDFN
7
6WHDPHGVDXVDJH 3HUIRUDWHGVWHDP
FRQWDLQHU
S
3UHKHDW
'LVK 6L]H $FFHVVRULHVFRRN
ZDUH
6KHOISRVLWLRQ 7\SHRIKHDWLQJ 7HPSHUDWXUH
LQ &
&RRNLQJWLPH
LQ PLQV
5RDVWILVKZKROH J :LUHUDFN
<
6WHDPHGEDVV J 3HUIRUDWHGVWHDP
FRQWDLQHU
S
6WHDPHG FRG ILOOHW IUHVK JSHUSLHFH 3HUIRUDWHGVWHDP
FRQWDLQHU
S
6WHDPHGFRGILOOHWIUR
]HQ
JSHUSLHFH 3HUIRUDWHGVWHDP
FRQWDLQHU
S
6WHDPHGVDOPRQILOOHW JSHUSLHFH 3HUIRUDWHGVWHDP
FRQWDLQHU
S
5RDVWVKULPS :LUHUDFN
<
6WHDPHGVKULPS 3HUIRUDWHGVWHDP
FRQWDLQHU
S
6WHDPHGFUDE 0D[LPXPRI
JSHUFUDE
3HUIRUDWHGVWHDP
FRQWDLQHU
S
5RDVWIUHVKR\VWHU :LUHUDFN
<
7HVWHGIRU\RXLQRXUFRRNLQJVWXGLR HQ
9HJHWDEOHVDQGVLGHGLVKHV
6WHDPLQJ
6WHDPLQJ LV D SDUWLFXODUO\ JHQWOH ZD\ RI FRRNLQJ IRRG 7KH
VWHDPVXUURXQGVWKHGLVKWKHUHE\SUHYHQWLQJDORVVRI
QXWULHQWVIURPWKHIRRG&RRNLQJWDNHVSODFHZLWKRXW
H[FHVVSUHVVXUH$VDUHVXOWWKHVKDSHFRORXUDQG
W\SLFDODURPDRIWKHGLVKHVDUHUHWDLQHG
$FFHVVRULHV
(QVXUH WKDW \RX DOZD\V XVH VXLWDEOH DFFHVVRULHV DQG WKDW
WKH\DUHSODFHGLQWKHULJKWVKHOISRVLWLRQ
3HUIRUDWHGVWHDPFRQWDLQHU
:KHQ VWHDPLQJ LQ WKH SHUIRUDWHG VWHDP FRQWDLQHU DOZD\V
LQVHUWWKHVROLGVWHDPFRQWDLQHUXQGHUQHDWK'ULSSLQJ
OLTXLGLVFDXJKW
&RRNZDUH
&RRNZDUHPXVWEHKHDWDQGVWHDPUHVLVWDQW&RRNLQJ
WLPHVDUHLQFUHDVHGLIWKLFNVLGHGRYHQZDUHLVXVHG
$OZD\VSODFHFRRNZDUHRQWKHLQGLFDWHGDFFHVVRULHV
&RRNLQJWLPHDQGTXDQWLW\
2EVHUYH WKH XQLW VL]HV LQGLFDWHG LQ WKH VHWWLQJV WDEOH 7KH
FRRNLQJWLPHLVUHGXFHGIRUVPDOOHUSLHFHVDQGLQFUHDVHG
IRUODUJHURQHV&RRNLQJWLPHLVDOVRLQIOXHQFHGE\WKH
TXDOLW\DQGULSHQHVVRIWKHIRRG7KLVPHDQVWKDWWKH
VHWWLQJYDOXHVLQGLFDWHGDUHSXUHO\JXLGHOLQHV
6WDSOH
$GGZDWHUEDVHGRQWKHSUHVFULEHGSURSRUWLRQ
)RUH[DPSOH DGGPOZDWHUIRUHYHU\J
6WHDPHGPXVVHOV J 3HUIRUDWHGVWHDP
FRQWDLQHU
S
3UHKHDW
'LVK 6L]H $FFHVVRULHVFRRN
ZDUH
6KHOISRVLWLRQ 7\SHRIKHDWLQJ 7HPSHUDWXUH
LQ &
&RRNLQJWLPH
LQ PLQV
'LVK 6L]H $FFHVVRULHVFRRN
ZDUH
6KHOISRVLWLRQ 7\SHRIKHDWLQJ 7HPSHUDWXUH
LQ &
&RRNLQJWLPH
LQ PLQV
6WHDPHGFODXOLIORZHU )ORUHWV 3HUIRUDWHGVWHDP
FRQWDLQHU
S
6WHDPHGJUHHQVR\
EHDQV
J 3HUIRUDWHGVWHDP
FRQWDLQHU
S
6WHDPHGFDUURWV )UHVKWKLQO\
VOLFHG
3HUIRUDWHGVWHDP
FRQWDLQHU
S
6WHDPHGVSLQDFK 3HUIRUDWHGVWHDP
FRQWDLQHU
S
6WHDPHGOHWWXFH 3HUIRUDWHGVWHDP
FRQWDLQHU
S
6WHDPHGDVSDUDJXV :KROH 3HUIRUDWHGVWHDP
FRQWDLQHU
S
6WHDPHGFKR\VXP :KROH 3HUIRUDWHGVWHDP
FRQWDLQHU
S
6WHDPHGORWXVURRW 6OLFHG 3HUIRUDWHGVWHDP
FRQWDLQHU
S
6WHDPHG<DP7DUR 6OLFHG 3HUIRUDWHGVWHDP
FRQWDLQHU
S
6WHDPHGVZHHWSRWDWR
SXUSOHVZHHWSRWDWR
:KROHPD[L
PXP RI J SHU
VZHHWSRWDWR
3HUIRUDWHGVWHDP
FRQWDLQHU
S
6WHDPHGVZHHWFRUQ &XWLQWRVHFWLRQV 3HUIRUDWHGVWHDP
FRQWDLQHU
S
6WHDPHGSRWDWRHV
ZKROH
0D[LPXPRI
JSHUSRWDWR
3HUIRUDWHGVWHDP
FRQWDLQHU
S
'LVK 6L]H $FFHVVRULHVFRRN
ZDUH
6KHOISRVLWLRQ 7\SHRIKHDWLQJ 7HPSHUDWXUH
LQ &
&RRNLQJWLPH
LQ PLQV
6WHDPULFH 0D[LPXPRI
J
8QSHUIRUDWHGVWHDP
FRQWDLQHU
S
6WHDPHGEXQV 0D[LPXP RI J
SHUEXQ
3HUIRUDWHGVWHDP
FRQWDLQHU
S
6WHDPVWXIIHGEXQV 0D[LPXPRI
J SHU VWXIIHG
EXQ
3HUIRUDWHGVWHDP
FRQWDLQHU
S
en 7HVWHGIRU\RXLQRXUFRRNLQJVWXGLR
'HVVHUW
$FFHVVRULHV
(QVXUH WKDW \RX DOZD\V XVH VXLWDEOH DFFHVVRULHV DQG WKDW
WKH\DUHSODFHGLQWKHULJKWVKHOISRVLWLRQ
&RRNZDUH
&RRNZDUHPXVWEHKHDWDQGVWHDPUHVLVWDQW$OZD\V
SODFHFRRNZDUHRQWKHLQGLFDWHGDFFHVVRULHV
0DNLQJ\RJXUW
+HDWPLONWRઊRQWKHFRRNWRSDQGWKHQOHDYHLWWR
FRROGRZQWRઊ,WLVVXIILFLHQWWRKHDWXOWUDKLJK
WHPSHUDWXUHVWHULOL]HGPLONWR&
$GGRQHWRWZRWDEOHVSRRQVRIQDWXUDO\RJXUWRU
FRUUHVSRQGLQJQXPEHURI\RJXUWVWDUWHUFXOWXUHVSHU
POPLONDQGVWLU
3XWWKHPL[WXUHLQWRDFOHDQDQGOLWWOHFRRNLQJERZO
FRYHUZLWKFOLQJILOP
3ODFHWKHVPDOOFRRNLQJERZORQWKHSHUIRUDWHGVWHDP
FRQWDLQHUDQGXVHWKHVHWWLQJVLQGLFDWHGLQWKHWDEOH
:KHQWKH\RJXUWLVUHDG\OHDYHLWWRFRROLQWKH
UHIULJHUDWRU
2YHUKHDWVWHDPLQJ
2YHUKHDW VWHDPLQJ LV D VSHFLDO VWHDPLQJ IXQFWLRQ IRU IRRG
ZLWKIHDWXUHVOLNHGHQVHILEURXVWLVVXHODUJHYROXPHDQG
GLIILFXOWWRPDWXUH8OWUDKLJKWHPSHUDWXUHVWHDPLVPRUH
OLNHO\ WR SHQHWUDWH WKH LQVLGH RI WKH IRRG DQG WKURXJK KLJK
GHQVLW\VWHDPWRPDNHWKHIRRGPRUHPDWXUHZKLFKFDQ
VKRUWHQWKHFRRNLQJWLPH
6WHDPHGGXPSOLQJV )UHVKGXPSOLQJV 3HUIRUDWHGVWHDP
FRQWDLQHU
S
)UR]HQGXPS
OLQJV
3HUIRUDWHGVWHDP
FRQWDLQHU
S
6WHDPIUR]HQSDFNDJHV 3HUIRUDWHGVWHDP
FRQWDLQHU
S
'LVK 6L]H $FFHVVRULHVFRRN
ZDUH
6KHOISRVLWLRQ 7\SHRIKHDWLQJ 7HPSHUDWXUH
LQ &
&RRNLQJWLPH
LQ PLQV
'LVK $FFHVVRULHVFRRNZDUH 6KHOISRVLWLRQ 7\SHRIKHDWLQJ 7HPSHUDWXUH
LQ &
&RRNLQJWLPH
LQ PLQV
<RJKXUW 6PDOOFRRNLQJEDVLQSHUIR
UDWHGVWHDPFRQWDLQHU
S
3HDUV &RRNZDUHSHUIRUDWHG
VWHDPFRQWDLQHU
S
5RFNFDQG\EDNHGSHDUV %DNLQJWUD\
<
)
3DSD\D &RRNZDUHSHUIRUDWHG
VWHDPFRQWDLQHU
S
6WHDPHGRUDQJHV &RRNZDUHSHUIRUDWHG
VWHDPFRQWDLQHU
S
'LVK 6L]H $FFHVVRULHVFRRN
ZDUH
6KHOISRVLWLRQ 7\SHRIKHDWLQJ &RRNLQJ WLPH LQ
PLQV
6WHDPHGSRUNZLWKSUHVHUYHG
YHJHWDEOH
0D[LPXPRIJ &RRNZDUHSHUIR
UDWHGVWHDPFRQ
WDLQHU
@
6WHDPHGSRUNULEV &RRNZDUHSHUIR
UDWHGVWHDPFRQ
WDLQHU
@
6WHDPHGFKLFNHQIHHW &RRNZDUHSHUIR
UDWHGVWHDPFRQ
WDLQHU
@
6WHDPHGZKROHFKLFNHQ NJ 8QSHUIRUDWHG VWHDP
FRQWDLQHU
@
6WHDPHGSXUSOHVZHHWSRWDWR 0D[LPXP RI J SHU VZHHW
SRWDWR
3HUIRUDWHGVWHDP
FRQWDLQHU
@

7HVWHGIRU\RXLQRXUFRRNLQJVWXGLR HQ
3URYLQJGRXJK
'RXJKZLOOSURYHFRQVLGHUDEO\PRUHTXLFNO\XVLQJWKH
'RXJKSURYLQJKHDWLQJW\SHWKDQDWURRPWHPSHUDWXUH
3RVLWLRQ WKH GRXJK LQWR WKH ERZO DQG FRYHU ZLWK FOLQJ ILOP
WKHQSXWWKHERZORQWKHSHUIRUDWHGVWHDPFRQWDLQHUIRU
WKHGRXJKIHUPHQWDWLRQ8VHWKHVHWWLQJVLQGLFDWHGLQWKH
WDEOH 2QO\ VWDUW RSHUDWLRQ ZKHQ WKH FRRNLQJ FRPSDUWPHQW
KDVIXOO\FRROHGGRZQ
'HIURVW
5HPRYH IUR]HQ IRRG IURP DQ\ SDFNDJLQJ ZKHQ GHIURVWLQJ
LW
3ODFH IUR]HQ IRRG LQWR WKH SHUIRUDWHG VWHDP FRQWDLQHU DQG
LQVHUWLWLQWRWKHDSSOLDQFHDWOHYHO$OZD\VVOLGHWKH
XQSHUIRUDWHGVWHDPFRQWDLQHULQXQGHUQHDWK8VH
GHIURVWLQJ IXQFWLRQ 6HW WKH VKRUWHVW WLPH LQLWLDOO\ DQG WKHQ
H[WHQGWKHWLPHLIQHFHVVDU\
7KH WLPH VSHFLILHG LQ WKH WDEOH LV LQWHQGHG DV D JXLGH ,W LV
GHSHQGHQWRQWKHTXDOLW\IUHH]LQJWHPSHUDWXUHઊ
DQGFRPSRVLWLRQRIWKHIRRG7LPHUDQJHVDUHLQGLFDWHG
7LS )RRGWKDWKDVEHHQIUR]HQLQWKLQQHUSLHFHVRULQ
SRUWLRQV GHIURVWV PRUH TXLFNO\ WKDQ IRRG LWHPV IUR]HQ LQ D
EORFN :KHQ GHIURVWLQJ VHQVLWLYH IRRG GHIURVW WKH VXUIDFH
SDUWZLWKWKHGHIURVWLQJIXQFWLRQILUVWWKHQOHDYHWKHIRRG
LQDPELHQWWHPSHUDWXUHWRILQLVKWKHGHIURVWLQJSURFHVV
7KDWFDQPDLQWDLQWKHTXDOLW\RIIRRG
5HKHDWLQJ
8VHFRQWDLQHUVZKLFKDUHDVIODWZLGHDQGKHDWUHVLVWDQW
DVSRVVLEOHZKHQUHKHDWLQJIRRG2QO\UHKHDWGLVKHVRI
WKHVDPHVL]HDQGW\SHDWWKHVDPHWLPH
'RQRWFRYHUIRRGZKLOHLWLVEHLQJUHKHDWHG
3ODFHWKHIRRGLQWKHFRRNZDUHRQWRWKHXQSHUIRUDWHG
VWHDPFRQWDLQHURUSODFHLWGLUHFWO\RQWRWKHXQSHUIRUDWHG
VWHDPFRQWDLQHUDWOHYHO
6WHDPHGSRWDWR 0D[LPXPRIJSHU
SRWDWR
3HUIRUDWHGVWHDP
FRQWDLQHU
@
(LJKWWUHDVXUHULFHSXGGLQJ 2YHUQLJKWLPPHUVLRQ &RRNZDUHSHUIR
UDWHGVWHDPFRQ
WDLQHU
@
'LVK 6L]H $FFHVVRULHVFRRN
ZDUH
6KHOISRVLWLRQ 7\SHRIKHDWLQJ &RRNLQJ WLPH LQ
PLQV
'LVK $FFHVVRULHVFRRNZDUH 6KHOISRVLWLRQ 7\SHRIKHDWLQJ &RRNLQJWLPHLQPLQV
3DVWU\ %RZOSHUIRUDWHGVWHDP
FRQWDLQHU
C
7REHFRQILUPHG
'LVK 6L]H $FFHVVRULHV
FRRNZDUH
6KHOISRVLWLRQ 7\SHRIKHDWLQJ &RRNLQJ WLPH LQ
PLQV
&KLFNHQSLHFHV JSHUSLHFH 3HUIRUDWHG
VWHDPFRQWDLQHU
B
)LVKZKROH J 3HUIRUDWHG
VWHDPFRQWDLQHU
B
)LVKILOOHWV JSHUSLHFH 3HUIRUDWHG
VWHDPFRQWDLQHU
B
6SDUHULEV JSHUSLHFH 3HUIRUDWHG
VWHDPFRQWDLQHU
B
'LVK 6L]H $FFHVVRULHV
FRRNZDUH
6KHOISRVLWLRQ 7\SHRIKHDWLQJ &RRNLQJ WLPH LQ
PLQV
9HJHWDEOHV 8QSHUIRUDWHG
VWHDPFRQWDLQHU
U
0HDW 6OLFHG 8QSHUIRUDWHG
VWHDPFRQWDLQHU
U
6WDSOHIRRGV 8QSHUIRUDWHG
VWHDPFRQWDLQHU
U
en 7HVWHGIRU\RXLQRXUFRRNLQJVWXGLR
7HVWGLVKHV
7KHVHWDEOHVKDYHEHHQSURGXFHGIRUWHVWLQVWLWXWHVWR
IDFLOLWDWHDSSOLDQFHWHVWLQJ
$VSHU(1
%DNLQJDQGJULOLQJ
6WHDP
'LVK $FFHVVRULHV 6KHOISRVLWLRQ 7\SHRIKHDWLQJ 7HPSHUDWXUH
LQ
&RRNLQJWLPH
LQ PLQV
6PDOOFDNH %DNLQJWUD\
<
:KLWHEUHDG :LUHUDFN
(
3UHKHDWIRUPLQV
'LVK $FFHVVRULHV 6KHOISRVLWLRQ 7\SHRIKHDWLQJ 7HPSHUDWXUH
LQ
&RRNLQJWLPH
LQ PLQV
%URFFROL6WHDPGLVWULEXWLRQ 3HUIRUDWHGVWHDPFRQWDLQHU
S
%URFFROL6WHDPVXSSO\ 3HUIRUDWHGVWHDPFRQWDLQHU
S
3HDV 3HUIRUDWHGVWHDPFRQWDLQHU
S
6SUHDGRXWN JSHDVHYHQO\LQWKHFRQWDLQHU

6

6

6

*9001471064*
9001471064
000709