Loading ...
Loading ...
Loading ...
Operation Guide 2931
11
12.
While the Hour, Minutes,
Year, Month, or Day
setting is flashing, use
BB
BB
B
(–) and
DD
DD
D (+) to change it.
• Holding down either button
scrolls the setting at high
speed.
Repeat the above steps as many times as necessary to
select each setting and change it as required.
• When setting the hour, make sure you specify AM (no indicator) or
PM (P) correctly when using 12-hour timekeeping, or that you
specify the correct 24-hour time.
• You can set the year within the range of 2000 to 2099.
The day of the week is set automatically in accordance with the
date you set.
• The watch makes adjustments for leap years and month lengths
automatically.
13.
When all of the settings are the way you want, press
the
AA
AA
A button to exit the setting screen.
• The display also will exit the setting screen automatically if
you do not perform any operation for about two or three
minutes.
10.
While the 12/24-hour
setting is selected, press
the
DD
DD
D button to toggle
the timekeeping format
between 12-hour (“12H”
indicator) and 24-hour
(“24H” indicator).
11.
While the seconds are
selected, press the
DD
DD
D
button to reset them to 00
in accordance with the
time signal on the radio,
TV, etc.
• Pressing D while the
seconds are in the range of
30 to 59 resets them to 00
and adds 1 to the minutes. In
the range of 00 to 29, the
minutes are unchanged.
• While the seconds are
flashing, you can also press
the B button to change the
illumination duration. See “To
specify the illumination
duration” for more information.
• From here you can use the
C button to select the
settings shown below. Each
press of C causes the
applicable setting to flash.
Power Saving
Beep/Vibration
Temperature Calibration
4. While the Beep/Vibration
setting is flashing, press
the
DD
DD
D button to toggle
between “BEEP” (beeper
alert) and “VIB” (vibration
alert).
• The VIB (vibration) indicator
appears when vibration alert it
selected. No indicator is
displayed while beep alert is
selected.
5. While Temperature
Calibration is selected,
use the
DD
DD
D (+) and
BB
BB
B (–)
buttons to change the
setting in 0.1
o
C steps.
• Holding down either button
scrolls the setting at high
speed.
• You range of the temperature
calibration setting is –9.9
o
C to
+9.9
o
C.
The temperature sensor is calibrated at the factory, and
further calibration normally is not required. Perform the above
operation only when you find that a temperature reading taken
with another accurate instrument is very different from the
reading produced by your watch. Take care that you perform
the calibration operation correctly. Using the wrong value can
make it impossible to correctly measure temperatures.
6. While the Power Saving
setting is selected, press
the
DD
DD
D button to toggle it
ON and OFF.
• Turning on Power Saving
causes the Power Saving
indicator to appear on the
setting screen.
Beep/Vibration
Vibration Indicator
Temperature
(Decrease)
(Increase)
Power Saving Indicator
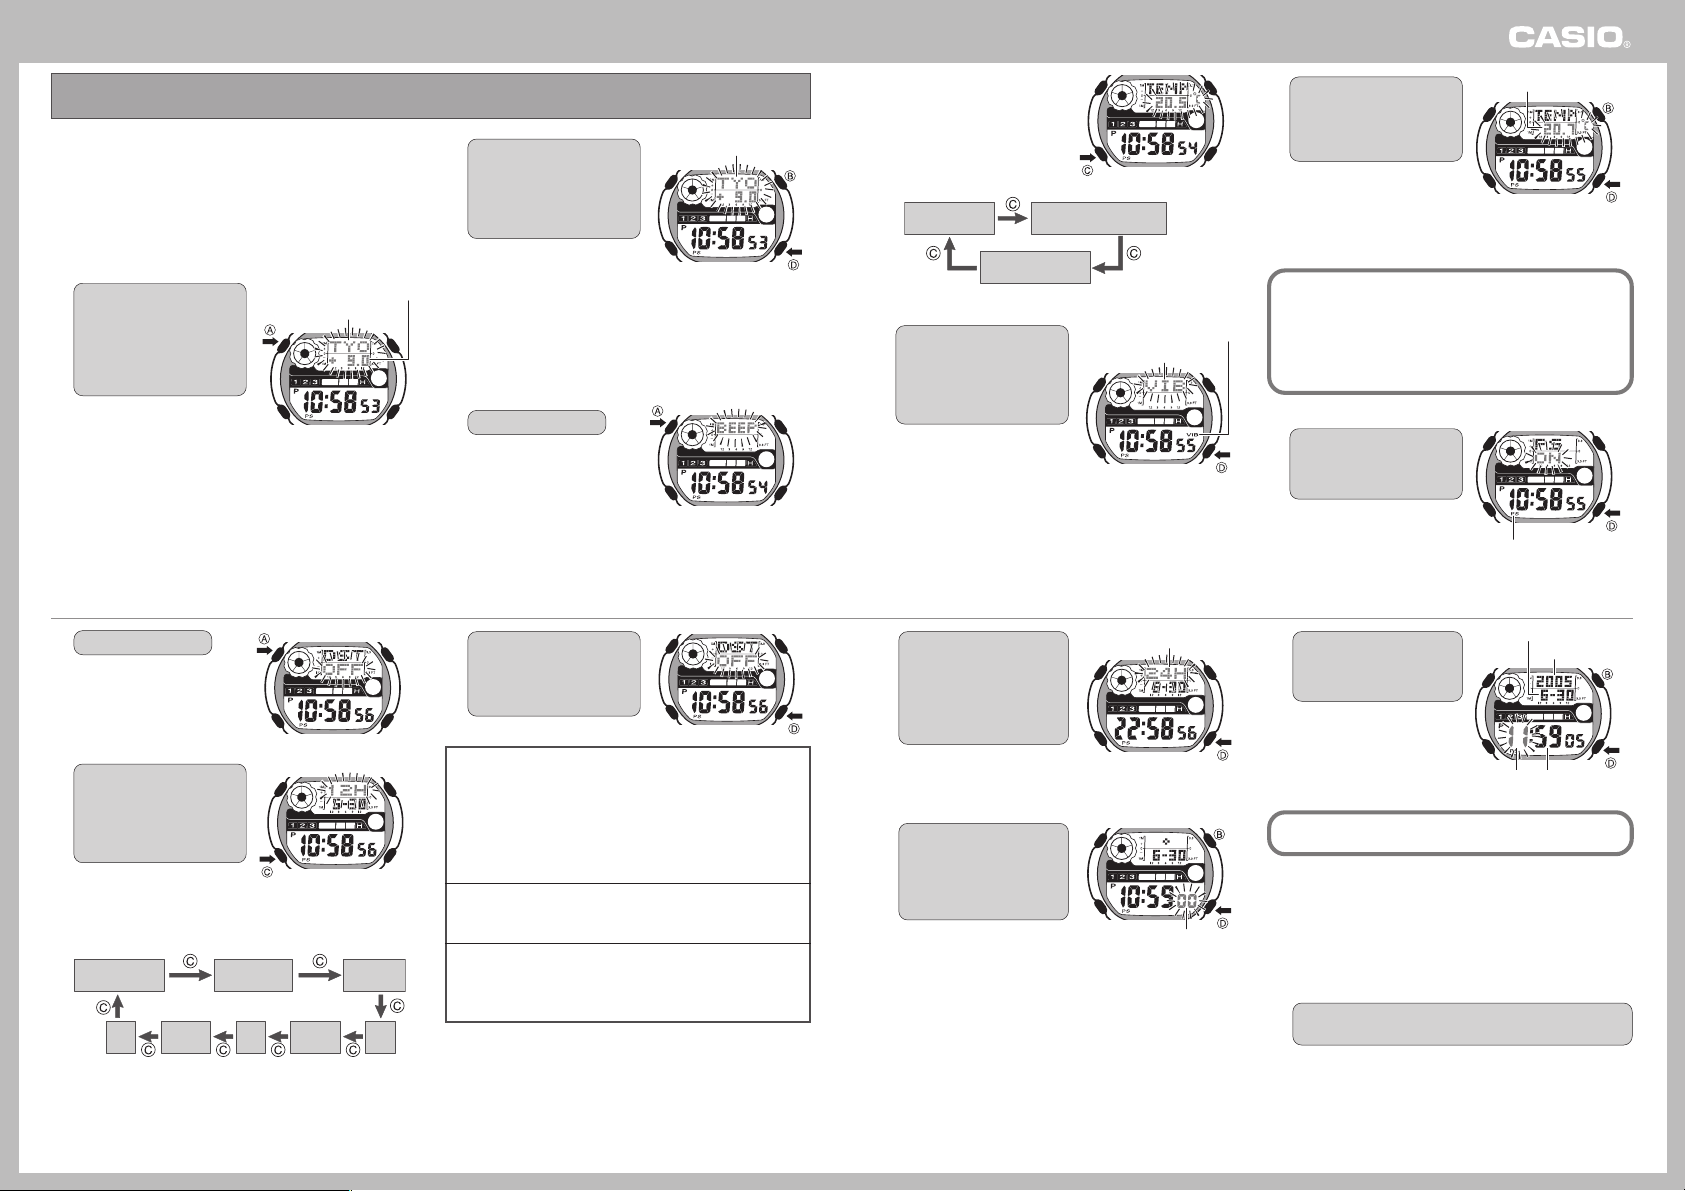
You can use the following procedure to set the current time and
date of the Home City that you have selected in the Timekeeping
Mode.
• Always use the Timekeeping Mode to set and adjust the current
time and date settings.
• You can also turn Power Saving on and off while setting the time
and date.
❚
To configure Home City settings
1. In the Timekeeping Mode,
hold down the
AA
AA
A button
for about two seconds
until the city code and
GMT differential start to
flash. This is the setting
screen.
2. Use the
DD
DD
D (+) and
BB
BB
B (–)
buttons to scroll through
the city codes until the
one you want to use as
your Home City is
displayed.
• D scrolls eastward, while B
scrolls westward. See “GMT
Differentials” for a list of city
codes.
• Holding down either button changes the setting at high speed.
• You can also press the C button so “AREA” is flashing, and
select a tide/Moon graph area. See “To configure location
settings”.
3. Press the
AA
AA
A button.
• This causes VIB (vibration
alert) or BEEP (beep alert) to
flash on the display.
TYO = Tokyo
(Back)
(Forward)
City Code
GMT Differential
Hour Minutes
Year
Month, Day
(Decrease)
(Increase)
Resets to 00.
12/24-hour Timekeeping
7. Press the
AA
AA
A button.
• This displays the DST setting.
8. From here you can use the
CC
CC
C button to select the
settings shown below.
Each press of
CC
CC
C causes
the applicable setting to
flash.
• Use the C button to cycle
through the time and date
settings shown below. Each
press of C causes the
applicable setting to flash.
Summer Time
12/24-hour
Hour
Minutes
Month
Year
Day
Seconds
9. While the Summer Time
setting is selected, use the
DD
DD
D button to cycle through
the settings described
below.
• AUTO
This setting enables the auto summer time setting, which
turns summer time on or off in accordance with the received
time calibration signal.
• This setting uses Japan summer time data when OSA or
TYO is selected as the Home City, and U.S. summer time
data when NYC, CHI, DEN, or LAX is selected as the
Home City.
• OFF
This setting turns off summer time, and displays the current
time normally.
• ON
This setting turns on summer time.
• Selecting this setting displays the DST indicator, and
advances the current time setting by one hour.
• Note that the above setting toggles between “OFF” and “ON”
when any city code other than HKG, TYO, OSA, NYC, CHI, DEN,
LAX, ANC, or HNL is selected as the Home City.
Setting the Home City Time and Date