
Safety o Assembly o Operation oTips &Techniques oMaintenance * Troubleshooting o Parts Lists oWarranty
\
\
\
\\
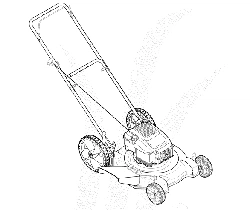
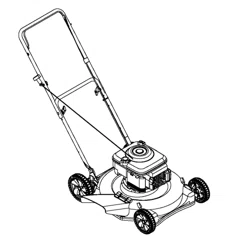
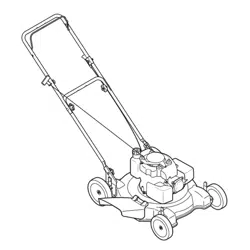
22" Rotary Mower -- Model Series 070
READ SAFETY RULES AND mNSTRUCTmONS CAREFULLY BEFORE OPERATmON
Warning: This unitis equippedwithan internalcombustionengineandshouldnot beusedon or nearany uniiprovedforest=covered,brush=
coveredor grass=coveredlandunlessthe engine'sexhaustsystemisequippedwitha sparkarrestermeetingapplicablelocalorstate laws(if any),
If a sparkarresteris used,it shouldbemaintainedineffectiveworkingorderby the operator,Inthe Stateof Californiathe aboveis requiredbylaw
(Section4442of the CaliforniaPublicResourcesCode),Otherstatesmayhavesimilarlaws,Federallawsapplyonfederallands,A sparkarrester
for the muffleris availablethroughyournearestengineauthorizedservicedealeror contactthe servicedepartment,RO,Box361131Cleveland,
Ohio44136=0019,
FORMNO,769=01538A
PRINTEDiN U,S,A MTD LLC, P.O. BOX 361131 CLEVELAND, OHiO 44136-0019 01/10/2005

This Operator's Manua_ is an important part of your new lawn mower, mtwH_ he_p you assemble,
prepare and maintain the unit for best performance. Please read and understand what it says.
Table of Contents
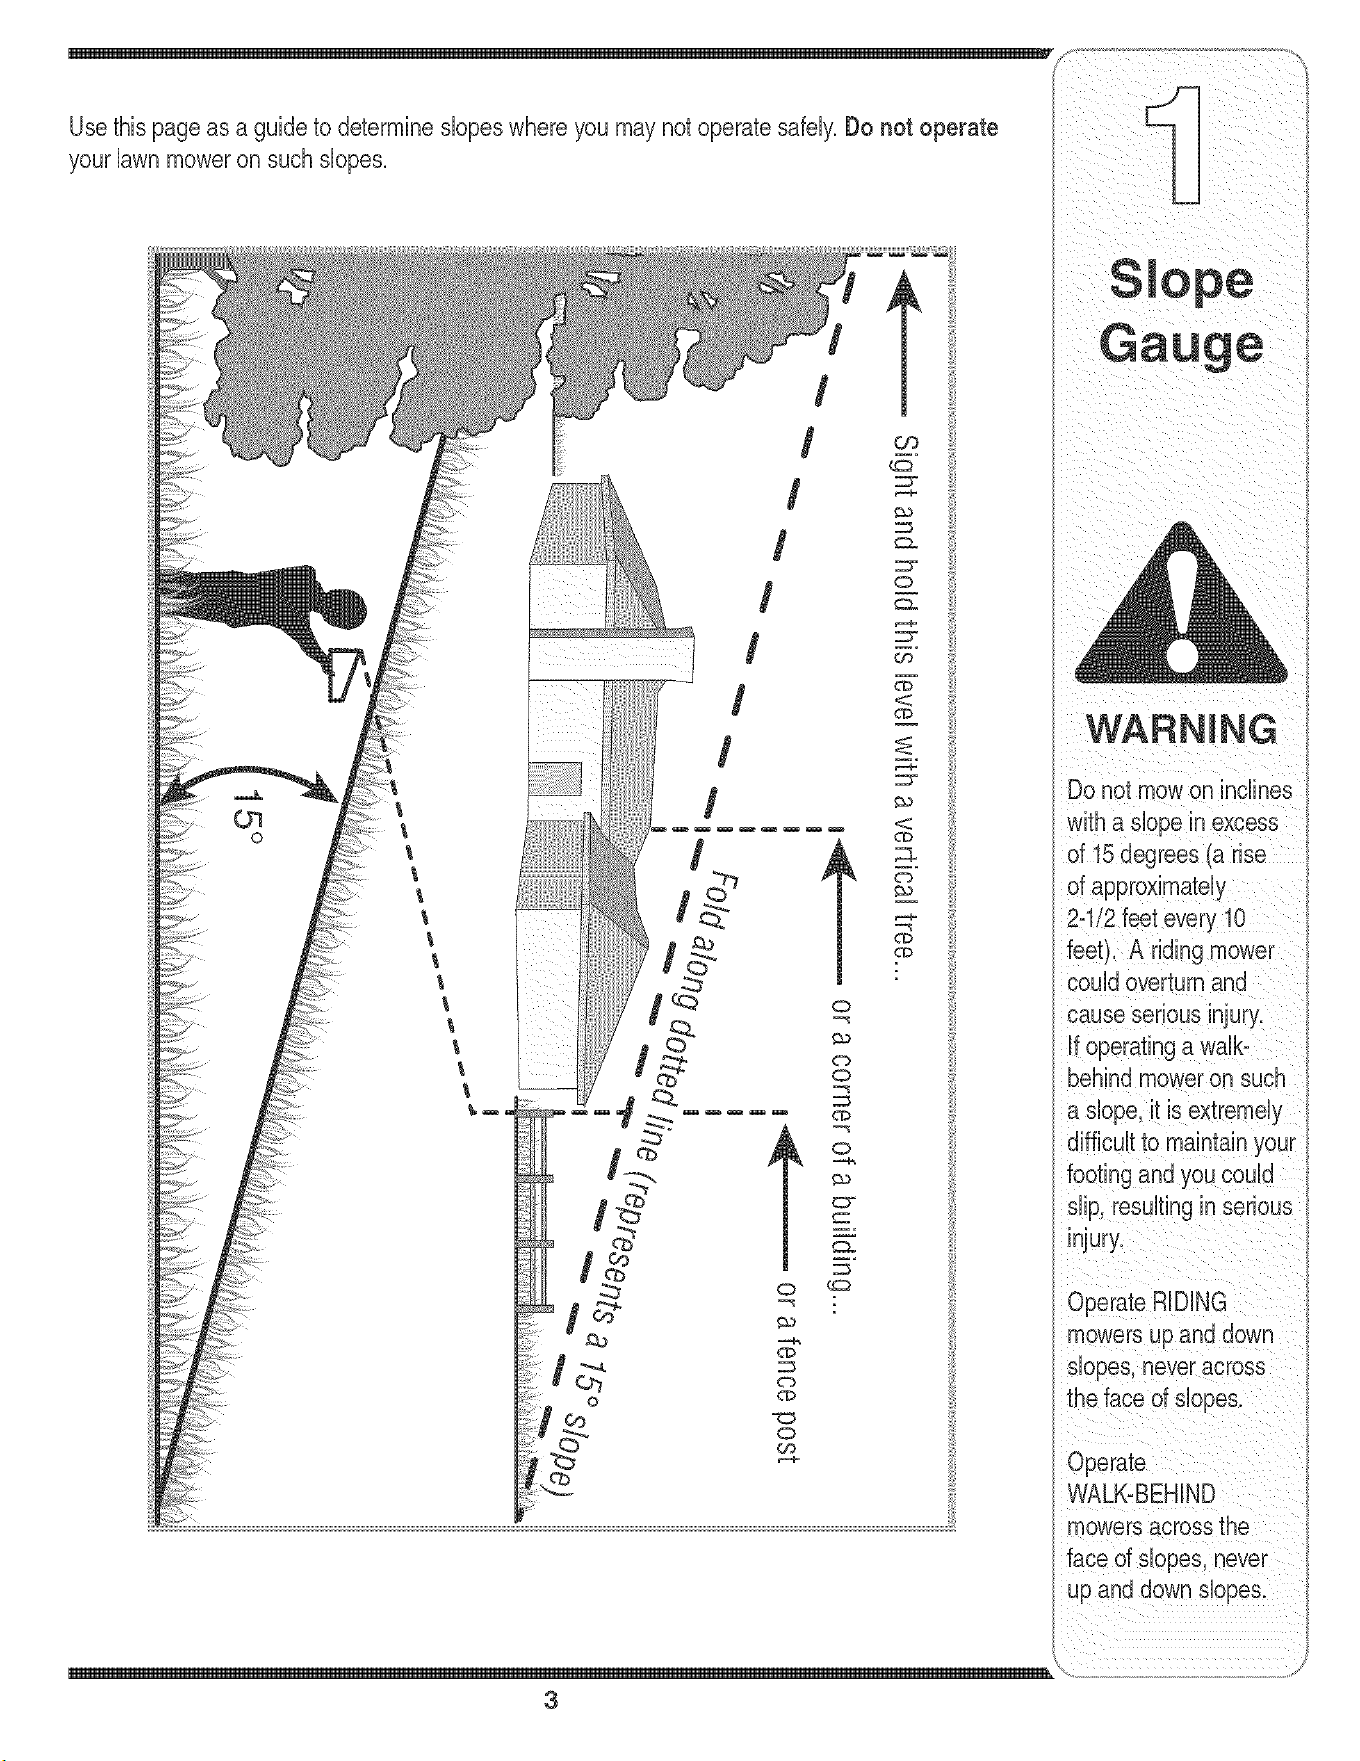
Slope Gauge ....................................................... 3
Safe Operation Practices ................................... 4
Setup and Adjustment ....................................... 6
Operating Your Lawn Mower .............................. 8
Maintaining Your Lawn Mower ......................... 10
Trouble Shooting .............................................. 12
Safety Labels .................................................... 13
Parts List ........................................................... 14
Warranty ............................................ Back Cover
Finding and Recording Model Number
BEFOREYOU STARTASSEMBLING
YOUR NEW EQUIPMENT,
please locatethe model plate on the equipmentand copy the
information to the sample model plate providedto the righL
Youcan locatethe model plate by standing at the operating
position and lookingdown at the rearof the deck. This
information will be necessaryto use the manufacturer'sweb
site and/or obtain assistance from the Customer Support
Department or an authorizedservice dealer.
f
Modem Number
www, mtdproducts,com
Serial Number
MTD LLC
P.O. BOX 361131
CLEVELAND, OH 44136
330-220-4683
800-800-731 0
Customer Support
P_ease do NOTreturn the unit to the retai_er from which it was
purchased, without first contacting Customer Support.
if you havedifficulty assemblingthis product or have any
questions regardingthe controls, operationor maintenanceof
this unit, you can seek help from the experts. Choose from the
options below:
Click here to search our knowledge base.
Search by product, keyword, or phrase.
1. Visit mtdproducts.com for many useful suggestions.
Clickon Customer Support button and you will get the four
options reproducedin this sample to the right. Click on the
appropriate buttonand help is immediatelyavailable.
2. Phonea Customer Support Representative
at 1(800) 800-7310.
3. The engine manufacturer is responsiblefor all engine°
relatedissues with regardsto performance,power-rating,
Login to check the status of your questions, modify
your inquiries, or update your personal profile.
Need local assistance? Click here to find authorized
service centers in your area.
specifications,warranty and service. Pleasereferto the
eng Need a manual and/or parts list? Download
separatelywith your unit, for more information, literaturefrom recentmodel years.
2
03 x= S
£
O
_5
o
(D
_5
03
(D
(D
Cz_
O
_5
E
o>.
(D
03
(D
Cz_
o
03
(D
@ CZ.
"7C_ O
o_
"_ o3
Ob
_50
(D O
Ob
E
£3-
03
D ;>.
Sight andhold this levelwith a verticaltree...
_,_ or a corner of a building...
I
__ or afence post
15°
0_
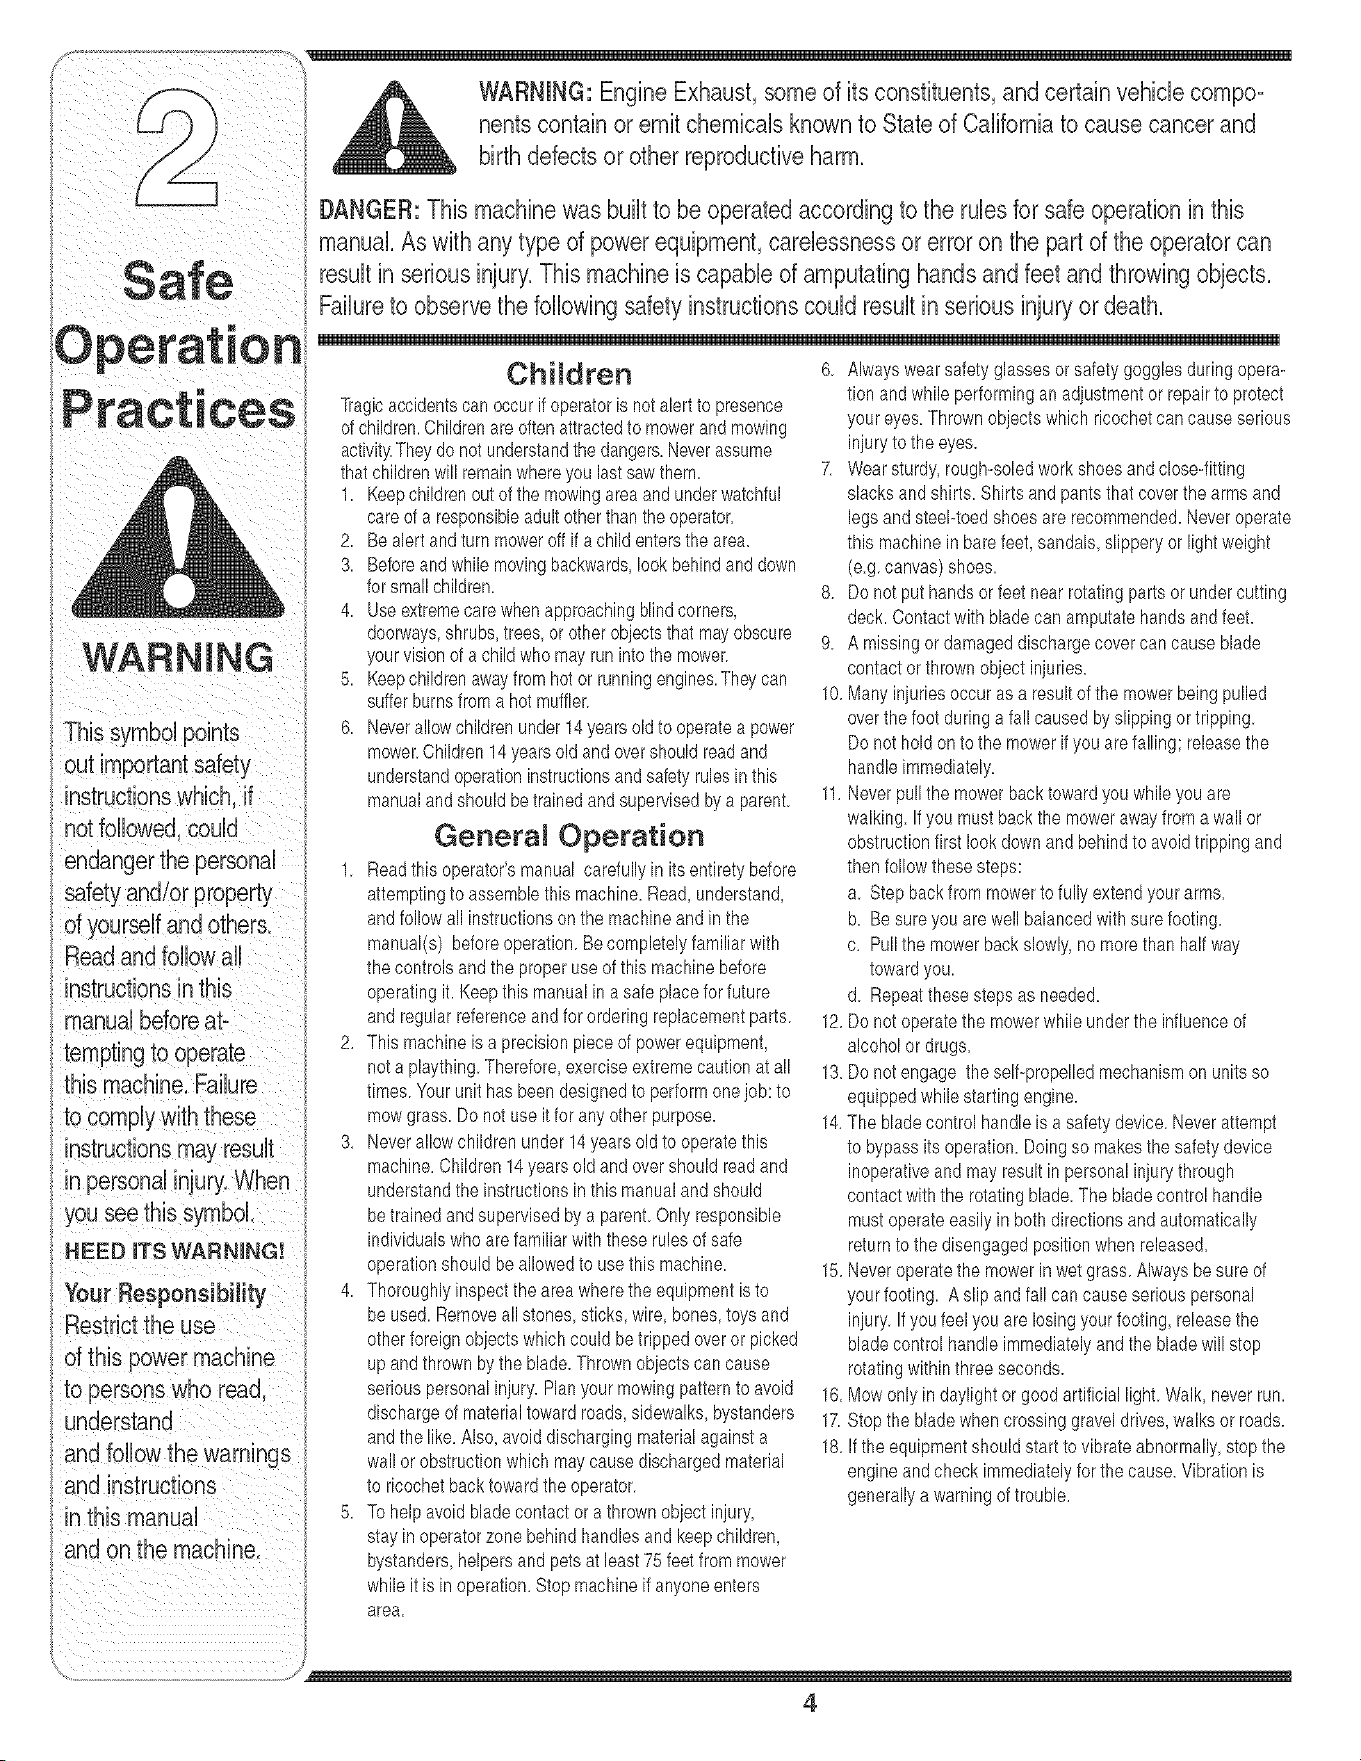
WARNING: Engine Exhaust,some of its constituents, and certain vehicle compo_
nents contain or emit chemicals knownto State of Californiato cause cancer and
birth defects or other reproductiveharm.
DANGER: This machine was built to be operatedaccording to the rubs for safeoperation in this
manuakAs with any type of power equipment, carelessness or error on the part of the operator can
Sa.'_e result in serious injury.This machineis capable of amputating hands and feet and throwing objects.
,, Failureto observethe following safetyinstructionscould result in serious injury or death.
Operation
Children 6. Alwayswear safetyglassesor safetygogglesduringopera-
WARNING
sut importantsafety
endangerthe personal
safetyand/orproperty
of yourselfandothers.
qead andfollowall
manualbeforeat-
temptingto operate
this machine. Failure
in personalinjury,When
you see this symbol.
HEED roTSWARNING!
Your Responsibility
Restrictthe use
sf this powermachine
to personswho read.
understand
andfollow the warnings
and instructions
in this manual
and on the machine.
Tragicaccidentscan occurifoperatoris notalert to presence
of children.Childrenare oftenattractedto mowerandmowing
activity.They do not understandthe dangers.Neverassume
thatchildrenwill remainwhereyoulastsawthem.
1. Keepchildrenoutof the mowingareaandunderwatchful
careof a responsibleadultotherthanthe operator.
2. Bealert andturn moweroffif a childentersthearea.
3. Beforeand whilemovingbackwards,look behindanddown
forsmallchildren.
4. Useextremecare whenapproachingblindcorners,
doorways,shrubs,trees,orotherobjectsthat may'obscure
yourvisionof a childwho mayrun intothemower.
5. Keepchildrenawayfromhot orrunningengines.Theycan
sufferburnsfroma hotmuffler.
6. Neverallowchildrenunder14yearsoldto operatea power
mower.Children14yearsold andovershouldreadand
understandoperationinstructionsandsafetyrulesin this
manualandshouldbetrainedandsupervisedbya parent.
General Operation
1. Readthis operator'smanual carefullyin its entiretybefore
attemptingto assemblethis machine.Read,understand,
andfollow all instructionsonthe machineandin the
manual(s) beforeoperation.Becompletelyfamiliarwith
thecontrolsandthe properuseof this machinebefore
operatingit.Keepthis manualin a safeplaceforfuture
and regularreferenceandfor orderingreplacementparts.
2. Thismachineis a precisionpieceof powerequipment,
nota plaything.Therefore,exerciseextremecautionat all
times.Yourunithasbeendesignedto performonejob: to
mowgrass.Do notuseitfor any otherpurpose.
3. Neverallowchildrenunder 14yearsold to operatethis
machine.Children 14yearsold and overshouldreadand
understandthe instructionsinthis manualandshould
betrainedand supervisedbya parent.Only responsible
individualswho arefamiliar withthese rulesofsafe
operationshould beallowedto use this machine.
4. Thoroughlyinspectthe areawherethe equipmentis to
beused. Removeall stones,sticks,wire,bones,toysand
otherforeignobjectswhichcould betripped overor picked
upand thrownby the blade.Thrownobjectscan cause
seriouspersonalinjury.Planyourmowingpatternto avoid
dischargeofmaterialtoward roads,sidewalks,bystanders
andthe like.Also, avoiddischargingmaterialagainsta
wall orobstructionwhich maycausedischargedmaterial
to ricochetbacktowardtheoperator.
5. Tohelpavoidbladecontact ora thrownobjectinjury,
stay inoperatorzone behindhandlesandkeepchildren,
bystanders,helpersand petsat least75 feet frommower
whileit isin operation.Stopmachineifanyoneenters
area.
tionandwhile performinganadjustmentor repairto protect
youreyes.Thrownobjectswhich ricochetcan causeserious
injuryto the eyes.
7. Wearsturdy, rough-soledworkshoesand close-fitting
slacksandshirts. Shirtsand pantsthat coverthe armsand
legs andsteel-toedshoesare recommended.Neveroperate
this machinein barefeet,sandals, slipperyor lightweight
(e.g.canvas)shoes.
8. Do notputhandsorfeet nearrotatingpartsor undercutting
deck.Contactwithblade canamputatehandsandfeet.
9. A missingor damageddischargecovercan causeblade
contactor thrownobject injuries.
10.Manyinjuriesoccur asa resultof the mowerbeingpulled
overthefoot duringa fall causedby slippingortripping.
Do notholdonto the mowerifyouare falling;releasethe
handleimmediately.
11.Neverpullthe mowerbacktowardyouwhileyouare
walking.If you mustback the moweraway'froma wall or
obstructionfirstlook downandbehindto avoidtrippingand
thenfollow thesesteps:
a. Stepback frommowerto fully extendyour arms.
b. Be sureyou arewellbalancedwithsure footing.
c. Pullthe mowerback slowly,no morethan half way
towardyou.
d. Repeatthese stepsas needed.
12.Do notoperatethe mowerwhileunderthe influenceof
alcoholor drugs.
13.Do notengage theself-propelledmechanismon unitsso
equippedwhilestartingengine.
14.Thebladecontrolhandleis a safetydevice.Neverattempt
to bypassits operation.Doingso makesthe safetydevice
inoperativeandmay resultinpersonal injurythrough
contactwiththe rotatingblade.The bladecontrolhandle
mustoperateeasilyin bothdirectionsandautomatically
returnto the disengagedpositionwhenreleased.
15.Neveroperatethe mowerinwet grass. Alwaysbesure of
yourfooting. A slipand fallcan causeseriouspersonal
injury.If you feelyou are losingyour footing,releasethe
bladecontrolhandleimmediatelyandthe bladewillstop
rotatingwithinthreeseconds.
16.Mowonly indaylightor good artificiallight.Walk,neverrun.
17.Stopthe bladewhencrossinggraveldrives,walksor roads.
18.If the equipmentshouldstart to vibrateabnormally,stopthe
engineandcheck immediatelyforthe cause.Vibrationis
generallya warningof trouble.
4

19.Shutthe engineoff andwait untilthe bladecomesto a
completestop beforeremovingthe grasscatcheror unclog-
gingthechute.
The cutting bladecontinuesto rotatefor a fewseconds after
the engineis shutoff. Neverplaceany part of the bodyin
the blade areauntilyouare surethe blade has stopped
rotating.
20.Neveroperatemowerwithoutpropertrail shield,discharge
cover, grasscatcher,bladecontrolhandleor othersafety
protectivedevicesin placeandworking.Neveroperate
mowerwithdamagedsafetydevices.Failureto do so,can
resultin personalinjury.
21.Mufflerandenginebecomehotand can causea burn.Do
nottouch.
22.Onlyuse parts and accessoriesmadefor this machineby
manufacturer.Failureto doso canresult inpersonalinjury.
23.If situationsoccurwhichare not coveredin this manual,
usecareand goodjudgment.Contactyour dealerfor
assistance.Telephone1-800-800-7310forthe nameof your
nearestdealer.
SJope Operation
Slopesare a majorfactorrelatedto slipandfallaccidentswhich
canresultinsevereinjury'.Operationon slopesrequiresextra
caution.Ifyoufeel uneasyon a slope,donotmowit.Foryour
safety,usethe slopegaugeincludedas part of this manualto
measureslopesbeforeoperatingthis uniton a slopedor hilly
area.If theslopeis greaterthan 15 degrees,do notmowit.
Do:
1. Mowacrosstheface ofslopes;neverup anddown.Exercise
extremecautionwhenchangingdirectiononslopes.
2. Watchfor holes,ruts, rocks,hiddenobjects,or bumpswhich
can causeyou to slipor trip.Tallgrasscan hideobstacles.
3. Alwaysbesure of yourfooting.A slip andfall cancause
seriouspersonalinjury.If youfeel you are losingyour
balance,releasethe blade controlhandleimmediately,and
the blade willstop rotatingwithin 3 seconds.
Do Not:
1. Do notmowneardrop-offs, ditchesorembankments,you
could loseyour footingor balance.
2. Do notmowslopesgreaterthan 15degrees as shownon
the slopegauge.
3. Do notmowon wetgrass. Unstablefootingcouldcause
slipping.
Service
Safe Handling Of Gaso%e:
1. To avoidpersonalinjury or propertydamageuseextreme
care in handlinggasoline.Gasolineis extremelyflammable
andthevaporsare explosive.Seriouspersonalinjurycan
occurwhengasolineis spilledon yourself oryour clothes
which canignite.
2. Washyour skinand changeclothesimmediately.
3. Useonly an approvedgasolinecontainer.
4. Neverfill containersinsidea vehicle or ona truckor trailer
bedwith a plasticliner.Alwaysplacecontainerson the
groundawayfromyourvehicle beforefilling.
5. Removegas-poweredequipmentfromthe truck ortrailer
andrefuelit onthe ground.Ifthis is notpossible,then refuel
suchequipmentona trailerwitha portablecontainer,rather
than froma gasoline dispensernozzle.
6. Keepthe nozzlein contactwith therim ofthefuel tank or
containeropeningat all timesuntil fuelingis complete.Do
notuse a nozzlelock-opendevice.
7. Extinguishallcigarettes,cigars, pipesandothersources
of ignition.
8. Neverfuel machineindoorsbecauseflammablevaporswill
accumulatein the area.
9. Neverremovegascap oradd fuelwhileengineis hot or
running. Allowengineto cool at leasttwo minutesbefore
refueling.
10.Neverover fill fuel tank. Filltankto no morethan 1/2inch
belowbottom of filler neckto providefor fuel expansion.
11.Replacegasolinecapandtightensecurely.
12.If gasolineis spilled,wipe it offthe engineand equipment.
Moveunitto anotherarea.Wait5 minutesbeforestarting
engine.
13.Neverstorethe machineorfuel containernearanopen
flame,spark orpilot light as ona water heater,space
heater,furnace ,clothesdryeror othergasappliances.
14.Toreducefire hazard,keepmowerfree of grass, leaves,
or otherdebrisbuild-up.Clean upoil orfuel spillageand
removeanyfuel soakeddebris.
15.Allowa mowerto cool at least5 minutesbeforestoring.
General Service:
1. Neverrun an engineindoorsor ina poorlyventilatedarea.
Engineexhaustcontainscarbonmonoxide,an odorlessand
deadlygas.
2. Beforecleaning,repairing,or inspecting,makecertainthe
bladeandall movingparts havestopped.Disconnectthe
sparkplugwire andgroundagainsttheengineto prevent
unintendedstarting.
3. Checkthe bladeandenginemountingboltsatfrequent
intervalsfor propertightness.Also,visuallyinspectbladefor
damage(e.g.,bent,cracked,worn)Replacebladewiththe
originalequipmentmanufacture's(O.EM.) bladeonly,listed
inthis manual.Use of parts whichdo notmeettheoriginal
equipmentspecificationsmayleadto improperperformance
andcompromisesafety!"
4. Mowerbladesaresharpandcan cut.Wrap thebladeorwear
gloves,anduseextracautionwhenservicingthem.
5. Keepallnuts,bolts,andscrewstight to be surethe equip-
ment is in safeworkingcondition.
6. Nevertamperwithsafetydevices.Checktheirproperopera-
tionregularly.
7. Afterstrikinga foreignobject,stopthe engine,discon-
nectthe sparkplugwire andgroundagainsttheengine.
Thoroughlyinspectthe mowerfor anydamage.Repairthe
damagebeforestartingandoperatingthe mower.
8. Neverattempt to makea wheel orcutting height adjustment
whilethe engineis running.
9. Grasscatchercomponents,dischargecover,and trail
shieldare subjectto wear anddamagewhichcould expose
movingparts orallow objectsto be thrown.Forsafety
protection,frequentlycheckcomponentsand replaceim-
mediatelywithoriginal equipmentmanufacturer's(O.E.M.)
parts only,listedin this manual.'Use of partswhich do
not meettheoriginal equipmentspecificationsmayleadto
improperperformanceandcompromisesafety!"
10.Donot changetheengine governorsettingor overspeedthe
engine.The governorcontrolsthe maximumsafeoperating
speedof the engine.
11.Maintainor replacesafetylabels,as necessary.
12.Observeproperdisposallawsand regulations.Improper
disposalof fluidsand materialscanharmtheenvironment.
Sae
Operation
m /
PractRces
i
safety and!or property
_uaUbefore attemptingto
Fai!ureto COmp!ywith
these instructions may
resuit in Pe!sonalinjury_
When you see th S
ii HEED JTSWARNmNG!
ii
Your ResponsibiJity
Of this power machine
5

i :T:il¸ ::
" I,Forshippingpurposes,thechutedeflectoron
your
) moweris heldin anuprightpositionbya retainer,
4_ _ Removethe retainerasfollows:
_- a,Pushehu ede lee orup owardseng ne,Hold ng
deflectorinthis position,removethe retainerand
Tools Requiredfor
Your mower is shipped
Step 1
Step 2
discard.SeeStep1.
b. Lowerthe chutedeflectorcarefullykeepingyour
fingersout of the way.
WARNING:The chute retainer
must be removed and discarded
before operating the mower.
2. Performthe followingsequencefor handlesetup:
a. Liftthe upperhandleupfromfoldedpositionA and
pullit to extendedpositionB followingthe arrowin
Step2. The handleshouldclickinto thisposition.
b. Makesurethe carriageboltis seatedproperly
inthe handle.Tightenwing nutssecuringupper
handleto the lowerhandle
3. if satisfiedwith heightof handle,tightenwingnuts
at the endsof the lowerhandleshownin Step3. For
convenienceof operating,youmayadjustthe handle
heightas follows:
a. Removethe wing nutsshownin Step3and remove
the lowerhandle.
b. Positioneachhandlebracketstudinto thetop hole
inthe lowerhandle.SeeStep3 inset.
c. Tightenthewing nuts.
4. insertpostoncableties into holesprovidedon the
lowerhandle.Pullcabletie tightandtrimexcess.See
Step4.
IMPORTANT
without gasoline or
Step 3 Step 4
6
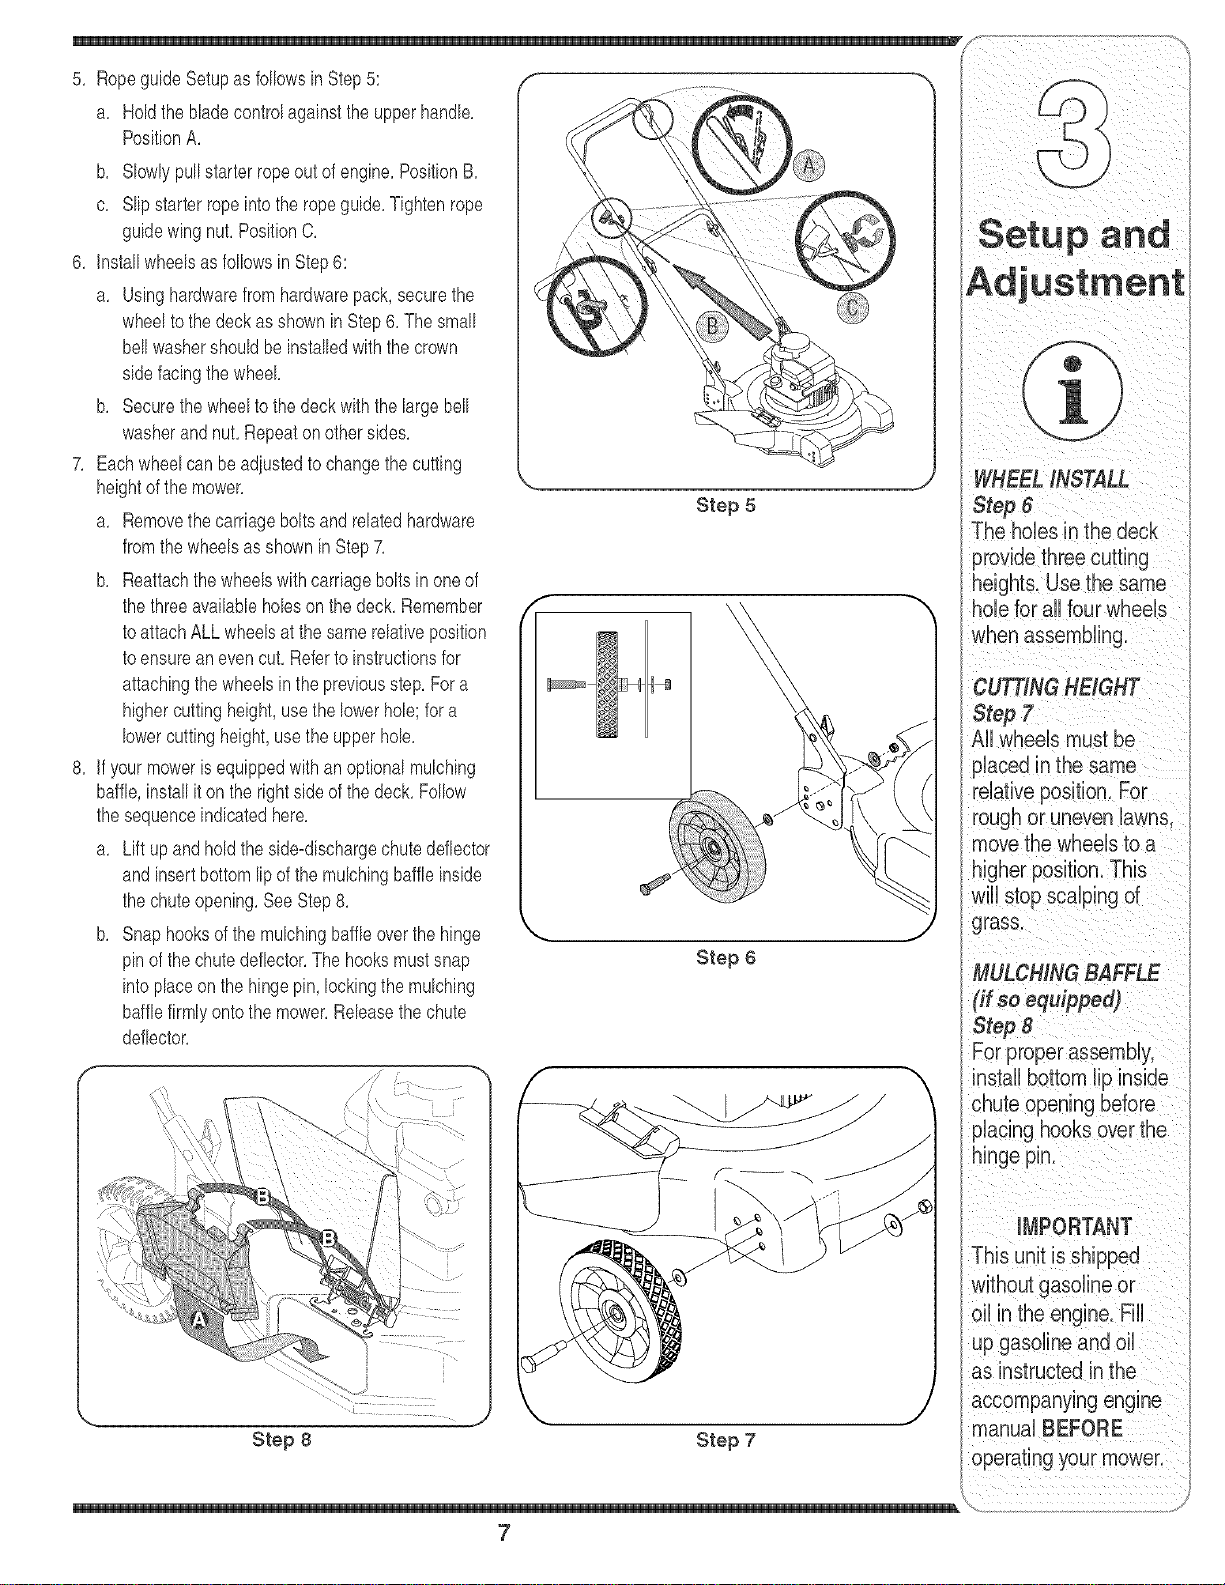
5, RopeguideSetupas followsin Step5:
a, Holdthe bladecontrolagainstthe upperhandle,
PositionA,
b, Slowlypullstarterropeoutof engine,PositionB,
c, Slipstarterropeintothe ropeguide,Tightenrope
guidewing nut,PositionC,
6, Installwheelsasfollowsin Step6:
a, Usinghardwarefromhardwarepack,securethe
wheelto thedeckas showninStep6, The small
bellwashershouldbeinstalledwiththe crown
sidefacingthewheel,
b, Securethe wheelto the deckwiththe largebell
washerandnut,Repeatonothersides,
7, Eachwheelcanbeadiustedto changethe cutting
heightof the mower,
a, Removethe carriageboltsand relatedhardware
fromthewheelsas showninStep7,
b, Reattachthe wheelswithcarriageboltsin oneof
the threeavailableholeson the deck,Remember
to attachALLwheelsat the samerelativeposition
to ensurean evencut, Referto instructionsfor
attachingthe wheelsinthe previousstep, Fora
highercuttingheight,use the lowerhole;for a
lowercuttingheight,usethe upperhole,
8, If yourmowerisequippedwithan optionalmulching
baffle,installit onthe rightside of the deck,Follow
the sequenceindicatedhere,
a, Lift upandholdthe side-dischargechutedeflector
andinsertbottomlipof the mulchingbaffleinside
the chuteopening,SeeStep8,
b, Snaphooksof the mulchingbaffleoverthe hinge
pinof the chutedeflector,The hooksmustsnap
into placeon the hingepin, lockingthe mulching
bafflefirmlyonto the mower,Releasethe chute
deflector,
/ ....
J
Step 8
Step 5
Step 6
Step 7
WHEELiNSTALL
Step6
The holes in the deck
)rovidethree cutting
heights. Use the same
holefor all four wheels
when assembling.
CUTTINGHEIGHT
Step7
All wheels nlJst be
)laced in the same
relativeposition, For
roughor unevenlawns,
move the wheels to a
higher position. This
will stop scalpingof
grass,
MULCHING BAFFLE
(if so equipped)
Step 8
placinghooks over the
hinge pun.
IMPORTANT
This unit is shipped
oiHin the engine. Fill
up gasoline and oil
as instructedinthe
accompanying engine
manualBEFORE
operating your mower,
7
WARNING
This blade control
mechanism is a
safety device. Never
attempt to bypass its
operations.
Use extreme care
when handling
gasoline. Gasoline is
extremely flammaMe
and the vapors are
explosive. Never fuel
the machine indoors
or while the engine
is hot or running.
Extinguish cigarettes,
cigars, pipes and
other sources of
ignition.
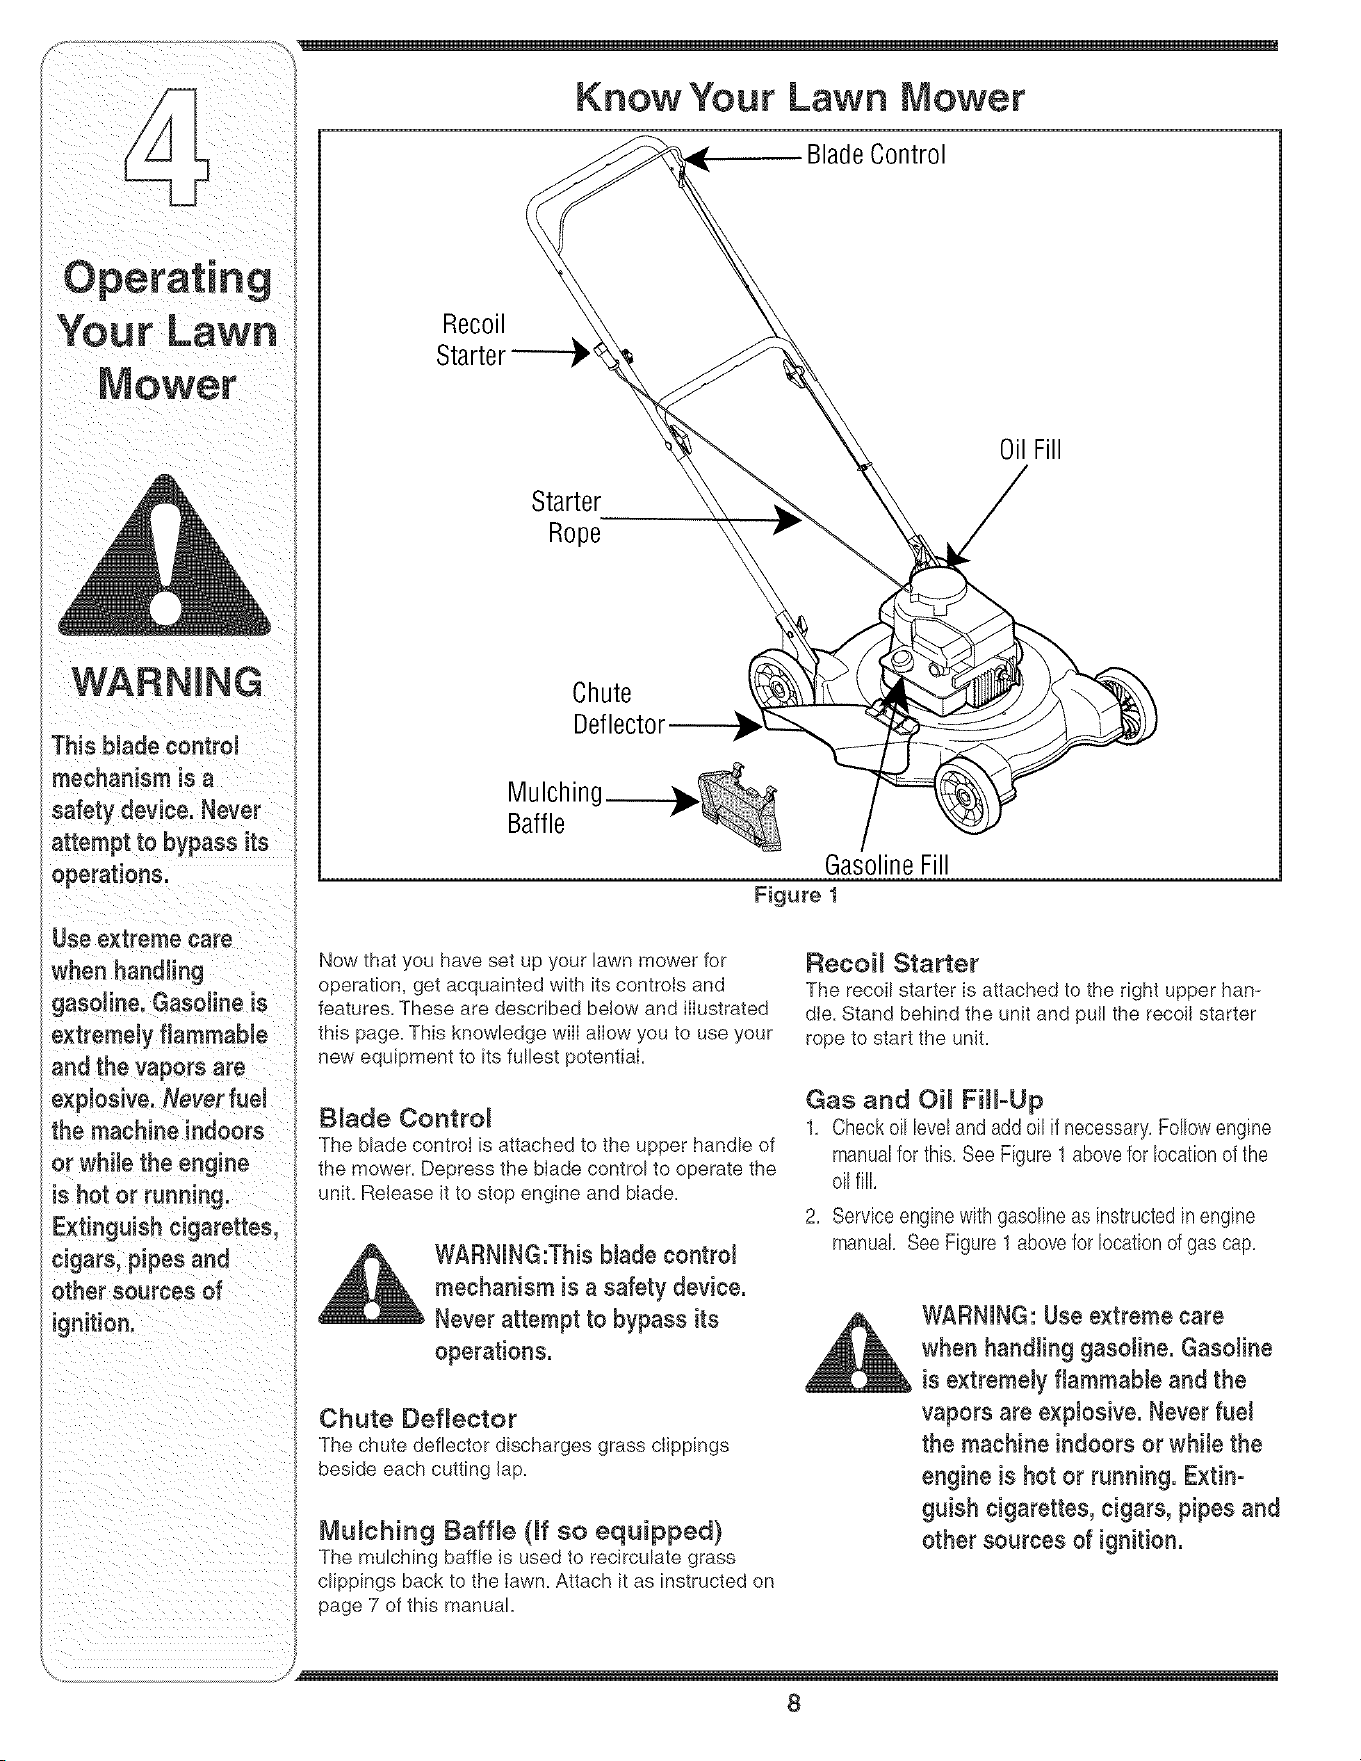
Blade Control
Recoil
Starter
Rope
Oil Fill
Chute
Mulchin(
Baffle
Gasoline Fill
Figure 1
Now that you have set up your lawn mower for
operation, get acquainted with its controls and
features. These are described below and illustrated
this page. This knowledge wilI allow you to use your
new equipment to its fullest potential.
Blade Control
The blade control is attached to the upper handle of
the mower. Depress the blade control to operate the
unit. Release it to stop engine and blade.
WARNiNG:This blade control
mechanism is a safety device.
Never attempt to bypass its
operations.
Chute Deflector
The chute deflector discharges grass clippings
beside each cutting lap,
Mu_ching Baffle (ff so equipped)
The mulching baffle is used to recirculate grass
clippings back to the Iawn. Attach it as instructed on
page 7 of this manual.
Recoi_ Starter
The recoil starter is attached to the right upper han-
dle. Stand behind the unit and pull the recoil starter
rope to start the unit.
Gas and Oil Fill-Up
1, Check oil level and add oil if necessary, Follow engine
manual for this, See Figure 1 above for location of the
oil fill
2, Service engine with gasoline as instructed in engine
manual See Figure 1 above for location of gas cap,
WARNING: Use extreme care
when handling gasoline. Gasoline
is extremely flammable and the
vapors are explosive. Never fuel
the machine indoors or while the
engine is hotor running. Extin-
guish cigarettes, cigars, pipes and
other sources of ignition.
/
8
into the eyes, which can damage
your eyes severely. Nways wear
safety gJasses while operating
the mower, or whiJe performing
any adjustments or repairs on it.
Starting Engine
WARNING: Be sure no one other
than the operator is standing
near the lawnmower whiJe
starting engine or operating
mower. Never run engine indoors
or in enclosed, poorly ventiJated
areas. Engine exhaust contains
carbon monoxide, an odorless
and deadly gas. Keep hands,
feet, hair and loose clothing away
from any moving parts on engine
and lawn mower.
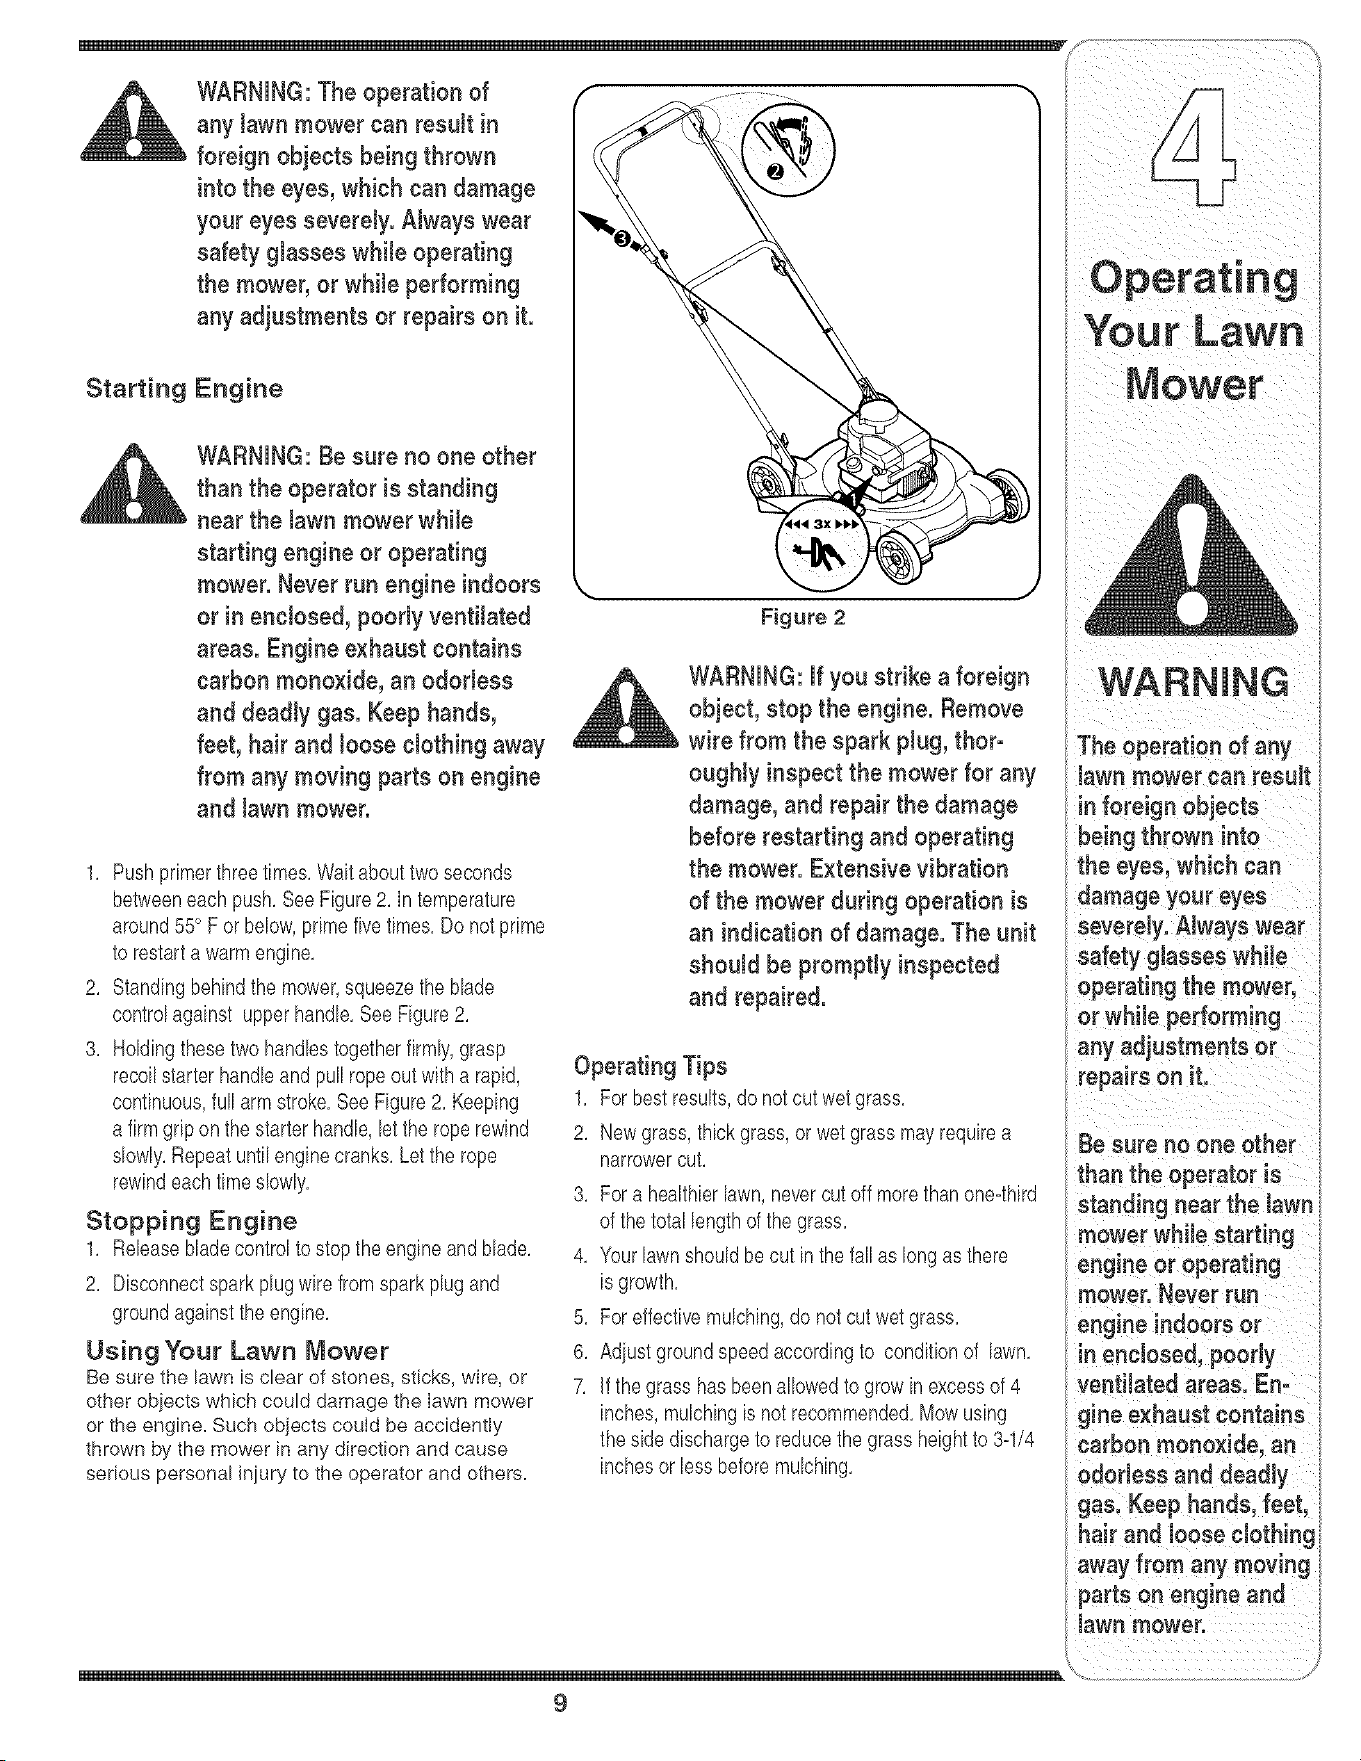
1, Pushprimerthreetimes,Waitabouttwoseconds
betweeneachpush,SeeFigure2, In temperature
around55° F or below,primefivetimes,Do notprime
to restarta warmengine,
2, Standingbehindthe mower,squeezethe blade
controlagainst upperhandle,SeeFigure2,
3, Holdingthesetwo handlestogetherfirmly,grasp
recoilstarter handleand pullropeout witha rapid,
continuous,full armstroke,SeeFigure2, Keeping
a firmgripon thestarter handle,let the roperewind
slowly,Repeatuntilenginecranks,Letthe rope
rewindeachtimeslowly,
Stopping Engine
1, Releasebladecontroltostopthe engineandblade,
2, Disconnectsparkplugwire fromsparkplugand
groundagainstthe engine,
Using Your Lawn Mower
Be sure the lawn is clear of stones, sticks, wire, or
other objects which could damage the Iawn mower
or the engine. Such objects could be accidentIy
thrown by the mower in any direction and cause
serious personal injury to the operator and others.
Figure 2
WARNING: if you strike a foreign
object, stop the engine. Remove
wire from the spark plug, thor-
ougNy inspect the mower for any
damage, and repair the damage
before restarting and operating
the mower. Extensive vibration
of the mower during operation is
an indication of damage. The unit
should be promptly inspected
and repaired.
Operating Tips
1, Forbestresults,do notcutwetgrass,
2, Newgrass,thickgrass,or wetgrassmayrequirea
narrowercut,
3, Fora healthierlawn,nevercutoff morethanone4hird
of thetotal lengthof the grass,
4, Yourlawnshouldbe cut inthe fallas longas there
is growth,
5, Foreffectivemulching,do notcutwetgrass,
6, Adiustgroundspeedaccordingto conditionof lawn,
7, ifthe grasshas beenallowedto grow inexcessof 4
inches,mulchingis not recommended,Mowusing
the side dischargeto reducethe grassheightto 3-1/4
inchesor lessbeforemulching,
9
4 rLawn
lawn mower can result
in foreign objects
being thrown !nto
the eyes which can
damage your eyes
severely. Nways wear
safety glasses While
operating the mower,
Be sure no one other
thontheopeiatoi
standing near the lawn
mower wNle starting
engine or operating
mower. Never run
eng ne ndoors or
!n eric osed, poor y
ventilated areas,
g!nee,ha.stcontains
carbon monoxide, an
odo,essanddoaa y
gas: Keep hands, feet,
hair and loose clothin_
away from any moving
parts Onengine and
lawn mower.
or doinganykindof
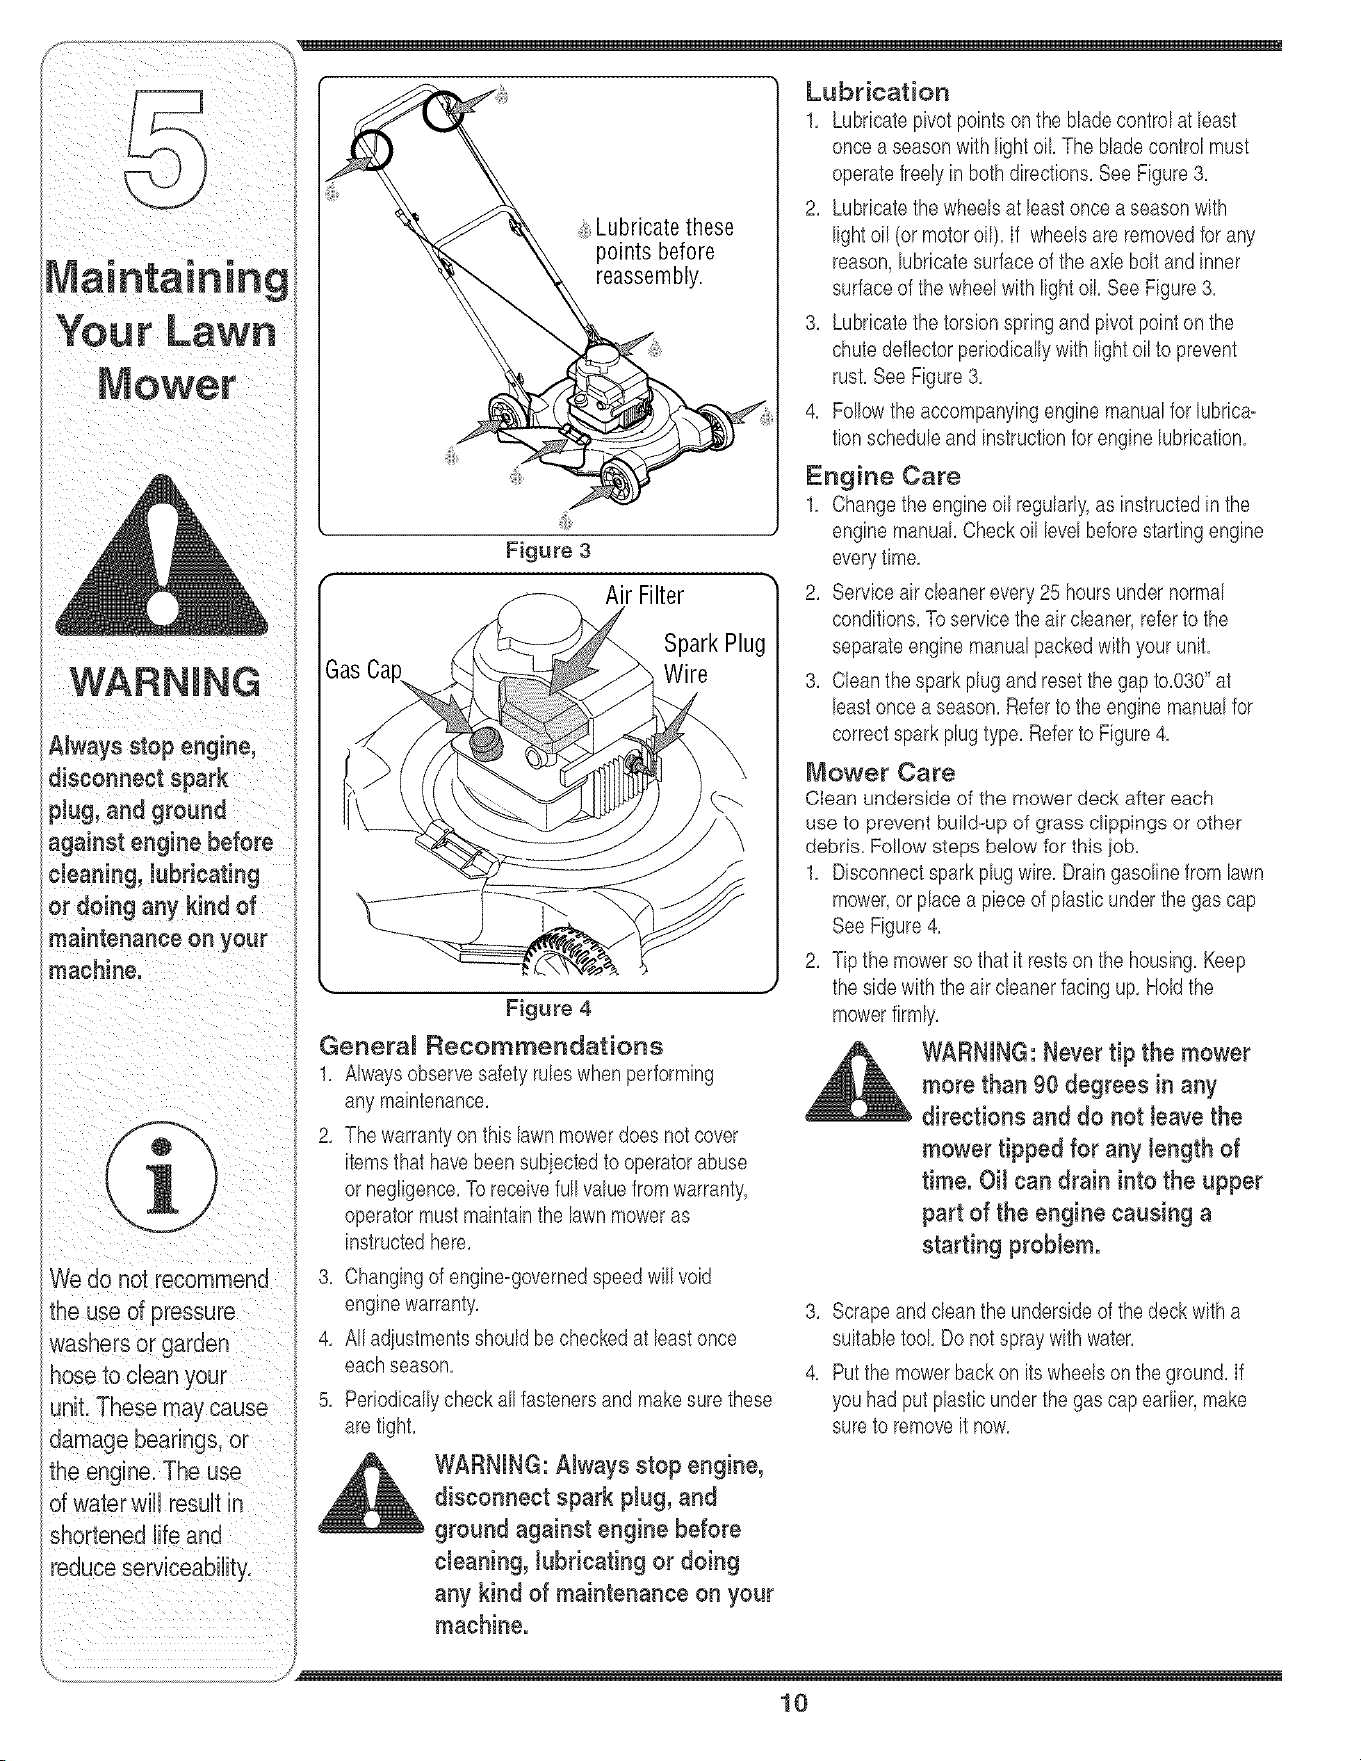
, Lubricate these
points before
reassembly.
Figure 3
Air Filter
Spark Plug
Wire
Figure 4
Genera_ Recommendations
1, Alwaysobservesafetyruleswhenperforming
any maintenance,
2, Thewarrantyon thislawnmowerdoesnot cover
itemsthathavebeensubiectedto operatorabuse
or negligence,Toreceivefull valuefromwarranty,
operatormustmaintainthe lawnmoweras
instructedhere,
3, Changingof engine-governedspeedwill void
enginewarranty,
4, Alladiustmentsshouldbecheckedat leastonce
eachseason,
5, Periodicallycheck allfastenersand makesurethese
aretight,
WARNING: Always stop engine,
disconnect spark plug, and
ground against engine before
cleaning, lubricating or doing
any kind of maintenance on your
machine.
Lubrication
1, Lubricatepivotpointsonthe bladecontrolat least
oncea seasonwithlightoil, The bladecontrolmust
operatefreelyin bothdirections,SeeFigure3,
2, Lubricatethe wheelsat leastoncea seasonwith
lightoil (or motoroil), If wheelsareremovedfor any
reason,lubricatesurfaceof the axle boltandinner
surfaceof the wheelwithlight oil SeeFigure3,
3, Lubricatethe torsionspringandpivotpointonthe
chutedeflectorperiodicallywith lightoilto prevent
rust, SeeFigure3,
4, Followtheaccompanyingenginemanualfor lubrica-
tionscheduleandinstructionfor enginelubrication,
Engine Care
1, Changethe engineoil regularly,as instructedinthe
enginemanual,Checkoil levelbeforestartingengine
everytime,
2, Serviceaircleanerevery25 hoursundernormal
conditions,Toservicethe aircleaner,referto the
separateenginemanualpackedwithyour unit,
3, Cleanthesparkplugandresetthegapto,030"at
leastonce a season,Referto the enginemanualfor
correctsparkplugtype, Referto Figure4,
Mower Care
Clean underside of the mower deck after each
use to prevent build-up of grass clippings or other
debris. Follow steps below for this job.
1, Disconnectsparkplugwire,Draingasolinefrom lawn
mower,or placea pieceof plasticunderthegas cap
SeeFigure4,
2, Tipthe mowerso thatit restsonthe housing,Keep
the sidewiththe aircleanerfacingup, Holdthe
mowerfirmly,
WARNING: Never tip the mower
more than 90 degrees in any
directions and do not leave the
mower tipped for any tength of
time. Oil can drain into the upper
part of the engine causing a
starting problem.
3, Scrapeand cleanthe undersideof the deckwitha
suitabletool Donotspraywithwater,
4, Putthemowerbackon itswheelsonthe ground,If
youhad putplasticunderthe gas capearlier,make
sureto removeit now,
10
WARNING:Whenremovingthe
cuttingbladefor sharpeningor
replacement, protect your hands
with a pair of heavy gloves or use
a heavy rag to hold the blade.
Periodicallyinspectthe bladeadapterfor cracks,
especiallyif you strikea foreignobiect,Replacewhen
necessary,Followthe stepsbelowfor bladeservice,
1, Disconnectsparkplugwirefromsparkplug,Turn
moweronits side makingsure thatthe air filterand
the carburetorareup,
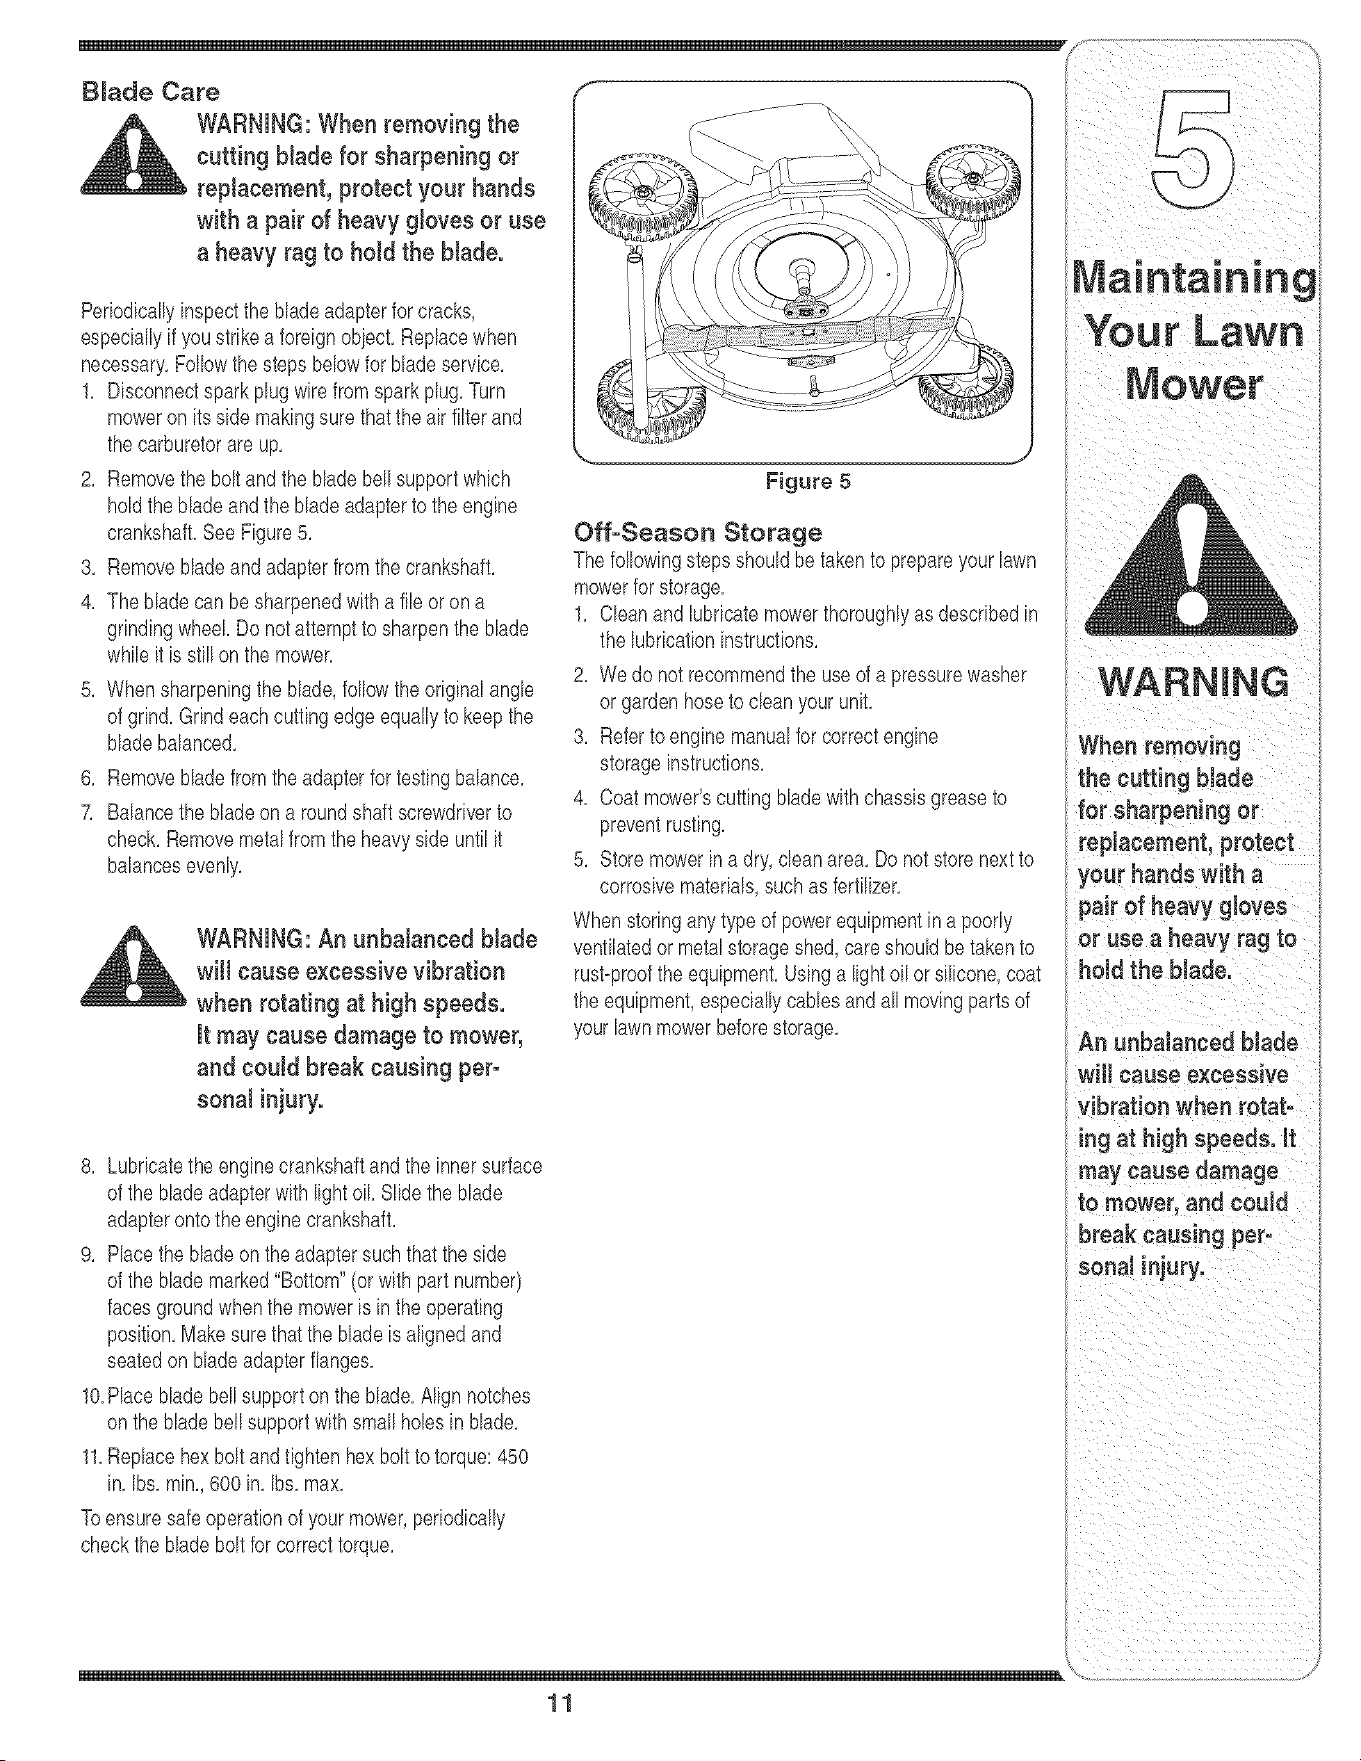
2, Removethe boltandthe bladebellsupportwhich
holdthe bladeandthe bladeadapterto the engine
crankshaft,SeeFigure5,
3, Removebladeandadapterfromthe crankshaft,
4, Thebladecan besharpenedwitha fileor ona
grindingwheel Do notattemptto sharpenthe blade
whileit is stillon the mower,
5, Whensharpeningthe blade,followthe originalangle
of grind,Grindeachcuttingedgeequallyto keepthe
bladebalanced,
6, Removebladefromthe adapterfor testingbalance,
7, Balancethe bladeon a roundshaft screwdriverto
check,Removemetalfromthe heavyside until it
balancesevenly,
WARNING: An unbalanced blade
will cause excessive vibration
when rotating at high speeds.
It may cause damage to mower,
and could break causing per°
sonal injury.
,_. .J
Figure 5
Off-Season Storage
The followingstepsshouldbetakento prepareyourlawn
mowerfor storage,
1, Cleanand lubricatemowerthoroughlyas describedin
the lubricationinstructions,
2, Wedo notrecommendthe use ofa pressurewasher
or gardenhoseto clean yourunit,
3, Refertoenginemanualfor correctengine
storageinstructions,
4, Coat mower'scuttingbladewithchassisgreaseto
preventrusting,
5, Storemowerina dry,cleanarea,Do notstorenextto
corrosivematerials,suchas fertilizer,
Whenstoringanytypeof powerequipmentina poorly
ventilatedor metalstorageshed,care shouldbetakento
rust=proofthe equipment,Usinga lightoilor silicone,coat
theequipment,especiallycanes andallmovingpartsof
yourlawnmowerbeforestorage,
8, Lubricatethe enginecrankshaftandthe innersurface
of the bladeadapterwithlightoiLSlidethe blade
adapterontothe enginecrankshaft,
9, Race thebladeon theadaptersuchthat theside
of the blademarked"Bottom"(orwithpart number)
facesgroundwhenthe moweris inthe operating
position,Makesure thatthe bladeis alignedand
seatedon bladeadapterflanges,
10,Race bladebellsupportonthe blade,Alignnotches
onthe bladebellsupportwithsmallholesin blade,
11,Replacehexbolt andtightenhex boltto torque:450
in, Ibs,min,,600 in, Ibs,max,
Toensuresafeoperationof your mower,periodically
checkthe bladeboltfor correcttorque,
11
WARNING
When removing
Ihe cutting blade
frorsharpening or
placement, protect
your hands with a
)air of heavy gloves
or use a heavy rag to
hold the blade.
An unbalanced blade
_villcause excessive
vibration when rotat-
ing at high speeds, it
may cause damage
to mower, and could
break causing per=
sonai injury.
\ /
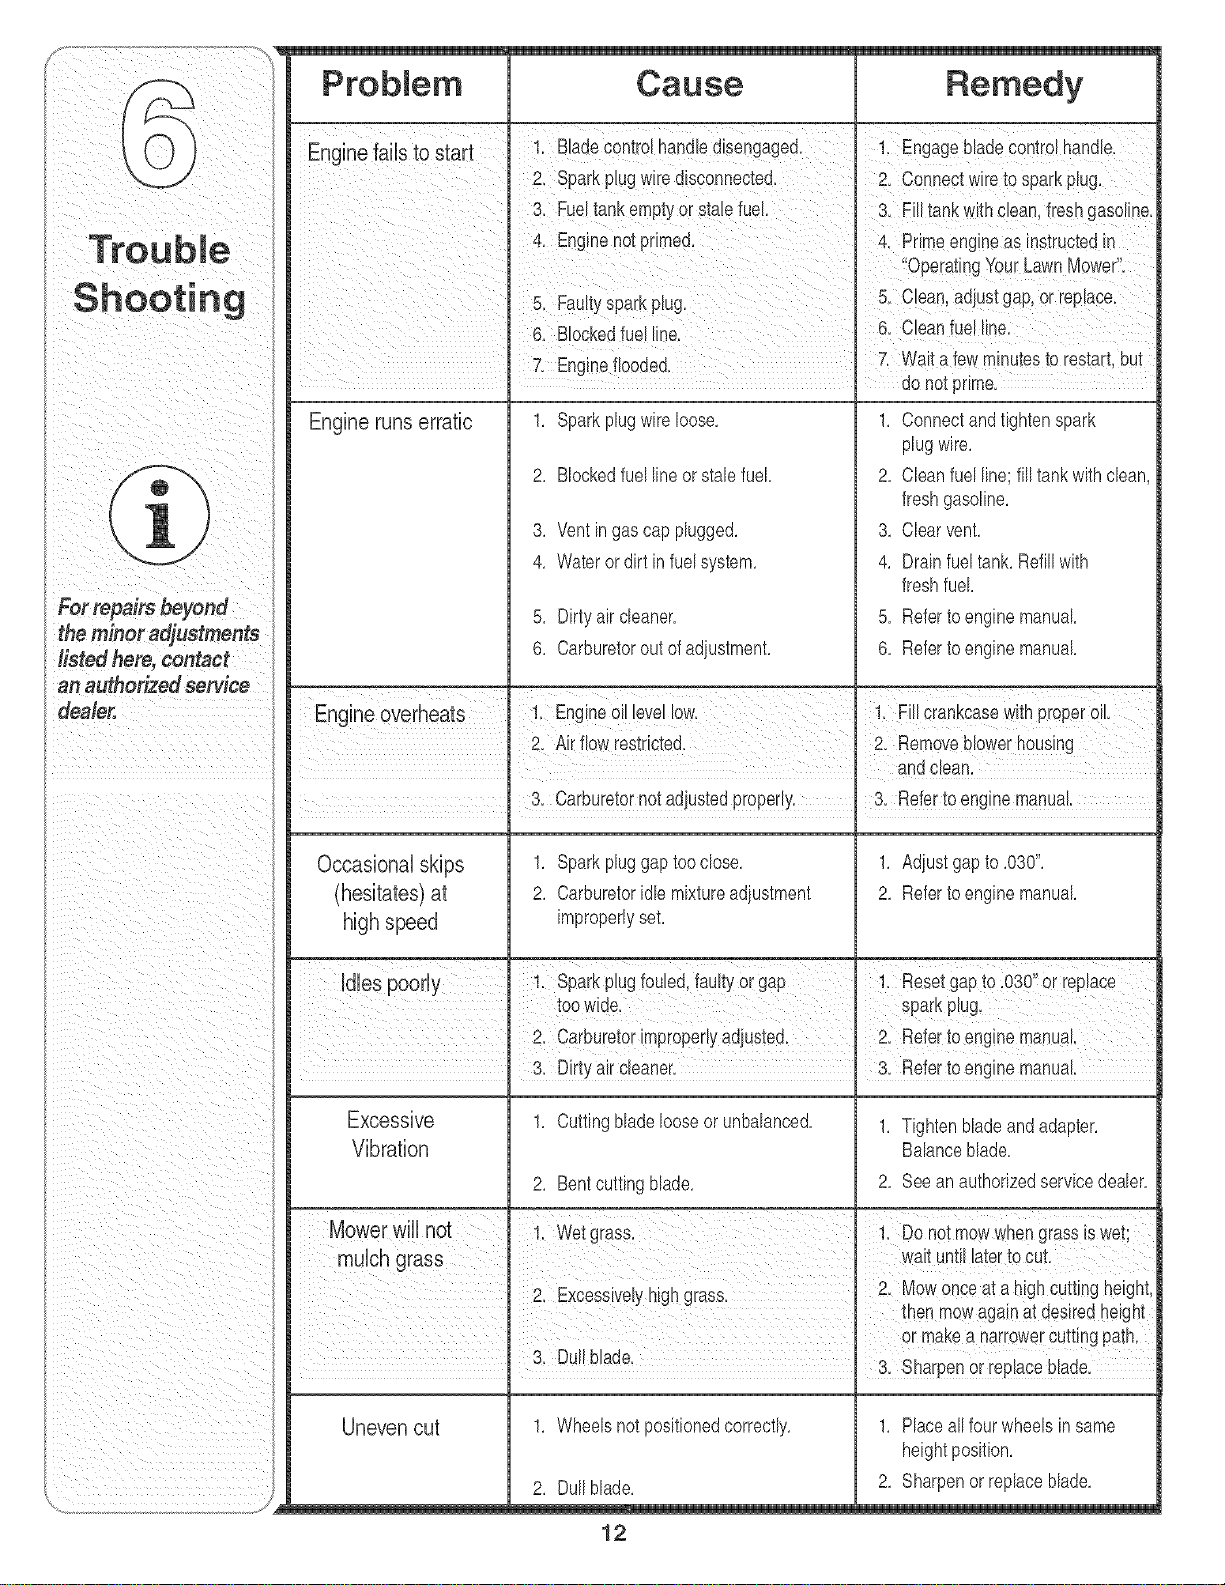
For repairs beyond
the minor adjustments
listed here, contact
an authorized service
dealer,
Problem Cause Remedy
Engine faius_0 start i: Bade contro hande dsengaged: i: Engagebade centre hande
2. SparkpBgwire disconnected. 2. Connectwire to sparkplug.
3. FueEtankemptyor Stabfuel. I 3. EilltankwithClean,freshgasoline.
& Enginenotpdmed. PdrneengineashStructed n
5 Faut S ark u Cean adjustgap orrepace
; Y P P g' ' i
7, Enginefiooded, 7, Watafewmnutestorestart, but
do not prime,
Engine runs erratic
1. Sparkplugwireloose.
2. Blockedfuellineor stab fuel
3. Ventingas cap plugged.
4. Waterordirt infuel system.
5. Dirtyaircleaner.
6. Carburetorout of adiustment.
1. Connectandtightenspark
plugwire.
2. Cleanfuelline; fill tankwithcban,
freshgasoline.
3. Clearvent.
4. Drainfuel tank.Refillwith
freshfuel
5. Referto enginemanual
6. Referto enginemanual
m
. 3. Carburetornotadjustedproperly. 3. Referto enginemanual
. •
Occasional skips
(hesitates)at
high speed
Excessive
Vibration
Uneven cut
1. Sparkpluggaptooclose.
2. Carburetoridlemixtureadjustment
improperlyset.
1. Cuttingbladelooseor unbalanced.
2. Bentcuttingblade.
1. Wheelsnotpositionedcorrectly.
2. Dullblade.
1. Adiustgapto .030".
2. Referto enginemanual
1. Tightenbladeandadapter.
Balanceblade.
2. Seean authorizedservicedealer.
1. Placeall fourwheelsinsame
heightposition.
2. Sharpenor replaceblade.
12
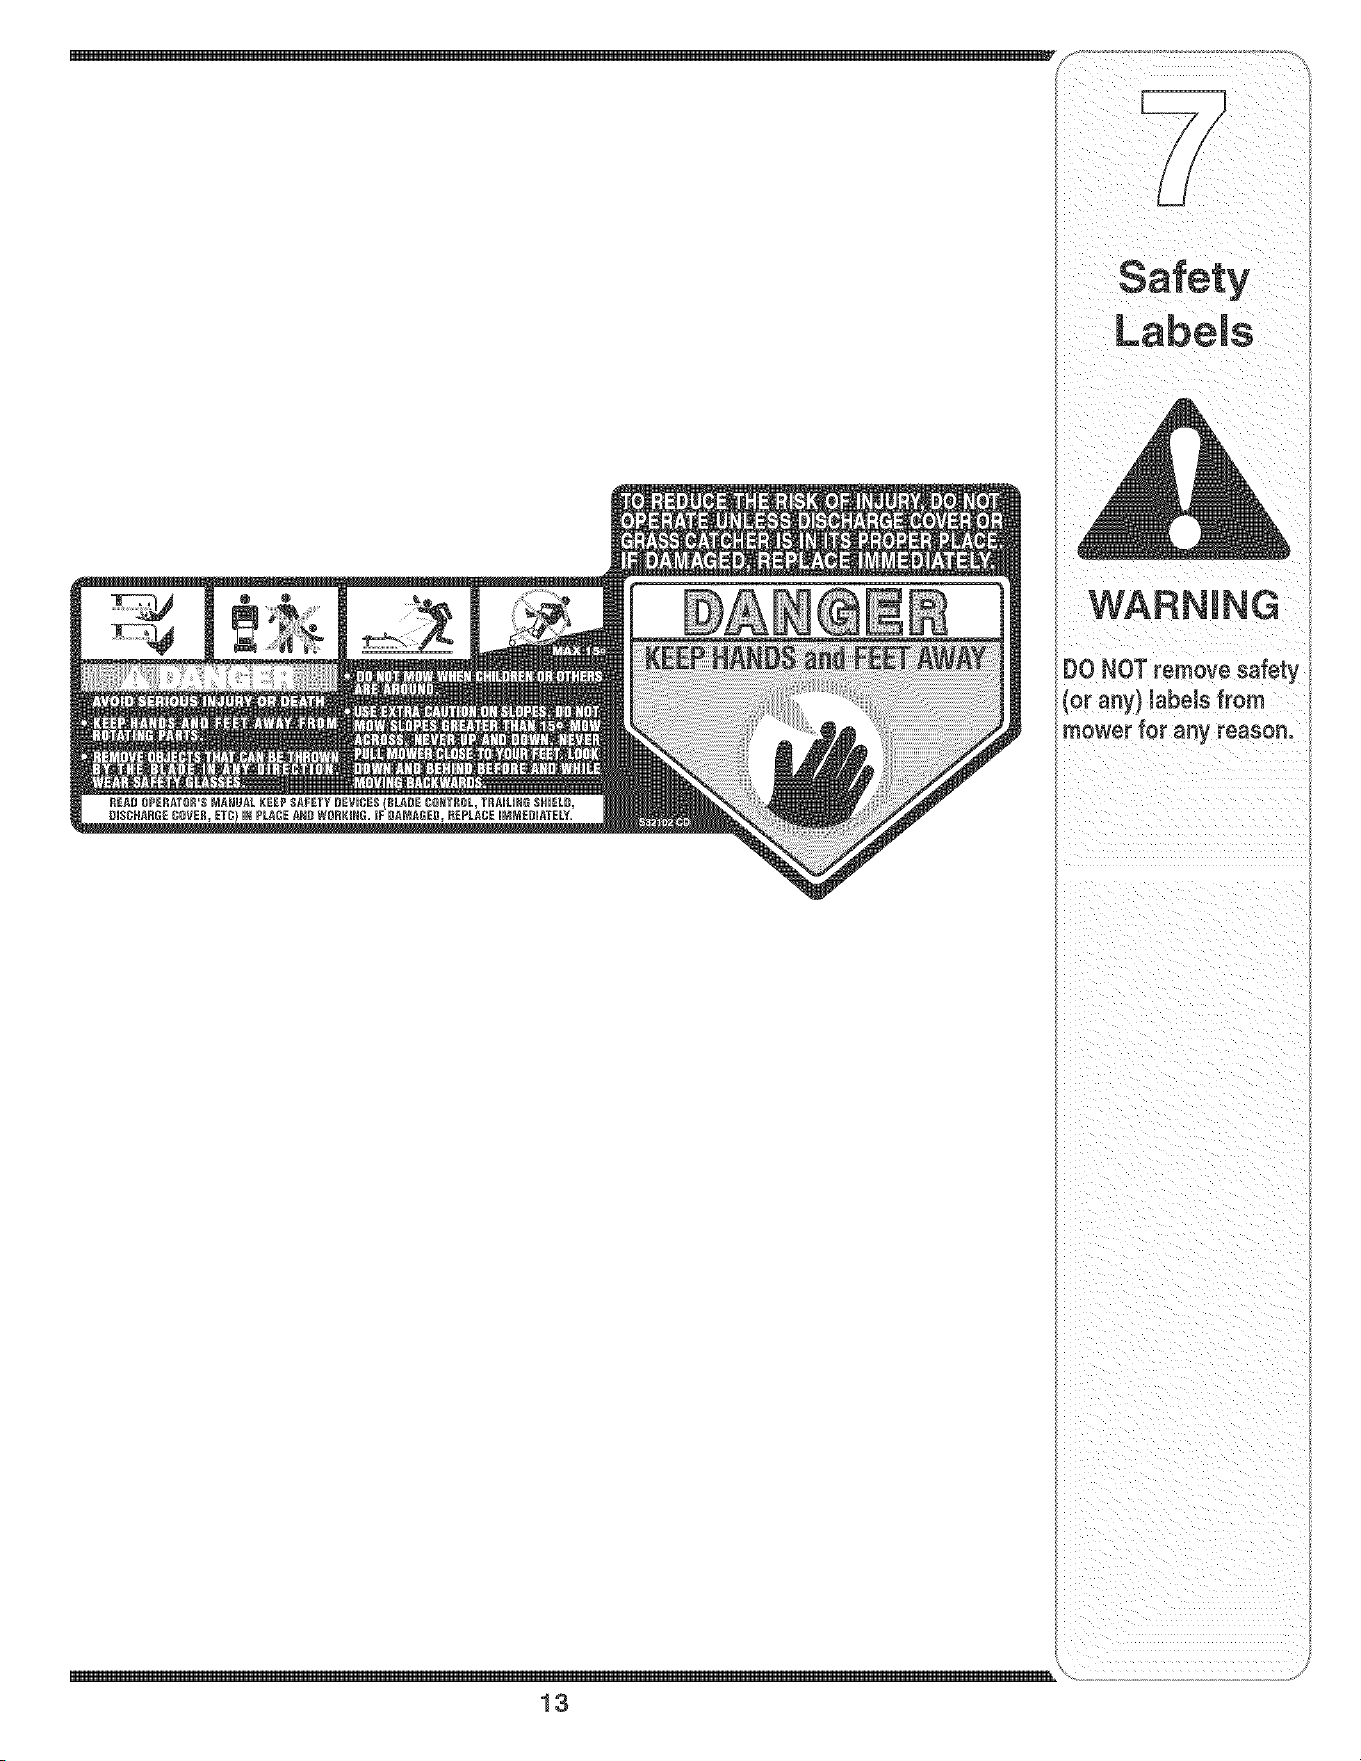
WARNING
DO NOT remove safety
(or any) labeJs from
newer for any reasen,
\
13
Q
14

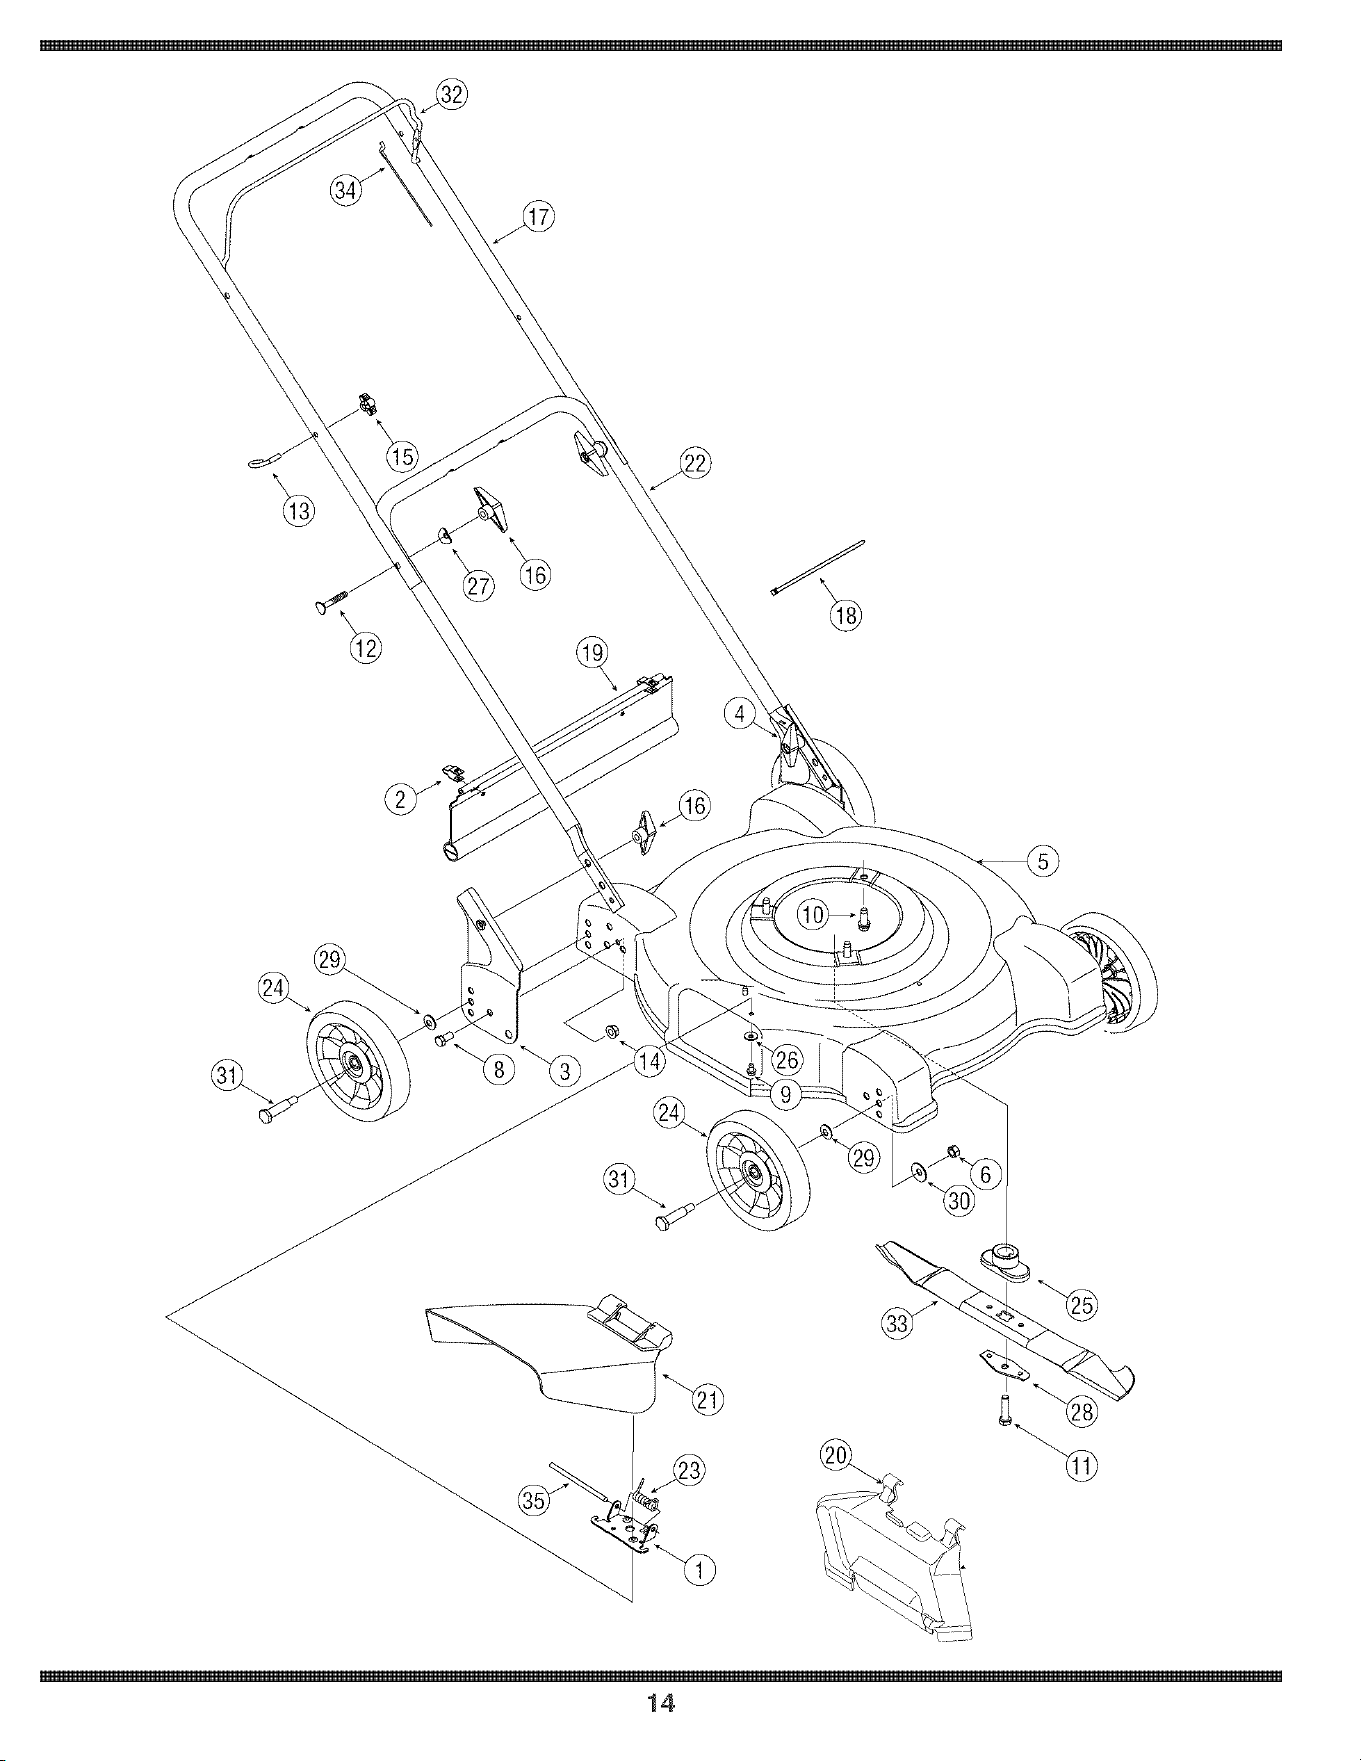
1 17032A ChuteHinge
17098 HingeC@
3 687-02145 HandleBracketAssembly-RH
!, .............
687-02144 HandleBracketAssembly-LH
5 787-01084A DeckAssembly,22"
6 712-3017 HexNut,3/8-16
7 Hubcap- RadialSpoke(NotShown)
............. Hubcap-Gray(Not Shown)
8 710-0216 HexCap Screw3/8-16x,75
!, ............
710-0599 TT Screw1/4-20x 0,5"
'/
710-0654A TT Screw3/8-16x 1,0
11 710-1044 HexCap Screw3/8-24x 1,5
CarriageBolt 5/16-18x 2,0
EyeBolt
LockNut3/8-16
Wing Nut
17 UpperHandle
18 CableTie
710-1174
710-1205
14 712-0431
!..............
720-0279
720-0284
749dO92A
725-0157
19 731-04019
731-04197t
731dO34B
22 749-04037
732-1014
24 734-04063
734-1987
734-1781
25 748-0376C
736-0270
27 736-0451
TrailShield
MulchingBaffle
HingedChuteDeflectorAssembly
LowerHandle
TorsionSpring
I
Wheel,7 x 1,5,Star-DiamGray
I
Wheel,8 x 1,8,SpokeBarGray
Wheel,8 x 1,75,Slot BarGray
BladeAdapter
BellWasher,265 IDx ,75OD
SaddleWasher,320IDx ,93 OD
....................................... b.............................................................
ShoulderScrew,,498x 1,635
BladeControl
31 738-0533
I..............
32 747d161A
33 742-0642A
34
742-0742At
746-0957
StandardBlade,22"
MulchingBlade,22"
BladeControlCable-37,25"
BladeControlCable-40,5"
BladeControlCable-55"
tlfequipped
Parts
i_ ill _ I£LII ILII ii ILII ILILII ILII ILIL
15

MANUFACTURER'S LIMITED WARRANTY FOR
The limitedwarrantyset forthbelowis givenby MTDLLCwithrespectto
newmerchandisepurchasedandusedin the UnitedStates,its posses_
sionsandterritories.
"MTD"warrantsthisproductagainstdefectsin materialandworkmanship
for a periodof two (2)yearscommencingonthe dateof originalpurchase
andwill,at its option,repairor replace,free of charge,anypart foundto
bedefectivein materialsor workmanship.This limitedwarrantyshallonly
applyif this producthas beenoperatedandmaintainedinaccordance
withthe Operator'sManualfurnishedwiththe product,and hasnot been
subiectto misuse,abuse,commercialuse,negbct, accident,improper
maintenance,alteration,vandaBm, theft,fire,water,ordamagebecause
of otherperilor naturaldisaster.Damageresultingfromthe installationor
useof any part,accessoryor attachmentnot approvedby MTDfor use
withthe product(s)coveredbythis manualwill voidyourwarrantyas to
any resultingdamage.
Normalwearpartsarewarrantedto befree fromdefectsinmaterialand
workmanshipfora periodof thirty (30)daysfromthedate of purchase.
Normalwearpartsin@de, butare notlimitedto itemssuchas: batteries,
belts,blades,bladeadapters,grassbags,riderdeckwheels,seats,snow
throwerskidshoes,shaveplates,augerspiralrubberandtires.
NOW TO OBTAmNSERVICE: Warranty service is available,WITH
PROOFOF PURCHASE,through your local authorizedservice
deabr. Tolocate the dealer in your area, check your Yellow Pages,or
contact MTD LLC at RO. Box 361131,Cbveland, Ohio 44136-0019, or
call 1-800-800-7310or 1430-220-4683 or log on to our Web site at
www.mtdproducts.com.
This limitedwarrantydoesnot providecoverageinthe followingcases:
a. Theengineorcomponentpartsthereof.Theseitemsmaycarrya
separatemanufacturer'swarranty.Referto applbabb manufacturer's
warrantyfor termsandconditions.
b. Logsplitterpumps,valves,andcylindershaveaseparateoneyear
warranty.
c. Routinemaintenanceitemssuchas lubricants,filters,blade
sharpening,tune_ups,brakeadiustments,clutchadiustments,deck
adiustments,andnormaldeteriorationof the exteriorfinishdueto use
orexposure,
d, Serviceeompbtedbysomeoneotherthanan authorizedservice
dealer,
e, MTDdoesnotextendany warrantyfor productssoldor exported
outsideof the UnitedStates,itspossessionsandterritories,except
thosesoldthroughMTD'sauthorizedchannelsof exportdistribution,
f, Replacementpartsthatare notgenuineMTDparts,
g, TransportationchargesandservicecaB,
No implied warranty, including any implied warranty of merchant°
ability offitness for a particular purpose, applies after the applicable
period of express written warranty above as to the parts as identi-
fied. No other express warranty, whether written or oral, except as
mentioned above,given by any person or entity, includinga dealer
or retailer, with respect to any product, shall bind MTD.During the
period of the warranty,the exclusive remedy is repair or replacement
of the product as set forth above.
The provisions as set forth in this warranty provide the sole and
exclusive remedyarising from the sale. MTDshall not be liable
for incidental or consequential loss or damage including, without
limitation, expenses incurred for substitute or replacement lawn care
services or for rental expenses to temporarily replace a warranted
product.
Somestatesdo not abw theexclusionor limitationof incidentalor
consequentialdamages,or limitationson howlonganimplbd warranty
lasts,so the aboveexclusionsor limitationsmaynotapplyto you.
in noeventshall recoveryof any kind begreaterthanthe amountof the
purchasepriceof the productsold.Alteration of safety features of the
product shall void this warranty. Youassumethe riskandliabilityfor
loss,damage,or iniuryto youand yourpropertyand/or to othersandtheir
propertyarisingout of the misuseor inabilityto use the product.
This limitedwarrantyshall notextendto anyoneotherthanthe original
purchaseror to the personfor whomit waspurchasedas a gift.
HOWSTATELAW RELATESTO THISWARRANTY: Thislimitedwar_
rantygivesyouspecificlegalrights,andyou mayalso haveother rights
whichvaryfromstateto state,
IMPORTANT:OwnermustpresentOriginalProofof Purchaseto obtain
warrantycoverage,
MTD LLC, P.O. BOX 381131 CLEVELAND, OHIO 44138-0019; Phone: 1-800-800-7310, 1-330-220-4883