
Safety • Assembly • Operation • Tips &Techniques • Maintenance • Troubleshooting • Parts Lists • Warranty
OF A O AL
22" Rotary Mower- Model Series 080
iMPORTANT
READ SAFETY RULES AND iNSTRUCTiONS CAREFULLY BEFORE OPERATION
Warning: Thisunit is equippedwithan internalcombustionengineandshouldnot beusedon or nearany uniiprovedforest-covered,brush-
coveredor grass-coveredlandunlesstheengine'sexhaustsystemis equippedwitha sparkarrestermeetingapplicablelocalor statelaws(if any).
If a sparkarresteris used,it shouldbemaintainedineffectiveworkingorderby the operator.In theStateof Californiathe aboveis requiredbylaw
(Section4442of the CaliforniaPublicResourcesCode).Otherstatesmayhavesimilarlaws.Federallawsapplyonfederallands.A sparkarrester
for the muffleris availablethroughyour nearestengineauthorizedservicedealeror contactthe servicedepartment,RO.Box361131Cleveland,
Ohio44136-0019.
PRINTEDIN U.S.A
MTD LLC, P.O. BOX 361131 CLEVELAND, OHIO 44136-0019
FORMNO.770-10342E
10/01/2004

This Operator's Manual is an important part of your new lawn mower, it will help you assemble,
prepare and maintain the unit for best performance. Please read and understand what it says.
Table of Contents
Slope Gauge ....................................................... 3
Safe Operation Practices ................................... 4
Setup and Adjustment ....................................... 6
Operating Your Lawn Mower .............................. 8
Maintaining Your Lawn Mower ......................... 10
Trouble Shooting .............................................. 12
Safety Labels .................................................... 13
Parts List ........................................................... 14
Finding and Recording Model Number
BEFOREYOU STARTASSEMBLING
YOUR NEW EQUIPMENT,
please locatethe model plate on the equipmentand copy the
information to the sample model plate provided to the right.
Youcan locate the model plate by standing at the operating
position and lookingdown at the rear of the deck. This
information will be necessary to use the manufacturer'sweb
site and/or obtain assistancefrom the Customer Support
Department or an authorizedservice dealer.
Model Number
www.mtdproducts.com
Serial Number
MTD LLC
P.O= BOX 361131
CLEVELAND, OH 44136
330-220-4683
800-800-7310
Customer Support
Please do NOTreturn the unit to the retailer from which it was
purchased, without first contacting Customer Support.
Ifyou have difficulty assemblingthis product or have any
questions regarding the controls, operationor maintenanceof
this unit, you can seek help from the experts. Choose from the
options below:
1. Visit mtdproducts.com for many useful suggestions.
Click on Customer Support buttonand you will get the four
options reproducedin this sample to the right. Click on the
appropriate buttonand help is immediatelyavailable.
2. Phonea Customer Support Representative
at 1(800) 800-7310.
3. The engine manufacturer isresponsiblefor all engine-
relatedissueswith regardsto performance, power-rating,
specifications,warranty and service. Pleasereferto the
engine manufacturer'sOwner's/Operator's Manual, packed
separately with your unit, for more information.
Click here to search our knowledge base.
Search by product, keyword, or phrase.
Login to check the status of your questions, modify
your inquiries, or update your personal profile.
Need local assistance? Click here to find authorized
service centers in your area.
Need a manual and/or parts list? Download
literature from recent model years.
2
O
o
o
>:.
(13
O3
(13
(13
O-
O
O
(--
O5
E
O
(13
(13
o3
(13
O-
O
o3
(13
E
(]3
(13
o
(13
C5
('5
O3
O5
(13
t"b
(13
O9
o5
(13
O-
O
O3
-5
O3
O
O
E
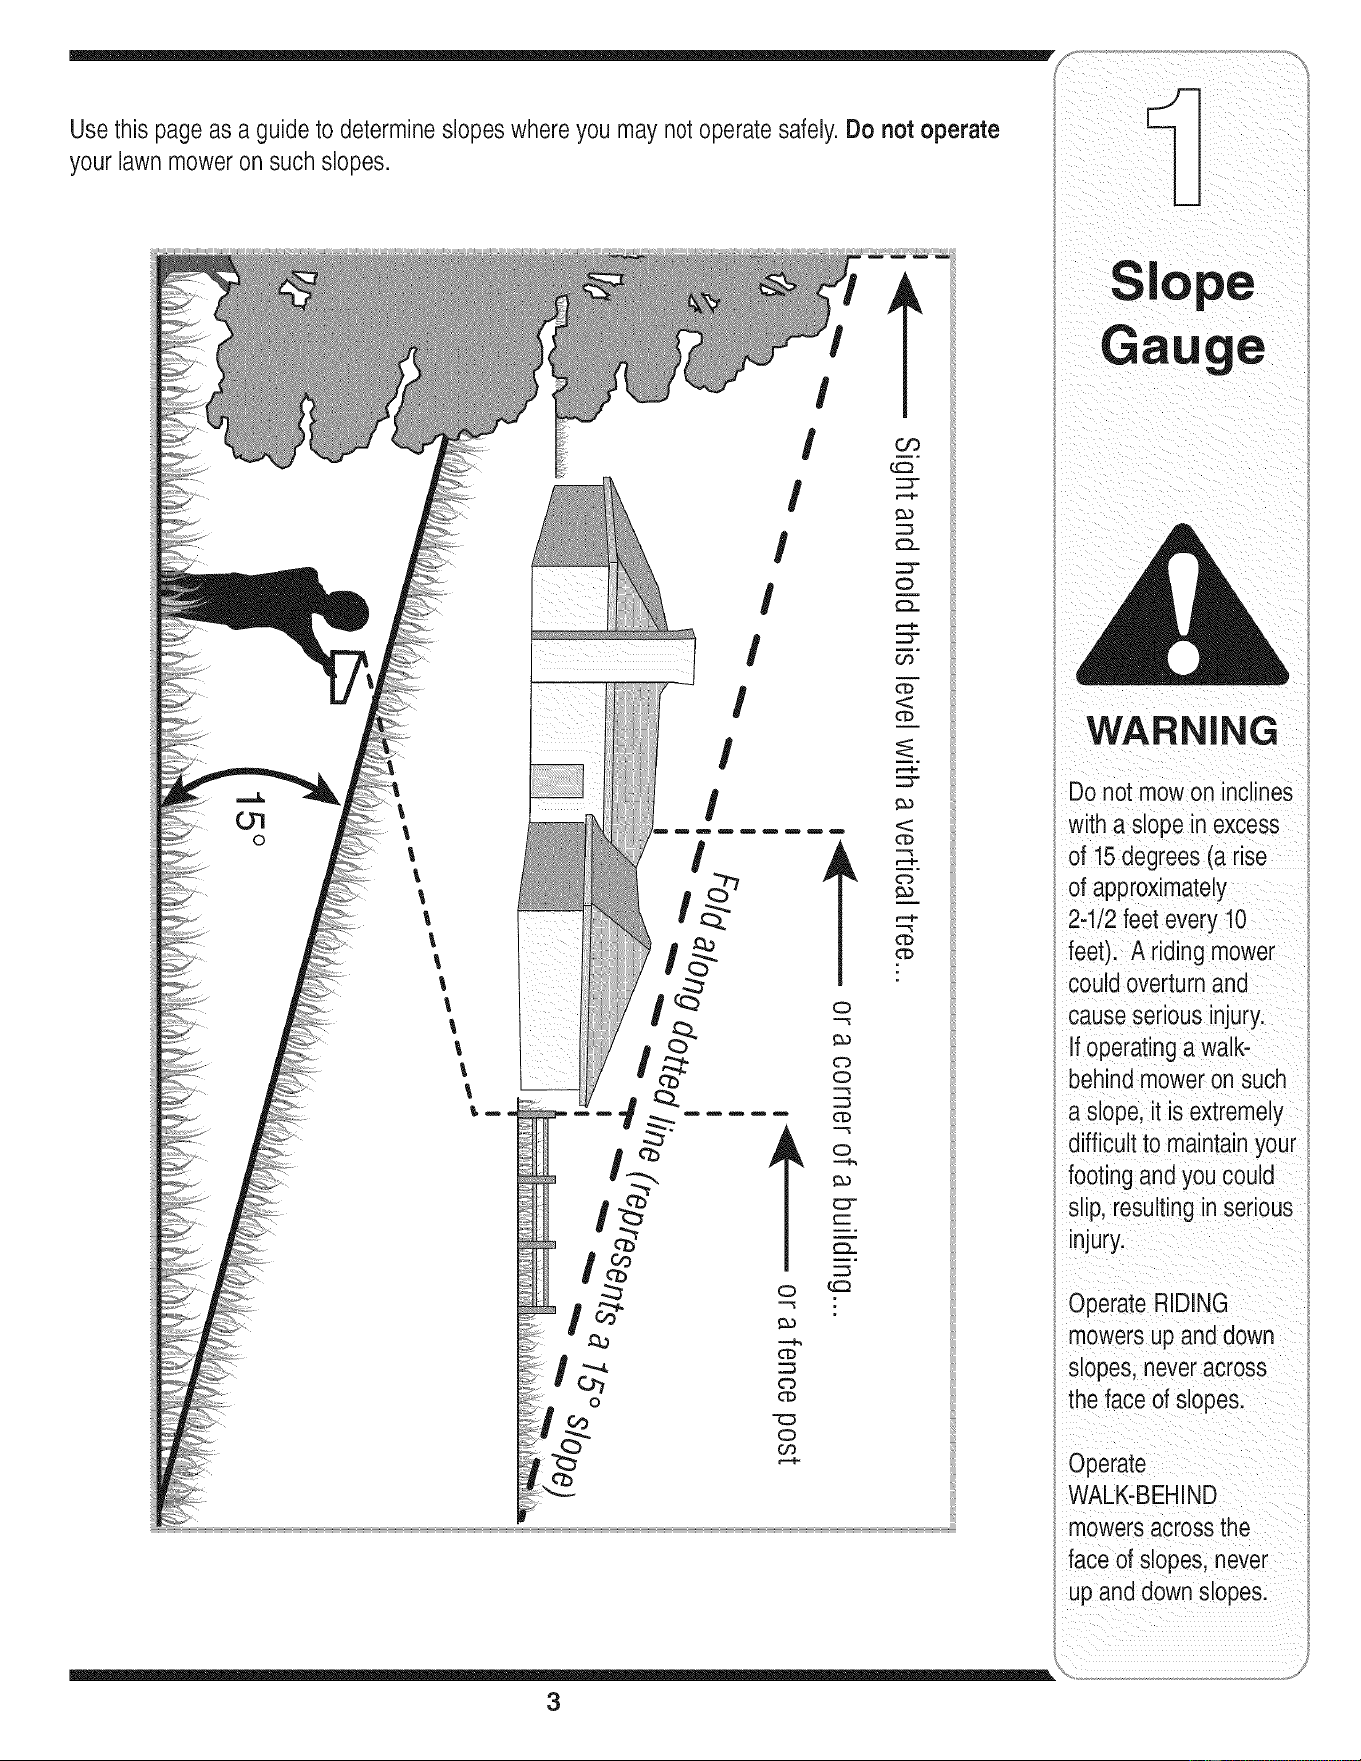
Sight and hold this levelwith a verticaltree...
also
I
15°
RNING
This symbol points
i out important safety
instructionswhich, if
notfollowed, could
endangerthe personal
i safetyand/or property
I of yourself and others.
Readand follow all
instructionsinthis man-
ual before attempting to
operatethis machine.
Failureto complywith
these instructionsmay
i resultin personal injury.
i When you see this
_symbol.
HEED ITS WARNING
Your
Responsibility
Restrictthe use
i ofthis power machine
i to personswho read,
understand
andfollow the warnings
and instructions
inthis manual
andon the machine.
WARNING: Engine Exhaust,some of its constituents, andcertain vehicle compo-
nents contain or emit chemicals knownto State of Californiato cause cancer and
birth defects or other reproductiveharm.
DANGER: This machinewas built to be operatedaccording to the rulesfor safe operation in this
manual.As with any type of power equipment,carelessness or error on the part of the operator can
result in serious injury.This machine is capable of amputatinghands andfeet andthrowing objects.
Failureto observethe followingsafety instructions could result in serious injury or death.
Children
Tragicaccidentscan occur ifoperatorisnotalert to presence
of children.Childrenare oftenattractedto mowerand mowing
activity.Theydonot understandthe dangers.Neverassume
thatchildrenwill remainwhereyoulastsawthem.
1. Keepchildrenoutof the mowingareaand underwatchful
careof a responsibleadultotherthanthe operator.
2. Bealert andturn moweroff if a childentersthearea.
3. Beforeand whilemovingbackwards,look behindanddown
forsmallchildren.
4. Useextremecare whenapproachingblindcorners,
doorways,shrubs,trees,or otherobjectsthat mayobscure
yourvisionof a child whomayrun intothe mower.
5. Keepchildrenawayfromhotor runningengines.Theycan
sufferburnsfroma hotmuffler.
6. Neverallowchildrenunder14yearsoldto operatea power
mower.Children14yearsoldand overshouldreadand
understandoperationinstructionsandsafetyrulesinthis
manualandshouldbetrainedandsupervisedbya parent.
Operation
Safe Handling Of Gasoline:
1. Toavoidpersonalinjuryor propertydamageuse
extremecare in handlinggasoline,Gasolineis extremely
flammableand thevapors are explosive,Seriouspersonal
injurycan occur whengasolineisspilledon yourselfor
yourclotheswhichcan ignite,
2. Washyourskin andchangeclothesimmediately,
3. Useonly an approvedgasoline container,
4. Neverfill containersinsidea vehicle oron a truck ortrailer
bedwith a plastic liner,Alwaysplacecontainersonthe
groundawayfromyourvehicle beforefilling.
5. Removegas-poweredequipmentfrom thetruck or
trailerandrefuelit onthe ground.Ifthis is notpossible,
then refuelsuch equipmenton a trailerwitha portable
container,ratherthan froma gasolinedispensernozzle.
6. Keepthe nozzleincontactwith the rimof thefuel tankor
containeropeningat alltimesuntil fueling is complete.Do
notuse a nozzlelock-opendevice.
7. Extinguishallcigarettes,cigars, pipesandothersources
of ignition.
8. Neverfuel machineindoorsbecauseflammablevapors
willaccumulateinthe area.
9. Neverremovegas caporaddfuel whileengineis hotor
running. Allowengineto cool at leasttwo minutesbefore
refueling.
10.Neverover fill fuel tank. Filltankto nomorethan Y2inch
belowbottomof filler neckto providefor fuelexpansion.
11.Replacegasolinecap andtightensecurely.
12.If gasolineis spilled,wipe it offthe engineand equipment.
Moveunitto anotherarea.Wait5 minutesbeforestarting
engine.
13.Neverstorethe machineor fuelcontainernearan open
flame,spark orpilot light as on a water heater,space heater,
furnace,clothesdryeror othergas appliances.
14.Toreducefire hazard,keepmowerfree of grass, leaves,
or otherdebris build-up.Cleanupoil orfuel spillageand
removeanyfuel soakeddebris.
15.Allowa mowerto cool at least5 minutesbeforestoring.
General Operation:
1. Readthis operator'smanual carefully inits entiretybefore
attemptingto assemblethis machine.Read,understand,
andfollowall instructionsonthe machineandin the
manual(s) beforeoperation.Be completelyfamiliarwith
thecontrolsandthe properuseofthis machinebefore
operatingit. Keepthis manualin a safeplaceforfuture and
regularreferenceandfor orderingreplacementparts.
2. Thismachineis a precisionpieceof powerequipment,not a
plaything.Therefore,exerciseextremecaution at all times.
Yourunithas been designedto performonejob:to mow
grass.Do notuse itfor any otherpurpose.
3. Neverallow childrenunder 14yearsold to operatethis
machine.Children 14yearsoldand overshould readand
understandthe instructionsinthis manualandshould
betrainedand supervisedby a parent.Onlyresponsible
individualswho arefamiliar withthese rulesof safe opera-
tionshould beallowedto usethis machine.
4. Thoroughlyinspectthe areawherethe equipmentis to
beused. Removeall stones,sticks,wire,bones,toys and
otherforeignobjectswhichcouldbetripped overor picked
upandthrownby the blade.Thrownobjectscancause
seriouspersonalinjury.Planyourmowingpatternto avoid
dischargeof materialtowardroads,sidewalks,bystanders
andthe like.Also, avoiddischargingmaterialagainsta wall
or obstructionwhichmaycausedischargedmaterialto
ricochetbacktowardthe operator.
5. Tohelpavoidbladecontact ora thrown objectinjury,stay in
operatorzonebehindhandlesand keepchildren,bystand-
ers, helpersand petsat least75 feetfrom mowerwhileit is
in operation.Stop machineif anyoneentersarea.
6. Alwayswearsafetyglassesor safetygogglesduringopera-
tionandwhile performinganadjustmentor repairto protect
youreyes.Thrownobjectswhich ricochetcancauseserious
injuryto the eyes.
7. Wearsturdy,rough-soledworkshoesand close-fitting
slacksandshirts. Shirtsand pantsthatcoverthe armsand
legs andsteel-toedshoesare recommended.Neveroperate
this machinein barefeet,sandals, slipperyor lightweight
(e.g.canvas)shoes.
8. Do notputhands orfeet nearrotatingparts or undercutting
deck.Contactwithblade can amputatehandsandfeet.
4

9. A missingor damageddischargecovercancauseblade
contactorthrownobject injuries.
10.Manyinjuriesoccuras a resultof the mowerbeingpulled
over thefoot duringa fall causedby slippingor tripping.
Donot holdon to the mowerif youare falling;releasethe
handleimmediately.
11.Neverpullthe mowerbacktowardyou whileyou are
walking.If you mustback the mowerawayfroma wall or
obstructionfirst lookdownandbehindto avoidtripping and
then followthese steps:
a. Stepbackfrommowerto fully extendyour arms.
b. Be sureyou are well balancedwithsurefooting.
c. Pullthe mowerbackslowly,nomorethan half way
towardyou.
d. Repeatthese stepsas needed.
12.Donotoperatethe mowerwhileunderthe influenceof
alcohol ordrugs.
13.Donotengagethe self-propelledmechanismonunitsso
equippedwhilestartingengine.
14.The bladecontrolhandleis a safetydevice.Neverattempt
to bypassitsoperation.Doingso makesthe safetydevice
inoperativeand mayresultin personalinjurythrough
contactwiththe rotatingblade.The bladecontrolhandle
mustoperateeasily in bothdirectionsand automatically
returnto the disengagedpositionwhenreleased.
15.Neveroperatethe mowerinwet grass. Alwaysbesure of
your footing. A slipandfall cancauseserious personal
injury.If youfeel youare losingyourfooting, releasethe
bladecontrolhandle immediatelyand the bladewillstop
rotatingwithinthreeseconds.
16.Mowonlyin daylightorgood artificial light.Walk,neverrun.
17.Stop the bladewhencrossinggraveldrives,walksor roads.
18.Ifthe equipmentshould startto vibrateabnormally,stopthe
engineand check immediatelyfor the cause.Vibrationis
generallya warningof trouble.
19.Shut theengineoff andwait untilthe bladecomesto
a completestop beforeremovingthe grasscatcheror
uncloggingthe chute.The cutting bladecontinuesto rotate
for a few secondsafterthe engineis shutoff. Neverplace
any partof the bodyinthe bladearea untilyouare sure the
bladehasstoppedrotating.
20. Neveroperatemowerwithoutpropertrail shield,discharge
cover,grass catcher,bladecontrolhandleor othersafety
protectivedevicesin placeand working.Neveroperate
mowerwithdamagedsafetydevices.Failureto do so,can
resultin personalinjury.
21. Mufflerandenginebecomehotandcan causea burn.Do
nottouch.
22.Only use parts and accessoriesmadefor this machineby
manufacturer.Failureto do so can result inpersonalinjury.
23. If situationsoccurwhich are notcoveredin this manual,use
care and goodjudgment.Telephone1-800-800-7310for
CustomerSupportandthe nameof yournearestdealer.
Slope Operation:
Slopesare a majorfactorrelatedto slipandfallaccidentswhich
can resultinsevereinjury.Operationon slopesrequiresextra
caution.If youfeel uneasyon a slope,do notmowit.Foryour
safety,usetheslopegaugeincludedas part of this manualto
measureslopesbeforeoperatingthis uniton a slopedor hilly
area.If theslopeis greaterthan 15degrees,do not mowit.
Do:
1. Mowacrossthefaceof slopes;neverupanddown.
Exerciseextremecautionwhenchangingdirectionon
slopes.
2. Watchfor holes,ruts,rocks, hiddenobjects,or bumps
whichcancauseyou to slip ortrip. Tall grasscan hide
obstacles.
3. Alwaysbe sureof your footing.A slip andfall cancause
seriouspersonalinjury.If youfeel youare losingyour
balance,releasethe bladecontrolhandleimmediately,and
theblade willstop rotatingwithinthree(3) seconds.
Do Not:
1. Do notmowneardrop-offs, ditchesorembankments,you
couldlose yourfootingor balance.
2. Do notmowslopesgreaterthan 15degreesas shownon
theslopegauge.
3. Do notmowonwetgrass. Unstablefootingcouldcause
slipping.
Service
1. Neverrun an engineindoorsorin a poorlyventilatedarea.
Engineexhaustcontainscarbonmonoxide,anodorlessand
deadlygas.
2. Beforecleaning,repairing,or inspecting,makecertainthe
bladeandall movingparts havestopped.Disconnectthe
sparkplugwire andgroundagainstthe engineto prevent
unintendedstarting.
3. Checkthe bladeandenginemountingboltsatfrequent
intervalsfor propertightness.Also,visuallyinspectbladefor
damage(e.g.,bent,cracked,worn)Replacebladewiththe
originalequipmentmanufacture's(O.E.M.)bladeonly,listed
inthis manual."Useof partswhichdo notmeetthe original
equipmentspecificationsmayleadto improperperformance
andcompromisesafety!"
4. Mowerbladesare sharpandcan cut.Wrapthebladeor wear
gloves,anduseextracautionwhenservicingthem.
5. Keepallnuts,bolts,andscrewstightto besurethe equip-
mentis insafeworkingcondition.
6. Nevertamperwithsafetydevices.Checktheir properopera-
tionregularly.
7. Afterstrikinga foreignobject,stopthe engine,discon-
nectthesparkplugwire andgroundagainsttheengine.
Thoroughlyinspectthe mowerfor anydamage.Repairthe
damagebeforestartingandoperatingthe mower.
8. Neverattemptto makea wheel or cuttingheightadjustment
whiletheengineis running.
9. Grasscatchercomponents,dischargecover,andtrail
shieldaresubjectto wear anddamagewhichcould expose
movingparts or allowobjectsto be thrown.Forsafety
protection,frequentlycheckcomponentsandreplaceim-
mediatelywithoriginal equipmentmanufacturer's(O.E.M.)
parts only,listedinthis manual."Useof parts which do
notmeetthe originalequipmentspecificationsmayleadto
improperperformanceandcompromisesafety!"
10.Do notchangetheenginegovernorsettingor overspeedthe
engine.The governorcontrolsthe maximumsafeoperating
speedof theengine.
11.Maintainor replacesafetylabels,as necessary.
12.Observeproperdisposallawsand regulations.Improper
disposalof fluidsand materialscanharmtheenvironment.
Practices
WARNING
This symbol points
out important safety
instructionswhich, if
not followed, could
endangerthe personal
safety and/or property
of yourselfand others.
Readand follow all
instructions inthis man-
ual before attemptingto
operate this machine.
Failureto comply with
these instructionsmay
result in personal injury.
Whenyou see this
symbol.
HEED ITS WARNING
Your
Responsibility
Restrictthe use
of this power machine
to personswho read,
understand
and follow the warnings
and instructions
inthis manual
and on the machine.
5
Setupand
Adjustment
Your mower is shipped
with the handle inthe
higherheight position.
NOTE: Eachend of
the lower handle must
be placed in the same
relative position.
IMPORTANT
This unit is shipped
Nithoutgasoline or
oil in the engine. Fill
up gasoline and oil
as instructed inthe
accompanying engine
manual BEFORE
operating your mower.
Step 1
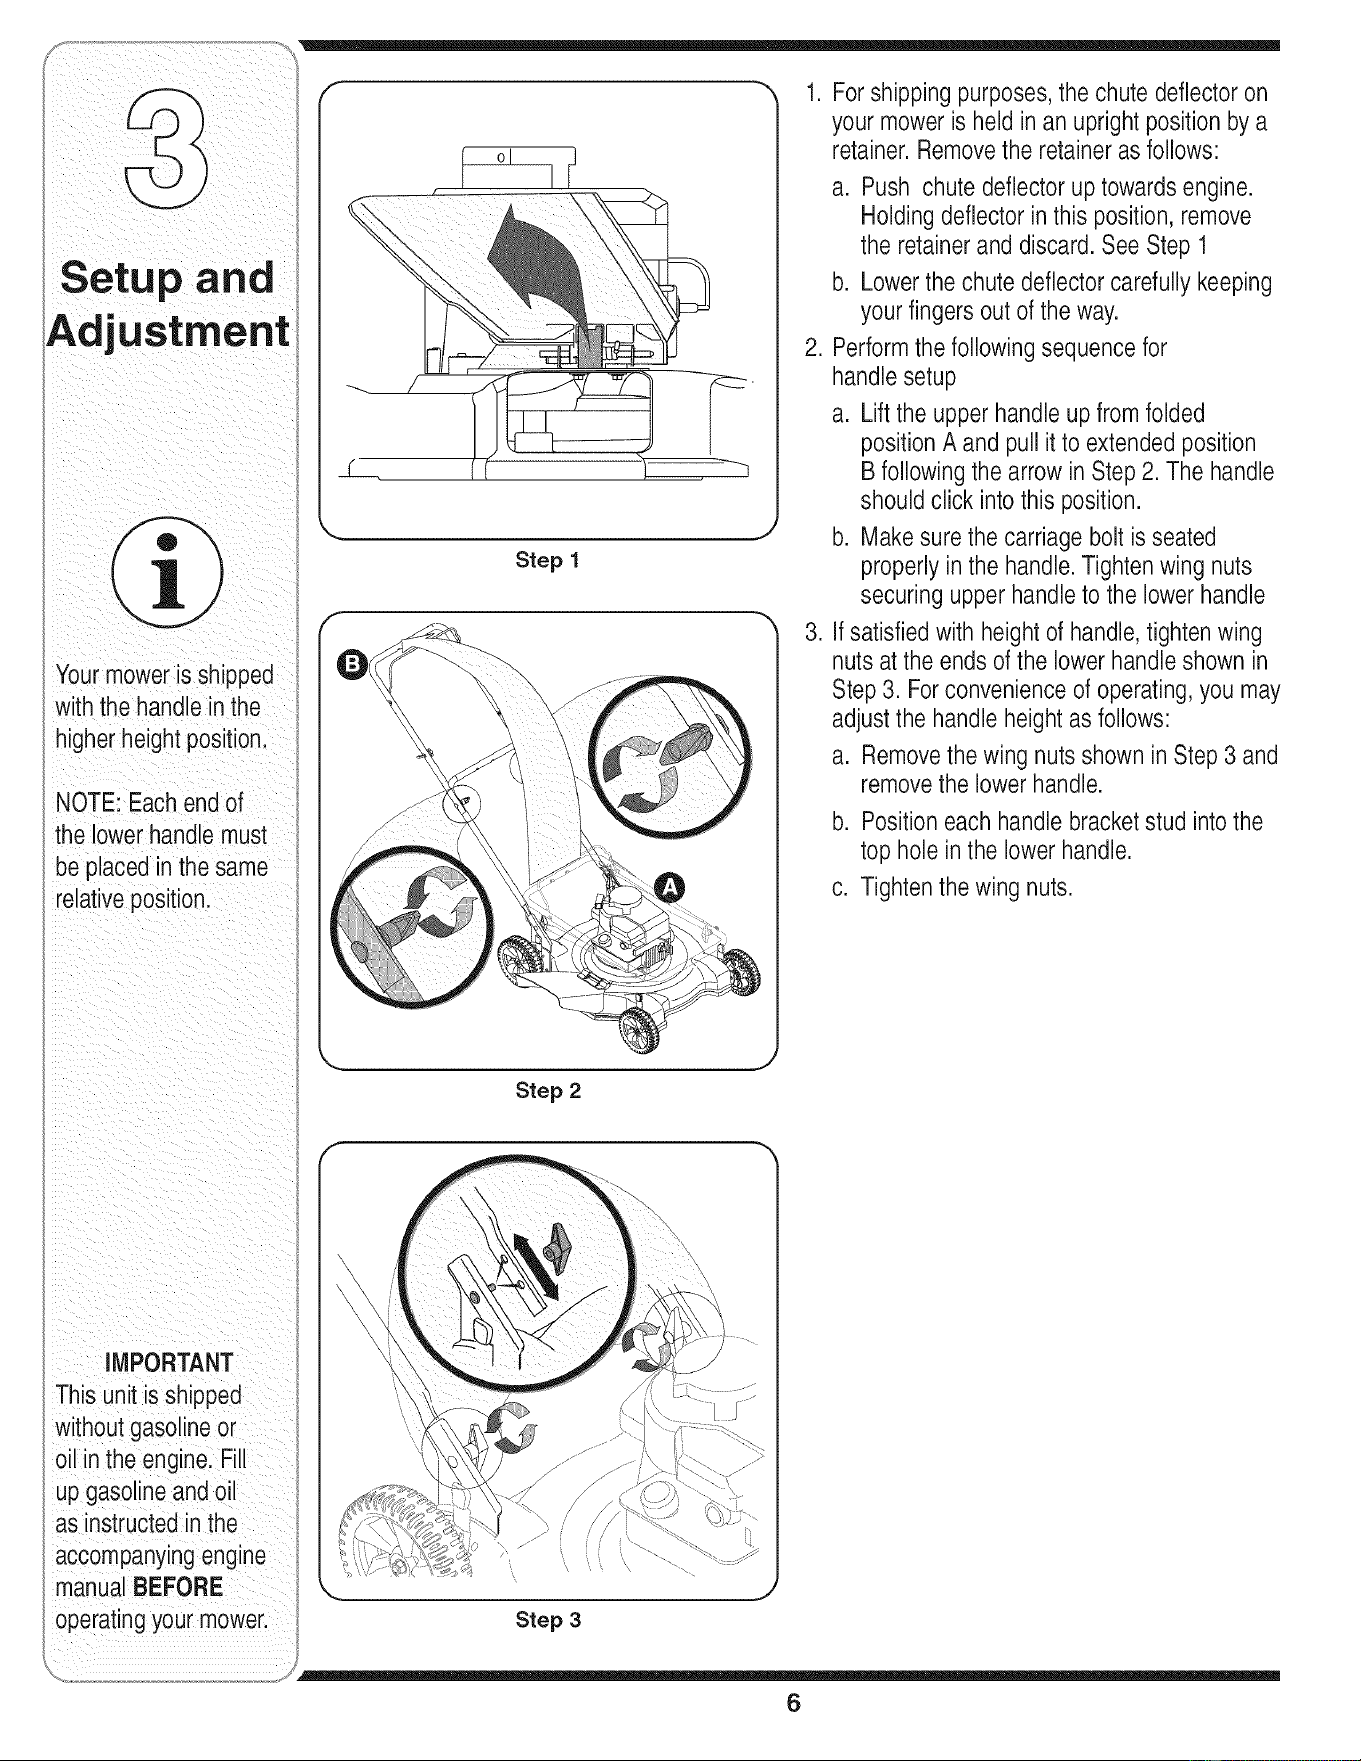
1. For shipping purposes, the chute deflectoron
your mower is held in an upright position bya
retainer.Removethe retainer as follows:
a. Push chute deflector up towards engine.
Holding deflector inthis position, remove
the retainerand discard. See Step 1
b. Lower the chute deflector carefully keeping
your fingers out of the way.
2. Perform the following sequence for
handle setup
a. Lift the upperhandle up from folded
position A and pull it to extended position
B following the arrow in Step2. The handle
should click into this position.
b. Make sure the carriage bolt is seated
properly in the handle.Tighten wing nuts
securing upper handleto the lower handle
3. If satisfiedwith height of handle,tighten wing
nuts at the ends of the lower handleshown in
Step 3. For convenienceof operating,you may
adjustthe handle height as follows:
a. Remove the wing nuts shown in Step 3 and
remove the lower handle.
b. Position each handle bracketstud intothe
top hole inthe lower handle.
c. Tighten the wing nuts.
Step 2
.J
Step 3
6
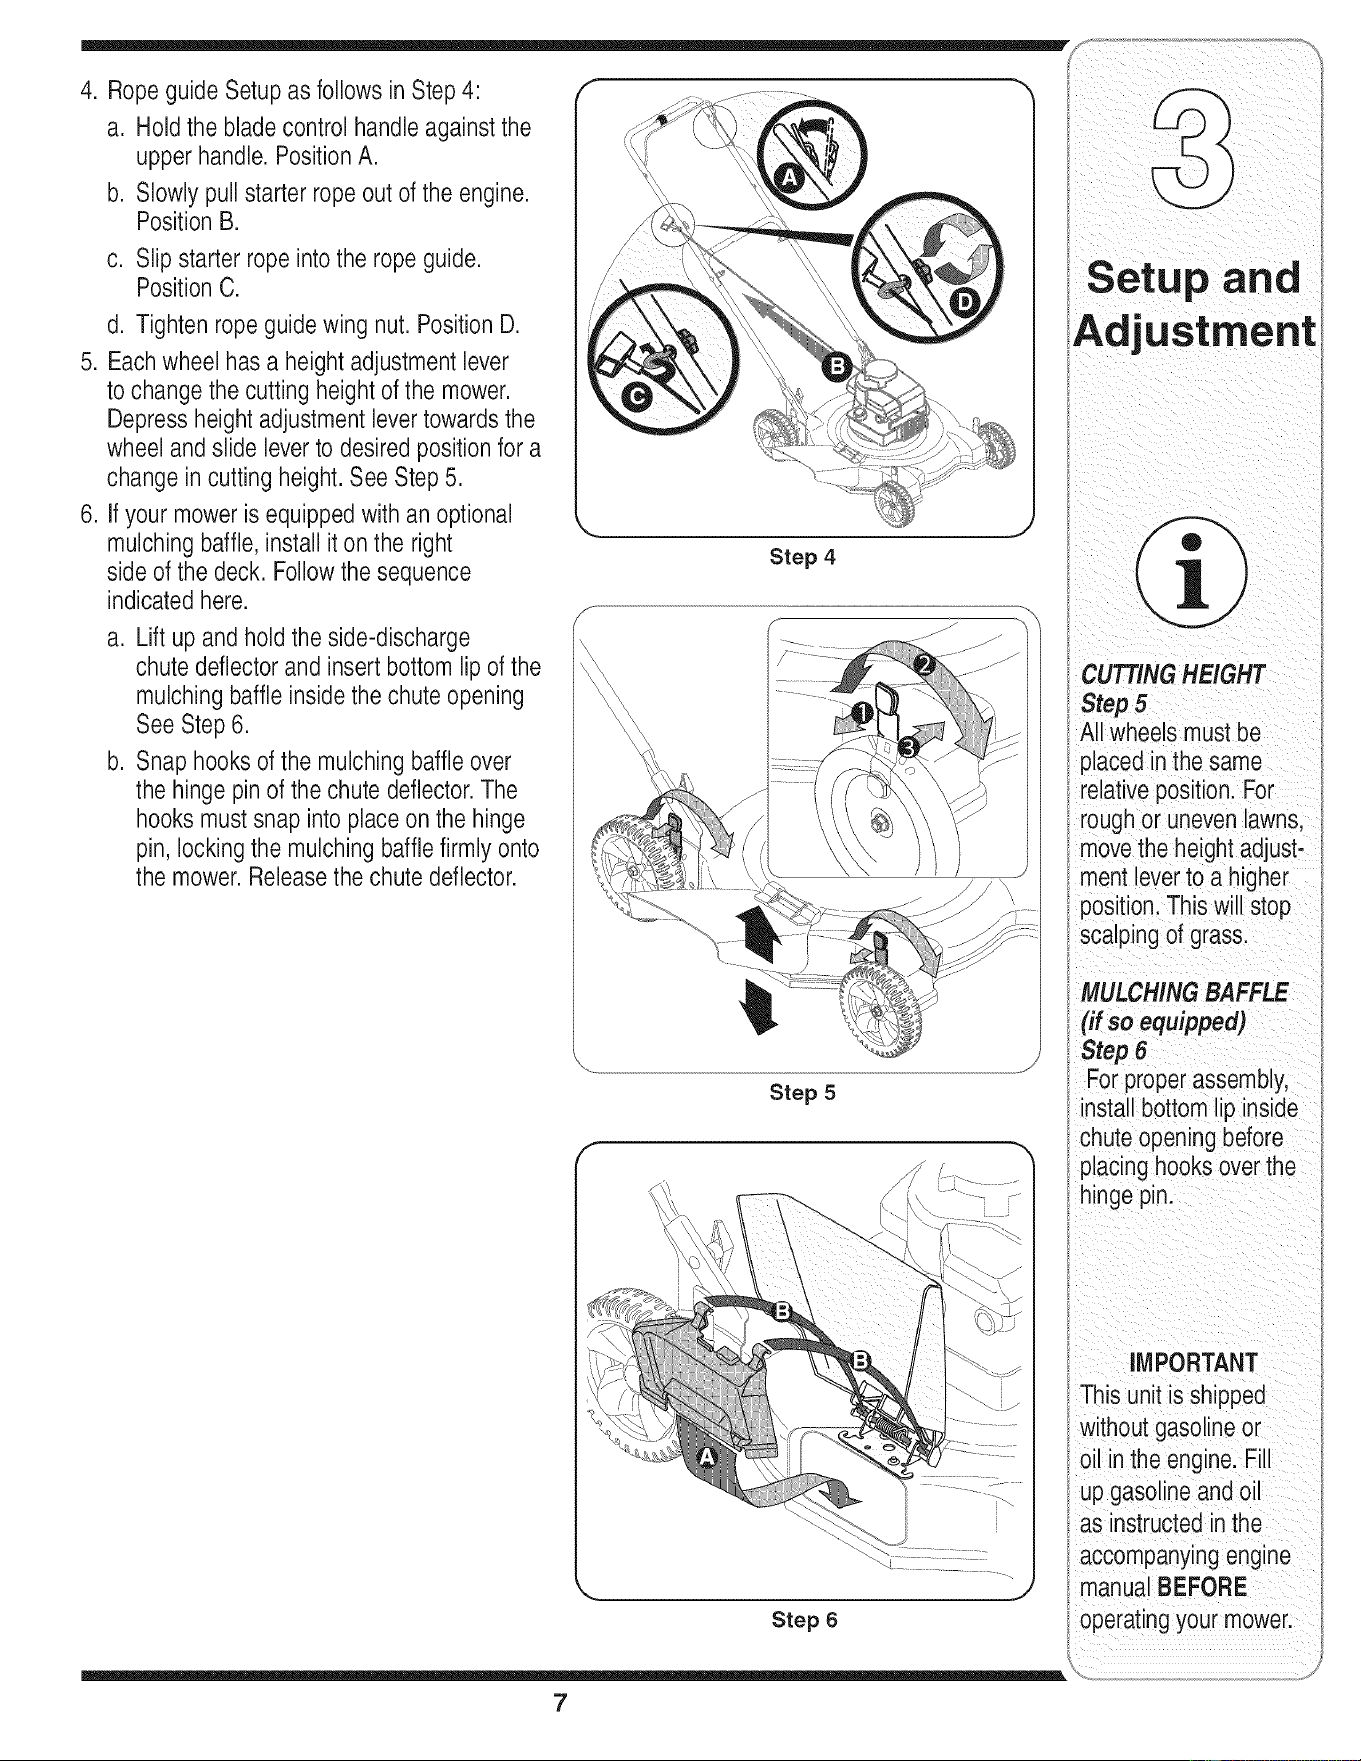
4. RopeguideSetupasfollowsinStep4:
a. Holdthebladecontrolhandleagainstthe
upperhandle.PositionA.
b. Slowlypullstarterropeoutoftheengine.
PositionB.
c. Slipstarterropeintotheropeguide.
PositionC.
d. Tightenropeguidewingnut.PositionD.
5. Eachwheelhasaheightadjustmentlever
tochangethecuttingheightofthemower.
Depressheightadjustmentlevertowardsthe
wheelandslidelevertodesiredpositionfora
changeincuttingheight.SeeStep5.
6. Ifyourmowerisequippedwithanoptional
mulchingbaffle,installitontheright
sideofthedeck.Followthesequence
indicatedhere.
a. Liftupandholdtheside-discharge
chutedeflectorandinsertbottomlipofthe
mulchingbaffleinsidethechuteopening
SeeStep6.
b. Snaphooksofthemulchingbaffleover
thehingepinofthechutedeflector.The
hooksmustsnapintoplaceonthehinge
pin,lockingthemulchingbafflefirmlyonto
themower.Releasethechutedeflector.
Step 4
Step 5
Adjustment
I
CUTTINGHEIGHT
Step 5
All wheels must be
placed inthe same
relative position. For
roughor unevenlawns,
movethe height adjust-
ment leverto a higher
position.This will stop
scalping of grass.
MULCHING BAFFLE
(if so equipped)
Step 6
Forproper assembly,
installbottom lip inside
chute opening before
placinghooks over the
hinge pin.
Step 6
7
IMPORTANT
This unit is shipped
without gasoline or
oil in the engine. Fill
up gasoline and oil
as instructed inthe
accompanying engine
manua BEFORE
operatingyour mower.
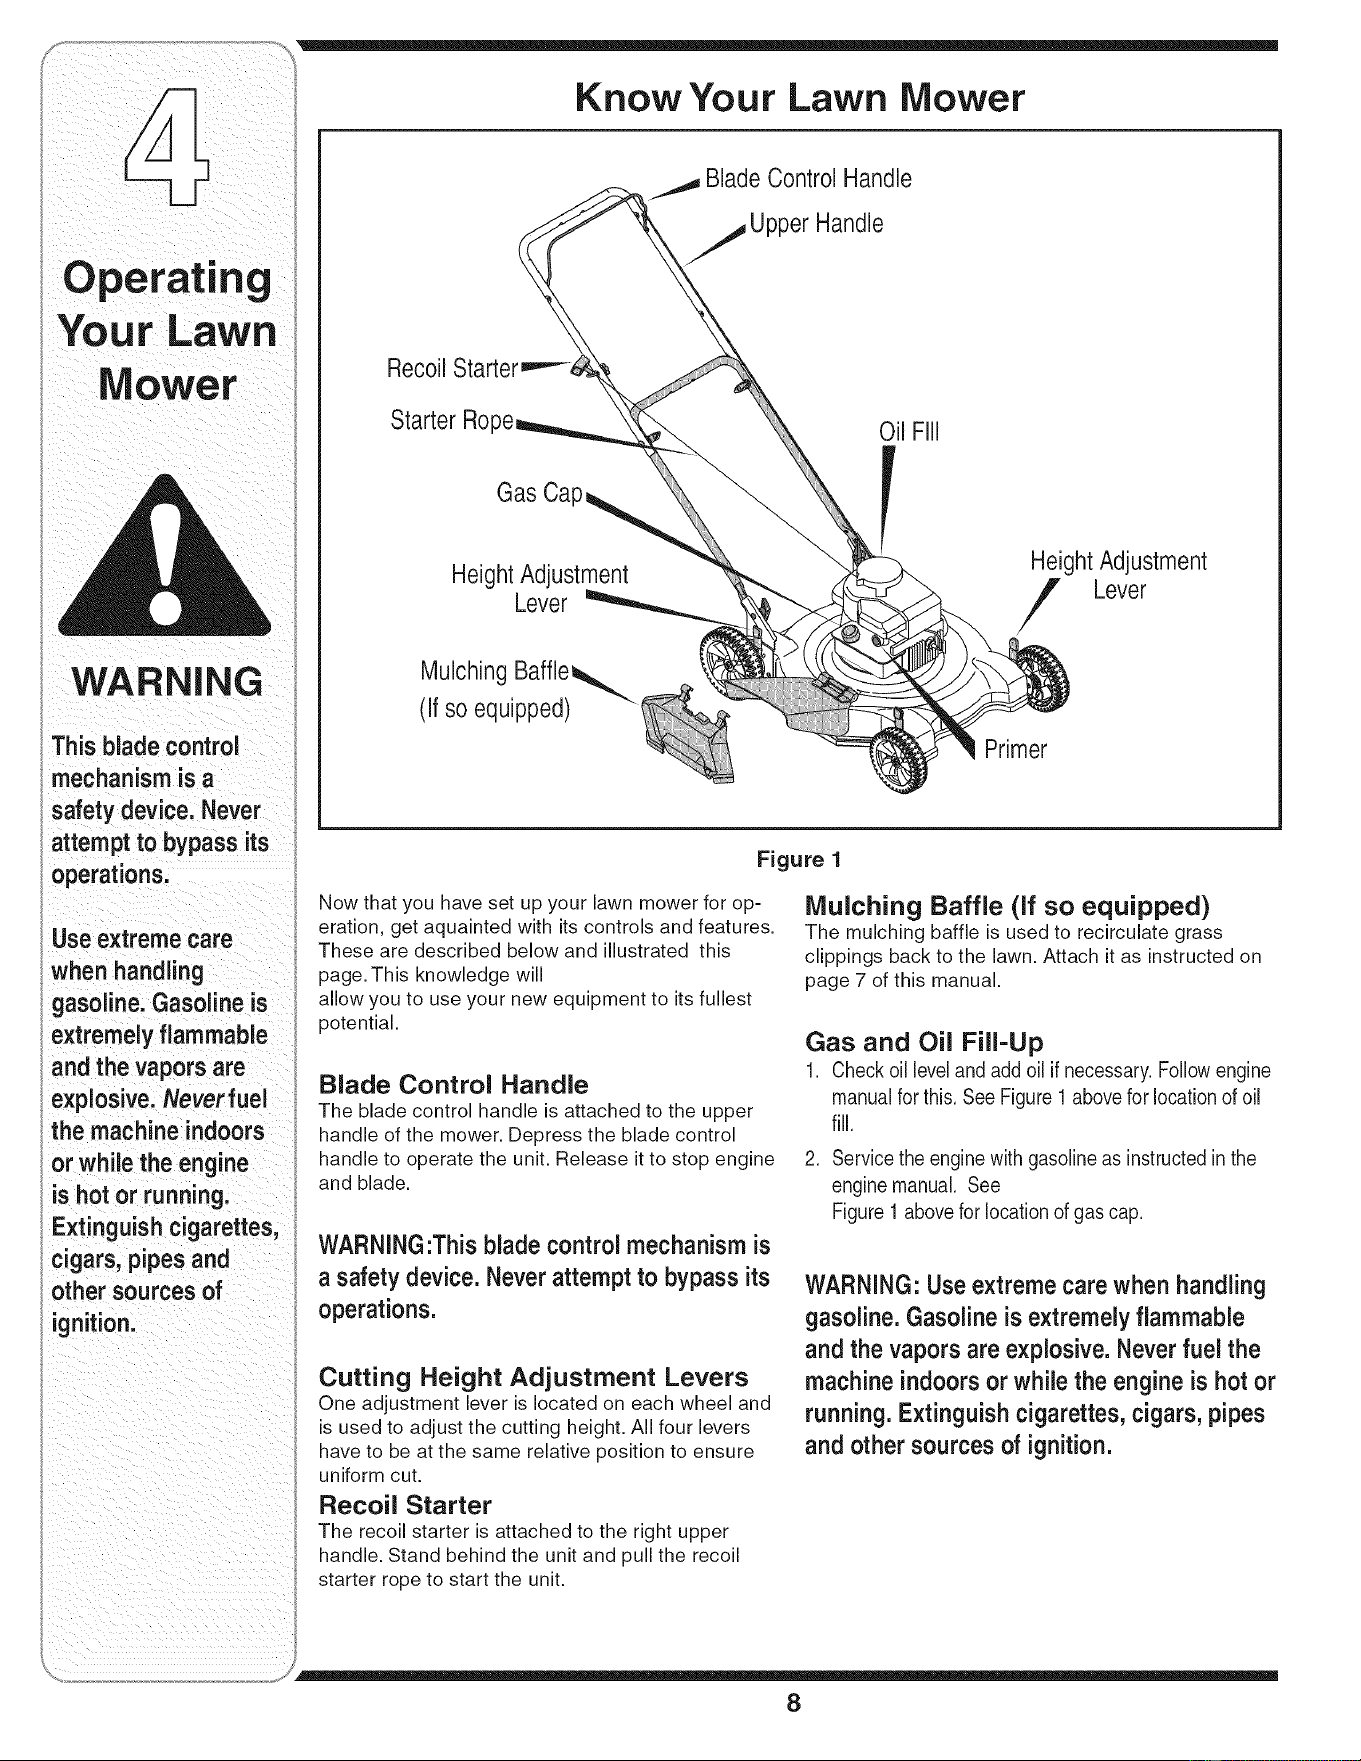
Know Your Lawn Mower
Mower
WARNING
This blade control
mechanism isa
safety device. Never
attempt to bypass its
operations.
Use extreme care
when handling
gasoline.Gasoline is
extremelyflammable
and the vapors are
explosive. Never fuel
the machine indoors
or while the engine
is hot or running.
Extinguish cigarettes,
cigars, pipes and
other sources of
ignition.
Blade Control Handle
Upper Handle
Recoil
Starter Ro
Gas Ca
Height Adjustment
Lever
Mulching Baffle_.,_
(If so equipped) !
Height Adjustment
Lever
Primer
Figure 1
Now that you have set up your lawn mower for op-
eration, get aquainted with its controls and features.
These are described below and illustrated this
page. This knowledge will
allow you to use your new equipment to its fullest
potential.
Blade Control Handle
The blade control handle is attached to the upper
handle of the mower. Depress the blade control
handle to operate the unit. Release it to stop engine
and blade.
WARNING:This blade control mechanism is
a safety device. Never attempt to bypass its
operations.
Cutting Height Adjustment Levers
One adjustment lever is located on each wheel and
is used to adjust the cutting height. All four levers
have to be at the same relative position to ensure
uniform cut.
Recoil Starter
The recoil starter is attached to the right upper
handle. Stand behind the unit and pull the recoil
starter rope to start the unit.
Mulching Baffle (if so equipped)
The mulching baffle is used to recirculate grass
clippings back to the lawn. Attach it as instructed on
page 7 of this manual.
Gas and Oil Fill-Up
1. Check oil level and add oil if necessary. Follow engine
manual for this. See Figure 1 above for location of oil
fill.
2. Servicethe enginewithgasolineas instructedinthe
enginemanual. See
Figure1abovefor locationof gascap.
WARNING: Use extreme care when handling
gasoline. Gasoline is extremelyflammable
and the vapors are explosive. Never fuel the
machine indoorsor while the engine is hot or
running. Extinguish cigarettes, cigars, pipes
and other sources of ignition.
8
WARNING: The operationof any lawn Stopping Engine
mower can result in forei n objects bein 1 Reeasebadecontro handeto stoptheengne and /_ I
g g
thrown into the eyes, which can damage theblade.
your eyes severely. Alwayswear safety 2. Disconnectsparkplugwirefromsparkplugand
glasses while operatingthe mower, or while groundagainstthe engine.
performing any adjustments or repairs on it.
Starting Engine
WARNING: Be sure no one other than the
operator is standing near the lawn mower
while starting engine or operating mower.
Never run engine indoors or in enclosed,
poorly ventilated areas. Engine exhaust
contains carbon monoxide, an odorless
and deadly gas. Keep hands, feet, hair and
loose clothing away from any moving parts
on engine and lawn mower.
Using Your Lawn Mower
Be sure the lawn is clear of stones, sticks, wire, or
other objects which could damage the lawn mower
or the engine. Such objects could be accidently
thrown by the mower in any direction and cause seri-
ous personal injury to the operator and others.
WARNING: If you strike a foreign object,
stop the engine. Remove wire from the spark
plug, thoroughly inspectthe mower for
any damage, and repair the damage before
restarting and operating the mower. Exten-
sive vibration of the mower during operation
isan indicationof damage. The unit should
be promptly inspectedand repaired.
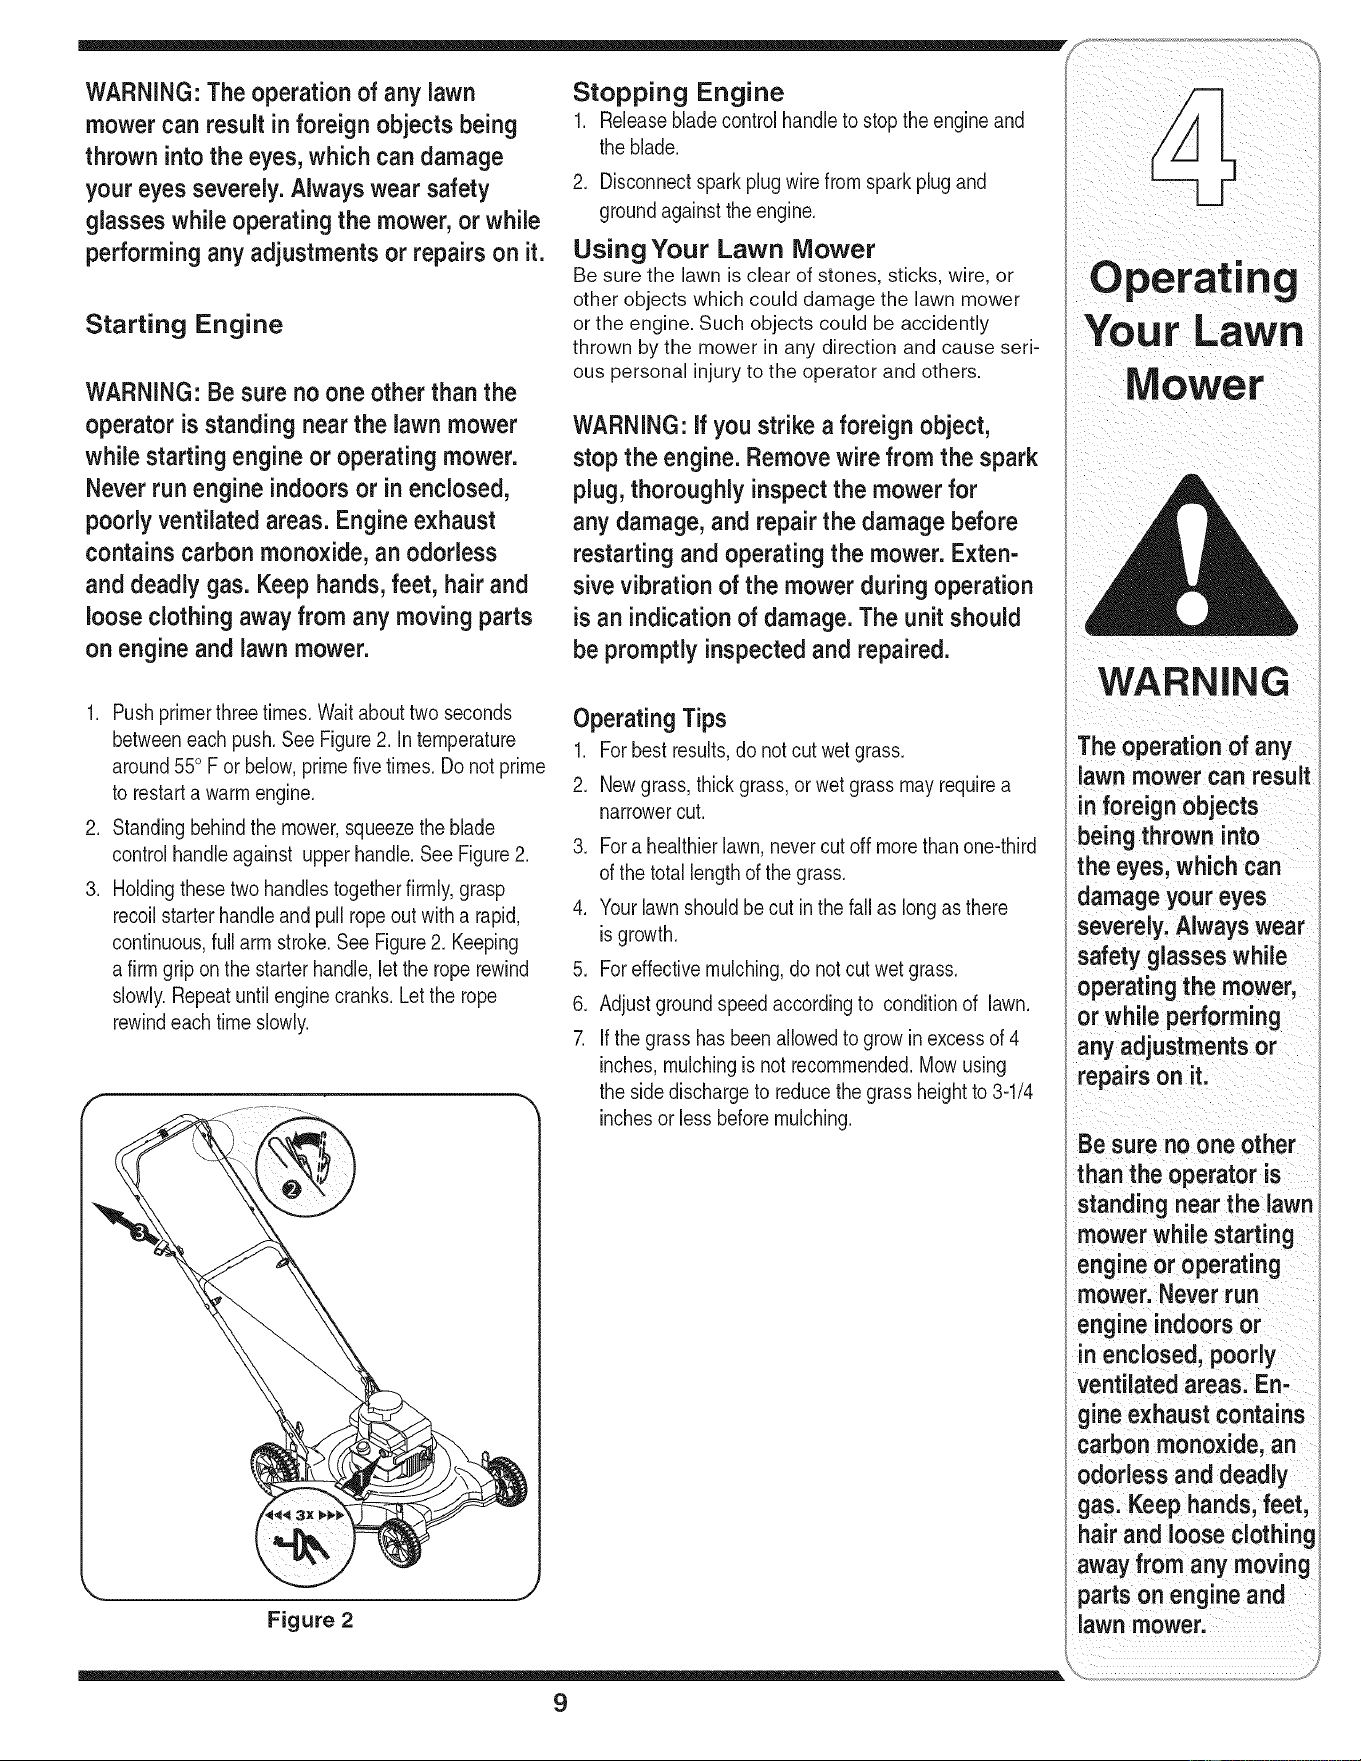
1. Pushprimerthreetimes.Waitabouttwoseconds
betweeneachpush.See Figure2. Intemperature
around550F or below,primefivetimes.Do notprime
to restarta warmengine.
2. Standingbehindthe mower,squeezethe blade
controlhandleagainst upperhandle.SeeFigure2.
3. Holdingthesetwo handlestogetherfirmly,grasp
recoilstarterhandleand pullropeout witha rapid,
continuous,full armstroke.SeeFigure2. Keeping
a firmgripon the starterhandle,let the roperewind
slowly.Repeatuntilenginecranks.Letthe rope
rewindeachtimeslowly.
r
Operating Tips
1. Forbestresults,do not cutwetgrass.
2. Newgrass,thickgrass,orwet grassmayrequirea
narrowercut.
3. Fora healthierlawn,nevercutoff morethan one-third
of the totallengthof the grass.
4. Yourlawnshouldbecut inthe fall as longas there
isgrowth.
5. Foreffectivemulching,donot cutwetgrass.
6. Adjustgroundspeedaccordingto conditionof lawn.
7. Ifthe grasshasbeenallowedto growin excessof 4
inches,mulchingis not recommended.Mowusing
the sidedischargeto reducethegrassheightto 3-1/4
inchesor lessbeforemulching.
Figure 2
WARNING
The operation of any
lawn mower can result
in foreign objects
being thrown into
the eyes, which can
damage your eyes
severely. Always wear
safety glasseswhile
operating the mower,
or while performing
any adjustments or
repairs on it.
Be sure no one other
than the operator is
standing near the lawn
mower while starting
engine or operating
mower. Never run
engine indoorsor
in enclosed, poorly
ventilated areas. En-
ineexhaust contains
_arbon monoxide, an
odorless and deadly
gas. Keep hands, feet,
hair and loose clothing
away from any moving
parts on engine and
lawn mower.
9
S?_:?_'_:!_ _ _!b_
Mainta=n
t
Your Lawn
ower
WAR. .G
i
A waysstopengine;
disconnect spark
plug, and ground
againstenginebefore
cleaning, lubricating
ordo nganyk ndof
maintenance onyour
We do ni
the use of pressure
washers or garden
hoseto clean your
unit. These may Cause
damage to eleCtric
Componentsispindles,
pulleys; bearingS,or
theengine;The use
of waterwil! resultin
shortened !ifeand
reduceserviceability;
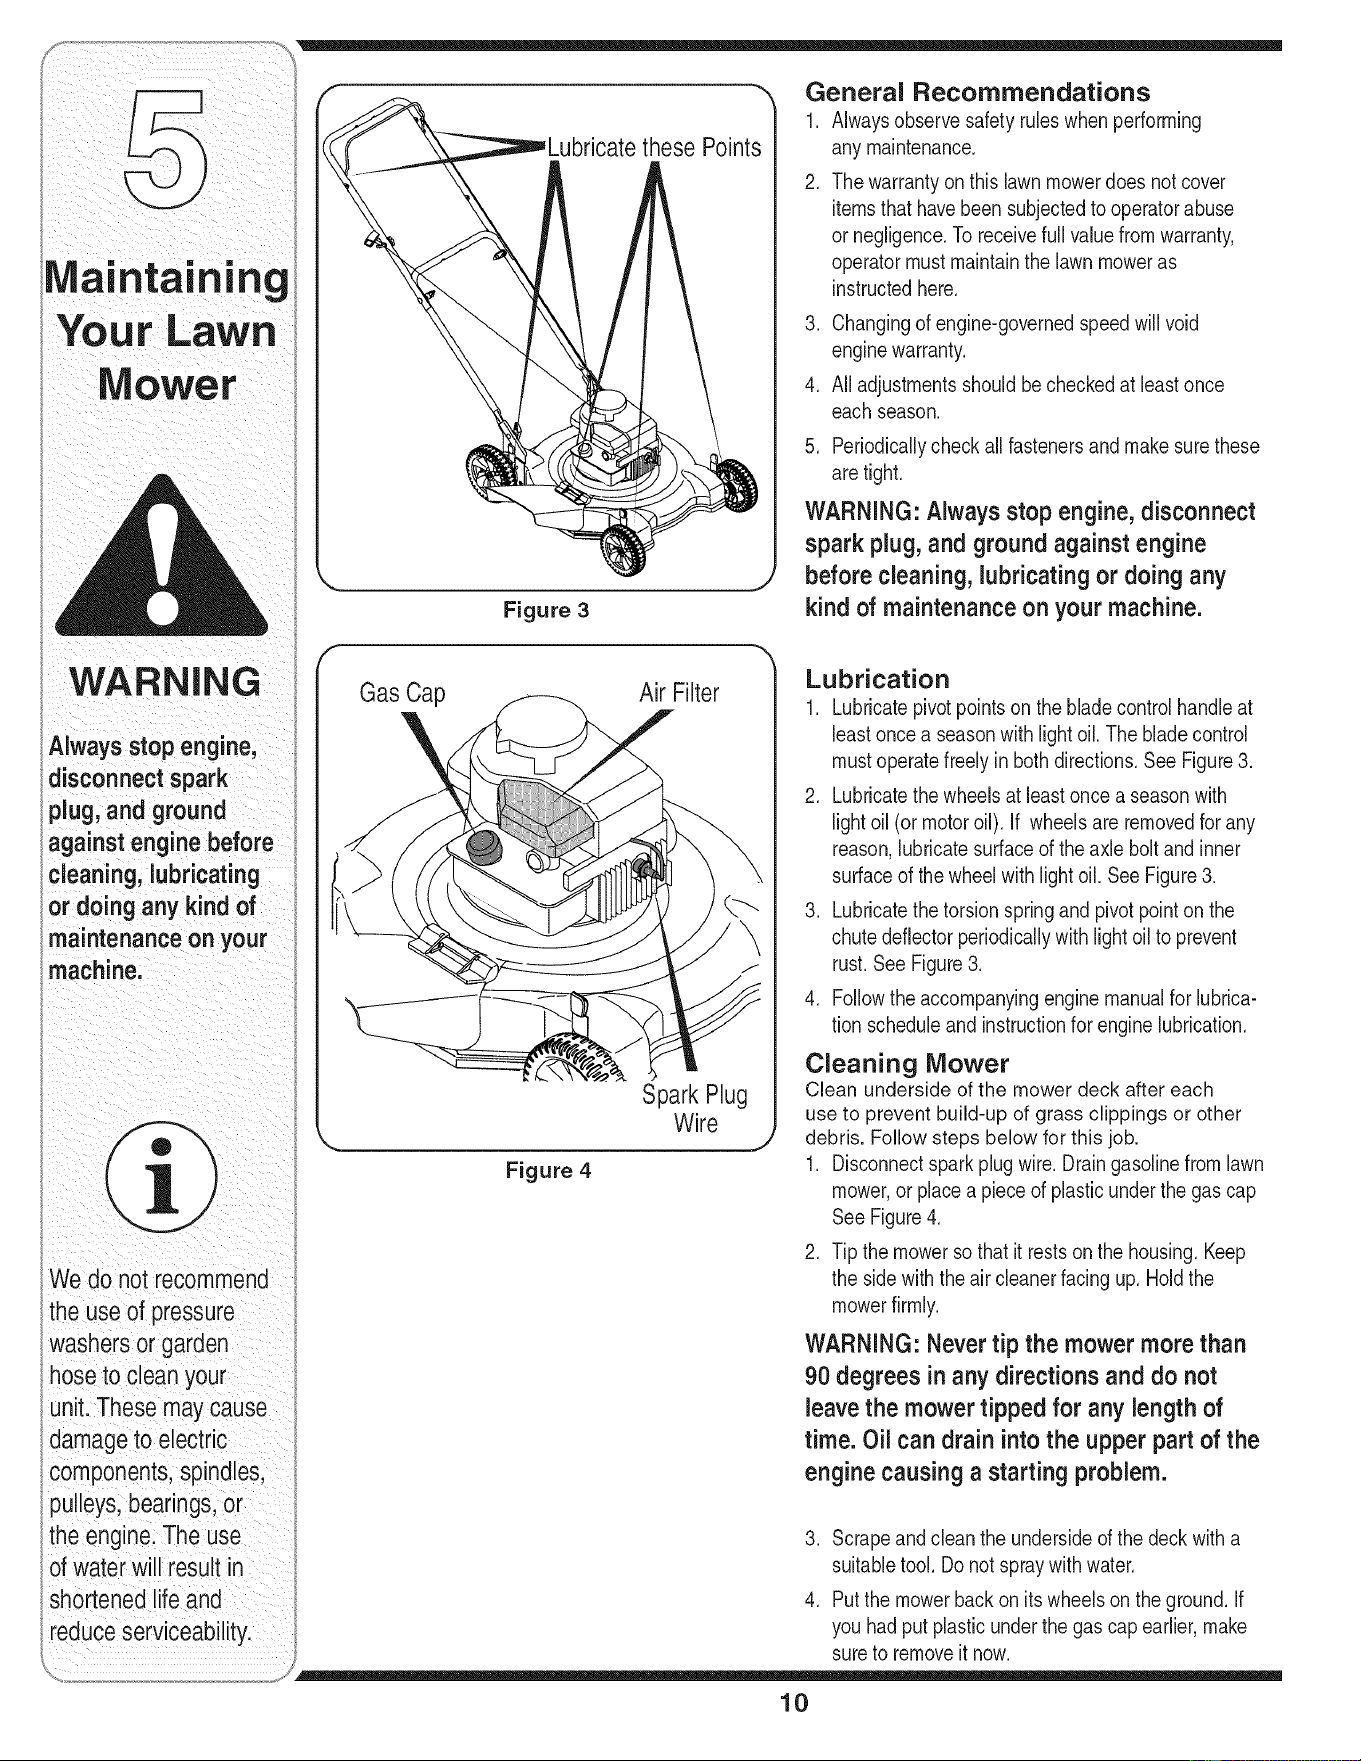
Figure 3
Gas Cap Air Filter
Spark Plug
Figure 4
General Recommendations
1. Alwaysobservesafetyruleswhenperforming
any maintenance.
2. Thewarrantyon thislawnmowerdoesnot cover
itemsthathavebeensubjectedto operatorabuse
or negligence.To receivefull valuefromwarranty,
operatormustmaintainthe lawn moweras
instructedhere.
3. Changingof engine-governedspeedwill void
enginewarranty.
4. Alladjustmentsshouldbecheckedat leastonce
eachseason.
5. Periodicallycheck allfastenersandmakesurethese
aretight.
WARNING: Always stop engine, disconnect
spark plug, and ground against engine
before cleaning, lubricating or doing any
kind of maintenance on your machine.
Lubrication
1. Lubricatepivotpointson the bladecontrolhandleat
leastoncea seasonwithlightoil. The bladecontrol
mustoperatefreelyinbothdirections.SeeFigure3.
2. Lubricatethe wheelsat leastoncea seasonwith
lightoil (ormotoroil). If wheelsareremovedfor any
reason,lubricatesurfaceof the axle boltandinner
surfaceof thewheelwithlight oil. SeeFigure3.
3. Lubricatethe torsionspringandpivotpointonthe
chutedeflectorperiodicallywith lightoilto prevent
rust.See Figure3.
4. Followthe accompanyingenginemanualfor lubrica-
tion scheduleandinstructionfor enginelubrication.
Cleaning Mower
Clean underside of the mower deck after each
use to prevent build-up of grass clippings or other
debris. Follow steps below for this job.
1. Disconnectsparkplugwire.Draingasolinefromlawn
mower,or placea pieceof plasticunderthegas cap
SeeFigure4.
2. Tip the mowerso that it restsonthe housing.Keep
the sidewiththe aircleanerfacingup. Holdthe
mowerfirmly.
WARNING: Never tip the mower more than
90 degrees in any directions and do not
leave the mower tipped for any length of
time, Oil can drain intothe upper part of the
engine causing a starting problem.
3. Scrapeandcleanthe undersideof the deckwitha
suitabletool.Do notspraywithwater.
4. Putthe mowerbackonitswheelsonthe ground.If
you hadput plasticunderthe gas capearlier,make
sureto removeit now.
10
Blade Care
WARNING: When removingthe culling blade
for sharpeningor replacement, protect your
handswith a pair of heavy glovesor use a
heavy ragto hold the blade.
Periodicallyinspectthe bladeadapterfor cracks,
especiallyif you strikeaforeignobject.Replacewhen
necessary.Followthe stepsbelowfor bladeservice.
1. Disconnectsparkplugwirefromsparkplug.Turn
moweronitssidemakingsurethattheair filterand
the carburetorareup.
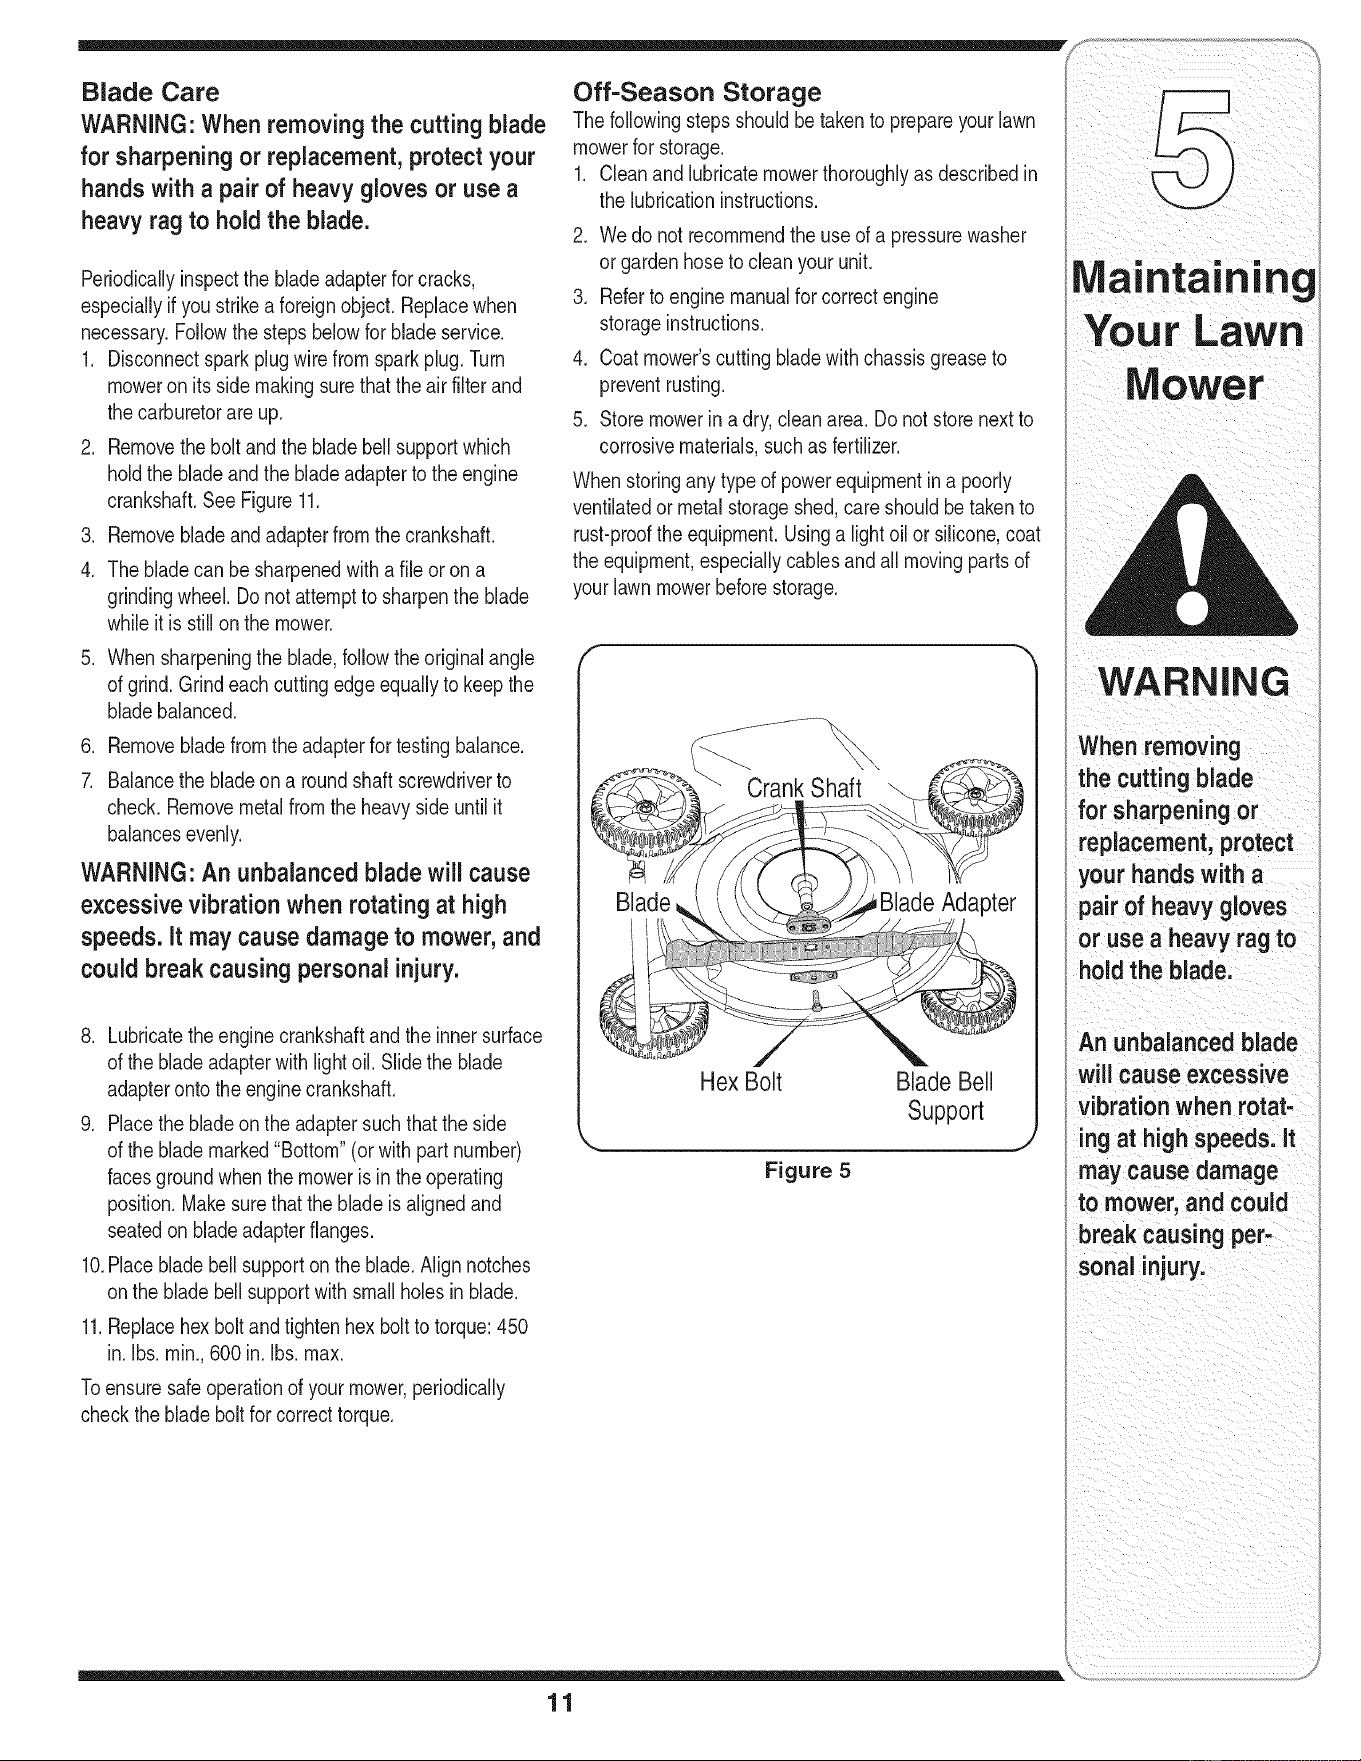
2. Removethe boltandthe bladebellsupportwhich
holdthe bladeandthe bladeadapterto the engine
crankshaft.SeeFigure11.
3. Removebladeandadapterfromthe crankshaft.
4. The bladecan besharpenedwithafile or ona
grindingwheel.Do notattemptto sharpenthe blade
whileit isstillonthe mower.
5. Whensharpeningthe blade,foNowthe originalangle
of grind.Grindeach cuttingedgeequallyto keepthe
bladebalanced.
6. Removebladefromthe adapterfor testingbalance.
7. Balancethe bladeon a roundshaft screwdriverto
check.Removemetalfromthe heavysideuntil it
balancesevenly.
WARNING:An unbalanced blade will cause
excessive vibration when rotating at high
speeds. It may cause damage to mower, and
could break causing personal injury.
8. Lubricatethe enginecrankshaftandthe innersurface
of the bladeadapterwithlightoil. Slidethe blade
adapterontothe enginecrankshaft.
9. Placethe bladeon theadaptersuchthatthe side
of the blademarked"Bottom"(orwithpart number)
facesgroundwhenthe mowerisintheoperating
position.Makesurethatthe bladeisalignedand
seatedon bladeadapterflanges.
10.Placebladebellsupportonthe blade.Alignnotches
onthe bladebellsupportwithsmallholesinblade.
11.Replacehexbolt andtightenhex boltto torque:450
in.Ibs.rain.,600in.Ibs. max.
Toensuresafeoperationof your mower,periodically
checkthe bladebolt for correcttorque.
Off-Season Storage
The followingstepsshouldbetakento prepareyourlawn
mowerfor storage.
1. Cleanandlubricatemowerthoroughlyas describedin
the lubricationinstructions.
2. We donot recommendthe useof a pressurewasher
or gardenhoseto cleanyour unit.
3. Referto enginemanualfor correctengine
storageinstructions.
4. Coatmower'scuttingbladewithchassisgreaseto
preventrusting.
5. Storemowerin a dry,clean area.Do notstorenextto
corrosivematerials,suchas fertilizer.
Whenstoringany typeof powerequipmentina poorly
ventilatedor metalstorageshed,care shouldbe takento
rust-proofthe equipment.Usinga lightoilor silicone,coat
the equipment,especiallycablesand allmovingpartsof
your lawnmowerbeforestorage.
Blade i BladeAdapter
Hex Bolt Blade Bell
Support
J
Figure 5
11
Maintaining
MoWer
WARNING
When removing
the cutting blade
for sharpening or
replacement, protect
your hands with a
pair of heavy gloves
or use a heavy rag to
hold the blade.
An unbalanced blade
will cause excessive
vibration when rotat-
ing at high speeds. It
may cause damage
to mower, and could
break causing per-
sonal injury.
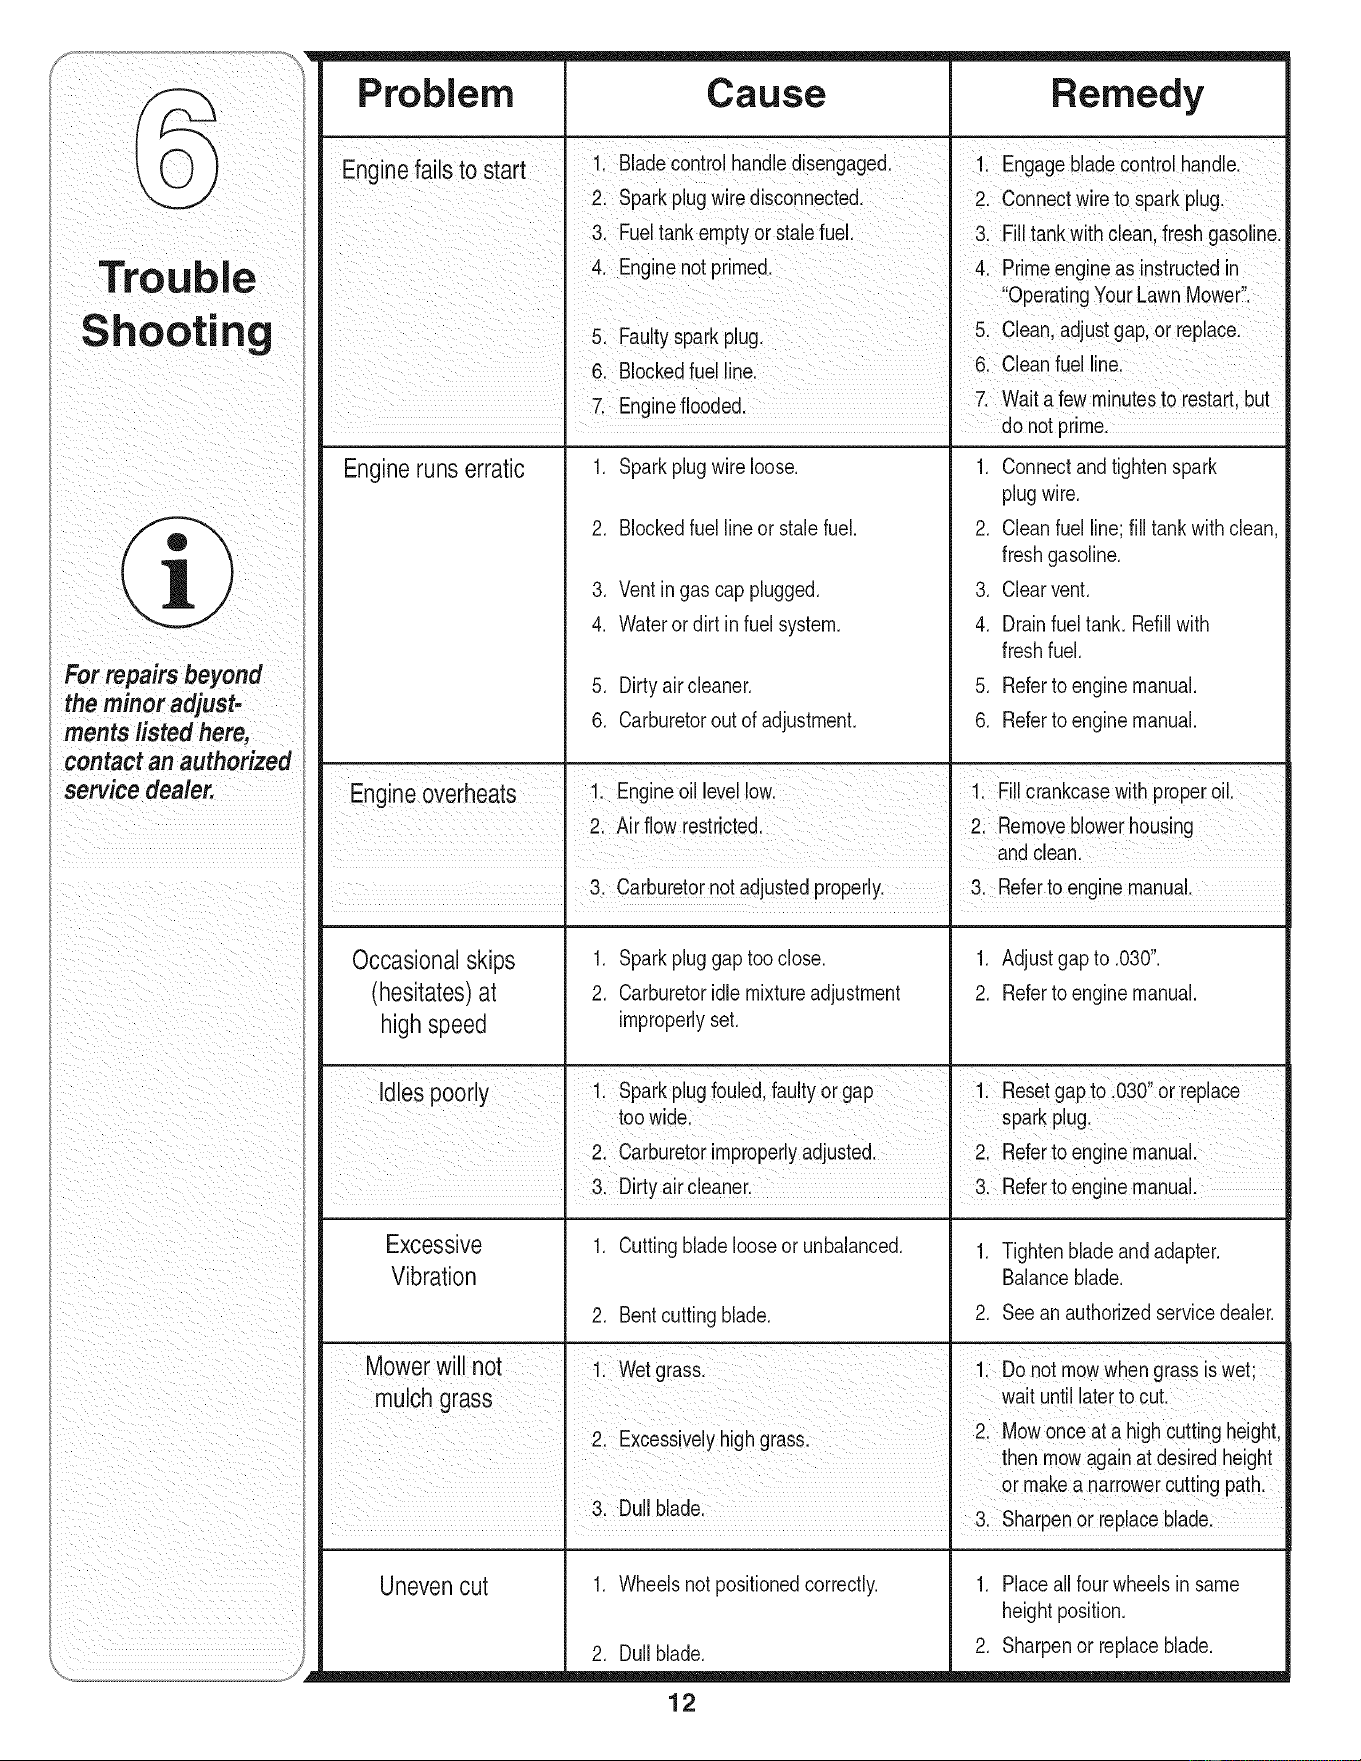
Shooting
For repairs beyond
thembo
merits listed here,
contact an authorized
service dealer.
iiiii!ilIIIIIIIIi i i !
i i i ii i i
Problem Cause Remedy
En n f ils to start Bladecontrolhandledisengaged
I 1: Engagebladecontrolhandle.
g ea , ....
2. Sparkplugwire disconnected. 21 connect wireto sparkplug,
&Fuel tankemptyorstalefuel. 31 Fill tankwith€ieanlfreshgasolinei
41 Enginenot prirned. & Primeengineas instructedin
OPerating ouiLawnMowei
Fut sark u 5 C ean adjustgap or repace
a y p p!g,
6. Blockedfuel iinel 6, Cleanfuel line;
7 Engine flooded 7. Waitafew minutesto restart,but
do not prime.
Engineruns erratic
1. Sparkplugwireloose.
2. Blockedfuellineor stalefuel.
3. Ventingas cap plugged.
4. Waterordirt infuel system.
5. Dirty aircleaner.
6. Carburetorout of adjustment.
1. Connectandtightenspark
plugwire.
2. Cleanfuel line;fill tankwithclean,
freshgasoline.
3. Clearvent.
4. Drainfuel tank. Refillwith
freshfuel.
5. Referto enginemanual.
6. Referto enginemanual.
Engne overheats 1 Engneoil levellow. 1. FIIcrankcasewithproperoil.
2. Airflow restricted• I 2. Removeblowerhousing
! I. andclean•
I 3. Carburetornotadjustedproperly• 3. Referto enginemanual.
Occasional skips 1. Sparkpluggaptooclose. 1. Adjustgap to .030".
(hesitates)at 2. Carburetoridlemixtureadjustment 2. Referto enginemanual.
high speed improperlyset.
Idles poorly 1. Sparkplugfouled,faultyorgap 1. Resetgapto .030"or replace
toowide. sparkplug
2 Carburetorimproperlyadjusted. 2. Referto enginemanual•
. 3 Dirty aircleaner. . 3 Referto enginemanual.
Excessive 1. Cuttingbladelooseor unbalanced. 1. Tightenbladeandadapter.
Vibration Balanceblade.
2. Bentcuttingblade. 2. Seean authorizedservicedealer.
Mower will not 1. Wetgrass. 1. Do not mowwhengrassis wet
mulch grass wait until ater to cut.
2 Excessivel' highgrass I 2. Mowonceat a highcuttingheight,
• Y " thenmowagainat desiredheight
I I or makea narrowercuttingpath.
3 Dullblade
! " ' ! 3. Sharpenorreplace blade•
Unevencut 1. Wheelsnot positionedcorrectly.
2. Dull blade.
12
1. Placeall fourwheelsin same
heightposition.
2. Sharpenor replaceblade.
ii i _iI_ii
13
\
\
\
_!i!/
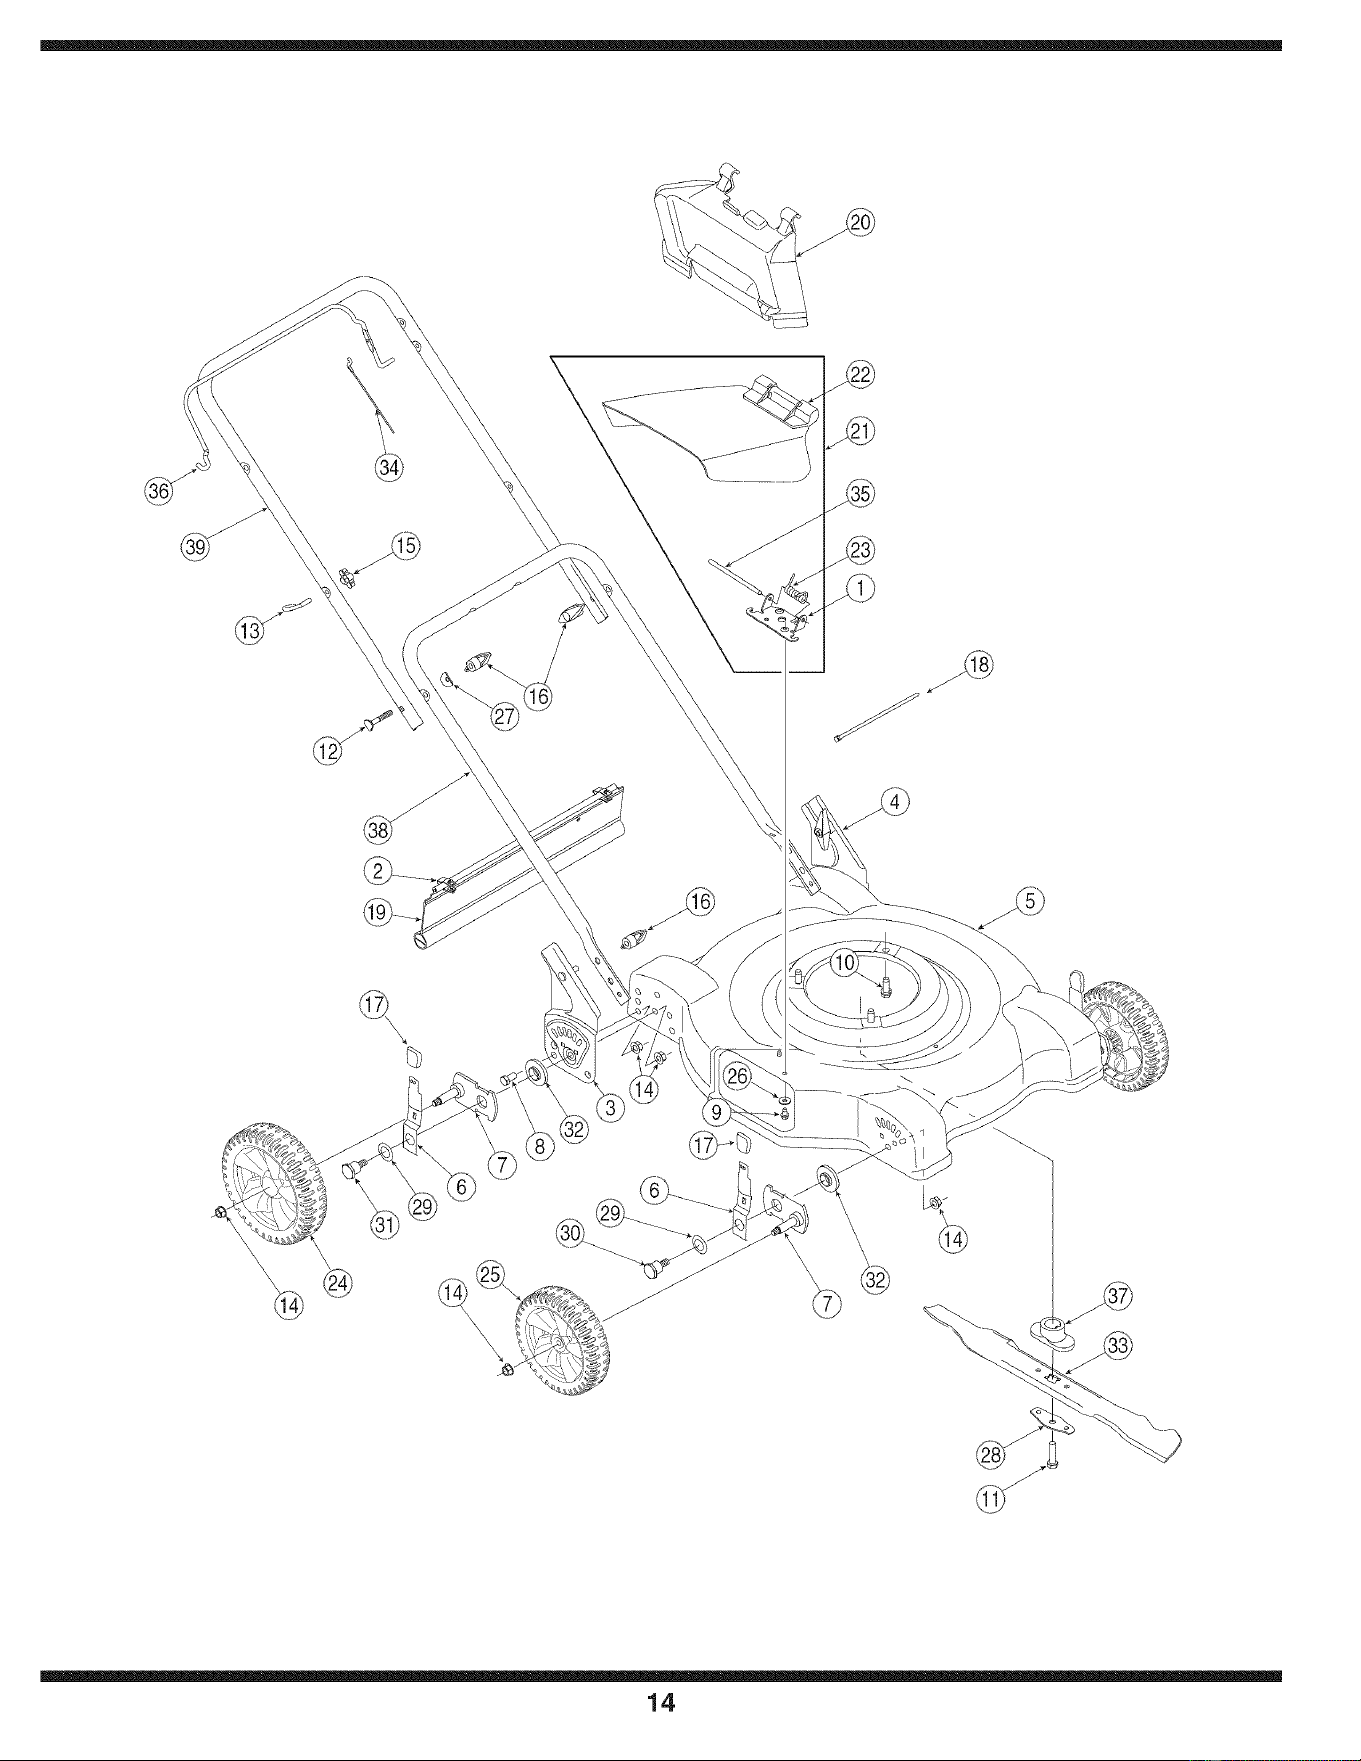
14
17032A ChuteHinge
17098 HingeClip
682-3064 HandleBracketAssemblyRH
682-3065 HandleBracketAssemblyLH
687-02048 DeckAssembly22" (nologo)
687-02051 LeverAssembly(includesRef.#17)
687-02094 PivotArm
710-0216 HexCapScrew3/8-16x .75
710-0599 TT Screw1/4-20x 0.5"
710-0654A TT Screw3/8-16x 1.0
710-1044 HexCapScrew3/8-24x 1.5
710-1174 CarriageBolt 5/16-18x 2.0
710-1205 EyeBolt
712-0431 LockNut3/8-16
720-0279 WingNut
720-0284 WingNut
720-0426 HeightAdjusterKnob
725-0157 CableTie
731-04019 TrailShield
731-04197 MulchingPlug(if equipped)
731-1034B HingedChuteDeflectorAssembly
731-1035B ChuteDeflector
732-1014 TorsionSpring
734-1987 RearWheel8 x 1.8
734-1988 FrontWheel7x 1.8
736-0270 BellWasher.265IDx .75OD
736-0451 SaddleWasher.320IDx .93 OD
736-0524B BladeBellSupport
736-0741 BellWasher.760IDx 1.25OD
738-1172 ShoulderScrew
738-1173 ShoulderScrew
741-0751 HeightAdjusterBearing
742-0642A StandardBlade22"
742-0742A MulchingBlade22"
746-0957 BladeControlCable- 37.25"
746-0946 BladeControlCable- 48.25"
746-1130 BladeControlCable- 40"
747-0710 HingePin
747-1161A BladeControlHandle
748-0376C BladeAdapter
749-04037 LowerHandle
749-1092A UpperHandle
Parts List
To order replacement
parts, contact 1-800-
800-7310 or visit www.
mtdproducts.com.
15

MANUFACTURER'S LiMiTED WARRANTY FOR
The limitedwarrantysetforthbelowisgivenby MTDLLCwithrespectto
newmerchandisepurchasedandusedin the UnitedStates,itsposses-
sionsandterritories.
"MTD"warrantsthisproductagainstdefectsin materialandworkmanship
for a periodof two(2) yearscommencingonthe dateof originalpurchase
andwill,at its option,repairor replace,free of charge,anypart foundto
bedefectiveinmaterialsor workmanship.Thislimitedwarrantyshallonly
applyif this producthas beenoperatedandmaintainedinaccordance
withthe Operator'sManualfurnishedwiththe product,andhas not been
subjectto misuse,abuse,commercialuse,neglect,accident,improper
maintenance,alteration,vandalism,theft,fire,water,ordamagebecause
of otherperilor naturaldisaster.Damageresultingfromthe installationor
useof any part,accessoryorattachmentnotapprovedby MTDfor use
withthe product(s)coveredbythis manualwill voidyourwarrantyas to
any resultingdamage.
Normalwearpartsarewarrantedto befree fromdefectsinmaterialand
workmanshipfor a periodof thirty (30)daysfromthe dateof purchase.
Normalwearpartsinclude,butare notlimitedto itemssuchas: batteries,
belts,blades,bladeadapters,grassbags,riderdeckwheels,seats,snow
throwerskidshoes,shaveplates,augerspiralrubberandtires.
HOW TO OBTAIN SERVICE: Warranty service is available,WITH
PROOFOF PURCHASE, through your local authorized service
dealer. To locate the dealer in your area, check your Yellow Pages, or
contact MTD LLC at RO. Box 361131,Cleveland, Ohio 44136-0019,or
call 1-800-800-7310or 1-330-220-4683or log on to our Web site at
www.mtdproducts.com.
Thislimitedwarrantydoesnot providecoverageinthe followingcases:
a. Theengineor componentpartsthereof.Theseitemsmaycarrya
separatemanufacturer'swarranty.Referto applicablemanufacturer's
warrantyfor termsandconditions.
b. Logsplitterpumps,valves,andcylindershavea separateoneyear
warranty.
c. Routinemaintenanceitemssuchas lubricants,filters,blade
sharpening,tune-ups,brakeadjustments,clutchadjustments,deck
adjustments,andnormaldeteriorationof the exteriorfinishdueto use
orexposure.
d. Servicecompletedby someoneotherthananauthorizedservice
dealer.
e. MTDdoes notextendany warrantyfor productssoldor exported
outsideof the UnitedStates,itspossessionsandterritories,except
thosesoldthroughMTD'sauthorizedchannelsof exportdistribution.
f. Replacementpartsthatarenot genuineMTDparts.
g. Transportationchargesand servicecalls.
No impliedwarranty,includingany impliedwarranty of merchant-
ability of fitness for a particularpurpose,applies after the applicable
periodof express written warranty above as to the partsas identi-
fied. No other express warranty, whether written or oral, except as
mentionedabove,givenby any personor entity,includinga dealer
or retailer,with respect to any product,shallbind MTD.Duringthe
periodof the warranty, the exclusive remedyis repairor replacement
of the productas set forth above.
The provisionsas set forth inthis warranty providethe sole and
exclusive remedyarising from the sale. MTDshall not be liable
for incidentalor consequential loss or damage including,without
limitation, expenses incurredfor substitute or replacementlawn care
services or for rentalexpenses to temporarily replacea warranted
product.
Somestatesdo not allowtheexclusionor limitationof incidentalor
consequentialdamages,or limitationson howlonganimpliedwarranty
lasts,so the aboveexclusionsor limitationsmaynotapplyto you.
In noeventshall recoveryof any kind begreaterthan theamountof the
purchasepriceof the productsold.Alterationof safetyfeatures of the
productshall void this warranty. Youassumethe riskandliabilityfor
loss, damage,or injuryto youandyour propertyand/orto othersandtheir
propertyarisingout of the misuseor inabilityto use theproduct.
Thislimitedwarrantyshall notextendto anyoneotherthanthe original
purchaseror to the personfor whomitwaspurchasedas a gift.
HOWSTATELAW RELATESTO THISWARRANTY: Thislimitedwar-
rantygivesyouspecificlegalrights,andyou mayalso haveother rights
whichvaryfromstateto state.
IMPORTANT: OwnermustpresentOriginalProofof Purchaseto obtain
warrantycoverage.
MTD LLC, P.O. BOX 361131 CLEVELAND, OHIO 44136-0019; Phone: 1-800-800-7310, 1-330-220-4683