Loading ...
Loading ...
Loading ...
11
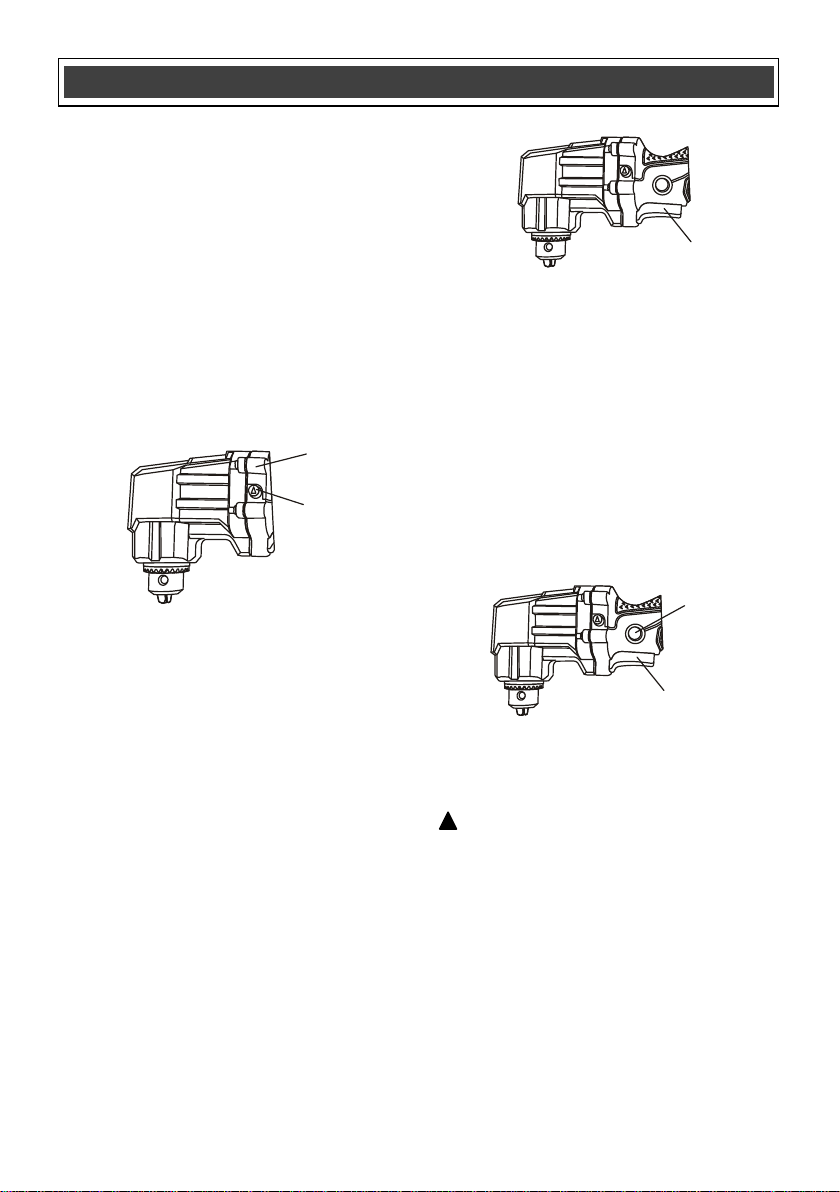
FORWARD/REVERSE SWITCH
The forward/reverse switch (1) is conveniently
mounted at the front of the drill housing (2)
(Fig. 1). To make the drill rotate clockwise for
drilling, slide the forward/reverse switch to the
left. To make the drill rotate counter-clockwise,
slide the forward/reverse switch to the right.
NOTES:
a) Never change the position of the
forward/reverse switch while the chuck is
turning.
b) The ON/OFF switch will NOT function with
the forward/reverse switch in the middle
position.
VARIABLE-SPEED TRIGGER SWITCH
This drill is equipped with a variable-speed
ON/OFF trigger switch.
1. To start the drill, gently squeeze the trigger
switch (1) (Fig. 2).
NOTE: The drill will turn at its slowest speed
when the switch is depressed slightly. The drill
will turn at its fastest speed when the switch is
fully depressed.
2. To stop the drill, release the switch.
NOTE: Drilling at a slow speed for an
extended period of time may cause the drill
motor to overheat. If the drill gets hot, stop
drilling and allow it to cool for at least 15
minutes.
LOCK-ON BUTTON
Your drill is equipped with a lock-on feature,
which is convenient when continuous drilling for
extended periods of time is required (Fig. 3). To
lock the switch ON, fully depress the trigger
switch (1), push in and hold the lock-on button
(2) located at the left side of the handle, then
release the trigger. Release the lock-on button
and your drill will continue running. To turn the
drill OFF, depress and release the trigger switch
to release lock.
NOTE: The lock-on button will only function
when the drill is running at full speed.
INSTALLING DRILL BITS
WARNING: Never hold the chuck body
with one hand and use the drill power to
rotate the drill body to loosen or tighten bits.
Serious injury may result.
1. Remove the drill plug from the power
source.
2. Rotate the chuck collar (1) to open or close
the jaws (2) to a point where the opening is
slightly larger than the bit size you intend to
use (Fig. 4). Raise the front of your drill
chuck slightly to prevent the bit from falling
out of the chuck jaws.
ASSEMBLY AND OPERATING
!
Fig. 3
1
2
Fig. 1
1
2
Fig. 2
1
Loading ...
Loading ...
Loading ...