Loading ...
Loading ...
Loading ...

5
ENGLISH INSTRUCTIONS
ASSEMBLY
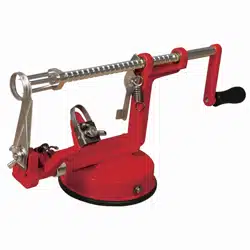
1. Attach the Handle with included 2” (5 cm) Screw to the Handle Shaft using a
Phillips head screwdriver until tight.
2. Screw the Handle Assembly onto the end of the Shaft until tight.
3. When attached, the handle will spin freely.
4. Remove the Protective Cap from the Food Prongs. Do not discard the
Protective Cap, as it will be used to safely store the Apple Peeler.
5. Attach the Apple Peeler to any at, smooth surface. Flip the Suction Cup Lever
so that it points to the Peeling Blade end of the unit. Hold the Suction Cup
Base rm and at against the countertop with one hand and move the Suction
Cup Lever over towards the Handle end of the unit.
6. Check to make sure the Apple Peeler is rmly xed to the surface.
Handle
2” Screw
Handle Shaft
Shaft
Suction
Cup Lever
Suction
Cup Base
CLEANING
1. Hand wash all parts that come in contact with food in warm, soapy water.
Rinse thoroughly. Dry immediately.
NOTE: The Apple Peeler is NOT dishwasher safe.
2. It is suggested to coat all the unpainted metal parts of the Apple Peeler with a
food-grade silicone spray.
3. Turn the Handle to bring the Shaft all the way in and through the Coring/Slicing
Blade. Place the Protective Cap onto the Food Prongs.
4. Place the Apple Peeler in its box. Store in a cool, dry location.
Cut Hazard. Blades are sharp, use care when handling. The
use of cut-resistant gloves is suggested.
w CAUTION
Loading ...
Loading ...
Loading ...