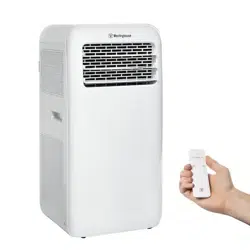

WPAC12000
PORTABLE ROOM AIR CONDITIONER
USER MANUAL
READ THIS MANUAL IN ITS ENTIRETY BEFORE INSTALLING
AND/OR OPERATING THE TRANSFER SWITCH
If you have questions or need assistance, please call customer service at 855-944-3571.
2 | Westinghouse Outdoor Power Equipment
INTRODUCTION
DISCLAIMERS
All information, illustrations, and specications in
this manual were in effect at the time of publishing.
The illustrations used in this manual are intended as
representative reference views only. We reserve the
right to make any specication or design change without
notice.
Manufacturer will bear no responsibility when personal
injury or property loss is caused by the following:
lDamage due to improper use or misuse of the product.
lProduct is altered, maintained, or used in a manner
contrary to instructions in this manual
lAfter verication, the defect is directly caused by corrosive
gas.
lAfter verication, the defects are due to improper operation
during transportation of product;
lOperate, repair, or maintain the unit contrary to instruction
manual or related regulations.
lAfter verication, the problem or dispute is caused by
the quality specication or performance of parts and
components that produced by other manufacturers;
lDamage is caused by natural calamities, bad use
environment or force majeure.
ALL RIGHTS RESERVED
All rights reserved. No reproduction allowed in any form
without written permission from Westinghouse Outdoor
Power Equipment.
DANGER
Read this manual before using or
performing maintenance on this product. Failure
to follow the instructions and safety precautions in
this manual can result in serious injury or death.
UPDATES
The latest User Manual for your Westinghouse
products can be found under our support tab. https://
westinghouseoutdoorpower.com/pages/manuals
Or scan the following QR code with your smartphone
camera to be directed to the link.
PRODUCT REGISTRATION
For trouble-free warranty coverage, it is important to
register your Westinghouse product.
You can register by:
lCompleting and mailing the product registration card
included in the carton.
lRegistering your product on-line at:
https://westinghouseoutdoorpower.com/pages/
warranty-registration
lScanning the following QR code
with your smartphone camera to be
directed to the mobile registration
link.
lSending the following product
information to:
Westinghouse Outdoor Power
Warranty registration
777 Manor Park Drive
Columbus, OH 43228
For Your Records
Date of Purchase:
Model Number:
Serial Number:
Place of Purchase:
IMPORTANT: Keep your purchase receipt for trouble-
free warranty coverage.
TABLE OF CONTENTS
Introduction ...................................................................... 2-3
Safety .............................................................................. 3-5
Components ........................................................................5
Assembly ......................................................................... 6-7
Operation ......................................................................... 7-8
Care and Maintenance .................................................. 9-10
Accessories .......................................................................10
Troubleshooting ............................................................10-11
Warranty ...................................................................... 12-13
Illustrations .................................................................. 14-19
Service Hotline/
Company Address ............................................... Back Page
SAVE THESE INSTRUCTIONS
Westinghouse Outdoor Power Equipment | 3
INTRODUCTION
SAFETY
SAFETY DEFINITIONS
The words DANGER, WARNING, CAUTION, and
NOTICE are used throughout this manual to highlight
important information. Make sure that the meanings
of this safety information is known to all who operate,
perform maintenance on, or are near the generator.
This safety alert symbol appears with
most safety statements. It means
attention, become alert, your safety
is involved! Please read and abide by
the message that follows the safety
alerts symbol.
DANGER
Indicates a hazardous situation
which, if not avoided, will result in death or serious
injury.
WARNING
Indicates a hazardous situation
which, if not avoided, could result in death or serious
injury.
CAUTION
Indicates a hazardous situation
which, if not avoided, could result in minor or
moderate injury.
NOTICE
Indicates a situation which can
cause damage to the generator, personal property,
and/or the environment, or cause the equipment to
operate improperly.
NOTE: Indicates a procedure, practice or condition
that should be followed for the generator to function
in the manner intended.
SPECIFICATIONS
Power Supply ...........................................1PH/115V~/60Hz
Current.......................................................................... 12 A
Max Operating Pressure
High Side .......................................... 3.8 MPa (550 psi)
Low Side ........................................... 1.6 MPa (236 psi)
Max Allowable Pressure: ......................... 5.3 MPa (725 psi)
Refrigerant Charge ...............................R32/390 g (13.8 oz)
Cooling Capacity (SAAC) ................................. 8000 BTU/h
Cooling Capacity (Room size) .................... Up to 400 sq. ft.
Unit Dimensions .................................. 13.5 x 27.2 x13.5 in.
Unit Weight ..............................................25.5 kg (56.2 lbs.)
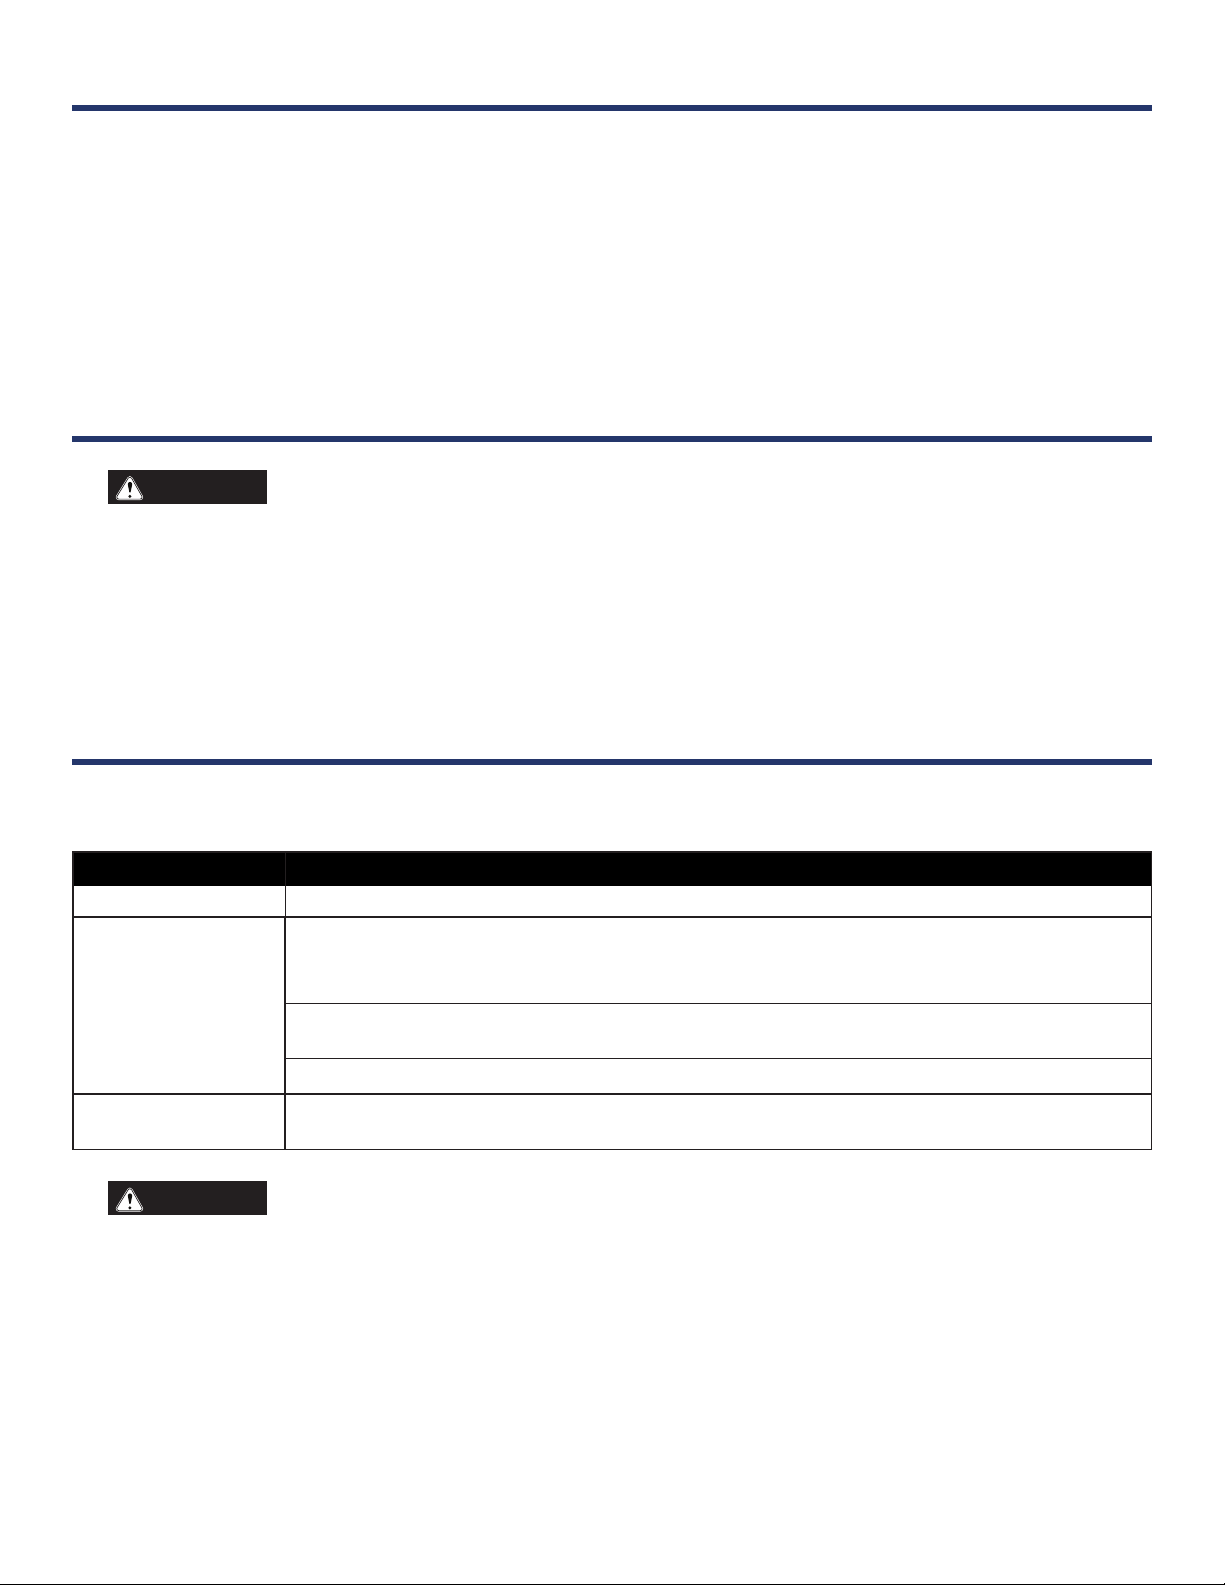
SAFETY SYMBOLS
Follow all safety information contained in this manual and
on the generator.
Symbol
Description
Safety Alert Symbol
Electrical Shock Hazard
Fire Hazard
Read Manufacturer’s Instructions
Do Not Operate in Wet Conditions
Ground. Consult with electrician to determine
grounding requirements before operation.
NOTICE
Thank you for choosing Westinghouse!
PLEASE READ BEFORE RETURNING THIS PRODUCT FOR ANY REASON.
If you have a question or experience a problem with your Westinghouse purchase, call us at 855-944-3571 to
speak with an agent.
SAVE THIS MANUAL FOR FUTURE REFERENCE.

4 | Westinghouse Outdoor Power Equipment
IMPORTANT SAFETY INSTRUCTIONS
WARNING
To reduce the risk of injury, the user
must read and understand the instructions before
using this product.
WARNING
When using this product, basic
precautions should always be followed, including the
following:
lBefore operation, please conrm whether power
specication complies with that on nameplate.
lBefore cleaning or maintaining the air conditioner, please
turn off air conditioner and pull out the power plug.
lEnsure that the power cord is undamaged. Do not pull or
drag the power cord to pull out the power plug or move
the air conditioner.
lDo not insert or pull out the power cord with wet hands.
lPlease use grounded power only. Make sure the grounded
power source is reliable. If the supply cord is damaged,
it must be replaced by the manufacturer, an authorized
service center, or a similarly qualied person in order to
avoid a hazard.
lDo not use this appliance if the power cord is damaged,
if water or refrigerant leaks from the unit, or if the unit
produces a burnt smell or unusual sound during use. Do
not attempt to repair the unit. Take the air conditioner to an
authorized service center or a similarly qualied person in
order to avoid a hazard.
lAvoid wet conditions. Liquid entering the motor could
cause a short circuit or other damage to air conditioner.
lDo not operate heating equipment around the air
conditioner.
lDo not operate the unit in the bathroom or laundry room.
lKeep far away from re, heat sources, ammable or
explosive gases, and other explosive objects.
lKeep children from playing or climbing on the air
conditioner. Do not put or hang dripping objects above
the air conditioner. Do not repair or disassemble the air
conditioner by yourself.
lDo not insert any objects into the air conditioner.
lDo not insert anything into the openings of the air
conditioner. If something is inserted, unplug the unit and
remove the object immediately. If the object can not be
removed, take the unit to an authorized service center.
lDo not use an extension cord with this appliance.
lMaintain and service the air conditioner as described later
in this manual. All other maintenance and service should
be performed by the manufacturer, an authorized service
center, or a similarly qualied person in order to avoid a
hazard.
lIf refrigerant leaks or requires discharge during installation,
maintenance, or disassembly, the unit should be serviced
by an authorized service center in compliance with local
laws and regulations.
lChildren should be supervised to ensure that they do not
play with the appliance.
lDuring operation, close doors and windows to improve
cooling effect.
lOperate the air conditioner on a smooth at surface to
reduce noise and vibration.
lThis air conditioner is equipped with casters. When rolling
the unit from place to place, ensure the air conditioner is
fully upright and all four casters are contacting the ground.
lDo not operate the air conditioner on an incline or in any
position other than upright. Tilting or tipping the unit can
cause liquid to enter into electrical components. If the
unit tips over, disconnect power immediately and contact
customer service.
lDo not operate in direct sunshine.
REFRIGERANT
WARNING
This unit uses a non-explosive
ammable refrigerant gas, R32, which can be ignited
by re.
The refrigerant used in this unit is the uoride R32, which
is specially cleaned. The refrigerant is considered mildly
ammable and has no odor.
Compared to common refrigerants, R32 is a nonpolluting
refrigerant with no harm to the ozonosphere. The
inuence upon the greenhouse effect is also lower. R32
has very good thermodynamic features and high energy
efciency. The units therefore need less lling.
SAFETY

Westinghouse Outdoor Power Equipment | 5
WARNING
• Appliance lled with ammable gas R32
• Appliance shall be installed,operated and stored in a room with a oor area larger than 43 sq. ft. (4 sqm) .
• The appliance shall be stored in a room without continuously operating ignition sources (for example: open ames,
an operating gas appliance, or an operating electric heater.)
• The appliance shall be stored in a well-ventilated area where the room size corresponds to the room area as speci-
ed for operation.
• The appliance shall be stored so as to prevent mechanical damage from occurring.
• Ducts connected to an appliance shall not contain an ignition source.
• Keep any required ventilation openings clear of obstruction.
• Do not pierce or burn.
• Be aware that refrigerants may not contain an odor.
• Do not use means to accelerate the defrosting process or to clean,other than those recommended by the manufac-
turer.
• Servicing shall be performed only as recommended by the manufacturer.
• Should repair be necessary, contact your nearest authorized Service Centre. Any repairs carried out by unqualied
personnel may be dangerous.
• Compliance with national gas regulations shall be observed.
• Read service manual.
UNDERSTANDING YOUR APPLIANCE
See Figure 1, page 14.
To reduce the risk of injury and product failure, read and
understand the information in this user’s manual as well
as the information on the product labeling.
CASTERS
The casters make it easy to move the air conditioner from
one location to another.
CONTROL PANEL
Use the control panel to turn the air conditioner on and off,
switch modes, select fan speeds, and set sleep timers.
DRAIN PLUG
Remove the drain plug to allow condensate water to
drain freely from the unit.
EXHAUST DUCT
The exhaust duct directs warm air away from the unit and
to the outside.
FILTERS
The lters protect the motor from debris and other
items that can accumulate during use. Never run the air
conditioner without lters in place.
GUIDE LOUVERS
Adjust the guide louvers to change the direction of the
air ow.
POWER CORD
Use the grounded power cord to connect the air
conditioner to an AC power supply.
REMOTE CONTROL
Use the remote control to operate the air conditioner from
a distance.
SAFETY
COMPONENTS

6 | Westinghouse Outdoor Power Equipment
REMOVING CARTON CONTENTS
WARNING
This product requires assembly. Do
not attempt to operate this product if the items shown
in the INCLUDED LIST are damaged or missing or
if items in the list are already assembled. Using an
improperly assembled product can be hazardous
and could result in serious personal injury.
lCarefully open the carton.
lRemove and inspect the cartoon contents. Verify that
all the items in the INCLUDED LIST are present and
undamaged.
lRecycle or dispose of the packaging materials properly.
INCLUDED LIST
See Figure 2, page 15.
Air Conditioner, Remote Control, Exhaust Duct,
Exhaust Connector, Cord Hook, Window Clip,
Screw (M4.2 x 16 mm) [3], AA Batteries (2), Fixed Base,
Rain Guard, Foam Seal (Adhessive), Foam Seal (Non-
adhessive), Mounting Plate, Bracket, Fixed Clip, Adjustment
Panel, Window Panel, Extension Panel, Exhaust Cover,
Screen and User Manual
NOTE: Some of the items in the included list are used for
assembling and operating the air conditioner. Other items
are needed to assemble and install the optional window vent
kit.
INSTALLING CORD HOOKS
See Figure 3, page 15.
lUnplug the air conditioner.
lLocate the screw mounts on the back of the unit.
lAlign the holes in the cord hooks with the holes in the
screw mounts.
lInstall screws and tighten securely.
NOTE: The top hook should be installed facing up and the
bottom hook should be facing down.
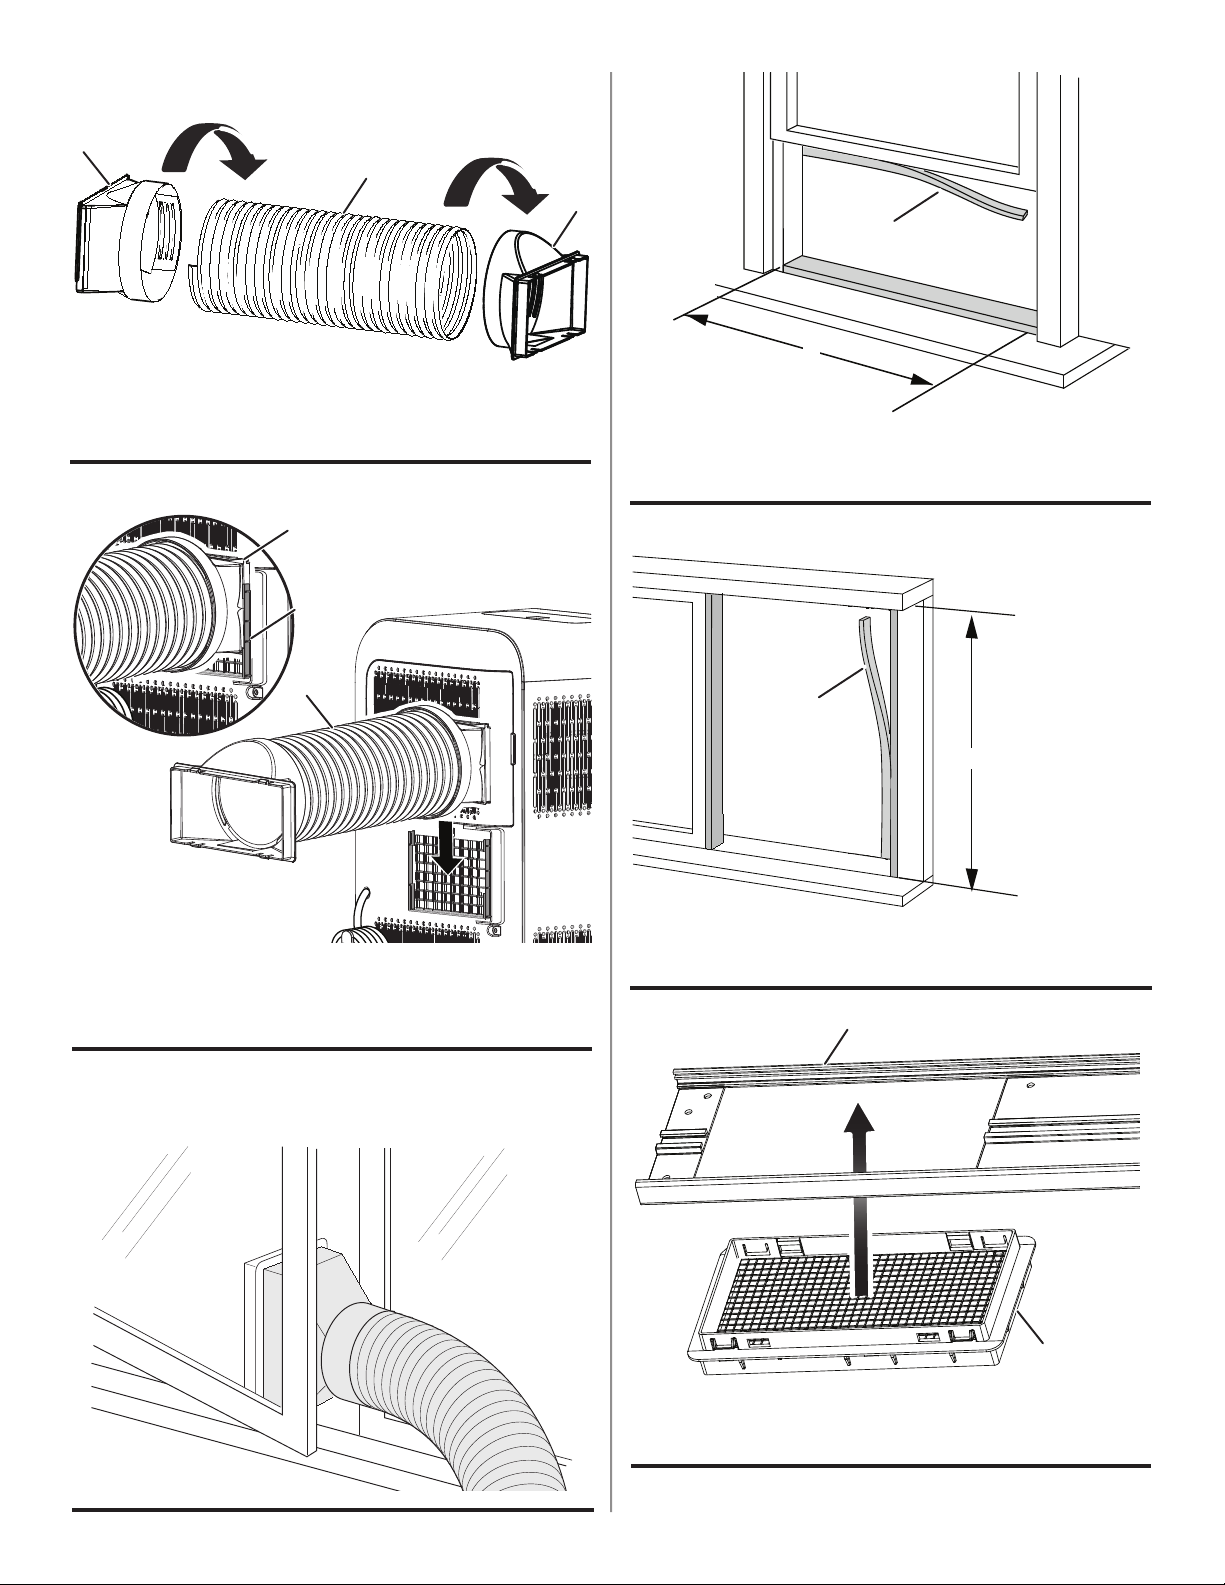
ATTACHING THE EXHAUST DUCT
See Figures 4 - 8, pages 15 and 16.
When installed, the exhaust duct should be as at as
possible. Do not extend the pipe or connect it with another
exhaust duct.
The length of the exhaust duct is less than 40 inches. Keep
the length as short as possible.
lUnplug the air conditioner.
lPlace the exhaust connector on one end of the exhaust
duct and turn clockwise to secure.
lPlace the window clip on the opposite end of the exhaust
duct and turn clockwise to secure.
lLocate the exhaust vent on the backside of the unit.
lSlide the exhaust connector into the grooves on either
side of the exhaust vent.
lRoute the other end of the exhaust duct outdoors.
NOTE: To vent heat through a window, install the window
vent kit as described in the next section.
To remove the exhaust duct:
lUnplug the air conditioner.
lSlide the exhaust connector on the exhaust duct up and
away from the air conditoner unit.
lIf applicable, slide the window clip on the exhaust duct off
of the screen on the window panel.
INSTALLING THE WINDOW VENT KIT
See Figures 9 - 22 , pages 16 - 18.
The following tools are recommended for installation, but
are not included with the product: screwdriver (medium size
Phillips, tape measure or ruler, knife or scissors, saw.
NOTE: If a window is too narrow for direct installation, a saw
may be needed to cut the window panel to an appropriate
size.
lUnplug the air conditioner.
lOpen the window and measure the width or height inside
the window frame.
lCut the foam seal (adhesive type) to the proper length
and attach it to your horizontal (or vertical) sliding window.
lInsert the screen into the back of the window panel.
Firmly press the screen into the window panel to ensure it
is installed securely
NOTE: The screen is designed to allow heat to escape
while preventing large bugs, such as moths, from entering.
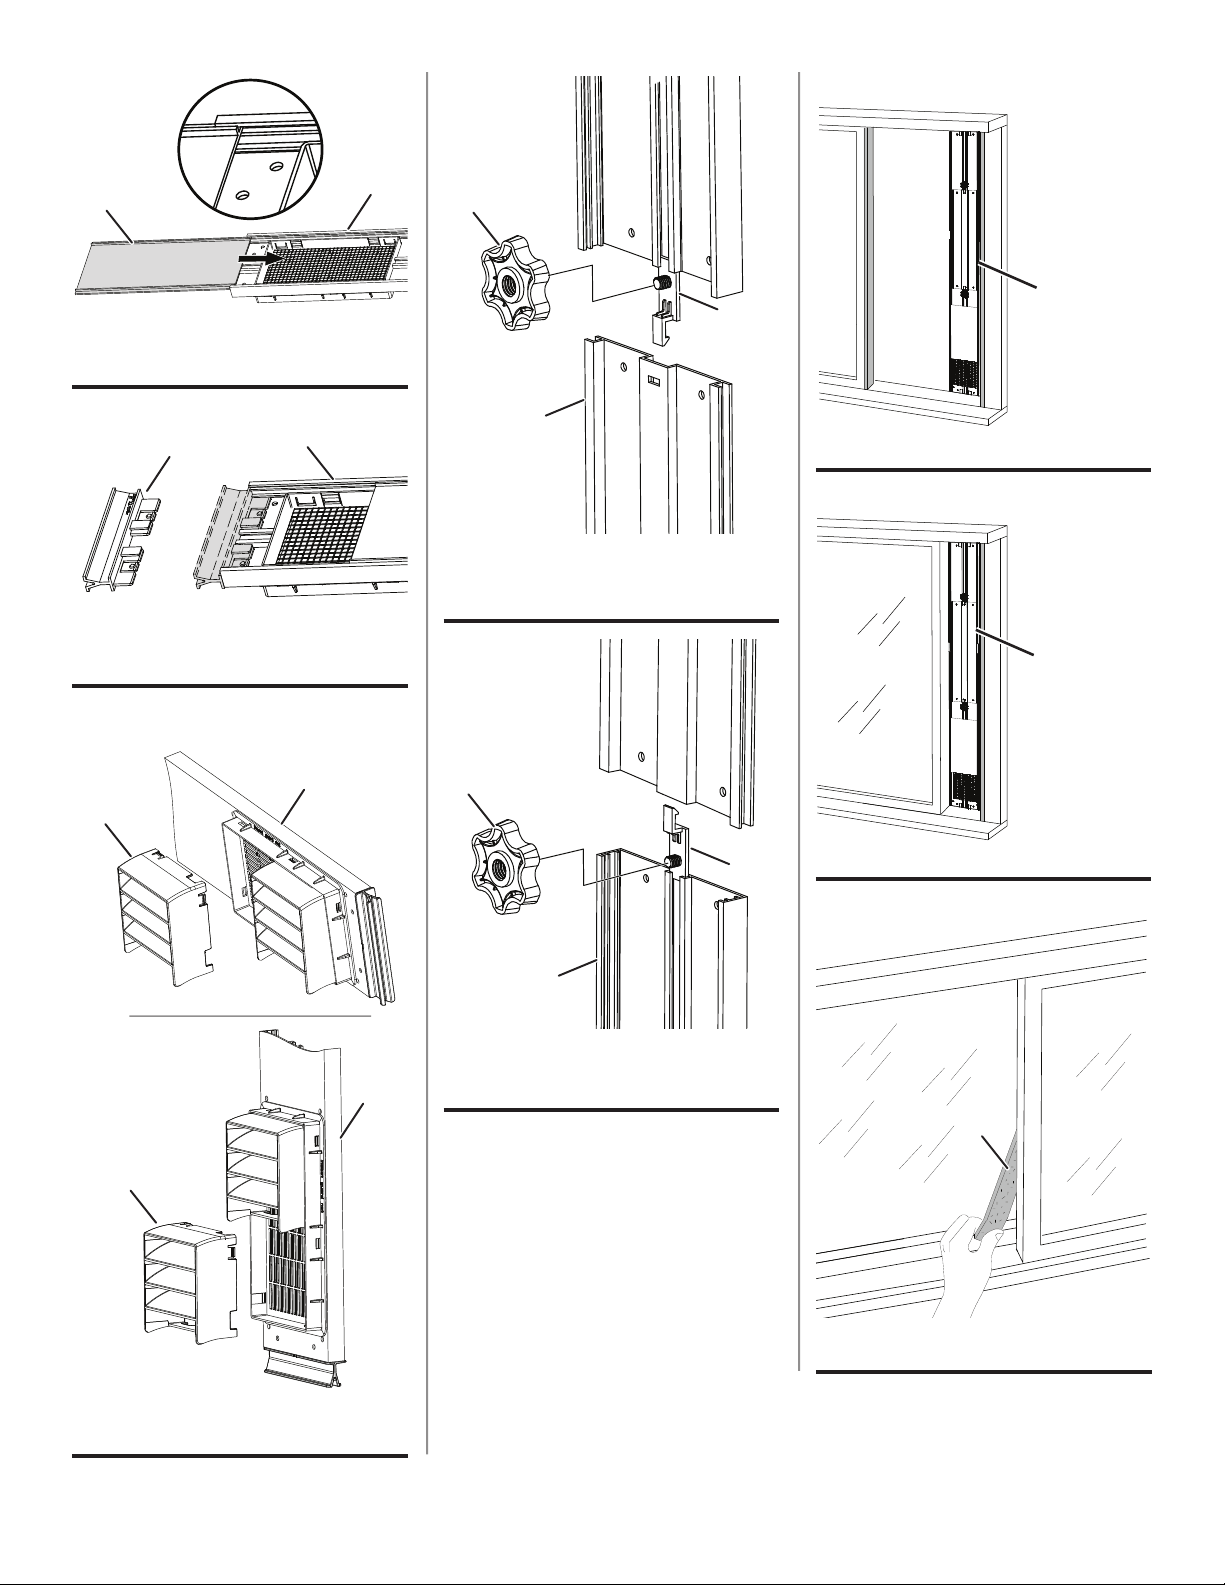
lSlide the exhaust cover into the grooves on the window
panel.
lInsert a xed base into the end of the window panel
closest to the screen. Make sure the xed base is fully
seated. If necessary, slide the exhaust cover down.
lAttach the rain guards to the screen by inserting the tabs
on the rain guards into the holes on the screen.
NOTE: The window panel can be installed vertically and
horizontally. Refer to gure 14 for the correct orientation
of the rain guards for vertical and horizontal installation.
ASSEMBLY

Westinghouse Outdoor Power Equipment | 7
lThe window panel can be modied to t different sized
windows that open vertically or horizontally up to 65 in.
• If the window opening is less than 30 in. for direct in-
stallation, use a saw to cut the window panel to the
appropriate size.
• If the window opening is larger than the window panel
(30 in.), use adjustment panels and/or extension pan-
els. Secure additional panels to the window panel us-
ing xed clips and mounting plates.
lInsert the remaining xed base into the end of the window
panel assembly.
lInstall the window panel assembly into the window frame.
Make sure that the exhaust cover is attached to the
window panel.
lStuff the foam seal (non-adhessive type) between the
glass and the window to prevent air and insects from
getting into the room.
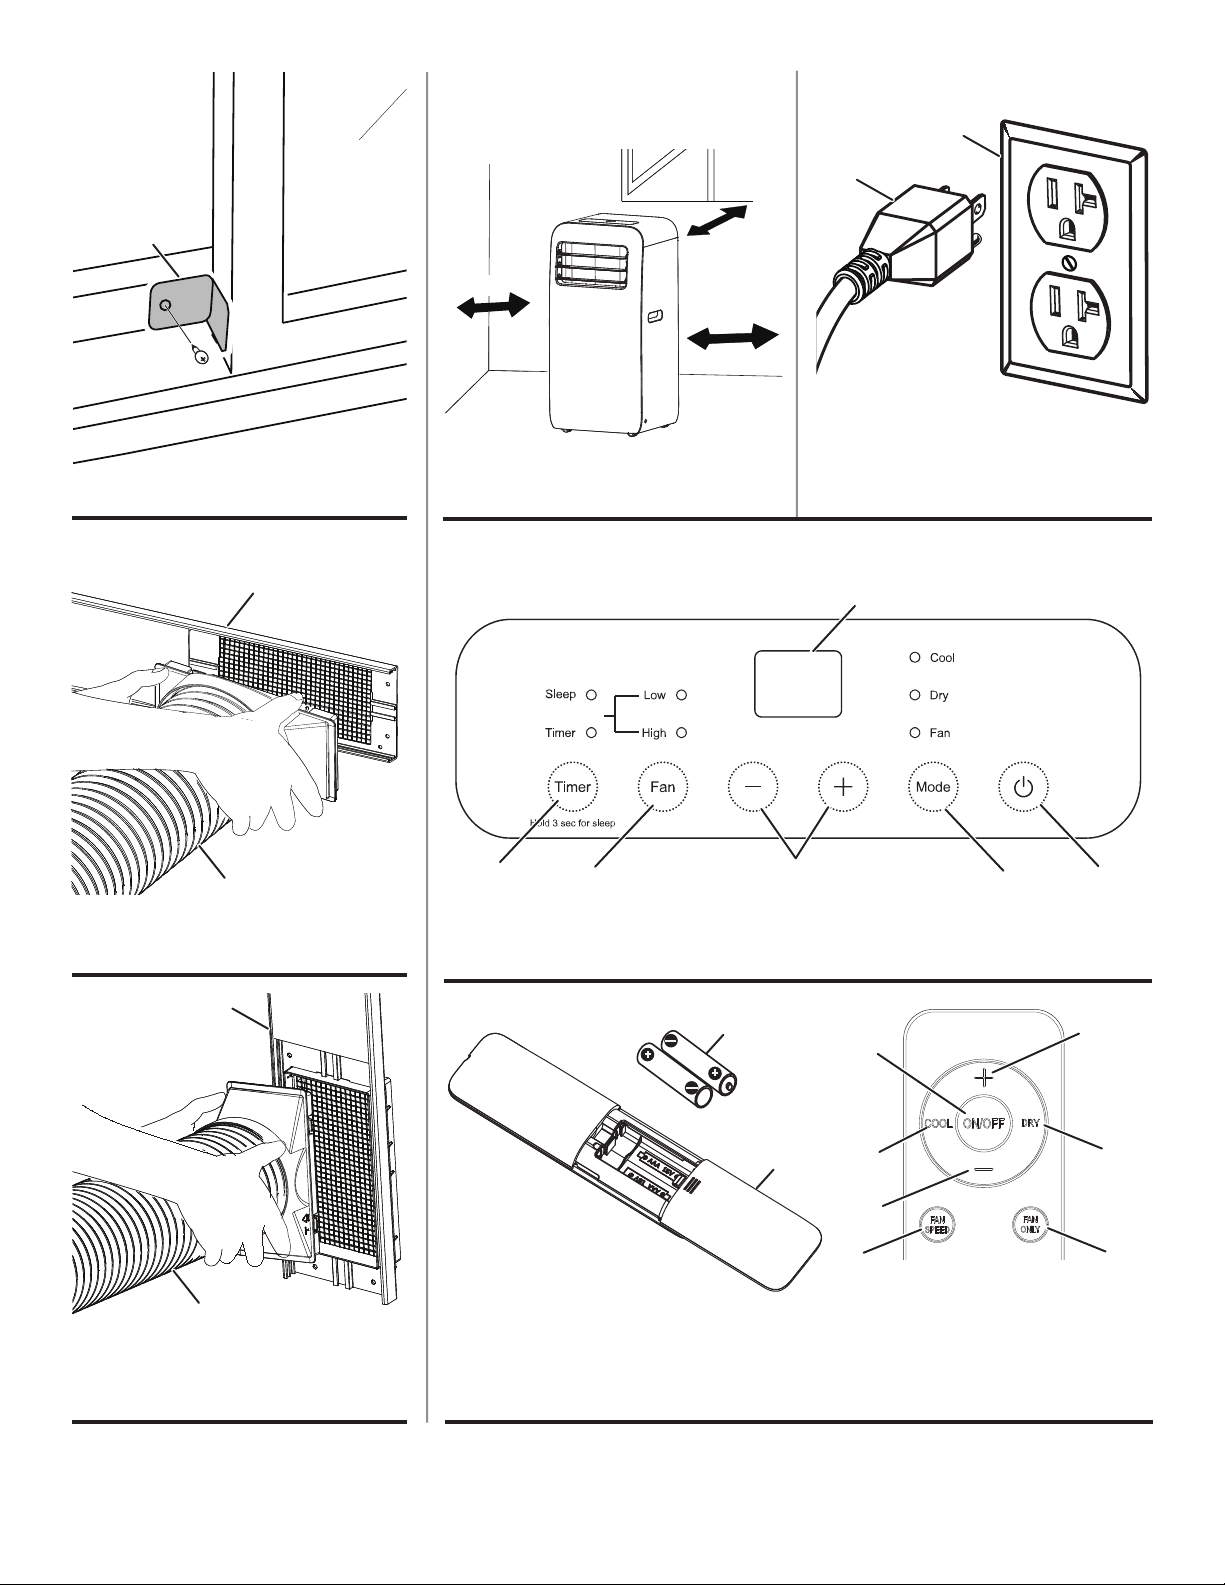
lIf desired, attach a bracket agains the edge of the window
to prevent it from moving.
lSlide the exhaust cover up to expose the screen.
lConnect the exhaust duct to the screen.
NOTE: When the exhaust duct is disconnected, slide the
exhaust cover over the screen.
WARNING
Routing the power cord in high
trafc areas or hiding it beneath rugs and carpets can
create a tripping hazard.
WARNING
Do not tip or tilt the appliance during
use or when changing locations. Tilting the unit could
cause liquid to spill which could result in electric
shock, a slippery surface, or property damage.
WARNING
When operating or moving the air
conditioner, ensure that the drain plug is securely in
place. Liquid spilling or leaking from the unit could
result in electric shock, a slippery surface, or property
damage.
SELECTING A SUITABLE LOCATION
See Figure 23, page 18
Use the following guidelines to select a location for the
unit:
lThe air conditioner must be operated within 61°F (16°C)
and 95°F (35°C).
lThe appliance is for indoor use only.
lThe appliance must be positioned so that a grounded
outlet is accessible.
lThis air conditioner is intended for home use only.
lDo not operate the air conditioner in a humid environment.
lPlease keep air inlet and air outlet clean, no obstacles.
lReserved space around the air conditioner: 30cm (12 in.)
OPERATING THE AIR CONDITIONER
See Figures 24 - 27, pages 18 and 19.
lPlace the air conditioner in a suitable location.
lPlug the air conditioner into a grounded outlet.
NOTE: The power supply should be 120 V, AC only
(normal household current), 60 Hz.
lUse the control panel or remote control to turn the air
conditioner on, choose modes, or set timers. Refer to
Using the Control Panel and Using the Remote Control
later in this section.
NOTE: When the air conditioner is on, the digital display
on the control panel will illuminate.
lThe distribution and direction of air ow can be adjusted
by moving the louvers up and down.
lWhen you are nished, use the control panel or remote
control to turn the air conditioner off.
USING THE CONTROL PANEL
See Figure 25, page 18.
Use the control panel to turn the air conditioner on and off,
switch modes, select fan speeds, and set sleep timers.
Increase/Decrease Buttons
Press the increase/decrease buttons (“+” or “-”) to change
the temperature in cool mode and adjust timer settings.
Display
Shows the set temperature in cooling mode.
ASSEMBLY
OPERATION

8 | Westinghouse Outdoor Power Equipment
Cool Mode Indicator
When the cool mode indicator above the mode button is lit,
the unit is operating in cool mode. In this mode, the fan and
the compressor run at the same time. The display will show
the set temperature.
NOTE: In cool mode, the temperature can be set between
61°F (16°C) and 86°F (30°C).
Dry Mode Indicator
When the dry mode indicator above the mode button is lit,
the unit is operating in dry mode. In this mode, the unit acts
as a humidier removing moisture from the air. The display
will be blank.
Fan Mode Indicator
When the fan mode indicator above the mode button is
lit, the unit is operating In this mode, the fan runs but the
compressor does not. The display will be blank.
Mode Button
Press the mode button to cycle between Cool, Dry and Fan
modes.
Timer Button (Timer Mode)
Use the timer button to turn the air conditioner on at a certain
time. For instance, the air conditioner can be set to begin
cooling in ve hours.
To schedule cooling, put the air conditioner in cool mode
and select a temperature. Press the timer button, then
use the increase/decrease buttons (“+” or “-”) to adjust the
timer setting by 30 minutes (up to 10 hours). Once your
desired time is selected, wait ve seconds for the input to be
accepted. The timer LED above the timer button will light up
indicating that the unit is in timer mode.
At the selected time, the unit will begin scheduled cooling.
Timer Button (Sleep Mode)
To conserve energy, the air conditioner can be programmed
to gradually decrease cooling during sleeping hours.
Press and hold the timer button for three seconds to enter
into sleep mode. The sleep LED above the timer button will
light up indicating that the unit is in sleep mode.
In sleep mode, the preset temperature will increase by
2°F (1°C) within one hour and 4°F (2°C) within two hours.
After the second hour, the unit will operate at the elevated
temperature.
NOTE: The sleep function is not available in fan mode or
dry mode.
On/Off Button
Use this button to turn the air conditioner on or off.
Fan Button
Press the fan button to cycle between low and high speeds.
Fan Speed Indicators
The indicators above the fan button show indicate fan speed.
ADDING/REPLACING REMOTE BATTERIES
See Figure 26, page 18.
lSlide the battery cover off of the remote control.
lInstall new AAA batteires (1.5V) into the remote control
according to their polarity.
lReplace the battery cover.
USING THE REMOTE CONTROLLER
See Figure 26, page 18.
Use the remote control to operate the air conditioner from
a distance.
Fan Speed Button
Press the fan speed button to cycle between low and high
speeds.
Fan Only Button
Press the fan only button to run the air conditioner in fan
mode. In this mode, the fan runs but the compressor does
not.
Cool Button
Press the cool button to run the air conditioner in cool mode.
In this mode, the fan runs but the compressor does not.
Dry Button
Press the dry button to run the air conditioner in dry mode.
In this mode, the unit acts as a humidier removing moisture
from the air.
On/Off Button
Use this button to turn the air conditioner on or off.
Increase/Decrease Buttons
Press the increase/decrease buttons (“+” or “-”) to change
the temperature in cool mode and adjust timer or sleeper
settings.
OPERATION

Westinghouse Outdoor Power Equipment | 9
WARNING
ELECTRIC SHOCK HAZARDS
Before cleaning maintaning the air conditioner, turn
off the unit and disconnect power.
Do not spray or splash water or other liquids onto the
unit; this may cause electric shock.
Do not use corrosive detergents to clean the
appliance; this may damage the plastic components,
and cause electric shock.
Do not use volatile liquids (such as paint thinner or
gas) to clean the air conditioner. This may damage
the appearance of air conditioner.
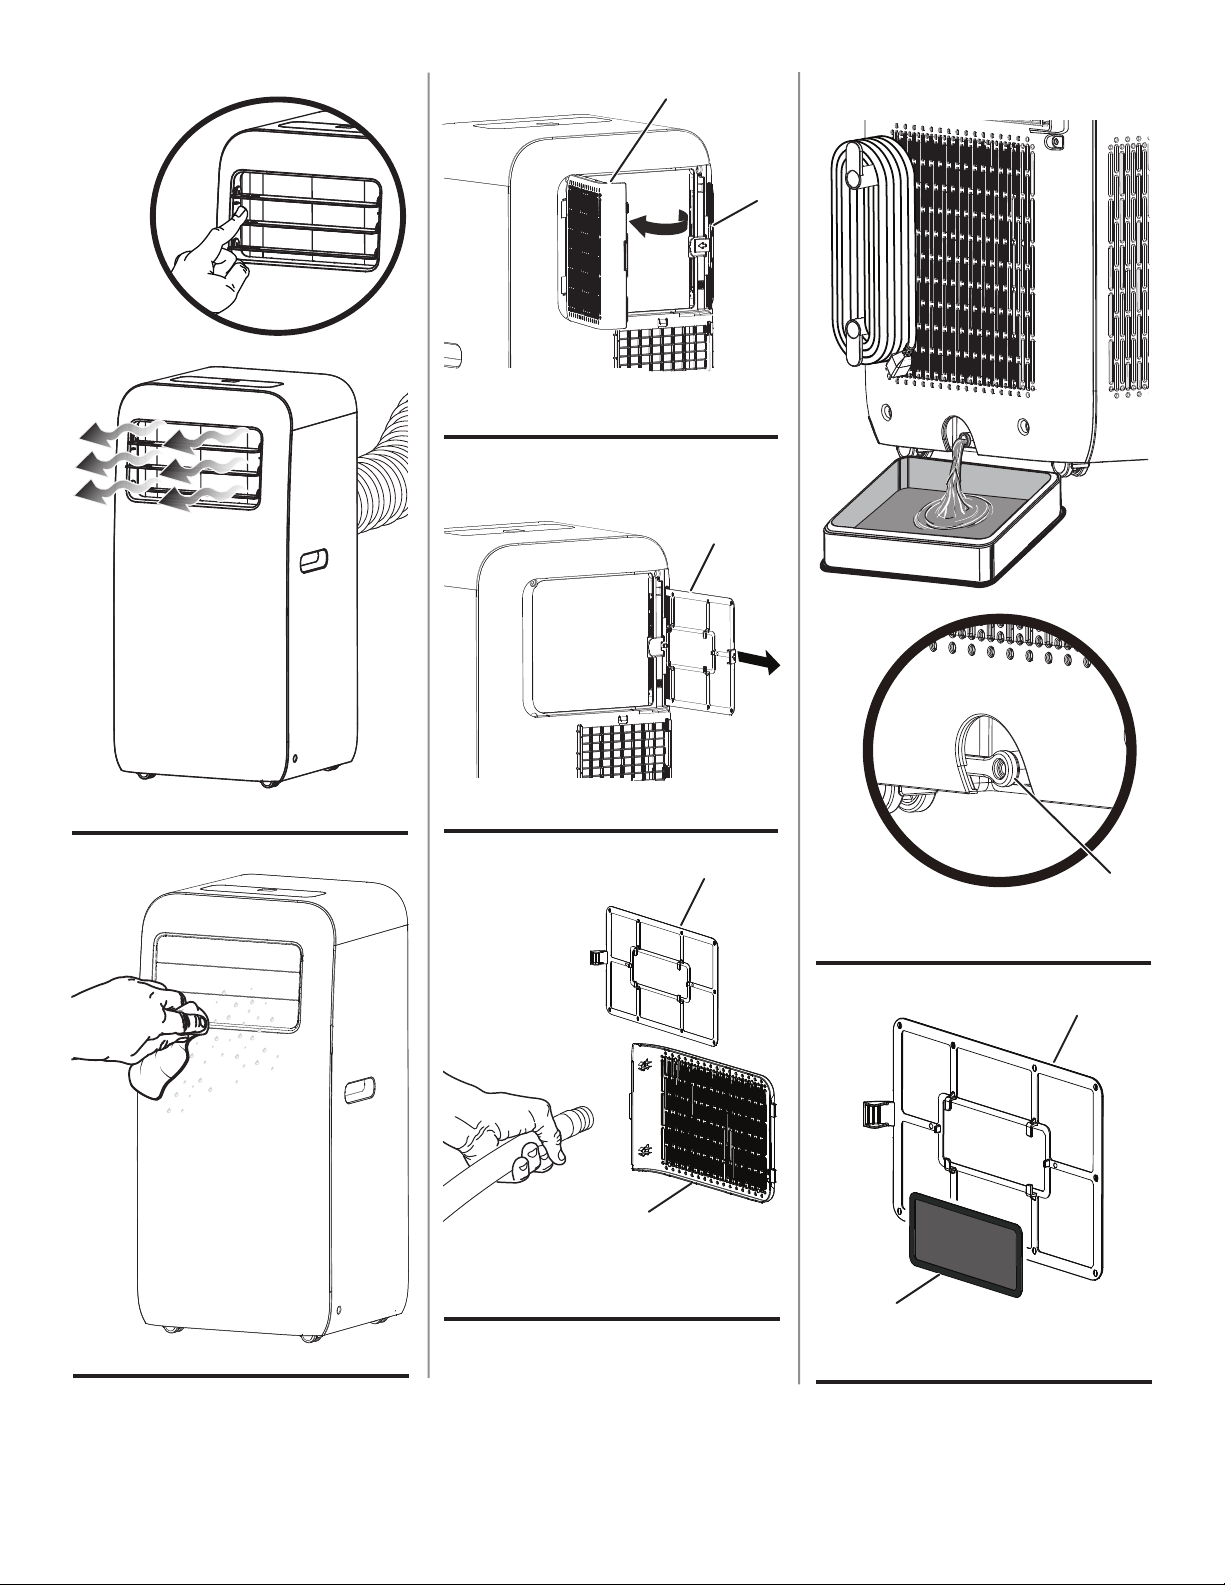
CLEANING OUTER CASE AND GRILLE
See Figure 28, page 19.
If there’s dust on the surface of outer case, use a soft towel
to wipe it. If the outer case is very dirty or greasy, use a
soft cloth dampened with mild detergent and water. Do NOT
allow water to drip in to the unit.
Use cleaner or soft brush to clean the grille.
CLEANING THE AIR FILTERS
See Figures 29 - 31, page 19.
NOTICE
The lters should be cleaned
once every three months. Clean the lters more
frequently if the unit is used in dusty environments.
Dirty air lters reduce air ow, decrease unit efciency,
and could prevent the unit from working properly.
The air conditioner has two air lters. One lter is accessible
from the exhaust side and the other is accessible from the
opposite side. The steps for removing and cleaning both
lters are the same.
lUnplug the air conditioner.
lOpen and remove the rear lter door.
lSlide the lter away from the air conditioner unit.
lRinse the rear lter door and lter with water to clean. If
the lter is very dirty, clean it with warm water and a mild
detergent. Do not use harsh chemicals or hot water.
NOTE: Allow the lter to dry completely before placing it
back in the unit.
NOTICE
Allow lters to air dry. Do not
attempt to dry lters with re or forced air. Doing
so could warp the frame of the lter or create a re
hazard.
lReplace the lter and lter door.
CLEANING THE EXHAUST DUCT
lUnplug the air conditioner.
lRemove the exhaust duct from the air conditoner and
window panel as described earlier in the Assembly
sectoin.
lClean the exhaust duct with warm water and a mild
detergent.
lAllow the exhaust duct to dry and then reinstall.
DRAINING COLLECTED WATER
See Figures 32, page 19.
When too much water has built up inside the unit, the air
conditoner will buzz eight times and the display will show
“H8”.
To drain the chasis:
lUnplug the air conditioner.
lMove the unit to an suitable location for draining.
lRemove the drain plug and allow the water to drain.
NOTE: Do not tilt the unit. Keep it vertical while moving
and draining.
lReinstall the drain plug.
WARNING
Be careful not to spill drain water
and make sure the drain plug is completley in place
before resuming operation. Liquid spilling or leaking
from the unit could result in electric shock, a slippery
surface, or property damage.
MAINTENANCE CHECK LIST
Before Use-Season:
lUnplug the air conditioner.
lEnsure that air inlets and air outlets are not blocked.
lVerify that the power cord and desired outlet are in good
condition.
lMake sure the air lters are clean.
lMake sure the remote control batteries are installed and
in good condition.
lEnsure that exhaust duct and window vent kit (if applicable)
is installed securely.
lVerify that exhaust duct is in good condition.
After Use-Season:
lUnplug the air conditioner.
lClean outer case, grille, and air lters.
lDrain the chasis.
lVerify that the window panel assembly is in good
condition. If the window panel assembly is damaged
contact customer service.
CARE AND MAINTENANCE
10 | Westinghouse Outdoor Power Equipment
CARE AND MAINTENANCE
TROUBLESHOOTING
LONG-TERM STORAGE
If you don’t use the air conditioner for a long time, please
maintain it by following steps for good performance:
lUnplug the air conditioner.
lDrain the chasis.
lWrap the cord around the cord hooks.
lClean the air conditioner and pack it well to prevent dust.
NOTICE FOR RECOVERY
lMany of the items included with the packing materials are
recyclable. Please recycle or dispose of these materials
properly.
WARNING
Do not use this appliance if the power cord is damaged, if water or refrigerant leaks from the
unit, or if the unit produces a burnt smell or unusual sound during use. Do not attempt to repair the unit. Take the
air conditioner to an authorized service center or a similarly qualied person in order to avoid a hazard.
WARNING
Use only recommended or equivalent replacement parts. Using an incorrect or incompatible
part might create a hazard that could result in serious personal injury.
These accessories available for purchase. Contact Westinghouse customer service toll-free at 1 (855) 944-3571.
Filter .................................................................................................................................................................. 111001060343
Charcoal Filter Insert
1
............................................................................................................................................... 11126072
1 The charcoal lter insert is designed to t in the center of the lter. See gure 33.
ERROR CODES
Code Solution
F1, F2, F4, F0 Contact customer service or take the air conditioner to an authorized service center.
E8,H3 Ambient temperature is too high. Allow ambient temperature to drop below 95°F (35°C), then re-
start the air conditoiner. Do not attempt to use this product in high-temperature or high-humidity
environments.
Turn off the air conditioner and remove any blockages from the evaporator or the condensor.
Plug the unit in and resume normal operation.
Contact customer service or take the air conditioner to an authorized service center.
H8 Pour out the water inside chassis. If “H8” still exist, please contact professional person to main-
tain the unit
ACCESSORIES

Westinghouse Outdoor Power Equipment | 11
TROUBLESHOOTING
PROBLEM POSSIBLE CAUSE SOLUTION
Air conditioner won’t
start or stops during
operation
Power outage Wait until power is restored and then resume operation.
Power cord is disconnected Connect power cord.
Air switch is tripped, circuit malfunction,
or fuse is burnt
Have unit repaired at an authorized service center.
Unit is restarted too soon after stopping
Wait for three (3) minutes, and then resume normal
operation
Evaporator needs to be defrosted
(Remove lter to view evaporator.)
This is normal and does not indicate a problem.
After defrosting is nished, the air conditioner will
resume normal operation.
Poor cooling
Unit connected to an extension cord (low
voltage)
Remove the extension cord and plug the unit
directly into a grounded receptacle.
Air lter is dirty Clean the air lter.
Set temperature is too high Adjust the temperature.
A door or window is open. Close door or window.
Air conditoner is not
responding to remote
control
Something is interfering with the singal
(such as static pressure, unstable
voltage)
Unplug the unit and wait three (3) minutes. Plug the
unit back in and resume normal operation.
Remote control is out of range.
Move the remote closer to the air conditioner (within
26 ft.)
The receiver on the air conditioner is
blocked.
Remove the obstacles.
The batteries in the remote control are
depleted.
Replace the remote control batteries.
There is uorescent light in the room.
Move the remote closer to the air conditioner
(within 26 ft.)
Turn off the uorescent light and try it again.
The unit is making a
crackling sound.
Unit was recently turned off/on.
This is normal and does not indicate a problem.
The noise is caused by heat expansion or
shrinkage due to change of temperature.
Abnormal sound
during operation
Interference from radio, thunderstorm, or
other electrical activity.
Unplug the unit and wait three (3) minutes. Plug the
unit back in and resume normal operation.
Unpleasant odor in
the room
Air lter is dirty Clean the lter.
No air blowing from
air conditioner
Air outlet or air inlet is blocked Eliminate the obstacles.
Desired temperature
can’t be obtained.
The desired temperature exceeds the
temperature setting range.
Choose a temperature between 61°F (16°C) and
86°F (30°C).
Liquid can be heard
moving inside the unit
The unit was just turned on or turned off.
This is normal and does not indicate a problem. The
noise is caused by refrigerant moving inside the air
conditioner.

12 | Westinghouse Outdoor Power Equipment
WESTINGHOUSE OUTDOOR POWER EQUIPMENT, LLC’S RESPONSIBILITY
Westinghouse Outdoor Power Equipment, LLC warrants to the original purchaser that its Westinghouse Outdoor Power
Equipment, LLC line of portable air conditioners will be free from defects in material and workmanship. Under normal use
and maintenance from the date of purchase, Westinghouse Outdoor Power Equipment, LLC agrees to repair or replace
at Westinghouse Outdoor Power Equipment, LLC discretion, any defective product free of charge at any authorized
Westinghouse Outdoor Power Equipment, LLC Authorized Service Dealer within the below listed applications, time periods,
limitations, and exclusions. THIS LIMITED WARRANTY IS EXTENDED TO THE ORIGINAL PURCHASER ONLY AND
IS NOT TRANSFERABLE TO SUBSEQUENT OWNERS. For a list of Westinghouse Outdoor Power Equipment, LLC
Authorized Service Dealers refer to www.wpowereq.com or call 1-855-944-3571.
OWNER’S RESPONSIBILITY
To ensure trouble free warranty coverage it is important that you register your Westinghouse Outdoor Power Equipment,
LLC portable air conditioner. You may register on-line at www.wpowereq.com, by automated phone at 1-855-944-3571, or
by lling out and returning to Westinghouse Outdoor Power Equipment, LLC the warranty registration card supplied with
your portable air conditioner. Registering your product conrms your warranty coverage and provides a direct link between
you and Westinghouse Outdoor Power Equipment, LLC if we nd it necessary to contact you.
Your receipt for purchase including date, model and serial number must be maintained and presented to a Westinghouse
Outdoor Power Equipment, LLC Authorized Service Dealer for warranty service. Proof of purchase rests solely with you,
the original purchaser.
You must demonstrate reasonable care and use and follow maintenance and storage guidelines prescribed in the operator’s
manual for your Westinghouse Outdoor Power Equipment, LLC unit. Should a product difculty occur, you must, at your
expense, deliver or ship your Westinghouse Outdoor Power Equipment, LLC unit to an Authorized Service Dealer for warranty
repairs (which must occur within the applicable warranty period), and arrange for pick-up or return of your unit after the
repairs have been made. For the Westinghouse Outdoor Power Equipment, LLC Authorized Service Dealer nearest to you,
call Westinghouse Outdoor Power Equipment, LLC’s automated phone at 1-855-944-3571 or may locate a Westinghouse
Outdoor Power Equipment, LLC Authorized Service Dealer at www.wpowereq.com Should you require assistance or have
questions concerning Westinghouse’s Outdoor Power Equipment, LLC Warranty Statement, you can contact us through the
web at www.wpowereq.com or call 1-855-944-3571.
PRODUCT WARRANTY APPLICATIONS & PRODUCT WARRANTY PERIODS
CONSUMER APPLICATION
For the purpose of the limited warranty “Consumer Application” means use by the original purchaser for the purpose of
personal residential household or recreational use.
Warranty: 1 year (12 months) for labor/1 year (12 months) for parts (manufacturing defects only)/and a total of 5 years (60
months) for compressor part only.
Westinghouse Outdoor Power Equipment, LLC may, at its discretion, replace the defective product with either a new or
remanufactured unit equivalent to your original purchase during the warranty period.
If proof of purchase is not available to establish the purchase date nor is the equipment registered as suggested herein, the
date of manufacturing as recorded by Westinghouse Outdoor Power Equipment, LLC will start the product warranty period.
EXCLUSIONS
Westinghouse Portable Air Conditioners that use non-Westinghouse replacement parts.
Costs of normal maintenance and adjustments.
Repairs or diagnostics performed by individuals other than Westinghouse Outdoor Power Equipment, LLC Authorized
Dealers not authorized in writing by Westinghouse.
Products that have been purchased as refurbished, like new, or second-hand.
Failures caused by any external cause, including but not limited to, collision, theft, vandalism, riot, war, re, freezing,
lightning, earthquake, windstorm, hail, water, ood, tornado, or hurricane.
WARRANTY

Westinghouse Outdoor Power Equipment | 13
Damage related to rodent and/or insect infestation.
Failure as a result of improper installation and usage as described in the User’s Manual.
Products that are modied or altered in a manner not authorized in writing by Westinghouse Outdoor Power Equipment,
LLC.
Any incidental, consequential or indirect damages caused by defects in materials or workmanship, or any delay in repair or
replacement of the defective part(s).
Failure due to misapplication.
Telephone, cellular phone, facsimile, internet access, or other communication expenses.
Expenses related to “customer instruction” or troubleshooting where no manufacturing defect is found.
Overnight freight or special shipping costs for replacement parts(s).
Overtime, holiday or emergency labor.
DISCLAIMER OF IMPLIED WARRANTIES
This limited warranty is in lieu of all other expressed or implied warranties, including any warranty of FITNESS FOR A
PARTICULAR PURPOSE OR USE and any implied warranty MERCHANTABILITY otherwise applicable to Westinghouse
Outdoor Power Equipment, LLC’s line of Westinghouse’s line of Portable Air Conditioners and its afliated companies shall
not be liable for any special, incidental or consequential damage, including lost prots. There are no warranties extended
other than as provided herein. This limited warranty may be modied only by Westinghouse Outdoor Power Equipment,
LLC. Any implied warranties allowed by law shall be limited in duration to the terms of the express warranty provided herein.
Some states do not allow the exclusion or limitation of incidental or consequential damages, so the above limitation may
not apply to you. This warranty gives you specic legal rights. You also have other rights from state to state. Westinghouse
Outdoor Power Equipment, LLC’S ONLY LIABILITY SHALL BE THE REPAIR OR REPLACEMENT AS STATED ABOVE.
IN NO EVENT SHALL WESTINGHOUSE BE LIABLE FOR ANY INCIDENTAL OR CONSEQUENTIAL DAMAGES, EVEN
IF SUCH DAMAGES ARE A DIRECT RESULT OF Westinghouse Outdoor Power Equipment, LLC’S NEGLIGENCE. Some
states do not allow the exclusion or limitation of incidental or consequential damages, so the above limitation may not apply
to you. This warranty gives you specic legal rights and you may also have other rights from state to state.
This limited warranty is given by Westinghouse Outdoor Power Equipment LLC (777 Manor Park Drive, Columbus, OH
43228).
WARRANTY
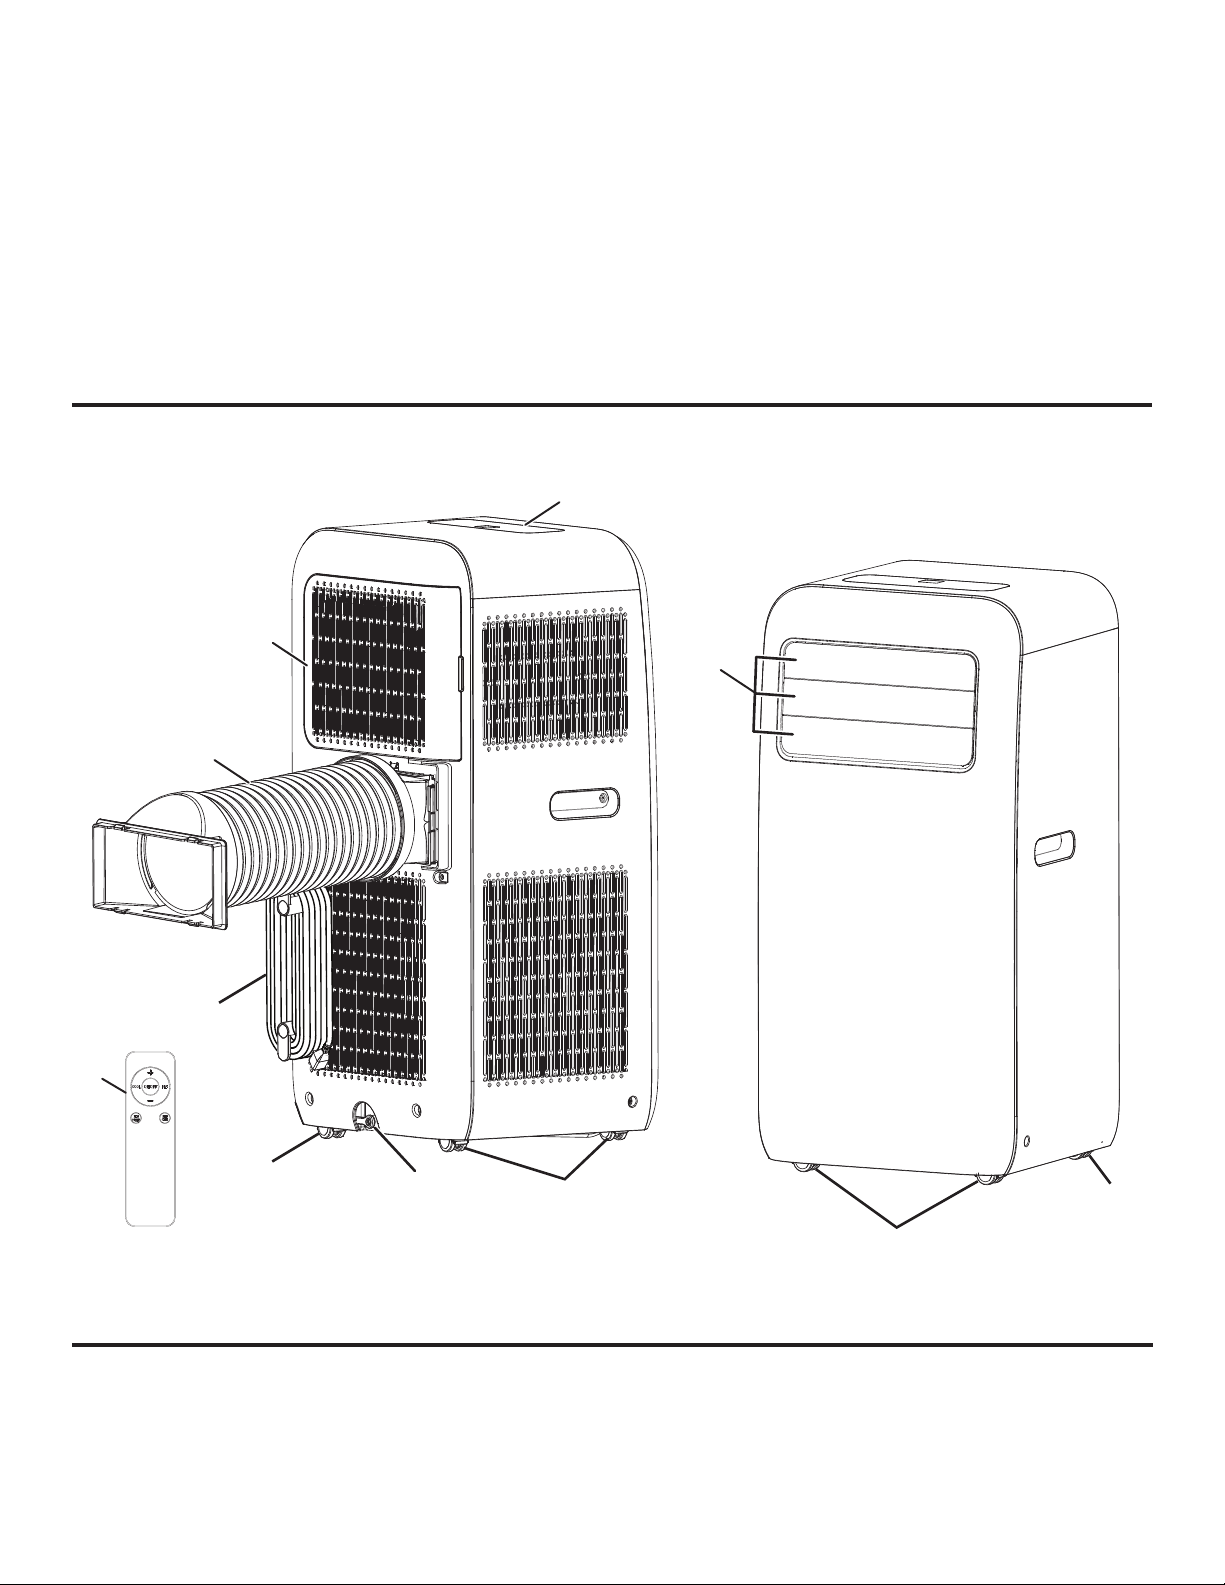
14
A - Control Panel
B - Guide Louver
C - Casters
D - Power Cord
E - Drain Plug
F - Remote Control
G - Rear Filter Door
H - Exhaust Duct
FIG. 1
DISCLAIMERS
All information, illustrations, and specications in this manual were in effect at the time of
publishing. The illustrations used in this manual are intended as representative reference
views only. We reserve the right to make any specication or design change without notice.
F
G
H
C
D
E
C
C
C
A
B

15
FIG. 2
A - Remote Control
B - Exhaust Duct
C - Exhaust Connector
D - Cord Hook
E - Window Clip
F - Screw
G - Fixed Base
H - Rain Guard
I - Foam Seal (Adhessive)
J - Foam Seal (Non-adhessive)
K - Mounting Plate
L - Bracket
M - Screw
N - Fixed Clip
O - Adjustment Panel
P - Window Panel
Q - Extension Panel
R - Exhaust Cover
S - Screen
A
B
F
G
H
O
P
Q
L
J
K
I
M
N
S
R
C
D
E
NEEDED TO ASSEMBLE AND OPERATE AIR CONDITIONER
NEEDED TO ASSEMBLE AND INSTALL WINDOW VENT KIT
A - Screw
B - Cord Hook
FIG. 3
A - About 24 in. (60.96 cm)
B - About 51 in. (129.54 cm)
FIG. 4
CORRECT
A
B
A
B
FIG. 5
INCORRECT
16
DIRECT EXHAUST OUTDOORS
A - Exhaust Connector
B - Exhaust Duct
C - Window Clip
A - Groove
B - Exhaust Duct
C - Exhaust Connector
FIG. 6
FIG. 8
FIG. 7
A - Window Panel
B - Screen
A - Foam Seal (Adhessive)
B - Width
A - Foam Seal (Adhessive)
B - Height
FIG. 9
FIG. 10
FIG. 11
A
B
B
B
A
C
A
C
A
A
B
B
17
FIG. 14
FIG. 12
FIG. 13
FIG. 15
FIG. 16
A - Window Panel
B - Rain Guard
A - Fixed Clip
B - Mounting Plate
C - Adjustment Panel
A - Fixed Clip
B - Mounting Plate
C - Extension Panel
A - Window Panel
B - Exhaust Cover
A - Fixed Base
B - Window Panel
FIG. 17
FIG. 18
A - Window Panel
A - Window Panel
B
B
B
B
A
A
A
A
B
B
C
C
A
A
A
A
FIG. 19
A - Foam Seal (Non-adhessive)
A
18
FIG. 21
FIG. 25
FIG. 26
FIG. 20
A - Exhaust Duct
B - Window Panel
A - Timer Button
B - Fan Speed Button
C - Increase/Decrease Buttons
A - Batteries
B - Battery Cover
C - Increase/Decrease Buttons
D - On/Off Button
D - Mode Button
E - On/Off Button
F - Display
E - Cool Mode
F - Dry Mode
G - Fan Speed Button
H - Fan Only Button
A - Bracket
CONTROL PANEL
A - 120V Grounded Outlet
B - Grounded PlugA - 12 in. (30 cm)
A - Exhaust Duct
B - Window Panel
FIG. 24
FIG. 23
FIG. 22
A
A
B
A
A
B
B
A
F
A
B
B
C
D
E
D
C
C
E
F
H
G
A
A
A
19
FIG. 31
FIG. 33
FIG. 27
FIG. 32
FIG. 29
FIG. 30
FIG. 28
A - Rear Filter Door
B - Filter
A - Filter
A - Rear Filter Door
B - Filter
A - Charcoal Filter Insert (Not Included)
B - Filter
A - Drain Plug
B
A
A
A
A
B
B
A

™ & © 2021 Westinghouse Electric Corporation
© 2021 Westinghouse Outdoor Power Equipment, LLC All Rights Reserved.
WPac12000
REV01
05/27/22