Loading ...
Loading ...
Loading ...

- 6 -
components frequently cleaned, inspected, and lubricated.
Note: If the equipment is stored outdoors, be sure to lubricate all parts
before and after use to ensure the equipment stays in good working
condition.
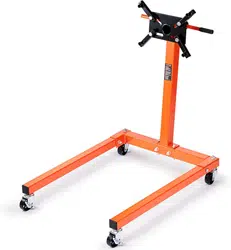
ASSEMBLY INSTRUCTIONS
1. Attach
Caster Assembly
(18) and front leg (15) to
rear support beam(10)
with washer (14), spring washer(13) ,nut (12)and bolt(16).
2. Attach
Caster Assembly
(19) to the front leg (15) with washer
(14),spring washer(13) and nut (12).Cover the end cover(17)at last.
3. Attach main post (9) to the finished rear support beam (10) assembly
with bolt (11), washer (14), spring washer(13) and nut (12).
4. Attach mounting arms (7) to head assembly (6)with bolt (8), washer
(5),spring washer(4) and nut (3).
5. Insert head assembly(6) into the hole of the main post(9). Line up the
hole in the head assembly(6) and the main post(9), and assembly them
by inserting the lock pin(2).
6. Insert the handle (1) into the hole of the head assembly(6).
7.
Tight all the screws.
ASSEMBLY DIAGRAM
Item
Name
Qty.
Item
Name
Qty.
01
Handle
1
11
Hex Head Bolt
M12x90mm
4
02
Lock Pin
1
12
Nut M12
10
03
Nut M14
4
13
Spring Washer M12
10
04
Spring Washer M14
4
14
Washer M12
10
05
Washer M14
4
15
Front Leg
2
06
Head Assembly
1
16
Hex Head Bolt
M12x70mm
2
07
Mounting Arms
4
17
End Cover
4
08
Hex Head Bolt M14x60mm
4
18
Caster Assembly 3"×70
2
9
Main Post
1
19
Caster Assembly 3"×25
2
10
Rear Support Beam
1
Loading ...
Loading ...
Loading ...