Loading ...
Loading ...
Loading ...

Page 5
Ceiling Kit - Discharge Outlet (Condenser exhaust)
& Discharge Make Up (Fresh Air Inlet)
1.
2.
Align the holes of the flange to the holes located on the top of the unit. Attach to the
top of the KwiKool unit using the factory supplied fasteners.
Attach each duct to the flanges on the replacement ceiling panel(s); secure the duct
to each flange using the supplied clamps.
Install the replacement ceiling panel(s) in the ceiling grid with the duct attached,
connect the open end of the duct to the flanges on your KwiKool and secure with
supplied clamps. Be sure the area where you are ducting can absorb the heat load
and is open enough to keep the system from returning its own hot discharge air.
Your KwiKool must have fresh make up air going to the condenser to operate.
**For Ceiling Kit Users** - The standard two duct ceiling kit (CK-XX) is recom-
mended to be used with KIBXX models for optimum performance. KwiKool’s Iceberg
(KIB) units may be used for primary, supplemental or standby cooling. Using
KwiKool’s exclusive ceiling kit ensures that you are able to utilize 100% of the units
rated capacity and without creating a negative pressure in your conditioned space.
KwiKool’s exclusive IO integral condenser system isolates both the condenser
discharge air and the condenser make up air from the conditioned space.
**Note: The space where the make up air and discharge air is directed (normally
above a drop ceiling) must be well ventilated and large enough for the heat load to
be absorbed. Condenser discharge air is prevented from entering the make up air
inlet by way of a factory installed deflector on your Ceiling Kit. Make sure that the
deflector is on the discharge (rear) duct from the unit. However if the condenser
discharge and return space is unventilated, closed off or unable to handle the heat
load, the make up air will continue to get hotter until the system is not able to handle
the high heat buildup. This will lead to the unit tripping its high pressure safety
switch. If this occurs, you will get an “HP” on the control panel. To resolve, fix the
lack of make up air and reset the high pressure switch per the instructions in the
Troubleshooting Guide section. Additionally, the ceiling kit replacement panel is not
limited to ceiling use and may be placed or fastened to any vertical or horizontal
surface providing the discharge and make up air is able to be directed to the space
where it is mounted. For areas with a closed ceiling or no ceiling use the double
flange ceiling kit method or extended duct method.
Visit www.KwiKool.com for more information and a complete set up guide.
Follow these installation steps:
3.
4.
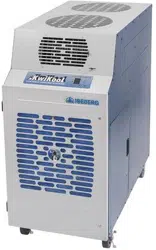
Ceiling Kit (Optional Accessory) - The ceiling kit is comprised of flanges with foam
tape, fasteners, two (2) eight foot lengths of flexible duct, duct clamps, and one
24”X24” replacement ceiling tile for KIB 1411 and KIB1811. All other KIB models use
two (2) 24”X24” replacement ceiling tiles.
C.
Loading ...
Loading ...
Loading ...