
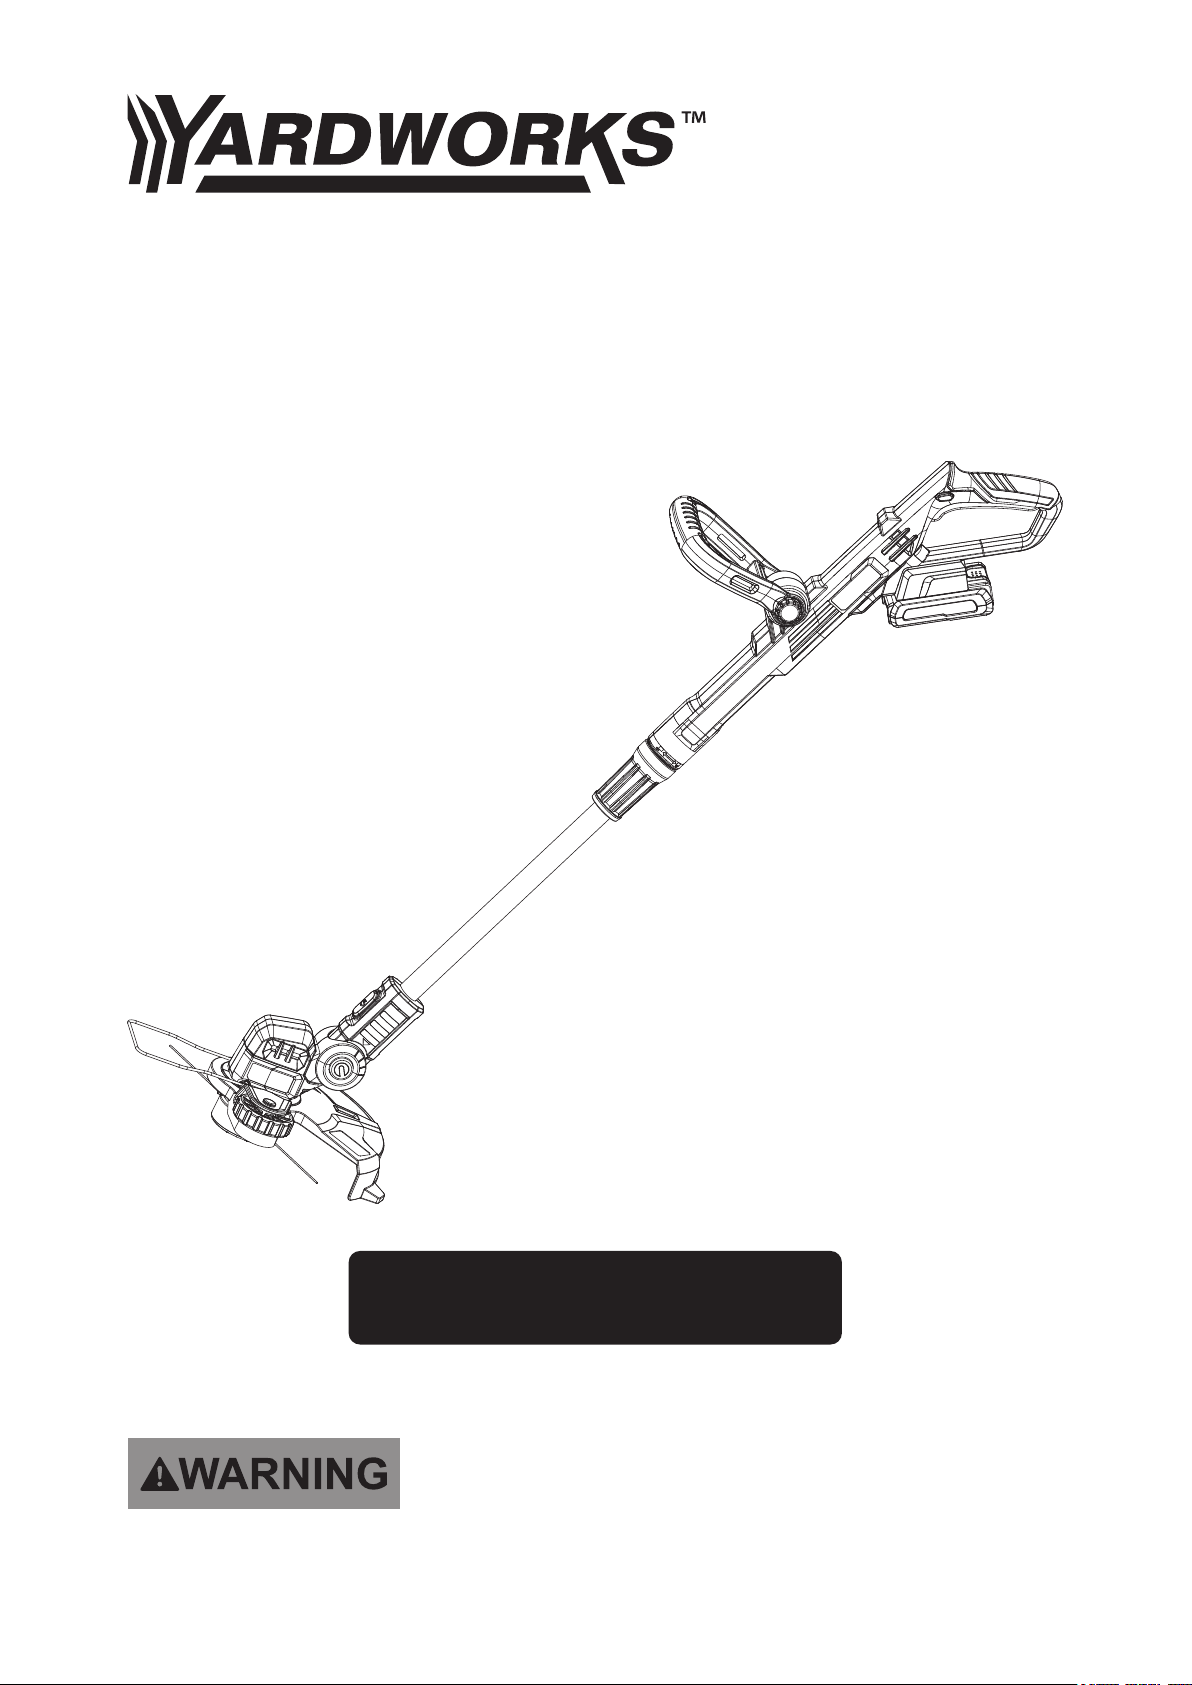
OPERATOR’S MANUAL
12-Inch 20V Lithium-ion String Trimmer With
(1) 20V 2.0Ah Lithium-ion Battery
267-2903
TOLL-FREE HELPLINE: 1-888-930-8528
Read this operator manual before using this product. Failure to do so can result in
serious injury. SAVE THIS MANUAL
TABLE OF CONTENTS
WARNING: Some dust created by power sanding, sawing, grinding, drilling and
other construction activities contains chemicals known to the state of California to cause
cancer, birth defects or other reproductive harm. Some examples of these chemicals
are:
Lead from lead-based paints,
Crystalline silica from bricks and cement and other masonry products, and
Arsenic and chromium from chemically - treated lumber.
Your risk from these exposures varies, depending on how often you do this type of
work. To reduce your exposure to these chemicals: work in a well-ventilated area, and
work with approved safety equipment, such as those dust masks that are specially
designed to filter out microscopic particles.
This page depicts and describes safety symbols that may appear on this product. Read,
understand, and follow all instructions on the machine before attempting to assemble
and operate it.
READ ALL INSTRUCTIONS!
READ & UNDERSTAND
INSTRUCTION MANUAL
SAFETY SYMBOLS
Safety Symbols
Important Safety Instructions
Know Your Tools
Charging Your Battery
Assembly
Operation
Maintenance
Troubleshooting
Warranty
.............................................................................1
........................................................2
...........................................................................6
...................................................................8
.......................................................................................9
.....................................................................................11
................................................................................14
..........................................................................16
......................................................................................17
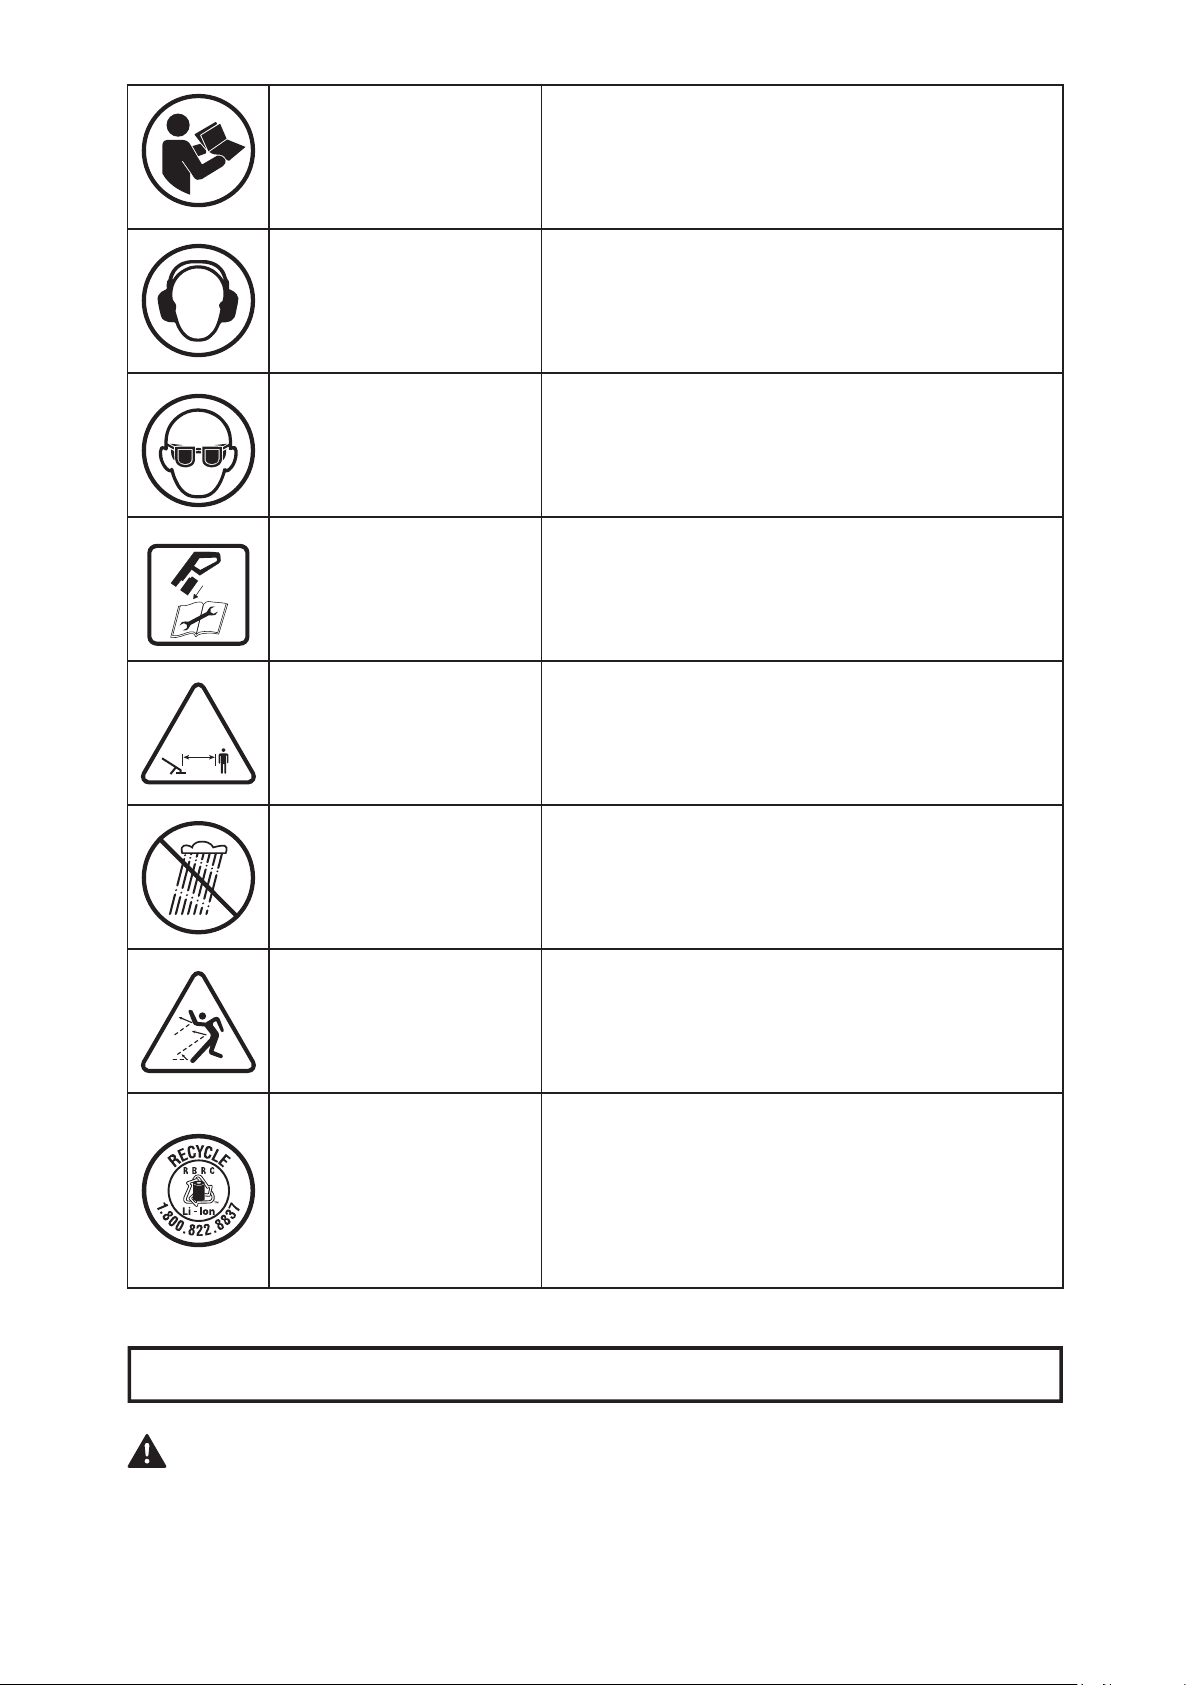
Read Operator's
Manual
To reduce the risk of injury, user must read
and understand operator’s manual before
using this product.
WARNING! When using electric trimmers, basic safety precautions should always
be followed to reduce the risk of fire, electric shock, and personal injury, including the
following:
IMPORTANT SAFETY INSTRUCTIONS
Noise may damage your hearing. Always wear
sound barriers (ear plugs or ear mufflers) to
protect your hearing.
Always wear safety goggles or safety glasses
with side shields and a full-face shield when
operating this product.
Remove Battery Pack before any repair or
maintenance.
Keep all bystanders at least 50 ft. away.
WARNING! Do not expose the unit to rain or
wet conditions.
Thrown objects can ricochet and result in
personal injury or property damage.
This product uses lithium-ion (Li-Ion) batteries.
Local, state, or federal laws may prohibit
disposal of batteries in ordinary trash. Consult
your local waste authority for information
regarding available recycling and/or disposal
options.
Wear Ear Protection
Wear Eye Protection
Remove Battery
Pack
Keep Bystanders
Away
Wet ConditionsAlert
Ricochet
Recycle Symbol
Minimum
50’ 15m

1) Avoid Dangerous Environment – Don’t use tools in damp or wet locations.
2) Don’t Use in Rain.
3) Keep Children Away - All visitors should be kept at a distance from work area.
4) Dress Properly - Do not wear loose clothing or jewelry. They can be caught in
moving parts. Use of rubber gloves and substantial footwear is recommended when
working outdoors. Wear protective hair covering to contain long hair.
5) Use Safety Glasses - Always use face or dust mask if operation is dusty.
6) Use Tool Properly - Do not use tool for any job except that for which it is intended.
7) Don’t Force Tool - It will do the job better and with less likelihood of a risk of injury
when used at the rate for which it was designed.
8) Don’t Overreach - Keep proper footing and balance at all times.
9) Stay Alert - Watch what you are doing. Use common sense. Do not operate tool
when you are tired.
10) Store Tools Indoors - When not in use, tools should be stored indoors in dry, and
high-up or locked place - out of reach of children.
11) Maintain Tool with Care - Keep cutting edge sharp and clean for best performance
and to reduce the risk of injury. Follow instructions for lubricating and changing
accessories. Keep handles dry, clean, and free from oil and grease.
12) Check Damaged Parts - Before further use of the tool, a guard or other part that is
damaged should be carefully checked to determine that it will operate properly and
perform its intended function. Check for alignment of moving parts, binding of
moving parts, breakage of parts, mounting, and any other condition that may affect
its operation. A guard or other part that is damaged should be properly repaired or
replaced by an authorized service center unless indicated elsewhere in this manual.
1. Prevent unintentional starting. Ensure the switch is in the off-position before con-
necting to battery pack, picking up or carrying the tool. Carrying the tool with your
finger on the switch or tool that has the switch on, invites accidents.
2. Disconnect the battery pack from the tool before making any adjustments, changing
accessories, or storing tool. Such preventive safety measures reduce the risk of
starting the tool accidentally.
3. Recharge only with the charger specified by the manufacturer. A charger that is
suitable for one type of battery pack may create a risk of fire when used with anoth-
er battery pack.
FOR ALL TOOLS
FOR ALL BATTERY-OPERATED GARDEN-
ING TOOLS

1. Keep guards in place and in good working order.
2. Keep hands and feet away from cutting area.
3. When replacing the cutting line, use no more than 0.065” (1.65mm) nylon line; using
heavier lines than recommended by the manufacturer increases the load on the
motor and reduces its operating speed. This results in overheating and damage to
the trimmer.
4. Clear the area to be cut before each use. Remove all objects such as rocks, broken
glass, nails, wire, or string that can be thrown or become entangled in the cutting
attachment. Make sure that other persons and pets are at least 50 ft. (15m) away.
5. Always hold the trimmer firmly, with both hands on the handles, while operating.
Wrap your fingers and thumbs around the handles.
6. Do not operate the trimmer while under the influence of alcohol or drugs.
7. Do not operate the trimmer in gaseous or explosive atmospheres. Motors in these
tools normally spark, and the sparks might ignite fumes.
4. Use tools only with specifically designated battery packs. Use of any other battery
packs may create a risk of injury and fire.
5. When battery pack is not in use, keep it away from other metal objects, like paper
clips, coins, keys, nails, screws or other small metal objects, that can make a con-
nection from one terminal to another. Shorting the battery terminals together may
cause burns or a fire.
6. Under abusive conditions, liquid may be ejected from the battery; avoid contact. If
contact accidentally occurs, flush with water. If liquid contacts eyes, additionally
seek medical help. Liquid ejected from the battery may cause irritation or burns.
7. Do not use a battery pack or tool that is damaged or modified. Damaged or modified
batteries may exhibit unpredictable behavior resulting in fire, explosion or risk of
injury.
8. Do not expose a battery pack or tool to fire or excessive temperature. Expo- sure to
fire or temperature above 1266°F may cause explosion.
9. Follow all charging instructions and do not charge the battery pack or tool outside
of the temperature range specified in the instructions. Charging improperly or at
temperatures outside of the specified range may damage the battery and in-
crease the risk of fire.
10. Have servicing performed by a qualified repair person using only identical replace-
ment parts. This will ensure that the safety of the product is maintained.
11. Do not modify or attempt to repair the tool or the battery pack (as applicable) except
as indicated in the instructions for use and care.
ADDITIONAL SAFETY RULES FOR STRING
TRIMMER AND EDGE TRIMMER

8. Damage to Trimmer - If you strike a foreign object with the trimmer or it becomes
entangled, stop the tool immediately, check for damage and have any damage
repaired before further operation is attempted. Do not operate with a broken guard
or spool.
9. If the equipment should start to vibrate abnormally, stop the motor and check imme-
diately for the cause. Vibration is generally a warning of trouble. A loose head may
vibrate, crack, break or come off the trimmer, which may result in serious or fatal
injury. Make sure that the cutting attachment is properly fixed in position. If the head
loosens after fixing it in position, replace it immediately. Never use a trimmer with a
loose cutting attachment.
10. Replace a cracked, damaged or worn-out cutting head immediately, even if damage
is limited to superficial cracks. Such attachments may shatter at high speed and
cause serious or fatal injury.
11. Check the cutting attachment at regular short intervals during operation, or immedi-
ately if there is a noticeable change in cutting behavior.
12. Do not wash with a hose; avoid getting water in motor and electrical connections.
13. To reduce the risk of injury from loss of control, never work on a ladder or on any
other insecure support. Never hold the cutting attachment above waist height.
14. If situations occur that are not covered in this manual, use care and good judgment.
Contact the TOLL-FREE HELPLINE: 1-888-930-8528 for assistance.
1. Do not dismantle, open or shred battery pack.
2. Do not expose battery pack to heat or fire. Avoid storage in direct sunlight. The cells
may explode. Check with local codes for possible special disposal instructions.
3. Do not short-circuit a battery pack. Do not store battery packs haphazardly in a box
or drawer where they may short-circuit each other or be short-circuited by other
metal objects. When battery pack is not in use, keep it away from other metal
objects, like paper clips, coins, keys, nails, screws or other small metal objects, that
can make a connection from one terminal to another. Shorting the battery terminals
together may cause burns or fire.
4. Do not subject battery pack to mechanical shock.
5. Observe the plus (+) and minus (–) marks on the battery back and equipment and
ensure correct use.
6. Keep battery pack out of the reach of children.
7. Always purchase the battery pack recommended by the device manufacturer for the
equipment.
8. Keep battery pack clean and dry.
9. Wipe the battery pack terminals with a clean dry cloth if they become dirty.
SAFETY WARNINGS FOR BATTERY PACK
1 2 14 13
3
5 791112
8
6
4
16
15
Save these instructions. Refer to them frequently and use them to instruct others
who may use this tool. If you lend this tool to someone else, also lend these
instructions to them to prevent misuse of the product and possible injury.
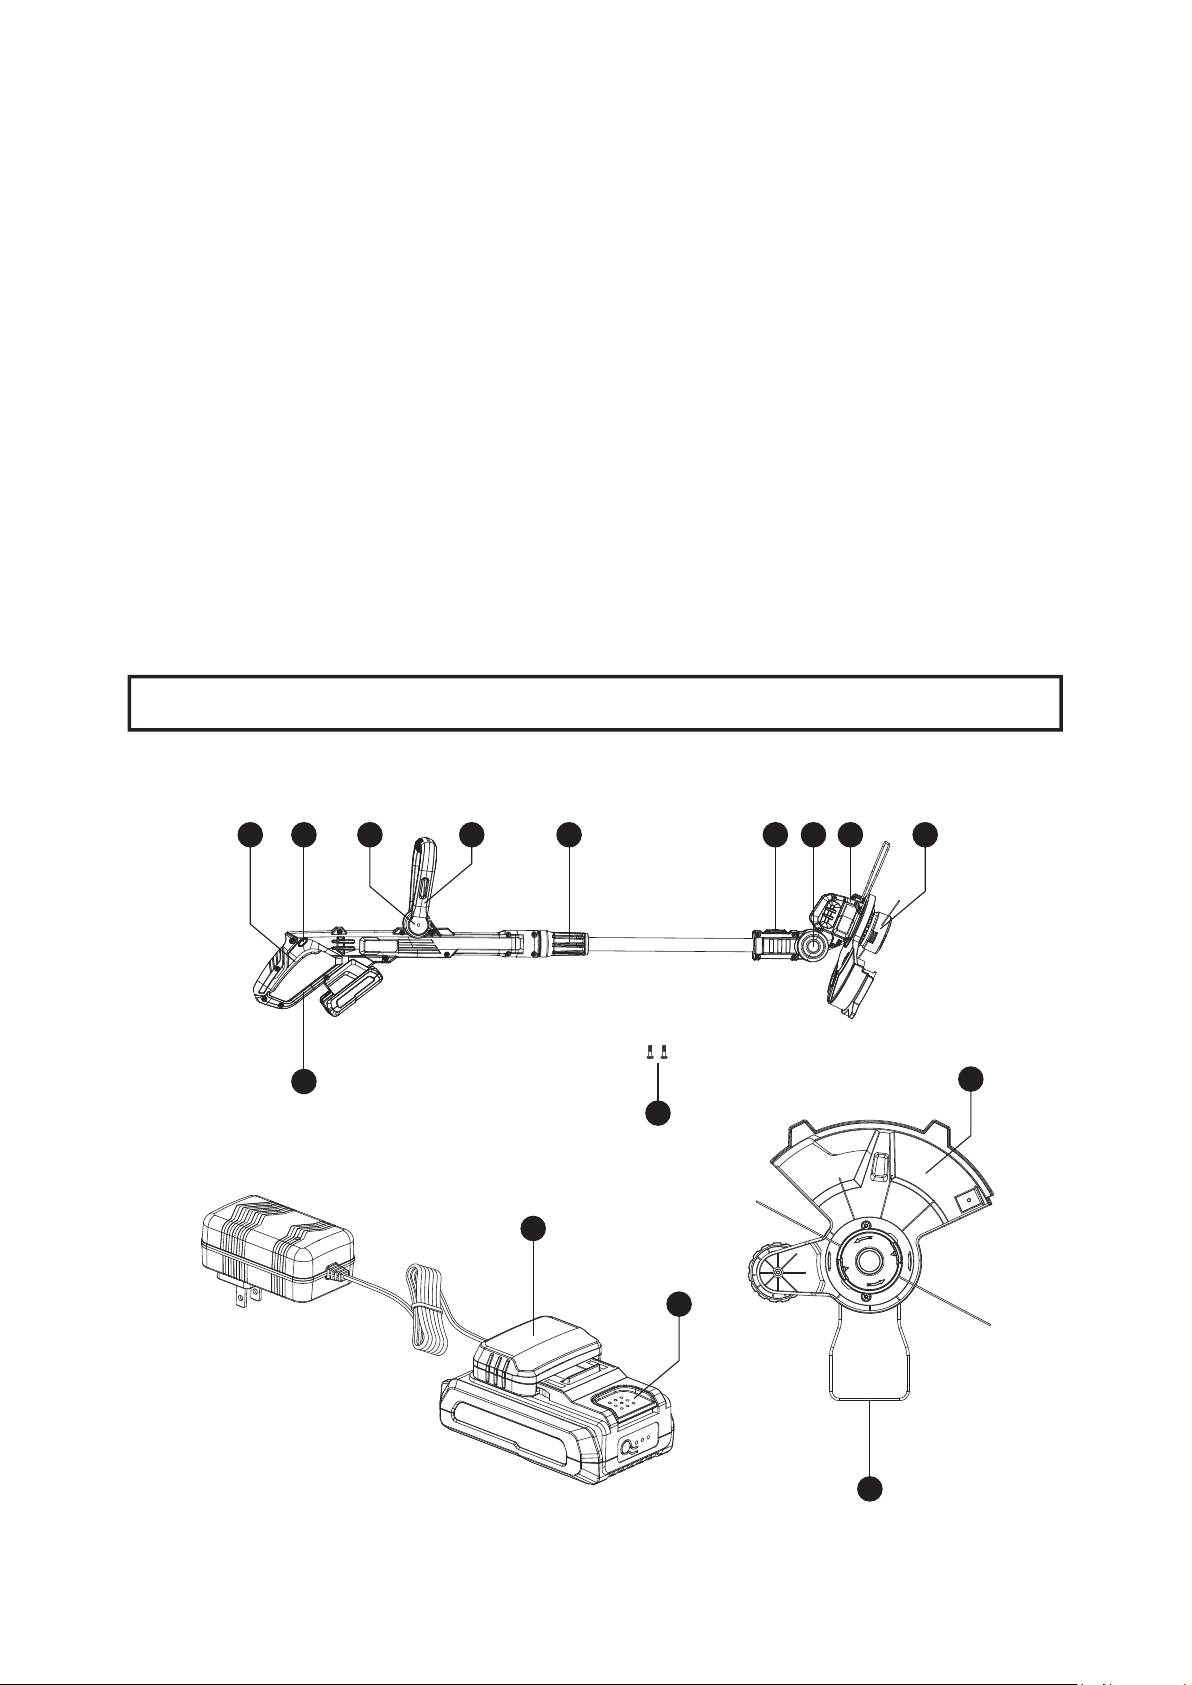
KNOW YOUR TOOLS
10. Battery pack need to be charged before use. Always use the correct charger and
refer to the manufacturer’s instructions or equipment manual for proper charging
instructions.
11. Do not leave battery pack on prolonged charge when not in use.
12. After extended periods of storage, it may be necessary to charge and discharge the
battery pack several times to obtain maximum performance.
13. Battery pack gives its best performance when it is operated at normal room tem-
perature (68 °F ± 41 °F).
14. Use only the battery pack in the application for which it was intended.
15. Remove the battery pack from the equipment when not in use.
16. Dispose of properly.

1. On/off switch
2. Safety lock
3. Operating handle
4. Battery pack
5. Shaft adjustment collar
6. Safety hood
Technical Data
Item No.
Voltage
No Load Speed
Cutting Diameter
Line Diameter
Battery
Charger
Charger Rating
Charging Time(Approx.)
267-2903
20V
6500RPM
12"
0.065"
20V 2.0Ah (D01102700)
1.5A (D02203000)
Input: 100-120V~50-60Hz 50W
Output: 21.2V, 1.5A
90mins
Packing List
Part Name
String Trimmer
Safety Guard
Flower Guard
Auxiliary Handle
Bolts for Safety Guard
Battery Pack
Charger
Operator's Manual
Quantity
1
1
1
1
2
1
1
1
7. Spool and line
8. Flower guard
9. Cutting head
10. Edging wheel
11. Lock for cutting head inclination
12. Edging function convert button
13. Auxiliary handle
14. Push button for adjusting front
handle
15. Battery charger
16. Screws for fitting safety hood

a. Connect the charger to the power supply (120V~60Hz). The red charging indication
LED will shine, indicating that the charger is working correctly.
b. Align the raised ribs of the battery pack with the battery-mounting slots in the char-
ger; slide the battery pack down onto the charger.
c. When the battery is inserted properly, the green light will slowly flash to indicate that
the battery is charging. The red light will turn off.
d. When the green light stays on, the battery is fully charged.
The battery pack is equipped with a push button for checking the charge level. Simply
press the push button to read off the battery charge level from the LEDs of the battery
indicator:
CHARGING YOUR BATTERY
Battery Indicator
Charging Your Battery
LED Indicator
3 lights on
2 lights on
1 light on
1 light flashing
Battery Charge Level/Working Conditions
70%<Charge Level≤100%
40%<Charge Level≤70%
10%<Charge Level≤40%
Charge level ≤10%
WARNING:
Do not use the charger outdoors or expose it to wet or damp conditions. Water
entering the charger will increase the risk of electric shock.
NOTICE: Lithium-Ion battery packs are shipped partially charged. Before using it the
first time, fully charge the battery pack.
NOTICE: You can charge two batteries at the same time with the charger provided.

- This product requires assembly.
- Carefully remove the product and any accessories from the box. Make sure that all
items listed in the packing list are included. Inspect the tool carefully to make sure
that no breakage or damage occurred during shipping.
- Do not discard the packing material until you have carefully inspected and satisfacto-
rily operated the tool.
Unpacking
NOTICE:
The battery pack will fully charge if left on the charger, but it will not over-
charge. If the battery pack remains on the charger for one month or more, it
will drop to lower charge capacity. If this occurs, re-install the battery pack on
the charger to recharge it fully.
A significantly reduced run time after fully charging the battery pack indicates
that the batteries are near the end of their usable life and must be replaced.
The charger may warm during charging. This is part of the normal operation
of the charger. Charge in a well-ventilated area.
Use the table below to determine charger light patterns and possible causes. For all
other issues, please ask the helpline for help.
Charger Led Indicator Table
Possible Reason
No load charging –There's no battery
inserted in the charger.
Normal charging – The battery is being
charged.
Fully charged – The battery is fully charged and
the charging process is finished.
Indication
Red Light – Off
Green Light – On
Red Light – On
Green Light – Off
Red Light – On
Green Light – Off
WARNING: If any parts are damaged or missing, do not operate this product until
the parts are replaced. Use of this product with damaged or missing parts could result in
serious personal injury.
ASSEMBLY
WARNING: Do not attempt to modify this product or create accessories not recom-
mended for use with this string trimmer. Any such alteration or modification is misuse
and could result in a hazardous condition leading to possibly serious personal injury.
WARNING: Always remove the battery pack from the product when you are assem-
bling parts, adjusting, cleaning, or when the product is not in use.
2
3
4
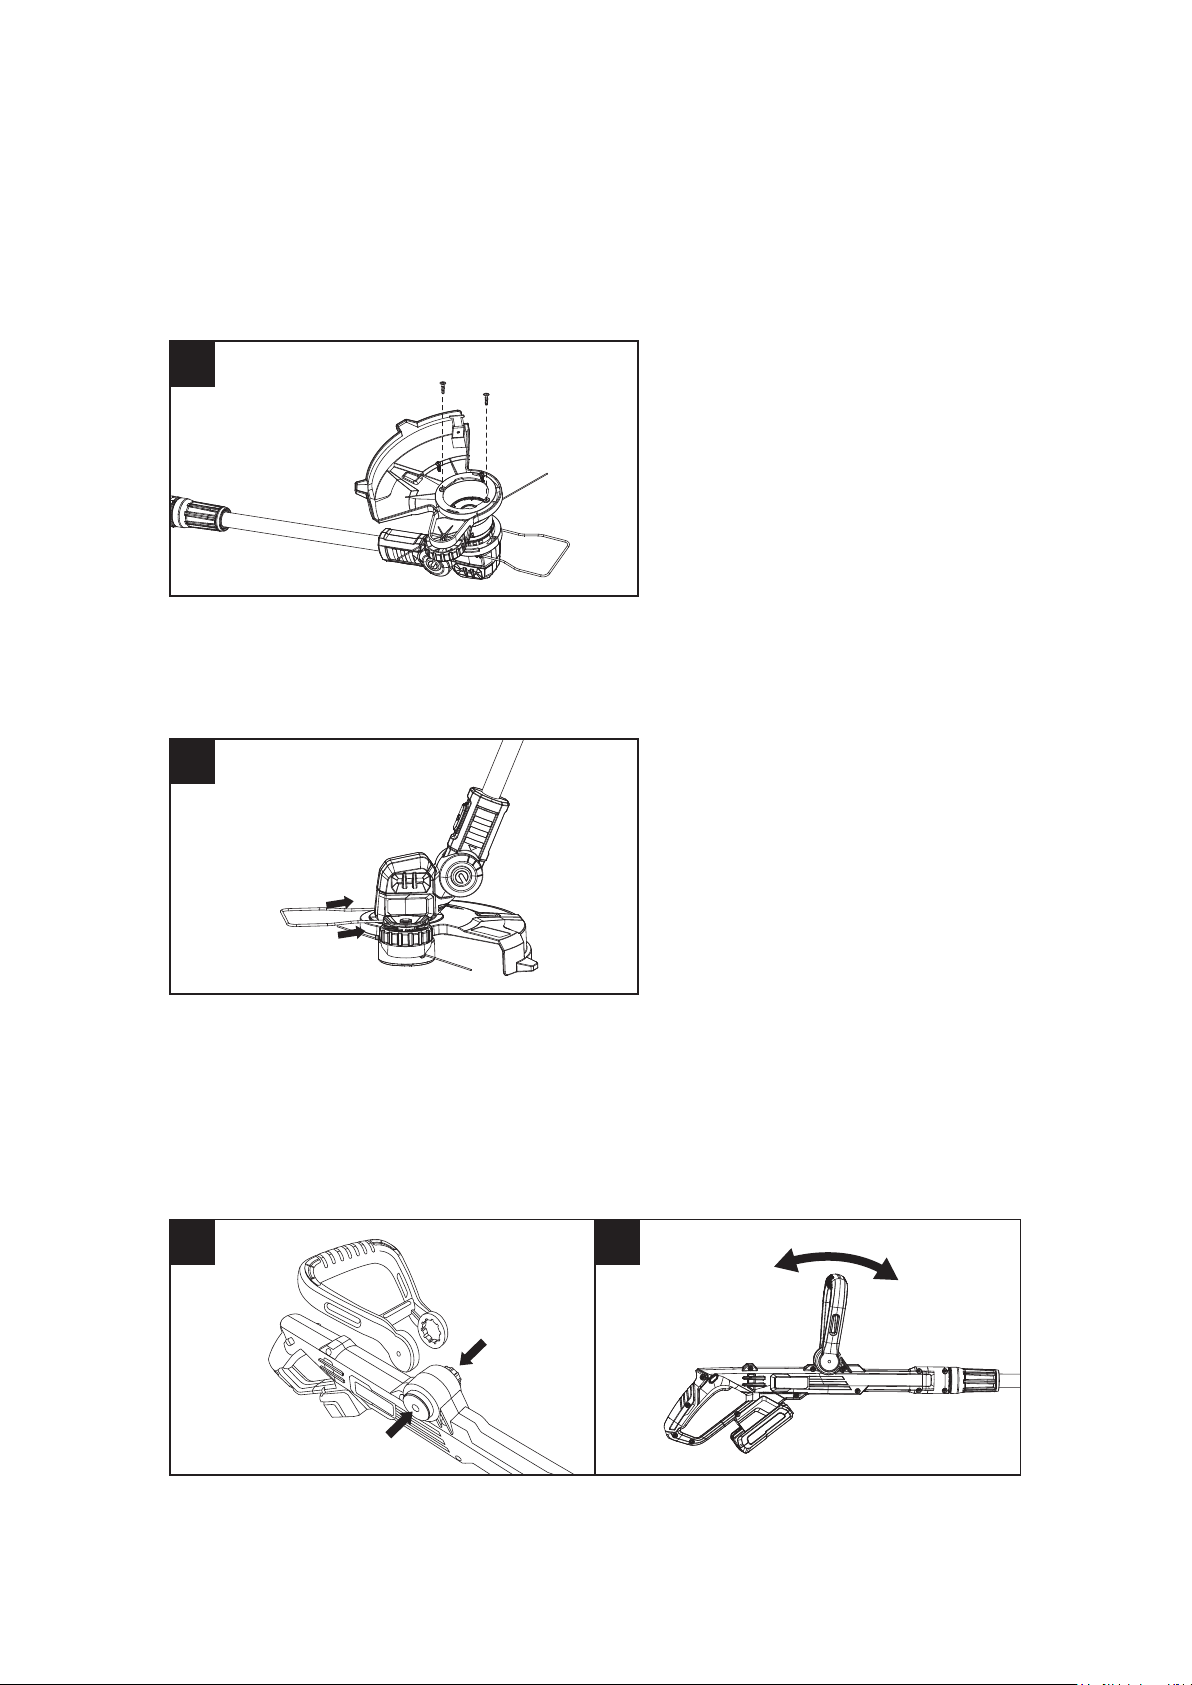
a. Place the string trimmer on a flat surface. Put the string trimmer upside down.
Mount the protective hood on the motor head.
b. Fix the safety guard with 2 bolts.
Fitting The Safety Guard(Fig. 1)
1
a. Push the auxiliary handle locking button, and mount the auxiliary handle onto the
seat.
b. Rotate the auxiliary handle to the required angle.
c. Release the unlock button and ensure the handle clicks into a locked position.
Fitting The Auxiliary Handle (Fig.3&4)
a. Attach the flower guard to the motor housing.
Fitting The Flower Guard(Fig. 2)
- If any parts are damaged or missing, please return the product to the place of
purchase.
2
2
1
6
OPERATION
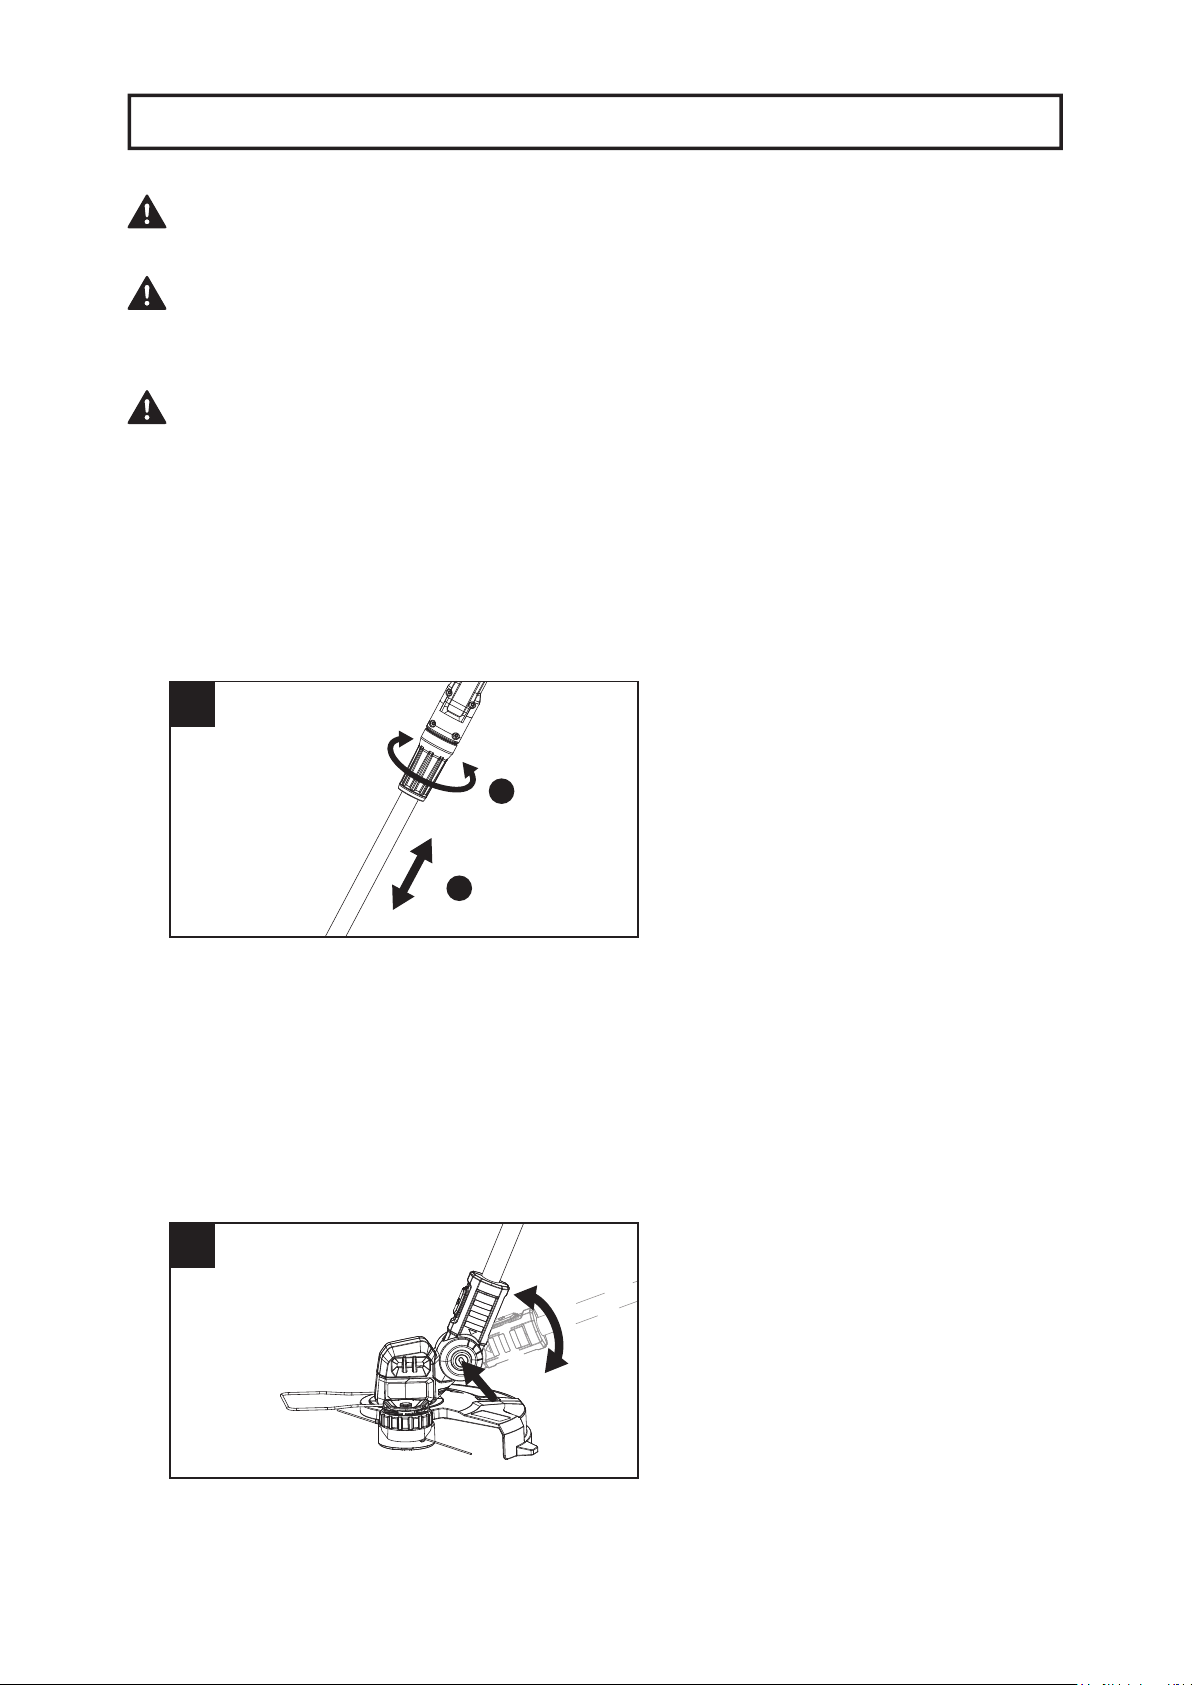
a. Slacken the locking collar.
b. Pull the telescopic pole to the desired length.
c. Retighten the locking collar.
Setting The Length Of Trimmer(Fig.5)
a. Press in and hold the cutting head locking button.
b. Tilt the cutting head to the required position.
c. Release the cutting head locking button and make sure the head clicks into a locked
position.
Setting The Angle Of The Cutting
Head(Fig.6)
WARNING: Do not allow familiarity with this product to make you careless.
Remember that a careless fraction of a second is sufficient to inflict serious injury.
WARNING: Always wear eye protection with side shields marked to comply with
ANSI Z87.1, along with hearing protection. Failure to do so could result in objects being
thrown into your eyes and other possible serious injuries.
WARNING: Do not use any attachments or accessories not recommended by the
manufacturer of this product. The use of attachments or accessories not recommended
can result in serious personal injury.
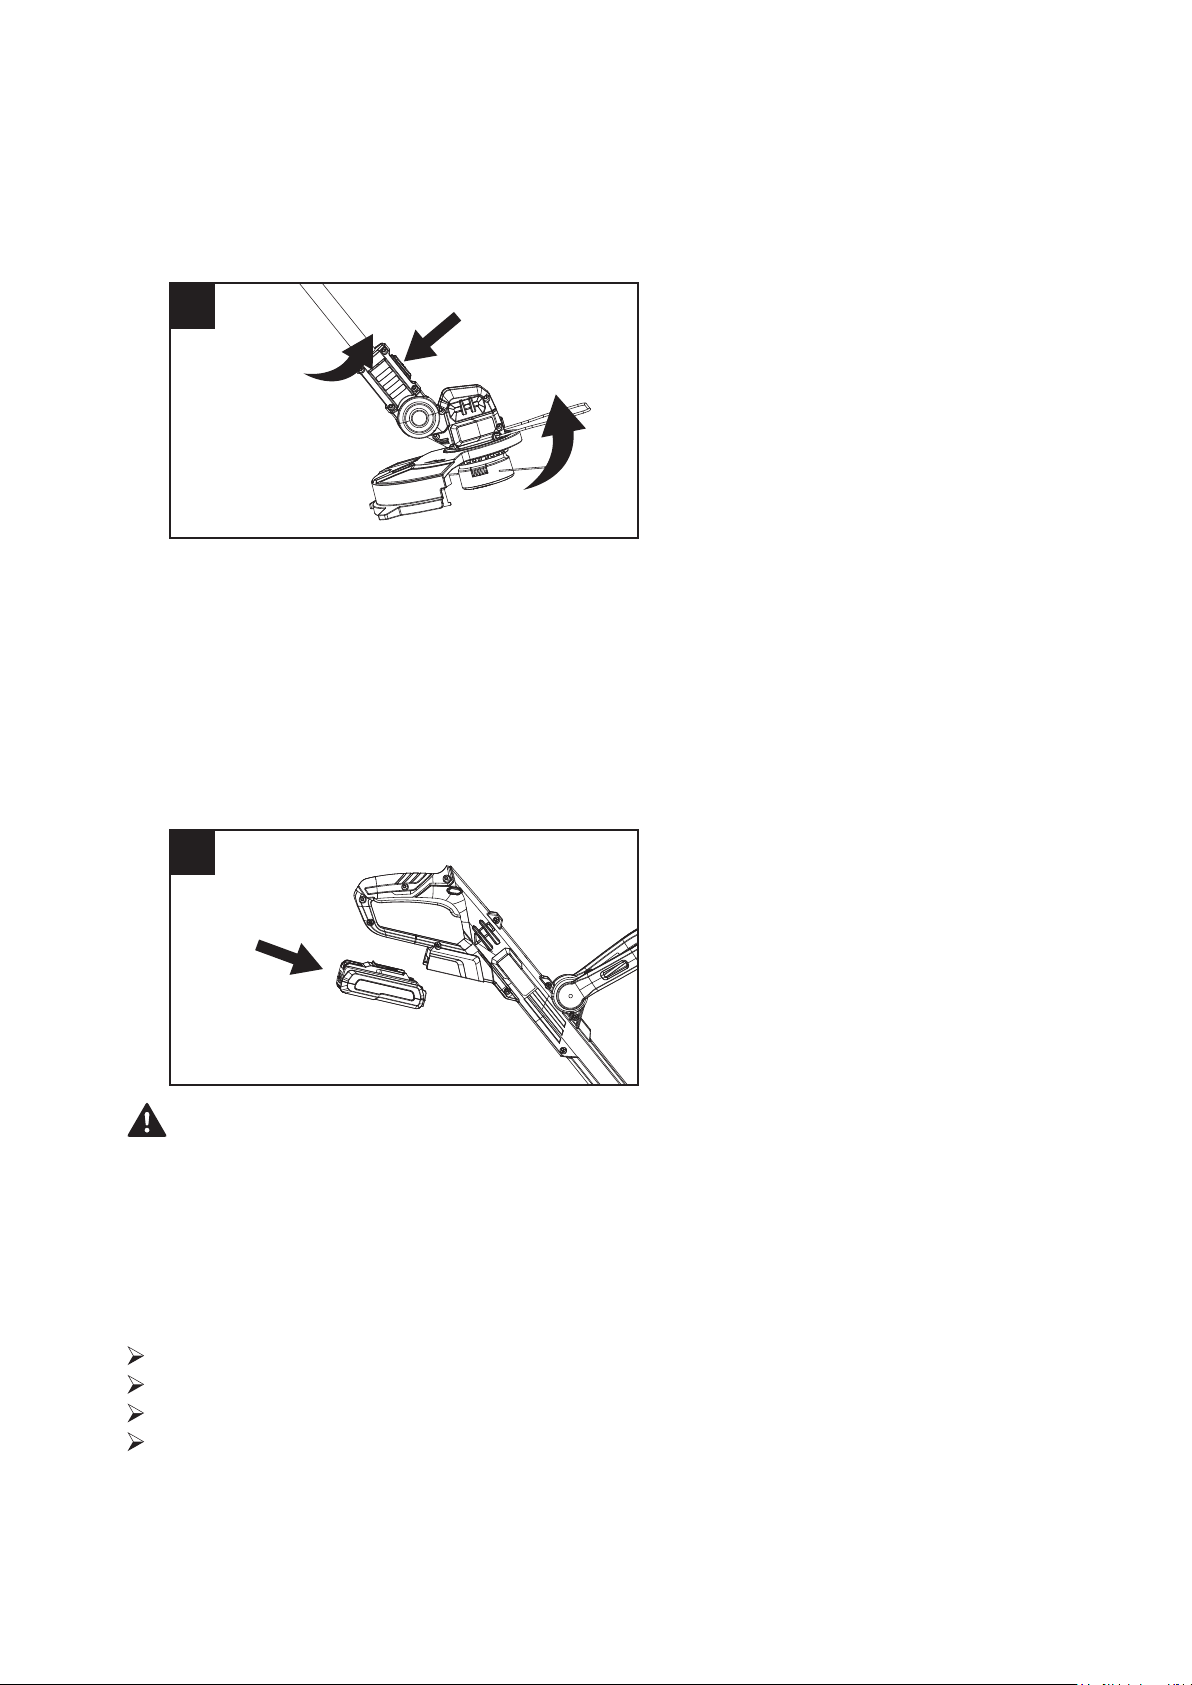
7 90°
8
a. Press the edging function converting button.
b. Turn the trimmer head 90°.Release the edging function converting button, and make
sure the string trimmer head is secured in place.
c. Now the string trimmer can be operated as a wheeled edger.
Converting To Edging Function(Fig.7)
Make sure that you have a secure and balanced footing.
Stand upright and hold the string trimmer in a relaxed position.
Make sure that the cutting line is not touching the ground or any other objects.
Hold the string trimmer with both hands: one hand on the rear handle and one hand
on the front-assist handle.
Starting/stopping The String Trimmer(Fig.9)
Starting/stopping The String Trimmer (Fig.9)
a. Align the ribs of the battery pack with the mounting slots in the string trimmer’s
battery port.
b. Press the battery pack towards the trimmer head until it snaps into position.
NOTICE: Make sure that the latch on the string trimmer snaps into place and the
battery pack is secured to the tool before beginning operation.
c. To remove, press the locking button and pull the battery away from the trimmer.
To Install/remove Battery Pack (Fig.8)
WARNING: Always be aware of the location of your feet and children or pets
around you when pressing the battery release button. Serious injury could result if the
battery pack falls. NEVER remove the battery pack at a high location.
9
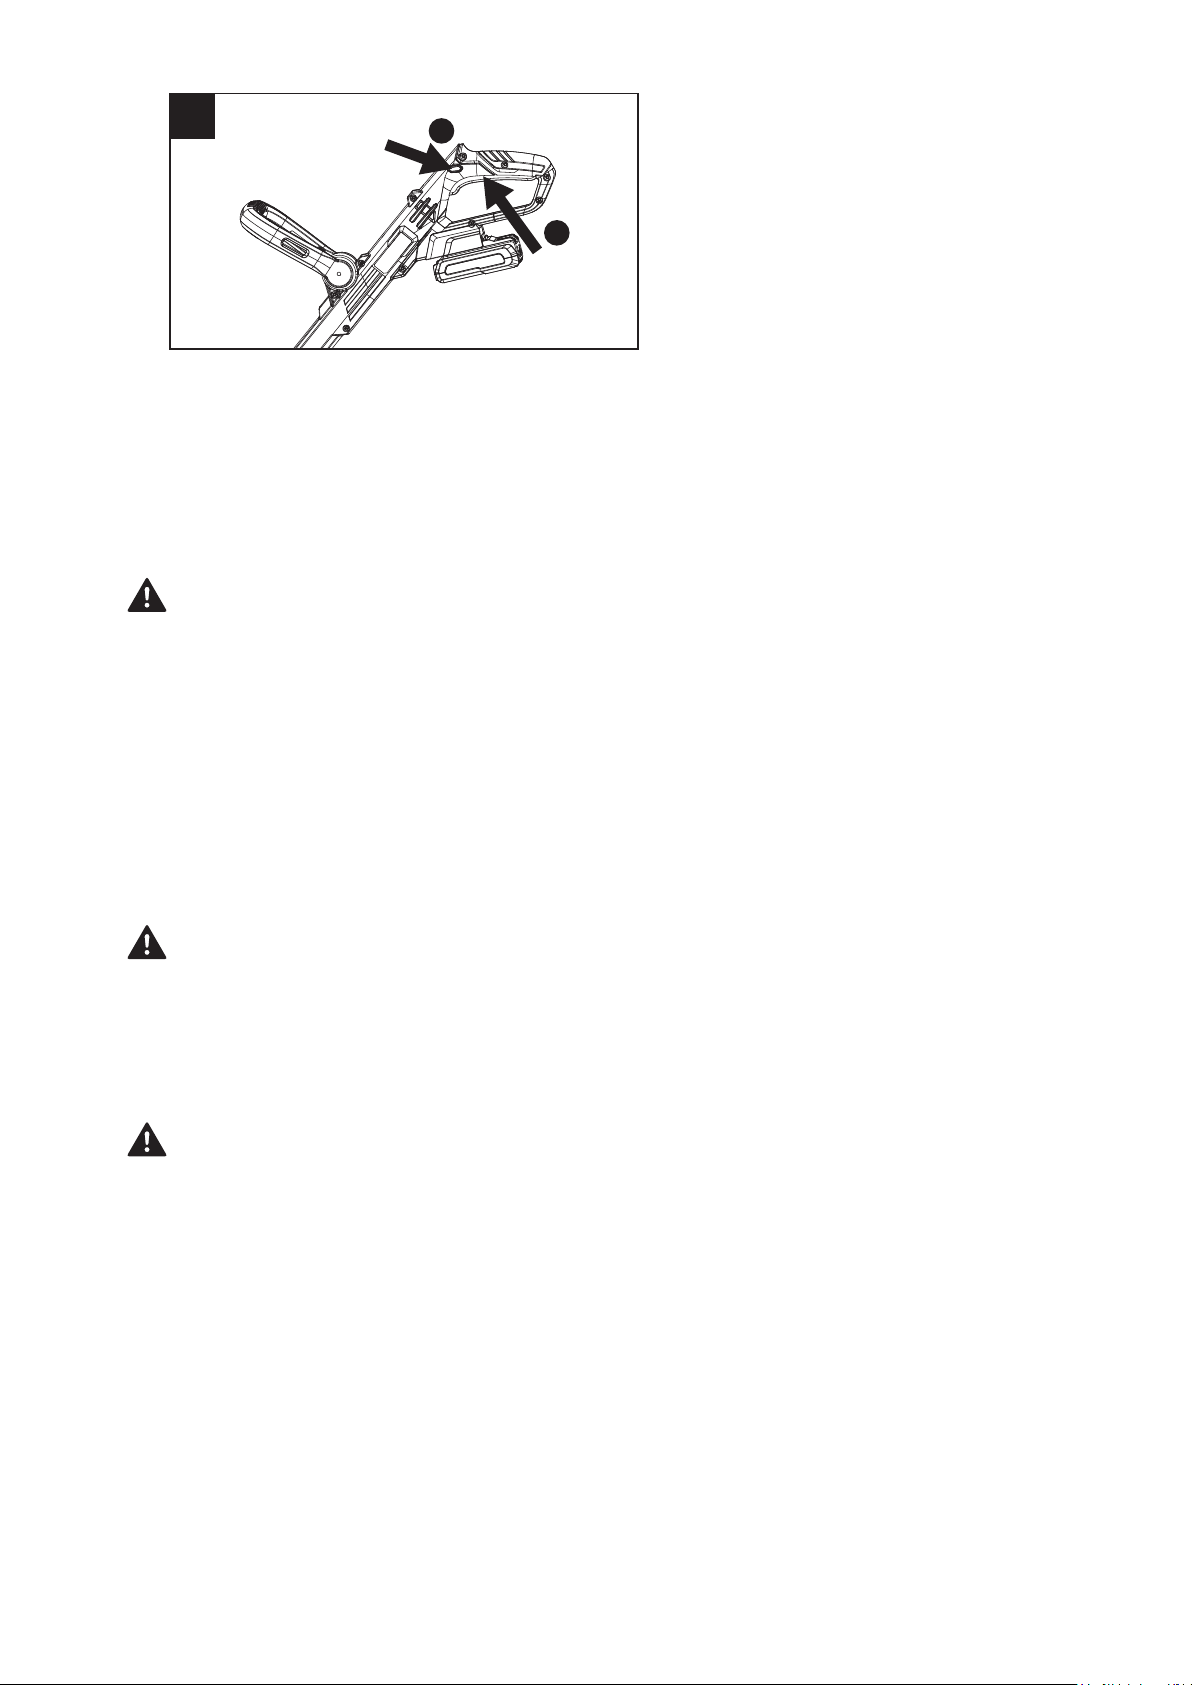
1
2
a. Press the lock-off button and hold it in that position. Depress the ON/OFF trigger to
turn on the string trimmer.
b. Release the lock off button after the trimmer is turned on.
c. To stop, release the ON/OFF trigger. Wait till the machine and the spool line come
to a complete stop.
NOTICE: The motor runs only when the lock off button and trigger are both
pressed.
The string trimmer comes with a full line spool. The line wears down during work. To
feed in new line:
a. Switch on the device, the line will automatically be increased by the centrifugal
force.
b. Switch off and switch on again until the line is increased to the right length. The
trimmer line will be cut to the right length by the blade on the safety guard.
Adjusting Cutting Line Length
The correct angle for the cutting head is parallel to the ground.
b. Do not force the trimmer. Allow the very tip of the line to do the cutting (especially
Tips For The Operating String Trimmer
Holding The String Trimmer
WARNING: Always remove the battery pack from the string trimmer during
work breaks and after finishing work.
WARNING: Dress properly to reduce the risk of injury when operating this
tool. Do not wear loose clothing or jewelry. Wear eye and ear/hearing protection.
Wear heavy, long pants, boots and gloves. Do not wear short pants or sandals or
go barefoot.
Before operating the unit, stand in the operating position and check that:
a. The operator is wearing eye protection and proper clothing.
b. One arm is slightly bent, and the hand on that arm is holding the rear handle.
c. The other arm is straight, with that hand holding the auxiliary handle.
d. The trimmer head is parallel to the ground and easily contacts the material to be cut
without the operator having to bend over.
WARNING: Do not remove or alter the line cutting blade assembly. Excessive
line length will cause the motor to overheat and may result in serious personal
injury.
10
NOTICE: Always use the recommended nylon cutting line with a diameter that
does not exceed 0.065 in. (1.65 mm). Using line other than that specified may
cause the string trimmer to overheat or become damaged.
Line Replacement(Fig.11)
along walls).
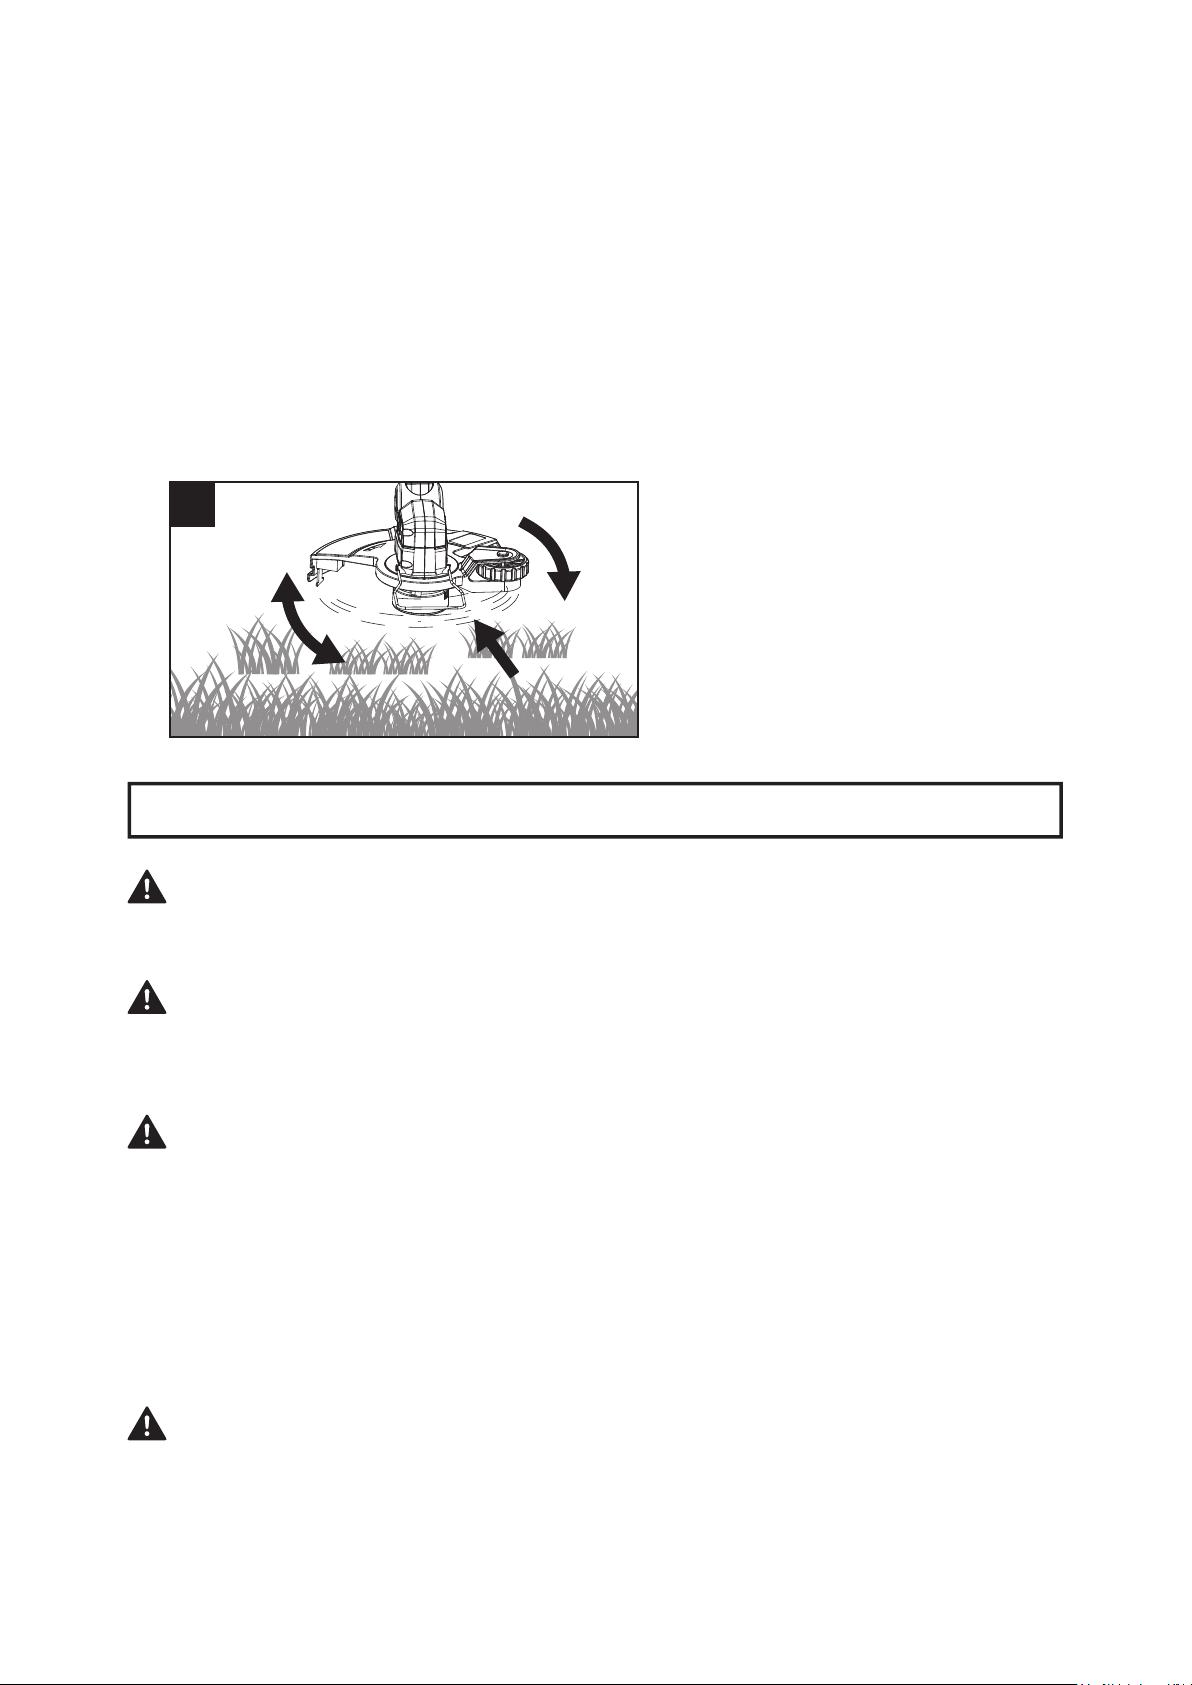
c. Cutting with the tip of the lines. Do not force the trimmer into uncut grass. Use the
recommended cutting area. (Fig. 10)
d. Grass over 8 inches (200 mm) should be cut by working from top to the bottom in
small increments to avoid premature line wear or motor drag.
e. Slowly move the trimmer into and out of the are being cut, maintaining the cutting
head position at the desired cutting height. This movement can be either a for-
ward-backward motion or a side-to-side motion. Cutting shorter lengths produces
best results.
f. Wire and picket fences can cause extra string wear or breakage. Stone and brick
walls, curbs, and wood may wear strings rapidly.
g. Avoid trees and shrubs. Tree bark, wood moldings, siding, and fence posts can
easily be damaged by the strings.
WARNING: When servicing, use only identical replacement parts. Use of any other
parts may create a hazard or cause product damage. To ensure safety and reliability, all
repairs should be performed by a qualified service technician.
MAINTENANCE
WARNING: To prevent serious personal injury, remove the battery pack from the
tool before servicing, cleaning, changing add-on attachments or removing material from
the unit.
WARNING: Never use metal-reinforced line, wire, or rope, etc. These can break off
and become dangerous projectiles.
WARNING: Battery tools do not have to plugged into an electrical outlet; therefore,
they are always in operating condition. To prevent serious personal injury, take extra
precautions and care when performing maintenance, service or for changing the cutting
attachment or other attachments.
11
12
a. Clear any grass that may have wrapped itself around the motor shaft or trimmer
head.
b. Use a small brush or a small brush and a small vacuum cleaner to clean the air
vents on the motor head.
c. Keep the air vents free of obstructions.
d. Clean the unit using a dry cloth.
e. Do not use any strong detergents on the plastic housing or the handle. They can be
damaged by certain aromatic oils, such as pine and lemon. Do not use solvents
such as kerosene. Moisture can also cause a shock hazard. Wipe off any moisture
with a soft dry cloth.
Clean The String Trimmer
Sharpen The Line-cutting Blade
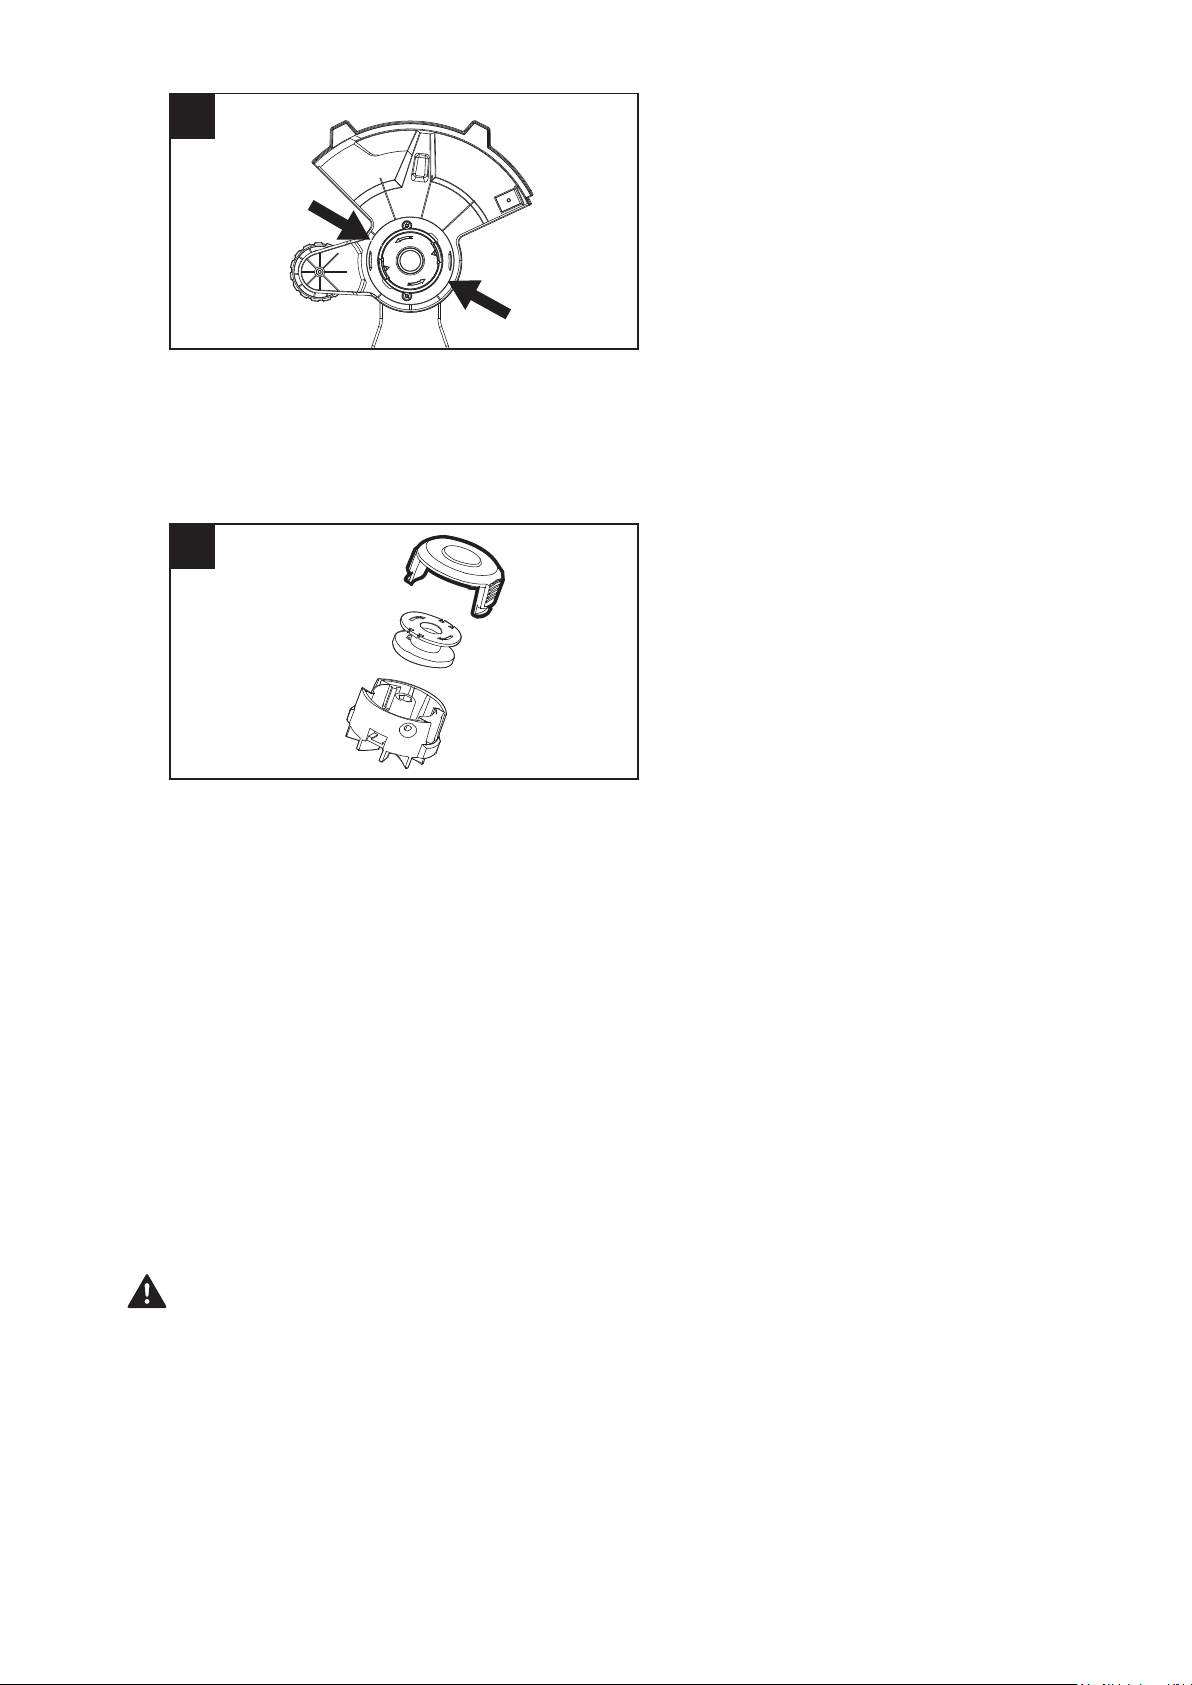
a. Remove the battery pack.
b. Press both locking devices together at the spool cover and remove the spool cover,
remove the old spool.
c. Fit the new spool or refilled spool in the trimmer head.
d. Refit the spool cover.
WARNING: Always protect your hands by wearing heavy gloves when per-
forming any maintenance on the line-cutting blade.
a. Remove the line-cutting blade from the guard.
b. Secure the blade in a vise.
c. Wear proper eye protection and gloves and be careful not to cut yourself.
d. Carefully file the cutting edges of the blade with a fine-tooth file or sharpening stone,
maintaining the original cutting-edge angle.
e. Replace the blade on the guard and secure it in place with the two screws.

a. Remove the battery pack from the trimmer.
b. Clean the tool thoroughly before storing it.
c. Store the unit in a dry, well-ventilated area, locked-up or up high, out of the reach of
children. Do not store the unit on or adjacent to fertilizers, gasoline, or other chemi-
cals.
Storing The String Trimmer
a. Protect the battery against moisture and water.
b. Store the battery only within a temperature range from 40°F to 104°F. As an exam-
ple, do not leave the battery in a vehicle or in the trimmer in direct sunlight.
c. Clean the ventilation slots of the battery occasionally with a soft, clean and dry
brush. A considerably shortened operating time after charging is an indication that
the battery is exhausted and must be replaced.
d. If you do not use the product for a long time, please charge and discharge the
battery park once every month.
Storing The Battery Pack

The battery pack is not
attached to the trimmer.
String trimmer
fails to start.
Attach the battery pack to the trimmer.
Possible Cause
Problem
Solution
TROUBLESHOOTING
Remove battery, check contacts and reinstall the
battery pack.
Charge the battery pack.
Press the lock-off button and hold it,
then depress the trigger to turn on
the string trimmer.
No electrical contact between
the trimmer and battery.
The battery pack is depleted.
The lock-off button and
trigger are not depressed
simultaneously.
Remove the battery pack and mount the guard on
the trimmer.
Use recommended nylon cutting line with diame-
ter no greater than 0.065
in. (1.65mm).
Stop the trimmer, remove the battery, and remove
the grass from the motor shaft and trimmer head.
Remove the trimmer head from the grass. The
motor will recover to work as soon as the load is
removed. When cutting, move the trimmer head in
and out of the grass to be cut and remove no
more than 8 inches of length in a single cut.
Cool the battery pack or string trimmer until the
temperature drops below 152°F (67°C).
Charge the battery pack.
Re-install the battery pack.
Rewind the line.
Remove the battery and replace the cutting line.
Remove the battery and clean the spool, spool
retainer and spool base.
Remove the battery, remove the line from the
spool and rewind.
The guard is not mounted on
the trimmer, resulting in an
overly long cutting line and
motor overload.
Heavy cutting line is used.
The motor shaft or trimmer
head is bound with grass.
The motor is overloaded.
The battery pack or string
trimmer is too hot.
The battery pack is depleted.
The battery pack is
disconnected from the
string trimmer
Line spool is not wound well.
There is not enough line on the
spool.
The trimmer head is dirty
The line is tangled on the
spool.
String trimmer
stops while
cutting.
Excessive
vibrations/ noise.
Trimmer will not
advance line.


Against Defects in Materials, Parts or Workmanship.
All Units Must Be Used and Maintained in Accordance with The Directions and Regula-
tions in the Operator's Manual.
Contact the TOLL-FREE HELPLINE: 1-888-930-8528 for assistance.
2-Year Tool, Battery and Charger Warranty
LIMITED WARRANTY SERVICE