
Technical Support and E-Warranty Certificate
www.vevor.com/support
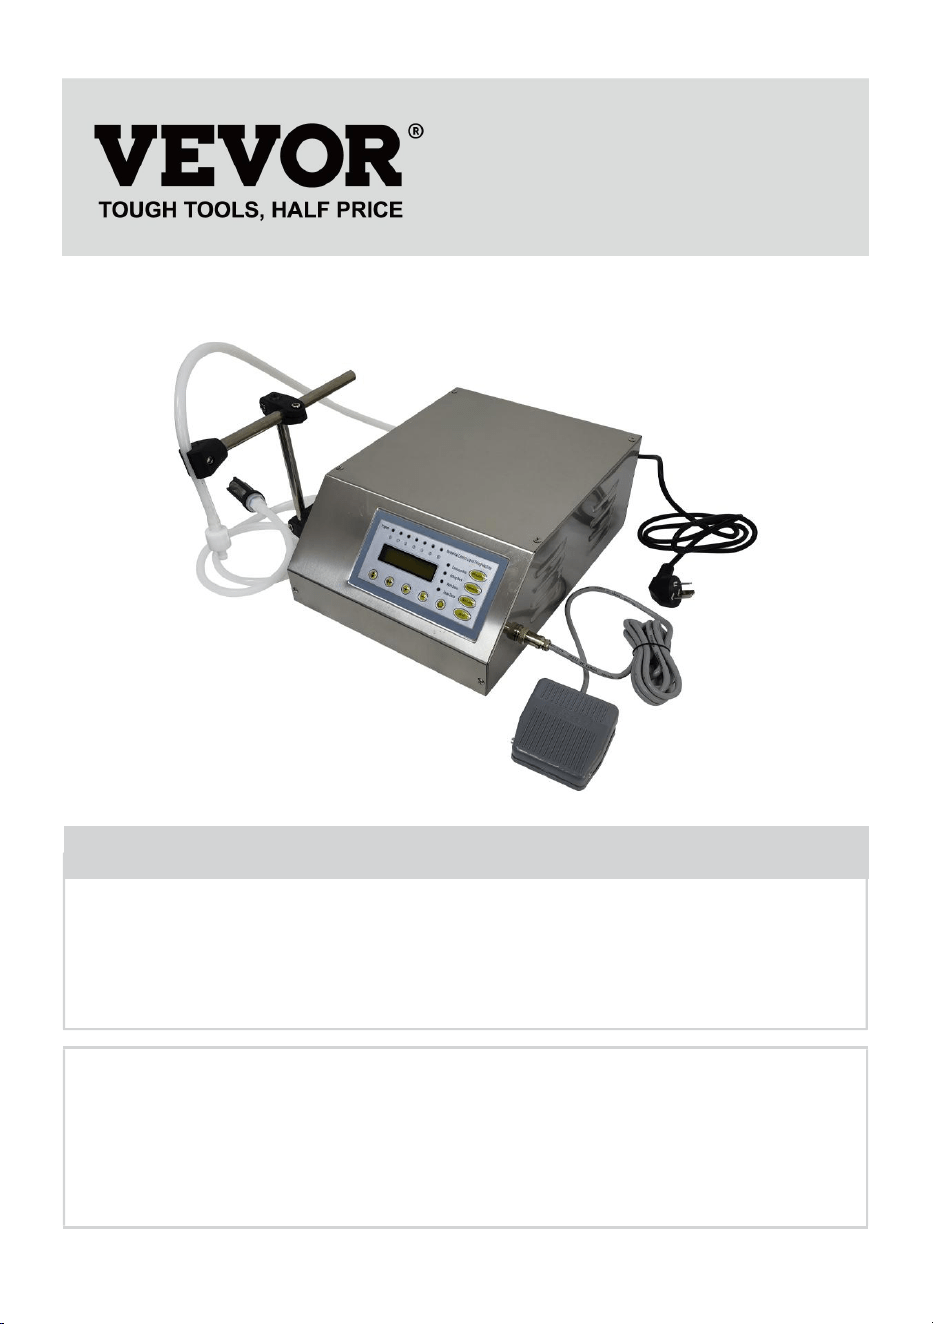
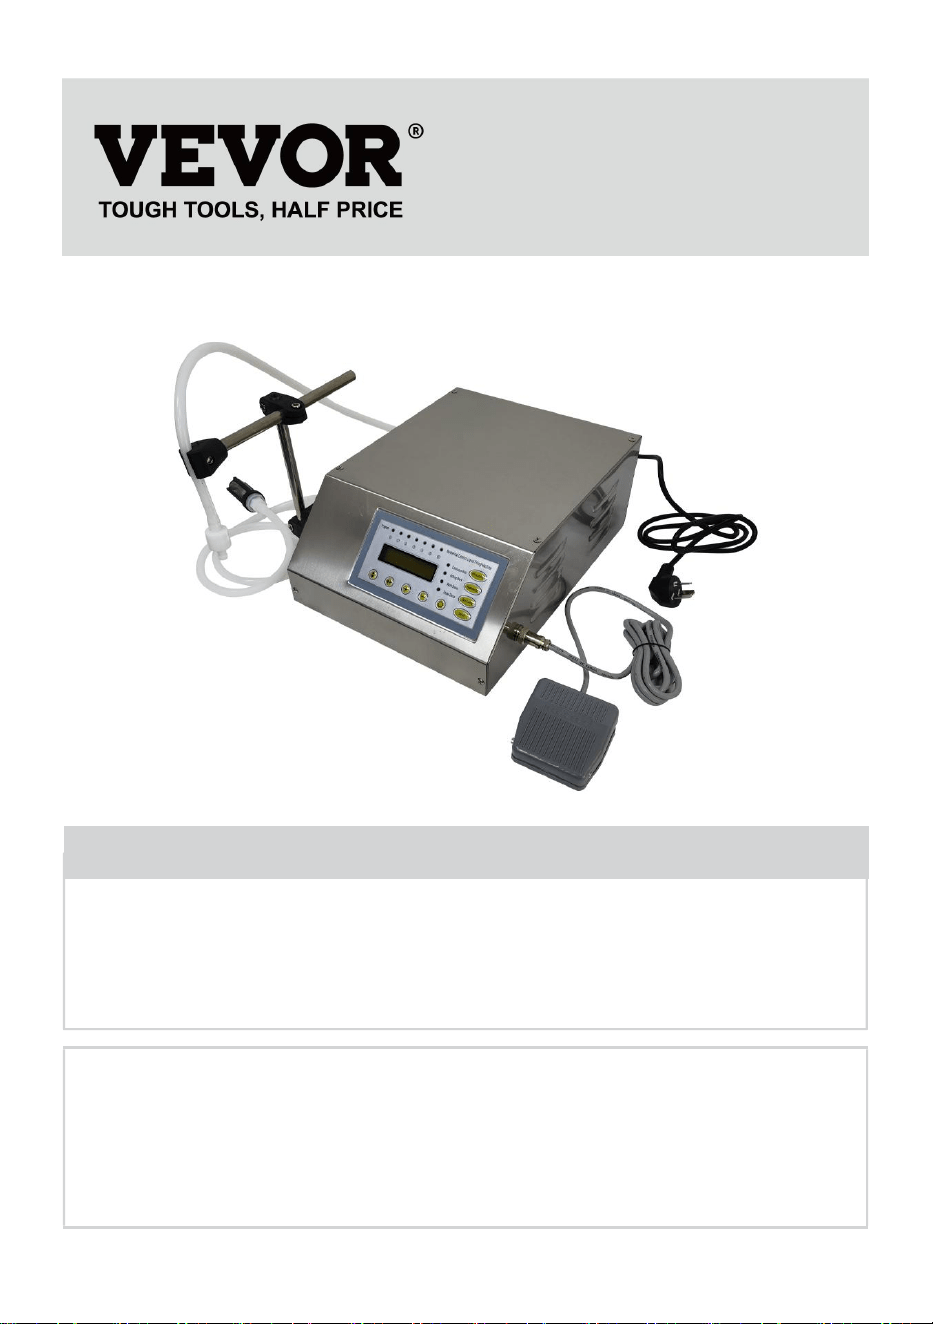
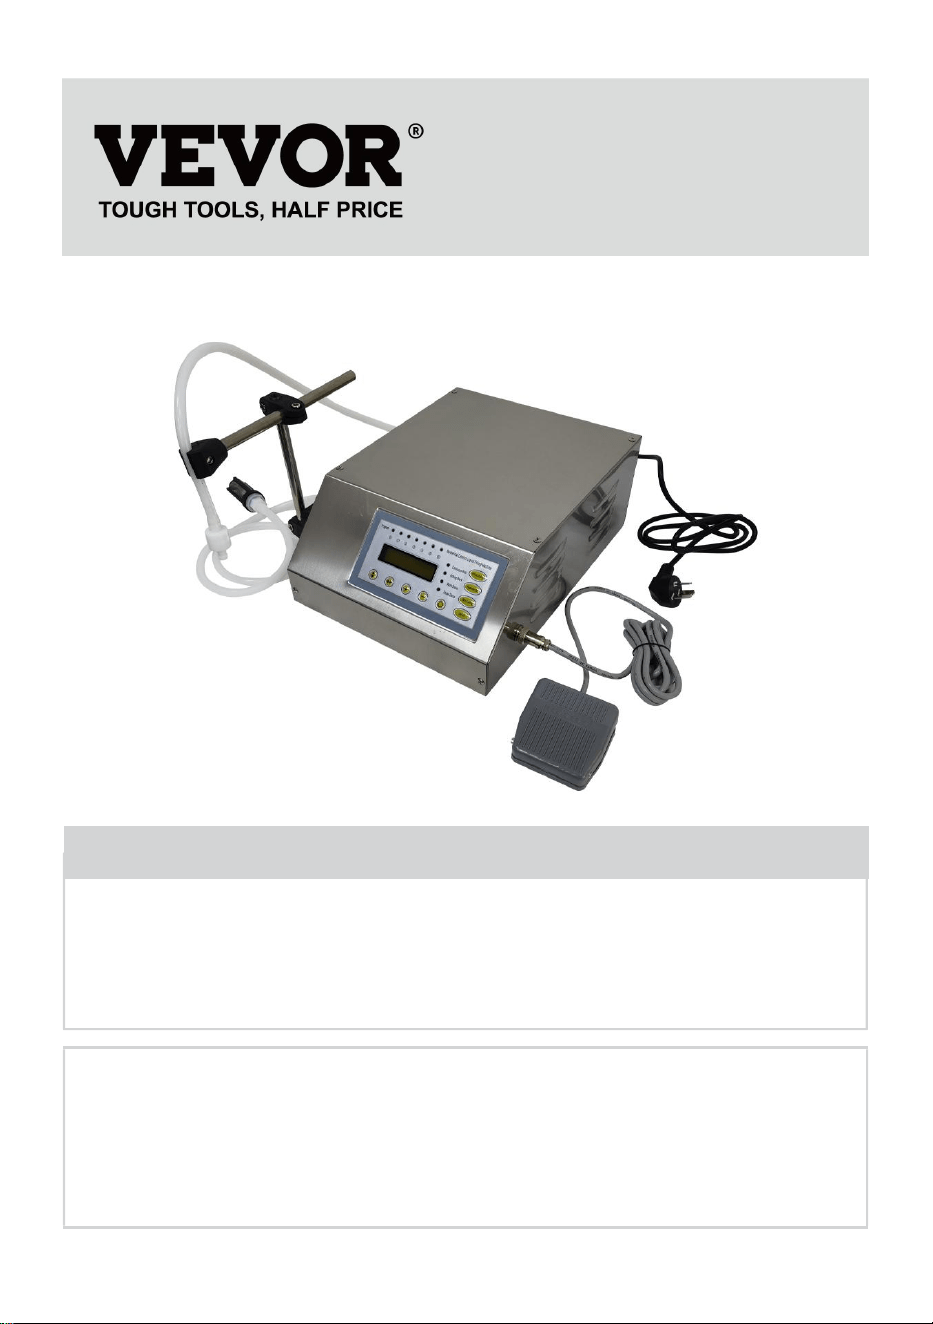
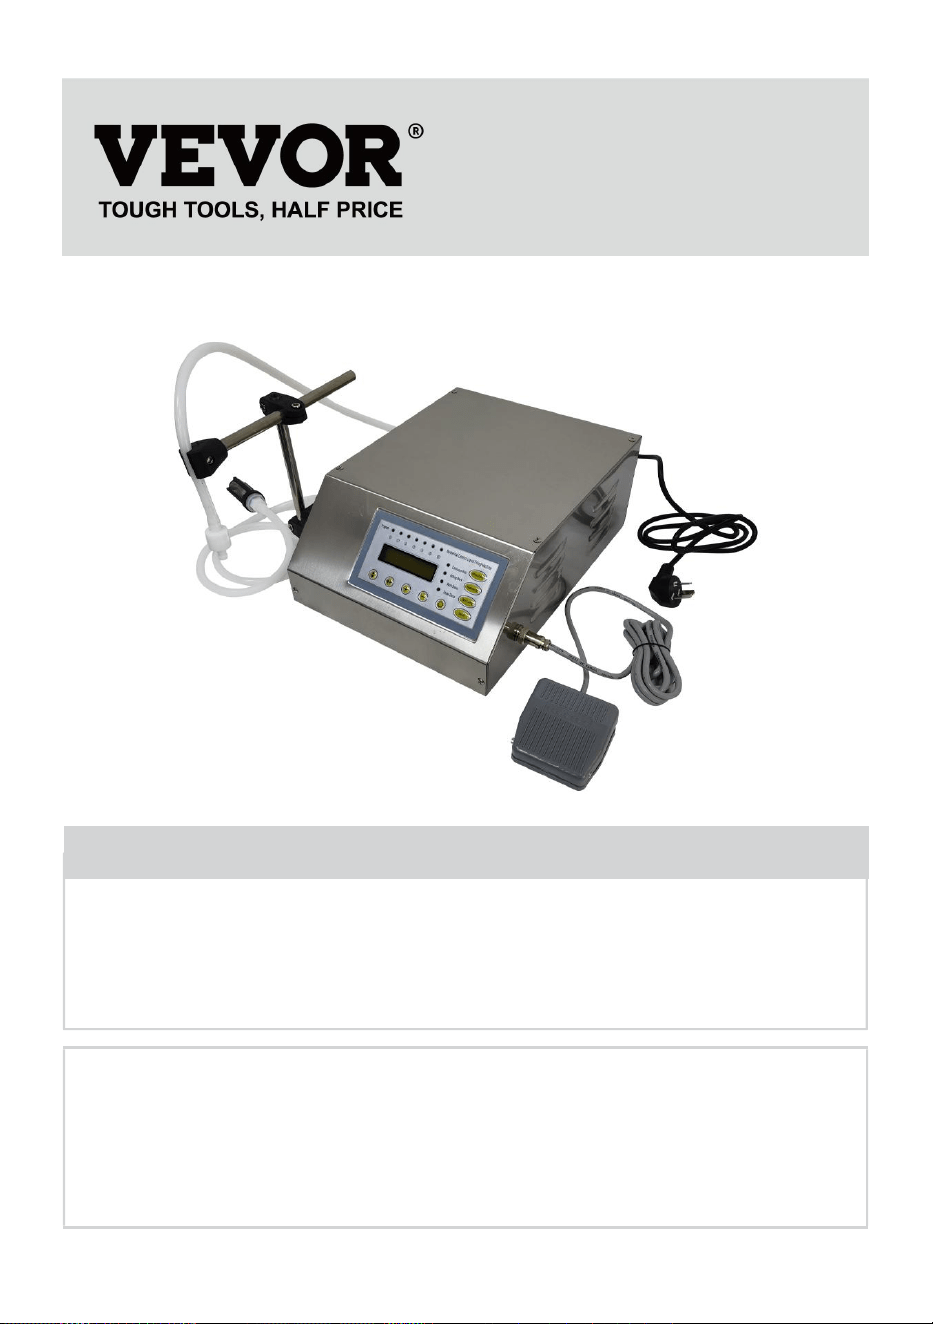
PASTE LIQUID FILLING MACHINE
USER MANUAL
We continue to be committed to provide you tools with competitive price.
"Save Half", "Half Price" or any other similar expressions used by us only represents an
estimate of savings you might benefit from buying certain tools with us compared to the major
top brands and does not necessarily mean to cover all categories of tools offered by us. You
are kindly reminded to verify carefully when you are placing an order with us if you are
actually saving half in comparison with the top major brands.
- 1 -
MODEL: GFK-160-V1
Have product questions? Need technical support? Please feel free to
contact us:
Technical Support and E-Warranty Certificate
www.vevor.com/support
NEED HELP? CONTACT US!
This is the original instruction, please read all manual instructions
carefully before operating. VEVOR reserves a clear interpretation of our
user manual. The appearance of the product shall be subject to the
product you received. Please forgive us that we won't inform you again if
there are any technology or software updates on our product.
Paste Liquid Filling Machine

- 2 -
1. Read carefully and understand all ASSEMBLY AND OPERATION
INSTRUCTIONS before operating.
2. Failure to follow the safety rules and other basic safety precautions may
result in serious personal injury.
GENERAL SAFETY RULES
Important reminder
1.Before use, please carefully read the product manual and ensure that
you understand and comply with all safety warnings and usage
precautions.
2. Do not use this product for other non designated purposes to avoid
unexpected risks.
3. This product is only applicable to users within the specified age group
and scope of application. Please strictly comply with relevant age
restrictions and warnings.
4. If there are any abnormalities in the product, please stop using it
immediately and contact the after-sales service center for consultation or
arrange for repair.
Environmental requirements for use
1. Avoid direct sunlight or contact with fire sources to prevent product
damage or fire.
2. Please ensure a stable usage environment and avoid the product from
being hit or dropped to avoid damage.
Safety Operation Guidelines
1. Please use a suitable power supply and voltage, and do not use
damaged power cords or plugs.
2. When using this product, do not short-circuit circuits or connect
mismatched devices to avoid risks such as electric shock and fire.
3. When foreign objects are found on the surface of the product, please
immediately stop using and remove the foreign objects before continuing to
use.
4. When using this product continuously for a long time, please rest in good
time to avoid excessive fatigue.

- 3 -
Maintenance and upkeep
1. Regularly maintain and clean the product. Before cleaning, please
disconnect the power supply and wipe it with a dry cloth. Be careful not to
use alcohol, acid or alkali solutions, etc Corrosive substances.
2. When the product is not in use for a long time, please disconnect the
power supply promptly to save energy and extend the product's lifespan.
3. Do not disassemble the product or replace components on your own. If
you encounter any malfunctions, please contact the after-sales service
center.
Emergency handling measures
1. When there are abnormal situations or accidents with the product,
please stop using it as soon as possible.If overheating, smoking, or
abnormal sound are found, please immediately cut off the power supply
and contact the after-sales service center.
3. If the product involves an emergency situation that may harm personal
safety, please call the emergency rescue number in a timely manner.
Disclaimers
1. We attach great importance to the safety and quality of our products, but
cannot assume responsibility for safety accidents caused by improper use
or operation.
SAVE THESE INSTRUCTIONS
MODEL AND PARAMETERS
Model
GFK-160-V1
Suitable liquid
All free-flowing pastes and liquids (no particles) such as
Soy sauce, beverages, white wine, vinegar, milk, alcohol
( less than 40%) etc
Filling Range
5ml-3500ml
Max Flow Rate
3.5 L/min
Control Mode
Pedal Switch and Automatic
Rating(s)
AC120V 60Hz
Power(Max.)
34W
- 4 -
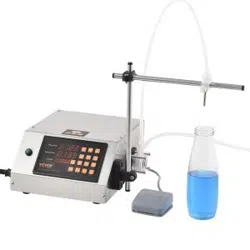
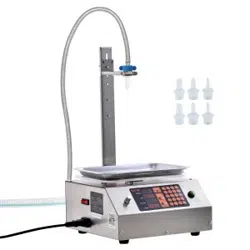
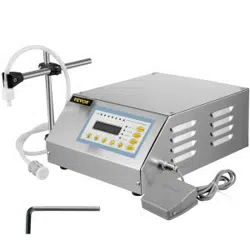
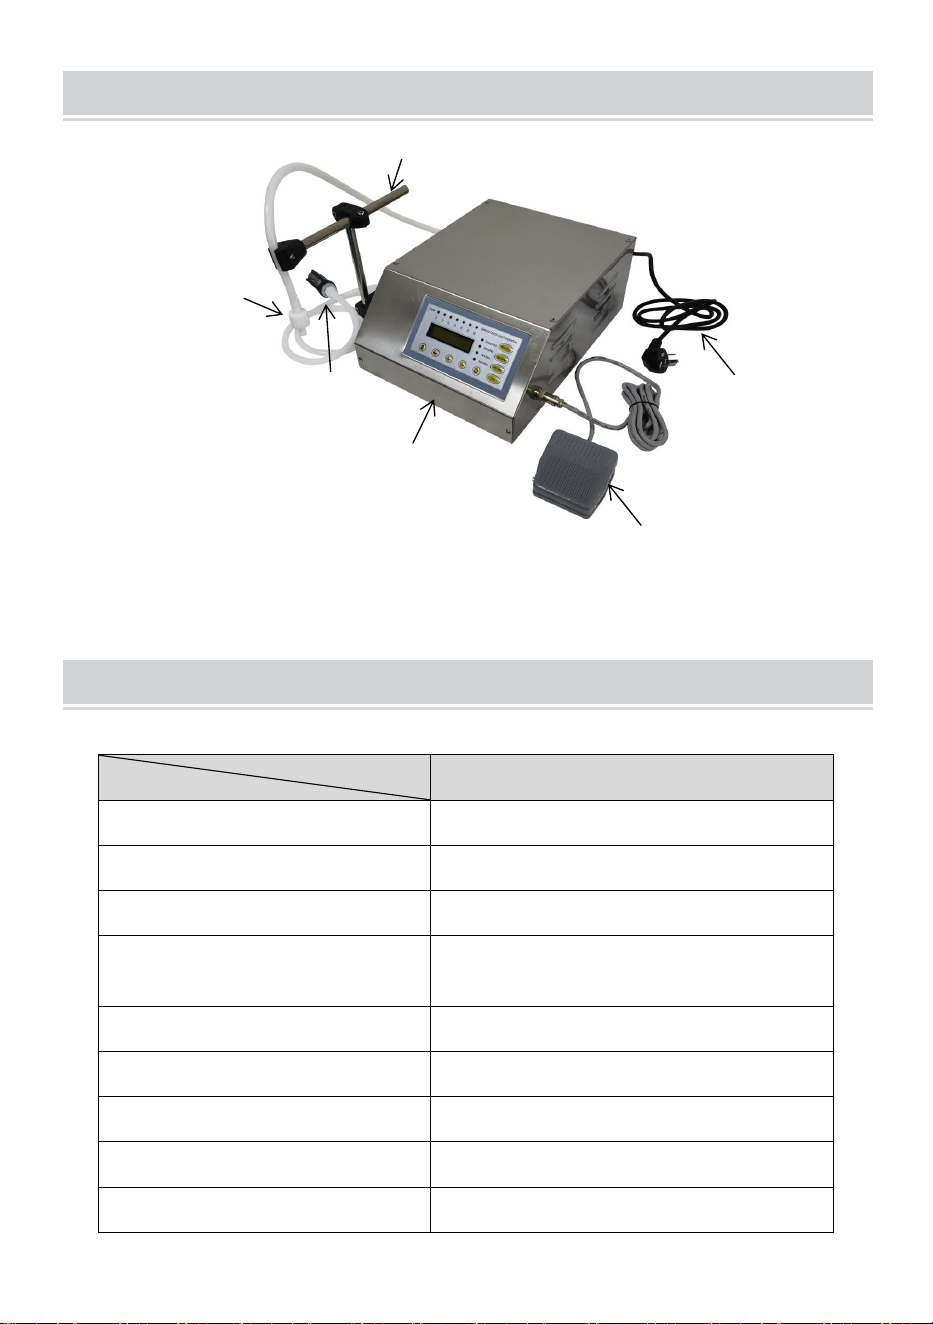
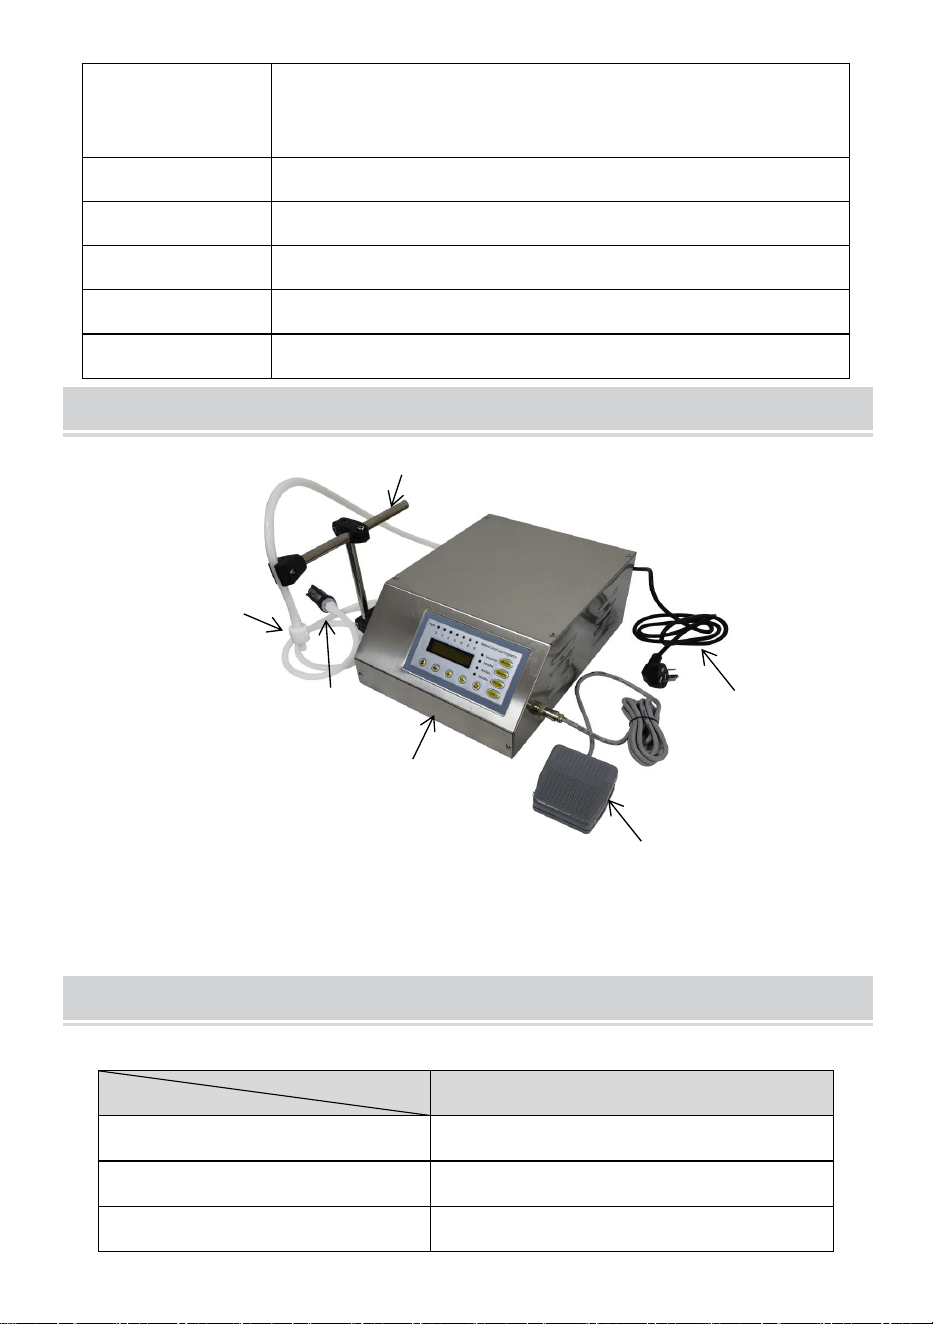
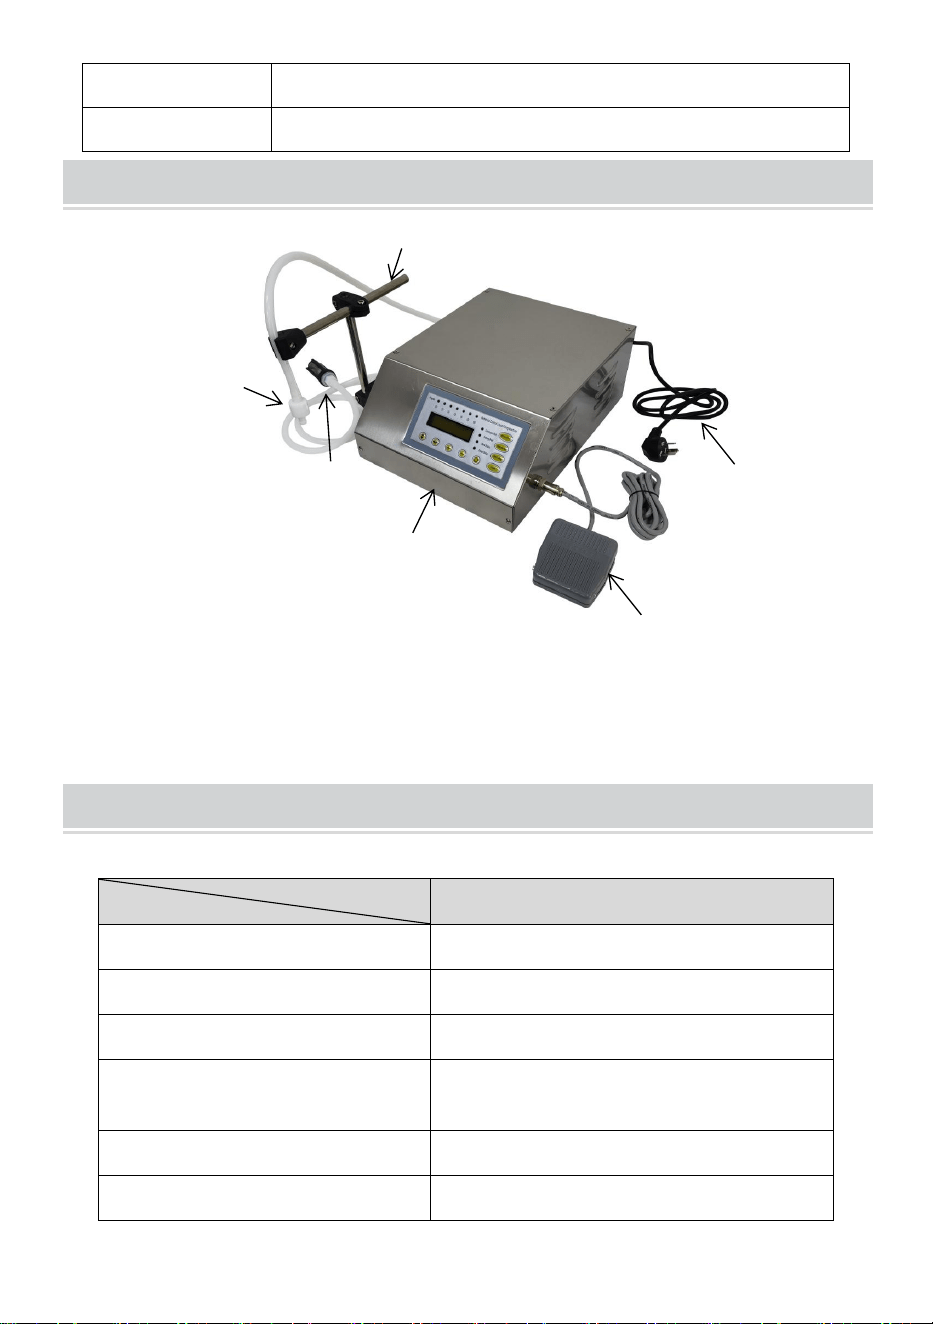
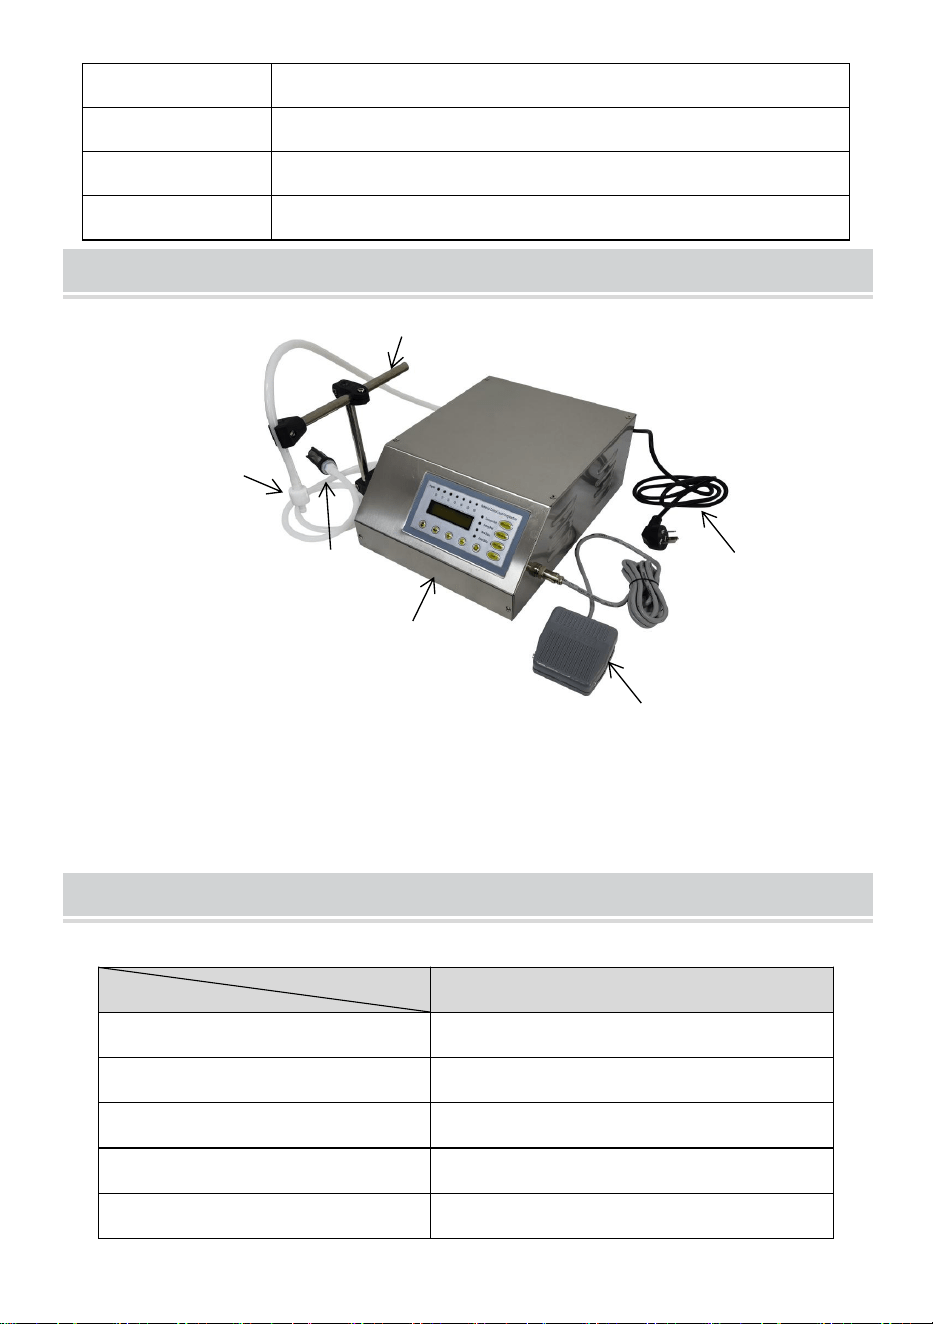
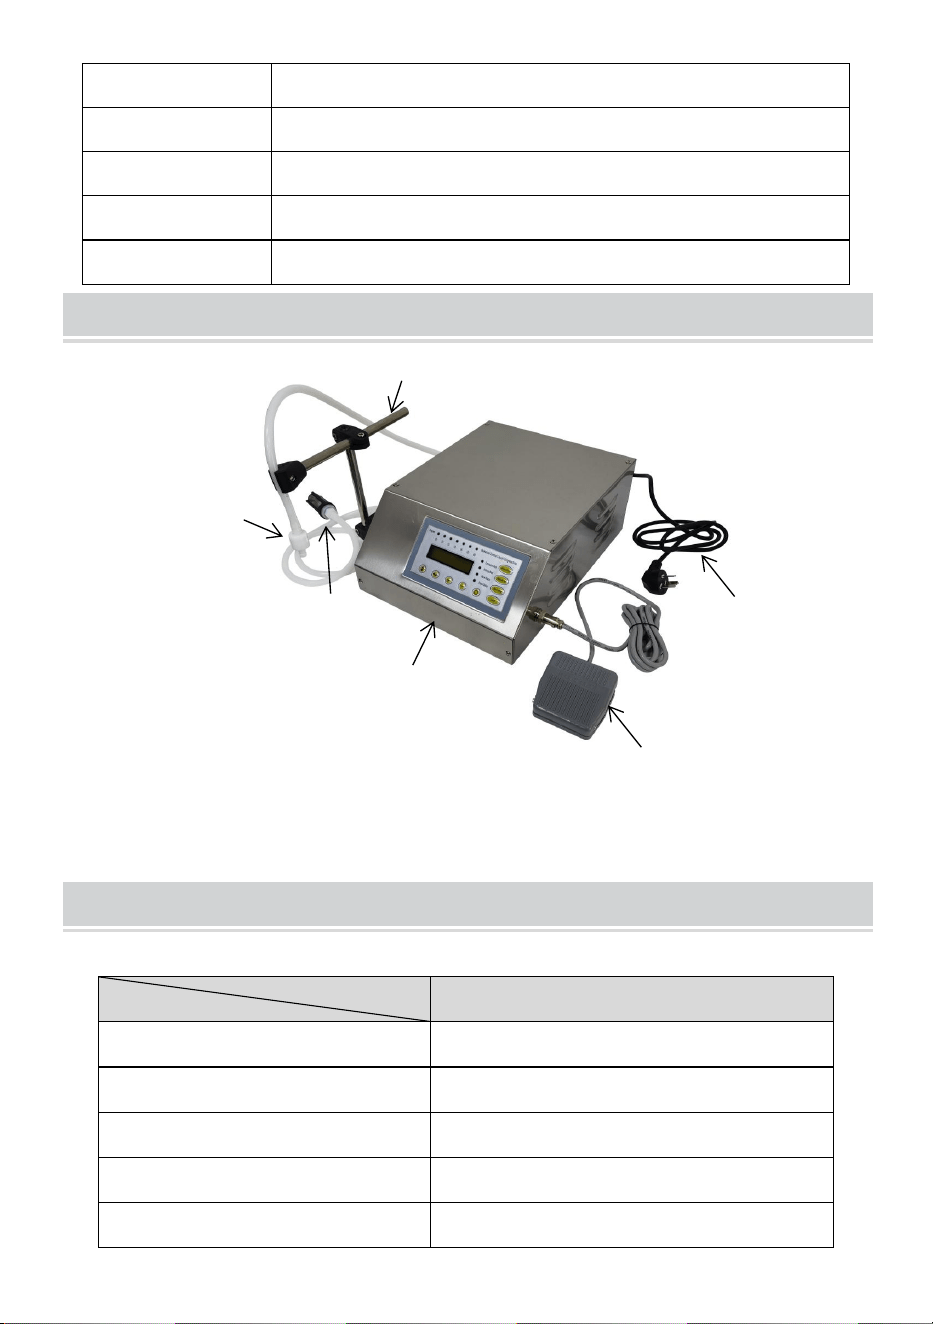
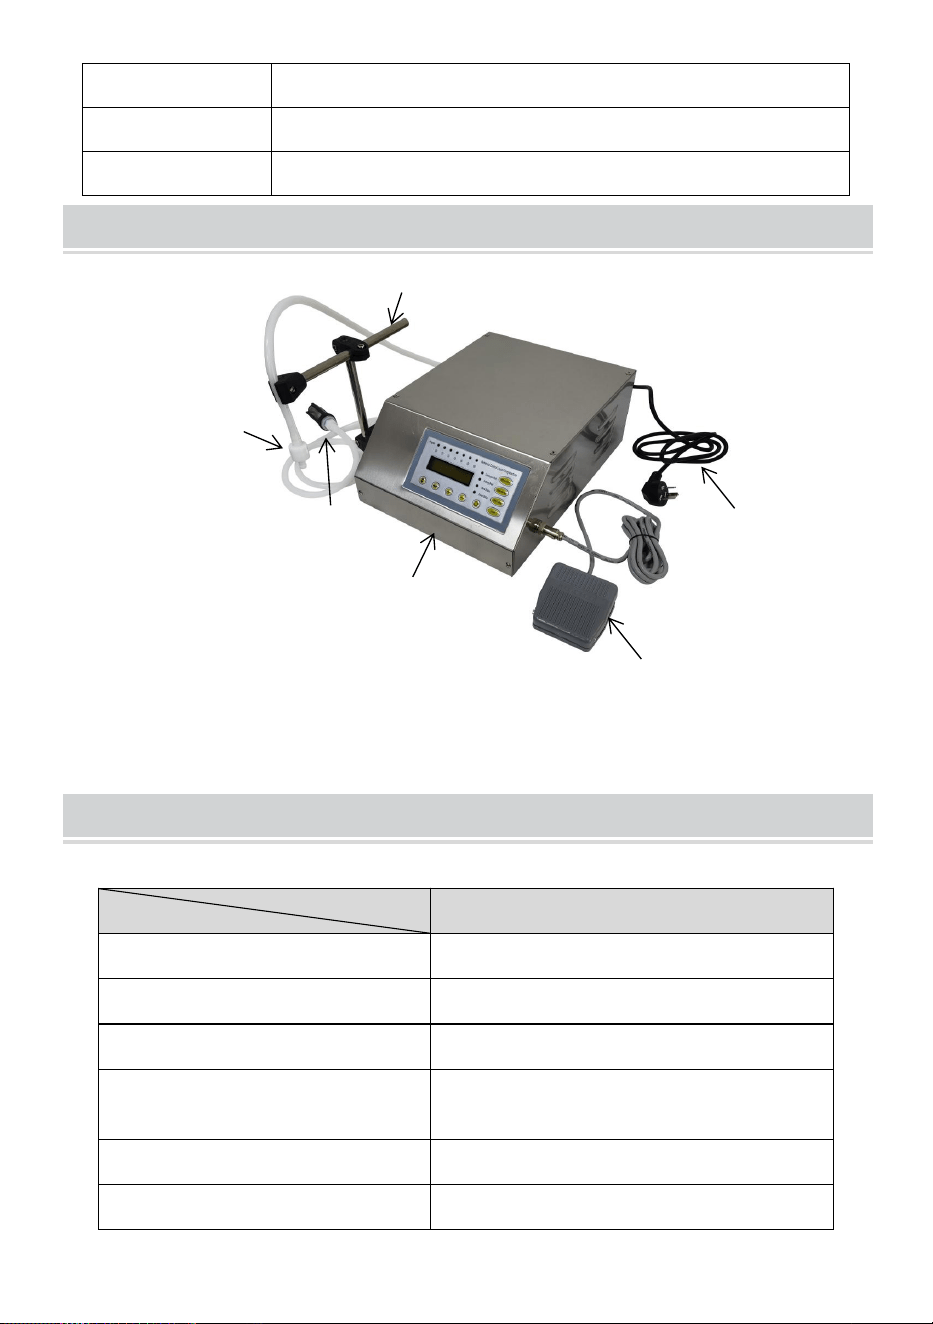
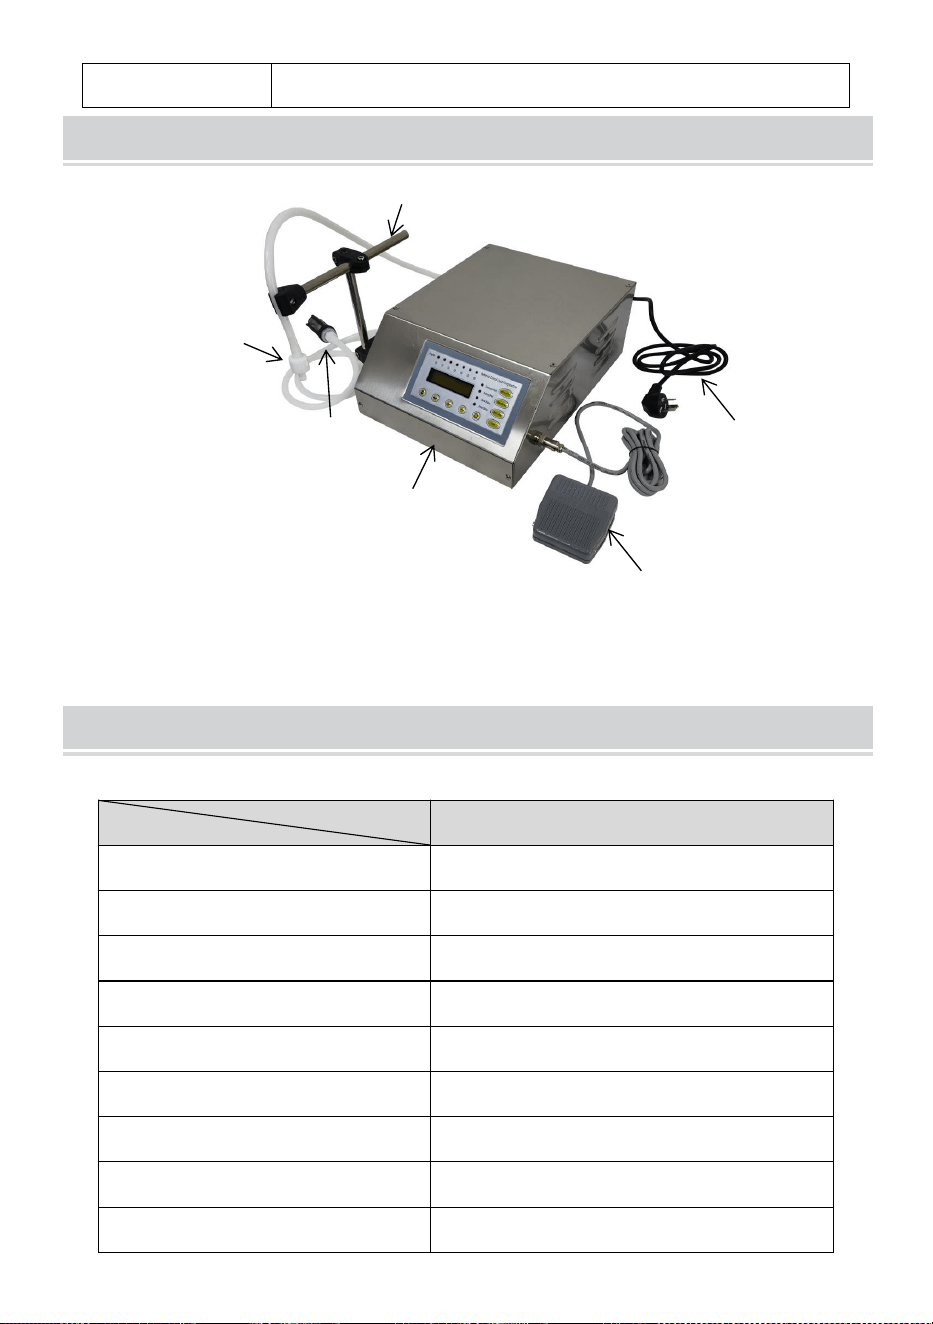
STRUCTURE DIAGRAM
1. Built-up Bracket 2.Outlet Hose and Filling Nozzle 3.Inlet Hose and Filter
4. Control Panel 5.Pedal Switch 6. Built-up Bracket
COMPONENTS
GFK-160-V1
User Manual
×1
Pedal Switch
×1
Power Cord
×1
Hex Wrench(5#、4#)
×2
Screw(M6*20mm)
×2
T-clamp
×1
Cross clamp
×1
Circular clip
×1
Rod
×2
Model
Parts
2
3
4
1
5
6
- 5 -
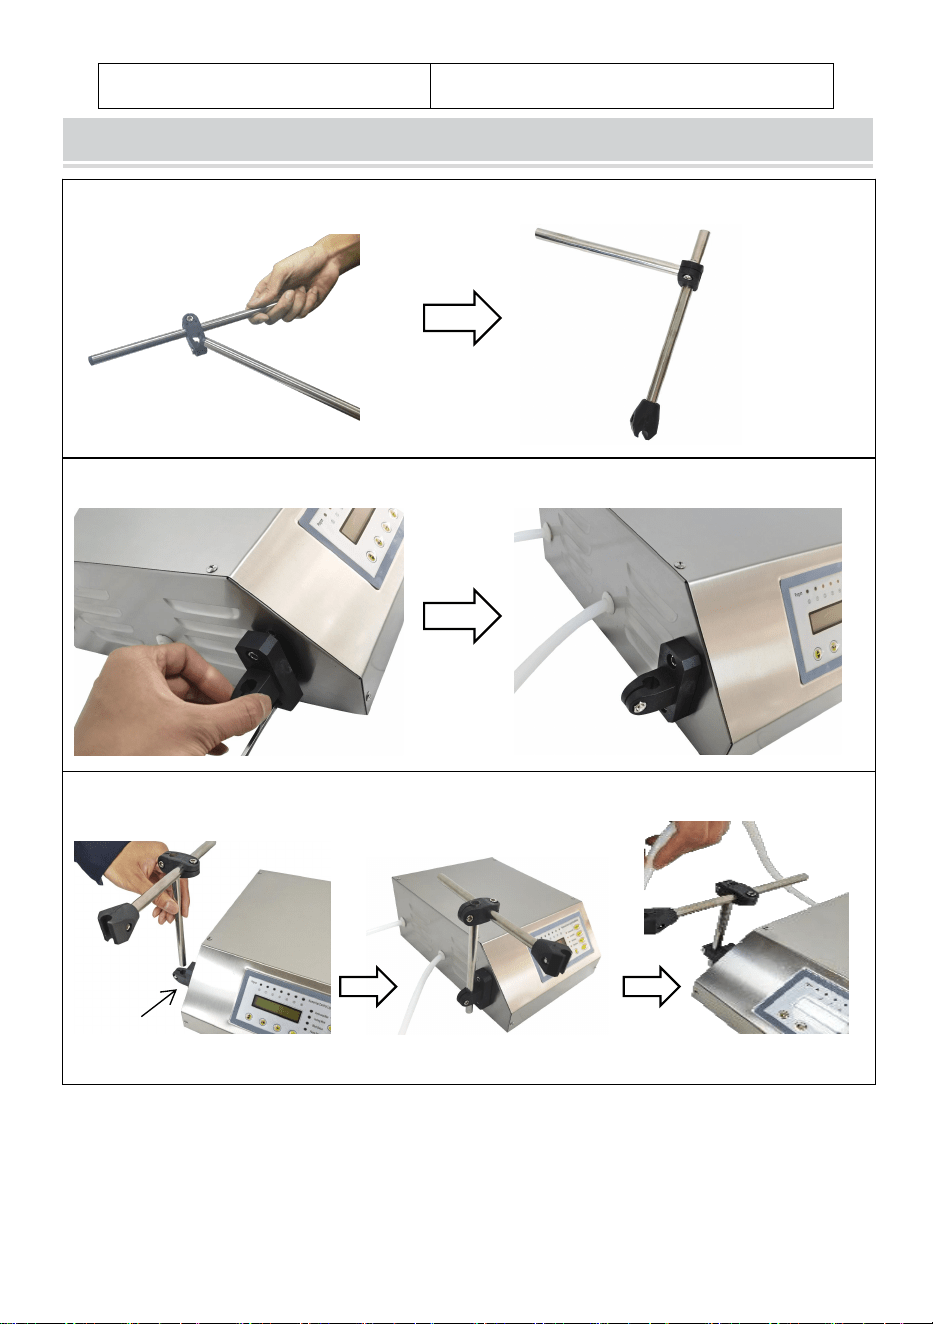
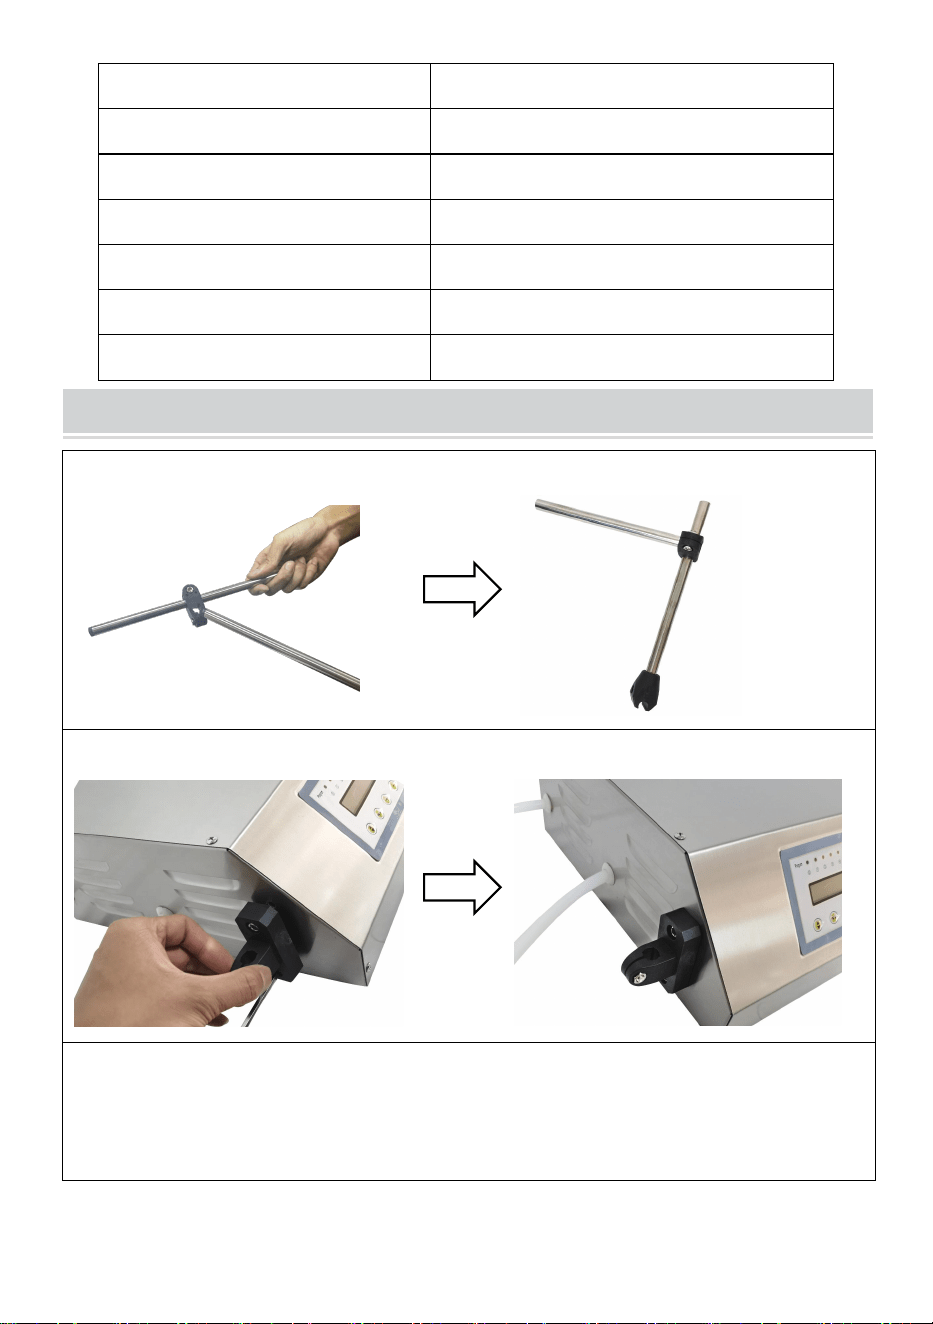
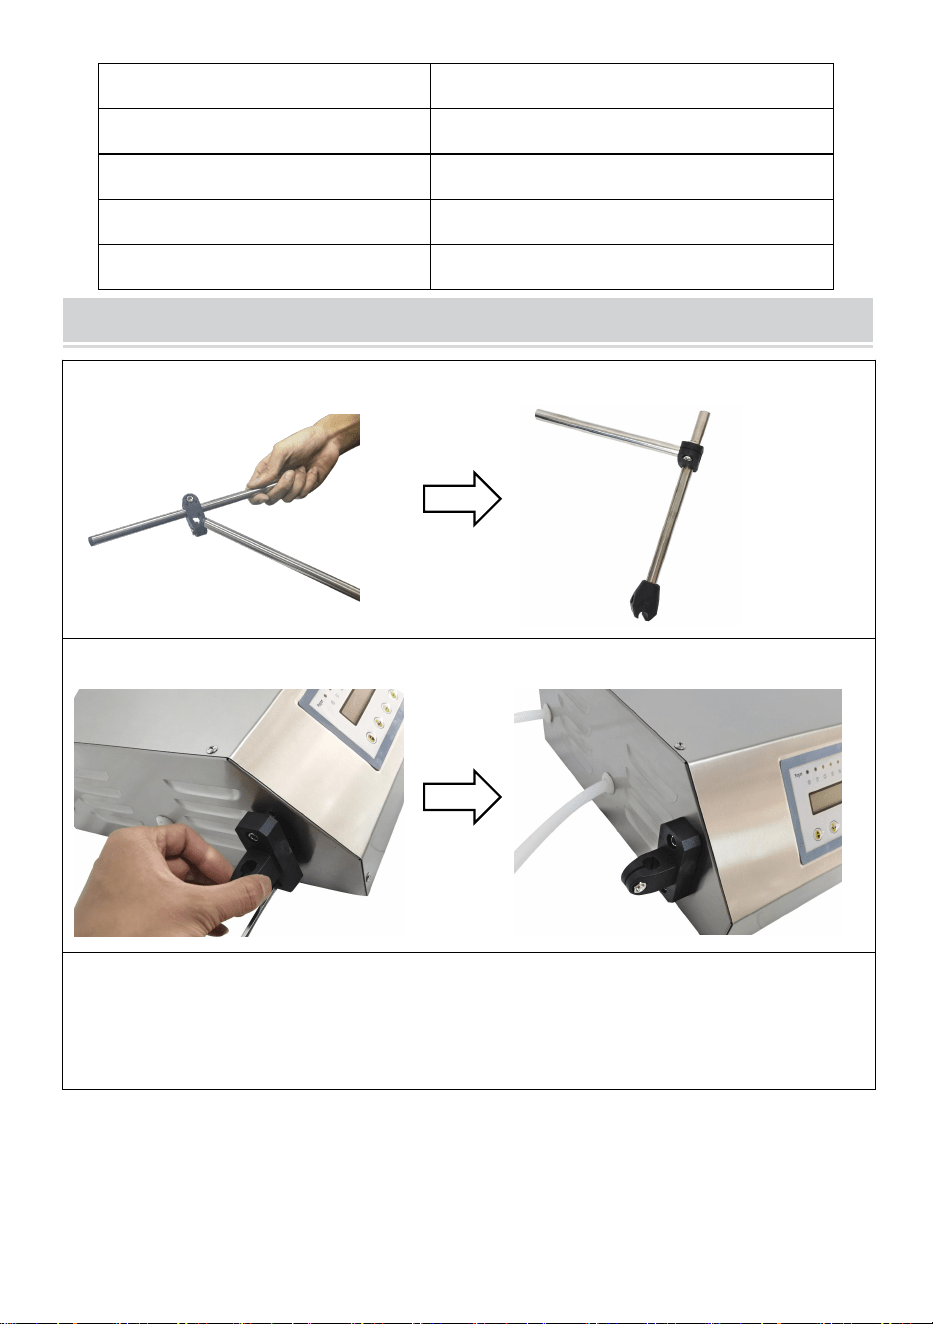
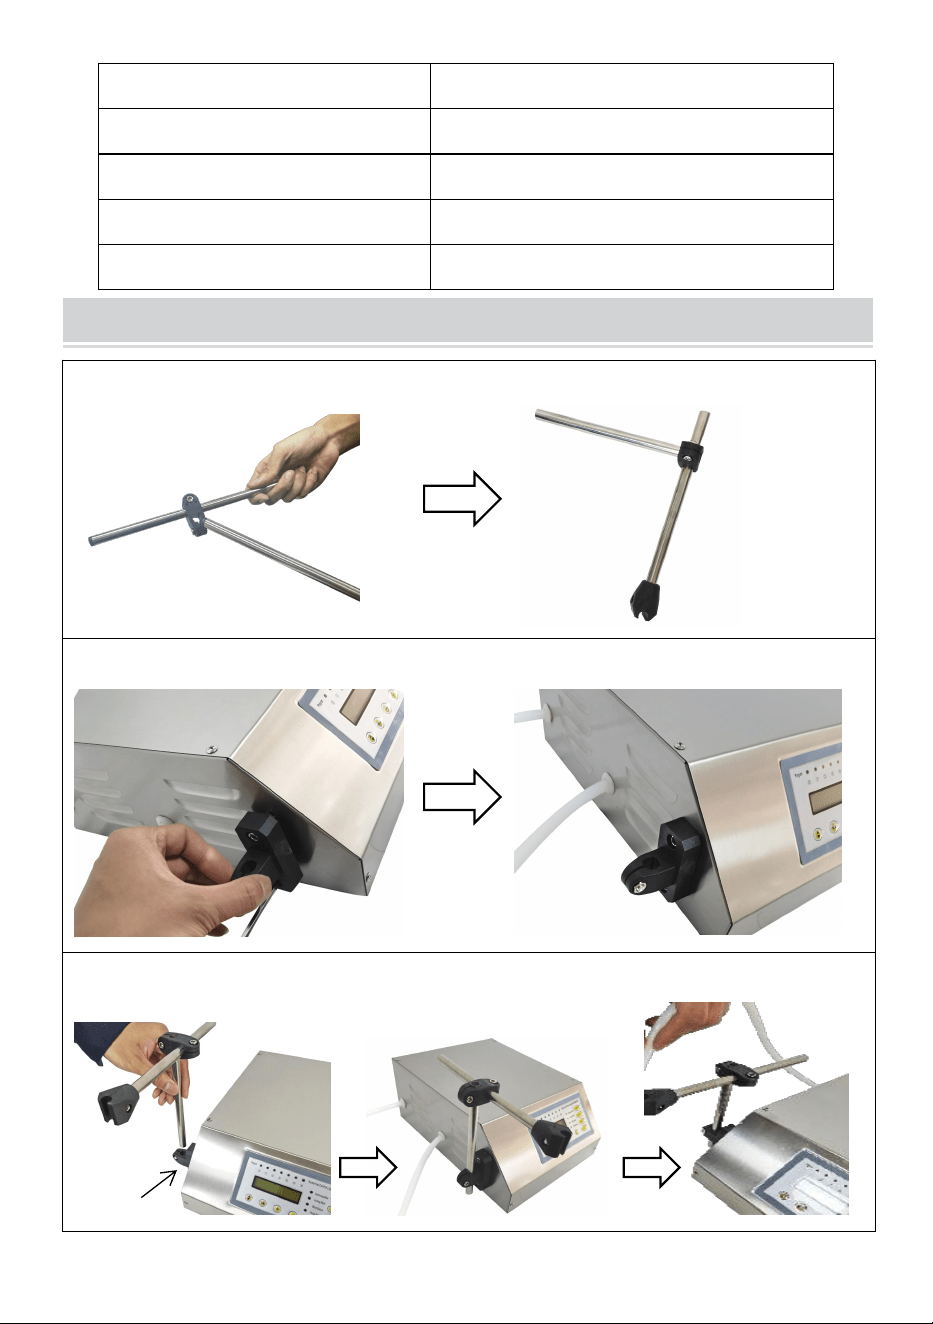
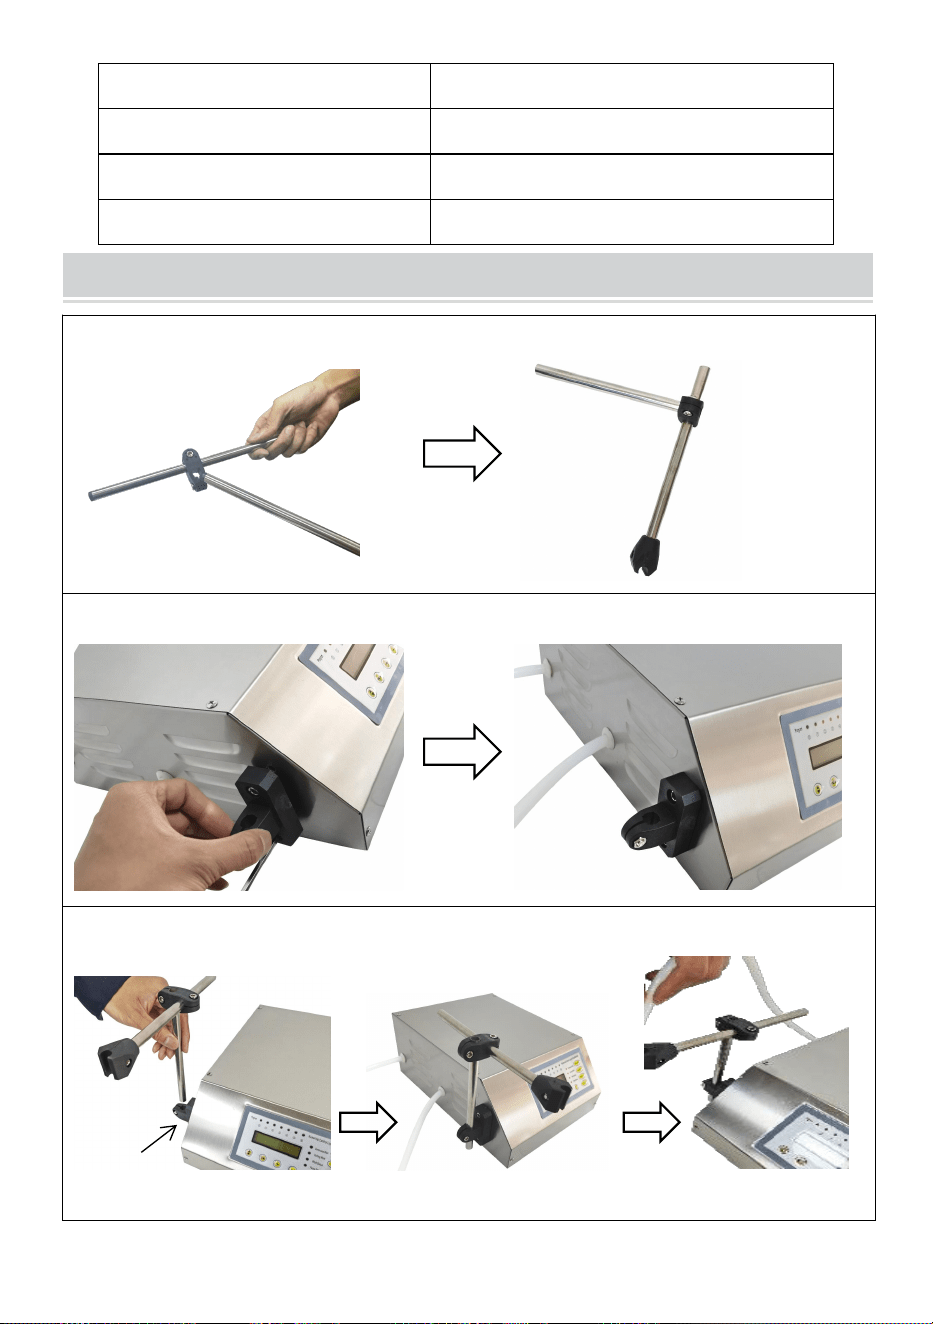
OPERATING INSTRUCTIONS
1.
Connect the two rods with a cross clamp as shown.
2.Install the T-clamp and fasten with screws
4.Install the above installed rods on the T clamp as shown.
Screwdriver
×1
T clamp
- 6 -
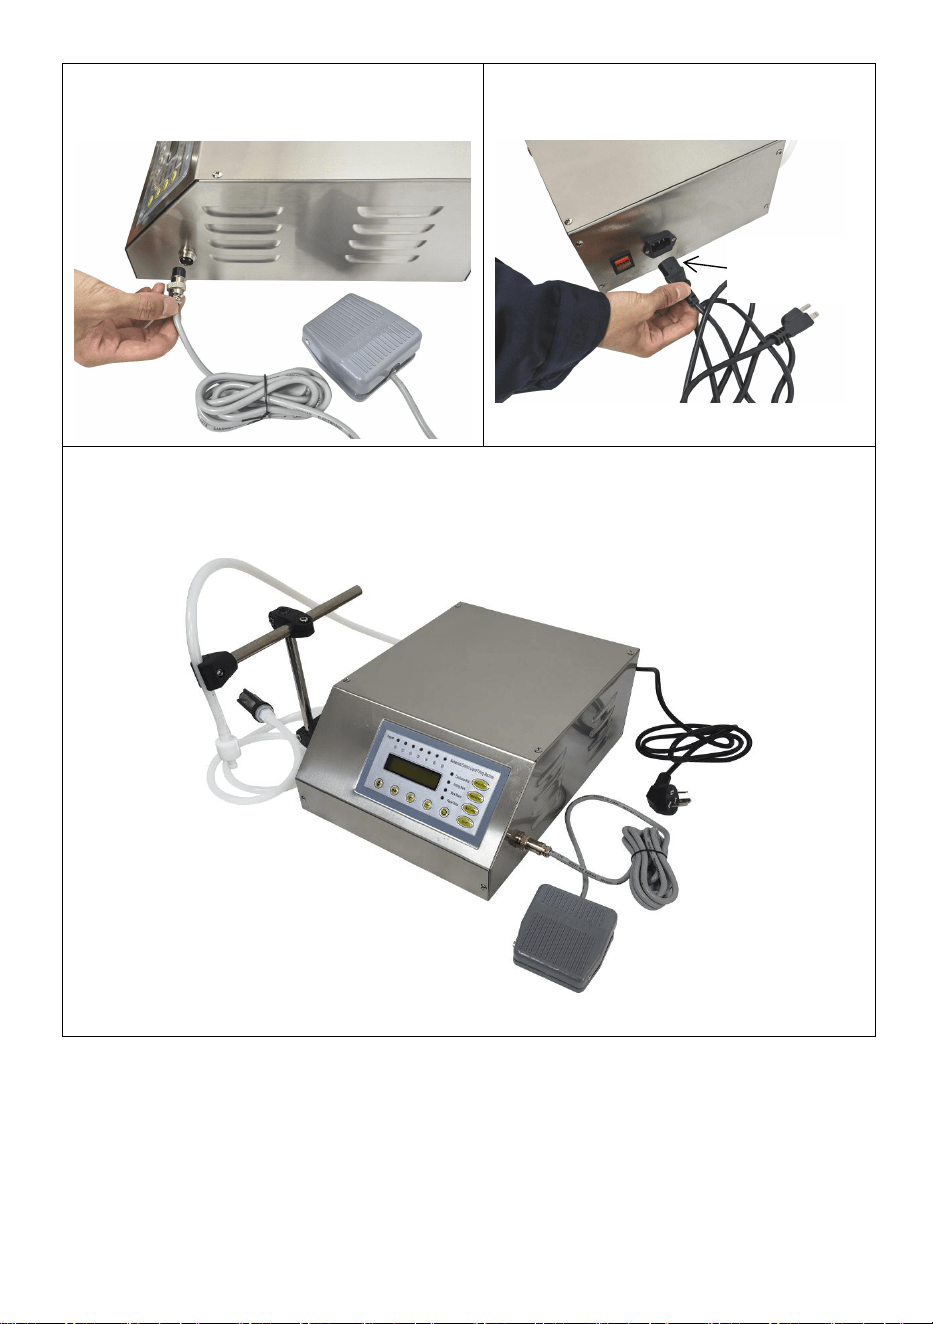
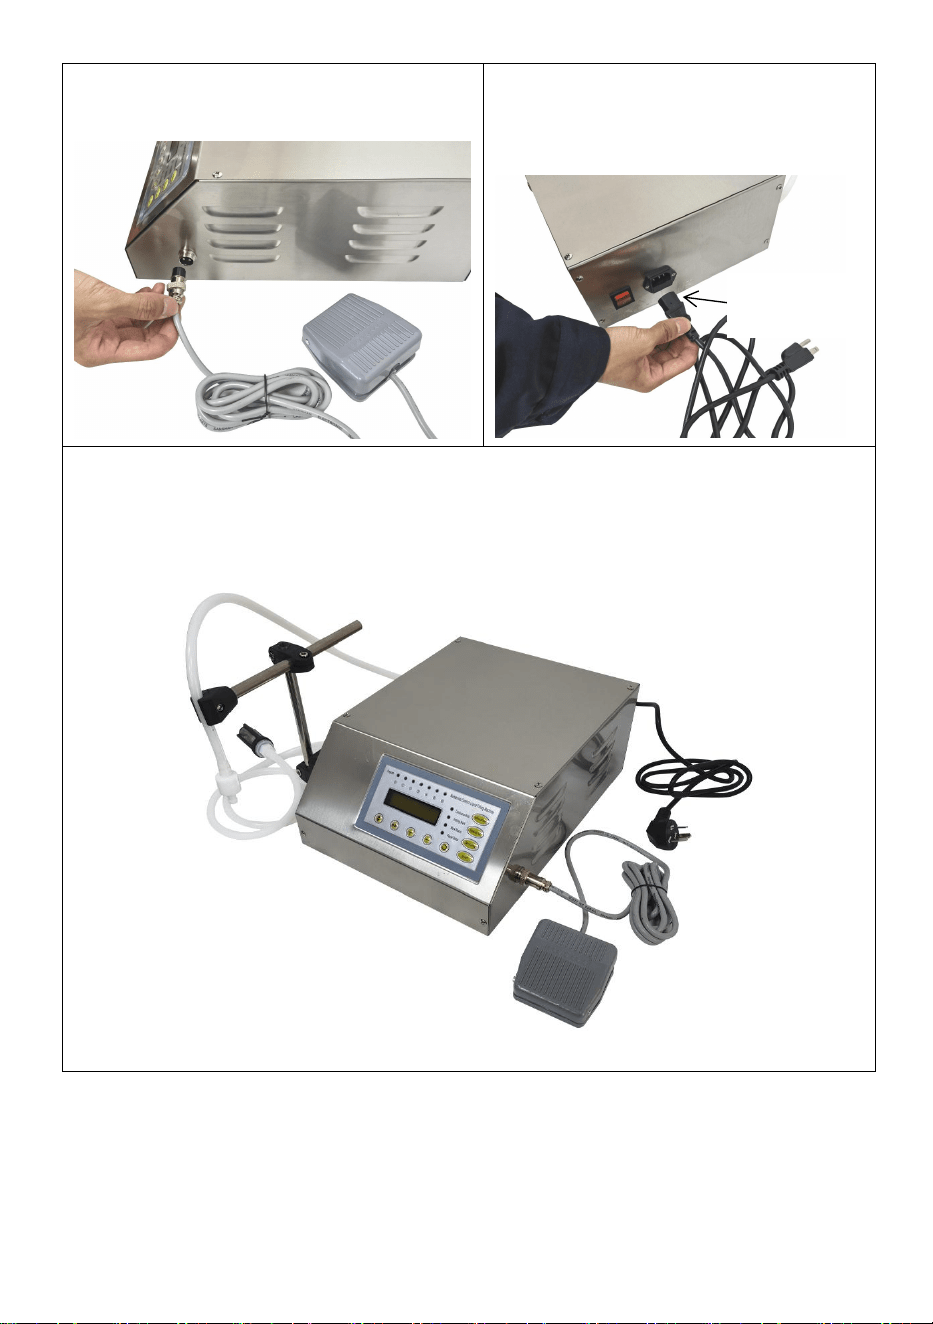
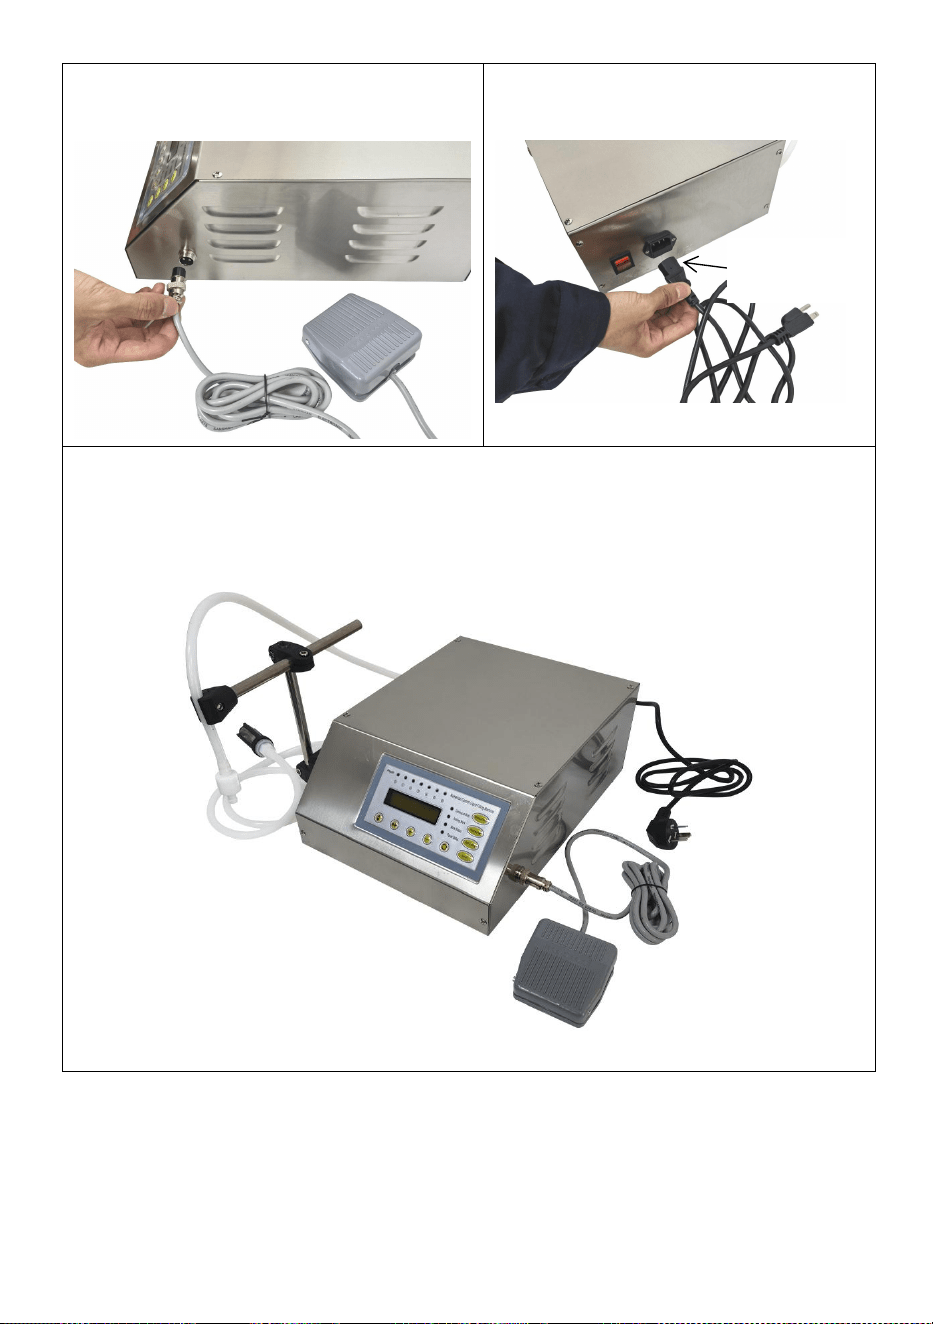
6. Connect the pedal switch as
shown.
Insert the power cord as shown.
8.Product assembly completed.
Note:The built-up Bracket and the filling nozzles can be adjusted as needed.
Power Cord
- 7 -
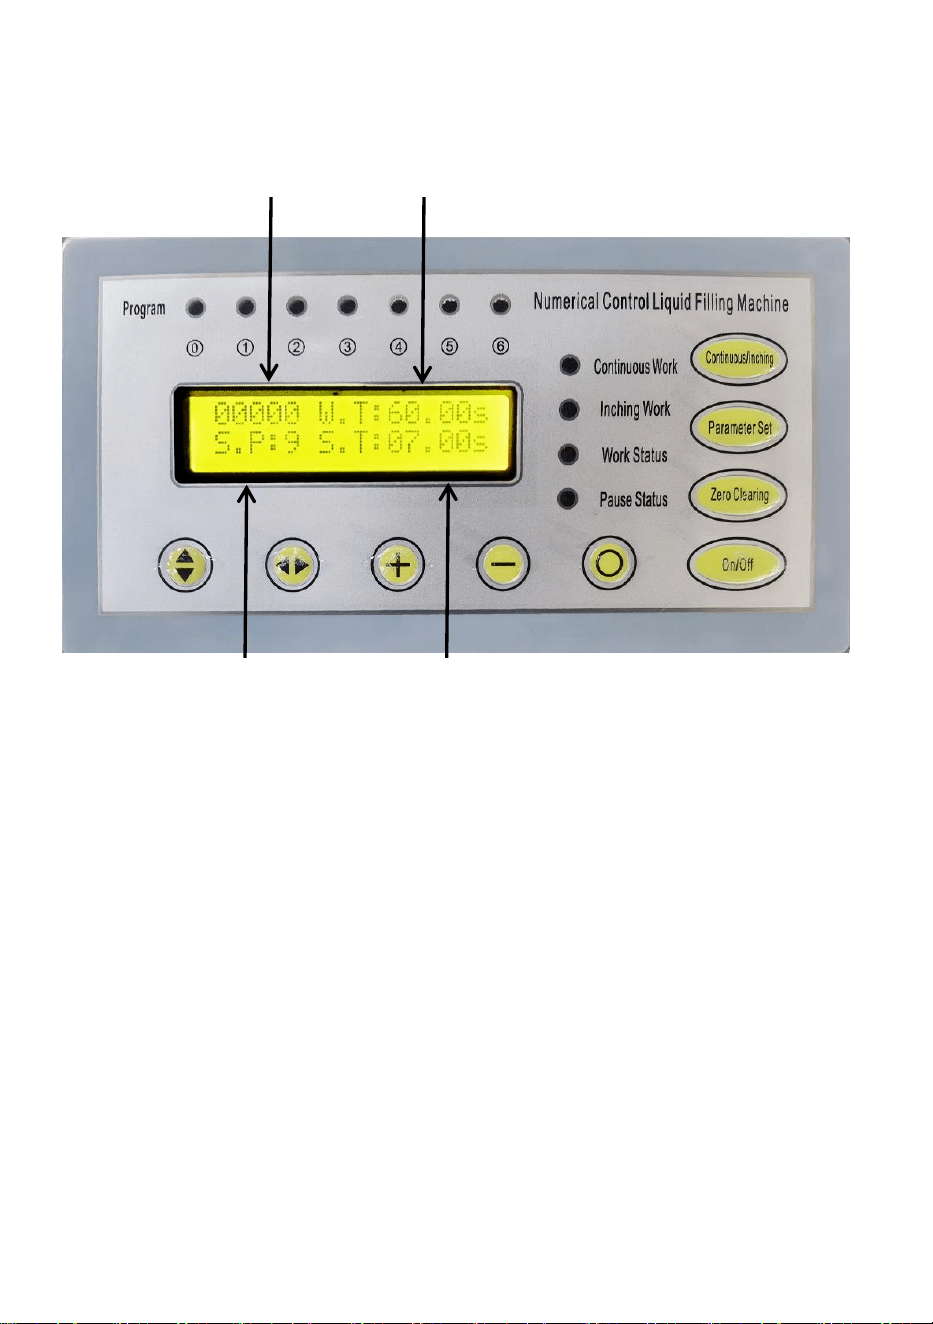
The operating instructions
Introduction of digital display interface:
1.The machine has two working modes(working mode must be set before
use):Continuous Work,Inching Work(pedal control)
Through the button (continuous/inching)
If you want to set it to Continuous Work modes :
·1)Press the pause button first(on/off).The pause status light lights up
·2)Press the button (continuous/inching)
When continuous work lights up,
it means that it is already in Continuous Work mode
·3)Press the start button (on/off) to start working
Same way set up to Inching Work mode (pedal mode)
2. How to adjust filling time, filling speed, and waiting time Press the
Settings button (Parameter set)
·Need to press 2-3 seconds.
·When the red light 1 flashes, it's ready to go
Count
Filling Time Setting
Speed
Interval Setting

- 8 -
·The cursor position is where the number can be set
·Then through (↕)(↔) buttons (+)(-) buttons to adjust the time, speed,
waiting time you need
3. The count cannot be adjusted and can only be cleared by the
button(Zero cleaning)
4.Adjust the selection of 6 groups of memory functions
·through the button (O) below
·First press (Parameter set)
·then press (O) button to switch 6 groups of functions
·You need to set it up and store it first
MAINTENANCE
1.It is better to clean the machine with clean water after every use, which
can prolong the service life of the pump.
2.Please clean the product and the filter in time after each use.
3.When the machine is not in use, please empty the liquid and store it in a
ventilated and dry place.
4.Please store the product in a dry and ventilated place.
5.Please replace the following consumable parts regularly:
Hose,Filter,Filling Nozzle

- 9 -
TROUBLESHOOTING
Problem
Possible Cause
Possible Solution
Not absorbing water
Machine first use or long
time no use, very few will
not absorb water,
because the pump
internal dry result.
You need to add some
water from the intake
pipe to the pump and
then start the machine.
The pump can't get
the liquid out
Hose inlet and outlet are
inverted
Confirm hose inlet into
liquid tank.
The power cord is not
plugged in
Reconnect the power
cord
Hose folded or damaged
Smooth hose or replace
hose
The power indicator
is off
The power cord is not
plugged in
Reconnect the power
cord

- 10 -
Address: Baoshanqu Shuangchenglu 803long 11hao 1602A-1609shi
Shanghai
Imported to AUS: SIHAO PTY LTD. 1 ROKEVA STREETEASTWOOD
NSW 2122 Australia
Imported to USA: Sanven Technology Ltd. Suite 250. 9166 Anaheim
Place, Rancho Cucamonga, CA 91730
REP
EC
SHUNSHUN GmbH
Römeräcker 9 Z2021, 76351
Linkenheim-Hochstetten, Germany
REP
UK
Pooledas Group Ltd
Unit 5 Albert Edward House, The
Pavilions Preston, United Kingdom
Made In China


Assistance technique et certificat de garantie électronique
www.vevor.com/support
MACHINE DE REMPLISSAGE DE LIQUIDE EN
PÂTE
MANUEL D'UTILISATION
We continue to be committed to provide you tools with competitive price.
"Save Half", "Half Price" or any other similar expressions used by us only represents an
estimate of savings you might benefit from buying certain tools with us compared to the major
top brands and does not necessarily mean to cover all categories of tools offered by us. You
are kindly reminded to verify carefully when you are placing an order with us if you are
actually saving half in comparison with the top major brands.

- 1 -
MODÈLE : GFK-160-V1
Have product questions? Need technical support? Please feel free to
contact us:
Technical Support and E-Warranty Certificate
www.vevor.com/support
NEED HELP? CONTACT US!
This is the original instruction, please read all manual instructions
carefully before operating. VEVOR reserves a clear interpretation of our
user manual. The appearance of the product shall be subject to the
product you received. Please forgive us that we won't inform you again if
there are any technology or software updates on our product.
Paste Liquid Filling Machine

- 2 -
3. Lisez attentivement et comprenez toutes les INSTRUCTIONS
D'ASSEMBLAGE ET D'UTILISATION avant d'utiliser l'appareil.
4. Le non-respect des règles de sécurité et des autres précautions de
sécurité de base peut entraîner des blessures corporelles graves.
GENERAL SAFETY RULES
Rappel important
1. Avant utilisation, veuillez lire attentivement le manuel du produit et vous
assurer que vous comprenez et respectez tous les avertissements de
sécurité et les précautions d'utilisation.
2. N'utilisez pas ce produit à d'autres fins non prévues afin d'éviter des
risques inattendus.
3. Ce produit est uniquement destiné aux utilisateurs appartenant à la
tranche d'âge et au domaine d'application spécifiés. Veuillez respecter
strictement les restrictions d'âge et les avertissements en vigueur.
4. S'il y a des anomalies dans le produit, veuillez cesser immédiatement de
l'utiliser et contacter le centre de service après-vente pour consultation ou
organiser une réparation.
Exigences environnementales pour l'utilisation
1. Évitez la lumière directe du soleil ou le contact avec des sources
d'incendie pour éviter d'endommager le produit ou de provoquer un
incendie.
2. Veuillez assurer un environnement d'utilisation stable et éviter que le
produit ne soit heurté ou ne tombe pour éviter tout dommage.
Consignes de sécurité opérationnelle
1. Veuillez utiliser une alimentation électrique et une tension appropriées et
n'utilisez pas de cordons d'alimentation ou de fiches endommagés.
2. Lors de l'utilisation de ce produit, ne court-circuitez pas les circuits et ne
connectez pas d'appareils incompatibles pour éviter les risques tels que
les chocs électriques et les incendies.
3. Si des objets étrangers sont trouvés sur la surface du produit, veuillez
immédiatement cesser de l'utiliser et retirer les objets étrangers avant de
continuer à l'utiliser.

- 3 -
4. Lorsque vous utilisez ce produit en continu pendant une longue période,
veuillez vous reposer à temps pour éviter une fatigue excessive.
Maintenance et entretien
1. Entretenez et nettoyez régulièrement le produit. Avant de le nettoyer,
débranchez l'alimentation électrique et essuyez-le avec un chiffon sec.
Veillez à ne pas utiliser d'alcool, de solutions acides ou alcalines, etc.
Substances corrosives.
2. Lorsque le produit n'est pas utilisé pendant une longue période, veuillez
débrancher rapidement l'alimentation électrique pour économiser de
l'énergie et prolonger la durée de vie du produit.
3. Ne démontez pas le produit et ne remplacez pas les composants
vous-même. En cas de dysfonctionnement, veuillez contacter le centre de
service après-vente.
Mesures de gestion d'urgence
1. En cas de situations anormales ou d'accidents avec le produit, veuillez
cesser de l'utiliser dès que possible. Si une surchauffe, de la fumée ou un
bruit anormal sont détectés, veuillez immédiatement couper l'alimentation
électrique et contacter le centre de service après-vente.
3. Si le produit implique une situation d'urgence qui peut nuire à la sécurité
personnelle, veuillez appeler le numéro de secours d'urgence en temps
opportun.
Avis de non-responsabilité
1. Nous attachons une grande importance à la sécurité et à la qualité de
nos produits, mais ne pouvons assumer la responsabilité des accidents de
sécurité causés par une utilisation ou un fonctionnement inapproprié.
CONSERVEZ CES INSTRUCTIONS
MODEL AND PARAMETERS
Modèle
GFK-160-V1
Liquide
approprié
Toutes les pâtes et liquides fluides (sans particules) tels
que la sauce soja, les boissons, le vin blanc, le vinaigre,
le lait, l'alcool (moins de 40 %), etc.
Gamme de
remplissage
5 ml à 350 ml

- 4 -
Débit max.
3,5 L / min
Mode de
contrôle
Interrupteur à pédale et automatique
Note(s)
CA 120 V 60 Hz
Puissance
(max.)
34W
STRUCTURE DIAGRAM
1. Support intégré 2. Tuyau de sortie et buse de remplissage 3. Tuyau d'entrée
et filtre 4. Panneau de commande 5. Interrupteur à pédale 6. Support
intégré
COMPONENTS
GFK-160-V1
Manuel d'utilisation
×1
Interrupteur à pédale
×1
Cordon d'alimentation
×1
Clé hexagonale (5#, 4#)
×2
Vis (M6*20mm)
×2
Model
Parts
2
3
4
1
5
6

- 5 -
OPERATING INSTRUCTIONS
1. Connectez les deux tiges avec une pince croisée comme indiqué.
2.Installez la pince en T et fixez-la avec des vis
4.Installez les tiges installées ci-dessus sur la pince en T comme indiqué.
Collier de serrage en T
×1
Serre-joints en croix
×1
Clip circulaire
×1
Tige
×2
Tournevis
×1
T clamp

- 6 -

- 7 -
7. Connectez l’interrupteur à pédale
comme indiqué.
Insérez le cordon d’alimentation
comme indiqué.
8. Assemblage du produit terminé.
Remarque : le support intégré et les buses de remplissage peuvent être
ajustés selon les besoins.
Power Cord

- 8 -
Le mode d'emploi
Présentation de l'interface d'affichage numérique :
1. La machine dispose de deux modes de fonctionnement (le mode de
fonctionnement doit être défini avant utilisation) : travail continu, travail
par à-coups (commande par pédale)
Par le bouton (continu/par paliers)
Si vous souhaitez le régler sur les modes de travail continu :
·1)Appuyez d'abord sur le bouton pause (marche/arrêt). Le voyant d'état
de pause s'allume
·2)Appuyez sur le bouton (continu/par à-coups)
Lorsque le travail continu s'allume,
cela signifie qu'il est déjà en mode de travail continu
·3)Appuyez sur le bouton de démarrage (marche/arrêt) pour commencer à
travailler
Configuration de la même manière pour le mode de travail par à-coups
Count
Filling Time Setting
Speed
Interval Setting

- 9 -
(mode pédale)
2. Comment régler le temps de remplissage, la vitesse de remplissage et
le temps d'attente Appuyez sur le bouton Paramètres (ensemble de
paramètres)
·Il faut appuyer 2 à 3 secondes.
·Lorsque le voyant rouge 1 clignote, il est prêt à fonctionner
·La position du curseur est l'endroit où le nombre peut être défini
·Ensuite, grâce aux boutons (↕)(↔) (+)(-) vous pouvez régler le temps, la
vitesse, le temps d'attente dont vous avez besoin
3. Le compte ne peut pas être ajusté et ne peut être effacé qu'à l'aide du
bouton (nettoyage à zéro)
4. Ajustez la sélection de 6 groupes de fonctions de mémoire
·via le bouton (O) ci-dessous
·Première pression (Paramètre défini)
·Appuyez ensuite sur le bouton (O) pour basculer entre 6 groupes de
fonctions
·Vous devez d'abord le configurer et le stocker
MAINTENANCE
1. Il est préférable de nettoyer la machine avec de l'eau propre après
chaque utilisation, ce qui peut prolonger sa durée de vie. de la pompe.
2. Veuillez nettoyer le produit et le filtre à temps après chaque utilisation.
3. Lorsque la machine n'est pas utilisée, veuillez vider le liquide et le
stocker dans un endroit aéré et sec.
4. Veuillez stocker le produit dans un endroit sec et aéré.
5. Veuillez remplacer régulièrement les pièces consommables suivantes :
Tuyau, filtre, buse de remplissage

- 10 -
TROUBLESHOOTING
Problème
Cause possible
Solution possible
N'absorbe pas l'eau
Première utilisation de la
machine ou longue
période d'inutilisation,
très peu n'absorberont
pas l'eau, car la pompe
interne résultat sec .
Vous devez ajouter un
peu d'eau du tuyau
d'admission à la pompe,
puis démarrer la
machine.
La pompe ne peut
pas obtenir
le liquide sort
L'entrée et la sortie du
tuyau sont
inversé
Confirmer l'entrée du
tuyau dans
réservoir de liquide.
Le cordon d'alimentation
n'est pas
branché
Rebranchez le cordon
d'alimentation
Tuyau plié ou
endommagé
Lisser le tuyau ou
remplacer le tuyau
Le voyant
d'alimentation est
éteint
Le cordon
d'alimentation n'est pas
branché
Rebranchez le cordon
d'alimentation

- 11 -
Adresse : Baoshanqu Shuangchenglu 803long 11hao 1602A-1609shi
Shanghai
Importé en Australie : SIHAO PTY LTD . 1 ROKEVA
STREETEASTWOOD NSW 2122 Australie
Importé aux États-Unis : Sanven Technology Ltd. Suite 250. 9166
Anaheim Place, Rancho Cucamonga, CA 91730
REP
EC
SHUNSHUN GmbH
Römeräcker 9 Z2021, 76351
Linkenheim-Hochstetten, Germany
REP
UK
Pooledas Group Ltd
Unit 5 Albert Edward House, The
Pavilions Preston, United Kingdom
Fabriqué en Chine


Technischer Support und E-Garantie-Zertifikat
www.vevor.com/support
PASTENFLÜSSIGKEITSFÜLLMASCHINE
BEDIENUNGSANLEITUNG
We continue to be committed to provide you tools with competitive price.
"Save Half", "Half Price" or any other similar expressions used by us only represents an
estimate of savings you might benefit from buying certain tools with us compared to the major
top brands and does not necessarily mean to cover all categories of tools offered by us. You
are kindly reminded to verify carefully when you are placing an order with us if you are
actually saving half in comparison with the top major brands.

- 1 -
MODELL: GFK-160-V1
Have product questions? Need technical support? Please feel free to
contact us:
Technical Support and E-Warranty Certificate
www.vevor.com/support
NEED HELP? CONTACT US!
This is the original instruction, please read all manual instructions
carefully before operating. VEVOR reserves a clear interpretation of our
user manual. The appearance of the product shall be subject to the
product you received. Please forgive us that we won't inform you again if
there are any technology or software updates on our product.
Paste Liquid Filling Machine

- 2 -
5. MONTAGE- UND BEDIENUNGSANLEITUNGEN vor der
Inbetriebnahme sorgfältig durch und stellen Sie sicher, dass Sie sie
verstanden haben .
6. Die Nichtbeachtung der Sicherheitsregeln und anderer grundlegender
Sicherheitsvorkehrungen kann zu schweren Verletzungen führen.
GENERAL SAFETY RULES
Wichtiger Hinweis
1. Lesen Sie vor der Verwendung sorgfältig das Produkthandbuch durch
und stellen Sie sicher, dass Sie alle Sicherheitswarnungen und
Vorsichtsmaßnahmen bei der Verwendung verstehen und einhalten.
2. Um unerwartete Risiken zu vermeiden, verwenden Sie dieses Produkt
nicht für andere, nicht vorgesehene Zwecke.
3. Dieses Produkt ist nur für Benutzer innerhalb der angegebenen
Altersgruppe und des angegebenen Anwendungsbereichs geeignet. Bitte
beachten Sie unbedingt die entsprechenden Altersbeschränkungen und
Warnhinweise.
4. Wenn das Produkt irgendwelche Anomalien aufweist, stellen Sie die
Verwendung bitte sofort ein und wenden Sie sich für eine Beratung oder
Reparatur an das Kundendienstzentrum.
Umweltanforderungen für den Einsatz
1. Vermeiden Sie direktes Sonnenlicht oder den Kontakt mit Feuerquellen,
um Produktschäden oder Brände zu vermeiden.
2. Bitte sorgen Sie für eine stabile Nutzungsumgebung und vermeiden Sie
Stöße oder Stürze des Produkts, um Schäden zu vermeiden.
Hinweise zur Sicherheit beim Betrieb
1. Bitte verwenden Sie ein geeignetes Netzteil und eine geeignete
Spannung und verwenden Sie keine beschädigten Netzkabel oder Stecker.
2. Schließen Sie bei der Verwendung dieses Produkts keine Stromkreise
kurz und schließen Sie keine unpassenden Geräte an, um Risiken wie
Stromschlag und Brand zu vermeiden.
3. Wenn Sie Fremdkörper auf der Oberfläche des Produkts finden,
beenden Sie die Verwendung bitte sofort und entfernen Sie die

- 3 -
Fremdkörper, bevor Sie es weiter verwenden.
4. Wenn Sie dieses Produkt über einen längeren Zeitraum ununterbrochen
verwenden, legen Sie bitte rechtzeitig eine Pause ein, um übermäßige
Ermüdung zu vermeiden.
Wartung und Instandhaltung
1. Warten und reinigen Sie das Produkt regelmäßig. Trennen Sie vor der
Reinigung die Stromversorgung und wischen Sie es mit einem trockenen
Tuch ab. Verwenden Sie keine ätzenden Substanzen wie Alkohol, Säuren
oder Laugen.
2. Wenn das Produkt längere Zeit nicht verwendet wird, trennen Sie es
bitte umgehend von der Stromversorgung, um Energie zu sparen und die
Lebensdauer des Produkts zu verlängern.
3. Zerlegen Sie das Produkt nicht und ersetzen Sie keine Komponenten
selbst. Wenn Sie auf Fehlfunktionen stoßen, wenden Sie sich bitte an den
Kundendienst.
Notfallmaßnahmen
1. Wenn es zu ungewöhnlichen Situationen oder Unfällen mit dem Produkt
kommt, stellen Sie die Verwendung so bald wie möglich ein. Wenn eine
Überhitzung, Rauchentwicklung oder ungewöhnliche Geräusche auftreten,
unterbrechen Sie bitte sofort die Stromversorgung und wenden Sie sich an
den Kundendienst.
3. Wenn im Zusammenhang mit dem Produkt eine Notsituation auftritt, die
die persönliche Sicherheit gefährden kann, rufen Sie bitte umgehend die
Notrufnummer an.
Haftungsausschlüsse
1. Wir legen großen Wert auf die Sicherheit und Qualität unserer Produkte,
können jedoch keine Verantwortung für Sicherheitsunfälle übernehmen,
die durch unsachgemäßen Gebrauch oder Betrieb verursacht werden.
BEWAHREN SIE DIESE ANWEISUNGEN AUF
MODEL AND PARAMETERS
Modell
GFK-160-V1
- 4 -
Geeignete
Flüssigkeit
Alle frei fließenden Pasten und Flüssigkeiten (ohne
Partikel) wie Sojasauce, Getränke, Weißwein, Essig,
Milch, Alkohol (weniger als 40%) usw.
Füllbereich
5 ml – 350 ml
Maximaler
Durchfluss
3,5 l / min
Steuerungsmod
us
Pedalschalter und Automatik
Bewertung(en)
Wechselstrom 120 V , 60 Hz
Leistung (max.)
34W
STRUCTURE DIAGRAM
1. 2. Auslaufschlauch und Einfüllstutzen 3. Zulaufschlauch und Filter 4.
Bedienfeld 5. Fußschalter 6. Auslaufbügel
COMPONENTS
GFK-160-V1
Bedienungsanleitung
×1
Fußschalter
×1
Netzkabel
×1
Model
Parts
2
3
4
1
5
6
- 5 -
OPERATING INSTRUCTIONS
1. Verbinden Sie die beiden Stangen wie gezeigt mit einer Kreuzklemme.
2. Installieren Sie die T-Klemme und befestigen Sie sie mit Schrauben
4.Installieren Sie die oben installierten Stangen wie gezeigt an der
T-Klemme.
Inbusschlüssel (5#, 4#)
×2
Schraube (M6*20mm)
×2
T-Klemme
×1
Kreuzklemme
×1
Runder Clip
×1
Stange
×2
Schraubendreher
×1

- 6 -
T clamp

- 7 -
8. Schließen Sie den Pedalschalter
wie gezeigt an.
Stecken Sie das Netzkabel wie
gezeigt ein.
8.Produktmontage abgeschlossen.
Hinweis: Die verbauten Halterungen und die Einfüllstutzen können beliebig
angepasst werden.
Power Cord

- 8 -
Die Bedienungsanleitung
Einführung der digitalen Anzeigeschnittstelle:
1. Die Maschine verfügt über zwei Arbeitsmodi (der Arbeitsmodus muss
vor der Verwendung eingestellt werden): Dauerbetrieb, Kriechbetrieb
(Pedalsteuerung)
Über die Taste (Dauer-/Tippbetrieb)
Wenn Sie den Dauerbetrieb einstellen möchten:
·1)Drücken Sie zuerst die Pause-Taste (Ein/Aus). Die Pause-Statusleuchte
leuchtet
·2)Drücken Sie die Taste (Dauerbetrieb/Tippbetrieb)
Wenn kontinuierliche arbeit leuchtet,
es bedeutet, dass es sich bereits im Dauerbetrieb befindet
·3)Drücken Sie die Starttaste (Ein/Aus), um mit der Arbeit zu beginnen
Gleiches gilt für die Einstellung des Inching-Arbeitsmodus
(Pedalmodus).
Count
Filling Time Setting
Speed
Interval Setting

- 9 -
2. So passen Sie Füllzeit, Füllgeschwindigkeit und Wartezeit an Drücken
Sie die Schaltfläche Einstellungen (Parametersatz)
· Muss 2–3 Sekunden lang gedrückt werden.
·Wenn das rote Licht 1 blinkt, ist es fahrbereit
·An der Cursorposition kann die Zahl eingestellt werden
·Dann durch (↕)(↔) Tasten (+)(-) Tasten, um die Zeit, Geschwindigkeit,
Wartezeit einzustellen, die Sie benötigen
3. Der Zählerstand kann nicht angepasst werden und kann nur durch
Drücken der Taste (Nullreinigung) gelöscht werden.
4. Passen Sie die Auswahl von 6 Gruppen von Speicherfunktionen an
·über die Schaltfläche (O) unten
·Erstes Drücken (Parametersatz)
·Drücken Sie dann die Taste (O), um zwischen 6 Funktionsgruppen zu
wechseln.
· Sie müssen es zuerst einrichten und speichern
MAINTENANCE
1. Es ist besser, die Maschine nach jedem Gebrauch mit sauberem
Wasser zu reinigen, was die Lebensdauer verlängern kann der Pumpe.
2. Bitte reinigen Sie das Produkt und den Filter rechtzeitig nach jedem
Gebrauch.
3. Wenn die Maschine nicht verwendet wird, entleeren Sie bitte die
Flüssigkeit und lagern Sie sie an einem belüfteten und trockenen Ort.
4. Bitte lagern Sie das Produkt an einem trockenen und belüfteten Ort.
5. Bitte ersetzen Sie regelmäßig folgende Verbrauchsteile :
Schlauch, Filter, Einfüllstutzen

- 10 -
TROUBLESHOOTING
Problem
Mögliche Ursache
Mögliche Lösung
Nimmt kein Wasser
auf
Maschine erste
verwendung oder lange
zeit nicht verwenden,
sehr wenige wird nicht
absorbieren wasser, weil
die pumpe interne
trockenes Ergebnis .
Sie müssen der Pumpe
etwas Wasser aus dem
Ansaugrohr hinzufügen
und dann die Maschine
starten.
Die Pumpe kann
nicht
die Flüssigkeit aus
Schlauchein- und
-auslass sind
invertiert
Bestätigen Sie den
Schlaucheinlass in
Flüssigkeitstank.
Das Netzkabel ist nicht
eingesteckt
Schließen Sie das
Netzkabel wieder an
Schlauch gefaltet oder
beschädigt
Schlauch glätten oder
Schlauch ersetzen
Die Betriebsanzeige
ist aus
Das Netzkabel ist nicht
eingesteckt
Schließen Sie das
Netzkabel wieder an

- 11 -
Adresse: Baoshanqu Shuangchenglu 803long 11hao 1602A-1609shi
Shanghai
Nach AUS importiert: SIHAO PTY LTD . 1 ROKEVA
STREETEASTWOOD NSW 2122 Australien
Importiert in die USA: Sanven Technology Ltd. Suite 250. 9166 Anaheim
Place, Rancho Cucamonga, CA 91730
REP
EC
SHUNSHUN GmbH
Römeräcker 9 Z2021, 76351
Linkenheim-Hochstetten, Germany
REP
UK
Pooledas Group Ltd
Unit 5 Albert Edward House, The
Pavilions Preston, United Kingdom
In China hergestellt


Supporto tecnico e certificato di garanzia elettronica
www.vevor.com/support
MACCHINA RIEMPITRICE DI LIQUIDI IN PASTA
MANUALE D'USO
We continue to be committed to provide you tools with competitive price.
"Save Half", "Half Price" or any other similar expressions used by us only represents an
estimate of savings you might benefit from buying certain tools with us compared to the major
top brands and does not necessarily mean to cover all categories of tools offered by us. You
are kindly reminded to verify carefully when you are placing an order with us if you are
actually saving half in comparison with the top major brands.
- 1 -
MODELLO: GFK-160-V1
Have product questions? Need technical support? Please feel free to
contact us:
Technical Support and E-Warranty Certificate
www.vevor.com/support
NEED HELP? CONTACT US!
This is the original instruction, please read all manual instructions
carefully before operating. VEVOR reserves a clear interpretation of our
user manual. The appearance of the product shall be subject to the
product you received. Please forgive us that we won't inform you again if
there are any technology or software updates on our product.
Paste Liquid Filling Machine

- 2 -
7. leggere attentamente e comprendere tutte le ISTRUZIONI DI
MONTAGGIO E FUNZIONAMENTO .
8. La mancata osservanza delle norme di sicurezza e di altre precauzioni
di sicurezza di base può causare gravi lesioni personali.
GENERAL SAFETY RULES
Promemoria importante
1. Prima dell'uso, leggere attentamente il manuale del prodotto e
assicurarsi di aver compreso e rispettato tutte le avvertenze di sicurezza e
le precauzioni d'uso.
2. Non utilizzare questo prodotto per scopi diversi da quelli indicati per
evitare rischi imprevisti.
3. Questo prodotto è applicabile solo agli utenti all'interno della fascia di
età e dell'ambito di applicazione specificati. Si prega di rispettare
rigorosamente le restrizioni di età e le avvertenze pertinenti.
4. In caso di anomalie nel prodotto, interromperne immediatamente
l'utilizzo e contattare il centro di assistenza post-vendita per una
consulenza o per organizzare la riparazione.
Requisiti ambientali per l'uso
1. Evitare la luce solare diretta o il contatto con fonti di calore per prevenire
danni al prodotto o incendi.
2. Assicurarsi che l'ambiente di utilizzo sia stabile ed evitare che il prodotto
venga colpito o lasciato cadere per evitare danni.
Linee guida operative di sicurezza
1. Utilizzare un alimentatore e una tensione adeguati e non utilizzare cavi
di alimentazione o spine danneggiati.
2. Quando si utilizza questo prodotto, non cortocircuitare i circuiti o
collegare dispositivi non corrispondenti per evitare rischi quali scosse
elettriche e incendi.
3. Se si rilevano corpi estranei sulla superficie del prodotto, interromperne
immediatamente l'utilizzo e rimuoverli prima di continuare a utilizzarlo.
4. Quando si utilizza questo prodotto ininterrottamente per un lungo
periodo, riposare per un po' di tempo per evitare un affaticamento

- 3 -
eccessivo.
Manutenzione e cura
1. Mantenere e pulire regolarmente il prodotto. Prima di pulirlo, scollegare
l'alimentazione e pulirlo con un panno asciutto. Fare attenzione a non
utilizzare alcol, soluzioni acide o alcaline, ecc. Sostanze corrosive.
2. Quando il prodotto non viene utilizzato per un lungo periodo, scollegare
tempestivamente l'alimentazione per risparmiare energia e prolungare la
durata del prodotto.
3. Non smontare il prodotto o sostituire i componenti da soli. In caso di
malfunzionamenti, contattare il centro di assistenza post-vendita.
Misure di gestione delle emergenze
1. In caso di situazioni anomale o incidenti con il prodotto, interromperne
l'utilizzo il prima possibile. In caso di surriscaldamento, fumo o rumori
anomali, interrompere immediatamente l'alimentazione e contattare il
centro di assistenza post-vendita.
3. Se il prodotto comporta una situazione di emergenza che potrebbe
mettere a repentaglio la sicurezza personale, chiamare tempestivamente il
numero di soccorso di emergenza.
Dichiarazioni di non responsabilità
1. Attribuiamo grande importanza alla sicurezza e alla qualità dei nostri
prodotti, ma non possiamo assumerci la responsabilità per incidenti di
sicurezza causati da un uso o funzionamento improprio.
SALVA QUESTE ISTRUZIONI
MODEL AND PARAMETERS
Modello
GFK-160-V1
Liquido adatto
Tutte le paste e i liquidi fluidi (senza particelle) come
salsa di soia, bevande, vino bianco, aceto, latte, alcol
(meno del 40%) ecc.
Gamma di
riempimento
5 ml - 350 ml
Portata
massima
3,5 litri / min
Modalità di
controllo
Interruttore a pedale e automatico
- 4 -
Valutazione(i)
AC120V 60Hz
Potenza (max.)
34W
STRUCTURE DIAGRAM
1. Staffa di montaggio 2. Tubo flessibile di scarico e ugello di riempimento 3.
Tubo flessibile di ingresso e filtro 4. Pannello di controllo 5. Interruttore a
pedale 6. Staffa di montaggio
COMPONENTS
GFK-160-V1
Manuale d'uso
×1
Interruttore a pedale
×1
Cavo di alimentazione
×1
Chiave esagonale (5#、4#)
×2
Vite (M6*20mm)
×2
Morsetto a T
×1
Model
Parts
2
3
4
1
5
6

- 5 -
OPERATING INSTRUCTIONS
1. Collegare le due aste con un morsetto a croce come mostrato in figura.
2. Installare il morsetto a T e fissarlo con le viti
4. Installare le aste sopra installate sul morsetto a T come mostrato.
Morsetto a croce
×1
Clip circolare
×1
Asta
×2
Cacciavite
×1
T clamp
- 6 -
9. Collegare l'interruttore a pedale
come mostrato.
Inserire il cavo di alimentazione
come mostrato.
8. Assemblaggio del prodotto completato.
Nota: la staffa montata e gli ugelli di riempimento possono essere regolati in
base alle esigenze.
Power Cord

- 7 -
Le istruzioni per l'uso
Introduzione dell'interfaccia di visualizzazione digitale:
1. La macchina ha due modalità di lavoro (la modalità di lavoro deve
essere impostata prima dell'uso): lavoro continuo, lavoro a impulsi
(controllo a pedale)
Tramite il pulsante (continuo/a impulsi)
Se si desidera impostarlo sulla modalità di lavoro continuo:
·1)Premere prima il pulsante di pausa (on/off).La spia di stato di pausa si
accende
·2)Premere il pulsante (continuo/a impulsi)
Quando si accende il lavoro continuo,
significa che è già in modalità Lavoro Continuo
·3)Premere il pulsante di avvio (on/off) per iniziare a lavorare
Stessa modalità impostata per la modalità Inching Work (modalità
pedale)
Count
Filling Time Setting
Speed
Interval Setting

- 8 -
2. Come regolare il tempo di riempimento, la velocità di riempimento e il
tempo di attesa Premere il pulsante Impostazioni (Set di parametri)
·È necessario premere per 2-3 secondi.
·Quando la luce rossa 1 lampeggia, è pronto per partire
·La posizione del cursore è dove è possibile impostare il numero
·Quindi tramite i pulsanti (↕)(↔) (+)(-) per regolare il tempo, la velocità, il
tempo di attesa di cui hai bisogno
3. Il conteggio non può essere regolato e può essere cancellato solo
tramite il pulsante (pulizia zero)
4. Regola la selezione di 6 gruppi di funzioni di memoria
·tramite il pulsante (O) qui sotto
·Prima pressione (Set di parametri)
·quindi premere il pulsante (O) per commutare 6 gruppi di funzioni
·Devi prima configurarlo e conservarlo
MAINTENANCE
1. È meglio pulire la macchina con acqua pulita dopo ogni utilizzo, il che
può prolungarne la durata. della pompa.
2. Si prega di pulire il prodotto e il filtro per tempo dopo ogni utilizzo.
3. Quando la macchina non è in uso, svuotare il liquido e conservarla in un
luogo ventilato e asciutto.
4. Conservare il prodotto in un luogo asciutto e ventilato.
5. Sostituire regolarmente le seguenti parti consumabili :
Tubo flessibile, filtro, ugello di riempimento

- 9 -
TROUBLESHOOTING
Problema
Possibile causa
Possibile soluzione
Non assorbe acqua
Al primo utilizzo della
macchina o dopo un
lungo periodo di
inutilizzo, pochissima
assorbirà l'acqua,
perché la pompa interna
risultato asciutto .
Bisogna aggiungere un
po' d'acqua dal tubo di
aspirazione alla pompa e
poi avviare la macchina.
La pompa non
riesce ad arrivare
il liquido fuori
L'ingresso e l'uscita del
tubo flessibile sono
invertito
Confermare l'ingresso
del tubo flessibile in
serbatoio del liquido.
Il cavo di alimentazione
non è
collegato
Ricollegare il cavo di
alimentazione
Tubo piegato o
danneggiato
Lisciare il tubo o
sostituirlo
L'indicatore di
alimentazione è
spento
Il cavo di alimentazione
non è
collegato
Ricollegare il cavo di
alimentazione

- 10 -
Indirizzo: Baoshanqu Shuangchenglu 803long 11hao 1602A-1609shi
Shanghai
Importato in AUS: SIHAO PTY LTD . 1 ROKEVA STREETEASTWOOD
NSW 2122 Australia
Importato negli USA: Sanven Technology Ltd. Suite 250. 9166 Anaheim
Place, Rancho Cucamonga, CA 91730
REP
EC
SHUNSHUN GmbH
Römeräcker 9 Z2021, 76351
Linkenheim-Hochstetten, Germany
REP
UK
Pooledas Group Ltd
Unit 5 Albert Edward House, The
Pavilions Preston, United Kingdom
Made in China


Soporte técnico y certificado de garantía electrónica
www.vevor.com/support
MÁQUINA DE LLENADO DE LÍQUIDO EN
PASTA
MANUAL DE USUARIO
We continue to be committed to provide you tools with competitive price.
"Save Half", "Half Price" or any other similar expressions used by us only represents an
estimate of savings you might benefit from buying certain tools with us compared to the major
top brands and does not necessarily mean to cover all categories of tools offered by us. You
are kindly reminded to verify carefully when you are placing an order with us if you are
actually saving half in comparison with the top major brands.

- 1 -
MODELO: GFK-160-V1
Have product questions? Need technical support? Please feel free to
contact us:
Technical Support and E-Warranty Certificate
www.vevor.com/support
NEED HELP? CONTACT US!
This is the original instruction, please read all manual instructions
carefully before operating. VEVOR reserves a clear interpretation of our
user manual. The appearance of the product shall be subject to the
product you received. Please forgive us that we won't inform you again if
there are any technology or software updates on our product.
Paste Liquid Filling Machine

- 2 -
9. Lea atentamente y comprenda todas las INSTRUCCIONES DE
MONTAJE Y OPERACIÓN antes de operar.
10. El incumplimiento de las normas de seguridad y otras precauciones de
seguridad básicas puede provocar lesiones personales graves.
GENERAL SAFETY RULES
Recordatorio importante
1. Antes de usar, lea atentamente el manual del producto y asegúrese de
comprender y cumplir con todas las advertencias de seguridad y
precauciones de uso.
2. No utilice este producto para otros fines no previstos para evitar riesgos
inesperados.
3. Este producto solo es apto para usuarios dentro del grupo de edad y el
ámbito de aplicación especificados. Respete estrictamente las
restricciones de edad y las advertencias pertinentes.
4. Si hay alguna anomalía en el producto, deje de usarlo inmediatamente y
comuníquese con el centro de servicio posventa para realizar una consulta
o solicitar una reparación.
Requisitos ambientales para su uso
1. Evite la luz solar directa o el contacto con fuentes de fuego para evitar
daños al producto o incendios.
2. Asegúrese de un entorno de uso estable y evite que el producto se
golpee o se caiga para evitar daños.
Directrices de seguridad para el funcionamiento
1. Utilice una fuente de alimentación y un voltaje adecuados y no utilice
cables de alimentación ni enchufes dañados.
2. Al utilizar este producto, no provoque cortocircuitos ni conecte
dispositivos no compatibles para evitar riesgos como descargas eléctricas
e incendios.
3. Cuando se encuentren objetos extraños en la superficie del producto,
deje de usarlo inmediatamente y retire los objetos extraños antes de
continuar usándolo.
4. Cuando utilice este producto de forma continua durante un tiempo

- 3 -
prolongado, descanse a tiempo para evitar una fatiga excesiva.
Mantenimiento y conservación
1. Realice el mantenimiento y la limpieza del producto con regularidad.
Antes de limpiarlo, desconecte la fuente de alimentación y límpielo con un
paño seco. Tenga cuidado de no utilizar alcohol, soluciones ácidas o
alcalinas, etc., sustancias corrosivas.
2. Cuando el producto no se utilice durante un período prolongado,
desconecte la fuente de alimentación rápidamente para ahorrar energía y
prolongar la vida útil del producto.
3. No desmonte el producto ni reemplace componentes por su cuenta. Si
detecta algún mal funcionamiento, comuníquese con el centro de servicio
posventa.
Medidas de manejo de emergencias
1. Cuando se produzcan situaciones anormales o accidentes con el
producto, deje de usarlo lo antes posible. Si detecta sobrecalentamiento,
humo o ruidos anormales, corte inmediatamente el suministro de energía y
comuníquese con el centro de servicio posventa.
3. Si el producto genera una situación de emergencia que pueda poner en
peligro la seguridad personal, llame al número de rescate de emergencia
de manera oportuna.
Descargo de responsabilidad
1. Damos gran importancia a la seguridad y calidad de nuestros productos,
pero no podemos asumir la responsabilidad por accidentes de seguridad
causados por un uso o funcionamiento inadecuados.
GUARDE ESTAS INSTRUCCIONES
MODEL AND PARAMETERS
Modelo
GFK-160-V1
Líquido
adecuado
Toda pasta y líquido fluido (sin partículas) como salsa de
soja, bebidas, vino blanco, vinagre, leche, alcohol
(menos del 40%), etc.
Rango de
llenado
5 ml - 350 0 ml
- 4 -
Caudal máximo
3,5 litros por minuto
Modo de control
Interruptor de pedal y automático
Calificación(es)
CA 120 V 60 Hz
Potencia (máx.)
34 W
STRUCTURE DIAGRAM
1. Soporte integrado 2. Manguera de salida y boquilla de llenado 3. Manguera
de entrada y filtro 4. Panel de control 5. Interruptor de pedal 6. Soporte
integrado
COMPONENTS
GFK-160-V1
Manual de usuario
×1
Interruptor de pedal
×1
Cable de alimentación
×1
Llave hexagonal (n.° 5, n.° 4)
×2
Tornillo (M6*20 mm)
×2
Model
Parts
2
3
4
1
5
6
- 5 -
OPERATING INSTRUCTIONS
1. Conecte las dos varillas con una abrazadera transversal como se muestra.
2. Instale la abrazadera en T y fíjela con tornillos.
4. Instale las varillas instaladas anteriormente en la abrazadera en T como
se muestra.
Abrazadera en T
×1
Abrazadera transversal
×1
Clip circular
×1
Vara
×2
Destornillador
×1

- 6 -
T clamp

- 7 -
10.Conecte el interruptor de pedal
como se muestra.
Inserte el cable de alimentación
como se muestra.
8.Montaje del producto completado.
Nota: El soporte incorporado y las boquillas de llenado se pueden ajustar
según sea necesario.
Power Cord

- 8 -
Las instrucciones de uso
Introducción de la interfaz de pantalla digital:
1. La máquina tiene dos modos de trabajo (el modo de trabajo debe
configurarse antes de su uso): trabajo continuo, trabajo lento (control de
pedal)
A través del botón (continuo/avance lento)
Si desea configurarlo en modo de trabajo continuo:
·1) Presione primero el botón de pausa (encendido/apagado). La luz de
estado de pausa se enciende.
·2)Presione el botón (continuo/avance lento)
Cuando el trabajo continuo se ilumina,
significa que ya esta en modo Trabajo Continuo
·3)Presione el botón de inicio (encendido/apagado) para comenzar a
trabajar.
De la misma manera que se configura el modo de trabajo de avance
Count
Filling Time Setting
Speed
Interval Setting

- 9 -
lento (modo pedal)
2. Cómo ajustar el tiempo de llenado, la velocidad de llenado y el tiempo
de espera Pulse el botón Configuración (Conjunto de parámetros)
·Es necesario presionar durante 2-3 segundos.
·Cuando la luz roja 1 parpadea, está listo para funcionar.
·La posición del cursor es donde se puede configurar el número.
·Luego a través de los botones (↕)(↔) (+)(-) podrá ajustar el tiempo, la
velocidad y el tiempo de espera que necesite.
3. El recuento no se puede ajustar y solo se puede borrar con el botón
(limpieza a cero)
4. Ajuste la selección de 6 grupos de funciones de memoria.
·a través del botón (O) de abajo
·Primera pulsación (Conjunto de parámetros)
· Luego presione el botón (O) para cambiar entre 6 grupos de funciones
·Primero debes configurarlo y almacenarlo.
MAINTENANCE
1. Es mejor limpiar la máquina con agua limpia después de cada uso, lo
que puede prolongar la vida útil. de la bomba.
2. Limpie el producto y el filtro a tiempo después de cada uso.
3. Cuando la máquina no esté en uso, vacíe el líquido y guárdela en un
lugar ventilado y seco.
4. Guarde el producto en un lugar seco y ventilado.
5. Reemplace periódicamente los siguientes consumibles :
Manguera, filtro, boquilla de llenado

- 10 -
TROUBLESHOOTING
Problema
Posible causa
Posible solución
No absorbe agua
La máquina se usa por
primera vez o no se usa
durante mucho tiempo, y
muy pocas no absorben
agua, debido a la bomba
interna. resultado seco
Es necesario agregar un
poco de agua desde la
tubería de entrada a la
bomba y luego poner en
marcha la máquina.
La bomba no puede
llegar
el liquido fuera
La entrada y salida de la
manguera son
invertido
Confirmar la entrada de
la manguera en
Tanque de líquido.
El cable de alimentación
no está
Enchufado
Vuelva a conectar el
cable de alimentación.
Manguera doblada o
dañada
Manguera lisa o
reemplácela
El indicador de
encendido está
apagado
El cable de
alimentación no está
Enchufado
Vuelva a conectar el
cable de alimentación.

- 11 -
Dirección: Baoshanqu Shuangchenglu 803long 11hao 1602A-1609shi
Shanghai
Importado a Australia: SIHAO PTY LTD . 1 ROKEVA
STREETEASTWOOD NSW 2122 Australia
Importado a EE. UU.: Sanven Technology Ltd. Suite 250. 9166 Anaheim
Place, Rancho Cucamonga, CA 91730
REP
EC
SHUNSHUN GmbH
Römeräcker 9 Z2021, 76351
Linkenheim-Hochstetten, Germany
REP
UK
Pooledas Group Ltd
Unit 5 Albert Edward House, The
Pavilions Preston, United Kingdom
Hecho en china


Wsparcie techniczne i certyfikat e-gwarancji
www.vevor.com/support
MASZYNA DO NAPEŁNIANIA PŁYNEM W
PAŚCIE
INSTRUKCJA OBSŁUGI
We continue to be committed to provide you tools with competitive price.
"Save Half", "Half Price" or any other similar expressions used by us only represents an
estimate of savings you might benefit from buying certain tools with us compared to the major
top brands and does not necessarily mean to cover all categories of tools offered by us. You
are kindly reminded to verify carefully when you are placing an order with us if you are
actually saving half in comparison with the top major brands.
- 1 -
MODEL: GFK-160-V1
Have product questions? Need technical support? Please feel free to
contact us:
Technical Support and E-Warranty Certificate
www.vevor.com/support
NEED HELP? CONTACT US!
This is the original instruction, please read all manual instructions
carefully before operating. VEVOR reserves a clear interpretation of our
user manual. The appearance of the product shall be subject to the
product you received. Please forgive us that we won't inform you again if
there are any technology or software updates on our product.
Paste Liquid Filling Machine

- 2 -
11. należy uważnie przeczytać i zrozumieć całą INSTRUKCJĘ MONTAŻU
I OBSŁUGI .
12. Nieprzestrzeganie zasad bezpieczeństwa i innych podstawowych
środków ostrożności może skutkować poważnymi obrażeniami ciała.
GENERAL SAFETY RULES
Ważne przypomnienie
1. Przed użyciem należy uważnie przeczytać instrukcję obsługi produktu i
upewnić się, że wszystkie ostrzeżenia dotyczące bezpieczeństwa i środki
ostrożności są zrozumiałe i stosowane.
2. Aby uniknąć nieoczekiwanych zagrożeń, nie należy używać tego
produktu do innych celów, niż te, do których został przeznaczony.
3. Ten produkt jest przeznaczony wyłącznie dla użytkowników w określonej
grupie wiekowej i zakresie zastosowania. Prosimy o ścisłe przestrzeganie
odpowiednich ograniczeń wiekowych i ostrzeżeń.
4. Jeśli w produkcie stwierdzone zostaną jakiekolwiek nieprawidłowości,
należy natychmiast zaprzestać jego używania i skontaktować się z
centrum obsługi klienta w celu konsultacji lub uzgodnienia naprawy.
Wymagania środowiskowe dotyczące użytkowania
1. Unikać bezpośredniego światła słonecznego i kontaktu ze źródłami
ognia, aby zapobiec uszkodzeniu produktu lub powstaniu pożaru.
2. Aby uniknąć uszkodzeń, należy zapewnić stabilne środowisko
użytkowania oraz chronić produkt przed uderzeniami i upadkiem.
Wytyczne dotyczące bezpieczeństwa
1. Prosimy używać odpowiedniego źródła zasilania i napięcia oraz nie
używać uszkodzonych przewodów zasilających lub wtyczek.
2. Podczas korzystania z produktu nie należy zwierać obwodów ani
podłączać niepasujących do siebie urządzeń, aby uniknąć ryzyka
porażenia prądem elektrycznym lub pożaru.
3. Jeżeli na powierzchni produktu znajdują się ciała obce, należy
natychmiast zaprzestać korzystania z produktu i usunąć je przed
ponownym użyciem.
4. W przypadku długotrwałego, nieprzerwanego stosowania produktu,

- 3 -
należy zapewnić sobie odpowiedni odpoczynek, aby uniknąć nadmiernego
zmęczenia.
Konserwacja i utrzymanie
1. Regularnie konserwuj i czyść produkt. Przed czyszczeniem odłącz
zasilanie i wytrzyj go suchą szmatką. Uważaj, aby nie używać alkoholu,
roztworów kwasów lub zasad itp. Substancji żrących.
2. Jeśli produkt nie jest używany przez dłuższy czas, należy natychmiast
odłączyć go od zasilania, aby oszczędzać energię i przedłużyć żywotność
produktu.
3. Nie rozmontowuj produktu ani nie wymieniaj podzespołów samodzielnie.
W przypadku jakichkolwiek usterek skontaktuj się z centrum obsługi
posprzedażowej.
Środki zaradcze w sytuacjach awaryjnych
1. W przypadku wystąpienia nietypowych sytuacji lub wypadków z
produktem należy jak najszybciej zaprzestać jego używania. W przypadku
przegrzania, dymienia lub nietypowego dźwięku należy natychmiast
odłączyć urządzenie od zasilania i skontaktować się z punktem
serwisowym.
3. Jeśli produkt wiąże się z sytuacją awaryjną, która może zagrozić
bezpieczeństwu osobistemu, należy niezwłocznie skontaktować się z
numerem alarmowym pogotowia ratunkowego.
Zastrzeżenia
1. Przywiązujemy dużą wagę do bezpieczeństwa i jakości naszych
produktów, ale nie możemy wziąć na siebie odpowiedzialności za wypadki
związane z bezpieczeństwem, spowodowane niewłaściwym
użytkowaniem lub obsługą.
ZAPISZ TE INSTRUKCJE
MODEL AND PARAMETERS
Model
GFK-160-V1
Odpowiedni płyn
Wszystkie sypkie pasty i płyny (bez cząstek), takie jak
sos sojowy, napoje, białe wino, ocet, mleko, alkohol
(mniej niż 40%) itp.
- 4 -
Zakres
napełniania
5ml- 350 0ml
Maksymalna
szybkość
przepływu
3,5 l / min
Tryb sterowania
Przełącznik pedałowy i automatyczny
Ocena(y)
Prąd zmienny 120 V 60 Hz
Moc (maks.)
34W
STRUCTURE DIAGRAM
1. Wspornik montażowy 2. Wąż wylotowy i dysza napełniająca 3. Wąż wlotowy
i filtr 4. Panel sterowania 5. Przełącznik pedałowy 6. Wspornik montażowy
COMPONENTS
GFK-160-V1
Instrukcja obsługi
×1
Przełącznik pedałowy
×1
Przewód zasilający
×1
Klucz imbusowy (5#, 4#)
×2
Śruba (M6*20mm)
×2
Model
Parts
2
3
4
1
5
6
- 5 -
OPERATING INSTRUCTIONS
1. Połącz oba pręty za pomocą zacisku krzyżowego, jak pokazano.
2. Zamontuj zacisk T i przymocuj go śrubami
4. Zamontuj wyżej zamontowane pręty na zacisku T, jak pokazano.
Zacisk T
×1
Zacisk krzyżowy
×1
Klips okrągły
×1
Pręt
×2
Śrubokręt
×1
T clamp

- 6 -

- 7 -
11.Podłącz przełącznik pedałowy w
sposób pokazany na rysunku.
Podłącz przewód zasilający w
sposób pokazany na rysunku.
8. Montaż produktu zakończony.
Uwaga: Zamontowany wspornik i dysze napełniające można regulować
według potrzeb.
Power Cord

- 8 -
Instrukcja obsługi
Wprowadzenie interfejsu wyświetlacza cyfrowego:
1. Maszyna ma dwa tryby pracy (tryb pracy musi zostać ustawiony przed
użyciem): praca ciągła, praca impulsowa (sterowanie pedałem)
Za pomocą przycisku (ciągły/impulsowy)
Jeśli chcesz ustawić tryb pracy ciągłej:
·1)Najpierw naciśnij przycisk pauzy (włącz/wyłącz). Zaświeci się kontrolka
stanu pauzy.
·2)Naciśnij przycisk (ciągły/impulsowy)
Gdy zapali się praca ciągła,
oznacza to, że jest już w trybie pracy ciągłej
·3) Naciśnij przycisk start (włącz/wyłącz), aby rozpocząć pracę
W ten sam sposób ustawiono tryb pracy impulsowej (tryb pedałowania)
2. Jak dostosować czas napełniania, prędkość napełniania i czas
Count
Filling Time Setting
Speed
Interval Setting

- 9 -
oczekiwania Naciśnij przycisk Ustawienia (Zestaw parametrów)
·Należy nacisnąć i przytrzymać przez 2-3 sekundy.
·Gdy czerwone światło 1 zacznie migać, urządzenie jest gotowe do użycia
·Pozycja kursora to miejsce, w którym można ustawić liczbę
·Następnie za pomocą przycisków (↕)(↔) (+)(-) dostosuj czas, prędkość i
czas oczekiwania, którego potrzebujesz
3. Licznika nie można regulować i można go wyczyścić jedynie za pomocą
przycisku (czyszczenie zerowe)
4.Dostosuj wybór 6 grup funkcji pamięci
·poprzez przycisk (O) poniżej
·Pierwsze naciśnięcie (zestaw parametrów)
·następnie naciśnij przycisk (O), aby przełączać się pomiędzy 6 grupami
funkcji
·Najpierw musisz go skonfigurować i zapisać
MAINTENANCE
1. Najlepiej czyścić maszynę czystą wodą po każdym użyciu, co może
wydłużyć jej żywotność. pompy.
2. Należy czyścić produkt i filtr po każdym użyciu.
3. Jeśli urządzenie nie jest używane, należy wylać płyn i przechowywać je
w wentylowanym i suchym miejscu.
4. Przechowuj produkt w suchym i wentylowanym miejscu.
5. Należy regularnie wymieniać następujące części eksploatacyjne :
Wąż, Filtr, Dysza napełniająca

- 10 -
TROUBLESHOOTING
Problem
Możliwa przyczyna
Możliwe rozwiązanie
Nie wchłania wody
Przy pierwszym użyciu
lub długim okresie
nieużywania urządzenia,
bardzo niewiele z nich
nie wchłonie wody,
ponieważ wewnętrzna
pompa wynik suchy .
Należy dodać trochę
wody z rury wlotowej do
pompy i dopiero wtedy
uruchomić maszynę.
Pompa nie może się
dostać
płyn na zewnątrz
Wlot i wylot węża są
odwrotny
Potwierdź wlot węża do
zbiornik na ciecz.
Przewód zasilający nie
jest
podłączony
Podłącz ponownie
przewód zasilający
Wąż jest złożony lub
uszkodzony
Wygładź wąż lub
wymień wąż
Wskaźnik zasilania
jest wyłączony
Przewód zasilający nie
jest
podłączony
Podłącz ponownie
przewód zasilający

- 11 -
Adres: Baoshanqu Shuangchenglu 803long 11hao 1602A-1609shi
Szanghaj
Importowane do AUS: SIHAO PTY LTD . 1 ROKEVA
STREETEASTWOOD NSW 2122 Australia
Importowane do USA: Sanven Technology Ltd. Suite 250. 9166 Anaheim
Place, Rancho Cucamonga, CA 91730
REP
EC
SHUNSHUN GmbH
Römeräcker 9 Z2021, 76351
Linkenheim-Hochstetten, Germany
REP
UK
Pooledas Group Ltd
Unit 5 Albert Edward House, The
Pavilions Preston, United Kingdom
Wyprodukowano w Chinach


Technische ondersteuning en e-garantiecertificaat
www.vevor.com/support
PASTA VLOEISTOF VULMACHINE
GEBRUIKSAANWIJZING
We continue to be committed to provide you tools with competitive price.
"Save Half", "Half Price" or any other similar expressions used by us only represents an
estimate of savings you might benefit from buying certain tools with us compared to the major
top brands and does not necessarily mean to cover all categories of tools offered by us. You
are kindly reminded to verify carefully when you are placing an order with us if you are
actually saving half in comparison with the top major brands.
- 1 -
MODEL: GFK-160-V1
Have product questions? Need technical support? Please feel free to
contact us:
Technical Support and E-Warranty Certificate
www.vevor.com/support
NEED HELP? CONTACT US!
This is the original instruction, please read all manual instructions
carefully before operating. VEVOR reserves a clear interpretation of our
user manual. The appearance of the product shall be subject to the
product you received. Please forgive us that we won't inform you again if
there are any technology or software updates on our product.
Paste Liquid Filling Machine

- 2 -
13. MONTAGE- EN GEBRUIKSAANWIJZINGEN zorgvuldig door en zorg
dat u ze begrijpt voordat u het apparaat gaat gebruiken.
14. Het niet naleven van de veiligheidsregels en andere elementaire
veiligheidsmaatregelen kan leiden tot ernstig persoonlijk letsel.
GENERAL SAFETY RULES
Belangrijke herinnering
1. Lees voor gebruik de product handleiding zorgvuldig door en zorg
ervoor dat u alle veiligheidswaarschuwingen en
gebruiksvoorzorgsmaatregelen begrijpt en naleeft.
2. Gebruik dit product niet voor andere dan de aangegeven doeleinden om
onverwachte risico's te voorkomen.
3. Dit product is alleen van toepassing op gebruikers binnen de opgegeven
leeftijdsgroep en het toepassingsgebied. Houd u strikt aan de relevante
leeftijdsbeperkingen en waarschuwingen.
4. Als er afwijkingen aan het product worden geconstateerd, stop dan
onmiddellijk met het gebruik ervan en neem contact op met de
klantenservice voor overleg of om een reparatie te regelen.
Milieueisen voor gebruik
1. Vermijd direct zonlicht en contact met vuurbronnen om schade aan het
product of brand te voorkomen.
2. Zorg voor een stabiele gebruiksomgeving en voorkom dat het product
wordt gestoten of valt om schade te voorkomen.
Veiligheidsrichtlijnen voor de bediening
1. Gebruik een geschikte voeding en spanning en gebruik geen
beschadigde netsnoeren of stekkers.
2. Sluit bij gebruik van dit product geen kortsluitingen en sluit geen
apparaten aan die niet bij elkaar passen, om risico's zoals elektrische
schokken en brand te voorkomen.
3. Wanneer er vreemde voorwerpen op het oppervlak van het product
worden aangetroffen, stop dan onmiddellijk met het gebruik en verwijder
de vreemde voorwerpen voordat u het product opnieuw gebruikt.
4. Wanneer u dit product gedurende een langere tijd achtereenvolgend

- 3 -
gebruikt, neem dan tijdig rust om overmatige vermoeidheid te voorkomen.
Onderhoud en verzorging
1. Onderhoud en reinig het product regelmatig. Koppel voor het reinigen de
stroomtoevoer los en veeg het af met een droge doek. Wees voorzichtig
met het gebruik van alcohol, zuur- of alkali-oplossingen, enz. Corrosieve
stoffen.
2. Wanneer het product gedurende een langere tijd niet wordt gebruikt,
dient u de stroomtoevoer onmiddellijk los te koppelen om energie te
besparen en de levensduur van het product te verlengen.
3. Demonteer het product niet en vervang de onderdelen niet zelf. Als u
storingen ondervindt, neem dan contact op met het aftersales service
center.
Noodmaatregelen
1. Wanneer er abnormale situaties of ongelukken met het product optreden,
stop dan zo snel mogelijk met het gebruik ervan. Indien er oververhitting,
rook of abnormale geluiden worden opgemerkt, schakel dan onmiddellijk
de stroomtoevoer uit en neem contact op met de after-sales service.
3. Als het product een noodsituatie veroorzaakt die de persoonlijke
veiligheid in gevaar kan brengen, bel dan tijdig het noodnummer.
Vrijwaring
1. Wij hechten veel waarde aan de veiligheid en kwaliteit van onze
producten, maar kunnen geen verantwoordelijkheid nemen voor
ongevallen die ontstaan door onjuist gebruik of bediening.
BEWAAR DEZE INSTRUCTIES
MODEL AND PARAMETERS
Model
GFK-160-V1
Geschikte
vloeistof
Alle vrijstromende pasta's en vloeistoffen (geen deeltjes)
zoals sojasaus, dranken, witte wijn, azijn, melk, alcohol
(minder dan 40%) etc.
Vulbereik
5 ml - 350 ml
Maximale
stroomsnelheid
3,5 l / min
- 4 -
Controlemodus
Pedaalschakelaar en automatisch
Beoordeling(en)
AC120V 60Hz
Vermogen
(Max.)
34W
STRUCTURE DIAGRAM
1. Opgebouwde beugel 2. Uitlaatslang en vulmondstuk 3. Inlaatslang en filter 4.
Bedieningspaneel 5. Pedaalschakelaar 6. Opgebouwde beugel
COMPONENTS
GFK-160-V1
Gebruiksaanwijzing
×1
Pedaalschakelaar
×1
Stroomkabel
×1
Inbussleutel (5#、4#)
×2
Schroef (M6*20mm)
×2
T-klem
×1
Model
Parts
2
3
4
1
5
6
- 5 -
OPERATING INSTRUCTIONS
1. Verbind de twee staven met een kruisklem zoals afgebeeld.
2. Plaats de T-klem en bevestig deze met schroeven
4. Plaats de hierboven gemonteerde staven op de T-klem zoals afgebeeld.
Kruisklem
×1
Ronde clip
×1
Hengel
×2
Schroevendraaier
×1
T clamp

- 6 -
12.Sluit de pedaalschakelaar aan
zoals afgebeeld.
Sluit het netsnoer aan zoals
afgebeeld.
8.Productassemblage voltooid.
Let op: De opgebouwde beugel en de vulmondstukken kunnen naar wens
worden aangepast.
Power Cord

- 7 -
De gebruiksaanwijzing
Introductie van digitale display-interface:
1. De machine heeft twee werkmodi (de werkmodus moet vóór gebruik
worden ingesteld): continu werken, inching-werk (pedaalbediening)
Via de knop (continu/inching)
Als u het wilt instellen op de modus Continue Werking:
·1) Druk eerst op de pauzeknop (aan/uit). Het pauzestatuslampje gaat
branden
·2) Druk op de knop (continu/inching)
Als continu werk oplicht,
het betekent dat het zich al in de modus Doorlopend Werken bevindt
·3) Druk op de startknop (aan/uit) om te beginnen met werken
Op dezelfde manier ingesteld op de Inching Work-modus (pedaalmodus)
2. Hoe de vultijd, vulsnelheid en wachttijd aan te passen Druk op de knop
Count
Filling Time Setting
Speed
Interval Setting

- 8 -
Instellingen (Parameterset)
·Je moet 2-3 seconden ingedrukt houden.
·Wanneer het rode lampje 1 knippert, is het klaar om te gaan
·De cursorpositie is waar het nummer kan worden ingesteld
·Gebruik vervolgens de knoppen (↕)(↔) (+)(-) om de tijd, snelheid en
wachttijd aan te passen die u nodig hebt
3. De telling kan niet worden aangepast en kan alleen worden gewist met
de knop (Zero cleaning)
4. Pas de selectie van 6 groepen geheugenfuncties aan
·via de onderstaande knop (O)
·Eerste druk (Parameterset)
·Druk vervolgens op de (O)-knop om te schakelen tussen 6 groepen
functies
·Je moet het eerst instellen en opslaan
MAINTENANCE
1. Het is beter om de machine na elk gebruik met schoon water te reinigen,
wat de levensduur kan verlengen van de pomp.
2. Maak het product en het filter na elk gebruik tijdig schoon.
3. Wanneer het apparaat niet in gebruik is, giet u de vloeistof eruit en
bewaart u het op een geventileerde en droge plaats.
4. Bewaar het product op een droge en geventileerde plaats.
5. Vervang de volgende verbruiksartikelen regelmatig :
Slang, filter, vulmondstuk

- 9 -
TROUBLESHOOTING
Probleem
Mogelijke oorzaak
Mogelijke oplossing
Geen water
opnemen
Machine eerste gebruik
of lange tijd niet gebruikt,
zeer weinig zal geen
water absorberen, omdat
de pomp intern droog
resultaat .
Voeg wat water toe via
de inlaatbuis aan de
pomp en start
vervolgens de machine.
De pomp kan niet
de vloeistof eruit
Slanginlaat en -uitlaat
zijn
omgekeerd
Bevestig de slanginlaat
in
vloeistoftank.
Het netsnoer is niet
aangesloten
Sluit het netsnoer
opnieuw aan
Slang gevouwen of
beschadigd
Slang gladstrijken of
slang vervangen
De stroomindicator
is uit
Het netsnoer is niet
aangesloten
Sluit het netsnoer
opnieuw aan

- 10 -
Adres: Baoshanqu Shuangchenglu 803long 11hao 1602A-1609shi
Shanghai
Geïmporteerd naar AUS: SIHAO PTY LTD . 1 ROKEVA
STREETEASTWOOD NSW 2122 Australië
Geïmporteerd naar de VS: Sanven Technology Ltd. Suite 250. 9166
Anaheim Place, Rancho Cucamonga, CA 91730
REP
EC
SHUNSHUN GmbH
Römeräcker 9 Z2021, 76351
Linkenheim-Hochstetten, Germany
REP
UK
Pooledas Group Ltd
Unit 5 Albert Edward House, The
Pavilions Preston, United Kingdom
Gemaakt in China


Teknisk support och e-garanticertifikat
www.vevor.com/support
KLISTRA VÄTSKEFYLLNINGSMASKIN
ANVÄNDARMANUAL
We continue to be committed to provide you tools with competitive price.
"Save Half", "Half Price" or any other similar expressions used by us only represents an
estimate of savings you might benefit from buying certain tools with us compared to the major
top brands and does not necessarily mean to cover all categories of tools offered by us. You
are kindly reminded to verify carefully when you are placing an order with us if you are
actually saving half in comparison with the top major brands.
- 1 -
MODELL: GFK-160-V1
Have product questions? Need technical support? Please feel free to
contact us:
Technical Support and E-Warranty Certificate
www.vevor.com/support
NEED HELP? CONTACT US!
This is the original instruction, please read all manual instructions
carefully before operating. VEVOR reserves a clear interpretation of our
user manual. The appearance of the product shall be subject to the
product you received. Please forgive us that we won't inform you again if
there are any technology or software updates on our product.
Paste Liquid Filling Machine

- 2 -
15. Läs noga och förstå alla MONTERINGS- OCH
DRIFTINSTRUKTIONER innan användning.
16. Underlåtenhet att följa säkerhetsreglerna och andra grundläggande
säkerhetsåtgärder kan leda till allvarliga personskador.
GENERAL SAFETY RULES
Viktig påminnelse
1. Innan användning, läs noga igenom produktmanualen och se till att du
förstår och följer alla säkerhetsvarningar och försiktighetsåtgärder vid
användning.
2. Använd inte denna produkt för andra icke avsedda ändamål för att
undvika oväntade risker.
3. Denna produkt är endast tillämplig på användare inom den specificerade
åldersgruppen och tillämpningsområdet. Vänligen följ strikt relevanta
åldersbegränsningar och varningar.
4. Om det finns några avvikelser i produkten, vänligen sluta använda den
omedelbart och kontakta kundservice för konsultation eller ordna
reparation.
Miljökrav för användning
1. Undvik direkt solljus eller kontakt med brandkällor för att förhindra
produktskador eller brand.
2. Se till en stabil användningsmiljö och undvik att produkten träffas eller
tappas för att undvika skador.
Riktlinjer för säkerhet
1. Använd lämplig strömförsörjning och spänning, och använd inte
skadade nätsladdar eller kontakter.
2. När du använder denna produkt ska du inte kortsluta kretsar eller
ansluta felaktiga enheter för att undvika risker som elektriska stötar och
brand.
3. När främmande föremål hittas på produktens yta, sluta omedelbart att
använda och ta bort främmande föremål innan du fortsätter att använda.
4. När du använder denna produkt kontinuerligt under en längre tid,
vänligen vila i god tid för att undvika överdriven trötthet.

- 3 -
Underhåll och skötsel
1. Underhåll och rengör produkten regelbundet. Före rengöring, vänligen
koppla bort strömförsörjningen och torka av den med en torr trasa. Var
försiktig så att du inte använder alkohol, syra eller alkalilösningar etc.
Frätande ämnen.
2. När produkten inte används under en längre tid, koppla ur
strömförsörjningen omgående för att spara energi och förlänga produktens
livslängd.
3. Ta inte isär produkten eller byt ut komponenter på egen hand. Om du
stöter på några fel, vänligen kontakta servicecentret.
Akuthanteringsåtgärder
1. Om det inträffar onormala situationer eller olyckor med produkten,
vänligen sluta använda den så snart som möjligt. Om överhettning, rökning
eller onormalt ljud upptäcks, bryt omedelbart strömförsörjningen och
kontakta kundservice.
3. Om produkten innebär en nödsituation som kan skada den personliga
säkerheten, vänligen ring nödräddningsnumret i tid.
Friskrivningsklausuler
1. Vi lägger stor vikt vid säkerheten och kvaliteten på våra produkter, men
kan inte ta ansvar för säkerhetsolyckor orsakade av felaktig användning
eller användning.
SPARA DESSA INSTRUKTIONER
MODEL AND PARAMETERS
Modell
GFK-160-V1
Lämplig vätska
Alla fririnnande pastor och vätskor (inga partiklar) som
sojasås, drycker, vitt vin, vinäger, mjölk, alkohol (mindre
än 40%) etc.
Fyllningsområde
5ml - 3500ml
Max
flödeshastighet
3,5 l / min
Kontrollläge
Pedalomkopplare och automatisk
Betyg(er)
AC120 V 60Hz
- 4 -
Effekt (max.)
34W
STRUCTURE DIAGRAM
1. Inbyggt fäste 2. Utloppsslang och påfyllningsmunstycke 3. Inloppsslang och
filter 4. Kontrollpanel 5. Pedalomkopplare 6. Inbyggt fäste
COMPONENTS
GFK-160-V1
Användarmanual
×1
Pedalbrytare
×1
Nätsladd
×1
Insexnyckel (5#, 4#)
×2
Skruv (M6*20mm)
×2
T-klämma
×1
Tvärklämma
×1
Cirkulärt klipp
×1
Stång
×2
Model
Parts
2
3
4
1
5
6

- 5 -
OPERATING INSTRUCTIONS
1.
Anslut de två stängerna med en tvärklämma enligt bilden.
2. Montera T-klämman och fäst den med skruvar
4. Installera de ovan installerade stängerna på T-klämman enligt bilden.
Skruvmejsel
×1
T clamp
- 6 -
13.Anslut pedalomkopplaren enligt
bilden.
Sätt i nätsladden enligt bilden.
8. Produktmonteringen slutförd.
Obs: Det uppbyggda fästet och påfyllningsmunstyckena kan justeras efter
behov.
Power Cord

- 7 -
Bruksanvisningen
Introduktion av digitalt displaygränssnitt:
1. Maskinen har två arbetslägen (arbetsläge måste ställas in före
användning): Kontinuerligt arbete, Inching Work (pedalkontroll)
Genom knappen (kontinuerlig/inching)
Om du vill ställa in det till lägen för kontinuerligt arbete:
·1)Tryck först på pausknappen (på/av). Pausstatuslampan tänds
·2)Tryck på knappen (kontinuerlig/inching)
När kontinuerligt arbete tänds,
det betyder att den redan är i läget för kontinuerligt arbete
·3)Tryck på startknappen (på/av) för att börja arbeta
På samma sätt ställs in till läget Inching Work (pedalläge)
2. Så här justerar du fyllningstid, fyllningshastighet och väntetid Tryck på
knappen Inställningar (parameteruppsättning)
Count
Filling Time Setting
Speed
Interval Setting

- 8 -
· Behöver trycka 2-3 sekunder.
·När den röda lampan 1 blinkar är den redo att köras
·Markörpositionen är där numret kan ställas in
·Sedan genom (↕)(↔)-knapparna (+)(-)-knappar för att justera den tid,
hastighet, väntetid du behöver
3. Räknaren kan inte justeras och kan endast nollställas med knappen
(Noll rengöring)
4.Justera urvalet av 6 grupper av minnesfunktioner
·genom knappen (O) nedan
·Första tryck (parameteruppsättning)
·tryck sedan på (O)-knappen för att byta 6 grupper av funktioner
·Du måste ställa in den och lagra den först
MAINTENANCE
1. Det är bättre att rengöra maskinen med rent vatten efter varje
användning, vilket kan förlänga livslängden av pumpen.
2. Rengör produkten och filtret i tid efter varje användning.
3. När maskinen inte används, töm vätskan och förvara den på en
ventilerad och torr plats.
4. Förvara produkten på en torr och ventilerad plats.
5. Byt ut följande förbrukningsdelar regelbundet :
Slang, filter, påfyllningsmunstycke

- 9 -
TROUBLESHOOTING
Problem
Möjlig orsak
Möjlig lösning
Absorberar inte
vatten
Maskin första
användning eller lång tid
ingen användning,
mycket få kommer inte
att absorbera vatten,
eftersom pumpen interna
torrt resultat .
Du måste tillsätta lite
vatten från inloppsröret
till pumpen och sedan
starta maskinen.
Pumpen kan inte få
vätskan ut
Slanginlopp och utlopp
är
omvänd
Bekräfta slanginloppet i
vätsketank.
Nätsladden är det inte
inkopplad
Anslut nätsladden igen
Slangen vikt eller skadad
Släta till slangen eller byt
ut slangen
Strömindikatorn är
släckt
Nätsladden är det inte
inkopplad
Anslut nätsladden igen

- 10 -
Adress: Baoshanqu Shuangchenglu 803long 11hao 1602A-1609shi
Shanghai
Importerad till AUS: SIHAO PTY LTD . 1 ROKEVA STREETEASTWOOD
NSW 2122 Australien
Importerad till USA: Sanven Technology Ltd. Svit 250 . 9166 Anaheim
Place, Rancho Cucamonga, CA 91730
REP
EC
SHUNSHUN GmbH
Römeräcker 9 Z2021, 76351
Linkenheim-Hochstetten, Germany
REP
UK
Pooledas Group Ltd
Unit 5 Albert Edward House, The
Pavilions Preston, United Kingdom
Tillverkad i Kina