RADIANT ELECTRIC RANGE T2
Installer: Pleaseleave this manualwith
thisappliance.
Consumer: Please read and keep this
manualfor futurereference.Keepsales
receiptand/orcancelledcheckas proofof
purchase.
Model Number
SerialNumber
Dateof Purchase
In our continuingeffort to im_
prove the quality and perfor_
mance d ourcookingproducts,
it maybe necessaryto make
changesto the appliancewith-
out revisingthisguide:
Ifyou havequestions,call:
1-800-688-9900U.S.A.
1-800-688-2002Canada
1-800-688-2080(U.S.TTYfor
hearingorspeechimpaired)
(Mon.-Fri.,8 am-8pm EasternTime)
Internet:http://www.maytag.com
For serviceinformation,seepage 19.
ECOOKING
Pages 1-3
.............................Pages 4-5
COOKING....................................Pages6"13
& CEAHIHG......................Pages 14"17
_[ORE Y0UCALL.................................Page 18
RRAHTY...................................................Page 19
DEL'UTiLiSATEUfl.................Page20
DELUSUARiO.............................Page 42
Form No. A/05/01 Part No. 8113P292-60 h t t p : / / w w w. m a y t a g. c o m 74005917 Litho U.S.A.

!
Read and follow all instructions before
using this appliance to prevent the
potential risk of fire, electric shock,
personal injury or damage to the appli-
ance as a result of improper usage of the
appliance. Use appliance only for its
intended purpose as described in this
guide.
To ensure proper and safe operation:
Appliance must be properly installed and
grounded by a qualified technician.
> ALL RANGES
CAN TIP AND
CAUSE
INJURIES TO
PERSONS
INSTALL ANTI-
TIP DEVICE
PACKEDWITH
RANGE
FOLLOW ALL
INSTALLATION INSTRUCTIONS
WARNING: To reduce risk of tip-
ping of the appliance from ab-
normal usage or by excessive
loading of the oven door, the ap-
pliance must be secured by a
properly installed anti-tip de-
vice.
To check if device is properly installed,
look underneath range with a flashlight to
make sure one of the rear leveling legs is
properly engaged in the bracket slot. The
anti-tip device secures the rear leveling
leg to the floor when properly engaged.
You should check this anytime the range
has been moved.
Turn off appliance and ventilating hood to
avoid spreading the flame. Extinguish
flame then turn on hood to removesmoke
and odor.
Cooktop: Smother fire or flame in a
pan with a lid or cookie sheet.
NEVER pick up or move a flaming
pan.
> Oven: Smother fire or flame by clos-
ing the oven door.
Do not use water on grease fires. Use
baking soda, a dry chemical or foam-type
extinguisher to smother fire or flame.
This appliance has been tested for safe
performance using conventional cook-
ware. Do not use any devices or acces-
sories that are not specifically recom-
mended in this manual. Do not use eyelid
covers, stove top grills or add-on oven
convection systems. The use of devices
or accessories that are not expressly
recommended in this manual can create
serious safety hazards, result in perfor-
mance problems, and reduce the life of
the components of this appliance.
WARNING: NEVER use appliance door,
or drawer, if equipped, as a step stool or
seat as this may result in possible tipping
of the appliance, damage to the appli-
ance, and serious injuries.
If appliance is installed near a window,
precautions should be taken to prevent
curtains from blowing over surface
elements.
NEVER use appliance to warm or heat
the room. Failure to follow this instruction
can lead to possible burns, injury, fire, or
damage to the appliance.
NEVER wear loose-fitting or hanging
garments while using the appliance.
Clothing could catch utensil handles or
ignite and cause burns if garment comes
in contact with hot heating elements.
To ensure proper operation and to avoid
damage to the appliance or possible
injury, do not adjust, service, repair or re-
place any part of the appliance unless
specifically recommended in this guide.
Refer all other servicing to a qualified
technician.
NEVER store or use gasoline or other
combustible or flammable materials in
the oven, near surface units or in the
vicinity of this appliance as fumes could
create a fire hazard or an explosion.
To prevent grease fires, do not let cook-
ing grease or other flammable materials
accumulate in or near the appliance.
Use only dry potholders. Moist or damp
potholders on hot surfaces may result in
a steam burn. Do not let potholders touch
hot heating elements. Do not use a towel
or other bulky cloth which could easily
touch hot heating elements and ignite.
Always turn off all controls when cooking
is completed.
NEVER heat unopened containers on the
surface unit or in the oven. Pressure
build-up in the container may cause con-
tainer to burst resulting in burns, injury or
damage to the appliance.
NEVER use aluminum foil to line drip
bowls or cover oven racks or oven bot-
tom. This could result in risk of electric
shock, fire, or damage to the appliance.
Use foil only as directed in this guide.
]
Aerosol-type cans are explosive when
exposed to heat and may be highly
flammable. Do not use or store near
appliance.
NEVER leave surface units unattended
especially when using high heat. An un-
attended boilover could cause smoking
and a greasy spillover can cause a fire.
This appliance is equipped with different
size surface elements. Select pans with
flat bottoms large enough to cover
element. Fitting pan size to element will
improve cooking efficiency.
If pan is smaller than element, a portion
of the element will be exposed to direct
contact and could ignite clothing or
potholder.
Only certain types of glass, glass/ceram-
ic, ceramic, earthenware, or other glazed
utensils are suitable for cooktop or oven
service without breaking due to the sud-
den change in temperature. Follow uten-
sil manufacturer's instructions when us-
ing glass.
Turn pan handle toward center of cook-
top, not out into the room or over another
surface element. This reduces the risk of
burns, ignition of flammable materials, or
spillage if pan is accidently bumped or
reached by small children.
NEVER cook on broken cooktop. If cook-
top should break, cleaning solutions and
spillovers may penetrate the broken
cooktop and create a risk of electric
shock. Contact a qualified technician im-
mediately.
Clean cooktop with caution. Some clean-
ers can produce noxious fumes if applied
to a hot surface. If a wet sponge, cloth, or
paper towel is used on a hot cooking
area, be careful to avoid steam burn.
Use extreme caution when moving the
grease pan or disposing of hot grease.
Allow grease to cool before attempting to
move pan.
Use care when opening door. Let hot air
or steam escape before removing or re-
placing food.
For proper oven operation and perfor-
mance, do not block or obstruct oven
vent duct. When in use, the vent and sur-
rounding area may become hot enough
to cause burns.
Always place oven racks in desired loca-
tions while oven is cool. If rack must be
moved while oven is hot, do not let
potholder contact hot element in oven.
Clean only parts listed in this guide. Do
not clean door gasket. The gasket is es-
sential for a good seal. Do not rub, dam-
age, or move the gasket.
Do not use oven cleaners. No commer-
cial oven cleaner or oven liner protective
coating of any kind should be used in or
around any part of the oven.
Before self-cleaning the oven, remove
broiler pan, oven racks and other utensils
to prevent excessive smoking, discolora-
tion of the oven racks or possible damage
to utensils.
Wipe up excessive spillovers, especially
greasy spills, before the clean cycle to
prevent smoking, flare-ups or flaming.
It is normal for the cooktop to become hot
during a clean cycle. Therefore, avoid
touching the cooktop, door, window or
oven vent during a clean cycle.
IT;
NEVER touch surface or oven heating
elements, areas near elements, or in-
terior surfaces of oven.
Heating elements may be hot even
though they are dark in color.Areas near
surface elements and interior surfaces of
an oven may become hot enough to
cause burns. During and after use, do not
touch or let clothing or other flammable
materials contact heating elements,
areas near elements, or interior surfaces
of oven until they have had sufficient time
to cool.
Otherpotentiallyhotsurfacesinclude:
Cooktop,areasfacingthecooktop,oven
vent,andsurfacesneartheventopening,
ovendoor,areasaroundthedoorand
ovenwindow.
NEVERleavechildrenaloneor unsuper-
visedinareawhereapplianceisinuseor
isstillhot.
NEVERallowchildrentositorstandon
anypartoftheapplianceastheycouldbe
injuredorburned.
CAUTION:NEVERstoreitemsof inter-
esttochildrenincabinetsaboveanappli-
anceoronbackguardof a range.Chil-
drenclimbingon appliance,dooror
drawertoreachitemscoulddamagethe
applianceor be burnedor seriously
injured.
Childrenmustbetaughtthattheappli-
anceandutensilsinoronit canbehot.
Lethotutensilscoolina safeplace,out
of reachof smallchildren.Children
shouldbetaughtthatanapplianceisnot
atoy.Childrenshouldnotbeallowedto
playwithcontrolsor otherpartsof the
unit.
Cleanrangehoodandfiltersfrequently
to preventgreaseor otherflammable
materialsfromaccumulatingonhoodor
filterandtoavoidgreasefires.
Turnthefanon whenflambeingfoods
(suchas CherriesJubilee)underthe
hood.
TheCaliforniaSafeDrinkingWaterand
ToxicEnforcementActof 1986(Proposi-
tion65)requirestheGovernorofCalifor-
niatopublishalistofsubstancesknown
totheStateofCaliforniatocausecancer
orreproductiveharm,andrequiresbusi-
nessesto warncustomersof potential
exposurestosuchsubstances.
Usersof this applianceare hereby
warnedthatwhentheovenisengagedin
theself-cleancycle,theremaybesome
lowlevelexposuretosomeofthelisted
substances,includingcarbonmonoxide.
Exposureto thesesubstancescanbe
minimizedbyproperlyventingtheovento
theoutdoorsduringtheself-cleancycle
byopeninga windowand/ordoorinthe
roomwheretheapplianceislocated.
IMPORTANT NOTICE REGARDING
PET BIRDS: Never keep pet birds in the
kitchen or in roomswhere the fumes from
the kitchen could reach. Birds have a
very sensitive respiratory system. Fumes
released during an oven self-cleaning
cycle may be harmful or fatal to birds.
Fumes released due to overheated cook-
ing oil, fat, margarine and overheated
non-stick cookware may be equally
harmful.
3
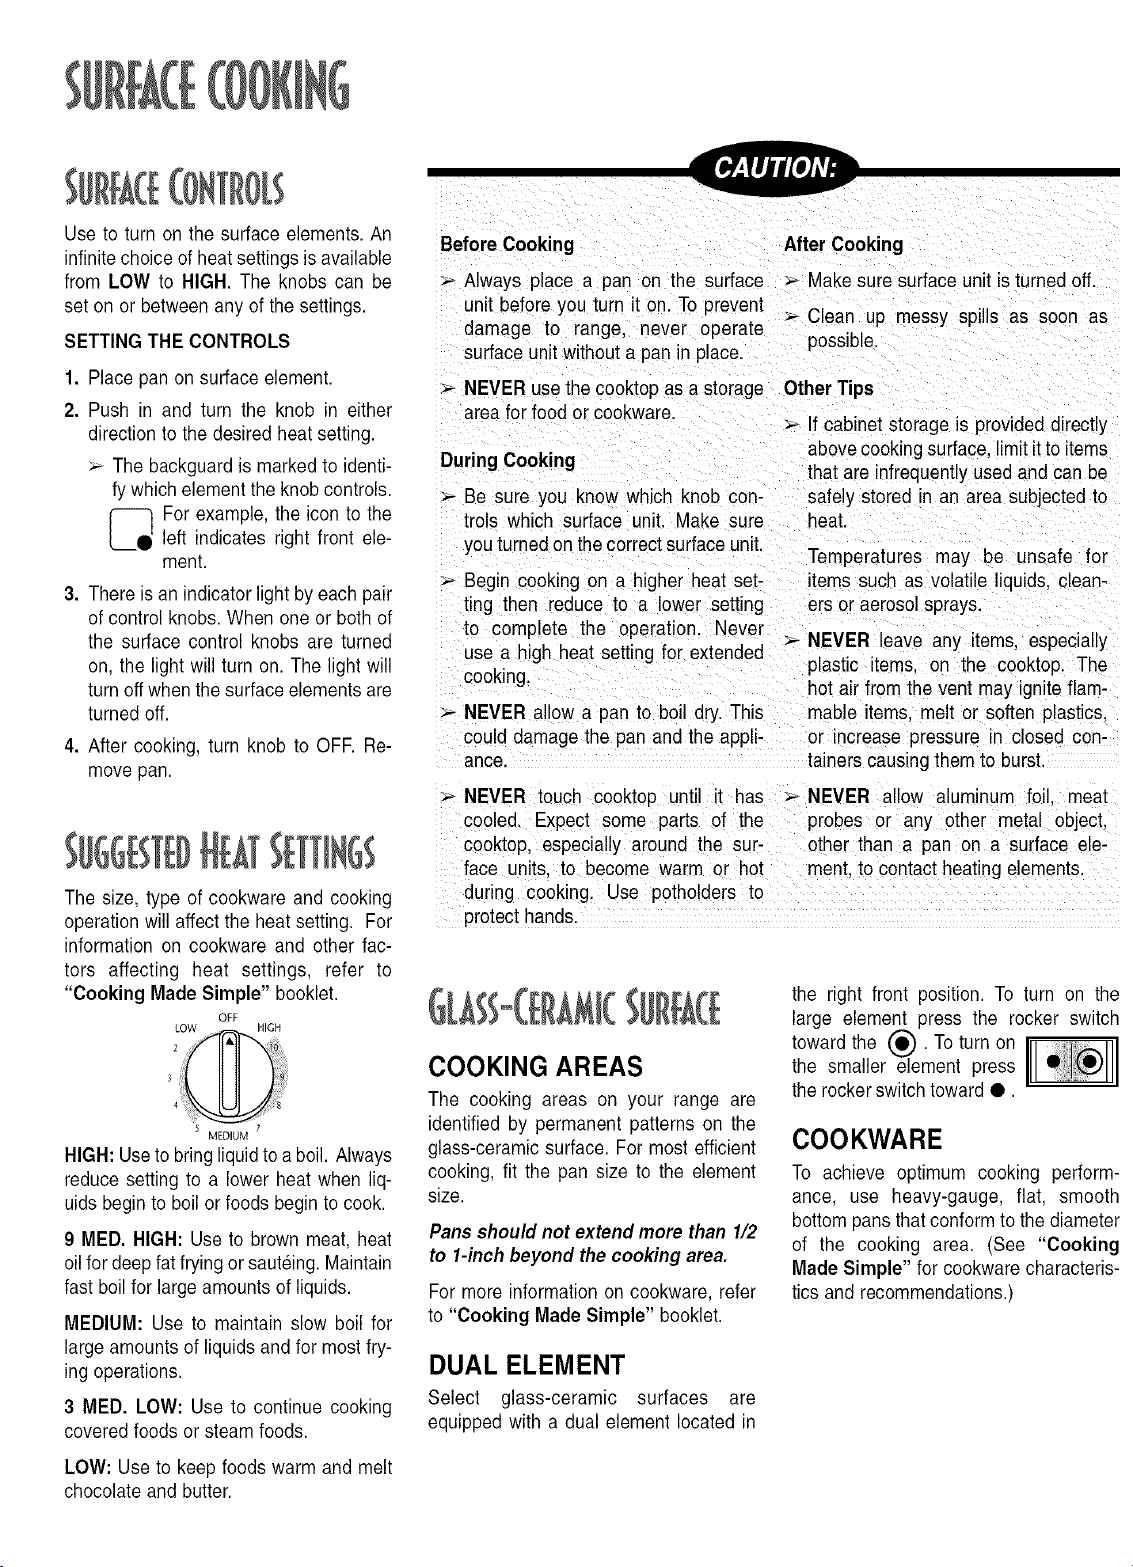
Use to turn on the surface elements• An
infinite choice of heat settings is available
from LOW to HIGH. The knobs can be
set on or between any of the settings•
SETTING THE CONTROLS
1. Place pan on surface element•
2. Push in and turn the knob in either
direction to the desired heat setting•
:_ The backguard is marked to identi-
fy which element the knob controls•
For example, the icon to the
left indicates right front ele-
ment.
3. There is an indicator light by each pair
of control knobs• When one or both of
the surface control knobs are turned
on, the light will turn on. The light will
turn off when the surface elements are
turned off.
4. After cooking, turn knob to OFF. Re-
move pan.
The size, type of cookware and cooking
operation will affect the heat setting• For
information on cookware and other fac-
tors affecting heat settings, refer to
"Cooking Made Simple" booklet•
OFF
LOW HIGH
2
3
4
MEDIUM 7
HIGH: Use to bring liquidto a boil. Always
reduce setting to a lower heat when liq-
uids begin to boil or foods begin to cook.
9 MED. HIGH: Use to brown meat, heat
oil for deep fat frying or sauteing. Maintain
fast boil for large amounts of liquids.
MEDIUM: Use to maintain slow boil for
large amounts of liquids and for most fry-
ing operations.
3 MED. LOW: Use to continue cooking
covered foods or steam foods.
LOW: Use to keep foods warm and melt
chocolate and butter.
Before Cooking After Cooking
Always place a pan on the surface :_ Make sure surface unit is turned off.
unit before you turn it on. To prevent >- Clean up messy spills as soon as
damage to range, never operate
surface unit without a pan in place, possible.
NEVER use the cooktop as a storage Other Tips
area for food or cookware.
DuringCooking
Be sure you know which knob con-
trols which surface unit. Make sure
you turned on the correct surface unit.
:_ If cabinet storage is provided directly
above cooking surface, limit it to items
that are infrequently used and can be
safely stored in an area subjected to
heat.
Temperatures may be unsafe for
Begin cooking on a higher heat set- items such as volatile liquids, clean-
ring then reduce to a lower setting ers or aerosol sprays.
to complete the operation Never :_
• ,, NEVER eave any terns, especa y
use a h gh heat setting for extended
cooking, plastic items• on the cooktop. The
hot air from the vent may ignite flam-
;-- NEVER allow a pan to boil dry. This mable items, melt or soften plastics,
could damage the pan and the appli- or increase pressure in closed con-
ance. tainers causing them to burst•
NEVER touch cooktop until it has _ NEVER allow aluminum foil. meat
cooled• Expect some parts of the probes or any other metal object,
cooktop, especially around the sur- otlqer than a pan on a surface ele-
face units, to become warm or hot merit, to contact heating elements.
during cooking. Use potholders to ....
protect hands.
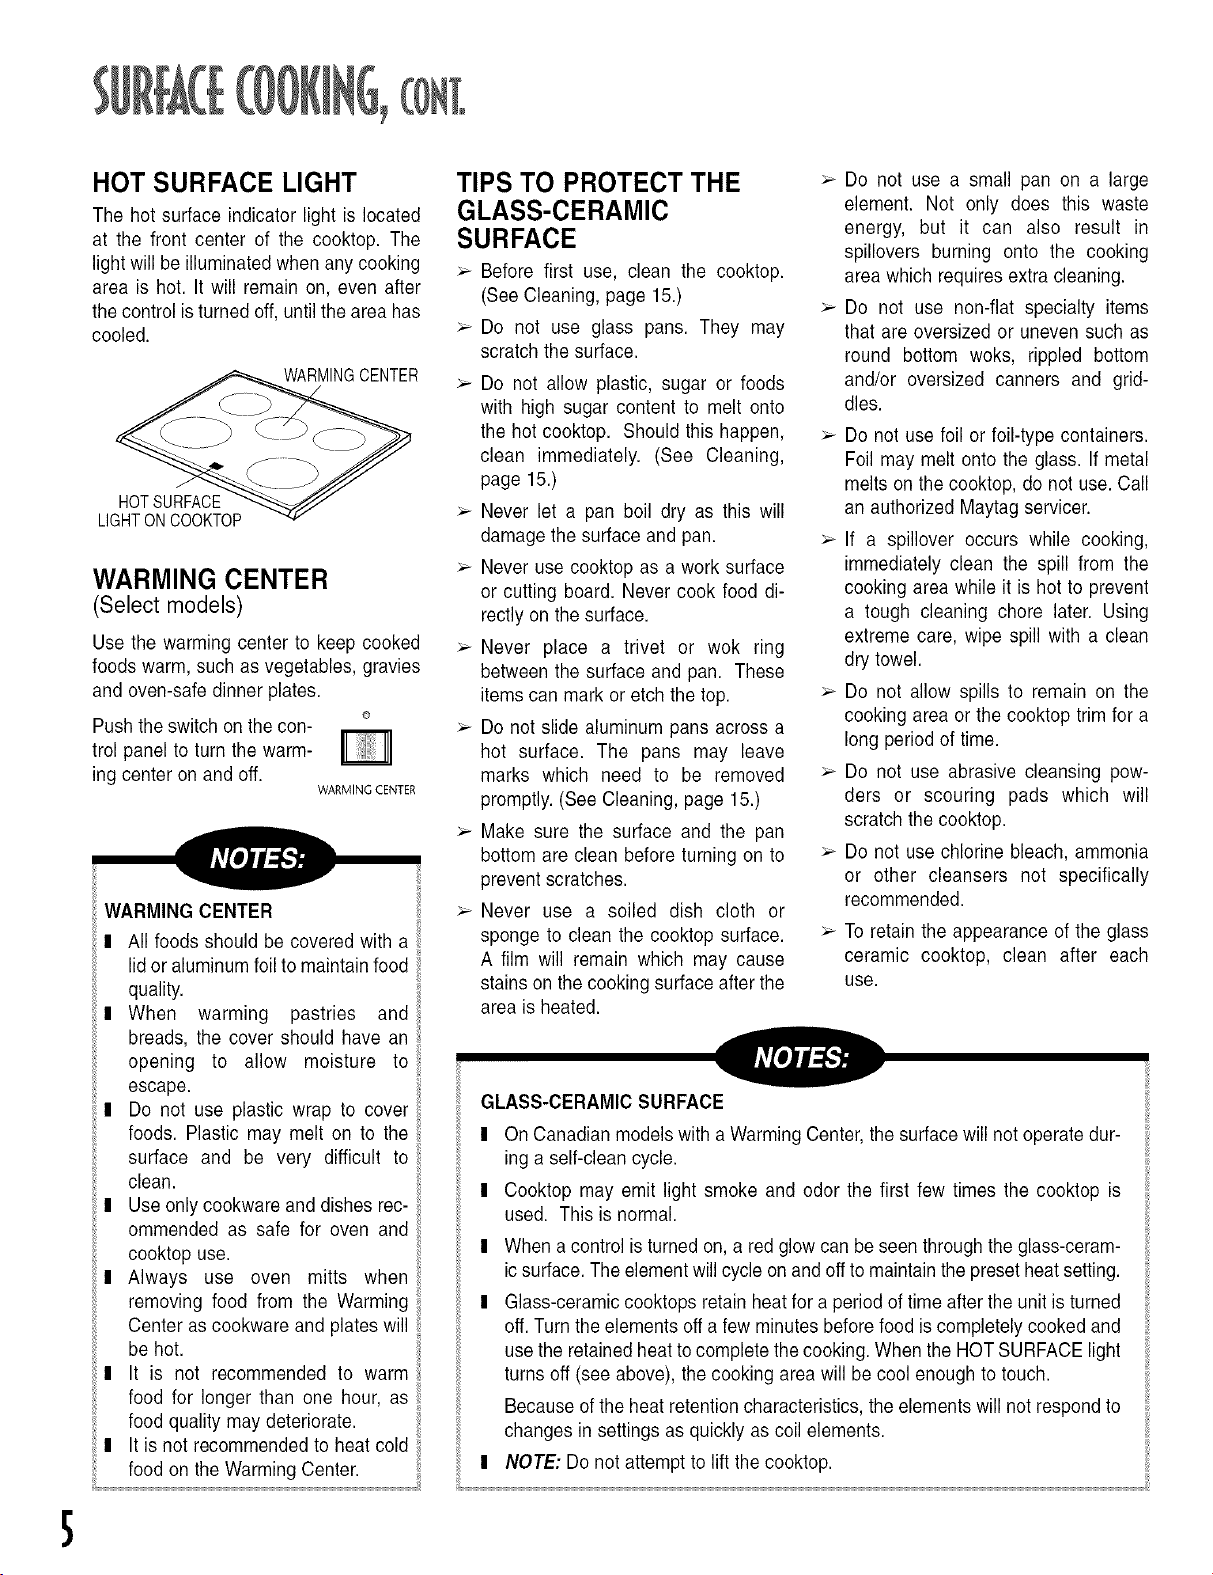
COOKING AREAS
The cooking areas on your range are
identified by permanent patterns on the
glass-ceramic surface. For most efficient
cooking, fit the pan size to the element
size.
Pans should not extend more than 1/2
to 1-inch beyond the cooking area.
For more information on cookware, refer
to "Cooking Made Simple" booklet•
DUAL ELEMENT
Select glass-ceramic surfaces are
equipped with a dual element located in
the right front position. To turn on the
large element press the rocker switch
toward the (O). To turn on I
I
the smaller element press
the rocker switch toward It.
COOKWARE
To achieve optimum cooking perform-
ance, use heavy-gauge, flat, smooth
bottom pans that conform to the diameter
of the cooking area. (See "Cooking
Made Simple" for cookware characteris-
tics and recommendations.)
5
HOT SURFACE LIGHT
The hot surface indicator light is located
at the front center of the cooktop. The
light will be illuminated when any cooking
area is hot. It will remain on, even after
the control is turned off, until the area has
cooled.
WARMINGCENTER
HOTSURFACE
LIGHTONCOOKTOP
WARMING CENTER
(Select models)
Use the warming center to keep cooked
foods warm, such as vegetables, gravies
and oven-safe dinner plates.
©
Push the switch on the con-
trol panel to turn the warm-
ing center on and off.
WARMING CENTER
WARMING CENTER
II All foods should be covered with a
lid or aluminum foil to maintain food
quality.
II When warming pastries and
breads, the cover should have an
opening to allow moisture to
escape.
II Do not use plastic wrap to cover
foods. Plastic may melt on to the
surface and be very difficult to
clean.
II Use only cookware and dishes rec-
ommended as safe for oven and
cooktop use.
II Always use oven mitts when
removing food from the Warming
Center as cookware and plates will
be hot.
II It is not recommended to warm
food for longer than one hour, as
food quality may deteriorate.
II It is not recommended to heat cold
food on the Warming Center.
TIPS TO PROTECT THE
GLASS-CERAMIC
SURFACE
Before first use, clean the cooktop.
(See Cleaning, page 15.)
Do not use glass pans. They may
scratch the surface.
Do not allow plastic, sugar or foods
with high sugar content to melt onto
the hot cooktop. Should this happen,
clean immediately. (See Cleaning,
page 15.)
Never let a pan boil dry as this will
damage the surface and pan.
Never use cooktop as a work surface
or cutting board. Never cook food di-
rectly on the surface.
Never place a trivet or wok ring
between the surface and pan. These
items can mark or etch the top.
Do not slide aluminum pans across a
hot surface. The pans may leave
marks which need to be removed
promptly. (See Cleaning, page 15.)
Make sure the surface and the pan
bottom are clean before turning on to
prevent scratches.
Never use a soiled dish cloth or
sponge to clean the cooktop surface.
A film will remain which may cause
stains on the cooking surface after the
area is heated.
Do not use a small pan on a large
element. Not only does this waste
energy, but it can also result in
spillovers burning onto the cooking
area which requires extra cleaning.
Do not use non-flat specialty items
that are oversized or uneven such as
round bottom woks, rippled bottom
and/or oversized canners and grid-
dles.
Do not use foil or foil-type containers.
Foil may melt onto the glass. If metal
melts on the cooktop, do not use. Call
an authorized Maytag servicer.
If a spillover occurs while cooking,
immediately clean the spill from the
cooking area while it is hot to prevent
a tough cleaning chore later. Using
extreme care, wipe spill with a clean
dry towel.
Do not allow spills to remain on the
cooking area or the cooktop trim for a
long period of time.
Do not use abrasive cleansing pow-
ders or scouring pads which will
scratch the cooktop.
Do not use chlorine bleach, ammonia
or other cleansers not specifically
recommended.
To retain the appearance of the glass
ceramic cooktop, clean after each
use.
GLASS-CERAMIC SURFACE
I On Canadian models with a Warming Center, the surface will not operate dur-
ing a self-clean cycle.
I Cooktop may emit light smoke and odor the first few times the cooktop is
used. This is normal.
I When a control is turned on, a red glow can be seen through the glass-ceram-
ic surface. The element will cycle on and off to maintain the preset heat setting.
I Glass-ceramic cooktops retain heat for a period of time after the unit is turned
off. Turn the elements off a few minutes before food is completely cooked and
use the retained heat to complete the cooking. When the HOT SURFACE light
turns off (see above), the cooking area will be cool enough to touch.
Because of the heat retention characteristics, the elements will not respond to
changes in settings as quickly as coil elements.
! NOTE: Do not attempt to lift the cooktop.
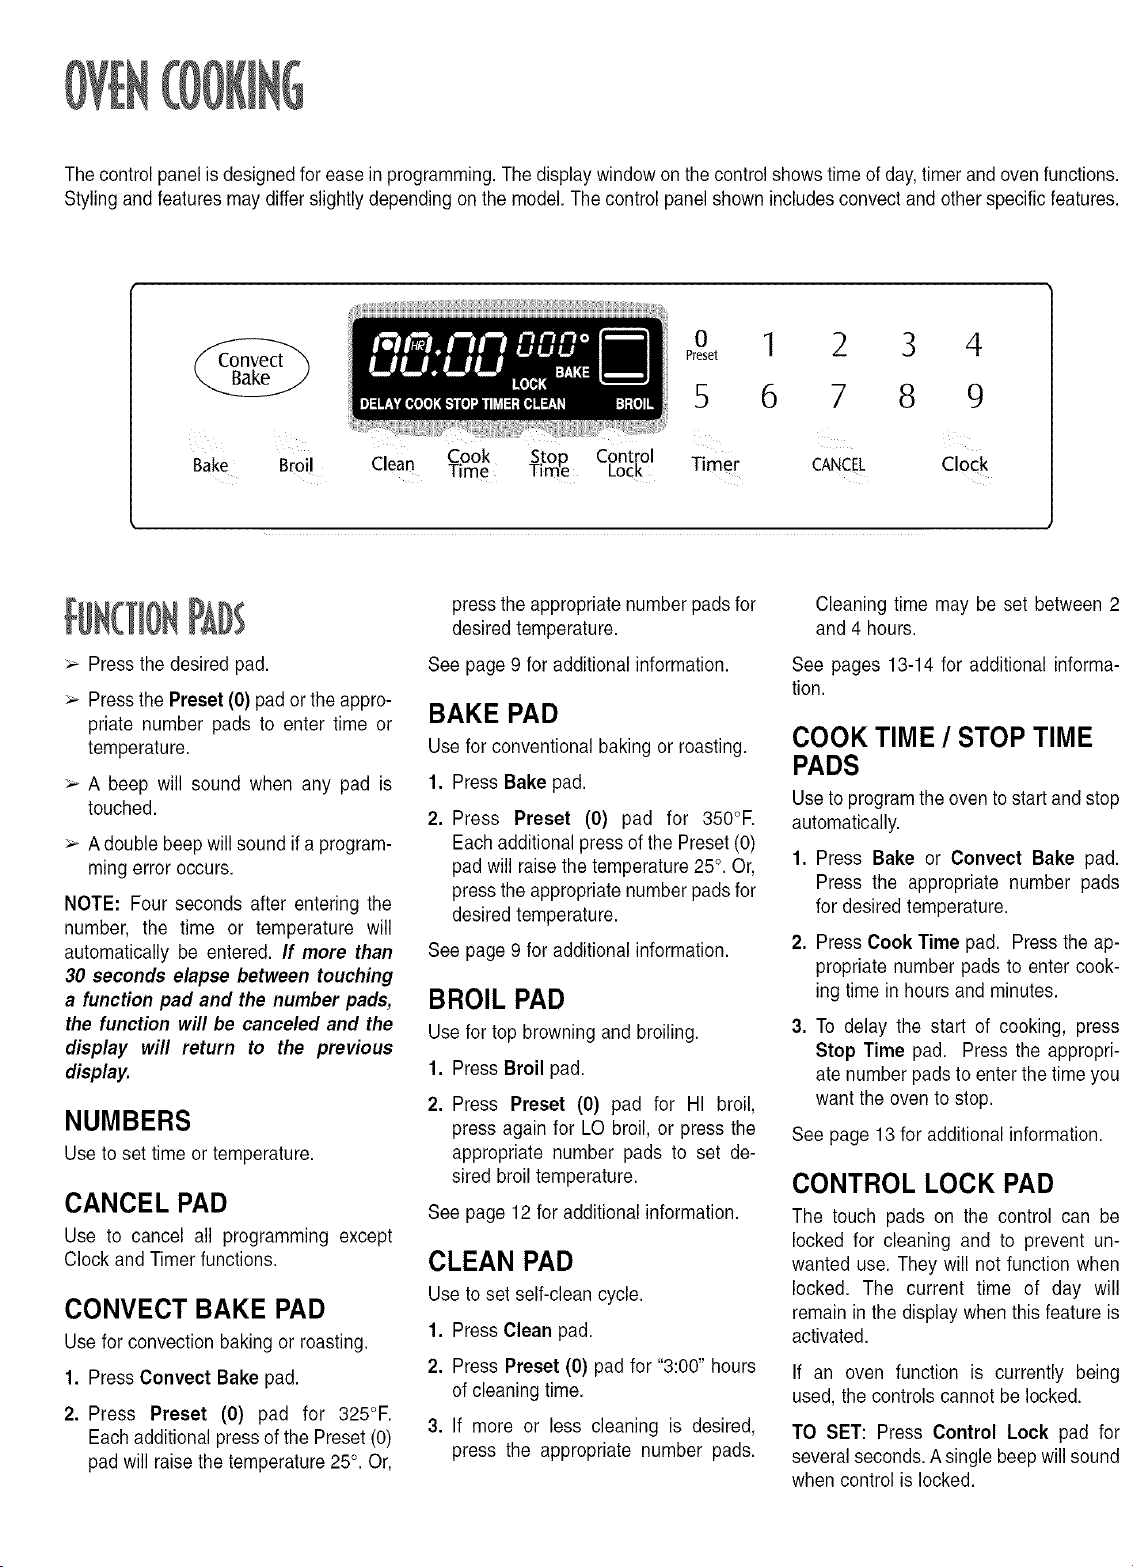
Thecontrolpanelisdesignedforeaseinprogramming.Thedisplaywindowonthecontrolshowstimeofday,timerandovenfunctions.
Stylingandfeaturesmaydifferslightlydependingonthemodel.Thecontrolpanelshownincludesconvectandotherspecificfeatures.
Bake
0
Preset
5
Bake Broil clean CookTime TimeStop cOntrolLock Timer
1 3 4
6 7 8 9
CANCEL Clock
> Press the desired pad.
> Press the Preset (0) pad or the appro-
priate number pads to enter time or
temperature.
>- A beep will sound when any pad is
touched.
> A double beep will sound if a program-
ming error occurs.
NOTE: Four seconds after entering the
number, the time or temperature will
automatically be entered. If more than
30 seconds elapse between touching
a function pad and the number pads,
the function will be canceled and the
display will return to the previous
display.
NUMBERS
Use to set time or temperature.
CANCEL PAD
Use to cancel all programming except
Clock and Timer functions.
CONVECT BAKE PAD
Use for convection baking or roasting.
1. Press Convect Bake pad.
2. Press Preset (0) pad for 325°F.
Each additional press of the Preset (0)
pad will raise the temperature 25°. Or,
press the appropriate number pads for
desired temperature.
See page 9 for additional information.
BAKE PAD
Use for conventional baking or roasting.
1. Press Bake pad.
2. Press Preset (0) pad for 350°R
Each additional press of the Preset (0)
pad will raise the temperature 25°. Or,
press the appropriate number pads for
desired temperature.
See page 9 for additional information.
BROIL PAD
Use for top browning and broiling.
1. Press Broil pad.
2. Press Preset (0) pad for HI broil,
press again for LO broil, or press the
appropriate number pads to set de-
sired broil temperature.
See page 12 for additional information.
CLEAN PAD
Use to set self-clean cycle.
1. Press Clean pad.
2. Press Preset (0) pad for "3:00" hours
of cleaning time.
3. If more or less cleaning is desired,
press the appropriate number pads.
Cleaning time may be set between 2
and 4 hours.
See pages 13-14 for additional informa-
tion.
COOK TIME / STOP TIME
PADS
Use to program the oven to start and stop
automatically.
1. Press Bake or Convect Bake pad.
Press the appropriate number pads
for desired temperature.
2. Press Cook Time pad. Press the ap-
propriate number pads to enter cook-
ing time in hours and minutes.
3. To delay the start of cooking, press
Stop Time pad. Press the appropri-
ate number pads to enter the time you
want the oven to stop.
See page 13 for additional information.
CONTROL LOCK PAD
The touch pads on the control can be
locked for cleaning and to prevent un-
wanted use. They will not function when
locked. The current time of day will
remain in the display when this feature is
activated.
If an oven function is currently being
used, the controls cannot be locked.
TO SET: Press Control Lock pad for
several seconds. Asingle beepwill sound
when control is locked.
IfanypadispressedwhenControlLock
isactivated,OFFwillappearinthedis-
playfor15seconds.
TO RESTORE:Pressand holdthe
ControlLockpadforseveralseconds.
TheindicatorwordOFFwilldisappear.
SETTING THE CLOCK
1. Press Clock pad.
The indicator word TIME will flash
in the display.
2. Press the appropriate number pads
until the correct time of day appears in
the display.
When electrical power is supplied or after
a power interruption, the last clock time
before power was interrupted will flash.
To recall the time of day when another
time function is showing, press the Clock
pad.
Clock time cannot be changed when the
oven has been programmed for clock
controlled cooking, self-clean or delayed
self-clean.
SETTING THE TIMER
Use to set and then signal the completion
of a time period up to 99 hours and 59
minutes (99:59).
The timer can be used independently of
any other oven activity and can be set
while another oven function is operating.
THE TIMER DOES NOT CONTROL THE
OVEN.
1. Press Timer pad.
The indicator word TIMER will
flash and "0HR:00" appears in the
display.
2. Press the appropriate number pads
until the desired number of minutes or
hours and minutes appear in the dis-
play.
Example: To set the Timer for 5 min-
utes, press the Timer pad and the
number 5 pad. The control will begin
countdown after a four second delay.
Example: To set the Timer for 1 hour
and 30 minutes, press the Timer pad
and the numbers 1,3,0 pads. The con-
trol will begin countdown after a four
second delay.
3. The last minute of the countdown will
be displayed as seconds.
4. At the end of the time set, one long
beep will sound and "End" will appear
in the display. To change the number
of timer reminder signals, see below.
TO CANCEL:
1. Press and hold Timer pad for several
seconds. The time of day will reap-
pear.
OR
2. Press the Timer pad and the "0" num-
ber pad. After a slight delay the time
of day will reappear.
NOTE: Pressing CANCEL pad to cancel
the timer will cancel ALL selected oven
functions except the timer.
TIMER BEEPS
You have a choice of three "end of
timer" reminder signals:
Option 1: One beep at the end of the
timer operation, then, one beep every 30
seconds for the next five minutes or until
the CANCEL pad is pressed.
Option 2: One beep at the end of the
timer operation, then, one beep every
minute for the next 12 hours or until the
CANCEL pad is pressed.
Option 3 (default option): One beep at
the end of the timer operation, then, no
other beeps.
SETTING THE TIMER BEEPS:
1. Press the Timer and CANCEL pads
at the same time and hold for several
seconds.
A single beep will sound.
Display will show the indicator word
TIMER and the current option - 1,
2or3.
2. Press the appropriate number pad (1,
2 or 3) to select the option you wish.
The current time of day will reappear
in the display after four seconds.
CLOCK CONTROLLED
OVEN COOKING BEEPS
You have a choice of three "end of
timed cook" reminder signals for pro-
grammed cooking:
Option 1 (default option): Four beeps
at the end of cooking then, one beep
every 30 seconds for the next five min-
utes or until the CANCEL pad is pressed.
Option 2: Four beeps at the end of
cooking, then, one beep every minute for
the next 12 hours or until the CANCEL
pad is pressed.
Option 3: Four beeps at the end of
cooking, then, no other beeps.
SETTING CLOCK CONTROLLED
OVEN COOKING BEEPS:
1. Press Cook Time and CANCEL pads
at the same time and hold for several
seconds.
A single beep will sound.
Display will show the indicator word
COOK and the current option - 1,2
or3.
7
2. Press the appropriate number pad
(1, 2 or 3) to select the option you
wish. The current time of day will reap-
pear in the display after four seconds.
CANCEL CLOCK DISPLAY
If you prefer that the time of day not be
displayed when the oven is not operating:
1. Press Clock and CANCEL pads at
the same time and hold for several
seconds. The time of day will disap-
pear in the display.
2. Press Clock pad to briefly recall the
time of day, if desired. The time of day
will appear in the display for four sec-
onds.
TO RESTORE:
Press the Clock and CANCEL pads at
the same time and hold for several sec-
onds. The time of day will reappear in the
display.
AUTOMATIC OVEN TURN
OFF/SABBATH MODE
The oven will automatically turn off
after 12 hours, if you accidentally leave it
on. You may deactivate this feature, if
desired.
TO ELIMINATE 12 HOUR TURN OFF:
1. Press the Clock pad and hold for sev-
eral seconds until "12" appears in the
display. The indicator word TIME will
flash in the display.
2. Press any number pad until 8888
appears in the display. Current time of
day will reappear after four seconds.
TO RESTORE:
Press the Clock pad and hold for several
seconds until 8888 appears. Press "1"
number pad. "12" will appear briefly in
the display followed by the current time of
day.
OVEN TEMPERATURE
ADJUSTMENT
If you think the oven should be hotter or
cooler, you can adjust it yourself. To
decide how much to change the oven
temperature, set the temperature 25° F
higher or lower than the temperature in
your recipe, then bake. The results of the
"test" should give you an idea of how
much to adjust the temperature.
TO ADJUST THE OVEN
TEMPERATURE:
1. Press the Bake pad.
2. Enter 550° by pressing the number
pads "5, 5, 0".
3. Press and hold the Bake pad for
several seconds until 0° appears in
the display.
4. Press any number pad to change the
temperature. Each time a pad is
pressed, the temperature changes by
5OR
Press repeatedly to reach +35° E
Continue pressing to reduce the
temperature up to -35° F.
If the oven temperature was previ-
ously adjusted, the change will be
displayed. For example, if the oven
temperature was reduced by 15°,
the display will show -15°.
5. When you have made the adjustment,
press the CANCEL pad and the time
of day will reappear in the display. The
oven will now bake at the adjusted
temperature.
NOTE: Do not change the temperature
setting more than 10° at a time before
testing the oven.
It is not necessary to readjust the oven
temperature if there is a power interrup-
tion. This adjustment will not affect broil
or clean temperatures.
Foodpreparation warning: Follow _ Fo ow the manufacturer's directions
food manufacturer's instructions. If a when using oven cooking bags.
plastic frozen food container and/or
Do not use oven for storing food or
its cover distorts, warps, or is other- cookware.
wise damaged during cooking,
immea ately discara the food and its _,- Be sure all packing material is
container. The food could be con- removed from oven before turning
taminated, on
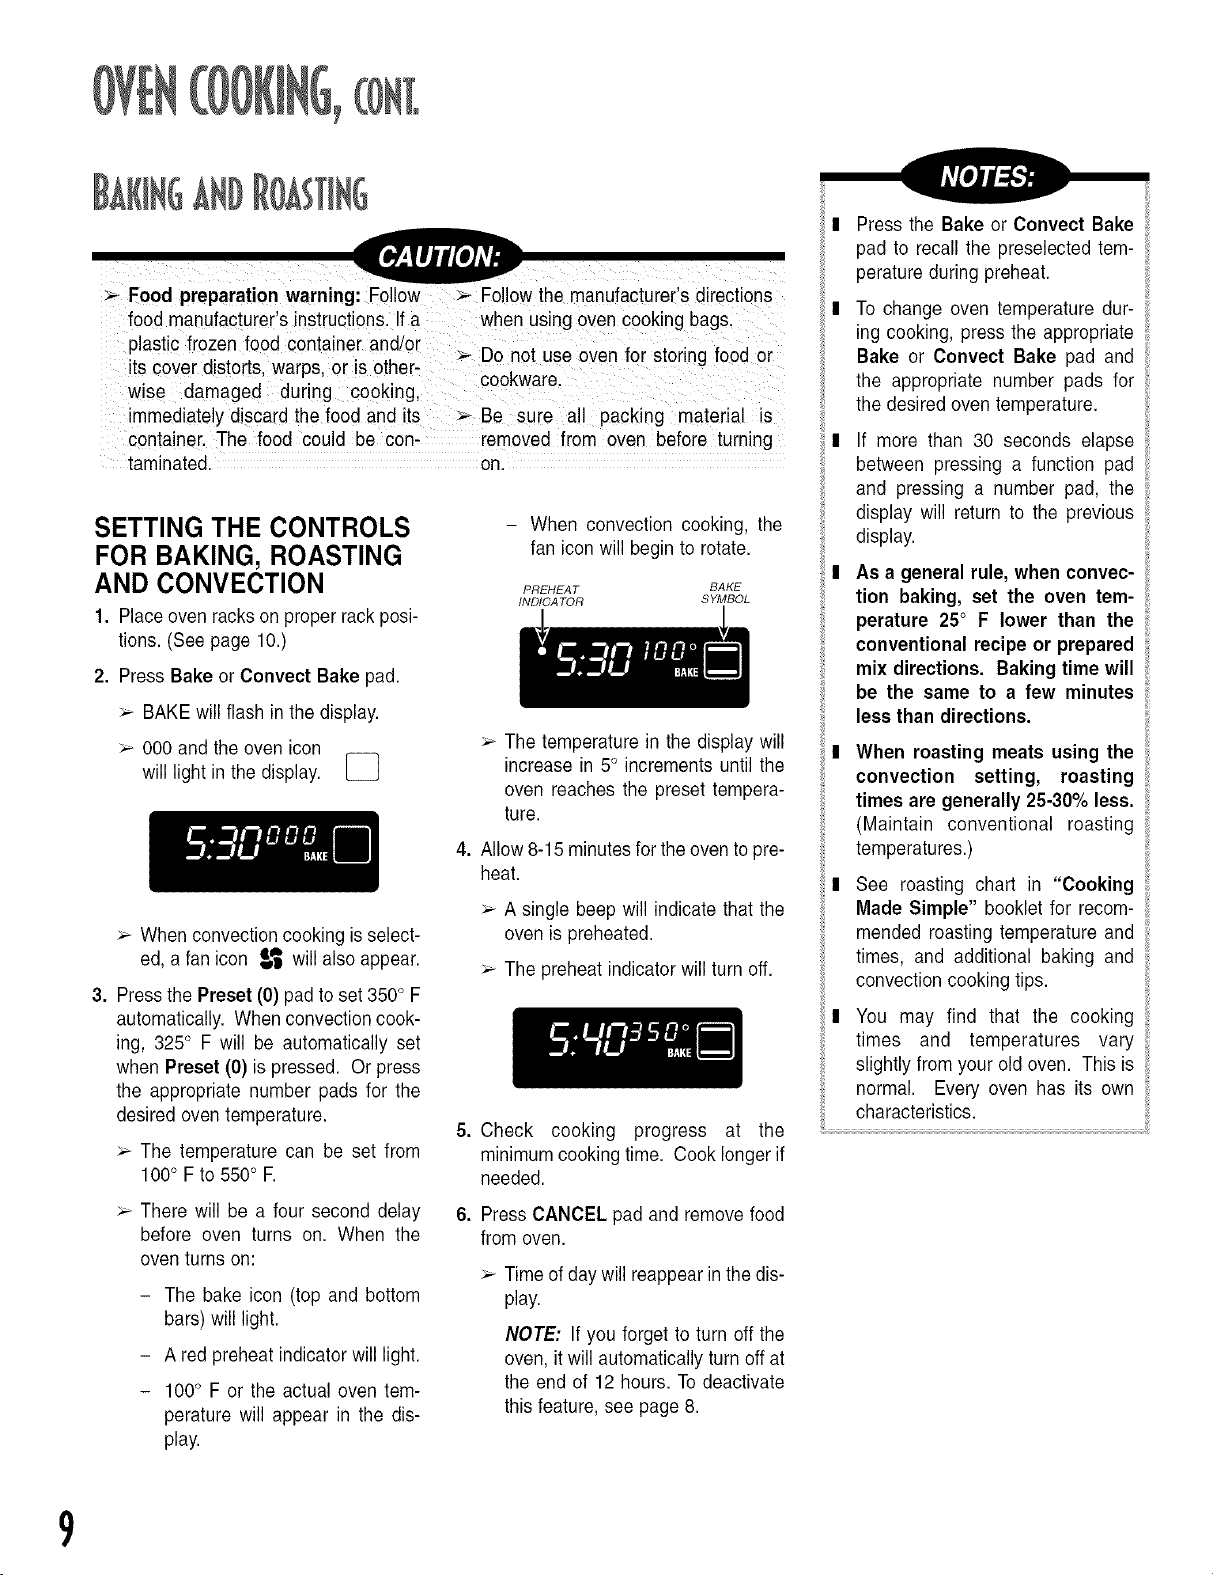
SETTING THE CONTROLS
FOR BAKING, ROASTING
AND CONVECTION
1. Place oven racks on proper rack posi-
tions. (See page 10.)
2. Press Bake or Convect Bake pad.
;_ BAKE will flash in the display.
;_ 000 and the oven icon
will light in the display.
When convection cooking is select-
ed, a fan icon $_ will also appear.
Press the Preset (0) pad to set 350° F
automatically. When convection cook-
ing, 325° F will be automatically set
when Preset (0) is pressed. Or press
the appropriate number pads for the
desired oven temperature.
The temperature can be set from
100° F to 550° F.
There will be a four second delay
before oven turns on. When the
oven turns on:
- The bake icon (top and bottom
bars) will light.
- A red preheat indicator will light.
- 100° F or the actual oven tem-
perature will appear in the dis-
play.
- When convection cooking, the
fan icon will begin to rotate.
PREHEAT BAKE
INDICATOR SYMBOL
The temperature in the display will
increase in 5° increments until the
oven reaches the preset tempera-
ture.
4. Allow 8-15 minutes for the oven to pre-
heat.
A single beep will indicate that the
oven is preheated.
The preheat indicator will turn off.
5. Check cooking progress at the
minimum cooking time. Cook longer if
needed.
6. Press CANCEL pad and remove food
from oven.
:_ Time of day will reappear in the dis-
play.
NOTE: If you forget to turn off the
oven, it will automatically turn off at
the end of 12 hours. To deactivate
this feature, see page 8.
II Press the Bake or Convect Bake
pad to recall the preselected tem-
perature during preheat.
II To change oven temperature dur-
ing cooking, press the appropriate
Bake or Convect Bake pad and
the appropriate number pads for
the desired oven temperature.
II If more than 30 seconds elapse
between pressing a function pad
and pressing a number pad, the
display will return to the previous
display.
II As a general rule, when convec-
tion baking, set the oven tem-
perature 25° F lower than the
conventional recipe or prepared
mix directions. Baking time will
be the same to a few minutes
less than directions.
I When roasting meats using the
convection setting, roasting
times are generally 25-30% less.
(Maintain conventional roasting
temperatures.)
I See roasting chart in "Cooking
Made Simple" booklet for recom-
mended roasting temperature and
times, and additional baking and
convection cooking tips.
I You may find that the cooking
times and temperatures vary
slightly from your old oven. This is
normal. Every oven has its own
characteristics.
9
When the oven is in use, the vent and
surrounding area may become hot
enough to cause burns. Never block the
vent opening.
NOVENVENT
,HT
Push the switch on the control panel to
turn the oven light on and
off. The oven light automat-
ically comes on whenever
the oven door is opened. OVENUCHT
DO not attempt to Change the rack
position when the oven is hot.
Convection ranges are equipped with
three racks. The racks are designed with
a lock-stop edge.
TO REMOVE: Pull rack straight out until
it stops at the lock-stop position; lift up on
the front of the rack and pull out.
TO REPLACE: Place rack on the rack
support in the oven; tilt the front end up
slightly; slide _//
rack back until it
clears the lock- _(_@/j_/
stop position; I_'_rv,\ __mrTTH/_/_,4,['_I
lower front and l_1
slide back into
the oven.
Do not cover an entire rack with alu-
minum foil or place foil on the oven
bottom. Baking results will be affect-
ed and damage may occur to the oven
bottom.
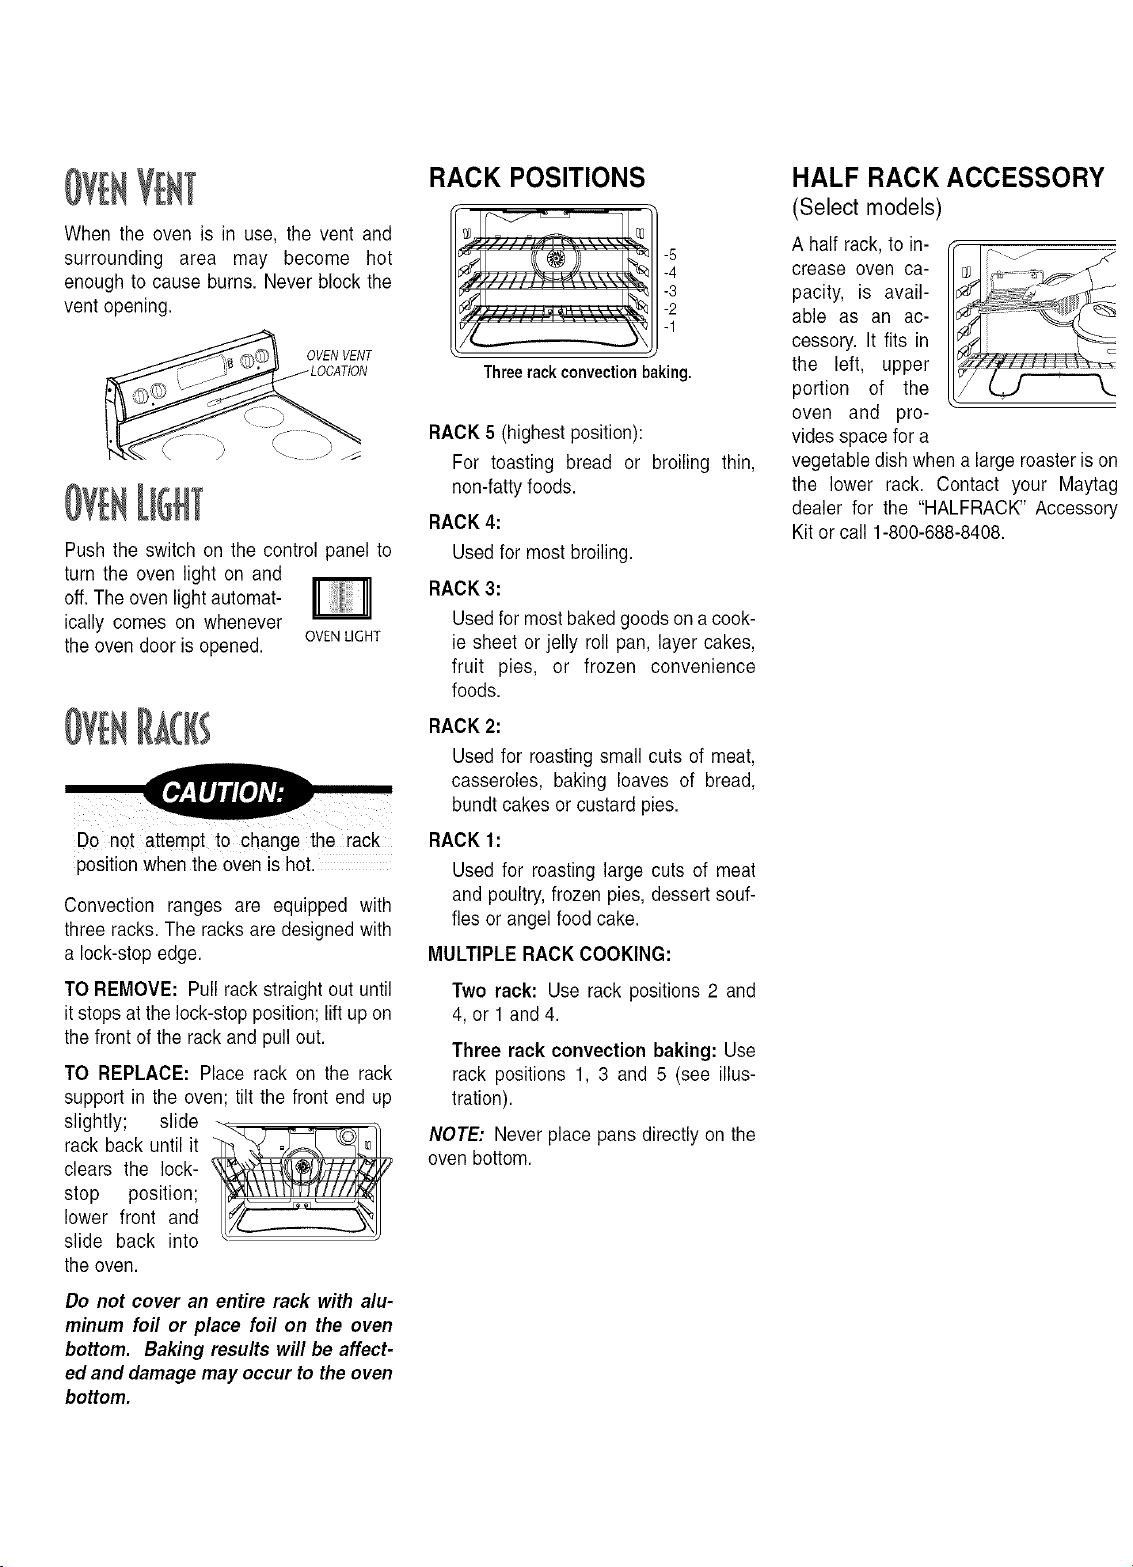
RACK POSITIONS
Threerackconvectionbaking.
RACK 5 (highest position):
For toasting bread or broiling thin,
non-fatty foods.
RACK 4:
Used for most broiling.
RACK 3:
Used for most baked goods on a cook-
ie sheet or jelly roll pan, layer cakes,
fruit pies, or frozen convenience
foods.
RACK 2:
Used for roasting small cuts of meat,
casseroles, baking loaves of bread,
bundt cakes or custard pies.
RACK 1:
Used for roasting large cuts of meat
and poultry, frozen pies, dessert souf-
fles or angel food cake.
MULTIPLE RACK COOKING:
Two rack: Use rack positions 2 and
4, or 1 and 4.
Three rack convection baking: Use
rack positions 1, 3 and 5 (see illus-
tration).
NOTE: Never place pans directly on the
oven bottom.
HALF RACK ACCESSORY
(Select models)
A half rack, to in-
crease oven ca-
pacity, is avail-
able as an ac-
cessory. It fits in
the left, upper
portion of the
oven and pro-
vides space for a
vegetable dish when a large roaster is on
the lower rack. Contact your Maytag
dealer for the "HALFRACK" Accessory
Kit or call 1-800-688-8408.
(Select models)
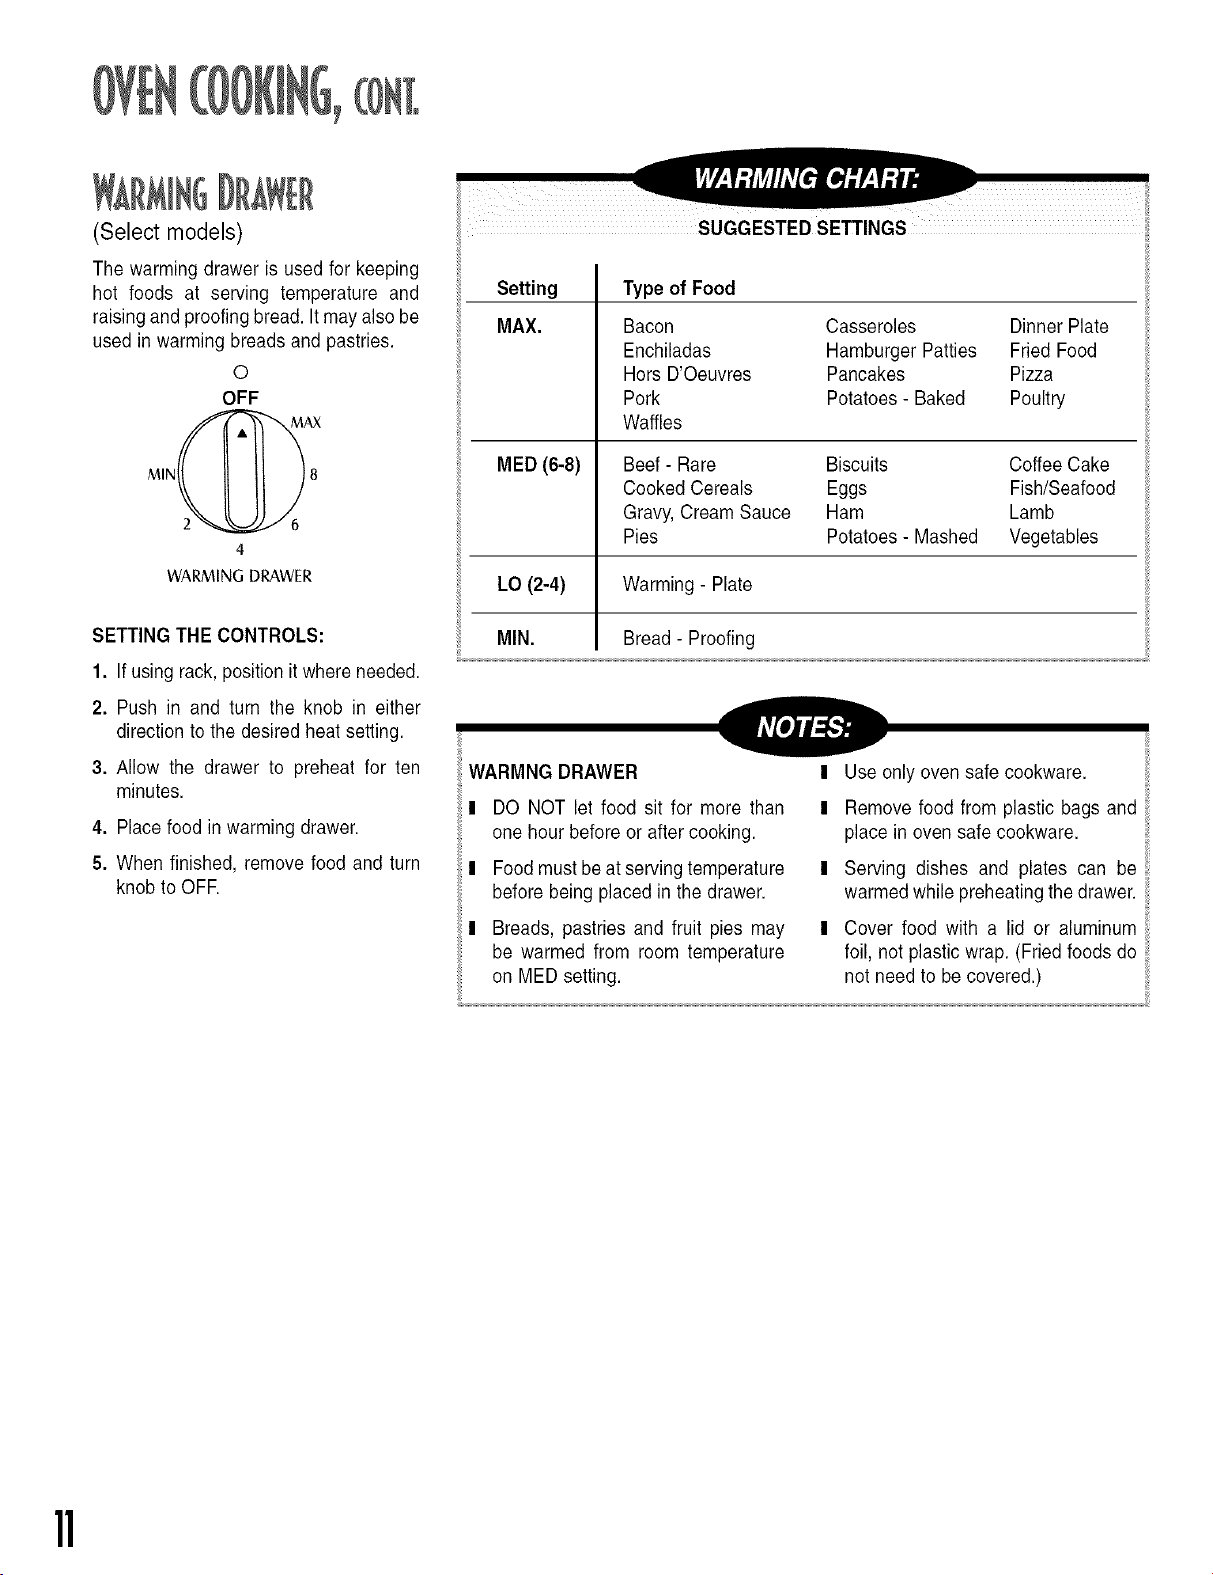
The warming drawer is used for keeping
hot foods at serving temperature and
raising and proofing bread. It may also be
used in warming breads and pastries.
O
OFF
MAX
MIN 8
2 6
WARMING DRAWER
SETTING THE CONTROLS:
1. If using rack, position it where needed.
2. Push in and turn the knob in either
direction to the desired heat setting.
3. Allow the drawer to preheat for ten
minutes.
4. Place food in warming drawer.
5. When finished, remove food and turn
knob to OFF.
SUGGESTED SETTINGS
Setting
MAX. Casseroles Dinner Plate
Hamburger Patties Fried Food
Pancakes Pizza
Potatoes - Baked Poultry
Type of Food
Bacon
Enchiladas
Hors D'Oeuvres
Pork
Waffles
Beef - Rare
Cooked Cereals
Gravy, Cream Sauce
Pies
MED (6-8) Biscuits Coffee Cake
Eggs Fish/Seafood
Ham Lamb
Potatoes - Mashed Vegetables
LO (2-4) Warming - Plate
MIN. Bread - Proofing
WARMNG DRAWER
DO NOT let food sit for more than
one hour before or after cooking.
Food must be at serving temperature
before being placed in the drawer.
Breads, pastries and fruit pies may
be warmed from room temperature
on MED setting.
II Use only oven safe cookware.
II Remove food from plastic bags and
place in oven safe cookware.
II Serving dishes and plates can be
warmed while preheating the drawer.
II Cover food with a lid or aluminum
foil, not plastic wrap. (Fried foods do
not need to be covered.)
11
For best results, use a pan designed for
broiling.
For additional broiling tips, refer to the
"Cooking Made Simple" booklet.
SETTING THE CONTROLS
FOR BROILING
Place the oven rack in the proper rack
position (see following chart).
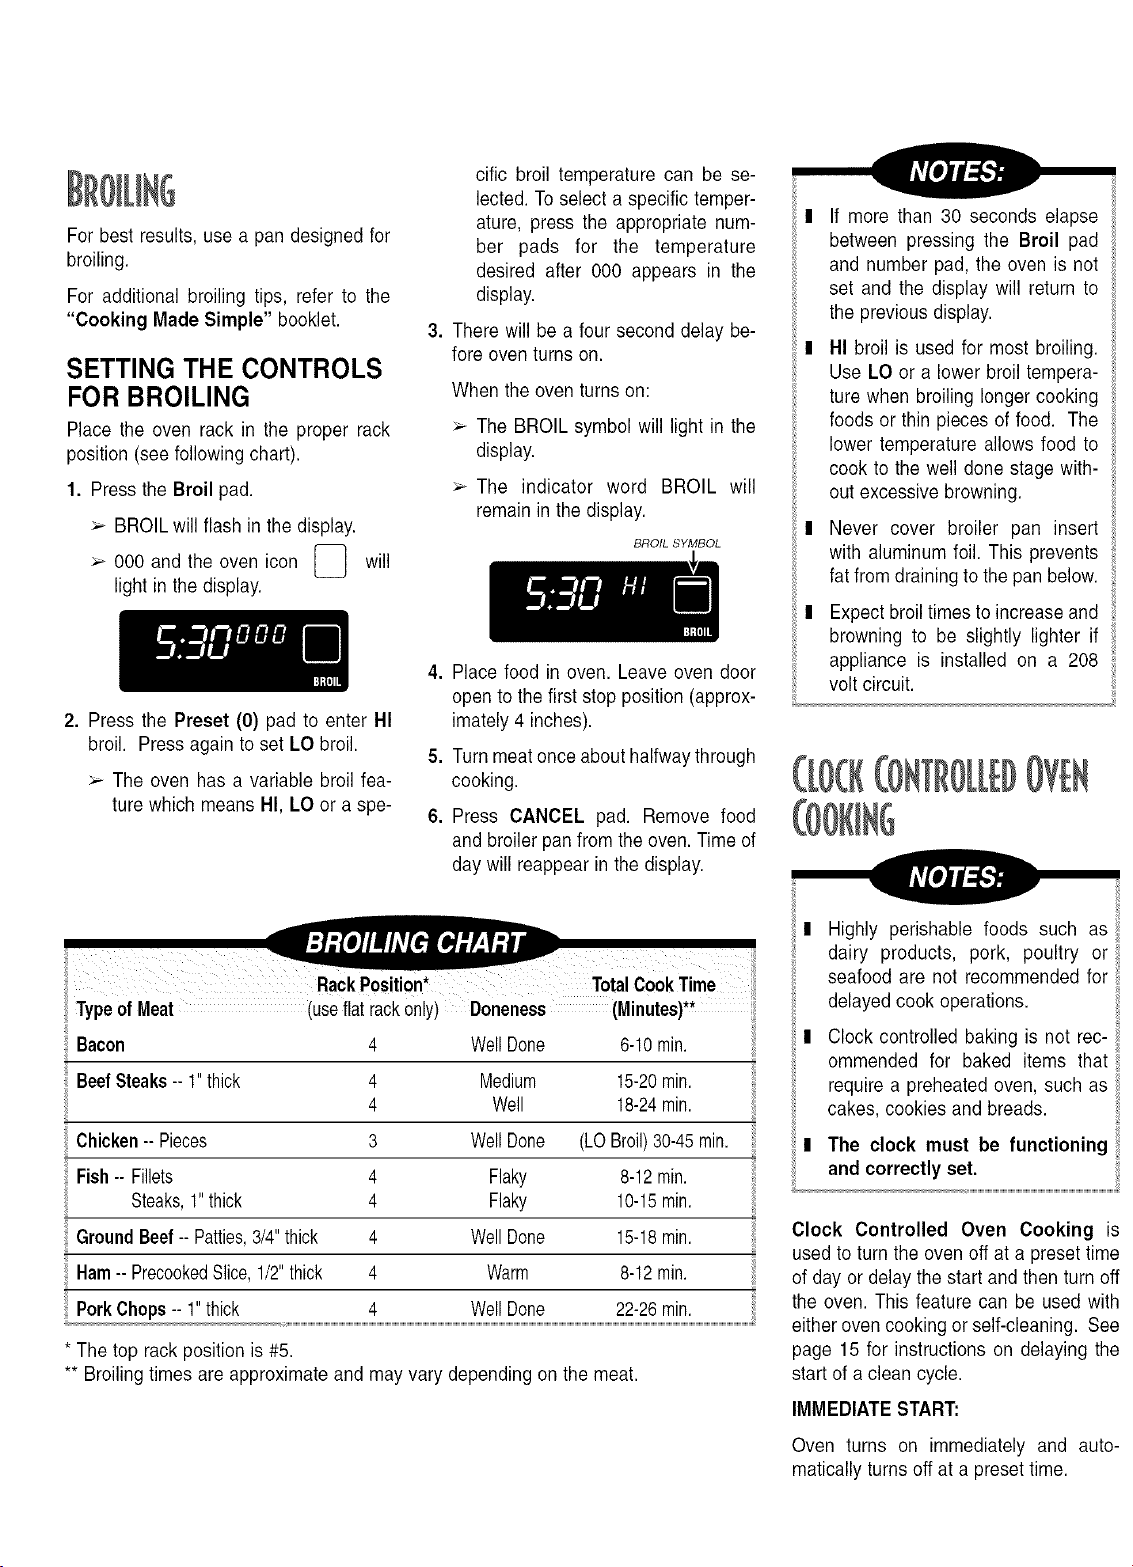
1. Press the Broil pad.
BROIL will flash in the display.
and the oven icon _ will000
light in the display.
2. Press the Preset (0) pad to enter HI
broil. Press again to set LO broil.
The oven has a variable broil fea-
ture which means HI, LO or a spe-
cific broil temperature can be se-
lected. To select a specific temper-
ature, press the appropriate num-
ber pads for the temperature
desired after 000 appears in the
display.
3. There will be a four second delay be-
fore oven turns on.
When the oven turns on:
The BROIL symbol will light in the
display.
The indicator word BROIL will
remain in the display.
BROIL SYMBOL
4. Place food in oven. Leave oven door
open to the first stop position (approx-
imately 4 inches).
5. Turn meat once about halfway through
cooking.
6. Press CANCEL pad. Remove food
and broiler pan from the oven. Time of
day will reappear in the display.
I If more than 30 seconds elapse
between pressing the Broil pad
and number pad, the oven is not
set and the display will return to
the previous display.
I HI broil is used for most broiling.
Use LO or a lower broil tempera-
ture when broiling longer cooking
foods or thin pieces of food. The
lower temperature allows food to
cook to the well done stage with-
out excessive browning.
I Never cover broiler pan insert
with aluminum foil. This prevents
fat from draining to the pan below.
iT
I Expect broil times to increase and
browning to be slightly lighter if
appliance is installed on a 208
volt circuit.
'k'k
Typeof Meat (useflat rackonly) Doneness (Minutes)
Bacon 4 Well Done 6-10rain.
Beef Steaks-- 1"thick 4 Medium 15-20rain.
4 Well 18-24rain.
Chicken -- Pieces 3 Well Done (LOBroil)30-45rain.
iii
Fish -- Fillets 4 Flaky 8-12min.
Steaks,1"thick 4 Flaky 10-15min.
GroundBeef -- Patties,3/4"thick 4 Well Done 15-18min.
ii Ham-- PrecookedSlice,1/2"thick 4 Warm 8-12rain.
Pork Chops-- 1"thick
* The top rack position is #5.
** Broiling times are approximate and may vary depending on the meat.
I Highly perishable foods such as i:
dairy products, pork, poultry or ii
seafood are not recommended for
delayed cook operations.
I Clock controlled baking is not rec- i!
ommended for baked items that
require a preheated oven, such as
cakes, cookies and breads.
The clock must be functioning
and correctly set.
Clock Controlled Oven Cooking is
used to turn the oven off at a preset time
of day or delay the start and then turn off
the oven. This feature can be used with
either oven cooking or self-cleaning. See
page 15 for instructions on delaying the
start of a clean cycle.
IMMEDIATE START:
Oven turns on immediately and auto-
matically turns off at a preset time.
13
DELAYED START:
Delays the start of cooking or cleaning
and automatically turns off at a preset
time.
Cook time can be set for up to 11 hours
and 59 minutes (11:59).
If more than 30 seconds elapse between
pressing a function pad and pressing the
appropriate number pads, the oven is
NOT set and display will return to the
previous display.
SETTING THE CONTROLS
TO START IMMEDIATELYAND TURN
OFF AUTOMATICALLY:
1. Press the Bake or Convect Bake
pad.
BAKE will flash and 000 and the
oven icon _-_ will appear in the
L_
display.
When convection cooking is select-
ed, a fan icon _ will appear in
the display.
Press the Preset (0) pad to set 350° E
When convection cooking, 325° F will
automatically beset. Or, press the ap-
propriate number pads for the desired
oven temperature.
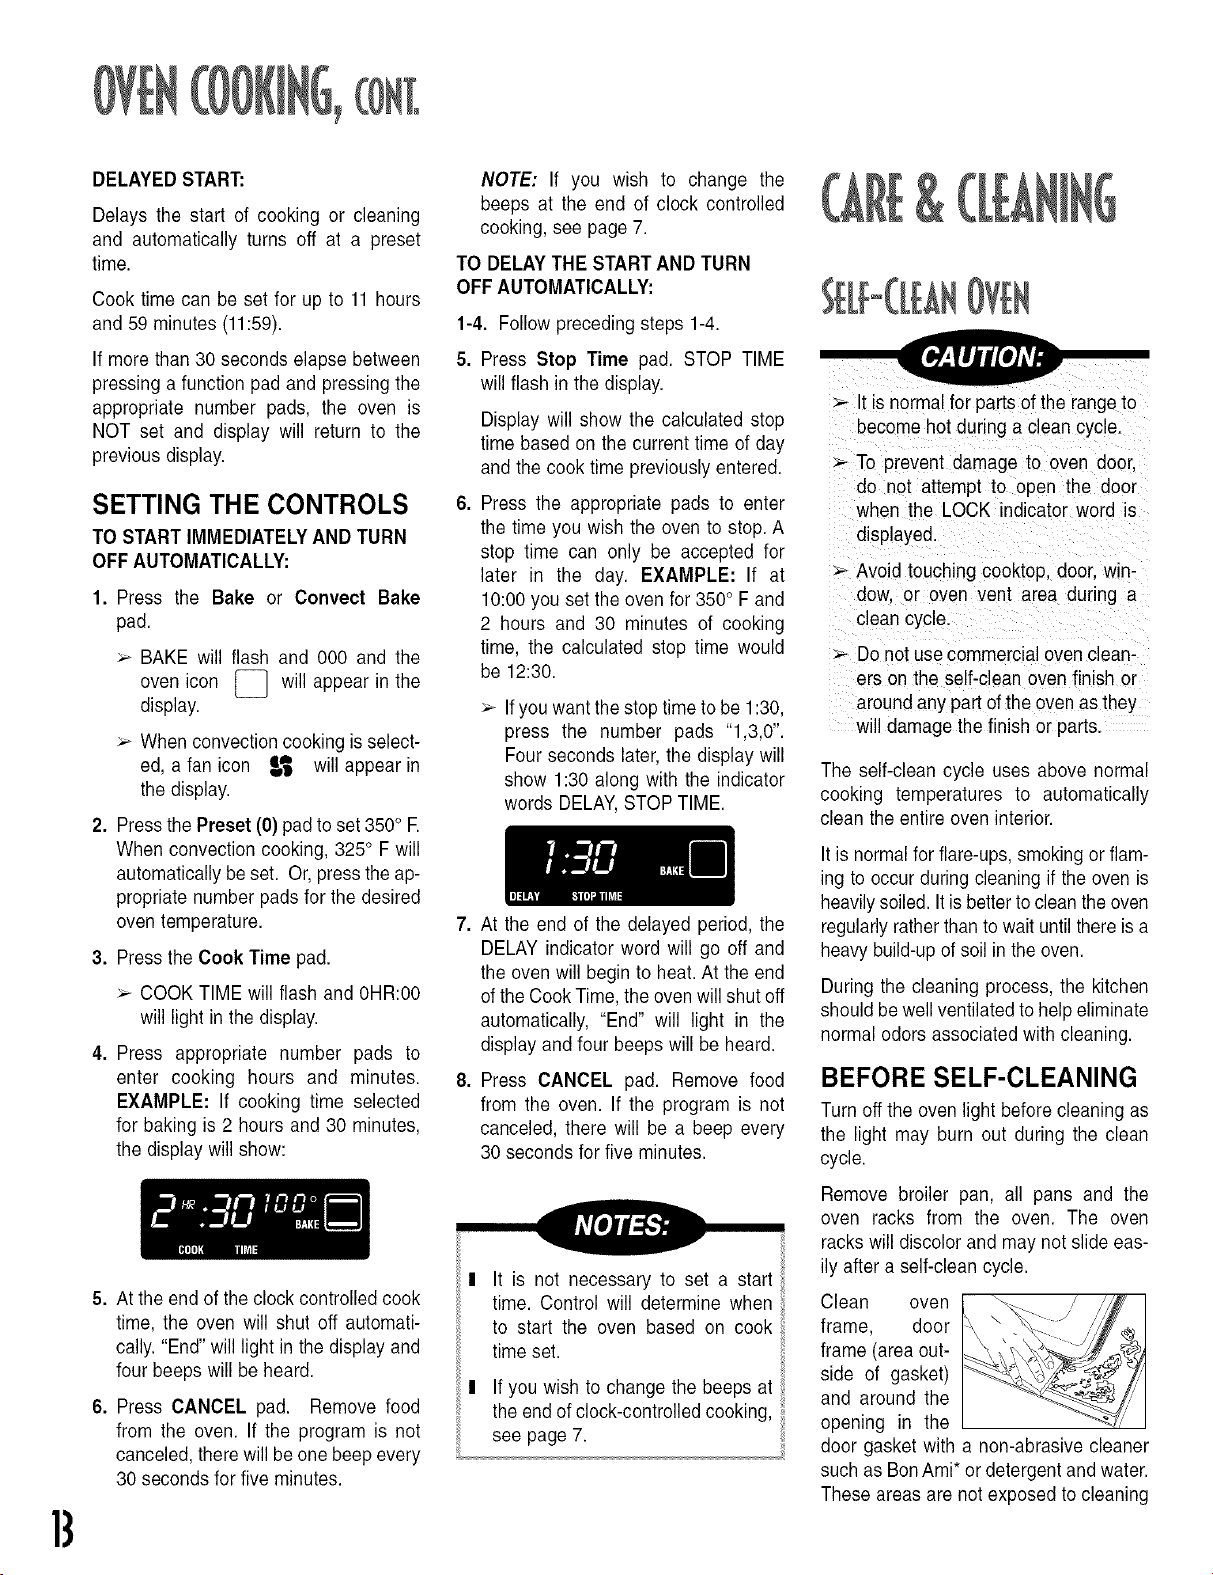
Press the Cook Time pad.
COOK TIME will flash and 0HR:00
will light in the display.
Press appropriate number pads to
enter cooking hours and minutes.
EXAMPLE: If cooking time selected
for baking is 2 hours and 30 minutes,
the display will show:
5. At the end of the clock controlled cook
time, the oven will shut off automati-
cally. "End" will light in the display and
four beeps will be heard.
6. Press CANCEL pad. Remove food
from the oven. If the program is not
canceled, there will be one beep every
30 seconds for five minutes.
NOTE: If you wish to change the
beeps at the end of clock controlled
cooking, see page 7.
TO DELAY THE START AND TURN
OFF AUTOMATICALLY:
1-4. Follow preceding steps 1-4.
5. Press Stop Time pad. STOP TIME
will flash in the display.
Display will show the calculated stop
time based on the current time of day
and the cook time previously entered.
6. Press the appropriate pads to enter
the time you wish the oven to stop. A
stop time can only be accepted for
later in the day. EXAMPLE: If at
10:00 you set the oven for 350° F and
2 hours and 30 minutes of cooking
time, the calculated stop time would
be 12:30.
If you want the stop time to be 1:30,
press the number pads "1,3,0".
Four seconds later, the display will
show 1:30 along with the indicator
words DELAY,STOP TIME.
7. At the end of the delayed period, the
DELAY indicator word will go off and
the oven will begin to heat. At the end
of the Cook Time, the oven will shut off
automatically, "End" will light in the
display and four beeps will be heard.
8. Press CANCEL pad. Remove food
from the oven. If the program is not
canceled, there will be a beep every
30 seconds for five minutes.
It is not necessary to set a start
time. Control will determine when
to start the oven based on cook
time set.
II If you wish to change the beeps at
the end of clock-controlled cooking,
see page 7.
8,
It is normal for parts of the range to
become hot during a clean cycle.
_.-To prevent damage to oven door.
do not attempt to open the door
when the LOCK indicator word is
displayed.
Avoid touching cooktop, door. win-
dow. or oven vent area during a
clean cycle.
Do not use commercial oven clean-
ers on the self-clean oven finish or
around any part of the oven as they"
will damage the finish or parts.
The self-clean cycle uses above normal
cooking temperatures to automatically
clean the entire oven interior.
It is normal for flare-ups, smoking or flam-
ing to occur during cleaning if the oven is
heavilysoiled. It is betterto clean the oven
regularly rather than to wait until there is a
heaw build-up of soil in the oven.
During the cleaning process, the kitchen
should be well ventilated to help eliminate
normal odors associated with cleaning.
BEFORE SELF-CLEANING
Turn off the oven light before cleaning as
the light may burn out during the clean
cycle.
Remove broiler pan, all pans and the
oven racks from the oven. The oven
racks will discolor and may not slide eas-
ily after a self-clean cycle.
Clean oven
frame, door
frame (area out-
side of gasket)
and around the
opening in the
_.,_ / //Zj I
\ \ _----- ,,',_' I
",-%:....... /
door gasket with a non-abrasive cleaner
such as BonAmi* or detergent and water.
These areas are not exposed to cleaning
temperaturesandshouldbecleanedto
preventsoilfrombakingon duringthe
cleancycle.
To prevent damage, do not clean or
rub the gasket around the oven door.
The gasket is designed to seal in heat
during the clean cycle.
Wipe up excess grease or spillovers from
the oven bottom to prevent excessive
smoking, flare-ups or flaming during the
clean cycle. For ease of cleaning, the
heating element can be lifted slightly
(1 inch).
Wipe up sugary and acidic spillovers
such as sweet potatoes, tomato or milk-
based sauces. Porcelain enamel is acid
resistant, not acid proof. The porcelain
finish may discolor if acidic spills are not
wiped up prior to a self-clean cycle.
DURING CLEAN CYCLE
When the LOCK indicator word lights in
the display, the door cannot be opened.
To prevent damage to door, do not force
door open when the LOCK indicator word
is displayed.
Some smoke and odor may be detected
the first few times the oven is cleaned.
This is normal and will lessen in time.
Smoke may also occur if oven is heavily
soiled or if broiler pan was left in oven.
As oven heats, you may hear sounds of
metal parts expanding and contracting.
This is normal and will not damage the
oven.
AFTER SELF-CLEANING
About one hour after the end of the clean
cycle, the LOCK indicator word will turn
off. At this point, the door can be opened.
Some soil may leave a light gray, pew-
dery ash which can be removed with a
damp cloth. If soil remains, it indicates
that the clean cycle was not long enough.
The soil will be removed during the next
clean cycle.
If the oven racks were left in the oven and
do not slide smoothly after a clean cycle,
wipe racks and embossed rack supports
with a small amount of vegetable oil to
restore ease of movement.
A white discoloration may appear after
cleaning if acidic or sugary foods were
not wiped up before the clean cycle. This
discoloration is normal and will NOT
affect performance.
Finelinesmayappearin theporcelainresult-
ingfromthe heatingandcoolingofthe finish.
This is normal and will not affect perform-
ance.
SETTING THE CONTROLS
FOR SELF-CLEAN
1. Close oven door.
2. Press Clean pad.
CLEAN will flash and "--:--" will
light in the display.
If door has not been closed, "door"
will light in the display and a signal
will beep until the door is closed
and the Clean pad is pressed
again.
3. Press Preset (0) pad for "3:00" hours
of cleaning time for an average soiled
oven. Or, press the appropriate num-
ber pads for the desired cleaning time
between two and four hours.
Four seconds after entering the clean-
ing time, the oven door will automati-
cally lock.
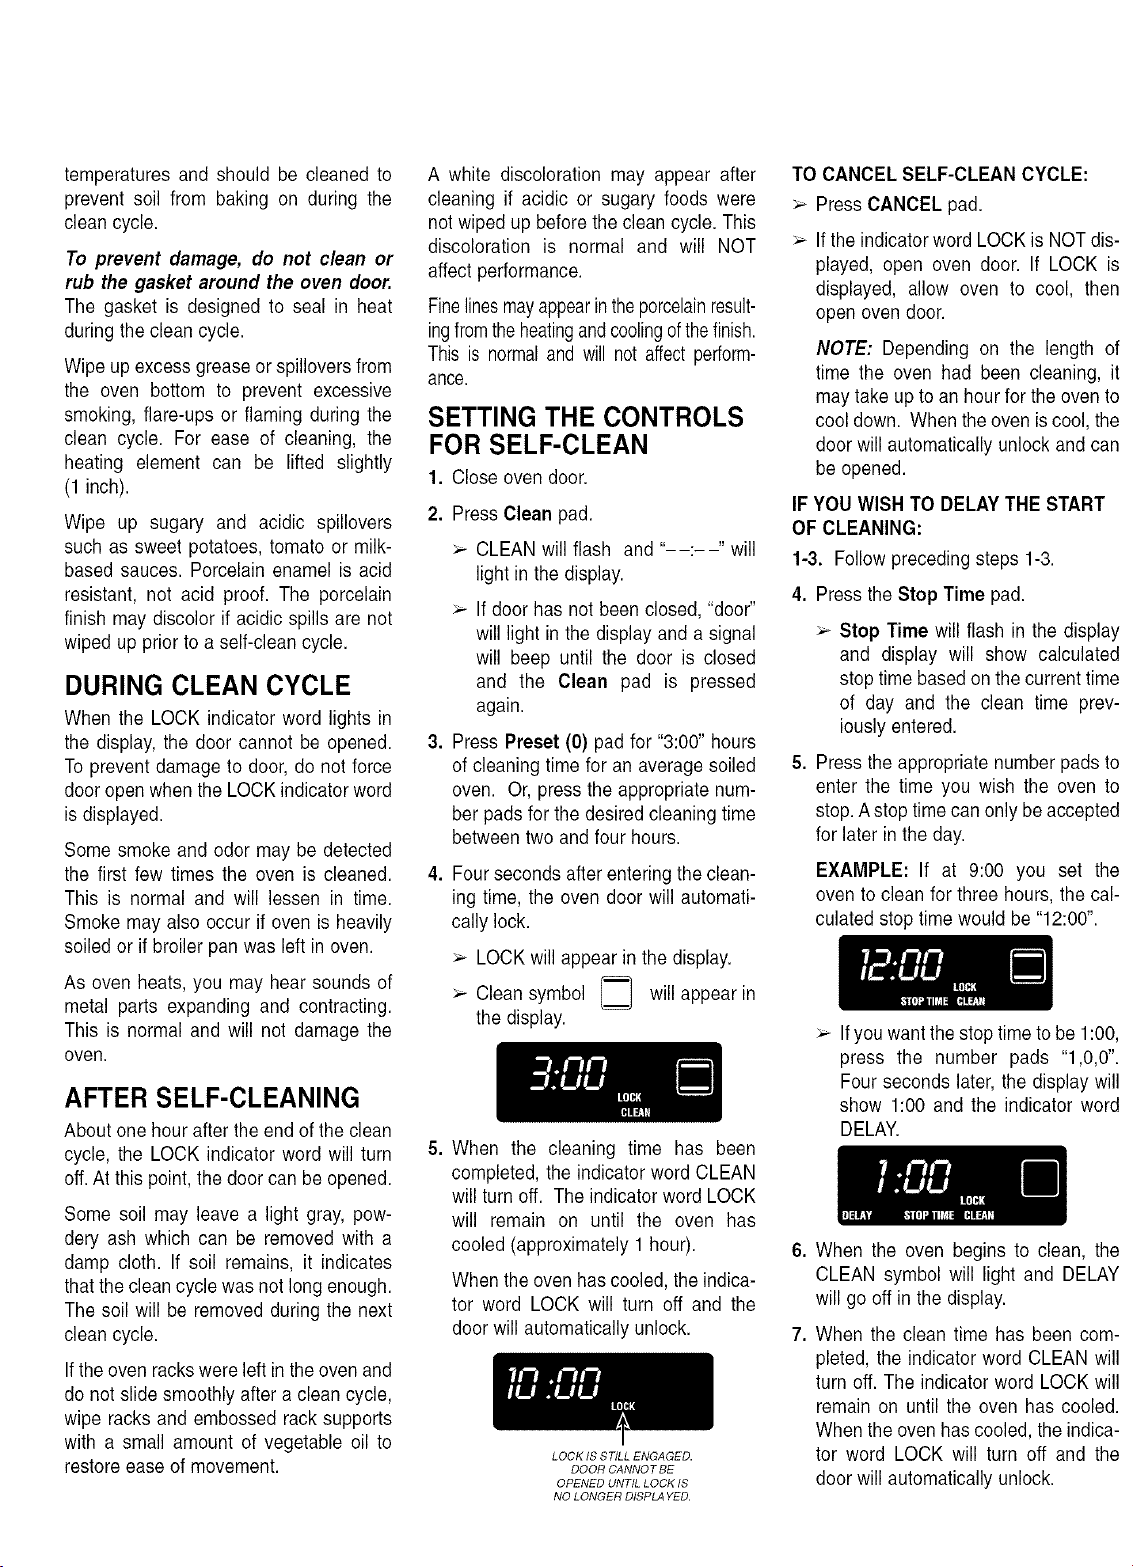
LOCK will appear in the display.
Clean symbol _ will appear
in
the display.
When the cleaning time has been
completed, the indicator word CLEAN
will turn off. The indicator word LOCK
will remain on until the oven has
cooled (approximately 1 hour).
When the oven has cooled, the indica-
tor word LOCK will turn off and the
door will automatically unlock.
LOCKISSTILLENGAGED.
DOOR CANNOTBE
OPENED UNTIL LOCKIS
NOLONGER D_PLAYED.
TO CANCEL SELF-CLEAN CYCLE:
Press CANCEL pad.
If the indicator word LOCK is NOTdis-
played, open oven door. If LOCK is
displayed, allow oven to cool, then
open oven door.
NOTE: Depending on the length of
time the oven had been cleaning, it
may take up to an hour for the oven to
cool down. When the oven is cool, the
door will automatically unlock and can
be opened.
IF YOU WISH TO DELAY THE START
OF CLEANING:
1-3. Follow preceding steps 1-3.
4. Press the Stop Time pad.
Stop Time will flash in the display
and display will show calculated
stop time based on the current time
of day and the clean time prev-
iously entered.
5. Press the appropriate number pads to
enter the time you wish the oven to
stop. Astop time can only be accepted
for later in the day.
EXAMPLE: If at 9:00 you set the
oven to clean for three hours, the cal-
culated stop time would be "12:00".
If you want the stop time to be 1:00,
press the number pads "1,0,0".
Four seconds later, the display will
show 1:00 and the indicator word
DELAY.
When the oven begins to clean, the
CLEAN symbol will light and DELAY
will go off in the display.
When the clean time has been com-
pleted, the indicator word CLEAN will
turn off. The indicator word LOCK will
remain on until the oven has cooled.
When the oven has cooled, the indica-
tor word LOCK will turn off and the
door will automatically unlock.
]5
_-Be sure appliance is off and al
parts are cool before handling or
cleaning. This is to avoid damage
and 3ossible burns.
To prevent staining or discoloration
clean appliance after each use.
If a part is removed, be sure it is
correctly replaced.
BACKGUARD & COOKTOP
PORCELAIN ENAMEL & TRIM ON
GLASS-CERAMIC SURFACES
Porcelain enamel is glass fused on metal
and may crack or chip with misuse. It is
acid resistant, not acid proof. All
spillovers, especially acidic or sugary
spillovers, should be wiped up immedi-
ately with a dry cloth.
When cool, wash with soapy water,
rinse and dry.
Never wipe off a warm or hot surface
with a clamp cloth. This may cause
cracking or chipping.
Never use oven cleaners, abrasive or
caustic cleaning agents on exterior fin-
ish of range.
BOILER PAN & INSERT
Never cover insert with aluminum foil as
this prevents the fat from draining to the
pan below.
Place soapy cloth over insert and pan;
let soak to loosen soil.
Wash in warm soapy water. Use soap
filled scouring pad to remove stubborn
soil.
Broiler pan and insert can be cleaned
in dishwasher.
CLOCK AND CONTROL
PAD AREA
Toactivate "Control Lock" for cleaning,
see page 6.
>- Wipe with a damp cloth and dry.
>-Glass cleaners may be used if
sprayed on a cloth first. DO NOT
spray directly on control pad and
display area.
CONTROL KNOBS
Remove knobs in the OFF position by
pulling forward.
:_ Wash, rinse and dry. Do not use abra-
sive cleaning agents as they may
scratch the finish.
Turn on each element to be sure the
knobs have been correctly replaced.
ENAMEL (PAINTED)
SIDE PANELS, DOOR HANDLE,
STORAGE & WARMING DRAWERS
When cool, wash with warm soapy
water, rinse and dry. Never wipe a
warm or hot surface with a damp cloth
as this may damage the surface and
may cause a steam burn.
For stubborn soil, use mildly abrasive
cleaning agents such as baking soda
paste or Bon Ami*. Do not use abra-
sive cleaners such as steel wool pads
or oven cleaners. These products will
scratch or permanently damage the
surface.
NOTE: Use dry towel or cloth to wipe up
spills, especially acidic or sugary spills.
Surface may discolor or dull if soil is not
immediately removed. This is especially
important for white surfaces.
GLASS
OVEN WINDOW & DOOR
Avoid using excessive amounts of
water which may seep under or
behind glass causing staining.
Wash with soap and water. Rinse with
clear water and dry. Glass cleaner
can be used if sprayed on a cloth first.
Do not use abrasive materials such as
scouring pads, steel wool or powdered
cleaners as they will scratch glass.
GLASS-CERAMIC
COOKTOP
Never use oven cleaners, chlorine
bleach, ammonia or glass cleaners
with ammonia. NOTE: Call an autho-
rized servicer if the glass-ceramic top
should crack, break or if metal or alu-
minum foil should melt on the cooktop.
;_ Allow the cooktop to cool before
cleaning.
>- General -Always clean cooktop after
each use, or when needed, with a
damp paper towel and Cooktop
Cleaning Creme* (Part No.
20000001)**. Then, buff with a clean,
dry cloth.
NOTE: Permanent stains will develop if
soil is allowed to cook on by repeatedly
using the cooktop when soiled.
Heavy Soils or Metal Marks -
Dampen a "scratchless" or "never
scratch" scrubber sponge. Apply
Cooktop Cleaning Creme* (Part No.
20000001)** and scrub to remove as
much soil as possible. Apply a thin
layer of the creme over the soil, cover
with a damp paper towel and let stand
30 to 45 minutes (2-3 hours for very
heaw soil). Keep moist by covering
the paper towel with plastic wrap.
Scrub again, then buff with a clean dry
cloth.
NOTE: Only use a CLEAN, DAMP
"scratchless"pad that is safe for non-stick
cookware. The pattern and glass will be
damaged if the pad is not damp, if the
pad is soiled, or ff another type of pad is
used.
Burned-on or Crusty Soils - Scrub
with a "scratchless" or "never scratch"
scouring pad and Cooktop Cleaning
Creme*.
NOTE: Hold a razor blade scraper at a
30° angle and scrape any remaining soil.
Then, clean as described /
above. Do not use
the razor blade for
daily cleaning as it
may wear the
pattem on the
glass.
Melted Sugar or Plastic - Immedi-
ately turn element to LOW and scrape
from hot surface to a cool area. Then
turn element OFF and cool. Clean res-
idue with razor blade scraper and
Cooktop Cleaning Creme*.
METAL FINISHES
Wash with soap and water, a glass
cleaner, or mild liquid detergent.
To prevent scratching or dulling of the
finish, do not use mildly abrasive,
abrasive, harsh or caustic cleaners
such as oven cleaners.
OVEN INTERIORS
Follow instructions on pages 13-14 for
Self-Cleaning Oven.
OVEN RACKS
Clean with soapy water.
Remove stubborn soil with cleansing
powder or soap-filled scouring pad.
Rinse and dry.
Racks will permanently discolor and
may not slide smoothly if left in the
oven during a self-clean operation. If
this occurs, wipe the rack and
embossed rack supports with a small
amount of vegetable oil to restore
ease of movement, then wipe off
excess oil.
PLASTIC FINISHES
TRIM & END CAPS
When cool, clean with soap and water,
rinse and dry.
Use a glass cleaner and a soft cloth.
NOTE: Never use oven cleaners, abra-
sive or caustic liquid or powdered cleans-
ers on plastic finishes. These cleaning
agents will scratch or mar finish.
NOTE: To prevent staining or discolora-
tion, wipe up fat, grease or acid (tomato,
lemon, vinegar, milk, fruit juice, mari-
nade) immediately with a dry paper towel
OVEN DOOR
Do not place excessive weight on
or stand on an open oven door.
This could cause the range to tip
over. break the door, or injure the
user.
Do not attempt to open or close
door or operate oven until door is
properly replaced.
Never place fingers between hinge
and front oven frame. Hinge arms
are spring mounted. If accidentally
hit. the hinge will slam shut against
oven frame and could injure your
fingers.
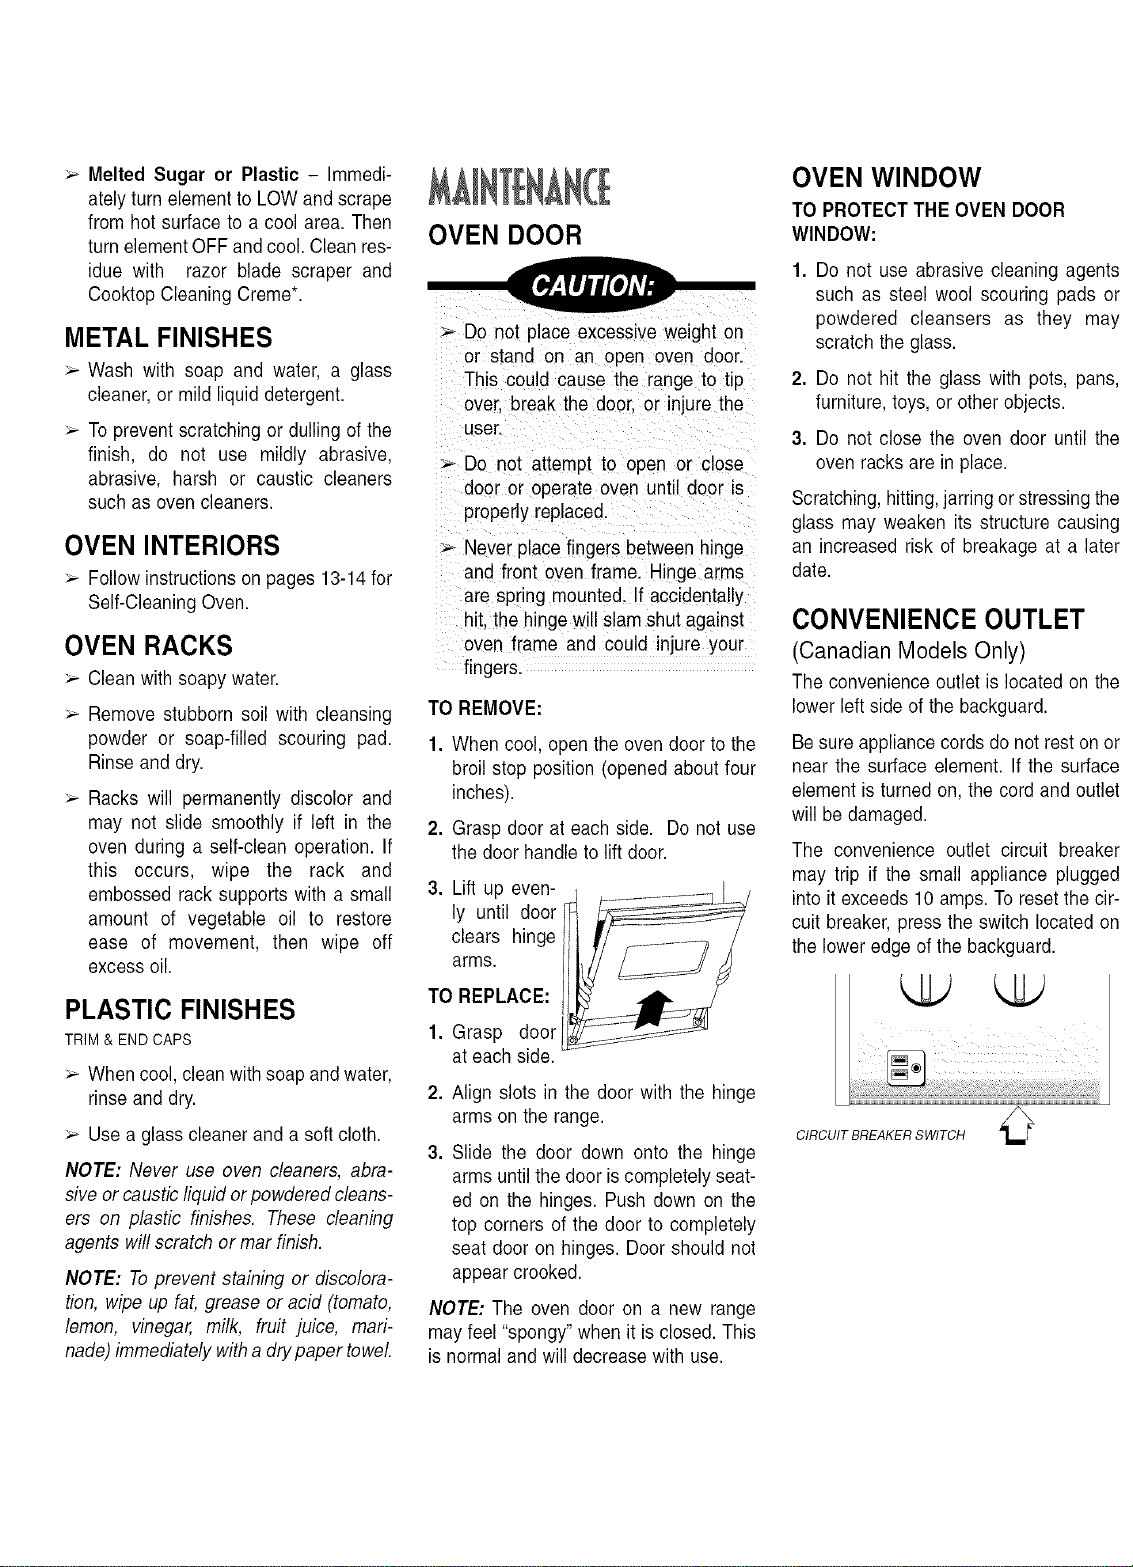
TO REMOVE:
1. When cool, open the oven door to the
broil stop position (opened about four
inches).
2. Grasp door at each side. Do not use
the door handle to lift door.
3. Lift up even- L
ly until door
clears hinge
arms.
TO REPLACE:
1. Grasp door
at each side.
2. Align slots in the door with the hinge
arms on the range.
3. Slide the door down onto the hinge
arms until the door is completely seat-
ed on the hinges. Push down on the
top corners of the door to completely
seat door on hinges. Door should not
appear crooked.
NOTE: The oven door on a new range
may feel "spongy" when it is closed. This
is normal and will decrease with use.
OVEN WINDOW
TO PROTECT THE OVEN DOOR
WINDOW:
1. Do not use abrasive cleaning agents
such as steel wool scouring pads or
powdered cleansers as they may
scratch the glass.
2. Do not hit the glass with pots, pans,
furniture, toys, or other objects.
3. Do not close the oven door until the
oven racks are in place.
Scratching, hitting, jarring or stressing the
glass may weaken its structure causing
an increased risk of breakage at a later
date.
CONVENIENCE OUTLET
(Canadian Models Only)
The convenience outlet is located on the
lower left side of the backguard.
Be sure appliance cords do not rest on or
near the surface element. If the surface
element is turned on, the cord and outlet
will be damaged.
The convenience outlet circuit breaker
may trip if the small appliance plugged
into it exceeds 10 amps. To reset the cir-
cuit breaker, press the switch located on
the lower edge of the backguard.
CIRCUIT BREAKER SWITCH
17
OVEN LIGHT
Disconnect power to range before
replacing light bulb
>- Use a dry potholder to prevent pos-
sible harm to hands when replacing
bulb.
Be sure bulb is coo before touch-
ing bulb.
Do not touch hot bulb with a damp
cloth as this may cause the bulb to
break_
BULB COVER
WIRE
RETAINER
TO REPLACE OVEN LIGHT BULB:
When oven is cool, hold bulb cover in
place, then slide wire retainer off
cover. NOTE: Bulb cover will fall if not
held in place while removing wire
retainer.
2. Remove bulb cover and light bulb.
3. Replace with a 40 watt appliance bulb.
4. Replace bulb cover and secure with
wire retainer.
Reconnect power to the range. Reset
clock.
LEVELING LEGS
> Be sure the anti-tip bracket secures
oneof the rear!eye!ing legs to the
floor to prevent the range from ac,
cidentally tipping.
The range should be leveled /_
when installed. If the range Iq
is not level, turn the plastic
leveling legs, located at _ _,/J
each corner of _ '.::'J
S/d--_ .; t"
the range, until __
range is level. __ _ ANTI-TIPBRACKET
LEVELING LEG
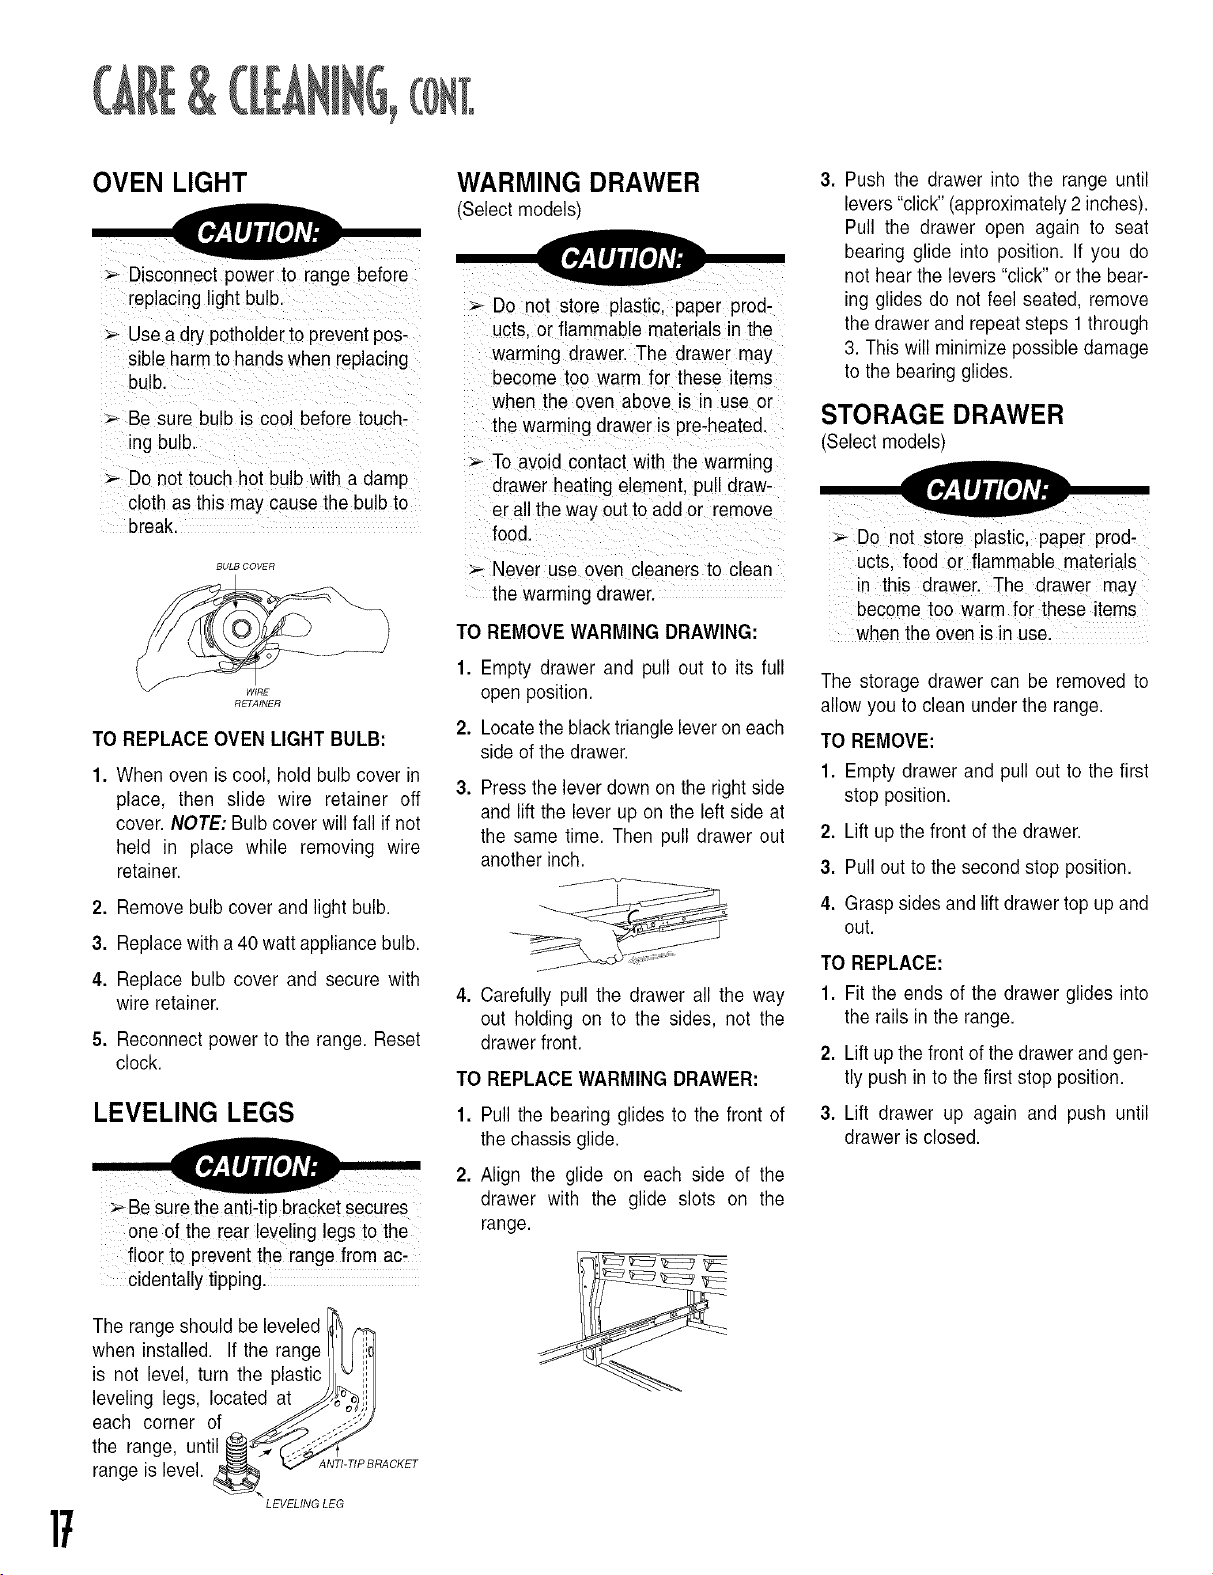
WARMING DRAWER
(Select models)
Do not store plasticl paper prod-
ucts, or flammable materials in the
warming drawer. The drawer may
become too warm for these items
when the oven above is in use or
the warming d[awer is pre-heated,
> To avoid contact with the warming
drawer heating element, pu!l draw,
e[ all the way out to add or remove
food.
> Never use oven cleaners to clean
the warming drawer.
TO REMOVE WARMING DRAWING:
1. Empty drawer and pull out to its full
open position.
2. Locate the black triangle lever on each
side of the drawer.
Press the lever down on the right side
and lift the lever up on the left side at
the same time. Then pull drawer out
another inch.
4. Carefully pull the drawer all the way
out holding on to the sides, not the
drawer front.
TO REPLACE WARMING DRAWER:
1. Pull the bearing glides to the front of
the chassis glide.
2. Align the glide on each side of the
drawer with the glide slots on the
range.
Push the drawer into the range until
levers "click" (approximately 2 inches).
Pull the drawer open again to seat
bearing glide into position. If you do
not hear the levers "click" or the bear-
ing glides do not feel seated, remove
the drawer and repeat steps 1 through
3. This will minimize possible damage
to the bearing glides.
STORAGE DRAWER
(Select models)
Do not Store plastic, paper pred,
ucts, food or flammable materials
in this drawer, The drawer may
become too warm for these items
when the oven is in use.
The storage drawer can be removed to
allow you to clean under the range.
TO REMOVE:
1. Empty drawer and pull out to the first
stop position.
2. Lift up the front of the drawer.
3. Pull out to the second stop position.
4. Grasp sides and lift drawer top up and
out.
TO REPLACE:
1. Fit the ends of the drawer glides into
the rails in the range.
2. Lift up the front of the drawer and gen-
tly push in to the first stop position.
3. Lift drawer up again and push until
drawer is closed.
FOR MOST CONCERNS,
TRY THESE FIRST:
II Check if oven controls have been
properly set.
II Check to be sure plug is securely in-
serted into receptacle,
II Check or re-set circuit breaker, Check
or replace fuse,
II Check power supply,
PART OR ALL OF APPLIANCE
DOES NOT WORK.
NOTE: On Canadian models with a
warming center, during a serf-clean
cycle - glass-ceramic cooking surface
will not operate.
II Check if surface and/or oven controls
have been properly set. See pages 4
and 9.
II Check if oven door is unlocked after
self-clean cycle, See page 14.
II Check if oven is set for a delayed cook
orclean program,See pages 13 and 14.
GLASS-CERAMIC SURFACE
SHOWS WEAR.
1. Tiny scratches or abrasions,
II Cooktop and pan bottom are clean.
Do not slide glass or metal pans
across top. Make sure pan bottom
is not rough. Use the recommend-
ed cleaning agents. See page 15.
2. Metal marks.
II Do not slide metal pans across top.
When cool, clean with Cooktop
Cleaning Creme. See page 15.
3. Brown streaks and specks.
II Spills not removed promptly.
Wiping with soiled cloth or sponge.
Pan bottom not clean.
4. Areas with a metallic sheen.
II Mineral deposits from water and
food.
5. Pitting or flaking.
II Sugary boilovers that were not
removed promptly. See page 15.
BAKING RESULTS ARE NOT AS
EXPECTED OR DIFFER
FROM PREVIOUS OVEN.
II Make sure the oven vent has not been
blocked. See page 10 for location.
II Check to make sure range is level.
II Temperatures often vary between a
new oven and an old one. As ovens
age, the oven temperature often
"drifts" and may become hotter or
cooler. See page 8 for instructions on
adjusting the oven temperature.
NOTE: It is not recommended to
adjust the temperature if only one or
two recipes are in question.
II Check that oven temperature is de-
creased by 25° F when convect bak-
ing.
II See "Cooking Made Simple" booklet
for more information on bakeware and
baking.
FOOD IS NOT BROILING
PROPERLY OR SMOKES
EXCESSIVELY.
II Check oven rack positions. Food may
be too close to element.
II Broil element was not preheated.
II Aluminum foil was incorrectly used.
Never line the broiler insert with foil.
II Oven door was closed during broiling.
Leave the door open to the first stop
position (about 4 inches).
II Trim excess fat from meat before broil-
ing.
II A soiled broiler pan was used.
OVEN WILL NOT SELF-CLEAN.
II Check to make sure the cycle is not
set for a delayed start. See page 14.
II Check if door is closed.
OVEN DID NOT CLEAN PROPERLY.
II Longercleaning time may be needed.
II Excessive spillovers, especially sugary
and/or acidic foods, were not removed
prior to the self-clean cycle.
OVEN DOOR WILL NOT UNLOCK
AFTER SELF-CLEAN CYCLE.
II Oven interior is still hot. Allow about
one hour for the oven to cool after the
completion of a self-clean cycle. The
door can be opened when the LOCK
indicator word is not displayed.
MOISTURE COLLECTS ON OVEN
WINDOW OR STEAM COMES
FROM OVEN VENT.
II This is normal when cooking foods
high in moisture.
II Excessive moisture was used when
cleaning the window.
THERE IS A STRONG ODOR OR
LIGHT SMOKE WHEN OVEN IS
TURNED ON.
II This is normal for a new range and will
disappear after a few uses. Initiating a
clean cycle will "burn off" the odors
more quickly.
II Turning on a ventilation fan will help
remove the smoke and/or odor.
II Excessive food soils on the oven bot-
tom. Use a self-clean cycle.
"F" PLUS A NUMBER
APPEARS IN THE DISPLAY
II This is called a fault code. If a fault
code appears in the display and beeps
sound, press the CANCEL pad. If the
fault code and beeps continue, dis-
connect power to the appliance. Wait
a few minutes, then reconnect power.
If fault code and beeps still continue,
disconnect power to the appliance and
call an authorized servicer.
If the oven is heavily soiled, excessive
flare-ups may result in a fault code
during a clean cycle. Press CANCEL
pad and allow the oven to cool com-
pletely, wipe out excess soil and reset
the clean cycle. If the fault code and
beeps still continue, disconnect power
to the appliance and call an authorized
servicer.
Full One Year Warranty - Parts and Labor
For one (1) year from the original retail pur-
chase date. any part which fails in normal
home use will be repaired or replaced free of
charge
Limited Warranties - Parts Only
Second Year - After the first year from the orig-
inal purchase date, parts which fail in normal
home use will be repaired or replaced free of
charge for the part itself,with the owner paying
all other costs, including labor, mileage and
transportation
Third Through Fifth Year - From the original
purchase date, parts listed below which fail in
normal home use will be repaired or replaced
free of charge for the part itself, with the owner
paying all other costs, including labor, mileage
and transportation.
Electronic Controls
>- Glass-Ceramic Cooktop: Due to thermal
breakage.
> Electric Heating Elements: Surface. broil
ana bake e ements on electric cooking
appliances.
,
,
,
4.
5.
.
Conditions and damages resulting from any of the following:
a. Improper installation, delivery, or maintenance.
b. Any repair, modification, alteration, or adjustment not authorized by the
manufacturer or an authorized servicer.
c. Misuse, abuse, accidents, or unreasonable use.
d. Incorrect electric current, voltage, or supply.
e. Improper setting of any control.
Warranties are void if the original serial numbers have been removed,
altered, or cannot be readily determined.
Light bulbs.
Products purchased for commercial or industrialuse.
The cost of service or service call to:
a. Correct installation errors.
b. Instruct the user on the proper use of the product.
c. Transport the appliance to the servicer.
Consequential or incidental damages sustained by any person as a result
of any breach of these warranties. Some states do not allow the exclusion
or limitation of consequential or incidental damages, so the above exclu-
sion may not apply.
Canadian Residents
The above warranties only cover an appliance
qstalled in Canada that has been certified or
listed by appropriate test agencies for compli-
ance to a National Standard of Canada unless
the appliance was brought into Canada due to
transfer of residence from the United States to
Canada.
Limited Warranty Outside the United States
and Canada- Parts Only
For two (2)years from the date of original retail
purchase, any part which fails in normal home
use will be repaired or replaced free of charge
for the part itself, with the owner paying al
other costs, including labor, mileage and trans-
portation.
The specific warranties expressed above are
the ONLY warranties provided by the manu-
facturer. These warranties give you specific
legal rights, and you may also have other rights
which vary from state to state.
II Call the dealer from whom your appliance was purchased or call Maytag
Appliances Sales Company, Maytag Customer Assistance at 1-800-688-
9900, USA or 1-800-688-2002 Canada to locate an authorized servicer.
II Be sure to retain proof of purchase to verify warranty status. Refer to
WARRANTY for further information on owner's responsibilities for war-
ranty service.
II If the dealer or service company cannot resolve the problem, write to
Maytag Appliances Sales Company, Attn: CAIR® Center, P.O. Box 2370,
Cleveland, TN 37320-2370, or call 1-800-688-9900 U.S.A. or 1-800-888-
2002 Canada.
U.S. customers using TTY for deaf, hearing impaired or speech impaired,
call 1-800-688-2080.
NOTE: When writing or calling about a service problem, please include
the following information:
a. Your name, address and telephone number;
b. Model number and serial number;
c. Name and address of your dealer or servicer;
d. A clear description of the problem you are having;
e. Proof of purchase (sales receipt).
II User's guides, service manuals and parts information are available from
Maytag Appliances Sales Company, Maytag Customer Assistance.
MAYTAG • 403 West Fourth Street North • P.O. Box 39 • Newton, Iowa 50208
19
CUISINII_RE ELI_CTRIQUE ._.I_LI_MENTS
RAYONNANTES T2
_iiiii¸ ::
!_iiiil
_iiiii!'
!_iiiil
!_iiiil ii
i_iiiilii
.......ii
.......ii
.......ii
MAY[AG
®
Installateur: Remettre ce manuel au
proprietaire.
Consommateur: Lire le manuel;
conserver le manuel pour consulta-
tion ult6rieure. Conserver la facture
d'achat ou le cheque encaiss6
comme preuve de I'achat.
Numero de modele
_U _OUR .............................Pages 27-34
Numero de serie
Date d'achat
ETHETTOYAGE.........Pages 35-39
_HT '
.......................DAPPELER.....................................Page 40
Nous nouseffor(_onsde toujours
am6liorerlaqualit6et [erendement
de nos produitsde cuisson,En
cons6quence, i] se peutque nous
rnodifionsrapparei!sansreviserle
pr6sent guide.
j,
DELUSUARIO................................Page 42
Si vous avez des questions,
t6lephonez au:
1-800-688-2002Canada
(lundi au vendredi, de 8 h &
20 h HNE)
Internet: http://www.maytag.com
Pour obtenir des renseignements
sur le service, consultezla page 41.
http://www.maytag.com
f
Lire toutes les instructions avantd'utiliser
cetappareil;observertoutesles instructions
poureliminerlesrisquesd'incendie,chocelec-
trique,dommagesmaterielset corporelsque
pourraitsusciterune utilisationincorrectede
I'appareil. Utiliser I'appareil uniquement
pourles fonctionsprevues,decritesdans ce
guide.
Pour une utilisation adequateet en secu-
rite, il fautqueI'appareilsoitconvenablement
installeparuntechnicienqualifie,et relie& la
terre.
>_ TOUTE CUISI-
NII_REPEUT
BASCULER ET
PROVOC
DES
BLESSURES.
INSTALLER LA
BRIDE
ANTIBASCU-
LEMENT
FOURNIEAVEC
CETTE CUISINIERE.
RESPECTER LES INSTRUC-
TIONS D'INSTALLATION.
AVERTISSEMENT: Pour reduire le
risque de basculement de I'appareil
I'occas_ond'une utilisation anor-
male ou d'un chargement excessif
de la porte du four, il faut que la
bride antibasculement soit conven-
ablement installee.
Pour determinersi la bride antibasculement
est convenablement installee sous la
cuisiniere,enlever le tiroir de remisageet
regarderendessousdelacuisinierepourveri-
tier si I'un des pieds arriere de reglagede
I'aplombest bienengagedansla fente de la
bride. Lorsquela cuisiniereest convenable-
mentcalee, la bride antibasculementimmo-
bilise le piedarrierecentrele sol. Wrifier la
parfaiteimmobilisationde la cuisinierepar la
bride apres chaque deplacement de la
cuisiniere.
Interromprele fonctionnementde rappareilet
de la hotte de ventilationpour minimiserle
risqued'extensiondes fiammes.Deindre les
fiammes,puismettrela hotteen marchepour
evacuerlafumeeet I'airvicie.
SURFACEDE CUISSON:Utiliseruncou-
vercleou uneplaque#.biscuitspouretouf-
fer les fiammesd'un feu qui se declare
clansunustensiledecuisine.
NEJAMAISsaisiroudeplacerunustensile
decuissonenflamme.
FOUR:Fermerlaportedufour pouretouf-
fer lesflammes.
Nepas projeterdeI'eausurunfeu degraisse.
Utiliser du bicarbonatede sodium, ou un
extincteur&mousseou&produitchimiquesec
poureteindrelesflammes.
,# P
Lasecuritedefonctionnementde cet appareil
a ete testeea. I'aided'ustensilesde cuisson
conventionnels.Nepasutiliserunustensileou
accessoire qui n'est pas specifiquement
recommandedans ce manuel.Ne pas utiliser
de couvre-el6ment,gril place sur la table de
cuissonousysDmedeconvectionadditionnel.
L'utilisationd'un dispositifou accessoirequi
n'estpasexpressementrecommandedansce
manuelpeutdegraderla securitedeI'appareil
ousaperformance,ou reduirela Iongevitedes
composants.
AVERTISSEMENT:NE JAMAIS utiliser la
porte du four ou le tiroir (le cas echeant)
commetabouret/siege/esc-abeau;ceci pour-
rait susciterun basculementde I'appareilet
desdommagesmaterielsetcorporelsserieux.
Si rappareilest installe pres d'une fen_tre,
veiller&ce queles rideauxnepuissentattein-
drelatabledecuissonsousI'effetd'uncourant
d'air.
NEJAMAIS utiliserlacuisinierepourchauffer
la piece.Le non-respectde cette instruction
peut _tre la cause de blessures, br01ures,
incendieoudeteriorationde I'appareil.
NEJAMAISporterdesv6tementsamplesIors
de I'utilisationde I'appareil.Un v_tementtrop
amplepeut accrocherla poigneed'un usten-
sileou s'enflammeret provoquerdes brQlures
s'iltoucheunelementchauffant.
Pour garantirun fonctionnementadequatet
poureviterdes dommagesmaterielsou cor-
porels, n'executer aucune operation de
reglage/reparation/remplacementde piecede
I'appareilqui n'estpas specifiquementrecom-
mandeedans ce guide. Confiertoute autre
interventiona.un technicienqualifie.
NE JAMAIS remiserou utiliserde I'essence
ou un autreproduitcombustibleou inflamma-
bledanslefour,ou_.proximitedela cuisiniere,
car les vapeursemisespeuventsusciterun
risqued'incendieou d'explosion.
Pour emp_cher qu'un feu de graisse se
declare,eviterrouteaccumulationde graisse
ou autres matieres inflammablesdans I'ap-
pareilouau voisinage.
Utiliser uniquementdes maniquesseches.
L'applicationd'unemaniquehumidesur une
surfacechaudepeut provoquerI'emissionde
vapeurbrQlante.Nepas laisserles maniques
toucherles elementschauffantschauds. Ne
pas utiliserune servietteou un autre textile
volumineuxqui pourraitfacilements'enflam-
meraucontactd'un elementchauffant.
Ramenerchaqueboutonde commande& la
positiond'arr_tapresI'achevementd'unecuis-
son.
NE JAMAISfaire chaufferun recipientnon
ouvertdans le four ou sur un elementde la
table de cuisson;I'accumulationde pression
dans le recipient pourrait provoquer son
eclatementet des dommagesmaterielsou
corporels.
NEJAMAISgarnirlefonddufour ouunegrille
du four avec de la feuille d'aluminium.Ceci
pourraitsusciterun risquede choc electrique
ou d'incendie,ou une autre deteriorationde
I'appareil. Utiliser de la feuille d'aluminium
uniquementselonles instructionsde ceguide.
De nombreux flacons d'aerosol peuvent
EXPLOSERIorsqu'onles expose&la chaleur,
et ils peuventcontenirun produittres inflam-
mable.Cviterd'utiliser ou remiserun flacon
d'aerosol&proximitedeI'appareil.
l]

NEJAMAISlaisserun elementde la tablede
cuissonallumesanssurveillance,particuliere-
ment avec une puissance de chauffage
elev@;ledebordementdu contenudeI'usten-
silepourraitprovoquerlagenerationdefum@
abondanteet I'inflammationde lagraisse.
Cet apparel comportedes elementschauf-
fantsdedifferentestallies.Utilisertoujoursun
ustensile&fond plat,de taille suffisantepour
qu'il puisserecouvrircompletementI'element.
Une bonneadaptationentrerustensileutilise
et lataille de I'elementmaximiseraI'efficacite
dela cuisson.
SiunustensileestpluspetitqueI'elementutil-
is& une parle de I'element chauffantest
exposeeet peutprovoquerI'inflammationd'un
v6tementoudes maniques.
Seuls certains mat@iaux de verre, vit-
roc@amique,c@amique,gres, ou certains
ustensilesvitrifies/emailespeuvent£tre util-
ises sur la table de cuissonou dartsle four
sansrisquede bris sousI'effetdu chocther-
mique.Observerles instructionsdu fabricant
lotsde I'utilsationd'un ustensiledeverre.
Orienterla poigneede chaqueustensilevers
lecentredelatabledecuissonet nonpasvers
I'ext@ieurou versun autreelementde la table
de cuisson;ceci reduirale risquede br£1ure,
inflammationde matiereinflammableou ren-
versement(unjeuneenfantpourraitsaisir/ren-
verserunustensiledentle mancheestoriente
vers I'ext@ieur).
I[ (llIIOl
NE JAMAISuti/ser une surfacede cuisson
casseeou f61ee:les solutionsde nettoyageet
renversementspeuventpenetrerdans la sur-
face de cuissonen entrafnantun risque de
chocelectrique.Prendreimmediatementcon-
tactavecuntechnicienqualifi&
Nettoyerprudemmentla surfacede cuisson.
Certainsproduitsdonnentdesfum@snocives
s'ilssontappliquessurunesurfacechaude.Si
I'onutiliseun linge,une@ongehumideoudu
papieressuie-toutsurunesurfacede cuisson
chaude,fairepreuvedeprudenceafind'eviter
dese briler parlavapeur.
Exercer une prudence extr6me Iors du
d@lacementdurecipientdegraisseoulotsde
I'eliminationde graisse chaude. Laisser la
graisserefroidiravantded@lacerI'ustensile.
Ouvrirtoujoursla porte du four tres prudem-
ment. Laisser Fair chaud ou la vapeur
s'echapperavantde retirer/introduireunplat.
Pour garantir une parfaite performancede
fonctionnementdu four, ne pas obstruer le
conduitde I'event.Lorsquelefourestutilis&la
zonevoisinede I'eventpeut6tre assezchaud
pourcauserdesbr01ures.
Placer les grilles £ I'emplacementapproprie
dans le four seulementIorsquele four est
froid;s'il estnecessairede d@lacerunegrille
alors que le four est chaud,veiller a ne pas
laisserlamaniquetoucherI'elementchauffant.
Nettoyeruniquementles piecesmentionnees
dans ce guide. Ne pas nettoyer le joint de
porte;lejointjoueun r61eessentielquant_.I'e-
tancheit& Ne pas frotter/endommagerou
d@lacerlejoint.
Ne pas ut/iser un produitde nettoyagepour
four.On nedoltutiliserdanslefourousur une
piecequelconquedu fouraucunproduitcom-
mercialde nettoyagedefourouderev6tement
deprotectiondes paroisinternes.
Avantd'executerune op@ationd'autonettoy-
age, retirerla lechefrite,les grillesdu four et
lesautresustensilespourevitertoutrisquede
generationexcessivede fumee,changement
de couleur des grilles ou det@iorationdes
ustensiles.
Avantuneop@ationd'autonettoyage,eliminer
paressuyagetoutex@sderesidusrenverses,
particuli@ementles matieres graisseuses,
poureviterlaformationde fumeeou I'infiam-
mationde ces residus.
IIest normalquela tablede cuissondevienne
chaudedurantuneop@ationd'autonettoyage;
parconsequent,eviterde toucherla table de
cuisson,la porte, le hublotou I'eventdu four
durantuneop@ationd'autonettoyage.
NE JAMAIStoucher les elementschauf-
fants dufour oude la tablede cuisson,ni
les surfacesvoisinesdes elementsou les
surfacesinterieuresdu four.
Un elementchauffantpeut_tre encorechaud
m_meIorsquesa teinteest sombre.Unesur-
face voisine d'un element chauffanta I'in-
terieurdufour ou surla tabledecuissonpeut
£tresuffisammentchaudepourprovoquerune
br£1ure.Pendant/apresI'utilisation,nejamais
toucherun element chauffantou laisser un
v£tementou autremateriauinflammablevenir
aucontactd'unelementou d'unesurfacevoi-
sine,ou d'une surfaceinternedu four,avant
quele refroidissementcompletait pu se pro-
duire.
f
Autressurfacepotentiellementchaudes:table
de cuisson,surfacesvoisinesde la table de
cuisson,eventdu four, surfacesprochesde
I'ouverturede I'event,portedu four, surfaces
voisinesde laporteet du hublot.
NEJAMAISlaisserdesenfantsseulsousans
supervisionIorsqueI'appareilestenserviceou
chaud.
NE JAMAIS laisserunenfants'asseoirou se
tenirsur unepartiequelconquede I'appareil.
MISEENGARDE:NE JAMAISremisersur le
dosseretd'unecuisiniereoudansunearmoire
au-dessusdes articlesauxquelsles enfants
peuvent s'interesser.Un enfant tentant de
grimpersur I'appareil,sur la porte ou sur le
tiroir pouratteindreun objet,pourraitendom-
magerI'appareilou subir de gravesbrQlures
ouautresblessures.
IIestimportantd'enseignerauxenfantsquela
cuisiniereet les ustensilesplacesdessusou
dedanspeuvent6tre chauds.Laisserrefroidir
les ustensilesen un lieu s0r, hors d'atteinte
des enfants.II est importantd'enseigneraux
enfantsqu'un appareilmenagern'est pas un
jouet, et qu'ils ne doivent toucher aucun
organede commandeou autrecomposantde
I'appareil.
Nettoyerfrequemmentles filtres et la hotte
poureviterI'accumulationde graisseet autres
matieresinflammablessusceptiblesde s'en-
fiammer.
Mettrele ventilateurenmarcheavantdefaire
flamberun mets sous la hotte (par exemple
cr_pesSuzette).
La Ioi californienneSafe DrinkingWater et
Toxic EnforcementAct de 1986(proposition
65)stipulelapublicationpar le gouverneurde
la Californied'une listedes substancesque
I'etat de Californieconsiderecomme can-
cerigenesou dangereusespour le systeme
reproducteur,et imposeaux entreprisescom-
merciales I'obligation de signaler a. leurs
clientslesrisquesd'expositionadetellessub-
stances.
Nousinformonsles utilisateursdecetappareil
que Iors d'une operationd'autonettoyage,ils
peuvent_tre exposesa.unefaibleconcentra-
tion de certainessubstancesfigurantdans la
listementionneeci-dessus,dontle monoxyde
decarbone.PourminimiserI'exposition,veiller
_.cequelapieceousetrouvelefour soitcon-
venablementaereedurantuneoperationd'au-
tonettoyage:ouverture d'une fen6tre et/ou
d'uneporte.
AVISIMPORTANT- OISEAUXFAMILIERS:
Les oiseauxont un systemerespiratoiretr_s
sensible. Ne pas garder un oiseau familier
dansla cuisineou dansune pieceou il pour-
rait _tre expose aux fumees. Les fumees
emisesdurantuneoperationd'autonettoyage
peuvent6tre dangereusesou mortellespour
un oiseau,de m_me que les fumeesemises
Iorsdu chauffageexcessifde graisse,huile,
margarine,par exempledans un ustensile&
garnissageanti-adhesion.
23
(E;INSTRB(TIONSPOgR

DE@M AHD
PourI'utilisationdeselementschauffantsde la
tablede cuisson.Reglagecontinude la puis-
sanceentrelespositionsextremesLOW/MIN.
et HIGH/MAX.On peut regler un bouton&
toutepositionentrecesdeuxextr6mes.
REGLAGEDESCOMMANDES
1. PlacerI'ustensilesurI'element.
2. Enfoncer/fairetournerle boutonjusqu'&la
positiondesiree(rotationdans unsens ou
dansI'autre).
> Desmarquessur le dosseretidentifient
I'elementcommandepar chaquebou-
t] on.Parexemple,lesymbolecor-
respondAI'elementavant/droit.
3. IIy a un voyantpourchaquepairede bou-
tons. Lorsqu'unou les deux boutonsdes
elementsde surfacecorrespondantssont
tournesdansla plaged'intensite,levoyant
s'allume. Le voyant s'eteint Iorsque les
deuxboutonscorrespondentssontrevenus
&la positionOFF(arr_t).
4. Apresunecuisson,ramenerle bouton&la
positiond'ARRC:T(OFF). RetirerI'usten-
sile.
POURR GLAG
On dolt choisirla puissancede chauffageen
fonction de divers facteurs: taille/type de
I'ustensile,et op@ationde cuisson.Pour Fin-
formationconcernantles ustensileset autres
facteursaffectantlapuissancedechauffage&
utiliser, voir la brochure <<La Cuisine
Simplifiee>>.
OFF
LOW _ HIGH
2
s
5 7
MEDIUM
AvantLa Cuisson
Apr_s La Cuisson
.............................. I'#l_ment
avantd'alimenterI'el6ment.Pour 6viter
quela cuisinieresubissedes dommages.
nejamaisfairefonctionnerun _l_mentde
la surfacede cuissonsansy placer un
ustensile.
> NEJAMAISutiliserlasurfacedecuisson
commelieu de remisaged'alimentsou
d'ustensiles.
DurantLa Cuisson
Veiller _, bien connaitre la correspon-
SassurerqueF_l_mentestarr_t_.
> Eliminer d_s que possible tousles
r#sidusde renversementet projections.
AutresConseiIs
> S'il y a une armoire de rangement
directementau-dessusde la surfacede
cuisson,onne dolty placerquedes arti-
clespeufrequemmentutilis6setquipeu-
vent Ctre exposes a la chaleur. La
chaleur#raisepar la cuisini_repourrait
susciterun proDl_mepour des articles
danceentrelesboutonsdecommandeet commeliquidesvolatils.3roduitsde net-
les el6ments.Veillera commanderrali-
men:ationde rel6mentcorrect.
Commencerla cu_ssonavec une puis-
sance de chauffage supeneure au
besoin, puis r_duire la puissancede
chauffagepour poursuivrela cuisson.Ne
toyageet flaconsd'a@osol
> NE JAMAISlaisseraucun articlesur la
surfacede cuisson.3articuli_rementles
articles en plastique. L'air chaud qui
s'_chappepar revent du four pourrait
provoquerI'inflammationd'un article in-
jamais utiliser une
chauffageeleveepourune cuissonpro-
Iong6e.
NE JAMAIS laisser le contenu d'un
ustensiles'_vaporercompl_tement:ceci >-
pourrait faire subir des dommages&
I'ustensileeta rappareil.
puissance de flammableoufaire fondrelamollirun arti-
cle de plastique,ou provoqueruneaug-
mentationde pressionprovoquant 1'8-
clatementd'un recipientferme.
NE JAMAIStoucherla surfacede cuis-
son avant qu'ellese soit compl_tement
refroidie.Certaineszonesde la surface
decuisson,particuli_rementauvoisinage
des 616ments chauffants, peuvent
devenirtreschaudesdurantunecuisson.
Utiliserdesmaniques.
NE JAMAISlaisserde la feuille d'alu-
minium, une sonde thermom_triquea
viandeou unobjetm_talliqueautrequ'un
ustensilede cuissonsur la surfacede
cuisson,entreren contactavec un el6-
meritchauffant.
HIGH(max.):PourI'ebullitiond'un liquide.On
dolttoujoursreduirelapuissancede chauffage
@s quela temp@atured'ebullitionest atteinte
oupourla cuissondu mets.
9MED.HIGH(moyenmax.):Pourrissolerles
viandes,chaufferI'huile(grandefritureou ali-
mentssautes)et pour le maintiende I'ebu]li-
tionrapided'unegrandequantitede liquide.
MEDIUM(moyen):Pourle maintiende I'ebul-
litionlented'unegrandequantitede liquideou
pourlaplupartdesop@ationsdefriture.
3MED.LOW(moyenrain.):Pourcontinuerla
cuissonde mets en casserolesfermeespar
couvercleou pourcuire_.la vapeur.
LOW (rain.): Pour fusion de chocolat ou
beurre,ou le maintiende la temp@atured'un
mets.
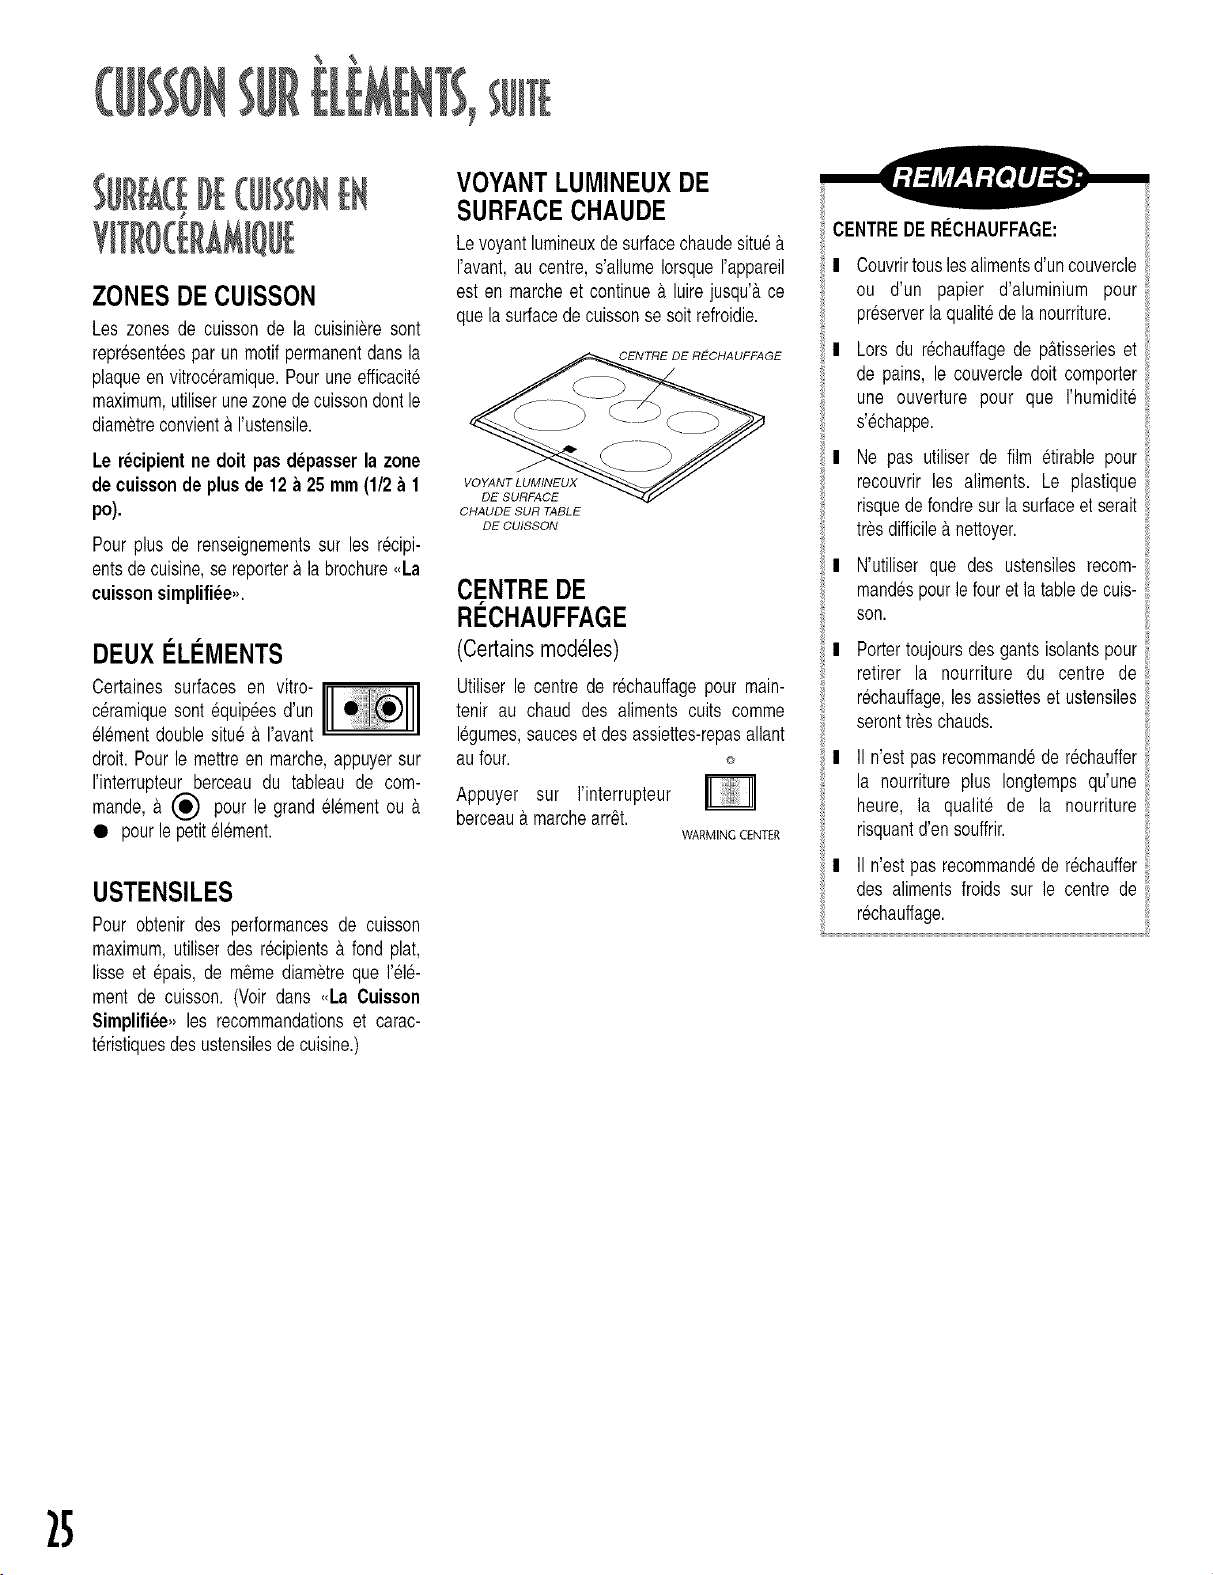
ZONESDE CUISSON
Les zonesde cuissonde la cuisinieresent
represent6espar un motifpermanentdans la
plaqueenvitroc@amique.Pouruneefficacite
maximum,utiliserunezonedecuissondontle
diametreconvienta I'ustensile.
Le recipientne doit pas depasserla zone
de cuissonde plusde 12 a 25 mm(1/2b 1
po).
Pour plus de renseignementssur les recipi-
entsde cuisine,se reportera la brochure,,La
cuissonsimplifiee,,.
DEUX I LI MENTS
Certaines surfaces en vitr° I I
ceramiquesentequipeesd'un
elementdoublesitue_.I'avant
droit.Pourle mettreen mar@e,appuyersur
I'interrupteurberceau du tableau de com-
man@,a (_ pour le grand element ou _.
• pourle petitelement.
USTENSILES
Pour obtenir des performancesde cuisson
maximum,utiliserdes recipientsa fond plat,
lisse et @ais, de m6mediametreque I'ele-
ment de cuisson.(Voir dans ,,La Cuisson
Simplifiee,, les recommandationset carac-
teristiquesdesustensilesdecuisine.)
VOYANTLUMINEUXDE
SURFACECHAUDE
Levoyantlumineuxdesurfacechaudesituea.
I'avant,au centre,s'allumeIorsqueI'appareil
est en marcheet continuea luire jusqu'#,ce
quela surfacedecuissonse soitrefroidie.
CENTRE DE RECHAUFFAGE
VOYANTLUMINEUX
DE SURFACE
CHAUDESUR _BLE
DE CUISSON
CENTREDE
RECHAUFFAGE
(Certains modeles)
Utiliser le centre de rechauffagepour main-
tenir au chaud des aliments cults comme
legumes,sauceset des assiettes-repasallant
aufour. e
Appuyer sur I'interrupteur
berceau&marchearr6t.
WARMING CENTER
CENTREDE RE_CHAUFFAGE:
! Couvrirtousles alimentsd'uncouvercle
ou d'un papier d'aluminium pour
preserverla qualitedela nourriture.
! Lors du rechauffagede p&tisserieset
de pains, le couvercledolt comporter
une ouverture pour que I'humidite
s'echappe.
I Ne pas utiliser de film etirable pour
recouvrir les aliments. Le plastique
risquedefondresurla surfaceet serait
tresdifficilea.nettoyer.
! N'utiliser que des ustensilesrecom-
mandespourle fouret la tabledecuis-
son.
Portertoujoursdesgantsisolantspour
retirer la nourriture du centre de
rechauffage,les assietteset ustensiles
seronttreschauds.
! II n'est pas recommandede rechauffer
la nourriture plus Iongtemps qu'une
heure, la qualite de la nourriture
risquantd'ensouffrir.
! II n'est pas recommandede rechauffer
des alimentsfroids sur le centre de
rechauffage.
15
CONSEILSDE PROTECTION
DE LA SURFACE
Avantdes'enservirlapremi@elois, net-
toyer la surface de cuisson. (Volt
Nettoyage,page 37.)
Ne pas utiliserde casserolesen verre.
Ellespourraientrayerla surface.
Ne pas utiliserde plastique,de sucre ni
d'alimentsrichesen sucre fondresur la
surfacede cuisson.Si cela se produisait
accidentellement,nettoyer immediate-
ment.(VoirNettoyage,page37.)
Nejamaislaisserlecontenud'unecasse-
rolebouillirjusqu'_,ce qu'ellesoitvidecar
celapourraitabfmerlasurfacedecuisson
et lacasserole.
Ne jamaisutiliserla surfacede cuisson
comme surface de travail ou comme
planche&decouper.Nejamaiscuired'al-
imentsdirectementsurlasurfacedecuis-
son,sansrecipient.
Ne jamaisutiliserde supportmetallique
ouanneaudewok entreun recipientet la
surfacede cuisson.Cesobjets peuvent
marquerou rayerlasurface.
> Ne pas glisser de recipientsmetalliques
sur la surfacede cuisson brt_lante.IIs
pourraientlaissersur le verre des mar-
ques quidoivent6tre nettoyeesimmedi-
atement.(VoirNettoyage,page37.)
Pouremp_cherquela surfacedecuisson
en vitroceramiquese trouve rayee ou
abfmee,nepasy laisserdesucre,de sel
oudegraisse.PrendreI'habituded'essuy-
erlasurfacedecuissonavecunlingepro-
preouunessuie-toutavantde I'utiliser.
SURFACEDECUISSONENVITROCC:RAMIQUE
!
!
Surlesmodelescanadiens,avecunecentrede rechauffage,leselementsdela surface
decuissonnefonctionnentpasdurantuneop@ationd'autonettoyage.
Lorsdespremieresutilisationsde lasurfacedecuisson,I'appareilpeutemettreun peu
defumeeet desodeurs.Ceciestnormal.
! Lorsdela misesoustensiond'un element,uneluminescencerougepeut_trevisible&
traversla surfaceen vitroceramique.Pourle maintiende la puissancede chauffage
desiree,I'elementestalimenteparintermittence.
! La surfacede cuissonen vitroc@amiquedemeurechaude pendantquelquetemps
apres I'extinctiond'un element. Lorsque le voyant HOT SURFACE(SURFACE
CHAUDE)s'eteint,onpeuttoucherla surfacede cuissonsansdanger.
Enraisondescaract@istiquesde retentionde la chaleur,leselementsne repondentpas
auxchangementsdereglageaussirapideentquedeselementsspirales.Dansle cascO
unproduitse renverse,retirerI'ustensiledela zonede cuisson.
! REMARQUE:Nepastenterde souleverla surfacede cuisson.
:_ Ne jamais utiliser de linge ou d'eponge
sale pournettoyerla surfacede cuisson.
IIs laisseraientun film invisible,ce qui
pourraitdecolorerla surfacede cuisson
Iorsqu'elleestutilisee.
;* Nejamaisutiliserunpetitrecipientsur un
grand element. Non seulement il y a
g_.chisd'energiemais il peuten resulter
des projectionsqui vont br_lersur la sur-
facedecuissonet devront_trenettoyees.
:_ Ne pas utiliser des recipientsspeciaux
non plats qui seraienttrop grandsou
fond inegalcommeles woksa fond rond,
lesgrillesou recipientsdegrandetaille
fondondule.
Nepasutiliserderecipientsenaluminium.
L'aluminiumrisquedefondresur leverre.
Si lemetalfondsurla surfacede cuisson,
ne pas I'utiliser.Appeler un reparateur
agreeMaytag.
:_ En casde renversementIorsdecuisson,
nettoyerimmediatementle produitrenver-
se de la surface de cuisson pendant
qu'elleest encorechaudeafind'eviterun
plusgrandnettoyagepar la suite.Userde
prudence, essuyer les renversements
avecunlingepropreet sec.
:_ Ne pas laisserles produitsrenversessur
la surfacede cuissonou sur la garniture
de la surface de cuisson pendant une
Iongueduree.
:_ Ne pas utiliserde poudrede nettoyage
abrasiveoudetampons_.recurerquiray-
eraientla surface.
:_ Nepasutiliserdejavellisant,ammoniaque
ou autresproduitsde nettoyagenon spe-
cifiquement recommandespour la vit-
roc@amique.
;* PourmaintenirI'aspectducooktopenvit-
roc@amique,nettoyezapreschaqueutili-
sation.

Letableaudecommandeestconcupourfaciliterlaprogrammation.L'afficheurindiquelesfonctionsdeI'horloge,deminuterieetdecuissonaufour.
LestyleetlescaracteristiquespeuventI'egerementvarletselonlemodele.Latableaudecommandeillustrecomprendlesfonctionsdedessiccation
etdecuissonaufouravecconvection.
Bake Broil
0
Preset
3 4
6 7 8 9
Clean cook Stop Control Timer CANCEL Clock
Time ume Lock
II III(TIOI
> Appuyersur la touchecorrespondant£ la
fonctiondesiree.
> Appuyersur la touchePreset (0) ou les
touches num@iquesappropriees pour
entrerI'heureou latemp@ature.
)- Lefour emetun signalsonorechaquefois
queI'onappuiesur unetouche.
> Undoublebipsefait entendreencasd'er-
reursde programmation.
REMARQUE:UnefoisqueI'onappuiesur un
chiffre,I'heureou la temperatureest automa-
tiquementenregistr@au bout d'un delai de
quatresecondes.Si un intervallede plus de
30secondes s'#coule entre la pression sur
une touche de fonction ou sur une touche
num#rique,leprogramme est annul#et I'af-
ficheur pr#sente de nouveau I'information
ant#rieure.
TOUCHES NUMI_RIQUES
S'utilisentpourentrerletempsoula temp@a-
ture.
TOUCHE CANCEL
S'utilise pour annuler toute programmation
saufles fonctionsde I'horlogeet de la minut-
erie.
CONVECT BAKE
(CUISSON AU FOUR
A CHALEUR TOURNANTE)
S'utilisepourlacuissondanslefour,&chaleur
tournante.
1. Appuyersur latoucheConvectBake.
2. Appuyer sur la touche Preset (0) pour
obtenirune temperaturede 325° F (1650
C). Chaque supplementaireappuyer sur
Preset (0) volonte lever la temp@ature
25°.Ou sur lestouchesnum@iquesappro-
pri@spourla temperaturesouhaitee.
Voir renseignementssupplementaires_. la
page30.
BAKE (CUlSSON AU FOUR)
S'utilisepourlacuissonaufour normale.
1. Appuyersur Bake.
2. Appuyersur Preset (0) (reglageautoma-
tique)pourunecuisson& 1770C (3500F).
Chaque supplementaire appuyer sur
Preset (0) volonte lever la temp@ature
25°. Ou sur les toucheschiffrees corre-
spondant&la temp@aturevoulue.
Voirpage30 pour des indicationsplusdetail-
I@s.
BROIL (CUISSON AU GRIL)
S'utilisepourdorerla nourritureou la cuisson
augril.
1. Appuyersur Broil.
2. Appuyersur Preset(0) pour selectionner
gril max. ou gril min. Ou sur les touches
chiffr@scorrespondant& la temp@ature
cuisson au gril voulue. Voir renseigne-
mentssupplementaires£ la page33.
CLEAN (NETTOYAG E)
S'uti/sepourreglerle four sur un cycled'au-
tonettoyage.
1. AppuyersurClean.
2. Appuyersur Preset (0) (reglageautoma-
tique)pouruncyclede3 heures.
3. Si plus ou moinsde nottoyageest desir&
appuyezlestoucheschiffr@sappropriees.
Le temps de nettoyagepeut 6tre place
entre2 et 4 heures.
Voir pages 35-36 pour des indicationsplus
detaill@s.
COOK TIME/STOP TIME
(TEMPS DE CUISSON/
HEURE D'ARRET)
S'utilisepourprogrammerla miseen marche
et I'arr£tautomatiquesdufour.
1. Appuyersur Bake (cuissonau four) ou
ConvectBake (cuissonaufour£ ehaleur
2t

tournante). Appuyer sur les touches
chiffr@scorrespondanta la temp@ature
decuissonvoulue.
2. Appuyersur Cook Time. Appuyersur les
toucheschiffreescorrespondantau temps
decuissonenheureset en minutes.
3. Pourdiffererlamiseenroutedelacuisson,
appuyersur Stop Time. Appuyersur les
chiffrescorrespondanta.rheure a laquelle
lacuissondolt_treterminee.
Voir page 34 pour des indications plus
detaillees.
CONTROL LOCK
(DESACTIVATION DES
COMMANDES)
Les touches de fonctionspeuvent6tre blo-
quees de facon a.emp_cherleur utilisation
pourdes raisonsde securiteou pourpermet-
tre le nettoyage.L'affichagecontinue& indi-
querrheure.
Si unefonctiondu four est en cours d'execu-
tion, il n'est pas possiblede verrouillerles
commandes.
RI_GLAGEDUVERROUILLAGEDES COM-
MANDES:Appuyeret maintenirlapressionsur
letoucheControlLock pendantplusieurssec-
ondes. Un signal sonore simple semblera
quandla commandeestverrouill@.
OFF reapparai'tpendant15 secondessi ron
appuiesur uneautretouche.
ANNULATION:Appuyeret maintenirla pres-
sion sur le touche Control Lock pendant
plusieurssecondes.LemotOFF(ARRC:T)dis-
paraftderafficheur.
CLOCK (RI GLAGE DE
L'HORLOGE)
1. Appuyersur latoucheClock (Horloge).
L'indicationTIME (minute)clignote&
I'affichage.
2. Appuyer sur les touches chiffrees cor-
respondant& I'heure,qui apparait & raft
fichage.
Lorsquele fourest missoustensionou apres
unepanne de courant,rheure qu'indiquaitle
four au momentde la panneclignotea raf-
fichage.
Pour v@ifierI'heurependantque I'affichage
indique une fonction minutee, appuyer sur
Clock.
II n'est pas possible de changer rheure
Iorsquele fourest programmepourunecuis-
sonminuteeou uncycled'autonettoyage.
TIMER (RI GLAGE DE
LA MINUTERIE)
On peut selectionneravec la minuterieun
tempsde d@omptede 1 minute(0:01)_.99
heures59minutes(99:59).
Onpeut utiliserla minuterieind@endamment
de toute autre activite du four, ou bien
Iorsqu'unefonctiondufourestencoursd'exe-
cution.LA MINUTERIENE CONTROLEPAS
LE FOUR.
Appuyersur latoucheTimer(Minuterie).
> L'indicationTIMER(minuterie)clignote
et ,,0HR:00,,&raffichage
Appuyer sur les touches chiffrees cor-
respondantau nombred'heureset demin-
utes desir@s, qui apparaissent & I'af-
fichage.
Exemple : Pour regler la minuteriesur 5
minutes,appuyersur Timer (minuterie)et
surlatoucheportantlechiffre5.Auboutde
cinqsecondes,I'affichageindique:
Exemple : Pourreglerla minuteriesur 1
heureet 30 minutes,appuyersur Timer
(minuterie)et sur lestoucheschiffr@s1,3
et 0. Auboutde cinqsecondes,raffichage
indique:
3. La derni@eminute de compte #.rebours
seraaffich@commesecondes.
4. A la fin de la p@iodededecompteun sig-
nal sonorelong est emis et le message
,,End,, (Fin) apparaft brievement.(Pour
changer les bips, voir Options de
Commande.)
POURANNULER:
Appuyer de fa_on prolong@ sur Timer
(minuterie).Au bout d'un court laps de
temps, raffichage indique a. nouveau
I'heure.
OU
2. AppuyersurTimeret surla touchechiffr@
,, 0 ,,. Au bout d'un court lapsde temps,
raffichageindique&nouveauI'heure.
NOTE:Si I'on appuiesur CANCEL(annuler)
pourannulerla minuterie,TOUTESles fonc-
tions programmeessont annuleesSAUF la
minuterie.
SIGNAL SONORE
DE MINUTERIE
II existetroischoixpourles bipssignalant
la finducompteb reboursde la miuterie.
Option 1: Unlongsignalsonore#.lafin de la
fonctionde minuterie,puis un signalsonore
courttoutesles 30secondespendantlescinq
prochainesminutesou jusqu'&ce que I'on
appuiesur latoucheCANCEL.
Option 2: Unlong signalsonore_.la fin de la
fonctionde minuterie,puis un signalsonore
court chaque minute pendant les 12
prochainesheures ou jusqu'& ce que I'on
appuiesur latoucheCANCEL.
Option 3: (par defaut)Un signalsonore& la
fin de la fonctionde minuterie,puis aucun
autresignal.
RI_GLAGEDESSIGNAUXSONORES
DE MINUTERIE:
1. Appuyer sur les touches Timer and
CANCELen m6metempset maintenirla
pressionpendantplusieurssecondes.
> Unseulsignalsonoreretentit.
> L'afficheurindiquelemotTIMER(minut-
erie)etI'optionencours- 1,2or3.
2. Appuyersurlestoucheschiffreescor-
respondant(1,2or3).L'heureectuelledu
jourreapparaft&I'afficheurapresquatre
secondes.
SIGNAUX SONORES -
CUISSON COMMANDI E
PAR L'HORLOGE
II existetroischoixpourles bipssignalant
la fin ducompte_ reboursde la miuterie.
Option 1: (standard) €:missionde quatresig-
nauxsonores&lafinde laperiodedecuisson,
puis un signalsonorea.intervaflede 30 sec-
ondes durant les cinq minutessuivantesou
jusqu'a ce qu'on appuie sur la touche
CANCEL(Annulation).
Option 2: €:mission de quatre signaux
sonoresAlafin dela periodedecuisson,puis
unsignalsonorechaqueminutedurantles 12
heuressuivantesoujusqu'ace qu'on appuie
sur latoucheCANCEL(Annulation).
Option 3: €:mission de quatre signaux
sonoresAlafin dela periodedecuisson,puis
riend'autre.
SI_LECTIONDESSIGNAUX
SONORES-- CUISSONAU FOUR:
Appuyer simultanementsur les touches
Cook Time (Tempsde cuisson)et CAN-
CEL (Annulation),pendantplusieurssec-
ondes.
> Un uniquesignalsonoreestemis.
> I_'afficheurindiquele motCOOK(cuis-
son)et I'optionencours- 1,2 or 3.
Appuyer sur les touches chiffrees cor-
respondant(1 2 or 3). L'heureectuelledu
jour reapparaft& I'afficheurapres quatre
secondes.
ANNULATION DE
L'AFFICHAGE DE L'HEURE
Si onprefereque I'heurenormalene soitpas
affichee:
1. Appuyersur lestoucheClock (hodoge)et
CANCELen m6metempset maintenirla
pressionpendanttroissecondes.
2. LorsqueI'heuren'est pas affichee,si on
souhaite lire I'heure, il suffit d'appuyer
brievementsur latoucheClock (Horloge).
RESTAURATION:
Appuyersimultanementpendanttrois secon-
des sur les touches Clock (Horloge) et
CANCEL (Annulation);I'heure normale de
I'horlogereapparaftrasurI'afficheur.
ARRI T AUTOMATIQUE DU
FOUR/MODE SABBAT
Lefours'eteintautomatiquement&la find'une
periode de 12 heures si on le laisse en
marcheparaccident.Onpeutdesactivercette
fonctionsi on le souhaite.
SUPPRESSIONDE L'EXTINCTION
AUTOMATIQUEAPRES12HEURES:
1. Appuyer/maintenir la pression sur la
toucheClock (Horloge)pendanttroissec-
ondes jusqu'a "12" apparaftre sur la
affichauge.L'indicationTIME(minute)clig-
noteAI'affichage.
2. Appuyer sur les touches chiffrees cor-
respondantpourfaireapparaftre8888sur
I'afficheur.L'heure normale de I'horloge
reapparaftrasur I'afficheurapres quatre
secondes.
RESTAURATION:
Appuyer/maintenirla pressionsur la touche
Clock jusqu'& "8888" apparaftre sur la
affichauge.Appuyerle touche"1". "12" appa-
raftresur laaffichaugeun instant,I'heurenor-
maledeI'horlogereapparaftrasurI'afficheur.
RI GLAGE DE LA
TEMPI RATURE DU FOUR
Si la cuissonaufour neproduitpas les resul-
tatsdesires,on peutajusterlatemperaturedu
four.PourpouvoirdeterminerI'amplitudede la
variationde temperaturenecessaire,selec-
tionner une temperature superieure ou
inferieurede 150C (25° F) a celle recom-
mandeedans la recette,puis executer une
cuissonau four.Leresultatdece testpermet-
trad'evaluerI'amplitudedelavariation&intro-
duire.
AJUSTEMENTDELA
TEMPERATUREDUFOUR:
1. Appuyersur la touche Bake (Cuissonau
four).
2. Entrer5500en appuyantsur les touches
chiffrees5, 5 et 0.
.
4.
Appuyersur Bake pendantplusieurssec-
ondes,jusqu'acequeI'affichageindique0°.
Appuyersur les toucheschiffreesquicon-
viennentpour selectionnerla modification
de temperaturedesiree.Lors de chaque
pressionsurunetouche,latemperaturede
reglageestmodifieede 5°.
_--Le thermostatpeut _tre augmenteou
diminue,de5° Fa la fois,de 350Fmax-
imum.
_--Silethermostatadejaete regleaupara-
vant, ce reglagesera indiqu&Si, par
exemple,le thermostata ete baissede
150E I'affichageindique-15°.
5. Quandvousavezfaitle reglage,appuyerle
touche CANCEL et I'heure normale de
I'horlogereapparaft.Lefourva maintenant
cuireen tenantcomptede la modification
apporteeauthermostat.
REMARQUE:Ne pas modifierle thermostat
deplusde 10° F sansd'abordfaire un nouvel
essaidecuisson.
IIn'estpas necessaired'ajusterde nouveaula
temperaturedufourapresunepanneou inter-
ruptionde I'alimentationde I'appareil.II n'est
pas possible d'ajuster les temperaturesde
cuissonau grilet denettoyage.
19
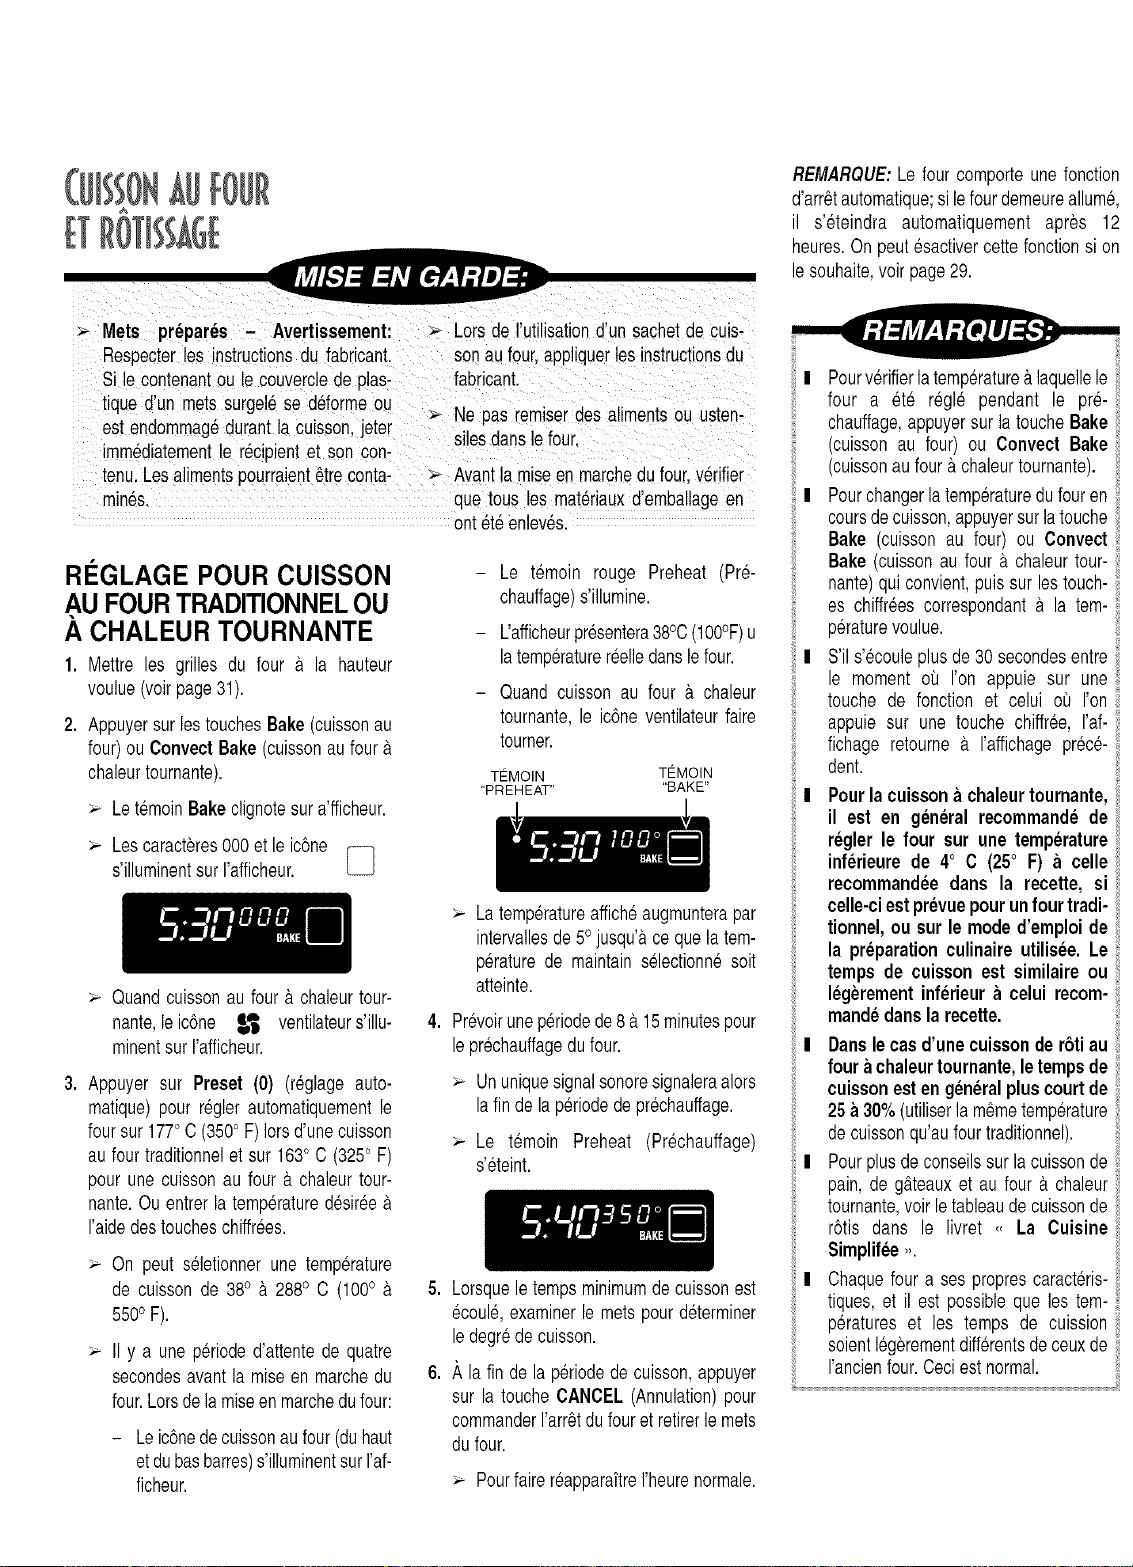
REMARCtUE:Le four comporteunefonction
d'arr£tautomatique;si lefourdemeurealum&
il s'eteindra automatiquement apres 12
heures.On peutesactivercette fonctionsi on
leso@ale, voir page29.
> Mets prepares - Avertissement: > Lotsde rutilisationd'un sachetde cuis-
Respecterles instructionsdu fabricant, sonau four,appliquerles instructionsdu
Si e contenantou le couverclede plas- fabricant.
tique d'un mets surgelese d#formeou
>- Ne 3as remlserdes alimentsou usten-
est endommag£durant la cuJsson,jeter silesdansle four.
imm6diatementle r6cipientet son con-
tenu.Lesalimentspourraient6treconta- >- Avantla mJseen marchedu four.v@ifier
min6s..... que tous les mat@iauxd'emballageen
ontet6 enlev6s.
RI GLAGE POUR CUISSON
AU FOUR TRADITIONNEL OU
CHALEUR TOURNANTE
1. Mettre les grilles du four £ la hauteur
voulue(voltpage31).
2. Appuyersur lestouchesBake (cuissonau
four)ou ConvectBake (cuissonau four£
chaleurtoumante).
LetemoinBakec/gnotesur a'fficheur.
Lescaracteres000et le ic6ne
s'illuminentsur I'afficheur. LJ
- Le temoin rouge Preheat (Pre-
chauffage)s'illumine.
- Uafficheurpresentera38o0(100OF)u
latemperaturereelledanslefour.
- Quandcuisson au four a chaleur
tournante,le ic6neventilateurfaire
tourner.
TEMOIN TEMOIN
PREHEAT" BAKE"
Quandcuissonau four & chaleurtour-
nante,le ic6ne _ ventilateurs'illu-
minentsur I'afficheur.
3. Appuyer sur Preset (0) (reglage auto-
matique)pour regler automatiquementle
foursur 177° C (350° F)Iors d'unecuisson
aufour traditionnelet sur 1630C (3250F)
pour une cuissonau four £ chaleurtour-
nante.Ou entrerla temp@aturedesir@£
I'aidedestoucheschiffrees.
On peut seletionnerune temperature
de cuissonde 38° & 288° C (100° &
5500F).
II y a une perioded'attentede quatre
secondesavantla miseen marchedu
four.Lorsdela miseenmarchedufour:
- Leic6nedecuissonaufour(duhaut
etdubasbarres)s'illuminentsurI'af-
ficheur.
Latemp@atureafficheaugmunterapar
intervallesde 50jusqu'&ce quela tem-
p@aturede maintainselectionn6soit
atteinte.
4. Prevoirunep@iodede8 a.15 minutespour
le prechauffagedu four.
Ununiquesignalsonoresignaleraalors
lafin de lap@iodede prechauffage.
Le temoin Preheat (Prechauffage)
s'eteint.
5. Lorsqueletempsminimumdecuissonest
ecoul& examinerle mets pourdeterminer
ledegrede cuisson.
6. A la fin de la p@iodede cuisson,appuyer
sur la toucheCANCEL(Annulation)pour
commanderI'arr£tdufouret retirerle mets
dufour.
PourfairereapparaftreI'heurenormale.
| Pourverifierla temperature&laquellele
four a ete regle pendant le pre-
chauffage,appuyersur la toucheBake
(cuisson au four) ou Convect Bake
(cuissonaufour &chaleurtournante).
! Pourchangerlatemp@aturedufouren
coursdecuisson,appuyersur latouche
Bake (cuisson au four) ou Convect
Bake (cuissonau four £ chaleurtour-
nante)qui convient,puis sur lestouch-
es chiffr@s correspondant& la tem-
p@aturevoulue.
! S'il s'ecouleplusde30 secondesentre
le moment oi I'on appuie sur une
touche de fonction et celui ot_ I'on
appuie sur une touche chiffree, I'af-
fichage retourne a. I'affichageprec6-
dent.
Pourla cuissona chaleurtournante,
il est en general recommandede
regler le four sur une temperature
inferieurede 40 C (250 F) a celle
recommandeedans la recette, si
celle-ciestprevuepourunfour tradi-
tionnel,ou sur le moded'emploide
la preparationculinaireutilisee. Le
temps de cuissonest similaireou
legerementinferieura celui recom-
mandedansla recette.
I Dansle casd'unecuissonde r6ti au
four a chaleurtournante,letempsde
cuissonesten generalpluscourtde
25a30%(utiliserla mSmetemp@ature
decuissonqu'aufour traditionnel).
! Pourplusde conseilssur lacuissonde
pain, de g£teauxet au four £ chaleur
tournante,voirle tableaude cuissonde
r6tis darts le livret <<La Cuisine
Simplifee,,.
I Chaquefour a ses proprescaracteris-
tiques,et il est possibleque les tem-
p@atureset les temps de cuission
soientlegerementdifferentsde ceuxde
I'ancienfour.Ceciestnormal.
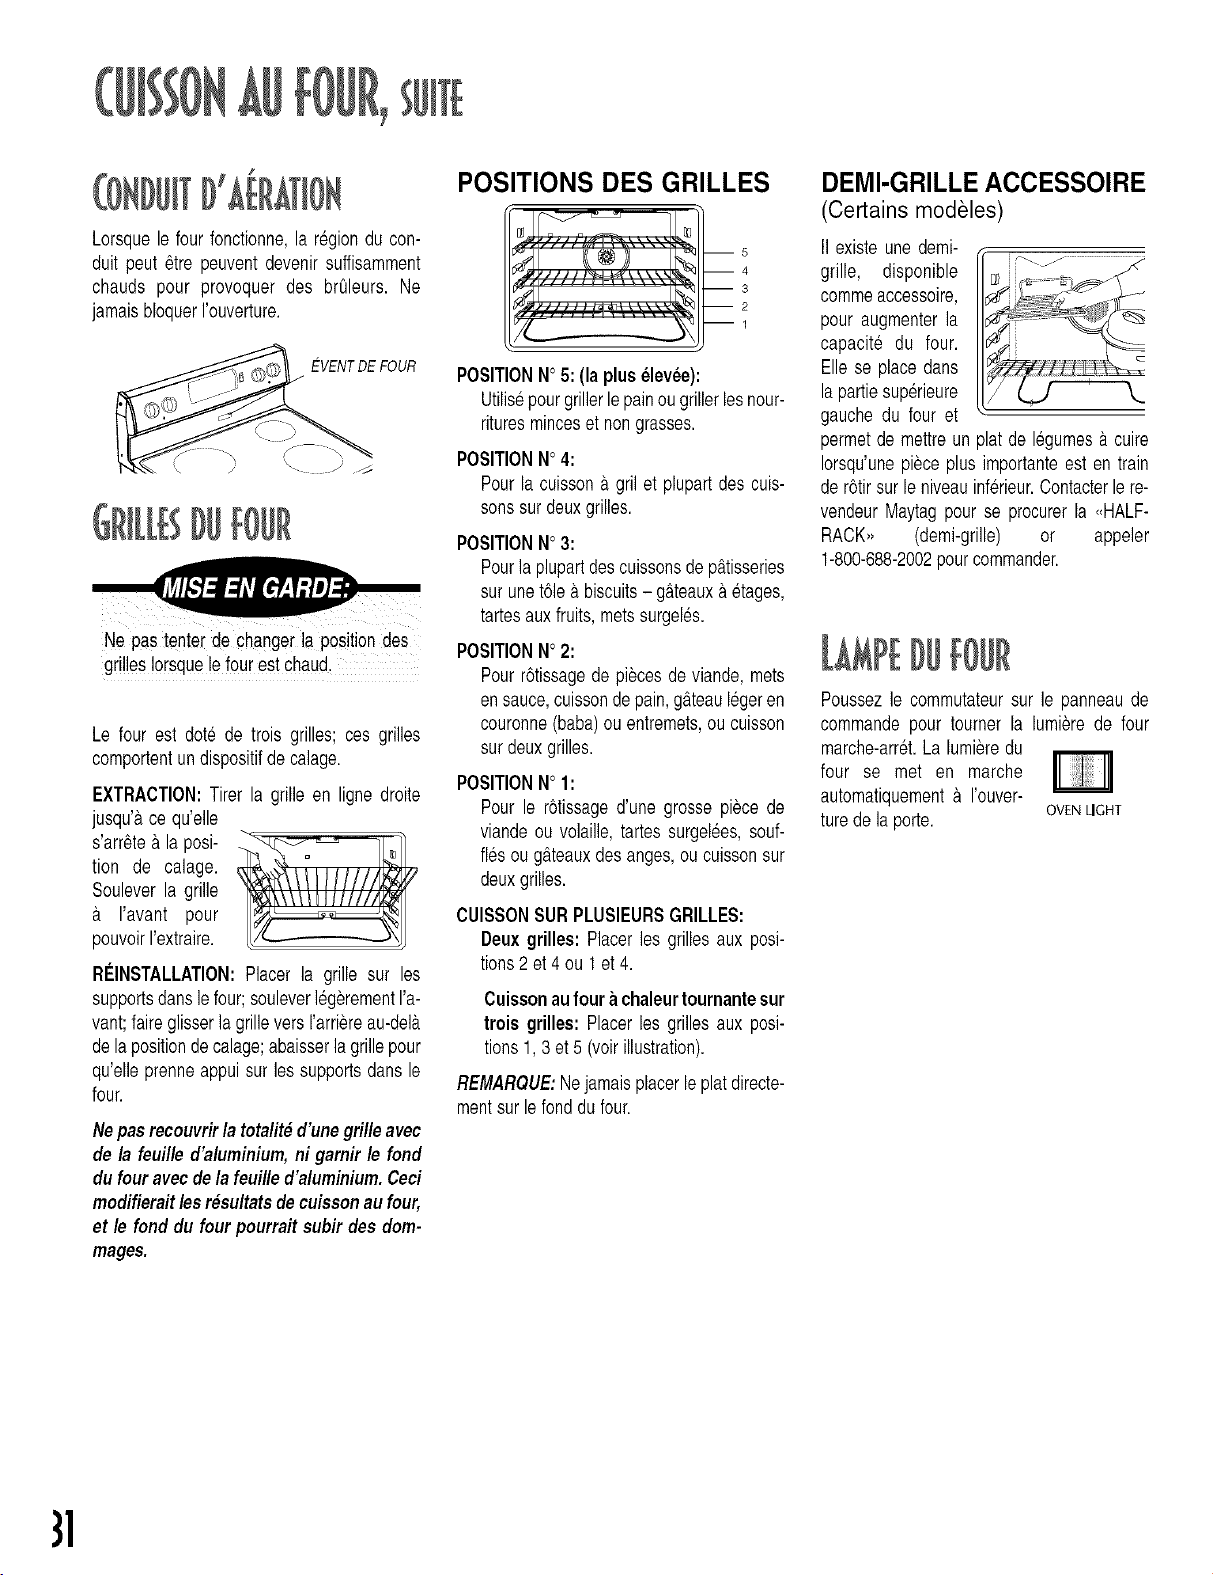
Lorsquelefourfonctionne,laregionducon-
duitpeut6trepeuventdevenirsuffisamment
chaudspourprovoquerdesbrOleurs.Ne
jamaisbloquerI'ouverture.
_LVENTDE FOUR
Ne pas tenterde changerla positiondes
grilles !orsque!efour estchaud,
Le four est dote de trois grilles;ces grilles
comportentundispositifde calage.
EXTRACTION:Tirer la grille en ligne droite
jusqu'&ce qu'elle
s'arr_te& la posi-
tion de calage.
Souleverla grille
a. I'avant pour
pouvoirI'extraire.
II flll
l!6t_\\tlllfllll_
RBNSTALLATION:Placer la grille sur les
supportsdartslefour; souleverlegerementI'a-
vant;faireglisserla grilleversrar@reau-del&
delapositiondecalage;abaisserla grillepour
qu'elleprenneappuisur les supportsdans le
four.
Nepas recouvrir la totalit_ d'unegrille avec
de la feuille d'aluminium, ni gamir le fond
du four avec de la feuille d'aluminium. Ceci
modifierait les r_sultatsde cuisson au four,
et le fond du four pourrait subirdes dom-
mages.
POSITIONS DES GRILLES
-- 1
POSITIONNo5: (la plus elevee):
Utilisepourgrillerlepainougrillerlesnour-
rituresminceset nongrasses.
POSITIONNo4:
Pourla cuisson&gril et plupartdes cuis-
sonssur deuxgrilles.
POSITIONNo3:
Pourla plupartdescuissonsdep&tisseries
sur unet61e&biscuits- g&teaux&etages,
tartesauxfruits,metssurgeles.
POSITIONNO2:
Pourr6tissagede piecesdeviande,mets
ensauce,cuissondepain,g&teaulegeren
couronne(baba)ou entremets,ou cuisson
sur deuxgrilles.
POSITIONNO1:
Pour le r6tissaged'unegrosse piece de
viandeou volaille, tartes surgelees,souf-
flesoug&teauxdes anges,oucuissonsur
deuxgrilles.
CUISSONSURPLUSlEURSGRILLES:
Deux grilles: Placerles grilles aux posi-
tions2 et 4 ou 1 et 4.
Cuissonaufour achaleurtournantesur
trois grilles:Placerles grilles aux posi-
tions1,3 et 5 (voirillustration).
REMARQUE:Nejamaisplacerleplatdirecte-
mentsur lefonddu four.
DEMI-GRILLE ACCESSOIRE
(Certains modeles
II existe une demi-
grille, disponible
commeaccessoire,
pour augmenterla
capacite du four.
Elle se placedans
la partiesup@ieure
gauchedu four et
permetde mettreun platde legumesa.cuire
Iorsqu'unepiece plus importanteest en train
der6tir surle niveauinf@ieur.Contacterle re-
vendeurMaytagpourse procurerla ,,HALF-
RACK,, (demi-grille) or appeler
1-800-688-2002pourcommander.
Poussezle commutateursur le panneaude
commandepour tourner la lumierede four
marche-arret.La lumieredu
four se met en marche
automatiquement& I'ouver-
turede laporte. OV[NLIGHT
}1
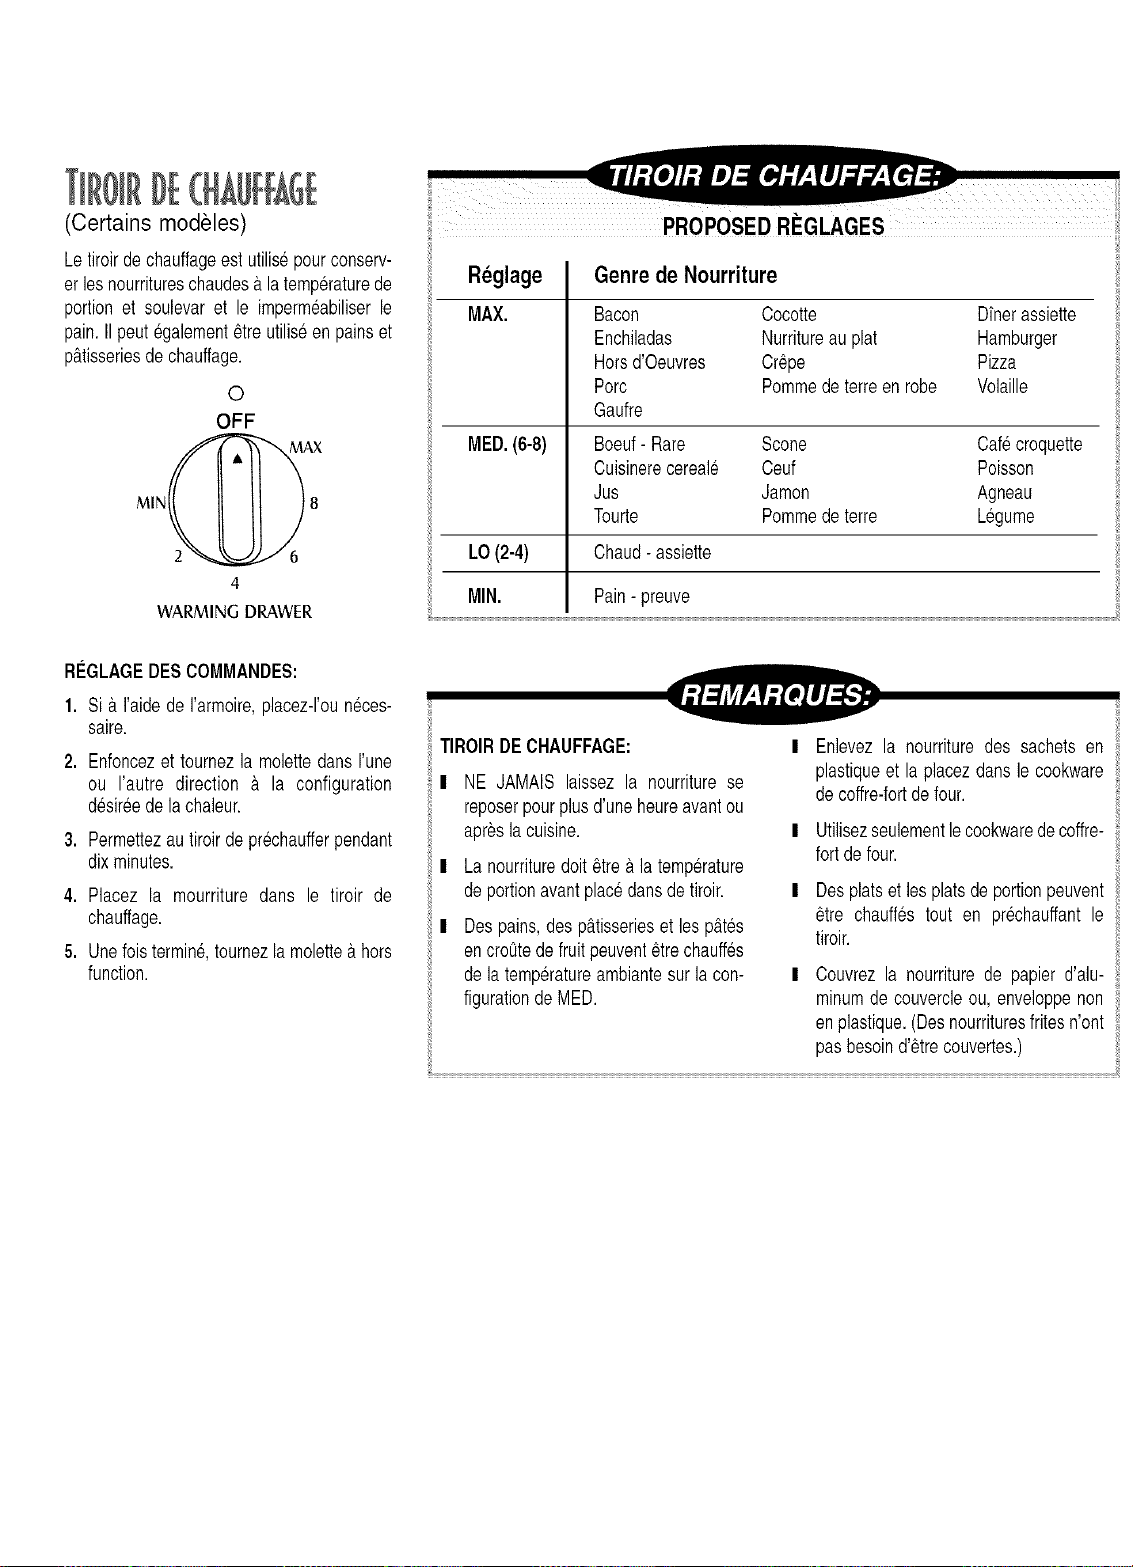
lollII 11ii[[iii
(Certains modeles)
Letiroirde chauffageest utilisepourconserv-
erles nourritureschaudes&latemp@aturede
portion et soulevar et le impermeabiliserle
pain.IIpeut egalement8tre utiliseen painset
p£tisseriesde chauffage.
0
OFF
MAX
MIN 8
WARMING DRAWER
_ PROPOSEDREGLAGES i
Reglage
MAX.
Genre de Nourriture
Cocotte Dfnerassiette
Nurritureau plat Hamburger
Cr@e Pizza
Pommedeterreen robe Volaille
Bacon
Enchiladas
Horsd'Oeuvres
Porc
Gaufre
Boeuf- Rare
Cuisinerecereale
Jus
Tourte
MED.(6-8) Scone Cafecroquette
Ceuf Poisson
Jamon Agneau
Pommedeterre Legume
LO(2-4) Chaud- assiette
MIN. Pain- preuve
RE_GLAGEDESCOMMANDES:
1. Si &I'aidede I'armoire,placez-I'ouneces-
saire.
2. Enfoncezet tournezla molettedans I'une
ou I'autre direction & la configuration
desir6ede lachaleur.
3. Permettezautiroirde prechaufferpendant
dix minutes.
4. Placez la mourriture dans le tiroir de
chauffage.
5. Unefoistermin&tournezla molette&hors
function.
TIROIRDECHAUFFAGE:
! NE JAMAIS laissez la nourriturese
reposerpourplusd'une heureavantou
apresla cuisine.
I La nourrituredoit @e &la temp@ature
deportionavantplacedansde tiroir.
I Despains,des p£tisserieset les p&tes
encroOtedefruitpeuvent6trechauffes
dela temp@atureambiantesurla con-
figurationde MED.
Enlevez la nourrituredes sachets en
plastiqueet la placezdansle cookware
decoffre-fortdefour.
I Utilisezseulementle cookwarede coffre-
fortdefour.
I Desplatset les platsde portionpeuvent
@e chauffes tout en prechauffantle
tiroir.
Couvrezla nourriturede papierd'alu-
minumde couvercleou, enveloppenon
enplastique.(Desnourrituresfritesn'ont
pasbesoind'etrecouvertes.)
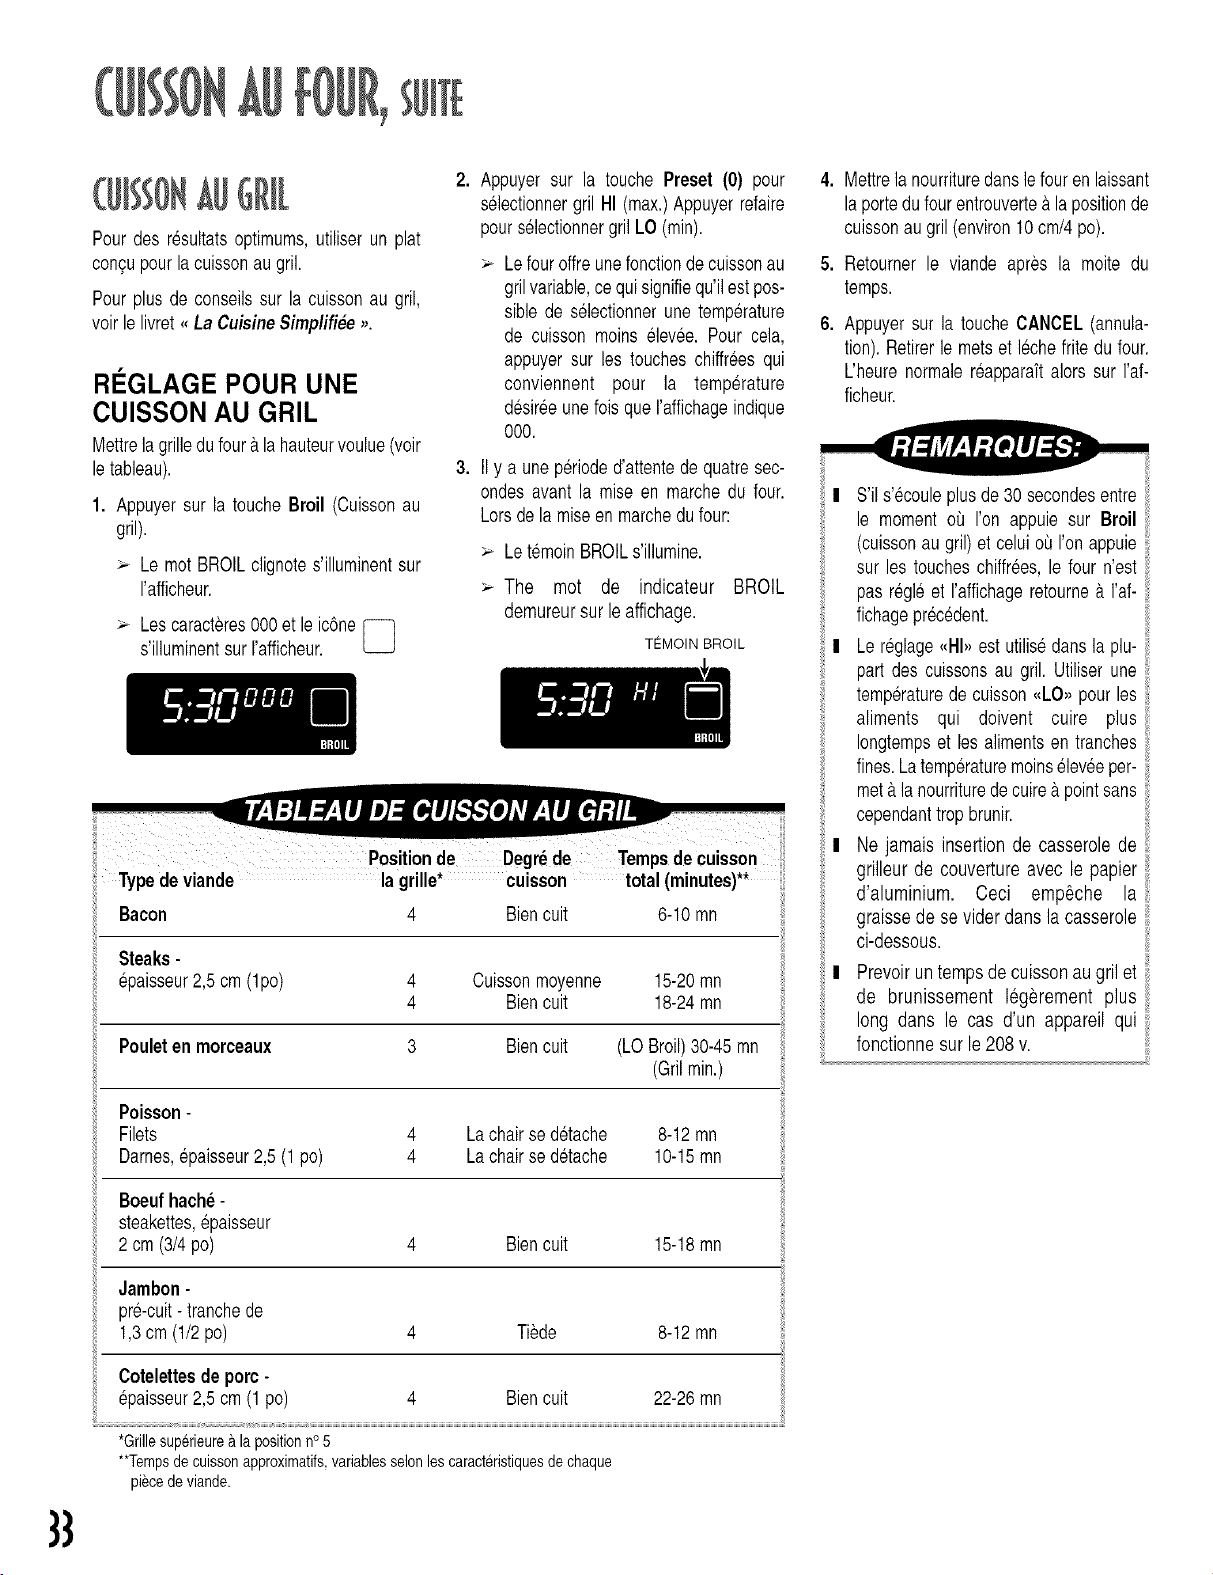
33
(W%ONkgGRI[
Pourdes resultatsoptimums,utiliserun plat
congupourla cuissonaugril.
Pourplus de conseilssur la cuissonau gril,
voirle livret<,La Cuisine$implifi#e ,>.
RI GLAGE POUR UNE
CUISSON AU GRIL
Mettrelagrilledufour&la hauteurvoulue(voir
letableau).
1. Appuyersur la toucheBroil (Cuissonau
gril).
> Le mot BROILclignotes'illuminentsur
I'afficheur.
> Lescaracteres000et le icSne[---q
LS
s'illuminentsur I'afficheur.
2. Appuyer sur la touche Preset (0) pour
selectionnergril HI (max.)Appuyerrefaire
pourselectionnergril LO (min).
Lefouroffreunefonctiondecuissonau
grilvariable,cequisignifiequ'il estpos-
sible de selectionnerune temp@ature
de cuisson moins elev6e. Pour cela,
appuyersur les toucheschiffreesqui
conviennent pour la temp@ature
desir@unefois queI'affichageindique
000.
3. IIy a unep@ioded'attentede quatresec-
ondes avantla mise en marchedu four.
Lorsdela miseen marchedufour:
> LetemoinBROILs'illumine.
The mot de indicateur BROIL
demureursur leaffichage.
TEMOIN BROIL
Bacon 4 Biencult 6-10mn
Steaks-
@aisseur2,5 cm (lpo) 4 Cuissonmoyenne 15-20mn
4 Biencult 18-24mn
Pouleten morceaux 3 Biencult (LO Broil)30-45mn
(Grilrain.)
Poisson -
Filets 4 La chairse detache 8-12mn
Dames,@aisseur2,5(1 po) 4 La chairse detache 10-15mn
Boeuf hache -
steakettes,@aisseur
2 cm(3/4po) 4 Biencult 15-18mn
Jambon-
pre-cuit- tranchede
1,3cm(1/2po) 4 Tiede 8-12mn
Cotelettesde porc-
@aisseur2,5 cm (1 po) 4 Biencult 22-26mn
*Grille sup@ieurea la positionno 5
**Tempsde cuisson approximatifs,variables selon les caracteristiquesde chaque
piece de viande.
4. Mettrelanourrituredanslefour enlaissant
laportedufour entrouverte&lapositionde
cuissonau gril(environ10cm/4po).
5. Retoumer le viande apres la moite du
temps.
6. Appuyersur la toucheCANCEL(annula-
tion).Retirerle metset lechefritedu four.
I_'heurenormalereapparaftalors sur I'af-
ficheur.
I S'il s'ecouleplusde30 secondesentre
le moment ou I'on appuie sur Broil
(cuissonau gril)et celuior)I'onappuie
sur les toucheschiffrees,le four n'est
pas regleet I'affichageretourne& I'af-
fichageprecedent.
I Le reglage,<HI>,est utilisedans la plu-
part des cuissonsau gril. Utiliserune
temp@aturede cuisson<<LO>>pourles
aliments qui doivent cuire plus
Iongtempset les alimentsen tranches
fines.Latemperaturemoinseleveeper-
met&lanourrituredecuire&pointsans
cependanttrop brunir.
I Ne jamais insertion de casserole de
grilleur de couvertureavec le papier
d'aluminium. Ceci emp6che la
graissede se vider dans la casserole
ci-dessous.
I Prevoiruntempsde cuissonaugril et
de brunissement legerement plus
long dans le cas d'un appareil qui ....
fonctionnesur le208 v.
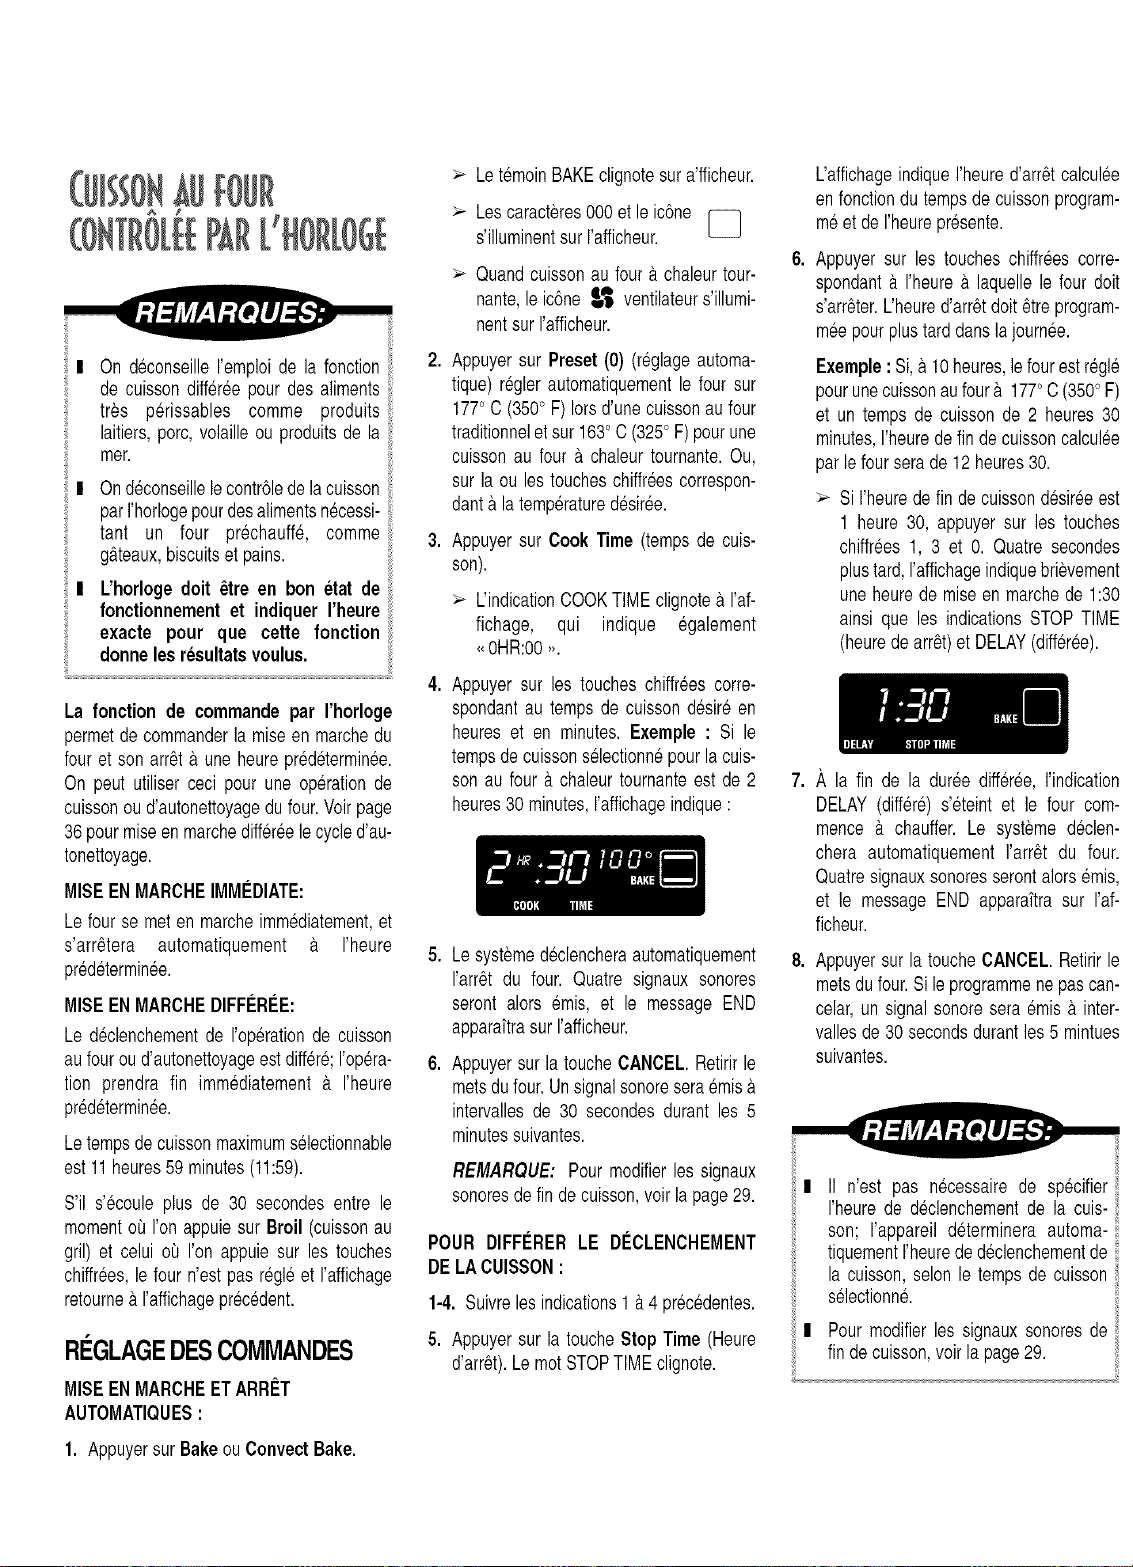
OndeconseilleI'emploidelafonction
decuissondiff@@pourdesaliments
tres p@issablescommeproduits
laitiers,porc,volailleouproduitsdela
mer.
Ondeconseillelecontr61edelacuisson
parI'horlogepourdesalimentsnecessi-
tant un four prechauffe,comme
g£teaux,biscuitsetpains.
L'horlogedolt _tre en bon etat de
fonctionnementet indiquer I'heure
exacte pour que cette fonction
donneles resultatsvoulus.
La fonction de commandepar I'horloge
permetdecommanderla miseen marchedu
four et son arr_t£ uneheurepredeterminee.
On peut utiliserceci pour une operationde
cuissonou d'autonettoyagedu four.Voirpage
36pourmiseen marchediff@@le cycled'au-
tonettoyage.
MISEENMARCHEIMMI_DIATE:
Le fourse meten marcheimmediatement,et
s'arr6tera automatiquement £ I'heure
predeterminee.
MISEENMARCHEDIFFI_RI_E:
Le declenchementde I'op@ationde cuisson
aufouroud'autonettoyageestdill@e;Iop@a-
tion prendra fin immediatement& I'heure
predeterminee.
Letempsdecuissonmaximumselectionnable
est11heures59minutes(11:59).
S'il s'ecoule plus de 30 secondesentre le
momentoi I'onappuiesur Broil (cuissonau
gril) et celui ot_I'on appuiesur les touches
chiffrees,le four n'estpas regleet I'affichage
retourne&I'affichageprecedent.
RI GLAGEDESCOMMANDES
MISEENMARCHEETARRI_T
AUTOMATIQUES:
1. Appuyersur BakeouConvect Bake.
LetemoinBAKEclignotesura'fficheur.
Lescaracteres000et le ic6ne
s'illuminentsur I'afficheur.
Quandcuissonau four & chaleurtour-
nante,leic6ne _ ventilateurs'illumi-
nentsur I'afficheur.
2. Appuyersur Preset(0) (reglageautoma-
tique) reglerautomatiquementle four sur
1770C (350° F) Iorsd'unecuissonaufour
traditionnelet sur 163oC (325° F) pourune
cuissonau four & chaleurtournante.Ou,
sur la ou les toucheschiffreescorrespon-
dant&latemp@aturedesir@.
3. Appuyersur Cook Time (tempsde cuis-
son).
L'indicationCOOKTIMEclignote&I'af-
fichage, qui indique egalement
<<0HR:00>>.
4. Appuyersur les toucheschiffreescorre-
spondantau tempsde cuissondesire en
heures et en minutes. Exemple : Si le
tempsdecuissonselectionnepour la cuis-
son au four a.chaleurtournanteest de 2
heures30minutes,I'affichageindique:
5. Lesystemedeclencheraautomatiquement
I'arr6t du four. Quatre signaux sonores
seront alors emis, et le messageEND
apparaftrasur I'afficheur.
6. Appuyersur la toucheCANCEL.Retirirle
metsdufour.Unsignalsonoreseraemis&
intervallesde 30 secondesdurant les 5
minutessuivantes.
REMARQUE: Pour modifierles signaux
sonoresdefin decuisson,voir lapage29.
POUR DIFFI_RERLE DI_CLENCHEMENT
DE LACUISSON:
1-4. Suivreles indications1£ 4 precedentes.
5. Appuyersur la toucheStopTime (Heure
d'arrSt).LemotSTOPTIMEclignote.
L'affichageindiqueI'heured'arr_tcalcul@
enfonctiondutempsde cuissonprogram-
meet deI'heurepresente.
Appuyersur les toucheschiffreescorre-
spondanta. I'heure& laquellele four dolt
s'arr_ter.L'heured'arr£tdolt _treprogram-
m@ pourplustard dansla journee.
Exemple: Si,£ 10heures,le fourest regle
pourunecuissonaufour& 1770C (350° F)
et un temps de cuissonde 2 heures30
minutes,I'heuredefin de cuissoncalcul@
parlefour serade 12heures30.
>- Si I'heurede fin de cuissondesireeest
1 heure30, appuyersur les touches
chiffrees1, 3 et 0. Quatre secondes
plustard,I'affichageindiquebrievement
uneheurede miseen marchede 1:30
ainsi que les indicationsSTOPTIME
(heurede arr£t)et DELAY(differ@).
.
la fin de la dur@ differee, I'indication
DELAY(diff@e)s'eteint et le four com-
mence & chauffer. Le systeme declen-
chera automatiquementI'arr£t du four.
Quatresignauxsonoresserontalorsemis,
et le messageEND apparaftrasur I'af-
ficheur.
Appuyersur la toucheCANCEL.Retirirle
metsdu four.Sile programmenepascan-
celar,un signal sonoresera emis& inter-
vallesde30 secondsdurantles5 mintues
suivantes.
ii
I II n'est pas necessairede specifierI
I'heurede diclenchementde la cuis-!
son; I'appareil determinera automa-
tiquementI'heurede declenchementde
la cuisson,selonle tempsde cuisson
selectionne.
I Pour modifierles signaux sonoresde ii
fin decuisson,voir la page29.
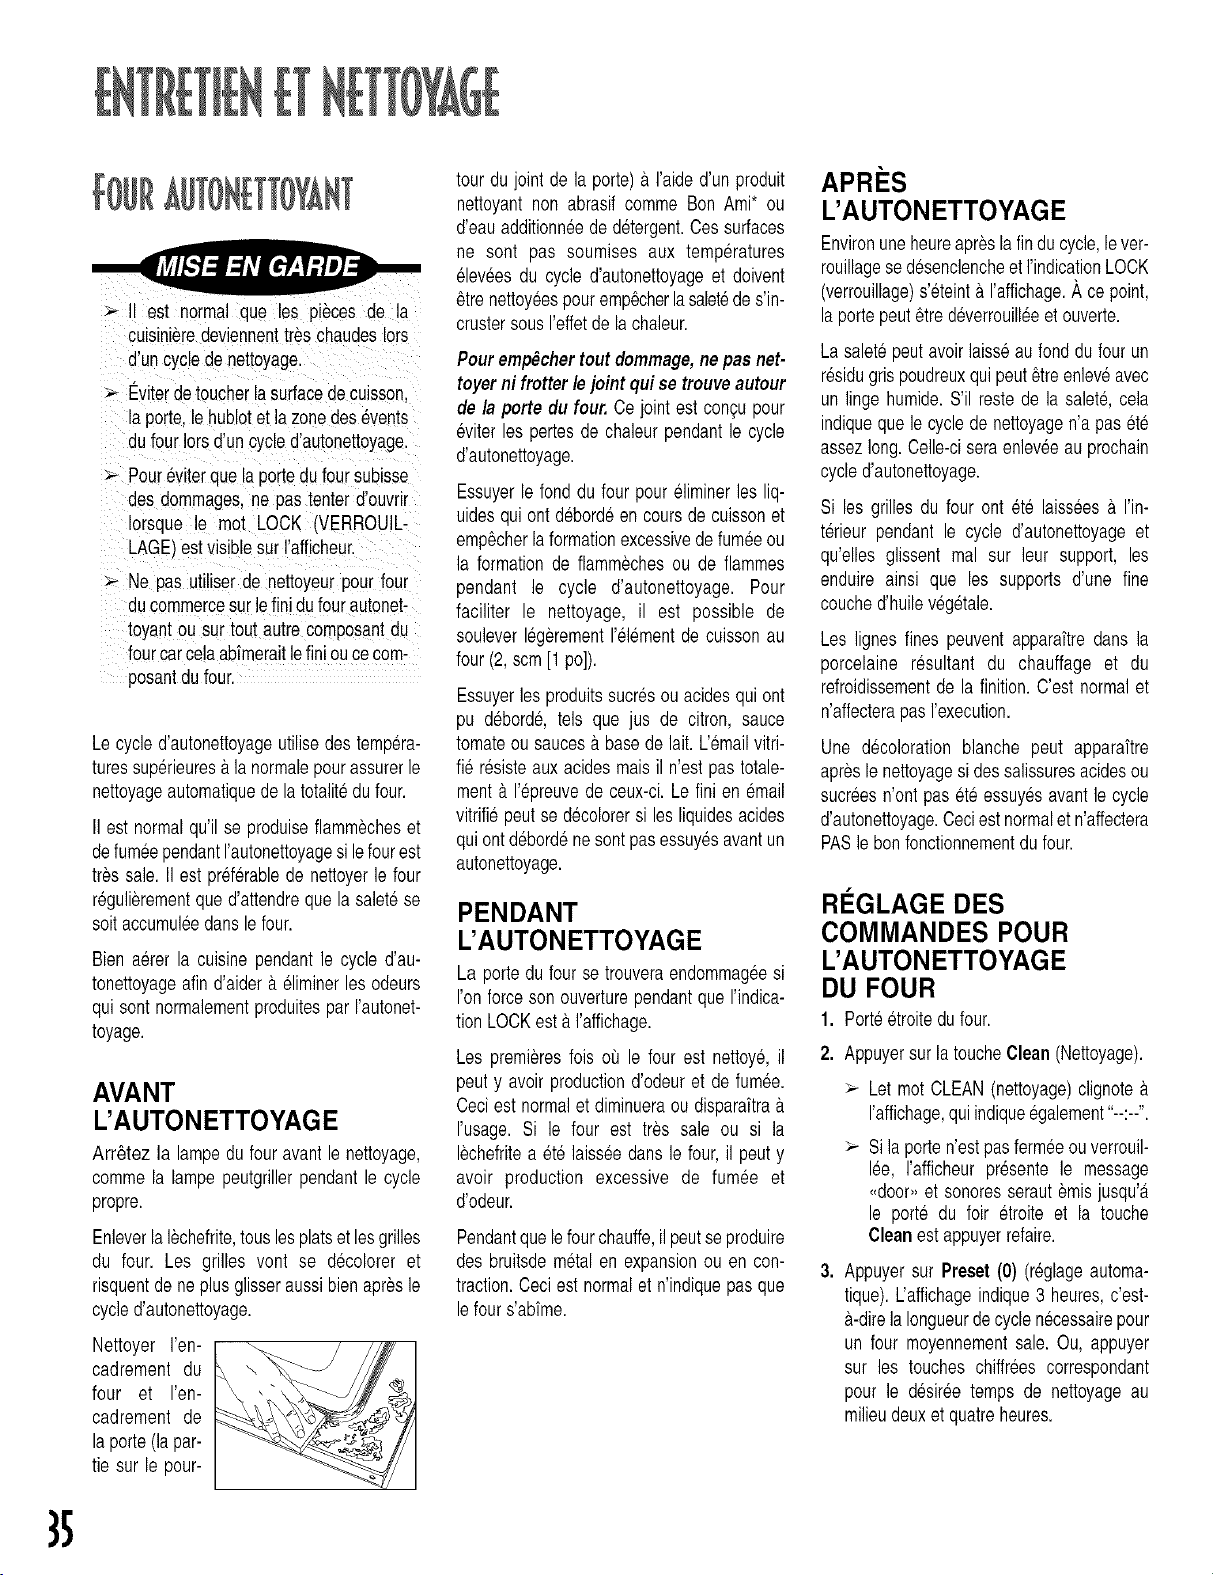
35
,_ II est normal que les pi_ces de la
cuisinleredeviennenttres chaudesIors
d'uncyclede nettoyage.
,_ Eviterdetoucherlasurfacede cuisson.
laporte,le hublotet la zonedesevents
dufour Iorsd'un cycled'autonettoyage.
Pourevlterquela portedu four subJsse
des dommages,ne pas tenterd'ouvrir
Iorsque le mot LOCK /VERROUlL-
LAGE_estvisiblesur rafficheur.
Ne pas utiliserde nettoyeurpourfour
ducommercesurlefini dufourautonet-
toyantou sur toutautre composantdu
fourcarcelaabfmeraitlefini ouce com-
posantdufour.
Le cycled'autonettoyageutilisedes tempera-
turessup@ieuresa lanormalepour assurerle
nettoyageautomatiquede la totalitedu four.
II est normalqu'il se produiseflammecheset
defum@pendantI'autonettoyagesi lefourest
tr_ssale. II estpref6rablede nettoyerle four
regulierementque d'attendreque lasaletese
soitaccumuleedanslefour.
Bien a@erla cuisinependantle cycle d'au-
tonettoyageafind'aider a.eliminerles odeurs
quisont normalementproduitesparI'autonet-
toyage.
AVANT
L'AUTONETTOYAGE
Arr_tez la lampedufour avantle nettoyage,
commela lampepeutgrillerpendantle cycle
propre.
Enleverlalechefrite,touslesplatset lesgrilles
du four. Les grilles vont se decolorer et
risquentdene plus glisseraussibienapr_sle
cycled'autonettoyage.
Nettoyer Fen-
cadrement du
four et I'en-
cadrement de
la porte(lapar-
tie sur le pour-
tour dujoint de la porte)a I'aided'unproduit
nettoyantnon abrasif comme Bon Ami* ou
d'eauadditionneede detergent.Cessurfaces
ne sont pas soumises aux temp@atures
elev@sdu cycle d'autonettoyageet doivent
_trenettoyeespouremp6cherla saletede s'in-
crustersousI'effetdelachaleur.
PourempOchertoutdommage,ne pasnet-
toyerni frotterlejointqui setrouveautour
de la porte du four. Cejoint est con_upour
eviterles pertesde chaleurpendantle cycle
d'autonettoyage.
Essuyerle fond du four poureliminerles liq-
uidesquiont debordeen coursde cuissonet
emp_cherlaformationexcessivedefumeeou
la formationde flammechesou de flammes
pendant le cycle d'autonettoyage. Pour
faciliter le nettoyage, il est possible de
souleverlegerementI'elementde cuissonau
four(2, scm[1 pc]).
Essuyerles produitssucresouacidesqui ont
pu debord& tels que jus de citron, sauce
tomateou saucesa.basede lait. L'emailvitri-
fie resisteauxacidesmaisil n'est pas totale-
ment& I'@reuvede ceux-ci.Le fini en email
vitrifiepeutse decolorersi les liquidesacides
quiontdebordenesontpas essuyesavantun
autonettoyage.
PENDANT
L'AUTONETTOYAGE
La portedu four se trouveraendommageesi
I'onforceson ouverturependantqueI'indica-
tionLOCKest a.I'affichage.
Les premieresfois ou le four est nettoy& il
peuty avoir productiond'odeuret de rum@.
Ceciestnormalet diminueraou disparaftra_.
I'usage. Si le four est tres sale ou si la
lechefritea ete laiss@dans le four, il peuty
avoir production excessive de fumee et
d'odeur.
Pendantquelefourchauffe,il peutseproduire
des bruitsdemetalen expansionou en con-
traction.Ceciest normalet n'indiquepas que
lefour s'abfme.
APRILS
L'AUTONETTOYAGE
Environuneheureapresla finducycle,lever-
rouillagese desenclencheet I'indicationLOCK
(verrouillage)s'eteint_.I'affichage.Ace point,
la portepeut_tre deverrouill@et ouverte.
Lasaletepeutavoirlaisseaufond du four un
residugrispoudreuxquipeut_treenleveavec
un linge humide.S'il restede la salet& cela
indiqueque le cyclede nettoyagen'a pas ere
assezlong.Celle-ciseraenleveeauprochain
cycled'autonettoyage.
Si les grilles du four ont ete laissees_. I'in-
terieur pendant le cycle d'autonettoyageet
qu'elles glissent mal sur leur support, les
enduire ainsi que les supports d'une fine
couched'huilevegetale.
Les lignes fines peuvent apparaftredans la
porcelaine resultant du chauffage et du
refroidissementde la flnition.C'est normalet
n'affecterapas I'execution.
Une d@oloration blanche peut apparaftre
apresle nettoyagesi dessalissuresacidesou
sucreesn'ontpas ete essuyesavantle cycle
d'autonettoyage.Ceciestnormalet n'affectera
PASlebon fonctionnementdu four.
RI GLAGE DES
COMMANDES POUR
L'AUTONETTOYAGE
DU FOUR
1. Porteetroitedufour.
2. Appuyersur latoucheClean(Nettoyage).
>- Let mot CLEAN(nettoyage)clignote&
I'affichage,quiindiqueegalement"--:--".
>- Si la porten'estpasfermeeouverrouil-
lee, I'afficheur presentele message
,,door,,et sonoresseraut emisjusqu'a
le porte du foir @cite et la touche
Cleanestappuyerrefaire.
3. Appuyersur Preset (0) (reglageautoma-
tique).L'affichageindique3 heures,c'est-
&-direla Iongueurdecyclenecessairepour
un four moyennementsale. Ou, appuyer
sur les touches chiffrees correspondant
pour le desireetemps de nettoyageau
milieudeuxet quatreheures.
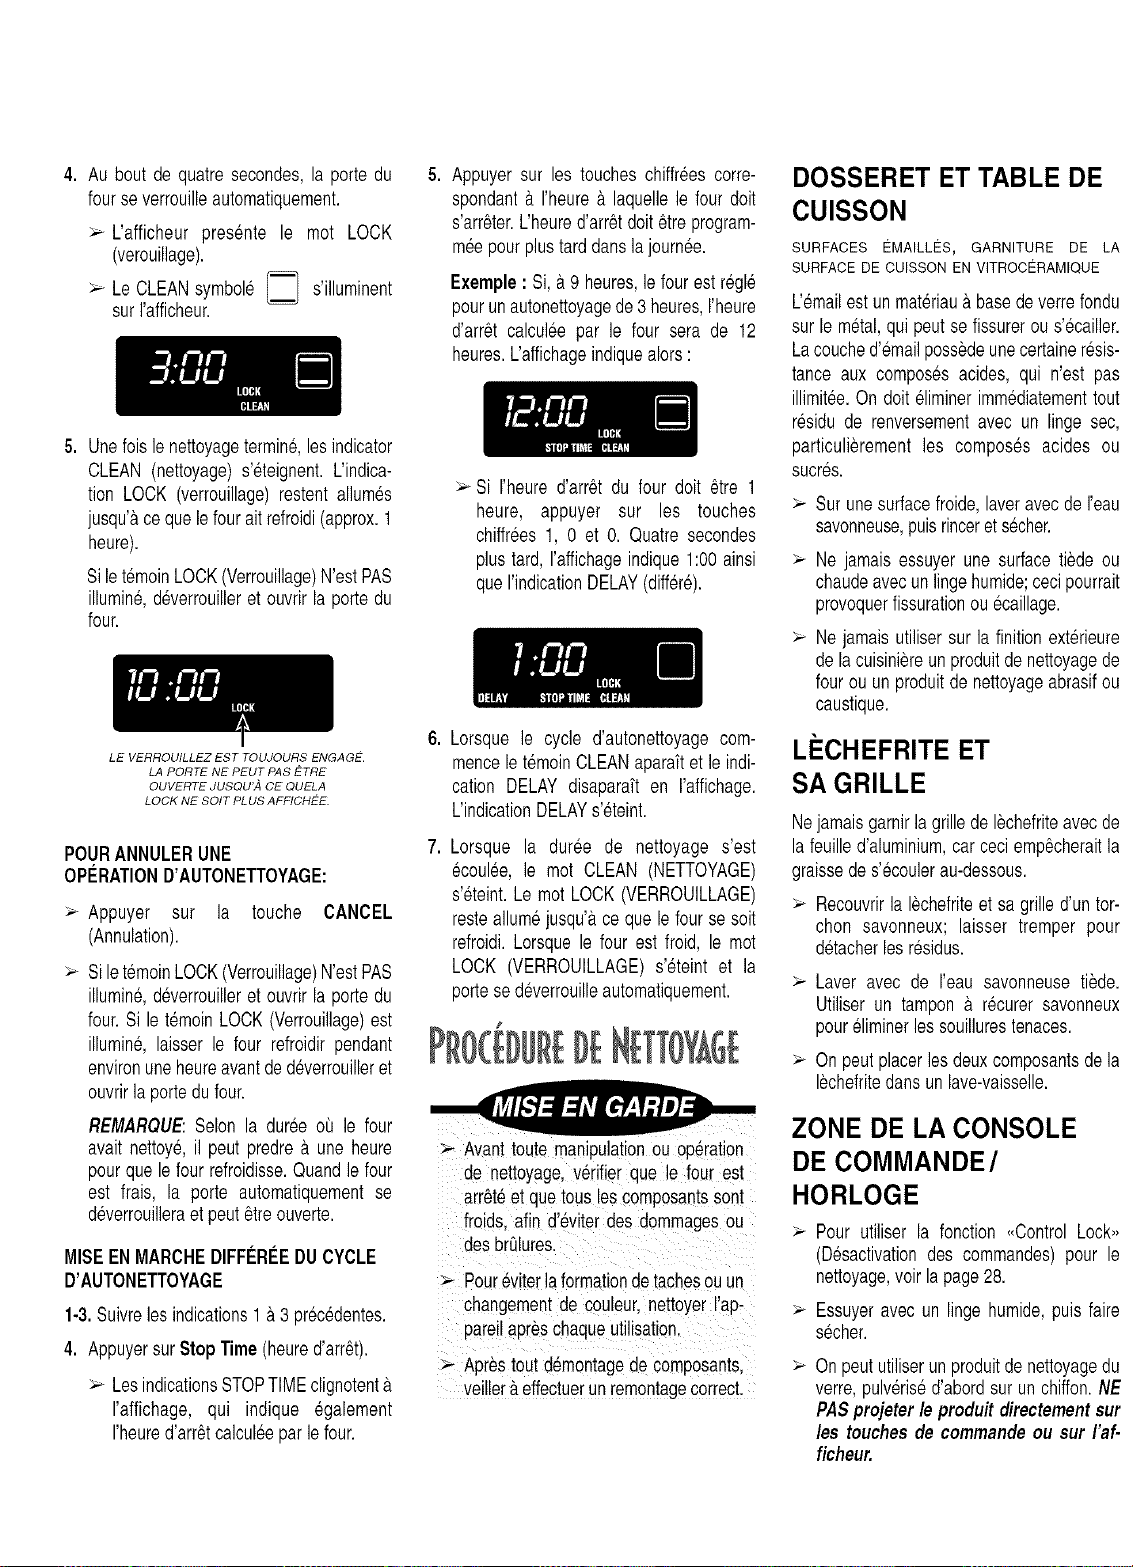
4. Auboutdequatresecondes,laportedu
fourseverrouilleautomatiquement.
:_ L'afficheurpresentele motLOCK
(verouillage).
:_ LeCLEANsymboleI--I s'illuminent
surI'afficheur.
Appuyersurlestoucheschiffr@scorre-
spondant#.I'heure&laquellelefourdolt
s'arr_ter.L'heured'arr6tdolt6treprogram-
meepourplustarddanslajournee.
Exemple: Si, #.9 heures,le four estregl6
pourunautonettoyagede 3 heures,I'heure
d'arr6t calcul@ par le four sera de 12
heures.L'affichageindiquealors:
5. Unefoislenettoyagetermin&les indicator
CLEAN (nettoyage)s'eteignent.L'indica-
tion LOCK (verrouillage)restent allumes
jusqu'acequelefourait refroidi(approx.1
heure).
Sile temoinLOCK(Verrouillage)N'estPAS
illumin&deverrouilleret ouvrirla portedu
four.
DOSSERET ET TABLE DE
CUISSON
LE VERROUlLLEZ EST TOUJOURS ENGAGE.
LA PORTE NE PEUT PAS ETRE
OUVERTE JUSQU',4 OE QUELA
LOCK NE SOIT PL US A FFICHEE.
SURFACES EMAILLC:S, GARNITURE DE LA
SURFACE DE CUISSON EN VlTROCERAMIQUE
POURANNULERUNE
OPE_RATIOND'AUTONETTOYAGE:
Appuyer sur la touche CANCEL
(Annulation).
>- Si letemoinLOCK(Verrouillage)N'estPAS
illumin&deverrouilleret ouvrirla portedu
four.Si le temoinLOCK(Verrouillage)est
illumin& laisser le four refroidir pendant
environuneheureavantdedeverrouilleret
ouvrirla portedufour.
REMARQUE:Selon la duree ot_lle four
avait nettoye,il peut predre #.une heure
pourquele four refroidisse.Quandle four
est frais, la porte automatiquementse
deverrouilleraet peut_treouverte.
,
L'emailestun mat@iau_.basede verrefondu
sur le metal,qui peutse fissurerou s'ecailler.
Lacouched'emailpos@deunecertaineresis-
tance aux composesacides, qui n'est pas
illimitee.On dolt eliminerimmediatementtout
residu de renversementavec un linge sec,
particulierementles composes acides ou
sucres.
> Si I'heured'arr6t du four dolt 6tre 1
heure, appuyer sur les touches
chiffrees1, 0 et 0. Quatre secondes
plus tar& I'affichageindique1:00 ainsi >-
queI'indicationDELAY(diff@e).
Lorsque le cycle d'autonettoyagecom-
menceletemoinCLEANaparaftet le indi-
cation DELAY disaparaft en I'affichage.
L'indicationDELAYs'eteint.
Lorsque la duree de nettoyage s'est
ecoulee, le mot CLEAN (NETTOYAGE)
s'eteint.Le motLOCK (VERROUILLAGE)
resteallumejusqu%,ce que lefour se soit
refroidi.Lorsquele four est froid, le mot
LOCK (VERROUILLAGE)s'eteint et la
portesedeverrouilleautomatiquement.
,_ Avanttoute manipulationou operation
de nettoyage,v@ifierque le four est
arr_teet quetousles composantssont
[roids.afin d'eviter desdommagesou
desbralures.
MISEENMARCHEDIFFI_RI_EDU CYCLE
D'AUTONETTOYAGE _ Pour_viterlaformationde tachesou un
1-3.Suivreles indications1a 3 precedentes, changementde couleur,nettoyerI'ap-
pareilapreschaqueutilisation.
4. Appuyersur Stop Time(heured'arr6t).
Aprestout d_montagede composants.
>- LesindicationsSTOPTIMEclignotent_. veiller_.effectuerunremontagecorrect.
I'affichage, qui indique egalement
I'heured'arr_tcalcul@par le four.
Surunesurfacefroide,laveravecde reau
savonneuse,puisrinceret secher.
Ne jamaisessuyer une surfacetiede ou
chaudeavecun lingehumide;cecipourrait
provoquerfissurationou ecaillage.
Ne jamaisutilisersur la finitionext@ieure
dela cuisiniereunproduitde nettoyagede
fourou un produitde nettoyageabrasifou
caustique.
L#CHEFRITE ET
SA GRILLE
Nejamaisgarnirla grillede lechefriteavecde
la feuilled'aluminium,car ceciemp_cheraitla
graissede s'ecoulerau-dessous.
>- Recouvrirla I_chefriteet sa grilled'un tor-
chon savonneux; laisser tremper pour
detacherlesresidus.
Laver avec de I'eau savonneusetiede.
Utiliser un tampona recurer savonneux
poureliminerles souillurestenaces.
Onpeutplacerlesdeuxcomposantsde la
lechefritedans unlave-vaisselle.
ZONE DE LA CONSOLE
DE COMMANDE/
HORLOGE
Pour utiliser la fonction ,,Control Lock,,
(Desactivationdes commandes)pour le
nettoyage,voir la page28.
Essuyeravec un lingehumide,puis faire
secher.
Onpeututiliserun produitde nettoyagedu
verre,pulverised'abordsur unchiffon.NE
PASprojeter le produit directement sur
/es touchesde commandeou sur /'af-
ficheur.
f _
BOUTONS DE COMMANDE
Placer chaque bouton & la position
d'ARRET(OFF),et retirerchaquebouton
(tirer).
Laver/rincer/fairesecher.Nepas utiliserun
agentde nettoyageabrasifsusceptiblede
rayerlafinition.
Faire fonctionnerbrievementchaqueel6-
mentpourverifierquele boutona 6te cor-
rectementr6installe.
SURFACES PEINTES
PANNEAUX LATC:RAUX, TIROIR DE
REMISAGE, TIROIR DE CHAUFFAGE, ET
POIGNES DE PORTE
Apres le refroidissement,laver avec de
I'eausavonneuse/rinceret fairesecher.Ne
jamais essuyer une surface tiede ou
chaudeavec un linge humide;la surface
pourraitsubirdesdommages,et la forma-
tion de vapeur pourrait provoquer des
br01ures.
Pourdessouillurestenaces,utiliserunpro-
duit de nettoyagepeuabrasifcommeBon
Ami*ou unep&tede bicarbonatede sodi-
um.Nepasutiliserunproduitdenettoyage
abrasifcaustiqueou agressifcomme un
produitdenettoyagede fourou un tampon
delained'acier;cesproduitsferaientsubir
des dommagespermanentsa.la surface
(rayures).
NOTE:Utiliserun essuie-toutou unlingesec
pourenleverles residusde renversementde
produitsacidesou sucres. Si ces residusne
sont pas enlevesimmediatement,la surface
peut subirun changementde couleurou une
autre degradation.Ceci est particulierement
importantpourunesurfaceblanche.
VERRE
HUBLOT ET PORTE DU FOUR
Eviter d'utiliser une quantite excessive
d'eau,susceptiblede s'infiltrerderrierela
plaquedeverreet de formerdestaches.
Laveraveceau et savon.Rinceravec de
I'eaupropreet fairesecher.On peututilis-
er un produitde nettoyagedu verre, pul-
veris6d'abordsurun chiffon.
Ne pas utiliser un produit de nettoyage
abrasif comme tampon & recurer,laine
d'acierouproduitde nettoyageen poudre.
Cesproduitsferaientsubirdesdommages
auverre.
SURFACE DE CUISSON
EN VITROCI RAMIQUE
Nejamais uti/iserde produits denettoyage
du four,jave//isant, ammoniaqueou pro-
duits de nettoyagedu verrecontenantde
en /'ammoniaque.REMARQUE:Prendre
contactavecun r_parateuragr_ si la sur-
face en vitroc_ramiquese fendi//e, se
casse ou si de /'a/uminiumou du m_ta/
fondsurla surface.
Laisser la surface de cuisson refroidir
avantdela nettoyer.
G6n6ralites- Nettoyerla surfacede cuis-
son apres chaque emploi ou au besoin,
avec du papier essuie-touthumidifieet
Cooktop CleaningCreme* (no de piece
20000001)**.Puis, essuyeravec un linge
secet propre.
REMARQUE: Des marques permanentes
vontse produiresi la salete reste sur la sur-
facedecuissonet estcuitede fa_onrep6t6e.
Saleteepaisseou marquesmetalliques
- Humidifierune eponge& recurer ,,ne
rayantpas,,.Appliquerdu produitde net-
toyagepour surfacede cuissonet frotter
pourretirerautantde saleteque possible.
Appliquerune mince Cooktop Cleaning
Creme*(n° de piece.20000001)**,recou-
vrir avecdupapieressuie-touthumidifieet
laisserpendant30 a 45 minutes (2 & 3
heurespourle sol tresIourd). Conservez
moite en couvrantla serviettede papier
d'enveloppeen plastique.Frotter & nou-
veau,puisessuyeravecunlingepropreet
sec.
REMARQUE:N'utiliserqu'untampona recur-
er ,ne rayantpas,,,propreet humide,sans
danger pour les ustensiles de cuisine non
adherents.Le verreet le motifserontendom-
mag6ssi le tamponn'est pas humide,s'il est
souilleousi unautre typede tamponest util-
ise.
Saletescuites ou dessech6es - Frotter
avecuntampona.recurer,,nerayantpas,,
et Cooktop CleaningCreme*.Tenir une
REMARQUE:Ne pas se servirdela lamede
rasoirtouslesjours,celapourraituserle motif
du verre.
Plastiqueousucrefondu - Reglerimme-
diatementI'el6mentsur LOWet gratterle
sucreet le plastiquede la surfacechaude
pour les pousservers une zone moins
chaude.Puis ETEINDREI'el6mentet le
laisserrefroidir.Nettoyerle residuavecun
grattoir& lame de rasoiret un produitde
nettoyagepour vitroceramique.
FINITION MI:tTALLIQUE
Laveraveceauet savon,unproduitdenet-
toyageduverre,ouun produitliquide&pul-
veriser.
Poureviter de former des rayuresou de
degraderla finition,ne pas utiliserun pro-
duitdenettoyageabrasifoupeu abrasif,ou
un produitde nettoyageagressifou caus-
tiquecommeuncomposede nettoyagede
four.
INTI RIEUR DU FOUR
Executerles instructionspresent6es& la
pages35-36pourI'autonettoyagedufour.
GRILLES DU FOUR
Nettoyeravecdereau savonneuse.
¢liminer les souillurestenaces avec une
poudredenettoyageou untampon&recur-
ersavonneux.Rinceret fairesecher.
Les grilles qu'on laissedans le four pen-
dant une operationd'autonettoyagepeu-
vent subirun changementde couleurper-
manentet ne plus glisser facilement.Si
cecise produit,frotterlesgrilleset lesrails
desupportdanslefouravecunpeud'huile
vegetalepourrestaurerlafacilitede glisse-
merit, puis enlever I'exces d'huile par
essuyage.
ARTICLES A FINITION
DE PLASTIQUE
GARNITURE DU DOSSERET ET EMBOUTS
Apresle refroidissement,nettoyeravecde
I'eausavonneuse,rinceretfaire secher.
>- Utiliserunproduitdenettoyagedu verreet
unlingedoux.
NOTE:Ne jamais utilisersur les finitionsde
plastiqueunproduit de nettoyageen poudre
ou un produitde nettoyageabrasffou caus-
tique,ou un produitde nettoyagede four; ces
produitsdet6rioreraientla finition.
37
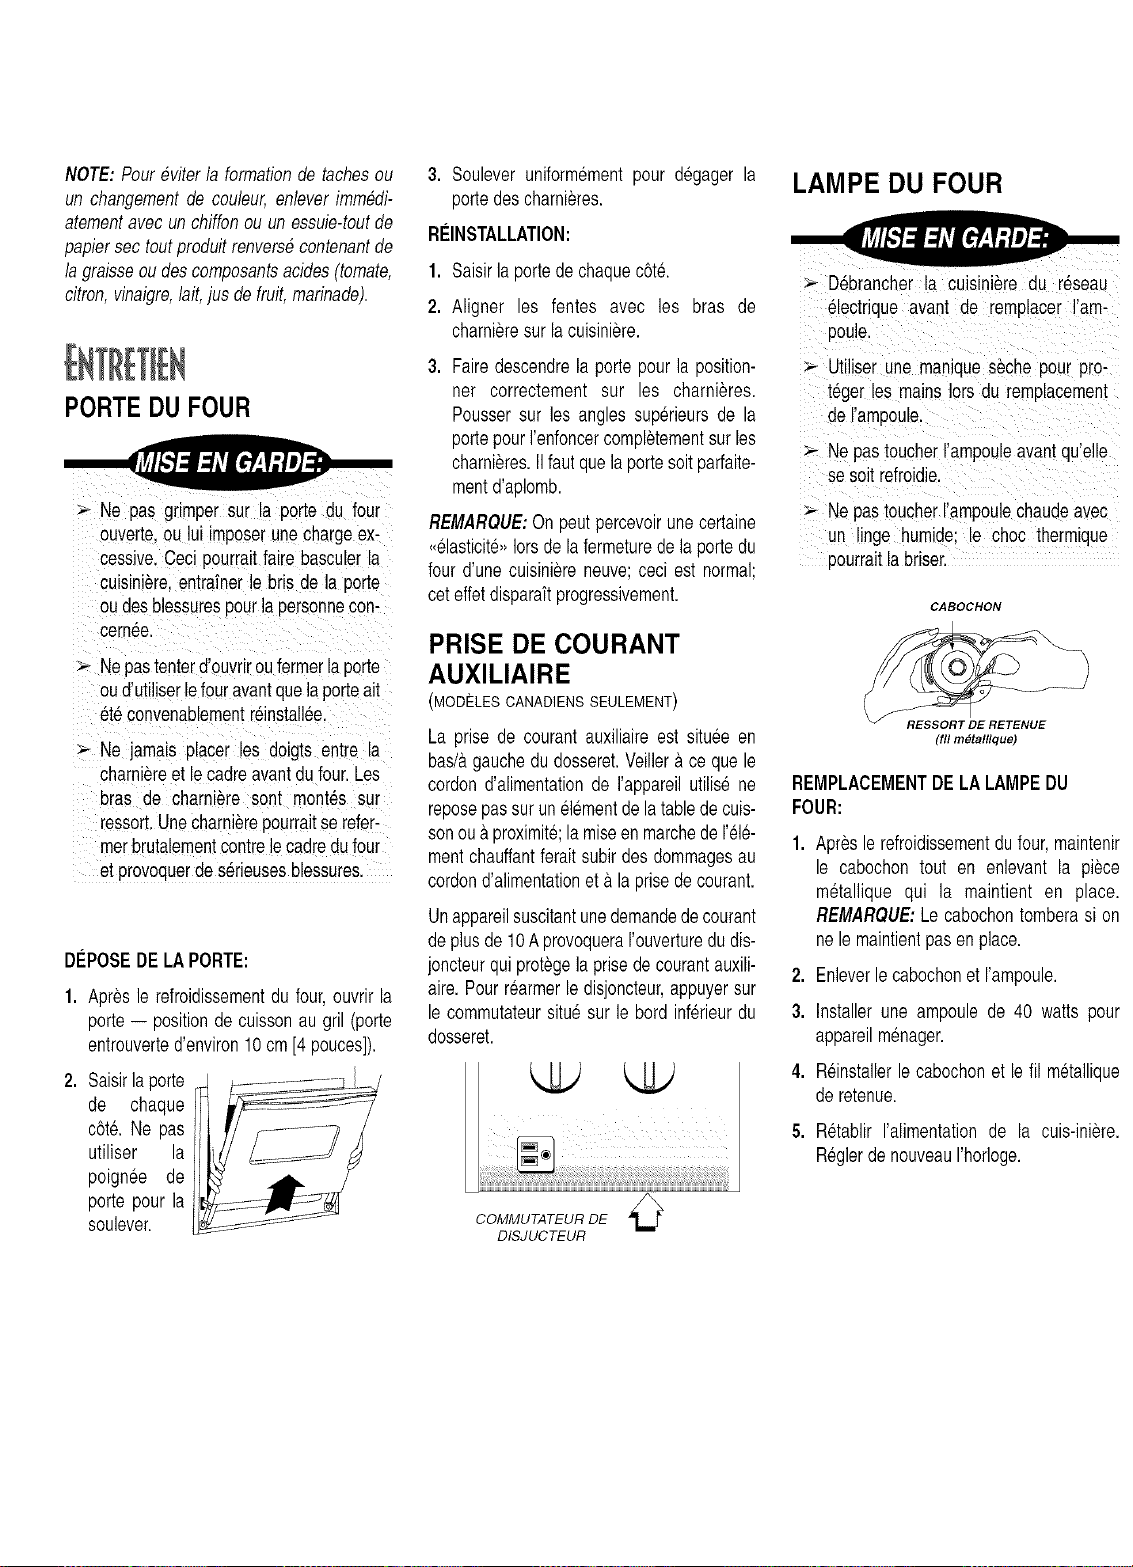
NOTE:Poureviterla formationde tachesou
un changementde couleur,enleverimmedi-
atementavecun chiffonou un essuie-toutde
oaoiersecroutarociulrrenverseconrenanrae
lagralsseouaescomoosanrsaclcies,rornare.
ctrron,vtnatgre,lait,jus de fruit,marinadeJ.
PORTEDU FOUR
Ne pas grimper sur la porte du four
ouverte,ou lui imposerunechargeex-
cessive.Cecipourraitfaire basculerla
cuisimere,entrafnerle bris de la porte
oudesblessurespourla personnecon-
cern6e.
Nepastenterd'ouvriroufermerlaporte
oud'utiliserlefouravantquelaporteait
et6convenablementr6install6e.
Ne jamais placer les doigts entre la
charni#reet lecadreavantdufour.Les
bras de charni_re sont mont6s sur
ressort.Unecharni_repourraitse refer-
merbrutalementcontrelecadredufour
et provoquerde s6rieusesblessures.
DISPOSEDE LAPORTE:
1. Apr#sle refroidissementdu four,ouvrir la
porte-- positionde cuissonau gril (porte
entrouverted'environ10cm[4 pouces]).
2. Saisirlaporte
de chaque
c6te. Ne pas
utiliser la
poignee de
porte pour la
soulever.
3. Souleveruniformementpour degager la
portedescharnieres.
RBNSTALLATION:
1. Saisirla portede chaquec6t6.
2. Aligner les fentes avec les bras de
charnieresurla cuisiniere.
3. Fairedescendrela porte pourla position-
ner correctement sur les charnieres.
Poussersur les angles superieursde la
portepourI'enfoncercompletementsur les
charnieres.IIfaut quela portesoit parfaite-
mentd'aplomb.
REMARQUE:Onpeut percevoirunecertaine
,,61asticit6,,Iorsde la fermeturede laportedu
four d'une cuisiniereneuve;ceci est normal;
ceteffetdisparaftprogressivement.
PRISE DE COURANT
AUXILIAIRE
(MODELES CANADIENS SEULEMENT)
La prise de courantauxiliaireest situee en
bas/_,gauchedu dosseret.Veillerace que le
cordond'alimentationde I'appareilutilisene
reposepassurunelementdelatabledecuis-
sonou&proximite;la miseenmarchedeI'el6-
mentchauffantferaitsubirdes dommagesau
cordond'alimentationet & la prisede courant.
Unappareilsuscitantunedemandedecourant
deplusde 10Aprovoquerarouverturedu dis-
joncteurquiprotegela prisede courantauxili-
aire.Pourrearmerle disjoncteur,appuyersur
le commutateursitue sur le bord inferieurdu
dosseret.
k.LLJ
COMMUTATEUR DE 0
DISJUCTEUR
LAMPE DU FOUR
D6brancherla cuisini#redu reseau
61ectrique avant de remp!acer!lain-
Uti!iserune maniques#che pour pro:
teger!es mains!ors du remplacement
deI'ampoule.
Ne pastoucherrampou!eavantqu'el!e
se soitrefroidie.
> Ne pastoucherrampoulechaudeavec
un !inge humide;le choc thermique
pourraitlabriser.
CABOCHON
\
RESSORT DE RETENUE
(tll metalllque)
REMPLACEMENTDE LALAMPEDU
FOUR:
1. Apr#sle refroidissementdu four, maintenir
le cabochontout en enlevant la piece
metallique qui la maintient en place.
REMARQUE:Le cabochontomberasi on
nele maintientpasenplace.
2. Enleverlecabochonet rampoule.
3. Installerune ampoule de 40 watts pour
appareilmenager.
4. Reinstallerle cabochonet lefil metallique
deretenue.
5. Retablir I'alimentationde la cuis-iniere.
ReglerdenouveauI'horloge.
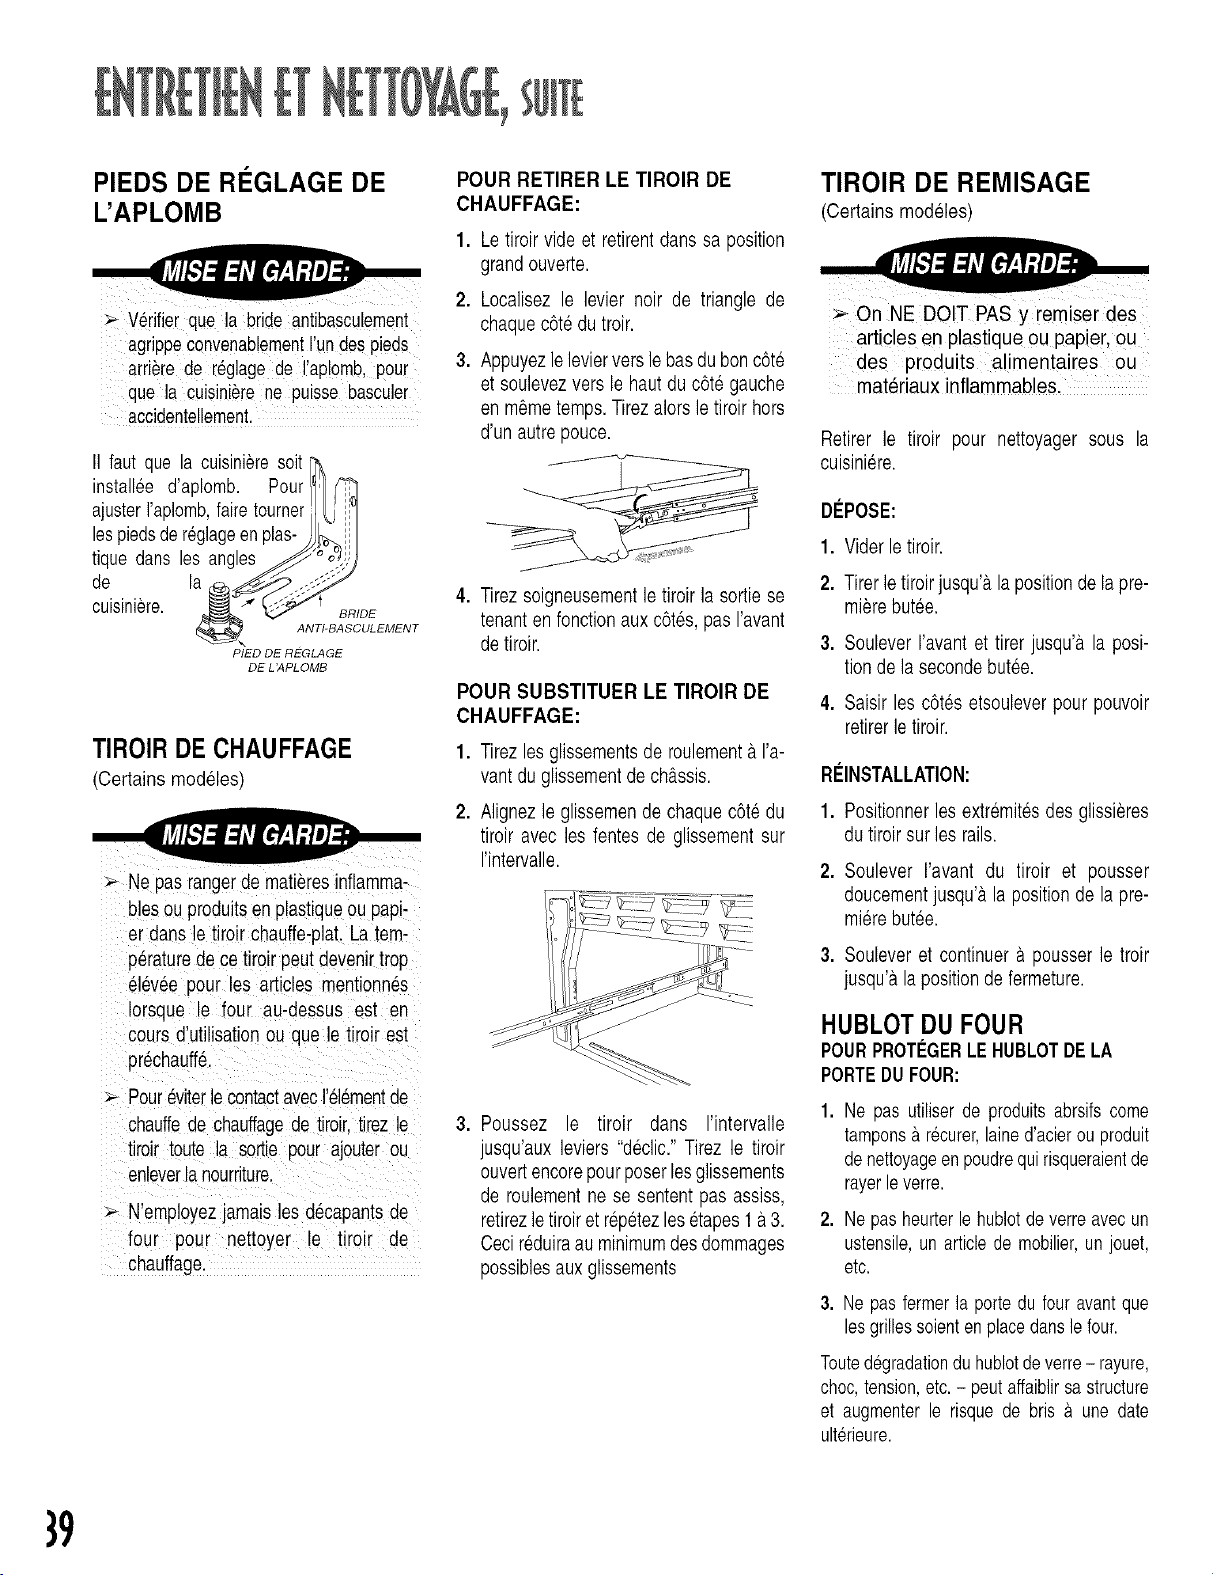
f _
PIEDS DE RI GLAGE DE
L'APLOMB
V#rifierque la bride antibasculement
agrippeconvenablementrun des pieds
arri#re de r_glagede rap!Drab,pour
que la cuisini#re ne puisse basculer
accidentellement.
II faut que la cuisinieresoit
installee d'aplomb. Pour
ajusterlaplomb,fairetourner j°
lespiedsdereglageenplas-
tique dans les angles_._ _..,,lj
de la _A_
cuisiniere. Ji_l_" _ BRIDE
?,,T,BABO LEME,T
PIED DE REGLAGE
DE L'APLOMB
TIROIRDECHAUFFAGE
(Certains modeles)
Ne 3as rangerde mati_resinflamma-
bles oo produitsen plastiqueou papi-
er dans le tiroir chauffe-plat.La tem-
peraturede ce tiroir peut devenirtrop
el_v_e pour les articles mentionn_s
Iorsque le four au-dessus est en
cours d'utilisationou que le tiroir est
prechauff&
Pour_vitere contactavec I'el_mentde
chauffede chauffagede tiroir,tirez le
tiroir toute la sortie pour ajouter ou
enleverla nourriture.
,_ N'employezjamais les d6capantsde
four pour nettoyer le tiroir de
chauffage.
POUR RETIRER LE TIROIR DE
CHAUFFAGE:
1. Le tiroir vide et retirentdans sa position
grandouverte.
2. Localisez le levier noir de triangle de
chaquec6tedu troir.
3. Appuyezleleviervers lebas du bonc6te
et soulevezvers le haut du c6te gauche
en m_me temps.Tirezalors le tiroir hors
d'un autre pouce.
4. Tirezsoigneusementle tiroir la sortie se
tenanten fonctionaux c6tes, pas I'avant
detiroir.
POUR SUBSTITUER LE TIROIR DE
CHAUFFAGE:
1. Tirezles glissementsde roulementa.I'a-
vantdu glissementde ch_.ssis.
2. Alignez le glissemende chaque c6te du
tiroir avec les fentes de glissementsur
I'intervalle.
3. Poussez le tiroir dans I'intervalle
jusqu'aux leviers "declic." Tirez le tiroir
ouvertencorepourposerlesglissements
de roulementne se sentent pas assiss,
retirezle tiroiret repetezlesetapes1 a 3.
Cecireduiraau minimumdes dommages
possiblesaux glissements
TIROIR DE REMISAGE
(Certains modeles)
On NE DO!T PAS y rem=serdes
articles en plastique ou papier, ou
des produits a!imentaires ou
materiaux inflammables.
Retirer le tiroir pour nettoyager sous la
CUlSlnlere.
DEPOSE:
1. Viderle tiroir.
2. Tirer le tiroirjusqu'a,la positionde la pre-
mierebutee.
3. Soulever I'avant et tirer jusqu'a,la posi-
tion de la secondebutee.
4. Saisir les c6tes etsouleverpour pouvoir
retirerle tiroir.
RE'INSTALLATION:
1. Positionnerles extremitesdes glissieres
du tiroir Burles rails.
2. Soulever I'avant du tiroir et pousser
doucementjusqu'b,la positionde la pre-
mierebutee.
3. Soulever et continuer a pousser le troir
jusqu'&la positiondefermeture.
HUBLOTDU FOUR
POURPROTEGERLE HUBLOTDE LA
PORTEDUFOUR:
1. Ne pas utiliserde produitsabrsifscome
tampons& recurer,lained'acierou produit
denettoyageen poudrequi risqueraientde
rayerleverre.
2. Ne pas heurterle hublotde verreavecun
ustensile,un articlede mobilier,un jouet,
etc.
3. Ne pas fermerla portedu four avantque
lesgrillessoientenplacedansle four.
Toutedegradationdu hublotde verre- rayure,
choc,tension,etc. - peutaffaiblirsa structure
et augmenterle risque de bris & une date
ulterieure.
}9
VERIFIER CERTAINS POINTS DANS
LES CAS SUIVANTS:
I V@ifierque les commandesdu four sont
correctementreglees.
I V@ifierque la fichede branchementest
correctementins@eedansla prisede cou-
rant.
I Inspecter/rearmerledisjoncteur.Inspecteri
remplacerlesfusibles.
I Contr61erla source d'alimentationelec-
trique.
NON-FONCTIONNEMENT
DE L'APPAREIL-TOTALOU PARTIEL.
REMAROUE:Sur les modelescanadiens
avec/e centre de r_chauffage,pendant/e
cycled'autonettoyage,/a surface de cuis-
sonen vitroc_ramiquene fonctionnepas.
I Verifiezsi lasurfaceeb'oulescommandes
du four sont bien regl6es.Consultezles
pages24et 30.
I V@ifiezsi laportedu fourest deverrouillee
apresunautonettoyage.Consultezla page
36.
I V@ifiezsi le four est regle pour une cuis-
son retardee ou pour un autonettoyage.
Consultezles pages34et 36.
LA SURFACE DE VITRO-CI-"RAMIQUE
SEMBLE USI_E.
1. Petites@afluresou abrasions.
I Assurez-vousquela surfacede cuisson
et le fondde la casserolesont propres.
Ne glissezpas les casserolesde verre
oude metalsur la surface.Wrifiez que
le fond de la casserole n'est pas
rugueux. Utilisez le produit nettoyant
recommande.Consultezla page 37.
2. Marquesde metal.
I Ne glissezpas les casserolesde metal
sur la surface. Lorsquela cuisinierea
refroidi, utilisez le produit nettoyant
recommande.Consultezla page 37.
3. Marqueset tachesbrunes.
III s'agit de deg_.tsqui n'ont pas ete
essuyes immediatement. Vous avez
essuyeavec un chiffonou une @onge
sale. Lefond d'unecasserolen'estpas
propre.
4. Zonesportantunlustremetallique.
I II s'agit d'un d@6t mineralcause par
I'eauou unaliment.
5. Piq0resouecaillage.
I IIs'agitdedeg&tsd'unalimentsucrequi
n'ont pas ere essuyesimmediatement.
Consultezlapage 37.
LA CUISSON DONNE DES RE_SULTATS
IMPRE_VUSOU DIFFCRENTSDU FOUR
PRE_CI_DENT.
I V@ifiezquela bouched'a@ationn'estpas
obstruee.Consultezla page 31 pourcon-
naftreI'emplacementde la bouche.
I V@ifiezquela cuisiniereest de niveau.
I Les temp@aturesentre une cuisiniere
neuve et une cuisiniere usageevarient
souvent.AvecI'&ge,latemp@aturedu four
s'ecarte souvent de la temp@ature
implicitepour devenirplus froide ou plus
chaude. Consultez la page 29 pour
obtenirles instructionssurle reglagede la
temp@aturedufour. REMARQUE:IIn'est
pas recommandede reglerlatemp@ature
Iorsqu'uneou deux recettesseulement
donnentde mauvaisresultats.
I Veiller& reduirela temp@aturedereglage
de25°Fpourunecuissonavecconvection.
I Consultez le livret ,, La Cuisine
Simplifiee _,pourobtenirde plus amples
renseignements sur les types de
casseroleset lacuissonaufour.
LES ALIMENTS NE GRILLENT PAS
CORRECTEMENTOU DCGAGENT
BEAUCOUP DE FUMI-"E.
! V@ifiezla positiondes grilles. Les ali-
mentssontpeut-6tretropprochesdesele-
ments.
I L'elementde grillagen'a pasete prechauf-
fe.
I Lepapierd'aluminiuma ererealutilise. Ne
couvrezjamaisla grillede la lechefriteau
moyend'un papierd'aluminium.
I Laportedu foura erefermeedurantlegril-
lage. Laissezla porte ouverte& la pre-
mierepositiondebutee(environ4pouces)
(toore).
I Enlevezle gras de la viandeavant de la
mettre&griller.
I Vousavezutiliseunelechefritesale.
LE FOUR NE S'AUTONETTOIE PAS.
I V@ifiezque le cycle n'estpas programme
pourund@art retarde.Consultezla page
36.
I V@ifiezque la portedu fourestfermee.
LE FOUR NE S'EST PAS NETTOY¢
CORRECTEMENT,
I I aurait fallu un cycle de nettoyageplus
long.
I Lesgrandsdeg&ts,surtoutd'alimentssucres
ouacidules,n'ontpasete essuyesavantle
cycled'autonettoyage.
LA PORTE DU FOUR NE SE
DCVERROUILLE PAS APRES LE
CYCLE D'AUTONETTOYAGE.
I L'int@ieur du four est encore chaud.
AIIouezenvironune heurepour que le four
se refroidisseapresun cycled'autonettoy-
age. VouspouvezouvrirlaporteIorsquele
motLOCK(verrouiller)nes'afficheplus.
L'HUMIDIT¢ S'ACCUMULE DANS LE
FOUR OU SUR LE FENf:TRE.
I CetteaccumulationestnormaleIorsqueles
alimentsau four ont une forte teneur en
humidite.
I Vousavezutiliseun ex@sde liquidepour
nettoyerle fen@tre.
IL Y A UNE FORTE ODEUR OU UNE
LI_GF:REFUMEE LORSQUE LE FOUR
EST ALLUMI-".
I II s'agit d'unesituationnormalepour une
cuisiniereneuve; elle s'estomperaa.I'utili-
sation.Uexecutiond'uncycled'autonettoy-
ageaidera & eliminerplus rapidementles
odeurs.
I Faitesfonctionnerle ventilateurpourevac-
uerlafumeeet lesodeurs.
I II y a une quantiteexcessivede saleteau
fonddu four.Executezun cycled'autonet-
toyage.
AFFICHAGE D'UN <<F_PLUS D'UN
NOMBRE APPARA|TRE
I II s'agitd'uncodede defectuosite.Si untel
codes'afficheet quedes signauxsonores
retentissent,appuyezsur la touche CAN-
CEL(annuler). Si lecodedemeureaffiche
et quelessignauxsonoressepoursuivent,
debranchez la cuisini@e. Attendez
quelques minutes, puis rebranchez la
cuisiniere. Si le code s'afficheencoreet
que les signauxsonores se poursuivent,
debranchezla cuisiniereet communiquez
avecuntechnicienautorise.
I Sile fouresttressale,unequantiteexces-
sivede saletepeut s'enflammeret activer
ainsi un code de defectuositedurant le
cycle d'autonettoyage. Appuyez sur la
touche CANCEL (annuler) et laissez
refroidir le four pendant completement,
eliminezexcessifde sol puis relancezle
cycle d'autonettoyage. Si le code de
defectuositeapparaitencoreetquelessig-
naux sonoresreprennent,debran-chezla
cuisiniereet communiquezavecuntechni-
cienautorise.
Garantiecomplbted'uneannee- Pibceset main-
d'oeuvre
Durantunep6rioded'un [1) an £compterde ladate
deI'achatinitial,toutepiecesubissantuned#failance
dartsles conditionsnormalesd'usage-n_nagersera
r6paree/remplac_egratuitement.
Garantielimit_e- piecesseulement
Deuxibmeannbe- Apres,apremiereann6esuivant
a date de I'achatinitial,toutepiecequi se revelerait
_tre d6fectueusedans des conditions normales
d'usagemenagersera r6par6eou remplaceegratu-
tement (piece seulement); le propri6taire devra
assumertousles autresfrais, y comprisles fraisde
main-d'oeuvre,de d_placementet de transport.
Dela troisibmeh lacinquiemeannie &compterde
a datedeI'achatinitialaud_tal, lespiecesde latste
ci-dessoussubissantuned#faillancedartsdescondi-
tionsnormalesd'usagemenagerserontr6par_esou
remplac_esgratulement(piecesseulement);le pro-
3ri6tairedevraassumertous lesautresfrais,y com-
3rlslesfraisdemain-d'oeuvre,de d_placementet de
transport.
Commandes_lectroniques
Surfacede cuisson en vitroc_ramique:Par
suitede bristhermique.
elements chauffants_lectriques: =-[_mentsde
surface,de grl et de cuissonsur apparels de
cuisson61ectrique,
R_sidentsCanadiens
Lesgarantiesci-dessuscouvrentunapparelinstall6
au Canada seulement s'il a et@agree par les
agencesde test habilit_es(verificationde la confor-
mit_a unenormenationaledu Canada).saufsi I'ap-
3arei[a et_ introduitau Canada£ 'occasiond'un
changementde residencedes Etats-Unisvers le
Canada.
Garantielimit_e horsdes Ctats-Unisetdu Canada
- Pibcesseulement
Pendantdeux(2)ans&compterde ladatede ['achat
initial au d6taiL toute piece qul se r@v6lerait@tre
d6fectueusedans des conditionsnormalesd'usage
m_nagersera repareeou remplac@egratuitement
tpi_ceseulement);le propri_tairedevraassumertous
es autresfrais,y comprislesfraisde main-d'oeuvre.
ded@placementet de transport.
Les garantiessp#cifiquesformul#esci-dessussont
IesSEULESquele fabricantaccorde.Cettegarantie
vousconf#redesdroitsjuridiquesspecifiqueset vous
pouvez #galementjouir d'autres droits, variables
d'uneprovincearautre.
.
4.
5.
111111III!III II 1111
Lesdommagesoudirangementsdusa:
a. Miseenservice,livraisonouentretieneffectuesincorrectement.
b. Toutereparation,modification,alterationettout reglagenon autorisespar le fab-
ricantoupar un prestatairede serviceapres-venteagre&
c. Accidents,mauvaiseutilisationou usageabusifouderaisonnable.
d. Alimentationelectrique(tension,intensite)incorrecte.
e. Reglageincorrectd'unecommande.
Les garantiesne peuvent£tre honoreessi les numerosde seried'origineont ere
enleves,modifiesou nesontpas facilementlisibles.
Ampoules.
Appareilsachetesauxfinsd'usagecommercialou industriel.
Lesfrais devisite d'un prestatairede serviceou de serviceapr_s-venteencourus
pourles raisonssuivantes:
a. Correctiond'erreursdemiseenservice.
b. InitiationdeI'utilisateur_.I'emploideI'appareil.
c. TransportdeI'appareilaux Iocauxdu prestatairede service.
Dommagessecondairesouindirectssubispartoutepersonnesuiteau non-respect
delagarantie.CertainesprovincesnepermettentpasI'exclusionoulalimitationdes
dommagessecondairesouindirects;parconsequentles limitationsouexclusionsci-
dessuspeuventnepass'appliquer&votrecas.
# #
Contacterle revendeurchezqui I'appareila eteachet&oucontacterMaytagAppli-
ancesSalesCompany/service-clientau 1-800-688-9900aux t:t.-U,ou 1-800-688-
2002auCANADA,pourobtenirlescoordonnesd'uneagencedeserviceagreee.
Veiller&conserverlafactured'achatpourjustifierdela validitede lagarantie.Pour
d'autresinformationsencequiconcernelesresponsabilitesduproprietaire&I'egard
duservicesousgarantie,voir le textede laGARANTIE.
Si le revendeurou I'agencede serviceapres-ventene peut resoudrele probleme,
• , @
ecrire£ MaytagAppliancesSalesCompany,attenlonCAIR Center,P.O.box2370,
Cleveland,TN 37320-2370ou telephonerau 1-800-688-9900aux I_.-U.ou 1-800-
688-2002au CANADA.
NOTE:Lorsdetoutcontactconcernantun probleme,fournirI'informationsuivante.
a. Nom,adresseet numerodetelephoneduclient;
b. Numerode modeleet numerode seriede I'appareil;
c. Nomet adressedu revendeurou de I'agencedeservice;
d. Descriptionclaireduproblemeobserve;
e. Preuved'achat(facturedevente).
Les guidesd'utilisation,les manuelsde serviceet les renseignementsdes pieces
sont disponiblesaupres de Maytag AppliancesSales Company,service-client
Maytag.
41
MAYTAG • 403 West Fourth Street North • EO. Box 39 • Newton, Iowa 50208
ESTUFA ELI_CTRICA A LOS ELEMENTOS
RADIANTES T2
MAYI'AG
®
Instalador: Por favor deje esta guia
junto con el electrodomestico.
Consumidor: Por favor lea y con-
serve esta gufa para referencia futu-
ra. Conserve el recibo de venta y/o
el cheque cancelado como prueba
de compra.
i_iiiilii
i_iiiil
NtJmero de Modele
NtJmerode Serie
Fecha de Compra
En nuesto contJnuoaf#m de
majorarla calidad y rendimiento
de nuestroselectrodomesticos,
i_iiiil
puede que sea necesariomodi_
ficar e electrodom6sticosin actu-
alizarestagu[a.
!_iiiilii
ii
Si tiene alguna pregunta, Ilame al:
!:i! 1-800-688-9900 (EE.UU.)
1-800-688-2002 (Canada)
(Lunes - Viernes, 8:00 a.m. -
8:00 p.m. Hora del Este)
Internet: http://www.maytag.com
43-45
_FICIE PARA(OCINAR........Pages 46-48
49-55
YLIMPIEZA....................Pages 56-60
_HTES
......................DELLAMAR............................Page 61-62
Para informaci6n sobre servicio,
ver p_gina 63.
http://www.maytag.com Litho U.S.A.
Leaysigatodaslas instruccionesantesde
usar este electrodomesticopara evitarel
riesgopotencialdeincendio,choqueelectrico,
lesi6n personalo datio al electrodomestico
comeresultadode su usoinapropiado.Utilice
este electrodomestico solamente para el
prop6sitoqueha sidedestinadosegt_nse de-
scribeen estagala.
Para asegurar funcionamiento correcto y
seguro: El electrodomesticodebeser instal-
adodebidamentey puestoa tierraper un tec-
nicecalificado.
TODASLASEST-
UFASSE
PUEDENVOL-
CARY CAUSAR
LESIONESP
SONALES
INSTALEELDIS-
POSITIVO
ANTIVUELCO
INCLUlDOCON
LAESTUFA
SIGATODASLAS INSTRUCClONES
DEINSTALAClON
ADVERTENClA: PARA REDUCIR
EL RIESGO DE VUELCO DEL
ELECTRODOMESTICOA CAUSA DE
USO ANORMAL0 DEBIDOA PESO
EXCESIVOENLAPUERTADELHORNO,
ES NECESARIOASEGURAREL ELEC-
TRODOMESTICOMEDIANTEUN DIS-
POSITIVOANTIVUELCODEBIDAMENTE
NSTALADO,
Para verificar si el dispositivoest,. debida-
menteinstalado,mire debajode la estufacon
una linternapara asegurarsede que uno de
los tornillosniveladorestraserosestedebida-
menteenganchadoen la ranuradel soporte.
El dispositivoantivuelcoasegura el tornillo
niveladortraseroal piso cuandoest,.debida-
mente enganchado. Esto debe verificarse
cadavez quela estufaseamovida.
Apagueel electrodomesticoy la campanade
ventilacbnparaevitar que las llamasse dis-
persen. Extingalasllamasluegoenciendala
campanaparaexpulsarel humoy el olor.
> Enla cubierta: Apagueelfuegoo la llama
enunasartenconuna tapao una bandeja
dehornear.
NUNCAlevanteo muevaunasartenenlla-
mas.
En el homo:Apagueel fuegoo la llama
cerrandola puertadelhomo.
No useaguaen los incendiosde grasa. Use
bicarbonatode soda, un productoqdmico
seco o un extinguidordel tipo con espuma
paraapagarunincendioo la llama.
Se ha comprobado el rendimiento y fun-
cionamientosegurode este electrodomestico
usando baterfas de cocinaconvencionales.
No useningt3ndispositivoo accesorioqueno
haya side espedficamenterecomendadoen
estagala. No usecubiertas,rejillassuperiores
de la estufa o sistemasde convecci6npara
homes. El uso de dispositivoso accesorios
queno seanexpresamenterecomendadosen
esta gu[a pueden crear peligrosgraves de
seguridad,afectarel rendimientoy reducirla
vida t_til de los componentes de este
electrodomestico.
ADVERTENCIA:NUNCAuse la puertadel
electrodomesticoo la gaveta,si la tiene,come
una banquetao asiento pues esto puede
resultar en la posible volcadura del elec-
trodomestico,datio al electrodomesticoy
lesionesgraves.
Siel electrodomesticoest,.instaladocercade
unaventana,sedebentenercuidadoparaevi-
tarquelascortinaspasensobreloselementos
superiores.
NUNCA use este electrodomesticopara
calentar o calefaccionarla habitaci6n. El
incumplimientodeestainstruccbnpuedecon-
ducira posiblesquemaduras,lesi6n,incendio
o datioal electrodomestico.
NUNCAuseropassueltasu holgadascuando
este usandoel electrodomestico.Las ropas
puedenenredarseen losmangosde los uten-
siliosoprendersefuegoy causarquemaduras
si la ropaentraen contactocon loselementos
calefactorescalientes.
Paraasegurarel funcionamientodebidoy evi-
tar datio al electrodomesticoo lesi6n, no
ajuste,repareni reemplaceningunapiezadel
electrodomesticoa menosqueseaespecifica-
menterecomendadoen esta gufa. Todaslas
otrasreparacionesdebenser hechaspor un
tecnicocalificado.
NUNCA almaceneni use gasolina u otros
materialescombustibleso inflamablesen el
homo,cercadelos elementossuperioreso en
lavecindaddeesteelectrodomesticopueslos
vaporespuedencrearunpeligrodeincendioo
unaexplosi6n.
Paraevitarincendiosdegrasa,nodejequese
acumulegrasade cocinarni otros materiales
inflamablesenla estufao cercade ella.
Usesolamentetomaollassecos. Lostomaol-
lashOmedosomojadosaltocarlassuperficies
calientespuedenproducirunaquemadurapor
vapor. No dejeque los tomaollastoquenlos
elementoscalefactorescalientes.No useuna
toalla ni otro patio voluminosopues puede
f_.cilmentetocar los elementoscalefactores
calientesy prendersefuego.
Siempreapaguetodos los controlescuando
hayaterminadode cocinar.
NUNCAcalienterecipientescerradosen los
elementossuperioreso en el homo. Laacu-
mulaci6n de presi6n en el interior puede
reventarel recipientecausandoquemaduras,
lesi6no datioal electrodomestico.
NUNCAuse papel de aluminiopara cubrir
una parrilla del homoo la parte inferiordel
homo. Elusoincorrectopuederesultarenun
riesgodechoqueelectrico,incendioo datioal
electrodomestico. Use papel de aluminio
solamentecomose indicaenestaguia.
Muchosenvasesdetipo aerosolson EXPLO-
SIVOScuandosonexpuestoal calorypueden
ser altamenteinfiamables.Evitesu uso o su
almacenamientocercadelelectrodomestico.
43
NUNCA deje los elementossuperioressin
supervisidn,especialmentecuandoestAusan-
dolos ajustesdecaloraltos. Underramesin
recibirla debidaatencidnpuedecausarhumo
y underramedegrasapuedecausarunincen-
dio.
Este electrodomestico tiene diferentes
tamahos de elementos superiores.
Seleccione utensilios que tengan bases
planasIo suficientementegrandesparacubrir
el elemento. La relaci6nadecuadaentre el
utensilioy elelementomejoraralaeficienciaal
cocinar.
Siel utensilioes mAspeque_oqueel elemen-
to,unaporcidndelelementoquedarAexpues-
ta y puedeencenderla ropao untomaollas.
Solamenteciertostiposdeutensiliosde vidrio,
vidrio/cerAmico,cerAmica,gresuotrosutensil-
ios vidriadosson convenientespara cocinar
en la superficieo en el hornosin quebrarse
debidoal repentinocambiode temperatura.
Sigalas instruccionesdelfabricantedel uten-
siliocuandousevidrio.
Girelosmangosdelosutensilioshaciaelcen-
tro de la cubierta,no hacia la habitacidno
sobreotro elementosuperior.Estoreduceel
riesgode quemaduras,encendidode materi-
ales inflamableso derramessi el sartenes
tocadoaccidentalmenteoalcanzadoporniSos
pequefios.
NUNCAcocinesobreunacubiertarota. Si la
cubiertadela estufase rompe,losagentesde
limpiezay los derramespuedenpenetrarla
cubiertarotay crearunriesgodechoqueelec-
trico. Pdngaseen contactoconuntecnicocal-
ificadoinmediatamente.
Limpie la cubierta con cuidado. Algunos
limpiadorespuedenproducirvaporesnocivos
si se aplicana unasuperficiecaliente. Si se
usa una esponja, paso o toalla de papel
hQmedaen una Areade la cubiertaque este
caliente, tenga cuidado para evitar que-
madurascon elvapor.
Use extremocuidadocuandomuevala olla
con aceiteo descartela grasacaliente. Deje
quela grasase enfrieantesde intentarmover
laolla.
Tenga cuidado cuando abra la puerta del
homo. Deje que escape el aire o el vapor
calienteantesdesacaro volvercolocarel ali-
mento.
Paraunfuncionamientoy rendimientoapropi-
adodel homo, no bloqueeni obstruyael con-
ducto de ventilacidndel homo. Cuando el
homo esta en uso, el Area circundantese
calientanIo suficientecomoparacausarque-
maduras.
Siemprecoloquelas parrillasdel homo en la
posicidndeseadacuandoel homo este fifo.
Si es necesariomoverunaparrillacuandoel
horno estA todavia caliente,no deje que el
tomaollas toque el elemento caliente del
horno.
Limpiesolamentelaspiezasquese indicanen
estagufa. Nolimpieel empaquede la puerta.
Elempaqueesesencialparaunsellohermeti-
co. No restriegue,dare, ni muevael empaque
dela puerta.
No use limpiadoresde homo. No se debe
usar ningOnlimpiadorde homo comercialni
recubrimientoprotectorparael forrodelhomo
de ningunaclase,en el homoo alrededorde
cualquierpiezadelmismo.
Antesde la autolimpiezadel homo, saquela
asadera,las parrillasdelhomoy otrosutensil-
ios para evitar el humo excesivo,la decol-
oraci6nde las parrillasdel homo o posible
dafioa los utensilios.
Limpie los derrames excesivos, especial-
mentelos derramesde grasa,antesdel ciclo
de la limpiezaparaevitarhumo,Ilamaradaso
llamas.
Es normal que la cubierta de la estufa se
calienteduranteel ciclode la limpieza.PorIo
tanto,evite tocar la cubierta,la puerta,ven-
tana o el respiraderodel homo duranteun
ciclode autolimpieza.
NUNCAtoquelasuperficieo los elementos
calefactoresdel homo, las Areascercade
los elementoso las superficiesinteriores
delhomo.
Los elementos calefactores pueden estar
calientes aQn cuando se vean de color
obscuro. Las Areascerca de los elementos
superioresy de las superficiesinterioresdel
homo puedencalentarseIo suficientecomo
paracausarquemaduras.Durantey despues
deluso,notoqueni dejeque las ropasu otros
materialesinflamablesentrenen contactocon
los elementoscalefactores,con las Areas
cercade los elementoso con las superficies
interioresdel homo hastaque no se hayan
enfriadocompletamente.
Otras superficies potencialmentecalientes
son: la cubiertade la estufa, las Areasque
estandirigidashaciala cubierta,el respiradero
delhomoy lassuperficiescercadelaabertura
delrespiradero,la puertadel homo,las Areas
alrededorde lapuertay laventanadelhorno.
IDi#BRA
NUNCAdejea los ni_os soloso sin super-
visidncuandoelelectrodomesticoesteenuso
o estecaliente.
NUNCApermitaquelosniSossesientenose
parenen ningunapartedel electrodomestico
puesse puedenlesionaro quemar.
ATENOION:NUNOA guarde arficulos de
interespara los niSos en los armariosque
estansituadossobrelaestufao en el protec-
tortrasero. LosniSosquese subena laestu-
fa,a la puertao al gabinetepara alcanzarlos
artfculospueden dafiar el electrodomestico,
quemarseo lesionarsegravemente.
Selesdebeenseharalosnixesqueelelec-
trodomesticoylosutensiliosqueest_.nenelo
sobreelpuedenestarcalientes.Dejeenfriar
losutensilioscalientesenunlugarseguro,
fueradelalcancedelosniSospequehos.Se
lesdebeense_ara losnihosqueunelec-
trodomesticonoesunjuguete.Nosedebe
permitirquelosniSosjueguenconloscon-
trolesuotraspiezasdelaestufa.
Limpielacampanadelaestufaylosfiltroscon
frecuenciaparaevitarquelagrasau otros
materialesinflamablesseacumulenen la
campanaoenelfiltroyevitarincendioscau-
sadosporlagrasa.
Enciendaelventiladorcuandococinealimen-
tosflameados(talcomo'CherriesJubilee')
bajolacampana.
La(Propuesta65)dela Leyde1986del
Estadode CaliforniasobreSeguridady
Contaminaci6ndelAguaPotable(California
SafeDrinkingWaterandToxicEnforcement
Actof 1986)exigequeel Gobernadorde
Californiapubliqueunalistadelassustancias
queseg0nel Estadode Californiacausan
canceroda_oalsistemareproductoryexige
quelosnegociosadviertanasusclientesdela
exposici6npotencialatalessustancias.
Losusuariosdeesteelectrodomesticosonpor
Iotantoaqufadvertidosdequecuandoel
homoest,.enciclodeautolimpieza,puede
haberalg0nnivelbajodeexposici6naalgunas
delassustanciasqueaparecenenla lista,
incluyendomon6xidodecarbono.Laexposi-
ci6na esassustanciaspuedeserreducida
ventilandodebidamenteel homoalexterior
duranteelciclodeautolimpieza,abriendouna
ventanay/ounapuertaenlahabitaci6ndonde
esteubicadoelelectrodomestico.
AVISO IMPORTANTERESPECTOA LOS
PAJAROSDOMESTICOS:Nuncamantenga
a los pajarosdomesticosen la cocinao en
habitacioneshasta dondepuedanIlegar los
humosdelacocina.Losp_.jarostienenunsis-
temarespiratoriomuysensitivo. Los humos
producidosdurante el ciclo de autolimpieza
delhomopuedenser perjudicialeso mortales
paralos p_.jaros.Los humosque despideel
aceitedecocina,la grasa,lamargarinasobre-
calentadosy la vajilla antiadherentesobreca-
lentadapuedentambienserperjudiciales.
45

Useestoscontrolesparaencenderloselemen-
tossuperiores.Se disponede una selecci6n
infinitadeajustesdelcalordesde'LOW'(BAJO)
hasta 'HIGH' (ALTO).Estas perillaspueden
colocarseen cualquieradeestosajusteso entre
ellos.
PROGRAMACIONDE
LOSCONTROLES
1. Coloqueel utensiliosobreelelementosu-
perior.
2. Oprimay girela perillaencualquierdirec-
ci6nhastael ajustede calordeseado.
Enel paneltraserose encuentramar-
cadocualelementocontrolacadaperil-
-_ola. Per ejemplo,indicael ele-
mentoderechodelantero.
3. Hayunaluz deindicadorpor cadaparde
perillasde control.Cuandounao ambas
perillas de control superficiales se da
vuelta en la luz se girar& Cuandoqua-
lesquierade lasperillasdecontrolsuperfi-
cialesse giran,laluzdar_,vueltaapagado.
La luz dar_.vuelta apagadocuando los
elementossuperficialessedanvueltaapa-
gado.
4. Despuesde cocinarcoloquela perilla en
la posici6n'OFF'(APAGADO).Retireel
utensilio.
ANTESDECOCINAR DESPUESDECOClNAR
Siemprecoloqueun utensilioen el ele-
mento superior antes de encenderlo.
Para evitar dafio a la estufa, nunca
enciendaun elementosuperiorsin tener
unutensiliosobreel.
•_ NUNCA use a cubierta de la estufa
comounaAreapara guardaralimentoso
utensilios.
FvllENTRASCOCINA
Aseg0resedequeusted sabecualperil-
Aseg0resedeque los elementossupen-
oresest#napagados.
>- Limpie cualquier derrame tan pronto
comosea posible.
OTRASSUGERENOIAS
Siexistenarmariosdirectamentesobrela
superficiede cocinar,coloque en ellos
articulosde uso poco [recuentey que
puedenset guardadoscon seguridaden
una.reaqueestarasujetaalcalor.
lacontrolacadaelemento.Asegdresede .....
,, Aigunas lemperaluras pueaen no ser
queustedencendloel elementocorrecto.........
segurasparaartlculos tales como ilqul-
Comienceacocinaren un ajustede calor dos volatiles,limp-iadoreso rociadores
alto luegoreduzcaa unajuste m_s bajo en aerosol.
paracompletarla cocci6n. Nuncauseun >- NUNCA deje ningdn arficulo, especial-
ajustedecalor alto paracocinardurante mente art[culos de plAstico,sobre la
untiempoprolongado.
,_ NUNCA permita que una olla hierva
hastasecarse.Estopodriadafar laolla y
elelectrodom6stico.
NUNCAtoquela superficiede la estufa
hasta que no se haya enfriado.
PosiblementealgunasAreasdelasuper-
cubiertade la estufa. El aire caliente
proveniente del respiradero puede
encenderlosart[culosinflamables,derre-
tir o ablandarlos pl_.sticoso aumentarla
presi6n en los contenedorescerrados
haci_ndolosreventar.
>- NUNCA permitaque el papel de alu-
ficie,especialmentealrededorde losele- minio, los term6metros de came o
mentos,se entibieno calientenmientras cualquierotto objetode metal,a excep-
est_cocinando.Usetomaollaspara pro- ci6nde unaollasobreun elementosupe-
[egersus manos rior. tenga contactocon los elementos
calefactores.
Eltamaffo,tipode utensilioy lacocci6nafec-
taran el ajuste del calor. Para informacidn
sobre los utensilios y otros factores que
afectanlos ajustesdel calor,consulteel fol-
leto"La CocinaFacil".
OFF
LOW _ HIGH
3
5 7
MEDIUM
'HIGH'(Alto): Se usa parahacer hervirun
Ifquido.Siemprereduzcael ajustea uncalor
m_.sbajo cuandolos Ifquidoscomiencena
herviro cuandolos alimentoscomiencena
cocinarse.
9 'MED.HIGH'(Med.Alto):Use para dorar
came,calentaraceiteparafrefrenunasarten
hondao parasaltear.Tambienparamanten-
er un hervorr_.pidoparacantidadesgrandes
de Ifquidos.
'MEDIUM'(Mediano):Usadoparamantener
un hervor lentopara grandescantidadesde
Ifquidoy parala mayoriadelas frituras.
3 'MED.LOW'(Med.Bajo): Useparacontin-
uarcocinandoalimentostapadoso paracoci-
naralvapor.
'LOW' (Bajo): Se utilizapara mantenerlos
alimentos calientes y derretir chocolatey
mantequilla.
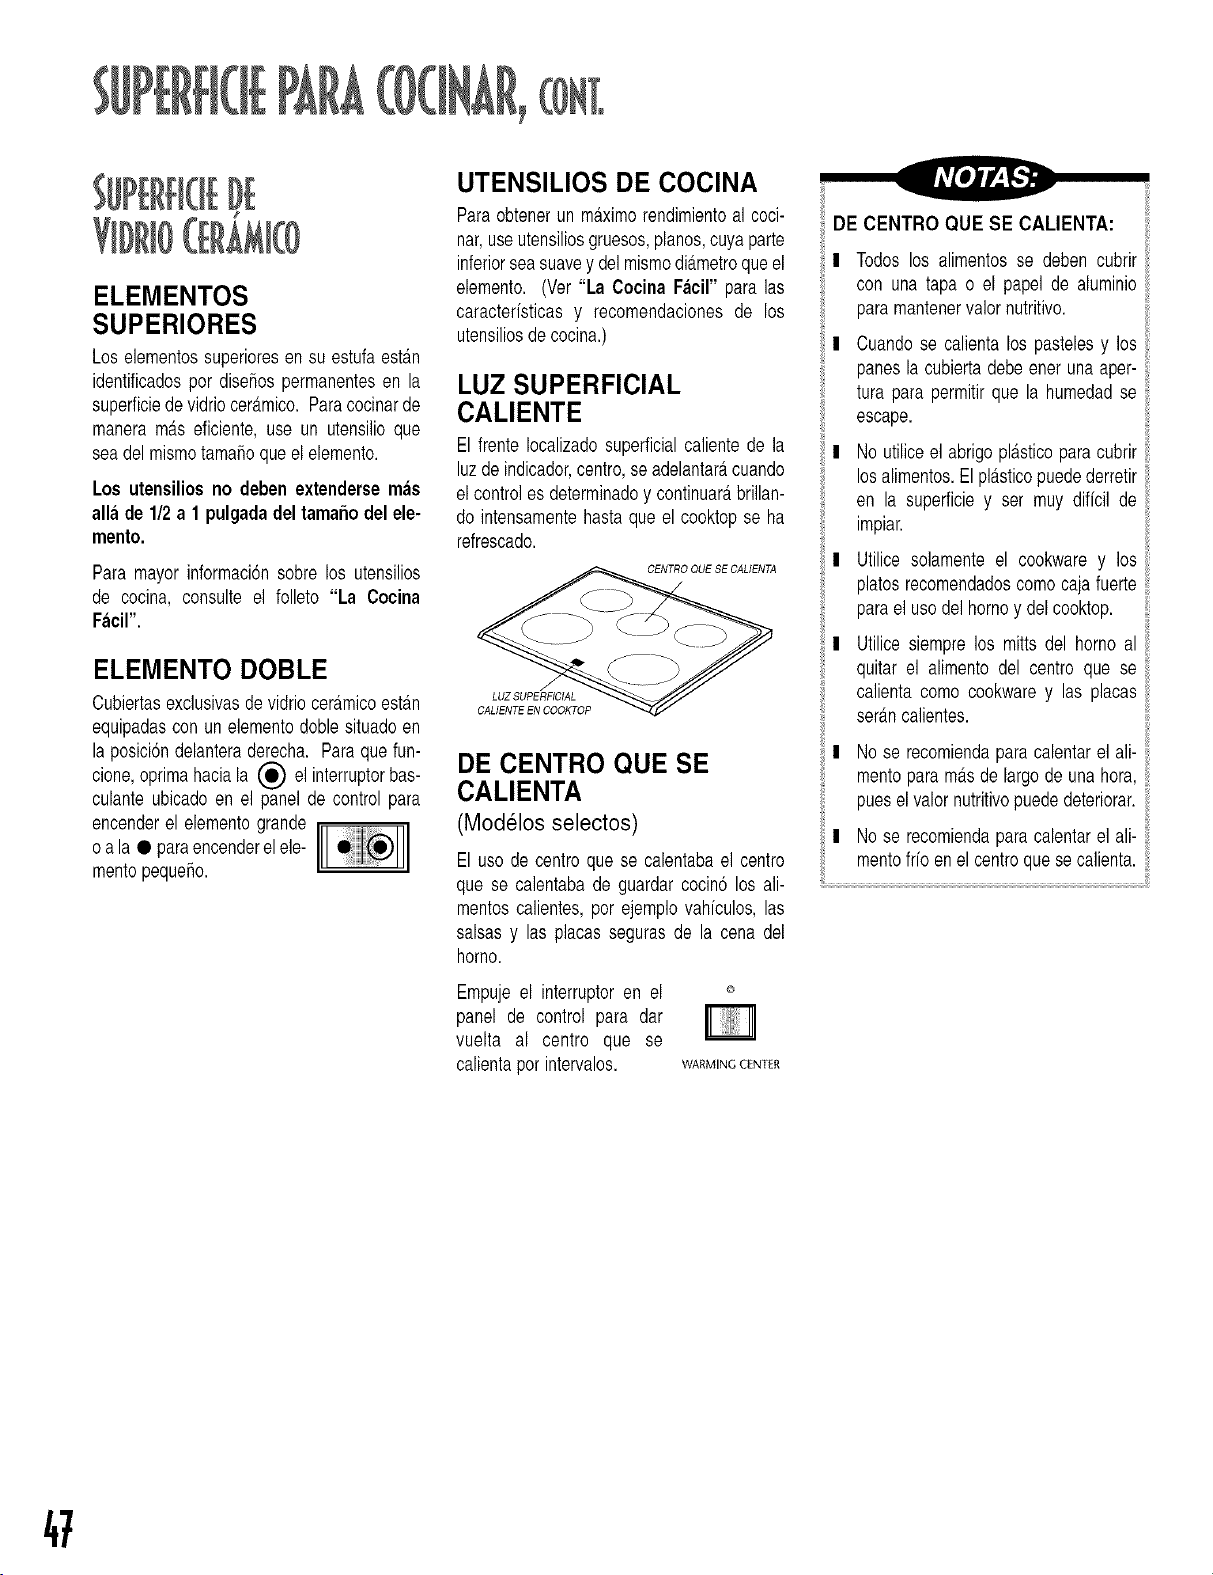
ELEMENTOS
SUPERIORES
Los elementossuperioresen su estufaesta.n
identificadospor diseSospermanentesen la
superficiedevidriocer_.mico.Paracocinarde
maneramOseficiente,use un utensilioque
seadelmismotamale queel elemento.
Los utensiliosno debenextendersemas
aliade 1/2 a 1 pulgadadeltamafiodelele-
mento.
Para mayor informaci6nsobre los utensilios
de cocina, consulte el folleto "La Cocina
Facil".
ELEMENTO DOBLE
Cubiertasexclusivasdevidriocera.micoesta.n
equipadascon un elementodone situadoen
la posici6ndelanteraderecha. Paraquefun-
haciala (0) el interruptorbas-clone,oprima
culanteubicadoen el panel de control para
encenderel elementogrande
oa la • paraencenderelele-
mentopeque5o.
UTENSILIOS DE COCINA
Paraobtenerun maximorendimientoal coci-
nat,useutensiliosgruesos,planes,cuyaparte
inferiorseasuavey delmismodiOmetroqueel
elemento. (Ver "La Cocina Facil" para las
caracterfsticasy recomendacionesde los
utensiliosdecocina.)
LUZ SUPERFICIAL
CALIENTE
El frenteIocalizadosuperficialcalientede la
luzde indicador,centro,se adelantarOcuando
el controles determinadoy continuarObrillan-
do intensamentehasta que el cooktopse ha
refrescado.
CENTRO QUE SE CALIENTA
LUZ SUPERFICIAL
CALIENTEEN COOKTOP
DE CENTRO QUE SE
CALIENTA
(Mod_los selectos)
El uso de centroque se calentabael centro
que se calentabade guardarcocin6 los ali-
mentoscalientes,por ejemplovahfculos,las
salsasy las placassegurasde la cena del
homo.
Empuje el interruptoren el °
panel de control para dar
vuelta al centre que se
calientaporintervalos. WARMINGCENT£R
DE CENTRO QUE SE CALIENTA:
! Todos los alimentosse deben cubrir
con una tapa o el papel de aluminio
paramantenervalornutritivo.
! Cuandose calientalos pastelesy los
panesla cubiertadebeener una aper-
tura para permitirque la humedadse
escape.
! No utiliceel abrigopla.sticoparacubrir
losalimentos.El plOsticopuedederretir
en la superficiey ser muy diffcil de
impiar.
! Utilice solamenteel cookwarey los
platesrecomendadoscomocajafuerte
parael usodel homoy delcooktop.
! Utilice siemprelos mitts del homo al
quitar el alimentodel centre que se
calientacome cookwarey las placas
serOncalientes.
! No se recomiendaparacalentarel ali-
mentoparam_.sde largo de una hora,
pueselvalornutritivopuededeteriorar.
! No se recomiendaparacalentarel ali-
mentofifo enel centrequese calienta.
47
SUGERENCIAS PARA
PROTEGER LA CUBIERTA
DE VIDRIO CERAMICO
Antesde usar por primeravez, limpie la
cubierta. (VerLimpieza,PAgina58.)
:_ No use utensiliosdevidrio. Puedenrayar
lasuperficie.
:_ Nodejequeen la cubiertacalientese der-
ritanplAsticos,aziJcaro alimentosconalto
contenidode aztJcar. Si esto sucede,
limpie inmediatamente.(Ver Limpieza,
PAgina58.)
:_ Nunca deje que una olla hierva hasta
quedarsecapuesestodatiarAlasuperficie
y el utensilio.
:_ Nuncause lacubiertacomounasuperficie
de trabajo ni como una tabla de cortar.
Nunca cocine alimentos directamente
sobrela cubierta.
:_ Nuncacoloqueunsoporteo unarodewok
entre la cubierta y el utensilio. Estos
arficulospuedenmarcaro rayar lacubier-
ta.
:_ No desliceutensiliosde aluminioa traves
de una cubierta caliente. Los utensilios
pueden dejar marcas que deben ser
limpiadasinmediatamente.(VerLimpieza,
PAgina58.)
:_ AsegtJresede que la cubiertay la parte
inferiordelutensilioestenlimpiasantesde
encender la estufa a fin de evitar
rayaduras.
:_ Para evitar las rayaduraso datio a la
cubiertade vidrio cerAmico,no deje azt_-
car, sal o grasas sobre los elementos.
Limpiela cubiertaconunpatiolimpioocon
toallasde papelantesde usarla.
:_ Nuncause un patio o una esponjasucia
paralimpiarla cubiertade la estufa. Esto
SUPERFICIE DE VIDRIO CERAMICO
I
!
Enlos modeloscanadienses,juntodecentreque se calienta,la cubiertade vidriocerAmi-
co nofuncionarAduranteunciclode autolimpieza.
Lacubiertadela estufapuedeemitirun pocode humoy olor la primeravez quese utiliza.
Estoes normal.
Cuandose enciendeunelementose puedever un reflejorojoatravesdela superficiede
vidriodecerAmico.Elelementose encenderAy apagaraparamantenerelajustede calor
preseleccionado.
Lascubiertasdevidrioceramicoretienenel calorpor un ciertoperfododespuesquese ha
apagadola estufa. Cuandola luzde SUPERFICIECALIENTEse apaga(verpAgina47),
el Areadondesecocinaestarafrfaal tacto.
Debidoa lascaracter[sticasderetenc6ndecalor,los elementosno responderanlos cam-
biosen los ajustestan rApidamentecomoIo hacenlos elementostubulares.En caso de
unposible derrame,retireel utensiliodelelemento.
| NOTA: No intentelevantaria cubiertade la estufa.
puededejaruna pelfculaque puede man-
char ia cubiertadespuesque el Area se
calienta.
:_ No use un utensiliopequetioen un ele-
mentogrande. Esto no s61odesperdicia
energfa sino que tambien pueden pro-
ducirsederramescalientessobrelacubier-
ta los cualesrequierenlimpiezaadicional.
:_ No useutensiliosno-pianosde la especial-
idadquesonde gran tamatioo desiguales
pot ejemplowoks inferioresredondos,los
conserverosonduladosy iasplanchasinfe-
rioresy/ode grantamatio.
:_ No desliceutensiliosde metalpesadosa
travesde lacubiertapuespuedenrayarla.
> No use aluminioni contenedoresdel tipo
dealuminio. El aluminiose puedederretir
en la cubiertade vidrio ceramico.Si el
metalse derriteen la cubierta,no use la
estufa. Llamea un tecnicoautorizadode
Maytag.
;* Si se produceun derramecuando este
cocinando,Ifmpieloinmediatamentede la
cubiertacuando esta este caliente para
evitar una limpiezamas dificil despues.
Tengamuchocuidado,limpieel derrame
conunatoallasecay limpia.
:_ No deje que los derramespermanezcan
sobrela cubiertao sobrela moldurade la
cubiertaporun periodode tiempoprolon-
gado.
:_ No use polvosde limpieza abrasivosni
esponjasde restregarquepuedanrayarla
cubierta.
> No use blanqueadora base de cloro,
amonfaco ni otros limpiadores que no
hayan sido especfficamenterecomenda-
dosparausarenelvidrioceramico.
;* Paraconservarel apperancedel cooktop
vidrio ceramica,iimpie despuesde cada
USO.
El controlelectr6nicoest,.diseradopara facilitarla programaci6n.El indicadorvisual en el controlelectr6nicomuestrala horadel dfa, el contador
detiempoy las funcionesdelhomo. Elestiloy lascaracterfsticaspuedenser ligeramentediferentesdependiendodel modelo. El panelde control
quese muestraenla ilustraci6nincluyelasfuncionesdehorneadoporconvecci6n.
Bake Broil
0
Preset
5
Clean Cook Stop Control
Time ume Lock Timer
l 2 3 4
6 7 8 9
CANCEL Clock
49
>- Oprimalatecladeseada.
>- Optima la tecla Preset (0) o las teclas
numericasapropiadaspara programarla
horao la temperatura.
>- Se oir_.unaserialsonoracadavezquese
oprimaunatecla.
>- Se oir_.ndosseralessonorassi ocurreun
errordeprogramaci6n.
NOTA: Cuatrosegundosdespuesde haber
colocadoel ntJmero,la horao la temperatura
se programar_.nautomaticamente.$i tran-
scurren m_s de 30 segundos cuando se
oprime una tecla de funci6n y las teclas
num_ricas, la funci6n ser_ canceladay el
indicador retomar_ al despliegue visual
previo.
TECLAS NUMI_RICAS
Uselas paraprogramarla horao la temper-
atura.
'CANCEL' (CANCELAR)
Se usa para cancelartoda la programaci6n
exceptolas funcionesdel Clock(Reloj)y del
Timer(ContadordeTiempo).
'CONVECT BAKE'
(HORNEADO POR
CONVECCION)
Seusa parahornearporconvecci6n.
1. Oprimalatecla'Convect Bake'.
2. Oprimanuevamentepara325° F u oprima
la tecla'Preset (0)'. Cadavezque oprima
'Preset (0)' se elevar_,la temperaturaen
25° R Tambienpuede oprimir las teclas
numericasapropiadaspara la temperatura
deseada.
Verinformaci6nadicionalenlas P_.ginas51y
52.
'BAKE' (HORNEAR)
Seusa parahorneadoo asadotradicional.
1. Oprimalatecla'Bake'.
2. Oprimalatecla'Preset' (0) (AjustePrevio)
para350°E Cadavezque oprima'Preset
(0)' se elevar_,la temperaturaen 25° R
Oprimalas teclasnumericascorrespondi-
entesa la temperaturadeseada.
Verinformaci6nadicionalenlas P_.ginas51y
52.
'BROIL' (ASARA LA
PARRILLA)
Seusa paradorary asara la parrilla.
1. Oprimalatecla'Broil'.
2. Oprimala tecla'Preset' (0) (AjustePrevio)
para'Hi broil' (Alto)y oprimanuevamente
para'LO broil' (Bajo)u oprimalas teclas
numericascorrespondientesa la temper-
aturadeseadadeasara la parrilla.
Verinformaci6nadicionalen laPa,gina54.
'CLEAN' (LIMPIAR)
Se usa para programar un
autolimpieza.
1. Oprimalatecla'Clean'.
ciclo de
2. Oprimalatecla'Preset' (0) (AjustePrevio)
para"3:00"horasdetiempodelimpieza.
3. Si se desea mas o menos tiempo de
limpieza,oprima la tecla numericacorre-
spondiente. E] tiempode limpiezapuede
programarsepara2y 4 horasdeduracidn.
VerinformacidnadicionalenlasP_.ginas56y 57.
'COOK TIME/STOP TIME'
(TIEMPO DE COCClON/
HORA DE PARADA)
Se usa para programarel horno para que
comiencey se detengaautomaticamente.
1. Optimala tecla'Bake' o 'Convect Bake.'
Oprimalas teclasnumericascorrespondi-
entesa la temperaturadeseada.
2. Oprimala tecla'Cook Time'. Oprimalas
teclas numericas correspondientespara
programarel tiempode cocci6nen horasy
minutes.
3. Para retrasarel comienzodel tiempode
cocci6n, oprima la tecla 'Stop Time'.
Oprimalas teclasnumericascorrespondi-
entesparaprogramarla horaen queusted
deseaqueel homose apague.
Verinformaci6nadicionalen lasP_.gina55.
CONTROL LOCK
(BLOQUEO DE LOS
CONTROLES)
Las teclasdecontrolpuedenser bloqueadas
paraevitarqueseanusadassinautorizaci6n.
Elias no funcionarAn cuando esten blo-
queadas. La hora correcta del d[a per-
manecer_,en el indicadorvisual cuandose
activeestacaracterfstica.
Siseesta.usandounafunci6ndelhomo,las
teclasdecontrolnopuedenserbloqueadas.
PROGRAMACIONDELBLOQUEODE LOS
CONTROLES:Oprimay mantengaoprimidas
le tecla'Control Lock' durantevariossegun-
dos.Unasolasenalact_sticasonarS,cuandoel
controles bloqueado.
La palabra'OFF' aparecer_,en el indicador
visual durante15 segundos. 'OFF' reapare-
cert.enel indicadorsi se oprimecualquierade
lasteclas.
PARA CANCELAR: Oprima y mantenga
oprimidasletecla'Control Lock'durantevar-
iessegundos.Lapalabra'OFF'desaparecera
delindicadorvisual.
CLOCK
(PROGRAMACION
DEL RELOJ)
1. Oprimalatecla'Clock' (Reloj).
La palabra'TIME'destellaraen el indi-
cador.
2. Optimalas teclasnumericascorrespondi-
enteshasta que la hera correctadel dfa
aparezcaen elindicador.
Cuandola estufa se enchufao despuesde
unafallade energfa,la tJltimaheradesplega-
da antes de la falla electricadestellaraen el
indicador.
Paravolvera desplegarla horadel dfa cuan-
do otra funci6nde tiempoeste desplegada,
oprimalatecla'Clock'.
Lahoradelrelojno puedesercambiadacuan-
doel homoha sidoprogramadoparahornea-
do controlado por reloj, para el ciclo de
autolimpiezao parael ciclo de autolimpieza
diferida.
TIMER
(PROGRAMACION DEL
CONTADOR DE TIEMPO)
Se usa paraprogramary luegoavisarel ter-
mino de un periodode tiempo de hasta99
horasy 59minutes(99:59).
El contadorfuncionaindependientementede
cualquierotra funci6ny puedeser programa-
do cuandoalgunaotra funci6ndel homoeste
activa.El contadordetiempo no controlael
homo.
1. Optima la tecla 'Timer' (Contador de
Tiempo).
>-La palabra 'TIMER' destellarA y
"OHR:O0'aparecerAen el indicador.
2. Oprimalas teclasnumericascorrespondi-
enteshastaqueel nQmerode minuteso de
horasy minutosaparezcaen el indicador
visual.
.
4.
Ejemplo:Paraprogramarelcontadorpara
5minutes,oprimalatecla'Timer' y latecla
numerica5. Elcontrolcomenzar_,la cuen-
ta regresivadespuesdeunretrasodecua-
tro segundos.
Ejemplo:Paraprogramarelcontadorpara
1 hora y 30 minutos, oprima la tecla
'Timer' y las teclasnumericas1, 3, 0. El
control comenzar&la cuenta regresiva
despuesde un retrasode cuatrosegun-
dos.
El t_fltimominuto de la cuenta regresiva
ser#.desplegadoen segundos.
AI finaldeltiempoprogramaticel contador
emitir_,unaseSalsonoray la palabra'End'
(Fin) se desplegar_,en el indicador.Para
cambiarel ntJmerode lasseSalessonoras
emitidaspot el contadorde tiempoy agre-
gar ma.sse5alessonoras,vea la siguiente
column&
PARACANCELAR:
1. Oprima y mantenga oprimida la tecla
'Timer' durante tres segundos. Reap-
arecer_,laheradel dfa.
O
2. Oprimalatecla'Timer' y la teclanumerica
"O". Despues de una pequeffa pausa,
aparecerala hora deldfa.
NOTA:Si se oprimela tecla 'CANCEL'para
cancelarel contadordetiempose cancelaran
TODAS las funciones seleccionadas del
homo,exceptoel relojy el contadordetiempo.
SENALES SONORAS DEL
CONTADOR DE TIEMPO
Hay tres opcionspara el extremode las
senalesdel recordatoriodeltemporizador.
Option 1: Unaserial al final de la operaci6n
delcontadorde tiempo,luegouna cortacada
30segundosdurantelossiguientescincomin-
uteso hastaque seoprimala tecla'CANCEL'.
Option 2: Unasenal al final de la operaci6n
delcontadorde tiempo,luegouna cortacada
minutedurantelassiguientes12horasahasta
quese oprimalatecla'CANCEL'.
Option 3:(opci6n implicia) Unasenalalfinal
dela operaci6ndel contadorde tiempo,luego
ningunaotrasenal.
PROGRAMACIONDE LASENALES
DELCONTADORDETIEMPO:
1. Oprimasimult_.neamentelas teclas'Timer'
y 'CANCEL' y mantengalas oprimidas
durantevariossegundos.
SecirC.unasolasenalsonora.
El indicadorvisualmostrar_,la opci6n
actual,1, 2 o 3.
2. Oprimala teclanumericacorrespondiente
(1, 2 o 3) para seleccionarla opcbn que
desee. La hora correctadel dfa reapare-
cert. en el indicadordespuesde cuatro
segundos.
OPCION DE SENAL
SONORA DE HORNEADO
CONTROLADO
POR RELOJ
Haytres opcionesparalos avisadoresde fin
de'cocci6ncontroladapor reloj'.
Option 1:(opcion defabrica)Cuatrosehales
sonorasal fin del horneado,despues una
seSalsonoracada 30 segundosdurantelos
cincominutossiguienteso hastaque se opri-
ma lateclaCANCEL.
Option 2: Cuatrosehalessonorasal finaldel
horneado,luegouna seSalsonoracadaminu-
todurantelassiguientes12horaso hastaque
seoptimalateclaCANCEL.
Option 3: CuatroseSalessonorasal finaldel
horneado,luego ningunaotraseSalsonora.
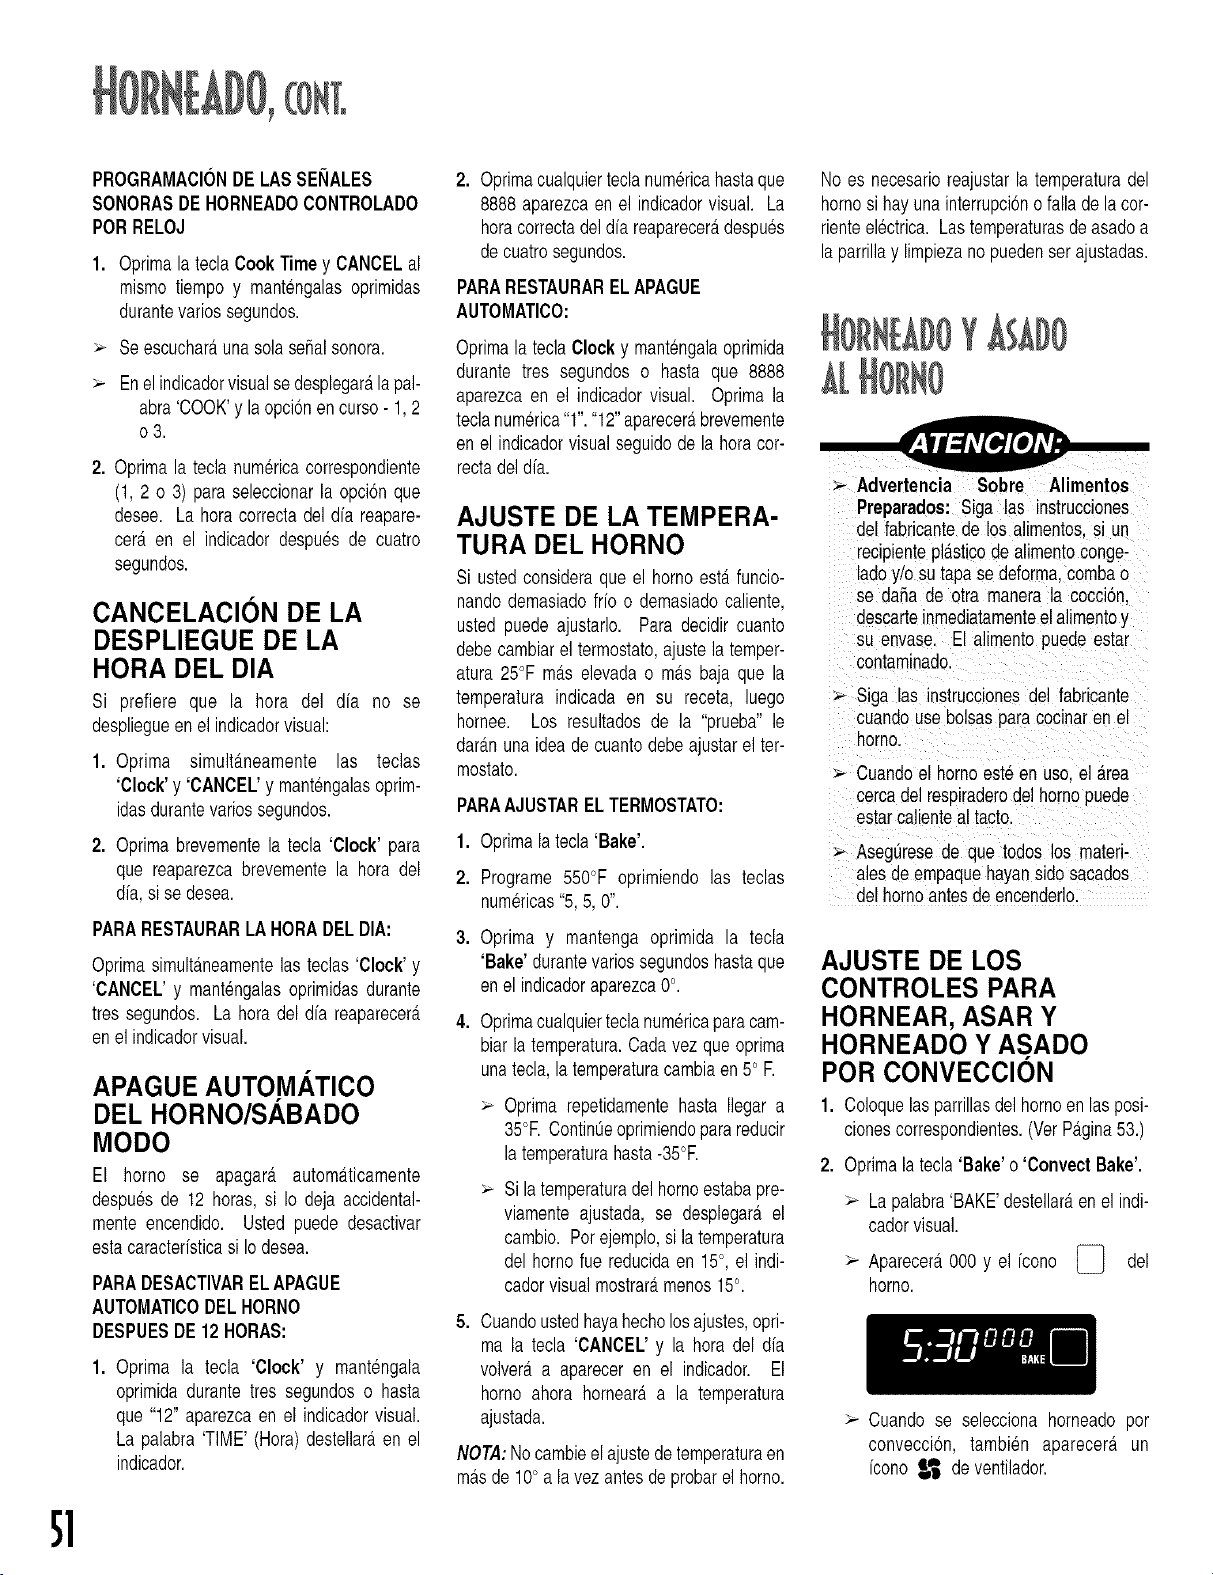
PROGRAMACIONDE LASSENALES
SONORASDE HORNEADOCONTROLADO
PORRELOJ
1. Oprimala teclaCookTimey CANCELal
mismotiempo y mantengalasoprimidas
durantevariossegundos.
Se escucharAunasolaserialsonora.
Enel indicadorvisualse desplegarAla pal-
abra'COOK'y laopci6nencurso- 1,2
03.
2. Oprimala teclanumericacorrespondiente
(1, 2 o 3) paraseleccionarla opci6nque
desee. La hora correctadel dfa reapare-
cerA en el indicadordespuesde cuatro
segundos.
CANCELACION DE LA
DESPLIEGUE DE LA
HORA DEL DIA
Si prefiere que la hora del dfa no se
despliegueen el indicadorvisual:
1. Oprima simultAneamente las teclas
'Clock' y 'CANCEL'y mantengalasoprim-
idasdurantevariossegundos.
2. Oprimabrevementela tecla 'Clock' para
que reaparezcabrevementela hora del
d/a,si se desea.
PARARESTAURARLA HORADELDIA:
OptimasimultAneamentelas teclas'Clock' y
'CANCEL'y mantengalasoprimidasdurante
tres segundos. La hora del dfa reaparecera
enel indicadorvisual.
APAGUE AUTOMATICO
DEL HORNO/S. BADO
MODO
El homo se apagarA automAticamente
despuesde 12 horas, si Io deja accidental-
mente encendido. Usted puede desactivar
estacaracterfsticasi Iodesea.
PARADESACTIVARELAPAGUE
AUTOMATICODELHORNO
DESPUESDE12 HORAS:
1. Oprima la tecla 'Clock' y mantengala
oprimidadurantetres segundoso hasta
que "12" aparezcaen el indicadorvisual.
La palabra 'TIME' (Hora)destellaraen el
indicador.
2. Oprimacualquierteclanumericahastaque
8888aparezcaen el indicadorvisual. La
horacorrectadeldfa reaparecerAdespues
decuatrosegundos.
PARARESTAURARELAPAGUE
AUTOMATICO:
Oprimala teclaClock y mantengalaoprimida
durante tres segundos o hasta que 8888
aparezcaen el indicadorvisual. Oprima la
teclanumerica'T'. "12"aparecerabrevemente
enel indicadorvisualseguidode la horacot-
rectadeldia.
AJUSTE DE LA TEMPERA-
TURA DEL HORNO
Si ustedconsideraque el homoestA funcio-
nandodemasiadofifo o demasiadocaliente,
usted puede ajustarlo. Para decidir cuanto
debecambiarel termostato,ajustela temper-
atura 25°F mAs elevadao mAs baja que la
temperaturaindicada en su receta, luego
homee. Los resultadosde la "prueba" le
darAnunaidea de cuantodebeajustarel ter-
mostato.
PARAAJUSTARELTERMOSTATO:
1. Optimalatecla'Bake'.
2. Programe 550°F oprimiendo las teclas
numericas"5, 5, 0".
Optima y mantenga oprimida la tecla
'Bake' durantevariossegundosbasraque
enel indicadoraparezca0°.
Optimacualquierteclanumericaparacam-
biarla temperatura.Cadavez queoprima
unatecla,la temperaturacambiaen 50E
> Oprima repetidamentehasta Ilegar a
35°R ContintJeoprimiendopara reducir
latemperaturahasta-35°R
> Si latemperaturadel hornoestabapre-
viamente ajustada,se desplegarAel
cambio. Potejemplo,si la temperatura
del homofue reducidaen 15°, el indi-
cadorvisualmostrarAmenos15°.
5. Cuandoustedhayahecholosajustes,opri-
ma la tecla 'CANCEL'y la hora del dia
volverAa apareceren el indicador. El
homo ahora hornearaa la temperatura
ajustada.
NOTA:Nocambieelajustedetemperaturaen
masde 10° a la vez antesde probarel homo.
No es necesarioreajustarla temperaturadel
homosi hayunainterrupci6no fallade lacor-
rienteelectrica.Lastemperaturasdeasadoa
la parrillay limpiezano puedenserajustadas.
Advertencia Sobre Alimentos
Preparados:SJgalas instrucciones
del fabricantede los alimentos,si un
reclpienteplAsticode alimentoconge-
ladoy!o sutapa se deform&combao
se daffa de otra manera la cocci6n.
descarteinmediatamenteel alimentoy
su envase. El alimentopuede estar
contaminado
> Siga las instruccionesdel fabricante
cuandouse bolsasparacocinaren el
homo
> Cuandoel homoest6en uso. el Area
cercadelrespJraderodelhomopuede
estarcalienteal tacto.
> Asegt3resede que todos los materi-
alesde empaquehayansidosacados
delhomoantesdeencenderlo.
AJUSTE DE LOS
CONTROLES PARA
HORNEAR, ASAR Y
HORNEADO Y ASADO
POR CONVECClON
1. Coloquelas parrillasdelhomoen lasposi-
clonescorrespondientes.(VerPagina53.)
2. Optimalatecla'Bake'o 'Convect Bake'.
> Lapalabra'BAKE'destellaraenel indi-
cadorvisual.
> Aparecera000 y el fcono [_ del
horno.
> Cuando se selecciona horneadopor
convecci6n, tambien aparecerA un
icono _'_ de ventilador.
51

3. Oprimalatecla'Preset' (0) (AjustePrevio)
para programarautoma.ticamente350°R
Cuandose horneapot convecci6n,325°F
se programarAnautomaticamentecuando
se oprimela tecla 'Preset' (0). U oprima
las teclas numericas correspondientes
parala temperaturadel homodeseada.
La temperatura puede programarse
desde100°Fa 550°E
Despuesde cuatrosegundosel homo
comenzarAa calentar.
-se iluminarA el fcono de hornear
(barrasuperiore inferior);
- se iluminar_,unindicadorrojode pre-
calentamiento;
-y en el indicadorvisual aparecerA
100°Fo la temperaturarealdel homo,
laquesea m_.salta.
- cuandose horneapor convecci6n,el
fconodelventiladorcomenzarAa girar.
PRECALENTAR COCER AL HORNO
INDICA DOR S[MBOL 0
Latemperaturaenelindicadoraumentar_.
enincrementosde5° hastaqueel homo
alcancelatemperaturaprogramada.
4. El homo demora entre 8-15 minutesen
precalentarse.
>- Cuandoel hornose ha precabntado,
emitiraunaseSalsonora.
>- La luz indicadorade precalentamiento
se apagar_,enel indicadorvisual.
5. Reviseel progresode la cocci6ncuando
hayatranscurridoel tiempomfnimodecoc-
ci6n. Cocinedurante ma.stiempo si es
necesario.
6. Oprimala tecla CANCELy saqueel ali-
mentodelhomo.
>- La horadel dfa reaparecer_,en el indi-
cadorvisual.
NOTA:Si seolvidade apagarel homo,
este se apagar_, automaticamente
despuesde12horas. Si deseadesacti-
varestacaracteristica,veala¢.gina 51.
II Paradesplegarla temperaturaprogra-
mada durante el precalentamiento,
oprimala correspondientetecla'Bake'
o 'Convect Bake'.
II Paracambiarla temperaturadelhorno
duranteel horneado,oprimala corre-
spondiente tecla 'Bake', 'Convect
Bake' o 'Convect Roast' y las teclas
numericas para la temperatura del
hornodeseada.
I Si transcurrenm_.sde 30 segundos
despuesdehaberseoprimidounatecla
de funci6ny antesde oprimiruna tecla
numerica,el indicadorvisual retornara
al despliegueanterior.
I Como regla general, cuando este
horneando por convecci6n, pro-
grame latemperaturadel homo 25°F
masbaja que Io que indica la receta
tradicional o las instrucciones de la
mezcla preparada. El tiempo de
horneadosera el mismo o unos
pocosminutosmenosqueel de las
instrucciones.
I Cuandose asa por convecci6n,los
tiempode asarsongeneralmentede
25-30% inferiores. (Mantenga las
temperaturasde asartradicionales.)
I Yea la tabla en el folleto"La Cocina
Facil" paralastemperaturasy tiempos
de asarrecomendados.
II Observar_.quelos tiemposde cocci6n
y las temperaturasvafian ligeramente
de las de su homo antiguo. Estoes
normal. Cadahomotienesus propias
caracteffsticas.
Oprimael interruptoren el panelde control
paraencendery apagarla luz del homo. La
luz del horno se enciende
automaticamentecuandose
abrela puerta. OVENLIGHT
Cuandoelhomoest,.enuse,esta_.reapuede
estartibia o calientebastanteper causaque-
mara.Cuandoel hornoeste en uso, nunca
bloqueela aberturadel respiradero.
LOCALIZACIONDEL
RESPIRADERODELHORNO
IR[[[A;
No intenteCambiarla posici6nde las
parrillascuandoe! homoest#ca!iente.
Su homo tiene dos parrillas. Han sido dis-
effadasconuntopede engancheenel borde.
PARASACAR: Tire de la parrilladerecho
haciaafuerahastaquese detengaen la posi-
ci6n del tope; de _
enganche;levante -_= J_./
el frentede la par- _[_k_k_\_I I I!////t._< I
rillayfirela hacia [[__JJafuera.
PARAVOLVERACOLOCAR:Coloquelapar-
rillaen el soportede la parrillaen el homo;
incline levemente hacia arriba el extremo
delantero;deslicela parrillahaciaatr_.shasta
quepasasobrelostopesdeenganche;bajeel
frentede la parrillay deslfcelahaciaadentro
del horno.
No cubra unaparrilla completa con papel
de aluminio ni coloque papel de aluminio
enla parte inferior del homo. Seafectarbn
los resultados del homeado y se puede
daffarla parte inferior del homo.
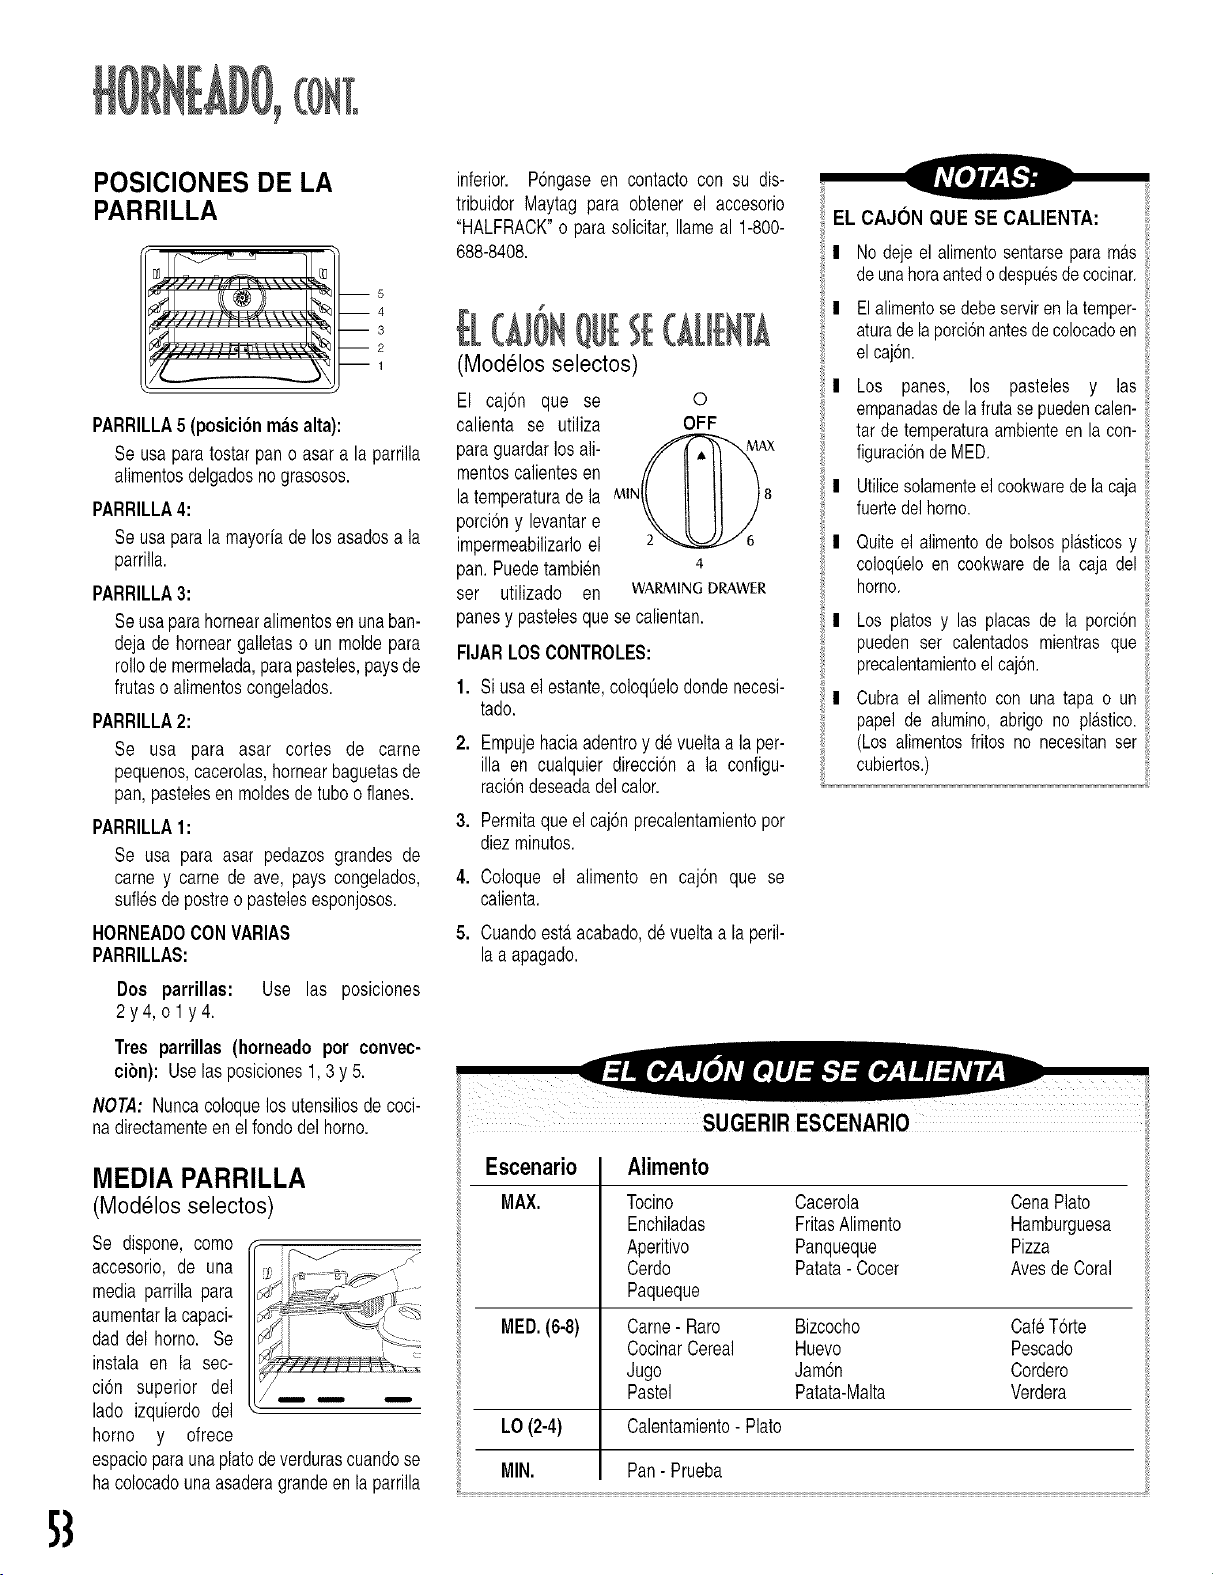
POSICIONES DE LA
PARRILLA
--5
--4
-- 3
2
-- 1
PARRILLA6 (posici6n masalta):
Se usa paratostarpan o asara la parrilla
alimentosdelgadosnograsosos.
PARRILLA4:
Seusa paralamayorfade losasadosa la
parrilla.
PARRILLA3:
Seusaparahornearalimentosen unaban-
deja de horneargalletaso un moldepara
rob de mermelada,parapasteles,paysde
frutaso alimentoscongelados.
PARRILLA2:
Se usa para asar cortes de came
pequenos,cacerolas,hornearbaguetasde
pan,pastelesen moldesdetuboo flanes.
PARRILLA1:
Se usa para asar pedazosgrandes de
came y carne de ave, pays congelados,
suflesde postreo pastelesesponjosos.
HORNEADOCONVARIAS
PARRILLAS:
Dos parrillas: Use las posiciones
2y4, oly4.
Tres parrillas (horneado por convec-
cibn): Use lasposiciones1, 3y 5.
NOTA: Nuncacoloquelos utensiliosde coci-
nadirectamenteen el fondodel horno.
inferior. P6ngaseen contactocon su dis-
tribuidor Maytag para obtener el accesorio
"HALFRACK"o para solicitar,Ilameal 1-800-
688-8408.
" QUa;6( NTA
(Mod61os selectos)
El caj6n que se 0
calienta se utiliza OFF
paraguardarlosali-
mentoscalientesen
la temperaturade la MIN 8
porci6ny levantare
impermeabilizarloel 2 6
pan.Puedetambien 4
ser utilizado en WARMINGDRAWER
panesy pastelesquesecalientan.
FIJARLOSCONTROLES:
1. Siusa el estante,coloqOelodondenecesi-
tado.
2. Empujehaciaadentroy devueltaa la per-
ilia en cualquier direcci6na la configu-
raci6ndeseadadelcalor.
3. Permitaqueel caj6nprecalentamientopor
diezminutos.
4. Coloque el alimento en caj6n que se
calienta.
5. Cuandoesta.acabado,devueltaa laperil-
la a apagado.
EL CAJON QUE SE CALIENTA:
!
!
No dejeel alimentosentarseparam_ts
deunahoraantedo despuesdecocinar.
Elalimentose debeserviren latemper-
aturadelaporci6nantesdecolocadoen
elcaj6n.
Los panes, los pasteles y las
empanadasdela frutasepuedencalen-
tar detemperaturaambienteen la con-
figuraciondeMED.
Utilicesolamenteelcookwaredela caja
fuertedelhorno.
! Quiteel alimentode bolsospl_tsticosy
coloqOeloen cookwarede la caja del
horno.
I Los platosy las placas de la porci6n
puedenser calentadosmientras que
precalentamienteelcaj6n.
I Cubrael alimentocon una tapa oun
papel de alumino,abrigo no plastico.
(Los alimentosfritos no necesitanser
cubiertos.)
SUGERIRESCENARIO
MEDIA PARRILLA
(Mod61osselectos)
Se dispone, come n_J._ "L_ _[._j ._
accesorio,de una Jl
media parrillapara .<_p_1..........*_._qy' ...._
aumentarla capaci- I1__S_I_-......._<'_-_
dad del homo. Se _ --_: ....
instala en la sec- _,t
ci6n superior del /L_,,,,,. ,..., ,,,,,,.,
lado izquierdo del
horno y ofrece
espacioparaunaplatodeverdurascuandose
hacolocadounaasaderagrandeen la parrilla
Escenario
MAX. Cacerola CenaPlato
FritasAlimento Hamburguesa
Panqueque Pizza
Patata- Cocer AvesdeCoral
Alimento
Tocino
Enchiladas
Aperitivo
Cerdo
Paqueque
Came- Raro
CocinarCereal
Jugo
Pastel
MED.(6-8) Bizcocho CafeT6rte
Huevo Pescado
Jam6n Cordero
Patata-Malta Verdera
LO (2-4) Calentamiento- Plato
MIN. Pan- Prueba
53
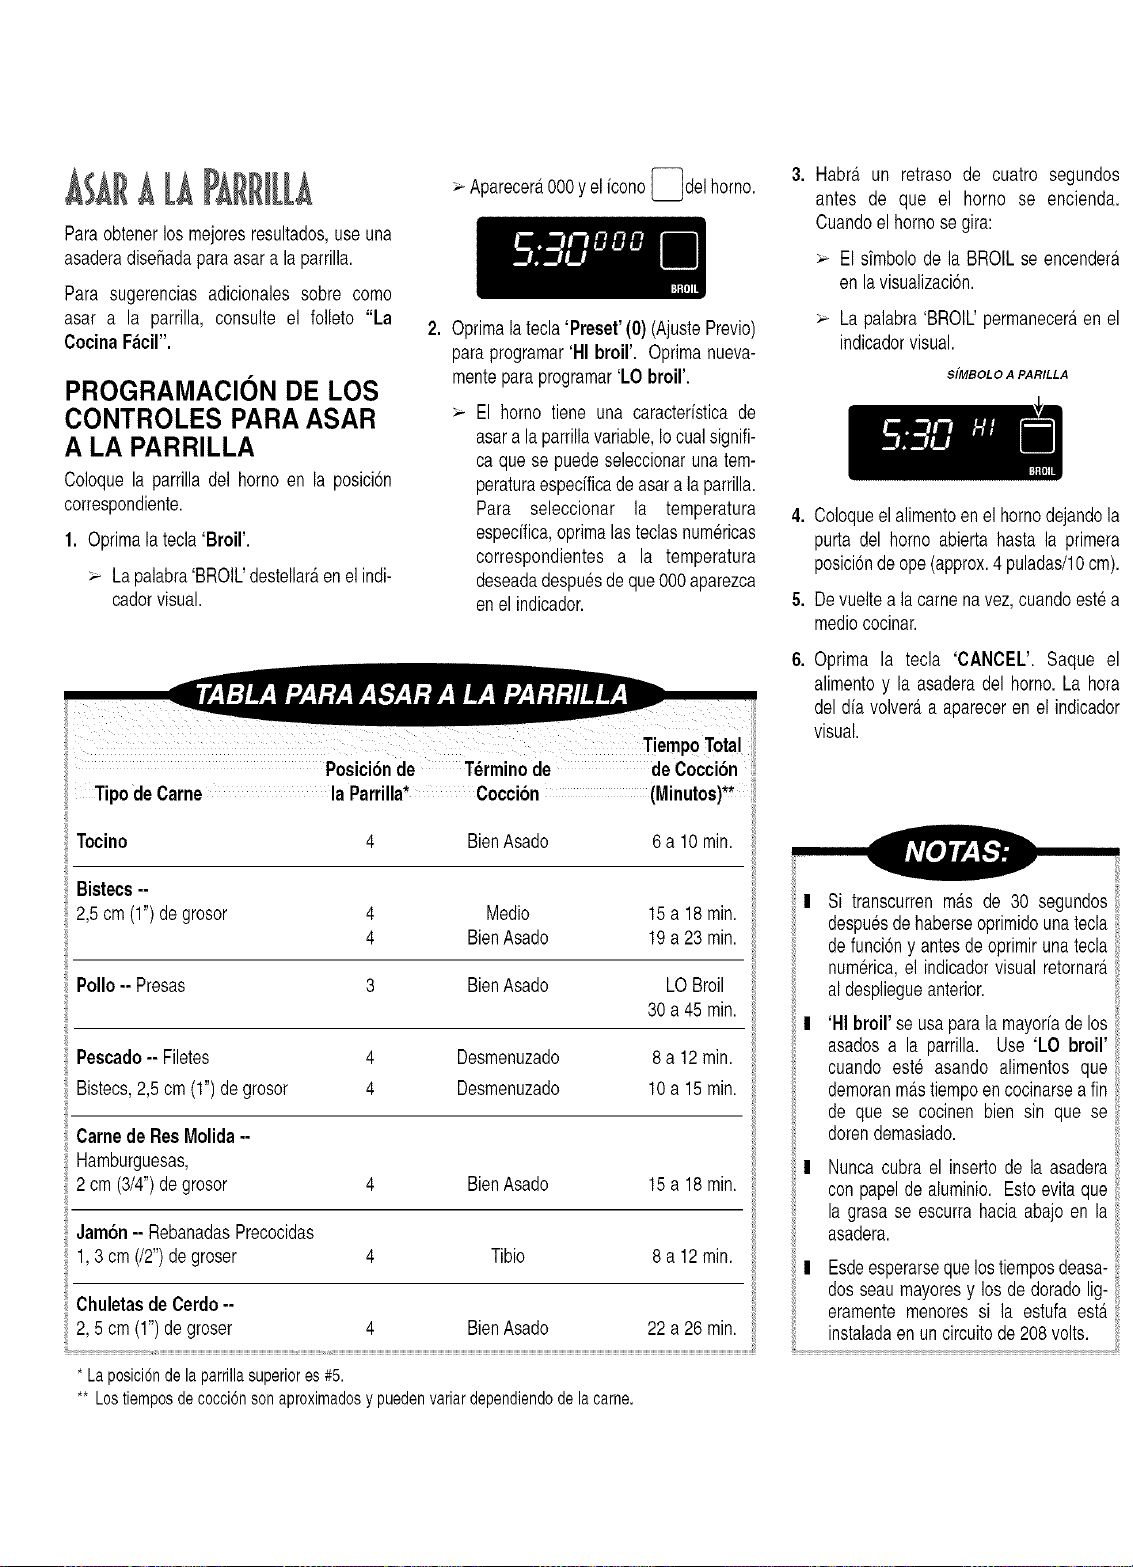
ALA
Paraobtenerlos mejoresresultados,use una
asaderadisefiadaparaasar ala parrilla.
Para sugerenciasadicionalessobre como
asar a la parrilla, consulte el folleto "La
CocinaFacil".
PROGRAMACIONDE LOS
CONTROLES PARA ASAR
A LA PARRILLA
Coloquela parrilladel hornoen la posici6n
correspondiente.
1. Oprimalatecla'Broil'.
Lapalabra'BROIL'destellar_,enel indi-
cadorvisual.
Aparecer_.000y elfcono[_del homo.
2. Oprimalatecla'Preset' (0) (AjustePrevio)
paraprogramar'HI broil'. Oprimanueva-
menteparaprogramar'LO broil'.
El homo tiene una caracterfsticade
asarala parrillavariable,Iocualsignifi-
ca que se puedeseleccionarunatem-
peraturaespedficadeasarala parrilla.
Para seleccionar la temperatura
espedfica,oprimalasteclasnumericas
correspondientes a la temperatura
deseadadespuesdeque000aparezca
enel indicador.
Posici6nde Tdrminode deCocci6n
Tipo de Came la Parrilla* Cocci6n (Minutos)**
3. Habr_.un retraso de cuatro segundos
antes de que el horno se encienda.
Cuandoel homose gira:
El sfmbolode la BROILse encendera
enla visualizaci6n.
> La palabra'BROIL'permaneceraenel
indicadorvisual.
S[MBOLO A PARILLA
.
.
6.
Coloqueel alimentoenel homodejandola
purta del homo abiertahasta la primera
posici6nde ope(approx.4 puladas/10cm).
Devueltea la camenavez,cuandoestea
mediococinar.
Oprima la tecla 'CANCEL'. Saque el
alimentoy la asaderadel homo.La hora
del dia volver_,a apareceren el indicador
visual.
Tocino 4 BienAsado 6 a 10 min.
Bistecs --
2,5cm (1")de grosor 4 Medio 15a 18min.
4 BienAsado 19a 23 rain.
Polio -- Presas 3 BienAsado LOBroil
30a 45 rain.
Pescado-- Filetes 4 Desmenuzado 8 a 12min.
Bistecs,2,5 cm(1")degrosor 4 Desmenuzado 10a 15rain.
Camede ResMolida --
Hamburguesas,
2 cm(3/4")de grosor 4 BienAsado 15a 18min.
Jam6n-- RebanadasPrecocidas
1, 3 cm(/2")degroser 4 Tibio 8 a 12 min.
Chuletasde Cerdo--
2, 5 cm(1")degroser 4 BienAsado 22a 26rain.
* Laposiciondelaparrillasuperiores#5.
** Lostiemposdecoccionsonaproximadosy puedenvariardependiendodelacame.
Si transcurrenm_.sde 30 segundos
despuesdehaberseoprimidounatecla
defunci6ny antesde oprimiruna tecla
numerica,el indicadorvisual retornara
al despliegueanterior.
'HI broil' se usaparalamayor[ade los
asadosa la parrilla. Use 'LO broil'
cuando este asando alimentos que
demoranm_.stiempoencocinarseafin
de que se cocinen bien sin que se
dorendemasiado.
Nuncacubra el insertode la asadera
con papelde aluminio. Estoevita que
la grasa se escurrahaciaabajoen la
asadera.
| Esdeesperarsequelostiemposdeasa-
dos seaumayoresy losde doradolig-
eramentemenores si la estufa esta
instaladaen uncircuitode208volts.
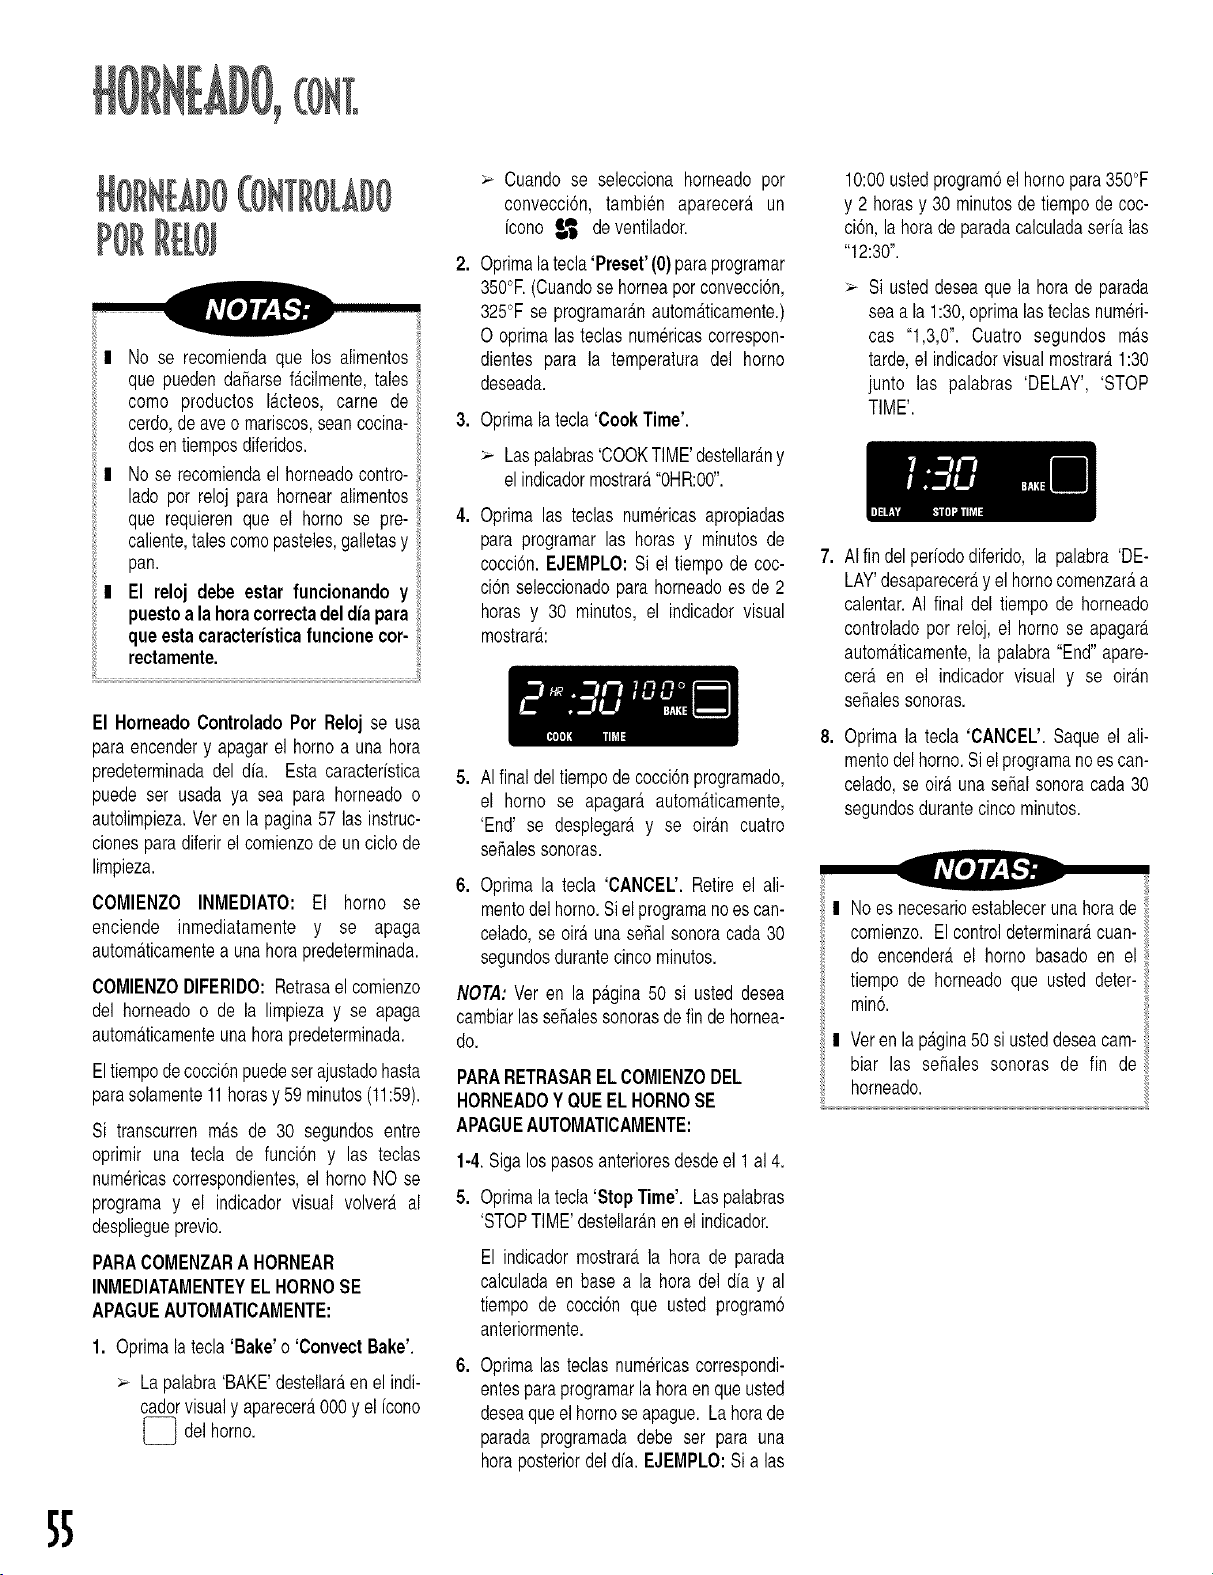
I No se recomiendaque los alimentos
que pueden da_arsef_.cilmente,tales
como productos I_.cteos, carne de
cerdo,de aveo mariscos,seancocina-
dosen tiemposdiferidos.
I No se recomiendael horneadocontro-
lado por reloj para hornearalimentos
que requierenque el homo se pre-
caliente,tales comepasteles,galletasy
pan.
II El reloj debe estar funcionandoy
puestoa lahoracorrectadeldia para
queestacaracteristicafuncione cor-
rectamente.
El HorneadoControlado Por Reloj se usa
paraencendery apagarel hornoa una hera
predeterminadadel dia. Esta caracteffstica
puede set usada ya sea para horneadoo
autolimpieza.Veren la pagina57 las instruc-
clonesparadiferirel comienzode unciclode
limpieza.
COMIENZO INMEDIATO: El homo se
enciende inmediatamente y se apaga
automaticamentea unahorapredeterminada.
COMIENZODIFERIDO:Retrasael comienzo
del horneadoo de la limpiezay se apaga
automb,ticamenteunahorapredeterminada.
Eltiempodecocci6npuedeserajustadohasta
parasolamente11 horasy 59minutos(11:59).
Si transcurrenm_.sde 30 segundosentre
oprimir una tecla de funci6n y las teclas
numericascorrespondientes,el homoNO se
programa y el indicador visual volver_,al
despliegueprevio.
PARACOMENZARA HORNEAR
INMEDIATAMENTEYELHORNOSE
APAGUEAUTOMATICAMENTE:
1. Oprimalatecla'Bake'o 'Convect Bake'.
Lapalabra'BAKE'destellarb,enel indi-
cadorvisualy aparecer_.000y el fcono
[_ delhomo.
> Cuando se selecciona horneadopor
conveccidn, tambien aparecera un
fcono _ deventilador.
Oprimalatecla'Preset'(0)paraprogramar
350°F.(Cuandose horneapor conveccidn,
325°Fse programar_.nautom_.ticamente.)
O oprimalas teclasnum@icascorrespon-
dientes para la temperatura del homo
deseada.
Oprimalatecla'Cook Time'.
> Laspalabras'COOKTIME'destellar_.ny
elindicadormostrar&"0HR:00".
Oprima las teclas num@icasapropiadas
para programarlas horas y minutesde
cocci6n.EJEMPLO:Si el tiempode coc-
ci6n seleccionadopara horneadoes de 2
horas y 30 minutes,el indicadorvisual
mostrar_.:
AIfinaldeltiempodecocci6nprogramado,
el homo se apagar#,autom#.ticamente,
'End' se desplegaray se oiran cuatro
sehalessonoras.
6. Optimala tecla 'CANCEL'. Retireel ali-
mentodelhomo.Siel programano escan-
celado,se oira una seSalsonoracada30
segundosdurantecincominutos.
NOTA:Ver en la pAgina50 si usted@sea
cambiarlasse5alessonorasdefin dehornea-
do.
PARARETRASARELCOMIENZODEL
HORNEADOY QUEEL HORNOSE
APAGUEAUTOMATICAMENTE:
1-4.Sigalospasosanterioresdesdeel 1al 4.
5. Optimala tecla'Stop Time'. Laspalabras
'STOPTIME'destellar_.nenel indicador.
El indicadormostrar_,la hera de parada
calculadaen base a la hora del dfa y al
tiempo de cocci6n que usted program6
anteriormente.
Oprimalas teclasnum@icascorrespondi-
entesparaprogramarla heraen queusted
deseaqueel hornose apague.La herade
parada programadadebe ser para una
heraposteriordeldfa. EJEMPLO:Sialas
10:00ustedprogram6el homopara350°F
y 2 horasy 30 minutosde tiempode coc-
ci6n,laherade paradacalculadaserfa las
"12:30".
> Si usteddeseaquela herade parada
seaa la 1:30,oprimalasteclasnum@i-
cas "1,3,0". Cuatro segundos m_.s
tar@,el indicadorvisualmostrar_.1:30
junto las palabras 'DELAY', 'STOP
TIME'.
AIfin delperfododiferido,la palabra 'DE-
LAY'desaparecer_,y el homocomenzar_,a
calentar.AI final del tiempode horneado
controladoper reloj, el homo se apagar_.
autom_.ticamente,la palabra"End"apare-
cert. en el indicadorvisual y se oiran
sehalessonoras.
Oprimala tecla 'CANCEL'.Saqueel ali-
mentodelhomo.Siel programano escan-
celado,se oira una sehalsonoracada30
segundosdurantecincominutes.
! No esnecesarioestablecerunaherade
comienzo.El controldeterminar_,cuan-
do encender_,el homo basado en el
tiempode horneadoque usted deter-
min6.
! Veren lapAgina50si usteddeseacam-
biar las seSales sonoras de fin de
horneado.
55
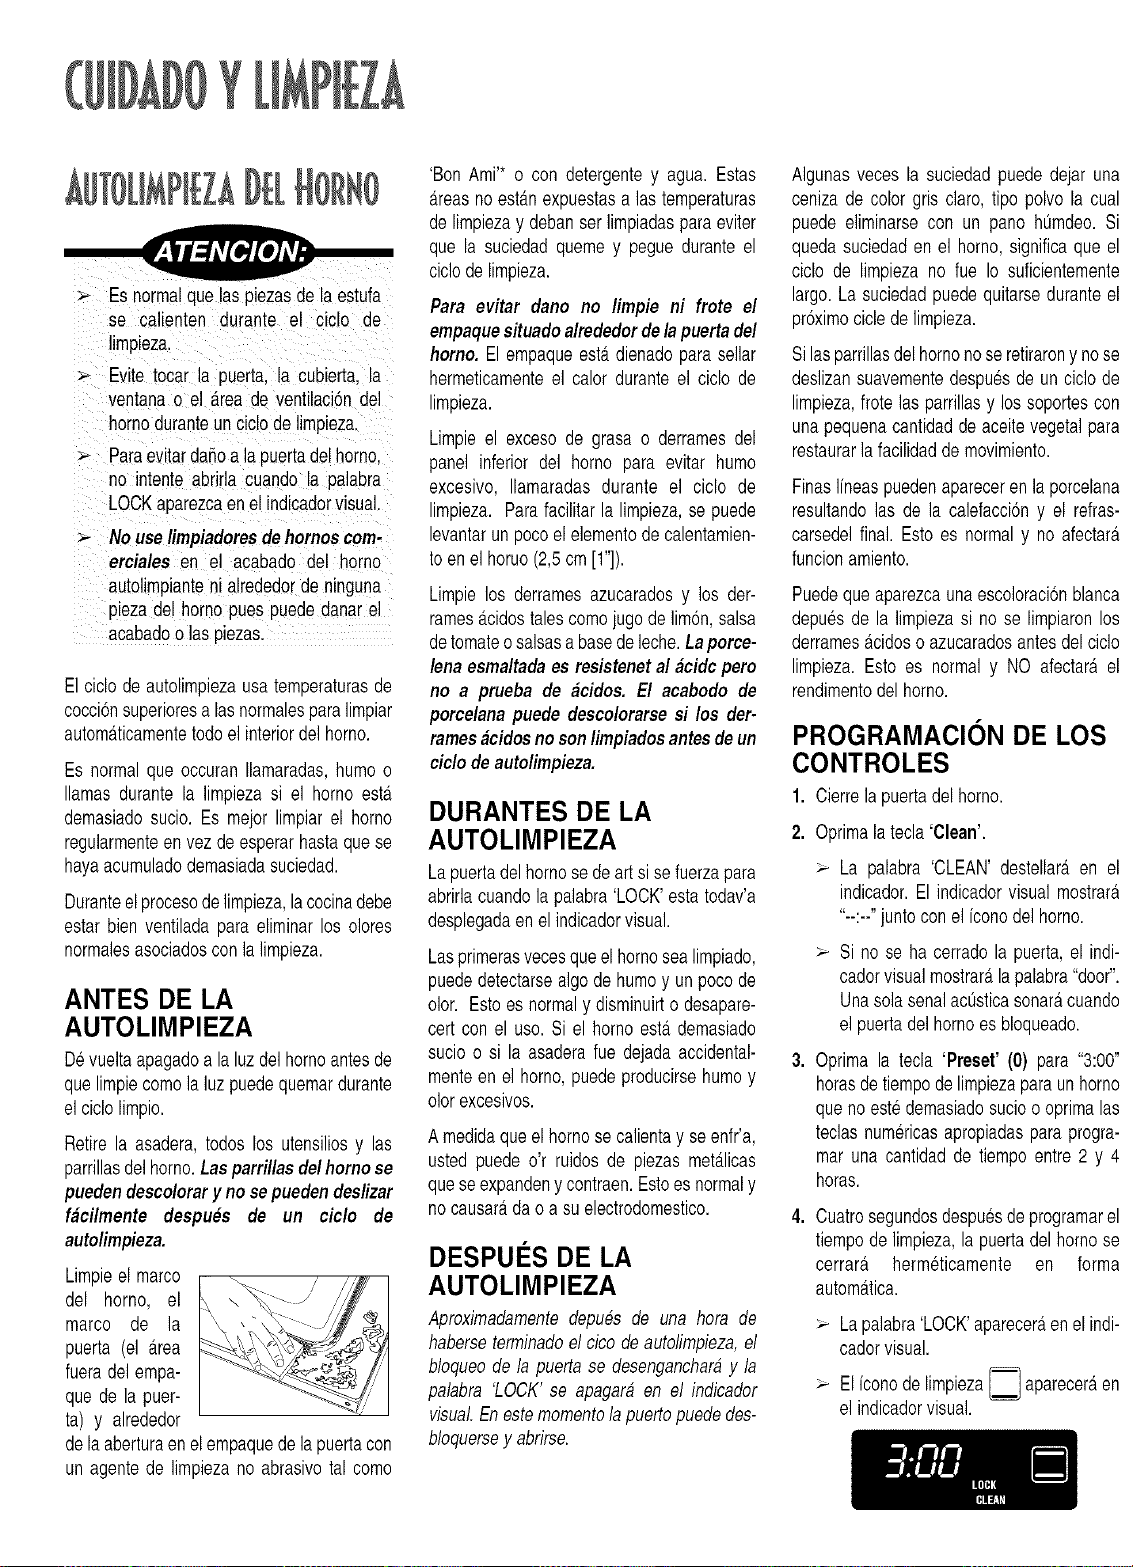
¥
_-- Esnormalque laspiezasde la estufa
se calienten durante el ciclo de
impieza.
_- Evitetocar la puerta,la cubierta,la
ventana3 el area de ventilacbndel
homoduranteunciclode limpieza.
_-- Dataevitardahoa la puertadel homo.
no intente abrirla cuando la palabra
LOCKaparezcaenel indicadorvisual.
> Nouselimpiadoresdehornoscom-
erciales en el acabado del homo
autolimpianteni alrededorde ninguna
31ezadel homopues puededanarel
acabadoo las piezas.
El ciclode autolimpiezausa temperaturasde
cocci6nsuperioresa lasnormalesparalimpiar
automaticamentetodo elinteriordel homo.
Es normalque occuran Ilamaradas,humoo
llamasdurante la limpiezasi el horno esta
demasiadosucio. Es mejor limpiarel homo
regularmenteen vez de esperarhastaque se
hayaacumuladodemasiadasuciedad.
Duranteelprocesodelimpieza,lacocinadebe
estarbien ventiladapara eliminarlos olores
normalesasociadoscon la limpieza.
ANTES DE LA
AUTOLIMPIEZA
Devueltaapagadoa laluzdel homoantesde
quelimpiecomola luzpuedequemardurante
elciclolimpio.
Retirela asadera,todos los utensiliosy las
parrillasdelhomo.Lasparrillas delhomo se
puedendescolorary no se pueden deslizar
f_cilmente despu_s de un ciclo de
auto/impieza.
Limpieel marco
del homo, el
marco de la
puerta (el _.rea
fuera delempa-
que de la puer-
ta) y alrededor
'\ /i#'# i
de la aberturaenelempaquedelapuertacon
un agentede limpiezano abrasivetal como
'Bon Ami'* o con detergentey agua. Estas
_.reasno est_.nexpuestasalas temperaturas
de limpiezay debanserlimpiadasparaeviter
que la suciedadquemey pegueduranteel
ciclode limpieza.
Para evitar dano no limpie ni frote el
empaquesituado alrededorde la puertadel
homo. El empaqueest,.dienadopara sellar
hermeticamenteel calor duranteel ciclo de
limpieza.
Limpieel exceso de grasa o derramesdel
panel inferior del homo para evitar humo
excesivo, Ilamaradas durante el ciclo de
limpieza. Parafacilitarla limpieza,se puede
levantarun pocoelelementodecalentamien-
to enel horuo(2,5cm [1"]).
Limpielos derramesazucaradosy los der-
rames_.cidostalescomojugode lim6n,salsa
detomateo salsasabasedeleche.Laporce-
lenaesmaltadaes resistenetal #cidc pero
no a pmeba de #cidos. El acabodo de
porcelana puede descolorarse si los der-
tames#cidosno son limpiadosantesde un
ciclo de autolimpieza.
DURANTES DE LA
AUTOLIMPIEZA
Lapuertadelhornose de art si sefuerzapara
abrirlacuandola palabra'LOCK'estatodav'a
desplegadaen el indicadorvisual.
Lasprimerasvecesqueel homosealimpiado,
puededetectarsealgode humoy un pocode
olor. Estoes normaly disminuirto desapare-
certcon el uso. Si el homo esta demasiado
sucioo si la asaderafue dejadaaccidental-
menteen el homo, puedeproducirsehumoy
olorexcesivos.
Amedidaqueel homose calientay seenfr'a,
usted puede o'r ruidosde piezasmet_.licas
quese expandeny contraen.Estoesnormaly
nocausar_,dao a su electrodomestico.
DESPUI S DE LA
AUTOLIMPIEZA
Aproximadamentedepues de una hora de
haberseterminadoel cicode autolimpieza,el
bloqueode la puertase desengancharay la
palabra 'LOCK' se apagaraen el indicador
visual.Enestemomentola puertopuededes-
bloquersey abrirse.
Algunasveces la suciedadpuededejar una
cenizade color gris claro,tipo polvo la cual
puede eliminarsecon un pano htJmdeo.Si
quedasuciedaden el homo, significaque el
ciclo de limpiezano fue Io suficientemente
largo.La suciedadpuedequitarseduranteel
pr6ximociclede limpieza.
Silasparrillasdelhornonoseretirarony nose
deslizansuavementedespuesde un ciclo de
limpieza,frotelas parrillasy los soportescon
unapequenacantidadde aceitevegetalpara
restaurarla facilidaddemovimiento.
FinasIfneaspuedenaparecerenla porcelana
resultandolas de la calefaccbny el refras-
carsedelfinal. Esto es normaly no afectara
funcionamiento.
Puedeque aparezcauna escoloraci6nblanca
depuesde la limpiezasi no se limpiaronlos
derramesacidoso azucaradosantesdel ciclo
limpieza.Esto es normal y NO afectara el
rendimentodel homo.
PROGRAMACION DE LOS
CONTROLES
1. Cierrela puertadelhomo.
2. Oprimalatecla'Clean'.
La palabra'CLEAN' destellar_,en el
indicador.El indicadorvisual mostrara
"--'--"juntocon el fconodel homo.
Si no se ha cerradola puerta,el indi-
cadorvisualmostrar_,lapalabra"door".
UnasolasenalactJsticasonarS,cuando
el puertadelhomoes bloqueado.
3. Oprima la tecla 'Preset' (0) para "3:00"
horasdetiempode limpiezaparaunhomo
queno este demasiadosucioo oprimalas
teclasnumericasapropiadasparaprogra-
mar una cantidadde tiempo entre 2 y 4
horas.
4. Cuatrosegundosdespuesdeprogramarel
tiempode limpieza,la puertadelhomose
cerrara hermeticamente en forma
autom_.tica.
> Lapalabra'LOCK'aparecer_,enel indi-
cadorvisual.
Elfconode limpieza[_ apareceraen
el indicadorvisual.
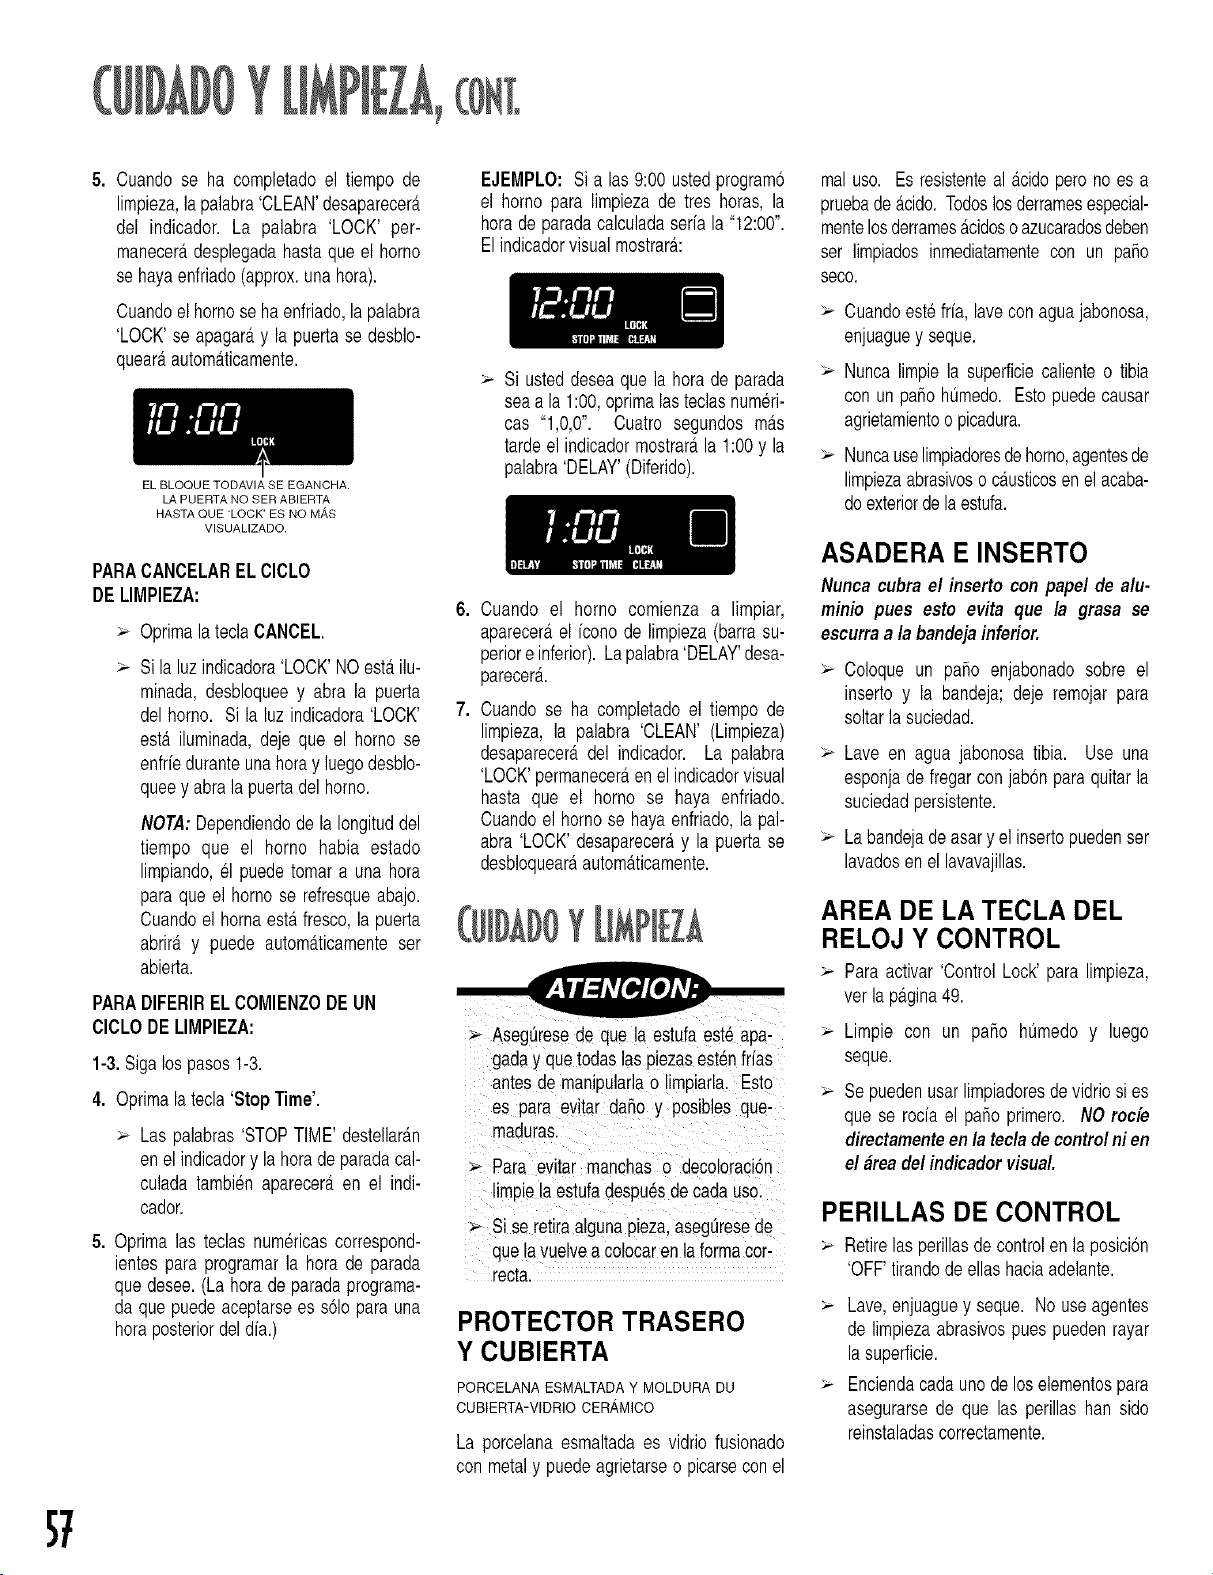
Y
Cuandose ha completadoel tiempo de
limpieza,lapalabra'CLEAN'desaparecer_.
del indicador. La palabra 'LOCK' per-
manecer_,desplegadahastaque el homo
se hayaenfriado(approx.unahora).
Cuandoel homose haenfriado,lapalabra
'LOCK'se apagar_,y la puertase desblo-
quear_,autom_.ticamente.
EL BLOQUE TODAVIA SE EGANCHA.
LA PUERTA NO SER ABIERTA
HASTA QUE 'LOCK' ES NO M,_,S
VlSUALIZADO.
PARACANCELARELClCLO
DE LIMPIEZA:
OprimalateclaCANCEL.
Si laluz indicadora'LOCK'NOest,.ilu-
minada,desbloqueey abra la puerta
del homo. Si la luz indicadora'LOCK'
esta iluminada,deje que el homo se
enfrfeduranteunahoray luegodesblo-
queey abrala puertadel homo.
NOTA:Dependiendode la Iongituddel
tiempo que el horno habia estado
limpiando,el puedetomara una hora
paraque el homose refresqueabajo.
Cuandoel hornaest,. fresco,la puerta
abrir_,y puede autom_.ticamenteser
abierta.
PARADIFERIRELCOMIENZODEUN
ClCLODELIMPIEZA:
1-3.Sigalospasos1-3.
4. Optimalatecla'Stop Time'.
Las palabras'STOPTIME' destellarAn
enel indicadory la herade paradacal-
culada tambienapareceraen el indi-
cador.
5. Oprimalas teclas numericascorrespond-
ientespara programarla horade parada
quedesee.(La horade paradaprograma-
da que puedeaceptarsees s61opara una
horaposteriordeldfa.)
EJEMPLO:Sialas 9:00 ustedprogram6
el homo para limpieza de tres horas, la
horade paradacalculadaseffala "12:00".
Elindicadorvisualmostrara:
> Si usteddeseaquela horade parada
seaa la 1:00,oprimalasteclasnumeri-
cas "1,0,0". Cuatro segundos m_.s
tardeel indicadormostrar_,la 1:00y la
palabra'DELAY'(Diferido).
Cuando el horno comienza a limpiar,
aparecer_,el [conode limpieza(barrasu-
periore inferior).Lapalabra'DELAY'desa-
parecer&
Cuandose ha completadoel tiempo de
limpieza, la palabra 'CLEAN' (Limpieza)
desaparecer_,del indicador. La palabra
'LOCK'permanecer_,enel indicadorvisual
hasta que el homo se haya enfriado.
Cuandoel homose hayaenfriado,la pal-
abra 'LOCK'desaparecer_,y la puertase
desbloquear_,automa.ticamente.
Y
_--Asegt)resede que la estufaeste apa-
gaday quetodaslas piezasest6nfrias
antesde manipularlao limpiarla. Esto
es para evitar datio y posiblesque-
maduras.
>- Para evitar mancnas o decoloraci6n
limpiela estufadespu6sdecadause.
Sise retiraalgunapieza,aseguresede
quelavuelvea colocaren la formacot-
recta.
PROTECTOR TRASERO
Y CUBIERTA
PORCELANAESMALTADAY MOLDURA DU
CUBIERTA-VIDRIOCER,4MICO
La porcelanaesmaltadaes vidrio fusionado
con metaly puedeagrietarseo picarsecon el
mal uso. Es resistenteal acidoperono es a
pruebade_.cido.Todoslosderramesespecial-
mentelosderramesacidosoazucaradosdeben
ser limpiadosinmediatamentecon un patio
seco.
Cuandoestefr[a, lavecon aguajabonosa,
enjuaguey seque.
>- Nunca limpiela superficiecalienteo tibia
con unpatio humedo. Estopuedecausar
agrietamientoo picadura.
>- Nuncauselimpiadoresde homo,agentesde
limpiezaabrasivosoc_.usticosen elacaba-
doexteriordelaestufa.
ASADERA E INSERTO
Nuncacubra el insertocon papel de alu-
minio pues esto evita que la grasa se
escurraa la bandejainferior.
>- Coloque un patio enjabonadosobre el
inserto y la bandeja;deje remojar para
soltarla suciedad.
Lave en agua jabonosatibia. Use una
esponjadefregarconjab6npara quitarla
suciedadpersistente.
>- La bandejade asary el insertopuedenser
lavadosenel lavavajillas.
AREA DE LA TECLA DEL
RELOJ Y CONTROL
Paraactivar 'ControlLock'para limpieza,
vet lapagina49.
Limpie con un patio hQmedoy luego
seque.
> Sepuedenusarlimpiadoresdevidriosi es
que se rocia el patio primero. NO rode
directamenteenla tecla de control ni en
el #readel indicador visual
PERILLAS DE CONTROL
Retirelas perillasde controlen laposici6n
'OFF'tirandodeeliashaciaadelante.
Lave,enjuaguey seque. No useagentes
de limpiezaabrasivospues puedenrayar
lasuperficie.
Enciendacadauno de loselementospara
asegurarsede que las perillas han side
reinstaladascorrectamente.
57
ESMALTE, PINTADO
PANELES LATERALES, GAVETA DE ALMACE-
NAMIENTO, CAJON QUE SE CALIENTA Y PUERTA
DEL TOCARAS
>- Cuandoestefifo, lavecon aguajabonosa,
enjuaguey seque. Nuncalave unasuper-
ficiecalienteo tibia con un paso hOmedo
pues esto puede dahar la superficie y
puedecausarunaquemaduraporvapor.
:_ Para las manchas persistentes, use
agentes de limpieza abrasives suaves
tales come una pasta de bicarbonatede
soda o Ben Ami*. No use agentes de
limpiezaabrasives,c_.usticoso _.speros
tales come esponjas de acero o
limpiadoresde horno. Estos productos
rayaran o daharan permanentementela
superficie.
NOTA: Use toallas secas o un paho para
limpiarlosderrames,eepecialmentederrames
bcidoso azucarados.La superficiese puede
descoloraru opacar si la suciedadno es
extrafdainmediatamente.Eeto ee especial-
menteimportanteparalassuperficiesblancas.
VIDRIO
VENTANA Y PUERTA DEL HORNO
:_ Eviteusar cantidadesexcesivasde agua
que puedaescurrirsedebajoo detr#.sdel
vidriocausandomanchas.
> Lave con agua y jabdn. Enjuaguecon
agualimpiay seque. El limpiadorde vidrio
se puedeusar si primerose roda en el
pa_o.
:_ No use materialesabrasivestales como
esponjasparafregar,agentesde limpieza
en polvo o lana de acero. DaSar_.nel
vidrio.
CUBIERTA - VIDRIO
CER.AMICO
Nunca use /impiadoresde homo, b/an-
queador con c/oro, amoniaco o
/impiadores de vidrio que contenga
amoniaco.NOTA:L/ame a un reparador
autorizadosila cubiertade vidriocer#mico
se agrieta,quiebrao si e/meta/o e/pape/
de a/uminiose derritesobre/a cubierta.
:_ Deje que la cubiertase enfffe antes de
limpiarla.
:_ Generalidades - Limpie la cubierta
despuesdecadauseo cuandoseanecesario
con una toalla de papel htJmeday con
CooktopCleaningCreme*(n_lmerode parte
20000001)**.Luegolustreconunpasolimpio
y seco.
NOTA: Se desarrollaran manchas perma-
nentessi la suciedadse deja que se cocine
unay otravezusandola cubiertacuandoest#
sucia.
:_ ManchasRebeldeso Marcasde Metal-
Humedezcauna esponjade gomaqueno
deje marcas. ApliqueCooktopCleaning
Creme*y frote parasacartantasuciedad
comeseaposible.Apliqueunacapadelga-
dadecrema,cubraconunatoalladepapel
htJmeday dejelareposardurante30 a 45
minutos(2 a 3 horas para el suelo muy
pesado).Mantengaht_medocubriendola
toalla de panel con el abrigo pl_.stico.
Restrieguenuevamente,luegolimpiecon
un paso secoy limpio.NOTA:Solamente
use esponjasLIMPIAS,HUMEDASy que
norayeny queseanseguraspara utensil-
losconacabadoantiadherente.Sedahara
el disehoy el vidriosi la esponjano estb
mojada,si la esponjaestasuciao se usa
otro tipodeesponja.
:_ Suciedades Quemadas o Pegadas -
Restrieguecon unaesponjade gomaque
no deje marcas y Cooktop Cleaning
Creme*.NOTA:Sostengaun restregador
con hojade afeitara un _.ngulode 30° y
restriegue cualquier suciedad que per-
manezca.Luegolimpiecomese describi6
anteriormente.
Plastico o Az_Jcar Derretida
Inmediatamenteenciendael elementoa
temperaturaBAJAy restrieguey raspeel
aztJcaro elpl_.sticodelasuperficiecaliente
haciaun areafib. Luegoapagueel ele-
mentoy deje que se enfffe. Limpie el
residuoconunraspadorconhojadeafeitar
y CooktopCleaningCreme*.
ACABADOS DE METAL
:_ Laveconaguay jab6n,limpiadordevidrio
o spraysliquidossuaves.
:_ Paraevitarrayaru opacarel acabado,no
use abrasivos suaves, abrasives,
limpiadores c_.usticos o asperos tales
comelimpiadoresde homo.
INTERIOR DEL HORNO
:_ Sigalas instruccionesenlap_.gina56y 57
paraHomoAutolimpiante.
PARRILLAS DEL HORNO
Limpieconaguajabonosa.
Saque las manchas persistentes con
limpiadoren polvoo unaesponjade fregar
conjabSn. Enjuaguey seque.
Las parrillasperderansu colorpermanen-
tementey pueden no deslizarsesuave-
mentesi se dejanen el hornoduranteel
ciclo de autolimpieza. Si esto ocurre,
limpiela parrillay los soportesde las par-
rillascon unapequeSacantidaddeaceite
vegetal para restaurar la facilidad del
movimiento,luego limpie el exceso de
aceite.
ACABADOS DE PL.ASTICO
GUARNICION TRASERA Y TAPAS DE EXTREMO
:_ Cuandoestefifo, limpieconaguay jab6n,
enjuaguey seque.
:_ Use un limpiador de vidrio y un paso
suave.
NOTA: Nunca use limpiadores de homo,
limpiadoresen polvo abrasivos o ffquidos
causticosen losacabadosdeplastico. Eetos
agentesde limpieza rayarano marcaranel
acabado.
NOTA:Paraevitarmanchaso descoloracidn,
limpielosderramesdegrasa,mantecao bcido
(tomate,limdn,vinagre,leche,jugo de fruta,
escabeche)inmediatamenteconunatoallade
papelo un paffo seco.
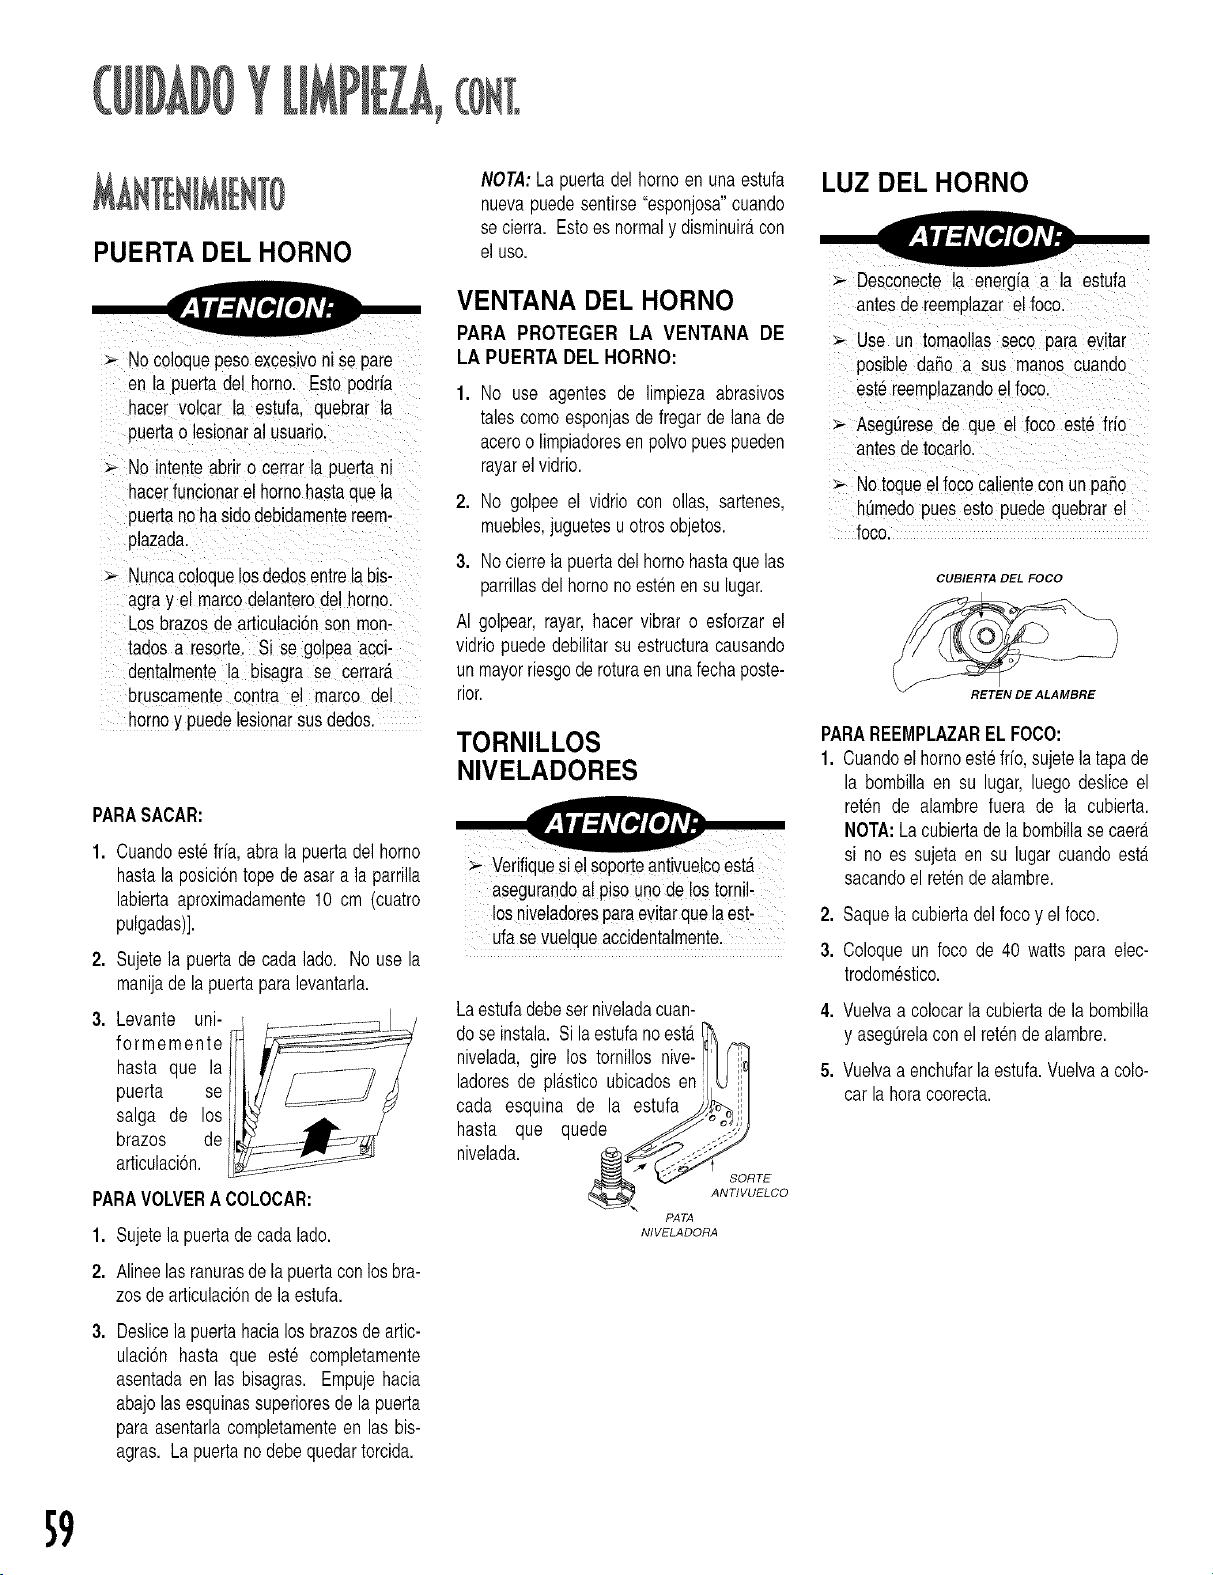
PUERTA DEL HORNO
Nocoloquepesoexcesivonl se pare
en la puertadel homo. Esto podria
hacer volcar la estufa, quebrar la
ouertao lesionaral usuario.
No ntenteabriro cerrarla puertani
hacer_'uncionarel hornohastaquela
puertanohasidodebidamentereem-
olazada.
Nuncacoloquelosdedosentrelabis-
agray el marcodelanterodelhomo.
Los brazosdearticulaci6nson mon-
tadosa resorte. Si se golpeaacci-
dentalmente la bisagra se cerrar#,
bruscamentecontra el marco del
homoy puedelesionarsusdedos.
PARASACAR:
.
3.
Cuandoestefrfa, abrala puertadel horno
hastala posicidntope de asar a la parrilla
labiertaaproximadamente10 cm (cuatro
pulgadas)].
Sujetela puertade cadalado. No use la
manijadela puertaparalevantarla.
Levante uni-
formemente
hasta que la
puerta se
salga de los
brazos de
articulacidn.
PARAVOLVERA COLOCAR:
1. Sujetela puertadecadalado.
2. Alineelas ranurasdelapuertaconlos bra-
zosdearticulaci6nde la estufa.
Deslicela puertahacialosbrazosdeartic-
ulacidn hasta que este completamente
asentadaen las bisagras. Empujehacia
abajolas esquinassuperioresde lapuerta
paraasentarlacompletamenteen las bis-
agras. La puertano debequedartorcida.
NOTA:Lapuertadel homoen unaestufa
nuevapuedesentirse"esponjosa"cuando
se cierra. Estoes normaly disminuir_,con
el uso.
VENTANA DEL HORNO
PARA PROTEGER LA VENTANA DE
LA PUERTADEL HORNO:
1. No use agentes de limpiezaabrasivos
talescomoesponjasde fregarde lana de
aceroo limpiadoresenpolvopuespueden
rayarel vidrio.
2. No golpeeel vidrio con ollas, sartenes,
muebles,juguetesuotrosobjetos.
3. Nocierrelapuertadelhomohastaquelas
parrillasdelhomo noestenensu lugar.
AI golpear,rayar,hacer vibrar o esforzarel
vidriopuededebilitarsu estructuracausando
unmayorriesgoderoturaenunafechaposte-
rior.
TORNILLOS
NIVELADORES
>-Verifique si e!soporteantivuelcoesta
asegurandoal piso unode lostornil-
losniveladoresparaevitarquelaest-
ufase vuelqueaccidentalmente.
Laestufadebeset niveladacuan-
dose instal& Si laestufanoest#.
nivelada,gire los tornillos nive-
ladoresde pl_.sticoubicadosen
cada esquina de la estufa
hasta que quede
nivelada. __
PA TA
NIVELADORA
SORTE
ANTIVUELCO
LUZ DEL HORNO
> Desconectela energ[a a la estufa
antes de reemplazarel foco.
> Use un tomao as seco para evtar
POSib!edafio a sus manoscuando
est6 reemplazandoe! foco.
>- Asegt_resede que el foco est_ fifo
antesdetocafl&
> No toqueel foco calientecon un patio
ht_medoPues esto puedequebrar eI
focol
CUBIERTA DEL FOCO
RETEN DE ALAMBRE
PARAREEMPLAZAREL FOCO:
1. Cuandoel homoestefifo, sujetelatapade
la bombillaen su lugar,luego desliceel
reten de alambre fuera de la cubierta.
NOTA:Lacubiertadela bombillase caer_.
si no es sujetaen su lugar cuandoest,.
sacandoel retendealambre.
2. Saquelacubiertadel foco y el foco.
3. Coloqueun foco de 40 watts paraelec-
trodomestico.
4. Vuelvaa colocarla cubiertade la bombilla
y aseg_brelaconel retende alambre.
5. Vuelvaa enchufarla estufa.Vuelvaacolo-
car lahoracoorecta.
59
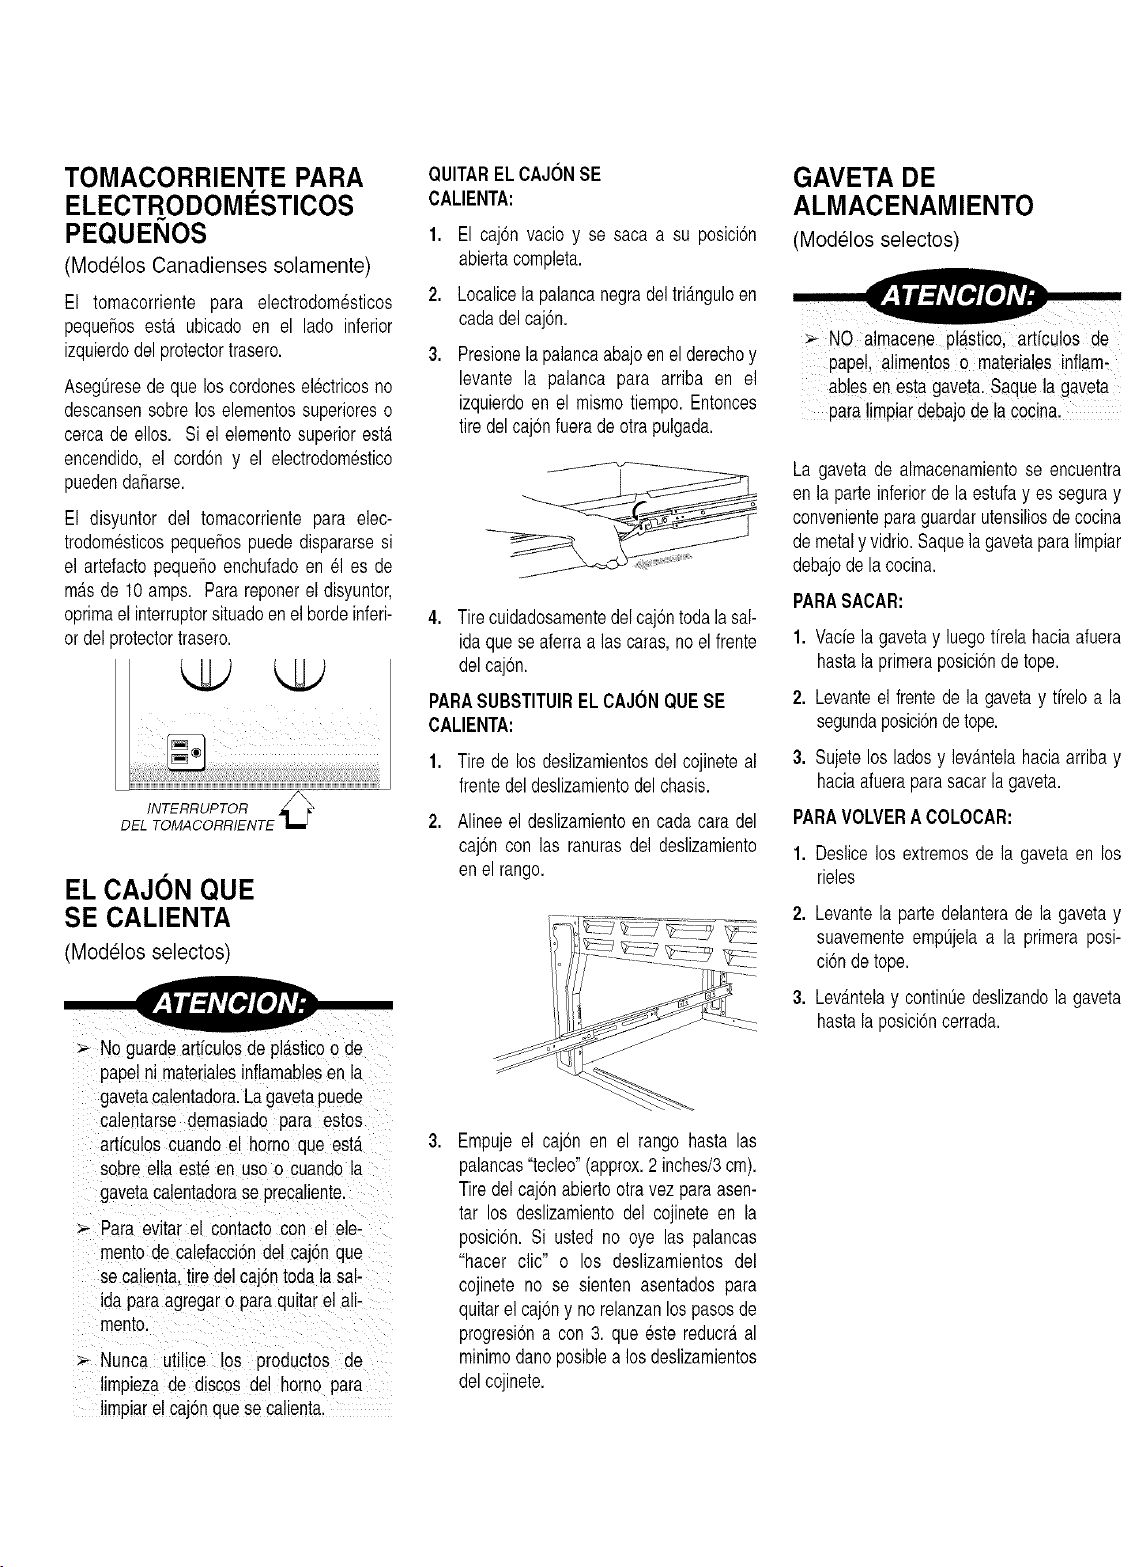
TOMACORRIENTE PARA
ELECTRODOMESTICOS
PEQUENOS
(Modelos Canadienses solamente)
El tomacorriente para electrodomesticos
pequeSosesta ubicado en el lado inferior
izquierdodelprotectortrasero.
Aseg_resede que los cordoneselectricosno
descansensobrelos elementossuperioreso
cercade ellos. Si el elementosuperioresta.
encendido,el cord6n y el electrodomestico
puedendaSarse.
El disyuntor del tomacorrientepara elec-
trodomesticospequeSospuededispararsesi
el artefactopequeSoenchufadoen el es de
masde 10amps. Parareponerel disyuntor,
oprimaelinterruptersituadoenelbordeinferi-
ordel _rotectortrasero.
INTERRUPTOR
DEL TOMACORRIENTE
EL CAJON QUE
SE CALIENTA
(Modelos selectos)
No guardeartfculosde pl_sticoo de
papelni materialesinflamablesen la
gavetacalentadora.Lagavetapuede
calentarse demasiado para estos
artfculoscuandoel homo que est_
sobreella est# en uso o cuandola
gavetacalentadorase precaliente.
Para evitar el contactocon el ele-
mentode calefacci6ndel caj6nque
se calienta,tiredel caj6ntodala sal-
idaparaagregaro paraquitarel ali-
mento.
Nunca utilice los productos de
limpiezade discos del homo para
limpiarelcaj6nquese calienta
QUITARELCAJONSE
CALIENTA:
1. El caj6n vacio y se saca a su posici6n
abiertacompleta.
2. Localicela palancanegradeltri_.nguloen
cadadelcaj6n.
3. Presionela palancaabajoen el derechoy
levante la palanca para arriba en el
izquierdoen el mismotiempo. Entonces
tire delcaj6nfueradeotra pulgada.
J
4. Tirecuidadosamentedelcaj6ntodalasal-
idaquese aferraalas caras,no elfrente
delcaj6n.
PARASUBSTITUIRELCAJONQUESE
CALIENTA:
1. Tire de los deslizamientosdel cojineteal
frentedeldeslizamientodel chasis.
2. Alineeel deslizamientoen cadacara del
caj6n con las ranurasdel deslizamiento
enel range.
Empujeel caj6n en el tango hasta las
palancas"tecleo"(approx.2 inches/3cm).
Tiredelcaj6nabiertootravezparaasen-
tar los deslizamientodel cojineteen la
posici6n.Si usted no oye las palancas
"hacer clic" o los deslizamientos del
cojinete no se sienten asentadospara
quitarel caj6ny no relanzanlospasosde
progresi6na con 3. que este reducr_,al
minimodanoposiblea los deslizamientos
delcojinete.
GAVETA DE
ALMACENAMIENTO
(Modelos selectos)
>_ NO almacene pl_stico, artfculos de
pape!,alimentos0 materialesinflam_
ab!esenesta gaveta.Saquela gaveta
para!impiardebajode la cocina,
La gaveta de almacenamientose encuentra
en la parteinferiorde la estufayes seguray
convenienteparaguardarutensiliosde cocina
demetaly vidrio.Saquelagavetaparalimpiar
debajode la cocina.
PARASACAR:
1. Vacfela gavetay luego firelahaciaafuera
hastala primeraposici6ndetope.
2. Levanteel frentede la gavetay tirelo a la
segundaposici6nde tope.
3. Sujetelos ladosy levantelahaciaarribay
haciaafueraparasacarlagaveta.
PARAVOLVERA COLOCAR:
1. Deslicelos extremosde la gavetaen los
rieles
2. Levantela parte delanterade la gavetay
suavementeempQjelaa la primera posi-
ci6ndetope.
3. Lev_.ntelay continLiedeslizandola gaveta
hastala posici6ncerrada.
PARA LA MAYORiA DE
LOS PROBLEMAS, HAGA
ESTO PRIMERO:
I Revise si los controles del homo estan
debidamenteajustados.
! Verifique si el enchufe esta firmemente
insertadoenel tomacorriente.
I Verifiqueo vuelvaa reporterel disyuntor.
Verifiqueo reemplaceel fusible.
I Verifiqueel suministrodeenergfaelectrica.
TODA LA ESTUFA O
PARTE DE ELLA NO
FUNCIONA.
NOTA:Enlos mode/oscanadiensesconde
centroquese ca/ienta/a superficiede coc-
ci6n de vidrio cer_mico no funcionar_
duranteel cic/ode auto/impieza.
! Revisesi la superficiey/o los controlesdel
homo est_.ndebidamenteajustados. Ver
p_.ginas46y 51.
! Verifiquesi la puertadel homo se ha des-
bloqueado despues del ciclo de
autolimpieza.Vet p_.ginas56y 57.
! Revise si el homo est,. ajustado para
horneadodiferidoo programade limpieza.
Vetp_.ginas55y 57.
LA SUPERFICIE DE
VIDRIO CERAMICO
MUESTRA DESGASTE
1. Ralladuraspequetiaso abrasiones.
I La cubiertay la parte inferiordel uten-
silioest_.nlimpios. Nodesliceutensilios
de metal o de vidrio a traves de la
cubierta. AsegQresede que la parte
inferiordelutensiliono sea_.spera.Use
los agentesde limpiezarecomendados.
Verp_.gina58.
2. Marcasde metal.
! No desliceutensiliosde metala traves
de la cubierta. Cuandose enfrfelimpie
conunacremade limpiezaparacubier-
tas.Vet p_.gina58.
3. Vetascafesy manchas.
! No se retiraroninmediatamentelos der-
rames. La cubiertase limpi6 con una
esponjao patio sucio. La parte inferior
delutensilionoesta limpia.
4. Areascon brillometa.lico.
I Dep6sitosmineralesdel aguay del ali-
mento.
5. Picaduraso escamas.
| Derramesazucaradosque no fueron
quitadosoportunamente.Verp_.gina58.
LOS RESULTADOS DEL
HORNEADO NO SON
COMO SE ESPERABAN O
SON DISTINTOS A LOS
DEL HORNO ANTERIOR.
I AsegtJresede queel respiraderodel homo
no este bloqueado.Verpagina52 para la
ubicaci6n.
! Verifiqueparaasegurarsede quela estufa
est,.nivelada.
Lastemperaturasa menudovarianentreun
homo nuevoy uno antiguo.A medidaque
pasa el tiempo, la temperaturadel homo
cambiay puede hacerse mas caliente o
m_.sfrfa. Ver p_.gina51 para las instruc-
clonesde como ajustar la temperaturadel
homo.NOTA:No se recomiendaajustarla
temperaturasi ha tenido problemascon
solounao dosrecetas.
I Verifiquequela temperaturadel homohaya
sido disminuidaen 25°F cuando use el
homeadoporconvecci6n.
I Consulteel folleto"La Cocina Facil" para
mayorinformaci6nsobre los utensiliosde
horneary el horneado.
LOS ALLIMENTOS NO SE
ASAN A LA PARRILLA EN
FORMA DEBIDA O SALE
DEMASIADO HUMO.
! Verifiquelas posicionesde las parrillasdel
homo. Elalimentopuedeestarmuycerca
delelemento.
! Elelementodeasarnofue precalentado.
I El papel de aluminio se us6 de manera
incorrecta. Nunca forre el inserto del
asadorconpapelde aluminio.
! La puertadel homoestabacerradamien-
tras se asabaa la parrilla.Deje la puerta
abiertaenlaprimeraposici6n(alrededorde
4 pulgadas).
! Recorteel exceso de grasa de la came
antesdeponerlaa asara la parrilla.
I Seus6 unaasaderasucia.
EL HORNO NO SE
AUTOLIMPIA.
I Verifiqueparaasegurarsede que el ciclono
este ajustado para un comienzodiferido.
Vetp_.gina57.
I Verifiquesi la puertaest,.cerrada.
EL HORNO NO SE LIMPIO
EN FORMA DEBIDA.
! Puede que sea necesario un tiempo de
limpiezam_.slargo.
! Losderramesexcesivos,especialmentede
alimentosazucaradosy/o _.cidosnofueron
limpiadosantesdelciclodeautolimpieza.
LA PUERTA DEL HORNO
NO SE DESBLOQUEA
DESPUES DEL CICLO DE
LIMPIEZA.
I El interiordel homotodavfaest,. caliente.
Dejeque paseaproximadamenteunahera
paraqueel hornoseenfrfeantesde quese
completeunciclode autolimpieza.La puer-
tapuedesetabiertacuandodesaparezcala
palabra'LOCK'delindicadorvisual.
6]
SE JUNTA HUMEDAD EN
LA VENTANA DEL HORNO
O SALE VAPOR POR EL
RESPIRADERO DEL
HORNO.
! Estoes normalcuandose cocinanalimen-
tosconalto contenidodehumedad.
! Seus6 humedadexcesivacuandolimpidla
ventana.
HAY UN FUERTE OLOR O
HUMO LEVE CUANDO SE
ENCIENDE EL HORNO.
! Estoesnormalenunaestufanuevay desa-
parecer_,despuesde unospocosusos. Si
seiniciaunciclodelimpiezaelolorse"que-
mar_."m_.sr@idamente.
! Encendiendo un ventilador ayudar_, a
extraerel humoy/oel olor.
! Haysuciedadexcesivade alimentosen la
parte inferiordel horno. Use un ciclo de
autolimpieza.
EN EL INDICADOR
APARECE LA LETRA "F"
M.AS UN NUMERO.
! Estoes uncddigode falla. Si apareceun
cddigode falla en el indicadorvisualy se
escuchaunaseSalsonora,oprimala tecla
'CANCEL'. Si el cddigode falla y la seSal
sonora oontintJan,desenchufela estufa.
Espereunosminutosluegovuelvaaenchu-
far laestufa. Si el cddigodefallay la sepal
sonoracontintJan,des-conectela estufay
Ilamea untecnicoautorizado.
Si el homo est,. excesivamentesucio,se
puedenproducir IlamaradasexcesivasIo
cualresultara,en un cddigode falladurante
el ciclo de limpieza. Oprima la tecla
'CANCEL'y deje que el homo se enfrie
completo,limpiar sacar de exceso tierra
luegovuelvaa ponerel ciclode limpieza.Si
elcddigodefallay la alarmasonoratodavfa
contintJa,desenchufela estufay Ilamea un
tecnicoautorizado.
Garant[a Completa de Un Afio - Piezas y
Mano de Obra
Durante un (1) afio desde la fecha original de
compra al per menor, se reparar__o reem-
plazar__gratuitamente cualquier pieza que falle
durante use normal en el hogar.
Garant[as Limitadas - Piezas Solamente
Segundo Afio - Despues del primer aSo de la
fecha original de corrora, se reemplazara, o
repararA §ratuitamente las piezas que fallen
durante use norma en el hogar en Io que
respecta alas piezas y el propietario deberA
pagar todos los otros costos incluyendo mane
de obra. kilometraje y transporte.
Desde el Tercero Hasta el Quinto Afio - A
partir de la fecha original de compra, se
reparara o reemplazar__ gratuitamente las
piezas indicadas a continuaci6n que fallen
durante use normal en Io que respecta alas
piezas y el propietario debera pagar todos los
otros costos incluyendo mane de obra kilome-
traje y transporte.
Controles Electrbnicos
Cubierta de Vidrie Cer_mico: Debido a
rotura termica.
Elementos Calefactores El_ctricos:
Elemento del asador y de hornear en las
estufas electricas.
Residentes Canadienses
Las garanffas antedores cubren solamente
aquellos electrodomesticos instalados en
Canada que han side certificados o aprobados
per las agencias de pruebas correspondientes
para cumplimiento con la Norma Nacional de
Canada a menos que el electrodomestico haya
side tra[do a Canada desde los EE.UU. debido
a un cambio de residencla.
Garant[a Limitada Fuera de los EE.UU. y
Canada - Piezas Solamente
Durante dos (2) aries de la fecha de compra
original al per menor, cualquier pieza que falle
durante use normal en el hogar sera_reem-
plazada o reparada gratuitamente en Io que
respecta a la pieza y el propietario deberA
pagar todos los otros costos incluyendo mane
de obra. kilometraje y transporte.
Las garantfas especfficas expresadas anterior-
mente son las UNICAS garantfas provistas per
el fabricante. Estas garantfas le otorgan dere-
chos tegales especfficos y usted puede tener
ademas otros derechos que varfan de un esta-
do a otro.
1. Situaciones y daSos resultantes de cualquiera de las siguientes eventuali-
dades:
a. Instalaci6n, entrega o mantenimiento inapropiados.
b. Cualquier reparaci6n, modificaci6n, alteraci6n o ajuste no autorizado
per el fabricante o per un centre de servicio autorizado.
c. Mal use, abuse, accidentes o use [rrazonable.
d. Corriente electrica, voltaje o suministro incorrecto.
e. Programaci6n [ncorrecta de cualquiera de los controles.
2. Las garant[as quedan hulas si los ntJmeros de serie originales hart side
retirados, alterados o no son facilmente legibles.
3. Feces.
4. Productos comprados para use comercial o industrial.
5. El costo del servic[o o Ilamada de servicio para:
a. Corregir errores de instalaci6n.
b. Instruir al usuar[o sobre el use correcto del artefacto.
c. Transporte del artefacto al establecimiento de servicio.
6. Los daSos consecuentes o [ncidentales sufridos per cualquier persona
come resultado del incumplimientode esta garant[a. En algunos estados
no se permite la exclusi6n o limitaci6n de daSos consecuentes o inciden-
tales, per Io tanto la fimitaci6n o exclusi6n anterior puede no aplicarse en
SU case.
Llame al distribuidor deride compr6 su electrodomestico o flame a Maytag
Appliances Sales Company, Maytag Customer Assistance al 1-800-688-
9900, EE.UU. o al 1-800-688-2002 en Canada para ubicar a un tecnico
autorizado.
I AsegQresede conservar la prueba de compra para verificar el estado de la
garantia. Consulte la secci6n sobre la GARANTIA para mayor informaci6n
sobre las responsabilidades del propietario para servic[o bajo la garantfa.
I Si el distribuidor o la compaSfa de servic[o no pueden resolver el prone-
ma, escriba a Maytag Appliances Sales Company, Attn: CAIR®,Center,
P.O. Box 2370, Cleveland, TN 37320-2370 o flame al 1-800-688-9900,
EE.UU. o al 1-800-688-2002, CANADA.
NOTA: Cuando flame o escriba acerca de un problema de servic[o, per
favor incluya la siguiente informaci6n.
a. Su nombre, direcci6n y ntJmero de telefono;
b. NtJmerode modelo y nQmerode serie;
c. Nombre y direcci6n de su distribuidor o tecnico de servic[o;
d. Una descripci6n clara del problema que estA experimentando;
e. Prueba de compra (recibo de compra).
I Las gu[as del usuario, manuales de servicio e [nformaci6n sobre las piezas
pueden solicitarse a Maytag Appliances Sales Company, Maytag
Customer Assistance.
MAYTAG • 403 West Fourth Street North • P.O. Box 39 • Newton, Iowa 50208
Part No. 8113P292-60 h t t p : / / w w w. m a y t a g. c o m 74005917
Form No, A/05/01 Lithe U.S.A.