E-BIKE
USER‘S MANUAL
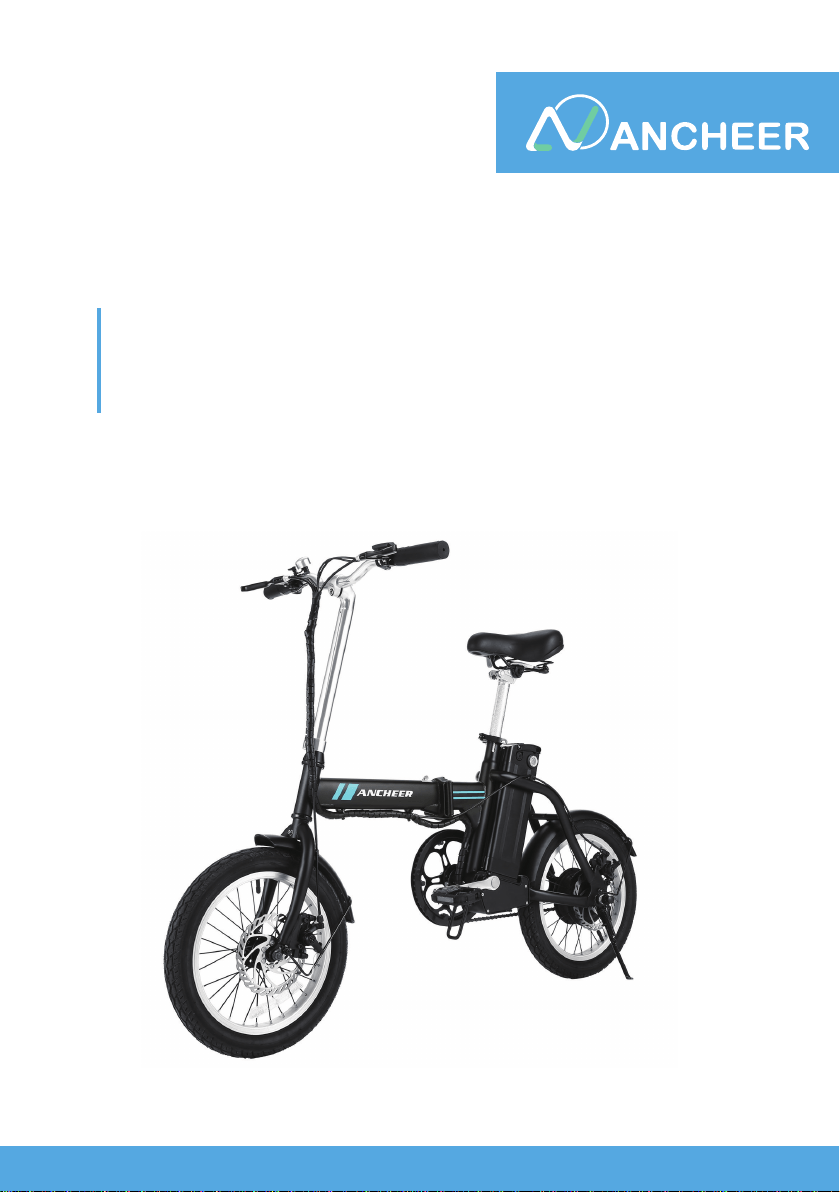
Thank you for purchasing the ANCHEER EBIKE.
The EBIKE features the most recent innovation in technology.

Read OWNER'S MANUAL and follow all Safety Messages and Instructions. Wear helmet
while riding the bike.
Do not use this bike for downhill competition or any aggressive off-road riding.
This e-bike is intended for use by persons 16 years or older that have the ability to control
the bike and follow the laws governing motorized bicycle use. Follow all Assembly and
Maintenance Instructions. Perform the Pre-Ride Checks before riding.
Failure to follow these WARNINGS and INSTRUCTIONS could lead to serious injury or
death.
Thank you for purchasing the ANCHEER EBIKE. The EBIKE features the most recent
innovation in technology.
Keep the battery out of reach of children.
Charging at 0°C~40°C/ 32°F~104°F, and discharging at -5°C~40°C/ 23°F~104°F. Please
do not store the battery in temperatures above 35°C/ 95°F or below -5°C/ 23°F.
Keep the battery dry, do not put the battery in acidic or alkaline liquid, keep away from
rain, fire and high temperature environment.
It is strictly forbidden to connect the positive and negative poles of the battery reversely,
and it is strictly forbidden to damage, disassemble or short-circuit the battery.
Used batteries are hazardous chemicals, and the used batteries should not be
disassembled without authorization, and recycled by relevant professional departments.
Use the original battery. Do not replace it with other brand’s or product’s battery.
●
●
●
●
●
●
WARNING

Following these techniques and tips can ensure you have a safe, fun riding experience on
your E-Bike.
Check to make sure your brakes are fully intact, pedals are securely installed, and
handlebars are locked in place.
Always wear a helmet and protective gear to avoid possible injury.
Make sure your feet are always on the pedals. Taking your feet off the pedals while
riding is dangerous.
Ensure the battery is fully charged especially if you plan to travel long distances.
Ensure your tires are Intact with no punctures.
Ensure the vehicle speed is safe to yourself and others,and be ready to stop at any
time.
Be aware of your surroundings at all times to ensure a safe ride. Your eyes are your
best tools for safely avoiding obstacles and slippery surfaces.
Stay in open spaces and flat areas,avoid steeps slopes or high traffic areas until you're
familiar with riding.
Please take the time to read your manual. We have tried to write it in a way that
is simple and easy to follow,while explaining how your bike works and how it is
maintained.
1.
2.
3.
4.
5.
6.
7.
8.
SAFE RIDING
TECHNIQUES & TIPS

Unpacking Your E-Bike
General Information
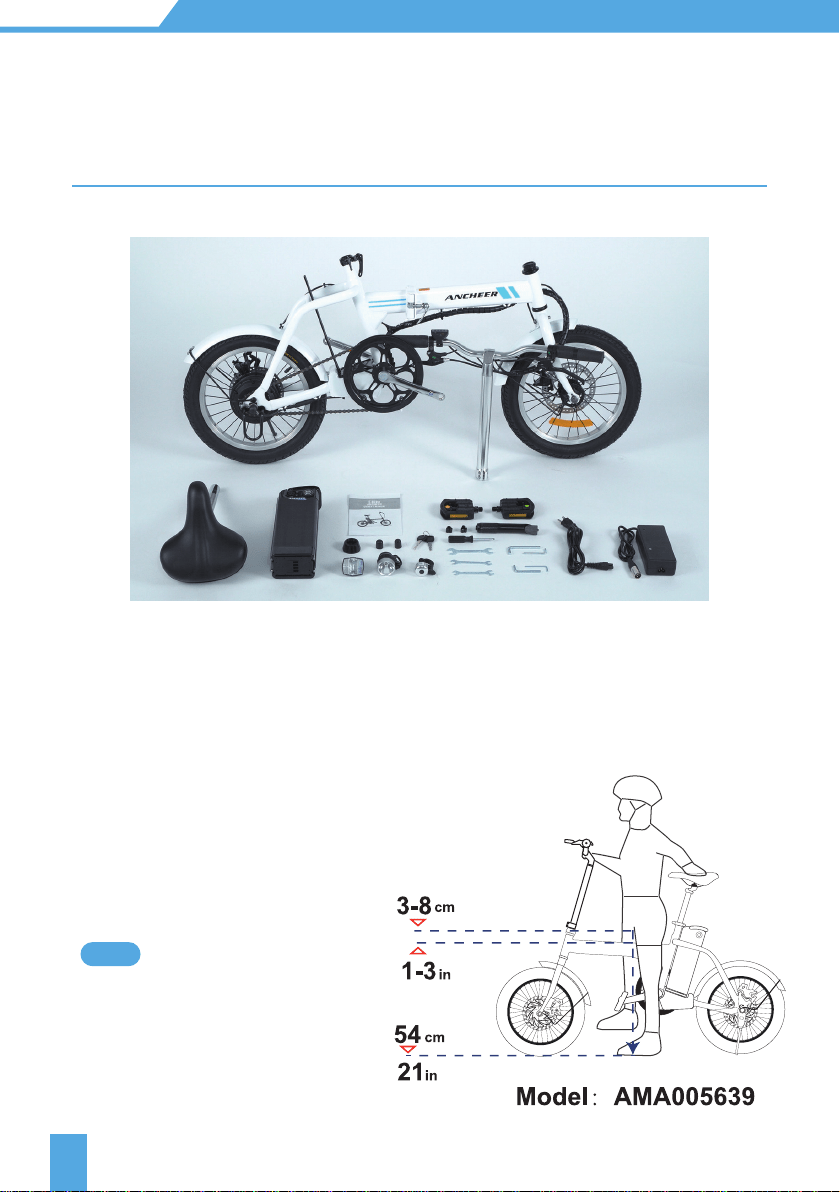
Contents Check List
Unfolding Your E-Bike
Fitting The Saddle
Pre-Ride Checks
Getting Started
Understanding Your Battery
Charging Your Battery
Simple Troubleshooting
Warranty
Warnings

ANCHEER
1
Specification:
Model NO. :
Frame :
Motor :
Battery :
Charging time:
Max Loading:
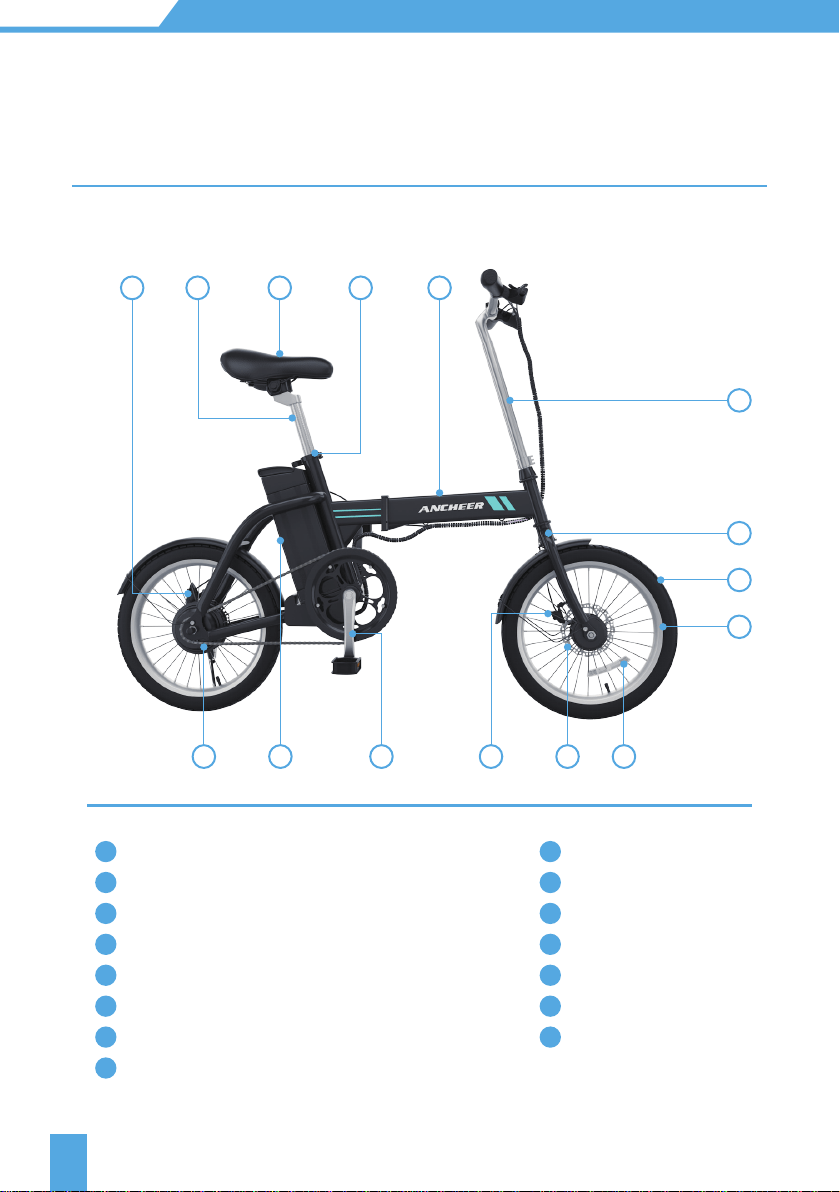
Your E-Bike
Saddle & Seat-post
Box Containing
Box Containing 2
16'' Folding ANCHEER
Steel
36V 250W Brushless
36V 8AH Lithium
4-6 Hours
100KG
a. Battery
a. Battery Charger
c. Manual
b. Two Set of Keys
b. Battery Lead
d. Tools
1
2
3
4
CONTENTS CHECK LIST
CONTENTS
CHECK LIST
IMPORTANT!
Please remeber that it is important to keep the carton your bike arrived in.
Couriers cannot collect your bike without a carton should you need to return
it to us.
ANCHEER
2
GENERAL
INFORMATION
1
2
3
4
57
10 14 1511 12 13
9 8 6
Rim Rear Disc Brake Callipers
Front Fork Battery
Tyre Chain
Stem Crank
Frame Front Disc Brake Calipers
Seat Post Clamp/ Seat Clamp Disc
Saddle Wheel Reflector
Saddle Post/ Seat Tube
91
2
3
4
5
6
7
8
10
11
12
13
14
15
1. Bike Components

ANCHEER
3
GENERAL
INFORMATION
16 21
17 22
24
19
20
18 23
Left Grip Right Grip
Left Brake Lever Right Brake Lever
Meter Handle Bar
Pedal Motor
Kick Stand
16 21
17 22
18 23
19 24
20
ANCHEER
4
GENERAL
INFORMATION
2. Tool List
For the sake of safety and comfortable
riding, when the rider stands on the ground
there should be clearance of 54cm/21in
from ground to the crotch of the rider. Also,
at least 3-8cm/1-3in between the crotch
and the top tube of the bike.
Standover height does not apply to
bicycles with step-through frames.
Instead, the limiting dimension is
determined by saddle height range.
You should adjust your saddle position
without exceeding the limit line on the
saddle tube.
0.24 inch (6mm)Allen Key
0.20 inch (5mm)Allen Key
0.16 inch (4mm)Allen Key
0.12 inch (3mm)Allen Key
Phillips - Slotted head Screwdriver
8-10 Open End Wrench
13-15 Open End Wrench
14-17 Open End Wrench
3. Standover Height
Note

ANCHEER
5
UNPACKING
YOUR NEW E-BIKE
Your bike comes 90% assembled in the carton.
Before you start to unpack your E-Bike we recommend you get another person to
assist you. It’s much easier to lift out of the box with 2 people.
Remove all the packing materials used to protect the bike and dispose of it later in a
responsible manner.
Once you have unpacked the bike,check to make sure there has not been any damage
in transit. If you find anything missing or damaged, contact ANCHEER customer
service: 626-333-4255 (US), [email protected] (US) / [email protected]
(International) / [email protected] (International)
1.
2.
3.
ANCHEER
6
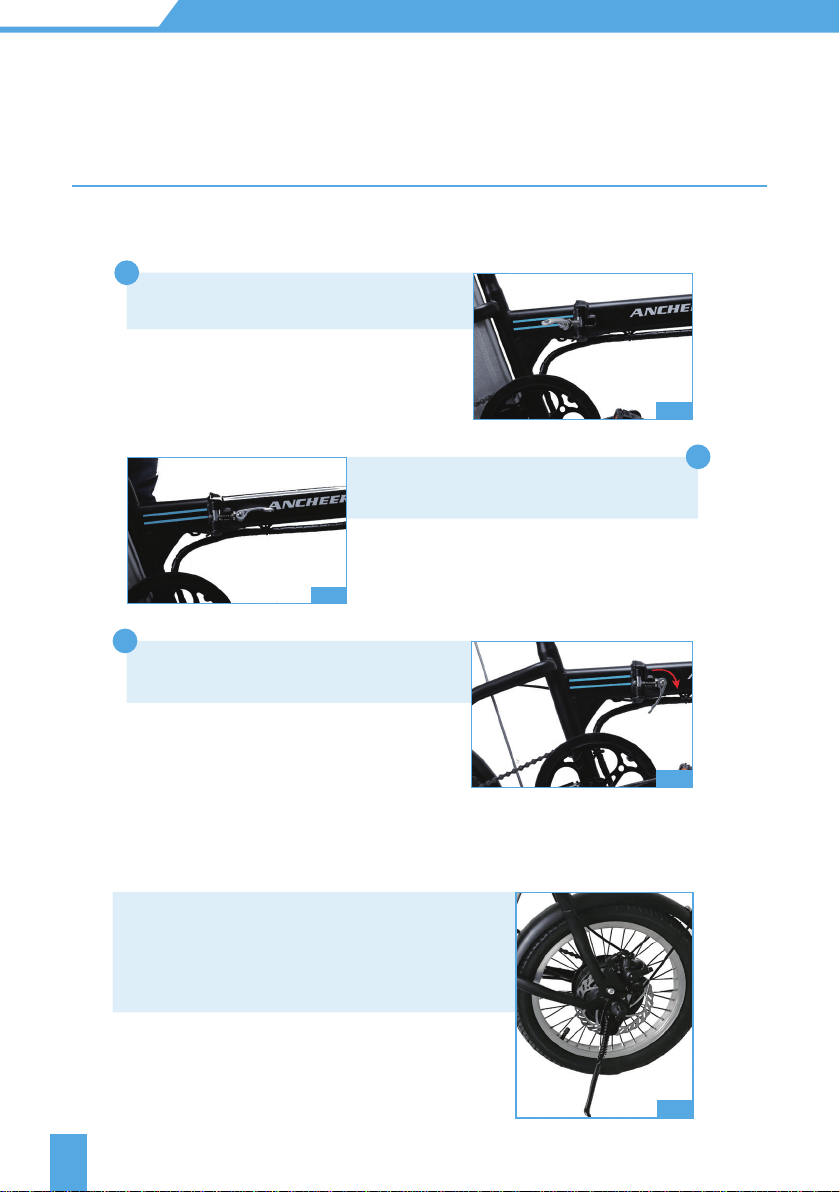
UNFOLDING
YOUR E-BIKE
Frame
Note:
Step1.
1.
2.
3.
Unfold the frame until the 2 sections are
in line. (Fig. 1)
Push the large lever towards the frame
to lock together. (Fig. 2)
Turn the sliver security clip as photo show
( Fig. 3)
To fold your frame for transport or storage simply reverse steps 1-3.
when you have unfolded your frame is a good
idea to rest your bike on the bike stand, which is
attached to the left rear chain stay. This makes it
much easier to complete the other steps.(Fig.4)
Fig.2
Fig.3
Fig.1
Fig.4
ANCHEER
7
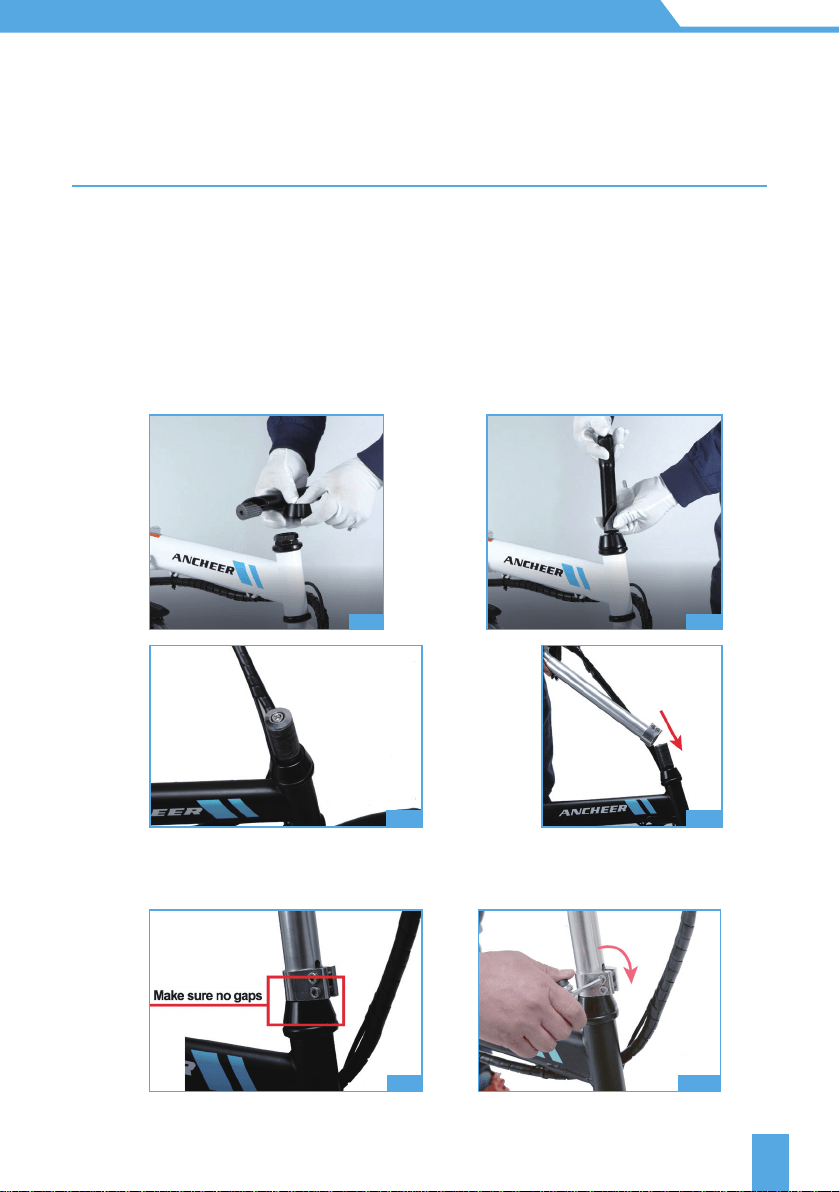
Be sure to tighten the screws at the stem, otherwise, the handlebar riser will easily
loosen.
UNFOLDING
YOUR E-BIKE
Handlebar and stem
Step 2.
A: Insert the handlebar into the stem
B: Tighten the two side screw of handlebar by allen key
C: Please refer to the picture below
Fig.7 Fig.8
Fig.10Fig.9
Fig.5 Fig.6
ANCHEER
8
UNFOLDING
YOUR E-BIKE
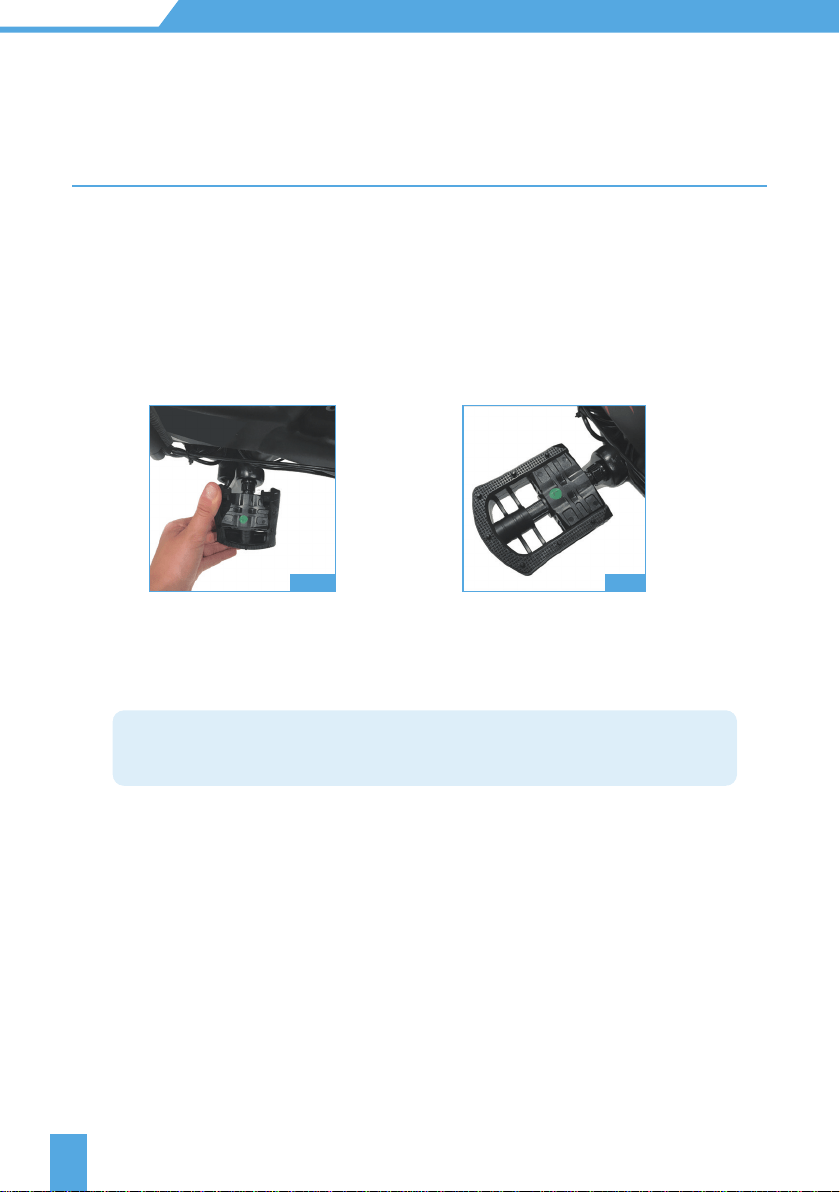
Pedals
Step 3.
Pull pedals out from folded position until they spring into flat position. (Fig.11)
To fold the pedals for storage or for transportation, you must press the pedal inward
towards the bike and then upward/downward once it has cleared the locking
mechanism . (Fig. 12)
Fig.11 Fig.12
Note:
Should you ever need to replace the pedals, remember the right pedal tightens
clockwise and the left pedal counter clockwise.
•
•
ANCHEER
9
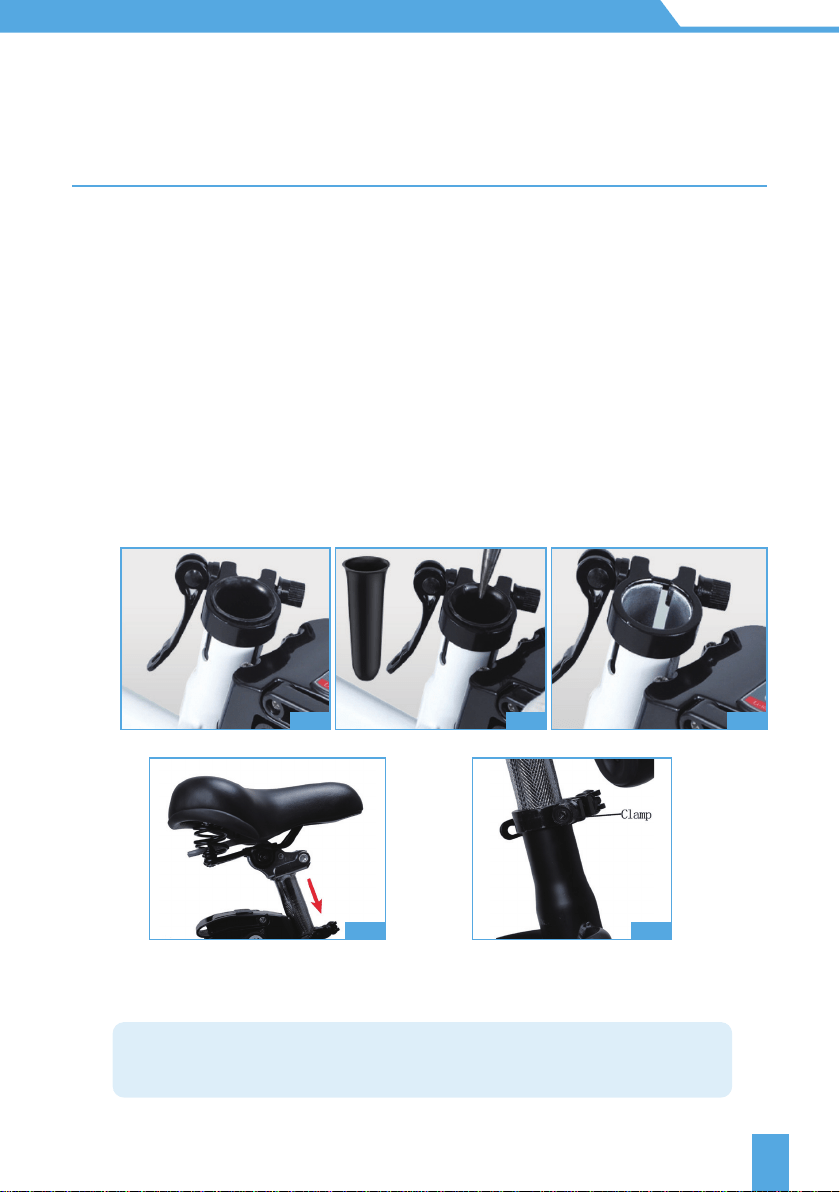
FITTING
THE SADDLE
Rease the seat post, use a tool to pull out the black tube, and check the seat tube.
Slide the seat post into the seat tube and close the tension lever on the quick-release
clamp to lock your seat in place. (Fig. 16)
Adjust the saddle height by releasing the clamp and tightening when at the correct
height.(Fig. 17)
If the clamp does not tighten enough to hold the saddle in position, simply release
the tension lever and rotate a quarter of a turn on the wheel nut and close the tension
lever. Repeat as necessary.
1.
2.
3.
4.
The saddle and seat post are already fitted together.
Fig.16 Fig.17
Note:
Do not raise the seat post higher than the minimum insertion Level, marked
clearly on the Seat post .(Fig. 17)
Fig.13 Fig.14 Fig.15

ANCHEER
10
PRE-RIDE
CHECKS
Check to make sure all fasteners are tight.
(See that at right for bolt sizes and locking torque spec.)
Check that your tires are inflated sufficiently.
(See tire wall for inflation information.)
Check that the brakes are working correctly.
(These are set by the factory and should not require adjusting)
Check your battery for charge.
(Note: your new E-Bike battery is supplied with a partial charge.)
Improper assembly or maintenance can lead to a crash.
Failure to do these pre-ride check may lead to severe injury.
1.
2.
3.
4.
Complete these checks before every ride.
TORQUE SPEC FOR LOCKING BOLT
50 - 60 ft-lb 5 - 6 N.m
9 - 10 N.m
11 - 12 N.m
M5
M6
M7
90 - 100 ft-lb
110 - 120 ft-lb
1
2
3
NO BOLT SPEC LOCKING TORQUE INDICATION
ANCHEER
11
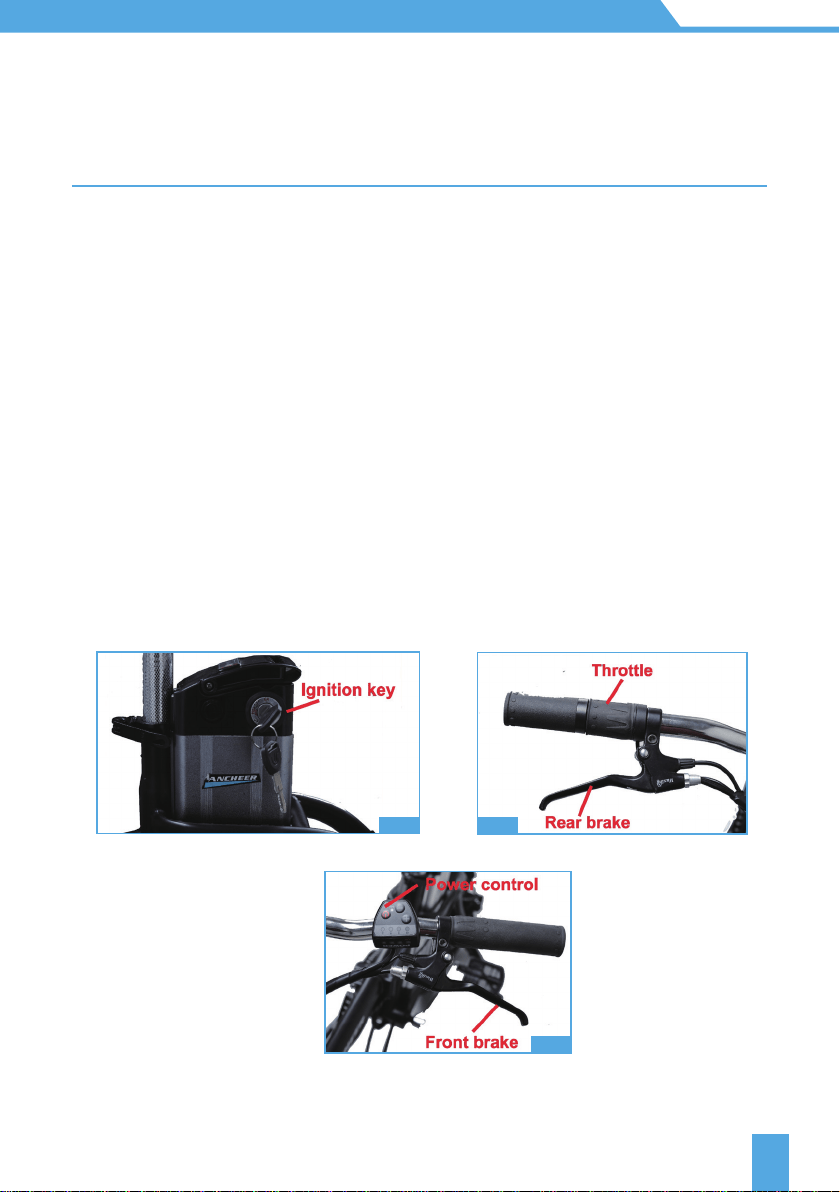
GETTING
STARTED
Switch on the battery on the left side of the frame. (Fig.18)
To tum on your E Bike, insert the ignition key below the battery indicator and tum
clockwise. (Fig.18)
THAT’S IT. You're ready to go.
Moving forward on your E Bike is as easy as twisting the throttle. (Fig.19)
Applying either brake will tum off the motor. (Fig.19 & 20)
To slow down, first let go of the throttle then gradually squeeze the rear brake (right)
to slow down the rear motorized wheel. (Fig.19)
To stop, first let go of the throttle, then squeeze the front and rear brakes to slow
down the front and rear wheels. (Fig.19 & 20)
1.
2.
3.
4.
5.
6.
7.
Simply explained, this is how your E-Bike works.
Fig.18 Fig.19
Fig.20

ANCHEER
12
UNDERSTANDING
YOUR BATTERY
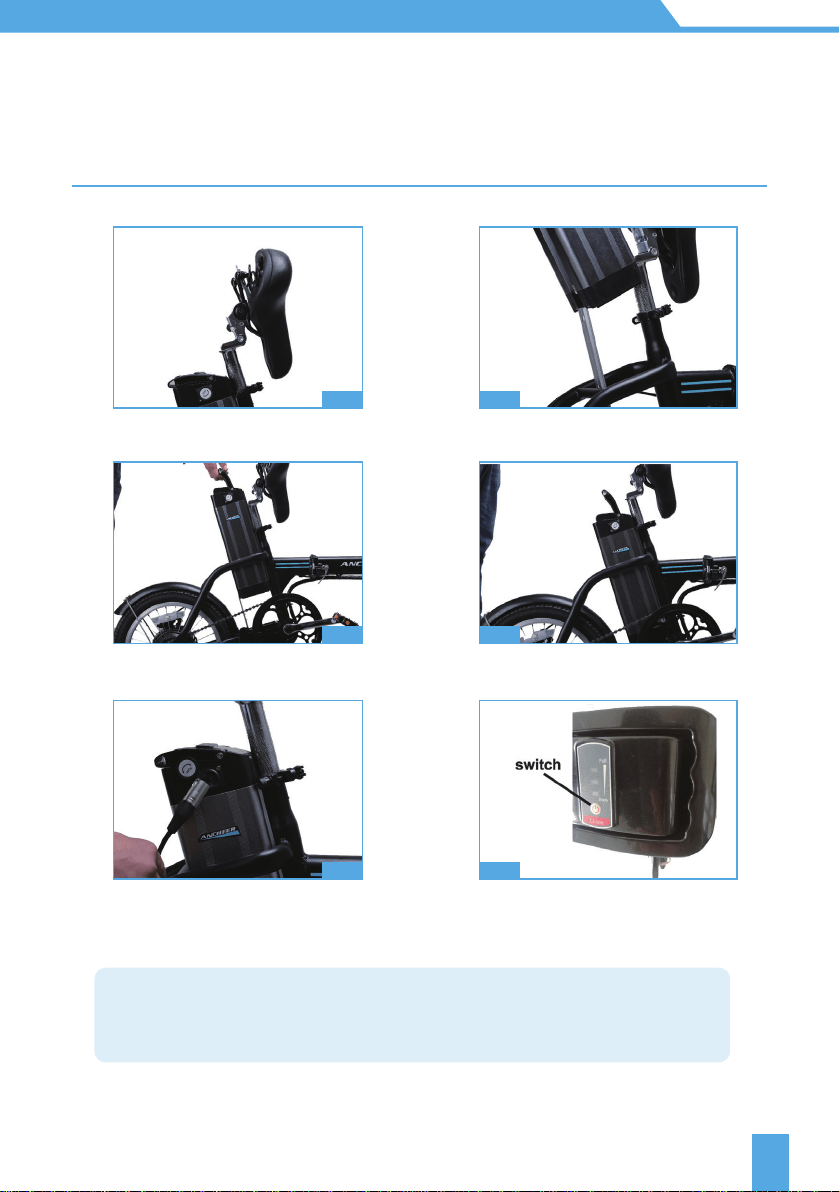
You are supplied with two keys to secure your battery to your bike. It is advisable to
separate the keys so that you don't lose both of them.
Release the quick-release mechanism and open the hinged frame, insert the key
and unlock the battery, remove the key, enabling you to remove the battery for
security or to charge it while away from the bike. (Fig.21 & Fig.22)
Once unlocked, the battery can be withdrawn from the frame .To replace the
battery simply reverse steps 2-3.
The charging port and battery ON/OFF switch are on the left side of the frame.
Remember to switch OFF when not in use, because leaving it in the ON position will
drain the battery. (Fig.23)
NOTE: Only charge your battery with the charger supplied with your E-Bike. The
charger is set to 110-240V.
Avoid dropping the charger as this may damage the sensitive electronics within
the casing.
The battery will stop charging automatically when it has reached full charge, but
it is not recommended to continue charging for any considerable amount of time
over what is required.
Battery install see the pictures .(Fig.21-Fig.24)
The more you use the assist, the more power it uses. Each rider is different, so power
usage can vary considerably with different rider weights and the terrain you ride. With
normal use, you should generally be able to obtain around 20 miles before you need to
recharge your battery.
We recommend that you get used to your new E-Bike and the level of assistance you
place on it. You'll soon be able to plan the length of the journey you can make and safely
return under assistance. If the charge runs out, you can ride your E-Bike as you would a
normal bike.
1.1
2.1
3.1
1.2
2.2
3.2
3.3
3.4
1.3
1. Security
2. Battery operation
3. Battery Charger and install
ANCHEER
13
UNDERSTANDING
YOUR BATTERY
Fig.21
Fig.23
Fig.25
Fig.22
Fig.24
Fig.26
IMPORTANT!
Any statements regarding battery performance or distances which can be
obtained per single charge are based on standard test conditions. Diverse terrain
and rider weight will of course produce varying results from those stated.
ANCHEER
14
UNDERSTANDING
YOUR BATTERY
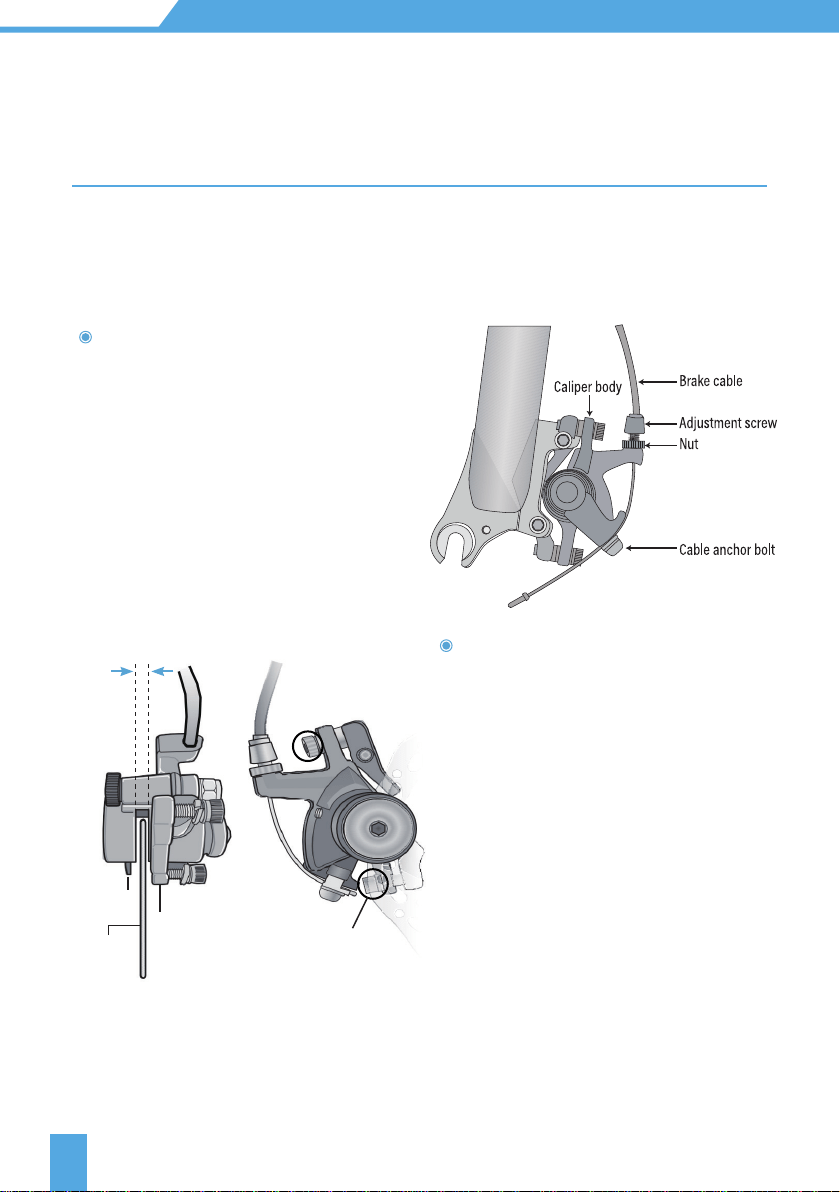
Brake Adjustment
If the brake is not sensitive, loosen the
anchor bolt of the brake cable to shorten
the brake distance of the brake cable and
then tighten the bolt. Or, lengthen the
distance of the brake cable when the brake
is too sensitive.
If the rotor always rubs against the
brake pad or the gap is too large, loose
the two centering adjustment screws,
but do not remove them. Slowly rotate
the wheel and check the space between
the rotor and the brake pad; adjust the
position of the brake pad and the rotor.
Centering the rotor and the pads to
avoid friction. After the adjustment is
complete, tighten the screws.
Ensure that the brake cables are properly inserted into the brake levers before aligning a
mechanical disc brake. If the disc rotor is bent or damaged, replace the rotor first.
Leave the same clearance on
both sides of the disc rotor
Brake pad
Disc rotor
Adjust caliper to
center the rotor
Centering
adjustment screws
ANCHEER
15
CHARGING
YOUR BATTERY
Plug your charger into the wall, the LED light will
illuminate Green
Connect the charger to the battery using the cord
provided, the LED light on the charger will change to
REO. This indicates it is charging.
Once fully charged the LED light on the charger
switches back to GREEN indicating the battery is fully
charged, and then goes off.
It is forbidden to modify the battery, electronic control system and the frame structure
of the bike, etc. Otherwise, it may cause safety hazards and void the warranty service. If
you continue to do so, all will be at your own peril.
Do not cover the charger with any material or substance that may restrict airflow to
the charger. The charger needs to 'breathe' to keep cool.
Charging your battery each time you use it no matter how far the trip, will prolong
the life of the battery.
DO NOT leave the battery discharged for long periods.
Never open the charger or change setting on charger .
Your battery can be charged on or off your bike.
To fully charge your battery,
allow approximately 4-6 hours.
1.
1.
2.
2.
3.
4.
3.
4.
Your Lithium battery arrives partially charged.
Fig.27
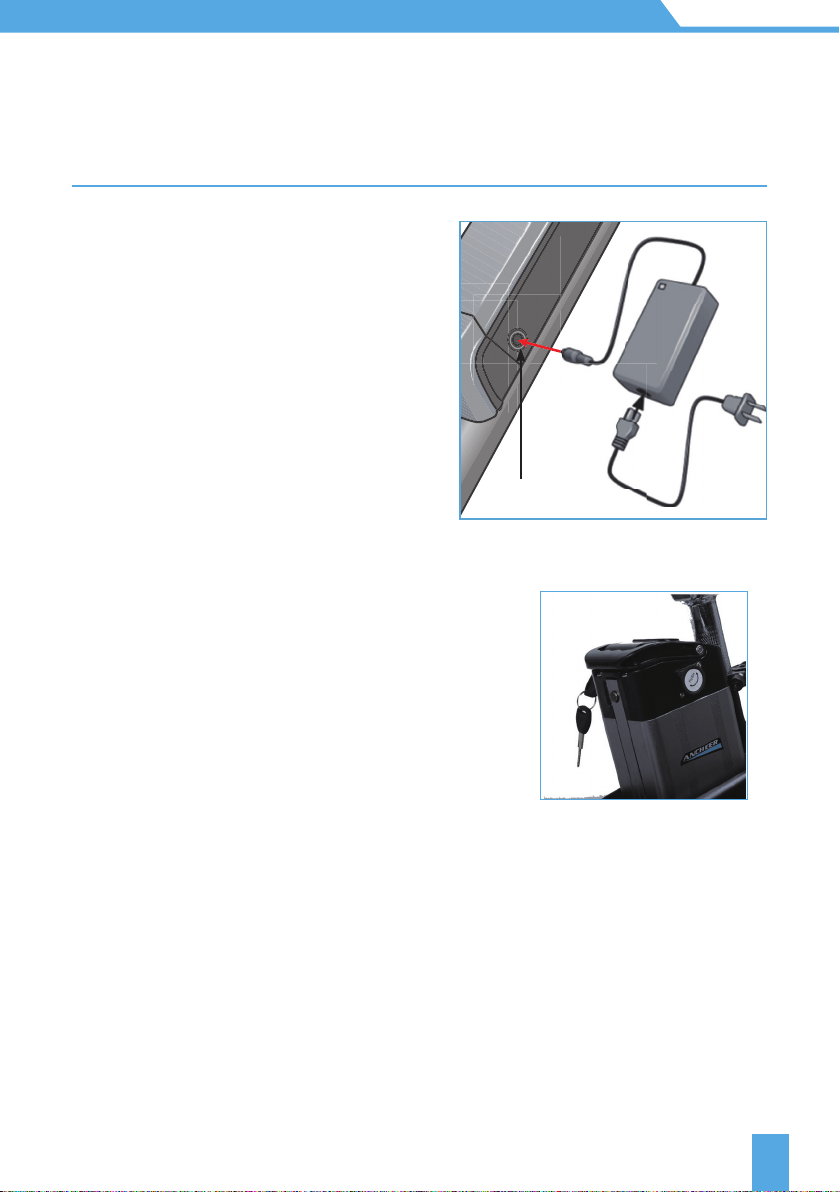
WHEN CHARGING THE BATTERY
Charging port
❶
❷
❸
❹
Insert the charger probe into the charger
port on the e-bike battery. As shown in the
figure.
Insert the pronged end of the battery cord
into the battery charger.
Insert the AC plug into an AC outlet.
The red indicator light turns on and will
remain red until it is fully charged. The
indicator light turns green once the battery
is fully charged.
ANCHEER
16
Improper maintenance can lead to a crash. Follow the below maintenance guidelines.
Failure to do so could result in injury.
Wipe your bike with a dry cloth, or neutral detergent.
Use lubrication oil for metal parts, i.e. Chain, axles.
Wipe down plastic painted parts with a quality cloth.
Increase the frequency of lubricating oil in wet or humid areas. (30SAE lubricating oil is
recommended)
General Maintenance
MAINTENANCE OF YOUR E-BIKE
CHARGING
YOUR BATTERY
We recommend that you should inspect your
bike every week, as things may loosen and need
tightening.
We recommend a full service on your bike every
3 months to keep it in excelleo this will result in
the battery falling into a dormant state, rendering
thent working order.
When stored and not in use, remove the battery and
store a cool, dry place. Charge your bike periodically,
as the battery will discharge over a period of non-
use. Failure to d battery unrepeatable.
Weekly Inspection.
Quarterly Inspection.
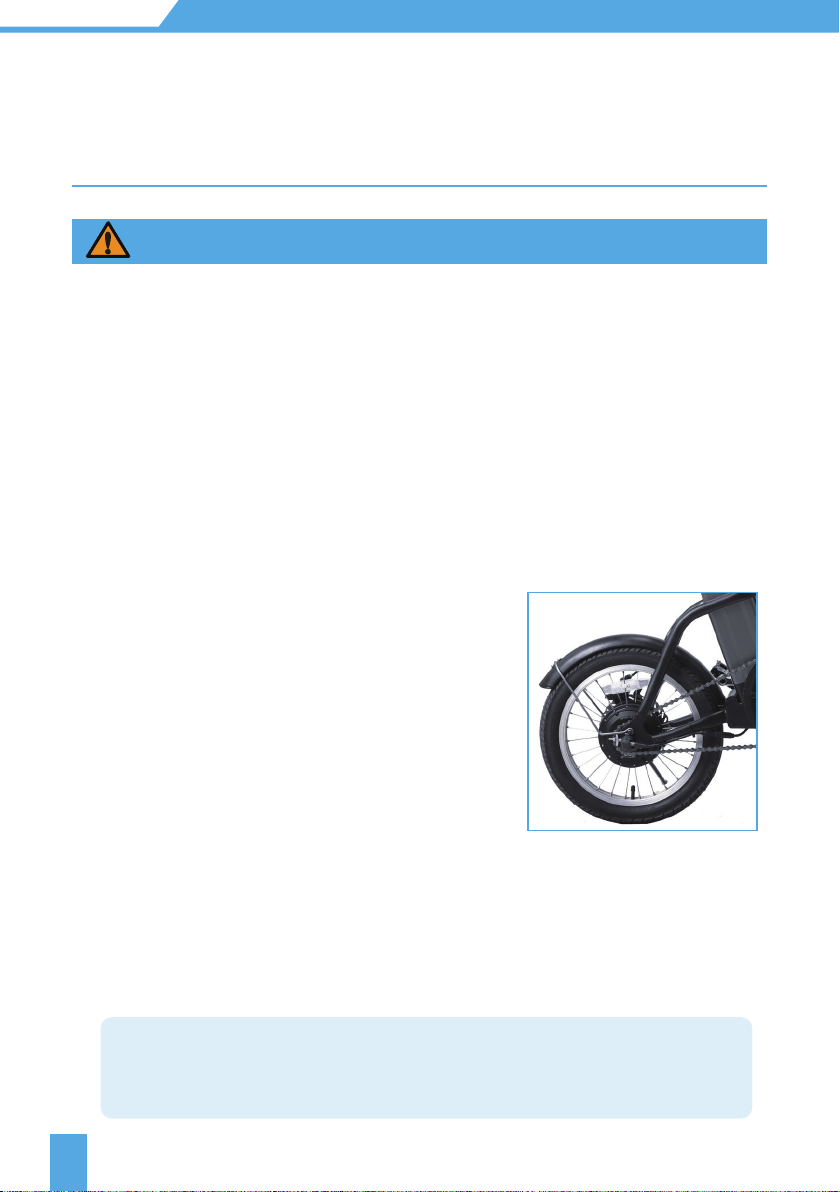
The front and rear axles and chain
can be oiled. However the motor
should not be lubricated.
Fig.28
It is recommended to charge the battery in the fireproof battery charging cover
when charging. And the battery should be stored in the fireproof battery charging
cover when not in use.
IMPORTANT!

ANCHEER
17
PROBLEM ACTION
CHECK
Low speed.
Charge battery.Battery power.
Is the power indicator on battery on?
Is the battery fully charged?
Does the charger work correctly?
Cable tension and worn blocks.
Dose the light on charge remain red
during charging period?
Can't turn on the meter
Reduced battery performance
Low battery power
Charger not giving full charge
Power indicator on
battery is on, but the
bike doesn't work.
Can you turn on the meter?
When you in pure electric mode,turn
the throttle,dose the motor work?
When you in assisted mode, turn the
pedal, dose the motor work?
Tire pressure.
Flat tire.
Load.
Inflate tire.
Repair tire.
Do not overload.
Email the seller for help
If not ,charge fully.
Replace battery.
Take to bike shop for service
If not , replace charger.
Email the seller for help
SIMPLE
TROUBLESHOOTING
If unsure on any of these points, or you fail to correct the problem, you can contact us by
email on the sales platform you bought at the first time. Our after-sell service team will
be glad to help you!!

ANCHEER
18
WARRANTY
Your ANCHEER Electric bike includes a One Year Limited Hardware Warranty. The
Warranty covers product defects in materials and workmanship under normal use.
This Warranty is limited to original purchasers. This Warranty starts on the date of your
purchase and lasts for one year (the "Warranty Period"). The Warranty Period is not
extended if the Product is repaired or replaced.
Warranty services are provided by the e-bike. If a hardware defect arises and a valid
claim is received within the Warranty Period, at its option and to the extent permitted
by law, ACHEER will resend new parts that are equivalent to new in performance and
reliability. This Warranty is not assignable or transferable.
This Warranty does not cover any damage due to: improper use; failure to follow the
product instructions or to perform any preventive maintenance; unauthorized repair;
external causes such as accidents, abuse, or other actions or events beyond our
reasonable control.
We provide lifetime customer support services. For any questions about the product,
please contact customer service from where you brought the equipment. We will be
happy to answer your questions.
You can also email us your inquiries at [email protected].
1 Year Limited Hardware Warranty
Support Services

ANCHEER
19
WARNINGS
Only use the e-bike and the drive assist system for safe, recreational riding. Use of the
e-bike for a purpose it was not intended for is dangerous and could result in property
damage, serious injury or death. Always follow the instructions for intended use and
limitations.
Use of this e-bike by persons (including children) with reduced physical, sensory or
mental capabilities or persons lacking experience and knowledge in the use of the
e-bike could result in serious injury or death. The owner of this e-bike must ensure this
product is not used by people with the conditions described above. Always follow the
rules, regulations and laws (including age limits) related to the use of an e-bike in its
area of use.
A child may not realize or understand the e-bike has moving parts and components
(e.g. battery). Never allow children to play or come into contact with the e-bike or its
parts. Always follow all rules, regulations and laws regarding age limits and operation
in the e-bike area of use.
Riding the e-bike through water could result in loss of control and damage to the
drive assist system. Do not ride into, or attempt to ride through, water or sub-merge
any part of the e-bike.
Riding with the kickstand in the down position may result in unexpected contact with
the ground or other objects causing loss of control. Always ensure the kickstand is in
the up position and securely locked in place before riding the e-bike.
Sitting on the e-bike with the kickstand down may result in the e-bike tipping over.
Never sit on the e-bike when it is only supported and stabilized by the kickstand. The
kickstand is not designed to support the weight of a person.
Overloading a rear basket could create dangerous riding conditions. Always observe
the maximum weight limit. Never overload the rear basket.
An improperly secured load on a rear rack could create dangerous riding conditions.
Always ensure the load on the rear rack is properly secured before riding.
Never move the shifter while pedaling backward, nor pedal backwards immediately
after having moved the shifter. This could jam the chain and cause serious damage
to the bicycle.
Operation General
Personal Restrictions
●
●
●
●
●
●
●
●

ANCHEER
20
WARNINGS
Like any mechanical device, a bicycle and its components are subject to wear and
stress. Different materials and mechanisms wear or fatigue from stress at different
rates and have different life cycles. If a component’s life cycle is exceeded, the
component can suddenly and catastrophically fail, causing serious injury or death
to the rider. Scratches, cracks, fraying and discoloration are signs of stress caused
fatigue and indicate that a part is at the end of its useful life and needs to be replaced.
Product life is often related to the kind of riding you do and to the treatment to which
you submit the bicycle. The bicycle’s warranty is not meant to suggest that the bicycle
cannot be broken or will last forever. It only means that the bicycle is covered subject
to the terms of the warranty.
Frequent inspection of your bike is important to your safety. Periodic, more detailed
inspection of your bicycle is important. How often this more detailed inspection is
needed depends upon you.You, the rider/owner, have control and knowledge of how
often you use your bike, how hard you use it and where you use it. The materials
used to make your bike determine how and how frequently to inspect. Ignoring this
WARNING can lead to frame, fork or other component failure, which can result in
serious injury or death.
The battery and battery charger contain hazardous materials. Always keep the
battery and battery charger away from children, animals, or persons incapable of
understanding the potential hazards.
The battery and battery charger contain no serviceable parts. Do not open,
disassemble, or modify the battery or charger.
Improper handling of the battery and battery charger may result in electrical fires,
explosion, severe burns or electrocution.
Do not move the battery or battery charger during charging.
Do not hold the battery charger during a thunder or lighting storm.
Do not plug or unplug the battery charger with wet hands.
Do not place any items on the battery charger.
Do not place the battery charger in liquids or metals.
Battery
●
●
●
●
●
●
●
●
●
Failure to observe the following warnings could result in electrical fires, explosion, severe
burns or electrocution.

ANCHEER
21
WARNINGS
Overcharging the battery could result in electrical fires, explosion, or severe burns.
Always disconnect the battery from the battery charger when the battery is fully
charged. Unplug the battery charger from the wall outlet when not in use.
A damaged battery or battery charger (e.g. cable, plug or housing) may result in
leakage of hazardous materials or be a potential source of sparking and fire. Always
examine the battery and battery charger before each use. Never charge a damaged
battery or use a damaged battery charger.Battery Charger Compatibility.
Charging the battery with an incompatible battery charger may result in electrical
fires, explosion, severe burns or electrocution. Ensure the battery charger and the
A/C outlet are the same voltage before charging the battery. Only charge the battery
using the battery charger specified by the instructions. Never use the battery charger
to charge any other batteries.Battery Charging Environment.
Battery can be charged on or off the bike. Locate both the battery and battery charger
indoors, in a clean, dry area with good ventilation to charge. Always place the battery
and battery charger on an even surface. Ensure the area is free from dust, moisture,
combustibles and keep the battery charger ventilation openings unobstructed.
If applicable, always turn the power switch on the battery off before attaching the
charger.
Contact between the battery contacts and metal objects such as paper clips, coins,
keys, nails, screws or other metal items could result in shorting out the battery and
cause electrical fires, explosion, or severe burns.
●
●
●
●
●
Correct tightening force on fasteners- nuts, bolts, screws- on your bicycle is important.
Too little force, and the fastener may not hold securely. Too much force, and the
fastener can strip threads, stretch, deform or break. Either way, incorrect tightening
force can result in component failure, which can cause you to loose control and fall.
Loose or damaged handlebar grips or extensions can cause you to lose control and
fall. Unplugged handlebars or extensions can cut you and cause serious injury in an
otherwise minor accident.
The area in which you ride may require specific safety devices. It is your responsibility
to familiarize yourself with the laws of the area where you ride and to comply with all
applicable laws, including properly equipping yourself and your bike as the law requires.
Observe all local bicycle laws and regulations. Observe regulations about bicycle
lighting, licensing of bicycles, riding on sidewalks, laws regulating bike path and trail
Operation General
1.
2.
3.

ANCHEER
22
WARNINGS
use, helmet laws, child carrier laws, special bicycle traffic laws. It’s your responsibility
to know and obey the laws. Failure to wear a helmet when riding may result in serious
injury or even death.
Do not remove the front or rear reflectors or reflector brackets from your bicycle. They
are an integral part of the bicycle’s safety system. Removing the reflectors reduces
your visibility to others using the roadway.Being struck by other vehicles may result in
serious injury or death.The reflector brackets may protect you from a brake straddle
cable catching on the tire in the event of brake cable failure. If a brake straddle cable
catches on the tire, it can cause the wheel to stop suddenly, causing you to lose control
and fall.
Although many catalogs, advertisements and articles about bicycling depict riders
engaged in extreme riding, this activity is extremely dangerous, increases your
risk of injury or death, and increases the severity of any injury. Remember that the
action depicted is being performed by professionals with many years of training and
experience. Know your limits and always wear a helmet and other appropriate safety
gear. Even with state-ofthe-art protective safety gear, you could be seriously injured or
killed when jumping, stunt riding, riding downhill at speed or in competition.Bicycles
and bicycle parts have limitations with regard to strength and integrity, and this type
of riding can exceed those limitations or dramatically reduce the length of their safe
use.
Failure to confirm compatibility, properly install, operate and maintain any component
or accessory can result in serious injury or death.Exposed springs on the saddle of
any bicycle fitted with a child seat can cause serious injury to the child.Changing the
components on your bike with other than genuine replacement parts may compromise
the safety of your bicycle and may void the warranty. Contact customer service before
changing the components on your bike.
If your seat post is not inserted in the seat tube, the seat post, binder or even frame
may break, which could cause you to lose control and fall.
When making saddle angle adjustments with a single bolt saddle clamp, always check
to make sure that the serrations on the mating surfaces of the clamp are not worn.
Worn serrations on the clamp can allow the saddle to move, causing you to lose control
and fall. Always tighten fasteners to the correct torque. Bolts that are too tight can
stretch and deform. Bolts that are too loose can move and fatigue. Either mistake can
lead to a sudden failure of the bolt, causing you to lose control and fall.
An insufficiently tightened stem clamp bolt, handlebar clamp bolt or bar end extension
clamping bolt may compromise steering action, which could cause you to lose control
and fall. Place the front wheel of the bicycle between your legs and attempt to twist
4.
5.
6.
7.
8.
9.

ANCHEER
23
WARNINGS
the handlebar/stem assembly. If you can twist the stem in relation to the front wheel,
turn the handlebars in relation to the stem, or turn the bar end extensions in relation to
the handlebar, the bolts are insufficiently tightened.Be aware that adding aerodynamic
extensions to handlebars will change the steering and braking response of the bicycle.
Bolt or bar end extension clamping bolt may compromise steering action, which could
cause you to lose control and fall. Place the front wheel of the bicycle between your
legs and attempt to twist the handlebar/stem assembly. If you can twist the stem in
relation to the front wheel, turn the handlebars in relation to the stem, or turn the bar
end extensions in relation to the handlebar, the bolts are insufficiently tightened.Be
aware that adding aerodynamic extensions to handlebars will change the steering and
braking response of the bicycle.WARNING!The shorter the brake lever reach, the more
critical it is to have correctly adjusted brakes, so that full braking power can be applied
within available brake lever travel. Brake lever travel insufficient to apply full braking
power can result in loss of control, which may result in serious injury or death.
All quick-release levers should be inspected before every ride to be sure they are fully
closed and secure. Failure to properly close a quick-release lever can cause loss of
control of the bicycle resulting in injury or death.Make sure the wheel is properly seated
and the quick-release lever is properly closed.
Disregarding or misunderstanding of the following safety warnings, the safety warnings
in the manuals associated with the e-bike parts, and safety labels on the e-bike could
result in serious injury or death.
10.
11.
12.
Anyone assembling, using, maintaining, transporting or storing this e-bike must read,
understand, and follow these safety warnings before performing any of the actions
stated.
●

TIANJIN GAMMA ELECTRIC TECHNOLOGY CO.,LTD
Made in China
Model: AMA005639
Tel: 626-330-6385
Monday-Friday 9:30AM-6:00PM
ANCHEER Customer Service