
www.tefal.com
IS6200
EN
1800125996 IS6200 Z1_110X154 06/04/12 13:24 Page2
1
17
16
2
3
4
5
7
8
9
10
6
18c
18b
18a
11
12
13
14
15
N
1800125996 IS6200 Z1_110X154 06/04/12 13:24 Page3
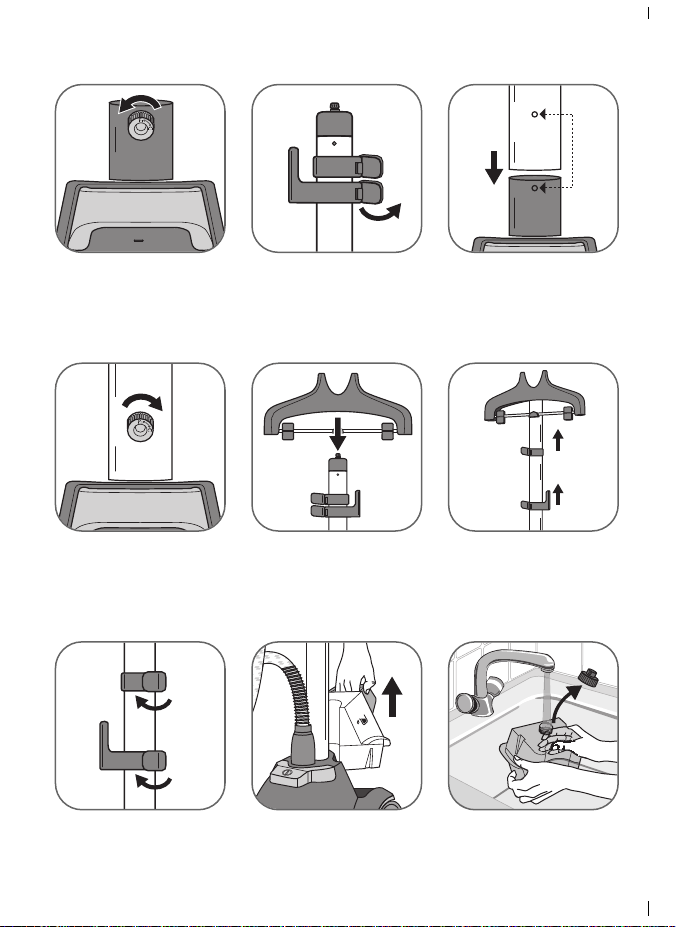
fig. 1 fig. 2 fig. 3
fig. 4 fig. 5 fig. 6a
fig. 6b fig. 7 fig. 8
“CLIC”
1800125996 IS6200 Z1_110X154 06/04/12 13:24 Page4
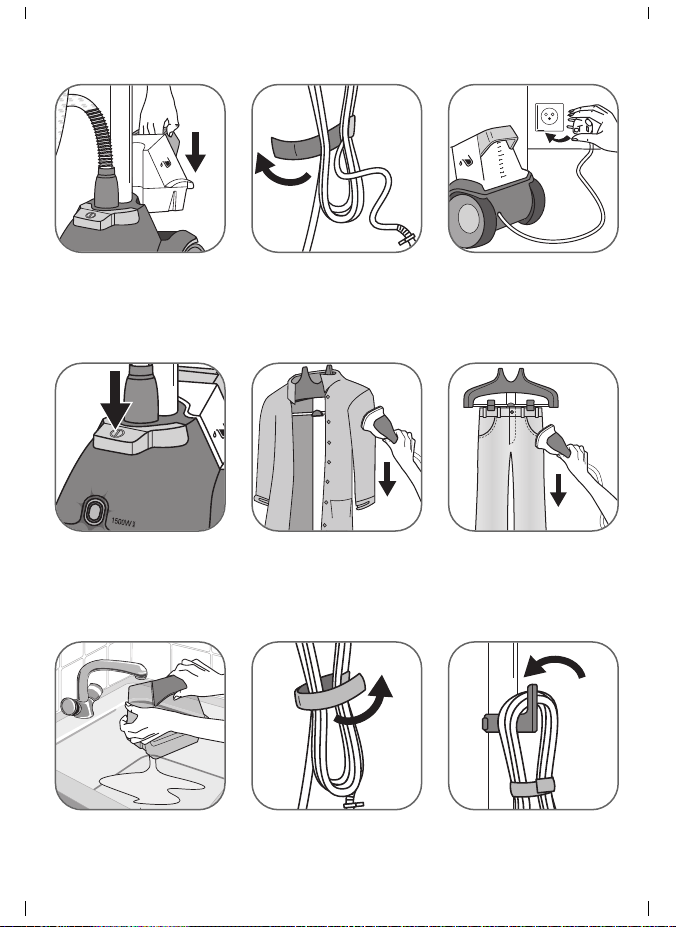
fig. 9 fig. 10 fig. 11
fig. 12 fig. 13 fig. 14
fig. 15 fig. 16a fig. 16b
1800125996 IS6200 Z1_110X154 06/04/12 13:24 Page5

1800125996 IS6200 Z1_110X154 06/04/12 13:24 Page6

SAFETY INSTRUCTIONS
PLEASE READ THESE INSTRUCTIONS CAREFULLY BEFORE FIRST USE
AND KEEP THEM IN A SAFE PLACE.
-This product has been designed for domestic use only. Any commercial use, inappropriate
use or failure to comply with the instructions, the manufacturer accepts no responsibility
and the guarantee will not apply.
-For your safety, this appliance conforms to the applicable standards and regulations (Low
Voltage, Electomagnetic Compatibility,Environmental Directives, as applicable...).
-Your product is an electrical appliance: it must be used in normal conditions of use.
-Always plug in your appliance into:
- An electrical installation with voltage between 220V and 240V.
- An earthed socket. If you are using a mains extension lead, ensure that it is correctly rated
(16A) with an earth, and is fully extended.
- Connecting to the wrong voltage may cause irreparable damage to the appliance and will
invalidate your guarantee.
- When using the appliance, one should pay attention to the steam emission. To reduce the
risk of contact with hot water emitting from steam vents, check appliance before each use
by holding it away from body and operating steam button.
- To reduce the risk of electric shock, do not immerse the appliance in water or other liquids.
- Appliance should always be turned «OFF» before plugging or unplugging from outlet.
Never pull the cord to disconnect it from the outlet, instead grasp the plug and pull to
disconnect.
- Do not allow the cord to touch hot surfaces. Let appliance cool completely before storing
away. Loop cord loosely around appliance when storing.
- Do not direct steam at people or animals, or use steamer on garments while they are
being worn.
- Always disconnect appliance from electrical outlet when filling with water, emptying,
cleaning or when not in use.
- Should the power cord or the steam hose become damaged, it must be replaced by a
TEFAL approved service centre to avoid the risk of danger or injury. Do not disassemble
or attempt to repair the appliance.
- This appliance is not intended for use by persons (including children) with reduced
physical, sensory or mental capabilities, or lack of experience and knowledge, unless they
have been given supervision or instruction concerning use of the appliance by a person
responsible for their safety.
- Children should be supervised to ensure that they do not play with the appliance.
- Burns could occur from touching hot metal parts, hot water or steam. Use care when you
empty a steam appliance, there may be hot water in the tank or inside the appliance.
- Fill water in water tank only and remove the water tank only when it is empty.
- Never drop or insert any object into any opening or hose.
- Always keep the hose and nozzle elevated above the water tank.
- Steam only in an up and down vertical motion. Never use steamer in a horizontal position
or tilt into a backward position, this may result in hot water discharge.
- Do not place the steam nozzle directly on any surface or the appliance power cord while
it is hot or plugged in. Use the stand provided.
- Use caution when changing attachments, as they may contain hot water from
condensation. Ensure the attachments are cooled off to avoid contact with hot water.
- The use of accessory attachments other than those provided by Tefal is not recommended
and may result in fire, electric shock or personal injury.
- This unit is for indoor use only.
1
EN
EN
DE
N
L
IT
ES
PT
SV
EL
TR
RU
UK
PL
1800125996 IS6200 Z1_110X154 06/04/12 13:24 Page1

- Do not cut or attempt to extend the steaming hose.
- To prevent the appliance over heating, when you hang clothes on garment hook for
removing crease, please assemble the attached garment telescopic handle and extend it
to its highest position.
Environmental protection first !
i Your appliance contains valuable materials which can be re-
covered or recycled.
‹ When disposing of it, take it to a local civic waste collection point.
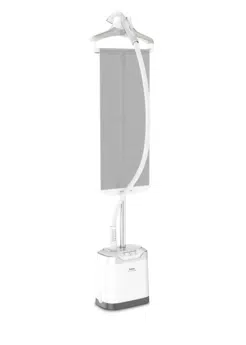
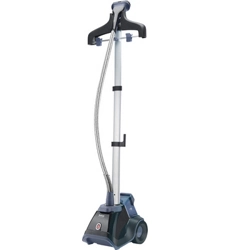
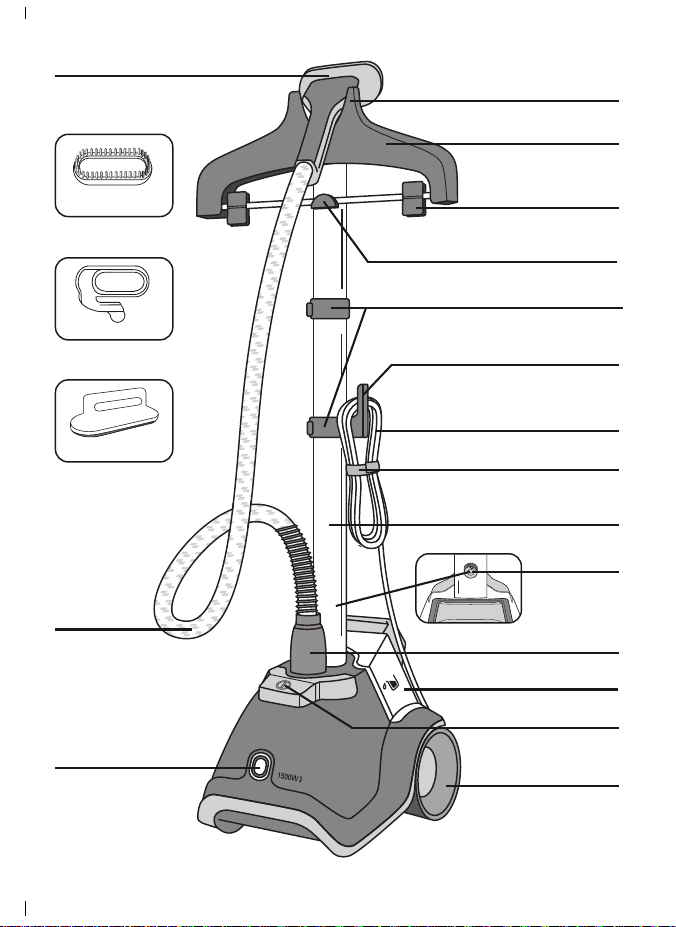
DESCRIPTION
GARMENT STEAMER ASSEMBLY
Telescopic handle and hanger assembly
1. Unscrew the handle's fastening screw on the base of the handle. (fig. 1)
2. Hold the handle such that the cord holder is on the left. Check that the 2 handle clips
are unlocked. (fig. 2)
3. Insert the handle into the base by pressing downwards until the holes of the handle and
base are at the same level, so that you can put the screw back. If the holes are not ali-
gned, check that the clips of the handle are well and truly unlocked. (fig. 3)
4. Screw the handle fastening screw back in as far as it will go so that the handle is firmly
fixed to the base. (fig. 4)
5. Push the hanger on the top of the handle vertically until you hear a click. (fig. 5)
6. Adjust the handle to the height required by sliding it upwards then locking the 2 clips.
(fig. 6a, 6b)
7. Install the steam head between the hanger hooks.
Filling the water tank
• Ensure that the steamer is unplugged. Remove the water tank from the base of the ap-
pliance by pulling the handle upwards (fig. 7). Unscrew the tank cap and fill the tank. (fig.
8). Maximum capacity is indicated by the “max” mark.
• The steamer must be used with TAP WATER. If the water in your area is hard, we re-
commends that you mix half tap water and half distilled water, which reduces the hard-
ness. You can also use bottled spring water.
IMPORTANT: Never use water that contains additives (starch, perfume, aromatic subs-
tances, softener, etc) in the steamer. Additives such as these can affect the proper-
ties of the steam and lead to the formation of deposits.
1. Steam head
2. Steam head hook
3. Built in hanger
4. Trouser/dress clips
5. Hanger holder
6. Handle locking clips
7. Electric cord holder
8. Electric cord
9. Velcro strip
10. Telescopic handle
11. Handle fastening screw
12. Steam hose connector
13. Removable water tank
14. ON/OFF pedal
15. Transport wheels
16. Textile steam hose
17. On/ off light
18. Built in accessories
a. Fabric brush
b. Crease attachment
c. Lint pad
2
1800125996 IS6200 Z1_110X154 06/04/12 13:24 Page2

• After closing the cap, turn the tank down and hold it by the handle. Check out that no
water is leaking through the cap.
• Place the water tank on the base (fig. 9).
USE
• Only operate the steamer on the floor clear of any materials which may obstruct the
base of the steamer (flat and horizontal surface). Do not obstruct the openings on the
lower part of the appliance. This appliance should not be used on very thick carpets or
rugs.
• Undo the Velcro strip and completely unwind the electrical cord. (fig.10)
• Plug in to power socket. (fig.11)
• Switch on by pressing the pedal located at the front of the appliance. The power indi-
cator light will come on. (fig.12)
• The appliance will begin producing steam after approximately 60 seconds.
• Hang the garments from the built-in hanger or from another hanger which may be sus-
pended from the hook located on the hanger rod. To steam trousers, we recommend
that you also use the support with clips as indicated in the illustration. (fig.14)
• Grasp the steam head with the steam vents pointing away from you.
• Start steaming by brushing material lightly with the grain of the fabric in an up/down
vertical motion. The fabric brush opens the weave of the fabrics for better steam pene-
tration.
• Start at the top the garment and gradually move downward (fig.13). Always steam in a
vertical position.
• For more ease, we recommend to pull the garment downward with your free hand while
steaming. Be careful not to touch the hot steam.
• During use, the hose may make a gurgling noise. This is a normal occurrence due to
condensation. If the appliance begins to gurgle, rest the steam head on its support for
a few moments in order to direct the condensation into the appliance once again.
ACCESSORIES
Before using an accessory, check the manufacturer recommendations.
It is also recommend that you carry out a test on part of the fabric which cannot be seen.
Fabric brush
The fabric brush opens the weave of the fabrics for better steam penetration.
• Attach the fabric brush to the steam head by lining up the bottom of the brush with the
bottom of the steam head. Gently push the top of the brush onto the steam head until
it clicks into place.
• Gently brush the area to be steamed with the
grain or nap of the fabric.
• Remove the fabric brush once unit is unplugged
and completely cool. Remove it by pressing on
the release tab on top of brush while pulling it for-
ward.
Warning: Never steam a garment while it is being worn.
The flexible pipe and the end of the steam head can become extremely hot during
use. This is perfectly normal. Be careful and avoid any prolonged contact.
Be sure unit is unplugged and completely cool before attaching accesories.
3
EN
EN
DE
N
L
IT
ES
PT
SV
EL
TR
RU
UK
PL
1800125996 IS6200 Z1_110X154 06/04/12 13:24 Page3

Crease attachment
• Remove the fabric brush. Completely slide the hook of the accessory into the slot loca-
ted in the lower part of the steam head.
• Push on the handle to open the crease attach-
ment.
• Place the garment between the crease attachment
and steam head.
• Release the handle.
• Starting at the top of the garment, move the
crease attachment in a downwards motion.
• Once unit is unplugged and completely cooled
down, remove the crease attachment by sliding it off of the steam head.
Lint pad
• The lint pad removes hair, lint and animal fur for a professional finish.
• To use the lint pad, slowly brush the clothing with the grain or nap of the fabric.
• The pad can be cleaned by brushing it in the opposite direction. We recommend clea-
ning the pad on an old cloth that can be discarded.
AFTER USE
• After using the garment steamer, switch off the appliance by pressing the pedal once
again. The power indicator light will go off, and you can then unplug the appliance.
• Hang the steam head in an upright position on the hook when not in use.
• Empty and rinse the water tank each time before storage in order to flush out any scale
particles. (fig.15)
• Loosely wind up the electrical cord and close with the Velcro strip, then hang it from the
clip on the handle. (fig.16a, 16b)
• Do not carry the steamer by the water tank handle. This appliance includes luggage
style wheels for added convenience when transporting.
TRANSPORT
• Your appliance is fitted with two wheels for ease of transport. Tilt the appliance towards
the rear holding the handle and then pull along to transport.
• You can also lift up the appliance in order to transport it, again holding the appliance by
the handle.
CLEANING
• Clean the main unit with a damp cloth.
• To maintain maximum performance, your steamer must be descaled occasionally. The
time between descaling operations depends on the quality of the water and the fre-
The lint pad is a separate accessory and cannot be attached to the steam head.You
can use the lint pad independently from the steamer.
Warning: Never touch the head until it has cooled down completely.
Do not attempt to lift up or transport the device holding the pedal, the water tank handle
or the built-in hanger.
4
1800125996 IS6200 Z1_110X154 06/04/12 13:24 Page4

quency with which you use the appliance. The appliance must be descaled at least once
a year or after 50 hours of use.
• To carry out a descaling operation, follow the following steps:
1. Ensure that the appliance has cooled down completely (2 hours minimum).
Remove the handle from the base by unscrewing the fixing screw.
2. Fill the water tank with fresh water and place it on the main unit
allowing water to fill the boiler.
3. Remove the water tank from the base and empty out the water via the water
tank filling hole by tipping the appliance over a sink. Limescale and other re-
sidues are thus removed.
4. Repeat step 2 and 3 several times until the scale has been removed.
CAUTION: Don’t fill the boiler by the steam head holes ! Never immerse the steam head
in water !
TIPS FOR BEST RESULTS WITH YOUR GARMENT
STEAMER
• We recommend checking the garment care label for manufacturer recommendations
before steaming. We also recommend testing the garment and strength of the colour on
an unobtrusive area such as an inner seam.
• Gently pull down on bottom of garment while steaming
• Gently press steamer brush into fabric while making slow passes
• To put crisp edges on trousers and shirts, use crease attachment
• Avoid contact between the steam head and silk or velvet.
• Certain garments are smoothed more easily on the reverse side.
• Heavy fabrics may need to be steamed longer.
• If you are using the steam head at a position close to the ground, raise the hose fre-
quently in order to avoid the formation of condensation. A gurgling noise may be heard
if the flexible pipe is pinched.
• If no steam is produced, if a gurgling sound is heard or if water is dripping through the
holes of the steam head, raise the steam hose occasionally to remove condensation inside.
• Be careful at all times.
5
EN
EN
DE
N
L
IT
ES
PT
SV
EL
TR
RU
UK
PL
1800125996 IS6200 Z1_110X154 06/04/12 13:24 Page5

TROUBLESHOOTING
Problems Possible causes Solutions
There is no steam. The appliance has not
been turned on.
Check that the appliance has been
plugged in correctly. Next press the
On/Off pedal, the power indicator
light located at the front of the
appliance will come on.
The hose has been
obstructed.
Check that the hose is not bent or
twisted.
There is no water left in
the water tank.
Switch off the device and fill the
water tank.
The steam flow is
low.
Your steamer has a
build-up of scale
because it has not been
rinsed out regularly.
See descaling process (Cleaning
paragraph).
The hose has been
obstructed.
There is no water left in
the water tank.
The steam is not ready
yet.
Check that the hose is not bent or
twisted.
Switch off the appliance and fill the
water tank.
The appliance will produce steam
about 60 seconds after it has been
switched on.
Water runs
through the holes
of the steam head.
There is condensation
in the hose.
Never use a steamer in the
horizontal position. Hold the hose
vertically outstretched and wait for
the condensed water to return to
the steamer.
The steamer takes
a long time to heat
and/or ejects white
particles.
Your steamer has a
build-up of scale
because it has not been
descaled
regularly.
See descaling process
(Cleaning paragraph).
If it is not possible to establish the cause of the problem, seek the assis-
tance of an approved TEFAL Service Centre www.tefal.co.uk
6
1800125996 IS6200 Z1_110X154 06/04/12 13:24 Page6

7
EN
EN
DE
N
L
IT
ES
PT
SV
EL
TR
RU
UK
PL
1800125996 IS6200 Z1_110X154 06/04/12 13:24 Page7
8
1800125996 IS6200 Z1_110X154 06/04/12 13:24 Page8
9
1800125996 IS6200 Z1_110X154 06/04/12 13:24 Page9

10
1800125996 IS6200 Z1_110X154 06/04/12 13:24 Page10

11
1800125996 IS6200 Z1_110X154 06/04/12 13:24 Page11

12
1800125996 IS6200 Z1_110X154 06/04/12 13:24 Page12

13
1800125996 IS6200 Z1_110X154 06/04/12 13:24 Page13
14
02/2012
1800125996 IS6200 Z1_110X154 06/04/12 13:24 Page14