OWNER’S MANUAL
WIRELESS
SOUND BAR
Please read this manual carefully before operating your set and retain it for future
reference.
Model
S40Q (S40Q, SPQ4-W)
2304_Rev02
www.lg.com
Copyright © 2022-2023 LG Electronics Inc. All Rights Reserved.
2
Sound Bar Quick Guide
Installing and using the Product
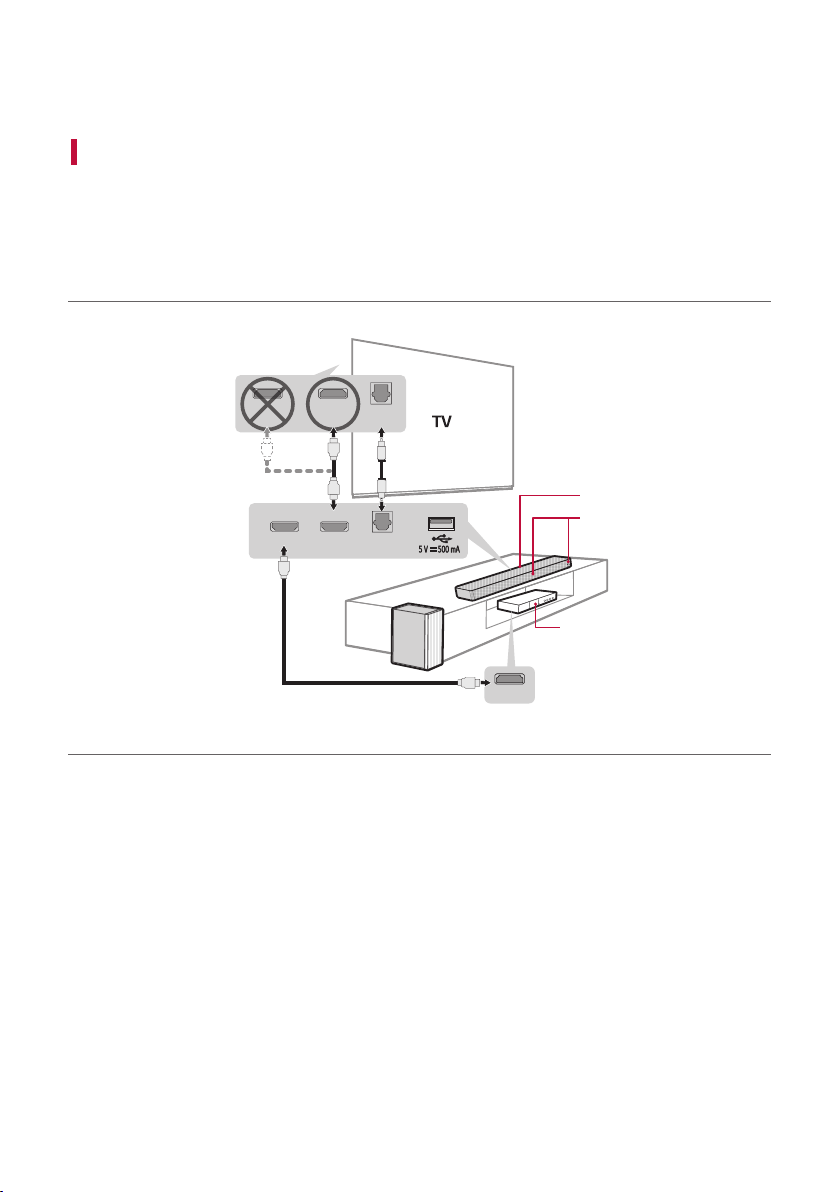
a Connect the sound bar to your TV via an optical cable or an HDMI
cable.
HDMI OUT
a
b
D
a
B
A
HDMI IN
(ARC)
HDMI IN
OPTICAL
OUT
C
OPTICAL
IN
HDMI ▶ TV
(ARC)
HDMI IN
A Sound bar
B Remote Control Receiver / Status LED
C Wireless Subwoofer - Install it close to the sound bar.
D External Device - (Blu-ray player, game console, etc.)
Soundbar Quick Guide
3
b If you are using an external device (ex. Blu-ray player, game console, etc.), connect it to the sound bar via an
HDMI cable.
c Connect to power in the following order: wireless subwoofer [ sound bar. Then, turn on the sound bar.
When the connection is automatically established with the sound bar, the LED on the wireless subwoofer will
light up green. ([ See “Connecting the Product” on page 6.)
d Using the product with your TV ([ See “Connecting with an
Optical Cable”, “Connecting with an HDMI Cable” on page 16,
19.)
A Press the Function button repeatedly until the rst from above LED lights up in white among the three
LEDs.
B On your TV's settings, set the output speaker to [HDMI ARC], [Optical], or [External Speaker].
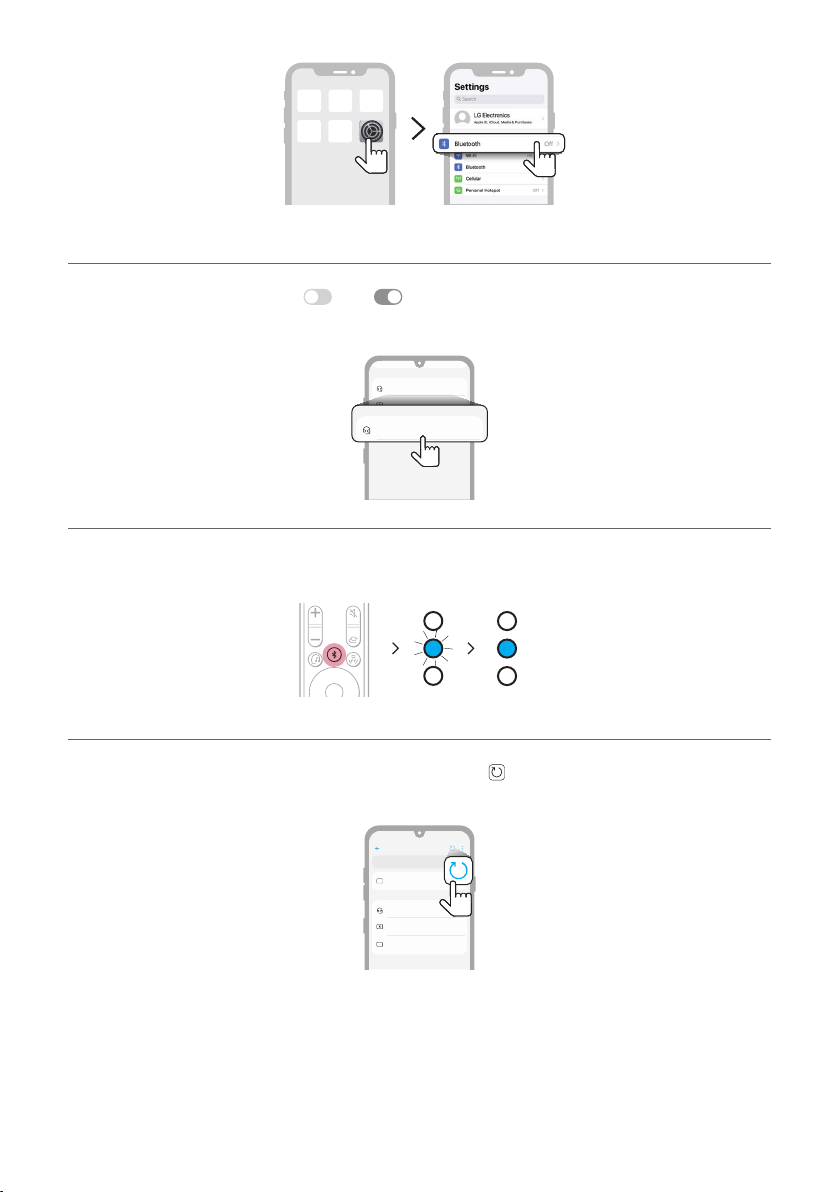
e Connecting the product to your smartphone via Bluetooth ([
See “Connecting via Bluetooth” on page 24.)
A Tap the Settings button on your smartphone and select Bluetooth. Turn on the Bluetooth function. (
Off > On)
B Press the Bluetooth pair
button. After a moment, the second LED lights up in blue and blinking among
the three LEDs.
C Find and tap the product on your smartphone. The product appears as “LG S40Q (XX)”.
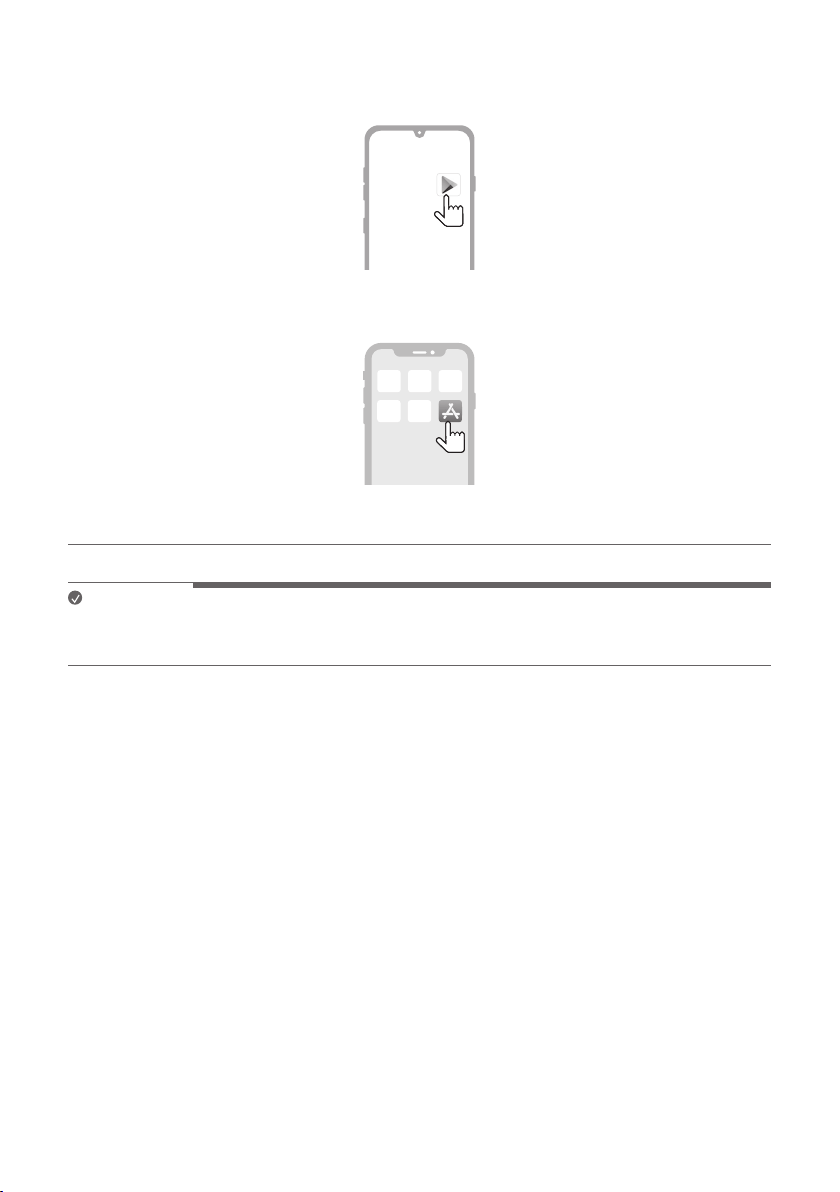
f Connecting to the LG Sound Bar app ([ See “Connecting with a
Smartphone via LG Sound Bar app” on page 27.)
A Find and install the LG Sound Bar app on Google Play or App Store from your smartphone.
B You can get more information regarding its use by selecting [Help] in [Setting].

4
Manually connecting the sound bar to the wireless subwoofer ([ See
“Connecting the wireless subwoofer manually” on page 8.)
If you see a red LED on the front of the wireless subwoofer, it means that the sound bar is not connected
to the subwoofer. If this is the case, connect them in the following order.
A Press the Power
button on the sound bar to turn it off.
B Press the PAIRING button on the back of the disconnected wireless subwoofer. Check if LED blinks
green.
- If you still see a red LED on the front of the wireless subwoofer, press and hold the button on the
back of the subwoofer again.
C Press the Power
button on the sound bar to turn it on.
D When the connection is established, you will see a green LED light on the front of the wireless
subwoofer.

5
Table of Contents
Sound Bar Quick Guide
2 Installing and using the Product
Installation
6 Connecting the Product
Exploring the Product
9 Front
11 Status LED
13 Back
14 Exploring Remote Control
Connecting to the TV
16 Connecting with an Optical Cable
18 Connecting with LG Sound Sync (Wireless)
19 Connecting with an HDMI Cable
Connecting to an External Device
21 Connecting with an HDMI Cable
23 Connecting with an Optical Cable
Using the Product as an Audio
System
24 Connecting via Bluetooth
27 Connecting with a Smartphone via LG Sound
Bar app
29 Connecting to a USB Storage Device
30 Voice feedback function
Mounting the Product to a Wall
31 Checking before mounting to a wall
33 Mounting the Product to a Wall
Safety Precautions
35 Safety and Regulatory
Before Reporting Product
Malfunction
38 Troubleshooting
Appendix
41 Specications
43 Registered Trademarks and Licenses
44 Handling the Product
6
Installation
Connecting the Product
You can enjoy a richer sound by connecting the sound bar to the wireless subwoofer.
Connecting the wireless subwoofer automatically
After completing installation, the wireless subwoofer will automatically be connected to the sound bar. Connect
the sound bar to the subwoofer in the following order.
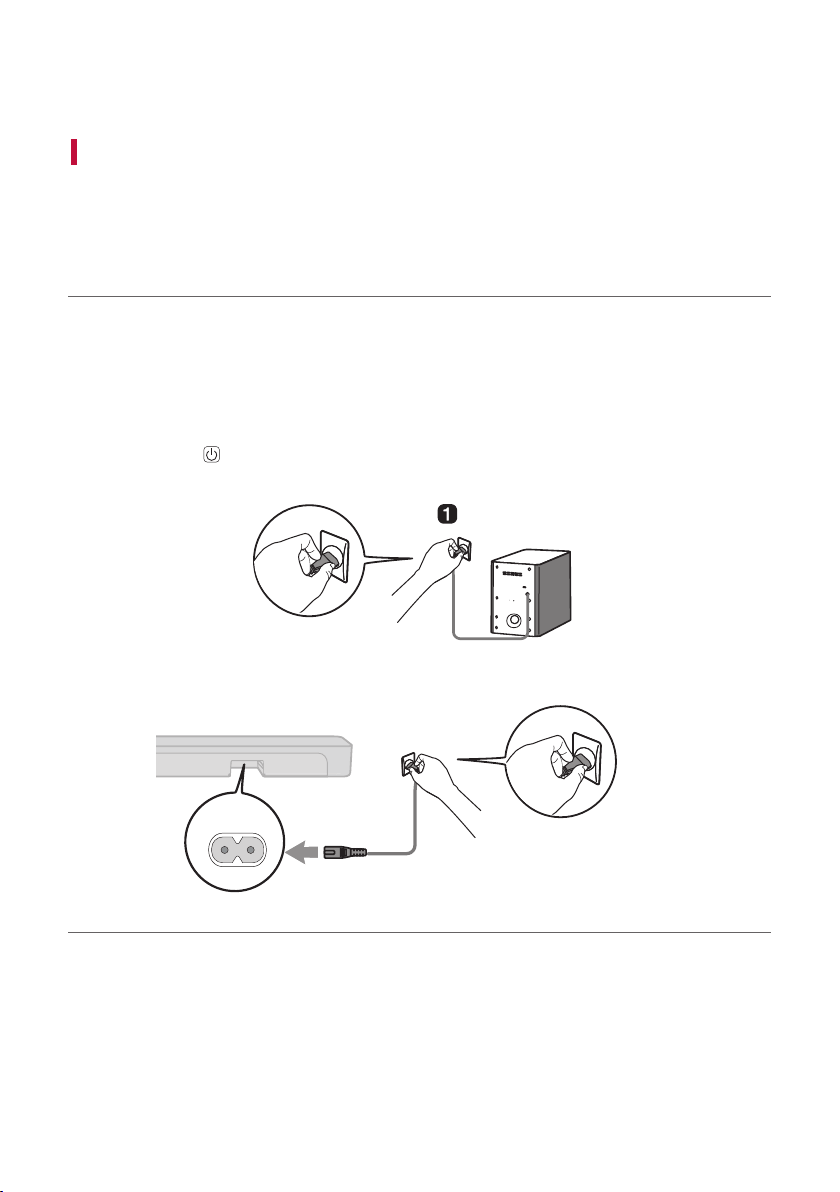
a Plug the power cable connected to the wireless subwoofer into an outlet.
b Plug the power cable to the AC IN (AC input) terminal on the back of the product.
c Plug the power cable connected to the product into an outlet. You will see the LED on the front of the sound
bar light up red.
d Press the Power
button on the sound bar to turn it on.
AC IN
b
c
e When the connection is automatically established, you will see the LED on the front of the wireless
subwoofer light up green.
Installation

7
Checking the connection with the LED on the front of the wireless
subwoofer
You can check the connection status by looking at the LED on the front of the wireless subwoofer.
LED Colour Status
Blinking green Connecting in progress
Green Connected successfully
Red Bad connection, or the subwoofer is in standby
Off Power cable not connected
8
Connecting the wireless subwoofer manually
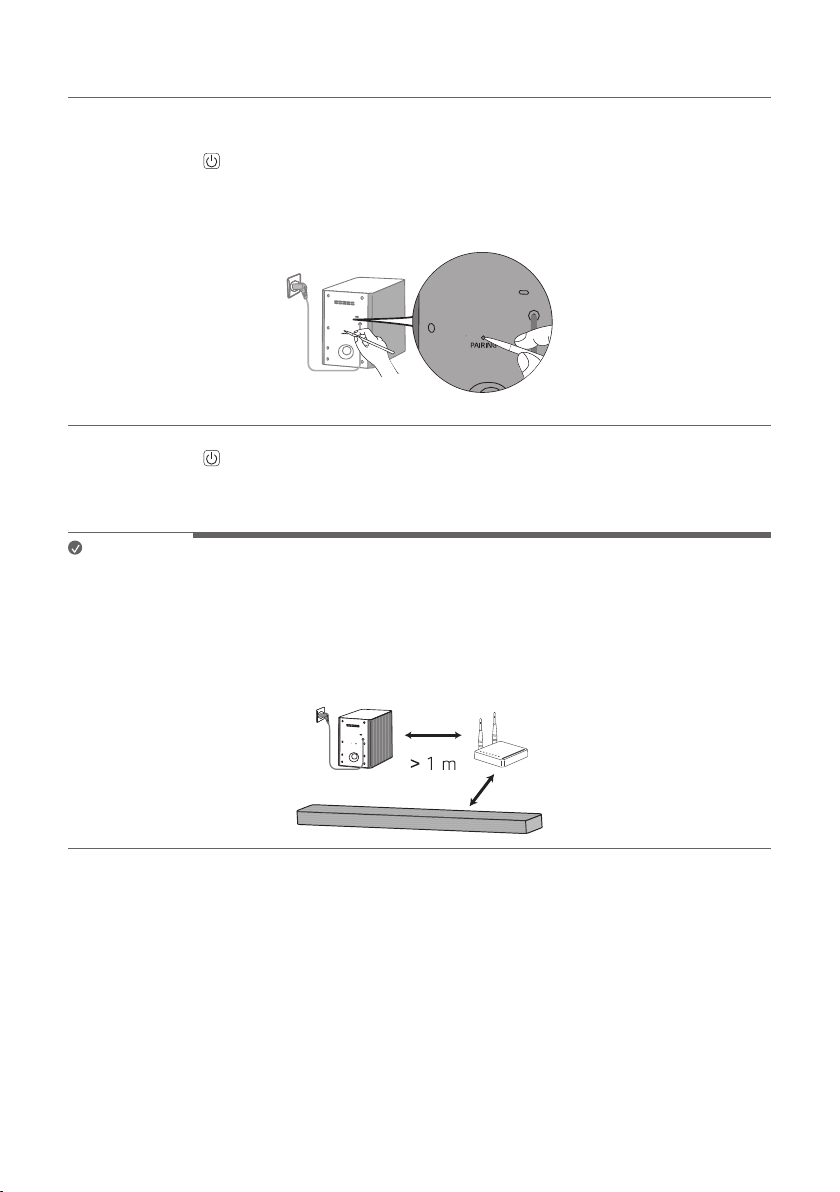
If you see a red LED on the front of the wireless subwoofer, it means that the sound bar is not connected to the
subwoofer. If this is the case, connect them in the following order.
a Press the Power
button on the sound bar to turn it off.
b Press the PAIRING button on the back of the wireless subwoofer. Check if the LED on the front of the
subwoofer is blinking green. If you still see a red LED on the wireless subwoofer, press and hold the button on
the back of the subwoofer again.
c Press the Power button on the sound bar to turn it on.
d When the connection is established, you will see the LED light on the front of the wireless subwoofer light up
green.
Note
• Install the sound bar as close to the wireless subwoofer as possible. The closer the distance between the sound
bar and the wireless subwoofer, the better the sound quality.
• Please ensure there are no obstacles between the sound bar and the wireless subwoofer.
• To prevent wireless interference, maintain a distance of at least 1 m between the sound bar or the wireless
subwoofer and any peripheral devices that generate strong electromagnetic waves (ex. wireless routers,
microwave ovens, etc.).
9
Exploring the Product
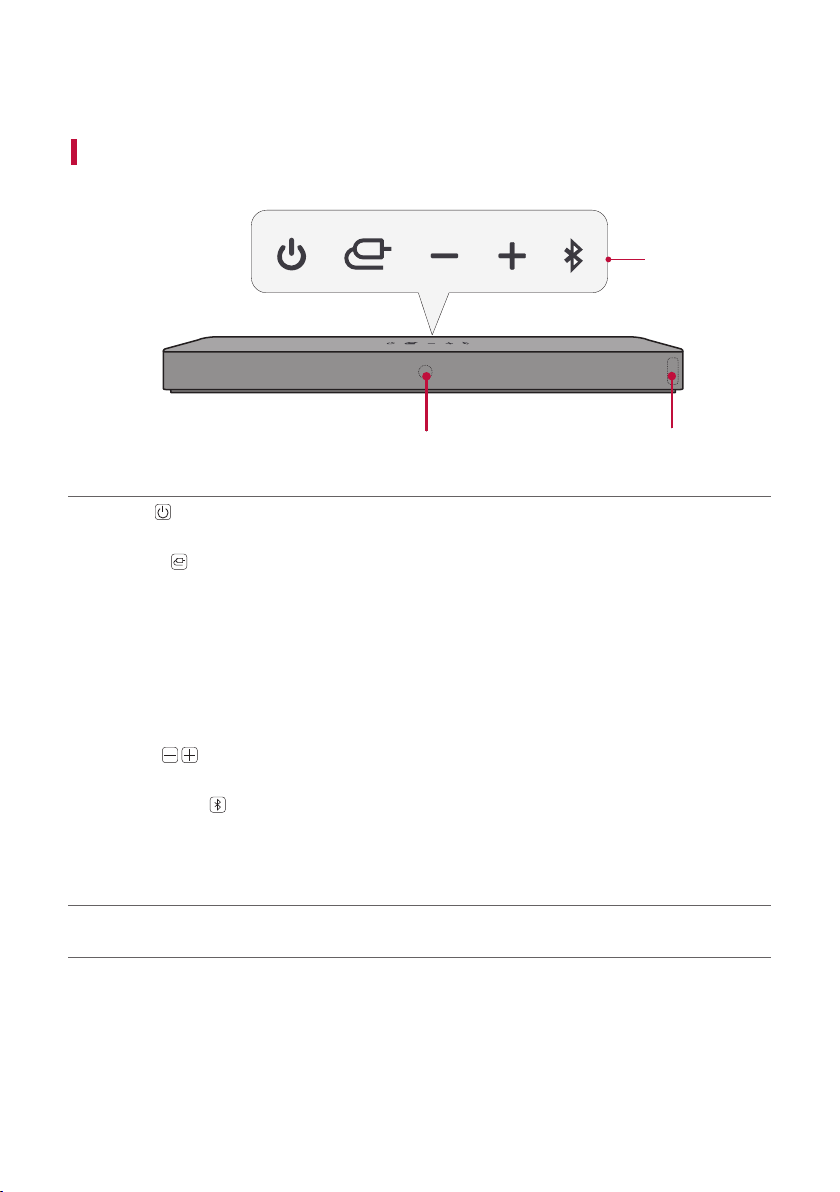
Front
a
b
c
a
Power
This turns the product on/off.
Function
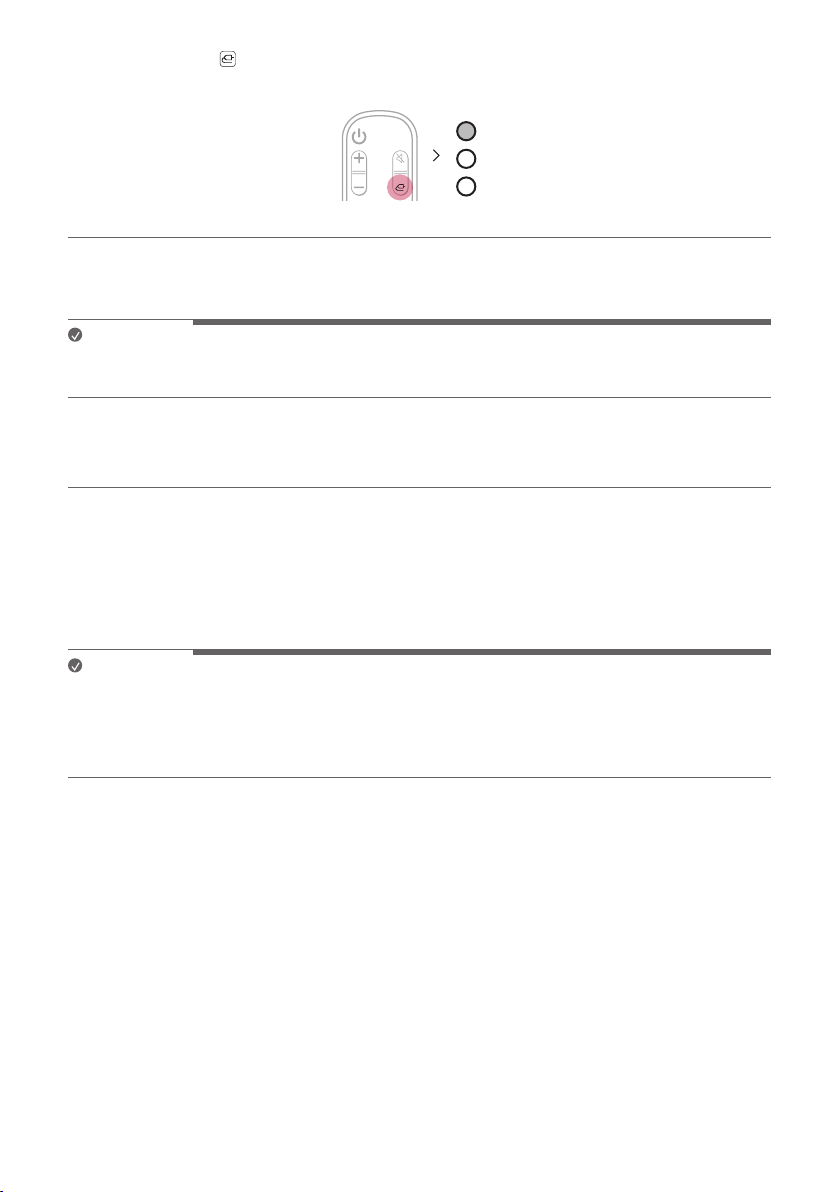
Press the button repeatedly to select the desired function or input mode.
• OPTICAL/HDMI ARC: Connects the product to a TV that supports an optical cable, ARC or LG Sound
Sync.
• Bluetooth: Connects the product via Bluetooth.
• LG TV: Connects the product to a TV that supports LG Sound Sync (Wireless).
• HDMI IN: Connects the product to an HDMI input port.
• USB: Connects the product to a USB storage device.
Volume
This adjusts the speaker volume.
Bluetooth pair
It allows you to pair your Bluetooth device such as a smartphone to this product for three minutes. ([
See “Connecting via Bluetooth” on page 24.)
It allows you to pair your LG TV to this product for three minutes. ([ See “Connecting with LG Sound
Sync (Wireless)” on page 18.)
b
Remote Control Receiver
This receives wireless signals from the remote control.
Exploring the Product

10
c Status LED ([ See “Status LED” on page 11)
• Options such as input mode and volume light up.
• If there is no active input for 15 seconds, the status LED will automatically dim. When you press the
button, the status LED will light up again.
Note
• To reduce power consumption, the product will automatically turn off after 15 minutes of no input signal from
an external device.
How to deactivate the wireless network connection(s).
Set up the Auto power function to off by the app and turn off the product.
11
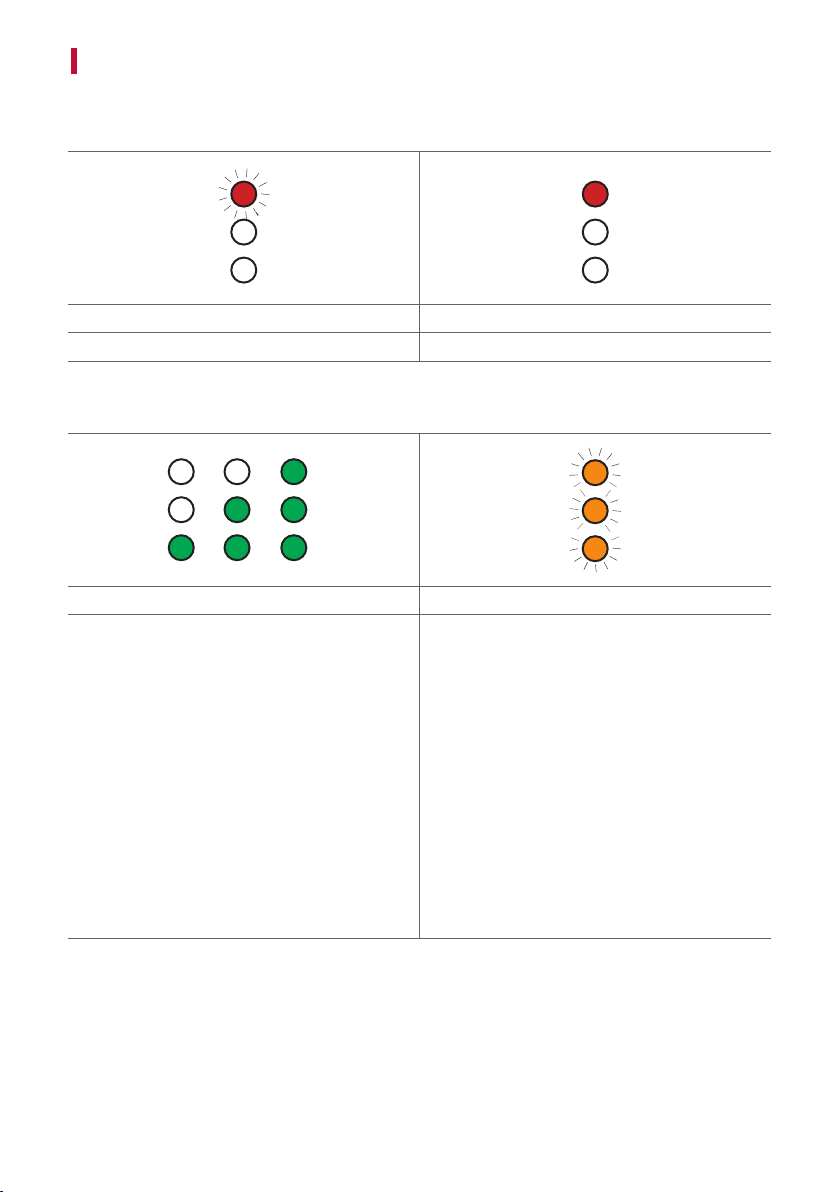
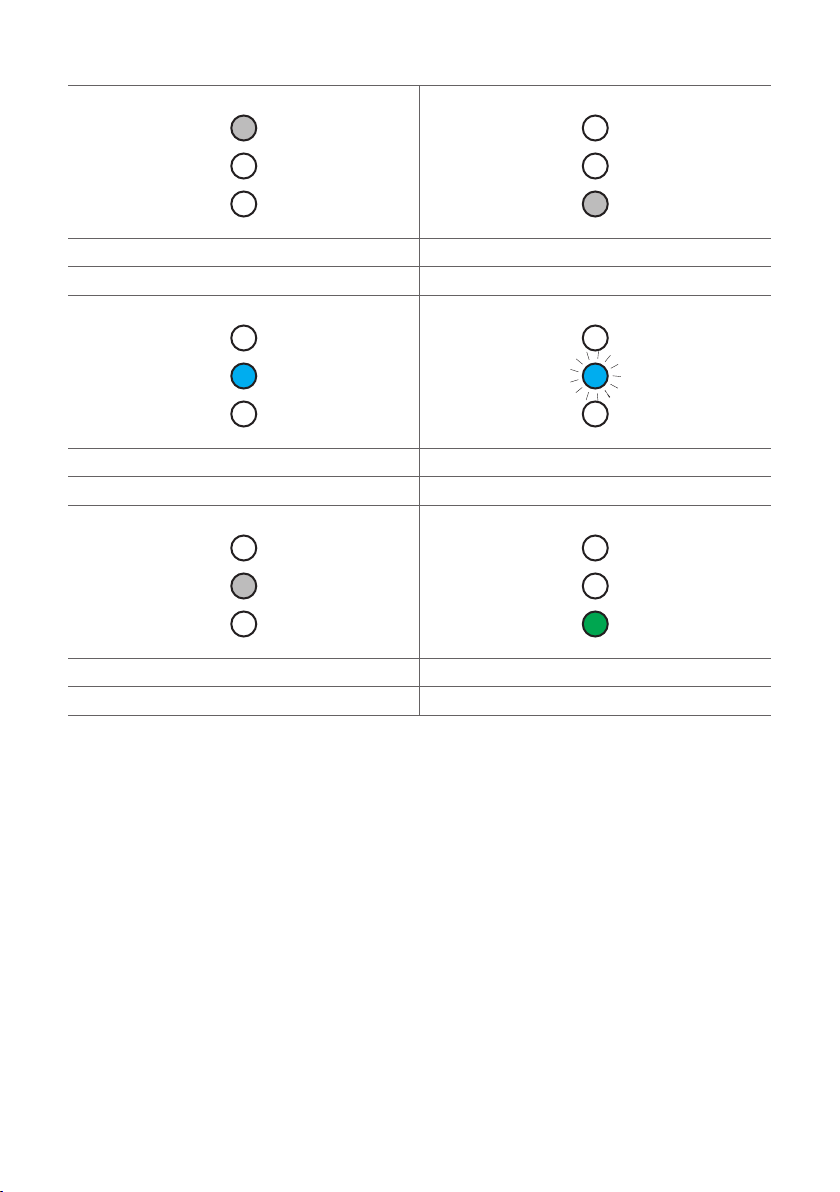
Status LED
Power On / Standby
Power on Standby
Red blinking Red
Volume
1
2
3
Volume control Mute
• Volume up: The LEDs get brighter and light up one
by one.
• Volume down: The LEDs get darker and turn off
one by one.
• The volume reaches maximum, all LEDs blink red.
• The volume reaches minimum, all LEDs turns off.
• If you press Up/Down button even when the
level has reached the maximum or minimum, the
current function LED will blink 3 times.
• The LED colour changes according to the volume
level.
• 1-33: Green
• 34-66: Yellow
• 67-99: Red
All LEDs blink orange.
12
Function
OPTICAL / HDMI ARC HDMI IN
White White
Bluetooth Bluetooth ready
Blue Blue blinking
LG TV USB
White Green
13
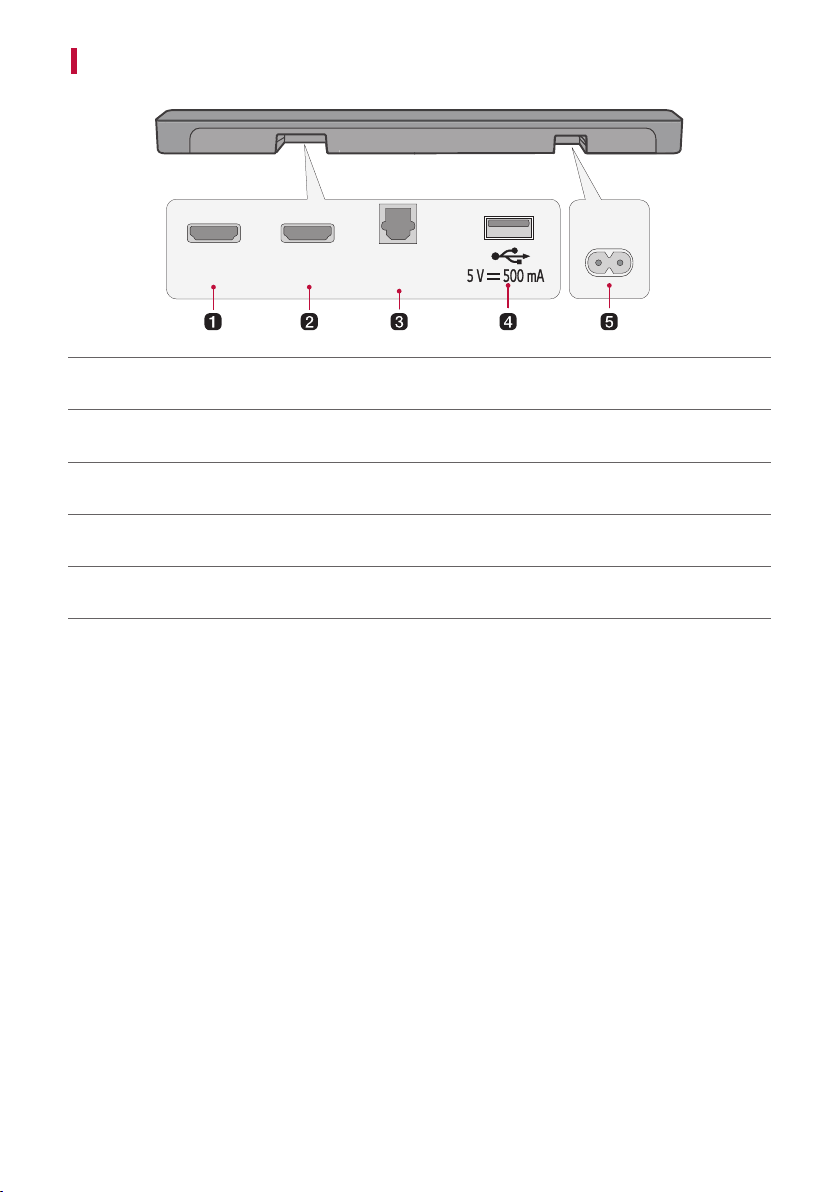
Back
AC IN
OPTICAL
IN
HDMI ▶ TV
(ARC)
HDMI IN
a
HDMI IN
Plug in an HDMI cable to connect an external device to the product.
b HDMI d TV (ARC)
Plug in an HDMI cable to connect the TV to the product.
c
OPTICAL IN
Plug in an optical cable to connect the TV to the product.
d
USB port
Plug in a USB storage device to play music with the product.
e
AC IN
Plug in a power cord.
14
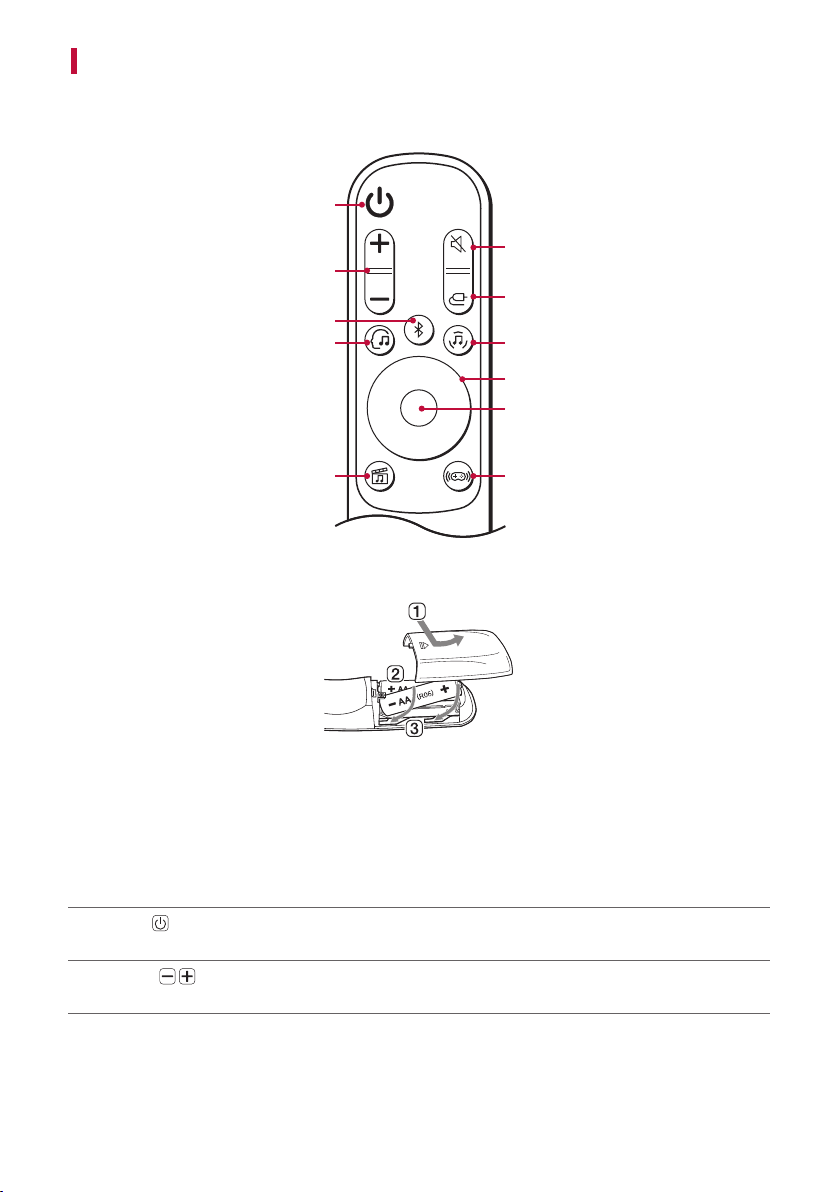
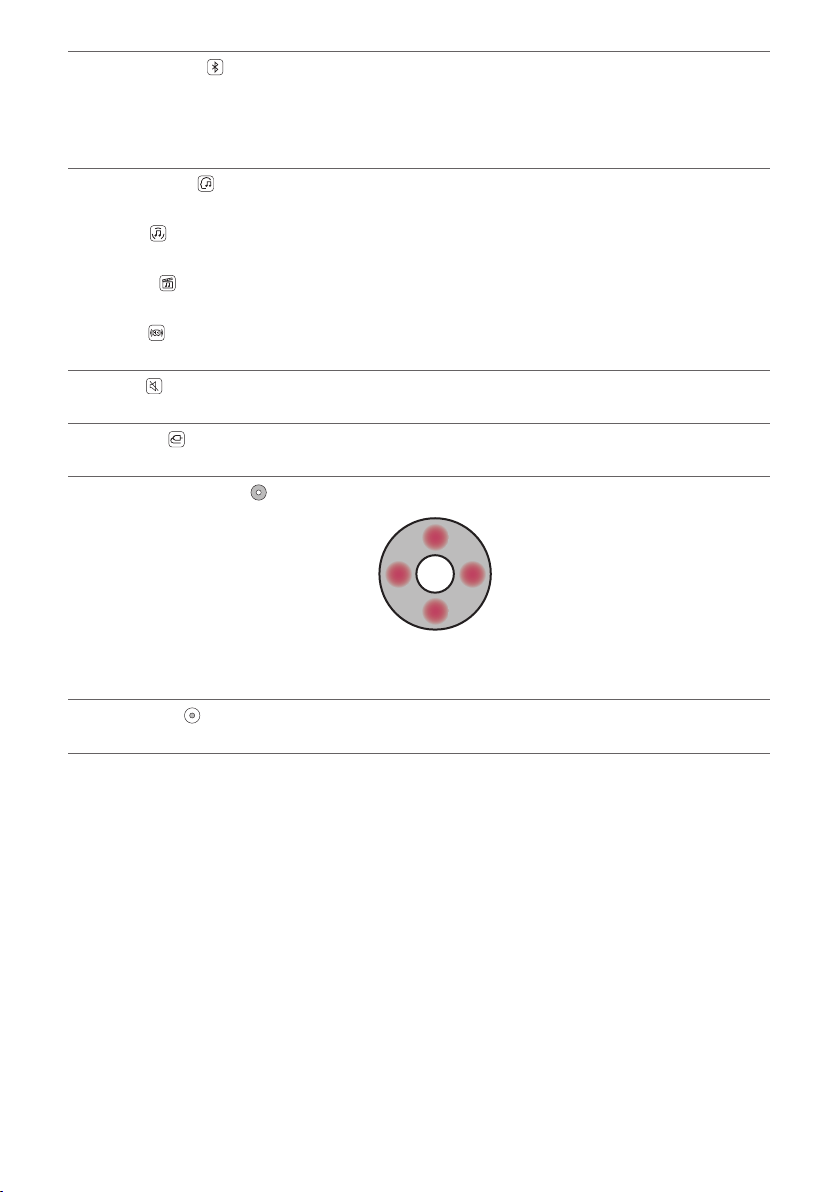
Exploring Remote Control
You can use the remote to control all functions of the product, from turning the power on/off to enabling
cinematic sound.
a
b
c
h
g
d
d
d
d
f
e
Replacement of Battery
Use AA 1.5V batteries. Replace the two batteries by inserting them into the remote control in accordance with the
directions indicated.
A Open the battery cover on the back of the remote control.
B Insert the batteries with the + and – ends corresponding to the markings.
C Close the battery cover.
Risk of re or explosion if the battery is replaced by an incorrect type.
a
Power
Turns the product on/off
b
Volume
Adjusts the sound volume
15
c
Bluetooth pair
It allows you to pair your Bluetooth device such as a smartphone to this product for three minutes. ([
See “Connecting via Bluetooth” on page 24.)
It allows you to pair your LG TV to this product for three minutes. ([ See “Connecting with LG Sound
Sync (Wireless)” on page 18.)
d
AI Sound Pro
Articial intelligence selects the optimal sound settings to suit your content.
Music
You can enjoy optimised sound.
Cinema
Play content with 3D sound similar to a movie theater.
Game
Optimised sound for game.
e
Mute
This turns off the sound from the product.
f
Function
Press the button repeatedly to select the desired input mode or function.
g
Up/Down/Left/Right
Up/Down: You can press the button to adjust the woofer level.
Left/Right: If you play a previous song, press Left button. If you play a next song, press Right button.
h
Play/Pause
If you play or pause a song, press this button.
16
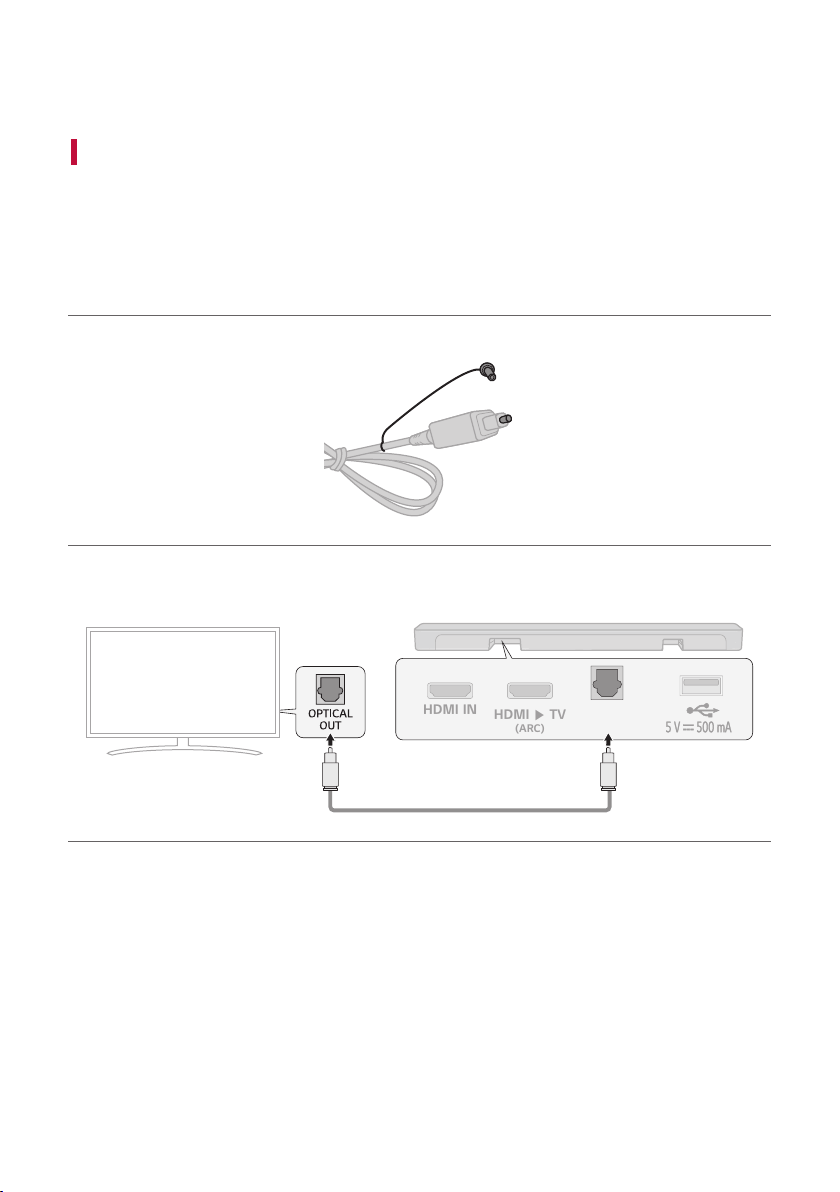
Connecting to the TV
Connecting with an Optical Cable
Transmit your TV’s audio to the product by connecting it to the TV with an optical cable. You can add a variety of
3D effects to the original audio to ll the room with a deep, rich sound.
Watching TV after connecting with an optical cable
a If the digital cable terminal has a cover, rst remove the covers from both ends.
b Using an optical cable, connect the OPTICAL IN terminal on the back of the product to the Optical Digital
Output (OPTICAL OUT) terminal on the TV as shown in the picture.
OPTICAL
IN
HDMI ▶ TV
(ARC)
HDMI IN
Connecting to the TV
17
c Press the Function button repeatedly until the rst from above LED lights up in white among the three
LEDs.
d Press the Settings button on the TV remote control to enter the [Speaker] menu and set the output speaker
to [Optical] or [External Speaker]. Settings and menu items may vary depending on the TV manufacturer.
Note
• If the optical input signal and the ARC signal attempt to connect at the same time, the ARC signal will take
priority.
When you use an LG TV
You can adjust the volume with the LG TV remote control if the TV is connected to the product with an optical
cable. You can only do so on a TV that supports the LG TV Sound Sync function. Check your TV’s user manual to
see if your TV is supported.
Functions controllable with an LG TV remote control
Volume, mute on/off
Note
• When using the product with an LG TV remote control, the volume and mute status set on the TV will
automatically be applied to the product.
• You can still use the product’s remote control even after connecting it to an LG TV.
• To use LG Sound Sync, you may have to change the sound setting of your TV. It may vary depending on the TV.
18
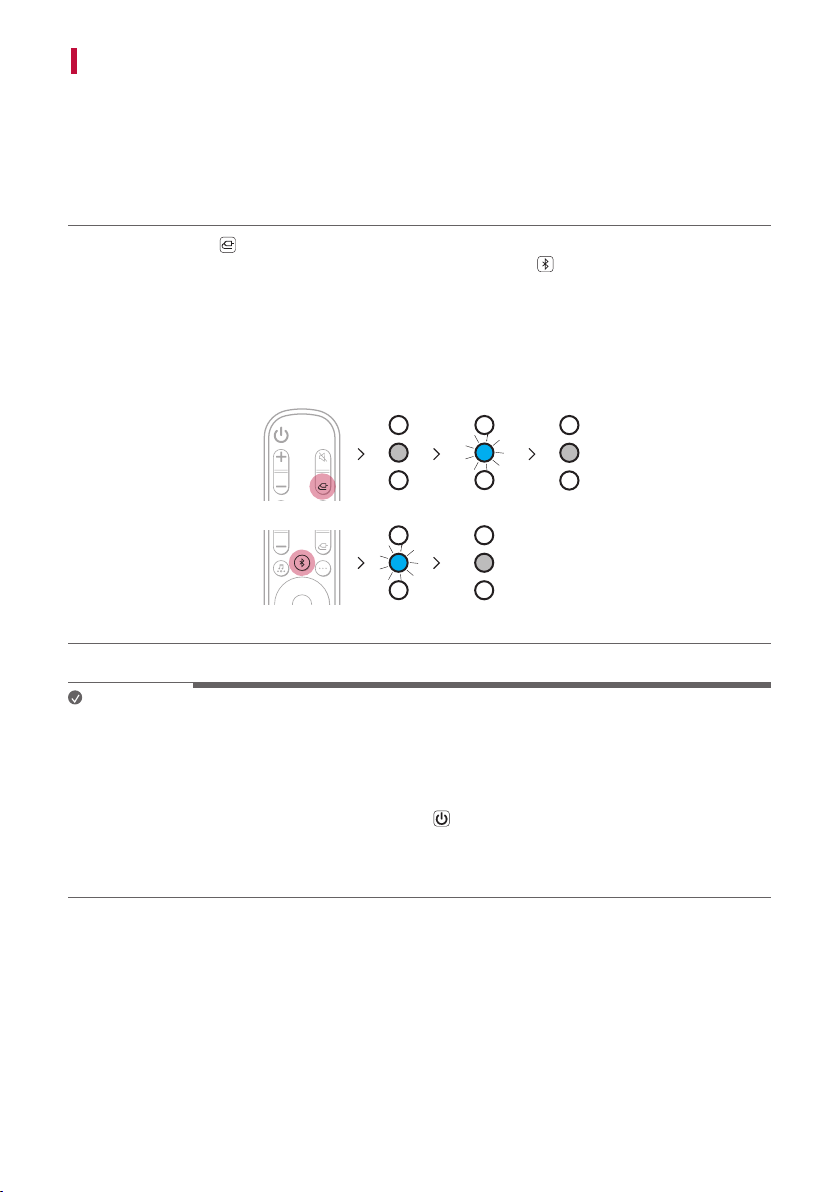
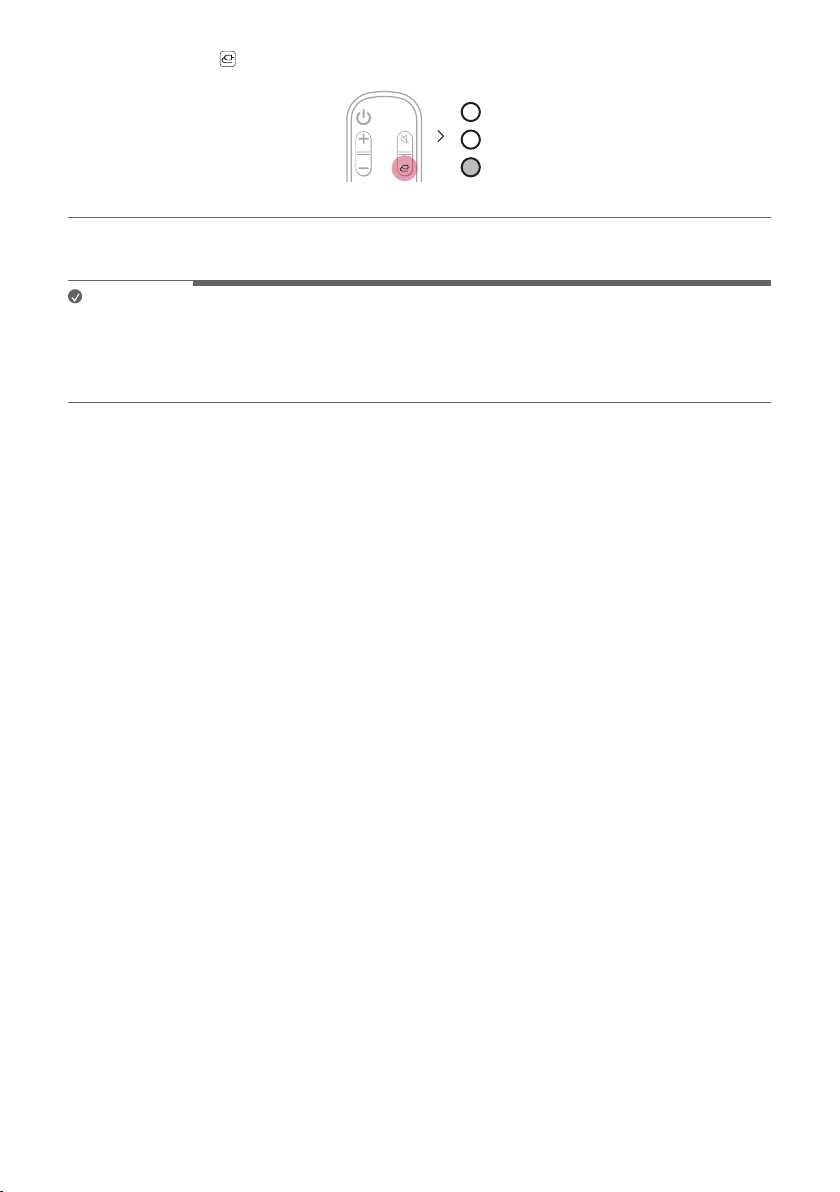
Connecting with LG Sound Sync (Wireless)
You can adjust the volume with the LG TV remote control if the TV is connected to the product with LG Sound
Sync (Wireless). Check out the TV user manual to see if your TV is supported.
Watching TV after connecting it wirelessly
a Press the Function button repeatedly until the second LED lights up in white among the three LEDs. After
a moment, it will change to blue and blink. Or Press the Bluetooth pair button. After a moment, second
LED lights up in blue and blinking.
b Press the Settings button on the TV remote control and enter the [Speaker] menu to set the output speaker
to [LG Sound Sync (Wireless)].
c When the product is connected to the TV via Bluetooth, the second LED lights up in white among the three
LEDs.
Note
• When reconnecting after the rst connection with LG Sound Sync, immediately lights up as a white LED.
• When using the product with an LG TV remote control, the volume and mute status set on the TV will
automatically be applied to the product.
• You can still use the product’s remote control even after connecting it to an LG TV.
• If you turn off the power of the product with the Power
button, the LG Sound Sync (Wireless) will be
disconnected.
• Depending on the TV, the product may be connected to the LG TV even if it is connected with the Bluetooth
function.
19
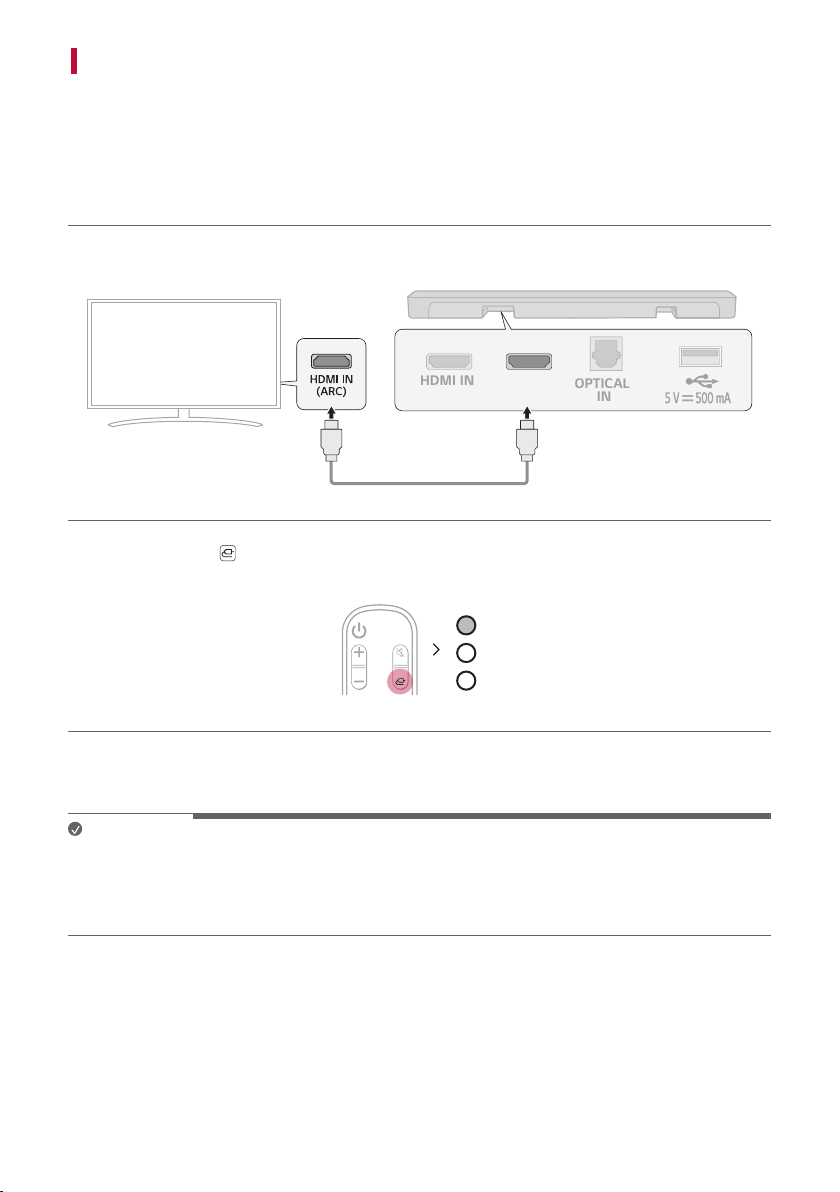
Connecting with an HDMI Cable
You can transmit TV audio to the product by connecting the TV to the product with an HDMI cable. Add a variety
of 3D effects to the original audio to ll the room with a deep, rich sound.
Watching TV after connecting with an HDMI cable
a Using the HDMI cable, connect the HDMI d TV (ARC) terminal on the back of the product to the HDMI IN
(ARC) terminal on the TV as shown in the picture.
OPTICAL
IN
HDMI ▶ TV
(ARC)
HDMI IN
b Press the Function button repeatedly until the rst from above LED lights up in white among the three
LEDs.
c Press the Settings button on the TV remote control to enter the [Speaker] menu and set the output speaker
to [HDMI ARC]. Settings and menu items may vary depending on the TV manufacturer.
Note
• Make sure that your TV supports the ARC function before you press the Setting button on the TV remote
control and turn on ARC. For more information on how to set the function, refer to the TV user manual as it
may differ depending on the TV.
• Use a certied cable with the HDMI logo.

20
SIMPLINK
• SIMPLINK refers to the HDMI-CEC function that allows you to use a single TV remote control to easily operate
an audio device or player connected to an LG TV via HDMI.
- Functions controllable with a SIMPLINK-compatible LG TV remote control: Power on/off, volume control,
mute on/off, etc.
• For more information on how to set up SIMPLINK, consult your LG TV’s user manual.
Note
• The SIMPLINK function may not work properly depending on the status of the product or other connected
devices.
- HDMI-CEC features by TV manufacturer: LG SIMPLINK, Sony BRAVIA Sync/Link, Philips EasyLink, Samsung
Anynet+, etc.
21
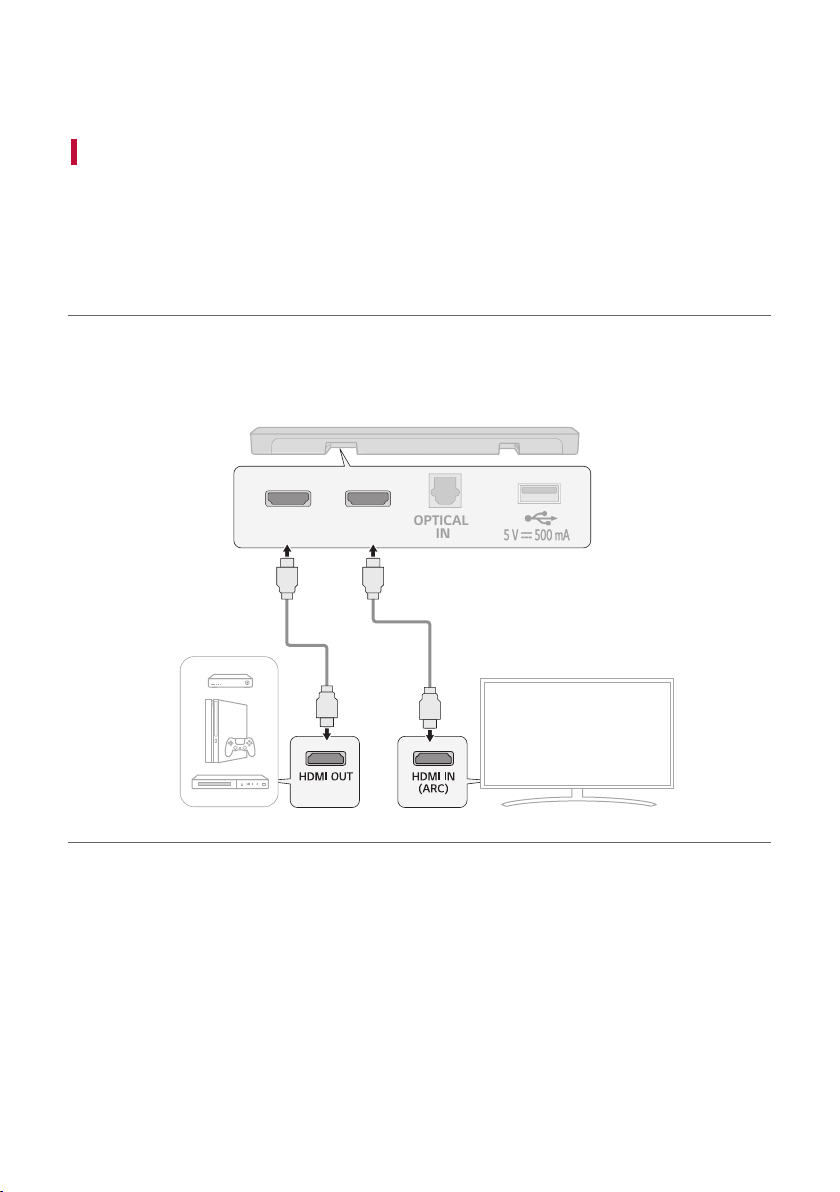
Connecting to an External Device
Connecting with an HDMI Cable
Connect the TV and external device (game console, DVD player, etc.) with an HDMI cable and enjoy a deep and rich
sound.
Connecting an external device via HDMI
a Connect an external device such as a DVD or Blu-ray player. Following the picture below, connect the HDMI
OUT terminal of the device to the HDMI IN terminal on the back of the product.
b Using the HDMI cable, connect the HDMI d TV (ARC) terminal on the back of the product to the HDMI IN
(ARC) terminal on the TV.
OPTICAL
IN
HDMI ▶ TV
(ARC)
HDMI IN
Connecting to an External Device
22
c Press the Function
button repeatedly until the third LED lights up in white among the three LEDs.
d When the external device is properly connected to the product, you can listen to the sound of the device.
Note
• Please check the audio output settings in the Settings menu of your external device (ex. Blu-ray player or TV).
The audio output should be set to [No encoding], [Bitstream], [Auto], or [Pass through]. For more information
on how to set the output, please refer to your external device’s user manual.
• Use a certied cable with the HDMI logo.
23
Connecting with an Optical Cable
Connect the TV and external device (game console, DVD player, etc.) with an optical cable and enjoy a deep and
rich sound.
Connecting an external device via optical cable
a Use the optical cable to connect the OPTICAL IN terminal on the back of the product to the OPTICAL OUT
terminal of your external device (ex. TV, Blu-ray player) as shown in the picture.
OPTICAL
IN
HDMI ▶ TV
(ARC)
HDMI IN
b Press the Function button repeatedly until the rst from above LED lights up in white among the three
LEDs.
24
Using the Product as an Audio System
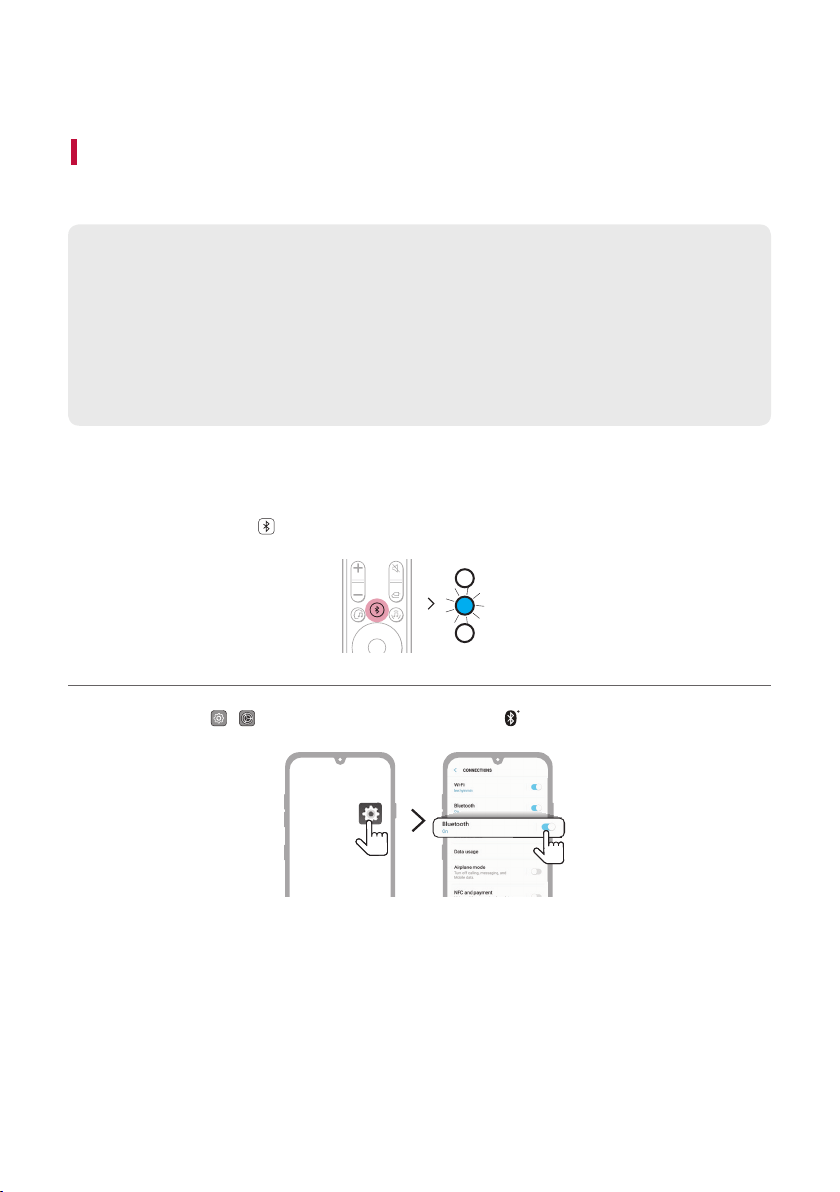
Connecting via Bluetooth
You can play music les stored on a Bluetooth device, or run music apps to enjoy the music with this product.
Please check the following rst.
• Bluetooth devices to be connected to the product should meet the following specications.
- Bluetooth 4.2 technology
- Codec: SBC, AAC
• Steps to connect the device to the product may vary depending on the Bluetooth device type and
model. For more information on how to connect the device, please refer to your external device’s user
manual.
Select the [Bluetooth] from your smartphone's Settings menu.
Settings menu items may vary depending on your smartphone manufacturer and model.
a Turn on the product.
b Press the Bluetooth pair
button. The second LED blinking in blue among the three LEDs.
c Tap the Settings ( / ) button on your smartphone and select Bluetooth.
(Android Phone)
Using the Product as an Audio System
25
(iPhone)
d Turn on the Bluetooth function. ( Off > On)
e You will see a list of connectable devices on your smartphone. Find and tap “LG S40Q (XX)”.
LG S40Q (XX)
Bluetooth devices
LG Smart Phone
Bluetooth devices
On
AVAILABLE DEVICES
Bluetooth
LG S40Q (XX)
Bluetooth devices
LG Smart Phone
Bluetooth devices
On
AVAILABLE DEVICES
f When the product is connected to the smartphone via Bluetooth, the blue LED stops blinking.
g If you cannot nd the product “LG S40Q (XX)”, tap the Refresh button at the top right of the screen on
the Android smartphone or turn the Bluetooth off and turn it on again on iPhone.
Bluetooth
Speaker
Bluetooth devices
LG Smart Phone
Bluetooth devices
On
AVAILABLE DEVICES
(Android Phone)

26
Not Connected
LG Speaeker1
Not Connected
Not Connected
Not Connected
Settings
LG Speaeker2
LG Speaeker3
LG Speaeker4
MY DEVICES
Now discoverable as “iPhone”
Bluetooth
Bluetooth
(iPhone)
h Run a Music app and listen to music on the smartphone.
Note
• The closer the Bluetooth device is to the product, the better your connection.
• If you pressed the Bluetooth pair
button of the product and selected the Bluetooth option, but could
not connect to the Bluetooth device, the blue LED blinking for 3 minutes. Check the status of the Bluetooth
device.
• When using Bluetooth, you should adjust the volume level to an appropriate level.
• XX is the last 2 digits of the MAC address of the product. For example, if the MAC address is
9C:02:98:4A:F7:08, it will be displayed as “LG S40Q (08)”.
27
Connecting with a Smartphone via LG Sound Bar app
Please use the LG Sound Bar app to run various functions of the product conveniently.
Please check the following rst.
• The LG Sound Bar app is available in the versions listed below.
- Android™ OS: Version 6.0 or higher
- iOS OS: Version 12 or higher
- Minimum supported versions for each OS may change later.
Installing the app
Install the LG Sound Bar app on your smartphone. To install the LG Sound Bar app, you can scan the QR code
with a QR code scan app or download on Google Play or the App Store.
Downloading with a QR code
a Scan the QR code below with a QR code scan app.
b You will be directed to a page where you can download the LG Sound Bar app. Tap the app to install it.
(Android Phone OS)
(iPhone OS)
28
Downloading from the Google Play or App Store
Go to the Google play or the App Store on your smartphone and search for the LG Sound Bar app to install it.
(Android™ Phone)
(iPhone)
Note
• Settings menu items may vary depending on the smartphone manufacturer and OS.
• Google, Android and Google Play are trademarks of Google LLC.
29
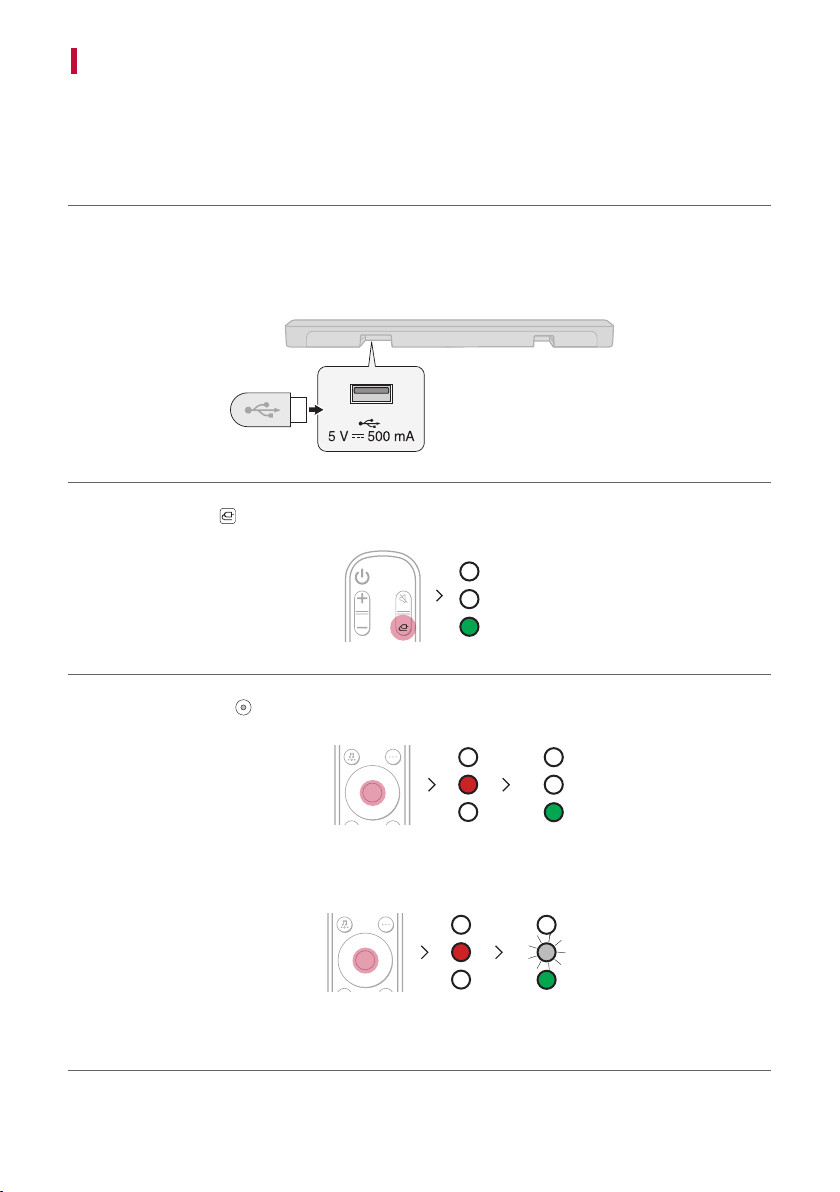
Connecting to a USB Storage Device
Enjoy high-quality sound by connecting a USB storage device containing music les to the product.
Connecting the product to a USB storage device
a Plug the USB storage device into the USB port on the back of the product.
• The product cannot play any devices connected via a USB storage device hub or a USB storage device cable.
• The product cannot be connected to any USB storage device, USB type MP3 player, or card reader that
requires a separate device drive to be installed.
b Press the Function button repeatedly until the third LED lights up in green among the three LEDs.
c Press the Play/Pause button on the remote control to enjoy the music.
Play
Pause

30
Note
• It is recommended that you purchase a separate USB gender changer to make it easier to plug in and out USB
storage devices.
• Purchase a USB gender changer with a USB 2.0 extension cable.
• USB devices with a large storage volume may take several minutes to browse through les.
• LG Electronics is not responsible for any data loss. Please always back up the data on your USB storage device
to minimise damage caused by data loss.
• Only FAT16/FAT32/NTFS formats are supported. exFAT format is not supported.
USB storage devices supported
• MP3 player
• Flash MP3 player
• USB ash device
• USB 2.0
This product may not recognise some USB storage devices.
Playable file specifications
File extension Sampling frequency / Bitrate
MP3 32 kHz - 48 kHz / 8 kbps - 320 kbps
WMA 32 kHz - 48 kHz / 56 kbps - 320 kbps
OGG 32 kHz - 48 kHz / 64 kbps - 320 kbps
File extension Sampling frequency
FLAC (16 bit/24 bit) 32 kHz, 44.1 kHz, 48 kHz, 88.2 kHz, 96 kHz, 176.4 kHz, 192 kHz
WAV (16 bit/24 bit) 32 kHz, 44.1 kHz, 48 kHz, 88.2 kHz, 96 kHz, 176.4 kHz, 192 kHz
• Number of playable les: Up to 2,000
• Maximum number of directories: Up to 200
• This product cannot play les protected by DRM (Digital Rights Management).
• This product cannot play video les from a USB storage device.
Voice feedback function
When you select a function or sound, the current status of the product is guided by voice.
You can turn this function on and off with app only.
31
Mounting the Product to a Wall
Checking before mounting to a wall
You can mount this product onto a wall.
When mounting the product to the wall, follow the instructions below.
Please check the following rst.
• It may be difcult to connect external devices and cables after wall-mounting. First, connect an external
device with the proper connection cable to the product before mounting it to the wall.
• Please note the following when you mount the product to the wall. Product damage or injury may occur
during the process.
- Do not put objects on top of the wall-mounted product.
- Secure the product rmly to the wall using the xing screws so that it does not fall off.
- Ensure it is out of the reach of children. Pulling or shaking the mounted product may cause it to fall.
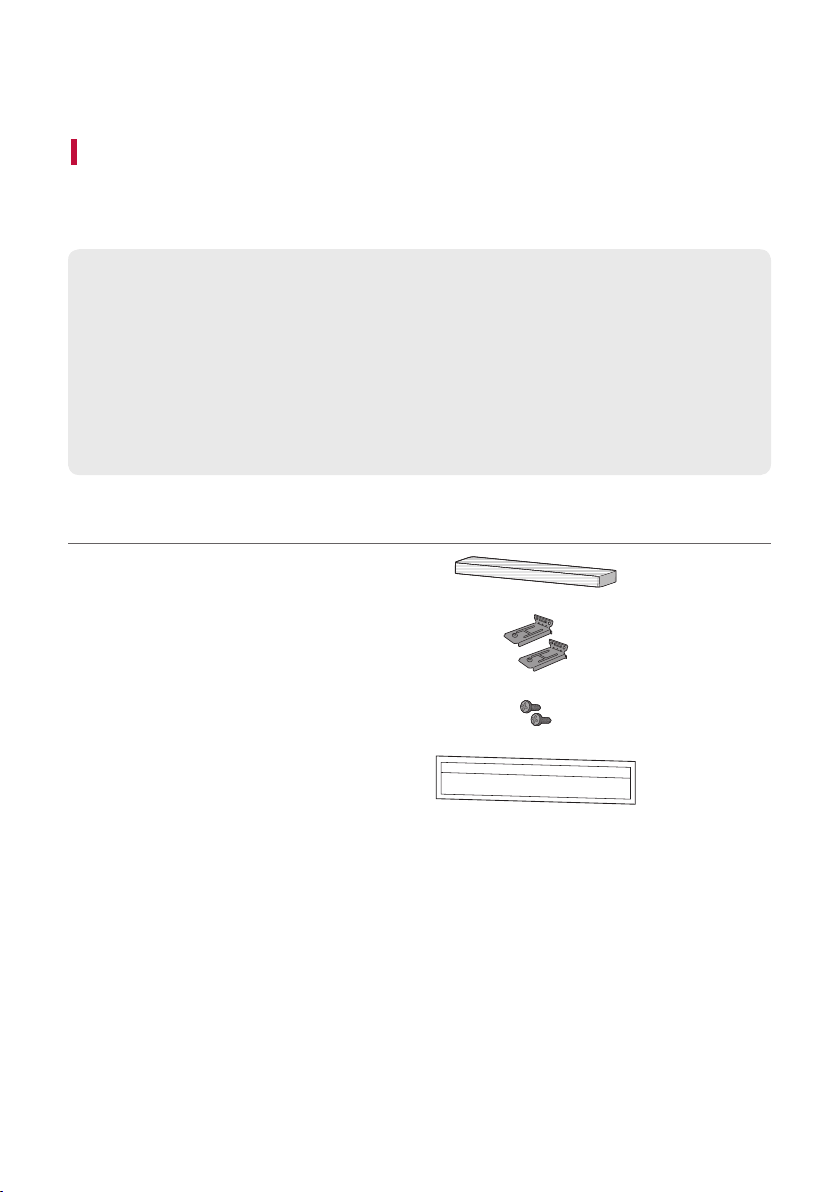
Components for mounting the product
Sound bar
Wall bracket
Sound bar screws
Wall bracket installation guide
Mounting the Product to a Wall

32
Sold separately
Bracket screws
Wall plugs
Note
• Screws and Wall Plugs are not supplied for mounting the product. We recommend the Hilti (HUD-1 6 x 30) for
the mounting.
33
Mounting the Product to a Wall
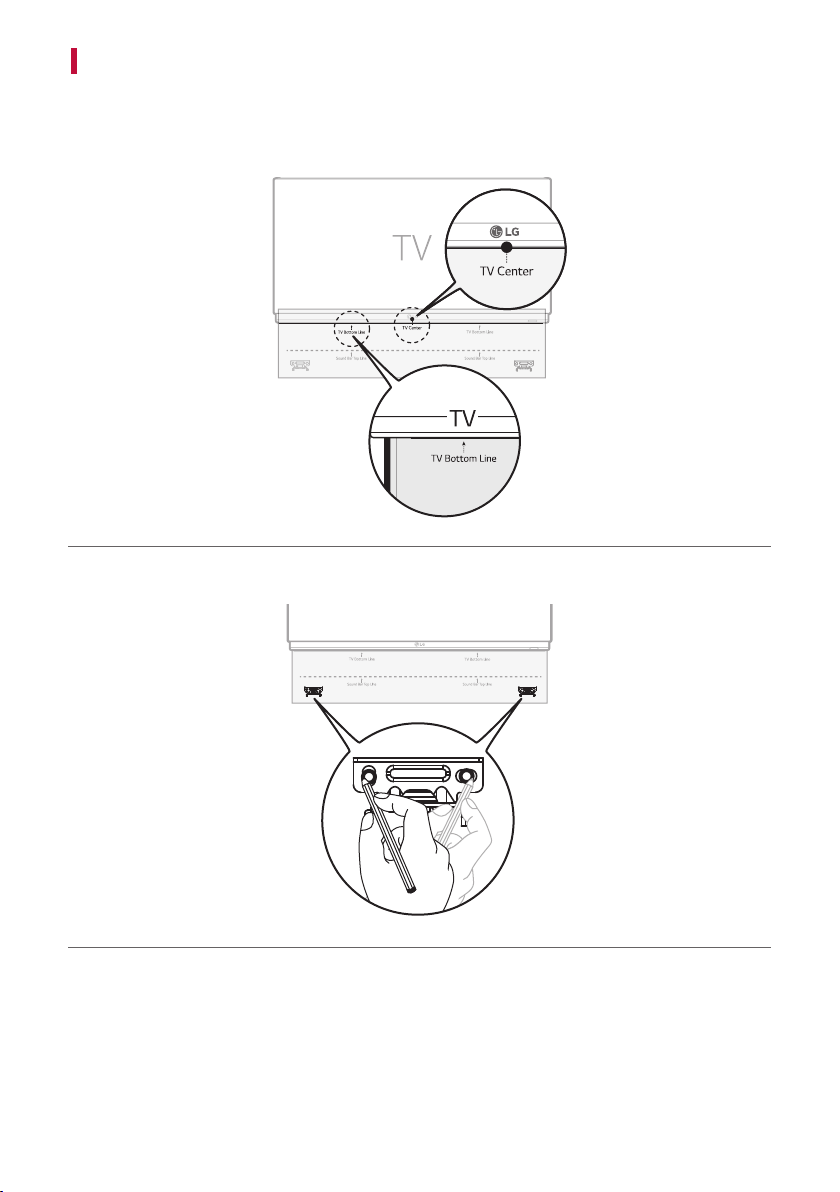
a Find the wall bracket installation guide in the product package.
b Align the “TV Bottom Line” on the wall bracket installation guide with the bottom of the TV, and attach it to
the wall. Align the centre of the wall-mounted TV with the part marked “TV Center” in the installation guide.
c With a pen, mark screw holes on the installation guide where the wall brackets will be attached.
d Drill screw holes in the marked positions on the installation guide.
e Remove the wall bracket installation guide from the wall.
34
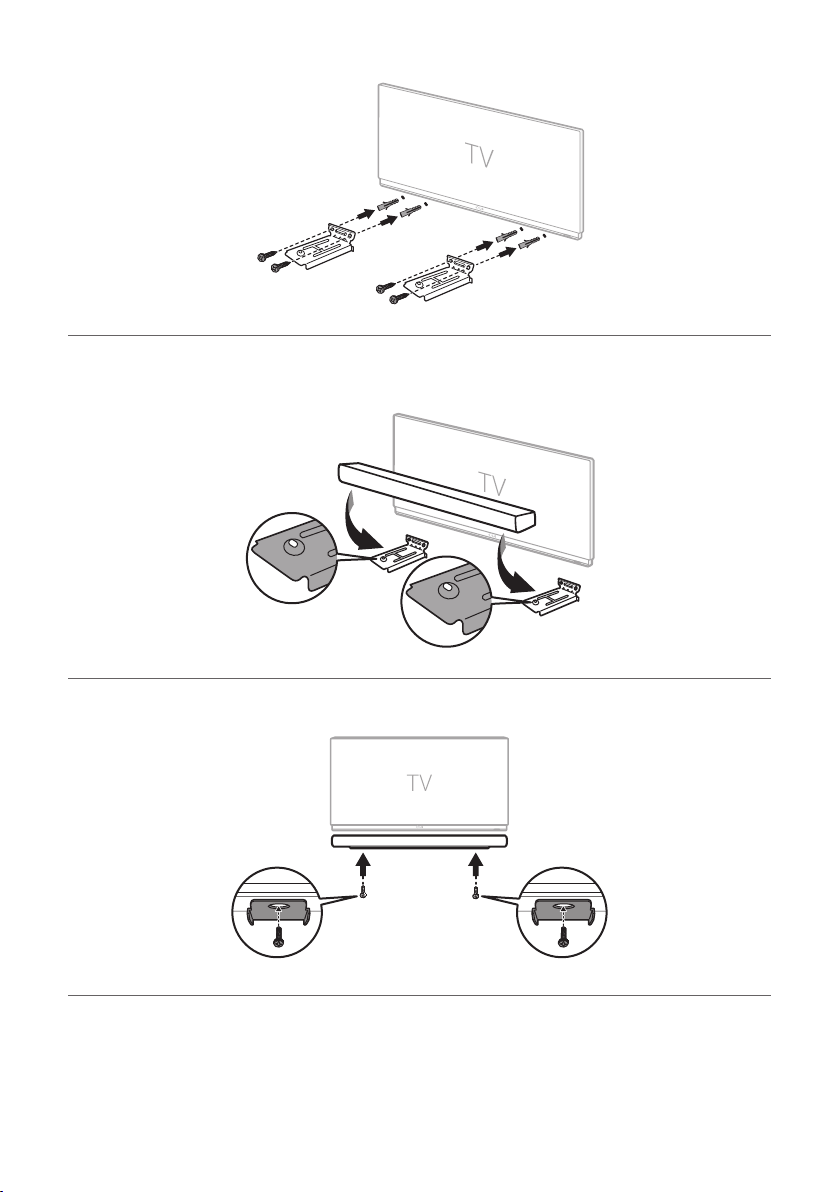
f Fix the brackets rmly to the wall using the wall plugs and screws.
g Place the product on the brackets. Position the product on the brackets so the screw holes on the bottom of
the product align with the screw holes on the wall bracket.
h Firmly attach the product to the wall brackets using the screws provided.
35
Safety Precautions
Safety and Regulatory
CAUTION
RISK OF ELECTRIC SHOCK
DO NOT OPEN
CAUTION: TO REDUCE THE RISK OF ELECTRIC SHOCK DO NOT REMOVE COVER (OR BACK) NO USER-
SERVICEABLE PARTS INSIDE REFER SERVICING TO QUALIFIED SERVICE PERSONNEL.
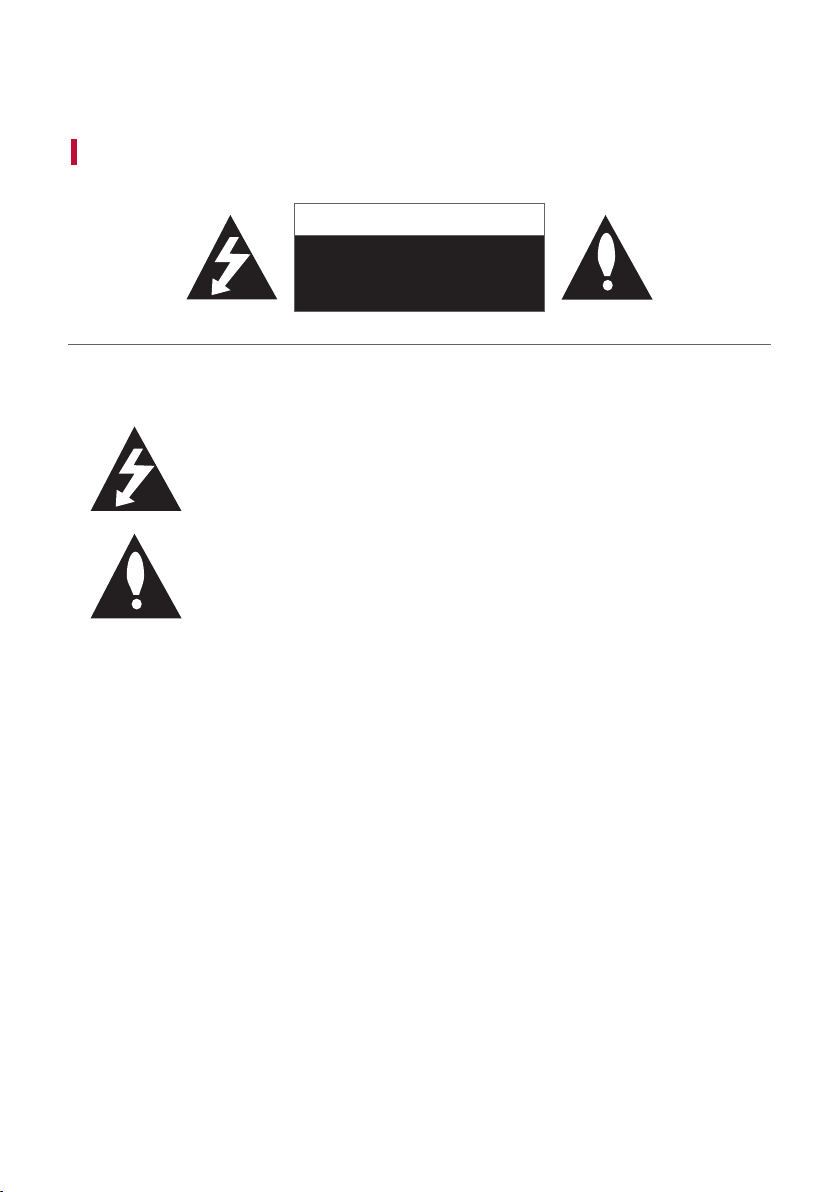
This lightning ash with arrowhead symbol within an equilateral triangle is intended to
alert the user to the presence of uninsulated dangerous voltage within the product’s
enclosure that may be of sufcient magnitude to constitute a risk of electric shock to
persons.
The exclamation point within an equilateral triangle is intended to alert the user to the
presence of important operating and maintenance (servicing) instructions in the literature
accompanying the product.
WARNING:
• TO PREVENT FIRE OR ELECTRIC SHOCK HAZARD, DO NOT EXPOSE THIS PRODUCT TO RAIN OR MOISTURE.
• Do not install this equipment in a conned space such as a book case or similar unit.
CAUTION:
• Do not use high voltage products around this product. (ex. Electrical swatter) This product may malfunction due
to electrical shock.
• No naked ame sources, such as lighted candles, should be placed on the apparatus.
• Do not block any ventilation openings. Install in accordance with the manufacturer’s instructions. Slots and
openings in the cabinet are provided for ventilation and to ensure reliable operation of the product and to
protect it from over heating. The openings should never be blocked by placing the product on a bed, sofa, rug or
other similar surface. This product shall not be placed in a built-in installation such as a bookcase or rack unless
proper ventilation is provided or the manufacturer’s instruction has been adhered to.
• The apparatus should not be exposed to water (dripping or splashing) and no objects lled with liquids, such as
vases, should be placed on the apparatus.
• For safety marking information including product identication and supply ratings, please refer to the main
label on the bottom or the other surface of the product.
• Be careful to make sure children do not put their hands or any objects into the *speaker duct.
- * speaker duct: A hole for plentiful bass sound on speaker cabinet. (enclosure)
Safety Precautions

36
CAUTION concerning the Power Cord
The Power Plug is the disconnecting device. In case of an emergency, the Power Plug must remain readily
accessible.
Check the specication page of this owner’s manual to be certain of the current requirements.
Do not overload wall outlets. Overloaded wall outlets, loose or damaged wall outlets, extension cords, frayed power
cords, or damaged or cracked wire insulation are dangerous. Any of these conditions could result in electric shock
or re. Periodically examine the cord of your device, and if its appearance indicates damage or deterioration, unplug
it, discontinue use of the device, and have the cord replaced with an exact replacement part by an authorised
service centre.
Protect the power cord from physical or mechanical abuse, such as being twisted, kinked, pinched, closed in a door,
or walked upon. Pay particular attention to plugs, wall outlets, and the point where the cord exits the device.
For models using an adapter
Only use the AC adapter supplied with this device. Do not use a power supply from another device or another
manufacturer. Using any other power cable or power supply may cause damage to the device and void your
warranty.

37
For models using a battery
This device is equipped with a portable battery or accumulator.
CAUTION: Risk of re or explosion if the battery is replaced by an incorrect type.
For models using a built-in battery
Do not store or transport at pressures lower than 11.6 kPa and at above 15,000 m altitude.
• replacement of a battery with an incorrect type that can defeat a safeguard (for example, in the case of some
lithium battery types);
• disposal of a battery into re or a hot oven, or mechanically crushing or cutting of a battery, that can result in
an explosion;
• leaving a battery in an extremely high temperature surrounding environment that can result in an explosion or
the leakage of ammable liquid or gas; and
• a battery subjected to extremely low air pressure that may result in an explosion or the leakage of ammable
liquid or gas.
Symbols
: Alternating current (AC).
0 : Direct current (DC).
: This is a class II equipment.
1 : Standby power state.
! : The power is turned on.
: Danger voltage.

38
Before Reporting Product Malfunction
Troubleshooting
If you experience the following issues while using the product, please perform several checks, as they may not be
malfunctions.
General Errors
Issue Solution
The product
does not work
properly
• Unplug the power cables and any external devices such as your TV, subwoofer, or
amplier from the product, then plug them in again.
The power does
not turn on
• Is the power cord plugged into the outlet properly?
- Connect the power plug to the outlet correctly.
There is no
sound
• Is the volume set to minimum?
- Press the Volume
button on the remote control to turn up the volume.
- If you are using an external device such as a set-top box, portable device, or
Bluetooth device, adjust the volume of the external device.
• Is the mute function activated?
- If all LEDs blink orange, the mute function is on. Press the Mute
button to
unmute.
• Is the correct product function selected according to the external device connected?
- Press the Function
button to check if you selected the correct function.
The subwoofer
does not
produce sound
• Is the product properly connected to the wireless subwoofer?
- If the LED on the front of the wireless subwoofer is blinking green or lit in red, it
means it is not connected. If the connection is established, a green light will appear.
Reconnect the product to the wireless subwoofer. ([ See “Connecting the
Product” on page 6.)
The remote
control does not
work properly
• When using the remote control, point it at the front of the product.
• Use the remote control within a 7-m radius of the product.
• Replace the batteries with new ones as needed.
LG Sound Sync
does not work
• Check whether your TV supports LG Sound Sync.
• Check if the TV is properly connected to the product via an optical cable.
- Press the Settings button on the TV remote control to check if the function is
turned on in [LG Sound Sync].
Before Reporting Product Malfunction

39
The product
volume is low
• Check the following and change the settings accordingly.
- Run the LG Sound Bar app, tap the Settings
button on the rst screen, and
change the [DRC] function to [Off] on the [Sound Settings] menu.
- When the product is connected to a TV, press the Settings button on the TV
remote control, select the [Speaker] menu, and change the [Digital Sound Output]
setting from [PCM] to [AUTO] or [BITSTREAM].
- If the product is connected to a playback device such as a DVD player or Blu-ray
disc player, go to the connected device's Settings menu. Change the [Digital Sound
Output] setting from [PCM] to [PRIMARY PASS-THROUGH] or [BITSTREAM]. Set
the [DRC] of the connected device to [OFF].
The product
fails to
recognise a USB
storage device
• The product may not support the le format of the USB storage device. Format the
USB storage device and reconnect it. When formatting, refer to the USB storage
device formats supported by the product and select an appropriate le format. ([
See “Connecting to a USB Storage Device” on page 29.)
A Bluetooth
device cannot
be paired
• Press the Settings button on the Bluetooth device and check whether the Bluetooth
function is enabled. If Bluetooth is enabled, turn it off and on, then try again.
• Remove any obstacles between the product and the Bluetooth device.
• Bluetooth pairing (connection) may not work properly depending on the Bluetooth
device type or the surrounding environment.

40
Problems in Wireless Connection
Issue Solution
There is radio
interference
• Install the product and the wireless subwoofer as close to each other as possible.
• Do not install the product on metal furniture.
• Wireless communication may not work properly in weak signal areas.
The Bluetooth
connection
is causing a
malfunction or
making noise
• Do you hear noise or experience malfunctions when using Bluetooth?
- Do not let any part of your body contact the transceiver of the Bluetooth device or
the product.
- Do not install the Bluetooth device on a wall or in a secluded spot.
- Remove any obstacles between the product and the Bluetooth device.
- Install the Bluetooth device near the product.
• When the Bluetooth device is too far from the product, Bluetooth may be
disconnected or malfunctions may occur.
- Install the Bluetooth device 1 m away from devices that use the same frequency
as the product, such as wireless routers, medical equipment, and microwave ovens.
41
Appendix
Specifications
General
Power Requirement Refer to the main label.
Power Consumption
Refer to the main label.
Networked standby : 1.0 W
Dimensions (W x H x D) Approx. 760.0 mm x 63.0 mm x 90.0 mm
Operation Temperature Range 5 °C - 35 °C
Operation Humidity Range 5 % - 60 %
Bus Power Supply (USB)
5 V 0 500 mA
Available Digital Input Audio Sampling
Frequency
32 kHz, 44.1 kHz, 48 kHz, 88.2 kHz, 96 kHz
Available Digital Input Audio format Dolby Audio™, PCM
Input/Output
OPTICAL IN 3.0 V (p-p), (optical audio connection terminal) × 1
HDMI IN 19-pin (Type A, HDMI™ connection terminal) × 1
HDMI d TV (ARC)
19-pin (Type A, HDMI™ connection terminal) × 1
Amplier (RMS output)
Total 300 W RMS
Front 50 W RMS×2 (Impedance: 6 Ω, THD 10 %)
Subwoofer 200 W RMS (Impedance: 3 Ω, THD 10 %)
Appendix

42
Wireless Subwoofer
Power Requirement Refer to the main label on the Wireless Subwoofer.
Power Consumption Refer to the main label on the Wireless Subwoofer.
Type 1-way 1 speaker
Impedance 3 Ω
Rated power 200 W RMS
Max. Power 400 W RMS
Dimensions (W x H x D) Approx. 171.0 mm × 390.0 mm × 261.0 mm
• Design and specications are subject to change without notice.

43
Registered Trademarks and Licenses
All trademarks and trade names are the property of their respective owners.
Dolby, Dolby Audio and the double-D symbol are trademarks of Dolby Laboratories Licensing Corporation.
Manufactured under license from Dolby Laboratories. Condential unpublished works. Copyright 2012-2021
Dolby Laboratories. All rights reserved.
The Bluetooth® word mark and logos are registered trademarks owned by the Bluetooth SIG, Inc. and any use of
such marks by LG Electronics is under license.
Other trademarks and trade names are those of their respective owners.
The terms HDMI, HDMI High-Denition Multimedia Interface, HDMI Trade Dress and the HDMI Logos are
trademarks or registered trademarks of HDMI Licensing Administrator, Inc.
“Made for iPhone,” and “Made for iPod” mean that an electronic accessory has been designed to connect
specically to iPhone, or iPod, respectively, and has been certied by the developer to meet Apple performance
standards. Apple is not responsible for the operation of this device or its compliance with safety and regulatory
standards. Please note that the use of this accessory with iPhone or iPod may affect wireless performance.

44
Handling the Product
When shipping the Product
Please save the original shipping carton and packing materials. If you need to ship the product, for maximum
protection, re-pack the product as it was originally packed at the factory.
Keeping the exterior surfaces clean
• Do not use volatile liquids such as insecticide spray near the product.
• Wiping with strong pressure may damage the surface.
• Do not leave rubber or plastic products in contact with the product for a long period of time.
Cleaning the product
To clean the product, use a soft, dry cloth. If the surfaces are extremely dirty, use a soft cloth lightly moistened
with a mild detergent solution. Do not use strong solvents such as alcohol, benzine, or thinner, as these might
damage the surface of the product.