INSTRUCTIONS FOR USE
WINE CLIMATE CABINET
EN
WCN111942G

3Introduction ................................................
3Welcome to our growing ASKO family! .......
4Safety instructions .....................................
4Safety of children and vulnerable people .....
4General safety ..............................................
6
FCC (Federal Communications Commission)
Informations: ................................................
7Installation ....................................................
8Electrical connection ...................................
9Use ...............................................................
9Care and cleaning .......................................
10Disposal .......................................................
11Installation and connection ......................
11Selecting the location ..................................
12Appliance placement ...................................
16Connecting the appliance ...........................
17
Before using the appliance for the first
time ..............................................................
17
Before you use the appliance for the first
time ..............................................................
17Energy-saving advice ..................................
18Storing wine ...............................................
18Wine storage tips .........................................
19Storing bottles ..............................................
20Description of the appliance .....................
26Operation ....................................................
26Display .........................................................
27First plug-in ..................................................
28Temperature setting .....................................
28Appliance Display Standby .........................
28Key lock mode .............................................
29Alarms ..........................................................
33SETTINGS MENU .........................................
47Wi-Fi function ...............................................
49Charcoal filter countdown and notification ...
49Sabbath mode .............................................
50Eco mode .....................................................
51Maintenance ...............................................
51Defrosting the appliance .............................
51Cleaning the appliance ................................
52Reversing the door opening direction .....
60Solving problems .......................................
60Tips & Tricks ................................................
61Error notifications .........................................
63General problems ........................................
64Other display warnings ................................
66Environmental aspects ..............................
66Disposal of packaging and appliance .........
67Service and warranty .................................
67Limited Warranty – Residential Appliances ..
67Items excluded from warranty .....................
67Disclaimer ....................................................
68ASKO Customer Care ..................................
68Service after expiration of limited warranty ...
Contents
Welcome to our growing ASKO family!
We are proud of our appliances. We hope that this appliance will be an appreciated and dependable
aid for many years to come.
Please read the operating instructions before use. They include general tips, information about the
settings and adjustments you can make, and the best way to take care of your appliance.
The following symbols are used throughout the manual and they have the following meanings:
INFORMATION!
Information, advice, tip, or recommendation
WARNING!
Warning – general danger
ELECTRIC SHOCK!
Warning – danger of electric shock
DANGER OF FIRE!
Warning – danger of fire
3
Introduction
Before the installation and use of the appliance, carefully read the
supplied instructions. The manufacturer is not responsible if an
incorrect installation and use causes injuries and damages. Always
keep the instructions with the appliance for future reference.
WARNING!
If the appliance is installed at an altitude of over 3280 ft (1000 m)
above sea level, there is a danger of glass cracking due to air
pressure. In such case, glass fragments could cause injury.
Safety of children and vulnerable people
• The appliance is not intended for use by persons (including
children) with reduced physical, sensory or mental capabilities,
or lack of experience and knowledge, unless they have been
given supervision or instruction concerning use of the appliance
by a person responsible for their safety.
• Children should be supervised to ensure that they do not play
with the appliance.
• Cleaning and user maintenance shall not be made by children
without supervision.
• Keep all packaging away from children.
• WARNING! Risk of child entrapment. Before you throw away your
old refrigerator or freezer:
- Take off the doors.
- Leave the shelves in place so that children may not easily climb
inside.
General safety
• Illumination in the appliance is only suitable for illumination of this
appliance and not for household room illumination.
• WARNING! This appliance is intended to be used in household
and similar applications such as:
4
Safety instructions

- staff kitchen areas in shops, offices and other working
environments;
- farm houses and by clients in hotels, motels and other
residential type environments;
- catering and similar non-retail applications.
WARNING!
Keep ventilation openings, in the appliance enclosure or in the
built-in structure, clear of obstruction.
Do not use mechanical devices or other means to accelerate the
defrosting process, other than those recommended by the
manufacturer.
Do not damage the refrigerant circuit.
Do not use water spray and steam to clean the appliance.
Clean the appliance with a moist soft cloth. Only use neutral
detergents. Do not use abrasive products, abrasive cleaning pads,
solvents or metal objects.
Do not store explosive substances such as aerosol cans with a
flammable propellant in this appliance.
If the supply cord is damaged, it must be replaced by the
manufacturer, its service agent or similarly qualified persons in
order to avoid a hazard.
5
Safety instructions
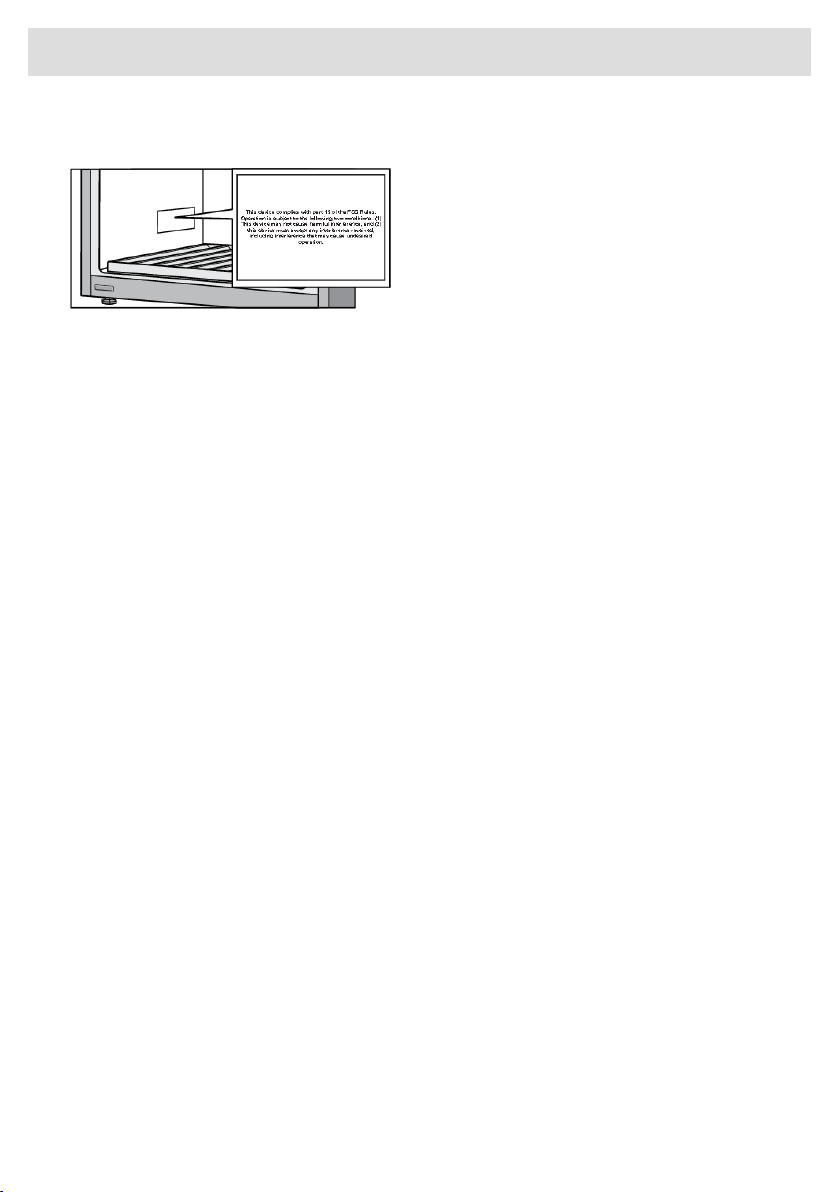
FCC (Federal Communications Commission) Informations:
• This device complies with
part 15 of the FCC Rules.
Operation is subject to the
following two conditions: (1)
This device may not cause
harmful interference, and (2)
this device must accept any
interference received,
including interference that
may cause undesired
operation.
• Changes or modifications not expressly approved by the party
responsible for compliance could void the user’s authority to
operate the equipment.
• NOTE: This equipment has been tested and found to comply with
the limits for a Class B digital device, pursuant to part 15 of the
FCC Rules. These limits are designed to provide reasonable
protection against harmful interference in a residential installation.
This equipment generates, uses and can radi-ate radio frequency
energy and, if not in-stalled and used in accordance with the
instructions, may cause harmful interference to radio
communications. However, there is no guarantee that interference
will not occur in a particular installation. If this equipment does
cause harmful interference to radio or television reception, which
can be determined by turning the equipment off and on, the user
is encouraged to try to correct the interference by one or more of
the following measures:
- Reorient or relocate the receiving antenna.
- Increase the separation between the equipment and receiver.
- Connect the equipment into an outlet on a circuit different from
that to which the receiver is connected.
- Consult the dealer or an experienced radio/ TV technician for
help.
6
Safety instructions

• This equipment should be installed and operated with a minimum
distance of 20 cm between the radiator and your body.
This device complies with Industry Canada license-exempt RSS
standard(s). Operation is subject to the following two conditions: (1)
this device may not cause interference, and (2) this device must
accept any interference, including interference that may cause
undesired operation of the device.
Installation
• Remove all the packaging.
• Do not install or use a damaged appliance.
• Obey the installation instruction supplied with the appliance.
• Always be careful when you move the appliance because it is
heavy. Always wear safety gloves.
• When tilting the appliance, make sure the door does not touch
the floor. The door glass pane is sensitive, especially to any lateral
impact (i.e. impact from the side, on the edge of the door).
• Make sure the air can circulate around the appliance.
• After you place the appliance, wait at least 4 hours before
connecting the appliance to the power supply. This is to allow the
oil to flow back in the compressor.
• Do not install the appliance close to radiators or cookers, oven
or hobs.
• Do not install the appliance where there is direct sunlight.
• Do not install this appliance in areas that are too humid or too
cold, such as the construction appendices, garages or cellars.
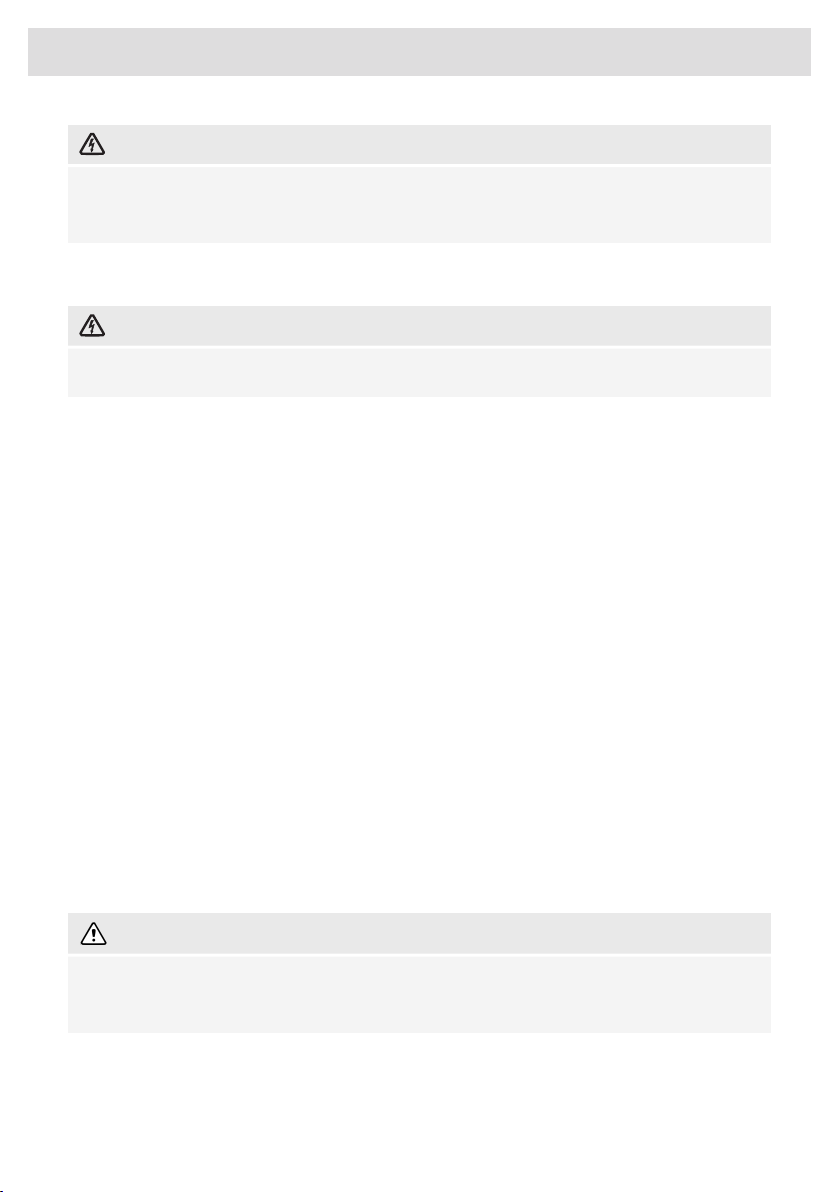
• When you move the appliance, lift it by the front edge to avoid
scratching the floor.
• Never move or lift the appliance by applying force on the door
handle.
7
Safety instructions
ELECTRIC SHOCK!
WARNING! When positioning the appliance, ensure the supply
cord is not trapped or damaged.
Electrical connection
ELECTRIC SHOCK!
WARNING! Risk of fire and electrical shock.
• The appliance must be earthed.
• All electrical connections should be made by a qualified
electrician.
• Make sure that the electrical information on the rating plate agrees
with the power supply. If not, contact an electrician.
• Always use a correctly installed shockproof socket.
• Do not use multi-plug adapters and extension cables.
• Make sure not to cause damage to the electrical components
(e.g. mains plug, mains cable, compressor). Contact the Service
or an electrician to change the electrical components.
• The mains cable must stay below the level of the mains plug.
• Connect the mains plug to the mains socket only at the end of
the installation. Make sure that there is access to the mains plug
after the installation.
• Do not pull the mains cable to disconnect the appliance. Always
pull the mains plug.
WARNING!
Do not locate multiple portable socket-outlets or portable power
supplies at the rear of the appliance
8
Safety instructions
Use
WARNING!
Risk of injury, burns, electrical shock or fire.
• Do not change the specification of this appliance.
• Do not put electrical appliances (e.g. ice cream makers) in the
appliance unless they are stated applicable by the manufacturer.
• Be careful not to cause damage to the refrigerant circuit. It
contains isobutene (R600a), a natural gas with a high level of
environmental compatibility. This gas is flammable.
• If damage occurs to the refrigerant circuit, make sure that there
are no flames and sources of ignition in the room. Ventilate the
room.
• Do not let hot items to touch the plastic parts of the appliance.
• Do not store flammable gas and liquid in the appliance.
• Do not put flammable products or items that are wet with
flammable products in, near or on the appliance.
• Do not touch the compressor or the condenser. They are hot.
Care and cleaning
WARNING!
Risk of injury or damage to the appliance.
• Before maintenance, deactivate the appliance and disconnect
the mains plug from the mains socket.
• This appliance contains hydrocarbons in the cooling unit. Only a
qualified person must do the maintenance and the recharging of
the unit.
9
Safety instructions

Disposal
WARNING!
Risk of injury or suffocation.
• Disconnect the appliance from the mains supply.
• Cut off the mains cable and discard it.
• Remove the door to prevent children and pets to be closed inside
of the appliance.
• The refrigerant circuit and the insulation materials of this appliance
are ozone friendly.
• The insulation foam contains flammable gas. Contact your
municipal authority for information on how to discard the appliance
correctly.
• Do not cause damage to the part of the cooling unit that is near
the heat exchanger.
10
Safety instructions

Selecting the location
Place the appliance in a dry and well aired
room. The permitted ambient temperature
range for the appliance depends on the
appliance’s climate class, which is shown on
the type plate.
WARNING!
Do not place the appliance in a room where the temperature can fall below 41°F (5°C): the
appliance may not work properly or become defective!
Relative humidityAmbient temperature range °CClassDescription
≤75%
50 to 90°F (10 to 32°C)SNExtended temperate
61 to 90°F (16 to 32°C)NTemperate
61 to 100°F (16 to 38°C)STSubtropical
61 to 109°F (16 to 43°C)TTropical
• In environments with high humidity level, condensate droplets may appear on the appliance’s
exterior surfaces.
• If the appliance is installed in a dry environment, we recommend to use humidity box included
in the appliance.
WARNING!
Install the appliance in a room with an adequate amount of air. There should be at least 35.3
cubic feet (1 m
3
) of air per every 0.28 oz (8 g) of refrigerant. The amount of refrigerant is indicated
on the rating plate inside the appliance.
WARNING!
Do not place the appliance in a room where temperature can drop to below 41°F (5°C). In such
environment, the appliance may not operate correctly, or it may become defective.
WARNING!
The appliance is not suitable for outdoor use and it may not be exposed to rain.
11
Installation and connection
Appliance placement
Appliance installation should be carried out by at least two persons, in order to avoid damage to the
appliance and physical injury of anyone involved.
When moving the appliance, be careful not to
push it on the floor because of potential
damages. There are two casters on the back
of the appliance housing, that make moving
the appliance around easier.
In order to safely install the appliance and for the appliance to operate correctly, it is important to
place it onto a surface with adequate load-bearing capacity. If necessary, consult an architect/
structural engineer. The surface should be smooth and level with the floor in the room.
The weight of an empty appliance is
approximately 304 lb (138 kg).
The weight of a fully loaded appliance is
approximately 1047 lb (475 kg).
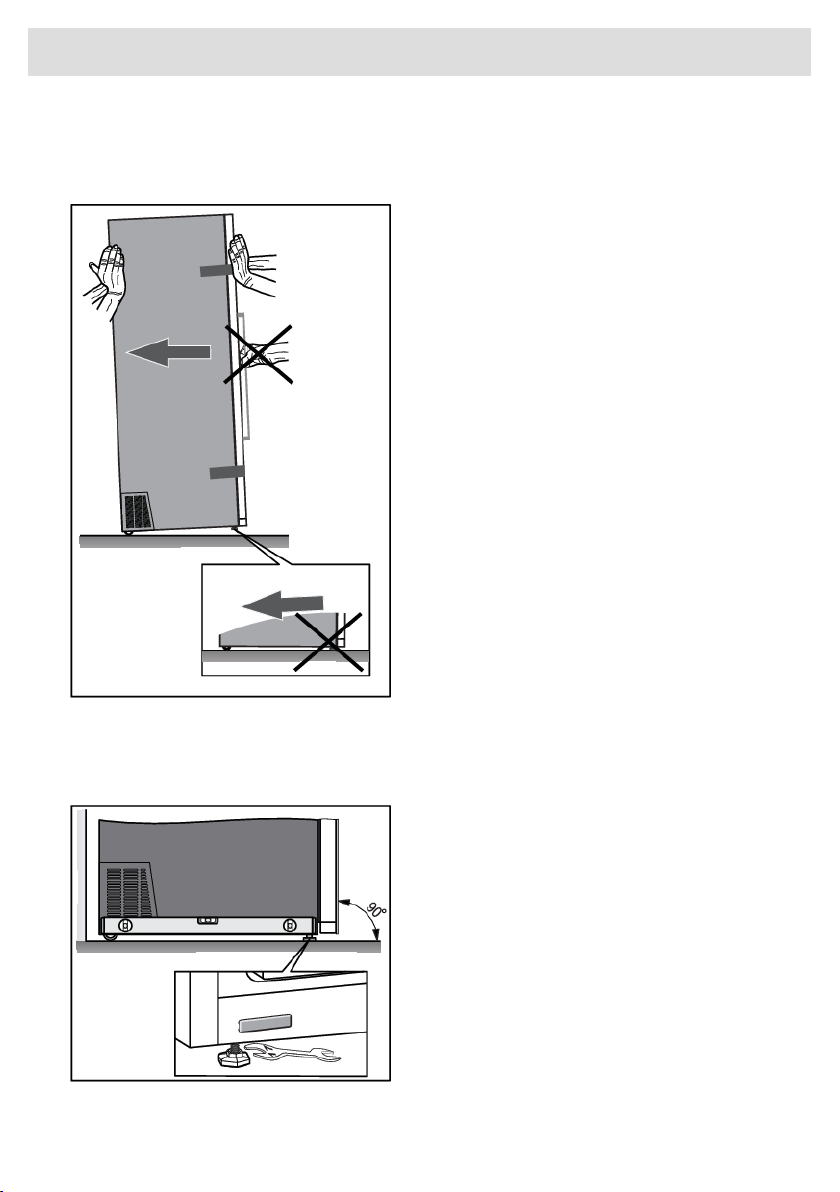
When the appliance is placed on the intended
surface, it should be completely level in order
to decrease vibration. To level the appliance,
use the adjustable feet at the front of the
appliance. An open wrench size 17 is required
for adjusting and fastening the feet.
12
Installation and connection
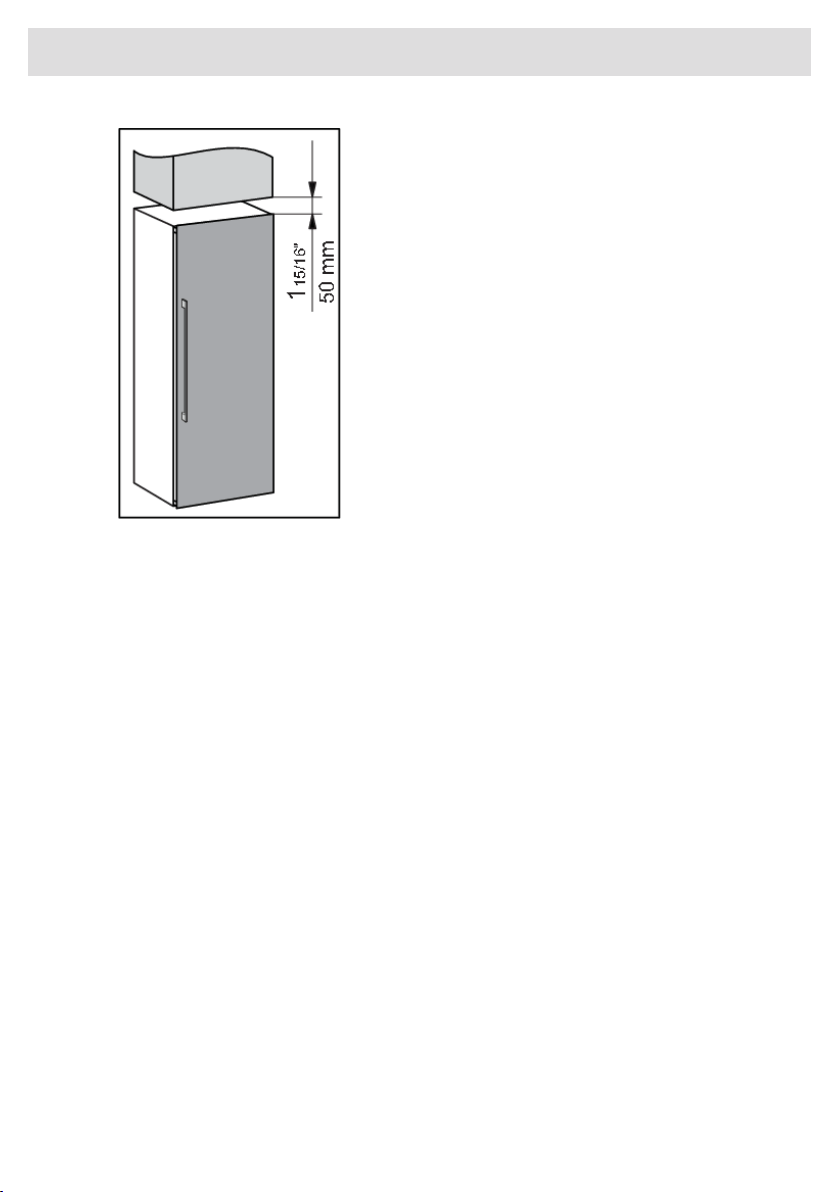
• Place the appliance at least
1 15/16" (50 mm) away from an electric or
gas stove, and at least 11 13/16" (300 mm)
away from a heat source (e.g. a radiator
or a heater). If such clearance is not
possible, then install an insulation panel.
• Do not expose the appliance to direct
sunlight.
• We recommend free-standing installation
of the appliance. When necessary, it can
also be placed adjacent to cabinetry, if
adequate ventilation and cooling of the
installation location (e.g. air-conditioning)
are provided. In such a case, the
appliance power consumption is likely to
increase.
• There has to be a clearance of at least
1 15/16" (50 mm) between the appliance
and any cabinet above it.
13
Installation and connection
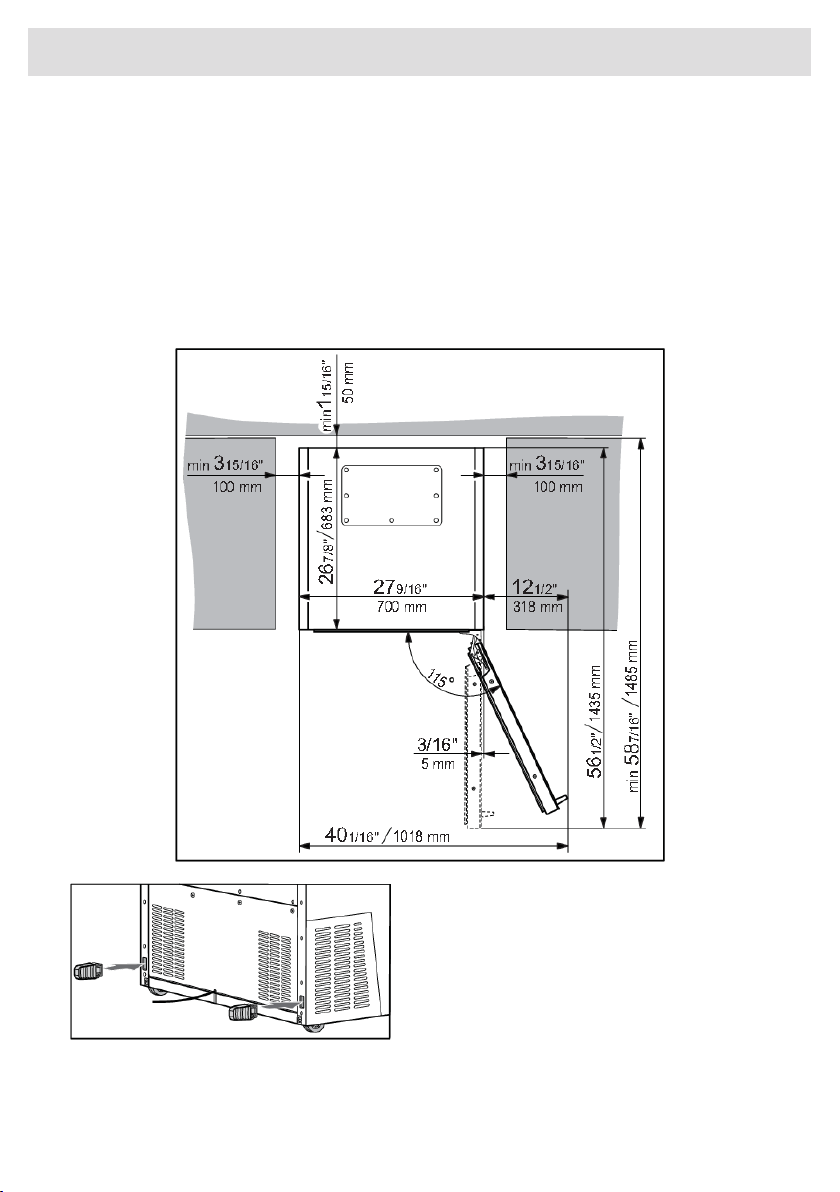
• To allow for adequate ventilation and cooling of the appliance, there has to be sufficient clearence
behind the appliance and on both sides as well (at least 1 15/16" (50 mm)). Please, also observe
the clearance required to fully open the door in order to allow pulling out the drawers and shelves
(see installation diagram).
• In cases of installation where there is less than 1 15/16" (50 mm) of space around the cabinet,
a recess must be made at the ventilation grilles on both sides of the appliance (ventilation grilles
must not be blocked) which must be able to supply or exhaust air on each side through an
opening of at least 31"
2
(200 cm
2
).
• Furthermore, 1 15/16" (50 mm) distance from the rear wall must always be maintained and must
be connected to an opening above or behind the cabinet.
• The appliance comes supplied with two
spacers that should be fitted in the slots
on the back of the appliance, one on either
side, near the bottom. The spacers ensure
adequate air circulation that is required for
correct appliance operation. The appliance
will operate normally without the spacers
in place; however, this could affect its
power consumption.
14
Installation and connection
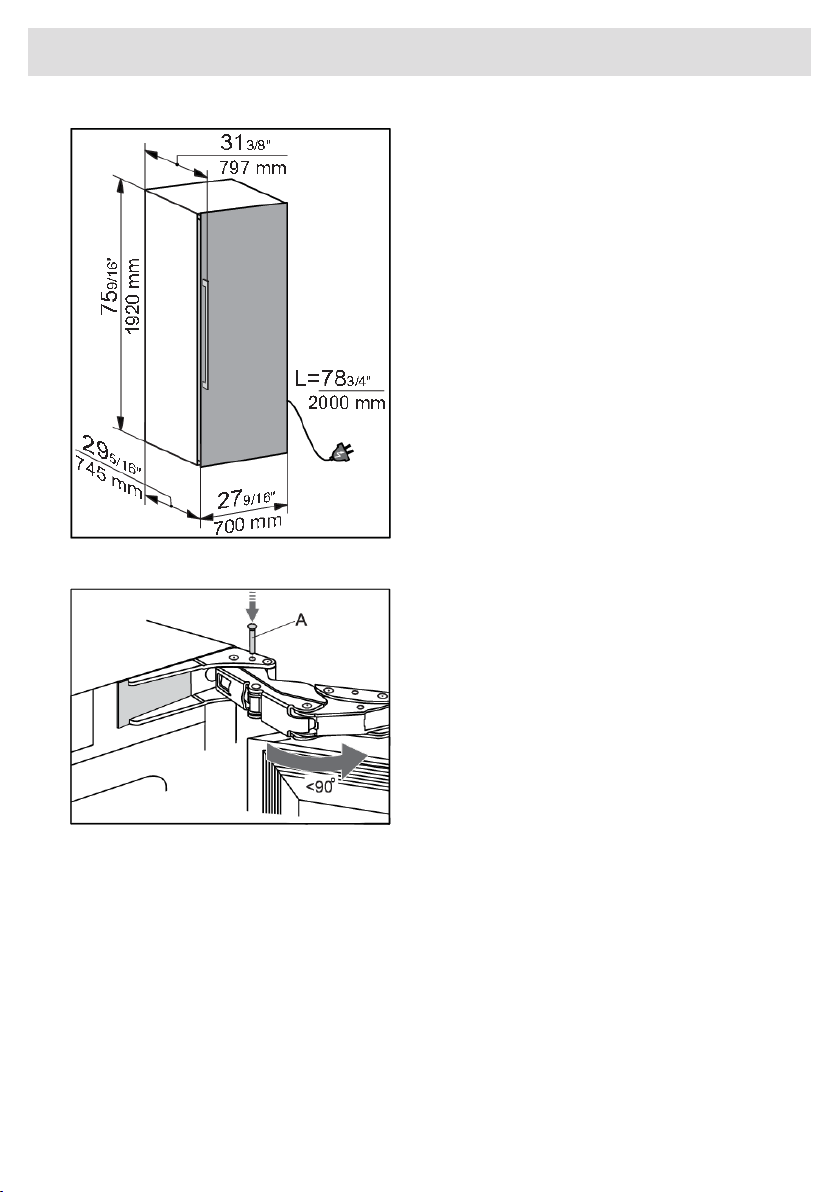
• Appliance dimensions are shown on the
drawing.
• If the appliance is placed in a way that
does not allow the door to be opened to
the 115° angle, the opening angle can also
be restricted to 90°. In this case, use the
door restrictors (A) supplied in the bag
containing the instruction manual. Carefully
open the door to an angle less than 90°
and insert the restrictor into the provided
opening in the lower hinge. Repeat the
same process for the upper hinge. When
inserting the restrictor into the hinge, you
may also use a small hammer.
• When the appliance is installed, its plug
should always be accessible!
• This appliance is not intended to be used
as a build-in appliance.
15
Installation and connection
Connecting the appliance
• Connect the appliance to the power supply with a plug. The socket must be earthed. The nominal
voltage and frequency required for the appliance are shown on the appliance’s type plate/label
with basic information.
• The appliance must be connected to the mains and earthed in accordance with the prevailing
standards and regulations. The appliance can withstand small variations in the mains voltage
to a maximum of plus or minus 6%.
WARNING!
When you are not going to use the appliance for a longer period then switch it off (with function
ON/OFF) and disconnect it from the mains. Empty and clean the appliance, than leave the door
ajar.
16
Installation and connection

Before you use the appliance for the first time
Do not connect the appliance to the mains until you have carefully read the instructions for the correct
and safe use of the appliance. We recommend that you keep these instructions for future use. If you
sell the appliance, enclose them with the appliance.
Inspect the appliance for damage and/or irregularities. If the appliance is damaged, contact the
store that sold you the appliance.
Allow the appliance to stand upright for at least 4 hours before you connect the appliance to the
mains. This reduces the risk of malfunctions resulting from transport effects on the refrigerant unit.
Before using the appliance for the first time, the interior and all internal accessories should be cleaned
with lukewarm water and a neutral cleaning agent. Wipe the cleaned parts with a cloth with clean
water and then dry them thoroughly.
Clean the wooden parts with a damp cloth. Make sure the wood is not too wet and leave the parts
to fully dry before returning them to the appliance.
Energy-saving advice
• Install the appliance as stated in the instructions for use.
• Continuous use of ECO mode is recommended.
• Do not open the door more than necessary.
• Do not cover or block the ventilation slots.
• Replace a damaged door gasket or a gasket that no longer provides a perfect seal as soon as
possible.
• When placing bottles on the shelves, make sure the air can freely circulate around them (observe
the recommendations from the instruction manual and do not place more bottles on the shelves
than recommended or indicated).
• In case of a power supply failure, leave the door closed as long as possible to maintain the
temperature inside the appliance.
17
Before using the appliance for the first time

Wine storage tips
Natural wine cellars are the ideal place to store wine, because of the scarce light, the lack of vibrations
and having a special climate. A wine’s temperature determines its flavour, and influences enjoyment.
Wine ageing depends on the environment conditions in which the wine is stored. By maintaining
constant optimum temperature, correct air humidity, and an atmosphere free from any odours, the
wine climate cabinet provides excellent conditions for storing your wine. It also provides an
environment free from harmful vibrations that could also affect the ageing process. Since every type
of wine has an optimum ageing time and climate, we suggest checking the recommended time to
open the bottle as advised by the winemaker.
Most people who drink wine, know you serve white wine and champagne chilled, and red wine on
room temperature. What people may not know that the "room temperature" that wine professionals
are referring to, is the temperature of wine caves in the Bordeaux region of France. Those caves are
about 55°F (13°C). A good wine climate cabinet, can keep your wines at a perfect serving temperature,
reducing the guesswork and sometimes the headache.
It is very important to maintain a constant temperature within the wine climate cabinet. In case of a
power failure, open the door as little as possible to maintain the temperature in the appliance interior.
A gradual increase in temperature will not have a negative impact on the wine.
The humidity should be between 50% and 80%. Too low humidity will result in a dry cork. Too high
humidity will cause mold. The ASKO Wine Climate Cabinet provides excellent ventilation with clean
air which helps preventing damage to labels and corks during storage.
The humidity levels in wine climate cabinet are particularly important for long term wine storage and
ageing. Recommended temperature for wine ageing is between 52°F (11°C) and 55°F (13°C). For
that purpose, the wine climate cabinet will maintain optimal ageing conditions and notify the user,
if the conditions deviate from them. Extremely high and low temperature settings are intended mainly
for the wine serving purposes. Wine is exposed to this conditions for shorter time periods and
therefore humidity should not have any negative effect on the wine. However, monitoring of relative
humidity levels is available regardless of the compartment temperature setting.
Major temperature changes can cause humidity levels to deviate from the desired levels and it may
take longer, e.g. about a week, for them to stabilize again. During this time, the notifications for
humidity out of zone will not appear.
Wine should be stored horizontally, especially corked wines. It will keep the cork moist and swollen
and prevent wine from unwanted contact with air. Short term storage, within some weeks, storing in
tilted position is preferred to keep the cork damp. If the position is too upward, the cork will dry out.
Screw and crown caps have less demands regarding the positioning.
The wine cabinet is fitted with an activated carbon filter which prevents odors that can pollute your
wines. The Activated Carbon filter is originally called HEGA filter (High Efficiency Gas Absorption).
It removes the gas molecules through a process of adsorption (not absorption). During adsorption,
the pollutants stick to the outside of the Activated Carbon filter.
By having your own wine climate cabinet in your house, this creates enjoyment of your wine on a
premium level like the wine came straight out of a real wine cellar.
18
Storing wine
Storing bottles
• Moving the bottles or excessive vibration can have a negative effect on the aging process and
thus on the wine’s flavour. The appliance is fitted with a special sensor that continuously measures
vibration. In case of excessive vibration, e.g. when the appliance door is slammed shut, an alarm
signal will sound and alarm key will flash on the display.
• Keep the bottles intended for daily use on the front half of the shelves. Keep the wines you intend
to store for a long time or age in the bottom part of the cabinet.
• Store the bottles horizontally, so that cork stoppers are also kept moist from within.
INFORMATION!
Mould can appear on bottle labels; this depends on the type of glue used for the label. Clean
the bottles and remove any residual glue.
INFORMATION!
White sediment can form on cork stoppers as a result of oxidation due to contact with air.
Wipe the sediment with a dry cloth. The sediment does not affect the quality of the wine.
19
Storing wine
This product contains a light source of energy efficiency class <G>.
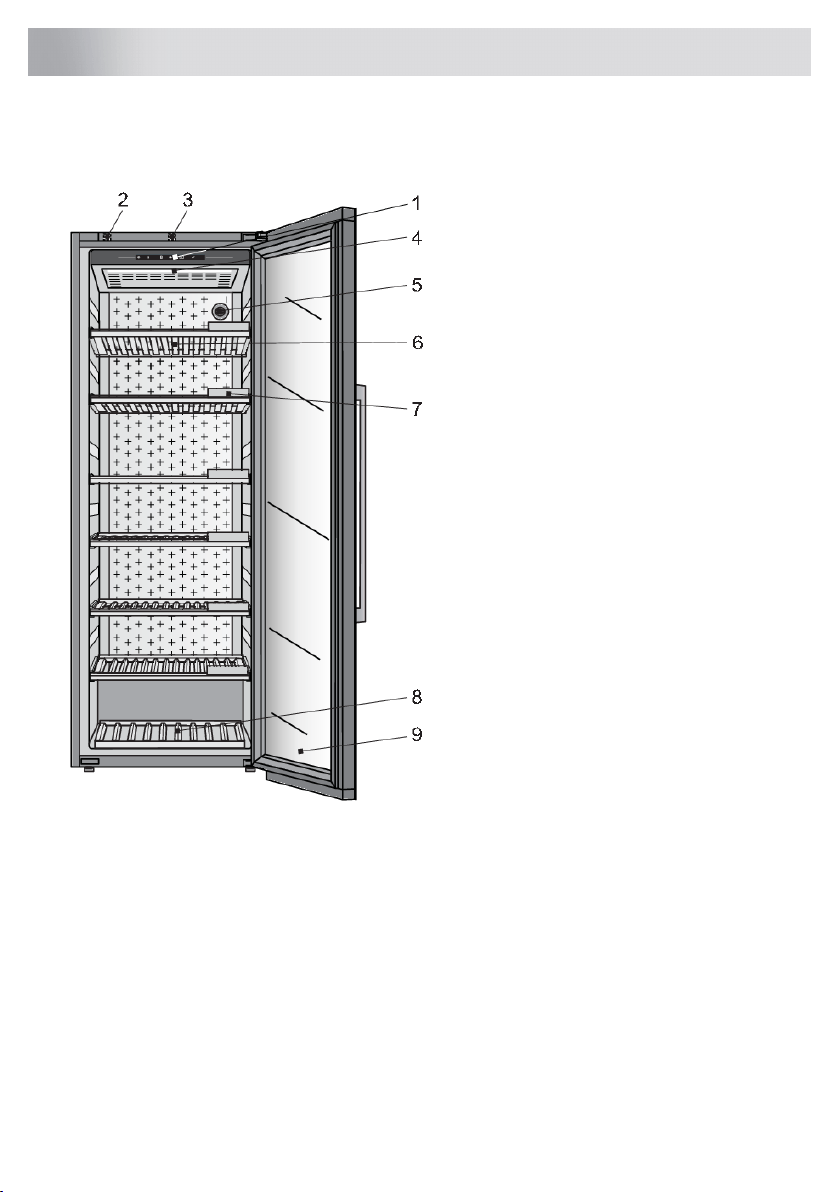
1. Control panel
2. Proximity sensor
3. Door sensor
4. LED illumination
5. Charcoal filter
6. Wooden bottle shelf
7. Chalkboard name tag
8. Wooden bottom bottle rack
9. 3-layered glass door with UV filter
Control panel (1)
By pressing the keys on display unit, you can control the operation of the wine climate cabinet and
set certain functions according to your preferences.
Proximity sensor (2)
When you are within a particular range of the appliance and the door is closed, proximity sensor
will provide feedback according to your preferences. They can be set in SETTINGS MENU.
If proximity sensor is ‘On’:
• Light change to (no change, ambient mode or functional mode)
• Display change to (no change, status screen)
20
Description of the appliance
Door sensor (3)
When you open or close the appliance door, light will change according to your preferences. They
can be set in SETTINGS MENU.
• Door open: light change to (no change, ambient mode or functional mode)
• Door closed: light change to (no change, ambient mode or functional mode)
Door sensor error is detected, when door open time reaches 10 minutes. In that case light is turned
off.
LED illumination (4)
LED illumination is installed on the appliance ceiling. Owing to the use of LED illumination, the wine
will not be exposed to UV rays and heat. The intensity, color and time interval of LED illumination
can be changed in SETTINGS MENU.
Two light modes can be set and saved to use in different situations: Ambient mode and Functional
mode.
Ambient mode: its purpose is to blend into the living space ambiance. It will be activated when the
door is closed (default).
Functional mode: its purpose is to provide a clear view on the shelves. It will be activated when
the door is opened (default).
Each light mode consists of a combination of intensity and warmth. These settings can be changed
to your preferences. Light color can be changed in range of 2700K-5000K, light intensity can be set
from 0% to 99%.
The activating and deactivating of the modes in different situations can be set in SETTINGS MENU.
Priorities for lights control settings
Priority
Switch light function – it overrides all other light settings, can only be
triggered from ConnectLife mobile application.
1.
Door sensor2.
Proximity sensor3.
Charcoal filter (5)
Fresh air is drawn into the appliance interior through active charcoal air filter. This ensures freshness,
as well as absence of dust and odours. The fan then distributes the air evenly across the appliance
interior.
Replace the air filter approximately every 12 months. A notification will appear on the display to
remind you it is time to replace the filter.
21
Description of the appliance
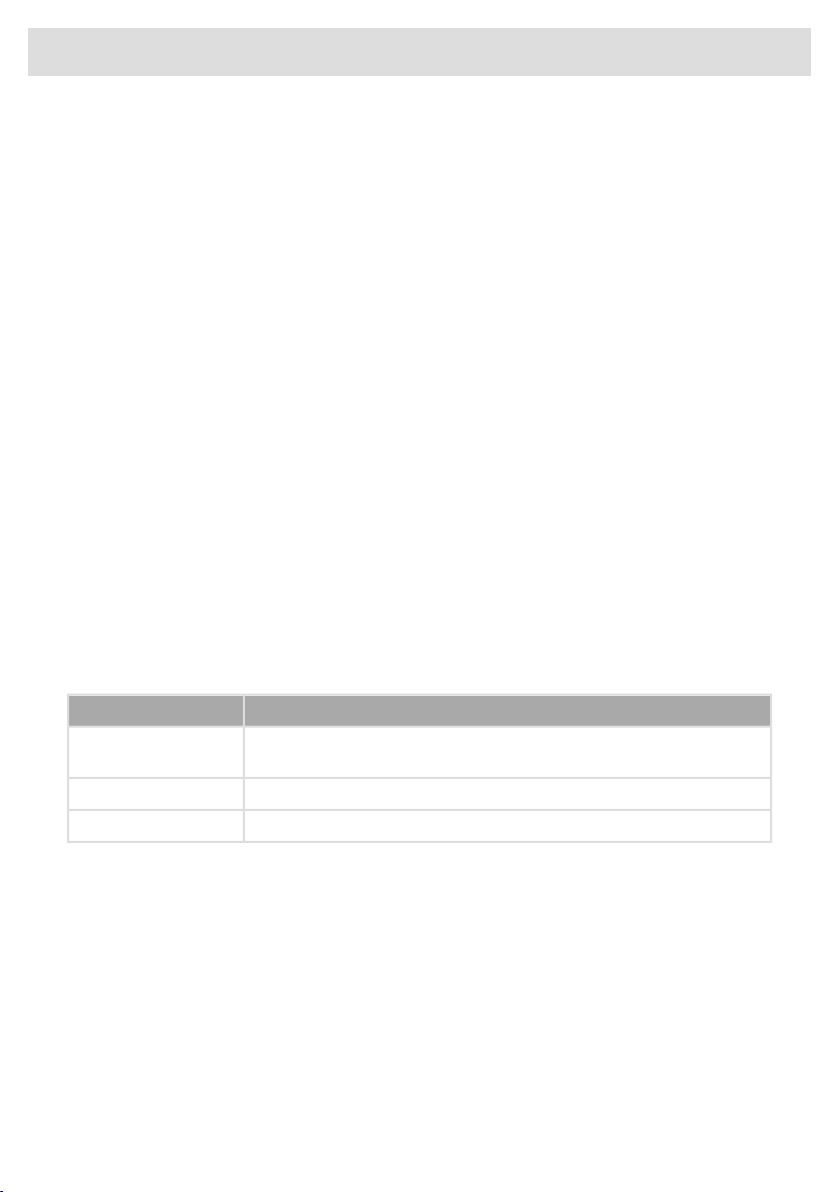
To replace the air filter:
1. Rotate the filter in the anti-clockwise
direction (1) and pull it out from the
appliance.
2. Insert a new filter into the filter slot and
rotate it clockwise until it clicks into place.
INFORMATION!
Charcoal air filter can be ordered as accessory.
For more informations refer to the local Asko dealer or to the Asko website of your country.
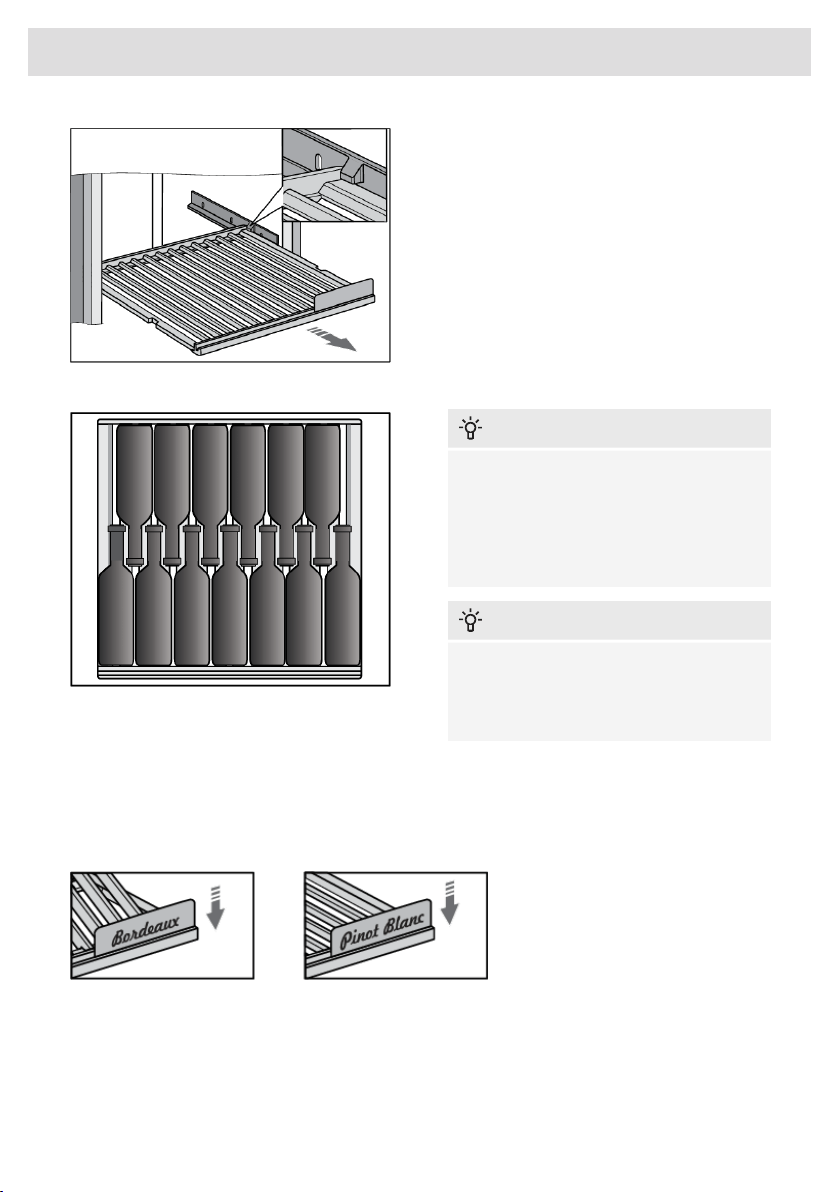
Wooden bottle shelf (6)
The shelves are placed on the plastic holders that are attached to the appliance cabinet.
INFORMATION!
Before removing any shelf from the appliance, the shelf should be completely empty.
Make sure the door is fully open before removing the shelves. This will prevent any damage to
the door gasket.
Be careful when pulling out the wooden shelves. Carefully pull out and push back the wooden
shelves in order not to expose the wine bottles to vibration.
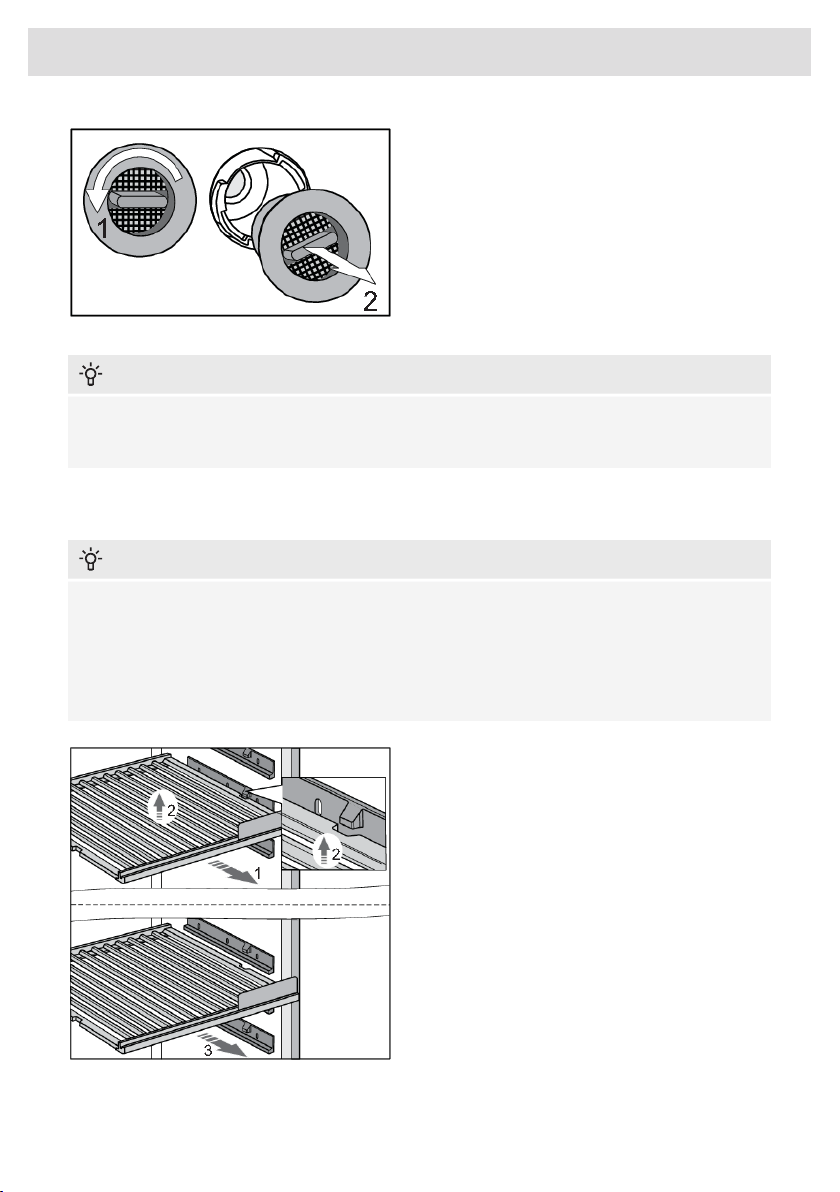
To remove a shelf from the appliance, partly
pull it towards you (1) until the two grooves on
the shelf and the block on the plastic shelf
supports are aligned. Then, lift the shelf (2)
and pull it out from the appliance (3). Take
care not to damage the door gasket.
To replace the shelf, proceed with the same
steps in the opposite direction.
22
Description of the appliance
The shelf can also be partly pulled out from
the appliance. The blocks on the plastic shelf
supports protect the shelf from being fully
extended and pulled out, which could result
in the shelf falling from the appliance.
INFORMATION!
Before you start adding bottles to a shelf,
check once more whether the shelf is
correctly placed on the plastic holders. Up
to 13 Bordeaux bottles (25.4 fl oz (0.75 l))
can be placed on each standard wooden
bottle shelf.
INFORMATION!
Higher humidity level inside the appliance
may cause the wooden parts to slightly
bend; this, however, will not affect their
functioning.
Chalkboard name tag (7)
Chalkboard name tags are supplied with the appliance. They can be installed at the front side of
each shelf. You can use chalk to indicate the wine stored on a particular shelf. The chalkboard name
tags can be wiped with a damp cloth.
23
Description of the appliance
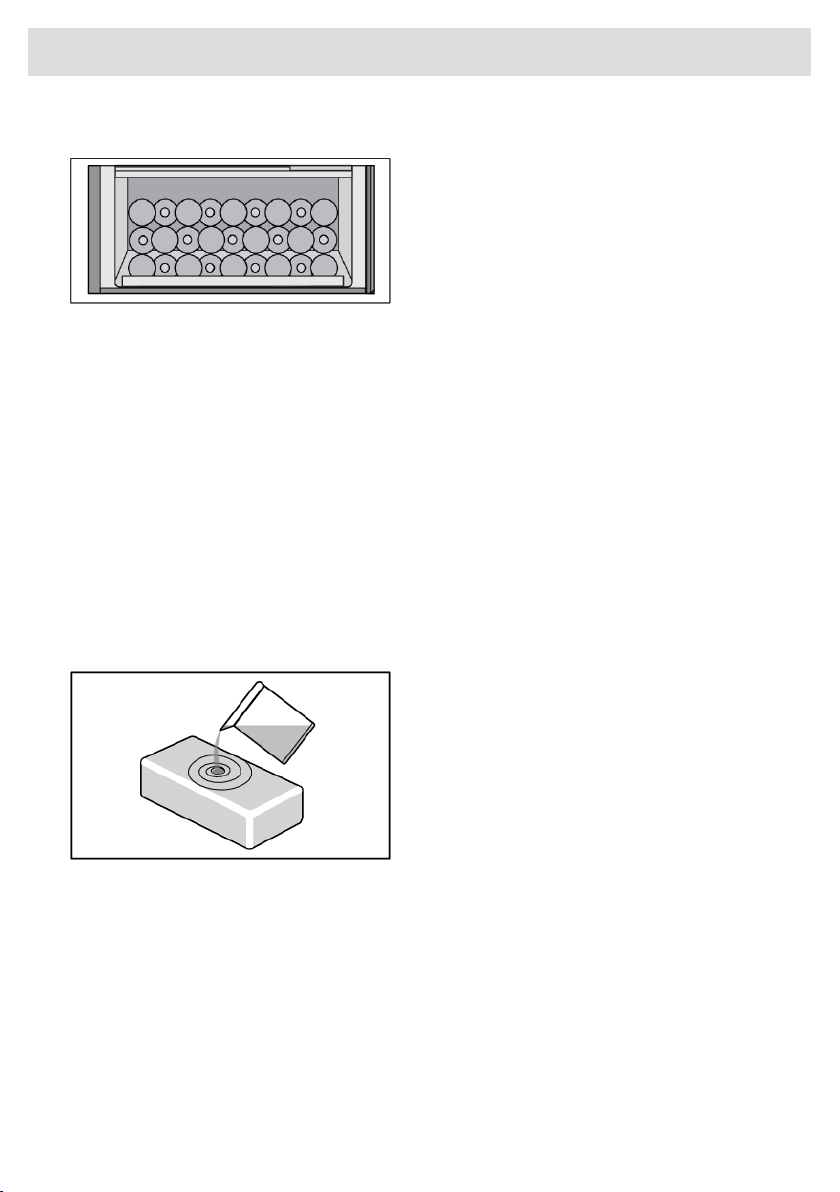
Wooden bottom bottle rack (8)
The wooden bottom bottle rack is intended for
storing the bottles in the compressor area. This
area is suitable for storing bottles you wish to
keep for a longer period of time, especially for
ageing without excessive vibration and
unnecessary movement. Up to 27 Bordeaux
bottles (25.4 fl oz (0.75 l)) can be stored on
the wooden bottom bottle rack.
3-layered glass door with UV filter (9)
The 3-layered glass door is filled with argon (a noble gas), which makes them more energy efficient.
For maximum protection from sunlight that can harm the wine’s aging process, an additional UV film
is used that stops 99% of sunlight.
The door closes automatically when the opening angle is less than 20°. The soft-close mechanism
gently closes the door.
Humidity box
One HumidityBox is supplied with the wine climate cabinet.
The purpose of this humidity box is to increase humidity of the Wine Climate Cabinet, to prevent
humidity to drop under 50% that can appear in certain conditions (when the Wine Climate Cabinet
is placed in an environment with low humidity).
You can monitor on the appliance display if there is low humidity (a notification will be given when
humidity reaches 50% and an alarm when it reaches 40%).
You can fill the box with 16.9 fl oz (0.5 l) of
water and place it in the cabinet.
HumidityBox is made of clay, a natural material
with the right characteristics to first absorb
water and then allow it to evaporate to increase
humidity.
The walls and bottom of the clay box are
glazed to prevent water leakage. Water is
absorbed by all walls, but will only evaporate
through the unglazed top surface.
The HumidityBox is made in an artisan workshop with fine craftmanship. As a result, minor irregularities
in material or shape may occur. They, however, do not have any effect on functionality.
The colour of the box changes when it is filled with water: as the walls absorb water, they become
darker. Depending on the hardness of your tap water, some white limescale stains may appear on
the material. To avoid this, you may use descaled or distilled water. The white stains can be washed
off.
After placing the HumidityBox in the correct zone, it will take approximately 9 hours to increase the
humidity back from 40% to 50%. After 9 hours, humidity will continue to slowly increase.
On average, the HumidityBox should be refilled every 30 days. The appliance will sound an alarm
when humidity gets too low (below 40%).
24
Description of the appliance
You can also buy additional HumidityBoxes when needed.
Please do not put the HumidityBox in the dishwasher, as this type of material is not dishwasher safe.
Because of the relatively thin walls, the box is fragile and should be handled carefully. Occasionally,
shower the inside of the box with tap water.
INFORMATION!
For more informations refer to the local Asko dealer or to the Asko website of your country.
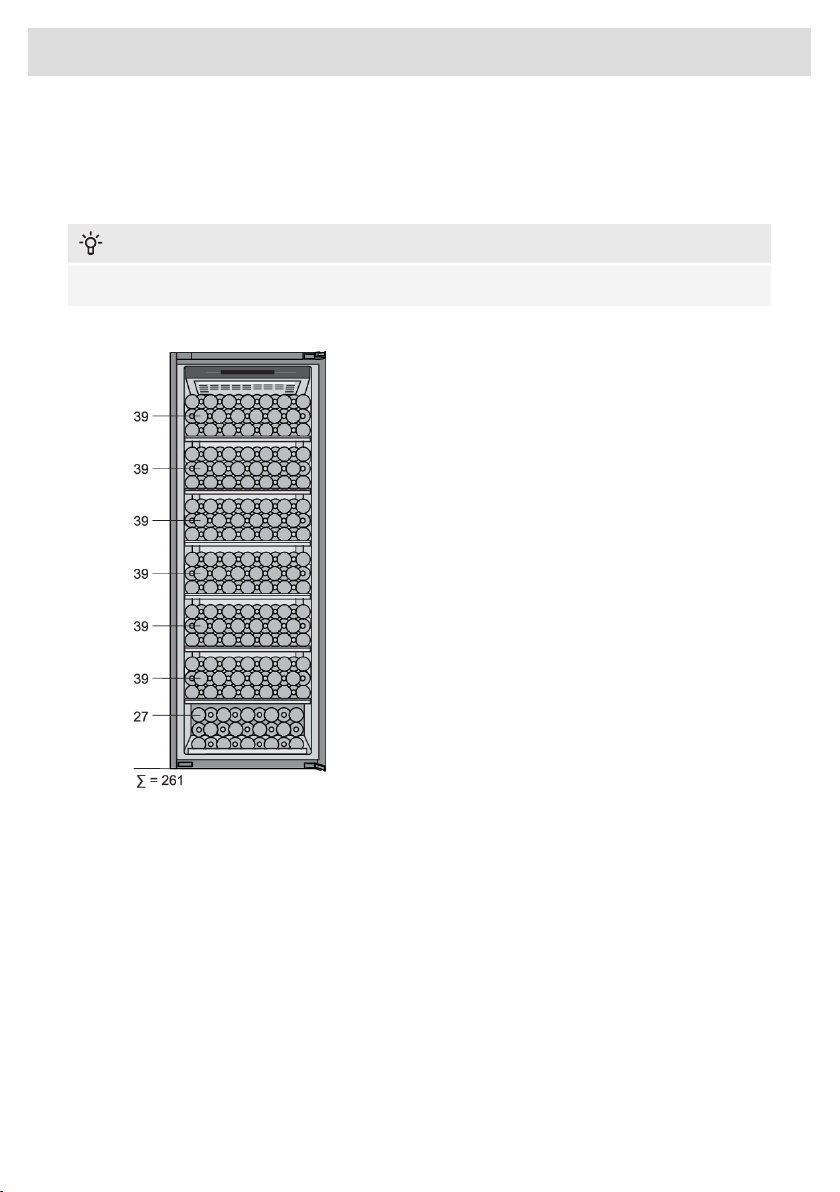
Appliance capacity
The basic appliance configuration allows
storing up to 261 Bordeaux bottles.
The number of bottles you can load onto each
shelf is indicated on the drawing.
25
Description of the appliance
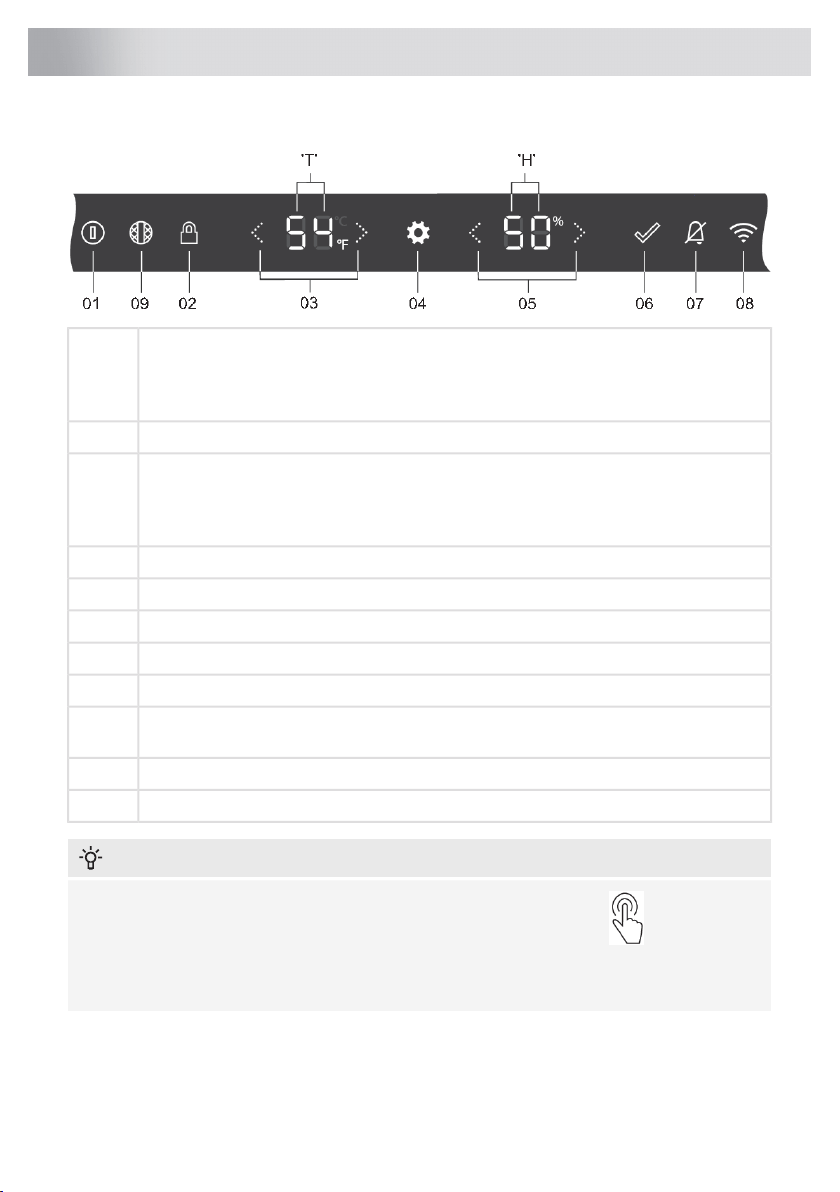
Display
On/Off key:01
• a long press (2 seconds) to switch the appliance on or off
• a short press to switch the appliance to or from Standby
Key lock key – to lock or unlock the user interface (3 seconds press)02
Temperature arrows:03
• to increase or decrease the set temperature
• to toggle through menu options inside SETTINGS MENU
Settings key – to go to SETTINGS MENU04
Value arrows – to select preferred setting or value inside SETTINGS MENU05
Confirmation key – to confirm setting from SETTINGS MENU06
Alarm key – to deactivate alarms07
Wi-Fi key – shortcut to go inside NETWORK CONNECTION inside SETTINGS MENU08
Charcoal filter key - shortcut to go inside SYSTEM 'Charcoal filter countdown' inside
SETTINGS MENU
09
Temperature display'T'
Humidity display'H'
INFORMATION!
For the best response, press the keys with the main part of your fingertip .
Whenever you press the key, a short tone will sound. Volume of the key sound can be set in
SETTINGS MENU.
26
Operation
Keylights intensity depends on the availability of the certain function:
Keylight intensity with door closed or
opened
0%Function not available
60%Function available
100%Function activated or to be activated
First plug-in
INFORMATION!
When the appliance is plugged in for the first time or after the appliance was disconnected from
the mains for a longer period of time it is mandatory to wait four hours until the appliance can be
activated.
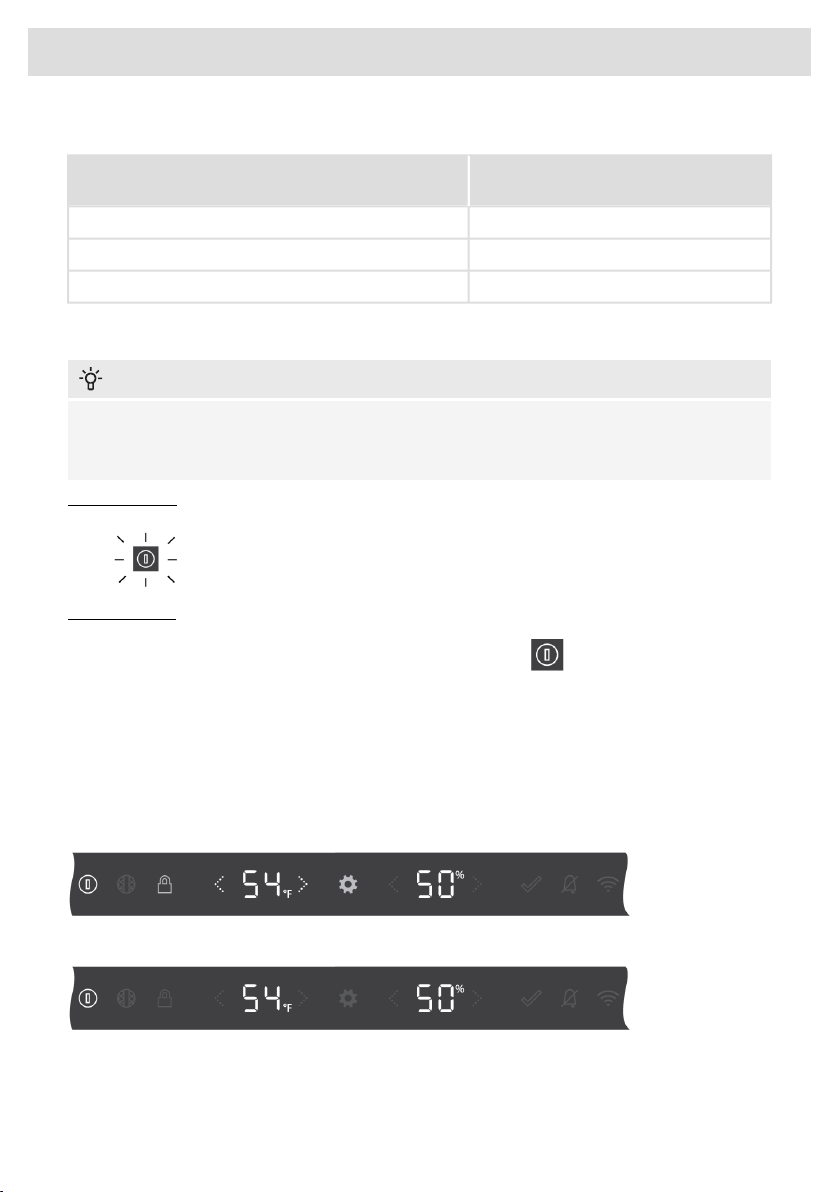
Appliance-Off is the default state of the appliance. After the appliance is plugged in to the power
supply, it is still Off. To indicate that the power cord is attached to the electricity On/Off key is blinking
softly . Display is still inactive.
Appliance-On is normal control state of the appliance.
Appliance is switched on with a 2 seconds press on On/Off key .
The appliance will start cooling with default setpoint temperature.
The display will switch to Status display, which is like the 'HOME' page of the appliance.
All functions and control modes are operating according to what is set in SETTINGS MENU. In
SETTINGS MENU you can see how to adjust each one of them and it can also be done through the
mobile application (refer to chapter “SETTINGS MENU“).
Status display: door open
Status display: door closed
Pressing on On/Off key for 2 seconds again, switches the appliance off.
27
Operation
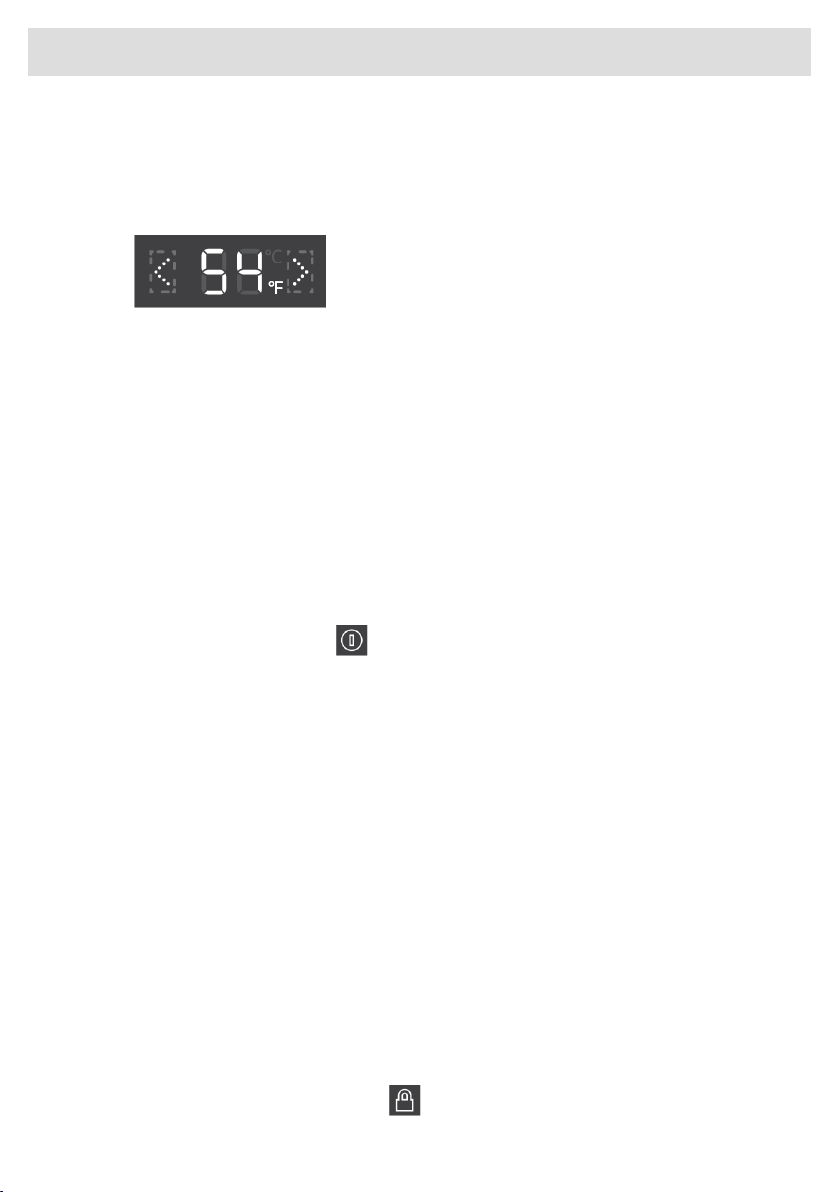
Temperature setting
Default setpoint temperature of the appliance is 54°F (12°C). This temperature can be changed
instantly in Status display, after the appliance is switched on.
Temperature of the appliance compartment can be set between: 41°F and 68°F (5°C and 20°C).
By pressing on the arrow keys, setpoint
temperature on display 'T' changes. With every
press, setpoint temperature will change 1°F
up or down. The setpoint temperature is saved
2 seconds after the last press on temp-up or
temp-down key.
When highest setpoint temperature is reached,
increasing arrow key is inactive and next press
is ignored.
Vice versa reaction occurs when lowest set
point temperature is reached.
Appliance Display Standby
Appliance Display Standby is a mode that display enters for optimal power consumption. Appliance
cooling system is operating normal.
Appliance Display Standby activation:
•
with a short press on On/Off key ,
• automatically, after a certain time of inactivity (standby time). It can be set in SETTINGS MENU.
It can not be activated in case of any errors detected and in case of opened door.
If Appliance Display Standby mode is active, it will end:
• by opening the door,
• by a short press on any key,
• when error indication is displayed on display,
• when proximity sensor detects movement, exception: if in SETTINGS MENU/ PROXIMITY AND
DOOR SENSOR/ Display changes to/ No change is selected.
When this mode ends, the appliance goes back to Status display.
Key lock mode
When Key lock mode is activated, it is not possible to switch off the appliance or to change any
setting. Appliance cooling system is operating normal. Settings can be changed only from
ConnectLife mobile application. Your preferences on proximity and door sensor, light and display
actions will be executed.
Key lock mode activation:
•
with a 3 seconds press on Key lock key ,
28
Operation
• automatically, after a certain time of inactivity. It can be set in SETTINGS MENU.
Status display: Key lock key active, door open
If you press on any other key, Key lock key will blink fast, 2 times. Press on any other key is ignored.
Exeption: In case that any of the alarms is triggered, short press on alarm key will cancel the
alarm.
Key lock mode deactivation:
•
with a 3 seconds press on Key lock key .
Alarms
Please refer also to chapter "Tips & Tricks" to learn more about possible reasons for each particular
alarm.
Temperature alarm
Temperature alarm sounds when the temperature in the appliance is out of range, for 3 hours
constantly. This means 5°F (3°C) above or 5°F (3°C) below the setpoint temperature.
The alarm key and setpoint temperature are blinking.
INFORMATION!
Every time the appliance is switched on again, it takes a while until the correct temperature is
reached. For this reason, the alarm is disabled for the first 6 hours after the appliance is switched
on to prevent the unnecessary activation of the alarm. Each time the door is closed, temperature
alarm is blocked for 3 hours.
If the difference between old setpoint and new setpoint is:
• less than 9°F (5°C), it has no influence on temperature alarm,
• between 9°F (5°C) and 18°F (10°C), temperature alarm is blocked for 24h,
• higher than 18°F (10°C), temperature alarm is blocked for 80h.
Stopping the alarm:
Short press on alarm key will stop the alarm from sounding, alarm key is not illuminated anymore.
Setpoint temperature continues to blink while the temperature is still out of range. If the temperature
is within range and temperature alarm is active, it will be canceled automatically.
29
Operation

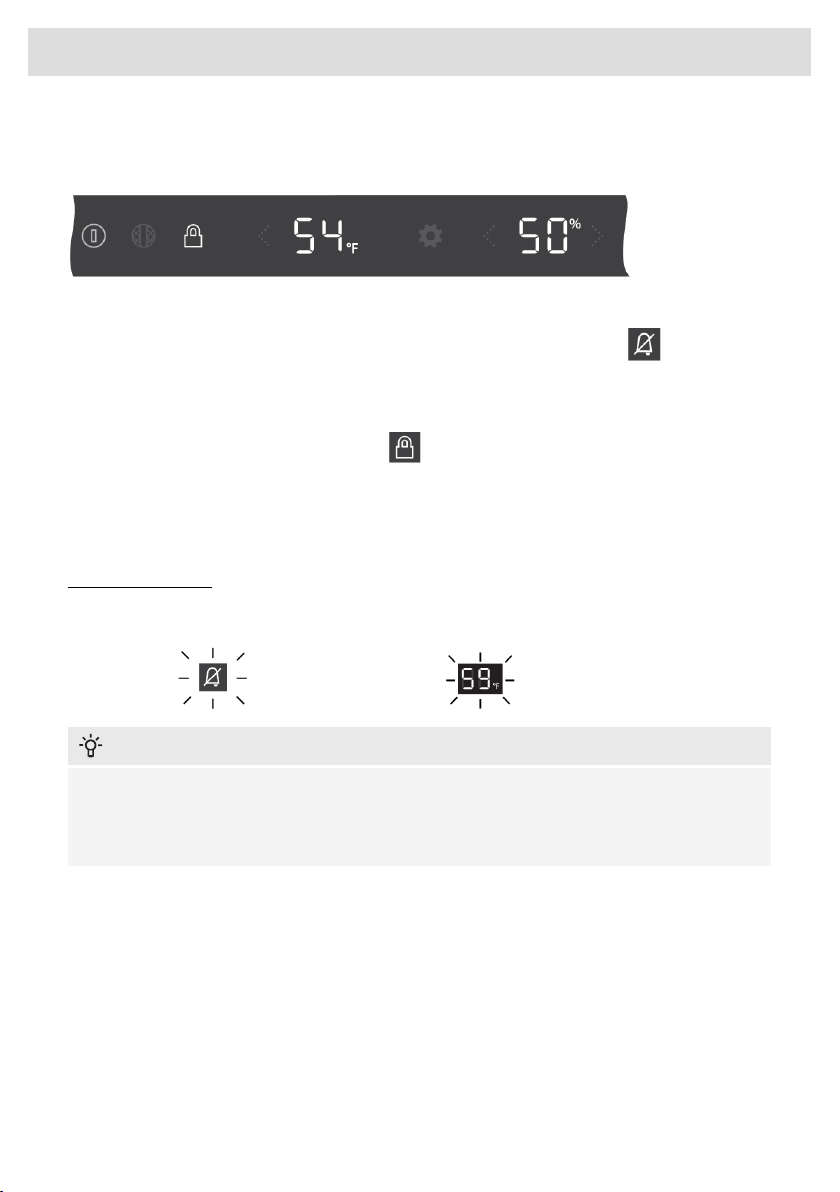
Humidity
Humidity can be (de)activated in SETTINGS MENU. If it is set to 'OF', then humidity is no longer
being monitored (not in the appliance and not in the mobile app). Display 'H' does not show any
value and automatically humidity alarm and humidity box refill notification are disabled.
Humidity alarm sounds when 7 days average value of compartment humidity falls below 40% or
rises above 80%, for 7 days constantly.
The alarm key is illuminated and alarm sound is heard. On press of alarm icon the alarm
is removed. Humidity value is blinking rapidly .
INFORMATION!
Every time the appliance is switched on, it takes a while until the correct humidity is reached. For
this reason, the alarm is disabled for the first 24 hours after the appliance is switched on to prevent
the unnecessary activation of the alarm. Each time the door is closed, humidity alarm is blocked
for 6 hours.
If the difference between old setpoint and new setpoint is less than 9°F (5°C), it has no influence on
humidity alarm.
If setpoint temperature for any compartment is set above or equal to 61°F (16°C), humidity alarm is
neglected.
Stopping the alarm:
Short press on alarm key will stop the alarm from sounding, alarm key is not illuminated anymore.
Humidity value continues to blink while the humidity is still out of range.
If humidity value reestablishes between 40% and 80% and humidity alarm is active , it will be canceled
automatically.
30
Operation
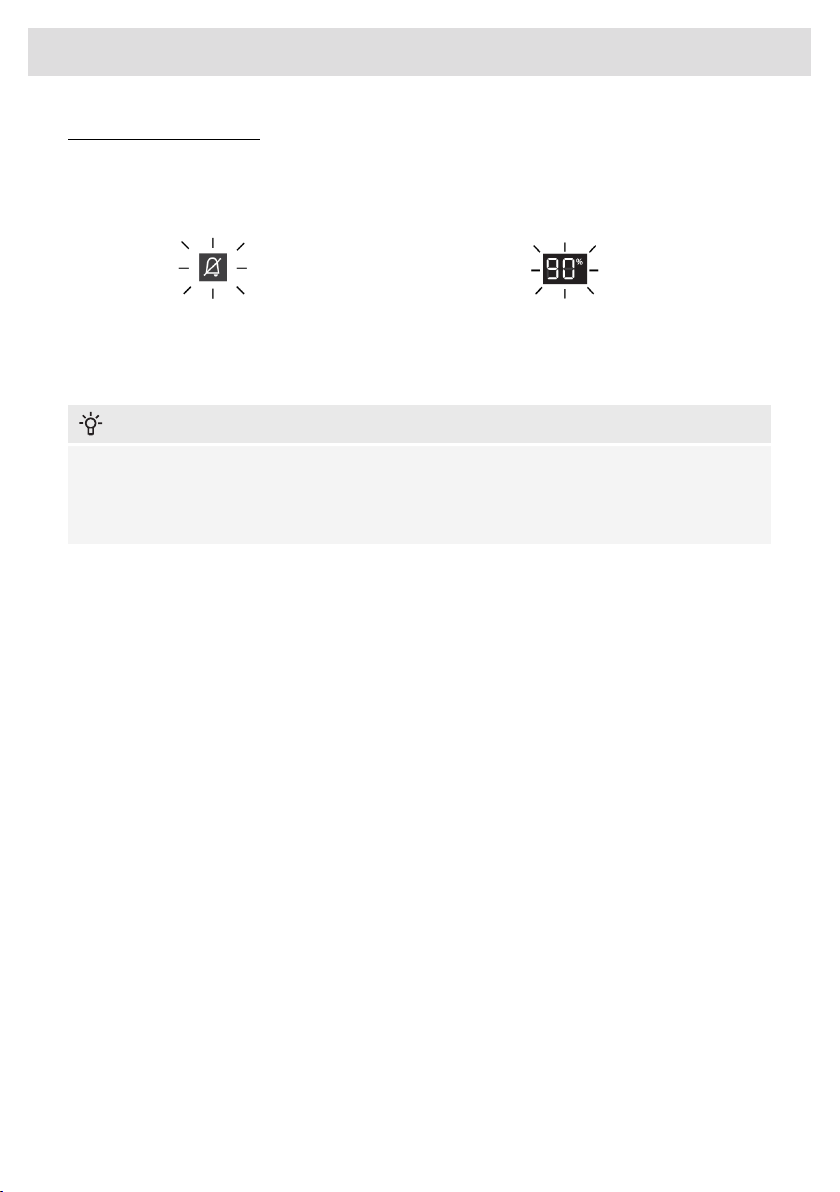
Humidity box notification
The appliance can notify you when humidity box needs to be refilled. Humidity box notification starts
when 7 days average value of compartment humidity is between 40% - 50% for 7 days constantly.
So you do not have to remember to check it yourself and can also help avoid triggering the humidity
alarm.
The alarm key and humidity value are blinking softly . No alarm sound is
heard.
Humidity box notification can be (de)activated in SETTINGS MENU. So if you do not have a humidity
box or you prefer to check the humidity box yourself, it can be set to 'OF', then humidity box notification
alarm is not active.
INFORMATION!
Every time the appliance is switched on, it takes a while until the correct humidity is reached. For
this reason, the notification is disabled for the first 24 hours after the appliance is switched on to
prevent the unnecessary activation of the notification. Each time the door is closed, humidity
notification is blocked for 6 hours.
If the difference between old setpoint and new setpoint is less than 9°F (5°C), it has no influence on
humidity notification.
Stopping the notification:
Short press on alarm key will cancel humidity box notification, alarm key is not illuminated anymore
but humidity value continues to blink until value goes between 50% and 80%.
If humidity value reestablishes between 50% and 80% and humidity box notification is active, it will
be canceled automatically.
31
Operation
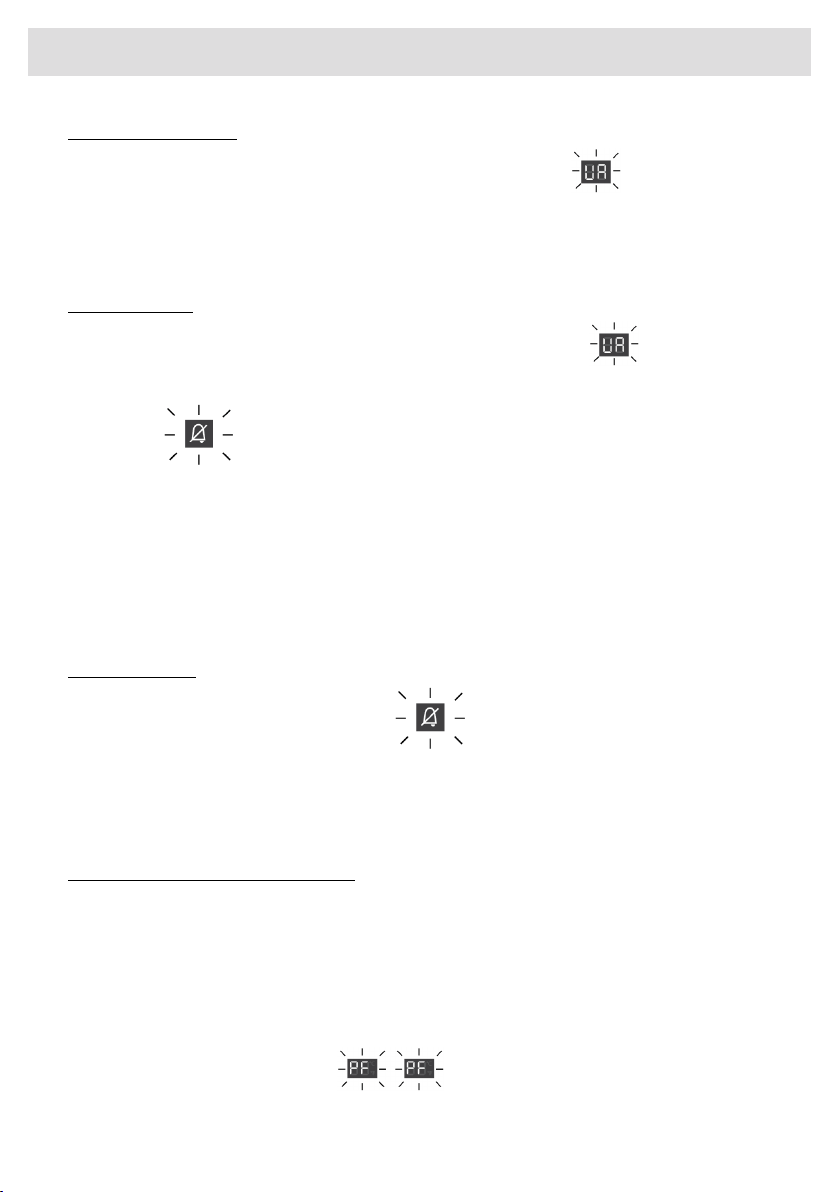
Vibrations notification
If light vibrations are detected, light vibrations alarm is triggered. 'UA' is blinking softly on
display 'T'.
Vibration has been noticed. Please close the door gently and pull-out /close the shelves gently,
making use of the soft close mechanism. Frequent vibrations can influence the quality of the wine
on longer term.
Vibrations alarm
If heavy vibrations are detected, heavy vibrations alarm is triggered. 'UA' is blinking rapidly
on display 'T'.
Alarm key is blinking.
A considerable vibration has been noticed. Please look into the proper placing and calibration of
the appliance. If it happens more often, please look into circumstances that can be cause of the
vibrations.
Stopping the alarm
Short press on any key will stop the alarm from sounding. Blinking of the alarm key stays active.
If vibrations alarm is active and vibrations value is within range, then vibrations alarm is canceled
automatically.
Open door alarm
Door alarm sounds and alarm key is blinking when the door is open for more than 3
minutes and there is no user interaction.
Short press on any key will stop alarm sounding and blinking of alarm key. If you do not close the
door, the alarm will switch on again after 5 minutes.
Closing the door will stop the alarm.
Power outage high temperature alarm
If the electricity power in which the appliance is plugged in fails or outages then appliance stops
cooling and temperature inside the compartment can be affected.
The power failure alarm is designed to alert after power is restored and appliance turned on that the
temperature inside the compartment is out of range. If the temperature is not out of range, power
failure alarm will not be triggered. When the appliance is in a place not frequently visited or you are
away for a long time this alarm will help you be aware after restoring the appliance that the temperature
of the bottles might have changed.
On displays 'T' and 'H' there is a 'PF' blinking.
32
Operation
Stopping the alarm:
Short press on alarm key will stop 'PF' blinking.
After that, current measured temperature and current humidity value will be shown on displays 'T'
and 'H'.
If you press on alarm key again, alarm will be canceled. Compartment setpoint temperature and
humidity level will be shown on displays 'T' and 'H'.
INFORMATION!
When Power outage high temperature alarm is canceled, Temperature alarm can be still active.
In that case, alarm behaves like Temperature alarm.
SETTINGS MENU
Because the appliance has extensive setting options, a menu system was defined to provide access
to all settings. As a default all settings are already set, so it is not necessary to go through SETTINGS
MENU. But to adapt the appliance settings to your preferences it is possible to do so.
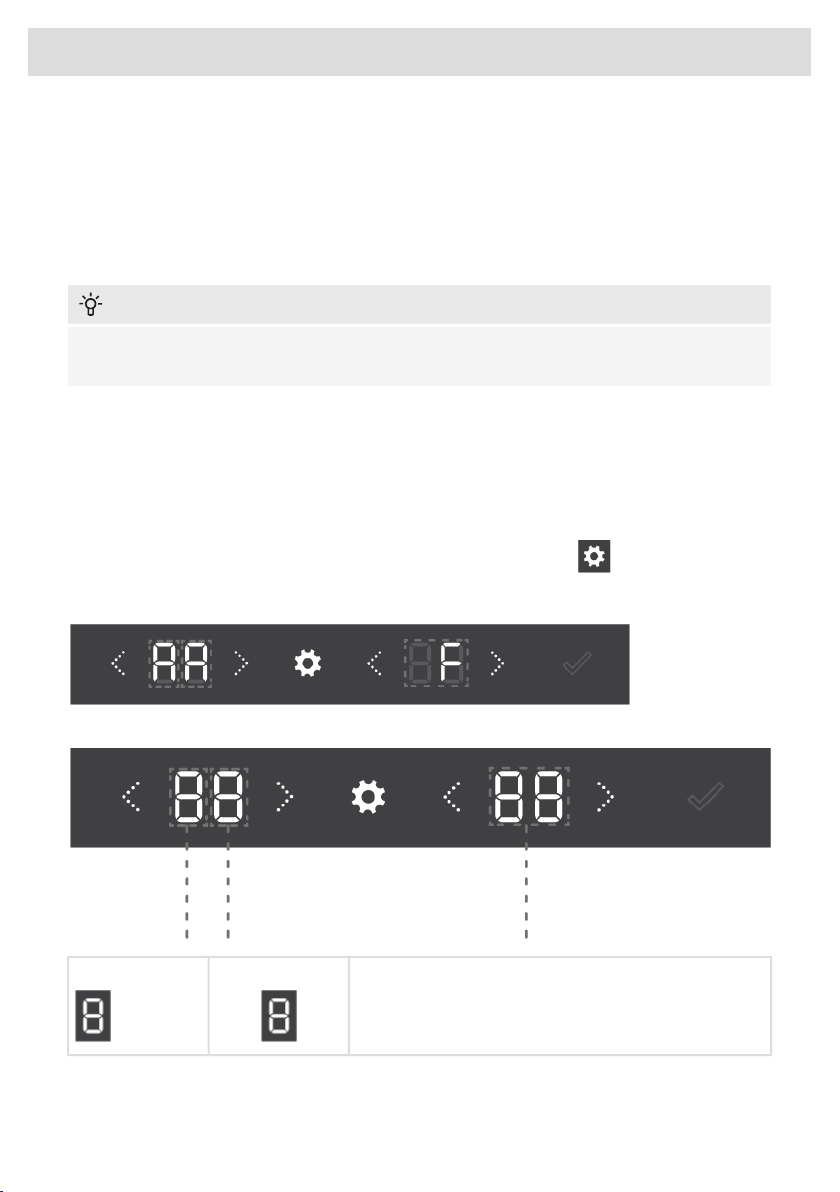
Enter SETTINGS MENU
You can enter SETTINGS MENU with a short press on the settings key .
First option in SETTINGS MENU will be shown.
Basic logic
According settings and values will be displayedMENU optionGROUP NAME
Options and values will be explained.
The temperature display 'T' will be used to represent the GROUP NAME of menu options and the
MENU option itself. There are 8 Groups of menu options: GENERAL, SOUNDS, DISPLAY, LIGHT,
PROXIMITY AND DOOR SENSOR, NIGHT MODE, NETWORK CONNECTION, SYSTEM.
33
Operation
The humidity display 'H' will be used to represent the settings and values that can be selected. It
differs per menu option how many or what kind of settings there are possible.
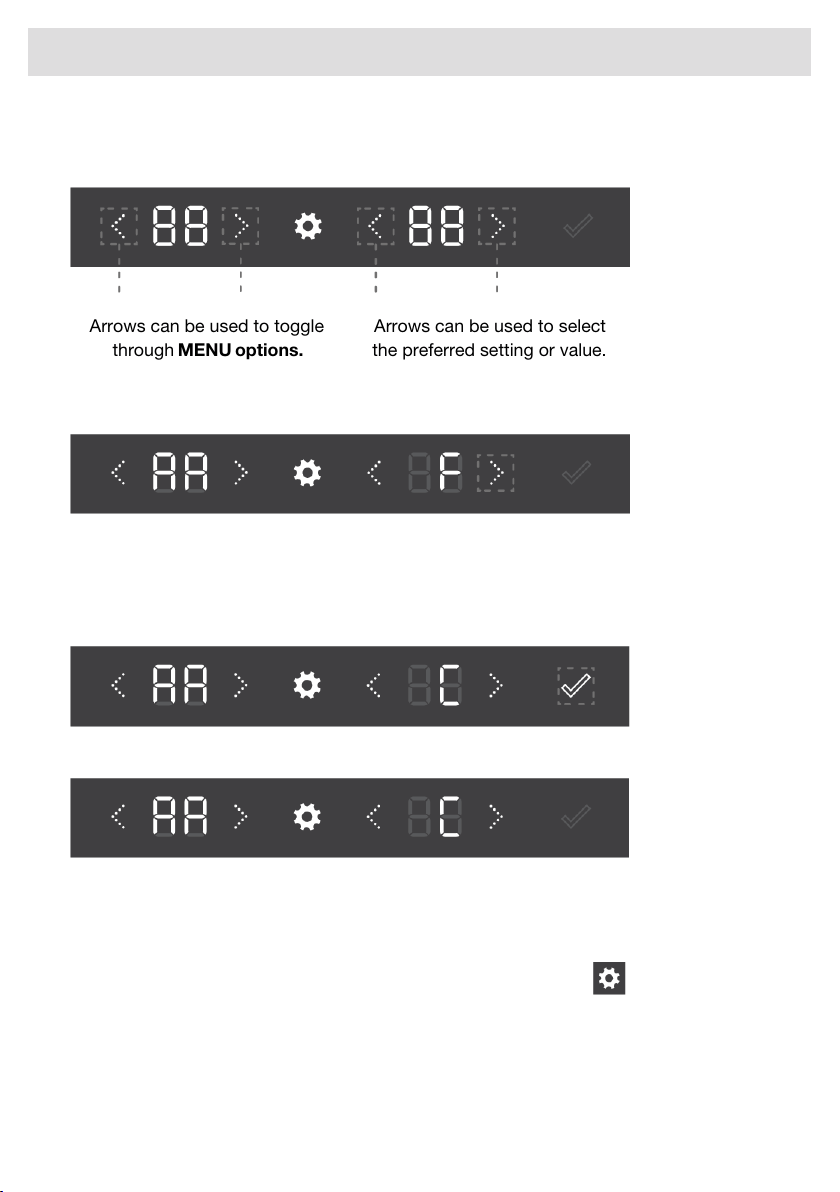
Arrows can be used to toggle
through MENU options.
Arrows can be used to select
the preferred setting or value.
Example
We will use the first option in SETTINGS MENU as an example:
First 'A' is representing MENU option Group: GENERAL.
Second 'A' is representing Menu option: Temperature unit.
Pressing the arrow key on the right of display 'H' will switch from 'F' representing °F to 'C' representing
°C.
Confirm key will be illuminated to indicate a confirmation is needed.
If confirm key is not illuminated, the visible setting is activated.
Pressing the arrow key on the right of display 'T' will enter the next MENU option.
Exit SETTINGS MENU
You can exit the SETTINGS MENU with a short press on the settings key .
Settings menu ends automatically after 5 minutes without user interaction.
34
Operation

INFORMATION!
If SETTINGS MENU is active, the alarm indications (audio and visual), error notifications and
Charcoal filter notifications are not active, they will be activated as soon as SETTINGS MENU is
closed.
SETTINGS MENU is not activated again when, after failure, power is restored or when appliance
goes back from Appliance-Off to Appliance-On.
In case of power failure, after power is restored, your settinngs will be set to values before power
was disconnected.
35
Operation
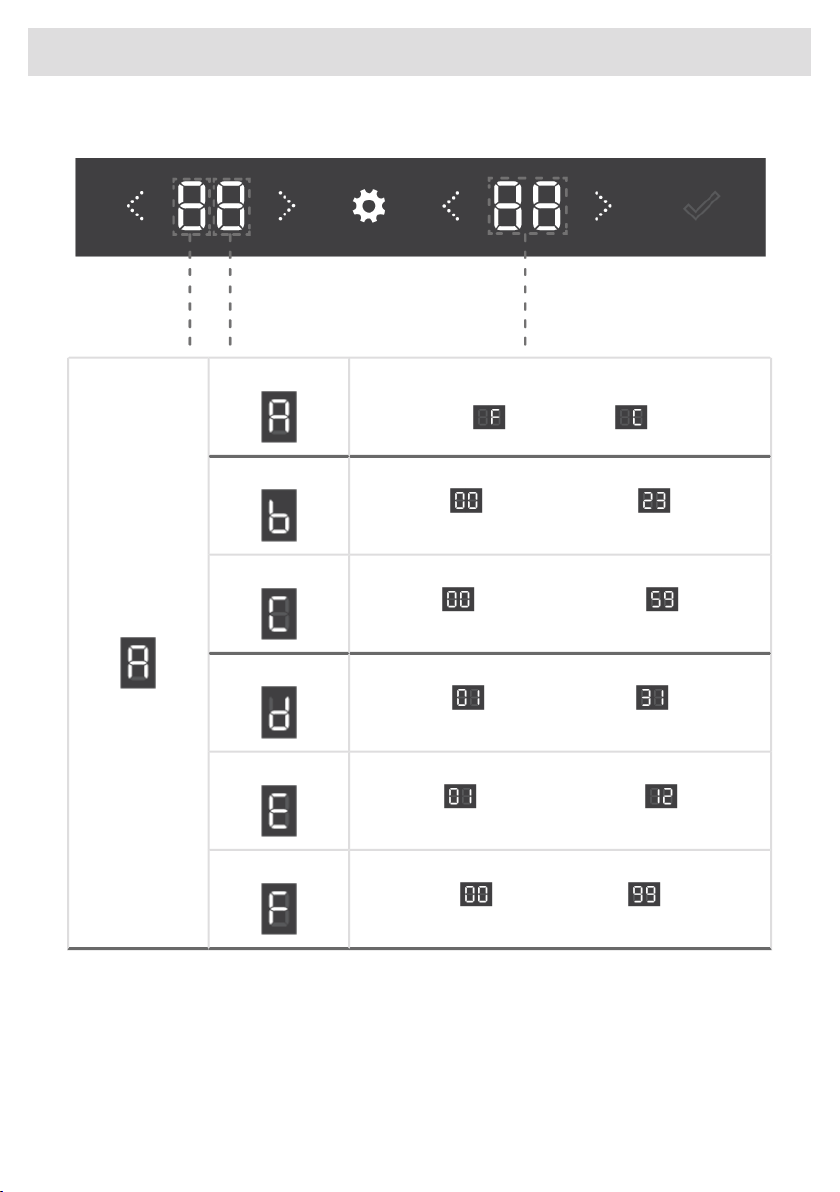
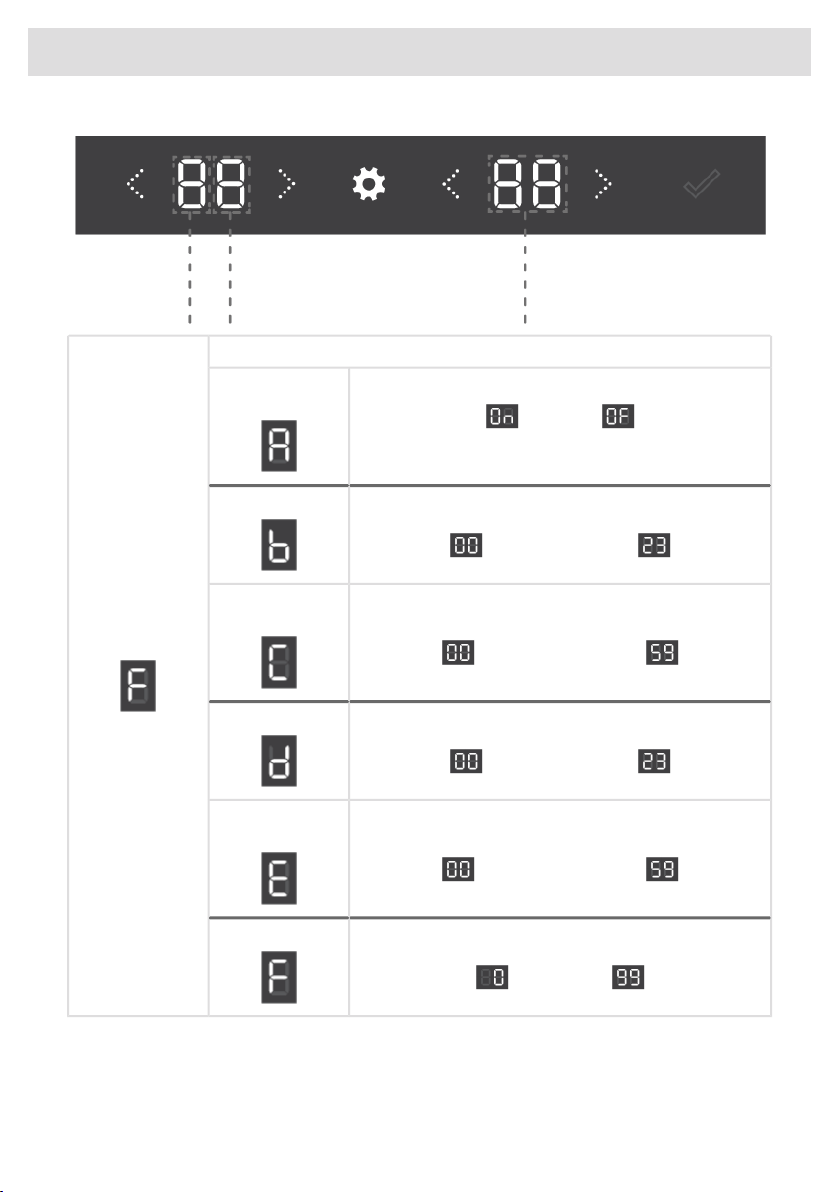
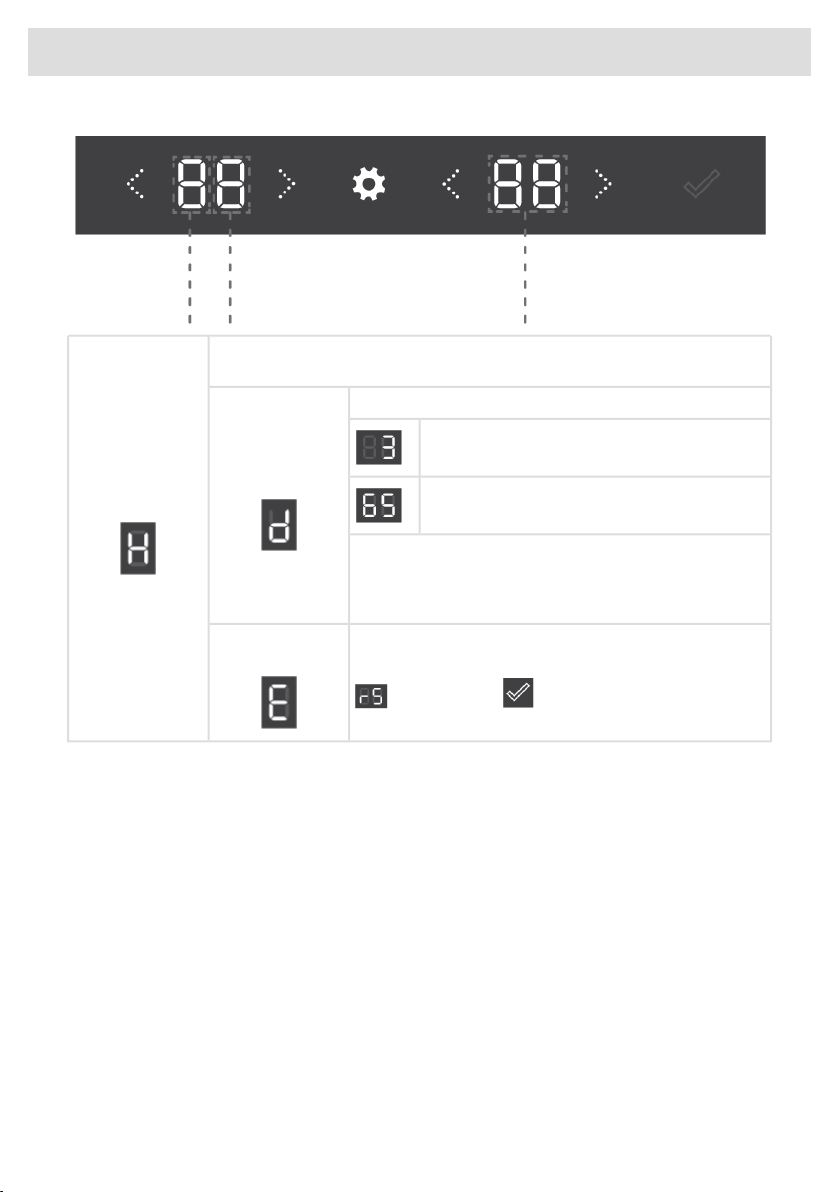
SETTINGS MENU table
Select temperature unit:
Temperature unit
GENERAL
from °F to °C
Select the hours of time:Time hours
from 00 to 23 hours
Select the minutes of time:Time minutes
from 00 to 59 minutes
Select the day:Date day
from 01 to 31 days
Select the month:Date month
from 01 to 12 months
Select the year:Date year
from 00 up to 99
36
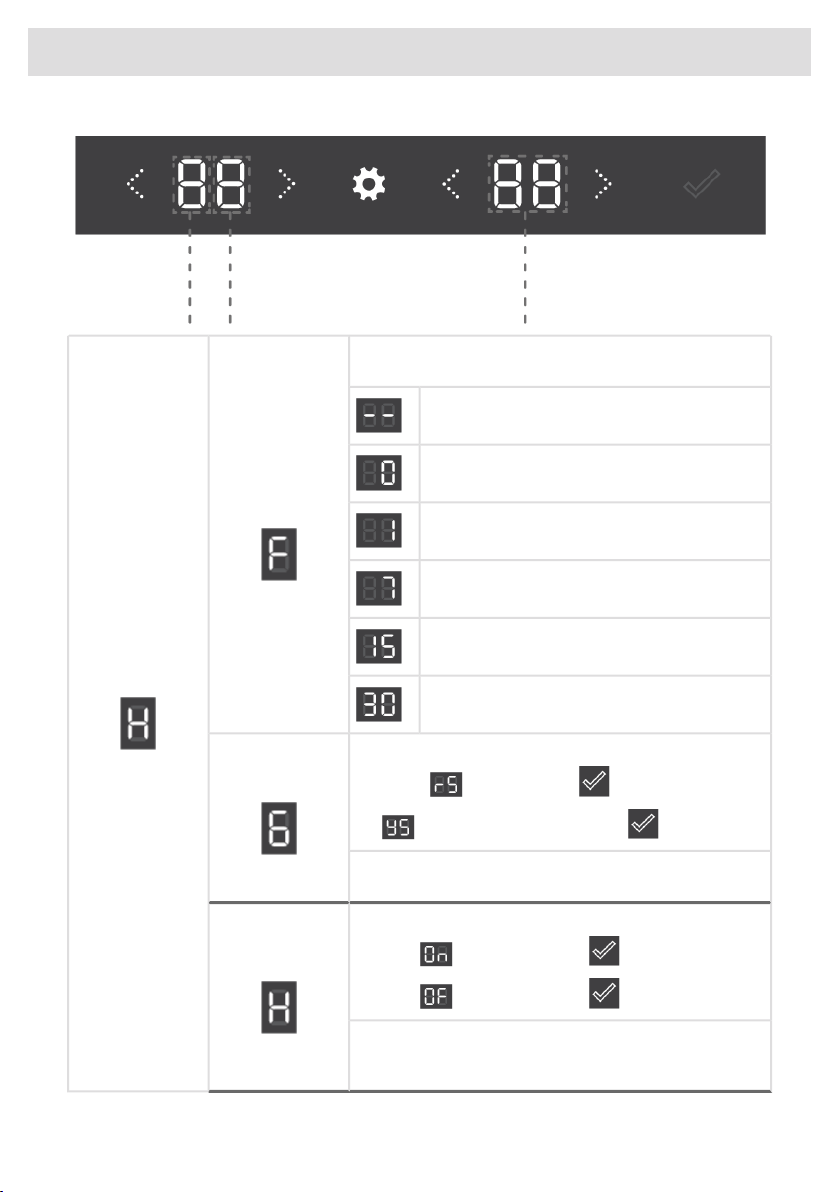
Operation
Select the preferred volume:
General sounds
SOUNDS
from 0 to 5
Select the preferred volume:Alarm sounds
from 0 to 5
Select the preferred volume:
Key sounds
from 0 to 5
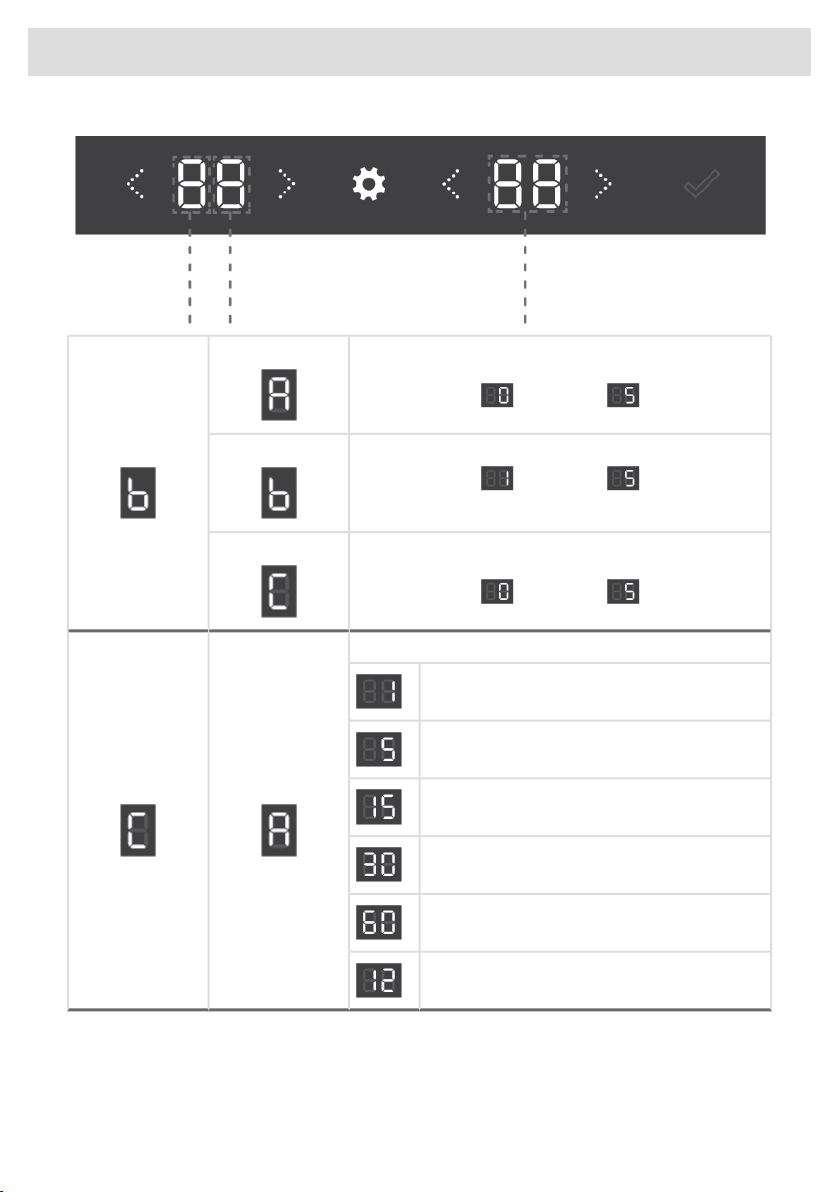
Time of inactivity after which display goes to standby:
Standby timeDISPLAY
1 minute
5 minutes
15 minutes
30 minutes
60 minutes
12 hours
37
Operation
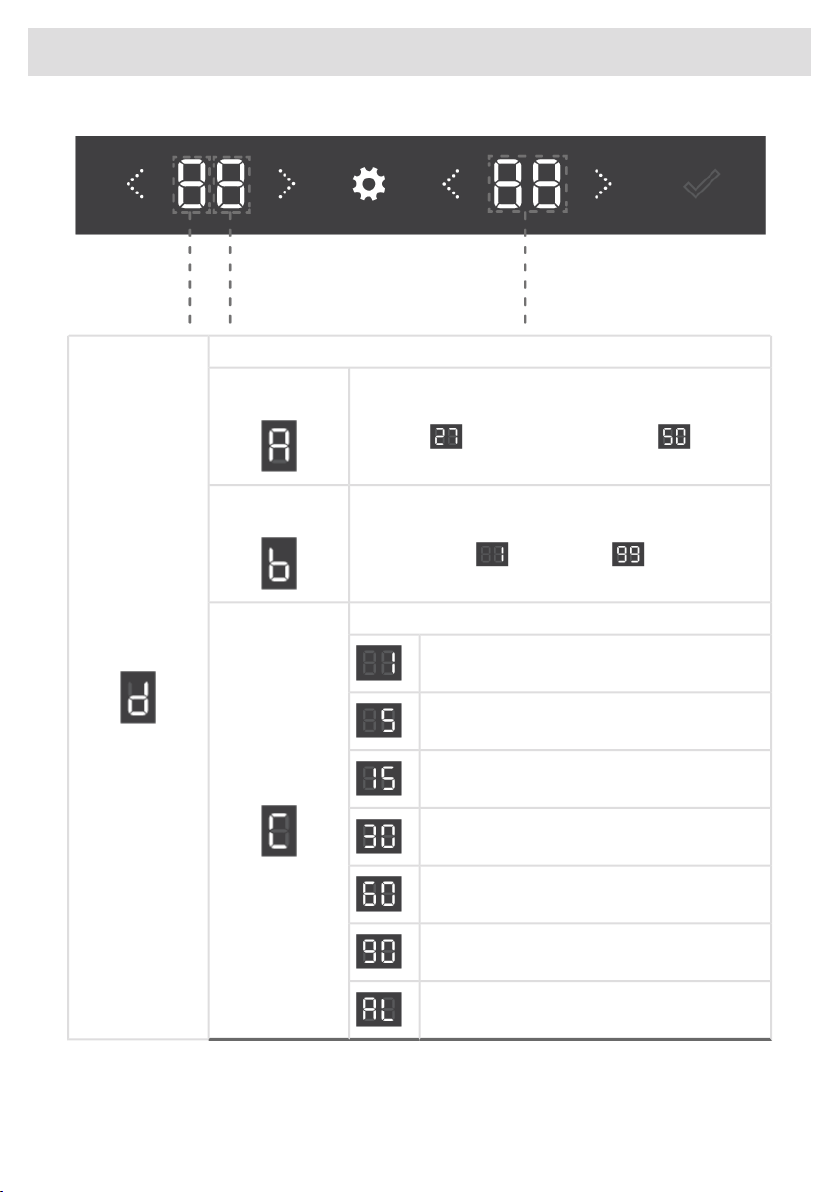
Explanation about the light modes can be found in chapter "LED illumination".
LIGHTS
Select the first two digits of the Kelvin value:
from 2700 to 5000 Kelvin
Ambient mode
Kelvin
Select the light intensity:
Ambient mode
intensity
from 0 to 99
How long will the cabinet be lit in Ambient mode:
ON for
1 minute
5 minutes
15 minutes
30 minutes
60 minutes
90 minutes
always
38
Operation
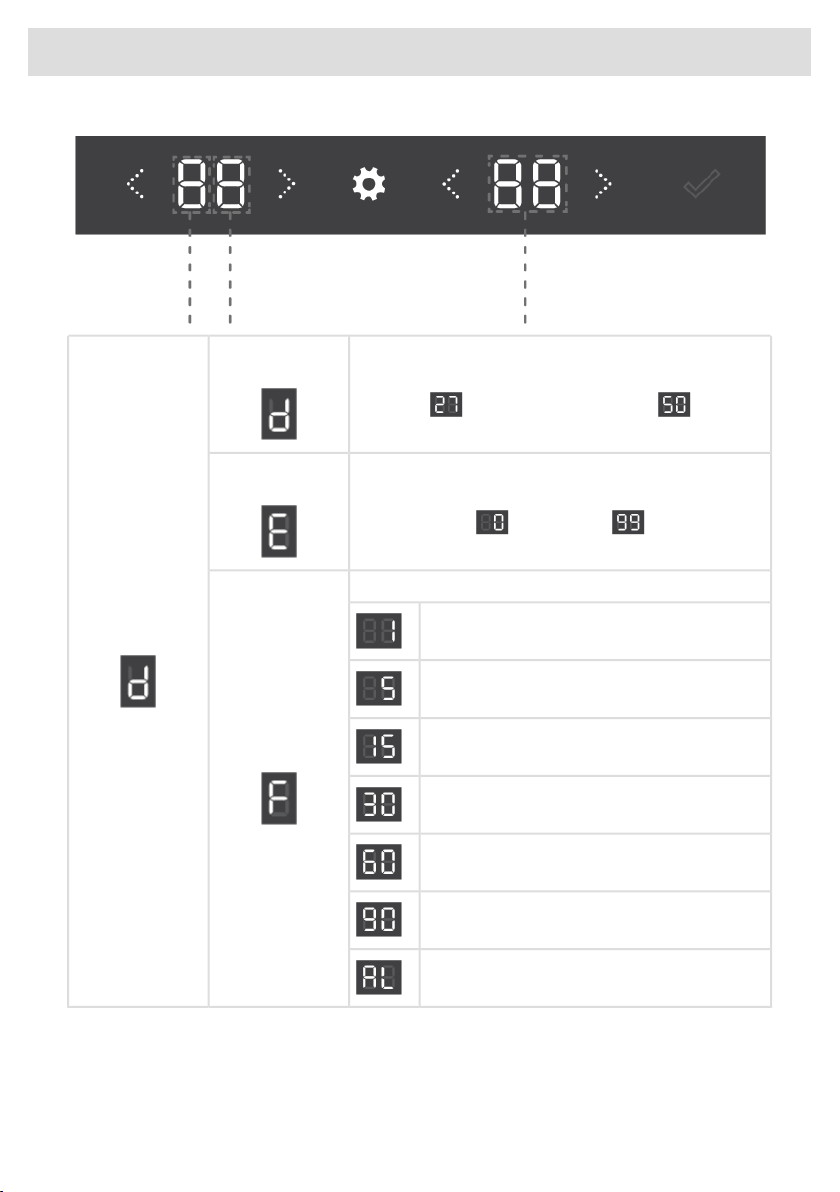
Select the first two digits of the Kelvin value:
Functional mode
Kelvin
LIGHTS
from 2700 to 5000 Kelvin
Select the light intensity:
Functional mode
Intensity
from 0 to 99
How long will the cabinet be lit in Functional mode:
ON for
1 minute
5 minutes
15 minutes
30 minutes
60 minutes
90 minutes
always
39
Operation
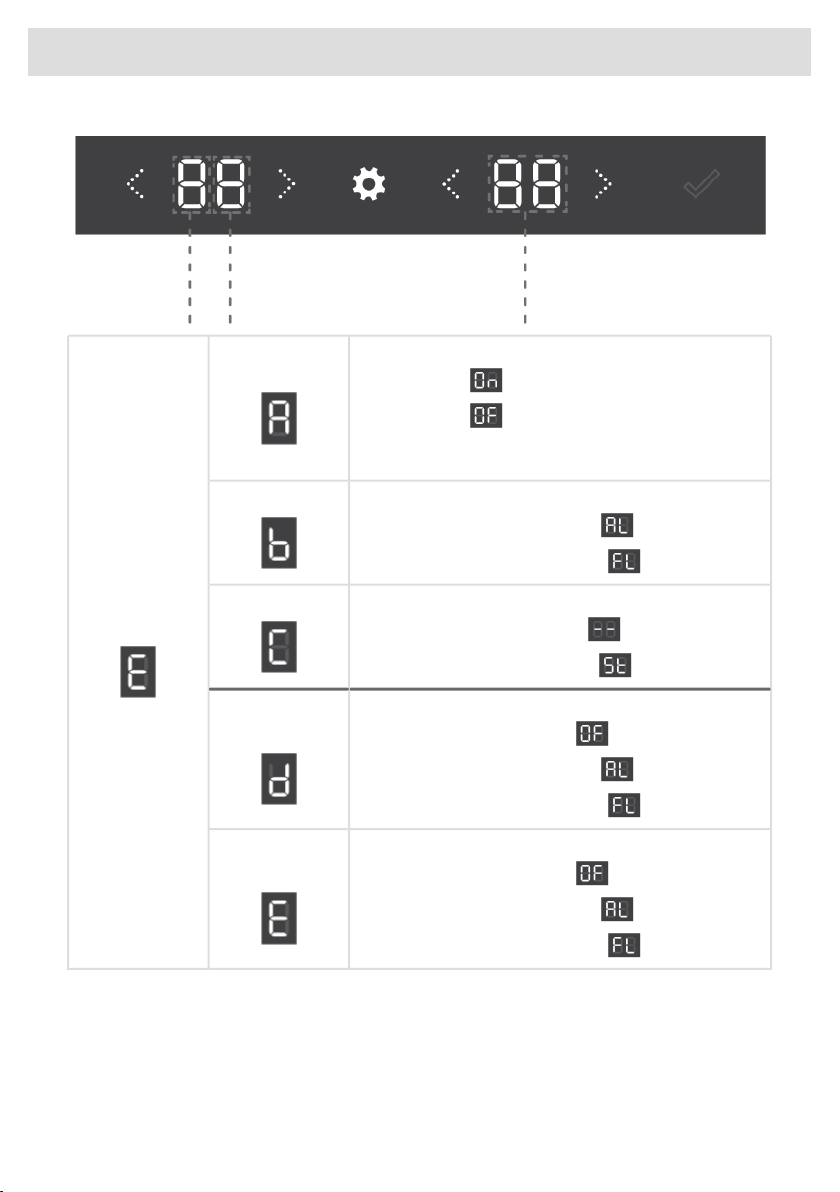
Proximity sensor can be (de)activated:
Proximity sensor
PROXIMITY AND
DOOR SENSOR
Proximity sensor on
Proximity sensor off
If Proximity sensor is set to 'On', associated settings
will become available.
On user poximity, light changes to:
Light change
Ambient mode
Functional mode
On user poximity, display changes to:
Display change
No change
Status display
During door opening, light changes to:
Door open –
light change
No light
Ambient mode
Functional mode
When door is closed, light changes to:
Door closed –
light change
No light
Ambient mode
Functional mode
40
Operation
Night mode will dim the light during a set time.
NIGHT MODE*
Night mode can be (de)activated:
On or Off
Night mode
status
If Night mode is set to 'On', associated settings will
become available.
Set the hours of the night mode starting time:
Start Time hours
from 00 to 23 hours
Set the minutes of the night mode starting time:
Start Time
minutes
from 00 to 59 minutes
Set the hours of the night mode ending time:
End Time hours
from 00 to 23 hours
Set the minutes of the night mode ending time:
End Time
minutes
from 00 to 59 minutes
Select the light intensity of the night mode:
Light dimming
from 0 to 99
41
Operation
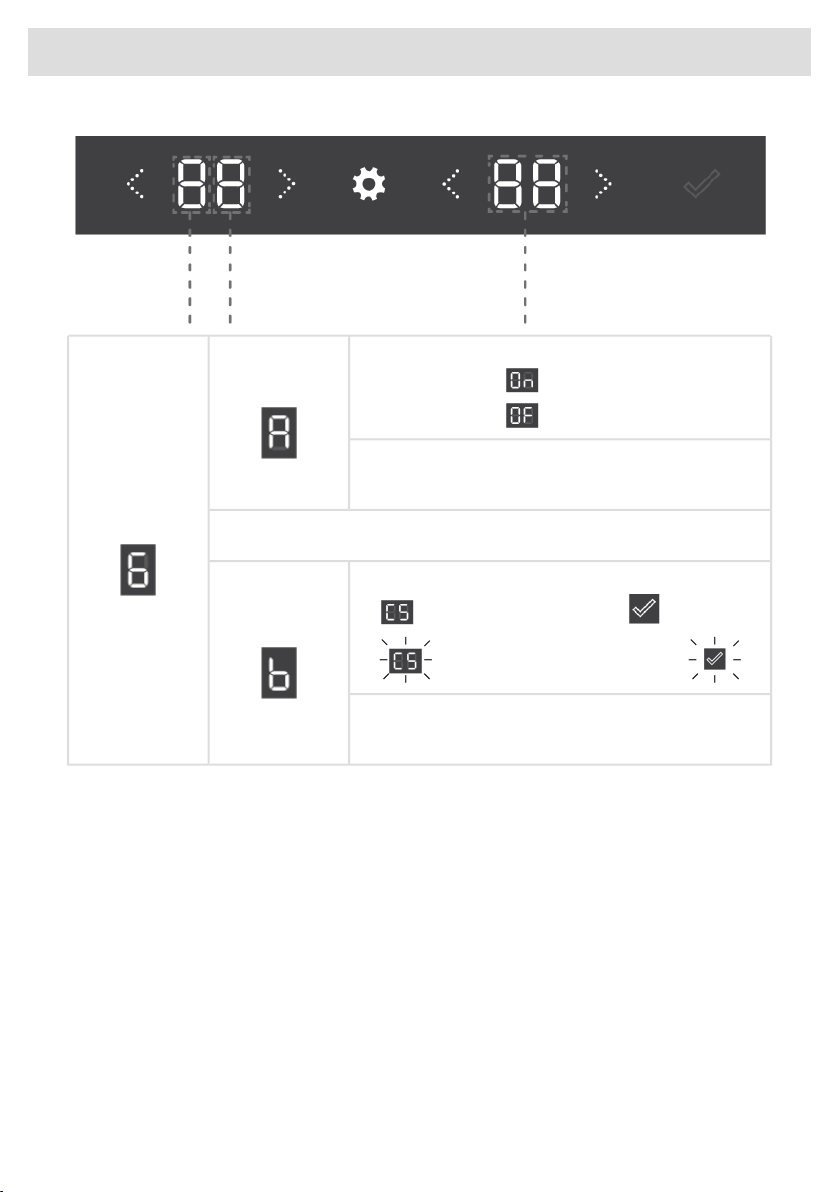
WLAN can be (de)activated:
WLAN Status
NETWORK
CONNECTION
WLAN on
WLAN off
Switch on the appliance Wireless Network to use the
appliance optimally in combination with our ConnectLife
application.
Explanation about the Connection Setup can be found in chapter “Connection
setup”.
Connection setup can be activated:
Connection Setup
Connection setup on, press to confirm
Both will be blinking during setup
The setup ends automatically if connection was succesfull
or after 3 minutes. Please follow the steps in chapter
“Connection setup”.
42
Operation
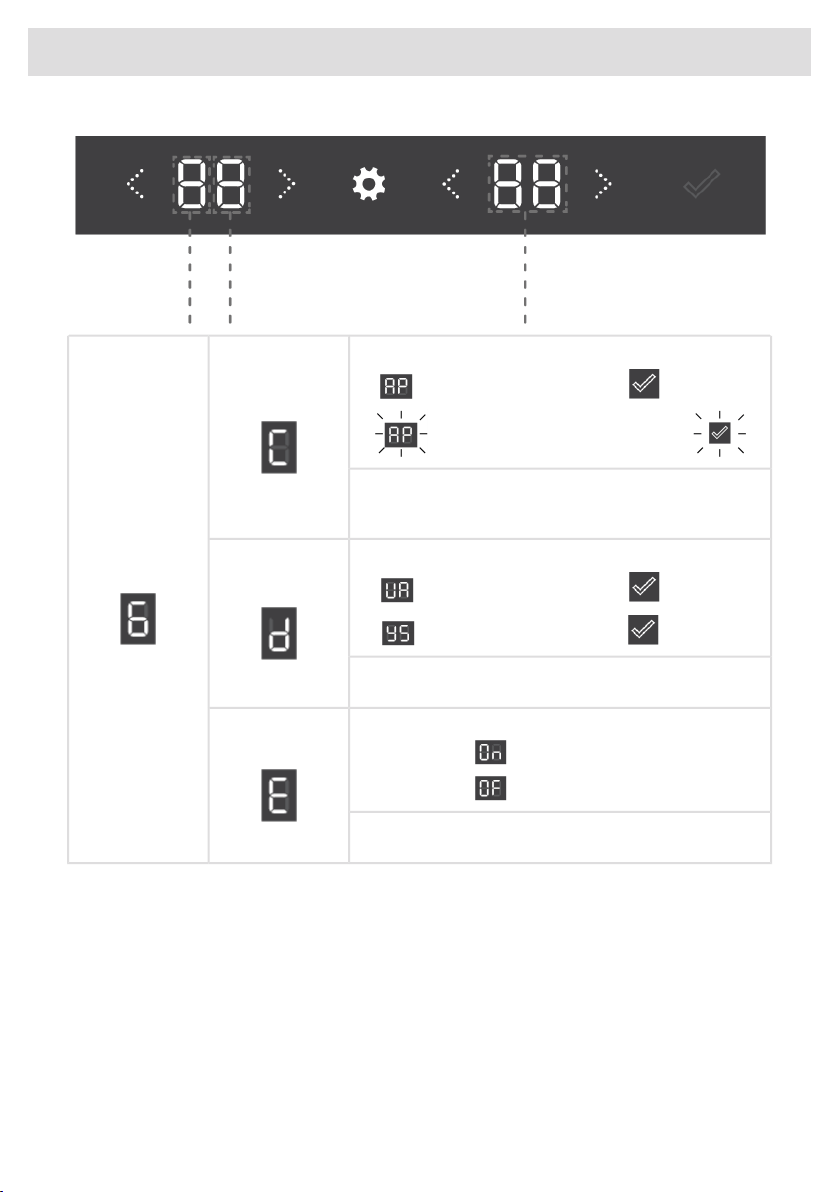
Appliance Pairing can be activated:
Appliance Pairing
NETWORK
CONNECTION
Appliance pairing on, press to confirm
Both will be blinking during pairing
The process ends automatcially if pairing was succesfull
or after 3 minutes. Appliance can be paired to (additional)
user account. Refer to the applicaton for further instructions.
Unpair All can be activated:
Unpair All
Appliance UnPair on, press to confirm
Are you sure? If YES, press to confirm
The process ends automatcially if UnPair was succesfull
or after 1 minute.
Remote control can be (de)activated:
Remote control
Remote control on
Remote control off
Remote control must be enabled to be able to control the
appliance from paired user accounts.
43
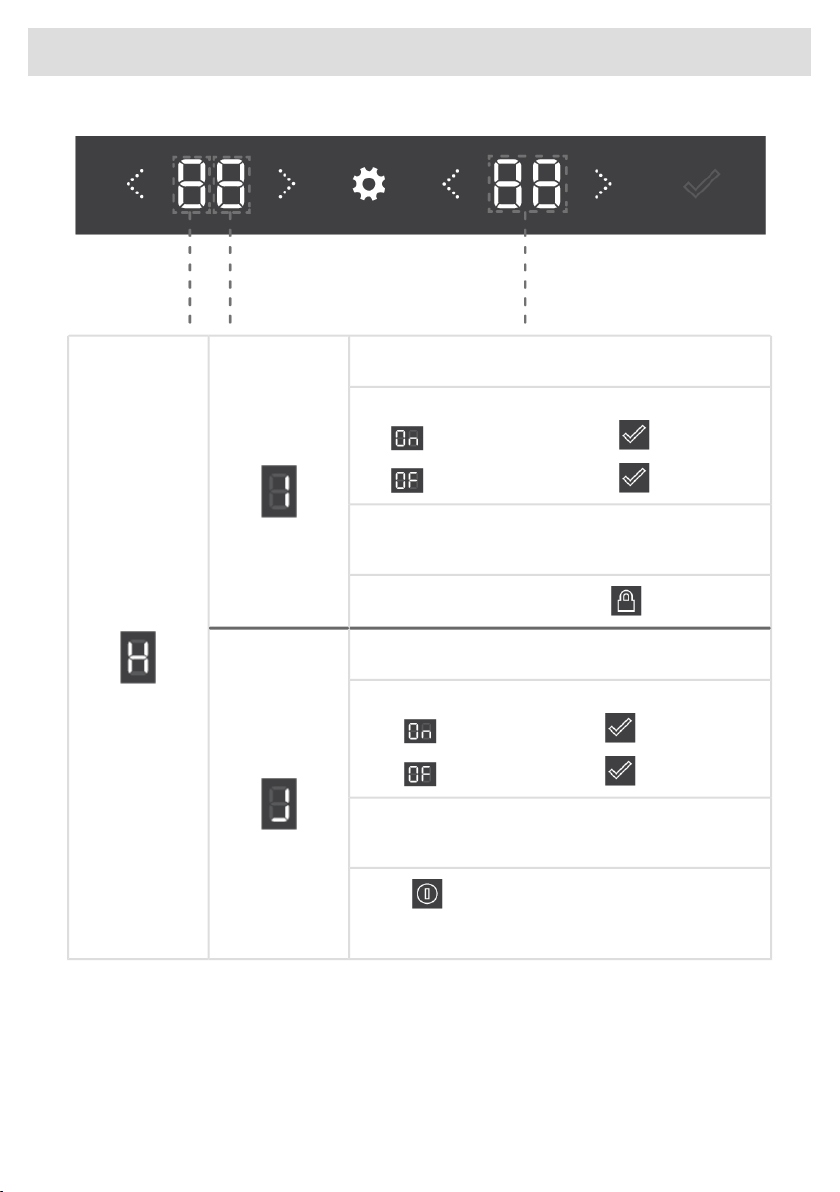
Operation
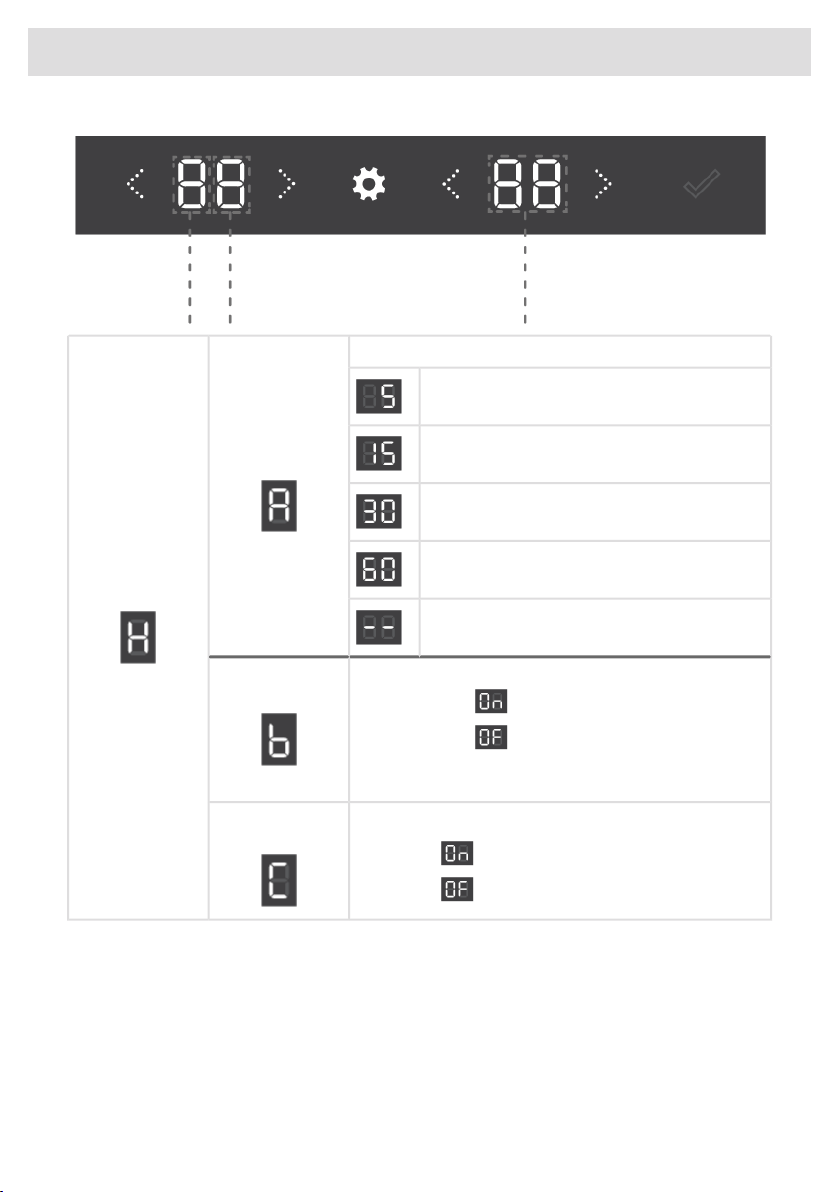
Key lock automatically activate it after:
Key lock mode
SYSTEM
5 minutes
15 minutes
30 minutes
60 minutes
never
Humidity can be (de)activated:
Humidity
Humidity alarm on
Humidity alarm off
If Humidity is set to 'On', associated settings will
become available.
Humidity box notification can be (de)activated:
Humidity box
notification
Humidity box notification on
Humidity box notification off
44
Operation
Explanation about the charcoal filter can be found in chapter "Charcoal filter
countdown and notification".
SYSTEM
Charcoal filter lifetime in days:
Charcoal filter
countdown
First digit of 3 digit number
Second and third digit of 3 digit number
Charcoal filter lifetime is 365 days. Countdown will show
the number of days left until the countdown. If a 'minus' is
in front of first digit, amount is showing days after expiration
date.
Charcoal filter lifetime RESET after replacing:
Charcoal filter
RESET
RESET, press to confirm
45
Operation
Set the number of days ahead of the end of the
countdown, when you wish to receive a notification:
Charcoal filter
notification
SYSTEM
no notification
on the day itself
1 day in advance
7 days in advance
15 days in advance
30 days in advance
Appliance can be reset to the factory settings:
Factory RESET
RESET, press to confirm
Are you sure? If YES, press to confirm
If you confirm RESET all personal settings and stored data
will be lost.
DEMO mode can be (de)activated:
DEMO mode
DEMO on, press to confirm
DEMO off, press to confirm
Appliance operation will be disabled. For demonstration
purposes the display, light, sounds, proximity- and door
sensor will be active.
46
Operation
Explanation about the Sabbath mode can be found in the
chapter "Sabbath mode".
Sabbath mode*
SYSTEM
Sabbath mode can be (de)activated:
Sabbath mode on, press to confirm
Sabbath mode off, press to confirm
Appliance will continue to operate, while extra functions
like light, display, sounds, alarms and proximity- and door
sensor will be disabled for 72 hours.
To disable Sabbath mode, press for 3 seconds.
Explanation about the ECO mode can be found in chapter
"ECO mode".
ECO mode*
ECO mode can be (de)activated:
ECO mode on, press to confirm
ECO mode off, press to confirm
Appliance will continue to operate, while extra functions
like light, display and proximity- and door sensor will be
disabled.
Press will temporarily activate the display. After 5
minutes of display inactivity, ECO mode will be activated
automatically.
Wi-Fi function
Wine climate cabinet reaches its full potential when connected to the cloud because everything can
be operated and monitored through ConnectLife mobile application on your smart device. Choosing
to remote control it from your device makes it easier to navigate through SETTINGS MENU for
example, and be connected to features that are unavailble on the appliance interface, like the light
47
Operation
switch control among others. Temperature and humidity values are mirrored at real time. Temperature
in the compartment can be changed in the app too, so the door can remain closed.
1. Mobile app
First, download the mobile application with your smart device and create a user account. It is available
on Google Play, App Store and AppGallery.
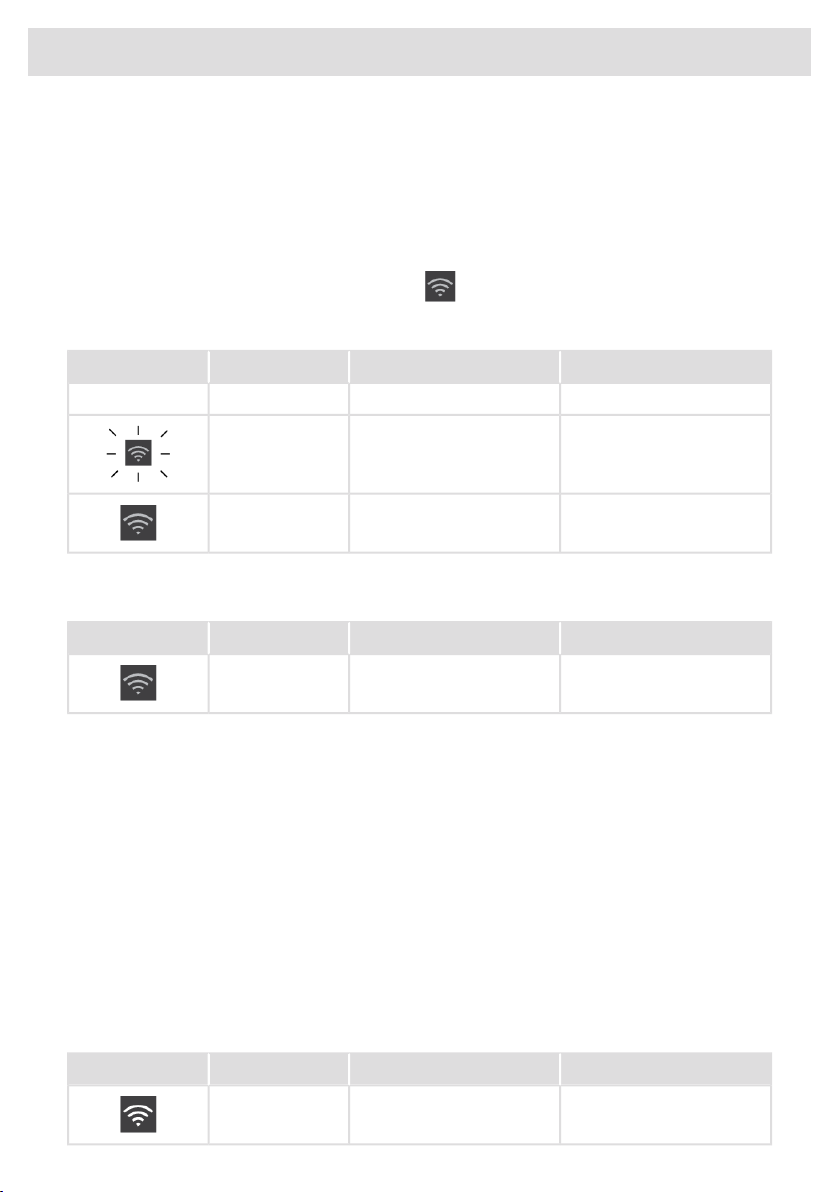
2. Wi-Fi modul activation:
•
directly, with a 2 seconds press on Wi-Fi key .
• or go to WLAN STATUS inside NETWORK CONNECTION inside SETTINGS MENU.
Remote controlCloud serviceWi-Fi modulWi-Fi icon
OffOffOffNo icon
(-)Not connectedOn
OffConnectedOn
3. Connection Setup
After the Wi-Fi modul is activated the appliance is ready to connect to the mobile app.
Remote controlCloud serviceWi-Fi modulWi-Fi icon
OffConnectedOn
The setup ends automatically if connection is successful or if after 3 minutes the connection has not
yet been established.
4. Pairing your appliance
After you are successfully connected to cloud service, pairing option is triggered automatically.
Appliance will be paired to your smart application user account.
You can pair multiple user accounts, so you can have have more than one smart device connected
to the wine climate cabinet.
Only on your smart device you can see if the pairing has been successful.
Pairing function ends automatically if pairing connection on the cloud is successful or if after 3
minutes the pairing connection has not been successfully established on the cloud.
5. Remote control
After you successfully pair a user to the wine climate cabinet, the appliance is ready to be operated
from the mobile app.
Remote controlCloud serviceWi-Fi modulWi-Fi icon
EnabledConnectedOn
48
Operation
6. Unpair all
By triggering this option appliance removes all paired user accounts. Data and saved settings remain
the same inside the appliance.
Unpairing function ends automatically if the unpairing process on the cloud is successful or if after
1 minute the unpairing has not been successful on the cloud.
7. Deactivate Wi-Fi modul:
When you wish to stop operating and monitoring the appliance on remote control, you can turn the
Wi-Fi module off the same way you activate it:
•
directly, with a 2 seconds press on Wi-Fi key .
• or go to WLAN STATUS inside NETWORK CONNECTION inside SETTINGS MENU.
When the Wi-Fi modul is off, you will not be able to use the mobile app. However, this does not mean
you will need to repeat the pairing process next time you turn the Wi-Fi modul on again. Instead, the
whole process will be automatic. If it occurs that connection between appliance and mobile cannot
be established, please give it some time or unpair and pair again your smart device. If problem
presists, contact customer support.
In case of power failure, state of Wi-Fi modul is saved. When power is restored, it will be the same
as before disconnection.
Charcoal filter countdown and notification
When the appliance is ‘On’ for the first time, charcoal filter countdown timer is set to 365.
Every 24 hours, when appliance is connected to power supply, 1 day is deducted.
In case of power failure, Charcoal filter lifetime value is saved. When power is restored, it will be the
same as before disconnection.
If you change time or date parameter, it will not affect charcoal filter countdown.
With a 2 seconds press on Charcoal filter key , you are redirected to Charcoal filter lifetime
inside SETTINGS MENU. Display 'H' shows Charcoal filter lifetime value.
When Charcoal filter notification setting is reached, Charcoal filter key is illuminated.
When Charcoal filter countdown timer is =0, then "0" is blinking on display H.
When Charcoal filter countdown timer expires, then Charcoal filter key is blinking.
After replacing filter, you have to reset Charcoal filter lifetime.
Sabbath mode
Sabbath mode will be activated for 72h directly after activation. All illuminated features and the
display will be temporarily disabled. The cooling system is operating normal. Sabbath mode will be
activated every week again on the same time of the same day.
Sabbath mode active phase ends:
49
Operation
• automatically 72 hours after activation,
•
with a 3 seconds press on Key lock key .
If any error occurs during Sabbath mode, it won't be showed until Sabbath mode is deactivated.
* Active Sabbath mode overrules ECO mode and Night mode for a maximum of 72 hours.
Eco mode
During ECO mode, the appliance internal illumination and display illumination are adjusted for best
energy consumption.
ECO mode is activated after 5 minutes of inactivity on Appliance's Display. Only On/Off key is
active. Appliance cooling system is operating normal.
In case of any errors detected, ECO mode ends. Error code is displayed.
In case of any alarms detected, ECO mode ends. Alarm indication is activated. After alarm is
confirmed the appliance goes back to Status display. After 5 minutes of inactivity, ECO mode will
be activated again.
50
Operation
Defrosting the appliance
• The wine climate cabinet is defrosted automatically. Drops of water will flow through an opening
in the rear wall into a tray fitted above the compressor, from where they will evaporate.
Cleaning the appliance
WARNING!
Switch off the appliance and remove the plug from the socket before you start cleaning it.
WARNING!
Do not use abrasive cleaning agents, as they can damage the surface.
WARNING!
Do not remove the rating plate located inside the appliance. The rating plate contains data that
you need in case of a repair.
• Before cleaning, remove the bottles from the appliance and store them in a cold place.
• Regularly clean the appliance interior with lukewarm water. If necessary, add a neutral detergent
or a special refrigerator detergent to the water. Use a soft cloth to clean all surfaces. Wipe the
cleaned parts with a cloth dampened with clean water and dry them thoroughly.
• Do not wash parts of the appliance in a dishwasher as they can be damaged.
• Remove any stains from wooden parts immediately to prevent them from soaking into the wood.
Clean the wooden parts with a damp cloth. Make sure the wood is not too wet and leave the
parts to dry completely before returning them to the wine cabinet.
Note: Wood is a natural material. Therefore, some stains (especially from red wine) may be hard to
remove.
Such stains can be removed by gently rubbing the wood with a very fine sandpaper and then treating
the sanded part with wood oil. The substance used to treat the wood should be safe for food contact.
• Clean the glass door with a suitable glass cleaner.
• Clean the gasket with lukewarm water, then wipe it with a soft cloth and dry it thoroughly.
• Regularly clean (using a vacuum cleaner) the ventilation slots on the appliance sides and back.
Accumulation of dust on the ventilation slots may result in increased power consumption.
WARNING!
If you do not intend to use the appliance for a long time, switch it off and disconnect it from the
power mains. Empty and clean the appliance, than leave the door ajar. This will prevent the
appearance of mould inside the appliance.
51
Maintenance
The direction in which the appliance door opens can be reversed.
In order to safely reverse the door opening direction, at least three people should carry out the
procedure described below. The door weighs about 88 lb (40 kg).
WARNING!
In order to avoid damaging the floor, use a floor mat or other suitable protection on the floor in
front of the appliance. Also, plan for a suitable spot where you will temporarily place the door
during the procedure.
Take care not to damage the door gasket. A damaged gasket will negatively affect appliance
operation.
WARNING!
The self-closing hinge could close and damage your fingers. Therefore, please be particularly
careful.
WARNING!
Disconnect the appliance from the power mains before reversing the door opening direction.
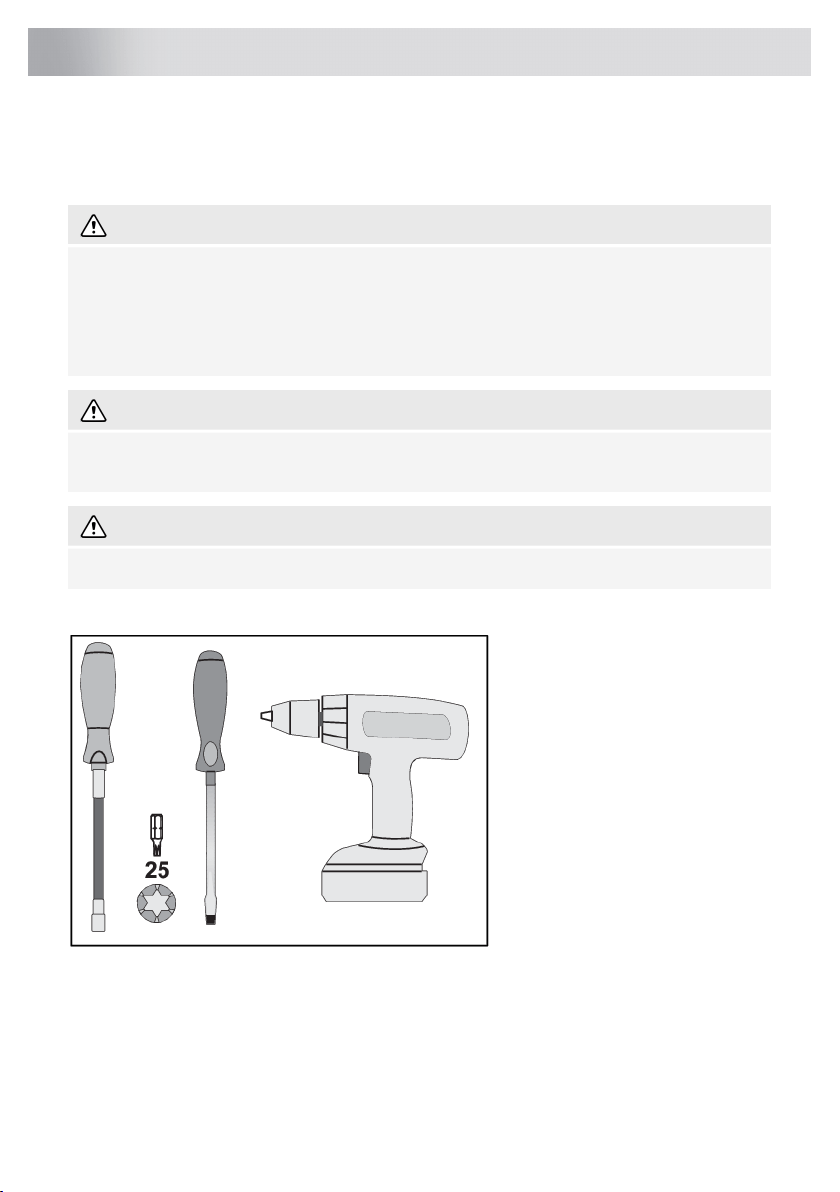
Tools required:
52
Reversing the door opening direction
To reverse the door opening direction, proceed as follows:
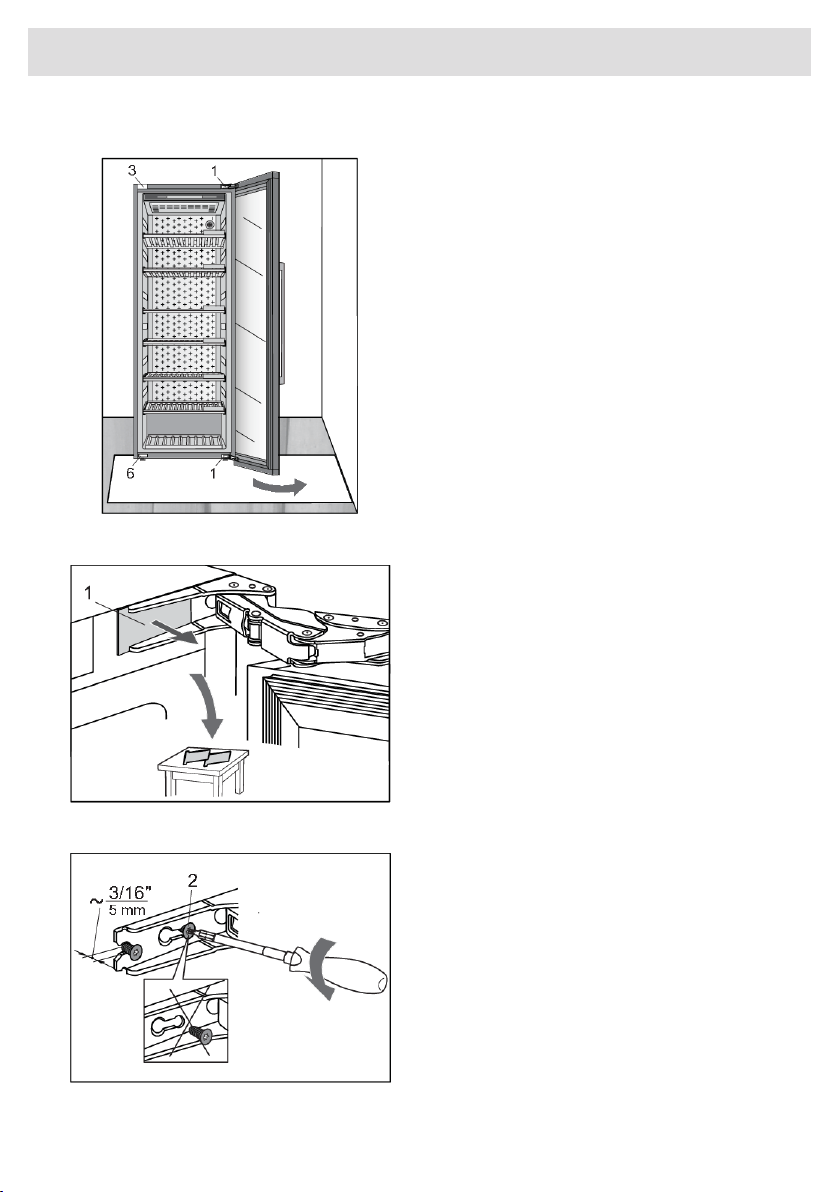
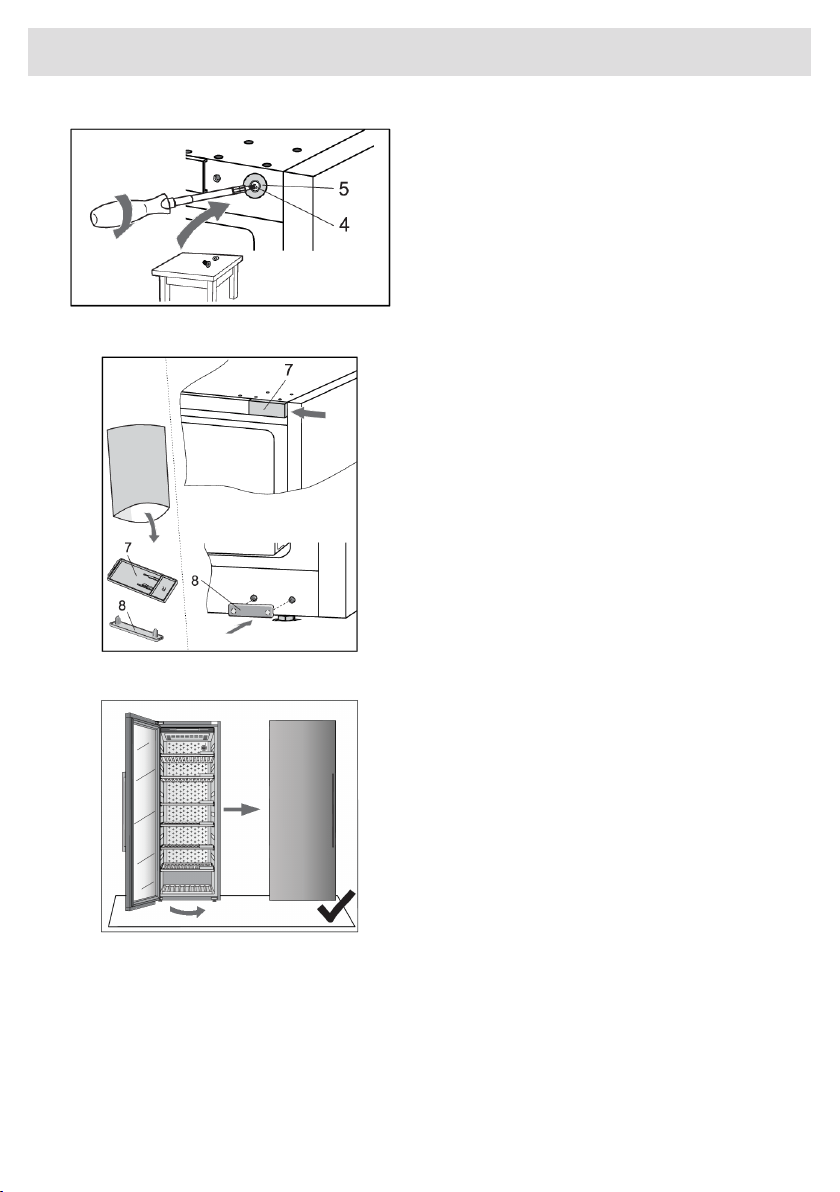
Open the appliance door.1.
Remove the two hinge caps (1) at the
top and bottom. Set them aside, as you
will need them later on.
2.
Partly (by no more than 5 mm) undo the
hinge screws (2) at the top and bottom.
Do not completely undo the screws. This
way, the door will remain in contact with
the housing.
3.
53
Reversing the door opening direction
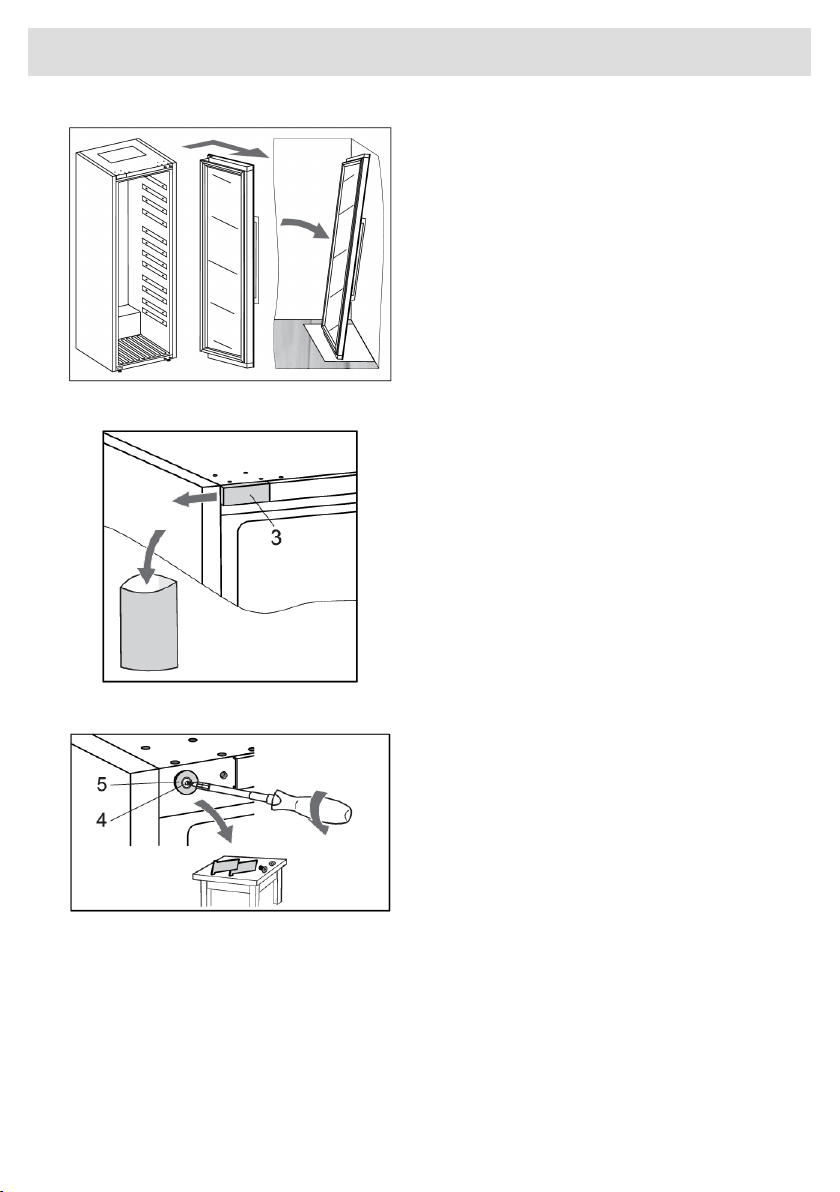
Remove the door, complete with the
hinges, by moving it in the direction
indicated by the arrow. Carefully place
the door on the surface prepared for this
purpose.
4.
Remove the cap (3). Save it (e.g. in the
bag with the instruction manual) if you
ever decide to reverse the door opening
direction back to the original setting.
5.
Undo the screw (4) and remove the cap
(5). Set them aside, as you will need
them later on.
6
54
Reversing the door opening direction
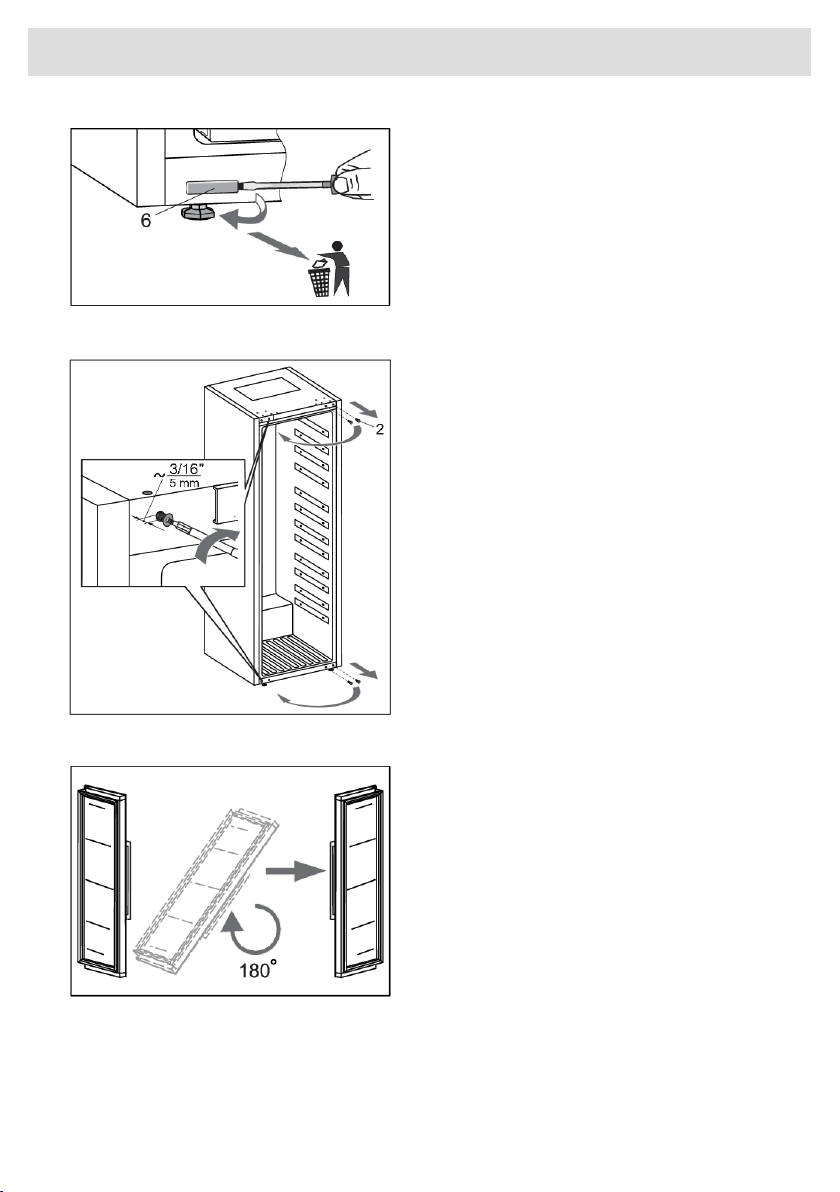
Remove the cap (6) and discard into the
bin for plastic waste.
7.
Completely undo the screws (2). Then,
partly screw them into the holes at the
top and bottom on the opposite side of
the housing.
8.
Carefully rotate the door by 180 degrees.9.
55
Reversing the door opening direction
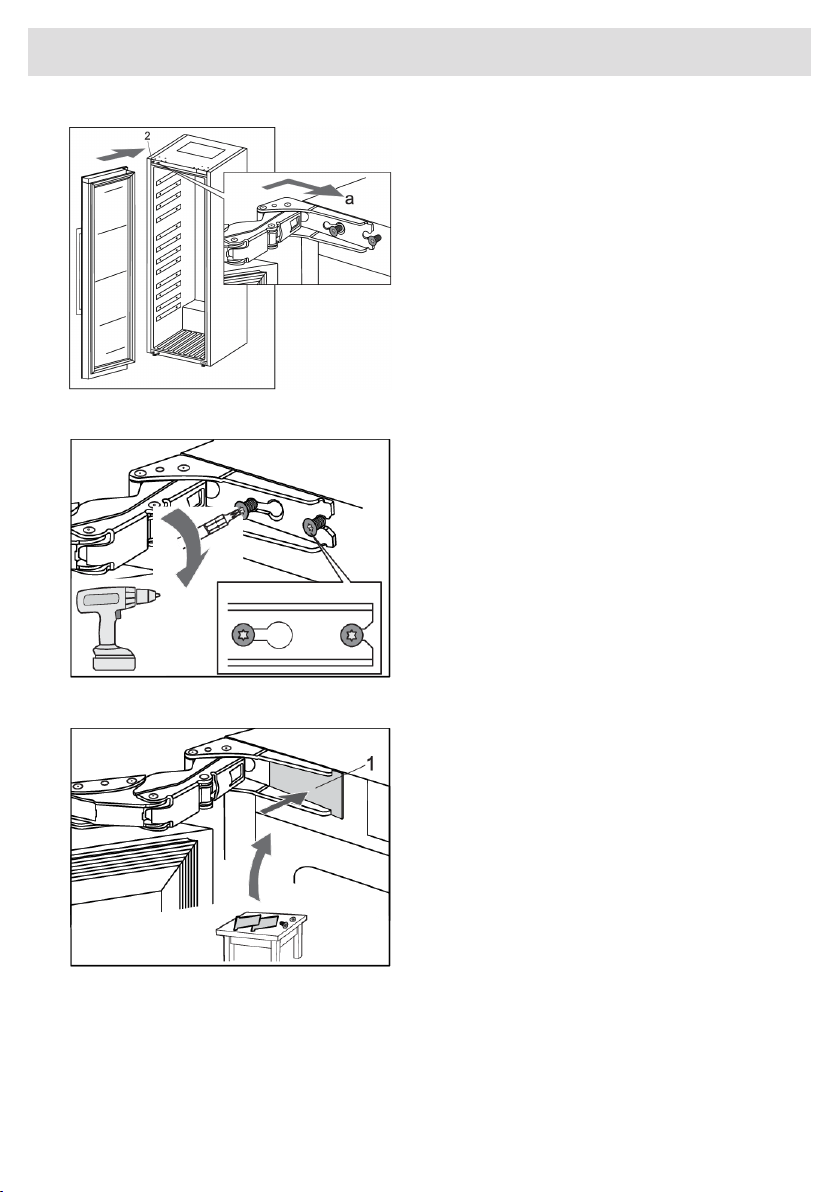
Hang the door onto the screws (2) at the
top and bottom and slide it in the
direction indicated by the arrow (a).
10.
Tighten the screws. The screws should
be tightened to a torque of 6.2 Nm.
11.
Replace the hinge caps (1).12.
56
Reversing the door opening direction
On the opposite side from the top hinge,
attach the cap (5) using the screw (4).
13.
Take the caps (7 and 8) from the bag
with the instruction manual and install
them on the side opposite from the
hinges.
14.
Close the door and make sure it is
aligned with the housing. The housing
side and the edge of the door should be
parallel.
15.
57
Reversing the door opening direction
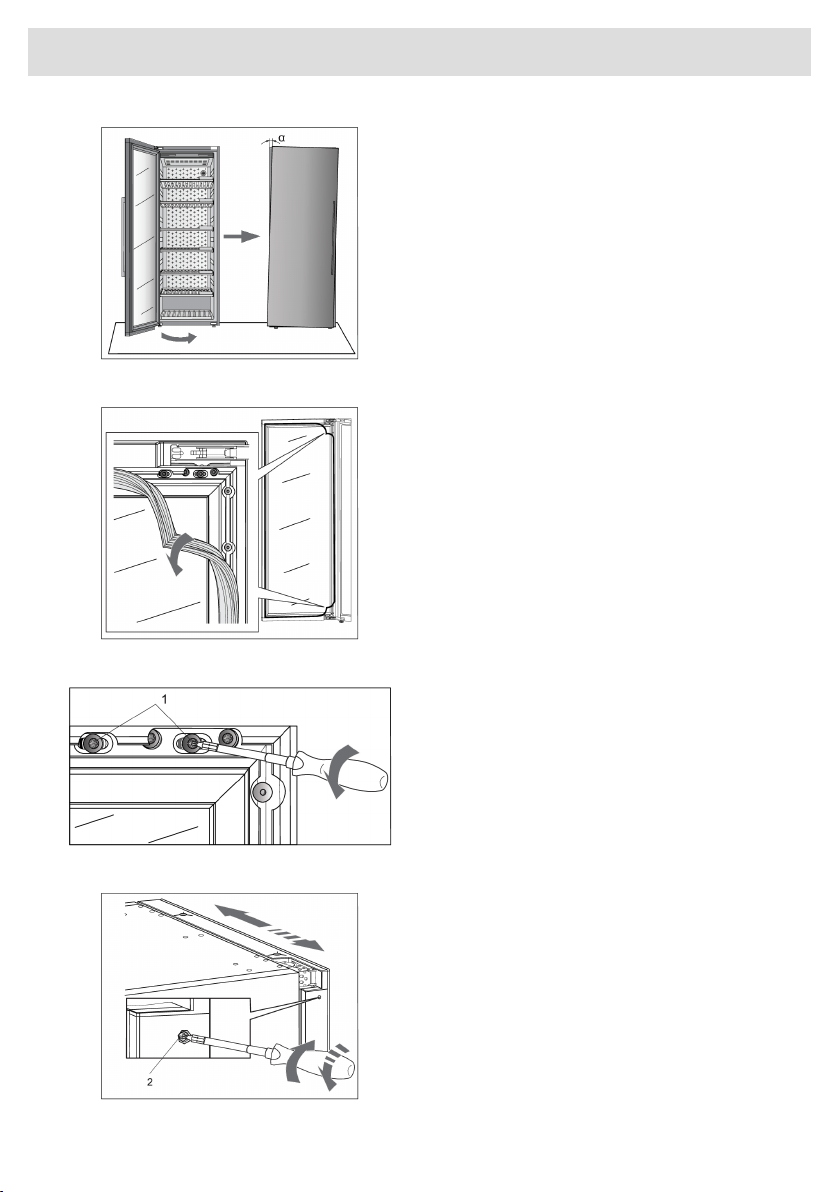
If the door is not aligned with the housing (the
angle α is not 0°),
then proceed as follows:
Open the door and detach the gasket
from its groove in the corners at the top
and bottom hinge.
1.
Release the screws (1) at the top and
bottom. Do not undo them completely!
2.
Close the door, then rotate the screw (2)
at the top and bottom to adjust the door
position.
3.
58
Reversing the door opening direction
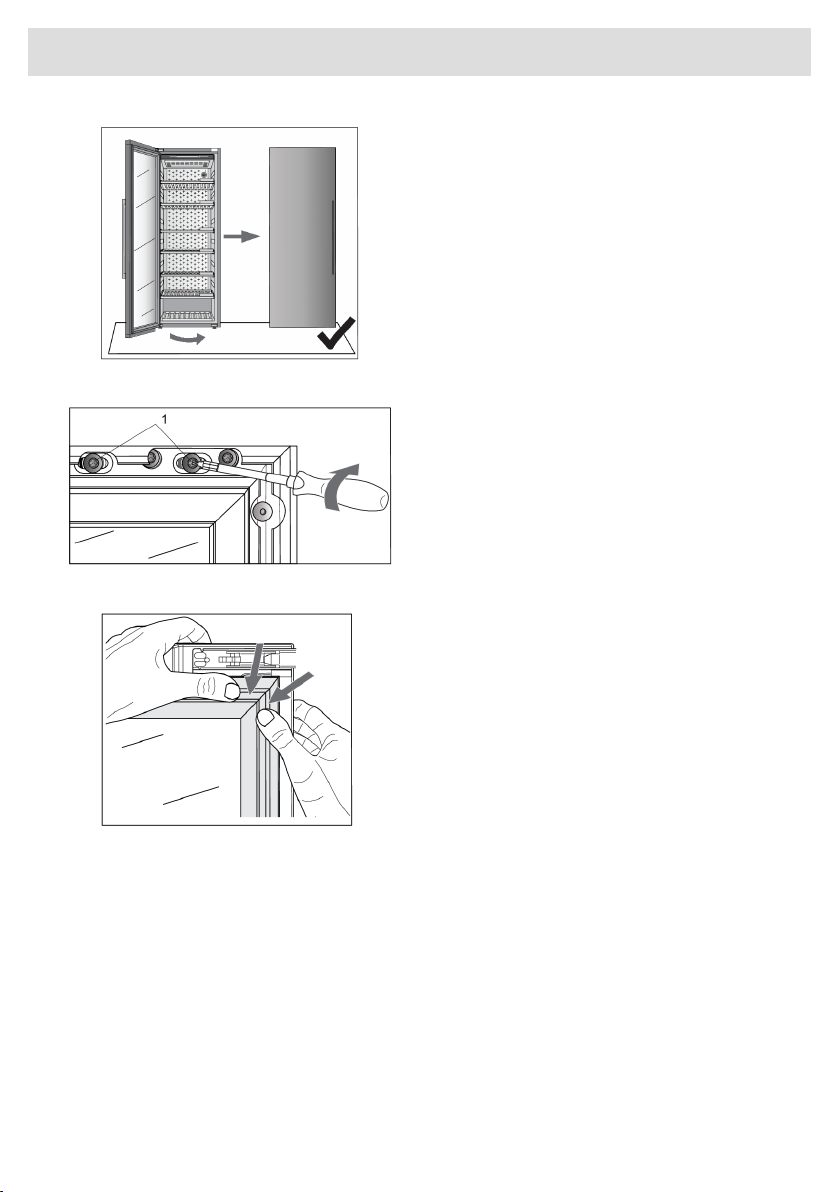
Adjust the door position until the edge
of the door is parallel to the side of the
housing.
4.
When the door edge is parallel to the
housing side, open the door again and
tighten the screws (1) you released at
the start of the door adjustment process.
5.
Carefully press the gasket back into the
groove in the door.
6.
59
Reversing the door opening direction
If you have any doubts about whether your appliance is working properly, we recommend to first
read suggestions below.
Tips & Tricks
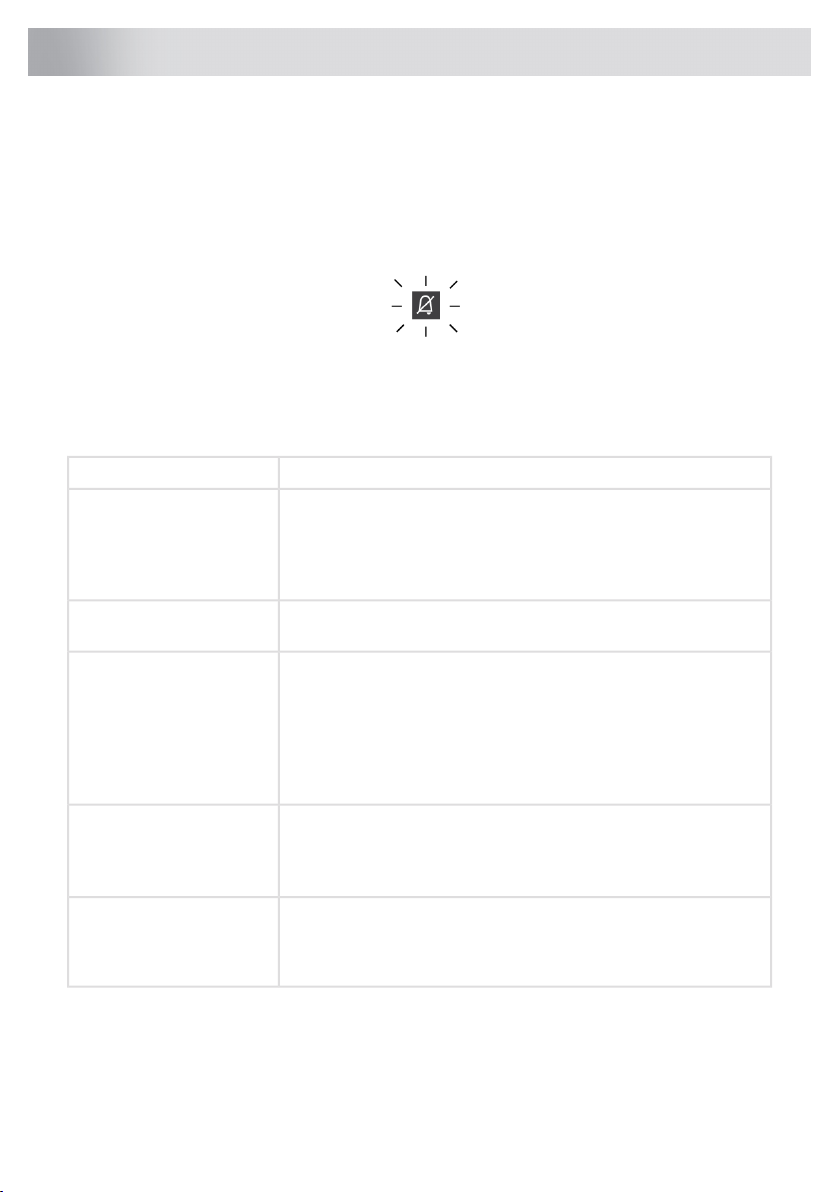
When temperature or humidity in the appliance is out of range an alarm will be triggered.
Alarm sounds and alarm key is blinking on display.
To remove the sound, short press alarm key .
The temperature or humidity will be blinking on the display until it has been recovered.
If the alarm has not been removed and the temperature or humidity has been recovered, the alarm
sound will stop and blinking on the display will end.
Temperature out of range
CountermeasuresPossible cause
Try to minimize opening the door of the wine climate cabinet
appliance. Prepare loading plan of large quantities of bottles in
advance to minimize the required time for loading.
Frequent and/or long door
openings.
Try to use the ConnectLife mobile application as much as possible
to change appliance settings.
Making larger changes of the temperature settings may take the
appliance a few hours to reach new settings.
Recent big changes in
temperature settings.
Especially introduction of larger quantities of new bottles to the
appliance may take longer for the appliance to reach the set
temperature range.
Introduction of new bottles.
If possible, we recommend to introduce already cooled bottles to the
appliance.
We recommend to let the appliance cool down to the set temperature
before introducing the first batch of your wine bottles.
It may take a few hours for the appliance to cool to the requested
setting after being turned on.
Recent start-up of the
appliance.
We recommend to let the appliance cool down to the set temperature
before introducing the first batch of your wine bottles.
Make sure that the appliance is installed in a well ventilated room
and is not exposed to extremely high or extremely low temperatures.
For detailed appliance installation instructions please refer to the user
manual [see chapter “Selecting the location”].
Extreme ambient
temperatures.
In case none of the above countermeasures helped and the "temperature out of range" warning
persists, please contact a service center.
60
Solving problems
Humidity out of range
CountermeasuresPossible cause
Try to minimize opening the door of the wine climate cabinet
appliance. Prepare loading plan of large quantities of bottles in
advance to minimize the required time for loading.
Frequent and/or long door
openings.
Try to use the ConnectLife mobile application as much as possible
to change appliance settings.
Making larger changes of the temperature settings may take the
appliance a few hours to reach new settings.
Recent big changes in
temperature settings.
Humidity levels in the appliance are strongly dependent on the
temperature changes and take longer to stabilize.
It may take a few hours for the appliance to cool to the requested
setting after being turned on.
Recent start-up of the
appliance.
Humidity levels in the appliance are strongly dependent on the
temperature changes and take longer to stabilize.
Make sure that the appliance is installed in a well ventilated room
and is not exposed to extremely high or extremely low temperatures.
Humidity levels in the appliance are strongly dependent on the
temperature changes and take longer to stabilize.
Extreme ambient
temperatures and/or humidity
levels.
For detailed appliance installation instructions please refer to the user
manual [see chapter “Selecting the location”].
In case of use in ambient with extremely high or extremely low
humidity levels you can purchase humidity stabilizer accessory set.
In case none of the above countermeasures helped and the "humidity out of range" warning persists,
please contact a service center.
Power failure
CountermeasuresPossible cause
If this power cut-outs appear to be frequent, contact professional
electrician to check electrical fuses, outlets and appliance's power
connecting cable.
Recent and/or frequent
power failure.
Power supply reset
In case of power failure or appliance is unplugged when it is functioning (Appliance-On), compressor
operation is blocked for 300 seconds when power is restored.
After power is restored, appliance control mode will be the same as set before disconnection.
61
Solving problems

Error notifications
If a component inside the appliance is failing, a notification will pop-up.
The notification will display a code. Codes for these errors can be found in the table below.
Code shown on
Display 'H'
Code shown on
Display 'T'
Description
Error
Code
E0E0
Communication error from power board to user
interface electronics.
E0
1EWi-Fi module can not turn on.E1
4EWi-Fi module can not connect to Cloud Service.E4
5E'Hard Pairing' process not successful.E5
6E'Unpair all' process not successful.E6
E8E8
Communication error from user interface electronics
to power board.
E8
9EDoor sensor error.E9
1FAppliance's compartment fan error.F1
2FCondenser fan error.F2
1HAppliance's compartment humidity sensor error.H1
1PProximity sensor error.P1
1tEnvironment temperature/humidity sensor error.t1
2tAppliance's compartment temperature sensor error.t2
3tEvaporator temperature sensor error.t3
1UVibration sensor error.U1
18Wi-fi modul error.81
In case there is a communication error between power board and user interface electronics, other
errors will not be displayed.
If any error indication on displays 'T' and 'H' is active, then other action on display is not possible.
For that there are, anyway, some exceptions:
• in case of any of alarms is active: alarm key is active (to reset active alarm),
• in case of active Key Lock mode: key lock key is active (for deactivating key lock),
• On/Off key is active, to enter Off mode with a 3 seconds press.
If several different errors are active in the same time, they will be displayed sequentially.
If after 3 hours since the user closed the message, the error is still not resolved, the error message
is displayed again.
62
Solving problems

The exception is error P1 (Proximity sensor), where the user can choose not to display this error
anymore. Error itself can not be disabled.
General problems
Cause/SolutionProblem
Appliance cools continuously
for a long time.
• The ambient temperature is too high.
• The door has been opened for too long or too frequently.
• The door does not seal properly (the seal is dirty, the door is
misaligned or the seal is damaged, etc.).
• A larger quantity of bottles is newly inserted.
• Insufficient air circulation around the compressor and condenser.
Check that there is sufficient ventilation around the appliance.
Appliance makes a noise.
• The appliance is cooled by a cooling system with a noise-causing
compressor. The noise level depends on the installation of the
appliance, its correct use and age.
• When you connect the appliance to the power supply, the noise
made by the compressor or liquid refrigerant may be slightly
louder. This does not indicate a fault and has no effect on the
service life of the appliance.The appliance will produce more
noise for some time.
• The appliance may temporarily produce more noise after the
door has been opened for too long or too frequently or, there is
a large amount of newly inserted bottles.
• The appliance may produce more noise when operating in a high
temperature environment.
Check if LED lighting is turned on. For additional information see
chapter »Settings/Light«.
LED light is not working.
You may not try to repair LED lighting. Please contact a service center.
63
Solving problems
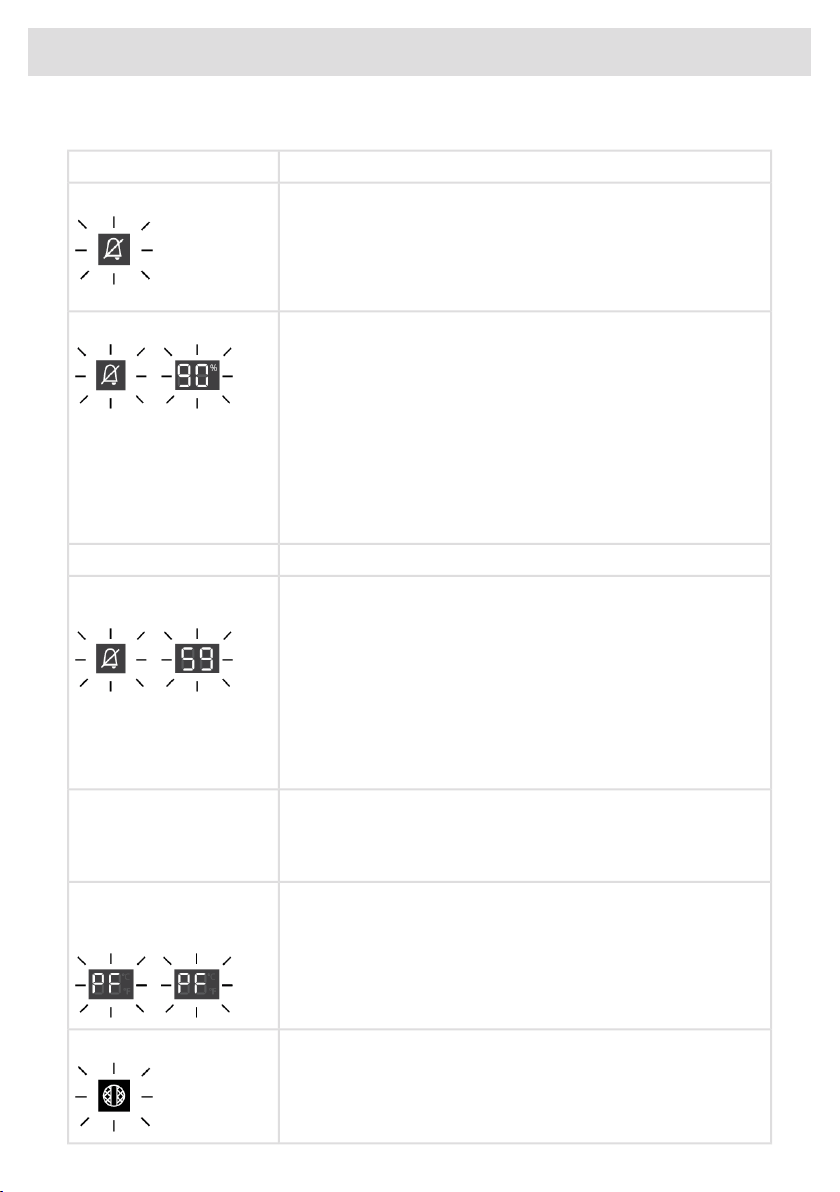
Other display warnings
Cause/SolutionWarning
The door is open:
• The door has been open too long: close the door.
• If the warning keeps showing, call the service center to arrange
repairs. The appliance operates in a safe mode until it is
corrected. The appliance automatically maintains the most
suitable temperature.
The value of humidity in the compartment is outside the permitted
limits.
The humidity is out of range:
Ensure that the appliance is located in in a well-ventilated area and
not exposed extremely low or extremely high temperatures.
You can find more information regarding possible causes and
potential solutions for this notification in section »Tips & Tricks«.
In the event that this occurs for a longer period of time since the last
intervention on the device (change tobetting, loading bottles, opening
doors,…) may mean that moisture sensor is out of order. Contact a
service center to correct the error. The appliance will operate in safe
mode until repaired by a service technician.
We advise to refill humidity box zone to stop the notification.The humidity is below 50%:
The temperature in the compartment is outside the permitted limits.The temperature is out of
range:
You can find more information regarding possible causes and
potential solutions for this notification in section »Tips & Tricks«
In the event that this occurs for a longer period of time since the last
intervention in the device (change of setting, loading of bottles,
opening of doors,…) it may mean that temperature sensor is out of
order. Contact a service center to correct the error. The appliance
will operate in safe mode until repaired by a service technician.
The appliance will automatically maintain the most suitable
temperature.
The detected vibrations of the appliance are outside the permitted
limits.
The vibrations are too high:
Check that the appliance is installed correctly (“Installation and
connection”).
After power is restored to the appliance, measured temperature in
the appliance is out of range. This means 3°C above or 3°C below
the setpoint temperature.
After the power is restored –
measured temperature is out
of range:
Replace the air filter.Charcoal filter is expired:
64
Solving problems

INFORMATION!
When calling a service center, you will have to state the type, model and serial number indicated
on the type plate on the inside of the appliance [see chapter “Selecting the location”].
When waiting for a service technician, do not open the appliance door to avoid an unnecessary
rise in temperature.
65
Solving problems
Disposal of packaging and appliance
This appliance is made from sustainable materials. This appliance must be disposed of in a
responsible manner at the end of its service life. Contact the local authorities for information about
the method.
INFORMATION!
See also the chapter ‘Disposal’ in the Safety instructions.
The packaging of the appliance is recyclable. The following materials may have been used:
• Cardboard.
• Polyethylene foil (PE).
• CFC-free polystyrene (hard PS foam).
These materials must be disposed of in a responsible manner and in accordance with government
regulations.
The appliance is marked with a crossed out wheeled bin symbol to
draw your attention to the requirement for the separate disposal of
domestic electrical appliances. This means that the appliance may not
be disposed of in unsorted household waste at the end of its service
life. The appliance must be taken to a special municipal waste
processing location for separated waste or to a dealer who provides
this service.
Collecting and disposing of domestic appliances separately avoids
detrimental consequences for humans and the environment. This
ensures that the materials used to make the appliance can be recovered
and that substantial savings in the use of energy and raw materials can
be achieved.
Declaration of conformity
We hereby declare that our products conform to the applicable
European Directives, Regulations and requirements, as well as all
requirements in the standards to which reference is made.
66
Environmental aspects

Limited Warranty – Residential Appliances
This Limited Warranty covers parts and labor, except as set forth in this Limited Warranty. Service
must be providedby an authorized ASKO service company. YOUR SOLE AND EXCLUSIVE REMEDY
UNDER THIS LIMITED WARRANTY SHALL BE PRODUCT REPAIR AS PROVIDED HEREIN. This
Limited Warranty is valid only when the ASKO Product is used in the country in which it was
purchased. Proof of original purchase date is required to obtain service under this Limited Warranty.
Residential ASKO Products Used Exclusively for Household/Personal Purposes:
Two (2) Years limited Warranty – Any warranty service claims for residential ASKO Products must
be filed with ASKO within two (2) years from date of purchase. Service will be provided during normal
business hours.
Residential ASKO Products Not Used Exclusively for Household/Personal Purposes or used
Commercially or used in Marine, Mobile or Aeronautical Applications:
One (1) Year limited Warranty– Any warranty service claimsfor ASKO Products not used exclusively
for household and personal use, or used commercially or used in marine, mobile, or aeronautical
applications must be filed with ASKO within one (1) year from date of purchase. Service will be
provided during normal business hours.
Items excluded from warranty
This limited warranty does not cover:
1. Replacement parts or repair labor if the ASKO Product is used in a manner that is inconsistent
with published user or operator instructions and/or installation instructions.
2. Service calls to correct the installation of the ASKO Product, to instruct you on how to use the
ASKO Product, to replace or repair house fuses, or to correct house wiring or plumbing.
3. Consumable items and parts, such as filters.
4. Damage resulting from accident, alteration, misuse, abuse, negligence, fire, flood, acts of God,
improper use, improper installation, installation not in accordance with electrical or plumbing
codes, or use of products not approved by ASKO, as well as any attempted repair by other than
authorized ASKO service companies.
5. Cosmetic damage, including scratches, dents, chips or other damage to the finish of the ASKO
Product, unless such damage results from defects in materials or workmanship and is reported
to ASKO within 5 days from date of purchase.
6. Pickup and delivery. The ASKO Product is intended to be repaired in your home.
7. Repairs to parts or systems resulting from unauthorized modifications made to the ASKO Product.
8. Expenses for travel and transportation for product service if the ASKO Product is located in a
remote area where service by an authorized ASKO service company is not available.
9. The removal and reinstallation of the ASKO Product if it is installed in an inaccessible location
or is not installed in accordance with ASKO’s published installation instructions.
10. Replacement parts or repair labor on ASKO Products with original model/serial numbers that
have been removed, altered or cannot be easily determined.
Disclaimer
YOUR SOLE AND EXCLUSIVE REMEDY UNDER THIS LIMITED WARRANTY SHALL BE PRODUCT
REPAIR AS PROVIDED HEREIN. EXPRESSLY DISCLAIMED ARE ALL OTHER EXPRESS AND IMPLIED
WARRANTIES, INCLUDING ANY IMPLIED WARRANTIES OF MERCHANTABILITY AND FITNESS
FOR A PARTICULAR PURPOSE. Some jurisdictions do not allow exclusion or limitations regarding
67
Service and warranty

warranty rights.This Limited Warranty gives you specific legal rights and you may have other rights
that vary from jurisdiction to jurisdiction. Attempted repair by any person other than an authorized
ASKO service company will void this Limited Warranty.
Limitation of liability
IN NO EVENT SHALL ASKO OR THE MANUFACTURER AND THEIR RESPECTIVE PARENTS, SUB-
SIDIARIES AND AFFILIATES BE LIABLE FOR CONSEQUENTIAL, INCIDENTAL, EXEMPLARY,
PUNITIVE OR SPECIAL DAMAGES. IN NO EVENT SHALL ASKO OR THE MANUFACTURER AND
THEIR RESPECTIVE PARENTS, SUBSIDIARIES AND AFFILIATES BE LIABLE FOR DAMAGES OTHER
THAN ACTUAL DAMAGESAND IN NO EVENT FOR DAMAGES IN EXCESS OF THE PRICE PAID
FOR THE ASKO PRODUCT AS TO WHICH A CLAIMIS MADE. Some jurisdictions do not allow the
exclusion or limitation of incidental, consequential or other damages, so these limitations and
exclusions may not apply to you. This Limited Warranty gives you specificlegal rights. You also may
have other rights that vary from jurisdiction to jurisdiction.
ASKO Customer Care
Read the chapter Solving problems before contacting the service department. If you have encountered
a problem that you cannot resolve, please contact your nearest dealer.
Service after expiration of limited warranty
For information about obtaining parts and labor after expiration of this Limited Warranty or arising
outside the scope of this Limited Warranty, please contact ASKO Customer Care.
68
Service and warranty
875291
US.ASKO.COM • CA.ASKO.COM • ASKO.COM/MX
-a1