Loading ...
Loading ...
Loading ...
English 14
9-1 Power on and check operation
• Make sure to perform the check operation after installation. (If the air
conditioner is operated using the indoor remote controller without
performing the check operation, the malfunction code “U3” is dis-
played in the indoor remote controller, and normal operation is dis-
abled.)
• In the check operation, the status of the outdoor unit is checked, and
incorrect wiring is checked for.
<Cautions on check operation>
• If the air conditioner is started within about 12 minutes after the
power of the indoor/outdoor unit is turned on, the H2P indicator lights
and the compressor does not run.
Confirm that the LED status is as shown in the table in (2) in
“9-1 Power on and check operation” before starting the air condi-
tioner.
• The air conditioner may require about 10 minutes maximum until it
can start the compressor after start of operation.
This period of time is required to homogenize the refrigerant status,
and does not indicate any failure.
• The check operation does not provide any means of checking the
indoor unit individually. For that purpose, perform the normal oper-
ation using the remote controller after finishing the check operation.
• The check operation is not available in any other mode such as the
recovery mode.
• Before running a check on the unit, changing the indoor remote con-
troller settings might cause the error code “UF” to be displayed and
prevent a proper check to be run.
9-2 Checks in normal operation
• After finishing the check operation, operate the air conditioner nor-
mally. (Heating operation is only available for RZQ-P models.)
(Heating is not available if the outside air temperature is 75 °F or
more. Refer to the operation manual supplied together with the
unit.)
• Confirm that the indoor and outdoor units are operating normally.
(If a knocking sound is heard in the liquid compression of the com-
pressor, stop the air conditioner immediately and energize the crank-
case heater for a sufficient period of time, then start the operation
again.)
• Run the indoor unit one by one in turn, and confirm that the corre-
sponding outdoor unit is running.
• Check to see if cold (or hot) air is coming out of the indoor unit.
• Press the fan direction button and fan speed control button on the
remote controller to see if the fan is operating normally.
<Cautions for normal operation check>
• Once stopped, the compressor will not start for about 5 minutes even
if the “ON/OFF” button on the remote controller is pressed.
• When the system operation is stopped by the remote control, the
outdoor unit may continue to operate for a further 3 minutes.
• If the system has not undergone the check operation by the test run
button since it was first installed, a malfunction code “U3” is dis-
played.
In this case, perform the check operation by referring to “9-1 Power
on and check operation”.
Make sure to turn
on the power 6 hours
before starting operation
for supplying the power
to the crankcase heater.
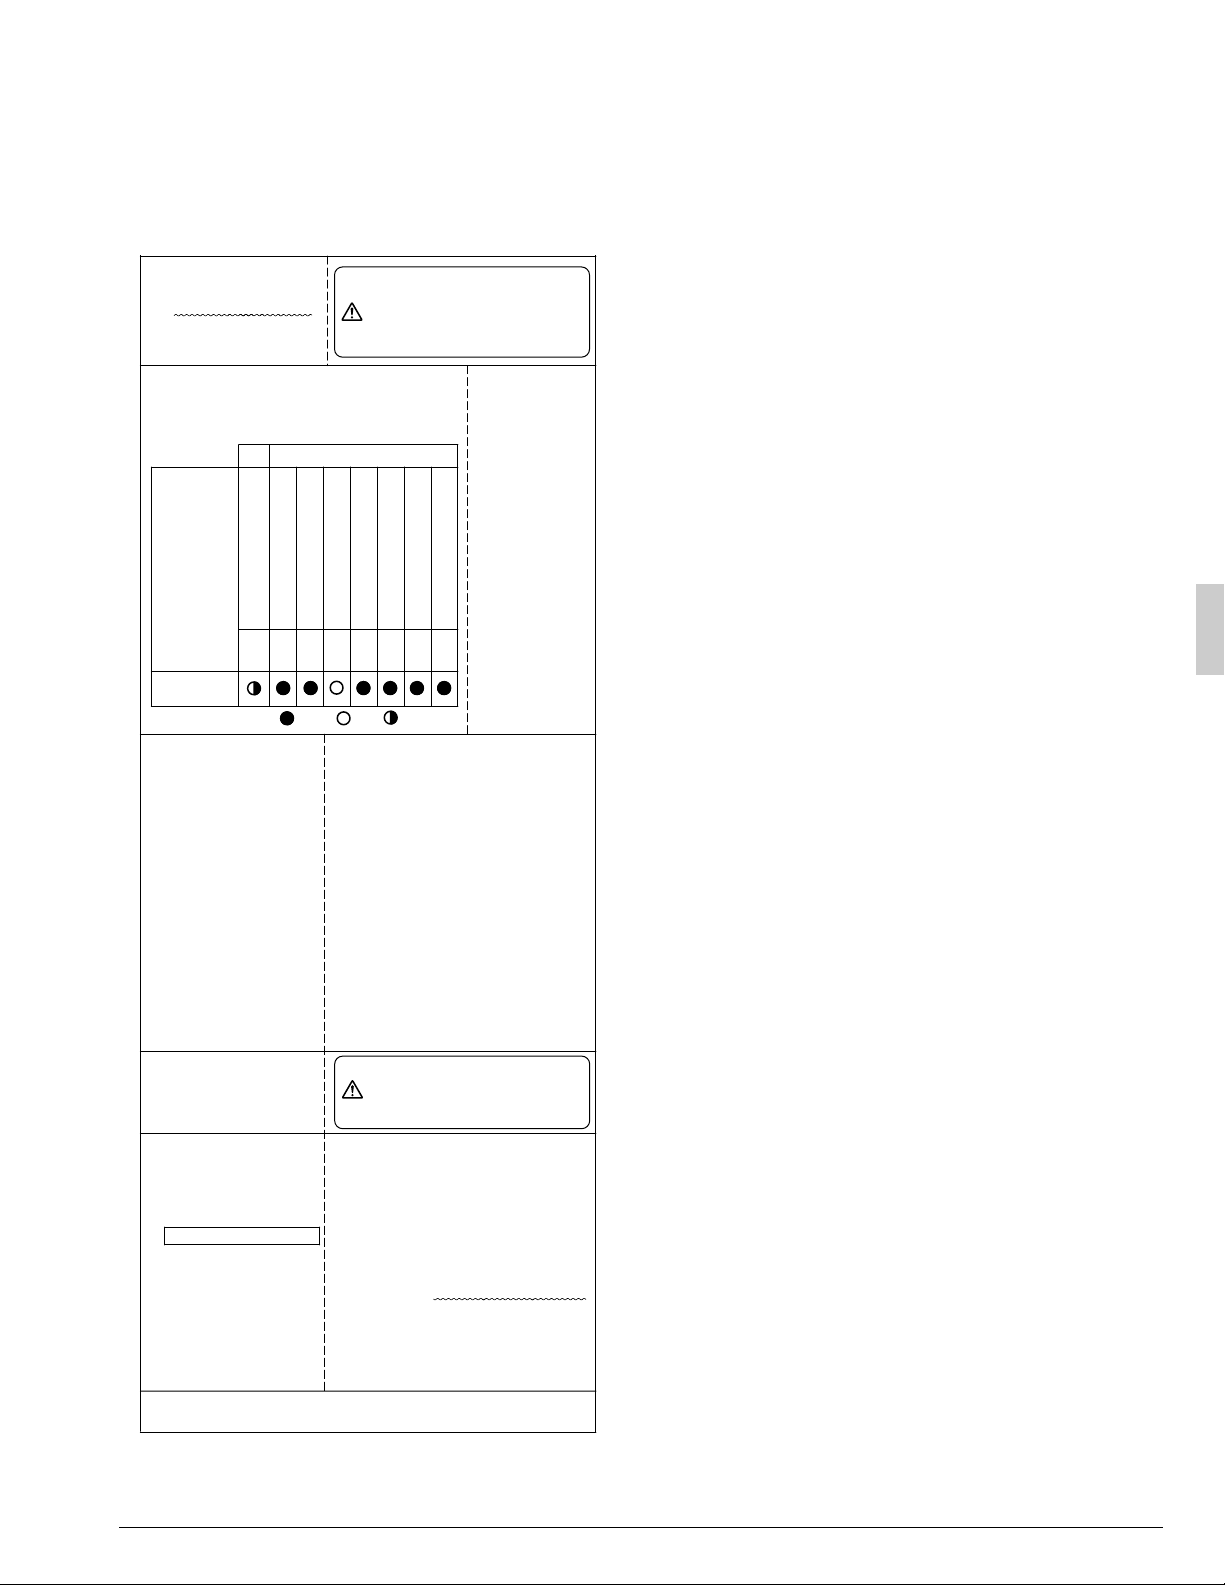
Caution
Outdoor
unit installed
H1P
H5P
H4P
H6P
H7P
H2P
H3P
HAP
Blinking
ON
OFF
LED display:
LED display
(Default
status
before
delivery)
Do not leave any stop
valve closed.
Otherwise the compressor
will fail.
SERVICE MONITOR
MODE
IND
SLAVE
MASTER
TEST/HWL
L.N.O.P.
DEMAND
• Close the front panel
of the outdoor unit.
• Turn ON the power
to the outdoor unit
and indoor unit.
(1)
(2)
• Open the front panel of the outdoor unit.
• Check the LED on the PC board (A1P
and A2P) in the outdoor unit to see if the
data transmission is performed normally.
(3)
(4)
Confirm that the stop
valves are open on both the
liquid and gas lines. If they
are closed, open them.
(5)
(6)
After the check operation, make sure to close the front
panel of the outdoor unit.
Caution
The power is
supplied to the
outdoor unit.
Take due care
during the work
to prevent
electric shock.
•
When performing the
low-noise operation
(L.N.O.P.) or demand
(DEMAND) operation
upon request from the
customer, perform the
setting using the
pushbutton switches
(BS1 to BS5) on the
PC board (A2P) in the
outdoor unit.
• Press each
pushbutton switch
from the opening of
the insulation cover.
(Do not remove the
insulation cover.)
• The power is supplied to the outdoor
unit. Take due care during the work to
prevent electric shock.
• Before using the pushbutton switches
(BS1 to BS5) for setting, confirm that
the microcomputer (SERVICE) monitor
is lit.
• For the setting method, refer to the
[Cautions on service] label attached on
the back of the front panel of the
outdoor unit. (Make sure to write the
contents of setting on the [Cautions on
service] label.)
Press and hold the test run
button (BS4) for 5 seconds or
more to start the check
operation.
For the details, refer to the
C
heck operation procedure
on the [Cautions on service]
label
.
• When leaving the outdoor unit during the
check operation for unavoidable reasons,
ask another installation worker to watch the
outdoor unit, or close the front panel.
• The system operates the check operation
for about 15 minutes (30 minutes
maximum), then stops automatically.
The system can start normal operation
about 5 minutes after the check operation if
the remote controller does not display any
malfunction code.
• During the check operation, the status
under execution is indicated on the remote
controller.
A2P
A1P
01_EN_3PN07193-7L.fm Page 14 Thursday, February 16, 2012 8:22 PM
Loading ...
Loading ...
Loading ...