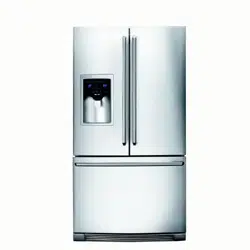
Use Et Care Guide
French Door Bottom Freeze_/Refrige_ator
Guia de Uso y Cuidado
Refrigerador con congelador inferior de puerta doble
Guide d'utilisation et d'entretien
R_frig_rateur 5 portes fran_aises/Cong_lateur en has

:i:_i_ii_i_!_!_i_i_ii_i_!iii!i!ii_!_i_i!_i_i!!_;i_i!_!:ii!_!:ii!_!_!ii_!_ii_i!_!!_!i_ii_i!ii_iiii_i_ii_:_!_i_i_!_;!i_ii_!i_i_i_i_iii_ii
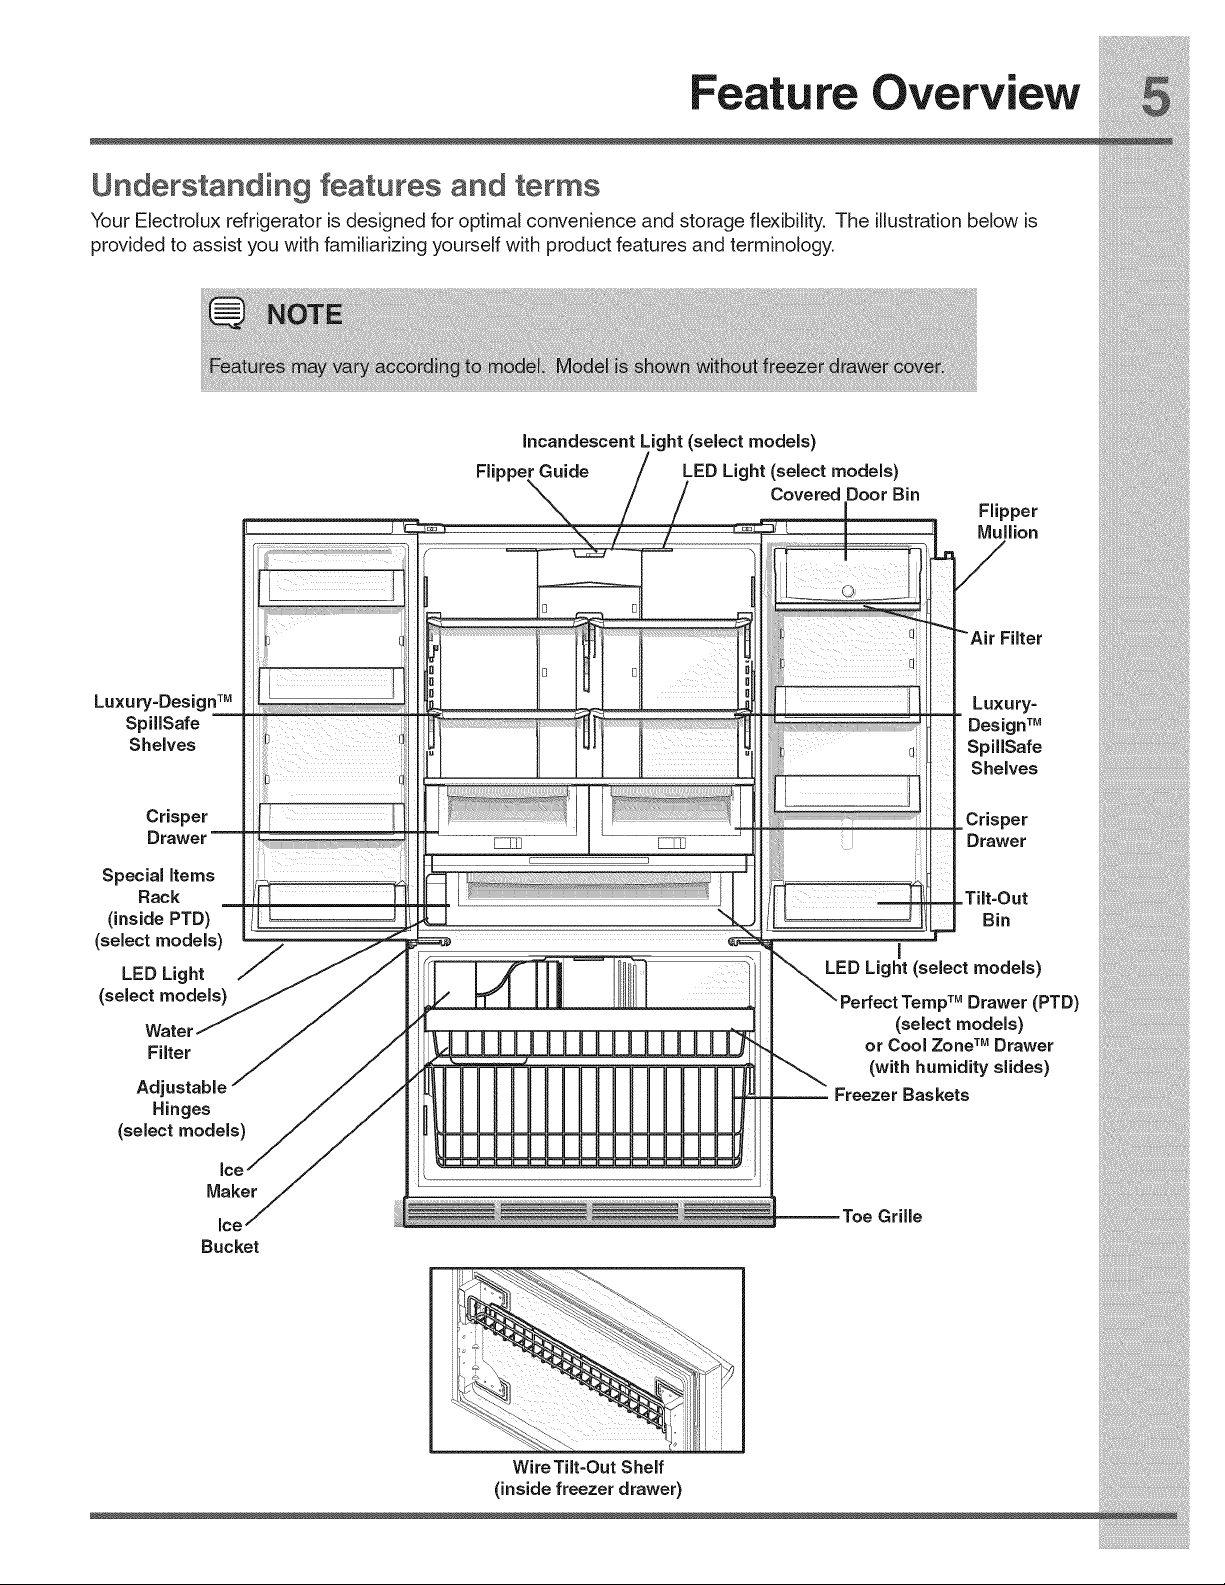
Finding information
Please read and save this guide TaMe of contents
Thank you forchoos ng E ectro ux our new prem um Fin in Inf rm in 2
[J g 0 at 0 ..............................................
brand in home appliances.This Use & Care Guide is
part of our comm tment to customer sat sfact on and f
Sa ely ............................................................... 3
;:::: product qualitythroughoutthe service life of your new
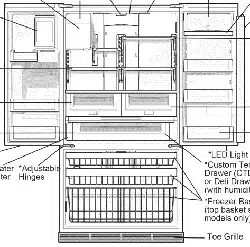
appliance. Feature Overview................................................. 5
Keep a [@COld fo[ quick Installation......................................................... 6
reference
Removing the Doors ............................................ 18
^ nn "in "h W" r^ I 1"
t;0 ecl gle ale _uppy .................................. ,_
__ c0.tro_s..........................................................._4
Electrolux model number
Aut0rnaticlcelVlaker............................................ 16
__nu--_-b_er St0rageFeatures ................................................ 17
Changing the Water andAir FiJters........................... 24
i!_!_i!i_ii_!i!_!_i!i_ii_!i!_!_i!i_ii_!i!_!_i!i_ii_!i!_!_i!i_ii_!i!_!_i!i_ii_!i!_!_i!i_ii_!i!_!_i!i_ii_!i!_!_i!i_ii_!i!_!_ii_i
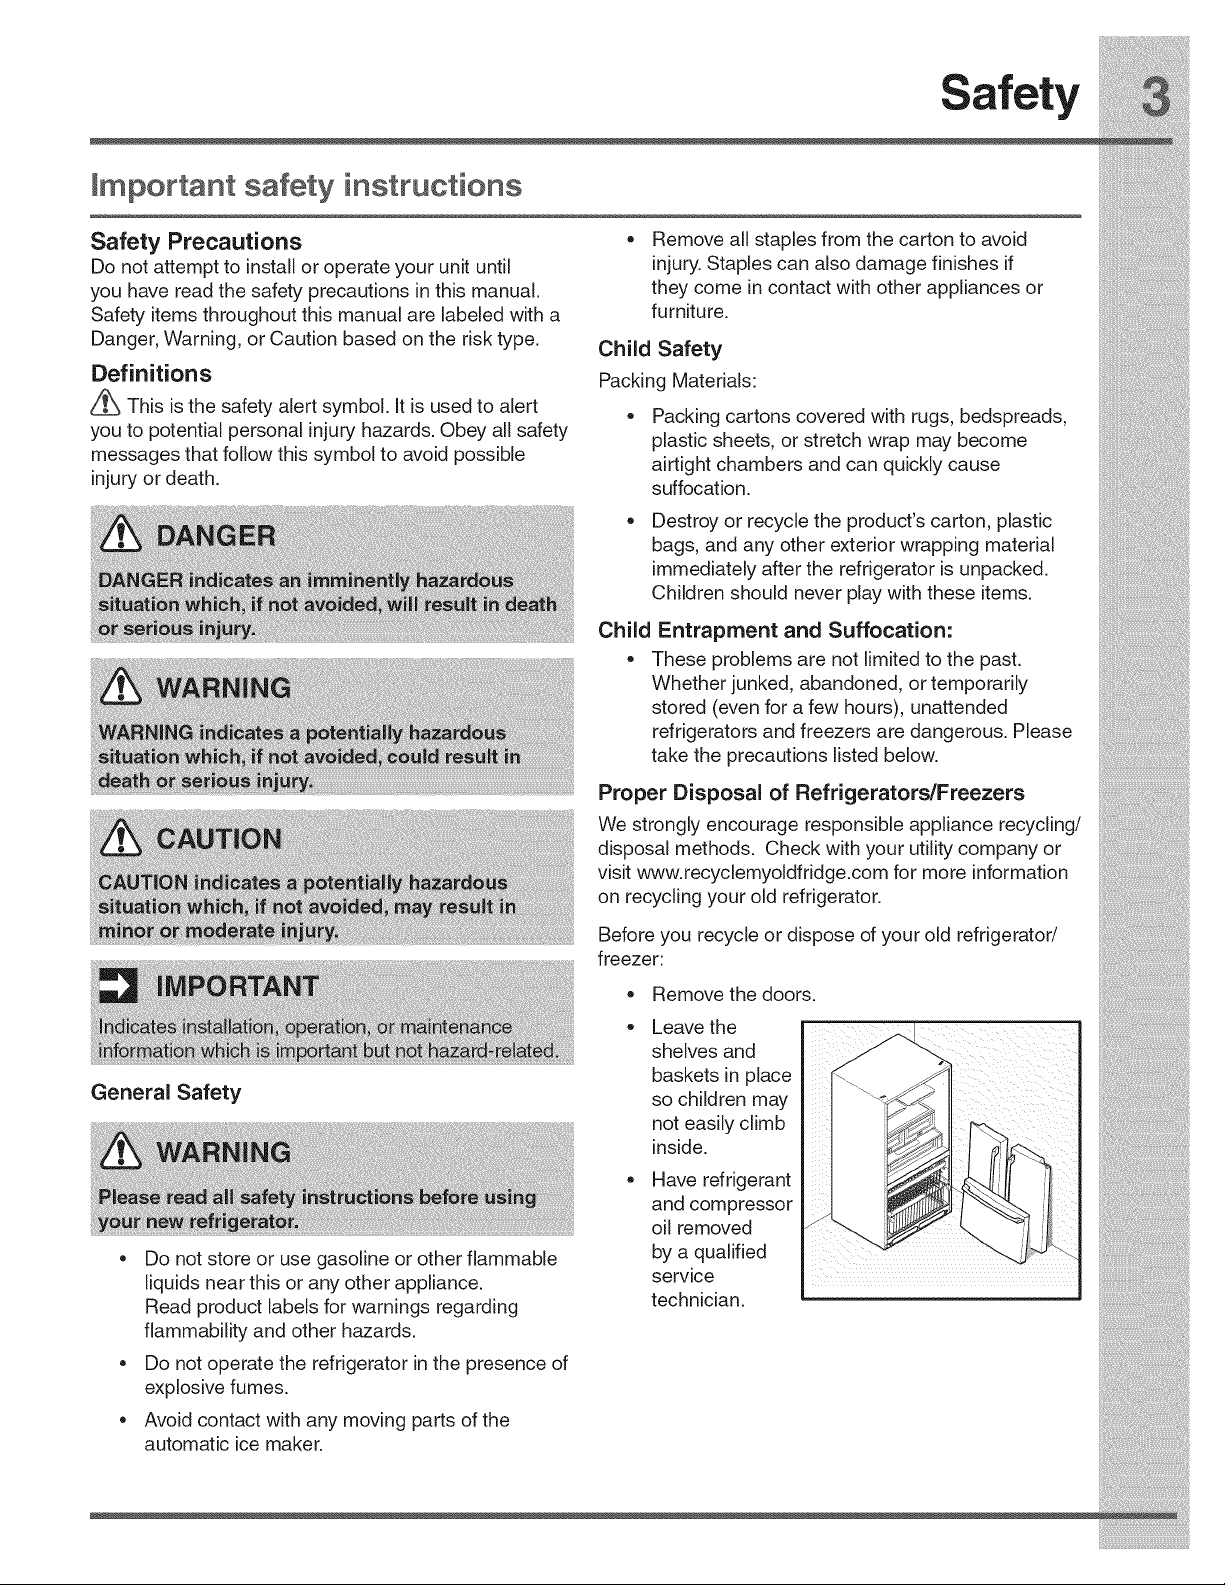
take the precautions listed below.
Proper Disposal of Refrigerators/Freezers i_i!_!_i!i_ii_!i!_!_i!i_ii_!i!_!_i!i_ii_!i!_!_i!i_ii_!i!_!_i!i_ii_!i!_!_i!i_ii_!i!_!_i!i_ii_!i!_!_i!i_ii_!i!_!_i!i_ii_!i!_!_iii_:_
Safety
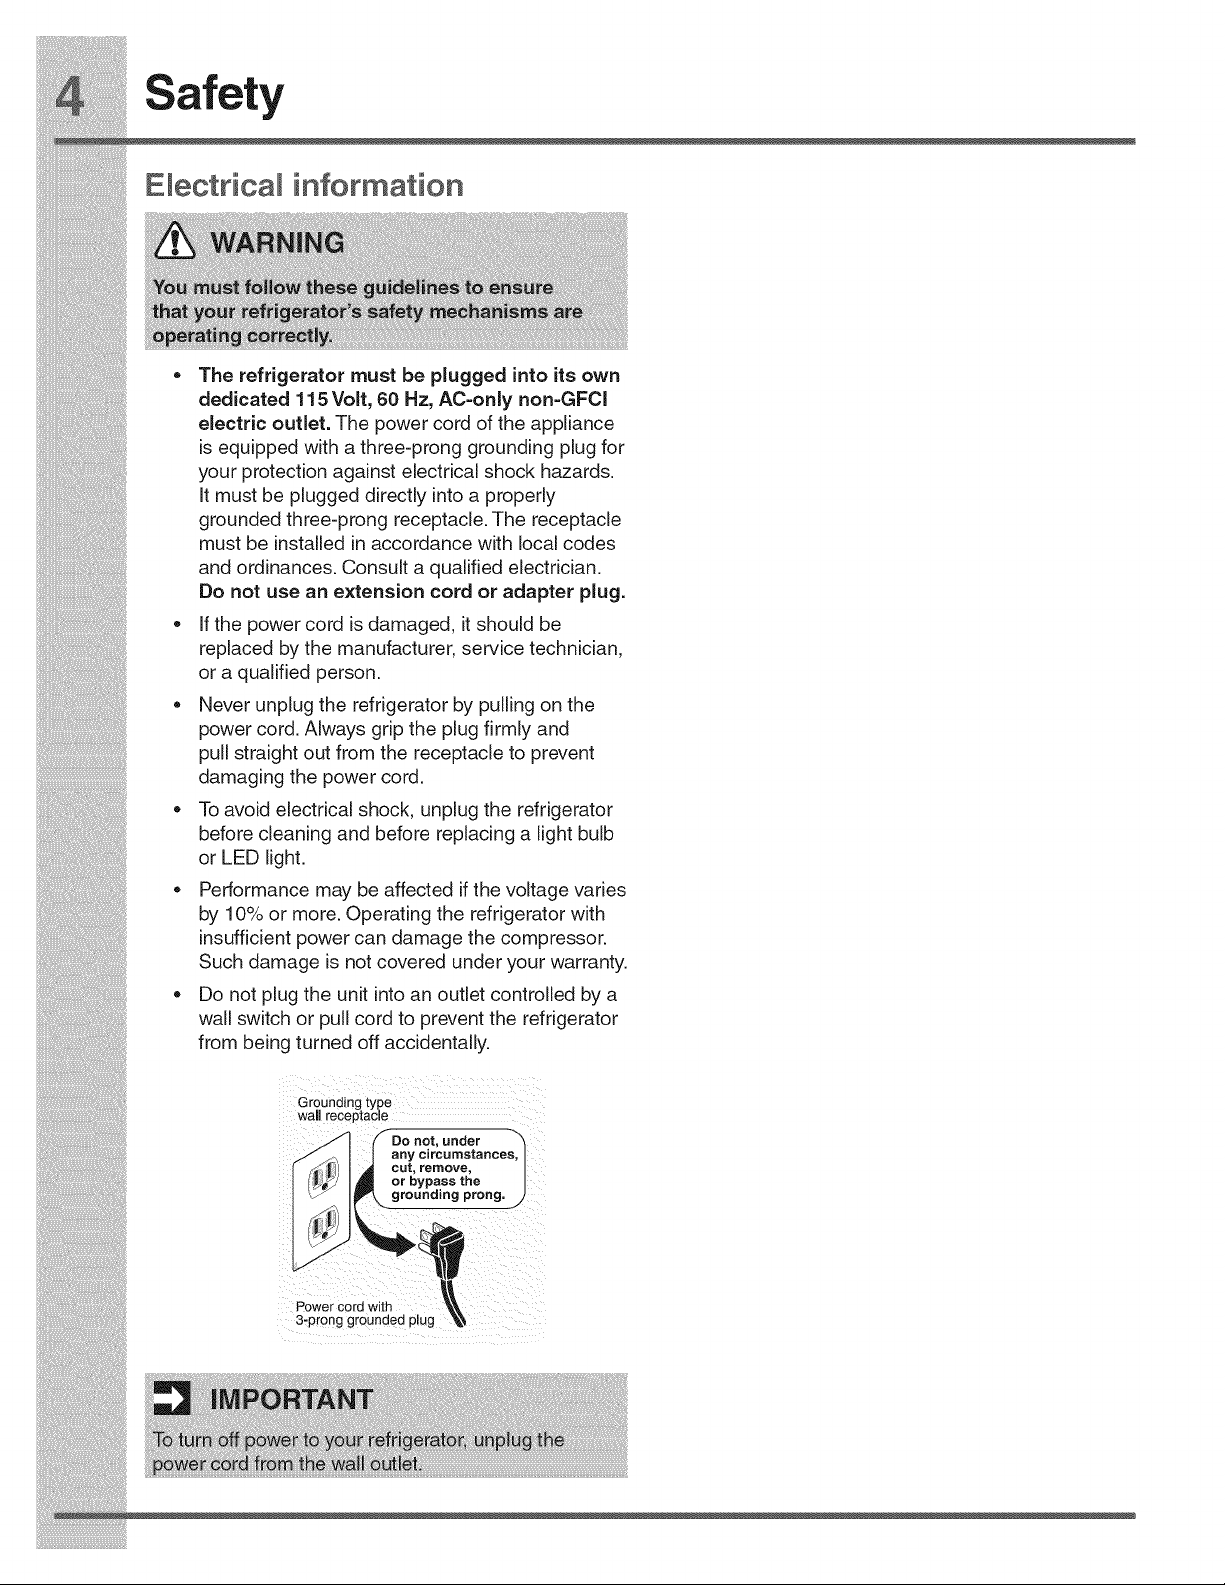
E ectrical information
=The refrigerator must be plugged into its own
dedicated 115 Volt, 60 Hz, AC-only non-GFCl
electric outlet. The power cord of the appliance
is equipped with a three-prong grounding plug for
your protection against electrical shock hazards.
it must be plugged directly into a properly
grounded three-prong receptacle. The receptacle
must be installed in accordance with local codes
and ordinances. Consult a qualified electrician.
Do not use an extension cord or adapter plug.
• If the power cord is damaged, it should be
replaced by the manufacturer, service technician,
or a qualified person.
Never unplug the refrigerator by pulling on the
power cord. Always grip the plug firmly and
pull straight out from the receptacle to prevent
damaging the power cord.
• To avoid electrical shock, unplug the refrigerator
before cleaning and before replacing a light bulb
• or LED light.
Performance may be affected if the voltage varies
by 10% or more. Operating the refrigerator with
insufficient power can damage the compressor.
Such damage is not covered under your warranty.
Do not plug the unit into an outlet controlled by a
wall switch or pull cord to prevent the refrigerator
from being turned off accidentally.
Grounding type
wwGallrnc_
3-prong groundedw= plug
;r c6rd from the Wall Outlet.
i!_!_i!i_ii_!i!_!_i!i_ii_!i!_!_i!i_ii_!i!_!_i!i_ii_!i!_!_i!i_ii_!i!_!_i!i_ii_!i!_!_i!i_ii_!i!_!_i!i_ii_!i!_!_i!i_ii_!i!_!_ii_i
Installation
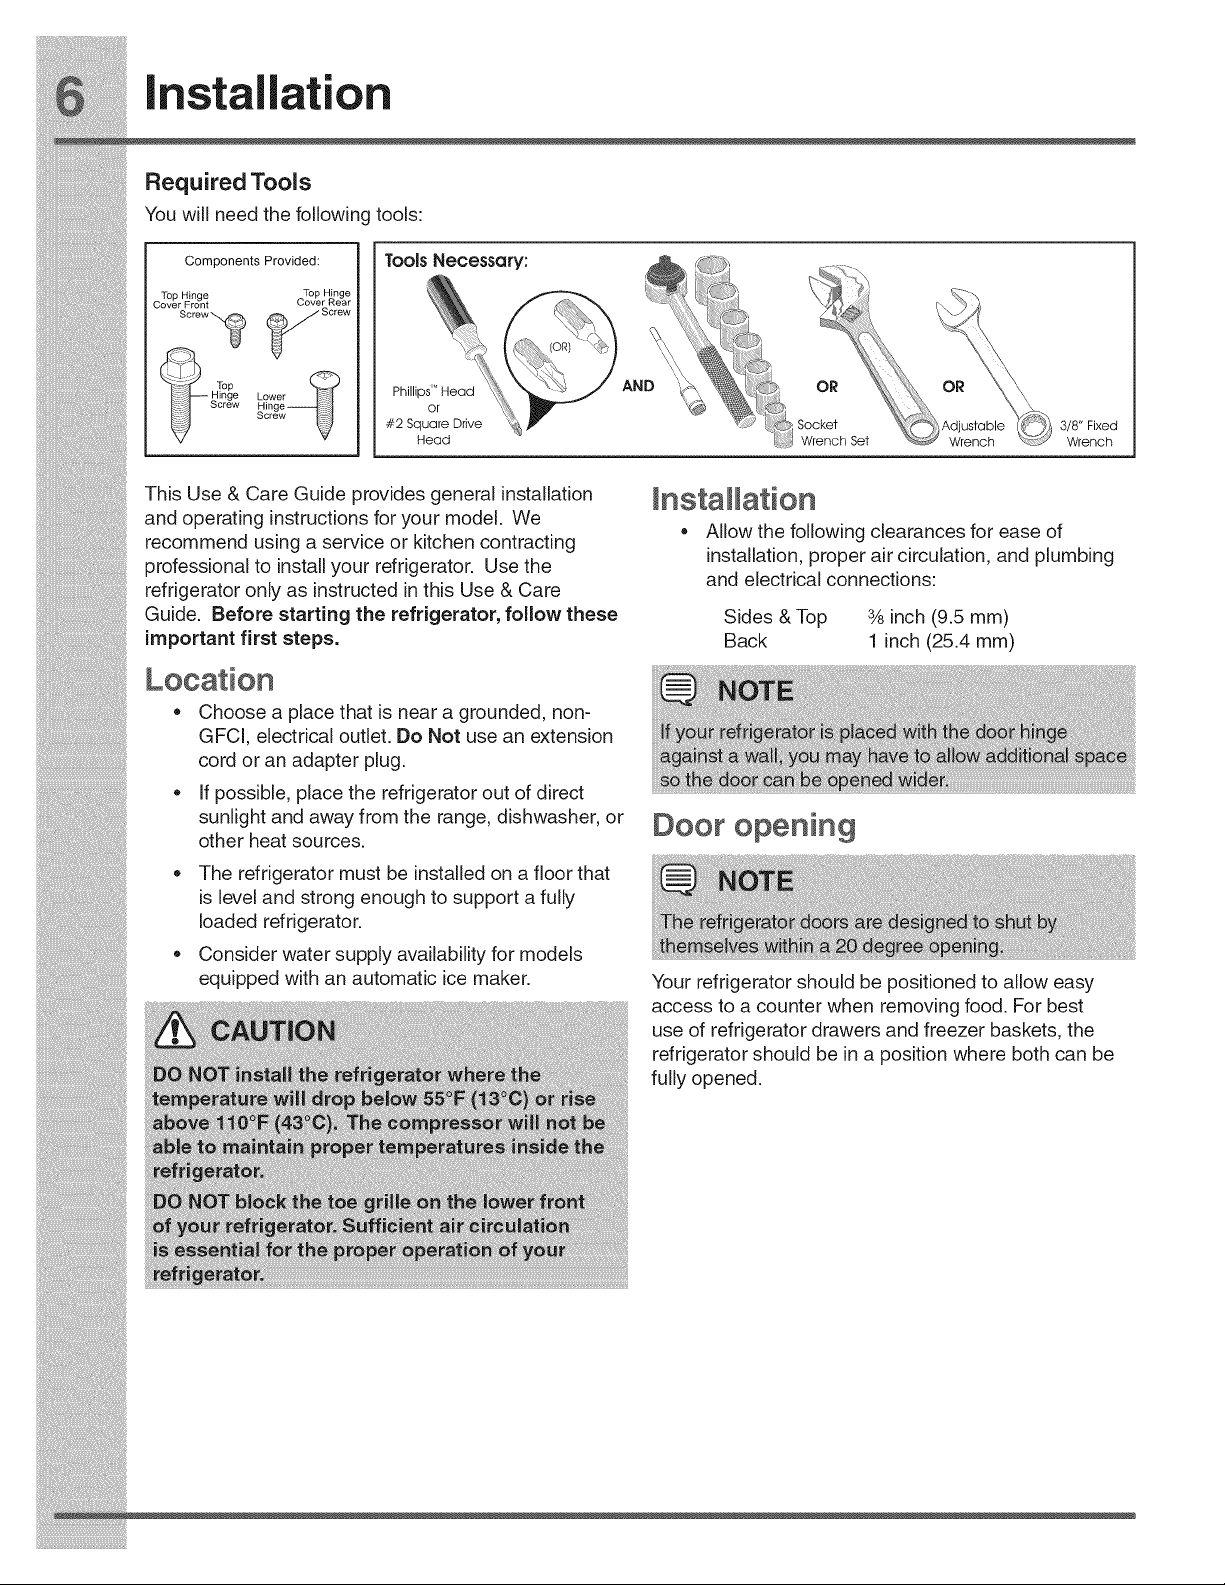
Required Tools
You will need the following tools:
Components Provided:
Top Hinge Top Hinge
Cover Front Cover Rear
S .... _ _S ....
sge_e_oow__
Screw_
Tools Necessary:
Phillips'" Head
or
#2 Square Drive
Head
AN OR
Socket 3/8" Fixed
Wrench Set Wrench
This Use & Care Guide provides general installation
and operating instructions for your model. We
recommend using a service or kitchen contracting
professional to install your refrigerator. Use the
refrigerator only as instructed in this Use & Care
Guide. Before starting the refrigerator, follow these
important first steps.
Allow the following clearances for ease of
installation, proper air circulation, and plumbing
and electrical connections:
Sides & Top % inch (9.5 mm)
Back 1 inch (25.4 mm)
Choose a place that is near a grounded, non-
GFCI, electrical outlet. Do Not use an extension
cord or an adapter plug.
i!_!_i!i_ii_!i!_!_i!i_ii_!i!_!_i!i_ii_!i!_!_i!i_ii_!i!_!_i!i_ii_!i!_!_i!i_ii_!i!_!_i!i_ii_!i!_!_i!i_ii_!i!_!_i!i_ii_!i!_!_ii_i
5
6
loosenfour(4)drawerscrews(two(2)oneach
side)toallowdrawertorotate.
Closedrawerandrecheckthesealonthegasket
(A). Openthedrawergrabbingbythesidesinthe
center(B). Be careful not to rotate the drawer.
Tighten four (4) drawer screws.
Recheck gasket seal.
7 Install the toe grille by fitting into place.
touching the cabinet on all four sides and that
cabinet is stable.
After unit is leveled, lower anti-tip leg until it
contacts the floor.
o
Door Door
i_i!_!_i!i_ii_!i!_!_i!i_ii_!i!_!_i!i_ii_!i!_!_i!i_ii_!i!_!_i!i_ii_!i!_!_i!i_ii_!i!_!_i!i_ii_!i!_!_i!i_ii_!i!_!_i!i_ii_!i!_!_iii_
Installation
i!_!_i!i_ii_!i!_!_i!i_ii_!i!_!_i!i_ii_!i!_!_i!i_ii_!i!_!_i!i_ii_!i!_!_i!i_ii_!i!_!_i!i_ii_!i!_!_i!i_ii_!i!_!_i!i_ii_!i!_!_ii_i
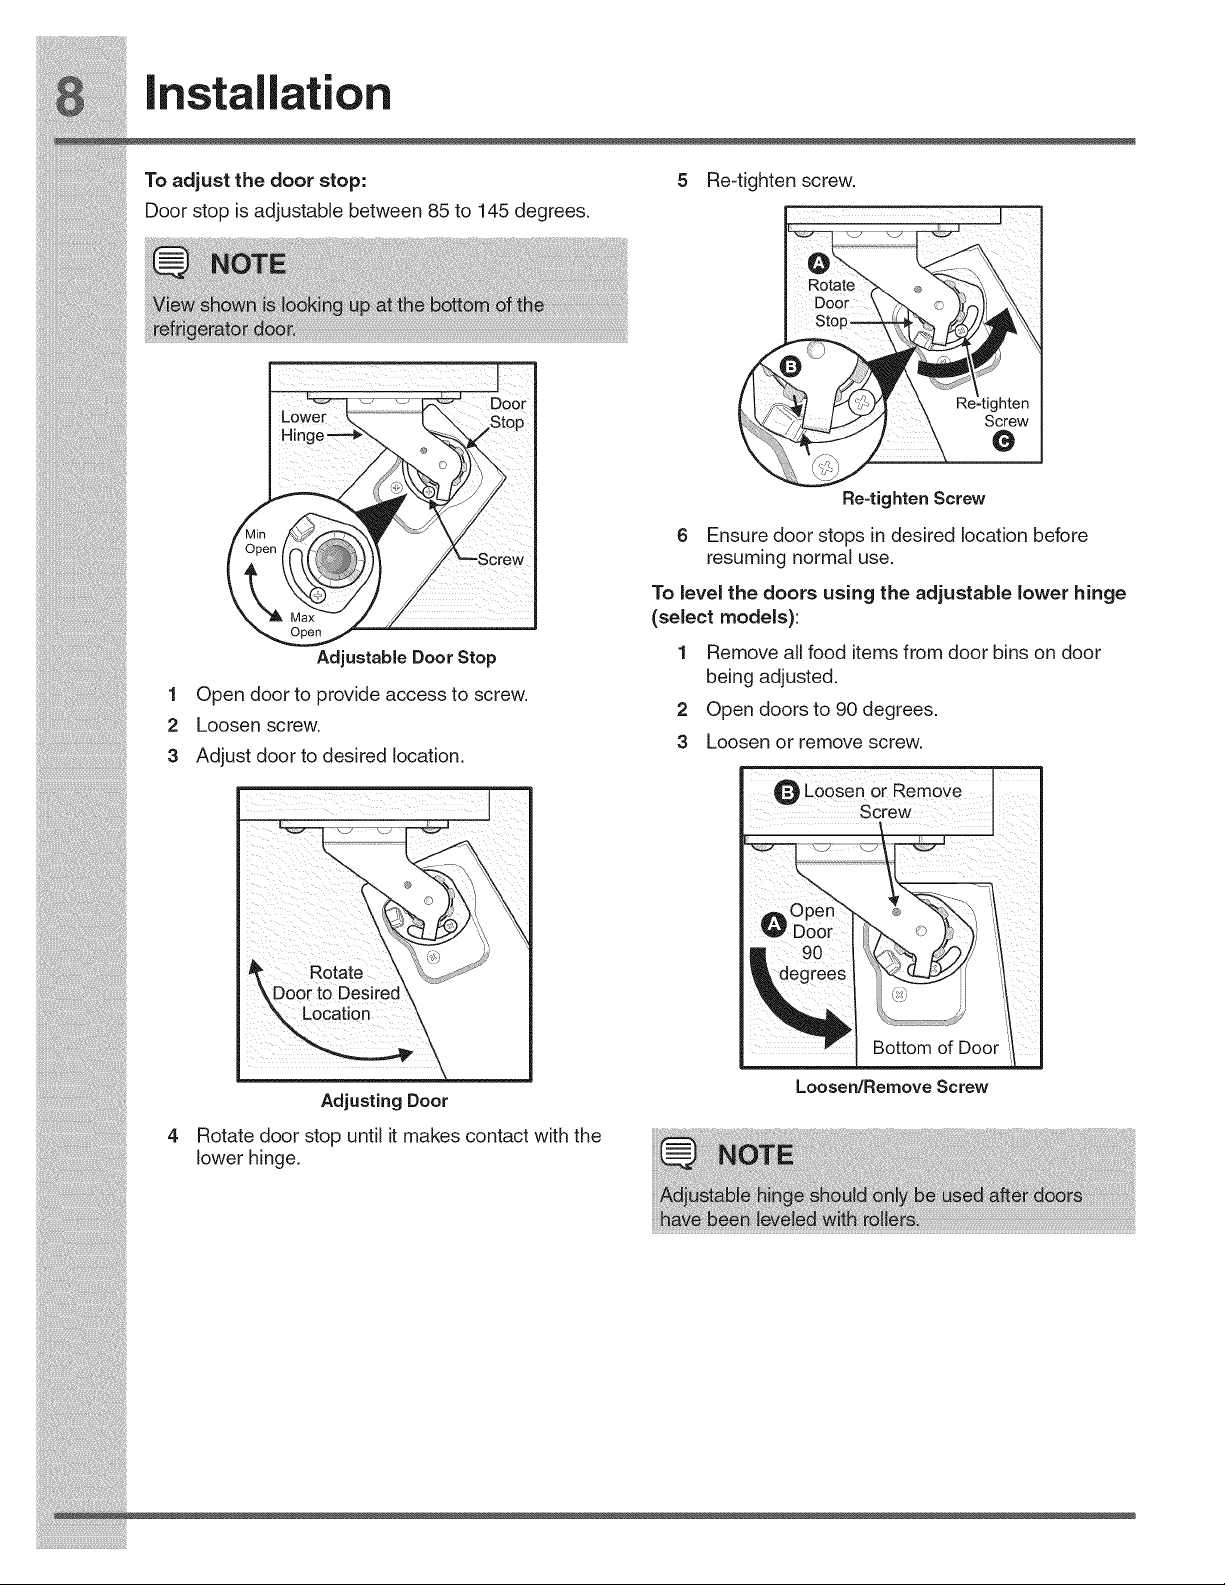
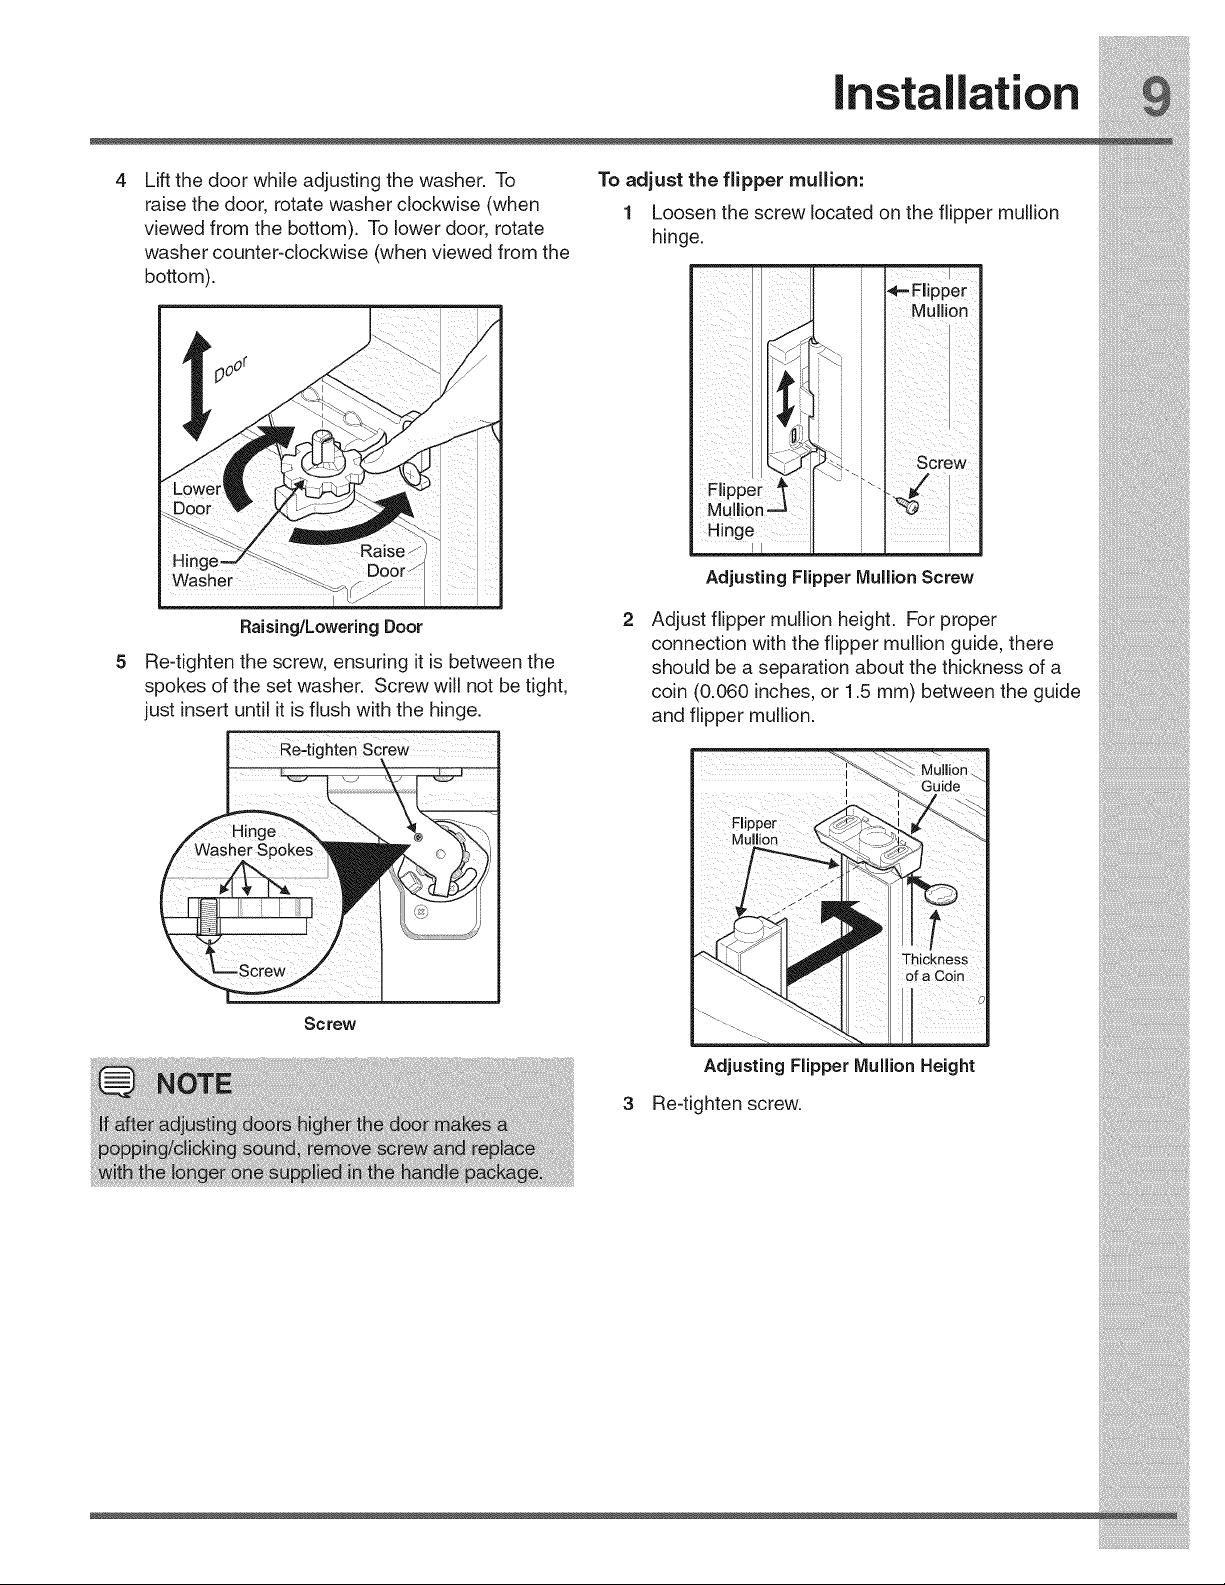
To adjust the door stop:
Door stop is adjustable between 85 to 145 degrees.
Adjustable Door Stop
1 Open door to provide access to screw.
2 Loosen screw.
3 Adjust door to desired location,
5 Re-tighten screw.
Screw
0
Re=tighten Screw
6 Ensure door stops in desired location before
resuming normal use.
To level the doors using the adjustable lower hinge
(select models):
1 Remove all food items from door bins on door
being adjusted.
2 Open doors to 90 degrees.
3 Loosen or remove screw.
i!_!_i!i_ii_!i!_!_i!i_ii_!i!_!_i!i_ii_!i!_!_i!i_ii_!i!_!_i!i_ii_!i!_!_i!i_ii_!i!_!_i!i_ii_!i!_!_i!i_ii_!i!_!_i!i_ii_!i!_!_ii_i
i_i!_!_i!i_ii_!i!_!_i!i_ii_!i!_!_i!i_ii_!i!_!_i!i_ii_!i!_!_i!i_ii_!i!_!_i!i_ii_!i!_!_i!i_ii_!i!_!_i!i_ii_!i!_!_i!i_ii_!i!_!_iii_
!_i_i_i!_!!i_!_i!i_!_i!!_!;_i_!i_i_!i!i_!!i_i!i_i!i!_!_i_ii_iiii_!_i_i_!_i_i!ii_!_!i!i_i_!!i_!!!_i_;_i!_;_i!_i_!_!;!i_;_!_!_
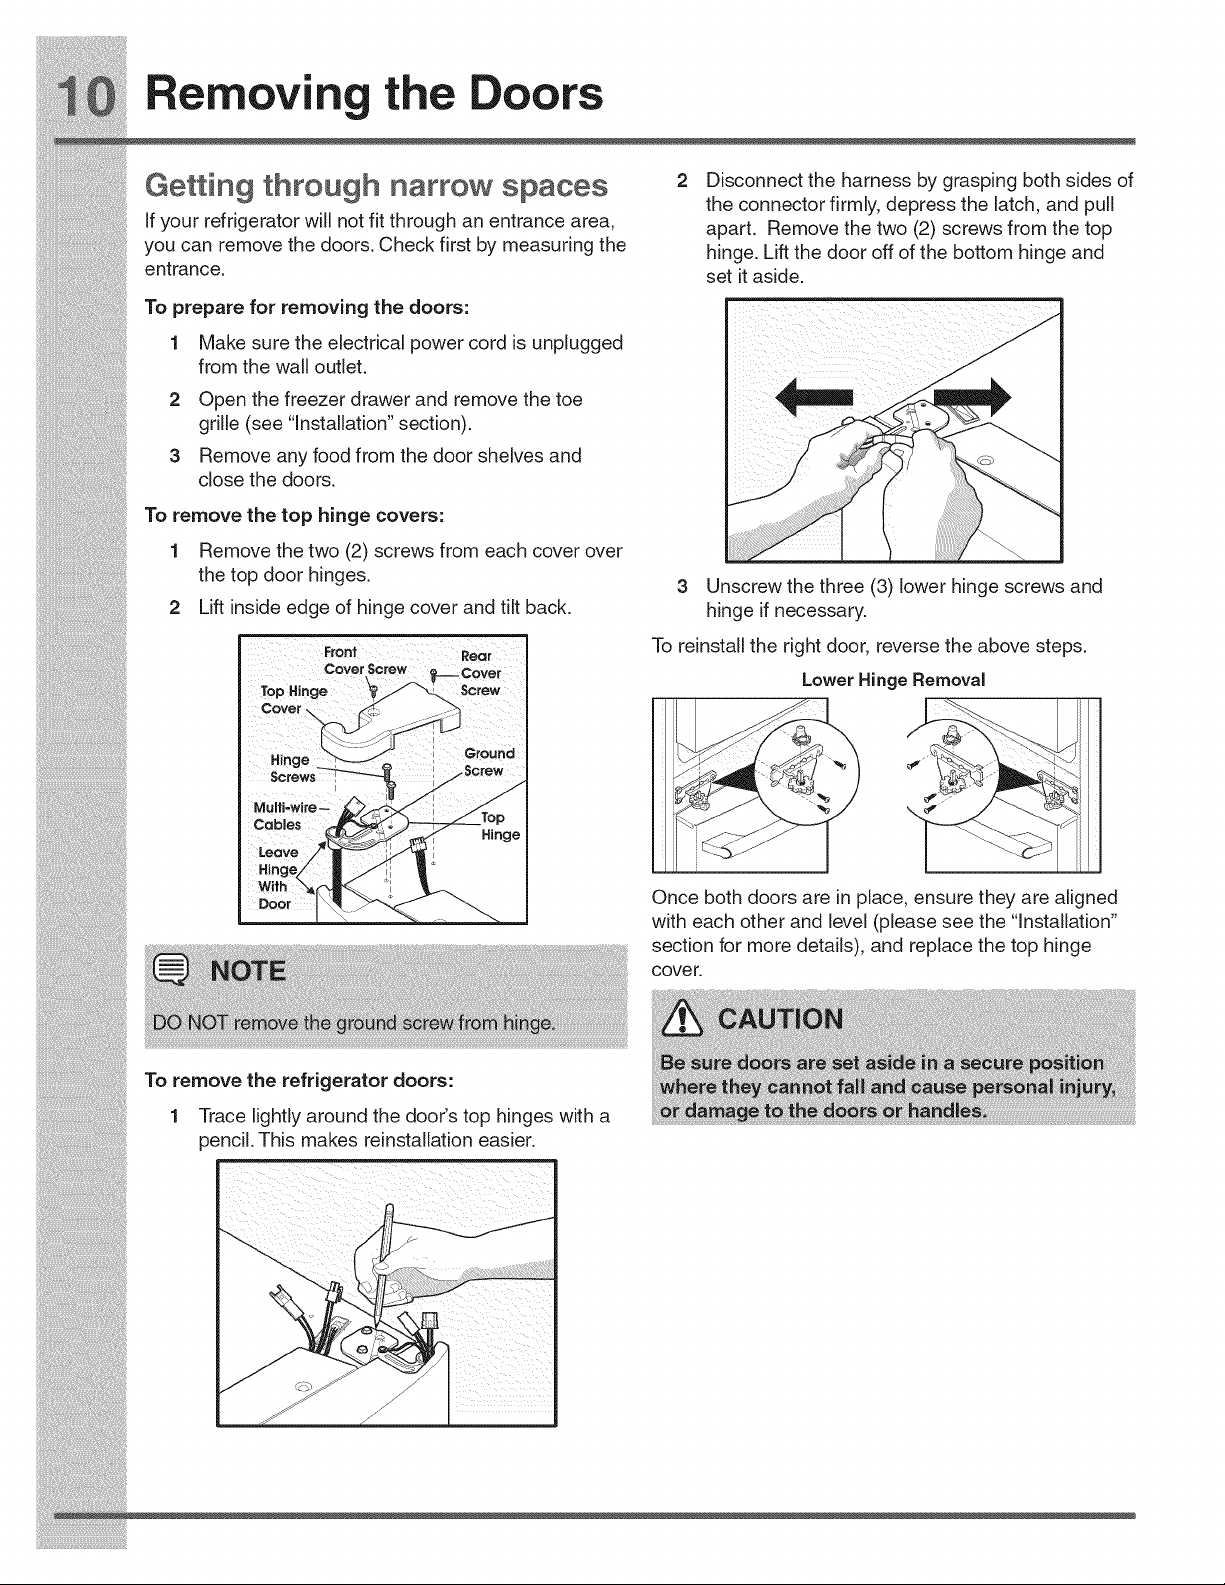
10 Removing the Doors
ttin thr h nrr w 2 Dsconnectthe harness bygraspng bothsdesof
G@ q OUq a 0 s_ao@s
, , _ . _, .the connectorfirmly depress the latch and pull
iTyour reTrigerator wht not Titthrougn an entrance area, apart Remove the two (2) screws from the top
youcanremovethedoors. Checkfirstbymeasuringthe hinge'.Liftthedooroffof'tlqebottomhingeanc!
entrance, set itaside.
To prepare for removing the doors:
1 Makesuretheelectricalpowercordisunpluggee
f,om,hew,t_o,_e_.
20penthefreezerdrawerandremovethetoe [ _ .._'_ [
grille(see"Installation section).
3 Removeanyfoodfromthedoorshelvesand
closethedoors.
1-o_o_ovothotophiogo_ovo_..
1 Removethetwo(2) screwsfromeachcoverover
the top door h nges
..... 3 Unscrew the three (3) lower hinge screws and
2 Lift insieeedgeofhingecoverandtiltback, hinge if necessary.
Toreinstalltherightdoor, reversetheabovesteps.
To_HinC°v erscrew -- _ _ LowerHingeRemoval
i!_!_i!i_ii_!i!_!_i!i_ii_!i!_!_i!i_ii_!i!_!_i!i_ii_!i!_!_i!i_ii_!i!_!_i!i_ii_!i!_!_i!i_ii_!i!_!_i!i_ii_!i!_!_i!i_ii_!i!_!_ii_i
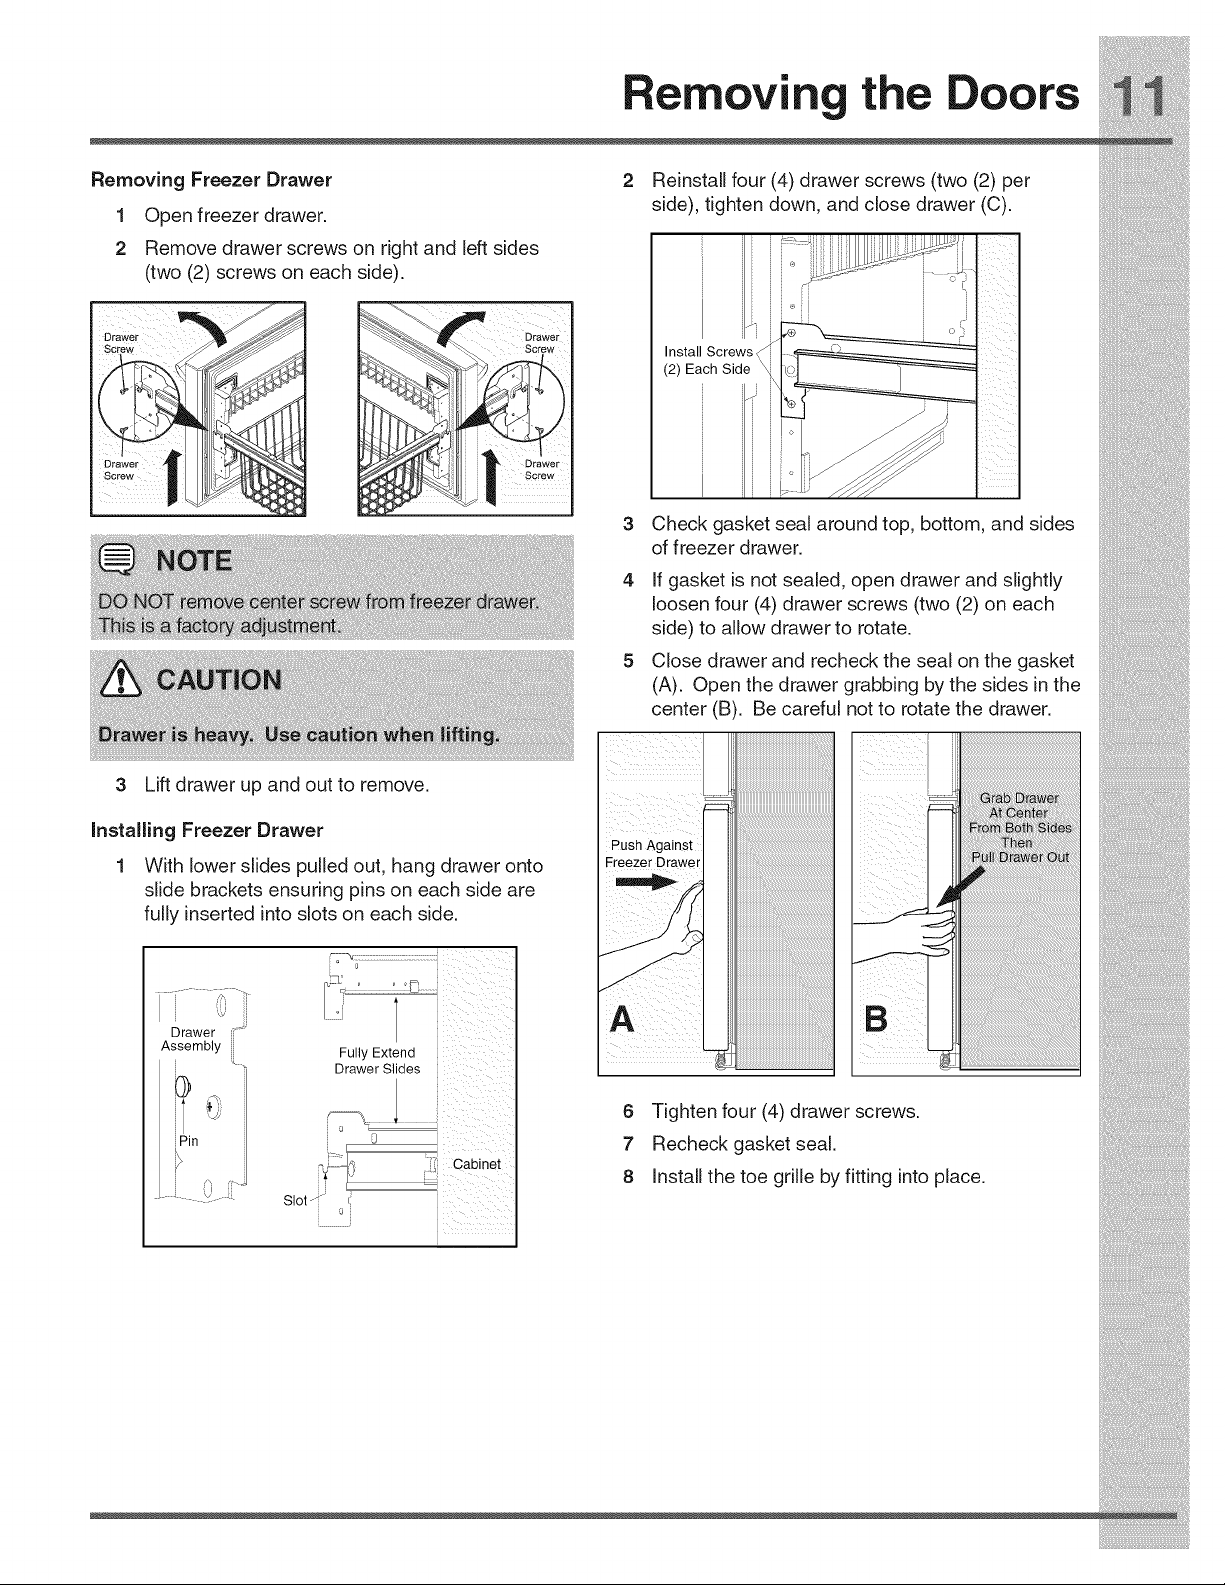
3 Liftdrawerupandoutto remove. i_i!_!_i!i_ii_!i!_!_i!i_ii_!i!_!_i!i_ii_!i!_!_i!i_ii_!i!_!_i!i_ii_!i!_!_i!i_ii_!i!_!_i!i_ii_!i!_!_i!i_ii_!i!_!_i!i_ii_!i!_!_iii_
!_i_i_!i!_i!i_i_!i_i_!!_!;_i_ii_;!_!;!_!_;!_!i!_i_;_i_;_:_:i_!_!_ii_iii;ii!_i_!i_:_i_:_!_!i_i_!_i!_ii!i_i_i_i_i!i_!_!i_iii
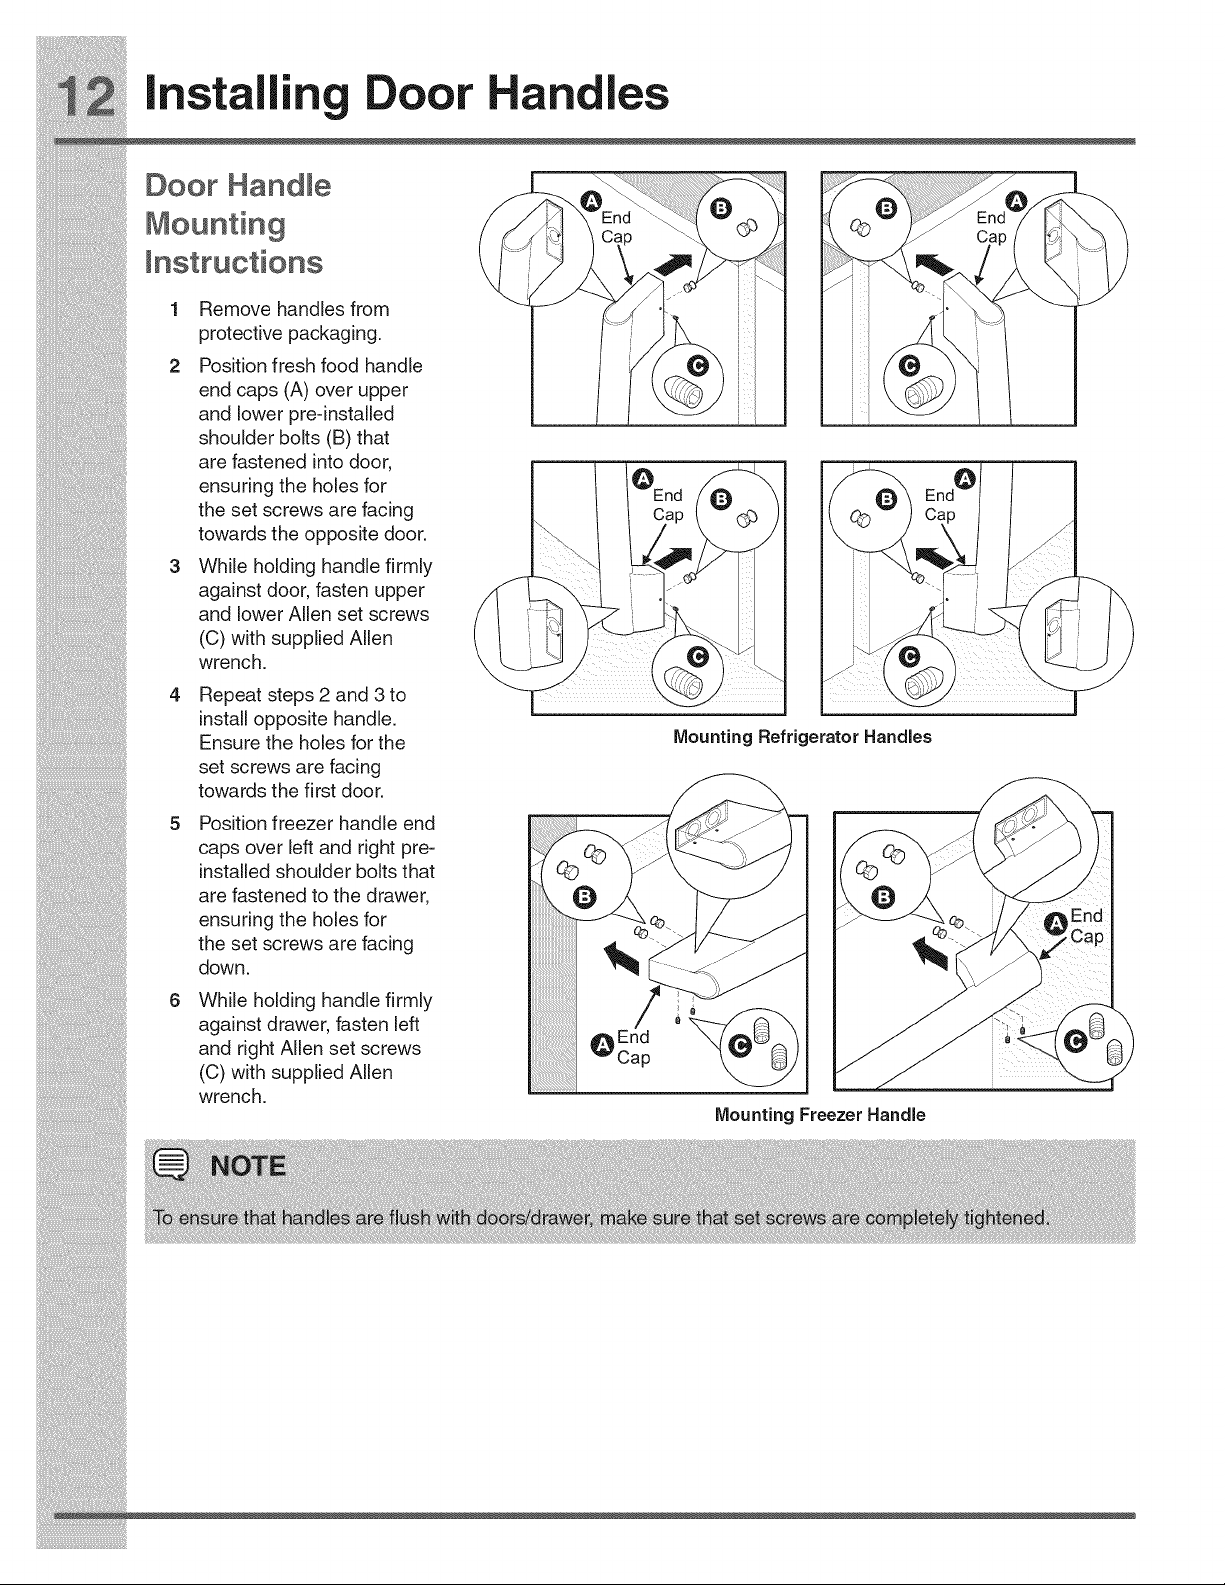
Installin Door andles
Door Handle _
Instructions _ _ _ p,,=_ )
; ::, 1 Remove handles from _ i
protective packaging. _, /! )
2 Position fresh food handle _ e'_ / _i (e<_
end caps (A)overupper _) i _! k
and lower pre-installed _ __U | i
shoulder bolts (a) that
are fastened into door = ==-==-z_"--=l r==--
ensuring the holes for d _ --XI i/"/_ _-_ E
the set screws are fac ng P _, ,_a C
towards the opposite door. :. 'P L'_'_)I IkQ_
3 While holding handle firmly _ _J_-_i I "-[-_ q
..... against door, fasten upper _ '_ / _ " %,
and lower Allen set screws if,, _ i _ ./_
(C) with supplied Alien ii_ _'_-. _ i I -. _,x_/4 )
................................................................ _ _Oy,_ ...... 1_ '
wrench. _z ,
4 Repeat steps 2 and 3 to 1 _j/)_{, _ _ _,_
install opposite handle. _
Ensure the holes for the Mounting Refrigerator Handles
..........................................................set screws are facing
towards the first door.
i!71!i!71!i!71!i!71!i!71!i!71!i!71!i!71!i!71!i!_!iliili
Connecti the Water Suppl
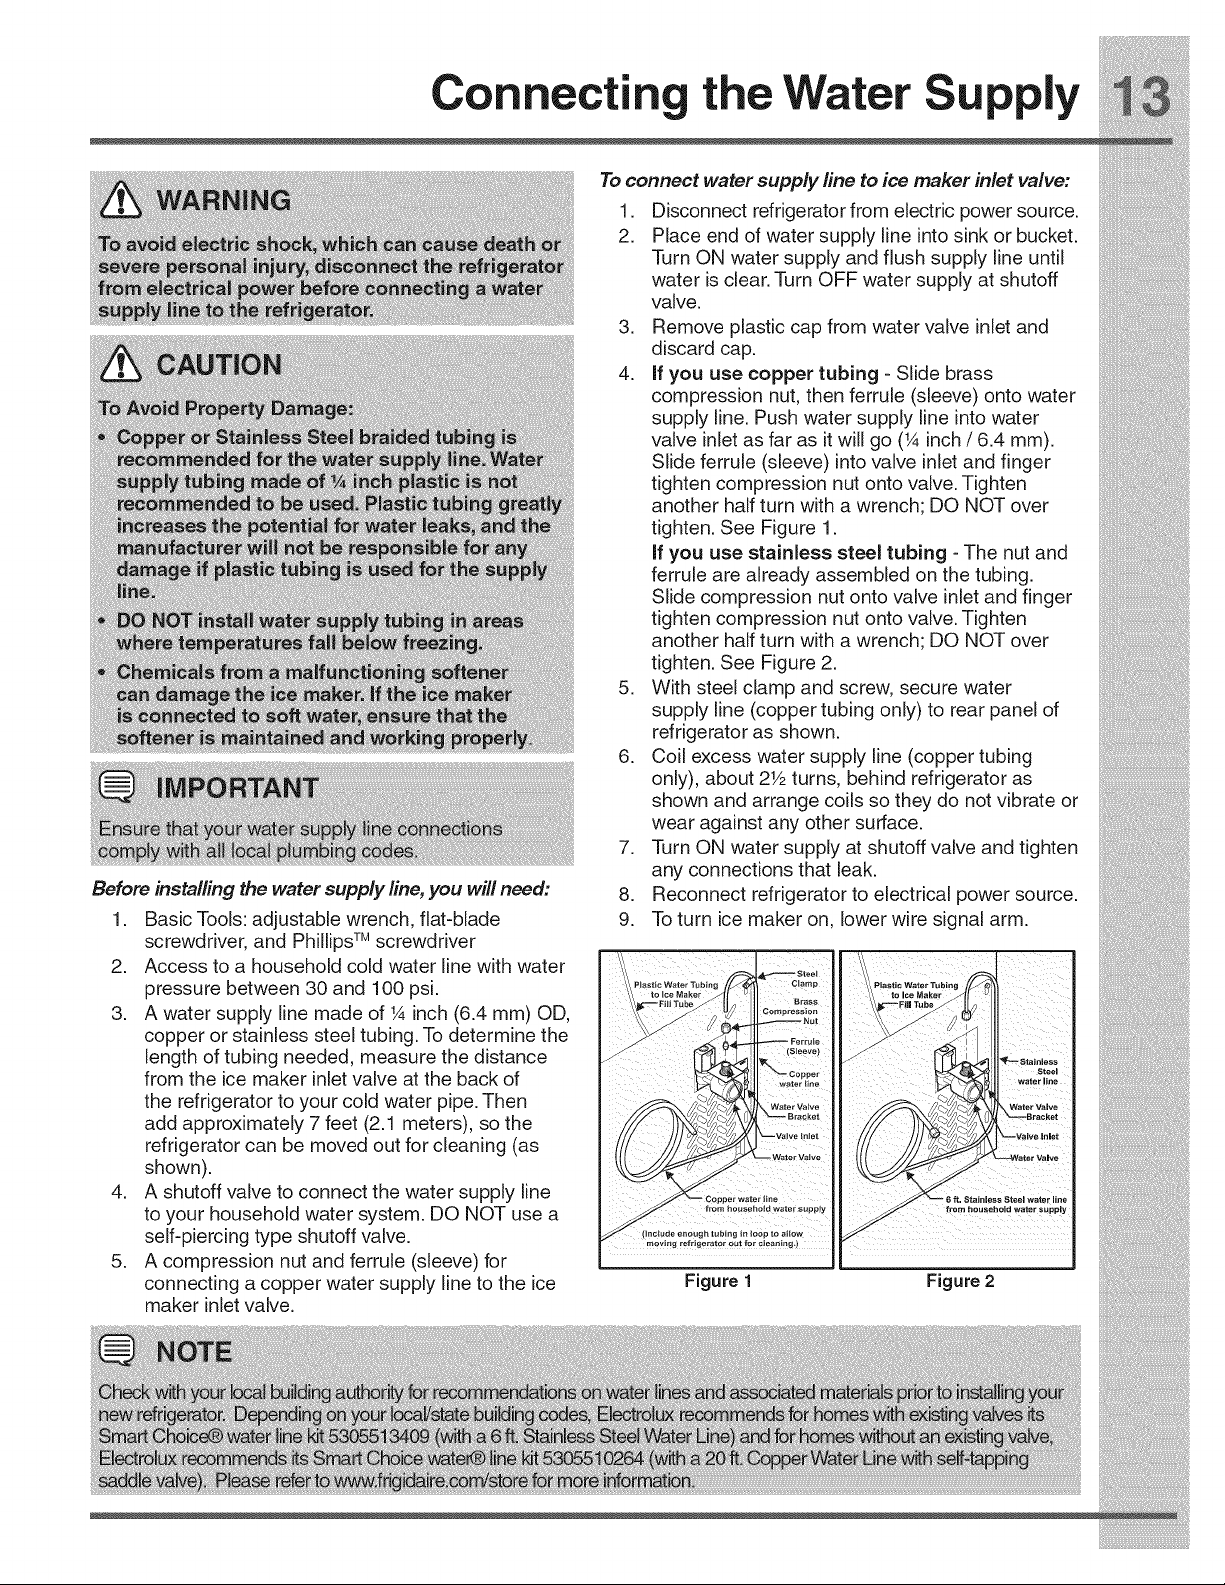
To connect water supply line to ice maker inlet valve:
1. Disconnect refrigerator from electric power source.
2. Place end of water supply line into sink or bucket.
Turn ON water supply and flush supply line until
water is clear. Turn OFF water supply at shutoff
valve.
3. Remove plastic cap from water valve inlet and
discard cap.
4. if you use copper tubing -Slide brass
compression nut, then ferrule (sleeve) onto water
supply line. Push water supply line into water
valve inlet as far as it will go (X inch /6.4 mm).
Slide ferrule (sleeve) into valve inlet and finger
tighten compression nut onto valve. Tighten
another half turn with a wrench; DO NOT over
tighten. See Figure 1.
if you use stainless steel tubing -The nut and
ferrule are already assembled on the tubing.
Slide compression nut onto valve inlet and finger
tighten compression nut onto valve. Tighten
another half turn with a wrench; DO NOT over
tighten. See Figure 2.
5. With steel clamp and screw, secure water
supply line (copper tubing only) to rear panel of
refrigerator as shown.
6. Coil excess water supply line (copper tubing
only), about 2Y2turns, behind refrigerator as
Controls
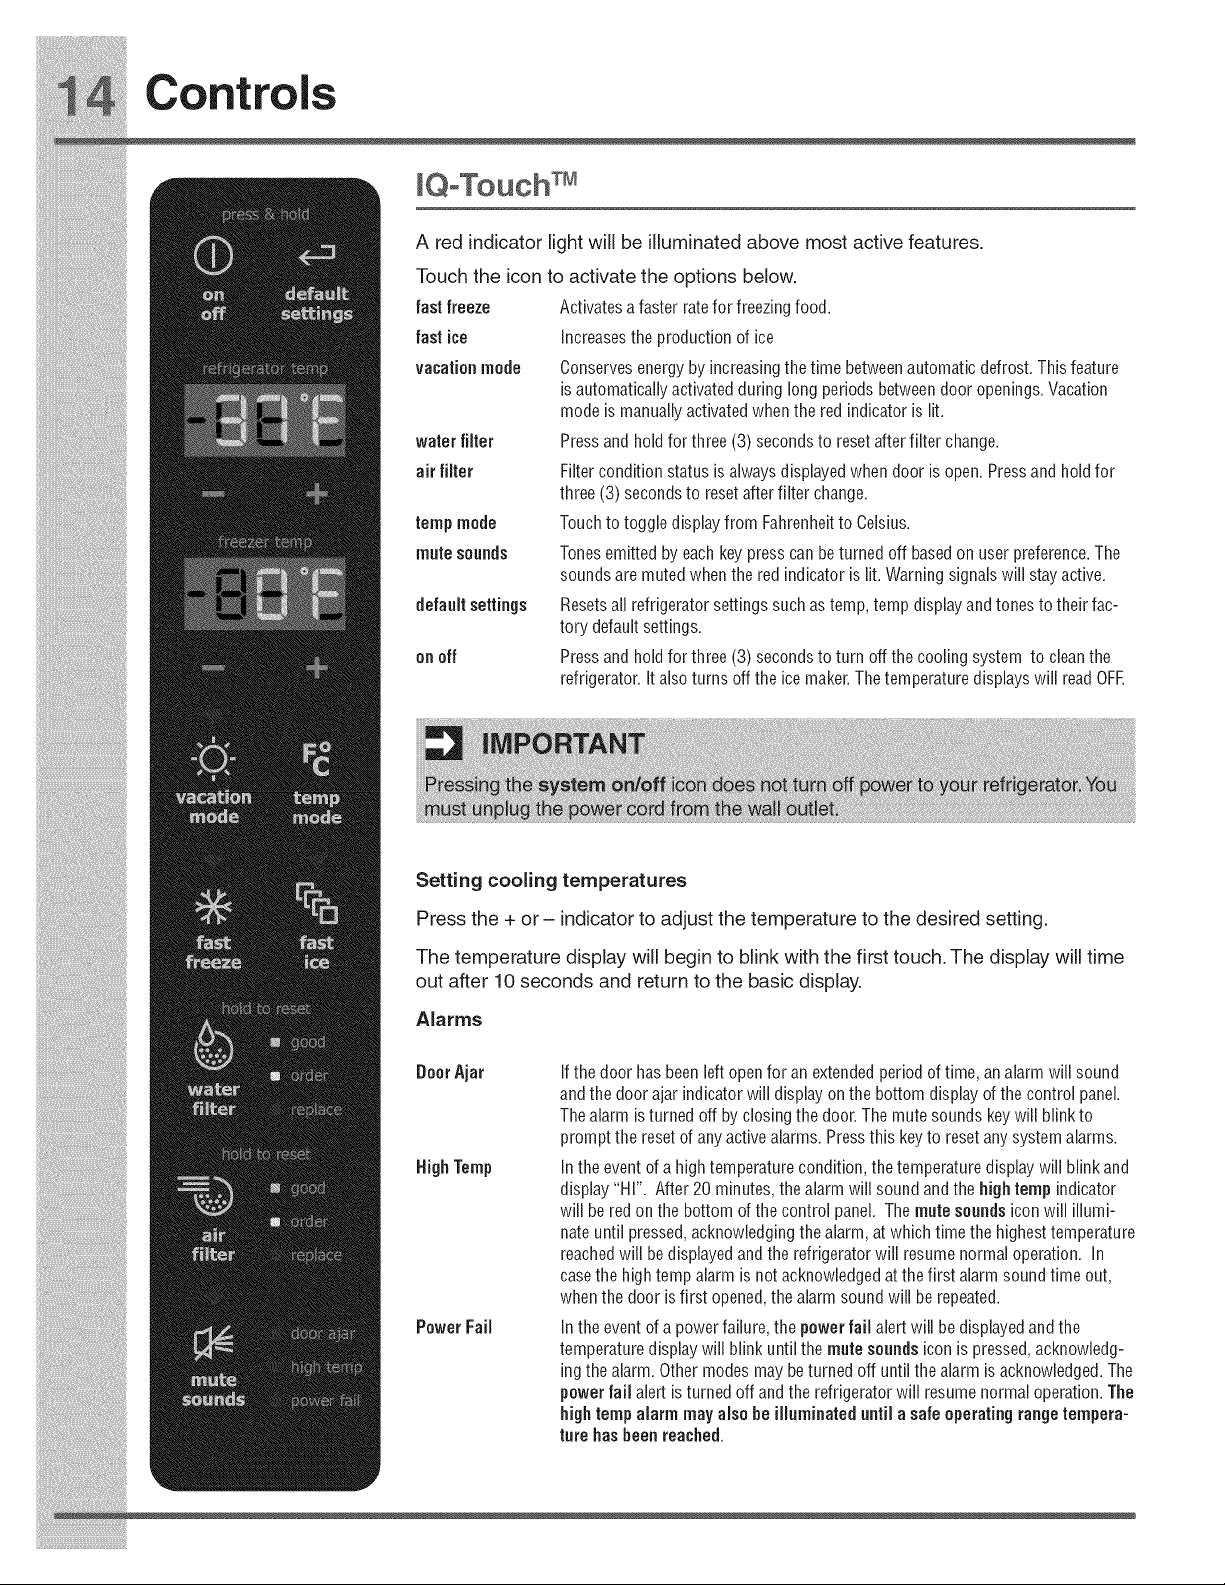
[OoTouch TM
Areeineicator[ightwi[[bei[[uminateeabovemostactivefeatures.
Touchtheicontoactivatetheoptionsbe[ow.
fastfreeze Activatesafasterrateforfreezingfood.
fastice Increasestheproductionofice
vaeationmode Conservesenergybyincreasingthetimebetweenautomaticdefrost. Thisfeature
isautomaticallyactivatedduring long periods betweendooropenings. Vacation
modeismanuallyactivatedwhenthered indicatoris lit.
waterfllter Pressandholdforthree(3) secondstoresetafterfilterchange.
airfilter Filterconditionstatusisalwaysdisplayedwhendoorisopen. Pressandholdfor
three(3) secondstoresetafterfilterchange.
tempm0de TouchtotoggledisplayfromFahrenheittoCelsius.
mutesounds Tonesemittedbyeachkeypresscanbeturnedoffbasedonuserpreference. The
::} soundsaremutedwhentheredindicatorislit. Warningsignalswillstayactive.
defaultsettiags aesetsallrefrigeratorsettingssuchastemp, tempdisplayandtonestotheirfac-
torydefaultsettings.
onoff Pressandholdforthree(3) secondstoturnoffthecoolingsystem tocleanthe
refrigerator. Italsoturnsofftheicemaker. Thetemperaturedisplayswill read OFF.
i!_!_i!i_ii_!i!_!_i!i_ii_!i!_!_i!i_ii_!i!_!_i!i_ii_!i!_!_i!i_ii_!i!_!_i!i_ii_!i!_!_i!i_ii_!i!_!_i!i_ii_!i!_!_i!i_ii_!i!_!_ii_i
Controls
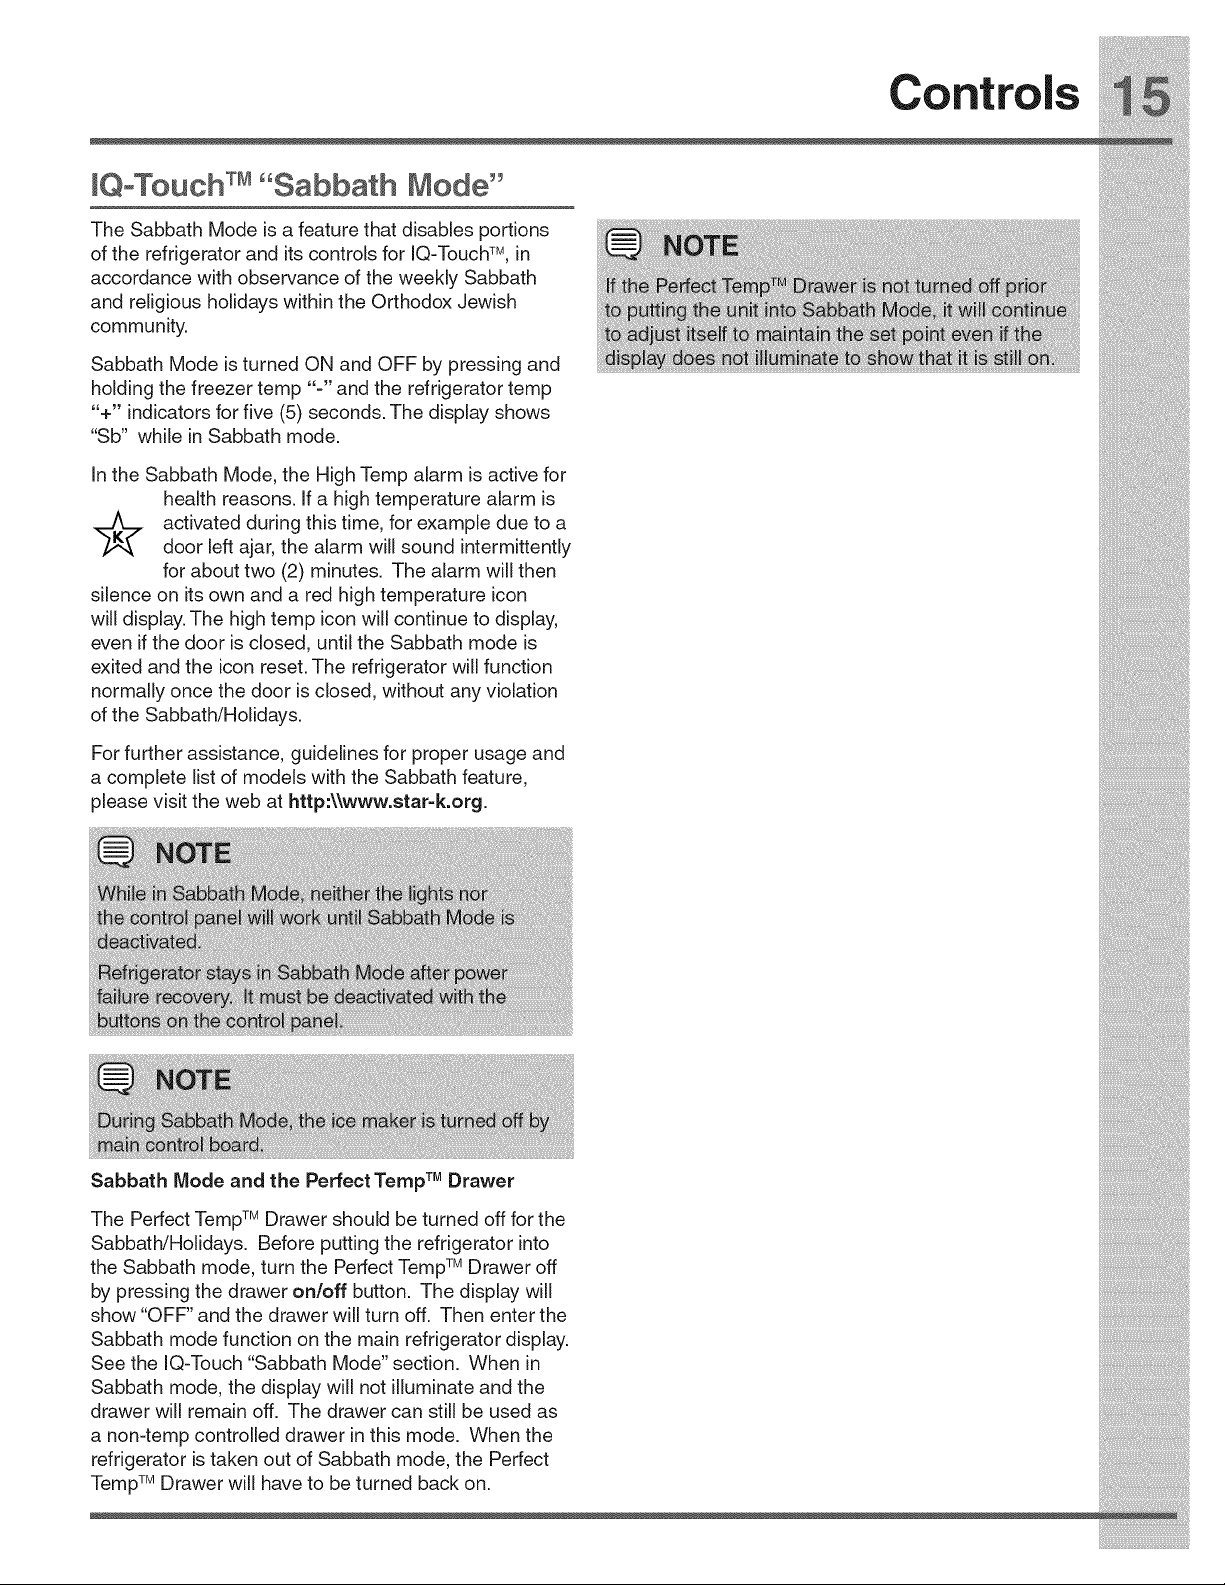
IQoTouch TM"Sabbath Mode"
The Sabbath Mode is a feature that disables portions
of the refrigerator and its controls for IQ-Touch TM,in
accordance with observance of the weekly Sabbath
and religious holidays within the Orthodox Jewish
community.
Sabbath Mode is turned ON and OFF by pressing and
holding the freezer temp "-" and the refrigerator temp
'%" indicators for five (5) seconds. The display shows
"Sb" while in Sabbath mode.
In the Sabbath Mode, the High Temp alarm is active for
health reasons. If a high temperature alarm is
activated during this time, for example due to a
door left ajar, the alarm will sound intermittently
for about two (2) minutes. The alarm will then
silence on its own and a red high temperature icon
will display. The high temp icon will continue to display,
even if the door is closed, until the Sabbath mode is
exited and the icon reset. The refrigerator will function
normally once the door is closed, without any violation
of the Sabbath/Holidays.
For further assistance, guidelines for proper usage and
a complete list of models with the Sabbath feature,
please visit the web at http:\\www.star-k.org.
NNi N N
:N :1
Sabbath Node and the Perfect Temp TMDrawer
The Peffect TempTUDrawer should be turned off for the
Sabbath/Holidays. Before putting the refrigerator into
the Sabbath mode, turn the Perfect Temp TM Drawer off
by pressing, the drawer on/off button. The display will
show "OFF and the drawer will turn off. Then enter the
Sabbath mode function on the ma,!nrefrigerator display.
See the IQ-Touch "Sabbath Mode section. When in
Sabbath mode, the display will not illuminate and the
drawer will remain off. The drawer can still be used as
a non-temp controlled drawer in this mode. When the
refrigerator is taken out of Sabbath mode, the Perfect
Temp TM Drawer wil! have to be turned back on.
Automatic ice
Ice maker operation & care
After the refrigerator is installed properly, the ice maker
can produce ice within 24 hours, it can completely fill an
ice bin in about three (3) days.
When using the ice maker for the first time and in order
for the ice maker to work properly, it is necessary to
clear air from water filter tubing. Once ice maker begins
making ice, allow the bucket to fill completely, then
discard the first TWO (2) FULL buckets of ice. It will
take at least two (2) days to completely fill the bucket on
regular ice making mode or 1 1/2days on fast ice mode.
The ice maker produces approximately four (4) pounds
of ice every 24 hours depending on usage conditions.
The following sounds are normal when the ice
maker is operating:
- Motor running
- Ice dropping into ice bin
- Water valve opening or closing
- Running water
Ice cubes stored too long may develop an odd
flavor. Empty the ice bin as explained below.
Fast Ice Function
Your refrigerator is equipped with a "Smart" Fast ice
Function, that will, if activated at your user interface,
allow an increase in ice production. You do not need to
deactivate it, if not needed, your refrigerator will operate
on normal conditions.
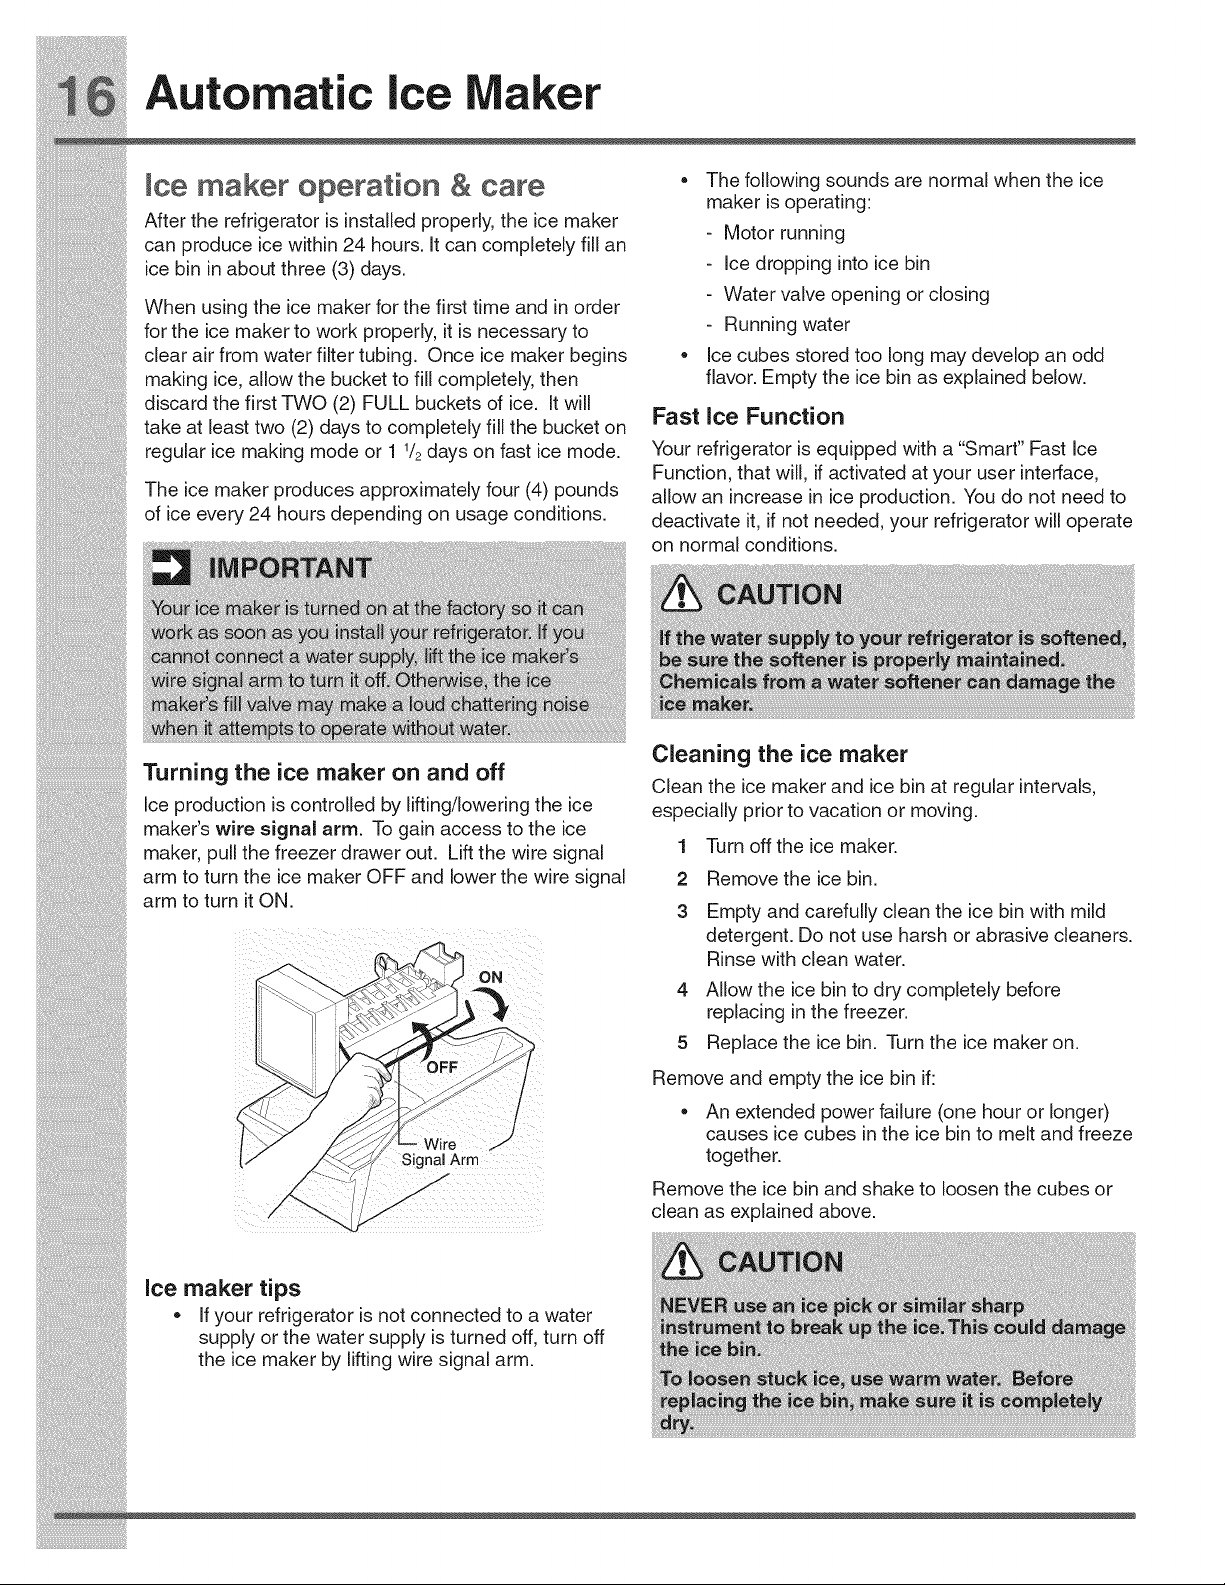
Turning the ice maker on and off
Cleaning the ice maker
Clean the ice maker and ice bin at regular intervals,
i!_!_i!i_ii_!i!_!_i!i_ii_!i!_!_i!i_ii_!i!_!_i!i_ii_!i!_!_i!i_ii_!i!_!_i!i_ii_!i!_!_i!i_ii_!i!_!_i!i_ii_!i!_!_i!i_ii_!i!_!_ii_i
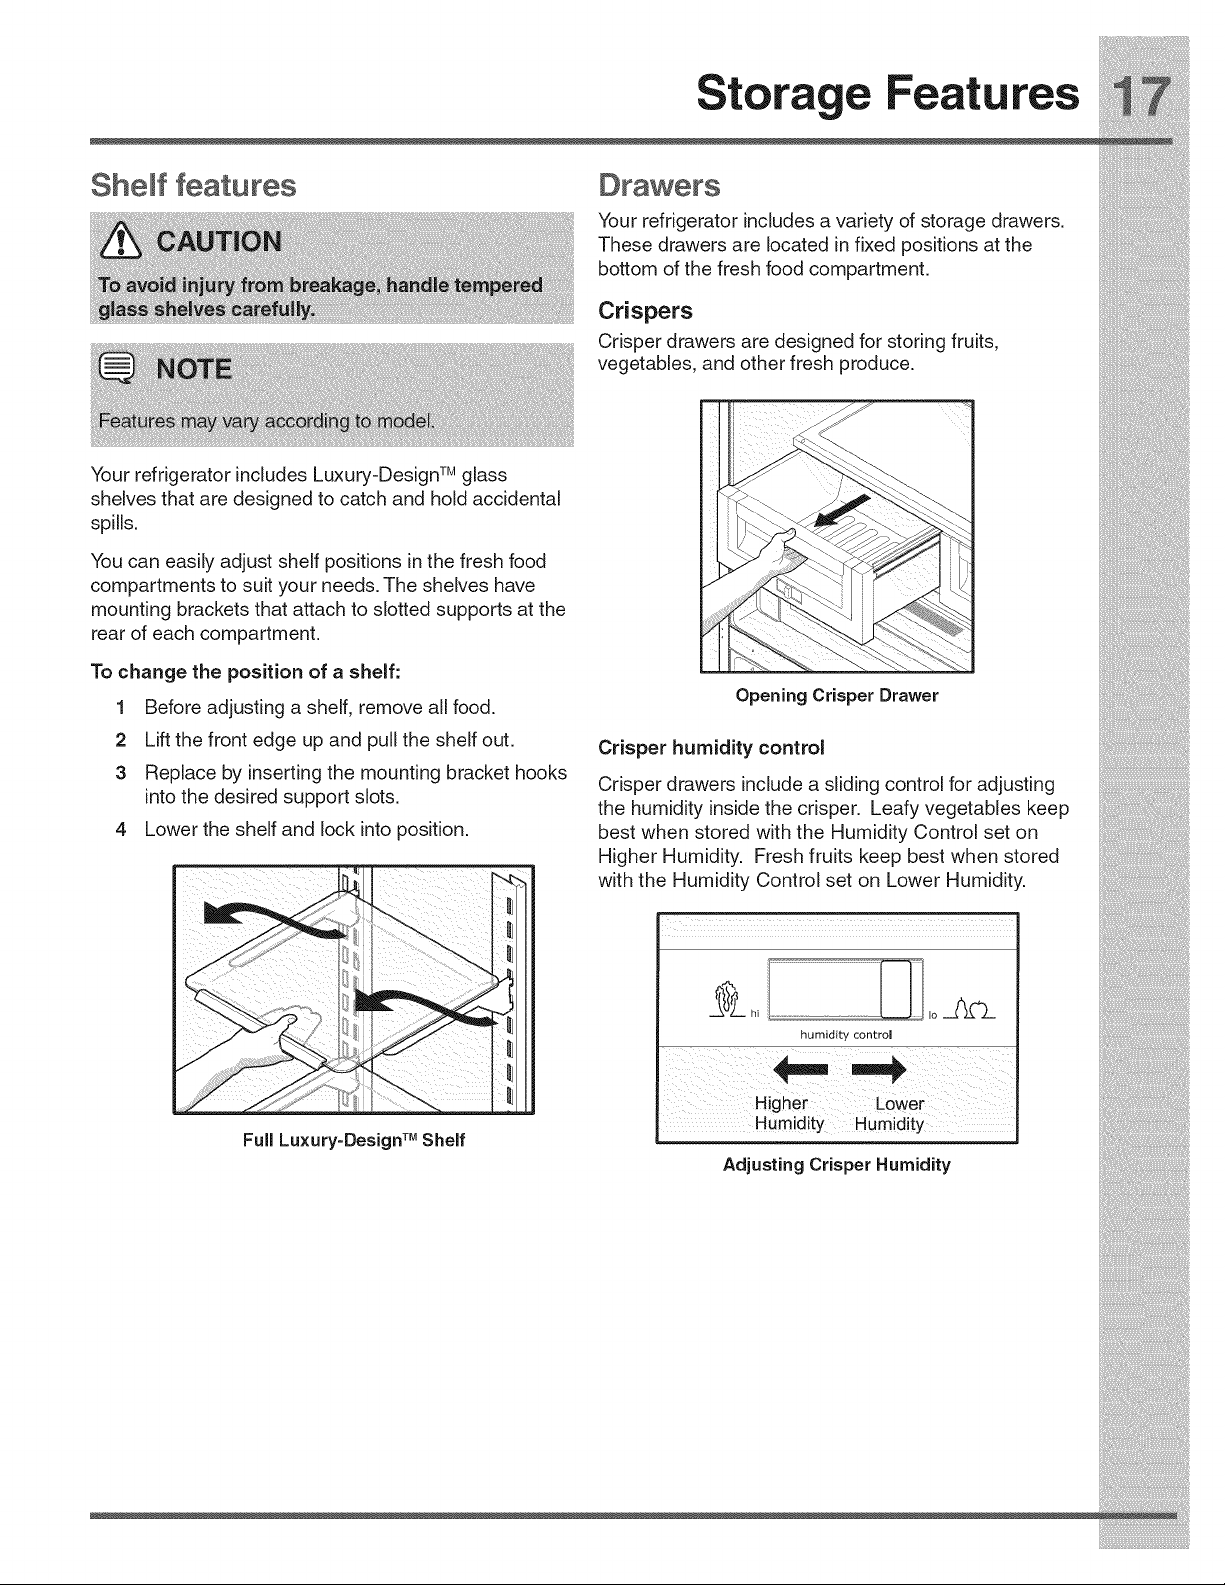
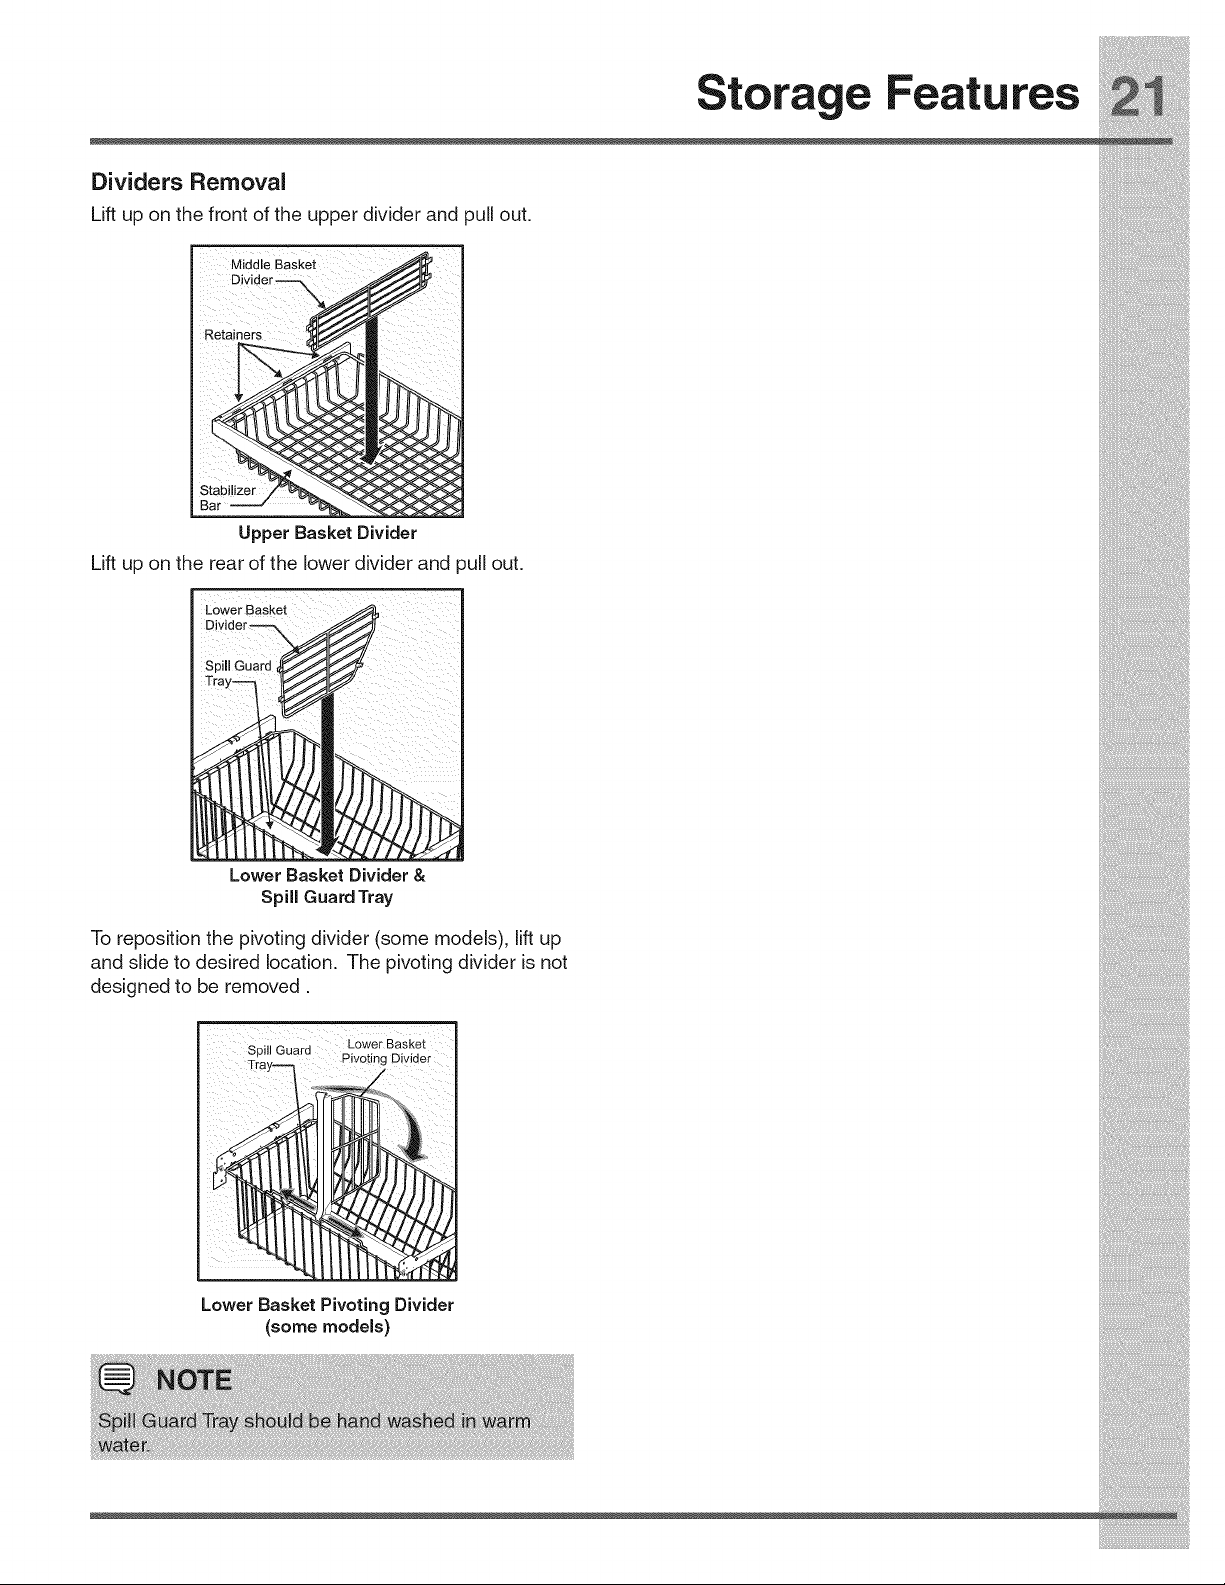
1 Beforeadjustinga shelf,removeallfood.
2 Liftthefrontedgeupandpulltheshelfout.
3 Replacebyinsertingthemountingbrackethooks
intothedesiredsupportslots.
Crisperhumidity control
Crisper drawers include a sliding control for adjusting i_i!_!_i!i_ii_!i!_!_i!i_ii_!i!_!_i!i_ii_!i!_!_i!i_ii_!i!_!_i!i_ii_!i!_!_i!i_ii_!i!_!_i!i_ii_!i!_!_i!i_ii_!i!_!_i!i_ii_!i!_!_iii_
Storage Features
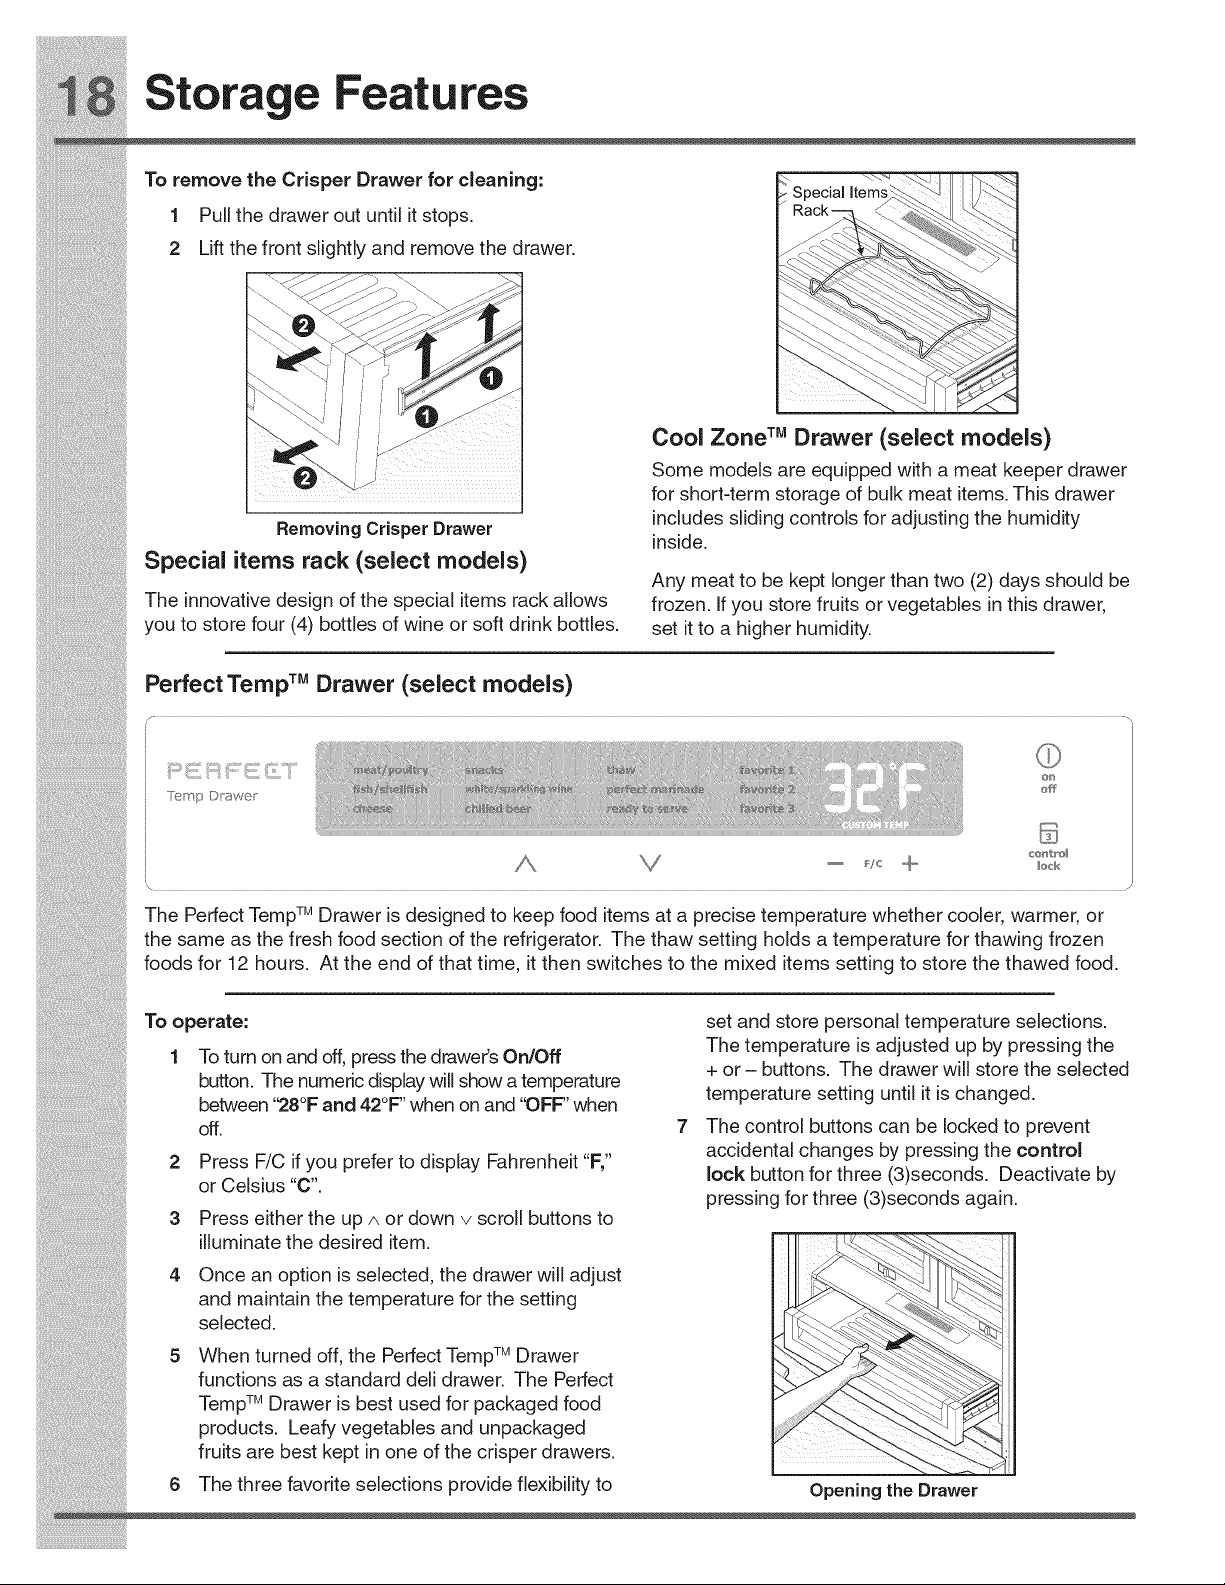
To remove the Crisper Drawer for cleaning:
1 Pull the drawer out until it stops.
2 Lift the front slightly and remove the drawer.
i
Removing Crisper Drawer
Special items rack (select models)
The innovative design of the special items rack allows
you to store four (4) bottles of wine or soft drink bottles.
Special It
Rack--7_.
f _:-_ -.:-.
JC-
Cool Zone TM Drawer (select models)
Some models are equipped with a meat keeper drawer
for short-term storage of bulk meat items. This drawer
includes sliding controls for adjusting the humidity
inside.
Any meat to be kept longer than two (2) days should be
frozen. If you store fruits or vegetables in this drawer,
set it to a higher humidity.
Perfect Temp TM Drawer (select models)
i!_!_i!i_ii_!i!_!_i!i_ii_!i!_!_i!i_ii_!i!_!_i!i_ii_!i!_!_i!i_ii_!i!_!_i!i_ii_!i!_!_i!i_ii_!i!_!_i!i_ii_!i!_!_i!i_ii_!i!_!_ii_i
Storage Features
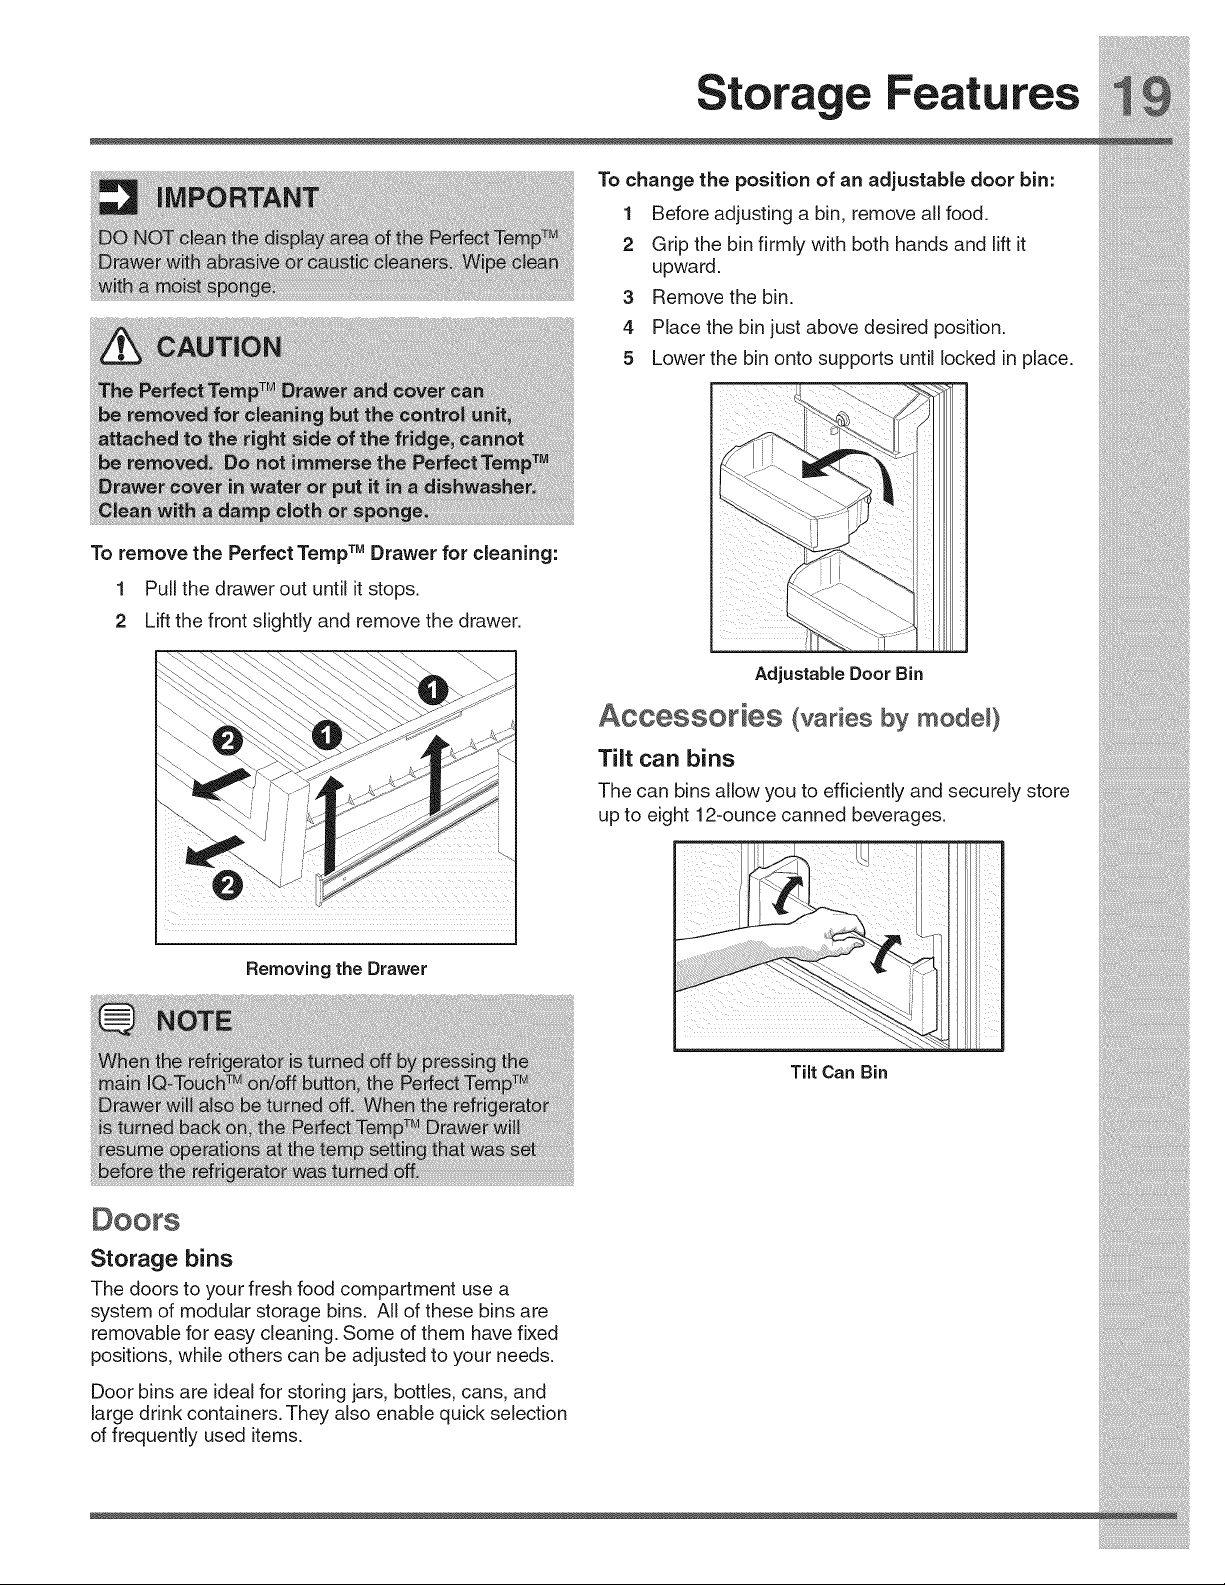
To change the position of an adjustable door bin:
1 Before adjusting a bin, remove all food.
2 Grip the bin firmly with both hands and lift it
upward.
3 Remove the bin.
4 Place the bin just above desired position.
5 Lower the bin onto supports until locked in place.
To remove the Perfect Temp TMDrawer for cleaning:
1 Pull the drawer out until it stops.
2 Lift the front slightly and remove the drawer.
Adjustable Door Bin
Accessories (varies by mode_)
Tilt can bins
Storage Features
i!_!_i!i_ii_!i!_!_i!i_ii_!i!_!_i!i_ii_!i!_!_i!i_ii_!i!_!_i!i_ii_!i!_!_i!i_ii_!i!_!_i!i_ii_!i!_!_i!i_ii_!i!_!_i!i_ii_!i!_!_ii_i
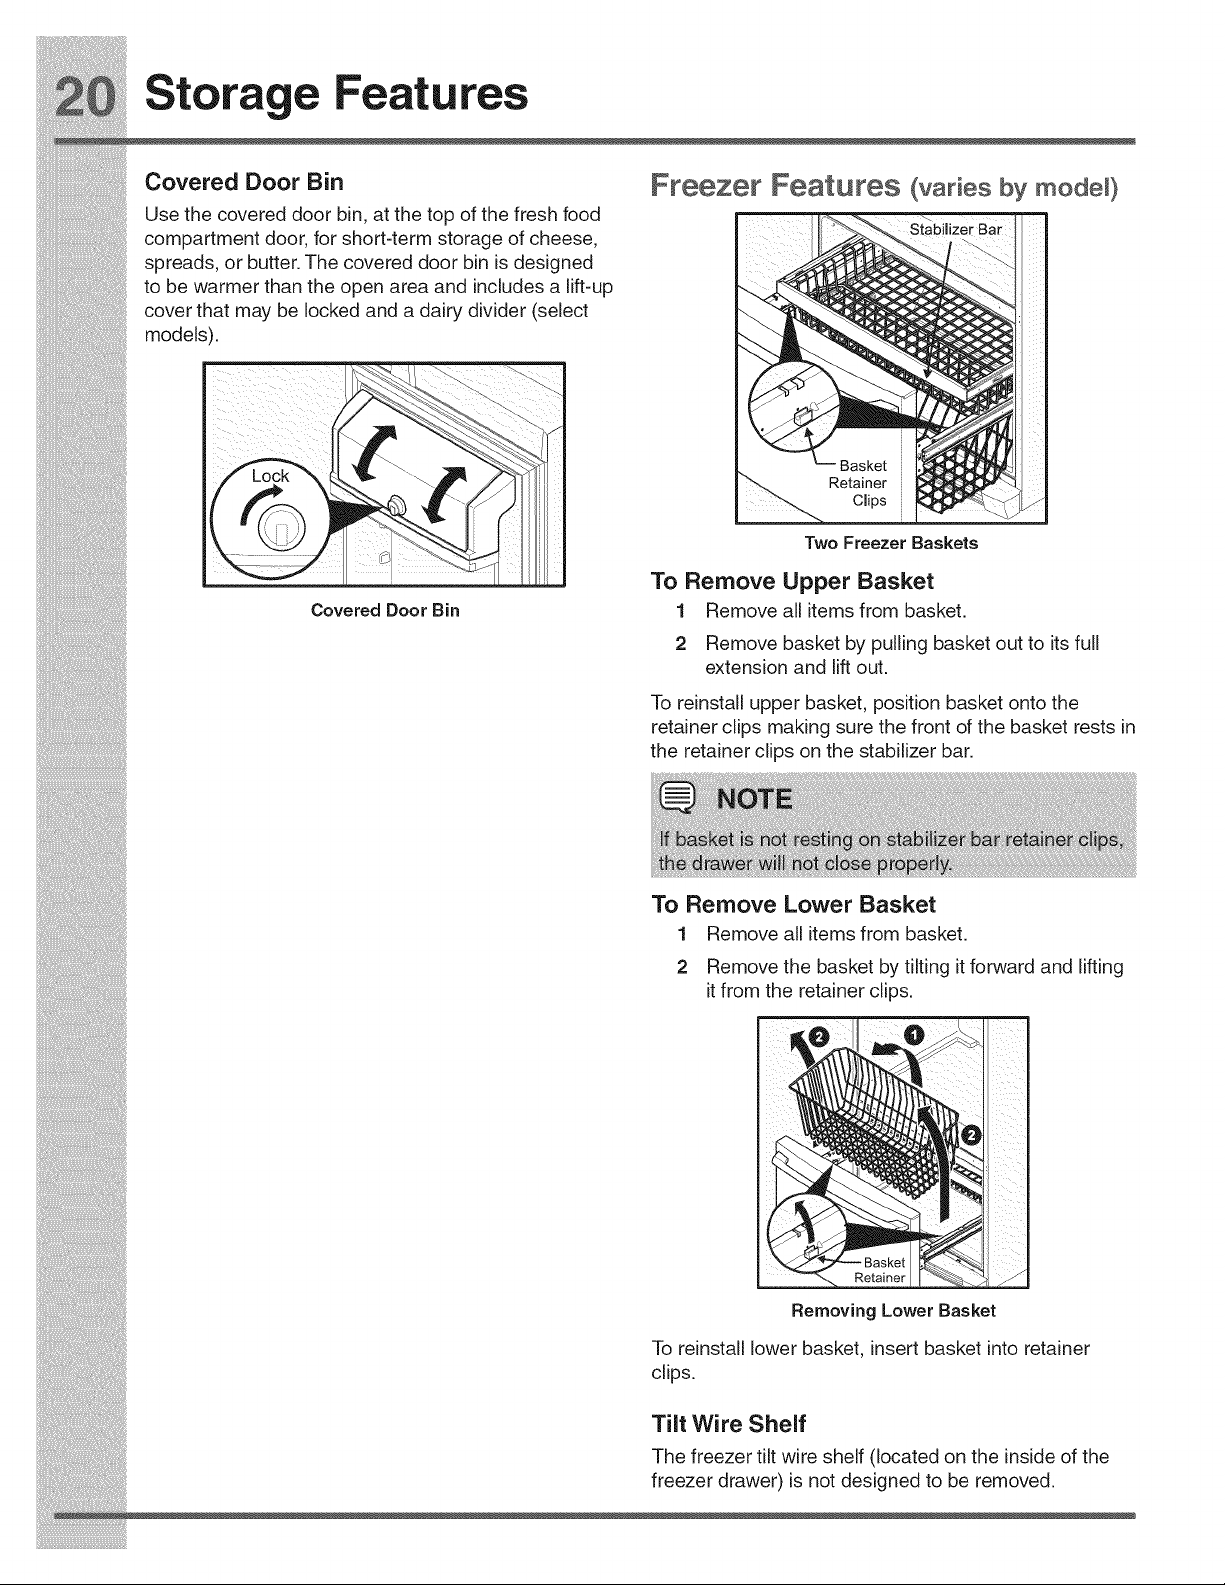
Covered Door Bin
Use the covered door bin, at the top of the fresh food
compartment door, for short-term storage of cheese,
spreads, or butter. The covered door bin is designed
to be warmer than the open area and includes a lift-up
cover that may be locked and a dairy divider (select
models).
Covered Door Bin
Freezer Features (varies by modeO
Stabilizer i
Two Freezer Baskets
iii!
z
To Remove Upper Basket
1 Remove all items from basket.
2 Remove basket by pulling basket out to its full
extension and lift out.
To reinstall upper basket, position basket onto the
retainer clips making sure the front of the basket rests in
the retainer clips on the stabilizer bar.
i!_!_i!i_ii_!i!_!_i!i_ii_!i!_!_i!i_ii_!i!_!_i!i_ii_!i!_!_i!i_ii_!i!_!_i!i_ii_!i!_!_i!i_ii_!i!_!_i!i_ii_!i!_!_i!i_ii_!i!_!_ii_i
i_i!_!_i!i_ii_!i!_!_i!i_ii_!i!_!_i!i_ii_!i!_!_i!i_ii_!i!_!_i!i_ii_!i!_!_i!i_ii_!i!_!_i!i_ii_!i!_!_i!i_ii_!i!_!_i!i_ii_!i!_!_iii_
i!_!_i!i_ii_!i!_!_i!i_ii_!i!_!_i!i_ii_!i!_!_i!i_ii_!i!_!_i!i_ii_!i!_!_i!i_ii_!i!_!_i!i_ii_!i!_!_i!i_ii_!i!_!_i!i_ii_!i!_!_ii_idays should be frozen. Refer to the "Controls" section for procedures on
temperature settings,
i!_!_i!i_ii_!i!_!_i!i_ii_!i!_!_i!i_ii_!i!_!_i!i_ii_!i!_!_i!i_ii_!i!_!_i!i_ii_!i!_!_i!i_ii_!i!_!_i!i_ii_!i!_!_i!i_ii_!i!_!_ii_i
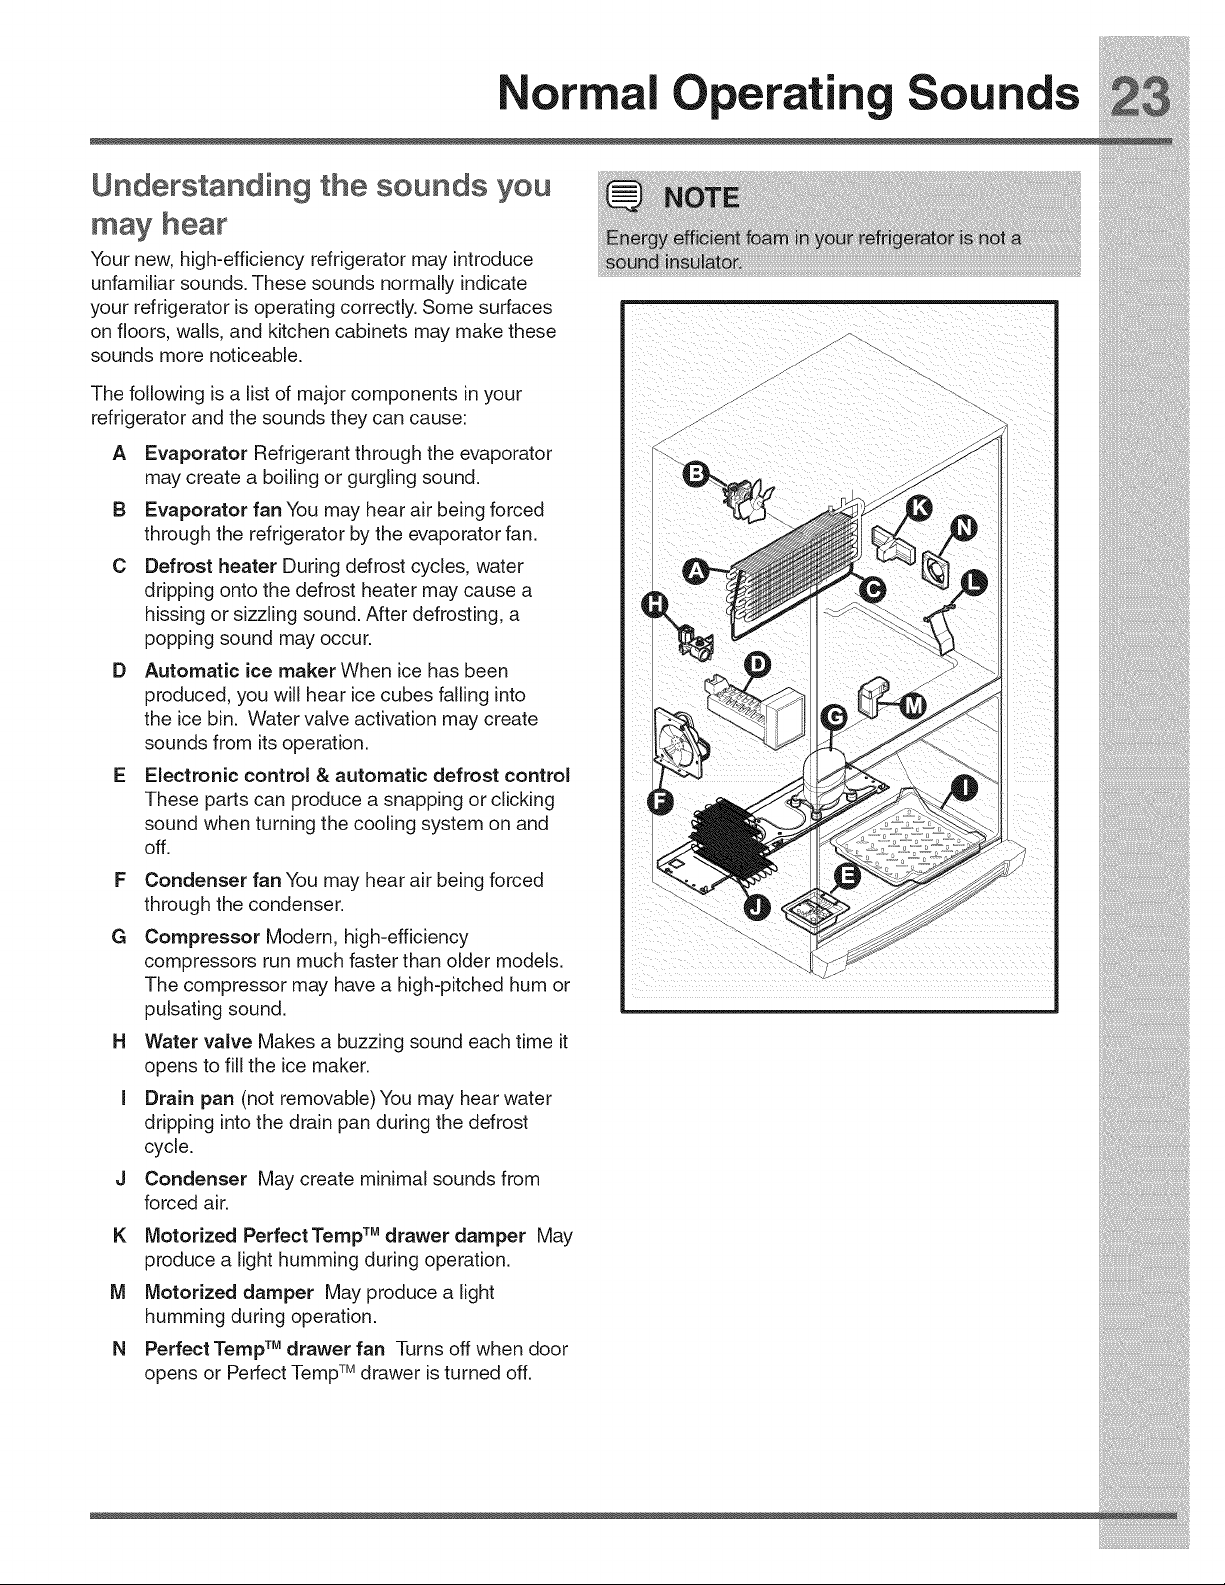
Normal perating Sounds
Understanding the sounds you
may hear
Your new, high-efficiency refrigerator may introduce
unfamiliar sounds. These sounds normally indicate
your refrigerator is operating correctly. Some surfaces
on floors, walls, and kitchen cabinets may make these
sounds more noticeable.
The following is a list of major components in your
refrigerator and the sounds they can cause:
A Evaporator Refrigerant through the evaporator
may create a boiling or gurgling sound.
B Evaporator fan You may hear air being forced
through the refrigerator by the evaporator fan.
C Defrost heater During defrost cycles, water
dripping onto the defrost heater may cause a
hissing or sizzling sound. After defrosting, a
popping sound may occur.
D Automatic ice maker When ice has been
produced, you will hear ice cubes falling into
the ice bin. Water valve activation may create
sounds from its operation,
E Electronic control & automatic defrost control
These parts can produce a snapping orclicking
soundwhenturningthecoolingsystemonand
off
F CondenserfanYoumayhearairbeingforced
throughthecondenser.
G Compressor Modern, high-efficiency
compressors run much faster than older models. ,
The compressor may have a high-pitched hum or
pu_sat_ngsound. , ,,,m,
14 WatervalveMakesabuzzingsoundeachtimeit
openstofillthe ice maker.
I Drainpan(notremovable) Youmayhearwater
dripping intothedrainpanduringthedefrost
cycle.
J Condenser Maycreateminimalsoundsfrom
forced air.
K MotorizedPerfectTempTUdrawerdamper May
producealighthummingduringoperation.
M Motorizeddamper Mayproducealight
hummingduringoperation.
a PerfecttempTMdrawerfan Turnsoffwhendoor
opensorPerfectTemptUdraweristurnedoff.
_i:_i_;Jii;!_!_:i!_i_i;!_i_i!_i_ii_i_!_!_i_
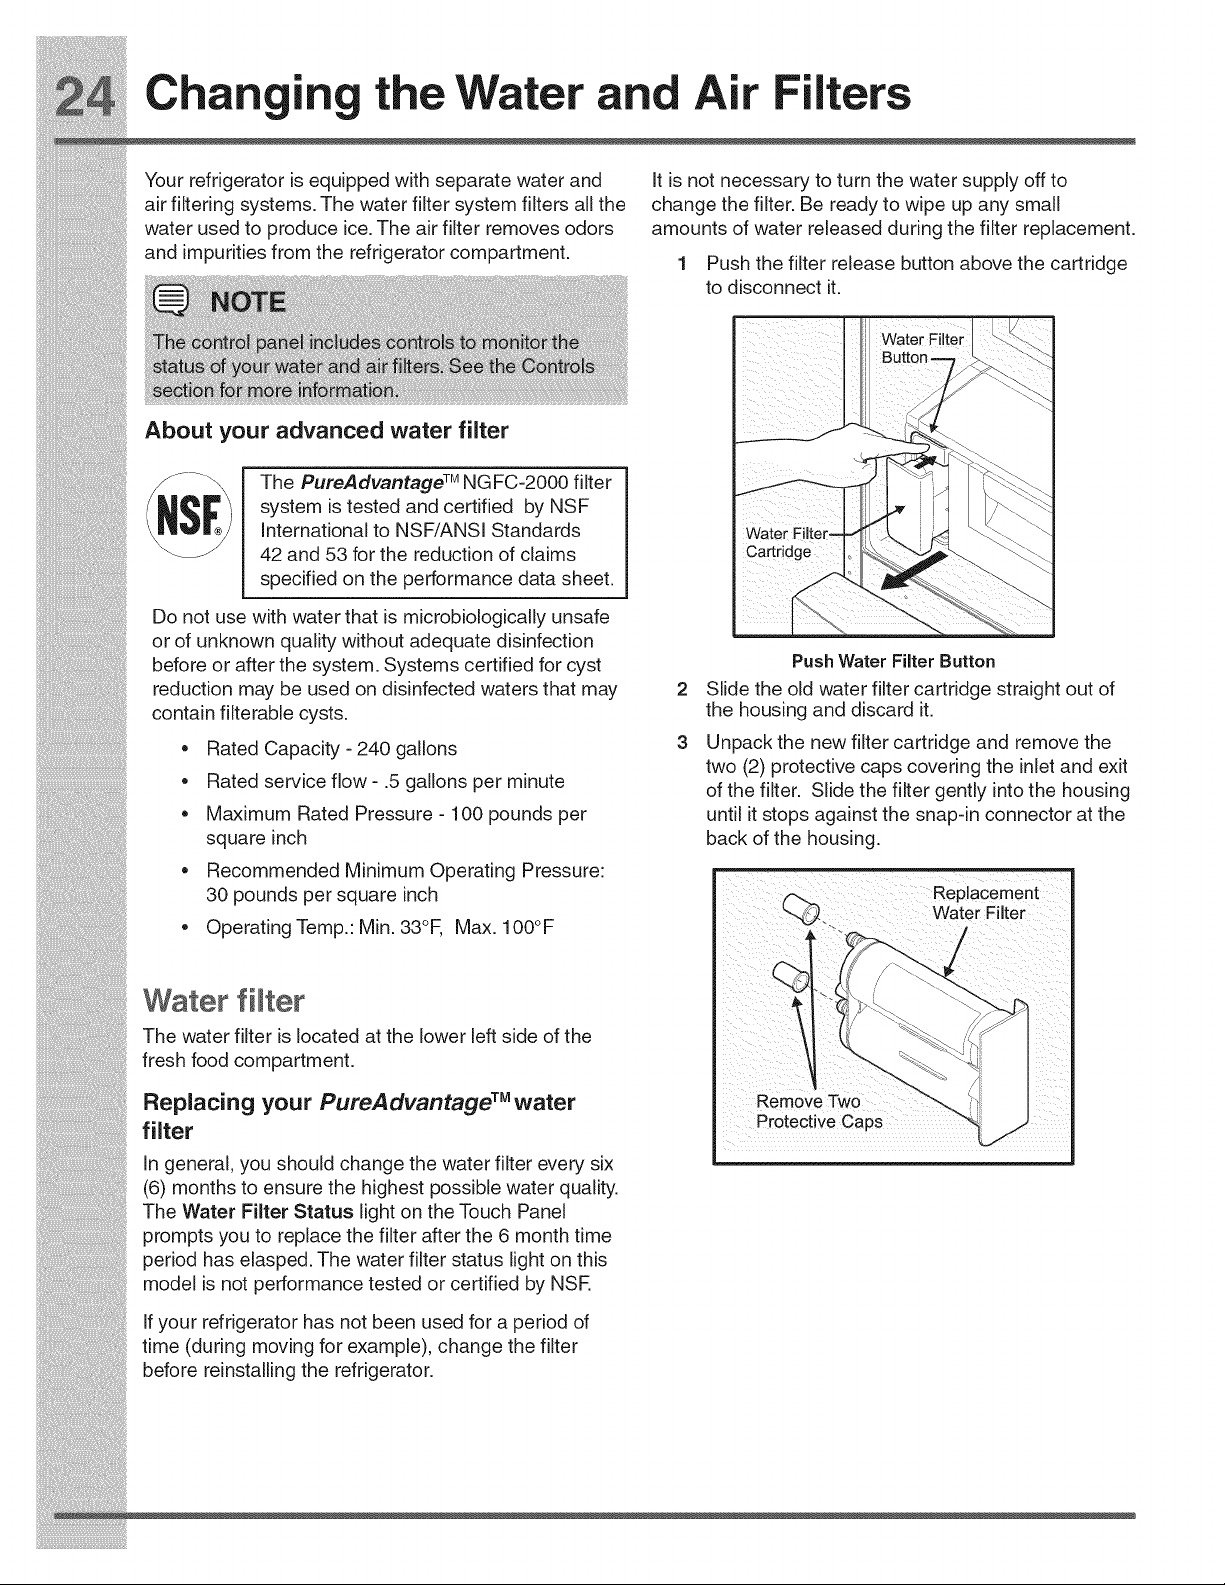
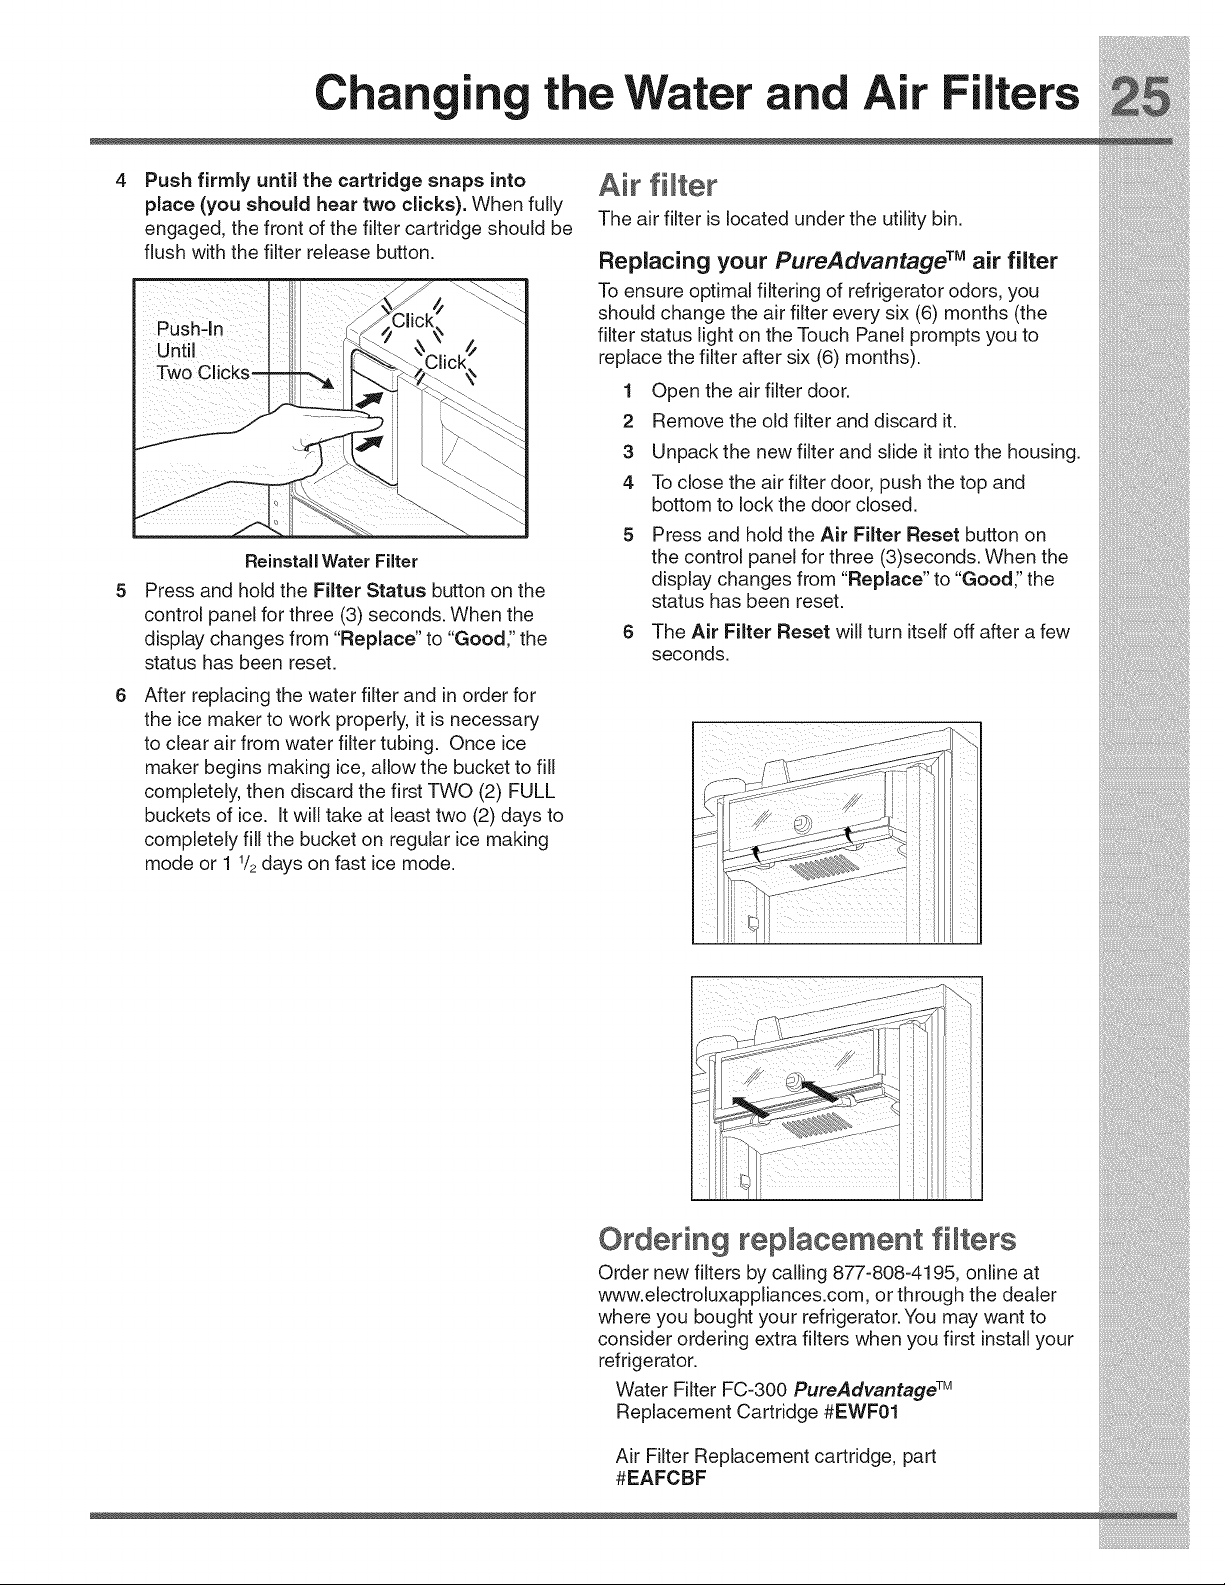
Changin theWater and Air Filters
Your refrigerator is equipped with separate water and It is not necessary to turn the water supply off to
air filtering systems. The water filter system filters all the change the filter. Be ready to wipe up any small
water used to produce ice. The air filter removes odors amounts of water released during the filter replacement.
and mpur t es from the refr gerator compartment • 1 Push the filter release button above the cartridge
to disconnect it.
About your advanced water filter I
I
/&|_'_ system s tested and cert fed by NSF
__"1 :yStrenmatlS:;:;: dNa?dANrSjlj;;abya?SsF I Wate[ "iiite! _ _L'_I
I 42 _duction of claims I cartridge I" ___-. _1
Do not use with water that is microbJologically unsafe
or of unknown quality without adequate disinfection
before or after the system. Systems certified for cyst PushWater Filter Button
reduction may be used on disinfected waters that may 2 Slide the old water filter cartridge straight out of
contain filterable cysts, the housing and discard it.
= Rated Capacity -240 gallons 3 Unpack the new filter cartridge and remove the
- - - two (2) protective caps covering the inlet and exit
• Rated service flow- .5 gallons per minute of the filter. Slide the filter gently into the housing
i!iiiiii!iiiiii!iiiiii!iiiiii!iiiiii!iiiiii!iiiiii!iiiiii!iiiiii!_!iiii
makerbeginsmakingice,allowthebuckettofill
completely,thendiscardthefirstTWO(2)FULL i_i!_!_i!i_ii_!i!_!_i!i_ii_!i!_!_i!i_ii_!i!_!_i!i_ii_!i!_!_i!i_ii_!i!_!_i!i_ii_!i!_!_i!i_ii_!i!_!_i!i_ii_!i!_!_i!i_ii_!i!_!_iii_
i!_!_i!i_ii_!i!_!_i!i_ii_!i!_!_i!i_ii_!i!_!_i!i_ii_!i!_!_i!i_ii_!i!_!_i!i_ii_!i!_!_i!i_ii_!i!_!_i!i_ii_!i!_!_i!i_ii_!i!_!_ii_i
the floor from being damaged.
i!_!_i!i_ii_!i!_!_i!i_ii_!i!_!_i!i_ii_!i!_!_i!i_ii_!i!_!_i!i_ii_!i!_!_i!i_ii_!i!_!_i!i_ii_!i!_!_i!i_ii_!i!_!_i!i_ii_!i!_!_ii_i
Handles
(Stainless Steel
Models Only)
• Stainlesssteel
cleaners
steel.
•Clean stainless steel front and handles with non-abrasive soapy water
and a dishcloth. Rinse with clean water and a soft cloth. i_i!_!_i!i_ii_!i!_!_i!i_ii_!i!_!_i!i_ii_!i!_!_i!i_ii_!i!_!_i!i_ii_!i!_!_i!i_ii_!i!_!_i!i_ii_!i!_!_i!i_ii_!i!_!_i!i_ii_!i!_!_iii_
v,v,v,v,v,v,v,v,v,v,v,v,v,v¸
i!_!_i!i_ii_!i!_!_i!i_ii_!i!_!_i!i_ii_!i!_!_i!i_ii_!i!_!_i!i_ii_!i!_!_i!i_ii_!i!_!_i!i_ii_!i!_!_i!i_ii_!i!_!_i!i_ii_!i!_!_ii_i
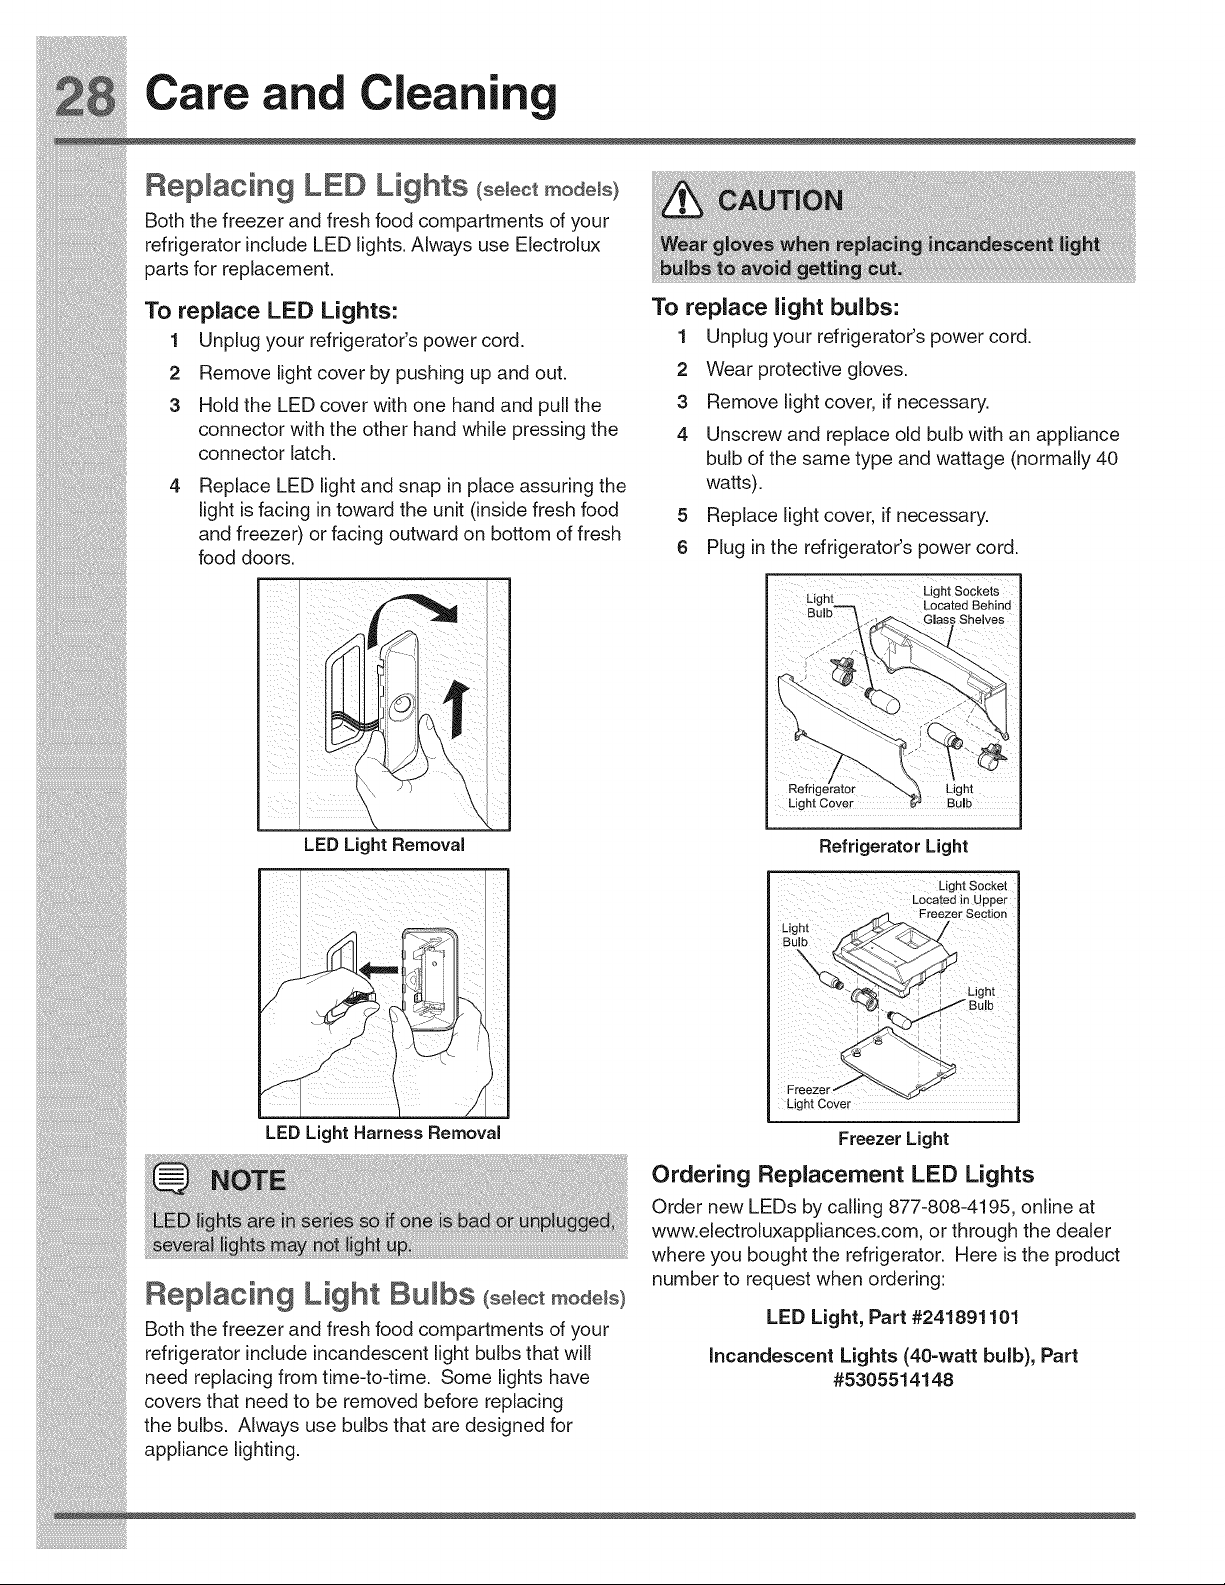
Care and Cnin
Replacing LED Lights (s÷ ÷otmodo s)
Both the freezer and fresh food compartments of your
refrigerator include LED lights. Always use Electrolux
parts for replacement.
To replace LED Lights:
1 Unplug your refrigerator's power cord.
2 Remove light cover by pushing up and out.
3 Hold the LED cover with one hand and pull the
connector with the other hand while pressing the
connector latch.
Replace LED light and snap in place assuring the
light is facing in toward the unit (inside fresh food
and freezer) or facing outward on bottom of fresh
food doors.
To replace light bulbs:
1 Unplug your refrigerator's power cord.
2 Wear protective gloves.
3 Remove light cover, if necessary.
4 Unscrew and replace old bulb with an appliance
bulb of the same type and wattage (normally 40
watts).
5 Replace light cover, if necessary.
6 Plug in the refrigerator's power cord.
Light SoCkets ]
Lght Located Behind
i!_!_i!i_ii_!i!_!_i!i_ii_!i!_!_i!i_ii_!i!_!_i!i_ii_!i!_!_i!i_ii_!i!_!_i!i_ii_!i!_!_i!i_ii_!i!_!_i!i_ii_!i!_!_i!i_ii_!i!_!_ii_i
open.
i_i!_!_i!i_ii_!i!_!_i!i_ii_!i!_!_i!i_ii_!i!_!_i!i_ii_!i!_!_i!i_ii_!i!_!_i!i_ii_!i!_!_i!i_ii_!i!_!_i!i_ii_!i!_!_i!i_ii_!i!_!_iii_
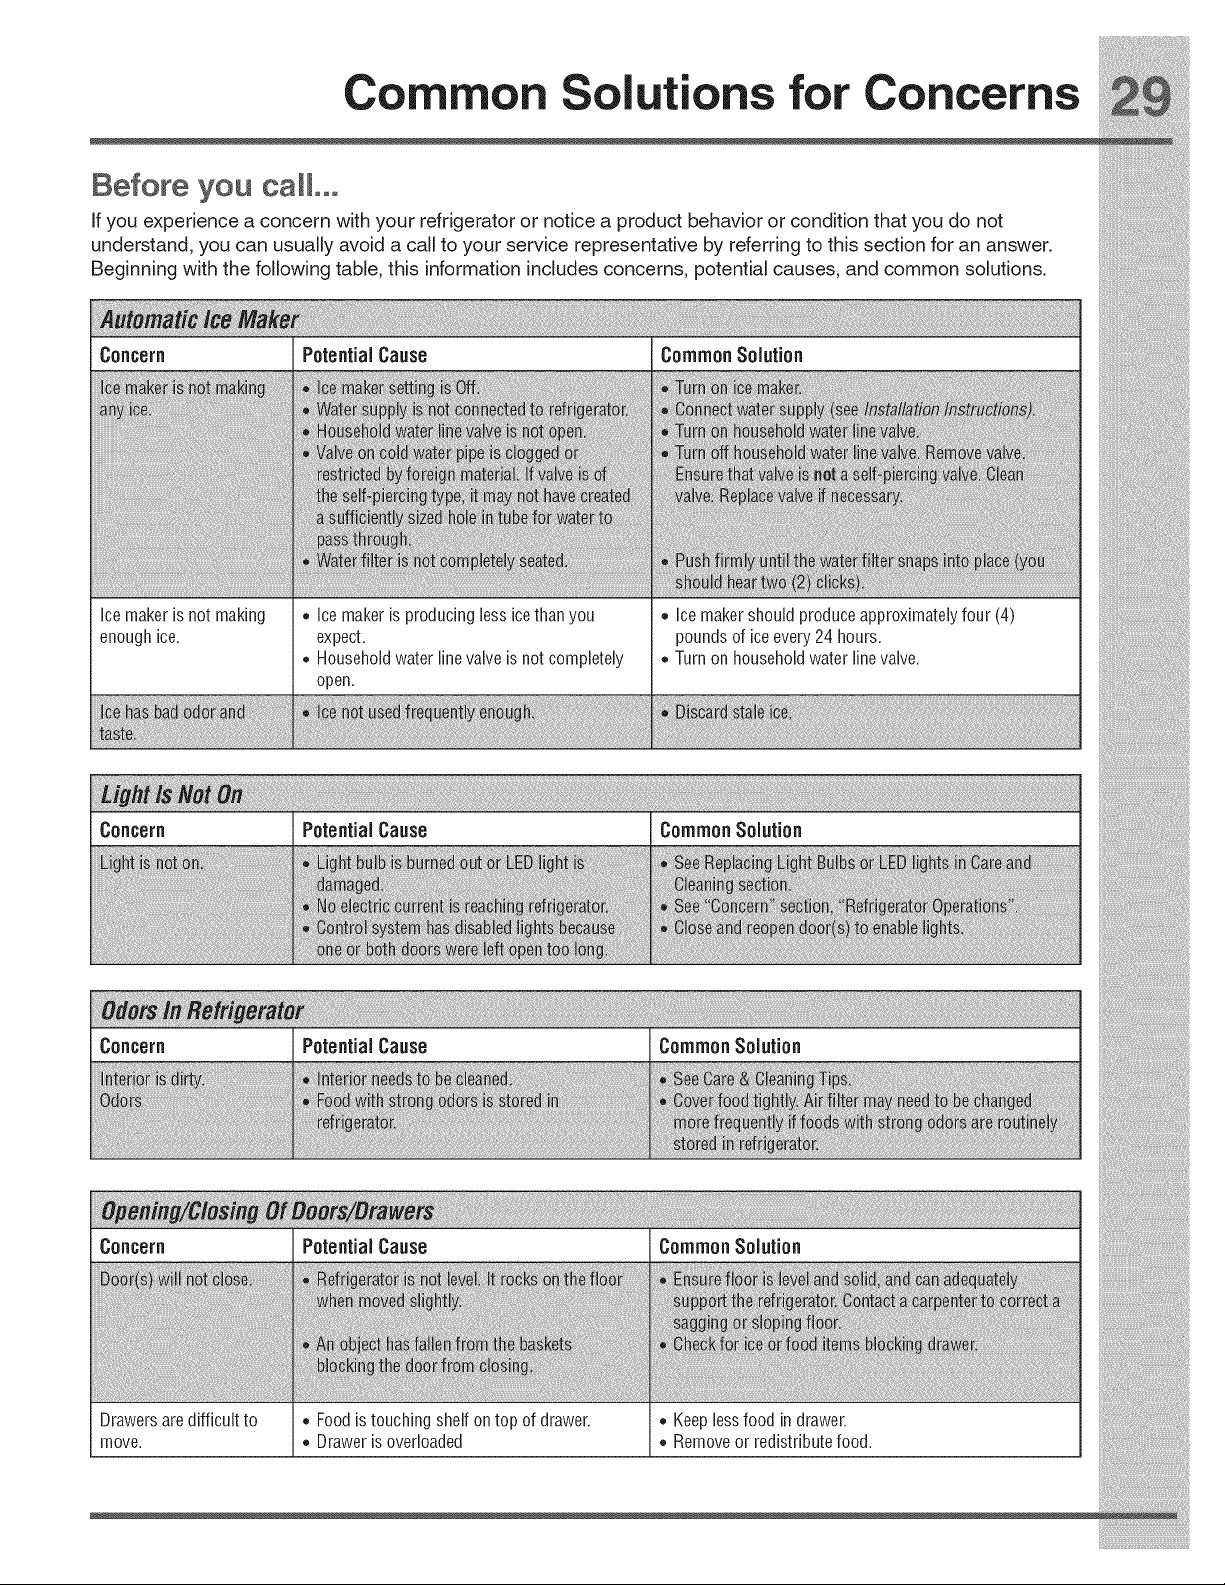
Common Solutions for Concerns
Concern PotentialCause Common Solution
Refrigeratorruns too
much ortoo long.
• Room or outside weather is hot.
Refrigerator has recently beendisconnected
for a period of time.
Automatic ice maker is operating.
Doors are openedtoo frequently or too long.
Refrigerator/freezerdoor may be slightly
open.
It's normal for the refrigerator to work longer under
these conditions.
It takes8-12 hours for the refrigerator to cool down
completely.
Ice makeroperation causes refrigerator to run slightly
more.
Warm air entering the refrigerator causes it to run more.
Open doors less often.
Ensurerefrigerator is level. Keepfood and containers
from blocking door. See Problem section, Opening/
Closing of Doors/Drawers.
Freezercontrol is set too cold (control found • Set freezer control to warmer setting until refrigerator
on side of left hand door), temperature is satisfactory. Allow 24 hours for
...................................................................................... temperatureto stabilize.
• Freshfood/freezer gasket is dirty, worn, • Cleanor changegasket. Leaksin door sealwill cause
cracked,or poorly fitted, refrigeratorto run longer in order to maintaindesired
temperatures.
This model is provided with a high-efficiency • It is normal for the compressor to run for long periods
variable-speedcompressor, of time.
concern Potent a cause commonsolution
o
: cti
Refrigeratortemperature •Refrigeratorcontrol is set too cold. • set refrigeratorcontrolto a warmer setting.Allow24
too cold. Freezer hours for temperature to stabilize.
temperature is
satisfactory.
_ze:
Foodstored in Meat •Meat Keepertemperature control is set too •Adjust Meat Keepertemperature control toe warmer
Keeper freezes(select cold. setting. Meat should be stored at a temperaturejust
models), below the freezing point for maximum fresh storage
time. It is normal for ice crystals to form dueto the
I moisture content of meat.
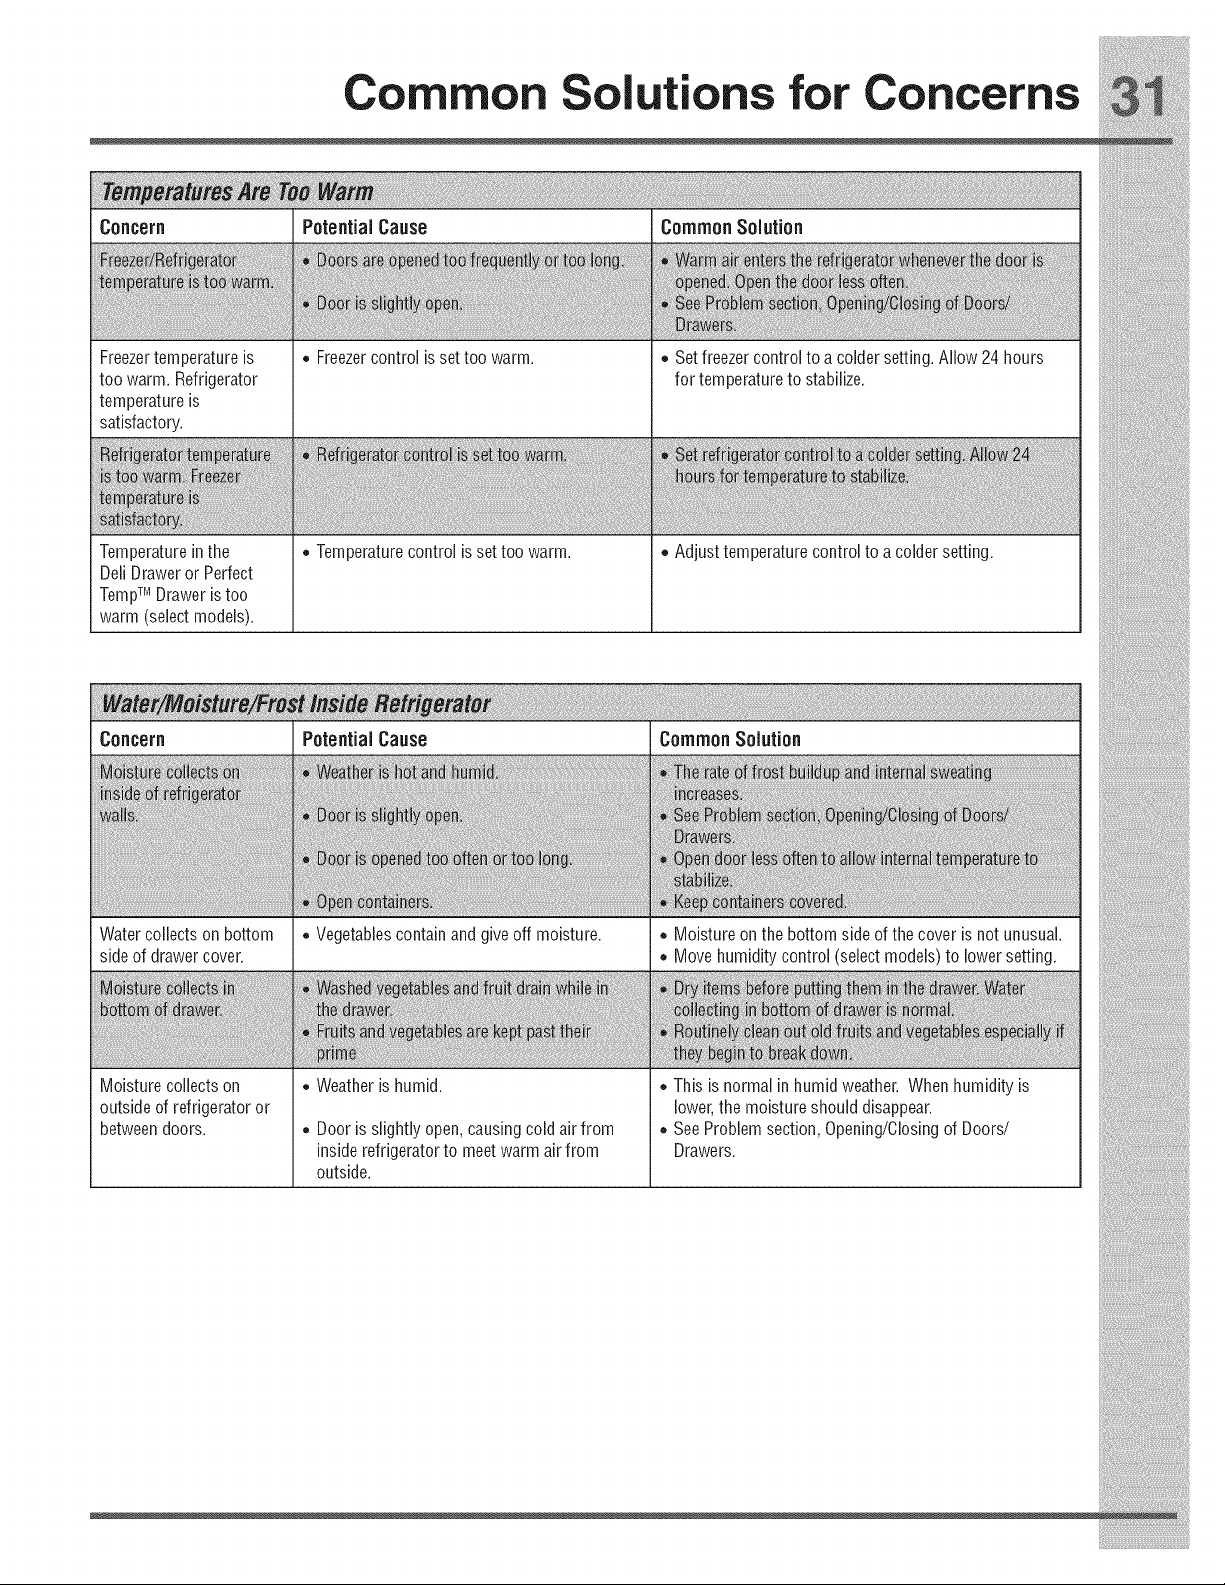
Common Solutions for Concerns
Freezertemperature is
too warm. Refrigerator
temperature is
satisfactory.
Temperature inthe
Deli Drawer or Perfect
TempTMDrawer is too
warm (select models).
• Freezercontrol is set too warm.
Temperaturecontrol is set too warm.
Set freezer control to a colder setting. Allow 24 hours
for temperature to stabilize.
Adjust temperature control to a colder setting.
Concern PotentialCause Common Solution
Worroo,y
MajorApplianceWarrantylnformation
Yourappliance is covered byaoneyearlimitedwarranty. Foroneyearfromyouroriginal dateofpurchase, Electroluxwill repairor
replace any parts of this appliance that prove to be defective in materials orworkmanship when such appliance is installed, used, and
maintained in accordance with the provided instructions. In addition, the cabinet liner and sealed refrigeration system (compressor,
condenser, evaporator, dryer or tubing) of your appliance is covered by a two through five year limited warranty. During the 2nd
through 5th years from your original date of purchase, Electrolux will repair or replace any parts in the cabinet liner and sealed
refrigeration system which prove to be defective in materials or workmanship when such appliance is installed, used, and
maintained in accordance with the provided instructions.
Exclusions
Thiswarrantydoesnotcoverthefollowing:
1. Products with original serial numbers thathave been removed, altered orcannot be readilydetermined.
2. Productthat has been transferred from its original owner to another party or removed outside the USAor Canada.
3. Rust on the interior or exterior of the unit.
4. Products purchased"as-is'are notcovered bythis warranty.
5. Food loss due to any refrigerator or freezer failures.
6. Products used in a commercial setting.
7. Service calls which do not involve malfunction or defects in materials or workmanship, or for appliances not in ordinary
household use or used other than in accordance with the provided instructions.
8. Service calls to correct the installation of your appliance or to instruct you how to use your appliance.
9. Expenses for making the appliance accessible for servicing, such as removal of trim, cupboards, shelves, etc., which are
not a part of the appliance when it is shipped from the factory.
10. Service calls to repair or replace appliance light bulbs, air filters, waterfilters, other consumables, or knobs, handles, or
other cosmetic parts.
11. Pickup and delivery costs;your appliance is designed to be repaired in the home.
12. Surcharges including, but not limited to, any after hour, weekend, or holiday service calls, tolls, ferry trip charges, or
mileage expense forservice calls to remote areas, including the state of Alaska.
13. Damages to the finish of appliance or home incurred during transportation or installation, including but not limited to floors,
cabinets, walls, etc.
14. Damag___au__dby:__rvic__p_rf_rm_dbyu_auth_riz_d__rvi____mpa_i__;u___fpart__th_rtha_g__ui_____ctr__ux
parts or parts obtained from persons other than authorized service companies; or external causes such as abuse, misuse,
inadequatepowersupply, accidents, fires, oractsofGod.
DlSCLAIMEROFIMPLIEDWARRANTIES;LIMITATIONOFREMEDIES
CUSTOMER'SSOLEAND EXCLUSIVE REMEDYUNDERTHISLIMITEDWARRANTYSHALLBE REPAIROR REPLACEMENTAS
PROVIDED HEREIN. CLAIMS BASEDON IMPLIEDWARRANTIES INCLUDINGWARRANTIES OF MERCHANTABILITY OR
FITNESS FOR A PARTICULAR PURPOSE ARE LIMITEDTO ONEYEAR ORTHE SHORTEST PERIODALLOWED BY LAW BUT
NOT LESSTHAN ONEYEAR. ELECTROLUX SHALL NOT BE LIABLE FOR CONSEQUENTIALOR INCIDENTAL DAMAGES SUCH
AS PROPERTY DAMAGE AND INCIDENTAL EXPENSES RESULTING FROM ANY BREACH OFTHISWRITTEN LIMITED
WARRANTYOR ANY IMPLIEDWARRANTY. SOME STATES AND PROVINCES DO NOTALLOWTHE EXCLUSION OR
LIMITATION OF INCIDENTALOR CONSEQUENTIAL DAMAGES OR LIMITATIONSON THE DURATION OF IMPLIED
WARRANTIES SOTHESE LIMITATIONS OR EXCLUSIONS MAY NOTAPPLYTOYOU.THISWRITTEN WARRANTY GIVESYOU
SPECIFIC LEGAL RIGHTS.YOU MAYALSO HAVE OTHER RIGHTSTHATVARY FROM STATE TO STATE.
If You NeedService
Keepyour receipt, deliveryslip, orsomeotherappropriate payment recordtoestablish thewarrantyperiodshouldservice be
required. If service is performed, it is in your best interest to obtain and keep all receipts. Service underthis warranty must be
obtained by contacting Electrolux atthe addresses orphone numbers below.
Thiswarrantyonlyapplies in the USA, Puerto RicoandCanada. ln the USAand Puerto Rico, yourappliance iswarranted by
Electrolux UajorAppliances North America, a division of Electrolux Home Products, Inc. In Canada, your appliance is warranted by
Electrolux Canada Corp. Electrolux authorizes no person to change or add to any obligations under this warranty. Obligations for
service and parts underthis warranty must be performed by Electrolux oran authorized service company. Productfeatures or
specifications as described orillustrated are subjectto change without notice.
USA Canada
1-877-435-3287 1-800-265-8352
Electrolux MajorAppliances North America Electrolux Canada Corp.
RO. Box 212378 5855 Terry FoxWay
Augusta, GA 30907 Mississauga, Ontario, Canada L5V 3E4