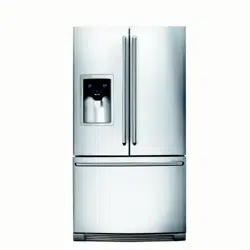
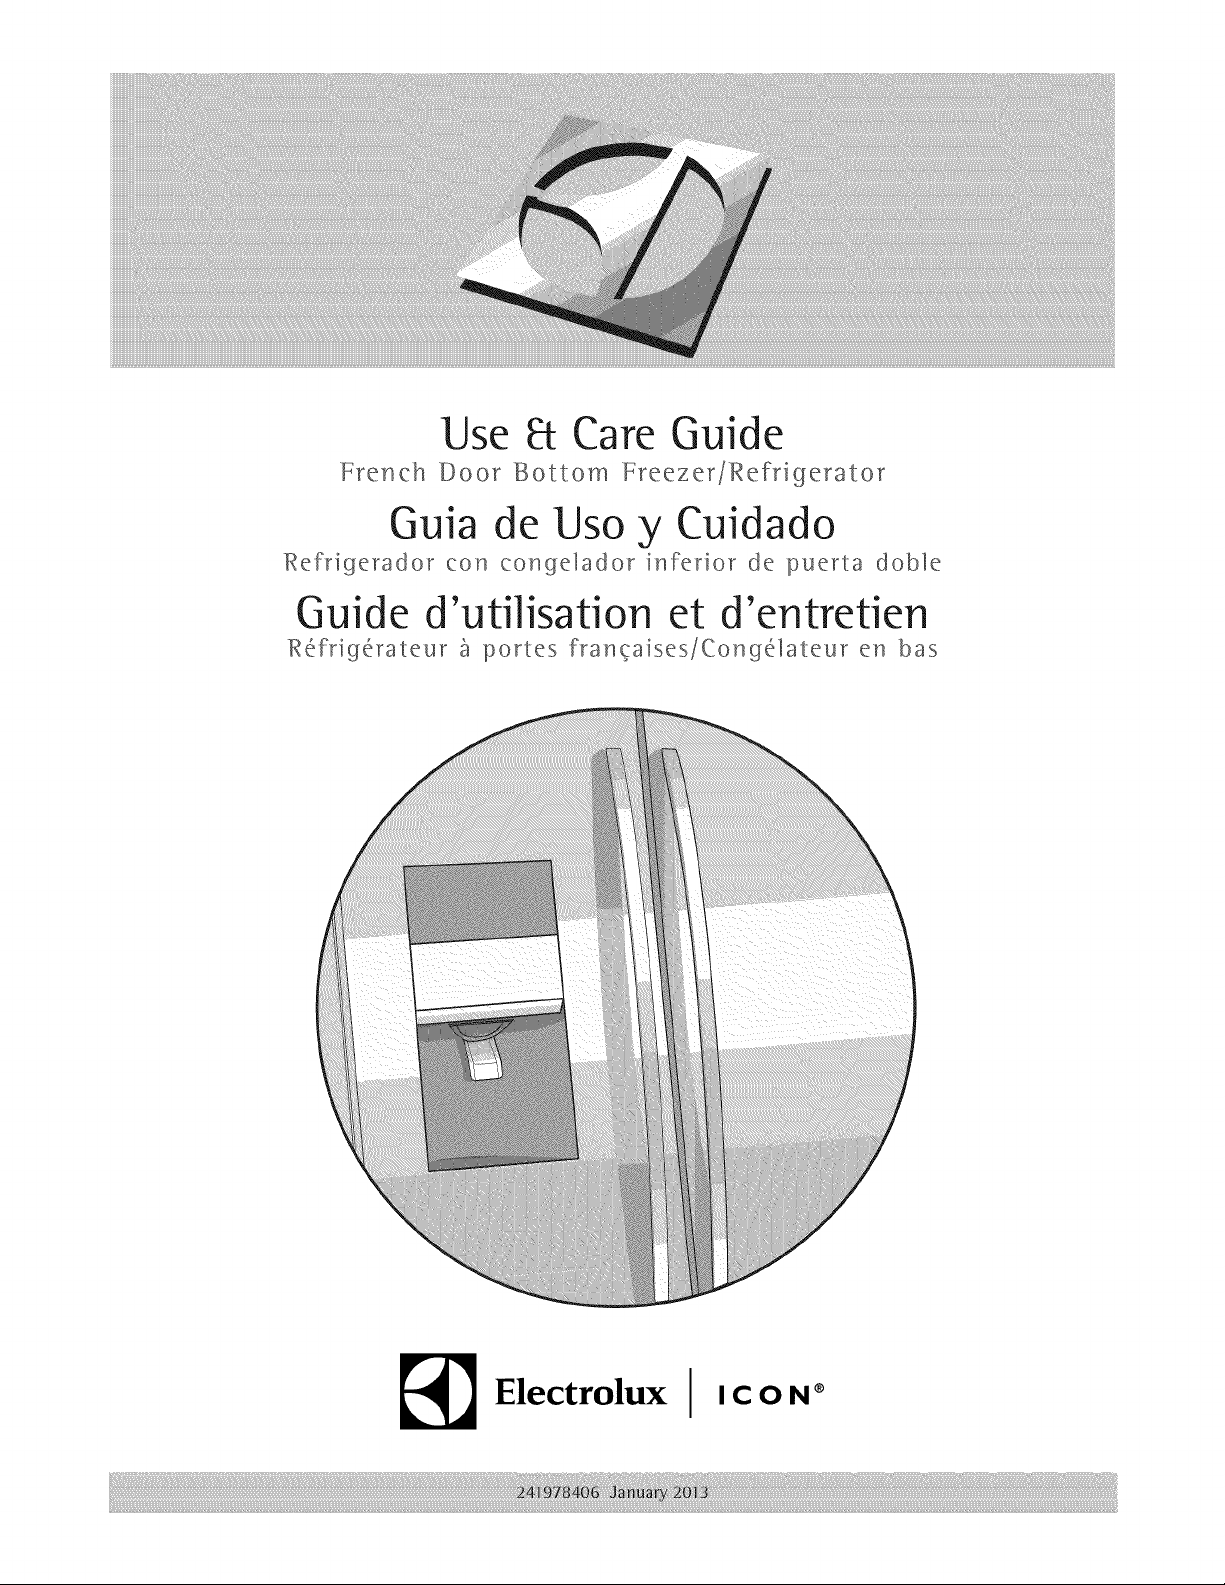
Use _ Care Guide
French Door Bottom Freezer/Refrigerator
Ouia de Uso yCuidado
Refrig_rador con cong_dador inferior d_ pu_rta dobl_
Guide d'utilisation et d'entretien
R___frigC_rateur _ portes fran_aises/CongCdateur en bas
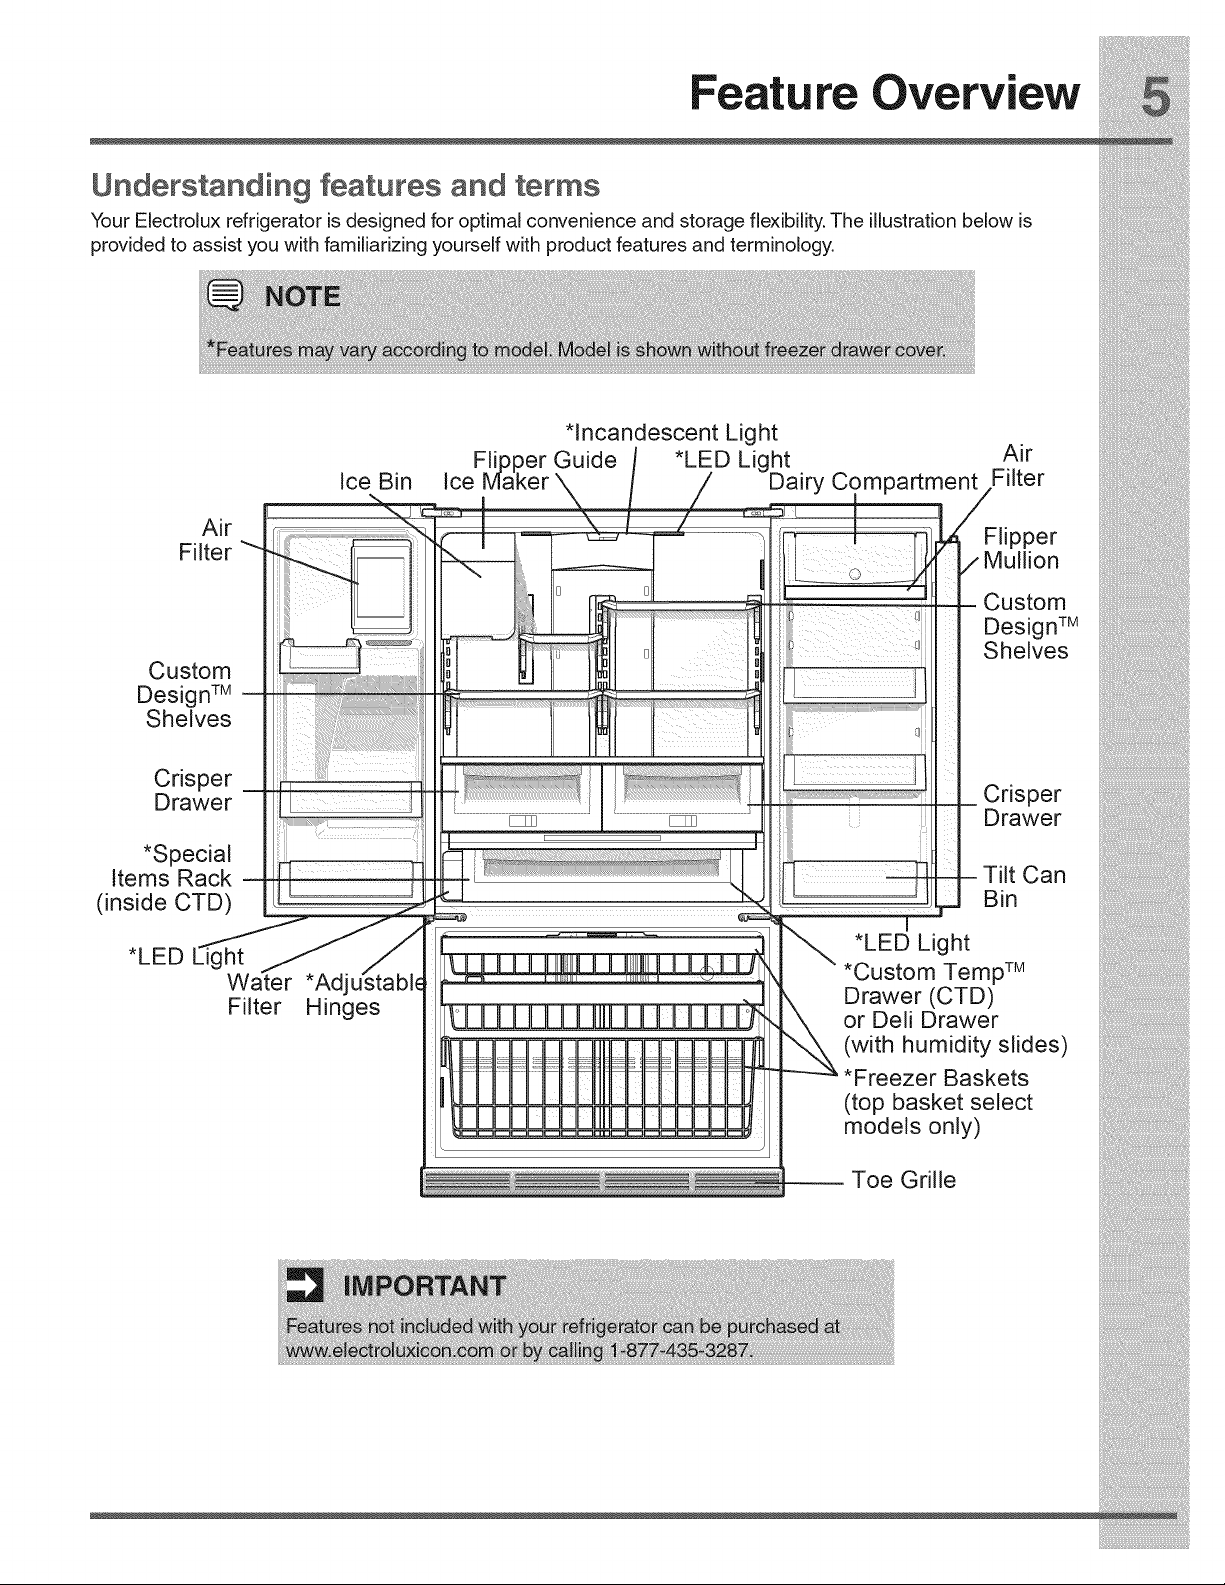
_Electrolux ICON ®
_i:_i_ii_i_!_!_i@!_!:ii!_!:ii!_!_!ii_!_ii_i!_!!_!i_ii_i!ii_iii@_i_i_i_iii_ii
Finding information
Please read and save this guide Tabmeof contents
Thank you forchoos ng E ectro ux our new prem um Fin in Inf rm in 2
[J g 0 at 0 ..............................................
brand in home appliances.This Use & Care Guide is
part of our comm tment to customer sat sfact on and f
Sa ety ............................................................... 3
product quality throughout the service life of your new
app ance •FeatureOverview................................................. 5
;;; Keep a record for quick
_Instal at on......................................................... 6
reference
Ro.,o_.gt,oDoo,,............................................_0
__ c0..00ti.gt,0w_t0,s.,,_v.................................._2
Purchase date
co.t,o_s..........................................................._4
__ A" rn "i I-W" rlVl k r'Di . r 17
ulo alc ce_ ale a e/ spe se ....................
19
;;;; Sto,_.gFoo_._S_v_.gE.o,gV..............................24
Changing the Water andAir Filters........................... 26
i!_!_i!i_ii_!i!_!_i!i_ii_!i!_!_i!i_ii_!i!_!_i!i_ii_!i!_!_i!i_ii_!i!_!_i!i_ii_!i!_!_i!i_ii_!i!_!_i@ii_i
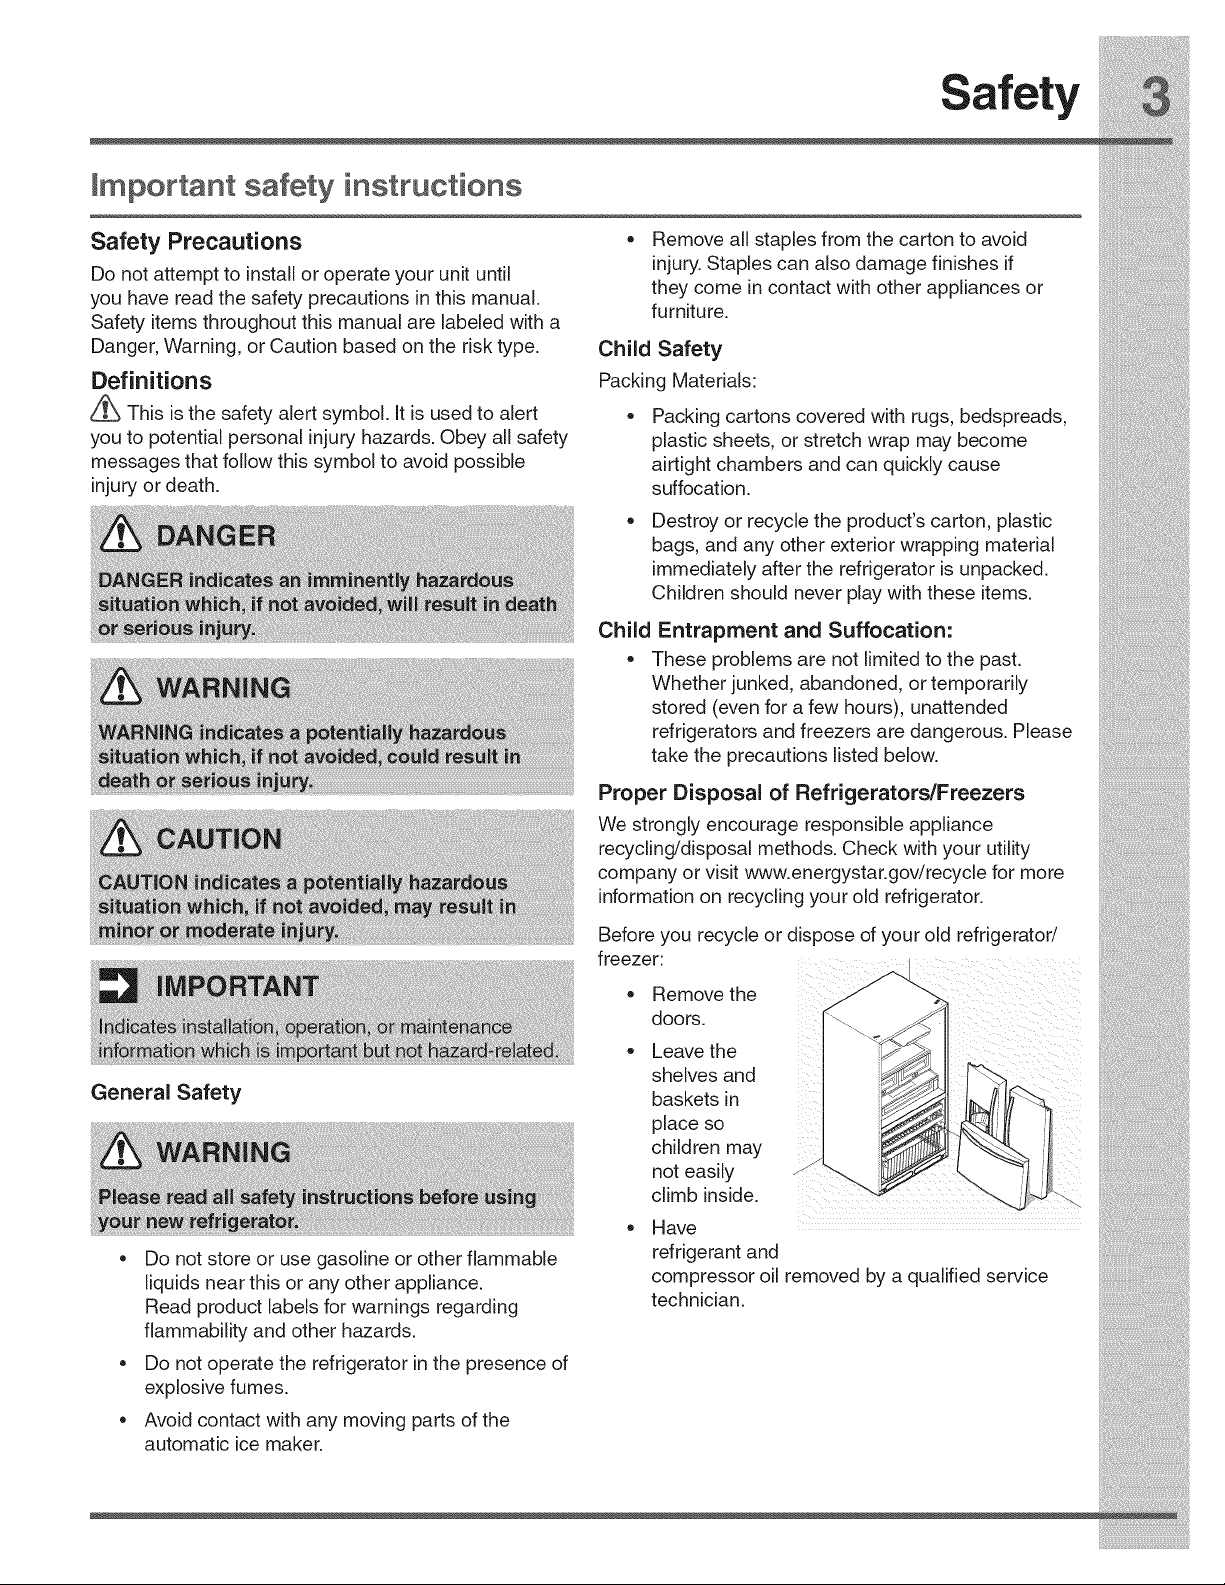
take the precautions listed below.
Proper Disposal of Refrigerators/Freezers i_i!_!_i!i_ii_!i!_!_i!i_ii_!i!_!_i!i_ii_!i!_!_i!i_ii_!i!_!_i!i_ii_!i!_!_i!i_ii_!i!_!_i!i_ii_!i!_!_i!i_ii_!i!_!_i!i_ii_!i!_!_iii_
Safety
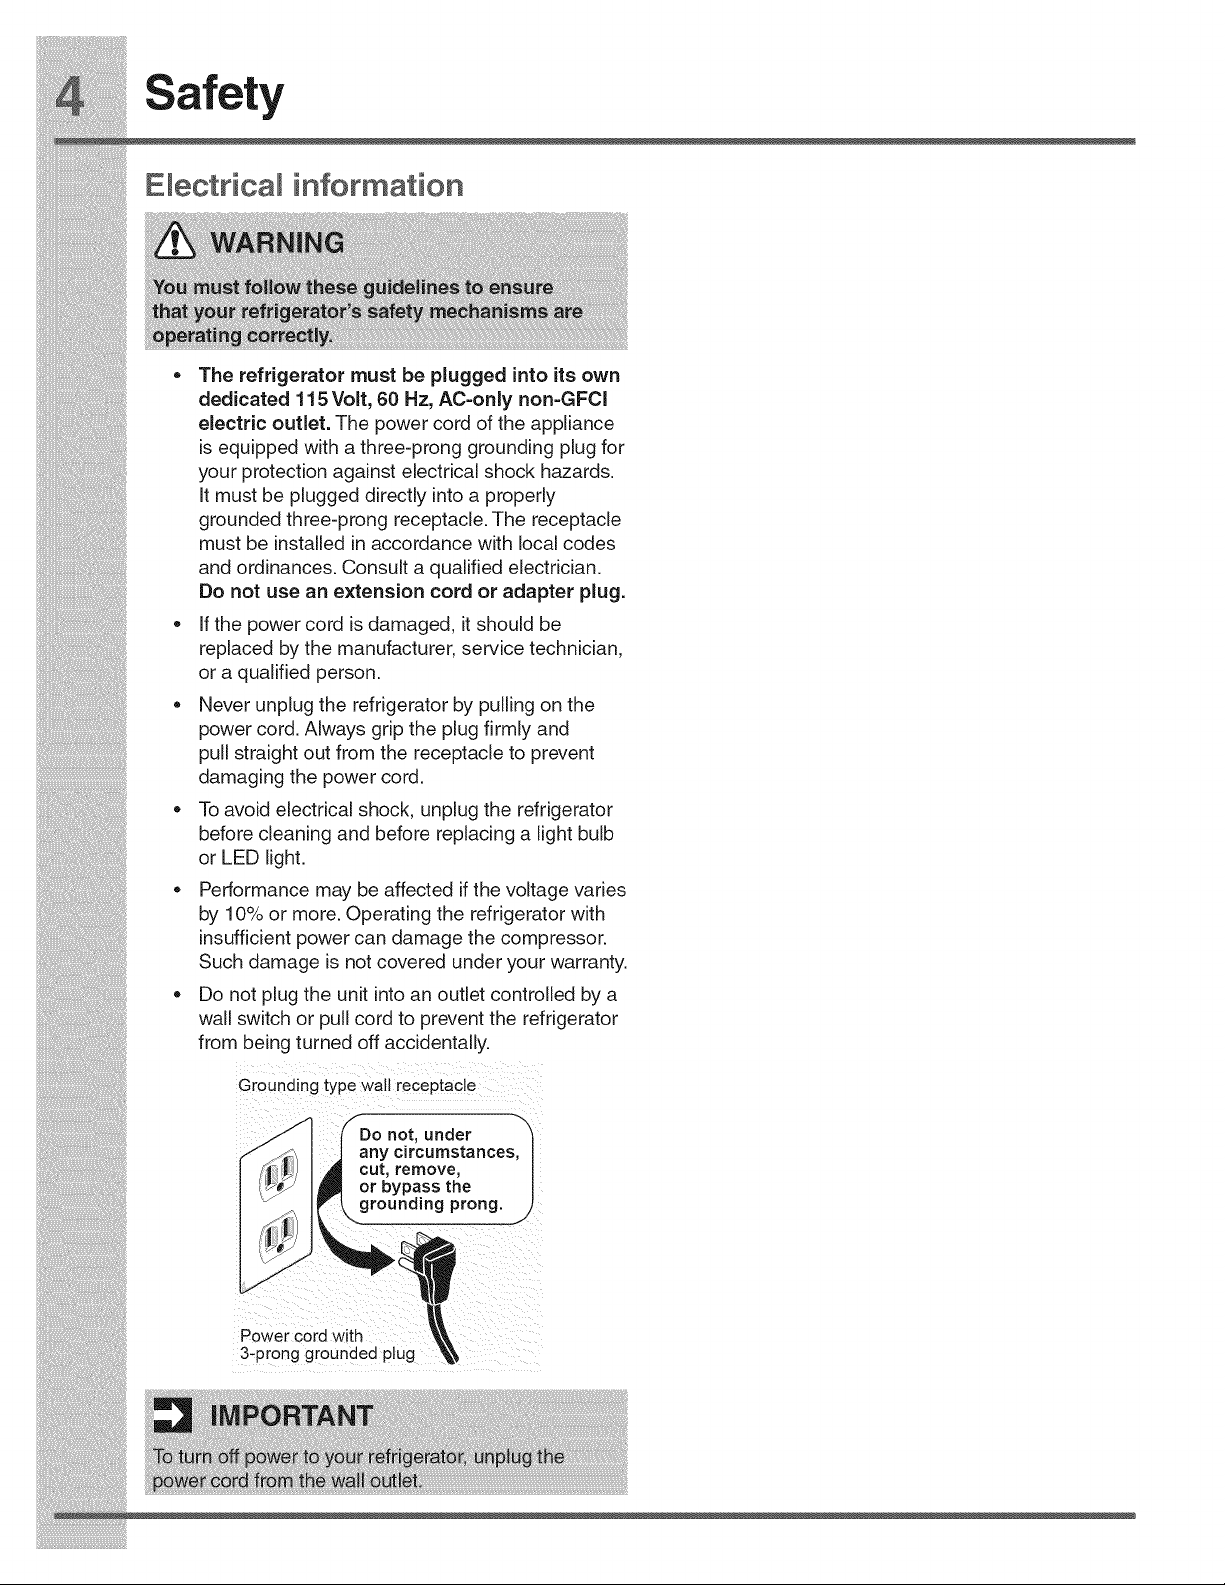
Emectrical information
*The refrigerator must be plugged into its own
dedicated 115 Volt, 60 Hz, AC-only non-GFCl
electric outlet. The power cord of the appliance
is equipped with a three-prong grounding plug for
your protection against electrical shock hazards.
It must be plugged directly into a properly
grounded three-prong receptacle. The receptacle
must be installed in accordance with local codes
and ordinances. Consult a qualified electrician.
Do not use an extension cord or adapter plug.
, If the power cord is damaged, it should be
replaced by the manufacturer, service technician,
or a qualified person.
= Never unplug the refrigerator by pulling on the
power cord. Always grip the plug firmly and
pull straight out from the receptacle to prevent
damaging the power cord.
, To avoid electrical shock, unplug the refrigerator
before cleaning and before replacing a light bulb
, or LED light.
Performance may be affected if the voltage varies
by 10% or more. Operating the refrigerator with
insufficientpower can damage the compressor.
Such damage is not covered under your warranty.
, Do not plug the unit intoan outlet controlled by a
wall switch or pull cord to prevent the refrigerator
from being turned off accidentally.
Grounding type wait receptacle
:p groundedp ug
:
v ,r C6rd _ the _11 o_let,
!_i_!_i!_!!i_i_!_i_!i!!i!i_i_i_!_!_ii_!_J_:_!_:_!_:_!_:_!i_!_i!!_!i_ii_i_Ji!i_i!i!_!i!_!!ii_i!!_;i_i_!_!i_i_i_i_ii_i_!_!_!_!_!_i_!!
Installation
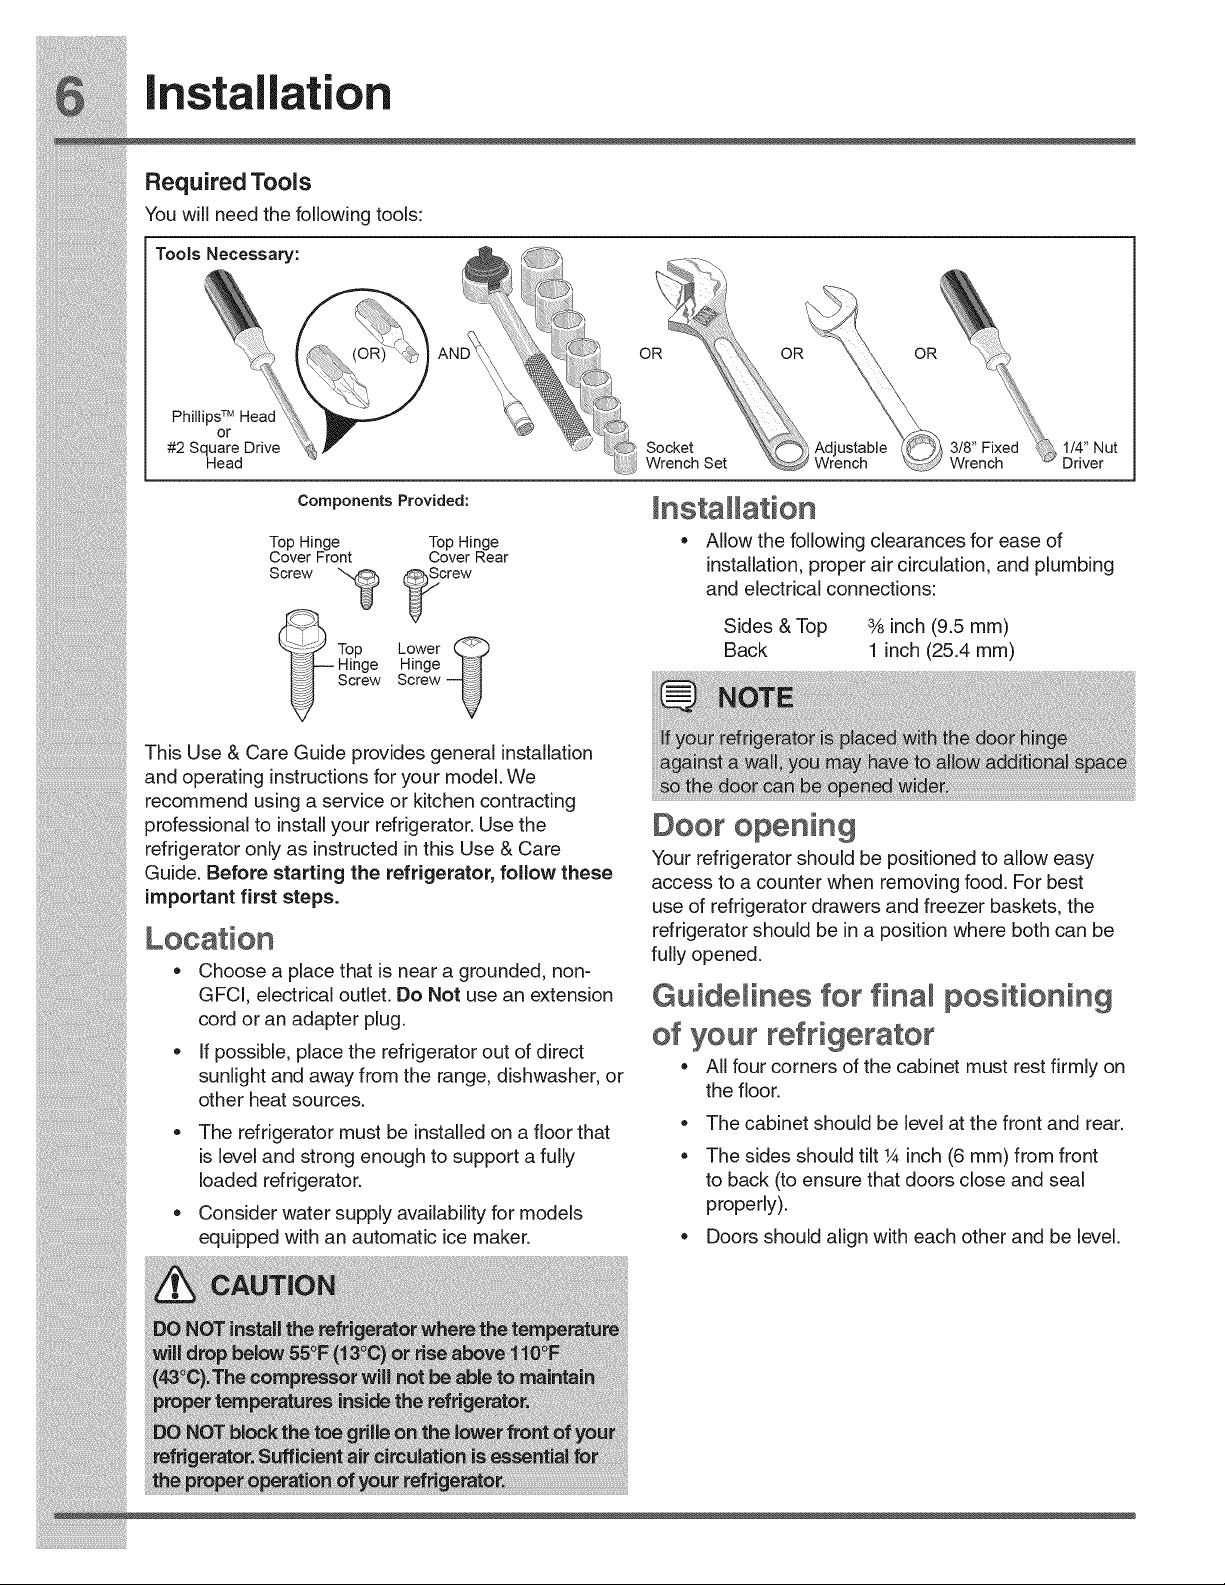
RequiredTools
Youwiiineedthefoliowingtools:
....
__ o o_ o_
S 3/8" Fixed _ 1/4" Nut
Compo°e°t,P,ovded" In t m_ti n
"S a a 0
:: TopHinge TopHinge AIIowthefollowingclearancesforeaseof
CoveerFro_ CoverRear Jnstallation, properaircirculation, andplumbJng
..... _j _ andelectricalconnections:
Sides & To 3/8inch 9 5 mm
_ • p .(.)
_-_-_ Top Lower _) Back 1 inch (25.4 mm)
_]----Hinge Hinge _>_
_Screw Screw_J
ThisUse&CareGuideprovidesgeneralinstallation
and operating instructions foryour model.We
i!_!_i!i_ii_!i!_!_i!i_ii_!i!_!_i!i_ii_!i!_!_i!i_ii_!i!_!_i!i_ii_!i!_!_i!i_ii_!i!_!_i!i_ii_!i!_!_i!i_ii_!i!_!_i!i_ii_!i!_!_ii_i
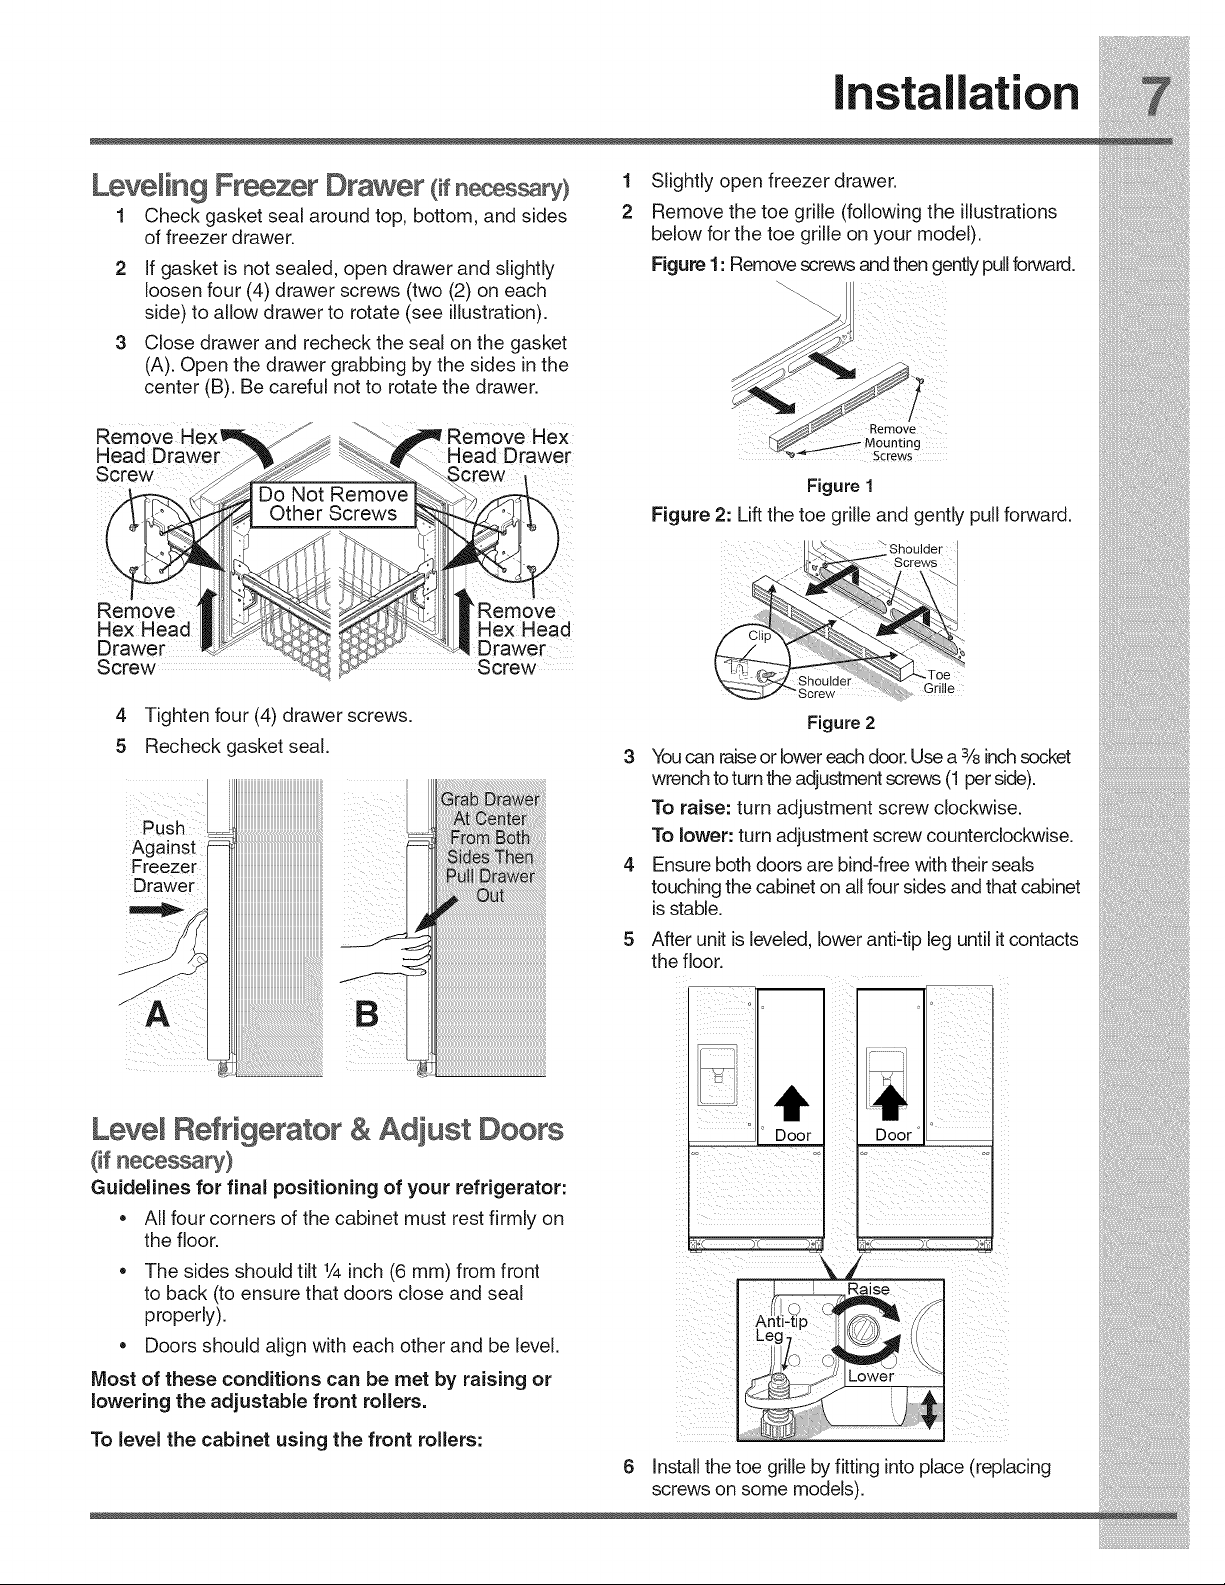
5 Recheckgasketseal.
wrenchtoturntheadjustmentscrews(1perside). i_i!_!_i!i_ii_!i!_!_i!i_ii_!i!_!_i!i_ii_!i!_!_i!i_ii_!i!_!_i!i_ii_!i!_!_i!i_ii_!i!_!_i!i_ii_!i!_!_i!i_ii_!i!_!_i!i_ii_!i!_!_iii_
Installation
i!_!_i!i_ii_!i!_!_i!i_ii_!i!_!_i!i_ii_!i!_!_i!i_ii_!i!_!_i!i_ii_!i!_!_i!i_ii_!i!_!_i!i_ii_!i!_!_i!i_ii_!i!_!_i!i_ii_!i!_!_ii_i
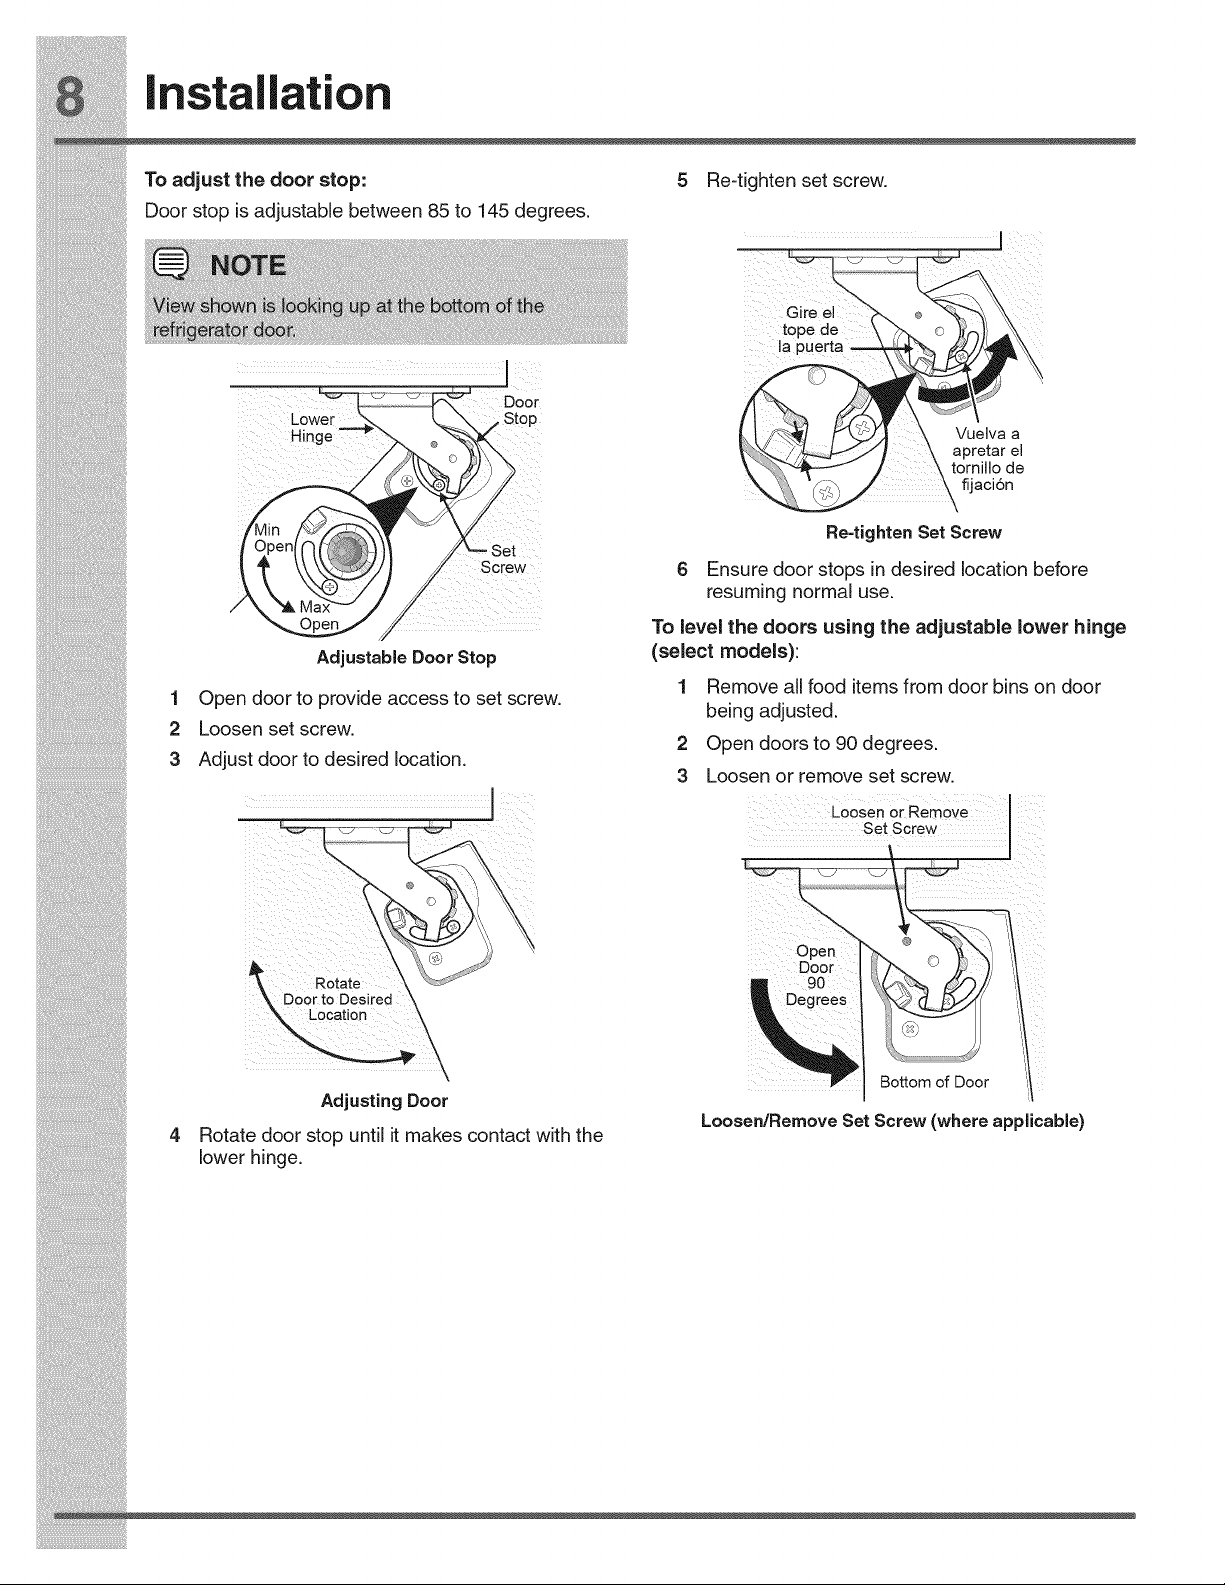
To adjust the door stop:
Door stop is adjustable between 85 to 145 degrees.
1
2
3
i !i ¸¸ _
Door
Lower _ __._ /Stop
_ Screw
Adjustable Door Stop
Open door to provide access to set screw.
Loosen set screw.
Adjust door to desired location.
5 Re-tighten set screw.
Gire
tope de
aa I
Vuelva a
apretar el
tomillo de
fijaci6n
Re=tightenSet Screw
6 Ensure door stops in desired location before
resuming normal use.
To level the doors using the adjustable lower hinge
(select models):
1 Remove all food items from door bins on door
being adjusted.
2 Open doors to 90 degrees.
3 Loosen or remove set screw.
i!_!_i!i_ii_!i!_!_i!i_ii_!i!_!_i!i_ii_!i!_!_i!i_ii_!i!_!_i!i_ii_!i!_!_i!i_ii_!i!_!_i!i_ii_!i!_!_i!i_ii_!i!_!_i!i_ii_!i!_!_ii_i
Re-tighten SetScrew i_i!_!_i!i_ii_!i!_!_i!i_ii_!i!_!_i!i_ii_!i!_!_i!i_ii_!i!_!_i!i_ii_!i!_!_i!i_ii_!i!_!_i!i_ii_!i!_!_i!i_ii_!i!_!_i!i_ii_!i!_!_iii_
Set Screw (where applicable)
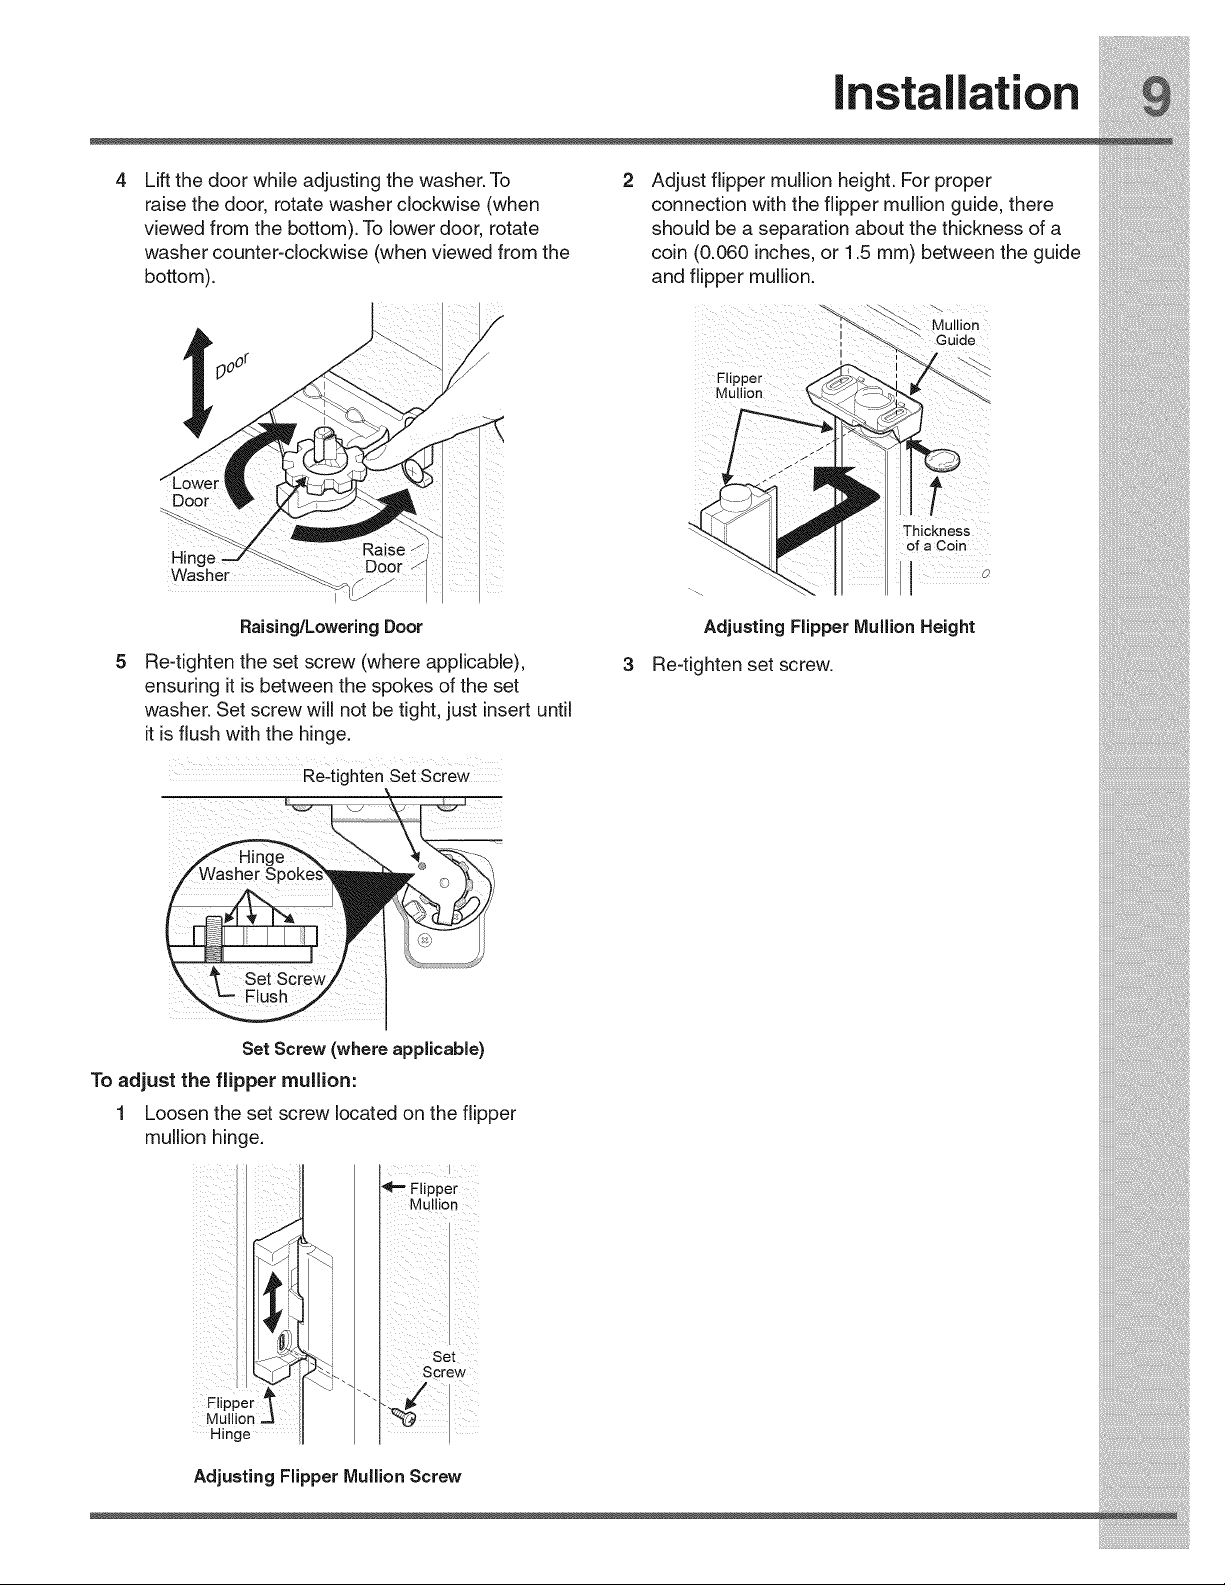
To adjust the flipper mullion:
1 Loosen the set screw located on the flipper
mullion hinge.
Fli
Hinge
Flipper
Mullion
Set
crew
Adjusting Flipper Mullion Screw
!_i_i:!i!!!_ii_ii_ii_ii_!i!!_!i!;i_!i_i!ii!i!i_iiii_iiii:_!_;_ii:i_i_i_i_i;!_i_!_!_!_;_i!_i!_i_!_!_i_i_!!i!:!_!i_!_!_!:!i_!_i_i_
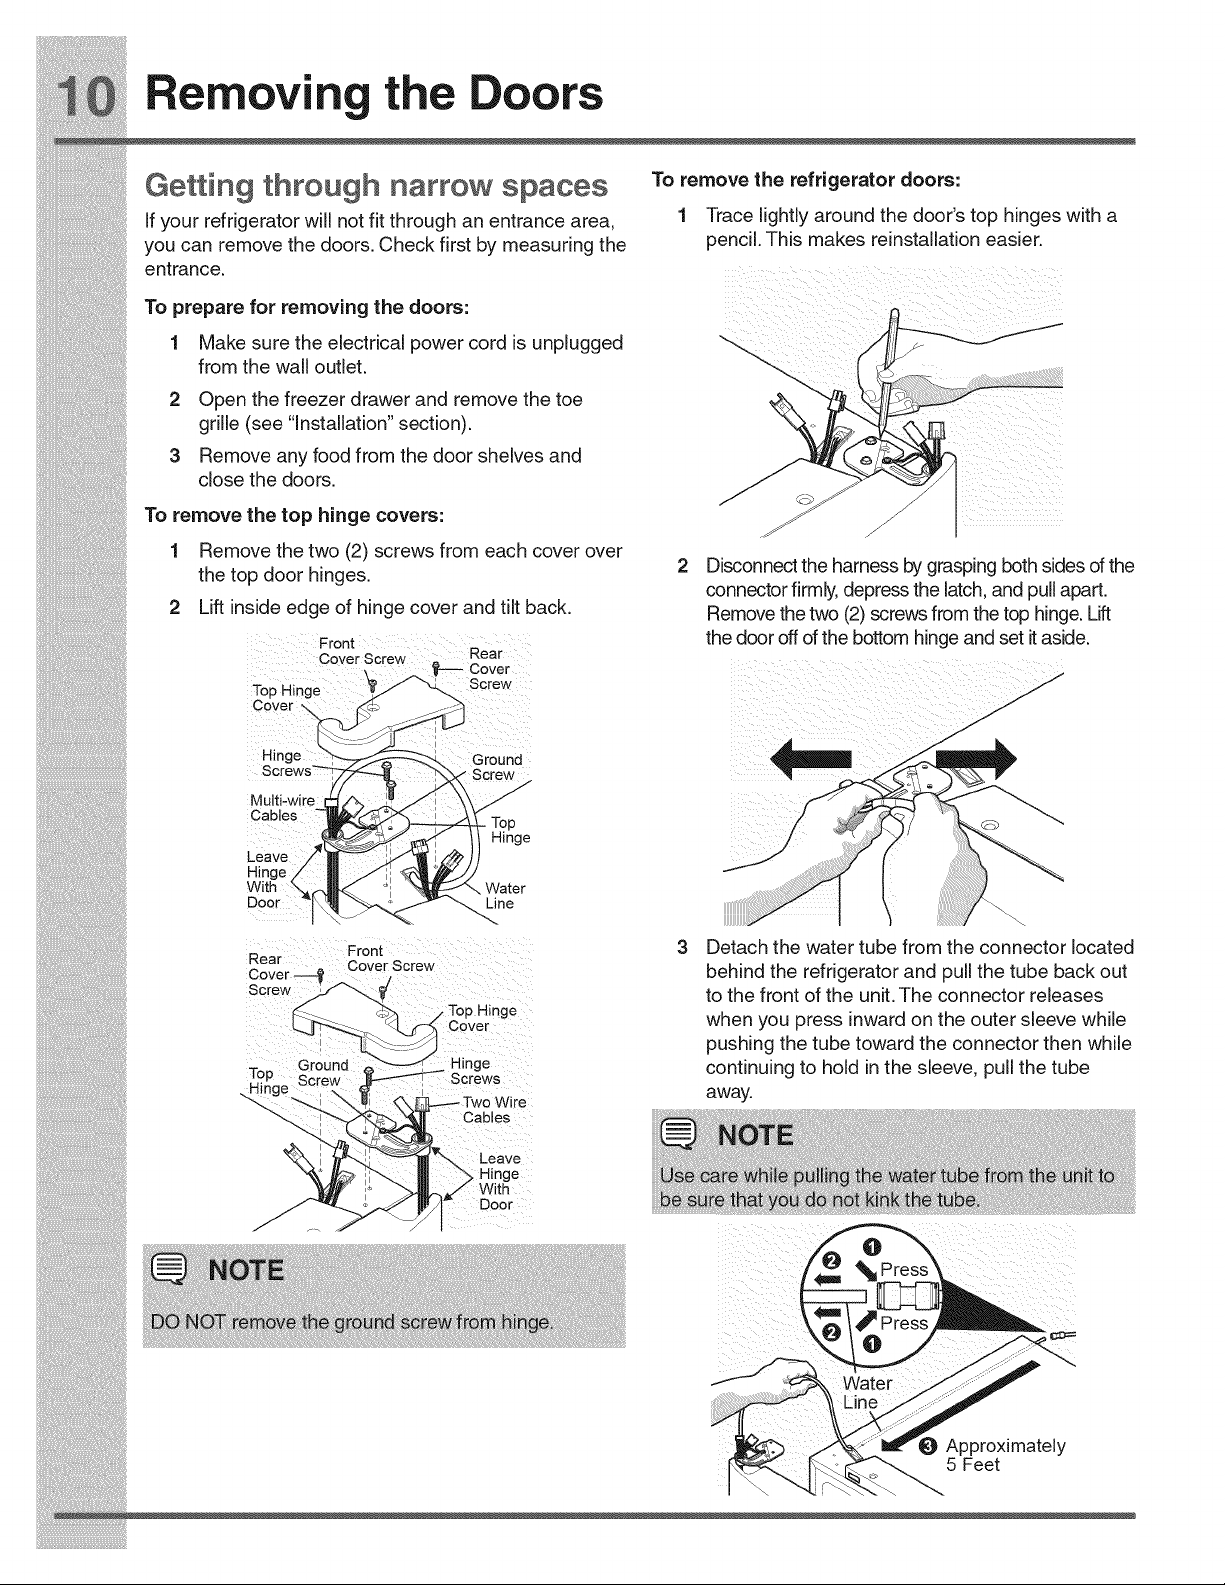
Gettin throu h narrow s aces Toremovetherefr_gerato_doo_-
g g P,"
Ifyourrefrigeratorwillnotfitthroughanentrancearea, 1 Tracelightlyaroundthedoorstophingeswitha
youcan removethedoors. Checkfirstbymeasuringthe pencil.Thismakesreinstallationeasier.
entrance.
1 Makesuretheelectricalpowercordisunplugged "'----..,r-_---___
fromthewalloutlet. "---....
20penthefreezerdrawerandremovethetoe
gr, e(see" nsta,at on'section)
3Removeanyfoodfromthedoorshelvesand ___
dosethedoors
1 Removethetwo (2) screwsfrom each coverover
the to door hin es 2 Disconnect the harness by grasping both sides of the
• . P. g i . connectorfirmly, depressthelatch, andpullapart.
2 Lift reside edge of hinge cover and tilt back . Removethetwo(2) screwsfromthetophinge. Lift
Front thedooroffofthebottomhingeandsetitaside.
Cover SCrew -. Rear
Cover
Top Hinge /- \,4._... Screw
Cover -...., _:::_
[
Hinge Ground
i!_!_i!i_ii_!i!_!_i!i_ii_!i!_!_i!i_ii_!i!_!_i!i_ii_!i!_!_i!i_ii_!i!_!_i!i_ii_!i!_!_i!i_ii_!i!_!_i!i_ii_!i!_!_i!i_ii_!i!_!_ii_i
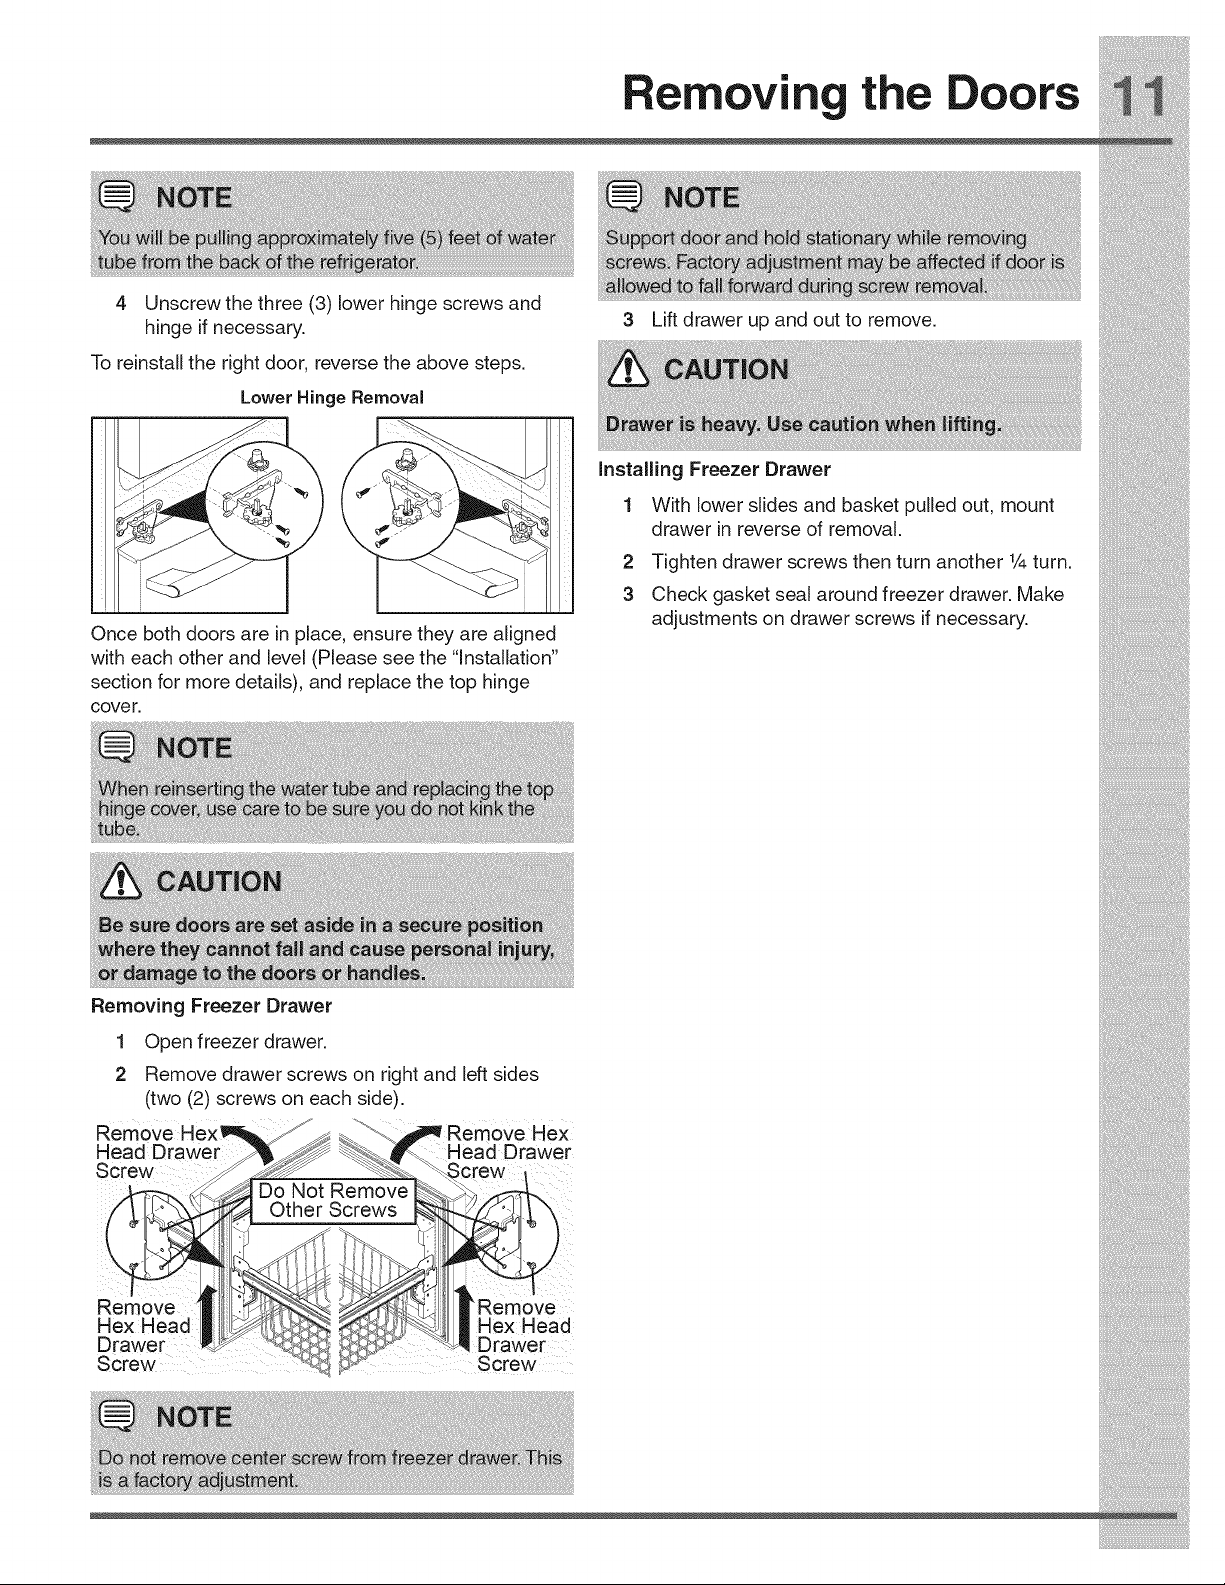
cover.
i_i!_!_i!i_ii_!i!_!_i!i_ii_!i!_!_i!i_ii_!i!_!_i!i_ii_!i!_!_i!i_ii_!i!_!_i!i_ii_!i!_!_i!i_ii_!i!_!_i!i_ii_!i!_!_i!i_ii_!i!_!_iii_
Connectin the Water upply
• A compression nut and ferrule (sleeve) for
connecting a copper water supply line to the ice
maker inlet valve.
i!_!_i!i_ii_!i!_!_i!i_ii_!i!_!_i!i_ii_!i!_!_i!i_ii_!i!_!_i!i_ii_!i!_!_i!i_ii_!i!_!_i!i_ii_!i!_!_i!i_ii_!i!_!_i!i_ii_!i!_!_ii_i
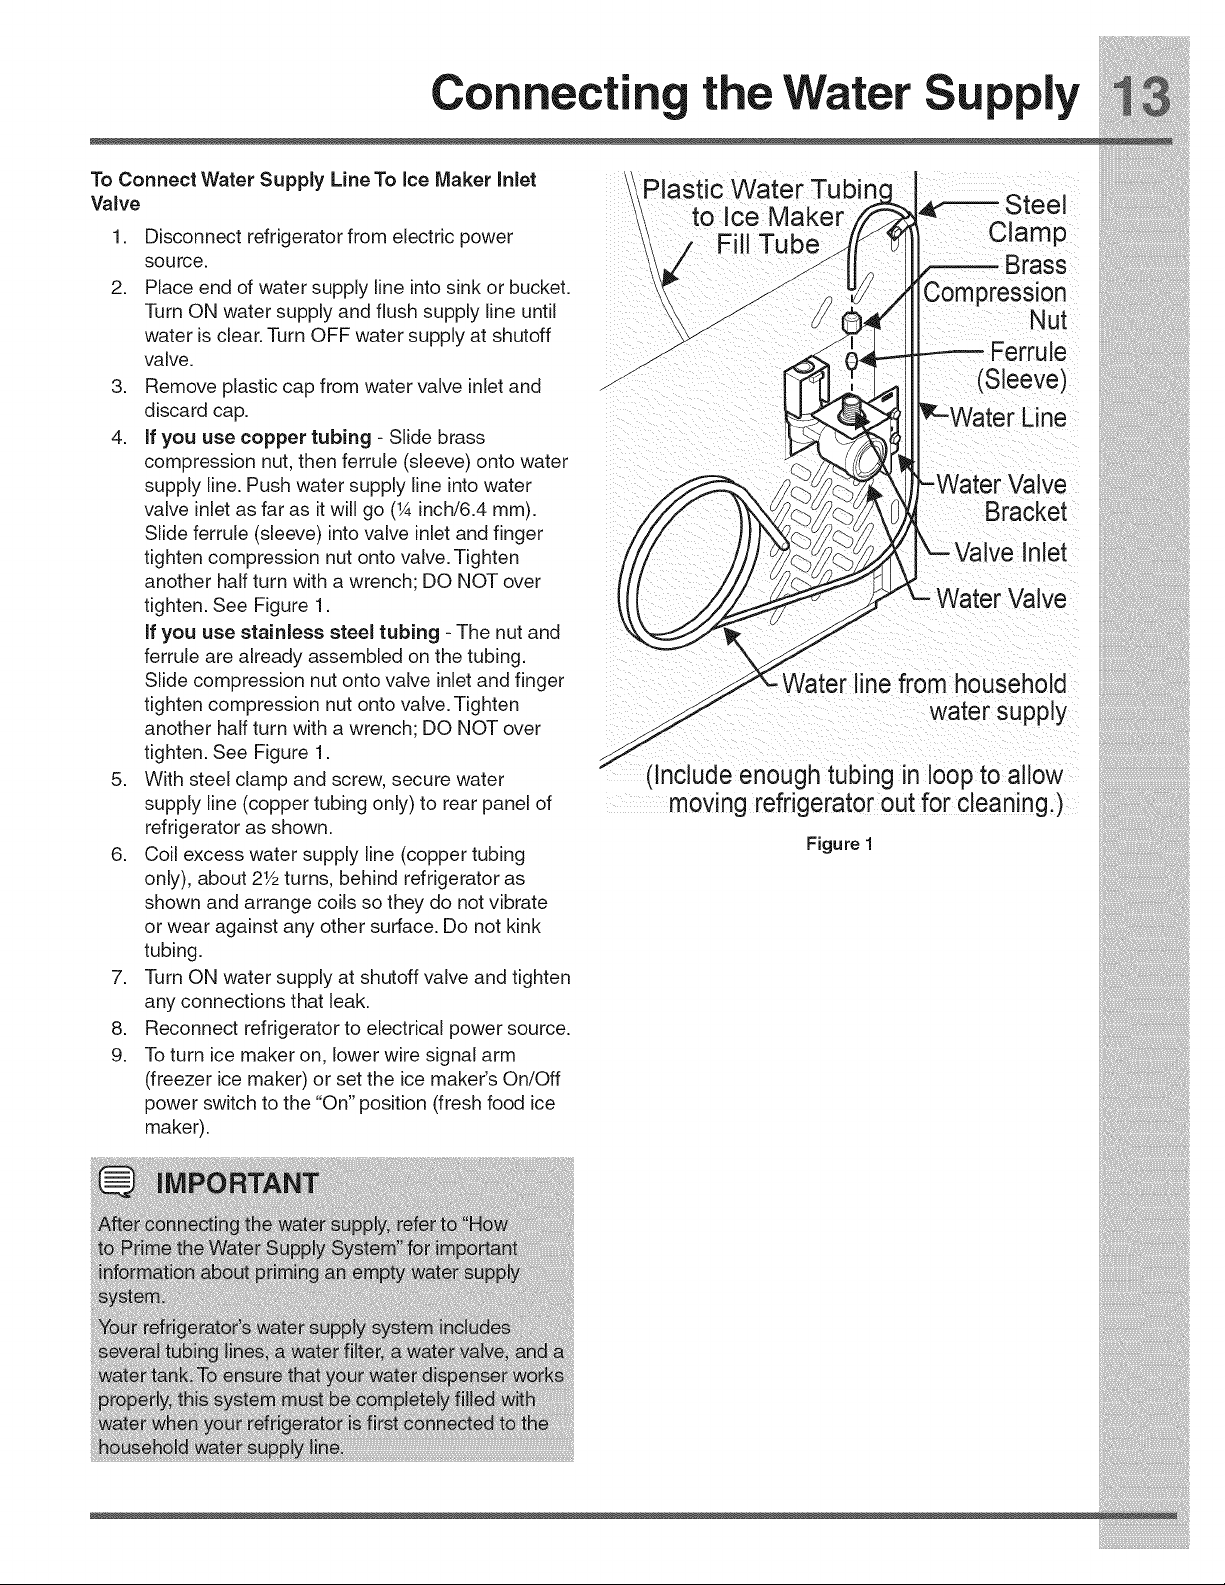
Connecti the Water Suppl
To Connect Water Supply Line To Ice Maker Inlet
Valve
1. Disconnect refrigerator from electric power /
source. /
2. Place end of water supply line into sink or bucket.
Turn ON water supply and flush supply line until
water is clear. Turn OFF water supply at shutoff _-/
/
valve. J
3. Remove plastic cap from water valve inlet and J"
discard cap.
4. If you use copper tubing - Slide brass
compression nut, then ferrule (sleeve) onto water
supply line. Push water supply line into water
valve inlet as far as it will go (1Ainch/6.4 mm). /
Slide ferrule (sleeve) into valve inlet and finger //
tighten compression nut onto valve. Tighten
another half turn with a wrench; DO NOT over
tighten. See Figure 1.
If you use stainless steel tubing - The nut and
ferrule are already assembled on the tubing.
Slide compression nut onto valve inlet and finger
tighten compression nut onto valve. Tighten
another half turn with a wrench; DO NOT over
tighten. See Figure 1.
5. With steel clamp and screw, secure water
Plastic Water Tubin
to Ice Maker
Fill Tube
Steel
Clamp
Brass
Compression
Nut
Ferrule
(Sleeve)
_--Water Line
-Water Valve
Bracket
X--Valve Inlet
_-Water Valve
Lterline from household
water supply
(Include enough tubing in loop to allow
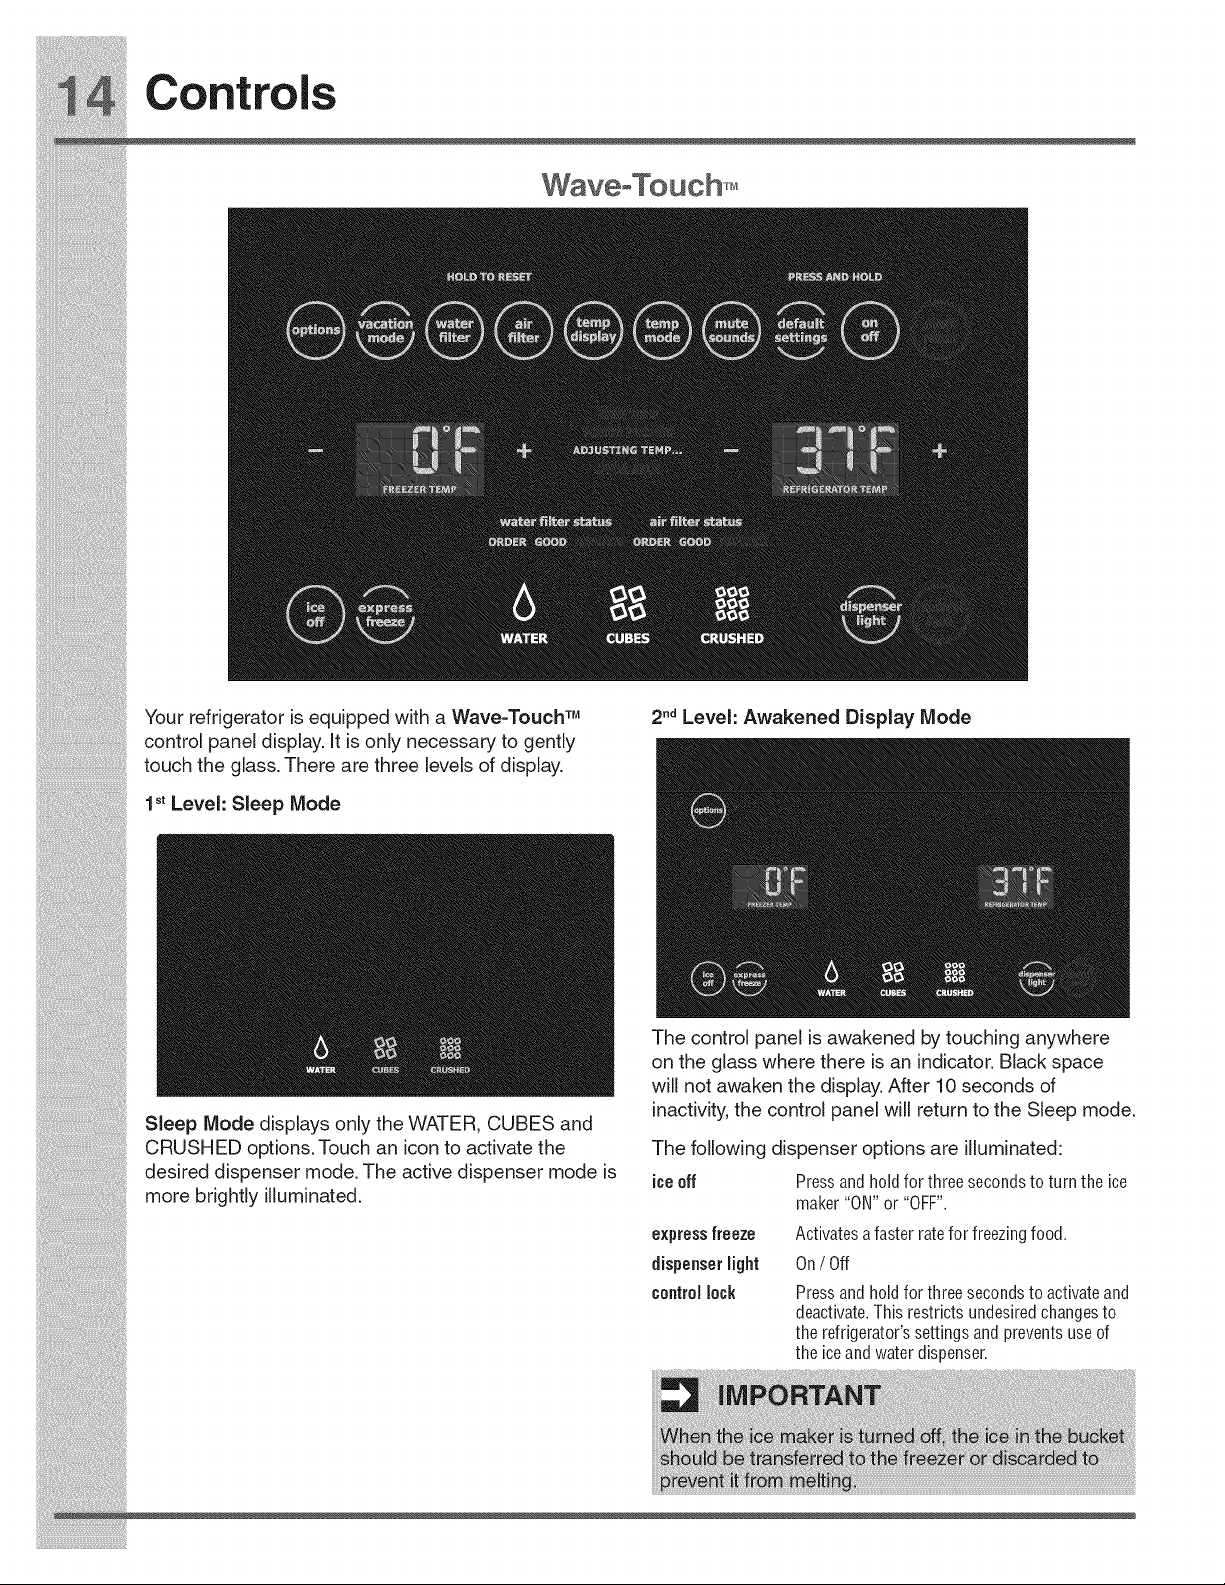
Controls
i!_!_i!i_ii_!i!_!_i!i_ii_!i!_!_i!i_ii_!i!_!_i!i_ii_!i!_!_i!i_ii_!i!_!_i!i_ii_!i!_!_i!i_ii_!i!_!_i!i_ii_!i!_!_i!i_ii_!i!_!_ii_i
Your refrigerator is equipped with a Wave=Touch TM
control panel display. It is only necessary to gently
touch the glass, There are three levels of display,
2ndLevel: Awakened Display Mode
i!_!_i!i_ii_!i!_!_i!i_ii_!i!_!_i!i_ii_!i!_!_i!i_ii_!i!_!_i!i_ii_!i!_!_i!i_ii_!i!_!_i!i_ii_!i!_!_i!i_ii_!i!_!_i!i_ii_!i!_!_ii_i
airfilter
tempdisplay
change.
Touchto display filter status. Press and hold for
three seconds to resetafter filter change.
When active, it allows the display of the freezer
and fridge temps during "Sleep Mode". The i_i!_!_i!i_ii_!i!_!_i!i_ii_!i!_!_i!i_ii_!i!_!_i!i_ii_!i!_!_i!i_ii_!i!_!_i!i_ii_!i!_!_i!i_ii_!i!_!_i!i_ii_!i!_!_i!i_ii_!i!_!_iii_
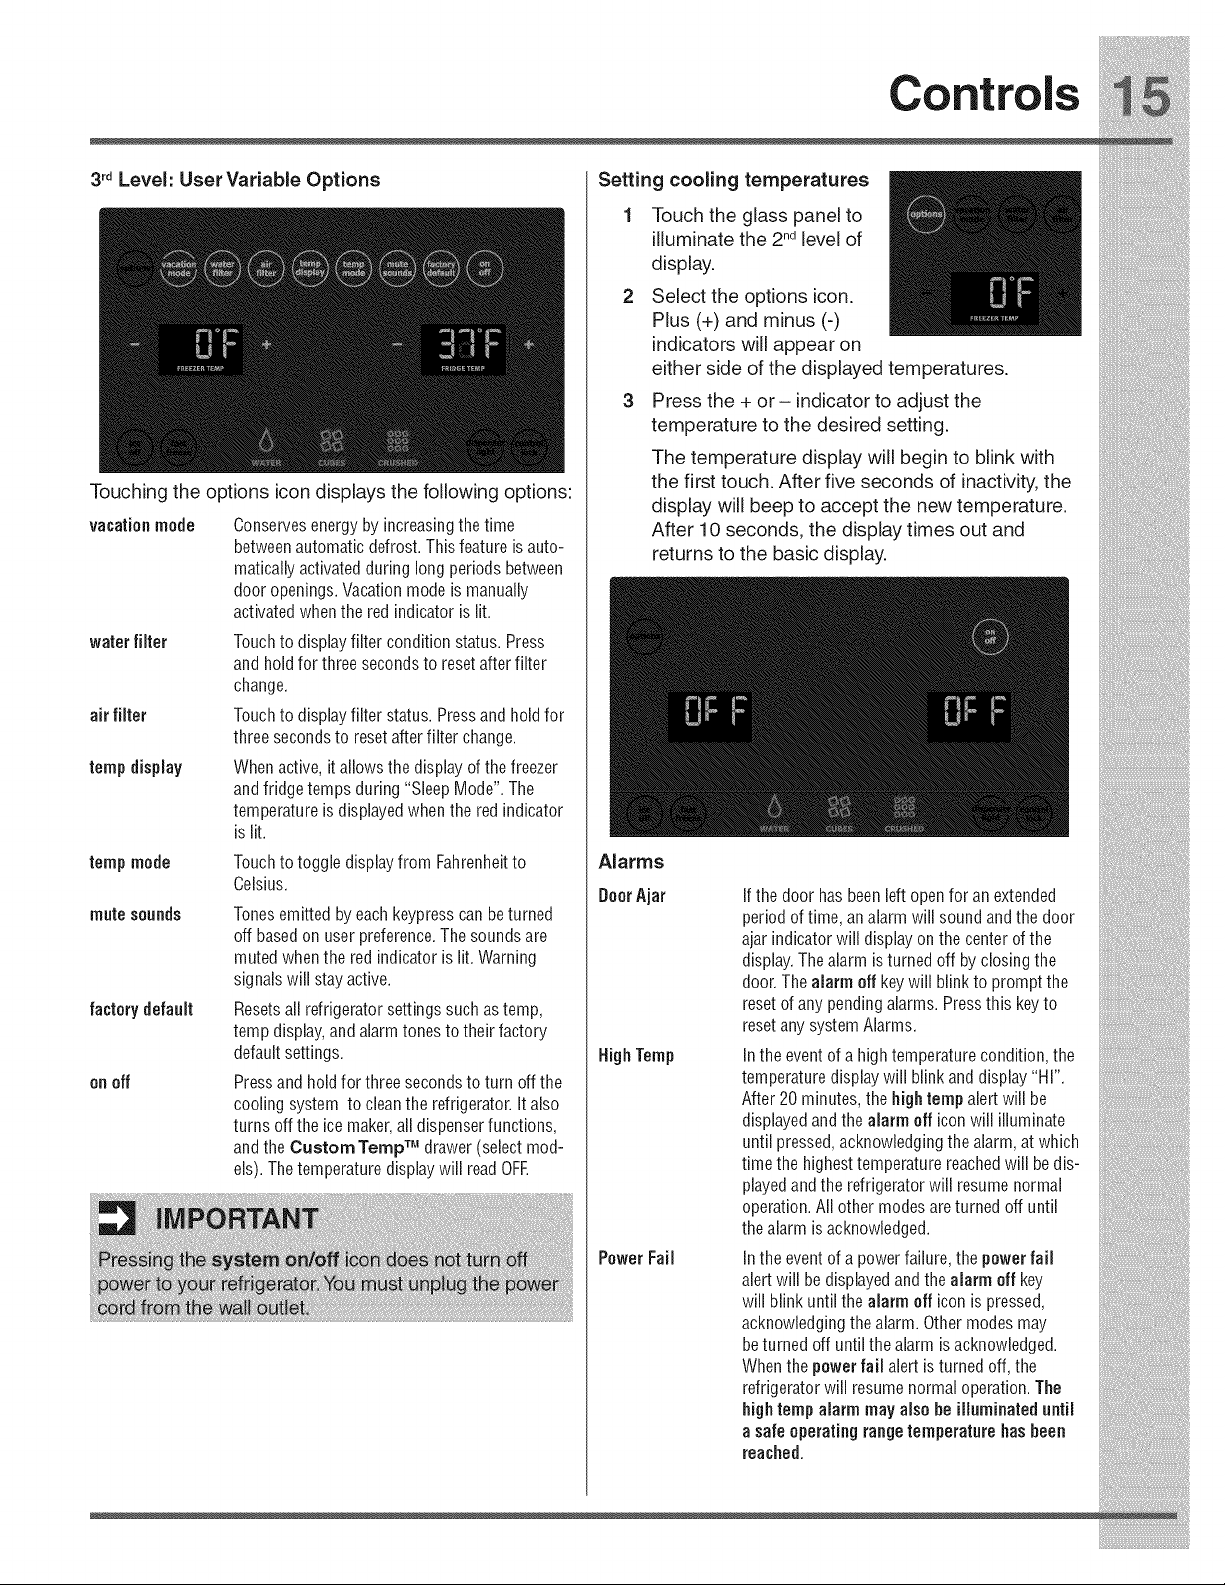
Sabbath Mode is turned ON and OFF by pressing
and holding both the freezer "-" and refrigerator"+"
i!_!_i!i_ii_!i!_!_i!i_ii_!i!_!_i!i_ii_!i!_!_i!i_ii_!i!_!_i!i_ii_!i!_!_i!i_ii_!i!_!_i!i_ii_!i!_!_i!i_ii_!i!_!_i!i_ii_!i!_!_ii_i
iii_i:iii,i_i!i_!_!_!!_!_!i_!_i!_!_ii_i_i_ii_!i_!i_!ii!_i_ii!_i_i!!_iiii!_!!!i_iii_iii_i_ii_ii_iii_!_
Automatic " Ice & orb _kedD|spenser[] _i;iiiiii!ilililil_i!ilililili!¸_i:iiiiiii!i!iii!i!!ii_i_i_i_i_i_i_!!_:!!iii_!i_!_ii_il
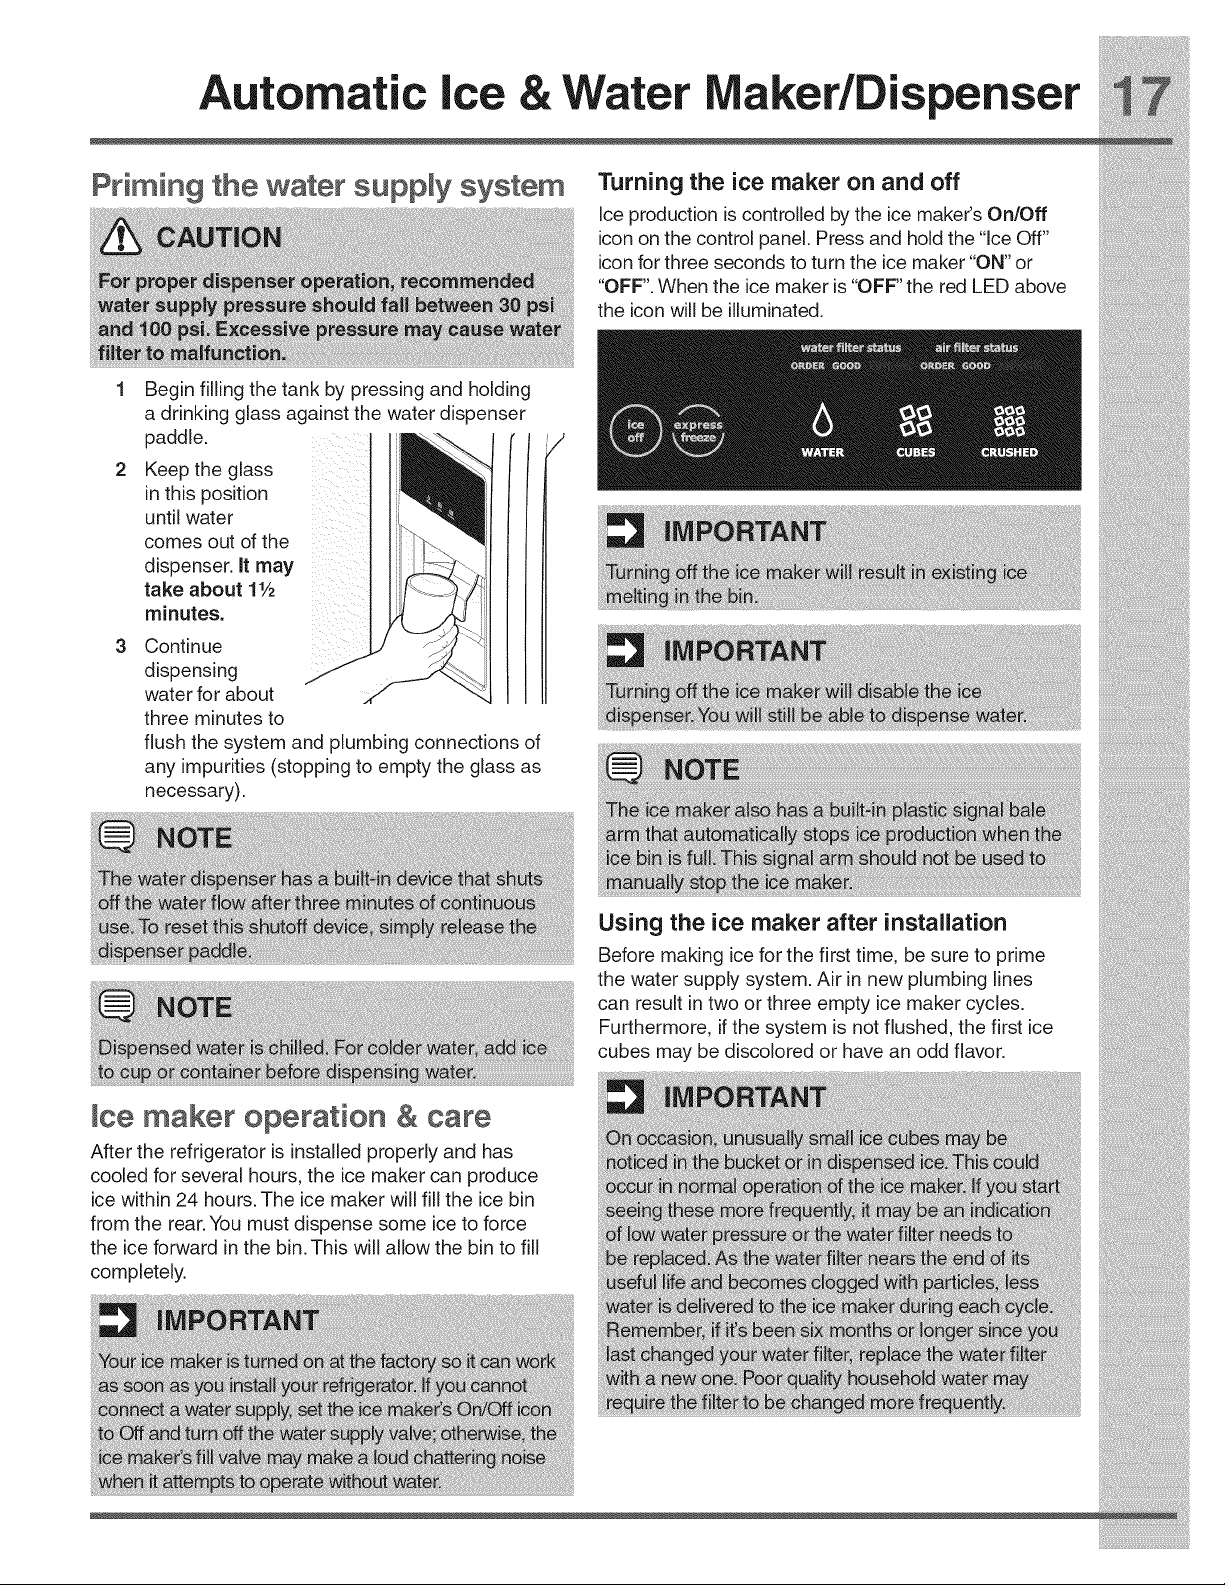
Priming the water supply system Turningthe ice makerOil and off
ice production is controlled by the ice maker s On/Of!,
icon on the control panel. Press and hold the "Ice Off
icon !or three seconds to turn the ice maker "ON" or
"OFF. When the ice maker is "OFF the red LED above
the conw be umnated
1 Begin filling the tank by pressing and holding
a drinking glass against the water dispenser
padd e _
2 KethPsthegla:s __ I I
P i
until water _' /[
comes out of the {/
dispenser. Jtmay I _-;_.{ | {
take about 1Y2 :_/_J | /
3 Continue
d spens ng .///- ,_,_i l /
water for about _%_ / /
three minutes to
flush the system and plumbing connections of
any impurities (stopping to empty the glass as
necessary).
Automatic ice aker/Dispenser
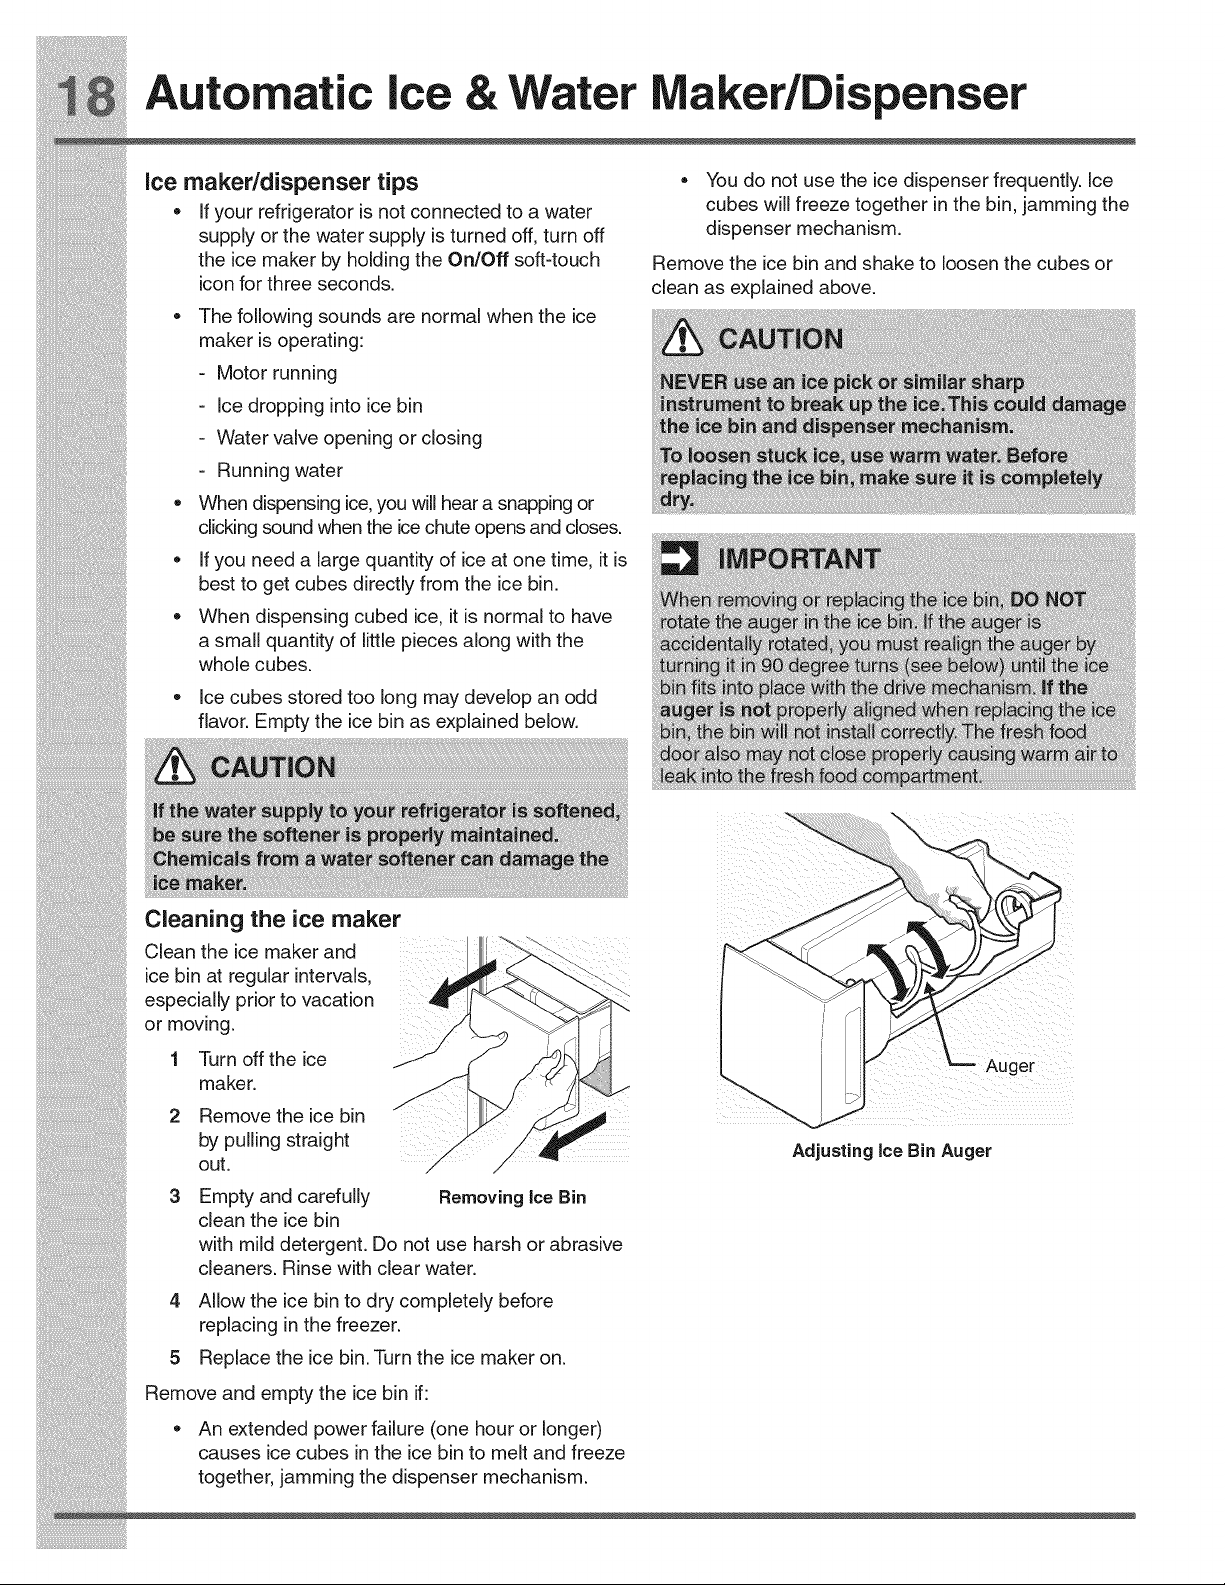
ice maker/dispenser tips
•If your refrigerator is not connected to a water
supply or the water supply is turned off, turn off
the ice maker by holding the On/Off soft-touch
icon for three seconds
• The following sounds are normal when the ice
maker is operating:
- Motor running
- Ice dropping into ice bin
- Water valve opening or closing
- Running water
• When dispensing ice,you will hear a snapping or
clicking sound when the ice chute opens and closes
• If you need a large quantity of ice at one time, it is
best to get cubes directly from the ice bin
• When dispensing cubed ice, it is normal to have
a small quantity of littlepieces along with the
whole cubes
•Ice cubes stored too long may develop an odd
flavor Empty the ice bin as explained below
• You do not use the ice dispenser frequently Ice
cubes will freeze together in the bin, jamming the
dispenser mechanism
Remove the ice bin and shake to loosen the cubes or
clean as explained above.
i!!_i!i_ii_!i!!_i!i_ii_!i!!_i!i_ii_!i!!_i!i_ii_!i!!_i!i_ii_!i!!_i!i_ii_!i!!_i!i_ii_!i!!_i!i_ii_!i!!_i!i_ii_!i!!_ii_i

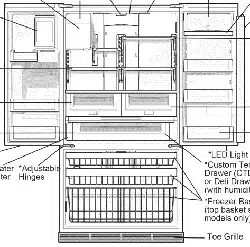
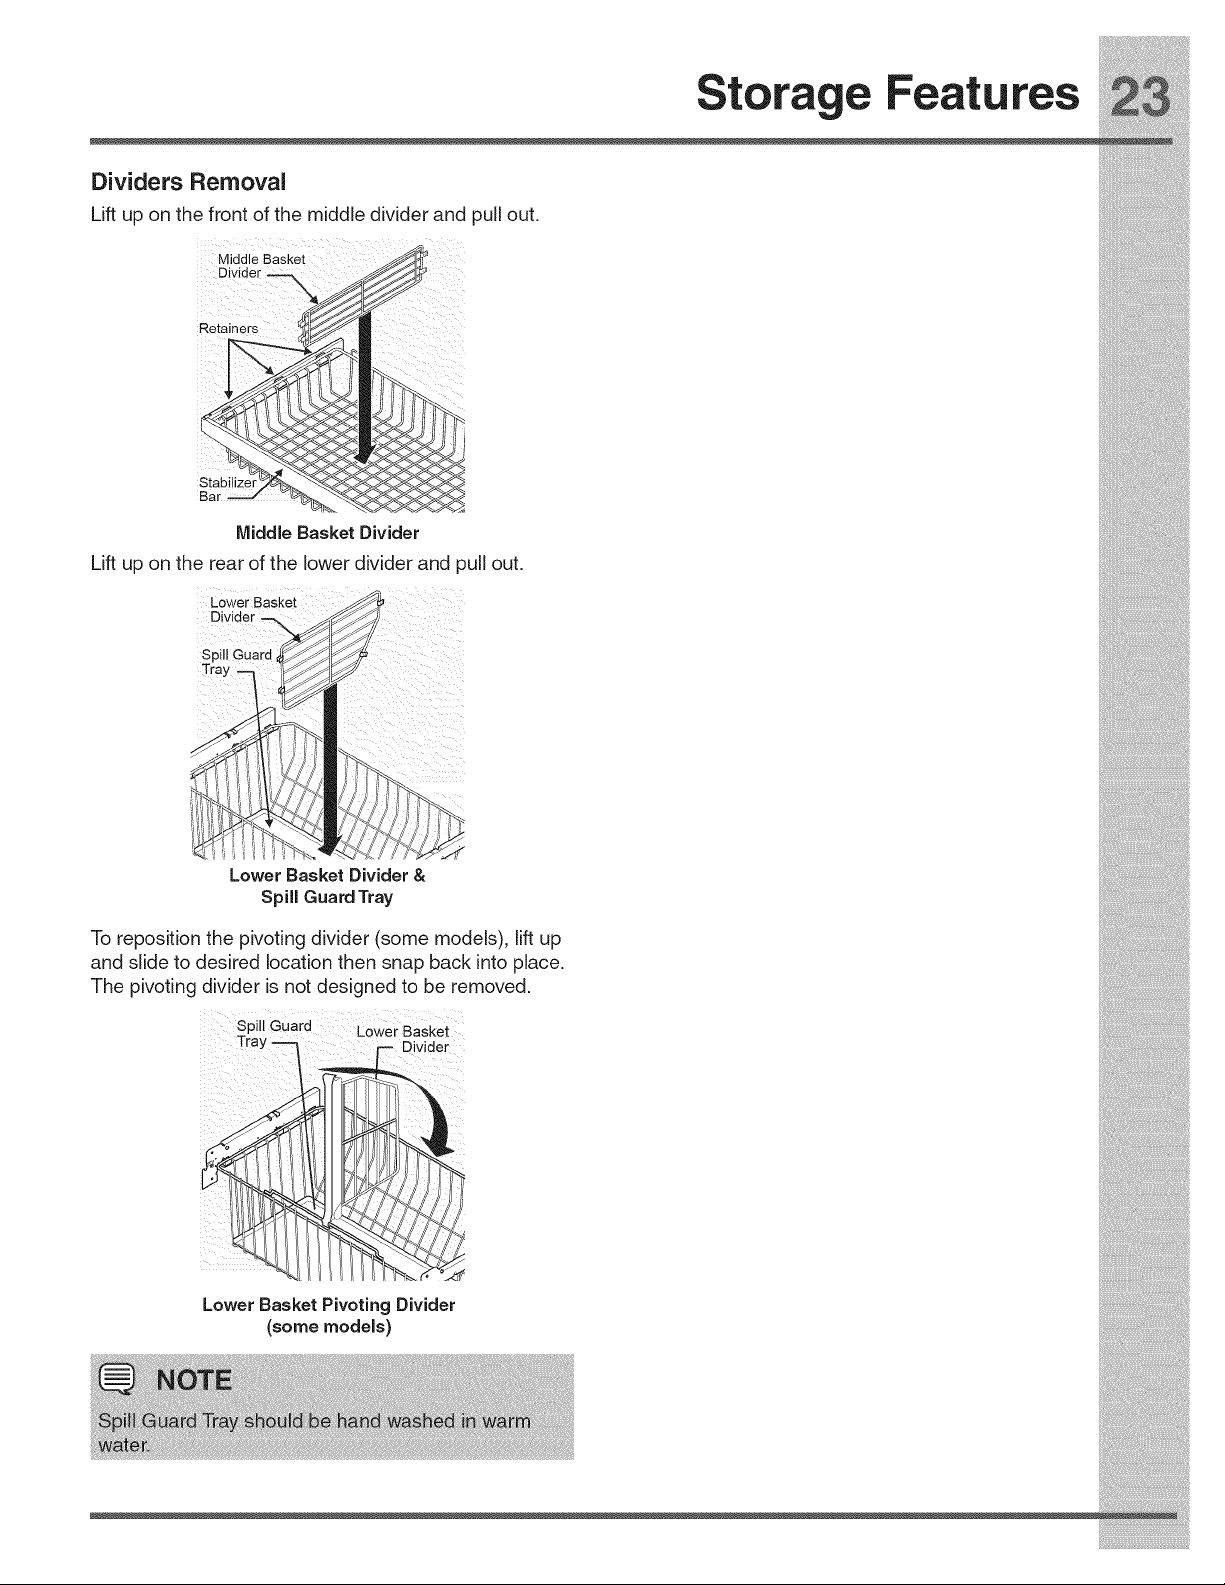
Storage Features
Your refrigerator includesCustom DesignTMglass shelves
that are designed to catch and hold accidental spills.
You can easily adjust shelf positions in the fresh food
compartments to suit your needs. The shelves have
mounting brackets that attach to slotted supports at the
rear of each compartment.
To change the position of a shelf:
1 Before adjusting a shelf, remove all food.
2 Lift the front edge up and pull the shelf out.
3 Replace by insertingthe mounting bracket hooks
into the desired support slots.
4 Lower the shelf and lock into position.
Half Custom Design TMShelf
Your refrigerator includes a variety of storage drawers.
These drawers are located infixed positions at the
bottom of the fresh food compartment.
Crispers
Crisper drawers are designed for storing fruits,
vegetables, and other fresh produce.
Shemffeatures
/,
_ .....
I Opening Crisper Drawer
....... crisperhumiditycontro_
Or,s e ,oc,o,oas,0,o0ooo,.o,,oro,,os,,o0
" the hum d ty ns de the cr sper Leafy vegetab es keep
Higher Humidity. Fresh fruits keep best when stored
with the Humidity Control set on Lower Humidity. :;:;
il
Full Custom DesignTMShelf (varies by model)
Lower
Humidity Humidity
Adjusting Crisper Humidity ::
Storage Features
To remove the Crisper Drawer for cleaning:
1 Pull the drawer out until it stops.
2 Lift the front slightly and remove the drawer.
"-4.
Removing Crisper Drawer
Special items rack (select models)
The innovative design of the special items rack allows
you to store four bottles of wine or soft drink bottles.
z Speciat Items
....<
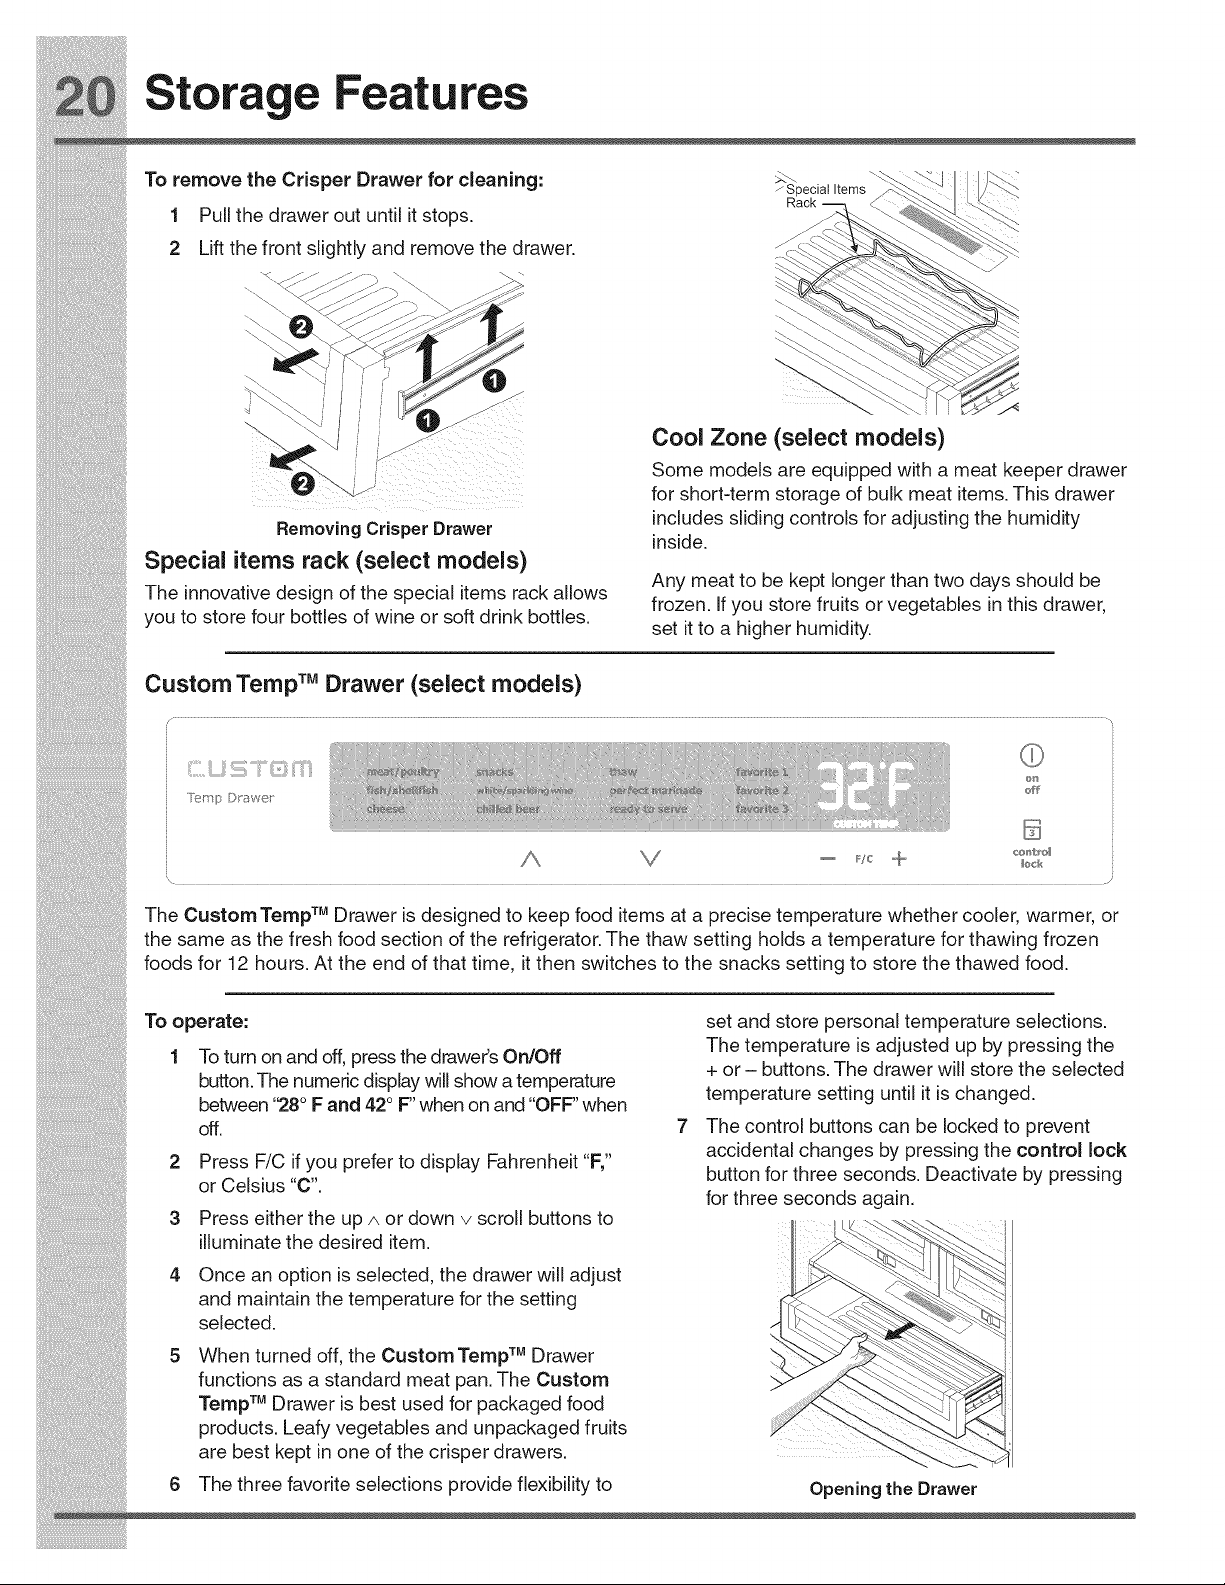
Cool Zone (select models)
Some models are equipped with a meat keeper drawer
for short-term storage of bulk meat items. This drawer
includes sliding controls for adjusting the humidity
inside.
Any meat to be kept longer than two days should be
frozen. If you store fruits or vegetables in this drawer,
set it to a higher humidity.
Custom Temp TM Drawer (select models)
i!_!_i!i_ii_!i!_!_i!i_ii_!i!_!_i!i_ii_!i!_!_i!i_ii_!i!_!_i!i_ii_!i!_!_i!i_ii_!i!_!_i!i_ii_!i!_!_i!i_ii_!i!_!_i!i_ii_!i!_!_ii_i
i!_!_i!i_ii_!i!_!_i!i_ii_!i!_!_i!i_ii_!i!_!_i!i_ii_!i!_!_i!i_ii_!i!_!_i!i_ii_!i!_!_i!i_ii_!i!_!_i!i_ii_!i!_!_i!i_ii_!i!_!_ii_i
Storage Features
To remove the Custom Temp TMDrawer for cleaning:
1 Pull the drawer out until it stops.
2 Lift the front slightly and remove the drawer.
To change the position of an adjustable door bin:
1 Before adjusting a bin, remove all food.
2 Grip the bin firmly with both hands and lift it
upward.
3 Removethe bin.
4 Place the bin just above desired position.
5 Lower the bin onto supports until locked in place.
/
iii
Adjustable Door Bin
Accessories (varies by model)
Tall bottle retainer
The tall bottle retainer keeps tall containers in the
bin from falling forward when opening or closing the
refrigerator door. To install, insert the ends of the
retainer into the holes.
i
.e..ov,°gtheDrawer
I I z_ /"%_-- Bottle
i etainer
Iill _ /_/ II
_i_g _R_ :nWcY°cUt:n:ffi b :n:lY g:: securely st°re
, /!j .... ...............................................
DO0[S t !:
Storage bins
The doors to your fresh food compartment use a Ii
system of modular storage bins. All of these bins are
removab e for easy c ean ng Some of them have f xed i
positions, while others can be adjusted to your needs.
Door bins are ideal for storing jars, bottles, cans, and
large drink containers. They also enable quick selection
of frequently used items. Tilt Can Bin
Storage Features
i!_!_i!i_ii_!i!_!_i!i_ii_!i!_!_i!i_ii_!i!_!_i!i_ii_!i!_!_i!i_ii_!i!_!_i!i_ii_!i!_!_i!i_ii_!i!_!_i!i_ii_!i!_!_i!i_ii_!i!_!_ii_i
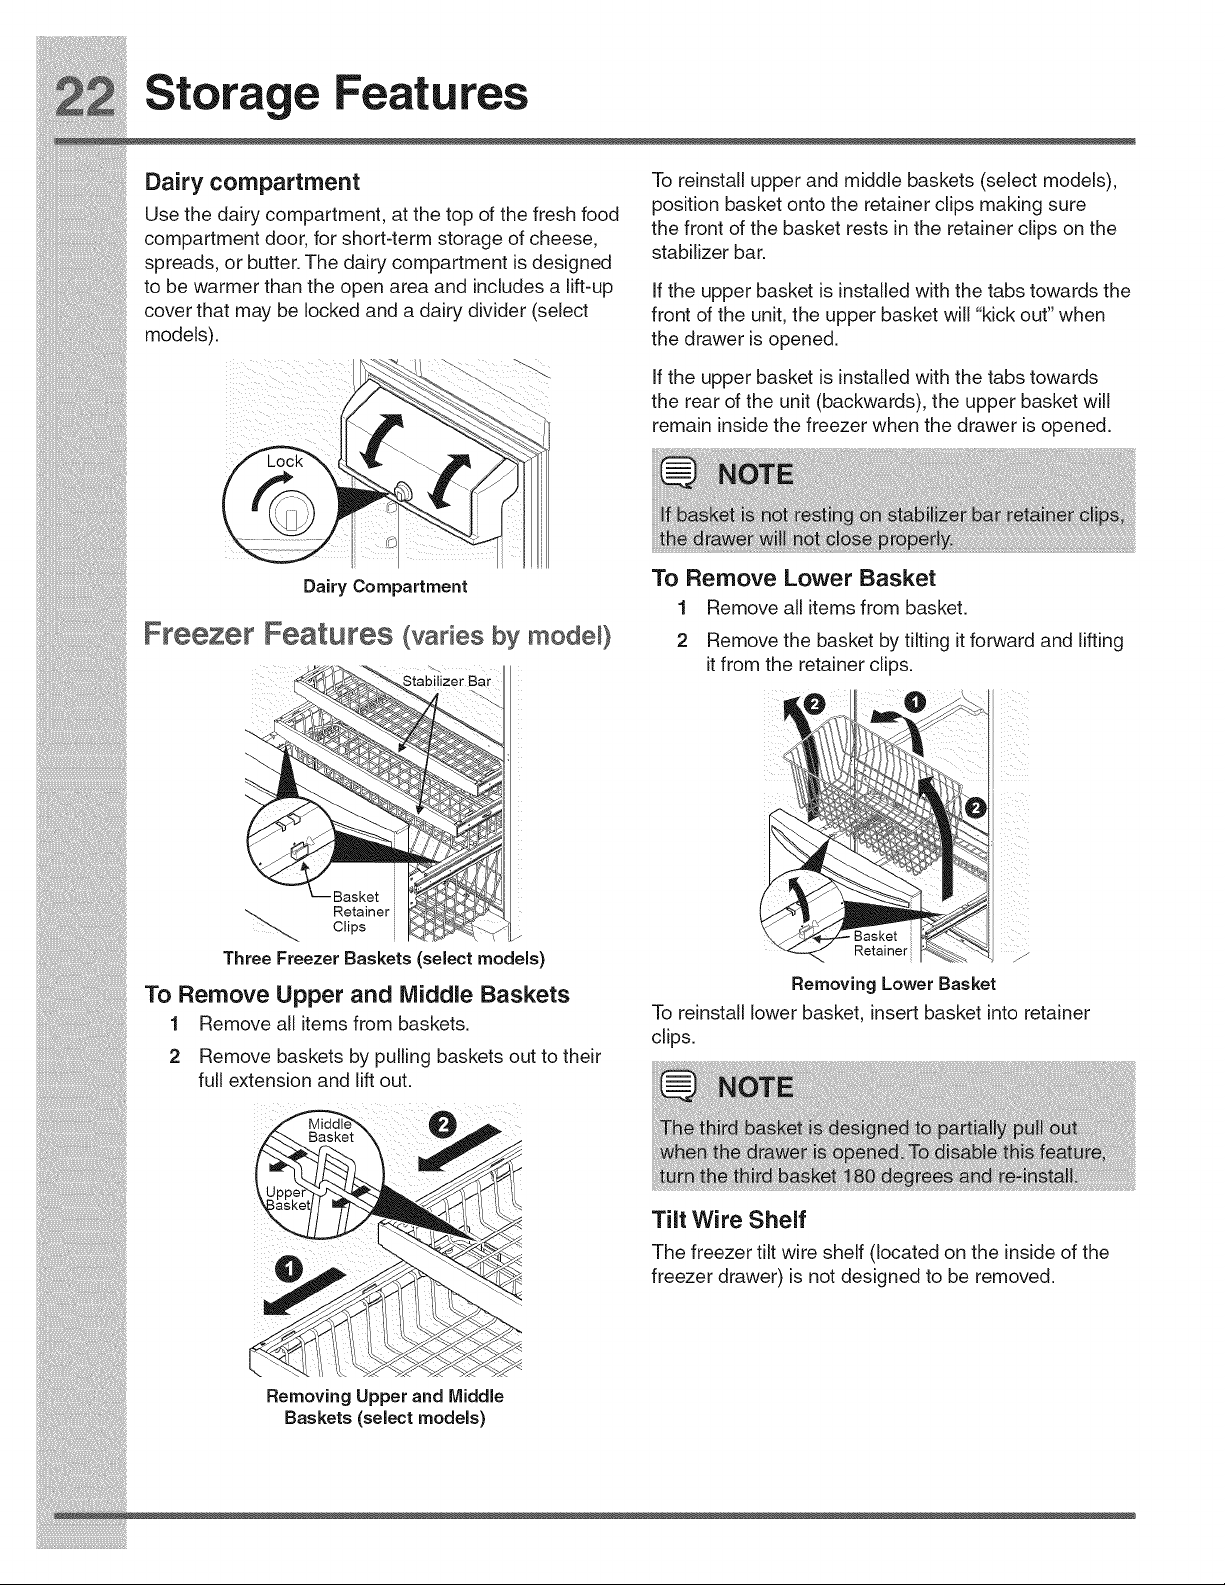
Dairy compartment
Use the dairy compartment, at the top of the fresh food
compartment door, for short-term storage of cheese,
spreads, or butter. The dairy compartment is designed
to be warmer than the open area and includes a lift-up
cover that may be locked and a dairy divider select
models).
iii iii _iii
Dairy Compartment
Freezer Features (varies by rood÷0
To reinstall upper and middle baskets (select models),
position basket onto the retainer clips making sure
the front of the basket rests in the retainer clips on the
stabilizer bar.
If the upper basket is installed with the tabs towards the
front of the unit, the upper basket will "kick out" when
the drawer is opened.
If the upper basket is installed with the tabs towards
the rear of the unit (backwards), the upper basket will
remain inside the freezer when the drawer is opened.
To Remove Lower Basket
1
2
Remove all items from basket.
Remove the basket by tilting it forward and lifting
it from the retainer clips.
i!_!_i!i_ii_!i!_!_i!i_ii_!i!_!_i!i_ii_!i!_!_i!i_ii_!i!_!_i!i_ii_!i!_!_i!i_ii_!i!_!_i!i_ii_!i!_!_i!i_ii_!i!_!_i!i_ii_!i!_!_ii_i
i_i!_!_i!i_ii_!i!_!_i!i_ii_!i!_!_i!i_ii_!i!_!_i!i_ii_!i!_!_i!i_ii_!i!_!_i!i_ii_!i!_!_i!i_ii_!i!_!_i!i_ii_!i!_!_i!i_ii_!i!_!_iii_
_:_i_i:_i_;_i!i_i_ii_i_!!ii_;_iii_i_i%_;i_!;!_!_i!ii_%_i_i_i_iii;i_!i!!!!!!_!_ii!_i_i
Stori Food and Savi Energy
"-'il;ii_i!i:!_!i_:!_!i_:!_!ii_iiii!iiiiiiil;!_i!iilI f r t tin f •Avodaddngtoo muchwarmfoodtothefreezer
deas o s o goods
%_i_!i_!i_!i_!i_!_ii_!iii_!_i1_!_i_!!i_!Ji!J_i_!_i!_!_i_!i_i_!_iii!_ at one time. This overloads the freezer slows the
ii_i_:_:_i_:_iiiiiiiiiiiii_i:iii_i_ii!i_!ii_!ii_!ii_!ii_!ii_i_!ii_i_!i!_i_!i!ii_!_!_i!i!i!i_i!_i_i!ii_i!_i_i_!_iii!_i_i_!_i_i!i!i_Fresh food storage o rateoffreezing andcan raisethetemperatureof
iiiiiiiiiiiiiiiiiiiiiiiiiiiiiiii_iiiii_iiiii_iiiii_i__!i!i__!i!i__!i!i__!i!i__!i!i_i!i!i_i!i__iii!ii!ii_!!!ii____!ii_i!i_i__i_i!_!i_i__!i_i!_i_i•Keepthefreshfoodcompartmentbetween3t_ F frozenfoods.
iii__i_:i_i_:i:iiiiiiiiiiiii_iiiii!iiii_i!!_!_i_i!i_!_!ii_!_!ii_!_!ii_!_i_____i!___!_!__i!_i_!__!i!!!_!__!i!_i__iii!_i_!_and40 Fwithanoptimumtemperatureof37 R •Leaveaspacebetweenpackages, socoldair
iii_i_ii_i_ii_ii_iiiiiiiiiiii__i!i!!__!_i_i___!__!iii___!iii__!iii__!ii___!___i_!!_!ii!ii!_i!___i!i!i!ii_ii_i_•Avoidovercrowdingtherefrigeratorshelves, cancirculatefreely, allowingfoodtofreezeas
i_i:iiii:iiii:iiii:iiiiii_!i!_i__i!_i___i__!i_i_ii_iii!ii__i!i:_ii!___!_!_!i_!_!i_!_!__!____i__!!i_i_i_i_!_i__!_!ii__i!_i!_i!_i!_i_!i!_i_i_!i_which reducesaircirculationandcauses uneven quicklyas possible.
coot_g. Ideas for saving energy
:i:iiii:iiii:iiii:iiiii_i_iiiii_i_i_ii_!i_ii_!i_ii_!i_ii_!i_i_i_i!_i_i_i!!!_i_i!i_i!i_i_i!i_i_i!i_ii1:ii_ii_i_!i!!_i!ii;!_!ii;!_!i_i_i_!_Fruits and vegetables Installation
:i:i_i_i_i_i_i_i_iiiiiii_!_!i_!_i!!_!_!i!_!_!i!_!_!iii!!_!i_i_!i_i!_i_!_i!_!_!i_i:i:_!_!z_!_!_!_!_i!J_:i_i!i!_i_!_i!_!i_i_i_•Storefruits andvegetables in crisperdrawers, .
.... •Locate the refrigerator in the coolest part of
wnere _rappea mo sture ne ps preserve fooa
ii:i:i:iiii:iiii!%!!!!!!i:!ii_iiiiiiiil!i%!iiiii!ili:;_ii!ii_ _ ,, _....... ÷...... ,_ the room, out of direct sunlight, and away from
:i_i_iiii:iii_!_!i_i_ii_ii!!i!!ii!!_:_i!_!!_i!!_i_i:i:ii_!ii_!_i_!:!_i_!:!_ heating ducts or registers.
•Wash items and remove excess water _ . .
_i:iiii:iiii:iiii:iiiiiii:iiii:iii_iiii_iiii_iiii_ii_i_i!:i_i_!!_ii!_ii!_!iii!ii_ii_i!_!_!_i!_!!_i_!Ji!i!iii_ii!_!i_!i_i_i!i_!_!i_i_ii" •Do not place the refrigerator next to heat-
iiii:ii:iiiiiiiiiiiiiiiiiiiiiiiiiiiiiiii!iii!i!iiiiiii!iiii!!:ii!!!i!ii!i!ii!i!i!i!iii!•Wrap any items that have strong odors or high producing appliances such as a range, oven, or
:iiiiiiiiiiiiiiii:iiii:iiiiiiiiiiiiiiiiiiiiiiiiiiiiiiiiiii!!i!i_ii!i:i!!!iiiiiiiiiiiiiiiiiii!iiiii!iiiiii!ilili!iiiii!iiiii!ililmoisture content, dishwasher. If this is not possible, a section of
_ii:ii:_i_i:iiiii:iiii:iii_iiii_iiii_iiii_iiii_iii_i_ii_i_ii_i_ii_i_ii_i_iii_!_i_ii_!_i_i_!_i_!_i_!_iii!!_i!!_!i__ t cab netry or an added ayer of nsuaton between
iiiiiii!ili:iiii:iiiii!!_i!!_i!!i!!_i_i!i;i_8
%!:!_:i_!_!_!_i;i:i_i;i:i_i;i:i_i;i:i_i;i:_i_!i_;i_i_;i_i_;i_i_i_!_i!:_i!_!;!i!_!;!ii!i_i!i_i!i_!i_:_:i_!_ the two appliances w_llhelp the refngerator
ii_i_:_:_i__:___!__!_i__!_!!!_i_i!_ii_i!_ii_i!_ii_i!_ii_i!_ii_i!_ii_i!_i!ii!i_!!__i:ii!!!_!_i_i__:__:__!i!!_i_!i!_i!i_•Wrap rawmeatandpoultryseparatelyand operate moreefficiently.
securely to prevent leaks and contamination of
:_ii:ii:i__`!i:i!ii!_ii__:!_!_iii_!_i__i___!_ii!_ii_ii_ii_i_i!ii!i:_!:ii!!_i_!_!_i!!!!!__i!_;i__otherfoodsorsurfaces •Levelthe refrigeratorsothatthedoorsclose
tightly.
® TM
i_i:ii:ii:iiii!ii_:!ii_:!ii_:!ii_i:!i_i_i!ii_i!i!ii!!iiii!!iiii!!iiii!!iiii!!i_!!!_i!_i!!_i_i_i_ii_ii_i_i_i!!_i_!i!_iUse the deli drawer or CustomTemp drawer
i:i:iii_i_iii_!_iiii_!ii_!_!ii_!_!ii_!_!ii_i!i!_i!i!_i!_i!_!ii_!_!ii_!_!ii_!_!ii_!_!ii_!_!_!_i_!_i_ii_!_i!i!_i_!i_ii!i_i!i_i!i!i!_!_!_and setto meat/poultry setting forshort-term Temperature settings
..........................................................storage. Any meat to be kept Iongerthan two •Referto the "Controls" section for procedures on
i!:!_i!i:ii_!i!:!_i!i:ii_!i!:!_i!i:ii_!i!:!_i!i:ii_!i!:!_i!i:ii_!i!:!_i!i:ii_!i!:!_i!i:ii_!i!:!_i!i:ii_!i!:!_i!i:ii_!i!:!_i_idays should be frozen, temperature settings.
i!_!_i!i_ii_!i!_!_i!i_ii_!i!_!_i!i_ii_!i!_!_i!i_ii_!i!_!_i!i_ii_!i!_!_i!i_ii_!i!_!_i!i_ii_!i!_!_i!i_ii_!i!_!_i!i_ii_!i!_!_ii_i
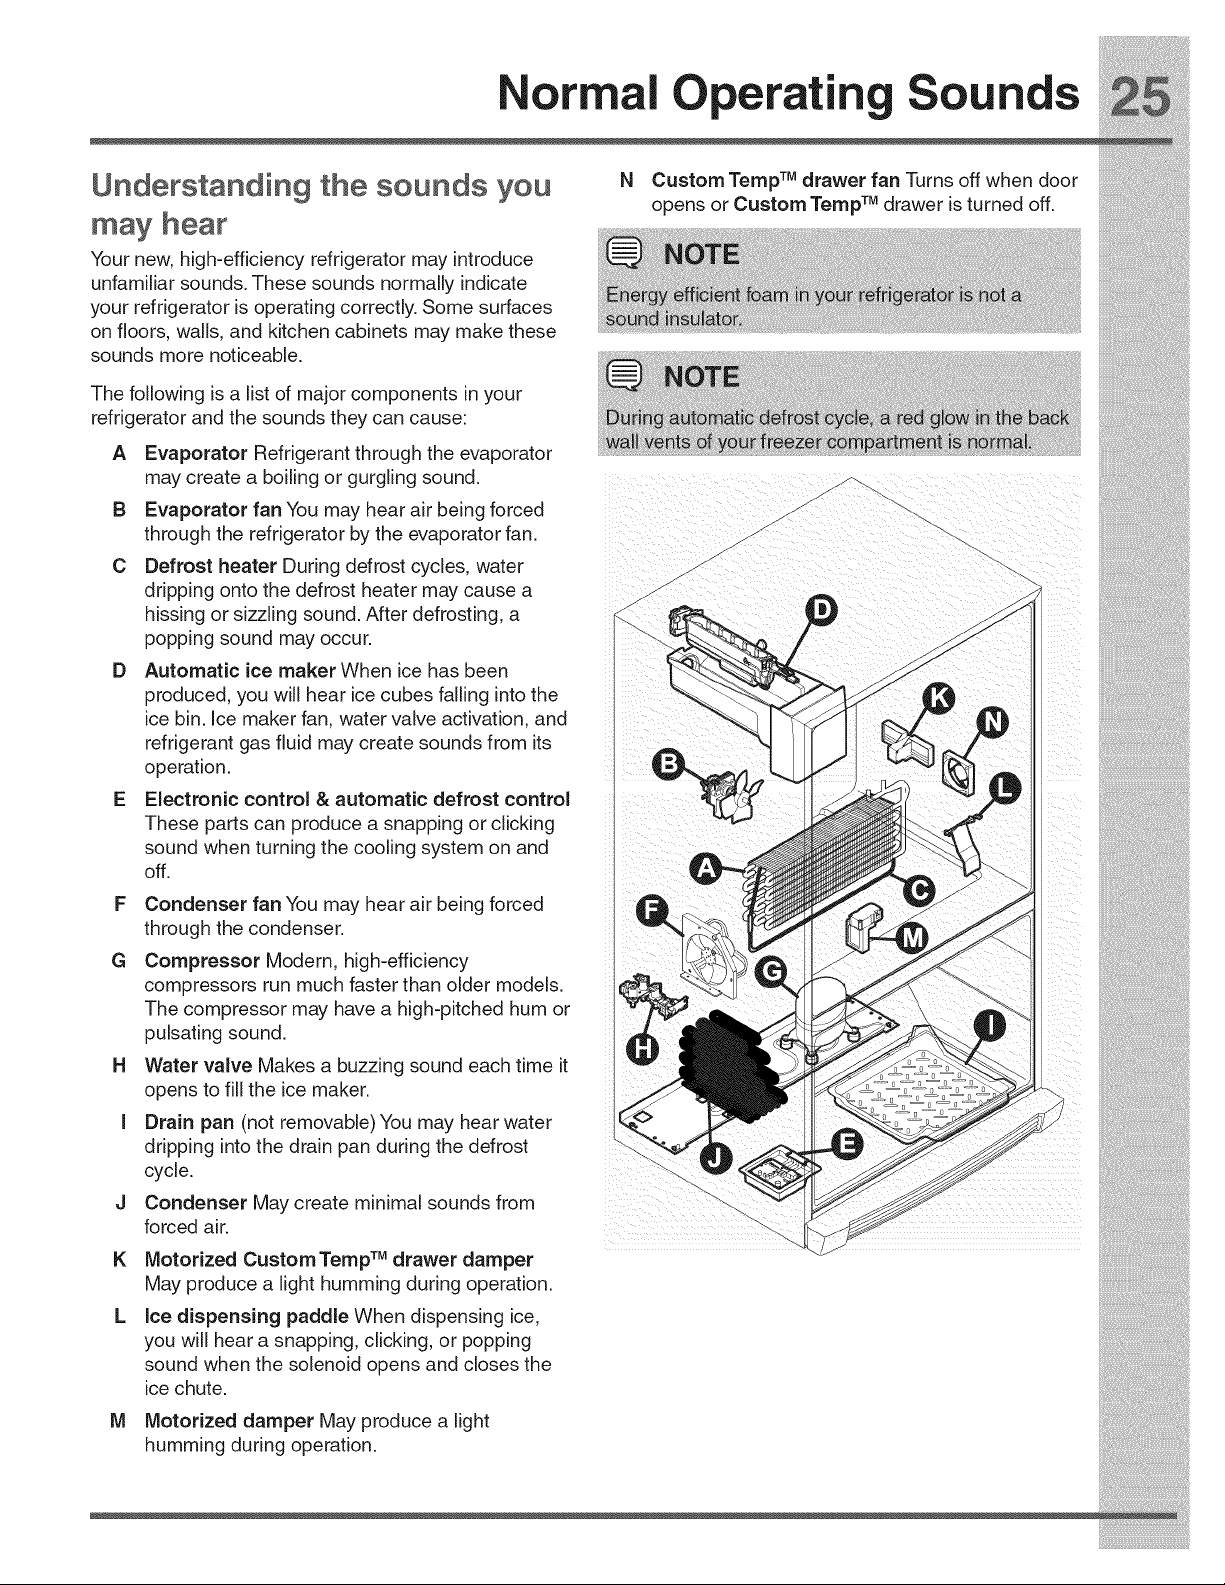
refrigerantgasfluidmaycreatesoundsfromits
Changin The Water and Air Filters
Your refrigerator is equipped with separate water and
air filtering systems. The water filter system filters all
dispensed drinking water, as well as the water used to
produce ice. The air filter removes odors and impurities
from the refrigerator compartment.
About your advanced water filter
The PureAdvantage TM ice and water filter
system is tested and certified by NSF
international to NSF/ANSI Standards
42 and 53 for the reduction of claims
specified on the performance data sheet.
Do not use with water that is microbiologically unsafe or
of unknown quality without adequate disinfection before
or after the system. Systems certified for cyst reduction
may be used on disinfected waters that may contain
filterable cysts.
Rated Capacity -400 gallons for
PureAdvantage TM ice and water filter
Rated service flow - .5 gallons per minute
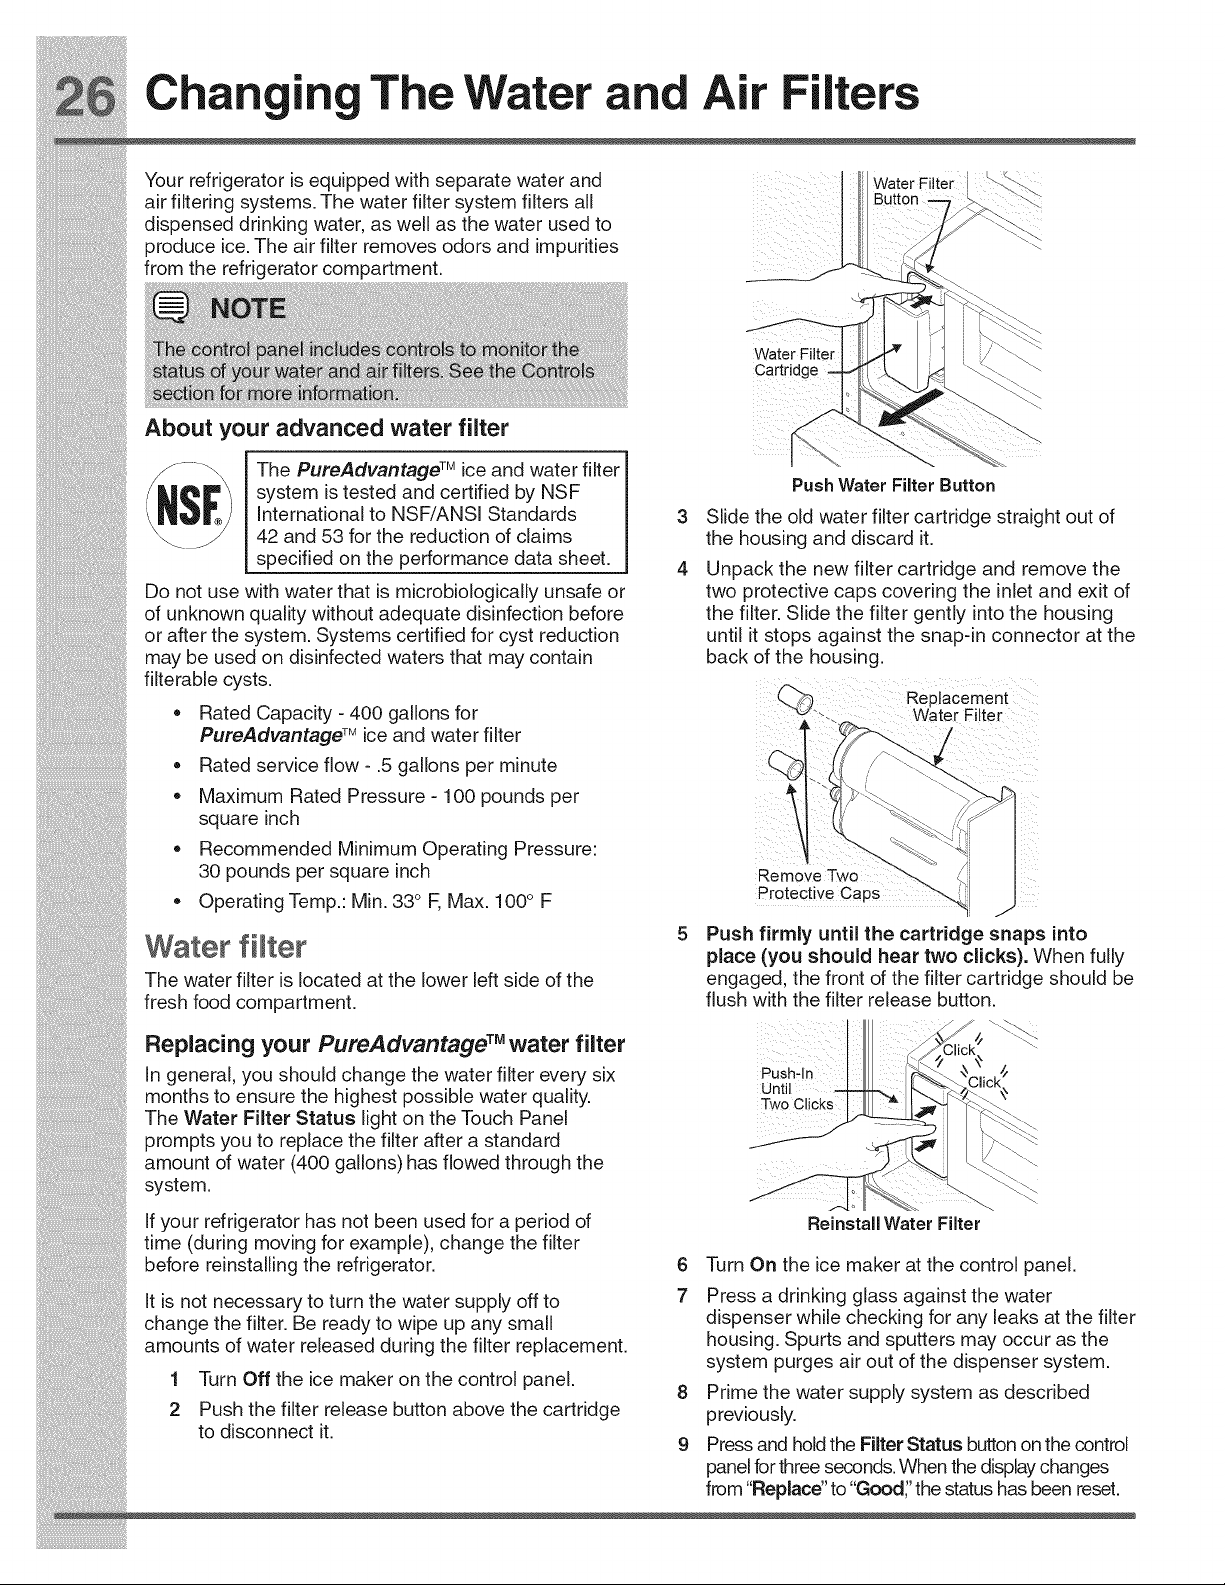
Water Filter
Car
3
4
Push Water Filter Button
Slide the old water filter cartridge straight out of
the housing and discard it.
Unpack the new filter cartridge and remove the
two protective caps covering the inlet and exit of
the filter, Slide the filter gently into the housing
until it stops against the snap-in connector at the
back of the housing.
ReplaCement
i
i!_!_i!i_ii_!i!_!_i!i_ii_!i!_!_i!i_ii_!i!_!_i!i_ii_!i!_!_i!i_ii_!i!_!_i!i_ii_!i!_!_i!i_ii_!i!_!_i!i_ii_!i!_!_i!i_ii_!i!_!_ii_i
hasbeenreset.
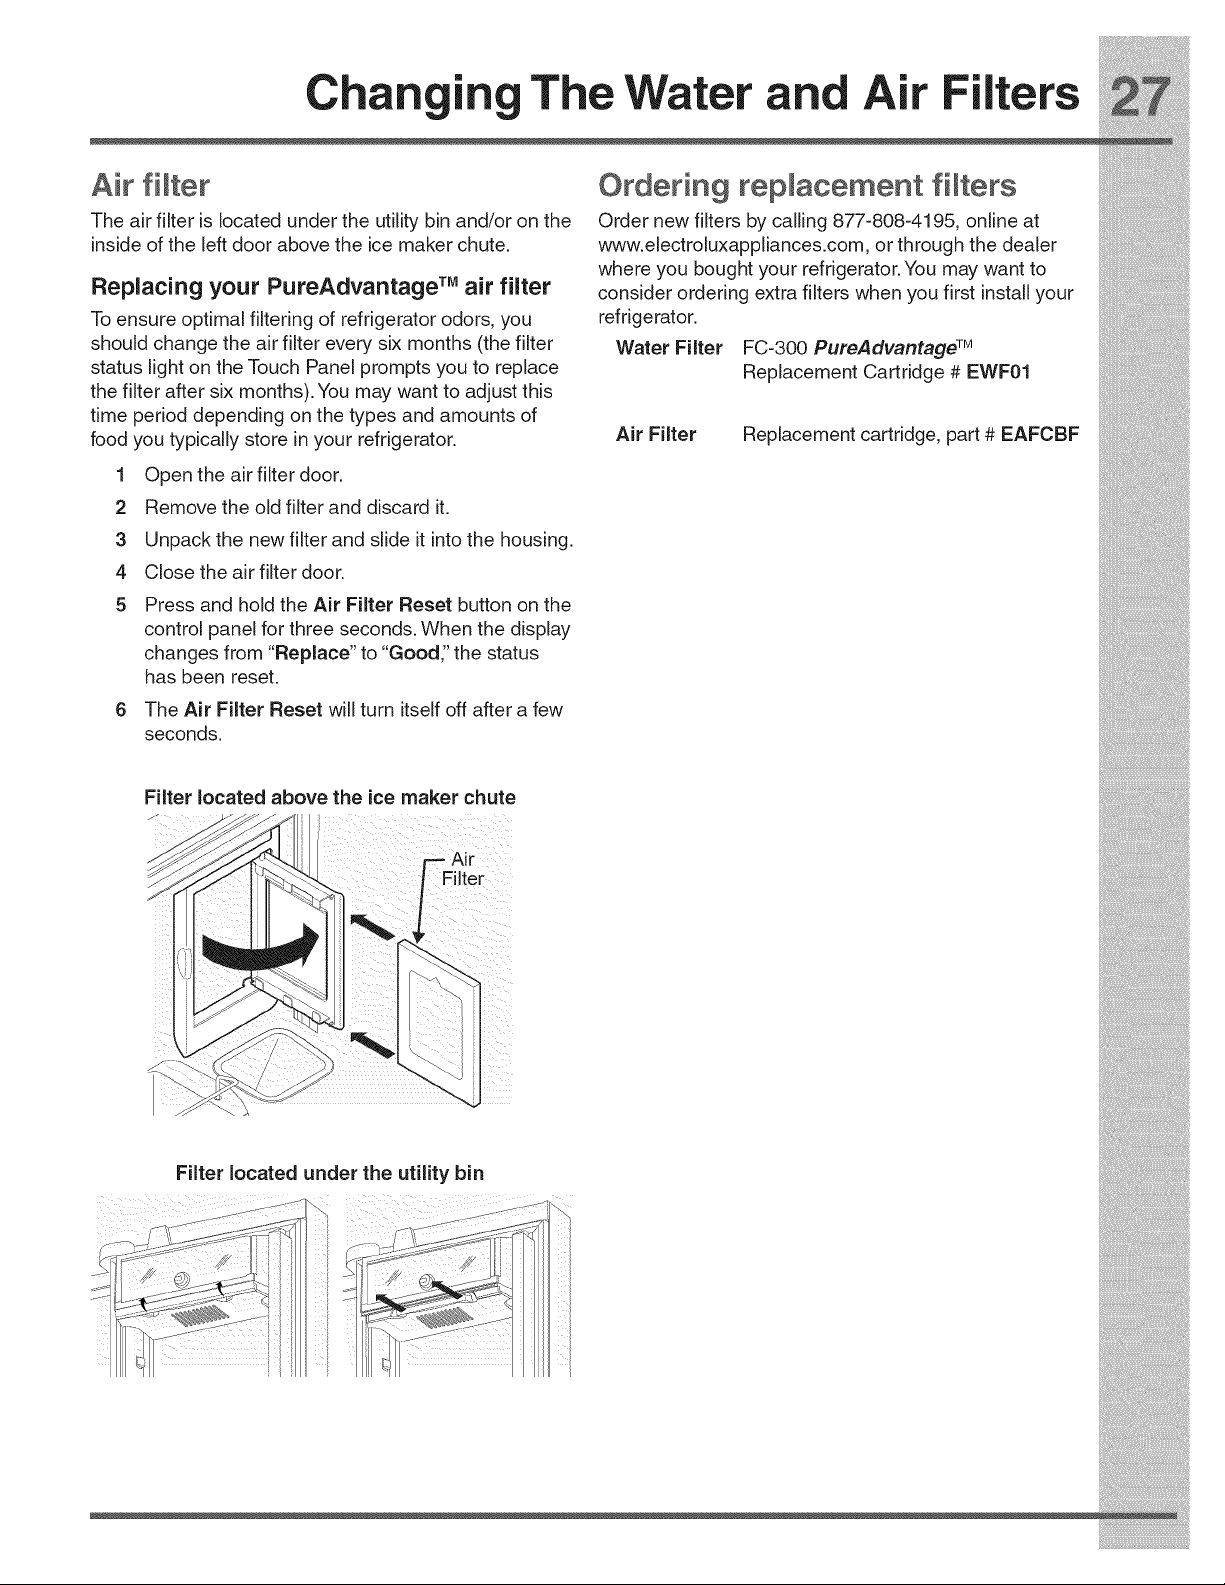
TheAir Filter Reset will turn itself off after a few
seconds.
Filter located above the ice maker chute i_i!_!_i!i_ii_!i!_!_i!i_ii_!i!_!_i!i_ii_!i!_!_i!i_ii_!i!_!_i!i_ii_!i!_!_i!i_ii_!i!_!_i!i_ii_!i!_!_i!i_ii_!i!_!_i!i_ii_!i!_!_iii_

::;iiii:iil;ii!iliiiiiii!!iil;i_iii_i¸i_!_!_7i!i!_ii!i_!;!i_i_i;ii_i;i_;_i_!i!ii_i!i!iiii_i_!i!iii!i_;_;i_!ii:i!_:_i_;_!!!_i:!!!i_!_!!i_!i_i
Care and C nin
Protecting your investment
Keeping your refrigerator clean maintains its appearance and prevents odor build-up. Wipe up any spills
immediately and clean the freezer and fresh food compartments at least twice a year.
.........................................!
• Never use metallic scouring pads, brushes, abrasive cleaners, or strong alkaline solutions on any surface.
• Never use CHLORIDE or cleaners with bleach to clean stainless steel.
• Do not wash any removable parts in a dishwasher.
• Always unplug the electrical power cord from the wall outlet before cleaning.
Do not remove the serial plate. Removal of your serial plate voids your warranty.
• Before moving your refrigerator, raise the anti-tip brackets so the rollers will work correctly. This will prevent
the floor from being damaged.
i!_!_i!i_ii_!i!_!_i!i_ii_!i!_!_i!i_ii_!i!_!_i!i_ii_!i!_!_i!i_ii_!i!_!_i!i_ii_!i!_!_i!i_ii_!i!_!_i!i_ii_!i!_!_i!i_ii_!i!_!_ii_i
Care and C nin
Care and cmeaning tips
Interior & Door • Soap and water
Liners .Baking soda and
water
Usetwo tablespoonsof bakingsoda in onequart of warm water.
.Be sure to wring excesswater out of sponge or cloth before cleaning around controls, light
bulb or any electrical part.
Drawers & Bins _ Soap and water •Usea soft cloth to clean drawer runners and tracks.
,, Do not wash any removable items (bins, drawers, etc.) in dishwasher.
Toe Grille ,, Soap and water
•Mild liquid
sprays
o Vacuum
•Removetoe grille (see Installation Instructions).
Vacuum both sides and wipe with sudsy cloth or sponge. Rinse and dry.
Exterior & •Soap and water •Never use CHLORIDEor cleaners with bleach to cleanstainless steel.
Handles •Cleanstainless steel front and handleswith non-abrasive soapy water and a dishcloth.
(Stainless Steel • Stainless steel Rinse with clean water and a soft cloth.
Models Only) cleaners • Use a non-abrasive stainless steel cleaner.Thesecleaners can be purchasedat most home
improvement or major department stores. Always follow manufacturer's instruction. Do not
use household cleanerscontaining ammonia or bleach.
NOTE:Always clean wipe and dry with grain to prevent scratching.
Wash the rest of the cabinet with warm water and mild liquid detergent. Rinse well and
wipe dry with a clean soft cloth.
m
ice Chute Extension |llB_ll_mlml installing the ice Chute Extension
The ice chute extension is _'__ 1 Turn the refrigerator
designed to better direct =j/j_t _................ off using the button
ice flow into containers ...... on the control panel _[[i
(refer to Owner s
Manua) _ ".... f_
2 Align the extension _1
with the ice chute so 1_'_) \ II
that the snap clips are I _' __
just inside the front - _' ._
edge of the chute Push Upward UntilThe
R-rn-vin-_u9 th-_ i--_,"h'u_t- Ext-n-i-n__u F-ru . Extension snaps In Place
3 Push upward untilthe
Cleaning extension snaps into place.
1 Turn the refr gerator off ....
. ^:__ ,_.^ _.. ,, .... ,_.^ 4 Turn your remgerator PaCK on.
contro pane (refer to __ _--_..........
Owner's Manual).
2 Press inward firmly on
the front of the chute
and pull down. _ _' _._
3Turn your refrigerator <_ _
back on. "' _ Pull[3own -!
Care and Cnin
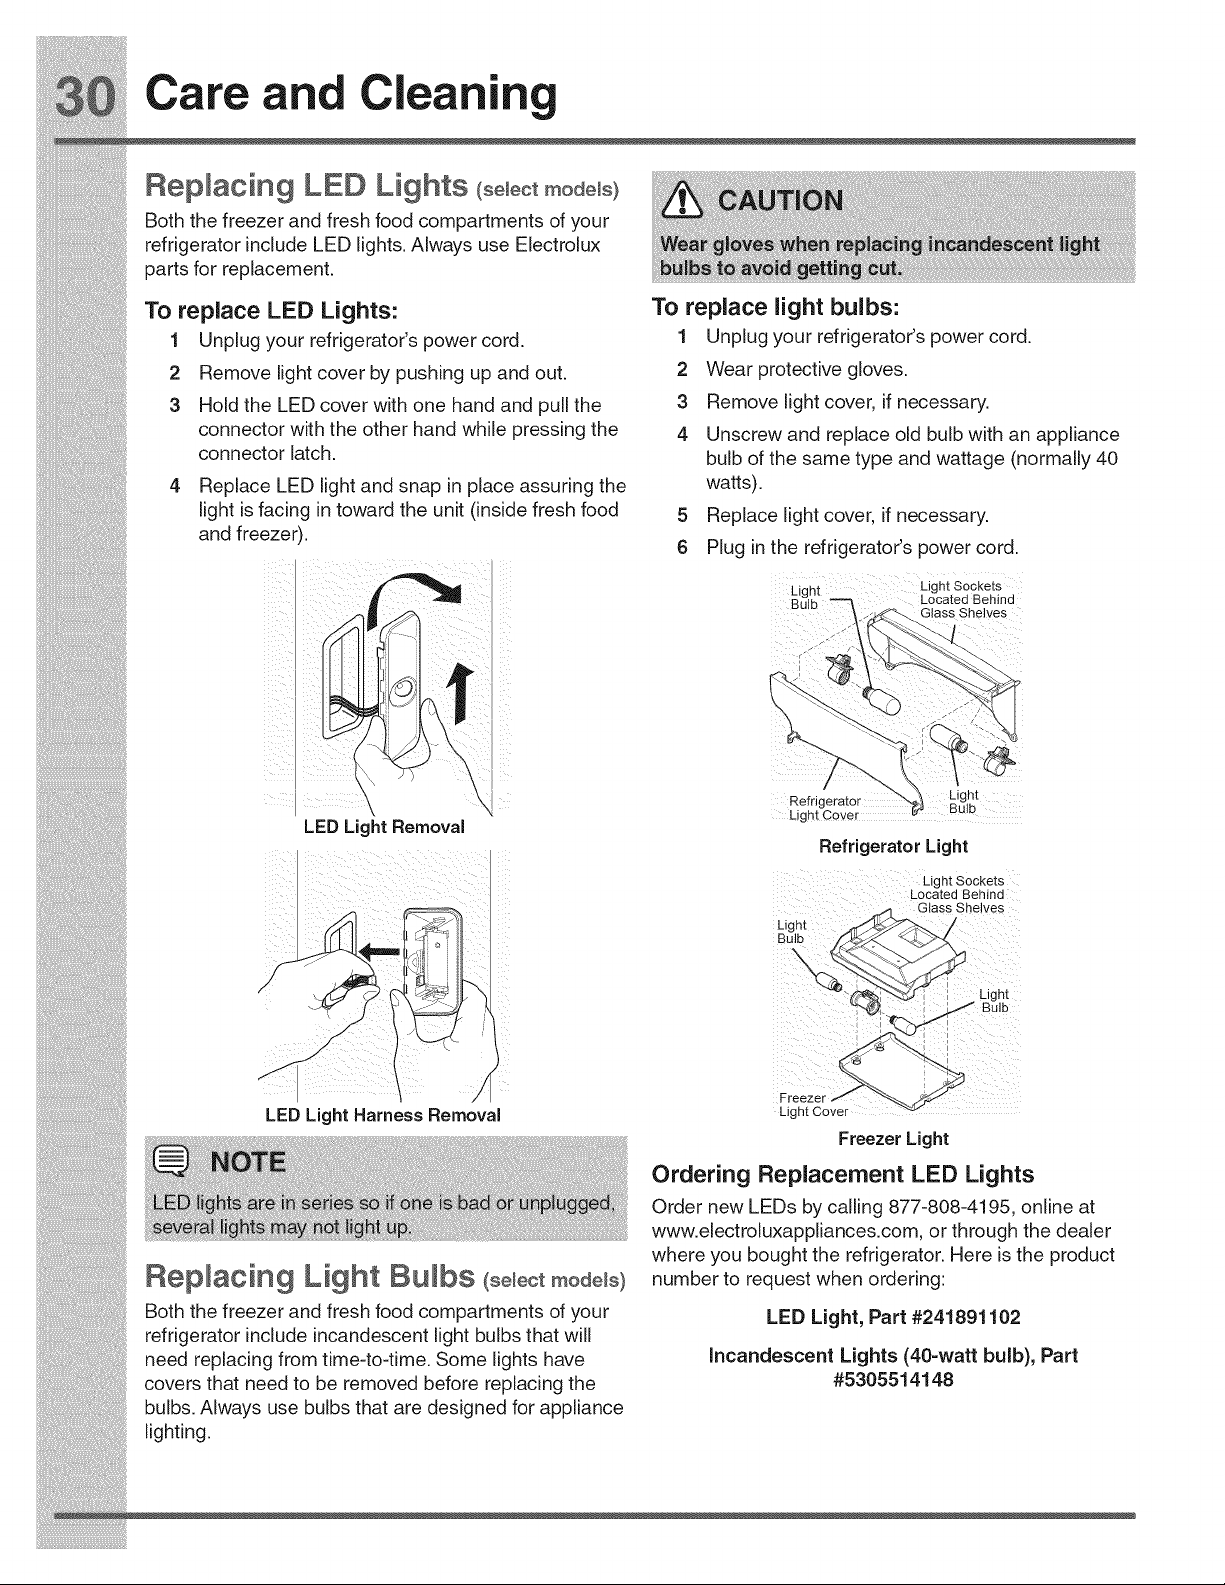
Replacing LED Lights (s÷ ÷otmod÷ s)
Both the freezer and fresh food compartments of your
refrigerator include LED lights. Always use Electrolux
parts for replacement.
To replace LED Lights:
1 Unplug your refrigerator's power cord.
2 Remove light cover by pushing up and out.
3 Hold the LED cover with one hand and pull the
connector with the other hand while pressing the
connector latch.
Replace LED light and snap in place assuring the
light is facing in toward the unit (inside fresh food
and freezer).
To replace light bulbs:
1 Unplug your refrigerator's power cord.
2 Wear protective gloves.
3 Remove light cover, if necessary.
4 Unscrew and replace old bulb with an appliance
bulb of the same type and wattage (normally 40
watts).
5 Replace light cover, if necessary.
6 Plug in the refrigerator's power cord.
LPht Light Sockets
u Located Behind
ass Shelves
i!_!_i!i_ii_!i!_!_i!i_ii_!i!_!_i!i_ii_!i!_!_i!i_ii_!i!_!_i!i_ii_!i!_!_i!i_ii_!i!_!_i!i_ii_!i!_!_i!i_ii_!i!_!_i!i_ii_!i!_!_ii_i
_i_i:_;_i_i_i!i!i:i_i_i_i_i_i_i_i_!_!_i_!;;_;_;_!_!_!;!_!_!_!_!_!_!!!_!!!_i_!i!_!i!_i!i!i!_i¸iiiili!ii!i!i!i!iiiii_iiiii_ii!ii
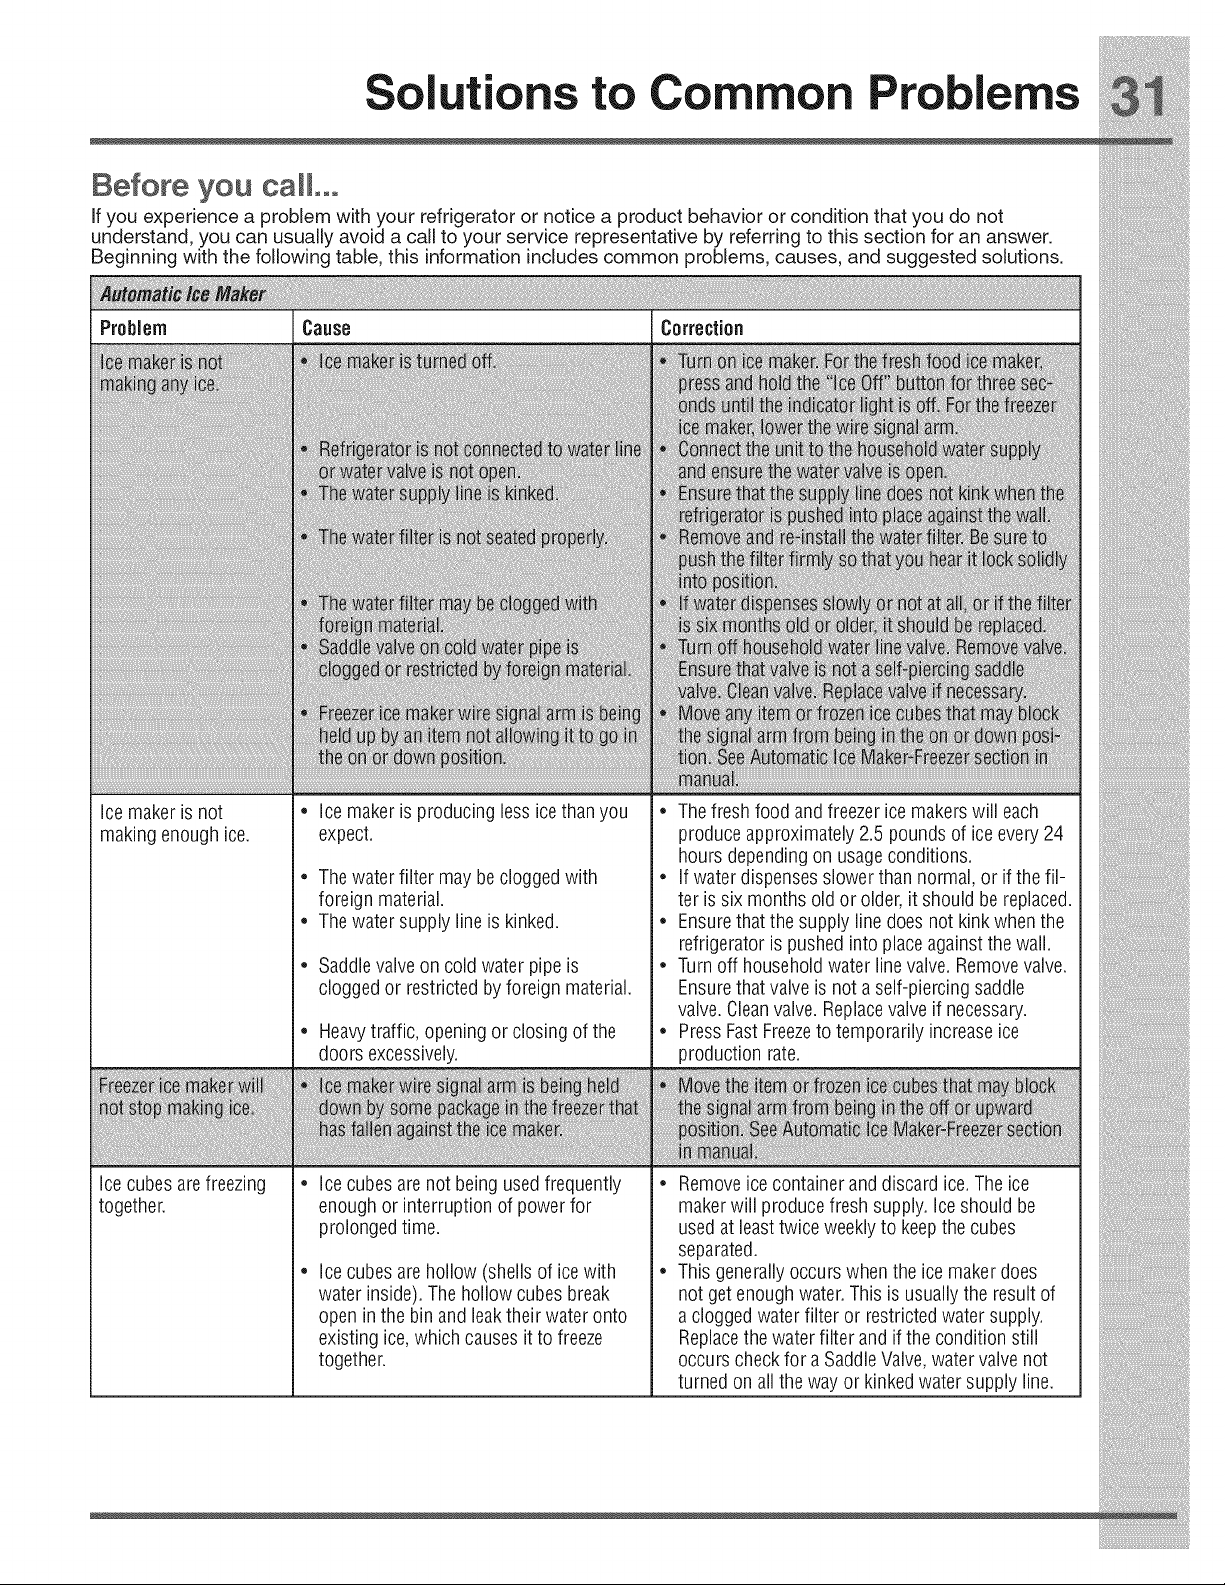
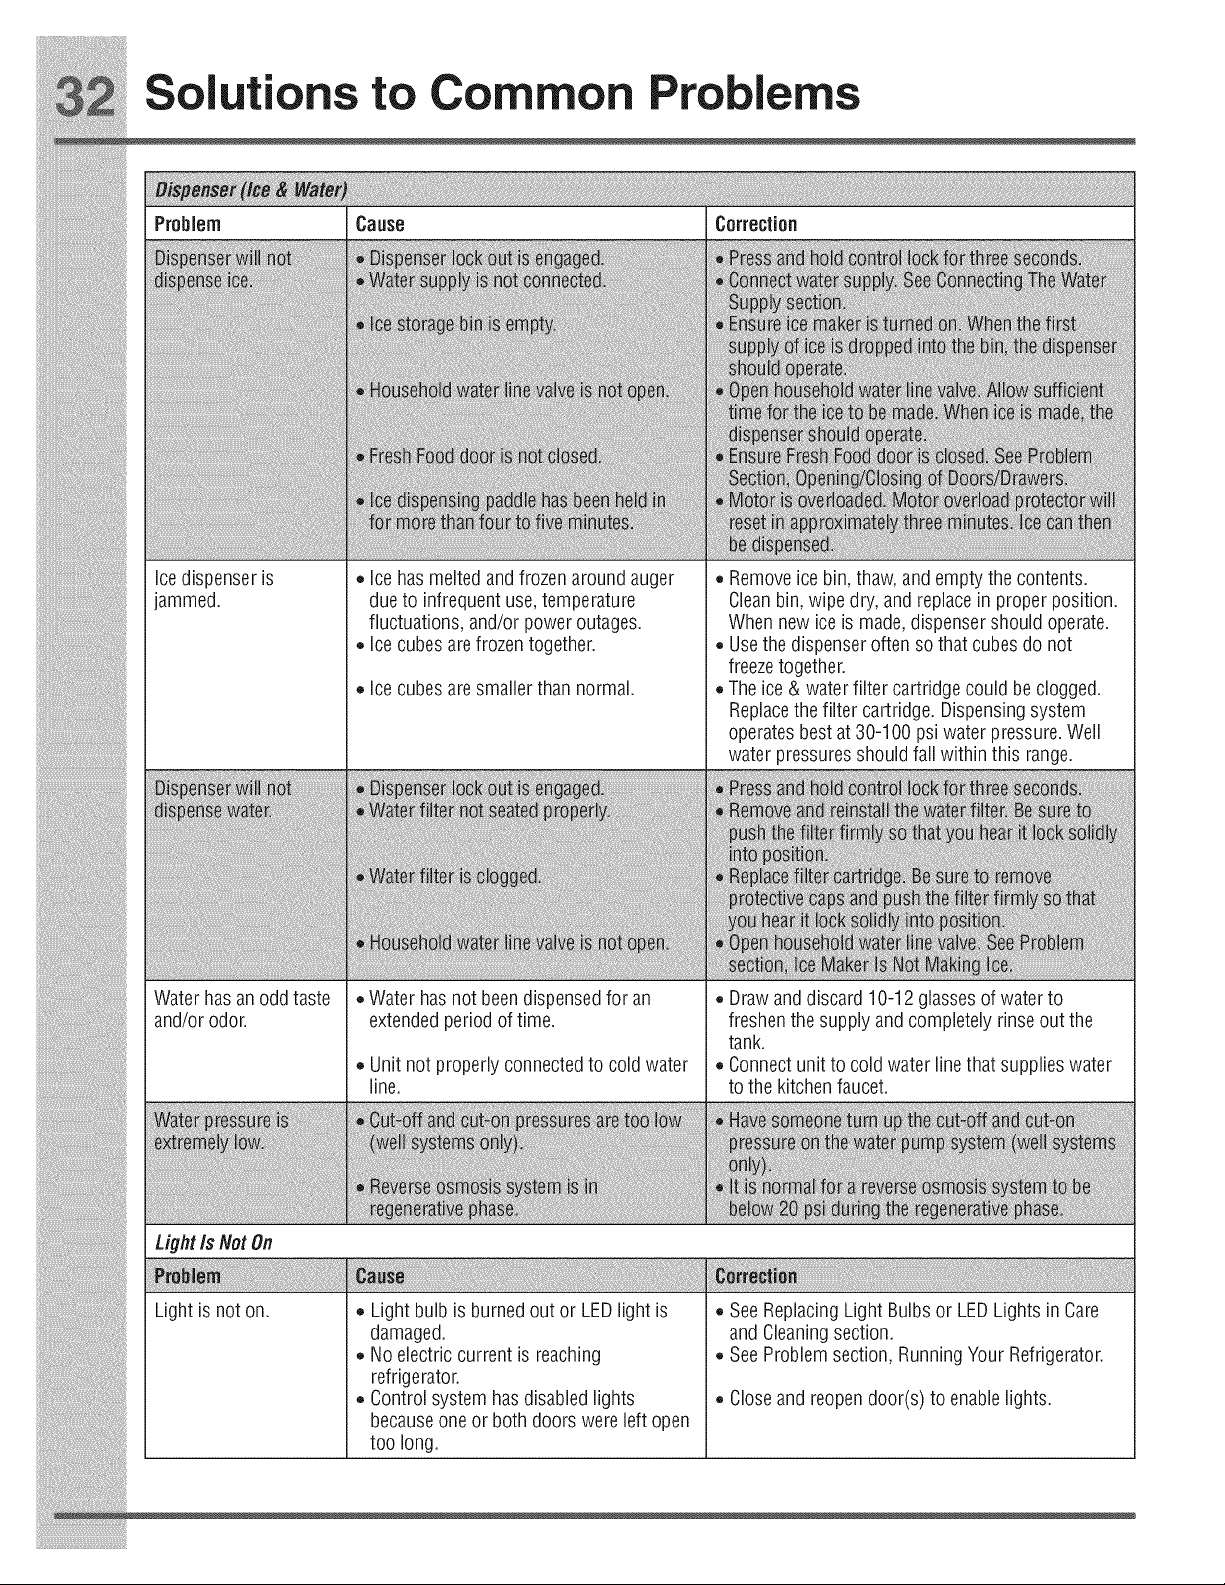
Solutions to Common Problems
Problem Cause Correction
ice dispenser is •ice has melted andfrozenaround auger •Removeice bin, thaw, and empty the contents.
ammed, due to infrequentuse temperature Cleanbin wipe dry and replacein properposition.
fluctuations and/or power outages. When new ice is made dispenser should operate.
• ice cubes are frozen together. • Usethe dispenser often so that cubesdo not
freezetogether.
Icecubes are smaller than normal. • Theice & water fllte r cartridge couId be clogged.
Replacethe filter cartridge. Dispensingsystem
operatesbest at 30-100 psi water ptessure. Well
water pressuresshould fall within this range.
i!_!_i!i_ii_!i!_!_i!i_ii_!i!_!_i!i_ii_!i!_!_i!i_ii_!i!_!_i!i_ii_!i!_!_i!i_ii_!i!_!_i!i_ii_!i!_!_i!i_ii_!i!_!_i!i_ii_!i!_!_ii_i
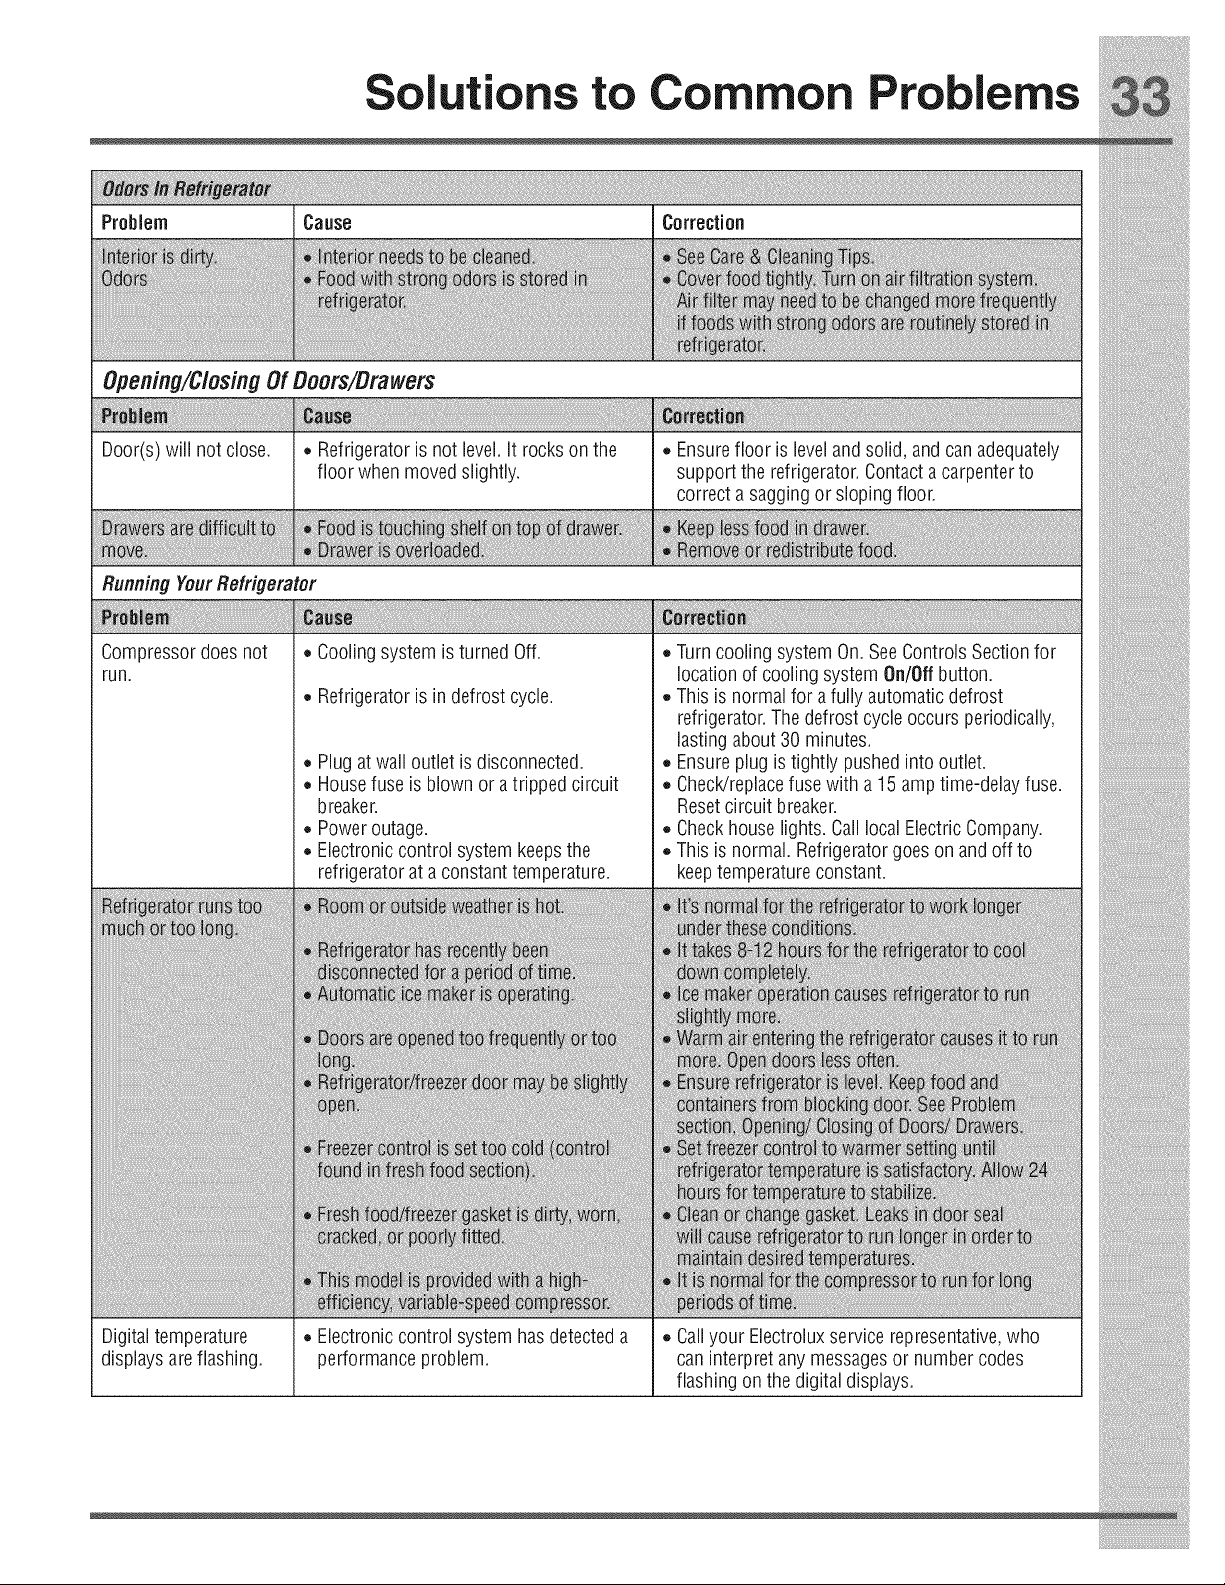
• Plugatwalloutletisdisconnected.
Housefuseisblownoratrippedcircuit Ensureplugistightlypushedintooutlet.
Check/replacefusewitha15amptime-delayfuse. i_i!_!_i!i_ii_!i!_!_i!i_ii_!i!_!_i!i_ii_!i!_!_i!i_ii_!i!_!_i!i_ii_!i!_!_i!i_ii_!i!_!_i!i_ii_!i!_!_i!i_ii_!i!_!_i!i_ii_!i!_!_iii_
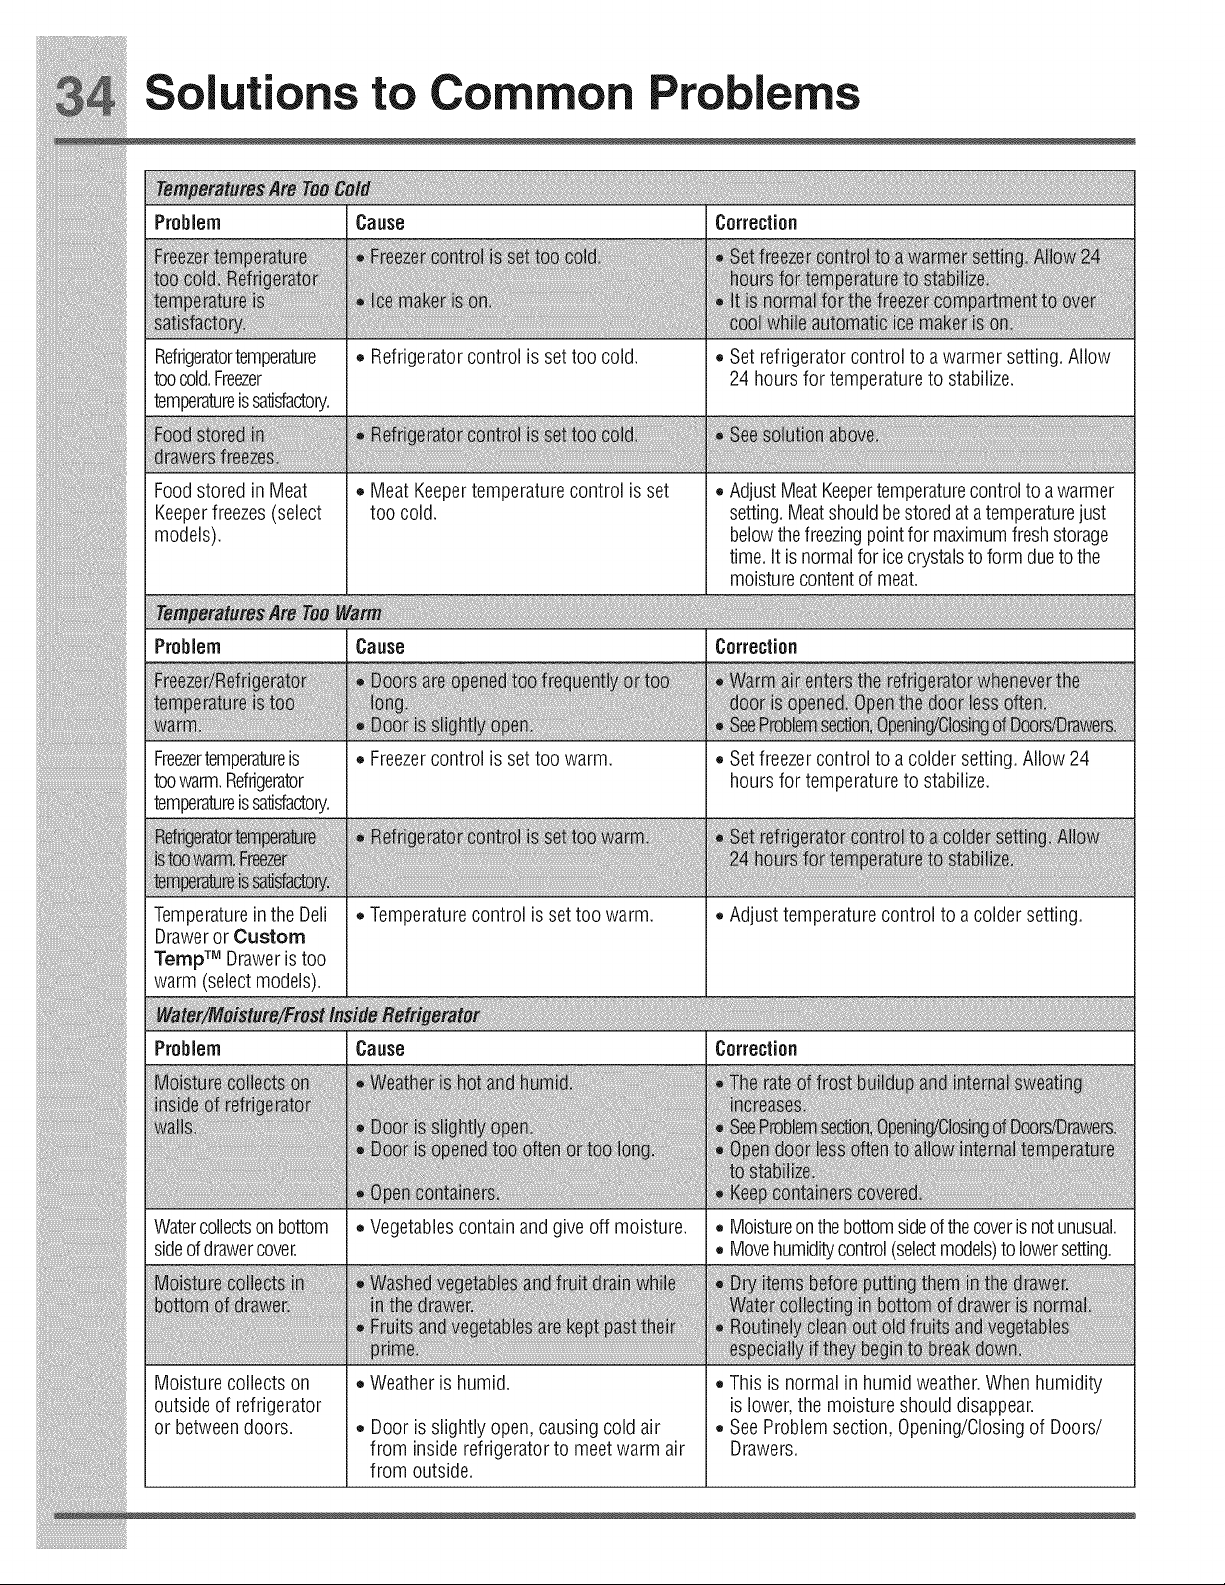
toowarm.Refrigerator
• Set freezercontrol to a colder setting. Allow 24
hours for temperatureto stabilize.
i!iiiiii!iiiiii!iiiiii!iiiiii!iiiiii!iiiiii!iiiiii!iiiiii!iiiiii!_!iiii
other cosmetic parts.
11. Pickup and delivery costs; your appliance is designed to be repaired in the home.
12. Surcharges including, but not limited to, any after hour, weekend, or holiday service calls, tolls, ferrytrip charges, or
mileageexpenseforservicecallstoremoteareas, includingthestateofAlaska.
13. Damages to the finish of appliance or home incurred during transportation or installation, including but not limited to
floors, cabinets, walls, etc.
14. Damages_ausedby:servi_e_perf_rm_dbyunau_h_rized_ervi_e__mpanie_;u_e_fpart___her_hangenui_eE_ec_r__ux
parts or parts obtained from persons otherthan authorized service companies; or external causes such as abuse,
misuse, inadequate powersupply, accidents, fires, or acts of God.
DISCLAIMEROFIMPLIEDWARRANTIES;LIMITATIONOFREMEDIES
CUSTOMER'SSOLEANDEXCLUSIVEREMEDYUNDERTHISLIMITEDWARRANTYSHALLBEREPAIROR
REPLACEMENT AS PROVIDED HEREIN. CLAIMS BASED ON IMPLIEDWARRANTIES INCLUDINGWARRANTIES
OF MERCHANTABILITY OR FITNESS FOR A PARTICULAR PURPOSE ARE LIMITEDTO ONEYEAR ORTHE
SHORTEST PERIOD ALLOWED BY LAW, BUT NOT LESSTHAN ONEYEAR. ELECTROLUX SHALL NOT BE LIABLE
FOR CONSEQUENTIALOR INCIDENTAL DAMAGES SUCH AS PROPERTY DAMAGE AND INCIDENTAL EXPENSES
RESULTING FROM ANY BREACH OFTHISWRITTEN LIMITEDWARRANTY OR ANY IMPLIEDWARRANTY. SOME
STATES AND PROVINCES DO NOTALLOWTHE EXCLUSION OR LIMITATION OF INCIDENTAL OR CONSEQUENTIAL :
DAMAGES OR LIMITATIONS ONTHE DURATION OF IMPUEDWARRANTIES SOTHESE LIMITATIONS OR EXCLUSIONS
MAY NOT APPLYTOYOU.THISWRITTEN WARRANTY GIVESYOU SPECIFIC LEGAL RIGHTS.YOU MAYALSO HAVE
OTHER RIGHTSTHATVARY FROM STATETO STATE. ':
IfYou NeedService
Keepy_urreceipt,delivery_lip__r__me_therappr_priatepaymentrec_rdt_e_tabli_hthewarrantyperi_d_h_uld_ervicebe
required. If service is performed, it is in your best interestto obtain and keep all receipts. Service underthis warranty must be
obtained by contacting Electrolux atthe addresses or phone numbers below.
ThiswarrantyonlyappliesintheUSA,PuertoRicoandCanadaIntheUSAandPuertoRico,yourapplianceiswarranted
by Electrolux Major Appliances North America, a division of Electrolux Home Products, Inc. In Canada, your appliance is
warranted by Electrolux Canada Corp. Electrolux authorizes no person to change or add to any obligations underthis warranty.
Obligations for service and parts underthis warranty must be performed by Electrolux or an authorized service company.
Productfeatures orspecifications as described or illustrated are subjectto change without notice. ::
USA Canada
1-877-435-3287 1-800-265-8352
Electrolux Major Appliances North America Electrolux Canada Corp.
10200 DavidTaylor Drive 5855Terry FoxWay
Charlotte, NC 28262 Mississauga, Ontario, Canada L5V 3E4