Loading ...
Loading ...
3
3
USAGE
Fan Operation: Always operate the fan in the upright position
following all instructions and recommendations listed in this
manual.
Fan Location: Place the fan in the area of the room that will
provide proper fan cooling.
Fan Connection: Plug fan directly into 120 volt A.C., 60 Hz wall
outlet. Be sure plug ts tightly in outlet. A loose connection may
cause overheating and damage to the plug or fan.
Note: To prevent overloading a circuit, do not plug the fan into a
circuit that is servicing other electrical needs.
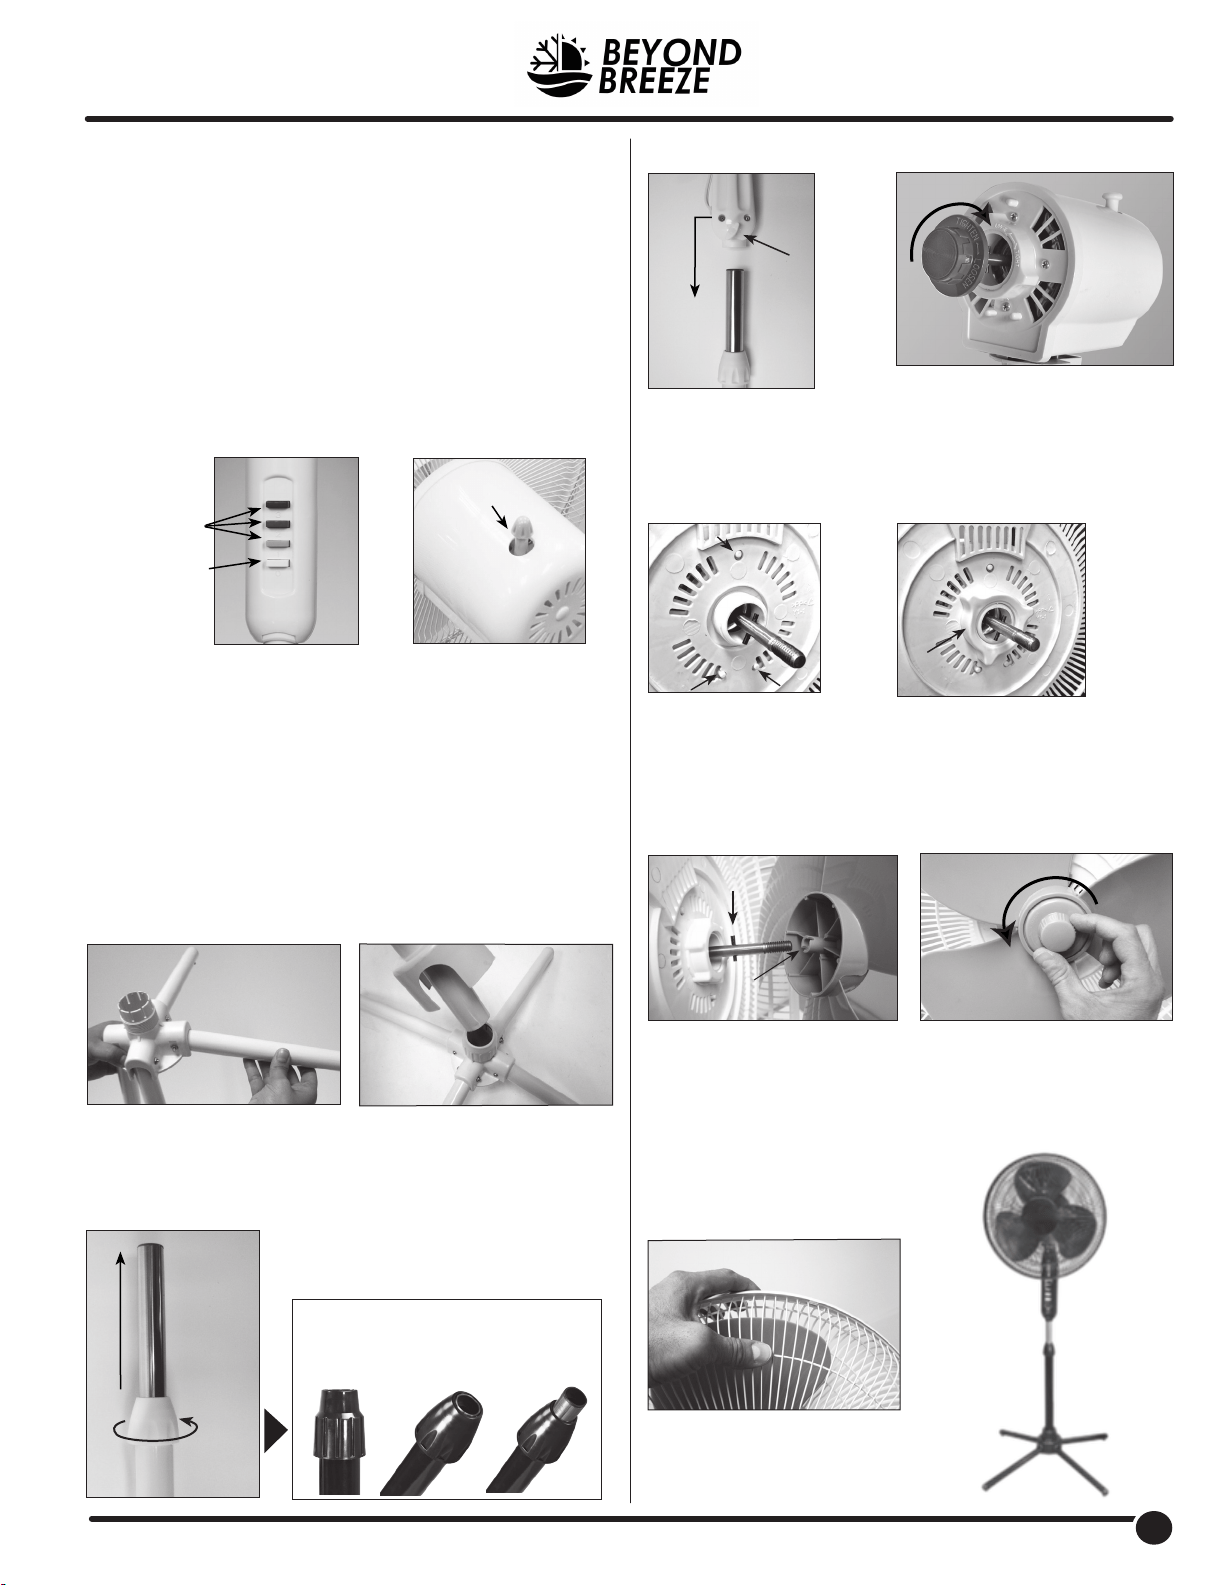
CONTROL PANEL
Turning Fan On/Off: Place fan on stable level surface. Plug
fan into properly grounded outlet. To start the fan, press
desired speed button: 1-LOW, 2-MED, 3-HIGH. Press 0-OFF to
discontinue use. Unplug fan when not in use.
Oscillation: To start fan oscillation, press Oscillation Control
Knob (located above motor housing) down. To stop oscillation
function, pull Oscillation Control Knob up while the fan is in any
oscillation position.
Fan Assembly
Simple assembly is required to use this fan.
On/Speed
Controls
Off
Controls
On/Off Speed Controls
Oscillation
Control
Oscillation Control Knob
Step 5
Step 7
Step 8
Unfold patented Quad-Pod
®
base legs.
With collar nut loosened, pull Chrome
Extension Pole out of Fan Pedestal.
Place decorative Plastic Flange
over Extension Pole to cover
the base. Slide pedestal pole
into base receptacle. Tighten
nut to secure in place. Slide
ange over base connection.
Step 1 Step 2
Step 3
Pull
Chrome
Extension
Out
Step 4
Assemble fan Control
Panel/Motor assembly
onto Chrome Extension
and tighten thumb screw.
Thumb
Screw
Lock Nut
Pin
Slot
Step 9
T
i
g
h
t
e
n
Remove any protective
covering over shaft before
Fan Blade Installation. Place
Fan Blade onto Motor Shaft.
Notice the pin on Motor Shaft
should t into slots of Fan
Blade.
With logo upright, attach Front
Grille to Rear Grille by snapping
them together. Be sure all 8 clips
are secure.
Thread Blade Cap onto
threaded end of Motor Shaft.
Note: Threads are reversed.
Tighten = Counter-clockwise.
Step 10
Remove the Blade Cap by
twisting it CLOCKWISE while
holding the metal shaft tightly.
Note: Threads are reversed.
Unscrew = Clockwise.
L
o
o
s
e
n
Step 6
Assemble Rear Grille
onto Motor Housing.
Rear Grille should t
into pins on fan motor
housing as shown.
Thread Locknut onto
Motor Housing to lock
Rear Grille in place.
Pin
Pin
Pin
Lock Nut
NOTE: The pedestal extension
pole may be recessed inside the
larger pole of pedestal body.
Loading ...