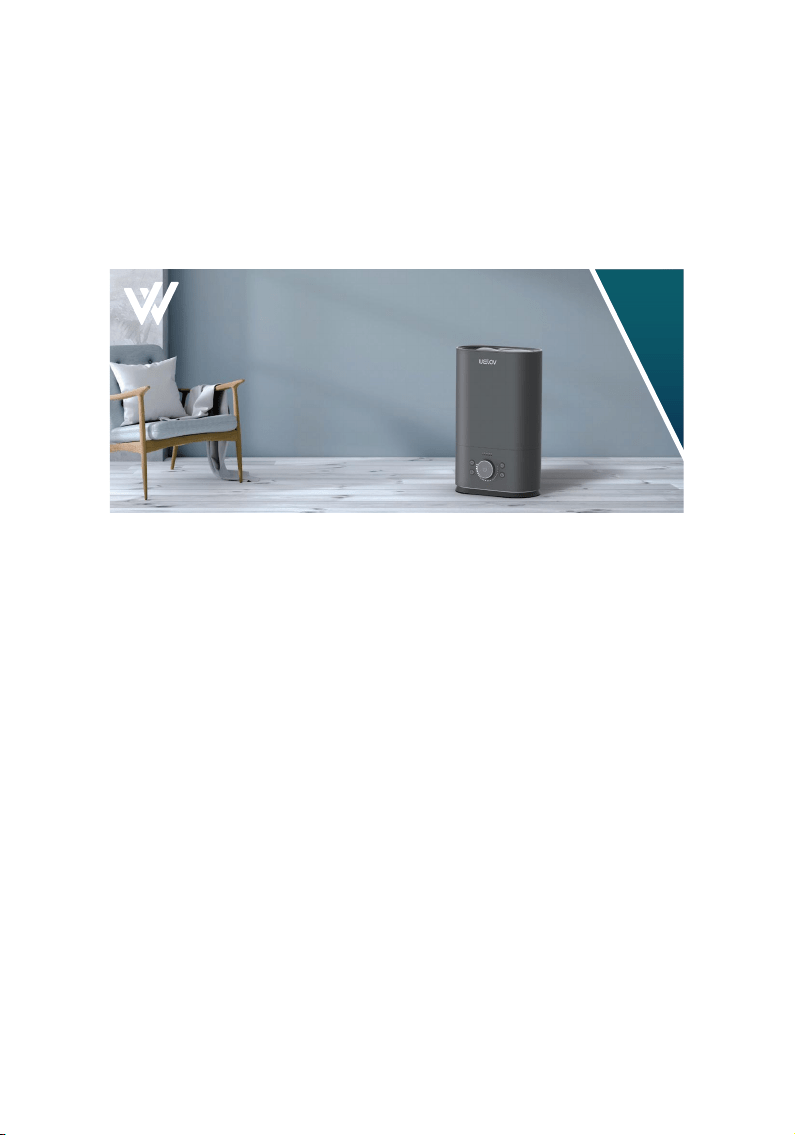
Humidifier
Please read all the
instructions before using
and keep it for future
reference.
Ultrasonic Cool Mist
H500
User Manual
V1.2
Welov comes with 1 Year Warranty that begins on the date of purchase.
Welov Corporation warrants all products to be of the highest
quality in material, craftsmanship, and service, effective from the
date of purchase to the end of the warranty period.The warranty
applies to the product and necessary parts and labor relating
thereto. The warranty does not apply to damage resulting from
failure to follow the operating instructions, accidents, abuse,
alterations, or disassembly by unauthorized individuals.
Register your product at
www.welovhome.com/registration
to extend your 1-year warranty by an additional year.
Please fill out all required fields and include your order ID, place of
purchase, and purchase date, if applicable.
If you have product questions or concerns, don't hesitate to contact us
directly at:
Welov has an award-winning warranty, exchange, and customer service
program that guarantees hassle-free solutions within 24 hours for any
issue you might have with this product!
WARRANTY
Extend Your Warranty by 1 Year

CONTENTS
IMPORTANT SAFETY INSTRUCTIONS - - - - - - - - - - - - 01
BEFORE USING THE HUMIDIFIER - - - - - - - - - - - - - - - - - - 01
WHEN USING THE HUMIDIFIER - - - - - - - - - - - - - - - - - - - 02
AFTER USING THE HUMIDIFIER - - - - - - - - - - - - - - - - - - - 04
WHAT'S INCLUDED - - - - - - - - - - - - - - - - - - - - - - - - 05
SPECIFICATIONS - - - - - - - - - - - - - - - - - - - - - - - - - - 05
PRODUCT OVERVIEW - - - - - - - - - - - - - - - - - - - - - - 06
OPERATION GUIDE - - - - - - - - - - - - - - - - - - - - - - - - 08
ADD WATER - - - - - - - - - - - - - - - - - - - - - - - - - - - - - - - - - - - - - 08
POWER/MIST CONTROL - - - - - - - - - - - - - - - - - - - - - - - - - - - - - 1 0
BOOSTMIST - - - - - - - - - - - - - - - - - - - - - - - - - - - - - - - - - - - - - 1 1
NIGHT LIGHT - - - - - - - - - - - - - - - - - - - - - - - - - - - - - - - - - - - - - 1 1
TIMER - - - - - - - - - - - - - - - - - - - - - - - - - - - - - - - - - - - - - - - - - 1 2
SLEEP MODE - - - - - - - - - - - - - - - - - - - - - - - - - - - - - - - - - - - - - 13
MEMORY FUNCTION - - - - - - - - - - - - - - - - - - - - - - - - - - - - - - - 1 4
LOW WATER PROTECTION - - - - - - - - - - - - - - - - - - - - - - - - - - - 1 4
MAINTENANCE AND CARE - - - - - - - - - - - - - - - - - - - 14
DAILY MAINTENANCE - - - - - - - - - - - - - - - - - - - - - - - - - - - - - - - 1 5
WEEKLY MAINTENANCE - - - - - - - - - - - - - - - - - - - - - - - - - - - - - 1 5
DUSTPROOF SPONGE CLEANING - - - - - - - - - - - - - - - - - - - - - - 1 9
END-OF-SEASON CARE AND STORAGE - - - - - - - - - - - - - - - - - - 1 9
TROUBLESHOOTING GUIDE - - - - - - - - - - - - - - - - - - 19
Please read these IMPORTANT SAFETY INSTRUCTIONS before using the humidifier.
Some issues could be avoided by doing so during the use of the product, but it is
not necessary to follow these instructions completely for operating the humidifier.
- Be aware that high humidity levels may encourage the growth of biological
organisms in the environment.
- Do not permit the area around the humidifier to become damp or wet. If dampness
occurs, turn the output of the humidifier down. If the humidifier output volume
cannot be turned down. Use the humidifier intermittently. Do not allow absorbent
materials such as carpeting, curtains, drapes, or tablecloths to become damp.
- Unplug the appliance during filling and cleaning.
- Never leave water in the reservoir when the appliance is not in use.
- Empty and clean the humidifier before storage. Clean the humidifier before next
use.
- Warning: Micro-organisms that may be present in the water or in the environment
where the appliance is used or stored, can grow in the water reservoir and be
blown in the air causing very serious health risks when the water is not renewed
and the tank is not cleaned properly every 3 days.
- Empty the tank and refill every third day. Before refilling, clean it with fresh tap
water or cleaning agents if required by the manufacturer. Remove any
scale, deposits, or film that has formed on the sides of the tank or on interior
surfaces, and wipe all surfaces dry.
01
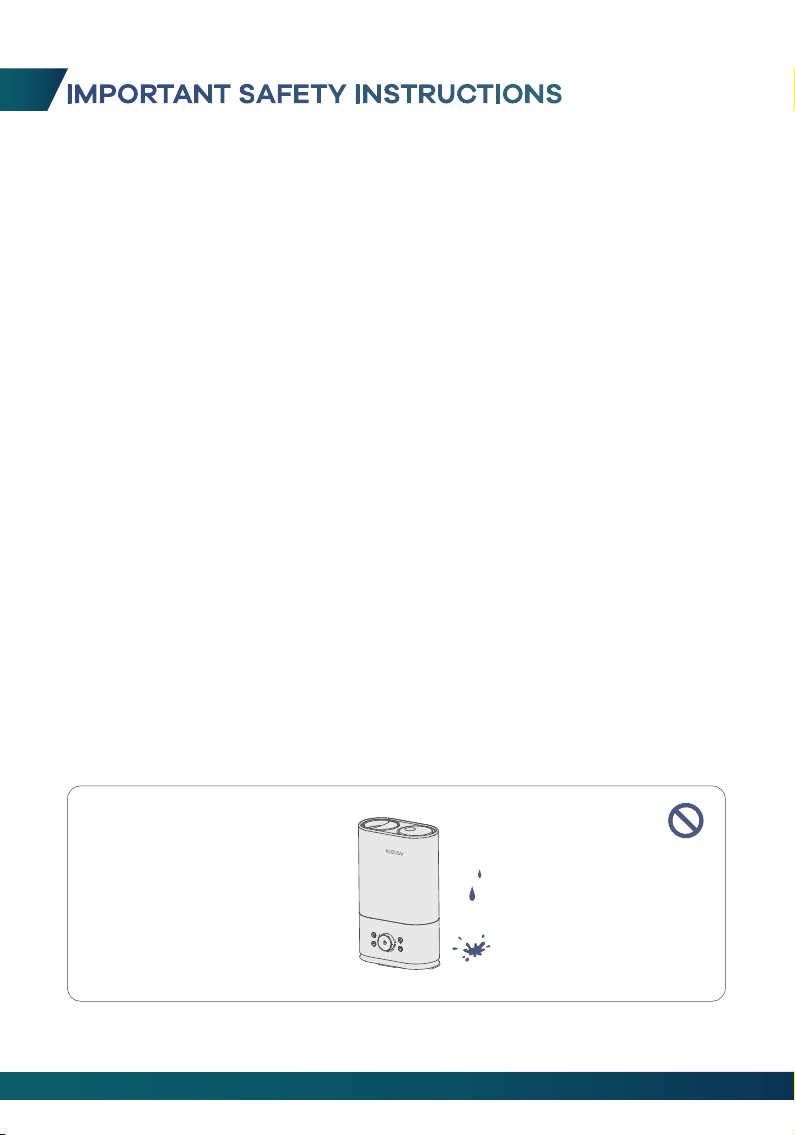
1. DO NOT place the humidifier in a wet environment.
BEFORE USING THE HUMIDIFIER
IMPORTANT SAFETY INSTRUCTIONS
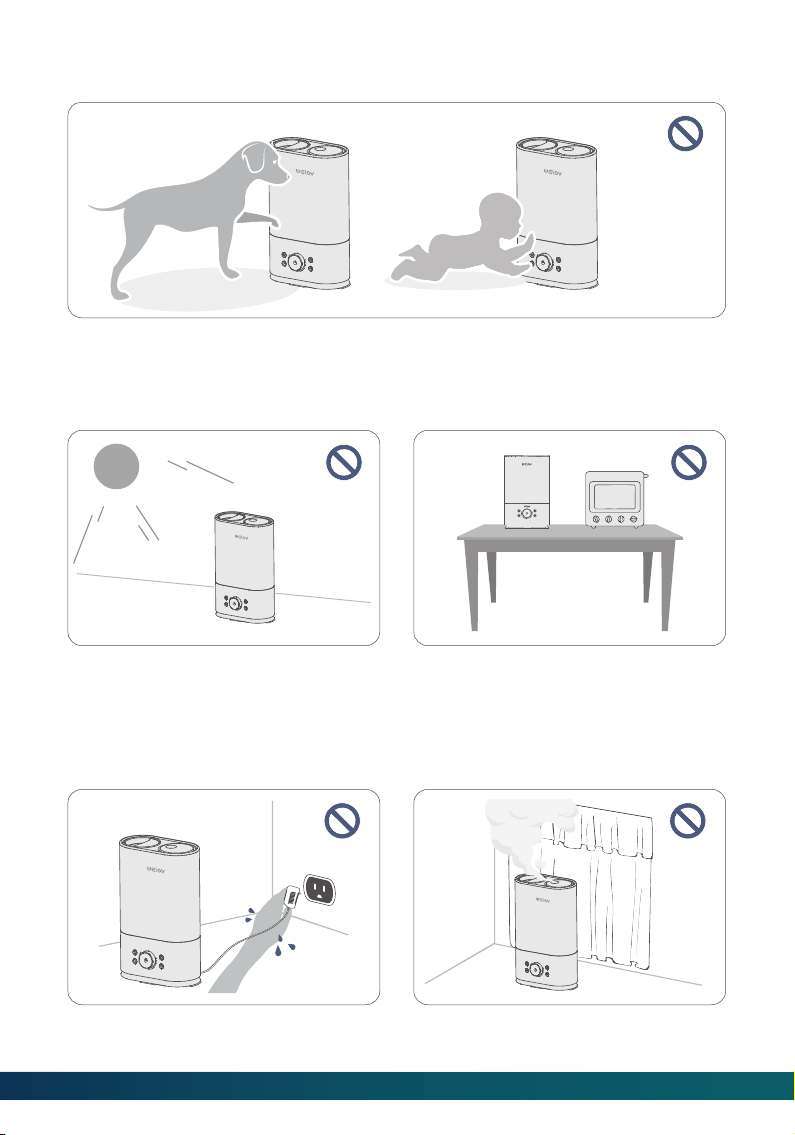
4. DO NOT place the humidifier near
open flames or heat sources, such as
stoves, ovens, radiators or
computers.
02
2. Please always keep the humidifier out of the reach of patients, children, and pets.
3. Please always place the humidifier on
a smooth, flat, lint-free, non-metallic,
waterproof and level surface; avoid the
direct sunlight.
2. DO NOT make the Nozzle facing
towards the wall or curtains.
1. DO NOT plug the power adapter into
an outlet with wet hands.
WHEN USING THE HUMIDIFIER
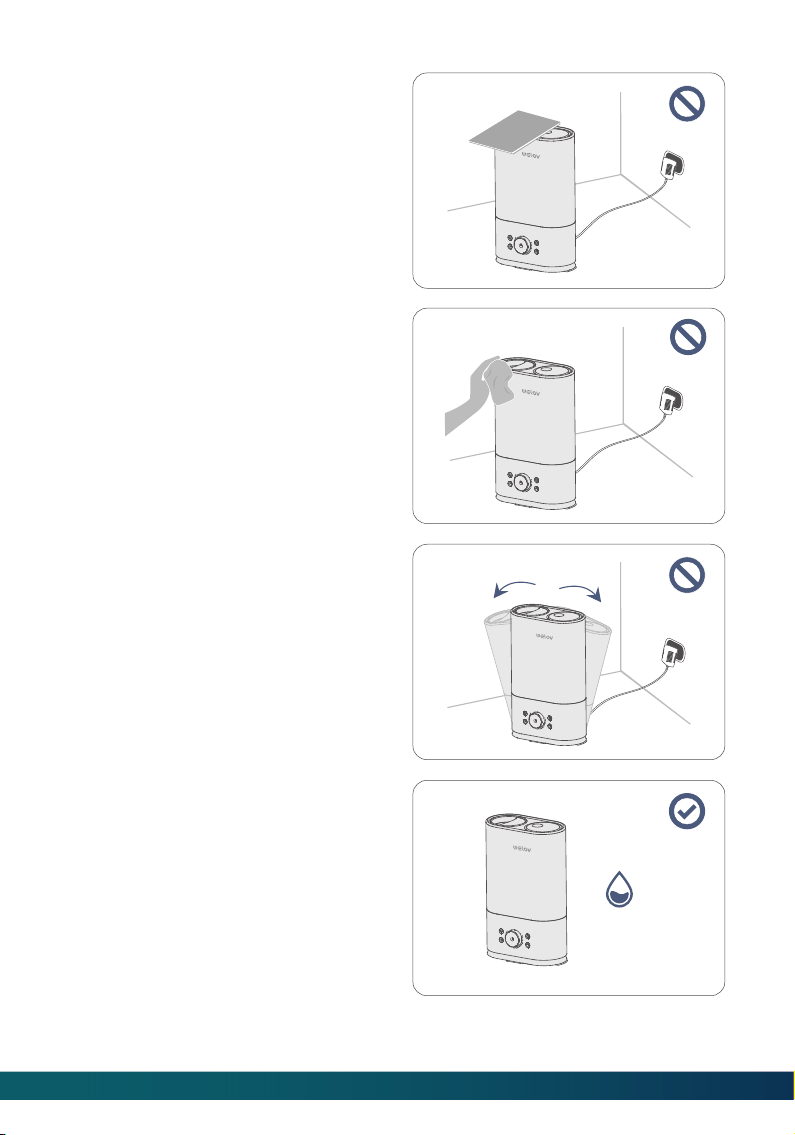
5. DO NOT move or tilt the humidifier
during operation.
6. The recommended ideal humidity is
between 40% - 60%. Please adjust the
mist as needed.
humidity:
40%~60%
3. DO NOT cover the Nozzle with your
hand or any other objects when the
humidifier is working to avoid damage
to the humidifier or injury.
4. DO NOT clean the humidifier when it is
connected to a power source or when it
is turned on.
03
Welov will accept no liability or responsibility for fires, explosions or electrical
shocks caused by improper operation, dismantling the humidifier or by not
adhering to the above safety instructions.
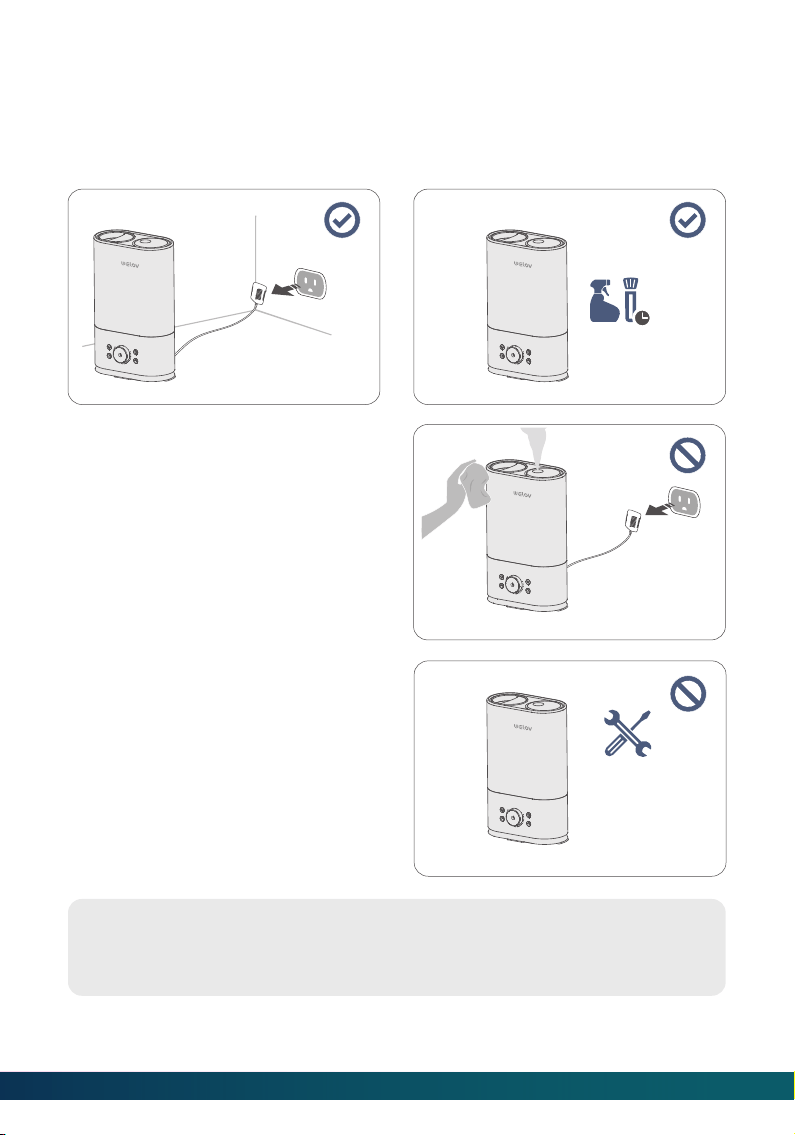
4. DO NOT attempt to repair, or adjust
any electrical/mechanical functions of
the humidifier by yourself.
3. DO NOT clean the humidifier
immediately after turning it off. Allow
the humidifier to cool down completely
before cleaning.
1. Always disconnect the power adapter
by unplugging it when the humidifier is
not in use.
2. The humidifier requires regular cleaning.
Please refer to the instructions mentioned
in the section of Maintenance and Care.
AFTER USING THE HUMIDIFIER
04
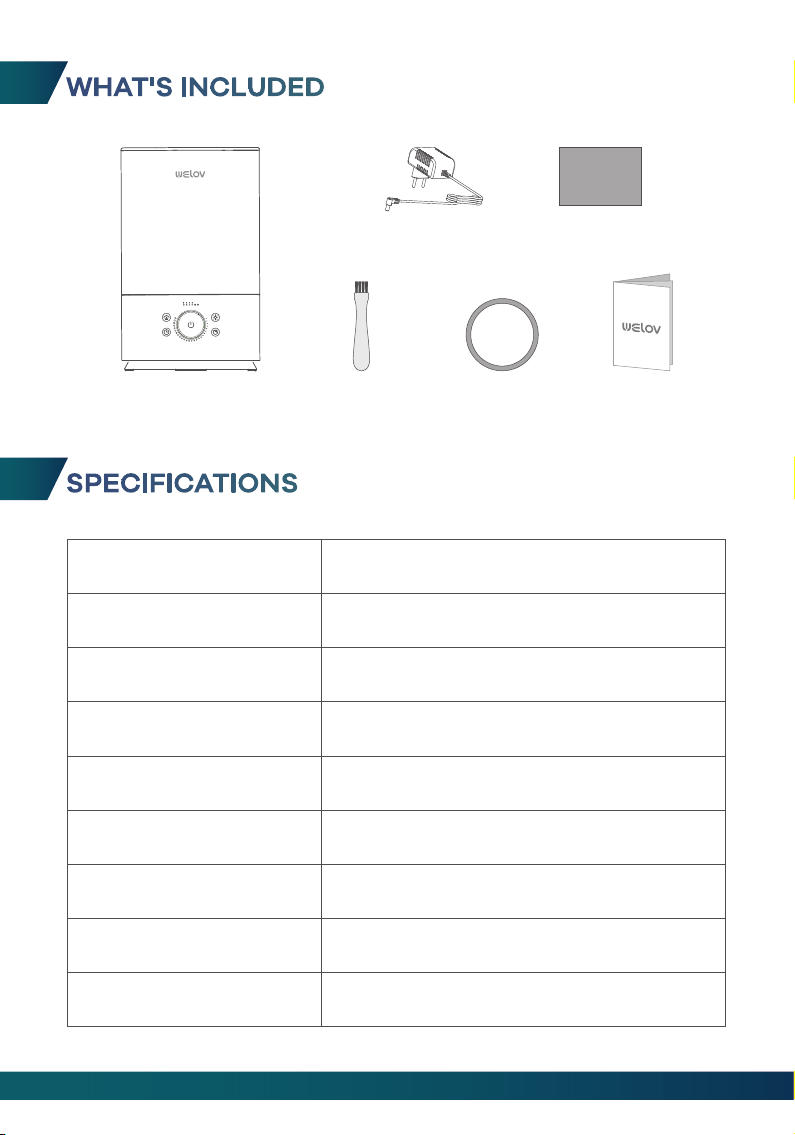
WHAT'S INCLUDED
SPECIFICATIONS
Model
Adapter Input
Adapter Output
Rated Input
Rated Power
Water Tank Capacity
Dimensions
Welov H500
AC 100-240 V; 50 / 60 Hz
DC 32 V 1.1 A
DC 32 V
35.2 W
6 L / 1.59 Gal
406 x 250 x 131 mm / 15.98 x 9.84 x 5.16 inches
Net Weight
Atomization Amount
2420 g / 85.4 oz
60-500 ml / H
User ManualCleaning Brush
Power Adapter Dustproof Sponge
Humidifier
05
Sealing ring
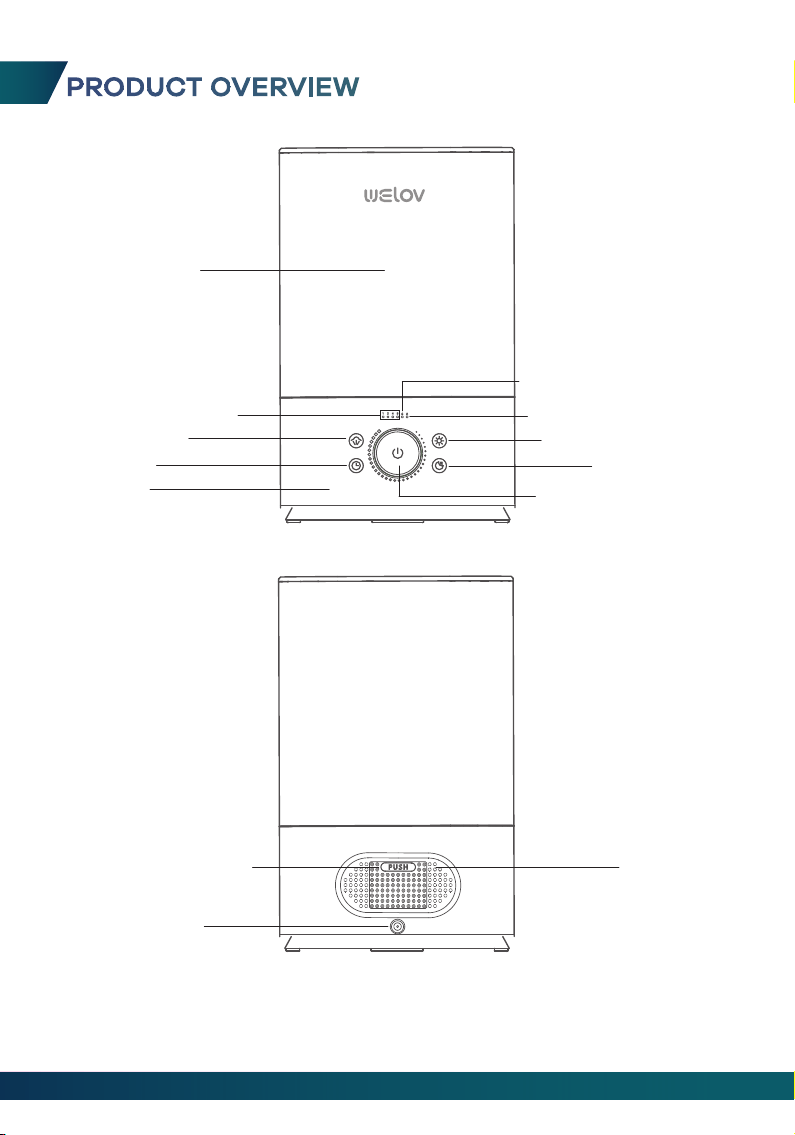
PRODUCT OVERVIEW
Water Tank
Timer Indicators
BoostMist
Water Level Indicator
Low Water Indicator
Sleep Mode
Power/Mist Control
Timer
Base
Dustproof Sponge Air Inlet
Power Input
Night Light Button
06
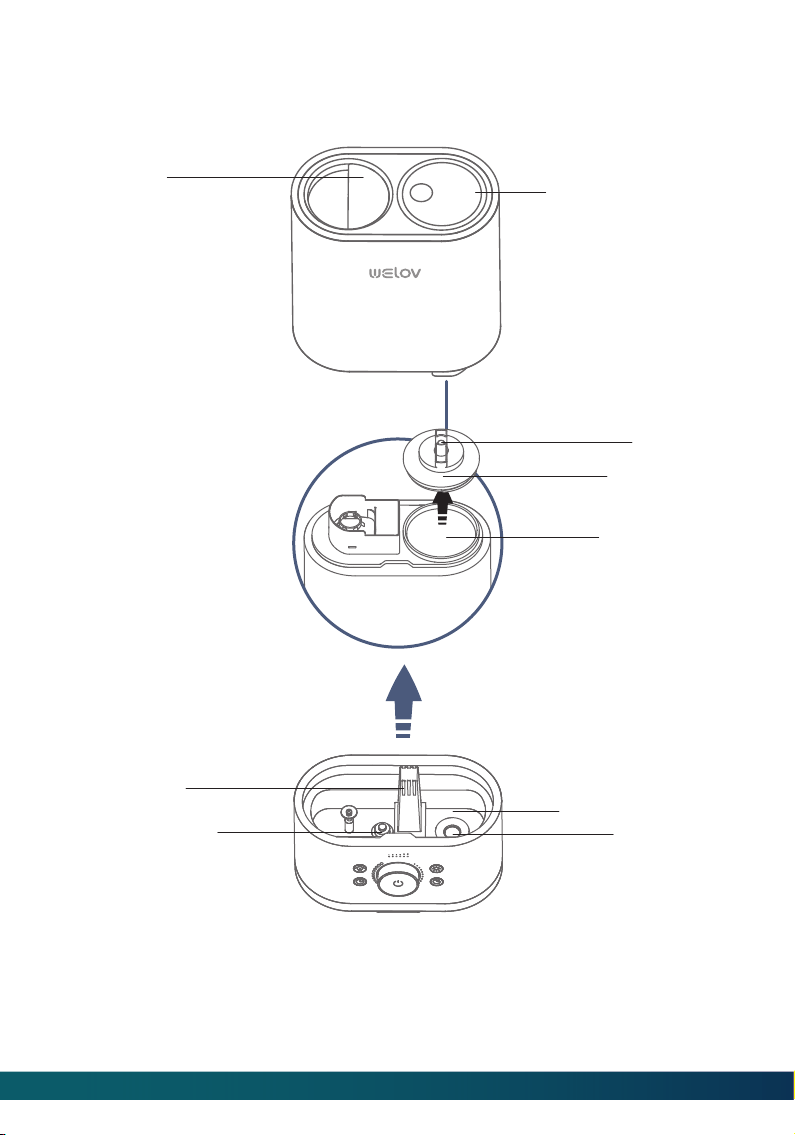
Handle
Air Outlet
Water Reservoir
Atomizer
Water Floater
Water Inlet
Tank Cap
Spring
Adjustable Nozzle
07
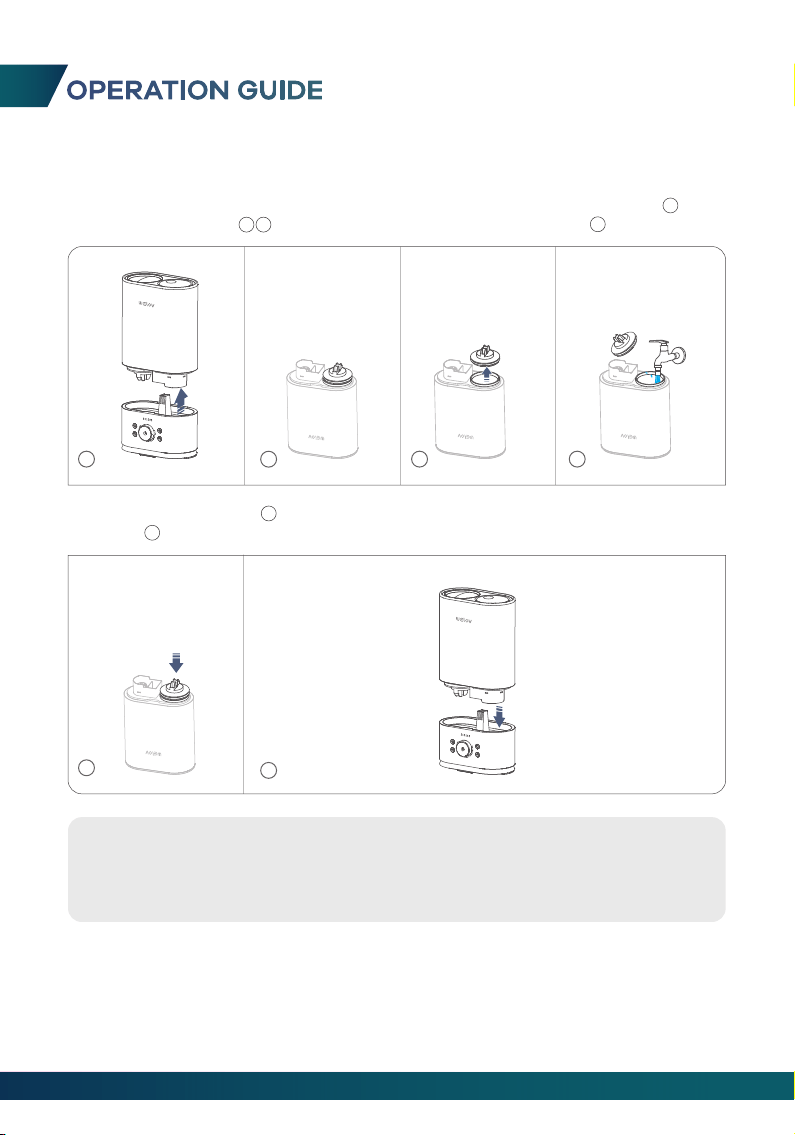
OPERATION GUIDE
5
6
Tips:
1. Make sure that the Water Tank and the Base are well fitted so that the
water can go to the Water Reservoir.
2. Please make sure that the sealing ring is well installed on the Tank Cap.
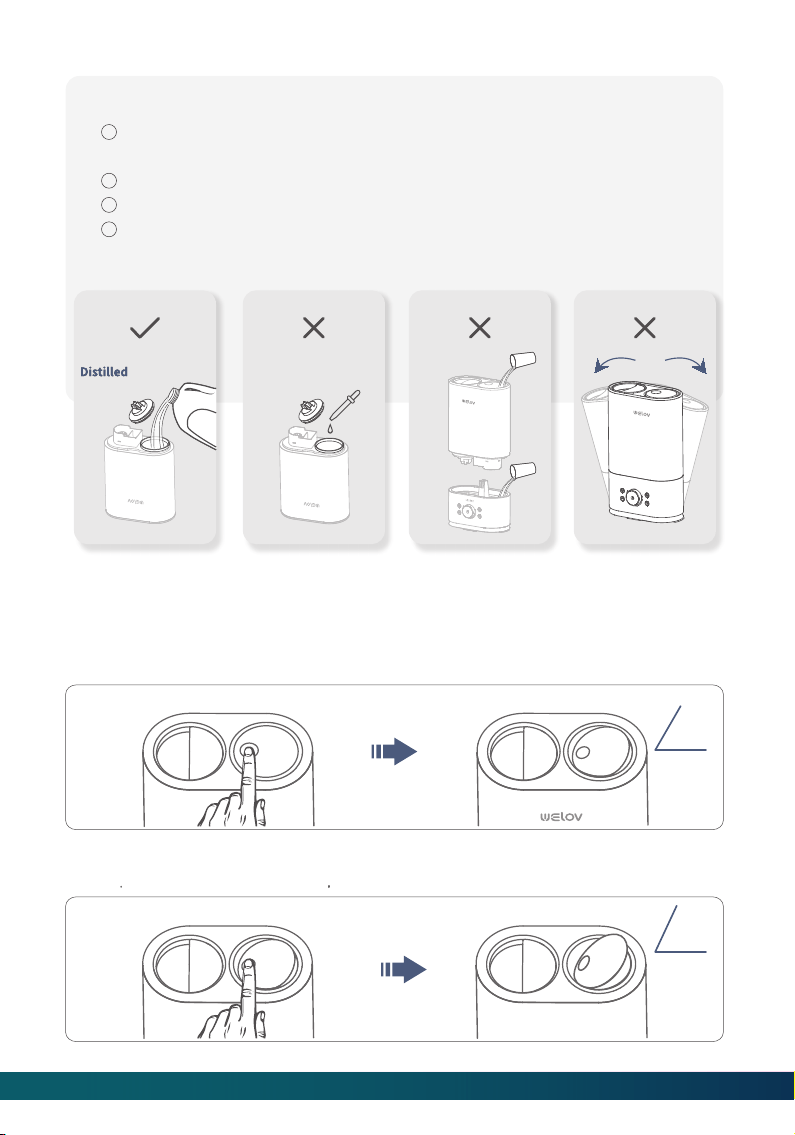
ADD WATER
1. Separate the Water Tank from the Base, turn the Water Tank upside down( ),
loosen the Tank Cap( ), then fill the tank with clean cool water( ).
1
4
2
3
2. Tighten the Tank Cap( ), then turn the Water Tank upright and put it back on
the Base( ).
5
6
1
2
3 4
08
09
Important:
If the tap water is too hard, we recommend using the filtered or distilled
water to avoid white dust. DO NOT use hot water.
DO NOT add any essential oils or medicinal tablets into the Water Tank.
DO NOT add water into the Base or through the Nozzle.
DO NOT move the humidifier while the Water Tank is full of water to
avoid leakage or Base overfilling.
1
2
3
4
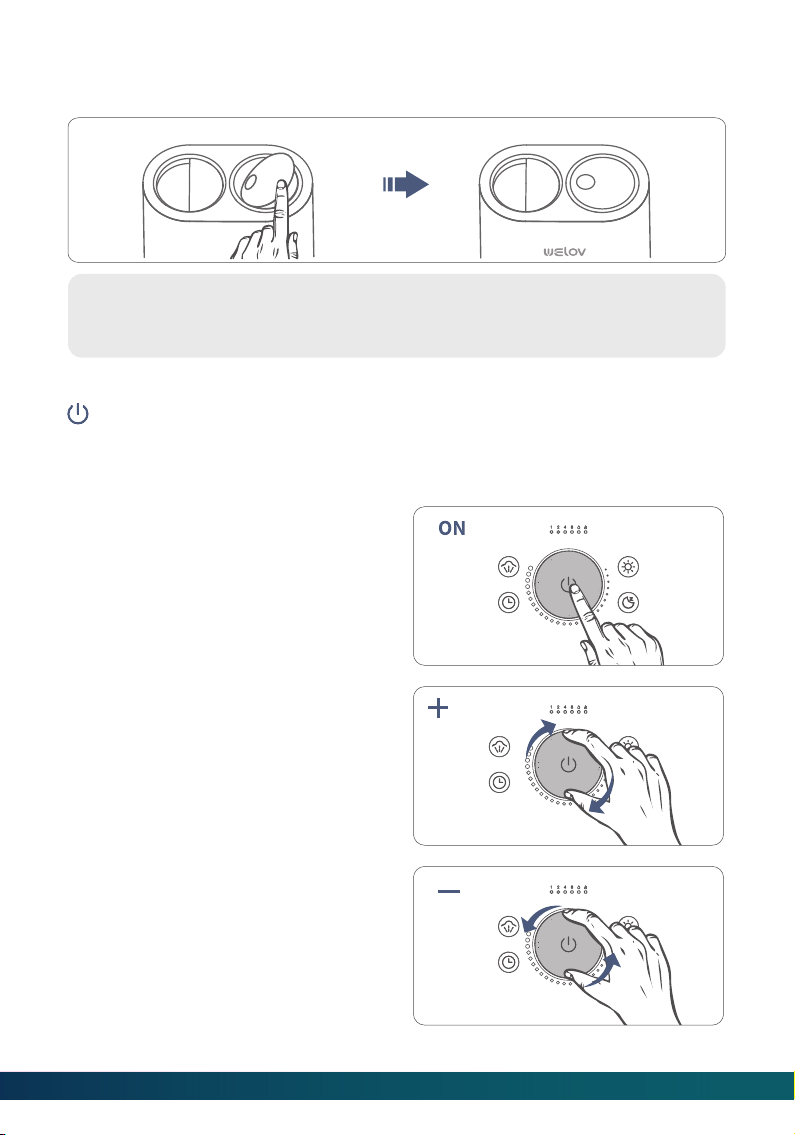
Step 1:
Press the top of NOZZLE, the NOZZLE will open on 65°.
OPEN / CLOSE NOZZLE
Step 2:
Press again the top of NOZZLE, the NOZZLE will open on 65°.
65°
65°
10
Tips:
The best MIST condition is NOZZLE on 65°.
Step 1:
Connect the Power Adpater to the humidifier and plug it into the socket. Open the
NOZZLE.
Step 2:
Pressthe Power/Mist Control to turn on
the humidifier. The Water Level
Indicator will light up in solid white at
the same time, and the mist will be the
minimum level by default.
Step 3:
Rotate the Power/Mist Control
clockwise to increase the intensity of
mist.
POWER/MIST CONTROL
Step 4:
Rotate the Power/Mist Control
counterclockwise to reduce the
intensity of mist.
Step 3:
Press the top of NOZZLE when the nozzle closing, the NOZZLE will close.
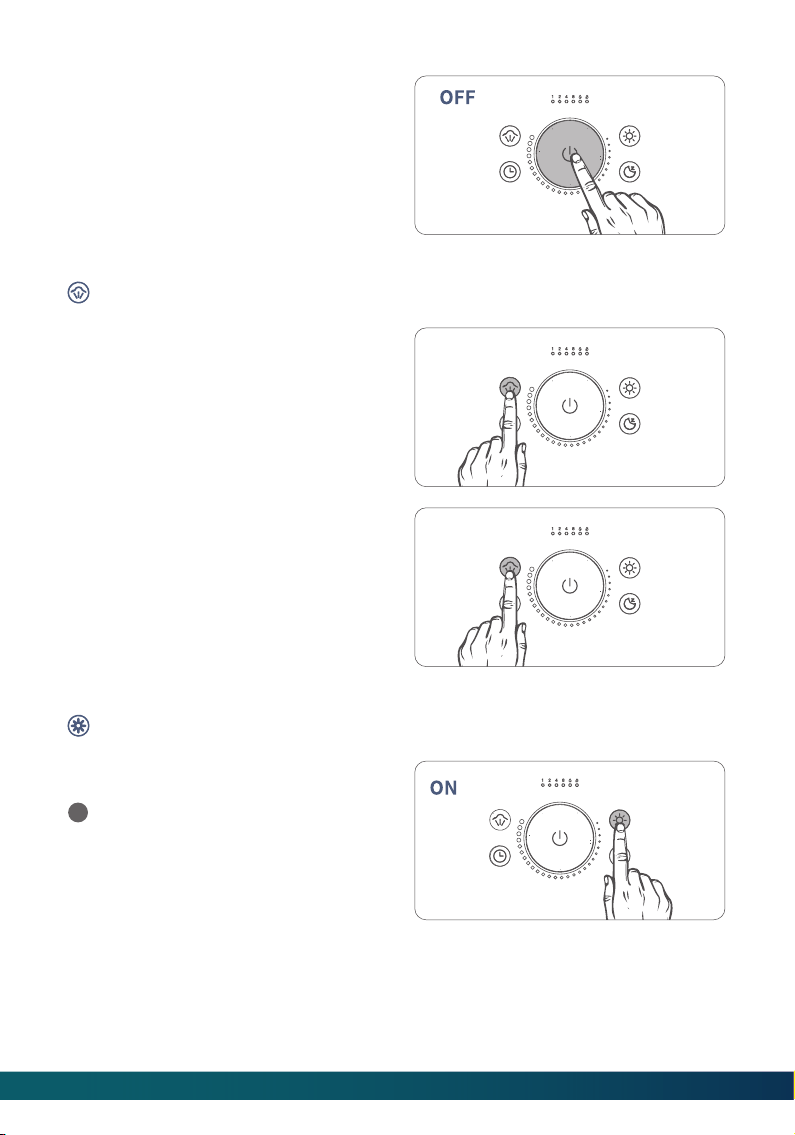
Step 5:
Press the Power/Mist Control again to
turn off the humidifier and the Water
Level Indicator will be off.
Step 1:
Press the BoostMist button to adjust
the mist to maximum intensity.
Step 2:
30 minutes later the mist intensity will
automatically return to the state before
activating this function. Or press the
BoostMist button again
BOOSTMIST
NIGHT LIGHT
Press the Night Light button to turn
on the light at the bottom. The
default brightness is set to the
medium level.
1
11
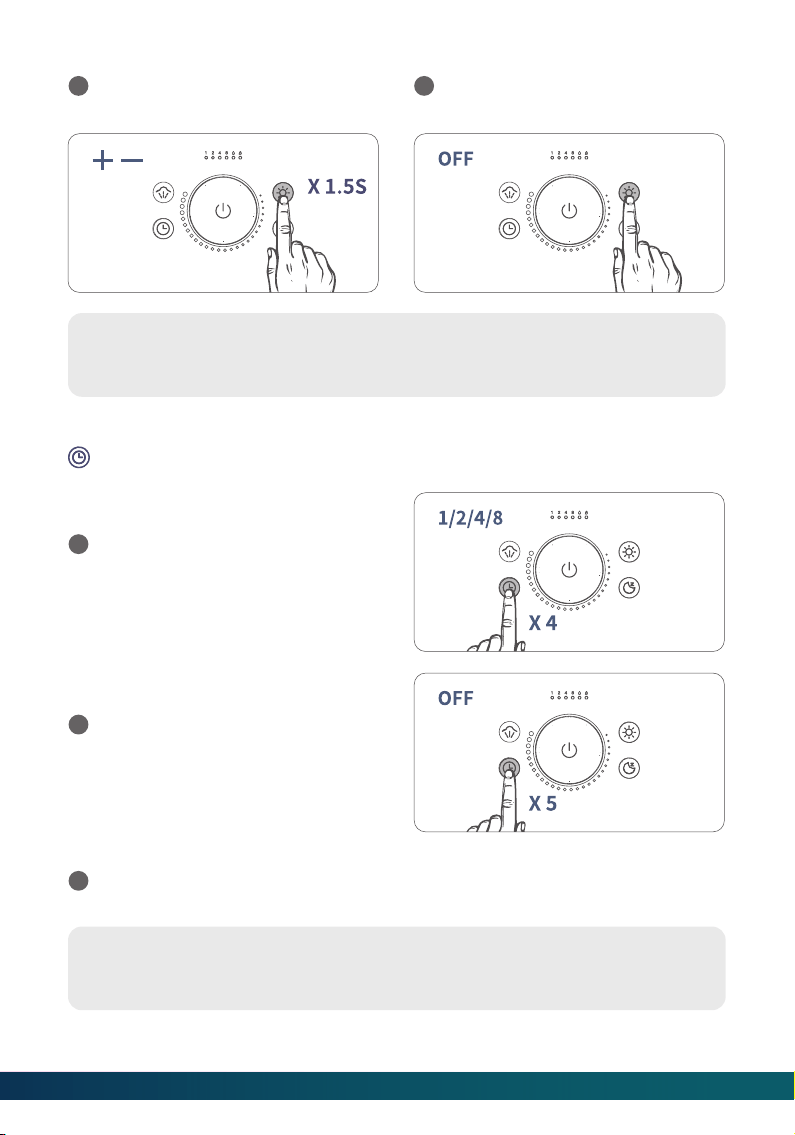
Tip:
Night Light function can be used alone when the humidifier is not producing
mist.
Tip:
Night Light function is not affected by the Timer.
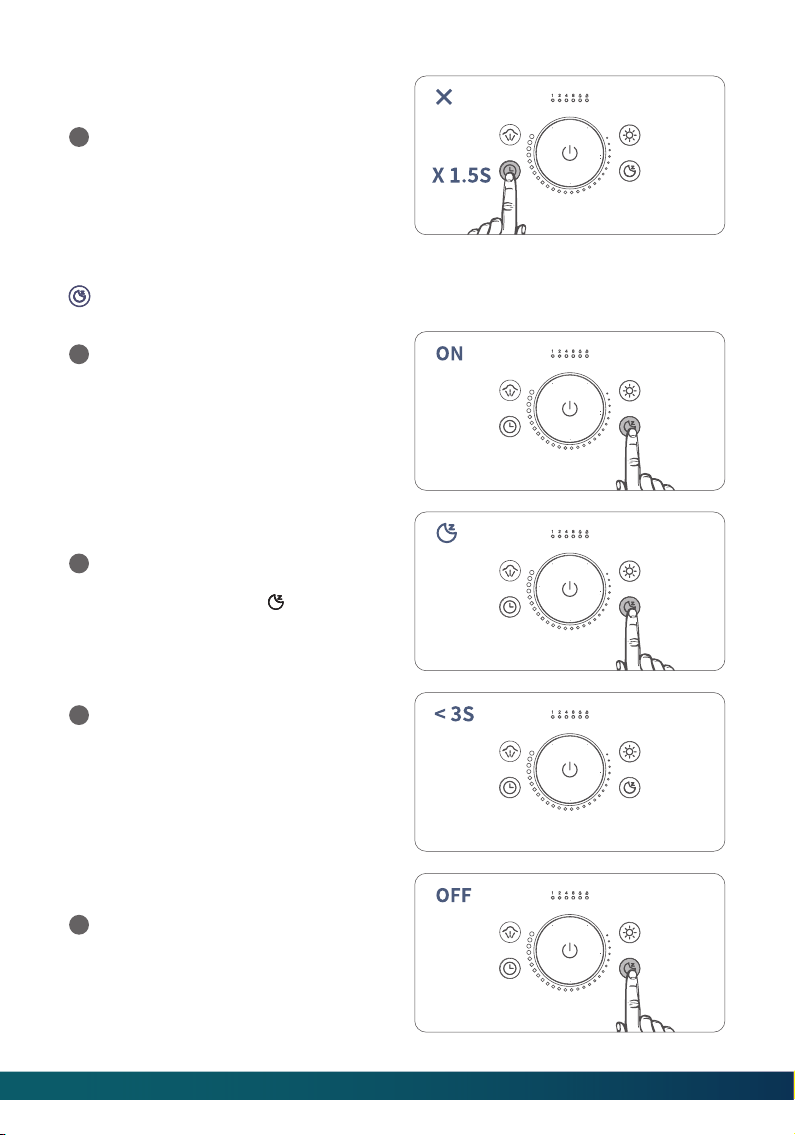
TIMER
Press the Timer button once at a
time to set a timer among 1H, 2H, 4H
and 8H and the corresponding
indicator will light up in warm white.
1
Press the Timer button for the fifth
time to disable the Timer function,
and the Timer Indicators will be off.
2
Long press the Night Light button
for 1.5S to adjust the brightness.
2
Press the Night Light button again
to turn off the light at the bottom.
3
After the Timer is up the humidifier will stop producing mist and the Water Level
Indicator will be off.
3
12
SLEEP MODE
Press the Sleep Mode button to
enable the Sleep Mode. All lights,
including Water Level Indicator,
Low Water Indicator, Timer
Indicator and Night Light will be off,
and the humidifier will continue to
produce mist.
1
After waking it up, you can make
some adjustment within 3S, such as
setting a Timer or adjusting the
Night Light brightness. After
finishing the above settings for 1S,
the humidifier will return to the
Sleep Mode.
3
Press the Sleep Mode button again
to exit the Sleep Mode, and the
humidifier will return to the state
before enabling the Sleep Mode.
4
In the Sleep Mode, press any button
or the Power/Mist Control to wake
up the humidifier. The icon will
light up.
2
Long press the Timer button for 1.5S
to cancel the timer setting
immediately.
4
13
14
MAINTENANCE AND CARE
Tip:
If there is no operation within 3S, the humidifier will return to the state before
waking it up.
Tip:
The memory function does not apply to the Timer and Sleep Mode functions.
MEMORY FUNCTION
If you turn off the humidifier without unplugging the adapter and then turn it on
again, the mist intensity of the humidifier will be the same as before the
humidifier was turned off.
If you turn off the Night Light without unplugging the adapter and then turn it
on again the Night Light brightness will remain the same as before the light was
turned off.
LOW WATER PROTECTION
When there is not enough water in the Water Reservoir, the Low Water Indicator and
the icon will turn red.
The humidifier will stop producing mist to prevent it from overheating and
damaging the Atomizer.
1
2
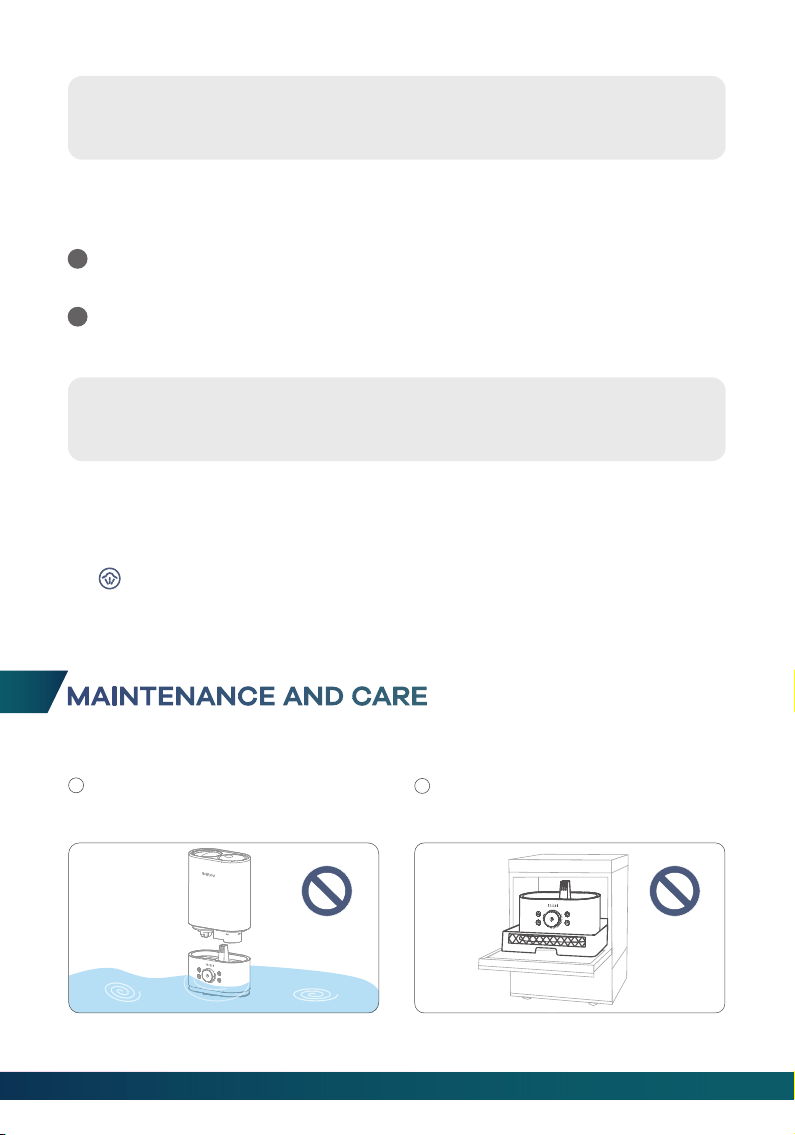
Important:
DO NOT submerge the Base in the
water.
1
DO NOT wash any parts of this
humidifier in the dishwasher; otherwise,
it will damage the humidifier.
2
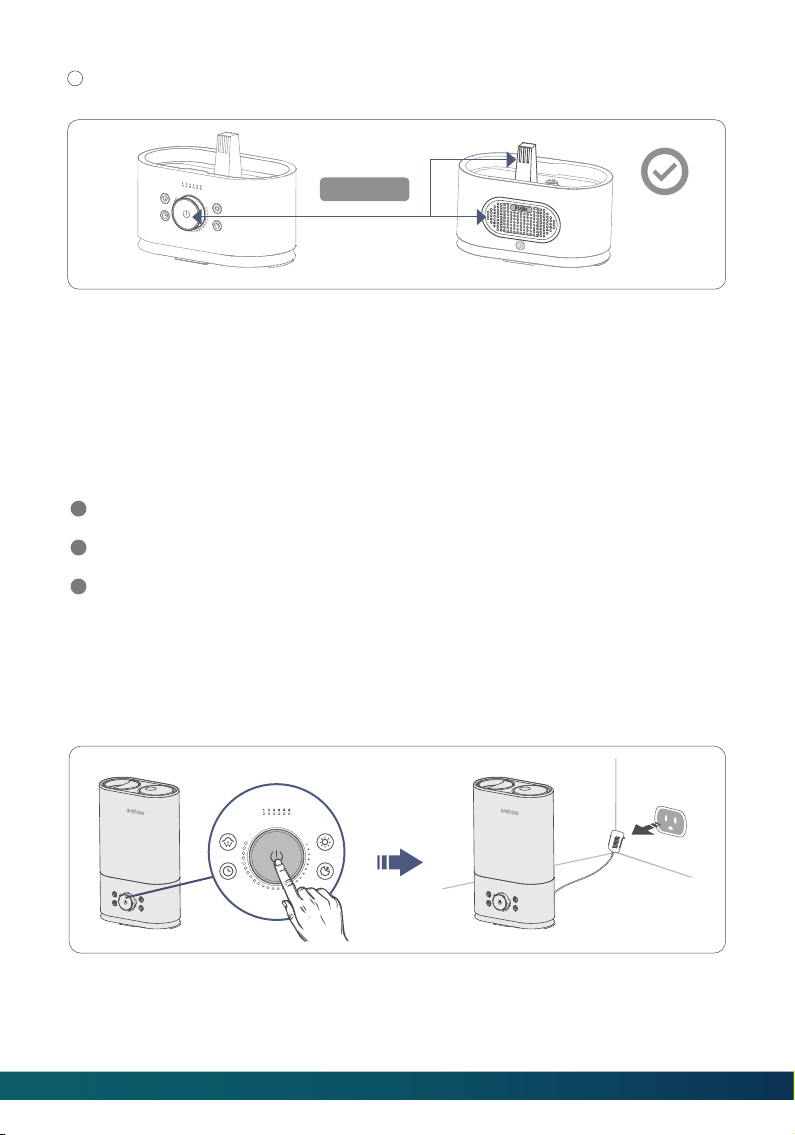
3
Make sure the water does not enter the Base through the Air Outlet, Air Inlet or
Power/Mist Control.
DAILY MAINTENANCE
Step 1: Turn off the humidifier and unplug the Power Adapter from the socket.
Step 2: Drain water from the Water Tank, Water Reservoir, and Base.
Scale Removal Instructions
Step 1:
Turn off and unplug the humidifier.
WEEKLY MAINTENANCE
1
2
3
To properly clean your humidifier, we recommend that you remove scale and
disinfect the humidifier separately.
DO NOT mix vinegar and bleach solution. To avoid damage to the humidifier, do
not use more than 1 teaspoon of bleach per gallon of water.
Please make sure the white sealing ring on the Tank Cap is installed correctly
after cleaning to avoid water leakage.
keep dry
15
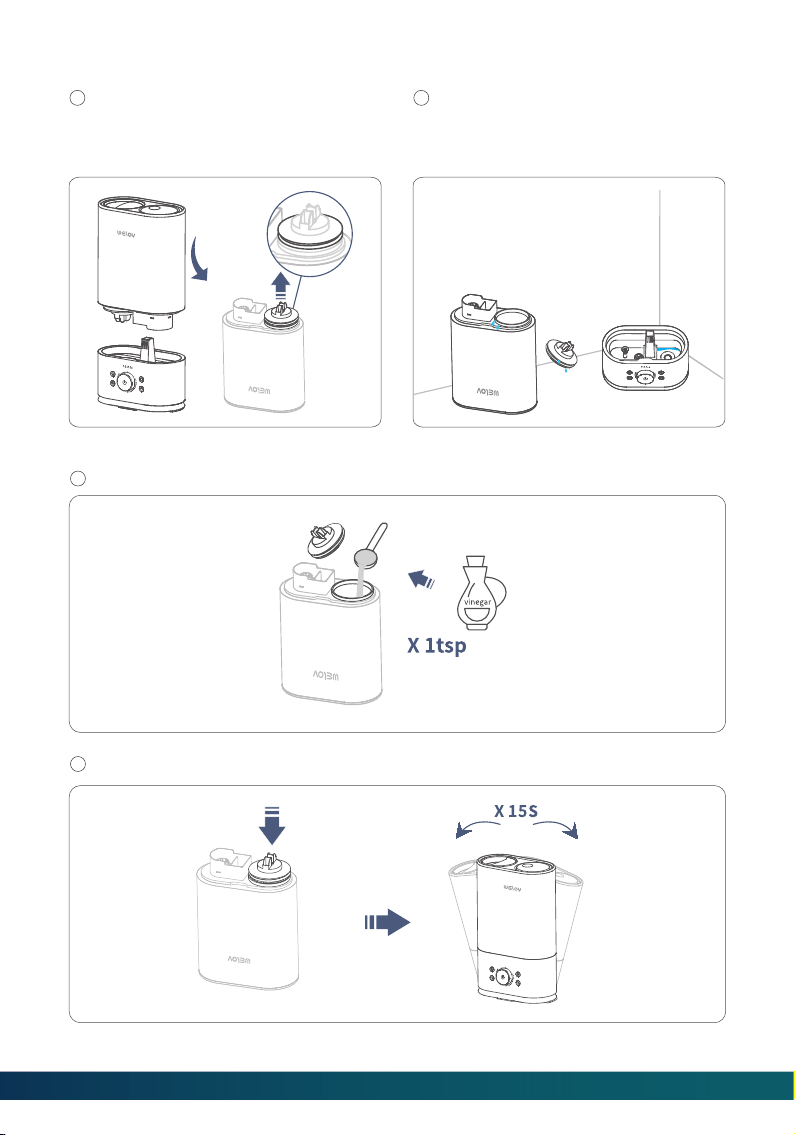
Step 2:
Separate the Water Tank from the
Base, then remove the Tank Cap.
Make sure that the white sealing ring
does not come off.
1
Drain water from the Water Tank and
Base, then remove all accessories
and set aside.
2
Step 3:
Fill the Water Tank halfway. Add in 1 teaspoon of undiluted distilled white vinegar.
1
Attach the Tank Cap and shake for 15 seconds.
2
16
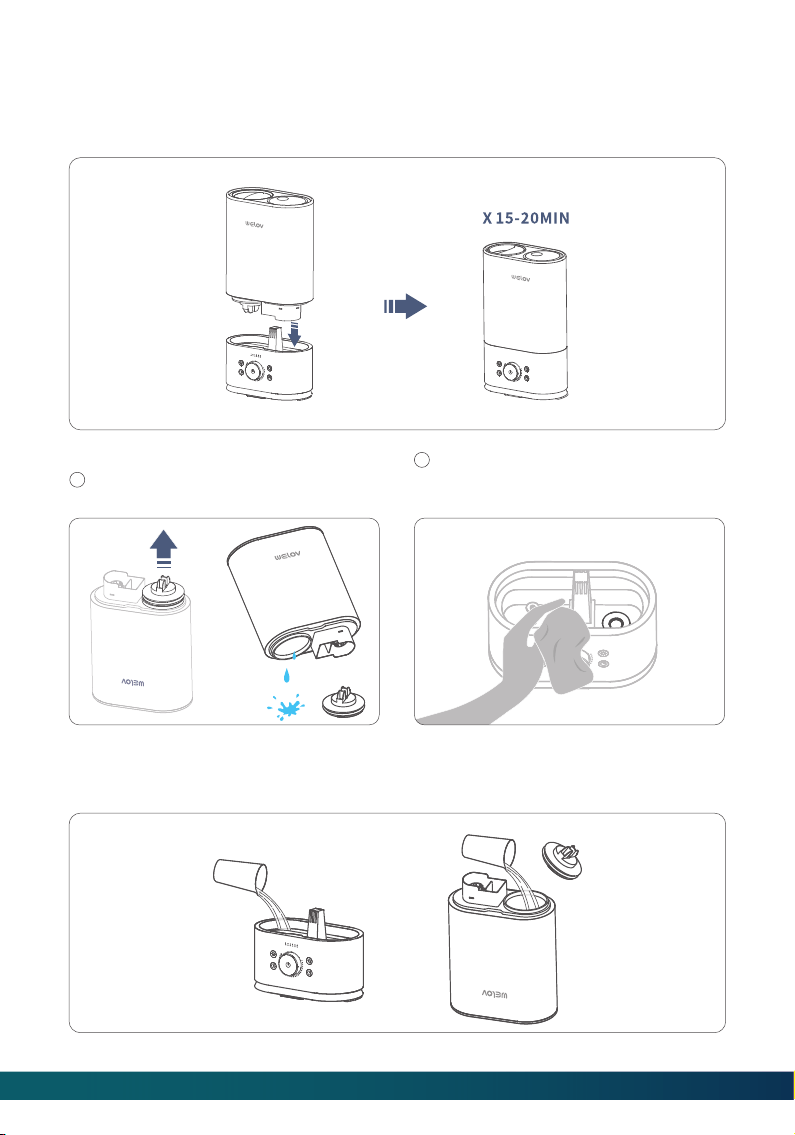
Step 5:
Uncap the Tank Cap and drain the
solution.
1
Step 6:
Wash both the Water Reservoir and Water Tank until the smell of vinegar ( for scale
removal) or bleach solution ( for disinfection, see below) is gone.
Wipe the Atomizer and floater with
a soft cloth to remove loose mineral
deposits.
2
Step 4:
Place the Water Tank back to the Base. The vinegar solution will enter the Water
Reservoir to loosen mineral scale on the Atomizer, Water Floater and the bottom of
the Water Tank. Leave it for 15-20minutes.
17
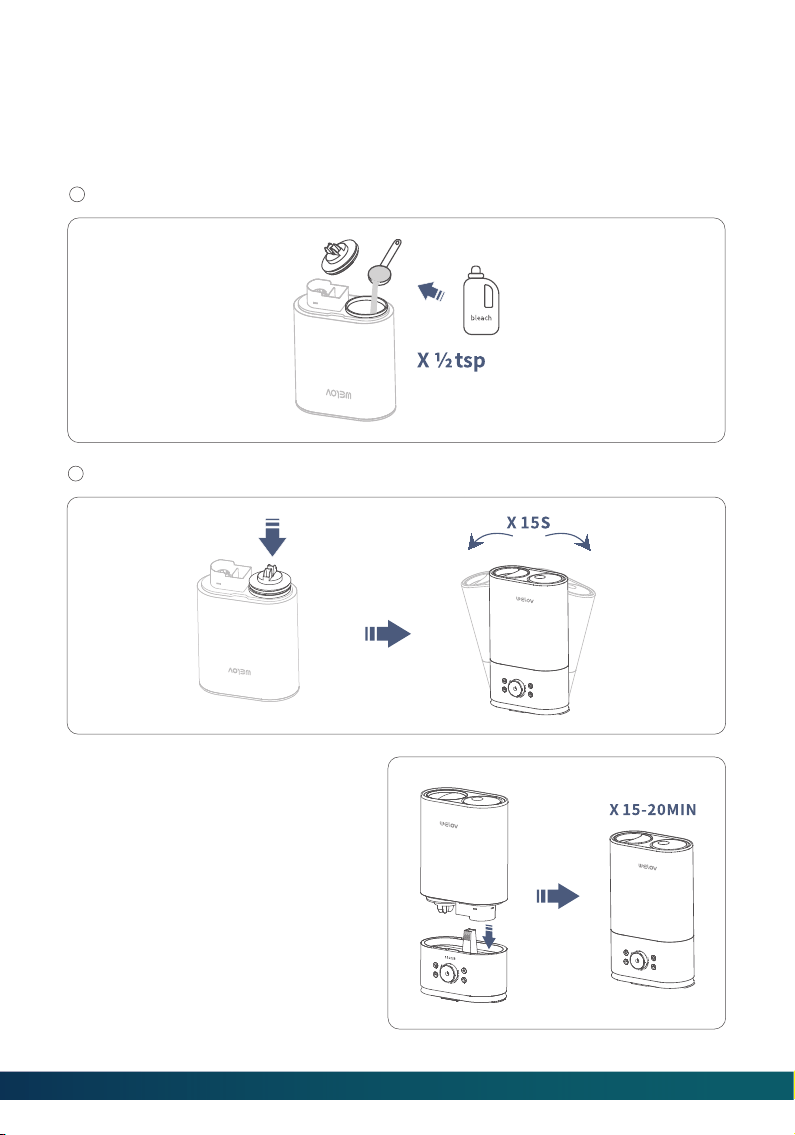
Step 3:
Place the Water Tank back to the
Base. The bleach solution will enter
and disinfect the Water Reservoir
and the other components. Leave
it for 15-20 minutes.
Disinfection Instructions
Step 1:
Follow steps 1 to 2 of the scale removal instructions in the previous section.
Step 2:
Fill the Water Tank halfway. Add ½ teaspoon of bleach into the Water Tank.
1
Attach the Tank Cap and shake for 15 seconds.
2
Step 4:
Follow steps 5 to 6 of the previous
section for scale removal to
complete the disinfection of the
humidifier.
18
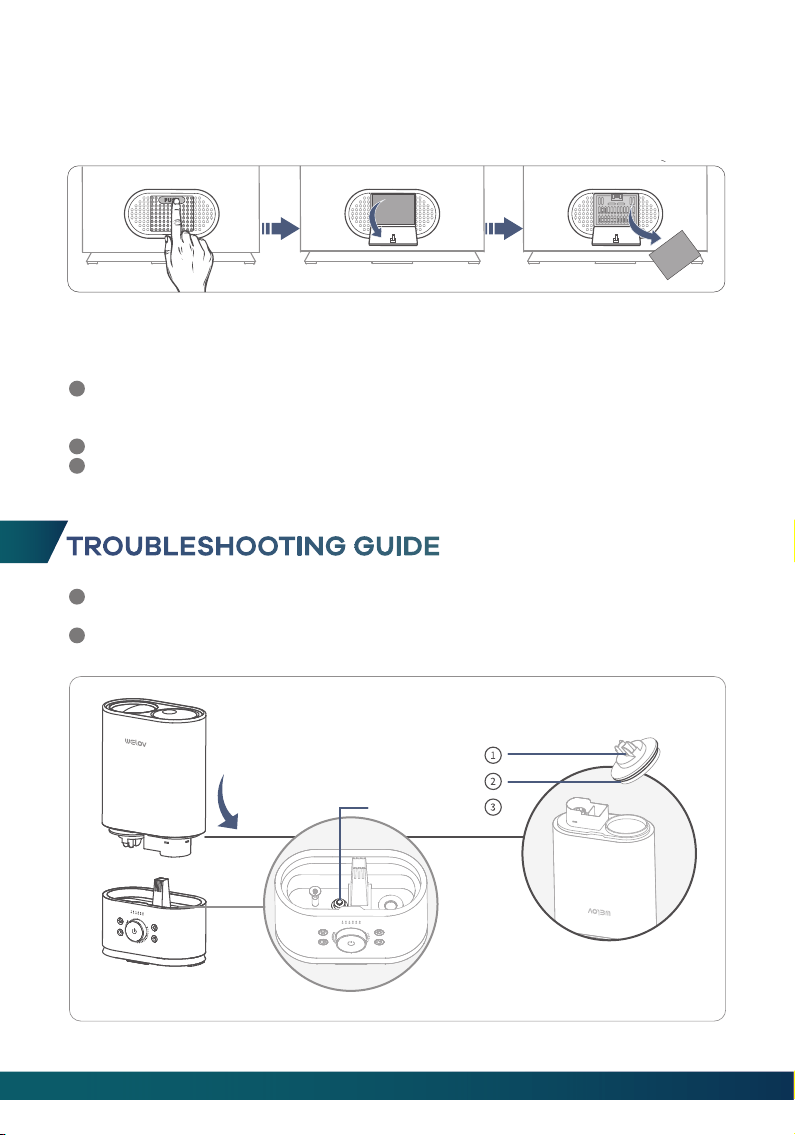
TROUBLESHOOTING GUIDE
If you need any further assistance, please feel free to contact us at
Failure to keep the humidifier clean and free of mineral deposits may affect the
operation of it.
1
2
Sealing Ring
Spring
Water Floater
1
2
3
END-OF-SEASON CARE AND STORAGE
Follow the cleaning instructions when the humidifier will not be used for at least
one week, or at the end of the season. Remove all accessories from the humidifier,
and allow the humidifier and accessories to dry completely before storing it.
DO NOT store water in the Base, Water Reservoir or Water Tank.
Pack the humidifier safely and store it in a cool, dry place.
DUSTPROOF SPONGE CLEANING
Clean the Dustproof Sponge (located on the back of the Base) with water or deter-
gent monthly, then put it back in place.
19

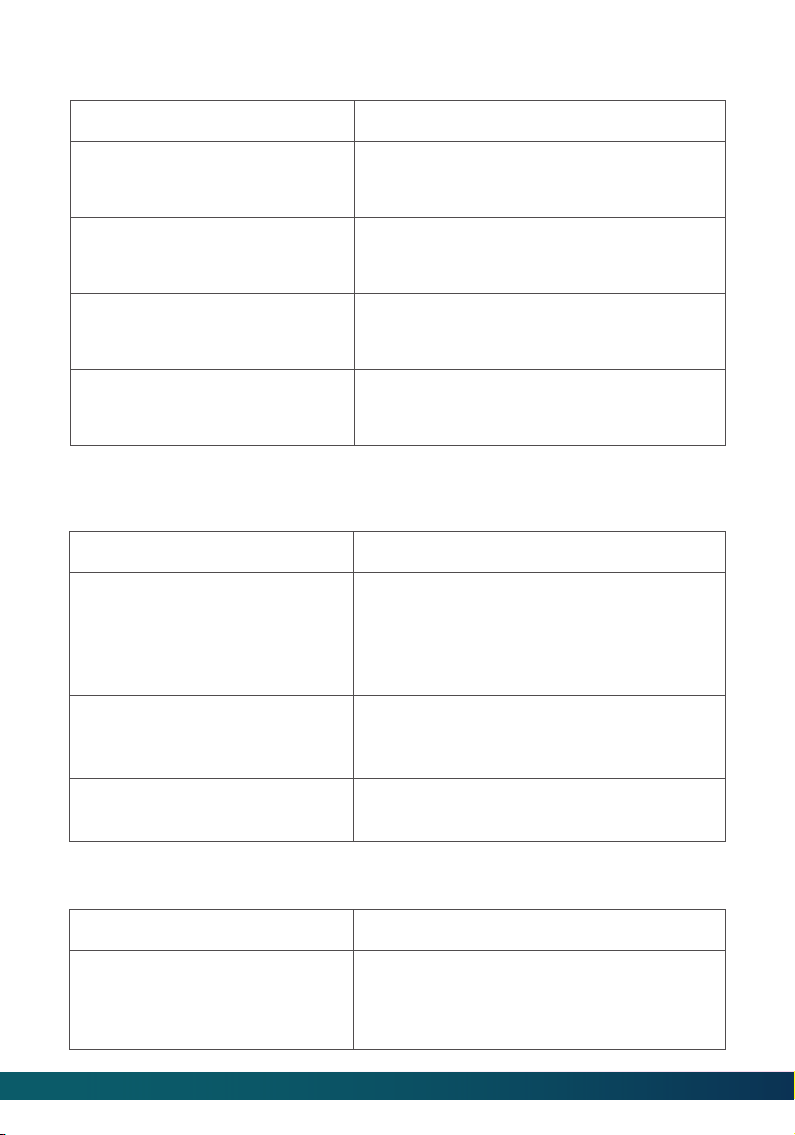
Possible Cause Solution
No water in the Water Reservoir.
Make sure the ① Spring is fixed correctly to
the bottom of the tank so that water can
pass through to the Base.
③ Water Floater was stuck.
Adjust the ③ Water Floater to a horizontal
position and make sure it can rise with
water.
Q2. The low water indicator stays red.
Possible Cause Solution
Not enough water inside the tank.
Refill and place the Water Tank back in
place.
Mist level is set too low.
Adjust the humidifier to the maximum mist.
Mineral build up on the Atomizer.
Check if any air comes out from the Nozzle
If not, clean water scale on the Atomizer as
instructed.
The Base might be overfilled.
Remove the tank,empty the Base, then
place the filled tank on the empty Base.
Q3. The water level indicator is white but there is no or little mist produced.
Possible Cause Solution
The humidifier is not plugged in. Make sure the humidifier is properly plugged
into a socket.
No power from the power outlet. Try to use other power outlets.
The humidifier is not turned on. Check if the humidifier has been turned on.
Q1. The water level indicator is off.
20
Possible Cause
Tank may be damaged.
Tank Cap is not tightened securely.
① Spring was stuck.
② Sealing Ring was not installed
on installed on the Tank Cap.
Q4. Tank leakage.
Possible Cause
Mist level is set too high for the
room size.
Air Inlet was blocked.
Low room temerature leads to
liquefaction.
Q5: The mist makes the surrounding tables or floors damp.Condensation occurs
around humidifier or on windows/walls.
Possible Cause
Mist level is set too low for the
room size.
Solution
Check for possible cracks in the tank. If yes
please replace it.
Tighten the Tank Cap.
Make sure the ① Spring is fixed correctly to
the bottom of the tank so that water can
pass through to the Base.
Make sure the ② Sealing Ring has been
installed on the Tank Cap. Please contact
us if it is lost.
Solution
1. Check if the room is too humid and adiust
the humidifier to alower mist40%-60%
works best.
2. Open door and windows or change to a
larger room.
Make sure the humidifieris placed ≥ 12inches
away from the wall.Make sure the Nozzle is
not facing the wall or window.
Adjust the room temperature to 25℃/77°F.
Solution
1.Adiust the humidifier to the maximum
mist.
2.Close door or windows to reduce air
ventilation,or change to a smaller room.
Q6. The humidification is too poor.
21
Air Inlet was blocked.
Low room temperature leads
to liauefaction.
Possible Cause
The tap water may contain too
much minerals.
Q7. White dust appears or the black coating on the base flakes off.
Possible Cause
Please clean the humidifier.
Q8: Strange odor.
Possible Cause
Water is going down to the Water
Reservoir.
Q9: Strange water noise.
Possible Cause
The humidifier works for too long.
Make sure the humidifier is placed ≥ 12
inches away from the wall. Make sure the
Nozzle is not facing the wall or window.
Adjust the room temperature to 25°℃/77F.
Solution
Please replace it with filtered or distilled
water.
Solution
1. Please make sure to clean the humidifier
according to the instructions.
2. Leave the empty Water Tank in a cool
place for 12 hours without covering Tank
Cap.
Solution
This is normal while it is working
Solution
Please power it off and put it in a well-
ventilated place for 10 minutes.
Q10: Humidifier is getting too hot.
22

CAUTION
The symbol indicates DC voltage
RECYCLING
Users should only operate the humidifier once they have understood all
the following important safety instructions. Users who have a disability and
need assistance are responsible for seeking support and ensuring their
own safety in line with the instructions given in this manual.
*Children should be supervised to ensure that they do not play with the
appliance.
*Unplug the appliance during filling and cleaning.
*Please confirm the composition and quantity of solution to be used
during maintenance. If salt is included, it is recommended not to use exces
sive amounts of solution.
*The appliance is not to be operated from a dc supply-If the supply cord
is damagedit must be replaced by the manufacturer, its service agent or
similarly qualified persons in order to avoid a hazard.
*The appliance is only to be used with the power supply unit provided with
the appliance.
23
CUSTOMER SUPPORTCUSTOMER SUPPORT
support@welovhome.com
www.welovhome.com