

2
Your new washing machine
You have chosen a Bosch washing
machine.
Please take a few minutes to read and
become familiar with the advantages of
your washing machine.
To meet the high quality demands
required by Bosch, every washing
machine that leaves our factory is
carefully checked to ensure that it
functions correctly and is in perfect
condition.
For more information on our products,
accessories, replacement parts and
services, see our website www.bosch-
home.com or contact our after-sales
service centres.
If the operating and installation
instructions describe different models,
any differences will be pointed out at the
relevant points in the text.
Read these operating and installation
instructions before switching on the
washing machine.
Display rules
: Warning!
This combination of symbol and signal
word indicates a possibly dangerous
situation. Not heeding the warning can
cause death or injuries.
Caution!
This signal word indicates a possibly
dangerous situation. Not heeding the
caution can cause property and/or
environmental damage.
Note/tip
Information about the optimum use of
the appliance/any other useful
information.
1. 2. 3. / a) b) c)
The steps are represented by numbers
or letters.
■ / -
Lists are represented by a small box or
a dash.

en
3
Contents
enInstruction Manual and Installation Instructions
8 Intended use. . . . . . . . . . . . . . . . .4
( Safety instructions . . . . . . . . . . .5
Children/people/pets . . . . . . . . . . . . . 5
Installation. . . . . . . . . . . . . . . . . . . . . . 6
Operation . . . . . . . . . . . . . . . . . . . . . . 8
Cleaning/Maintenance . . . . . . . . . . . 10
7 Environmental protection . . . . .11
Packaging/used appliance . . . . . . . . 11
Tips on economical use . . . . . . . . . . 12
5 Positioning and connecting . . .12
Standard accessories . . . . . . . . . . . . 12
Safety instructions. . . . . . . . . . . . . . . 13
Installation surface . . . . . . . . . . . . . . 13
Installation on a base or a wooden joist
floor . . . . . . . . . . . . . . . . . . . . . . . . . 13
Installing the appliance in a kitchenette
. . . . . . . . . . . . . . . . . . . . . . . . . . . . . 14
Removing the transport locks. . . . . . 14
Hose and cable lengths . . . . . . . . . . 15
Water inlet. . . . . . . . . . . . . . . . . . . . . 16
Water outlet . . . . . . . . . . . . . . . . . . . 17
Alignment . . . . . . . . . . . . . . . . . . . . . 18
Electrical connection. . . . . . . . . . . . . 18
Before washing for the first time . . . . 19
Transportation. . . . . . . . . . . . . . . . . . 19
* Getting to know the appliance 21
Appliance . . . . . . . . . . . . . . . . . . . . . 21
Control panel . . . . . . . . . . . . . . . . . . 22
Display panel . . . . . . . . . . . . . . . . . . 23
Z Laundry. . . . . . . . . . . . . . . . . . . .24
Protecting your laundry and appliance
. . . . . . . . . . . . . . . . . . . . . . . . . . . . . 24
Sorting laundry . . . . . . . . . . . . . . . . . 24
Starching . . . . . . . . . . . . . . . . . . . . . 25
Dyeing/bleaching . . . . . . . . . . . . . . . 25
P Overview of programmes . . . . . 26
Selectable programme . . . . . . . . . . .26
0 Programme default settings. . . 30
6 Temp. °C . . . . . . . . . . . . . . . . . . . .30
0 rpm . . . . . . . . . . . . . . . . . . . . . . . .30
ñ Finished in. . . . . . . . . . . . . . . . . . .30
\ Additional programme settings31
x Anti Stain . . . . . . . . . . . . . . . . . . .31
ã Pretreatment . . . . . . . . . . . . . . . .31
Ï Rinse Plus . . . . . . . . . . . . . . . . . .31
p Easy Iron . . . . . . . . . . . . . . . . . . .32
G SpeedPerfect . . . . . . . . . . . . . . .32
1 Operating the appliance . . . . . . 32
Preparing the appliance . . . . . . . . . .32
Select programme/switch on the
appliance. . . . . . . . . . . . . . . . . . . . . .32
Placing laundry into the drum . . . . . .33
Measure and add detergent and care
products . . . . . . . . . . . . . . . . . . . . . .33
Starting the programme . . . . . . . . . .34
Childproof lock . . . . . . . . . . . . . . . . .34
Adding/removing laundry . . . . . . . . .35
Changing the programme . . . . . . . . .35
Cancel the programme . . . . . . . . . . .35
Programme end . . . . . . . . . . . . . . . .35
Removing laundry/switching off the
appliance. . . . . . . . . . . . . . . . . . . . . .35
Q Appliance settings . . . . . . . . . . 36
H Sensors . . . . . . . . . . . . . . . . . . . 37
Unbalanced load detection system . .37
2 Cleaning and maintenance. . . . 37
Appliance housing/control panel. . . .37
Drum . . . . . . . . . . . . . . . . . . . . . . . . .37
Descaling . . . . . . . . . . . . . . . . . . . . .37
Emptying the detergent draw, cleaning
the detergent drawer and its housing37
Cleaning the measuring aid A for liquid
detergent . . . . . . . . . . . . . . . . . . . . . .38

en Intended use
4
Drain pump is blocked . . . . . . . . . . 39
The drain hose at the siphon is blocked
. . . . . . . . . . . . . . . . . . . . . . . . . . . . 40
Filter in the water supply is blocked 40
3 Faults and what to do about them
41
Emergency release . . . . . . . . . . . . . 41
Information on the display panel . . . 42
Faults and what to do about them . . 43
4 After-sales service . . . . . . . . . . 45
[ Consumption values . . . . . . . . 46
J Technical data. . . . . . . . . . . . . . 47
r Aqua-Stop warranty . . . . . . . . . 47
8 Intended use
Intended use
■ This appliance is intended for private
domestic use only.
■ Do not install or operate this
appliance anywhere that is liable to
experience frost and/or outdoor
conditions. There is a risk that the
appliance will be damaged if
residual water in it freezes. If hoses
freeze up, they may crack/burst.
■ This appliance must only be used for
washing domestic laundry,
consisting of machine-washable
items and hand-washable woollens
(see label on item). Using the
appliance for any other purpose is
outside of the scope of its intended
application and is forbidden.
■ This appliance is suitable for
operation with mains water and
commercially available detergents
and care products (must be suitable
for use in washing machines).
■ This appliance is intended for use up
to a maximum height of
4000 metres above sea level.
Before you switch on the appliance:
Check that there is no visible damage to
the appliance. Do not operate the
appliance if it is damaged. Should you
have any problems, please contact your
specialist dealer or our customer
service.
Read and follow the operating and
installation instructions and all other
information provided with this appliance.
Retain the documents for subsequent
use or for subsequent owners.

Safety instructions en
5
( Safety instructions
Safety instructi ons
The following safety information
and warnings are provided to
protect you from injury and to
prevent material damage to
your surroundings.
It is nevertheless important to
take the necessary precautions
and to proceed with care when
installing, maintaining, cleaning
and operating the appliance.
Children/people/pets
:Warning
Risk of death!
Children and other people who
are unable to assess the risks
involved when using the
appliance may injure
themselves or may find
themselves in life-threatening
situations. Therefore please
note:
■ The appliance may be used
by children over the age of 8
years and by persons with
reduced physical, sensory or
mental capacity or by
persons with a lack of
experience or knowledge as
long as they are supervised
or have received instruction
on how to use the appliance
safely and they have
understood the potential
risks of using the appliance.
■ Children must not play with
this appliance.
■ Do not allow children to
clean or maintain this
appliance unsupervised.
■ Keep children under 3 years
and pets away from this
appliance.
■ Do not leave the appliance
unattended when children or
other people who are unable
to assess the risks are in the
vicinity.
:Warning
Risk of death!
Children may lock themselves
inside appliances and find
themselves in a life-threatening
situation.
■ Do not position the
appliance behind a door, as
this may obstruct the
appliance door or prevent it
from opening completely.
■ Once an appliance has
reached the end of its life,
pull the mains plug from the
socket before severing the
mains cable, and then
destroy the lock on the
appliance door.
:Warning
Risk of suffocation!
If allowed to play with the
packaging/plastic film or
packing components, children
may become caught in these or
pull them over their heads and
suffocate.
Keep packaging, plastic film
and packing components away
from children.

en Safety instructions
6
:Warning
Risk of poisoning!
Detergents and care products
may result in poisoning if
consumed.
If accidentally swallowed, seek
medical advice. Keep
detergents and care products
out of the reach of children.
:Warning
Risk of burns!
When washing at high
temperatures, the glass in the
appliance door becomes hot.
Stop children from touching the
appliance door when it is hot.
:Warning
Eye/skin irritation!
Contact with detergents or care
products may cause eye/skin
irritation.
Rinse eyes/skin thoroughly if
they/it come(s) into contact
with detergents or care
products. Keep detergents and
care products out of the reach
of children.
Installation
:Warning
Risk of electric shock/fire/
material damage/damage to
the appliance!
If the appliance is not installed
properly, this may lead to a
dangerous situation. Ensure
the following:
■ The mains voltage on your
power socket must match
the rated voltage specified
on the appliance
(identification plate). The
connected loads and the
required fuse protection are
specified on the identification
plate.
■ The mains plug and the
protective contact socket
must match and the earthing
system must be correctly
installed.
■ The installation must have an
adequate cross section.
■ The mains plug must be
freely accessible at all times.
If this is not possible, in
order to comply with the
relevant safety regulations, a
switch (all pole
disconnection) must be built
into the permanent
installation in accordance
with electrical installation
regulations.
■ If using a residual current
circuit breaker, only use one
that bears the following
mark: z. The presence of
this mark is the only way to
be sure that it fulfils all the
applicable regulations.

Safety instructions en
7
:Warning
Risk of electric shock/fire/
material damage/damage to
the appliance!
If the appliance's mains cable is
altered or damaged, this may
result in electric shock, short
circuiting or fire due to
overheating.
The mains cable must not be
kinked, crushed or altered, and
must not come into contact with
any heat sources.
:Warning
Risk of fire/material damage/
damage to the appliance!
The use of extension cords or
power strips may result in fire
due to overheating or short
circuiting.
Connect the appliance directly
to an earthed socket that has
been correctly installed. Do not
use extension cords, power
strips or multi-way couplers.
:Warning
Risk of injury/material
damage/damage to the
appliance!
■ The appliance may vibrate or
move when in operation,
potentially resulting in injury
or material damage.
Place the appliance on a
clean, even, solid surface
and, using a spirit level to
guide you, level it with the
screw-in feet.
Risk of injury/material damage/damage to the appliance!
■ If you take hold of any of the
appliance's protruding parts
(e.g. the appliance door) in
order to lift or move it, these
parts may break off and
cause injury.
Do not take hold of any of
the appliance's protruding
parts in order to move the
appliance.
:Warning
Risk of injury!
■ The appliance is very heavy.
Lifting it may result in injury.
Do not lift the appliance on
your own.
Risk of injury!
■ The appliance has sharp
edges on which you could
cut your hands.
Do not take hold of the
appliance by its sharp
edges. Wear protective
gloves to lift it.
Risk of injury!
■ If the hoses and mains
cables are not correctly
routed, they may constitute a
tripping hazard, which may
result in injury.
Route hoses and cables
such that they do not
constitute a tripping hazard.

en Safety instructions
8
Caution!
Material damage/damage to
the appliance
■ If the water pressure is too
high or too low, the
appliance may not be able to
operate properly, and it may
also result in material
damage or damage to the
appliance.
Make sure that the water
pressure in the water supply
facility is at least
100 kPa (1 bar), and does
not exceed
1000 kPa (10 bar).
Material damage/damage to the appliance
■ If the water hoses are altered
or damaged, this may result
in material damage or
damage to the appliance.
The water hoses must not be
kinked, crushed, altered or
severed.
Material damage/damage to the appliance
■ The use of hoses supplied
by other brands to connect
to the water supply may
result in material damage or
damage to the appliance.
Use the hoses supplied with
the appliance or genuine
spare part hoses only.
Material damage/damage to the appliance
■ The appliance is secured for
transportation by transport
locking devices. If the
transport locking devices are
not removed before the
appliance is operated, this
may result in damage to the
appliance.
It is important to completely
remove all transport locking
devices before using the
appliance for the first time.
Make sure that you retain
these transport locking
devices separately. It is
important to refit the
transport locking devices if
the appliance is to be
transported, in order to
prevent the appliance from
being damaged in transit.
Operation
:Warning
Risk of explosions/fire!
Laundry that has been
pretreated with cleaning agents
that contain solvents, e.g. stain
remover/cleaning solvent, may
cause an explosion in the drum.
Rinse the laundry thoroughly
with water before washing it in
the machine.
:Warning
Risk of poisoning!
Poisonous fumes may be given
off by cleaning agents that
contain solvents, e.g. cleaning
solvent.
Do not use cleaning agents that
contain solvents.

Safety instructions en
9
:Warning
Risk of injury!
■ If you support your weight/sit
on the appliance door when
it is open, the appliance may
tip over, which may result in
injury.
Do not support your weight
on the appliance door when
it is open.
Risk of injury!
■ If you climb onto the
appliance, the worktop may
break, which may result in
injury.
Do not climb onto the
appliance.
Risk of injury!
■ If you reach into the drum
while it is still rotating, you
risk injuring your hands.
Wait until the drum has
stopped rotating.
:Warning
Risk of scalding!
When washing at high
temperatures, there is a risk of
scalding if you come into
contact with hot detergent
solution (e.g. when draining hot
detergent solution into a
washbasin).
Do not reach into the hot
detergent solution.
:Warning
Eye/skin irritation!
Detergent and care products
may spray out if the detergent
drawer is opened while the
appliance is in operation.
Rinse eyes/skin thoroughly if
they/it come(s) into contact
with detergents or care
products. If accidentally
swallowed, seek medical
advice.
Caution!
Material damage/damage to
the appliance
■ If the amount of laundry in
the appliance exceeds its
maximum load capacity, it
may not be able to operate
properly, or this may result in
material damage or damage
to the appliance.
Do not exceed the maximum
load capacity of dry laundry.
Make sure you comply with
the maximum load capacities
specified for each of the
programs.
Material damage/damage to the appliance
■ If you pour the wrong
quantity of detergent or
cleaning agent into the
appliance, this may result in
material damage or damage
to the appliance.
Use detergents/care
products/cleaning agents
and softeners in accordance
with the manufacturers'
instructions.

en Safety instructions
10
Cleaning/Maintenance
:Warning
Risk of death!
The appliance is powered by
electricity. There is a risk of
electric shock if you come into
contact with live components.
Therefore please note:
■ Switch off the appliance.
Disconnect the appliance
from the power supply (pull
out the plug).
■ Never take hold of the mains
plug with wet hands.
■ When removing the mains
plug from the socket, always
take hold of the plug itself
and never the mains cable,
otherwise this may damage
the mains cable.
■ Do not make any technical
modifications to the
appliance or its features.
■ Repairs and any other work
on the appliance must only
be conducted by our
customer service or by an
electrician. The same applies
for replacing the mains cable
(when necessary).
■ Spare mains cables can be
ordered from our customer
service.
:Warning
Risk of poisoning!
Poisonous fumes may be given
off by cleaning agents that
contain solvents, e.g. cleaning
solvent.
Do not use cleaning agents that
contain solvents.
:Warning
Risk of electric shock/material
damage/damage to the
appliance!
If moisture penetrates the
appliance, this may cause it to
short circuit.
Do not use a pressure washer,
steam cleaner, hose or spray
gun to clean your appliance.
:Warning
Risk of injury/material
damage/damage to the
appliance!
The use of spare parts and
accessories supplied by other
brands is dangerous and may
result in injury, material damage
or damage to the appliance.
For safety reasons, use
genuine spare parts and
accessories only.

Environmental protection en
11
Caution!
Material damage/damage to
the appliance
Cleaning agents and agents for
pretreating laundry (e.g. stain
removers, prewash sprays, etc.)
may cause damage if they
come into contact with the
surfaces of the appliance.
Therefore please note:
■ Do not allow these agents to
come into contact with the
surfaces of the appliance.
■ Clean the appliance with
nothing but water and a soft,
damp cloth.
■ Remove any detergent,
spray or other residues
immediately.
7 Environmental
protection
Environmental protection
Packaging/used appliance
Do’s
■ Hand over the old/discarded
electronic equipment only to
authorized collection centers for
disposal
■ Consult the authorized service
center as to whether the Electronic
Equipment can be repaired or not,
before discarding
■ Consult the retailer about appliance
take back schemes
Don’ts
■ Don’t dump the discarded Electronic
Equipment in the open or in any land
fill site, as this will result in
contamination of the soil and the
ground water
■ Don’t dispose of the discarded
Electronic Equipment in household
bins or Municipal bins
■ The product is not meant for re-sale
to any unauthorized agencies/scrap
dealers
■ Don't keep any replaced spare
part(s) from the product in an
exposed area
)
Dispose of packaging in an
environmentally-responsible
manner.
The following Do’s and Don’ts
provide a framework for the
return and recycling of used
products when available in
your area.
en Positioning and connecting
12
Tips on economical use
■ Always fill the appliance with the
maximum amount of laundry for
each programme.
■ Wash normally soiled laundry
without pretreating.
■ For light and normal soiling in
laundry, you can save energy and
detergent.
■ The selectable temperatures apply
to the care labels on the textiles. The
temperatures in the appliance may
deviate from this so that you get the
optimum mix of energy-saving and
washing results.
■ Low power mode: If the appliance is
not operated for a prolonged period
(approx. 5 minutes), the display
panel lighting goes out before the
programme starts and after the
programme has ended, ~ (indicator
lamp of Start/Reload A button)
flashes. Select any button to activate
the display backlighting.
Low power mode is not be activated
when the programme is running.
■ If the laundry will be dried in a dryer,
select the spin speed according to
the dryer manufacturer's instructions.
5 Positioning and
connecting
Positioning and connecti ng
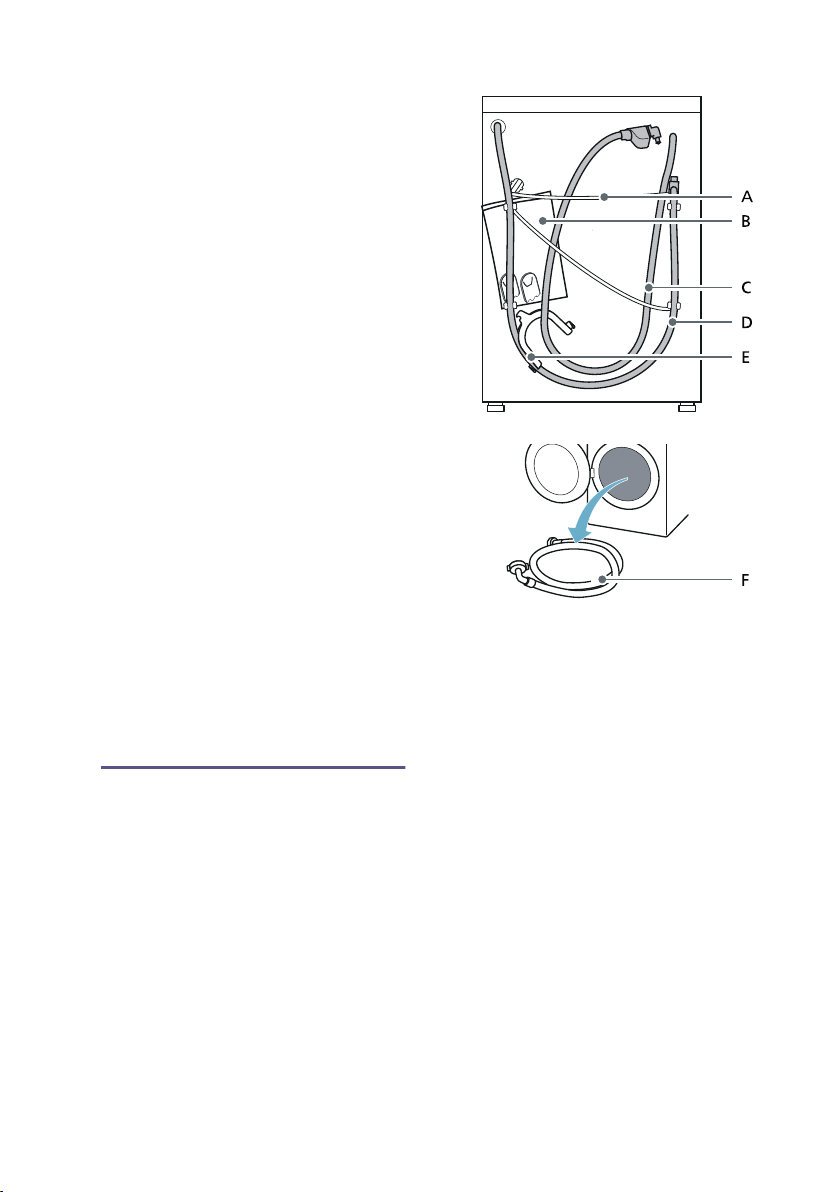
Standard accessories
Note: Check the appliance for transport
damage. Never use a damaged
appliance. If you have any complaints,
contact the dealer from whom you
purchased the appliance or our
Customer Service.
A Mains lead
B Bag:
■ Installation and operating
instructions
■ Customer Service location
directory*
■ Warranty*
■ Supplementary sheet for the
installation and operating
instructions*
■ Cover caps for openings after
the transport braces have
been removed
■ Home Connect Installation
Guides*
C Water inlet hose on aquaStop
models
D Water outlet hose
E Elbow for securing the water
outlet hose*
F Cold water inlet hose on
Standard/Aqua-Secure models
* Depending on the model

Positioning and connecting en
13
In addition, a hose clamp (24 - 40 mm
diameter, available from specialist
retailers) is required to connect the
water outlet hose to a siphon.
Useful tool
■ Spirit level for aligning
■ Wrench with:
– WAF13 for loosening the
transport braces and
– WAF17 for aligning the appliance
feet
Safety instructions
:Warning
Risk of injury!
■ The appliance is very heavy.
Be careful when lifting/transporting
the appliance.
■ When the appliance is lifted by its
protruding parts (e.g. the appliance
door), the components may break
off and cause injuries.
Do not lift the appliance by
protruding parts.
■ If the hose and mains cables are not
routed properly, there is a risk of
tripping and injury.
Lay hoses and cables in such a way
that there is no risk of tripping.
Caution!
Damage to the appliance
Frozen hoses may rip/burst.
Do not install the appliance in areas
exposed to frost or outdoors.
Caution!
Water damage
The connection points for the water
supply hose and water drain hose are
under high water pressure. To prevent
leaks and water damage, you must
follow the instructions in this section.
Notes
■ In addition to the safety information
listed here, the local water and
electricity supplier may have special
requirements.
■ If in doubt, have the appliance
connected by a specialist.
Installation surface
Note: The appliance must be stable
aligned so that it does not move
around.
■ The installation surface must be firm
and level.
■ Soft floors/floor coverings are not
suitable.
Installation on a base or a
wooden joist floor
Caution!
Damage to the appliance
The appliance may "wander" and tip/
topple from the base when spinning.
The feet of the appliance must be
secured with holding brackets.
Order no. WMZ 2200, WX 975600,
CZ 110600, Z 7080X0.
Note: On wooden joist floors, install the
appliance:
■ In a corner, if possible,
■ On a water-resistant wooden board
(min. 30 mm thick) which is screwed
tightly to the floor.
en Positioning and connecting
14
Installing the appliance in a
kitchenette
:Warning
Risk of death!
There is a risk of electric shock if you
touch live components.
Do not remove the appliance covering
plate.
Notes
■ Recess width of 60 cm required.
■ Only install the appliance
underneath a continuous worktop
that is securely connected to
adjacent cabinets.
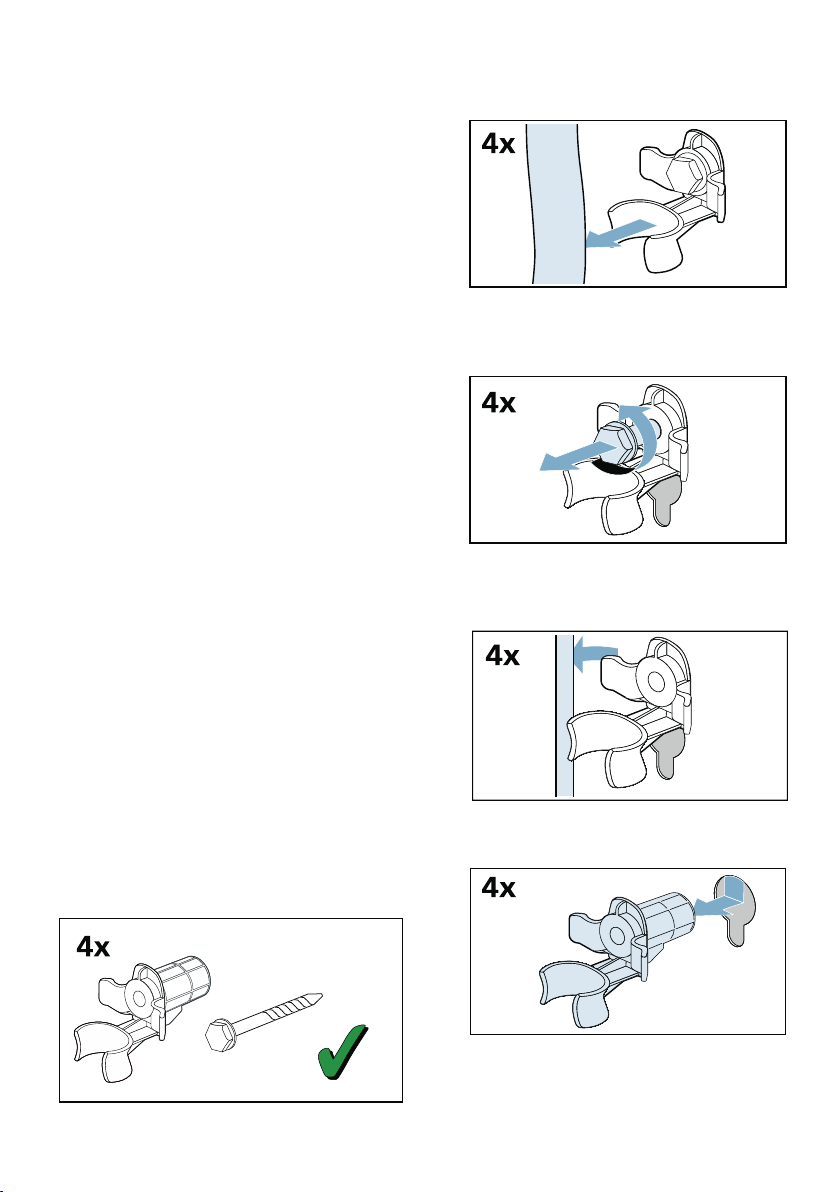
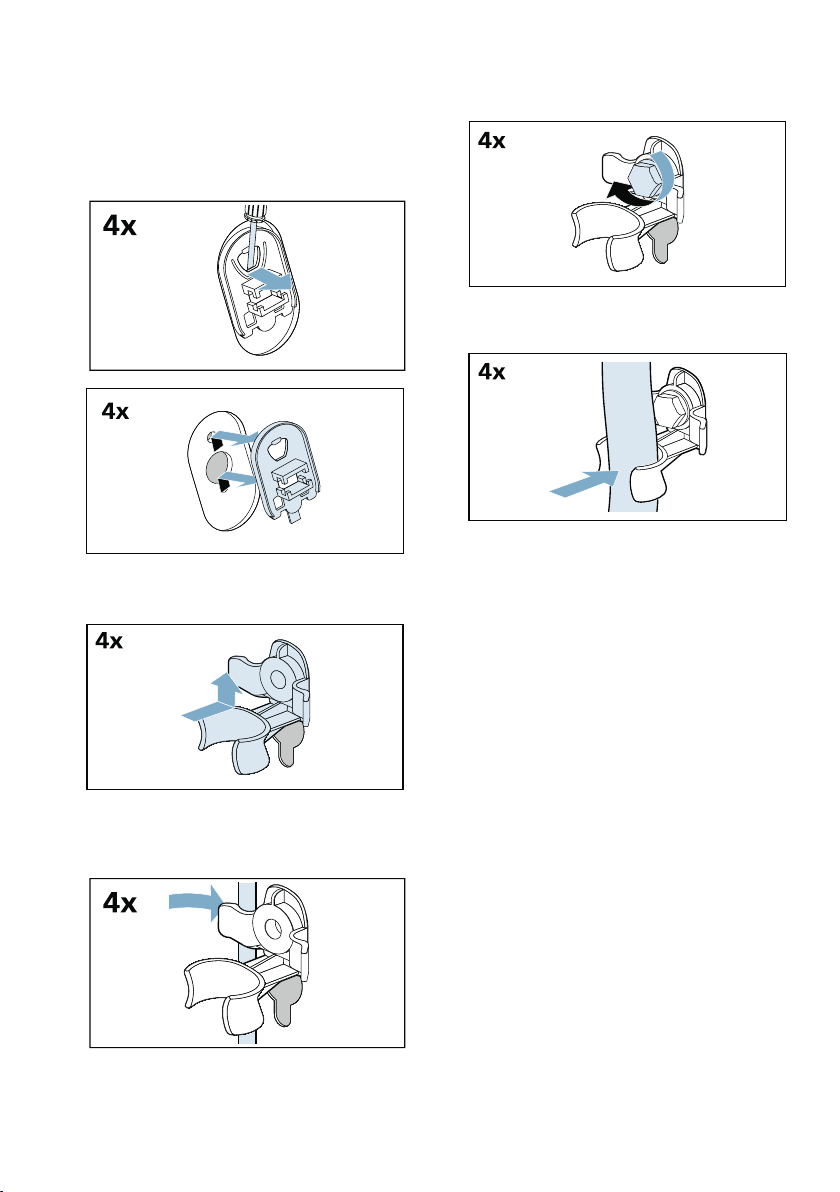
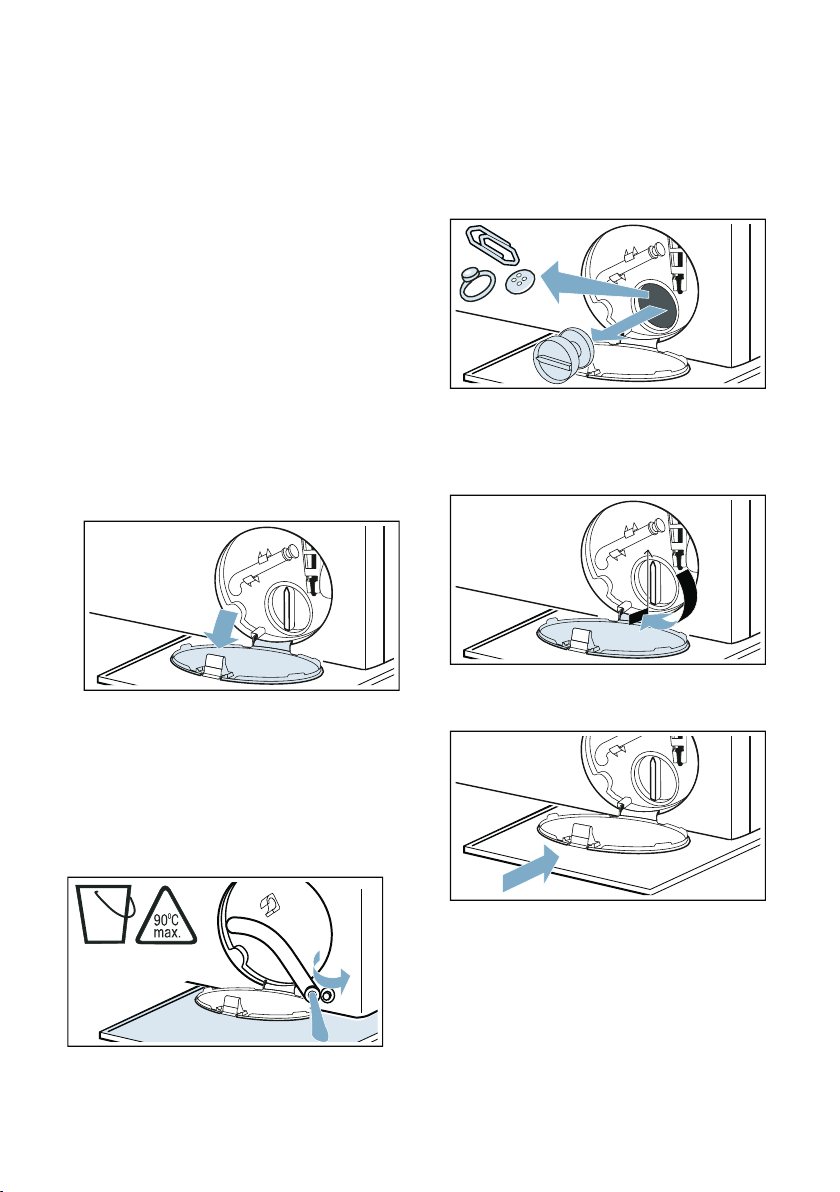
Removing the transport locks
Caution!
Damage to the appliance
■ The appliance is secured for
transportation using transport locks.
If the transport locks are not
removed, the appliance may
become damaged when it is
operated.
Before using the appliance for the
first time, make sure that you
completely remove all four transport
locks. Keep the locks in a safe
place.
■ To prevent transport damage from
occurring if the appliance is moved
at a later date, you must refit the
transport locks before transporting
the appliance.
Note: Keep the screws and sleeves in
a safe place.
1. Take the hoses out of the holders.
2. Unscrew and remove all four
transport brace screws.
a) Remove the mains cable from the
holders.
b) Remove the sleeves.
Positioning and connecting en
15
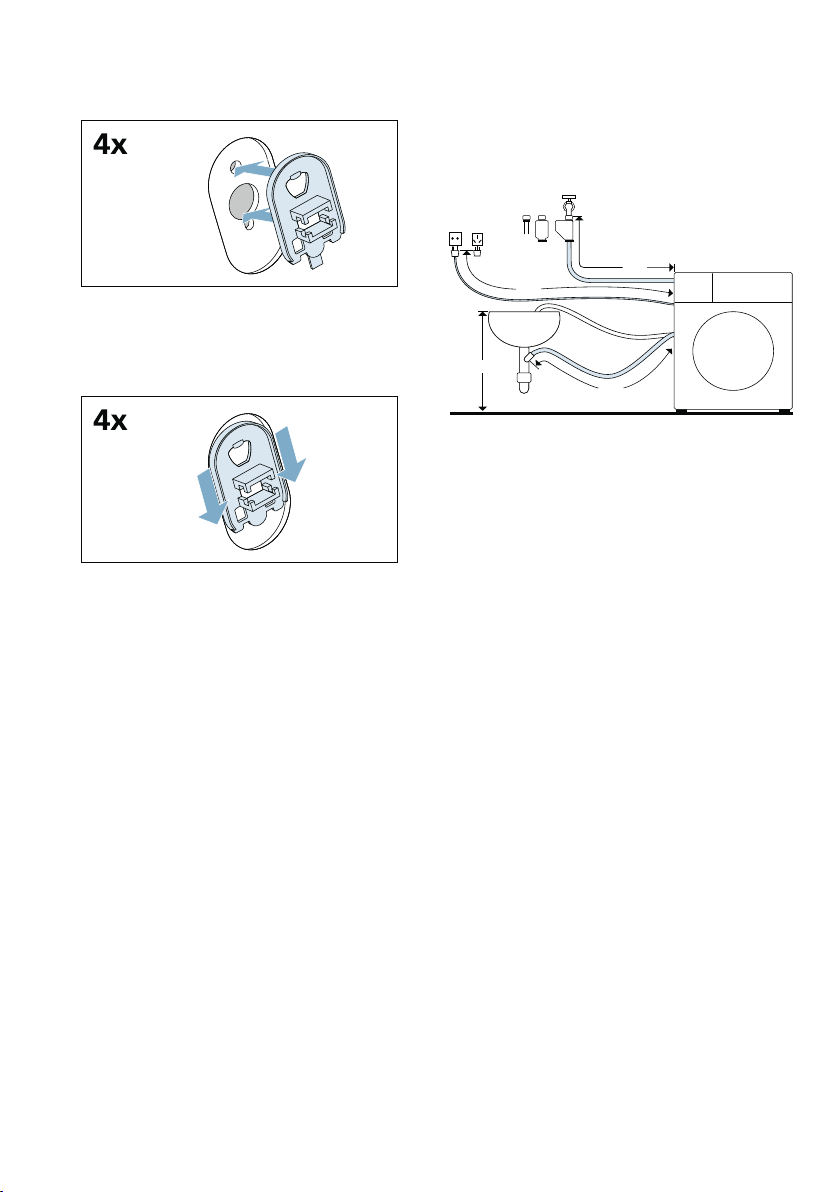
3. Fit the covers.
4. Lock the covers firmly in place by
applying pressure to the snap-in
hooks.
Hose and cable lengths
Connection on left side
or
( ~ 140 cm
0 ~ 150 cm
8 ~ 95 cm
@ 0 cm ~ 100 cm
#
en Positioning and connecting
16
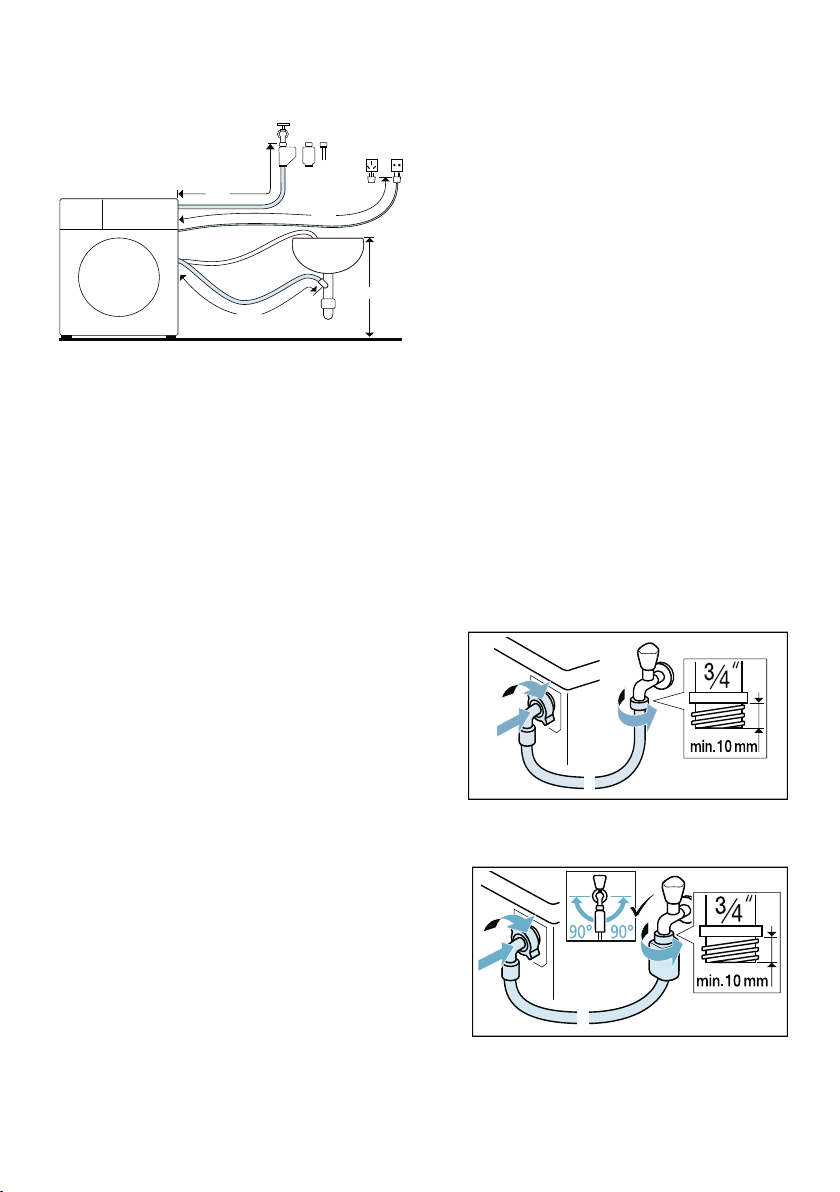
Connection on right side
Note: If the supply hose is too short for
your connection, you can order an
extension from the after-sales service.
Water inlet
:Warning
Risk of death!
There is a risk of electric shock if you
touch live components.
Do not immerse the Aqua-Stop safety
valve* in water (it contains an electric
valve).
* Depending on the model
Observe the following when connecting
the appliance:
Notes
■ Only operate the appliance using
cold mains water.
■ Do not connect the appliance to the
mixer tap of an unpressurised hot-
water boiler.
■ Do not use a used supply hose. Only
use the supply hose supplied or one
that was purchased from an
authorised specialist retailer.
■ Do not bend, squash, modify or cut
through the water supply hose
(otherwise its strength is no longer
guaranteed).
■ Only tighten the screw connections
by hand. If the screw connections
are tightened too much with a tool
(pliers), the thread may be
damaged.
Optimum water pressure in the supply
network
At least 100 kPa (1 bar)
Maximum 1000 kPa (10 bar)
When the tap is open, the water flow is
at least 8 l/min.
If the water pressure is higher than this,
a pressure-reducing valve must be
installed.
Connection
1. Connect the water supply hose to
the water tap (¾" = 26.4 mm) and to
the appliance:
– Model: Standard
– Model: AquaSecure
( ~ 95 cm
0 ~ 190 cm
8 ~ 140 cm
@ 0 cm ~ 100 cm
#

Positioning and connecting en
17
– Model: Aqua-Stop
Tip: Connect also an external water
filter (depending on the model)
between water supply hose and tap.
The filter filters dirt particles out of the
water.
Water filter must be cleaned regularly
to remove contaminants. This will
prevent blockages. See also ~
separate installation and cleaning
instruction for water filter.
2. Open the water tap carefully,
checking the leak tightness of the
connection points. The screw
connection is under mains water
pressure.
Water outlet
:Warning
Risk of scalding!
When you are washing at high
temperatures, there is a risk of scalding
if you come into contact with hot water
(e.g. when draining hot water into a
washbasin).
Do not reach into the hot water.
Caution!
Water damage
When water is being pumped away, the
outlet hose is under water pressure and
may slip out of the wash basin or
connection point.
Secure the drain hose so that it cannot
slip out.
Caution!
Damage to the appliance/fabrics
If the end of the drain hose is immersed
in the drained water, water may be
sucked back into the appliance and
may damage the appliance/fabrics.
Make sure that:
■ The plug does not block drainage
from the washbasin.
■ The end of the drain hose is not
immersed in the drained water.
■ The water drains away quickly
enough.
Note: Do not kink the water drain hose
or put strain on it lengthways.
Connection
■ Drainage into a siphon
The connection point must be
secured using a hose clamp with a
diameter of 24 - 40 mm (available
from specialist dealers).
■ Drainage into a washbasin
Secure the outlet hose so that it
cannot slip out.
Elbow available from after-sales
service:
Individual part number 00655300
en Positioning and connecting
18
■ Drainage into a plastic pipe with
rubber bushing or into a drainage
pit
Note: The plastic pipe is not
standard accessory, available from
specialist dealers.
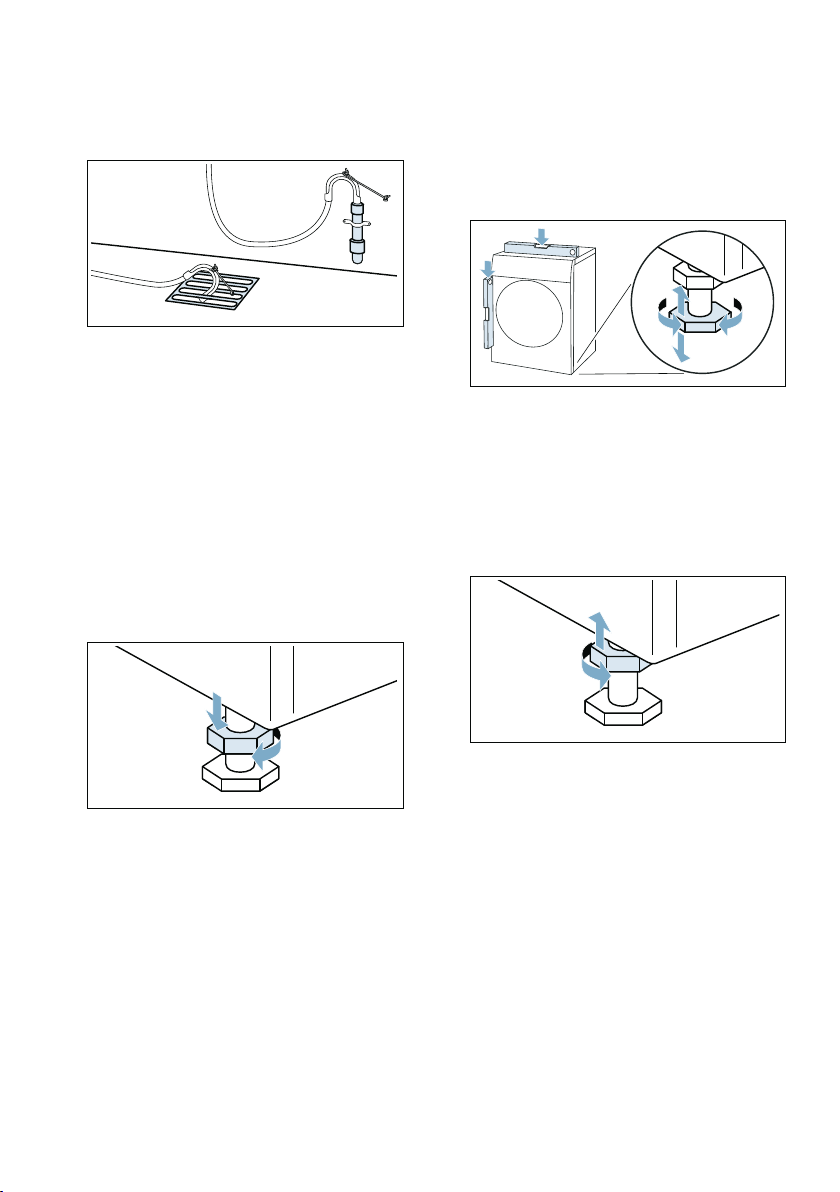
Alignment
Level the appliance using a spirit level.
Incorrect levelling may result in intense
noise, vibrations and "wandering".
1. Loosen the lock nuts using a
wrench, by turning it in a clockwise
direction.
2. Check the alignment of the
appliance with a spirit level, and
adjust it if necessary. Change the
height by turning the appliance feet.
All four appliance feet must stand
firmly on the ground.
3. Tighten the lock nut against the
housing.
In doing so, hold the foot tight and
do not adjust its height.
The lock nuts on all four appliance
feet must be screwed tightly against
the housing.
Electrical connection
:Warning
Risk of death!
There is a risk of electric shock if you
touch live components.
■ Never touch or hold the mains plug
with wet hands.
■ Only pull out the mains cable by the
plug and never by the cable, as this
could damage it.
Observe the following information and
ensure that:

Positioning and connecting en
19
Notes
■ The mains voltage and voltage
indicated on the appliance (rating
plate) are the same.
The connected load and fuse
required are specified on the rating
plate.
■ The appliance is only connected to
an alternating current via a properly
installed earthed socket.
■ The mains plug fits the socket.
■ The earthing system is properly
installed.
■ The mains cable is only replaced by
a qualified electrician (if this is
necessary). Replacement mains
cables are available from the after-
sales service.
■ No multiple plugs/couplings or
extension cables are used.
■ If an earth-leakage circuit breaker is
used, only a type which displays this
symbol is used: z.
Only this symbol guarantees
compliance with the currently
applicable regulations.
■ The mains plug can be accessed at
all times.
■ The mains cable is not bent,
squashed, modified, cut through, or
in contact with heat sources.
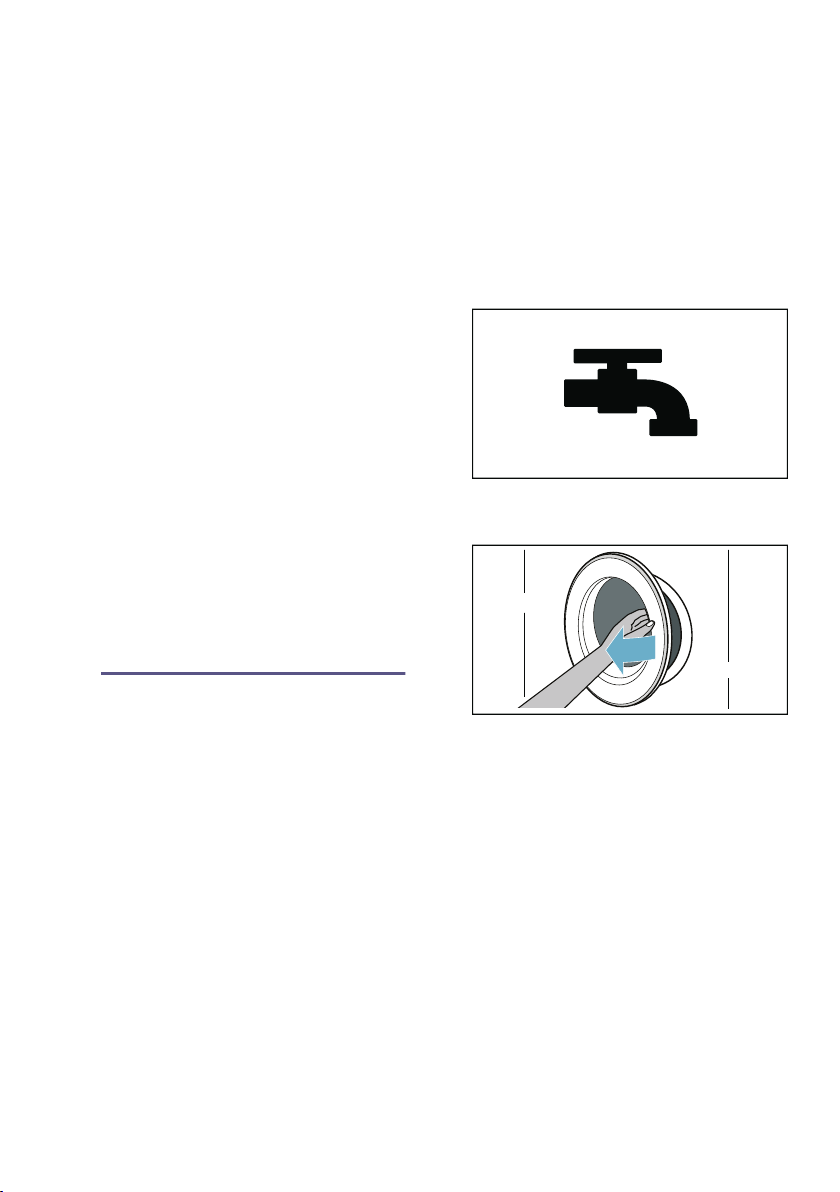
Before washing for the first
time
The appliance was inspected
thoroughly before leaving the factory. To
remove any residual test water, run the
Û Drum Clean programme the first
time without laundry.
Note:
■ The appliance must have been
installed and connected properly.
~ "Positioning and connecting"
on page 12
■ Never switch on a damaged
appliance.
1. Insert mains plug.
2. Turn the water tap on.
3. Close the door. Do not load any
laundry.
4. Select the Û Drum Clean 90°C
programme.
5. Open the detergent drawer.
6. Pour approx. 1 litre of water into
dispenser II.
7. Add standard detergent to dispenser
II according to manufacturer’s
instructions for light soiling.
Note: To prevent frothing, use only
half the recommended amount
of detergent. Do not use any
woollens or mild detergents.
8. Close the detergent drawer.
9. Select Start/Reload A.
10.When the programme ends, turn the
programme selector to Off.
Your appliance is now ready for use.
Transportation
e.g. when moving home
Preparatory work:
1. Turn off the water tap.
2. Reduce the water pressure in the
supply hose. ~ Page 40
3. Drain any residual water.
~ Page 39
4. Disconnect the appliance from the
mains.
5. Remove the hoses.
6. Empty the dispensers.
Caution!
Risk of damage to the appliance
caused by detergent/fabric softener
leaking from the dispensers
Leaking detergent/fabric softener
can prevent the appliance from
working correctly, e.g. due to
damage to the electronics.
Empty the dispensers before
transporting the appliance.
en Positioning and connecting
20
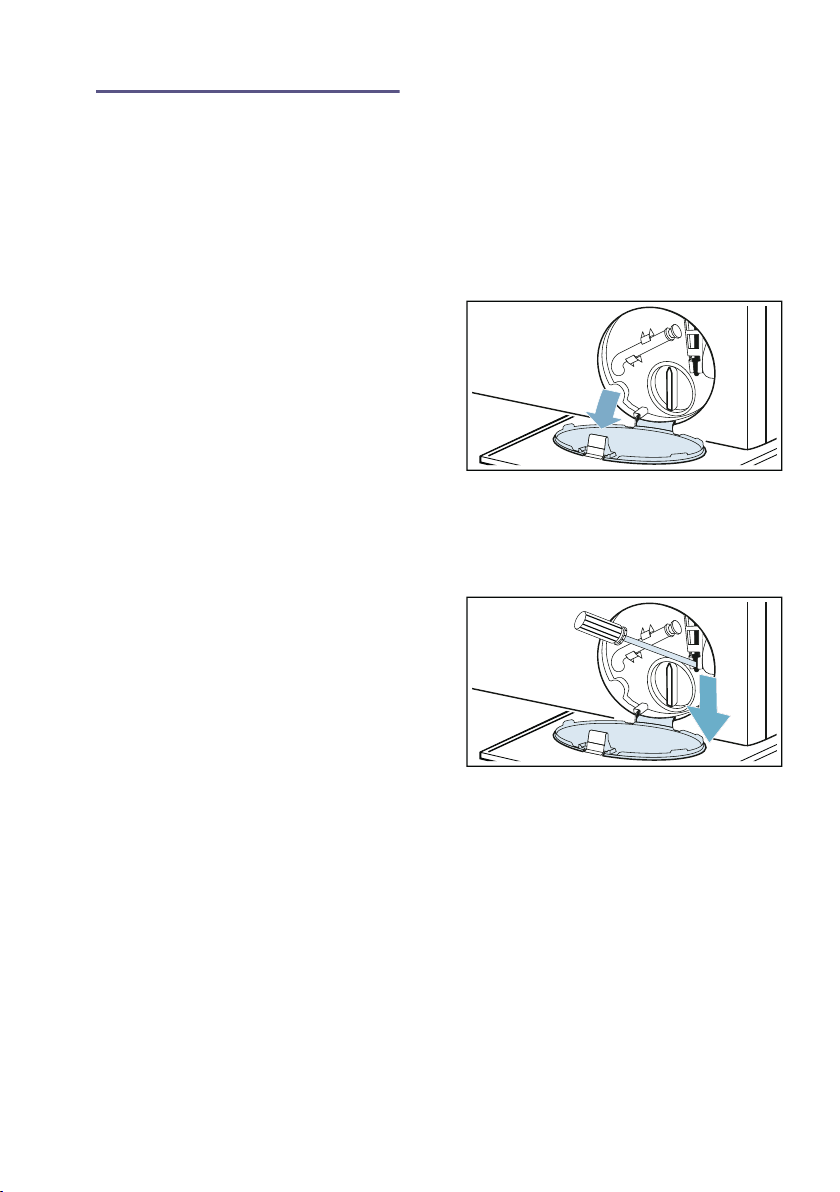
Installing the transport locks:
1. Remove the covers and keep them
in a safe place.
Note: Use a screwdriver if
necessary.
2. Insert all four sleeves.
a) Clip the mains cable securely in
the holders.
b) Insert and tighten the screws.
c) Clip the hoses securely in the
holders.
Before switching on the appliance
again:
Notes
■ The transport braces must be
removed.
~ "Removing the transport locks"
on page 14
■ Pour approx. 1 litre of water into
dispenser II, select the [ Drain
programme and start.
This will prevent detergent from
flowing straight into the drain during
the next wash.
Getting to know the appliance en
21
* Getting to know the appliance
Getti ng to know the appliance
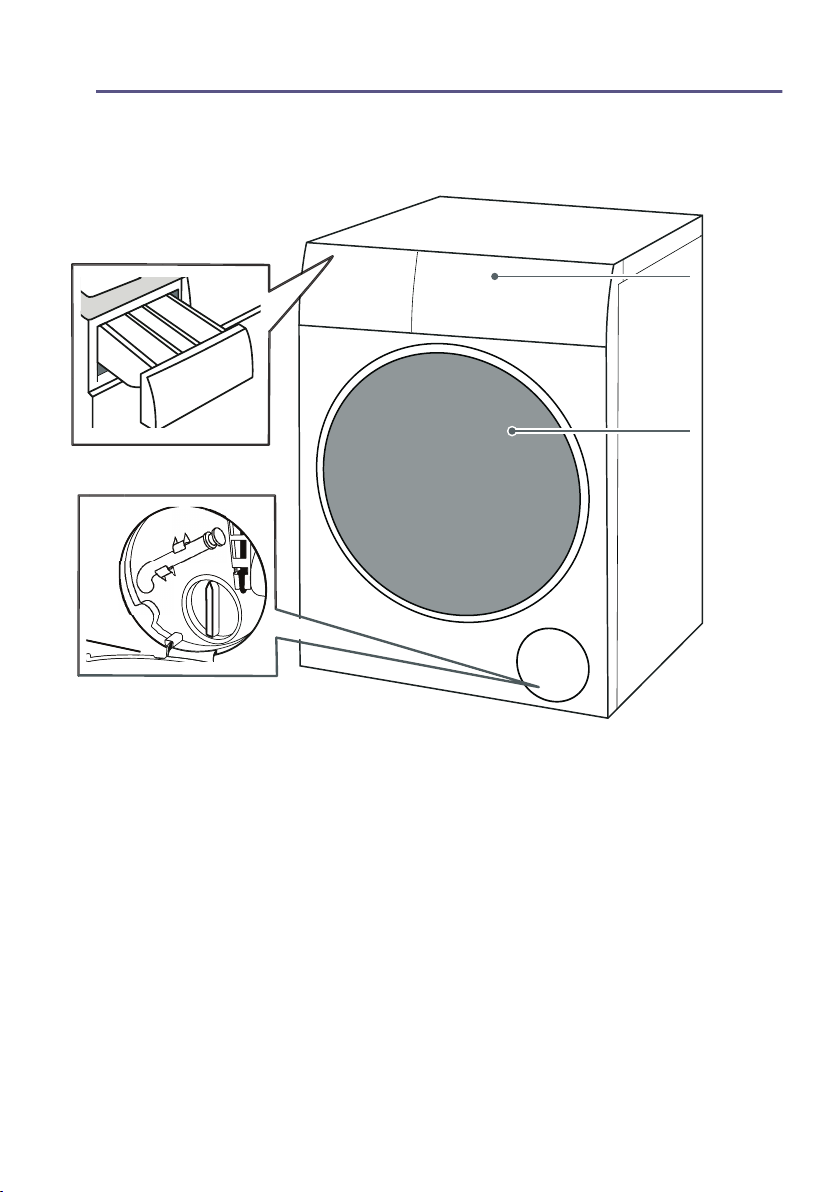
Appliance
#
( Detergent drawer
0 Control panel
8 Loading door
@ Service flap

en Getting to know the appliance
22
Control panel
#
( Programme default settings
can be changed.
Overview of all programme
default settings ~ Page 30
0 Additional programme
settings can be selected.
Overview of all additional
programme settings
~ Page 31
8 Start/Reload A button for
starting, interrupting, (e.g.
adding laundry) and cancelling
a programme.
@ Programme selector for
selecting the programme and
for switching the appliance on
and off.

Getting to know the appliance en
23
Display panel
Programme default settings
Additional programme settings
Status indicators for the programme
progress (programme sequence)
Display Setting Description
— - 90° Temperature Temperature that
can be set in °C
— = cold
2 - 1200* Spin speed Spin speed in rpm
(revolutions per
minute)
2 = No spin
2:30* Programme
remaining time
Programme
remaining time
depends on the
programme selec-
tion in h:min
(hours:minutes)
0.5 - 24 h Finish in time Programme ends
after ... h (h =
hours)
8.0* kg Maximum load
for washing
Recommended
load in kg
* Depending on the selected model and pro-
gramme.
Display Setting
¤/°/¶/¡ Anti Stain
W/T Pretreatment
+1/+2/+3 Rinse Plus
p Easy Iron
G SpeedPerfect
Display Setting
~ Start/Reload button
ã Pretreatment
N Wash
O Rinse
0 Spin/Drain
End Programme end

en Laundry
24
Z Laundry
Laundry
Protecting your laundry and
appliance
Caution!
Damage to the appliance/textiles
Foreign objects (e.g. coins, paper clips,
needles, nails) may damage the
washing or components of the
appliance.
The following instructions must be
observed when preparing your laundry:
■ Always follow the manufacturer's
instructions when dosing
all detergents, cleaning aids, care
products and cleaning agents.
■ Do not exceed maximum load.
Overfilling will impair the washing
result.
■ Keep detergents and agents for the
pretreatment of laundry (e.g. stain
remover, prewash sprays, etc.) away
from the surfaces of the appliance.
Using a damp cloth, immediately
remove any fine spray residue and
other residue or droplets.
■ Empty any pockets. Remove any
foreign objects.
■ Remove metal parts (paper clips,
etc.).
■ Trousers, knitwear and knitted
textiles, e.g. jersey garments, T-shirts
or sweatshirts, should be turned
inside out.
■ Ensure that underwired bras are
appliance-washable.
■ Wash delicates in a net or bag
(tights, underwired bras, etc).
■ Close zips, button up covers.
■ Brush sand out of pockets and
collars.
■ Remove curtain fittings or place in a
net/bag.
Sorting laundry
Sort your laundry according to the care
instructions and manufacturer's
information on the care labels,
depending on:
■ Type of fabric/fibre
■ Colour
Note: Laundry may discolour. Wash
white and coloured items separately.
Wash new coloured items separately
the first time you wash them.
■ Soiling
Wash laundry with the same level of
soiling together.
– Light: Do not need to pretreat,
select the G SpeedPerfect
setting if necessary.
– Normal
– Heavy: Load less laundry, need
to pretreat or soak laundry firstly.
– Stains: Remove/pretreat stains
while they are fresh. First dab
with soapy water; do not rub.
Then wash the items of laundry
with the appropriate programme.
Stubborn or dried-in stains can
sometimes only be removed by
washing several times.
■ Symbols on the care labels
M Suitable for normal washing
process;
e.g. i Cottons programme
N A gentle washing process is
required;
e.g. = Synthetics programme
O An especially gentle washing
process is required;
e.g. “ Delicates/
Silk programme
W Suitable for washing by hand;
e.g. W Wool p programme
Ž Do not machine wash.

Laundry en
25
Starching
Note: Laundry should not be treated
with fabric softener.
1. Switch on the appliance.
2. Select the à Rinse programme.
3. Measure starch into dispenser I in
accordance with the manufacturer's
instructions (clean first if necessary).
4. Touch the Start/Reload A button.
Dyeing/bleaching
Dye should only be used in normal
household quantities. Salt may damage
stainless steel. Always follow the dye
manufacturer's instructions.
Do not use the appliance to bleach
clothes.

en Overview of programmes
26
P Overview of programmes
Overview of programmes
Selectable programme
Programme/Type of washing Options/Information
Name of the programme
Brief explanation of the programme and for which fabrics it is
suitable.
Max. load as kg
depending on the model and the pro-
gramme
selectable temperature* as °C
selectable spin speed* in rpm
possible additional programme settings*
softener
i Cottons
Hard-wearing fabrics, heat-resistant fabrics made of cotton or
linen.
8.0 kg/5.0** kg
— - 90 °C
400 - 1200 rpm
x Anti Stain, ã Pretreatment, Ï
Rinse Plus, p Easy Iron, G Speed-
Perfect
possible
0 Cottons Eco
Hard-wearing fabrics, heat-resistant fabrics made of cotton or
linen.
Energy-optimised washing by reducing the temperature while
achieving a comparable washing result for the i Cottons pro-
gramme.
Note: The washing temperature is lower than the selected tem-
perature. If you want to achieve a higher water temperature, use
the i Cottons programme with a higher temperature as re-
quired.
8.0 kg
— - 90 °C
400 - 1200 rpm
x Anti Stain, ã Pretreatment, Ï
Rinse Plus, p Easy Iron
possible
= Synthetics
Textiles made of synthetic materials or blended fabrics.
4.0 kg
— - 60 °C
400 - 1200 rpm
x Anti Stain, ã Pretreatment, Ï
Rinse Plus, p Easy Iron, G Speed-
Perfect
possible
* Depending on the model and the programme.
** Reduced load with G SpeedPerfect additional programme setting.

Overview of programmes en
27
o Daily Wash
Mixed load of cottons and synthetic fabrics.
4.0 kg
— - 60 °C
400 - 1200 rpm
x Anti Stain, ã Pretreatment, Ï
Rinse Plus, p Easy Iron, G Speed-
Perfect
possible
“ Delicates/Silk
For delicate, washable fabrics, e.g. made of silk, satin, synthetic
fibres or blends (e.g. silk blouses, silk scarves).
2.0 kg
— - 40 °C
2 - 800 rpm
x Anti Stain, ã Pretreatment, Ï
Rinse Plus, p Easy Iron
possible
W Wool p
Hand- or appliance-washable fabrics that are made of wool or
contain wool;
particularly gentle wash programme to prevent laundry from
shrinking, with longer pauses in the programme (during which
the items rest in the water).
2.0 kg
— - 40 °C
2 - 800 rpm
-
possible
Û Drum Clean
Programme for cleaning and caring for the drum and the outer
tub, e.g. before running the first wash cycle, if washing fre-
quently at a low temperature (40 °C or lower) or if an odour has
developed after a prolonged period of non-use. The symbol Û
(memory function, drum care) flashes if you have not used any
programme at a temperature of 60 °C or higher for an extended
period.
Notes
■ Run programme without laundry.
■ Switching the drum care information signal on/off.
~ Page 36
■ Always follow the manufacturer's instructions when dosing
the detergent.
0.0 kg
-
1200 rpm
-
not possible
Programme/Type of washing Options/Information
* Depending on the model and the programme.
** Reduced load with G SpeedPerfect additional programme setting.

en Overview of programmes
28
à Rinse
For rinsing with a subsequent spin cycle.
-
-
2 - 1200 rpm
Ï Rinse Plus, p Easy Iron
possible
0 [ Spin/Drain
For spinning with a selectable spin speed and subsequent
draining. If you have selected 2, it will run [ Drain pro-
gramme, the water is only drained after rinse process, no spin
cycle.
-
-
2 - 1200 rpm
p Easy Iron
not possible
6 Duvet
For gentle cleaning of microfibre blankets, pillows and clothing
filled with down or synthetic fibres. Wash larger items individu-
ally. We recommend using a small dose of a detergent
designed for delicates.
2.5 kg
— - 60 °C
400 - 1200** rpm
Ï Rinse Plus
not possible
¢ Kids
Programme suitable for washing kidswear made of cotton or
synthetic textiles.
8.0 kg
— - 90 °C
400 - 1200 rpm
x Anti Stain, ã Pretreatment, p
Easy Iron
possible
w Sportswear
Sportswear and leisurewear made from microfibre fabrics.
Note: Before washing, clean the detergent drawer thoroughly
(all compartments) to remove fabric-softener residue.
2.0 kg
— - 40 °C
400 - 800 rpm
x Anti Stain, ã Pretreatment, Ï
Rinse Plus, p Easy Iron
not possible
Programme/Type of washing Options/Information
* Depending on the model and the programme.
** Reduced load with G SpeedPerfect additional programme setting.

Overview of programmes en
29
; AllergyPlus
Hard-wearing fabrics made of cotton or linen.
Note: Particularly suited to washing items that need to be hy-
gienically clean and especially kind to sensitive skin thanks to
the longer wash cycle at a defined temperature, higher water
level and longer spin cycle.
6.5 kg
— - 60 °C
400 - 1200 rpm
x Anti Stain, ã Pretreatment, Ï
Rinse Plus, p Easy Iron, G Speed-
Perfect
possible
-/, Super Quick 15’/30’
- Super Quick 15’ programme: For less soiling and low load
capacity, e.g., daily changing laundry or new laundry. , Super
Quick 30’ programme: For less soiling cotton or linen laundry.
Note: The default programme is - Super Quick 15’, when
you deactivate G SpeedPerfect setting, it will run , Super
Quick 30’ programme.
4.0 kg/2.0** kg
— - 40 °C
400 - 1200** rpm
Ï Rinse Plus, G SpeedPerfect
possible
Programme/Type of washing Options/Information
* Depending on the model and the programme.
** Reduced load with G SpeedPerfect additional programme setting.

en Programme default settings
30
0 Programme default
settings
Programme default sett ings
You can change the default settings for
selected programmes. The settings can
be changed even while the selected
programme is running. The effects
depending on the progress of the
programme.
6 Temp. °C
Before and after the programme starts,
you can change the temperature
setting, depending on what stage the
programme is in, by adjusting the
desired temperature on the display.
The maximum temperature that can be
set depends on the programme that has
been selected.
0 rpm
Depending on what stage the
programme is in, you can change the
spin speed (in rpm; revolutions per
minute) before and during the
programme.
setting 2: 2 =”No spin”. The rinsing
water is drained but there is no final
spin. The laundry stays wet inside the
drum, e.g. for items that should not be
spun.
You can select “No spin” to prevent
creasing if the laundry will not be taken
out of the appliance immediately after
the programme has ended.
The maximum speed that can be set
depending on the model and the
programme that has been selected.
ñ Finished in
Before starting the programme, you
can preselect the programme end
("Finish in" time) in 0.5h (h = hour)
increments (between “minimum
selectable ending time” and 9.5h) or 1
hour increments (between 10h and
24h) up to a maximum of 24 hours.
To do this:
1. Select a programme (except
myTime
*
programme).
The programme duration is
displayed for the selected
programme, e.g. 2:30
(hours:minutes).
2. Select the ñ Finished in button
repeatedly until the required number
of hours is displayed.
3. Select the Start/Reload A button.
The programme starts.
The selected number of hours (e.g.
8h) is shown in the display panel
and counts down until the
programme starts. The duration of
the programme is then displayed.
Note: The length of the programme is
automatically adjusted when the
programme is running. Changes to the
programme default settings or
additional programme settings may also
change the programme duration.
After starting the programme (if a
“Finish in” time has been selected and
the programme has not yet started), you
can change the preselected number of
hours as follows:
1. Select the Start/Reload A button.
2. Select the ñ Finished in button
repeatedly to change the number of
hours.
3. Select the Start/Reload A button.
* Depending on the model

Additional programme settings en
31
\ Additional programme
settings
Additional programme setti ngs
Note: You can find possible additional
programme settings in the overview;
these differ depending on the model.
By selecting additional programme
settings, you can better adapt the
washing process to your items of
laundry.
The settings can be selected or
deselected depending on the progress
of the programme.
The button indicator lamps light up if a
setting is activated.
The settings are not retained after the
appliance is switched off.
x Anti Stain
Types of stain that can be selected:
Do not let stains dry. Remove solid
substances beforehand.
Select a programme with a stain type:
1. Arrange items of washing as usual.
2. Select a programme.
3. Select a stain type (depending on
the selected programme).
4. Start the programme.
The appliance adjusts the average
washing temperature, drum movement
and soaking time to the specific type of
stain. Hot or cold water, gentle or
intensive washing and long or short
soaking ensure that the wash
programme sequence is specially
adapted to each type of stain. This
makes sure that stains are treated in the
best possible way.
ã Pretreatment
Touch ã Pretreatment to activateW
(Handsoaking) or T (Prewash).
W (Handsoaking): Before the main
wash cycle starts, the washing remains
for longer in the water to partially
dissolve intensive soiling. After the
handsoaking process, it is possible to
add laundry within 15 minutes while '
blinks, touch Start/Reload A button to
continue the programme after you add
laundry. Afterwards the main wash cycle
starts. And if you don’t need to add
laundry, you can touch Start/Reload A
button to continue the programme
immediately, don’t need to wait 15
minutes.
Notes
■ Put the detergent into dispenser I
and II.
■ To avoid discolouration, only soak
laundry of the same colour together.
T (Prewash): Prewash for heavily
soiled laundry.
Note: Put the detergent into dispenser I
and II.
Ï Rinse Plus
Settings that can be selected:
Additional rinse cycles for particularly
sensitive skin and/or for areas with very
soft water.
Longer programme duration, due to
additional rinse cycle.
The number of rinse cycles that the
programme actually runs depends on
the number that is set as a basic setting
for the programme.
¤ Tea
° Oil
¶ Blood
¡ Cosmetics
+1 + 1 rinse cycle
+2 + 2 rinse cycles
+3 + 3 rinse cycles
en Operating the appliance
32
p Easy Iron
A special operation using reduced spin
speed followed by fluffing to help
reduce creasing.
Touch p Easy Iron to activate or
deactivate it.
Note: If p Easy Iron has been
activated, the laundry will have retained
a higher than average level of moisture
after spinning.
G SpeedPerfect
Washing in a shorter time while
achieving a washing result that is
consistent with the normal performance.
Touch G SpeedPerfect to activate or
deactivate it.
Note: With the G SpeedPerfect
additional programme setting activated,
the maximum load of washing will be
reduced.
1 Operating the
appliance
Operati ng the appli ance
Preparing the appliance
The appliance was tested before
delivery. To remove residual water from
the test procedure, the first wash cycle
should be run without laundry using the
Û Drum Clean programme.
~ "Before washing for the first time"
on page 19
Notes
■ Never switch on a damaged
appliance!
■ Inform customer service!
1. Insert mains plug.
:Warning
Risk of death from electric shock!
Risk of death if live parts are
touched.
– Never pull out the mains plug by
tugging the power cord.
– Insert/pull out the mains plug
with dry hands only.
2. Turn the water tap on.
3. Open the appliance door.
Select programme/switch on
the appliance
Note: If you have activated the
childproof lock, you must first deactivate
it before you can set a programme.
Use the programme selector to select
the required programme. The
programme selector can be rotated in
either direction.
The appliance is switched on.
Operating the appliance en
33
The programme default settings for the
selected programme alternately appear
in the display panel:
■ The maximum load and
■ the duration of the programme and
■ ...
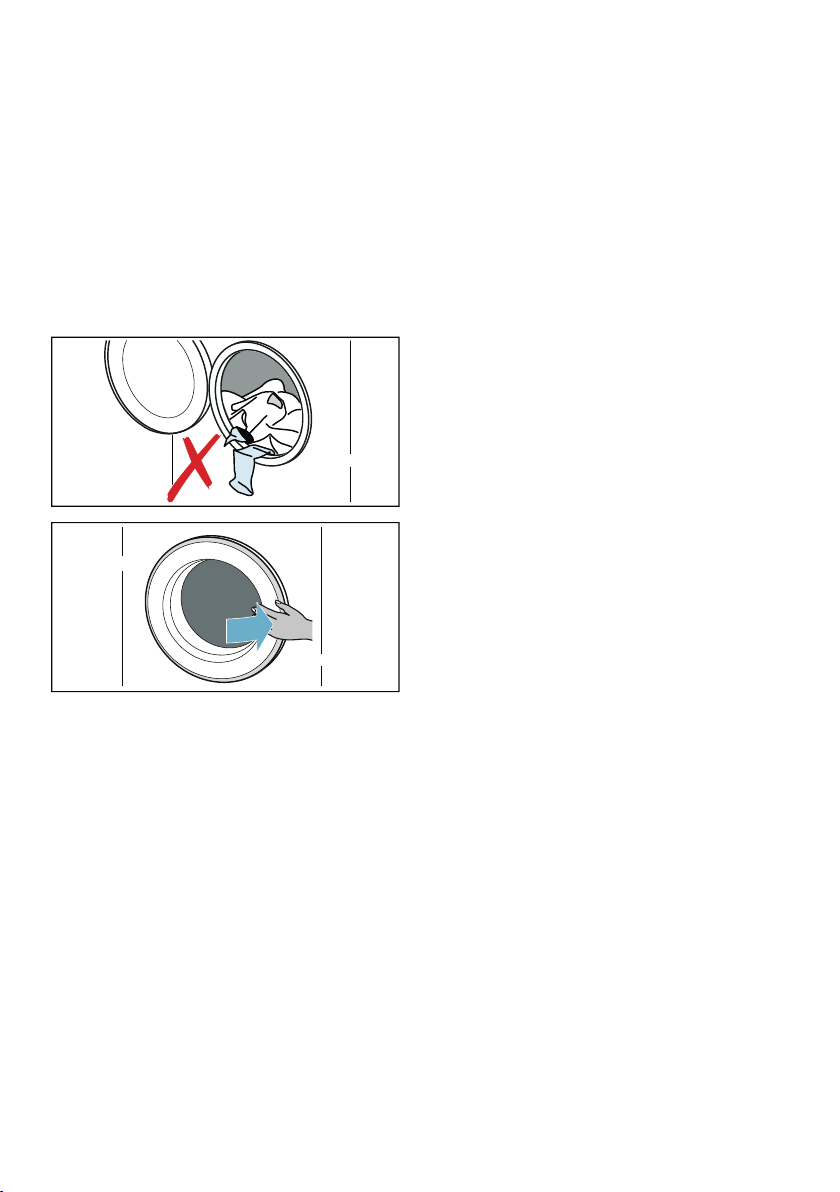
Placing laundry into the drum
Insert the laundry.
Close the door.
Notes
■ Unfold and load presorted items
of laundry. Mix large and small
items. Washing items of different
size distribute themselves better
during the spin cycle. Individual
items of washing may cause
an unbalanced load.
■ Observe the maximum specified
load. Overfilling adversely affects the
washing result and promotes
creasing. Make sure that no items of
laundry are trapped between the
door and the rubber seal, and close
the door.
Measure and add detergent
and care products
Caution!
Damage to the appliance
Detergents and agents for the
pretreatment of laundry (e.g. stain
remover, prewash sprays, etc.) may
damage the surfaces of the appliance.
Keep these agents away from the
surfaces of the appliance. Using a
damp cloth, immediately remove any
fine spray residue and other residue/
droplets.
Dosing
Dose the detergents and care products
according to:
■ water hardness (ask your water
supply company),
■ the manufacturer’s specifications on
the packaging,
■ the amount of laundry,
■ soiling.
Filling the dispensers
1. Pull out the detergent drawer.
:Warning
Eye / skin irritation!
If the detergent drawer is opened
while the appliance is running,
detergent/care product may run out.
Carefully open the drawer.
If detergent/care product comes into
contact with eyes or skin, rinse
thoroughly.
If accidentally swallowed, seek
medical advice.
en Operating the appliance
34
2. Pour in detergent and/or cleaning
product.
*depending on the model
Notes
■ Always follow the manufacturer's
instructions when dosing
all detergents, cleaning aids, care
products and cleaning agents.
■ Dilute viscous fabric softener
and fabric conditioner with water.
This will prevent blockages.
■ Be careful when opening the
detergent drawer while the appliance
is running.
Measuring aid A* for liquid detergent
*depending on the model
Position the measuring aid A for
measuring the correct amount of liquid
detergent:
1. Pull out the detergent drawer. Insert
the liquid detergent container into
dispenser II for main wash.
2. Pour liquid detergent into liquid
detergent container and do not
exceed the Maximum mark.
3. Close the detergent drawer.
Note: Do not use the viscous liquid
detergent.
Starting the programme
Touch and hold Start/Reload A button
for 1~2 seconds, then release the
button. The programme starts and the
appliance door is locked.
The ñ Finished in is shown in the
display panel and counts down until the
programme starts. After the programme
has started, the programme duration is
displayed. And the symbols for the
programme progress are lighting up.
Childproof lock
You can lock the appliance to prevent
the settings you have set from being
changed inadvertently. To do this,
activate the childproof lock.
To activate the childproof lock:
After the programme starts, Touch and
hold the p Easy Iron and ñ Finished
in buttons for 3 seconds. The symbol E
lights up in the display panel.
■ E lights up: The childproof lock is
activated.
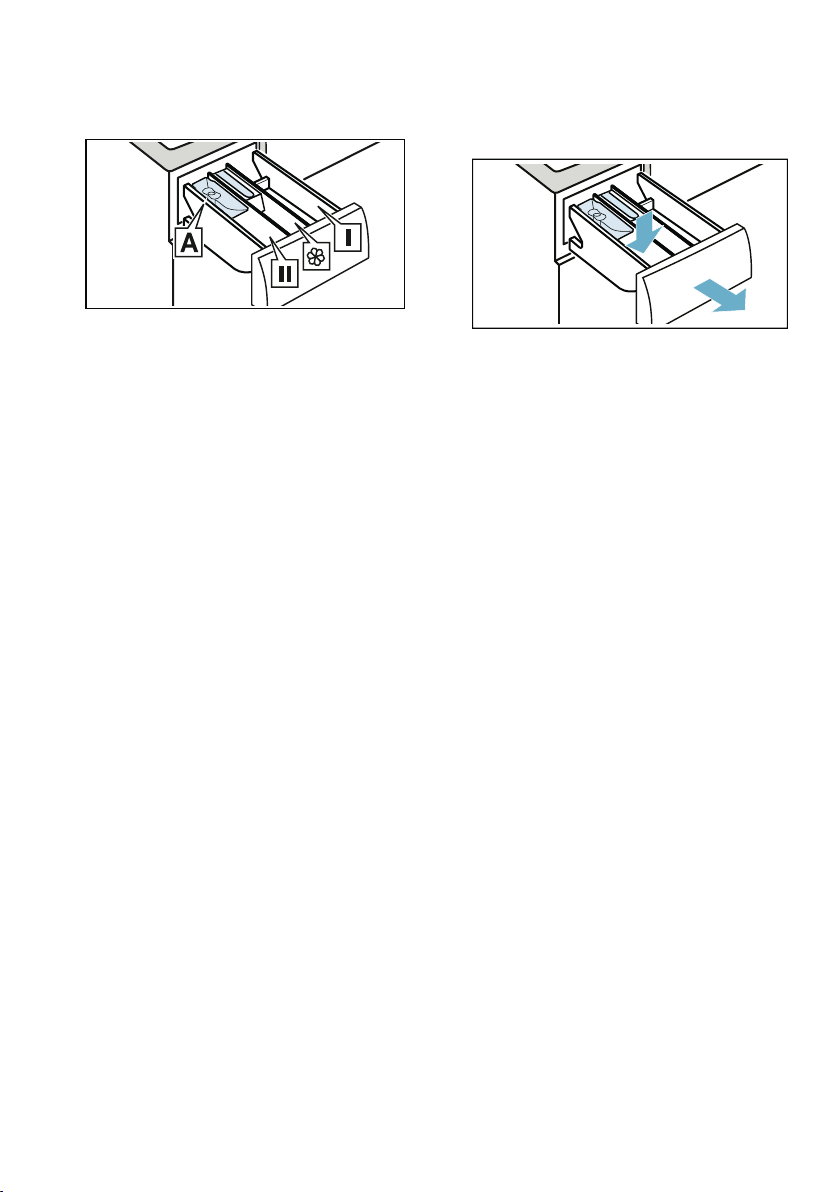
Dispenser I Detergent for pretreat and
clothing disinfectant. (only for
the appliance with
pretreatment and disinfectant
function)
Dispenser i Softener, starch. Do not exceed
the maximum load.
Dispenser II Detergent for main wash, water
softener, bleach, stain remover.
Dispenser A* For dosing liquid detergent.

Operating the appliance en
35
■ E flashes: If the programme and
programme settings are adjusted
while childproof lock is activated.
Note: When the programme ends, End
is displayed. The door is unlocked. E
symbol remain on to remind you to
deactivate the childproof lock.
To deactivate the childproof lock:
Touch and hold the p Easy Iron and ñ
Finished in buttons until the symbol E
disappears.
Adding/removing laundry
After starting the programme, you can
add or remove laundry if necessary.
Touch the Start/Reload A button. The
appliance checks whether reloading is
possible.
If the following appears on the display
panel:
■ The symbol Õ disappears, reloading
is possible.
■ The symbol Õ lights up, reloading is
not possible.
To continue the programme, touch the
Start/Reload A button. The
programme continues automatically.
Notes
■ Do not leave the door open for too
long when adding laundry as water
from the laundry may leak out.
■ For safety reasons, the door remains
locked when the water level or
temperature is high, or while the
drum is turning, and it is not possible
to add laundry during this time.
Changing the programme
If you have started the wrong
programme by mistake, you can
change the programme as follows:
1. Touch the Start/Reload A button.
2. Select another programme.
3. And touch the Start/Reload A
button again. The new programme
starts from the beginning.
Cancel the programme
For programmes at high temperatures:
1. Touch the Start/Reload A button.
2. To cool down laundry: Select à
Rinse.
3. And touch the Start/Reload A
button again.
For programmes at low temperatures:
1. Touch the Start/Reload A button.
2. Select 0 [ Spin/Drain.
3. And touch the Start/Reload A
button again.
Programme end
End lights up on the display panel and
~ and Õ displays are off.
If you have selected 2, the water is only
drained after rinse process, no spin
cycle.
Removing laundry/switching
off the appliance
1. Set programme selector to Off.
2. Open the door and remove the
laundry.
3. Turn off the water tap.
Note: Not required for Aqua-Stop
models.
Notes
■ Do not leave any items of laundry in
the drum. They may shrink in the
next wash or discolour another item.
■ Remove any foreign objects from the
drum and the rubber seal – risk of
rusting.
en Appliance settings
36
■ Wipe the rubber seal dry.
■ Leave the door and detergent
drawer open so that any residual
water can evaporate.
■ Always wait until the programme
ends, as the appliance could still be
locked. Then switch the appliance
on and wait for it to unlock.
Q Appliance settings
Appliance sett ings
You can change the following settings:
■ The volume of the end signal.
■ The volume of the button signal.
■ Switching the drum care information
signal on/off.
You will need to activate the setting
mode in order to change these settings.
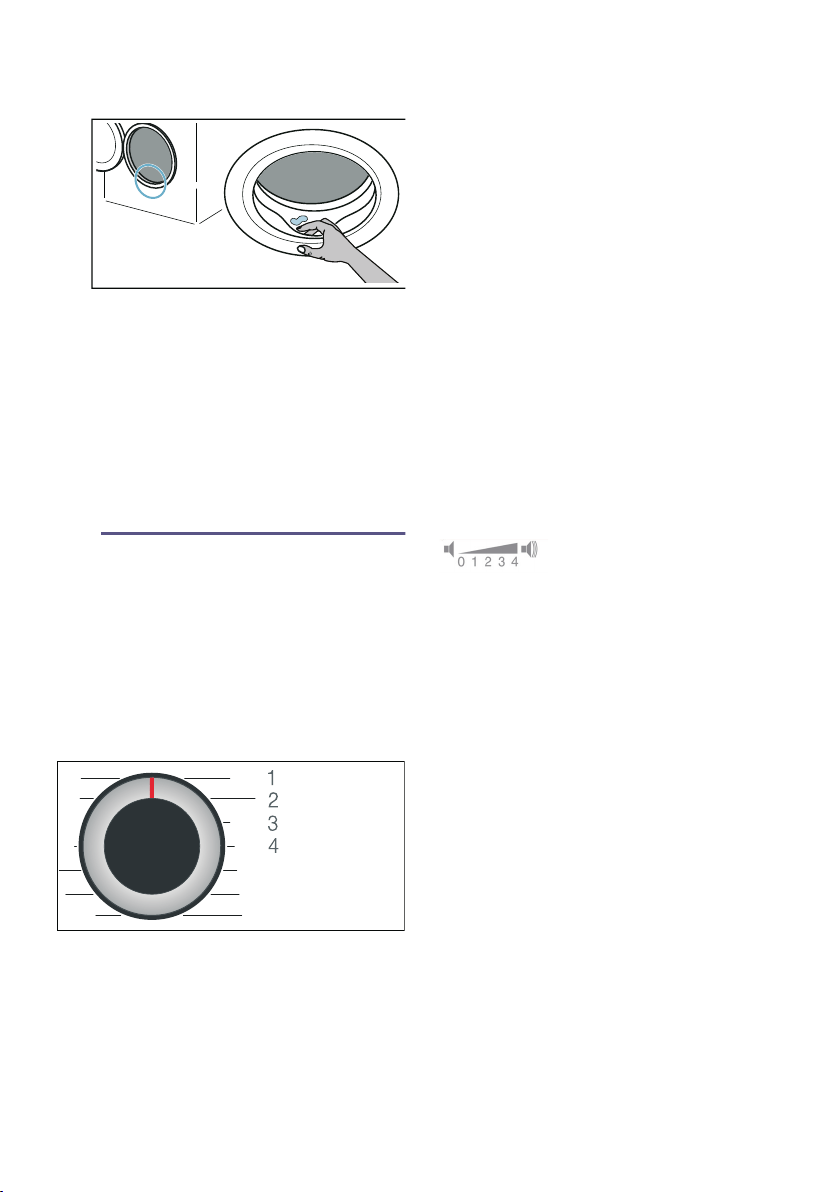
Activate setting mode:
1. Set the programme selector to
position 1. The appliance is switched
on.
2. Touch and hold the 0 rpm button
and, at the same time, turn the
programme selector clockwise to
position 2. Release the 0 rpm
button.
The setting mode is activated and the
preset setting appears in the display
panel.
Changing the volume and drum care
information
Use the ñ Finished in button to change
the following settings at the
corresponding programme selector
positions:
■ 2: The volume of the end signal.
■ 3: The volume of the button signals.
■ 4: Switching the drum care
information signal on/off.
Exiting setting mode
You can now end the process and set
the programme selector to the Off
position. The settings are saved.
1/2/3/4... positions on the
programme selector
0 = off, 1 = quiet,
2 = medium, 3 = loud,
4 = very loud
Ž on
Πoff
Sensors en
37
H Sensors
Sensors
Unbalanced load detection
system
The automatic unbalanced load
detection system detects imbalances
and ensures even distribution of the
laundry by repeatedly starting and
stopping drum spinning.
If the laundry is extremely unevenly
distributed, the spin speed is reduced
or the spin cycle is not performed for
safety reasons.
Note: Place large and small items of
laundry evenly in the drum.
2 Cleaning and
maintenance
Cleaning and maintenance
:Warning
Risk of death!
There is a risk of electric shock if touch
live components.
Turn the programme selector to Off.
Pull out the mains plug.
Caution!
Fire and explosion hazard!
Toxic vapours can be produced by
cleaning agents that contain solvents,
e.g. cleaning solvent.
Do not use cleaning agents that contain
solvents.
Caution!
The appliance may be damaged!
Cleaning agents that contain solvents,
e.g. cleaning solvent, can damage
surfaces and components in the
appliance.
Do not use cleaning agents that contain
solvents.
Appliance housing/control
panel
■ Remove the detergent residue
immediately.
■ Wipe the housing and the control
panel with a soft, damp cloth.
■ Do not use abrasive cloths, sponges
or detergents (stainless steel
cleaner).
■ Do not clean the appliance with a
water jet.
Drum
Use chlorine-free cleaning agents, do
not use steel wool.
If there are odours in the appliance, or
to clean the drum, run the Û Drum
Clean 90°C programme without
laundry.
Descaling
Descaling should not be necessary if
the detergent is measured out correctly.
However, if it is required, follow the
manufacturer's instructions for the
descaling agent. Suitable descalers can
be obtained via our website or from
customer services.
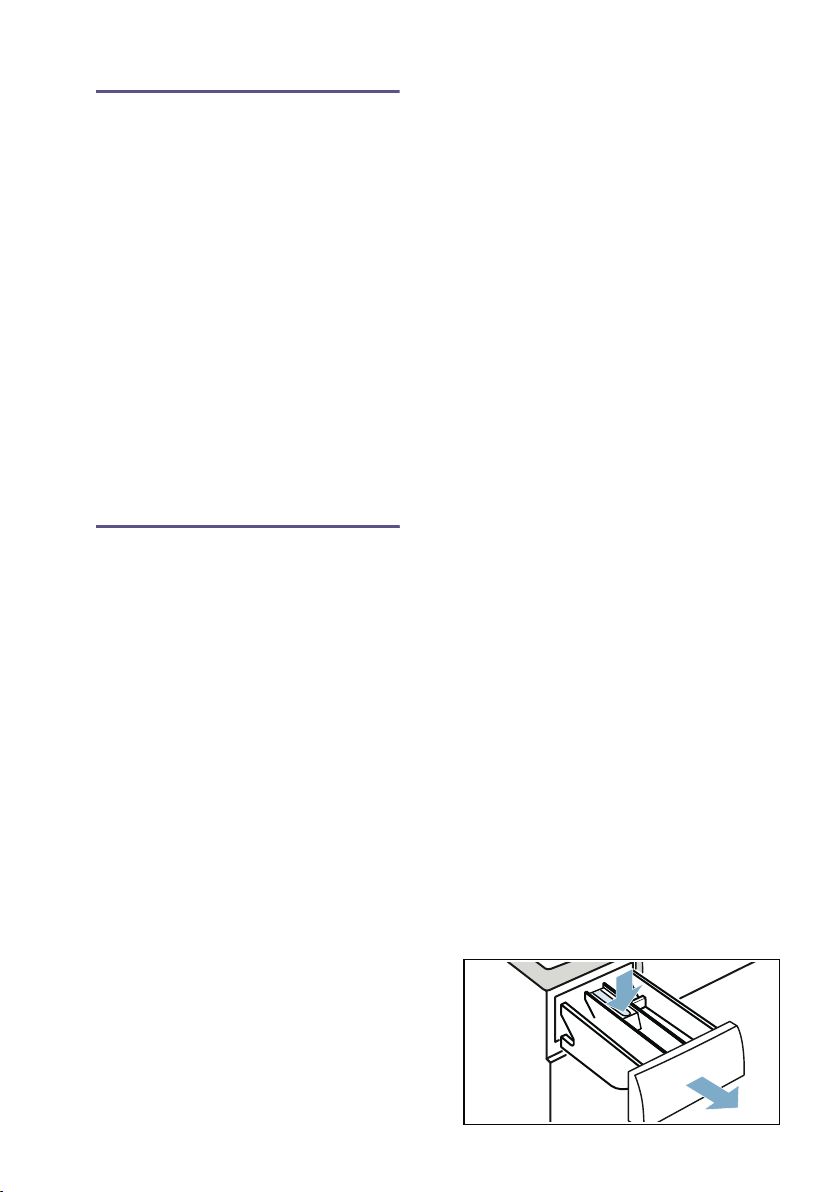
Emptying the detergent draw,
cleaning the detergent drawer
and its housing
If the appliance contains detergent or
fabric softener residues:
1. Pull out the detergent drawer. Press
down the insert and fully remove the
drawer.
en Cleaning and maintenance
38
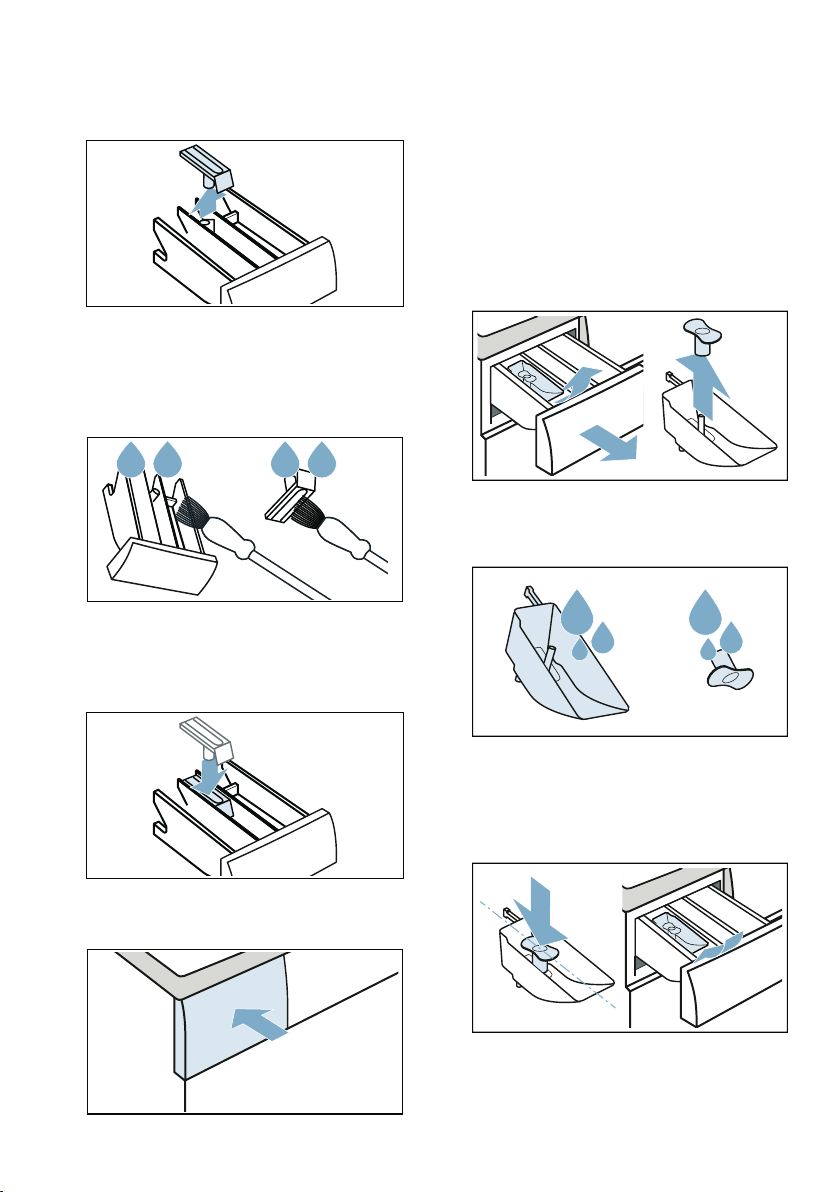
2. To remove the insert: Push the insert
upwards from below with your finger.
3. Clean the detergent dispenser tray
and insert with water and a brush,
and dry it. Clean the inside of the
housing as well.
4. Fit the insert and lock it in place
(push the cylinder onto the guide
pin).
5. Push in the detergent drawer.
Note: Leave the detergent drawer open
so that any residual water can
evaporate.
Cleaning the measuring aid A
*
for liquid detergent
If it contains liquid detergent residue:
1. Hold the measuring aid, pull the
cover upward and disconnect them.
2. Clean the measuring aid and cover
with water and brush.
3. Install the cover back to the
measuring aid. Pay attention to the
assemble mark, and press the cover
until click sounds.
* depending on the model
Cleaning and maintenance en
39
Note: Clean the measuring aid
regularly to avoid residue and
blockages.
Drain pump is blocked
Note: Turn the water tap off to prevent
more water from flowing in and to
ensure that it is drained via the pump.
:Warning
Risk of scalding!
When you wash at high temperatures,
the water gets very hot. If you come into
contact with the hot water, you may be
scalded.
Allow the water to cool down first.
1. Turn the programme selector to Off.
Pull out the mains plug.
2. Open the service flap.
3. Take the drain hose out of the
retainer.
Remove the sealing cap and pour
the water out into a suitable
container.
Replace the sealing cap and place
the drain hose back in the retainer.
4. Carefully unscrew the pump cover;
residual water may leak out.
Clean the interior, pump cover
thread and pump housing. The
impeller in the drain pump must be
able to rotate.
5. Refit and screw on the pump cover.
The handle must be in a vertical
position.
6. Close the service flap.
Note: To prevent unused detergent
from flowing straight into the drain
during the next wash: Pour 1 litre of
water into dispenser II and start the [
Drain programme.

en Cleaning and maintenance
40
The drain hose at the siphon
is blocked
1. Turn the programme selector to Off.
Pull out the mains plug.
2. Loosen the hose clamp. Carefully
remove the drain hose; residual
water may leak out.
3. Clean the drain hose and siphon
connecting piece.
4. Re-attach the drain hose and secure
the connection point using the hose
clamp.
Filter in the water supply is
blocked
Release water pressure in the supply
hose:
1. Turn off the water tap.
2. Select the i Cottons (activate G
SpeedPerfect setting) programme.
Note: If your appliance with
intelligent dosing system
*
, you also
need to deactivate the intelligent
dosing system.
3. Select the Start/Reload A button.
Allow the programme to run for
approx. 40 seconds.
4. Turn the programme selector to Off.
5. Pull out the mains plug.
Clean the filters:
1. Disconnect the hose from the rear of
the appliance.
2. Use pliers to remove the filter.
3. Clean the filter with a small brush.
4. Connect the hose and check for
leaks.
* Depending on the module
Faults and what to do about them en
41
3 Faults and what to do
about them
Faults and what to do about them
Emergency release
E.g. power outage or in the event of a
loss of power
The programme continues when the
power supply is restored.
However, if the laundry has to be
removed, the appliance door can be
opened as follows:
:Warning
Risk of scalding!
When you are washing at high
temperatures, there is a risk of scalding
if you come into contact with hot water
and laundry.
If possible, leave it to cool down first.
:Warning
Risk of injury!
Reaching into the drum while it is still
turning may cause hand injuries.
Do not reach into the drum when it is
turning.
Wait until the drum has stopped turning.
Caution!
Water damage!
Any escaping water may cause water
damage.
Do not open the door if water can be
seen through the glass.
1. Turn the programme selector to Off.
Pull out the mains plug.
2. Open the service flap.
3. Drain the water. ~ Page 39
4. Pull the emergency release
downwards with a tool and release.
The door can then be opened.

en Faults and what to do about them
42
Information on the display panel
Display Cause/Remedy
Õ ■ Flashes fast + signal: The door was opened and the water level is too high.
Close the door, continue the programme with Start/Reload A button or
select [ Drain.
■ Flashes slowly: The door lock temperature is too high to open the door. Wait
approx. 30 seconds until the door lock temperature cools down.
r ■ Flashes (no water supply): Water tap turned on? Filter in the water supply is
blocked?
~ "Filter in the water supply is blocked" on page 40
If an additional water filter has been installed (depending on the model), check
for contaminants and clean if required ~ separate installation and cleaning
instruction for water filter.
Is the supply hose kinked or trapped?
■ Lights up (low water pressure): For information only. This will not affect the
programme progress. The programme duration is extended.
E lights up The childproof lock is activated – deactivate it.
The symbol Û
flashes
Run the Û Drum Clean programme to clean and care for the drum and the outer
tub.
Notes
■ Run the programme without laundry.
■ Use washing powder or a detergent containing bleach. To prevent foaming,
only use half the amount of detergent recommended by the detergent manu-
facturer. Do not use detergent designed for woollens or delicates.
■ Switching the drum care information signal on/off.~ Page 36
E:36
alternating with
-10 and End
when programme is
finished
■ The drain pump is blocked.
~ "Drain pump is blocked" on page 39
■ The drain hose at the siphon is blocked.
~ "The drain hose at the siphon is blocked" on page 40
E:35
alternating with
-10 and End
when programme is
finished (Suitable for
special models)
There is water in the base trough, the appliance is leaking. Turn off the tap. Call
customer services.
Other displays Turn the programme selector to Off, wait for five seconds and then switch it on
again. If the display appears again, call customer services.

Faults and what to do about them en
43
Faults and what to do about them
Faults Cause/Remedy
Water is leaking from the
appliance.
■ Attach the drain hose correctly or replace it.
■ Tighten the screw fitting on the supply hose.
The door cannot be
opened.
■ The temperature in drum is too high to open the door.
■ The safety function is activated. Stop the programme?
■ The water level in drum is too high.
■ Can the door only be opened by the emergency release?
~ "Emergency release" on page 41
The appliance is not filling
with water.
Detergent is not being dis-
pensed.
■ Programme does not start?
■ Is the tap turned on?
■ Could the filter in the water supply be blocked?
~ "Filter in the water supply is blocked" on page 40
Note: If an additional water filter has been installed (depending on the
model), check for contaminants and clean if required ~ separate installa-
tion and cleaning instruction for water filter.
■ Is the supply hose kinked or trapped?
The programme will not
start.
■ Have you touched the Start/Reload A button or selected ñ Finished
in?
■ Is the door closed?
■ Childproof lock activated? Deactivate childproof lock.
■ Shop mode activated? If the display shows à•‹ for 5 s after you have
switched on the appliance, the appliance is in shop mode. Wait for the dis-
play message à•‹ to disappear. Touch and hold Start/Reload A for at
least 5 s. ‹”” will appear in the display panel. Turn the programme selec-
tor to Off. Now you already turned off the shop mode. You can use the
appliance now as usual.
The programme has
started and the drum is
rotating, but the drum is
not filling with water.
Not a fault – Some programme specifically detect and weigh the load after the
program has started in order to calculate the optimum amount of water for
washing. The drum will then start filling with water.
The water is not draining. ■ Could the drain pump be blocked?
~ "Drain pump is blocked" on page 39
■ Could the drain hose at the siphon be blocked?
~ "The drain hose at the siphon is blocked" on page 40
Water is not visible in the
drum.
Not a fault – the water is below the visible area.
The wrong detergent/fab-
ric softener has been
poured into the dis-
penser(s).
Empty the dispenser(s), clean it/them and pour in the correct product.
~ "Emptying the detergent draw, cleaning the detergent drawer and its hous-
ing" on page 37
~ "Measure and add detergent and care products" on page 33
Detergent/fabric softener
has congealed in the dis-
pensers.
Empty the dispenser(s), clean it/them and pour in the correct product.

en Faults and what to do about them
44
Foam is leaking from the
detergent drawer.
Too much detergent used?
Mix 1 tablespoon of fabric softener with ½ litre of water and pour into
dispenser II. (Not for outdoor, sports and down-filled textiles!)
Reduce detergent dosage for the next wash cycle.
Use commercially available low foam detergent and care product which are
suitable for machine.
Repeated, intensive foam-
ing.
Have you used too much detergent? Add less detergent in the next time you
run a wash cycle with the same load.
Detergent/fabric softener
drips off the seal and col-
lects on the door or in the
seal fold.
There is too much detergent/fabric softener in the dispensers. Do not fill the
dispensers above the max. mark.
The spin result is not sat-
isfactory.
Laundry wet/too damp.
■ Not a fault – the unbalanced load detection system has interrupted the
spin cycle because the laundry is unevenly distributed. Distribute small and
large items of laundry evenly in the drum.
■ Is p Easy Iron additional programme setting selected (depending on the
model)?
■ Is Silent wash additional programme setting or Silent wash programme
selected (depending on the model)?
■ Is the selected speed too low?
The spin cycle runs sev-
eral times.
Not a fault – the unbalanced load detection system is adjusting an imbalance.
The programme is taking
longer than usual.
■ Not a fault – the unbalanced load detection system is adjusting an imbal-
ance by repeatedly distributing the laundry.
■ Not a fault – the foam detection system is activated – a rinse cycle has
been switched on.
The length of the pro-
gramme changes during
the wash cycle.
Not a fault – the programme sequence is optimised for the specific washing
process. This may change the length of the programme shown on the display
panel.
Odours, stain formation in
the appliance.
Run the Û Drum Clean 90°C programme without laundry.
Add washing powder or a detergent containing bleach.
Note: To prevent foaming, only use half the amount of detergent recommend-
ed by the detergent manufacturer. Do not use detergents designed for woollens
or delicates.
Loud noises, vibrations
and appliance "move-
ment" during the spin
cycle.
■ Is the appliance aligned? ~ "Alignment" on page 18
■ Are the appliance's feet fixed? Secure the appliance's feet.
■ Have the transport locks been removed? ~ "Removing the transport
locks" on page 14
The display panel indica-
tor lights do not work
while the appliance is run-
ning.
■ Has there been a power failure?
■ Have the fuses blown? Reset/replace the fuses.
■ If the fault occurs repeatedly, call customer services.
Faults Cause/Remedy

After-sales service en
45
4 After-sales service
After-sales service
If you cannot rectify a fault yourself,
(~ "Faults and what to do about them"
on page 41), please contact our after-
sales service.
We will always find an appropriate
solution to avoid unnecessary visits by
engineers.
Please provide the after-sales service
with the product number (E-Nr.) and the
production number (FD) of the
appliance.
You can find this information
(depending on the model):
■ On the inside of the loading door
■ On the back of the appliance
Trust the expertise of the
manufacturer. Contact us. By doing so,
you can be sure that the repairs are
carried out by trained service personnel
using genuine spare parts.
There is detergent resi-
due on the laundry.
■ Some phosphate-free detergents contain water-insoluble residue.
■ Select à Rinse or brush the laundry after washing.
If you cannot rectify a fault yourself (after turning the programme selector to Off and switch on again) or a
repair is required:
■ Turn the programme selector to Off. Pull out the mains plug.
■ Turn off the tap and call customer services.
Faults Cause/Remedy
E-Nr. Product number
FD Production number
(1U )'

en Consumption values
46
[ Consumption values
Consumption values
Recommended wash mode for normally soiled clothes at rated load capacity used
for the evaluation of the captioned model under the Singapore Mandatory Water
Efficiency Labelling Scheme (MWELS) is 0 Cottons Eco 60°C.

Technical data en
47
J Technical data
Technical data
Dimensions:
848 mm x 598 mm x 590 mm
(height x width x depth)
Weight:
72 kg
Mains connection:
Nominal voltage 220-240V, 50Hz
Minimum installation protection
(c)10A
Nominal power 1900-2300 W
Water pressure:
100–1000 kPa (1–10 bar)
r Aqua-Stop warranty
Aqua-Stop warranty
Only for appliances with Aqua-Stop
In addition to warranty claims against
the vendor based on the purchase
agreement and to our appliance
warranty, we will provide compensation
under the following conditions:
1. If water damage is caused due to a
fault in our Aqua-Stop system, we
will compensate domestic
customers for the damage caused.
2. The liability guarantee is valid for the
service life of the appliance.
3. It is a prerequisite of all warranty
claims that the appliance with Aqua-
Stop must have been installed and
connected correctly in accordance
with our instructions; this also
includes a correctly fitted Aqua-Stop
extension (genuine accessories).
Our warranty does not cover
defective feed lines or fittings
leading to the Aqua-Stop connection
at the tap.
4. Appliances with Aqua-Stop do not
need to be supervised during
operation, nor secured afterwards by
turning off the tap.
The tap only needs to be turned off if
you are away from home for a long
period, e.g. for several weeks'
holiday.

Thank you for buying a
Bosch Home Appliance!
Register your new device on MyBosch now and profit directly from:
• Expert tips & tricks for your appliance
• Warranty extension options
• Discounts for accessories & spare-parts
• Digital manual and all appliance data at hand
• Easy access to Bosch Home Appliances Service
Free and easy registration – also on mobile phones:
www.bosch-home.com/welcome
Looking for help?
You'll find it here.
Expert advice for your Bosch home appliances, help with problems
or a repair from Bosch experts.
Find out everything about the many ways Bosch can support you:
www.bosch-home.com/service
Contact data of all countries are listed in the attached service direct-
ory.
*9001444858*
9001444858 (020602)
en
BSH Hausgeräte GmbH
Carl-Wery-Straße 34
81739 München, GERMANY
www.bosch-home.com
A Bosch Company